

Page 1

Sibelius® | First Reference Guide
version 2018.1
Page 2

Legal Notices
© 2018 Avid Technology, Inc., (“Avid”), all rights reserved. This guide may not be duplicated in whole or in part without the written
consent of Avid.
003, 192 Digital I/O, 192 I/O, 96 I/O, 96i I/O, Adrenaline, AirSpeed, ALEX, Alienbrain, AME, AniMatte, Archive, Archive II,
Assistant Station, AudioPages, AudioStation, AutoLoop, AutoSync, Avid, Avid Active, Avid Advanced Response, Avid DNA,
Avid DNxcel, Avid DNxHD, Avid DS Assist Station, Avid Ignite, Avid Liquid, Avid Media Engine, Avid Media Processor,
Avid MEDIArray, Avid Mojo, Avid Remote Response, Avid Unity, Avid Unity ISIS, Avid VideoRAID, AvidRAID, AvidShare,
AVIDstripe, AVX, Beat Detective, Beauty Without The Bandwidth, Beyond Reality, BF Essentials, Bomb Factory, Bruno, C|24,
CaptureManager, ChromaCurve, ChromaWheel, Cineractive Engine, Cineractive Player, Cineractive Viewer, Color Conductor,
Command|8, Control|24, Cosmonaut Voice, CountDown, d2, d3, AAE, D-Command, D-Control, Deko, DekoCast, D-Fi, D-fx,
Digi 002, Digi 003, DigiBase, Digidesign, Digidesign Audio Engine, Digidesign Development Partners, Digidesign Intelligent
Noise Reduction, Digidesign TDM Bus, DigiLink, DigiMeter, DigiPanner, DigiProNet, DigiRack, DigiSerial, DigiSnake,
DigiSystem, Digital Choreography, Digital Nonlinear Accelerator, DigiTest, DigiTranslator, DigiWear, DINR, DNxchange,
Do More, DPP-1, D-Show, DSP Manager, DS-StorageCalc, DV Toolkit, DVD Complete, D-Verb, Eleven, EM, Euphonix,
EUCON, EveryPhase, Expander, ExpertRender, Fairchild, FastBreak, Fast Track, Film Cutter, FilmScribe, Flexevent,
FluidMotion, Frame Chase, FXDeko, HD Core, HD Process, HDpack, Home-to-Hollywood, HyperSPACE, HyperSPACE
HDCAM, iKnowledge, Impact, Improv, iNEWS, iNEWS Assign, iNEWS ControlAir, InGame, Instantwrite, Instinct,
Intelligent Content Management, Intelligent Digital Actor Technology, IntelliRender, Intelli-Sat, Intelli-Sat Broadcasting
Recording Manager, InterFX, Interplay, inTONE, Intraframe, iS Expander, iS9, iS18, iS23, iS36, ISIS, IsoSync, LaunchPad,
LeaderPlus, LFX, Lightning, Link & Sync, ListSync, LKT-200, Lo-Fi, MachineControl, Magic Mask, Make Anything Hollywood,
make manage move|media, Marquee, MassivePack, MassivePackPro,Maxim, Mbox, Media Composer, MediaFlow, MediaLog,
MediaMix, Media Reader, Media Recorder, MEDIArray, MediaServer, MediaShare, MetaFuze, MetaSync, MIDI I/O, Mix Rack,
Moviestar, MultiShell, NaturalMatch, NewsCutter, NewsView, NewsVision, Nitris, NL3D, NLP, NSDOS, NSWIN, OMF,
OMF Interchange, OMM, OnDVD, Open Media Framework, Open Media Management, Painterly Effects, Palladiium,
Personal Q, PET, Podcast Factory, PowerSwap, PRE, ProControl, ProEncode, Profiler, Pro Tools, Pro Tools|HD, Pro Tools LE,
Pro Tools M-Powered, Pro Transfer, QuickPunch, QuietDrive, Realtime Motion Synthesis, Recti-Fi, Reel Tape Delay,
Reel Tape Flanger, Reel Tape Saturation, Reprise, Res Rocket Surfer, Reso, RetroLoop, Reverb One, ReVibe, Revolution, rS9,
rS18, RTAS, Salesview, Sci-Fi, Scorch, ScriptSync, SecureProductionEnvironment, Shape-to-Shape, ShuttleCase, Sibelius,
SimulPlay, SimulRecord, Slightly Rude Compressor, Smack!, Soft SampleCell, Soft-Clip Limiter, SoundReplacer, SPACE,
SPACEShift, SpectraGraph, SpectraMatte, SteadyGlide, Streamfactory, Streamgenie, StreamRAID, SubCap, Sundance,
Sundance Digital, SurroundScope, Symphony, SYNC HD, SYNC I/O, Synchronic, SynchroScope, Syntax, TDM FlexCable,
TechFlix, Tel-Ray, Thunder, TimeLiner, Titansync, Titan, TL Aggro, TL AutoPan, TL Drum Rehab, TL Everyphase, TL Fauxlder,
TL In Tune, TL MasterMeter, TL Metro, TL Space, TL Utilities, tools for storytellers, Transit, TransJammer, Trillium Lane Labs,
TruTouch, UnityRAID, Vari-Fi, Video the Web Way, VideoRAID, VideoSPACE, VTEM, Work-N-Play, Xdeck, X-Form,andXMON
are either registered trademarks or trademarks of Avid Technology, Inc. in the United States and/or other countries.
Bonjour, the Bonjour logo, and the Bonjour symbol are trademarks of Apple Computer, Inc.
Thunderbolt and the Thunderbolt logo are trademarks of Intel Corporation in the U.S. and/or other countries.
This product may be protected by one or more U.S. and non-U.S. patents. Details are available at www.avid.com/patents.
Product features, specifications, system requirements, and availability are subject to change without notice.
Guide Part Number 9329-65929-00 REV A 01/18
ii
Page 3

Contents
Introduction 1
The story of Sibelius ............... 3
About this Reference Guide ......... 5
Working with the ribbon ............ 9
Undo and Redo .................. 15
Connecting external MIDI devices . . . 17
1 File tab 19
1.1 Working with files ............. 21
1.2 Sharing and emailing files ....... 25
1.3 Sharing on the web ............ 29
1.4 Starting a new score ............ 31
1.5 Opening MIDI files ............ 35
1.6 Opening MusicXML files ....... 39
1.7 PhotoScore Lite ............... 43
1.8 AudioScore Lite ............... 57
1.9 Printing ..................... 65
1.10 Exporting audio files .......... 73
1.11 Exporting video files .......... 75
1.12 Exporting graphics ............ 79
1.13 Exporting MIDI files .......... 81
1.14 Exporting MusicXML files ..... 83
1.15 Exporting to previous versions . . 85
1.16 Exporting to Avid Scorch ...... 89
1.17 Exporting Scorch web pages .... 95
1.18 Exporting PDF files ........... 99
1.19 Preferences ................ 101
1.20 Display settings ............. 103
1.21 Keyboard shortcuts .......... 105
2 Home tab 107
2.1 Selections and passages ........ 109
2.2 Ideas ....................... 115
2.3 Instruments ................. 121
2.4Staves...................... 125
2.5 Bars and bar rests ............. 127
2.6 Color ...................... 129
2.7 Filters and Find .............. 131
2.8 Hiding objects ............... 133
2.9 Sibelius | Cloud Sharing ....... 135
2.10 Plug-ins ................... 137
3 Note Input tab 143
3.1 Introduction to note input ...... 145
3.2 Keypad ..................... 147
3.3 Mouse input ................. 151
3.4 Alphabetic and step-time input . . 153
3.5 Keyboard window ............ 161
3.6 Guitar tab input .............. 163
3.7 Fretboard window ............ 165
3.8 Guitar notation and tab ........ 167
3.9 Triplets and other tuplets ....... 171
3.10 Transposing ................ 175
3.11 Note input options ............177
3.12 Input Devices ............... 179
3.13 Flexi-time .................. 187
3.14 Voices ..................... 193
3.15 Arrange ................... 197
3.16 Transformations ............. 199
3.17 HyperControl™ ............. 203
4 Notations tab 207
4.1 Clefs ....................... 209
4.2 Key signatures ............... 213
4.3 Time signatures .............. 215
4.4 Barlines .................... 217
4.5 Lines ...................... 219
4.6 Hairpins .................... 223
4.7 Slurs ....................... 225
4.8 Symbols .................... 229
4.9 Noteheads .................. 231
4.10 Percussion ................. 235
4.11 Beam groups ............... 239
4.12 Beam positions .............. 243
4.13 Importing graphics ........... 245
4.14 Brackets and braces .......... 247
4.15 Accidentals ................. 249
4.16 Arpeggios .................. 251
4.17 Articulations ................ 253
4.18 Grace notes ................ 255
4.19 Jazz articulations ............ 257
4.20 Repeat bars ................. 259
4.21 Stems and leger lines ......... 261
4.22 Ties ....................... 263
4.23 Tremolos .................. 265
iii
Page 4

Contents
5 Text tab 267
5.1 Working with text .............269
5.2 Common text styles ............275
5.3 Figured bass and Roman numerals 281
5.4 Instrument names .............283
5.5 Typography ..................287
5.6 Lyrics ......................291
5.7 Chord symbols ...............297
5.8 Edit Chord Symbols ...........305
5.9 Rehearsal marks ..............307
5.10 Bar numbers ................309
5.11 Page numbers ...............311
5.12 Wildcards ..................313
6 Play tab 317
6.1 Working with playback .........319
6.2 Playback Devices .............321
6.3Mixer.......................331
6.4 Live Tempo ..................341
6.5 Live Playback ................343
6.6 Interpretation of your score ......345
6.7 Performance .................349
6.8 Repeats .....................353
6.9 Video .......................357
6.10 Timecode and hit points .......361
6.11 Sibelius First Sounds .........363
6.12 MIDI for beginners ...........365
6.13 Virtual instruments for beginners 369
6.14 Working with virtual instruments 375
6.15 ReWire ....................381
6.16 MIDI messages ..............385
6.17 SoundWorld ................393
7 Layout tab 397
7.1 Document Setup ..............399
7.2 Title pages ...................403
7.3 Staff spacing .................405
7.4 Magnetic Layout ..............409
7.5 Auto Breaks ..................413
7.6 Breaks ......................415
7.7 Layout and formatting ..........419
7.8 Attachment ..................423
7.9 Working with parts ............425
8 Appearance tab 429
8.1 Music engraving ..............431
8.2 House Style ..................437
8.3 Note spacing .................441
8.4 Music fonts ..................445
10 Review tab 447
10.1 Annotations .................449
10.1 Comments ..................451
10.2 Highlight ...................453
10.3 Versions ....................455
11 View tab 457
11.1 Document view ..............459
11.2 Zoom ......................463
11.3 Invisibles ...................465
11.4 Panels .....................467
11.5 Window options .............469
Glossary 471
Keyboard shortcuts 481
Visual index 489
Index 497
iv
Page 5

Introduction
1
Page 6

Introduction
2
Page 7

The story of Sibelius
The story of Sibelius
Twins Ben and Jonathan Finn first began work on Sibelius when they were students in 1987,
and spent six years of their spare time developing a vast range of sophisticated features, with
an intuitive user interface and built-in intelligence that had never been seen in previous music
programs. In 1993, after graduating from Oxford and Cambridge Universities, the Finns
started their own company to sell the program, unsure of what to expect.
Sibelius proved to be an instant success, and over the course of the following decade the
Finns’ company grew beyond all expectations, with offices in the USA, UK, and Australia,
and customers in more than 100 countries worldwide.
In 2006, Sibelius was acquired by Avid, makers of Pro Tools, Media Composer and other
industry-standard products for digital media production and music creation, and continues to
go from strength to strength. In fact, it’s the world’s best-selling music notation software.
Sibelius First itself was introduced in 2008. A simplified version of Sibelius suitable for home
use, it produces the same beautiful scores as its big brother, but with some of the more esoteric
or advanced features removed.
Who uses Sibelius?
Famous Sibelius users include conductor Michael Tilson Thomas, composer Steve Reich, choral composer John Rutter, rock guitarist Andy Summers, jazz musician Jamie Cullum, and the
Royal Academy of Music, London. Top publishers such as Hal Leonard, Music Sales and
Boosey & Hawkes use Sibelius both for traditional publishing and to deliver music via the
Internet straight to a customer’s printer.
Sibelius First is designed to make writing and sharing music as easy as possible, for every kind
of musician—aspiring composers, arrangers and songwriters, students, instrumental teachers,
and more besides.
3
Page 8

4
Page 9

About this Reference Guide
About this Reference Guide
This Reference Guide is a comprehensive guide to all of Sibelius First’s features. For explanations of Sibelius First’s more basic features, and when familiarizing yourself with the program,
you will probably find it easier to refer to the tutorials, which you can find in File Help within
the program.
Chapters and topics
This Reference Guide is divided into 10 chapters, corresponding to the 10 tabs at the top of the
Sibelius First window, containing smaller topics. You will find a list of all these topics in the
Contents, though you will probably find the Index even more useful for finding information
on specific areas of the program. Check the Visual index if you know how you want something
to look, but you don’t know what it’s called. The Glossary explains musical and technical
terms.
On-screen reference
To start the on-screen Reference Guide, click the button at the right-hand end of the
ribbon tab bar, shown on the right, find it within Help in the File tab, or type the shortcut F1 or ?.
Whichever application your computer uses to view PDF files will open—on Windows this is
normally Adobe Reader, and on Mac it is normally Preview—and the on-screen Reference
Guide will appear. To navigate the on-screen Reference Guide, you can use the bookmarks and
Edit Find features built in to Adobe Reader and Preview.
Bookmarks are like a table of contents that you can have open beside the document you’re
reading, allowing you to jump to any chapter, topic, or even sub-heading in the Reference
Guide. To show bookmarks:
In Adobe Reader, choose View Navigation Panels Bookmarks; a panel like that shown
below left will appear at the left of your screen.
In Preview on Mac, choose View Sidebar Show Sidebar; a panel like that shown below
right will slide out of the right-hand side of the window.
5
Page 10

To search within the on-screen Reference Guide, use the Edit Find feature, or alternatively:
In Adobe Reader, you can simply type into the Find box on the toolbar shown below left,
then use the next and previous result buttons to skip forwards and backwards.
In Preview on Mac, you can type into the Search box in the drawer, shown below right, then
click in the list of results to skip forwards and backwards.
Typography and cross-references
Names of computer keys, menus and dialogs are written like this.
The main way in which you find commands in Sibelius First is via the ribbon, a wide band of
command buttons that appear at the top of the screen when you click a tab like File or Home.
Each tab describes a related set of commands (Note Input, Notations, Text, Layout, etc.); when
you click a tab, the ribbon changes to show the buttons that let you use those commands. Each
ribbon tab contains a number of groups of related commands.
As a quick way of describing how to access a particular command, this Reference Guide uses
the following format: “choose Home Instruments Add or Remove” means “click the Home
tab, look for the Instruments group, and click the Add or Remove button.”
The ribbon is explained in greater detail on the following pages, so if this all sounds mysterious to you, don’t worry.
4.1 Clefs means “see the Clefs topic at the start of chapter 4 of the Reference Guide.”
Basic terminology
Most of the computer terminology used in this Reference Guide will be understood by almost
all readers, but has been included in case one or two of the terms are unfamiliar:
Some keys are labeled differently on different keyboards, particularly on Mac. For the pur-
poses of this Reference Guide, these are the conventions:
Mac symbol Mac name Windows equivalent
Command Ctrl (“Control”)
^ Ctrl None
Shift Shift
Option Alt
Return Return
Enter Enter (on numeric keypad)
(on main keyboard)
6
Page 11

About this Reference Guide
Notice how, somewhat confusingly, the key labeled Ctrl (or sometimes Control, depending
on the model of your keyboard) on Mac is not the same as the key labeled Ctrl on Windows.
Mac shortcuts using Ctrl are very rare in Sibelius First, but where they appear, they are written using the symbol ^ (as it appears in menus etc. on Mac) to avoid confusion for Windows
users.
Sibelius First is almost identical on Windows and Mac, but where there are differences,
mainly in keyboard shortcuts, the Windows convention is listed first. For more information
on the differences between Mac and Windows keyboard shortcuts, Keyboard shortcuts at
the end of this Reference Guide, which lists all keyboard shortcuts available.
“Type Ctrl+A or A” means hold down the Ctrl (Windows) or (Mac) key and type A.
Even though A is written as a capital letter, don’t type Shift unless explicitly told to do so.
Similarly, for standard shortcuts like Ctrl+? or ? where both / and ? exist on the same key,
you actually type Ctrl+/ or / without using Shift.
Similarly, “Alt+click or -click” means hold down the Alt (Windows) or (Mac) key and
click.
To click something means to move the mouse arrow over it and click the left mouse button.
To right-click something means to point at it with the mouse and click the right mouse but-
ton. If you are using a MacBook or other portable Mac, to achieve the equivalent of a rightclick, hold the Ctrl key and click the trackpad.
To drag something means to point at it with the mouse, and then click and hold the left
mouse button while moving the mouse. To finish dragging, just let go of the mouse button.
A dialog is a window with buttons on. Some dialogs are divided into several pages and have
labeled tabs at the top, or a list box at the left-hand side, which you can click to switch
between pages of the dialog.
The numeric keypad is the rectangle of numbers and other characters at the very right-hand
side of your computer keyboard. (Notebook (laptop) computers usually don’t have a separate numeric keypad— Keyboard shortcuts for more information.)
“Return” is the large key to the right of the letter keys. On some keyboards it is labeled with
“Enter” or a special arrow symbol, but we always call it Return.
“Enter” is the large key at the bottom right of the numeric keypad. On some keyboards it is
unlabeled, but it still means Enter.
Less well-known terminology is in the Glossary at the end of this book.
American and British English
Sibelius First and this book use American English, but for the benefit of readers in other countries, some non-American terms such as “crotchet” are included in parentheses.
British readers may be interested to know that in America, both “bar” and “measure” are used
(so for universality we’ve opted for “bar”), and “staff” means British “stave.” Any British
readers who are offended by the American spelling of “center,” “color” and so on will just
have to use a pen on the screen.
7
Page 12

8
Page 13

Working with the ribbon
Working with the ribbon
The ribbon is the wide band of command buttons that appears at the top of the Sibelius First
window, housing all of the features of the program, organized according to task. In addition to
the ribbon, every Sibelius First document window also contains other useful controls.
The Sibelius First window
The picture below shows a typical Sibelius First window, so you can see where the ribbon is,
and several other useful controls at the top and bottom of the window:
Ribbon tabs
The ribbon
Document tabs
Quick Access Toolbar
(Windows only)
Information
read-outs
Title bar
Status bar Zoom controlsDocument view
Find box
buttons
Window buttons
(at top left on Mac)
Help button
Minimize ribbon
Switch tab
Open new tab
Here’s a quick guided tour to the Sibelius First window, starting at the top and working our
way down:
Quick Access Toolbar (Windows only): this has three important buttons: Save, Undo and
Redo. The Undo and Redo buttons also have menus attached to them, allowing you to
quickly undo or redo to any point since you opened the score. (On Mac, these options are
found in the File and Edit menus respectively.)
Title bar: this shows the filename of the document, and the name of the current dynamic part
or version being viewed (if applicable). On Windows, you will see an asterisk (*) after the
filename if the score has unsaved changes. (On Mac, you will instead see a black dot inside
the red close button at the top left-hand corner of the window.)
9
Page 14

Window buttons: the title bar contains a set of buttons for working with the current window.
On Windows, these buttons appear at the top right-hand corner, while on Mac, they appear at
the top left-hand corner.
Minimize is the first of the three buttons on Windows, and the middle of the three on Mac.
Click this to make your score window disappear from the screen without closing the file.
Restore down/Maximize (called Zoom on Mac) is the second of the three buttons on
Windows, and is the third of the three buttons on Mac. This button resizes the document
window. Clicking this button toggles your window between maximum size or its previous
size.
Close is the third of the three buttons on Windows, and the first on the Mac. As the name
suggests, clicking this button closes the current window.
Find box: type one or more keywords into this box to see a list of suggested controls on any
of the ribbon tabs; very useful for finding something if you can’t remember exactly where it
is. As you type, Sibelius First shows a list of matching controls: use / to choose the one
you need, then hit Return to be taken there. Sibelius First helpfully highlights the control for
you. Sibelius First also provides a customizable keyboard shortcut to search for any command in the Ribbon and then press Return (Mac) or Enter (Windows) to execute the command immediately. This lets you quickly execute common commands while the Ribbon is
hidden. Press Control+0 (Mac) or Alt+0 (Windows) to enter the Find in Ribbon Search field
(you can define your own keyboard shortcuts for entering the Find in Ribbon Search field in
File > Preferences > Keyboard Shortcuts > Other > Activate Find in Ribbon).
Minimize Ribbon: the ribbon (described below) takes up a reasonable amount of vertical
space. If you want to see more of your score as you work on it, click the Minimize Ribbon
button. When you do, the ribbon disappears, leaving only the ribbon tabs across the top of
the screen. To make the ribbon reappear, click the button again to make the ribbon reappear
permanently, or simply click whichever tab you want to use to make the ribbon reappear
until you have finished making a choice from it, at which point it disappears again.
Help: click the ? button to open this Reference Guide in its on-screen form. You can find
further help in the File tab of the ribbon.
The ribbon: discussed in more detail below.
Document tabs: you can open multiple different views of the same document—e.g. a full
score and individual instruments’ parts—inside a single window, and switch between them
using these tabs. When you start a new score, only one tab will be shown, labeled Full Score.
You can open new tabs using the + button at the right-hand side of the document tab bar, or
through other options that switch the view (e.g. hitting W switches between the full score
and the dynamic part corresponding to the current selection).
Open new tab: this + button shows a menu that allows you to open a new tab containing a
different view from the current score, including dynamic parts and saved versions. You can
also choose New Window, which opens the current tab in a new window. You don’t have to
click the button itself to open the menu: simply right-click anywhere along the document tab
bar to do the same thing.
Switch tabs: if you have many tabs open at once, you may not be able to see all of the names
of the tabs clearly across the width of the tab bar. Click this button to show a menu listing all
of the open tabs in the current window, allowing you to quickly switch to any of them.
Status bar: the status bar runs along the bottom of the window, which gives you information
about the current document and has some useful buttons for quick access.
Information read-outs: at the left-hand of the status bar is a series of useful read-outs. From
left to right: the current page and the total number of pages; the total number of bars; the
instrument on which the current selection resides, if there is one; the range of the current
10
Page 15

Working with the ribbon
selection, if there is one; the timecode of the current selection; the pitches of the selected
notes (or the first note or chord of a passage if you have a range of music selected); the harmony of the chord made up by all of the selected notes at the start of the selection, displayed
as a chord symbol; a description of the current operation (e.g. Edit Passage or Edit Text);
whether or not the current view is currently displayed at concert (sounding) pitch or transposing (written) pitch; whether Layout Hiding Staves Focus on Staves is switched on;
whether or not Magnetic Layout is enabled or disabled for the selected objects; and/or the
font and point size of the selected text object.
Zoom controls: at the right-hand end of the status bar is a slider with—and + buttons at either
end that allow you to change the zoom level of the current view quickly and easily. To the
left of the slider is a read-out of the current zoom level, expressed as a percentage.
Document view buttons: to the left of the zoom controls is a set of buttons that allow you to
switch between different types of view quickly, for example between showing the pages of
your score laid out horizontally and Panorama view. These buttons are also found on the
View tab of the ribbon.
The ribbon tabs
The ribbon itself is split into 10 tabs. The first tab, File, is unlike the other tabs: clicking it
hides the score altogether and instead shows you a special view called Backstage, which contains everything you might want to do with a file (as opposed to what you might do to a file,
which is what the other nine tabs are for). From the File tab you can create, open, save and
close files, import and export them in different formats, print music out, share your music
online, get detailed help, and more. (The first chapter of this book is devoted to the operations
you can perform from the File tab.)
The other nine tabs are ordered roughly according to the order in which you typically perform
tasks while working on a score, so as you make your way from the start of a project towards its
end, you will typically work your way through most of the tabs of the ribbon from left to right.
(This book is likewise ordered according to the order of the tabs.)
These nine tabs contain the following kinds of commands:
Home: basic score setup, like adding or removing instruments and bars, plus key editing
operations, including clipboard operations and Sibelius First’s powerful filters.
Note Input: commands relating to alphabetic, step-time and Flexi-time input, plus note edit-
ing operations, compositional tools such as explode/reduce, and transformations such as retrograde, inversion, and so on.
Notations: all of the basic markings other than notes, rests and text, including clefs, key and
time signatures, special barlines, lines, symbols, notehead types, etc.
Text: font style and size controls, choice of text styles, plus lyrics, chord symbols, rehearsal
marks, and bar numbering options.
Play: choice of playback configuration, mixer, transport (playback) controls, options for how
Sibelius First should interpret your score during playback, and features for writing music to
video.
Layout: document setup options such as page and staff size, staff spacing, hiding staves,
Magnetic Layout, plus some formatting controls.
Appearance: options that affect the visual appearance of your score, including note spacing
and instrument name format, plus commands to reset or change the design or position of the
objects in your score.
Review: add sticky note comments or highlights and create and view multiple versions of the
same score.
11
Page 16

View: change the layout and size of the music on the screen, show or hide various “invisi-
bles” and other helpful markings that provide useful information about your score, hide or
show extra panels for advanced operation, and arrange or switch between the open document windows.
Groups and controls
Each ribbon tab contains a number of groups, which organize related commands together. The
name of each group is shown below the names of the individual commands in gray text, and
groups are separated from each other by a vertical line:
The picture above shows the Common, Lines and Symbols groups from the Notations tab.
Each group contains one or more controls of various types, including buttons, buttons that
open menus, split buttons (where half the button is a regular button and the other half opens a
menu), checkboxes, combo boxes and galleries, which are menus with special features. Galleries come in two flavors:
Drop-down galleries: these may look a lot like normal menus, displaying their contents as
text, or they may display their contents graphically. Unlike regular menus, galleries typically
list options organized by category, which can then be filtered (see below). An example of a
textual gallery is Home Select Filters. All of the buttons in the Notations Common group
shown in the picture above use drop-down graphical galleries.
In-ribbon galleries: these galleries are embedded directly in the ribbon, allowing you to see
the first few items in the gallery without opening it. In-ribbon galleries allow you to scroll up
and down the list using the scroll arrow buttons at the right-hand end, or to open the gallery,
making it appear like a drop-down gallery. Notations Lines and Notations Symbols both
contain in-ribbon galleries, shown in the picture above.
Depending on the width of the window, the ribbon will do its best to display as many as possible of the controls in all of the groups on the current tab. Some controls may be stacked vertically to save space, or perhaps even hide their textual description. If space gets very tight,
some groups may end up collapsed, which means that instead of showing each of its controls
directly on the ribbon, all of the controls are collapsed behind a single button, which shows the
whole contents of the group below the ribbon when clicked, like this:
In the picture above, several of the groups on the Layout tab are collapsed, and the Staff Spac-
group has been opened by clicking the button that represents the collapsed group.
ing
12
Page 17

Working with the ribbon
Sibelius First has so many commands that in order to ensure every group on every tab is not
shown collapsed, your screen display has to be at least 1920 pixels wide!
13
Page 18

Keyboard access
The ribbon includes a number of time-saving features to help you to learn and get around the
program quickly, chief among them the ability to access every command via the keyboard
using key tips. Key tips are special shortcuts that take you straight to a command, whichever
ribbon tab it is on.
To show key tips, simply hit Alt (Windows) or Ctrl (Mac): you don’t need to hold the key
down. A small overlay appears below each tab’s name:
To access a tab, simply type the key tip shown for that tab. For example, type L to switch to the
Layout tab:
Now type the key tip shown (usually two letters) for the command you want to use.
Once you have set the focus into the ribbon by hitting Alt (Windows) or Ctrl (Mac), you can
also navigate around the tabs and the controls in each tab using the arrow keys or Tab and
Shift-Tab, then use either Space, Return or Enter to activate the button or other control that is
currently in focus.
Screen tips
Every command in the ribbon also has an extended text
description, which appears if you hover your mouse over
it for a moment. These descriptions are called screen tips,
and they provide useful additional context on each command.
On the right, you can see the screen tip for Home
Clipboard Select Graphic
. Notice how a keyboard shortcut is shown in parentheses after the name of the command. Unlike key tips, which can only be used in
sequence after hitting Alt (Windows) or Ctrl (Mac), this
kind of keyboard shortcut can be used from anywhere,
and furthermore you can customize them if you want to.
Launching related dialogs
Some groups in the ribbon have a small extra button in the
bottom right-hand corner called a dialog launcher button,
which when clicked, you will be surprised to learn, launches
a dialog containing further options relating to the commands
in that group.
In the picture above, the mouse pointer is over the dialog launcher button in Layout Document
, which launches the Document Setup dialog, in which you can change the page size,
Setup
orientation and margins with additional options over and above those on the ribbon.
14
Page 19

Working with the ribbon
Saving your working environment
Sibelius First automatically keeps track of the arrangement of windows and tabs while you are
working on your score, so that it can restore them the next time you open it. When you re-open
a score you have worked on before, Sibelius First will:
Open the document window to the same size and position you had used when you last closed
it.
Open all the tabs that were open when you last closed it, and bring the last-used tab into
focus.
Set the zoom level and type of view to the same as those used when you last closed it.
Restore the settings on the View tab of the ribbon for which “invisibles” (useful things that
display on the screen but are not normally printed out) should be shown.
Open the panels (such as the Mixer, Ideas panel, etc.) that were open when you last closed it.
Notes for upgraders
If you have upgraded from Sibelius 6 First, Sibelius 6 Student or earlier, you may be a little
disorientated when you first run your new version of Sibelius First and see that the old menus
and toolbar have been replaced by the ribbon. But don’t worry: you’ll soon get used to it, and
before long you’ll find it much clearer than before. The Find in ribbon box at the top right-hand
corner of the ribbon is an invaluable tool in searching for features that you have temporarily
mislaid.
Here, broadly speaking, is how to find things in the ribbon according to the menus used in earlier versions of Sibelius First:
File menu items are now found in the File tab.
Edit menu items are split between the Quick Access Toolbar (for undo and redo), Home tab
(for selecting, filtering and coloring), Notations tab (for multiple voices) and the Text tab (for
chord symbol settings). You can still access a cut-down version of the Edit menu by rightclicking on a selection in your score, just as in previous versions of Sibelius First.
View menu items are found in the View tab.
Notes menu items found in the Note Input tab.
Create menu items are split between the Notations and Text tabs. You can still access the
Create menu by right-clicking on the score window with nothing selected, just as in previous
versions of Sibelius First.
Play menu items are found in the Play tab.
Layout menu items are found in the Layout tab, except for Reset Design and Reset Position,
which are on the Appearance tab.
Plug-ins: the most useful ones appear individually on the ribbon next to related features of
the program. The Home tab also has a dedicated Plug-ins gallery with even more plug-ins.
Window menu items are found on the View tab.
Help menu items are found in the File tab, in the Help pane.
As far as possible, keyboard shortcuts are the same as in previous versions of Sibelius First, so
power users who have memorized a lot of shortcuts should feel right at home.
15
Page 20

16
Page 21

Undo and Redo
Undo and Redo
Two of the most important features in Sibelius First are undo and redo, which allow you to
move backwards and forwards through the edits you have made since you opened the score
you’re working on. How you access undo and redo is, unusually, different in the Windows and
Mac versions of Sibelius First.
Windows users
On Windows, undo and redo are found on the Quick Access Toolbar, which appears in the top left-hand corner of each Sibelius First
document window, as shown on the right.
To undo the last thing you did, click the left-pointing arrow, or type
the shortcut Ctrl+Z. You can click the menu part of the button to
show the undo history menu: click on any item in the menu to undo
directly to that point.
To redo an operation you didn’t mean to undo, click the right-pointing arrow, or type the shortcut Ctrl+Y. As with undo, you can click
the menu part of the button to show the redo history button. The
most recent operation you undid is at the top of the list, so click the
top item to redo one step, the second item to redo two steps and the
bottom item to redo everything you undid and get back to where
you were. (If you see what I mean.)
Mac users
On Mac, undo and redo are found in the Edit menu. Choose Edit Undo, or type the shortcut
Z to undo the last thing you did. The Edit menu tells you what the last thing you did was, in
case you have a very short memory. (Well, it tells you the last thing you did in Sibelius First—
it won’t say Undo Sneeze, entertaining though that might be.)
Edit Undo History (shortcut Ctrl+Shift+Z or Z) lists all the recent operations you’ve done,
and lets you hop back to a particular earlier point in time. The most recent operation is at the
top of the list, so click the top item to undo one step, the second item to undo two steps and the
bottom item to undo as far back as you can go.
To redo an operation you didn’t mean to undo, choose Edit Redo, or type the shortcut Y.
Again, the Edit menu tells you what it was you just redid.
Edit Redo History (shortcut Ctrl+Shift+Y or Y) is like Undo History, but lists all the things
you can redo after you’ve done a load of undoing.
15
Page 22

16
Page 23

Connecting external MIDI devices
Connecting external MIDI devices
There are three steps to setting up your external MIDI devices: connecting the hardware,
installing the necessary software (if any), and then setting up MIDI in Sibelius First. This topic
takes you through the first two steps, and the last step is described in 3.12 Input Devices on
page 179.
Connecting MIDI devices to your computer
MIDI stands for Musical Instrument Digital Interface. It is a standard, not a thing—the universal standard for connecting electronic musical instruments together. MIDI keyboards, synthesizers, sound modules, samplers and other electronic music gadgets can all be plugged into one
another with MIDI cables, and can also be plugged into your computer. Virtual instruments
and software synthesizers are also MIDI compatible, and as they’re already in your computer
you don’t need to attach cables at all in order to play music back.
All modern MIDI devices, such as controller keyboards, have USB connections, enabling you
to connect your MIDI keyboard directly to your computer using only one USB cable.
For older MIDI devices without direct USB connections, you can connect a separate MIDI
interface to a USB port on the back of your computer, and plug your MIDI device into the
MIDI interface using MIDI cables.
Connecting MIDI devices directly via USB
All new MIDI keyboards and other devices can connect directly to your computer’s USB
sockets without the need for a separate MIDI interface. To install one of these devices, simply
connect a USB cable (which may be provided with your device) to your computer, and follow
the on-screen instructions to install the necessary driver software, if any.
Once any required drivers are correctly installed, you can set up input and playback in Sibelius
First— 3.12 Input Devices.
You should switch on the power on your USB-connected MIDI devices before running Sibel-
ius First. Failure to do so may result in Sibelius First not correctly detecting your MIDI device
when it loads. Be aware that some bus-powered devices, meaning devices that have no separate power supply unit and draw power directly through the USB cable, will only work reliably
if connected to a USB socket on your computer, not on an external device such as a USB hub
or, say, your Mac’s keyboard.
Connecting MIDI devices via a MIDI interface
A MIDI interface is a small box that sits between your computer and your external MIDI
devices, sending MIDI data back and forth. MIDI interfaces usually connect to a USB port on
your computer. You would only need a MIDI interface if your external MIDI device doesn’t
have its own direct USB connection.
MIDI interfaces often require additional driver software, which will be supplied by your
device’s manufacturer.
We’ll assume your MIDI interface connects via USB, and
show you a common MIDI setup. Connections between MIDI
devices all use standard MIDI cables, pictured on the right.
To plug in just a MIDI keyboard, connect its “Out” socket to the MIDI interface’s “In” socket.
This means that music played on the keyboard will go out of the keyboard, along the cable and
in to the computer.
17
Page 24

To make the computer play back music into the keyboard (e.g. if the keyboard has sounds built
into it), also connect the MIDI interface’s “Out” to the keyboard’s “In.”
If your keyboard has two “In” or “Out” sockets, it usually doesn’t matter which you use—
they’re just convenient duplicates of each other.
So connecting up such a keyboard looks like this:
If you want to connect just, say, a sound module, rather than a keyboard, simply connect the
MIDI interface’s “Out” to the sound module’s “In.”
Once you’ve connected your MIDI devices to your computer, you can set up input in Sibelius
First— 3.12 Input Devices on page 179.
18
Page 25

File tab
Page 26

File tab
20
Page 27

1.1 Working with files
1.1 Working with files
This topic explains saving scores in Sibelius format, and (for more advanced users) how to
access files containing custom Sibelius First settings (e.g. house styles). The other topics in
this chapter will tell you how to share files with other people, whether or not they have Sibelius First, and how to import and export files in various formats.
Creating a score
There are several ways to start a new score in Sibelius First— 1.4 Starting a new score.
File size
Sibelius files typically occupy around 20K plus 1K per page (excluding any imported graphics), even for band or orchestral music. This means you can fit literally millions of pages on
your hard disk, and even huge scores can easily be sent by email. So even if your name is J.S.
Bach, disk space is unlikely ever to present a problem when using Sibelius First.
Saving
Saving works just like in any other program, using File Save As (shortcut Ctrl+Shift+S or
S) and File Save (shortcut Ctrl+S or S). In addition to being able to save Sibelius scores,
you can also export other formats, such as MusicXML, MIDI, audio, video and PDF; for more
details, see the relevant topics in this Reference Guide.
A convenient place to save is the Scores folder that Sibelius First has helpfully created for you.
On Windows, the Scores folder is created inside your My Documents folder; on Mac, it is inside
your user Documents folder.
When you next open the score after saving, it will open at the point at which you were working
on it when you saved, with the window in the same position, the same panels and windows visible, and even at the same zoom factor.
Auto-save
Sibelius First can automatically save your score at timed intervals so that, should your computer crash, the most work you can lose is a few minutes’ worth. Rather than saving your
actual file, Sibelius First makes a copy of your score and saves it into a special hidden folder.
If Sibelius First doesn’t shut down correctly (for example, if your computer crashes or there is
an interruption in power), the next time you start the program, it checks the special folder, and
if it finds any scores in that folder, you will be asked if you want to restore them.
When you close Sibelius First normally, it deletes all the files in the special folder—so it’s
essential that you don’t save any files in there yourself!
Backups
Each time you save, the score (with a version number added to the name) is also saved in
Backup Scores in your Scores folder. If you ever accidentally delete or mess up a score, look in
this backup folder to get the latest version you saved, or earlier versions too. This folder stores
the last 200 scores you saved; older copies are progressively deleted to stop your disk from
filling up, so don’t use this folder to store your own backups!
Backup scores are created when you save manually, not each time Sibelius First auto-saves;
but unlike auto-saved scores, backup scores are not deleted when you close Sibelius First.
21
Page 28

Catalog information
The File Info pane can be used to enter information about your score, such as its title, composer, arranger, copyright, and so on, which is automatically used when you publish your score
on the Internet ( 1.17 Exporting Scorch web pages). You will find that several fields are
already filled in if you specified title, composer, etc. at the time you created your score.
The right-hand side of File Info shows you useful details about your score, such as the date it
was created, when it was last saved, how many pages, staves and bars it contains, and so on.
The values you enter into the fields in the File Info pane can also be used as wildcards in text
objects throughout your score. For details on wildcards and how to use them in Sibelius First,
5.12 Wildcards.
User-editable files
The standard files included with Sibelius First are non-deletable; you should not change anything inside the installation folder itself (or the application package—sometimes known as a
“bundle”—on Mac), which is where they are stored.
Your own (user-editable) files are stored in specific folders inside your user account’s applica-
tion data folder of your computer, the location of which will differ depending on the operating
system you are using:
Windows: C:\Users\username\Application Data\Avid\Sibelius\
MacOSX: /Users/username/Library/Application Support/Avid/Sibelius
On Windows, you can go quickly to this location by clicking the Sibelius First (User Data)
shortcut in the Sibelius First program group in your Start menu. The application data folder is
hidden by default and will not be otherwise visible in Windows Explorer. If you wish to access
this folder via Explorer, go to Control Panel and click Folder Options from any open Explorer
window. Click the View tab and from the Files and Folders list choose Show hidden files and
.
folders
Inside the Sibelius First application data folder you will find various folders whose names
indicate the content they contain. (On Mac, it is possible for there to be no folders at all, as
they are only created when you create or edit a file that is saved in that location.)
You can copy any appropriate file to the user area directories and Sibelius First will use it
when you next start the program. Files you have added or created can also be deleted with no
ill side-effects.
Scorch templates and textures
You can create your own Scorch templates and paper/desk textures. Place them inside the rele-
vant folder in the application data folder, and Sibelius First will detect them. Scorch templates
go in the folder called Scorch templates, and textures (in Windows BMP format only) in the
folder called Textures.
Quick Look (Mac only)
Quick Look is a feature built in to Mac OS X that allows you to preview instantly the contents
of your documents directly from the Finder, without having to wait while you open the applications that created them: simply select the document in the Finder, and hit Space. Many documents also show thumbnail previews on the desktop and in Finder windows, and if you set
Finder windows to use Cover Flow, you can flip through folders of documents very quickly.
22
Page 29

1.1 Working with files
Sibelius First fully supports Quick Look, so instead of the usual document icon, you will see a
thumbnail of the first page of the score: select it and hit Space (or click the Quick Look icon in
the Finder) to see a larger preview of the score. You can scroll through pages by grabbing the
scroll bar at the right-hand side of the preview.
Spotlight (Mac only)
Spotlight is Mac OS X’s built-in search engine. Simply click the Spotlight icon at the top righthand corner of the screen, or type the keyboard shortcut -Space, and type the search term
you’re looking for. You can search for Sibelius scores using Spotlight, simply by typing the
filename, or indeed any bit of text you know is contained within (e.g. title, composer, lyrics,
instrument names, and so on). Once you’ve found one or more scores, simply hit Space to preview it using Quick Look (see above), or double-click to open it in Sibelius First.
23
Page 30

24
Page 31

1.2 Sharing and emailing files
1.2 Sharing and emailing files
It’s easy to share music you have written in Sibelius First with other people.
To learn more about how you can easily publish and share your music online (including as
audio tracks or videos), see 1.3 Sharing on the web.
Sharing files with other users of Sibelius
If the person you are working with also has Sibelius or Sibelius First, then simply send the file
by email (see below), or on removable media such as a USB flash drive or CD-R.
Find out what version of Sibelius the person you’re sending files to is using. If they have the
same or a later version of Sibelius as you, you can simply save your file as normal and send it
to them. If, however, they have an earlier version of Sibelius (or are using an earlier version of
Sibelius Student or Sibelius First), you will need to export your score in an earlier file format
before emailing. Fortunately, Sibelius First makes this very easy—Sending files via email
below.
Sharing files with people who don’t use Sibelius First
If the recipient doesn’t have Sibelius First, there are a number of other means of sharing files
with them:
Share scores with Sibelius | Cloud Sharing— 2.9 Sibelius | Cloud Sharing.
If the recipient has an iPad, ask them to download and install the Avid Scorch app. Save and
attach your score to an email for them to open on their device— 1.16 Exporting to Avid
.
Scorch
Ask them to download and install the trial version of Sibelius First from www.sibelius.com,
then send the file to them. After the trial expires, it can only print a single, watermarked
page, so if you want them to be able to print your score, this isn’t the best way.
Publish the music on your own web site— 1.17 Exporting Scorch web pages.
Export a PDF of your score and send it to them— 1.18 Exporting PDF files.
If the recipient has another music program and wants to listen to and perhaps edit your
music, send them a MIDI file ( 1.13 Exporting MIDI files) or, preferably, a MusicXML
file ( 1.14 Exporting MusicXML files).
If you want to send your music to somebody else so they can hear it, but you don’t need
them to see the score, you could also export an audio file from Sibelius First and then either
burn it to an audio CD or compress it into an MP3 file and send it via email—
1.10 Exporting audio files.
If you want to send your music to somebody else so they can hear it, and you do need them
to see the score, you can export a video file from Sibelius First— 1.11 Exporting video
.
files
If you want to publish your music online for people to view and print—or use a video- or
audio-sharing service—Sibelius First can export a suitable file and upload it directly to your
Score Exchange— 1.3 Sharing on the web.
25
Page 32

Sending files via email
Sending files by email is very easy, using Sibelius First’s built-in emailing feature. Simply
choose File Share Send Using Email and enter your email address at the top of the pane, then
type the email address of the person you want to send your score to, along with any message
you wish to send, and click the Send Email button:
By default, Sibelius First also sends a copy of the email and attachments to your email address,
which allows you to keep track of emails you’ve sent previously—if you would rather not
receive copies of the emails you send in this way, simply uncheck Send me a copy of this email.
Using the various options above the message details, you can choose to send any combination
of:
A Sibelius First score, which is also fully interchangeable with Sibelius.
A file for opening in a previous version of Sibelius.
PDF files of the score and or parts.
By default, Sibelius First sends a Sibelius First score and a PDF file (of the score only).
If you choose to send a file for opening in an earlier version, you can choose which version (as
far back as Sibelius 2) from the drop-down list. When you send the email, Sibelius First
exports a copy of the score in the earlier format and attaches it to the email.
26
Page 33

1.2 Sharing and emailing files
If you choose to send a PDF file, you can choose from three options:
Score only exports only the full score.
Score and all parts (one file) exports the full score and a single copy of each part into a single
PDF file.
All parts only (separate files) exports a single copy of each part, with a separate PDF file for
each part.
In each case, the exported PDF files are attached to the email that will be sent when you click
Send Email. To learn more about exporting PDF files of your score— 1.18 Exporting PDF
.
files
If you wish to send an email in this way to more than one recipient, type their email addresses
separated by semicolons, like this: recipient1@example.com; recipient2@example.com; recipi-
ent3@example.com
and so on.
When sending emails in this manner from Sibelius First, please be considerate towards others
and do not send any materials that might be thought of as “spam” or which are abusive, illegal,
obscene or threatening in any way.
You may not use this service to violate copyright or any other property right and you should
not make false or misleading statements of fact or misrepresentations of the origin of the material you are sending.
Sending files via email from another program
If you prefer to send email from your own email program—or if you’ve chosen to export a
score optimized for viewing in the Avid Scorch app—it’s still very easy, but the exact procedure differs according to the email program you use:
Windows Mail, Outlook Express or Mozilla Thunderbird: start a new message, then click the
Attach button (with a paperclip icon), find the file and click Attach to attach it to the mes-
sage. Then send it as normal.
Apple Mail: start a new message, then simply drag and drop the file you want to attach to the
message into the message window, and send it as normal.
Eudora: start a new message, right-click (Windows) or Control-click (Mac) on the message
body, and choose Attach file. Find the file you want to attach, and double-click its name to
attach it to the message, which you can then send as normal.
If you don’t use any of the above programs, consult the documentation for your particular
email client for details on sending file attachments.
Files on Windows or Mac
Sibelius First for Windows and Sibelius First for Mac use exactly the same file format. You
can move a Sibelius score between Mac and Windows without any conversion at all—see
below.
Both file formats use Unicode, a standard international character set, which means that special
characters (like accented letters) are automatically translated between Mac and Windows.
Music and text fonts are also substituted intelligently.
Sibelius files have a .sib extension. On Mac, Sibelius files are also of kind “Sibelius document” (internally the Creator is “SIBE” and the Type is “SIBL”).
27
Page 34

Opening Mac scores on Windows
If you are trying to open a score created on the Mac given to you on a CD-R or another disk,
make sure the disk is formatted for Windows—although the Mac can read Windows disks,
Windows cannot read Mac disks.
To open the file in Sibelius First for Windows, you may have to add the file extension .sib.
Although Sibelius First adds this file extension by default on both Windows and Mac, some
Mac users prefer not to use file extensions; this causes a problem on Windows, because the file
extension tells Windows this is a Sibelius file.
You can add the file extension in Windows by right-clicking on the file icon (in My Computer
or Windows Explorer) and selecting Rename. Change the extension, and then hit Return (on the
main keyboard). You may be prompted that changing file types can render them unusable,
because Windows assumes that you don’t know what you’re doing. If asked whether you are
sure you wish to proceed, click Yes.
Once you have renamed the file, you can open it in the usual way by double-clicking.
Opening Windows scores on Mac
To open a file created using Sibelius First for Windows, simply choose File Open and doubleclick the name of the file in the dialog.
28
Page 35

1.3 Sharing on the web
1.3 Sharing on the web
The File Share page houses all of Sibelius
First’s features for sharing and publishing your
music via email and online publishing using
Score Exchange.
From here you can choose to send an email
directly from within Sibelius First, with your
score attached in a choice of formats.
Share video using Sibelius’s video export or
export an audio track of your score to share.
Integration with Score Exchange allows you to
publish scores online.
You can also share scores with Sibelius | Cloud
Sharing— 2.12 Sibelius | Cloud Sharing.
Of course, Sibelius First also offers the ability to print ( 1.9 Printing), export scores as
MIDI, MusicXML or PDF ( 1.13 Exporting MIDI files, 1.14 Exporting MusicXML files,
1.18 Exporting PDF files), and create audio and video files on disk ( 1.10 Exporting audio
, 1.11 Exporting video files).
files
You can also export your scores to the Avid Scorch mobile app and take them anywhere
( 1.16 Exporting to Avid Scorch).
Send Using Email
The File Share Send Using Email pane contains options for sending your score as an email
attachment in a choice of formats, all without ever having to leave Sibelius First.
For full details on this, see Sending files via email on page 26.
Publishing for others to view, purchase and print
Sibelius First allows you to upload and publish your scores as digital sheet music to
ScoreExchange.com.
Score Exchange is a web site for finding and purchasing new sheet music from composers and
arrangers all over the world. ScoreExchange.com offers thousands of scores for every
instrumentation imaginable—from solo pieces to works for full orchestra, from classical to
pop.
With Score Exchange you can upload, publicize, sell or give away your musical compositions
and arrangements. For more details, visit www.scoreexchange.com.
29
Page 36

The File Share Publish to Score Exchange pane contains options for preparing and sending
your score to your ScoreExchange.com account. (If you don’t already have an account, click
the Register button to be taken directly to ScoreExchange.com to sign up for one.
Enter the email address and password you used to create your Score Exchange account and
click Sign In to enable the remaining options. (If you switch on the Keep me signed in checkbox
before clicking Sign In, Sibelius First will remember your login details between sessions, so
that when you next run the program, you will automatically be signed into your account.)
Under the Score Info heading, you can see at a glance which of the fields in the File Info tab
you’ve already completed, which is useful as Score Exchange is able to use this information to
tell people more details about your score once you’ve uploaded it.
You will also see a list of the instrumental parts created automatically by Sibelius First for
every instrument in your score. You can choose whether these should be removed from the file
you upload to ScoreExchange.com; all parts are included by default. These parts can then be
made available separately to purchase or download.
When you click the Publish button, Sibelius First will open your web browser and take you to
ScoreExchange.com where you can provide additional details about your score to make it easier to find—or you can choose to hide the score from public view until it’s ready.
30
Page 37

1.4 Starting a new score
1.4 Starting a new score
There are several ways of starting a new score in Sibelius First: you can import music from
another program in MusicXML or MIDI format, scan printed music with PhotoScore, or input
music via microphone using AudioScore.
Of course, you can also start working on a new score, in one of two ways.
Score Starter templates
Sibelius First comes with 40 Score Starter templates in a variety of styles and genres, to help
you start writing straight away, without worrying about the details of how your score appears.
To access these, close any open scores and click the Score Starter tab in the Quick Start window.
A selection of ten different musical genres appear—everything from Blues and Country
through to Rock, Classical or Latin. Click on any of these icons to see thumbnail views of a
range of styles within that genre. Each of these styles corresponds to a template that you can
use to begin writing music; click on the thumbnail to see information about the template
(including key signature, time signature and tempo) and to hear a preview of the sort of music
this style corresponds to.
Click Choose to open a score based on this style template. When the score opens, you are ready
to start writing immediately. All the details like instruments, key signatures, time signatures,
clefs—and even a title—have already been added to the score, so that you can concentrate on
creating music. Many of the Score Starter templates already contain bits of melody, rhythm,
accompaniment or chord progressions, so if you’re stuck for inspiration or are looking for
something stylish to kick-start your creative process, you’ll find something suitable.
31
Page 38

Manuscript paper
You can also simply start a score from scratch:
With no score open, click the New tab in the Quick Start window.
With a score already open, choose the File tab, and click the New button, or type the shortcut
Ctrl+N or N.
In either case, you will end up looking at a list of templates, called manuscript papers,organized into folders, and showing a thumbnail view of each one. The preset manuscript paper
choices have various combinations of instruments, along with other less obvious settings to
improve the look and playback of your score. You do not have to use the instruments exactly
as provided—feel free to delete instruments or add new ones.
It’s better to use a manuscript paper containing instruments than to start with a blank page,
even if the instrumentation isn’t exactly right, because various other options are already set for
you in the manuscript papers appropriate for the particular type of music.
There are more than 35 predefined manuscript papers supplied with Sibelius First, categorized as
follows:
No category: Basic templates for Treble staff, Bass staff and Blank, which has no preset instru-
ments.
Chamber Groups: brass, wind and string trio, quartet and quintet templates.
Choral and Song: various Choir manuscript papers are included, some (called reduction) with
the singers reduced onto two staves (“closed score”), some with organ or piano accompaniment, plus Voice + keyboard for piano/vocal music.
Jazz: a number of suitable templates using “handwritten” house styles.
Orchestral: A simple String orchestra template.
Rock and Pop: templates for guitar-driven pop groups and R & B bands.
Solo Instruments: various manuscript papers for guitar notation and tab, including Piano and
Lead sheet.
To browse through the categories more quickly, you can collapse a category by clicking its title
bar, or hold Shift and click any heading to collapse or expand all of the categories at once.
32
Page 39
1.4 Starting a new score
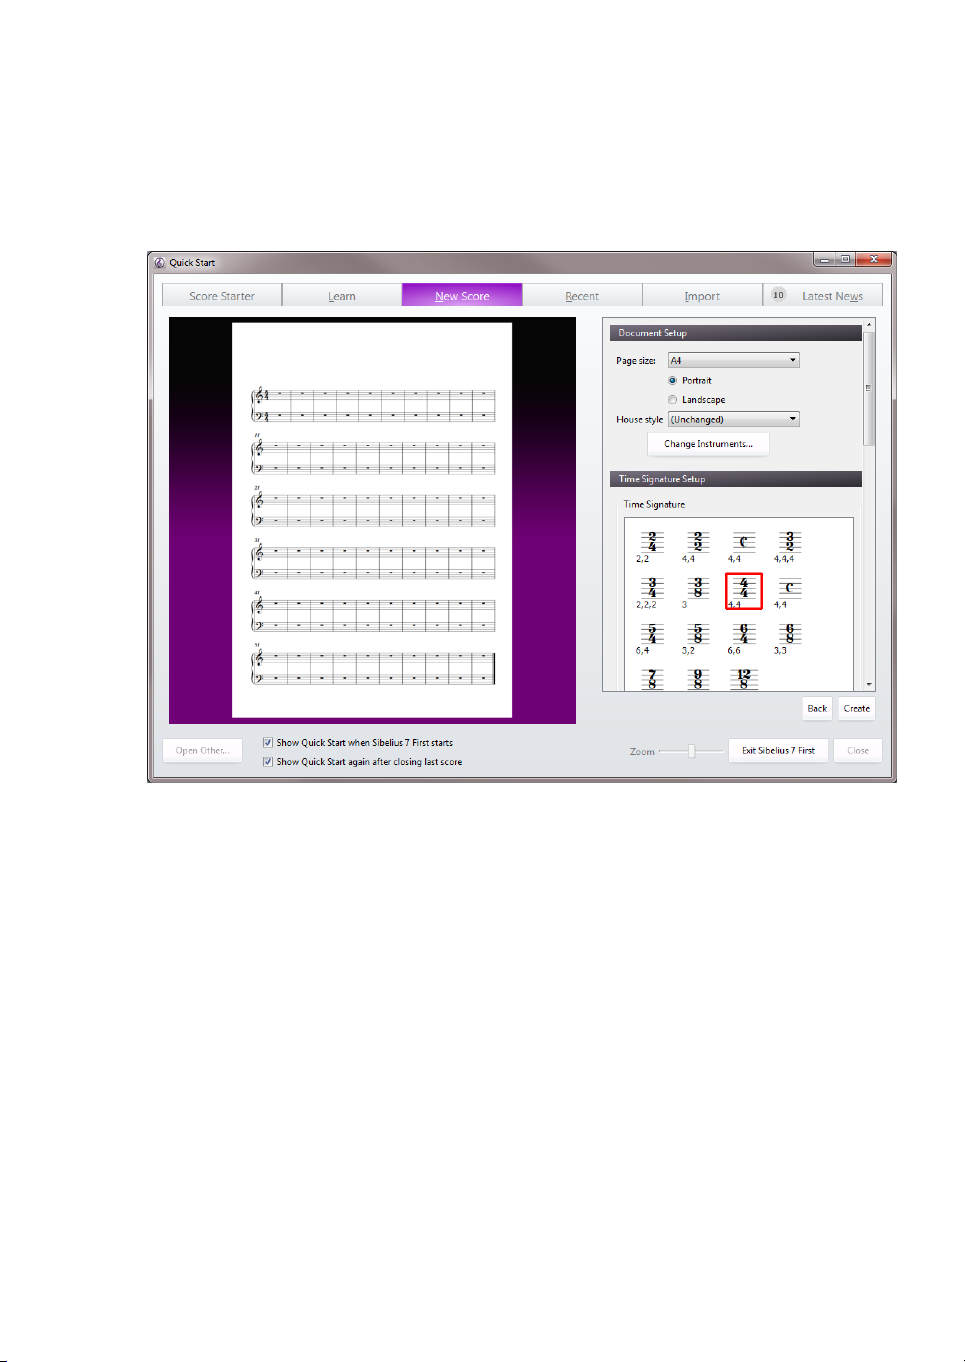
Setting up your score
To get started with your score right away without modifying the instruments it contains, or setting an initial key or time signature, simply double-click your chosen manuscript paper. To
modify the manuscript paper, click it just once, and you will see a zoomed-in version of the
template, together with some options to its right.
Using the options on the right you can modify the page size, orientation, instruments to be
used, individual staff sizes, time signature, key signature, initial tempo, and, if you’re really
planning ahead, even specify the title and composer of the piece.
You can always add or change any element that you added when you created the score later, so
don’t feel any pressure. For now, you can make as many or as few of these decisions as you
like, and to get started on the score itself, click Create at any time.
33
Page 40

34
Page 41

1.5 Opening MIDI files
1.5 Opening MIDI files
If you don’t know much about MIDI, 6.12 MIDI for beginners, which explains what MIDI
files are. If you’re wondering where you can get MIDI files from, see Downloading MIDI files
below.
Importing a MIDI file
Open a MIDI file just like a normal Sibelius file: simply choose File Open (shortcut Ctrl+O or
O), locate the file (on Windows, MIDI files usually have the file extension .mid), and click
Open.
A dialog appears with importing options you can set (detailed below). Normally, you should
just click OK, and then wait a few seconds for the MIDI file to open.
Some MIDI files contain no program changes (even though they contain instrument names),
which means that the instruments have to be guessed. If so, Sibelius First warns you that the
instrument names, sounds, clefs, and other details may be wrong. You should either adjust the
instrument’s clef etc. by hand, or (preferably) make or obtain a copy of the MIDI file that does
contain the necessary program change information, and import that MIDI file instead.
If you find that the imported MIDI file doesn’t look as good as you had hoped, try changing
some of the import settings—see Import options below.
Once the MIDI file is imported you can play back, edit, save, print and create parts from it just
as if you’d inputted the music yourself. Imported MIDI files play back with every nuance of
the original sequence.
Import options
The options on the MIDI File tab of the Open MIDI File dialog are as follows:
MIDI file uses this sound set allows you to specify whether the program and bank numbers
use General MIDI or another sound set. This helps Sibelius First guess what the instruments
are. Normally you can leave this option at General MIDI, or switch it off altogether if you
simply want to import the MIDI file “as is.”
35
Page 42

Only one staff per track is useful if you open a MIDI file which notates a piano (say) as two
separate piano tracks, one for the left hand and another for the right hand. Switch on this
option and each hand will be written as one staff, not two; you can then clean it up by creating a new piano and copying the two hands into it. Finally, delete the original two pianos.
Keep track order is switched off by default; this makes Sibelius First choose the order of the
instruments. Switch it on to keep the instruments in the same order as the tracks in the MIDI
file.
Keep track names makes Sibelius First use the name of each track as the instrument name;
switch it off to use the default instrument names for the instruments Sibelius First guesses.
Hide empty staves is switched on by default; this makes Sibelius First hide empty staves
throughout the resulting score, which is often useful because many MIDI files have tracks
that are empty except for short passages; as a result, hiding empty staves can make the score
easier to read.
Import markers as hit points makes Sibelius First convert all markers in the MIDI file into hit
points in the score it creates. When switched off, Sibelius First will import the markers as
standard text objects.
Use frame rate from SMPTE header tells Sibelius First to set the frame rate settings used for
displaying hit points according to the settings in the MIDI file.
Use tab for guitars specifies whether Sibelius First should import any guitar tracks in the
MIDI file onto tab staves; if the option is switched off, guitars will be imported onto notation
staves.
Use multiple voices determines whether Sibelius First should use two voices where appropri-
ate to produce cleaner notation; normally this option should be switched on.
Show metronome marks makes all metronome marks visible. If there are lots of changes of
tempo (e.g. rits. and accels.) then you may want to switch this option off, which will hide the
metronome marks in the score, making it look cleaner but still playing back the same.
The Document Setup options allow you to choose the Page size, House style and orientation
(Portrait or Landscape) of the resulting score.
For details of the options on the Notation tab, see Flexi-time options on page 190.
Recommended import options
The precise combination of options you should choose in the Open MIDI file dialog will
depend on a number of different factors, for example:
If you are importing a MIDI file to create clean notation, you should switch off the Notation
tab options to notate staccati and tenuti, and try a number of different Minimum note value
settings until you get the cleanest result.
If you are importing a MIDI file for playback only, it doesn’t matter which options you
choose, as Sibelius First will always play back the MIDI file exactly as it sounds.
If you are importing a file created by someone else, probably on a different device (e.g. a
MIDI file you have downloaded from the Internet), you should set MIDI file uses this sound
to the device it was created for.
set
If you are importing a file that you know uses the General MIDI sound set, make sure you
have chosen General MIDI under MIDI file uses this sound set.
The default Notation tab settings work well in most cases, as follows: Adjust rhythms on, Mini-
mum note value
sixteenth note (semiquaver), Staccato and Tenuto on. If you are reading a MIDI
file in which the rhythms are completely exact (if it’s already quantized, say), switch Adjust
rhythms
off.
36
Page 43

1.5 Opening MIDI files
If you set Minimum note value unrealistically long—e.g. if it’s set to eighth notes (quavers)
when the MIDI file contains long runs of sixteenth notes (semiquavers)—Sibelius First obviously can’t render the runs properly using eighth notes and may be forced to produce junk.
(Sibelius First will have to approximate the runs of sixteenth notes using tuplets of eighth
notes or by joining some pairs of sixteenth notes together to form eighth note chords.)
The tuplet options are up to you:
Simple means tuplets are notated only if they contain equal note values.
Use Moderate and Complex for more irregular rhythms.
Remember that if a particular tuplet (say a triplet) is used in a MIDI file, you must set this
option to at least Simple, or it won’t be read correctly! Beware however that if, say, you set all
the tuplets to Complex, Sibelius First may discover elaborate tuplet rhythms where you weren’t
expecting them, so be cautious.
Cleaning up MIDI files
Because MIDI files don’t contain any notation data, they can end up looking a little messy
after opening them in Sibelius First. Here are some hints for getting better results, both before
and after conversion:
If the MIDI file uses non-standard program numbers (e.g. if it is set up to play on an unusual
MIDI device), Sibelius First will not be able to identify the instruments correctly and they
may appear with unexpected characteristics, such as with the wrong clefs or in the wrong
order. Similarly, if the MIDI file uses channel 10 for pitched instruments, these may be
imported by Sibelius First as percussion instruments. This depends on whether or not you
selected an appropriate MIDI device when opening the MIDI file.
If this happens, try importing the file again, changing the MIDI file uses this sound set setting
If the MIDI file is not fully or properly quantized, you may find that the rhythms are not
notated as cleanly as you might expect. If you have access to a sequencer, you could try requantizing the file and opening it in Sibelius First again. Alternatively, try using Note Input
Flexi-time Renotate Performance
, which can both revoice and requantize the music intelli-
gently (see Cleaning up after Flexi-time on page 188 for more details).
The kind of cleaning up that is most commonly required after opening a MIDI file is making
unpitched percussion staves more legible— 4.10 Percussion for more details.
When Sibelius First imports unpitched percussion in a MIDI file, each drum sound is con-
verted to the notehead and staff position (i.e. line or space) defined in the 5 lines (drum set)
instrument. If a drum sound is used where the notation isn’t defined in this instrument type,
Sibelius First makes up a notation using normal, cross and diamond noteheads in empty positions on the staff.
Frame rate
If you know the frame rate you actually want to use, choose Set frame rate on the MIDI File
page of the Open MIDI File dialog, and select the desired frame rate from the menu instead. (If
you have no idea what any of this means, don’t worry—just leave these options as they are.)
37
Page 44

Technical details
Sibelius First imports MIDI files of types 0 and 1. When importing, Sibelius First intelligently
works out which instruments to use (using track names if they are present, otherwise using the
sounds), and is able to distinguish between, say, Violin and Viola, Clarinet and Bass Clarinet,
or Soprano and Alto by the range of the music in each track. Sibelius First cleans up the
rhythm using the Flexi-time algorithm, and retains as much or as little MIDI message data as
you specify (e.g. metronome marks, program changes and so on). Sibelius First also automatically reduces the staff size if there are too many instruments for the page size.
Downloading MIDI files
There are many online resources for MIDI files. If you are looking for a particular piece, you
can try a search using www.google.com, e.g. typing the name of the piece followed by the
words “MIDI file.” Or you could try visiting one of the following sites:
www.prs.net: more than 16,000 or so classical music files, all public domain.
www.musicrobot.com: a search engine for locating pop music MIDI files on the web.
www.cpdl.org: an excellent choral music public domain site with thousands of files.
www.cyberhymnal.org: every major hymn tune, with downloadable lyrics too.
Not all the files on these sites are in MIDI format—some may be in PDF or another format.
Some may even be in an audio format, like MP3, which cannot be opened by Sibelius First. So
look carefully to see what the actual format of the file is, before you try and download it.
(Sibelius First can, however, open files in various formats—check the other topics in this chapter for details.)
Once you’ve found the MIDI file you’re looking for in your web browser, identify the link to
download it; links are normally underlined. Do not click on the link directly, as that will simply make the MIDI file play inside your web browser: we want to download it, not play it.
Instead:
Right-click (Windows) or Control-click (Mac) the link, and a menu will appear.
Choose Save Link As, Save Target As or Download Link (the exact wording depends on which
web browser you are using).
Depending on your web browser, you may be prompted to choose where to save the file, in
which case choose somewhere easy to remember, like your Desktop.
Now the file will be downloaded. MIDI files are normally very small, so this will probably
take only a second or two.
Congratulations! You’ve now downloaded a MIDI file—and in fact the above steps can be
used to download any type of file from the web.
Make sure you know what the MIDI file is called and where you saved it (normally to your
Desktop), then open Sibelius First, and follow the steps in Importing a MIDI file at the start of
this topic.
You should be aware that if you download or publish MIDI files of someone else’s music with-
out permission you are likely to infringe copyright. Copyright infringement is illegal.
Most music states if it is copyright and who the copyright owner is. If you have are unsure of
the copyright status of a MIDI file you have downloaded, please contact the music’s publisher,
composer or arranger.
38
Page 45

1.6 Opening MusicXML files
1.6 Opening MusicXML files
Sibelius First’s built-in MusicXML 2.0 file converter allows you to open MusicXML files created in a number of music applications, including Finale version 2003 and later and SharpEye.
The purpose of the file converter is to save you time, not to convert every score so that it is
identical to the original.
What is MusicXML?
MusicXML is an interchange file format for music notation applications. It provides a better
way to transfer notation between different programs than other formats such as MIDI files.
Creating MusicXML files in Finale
How you create MusicXML files in Finale depends on the version of Finale you are using:
Finale 2006 or later: choose File MusicXML Export.
Finale 2003, 2004 or 2005 (Windows only): choose Plug-ins MusicXML Export.
If you are using Finale 2004 or Finale 2005 on Mac OS X, or are using a version earlier than
Finale 2003 on Windows, you will require the separate Dolet plug-in to export MusicXML
files, which can be purchased from www.recordare.com. If you are using Dolet, you can export
a MusicXML file by choosing Plug-ins MusicXML Export MusicXML.
Opening a MusicXML file
MusicXML files typically have one of two file extensions: uncompressed MusicXML files
have the extension .xml, and compressed MusicXML 2.0 or later files have the extension .mxl.
Sibelius First can open MusicXML files with either extension.
Open a MusicXML file just like a normal Sibelius file: simply choose File Open (shortcut Ctrl+O or O), locate the
file, and click Open. Sibelius First will show a dialog, shown
on the right, with the following options:
Use page and staff size from MusicXML file is switched on
by default if the MusicXML file you are opening is version
1.1 or later; this tells Sibelius First to try and preserve the
page and staff size of the MusicXML file. If you switch this
off, you can set the paper size and orientation for the
imported MusicXML file, and Sibelius First will use the
default staff size as determined by the house style chosen
below in the dialog.
Use layout and formatting from MusicXML file is also switched on by default if the
MusicXML file is version 1.1 or later; when switched on, Sibelius First will try to preserve
the layout and formatting (e.g. distances between staves, system and page breaks, etc.) of the
original MusicXML file. If you switch this off, Sibelius First will effectively unlock the format of the resulting score, using its default layout and formatting.
House style allows you to import a specific house style into the resulting score; if you leave
this set to Unchanged, Sibelius First will use its default house style. If you choose another
house style, note that the page size and staff size specified in the house style will not be used
in the resulting score unless you switch off Use page and staff size from MusicXML file.
39
Page 46

Let Sibelius First choose instruments tells Sibelius First to attempt to automatically identify
the instruments in the MusicXML file. If you find that Sibelius First creates the wrong
instruments, import the file again, and switch this option off, which will prompt Sibelius
First to show you the following dialog after you click OK:
Instruments in file at the left-hand side shows the individual parts in the MusicXML file
In the order that the staves are displayed in the Instruments in file list, choose the Sibelius
First instruments you want to use for each part (rather like in the Instruments dialog);
either double-click the instrument or click Add to add it to the Instruments to create list at
the right-hand side of the dialog.
When all of the parts have been mapped onto Sibelius First instruments, the OK button
becomes enabled; click this to finish opening the file.
Use instrument names from MusicXML file tells Sibelius First to set the instrument names at
the start of systems to the names specified in the MusicXML file. If you want Sibelius First
to use its own default instrument names instead, switch this option off.
When you have set the options as you wish, click OK, and the MusicXML file will be
imported. You can then check and edit the file as necessary.
Warning messages
Some MusicXML files may contain errors, which will be displayed in a dialog listing each error
and the location at which it occurred in the file you are opening. Each error may be one of three
kinds:
Fatal errors: if the file is not valid XML, this is a fatal error, and it cannot be opened at all.
Validation errors: if the file is valid XML, but the specific syntax of the MusicXML ele-
ments contains errors or inconsistencies, then Sibelius First will attempt to open the file, but
the resulting score may have unexpected problems in it, and you should proceed with caution.
Warnings: the XML validator sometimes reports warnings about the XML files when they
are opened. These should not normally prevent the file from opening correctly.
Importing MusicXML files saved in a sequencer
Sibelius First’s MusicXML importer is optimized to give the best results when opening
MusicXML files saved directly from Finale or using Finale’s Dolet plug-in. In extreme circumstances, some MusicXML files, especially those created in sequencers with no notation capabilities, may fail to produce any legible notation at all.
40
Page 47

1.6 Opening MusicXML files
Supported versions
Sibelius First’s MusicXML converter is based around MusicXML 2.0. Files created in earlier
MusicXML formats open correctly, provided they are valid. Files created with future versions
of MusicXML should also open, though new features will not be imported.
Sibelius First can only open MusicXML files that use the partwise.dtd top-level DTD (Document Type Definition). If your file uses the timewise.dtd DTD, you will need to use XSLT to
convert your timewise MusicXML file into a partwise MusicXML file. One such converter is
available online at: http://www2.freeweb.hu/mozartmusic/pttp/converter.html.
Limitations
The limitations of Sibelius First’s MusicXML import feature are summarized below:
Feature Limitation
Articulations Some articulations may be positioned on the wrong side of a note or chord.
Barlines If different staves have different barline types simultaneously, Sibelius First will use the barline type of the
Beams Sub-beams do not import.
Chord symbols
Clefs Special percussion and tab clefs available in MusicXML will be replaced with the closest matching clef
Cross-stave notes MusicXML files that use a number of voices across staves may import some notes on the wrong staff.
End repeat lines The positioning of end repeat lines may need manual adjustment after they have been imported.
Key signatures
Layout Sibelius First can only use one page size for the entire score being imported.
Lyrics
Metronome marks Metronome marks containing 256th, 128th, 64th and long (breve) notes are not imported by Sibelius First.
Ornaments Some ornaments will not be imported. Mordents, trills and turns are imported.
Rests Extra rests resulting from multiple voices on the same staff are automatically removed, but some extra
Slur
Symbols Symbols are not imported.
Staves Changes of staff type are not imported.
Stems
The
technical and ornaments elements are not imported.
uppermost part.
Heavy, heavy-light and heavy-heavy barlines are not imported.
Some chord symbols may not be imported (when they are using a
MusicXML specifies that all chord symbols go above the top staff in a part only.
The kind instances Neapolitan, Italian, French, German, pedal (pedal-point bass) and
function element).
Tristan are all imported as major chords.
If the
function element is not present in the harmony element, the chord symbol is not imported.
available in Sibelius First.
MusicXML is not capable of differentiating between clefs at the start or end of a bar.
Files containing chords with notes in different staves are not imported correctly.
major and minor modes are recognized for the mode element.
Only
If the
fifths element is missing, the key signature will be imported as an atonal key signature.
Other
key child elements (e.g. key-step and key-alter) are ignored.
If a part has more than one staff, key signatures may be omitted from one or more of those staves.
Key signatures that fall after the barline in some other music notation programs may fall behind the barline
in Sibelius First.
Objects that are only graphically offset in the file may have an impact on playback in Sibelius First.
laughing, humming, end-line, end-paragraph and editorial elements are ignored.
The
All metronome marks adopt Sibelius First’s default positions.
Only metronome marks in the top staff of the uppermost part are read by the XML importer.
Metronome marks may be duplicated if the uppermost part in the file has more than one staff.
rests may still occur, e.g. in cross-staff passages.
continue attribute is not imported.
The
The entity attributes
position and bezier are not imported.
placement and orientation are not imported.
The stem values
none and double are not imported.
41
Page 48

Feature Limitation
Tex t
Ties
Time signatures Sibelius First will not import compound time signatures (e.g. 2/4 + 6/8), but beat divisions that occur only
Some text items are imported via the
imported.
Specific figured bass elements such as parentheses, elision and extend are not imported.
The
directive element is not imported.
The
tie element is ignored completely; only ties specified by the tied element are imported.
number attribute is ignored.
The
All ties are imported as solid ties.
The position, placement, orientation, bezier-offset, bezier-x and bezier-y attributes are not
imported.
in the numerator (e.g. 2+3 / 4) will be imported.
dynamics element, but none of the dynamics attributes are
Senza-misura elements are not imported.
The
single-number attribute value for symbol is not imported (if present it is imported as normal)
If different time signatures occur in different staves simultaneously, Sibelius First will use the time signature from the uppermost staff.
Tuplets Some versions of the Dolet plug-in for Finale don’t place the start and stop elements of tuplets in the right
place, which may cause tuplets to import incorrectly.
tuplet attributes placement, position, show-type, show-number, bracket and line-
The
shape
are not imported.
42
Page 49

1.7 PhotoScore Lite
1.7 PhotoScore Lite
INTRODUCTION
PhotoScore Lite from Neuratron is a music scanning program designed to work with Sibelius
First—the musical equivalent of a text OCR (optical character recognition) program.
It is a sophisticated program with many advanced features. If you intend to scan relatively
complex scores such as orchestral/band music, or scores of many pages, we strongly recommend that you start with more simple music until you are proficient with PhotoScore Lite, and
then familiarize yourself with the ADVANCED FEATURES section.
On-screen help
In addition to this topic, PhotoScore Lite has its own on-screen help: to access it, choose Help
Neuratron PhotoScore Help
PhotoScore Ultimate
An advanced version of PhotoScore Lite, called PhotoScore Ultimate, is available to buy sepa-
rately, with extra features and enhancements. PhotoScore Ultimate reads many more musical
markings (including tuplets, slurs, grace notes, cross-staff beaming, guitar tab, chord diagrams, repeat barlines etc.) and reads scores with more than 12 staves.
For details of PhotoScore Ultimate, see http://www.sibelius.com/photoscore.
Scanning
Scanning text is difficult for computers to do, and has only achieved reasonable accuracy in
the last few years. Music scanning is much harder because of the more complicated range of
symbols involved, and because of the complex two-dimensional “grammar” of music.
The difficulty with scanning music or text is that by scanning a page, a computer does not
“understand” it. As far as the computer is concerned, scanning a page merely presents it with a
grid of millions of black and white dots, which could be music, text, a photograph or anything
else.
The process of actually reading or interpreting music, text or pictures from this grid of dots is
extremely complex and poorly understood. A large part of the human brain, containing many
millions of connections, is devoted solely to solving this “pattern recognition” problem.
(shortcut F1) from PhotoScore Lite’s menus.
Suitable originals
PhotoScore Lite is designed to read originals that:
Are printed rather than handwritten (and use notes with an “engraved” appearance rather
than a “handwritten” appearance, e.g. from a fake book).
Fit on your scanner (i.e. the music itself is typically no larger than Letter/A4 size, though the
paper may be slightly larger).
Have a staff-size of at least 0.12”/3mm.
Use no more than 12 staves per page, and 2 voices per staff. (Additional staves or voices will
be omitted.)
Are reasonably clear—for example, staff lines should be continuous and not broken or
blotchy, half note (minim) and whole note (semibreve) noteheads and flats should have a
continuous circumference and not be broken or filled in, beams on sixteenth notes (semiquavers) and shorter notes should have a significant white gap in between, and objects that are
meant to be separate (e.g. noteheads and their preceding accidentals) should not overlap or
be blotched together.
43
Page 50

Music that does not match the above will probably work, but with considerably reduced accuracy.
Scanning from photocopies is not particularly recommended unless the photocopier is a
particularly good one, as photocopying tends to degrade the quality of an original significantly.
You may be obliged to scan from a reduced photocopy if your original is bigger than your
scanner, but you should expect lower accuracy.
Using PhotoScore Lite without a scanner
In addition to reading music that you scan yourself using a scanner, it is possible to “read”
music without using a scanner, either by opening individual pages that you have saved as
graphics files, or by opening PDF files.
To work with graphics files, you will need each page of music stored as a separate graphics file
on your computer in .bmp (bitmap) format on Windows, or TIFF and PICT (Picture file) format
on Mac.
PhotoScore Lite can also read PDF files. Reading a PDF file may be useful if the music you
want to scan is available in PDF format from a web site, or if you want to convert a file from
another music program by producing a PDF file and then opening it in PhotoScore Lite.
Before you decide upon using PDF files as the way of converting files from another music program, check that the program doesn’t export a file format that Sibelius First can read directly,
e.g. MusicXML, as this would be preferable to using PDF files.
Copyright music
You should be aware that if you scan someone else’s music without permission you are likely
to infringe copyright. Copyright infringement by scanning is illegal.
Most music states if it is copyright and who the copyright owner is. If you have a piece of
music that you want to scan and you are not sure about its copyright status, please contact the
music’s publisher, composer or arranger.
GETTING GOING
Like Sibelius First, PhotoScore Lite functions in exactly the same way on Windows and Mac.
Start PhotoScore Lite by running it from the Start menu (Windows) or double-clicking its icon
in the Applications folder (Mac). Sibelius First doesn’t need to be running when you use PhotoScore Lite.
The four stages
There are four stages when using PhotoScore Lite:
Scanning the pages or opening a PDF file. When you scan a page, PhotoScore Lite takes a
“photograph” of your original. Similarly, when you open a PDF file, PhotoScore Lite takes a
“photograph” of it, so that it can read it in the next step.
Reading the pages. This is the clever bit, where PhotoScore Lite “reads” the scanned pages
to work out what the notes and other markings are.
Editing the resulting music. Here you correct any mistakes that PhotoScore Lite has made.
Editing within PhotoScore Lite works in much the same way as editing music in Sibelius
First. Almost any marking can be corrected or input in PhotoScore Lite, but it is only essential at this stage to correct rhythmic mistakes—other corrections can be made after sending
the score to Sibelius First if you prefer.
Sending the music to Sibelius First. This is done simply by clicking on a button. After a
moment the music pops up as a Sibelius First score just as if you’d inputted it all yourself.
You can then play the music back, re-arrange it, transpose it, create parts, or print it out.
44
Page 51

1.7 PhotoScore Lite
Quick start
Before we examine how to use PhotoScore Lite in detail, let’s run through the process quickly
to introduce the four stages.
The first step is either to scan some music, or to open a page you have already scanned, or to
open a PDF file:
To scan a page, choose File Scan pages (shortcut Ctrl+W or W); your scanner interface
will load. Scan a page and it is added to PhotoScore’s list of scanned pages.
To open a graphics file, choose File Open; when prompted for the resolution the image was
scanned at, choose the appropriate setting and click OK. The graphics file is then added to
the list of scanned pages.
To open a PDF file, choose File Open PDFs. You will be prompted to choose the resolution;
normally you can leave this at the default of 300 dpi and click OK. If the PDF is password
protected, you will then be prompted to provide the password. You can open more than one
PDF at once, and enter the range of pages to be examined within each PDF if necessary.
As soon as you scan a page or open a PDF or graphics file, each page appears in the Pages
pane, which is at the left hand of the main PhotoScore Lite window. Each page first appears
under Pending Pages, and PhotoScore Lite immediately proceeds to read the pages you have
added, Reading each page will take a little while (depending on the speed of your computer)
and a green progress bar fills up behind the name of the page in the Pending Pages list. As PhotoScore Lite completes reading each page, it moves to the list below, Read Pages.
When PhotoScore Lite has finished reading the pages, the main editing window will appear:
From this window you can edit any errors in the music.
45
Page 52

When you are satisfied with the corrections you have made, choose File Send to Sibelius
(shortcut Ctrl+D or D) to send the music to Sibelius First.
If Sibelius First is not already running, it will start up, and the Open PhotoScore File dialog will
appear, which allows you to choose various options concerning which instruments will be used
in the Sibelius First score. Don’t worry about these now—just click OK. Moments later, the
Sibelius First score will appear, ready for editing, just as if you had inputted it yourself.
1. SCANNING OR OPENING A PDF
Before you scan, choose File Scanner Setup to choose whether you want to use PhotoScore’s
own scanning interface—in which case choose PhotoScore—or your scanner’s own interface—in which case choose TWAIN (scanner default)—and click OK. By default, PhotoScore
Lite will use your scanner’s own interface, which is fine, since you are presumably familiar
with the way your scanner’s software works.
Next, measure the size (height) of staves in the page you want to scan and choose a resolution
using the following table, and scan in black & white or gray—not color:
Staff size Resolution
0.25”/6mm or more 200 dpi
0.15-0.25”/4–6mm 300 dpi
0.12-0.15”/3–4mm 400 dpi
Reading accuracy and speed will be considerably reduced if you scan at too low or too high a
resolution. So, for example, do not scan at 400 dpi unless the staves really are small.
Usually, you can choose whether to scan in black & white or grayscale (shades of gray). Scanning in gray produce significantly more accurate results—if the option is not available in your
scanning dialog, consult your scanner’s documentation.
Now you can scan your first page—try a page or two of simple keyboard music or something
similar:
Put the page of music (the “original”) into your scanner, face-down and with the top of the
page pointing away from you.
Put one edge of the original flush against the raised edge of the glass.
You can put the page on its side if it fits better. PhotoScore Lite will automatically rotate the
page by 90 degrees if necessary. However you should normally align the top of the page
with the left edge of the scanner to ensure it does not turn out upside down. Don’t worry
though if it is scanned upside down, as it is easy to correct later on.
If you are scanning in gray, then the page does not need to be completely straight, providing
that it is not more than 8 degrees off—PhotoScore Lite will automatically make the page
level (to within 0.1 degrees) without loss of detail. It will still be rotated if scanning in black
& white, but there will be loss of detail, and thus less accurate results.
Choose File Scan Pages, or click the Scan Pages button on PhotoScore Lite’s toolbar.
After a moment, the scanner will whir into life and transfer the page to your computer. (If
this doesn’t happen, see POSSIBLE PROBLEMS below.)
If you are scanning from a fairly thick book, gently press down the lid (or the book if easier)
during scanning to keep the page flat on the glass.
A window will appear for you to enter a name for the page, which will be something like
Score 1, Page 1 by default. You can change this to any name you like (although to avoid any
unexpected results it should end with a number)—something like Piano p1 would do—then
click OK. Subsequent pages you scan will be automatically numbered e.g. Piano p2, and a
dialog will not appear.
46
Page 53

1.7 PhotoScore Lite
Wait a few seconds while PhotoScore Lite makes the image level, chooses the best bright-
ness, and locates the staves.
PhotoScore will now be ready to scan the next page, so put the page of music in the scanner,
then click the button that tells your scanner to start scanning again, and proceed as for the
first page. If the scanning interface does not reappear, simply click the Scan Pages button
again.
Continue until you have scanned all the pages that you want to scan.
A scan of the first page will then appear. The buff paper color indicates that you are looking
at a scanned image (a “scan”) of the original page.
Check that all the staves are highlighted in blue—this shows that PhotoScore Lite has
detected where they are.
If the page has systems of two or more staves, check also that the staves within each system
are joined at the left-hand end by a thick vertical (or near-vertical) red line.
If not all staves are blue, or not all staves within systems are joined with a red line, you can
manually tell PhotoScore Lite where they are (see ADVANCED FEATURES below).
(Ignore the other buttons at the top of this window, which are also explained in ADVANCED
FEATURES
below.)
Scanning summarized
Once you’ve scanned a few pages you’ll rapidly get into the routine of it. The procedure can
be summarized as follows:
Place page in scanner.
Click the scanner button or choose File Scan Pages.
Choose the resolution, and whether to scan in black & white or gray.
Click Scan.
If it’s the first page, enter a name for the page (or leave the default name).
Go on to next page.
Catalog of scanned pages
It’s important for you to understand that whenever you scan a page, PhotoScore Lite adds it to
a single list or “catalog” of scanned pages to be read later. You do not need to save scanned
pages or the catalog—it is stored on your hard disk automatically.
This means that whenever you start using PhotoScore, it still remembers any pages you
scanned previously. (You can delete pages that you no longer need to keep.)
We’ll tell you more about the catalog later.
Hints on scanning
If you want to read a page of music smaller than the size of your scanner, you should make
sure that only that portion is scanned.
Most scanner interfaces allow you to scan part of a page, usually by clicking a Preview but-
ton to produce a thumbnail image, which may seem a little “blocky.” You can then adjust the
required area by dragging from the edges of the thumbnail.
Then click Scan to scan the selected area at high resolution. Every time you click Scan after
this, only the selected area will be scanned, until you change it.
Ensure that all of the music on the page you are scanning is on the glass of the scanner.
It doesn’t matter if your original is larger than Letter/A4, so long as the music itself will fit
onto Letter/A4.
47
Page 54

If you are scanning a page that is smaller than Letter/A4 size, it doesn’t matter where on the
glass you position the original. However, it helps if you put the edge of the page flush
against the edge of the glass, to ensure that it’s straight.
If you are scanning a small music book then you may be able to fit a double-page spread
(two facing pages side-by-side) on the scanner glass, but don’t try this—PhotoScore Lite can
only read one page at a time. Scan each page separately.
For simplicity, we recommend that you scan all the pages in a piece of music before reading
them all. You are allowed to scan a page, then read it, then scan another and so on (see
ADVANCED FEATURES below), but we don’t suggest you try anything like this until you
are proficient with PhotoScore Lite.
2. READING
As mentioned earlier, just scanning a page simply presents the computer with a grid of mil-
lions of black and white dots, which as far as it’s concerned could be anything from text to a
photograph.
“Reading” the music is the clever bit, where PhotoScore Lite works out from the scan where
and what the notes and other markings on the page are.
Pages Pane
On the left-hand side of the PhotoScore Lite window you should see
the pages pane, as shown here. If you can’t see this, choose View
Toggle Pages Pane
.
Pages that have not yet been read appear in the upper half of the
pages pane, under the heading Pending Pages. Notice how PhotoScore
Lite helpfully shows you a thumbnail of the scanned page as you
hover your mouse pointer over its name.
When you want to read a page you have scanned, click the little
checkbox at the right-hand side, which expands to say Read when you
hover your mouse pointer over it. PhotoScore Lite will start to think,
and the blue bar behind the name of the page will turn green as PhotoScore reads the page.
If you accidentally scanned the pages in the wrong order, you can correct the order in the list of Pending Pages simply by clicking and dragging the pages into the correct order.
If you just scanned in some pages or opened a PDF, however, your pages have probably
already been read by PhotoScore Lite, and so will be found in the lower half of the pages pane,
under the heading Read Pages. The pages are automatically grouped into scores; you can show
and hide the individual pages in each score by clicking the + or – button at the left-hand side.
To view a page in order to edit it, click on its name under Read Pages.
What PhotoScore Lite reads
PhotoScore Lite reads the following musical markings:
Notes, chords (including tail direction, beams and flags) and rests.
Flats, sharps and naturals.
Treble and bass clefs, key signatures, time signatures.
5-line staves (normal and small), standard barlines, 6-line guitar tab.
The format of the page, including the page size, staff-size, margins, and where systems end.
48
Page 55

1.7 PhotoScore Lite
PhotoScore Ultimate, available separately, also reads text (including lyrics, dynamics, instrument names, fingering, etc.), a wider variety of clefs and accidentals, tuplets, guitar chord diagrams, and various other markings such as codas, segnos, ornaments, pedal markings and
repeat endings. PhotoScore Ultimate can even read neat handwritten music!
Hints on reading
You should not need to interrupt reading, but you can normally do so if necessary by hitting
Esc or ., or by clicking Cancel on the progress window. PhotoScore Lite will show the part
of the page it has already read. You should delete this page by choosing Edit Delete page
before re-scanning or re-reading the page.
If the computer gives a warning message while reading a page, or if a page seems to be tak-
ing a very long time to read, see POSSIBLE PROBLEMS below.
If you like, you can ask PhotoScore Lite to read just a single scan or a choice of scans
instead of the whole score; see ADVANCED FEATURES below.
3. EDITING
When PhotoScore Lite has finished reading the music, its interpretation of the first page pops
up in a window called the output window. Here you can edit mistakes PhotoScore Lite has
made.
Notice how the pages pane doesn’t appear in the picture above: in order to give yourself more
room to edit the music, it’s a good idea to hide it while you edit, by choosing View Toggle
Pages Pane
(shortcut Ctrl+E or E).
The top part of the window (with a buff-colored background) shows you the original page. The
Full detail view window at the top right-hand corner shows a zoomed-in portion of the original
page, according to where you point your mouse.
The large bottom part of the window (with a light gray background) shows PhotoScore Lite’s
interpretation of the first scan—that is, what PhotoScore Lite thinks the first page of the original says. Hence this part of the window is where PhotoScore Lite’s mistakes can occur.
49
Page 56

At the top left of the window it says (e.g.) Page 1 of 2, and by clicking on the arrows you can
move through all of the pages that have been read (the output score). It makes sense to edit the
first page completely, then advance to the second page and so on until the whole output score
has been edited.
To the bottom right of the window is the Keypad, similar in function to Sibelius First’s Keypad. This can be repositioned by clicking its title bar, and dragging.
There is a Create menu at the top of the window, which is also similar in function to the Create
menu you can show in Sibelius First by right-clicking on the score with no selection, though
features not appropriate for PhotoScore Lite have been omitted.
What to correct
The minimum level of correction recommended before sending the output score to Sibelius
First is to correct key signatures and time signatures. Other mistakes such as pitch can be corrected in Sibelius First, but correcting key signatures and time signatures is much easier in
PhotoScore Lite, so we recommend you do that.
In particular, if the score you are scanning is a transposing score, you will need to correct the
key signatures of the transposed instruments—to delete a single key signature, select it and
type Ctrl+Delete or -Delete. Then add the correct key signature to that staff alone: choose
Create Key Signature (shortcut K), and Ctrl+click or -click the staff to which you want to
add the key signature.
To correct rhythmic mistakes, add the appropriate time signature if it’s not already present:
choose Create Time Signature (shortcut T) and click in one of the staves to add the time signature. Once PhotoScore Lite knows the time signature, any rhythmic inaccuracies are indicated by
small red notes over the barline, showing the number of missing or extra beats. As you correct
the mistakes, these red notes disappear—and once your score is free of red notes, you can send it
to Sibelius First.
Once you are more proficient with PhotoScore Lite, you can correct the music completely in
PhotoScore Lite before sending it to Sibelius First. The advantage of this is that you can spot
errors by looking at the scanned original on the screen instead of having to refer to it on paper.
Checking for mistakes
Check for mistakes by comparing the bottom part of the window with the original scan at the
top. The top and bottom parts move about to show the region of the page the mouse is pointing
at.
Avoid the temptation to compare the output page with the original music on paper—it is
almost always quicker to compare with the scan on the screen.
At the top right of the output window is the full detail view window, which shows in close-up
the part of the original that the pointer is over. Ctrl+clicking or -clicking on this window
makes the view larger or smaller. This window can be repositioned by clicking its title bar and
dragging.
MIDI playback
Another way to check for mistakes is to have the output played back to you. Your computer
will need a MIDI device attached to make use of this feature (if you have more than one
attached, the default one will be used).
To play the whole page from the start, ensure that nothing is selected by clicking on an area of
the page with no notation. Then choose Play Play/Stop (shortcut space), or click the Play button on the toolbar. Do the same to stop the music. To play from a particular point on the page,
50
Page 57

1.7 PhotoScore Lite
select an object in each of the staves you want playback from. It will commence from the start
of the bar with the earliest selection.
By default, all the staves will play back with a piano sound, but you can change this: rightclick (Windows) or Control-click (Mac) the names at the start of the first system (e.g. Staff 1),
choose Instruments from the context menu, then click Rename. You will see a dialog that looks
a little like Sibelius First’s Create Instruments dialog, from which you can choose the correct
name (and therefore the sound) used by that staff.
While the music is playing, the currently played bars will be highlighted in gray.
4. SENDING TO SIBELIUS FIRST
Once you have edited all the pages in the score, you should send
them to Sibelius First. Choose File Send to Sibelius (shortcut
Ctrl+D or D), or simply click the little icon next to the Save
button at the top of the output window.
If Sibelius First isn’t already running, it will start, and the Open
PhotoScore or AudioScore File
This is a transposing score: switch on this option if your score
dialog will appear:
contains transposing instruments, and you will be prompted to
choose the correct instruments when you click OK.
Use default instruments
: opens the file without trying to work out
which instruments are used in the score.
Choose instruments: allows the user to choose an instrument for
each staff in the score from a dialog similar to the usual Instruments dialog; choose the staff
in the scanned music that you want to replace with a Sibelius First instrument, then click
Add as normal. If you add an instrument that normally uses two staves (such as a piano), this
will ‘use up’ two of the staves in the left-most list on the dialog.
Let Sibelius First choose instruments: with this option switched on, Sibelius First will attempt
to work out which instruments are used in the score; it does this by checking the names of
the staves that are set in PhotoScore—if a staff’s name doesn’t match an instrument Sibelius
First knows, it opens the file with the default piano sound.
Use scanned page dimensions: this option tells Sibelius First to format the score according to
the page size suggested by PhotoScore. By default, the page size of the selected manuscript
paper used for importing will be used instead, but you can switch this on if you like.
The Page size, House style and orientation (Portrait or Landscape) options determine the doc-
ument setup of the resulting score.
Once your music has been opened in Sibelius First you can do anything you like to it, just as if
you had inputted it yourself—but see Multi-staff instruments below for some clarification.
Editing rhythmic mistakes
If you send a score from PhotoScore Lite to Sibelius First which has bars that don’t “add up,”
Sibelius First will lengthen bars that are too short, and shorten bars that are too long.
To do this, Sibelius First compares the length of the bars with the prevailing time signature. If
a bar is too short, Sibelius First simply inserts rests at the end. If a bar is too long, Sibelius First
shortens it by omitting one or more notes/rests at the end of the bar.
Although Sibelius First adjusts the lengths of bars like this, you are strongly advised to correct
faulty rhythms in PhotoScore Lite in the first place rather than trying to fix them in Sibelius
First afterwards, as it will save you extra work.
51
Page 58

Format
Sibelius First uses Make Into System and Make Into Page to ensure that the format of the music
is the same as the original. However, if the notes seem uncomfortably close together or far
apart in the end result, try changing the staff size in Layout Document Setup Document Setup
(shortcut Ctrl+D or D). Alternatively, if you don’t need the format of the music to match the
original, select the whole score (Ctrl+A or A) and unlock the format (Ctrl+Shift+U or U).
Multi-staff instruments
For instruments that use two staves by default, such as a piano, you may find that it isn’t possible to use cross-staff beaming in music you have scanned. This is because PhotoScore Lite
treats all staves as separate instruments, which means that, by default, multi-staff instruments
such as keyboards will be sent to Sibelius First as two separately-named staves without a
brace.
When you send a PhotoScore file to Sibelius First, you can use the Open PhotoScore File dialog
to tell Sibelius First that, say, staves 1 and 2 are actually the right- and left-hand staves of a
piano—either choose the instruments yourself, or click Let Sibelius First choose instruments.
For multi-staff instruments such as Flutes 1+2, if you want them to be written as two subbracketed staves with a single name, you could import both staves as a piano, and then change
the name and the sound ( 6.3 Mixer).
If your original contains instruments that have a different number of staves on different systems—e.g. strings that are sometimes divisi—see ADVANCED FEATURES below.
Closing the output score
Once you have finished scanning a score and have sent it to Sibelius First, and are satisfied
with the result, you should close the score in PhotoScore Lite before you start scanning a new
one. To do this, simply choose File Close Score; if the score has unsaved changes, you will be
prompted to save.
Deleting unwanted scans
PhotoScore Lite automatically saves each page you scan as a scanned image. This occupies a
not insignificant amount of hard disk space, so you should regularly delete scans that have
been read. You do not, however, have to delete the scans before scanning the next piece of
music.
To delete unwanted scans:
If the pages pane is not currently shown, choose View Toggle Pages Pane (shortcut Ctrl+E or
E).
Click on the name of the page you want to delete; you can select more than one page at the
same time by holding down Shift and clicking elsewhere in the list. When a page is selected,
the word Remove appears to the right of its name: click Remove to delete the pages.
PhotoScore will warn you that you are about to delete these pages: click Yes to confirm their
deletion.
52
Page 59

1.7 PhotoScore Lite
POSSIBLE PROBLEMS
Scanning takes a long time
If there are no signs of scanning happening—i.e. if after clicking on the Scan or Preview button
the scanner remains silent with no lights moving or flashing—communication between the
computer and the scanner has probably been interrupted.
Check that the scanner is switched on and that the cable between it and the computer is firmly
connected at both ends. If this doesn’t help, try reinstalling your TWAIN scanner driver software.
Beware that some scanners need to be switched on before the computer is turned on, otherwise
they are not detected.
Not all staves/systems are detected
If after scanning a page you find that not all staves are highlighted in blue, or the staves are not
correctly joined into systems by a thick red vertical line, this may be because:
The original has 13 or more staves on a page: only PhotoScore Ultimate can scan scores
with more than 12 staves.
The original was not flat on the scanner glass: always close the lid when scanning, unless
scanning a thick book. It may also help if you gently press down on the scanner lid during
scanning.
The page was scanned at too low a resolution (i.e. the staves are smaller than you think):
check the staff size, alter the scanner setting accordingly, and re-scan.
You tried scanning a double-page spread: PhotoScore Lite cannot read both pages of a dou-
ble-page spread (e.g. from a miniature score) at once. Re-scan each of the pages separately.
Ensure that the music on the facing page is completely off the glass, or not scanned—if any
of it impinges on the scan, PhotoScore Lite will not read the music correctly.
The staves are not clear enough in the original to be detected: in this case, you can tell Pho-
toScore Lite where any missing staves are located on the page—see ADVANCED FEA-
TURES
below.
Reading takes a long time
If the page was scanned without being flat on the glass or with the lid open: you will get a
black border around the page that may spread across and obliterate some of the music. This
can make PhotoScore Lite take an extremely long time to read the page. If this happens,
interrupt reading (see below), then re-scan the page.
If not all staves were detected after scanning (i.e. some were not highlighted in blue): this
can slow reading down, see Not all staves/systems are detected above.
Music reads inaccurately
If you find music seems to be reading very inaccurately, this may be because:
The original is of poor quality, e.g. a photocopy or an old edition.
The original is handwritten (or uses a music font that looks handwritten): PhotoScore Lite is
not designed to read handwritten music.
The music uses more than two voices.
The music was scanned in black & white and was not straight enough: it is recommended
that you scan in shades of gray.
The music was not straight enough when scanned and Make scans level was not selected in
the preferences (see ADVANCED FEATURES below).
The music symbol designs used in the original are of a non-standard shape or size.
53
Page 60

ADVANCED FEATURES
PhotoScore Lite has many features and options for more advanced use.
You are strongly recommended to familiarize yourself with this whole section before embark-
ing on any intensive scanning, such as orchestral/band scores or scores with many pages.
Choosing between scanners
In the unlikely event that you have more than one scanner connected to your computer, you
can choose between multiple scanner drivers by choosing File Select Scanner.
Adjusting detected staves/systems
When you scan a page, PhotoScore Lite highlights staves it detects in blue, and joins them into
systems with vertical red lines.
However, if the original is of poor quality, PhotoScore Lite may not detect some of the staves/
systems, and you should tell PhotoScore Lite where they are.
The easiest method is to select the nearest blue staff (by clicking on it) and copy it by
Alt+clicking or -clicking over the center line of the missing staff (the horizontal position is
not important).
You can create a blue staff from scratch by clicking and dragging it out with the left mouse
button.
After creating the staff, ensure that it is joined to any other staves in the same system (see
below).
PhotoScore Lite will automatically “clip” the staff in place, by adjusting the position and size
of it, if it finds an appropriate staff underneath. If it fails to position/size the staff correctly,
scale the image to full size (by clicking on the button at the top marked 100) and adjust it using
the blue “handles.”
You can drag any blue staff up and down with the left mouse button. This also causes the
staff to automatically clip in place.
You can drag the ends of blue staves around, and can even put blue staves at an angle.
You can alter the size of any blue staff—pull the “handles” in the middle of the staff up or
down. PhotoScore Lite can read pages that have a mixture of staff-sizes, and each blue staff
can have a different size. The top circular handle allows you to change the curvature of the
staff. This is useful when scanning pages from thick books, where it is not possible to prevent the page from being curved at the edges.
If any scanned staff is left with no blue staff on top of it, the scanned staff and any music on
it will be ignored when the page is read. This can slow reading down, but is otherwise harmless.
To join two adjacent staves together into the same system, click one staff so it goes red, then
Alt+click or -click the other staff. They will be joined near the left-hand end by a thick
vertical (or near-vertical) red line.
To separate two joined staves into two separate systems, do exactly the same as for joining
two staves.
PhotoScore Lite automatically guesses whether staves should be joined together or not when
you create new ones, or move existing ones.
If you’ve messed up the blue staves and want to start again, Ctrl+double-click or -double-
click the scan, and PhotoScore Lite will reset the blue staves to their original positions.
When you have finished editing the staves/systems, check carefully that the staves are all
joined into systems correctly, as you cannot alter this once the page has been read.
54
Page 61

1.7 PhotoScore Lite
Scan window options
If you have chosen to use PhotoScore’s scanning interface in File Scanner Setup, there are
various further options and buttons available on the scan window:
The Read this page button reads just this scan. Clicking the arrowed part of the button opens
a menu that lets you choose where in the output score to insert this page once it has been
read.
Scale produces a dialog that lets you zoom in and out of the scan. The button to the right of
Scale zooms the image to fit the main window; 50 zooms to 50%; 100 zooms to 100%.
Upside down quickly rotates the image by 180 degrees, in case it was scanned the wrong way
up.
Re-scan re-scans the page.
On side quickly rotates the image by 90 degrees, in case it was scanned on its side.
Omitted staves
In scores for many instruments, particularly orchestral scores, unused staves are often omitted.
If you replace the default instrument names (e.g. “Staff 1”) at the start with proper names, then
on subsequent systems PhotoScore Lite will allocate instruments to staves in order from the
top down. Hence, if the original page omits an instrument from one system, then in the output
window some of the staves will have the wrong names. To correct a name in this situation,
Right-click or Control-click over the existing instrument name against the staff in question,
and choose the correct instrument from the list of current instruments.
On any system that has staves omitted you will probably have to correct several instrument
names like this. Do it with care, otherwise confusion will arise.
Multi-staff instruments
For multi-staff instruments such as keyboards and divided wind and strings, PhotoScore Lite
treats each staff as a separately-named instrument.
If the number of staves for a multi-staff instrument varies at all in the original, e.g. where
strings are divisi, then to avoid any confusion between the staves it’s best to give them slightly
different names, e.g. Viola a and Viola b. You can change the names back once the score has
been sent to Sibelius First.
Wherever any of the instrument’s staves are omitted, follow Omitted staves (above).
N.B. If the number of staves for the instrument increases (say from 1 to 2) during the score,
and the second staff has not occurred before, treat it by following Instruments/staves intro-
duced after the start
(below).
Instruments/staves introduced after the start
Some scores include instruments or staves that are not shown on the first system.
When this happens, on the system where the instrument/staff is first introduced you should do
the following:
First, correct the names of each of the other staves:
Right-click (Windows) or Control-click (Mac) each name, and choose the correct name from
the list of current instruments.
Then tell PhotoScore Lite the name of the newly-introduced instrument/staff.
Point over whatever name it has filled in (which may say e.g. Staff 5, or the name of an
omitted instrument). Right-click (Windows) or Control-click (Mac), click New, and click a
name from the list of instruments displayed. If you want a non-standard name, you can edit
the name at the bottom.
55
Page 62

You must do this with care—or else a lot of confusion can arise.
Small staves
In the output window, small staves are displayed at full size to make them legible, but they are
indicated by the following symbol at the end of the staff:
Other preferences
The File Preferences dialog contains various other options, as follows.
On the Scanning page:
Automatic scanning and Scan more quickly are only available in PhotoScore Ultimate.
PhotoScore: with this selected, PhotoScore uses its own simple scanning interface.
TWAIN (scanner default): when chosen, the standard TWAIN interface (that works with
all scanning programs) will be used when you choose File Scan pages.
Select TWAIN scanner
allows you to choose which scanning device PhotoScore should
use.
Make scans level: with this switched on, PhotoScore Lite will work out how rotated a scan
is, and then rotate it so that the staves are level. It is recommended that this is left
selected.
Read pages after scanning/opening is only available in PhotoScore Ultimate.
On the Reading page, most options are disabled (since they are only available in PhotoScore
Ultimate). The only option you can switch on or off is Ties, Slurs and Hairpins, which is
partly enabled, because PhotoScore Lite can only read ties.
On the Editing page:
Automatic page margins: creates suitable page margins on each page.
Attach scanned staff panel to current staff: on the output window, this puts the original scan
just above the highlighted staff instead of at the top of the window. This means you have
to move your eyes less when comparing the output with the original, but the effect can be
confusing.
Drag paper by: allows you to choose whether you drag the paper either by clicking and
dragging, or Holding Shift and dragging (in a similar way to the options in the Mouse page
of Sibelius First’s File Preferences dialog).
On the Advanced page:
MIDI playback device allows you to choose which of your computer’s playback devices
PhotoScore should use for playback.
System playback properties launches your operating system’s sound and audio device
properties dialog, allowing you to choose your playback and recording devices for audio,
and your preferred playback device for MIDI.
Display splash screen at start-up: allows you to switch off the PhotoScore Lite splash
screen when you run the program.
Auto-save to backup file every n minutes: automatically backs up your score regularly at
the time interval specified.
If you change any of these options, they will remain as the new default settings each time use
you PhotoScore until you change them again.
56
Page 63

1.8 AudioScore Lite
1.8 AudioScore Lite
AudioScore Lite from Neuratron is a transcription program designed to work with Sibelius
First. You can use it to input music into Sibelius First by playing a monophonic acoustic
instrument (such as a flute, clarinet or trumpet) or singing into a microphone—or you can
import an existing audio file in .wav or .aiff format. AudioScore listens to your performance,
transcribes the notes, and allows you to edit them before sending them to Sibelius First for further editing.
On-screen help
In addition to this topic, AudioScore Lite has its own on-screen help: to access it, choose
Help Neuratron AudioScore Help from AudioScore Lite’s menus.
AudioScore Ultimate
An advanced version of AudioScore Lite, called AudioScore Ultimate, is available to buy sep-
arately. AudioScore Ultimate can recognize up to 16 instruments or notes simultaneously, can
import MP3 audio files, and supports more advanced note editing.
For details of AudioScore Ultimate, see http://www.sibelius.com/audioscore.
Suitable microphones
AudioScore Lite will work with any microphone connected to your computer via the USB,
microphone input or line input ports. However, cheap microphones—which typically produce
large amounts of background noise—may not produce the best results. One indication that
your microphone may not be of sufficient quality is that AudioScore Lite’s level meter when
recording shows a high level even when you are not playing or singing.
AudioScore Lite will attempt to recognize the performance regardless, but the result will be
less accurate, particularly at extremes of pitch. Playing or singing more loudly or closer to the
microphone (taking care not to touch or blow on it) may help, but if you want to use AudioScore most successfully, a good quality microphone will improve the quality of results you can
obtain.
Suitable performances
For best results, try to perform as clearly and as cleanly as possible, at a steady tempo; for
example, if you are playing violin, move your fingers between strings as silently as possible,
and avoid tapping on the instrument’s body with the bow or your fingers. Try to perform in
quiet surroundings with as little background noise as possible (including electrical interference, which you will often hear as a low “hum” if your cabling is poorly shielded).
Copyright music
You should be aware that if you record someone else’s music without permission you are
likely to infringe copyright. Copyright infringement is forbidden by the Sibelius First license
agreement.
Starting AudioScore Lite
Run AudioScore Lite via its icon in the Start menu (Windows) or in the Applications folder
(Mac).
In AudioScore Lite, choose File Select Devices to check that appropriate audio input and
MIDI output devices are selected. You must make sure that you choose the input device that
corresponds to the input to which your microphone is connected; unless your microphone is
connected via USB, it may well be called something cryptic.
57
Page 64

The three stages
There are three stages when using AudioScore Lite:
Creating tracks. AudioScore records your performance, works out what notes and pitches
are played, and determines the rhythm of your performance. AudioScore Lite allows you to
create up to four tracks (i.e. four instruments, or four staves in Sibelius First) in a single project.
Editing tracks. Edit the performance to create a basic score containing the intended rhythm
and pitches.
Sending to Sibelius First. This is done simply by clicking a button. After a moment, the
music appears in Sibelius First, as if you’d inputted it using any other input method.
You can then play the music back, re-arrange it, transpose it, create parts, or print it out.
1. CREATING TRACKS
The first stage is to create one or more tracks, either by recording using a microphone, or opening an existing audio file (in .wav or .aiff format, or from an audio CD).
Recording a new track using a microphone
Click Record new track on the toolbar (shortcut * on the numeric keypad). Before recording
begins, this dialog appears:
If you want to record to a metronome click, you can choose between one of the predefined
tempos (e.g. Adagio (slow) or Allegro (fast)), or enter a tempo of your own choosing in
quarter note (crotchet) beats per minute.
If you want to record in your own time without a metronome click, choose Calculated from
performance
. AudioScore will do its best to work out the note durations automatically, and
it’s easy to adjust them if it makes any errors.
Whether or not you are recording to a click, you should set the time signature before you
begin: only simple time signatures are available in AudioScore Lite, so if you need compound time signatures (like 6/8) you will need to upgrade to AudioScore Ultimate.
58
Page 65

1.8 AudioScore Lite
Now you can simply click
out what instrument to use, or click
RecordorOpen
Instrument
, in which case AudioScore will automatically work
to choose the instrument you are going to record
with:
First, choose whether to name your instruments in English, German or Italian.
Next, choose the appropriate instrument family from the Section list.
Finally, choose the instrument itself from the Available list, and set a custom Name if you
want.
You can switch on Set as the default instrument for all tracks in this composition if you don’t want
to have to choose the instrument again for any other tracks you subsequently add.
Click Record, and if you chose to play to a metronome click, AudioScore will play one bar of
clicks; otherwise, it will start recording right away. Sing or play into your microphone, and as
you do so, you will see the music appear in the top half of the window, known as the perfor-
mance area:
The performance area shows AudioScore’s interpretation of the current track in terms of pitch
and time, and is also where you edit the pitch, position and duration of notes.
59
Page 66

Below the performance area is the score preview area, which shows AudioScore’s interpretation of all tracks in notation: the current track shown in the performance area is highlighted in
light blue in the score preview area.
You can resize the performance area and the score preview area by clicking and dragging the
divider between the two areas.
You will also see a small input level window, which shows the current input level from your
microphone. You can resize this window by clicking and dragging its edges.
When you have finished recording, click Stop recording on the toolbar, hit Space (Windows
only), or hit * on the numeric keypad. Depending on the speed of your computer, AudioScore
may need to finish recognizing the notes in your performance before you can proceed: the
black information bar at the bottom of AudioScore’s window shows you the progress.
Recording another track
To record another track, simply click Record new track again. The new track is inserted directly
below the track selected in the score preview area. To select a track, click the instrument name
in the score preview area; you can select multiple adjacent tracks by Shift-clicking, or multiple
non-adjacent tracks by Ctrl+clicking or -clicking.
As you record your new track, AudioScore will play back all of the existing tracks (if no track
was selected before you started recording), or just the tracks you selected before starting
recording. AudioScore will use the same tempo and metronome settings as used for the previous track. If your first track was recorded freely without a metronome, AudioScore will use the
tempo it worked out from your first performance as the basis of the metronome click for subsequent tracks.
Inserting music into an existing track
To insert or append more music to an existing track, select the track in the score preview area
by clicking its name, then click in the performance area at the point at which you want to insert
more music. Choose File Record to Current Track, or click the small red record button at
the top left-hand corner of the performance area (not the main Record new track button on the
toolbar).
Creating a new track from an audio file
To create a new track from an audio file, choose File Open, and choose the .wav or .aiff file
you want to open, or insert an audio CD into your computer’s DVD-ROM drive and choose
that. Just as when you record a track using a microphone, AudioScore prompts you to choose
the tempo, time signature and instrument, so see Recording a new track using a microphone
above for help with those settings. Unless you already know the tempo of your audio file, you
should choose Calculated from performance instead of one of the preset tempos.
2. EDITING TRACKS
Having recorded one or more tracks, the next stage is to edit them.
Playing back the performance
To play back your performance, click in the performance area to set the starting position, then
choose Play Play/Pause Original (shortcut O) or click the small green playback button at
the top left-hand corner of the performance area. The notes in the performance area are highlighted during playback.
60
Page 67

1.8 AudioScore Lite
Playing back an individual note
To play back an individual note, simply click it in the performance area. If the note is part of a
chord, double-click the note to play the whole chord.
Deleting tracks
To delete the current track (i.e. the one displayed in the performance area, and highlighted in
the score preview area), choose Edit Delete Current Track.
To delete multiple tracks, select them in the score preview area with Shift-click or Ctrl+click
or -click, then choose Edit Delete Selected Tracks.
Beware: deleting a track cannot be undone, so be careful!
Editing notes
You can only edit notes in the performance area, not in the score preview area. As you move
the mouse pointer over the performance area, the mouse pointer changes to help you understand what kinds of edits you can make. Notice also that the black information bar at the bottom of the screen updates to show you useful information about whatever your mouse pointer
is hovering over:
Type of object Time position Pitch Frequency Tuning meter Tempo
To select a single note, simply click on it. To select a range of notes, click and drag on a blank
bit of the performance area. You can also select a continuous range of notes using Shift-click,
or add individual notes to the selection using Ctrl+click or -click.
The edits you can make to notes are as follows:
Drag a note up and down to change its pitch. Hold Alt or to change the pitch by half-steps
(semitones).
Drag the left- or right-hand end of a note to change its duration. Rests are automatically cre-
ated in the score preview area if notes don’t adjoin. Where notes do adjoin, dragging the
boundary between the notes lengthens one and shortens the other.
Drag a note left or right to change its position in the bar.
Delete a note by selecting it and hitting Delete.
To split a note (e.g. because AudioScore did not correctly detect two or more notes of the
same pitch one after another), select it, then choose Notes Split Into Two/Three/Four; you
can also right-click (Windows) or Control-click (Mac) a note to see these options.
To join two or more notes into a single note (which will end up with the pitch of the first
note), select the notes you want to join, and choose Notes Join Notes into One. This option is
also available when you right-click (Windows) or Control-click (Mac) a note.
Moving barlines
The vertical lines in the performance area denote beats and barlines: beats are shown in light
gray, and barlines are shown in black. You can move barlines simply by clicking and dragging
them. As you do so, the score preview area updates to show the resulting notation.
If your original performance was recorded to a click, you can adjust the barlines in any order,
but if your original performance was recorded freely, you should adjust the barlines from left
to right.
61
Page 68

Inserting a bar
If you need to insert a bar, click in the performance area at the point at which you want to
insert a bar, then choose one of the options from the Notes Insert Bar submenu:
In Current Track adds a single empty bar to the current track.
In All Tracks adds a single empty bar to all tracks.
Other allows you to add more than one bar to the current track, the selected track(s), or all
tracks. In the dialog that appears, you can also switch on Fill with notes to fill the newlycreated bars with notes.
Changing the key signature
AudioScore attempts to set the appropriate key signature automatically, but in the event that
you want to change it, choose Composition Key Signature, then choose the desired key signature from the Major Key or Minor Key submenu.
Changing the time signature
If you want to change the time signature after making your initial choice when recording your
first track, choose Composition Time Signature, choose the desired time signature, and click
OK.
Changing the instrument
If you want to change the instrument used by the current track, choose Composition Set
Instrument for Current Track
, choose the desired instrument, and click OK.
Staff display and piano roll display
AudioScore has two modes for displaying the notes in the performance area. By default, it dis-
plays the pitches on a regular 5-line staff. When you drag a note up and down in diatonic
mode, it snaps to the next diatonic pitch, unless you hold down Alt or to move the note by
half-steps (semitones).
You can switch to a piano roll display by clicking the button at the top of the performance
area. A piano keyboard appears at the left-hand side of the performance area, and the selected
note is highlighted on the keyboard. Switch back to staff display by clicking .
3. SENDING TO SIBELIUS FIRST
Once you are satisfied with the appearance of the tracks in the score preview area, it’s time to
send your music to Sibelius First.
Create Score
You can choose File Create Score to format the music from the score preview area as a page of
music, which you can edit in a similar way to editing scanned music in PhotoScore
( 1.7 PhotoScore Lite). However, since AudioScore Lite can’t print, and since you have
Sibelius First, you can normally proceed directly to sending a score to Sibelius First.
Send to Sibelius First
To send your score to Sibelius First, simply click the Send to Sibelius button on the toolbar, or
choose File Send to Sibelius (shortcut Ctrl+D or D). If Sibelius First isn’t already running,
it will launch, and a dialog will appear asking you to choose instruments and set the page size.
This dialog is the same as the one that appears when you send music from PhotoScore to Sibelius First—for more details, see 4. SENDING TO SIBELIUS FIRST on page 51.
62
Page 69

1.8 AudioScore Lite
Saving an .opt file
If, for some reason, clicking the Send to Sibelius button doesn’t work, you can use File Save
to save your current AudioScore project as a PhotoScore (.opt) file. Once you have saved
As
your AudioScore project as an .opt file, you can open the .opt file directly in Sibelius First
using File Open.
63
Page 70

64
Page 71

1.9 Printing
1.9 Printing
For details of standard paper sizes and advice on what page and staff sizes to use for particular
types of music, 7.1 Document Setup.
Setting the default paper siz e
Each Sibelius First score you create stores its own print settings, including the default paper
size on which it should be printed, but it can be helpful to check that your printer driver is set
to use the correct default paper size.
On Mac, each program on your computer maintains its own default paper size, so you simply
need to ensure that the correct size is set in the Page Setup dialog, which you can access from
the File Print pane in Sibelius First.
On Windows, you can also change the paper size via the Page Setup dialog, but this only affects
documents printed from Sibelius First. The next time you start up Sibelius First, its default paper
size is reset to your printer driver’s default again. This means that you should ensure your
printer’s default settings are correct. To do this:
From the Start menu, click Devices and Printers.
Right-click your printer’s icon and choose Printing preferences.
Exactly what you will see next varies by printer manufacturer and model, but somewhere
within the printer’s settings you should be able to the correct default paper size, then click
OK twice to confirm the changes.
Quick printing
To print your score, click the File tab, then choose the Print pane, or type the shortcut Ctrl+P or
P). At the top of the pane is a large Print button: if you just want to print one or more copies
of your score without setting any advanced features, you can simply set the number of copies,
make sure that the Print full score checkbox is switched on, and click Print to send your score to
the default printer.
65
Page 72

Printing options
For more sophisticated printing needs, such as booklets, take a look at the other options in the
Print pane.
On the right is a large print preview, which shows exactly what will be sent to your printer. If,
for example, you set your B5 score to print on A4 paper with borders and crop marks showing,
the print preview will show you exactly how this will look. Likewise, if you set your portrait
score to print 2-up on landscape paper, the print preview will show you exactly what will come
out of your printer. Below the print preview are controls to flip between the pages that will be
printed, and to zoom the print preview in or out, so you can take a closer look if you like.
On the left are the options for setting up the print job, as follows:
Printer lists the printers available to your computer. By default, the printer you have chosen
as your system-wide default will be chosen, unless you have previously chosen another
printer during this session.
Printer Properties either launches the printer preferences dialog for the chosen printer
(Windows) or takes you to the Print & Fax pane of System Preferences (Mac). On Windows,
changes made here only take effect until you quit Sibelius First: to make permanent changes
to your printer’s default settings, use Printer Preferences in Printers and Devices in Control
Panel.
Duplex Options allows you to tell Sibelius First how the chosen printer handles duplex print-
ing—see Double-sided printing below.
Print all pages / Print current page / Print Range chooses between printing all, one or some of
the pages of the score—see Print range below.
Print one sided / Manually print both sides / Automatically print both sides chooses between
printing on only one side of each sheet of paper, asking you to flip the paper over half way
through the print job in order to print on the other side as well, or printing on both sides of
each sheet of paper automatically (this latter option only being available if your printer has
an automatic duplexing feature)—see Double-sided printing below.
Uncollated / Collated chooses between printing all copies of required pages together, or
printing all of the pages required for each copy together—see Collate below.
Portrait Orientation / Landscape Orientation changes the orientation of how the page will be
printed, but it doesn’t change the orientation of the score itself (to do that, use Layout
Document Setup Orientation
). Be careful if you change this: unless you switch on Fit to paper
or otherwise adjust Scale (see below) it will result in some part of the page not being printed.
Normal / Spreads / Booklet / 2 Pages per Sheet chooses between printing a single page of the
score onto a single side of a sheet of paper, and three other imposition options that each put
two pages onto a single side of a sheet of paper—see below.
Fit to paper automatically shrinks the pages of your score if necessary to fit onto the currently
chosen paper size—see Fit to paper below.
Scale allows you to set any scale factor for printing. Your music is normally printed at 100%
size. To reduce the music to fit onto smaller paper, simply switch on Fit to paper instead of
working out the scale factor yourself.
Date and time footer tells Sibelius First to print date and time footers on each page of your
score. This is useful for keeping track of different versions of a score. For details on setting
up and customizing this footer, 1.19 Preferences.
Border prints a thin border around the page. When printing on outsize paper, this makes the
pages easier to visualize, and easier to guillotine, than just using crop marks. It’s also very
useful to proof-read scores scaled to (say) 65%, with Border and Spreads (see below)
switched on.
66
Page 73

1.9 Printing
Crop marks are little cross-hairs used in professional publishing to point to the corners of the
page. Crop marks are required because books are printed on oversized paper that is subsequently trimmed to the required size. It’s only sensible to use crop marks if you’re printing
on paper that is larger than your score’s pages.
View options prints options switched on in the View tab, such as highlights, hidden objects
and note colors— 11.3 Invisibles for more details of these options.
Print in color (Windows only) tells Sibelius First to print any objects that you have colored in
your score in color (or gray if you have a black-and-white printer). Colors in any graphics
you may have in your score will also be printed. When switched off, colored objects print in
black.
On Mac, an extra button, Use OS Dialog, appears at the bottom left-hand corner of the Print
pane, which allows you to use the standard Mac OS X-provided Print dialog rather than the
special controls provided by Sibelius First. Note that if you choose to use the Mac OS X dialog, most of the options described in these pages will not be available.
Print range
If you don’t want to print the whole score, you can type a list of pages to print (e.g. 1, 3, 8),
and/or a range of pages (e.g. 5-9), which can be backwards to print in reverse order (e.g. 9-5).
The page numbers you specify here are not necessarily the page numbers displayed in the
score if your score uses page number changes. Instead they refer to the physical pages in your
score: if you want to print the second, third, and fourth pages of the score, even though they
may be numbered ii, iii and iv, you type 2-4 in the Pages control. 5.11 Page numbers.
Collate
When you print multiple copies of a score, by default, multiple copies are printed Uncollated,
so if you choose two copies the pages will come out in the order 1, 1, 2, 2, 3, 3, etc.
However, if you choose Collated, each copy of the score is collated properly, so the pages
come out in the order 1, 2, 3, 4... 1, 2, 3, 4.... This saves you having to sort the pages into order
yourself, but on laser printers printing may take a little longer.
Fit to paper
This scales the score down in size, if necessary , so that the music fits within the print margins of
the paper, to avoid the edges of the music being clipped. This is particularly useful for printing
Letter sized scores on A4 paper (and vice versa), and for reducing Tabloid/A3 scores onto Letter/
A4 paper. Fit to paper does not however expand the music to fill the paper if it is larger than the
page size.
Beware that US paper sizes such as Letter and Tabloid are not quite the same shape as each
other, so the page margins may turn out differently than you expect. No such problem arises
with European paper sizes.
This option automatically adjusts the Scale setting, so if you have Fit to paper switched on, you
can’t change the Scale setting yourself.
Double-sided printing
If your printer does not support automatic duplex printing, before you embark on a major print
job, you should make sure to tell Sibelius First how your printer feeds paper. The variables are
whether printed sheets come out of your printer face up or face down, and whether the paper
needs to be flipped over before it is fed back into the printer. These two factors together determine whether or not the pages to be printed on the other side of each sheet should be printed in
reverse order.
67
Page 74
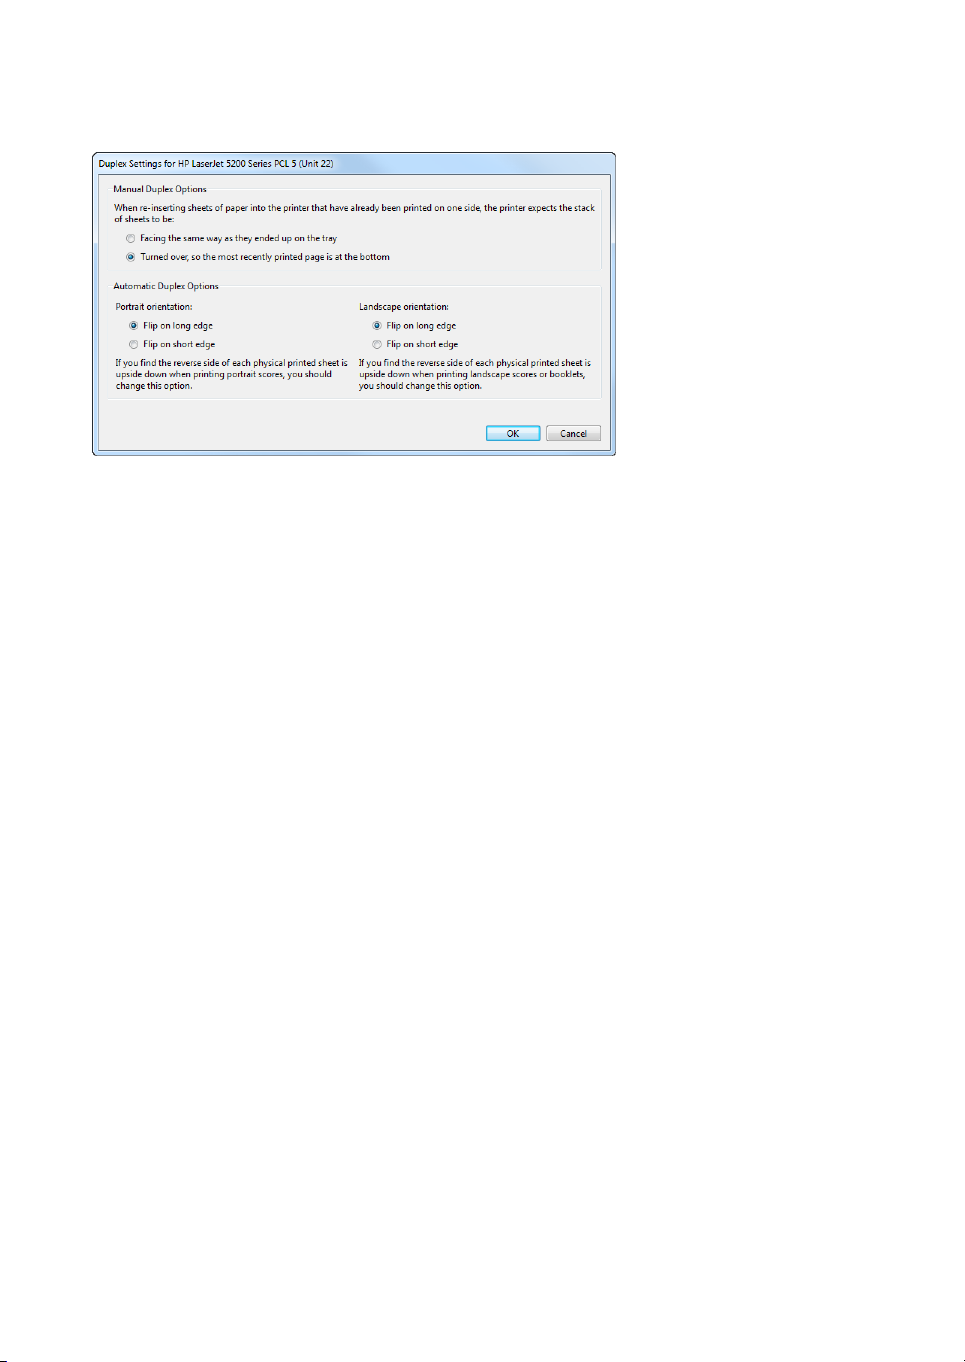
Before you print, choose File Print and click Duplex Options, to see this dialog:
In the Manual Duplexing Options group, choose the radio button that matches the behavior of
your printer. This determines whether or not the pages to be printed on the reverse of each
sheet of paper should be printed in reverse order. Sibelius First remembers this setting for each
printer on your system, so you will only need to set it once per printer.
Once you have this set correctly:
Select Print all pages and Manually print both sides, then click Print. Sibelius First will print
the odd-numbered (i.e. right-hand) pages, then stop and show a message box telling you to
turn the paper over and feed it back into the printer: don’t click OK until you have done this,
because Sibelius First will start printing the even-numbered pages as soon as you click OK.
Feed the pages back into the printer, flipping them if necessary.
Now click OK. Sibelius First now prints the even-numbered (i.e. left-hand) pages on the
back of the odd-numbered ones.
If your printer supports automatic duplex printing, then you don’t need to worry about manually re-feeding any pages, but Sibelius First does need to know how your printer flips the
paper, and this can vary based on whether you are printing portrait or landscape. If you imagine a sheet of paper in portrait orientation, you can flip it on its long edge, turning it over like
the page of a portrait book, or you can flip it on its short edge, turning it over like the page of a
notebook with spiral binding at the top (sometimes known as tumbling).
The best way to establish how your printer behaves is to try it out. With a score open whose
pages are in landscape orientation:
Choose File Print, select Print all pages, Normal, and Automatically print both sides, then
click Print.
Check the music is the same way up on both sides of the paper. If it is not, go back to Duplex
Options
and choose the Flip on short edge radio button under Portrait orientation, then try
again.
Now choose File Print, select Booklet, and Automatically print both sides, then click Print.
Check the music is the same way up on both sides of the paper. If it is not, go back to Duplex
Options
and choose the Flip on short edge radio button under Landscape orientation, then try
again.
68
Page 75

1.9 Printing
The settings in Duplex Options are remembered by Sibelius First on a per-printer basis, so once
you have established how the automatic duplexing works for your printer for both portrait and
landscape scores, you won’t need to change this again in future.
Spreads
This prints two consecutive pages side by side on each sheet of paper,
and odd-numbered pages are always printed at the right-hand side of
the paper. This format is suitable for proofing.
Difference between
spreads and 2-up on
a six page document:
With Spreads selected, either:
Make sure your paper is at least twice the size of your pages in
Sibelius First (e.g. Tabloid/A3 paper for Letter/A4 pages).
Use the same page size as paper size but reduce the Scale accord-
ingly, e.g. print Letter/A4 pages at 68% on Letter/A4 paper.
Spreads 2-Up
1
2 3
Then print as normal, using any other options such as Border.
4 5
2-Up
Similar to Spreads, except that the first page you specify is always
printed on the left.
Booklet
A “booklet” is a small book consisting of double-sided pages stapled in the middle. Booklets
are printed with two pages side-by-side on sheets of paper that are twice the size of the pages.
The pages have to be numbered strangely when printed so that it all works when the booklet is
assembled. For instance, the outermost sheet of a 16-page booklet would have pages 16 and 1
on the front (in that order) and pages 2 and 15 on the back. Fortunately this complicated layout
procedure, known technically as “imposition,” is done automatically for you by Sibelius First.
To print as a booklet, choose Booklet in File Print. Many of the other options are then set and
disabled, to ensure you get the right result: booklets are always printed in landscape orientation, always collated, and always using both sides of each sheet of paper (you can choose
between manual and automatic duplexing if your printer supports automatic duplexing). Click
Page Setup to check that the right paper size is chosen: you could print a booklet from a score
that uses A4 pages either on A3 paper, so that each A4 page is printed full-size, or on, say, A4
paper, so that each A4 page is printed at 70% of its full size.
Notice that the print preview shows what will actually be printed on each side of each sheet of
paper. The first page shown in the preview is one side of the first sheet of paper, the second
page is the other side of that sheet, the third page is the first side of the second sheet, and so on.
This is not, however, the order in which the pages will come out of your printer: Sibelius First
will print one side of each sheet first, then prompt you to turn over the printed stack and feed it
back into the printer to print the other side.
You may notice that the first page shown in the print preview is completely blank. This might
happen if your score has, say, six pages, and the first page is numbered as page 2: this requires
an 8-page booklet, with pages 8 and 1 (the outside of the booklet) left blank. If you find that
Sibelius First prints a blank sheet at the start of a booklet printing job, don’t discard that blank
sheet: feed it back into the printer to be sure of getting the correct result.
6
1
3 4
5 6
2
69
Page 76
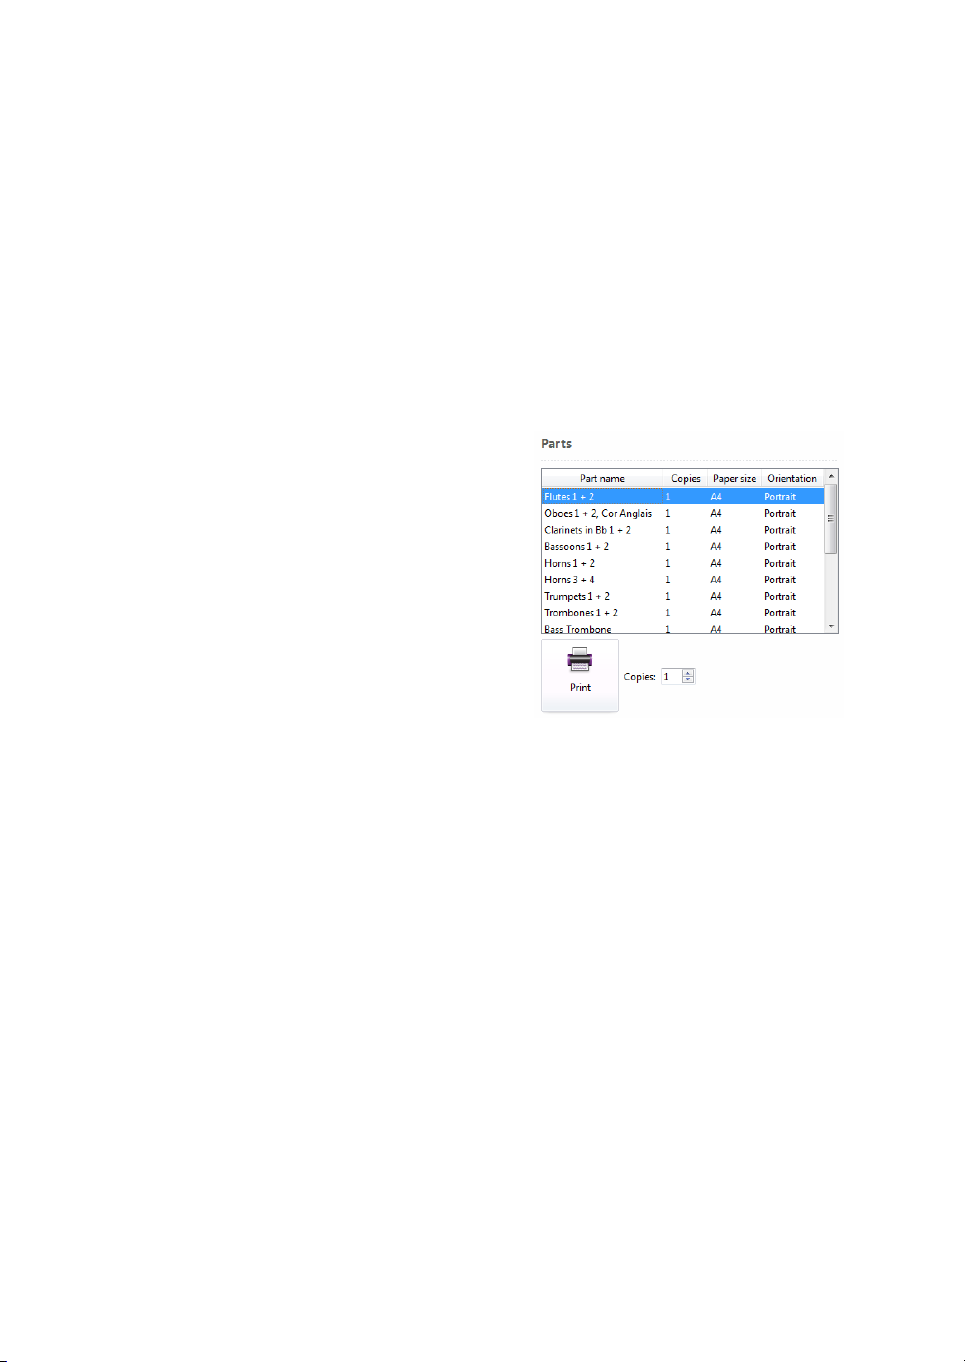
Finally, choose how many copies of the booklet you want to print using the Copies control next
to the large Print button, then click Print. Sibelius First will print the outward pages of all of the
copies of the booklet, then show a message box prompting you to turn the paper over and feed
it back into the printer. Once you have done this, click OK and Sibelius First will print the
inward pages.
For example, the printing order of an 8-page booklet is like this:
Outward pages: 1 & 8 (together, page 1 on the right), 3 & 6.
Inward pages: 2&7,4&5.
Note also that two adjacent page numbers on a sheet always add up to the total number of
pages (rounded up to a multiple of four), plus 1; in the above case, 9.
When the job has finished, simply fold each booklet in half, and staple it.
Printing dynamic parts
To print dynamic parts, switch on the Print Parts
checkbox, to select parts for printing, or choose File
when viewing a part, which selects just the cur-
Print
rent part for printing. In either case, you see the regular File Print page, with an extra table at the top of the
page, above the large Print button (see right).
The table lists the parts in the score, the number of
copies to be printed (though you can also adjust the
numbers here if you like), and the saved paper size
and orientation (as specified in Page Setup). Any
changes you make to the controls in File Print or the
Page Setup dialog will be applied to all of the parts
selected in the table at the top of the page.
When you click Print, Sibelius First will print all of the selected parts, one after the other. If
you are printing more than one part, you will not be able to adjust the page range in the Print
page, and if you adjust the number of copies to be printed, the number specified here will override the individual settings of the parts to be printed.
Choosing good paper
Investing in very good paper can make your printouts look twice as good. Good paper is bright
white, is very opaque so the music doesn’t show through the back, and is reasonably stiff so it
doesn’t flop on a music stand. Avoid ordinary thin typing paper or photocopier paper—we
recommend paper of about 26 lb/ream or 100 gsm.
Problems with margins
Some printers may cut off the edges of your music, particularly the bottom edge. This is
because most printers need room to grip the paper.
One solution is to move the music further away from the edge by increasing the music’s page
margins using Layout Document Setup Margins.
If your music’s layout is sensitive to reformatting, and you find that only (say) the bottom of
the page is being cropped off, you can prevent the music reformatting by decreasing the top
page margin by (say) 0.2 inches (5mm) when you increase the bottom margin by 0.2 inches
(5mm), so that the music just moves up the page a little. Alternatively, use Lock Format before
adjusting the margins ( 7.7 Layout and formatting).
70
Page 77

1.9 Printing
Problems with double-sided printing
Laser printers tend to wrinkle paper slightly when printing on it. This can make printers misfeed if you put paper back in to print on the other side. This problem will be reduced if you
leave the paper to settle for an hour or so after printing the first side, or if you feed the paper
manually sheet by sheet for the second side (which is a bore). Some misfeed problems are also
caused by residual static from the corona charge in most laser printers; it may be alleviated by
“riffling” the paper before re-feeding.
If your printer misfeeds, try any or all of these:
Leave the paper to cool for a while after printing the first side.
Manual feed the second side.
Open the exit flap (if there is one) on the printer, which provides a straighter feed path.
If toner on the first side slips off when printing the second side:
Leave the paper to cool for a while after printing the first side.
If there are settings to feed the paper faster (e.g. a lower print resolution), try these for the
second side.
71
Page 78

72
Page 79
1.10 Exporting audio files
1.10 Exporting audio files
6.11 Sibelius First Sounds, 1.3 Sharing on the web.
Sibelius First can save a digital audio file of your score, ready to burn straight onto CD or turn
into an MP3 file to post on the Internet. You must be using a playback configuration that uses
one or more virtual instruments in order to save audio files from Sibelius First, such as the supplied Sibelius First Sounds sound library ( 6.11 Sibelius First Sounds).
Exporting the whole score
To create a digital audio file of your entire score in WAV (Windows) or AIFF (Mac) format:
If you are using virtual instruments simultaneously with other MIDI devices for playback,
only the staves that are played back through virtual instruments can be exported as audio.
Therefore, you should preferably ensure that your current playback configuration only uses
virtual instruments before you start ( 6.2 Playback Devices).
Choose File Export Audio to see the exporting options.
You can choose which playback configuration to use: if the current configuration is unsuit-
able, Sibelius First shows you a yellow warning triangle (meaning that only some of the
staves will be exported), or a red warning circle (meaning that none of the staves will be
exported), to remind you to choose a more appropriate configuration.
You can choose whether to export the score from the start of the score, or from the current
position of the playback line, if it is not currently located at the start of the score.
You can specify the bit-depth and the sample rate to export: normally a depth of 16 bits and
a sample rate of 44.1KHz is sufficient (equivalent to CD-quality audio), but if you know
what you’re doing you can increase these settings, producing a higher-quality audio file at
the expense of requiring more hard disk space.
Sibelius First tells you how long the audio file will be, and approximately how much hard
disk space it will occupy.
Filename: determines the name of the file given to the exported audio file.
Save to folder: allows you to choose where the exported audio file will be saved; click
Browse and choose the desired folder.
When you are happy with these settings, click Export at the bottom of the page
(as shown on the right) and export will begin. Sibelius First exports the audio
file off-line, meaning that it does not play the score back audibly while it
works; instead, it streams the audio data direct to your hard disk. Depending
on the complexity of the score and the speed of your computer, export may be
faster or slower than real time. This has the advantage that if the score is too complex for
your computer to be able to play back in real time without glitching or stuttering, you will
still be able to export a glitch-free audio track: it will just take longer to export than it would
take to play the score back directly.
If you want to stop the recording at any point, click Cancel in the progress window that
appears. The partial audio file will be saved in the specified location.
73
Page 80

Exporting each staff as audio
To export each staff in your score as a separate audio file—sometimes called a stem—you can
use an included plug-in. If you would like to export only some of the staves in your score,
select those staves before running the plug-in; otherwise, to export all staves, make sure nothing is selected, then choose Home Plug-ins Export Each Staff as Audio. A simple dialog
appears, in which you can choose whether to Export multi-staff instruments together (which
exports e.g. both the right- and left-hand staves of a piano together) or Export each staff sepa-
(which exports them as separate audio files).
rately
You can also choose the format of filename to be used, and the location where the audio files
should be saved; by default they will be saved alongside the score. Click OK, and a progress
bar appears as each audio file is exported; this can take a little while, so be patient.
Sharing audio files on the web
If you want to publish your music online for people to listen to and comment on, Sibelius First
can export a suitable file and upload it directly to the audio-sharing service SoundCloud—
1.3 Sharing on the web.
Burning audio files to CD
If you have a CD-R/RW drive (or “CD burner” as they are often known) in your computer, it
should have come supplied with some software for creating data and audio CDs. The exact
process for burning audio files saved from Sibelius First onto an audio CD will vary according
to the program supplied with your CD burner; see its manual for details.
Creating MP3 files
MP3 (or MPEG Audio Layer 3 to give it its full name) is the most widely-used format for sharing music on the Internet or via email, as it is much smaller than a WAV or AIFF file. Once
you have saved an audio file from Sibelius First, you can easily convert it into an MP3 file
using freely-available software, such as Apple iTunes.
Having exported your audio tracks from Sibelius First, simply drag them into iTunes to add
them to your music library, then follow the steps listed on Apple’s web site to convert the new
items in your library to MP3 format: http://support.apple.com/kb/ht1550.
74
Page 81

1.11 Exporting video files
1.11 Exporting video files
6.11 Sibelius First Sounds, 1.3 Sharing on the web.
Sibelius First can save a digital video file of your score, ready to burn straight onto DVD or
upload to the Internet. You must be using a playback configuration that uses one or more virtual instruments in order to save video files from Sibelius First, such as the supplied Sibelius
First Sounds sound library ( 6.11 Sibelius First Sounds).
Exporting the whole score
To create a digital video file of your entire score in WMV (Windows) or MOV (Mac) format:
If you are using virtual instruments simultaneously with other MIDI devices for playback,
only the staves that are played back through virtual instruments can be exported as video.
Therefore, you should preferably ensure that your current playback configuration only uses
virtual instruments before you start ( 6.2 Playback Devices).
Choose File Export Video to see the exporting options:
You can choose which playback configuration to use: if the current configuration is unsuit-
able, Sibelius First shows you a yellow warning triangle (meaning that only some of the
staves will be exported), or a red warning circle (meaning that none of the staves will be
exported), to remind you to choose a more appropriate configuration.
You can choose whether to display the playback line in your exported video.
You can choose to use the current score paper texture as the background in your video, or
just use a plain white background. (See Textures on page 103 for details on how to change
the score paper texture—note that only the score paper texture is used when exporting videos, not those of parts and saved versions.)
75
Page 82

You can choose which staves you want to be displayed in the video (although the playback
from all staves in the score will be audible unless you’ve muted them in the Mixer—
6.3 Mixer), to ensure that the music isn’t too squashed to be legible.
Sibelius First includes all the staves by default, but you can override this if you prefer; or, if
you wish, you can preserve the exact layout of your score—generally you should only do
this if you want to adjust the appearance of your score by hand, see Manually preparing
scores for video export
below.
Sibelius First reformats the display to make best use of the video proportions—the Preview
shows you how the score will look when rendered as a video.
You can specify the resolution to export at: normally a standard definition (480p) is suffi-
ciently legible, but if you know what you’re doing you can increase these settings, producing
a higher-quality video file at the expense of requiring more hard disk space. To learn more
about different video resolutions, see A word about video resolutions below.
Sibelius First tells you how long the video file will be, and the maximum hard disk space it
will occupy (in reality this will vary according to how busy your score is and which display
options you’ve chosen).
Filename: determines the name of the file given to the exported video file.
Save to folder: allows you to choose where the exported video file will be saved; click
Browse and choose the desired folder.
When you are happy with these settings, click Export at the bottom of the page
(as shown on the right) and export will begin. Sibelius First exports the video
file off-line, meaning that it does not play the score back audibly while it
works; instead, it streams the audio data direct to your hard disk and synchronizes this with the video frames. Depending on the complexity of the score
and the speed of your computer, export may be faster or slower than real time. This has the
advantage that if the score is too complex for your computer to be able to play back in real
time without glitching or stuttering, you will still be able to export a glitch-free audio track
for the video: it will just take longer to export than it would take to play the score back
directly.
If you want to stop the export at any point, click Cancel in the progress window that appears.
Exporting individual parts
It can sometimes be useful to export a video, say for rehearsal purposes, which contains only
one instrumental part’s music but in which you can hear all the instruments in the score playing back.
To create a digital video file of an individual instrumental part in this way:
As with exporting the full score, you should preferably ensure that your current playback
configuration only uses virtual instruments before you start ( 6.2 Playback Devices).
Click the + menu at the right-hand end of the document tab bar, below the ribbon.
Click the name of the part you wish to view and Sibelius First will open it in a new tab.
Choose File Export Video to see the exporting options.
Most of the same options are available as when exporting the full score, with the exception
of the layout settings for choosing the staves to appear in the video.
Note that a warning message is displayed, telling you that only the staves in the current
part will be displayed in the video you export.
Even though only one part’s music will be displayed, remember that the soundtrack will
contain audio from all the instruments in the score—to change this, use the Mute and Solo
buttons in the Mixer before exporting ( 6.3 Mixer).
76
Page 83

1.11 Exporting video files
Choose the display settings, resolution and a filename using the remaining options.
Finally, click Export at the bottom of the page and export will begin.
If you want to stop the export at any point, click Cancel in the progress window that appears.
A word about video resolutions
You should carefully consider which resolution you intend to export at, since different resolu-
tions have different aspect ratios (the relationship of width to height). Most videos either use a
4:3 ratio or 16:9 ratio for widescreen. If you’re ever short of things to do, you could try measuring your computer monitor or television screen to find out which aspect ratio it uses.
Video resolutions are usually described in terms of width x height (in pixels), or abbreviated to
the height in pixels followed by a letter indicating whether the lines of each frame of the video
are drawn in sequence (non-interlaced or progressive scanning, abbreviated to “p”) or alternately drawn (interlaced scanning, abbreviated to “i”). Different resolutions will give rise to
very different quality videos.
Consider whether your video will be watched on a device with a small screen, such as a
smartphone, or on larger devices like tablets or a high-definition monitor or television.
Sibelius First exports at a range of standard video resolutions, all of which use progressive
scan (indicated by the “p”), suitable for watching on a range of display sizes:
Fastest (360p) uses a 4:3 aspect ratio, 480 pixels wide by 360 pixels high. This is the lowest
quality video you can export from Sibelius First, suitable for watching on small screen
devices such as smartphones, but it has the advantage of being quicker to upload to the Internet.
Standard (480p) uses a 4:3 aspect ratio, 640 pixels wide by 480 pixels high. This resolution
should be sufficient for you to read most scores on standard-definition (SD) screens including tablet devices.
HD (720p) uses a 16:9 aspect ratio, 1280 pixels wide by 720 pixels high. This is the standard
high-definition (HD) video resolution, suitable for watching on any HD display, however the
size of the file produced means this will be much slower to upload to the Internet.
Full HD (1080p) uses a 16:9 aspect ratio, 1920 pixels wide by 1080 pixels high. This is the
highest quality video you can export from Sibelius First, though not all HD displays support
such a high resolution. Videos exported at Full HD are likely to take substantially longer to
upload to the Internet.
If you are publishing your video on YouTube or Facebook, note that these services automatically produce lower-resolution versions of videos you upload, so you should export at the
highest resolution you can— 1.3 Sharing on the web.
Manually preparing scores for video export
Sibelius First automatically chooses optimal settings for laying out your score based on the
resolution you choose to export at. However, if you would prefer to lay out your score by hand
for a video display, here are a few things to bear in mind (for more detailed instructions on
how to make these kinds of changes, 7.1 Document Setup, 7.7 Layout and formatting).
Choose a page size appropriate to the resolution and aspect ratio of the video you will export
at; here are some sensible defaults:
If exporting at 360p or 480p, set a custom page size of 11.69 inches wide by 8.77 inches
tall (297mm wide by 222.8mm tall).
If exporting at 720p or 1080p, set a custom page size of 11.69 inches wide by 6.58 inches
tall (297mm wide by 167.1mm tall).
77
Page 84

Unlock all formatting in the score and then check to see if any new page or system breaks
need to be added ( 7.6 Breaks).
Consider reducing the staff size only if the music on the page is too cramped; aim to fit a sin-
gle system on a page if there are four or more staves in the score, two systems to a page if
there are three staves and three systems to a page for one-staff scores.
To prevent your score being squashed into the center of the page, reduce the top and bottom
staff margins to around 5mm (if your score has a title, you may wish to set the top staff margin to be 25mm on the first page only).
To automatically improve the layout and appearance of the score, you should also consider
making judicious use of these tools:
Appearance Reset Notes Reset Note Spacing
Layout Staff Spacing Reset Space Above/Below
Layout Staff Spacing Optimize
Layout Hiding Staves Hide Empty Staves
The various options in the Layout Format group
When you’re happy with the layout and appearance of your score, choose File Export Video,
select Use score layout and then choose any other options you wish before clicking the Export
button.
Sharing video files on the web
If you want to publish your music online for people to view and comment on, Sibelius First
can export a suitable file and upload it directly to a range of video-sharing services—
1.3 Sharing on the web.
Burning video files to DVD
If you have a DVD-R/RW drive (or “DVD burner” as they are often known) in your computer,
it should have come supplied with some software for creating DVDs. The exact process for
burning video files saved from Sibelius First onto a DVD will vary according to the program
supplied with your DVD burner; see its manual for details.
78
Page 85

1.12 Exporting graphics
1.12 Exporting graphics
There are two main ways to export graphics from Sibelius First:
Copy and paste directly into another application—see Copying graphics to the clipboard
below.
Exporting the whole score and/or its instrumental parts as PDF files— 1.18 Exporting
PDF files
If your final document will consist mostly of music, you can alternatively use Sibelius First
itself as the program in which to assemble music and graphics, e.g. to create worksheets or
scores with a graphical cover page— 4.13 Importing graphics.
Copying graphics to the clipboard
Sibelius First allows you to copy an area of a score to the clipboard, which you can then paste
directly into another application as a graphic.
If you want to export a specific bar or passage, select it first.
Choose Home Clipboard Select Graphic (shortcut Alt+G or G).
If you made a selection, a dashed box appears around the selection. If you didn’t make a
selection, the cursor will turn into a crosshair and you can click and drag around the area of
the score you wish to export.
Adjust the size of the marquee (see below) so that it encloses exactly what you want to copy.
Choose Home Clipboard Copy (shortcut Ctrl+C or C).
Switch to the destination application, and choose Edit Paste (shortcut normally Ctrl+V or
V)orEdit Paste Special.
When you use copy and paste graphics export, Sibelius First produces a bitmap graphic.
.
Adjusting the marquee
To adjust the marquee, you can:
Click and drag a handle to extend the marquee in that direction.
Hold down Ctrl or and drag either left- or right-hand handles to snap the ends of the mar-
quee to barlines.
Hold down Shift and drag any handles to enlarge the marquee proportionally in both direc-
tions, e.g. to make the marquee taller both above and below the staff, grab one of the top
handles and hold down Shift as you drag to extend the marquee both upwards and downwards.
If you have a passage or system selection in the score prior to carrying out the above steps,
Sibelius First will automatically draw a box around that area when you choose Select Graphic.
The box will snap to the top and bottom of staves and so you will probably find it necessary to
extend the selection both up and down. To do this, hold down Shift and drag the top handle of
the box up.
79
Page 86

Inserting graphics into Microsoft Word
To place a graphic created in Sibelius First that you have copied to the clipboard using the
steps above into a Word document:
Position the caret in your Word document where you want the graphic to go.
Choose Edit Paste, shortcut Ctrl+V or V. The graphic will appear in your document.
Now, increase or decrease the size of the music by dragging any corner of the box. Do not
drag an edge, otherwise the music will stretch and lose the correct aspect ratio. (Type Ctrl+Z
or Z to undo if you do this by accident.)
In some versions of Microsoft Word, you may find that attempting to paste a graphic from
another application does not work correctly. If you find this to be the case, choose Edit Paste
Special
and, from the list of available formats, choose Bitmap.
Beware of editing the graphic within Word—its graphics editor does not handle music well
and might produce unexpected results. Use a dedicated graphics program instead.
80
Page 87

1.13 Exporting MIDI files
1.13 Exporting MIDI files
You can export a score as a MIDI file, so you can easily transfer music into virtually any other
music program. You do not need a MIDI interface or any MIDI devices in order to export a
MIDI file.
Exporting a MIDI file
Choose File Export MIDI. A page of options appears.
You can choose whether you want to export the MIDI file for The current playback device(s)
or A different playback device. By default, Sibelius First will choose to export a MIDI file
suitable for playback on a General MIDI device, which is appropriate for e.g. sending a MIDI
file to somebody else for them to listen to. However, if you’re using a virtual instrument and
want to export a MIDI file to open in, say, a sequencer like Pro Tools in order to continue
working on the MIDI performance, then choose the appropriate sound set from the A differ-
ent playback device
controller changes, keyswitches and so on.
You can also choose whether you want to export a
every purpose, a
as some electronic pianos and keyboards, that can only play Type 0 MIDI files. Refer to your
device’s documentation to find out whether it requires Type 0 or Type 1 MIDI files; if in
doubt, choose
Tick resolution is a comfortingly obscure option. The default of 256 PPQN (“Pulses Per
Quarter Note”) matches Sibelius First’s internal resolution and is recommended. Again,
however, there are certain devices that can only play MIDI files with specific PPQN settings. Refer to your device’s documentation to find out whether it requires a specific value;
if in doubt, leave this set to 256. (Choosing a higher PPQN value doesn’t make the exported
MIDI file any more “accurate”, since Sibelius First’s internal resolution is fixed at 256.)
Export pick-up bars as full bars padded with rests allows you to choose how Sibelius First
should handle pick-up (upbeat) bars at the start of the score: with this option switched on
(the default), Sibelius First exports a pick-up bar as a bar of full duration padded with rests at
its start, which works well for playback. However, if you are exporting a MIDI file from
Sibelius First for the purposes of using it as a tempo track in a sequencer or DAW for
ReWire sync, it is more useful to export an initial pick-up bar as a short bar with a different
time signature than the first full bar, in which case you should switch this option off.
If you have muted any of the instruments in your score, Sibelius First will not by default
include these instruments in an exported MIDI file (on the grounds that the MIDI file should
play back the same as the score plays back in Sibelius First). You may, however, want to
include all instruments in your MIDI file so that you can work with them in your sequencer,
in which case switch off Omit muted instruments.
Once you have chosen the right options, click OK. Then type in the File name you want to
use—make it different than your original Sibelius First file to avoid confusion! Find a suitable place to save, then click Save.
When exporting MIDI files, Sibelius First includes all of the playback options such as Espres-
sivo, Rubato and Rhythmic feel. So you can even use Sibelius First as an ingenious “MIDI file
improver”—just open a MIDI file, switch on some interesting playback settings and save an
improved version as a MIDI file in a moment!
list. Sibelius First will export the MIDI file with all the appropriate MIDI
Type 1
Type 1
Type 0orType 1
MIDI file is recommended. However, there are certain devices, such
.
MIDI file. For nearly
81
Page 88

Exporting each instrument as a MIDI file
You can also export each instrument to a separate MIDI file, using Home Plug-ins Export
Each Instrument as MIDI
.
Rubato
If Rubato is switched on in Play Interpretation Performance, and the score is saved as a MIDI
file, the timing changes made by Rubato will appear in the file, and consequently the notes will
be “out of alignment” when the file is opened in a MIDI sequencer.
This is because Rubato manipulates note start times directly, rather than creating tempo
changes. So if you want to save a MIDI file for use in other programs, and you want it to be
correctly quantized, set Rubato to Meccanico before you save the MIDI file.
Repeats
By default, MIDI files saved from Sibelius First will include any repeats present in the original
score. If, for some reason, you would prefer repeats not to be included, set Don’t play repeats in
Play Interpretation Repeats before saving the MIDI file.
82
Page 89

1.14 Exporting MusicXML files
1.14 Exporting MusicXML files
MusicXML is an interchange file format for music notation applications. It provides a better
way to transfer notation between different programs than other formats such as MIDI files. If
you need to share files with friends or colleagues using other music software, including Finale
PrintMusic, then MusicXML is the ideal format to use.
To export a MusicXML file, choose File Export MusicXML. There is only one
choice to make: whether to use compressed MusicXML (file extension .mxl)or
uncompressed MusicXML (file extension .xml) format, then click the big Export
button (shown on the right).
Unless you know that the destination application into which you plan to import
your MusicXML file does not support compressed MusicXML, we recommend that you use
the compressed format. It has two main advantages: firstly, the resulting file is much smaller
and therefore easier to transport from place to place, e.g. by email; and secondly, only compressed MusicXML files can include graphics. If your score contains imported graphics and
you choose to export an uncompressed MusicXML file, Sibelius First will warn you that the
graphic will not be exported.
Limitations
MusicXML is a sophisticated format that is designed to describe the full breadth of common
practice music notation, so not all applications implement everything it can contain. As such,
the same MusicXML file may produce different results when opened in different applications.
Likewise, Sibelius First does not currently implement every part of the MusicXML specification, but it exports sufficient data to make MusicXML the optimal way of transferring notation
data from Sibelius First to other programs.
83
Page 90

84
Page 91

1.15 Exporting to previous versions
1.15 Exporting to previous versions
Sibelius First is fully backwards compatible. Sibelius First can open files from all previous
versions of Sibelius for Windows and Mac, including files saved in previous versions of Sibelius Student, Sibelius First and G7.
Older versions cannot open files saved in the present version, but you can use File Export
Previous Version
Sibelius 2. Note, however, that these earlier versions don’t have all the features of Sibelius
First, so scores may not look precisely the same when opened in them as they look in Sibelius
First. In particular, the elements listed below are omitted or changed (i.e. not exported in the
file).
Note also that Sibelius 3 Student is limited to eight staves, and G7, Sibelius 5 Student, Sibelius
5 First and Sibelius 6 Student to 12 staves, so if your score has more than the maximum number of staves supported by those programs, Sibelius will not allow you to export in that format.
You should always choose the latest possible version of Sibelius as the target version, to minimize the amount of data loss. Once you have chosen the target version from the list in File Export Previous Version, simply click the big Export
button (shown on the right) to export the file.
Differences in all previous and cut-down versions of Sibelius
The following are omitted or changed when exporting files to all other versions of Sibelius:
Imported graphics that rely on a transparent background or opacity will look different. All
graphics are converted to TIFF on export, so SVG graphics may appear at a lower resolution.
Symbols that rely on imported graphics will not be exported.
Te x t that uses per-object leading (line spacing), tracking, superscript/subscript, horizontal or
vertical character scaling, custom background color, etc. will look different. Text objects that
use frames for automatic word-wrapping will have hard line breaks inserted, and fully justified text will appear left-aligned.
to save files that can be opened by any version of Sibelius as far back as
Differences in Sibelius 2, 3, 4, 5, Sibelius 5 First and Sibelius 5 Student
The following are retained in Sibelius 6, Sibelius 6 First and Sibelius 6 Student, but omitted or
changed in earlier versions:
Arpeggio lines attached to notes, as created from the Keypad, will be converted into regular
arpeggio lines.
Articulations:
Articulations below the note that have been independently dragged will be shown at their
default position, unless the articulations above the note have not been dragged (in which
case the bottom position will be used).
Articulations in the staff may move to less ideal positions.
Bowing markings that are positioned outside slurs above the staff when other articula-
tions are inside the slur will appear inside the slur.
Bar rests: double whole note (breve) bar rests in 4/2 will appear as normal whole note
(semibreve) bar rests.
Cautionary accidentals will be omitted.
85
Page 92

Chord symbols:
Horizontal guitar chord diagrams will appear as vertical chord diagrams.
Fingering shown in dots on guitar chord diagrams will not appear.
All fingering dots will appear as black dots, regardless of the design used in Sibelius 6.
Chord diagrams that do not have a dot on a specific string but also do not show an O or an
X above the frame will show an O above the string.
Comments will be omitted.
Jazz symbols (plop, scoop, fall, doit) will be converted into regular symbols.
Live Tempo data will be omitted.
Magnetic Layout positions will be frozen, and not all objects will appear in the same posi-
tions in earlier versions, e.g. continuation segments of lines after system or page breaks.
Slash noteheads may appear in different positions on the staff for transposing instruments.
Slurs will appear at their default thickness, shape and design; they may also curve in the
opposite direction (i.e. slurs that are below the staff in Sibelius 6 may appear above in earlier
versions).
Staff spacing will be different, because earlier versions of Sibelius always justify the distance
between staves of multi-staff instruments. (Extra space provided for lyrics, system object
positions, and between groups of bracketed/braced instruments will be retained until the staff
spacing is reset in the earlier version.)
Ties will appear at the same thickness as slurs.
Two-bar and four-bar repeat bars will not look correct, and any automatic formatting produced by such repeat bars will not be retained in earlier versions, so bars may appear on different systems.
The vertical positions of system objects such as rehearsal marks at system object positions
other than above the top staff may be different.
Repeat bars will not play back in earlier versions.
Differences in Sibelius 2, 3, 4, G7, and Sibelius 3 Student
The following are retained in Sibelius 5, Sibelius 5 First, and Sibelius 5 Student, but omitted or
changed in earlier versions:
Bar numbers:
If bar numbers are set to appear every n bars, n will be turned into one of the existing
options in earlier versions, so bar numbers may appear on different bars.
Bar numbers automatically hidden at the same locations as rehearsal marks will not be hidden.
Bar numbering will not take repeats into account.
Ideas saved in the score will be omitted.
Margin changes (including those produced by the After first page option in Layout
Document Setup
, and by special page breaks) are omitted; all pages in the score will use the
margins defined on the first page of the score.
Multirests in parts may split differently in Sibelius 4 and earlier, due to page-attached system
text not splitting multirests in Sibelius 5 and later.
Page number changes are omitted; when opened in earlier versions, the pages will simply be
numbered from the first page.
Special page breaks are converted into regular page breaks, and any text items, symbols or
graphics set to appear on the blank pages are deleted from the score, together with blank
page text styles.
86
Page 93

1.15 Exporting to previous versions
Stem directions and rest placement may change, where notes or rests have been hidden.
Technique text such as “pizz.” and “arco” will not play back correctly in the earlier version.
All new instrument definitions, staff types, and ensemble data are omitted.
Differences in Sibelius 2, 3, G7, and Sibelius 3 Student
The following are retained in Sibelius 4, but omitted or changed in earlier versions:
Dynamic parts: any parts that exist in your score are omitted ( 7.9 Working with parts).
Optical beam positions: beams will slightly change position when opened in earlier versions
( 4.12 Beam positions).
Optical ties: ties will slightly change position when opened in earlier versions ( 4.22 Ties).
Justification: the horizontal and vertical justification of notes and systems may change when
opened in earlier versions ( 7.3 Staff spacing).
Further differences in Sibelius 2
The following are retained in Sibelius 4, Sibelius 3, G7 and Sibelius 3 Student, but omitted or
changed in Sibelius 2:
Note spacing: some note spacing options (e.g. minimum space around notes, flags, etc.) are
omitted; note spacing may adjust slightly when the file is opened, especially when the spacing is particularly tight or loose, but the overall layout (number of bars per system and page)
will not change.
Playback: all Live Playback data will be omitted ( 6.5 Live Playback); gaps between
movements in the same score ( 6.7 Performance).
Colored objects (including the color of highlights) will not appear colored.
Sibelius 1.4 users
If you know people who use Sibelius 1.4 and you want to share files with them, they must
update to the current version, as you cannot export from the current version in Sibelius 1.4 format.
87
Page 94

88
Page 95

1.16 Exporting to Avid Scorch
1.16 Exporting to Avid Scorch
If you have an iPad, the Avid Scorch app transforms it into an
interactive music stand, score library, and sheet music store.
Avid Scorch displays truly interactive notation—not just a PDF or
image—so the music you write in Sibelius First can be transferred
to your device and then adapted, transposed and played back.
Whether you want to showcase your own music or purchase scores
from world-class publishers, Avid Scorch is the easy way to practice and perform your favorite sheet music on the go.
Visit www.avid.com/scorch to find out more.
To learn how to let anyone view, play back, transpose, and print
scores from your own web site, using the free Scorch plug-in,
1.17 Exporting Scorch web pages.
Export settings
To export a copy of your score ready for transferring to your iPad, choose File Export Avid
to see the pane of options controlling how your score will appear:
Scorch
89
Page 96

You can choose how your exported score should be laid out:
Choosing Do not change score’s layout will preserve the layout of your score exactly as it
appears in Sibelius First, so only choose this if you’ve set a custom page size and margins by
hand to make best use of the iPad’s display (see Manually preparing scores for Avid Scorch
below).
By default, Optimize score’s layout for device is chosen, meaning that Sibelius First looks at
your score and scales it appropriately to make best use of the iPad’s display, taking into
consideration things like page orientation, number of staves, reduced margins and so on.
If you want to tweak the optimized score, Sibelius First provides easy control over the Page
margins
and Staff size directly. You can change the Horizontal (left and right) and the Vertical
(top and bottom) page margins independently of one another.
You can see the effects of any changes to the layout of your score, and see how it will look
when framed by a bezel, in the large preview.
Click Reset to Defaults to restore the settings Sibelius First applied to your score.
If you want to review these changes or make any other alterations to your score before trans-
ferring it to your iPad, or if you want to email your score directly from within Sibelius First,
switch on the After exporting, automatically open new score in Sibelius First checkbox.
Once you are happy with the settings, click the big Export button (shown on the
right). Sibelius First suggests a filename (which you can change if you wish) and
then saves the optimized score in the chosen location.
You’re now ready to transfer the score to your iPad—see Transferring scores to
your iPad
below.
Manually preparing scores for Avid Scorch
If you would prefer to lay out your score by hand so that it makes best use of the iPad’s display, here are a few things to bear in mind (for more detailed instructions on how to make
these kinds of changes, 7.1 Document Setup, 7.7 Layout and formatting).
Page orientation makes a big difference.
Landscape scores are better suited to music with lots of instruments, since you can fit
more bars onto a single page, but usually only one system.
Portrait scores are better for smaller ensembles with two or more systems per page
(Scorch will scroll by half a page on these sorts of scores).
Page size should be set appropriately for the iPad’s 4:3 dimensions, however bear in mind
that even in Scorch’s Music Stand (or full screen) mode, 20 pixels of the iPad’s display are
always reserved for the status bar at the top of the screen. Therefore, some good starting
points for page sizes are listed below.
Page margins should be as small as possible to make best use of the small screen, otherwise
your score will be surrounded by white space. It’s helpful to think of the iPad’s bezel (the
frame around the screen) as an extension of the margins.
Staff size shouldn’t be too small, otherwise you may find that you can’t read the music at all
when you view it on your iPad, which wouldn’t be much use!
To give you somewhere to start from, here are some sensible defaults.
90
Page 97

1.16 Exporting to Avid Scorch
For landscape scores:
A page size of 11.69 inches wide by 8.54 inches tall (297mm wide by 216.9mm tall).
Page margins of 4.0mm on all sides.
A staff size of between 3.9mm and 8.0mm, depending on the number of staves in your
score.
For portrait scores:
A page size of 8.27 inches wide by 10.81 inches tall (210mm wide by 274.5mm tall).
Page margins of 4.0mm inches on all sides.
A staff size of between 6.5mm and 9.0mm, depending on the number of staves in your
score.
Remember that you can quickly gauge the effect of any changes you make by choosing File
Export Avid Scorch
to see how the score looks when framed by a bezel. If you don’t like what
you see, you can either Undo your changes, or choose the Optimize score’s layout for device
option on the File Export Avid Scorch pane.
When you’re happy with the score’s appearance choose File Save As to save a copy of the
score. You’re now ready to transfer the score to your iPad—see Transferring scores to your
below.
iPad
Catalog information
Avid Scorch generates a cover image for any scores you
add to your score library, using catalog information such
as the composer and title, as in the examples on the left.
All you have to do is type the details into the Title,
Composer etc. fields when creating your score, or subse-
quently into the File Info page; then when you transfer
the score to your library on the iPad, Avid Scorch will
include this information automatically on the cover.
If, when you export from Sibelius First, you haven’t
entered anything in the File Info page, you will be
warned that the Title and Composer fields are blank, by a little yellow warning triangle and a
message. If you neglect to supply this information in Sibelius First, Avid Scorch will simply
show the .sib filename when you transfer the score.
Transferring scores to your iPad
There are three ways to transfer scores you’ve created in Sibelius First to Avid Scorch on your
iPad: email yourself a copy, use a file-syncing service or transfer directly using iTunes on your
computer.
The easiest way is to email your score:
Either open the score you want to transfer or export an optimized version of the score (mak-
ing sure to switch on the After exporting, automatically open new score in Sibelius First checkbox before clicking the Export button).
Choose File Share Send Using Email and send an email to the address you use on your
iPad, attaching just a Sibelius file (although Avid Scorch can open PDFs too, if you wish)—
see Sending files via email on page 26.
91
Page 98

Open the email on your iPad, tap on the .sib attachment
and look for the Open in buttons shown on the right.
Tap Open in Avid Scorch or choose it from the list of
available apps.
Avid Scorch will launch and display the score you just
opened.
The process of opening from a file-syncing app is very similar (these instructions are for Dropbox, some steps may differ for other services):
Move or copy the score you want to transfer into your Dropbox, or export an optimized ver-
sion of the score to that location.
Open the Dropbox app on your iPad, tap on the .sib
document and again look for the Open in buttons shown on
the right.
Tap Open in Avid Scorch or choose it from the list of
available apps.
Avid Scorch will launch and display the score you just opened.
Finally, to transfer using iTunes on your computer (which is the easiest way to transfer lots of
files together):
Connect your iPad to your to your computer.
Launch iTunes on your computer.
Select your iPad from the Devices section of iTunes, as shown on the
right.
Click the Apps tab and scroll down to the bottom of the page.
Under the File Sharing section, you’ll see a list of all the apps on your
iPad that you can transfer files to.
Choose Avid Scorch from the list to see all the scores in your library:
92
Page 99

1.16 Exporting to Avid Scorch
To transfer your scores, you can either:
Drag-and-drop .sib files onto the Avid Scorch Documents list to copy them.
Click the Add button, navigate to the score(s) you want to copy from your computer, and
choose Open.
The next time you launch Avid Scorch, the score(s) you just transferred will be available in
your library.
Offering your music in the Scorch Store
Avid Scorch offers access to a huge online catalog of sheet music with everything from chart-
toppers to classics available as in-app purchases. The great news is that you too can publish
your Sibelius First scores and sell them to others, or make them available as free downloads.
If you want to offer your music for sale or download in the Scorch Store, you will need to have
a Score Exchange account and opt into the reseller program: visit www.scoreexchange.com for
more details.
To learn how to upload your music to ScoreExchange.com, see Publishing for others to view,
purchase and print
on page 29.
93
Page 100

94
 Loading...