

Page 1
Upgrading to
Page 2

Edition 5.1a
October 2007
Booklet written by Daniel Spreadbury.
Please email any suggestions for improvements to this booklet to docs@sibelius.com (but please
do not use this address for suggestions or queries about the Sibelius program itself – see the separate
Latest information & technical help sheet for the correct address for your country).
Sibelius copyright © Sibelius Software, a division of Avid Technology, Inc., and its licensors 1987–2007
Upgrading to Sibelius 5 copyright © Sibelius Software, a division of Avid Technology, Inc., 2007
Published by Sibelius Software, The Old Toy Factory, 20–23 City North, Fonthill Road, London
N4 3HF, UK
All rights reserved. This booklet may not be reproduced, stored in a retrieval system or transmitted in any form or by any means – electronic, recording,
mechanical, photocopying or otherwise – in whole or in part, without the prior written consent of the publisher. Although every care has been taken in
the preparation of these release notes, neither the publisher nor the authors can take responsibility for any loss or damage arising from any errors or omis-
sions it may contain.
Sibelius, the Sibelius logo, Scorch, Flexi-time, Espressivo, Rubato, Rhythmic feel, Arrange, ManuScript, Virtual Manuscript Paper, Opus, Inkpen2, Reprise,
Helsinki, magnetic, multicopy, Optical, Dynamic parts, Panorama, SoundWorld, Ideas, the blue notes and double helix logos, SibeliusMusic.com, Sibel-
iusEducation.com, ‘The fastest, smartest, easiest way to write music’ and ‘99% inspiration, 1% perspiration’ are all trademarks or registered t rademarks of
Sibelius Software, a division of Avid Technology Inc., in the USA, UK and other countries. All other trademarks are acknowledged as the property of their
respective owners.
Page 3

Contents
Introduction. . . . . . . . . . . . . . . . . . . . . . . . . . . . . . . . . . . . . . . . . . . . . . . . . . . . . . . . . . . . . . . . . . . . . . . . . . . . 4
Installation 5
Upgrading on Windows . . . . . . . . . . . . . . . . . . . . . . . . . . . . . . . . . . . . . . . . . . . . . . . . . . . . . . . . . . . . . . . . . . 7
Upgrading on Mac . . . . . . . . . . . . . . . . . . . . . . . . . . . . . . . . . . . . . . . . . . . . . . . . . . . . . . . . . . . . . . . . . . . . . 15
Upgrading existing scores . . . . . . . . . . . . . . . . . . . . . . . . . . . . . . . . . . . . . . . . . . . . . . . . . . . . . . . . . . . . . . . 21
Upgrading from Sibelius 1.x . . . . . . . . . . . . . . . . . . . . . . . . . . . . . . . . . . . . . . . . . . . . . . . . . . . . . . . . . . . . . 25
What’s new? 27
Playback . . . . . . . . . . . . . . . . . . . . . . . . . . . . . . . . . . . . . . . . . . . . . . . . . . . . . . . . . . . . . . . . . . . . . . . . . . . . . . 29
Ideas . . . . . . . . . . . . . . . . . . . . . . . . . . . . . . . . . . . . . . . . . . . . . . . . . . . . . . . . . . . . . . . . . . . . . . . . . . . . . . . . . 34
Panorama. . . . . . . . . . . . . . . . . . . . . . . . . . . . . . . . . . . . . . . . . . . . . . . . . . . . . . . . . . . . . . . . . . . . . . . . . . . . . 39
Cues . . . . . . . . . . . . . . . . . . . . . . . . . . . . . . . . . . . . . . . . . . . . . . . . . . . . . . . . . . . . . . . . . . . . . . . . . . . . . . . . . 41
Instruments . . . . . . . . . . . . . . . . . . . . . . . . . . . . . . . . . . . . . . . . . . . . . . . . . . . . . . . . . . . . . . . . . . . . . . . . . . . 44
Numbering. . . . . . . . . . . . . . . . . . . . . . . . . . . . . . . . . . . . . . . . . . . . . . . . . . . . . . . . . . . . . . . . . . . . . . . . . . . . 46
Reprise and other fonts . . . . . . . . . . . . . . . . . . . . . . . . . . . . . . . . . . . . . . . . . . . . . . . . . . . . . . . . . . . . . . . . . 48
Plug-ins . . . . . . . . . . . . . . . . . . . . . . . . . . . . . . . . . . . . . . . . . . . . . . . . . . . . . . . . . . . . . . . . . . . . . . . . . . . . . . 51
Look and feel . . . . . . . . . . . . . . . . . . . . . . . . . . . . . . . . . . . . . . . . . . . . . . . . . . . . . . . . . . . . . . . . . . . . . . . . . . 55
Other improvements and fixes . . . . . . . . . . . . . . . . . . . . . . . . . . . . . . . . . . . . . . . . . . . . . . . . . . . . . . . . . . . 58
Appendices 71
Appendix A: Improvements up to Sibelius 4.1.5. . . . . . . . . . . . . . . . . . . . . . . . . . . . . . . . . . . . . . . . . . . . . 72
Appendix B: Menu changes . . . . . . . . . . . . . . . . . . . . . . . . . . . . . . . . . . . . . . . . . . . . . . . . . . . . . . . . . . . . . . 75
Appendix C: Keyboard shortcuts . . . . . . . . . . . . . . . . . . . . . . . . . . . . . . . . . . . . . . . . . . . . . . . . . . . . . . . . . 76
3
Page 4

Introduction
Thank you for upgrading to Sibelius 5. We are sure that you will find this major upgrade faster,
smarter and easier than ever before. With the new Ideas feature, you can capture, organize,
retrieve, and re-use every melody, motive or other musical material you come up with, putting it
all at your fingertips. Panorama displays your score on a single continuous system on an infinitelywide page, allowing you to let your creativity flow without worrying about page layout. With a new
high-quality sound library and the ability to use any virtual instrument or effect seamlessly within
Sibelius, you can hear your score played back more realistically than ever before. You can make
instrumental cues for your parts in moments, change instruments anywhere along a staff, create
title and other blank pages with a single click – and that’s only the beginning!
This booklet tells you how to install your new version of Sibelius and summarizes all of the improvements. Refer to Sibelius Reference (see below) to get full details of how to use the new features.
We strongly recommend that you read this booklet in its entirety before you use your upgrade. At
the very least, you must follow the upgrade instructions on the next few pages.
Sibelius Reference
Sibelius 5’s documentation is split into two: the Handbook, which tells new users how to install the
software and introduces them to its basic features; and Reference, which explains every feature of
the program in detail. You don’t need the Sibelius 5 Handbook so it isn’t included with this
upgrade.
Reference is available on-screen from within Sibelius 5: simply choose Help
(shortcut F1 or
Reference is also available as an optional printed book. If you would like to buy one, please visit
www.sibelius.com/buy for more information.
Here are the main additions and changes to Sibelius Reference since Sibelius 4:
* 3. Text and 7. Files have been reorganized, with a larger number of shorter topics, to make it
easier to find specific help
*
5.4 Dynamic parts
* All the new features and improvements either have new topics or substantially revised existing
topics, and you will see directions to these topics at the appropriate points in this booklet.
X?), and it will open in Adobe Reader (Windows) or Preview (Mac).
has also been moved to a new chapter,
6. Parts
> Sibelius Reference
, and split into shorter topics
In your upgrade pack
In addition to this booklet, check that you have received all of the following items:
* Sibelius 5 DVD-ROM
* Upgrade Code (or codes, if you have more than one Sibelius copy with different serial numbers),
which will be printed on a separate sheet of paper
* Latest information and technical help sheet
* Reference book (if you opted to purchase it along with your upgrade).
4
Page 5

Installation
Installation
5
Page 6

Installation
6
Page 7

Upgrading on Windows
Upgrading on Windows
Important
If you are installing your upgrade onto the same computer as your previous version of Sibelius:
* Do not uninstall your previous version of Sibelius before installing the upgrade
* Make sure that the copy of Sibelius you wish to upgrade is registered (and for Sibelius 2.x and
Sibelius 1.x, does not have its saving feature transferred to another computer). You can upgrade
an unregistered copy of Sibelius, but it will still be unregistered after the upgrade.
If you are installing your upgrade onto a different computer than your previous version of Sibelius:
* If you are upgrading from Sibelius 3 or Sibelius 4, run your previous version of Sibelius on your
old computer and choose Help
before installing Sibelius 5 on your new computer
* If you are upgrading from Sibelius 2 or Sibelius 1.4, uninstall your previous version of Sibelius
from your old computer before installing Sibelius 5 on your new computer – see Uninstalling
older versions of Sibelius on page 14.
Whichever version of Sibelius you are upgrading from, if you are installing Sibelius 5 on a new
computer, you do not need to install your previous version of Sibelius on your new computer in
order to install your upgrade.
Minimum requirements
Minimum requirements for Sibelius 5 alone:
> Unregister Sibelius to unregister Sibelius over the Internet
Installation
Windows XP SP2 or Windows Vista, 512MB+ RAM, 350MB hard disk space, DVD-ROM drive
Additional recommendations for using Sibelius Sounds Essentials and Kontakt Player 2, especially
for scores with many instruments:
1GB+ total RAM, 3.5GB total hard disk space, ASIO-compatible soundcard
You can use Sibelius Sounds Essentials if your computer doesn’t meet the recommended requirements, but you may find that you cannot use as many sounds simultaneously.
You must be running at least Windows XP Service Pack 2 to install and run Sibelius 5. If you have
Windows 95, Windows 98, Windows Me, Windows 2000 or Windows NT 4.x, you need to purchase an upgrade to a more recent version of the Windows operating system.
How to determine if you are running Windows XP Service Pack 2
If you have Windows XP but are unsure whether or not you have Windows XP Service Pack 2:
* Click the Start button, then choose Run...
* Ty pe winver in the Open box, and hit Return (on the main keyboard)
7
Page 8

Installation
* You will see a simple window, like this:
You sh ou ld se e Service Pack 2 at the end of the second line of text. If you don’t, then you need to
update to Service Pack 2. The simplest way of doing this is to download it automatically by choosing Windows Update from the Start menu. If the computer on which you want to run Sibelius
isn’t connected to the Internet, you can obtain Windows XP Service Pack 2 on CD-ROM or via a
special download that can be burned to CD and deployed on another computer. See http://
www.microsoft.com/windowsxp/sp2/default.mspx for more details.
Sibelius 1.x users
If you are installing your upgrade onto the same computer as your previous version of Sibelius,
check that your previous version of Sibelius is 1.2 or later. To do this, run Sibelius, then choose
Help
> About Sibelius. The version number is shown in the bottom right-hand corner of the win-
dow that appears.
Important: If you are running a version of Sibelius earlier than 1.2:
* Quit Sibelius, if it is running
* Insert your Sibelius 5 DVD-ROM; after a few moments, a menu will appear. Click Browse this
DVD.
* A Windows Explorer window will appear, showing you the contents of the DVD-ROM. Double-
click the Update Sibelius 1.x to 1.4 folder, and finally double-click the Update Sibelius
(English) icon to update your existing version of Sibelius to 1.4.
* Follow the instructions on-screen; you may be prompted to restart your computer. If so, wait for
your computer to restart.
* Now run Sibelius again to check that the update has been successful. It is very important that you
run Sibelius after you update it!
* The splash screen should say “Version 1.4.” If you missed the splash screen, check the version
again from Help
* Quit Sibelius again.
> About Sibelius.
Multiple copies and site licenses
If you have more than one copy of Sibelius using the same serial number, such as a 5-pack, second
registration or laptop copy, simply follow the same upgrading instructions on each computer,
using the same Upgrade Code.
8
Page 9

Upgrading on Windows
If you have more than one Sibelius serial number (e.g. two 5-packs), follow the upgrading instructions on each computer, using the Upgrade Code that applies to the Sibelius serial number used on
that computer. The Upgrade Code in each upgrade pack says which serial number it applies to. If
you’re not sure which serial number is used on which computer, don’t worry – Sibelius tells you
when it asks for the Upgrade Code.
If you have a Sibelius network license, please read the separate Installing and registering net-
work site licenses booklet enclosed in the upgrade box.
Administrator privileges
You must install Sibelius using a user account on your computer with administrator privileges. In
order to register Sibelius after installing it, you must either be using an administrator user account,
or be able to provide an administrator username and password when prompted.
Therefore we recommend that you install Sibelius 5, then after installing it, launch it and register it
(if it is unregistered) as an administrator user.
After having registered the software, we recommend that you run Sibelius (like all other applications) as a non-privileged user, to increase the security of your system.
If you’re the only person who uses your computer, or you don’t know anything about user accounts
or administrator privileges on your computer, you can safely ignore the above and install the software as usual.
Installation
Installing your upgrade
* Exit any programs that are running. It’s a particularly good idea to exit any anti-virus programs
loaded automatically at start-up (for example, McAfee Virus Scan or Norton AntiVirus).
* Take the Sibelius DVD-ROM out of its case, put it (labeled side up) in the DVD-ROM drive of the
computer, and close the drive slot
* Wait for a few seconds. The DVD-ROM drive should start up and a dialog will appear on the
screen.
* (If there’s no sign of activity after a while, click the Start menu, choose Run and
type X:\amplayer, where X is the letter of your DVD-ROM drive, then hit Return on the main
keyboard.)
* On Windows Vista, you may see a small window called AutoPlay appear. Under Install or run
program, click Run amplayer.exe.
* In the main installation window, click Install Sibelius 5 to start upgrading Sibelius
* On Windows Vista, your screen may now go dark and a window titled User Account Control
will appear. Click Allow to tell Windows that you are happy for the installation to proceed.
* If you do not have the Microsoft Windows Installer installed, you will be told that it must be
installed. Click Install, and wait while the Windows Installer kit is installed. This may take a
couple of minutes.
* Next, if you do not have the Microsoft .NET Framework 2.0 installed, you will be told that it
must be installed. Click Install, then if you are prompted to read a license agreement, click
Accept to accept the terms of the license agreement you are shown, and then wait patiently
while the .NET Framework is installed. This may take a couple of minutes.
9
Page 10

Installation
* Next, you will be told that the Visual C++ Runtime Libraries need to be installed. Click Install
and wait while the libraries are installed.
* After a few more seconds, a window appears that says Welcome to the Sibelius 5
Installation Wizard. Click Next.
* You are given the opportunity to read the Sibelius license agreement, which is also at the end of
Reference. Click I accept the license agreement, then click Next.
* The installer suggests a folder to install Sibelius into. Unless you have strong feelings about
where you want Sibelius to go and you know how to alter it, leave this set to the default. You’re
asked if you want to install Sibelius for Anyone who uses this computer or Only for me,
which determines whether everybody who uses your computer will see a shortcut to Sibelius on
the Desktop, or just you. We recommend you leave it on Anyone who uses this computer.
Click Next.
* It tells you you’re now ready to install Sibelius. Click Next.
* Things flash and zoom past on the screen as Sibelius is installed. This may take several minutes.
* When the installer has completed, click Finish to return to the window that first appeared when
you inserted the DVD-ROM.
Before you run Sibelius 5 for the first time, you should now consider whether to install any other
applications from the Sibelius 5 DVD-ROM.
Installing Sibelius Sounds Essentials
Sibelius Sounds Essentials is a high-quality library of sounds for use with Sibelius – see Sibelius
Sounds Essentials on page 29 for more details. To install it:
* If the window that appeared when you first inserted the Sibelius 5 DVD-ROM is still open, click
Install Sibelius Sounds Essentials in that window to begin. If the window isn’t visible, reinsert your Sibelius 5 DVD-ROM, and it will appear after a few seconds.
* After a few moments, the installer will start. Click Next.
* You are given the opportunity to read the Sibelius Sounds Essentials license agreement. Do so,
then click I Accept.
* You will be told that installing the sound library will take some time, during which it may appear
that the process has stopped. Click Next.
* You are told where Kontakt Player 2, the sample player used by Sibelius Sounds Essentials, will
be installed. It is recommended that you accept the default location – so just click Next.
* Next you are told where the sample library itself will be installed. The sample library is around
3GB in size, so you should ensure that the chosen location has sufficient space. Normally the
suggested default is fine, so unless you know you have insufficient space in that location, click
Next.
* Next you are told where the Kontakt Player 2 VST virtual instrument will be installed. The
default location should be C:\Program Files\Sibelius Software\VSTPlugins, and you should
not change this. Click Next.
* Finally you are asked to choose the name of the Start menu group to add the Sibelius Sounds
Essentials icons to. Just click Next.
10
Page 11

Upgrading on Windows
* Now things flash and whizz across the screen as Sibelius Sounds Essentials is installed. You may
notice that the Time remaining read-out says that the installation will be finished in 0 seconds
for quite some time – this is normal. Just wait patiently while the library is installed; it may take
several minutes.
* You will eventually be told that Sibelius Sounds Essentials has been installed successfully. Click
Finish.
Installing Scorch
You should now install the latest version of Scorch, the free web browser plug-in for viewing, playing, transposing and printing Sibelius scores on the Internet:
* If the window that appeared when you first inserted the Sibelius 5 DVD-ROM is still open, click
Install Scorch in that window to begin. If the window isn’t visible, re-insert your Sibelius 5
DVD-ROM, and it will appear after a few seconds.
* After a few moments, a window appears that says Welcome to the Sibelius Scorch Setup
Wizard. Click Next.
* You are given the opportunity to read the Scorch license agreement. Read it, click the I Agree
radio button, then click Next.
* You are prompted to choose an installation folder for Scorch. Again, simply click Next.
* It tells you you’re now ready to install Scorch. Click Next.
* Things flash and whizz across the screen as Scorch is installed. This only takes a few moments.
* When the installer has completed, click Close.
Installation
Installing PhotoScore Lite
Unless you have purchased PhotoScore Ultimate along with your upgrade or already have PhotoScore Ultimate (or an earlier version of PhotoScore Professional) installed, you should now install
the latest version of PhotoScore Lite from your Sibelius 5 DVD-ROM:
* If the window that appeared when you first inserted the Sibelius 5 DVD-ROM is still open, click
Install PhotoScore Lite in that window to begin. If the window isn’t visible, re-insert your Sibelius 5 DVD-ROM, and it will appear after a few seconds.
* If your screen resolution is set to smaller than 1024 x 768, a message will pop up recommending
you increase it. Just click OK.
* Click Next to see the license agreement for PhotoScore Lite. Read it and click Next
* You’re asked to fill in a few details: type in your Name; the Product ID field is filled in for you.
When you’ve filled in the form, click Next.
* PhotoScore Lite tells you where it will be installed; again, you can change this if you have strong
feelings about it. Otherwise, click Next.
* Click Next once more and PhotoScore Lite will be installed, then click Finish.
Upgrading Sibelius Sounds products
If you have Kontakt Gold (which is now called Sibelius Sounds Gold), Garritan Personal Orchestra
Sibelius Edition or Sibelius Rock and Pop Collection, you will need to upgrade them to use them
with Sibelius 5. You can download your free upgrade for these products from the Sibelius web site:
11
Page 12

Installation
http://www.sibelius.com/products/sibelius_sounds/upgrade.html
Running for the first time
Running Sibelius 5 for the first time completes the upgrade procedure.
* On Windows XP:
% Run Sibelius 5 either by double-clicking the icon on your desktop, or by choosing Start >
Programs > Sibelius Software > Sibelius 5. Then the following will happen:
% If you are not logged in as an administrator user, you will be asked for the administrator user-
name and password.
* On Windows Vista:
% Click the Start button
% Select Computer from the menu to see your computer’s disk drives
% Navigate to C:\Program Files\Sibelius Software\Sibelius 5
% Right-click the Sibelius application icon and select Run as Administrator from the context
menu. (After you have successfully upgraded Sibelius, you can quit the program and then run
it from the shortcut in the Start menu as normal; there is no need to Run as Administrator
once you have completed the upgrade procedure.)
% If you are logged in as an administrator user on Windows Vista, you may be prompted to give
your permission for the procedure to continue.
* You are asked if you have an earlier registered version of Sibelius installed on your computer.
If you have installed your upgrade on the same computer as your previous version of Sibelius,
click Yes, then:
% Sibelius will show you a list of all the copies of Sibelius installed on your computer. Typically
you will only see one copy listed (i.e. the copy of Sibelius from which you are upgrading), so
choose it and click OK.
% The Enter Upgrade Code dialog appears. Fill out your name, and then enter your Upgrade
Code. The Upgrade Code is printed on a sheet of paper included inside your upgrade pack –
type it in and click OK. If you have more than one Sibelius serial number and hence more
than one Upgrade Code, ensure you type the Upgrade Code for the appropriate serial number.
(It will tell you if you typed the wrong one in any case.)
% Click OK, and the Sibelius 5 splash screen will appear.
If, on the other hand, you have installed your upgrade on a different computer than your previous version of Sibelius, click No, then:
% You will be prompted to enter your Sibelius serial number. You will find this on the back of
the CD case that your original version of Sibelius came in; it’s the number beginning with S.
% Click OK, and the Sibelius 5 splash screen will appear.
% You will then be prompted to register Sibelius. You should do this now, so choose the On the
Internet radio button and click Next, then follow the instructions on the screen. If you need
help with registering Sibelius, refer to Registering Sibelius in the Handbook.
% You will be told that Sibelius has been registered successfully.
12
Page 13

Upgrading on Windows
* When Sibelius has loaded, the Quick Start dialog appears. Switch off Show this each time
Sibelius starts if this kind of thing annoys you.
Now you’ve finished installing Sibelius, take your Sibelius 5 DVD-ROM and put it in your existing
Sibelius CD-ROM case, and throw away any old Sibelius CD-ROMs you have lying around (as they
will no longer be of use). It’s important that you put your new DVD into the old case, because the
case has your serial number printed on the back.
Restoring old files
You may have written or customized plug-ins, manuscript papers, feature sets, Arrange styles, etc.
in earlier versions of Sibelius. Each version of Sibelius stores these files in different locations, and if
you want to use them in Sibelius 5, you’ll need to copy them manually from their old location to
the appropriate new one. To find the location where Sibelius 5 keeps user-created files:
* Double-click My Computer or open a Windows Explorer window
* Choose Tools > Folder Options, and click the View tab
* Under Advanced Settings, make sure Show hidden files and folders is selected
* Click OK to close the Folder Options dialog
* Navigate to the appropriate folder for your version of Windows:
% Windows XP: C:\Documents and Settings\username\Application Data\
% Windows Vista: C:\Users\username\AppData\Roaming\
* You may now see a folder called Sibelius Software, in which case double-click the folder to go
inside it. If you don’t see that folder, choose File
name of the folder, then double-click the newly-created folder to go inside it.
* Choose File > New Folder again, and type Sibelius 5 as the name of the folder. Double-click the
newly-created folder to go inside it.
> New Folder, type Sibelius Software as the
Installation
This is the location in which Sibelius 5 expects to find customized data like plug-ins, manuscript
papers, and so on, each type within its own folder.
If you are upgrading from Sibelius 4 and have modified any of these files, you will already have a
folder called Sibelius 4 in the same location. You can simply drag the folders from the Sibelius 4
folder into your new Sibelius 5 folder.
If you are upgrading from Sibelius 1, Sibelius 2 or Sibelius 3, you will need to move only those files
that you have customized (and want to keep) from their old location to the new one as follows:
Component type Old location:
C:\Program Files\Sibelius Software\Sibelius 3\
Arrange styles
House Styles
Manuscript paper
Feature sets
Plug-ins
Scorch web templates
Te xt u re s
Arrange Styles\ Arrange Styles\
House Styles\ House Styles\
Manuscript paper\ Manuscript paper\
Menus and Shortcuts\ Menus and Shortcuts\
Plugins\ Plugins\
Manuscript paper\ Scorch Templates\
Textures\ Textures\
Sibelius 5 location:
...
\Sibelius Software\Sibelius 5\
13
Page 14

Installation
Most of these old folders won’t exist if you are upgrading from Sibelius 1, so you won’t have to copy
anything from them.
Whichever version you’re upgrading from, note that:
* Due to changes in ManuScript, plug-ins you have created or edited yourself may no longer work
in Sibelius 5; consult the ManuScript documentation in the Extras folder for more details.
* Due to changes in sound sets, sound sets created in any previous version of Sibelius will not
work in Sibelius 5.
* To take advantage of many of Sibelius 5’s new features, you will need to import one of the new
Sibelius 5 house styles into your existing scores and manuscript papers, or else recreate your
own manuscript papers from scratch in Sibelius 5.
Uninstalling older versions of Sibelius
Note that your previous copy of Sibelius 1.x, 2.x, 3.x or 4.x will still be on your computer but will no
longer be registered, so we recommend that you uninstall it. To uninstall Sibelius, go to Start
Settings > Control Panel, and double-click Add/Remove Programs (Windows XP) or Programs
and Features (Windows Vista).
You sh ou ld se e Sibelius, Sibelius 2, Sibelius 3 or Sibelius 4, then Sibelius 5, one after the other
in the list – select the old version and then click Change/Remove (Windows XP) or Uninstall
(Windows Vista). Make sure you do not select Sibelius 5 as this will delete the new version. Then
follow the instructions on the screen to uninstall the old version.
>
14
Page 15
Upgrading on Mac
Upgrading on Mac
Important
If you are installing your upgrade onto the same computer as your previous version of Sibelius:
* Do not uninstall your previous version of Sibelius before installing the upgrade
* Make sure that the copy of Sibelius you wish to upgrade is registered (and for Sibelius 2.x and
Sibelius 1.x, does not have its saving feature transferred to another computer). You can upgrade
an unregistered copy of Sibelius, but it will still be unregistered after the upgrade.
If you are installing your upgrade onto a different computer than your previous version of Sibelius:
* If you are upgrading from Sibelius 3 or Sibelius 4, run your previous version of Sibelius on your
old computer and choose Help
before installing Sibelius 5 on your new computer
* If you are upgrading from Sibelius 2 or Sibelius 1.4, uninstall your previous version of Sibelius
from your old computer before installing Sibelius 5 on your new computer – see Uninstalling
older versions of Sibelius on page 20.
Whichever version of Sibelius you are upgrading from, if you are installing Sibelius 5 on a new
computer, you do not need to install your previous version of Sibelius on your new computer in
order to install your upgrade.
Minimum requirements
Sibelius 5 is a Universal application, which means that it runs on both older Macs
with PowerPC processors and new Macs with Intel processors.
> Unregister Sibelius to unregister Sibelius over the Internet
Installation
Minimum requirements for Sibelius 5 alone:
Mac OS X 10.4 or later, 512MB+ RAM, 350MB hard disk space, DVD-ROM drive
Additional recommendations for using Sibelius Sounds Essentials and Kontakt Player 2, especially
for scores with many instruments:
G5 or Intel processor, 1GB+ total RAM, 3.5GB total hard disk space
You can use Sibelius Sounds Essentials if your computer doesn’t meet the recommended requirements, but you may find that you cannot use as many sounds simultaneously.
If you are running a version of Mac OS X earlier than Mac OS X 10.4, you cannot install and run
Sibelius. You may want to upgrade Mac OS X now, although this normally incurs an upgrade fee.
See www.apple.com for details.
It is recommended that you are running the most up-to-date version of Mac OS X to use Sibelius.
Choose the Software Update pane from System Preferences to check that you are using the
latest version.
15
Page 16
Installation
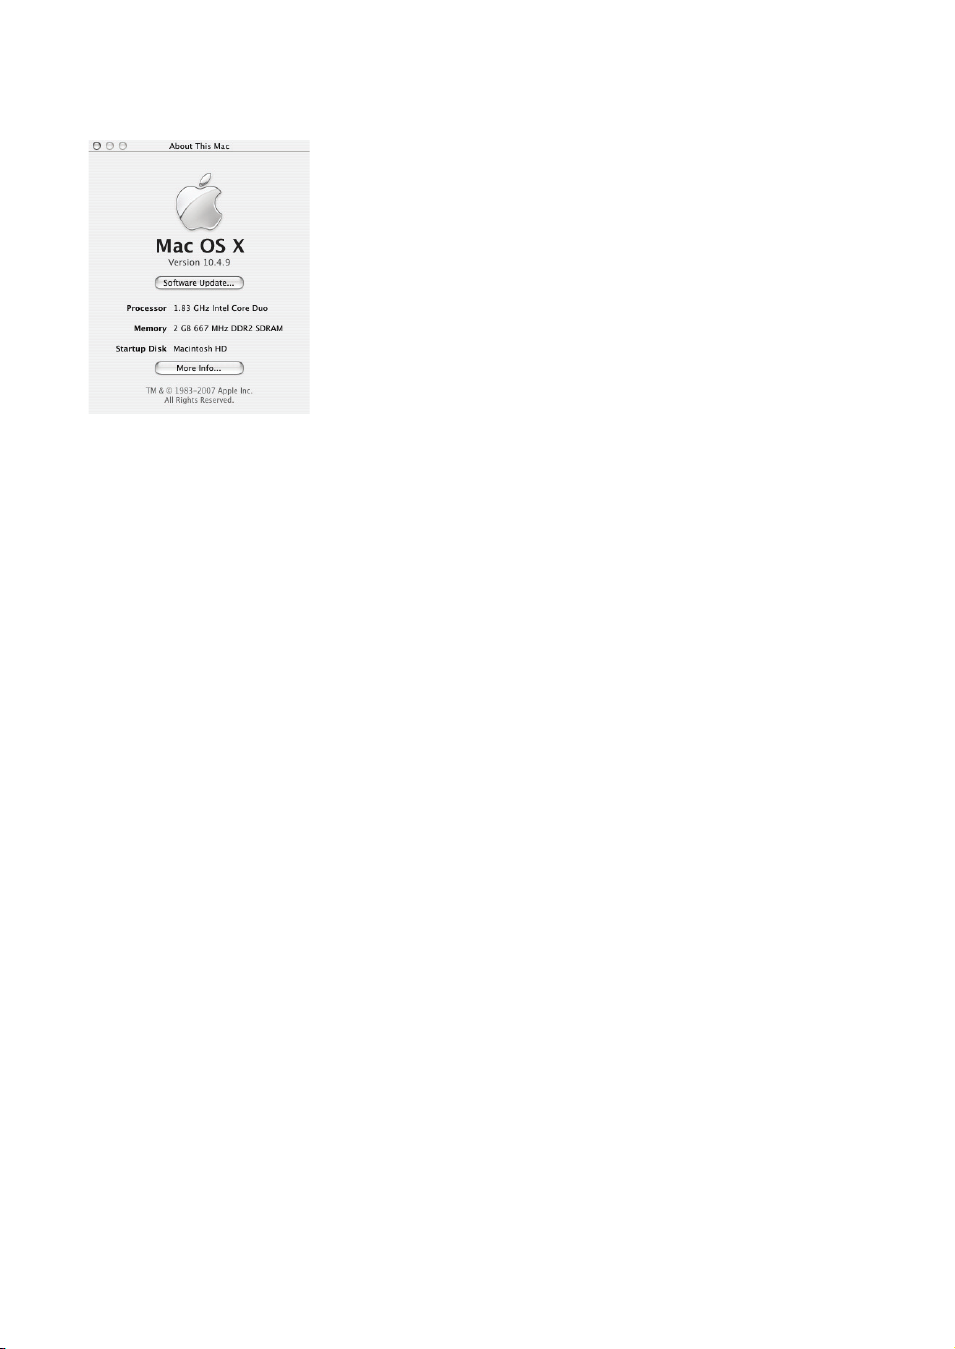
How to determine if you are running Mac OS X 10.4 Tiger or later
Choose About This Mac from the Apple menu. You will see a simple window, like this:
Just below the large text that reads Mac OS X you will see text that reads something like Version
10.4.9. Provided the first part of this number is 10.4 or greater, you are running Mac OS X 10.4
Tiger or a newer version of Mac OS X, and you can install and run Sibelius 5.
Multiple copies and site licenses
If you have more than one copy of Sibelius using the same serial number, such as a 5-pack, second
registration or laptop copy, simply follow the same upgrading instructions on each computer,
using the same Upgrade Code.
If you have more than one Sibelius serial number (e.g. two 5-packs), follow the upgrading instructions on each computer, using the Upgrade Code that applies to the Sibelius serial number used on
that computer. The Upgrade Code included in each upgrade pack says which serial number it
applies to. If you’re not sure which serial number is used on which computer, don’t worry – Sibelius
tells you when it asks for the Upgrade Code.
If you have a Sibelius network license, please read the separate Installing and registering net-
work site licenses booklet enclosed in the upgrade box.
Administrator privileges
In order to correctly install and register Sibelius 5, you will need to be logged into your computer
using a user account that has administrator privileges.
Therefore we recommend that you install Sibelius 5, then after installing it, launch it and register it
(if it is unregistered) as an administrator user.
After having registered the software, we recommend that you run Sibelius (like all other applications) as a non-privileged user, to increase the security of your system.
If you’re the only person who uses your computer, or you don’t know anything about user accounts
or administrator privileges on your computer, you can safely ignore the above and install the software as usual.
16
Page 17

Upgrading on Mac
Installing your upgrade
* Take the Sibelius DVD-ROM out of its case, put it (labeled side up) in the DVD-ROM drive of the
computer, and close the drive slot.
* Wait for a few seconds. An icon for the DVD, labeled Sibelius 5, should appear on your desktop,
and a window should open automatically; if it doesn’t, double-click the Sibelius 5 icon.
* To install your upgrade, simply drag the Sibelius 5 icon off the DVD into the Applications
folder on your Mac’s hard disk. Don’t double-click the Sibelius 5 icon in the DVD’s window, as
Sibelius will not work properly when run directly from the DVD-ROM.
* A progress bar will appear as the application is copied to your hard disk; when it disappears,
Sibelius has been successfully installed.
Before you run Sibelius 5 for the first time, you should now consider whether to install any other
applications from the Sibelius 5 DVD-ROM.
Installing Sibelius Sounds Essentials
Sibelius Sounds Essentials is a high-quality library of sounds for use with Sibelius – see Sibelius
Sounds Essentials on page 29 for more details. To install it:
* Insert the Sibelius 5 DVD-ROM, if it’s not already in the drive.
* Double-click Install Sibelius Sounds Essentials to start the installation.
* You will be prompted to enter your administrator password; do so, then click OK.
* After a few moments, you will be prompted to choose a location to install Kontakt Player 2. By
default it will create a folder called Kontakt Player 2 inside Applications on your Mac’s main
hard disk. Unless you feel strongly about where it should go, just click Continue.
* Next you are prompted to choose between an Easy Install or a Custom Install. Leave it set to
Easy Install and click Install.
* A progress bar zooms across the screen as the sample library is installed. This will take several
minutes to complete, so wait patiently, even if nothing appears to be happening.
* Finally the installation is complete! Click Quit to close the installer.
Installation
Installing Scorch
You should install the latest version of Sibelius Scorch (which allows you to view, play, transpose
and print Sibelius scores on the internet), so double-click the Other Applications folder in the
Sibelius 5 DVD window. Another window with smaller icons will appear. Double-click Install
Scorch:
* You are prompted to type your computer’s administrator password. Type it, and click OK.
* You are given the opportunity to read Scorch’s license agreement; read it, and click Accept
* On the next screen, simply click Install
* A progress bar zooms across the screen, and you’re then told that installation was successful.
Click Quit.
Installing PhotoScore Lite
Unless you have purchased PhotoScore Ultimate along with your upgrade or already have PhotoScore Ultimate (or an earlier version of PhotoScore Professional) installed, you should now install
17
Page 18

Installation
the latest version of PhotoScore Lite. Double-click the Other Applications folder in the
Sibelius 5 DVD window. Another window with smaller icons will appear, then double-click
Install PhotoScore Lite:
* You are shown PhotoScore Lite’s license agreement; read it, and click Accept
* On the next screen, simply click Install
* A progress bar zooms across the screen, and you’re then told that installation was successful.
Click Quit.
Upgrading Sibelius Sounds products
If you have Kontakt Gold (which is now called Sibelius Sounds Gold), Garritan Personal Orchestra
Sibelius Edition or Sibelius Rock and Pop Collection, you will need to upgrade them to use them
with Sibelius 5. You can download your free upgrade for these products from the Sibelius web site:
http://www.sibelius.com/products/sibelius_sounds/upgrade.html
Running for the first time
Running Sibelius 5 for the first time completes the upgrade procedure. So run Sibelius by doubleclicking the Sibelius 5 icon in the Applications folder:
* You will be prompted to type your computer’s administrator password. Type it, and click OK.
* The Sibelius License Agreement is displayed. Read it and click Agree.
* You are asked if you have an earlier version of Sibelius installed on your computer.
If you have installed your upgrade on the same computer as your previous version of Sibelius,
click Yes, then:
% Sibelius will show you a list of all the copies of Sibelius installed on your computer. Typically
you will only see one copy listed (i.e. the copy of Sibelius from which you are upgrading), so
choose it and click OK.
% The Enter Upgrade Code dialog appears. Fill out your name, and then enter your Upgrade
Code. The Upgrade Code is printed on a sheet of paper included inside your upgrade pack –
type it in and click OK. If you have more than one Sibelius serial number and hence more
than one Upgrade Code, ensure you type the Upgrade Code for the appropriate serial number.
(It will tell you if you typed the wrong one in any case.)
% Click OK, and the Sibelius 5 splash screen will appear.
If, on the other hand, you have installed your upgrade on a different computer than your previous version of Sibelius, click No, then:
% You will be prompted to enter your Sibelius serial number. You will find this on the back of
the CD case that your original version of Sibelius came in; it’s the number beginning with S.
% Click OK, and the Sibelius 5 splash screen will appear.
% You will then be prompted to register Sibelius. You should do this now, so choose the On the
Internet radio button and click Next, then follow the instructions on the screen. If you need
help with registering Sibelius, refer to Registering Sibelius in the Handbook.
% You will be told that Sibelius has been registered successfully.
* When Sibelius has loaded, the Quick Start dialog appears. Switch off Show this each time
Sibelius starts if this kind of thing annoys you.
18
Page 19

Upgrading on Mac
Now you’ve finished installing Sibelius, take your Sibelius 5 DVD-ROM and put it in your existing
Sibelius CD-ROM case, and throw away any old Sibelius CD-ROMs you have lying around (as they
will no longer be of use). It’s important that you put your new DVD into the old case, because the
case has your serial number printed on the back.
Restoring old files
Advanced users only
You may have written or customized plug-ins, manuscript papers, feature sets, Arrange styles, etc.
in earlier versions of Sibelius. Each version of Sibelius stores these files in different locations, and if
you want to use them in Sibelius 5, you’ll need to copy them manually from their old location to
the appropriate new one.
To find the location where Sibelius 5 keeps user-created files:
* Open a new Finder window
* Navigate to /Users/username/Library/Application Support
* You may now see a folder called Sibelius Software, in which case double-click the folder to go
inside it. If you don’t see that folder, type
ware as the name of the folder. Double-click the newly-created folder to go inside it.
* Ty pe xXN again, and type Sibelius 5 as the name of the folder. Double-click the newly-created
folder to go inside it.
xXN to create a new folder, and type Sibelius Soft-
Installation
This is the location in which Sibelius 5 expects to find customized data like plug-ins, manuscript
papers, and so on, each type within its own folder.
If you are upgrading from Sibelius 4 and have modified any of these files, you will already have a
folder called Sibelius 4 in the same location. You can simply drag the folders from the Sibelius 4
folder into your new Sibelius 5 folder.
If you are upgrading from Sibelius 1, Sibelius 2 or Sibelius 3, you will need to move only those files
that you have customized (and want to keep) from their old location to the new one as follows:
Component type Old location:
/Applications/Sibelius 3/
Arrange styles
House Styles
Manuscript paper
Feature sets
Plug-ins
Scorch web templates
Sound sets
Te xt u re s
Arrange Styles/ Arrange Styles/
House Styles/ House Styles/
Manuscript paper/ Manuscript paper/
Menus and Shortcuts/ Menus and Shortcuts/
Plugins/ Plugins/
Manuscript paper/ Scorch Templates/
Sounds/ Sounds/
Textures/ Textures/
Sibelius 5 location:
/Users/username/Library/Application Support/Sibelius Software/Sibelius 5/
Most of these old folders won’t exist if you are upgrading from Sibelius 1, so you won’t have to copy
anything from them.
19
Page 20

Installation
Whichever version you’re upgrading from, note that:
* Due to changes in ManuScript, plug-ins you have created or edited yourself may no longer work
in Sibelius 5; consult the ManuScript documentation in the Extras folder for more details.
* Due to changes in sound sets, sound sets created in any previous version of Sibelius will not
work in Sibelius 5.
* To take advantage of many of Sibelius 5’s new features, you will need to import one of the new
Sibelius 5 house styles into your existing scores and manuscript papers, or else recreate your
own manuscript papers from scratch in Sibelius 5.
Uninstalling older versions of Sibelius
Your previous copy of Sibelius 2, 3 or 4 will still be on your computer but no longer be registered,
so we recommend that you uninstall it.
If you have upgraded from Sibelius 2, beware that the default location for scores you have created is
the Scores folder inside the Sibelius 2 program folder. So before you uninstall Sibelius 2, you
should first move your Scores folder out of the Sibelius 2 program folder to somewhere safe to
avoid deleting all your music!
Now find the old folder (probably called Sibelius 2 or Sibelius 3) or the Sibelius 4 application
icon and drag it to the Trash.
20
Page 21
Upgrading existing scores
Upgrading existing scores
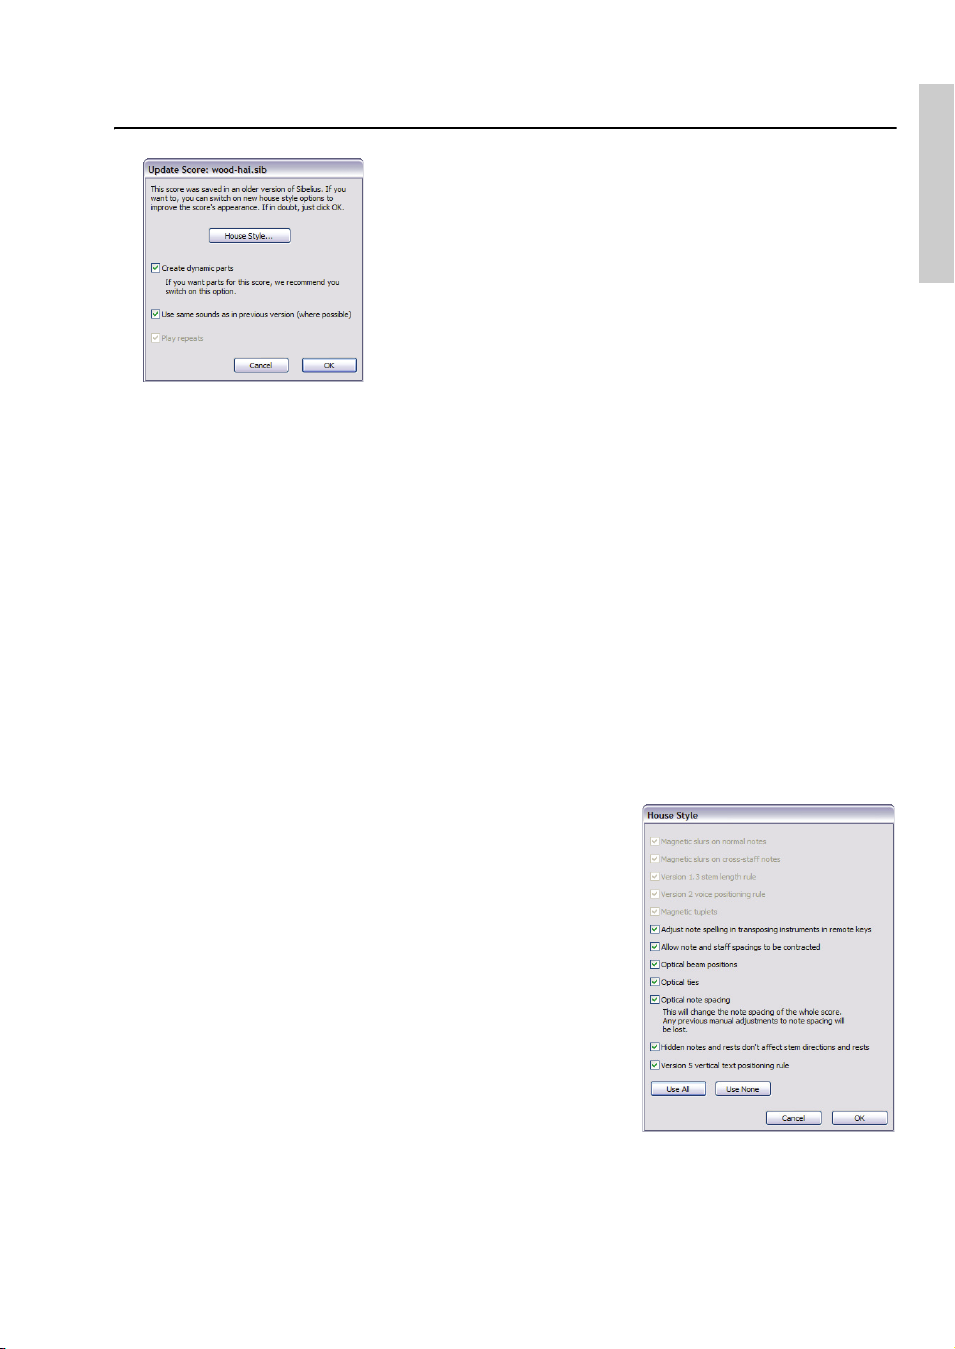
When you first open a score that was last saved in an earlier version of Sibelius in Sibelius 5, the Update Score dialog appears, as
shown on the left.
This dialog offers you the chance to switch on options in your score
that will improve its appearance or make new features available. If
you click Cancel, the file will not be opened; if you click OK, the
file will be opened with the options chosen applied to it.
The three options on the main dialog will not affect the appearance
of your score:
* Create dynamic parts determines whether or not to create a default set of dynamic parts in
your score. If your score already has parts (because you created it in Sibelius 4), then this option
will be disabled.
* Play repeats determines whether Sibelius should pay attention to any repeat barlines in the
score. Normally this checkbox will be disabled, since the option has been switched on by default
in all but the earliest versions of Sibelius, but if it is enabled, you should switch it on to ensure
correct playback and display of bar numbers in the score.
* Use same sounds as previous version (where possible) allows you to choose whether Sibel-
ius should attempt to retain the same sound for each staff in your score as was used to play it
back in whatever previous version of Sibelius it was last saved in. This option will only take effect
if you have Sibelius 5-compatible sound sets installed for the devices you were using when you
last saved the score. See Playback of existing scores below for more information about
playback of existing scores.
Installation
If you want your score to take advantage of other features
newer than your score, which might include magnetic slurs and
tuplets, Optical beams, Optical ties and Optical spacing, you
can click House Style, which shows the dialog shown on the
right.
All of the options in the House Style dialog will change, and
generally improve, the appearance of your score. However, if
you switch them on, you will then have to check that none of
the changes have had undesirable effects.
Options are enabled or disabled depending on the version of
Sibelius in which the score was last saved. Sibelius remembers
which options you choose each time you use the dialog, so if
you know that in general you always want to bring your scores
right up-to-date to keep working on them in Sibelius 5, click Use All, which will enable all the
options (even any that are not available for the particular score you’re opening), and you won’t
need to visit the House Style dialog again in future. Conversely, if you know you never want Sibe-
21
Page 22

Installation
lius to change the appearance of your scores when you open them, click Use None, which disables
all the options.
For further details,
b 8.10 Opening files from previous versions in Sibelius Reference.
Automatic changes
When you first open a score from an older version of Sibelius in Sibelius 5, it makes a few automatic changes, in particular:
* Sibelius creates a number of useful text styles in your score, if they were not already there
(including Plain text, Lyrics above staff, Lyrics (chorus), Time signatures (one staff only),
Repeat (D.C./D.S./To Coda), Block Lyrics, Timecode, Hit points, Duration at end of score,
Chord diagram fingering, etc.)
* Sibelius creates a number of line styles in your score, if they were not already there (including all
the rit./accel. lines)
* If your score was created in Sibelius 2 or earlier, any coda and segno symbols are converted to
system symbols when opened in Sibelius 5, so that the repeats can be played back properly. This
will only affect the appearance of a score if more than one row of system objects is visible in each
system (as configured in House Style
* Sibelius converts staff type changes, transposition changes and text that triggers a change of
> System Object Positions).
playback sound (e.g. “To Flute”) to instrument changes – see Instrument changes in existing scores below.
Instrument changes in existing scores
Instrument changes are a new feature in Sibelius 5 that incorporates the existing staff type change
and transposition change features. They allow you to change the instrument used by a staff partway through the score, changing the playback sound, transposition, staff type, and instrument
name on subsequent systems as appropriate.
Because staff type changes and transposition changes were simply ways of producing individual
aspects of instrument changes, you can no longer create staff type or transposition changes in new
scores, and when opening an existing score, Sibelius converts them to instrument changes.
In addition, the old mechanism for changing the playback sound of a staff – by typing the name of
the instrument whose sound you want to switch to using a staff text style like Technique – has
been replaced by instrument changes in Sibelius 5. So typing (say) “Flute” above the staff will no
longer produce a change in instrument sound on playback, though you can still achieve playback
of different playing techniques (such as mute or pizzicato) by typing text above the staff.
Sibelius converts staff type changes, transposition changes and playback sound changes in existing
scores as follows:
* Each staff type change, transposition change and playback sound change is converted into a sep-
arate instrument change object, unless they are at exactly the same rhythmic position in the
score, in which case it combines them into a single instrument change
* Sibelius works through each staff from left to right, accumulating the effects of each change. So
if you have a Clarinet in Bb staff that first has a transposition change to Eb, then a text change
“Alto saxophone”, you will end up with two instrument changes: the first takes care of the trans-
22
Page 23

Upgrading existing scores
position change, and the second takes care of the playback change but also includes the transposition change of the first instrument change. (This normally means that you can safely delete all
but the right-most instrument change after you have opened the score in Sibelius 5.)
* Sibelius creates a new instrument definition in your score for each converted instrument
change. You can find them in House Style
> Edit Instruments, in the All instruments ensem-
ble, alongside the instruments they are based on. So in the example above, you would see two
new instruments listed in the Woodwind family Clarinet in Bb (transp. Eb 3) and Alto saxo-
phone (transp. Eb 3).
After opening your score in Sibelius 5, you may want to replace the instrument changes that Sibelius has created by itself with a standard instrument change to the desired instrument. For more
details about instrument changes,
b 2.14 Instruments in Sibelius Reference.
Be aware that Sibelius only converts staff type changes that are actually used in the score into
instrument changes. So if you have defined your own guitar tab, percussion or other staff types
that you want to continue using in Sibelius 5, make sure that each of them is used in the score
before you open it in Sibelius 5. Each of the staff types will then appear in House Style
Instruments so you can edit it further.
Playback of existing scores
There are many substantial improvements to playback in Sibelius 5, details of which can be found
later on in this booklet. However, you may find that your scores do not play back precisely the
same in Sibelius 5 as they did in Sibelius 4 or earlier versions. For example:
Installation
> Edit
* If you previously used Kontakt Silver for playback, this is no longer available in Sibelius 5; it has
been replaced by the new Sibelius Sounds Essentials library, which includes many more sounds
than Kontakt Silver
* If you used a MIDI device for which no sound set was available, and achieved correct playback
by manually setting the MIDI channel and program number of each staff in the Mixer, you will
have to set this up again in Sibelius 5
* If you used MIDI messages to achieve advanced playback effects, beware that these may not pro-
duce the same effect in Sibelius 5 (e.g. because the playback device you used in a previous version is no longer available), especially if your score is now played back by a different device
* If you defined your own unpitched percussion staff types in an earlier version, they will not
automatically play back correctly in Sibelius 5. You will need to use the House Style
Instruments dialog to update the staff type to play back correctly.
b 2.21 Percussion and
7.12 Edit Instruments in Reference.
You are recommended to read carefully the information about changes to playback in Sibelius 5
provided in this booklet before you convert all your existing scores to Sibelius 5.
Importing a house style
If you choose not to update your score using the Update Score dialog but later want to enable various new features, the simplest thing to do is use House Style
one of the supplied house styles.
> Import House Style to import
> Edit
23
Page 24

Installation
After importing a new house style into an existing score, it may play back slightly differently, and
editing elements such as lines and noteheads might be slightly different, particularly if the score
originated in Sibelius 1.x. You should be aware that:
* Your score may play back slightly differently because of the new words added to the Play >
Dictionary dialog when you import a house style; for example, words such as “solo” and “mute”
now have a different effect in Sibelius 5 than they used to in Sibelius 1.x.
* By default, notes play back slightly longer in Sibelius 5 than in Sibelius 1.x. Generally this greatly
improves the sound of playback by making it more legato, but if you prefer the old effect, you can
modify the duration of unslurred notes in the Play
* Many new notehead types are defined in Sibelius 5 compared to Sibelius 1.x, and these are all
> Performance dialog.
added to the list of noteheads available in your score when you import the default house style;
however, they are not listed or numbered in the order shown in Sibelius Reference.
If you encounter any other unexpected behavior while working with existing scores in Sibelius 5,
please check the online Help Center at www.sibelius.com/helpcenter for more details.
24
Page 25

Upgrading from Sibelius 1.x
Upgrading from Sibelius 1.x
If you’re upgrading from Sibelius 1.x (i.e. Sibelius 1.4 or earlier), you not only get all the new features and improvements of Sibelius 5, but also the more than 600 improvements added in Sibelius
2, Sibelius 3 and Sibelius 4. There’s not room enough in this booklet to go through them in detail,
but there’s a summary of them in Appendix A: Improvements up to Sibelius 4.1.5 on page
72, and full details are in Sibelius Reference.
The most obvious changes will be to Sibelius’s menus, keyboard shortcuts, and note input.
Changes to the first two are detailed in Appendix B: Menu changes on page 75 and Appendix
C: Keyboard shortcuts on page 76. For note input changes, read on.
Note input
While Flexi-time input is essentially the same in Sibelius 5 as in Sibelius 1.x, both alphabetic and
step-time input have changed significantly.
The most obvious change is that the Enter key on the Keypad no longer says Edit Note: this is
because there’s now a clearer distinction between inputting a note and editing it, thanks to the
caret, a vertical line (colored according to the voice that you’re working in, e.g. blue for voice 1,
purple for voice 4) that appears when you are inputting music:
* When the caret is visible, anything you type on the numeric keypad or select on the on-screen
Keypad (e.g. note value, articulations, accidentals) applies to the next note you input, either by
typing A–G on the main keyboard, or play a note or chord on your MIDI keyboard.
* When a note is selected and the caret is not visible, anything you type on the numeric keypad or
select on the on-screen Keypad applies to the currently selected note, and modifies it immediately (so there’s no longer any need for the Edit Note button).
Installation
The Enter key on the Keypad is now used for adding ties to notes; the + key that was used in Sibelius 1.x for adding ties is now used to advance to the next Keypad layout.
The N key is no longer used for building chords by adding a note a third above the selected note:
instead, it is the shortcut for Notes
caret visible) and editing (with no caret visible). You can now build chords far more powerfully
using the number and letter keys on the main keyboard:
* The numbers 1–9 on the main keyboard build chords by adding notes from a unison to a ninth
above: e.g. typing 3 adds a note a third above the selected note; typing Shift-1–9 adds notes
below, so Shift-5 adds a note a fifth below the selected note. You can also use these on passages:
e.g. just hit 8 to turn a selected bass line into octaves.
* Shift-A–G adds a note of the specified name above the selected note: e.g. typing Shift-D adds a
D above the selected note.
Other useful improvements include Notes
which allows you to quickly change the pitch of existing notes, automatically skipping over rests as
you go. This is useful when two staves have the same rhythm but different pitches – input one
staff’s notes, copy them to the other staff, and re-input the pitches (keeping the rhythm
unchanged).
> Input Notes, which switches between inputting (with the
> Re-input Pitches (shortcut Ctrl+Shift+I or xXI),
25
Page 26

Installation
Creating objects without the mouse
In Sibelius 1.x, a few objects were positioned automatically at the selected note when you typed a
keyboard shortcut, such as slurs (with S), hairpins, accidentals, articulations, etc.
In Sibelius 5 we’ve extended this behavior to almost all other objects. This means:
* you don’t have to use the mouse to create objects (though you still can if you want to)
* you can create almost all of the music in a single “pass” by adding dynamics etc. to notes as you
go along, instead of having to add them afterwards.
It’s simple to use: with a note or rest selected, create an object from the Create menu or with a keyboard shortcut, e.g. type Ctrl+E or
the text with the mouse, the caret appears instantly in an intelligent place next to the note. Type
some expression text, hit Esc to finish, and you can then resume inputting notes. At no point did
you need to touch the mouse!
It works exactly the same way for creating lines, clefs, symbols, time signatures, key signatures, etc.
Because people work from left to right, creating a clef or key change puts it after the selected note
rather than before, and creating a time signature puts it at the start of the next bar. (So you still
need to use the mouse to create a key signature or time signature at the start of the score.)
Like all new experiences, this takes a bit of getting used to, particularly if you find your hand wandering towards the mouse of its own accord (resist the temptation!). But with a bit of practice you’ll
appreciate the efficiency of working this way.
XE to get Expression text. Instead of waiting for you to place
If, however, you prefer that Sibelius behave as it used to in version 1.x, e.g. that all objects should
be placed with the mouse rather than created automatically, you can restore this behavior via a
preferences option:
* Choose File > Preferences (in the Sibelius menu on Mac), and choose the Mouse page from the
list at the left-hand side of the dialog
* Change the option under When you create an object to Click the mouse to position it.
Selecting where to create an object
When creating objects without using the mouse, it’s useful to select the note or rest where you want
the object to appear without using the mouse. If you don’t use shortcuts much to move between
notes, this is the perfect opportunity to learn how to do so!
The basic keys are
and down. Hold Ctrl or
(rather than stepping up/down through each note of a chord). If no objects are selected, you can
now select the first object on the page just by typing Ta b.
0/1 to move left and right through notes, and Alt+3/2 or z3/2 to move up
X at the same time to skip whole bars left/right, or whole staves up/down
26
Page 27

What’s new?
What’s new?
27
Page 28

What’s new?
28
Page 29

Playback
Sibelius 5 features a whole raft of improvements to playback. Your scores will sound better than
ever played back with the new built-in sound library, Sibelius Sounds Essentials, featuring more
than 150 high-quality sounds. You can also use any other VST or Audio Unit-compatible virtual
instrument or effect directly within Sibelius, and control playback through the redesigned Mixer.
Playback
In addition, the Play
control than ever over how your score plays back. Add to this a revolutionary new way of describing and choosing sounds called SoundWorld, and altogether Sibelius 5 represents a dramatic
advance in playback.
> Dictionary dialog has been redesigned and extended, allowing you greater
Tut orial v id eo s
For a general introduction to playback in Sibelius, choose Help > Tuto ria l Vid eos , then click
13 Playback.
For an introduction to using Sibelius Sounds Essentials and Kontakt Player 2, try the 14 Sibelius
Sounds and Kontakt Player 2 tutorial video.
Sibelius Sounds Essentials
Sibelius comes with Sibelius Sounds Essentials, a high-quality sound library consisting of a complete set of General MIDI sounds, together with carefully chosen instruments from Sibelius
Sounds Rock and Pop Collection, the award-winning Garritan Personal Orchestra, Garritan
Marching Band and Garritan Jazz and Big Band, and Tapspace’s Virtual Drumline. The result is a
versatile collection of sounds well-suited for every genre of music.
For more information,
If you like the sounds from Garritan Personal Orchestra, Garritan Marching Band, Garritan Jazz
and Big Band, Tapspace Virtual Drumline 2, and Sibelius Rock and Pop Collection that are
included in Sibelius Sounds Essentials, you can purchase the full versions of these products direct
from Sibelius or from your dealer. Choose Help
b 4.4 Sibelius Sounds Essentials in Sibelius Reference.
> Sibelius Sounds for more information.
What’s new?
Kontakt Player 2
Sibelius now includes Kontakt Player 2, an enhanced version of the sample player from Native
Instruments, replacing the previous version of Kontakt Player supplied with Sibelius 4 and Sibelius
3. It plays the sounds from Sibelius Sounds Essentials and many other sample libraries, including
those in the Sibelius Sounds range, and those produced by Garritan, Tapspace and other vendors.
Kontakt Player 2 allows up to 16 sounds to be loaded simultaneously, and more than one instance
of Kontakt Player 2 can be used at once, allowing as many sounds as your computer can cope with.
Kontakt Player 2 also includes a number of built-in effects, including reverb, compression, equalization (EQ), filters, and delays, which can be applied globally to all slots in the player to use less
computer power.
For more information on how to use Kontakt Player 2,
Sibelius Reference.
b 4.4 Sibelius Sounds Essentials in
29
Page 30

What’s new?
Other Sibelius Sounds products
If you have purchased any of the other Sibelius Sounds products – Kontakt Gold (now known as
Sibelius Sounds Gold), Garritan Personal Orchestra Sibelius Edition, and Sibelius Rock and Pop
Collection – download a free update to enable these products to work with Sibelius 5. To obtain the
update, choose Help
> Help Center and follow the links in the online Help Center.
Playback Devices
Sibelius now supports a variety of hardware and software devices, including:
* External MIDI hardware, such as sound modules and keyboards with sounds built-in;
* Internal MIDI hardware, such as some soundcards’ built-in synthesizers;
* Virtual instruments that use VST or Audio Unit technology, including the supplied Kontakt
Player 2.
You can use these devices in any combination by setting up a playback configuration, which is a
collection of playback device settings that determines the devices available to Sibelius and how
they should be used for playback. You can set up as many playback configurations as you like,
using different devices in each one, and switch between them at any time.
You create, edit and change playback configurations in the redesigned Play
dialog. For further information,
b 4.11 Playback Devices in Sibelius Reference.
> Playback Devices
For an introduction to the world of virtual instruments and effects, b 4.13 Virtual instru-
ments for beginners in Sibelius Reference.
Mixer
The Mixer has been completely redesigned in a compact vertical layout with more features. There
are extra faders for virtual instruments and effects, a master volume control, and you can adjust the
volume and pan of whole instrument families (e.g. brass, strings) at once. And if you have an MAudio keyboard you can use its own faders and transport buttons to control Sibelius’s playback.
The Mixer now displays five different kinds of strip, each representing a different kind of information:
* Each staff in the score has a staff strip, allowing you to
change the volume, pan, solo/mute, initial sound and playback device of the staff
* You can save vertical space by showing group strips instead
of individual staff strips. Group strips allow you to adjust
the relative volume and pan of all the instruments in the
same family (e.g. woodwind, brass, strings), together with
soloing and muting whole families with a single click.
* Each virtual instrument you are using to play back your
score (e.g. Kontakt Player 2, as used by the built-in Sibelius
Sounds Essentials library), has its own virtual instrument
strip, allowing you to show and hide its window in order to change settings specific to that virtual instrument. You can also route its output to any effects you have in your current playback
configuration.
30
Page 31

Playback
* Sibelius 5 has four effects buses, allowing you to load one or more effects (including reverb, cho-
rus, delay, flange, etc.). Each of the four buses has its own effects bus strip, allowing you to show
and hide the effects’ windows in order to change settings specific to each effect.
* Finally, the master volume strip allows you to adjust the overall volume of all the virtual instru-
ments used to play back your score. This has no effect on MIDI devices, however. This strip also
allows you to show and hide the interfaces of up to four effects loaded into the master insert
effects bus.
For more information,
b 4.3 Mixer in Sibelius Reference.
Better, faster audio files
Even if your computer isn’t powerful enough to play a score back in all its glory, Sibelius can now
create a perfect, glitch-free audio file of it. And if you have a fast computer, Sibelius 5 creates the
audio file faster than real time.
For more information,
b 8.13 Exporting audio files in Sibelius Reference.
Playback Dictionary
You can now specify exactly how articulations, lines, tremolos and symbols play back – for example, to change the loudness of accents, length of staccatos and fermatas (pauses), the speed of
tremolos and spread chords, and expressions such as sfz and fp. Hairpins automatically read
dynamics to work out how loud or soft they should end up, and sustained notes get continuously
louder or softer along the hairpin.
Sibelius 5 will even automatically use a dedicated sound sample if your playback device has one,
e.g. for marcato trumpet, slurred strings, lifts and falls, or buzz rolls. It tells your playback device
which sample to use via keyswitching, MIDI controller values and velocity layers, and these are
also exported in MIDI files. But the technicalities are all handled automatically, so you never have
to set it up or think about it!
Although all the most standard markings are predefined for you, you can now modify exactly what
effect they have on playback using Sibelius’s Play
dealing with a different kind of item that can affect playback:
> Dictionary dialog. This now has six pages, each
What’s new?
* Staff text, for playing instructions that apply only to a single staff, e.g. ff, legato
* System text, for instructions that apply to all instruments, e.g. Fast, Swing, Adagio
* Staff lines, for lines that apply to a single staff, e.g. trills, octave (8va) lines, slurs, hairpins
* Articulations, e.g. staccato, tenuto, and also one-note tremolos and buzz rolls
* Noteheads, for effects produced by noteheads, e.g. harmonics, ghost notes
* Symbols, for other instructions displayed graphically, e.g. scoops, falls, mallets and beaters for
percussion.
For more information,
b 4.8 Playback dictionary in Sibelius Reference.
Hairpins and trills
Hairpins now determine their end dynamics automatically, either by looking at the Expression text
dynamic immediately following the right-hand end of the hairpin, or by increasing or decreasing
the dynamic by one dynamic level (e.g. mf to f ) if no end dynamic is specified.
31
Page 32

What’s new?
Trills now play back with a diatonic interval – either a half-step (semitone) or whole step (tone) as
appropriate based on the current key signature – by default.
You can control the playback of individual hairpins and trills using new options on the Playback
panel of Properties.
For more information,
b 4.2 Interpretation of your score and 5.14 Properties in Sibelius
Reference.
SoundWorld
SoundWorld is a new standard developed by Sibelius Software for naming and classifying sound
timbres. This replaces the messy patchwork of patch numbers and (often cryptic) names used by
MIDI keyboards, sound modules and sound libraries to specify their sounds. Instead you can
choose the sounds you want using standardized, user-friendly names. Because the names are independent of a particular playback device, Sibelius can play a score which was originally created for
different devices than the ones in your system. Also, if a sound is not available in the current playback configuration Sibelius can intelligently find the best alternative and use that instead. It can
also play instrumental techniques (such as slurs and accents) using specialized sounds if they are
available, rather than just approximating them by changing duration or volume.
SoundWorld refers to each sound using a structured name called a sound ID, such as wood-
wind.flutes.flute, woodwind.flutes.piccolo.flutter-tongue or strings.violin.ensemble.pizzicato. Notice how each sound ID usually starts with an instrument family then the instrument
name, sometimes followed by playing techniques specific to that instrument.
Sound IDs appear in Sibelius wherever you specify sounds. For example:
* Each instrument has a preferred sound ID, which you can change in House Style >
Edit Instruments
* The Mixer shows the sound ID of each staff in the score
* Each notehead on a percussion staff has a preferred sound ID, which you can change by editing
the instrument
* All playing techniques and articulations for instruments are described by sound IDs, which you
can change in Play
> Dictionary.
A SoundWorld simply means a collection of sound IDs, organized into a tree structure. The specific SoundWorld that Sibelius uses is called the Sibelius Standard SoundWorld (or S3W for short),
which is a fairly comprehensive list of sounds available in leading sound libraries and MIDI
devices. As more sounds become available, new sound IDs will be added to S3W.
For more information,
b 4.16 SoundWorld in Sibelius Reference.
If, however, you would prefer to see program names for your specific playback device instead of
sound IDs, in the Mixer window and House Style
File
> Preferences (in the Sibelius menu on Mac), go to the Playback page, and set the Display
> Edit Instruments dialog, choose
option at the top right of the window to Program names.
For more information,
b 4.3 Mixer in Sibelius Reference.
32
Page 33

Other playback improvements
* The Play in Background button has been removed from the new Play > Playback Devices dia-
log; the application now owns all MIDI and audio devices while it is running.
* The playback line now moves once every note or once every beat, whichever is the sooner.
* Play > Substitute Devices has been removed, as it is no longer necessary.
* Play > Garritan Personal Orchestra Options has been removed, as it is no longer necessary.
*
Sibelius now correctly plays tied-to notes where the tied-from note is before an end repeat barline.
Playback
Virtual instruments and effects folder (Windows only)
Sibelius can only look inside a single nominated folder for VST instruments and effects. If you
already have VST instruments or effects on your computer, you should copy them into the folder
specified by Sibelius, which is C:\Program Files\Sibelius Software\VSTPlugins by default.
You ca n c h a ng e th e f ol de r by ch oo si ng Play
Options.
> Playback Devices, then clicking Audio Engine
What’s new?
33
Page 34

What’s new?
Ideas
b 5.8 Ideas in Sibelius Reference.
When writing music you often come up with a bit of melody, rhythm, accompaniment or chord
progression with some potential. Arrangers and copyists may use and reuse a large number of specific chunks of notation, such as text markings, specific chord symbols or diagrams, and so on.
We ca ll the se fra gme nts ideas: snippets of any length, any kind and for any number of instruments.
Just tap a key to capture an idea and store it for later. Once you’ve captured an idea you can edit it,
tag it with your own keywords (e.g. canon, lyrical, riff) to help find it again, or even color-code it.
The Ideas window lets you browse and search through all the available ideas, and even play them
back. Using an idea is as simple as pasting from the clipboard; Sibelius even transposes ideas into
the right key and range.
You can import and export sets of ideas to share with others – even via the Internet. If you’re a
teacher or educator, you can save a set of ideas inside a score in order to create a compositional
worksheet for your students.
Furthermore, Sibelius comes with more than 1500 built-in ideas, spanning many instruments and
musical genres, so if you’re stuck for inspiration or are looking for something stylish to kickstart
your creative process, you’ll find something suitable in seconds.
Tuto ri al vid eo
For an introduction to ideas, choose Help > Tu tori al Vi de o s, then click 07 Ideas.
What’s in an idea
An idea can consist of practically anything you can write in Sibelius. You can select any amount of
music – from a single note on one staff up to hundreds of bars on any number of staves – and capture it as an idea. You can also select other kinds of objects – such as lines, symbols, text objects
and even imported graphics – and capture them as ideas, with or without notes.
As well as music, an idea also contains tags. Tags are how you label your ideas using keywords to
describe each idea so that you can easily find it later on. This is useful when you have thousands of
ideas to sift through! In addition to the tags that you specify, Sibelius automatically tags each idea
with other information, including key and time signature, tempo, and so on. You can search for
ideas using any of the tags you have chosen yourself or the ones Sibelius adds automatically. You
can also assign a specific color to any idea.
Ideas window
The main way of working with ideas is the Ideas window, which you can show and hide by
choosing Window
shown on the right.
> Ideas (shortcut Ctrl+Alt+I or zXI), or by clicking the toolbar button
34
Page 35

Ideas
Type tags here...
...then choose whether to
show ideas from the current
Score, the Library, or All
Selected idea has a border around it;
use
2/3 to move the selection after
clicking on one
Copy
Paste
Edit
Edit Idea Info
Delete
Add to Score Ideas
Add to Library
Switch to
detailed view
...or click the arrow to see a list...
Capture Idea
The Ideas window has two views, compact and detailed. By default, it opens in compact view,
which looks like this:
What’s new?
Try s w itchin g betwe en Library, Score and All. When the Library button is switched on, you have
access to the more than 2000 built-in ideas. Try scrolling up and down the list.
Each idea shows a small preview of the music or other objects contained within it; normally you
will see two or three bars of one staff (though ideas can contain any number of bars or instruments). Important tags are shown in the four corners around the notation preview: at the top left,
the idea’s name; at the top right, the letter L appears if the idea is located in the library rather than
the current score; at the bottom left, the time signature of the idea; and at the bottom right, the
tempo of the idea.
Try clicking on the arrow at the top of the window to see a list of the most common tags. Choose
one from the list, and the list below shows only ideas that match the tag you have typed. Click the
arrow again to see a list of the most common tags that are used by ideas that use the tag you initially chose. By choosing tags in this way you can quickly narrow the list of ideas down to ones that
might be suitable.
Auditioning ideas
To check how an idea sounds, simply click and hold the mouse button on it: the idea will play
repeatedly until you release the mouse button.
Capturing an idea
You create an idea by selecting some material in the score and choosing Edit > Capture Idea
(shortcut Shift-I). You can capture an idea from any kind of selection, including:
* Passage selections of any numbers of bars and staves
35
Page 36

What’s new?
* A single selected object, e.g. a note, text object, line, etc.
* Multiple selections of notes, e.g. the first and third beats of a bar, selected via Ctrl+click or X-
click, or by a filter
* Multiple selections of things other than notes, e.g. a series of Expression text objects and hair-
pins, selected via Ctrl+click or
X-click, or by a filter.
There are certain obvious things you can’t capture as ideas. For example, you can’t capture an accidental, beam or articulation without capturing the note or notes to which it’s attached. A good rule
of thumb is that if you can copy and paste it, you can capture it as an idea.
Finding an idea
To find an idea, type one or more tags into the box at the top of the Ideas window, then choose an
idea from the list.
As you type in the box, Sibelius drops down the menu below so that you can see tags that match
what you have typed (e.g. if you type “cl” you may see “clarinet”, “closed”, “classical”, and as soon as
you add “a”, “closed” will disappear from the list). You can either keep typing, or use the arrow keys
or the mouse to select one of the tags from the list. As soon as you have chosen a tag or hit space to
show that you have finished typing one tag, the list of ideas in the main part of the window is
updated.
You can then type another tag. When you add a second tag, only those ideas that match both your
original tag and your new tag will be shown in the list. As before, when you start to type into the
box, the menu drops down to show you the possible tags that match the letters you have typed so
far.
Each time you add another tag, the choice of ideas in the main part of the window is reduced
accordingly to show only those ideas that match all the tags you have typed into the box. You can
then select the idea you want in the list by clicking on it.
Ideas are listed in the main part of the Ideas window in descending order of relevance. If the tag
you typed is in the idea’s Name, then it is considered highly relevant; if the tag occurs in the general list of Tag s, then it is considered quite relevant; if the tag occurs in the tags generated automatically by Sibelius, it is considered a little relevant.
Pasting an idea
Before you can paste an idea, you have to copy it to the clipboard. To do this, simply select it in the
Ideas window, then either type Ctrl+C or
dow, or right-click (Windows) or Control-click (Mac) and choose Copy from the context menu.
Pasting an idea into a score is just like any other kind of pasting: either select the place in the score
where you want the idea to appear, then choose Edit
sure you have nothing selected, then choose Edit
idea to go. You could also click the Paste button at the bottom of the Ideas window.
Unlike normal pasting, when pasting an idea Sibelius does some extra things for you by default:
namely, it transposes the idea to match the prevailing key of the score at the point where you paste,
and it also transposes by octaves to ensure that the music fits the playable range of the instrument
into which you paste the idea.
XC, or click the Copy button at the bottom of the win-
> Paste (shortcut Ctrl+V or XV); or make
> Paste, and click in the score where you want the
36
Page 37

If you want to keep track of where you have used ideas in your score (or if you’re a teacher and you
want to see where students have used them), switch on Create colored highlight, which is also
on the Files page of File
> Preferences (in the Sibelius menu on Mac). This creates a highlight in
the idea’s background color where you paste it.
Built-in ideas
Sibelius includes more than 2000 ideas, designed to provide inspiration to composers of all ages,
and covering as wide a range of genres as possible at a basic level.
Ideas
Each idea has a unique name, normally the genre name, followed by the instrument (or instruments) in the idea, followed by a number. In general, the higher the number, the more complex the
music in the idea. The built-in ideas are also color-coded by genre (as shown in the list below).
To find ideas in a specific genre, first type one of the following tags:
* African (peach)
* Chill Out (pastel green)
* Classical (lime green)
* Concert Band (bright green)
* Country (yellow)
* Dance (gray)
* Film (light blue)
* Folk (olive)
* Funk (gray-pink)
* Garage (misty blue)
* Groovy (pastel pink)
* Hip Hop (pastel blue)
* Jazz (mid-pink)
* Latin (orange)
* Marching Band (turquoise)
* Modern Classical (dull green)
* Motown (beige)
* Pop (bright blue)
* Reggae (violet)
* Rock (bright pink)
You can then further narrow down the matches using tags like the following:
* Instrument, e.g. guitar, drum, piano
* Te mp o , e.g. fast, slow, moderato
* Idea type, e.g. melody, accompaniment, rhythm
* Complexity, e.g. basic, moderate, complex
* Mood, e.g. happy, sad, reflective
* Characteristics, e.g. exciting, lively, relaxed, majestic, major, minor, swing, dramatic, humorous
What’s new?
Type one or more tags from these categories and you’ll soon find ideas that suit your purposes.
Some further hints for using the built-in ideas in your own scores:
*
The ideas vary in length, typically between two and eight bars. The longer ideas are suitable for
e.g. demonstrating particular points of composition, style or playing technique, while the shorter
ideas are more suitable for adapting, repeating or otherwise using in your own compositions.
* Nearly all of the ideas are for single instruments (as specified in their names), and will work best
when pasted onto that instrument, or a closely related one. However, you can paste an idea onto
any staff in your score, and Sibelius will transpose it to fit the instrument’s range as appropriate,
so don’t be afraid to experiment.
37
Page 38

What’s new?
*
All of the ideas within each genre have been designed to work together, though they do not necessarily share the same harmonic structures or chord sequences. Ideas with the same number for
different instruments, e.g.
* The built-in ideas have been designed to sound at their best when played back through Sibelius
Sounds Essentials with Play
Reggae Bass 1
> Live Playback switched on, but you can of course play them back
and
Reggae Keyboard 1
, will generally fit together.
on any device.
Editing an idea
You can edit both the music and the tags of ideas. To edit an idea’s tags, select it in the Ideas window, then click the Edit Idea Info button at the bottom of the window, or right-click and choose
Edit Idea Info from the context menu.
To edit the music in an idea, select it in the Ideas window, then click the Edit Idea button at the
bottom of the window, or right-click and choose Edit Idea from the context menu.
A new document window will appear, as if you had opened another score. You can edit it just like
any other score.
When you have finished editing your idea, simply save it by choosing File
or
XS), then close the window by choosing File > Close (shortcut Ctrl+W or XW) to return to
> Save (shortcut Ctrl+S
your original score.
If you want to discard any unsaved changes in your idea, simply choose File
> Close, then click No
when asked if you want to save your changes.
Where ideas are saved
An idea can be saved either in the current score, or to the library. When an idea is saved in a score,
it can only appear in the Ideas window when that score is open, and when the Score button is
switched on. When an idea is saved in the library, it can appear in the Ideas window when any
score is open, provided the Library button is switched on.
By default, when you capture an idea, it is added to your current score, which means that it is available only to that score, unless you select it and click Add to Library in the Ideas window. If you
would prefer all your ideas to go directly to the library instead, set Add captured ideas to Library
on the Ideas page of File
> Preferences (in the Sibelius menu on Mac).
Sharing ideas
If you want to share your ideas with others, there are two ways to achieve this: either save the ideas
you want to share to a specific score, and then distribute that score (this is useful for setting
projects for students); or export a selection of ideas as an .ideas file that can be imported into
someone else’s ideas library.
Importing ideas
To import ideas into your library, e.g. if you have received an .ideas file from another Sibelius user,
switch to the Ideas window’s detailed view, then click Import. You are prompted to choose the
.ideas file you want to import; click Open and a simple dialog appears, allowing you to specify
whether the incoming ideas should be added to the library or to one of the scores you currently
have open.
38
Page 39

Panorama
Panorama
b 5.10 Panorama in Sibelius Reference.
Panorama is an alternative way of viewing your score. Instead of being laid out on the screen in
pages, exactly as it will be printed out, you can view your score as a single system of music, laid out
on an infinitely-wide piece of paper. This kind of view is sometimes called scroll view or galley view
in other programs.
Using Panorama allows you to concentrate on inputting and editing without thinking about the
page layout. Note input in Panorama is also very convenient, particularly if you have more than
one system per page in normal view; Panorama eliminates the vertical movement of music from
system to system, and so the score only ever moves horizontally. This reduces the disorientation
you can sometimes feel when working quickly in normal view.
Tut orial v id eo
For an introduction to ideas, choose Help > Tut ori al Vi deo s, then click 09 Panorama, Focus on
Staves and Properties.
Switching on Panorama
To switch on Panorama, simply choose View > Panorama (shortcut Shift-P), or click the
toolbar button shown on the right. When viewing your score like this, Sibelius also does
the following:
What’s new?
* Disables the Navigator, because there’s only one page
* Switches on View > Scroll Bars
* Switches on View > Staff Names and Bar Numbers.
To swi tch of f Panor a ma, s i mply c hoos e View
If you switch off scroll bars or Staff Names and Bar Numbers while in Panorama, Sibelius only
changes the settings for as long as you’re in Panorama, but remembers them the next time you use
Panorama.
> Panorama again.
Moving around in Panorama
Working in Panorama is as close as possible to working in normal view; you can use all the same
navigation shortcuts (e.g. Home, End, Page Up or
zoom. Try the Fit page height zoom level, which is particularly useful as it makes sure that you
can see all of the staves on the screen at once.
Notice that as you drag the start of the music off the left-hand side of the screen, you will see a useful reminder of the current clef and key signature on each staff, drawn in light blue.
8, Page Down or 9, etc.) and features like
Inputting and editing in Panorama
Inputting and editing in Panorama is practically the same as in normal view. There are a few things
you can’t do in Panorama, because they don’t make sense when there are no pages:
39
Page 40

What’s new?
* You cannot see or input page-aligned text (such as Title, Header (after first page), etc.)
* If View > Layout Marks is switched on, Sibelius draws layout marks above barlines, and though
you can create system or page breaks if you want to, you won’t see their effect
* Scores cannot be printed in Panorama (because few printers can handle infinitely-wide paper!),
so when you choose File
* Layout > Hide Empty Staves cannot be used to hide staves on specific systems in Panorama,
> Print, Sibelius will print the score in normal view instead
because there is only a single system; so any staves that are hidden in normal view will appear
* Edit > Go to Page and Create > Other > Page Number Change are disabled
* Layout > Align Staves is disabled
* When you choose File > Export > Graphics, you can only export a Graphic selection, and not
specific systems or pages.
Note spacing in Panorama
In Panorama, Sibelius uses a fixed justification factor in its note spacing; in other words, Sibelius
loosens the note spacing by a fixed amount, specified by an option on the Files page of File
erences (in the Sibelius menu on Mac), rather than the variable justification factor on every system in normal view required to make the music fit the width of the page.
Notice, though, that any manual adjustments you make to note spacing are shown in Panorama, so
if you widen the spacing of a bar in normal view (e.g. to avoid collisions between chord symbols),
those adjustments will be shown in Panorama as well. Be aware also that if you adjust the note spacing in Panorama, the adjusted spacing may be narrower or wider when you switch back to normal
view, because Sibelius then has to justify the spacing to make the music fit the width of the page.
> Pref-
Staff spacing in Panorama
In Panorama, Sibelius uses the space between systems as defined on the Staves page of House
Style
> Engraving Rules, multiplied by a fixed justification factor as specified by an option on the
Files page of File
> Preferences (in the Sibelius menu on Mac). Because there is no fixed page
height, Sibelius ignores the value of Justify staves when page is x% full, with the result that
staves can sometimes appear closer together in Panorama than in normal view. If you find them
too close together, change the value in Preferences.
Usefully, however, you can adjust the distance between staves in Panorama without it affecting
normal view, which you may want to do if notes or other objects above or below the staff collide
with other objects: just drag or otherwise nudge them in the usual ways.
Using Panorama with Focus on Staves
When you use View > Focus on Staves to look at just a couple of staves from your score, the lay-
out in normal view can be a little odd due to the other staves missing; try switching on View
orama at the same time, which makes Focus on Staves considerably more convenient.
Opening scores in Panorama
When you save a score, Sibelius remembers whether or not Panorama was switched on, and when
you re-open it later on, it will automatically switch on Panorama if required. You can tell Sibelius to
always use Panorama or normal view instead if you prefer on the Files page of File
(in the Sibelius menu on Mac).
> Preferences
> Pan-
40
Page 41

Cues
b 2.10 Cues in Sibelius Reference.
Creating cues in parts is now the work of a moment. Simply copy the music you want to appear in
the cue, and choose Edit
> Paste As Cue. Sibelius 5 does the rest for you – read on.
Cues
Paste as Cue
It only takes a moment to create a cue passage using Sibelius 5’s new Edit > Paste as Cue feature:
* Make sure you are looking at the full score rather than one of the dynamic parts. Although you
can use Edit
score, so that you can see the staff you are taking material from, and paste the cue into multiple
instruments at the same time
* Copy the music you want to use as a cue to the clipboard by selecting it, then choosing Edit >
Copy (shortcut Ctrl+C or XC)
* Select the bar rest or other rest(s) in the staff or staves on which you want the cue to appear, then
choose Edit
one staff, Sibelius will paste the cue onto all the selected staves using multicopy.
That’s all there is to it! A number of useful things are done for you when pasting a cue passage:
* The copied music is pasted into the first unused voice, with all the notes and other markings
made cue-size
* The cue is hidden in the full score but is shown in the parts (though if you want to, you can tell
Sibelius to show the cue in the full score as well)
* Any awkward transpositions (e.g. cueing a clarinet in A on a horn in F staff) are taken care of,
and – if necessary – either a suitable clef or an octave line is added to ensure the cue is easily
readable, according to your preferences
* The name of the cued instrument is written above the cue
* If the staff type (e.g. number of lines) of the cued instrument and the destination staff don’t
match, appropriate instrument changes are created at the start and end of the cue
* Particular markings (such as lyrics, dynamics, slurs and hairpins) are automatically included or
excluded, according to your preferences
* The cue notes are set not to play back
* Suitable bar rests are added in an unused voice in both the full score and the parts, so that they
look correct (though if you want to, you can tell Sibelius not to add bar rests in the parts).
> Paste as Cue in a dynamic part, it’s much more convenient to use it in the full
> Paste as Cue (shortcut Ctrl+Shift+Alt+V or xzXV). If you select more than
What’s new?
About the only thing Sibelius doesn’t do is decide which instrument you should use for the cue,
although it can even suggest where cues should be added – read on.
Suggest Cue Locations plug-in
When preparing parts for performance, one of the more time-consuming aspects is determining
where cues would be most useful to the performers. You may want to add cues after a certain num-
41
Page 42

What’s new?
ber of bars’ rest, or after a certain length of time. Plug-ins
> Other > Suggest Cue Locations can
do this for you.
Check Cues plug-in
Any edits you make to the music in your score after cueing the parts may potentially lead to errors
in the cues, because Sibelius doesn’t automatically update the cue passages if the source staves
from which they take their material are subsequently edited. However, a new plug-in is included
that can check cues against the music from which they are taken and warn you if it finds any disparities; simply select the passage in question and choose Plug-ins
> Proof-reading > Check
Cues.
Paste as Cue preferences
Various options for determining exactly what happens when you do Edit > Paste as Cue are found
on the Paste as Cue page of File
The Pitch of Cue options provide three alternatives for how Sibelius should resolve differences in
range between the source and destination staves:
* Change clef if necessary adds a clef at the start of the pasted cue, if the clefs used by the source
and destination staves don’t match. So if you paste a cue from, say, a cello staff onto a flute staff,
Sibelius will create a bass clef at the start of the cue and restore the treble clef at the end. Note
that these clef changes are only visible in the part.
* Add octave line if necessary adds an octave line (up to two octaves up or down, i.e. 8va,
15ma, 8vb or 15mb) over the pasted cue if Sibelius has to transpose the cue by one or more
octaves to ensure that it fits comfortably on the staff.
* Neither will simply paste the cue into the clef of the destination staff without transposing the
music by octaves.
> Preferences (in the Sibelius menu on Mac).
The Copy into Cue options allow you to choose whether or not Sibelius should include Slurs,
Articulations, Dynamics, Lyrics and Technique text in the pasted cue.
It’s conventional for cue passages in parts to show bar rests in addition to the cue notes, as an extra
visual indicator to the player that the notes are for informational purposes only, and not to be
played. However, in some kinds of music, including jazz, it’s common for cues simply to be written
in smaller notes without adding bar rests. Show bar rests with cue (in parts) allows you to
choose which of these conventions to follow: when switched on (the default), the part’s original bar
rests are shown in addition to the cue notes; when switched off, only the cue notes themselves are
shown.
Again, in some kinds of music, commonly jazz, you sometimes see the word “Play” written after
the cue, to remind the performer that she should now start playing again. Write ‘Play’ after cue,
switched off by default, does this. It is most useful if you switch off Show bar rests with cue (in
parts).
In most kinds of music it’s conventional for cues to be shown only in the parts, so Hide cues in
full score is switched on by default. However, scores in some fields of music, such as musical theater, usually show cues in the full score, so switching this option off is useful in those situations.
42
Page 43

Be aware that changing the options here will not affect cues you have already pasted; they only
affect cues you subsequently create using Edit
> Paste as Cue.
Hide Empty Staves
Staves can now be hidden via Layout > Hide Empty Staves provided any objects on the staff are
set to be hidden in the current view. This means that a staff can be hidden in the full score if it contains a hidden cue passage that is set to show in a dynamic part.
Hitting Delete will now never hide empty staves; if you want to hide staves, you must explicitly
choose Layout
> Hide Empty Staves.
Cues
What’s new?
43
Page 44

What’s new?
Instruments
Scores often have two or more instrument played by the same person – such as percussion, or clarinet doubling saxophone. Or sometimes you need to rewrite a whole part for a different instrument. Now Sibelius will do this automatically for you: simply create an instrument change
anywhere in the music, and Sibelius 5 will change the instrument from that point onwards – altering its name, clef, sound, even the transposition and staff type if necessary.
Plus, if you write for unusual instruments you can now design your own, choosing the name, clef,
range, sound, etc. you want. From glockenrimba to trumpet in F#, your imagination is the only
limit!
Instrument changes
Sibelius makes it easy to change instruments at any point along a staff using Create > Other >
Instrument Change. The following dialog appears:
Choose the instrument you want to change to from the list. The two extra options you can set are
as follows:
* If Add clef (if necessary) is switched on, Sibelius will create a clef change at the point where
the instrument change occurs, if the clef of the new instrument is different from that of
the original instrument
* If Announce at last note of previous instrument is switched on, Sibelius will create a warn-
ing, “To [instrument]”, at the start of the rests preceding the change.
Now click OK. If you didn’t have a selection before you opened the dialog, your mouse pointer will
now be blue, and you can click in the score to place your instrument change; otherwise, Sibelius
automatically creates the instrument change (or changes) at the selection.
44
Page 45

Instruments
Sibelius always does the following for you when you create an instrument change:
* Changes the playback sound of the staff as appropriate
* Changes the instrument name on subsequent systems (which you can edit if you wish)
* Writes the name of the new instrument above the top of the staff where it starts playing (you can
edit this if you wish)
* Changes the transposition of the staff, if appropriate (e.g. if switching from a Bb to A clarinet),
showing an appropriate change of key signature if Notes
* Changes the staff type, if appropriate (e.g. number of staff lines, tab or normal notation, etc.).
> Transposing Score is switched on
The pictures below show how instrument changes appear in your score, in this case when changing from Clarinet in Bb to Alto Saxophone (in Eb). On the left, View
on (so you can see exactly where the instrument changes as a gray rectangle), and Notes
posing Score is switched off (i.e. the music is in sounding pitch); on the right, Notes
> Hidden Objects is switched
> Tra ns -
> Tran sp os -
ing Score is switched on.
Because instrument changes incorporate both transposition changes and staff type changes, it is
no longer possible to create these separately in Sibelius 5, so both Create
Change and Create
> Other > Staff Type Change have been removed.
> Other > Transposition
What’s new?
For more details, b 2.14 Instruments in Sibelius Reference.
Edit Instruments
House Style > Edit Instruments allows you to create, edit and delete instrument types.
For more details, b 7.12 Edit Instruments in Sibelius Reference.
Creating instruments
Layout > Instruments and Staves has moved to Create > Instruments in Sibelius 5, but retains
the same shortcut I. The dialog has a new Small staff checkbox, which you can use to determine
whether or not a staff is shown at small size (moved from the Staves panel of Properties, which
was present in Sibelius 4 and earlier but has now been removed).
45
Page 46

What’s new?
Numbering
Bar numbers, page numbers and rehearsal marks now support special numbering formats used in
some types of score.
Bar numbers
Working with bar numbers has been considerably simplified. In previous versions of Sibelius, the
frequency, position and appearance of bar numbers were set in four dialogs; now, frequency and
position are set on the Bar Numbers page of House Style
set by editing the Bar numbers text style.
Automatic bar numbers are now treated more like real objects, and can be selected, moved, and filtered just like anything else. Any bar number can be hidden simply by selecting it and choosing
Edit
> Hide or Show > Hide.
For more details, b 3.6 Bar numbers in Sibelius Reference.
Bar number changes
Create > Other > Bar Number Change has been extended to allow a variety of new advanced
options:
* You can now create bar numbers in a variety of formats, including1a, 1b, 1c…, 1A, 1B, 1C…,
a, b, c… and A, B, C…
* You can add text before or after bar numbers (e.g. 1 new, 2 new, 3 new… or alt 1, alt 2, alt
3…)
* You can create a bar number change that doesn’t increase the bar numbering, useful for special
cases like splitting a bar around a system break, via the new No bar number (and don’t count
bar) option.
* Sibelius will now correctly display a range of bar numbers under a multirest if the first bar of the
multirest contains a bar number change, and ranges of bar numbers under multirests are always
positioned below the staff if they are set to be centered.
> Engraving Rules, and appearance is
Selecting a passage before creating a bar number change to an alternative format (e.g. 1a, 1b,
1c…) will result in Sibelius “resetting” the bar number format to the original format on the bar
following the end of the selection.
New Engraving Rules for bar numbers
All options concerning the appearance and positioning of bar numbers are set on the Bar Numbers page of House Style
* The new Count repeats option allows bar numbering to take repeat structures in a score into
account and display this in a variety of ways
* To make bar numbers go below the bottom staff, you now only need to set the Below bottom
staff option in the Selected staves list box
* You can make bar numbers appear at user-defined intervals (e.g. every 8 bars, every 16 bars)
* The new Hide at rehearsal marks option automatically hides bar numbers on barlines where
rehearsal marks are present
46
> Engraving Rules, including the following new options:
Page 47

Numbering
* When bar numbers are set to be centered in the bar, bar number changes are now also centered
in the bar.
Go to Bar
Edit > Go To Bar is now more useful in scores containing multiple songs, movements or pieces
with bar numbers reset to 1 at the start of each: if you repeatedly go to the same bar number, it will
now select the next bar in the score that has the chosen bar number, allowing you to navigate usefully in scores containing bar number changes.
Page numbers
Sibelius 5 lets you renumber, change the format of or hide page numbers anywhere in a score. For
example, you could number the introductory pages of your score i, ii, iii… or a, b, c…, with the
music pages numbered 1, 2, 3..., using the new Create
You can choose whether or not page numbers should be hidden or shown, and restart page numbers from any number in any format from any page in the score. Creating a page number change
automatically creates a page break in the score.
Page numbers can now be hidden or shown like other objects, using the options in Edit
Show. Hiding or showing the first page number in a page number change hides or shows just the
first page number; hiding or showing any subsequent page number hides or shows all page numbers in that page number change.
Also:
* Edit > Go To Page now allows you to go to a page number in any format.
* New options on the Layout page of Multiple Part Appearance allow you to choose whether or
not page number changes from the full score should appear in dynamic parts; if not, you can
specify the first page number of each part in this dialog instead.
* The Page numbers page of House Style > Engraving Rules has been removed; all page number
options are now controlled via the new Create
For more details,
b 3.7 Page numbers in Sibelius Reference.
> Other > Page Number Change feature.
> Hide or
> Other > Page Number Change feature.
What’s new?
Rehearsal marks
New Prefix and Suffix controls on the Rehearsal Marks page of House Style > Engraving Rules
make it easy to use fonts that e.g. provide hand-drawn boxes around rehearsal marks (like the new
Reprise Rehearsal font – see Reprise and other fonts on page 48).
You can also add extra characters before and/or after the automatic component of a rehearsal
mark, e.g. to produce sequences such as 1A, 2A, 3A, etc., using the new New prefix/suffix check-
box in Create
For more details,
> Rehearsal Mark dialog.
b 3.8 Rehearsal marks in Sibelius Reference.
47
Page 48

What’s new?
Concert
Swing (q = 200)
Just WaSTin’ tIme
“Itchy” Pete Milligan
Dm
G9
{M`u`t`e`}
C11(b9)
[A]
5
1.
Am7
Dº
Gm/Bb
F13
Reprise and other fonts
Reprise™
Reprise is the latest in Sibelius’s growing range of elegant fonts. In fact, Reprise is a family of nine
fonts that produce an astonishingly realistic simulation of hand-copying. Its music symbols are
drawn with a fixed-width nib (rather than the italic nib used in Inkpen2), and additionally it
includes two rubber-stamp fonts for titles and other large text.
Special characters and plug-ins are included for adding hand-drawn lines and boxes to text and
rehearsal marks, and house styles for incorporating Reprise into scores. Overall, Reprise is a beautiful reproduction of traditional hand-copying, in a style particularly suitable for jazz, lead sheets,
big band, and show music.
For more details,
Opus Note Names
The new Opus Note Names font writes the name of the note inside the notehead, like this:
This is ideal for music for beginning instrumental students. To use the new font, select the passage
in which you want to write note names, or the whole score, and choose Plug-ins
Note Names to Noteheads.
For more details,
48
b 7.7 House Style™ in Sibelius Reference.
b 5.11 Plugins in Sibelius Reference.
> Other > Add
Page 49

Reprise and other fonts
Bb7Bb7
EbEbFm7Fm7 F#º7F#º7
Eb/GEb/G
AbAb
Fm7Fm7
F#º7Gm7
Chord symbols
There are two new fonts for chord symbols - Opus Chords Sans and Opus Chords Sans Condensed
– with regular and narrow sans serif characters, similar to Arial or Helvetica. Plus various extra
characters can now be included in chord symbols.
For more details,
Early music & avant garde
Sibelius 5 now includes over 200 extra music symbols for early and contemporary music, in the
new Opus Ornaments and Opus Special Extra fonts, including:
b 3.4 Chord symbols in Sibelius Reference.
What’s new?
For more details,
b 2.25 Symbols in Sibelius Reference.
49
Page 50

What’s new?
T qT
wD7TqSSp7 S D
{qD7}Tp{wD7}qTpqT6SpSp D
wD7
Functional analysis
Musicologists and students can now write functional analysis in Sibelius 5, thanks to the new Opus
Function Symbols font and text style.
For more details,
Other improvements
* Opus Chords and its equivalent fonts now contain the following new characters:
% “alt.”, for altered chords (Unicode 00BD)
% A slash notehead symbol, for typing rhythm slashes in chord symbols (Unicode 00BC)
% Stackable + and – characters, as an alternative to using sharps and flats in chord symbols
with stacked alterations (Unicode 00F2–00FD)
% 6/9 symbol as digits aligned above each other rather than as a fraction (Unicode 00DA)
% “4 over 2” as an alternative to “2 over 4” (Unicode 00D1)
% Large versions of °, ± and ² that sit on the font baseline (Unicode 00B0, 00B1 and 00B2
respectively)
% Bar repeat symbol, so it can be typed above the staff aligned with the chord symbols (Unicode
00A3).
All of these characters are included in the chord symbol word menus for easy input.
* The Arabic numerals in Opus Roman Chords have been increased in size relative to the alpha-
betic characters, to make them more legible.
* Opus Special and its equivalent fonts now contain the following new characters:
% include alternative characters for slash noteheads (with vertical ends for better alignment
with stems) and diamond noteheads (as an alternative notehead for half and whole notes
when writing rhythmic notation).
% new Layout Marks symbol for special page breaks
% new blank accordion coupler symbols for left-hand couplers.
* Opus Text and its equivalent fonts now include a tilde character, and a special equals sign with
dots above and below the horizontal strokes to signify “circa,” and two halves of an H-bar symbol
(on curly braces, { and }) for writing in page turn warnings specifying the numbers of bars’ rest
on the next page.
* Opus Metronome and its equivalent fonts now include parentheses characters.
50
* The alignment of time signatures digits in Helsinki has been improved.
* Underlined text in Inkpen2 Script now has an underline of the correct position and thickness.
* The symbols for blank chord diagrams in Inkpen2 Special now look correct.
b 3.5 Figured bass and Roman numerals in Sibelius Reference.
Page 51

Plug-ins
You can now undo plug-ins, so you needn’t be afraid of trying them out! To undo the effects of a
plug-in, simply choose Edit
The ManuScript language used by Sibelius’s plug-ins has also been substantially extended and
enhanced, which means that plug-ins can now do much more powerful things – see the separate
Using the ManuScript Language documentation for more details.
Sibelius 5 has more than 20 new plug-ins. Each of the new plug-ins is documented in detail in
Sibelius Reference –
Chord Symbols
There is a new Plug-ins > Chord Symbols folder, making three existing plug-ins (Add Chord
Symbols, Realize Chord Symbols and Diagrams, Chord Symbols as Fractions) easier to find,
and adding a new plug-in, Add Capo Chord Symbols, which can write appropriate chord symbols above the staff for guitars with capos set at specific fret positions.
Composing Tools
There are three new plug-ins in the Plug-ins > Composing Tools folder:
* Add Hit Point Staff creates a new single-line staff in the score and creates a note on that staff at
the rhythmic position of each hit point in the score. This makes it much easier to visualize the
exact rhythmic position of each hit point within a bar.
* Explode
ing “explode” Arrange styles, providing greater control over how each note should be distributed
to each instrument.
*
Fit Selection to Time
at which it should end, creating tempo changes as necessary, invaluable when working with video.
*
Reduce
plug-in, it complements the existing “reduction” Arrange styles, providing greater control.
* Transform Scale takes a given selection of music and transforms it from one scale (e.g. major)
to another (e.g. pentatonic), transposing each note appropriately.
separates music from one staff onto a larger number of staves. It complements the exist-
condenses music from a greater number of staves onto a single staff. Like the new
> Undo after running the plug-in.
b 5.11 Plug-ins for more details.
takes a passage of music and determines its duration or the time position
Plug-ins
What’s new?
Explode
Other
There are four new plug-ins in the Plug-ins > Other folder:
* Add Note Names to Noteheads draws the names of notes inside the noteheads of every note
in your score, using the special Opus Note Names font – see Reprise and other fonts on
page 48.
* Groovy Music Mark-up is for marking up Sibelius scores in a special way before exporting a
MIDI file to ensure correct import into the Groovy Music range of primary educational software
* Make Piano Four Hands Layout takes a score written for two pianos (or indeed any two key-
board instruments), and creates a new score in the conventional format for four hands piano
music, with music for the lower player (secondo) on left-hand pages, and music for the higher
player (primo) on right-hand pages
51
Page 52

What’s new?
* Split Bar splits a bar in two, useful for e.g. splitting a bar across a system or page break
* Suggest Cue Locations identifies suitable locations for cues based on number of bars’ rest or
rests of a minimum duration (in minutes and seconds), and marks them in the score – see Cues
on page 41.
Playback
New Plug-ins > Playback > Add Continuous Control Changes plug-in, which can add a wide
variety of MIDI messages to the score to automate special or advanced effects present in a number
of third-party sample libraries, e.g. Garritan Jazz and Big Band.
Proof-reading
There are two new plug-ins in the Plug-ins > Proof-reading folder:
* Check Cues checks that a pasted cue still matches the source staff from which the notes were
taken – see Cues on page 41
* Check Lyrics Hyphenation checks the lyrics in your score to see that they are correctly
hyphenated, and can correct them automatically if not.
Simplify Notation
There is a new Plug-ins > Simplify Notation folder, making several existing plug-ins (Combine
Tied Notes and Rests, Duplicates in Staves, Remove Overlapping Notes, Remove Rests,
Remove Unison Notes) easier to find, and adding the following three new plug-ins:
* Renotate Performance can be used with any music input via Flexi-time or imported from a
MIDI file, and is particularly effective with keyboard music (on two staves). It performs a general simplification of the music, producing more legible notation by examining durations, split
point, voicing, and so on.
* Move to Other Staff moves a note from one staff of a piano or other keyboard instrument to
the other. Useful if a note has ended up on the wrong staff after Flexi-time input or MIDI import.
* Change Split Point can adjust the split point of a given selection, moving notes above or below
a specified pitch to the other staff of a keyboard instrument.
Text
New Plug-ins > Tex t > Add Brackets to Reprise Script plug-in, which automatically inserts the
necessary characters into existing text objects in the score to add the brackets and lines characteristic of hand-copied jazz – see Reprise and other fonts on page 48.
Tu pl et s
There is a new Plug-ins > Tup le ts folder, including the following eight new plug-ins:
* Add Notes to Tuplet lengthens a tuplet to include as many extra notes as you selected within
the tuplet, changing its ratio to keep the overall duration of the tuplet the same
* Change Tuplet Ratio rewrites the ratio of a selected tuplet without changing its duration (e.g.
3:2 can become 6:4, 6:8, etc.)
* Lengthen Tuplet takes a tuplet and selected notes following the tuplet and adds those notes to
the end of the tuplet
52
Page 53

* Make into Tuplet takes a selection of notes and turns them into a tuplet, offering to pad the bar
with rests either before or after the new tuplet
* Remove Notes from Tuplet deletes the selected notes from the tuplet, changing its ratio to
keep the overall duration of the tuplet the same
* Shorten Tuplet takes a selection of notes inside a tuplet and removes them from the tuplet,
rewriting them as normal notes
* Split or Join Tuplet takes a single tuplet and splits it into two, or takes two or more tuplets and
joins them into a longer one
* Tuplet Preferences provides options used by the other plug-ins in the Tup le ts folder.
Other updated plug-ins
Many existing plug-ins have also been updated in Sibelius 5, including:
* Three plug-ins found in the Plug-ins > Accidentals folder – Simplify Accidentals, Respell
Flats as Sharps and Respell Sharps as Flats – have been updated such that they no longer dis-
card Live Playback data, beam groupings, and notehead types of the notes processed by each
plug-in.
* Plug-ins in the Batch Processing folder now always produce filenames with the correct exten-
sion, even if the filename contains one or more periods before the file extension.
* Plug-ins > Batch Processing > Calculate Statistics (useful for copyists, etc.) now produces sta-
tistics on a single score or a whole folder of scores, and now exports a text file rather than producing a score into which to write the results.
* Plug-ins > Batch Processing > Convert Folder of Scores to Graphics can now export graph-
ics in PNG format.
* Plug-ins > Chord Symbols > Realize Chord Symbols and Diagrams now positions the new
accompaniment instruments better, adds a new “Piano (left-hand only)” accompaniment style,
and can be run when Notes
* Plug-ins > Composing Tools > Add Simple Harmony now positions the new instruments it
creates below the other staves in the score.
* Plug-ins > Composing Tools > Pitch Mapping can now handle enharmonically equivalent
notes appropriately.
* Plug-ins > Composing Tools > Retrograde can now reverse music that contains triplets and
other tuplets.
* Plug-ins > Notes and Rests > Add Slash Noteheads for Parts can now handle tuplets and
instrument changes, and prevents the user from running it when viewing a dynamic part.
* Plug-ins > Notes and Rests > Combine Tied Notes and Rests now combines all the rests in a
bar into a bar rest where possible.
* Plug-ins > Notes and Rests > Double Note Values and Halve Note Values can now handle
triplets and other tuplets.
* Plug-ins > Other > Add Harp Pedaling now has an option for whether or not unused strings
should show their pedals in flat or natural positions, and the algorithm to determine time
elapsed between pedal diagrams has been improved.
> Transposing Score is switched on.
Plug-ins
What’s new?
53
Page 54

What’s new?
* Plug-ins > Other > Scales and Arpeggios has been improved such that scores produced by this
plug-in now create hidden key signature changes instead of visible ones, and also add double
barlines between scales.
* Plug-ins > Proof-reading > Proof-read can now run the new Check Cues plug-in.
* Plug-ins > Text > Change Dynamics can change dynamics for both Helsinki Text and Reprise
Te xt .
* Plug-ins > Te xt > Save Lyrics has been renamed as Export Lyrics, for consistency with other
features in the program.
* Plug-ins > Tex t > Smarten Quotes no longer loses line breaks in multi-line text objects it pro-
cesses to smarten the quotes within them.
54
Page 55

Look and feel
New Scan
Export
Audio
Open Save Print
Undo
Redo
Zoom
Current zoom Focus on
Staves
Current part
Switch
score/part
Reference
Hide/show tool windows
Transposing
score
Panorama
Navigator Playback
Ideas
Vid eo
Hide Tool
Wind ows
Keypad Mixer Parts Properties
Look and feel
If you are upgrading from Sibelius 4, the look and feel of Sibelius 5 will be immediately familiar,
with only a couple of changes, allowing you to get back to work right away. If you are upgrading
from an earlier version of Sibelius, there will be a few more changes to get used to. There are many
improvements that will make working with the software quicker and more comfortable.
Too lb ar
The toolbar now has the following controls:
The only new button added since Sibelius 4 is for Panorama, just to the right of the zoom menu.
The new group of buttons at the far right-hand side of the toolbar are for hiding and showing Sibelius’s eight floating tool windows, as follows:
What’s new?
Menus
These buttons correspond to the options in the Window menu, and all have keyboard shortcuts.
The only change here is that there is no longer a button for Kontakt Player; in its place is a button
for showing the new Ideas window.
Various menu items have been renamed slightly or moved to other menus. The most important
changes since Sibelius 4 are:
* Layout > Instruments and Staves has been moved to Create > Instruments, but retains the
same shortcut I
* Layout > Focus on Staves has been moved to View > Focus on Staves, but retains the same
shortcut Ctrl+Alt+F or
* Input device options have moved from the Input Device page of Play > Playback and Input
Devices to a new Input Devices page in File
* Window > Kontakt Player has been removed because Sibelius can now use any virtual instru-
zXF
> Preferences (in the Sibelius menu on Mac)
ment; you can show the new Kontakt Player 2 window (and other virtual instruments) via the
redesigned Mixer window.
Full details are in Appendix B: Menu changes on page 75, including changes to menus from
earlier versions of Sibelius.
55
Page 56

What’s new?
Keyboard shortcuts
Though we’ve added a few new keyboard shortcuts in this upgrade, we’ve changed only one keyboard shortcut since Sibelius 4: Shift-P is now the shortcut for View
> Panorama, and Play > Per-
formance no longer has a keyboard shortcut.
If you’re upgrading from a version earlier than Sibelius 4, there will be more keyboard shortcut
changes to get used to – full details are in Appendix C: Keyboard shortcuts on page 76.
Note input
There are no significant changes to note input in Sibelius 5. One useful new feature, however, is
that if you select a passage before you create a clef, time signature or key signature, Sibelius will
automatically restore the original clef, time signature or key signature at the end of the selected
passage. It will do this regardless of the length of the passage, so if you typically click in an empty
part of a bar (which makes a passage selection of one bar) before you create one of these objects,
Sibelius will now automatically restore the original object at the end of the bar, which may not be
what you want. If you want to disable the creation of restorative objects at the end of selections of
one bar or shorter in length, switch off Restore original item after single-bar selection on the
Note Input page of File
If you are upgrading from Sibelius 2 or 3, there is one further significant change, introduced in
Sibelius 4, that you need to know about: space is no longer used for inputting rests. Instead, the 0
key on the numeric keypad is used for inputting rests. This also means:
> Preferences (in the Sibelius menu on Mac).
* In previous versions, hitting 0 on the numeric keypad with one or more notes or rests selected
would toggle the selection between notes and rests.
* In previous versions, hitting space with a note selected would show the note input caret after the
selected note, allowing you to continue note input from that point.
* If you are using a notebook (laptop) computer and therefore do not have a numeric keypad on
your keyboard, we recommend choosing the Notebook (laptop) features feature set on the
Menus and Shortcuts page of File
> Preferences, which assigns the numeric keypad functions
to the row of number keys on the main keyboard (Windows only).
For details of how to make Sibelius 5 behave as closely as possible to Sibelius 3 or Sibelius 2 with
regard to note input shortcuts, see http://www.sibelius.com/helpcenter/en/a481. But, of
course, we don’t recommend this: if at all possible you should learn the new note input shortcuts.
For further help with customizing Sibelius’s keyboard shortcuts,
b 5.9 Menus and shortcuts
in Sibelius Reference.
Navigator
If you are upgrading from Sibelius 3 or earlier, be aware that the behavior of the Navigator window
changed in Sibelius 4.
In earlier versions, to continue scrolling over long distances (e.g. more than a couple of pages) you
had to keep moving the mouse – if you were dragging a really long way, you may even have had to
pick your mouse up from the desk, while keeping the mouse button held down, and put it down
again in order to have enough room on your desk to keep scrolling! This made using the Navigator
rather tiring.
56
Page 57

Look and feel
Now, the Navigator has scrolling “zones” at its left- and right-hand sides. So to scroll more than a
page or two, keep the mouse button held down and move the pointer towards the edge of the Navigator, and Sibelius will start scrolling. Once Sibelius has started scrolling, you can keep the mouse
pointer in the same position, and Sibelius will keep scrolling; move the mouse pointer further in
the same direction and Sibelius will scroll faster.
If you find the new behavior of the Navigator awkward at first, why not try out some of the other
quick navigation methods in Sibelius? For example, hitting Home and End moves the score left
and right a screenful or a page at a time; Ctrl+Home or
Ctrl+End or
X7 goes to the end of the score. Page Up and Page Down (8 and 9 on some Mac
keyboards) moves the score up and down; Ctrl+Page Up or
Ctrl+Page Down or
X9 moves to the bottom of the page. You can also switch on View > Scroll
X4 goes to the start of the score and
X8 moves to the top of the page and
Bars, which can be dragged to any point in the score. And if your mouse has a wheel button, you
can use that to scroll up and down: hold Shift to scroll left and right, and hold Ctrl or
X to zoom in
and out.
Even more Mac improvements
Sibelius 5 is a Universal application, meaning it runs at full speed on Mac OS X on both PowerPC
and Intel processors. Sibelius 5 also takes advantage of the latest Apple technologies, making it the
most Mac-friendly version yet:
* The appearance of dialog elements has been improved, including using the latest Human Inter-
face Toolbox controls for list boxes, combo boxes and pop-up menus.
* Custom dialog elements (e.g. the list of symbols in Create > Symbol, the list of clefs in Create >
Clef, the score preview in Layout > Document Setup, etc.) are now drawn using Quartz for
improved appearance.
* It is now possible to use X. as an equivalent to Esc in all dialogs with a Cancel button.
* Menu names in the menu bar no longer flash while inputting text into the score.
* Various cosmetic problems with dialog controls and elements have been fixed.
* Sibelius now only uses Quartz for the clearest, smoothest screen display possible. OpenGL
smoothing is no longer available.
What’s new?
Other improvements
* While Sibelius is loading, messages appear on the splash screen to tell you what it’s doing.
* The Tex tu res page of File > Preferences (in the Sibelius menu on Mac) has been changed such
that you can now set the desktop and paper textures for the full score, dynamic parts, and for
editing ideas independently, with a graphical preview in the dialog.
* Dialogs now use standard group boxes rather than custom separator lines where appropriate.
* Dialogs that do not have a Cancel button are now consistently confirmed by clicking Close,
rather than some having an OK button and others having a Close button.
* Help > Grove Music has been removed from the program.
57
Page 58

What’s new?
Other improvements and fixes
The other new features and improvements in Sibelius 5 are summarized below in alphabetical order.
For more details, refer to the appropriate section of Sibelius Reference – either in the new printed
book (if you have purchased one) or on-screen by choosing Help
F1 or
X?).
Accidentals
When notes in two voices coincide in the bar, and one voice is cue-sized, accidentals on notes in
the cue-sized voice will now always appear at the correct size.
Articulations
* You can now define the playback behavior of each articulation type on the new Articulations
page of Play
* Articulations can now be flipped correctly to the other side of notes when cross-staff beaming is
used.
* Moving notes between voices using Alt+2 or z2 etc. no longer causes articulations to be lost.
> Dictionary – see Playback on page 29.
Bars and bar rests
New Edit > Delete Bar feature (shortcut Ctrl+Backspace or X-Delete) that deletes the selected
bars.
> Sibelius Reference (shortcut
Beams
New Adjust for cross-staff and between-note beams option on the Beams and Stems page
of House Style
wrong side of noteheads in cross-staff beaming; and stems are now drawn on the correct side of
the notehead if you drag a beam between a very low and a very high note on the same staff. This
option is on by default in new scores.
> Engraving Rules, which fixes two problems: stems no longer appear on the
Breaks
* You can now insert blank pages anywhere with a couple of clicks, using the new Layout > Break >
Special Page Break feature (shortcut Ctrl+Shift+Return or xXReturn), then add text, graph-
ics, etc. to produce title pages and performance instructions.
* Blank pages even work in parts too – in fact, you can make any blank page or title page appear in
the score, the parts, or both.
* Special page breaks also allow you to modify the page and staff margins on subsequent pages –
see Document Setup below.
* Layout marks (e.g. system break, page break, special page break icons) can now be selected by
clicking them, so that they can be deleted.
* New Create > Title Page dialog, allowing you to create one or more blank pages at the start of
the score and automatically add Title, Composer, etc. text to it.
58
Page 59

Other improvements and fixes
Chord symbols
The word menus for chord symbols have been overhauled, providing easier access to chord symbols following different conventions, including:
* Root accidentals on the baseline, rather than superscript root accidentals
* +/- for stackable alterations instead of flat and sharp symbols
* Different word menus for maj/min, ma/mi, Brandt-Roemer chord types etc.
Clefs
* Create > Clef now allows the creation of clefs that change when Notes > Transposing Score is
switched on and off. This is useful for low wind and brass instruments, that tend to be written in
one clef for scores in concert pitch, and in another when written at transposed pitch.
* When creating a clef with a passage selection, Sibelius now automatically creates a second clef at
the end of the selection to revert to the original clef for you.
Document Setup
* New After first page option in Layout > Document Setup allows the user to set the top and
bottom staff margins (i.e. the bounding box describing the vertical extent of the staves on a
page) independently for the first page of the score and all subsequent pages. This makes it very
easy to leave room for e.g. the title text at the top of the first page and any copyright text at the
bottom of the first page without affecting the layout of subsequent pages.
* It is now possible to change the page and staff margins for sections of the score by creating a spe-
cial page break (see Breaks above).
What’s new?
Dynamic Parts
* The Document Setup page of Multiple Part Appearance now includes a Margins button,
allowing the user to set the page and staff margins of one or more parts directly. As a result, the
option Lower first system by n spaces on the Layout page of the same dialog has now been
removed.
* New options on the Layout page of Multiple Part Appearance allow you to determine how (or
whether) special page breaks in the full score should appear in dynamic parts.
* Copy Part Layout now copies page size, staff size, page and staff margins, distance between
staves and systems (as defined on the Staves page of House Style
> Engraving Rules), page
number changes, and special page breaks.
* Dynamic parts set to portrait orientation now print correctly in portrait when the score is set to
landscape (Windows only).
Edit Sound Sets
Play > Edit Sound Sets has been removed from Sibelius in the light of extensive changes to the
format of sound set files. Choose Help
information about creating your own sound sets.
> Help Center to visit the online Help Center for more
59
Page 60

What’s new?
Edit Staff Types
House Style > Edit Staff Types has been removed from Sibelius, because staff types now only
exist in relation to specific instruments. To edit the staff type used by an instrument, use House
Style
> Edit Instruments.
Edit Symbols
Clicking Delete in House Style > Edit Symbols no longer removes the symbol entirely from the
list; instead, it clears the existing slot.
Edit Text Styles
* The Attached to read-out on the General page of Edit Text Style has been removed, in favour
of showing the type of text style being edited in the dialog’s caption; it now reads Staff Text
Style, System Text Style or Blank Page Text Style as appropriate.
* The Vertical Posn page of Edit Text Style has been reorganized to make the different options
suitable for staff text, system text and blank page text clearer.
* New Relative to first page margins only checkbox on both the Horizontal Posn and Vertical
Posn pages of Edit Text Style. This determines whether page-aligned text that is “snapped” to
margins should always be drawn at the same horizontal and/or vertical position as the margins
on the first page of the score, or should be positioned according to the current page margins (as
determined by any margin changes in special page breaks).
* The Word menu drop-down on the General page of Edit Text Style now shows a scroll bar
when necessary, allowing the user to choose all the available word menus if there are more than
15 present.
Exporting audio
Sibelius now exports audio files “off-line,” i.e. not in real time. For simple audio files, this means
that export may be much quicker than real time; for more complex audio files, it may be slower
than real time, but the resulting audio file will be glitch-free. This means that you can now export
audio files that are more complex than your computer can play in real time.
Exporting graphics files
* Sibelius can now export graphics in Portable Network Graphics (PNG) format via File > Export >
Graphics.
* Sibelius can now export Windows bitmap graphics (BMP) via File > Export > Graphics on Mac.
* Options in the File > Export > Graphics dialog now stick at what you set them to throughout a
session.
* Sibelius no longer supports EMF graphics export (Windows only).
Exporting MIDI files
* Sibelius can now export a MIDI file designed to play on any sound set without requiring you to
adjust the playback settings of the current score. For example, if you are working with Sibelius
Sounds Essentials in Kontakt Player 2 (which is not General MIDI-compatible) but want to
export a MIDI file to be played by a standard media player, you can choose to export a General
MIDI-compatible MIDI file by selecting the General MIDI sound set in the Export MIDI File
Options dialog. Conversely, if you are using a sample library and want to export a MIDI file to
60
Page 61

Other improvements and fixes
continue working with the file in a sequencer, export a MIDI file targeted at your current sound
set, and all existing key switches, MIDI controllers etc. will be exported in the MIDI file, reducing the amount of reprogramming you have to do in your sequencer.
* Sibelius can now export both Type 0 and Type 1 MIDI files (previously it could export only Type
1), as determined in the new Export MIDI File Options dialog.
* The MIDI tick resolution (pulses per quarter note, or PPQN) of exported MIDI files can now be
set via the new Export MIDI File Options dialog.
Files
* Sibelius 5 scores are now considerably smaller than scores in previous versions; they are up to
50% smaller.
* When saving a score for the first time, Sibelius now suggests a filename automatically, based on
the Title field in File
* Sibelius 5 can export scores in Sibelius 4, Sibelius 3 (or Sibelius Student or G7), and Sibelius 2
format, via the File
* New Hidden notes and rests don’t affect stem directions and rests option in the House
Style dialog accessed from the Update Score dialog when opening scores created in earlier ver-
sions of Sibelius.
* Add Instruments button on the first page of File > New has been renamed to Change Instru-
ments to make it clearer that you can add and remove instruments from manuscript papers in
this way.
* The Create title page option on the final page of File > New now creates a title page using a
special page break (see Breaks above).
* The focus is now set correctly in the Title field in File > Score Info when the dialog is opened,
allowing the user to type directly into the dialog without clicking to activate the edit control
(Mac only).
* New Instrument changes field in File > Score Info, which lists all the instrument changes used
in the full score or current part. This corresponds to the new text wildcards \$InstrumentChanges\ and \$HeaderInstrumentChanges\, which can be useful in dynamic parts
(e.g. so Part name can be “Reeds 1” and Instrument changes can be “Clarinet, Alto Sax”).
Other new Score Info fields include Dedication, Artist, Year of composition, Composer’s
Dates, Opus Number, Copyist.
* In very large scores (with many staves at a very small staff size on a large page size), it was some-
times not possible to view the end of the score. This is now fixed.
* The reliability of File > Append Score has been much improved on earlier versions, where it was
possible for this operation to cause Sibelius to crash.
> Score Info, if it is set, or Title text in the score.
> Export > Sibelius 2, 3, 4 or Student menu option.
What’s new?
Filters
* New Edit > Filter > Bar Numbers quick filter, to select all the bar numbers in the selection (see
Numbering on page 46).
* New Edit > Filter > Page Number Changes quick filter, to select all the page number changes in
the selection (see Numbering on page 46).
61
Page 62

What’s new?
Focus on Staves
Layout > Focus on Staves has been moved to View > Focus on Staves.
Guitar tab
Grace note-sized guitar tab numbers are now correctly aligned with full-size tab numbers.
Help
Help > Sibelius Reference now launches a PDF version of the Sibelius Reference book instead of
the web-based system used in Sibelius 4. This opens faster and is easier to read.
Hiding objects
New Hidden notes and rests don’t affect stem directions and rests option on the Notes and
Tremolos page of House Style
> Engraving Rules. With this option switched on, Sibelius will
ignore hidden notes and rests when deciding the stem direction and vertical positioning of rests in
other voices.
House styles
* When importing a house style into a score, Sibelius will now make more intelligent decisions
about how to merge the new styles in the house style with the existing styles in the destination
score:
% All compulsory styles in the house style (e.g. default text styles, default instruments, default
symbols, none of which can be deleted) replace the corresponding styles in the destination
score.
% Any user-defined styles in the house style that match completely the appearance of a style
already in existence in the destination score will not be imported (so as to avoid unnecessary
duplication of identical styles).
% Any user-defined styles in the house style that either do not exist in the destination score, or
which correspond to existing styles (e.g. have the same name) but do not have the same
appearance, are added to the styles in the destination score (so as to avoid overwriting existing user-defined styles with non-matching styles).
* These changes also apply to copying and pasting material between scores – see Selections and
passages below.
* In addition, it is now possible to import e.g. a single text style, or a single symbol, by copying and
pasting that item from one score to another; this now imports only those styles necessary to represent the pasted item. This effectively allows the “merging” of items from many different scores
and/or house styles into a single master house style.
* The option to import Staff types from a house style file has been replaced with an option to
import Instrument definitions – see Edit Staff Types and Staves for more details.
Importing graphics
* TIFF graphics imported using Create > Graphic can be placed on blank pages created using spe-
cial page breaks.
* Graphics imported via Create > Graphic can now be made cue-sized.
* Graphics imported via Create > Graphic now scale correctly when attached to small staves.
62
Page 63

Other improvements and fixes
Importing MIDI files
The Open MIDI File dialog now has a new Hide empty staves option, switched on by default. To
ensure that all staves are shown throughout the resulting score after the MIDI file has been
imported, switch this option off.
Installing Sibelius
* Sibelius now uses a standard Windows Installer (MSI) installer package, making it simpler to
deploy in network environments (Windows only).
* Sibelius now requires Microsoft .NET Framework 2.0 to be installed. The installer will prompt
you to download the correct version if it is not already installed (Windows only).
Key signatures
When creating a key signature with a passage selection, Sibelius automatically creates a second key
signature at the end of the selection to revert to the initial key for you.
Lines
* You can now edit the apertures of hairpins on a hairpin-by-hairpin basis, using new controls in
the Lines panel of Properties. The closed end, open end, small continuation and large continuation apertures can all be individually edited. Setting Closed end aperture to a value greater than
0 produces “open” hairpins sometimes used by contemporary composers.
* Hairpins now determine their end dynamic automatically in playback, either by looking at an
explicit text dynamic directly afterwards, or by increasing or decreasing by one dynamic level if
no explicit dynamic is found.
* When extended or retracted with space or Shift-space, hairpins now snap to a position just
before the barline, preventing them from crossing system or page breaks when they end before
the first note of the next bar.
* It is no longer possible for the second half of a hairpin to point the wrong way after a system or
page break.
* Continuation large aperture n spaces for hairpins on the Lines page of House Style >
Engraving Rules now works correctly.
What’s new?
Lyrics
* To save typing all the lyrics into a score, you can now add them automatically from a text file
using the new Create
labification of the words (provided the text is in English, German, French, Spanish or Latin) and
paste the text into the score, taking into account slurs to produce melismas.
* Pasting lyrics from the clipboard can now also automatically hyphenate lyrics as you paste them.
New options to control this are on the Others page of File
on Mac).
* If you type the lyrics in yourself, Sibelius will check that you’ve split syllables in the right places –
see Plug-ins on page 51.
* All lyrics text styles can now be created from a single menu, Create > Tex t > Lyrics.
> Lyrics > From Text File feature. Sibelius will determine the correct syl-
> Preferences (in the Sibelius menu
63
Page 64

What’s new?
Manuscript papers
* Several new manuscript papers, including Bass staff, Mariachi band, Orchestra, concert,
Orff classroom 1, and Orff classroom 2.
* Scores created in Sibelius 5 now include the following new text styles by default:
% Boxed system text: new system text style, suitable for boxed instructions that should be
printed in all parts.
% Plain system text: new system text style, suitable for general instructions that should be
printed in all parts by default.
% Boxed text (on blank page), Composer (on blank page), Dedication (on blank page),
Plain text (on blank page), Plain text, right (on blank page), Plain text, centered (on
blank page), Subtitle (on blank page) and Title (on blank page) text styles, for use on
blank pages created using special page breaks.
% Instrument name (cues): staff text style used by Edit > Paste as Cue to label cue passages
% Instrument change: staff text style used by Create > Instrument Change for the name of
the new instrument.
% Function symbols: new staff text style for functional analysis, using the new Opus Function
Symbols font.
% Metric modulation: new system text style for writing metric modulations, using the Opus
Metronome font.
* New scores created in Sibelius 5 no longer include the text styles Title (on title page) and
Composer (on title page), as these have been replaced by new text styles found in the Create
Text > Blank Page Text submenu. These old text styles will continue to exist in scores created in
Sibelius 3 or 4.
* In new scores created in Sibelius 5, page-attached repeating text (e.g. page numbers, headers,
footers, etc.) will always be positioned horizontally and vertically according to the page margins
of the first page of the score. If you want the position of a text object to take into account any
changes to page margins in the score, switch off the Relative to first page margins only
options on the Horizontal Posn and/or Vertical Posn tabs of Edit Text Style – see Edit Text
Styles above for more information. If you want the new default behaviour in existing scores,
you should either import one of the standard house styles supplied with Sibelius 5, or switch
these options on for your existing text styles.
* New scores created in Sibelius 5 have the new Hidden notes and rests don’t affect stem
directions and rests option from the Notes and Tremolos page of House Style
Rules switched on by default.
* New scores created in Sibelius 5 have Large continuation aperture n spaces set to 1.1 on the
Lines page of House Style
> Engraving Rules.
> Engraving
>
Multirests
* Page-attached system text (such as Header (after first page)) no longer causes multirests to
split. In earlier versions of Sibelius, such text items attached to a bar other than bar 1 would
result in multirests splitting at the bar to which the text was attached; now the multirest will not
split, but the text will not be shown in the part. To ensure that the multirest doesn’t split and that
the text is drawn, make sure that header text is attached to bar 1.
64
Page 65

Other improvements and fixes
* You can now change the width of a multirest by dragging the barline at either end, even if that
barline is a special barline (e.g. a double barline).
Noteheads
Scores now include new notehead types:
* The rhythm slash noteheads (noteheads 3 and 4) have been improved, so that alignment with
stems is improved
* New large cross notehead (notehead 26) suitable for unison marching percussion
* New slash noteheads (noteheads 27 and 28) that have the same appearance as noteheads 3 and 4
in older versions, but which do play back
* New cross notehead using the double sharp symbol as the cross (notehead 29)
* New “ping” notehead for unpitched percussion (notehead 30).
The numbers of these noteheads may end up different when Sibelius adds them automatically to
existing scores; to check which notehead is which in a particular score, use House Style
Noteheads.
Note input
* New Restore original item after single-bar selections option on the Note Input page of
File
> Preferences (in the Sibelius menu on Mac), switched on by default. If you switch this off,
Sibelius will no longer create restorative time signatures, key signatures, clefs, instrument
changes, etc. if the selection is of a bar or shorter in length.
* If you switch off Play notes as you edit on the Note input page of File > Preferences (in the
Sibelius menu on Mac), Sibelius will remain completely silent when inputting or editing notes
via mouse input, alphabetic input or step-time input. It will only play the notes during Flexitime input or playback.
* Sibelius no longer crashes if you try to add too many notes to a chord using the number keys on
the main keyboard.
What’s new?
> Edit
Opening MusicXML files
The quality of MusicXML file conversion has been improved dramatically in Sibelius 5:
* The Open MusicXML File dialog has been redesigned to make the options clearer, and new
options have been added to allow you to choose whether you want to retain the layout and formatting of the MusicXML file.
* Sibelius can now open MusicXML 2.0 files, in both their uncompressed (.xml) and compressed
(.mxl) formats.
* Layout and formatting is much more accurately imported for MusicXML 1.1 or later files,
including staff spacing, hidden staves, system layout, blank pages, multirests and more.
* Sibelius now imports many more notations from MusicXML files, including unpitched percus-
sion staves, guitar chord diagrams, notehead types, hidden objects, tremolos, nested tuplets,
cautionary key signatures, and more.
65
Page 66

What’s new?
* Importing of text objects from MusicXML files is substantially improved, including font, point
size, positioning of text and lines, support for page-attached text (such as headers, page numbers, and so on), bar numbers, and more.
* Various problems relating to correctly determining the lengths of bars in MusicXML files (relat-
ing to the different ways of describing tuplets, multiple voices, cross-staff beaming, grace notes,
etc.), resulting in bars that looked correct until you attempted to edit them, at which point it
became obvious that the bar was the wrong length, have been resolved.
Percussion
* When editing the mapping of noteheads to drum sounds in the Edit Staff Type dialog (now
accessed from House Style
> Edit Instruments), the drum sound is no longer chosen from a
preset list of General MIDI percussion sounds or a specific MIDI pitch. Instead, the mapping is
now defined by the new SoundWorld sound IDs, which can more accurately describe the variety
of percussion sounds available on today’s hardware and software instruments.
* You can now make a combination of notehead and articulation on a percussion staff make a spe-
cific sound, e.g. to contrast open and closed hi-hat.
Performance
New option Convert Live Playback velocities to dynamics on sustaining instruments in
Play
> Performance. When switched on, this option means that Live Playback velocities are con-
verted to dynamics rather than to attack for sustaining instruments that use the modulation wheel
for volume (e.g. in Garritan Personal Orchestra).
Preferences
* New Input Devices page has been added to File > Preferences (in the Sibelius menu on Mac).
This page contains some of the controls that used to be on the Input Devices page of Play
Playback and Input Devices, which has now been removed. The other controls are now found
on the existing Note Input page of File
* New Playback page been added to File > Preferences (in the Sibelius menu on Mac). This page
contains some of the controls that used to be on the Play
> Preferences.
> Performance dialog, and addition-
ally some options similar to those that used to be in Kontakt Player Options in Play
back and Input Devices in Sibelius 4.
* Multi-user installations of Sibelius (serial numbers beginning SCxF, SCxM, SCxW) now write
preferences to the global preferences area for all users when run by an administrator user, so
that limited-privilege user accounts on that machine do not need to set up their own preferences
each time the application runs.
Printing
The File > Print dialog has been reorganized to make it fit into smaller display resolutions, and
Alt+letter shortcuts for the various options have been improved (Windows only).
Properties
* The Staves panel of Properties has now been removed:
% The Small staff checkbox is now found in Create > Instruments.
>
> Play-
66
Page 67

Other improvements and fixes
% Changing the range of an instrument is now done via the new Edit Instrument dialog,
accessed via House Style
% To change the initial staff type of a staff, use Create > Other > Instrument Change to change
> Edit Instruments.
the initial instrument of a staff, which will also change the staff type.
* The General panel of Properties now has a helpful read-out of the page number of the current
selection.
* The Lines panel of Properties has new controls for adjusting the apertures of individual hairpins
– see Lines above.
* The Playback panel of Properties has new controls for adjusting the playback of hairpins and
trills.
Scanning
* PhotoScore can now read cross-staff beaming, piano pedal lines, repeat barlines, 1st- and 2nd-
ending lines, and other new symbols
* PhotoScore Ultimate (the new name for PhotoScore Professional) can read some handwritten
noteheads
* Sibelius now correctly imports multirests from PhotoScore files
* Positioning of text in files imported from PhotoScore has been improved
* Cue-sized notes in PhotoScore are now correctly imported as cue notes in Sibelius
What’s new?
Selections and passages
* New Edit > Select > Select Bars dialog (shortcut Ctrl+Alt+A or zXA) allows you to quickly
select from the current bar to any bar later in the score, or to the very end of the score.
* Copying and pasting material between scores will now only create any text styles, line styles,
staff types, notehead types and symbols used by the copied material, rather than effectively
importing the entire house style of the score from which the material was copied.
*
If material to be pasted includes a user-defined style (e.g. a text style) that has the same name as a
style in the score into which the material is to be pasted, but the appearance of those styles do not
match (e.g. they use a different font), Sibelius now creates a new user-defined style with a different name in the destination score, rather than the pasted objects assuming the existing style.
* Edit > Select > Select More now selects all the bar numbers on a system if invoked with a bar
number selected.
* Copying a group of notes that cross a barline no longer unexpectedly erases notes that follow the
pasted music in the destination bar.
Staves
* Create > Other > Staff Type Change has been removed from Sibelius. To change the staff type
of an existing instrument, users should now use Create
> Instrument Change to change to an
instrument with the appropriate staff type – see Instrument changes on page 44.
Symbols
* The list of symbols in Create > Symbol now opens at the correct row when the dialog is
reopened, so that you can see the previously selected symbol.
67
Page 68

What’s new?
* More than 180 new symbols, including early music ornaments, arrows, note clusters, extra con-
ductor symbols, and more – see Reprise and other fonts on page 48.
Text
* Word menus (which appear when you right-click (Windows) or Control-click (Mac) during text
input) are now larger by default. You can also now adjust the font size of word menus on the
Word Menus page of File
* Text can now be set to be cue-sized by selecting it and hitting the cue-sized button on the Key-
pad, or switching on the Cue-sized checkbox in the General panel of Properties.
* Sibelius now includes a new kind of text alongside staff text and system text: blank page text.
Blank page text can only be created on blank pages created using special page breaks.
* The Create > Te xt submenu has been reorganized, with all lyrics text styles now found in the
new Create
> Tex t > Lyrics submenu, and new blank page text styles found in the new Create >
Text > Blank Page Text submenu.
* Text that repeats on multiple pages but which is set not to display on the first page (i.e. the page
to which it is attached), such as Header (after first page), now appears on the page to which it
is attached, but is always hidden on that first page. This makes it much easier to create this text
(since you don’t have to have both the page to which the text is attached and the page upon
which the text is supposed to appear in view at once).
*
The
\$Time\
and
\$FileDate\
> Preferences (in the Sibelius menu on Mac).
wildcards now produce time in the correct local format (Mac only).
Time signatures
* Create > Time Signature now has a checkbox option Rewrite bars up to next time signa-
ture, on by default, instead of asking you after you click OK whether you want the following bars
to be rewritten.
* When creating a time signature with a passage selection, Sibelius automatically creates a second
time signature at the end of the selection to revert to the original time signature for you.
Tran sp osi ng
* Notes > Tra ns po se now lets you directly choose the key to transpose the music into, as an alter-
native to specifying the transposition in terms of intervals.
* New Change key at start option in Notes > Tra nsp os e, to automatically add a new key signa-
ture at the start of the selection, when transposing a system passage.
Tremolos
You can now define the playback behavior of each kind of one-note tremolo and buzz roll (“z on
stem”) on the new Articulations page of Play
> Dictionary.
Triplets and other tuplets
* Sibelius now includes a suite of plug-ins that make editing tuplets in your score much simpler –
see Plug-ins on page 51 for more details.
* When tuplets are made cue-sized, their bracket and number are now correctly scaled.
68
Page 69

Other improvements and fixes
Video
* Accuracy of synchronization between score playback and attached video files is improved.
* Shift-[ and Shift-] now work to advance through the video a frame at a time in all frame rates,
including 29.97 non-drop.
View menu
* New View > Panorama menu item (shortcut Shift-P), which switches on Panorama.
* New Fit page height zoom level, which is useful when working in Panorama.
Window menu
* Window > Kontakt Player has been removed (along with its corresponding toolbar button),
because you can now access Kontakt Player 2 and other virtual instruments via the buttons in
the Mixer window.
* New Window > Ideas menu item (shortcut Ctrl+Alt+I or zXI) and toolbar button, to show and
hide the new Ideas window – see Ideas on page 34.
What’s new?
69
Page 70

What’s new?
70
Page 71

Appendices
Appendices
71
Page 72

Appendices
Appendix A: Improvements up to Sibelius
4.1.5
The following is a list of the most important improvements made up to Sibelius 4.1.5. In general,
bug fixes are not listed here.
Improvements are annotated (v2), (v3) or (v4), depending on which version they were added in. If
you are upgrading from Sibelius 1.x, then in addition to the new features of Sibelius 5, you also get
the more than 600 improvements introduced in Sibelius 2, Sibelius 3 and Sibelius 4.
For further information, please consult the relevant Sibelius Reference section.
Feature Improvements
Accidentals Improved positioning of accidentals in chords (v2), and ability to hide them (v3).
Arrange™ Saves time arranging and orchestrating by copying music intelligently into combinations of instru-
Articulations Articulations can be flipped, are automatically positioned at the stem ends of notes, and are centered
ASCII tab files Import and export ASCII tab files (v3)
Barlines Early music barlines (barlines between staves, tick, short) and option to set default barline type (v2)
Bar numbers Multirests can show ranges of bar numbers below them, bar numbers can be dragged any distance,
Beams Extensive improvements to the handling of beams, including beaming over rests, beaming of tuplets,
Brackets and braces Brackets and braces are now hidden if there is no barline at the left-hand side of the system (v3)
Breaks Auto page breaks for automatic page turns at rests in extracted parts (v3)
Chord diagrams Chord diagrams (guitar frames) can be transposed, and stored in libraries for easy sharing (v3); chord
Chord symbols New characters in Inkpen2 Chords and Opus Chords, new Opus Roman Chords and Opus Japanese
Color Change the color of almost any object in the score (v3)
Display settings New display smoothing options, including OpenGL on Mac OS X (v3); many high-quality desk and
Document setup Independent margins for left- and right-hand pages, new “staff margins” feature determines position
Dynamic parts Instrumental parts are stored in the same file as the full score; changes in the score are automatically
Edit Text Styles New Edit All Fonts dialog allows you to quickly change the fonts used in your score (v3)
Exporting audio Using Kontakt Silver or Gold, Sibelius can save a digital audio file of your score, ready to burn straight
Exporting graphics Copy and paste graphics to other applications (v4); embed fonts in EPS files, and automatically choose
Files New Quick Start dialog that appears when you first run the program (v3); New Score dialog, which
ments, with over 140 included styles (including “explode” and “reduction”), and the ability to create
your own (v2)
on the stem when they are at the stem end of a note (v2)
and bar numbers respect the horizontal positioning options of the bar numbers text style (v4)
and editing beam groupings (v3); Optical beam positions algorithm, beaming across system and page
breaks, direction of fractional beams can be flipped, French beaming (v4)
diagrams can show fingerings above or below them (v4)
Chords fonts (v4)
paper textures to make your working environment more pleasant (v2);
of staves relative to instrument names (v2), new standard page sizes for parts (v4)
reflected in the parts, and vice versa; automatically print all parts; new Auto Layout dialog, can provide automatic system and page breaks (v4)
to CD (v3)
the most appropriate export format for your chosen program (v2)
takes you through the process of creating your score in five easy steps (v3); ability to export scores in
Sibelius 2, Sibelius 3, G7 and Sibelius Student formats (v4).
72
Page 73

Appendix A: Improvements up to Sibelius 4.1.5
Featur e Improveme nts
Filters and find New Advanced Filter dialog and Find/Find Next dialogs, and many new “quick filters” (v2)
Flexi-time Automatically splits music into two voices, and user-definable thresholds for staccato/tenuto (v3)
Focus on Staves Hide all the staves you don’t want to see (even if they have music in them), leaving just the staves you
want to work on (v3)
Guitar tab Comprehensive support for (and playback of) guitar tab markings such as bends, slides, etc. New tab
input method using the keyboard, new tab staff types, new options for stem lengths in tab (v2).
Hiding objects Ability to hide almost any object in the score, e.g. to mark up a score with hidden cues which reappear
in extracted parts (v2)
Highlight Highlighter pen to mark up music (v2)
House Style™ New House Style menu containing all the settings you need to adjust the appearance of scores (v2);
many supplied house styles, including several that use different text fonts (v4)
Importing graphics Import color and monochrome TIFF graphics (v2)
Instruments Sibelius now supports more than 400 different instruments (v3); “comfortable” and “professional”
Internet publishing Scorch on Mac has a tempo slider (v4); Scorch has enhanced playback and prints color graphics (v2);
Keyboard shortcuts More than 200 keyboard shortcuts in total – you can now do almost everything without the mouse.
Key signatures Different key signatures on different staves (v2)
Kontakt Player Sibelius includes a specially-written software sample playback device from Native Instruments that
Lines New system lines for rit./accel. playback (v2)
Live Playback Reproduces the precise timing and dynamics of music entered via Flexi-time or imported from a
Lyr ic s Copy and paste lyrics to and from other programs, e.g. word processors (v2). New options for lyric
ManuScript language Many improvements to the built-in ManuScript programming language.
Manuscript papers More than 60 pre-defined manuscript papers
Menus and shortcuts New keyboard shortcut defaults for Sibelius Coloured Keyboard and for use with a notebook (laptop)
Mixer Resizable Mixer window replaces the Sounds dialog, allowing you to adjust playback in real time (v2)
Multirests Longer multirests take up more horizontal space (v4)
Music fonts New Helsinki music font (v4); new Opus Metronome, Opus Figured Bass fonts (v4); new Inkpen2
Noteheads Now 24 default notehead types, including silent and stemless noteheads (v3)
Note input Caret shows where you are during note input; create text, time signatures, chords, etc. while inputting
Note spacing Optical note spacing avoids collisions, improves tuplet spacing, etc. (v3)
Opening MIDI files Imports markers as hit points (v4); recognition of tuplets improved (v4).
Opening MusicXML files
Page numbers Page numbers can now be aligned to the staff margin instead of the page margin (v3)
instrument ranges shown using two shades of red (v2). Instruments dialog allows you to re-order
staves after creating them (v3).
choose whether to allow visitors to your web site to print and save your scores via Scorch (v2)
Create your own sets of keyboard shortcuts, and disable features you don’t need (v3).
provides high-quality playback (v3); Sibelius Sounds range of additional sound libraries available for
separate purchase (v4)
MIDI file, allowing you to fine-tune the performance (v3)
spacing, and for lyrics in East Asian languages (v3).
computer (v4)
music font, replacing the old Inkpen font (v2)
notes from the computer keyboard; use Multicopy to copy dynamics to every staff of a band/orchestra,
or fill bars with ostinato patterns, etc. (v2). “Shadow note” shows the pitch of the note you’re about to
create, and notes can be created anywhere in an empty bar with the mouse. Improved Re-input Pitches
feature for changing the pitches of existing notes without reinputting them (v3). Sibelius moves the
screen much less frequently during note input and editing (v4).
Import MusicXML 1.1 files, as created by Finale 2003 or later and other music applications (v4)
Appendices
73
Page 74

Appendices
Feature Improvements
Percussion New buzz roll (z on stem) option, which plays back as an unmeasured tremolo (v4)
Performa nce New Rubato and Rhythmic feel playback options produce even more realistic playback (v2)
Playback Plays rits., accels., glissandos, guitar bends, slides (v2), complex repeat structures (D.C., D.S., Coda,
etc.), metric modulations, etc. (v3); new Playback window with enhanced transport controls (v4)
Plug-ins More than 60 new plug-ins, including Realize Chord Symbols (v3), Copy Articulations and Slurs (v4),
Add Simple Harmony (v4), What is Where (v4), etc.
Printing Print a date and time footer, new 2-up printing mode (v4)
Properties New Properties window with 7 collapsible panels lets you adjust objects individually or en masse (v2)
Scanning PhotoScore Lite reads two voices on the same staff, can handle transposing scores, reads guitar tab
Sibelius Reference Complete text of user guide Reference available on-screen via Help > Sibelius Reference (v4)
Sound sets Integrated sound set editor, allowing users to create sound sets for unsupported MIDI devices (v3)
Staff spacing Align Staves dialog allows you to position staves accurately throughout the score; Staff Rulers show
Staves Sibelius shows where one or more staves in a system are hidden with a dashed blue line. You can now
Symbols Many new symbols added. Symbols can be attached to the system as well as the staff (v3).
Text Text can now have a fixed size, regardless of staff size, new wildcards to automatically substitute values
Tie s Optical ties produce great-looking ties by default; drag tie endpoints any distance (v4)
Timecode Tempo and timecode readout on the toolbar during playback; calculate duration of the score and print
Tre mo lo s House Style options for the appearance of tremolos (v2); Properties option for whether or not to play a
Triplets & other tuplets “Magnetic” tuplets, intelligently positioned like slurs (v2)
Tut or ial v ideos 20 video walkthroughs, introducing you to all of the main features of Sibelius (v4)
Video Add a video to your score, synchronized during playback, allowing you to write music to picture (v4)
View menu New Note Colors options, including coloring notes according to their voice, or “pitch spectrum” (col-
Window menu New Window
Worksheet Creator Choose from more than 1700 ready-made worksheets, projects, exercises, songs, instrumental pieces,
(v3), and scans and reads all pages automatically (v4)
distances between staves; move staves with keyboard shortcuts (v2)
indent systems from the right-hand side (v3).
from File
> Score Info in text objects in the score, iprovements to word menus, comprehensive figured
bass support (v4)
it at the end; write timecodes above every barline in a variety of formats (v2); takes repeats into
account (v3); new frame rates (v4); dedicated text styles for timecode and hit points (v4)
tremolo (v4)
oring them according to sounding pitch) (v2)
> Hide Tool Windows option, and new toolbar buttons for tool windows (v4)
posters, reference materials and other resources (v4).
74
Page 75

Appendix B: Menu changes
Appendix B: Menu changes
The table below lists all the Sibelius 4 menu items that have been changed in Sibelius 5. Completely
new menu items are not listed.
Sibelius 4 Sibelius 5
Create > Other > Staff Type Change Removed; use Create> Other > Instrument Change instead.
Create > Other > Transposition Change Removed; use Create > Other > Instrument Change instead.
Play > Substitute Devices
Play > Playback and Input Devices Playback device options now in Play > Playback Devices; input
Play > Edit Sound Sets
Play > Garritan Personal Orchestra Options
Layout > Focus on Staves View > Focus on Staves
Layout
> Instrument and Staves Create > Instruments
House Style > Edit Staff Types Removed; use House Style > Edit Instruments instead.
Window > Kontakt Player
Main menu changes from Sibelius 3 to Sibelius 4:
Removed.
device options now on
Preferences (in the Sibelius menu on Mac)
Removed.
Removed.
Removed; show and hide virtual instrument windows via the
Mixer instead.
Input Devices page of File >
Appendices
* Sibelius 4 now has a single multi-page File > Preferences dialog (in the Sibelius menu on Mac),
combining a number of other dialogs from Sibelius 3, including View
> Smoothing and View >
Text ure s, as well as various new options
*
All operations for exporting files – e.g. for saving in earlier versions of Sibelius, or as a MIDI file,
or a graphics file, and so on – are done via the
* House Style > Use Multirests has been moved into the Layout > Auto Layout dialog, but the
shortcut Ctrl+Shift+M or
xXM still works.
File>
Export
submenu, instead of via
File>
Save As
Main menu changes from Sibelius 2 to Sibelius 3:
* The list of files you’ve worked on recently has now been moved to the Files > Open Recent Files
submenu, and has been increased to 10 files
* The Create menu has been simplified, with the less-often used items now moved to the
Create
> Other submenu.
Main menu changes from Sibelius 1.x to Sibelius 2:
* Flexi-time is now in the Notes menu
* Espressivo, Swing and Reverb are in the Play > Performance dialog
* Several items from the View menu are now in the Window menu
* New House Style menu from which you can edit all aspects of a score’s house style. The former
House Style dialog is now called Engraving Rules.
75
Page 76

Appendices
Appendix C: Keyboard shortcuts
Sibelius 5 has a number of new shortcuts, and a few changes to existing shortcuts, which are
described below.
New keyboard shortcuts
The table below lists all the new keyboard shortcuts in Sibelius 5:
Function Windows shortcut Mac shortcut
Edit > Capture Idea
> Paste as Cue
Edit
Edit > Select> Select Bars
> Delete Bars
Edit
View > Panorama
> Break > Special Page Break
Layout
Window > Ideas
Changes to shortcuts from earlier versions
The table below lists the changes to keyboard shortcuts from earlier versions in Sibelius 5.
Shift-I
+Shift+Alt+V
Ctrl
Ctrl+Alt+A
+Delete
Ctrl
Shift-P
+Shift+Return
Ctrl
Ctrl+Alt+I
xI
xzXV
zXA
X-Delete
xP
xXReturn
zXI
Function Was Sibelius5
Changes to Sibelius 4 shortcuts
-P
Play > Performance
Changes to Sibelius 3 shortcuts
Rewind/fast-forward
Edit > Hide or Show> Show Ctrl+Shift+S or xXS Ctrl+Shift+H or xXH
Window
Shortcuts for using the Keypad on laptop computers (Windows only)
File > Extract Parts Ctrl+Shift+X or xXX
Changes to Sibelius 2 shortcuts
View > Note Colors > Notes Out of Range Ctrl+Alt+N or zXN
View > Note Colors > Pitch Spectrum Ctrl+Alt+P or zXP
Create > Chord Diagram (was Create > Guitar Frame)
Create > Tex t > Metronome mark Ctrl+M or XM
Notes > Input Notes
Window > Properties Ctrl+I or XI Ctrl+Alt+P or zXP
> Mixer (Mac only) zXM
Shift
0/1
Ctrl+Alt+Q/W/E/R/A/
S/D/Z/X/C/R
UShift-K
VN
No shortcut
[ / ]
M
Use the Notebook (lap-
top) features
feature set instead
No shortcut
No shortcut
No shortcut
No shortcut
Changes to Sibelius 1.x shortcuts
There are many further changes to shortcuts from Sibelius 1.x. For a full list of all the keyboard
shortcuts now used by Sibelius,
b 5.9 Menus and shortcuts in Reference.
76
 Loading...