

Page 1

Pinnacle ShowCenter
Page 2

Pinnacle ShowCenter
User’s Guide
GB/US November 2004
41005108
© Pinnacle Systems GmbH 2004
All rights reserved.
No part of this manual may be reproduced or transferred to other media without
explicit written permission from Pinnacle Systems GmbH, Braunschweig,
Germany.
All brand or product names are trademarks or registered trademarks of their
respective holders.
Manufactured under license from Dolby Laboratories.
"Dolby" and the double-D symbol are trademarks of Dolby Laboratories.
This manual is printed on chlorine-free, bleached paper using solvent-free ink.
Pinnacle Systems GmbH has written this manual to the best of its knowledge,
but does not guarantee that the programs/systems will fulfill the users’ intended
applications.
No warranty is made as to the specifications of features.
Pinnacle Systems GmbH retains the right to make alterations to the content of
the manual without obligation to inform third parties.
All quotes, sales, supply and manufacturing contracts from Pinnacle Systems
GmbH, including consulting, installation and other contractual services are
subject exclusively to the General Sales and Delivery Terms of Pinnacle
Systems GmbH.
Page 3

Table Of Contents
Basics....................................................................................................................1
Safety Instructions.............................................................................................1
The Idea in Words .............................................................................................4
The Idea in a Picture..........................................................................................5
The Components................................................................................................6
Package Contents ..............................................................................................7
System Requirements ........................................................................................9
Set up Your ShowCenter System........................................................................11
Set up Your ShowCenter System in Two Steps - Overview ...........................11
Installing the Software.....................................................................................12
Connecting Your Devices ...............................................................................14
Configuration of a Network Connection .........................................................19
Pinnacle MediaManager .....................................................................................25
Overview .........................................................................................................25
The Media Library...........................................................................................28
The Media Player ............................................................................................34
Importing Media Files .....................................................................................36
Organizing Media Files ...................................................................................48
Using Playlists.................................................................................................52
Exporting Media Files .....................................................................................55
The Menus.......................................................................................................61
Real Rhapsody Music Service.........................................................................66
File Formats.....................................................................................................69
Television ...........................................................................................................73
Turning on the ShowCenter Player and the Television...................................73
Introduction to the TV Menu...........................................................................74
TV Menu - Music ............................................................................................76
TV Menu - Movies ..........................................................................................79
TV Menu - Photos ........................................................................................... 82
TV Menu - PCTV............................................................................................86
TV Menu - Settings .........................................................................................89
iii
Page 4

Pinnacle ShowCenter
Remote Control...................................................................................................95
Remote Control Keypad Layout......................................................................95
Button Descriptions in Detail ..........................................................................96
Troubleshooting for the Remote Control ......................................................100
Specifications....................................................................................................101
Hardware .......................................................................................................101
Technical Support.............................................................................................103
Getting Technical support .............................................................................103
License information ..........................................................................................105
Pinnacle End User License Agreement ......................................................... 105
Glossary ............................................................................................................109
Index .................................................................................................................117
iv
Page 5

Basics
Safety Instructions
Please read and follow these instructions for your own safety, and to ensure that
your device functions properly.
Power Cable and Plug
Please make sure to obey the following instructions in order to prevent the
device from malfunctioning and to prevent electrical shock, fires, and injuries:
When disconnecting the power to your device, always unplug it by pulling
the plug itself and not the cable.
Don't ever plug in or unplug the power cable with wet hands.
Keep the power cable away from heaters and radiators.
Never put heavy objects on the power cable.
Don't try to repair the power cable yourself or to modify it in any way, shape,
or form.
Regularly clean off the dust, dirt, etc. from the plug.
If you drop the device or damage it in any fashion, turn it off and disconnect
the power plug.
If the device produces smoke, strange smells, or noises, turn it off and
disconnect the power plug. Contact your dealer immediately.
Where Not to Install the Device
Do not install the device in any of the following locations:
In direct sunlight, next to radiators or other heat sources or in vehicles parked
in direct sunlight with all the windows rolled up and the doors closed.
Locations with extremely high temperatures (95°F or greater) or levels of
humidity (90% or greater).
Very dusty or sandy locations.
Locations where there are vibrations, shaking or slanted surfaces underneath.
This could damage the components in the device.
On flammable surfaces such as cloth-covered tables.
Keep the device away from flower vases, bathtubs, sinks, etc., and from
locations where the device is exposed to precipitation. The device may be
severely damaged if any liquid enters it.
1
Page 6

Pinnacle ShowCenter
Problems With Other Devices
Set up the device in a horizontal position and do not place any heavy objects
on it.
Do not place the device on an amplifier or any other device that gives off
heat.
Housing and Internal Components
Never remove or open any part of the housing and do not try to perform any
repairs yourself. Any maintenance or repair work should be done by a
qualified repair person.
Keep fingers and objects away from the inside of the device.
It is dangerous to touch any of the components inside the device. Doing so
may injure you and damage the device.
Do not place any foreign objects on the device.
Condensation
Condensation may develop in the device in the following circumstances:
Right after a nearby heater or radiator has been turned on.
In a very humid or steam-filled room.
If the device has been moved from a cold location to a warm one.
Condensation in the device may cause it to malfunction. In this case, turn off the
device and wait around 1 hour until the condensation has evaporated. Then you
can use it again.
Non-Use
Turn off the device when you are not using it.
If you are not planning on using the device for a long period of time, you
should unplug it from the power socket.
Accessories
Use only the accessories included with or recommended for the device in order
to minimize the risk of fire, electrical shock or interference.
Batteries
Put in the batteries shipped with the device as shown in the remote control
battery case.
NEVER combine old and new batteries or different types of batteries
(alkaline and non-alkaline).
Once the batteries are discharged, make sure to dispose of them in
accordance with legal and environmental requirements.
2
Page 7

Basics
Copyrights
Make sure not to violate any copyrights when you use music, movie and digital
photo files.
Any changes or additions to the printed documentation can be found in the
read-me file on the CD-ROM included with the device.
The CE Declaration of Compliance and the FCC Compliance Statement for
Pinnacle ShowCenter are included as PDF files on the CD-ROM included with
the device.
3
Page 8

Pinnacle ShowCenter
The Idea in Words
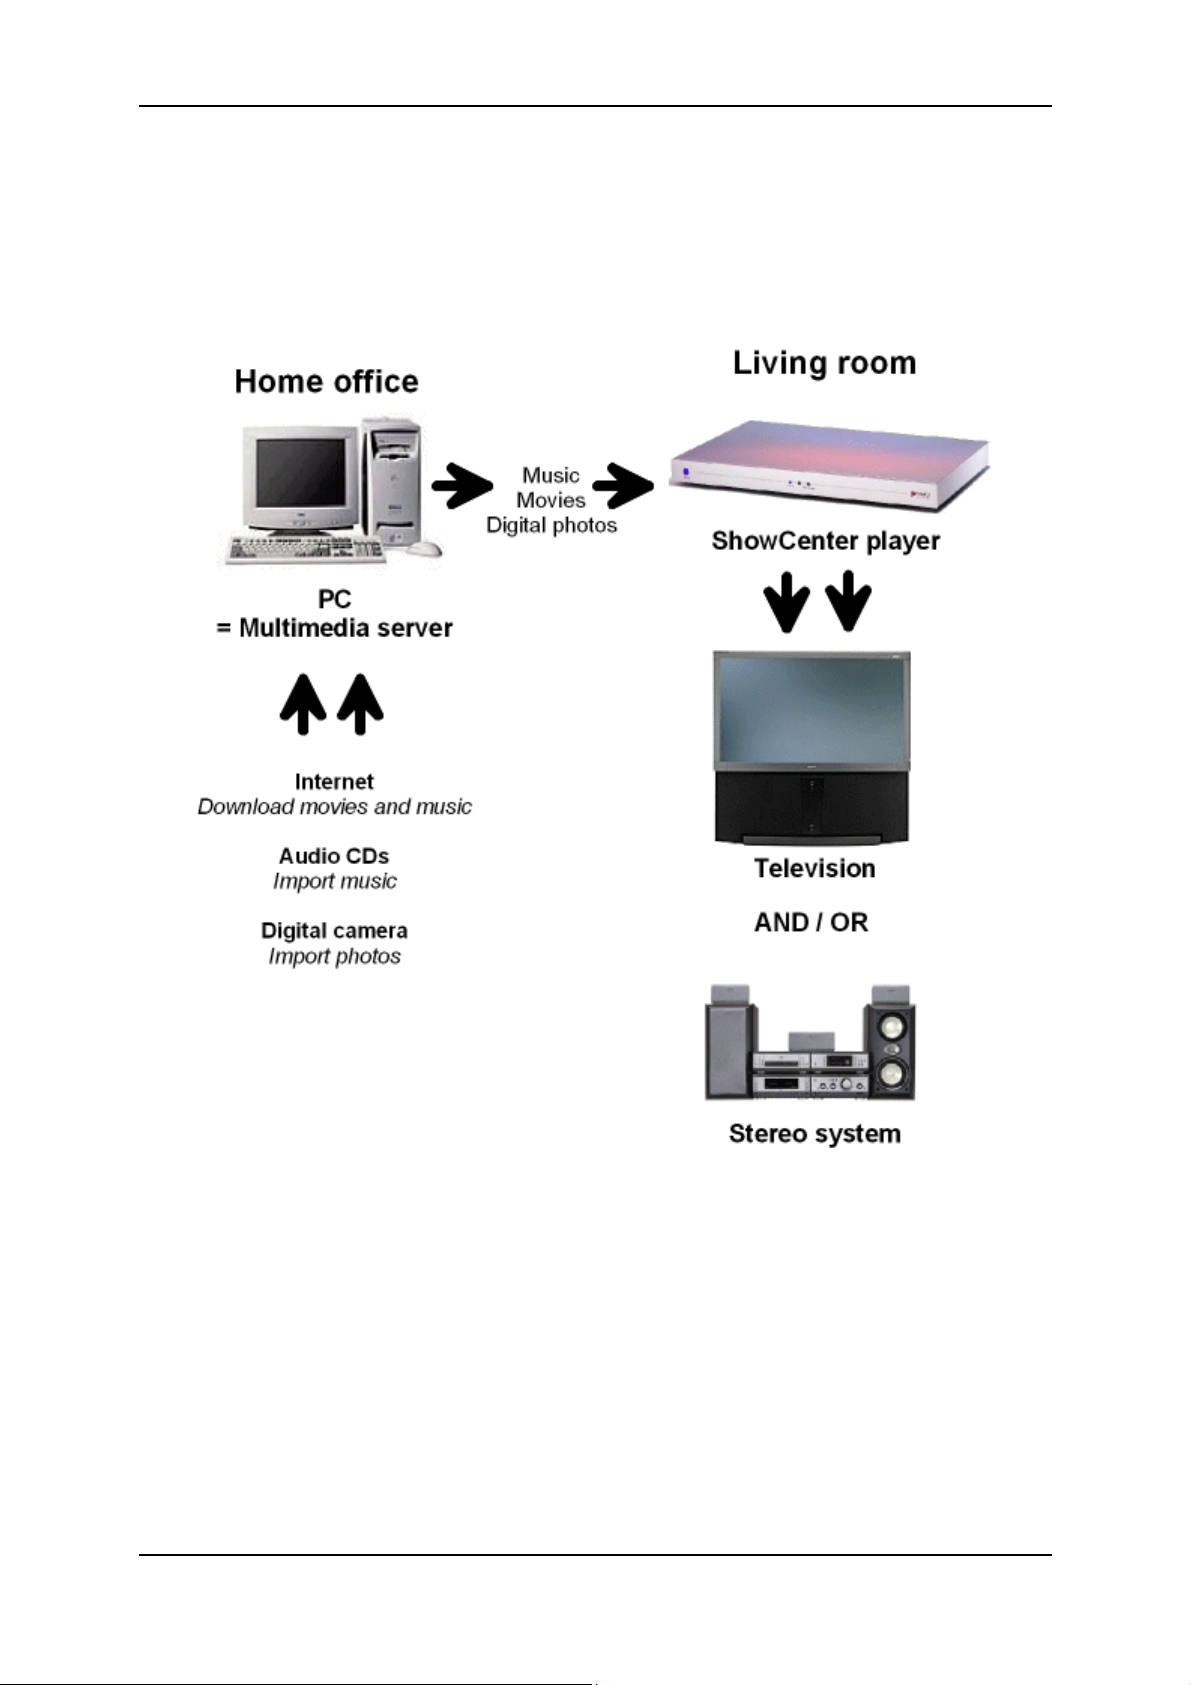
Pinnacle ShowCenter allows you to playback the following media types:
Music files
Movies and other video files
digital photos
You can download them from various sources, including the internet, and
manage them on your PC, view them on your TV or play them back on your
stereo system. And, so that you don't have to get up from the couch to switch
files, it comes with a convenient remote control.
Pinnacle ShowCenter combines a living-room component, a home PC, a
remote control and media-management software.
Pinnacle ShowCenter organizes all your media files in an intelligent
multimedia database on your PC so that you can easily find them and have
easy, convenient access to them.
Do you use the broadband internet access on your PC (DSL or cable modem) to
download audio and video files, but would like to be able to organize them and
play them back any time you want?
Do you want to archive your digital photos, movies, and audio CDs so that you
have instant access to them?
Pinnacle ShowCenter is the perfect solution in both cases!
Pinnacle ShowCenter allows you to organize your media collection so that
you can play back your favorite movies, pull up your favorite photos and listen
to your favorite music on your stereo system any time you want.
Pinnacle ShowCenter allows you to create one simple system that keeps your
PC out of your living room but still lets you enjoy all the benefits of modern
media.
At the end of this manual is a section entitled "Glossary" where you can
look up definitions of unfamiliar terms. If you're still not sure what to do, please
consult the manuals for your television, your stereo system, and your PC
components.
4
Page 9
Basics
The Idea in a Picture
This overview shows one possible setup of the system components in your
house:
5
Page 10

Pinnacle ShowCenter
The Components
The Pinnacle ShowCenter system consists of the following components:
Hardware
ShowCenter Player
The ShowCenter Player creates a multimedia home network together with
your PC and your television and/or your stereo system. The ShowCenter
Player acts like a network client, allowing you to view on your television or play
back on your stereo system any movies, photos, and songs that are stored on
your PC.
Depending your model, your network connection may be wired or wireless.
Remote Control (Infrared)
The remote control allows you to use the menu displayed on the television
screen.
Software
Pinnacle MediaManager
The Pinnacle MediaManager Application, which is installed on your PC, permits
you to import, manage and organize music files, movies, and digital photos in
your constantly updated ShowCenter Database.
You can also create playlists where your favorite music, movies, or photos are
organized according to your own special criteria.
The media files on your PC can come from the internet, from your audio
CDs or from your digital camera.
ShowCenter Server
The ShowCenter Server installed on your PC is what connects the ShowCenter
Application to the ShowCenter Player. The Server delivers data selected in the
TV menu to the ShowCenter Player so that you can play it back on your
television set or stereo system.
ShowCenter Database
The ShowCenter Database is used by the Pinnacle MediaManager Application
and the Server to exchange information across all media. The database contains
all the information about storage locations and file types and stores any other
available information (e.g., playlists). This ensures that the Pinnacle
MediaManager can easily find all the data and that the Server can make any file
available to be played back on the television and/or stereo system.
6
Page 11
Basics
Package Contents
Before you start the installation, check to make sure that you have all the
package contents. If a part is missing or damaged, contact your dealer
immediately. Keep the packaging material in case you have to transport the
original parts again.
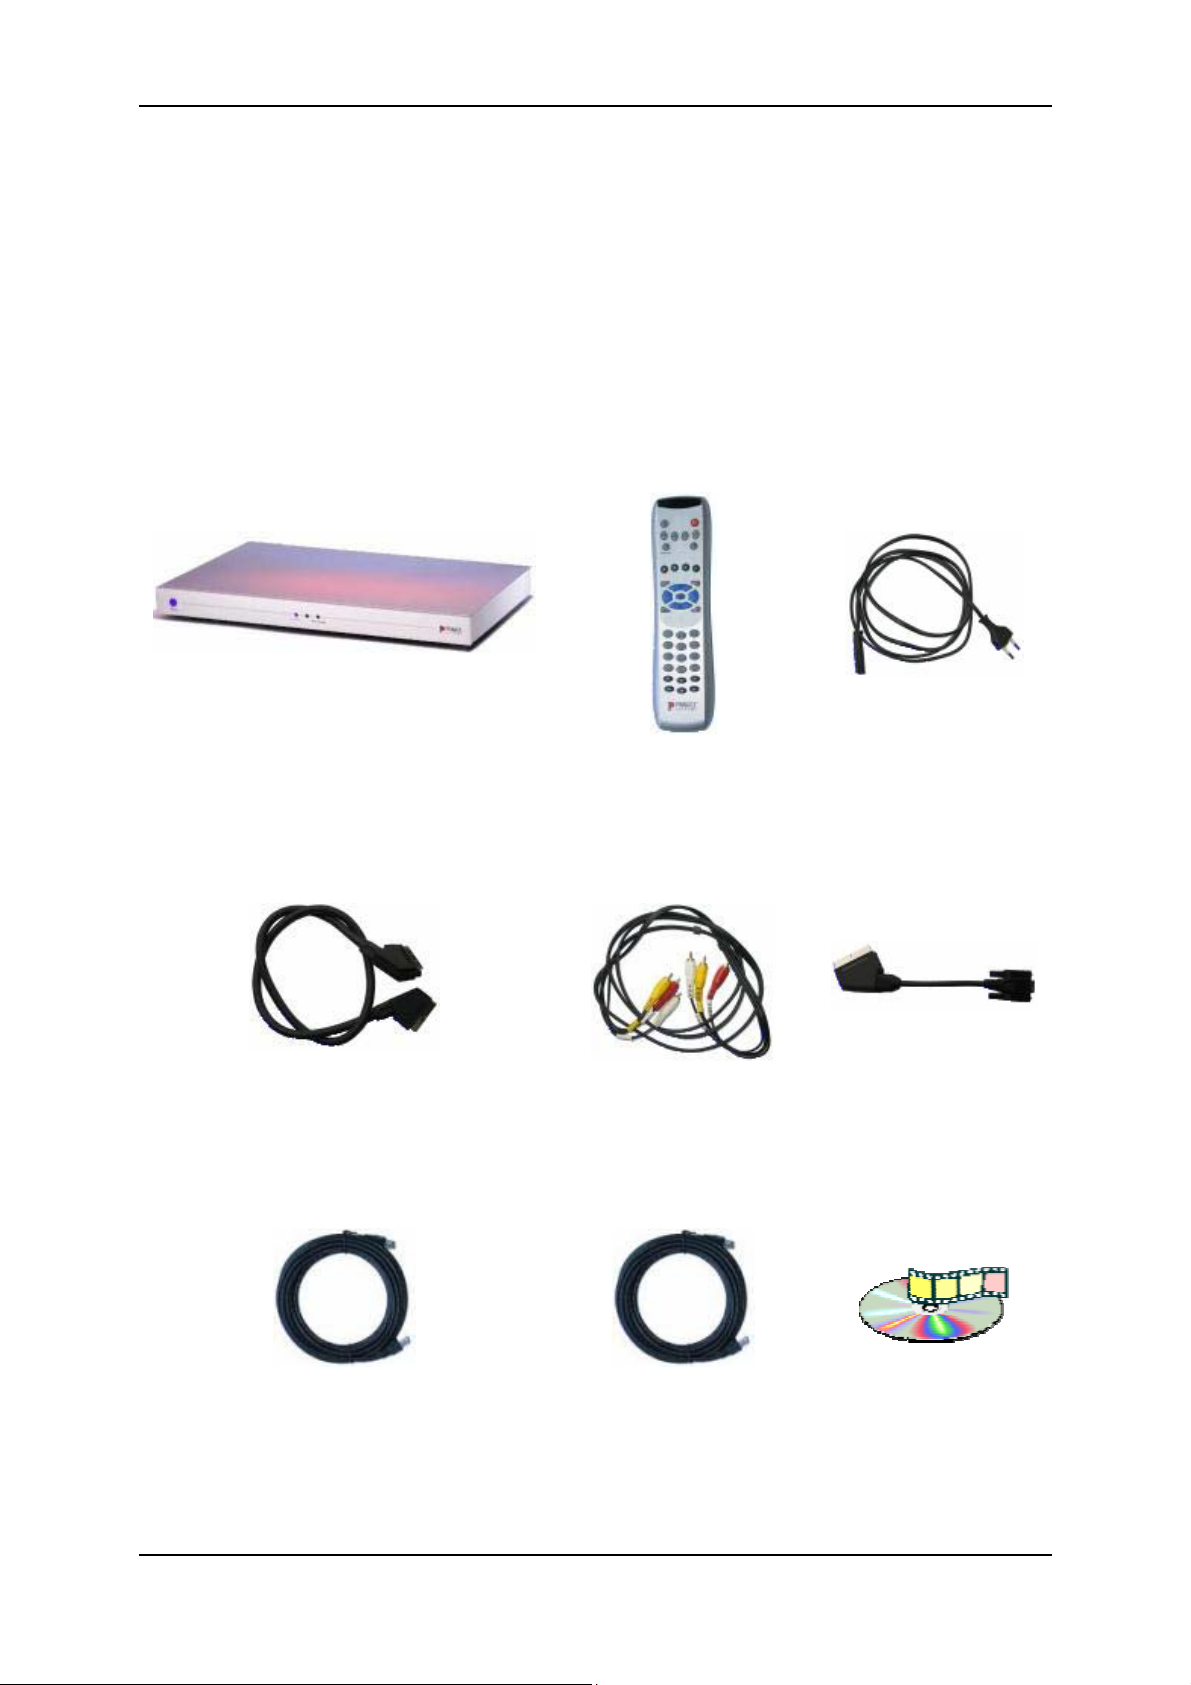
Your Package Contains
Hardware
ShowCenter Player
with integrated power supply
SCART cable
(only in Europe)
Remote control with
"Mignon 1.5 V"
batteries
(R06, AA)
Video and audio
cable
(only outside
Europe)
Power cable
(different for each
country)
SCART-VGA
adapter
(only for some
models)
Ethernet cable
(length: 33')
Crossover cable
(length: 16', only for
some models)
CD-ROM with
applications,
sample files and
drivers
7
Page 12
Pinnacle ShowCenter
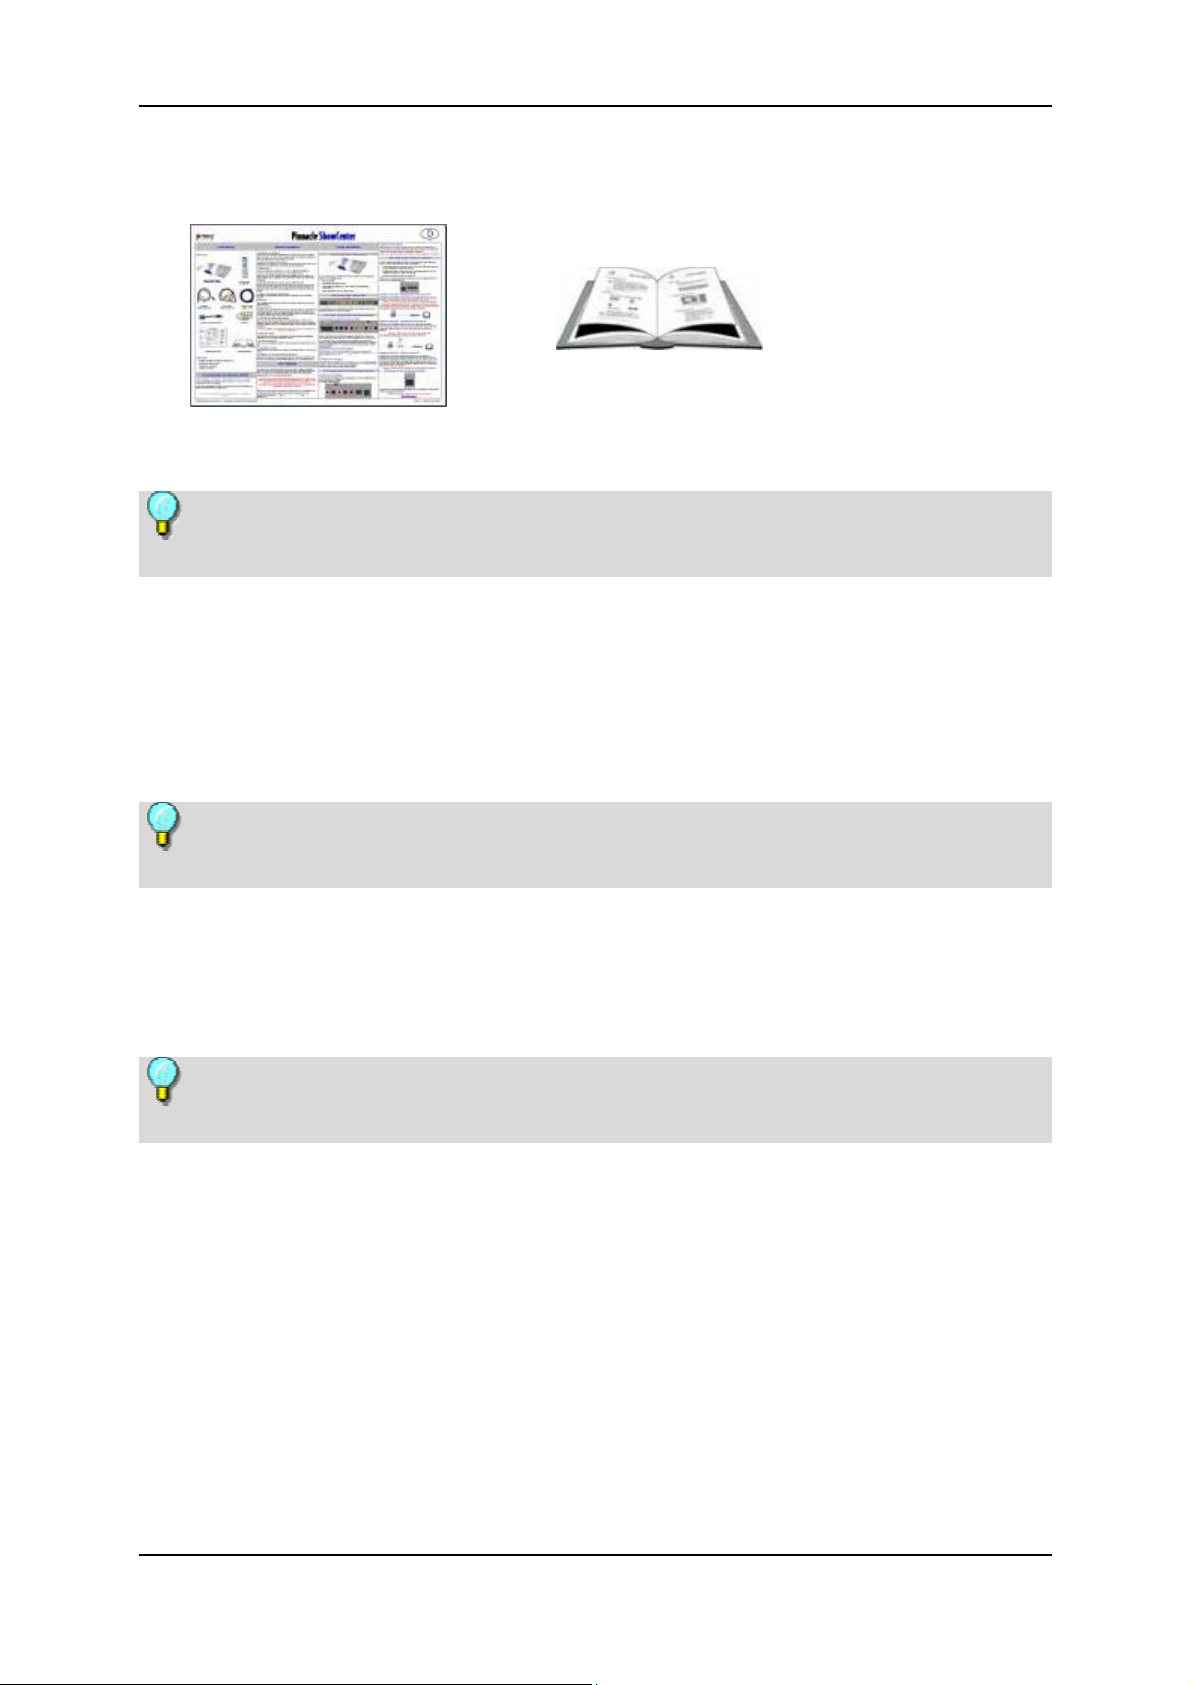
Documentation
QuickStart guide User manual
Note: some models may not have the same package contents as shown
above.
Software
The following software is on the CD-ROM:
Software for Windows 2000 or Windows XP
Pinnacle ShowCenter does not support Windows 95, Windows 98,
Windows Millennium Edition or Windows NT.
Pinnacle MediaManager
ShowCenter Server
Note: some models may not have the same package contents as shown
above.
You also need
Computer
Television and/or stereo system
8
Page 13

Basics
System Requirements
Your system must meet the following requirements for your Pinnacle
ShowCenter to work properly:
Computer Hardware
Processor
You must have at least a Pentium® III 1GHz, or a comparable AMD processor
- We recommend a Pentium® 4 1.8 GHz or a comparable AMD processor.
RAM
256 MB minimum - 512 MB recommended.
Hard Drive
At least 5 GB available storage space on your hard drive.
Graphics Card
DirectDraw-compatible graphics card (AGP graphics card with MPEG 2
decoding support recommended) with 16 Bit color depth (65536 colors) or
greater and 800 x 600 pixel or better resolution.
DirectDraw support:
Before you can use the application, you must have a graphics card and DirectX
9.x installed. The installer will check to make sure that your system meets these
requirements and, if necessary, will automatically install DirectX 9.x.
Sound Card
DirectX 9.x-compatible sound card.
Ethernet Connection
10BaseT - 100BaseT recommended.
For setting up a wireless network connection your PC must have a WLAN
adapter or must be connected to an existing access point.
If you are using a 10BaseT Ethernet connection, you may encounter
problems when streaming high-bandwidth video files. We strongly recommend
that you have a 100BaseT connection, especially if you are using other network
functions.
9
Page 14

Pinnacle ShowCenter
Computer Software
Windows 2000 with Service Pack 4 installed (or higher) or Windows XP with
Service Pack 1 installed (or higher).
10
Page 15

Set up Your ShowCenter System
Set up Your ShowCenter System in Two Steps Overview
This section provides an overview of how to set up your ShowCenter system.
Each step will be explained in detail in the following chapters.
We recommend the following procedure:
1. Install the software
First install the software on your computer.
You will install the following components:
Pinnacle MediaManager
ShowCenter Server
Sample files
2. Connecting Your Devices
Now connect the ShowCenter Player to your computer as well as your television
and/or stereo system.
Depending on your model, you may use wired or wireless network
connections.
11
Page 16
Pinnacle ShowCenter
Installing the Software
This section explains how to install the ShowCenter software on your PC. The
installer will create a Pinnacle ShowCenter program group with several
subgroups where it will copy all the software components you need.
You will need administrator privileges to install the software under
Windows 2000 / Windows XP.
You must be a member of the "Power User" group or higher in order to use the
applications.
1. Insert the Installation CD
Insert the installation CD in your CD drive. The setup program will either
launch automatically or you will have to launch autorun.exe from the CDROM.
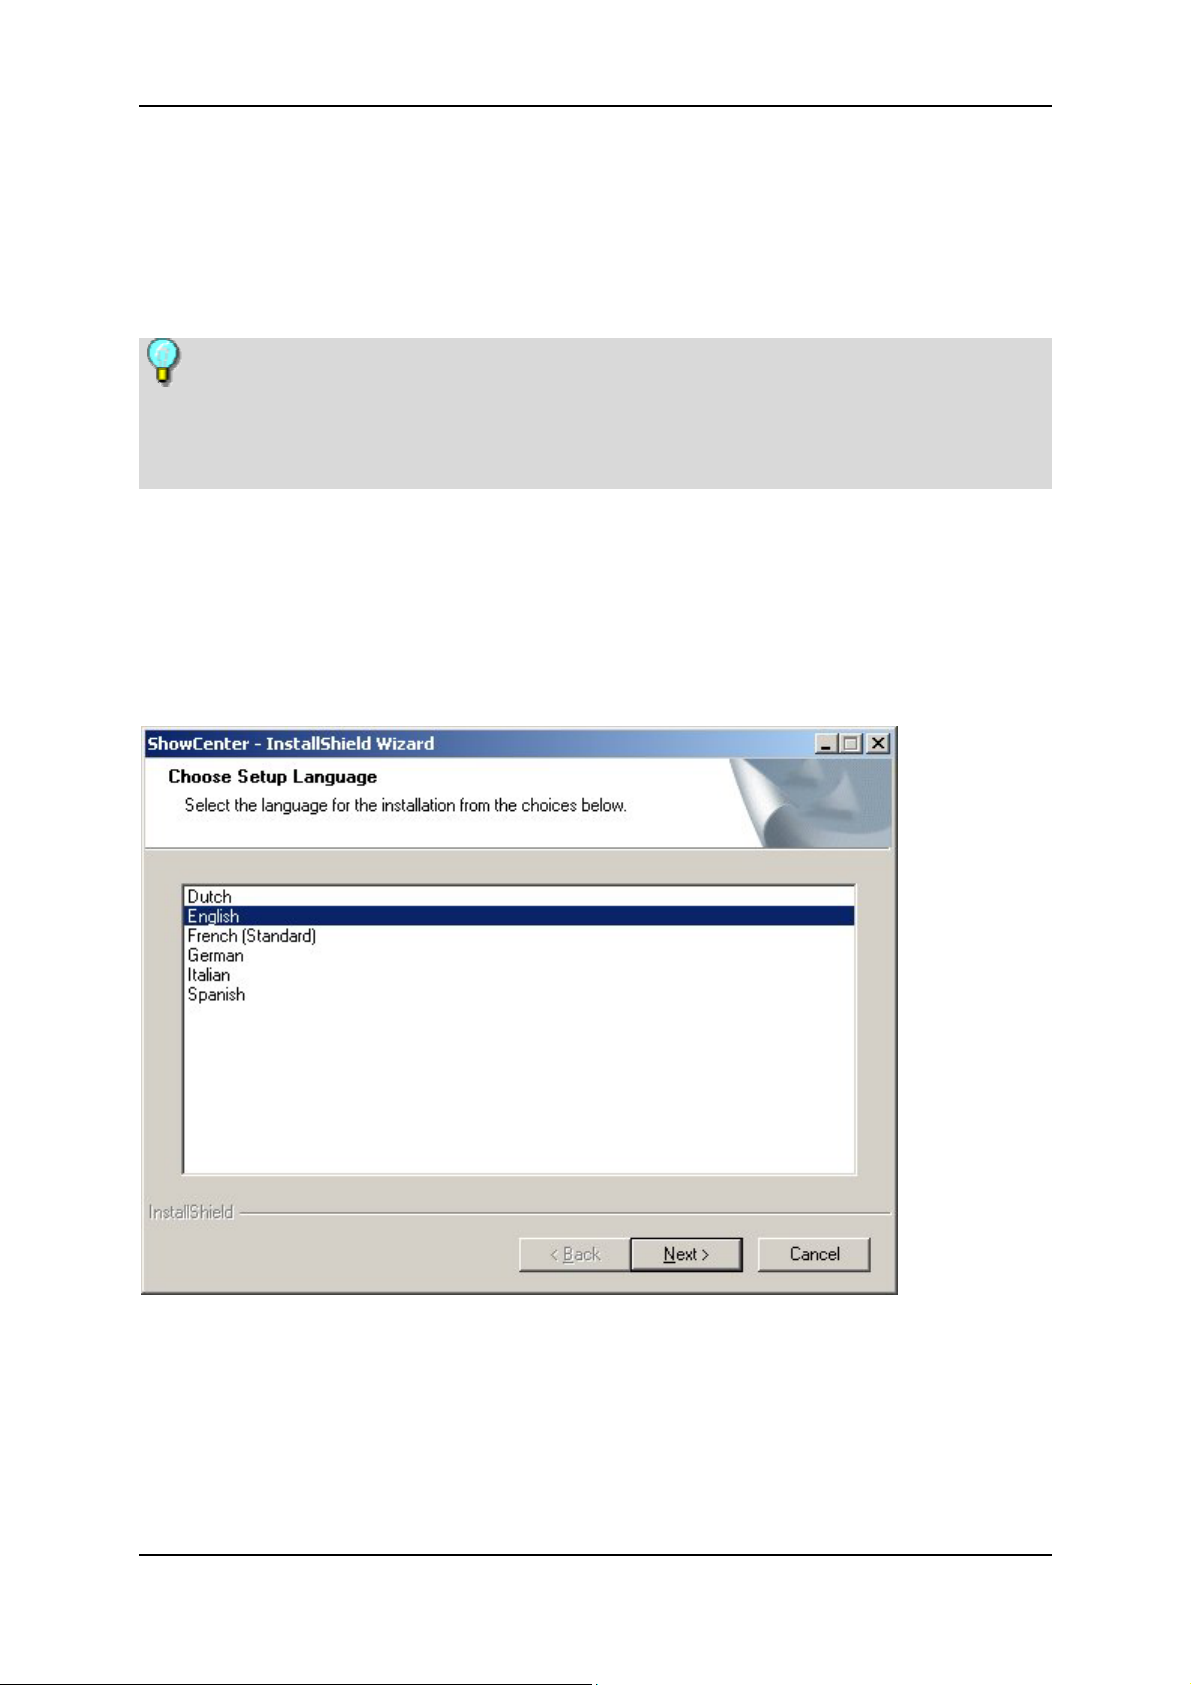
The installer will launch, and display the following dialog box:
2. Choose Language, Click Next
Choose your language for the installation and the software and then click
next.
3. Click Next
Click Next again to continue with the installation.
12
Page 17

Set up Your ShowCenter System
4. Agree to the License Agreement and Click Next
Please read the license agreement carefully, agree to it by selecting the
corresponding option and then click Next.
5. Enter Your User Information and Click Next
Enter the user information and serial number (see CD case). Specify whether
the application should be made available for all users on the computer, or only
for yourself. Then click Next.
6. Select the Setup Type and Click Next
Next, you select a setup type.
Complete
The program is installed with full functionality. Takes up the most space on
your hard drive.
Custom
You can choose which options should be installed yourself. Recommended for
advanced users. Among other things, you can also change the destination
path for the directory where the software is installed.
Click Next once you are finished.
7. Select Components, Click Next
If you have chosen the Custom setup, you will be asked to select which
components you want installed. Once you are finished with this, click Next.
This step is not necessary if you have opted for the Complete setup.
8. Start the Installation
The system is now ready to install. Click the Install button in order to start
copying.
9. Desktop Shortcut
Click Yes if you want a shortcut on your desktop.
10. Reboot Your System
If Windows asks you to reboot, you should reboot your system now.
11. Install Third-Party Applications
After rebooting, you can install any other programs that you have selected as
components (such as Acrobat® Reader).
13
Page 18
Pinnacle ShowCenter
Connecting Your Devices
ShowCenter Player - Front View
The following operating and signaling elements are located on the front of the
ShowCenter Player:
Power on/off switch
LED status indicator - stand by, on/off
Infrared receiver for the remote control
LED indicator for signals (e.g. "New files in watch folder")
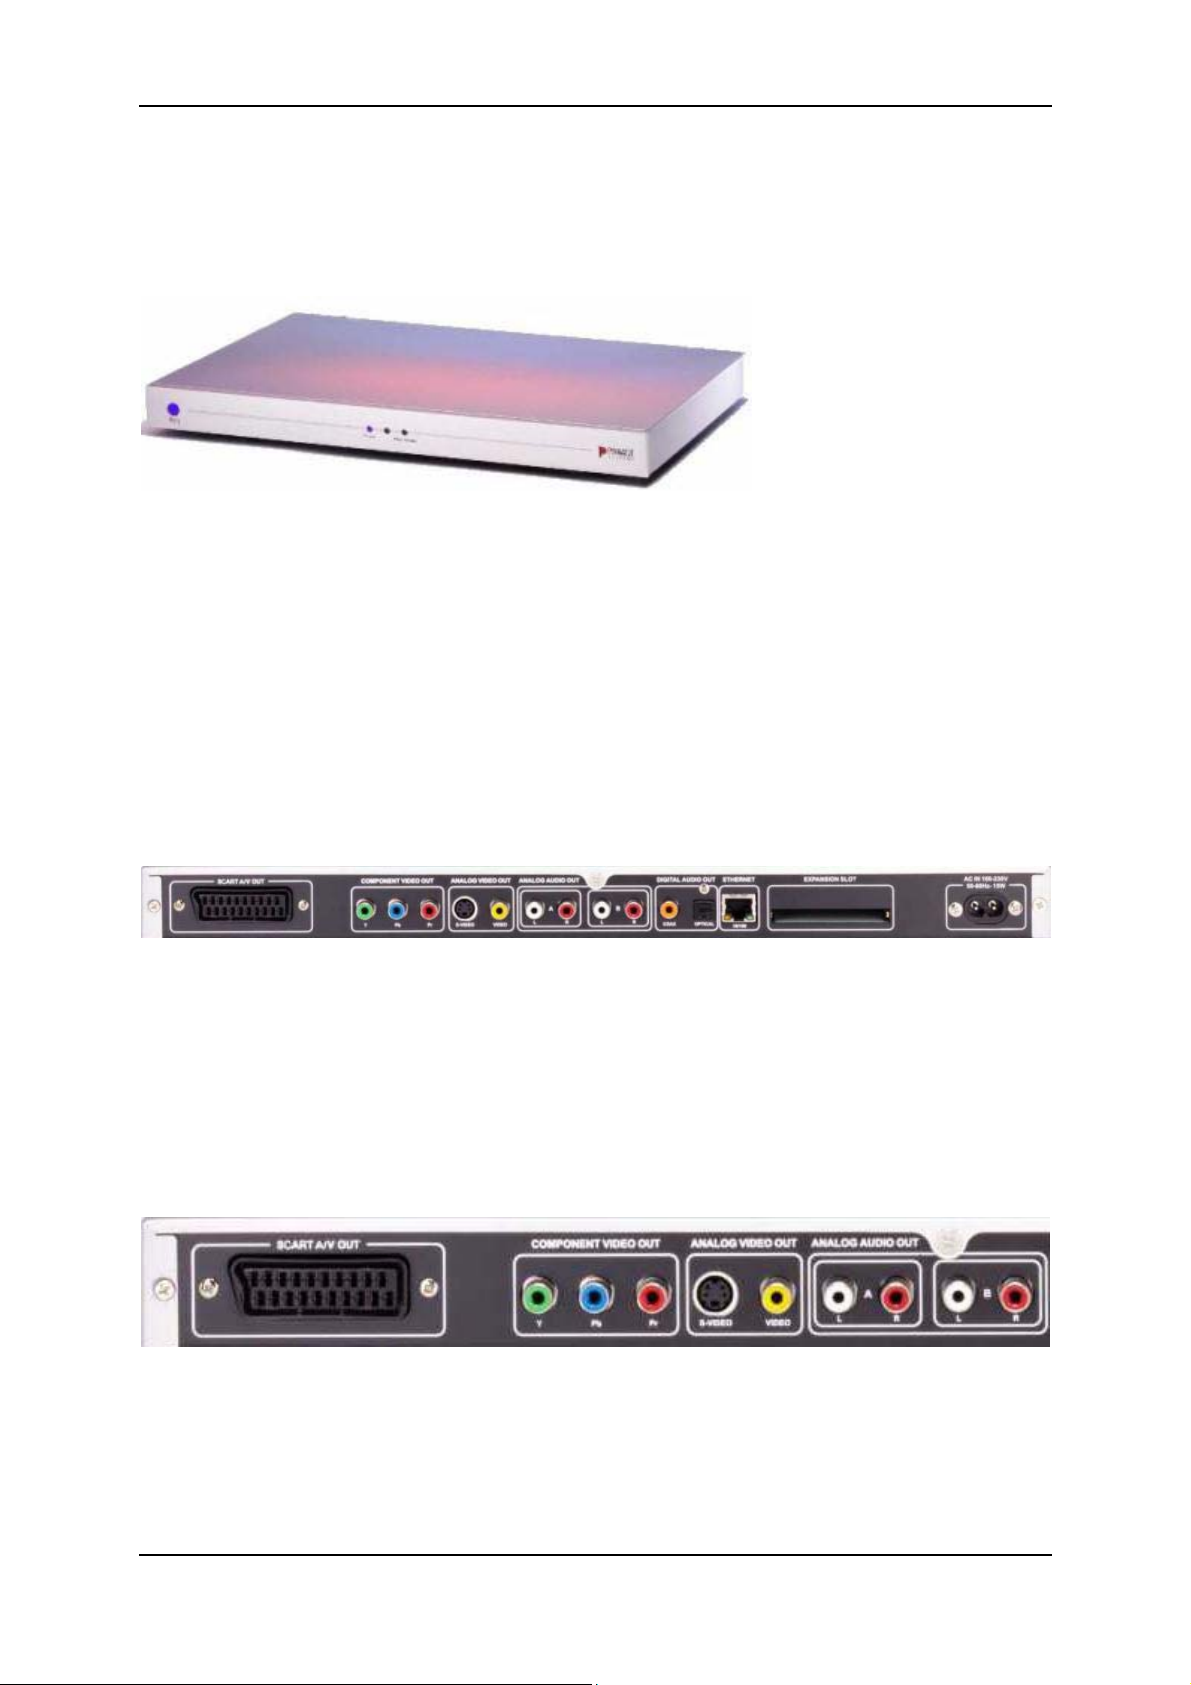
ShowCenter Player - Rear View
The connections on the rear of the ShowCenter Player are explained in detail in
the following steps.
1. Connecting the ShowCenter Player to the Television
SCART Out / Video and Audio Out
Europe: Connect the SCART cable included in the package to the SCART
Output on the ShowCenter Player and to an available SCART Input on your
television. If at all possible, select a SCART connection on your television that
supports RGB signals, since this will provide the best possible image quality.
14
Page 19

Set up Your ShowCenter System
Make sure to change the settings in the ShowCenter Player's Preferences menu
to SCART RGB.
U.S.: Connect the Analog Video Output to an analog Video Input on your
television using the video cable (yellow plug) from the package. Next, connect
the "A" Analog Audio Out jacks to the stereo Audio In jacks on your television
using the stereo audio cable (red and white plugs) from the package.
More Information on the Video Out Jacks
S-Video Out: Offers better-quality images than the normal analog video out
jack.
Component Video Out: This connector offers the best possible video quality
because it transmits the video components separately. It also supports the "PAL
progressive" format and several HD formats (U.S. only). However, only very
advanced-technology televisions offer a Component Video In.
Connecting a VGA Monitor
You can also use the VGA-SCART adapter cable (available as an optional
accessory) to connect a VGA monitor or a projector with a VGA In connection
to the ShowCenter Player's SCART Out connection. The video mode for this
setup is always 1024x768, 60Hz.
Note: the first time you turn on the ShowCenter Player, the only active
connections will be the SCART Out, the Analog Video Out and the S-Video Out
connectors. So you will see no picture if you have a VGA monitor or a
television connected to other outputs. You can switch to the other outputs by
clicking the Video Out button on the remote control. Just press the button and
wait for five seconds. If you haven't gotten a picture yet, just press the button
and wait again. You may have to repeat this process up to eleven times in order
to cycle through all the Video Out modes.
The next time you turn off the ShowCenter Player, you will first have to select
the correct Video Out from the Preferences menu since any setting made with
the Video Out button is not permanent.
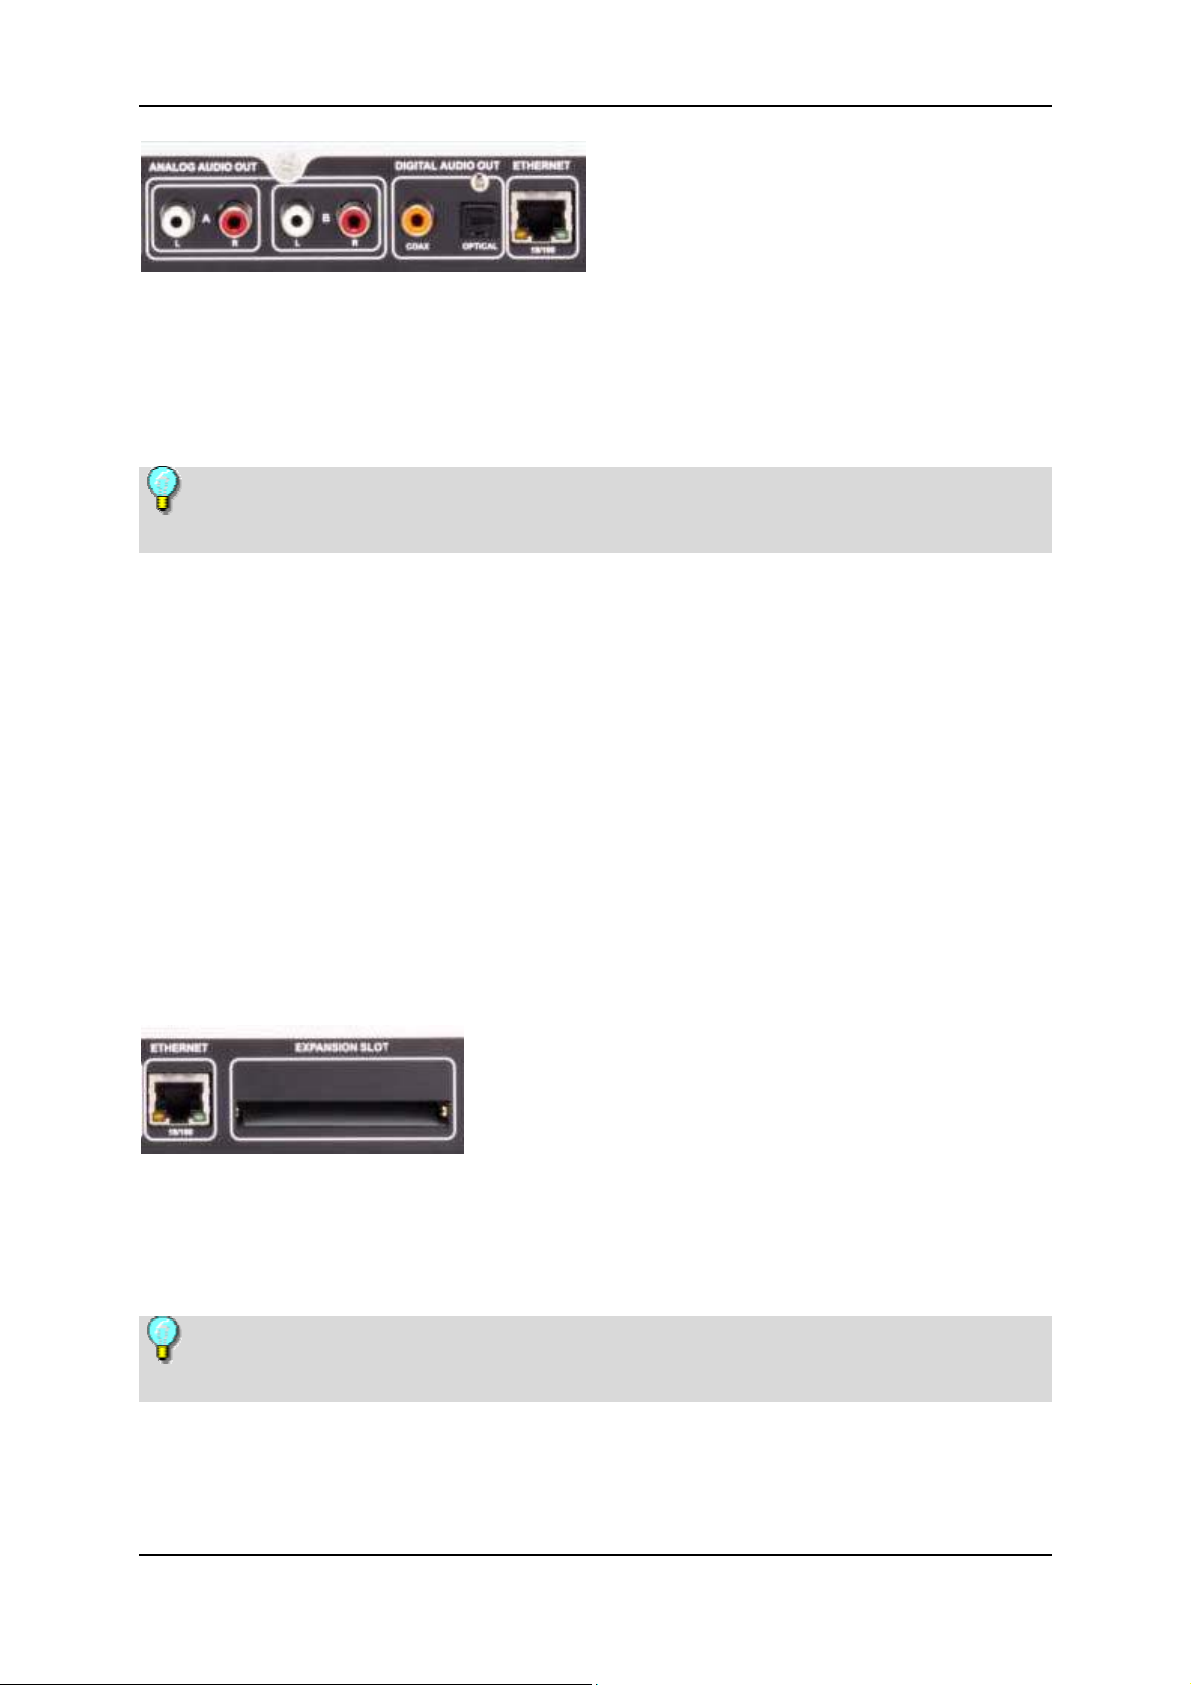
2. Connecting the ShowCenter Player to Your Stereo
System
Analog Audio Out Jacks
Connect the analog Audio Out jacks - for example the "B" jacks (left/right) -
to the corresponding input jacks on your stereo system. Make sure to not mix
the colors.
15
Page 20
Pinnacle ShowCenter
Digital Audio Out Jacks
If you have a surround-sound system, you can use either the coax connector
or the fiber-optic connector (optical) on the ShowCenter Player for these
connections.
Movies with Dolby®Digital ("AC3") sound output their sound signals
through the digital and not the analog audio output ports.
3. Connecting the ShowCenter Player to Your PC
There are various ways of connecting your PC and the ShowCenter Player
through the network:
Network connection - wired with a direct connection between your PC and
the ShowCenter Player (crossover)
Network connection - wired, PC and ShowCenter Player are connected via a
router or similar device
Network connection - wireless ("wireless LAN" or "WLAN")
Select whichever option is the most suitable for you considering your own
equipment setup.
Direct Wired Network Connection (Crossover)
Use a crossover cable to connect the Ethernet port of the ShowCenter Player
to the network card on your PC.
Note: you must use the crossover cable included in the package for this
setup. It is NOT included with all ShowCenter delivery variants!
16
Page 21
Set up Your ShowCenter System
The following image shows how this connection essentially works:
Wired Network Connection Via a Router
If you have a network router attached to your PC, connect the ShowCenter
Player's Ethernet port to an available Ethernet port on the router using the
Ethernet cable from the package.
Note: you must have "DHCP" activated in the router.
The following image shows how this connection essentially works:
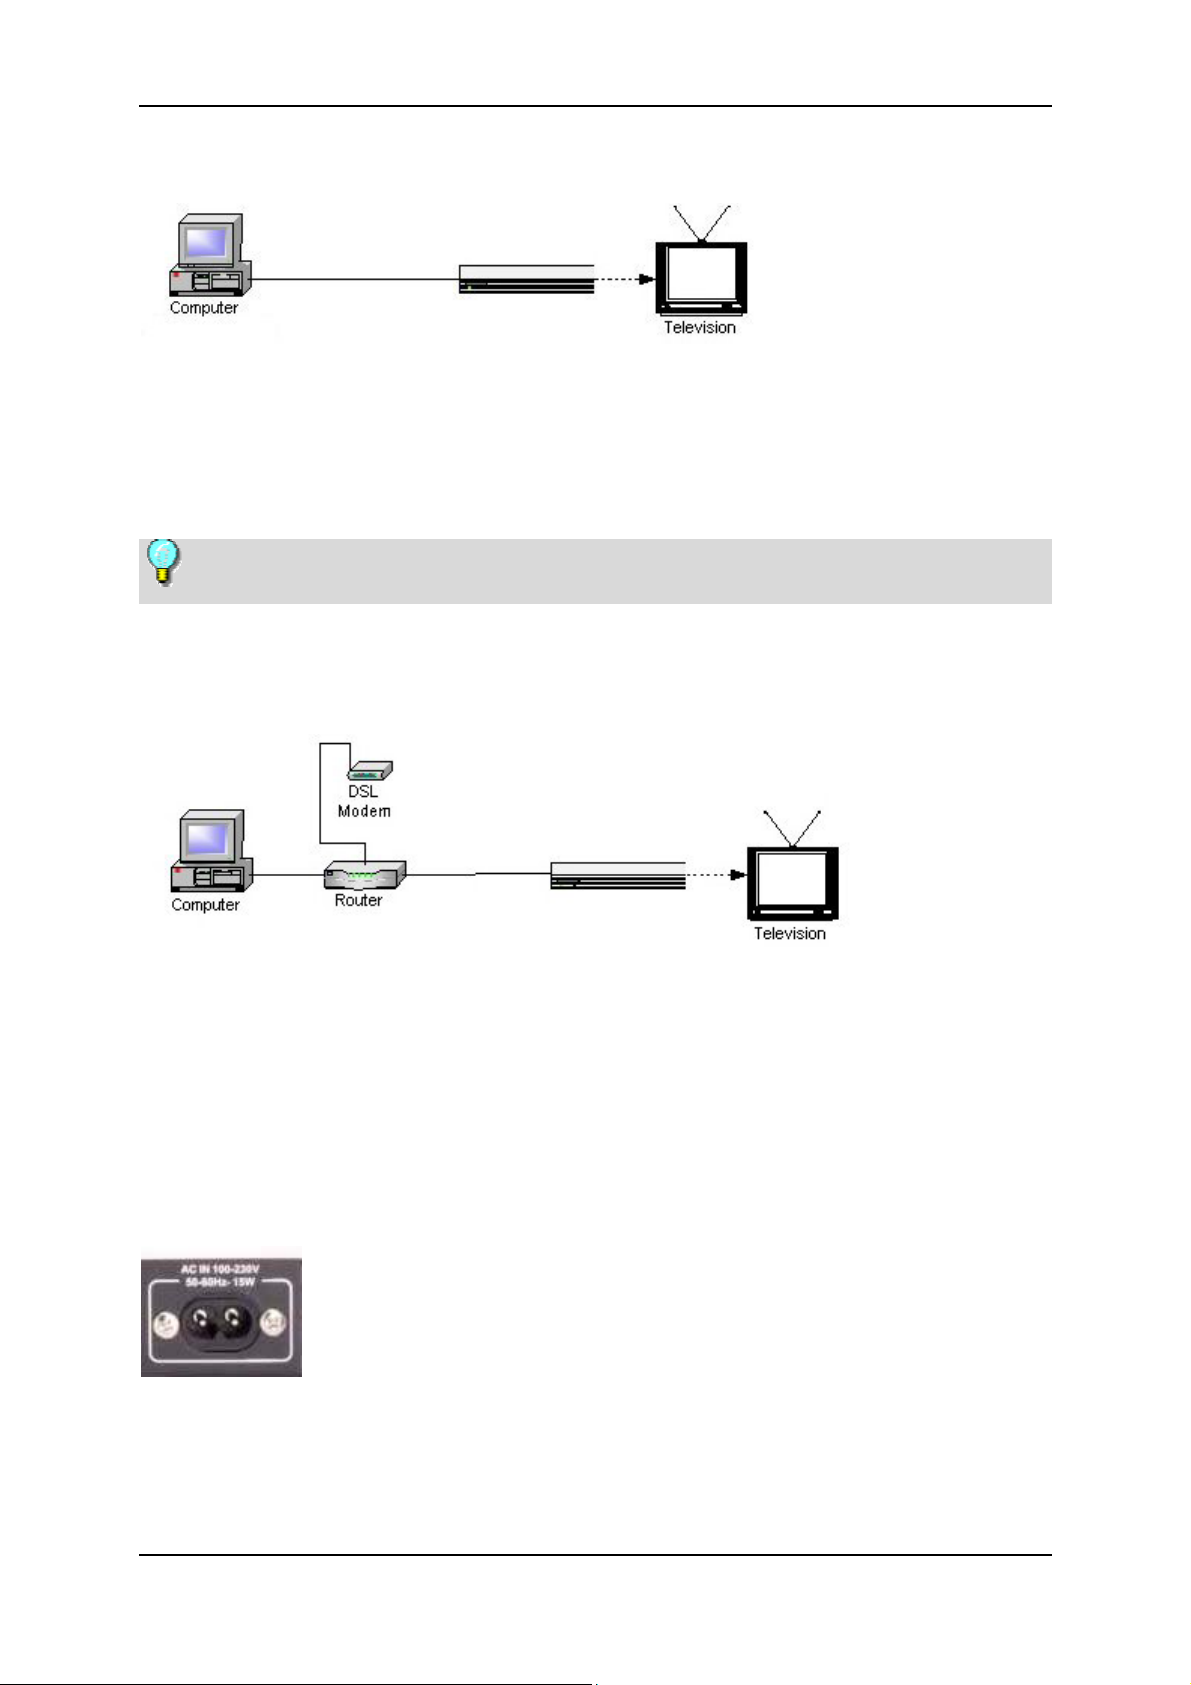
Network Connection - Wireless ("wireless LAN" or "WLAN")
Plug a WLAN network expander certified by Pinnacle into the expansion slot
provided on the ShowCenter Player.
The WLAN configuration is described in detail in the following section.
4. Connecting to the Power Outlet
Please use the power cable from the package to connect the ShowCenter Player
to the power outlet.
17
Page 22

Pinnacle ShowCenter
5. Putting Batteries in the Remote Control
Put the batteries from the package in the remote control as shown in the remote
control battery case.
Once you have connected everything, you can turn on the ShowCenter
Player and the other devices.
Now you just have to sit back and enjoy your new Pinnacle ShowCenter!
18
Page 23
Set up Your ShowCenter System
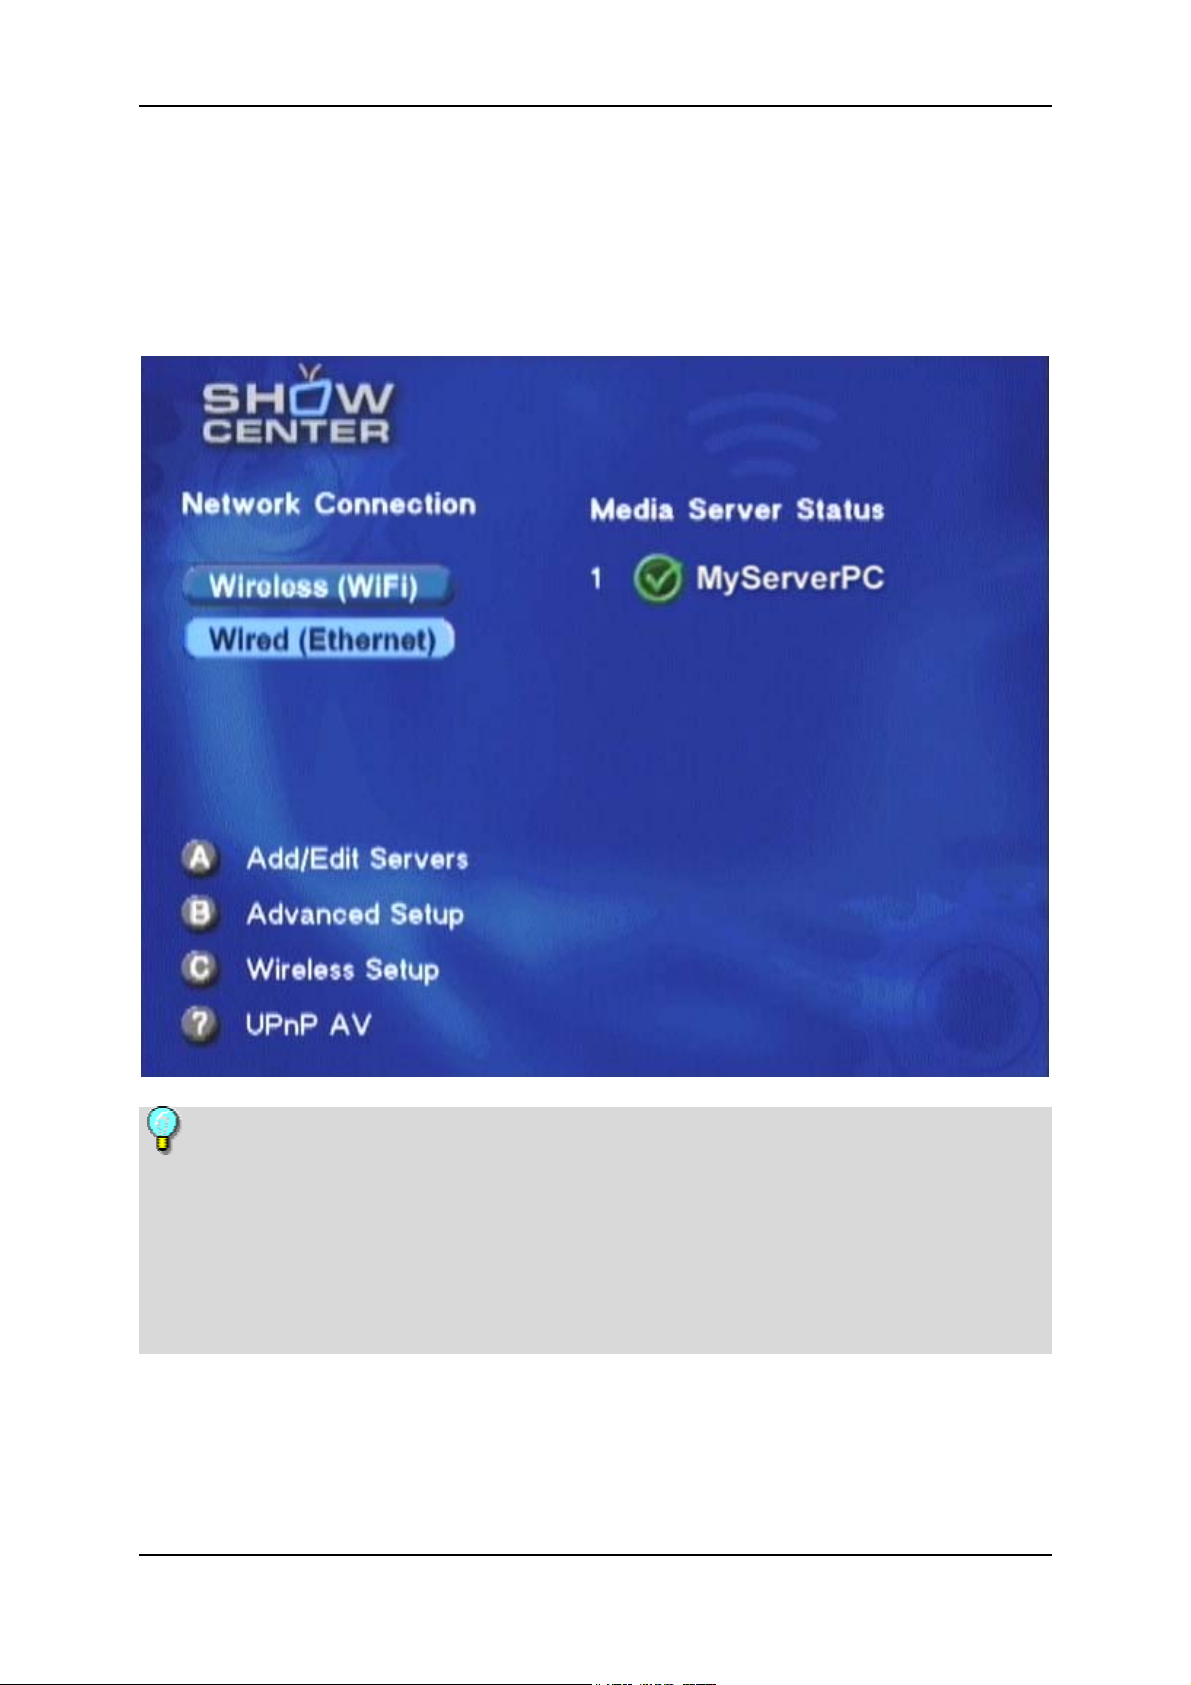
Configuration of a Network Connection
After you turn on the ShowCenter Player, you see the following Server
Selection menu on the connected television. The configuration differs depending
on the type of connection (Ethernet cable or wireless).
If the display on your ShowCenter Player differs from what you see here,
your firmware is not the latest version. In this case, we recommend first
updating the firmware by connecting the ShowCenter Player to your PC or
network using an Ethernet cable. The update is then performed automatically.
It is also possible to configure a wireless connection using older versions of the
firmware, but this is neither very easy nor convenient. If you would like to know
more, refer to the section "Wireless Network Connections (Old Firmware)".
Ethernet Network Connection
For a network connection via an Ethernet cable, first remove any wireless
networking card from the ShowCenter Player. Choose the Wired (Ethernet)
button by selecting it with the blue navigation buttons on the remote control and
19
Page 24

Pinnacle ShowCenter
then pressing the OK button. The ShowCenter now automatically detects the
PCs in your network which have ShowCenter software running. They are listed
on the right. Select one of these PCs and press OK to create the connection.
Pressing the B button will allow you to access further menu pages for the
ShowCenter network configuration. This is only necessary for special settings,
for example, if you want to manually configure the IP address of the
ShowCenter Player.
Wireless Network Connection
A wireless network connection (WLAN) can be created in two ways.
The first way is to create a wireless connection directly between the ShowCenter
Player and a PC. This is also called "ad hoc mode" or a "wireless direct
connection". For this, your PC must have a WLAN adapter.
The second way is to use "infrastructure mode" via a WLAN access point
(WLAN router).
In the following, PC configuration for a wireless network is described first.
Wireless Direct Connection (Ad Hoc Mode)
First make sure that the WLAN adapter on you PC is properly installed,
activated, and functioning.
Open the control panel via Start/Settings.
Double-click on the Network and Dial-up Connections icon and then on the
icon for the WLAN adapter on your PC.
Click on Advanced and then on Add. If you have installed Windows XP
Service Pack 2, click on Modify advanced settings, then on the Wireless
Networks tab and then on Add.
In the following dialog window, enter a name for the network (letters and
numbers without spaces) and then for the network authentication type, select
Open.
If you would like to encrypt your network, select WEP as data encryption and
deactivate the checkbox The key is provided for me automatically. Now enter
a network key.
However, we recommend that you first deactivate the encryption to make it
easier for you to check whether the wireless connection is functioning correctly.
The network key is the "password" for your wireless network. It has to be
entered in hexadecimal format (digits 0 to 9 and letters a to f only). For 64-bit
encryption, the key needs to be made up of exactly ten Hex characters. For 128bit encryption, it is 26 Hex characters. Make a note of the key, since you will
also need to enter it in the ShowCenter Player.
20
Page 25
Set up Your ShowCenter System
Finally, do not forget to activate the checkbox This is a computer-to-computer
(ad hoc) network and confirm it twice with OK. Your PC is now waiting for a
wireless connection with the ShowCenter.
Connecting to an Access Point (Infrastructure Mode)
Make sure that your access point is activated and properly configured and that
there is a network connection to the PC which has ShowCenter software
running. If your wireless network uses WEP encryption, you need the WEP key
as a Hex character string for the following.
Wireless Network Configuration for the ShowCenter Player
Insert the wireless networking card into the ShowCenter Player expansion slot
and disconnect any Ethernet cable. Select the Wireless (WiFi) button in the
Server Selection menu of the ShowCenter Player by selecting it with the blue
navigation buttons on the remote control and then pressing the OK button. Or
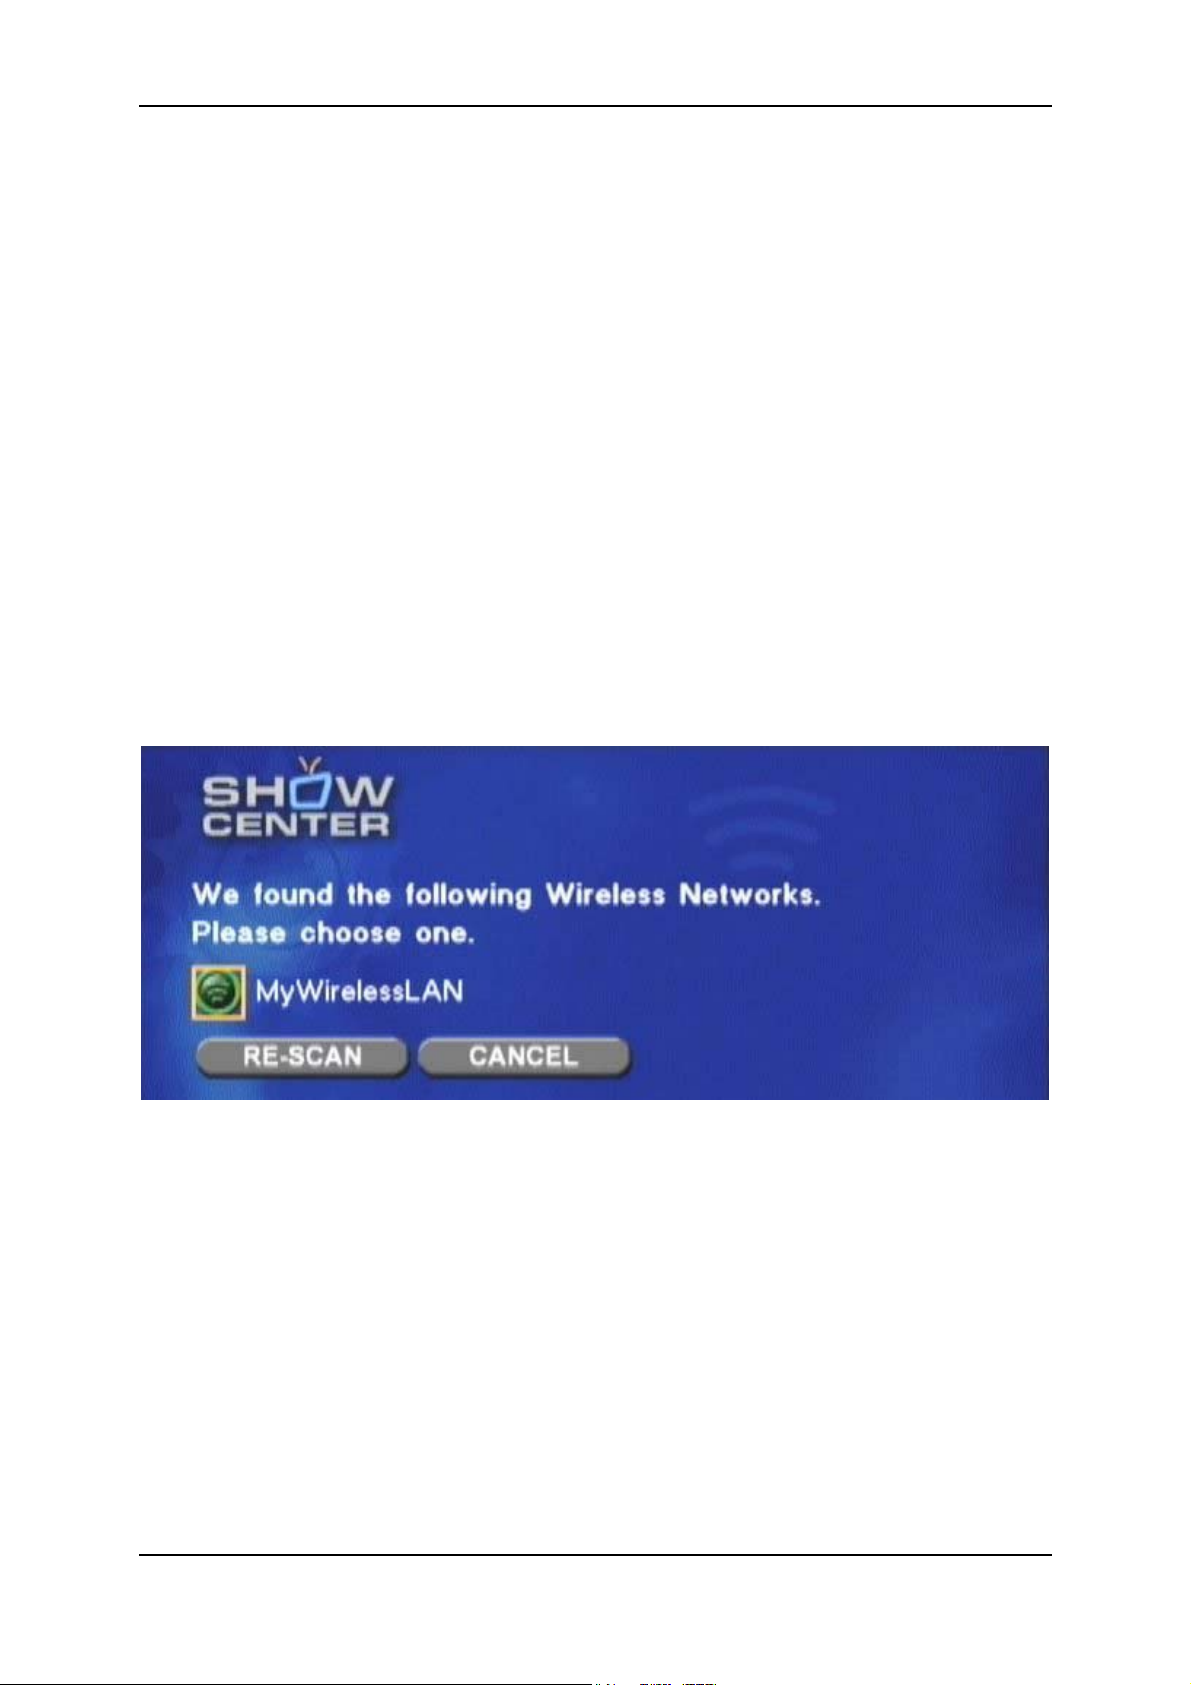
you can press the C button to do this. The ShowCenter Player then performs a
reset, searches for wireless networks and after a few seconds, displays the
results.
In this menu, choose the name (SSID) of your wireless network and press OK.
If no network is displayed, check the configuration of your WLAN adapter or
WLAN access point and select Re-Scan to perform a new search for wireless
networks.
21
Page 26
Pinnacle ShowCenter
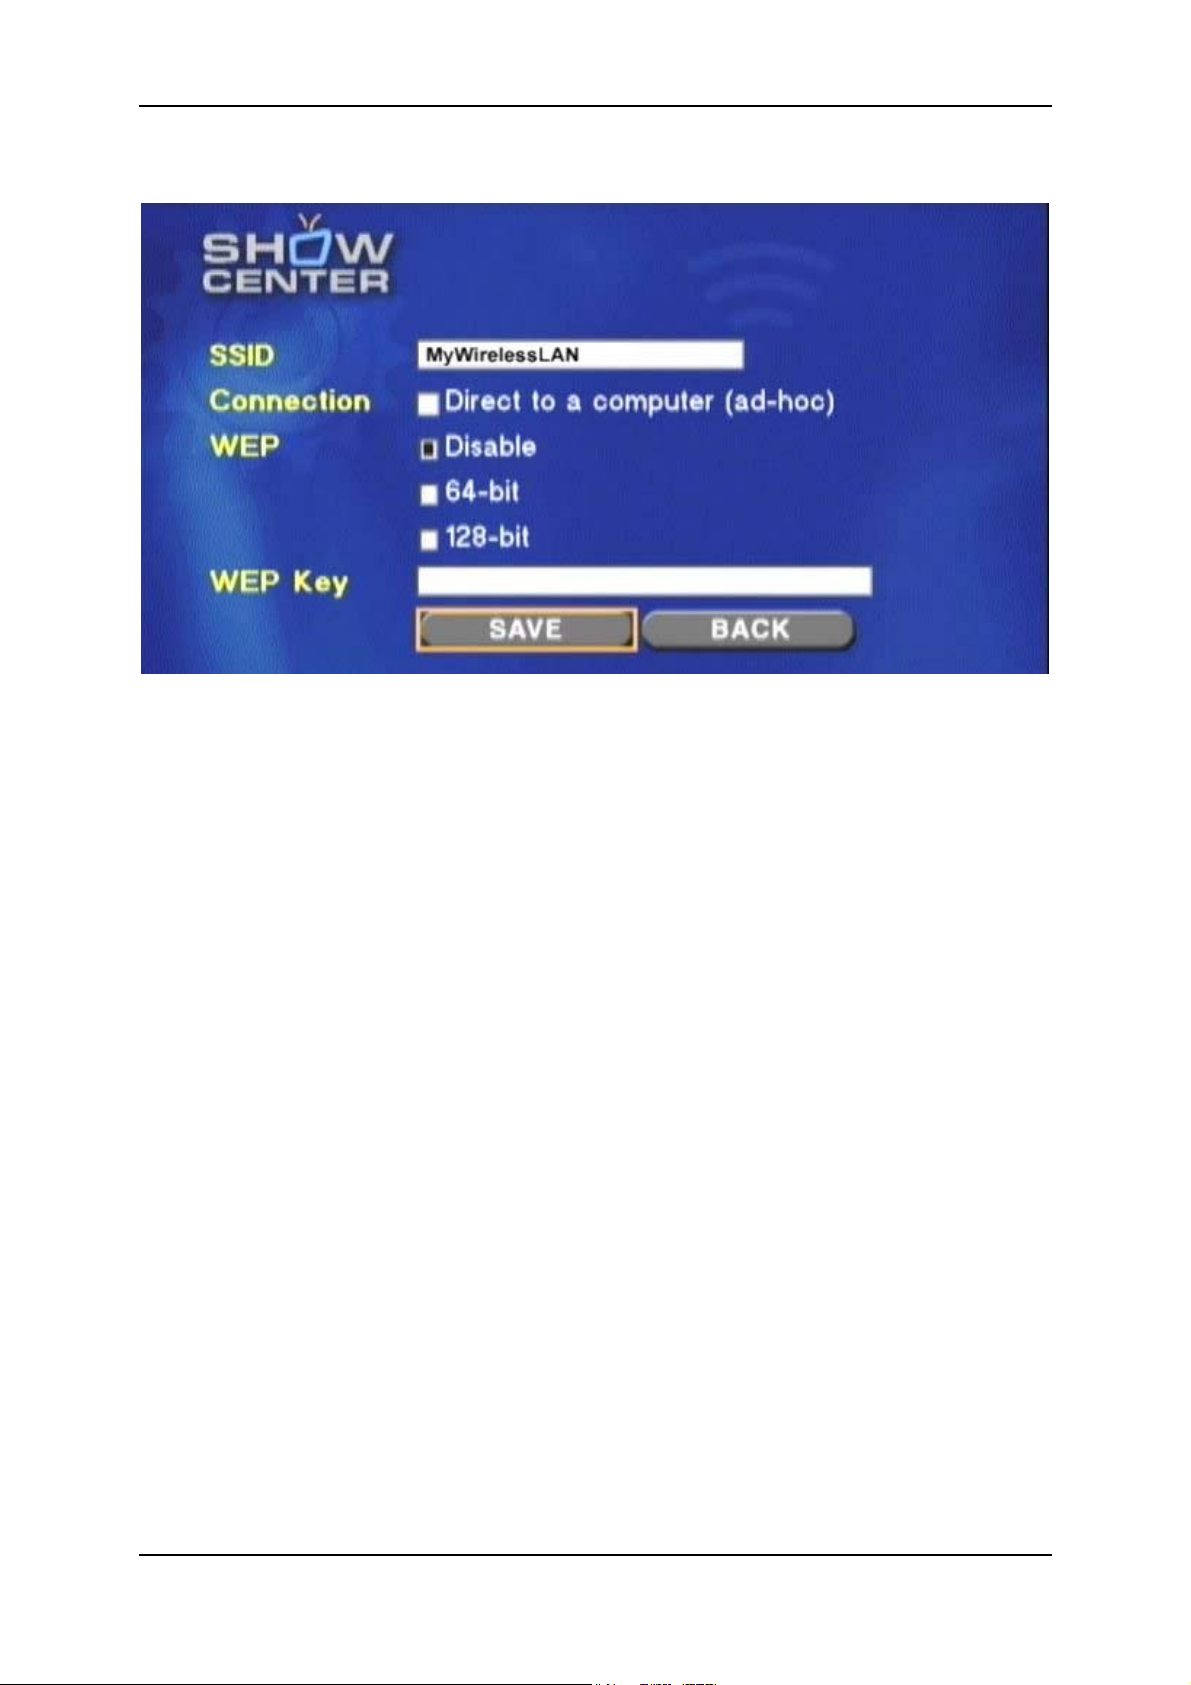
After choosing the network, you see the following menu:
The network name (SSID) is already automatically configured here. Activate the
Direct to a computer checkbox if this is a wireless direct connection ("adhoc"). If you use WEP encryption in your network, select the type of key and
then enter the key under WEP Key.
When entering a hexadecimal key, you may only use the numbers 0 to 9 and the
lower-case letters a to f. The C/N key can be used to switch between upper and
lower-case letters and between letters and numbers.
After completing your entry, press the SAVE button. The ShowCenter Player
restarts and after a few seconds the Server Selection menu appears again. An
attempt is made to connect to the previously configured wireless network - this
may take a few minutes. When the connection has been made, the PCs on your
network, which have ShowCenter software running, are displayed on the right.
Select one of these PCs and press OK to connect the ShowCenter Player with
this server PC.
Wireless Network Connections (Old Firmware)
Old versions of the ShowCenter Player firmware cannot perform automatic
searchs for wireless networks. In this case, a connection is created by pressing
the B button in the Server Selection menu and then selecting WiFi Setup. Enter
the configuration data for the wireless connection into this menu. In this case,
the WEP key must be entered in hexadecimal code and must be either ten or 26
characters long (64 or 128-bit encryption).
For a wireless direct connection, you also need to configure your server PC as
described previously.
22
Page 27

Set up Your ShowCenter System
After a connection has been made, a firmware update is automatically
performed. After this, you may need to reenter the configuration data for the
ShowCenter Player, since it can be deleted by the update.
More Network Configuration Tips
Firmware Updates
The latest versions of the ShowCenter software usually contain the latest version
of the ShowCenter Player firmware. This is automatically loaded after the
installation. After a firmware update, you may need to reconfigure a new
wireless network, since the current settings can be deleted by the firmware
update.
Manually Adding a Server
If your server PC is not automatically detected, you can add it manually. To do
this, first open a command prompt on your server PC and enter the command
ipconfig. Windows now displays the IP addresses of all the network adapters.
Make a note of the IP address of the adapter, over which the connection to the
ShowCenter Player should be made.
After this, press the A button in the Server Selection menu and then select Add
a server. Enter a name for the server and the previously noted IP address, and
save the settings. The new server PC now appears in the Server Selection menu.
Automatically Connect With a Server
If you only use one server PC, you can automatically connect to this server. To
do this, press the A button in the Server Selection menu. Then select Edit a
server and choose your server PC. Now activate the checkbox Always connect
to this server and save the setting.
Manual Network Configuration
You can access the setting pages for manually configuring Ethernet and wireless
networks by pressing the B button in the Server Selection menu. We recommend
using these settings only in special circumstances or when no connection can be
made otherwise.
WLAN Network Extensions for the ShowCenter
For an 802.11g standard network connection (54Mbit/sec), you can only use the
card provided by Pinnacle. This card is not suitable for use in other devices such
as notebooks.
23
Page 28

Pinnacle ShowCenter
WLAN Range and Data Rates
The range of wireless networks is limited and decreases drastically when
devices are separated by walls. Many manufacturers of WLAN products indicate
ranges based on measurements made on open fields and under ideal
circumstances. In practice, actual performance does not even come close to the
ranges indicated. In our tests, we have found that the distance of transmission is
not more than eleven yards if there is a wall in the way.
The maximum data rate for realtime video transmission using the 802.11g
standard is approximately 9 to 10 Mbit/sec. This is sufficient even for DVDcompatible formats. However, when the distance is increased or when walls are
in the transmission path, the maximum data rate decreases.
Firewalls
If you use a firewall between your PC and ShowCenter, then ports 8000 (TCP)
and 1900 (UDP) must be enabled because they are required for communication
between the ShowCenter Player and the server. Many WLAN access points are
at the same routers, i.e. they establish connections to the Internet (e.g. via DSL
or cable modem). In this case, a firewall is generally integrated which, however,
only works "outward" (that is, in the direction of the Internet). The
aforementioned ports should not be enabled for such a firewall as the contents of
your media database are otherwise visible from the Internet.
Limitation to Special MAC Addresses
If you have configured the access point to secure your wireless network so that it
permits only devices with certain MAC addresses, you must add the MAC
address of the ShowCenter WLAN network expansion card to this list. The
MAC address is located on a sticker on the ShowCenter network card. Note that
this is not the MAC address that is indicated in the settings of the ShowCenter
Player.
Permanent IP Address
As a standard the ShowCenter Player uses an IP address assigned via DHCP. If
no DHCP server is on the network, ShowCenter selects an IP address itself.
You can also manually assign a permanent IP address to the ShowCenter Player
for special network configurations. In order to do so, press the "B" button on
the remote control in the Server Selection menu. Now select IP Config and
then Switch to manual. Now you can enter the values.
24
Page 29

Pinnacle MediaManager
Overview
What the Pinnacle MediaManager Does
The Pinnacle MediaManager is installed on your PC so that you can import the
following:
Music files
Movies and other video files
Digital photos
You can manage and organize these files in the MediaManager database which
is constantly updated.
You can also create personal playlists – compilations of your favorite songs,
movies or photos organized according to your own criteria. These playlists can
also be exported so that, among other things, you can burn an audio CD.
25
Page 30
Pinnacle ShowCenter
Main Window of the Pinnacle MediaManager
You can launch the Pinnacle MediaManager from the Pinnacle program group
in the Start Menu or by double-clicking the Desktop shortcut. The following
window will open:
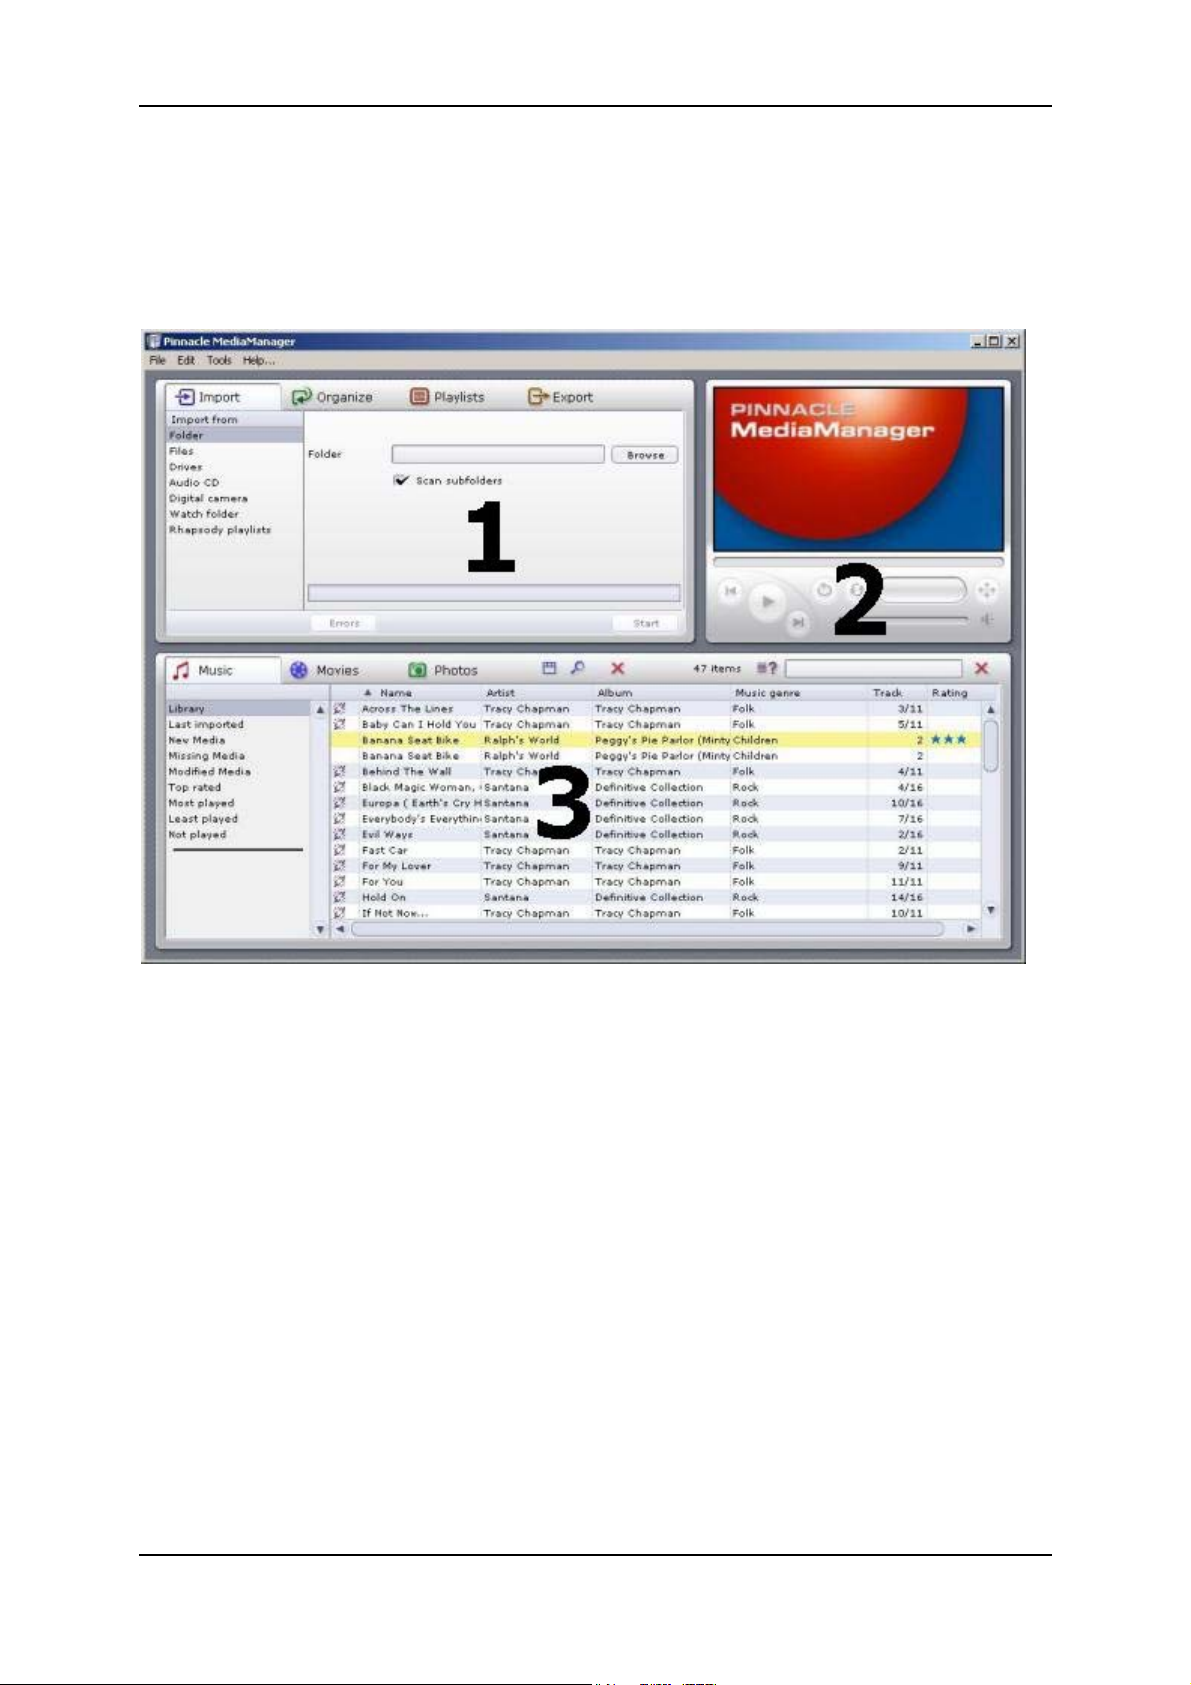
The window contains the following sections:
Section 1:
The Tools section with the Import, Organize, Playlists and Export tabs,
located in the upper left-hand corner.
Section 2:
The Media Player in the upper right-hand corner.
Section 3:
The Media Library with the Music, Movies and Photos tabs, located in the
bottom half of the window.
Menu Bar:
At the very top of the window is the menu bar, which contains the File, Edit,
Tools and Help menus.
26
Page 31

Pinnacle MediaManager
The window layout varies depending on what tools and lists you have selected;
the three sections work together closely and interactively. How the sections
work individually is explained in detail in the following chapters.
We will first focus on the Media Library and the Media Player to give you the
basic tools you need to use the application.
In later chapters, we will look at the more advanced functions – Import,
Organize, Playlists and Export – as well as the menus.
27
Page 32

Pinnacle ShowCenter
The Media Library
Introduction to the Media Library
Media Types
The Media Library displays the contents of the database sorted by media type.
Access each media type by clicking on the corresponding tab:
Music tab
Movies tab
Photos tab
Categories
For each media type, you can toggle between the categories listed on the lefthand side.
Library
Displays all the files in the database.
Last imported
Displays the most recently imported files. For example, if you import 3 CDs in a
row, you will only see the tracks from the third CD.
New Media
All the files imported over the past twenty-four hours.
Missing Media
Although the media displayed here exist as entries in the database, the
associated files are no longer where they were saved originally. They can no
longer be found because they have been either accidentally deleted, moved or
renamed. These entries are marked in the left column of the Media Library with
the corresponding icon.
28
Page 33

Pinnacle MediaManager
The Pinnacle MediaManager automatically looks for missing media at certain
time intervals. You can set the time interval via the File under Settings. If you
want to do a manual search, select Find missing media from the Shortcut menu
or via the Tools menu.
You can access the Shortcuts menu by right clicking the entry you want in the
Media Library list. From here, you can use the Repair missing media function
to browse for missing files or you can "repair" broken links by entering the new
file location or file name.
Modified Media (applies only to music file)
If you use a different software program to modify the ID3 tags of your music
files, the data no longer corresponds to the values in the Pinnacle Media
Manager database. This situation is automatically detected in a way similar to
Missing Media. The entries are marked in the left column with the
corresponding icon.
You can now enter new values for the ID3 tags via the function area Organize.
Or you can also update the database by reading the values of the modified ID3
tags from the file. To do this, select the entries, right click and then select
Update values from file in the Shortcut menu.
Highest Rating
Files given a four or five star rating are displayed here. The rating is assigned
either via the Shortcut menu or via the function area Organize and displayed
using star icons.
Playback Counter
The Pinnacle MediaManager contains a playback counter, which displays and
categorizes media files according to the following categories:
Frequently played:
The media files displayed are the ones played most frequently by the user.
Rarely played:
The media files displayed are the ones played least frequently by the user, but
have been played at least once.
Not yet played:
The media displayed are the ones, which have not yet ever been played.
The playback counter can be reset via the Shortcut menu.
Automatic playlists are created and constantly updated for the categories
Highest rating, Frequently played, Rarely played, and Not yet played.
User-Defined Playlists
The files in the selected playlist are displayed.
29
Page 34

Pinnacle ShowCenter
Details
The right-hand list displays details for individual files. These details will vary
depending on whether you have selected the Music, Movies or Photos media
type tab. These sorting criteria are also called tags.
Depending on which media type you select, you may see the following
information: file status, track/movie/photo name, date created, etc.
As in Windows Explorer, you can left-click a column header to resort the files in
the list.
You can change the order of the columns by left-clicking the column headers
and dragging them to a new location.
Right-clicking a column header will bring up a pop-up menu where you can
choose which columns to display and which not.
Icons
The icons in the left column of the Media Library have the following meanings:
The file has accidentally been deleted or moved or it can no longer be found
because it has been renamed.
The original organizational identifiers of the file have been modified.
The file originates from the Rhapsody Music Service.
The file is currently being played back.
The playback of the file is currently on hold.
There are further icons associated with file conversion. They are explained
in the section "File Conversion".
Shortcut Menu
Please note that you only need to right click on a list entry in the Media Library
to access the extensive Shortcut menu. Most Media Library functions are
available here in order to access them more quickly. Simply select the option
you want.
Read the following sections carefully to learn how the Media Library can help
you find, sort, and delete your media files.
30
Page 35

The Sort View in the Media Library
Pinnacle MediaManager
You can toggle the sort view on and off by clicking the
the tabs.
Clicking this button will split the list horizontally into two new sections.
The upper half of the list can be used to sort or filter the media files displayed in
the lower half. In other words, in the upper half you set a filter that selects which
files can be displayed in the lower half.
Example: You have activated the Music tab and now want to display all the
tracks in your database in the Soul genre.
button to the right of
You can open the menu with the
should be displayed in the sort view. We recommend listing photos, for
example, according to date.
button and determine which columns
31
Page 36

Pinnacle ShowCenter
Searching in the Media Library
On the far right-hand side of the Media Library is the search field:
To quickly find a particular media file in the database, just enter any search term
in the search field.
You can use the button to determine whether only certain ranges in the
database should be searched, e.g. according to "Name", "Artist" or "Album", or
whether the entire database should be searched.
Any files that have names containing the search term will be displayed in the
list. To enter a new search term, simply click in the search field and overwrite
the old search term, or clear the field by clicking the
button.
32
Page 37

Deleting Files in the Media Library
Deleting Files
Pinnacle MediaManager
To the right of the tabs is a
Select one or more files in the list and then click this button.
The entries are deleted from the database. The associated media files can also be
deleted from the hard disk if you select the corresponding option in the dialog
box displayed.
If you want to include the files in the database again, you will have to reimport
them.
button.
33
Page 38

Pinnacle ShowCenter
The Media Player
Using the Media Player and Its Controls
The Media Player plays the media files in the database on your PC. Video files
and photos are played/displayed on its 16:9 screen. To toggle full-screen
playback on your PC monitor, double-click the Media Player screen. Doubleclick the screen again to revert to the main Pinnacle MediaManager view. Audio
files are played back using your sound card and computer speakers. Audio files
also require you to use the Media Player controls.
To make them easier to use, all controls have a tooltip field that appears
when your mouse pointer is placed over the buttons.
Individual Explanations of Controls:
Start/Pause Playback
Select a file in the Media Library and then double-click it. The movie or the
photo will appear on the Media Player screen, and the button will change
appearance. Click the button again to stop playback.
In the left column of the Media Library next to each entry, the corresponding
icons appear in miniature.
Previous
Click this button to play back the previous file in the playlist.
34
Page 39

Pinnacle MediaManager
Next
Click this button to play back the next file in the playlist.
Shuffle
The music, video or photo files will be played/displayed in random order.
Repeat
If you click this button while a playlist is being played, the list will be played
back over and over until you deactivate the feature by clicking the button again.
Video Format
While playing a movie, you can click this button to select the video format
(standard 4:3, letterbox or widescreen 16:9. Note that a tooltip field will appear
when you place the cursor over this button. The video format you select for a
movie will be saved in the database – you won't have to reset it the next time
you watch the movie.
Progress Bar
This slider indicates by its position how much of the current audio or movie file
you have heard or seen. You can also move back and forth to anywhere in the
file by dragging the slider with your mouse.
Time Display
This shows you how long the audio or video file has been playing.
Volume Control
Located on the right-hand side of the screen section, this slider can be dragged
up and down with the mouse to set the volume.
Mute
Click this button to turn the sound on and off.
35
Page 40

Pinnacle ShowCenter
Importing Media Files
Introduction to the Import Tab
You will see the following window if you select the Import tab in the Tools
section:
You can import media files to the MediaManager Database from the following
sources:
Folder: From a folder on your PC.
Files: One or more files from a selected folder.
Drives: From any drive on your PC.
Audio CD: From the audio CDs that you wish to archive in the
MediaManager Database.
Digital camera: Photos taken with your digital camera.
Watch folder: From a watch folder on your PC.
Rhapsody playlists: Download Rhapsody playlists onto your PC.
Due to licensing restrictions, this function is not available in every version of
the Pinnacle MediaManager.
In the tab for a particular media type in the Media Library, you can see the
imported files in the Last imported category and in other categories.
Right-click the list and select the Display in Explorer option from the pop-up
menu in order to open the folder on your PC hard drive where the files are
stored.
The following sections explain the features for the individual categories in more
detail.
36
Page 41

Pinnacle MediaManager
Import - Folder
You will see the following window if you select the Folder category in the
Import tab in the Tools section:
Folder
Click the Browse button to select which folder on your computer you want to
import media files from. Once you have found the folder, click the Open button.
The folder and the number of files selected will be displayed above the progress
bar.
Scan Subfolders
If you activate this checkbox, the application will import any files it finds in the
subfolders.
If you are importing photos, the names of the subfolders will also be imported as
photoalbum names.
Movie titles act as names for collections. If a movie consists of several files,
these files will be grouped together in a collection.
Start
When you are finished with your settings, click the Start button. The progress
bar will display 100% when the import is complete. You will also be told how
many files were imported and how many, if any, were rejected because their
format wasn't supported or they were already listed in the database. All imported
files will be displayed in the Media Library in the bottom half of the window,
listed by media type and category.
37
Page 42

Pinnacle ShowCenter
Import - Files
You will see the following window if you select the Files category under the
Import tab in the Tools section:
Files
Click the Browse button to select which file(s) you want to import to the
database from a folder on your hard drive. Once you have selected the files,
click the Open button. The folder and the number of files selected will be
displayed above the progress bar.
Start
When you have made your selection, click the Start button.
The progress bar will display 100% when the import is complete. You will also
be told how many files were imported and how many, if any, were rejected
because their format was not supported or they were already listed in the
database.
All imported files will be displayed in the Media Library in the bottom half of
the window, listed by media type and category.
Playlists from other programs can also be imported by using this function
(M3U format).
38
Page 43

Pinnacle MediaManager
Import - Drives
You will see the following window if you select the Files category under the
Import tab in the Tools section:
Hard Disk
In the drop-down list, select the hard drive on your computer that you wish to
import media files from.
Ignore 'Windows' and Ignore 'Program Files'
If you have activated these checkboxes, the application will not scan the
Windows and/or Program Files folders. This is generally a good idea because
these folders generally do not contain any noteworthy media files.
If you are importing photos, the names of the subfolders will also be imported as
photoalbum names.
Movie titles act as names for collections. If a movie consists of several files,
these files will be grouped together in a collection.
Start
When you are finished with your settings, click the Start button.
You will be told how many files were imported and how many, if any, were
rejected because their format wasn't supported or they were already listed in the
database.
All imported files will be displayed in the Media Library in the bottom half of
the window, listed by media type and category.
39
Page 44

Pinnacle ShowCenter
Import - Audio CD
Due to licensing issues, this function is not available in all versions of the
Pinnacle MediaManager.
You will see the following window when you select the Audio CD category
under the Import tab in the Tools section:
This feature allows you to import your audio CDs to the MediaManager
Database. The tracks on each CD are read in and separated into individual MP3
files.
You may have problems importing copy-protected audio CDs.
Insert the CD and Select the Drive
Insert the audio CD in your computer's CD drive. If your computer has several
CD or DVD drives, you will have to select the drive from the Drive drop-down
list.
The application will read in the CD tracks and display them by number in the
Track column.
40
Page 45

Pinnacle MediaManager
Get Titles
You will need an active internet connection to use this feature.
The names and titles of all known audio CDs are stored in an internet database.
The Get Titles feature allows you to import this information to the
MediaManager Database along with the tracks from the CD. If you click this
button, the application will search for the data online and will generally display
it immediately as shown below.
If you cannot connect to the internet or if your CD is not listed in the internet
database, you can enter the titles as well as artist and album names manually.
Just left-click the corresponding fields to enter this information.
You can also play back individual CD tracks by double-clicking the title. The
Media Player will display a special image indicating that you are playing back
from the CD.
41
Page 46

Pinnacle ShowCenter
If you look in the Start column, you will see a checkbox for each track.
Activating these checkboxes allows you to select which tracks you want to
import.
Here's a helpful tip: if you want to select all the tracks at once, right-click the
Start column and choose Select all from the pop-up menu.
Start
When you are finished with your settings, click the Start button. During the
import, each track is assigned its own progress bar.
The progress bar at the bottom will display 100% once all selected titles have
been imported.
In the Music tab in the Media Library, you can see the files imported from
your audio CD in the Last imported category and in other categories.
Unless you have already defined a folder in the Preferences item in the File
menu, imported audio files will be saved by default to the ...\My Documents\My
Music folder on your PC's hard drive.
Ejecting the CD
Click this button to eject the CD from the drive.
Closing the CD Drive
You can close the CD drive by clicking this button.
42
Page 47

Pinnacle MediaManager
Import - Digital Camera
At present, only cameras with WIA drivers are supported. Since Windows
2000 does not support WIA, this feature is only available in Windows XP.
You will see the following window when you select the Digital camera
category under the Import tab in the Tools section:
Camera
To import photos to the MediaManager Database directly from a digital camera,
select the camera from the Camera drop-down list.
If you connected a new camera to your PC while the MediaManager was active,
just click the Refresh button. It will then appear in the drop-down list.
Album
Enter a name for your album.
Delete photos on camera
Activate this checkbox to have the photo files removed from your camera's
memory after being imported.
43
Page 48

Pinnacle ShowCenter
Start
When you are finished with your settings, click the Start button. The progress
bar will display 100% when all files have been imported.
In the Photos tab in the Media Library, you can see the imported files in the
Last imported category and in other categories.
Unless you have already defined a folder in the Preferences item in the File
menu, imported photo files will be saved by default to the ...\My
Documents\My Pictures folder on your PC's hard drive.
44
Page 49

Pinnacle MediaManager
Import - Watch Folder
You will see the following window when you select the Watch folder category
under the Import tab in the Tools section:
Here you can specify/add any number of directories as watched directories on
your PC. The Media Server constantly checks these directories for new or
deleted files and records this information to the database – even if the
MediaManager is not active. You can designate the watched directories yourself
and see them all in the list in the right half of the window.
Define/Create New Watch Folder
Click this button to define/create a new watch folder.
New watch folders start out active by default. To deactivate a watch folder, click
the button in the first column of the list.
Options for Watch Folders
If you click the last column in the list of watch folders, a menu will appear
where you can select additional options for each watch folder:
Subfolder
If this option is activated, the server will watch all subfolders as well.
If you are watching folders with photos, the names of the subfolders will be
imported as photoalbum names.
Movie titles act as names for collections. If a movie consists of several files,
these files will be grouped together in a collection.
45
Page 50

Pinnacle ShowCenter
Delete Watch Folder
Click this button to delete a watch folder from the database.
Only the reference to the folder will be deleted from the database; the folder
itself will still be stored on your PC's hard drive. To make the folder appear
again in the database, you will have to redefine it as a watch folder.
Scan Watched Directories Again
Click on this button to scan all of the watched directories again. This is useful if,
for example, the Media Server has been switched off temporarily.
46
Page 51

Pinnacle MediaManager
Import - Rhapsody Playlists
Due to licensing restrictions, this function is not available in every version
of the Pinnacle MediaManager.
If you select the category Rhapsody Playlisten in the function area under the
tab Import, the window will be structured as shown below. With the help of this
function, you can import Rhapsody playlists into the MediaManager Database.
The Real Rhapsody application needs to be active in order for the playlists to be
displayed.
In the left column of the list, you see a checkbox for every playlist. Click on the
checkbox for any number of playlists you would like to have imported.
Start
When you are finished setting preferences, click on the Start button.
You can now view the imported titles, for example, in the category Last
imported under the tab Music in the Media Library.
47
Page 52

Pinnacle ShowCenter
Organizing Media Files
Organizing File Tags
Various organizing tags can be used to manage the three media types (music,
movies, photos) in the Pinnacle MediaManager. These organizational criteria
serve to rank all files of a specific media type.
Organizing tags are exclusive tags. That means that if a music file has been
assigned to the Pop genre, it can't also be assigned to the Classical genre.
Music files
The original ID3 tags of the imported files are normally used to categorize these
files according to name, artist, album, genre, etc.
If a music file is not categorized according to ID3 tags but according to folder
and file names, select Update values using file/directory names via the Media
Library Shortcut menu. Then select a category structure from the dialog
displayed. Compare this to the display underneath and click on OK.
Movies
When importing movies, the default categorization criteria for Genre is the
name of the folder where the movie is found. If the movie is made up of
multiple parts, these parts are automatically grouped together into a collection.
The categorization criteria Series is not set by default. You can change this via
the File/Preferences/Import menu. For example, you can fill the fields Genre
and Series with the names of folders at different levels in the directory
hierarchy.
Photos
If you import photos, the directory name is used as the photoalbum name by
default. For the creation date, the date the photo was taken (found in the EXIF
tag) is used.
Tip: If your photos do not have access to this date, the creation date is first
displayed as <Unknown>. When you select the photos, select "Organize" and
click on <Unknown>. Select the function "File date" via the menu to set the
creation date of the photo. This is usually the date when you copied the photos
to your PC.
48
Page 53

Pinnacle MediaManager
Customized File Tags (Keywords)
In addition to the organizing tags, you can also assign customized tags
(keywords).
These non-exclusive tags will help you to organize your media files.
Assigning a Keyword - An Example
You can create the keyword "My Wedding" and assign all wedding-related
media files to it. This will make it a snap at some later date to filter out all the
files in "My Wedding" from the rest of the files in the Media Library.
Assigning Several Keywords - An Example
You can assign several keywords to one file. For example, some of the files to
which the "My Wedding" keyword has already been assigned can be assigned
one or more additional keywords, such as "At the rehearsal dinner", "At the
church" or "At the reception".
Display Keywords
This button
display in the Media Library sort view.
lets you open the context menu and switch on the keywords
49
Page 54

Pinnacle ShowCenter
Introduction to the Organize Tab
You will see the following window when you select the Organize tab in the
Tools section:
The Organize tab helps you to change or add tags for your media files so as to
better organize your files.
Defining a New Keyword
On the left-hand side, you can assign keywords to the media files in the
MediaManager Database. You can then use the keywords as search terms in
order to find certain files quickly. You can assign several keywords to a single
file.
Select one or more files in the Media Library list and click the
create a new keyword for the selected files.
Deleting a Keyword
Select the keyword you want to delete from the database and then click the
button.
Field and Value - Changing Organizing Tags
Whenever you select an entry in the Media Library list, you will also see the
value assigned to each field. By double-clicking, you can access and modify the
individual values.
button to
For some organizing tags such as Genre, the application will suggest common
terms (Pop, Rock, Classical) even if you haven't imported any files in this
category. Just click the entry once to see the suggestions.
50
Page 55

Pinnacle MediaManager
For music genres, you have the Rebuild this list via the Shortcut menu. If you
select this option, unused entries are deleted from the list and only those genres
are displayed whose media files are assigned in the database.
Once you are finished modifying the values for an entry in the list, click the
button to have the values written to the database. The changes will be shown
accordingly in the Media Library.
Note: changing tags that are associated with metadata (such as MP3
metadata) will cause these changes to be made in the associated file as well.
Undo Button
Click this button to undo previous changes. However, you can only undo
changes if you have yet accepted them by clicking the
Rotate Clockwise/Counterclockwise (For Photos)
Selecting a photo from the Media Library will bring it up in the Media Player.
You can rotate the photo by clicking on these two buttons.
Next, click the
new position will be used whenever the photo is displayed on the television.
button to have the new position saved to the database. The
button.
Restricted Access
You have the option of setting the Restricted access value for each media file
with the click of a mouse.
According to the setting value, for a particular file this may mean that the
correct access code will have to be entered from the menu of the output device
before the file can be played on the output device.
Note: the access code only applies to media playback from the menu of the
output device. All files can still be accessed from the MediaManager on your
PC.
51
Page 56

Pinnacle ShowCenter
Using Playlists
Introduction to the Playlists Tab
You will see the following window when you select the Playlists tab in the
Tools section:
This section is where you create personal playlists in which you list your
favorite music, movies and photos, organized according to your own criteria.
Since each playlist can only contain one type of media, you will be creating
playlists for music, movies or photos. You cannot mix these different types of
media in one playlist.
Playlist Catalog
All the playlists are displayed in the left column.
Individual Playlist Contents
The right column displays the contents of the individual playlists. Selecting a
playlist in the left column will bring up detailed information in the right column
about the media files in the playlist.
52
Page 57

Creating and Editing Playlists
Pinnacle MediaManager
Creating a New Playlist
Click the
An input field, which is by default called Playlist, will appear in the left-hand
side of the list. Double-click the field to access it and enter your own name for
the new playlist.
Now it's time to put together the media files you want in this playlist. Select one
or more files from the Media Library in the database and drag them up to the
right-hand section.
If you do not want to drag with the mouse, you can use the
Organizing Items in a Playlist
Select the file you want to move within the playlist and drag it to its new
position. Or, if you prefer, you can use the two
Deleting Playlists or Items
button to create a new playlist.
button instead.
and buttons instead.
If you want to delete a playlist or remove a file from the playlist, just select it
and then click the
button.
53
Page 58

Pinnacle ShowCenter
Slideshows
There are two extra things to do when creating photo playlists ("slideshows"):
1. Click the last column for a given entry in order to specify the display time
for a photo. If you select manual, the slideshow will not automatically
continue after that particular photo. To change the display time for all photos
at once, first right-click and choose Select all from the menu. Then, leftclick on the display time for any entry in order to set the time for all photos.
2. If you want to play background music during a slideshow then select an
appropriate music playlist from the drop-down list. This list will be played to
your photos on the output device.
Playback in the Media Player
Double-click an entry in the playlist to play it back with the Media Player. Once
that particular item is finished, the application will automatically move on the
next entry in the playlist. You can also use the Next, Previous, Shuffle, and
Repeat functions in the Media Player. When playing back a slideshow, the
Media Player will only display the photos; it will not play any selected music
playlist.
54
Page 59

Pinnacle MediaManager
Exporting Media Files
Introduction to the Export Tab
You will see the following window when you select the Export tab in the Tools
section:
In this section, you can export copies of media files from your MediaManager
playlists to a:
New folder on your hard drive
M3U playlist
CD burner or DVD burner
The following sections explain the features for the individual categories in more
detail.
55
Page 60

Pinnacle ShowCenter
Exporting to a Folder
You will see the following window when you select the Folder category under
the Export tab in the Tools section:
In this section, you can export the items in a playlist to a new folder on your
hard drive. The export will create copies of the media files.
Playlist
Select a playlist from the drop-down menu.
Folder
Use the Browse button to the right to select the folder you want the playlist to be
exported to.
Create subfolders
Activate this checkbox to have subfolders created based on the sort criteria of
the original files (e.g., artist, album, photo album).
If a particular file does not have all the tags, this option will create a subfolder
called Unknown.
Note: this option is not active when you export video playlists.
56
Page 61

Pinnacle MediaManager
Create M3U playlist
If this checkbox is activated, you will both export the selected playlist to a folder
and create an M3U-compatible playlist.
Start
When you are finished with your settings, click the Start button. The progress
bar will display 100% once all the files have been exported. You will also be
told how many files were exported.
57
Page 62

Pinnacle ShowCenter
Exporting to an M3U Playlist
You will see the following window when you select the Playlist category under
the Export tab in the Tools section:
In this section, you can export a MediaManager playlist to an M3U playlist. The
playlist will contain references to the actual location where your media files are
stored.
Playlist
Select the playlist you want to export from the drop-down menu.
File
Use the Browse button to the right to select the file you want exported to the
selected playlist. Then enter the name you want to give to the file.
Start
When you are finished with your settings, click the Start button.
58
Page 63

Pinnacle MediaManager
Exporting to a Burner
You will see the following window when you select the Burner category under
the Export tab in the Tools section:
In this section, you can export a playlist to burn to CD or DVD.
Playlist
Select the playlist you want to export from the drop-down menu.
Disc type
The choice of output formats will depend on what kind of media files are in the
playlist. Select a format from the drop-down list.
Music
Audio CD: You want to burn an audio CD that you can play on your stereo
system or in your car's CD player. Any MP3 files will be automatically decoded.
MP3 Data CD/DVD: You want to burn MP3 files to a CD or a DVD. All tracks
in the playlist will have to be converted to the MP3 format.
Data CD/DVD: You want to burn original music files (MP3, WMA or WAV)
to a CD. Any converted versions will not be used.
Movies
Depending on what format the media files are in and whether converted copies
are available, you will be given the option of burning a VCD (VideoCD), SVCD
(SuperVideoCD) or DVD. You can always select a data CD/DVD, which will
59
Page 64

Pinnacle ShowCenter
burn the media files in their original format. You cannot start the burning
process if the file(s) is (are) too long for a CD or DVD.
Photos
Photos are always burned as original media files to a data CD/DVD.
Recorder
Select the burner you wish to use and click Start. The progress bar will display
100% when the burning process is complete.
The CD/DVD burner in the Pinnacle MediaManager is optimized for fast,
easy burning. It cannot create DVD menus nor can it spread long files/playlists
over several discs. If you need more sophisticated burning features, we
recommend using Pinnacle INSTANT CD/DVD.
60
Page 65

Pinnacle MediaManager
The Menus
The File Menu
The File Menu Contains the Following Options:
New Playlist From Selection
If you have selected one or more files in the Media Library and then choose this
option, the selected files will be used to create a new playlist.
On the left-hand side of the Media Library, you will see an input field with a
default name where you can enter your own name for the new playlist.
For more information, consult the Creating and Editing Playlists section.
Play Selection
Select one or more files from the Media Library and choose this option. The
selection will now be played back / displayed in the Media Player.
Preferences
Choosing this menu item will bring up a dialog box where you can make all
your settings for the Pinnacle MediaManager:
Audio CD Import
Format (quality and bitrate)
Speed
General
Language
Data conversion settings
Skin settings
Specify the access code (PIN) for restricted file access
Define folders for audio, video and image files and for temporary files
Playback
Playback settings: device and memory buffer
61
Page 66

Pinnacle ShowCenter
Key Commands
Choosing this menu item will bring up a dialog box where you can create, edit
and delete customized key commands and macros.
Quit
Choose this option to exit the Pinnacle MediaManager.
62
Page 67

Pinnacle MediaManager
The Edit Menu
The Edit Menu Contains the Following Options:
Cut
Select the text you want to move and click Cut in the menu. Then, click the
location where you want to paste the text and click Paste in the menu.
The text will be removed from its original location and inserted at the new
location.
Copy
Select the text you want to copy and click Copy in the menu. Then, click the
location where you want to paste the text and click Paste in the menu.
The text will remain at its current location and will also be inserted at the new
location.
Paste
This command allows you to paste text at one location that you have cut or
copied from another location using the Cut or Copy commands.
Delete
Select the files and then choose this option from the menu in order to
permanently remove the files.
Select All
This option allows you to simultaneously select all the files in an active area
(e.g., the Media Library list).
Select None
This option allows you to undo the selection for files in an active area (e.g., the
Media Library list).
63
Page 68

Pinnacle ShowCenter
Select Invert
This option allows you to simultaneously select all the files in an active area
(e.g., the Media Library list), or to undo an existing selection.
Browse
This option brings you to the Media Library sort view. There is a separate, more
detailed section in the manual for this feature.
64
Page 69

Pinnacle MediaManager
The Tools Menu
In the Tools menu, you have the following options:
Import old database
With this function, you can import a database created with version 1.5 or older
of the ShowCenter application
Find missing/modified media
To do a manual search for missing or modified media in the database, select this
option. The search runs in the background and can take several minutes. The
missing and modified media are then marked in the left column with their own
icons.
Save database
With of this function, you can save an existing database. Select the option and
then indicate the desired target directory and file name. This procedure saves an
XML file. You can also generate more than one XML file, for example, at
different intervals.
Restore database
This function is used to restore a saved database. The Pinnacle MediaManger
automatically chooses the correct target directory in order to make the
previously saved XML files available again. The selected file is then loaded into
the database so that the media files in the Media Library are visible again.
65
Page 70

Pinnacle ShowCenter
Real Rhapsody Music Service
Real Rhapsody Music Service - Overview
The Rhapsody Service is currently not available in all areas. Check
www.rhapsody.com for current information as to whether Rhapsody is available
in you country.
The Rhapsody Music Service from RealNetworks gives you unlimited access to
one of the largest legal music databases in the internet. Choose from over
700,000 titles for your playlists and put your own radio stations together.
Used with the ShowCenter, you can now also listen to Rhapsody music in the
comfort of you own living room. Pinnacle MediaManager automatically imports
all the titles and radio stations in your Rhapsody Library and even lets you
combine Rhapsody music with other titles to create new playlists.
Due to licensing restrictions, not every version of the Pinnacle
MediaManager supports the Rhapsody Music Service.
Installation and Registration
To use the music service, you need the Rhapsody application, as well as a
subscription - you can get both at www.rhapsody.com
. Download the Rhapsody
application and install it on the same PC where the ShowCenter software is also
installed
Configuring the Rhapsody application
After starting up and registering the program, open the Options menu and select
User Settings... . n the dialog window, click on the tab UPnP and activate the
checkbox Start UPnP Server once logged on. Then click on Start to start the
UPnP server.
66
Page 71

Pinnacle MediaManager
Now you can fill the Rhapsody application library with the music of your
choice, as well as select radio stations and even configure the application
yourself.
Rhapsody music and the Pinnacle MediaManager
All the titles and albums in the Rhapsody Library are automatically imported
into the Pinnacle MediaManager Media Library and are available as music
under the genre Rhapsody. This synchronization is also done when the Pinnacle
MediaManager is closed.
You can modify the synchronization settings or deactivate the synchronization
process via File/Preferences/Rhapsody. Note that the synchronization of a
large library can last several minutes.
In the Pinnacle MediaManager, Rhapsody titles are marked with their own icon.
You can create playlists of Rhapsody titles, as well as mixed playlists of
Rhapsody music together with, for example, MP3 titles.
All the playlists created with the Rhapsody application are displayed and can be
imported into the Pinnacle MediaManager, via Import/Rhapsody playlists.
Older playlists with the same name are not overwritten.
Due to licensing restrictions, the playback of Rhapsody titles via the
Pinnacle MediaManager on a PC is currently not possible.
67
Page 72

Pinnacle ShowCenter
Rhapsody music and the ShowCenter Player
Just like other music, Rhapsody titles are displayed in the TV menu Music in
the ShowCenter Player. However, Rhapsody titles are marked with their own
icon. Note that it can take several minutes until newly added music is displayed
in the ShowCenter Player.
Radio stations in the Rhapsody Library are automatically made available via
Music/Internet Radio/Rhapsody Radio.
You can play back Rhapsody music via the ShowCenter Player only if the
Rhapsody application has already been started and you have logged on.
68
Page 73

File Formats
Supported File Formats
Supported Audio File Formats
MP3
WAV
WMA
Supported Video File Formats
MPEG 1
MPEG 2 (including VOB files)
MPEG 4 AVI (Versions 3, 4, 5) [simple profile]
XviD AVI [simple profile]
DV AVI
Pinnacle MediaManager
WMV
Supported Photo Formats
JPG
PNG
GIF
BMP
69
Page 74

Pinnacle ShowCenter
Converting Files
The Pinnacle MediaManager can convert media into other formats. For
example, you can convert an MPEG 2 movie file into the MPEG 1 VCD format
for burning onto a CD.
If you use the Pinnacle ShowCenter, this file conversion function is useful for
formats, which you cannot directly play back via the ShowCenter Player such
as, for example, DV-AVI video clips.
During conversion, a copy of the media is created, while the original file
remains unchanged. You can define where to save this copy in the
File/Preferences menu of the Pinnacle MediaManager. Here you can also
configure an automatic media conversion, as well as keep track of the current
status of running conversions.
In order to convert a media file, select it in the Media Library, right click and
then select the format you want via the Shortcut menu Convert/Convert to.
You can initiate conversions for more than one medium at a time. These
conversions are then queued and processed one after the other. Conversion runs
in the background and keeps going, even if you close the Pinnacle
MediaManager.
File Status
For each media type, the Media Library displays details on individual files in
the list to the right. The first column shows the file state, which describes the
file's conversion status.
70
Page 75

Pinnacle MediaManager
Any file in a given category can have one of the following file states
(indicated by the icon):
The file needs to be converted before it can be played back.
The file can be found in the conversion queue.
The file is currently being converted.
The conversion of this file is completed.
Conversion Options
Right-click a file in the list to bring up the pop-up menu, where you can choose
among the following options:
Convert to
The selected file will be converted. You can choose between the following
movie formats:
VCD (VideoCD)
The video is compressed using MPEG 1 to one-fourth of its original image size
(352x240 or 288). The data rate is 1.15 Mbps in total. That means that one CD
(650 MB) can hold a little over an hour's worth of video and audio. While the
video quality is rather poor, VCDs can be played back in most DVD players.
SVCD (SuperVideoCD)
The video is compressed using MPEG 2 with full vertical resolution and 2/3
horizontal resolution. The data rate is 2.5 Mbps and one CD can only hold a
little less than a half an hour's worth of video and audio. The video quality is
much better than on a VCD, but only some DVD players accept the SVCD
format.
DVD LongPlay
The video is compressed using MPEG 2 with full vertical resolution and 1/2
horizontal resolution. The data rate is 3.5 Mbps, which makes for very goodquality video. DVD LongPlay can be burned to DVDs and is accepted by
virtually all DVD players. It is also an excellent format for converting high-datarate video to a low enough data rate to be able to play it back over a wireless
network.
71
Page 76

Pinnacle ShowCenter
DVD
The video is compressed using MPEG 2 with full resolution. The data rate is 6
Mbps, which may produce excellent-quality video, but it is too high to be
transmitted over a wireless network. Converting to DVD format only really
makes sense for wired 100-Mbps networks or for burning a DVD that essentially
all DVD players can read.
The audio is always compressed using the MPEG 1 layer 2 format (stereo).
Delete converted files
With of this function, you can delete the converted files. The original files
remain unchanged.
Cancel conversion
A planned or already running conversion is cancelled. The original file remains
unchanged.
72
Page 77

Television
Turning on the ShowCenter Player and the Television
After you turn on the ShowCenter Player, the television screen will show the
ShowCenter logo for a few seconds and then the server options menu.
The ShowCenter Player will now automatically detect all available server
PCs in the network. Server PCs are computers on which the ShowCenter
software was installed and the ShowCenter Server is active. They will be
displayed after a few seconds on the right-hand side, marked with a green
checkmark. Select one of the servers with the direction keys and press OK to
connect to it.
Server PCs that are not currently active are marked with a red no-access
icon. In general, you cannot connect to inactive servers.
73
Page 78

Pinnacle ShowCenter
Introduction to the TV Menu
Once the computer, the television, and the ShowCenter Player have been
turned on and the connection to a server PC has been established, the
following menu will appear on the TV screen:
The left side of the screen lists the media types and some special features. The
menu option PCTV is only available if you have installed a Pinnacle PCTV
series product on your server PC.
The right side contains the index for the selected media type. It is easy to
differentiate between media types because they are shown in different colors.
The main screen, which is always set to New Media, shows to the right the ten
most recently imported media files. These files may be music, movie or photo
files.
If new files have been imported since the last time you invoked this menu
then this is indicated by a signal next to the "New Media" button.
You can use the remote control to navigate in the menu and choose which
media you want to view.
74
Page 79

Television
The following sections provide more information about the menu structure of
the individual media types as well as settings and special functions.
Do You Have Questions?
If you have any questions while using the menu, press this button on your
remote control to access the interactive help feature for the TV menu. A video
will be displayed on the television screen for whichever media type is currently
selected.
75
Page 80

Pinnacle ShowCenter
TV Menu - Music
The Music Start Menu is divided up into the following categories:
New Music
The most recently imported music files are displayed in "Artist-Album" format.
If you press OK on the remote control, then all of the titles of the album are
shown.
Playlists
A list of all the playlists created with the Pinnacle MediaManager application is
displayed. If you select a playlist and then press OK, then all of the titles in this
playlist are shown.
Auto-Playlists
Automatic playlists are created for the Pinnacle MediaManager categories
Highest rating, Frequently played, Rarely played, and Not yet played, which
are then accessible via this menu option.
Internet Radio
While the ShowCenter is being installed on your PC, the directory ShowCenter
Radio, which contains several links to sample radio stations, is created in
Internet Explorer.
76
Page 81

Television
You can store additional radio stations from the Internet as favorites at any time,
e.g., from the internet page www.shoutcast.com
internet page, right-click one of the "Tune In!" buttons, select "Add to
Favorites…" from the context menu and then the directory ShowCenter
Radio.
Any saved radio stations are displayed in the Internet Radio menu. Subdirectories located in the ShowCenter Radio directory are shown in square
brackets.
Select the desired directory and/or radio station with the remote control and then
press OK.
Internet Radio is not active unless you have internet access. You can
deactivate this menu item via "Music Options" in the "Settings" menu.
. Once you have opened the
We recommend that you use the program "Winamp" from Nullsoft to listen
to internet radio on your PC. It is available on the internet at www.winamp.com.
Genre
A list of the different music genres is displayed. You can access a list of the
corresponding artists by selecting a music genre and pressing OK.
Artist
A list of the artists is shown. You can access the list of albums with OK.
Album
A list of the albums is shown. You can access the song title selection list with
OK.
Song Title
All of the titles included in the database are displayed. You can play a selected
song by pressing OK.
Special Functions in the Music Menu
The A, B, and C buttons on the remote control and their functions in the Music
menu are described below. Each is respectively displayed on the lower left-hand
side of the screen. The respective function is executed by pressing the
corresponding button.
77
Page 82

Pinnacle ShowCenter
A - Play All
Any music pieces currently displayed on the right are played one after the other.
B - Shuffle & Play
Any music pieces currently displayed on the right are first shuffled in their order
and then played.
C - Search
Selecting this function will call up a text entry field. Enter a search term of your
choice and then press OK. All files found using the search term are then
displayed in the list on the right-hand side of the screen.
You can also use the input keys 2 - 9 (or A - Z) in order to search for entries
in alphabetical order. Press "1" to return to the previous list.
Remote Control Functions While Playing Music
"?" Button
Detailed information about the current track is displayed when this button is
pressed.
"Cursor Left" and "Cursor Right" Buttons
These buttons let you jump to any position in the track currently being played.
Buttons 0 to 9
Buttons 0 to 9 let you enter a desired percentage in order to skip to another
position in the track currently being played.
"Next Track" and "Previous Track" Buttons
These buttons let you play the next/previous music piece of the selection.
It is not possible to scroll through the music collection while pieces of
music are being played.
78
Page 83

TV Menu - Movies
Television
The Movies Start Menu is divided into the following categories:
New Movies
The most recently imported films are displayed with their titles. If you press OK
on the remote control, the film selected is played.
Playlists
Displays a list of all of the playlists that have been created. If you select a
playlist and then press OK, all of the films in this playlist are displayed.
Auto-Playlists
Automatic playlists are created for the Pinnacle MediaManager categories
Highest rating, Frequently played, Rarely played, and Not yet played, which
are then accessible via this menu option.
Genre
A list of the various film genres is displayed. By selecting a genre and pressing
OK you can access the list of corresponding films.
79
Page 84

Pinnacle ShowCenter
Series
A list of the various series is displayed. Select a series and press OK to access
the list of the corresponding movies.
All Movies
All of the films included in the database are displayed. You can play a selected
film by pressing OK.
The name of the collection is always displayed for films. Thus films which
consist of several files are automatically grouped and the files are played
successively. You can switch between the individual files during playback with
the "Next Track" and "Previous Track" buttons on the remote control.
Special Functions in Movies Menu
The buttons A, B, and C on the remote control and their functions in the Movies
menu are described below. These buttons are displayed on the lower left-hand
side of the screen. Each function is executed by pressing the corresponding
button.
After calling up the "Playlists" menu, you have the
following options:
A - Play Selected
All of the films included in the selected playlist are played one after another.
B - Shuffle & Play
Any films included in the selected playlists are first shuffled and then played.
We recommend using this function for music videos.
80
Page 85

Television
C - Search
A text input field appears on the screen if you select this function. Enter any
search term and then select OK. In the list on the right, the media, which are
associated with the search term, are then displayed.
You can also use the input keys 2 - 9 (or A - Z) to search for entries in
alphabetical order. Press "1" to return to the previous list.
Remote Control Functions While Watching a Film
"A" Button
This button lets you change the screen size of the film currently being shown.
The standard setting is made in the "Settings" - "Video Start Size" menu.
"B" Button
This button can be used to switch between soundtracks for films with several
different soundtracks.
"C" Button
A subtitle can be displayed with this button.
The function can only be activated for VOB files with subtitle tracks.
"?" Button
Pressing this button will display details about the current film.
"Cursor Left" and "Cursor Right" Buttons
These buttons let you to jump to any position in the film currently being shown.
Buttons 1 to 9
Buttons 1 to 9 allow you to enter a desired percentage value (10%, 20%, etc.) for
skipping to another position in the film currently being shown.
"Next Track" and "Previous Track" Buttons
These buttons are used to show the previous/next film in a playlist or collection.
81
Page 86

Pinnacle ShowCenter
TV Menu - Photos
The Photos start menu is split into the following categories:
New Photos
The most recently imported photos are displayed in the form of a photo album
list. To display a slideshow, select a photo album using the remote control and
press OK.
Slideshows
This function displays a list of all slideshows stored. To see a slideshow on
screen, select the slideshow and then press OK.
Auto-Slideshows
Automatic slide shows are created for the Pinnacle MediaManager categories
Highest rating, Frequently played, Rarely played, and Not yet played, which
are then accessible via this menu option.
By Date
This is where you can perform a search for photos according to chronological
specifications (year, month, day).
82
Page 87

Television
Photo Albums
This function displays a list of all available photo albums. When you select a
photo album, its contents will be displayed as thumbnails.
Special Functions in the Photos Menu
The A, B, and C buttons on the remote control change function according to
which part of the menu you are currently in. The applicable functions are
displayed in the bottom right section of the screen. Press the relevant button to
perform the desired function.
After calling up the Photo Album menu, you have the
following options:
A- Play Selected
All photos included in the selected album are displayed one after another.
83
Page 88

Pinnacle ShowCenter
B - Step Selected
The first photo from the album selected is displayed. Use Previous Track and
Next Track to switch back and forth between photos.
C - Search
Selecting this function will call up a text entry field. Enter a search term and
then press OK. All files found using the search term are then displayed in the
list on the right-hand side of the screen.
You can also use the 2 – 9 keys (or A - Z) to search for entries
alphabetically. Press 1 to return to the previous list.
After calling up a photo album, you have the following
options:
The A, B, and C buttons, which are displayed in the lower left-hand corner of
the screen (or the corresponding buttons on the remote control), have the
functions described below in the Photos menu. Press the relevant button to call
up the desired function.
A - Play Album
All photos currently included in the list on the right are displayed one after
another.
B - Step Album
The photos from the currently displayed list can be called up individually using
the Previous Track and Next Track buttons.
C - Shuffle & Play
All photos currently displayed on the right are shuffled before being displayed.
84
Page 89

Television
Remote Control Functions During Slideshows/Photo
Albums
Full-screen Button
With this button you can shift between full-screen and thumbnail display format.
"A" Button
After pressing the "A" button, use the arrow buttons on the remote control to
alter the size of the image (zoom) or of a detail (pan).
Press the Play button to move on to the next photo.
The background music is paused in this mode.
"B" Button
Use this button to rotate the photo displayed.
Press the Play button to move on to the next photo.
The background music is paused in this mode.
"C" Button
Use this button to show or hide the title of the photo currently displayed.
"?" Button
Pressing this button will display details about the photo currently displayed.
"Next Track" and "Previous Track" Buttons
These buttons are used to display the next/previous photo in a slideshow or
photo album.
85
Page 90

Pinnacle ShowCenter
TV Menu - PCTV
The "PCTV" option will only appear on the TV menu if a ShowCentercompatible Pinnacle PCTV product has been installed on your PC. Please refer
to our Internet site www.pinnaclesys.com for a full list of ShowCentercompatible PCTV products.
Installing a PCTV Product
If a PCTV product has already been installed on your PC before you install
ShowCenter, the system automatically detects the PCTV product and adds the
PCTV option to the ShowCenter TV menu.
If the PCTV option does not appear in the TV menu, select Settings, General,
and then PCTV Detection. The PCTV option will be available after a few
seconds.
86
Page 91

Television
The PCTV start menu is divided into the following categories:
Record Now / Scheduled Recordings
If you want to begin a recording immediately, select this option using the remote
control and then press OK. Now select the desired station and duration of
recording and confirm the recording details with Apply.
The recording will start immediately and the Record Now menu option will
switch to Scheduled Recordings after a short time.
If you want to watch a recording while it is still in progress, select this option.
You can now use further standard playback functions (e.g., pause, fast-forward,
rewind).
Recording Programming
This menu allows you to program recordings. Press the "A" button on the
remote control and set the desired recording date using the calendar displayed,
select the further options and the relevant station and confirm your recording
details with Apply.
Press "C" to cancel the programming entry.
All recordings currently programmed are now listed in chronological order.
Press "B" to edit these entries or "C" to delete them.
If the recording you have programmed does not appear on the list, please
check whether any information was incorrect or missing. It may be the case, for
example, that a time limit has been exceeded.
New Recordings
Selecting this menu item will display all new TV recordings, listed according to
date and time of recording.
All Recordings
Selecting this menu item will display a list of all TV recordings in alphabetical
order.
Further Information on TV Recordings
Channel List
The Pinnacle MediaManager application imports the channel list from the PCTV
VISION application.
87
Page 92

Pinnacle ShowCenter
Storage Location for TV Recordings
All TV recordings are stored by the Media Library of the Pinnacle
MediaManager under Media Type – Movies and under the TV film genre,
where they can be organized or deleted.
The recordings can also be called up in the PCTV Vision gallery, where they
can also be deleted.
Capture Format
The capture (recording) format (e.g., VCD or SVCD) can be defined in the
PCTV Vision settings.
88
Page 93

TV Menu - Settings
Television
The following settings can be made on this screen page:
Locks
If you have stored some of your media files with an access code (PIN number)
and the corresponding setting in the Pinnacle MediaManager application and
now want to have full access to all files, proceed as follows:
First, confirm the Lock field, enter your PIN number and then press OK. You
now have unrestricted access to all media files.
If you want to reapply restricted access, press OK.
Media files that are to be subject to restricted access are selected separately
in the Organize tab of the Pinnacle MediaManager application.
89
Page 94

Pinnacle ShowCenter
General
Language
Select the desired language for the TV menu and then press the OK button on
the remote control.
Skin
This option allows you to choose from a range of designs for the TV menu.
Screen Saver
Select the period of time that you want the system to wait for prior to switching
on the screen saver for your TV. The screen saver is generally deactivated while
a film or image is currently being displayed.
PCTV Detection
This function detects the PCTV product installed on your computer. This takes a
few seconds – if the process is successful, then the PCTV functions will be
available via the TV menu.
Reload Firmware
This option is used to reload the firmware of the ShowCenter Player. This
should only be performed in conjunction with a software update.
Music Options
Internet Radio
From here, you can switch the option Internet Radio Internet Radio off and on
in the Music Menu.
Shortcut Keys
Use this function to assign music playlists and internet radio stations to the keys
0-9 on the remote control. Using the menu option New media, you can play
back programmed music with the keys 0-9 without the television being on.
Video Preferences
Subtitles
In this menu option, you can turn the subtitles for AVI movie files on and off.
Subtitle files need to be in the same directory as the movie files themselves and
they need to have the same name. Supported file formats include MicroDVD
(SUB), SubRip (SRT) and Substation Alpha (SSA).
90
Page 95

Television
Video Start Size
Select whether a film is to be played back initially in "picture-in-picture" mode
or immediately in full-screen mode.
You can also change the video start mode using the full-screen button on the
remote control.
Movie Display
This function lets you choose whether the size of the playback format for films
is, for example, to be adjusted to your TV, or whether another format is to be
used.
You can also set the video output size while a film is being played by
pressing the "A" button on the remote control.
Dolby Digital Output
By default, the ShowCenter Player plays movies with Dolby Digital sound only
via the digital audio output jacks. If you would also like to play back Dolby
Digital sound via analog audio connections, you will need to first pay a fee and
activate this function. This occurs on the server PC via
Start/Programs/Pinnacle ShowCenter/Options/Activation of Dolby(R)
Digital soundtracks on analog audio outputs.
The menu option Dolby Digital Output is visible only after activation. Here
you can decide whether Dolby Digital sound is to be made available either as a
stereo signal via the analog and digital audio output jacks or as surround sound
using the digital audio output jacks exclusively.
Photo Options – General
Transition
This option allows you to select the type of transition between the photos
displayed.
Filtering
This function is used to switch the flicker filter on or off and select the desired
flicker filter level.
Pressing "A" on the remote control will display a comparative selection of
91
Page 96

Pinnacle ShowCenter
photos from the Pinnacle MediaManager Database as they would appear with
the filter switched on and off.
The filter should be switched on for TVs with picture tubes in order to
minimize flicker. We recommend a setting of 25%.
In the case of plasma or LCD TVs, the filter should be deactivated so as to
ensure maximum picture quality.
Color Correction
The color correction function automatically improves the quality of the photos
displayed.
Pressing "B" on the remote control will display a comparative selection of
photos from the ShowCenter database as they would appear with and without
color correction.
Photo Titles
This function allows you to switch the photo titles on or off.
This function can also be activated while photos are being displayed by
pressing the "C" button on the remote control.
Photo Options – Album Settings
Background Music
This function allows you to select a music playlist to run while photos from an
album are being displayed. The pieces of music on the relevant playlist are
always shuffled before being played.
Note: The background music during a slide show is selected in the Pinnacle
MediaManager application, not via the TV menu!
Time Per Slide
This option allows you to set the display time for photos when called up from
photo albums.
Note: The duration of a slide show currently being displayed is selected in
the Pinnacle MediaManager application, not via the TV menu!
92
Page 97

Television
Video Output
Select the desired video output (e.g., SCART, Component).
After a new output has been selected, ShowCenter will use this as the
standard output and wait several seconds for you to confirm by pressing OK. If
it does not receive confirmation, ShowCenter will return to the original output.
Special Functions in the Settings Menu
A - Server
Press this button on the remote control to proceed to the server select function.
Select the computer/server from which media are to be exported to the TV.
B - Advanced
Press this button on the remote control to proceed to the firmware settings page.
This is where, for example, the network configuration settings are made.
C - Screen Adjust
Press this button on the remote control to center the menu screens. To do this,
use the arrow keys and then press OK to store the position. This option has no
effect on film or photo playback.
Please bear in mind that the A, B, and C buttons have additional functions
according to the media type and category selected. The latter are always
displayed in the lower-left corner of the screen.
93
Page 98

Page 99

Remote Control
Remote Control Keypad Layout
This image gives you an overview of what functions you can perform with the
ShowCenter remote control:
95
Page 100

Pinnacle ShowCenter
Button Descriptions in Detail
With your ShowCenter remote control in hand, you can access many
ShowCenter features from the comfort of your recliner or sofa. The functions
assigned to the individual buttons are described below in detail:
On/Off
This button turns the ShowCenter Player on and off.
Mute
This button turns the sound on and off.
Open Music / Movies / Photo Start Menu,
Open Home Page
These buttons open the music, movies and photo start menus as well as the
home page, where you can select a particular menu function.
Change Video Out
This button toggles between individual video outputs. The screen will show the
selected video output. If you do not see any image on your screen, just press the
"Change Video Out" button until you do see an image.
This button is only for emergencies. The video output can also be selected
in the TV Menu via "Settings" -"Video Output".
Full-Screen
Press this button to enlarge the preview window initially used to display a movie
or a photo to full-screen mode, or to return to the preview window from fullscreen mode.
Miscellaneous Functions
The functions assigned to these buttons vary depending on which media type
and category are selected. The functions are displayed in the lower left-hand
corner of the screen. Pressing a button will initiate the associated function. Press
the relevant button to call up the desired function.
96
 Loading...