

Page 1

Pinnacle ShowCenter
Page 2

Pinnacle ShowCenter
User’s Guide
GB September 2003
41003322
© Pinnacle Systems GmbH 2003
All rights reserved.
No part of this manual may be reproduced or transferred to other media without
explicit written permission from Pinnacle Systems GmbH, Braunschweig,
Germany.
All brand or product names are trademarks or registered trademarks of their
respective holders.
This manual is printed on chlorine-free, bleached paper using solvent-free ink.
Pinnacle Systems GmbH has written this manual to the best of its knowledge,
but does not guarantee that the programs/systems will fulfill the users’ intended
applications.
No warranty is made as to the specifications of features.
Pinnacle Systems GmbH retains the right to make alterations to the content of
the manual without obligation to inform third parties.
All quotes, sales, supply and manufacturing contracts from Pinnacle Systems
GmbH, including consulting, installation and other contractual services are
subject exclusively to the General Sales and Delivery Terms of Pinnacle
Systems GmbH.
Page 3

Table Of Contents
Basics....................................................................................................................1
Safety information.............................................................................................1
The concept in words ........................................................................................4
The concept in pictures......................................................................................5
The components ................................................................................................6
Package contents ...............................................................................................8
System requirements .......................................................................................10
Setting up the ShowCenter system .....................................................................11
Three steps to the ShowCenter system - Overview.........................................11
Installing the software .....................................................................................12
The Quickstart Assistant .................................................................................15
Connecting devices..........................................................................................18
The ShowCenter application............................................................................... 23
Overview .........................................................................................................23
The Media Library...........................................................................................26
The Media Player ............................................................................................31
Importing media files ......................................................................................33
Organising media files.....................................................................................44
Managing playlists ..........................................................................................48
Exporting media files ......................................................................................51
The menus .......................................................................................................57
File formats......................................................................................................61
ShowCenter Server and ShowCenter Control Panel...........................................65
Setting server preferences with the ShowCenter control panel.......................65
The TV screen.....................................................................................................69
Switching on the ShowCenter Player and the TV set......................................69
The TV screen menu - Overview ....................................................................71
TV Menu - Music ............................................................................................73
TV Menu - Movies ..........................................................................................74
TV Menu - Photos ........................................................................................... 76
TV Menu - Access...........................................................................................77
TV Menu - Settings .........................................................................................78
TV Menu - Special functions ..........................................................................80
i
Page 4

Table Of Contents
The remote control..............................................................................................83
Remote control key commands .......................................................................83
Description of the keys in detail......................................................................84
Possible causes of faults with remote control operation .................................87
Technical data.....................................................................................................89
Hardware .........................................................................................................89
Technical support................................................................................................91
Getting Technical support ...............................................................................91
License information ............................................................................................93
Pinnacle End User License Agreement ........................................................... 93
Glossary ..............................................................................................................97
Index .................................................................................................................105
ii
Page 5

Basics
Safety information
Please take note of the following information in the interests of your own safety
and trouble-free operation of your equipment.
Mains cable and mains plug
Careful attention must be paid to the following points in order to avoid
operational faults with the equipment and to prevent electric shock, fire and
injury:
When removing the mains cable from the socket, always pull on the plug and
never on the cable.
Do not connect and remove the mains cable with wet hands.
Keep the mains cable away from heaters.
Never place heavy objects on the mains cable.
Never try to repair the mains cable yourself or to modify it in any way.
Clean dust, dirt etc. from the mains plug at regular intervals.
If the unit should be dropped or become damaged in any other way, switch it
off and unplug the mains cable.
If the unit should emit smoke, unusual smells or noises, switch it off and
unplug the means cable. In such cases, please contact your dealer.
Location
Avoid setting up the unit in the following places:
Locations with direct sunlight, next to radiators or other sources of heat or in
vehicles, which are parked directly in the sun with the windows and doors
closed.
Locations with very high temperature (more than 35° C) or humidity (more
than 90%).
Very dusty or sandy locations.
Locations subject to vibration or shock or with a sloping base, as otherwise
the components inside the unit could be damaged.
On inflammable surfaces, such as blankets.
Keep the unit away from flower vases, bath tubs, washbasins etc. and places
exposed to rainfall. If liquid should find its way into the unit, this can lead to
serious damage.
1
Page 6

Pinnacle ShowCenter
Setting up with other equipment
Set the unit up in a horizontal position and do not place heavy objects on top
of it.
Do not place the unit on an amplifier or other equipment that can become
hot.
Case and internal components
Under no circumstances remove or open any part of the case and do not try to
carry out repairs yourself. All maintenance or repair work must be carried out
by qualified specialists.
Do not place fingers or objects inside the unit.
Touching the components inside the unit is dangerous and can lead to severe
injury and damage to the equipment.
Do not place any foreign objects on top of the unit.
Formation of condensation
Condensation can form inside the unit under the following conditions:
Directly after switching on a heater in the vicinity.
In a very damp room or a room filled with water vapour.
When the unit is brought from a cold into a warm place.
Moisture inside the unit can lead to faulty operation under certain circumstances.
In such a case, switch the unit off and wait for approximately 1 hour until the
moisture has evaporated. Only then should you continue to use the unit.
Non-use
Switch the unit to standby mode when it is not in use.
If the unit is not used for extended periods, then the mains plug should be
removed from the socket.
Accessories
Use only the accessories supplied or recommended in order to avoid the risk of
fire and electric shock and possible interference.
Batteries
Insert the batteries as shown in the battery compartment of the remote
control.
Never mix old and new batteries or use batteries of different types (standard,
alkali) at the same time!
When the batteries are flat, ensure that they are disposed of according to the
regulations and in an environmentally friendly manner.
2
Page 7
Basics
Copyright
When making use of music files, video files and digital photos, ensure that the
copyrights are not infringed.
Any changes or additions, which could no longer be taken into account in
the printed documentation, are described in the Read-me file on the CD-ROM
supplied.
You will find the Declaration of Conformity (CE Declaration) and the "FCC
Compliance Statement" for Pinnacle ShowCenter as a separate PDF file on the
CD-ROM supplied.
3
Page 8

Pinnacle ShowCenter
The concept in words
With Pinnacle ShowCenter you can manage
music files
movie and other video files and
digital photos
from different sources, including the Internet, on your PC, view them on your
TV set or play them back on your stereo system. Everything is conveniently
controlled by remote control from your sofa.
Pinnacle ShowCenter is a combination of components readily found in the
living room, the home PC, a remote control and a software program for
managing the media.
Pinnacle ShowCenter arranges all your media in an intelligent multimedia
database on your PC so that they can be quickly found and gives you access
to all these files in a simple and convenient manner.
Do you use your PC with broadband Internet access (DSL or cable modem) for
downloading audio and video files and do you want to be able to arrange these
and to view or play them back at any time?
Do you want to archive your digital photos, videos and audio CDs and have
them available at all times?
Pinnacle ShowCenter is the right solution in both cases!
With Pinnacle ShowCenter you can maintain order in your media collection
and have your favourite movies and photos available for viewing on the TV and
your favourite music available for playing back on your stereo system at any
time.
With Pinnacle ShowCenter you can build up a simple system, which will
allow you to keep the PC out of your living room and yet still enjoy all the
advantages of modern media there.
You will find an explanation of all the necessary terms in the "Glossary"
section at the end of this manual. In case of doubt, please also refer to the
documentation provided with your TV set, your stereo system and your PC
components.
4
Page 9
Basics
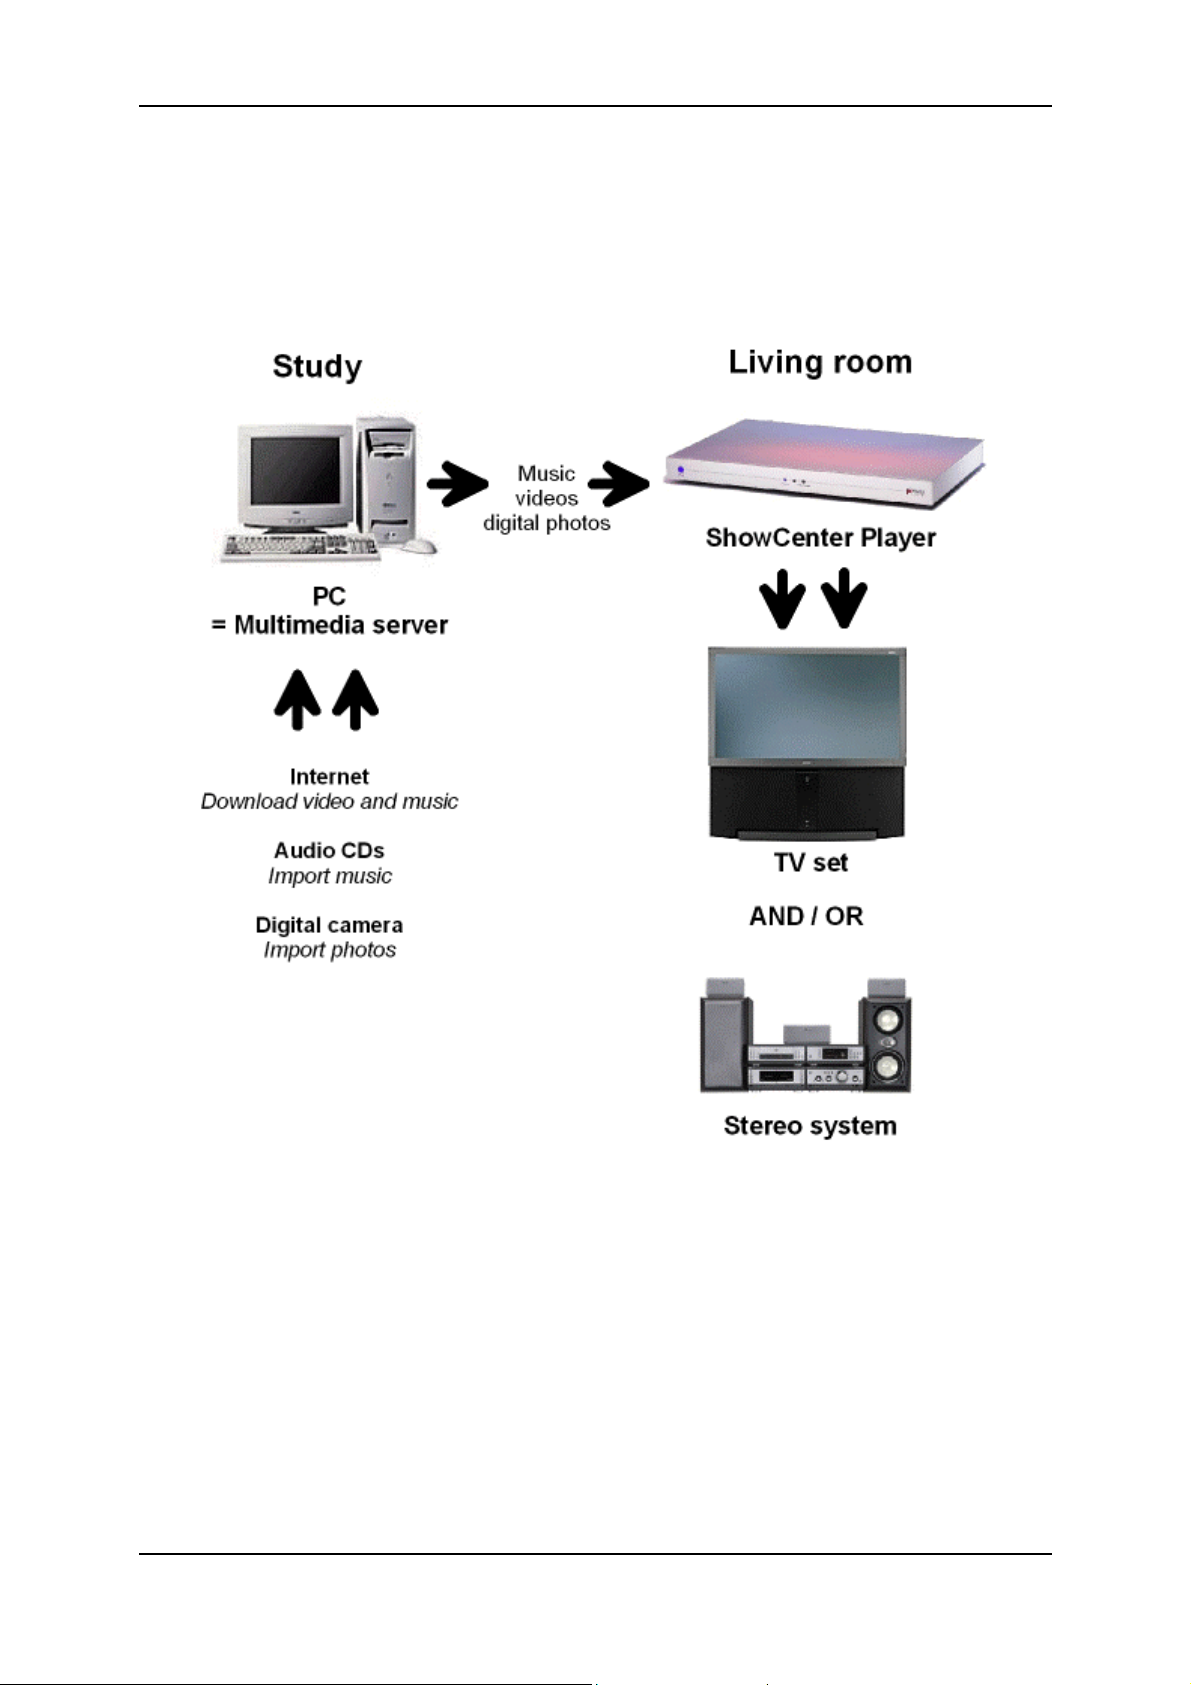
The concept in pictures
This overview drawing gives you an example of how the system components
may be arranged in the different rooms of your house:
5
Page 10

Pinnacle ShowCenter
The components
The Pinnacle ShowCenter system consists of the following components:
Hardware
ShowCenter Player
The ShowCenter Player, together with your PC and TV set and/or your
stereo system, forms a Multimedia Home Network. The ShowCenter Player
takes on the function of a network client and enables movies or photos stored on
your PC to be viewed on your TV set, or music files to be played back via your
stereo system.
Depending on the product version, the network can be connected with
cables or can be wireless.
Remote control (infrared)
You can control the menu shown on the TV screen by means of the remote
control.
Software
ShowCenter application
The ShowCenter application is installed on your PC and is used for importing
music files, movies and digital photos into the continuously updated
ShowCenter database and for the management and organisation of these
files.
If you like, you can create playlists in which you can bring together your
favourite music, movies or photos arranged in accordance with your own
criteria.
The media files on your PC can come from the Internet, from your audio
CDs or from your digital camera, for example.
ShowCenter server
The ShowCenter server is installed on your PC and forms the connection
between the ShowCenter application and the ShowCenter player. The data,
which you call up from your TV screen by means of the menu and that you then
want to view on the TV set or play back on the stereo system, is made available
to the ShowCenter player by the server.
6
Page 11

Basics
The ShowCenter server comprises two types of server whose settings can be
checked or changed by means of the ShowCenter control:
the streaming server, which provides the user interface for the TV set, and
the media server, which ensures access to the database, monitors folders
and, if necessary, converts the format of media files.
ShowCenter database
The ShowCenter database is used by the ShowCenter application and the server
for information exchange via all media. The database holds all information
concerning the storage location and the type of files and stores all available
additional information (e.g. playlists). This information can thus be easily found
again using the ShowCenter application and can be made available by the server
for playing back on the TV set and/or stereo system.
7
Page 12
Pinnacle ShowCenter
Package contents
Before you begin installation, check that the contents of the package are
complete. If a part should be missing or damaged, please refer to your dealer.
Keep the packing material in case you ever need to ship the original parts at a
later date.
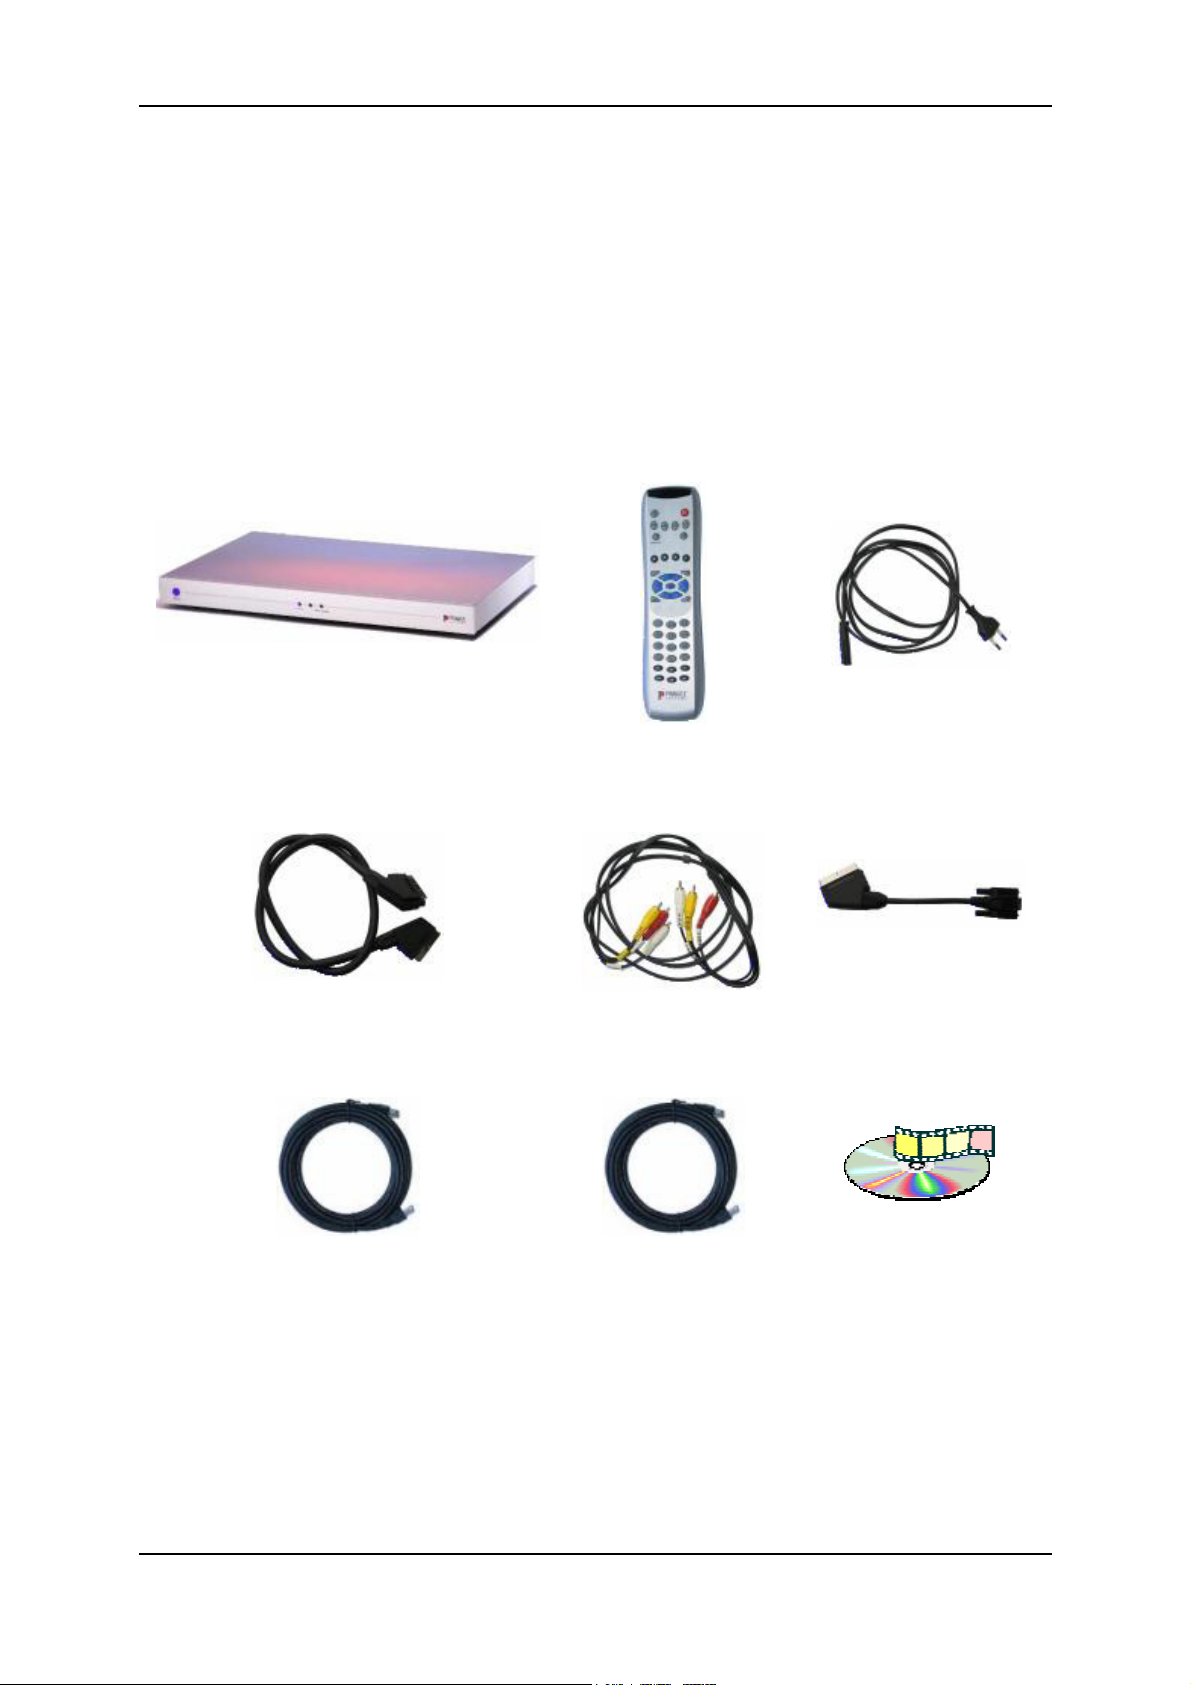
This is what you receive from us
Hardware
ShowCenter Player
with integral power supply
SCART cable
(Europe)
Remote control with
"Mignon 1.5 V" batteries
(R06, AA)
Video cable
(outside Europe)
Mains cable
(country specific)
SCART-VGA adapter
(only supplied with some
versions)
8
Ethernet cable
(Length: 10 m)
Crossover cable
(Length: 5 m, depending
on model)
CD-ROM with applications,
example data and drivers
Page 13
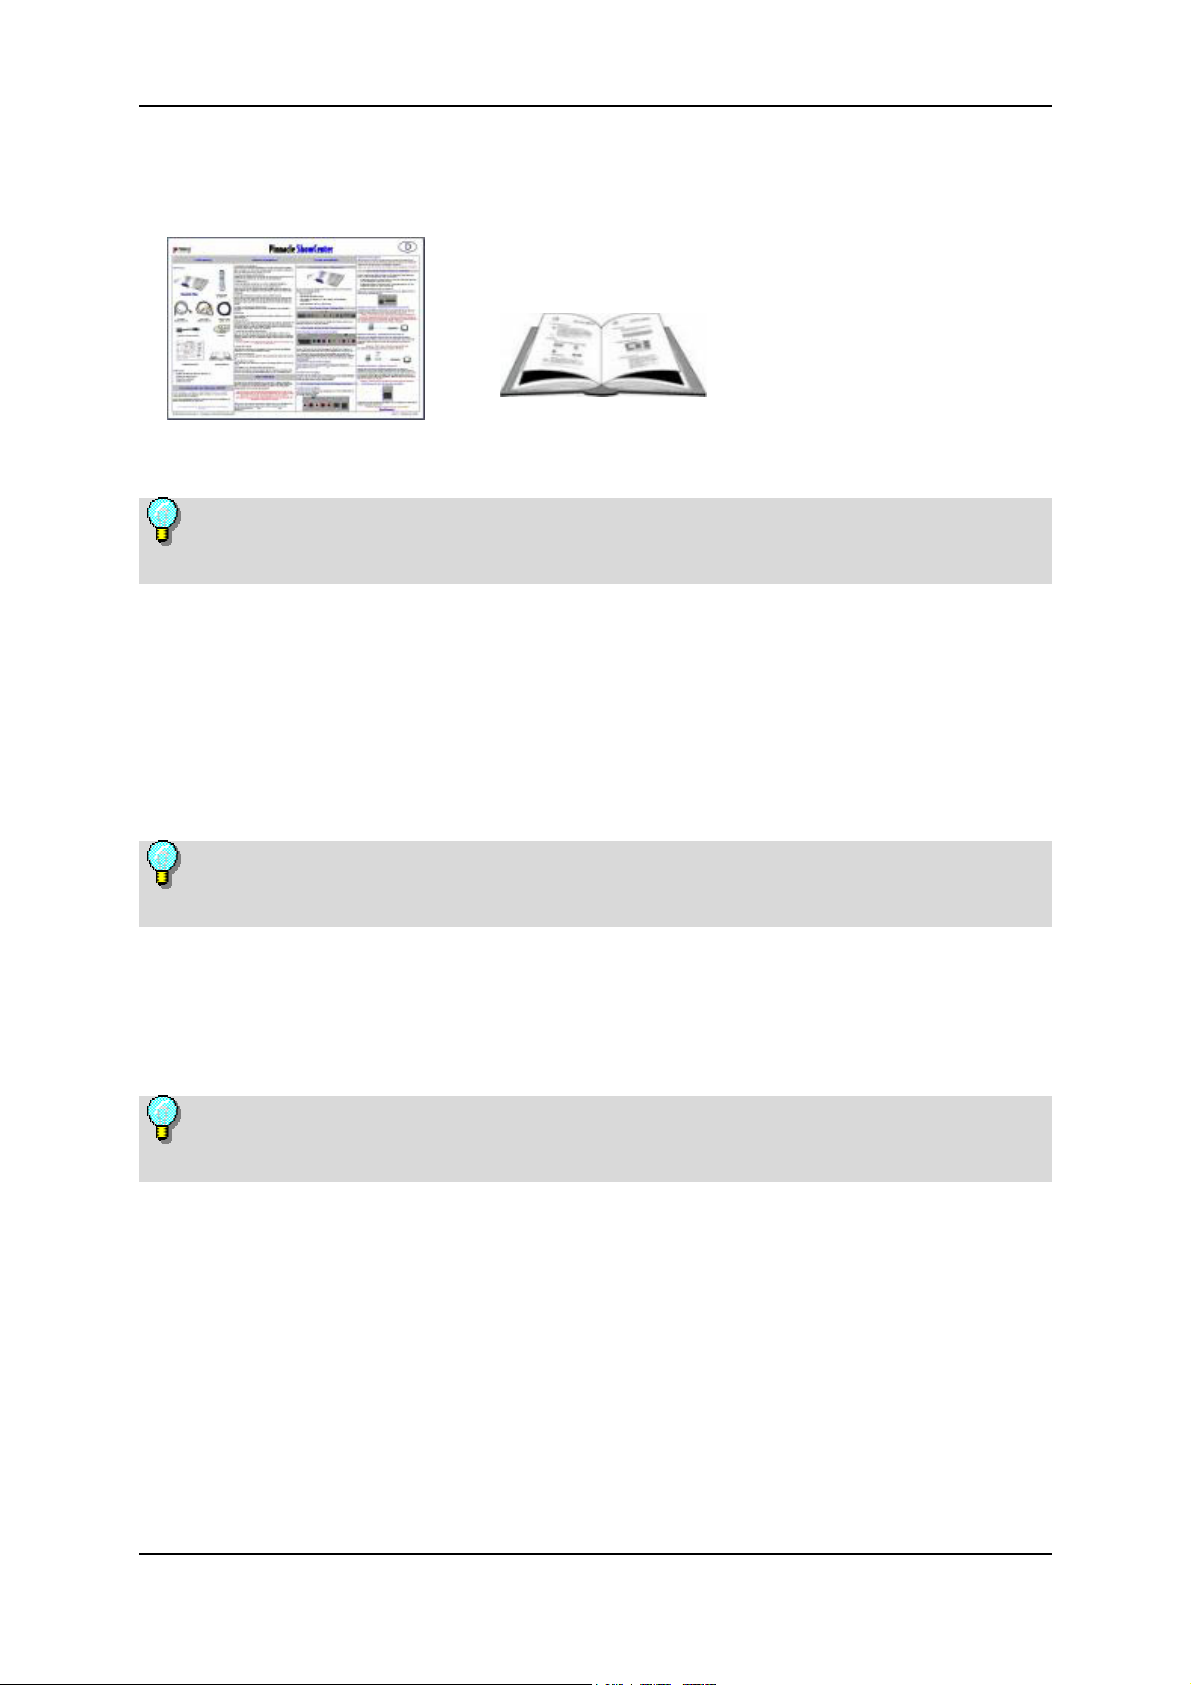
Documentation
Basics
Quick Install Guide User’s Guide
Please note that the package contents may vary from that shown here
depending upon the model!
Software
The following software can be found on the CD-ROM supplied with the
equipment:
Software for Windows 2000 or Windows XP
The Windows 95, Windows 98, Windows Millennium Edition and
Windows NT operating systems are not supported by Pinnacle ShowCenter.
ShowCenter Quickstart Assistant
ShowCenter application
ShowCenter server
Please note that the package contents may vary from that shown here
depending upon the model!
In addition, you will need
Computer
TV set and/or stereo system
9
Page 14

Pinnacle ShowCenter
System requirements
Your system must fulfil the following requirements to enable Pinnacle
ShowCenter to operate perfectly:
Computer hardware
Processor
At least Pentium ® III with 1GHz or comparable AMD processor
- recommended Pentium ® 4 with 1.8 GHz or comparable AMD processor.
Working memory
At least 256 Mbytes - recommended 512 Mbytes.
Hard disk
Hard disk with at least 5 GB free space.
Graphics adapter
DirectDraw-compatible graphics adapter (AGP graphics adapter with MPEG 2
decoding support recommended) with at least 16-bit colour depth (65536
colours) and a resolution of at least 800 x 600 pixels.
DirectDraw support:
Before you can work with the application, a graphics card with completely setup DirectX 9.x must be installed. The installation program will check this and
will install DirectX 9.x automatically if necessary.
Sound adapter
DirectX 9.x-compatible sound adapter.
Ethernet connection
10BaseT - recommended 100BaseT.
A Wi-Fi access point will be required for a wireless connection.
Problems may arise with a 10BaseT Ethernet connection when streaming
video files with high bandwidth. We therefore strongly recommend a 100BaseT
connection, particularly when other network functions are active!
Computer software
Windows 2000 with Service Pack 4 installed or Windows XP with Service Pack
1 installed.
10
Page 15

Setting up the ShowCenter system
Three steps to the ShowCenter system Overview
This section describes the procedure for setting up the ShowCenter system in the
form of an overview. Each step is explained in detail in the following
chapters.
The following procedure is recommended:
1. Install the software
First install the software on your computer.
The following components will be installed:
ShowCenter Quickstart Assistant
ShowCenter application
ShowCenter server
Example files
2. Quickstart Assistant
The Quickstart Assistant will start automatically as soon as the software
installation is complete. The Quickstart Assistant will help you to set up all
necessary preferences for the system step-by-step.
3. Connect the equipment
Now make the connections between the ShowCenter Player and your computer
and to the TV set and/or your stereo system.
Depending on the product version, the network can be connected with
cables or can be wireless.
11
Page 16
Pinnacle ShowCenter
Installing the software
This section describes the installation of the ShowCenter software on your PC.
In the course of the installation, the Pinnacle ShowCenter program group will
be created with its sub-groups, into which all necessary software components
will be copied.
You must have administrator rights in order to carry out the installation
under Windows 2000 / Windows XP.
You must be a member of the "main user" group or higher to be able to use the
applications.
1. Insert the installation CD
Place the installation CD provided in the appropriate drive of your computer.
The setup program will now start automatically or you can start autorun.exe
from the CD-ROM.
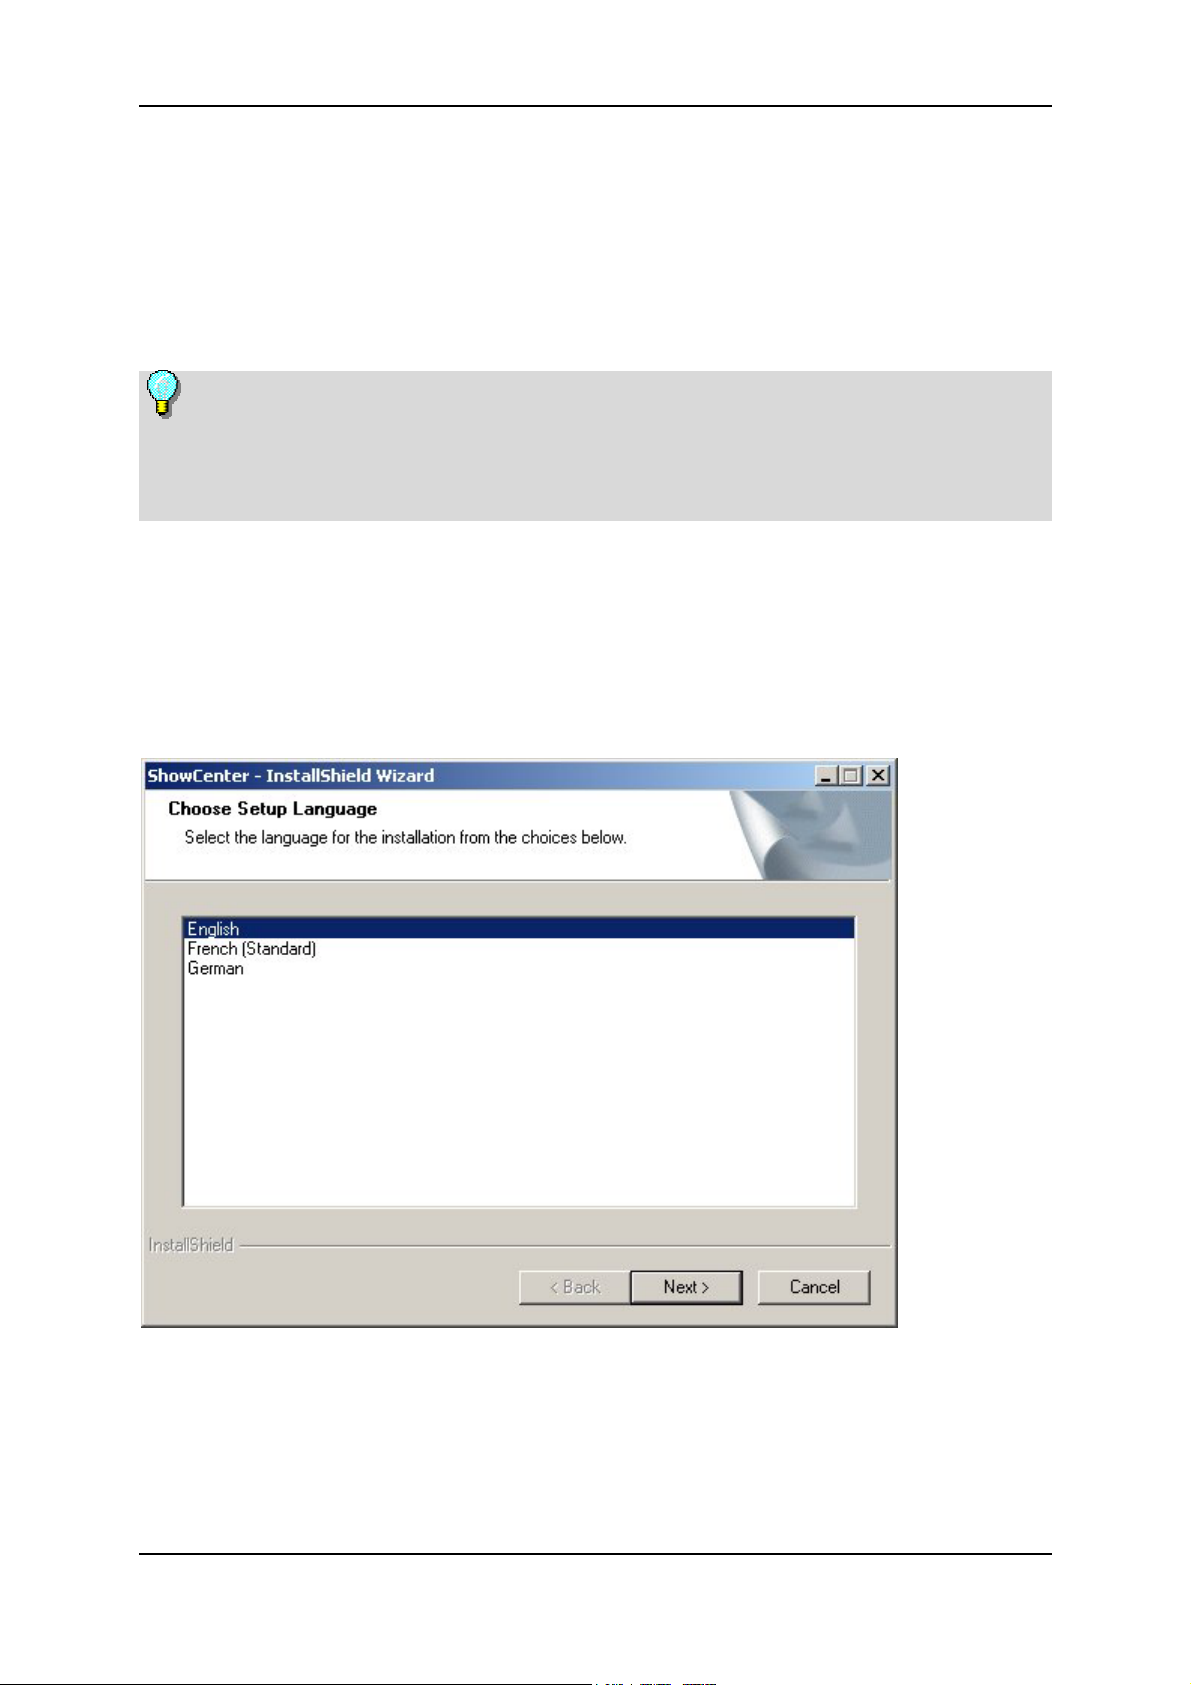
The installation program will now start with the following dialog box:
12
Page 17

Setting up the ShowCenter system
2. Choose language, click Next
Choose the required language for the installation process and the software to
be installed and then click Next.
3. Click Next
Click again on Next to continue with the installation.
4. Accept the licence agreement and click Next
Please read the licence agreement carefully, confirm your agreement by
choosing the appropriate option and then click Next.
5. Enter the user information and click Next
Enter the required user information and the serial number (see CD sleeve).
Choose whether the application is to be available for use by all users of the
computer or only by you. Then click Next.
6. Choose Setup type, click Next
Here you can choose which type of installation you want to carry out.
Complete
The program will be installed with all functions. Requires the most memory
space.
Custom
You can choose the options to be installed yourself. Recommended for
experienced users. Amongst other things, you can change the target path for
the folder in which the software is to be installed here.
When you have made your choice, click Next.
7. Choose components, click Next
If you have chosen the custom setup, you can choose those specific
components that you want to install in the following window. After you have
defined the installation, click Next.
This installation step is not necessary if you have chosen the Complete
setup.
8. Start installation
The system is now ready for installation. Click the Install button to start the
copying process.
13
Page 18

Pinnacle ShowCenter
9. Desktop shortcut
If you want a shortcut on your desktop, now click Yes.
10. Restart the system
If Windows suggests restarting the system, do this now.
11. Installing third-party applications
After the system has been restarted, further programs will be installed if you
have selected these as components (e.g. Acrobat ® Reader).
12. Continue with the section "Quickstart Assistant"
On completing the software installation, please continue with the section
"Quickstart Assistant".
14
Page 19
Setting up the ShowCenter system
The Quickstart Assistant
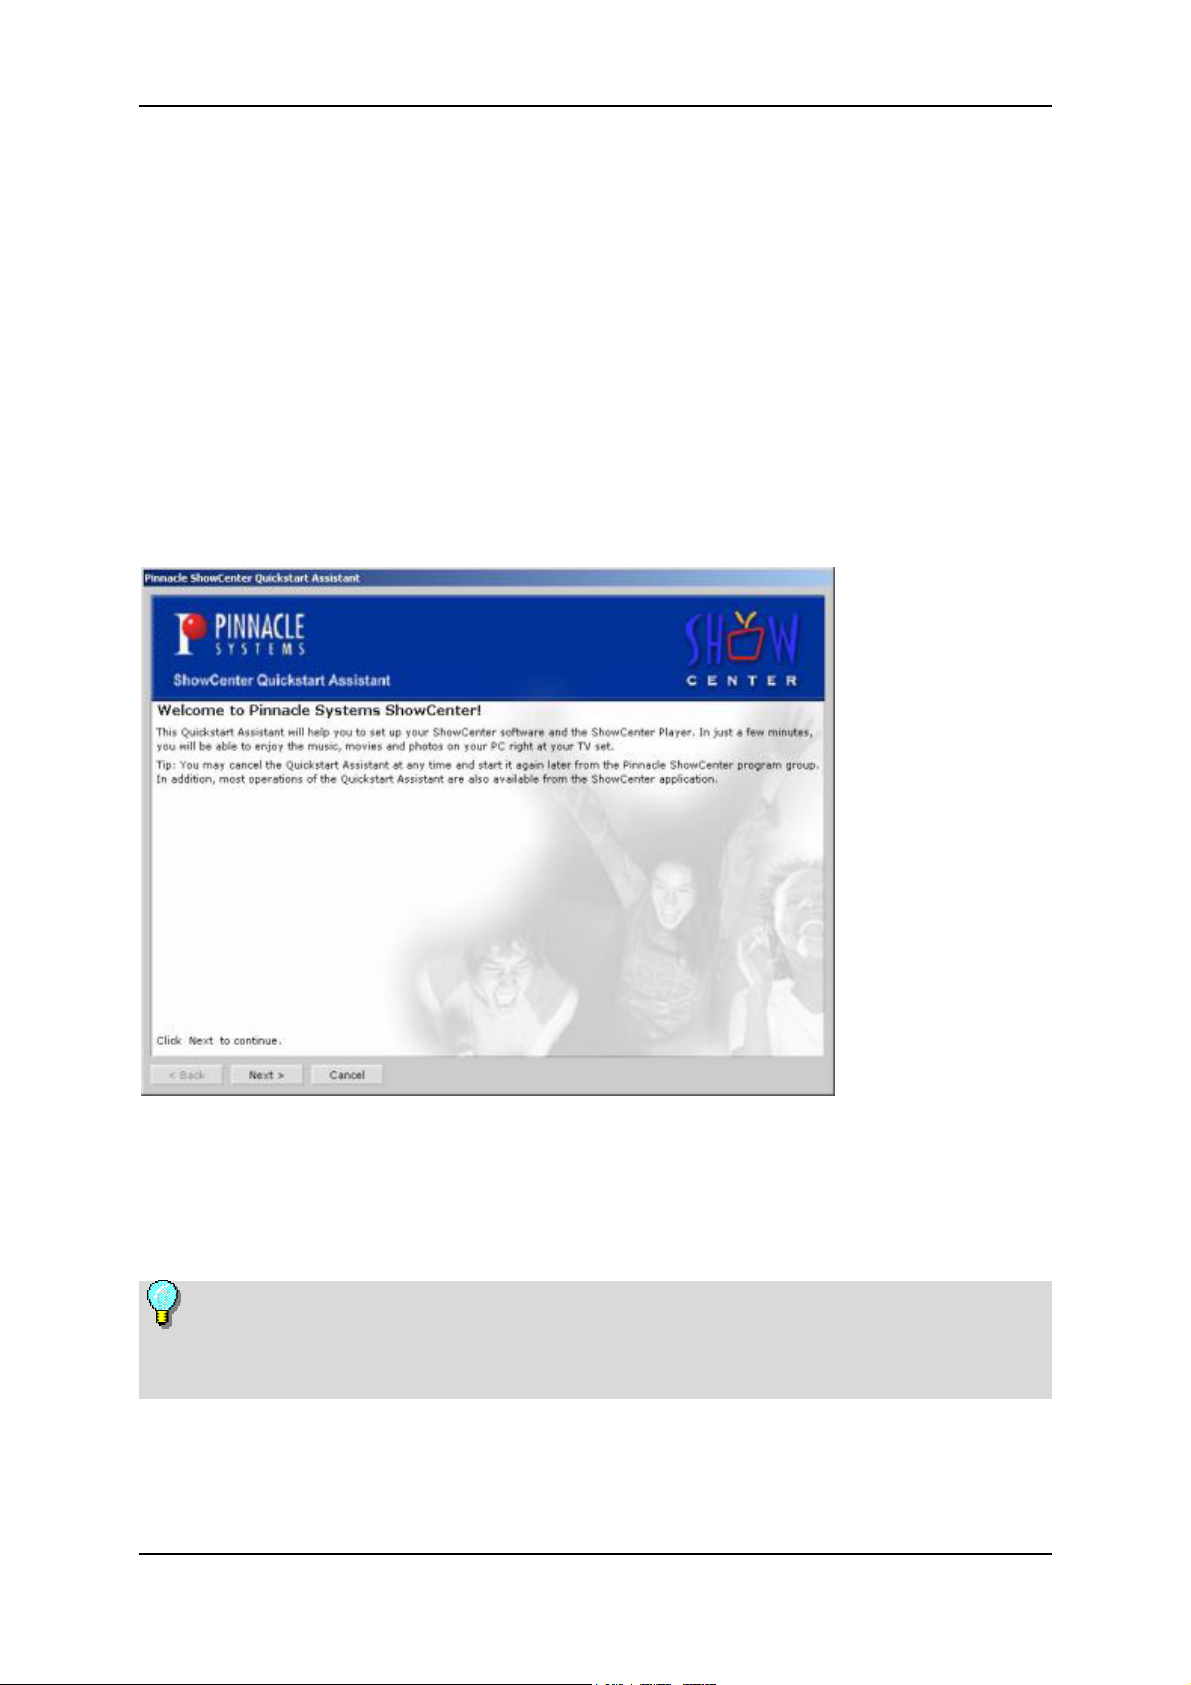
The Quickstart Assistant will start automatically as soon as the software
installation is complete. The Quickstart Assistant will help you to set up all
necessary preferences for the system step-by-step.
You can close the Quickstart Assistant at any time and run it again later from
the Start menu via the Pinnacle program group.
Most preferences can also be set up in the ShowCenter application. To do
this, open the ShowCenter application either from the Start menu via the
Pinnacle program group or by double-clicking on the desktop shortcut.
The following window will open:
The individual steps are explained here in brief. In each case, follow the
instructions on the screen.
Importing the Windows Media Player database
This function is only supported from Version 9 of the Windows Media
Player. If only an older version of Windows Media Player is installed, then the
import function is not available.
15
Page 20

Pinnacle ShowCenter
The Windows Media Player database on your PC is searched for information on
compatible media files (music, videos, photos). In doing so, not only are the
Microsoft demo files found but also other files, which may be on your computer
and stored in the Windows Media Player database. All files in question will be
imported into the ShowCenter database.
Importing TV recordings from a Pinnacle PCTV product
This function is only available when a Pinnacle PCTV product is installed
on your PC.
TV programmes, which have been recorded with a Pinnacle PCTV product, can
be imported into the ShowCenter database and you can view these on your TV
set via the ShowCenter Player. A watched folder can be created for these
recordings on your computer so that all recordings that are made are imported
into the ShowCenter database automatically.
Importing other media files
In the step that now follows, you are asked which folders and/or hard drives on
your PC should be searched for other media files. Folders to be searched can, for
example, be the Windows "My Computer" folder, other folders or even
complete hard drives on your computer. All files on your computer that are
found and which are compatible will be imported into the ShowCenter
database.
Folders used by ShowCenter
First of all, the folders on your PC, which are to be used for music files from
audio CDs and for photos from a digital camera, are defined here.
A folder is then selected, in which all converted files are to be stored. Please
note that converted files use a lot of memory space, particularly when long
movies are concerned.
A temporary folder for the burning of CDs/DVDs is also selected. Here, too,
it should be noted that a lot of memory space is required.
16
Page 21

Setting up the ShowCenter system
Code for restricted file access
The access to particular media files via the menu on the screen can be restricted
by means of an access code. When you specify an access code, the media files
concerned can only be viewed on the TV set or listened to on the stereo system
by people who know this access code.
The media files, for which restricted access is to apply, are defined individually
in the function area of the ShowCenter application under the Organize tab.
Note: The access code only applies for playing media via the menu on the
TV screen. All files will continue to be accessible via the ShowCenter
application on the PC!
Network connections
With the help of the Quickstart Assistant, you now configure the network
connections for the ShowCenter system and connect the devices. Follow the
instructions on the screen.
You should also have the section of the manual entitled "Connecting devices" to
hand, which describes the procedure in pictures and in words.
Closing the Quickstart Assistant
Once you have gone through all the steps in the Quickstart Assistant, all the
necessary settings for your ShowCenter system will have been made. No further
settings are required.
All ShowCenter components are now ready for use and you can start viewing
movies or photos on your TV set or playing music files via your stereo system
immediately.
To close the Quickstart Assistant, click on the Finish button.
17
Page 22
Pinnacle ShowCenter
Connecting devices
ShowCenter Player - Front view
The following control and indicating devices are located on the front of the
ShowCenter Player:
On/Off switch
LED status indicator for "Standby" and On/Off
Infrared receiver for remote control
LED signal indicator (e.g. "New files in watched folder")
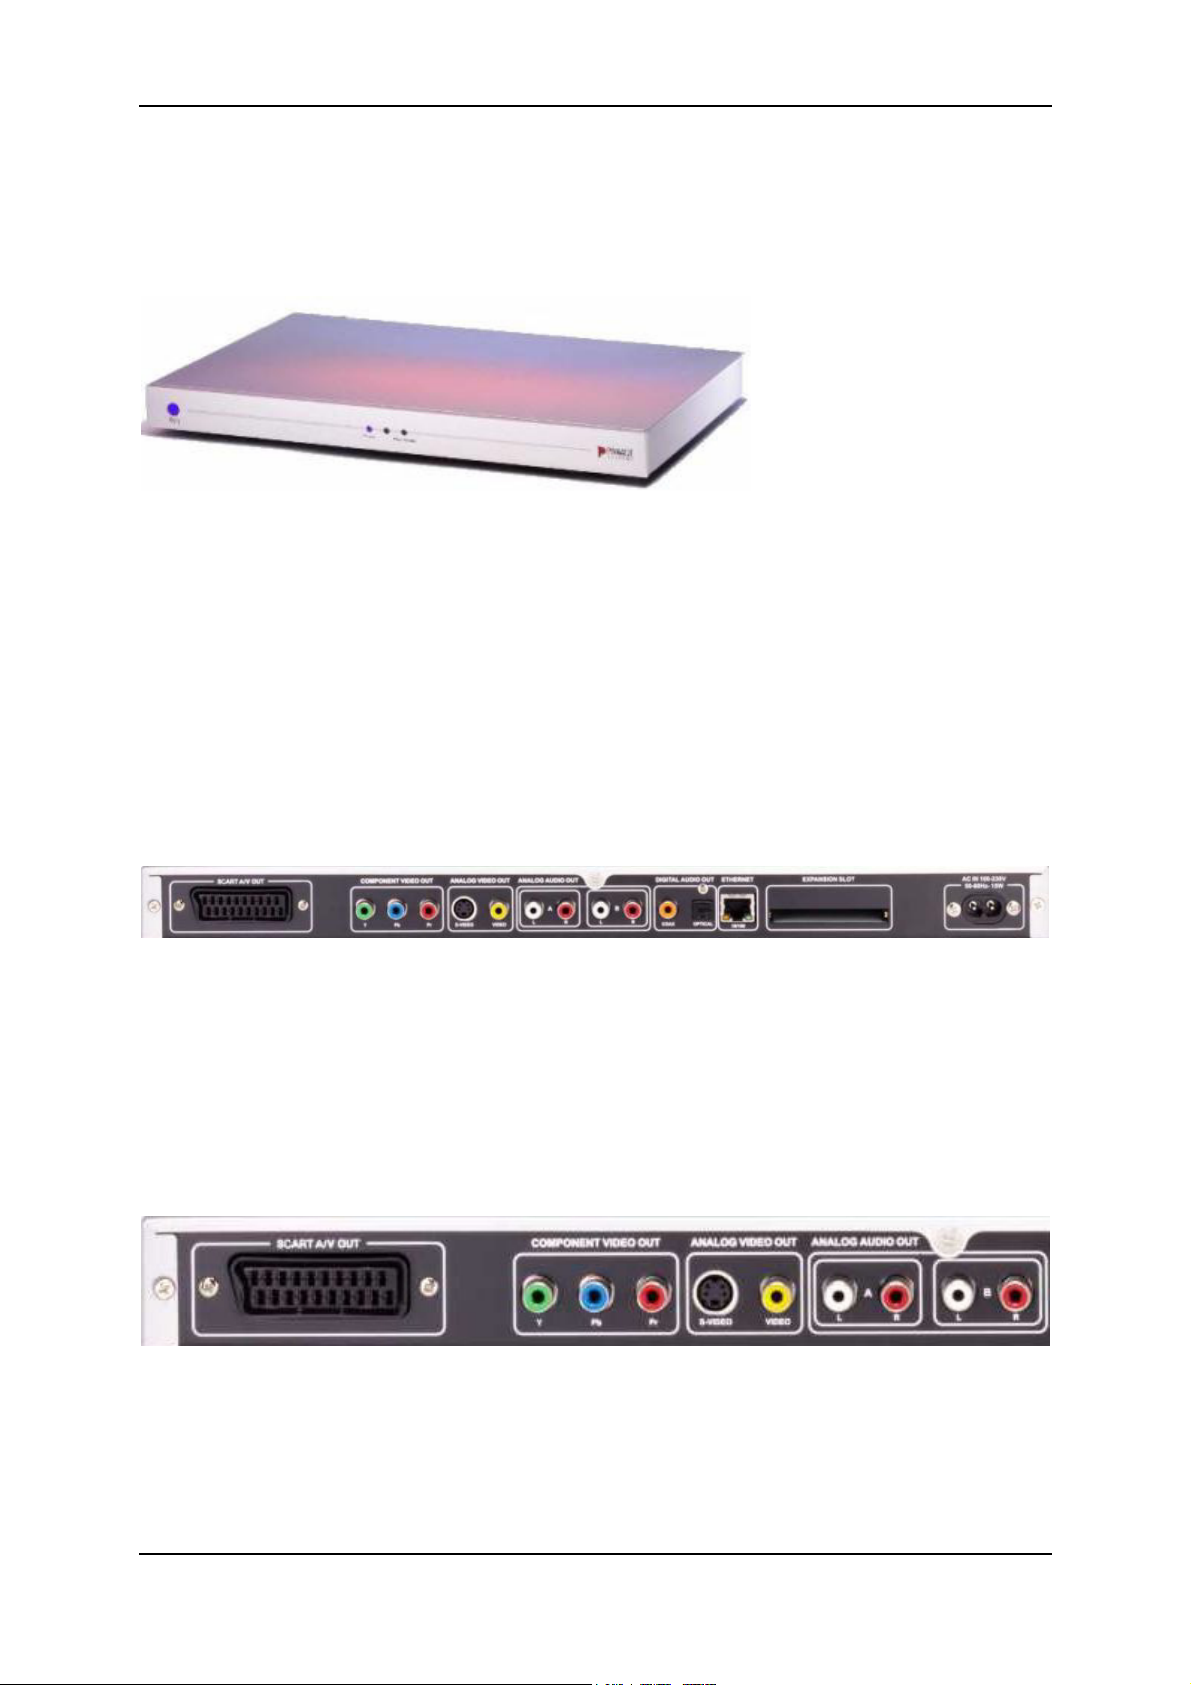
ShowCenter Player - Rear view
The connections on the rear of the ShowCenter Player are described in detail in
the following steps.
1. Connecting the ShowCenter Player to a TV set
SCART output / Video and audio output
Europe: Connect the SCART output of the ShowCenter Player to a free SCART
input of your TV set using the SCART cable provided. If possible, your TV's
SCART connector should support RGB signals, as this transmission provides
the best picture quality. You should later change over to SCART-RGB using the
ShowCenter Player's Preferences menu.
18
Page 23

Setting up the ShowCenter system
USA: Connect the"Analog Video Out" output to a suitable video input of your
TV set using the video cable provided (yellow plug). Also, connect the analogue
audio outputs marked "A" to the corresponding stereo audio inputs of your TV
set using the stereo audio cable provided (red and white plugs).
More about the video outputs
S-Video output: This provides better quality than the normal analogue video
output.
Component Video output: This connection has the best possible video quality
due to the separate transmission of the video components. Furthermore, the
"PAL progressive" format and various HD formats (USA only) are also
provided here. However, only the most recent television sets have a Component
input.
Connecting a VGA monitor
You can also drive a VGA monitor or a projector with a VGA input from the
SCART output of the ShowCenter Player using the VGA-SCART adapter cable,
which is available as a separate accessory. In this case, the video mode is always
1024x768, 60Hz.
Note: When the ShowCenter Player is switched on for the first time, only
the SCART output together with the analogue video output and the S-Video
output are active. A VGA monitor or a television set connected to the other
outputs will therefore initially remain dark. You can change over to the other
outputs by means of the "Video Out" button on the remote control. Press the
button and then wait for five seconds. If no picture appears, then press the button
again and wait once more. This procedure must be repeated up to eleven times
in order to switch through all video output modes.
Before switching off the ShowCenter Player, you must still select the correct
video output via the Preferences, as the setting using the "Video Out" button is
only temporary.
2. Connecting the ShowCenter Player to a Hi-Fi system
Analogue audio outputs
Connect the analogue audio outputs, e.g. "B" (Left/Right), to the appropriate
inputs of your stereo system. Take care to ensure the correct colour orientation
when doing so.
19
Page 24
Pinnacle ShowCenter
Digital audio outputs
If you have a Surround Sound system, you can use either the ShowCenter
Player's coaxial connector or the fibre optic connector to make the appropriate
connections.
The sound for movies with Dolby®Digital ("AC3") is only output via the
digital and not via the analogue audio outputs.
3. Connecting the ShowCenter Player to a PC
There are several ways of making a network connection between your PC and
the ShowCenter Player:
Network connection - using cables with direct connection between PC and
ShowCenter Player (crossover)
Network connection - using cables, connection between PC and ShowCenter
Player via a router for example
Network connection - wireless
Choose the option, which is most suitable for you depending upon the
technical circumstances.
Network connection - using cables, direct (crossover)
Connect the ShowCenter Player's Ethernet connector to the network card in
your PC using the Ethernet cable provided.
Note: In this case, the crossover cable provided must also be used.
20
Page 25
Setting up the ShowCenter system
The following diagram shows an overview of the principle:
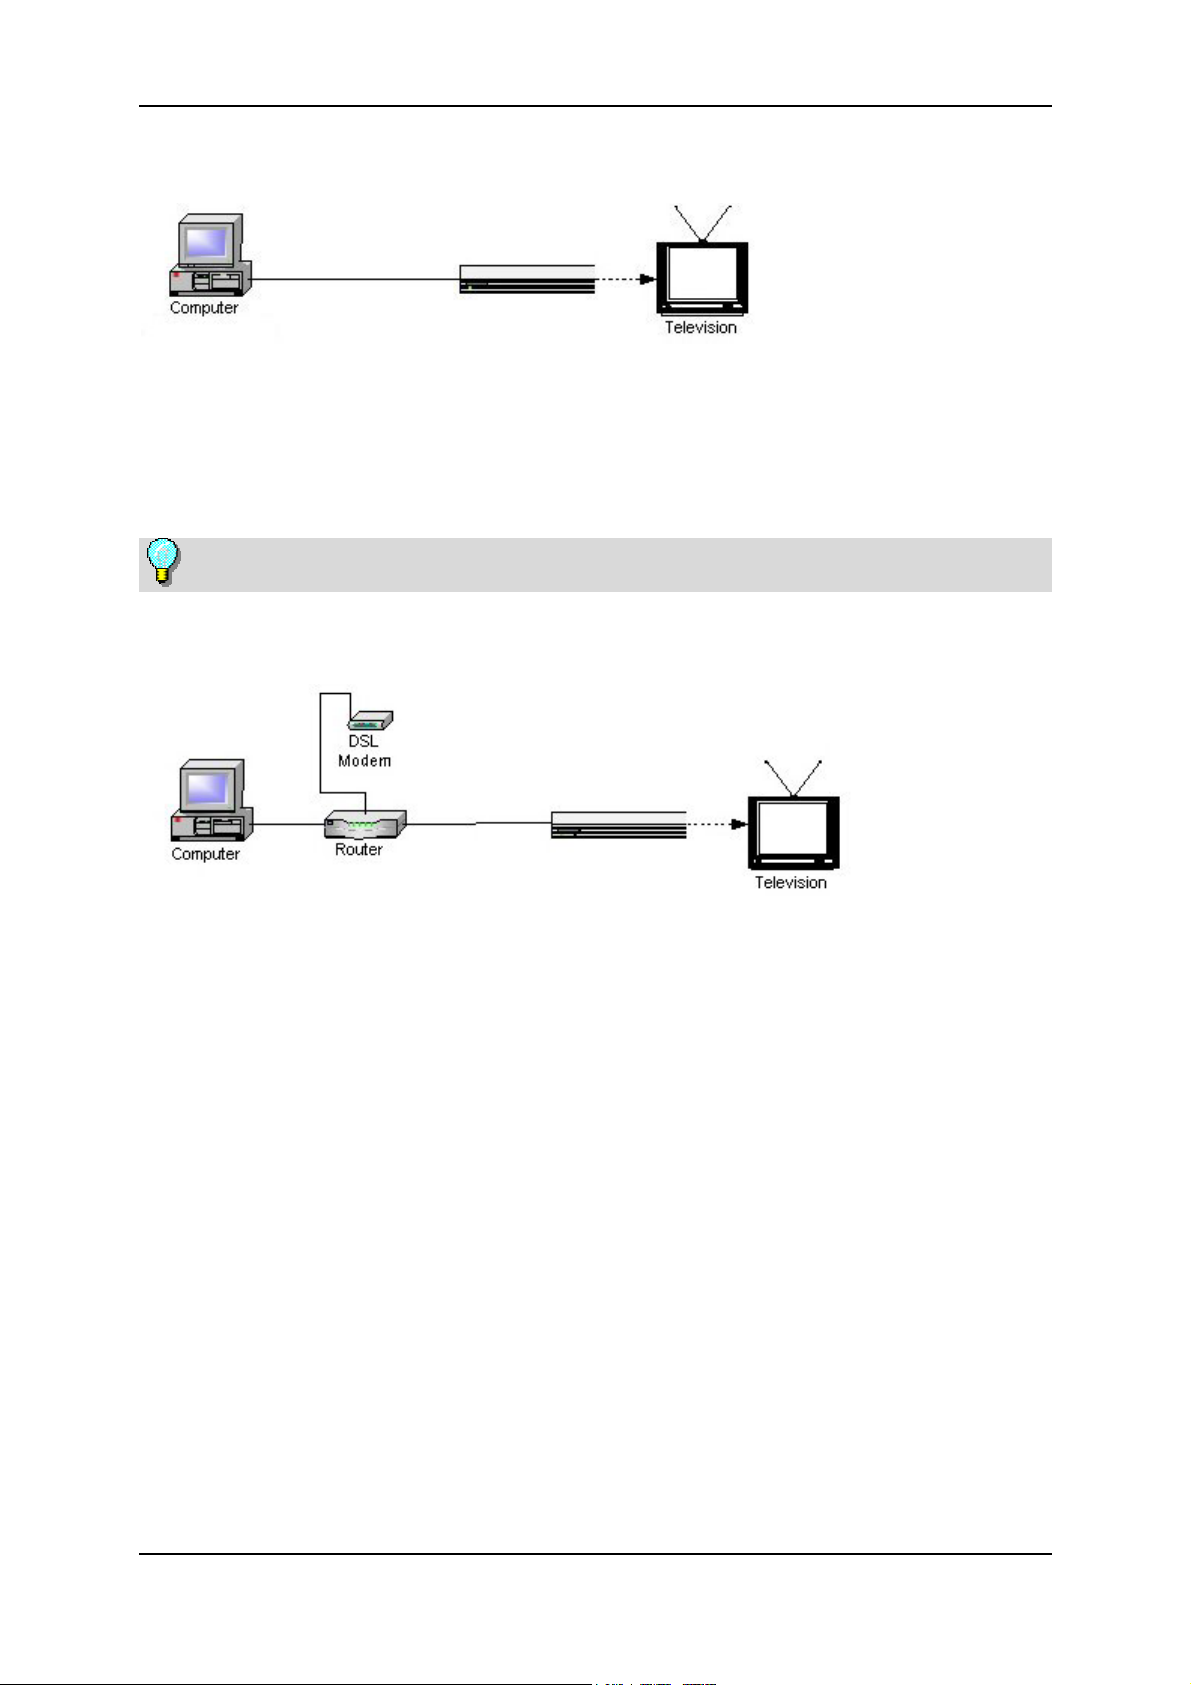
Network connection - using cables, via router
If you have a network router connected to your PC, connect the ShowCenter
Player's Ethernet connector to a free Ethernet connector on the router using
the Ethernet cable provided.
Note: "DHCP" must be switched on in the router.
The following diagram shows an overview of the principle:
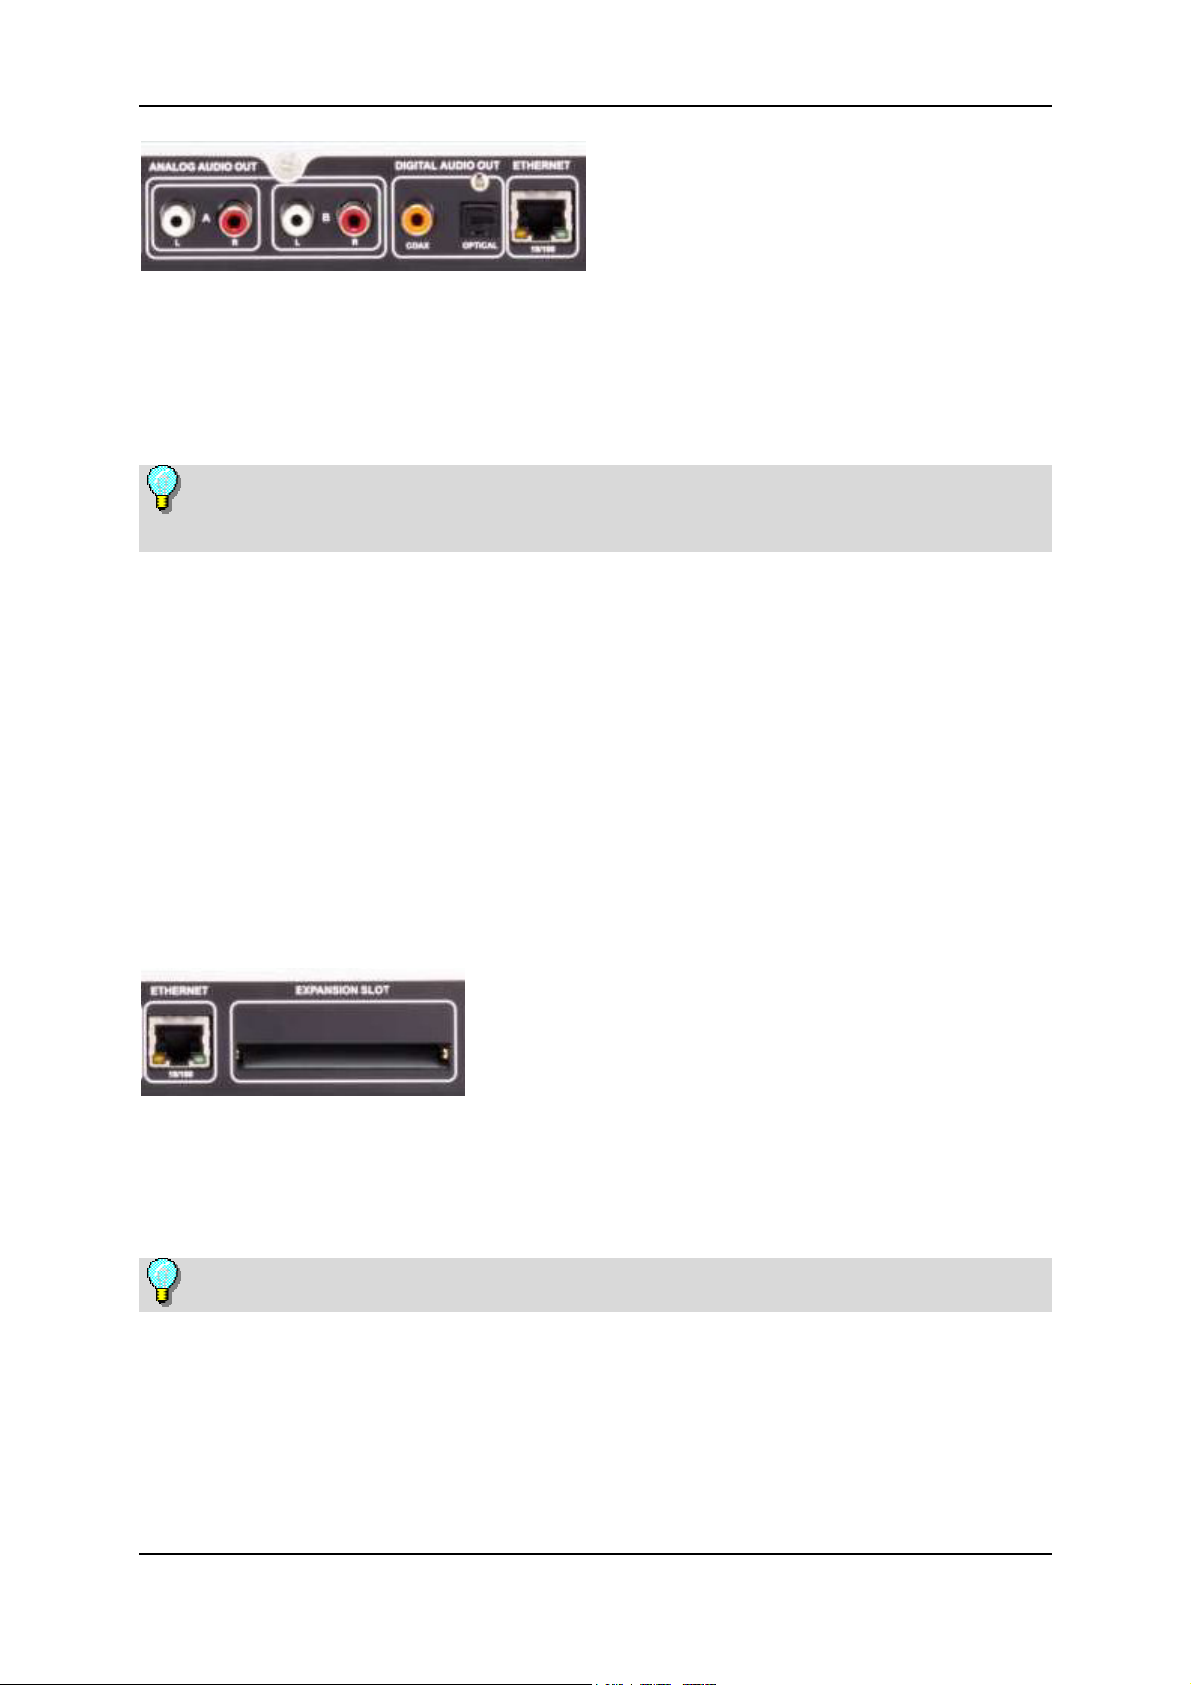
Network connection - wireless
Plug a Pinnacle-certified wireless network expansion module into the
expansion slot provided in the ShowCenter Player.
Configuring the wireless network connection
If you are setting up your wireless network for the first time, then choose
"ShowCenter" as the SSID - in doing so, take note of upper/lower case letters.
As standard, the ShowCenter Player is pre-configured to the SSID
"ShowCenter" and the WEP encryption is switched off.
If you already have a wireless network, then you must set its SSID and, if
necessary, also the WEP key, on the ShowCenter Player. To do this, proceed as
follows:
1. Switch on your ShowCenter Player. First the logo and then, after a few
seconds, the server selection menu, will appear on the TV screen.
2. Press the B button on the remote control. The firmware setup page will
appear.
3. Select WiFi Setup with the cursor keys and press OK.
21
Page 26
Pinnacle ShowCenter
4. On this page, you can now enter the SSID of your wireless network. When
doing so, take note of upper/lower case letters (use the C/N button on the
remote control to change over if necessary).
5. If necessary, also switch on the WEP encryption and enter the WEP key for
your wireless network.
6. If your wireless network does not have an access point, but instead you want
to connect the ShowCenter Player directly to your PC via a PC-WiFi
adapter, then choose "Direct to a computer (ad hoc)".
7. After entering all the data, you must still navigate to the Save button and
press OK. The ShowCenter Player will now carry out a restart.
The WEP key must be entered as a 10-digit (64-bit encryption) or a 20-digit
(128-bit encryption) hexadecimal number, e.g."7a3f017b30" (64 bit). You can
switch between lowercase letters, uppercase letters and numbers using the "C/N"
button on the remote control.
When you display the WiFi Settings page again later, the fields for the WEP key
will always be empty for security reasons - the key is stored internally however.
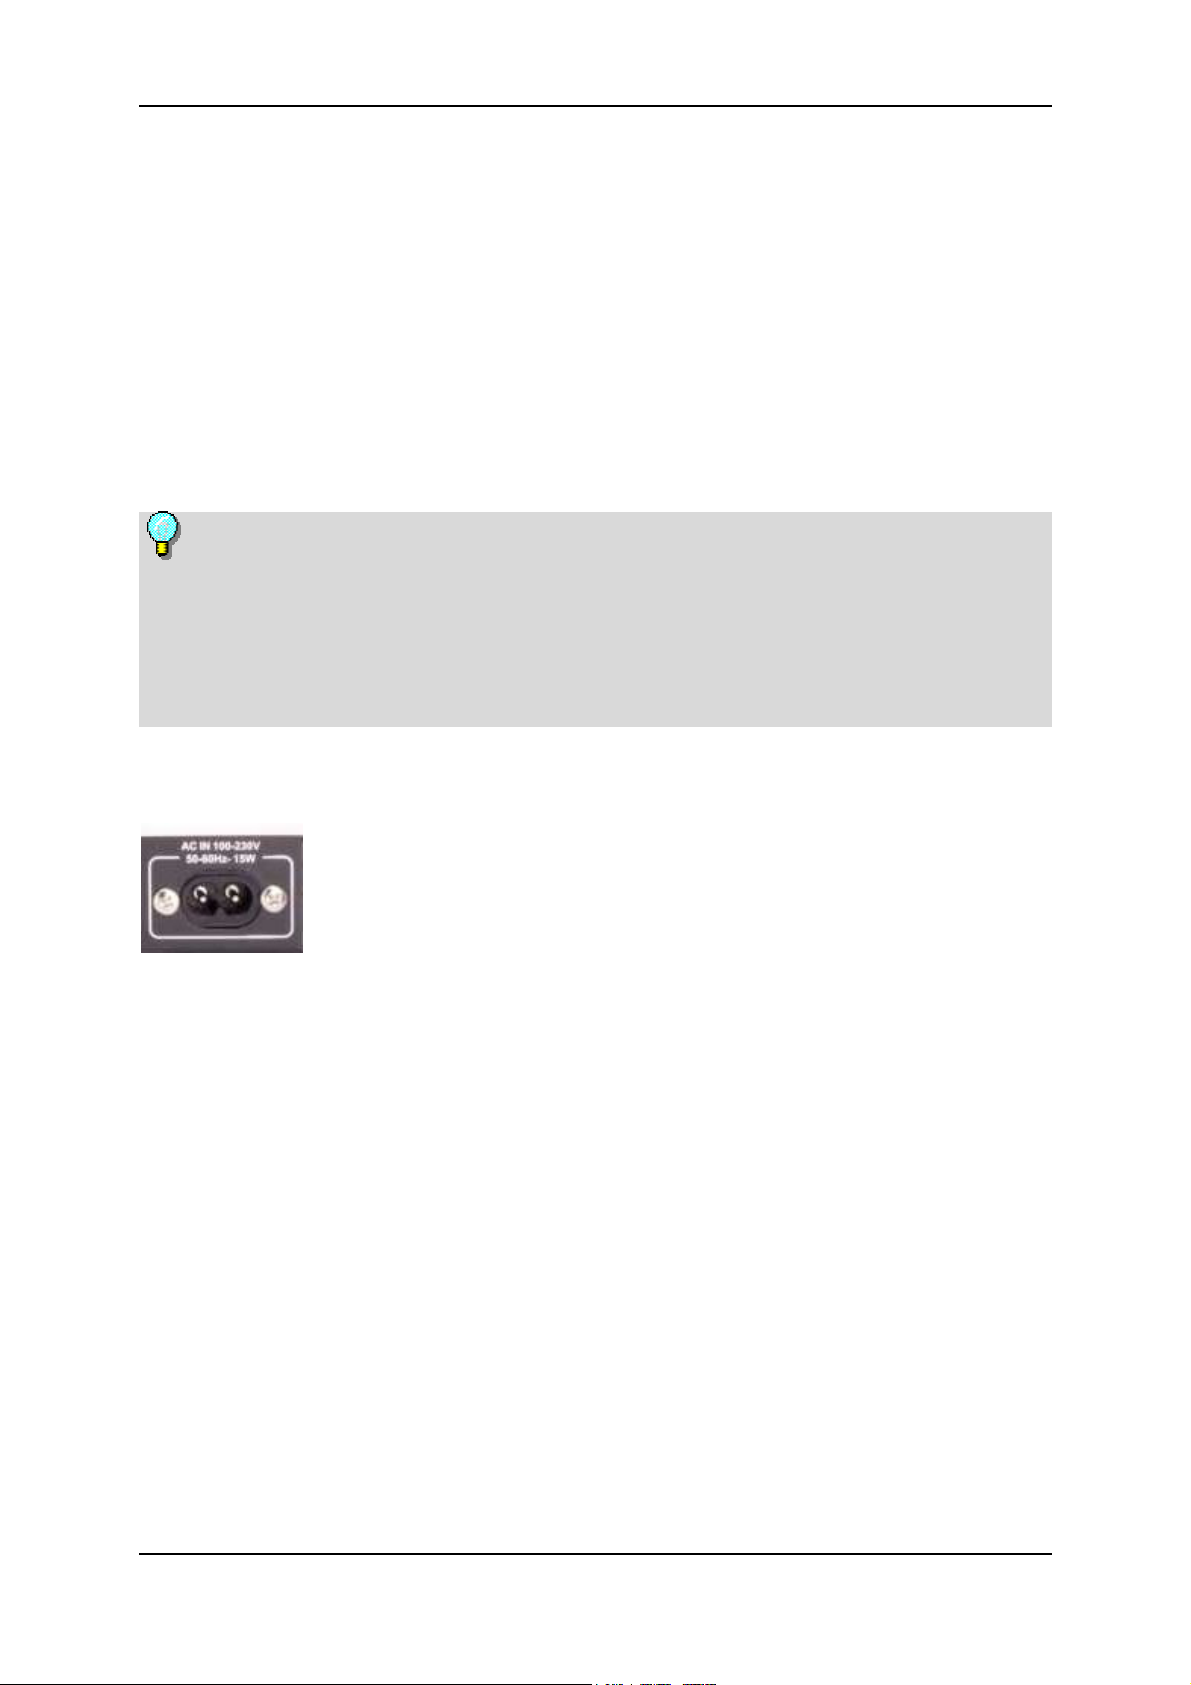
4. Connecting to the mains supply
Use the mains cable provided to connect the ShowCenter Player to the mains
supply.
5. Fitting the batteries in the remote control
Insert the batteries provided as shown in the battery compartment of the remote
control.
After making all the connections, you can switch on the ShowCenter Player
and the other devices.
Pinnacle Systems wishes you hours of enjoyment with Pinnacle
ShowCenter!
22
Page 27

The ShowCenter application
Overview
What the ShowCenter application does
The ShowCenter application is installed on your PC and is used for importing
music files
movies and other video files, and
digital photos
into the continuously updated ShowCenter database and for the management
and organisation of these files.
If you like, you can create playlists in which you can bring together your
favourite music, movies or photos organised in accordance with your own
criteria. These playlists can also be exported for the purposes of burning an
audio CD, for example.
23
Page 28
Pinnacle ShowCenter
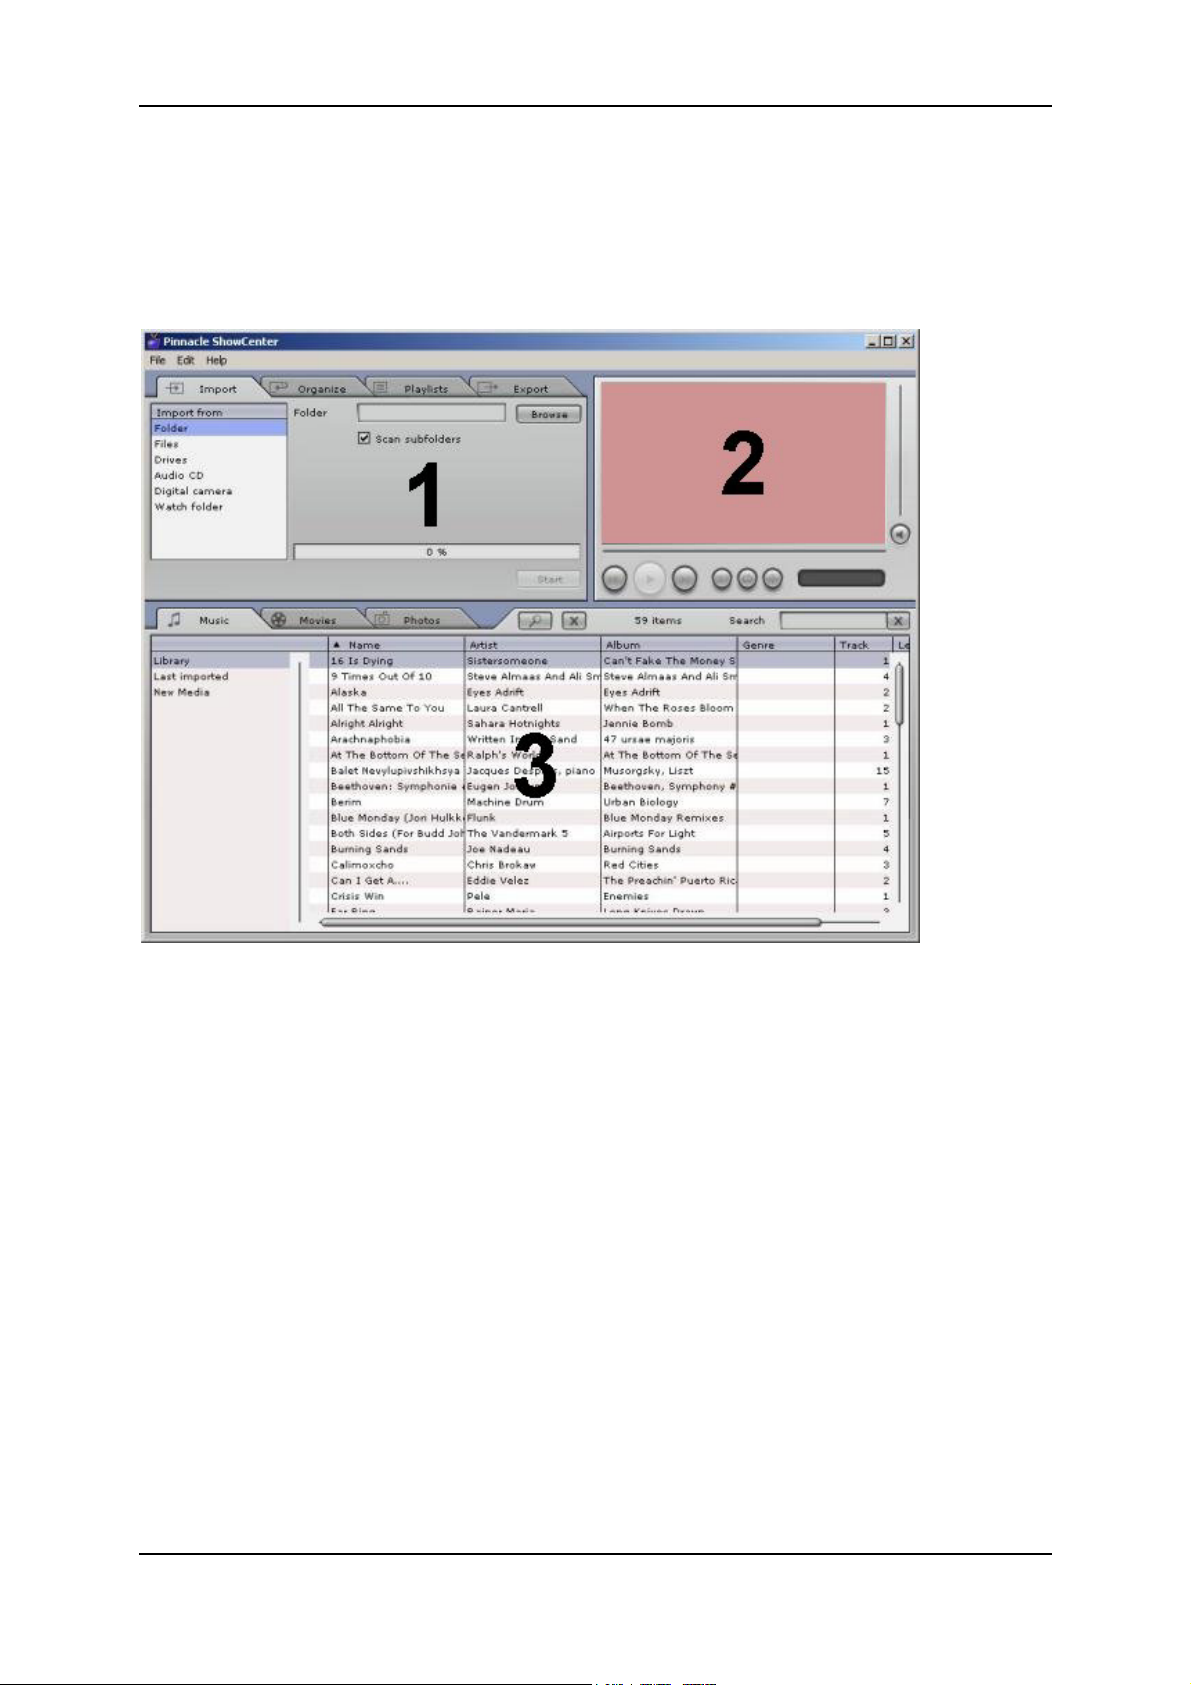
The ShowCenter application start window
You can start the ShowCenter application either from the Start menu via the
Pinnacle program group or by double-clicking on the desktop shortcut. The
following window will open:
The window is divided into the following areas:
Area 1:
The function area on the top left-hand side with the Import, Organize,
Playlists and Export tabs.
Area 2:
The Media Player on the top right-hand side.
Area 3:
The Media Library in the bottom part with the Music, Movies and Photos
tabs.
Menu bar:
At the top edge, you will also see the menu bar with the supporting menus File,
Edit and Help.
24
Page 29

The ShowCenter application
The window view changes depending on the choice of different functions and
list types and the three areas work interactively and closely together. You will
find detailed information on the individual areas in the following sections.
The Media Library and the Media Player area are explained first in order to
provide the basic tools for working with the application.
The special functions, Import, Organize, Playlists and Export as well as the
menus are explained in the later sections.
25
Page 30
Pinnacle ShowCenter
The Media Library
An overview of the Media Library
Types of media
The Media Library represents the contents of the database with reference to the
three different types of media, divided into the
Music tab
Movies tab and the
Photos tab.
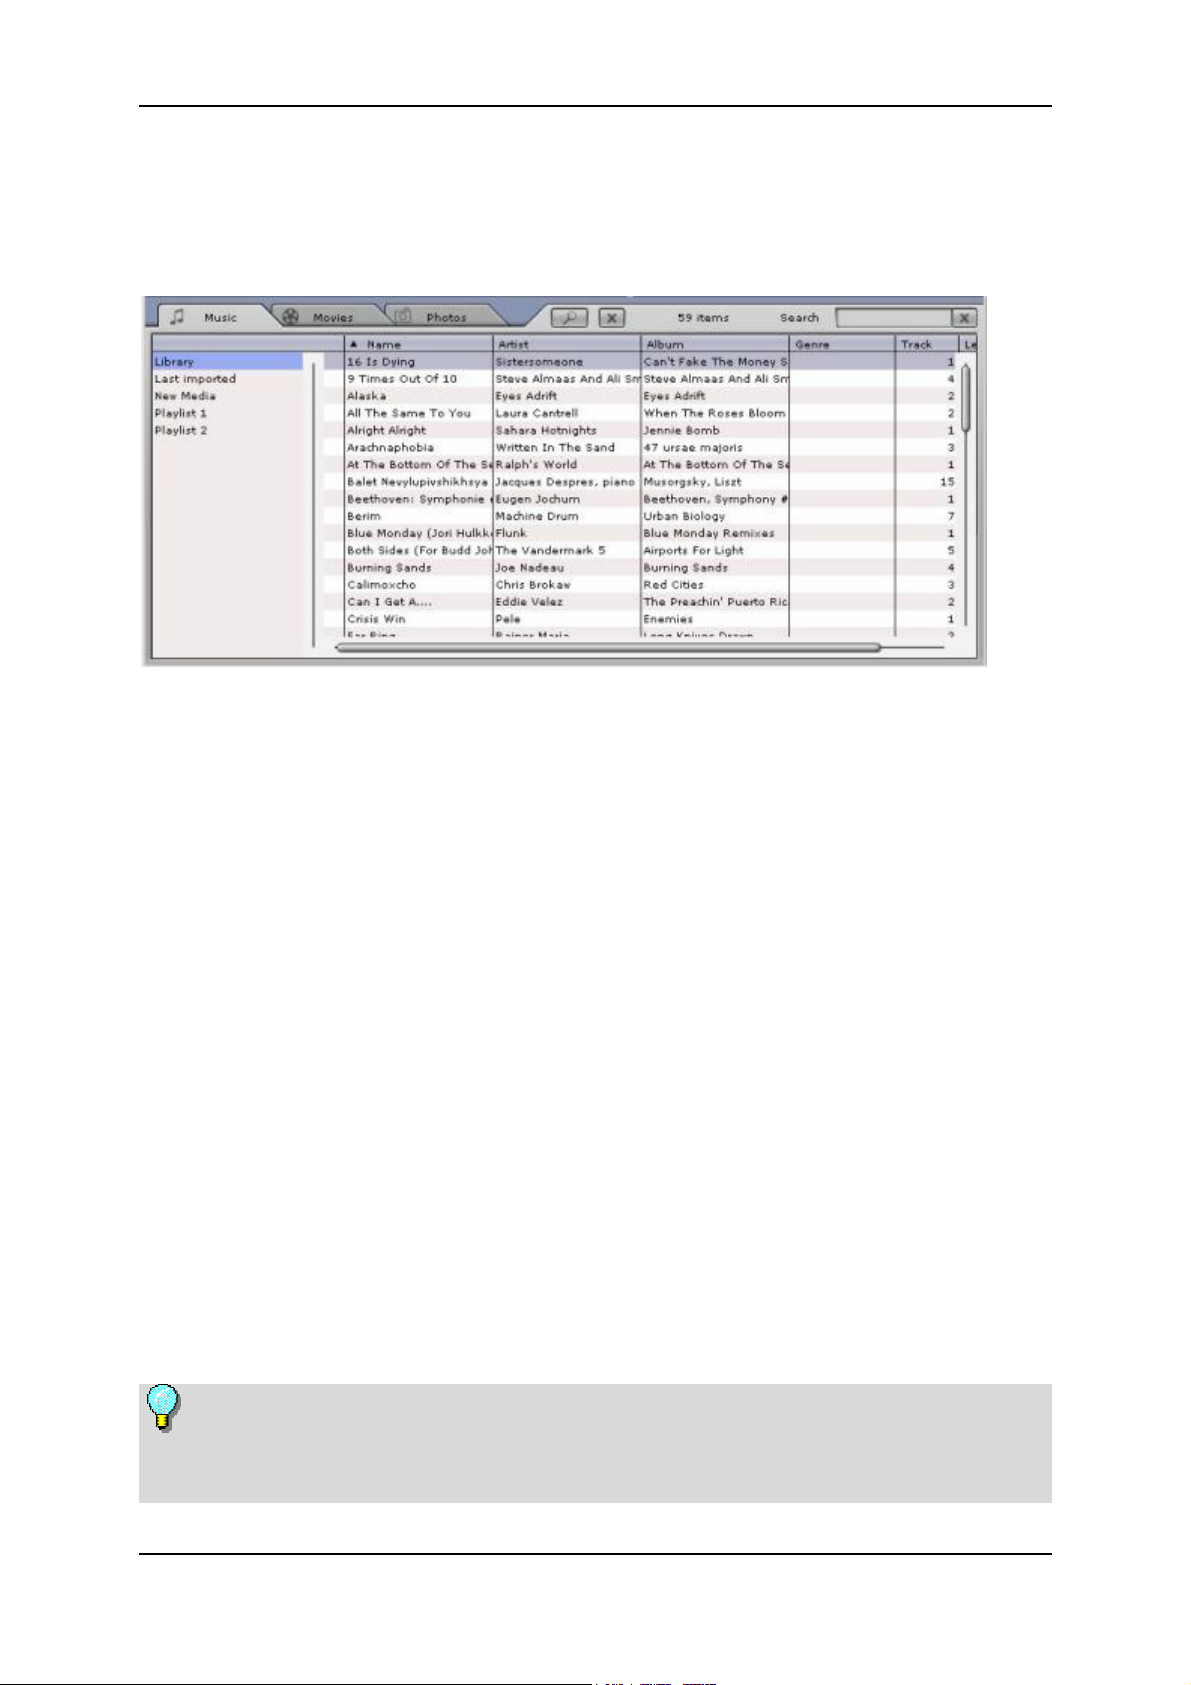
Categories
Within the media types, you can switch between the following categories on
the right-hand side:
Library:
All files contained in the database are shown.
Last imported:
The last files imported are displayed. If, for example, 3 CDs are imported one
after the other, then only the song titles of the third CD will be visible here.
New media:
The last files imported over a period of one day are displayed.
Playlists:
The files contained in the selected playlist are displayed.
When the application is installed, example files are copied to the hard drive
of your PC and automatically imported into the ShowCenter database. These are
visible in the appropriate categories the very first time the application is started.
26
Page 31

The ShowCenter application
Details
Different details concerning the individual files will be displayed in the list on
the right-hand side depending upon whether you have selected the Music,
Movies or Photos tab/media type. These sort criteria are also referred to as
fields.
Depending upon the media type currently selected, you will see the following
information in the columns, for example: file status, name of the song
title/movie/photo, date created etc.
If no information has been stored in the database for the individual fields,
then the corresponding columns will remain empty.
As in Windows Explorer, you can click on the individual column title with the
left mouse button to change the sortation of the files in the list.
You can change the order of the columns by dragging the column title while
holding the left mouse button pressed.
By clicking with the right mouse button, you can open the context menu from
which you can select which columns are to be displayed and which are not.
Please read how the Media Library can help you to sort and manage your media
files in the following sections.
27
Page 32

Pinnacle ShowCenter
The Media Library browser
You can switch the browser on or off with the
side next to the tabs.
When you click on this button, the list divides horizontally into two parts.
The top half of the list can now be used to sort the media files displayed in the
bottom half or to narrow them down according to certain criteria. You therefore
define a filter in the top half for displaying the files in the bottom half.
button on the right-hand
Example: You have activated the Music tab and now want to display all the
song titles in the database belonging to the pop genre.
Tip: By clicking with the right mouse button on the column title in the top
half of the list, you can use the context menu to select which columns are to be
displayed.
28
Page 33

The ShowCenter application
The Media Library Search function
You will find the Search function on the extreme right-hand side of the Media
Library:
Enter any search word in the input field to quickly find a particular media file
in the database.
The files containing the search word will now be shown in the list. If you want
to enter a new search word, click in the input field and overwrite the previous
one or delete it with the button.
29
Page 34

Pinnacle ShowCenter
Deleting and moving files in the Media Library
Deleting files
On the right-hand side, next to the tabs, you will see the
Mark one or more entries in the list and then click on this button. The entries
will be deleted from the database but will still remain stored on your PC's hard
drive. To make them visible in the database once more, they must be reimported.
Moving files
If files are moved to a different folder on your PC hard drive, then they will no
longer be accessible via the ShowCenter application. To make them visible in
the database once more, the entries must first be deleted and the files then reimported.
button.
30
Page 35

The ShowCenter application
The Media Player
Using the Media Player and its controls
The Media Player is used for viewing the media files that are present in the
database on the PC. Video files and photos are reproduced on its 16:9 screen.
Audio files are reproduced via the sound adapter and your computer's
speakers. The Media Player controls are also used for this.
For better orientation, all functions are provided with a QuickInfo field,
which is displayed when you move the mouse over the buttons.
Here are the controls in detail:
Play/Pause
Choose a file from the Media Library with the mouse and then click on this
button. Or double-click the file in the list. The movie or the photo will now be
shown on the Media Player screen and the button will change its appearance.
If you click it again, playback is stopped.
Previous
You can play the previous file in the playlist by clicking this button.
Next
You can play the next file in the playlist by clicking this button.
31
Page 36

Pinnacle ShowCenter
Shuffle
The order in which music tracks, video files or photos are played from the
chosen playlist will be decided at random.
Repeat
If you activate this button while a playlist is being played, on completion, the list
will be repeated until you deactivate the button by clicking it again.
Aspect ratio
You can define the aspect ratio here while a movie is being played (standard 4:3,
letterbox or widescreen 16:9). Note the QuickInfo field when you move the
mouse over this button. The aspect ratio chosen for the current movie is stored
in the database so that it does not have to be reset the next time the movie is
played.
Double-clicking on the Media Player screen switches to full-screen display on
the PC monitor. You can return to the ShowCenter application view by doubleclicking again.
Progress
The position of this slide control shows the time-related progress of the current
audio file or movie as it is being played. You can also use it for steplessly
jumping forwards and backwards within the file currently being played by
dragging the slider while holding the left mouse button pressed.
Time display
Here you can see how long the audio or video file that is currently being played
has already run.
Volume
You can use this control on the right-hand side of the screen area for variable
adjustment of the volume by dragging it while holding the left mouse button
pressed.
Mute
You can switch the sound on or off by clicking this button.
32
Page 37

The ShowCenter application
Importing media files
Import tab - Overview
When you select the Import tab in the function area, the window is made up as
follows:
You can import media files into the ShowCenter database from the following
sources:
Folder: From a folder on your PC.
Files: One or more files from a selected folder.
Drives: From complete hard drives in your PC.
Audio CD: From your audio CDs that you want to archive in the
ShowCenter database.
Digital camera: Photos from your digital camera.
Watch folder: From a watched folder on your PC.
You can see the imported files in the Media Library under the tab for the
appropriate media type, e.g. in the Last imported category.
You can open the folder on your PC hard disk in which the files are stored by
right-clicking with the mouse on the list and selecting the Show in Explorer
option from the context menu.
The functions for the individual categories are described in detail in the
following sections.
33
Page 38

Pinnacle ShowCenter
Import - Folder
When you select the Folder category on the Import tab in the function area,
the window is made up as follows:
Folder
With the help of the Browse button, you can specify the folder on your
computer from which you want to import media files. When the selection is
complete, click on the Open button. The number of selected files and the folder
will now be displayed above the progress bar.
Scan subfolders
When this checkbox is activated, files from all subfolders will be imported at the
same time.
In the case of photos, the names of the subfolders will be imported as the
photo album names.
Movie titles will be used as the name for the collection. If a movie consists of
several files, these will be grouped together in one collection.
Start
When all the settings have been made, click on the Start button. The progress
bar will show 100% when the import process is complete. You will also be told
how many files have been imported and how many may have been rejected
because they were not available in a supported format or were already contained
in the database. All imported files can now be seen in the Media Library in the
bottom part of the application window under the appropriate media type and
category.
34
Page 39

The ShowCenter application
Import - Files
When you select the Files category on the Import tab in the function area, the
window is made up as follows:
Files
With the help of the Browse button, select the file(s), which you want to import
into the database, from a folder on your hard disk. When the selection is
complete, click on the Open button. The number of selected files and the folder
will now be displayed above the progress bar.
Start
When you have made your selection, click on the Start button.
The progress bar will show 100% when the import process is complete. You will
also be told how many files have been imported and how many may have been
rejected because they were not available in a supported format or were already
contained in the database.
All imported files can now be seen in the Media Library in the bottom part of
the application window under the appropriate media type and category.
35
Page 40

Pinnacle ShowCenter
Import - Drives
When you select the Drives category on the Import tab in the function area,
the window is made up as follows:
Hard disk
Choose the drive on your computer, from which you want to import media files,
with the help of the drop-down list.
Ignore 'Windows' and Ignore 'Program files'
When these two checkboxes are activated, the corresponding folders will not be
scanned. This is generally sensible, as there are not normally any useful
media files to be found in these folders.
In the case of photos, the names of the subfolders will be imported as the
photo album names.
Movie titles will be used as the name for the collection. If a movie consists of
several files, these will be grouped together in one collection.
Start
When all the settings have been made, click on the Start button.
When the import process is complete, you will be shown how many files have
been imported and how many may have been rejected because they were not
available in a supported format or were already contained in the database.
All imported files can now be seen in the Media Library in the bottom part of
the application window under the appropriate media type and category.
36
Page 41

The ShowCenter application
Import - Audio CD
When you select the Audio CD category on the Import tab in the function
area, the window is made up as follows:
You can import your audio CDs into the ShowCenter database with this
function. The music tracks on a CD will be read in and separated into
individual MP3 files.
There may be problems importing audio CDs with copy protection!
37
Page 42

Pinnacle ShowCenter
Inserting the CD and selecting the drive
Place the audio CD to be imported in the CD drive of your computer. If you
have several CD or DVD drives in your computer, select the appropriate one
from the drop-down Drive list.
The titles of the CD will now be read in and shown together with their numbers
in the Track column.
Get titles
You will need an active Internet connection to use this function!
The names and titles of all known audio CDs are stored in an Internet
database. With the Get titles function, you can import this information for the
current CD into the ShowCenter database. When you click this button, the
system will search on the Internet for the data, which will normally be displayed
immediately as follows.
If you are unable to establish an Internet connection or if your CD is not
included in the Internet database, you can also enter the song title, artist and
album names manually. To do this, click with the left mouse button on the
appropriate fields.
You can also play individual song titles from the CD by double-clicking on the
song title with the left mouse button. The CD playback is shown by means of a
special graphics display in the Media Player.
38
Page 43

The ShowCenter application
In the Start column, you will see a selection box for each song title. You can
now select individual titles or all titles for importing by clicking with the mouse.
Tip: If you want to select all song titles at once, click with the right mouse
button on the title of the Start column and choose Select all from the context
menu.
Start
When all settings have been made, click on the Start button. You will see a
progress bar for each song title during the import process.
The lower progress bar will show 100% when all the selected titles have been
imported.
You will now be able to see the song titles imported from your audio CD in the
Media Library under the Music tab, e.g. in the Last imported category.
If you have not defined a different folder for this purpose under Preferences in
the File menu or in the Quickstart Assistant, the imported audio files will be
stored by default in the ...\My Computer\My Music folder on the hard disk of
your PC.
A dedicated subfolder with the name of the album/artist will be created for each
audio CD imported.
Eject CD from drive
You can eject the CD from the drive by clicking on this button.
39
Page 44

Pinnacle ShowCenter
Import - Digital camera
Only cameras with WIA driver are supported at the present time. As only
Windows XP supports WIA, this function is not available under Windows 2000.
When you select the Digital camera category on the Import tab in the function
area, the window is made up as follows:
Camera
If you want to import photos into the ShowCenter database directly from a
digital camera, choose the appropriate camera from the drop-down Camera list.
If you connect a new camera to your PC while the application is active, click on
the Refresh button so that this will be displayed in the drop-down list.
Album
Now specify the name of the album.
Remove after import
If you activate this checkbox, the photo files will be deleted from the camera
memory after they have been imported.
40
Page 45

The ShowCenter application
Start
When all the settings have been made, click on the Start button. The progress
bar will show 100% when the import process is complete.
You will now be able to see the imported files in the Media Library under the
Photos tab, e.g. in the Last imported category.
If you have not defined a different folder for this purpose under Preferences in
the File menu or in the Quickstart Assistant, the imported photo files will be
stored by default in the ...\My Computer\My Pictures folder on the hard disk
of your PC.
41
Page 46

Pinnacle ShowCenter
Import - Watched folder
When you select the Watch folder category on the Import tab in the function
area, the window is made up as follows:
Here, you can specify/create any number of folders on your PC as watched
folders. Each time the ShowCenter Server is started, it will check these folders
for new files and will cause them to be automatically imported into the
ShowCenter database. This will also take place when the ShowCenter
application is not active. You can allocate your own names to the watched files
and you will see all of them in the clearly arranged list in the right-hand part
of the window.
Create new watched folder
Click on this button to specify/create a new watched folder.
Either choose an already existing folder on your hard disk and confirm with OK,
or create a completely new folder by means of the Create button and then
confirm with OK.
Newly added watched files are initially active by default. In order to deactivate
a watched file, click on the checkmark in the first column of the list.
The converted files folder cannot be specified as a watched folder!
42
Page 47

The ShowCenter application
Options for watched folders
If you click with the mouse on the last column in the list of watched folders,
you can choose further options from a menu for each watched folder:
Subfolder
When this option is activated, all subfolders will also be watched.
In the case of photos, the names of the subfolders will be imported as the
photo album names.
Movie titles will be used as the name for the collection. If a movie consists of
several files, these will be grouped together in one collection.
Delete watched folder
Click on this button to delete a watched folder from the database.
The folder will only be deleted from the database and will still be present on
the hard disk of your PC. To make it visible in the database again, you must
specify it as a watched folder once more.
43
Page 48

Pinnacle ShowCenter
Organising media files
Organisational file tags
The three different types of media (music, videos, photos) that you can manage
with the ShowCenter application, have different organisational tags. These
sorting criteria define a hierarchy within the files of a media type.
Organisational tags are exclusive tags, i.e. if a music file is assigned to the
"Pop" music genre, it cannot belong to the "Classic" genre at the same time.
Tags for digital photos - Examples
Photo album Photo
My wedding At the registry office
My wedding In the church
My wedding In the restaurant
44
Page 49

The ShowCenter application
User-defined file tags (keywords)
User-defined tags (keywords) can be assigned in addition to the
organisational tags.
These are so-called non-exclusive tags, on the basis of which the media files
can be sorted.
Assigning a keyword - Example
You can create the keyword "My wedding", for example, and assign this to all
associated media files. At a later date, you can then easily filter out the files,
which belong to "My wedding", from the overall contents of the Media Library,
based on this keyword.
Assigning several keywords - Example
Several keywords can be associated with one and the same file. In this way, you
can assign an additional keyword or several additional keywords to some of the
files that are already associated with the keyword "My wedding". For example,
"At the registry office", "In the church" or "In the restaurant".
Show keywords
You can activate the display of the keywords in the Library view from the menu
by right-clicking in the browser.
45
Page 50

Pinnacle ShowCenter
Organize tab - Overview
When you select the Organize tab in the function area, the window is made up
as follows:
The Organize function will help you to change sort criteria or tags for your
media files or to add new ones.
Defining a new keyword
On the left-hand side, you can assign keywords to the media files in the
ShowCenter database, which you can later use as search criteria in order to find
particular files quickly. Several keywords can also be assigned to one and the
same file.
Mark one or more files in the Media Library list and click on the
to create a new keyword for the selected files.
Deleting a keyword
Mark the keyword that is to be deleted from the database and then click on the
button.
Field and Value - Changing organisational tags
button
When an entry in the Media Library list has been marked, you will see the
corresponding value for each field. By double-clicking with the mouse, you will
have access to the individual values and will be able to edit these.
For some organisational tags, such as musical genre for example, suggestions
are made for common descriptions (Pop, Rock, Classic), even when no files in
this category have been imported as yet. Click once on the entry.
46
Page 51

The ShowCenter application
When you have finished editing the values for an entry in the list, click on the
button to transfer the values to the database. The changes will now be
shown accordingly in the Media Library.
Note: If tags that are associated with metadata (such as MP3 tags, for
example) are changed, then these changes will also be made in the appropriate
file!
Undo button
You can undo changes that have been made previously by means of this button.
This is only possible, however, before pressing the
Rotate clockwise/anticlockwise (for photos)
When you select a photo in the Media Library, it will be displayed in the Media
Player. You can rotate the image with these two buttons.
Next click on the
will be taken into account when the photo is displayed on the TV set.
Restricted access
The Restricted Access value for any required media file can be set to Yes or No
by clicking with the mouse.
If you have set the value for a file to Yes, then this file can only be viewed on
the TV set/played back on the stereo system if the correct access code has first
been entered via the TV menu.
The standard setting for newly imported files is always No.
button to store the rotation in the database. The rotation
button.
Note: The access code is only applicable for replaying media via the menu
on the TV screen. All files will continue to be accessible via the ShowCenter
application on the PC!
47
Page 52

Pinnacle ShowCenter
Managing playlists
Playlists tab - Overview
When you select the Playlists tab in the function area, the window is made up
as follows:
At this point, you can create personal playlists, in which you can bring together
your favourite music, movies or photos sorted in accordance with your own
criteria.
Only media of one type can be brought together within a playlist. You
therefore create playlists for music, movies or photos. It is not possible to mix
these media in one playlist.
Schedule of playlists
All existing playlists are displayed in the left-hand area.
Contents of the individual playlists
The contents of the individual playlists are displayed in the right-hand area. If
a playlist is selected in the left-hand area, you will see the details of the media
files belonging to this playlist in the right-hand area.
48
Page 53

Creating and editing playlists
The ShowCenter application
Creating a new playlist
Click on the
In the list on the left is an input field that, as standard, is called Playlist. This
field becomes accessible by double-clicking and you can enter the required
name for the new playlist.
Now assemble the media files that are to belong to this playlist. To do this,
choose one or more files from the Media Library in the database and drag these
up into the right-hand area using the mouse.
Instead of working with the mouse, you can also use the
Sorting the contents of the playlist
Mark the file, which is to be moved to a different place in the playlist, and drag
this with the mouse to the required position. As an alternative, you can work
with the two buttons
Deleting playlists or contents
When you want to delete a playlist or a file from the playlist, mark this with the
button when you want to create a new playlist.
button.
and .
mouse and then click on the
button.
49
Page 54

Pinnacle ShowCenter
Special features for slide shows
There are two special features with playlists made up from photos ("slide
shows"):
1. Click in the last column of an entry to change the time for which the photo
is displayed. If you select Manual here, then the system will not move on
automatically to the next photo. To change the display time for all photos
simultaneously, first click with the right mouse button and then choose
Select all from the menu. By left-clicking on the display time of any entry,
you can then specify the display time for all photos.
2. The last entry in the slide show is called Audio. You can choose a music
playlist here by clicking with the mouse. This will then be played back with
your photos on the ShowCenter Player.
Playback via the Media Player
Double-click on an entry in the playlist in order to play this back using the
Media Player. When playing is complete, the system will automatically continue
by playing the following entry. The Media Player functions Forwards,
Backwards, Shuffle and Repeat are also available. When playing back a slide
show using the Media Player, only photos will be displayed and any music
playlist that may have been selected will not be played.
50
Page 55

The ShowCenter application
Exporting media files
Export tab - Overview
When you select the Export tab in the function area, the window is made up as
follows:
Here, you can export copies of media files from your ShowCenter playlists
into a new folder on your hard disk,
into a Winamp playlist,
onto a CD burner/DVD burner.
The functions for the individual categories are described in detail in the
following sections.
51
Page 56

Pinnacle ShowCenter
Exporting to a folder
When you select the Folder category on the Export tab in the function area,
the window is made up as follows:
Here, you can export the contents of a playlist into a new folder on your hard
disk. When you do this, copies of the media files are created.
Playlist
Choose a playlist from the drop-down menu.
Folder
With the help of the Browse button on the right-hand side, select a folder into
which the chosen playlist is to be exported.
Create subfolders
If you activate this check box, subfolders will be created corresponding to the
sort criteria for the original files to be exported (e.g. Artist, Album, Photo
album).
If not all tabs are available for a particular file, a subfolder with the name
Unknown will be created.
Note: This function is not active when exporting video playlists!
52
Page 57

The ShowCenter application
Create a Winamp playlist
If you activate this checkbox, in addition to exporting the chosen playlist to a
folder, a Winamp-compatible playlist will be created.
Start
When you have made all the settings, click on Start. The progress bar will show
100% when the export is complete. You will also be told how many files have
been exported.
53
Page 58

Pinnacle ShowCenter
Exporting to a Winamp Playlist
When you select the Playlist category on the Export tab in the function area,
the window is made up as follows:
Here you can export a ShowCenter playlist to a Winamp playlist. This refers
to the actual memory location for your media files.
Playlist
Choose the playlist to be exported from the drop-down menu.
File
With the help of the Browse button on the right-hand side, select the file into
which the chosen playlist is to be exported and enter the required filename.
Start
When you have made all the settings, click on Start.
54
Page 59

The ShowCenter application
Exporting to a burner
When you select the Burner category on the Export tab in the function area,
the window is made up as follows:
Here, you can export a playlist for the purposes of burning a CD or a DVD.
Playlist
Choose the playlist to be exported from the drop-down menu.
Disc type
Appropriate output formats are offered depending on the type of media files
contained in the playlist. Choose the required one from the drop-down list.
Music
Audio CD: An audio CD will be burnt, which you can play on your stereo
system or CD player. MP3 files are automatically decoded for this purpose.
MP3 Data CD/DVD: The system will burn a CD or DVD with MP3 files. To
do this, all music tracks in the playlist must have been converted to MP3 format.
Data CD/DVD: The system will burn a CD with the original music files (MP3,
WMA or WAV). If converted versions are available, these will not be used.
Movies
VCD (VideoCD), SVCD (SuperVideoCD) and DVD formats will be offered
depending upon the format of the media files and the availability of converted
copies. In any case, Data CD/DVD can be selected, in which case the media
files will be burnt in original format.
55
Page 60

Pinnacle ShowCenter
Photos
Photos are also burnt to a Data CD/DVD, in which case the original media files
are used.
Recorder
Select the required recorder (burner) and click on Start. The progress bar will
show 100% when the burning process is complete.
The CD/DVD burner in the ShowCenter application is optimised for rapid
and easy burning. It is not able to create menus on DVDs or to spread long
files/playlists over several discs. For more demanding burner tasks, we
recommend Pinnacle INSTANT CD/DVD.
56
Page 61

The ShowCenter application
The menus
The File menu
In the File menu you will find the following options:
New Playlist from Selection
If you have marked one or more files in the Media Library and then choose this
option, a new playlist will be created from the marked files.
An input box appears on the left-hand side of the Media Library with a standard
name in which you can enter the required name of the new playlist.
Further details on this topic are described in the section Creating and editing
playlists.
Play selection
Select one or more files in the Media Library and then choose this option. The
selection will now be played/displayed on the MediaPlayer.
Preferences
This option gives you access to a dialog box in which you can set all the
preferences necessary for the ShowCenter application:
Audio CD Import
Format (quality and bit rate)
Speed
General
Language
Settings for file conversion
Skin selection
Entry of access code (PIN code) for restricted file access
Definition of the folders for audio, video and photo files as well as for
temporary files
Playback
Settings for playback: device and buffer memory
57
Page 62

Pinnacle ShowCenter
Key commands
When this menu option is selected, a dialog box opens in which you can create,
edit and delete user-defined key commands and macros.
Quit
You can close the ShowCenter application with this option.
58
Page 63

The ShowCenter application
The Edit menu
In the Edit menu you will find the following options:
Cut
Mark the text passages to be moved, select Cut from the menu, click on the
point where the text passages are to be inserted and then select Paste from the
menu.
The text passages will be removed from the original position and inserted at the
new position.
Copy
Mark the text passages to be copied, select Copy from the menu, click on the
point where the text passages are to be inserted and then select Paste from the
menu.
The text passages will remain in the original position and, in addition, will be
inserted at the new position.
Paste
With this command, you can insert text passages at a new position, which you
have cut or copied from elsewhere by means of the Cut and Copy commands
respectively.
Delete
Mark the required files and select this option from the menu to permanently
delete the files.
Select All
With this option, you can select all the files in an active area at one go (e.g.
Media Library list).
Select None
With this option, you can remove the marking from files in an active area (e.g.
Media Library list).
59
Page 64

Pinnacle ShowCenter
Select Invert
With this option, you can either mark all the files in an active area at one go (e.g.
Media Library list) or remove marking that already exists.
Browse
With this option, you jump to the Media Library browser. Further details on
this topic are described in the appropriate section.
60
Page 65

The ShowCenter application
File formats
File formats supported
The ShowCenter system supports several media file formats "straight out of the
box", but not all those that are to be found on the market. Files that are initially
incompatible are still imported into the ShowCenter database, however, as they
are automatically converted to a compatible format in the background and
then stored on your PC's hard drive. The original files are also retained and
are visible in the database.
Audio file formats supported
MP3
WMA
Files that are not originally available in MP3 are converted to MP3.
Video file formats supported
MPEG 1
MPEG 2
DivX ™ AVI (Version 4 or 5) [simple profile]
XviD AVI [simple profile]
DV AVI
WMV
The DV AVI and WMV formats are converted. The target format can be
specified under Preferences in the File menu.
Photo formats supported
JPG
PNG
GIF
61
Page 66

Pinnacle ShowCenter
File conversion
The ShowCenter Player can only play back a few music and video formats
directly. Others, such as Windows Media Audio (WMA) or DV AVI video
clips, must first be converted into a format known to the ShowCenter
Player. This is controlled by the ShowCenter application, but also takes place in
the Media Server when the application is closed. When this happens, a
converted copy is created - the original file is not changed.
You specify which formats are to be automatically converted after importing
and also define the target format under Preferences in the ShowCenter
application. As standard, music files are automatically converted. On the other
hand, video files are only converted when you initiate this by selecting the file in
the Media Library, then clicking with the right mouse button and choosing
"Convert to ..." in the menu.
Converted files are stored in the location, which you have specified in the
Quickstart Assistant. This location can also be changed under Preferences in
the ShowCenter application. Please note that the conversion, especially of video
files, can take up a large amount of space.
File status
In the Media Library, different details concerning the individual files are
shown in the list on the right-hand side for each type of media. In the first
column, you will see a description of the conversion status for each file.
62
Page 67

The ShowCenter application
Each file in a selected category can have the following file status
(recognisable by the symbol):
The file is not ready for playing/displaying on the TV set or stereo system. It
must be converted first.
The file is in the waiting list for conversion and is not ready for
playing/displaying on the TV set or stereo system.
The file is currently being converted and is not ready for playing/displaying on
the TV set or stereo system.
An error has occurred during conversion of this file. Examples of this could be
an unknown codec or no memory space.
If there is no symbol in the file status column, then the file is ready for
playing/displaying on the TV set or stereo system.
Conversion functions
Right-clicking on a file in the list will open the context menu and you can
choose between the following options:
Convert to
The selected file will be converted. This may also be appropriate, for example,
when the file is already compatible with the ShowCenter system but is to be
converted to a special format for a CD or DVD. The target format is likewise
chosen via the context menu.
For movies, the following formats are available:
VCD ("VideoCD")
The movie is compressed to one-quarter of the size (352x240 or 288) in
accordance with MPEG 1. The overall data rate is 1.15 Mbit/sec. One CD
(650Mbyte) therefore holds a good hour of picture and sound. However, the
video quality is rather low but in return a VCD the can be played by most DVD
players.
SVCD ("SuperVideoCD")
The movie is compressed in MPEG 2 format with full vertical resolution but
with the horizontal resolution reduced to 2/3. The data rate is 2.5 Mbit/sec and
one CD holds barely half an hour of picture and sound, but the video quality is
considerably better than with VCD. However, only some DVD players will
accept the SVCD format.
63
Page 68

Pinnacle ShowCenter
DVD LongPlay
Here, the movie is compressed in MPEG 2 format with half horizontal
resolution and full vertical resolution. The data rate is 3.5 Mbit/sec, resulting in
very good video quality. DVD LongPlay can be burnt on DVDs and nearly all
DVD players will accept this format. It is also well suited for converting a
movie with high data rate to a lower data rate, which is suitable for wireless
networks.
DVD
The video is compressed with full resolution in accordance with MPEG 2. The
data rate is 6 Mbit/sec, which results in excellent video quality but which is too
high for transmission by wireless networks. Conversion to the DVD format is
therefore only sensible for cable-based 100 Mbit/sec networks or for burning a
DVD, which can then be played on nearly all DVD players.
For all formats, the sound is always compressed in the "MPEG 1 layer 2" format
(stereo).
When you use a wireless network connection to the ShowCenter Player,
then the maximum data rate for transmission is approximately 4 Mbit/sec. This
is no problem for music and photos, but movies with data rates higher than 4
Mbit/sec cannot be played without jumping. In such cases, the movies
concerned should be converted, the best quality being achieved with the DVD
LongPlay format.
Delete converted file
All converted files present will be deleted.
Cancel conversion
A conversion that is already running will be cancelled.
64
Page 69

ShowCenter Server and ShowCenter Control Panel
Setting server preferences with the ShowCenter control panel
The server settings can be checked or modified using the ShowCenter control
panel. You can start the ShowCenter control panel either from the Start menu
via the Pinnacle program group or by clicking with the mouse on the
icon in the information area of the task bar.
Media Server settings
The Media Server safeguards access to the database and makes data
available via the ShowCenter Player, which you want to call up on your TV
screen by means of the menu and then view on the TV or play back on the
stereo system.
The Media Server also undertakes the monitoring of the specified folders as
well as converting the format of media files, which cannot be played in their
original form on the ShowCenter Player. These are converted to a suitable
format in the background and can then be played or viewed.
In order to view the Media Server settings, click on the appropriate button in the
ShowCenter control panel.
65
Page 70

Pinnacle ShowCenter
Start / Stop
Conversion can take a lot of computer power and thus interfere with your work
on the PC. If this should be the case, conversion can be stopped by means of this
button and resumed later by clicking again. However, this will cause the current
conversion to be lost and it will be started again from the beginning.
OK
With this button, you confirm the current settings and the window will close.
Quit
With this button, you can shut down the ShowCenter control panel and the
window will close.
Streaming Server settings
The Streaming Server provides the data for the TV user interface in the form
of HTML/PHP pages. These enable you to navigate by means of the remote
control to musical tracks, movies and photos in your database that you want to
play back or view.
In order to view the Streaming Server settings, click on the appropriate button in
the ShowCenter control panel.
Network interface settings
If you have several options for setting up a network connection in your system,
choose the connection to which the ShowCenter Player is connected here. The
associated IP address will be displayed.
66
Page 71

ShowCenter Server and ShowCenter Control Panel
Start / Stop
You can activate or deactivate the Streaming Server by means of this button.
The selected network connection will be set up or switched off. It may be
necessary to switch the Streaming Server off and on again if you make changes
to your network configuration.
OK
With this button, you confirm the current settings and the window will close.
Quit
With this button, you can shut down the ShowCenter control panel and the
window will close.
67
Page 72

Page 73

The TV screen
Switching on the ShowCenter Player and the TV set
When the ShowCenter Player is switched on, the ShowCenter logo will
appear on the TV screen first of all and then, after a few seconds, the server
selection menu.
The ShowCenter Player now automatically detects all the available server
PCs on the network. These are PCs on which the ShowCenter software has
been installed and on which the ShowCenter Server is active. After a few
seconds, these will be displayed on the right-hand side and marked by means of
a green tick. Select one of the servers with the cursor keys and press OK to
establish a connection to this PC.
Server PCs, which are not currently active, are indicated by a red
prohibition symbol. In general, it will not be possible to establish a connection
to these PCs.
If no server PC is displayed even after waiting for some time, then please
first check the network connection between the ShowCenter Player and the PC.
Ensure that the ShowCenter software is installed on the PC and that the
ShowCenter control is running. Finally, check whether the correct network
69
Page 74

Pinnacle ShowCenter
adapter has been selected in the ShowCenter control. If you are using a wireless
network, then please check the settings for SSID and WEP encryption (see
Chapter "Setting up the ShowCenter system - Connecting devices").
If the server PC is not detected
The ShowCenter Player detects server PCs using the "Universal Plug & Play"
protocol. Many network routers or switches block this protocol. In such cases, it
will be necessary to set up the server PC manually. To do this, proceed as
follows:
1. Open the ShowCenter control panel on the server PC and note the IP
address, which is shown in the Streaming Server area. The IP address
consists of four numbers separated by decimal points, for example
"169.123.17.5".
2. Select the Add Server icon on the ShowCenter Player and press OK. On the
following page, enter any name and then the IP address that you have noted.
Tip: You can switch between lowercase letters, uppercase letters and
numbers/characters by means of the C/N button.
3. In the first instance, leave the Always connect to this server option
deactivated.
4. Select Save with the cursor keys and press OK. Then select Back to return
to the server selection menu.
5. Here, you will now see the server PC that has just been set up. Select it and
press OK, even if the prohibition symbol is visible. The connection to the
server PC will now be established.
Further options in the server selection menu
Superfluous servers can be removed from the list with Delete Server, for
example if the name of your PC has been changed. With Edit Server, you can
first select a server PC, the IP address of which can then be edited. The Always
connect to this server option, which is available here, has the effect of making
the ShowCenter Player automatically connect to this server when it is switched
on.
If you have activated the "Always connect to this server" option, you can
still open the server selection menu by pressing the "A" button on the remote
control. However, this will only work in menus, which do not assign alternative
functions to the "A" button.
When a connection has been established to a server PC, the menu will appear on
the TV screen after a short time. This is described in detail in the following
sections.
70
Page 75

The TV screen
The TV screen menu - Overview
When the computer, the TV set and the ShowCenter Player are switched on
and a connection has been established to a server PC, the following menu will
appear on the TV screen after a short time:
On the left-hand side, you will see the media types and some special
functions. On the right-hand side the corresponding list of contents will
appear depending upon the media type selected. The media types are
distinguished from one another by different colours.
The entry screen is always set to New Media and shows a list of the ten media
last imported on the right-hand side. This can be a mixture of music, movies and
photos.
If new files have been imported into a watched folder since you last opened
this screen, this will be shown by means of an indicator next to the "New media"
button.
You can actuate the menu and choose which media you want to view with the
remote control.
You will find out more about the menu structure for the individual media types
and about Settings and Special functions in the following sections.
71
Page 76

Pinnacle ShowCenter
If you should have any questions...
If you should have any questions while using the menu, you can open the
interactive Help for the TV menu with this button on the remote control. An
appropriate movie will be shown on your TV screen depending upon which type
of media you have currently selected.
72
Page 77

TV Menu - Music
The TV screen
The Music start menu is divided into the following categories:
New Music:
The music files last imported are displayed in the format "Artist-Album". All
titles on the album will be displayed if you press OK on the remote control.
Playlists:
A list of all playlists that have been created are displayed. If you select a
playlist and then press OK, all titles of this playlist will be displayed.
Genre:
A list of the different music genres is displayed. You can jump to a list of the
appropriate artists by selecting a genre and pressing OK.
Artist:
A list of artists is displayed. You can jump to the list of albums by pressing
OK.
Album:
A list of albums is displayed. You can jump to the title selection list by
pressing OK.
Song Title:
All titles in the database are displayed. You can play a selected song by
pressing OK.
73
Page 78

Pinnacle ShowCenter
TV Menu - Movies
The Movies start menu is divided into the following categories:
New Movies:
The last movies imported are displayed together with their titles. The
currently selected movie will be played when you press OK on the remote
control.
Playlists:
A list is displayed of all playlists that have been created. If you select a
playlist and then press OK, all movies in this playlist will be displayed.
Genre:
A list of the different movie genres is displayed. You can jump to a list of the
appropriate movies by selecting a genre and pressing OK.
All Movies:
All movies in the database are displayed. You can play a selected movie by
pressing OK.
74
Page 79

The TV screen
Switching to full-screen mode
When a movie is selected for playing, it will appear in a preview window
at the bottom left of your TV screen. To switch to full-screen mode, press the
Full-Screen button on the remote control.
In the case of movies, the name of the collection is shown in each case. As a
result, movies, which consist of several files, are automatically grouped together
and the files played one after the other. You can switch between the individual
tracks while the movie is being played by using the "Next track" and "Previous
track" buttons on the remote control.
75
Page 80

Pinnacle ShowCenter
TV Menu - Photos
The Photos start menu is divided into the following categories:
New Photos:
The photos last imported are displayed as a photo album list. A slide show
will be displayed when you select a photo album with the remote control
and press OK.
Slideshows:
A list is displayed of all slide shows that have been created. If you select a
side show and then press OK, the side show will be displayed on the screen.
Photo Albums:
A list of all available photo albums is displayed. You can display a photo
album as a slide show by pressing OK.
Switching to full-screen mode
When a photo is selected for display, it will appear in a preview window
at the bottom left of your TV screen. To switch to full-screen mode, press the
Full-Screen button on the remote control.
76
Page 81

TV Menu - Access
The TV screen
If you have safeguarded your media files with an access code (PIN code) and the
appropriate setting in the ShowCenter application and you now want full access
to all data, proceed as follows:
First click on Locks, enter your PIN code and then press OK. You will now
have unrestricted access to all media.
To restrict access once more, press OK.
The media files, to which restricted access is to apply, are defined
individually in the function area of the ShowCenter application under the
Organize tab.
77
Page 82

Pinnacle ShowCenter
TV Menu - Settings
The following settings can be made on this screen:
Language:
Choose the required language for the TV menu and then press the OK button
on the remote control.
Video Output:
Select the required video output (e.g. Scart, Component)
Movie Display:
The movie being played back can be adjusted to suit your TV screen,
displayed in full-screen mode or in its original format.
Screen Saver:
Choose a time period after which the screensaver on your TV should be
activated when no controls are operated.
Reload Firmware:
The ShowCenter Player firmware is reloaded with the help of this option.
This should only be carried out as part of a software update.
78
Page 83

The TV screen
A - Server
Pressing this button on the remote control will bring you to the server selection
function. Select the computer/server from which media are to be transferred to
the TV.
B - Advanced
Pressing this button on the remote control will bring you to the Firmware
Settings page. Settings for the network configuration, for example, can be made
here.
C - Screen Adjust
By pressing this button on the remote control, you can adjust the position of the
picture on the menu screens. To do this, press the cursor keys and then OK to
save the position. This option does not affect the playing of movies and photos.
Please note that the three buttons A, B and C have different functions
dependent upon the type of media and category selected. These are shown in
each case at the bottom left-hand edge of the screen. See also the section entitled
"TV Menu - Special functions".
79
Page 84

Pinnacle ShowCenter
TV Menu - Special functions
The three buttons A, B and C in the TV Menu, and also the corresponding
buttons on the remote control, have different functions depending upon the type
of media and category selected. These are shown in each case at the bottom
right-hand edge of the screen. The appropriate function is carried out when a
button is pressed.
A - Play All
All media that are currently shown on the right-hand side are played one after
the other.
B - Shuffle & Play
The order of the media that are currently shown on the right-hand side is first
mixed and the media are then played back.
C - Search
If you select this function, a text input field will appear, as can be seen in the
following example:
80
Page 85

The TV screen
Enter any search term here and then choose OK. The media, which could then
be associated with the search term, will now be displayed in the list on the righthand side.
81
Page 86

Page 87

The remote control
Remote control key commands
You will find an overview of the individual functions of the ShowCenter remote
control in the following drawing:
83
Page 88

Pinnacle ShowCenter
Description of the keys in detail
Your ShowCenter remote control enables you to call up the many functions of
your ShowCenter application from the comfort of your TV chair or sofa. To
enable you to better understand the functions of the individual buttons, these are
described in detail below:
On/Off
You can switch the ShowCenter Player on and off with this button.
Sound On/Off
You can switch the sound on and off with this button.
Open Music/ Movies/ Photo start menu,
open summary page
With these buttons, you can open the music, movies or photo start menus or the
summary page from where you can make a more detailed selection of the
functions you require.
Change video outputs
You can switch between the individual video outputs by means of this button.
The video output selected at any time will be shown on the screen. If you cannot
see a picture on the screen, press the "Change video outputs" button until a
picture is displayed.
Full-screen
With this button, you can enlarge the preview window that appears when you
start to play a movie or display a photo to the full size of your screen or switch it
back to a preview window again.
Various functions
These buttons have different functions depending upon the type of media and
category selected. These are shown in each case at the bottom right-hand edge of
the screen. The appropriate function is carried out when a button is pressed.
84
Page 89

The remote control
Help
You can call up the interactive Help for the TV menu with this button. An
appropriate movie will be shown on your TV screen depending upon which type
of media you have currently selected.
Cursor keys (Up, Down, Left, Right)
With these keys, you can navigate within a window in order to select a function.
You can tell which function has been selected by the background highlighted in
colour.
Confirm
You start the function that you have selected by means of this button.
Window selection back
You can change to the menu that was previously displayed by means of this
button.
Selection page up, Selection page down
With these buttons, you can page up and down in a selection box, which exceeds
the size of a window (recognisable by the arrows above and below the selection
box), whereby the whole list of contents will become visible.
Change selection
With this button, you can jump from one selection box to the next selection box
on the same page. The currently selected box can be recognised by the
background highlighted in colour.
85
Page 90

Pinnacle ShowCenter
Input keys, Caps Lock/NUM (C/N) key,
Delete key (DEL)
You can enter letters and numbers using the input keys. In doing so, you have
various options. Either press a key repeatedly until the required number or
required letter appears in the order shown on the key inscription (similar to
using a mobile phone) or use the Caps Lock/NUM key (C/N). Depending upon
how often you press the C/N key, lowercase letters, uppercase letters or numbers
only will be available.
You can delete the last letter entered or the last number entered by means of the
"Delete entry" (DEL) key.
Play/Pause, Stop
You can start the movie that you have selected by means of the Play/Pause
button. If the button is pressed during playback, the movie will be paused;
pressing the button again will resume playback without interruption. The movie
is stopped by pressing the Stop button during playback.
Fast forward, Fast rewind, Next track,
Previous track
You can forward wind or rewind a movie to any point you require by means of
the Fast forward/Fast rewind buttons. You can jump within the elements of a
playlist, slide show or collection using the Next track/Previous track buttons.
86
Page 91

The remote control
Possible causes of faults with remote control operation
If your ShowCenter remote control does not work as expected, please check the
following points:
Are you pointing the remote control directly at the receiver?
The angle with the receiver should be a maximum of 30°.
Is it possible that the distance between the remote control and the receiver is
too great?
The remote control has a range of approximately 5 metres.
Is there a free line of sight between the remote control and the receiver?
Are the remote control batteries fitted correctly and not flat?
87
Page 92

Page 93

Technical data
Hardware
Mains connection
Multi-voltage - for power supply with automatic voltage changeover (100 -
230 V / 50 - 60 Hz / 15 W).
Audio and video outputs
SCART (Europe) with FBAS and RGB support
Colour Component Video, 3 x Cinch
Composite Video (Cinch)
S-Video (Mini DIN)
2x Stereo audio (each 2x Cinch)
- one for connecting to the TV set and one for connecting to the stereo
system
Digital audio outputs: Toslink and S/PDIF
Ethernet connection
10/100BaseT
Expansion slot
PCMCIA slot for a wireless network expansion module and memory
expansion module
Only for the 802.11b Wi-Fi PCMCIA card recognised by Pinnacle! Please
look in the compatibility list on the Internet under www.pinnaclesys.com for upto-date information.
Processor
Standard processor with MPEG/MP3 hardware decoder: Sigma Designs
RealImage EM 8551.
89
Page 94

Page 95

Technical support
Getting Technical support
If problems should occur with your Pinnacle Systems product, please check
first that the latest version of the software has been installed on your computer
system.
Pinnacle Systems provides a free, round-the-clock service, which enables users
to rectify problems themselves. You will be able to find answers to your
questions seven days a week, right around the clock.
You will find this technical support at:
http://www.pinnaclesys.com
Click on Support and select your product from the product list. Select your
product again in the Interactive Support category and you will then be able to
choose from the following support options:
1. Frequently asked questions.
This is the best way of obtaining answers to your questions. Here you will find
hundreds of technical problems and their solutions sorted by subject areas.
These are shown in the order of the 20 most frequently read questions. In
addition, you can also sort the documents according to problem categories. To
do this, use the pull-down Category menu.
Please use the search function to obtain answers to special questions.
2. Ask a question and receive an answer.
Simply enter your question or the symptoms of your problem and you will
obtain a list of the most obvious solutions. If you do not obtain a satisfactory
solution, please rephrase your question. For example, instead of "I get error
messages" you could enter "I get error messages when installing the software".
Instead of entering a specific question, you can select one of the main functions
listed for your product or a general subject area from the pull-down Category
list. The ten most frequently asked questions and the appropriate solutions in the
category that you have selected will then be displayed.
91
Page 96

Pinnacle ShowCenter
3. E-mail support.
If you are unable to find an answer to your questions with the help of our web
site, Pinnacle Systems also offers technical support by e-mail. E-mails will be
answered as quickly as possible. Please use the Ask a Question box for this
purpose. Before the e-mail is submitted, five solutions to your problem will be
suggested. Please read these carefully, as more than 70% of customers find
suitable answers in these proposed solutions.
4. Discussion forum.
More than 100,000 registered users make use of this free service. Visit the
Pinnacle Systems online discussion forum to see whether your question has
already been asked and a suitable answer found. To use the service, ask your
question in the discussion forum and you will receive help from Pinnacle
Systems or other users.
A search function is provided in the discussion forum. If you enter "poor
picture", for example, contributions on this subject will be displayed.
When you make use of Pinnacle Systems technical support, you should have
all the technical information on your computer configuration ready to hand.
92
Page 97

License information
Pinnacle End User License Agreement
This End User License Agreement (“License”) is a legal agreement between you
and Pinnacle Systems (“Pinnacle”) regarding Pinnacle’s software and the
accompanying documentation (collectively, the “Software”). CAREFULLY
READ THE FOLLOWING LICENSE. USING THIS SOFTWARE
INDICATES YOUR ACCEPTANCE OF THIS LICENSE. IF YOU DO NOT
ACCEPT OR UNDERSTAND THE TERMS OF THIS LICENSE, YOU
SHOULD NOT INSTALL THE SOFTWARE AND PROMPTLY RETURN
THIS PRODUCT TO YOUR VALUE-ADDED RESELLER.
1. License Grant. Subject to the restrictions set forth below, this License grants
you a non-exclusive, perpetual license to (a) install the Software on only one
computer; (b) use or authorize use of the Software on only one computer; (c)
make one copy of the Software, in machine-readable form, solely for backup
purposes; provided you include all copyright and other proprietary rights notices
on the copy and (d) transfer the Software and this License to another party if the
other party agrees to accept the terms and conditions of this License. If you
transfer the Software, you must at the same time either transfer all copies to the
same party or destroy any copies not transferred. If you transfer possession of
any copy of the Software to another party, your License is automatically
terminated.
2. License Restrictions. You may not, or allow any third party to, (a) rent,
lease, sell, loan or otherwise transfer the Software or any of your rights and
obligations under this License; (b) install the Software on a network for use by
multiple users, unless each user has purchased a license; (c) reverse-engineer,
decompile or disassemble the Software or hardware in whole or in part; (d)
remove or destroy any copyright notices or other proprietary markings of the
Software or any third-party software; (e) modify or adapt the Software, merge
the Software into another program or create derivative works based on the
Software; (f) make copies of or distribute, for profit or otherwise, the Software,
except as expressly provided above; (g) make any alteration, modification,
connection, disconnection, improvement or adjustment of any kind to or use the
Software except as explicitly contemplated in the enclosed documentation and in
this License and (h) sublicense, transfer or assign this License or any of the
rights and obligations granted under this License, except as explicitly
contemplated in this License. Any purported transfer or assignment will be
void.
93
Page 98

Pinnacle ShowCenter
3. Export Restrictions. The export and re-export of Pinnacle software products
are controlled by the United States Export Administration Regulations and such
software may not be exported or re-exported to any country to which the United
States embargoes goods. In addition, Pinnacle software may not be distributed
to persons on the Table of Denial Orders, the Entity List, or the List of Specially
Designated Nationals. By downloading or using a Pinnacle software product
you are certifying that you are not a national of any country to which the United
States embargoes goods and that you are not a person on the Table of Denial
Orders, the Entity List, or the List of Specially Designated Nationals.
4. Ownership. The license granted hereunder does not constitute a transfer or
sale of ownership rights in or to the Software. Except for the license rights
granted above, Pinnacle retains all right title and interest in and to the Software
including all intellectual property rights therein. The Software is protected by
applicable intellectual property laws, including United States copyright laws and
international treaties.
5. Third Party Proprietary Property. This Software may contain the
proprietary property of others, which has been licensed to Pinnacle, your use of
the Software is expressly conditioned on your agreement not to remove any
copyright notices or other proprietary markings of the third party software.
6. Security. You acknowledge and agree that in order to protect the integrity of
certain third party content, Pinnacle and/or its licensors may provide for
Software security related updates that will be automatically downloaded and
installed on your computer. Such security related updates may impair the
Software (and any other software on your computer which specifically depends
on the Software) including disabling your ability to copy and/or play "secure"
content, i.e. content protected by digital rights management. In such an event,
Pinnacle and/or its licensors shall use reasonable efforts to promptly post notices
on Pinnacle’s web site explaining the security update and providing instructions
to end-users for obtaining new versions or further updates of the Software that
restore access to secure content and related features.
7. Term and Termination. This License shall be effective upon installation of
the Software and shall terminate upon the earlier of (a) your failure to comply
with any term of this License; (b) return, destruction or deletion of all copies of
the Software in your possession or (c) transfer of the Software and this License
to another party in accordance with Section 1(d). Pinnacle’s rights and your
obligations shall survive termination of this License.
8. Limited Warranty. Pinnacle warrants to the original licensee that the
Software, as delivered, will perform in accordance with the accompanying
documentation for a period of 30 days from the date of the original purchase
(“Limited Warranty”). Pinnacle’s entire liability and your exclusive remedy for
breach of the preceding Limited Warranty shall be, at Pinnacle’s sole option,
repair or replacement of the Software that does not meet the warranty set forth
94
Page 99

License information
herein and that is returned to Pinnacle. This limited warranty shall be void if
failure of the Software has resulted from any accident, abuse, misuse or
misapplication by you. Any replacement Software will be warranted for the
remainder of the original warranty period or 30 days, whichever is longer.
9. NO OTHER WARRANTIES. EXCEPT AS SET FORTH ABOVE, THE
SOFTWARE IS PROVIDED ON AN “AS IS” BASIS. YOU ASSUME ALL
RESPONSIBILITIES FOR THE QUALITY AND PERFORMANCE OF THE
SOFTWARE. TO THE MAXIMUM EXTENT PERMITTED BY
APPLICABLE LAW, PINNACLE DISCLAIMS ALL WARRANTIES,
EITHER EXPRESS OR IMPLIED, INCLUDING BUT NOT LIMITED TO
IMPLIED WARRANTIES OF MERCHANTABILITY,
NONINFRINGEMENT, AND FITNESS FOR A PARTICULAR PURPOSE.
LICENSOR DOES NOT WARRANT THAT THE FUNCTIONS
CONTAINED IN THE SOFTWARE WILL MEET YOUR REQUIREMENTS,
BE UNINTERRUPTED OR ERROR FREE.
10. LIMITATION OF LIABILITY. YOU AGREE THAT IN NO EVENT
WILL PINNACLE BE LIABLE FOR ANY CONSEQUENTIAL, SPECIAL,
INDIRECT, INCIDENTAL OR PUNITIVE DAMAGES WHATSOEVER,
EVEN IF PINNACLE HAS BEEN ADVISED OF THE POSSIBILITY OF
SUCH DAMAGES. IN NO EVENT SHALL PINNACLE’S LIABILITY
EXCEED THE TOTAL AMOUNT OF THE FEES PAID FOR THE
SOFTWARE. Some states/jurisdictions do not allow the limitation or exclusion
of incidental or consequential damages in certain circumstances, so the above
limitations may not apply in some circumstances.
11. General. This License is governed by the laws of the State of California and
by the federal laws of the United States, without reference to conflict of laws
principles. The federal and state courts within the County of Santa Clara,
California shall have excusive jurisdiction to adjudicate any dispute arising out
of this License and you hereby consent to the personal jurisdiction of the federal
and state courts within the County of Santa Clara, California. This License is
the entire agreement between you and Pinnacle and supersedes any other
communication with respect to the Software. No modification of or amendment
to this License will be effective unless in writing signed by both parties. If any
provision of this License is held invalid or unenforceable, the remainder of this
License will continue in full force and effect.
95
Page 100

 Loading...