

Page 1
Quick Start Guide
English
Page 2
Session with Micro Quick Start Guide » 1
1 Introduction
* Latency: M-Audio Micro utilizes ASIOTM driver technology. Previously only found in expensive professional audio
interfaces, this technology allows for fast access to your audio hardware. Gaming soundcards or built-in audio ports
usually do not have ASIO drivers and therefore require more time for audio processing. This causes a distracting delay
known as “latency.” This delay occurs between performing an action (e.g. singing or pressing a key on a keyboard) and
hearing a sound through your speakers (or headphones). M-Audio’s advanced drivers virtually eliminate this latency and
help keep action and sound together. Make sure your microphone and speakers are plugged into Micro to take advantage
of its superior performance.
Welcome to the world of music production. This
package consists of the Session music creation
software and the M-Audio Micro audio interface.
This powerful combination of hardware and software
gives you everything you need to turn your computer
into a complete music production center.
Session software was designed from scratch to give
you access to professional features for recording,
editing, and mixing your music while remaining
simple and easy to use. It features an intuitive
interface and massive library of sounds so you can
start making music right away.
M-Audio Micro is a high-performance audio interface
specifically designed for music production.
Its efficient driver architecture outperforms most
gaming sound cards or built-in audio ports by
providing ultra-low latency*.
M-Audio Micro also acts as an authorization key for
Session—the program cannot run without Micro or
another qualified M-Audio device attached to your
computer.
This document will guide you through the installation
process for Session and the M-Audio Micro
hardware.
For more information and 12 in-depth
tutorials on how to use Session, please refer
to the program’s built-in manual under
Help > Manual.
Page 3
2 » Session with Micro Quick Start Guide
2 Installing the M-Audio Session Software
PLEASE NOTE: Do not connect your Micro audio interface to your computer until the Session
software has been installed. Leave Micro disconnected until instructed to connect it.
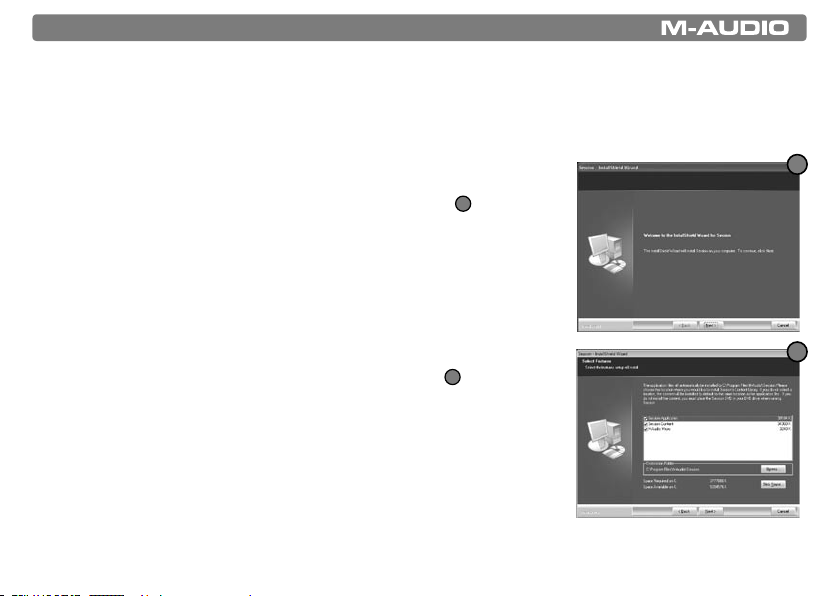
1. Insert the M-Audio Session DVD-ROM into your computer’s
DVD-ROM drive.
2. The computer will automatically display the install screen
1
. If your
computer does not launch the installer, manually start it by clicking on
Start > My Computer* and then double-clicking Session.
3. Follow the software installer’s on-screen direction prompts.
4. Session comes with a large library of loops and instrument samples
for music creation, known as Session Content. This Content requires
approximately 4 GB of disk space and may take as long as 30 minutes
to install. This behavior is normal. During the installation process, you will
be asked if you would like to install this content, as well as the Session
Application, and the driver for the Micro audio interface
2
. The M-Audio
Micro driver is required in order to use the Micro audio interface.
If you do not have 4 GB of disk space available, you may choose not to
install the Session Content, but you will then have to place the Session
DVD in your DVD-ROM drive whenever you run Session. Accessing
Session’s content via DVD-ROM results in slightly slower computer
performance. If the required hard drive space is available, installing the
Session Content on your computer’s hard drive is recommended.
*If you are using Windows Vista, “My Computer” will be labeled “Computer” in this step.
1
2
Page 4
Session with Micro Quick Start Guide » 3
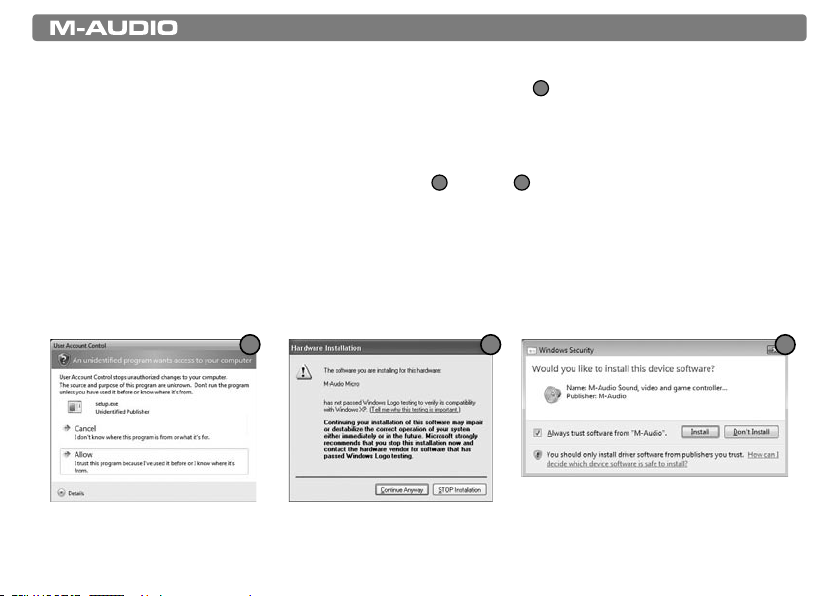
5. Windows Vista users may encounter the following message while the Micro device driver is being
installed: “An unidentified program wants access to your computer.”
3
Click Allow to continue
installation.
6. At various points in this installation process, you may be notified that the driver being installed has not
passed Windows Logo Testing (Windows XP), or asked whether the program you wish to run is a trusted
application (Windows Vista). Click Continue Anyway
4
or Install
5
to proceed with installation.
7. Click “Finish” once the installer has completed the installation.
IMPORTANT: The Micro audio interface serves as the copy protection key for Session and
must be connected to your computer for Session to launch.
3
4
5
Page 5

4 » Session with Micro Quick Start Guide
3 Setting Up the Micro USB Audio Interface
Once the Micro drivers have been installed via the Session software installation, connect the Micro USB audio
interface to an available USB port on your computer. Your computer will recognize the new hardware and will
briefly display a Found New Hardware message
6
. In Windows XP, you may be prompted with a Windows
Logo testing message. Click Continue Anyway.
4
6
Windows VistaWindows XP
Page 6

Session with Micro Quick Start Guide » 5
4 Audio Connections
Once the M-Audio drivers and Session are installed, you’ll need to connect your equipment (microphones,
instruments, speakers, headphones, etc.) to M-Audio Micro. The diagrams below demonstrate how
everything should be connected:
1. Connect a microphone, instrument (electric guitar or bass), or line-level source (synthesizer, CD player, DJ
mixer, etc.) to M-Audio Micro’s 1/8” input.
computer
electric
guitar or bass
microphone
synthesizer
CD player
Page 7

6 » Session with Micro Quick Start Guide
2. Connect your headphones or powered speakers to the 1/8” output.
computer
speakers
headphones
3. Use the Control Panel software to adjust input and output levels. See the following chapter for more
information.
Note that it is possible to configure Session to use the existing audio inputs and outputs on your
computer without plugging anything into M-Audio Micro. We do not recommend this because the
only way to get the superior sound quality and accelerated audio performance of M-Audio Micro is to
connect your equipment to Micro itself.
Page 8

Session with Micro Quick Start Guide » 7
5 Control Panel
Double-click the red M-Audio icon in your computer’s system tray to open the M-Audio Micro
Control Panel.
Windows VistaWindows XP
Double-click the red
M-Audio Icon
Note: You may need to restart your computer after the installation in order for this icon to become available.
Page 9

8 » Session with Micro Quick Start Guide
Levels Tab:
< Input Gain: Use this slider to adjust the input level.
Settings below the center line will work well with
line-level devices such as electronic keyboards or CD
players as well as with instruments like electric guitars
or basses. Settings above this line will work for most
handheld and PC desk microphones (dynamic and
electret microphones).
< Monitor Mix: This slider allows you to listen to your
input signal before any audio processing
(and its resulting latency) takes place. What you hear
is the exact signal as it sounds when entering M-Audio
Micro before it is sent to your audio software. This
method is also called “Hardware Monitoring” and becomes useful if your computer cannot facilitate
latency settings that are low enough for real-time recording. Adjust this slider until you have achieved
the desired balance between input and playback levels.
Note: The Session software features another, more sophisticated monitoring method that allows
you to hear audio effects while recording. In order to minimize undesirable signal delays when
monitoring through the Session software, it is necessary to set the latency slider in the M-Audio
Micro Control Panel to a low value. Be aware that using a low latency setting can increase the
demands placed on your computer’s system resources. To use this feature in Session, enable the
Input Monitor Button on the track you wish to record to. Check the manual found in Session under
Help > Manual for more information on this feature.
< Output Volume: This slider sets M-Audio Micro’s output level.
Page 10

Session with Micro Quick Start Guide » 9
Latency Tab:
This slider allows you to adjust the driver latency.
The lower the number, the shorter the latency. However,
as this number decreases, the processing demands
placed on your computer increase. The default setting of
“256” should work well for many computers, however,
if you experience clicks and pops during recording or
playback, you will need to increase this setting.
Note: This setting cannot be modified while Session
(or another audio application) is running, unless the
M-Audio Micro Control Panel is opened from within the
Session software: Options > Audio Hardware > ASIO
Settings.
About Tab:
The M-Audio Micro Control Panel’s about tab provides
links to driver updates, knowledge base articles, technical
support contact information and other useful resources.
You can also find version numbers of the M-Audio Micro’s
installed software components here. You may need this
information if you ever have the need to contact Technical
Support.
Page 11

10 » Session with Micro Quick Start Guide
6 Additional Information
Updating Session:
If your computer has an Internet connection, you can easily update to the latest version of Session.
To do this, simply click Help > Check for Updates in the Session software. This will open your web
browser to a page on M-Audio’s website containing the latest version of the software and information on
how to update.
Upgrading your hardware:
If you enjoy using M-Audio Micro but need additional features such as microphone preamplifiers or
additional inputs and outputs, consider upgrading the interface. M-Audio builds a full line of high
performance professional audio products including Fast Track USB, Fast Track Pro, MobilePre USB or
FireWire Solo. All of these products give you expanded functionality and are 100% compatible with
Session.
Page 12

Session with Micro Quick Start Guide » 11
7 Warranty
Warranty Terms
M-Audio warrants products to be free from defects in materials and workmanship, under normal use and
provided that the product is owned by the original, registered user. Visit www.m-audio.com/warranty for
terms and limitations applying to your specific product.
Warranty Registration
Immediately registering your new M-Audio product entitles you to full warranty coverage and helps MAudio develop and manufacture the finest quality products available. Register online at www.m-audio.
com/register to receive FREE product updates and for the chance to win M-Audio giveaways
Page 13

© 2007 Avid Technology, Inc. All rights reserved. Product features, specifications, system requirements
and availability are subject to change without notice. Avid, M-Audio, Session and M-Audio Micro are either
trademarks or registered trademarks of Avid Technology, Inc. All other trademarks contained herein are the
property of their respective owners.
Micro
Tested to comply with
FCC standards
FOR HOME OR STUDIO USE
WARNING: This product contains chemicals, including lead, known to the State of California to cause
cancer, and birth defects or other reproductive harm. Wash hands after handling.
071019_SssnMicro_QSG_EN01
 Loading...