

Page 1

Avid® ProEncode
Setup and User’s Guide
™
a
Page 2

Copyright © 2001–2002 Avid Technology, Inc. and its licensors. All rights reserved.
Avid ProEncode Setup and User’s Guide • Part 0130-05058-01 Rev. A • April 2002
2
Page 3

Contents
Chapter 1 Overview
ProEncode Basics . . . . . . . . . . . . . . . . . . . . . . . . . . . . . . . . . . . . . . . . . . . . 7
Software Components . . . . . . . . . . . . . . . . . . . . . . . . . . . . . . . . . . . . . . . . 9
ProEncode Client. . . . . . . . . . . . . . . . . . . . . . . . . . . . . . . . . . . . . . . . . 9
DMS Broker . . . . . . . . . . . . . . . . . . . . . . . . . . . . . . . . . . . . . . . . . . . . 10
ProEncode Provider . . . . . . . . . . . . . . . . . . . . . . . . . . . . . . . . . . . . . 11
DMS Administration Tool. . . . . . . . . . . . . . . . . . . . . . . . . . . . . . . . 12
Configurations and Requirements . . . . . . . . . . . . . . . . . . . . . . . . . . . . 13
Avid Unity MediaNet Environment . . . . . . . . . . . . . . . . . . . . . . . 13
Local Area Network (LAN) Environment . . . . . . . . . . . . . . . . . . 17
PortServer Pro Environment. . . . . . . . . . . . . . . . . . . . . . . . . . . . . . 19
Encoding Workflow . . . . . . . . . . . . . . . . . . . . . . . . . . . . . . . . . . . . . . . . . 20
QuickTime Reference Movies . . . . . . . . . . . . . . . . . . . . . . . . . . . . . . . . 21
Using Help. . . . . . . . . . . . . . . . . . . . . . . . . . . . . . . . . . . . . . . . . . . . . . . . . 21
Chapter 2 Installing and Configuring ProEncode
Installation and Configuration Check List . . . . . . . . . . . . . . . . . . . . . 23
Preparing the Network Environment for ProEncode . . . . . . . . . . . . 25
Setting the Location of the Temporary File Folder . . . . . . . . . . . 26
Sharing Folders . . . . . . . . . . . . . . . . . . . . . . . . . . . . . . . . . . . . . . . . . 27
Attaching the Application Key . . . . . . . . . . . . . . . . . . . . . . . . . . . . . . . 29
Setting Up the DMS Broker . . . . . . . . . . . . . . . . . . . . . . . . . . . . . . . . . . 30
Installing the DMS Broker Software . . . . . . . . . . . . . . . . . . . . . . 30
Configuring the DMS Broker. . . . . . . . . . . . . . . . . . . . . . . . . . . . . 30
Setting Up the DMS Administration Tool . . . . . . . . . . . . . . . . . . . . . 32
3
Page 4

Adding Users . . . . . . . . . . . . . . . . . . . . . . . . . . . . . . . . . . . . . . . . . . . 36
Installing the ProEncode Service . . . . . . . . . . . . . . . . . . . . . . . . . . . . . 38
Setting Up an Encoder. . . . . . . . . . . . . . . . . . . . . . . . . . . . . . . . . . . . . . . 39
Installing and Configuring the Encoding Application . . . . . . . 39
Installing the ProEncode Provider Software . . . . . . . . . . . . . . . . 39
Registering a ProEncode Provider with the DMS Broker. . . . . 40
Configuring the ProEncode Provider . . . . . . . . . . . . . . . . . . . . . . 42
Setting Up a ProEncode Client . . . . . . . . . . . . . . . . . . . . . . . . . . . . . . . 44
Installing the ProEncode Client Software . . . . . . . . . . . . . . . . . . 45
Configuring a ProEncode Client . . . . . . . . . . . . . . . . . . . . . . . . . . 46
Checking the Installation and Configuration. . . . . . . . . . . . . . . . . . . 51
Chapter 3 Using ProEncode
Encoding a Clip or Sequence . . . . . . . . . . . . . . . . . . . . . . . . . . . . . . . . . 53
Sending a Clip or Sequence to ProEncode . . . . . . . . . . . . . . . . . . . . . 54
Adding a File to ProEncode . . . . . . . . . . . . . . . . . . . . . . . . . . . . . . . . . . 58
Monitoring the Encoding . . . . . . . . . . . . . . . . . . . . . . . . . . . . . . . . . . . . 59
Chapter 4 Using the DMS Administration Tool
The DMS Administration Tool . . . . . . . . . . . . . . . . . . . . . . . . . . . . . . . 62
Opening the DMS Administration Tool . . . . . . . . . . . . . . . . . . . . . . . 62
Exploring the DMS Administration Tool . . . . . . . . . . . . . . . . . . . . . . 63
Using the DMS Jobs Page. . . . . . . . . . . . . . . . . . . . . . . . . . . . . . . . . . . . 65
Opening the DMS Jobs Page . . . . . . . . . . . . . . . . . . . . . . . . . . . . . 65
DMS Jobs Page . . . . . . . . . . . . . . . . . . . . . . . . . . . . . . . . . . . . . . . . . 66
Customizing the Jobs List . . . . . . . . . . . . . . . . . . . . . . . . . . . . . . . . 67
Navigating the Jobs List. . . . . . . . . . . . . . . . . . . . . . . . . . . . . . . . . . 68
Updating the Jobs List . . . . . . . . . . . . . . . . . . . . . . . . . . . . . . . . . . . 68
Purging the Jobs List . . . . . . . . . . . . . . . . . . . . . . . . . . . . . . . . . . . . 69
Viewing Details About a Job . . . . . . . . . . . . . . . . . . . . . . . . . . . . . 70
Canceling a Job . . . . . . . . . . . . . . . . . . . . . . . . . . . . . . . . . . . . . . . . . 72
Retrying a Job . . . . . . . . . . . . . . . . . . . . . . . . . . . . . . . . . . . . . . . . . . 73
Using the DMS Providers Page . . . . . . . . . . . . . . . . . . . . . . . . . . . . . . . 73
4
Page 5

Opening the DMS Providers Page. . . . . . . . . . . . . . . . . . . . . . . . . 73
DMS Providers Page. . . . . . . . . . . . . . . . . . . . . . . . . . . . . . . . . . . . . 74
Customizing the DMS Providers Display . . . . . . . . . . . . . . . . . . 75
Deleting Providers . . . . . . . . . . . . . . . . . . . . . . . . . . . . . . . . . . . . . . 75
Using the DMS Users Page. . . . . . . . . . . . . . . . . . . . . . . . . . . . . . . . . . . 77
Opening the DMS Users Page . . . . . . . . . . . . . . . . . . . . . . . . . . . . 77
Setting Up User Accounts . . . . . . . . . . . . . . . . . . . . . . . . . . . . . . . . 77
Editing User Accounts . . . . . . . . . . . . . . . . . . . . . . . . . . . . . . . . . . . 78
Deleting User Accounts . . . . . . . . . . . . . . . . . . . . . . . . . . . . . . . . . . 80
Reassigning Passwords . . . . . . . . . . . . . . . . . . . . . . . . . . . . . . . . . . 81
Appendix A cleaner 5
Overview . . . . . . . . . . . . . . . . . . . . . . . . . . . . . . . . . . . . . . . . . . . . . . . . . . 83
Installing cleaner 5. . . . . . . . . . . . . . . . . . . . . . . . . . . . . . . . . . . . . . . . . . 84
Appendix B Exporting QuickTime Reference Movies
Exporting QuickTime Reference Movies to ProEncode . . . . . . . . . . 87
QuickTime Reference Export Options. . . . . . . . . . . . . . . . . . . . . . . . . 92
Appendix C Troubleshooting ProEncode
Finding Solutions for Specific Problems. . . . . . . . . . . . . . . . . . . . . . . 98
General Troubleshooting Procedure. . . . . . . . . . . . . . . . . . . . . . . . . . 101
Checking the User Information File. . . . . . . . . . . . . . . . . . . . . . . . . . 102
Checking the Log File . . . . . . . . . . . . . . . . . . . . . . . . . . . . . . . . . . . . . . 103
Index
5
Page 6

6
Page 7

CHAPTER 1
Overview
This chapter provides an overview of the ProEncode application. It
includes the following sections:
• ProEncode Basics
• Software Components
• Configurations and Requirements
• Encoding Workflow
• QuickTime Reference Movies
ProEncode Basics
Today’s production houses face a rising demand for translating media
into formats suitable for distribution via the Web, DVD, or CD-ROM
— often at the same time. ProEncode software automates this
computing-intensive process and lets you move the encoding
operation to lower cost, dedicated workstations. These workstations,
connected in a network and working simultaneously, serve as your
“encoding farm.” Distributing the encoding frees editing workstations
to perform other tasks and allows you to generate two streams of
revenue-producing work in parallel.
7
Page 8

For example, you can use Avid Distributed Media Services (DMS) and
ProEncode to send a sequence from your Media Composer
®
system to
multiple encoding workstations, which then simultaneously create a
QuickTime movie, an MPEG-2 movie, and any other formats available
from the encoding application. While these workstations are encoding,
you can work on your next Media Composer sequence.
You can use ProEncode in an Avid Unity
MediaNet environment,
where the editing station and the encoding stations are connected in a
Fibre Channel network. You can also use ProEncode in a local area
network (LAN), such as an Ethernet network, that uses an
Avid Xp res s
®
DV system or Avid NewsCutter® XP system as the
media source.
ProEncode is also supported as a PortServer Pro client. PortServer Pro
client functionality is achieved by connecting the ProEncode Provider
to an Avid Unity PortServer workgroup. This allows you to access,
through the PortServer, workspaces in an Avid Unity MediaNet
workgroup and take advantage of the file-sharing capabilities, system
scalability, and flexibility offered by PortServer Pro and MediaNet
workgroup architectures.
ProEncode is a service that is layered on top of the DMS software
infrastructure. The DMS Broker and the DMS Administration Tool
manage all services that use DMS. As Avid develops new services, we
will use the same components to manage these additional services.
8
Page 9

Software Components
ProEncode consists of the following software components:
• ProEncode Client
• DMS Broker
• ProEncode Provider
• DMS Administration Tool
This section describes each component and how it functions. For
complete information about using the software components, see
Chapter 3.
ProEncode Client
The ProEncode Client software resides on the Avid editing system.
The Client starts the encoding process by placing your jobs in a batch
and submitting them to the DMS Broker for further processing. The
Client user interface includes the Add Jobs dialog box and the
ProEncode Client window.
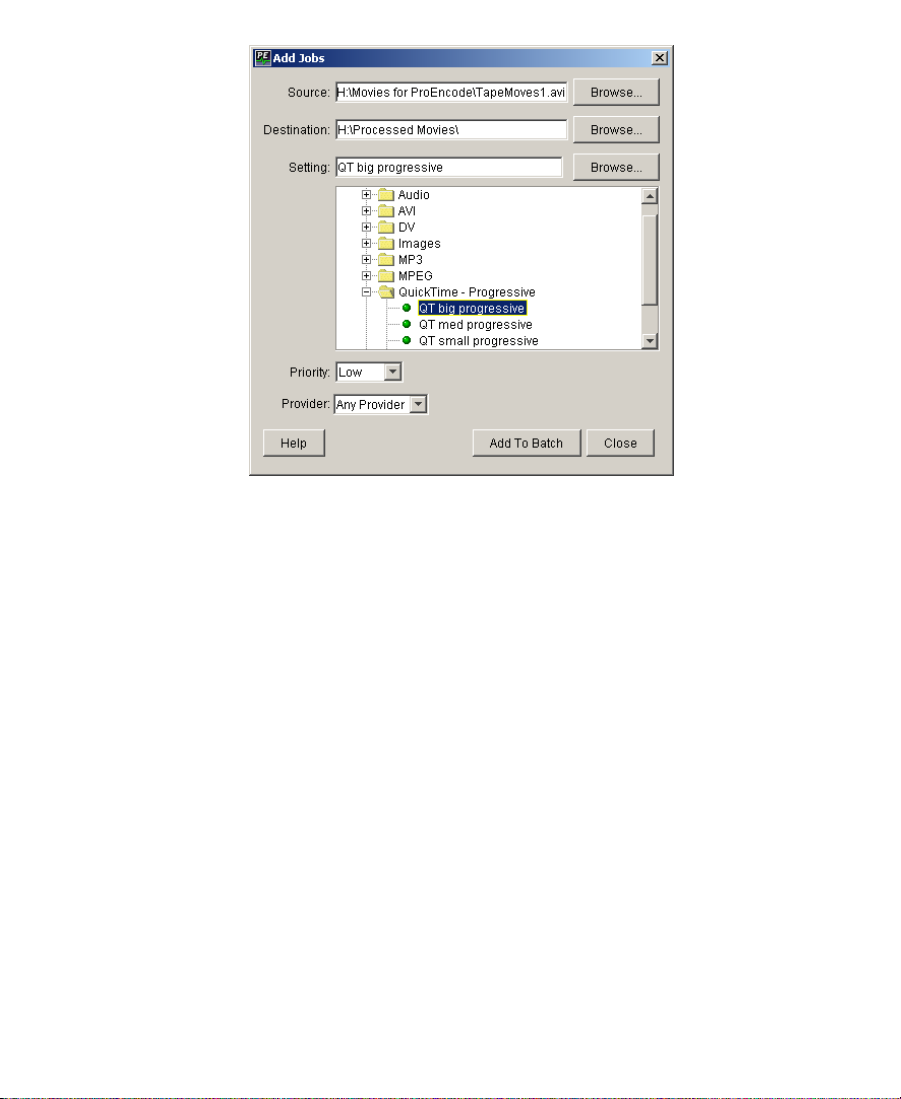
The Add Jobs dialog box allows you to select the source movie and
other specifications for the job.
9
Page 10
DMS Broker
The ProEncode Client window displays information about the jobs
that you have added to your batch.
The DMS Broker software resides on a computer other than the
computer running the Client software. In most cases, this computer
also performs the encoding, although you can install the Broker on its
own computer. The Broker serves as a go-between: it matches
encoding jobs and their corresponding settings with a suitable
encoding station. The Broker chooses an encoding station based on
which stations are available for use and which stations are configured
for a particular type of encoding.
The Broker also functions as a Web server for the DMS Administration
Tool (see “DMS Administration Tool” on page 12). Distributed Media
Services (DMS) is the software infrastructure on which ProEncode is
10
Page 11

layered. For more information about DMS, see “ProEncode Basics” on
page 7.
The DMS Broker window displays information about the status of the
Broker and the jobs in the batch.
ProEncode Provider
The ProEncode Provider software resides on the computer that
performs the encoding (the encoding station or encoder). The Provider
starts the encoding application and sends it information about a job.
The Provider then monitors the job and sends information about the
job status to the DMS Broker.
The ProEncode Provider window displays information about the
status of the Provider and the job.
11
Page 12

DMS Administration Tool
The DMS Administration Tool is a Web-based application that you can
access through a browser from anywhere on the Internet. The DMS
Administration Tool displays information about the ProEncode
system, such as job status and ProEncode Providers. It is also a tool for
managing jobs, providers, services, and users. For more information
about the DMS Administration Tool, see Chapter 4.
Distributed Media Services (DMS) is the software infrastructure on
which ProEncode is layered. For more information about DMS, see
“ProEncode Basics” on page 7.
12
Page 13

Configurations and Requirements
You can configure ProEncode in three different network environments:
• Avid Unity MediaNet Environment
• Local Area Network (LAN) Environment
• PortServer Pro Environment
Avid Unity MediaNet Environment
Figure 1-1 shows ProEncode components in an Avid Unity MediaNet
environment.
13
Page 14
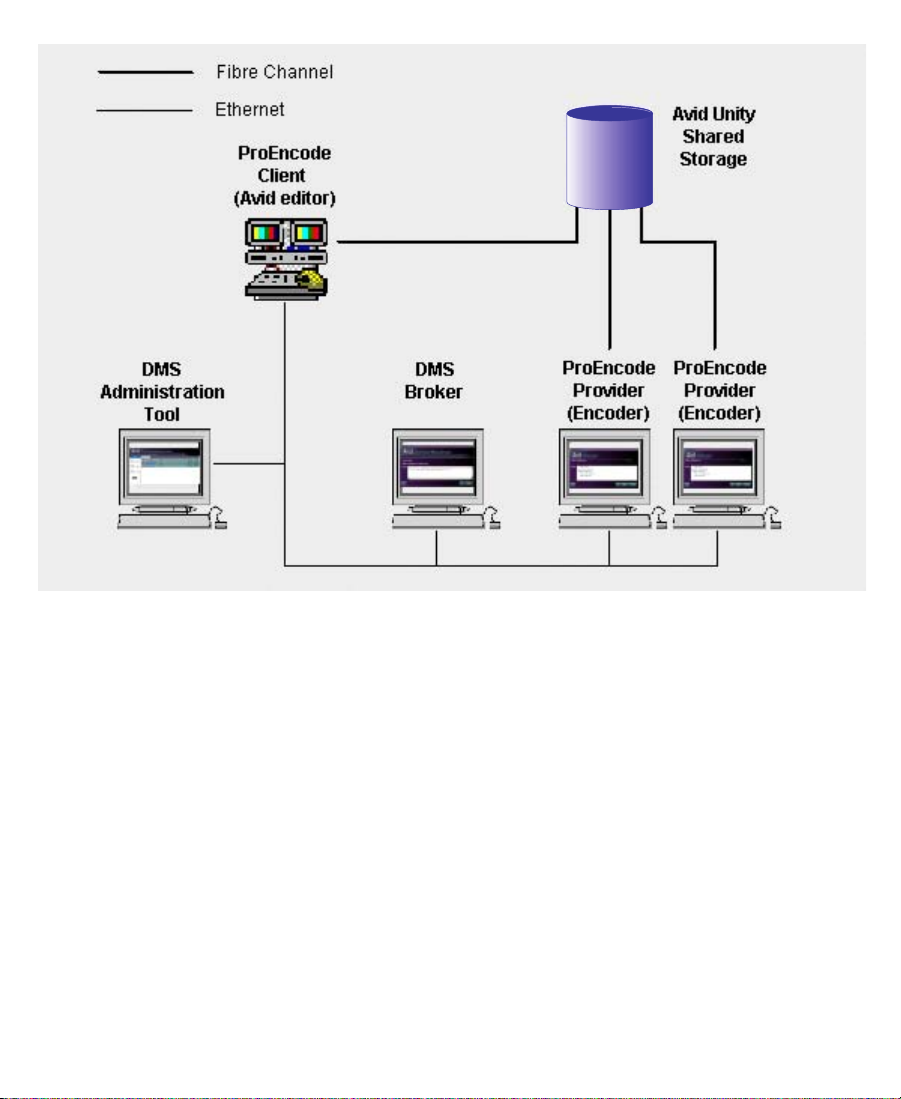
Figure 1-1 ProEncode Components in an Avid Unity MediaNet
System Requirements
ProEncode components in an Avid Unity MediaNet environment have
the following system requirements:
• ProEncode Client: A computer running one of the following Avid
Environment
editing applications:
-Symphony
-Media Composer
™
Release 3.1 or later
or Film Composer® Release 10.1 or later
(Windows or Macintosh)
- Avid Xpress Release 4.1 or later (Windows or Macintosh)
14
Page 15

- NewsCutter Release 2.0 or later
- NewsCutter XP Release 2.0 or later
Minimum hardware requirements are the same as the Avid editing
application’s requirements.
• DMS Broker: A computer running Windows 2000
-Pentium
- 94 MB of RAM
- 800 x 600, 16-bit display
The computer also requires Internet Explorer 5.5 or later. For more
information, see the Avid ProEncode Release Notes.
• ProEncode Provider: A computer running Windows 2000 that is
an Avid Unity client
- Pentium-class processor or faster
- 94 MB of RAM
- 800 x 600, 16-bit display
The computer also requires Internet Explorer 5.5 or later. For more
information, see the Avid ProEncode Release Notes.
®
-class processor or faster
n
The Broker can run on an encoder or on its own system.
• DMS Administration Tool: A computer running Windows and
Network Requirements
ProEncode components in an Avid Unity MediaNet environment have
the following network requirements:
Internet Explorer 5.0 or later or a Macintosh system running
Internet Explorer 5.0
You can download Internet Explorer from the Microsoft
(www.microsoft.com).
15
®
Web site
Page 16

• Computers running the ProEncode Client and ProEncode
Provider need to be licensed and enabled as clients in an
Avid Unity MediaNet Fibre Channel network. Computers running
the Provider need access to all workspaces referenced by the clip
or sequence being encoded. For complete information on
configuring Avid Unity MediaNet clients, see the Avid Unity
MediaNet Windows Fibre Channel Client Setup Guide or the
Avid Unity MediaNet Macintosh Fibre Channel Client Setup Guide.
• The computer running the DMS Broker does not need to be an
Avid Unity MediaNet client but does need to be connected to the
MediaNet clients and encoders in a local area network. In most
cases, the Broker runs on an encoder.
• The computer running the DMS Administration Tool must have
an Internet connection to the Broker.
16
Page 17
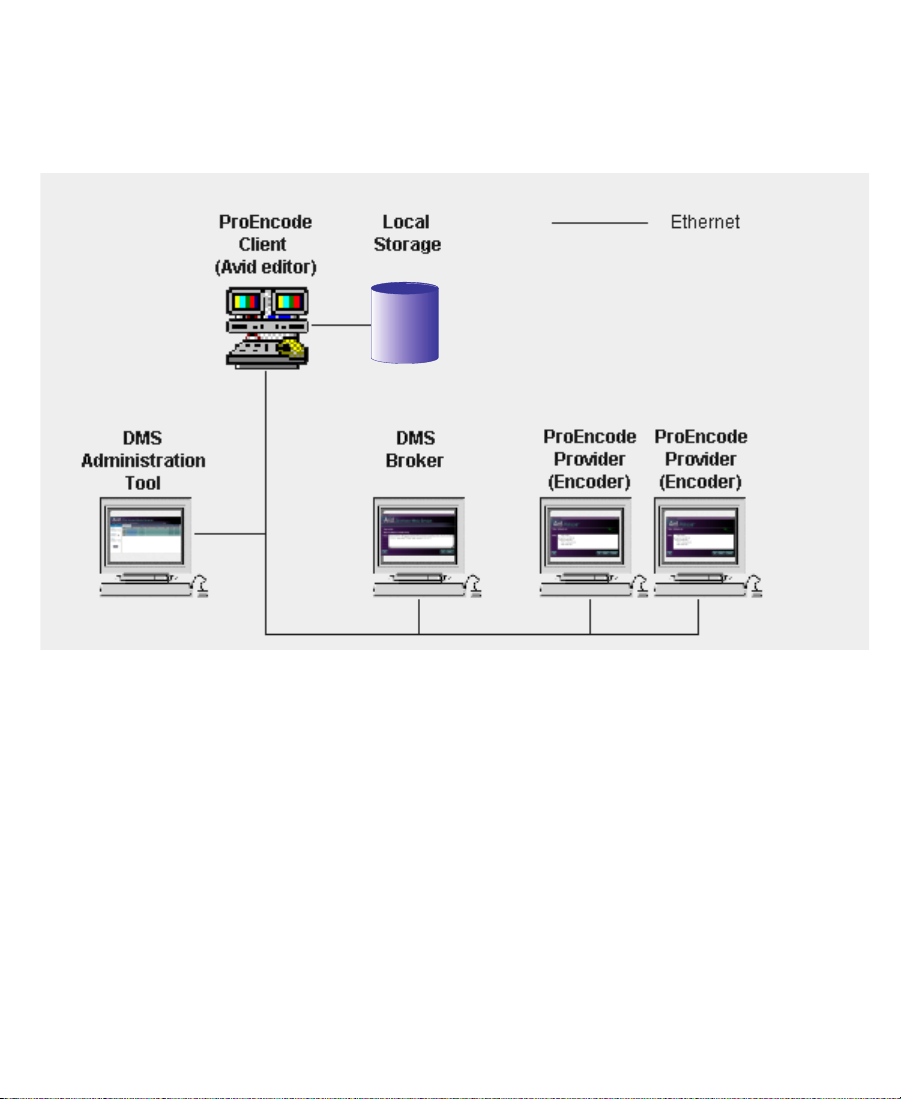
Local Area Network (LAN) Environment
Figure 1-2 shows ProEncode components in a local area network
(LAN) environment.
Figure 1-2 ProEncode Components in a LAN Environment
System Requirements
ProEncode components in a LAN environment have the following
system requirements:
• ProEncode Client: A computer running one of the following Avid
editing applications:
- Avid Xpress DV Release 2.0 or later
- NewsCutter XP Release 2.0 or later
17
Page 18

Minimum hardware requirements are the same as the Avid editing
application’s requirements.
• DMS Broker and ProEncode Provider: A computer running
The Broker can run on an encoder or on its own system.
n
• DMS Administration Tool: A Windows system running Internet
Network Requirements
ProEncode components in a LAN environment have the following
network requirements:
Windows NT. Encoding systems require cleaner
Minimum hardware requirements are the same as cleaner 5
requirements:
- Pentium-class processor or faster
- 94 MB of RAM
- 800 x 600, 16-bit display
The computer also requires Internet Explorer 5.5 or later. For more
information, see the Avid ProEncode Release Notes.
Explorer 5.0 or later
You can download Internet Explorer from the Microsoft Web site
(www.microsoft.com).
™
5.0.2 or later.
• Computers running the ProEncode Client and the DMS Broker
need to be connected to the encoders in a LAN that uses the
TCP/IP protocol.
• The source folder for the original movie and the destination folder
for the completed movie need to be shared with computers
running the ProEncode Provider. For more information, see
“Sharing Folders” on page 27.
• The computer running the DMS Administration Tool must have
an Internet connection to the Broker.
18
Page 19
PortServer Pro Environment
The following illustration shows how the PortServer and MediaNet
infrastructure fit together.
Avid Unity MediaNet
workgroup
Avid Unity
MediaNet
file system
Fibre Channel
MediaNet client
MediaNet client
MediaNet client
MediaNet client
PortServer Pro
ProEncode Provider
Gigabit Ethernet
PortSwitch
100BASE-T
Ethernet
NewsCutter XP
with ProEncode
NewsCutter XP
with ProEncode
NewsCutter XP
with ProEncode
NewsCutter XP
with ProEncode
ProEncode Provider
ProEncode supports jobs submitted by PortServer Pro editing systems,
such as NewsCutter XP. In addition, your ProEncode Provider
software can access, through a PortServer Pro connection, media files
stored in the Avid Unity MediaNet file system. This support frees up a
Fibre Channel port in the MediaNet workgroup and allows you to use
it for other purposes.
19
Page 20

Encoding Workflow
This section describes the typical workflow for using ProEncode to
manage encoding. For more information, see “Encoding a Clip or
Sequence” on page 53.
1. Make sure you have configured your ProEncode Client properly.
See “Configuring a ProEncode Client” on page 46.
2. In an Avid editor, select the clip or sequence you want to encode.
3. Choose File>DMS>ProEncode.
The Export window opens, and the ProEncode Applet window
opens. The Add Jobs dialog box also appears.
4. Select a Setting, Provider, and Priority.
5. Click Add To Batch.
6. Click Close.
7. Review the information in the ProEncode Client window.
8. Click Submit.
9. In the Export window, you can rename the output file name. Do
not change the location for the file in the Saved In text box.
10. Click Save.
The export operation occurs. When the editing system is finished
with the export, it notifies the Broker that the export is complete.
The Broker matches the job and corresponding settings with a
suitable encoder, based on availability and specific hardware
configurations (if applicable). When the ProEncode Provider on
the encoder signals that the encoder is available, the Broker tells
the Provider to start the job.
The encoded movie is stored in the specified destination and,
optionally, you receive a message that the job is complete.
20
Page 21

QuickTime Reference Movies
A QuickTime reference movie is a QuickTime movie that contains
composition information but no movie data. Instead, the movie
contains pointers to the original media in the OMFI MediaFiles
directory on local or network media drives. Because the QuickTime
reference movie does not contain media, the file is much smaller than a
standard QuickTime movie. Therefore, exporting a clip or sequence as
a QuickTime reference movie is faster and requires less disk space than
exporting the clip or sequence as a QuickTime movie. When you play
back the movie in QuickTime Player, the movie references the media
files.
On an Avid editing system, you can choose Send To ProEncode and
the system automatically creates a QuickTime reference movie.
Alternatively, you can create one or more QuickTime reference movies
and then add them to the Client (see “Exporting QuickTime
Reference Movies to ProEncode” on page 87). In both cases, the
referenced media must be stored on shared drives that the encoders
can access.
n
Using Help
You can also use ProEncode to manage the encoding of video or audio files in
any format that cleaner 5 can process. See “Adding a File to ProEncode”
on page 58.
You can get help and background information for tasks, windows, and
dialog boxes through the ProEncode Help system.
To open Help, do one of the following:
t Click the Help button in a window or dialog box.
t In the DMS Administration Tool, click Help in the mode selector.
21
Page 22

A Web browser displays a Help page with information specific to the
window or dialog box. You can then use the Contents, Index, or Search
button to find additional information.
To find out more about how to use Help:
t Click the Using Help button in the Help system.
The Help system uses your system’s default Web browser, except
when you view Help from the DMS Administration Tool. In this case,
it uses the same browser as the DMS Administration Tool. Help
requires Internet Explorer 5.0 or later.
22
Page 23

CHAPTER 2
Installing and Configuring ProEncode
This chapter describes how to set up your ProEncode system. It
includes the following sections:
• Installation and Configuration Check List
• Preparing the Network Environment for ProEncode
• Attaching the Application Key
• Setting Up the DMS Broker
• Setting Up the DMS Administration Tool
• Installing the ProEncode Service
• Setting Up an Encoder
• Setting Up a ProEncode Client
• Checking the Installation and Configuration
Installation and Configuration Check List
Ta bl e 2 - 1 lists the steps for installing and configuring ProEncode and
where to find more information about each step.
23
Page 24

Table 2-1 ProEncode Installation and Configuration
Check List
Ta sk Section Reference
Before you begin:
❑ Check your configuration. “Preparing the Network Environment for
ProEncode” on page 25
❑ Set the location of the temporary file folder. “Setting the Location of the Temporary File
Folder” on page 26
❑ Set up sharing for folders. “Sharing Folders” on page 27
On the computer you will use as the DMS Broker:
❑ Attach the application key to the DMS Broker. “Attaching the Application Key” on page 29
❑ Install the DMS Broker software. “Installing the DMS Broker Software” on
page 30
❑ Start the Broker and configure it to send mail. “Configuring the DMS Broker” on page 30
❑ Change the DMS Administrator account
password.
“Setting Up the DMS Administration Tool”
on page 32
❑ Install the ProEncode Service. “Installing the ProEncode Service” on
page 38
On each computer you will use as a ProEncode
Provider:
❑ Install and configure the encoding application. See the appropriate Appendix that applies to
your encoding application.
❑ Install the ProEncode Provider software. “Installing the ProEncode Provider
Software” on page 39
❑ Register the Provider with the Broker. “Registering a ProEncode Provider with the
DMS Broker” on page 40
24
Page 25

Table 2-1 ProEncode Installation and Configuration
Check List (Continued)
Ta sk Section Reference
❑ Configure the Provider and connect to the
Broker.
On each computer you will use as a ProEncode
Client:
“Configuring the ProEncode Provider” on
page 42
❑ Install the ProEncode Client software. “Installing the ProEncode Client Software”
on page 45
❑ Configure the ProEncode Client. “Configuring a ProEncode Client” on
page 46
Preparing the Network Environment for ProEncode
Before installing ProEncode software, do the following:
• Make sure the configuration conforms to the hardware, software,
and network requirements listed in “Configurations and
Requirements” on page 13.
• Make sure you know which system in the network will serve as
the DMS Broker and which systems will serve as encoders. You
can install the Broker on an encoder or install it on its own system.
Do not install the Broker on a system running an Avid editing
application and the ProEncode Client.
• In an Avid Unity environment, plan the workspaces that the
editing application will use. Your encoders will also access these
workspaces. Map these workspaces as drives on both the editing
application system and the encoders, as described in the
Avid Unity MediaNet for Windows Fibre Channel Client Quick Start
Card and Avid Unity MediaNet for Macintosh Fibre Channel Client
Quick Start Card.
25
Page 26

n
If you have multiple workspaces, you need to map only one workspace to a
drive. Avid Unity will allow access to other workspaces automatically, based
upon the permissions set in the Avid Unity MediaNet Administration Tool.
• Set the location of the temporary file folder, as described in
“Setting the Location of the Temporary File Folder” on page 26.
• Set up sharing for folders, as described in “Sharing Folders” on
page 27.
Setting the Location of the Temporary File Folder
When you choose the Send To ProEncode option, the Avid editing
system creates a QuickTime reference movie that it automatically
places in a folder for temporary files. For more information, see
“QuickTime Reference Movies” on page 21.
n
If you create QuickTime movies without sending them directly to ProEncode
(for example, you use an application other than an Avid video editor), you
choose the settings and the location for the movie when you export the file. See
“Exporting QuickTime Reference Movies to ProEncode” on page 87.
To set the location of the temporary file folder:
1. Start your Avid editing application.
2. Click the Settings tab in the Project window.
The Settings scroll list appears.
3. Double-click DMS.
The DMS Settings dialog box appears.
26
Page 27
Sharing Folders
4. In the Shared Storage text box, browse to the location where you
want to create the QuickTime reference movie.
In an Avid Unity MediaNet environment, this folder needs to be in
a workspace that the encoders can access.
In a LAN environment, this folder needs to be on a local drive.
You must then set up the folder for sharing. See “Sharing Folders”
on page 27.
5. Click OK.
To use ProEncode, the Client and encoders need to access the
following folders:
• OMFI MediaFiles folder on media drives referenced by your clip
or sequence.
• Temporary folder, as set in the General settings of your Avid
editing application (see “Setting the Location of the Temporary
File Folder” on page 26).
27
Page 28

• Any other folder that serves as the source for an encoding job, as
set in the Add Jobs dialog box (see “Sending a Clip or Sequence
to ProEncode” on page 54) or in the Client settings (see
“Configuring a ProEncode Client” on page 46).
• Destination folder, as set in the Add Jobs dialog box (see “Sending
a Clip or Sequence to ProEncode” on page 54) or in the Client
settings (see “Configuring a ProEncode Client” on page 46).
Sharing Folders in an Avid Unity MediaNet Environment
If you are working in an Avid Unity MediaNet environment, the
media for the clip or sequence that you are encoding needs to be on a
mounted MediaNet workspace. This workspace needs to be shared by
the Client and the encoder. You cannot use media that is on a local
drive. You also need to specify a shared workspace for the temporary
folder and the destination folder.
For more information about Avid Unity MediaNet requirements, see
“Avid Unity MediaNet Environment” on page 13. For information
about configuring Avid Unity MediaNet clients, see the Avid Unity
MediaNet Windows Fibre Channel Client Setup Guide or the Avid Unity
MediaNet Macintosh Fibre Channel Client Setup Guide.
Sharing Folders in a LAN Environment
If you are working in a LAN environment, you must enable sharing
for the temporary folder (see “Setting the Location of the Temporary
File Folder” on page 26) and the destination folder (see “Configuring
a ProEncode Client” on page 46).
n
You do not need to explicitly enable sharing for the OMFI MediaFiles folders.
The Avid editing application automatically enables sharing for media folders.
To share folders on a Windows system:
1. Make sure you are logged in with administrative privileges.
2. Select the folder that you want to share.
28
Page 29

3. Right-click the folder, and choose Properties from the shortcut
menu.
4. Click the Sharing tab, and then select the Shared As option.
You can keep the folder name (the default) or change the name to
one that you want to appear on the network. Accept the other
default settings.
If you need to set permissions, make sure the encoders will have
access to the folder.
5. Click OK.
The folder can now be shared.
6. On each encoding system, map the shared folders as network
drives. For more information on mapping drives, see the Windows
Help.
Attaching the Application Key
The application key, commonly referred to as a dongle, allows the
ProEncode software to run on your system. It also lets you access only
the number of encoders for which you have purchased licenses.
c
n
The application key must connect to a USB port on your system.
To attach the application key:
1. On the computer that will run the DMS Broker, locate a USB port.
2. Attach the application key to the port.
Do not lose the application key. Your ProEncode software does not
function without it. If you lose your application key, you must
purchase another key from Avid.
If you are running a standalone system, the application key must be installed
on the standalone system.
29
Page 30

Setting Up the DMS Broker
For conceptual
information about the
Broker, see “DMS
Broker” on page 10.
Setting up the DMS Broker requires the following procedures:
• Installing the DMS Broker Software
• Configuring the DMS Broker
Installing the DMS Broker Software
To install the DMS Broker software:
1. Insert the ProEncode CD-ROM into the CD-ROM drive.
If the installer doesn’t start automatically after you insert the
CD-ROM, do the following:
a. Double-click the My Computer icon.
b. Double-click the CD-ROM icon.
c. Double-click Launch.exe to start the installer.
The Avid Technology window opens.
2. Click Installers.
3. Click Install DMS Broker.
4. Follow the instructions in the installation program.
5. When the installation is complete, click Exit.
Configuring the DMS Broker
After you have installed the DMS Broker software, you can configure
the Broker so that it sends an e-mail notification about the status of
your encoding jobs. This configuration is necessary if you are using
the NewsCutter Post to Web feature.
30
Page 31

To configure the DMS Broker:
1. Click the Start button, point to Programs, point to Avid, and then
select DMS Broker.
The DMS Broker window opens.
The DMS Broker window displays current information, including
the host name for the system on which the Broker resides. The
DMS Broker uses the host name to identify itself on the network.
Note the Broker name because you need to supply it when you set
up the ProEncode Provider and ProEncode Client.
2. Click the Settings button.
The Broker Settings dialog box appears.
31
Page 32

3. Supply information for mailing notifications from the Broker to
the Client:
a. SMTP (Simple Mail Transfer Protocol) Server: Type the name
of your local mail server, such as mail.mycompany.com.
If you don’t know your mail server, see your network
administrator.
b. From Address: Type an e-mail address for the Broker, such as
DMSBroker@mycompany.com.
c. (Option) Type an SMTP Username and Password if your
network supports secure e-mail. These settings give the
Broker a name and password so that it can successfully send
e-mail notification. If a network does not use secure e-mail, the
settings do not apply and will be disregarded.
d. Click OK.
Leave the DMS Broker window open while you install and configure
the remaining ProEncode components.
Setting Up the DMS Administration Tool
For conceptual
information about the
DMS Administration
Tool, see “DMS
Administration Tool”
on page 12. For
information about
using it, see Chapter 4.
The DMS Administration Tool software is installed at the same time as
the DMS Broker. The DMS Administration Tool uses accounts to access
information. The default login for the DMS Administration Tool is the
login name Administrator, without a password. You should give this
account a password after installing the Broker software.
To change the Administration Tool account password:
1. Open a standard Web browser, either on the computer running the
DMS Broker or on another networked computer. You must use
Internet Explorer.
2. Type a URL for the DMS Broker in the following form:
http://broker_name:8080
32
Page 33

For example,
http://broker1:8080
3. Press Enter (Windows) or Return (Macintosh).
n
You can find the Broker name in the Name field of the DMS Broker window.
The DMS Administration Tool login screen appears.
4. Type Administrator in the User Name text box.
5. Click Login.
The DMS Jobs page appears.
33
Page 34

Mode
selector
User Name
link
6. Click Users in the mode selector.
The Users page appears.
7. Click the User Name link for the user you want to edit.
The Edit User window opens.
34
Page 35

8. Type a password in the Password text box. Then, type it again in
the Retype Password text box.
Passwords are case sensitive and can contain only letters,
numbers, and underscores. They can be up to 255 characters in
length. Passwords are optional, but Avid recommends a password
for the Administrator account.
c
n
If you forget the Administration password, you need to delete and
re-create all accounts. For more information, see “Reassigning
Passwords” on page 81.
9. Type a real name as you want it to appear on the Users page.
10. (Option) Type an e-mail address and phone number.
11. If the user you are editing is an administrator, select the Is
Administrator check box.
12. Click Save.
13. Close the Users page by closing the browser window.
Non-administrators can see and edit only their own user’s page.
35
Page 36

Adding Users
Add button
You can create additional users from the DMS Users page.
To create users:
1. Click Users in the mode selector.
The Users page appears.
2. Click the Add button.
The Create User window opens.
36
Page 37

3. Type the user name.
4. Type a password in the Password text box. Then, type it again in
the Retype Password text box.
Passwords are case sensitive and can contain only letters,
numbers, and underscores. They can be up to 255 characters in
length. Passwords are optional, but Avid recommends a password
for the Administrator account.
c
If you forget the Administration password, you need to delete and
re-create all accounts. For more information, see “Reassigning
Passwords” on page 81.
5. Type a real name as you want it to appear on the Users page.
6. (Option) Type an e-mail address and phone number.
7. If the user you are creating is an administrator, select the Is
Administrator check box.
8. Click Save.
37
Page 38

Installing the ProEncode Service
Before you set up the encoder, you must install the ProEncode service.
You must be an administrator to install the ProEncode service.
To install the ProEncode service:
1. Open the DMS Administration Tool (see “Opening the DMS
Administration Tool” on page 62).
2. Click Services in the mode selector.
The Services page appears.
3. Click the Install button.
4. Browse to the ProEncode.zip file (located on the CD shipped with
your system).
5. Click Install.
The ProEncode service will be installed.
38
Page 39

Setting Up an Encoder
For conceptual
information about the
ProEncode Provider, see
“ProEncode Provider”
on page 11.
Setting up an encoder requires the following procedures:
• Installing and Configuring the Encoding Application
• Installing the ProEncode Provider Software
• Registering a ProEncode Provider with the DMS Broker
• Configuring the ProEncode Provider
Repeat these procedures for each encoder that you add to a ProEncode
system.
Installing and Configuring the Encoding Application
You must install the encoding application on the encoders. Each
encoder needs its own registered copy of the encoding application. See
the appropriate Appendix for information on installing the encoding
application. For example, if you have cleaner 5 as the encoding
application, see Appendix A.
Installing the ProEncode Provider Software
To install the ProEncode Provider software:
1. Quit all Windows applications.
2. Insert the ProEncode CD-ROM into the CD-ROM drive.
If the installer doesn’t start automatically after you insert the
CD-ROM, do the following:
a. Double-click the My Computer icon.
b. Double-click the CD-ROM icon.
c. Double-click Launch.exe to start the installer.
The Avid Technology window opens.
39
Page 40

3. Click Installers.
4. Click Install ProEncode Provider.
5. Follow the instructions in the installation program.
6. When the installation is complete, click Exit.
The ProEncode Provider installer includes the Avid codecs for
QuickTime. A codec (a term derived from compressor and
decompressor) is hardware or software that compresses and
decompresses data. Encoding applications require the Avid software
codecs to decompress the QuickTime reference movie and create the
final encoded movie.
Registering a ProEncode Provider with the DMS Broker
You use the DMS Administration Tool Providers page to register each
ProEncode Provider with the DMS Broker. This process supplies the
Broker with information about the encoder.
To register a ProEncode Provider with the DMS Broker:
1. Make sure the DMS Broker is running. See “Setting Up the DMS
Broker” on page 30.
2. Make sure the ProEncode service is installed. See “Installing the
ProEncode Service” on page 38.
3. Open the DMS Administration Tool (see “Opening the DMS
Administration Tool” on page 62) on the system to be running the
Provider.
4. Click Providers in the mode selector.
The Providers page appears.
40
Page 41

5. Click the Register button.
The Register Provider window opens.
6. Select the Service, in this case, ProEncode.
7. In the Provider Name text box, type the name of the encoder.
8. In the Application Name text box, type the name of the encoder
application, such as ProEncode Provider.
9. Click Register.
The Provider will be registered.
41
Page 42

Configuring the ProEncode Provider
After you have installed the ProEncode Provider software, you need to
configure the Provider by choosing the appropriate settings.
To configure the ProEncode Provider:
1. Make sure the DMS Broker is running (see “Configuring the
DMS Broker” on page 30).
2. Click the Start button, point to Programs, point to Avid, and then
select ProEncode Provider.
A message appears, informing you that you must supply the
Provider name and the Broker name.
3. Click OK.
The Provider Settings dialog box appears.
4. Specify the settings that you want, as described in Ta b le 2 - 2.
42
Page 43

Table 2-2 ProEncode Provider Settings
Setting Description
Provider Name Type the Provider name that you supplied when
you registered the Provider. If you need to change
the Provider name, you can type the new name
here, but you also need to change it and re-register
the Provider (see “Registering a ProEncode
Provider with the DMS Broker” on page 40).
Broker Name Type the Broker name as shown in the DMS Broker
window.
Automatically Connect Select Yes to connect to the Broker whenever the
Provider software is started. If you select No, you
need to connect the Provider before you can use
ProEncode.
Settings Directory Point to the correct encoding application settings
directory to let the Provider know where to go for
the correct encoding application settings. Browse if
necessary.
5. Click OK.
The Provider Settings dialog box closes.
6. In the ProEncode Provider window, click Connect to connect the
Provider to the Broker. If you selected Yes for Automatically
Connect in the Provider Settings dialog box, the Provider will
connect automatically to the Broker.
7. After the connection is made, the Status line in the ProEncode
Provider window reads “Waiting for Jobs,” and the History
window displays the message “Connection Established.” The
Connect button changes to Disconnect.
43
Page 44

n
If the Provider cannot connect to the Broker, the Status line reads
“Connection Error.” Make sure the Broker is running, and then click Connect
again.
Leave the ProEncode Provider window open.
8. To set up other encoders, see “Setting Up an Encoder” on page 39.
Setting Up a ProEncode Client
Setting up a ProEncode Client requires the following procedures:
• Installing the ProEncode Client Software
• Configuring a ProEncode Client
44
Page 45

Installing the ProEncode Client Software
To install the ProEncode Client software (Windows):
1. Insert the ProEncode CD-ROM into the CD-ROM drive.
If the installer doesn’t start automatically after you insert the
CD-ROM, do the following:
a. Double-click the My Computer icon.
b. Double-click the CD-ROM icon.
c. Double-click Launch.exe to start the installer.
The Avid Technology window opens.
2. Click Installers.
3. Click Install ProEncode Client.
4. Follow the instructions in the installation program.
5. When the installation is complete, click Exit.
To install the ProEncode Client software (Macintosh):
1. Insert the ProEncode CD-ROM into the CD-ROM drive.
2. Double-click the ProEncode Installer icon.
The ProEncode Install window opens.
45
Page 46

3. Accept the default installation location from the Install Location
pop-up menu, or choose another location.
4. Click Install.
The installation starts. When it is complete, a message appears.
5. Click Quit.
Configuring a ProEncode Client
After you have installed the ProEncode Client software, you must
provide the Client with the Broker name.
The ProEncode Client installs a ProEncode Client applet also. The
applet uses the settings from the DMS Settings dialog box in your Avid
editing application Settings tab. For the applet to run properly, you
must install Java
Notes.
™
1.3. For information, see the Avid ProEncode Release
46
Page 47

ProEncode Client software includes optional settings that you can
specify according to your work needs. If necessary, you can override
these optional settings in the Add Jobs dialog box (see “Sending a
Clip or Sequence to ProEncode” on page 54).
You can configure the ProEncode Client on a standalone system (a
system that is not an Avid editing system), or you can configure the
ProEncode Client on an Avid editing system. See the following
procedures.
To configure a standalone ProEncode Client:
1. Open the ProEncode Client window:
- (Windows) Click the Start button, point to Programs, point to
Avid, and then select ProEncode Client.
- (Macintosh) Open the ProEncode folder, and then double-click
the ProEncode Client icon.
A message box appears, informing you that you must supply the
Broker name.
2. Click OK.
The Client Settings dialog box appears.
Windows
47
Page 48

Macintosh
Specify the settings that you want, as described in Ta b l e 2 - 3.
Table 2-3 ProEncode Client Settings
Setting Description
Default Source File (Option) Type the path and file name for the source
QuickTime reference movie. You can click the
Browse button to find and select the file.
Default Destination (Option) Type the path for the folder where you
want the final encoded movies to be sent. You can
click the Browse button to find and select the path.
Default Batch Name (Option) Type a name for the batch. The batch
name appears in any notification messages you
receive.
Broker Name Type the Broker name as shown in the DMS Broker
window.
3. Click OK.
The ProEncode Client window opens.
48
Page 49

4. Click Quit.
A message box appears and asks if you really want to quit.
5. Click Yes.
The ProEncode Client window closes.
To configure a ProEncode Client on an Avid editing system:
1. Start your Avid editing application.
2. Click the Settings tab in the Project window.
The Settings scroll list appears.
3. Double-click DMS.
The DMS Settings dialog box appears.
49
Page 50

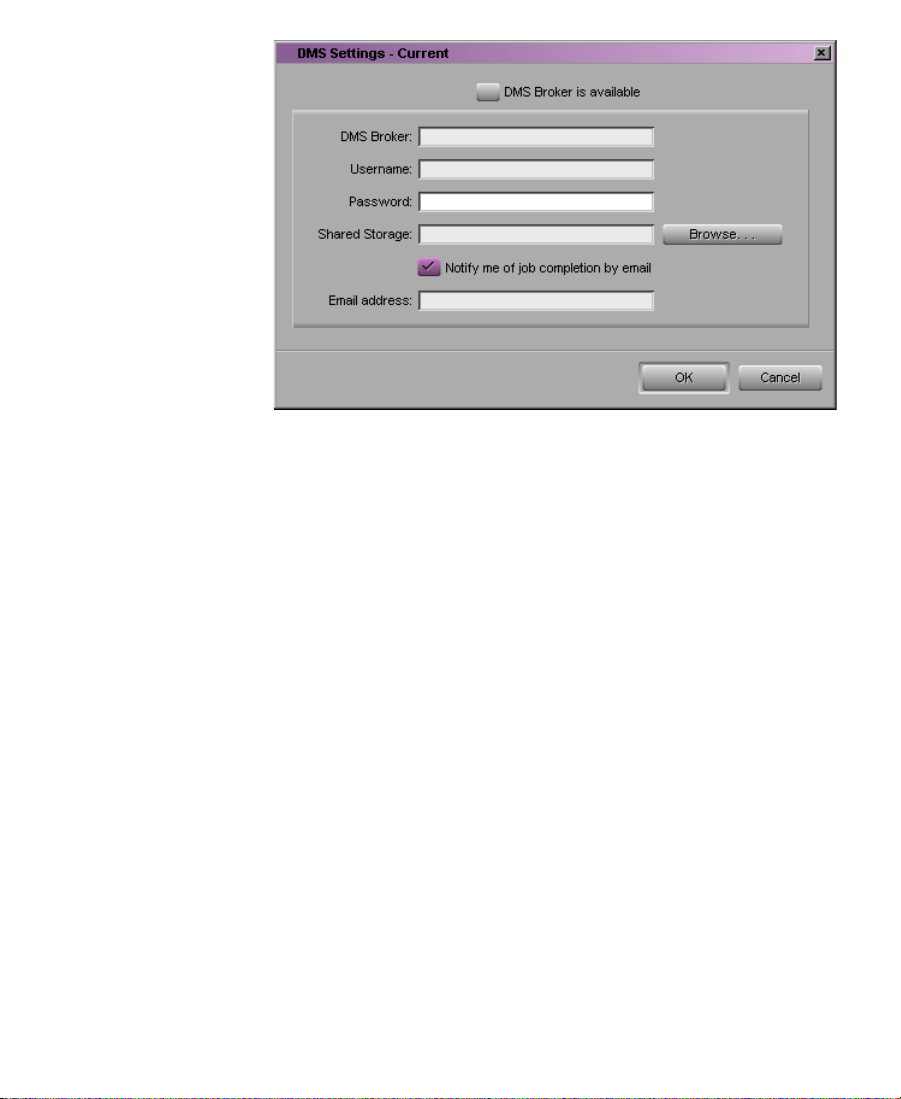
4. Type the DMS settings using the descriptions in Ta b le 2 -4 .
Table 2-4 DMS Settings
Setting Description
DMS Broker is available Click to make sure you are connected to the DMS
Broker. You can deselect this option to disconnect
without losing your setting information.
DMS Broker Type the Broker name as shown in the DMS Broker
window.
Username Type your user name. You must be a registered
user to submit jobs.
Password Type a password.
50
Page 51

Table 2-4 DMS Settings (Continued)
Setting Description
Shared Storage Type the directory where you intend to save the
QuickTime reference movie. You can click the
Browse button to locate the directory.
Email address (Option) If you select “Notify me of Job completion
by email,” type your e-mail address.
Checking the Installation and Configuration
To check the ProEncode installation and configuration:
1. Make sure the DMS Broker is running. The Status line should read
“The Broker is currently running.” If at least one Provider is
connected, the History window shows the message
“ListJobsWithInfo.”
2. Make sure the Providers and settings are registered with the
Broker:
a. Open the DMS Administration Tool (see “Setting Up the
DMS Administration Tool” on page 32).
b. Click Providers in the mode selector. You should see a list of
the Providers you have registered along with their connection
status.
c. Check Provider Details on the Providers page to see the
settings.
For more information about using the DMS Administration Tool,
see Chapter 4.
3. Make sure each Provider is running. The Status line should read
“Waiting for Jobs.”
51
Page 52

52
Page 53

CHAPTER 3
Using ProEncode
This chapter describes how to use the ProEncode application. It
includes the following sections:
• Sending a Clip or Sequence to ProEncode
• Adding a File to ProEncode
• Monitoring the Encoding
Encoding a Clip or Sequence
There are two methods for encoding a clip or sequence:
• Select the clip or sequence within an Avid editing application, and
send it to ProEncode. See “Sending a Clip or Sequence to
ProEncode” on page 54.
• Export a QuickTime movie or any other file that the encoding
application can process, and add it to ProEncode. See “Adding a
File to ProEncode” on page 58.
53
Page 54

Sending a Clip or Sequence to ProEncode
To send a clip or sequence to ProEncode:
1. Check the following:
- Make sure the DMS Broker is running.
- Make sure the ProEncode Provider software is running on the
encoders you want to use.
n
n
You can also right-click
(Windows) or Ctrl+click
(Macintosh) a clip or
sequence in a bin, and
choose Send To
ProEncode from the
shortcut menu.
You can submit jobs to the Broker even if no encoders are available. The
Broker will assign the jobs when one or more encoders become available.
However, you will not be able to select a specific provider.
2. In your Avid editing session, select the clip or sequence in one of
the following ways:
t Click the clip or sequence in a bin.
t Click in the Timeline.
t Click the monitor that displays the clip or sequence you want
to export.
The Avid editing system will automatically create a QuickTime reference
movie that includes all tracks of an entire clip or sequence. If you want to use
IN and OUT points or selected tracks, see “Exporting QuickTime
Reference Movies to ProEncode” on page 87.
3. Choose DMS from the File menu, and choose ProEncode from the
submenu.
The Avid editing system processes the sequence by rendering any
unrendered effects, creating files for audio media, and creating a
QuickTime reference movie that points to video and audio media.
After the movie is created, the Add Jobs dialog box appears.
54
Page 55

Profiles window
4. In the Add Jobs dialog box, the Source text box displays the
location of the QuickTime reference movie created by the Avid
editing system. Select the following parameters for the job:
a. In the Destination text box, type the path for the folder that
will hold the encoded movie or click Browse to find and select
the folder.
You can set a default destination in the Client Settings dialog
box (see “Configuring a ProEncode Client” on page 46).
b. In the Profiles window, select a setting from the list.
This list includes all encoding application settings that have
been registered with the Broker, organized by folder.
Double-click the Folder icon to view the individual settings
within the folder.
55
Page 56

Each setting is preceded by a colored Signal icon that indicates
the following:
Color Meaning
Green A Provider that can use this setting is online.
Amber At least one Provider can use this setting, but it is not online.
You can submit a job, which will be processed when a
Provider that can use the setting becomes available.
Red No registered Provider can use this setting. This situation
might occur if you create a custom setting on a Provider and
then delete the Provider. You can use the DMS Administration
Tool to delete the setting.
Click Browse if you want to find and select a setting that is not
currently registered with the Broker. For example, if you
created a custom setting by using cleaner 5 on the Client, you
can send that setting file along with the job to a particular
encoder.
c. Select a priority for this job from the Priority list.
If there are multiple jobs, the priority determines which jobs
are processed first.
d. (Option) Select a specific ProEncode Provider for this job from
the Provider list.
Selecting a Provider may be necessary if you are sending a
custom setting with the job. You can also use this setting to
override whatever assignment the Broker would have made.
5. After you have selected the parameters, click Add To Batch.
The job is added to the current batch. You can now add another job
to the batch. In most cases, you would use the same QuickTime
reference movie with different parameters.
56
Page 57

6. After you have added all jobs to your batch, click Close.
The Add Jobs dialog box closes, and the jobs are shown in the
ProEncode Client window, along with information about each job.
7. If you want to delete or change a job, select the job and click
Remove Job. You can then add the job again, using new
parameters.
8. (Option) Type a name in the Batch Name text box.
A batch name identifies the group of jobs for notification. The
batch name appears in any notification message sent by the
Broker. Jobs are not identified by batch in the DMS Administration
Tool.
You can set a default batch name in the Client Settings dialog box
(see “Configuring a ProEncode Client” on page 46). If you don’t
name the batch, the DMS Administrator will monitor the batch
using an internally generated job ID.
9. (Option) If you want to be notified about the failure or completion
of the jobs in this batch, click Notification.
The Notification Settings dialog box appears.
57
Page 58

10. Select the notification options you want. If you do not want to
receive notification, do not select either check box. Click OK.
11. Click Submit.
A dialog box appears asking for user name and password. You
must be a registered DMS user to submit jobs.
The Client sends information about all jobs in the batch to the Broker,
which in turn assigns each job to a Provider. The Provider starts the
encoding application, which processes the job. The Provider then
sends information about the job to the DMS Broker. If you have chosen
to receive a notification, the Broker sends a message to the Client.
Adding a File to ProEncode
You can use ProEncode to manage the encoding of any video or audio
format that the encoding application can process, such as QuickTime,
AVI, or AIFF.
58
Page 59

To add a file to ProEncode:
1. Make sure the file is in a folder that can be accessed by an encoder.
For more information, see “Sharing Folders” on page 27.
2. Start the Client by pointing to the Start button, pointing to
Program Files, pointing to Avid, and then selecting ProEncode
Client.
The Add Jobs dialog box appears.
3. Type the path for the source file in the Source text box, or click
Browse and navigate to the file.
4. To encode the file, see “Sending a Clip or Sequence to
ProEncode” on page 54. Begin the procedure at step 4.
Monitoring the Encoding
For troubleshooting
information, see
Appendix C.
After you submit the batch to be encoded, you can monitor the jobs
using the following:
• DMS Administration Tool: The DMS Administration Tool gives
you the most information for monitoring and managing jobs. For
complete information, see Chapter 4.
• DMS Broker and ProEncode Provider windows: Each window
includes a Status line and a History window. The History window
includes information that you can use for troubleshooting.
59
Page 60

60
Page 61

CHAPTER 4
Using the DMS Administration Tool
The DMS Administration Tool lets you monitor and manage all
aspects of your ProEncode system. This chapter includes the following
sections:
• The DMS Administration Tool
• Opening the DMS Administration Tool
• Exploring the DMS Administration Tool
• Using the DMS Jobs Page
• Using the DMS Providers Page
61
Page 62

The DMS Administration Tool
The DMS Administration Tool is the user interface for viewing and
managing the DMS Broker. Distributed Media Services (DMS) is the
software infrastructure on which ProEncode is layered. For more
information about DMS, see “ProEncode Basics” on page 7.
The DMS Administration Tool is a Web-based application that
communicates with the DMS Broker’s built-in Web server. This
communication lets you manage ProEncode through a browser from
anywhere on the Internet.
The DMS Administration Tool performs two types of functions:
• Provides detailed information about the ProEncode system, based
on lists of jobs, encoders, profiles, and users
• Provides controls for managing the ProEncode system, such as the
ability to cancel jobs, delete ProEncode Providers, delete profiles,
and create or delete users
Opening the DMS Administration Tool
You can use the DMS Administration Tool on any computer that has
an Internet connection to the computer that is running the DMS
Broker.
To open the DMS Administration Tool:
1. Open a standard Web browser. You must use Internet Explorer 5.0.
2. Type a URL for the DMS Broker in the following form:
http://broker_name:8080
For example,
http://broker1:8080
3. Press Enter (Windows) or Return (Macintosh).
62
Page 63

n
You can find the Broker name in the Name field of the DMS Broker window.
The DMS Administration Tool login screen appears.
4. Type your user name and password (see “Using the DMS Users
Page” on page 77).
5. Click Login.
If the user name and password are accepted, the DMS Jobs page
appears.
Exploring the DMS Administration Tool
The DMS Administration Tool user interface consists of four areas:
• Mode selector: Determines the DMS Administration Tool’s
functional mode and which mode-related controls are displayed.
• Navigation controls: Appear only on the Jobs page. The controls
determine what jobs are displayed (see “Navigating the Jobs List”
on page 68).
63
Page 64

Mode selector
Navigation controls
• Control frame: Displays different options, depending on the mode
in which you are working.
• Results frame: Displays information based on your choices in the
control frame, as described in the following sections.
Control frame
Results frame
Ta bl e 4 - 1 describes the five modes and where to find more
information about them.
Table 4-1 ProEncode Modes
Mode Description Section Reference
Jobs Displays the status and other information
about jobs submitted to the DMS Broker. Lets
you cancel, delete or retry jobs, depending on
your level of privilege.
64
“Using the DMS Jobs Page” on
page 65
Page 65

Table 4-1 ProEncode Modes (Continued)
Mode Description Section Reference
Providers Displays information about encoders that are
running ProEncode Provider software. Lets
you add, delete, and view settings, depending
on your level of privilege.
Profiles Displays a list of application profiles that have
been registered with the Broker. Lets you delete
profiles, depending on your level of privilege.
ProEncode does not currently use this feature
of Distributed Media Services.
Services Use to install services to DMS. “Installing the ProEncode
Users Displays a list of user accounts. Lets you create,
edit, and delete accounts, depending on your
level of privilege.
“Using the DMS Providers
Page” on page 73
Service” on page 38
“Using the DMS Users Page” on
page 77
Using the DMS Jobs Page
The DMS Jobs page lets you view information about ProEncode jobs,
cancel jobs, delete jobs, and retry jobs.
Opening the DMS Jobs Page
To open the DMS Jobs page:
t Open the DMS Administration Tool (see “Opening the DMS
Administration Tool” on page 62).
The DMS Jobs page appears by default after you log in to the DMS
Administration Tool. If the DMS Jobs page does not appear, click
Jobs in the mode selector.
65
Page 66

DMS Jobs Page
The DMS Jobs page displays information about jobs you have
submitted to the DMS Broker. Ta b l e 4 - 2 describes the information
displayed on the DMS Jobs page.
Table 4-2 DMS Jobs Page Information
Jobs Page
Column Description
Status The colors and icons in the display indicate the status of
the job:
Yellow bar with no icon = Encoding is processing.
Green bar with Check Mark icon = Encoding is completed.
Gray bar with Stop icon = Encoding has been canceled.
Caution icon = Encoding has failed with an error.
Gray bar with no icon = Encoding is pending or is in a
queue.
Service Lists the name of the installed service.
Service The name of the service the job was sent to.
Job The file name submitted by the ProEncode Client, with the encoding application
Setting name appended to it.
User The owner name submitted by the ProEncode Client.
Progress
Indicator (%)
Start Time The date and time that the encoding application started the encoding.
End Time The date and time that encoding application finished the encoding.
The percentage of the job completed.
66
Page 67

Customizing the Jobs List
By default, the DMS Jobs page displays all ProEncode jobs that the
Broker is currently monitoring. You can customize your view to show
only your jobs or to show only jobs in a selected state.
To customize the Jobs list:
1. Open the DMS Administration Tool (see “Opening the DMS
Administration Tool” on page 62).
The DMS Jobs page appears by default after you log in to the DMS
Administration Tool. If the DMS Jobs page does not appear, click
Jobs in the mode selector.
2. In the control frame of the Jobs page, select ProEncode from the
Service list.
3. Select All Users or a user name from the User Name list.
n
The administrator account allows you to cancel or delete any job. Other
accounts let you cancel only the jobs for that account. See “Setting Up User
Accounts” on page 77.
4. Select one of the following from the Status list:
- All States: Displays all jobs with their current status
- Processing: Displays only jobs that are currently being
encoded
- Completed: Displays only jobs that have been successfully
encoded
- Canceled: Displays only jobs that have been canceled through
the Administrator
- Error: Displays only jobs that have stopped with an error
- Pending: Displays only jobs that are waiting to be encoded
5. Click the Filter button.
67
Page 68

In the results frame, the DMS Jobs page displays jobs that match your
choices.
Navigating the Jobs List
The DMS Administration Tool displays jobs in blocks of 15 jobs. It also
organizes jobs in groups of 100. Using the following navigation
controls, you can view the Jobs list.
To view the previous 15 jobs or the next 15 jobs:
t Click the Previous or Next button.
To view the previous group or the next group of 100 jobs:
t Click the Previous Group or Next Group button. The DMS
Administration Tool displays the first 15 jobs of the group.
To view the beginning or the end of the entire list:
t Click the First or Last button. The DMS Administration Tool
displays the first 15 or the last 15 jobs of the list.
Updating the Jobs List
The Jobs list is automatically updated to show the progress and status
of a job.
If any jobs have been added or deleted since you opened the Jobs
page, the Refresh button is enabled in the upper right portion of the
interface. This button indicates that you are able to update the Jobs list
and view changes.
68
Page 69

To update the Jobs list, do one of the following:
t Click the Refresh button, if available.
t Click any navigation button.
Purging the Jobs List
To purge the Jobs list:
1. On the DMS Jobs page, click the Purge button.
The Purge Jobs window opens.
2. Select the applicable service from the Service list.
3. Select a particular user or Any User from the Submitted By list,
depending on the jobs you want to purge.
4. Select which states of jobs you want to purge.
5. Click Purge.
The Jobs list no longer contains the jobs you selected.
69
Page 70

If a purge fails, you will get a dialog box listing the job that failed
to delete and a reason for the failure.
Viewing Details About a Job
n
You must be logged in as the job owner or an Administrator to view a job’s
details.
To view details about a job:
t On the DMS Jobs page, click the hyperlinked job name that
appears in the Job column.
The Job Details window opens in a separate browser window.
70
Page 71

Some of this information is also shown on the DMS Jobs page.
Ta bl e 4 - 3 provides information about all the entries on the Job Details
window.
Table 4-3 Job Details Window Information
Entry Description
Name A name automatically generated by the DMS Broker, consisting of a
combination of the file name (as submitted to the ProEncode Client) and
encoding application setting.
Service The DMS service; in this case, ProEncode.
State The current status of the job (see Table 4-2 on p age 66).
Submitted By: The user name associated with the job, as submitted by the ProEncode Client.
Priority The priority of the job, as submitted by the ProEncode Client.
Provider The name of the encoder, as registered with the DMS Broker.
Requested Provider The name of the Provider requested, if one was specified.
Job ID A number automatically generated by the DMS Broker.
Batch ID The number of the batch containing the job.
Submitted At The date and time the job was submitted by the ProEncode Client to the DMS
Broker.
Started At The date and time the encoding was started by the encoding application.
Completed At The date and time the encoding was completed by the encoding application.
Progress The percentage of the job that has been encoded.
Notification Displays whether notification of job completed or job error is enabled or
disabled.
source The location of the source file, as submitted by the ProEncode Client.
71
Page 72

Table 4-3 Job Details Window Information (Continued)
Entry Description
destination The location for the finished file, as submitted by the ProEncode Client.
ommCredentials Information that allows ProEncode to interact with Avid Unity
MediaManager.
mobid Identifies the media you are encoding.
setting The encoding application setting, as submitted by the ProEncode Client.
Canceling a Job
You can cancel a job that is in the Pending or Processing state.
n
You can cancel only jobs that have been submitted under your name. If you
have logged in as an Administrator, you can cancel any job.
To cancel a ProEncode job:
1. Open the DMS Administration Tool (see “Opening the DMS
Administration Tool” on page 62).
2. On the DMS Jobs page, click the hyperlinked job name that
appears in the Job column.
The Job Details window opens in a separate browser window.
3. Click Cancel Job.
A dialog box appears and asks if you are sure you want to cancel
the job.
4. Click OK.
The job remains in the Jobs list but the state changes to Canceled.
72
Page 73

Retrying a Job
You can retry a ProEncode job that is in the Canceled or Error state.
To retry a ProEncode job:
1. Open the DMS Administration Tool (see “Opening the DMS
Administration Tool” on page 62).
2. On the DMS Jobs page, click the hyperlinked job name that
appears in the Job column.
The Job Details window opens in a separate browser window.
3. Click Retry job.
The DMS Broker changes the state to Pending and places the job in
the queue for the next available Provider.
Using the DMS Providers Page
The DMS Providers page displays information about computers that
are running ProEncoder Provider software (encoders) and are
registered with the DMS Broker.
Opening the DMS Providers Page
To open the DMS Providers page:
1. Open the DMS Administration Tool (see “Opening the DMS
Administration Tool” on page 62).
2. Click Providers in the mode selector.
The DMS Providers page appears.
73
Page 74

DMS Providers Page
Ta bl e 4 - 4 describes the information displayed on the DMS Providers
page.
Table 4-4 DMS Providers Page Information
Providers Page
Column Description
Provider Name The name of the encoder, as registered with the DMS Broker
Service The DMS service; in this case, ProEncode
Host Name The computer name of the Provider
Application Name The name of the Provider application; in this case, ProEncode Provider
Status Indicates whether the Provider is connected to the DMS Broker
74
Page 75

Customizing the DMS Providers Display
By default, the DMS Providers page displays all Providers that are
registered with the DMS Broker. You can customize your view to show
only the connected Providers.
To customize the Providers display:
1. Open the DMS Administration Tool (see “Opening the DMS
Administration Tool” on page 62).
2. Click Providers in the mode selector.
3. In the control frame of the Providers page, select ProEncode from
the Service list.
4. Select All Providers or Connected from the Connection Status list.
5. Click the Filter button.
In the results frame, the DMS Providers page displays encoders that
match your choices.
Deleting Providers
n
You must be logged in as an Administrator to delete Providers.
To delete a Provider:
1. Open the DMS Administration Tool (see “Opening the DMS
Administration Tool” on page 62).
2. Click Providers in the mode selector.
75
Page 76

3. Click the check box to the left of the Provider’s name, and click
Delete.
A dialog box appears and asks if you are sure you want to delete
the Provider.
4. Click OK.
The Provider is no longer registered with the DMS Broker. To register
it again, see “Registering a ProEncode Provider with the DMS
Broker” on page 40.
n
The Register button appears only to users with Administrator privileges.
76
Page 77

Using the DMS Users Page
The DMS Users page lets you create and manage user accounts.
n
The default login for the DMS Administration Tool is the user name
Administrator, without a password. You should assign a password to this
account after you install the DMS Broker. See “Setting Up the DMS
Administration Tool” on page 32.
Opening the DMS Users Page
To open the DMS Users page:
1. Open the DMS Administration Tool (see “Opening the DMS
Administration Tool” on page 62).
2. Click Users in the mode selector.
The DMS Users page appears, listing user accounts in the User
Name column.
Setting Up User Accounts
To set up a user account:
1. Open the DMS Administration Tool (see “Opening the DMS
Administration Tool” on page 62).
2. Click Users in the mode selector.
3. Click Add.
The Create User window opens.
77
Page 78

4. Type a user name in the User Name text box.
User names and passwords are case sensitive and can contain only
letters, numbers, and underscores. They can be up to 255
characters in length.
5. (Option) Type a password in the Password text box. Then, type it
again in the Retype Password text box.
Passwords are not required.
6. Click Save.
Editing User Accounts
To edit a user account:
1. Open the DMS Administration Tool (see “Opening the DMS
Administration Tool” on page 62).
2. Click Administration in the mode selector.
3. Click the link in the User Name column for the user you want to
edit.
78
Page 79

The Edit User window opens.
4. Make any required changes.
5. Click Save.
79
Page 80

Deleting User Accounts
n
You must be logged in as an Administrator to delete user accounts.
To delete a user account:
1. Open the DMS Administration Tool (see “Opening the DMS
Administration Tool” on page 62).
2. Click Users in the mode selector.
The Users page appears.
3. Click the check box to the left of the User Name for each account
you want to delete.
4. Click Delete.
A dialog box appears and asks if you are sure you want to delete
the user account.
5. Click OK.
The user account is deleted.
80
Page 81

Reassigning Passwords
If a user forgets his or her password, you need to assign a new one. If
the Administrator forgets his or her password, you need to delete and
re-create all accounts.
To reassign a user password:
1. Open the DMS Administration Tool (see “Opening the DMS
Administration Tool” on page 62).
2. Click Users in the mode selector.
The Users page appears.
3. Click the link in the User Name column for the user you want to
edit.
The Edit User window opens.
4. Type a password in the Password text box. Then, type it again in
the Retype Password text box.
5. Click Save.
81
Page 82

To delete and re-create all accounts:
1. Open the DMS Administration Tool (see “Opening the DMS
Administration Tool” on page 62).
2. Click Users in the mode selector.
The Users page appears.
3. Click Select All.
4. Click Delete.
A dialog box appears and asks if you are sure you want to delete
the user accounts.
5. Click OK.
The user accounts are deleted.
6. Re-create all user accounts (see “Setting Up User Accounts” on
page 77).
n
The user “Administrator” cannot be deleted. If you try to delete
Administrator, you will receive an error message.
82
Page 83

Overview
APPENDIX A
cleaner 5
c
cleaner 5 is a cross-platform solution that supports all major streaming
media formats, including RealSystem, Windows Media
and MP3, as well as AVI, MPEG-1, and MPEG-2.
ProEncode requires cleaner 5.0.2 or later. ProEncode does not
support earlier releases of cleaner or media cleaner
You install cleaner 5 on each encoder and then register the Provider.
See “Registering a ProEncode Provider with the DMS Broker” on
page 40.
When the Broker sends a job to an encoder, the ProEncode Provider
starts cleaner 5, monitors the encoding, and sends information about
the job to the Broker. cleaner 5 creates the output movies in the
destination folder.
™
, QuickTime,
®
Pro.
83
Page 84
For more specific requirements, see the Autodesk Web site at
www.autodesk.com.
Installing cleaner 5
You must install cleaner 5 on the encoders. Each encoder needs its own
registered copy of cleaner 5.
After installing the application, you must start it so that it can build
the initial list of cleaner settings. You also need to set preferences that
enable cleaner to work efficiently with ProEncode.
c
ProEncode requires cleaner 5.0.2 or later. ProEncode does not
support earlier releases of cleaner.
84
Page 85

To install and configure cleaner 5 software:
1. Insert the cleaner 5 CD-ROM, and follow the on-screen or printed
instructions.
2. Start the cleaner 5 application.
3. Choose Preferences from the Edit menu.
The cleaner 5 dialog box appears.
4. In the News & Updates section, select “Only when requested”
from the list.
5. In the Processing section, select “Append setting to file name.”
This setting prevents the accidental overwriting of files. This
might occur, for example, if you are processing for both MPEG-1
Video CD and MPEG-1web.
6. In the Streaming Server Paths section, type the streaming server
paths you are using.
85
Page 86

If you select a streaming setting through ProEncode and these text
boxes are blank, the job will fail.
7. Click OK.
8. Quit Cleaner 5.
9. Continue with “Registering a ProEncode Provider with the DMS
Broker” on page 40.
86
Page 87

APPENDIX B
Exporting QuickTime Reference Movies
This appendix describes how to export QuickTime reference movies
from an Avid editing application and then add them to ProEncode. It
includes the following sections:
• Exporting QuickTime Reference Movies to ProEncode
• QuickTime Reference Export Options
Exporting QuickTime Reference Movies to ProEncode
When you use the Send To ProEncode command to automatically send
a clip or sequence to ProEncode, the Avid editing application creates a
QuickTime reference movie that includes default settings. These
settings are listed in “QuickTime Reference Export Options” on
page 92. If you prefer to use other settings, you can export a
QuickTime reference movie from the Avid application or another
application that supports QuickTime reference movies and add it to
ProEncode.
87
Page 88

n
The source folder, destination folder, and media must be on a shared drive or
on shared storage. See “Sharing Folders” on page 27.
Use this procedure if you have any of the following applications:
• Symphony Release 3.1 or later
• Media Composer or Film Composer Release 10.1 (Windows or
Macintosh) or later
• Avid Xpress Release 4.1 or later
• NewsCutter Release 2.0 or later
For other applications from which you are exporting, see their
documentation.
To export a QuickTime reference movie:
1. Identify the clip or sequence that you want to export in one of the
following ways:
t To export specific tracks in a clip or sequence, enable those
tracks in the Track Selector panel, and disable all others.
t To export part of a clip or sequence, mark IN and OUT points.
t To export the entire clip or sequence, clear IN and OUT points,
and make sure the topmost video and audio tracks are
monitored.
2. Select the clip or sequence in one of the following ways:
t Click the clip or sequence in a bin.
t Click in the Timeline window.
t Click the monitor that displays the clip or sequence you want
to export.
3. Choose Export from the File menu.
The Export As dialog box (Windows) or a destination dialog box
(Macintosh) appears.
88
Page 89

Windows
Macintosh
89
Page 90

4. Select the Export settings by doing one of the following:
t If you created a setting in advance, choose the setting from the
Export Setting list and go to step 10.
t If you want to create or edit a setting, go to step 5.
5. Click Options.
The Export Settings dialog box appears.
90
Page 91

6. Choose QuickTime Reference from the Export As pop-up menu.
The Export Settings dialog box displays the QuickTime Reference
options.
7. Select the necessary QuickTime Reference options as described in
Ta bl e B - 1 .
If you want to create a movie with IN and OUT points, enabled
tracks, or both, select the appropriate options in the upper right
corner of the dialog box.
8. Click Save As.
The Save Export Setting dialog box appears.
9. Type a name for the setting in the Setting Name text box, and click
OK.
n
c
The Export As dialog box (Windows) or the destination dialog box
(Macintosh) appears, with the default QuickTime reference movie
file name extension in the File name text box.
10. Select the destination folder for the file.
Make sure an encoder can access the destination folder. For more information,
see “Sharing Folders” on page 27.
11. (Option) Change the file name.
12. Click Save.
The file is exported and appears at the chosen destination.
If the export process is interrupted, the entire file is unusable. You
need to repeat the export process.
91
Page 92

To encode a clip or sequence, see “Adding a File to ProEncode”
on page 58.
QuickTime Reference Export Options
When you use the Send To ProEncode command to automatically send
a clip or sequence to ProEncode, the Avid editing application creates a
QuickTime reference movie that includes the following settings:
• Flatten Video Tracks
• Fill Spaces with Black
• Render All Video Effects
•Premix Audio Tracks
•Use Network Media References
• Add Shares for Media Drives
•Pixel Aspect Ratio: Square
If you want to use different options, export a QuickTime reference
movie as described in “Exporting QuickTime Reference Movies to
ProEncode” on page 87.
Ta bl e B - 1 describes the QuickTime Reference options in the Export
Settings dialog box.
Table B-1 Export Settings Dialog Box
QuickTime Reference Options
Options Description
Use Marks When this option is selected, the system uses current IN and OUT points
in the selected clip or sequence to determine the starting and ending
frames for export. To export the entire clip or sequence, deselect this
option.
92
Page 93

Table B-1 Export Settings Dialog Box
QuickTime Reference Options (Continued)
Options Description
Use Enabled Tracks When this option is selected, the system uses tracks that are enabled in the
Timeline. To export the entire clip or sequence, deselect this option.
Flatten Video Tracks When this option is selected, the composition is exported as one video
track. When this option is deselected, one QuickTime video track is
generated for each video track in the composition, and you cannot select
Fill Spaces with Black. Because most third-party applications do not
understand multiple QuickTime video tracks, it is a good idea to select
this option. This option is selected automatically if you selected the Fast
Draft Defaults and the Digital Mastering Defaults options.
Fill Spaces with Black When this option is selected, blank spaces in video tracks are filled with
black in the QuickTime movie. Because QuickTime movies do not
recognize blank spaces, it is a good idea to select this option. When this
option is deselected, a QuickTime movie might interpret spaces in the
video track as gray or the background of the player. This option is selected
automatically if you selected the Fast Draft Defaults and Digital
Mastering Defaults options.
Render All Video Effects When this option is selected, all unrendered video effects, including matte
keys and titles, are rendered before export. When this option is deselected,
any unrendered effects are ignored. This option is selected automatically
if you selected the Digital Mastering Defaults option.
Premix Audio Tracks When this option is selected, the audio tracks in the composition are
mixed to stereo AIFF-C files created at the same location as the movie.
When this option is deselected, the original audio is exported. This option
is selected automatically if you selected the Digital Mastering Defaults
option.
Fast Draft Defaults Click this button for a faster export. This button automatically selects
Flatten Video Tracks and Fill Spaces with Black. It automatically deselects
Render All Video Effects and Premix Audio Tracks.
Digital Mastering
Defaults
Click this button to render all video effects and premix audio tracks before
exporting the file. This button automatically selects Flatten Video Tracks,
Fill Spaces with Black, Render All Video Effects, and Premix Audio
Tracks.
93
Page 94

Table B-1 Export Settings Dialog Box
QuickTime Reference Options (Continued)
Options Description
Use Network Media
References
Add Shares for Media
Drives
Pixel Aspect Ratio The pixel aspect ratio allows you to apply a scaling to the video: Square,
When this option is selected, the exported movie uses the machine and
share name of the media drive in the QuickTime reference movie instead
of a drive letter. Select this option when the media files referenced by the
movie are accessed remotely over the network. If the media files are
stored on the same drive as the QuickTime reference movie, you do not
need to select this option. When this option is deselected, Add Shares for
Media Drives appears dimmed.
When this option is selected, the system creates a new drive share for
referenced media files stored on unshared network drives. The drive
share is hidden; that is, other users do not see the shared drive when
browsing your computer. You do not need to select this option when
media is stored on the same drive as the QuickTime reference movie.
4:3 Non-Square, or 16:9 Non-Square. The pixel aspect ratio allows you to
control the display format without modifying the source file.
This feature creates metadata — additional data that is stored with the
QuickTime movie. Some applications, such as the QuickTime Player and
Avid ePublisher, can interpret this metadata and scale the image at
display time.
The pixel aspect ratio is useful for QuickTime reference movies because
you do not modify the source files of referenced movies. For example, if
your source movies are stored at the standard 720 x 486 for NTSC
(720 x 576 for PAL), you can create two different QuickTime reference
movies that use the same referenced source files — one that uses 4:3 and
another that uses 16:9.
94
Page 95

959697
Page 96

Page 97

APPENDIX C
Troubleshooting ProEncode
This appendix provides information on troubleshooting your
ProEncode system. If you have problems encoding jobs with
ProEncode, see the following sections:
• Finding Solutions for Specific Problems
• General Troubleshooting Procedure
• Checking the User Information File
• Checking the Log File
Page 98

Finding Solutions for Specific Problems
See Ta bl e C - 1 for problems, probable causes, and solutions.
Table C-1 Troubleshooting ProEncode
Problem Probable Cause Solution
DMS Broker
The Broker does not start
and displays an application
key error.
ProEncode Provider
The Provider cannot contact
the Broker. The error
message “Connection Error Unknown Provider”
appears.
The Provider does not start
the encoding application.
There is no application key or the
application key is not working
properly.
The Provider has not been registered. Register the Provider (see
The Broker is not running. Start the Broker.
The Provider settings have an incorrect
name for Provider, Broker, or both.
The encoding application is not
installed on the computer.
Make sure the application key
is properly connected (see
“Attaching the Application
Key” on page 29). Then,
reinstall the Broker software
(see “Installing the DMS
Broker Software” on page 30).
“Registering a ProEncode
Provider with the DMS
Broker” on page 40).
Change the settings for the
Provider (see “Configuring the
ProEncode Provider” on
page 42).
Install the encoding application
(see the appropriate Appendix).
On a Windows system, Internet
Explorer 5.5 is not installed.
98
See the Avid ProEncode Release
Notes.
Page 99

Table C-1 Troubleshooting ProEncode (Continued)
Problem Probable Cause Solution
Processed jobs are output to
an incorrect or unknown
location.
SETTINGS ERROR message
appears in the encoding
application, and no jobs
encode.
CAN’T ADD error message
appears in the encoding
application, and no jobs
encode.
The folder specified in the ProEncode
Client Add Jobs dialog box is incorrect
or does not exist.
The drive or workspace specified for
output is not available.
On a Macintosh client, the Avid Unity
Server name is incorrect.
The temporary directory for the Avid
editing application or the ProEncode
Client’s source setting is either offline
or not on a shared volume.
Make sure the output folder
exists (see “Configuring a
ProEncode Client” on page 46
or “Sending a Clip or
Sequence to ProEncode” on
page 54).
Make sure the drive or
workspace is online and shared
correctly (see “Sharing
Folders” on page 27).
Specify the correct Avid Unity
Server name (see “Configuring
a ProEncode Client” on
page 46).
In an Avid Unity MediaNet
configuration, make sure the
workspace that contains the
media is online.
In a LAN configuration, make
sure the folder is shared (see
“Sharing Folders” on page 27).
Then, resubmit the job.
A job with a streaming
setting does not encode, and
the encoding application
displays a dialog box.
The Provider is not correctly registered
with the Broker.
The encoding application has not been
configured with default streaming
servers.
99
Register the Provider (see
“Registering a ProEncode
Provider with the DMS
Broker” on page 40).
Configure streaming servers in
the encoding application (see
the appropriate Appendix for
the encoding application
information).
Page 100

Table C-1 Troubleshooting ProEncode (Continued)
Problem Probable Cause Solution
ProEncode Client
In the Add Jobs dialog box, a
Provider does not appear.
In the Add Jobs dialog box,
no settings appear.
In the Add Jobs dialog box, a
custom setting does not
appear.
DMS Administration Tool
You can’t see newly
submitted jobs on the DMS
Administration Tool Jobs
page.
The DMS Administration
Tool shows a job as complete,
but no output file exists.
The Provider is not running or not
available.
The Provider is not registered. On the encoder, register
Settings failed to register with the DMS
Broker.
The setting is not stored in the path
defined in the Provider Settings.
You need to refresh the view. In the DMS Administration
The destination folder specified in the
ProEncode Client Add Jobs dialog box
is full.
Start the Provider.
ProEncode (see “Registering a
ProEncode Provider with the
DMS Broker” on page 40).
On the encoder, register
ProEncode (see “Registering a
ProEncode Provider with the
DMS Broker” on page 40).
On the encoder, register
ProEncode (see “Registering a
ProEncode Provider with the
DMS Broker” on page 40).
Tool, click the Refresh button.
Free up space, or choose a
different destination location.
The destination folder specified in the
ProEncode Client Add Jobs dialog box
is incorrect or does not exist.
100
Make sure the output folder
exists (see “Configuring a
ProEncode Client” on page 46
or “Sending a Clip or
Sequence to ProEncode” on
page 54).
 Loading...