

Page 1
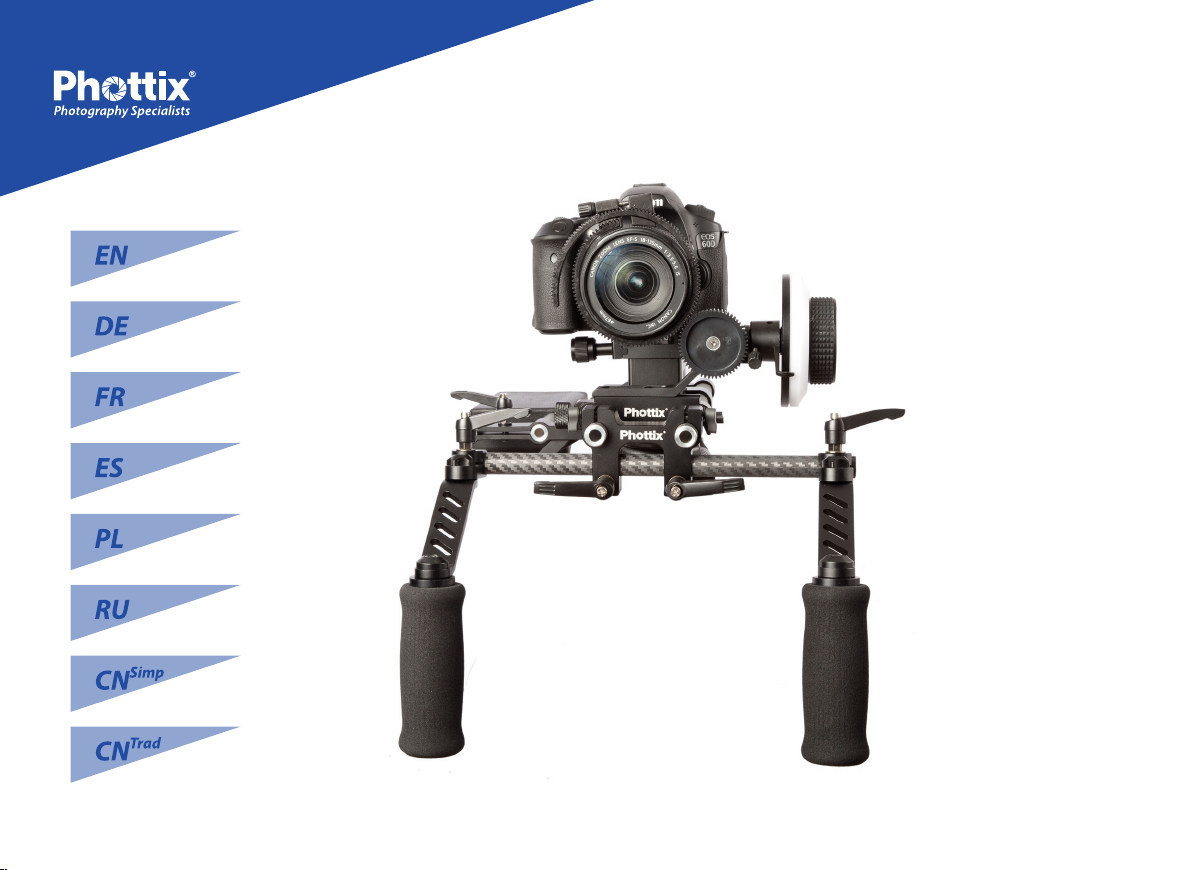
Trafo Jr Assembly Instructions
www.phottix.com
1
Page 2
1
Page 3
EN
Trafo Jr Assembly Instructions
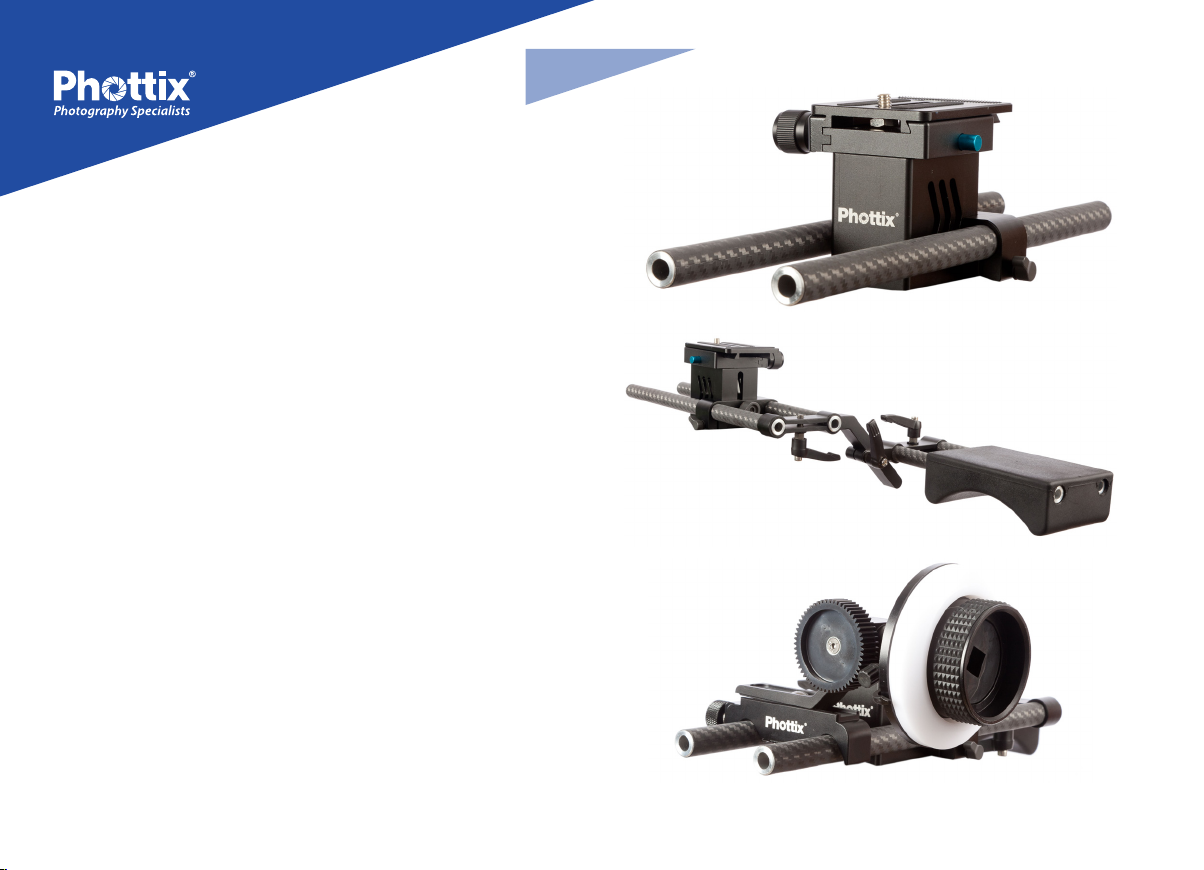
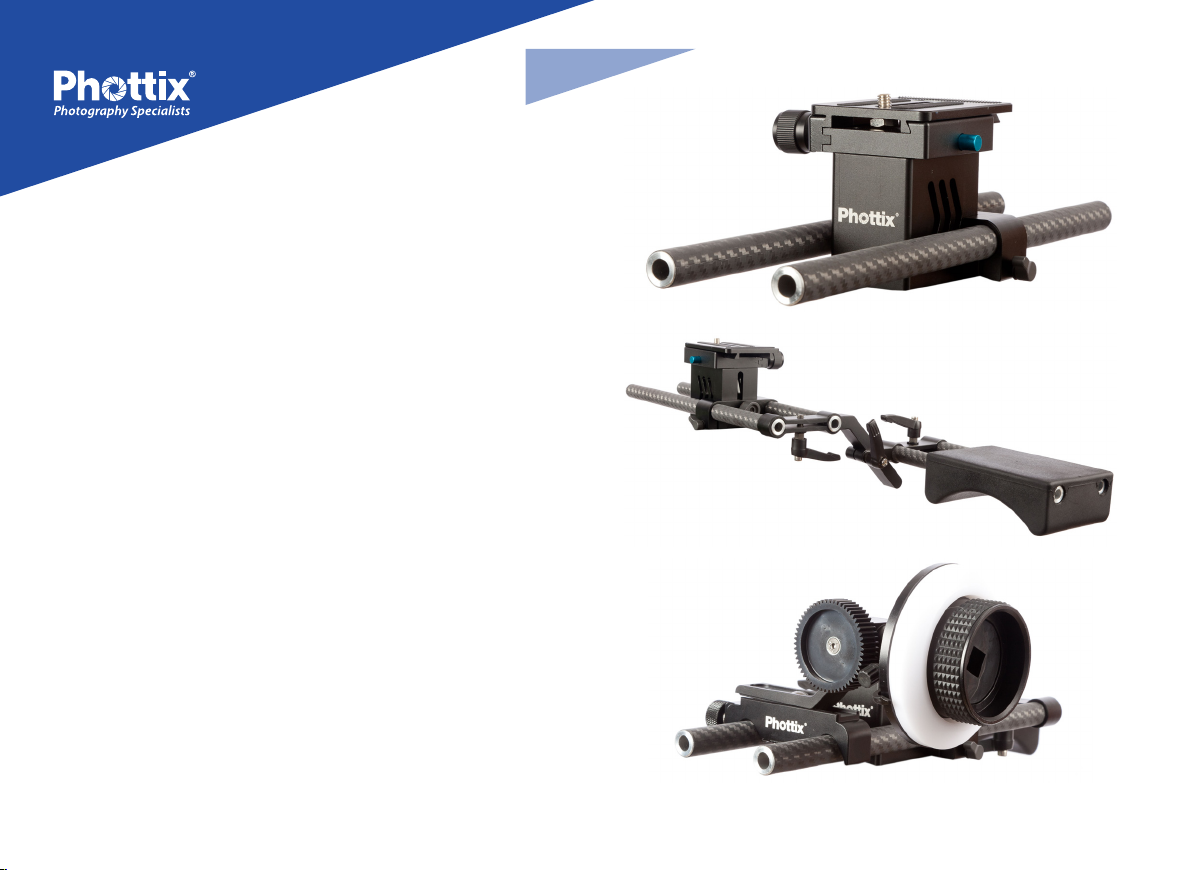
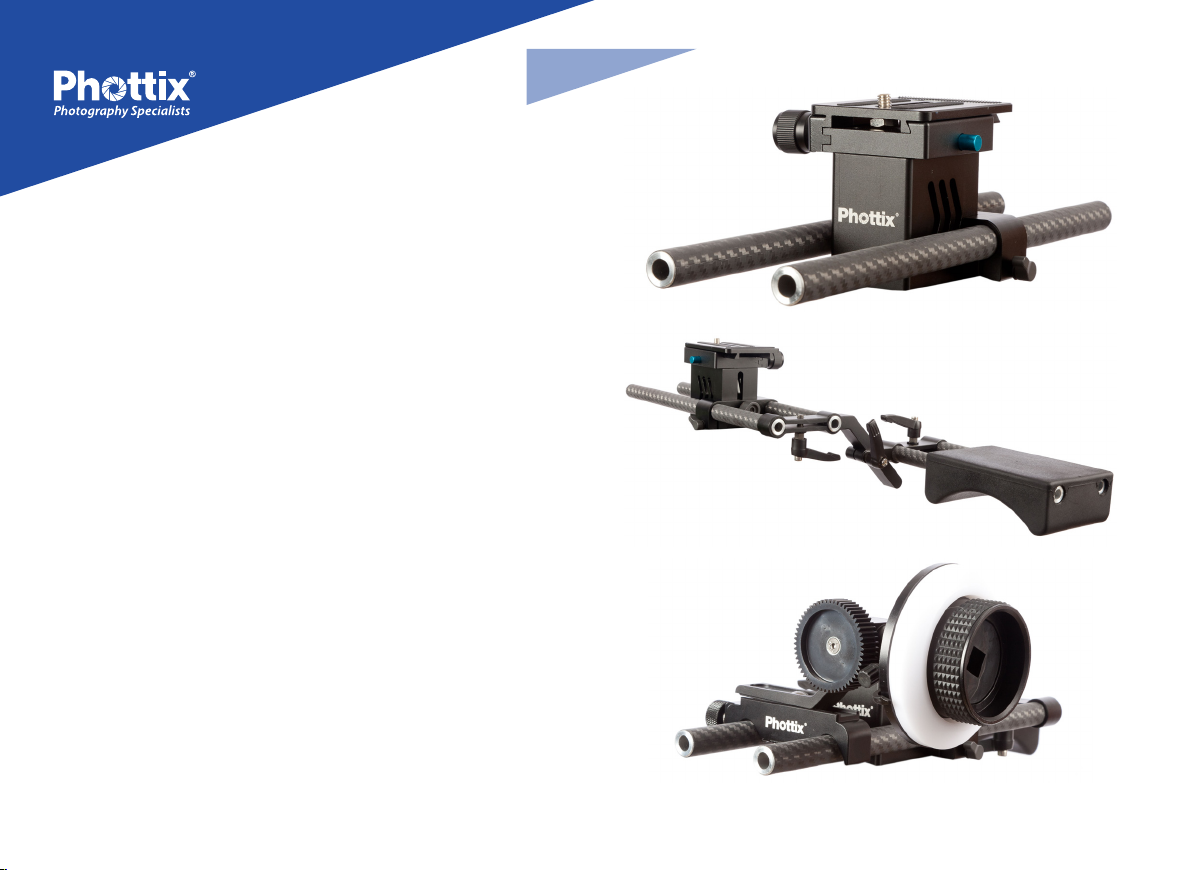
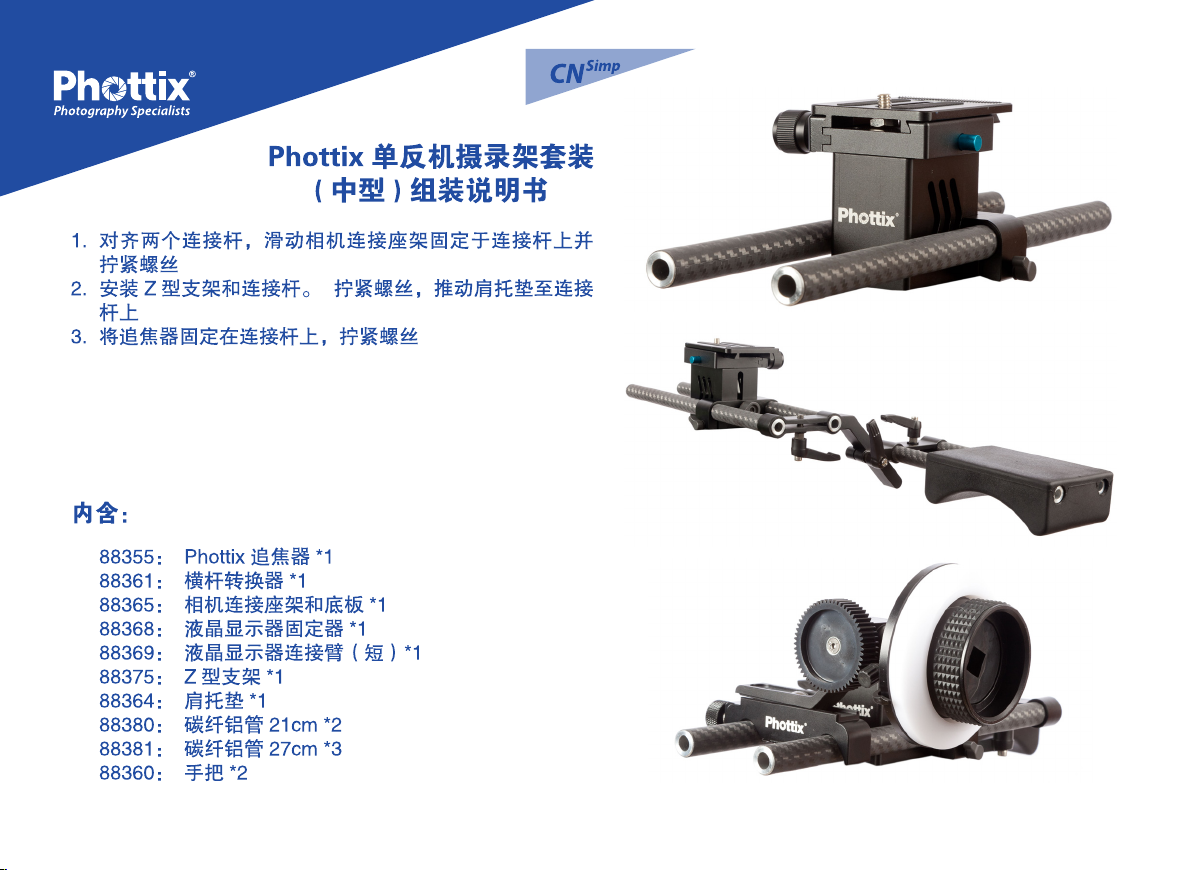
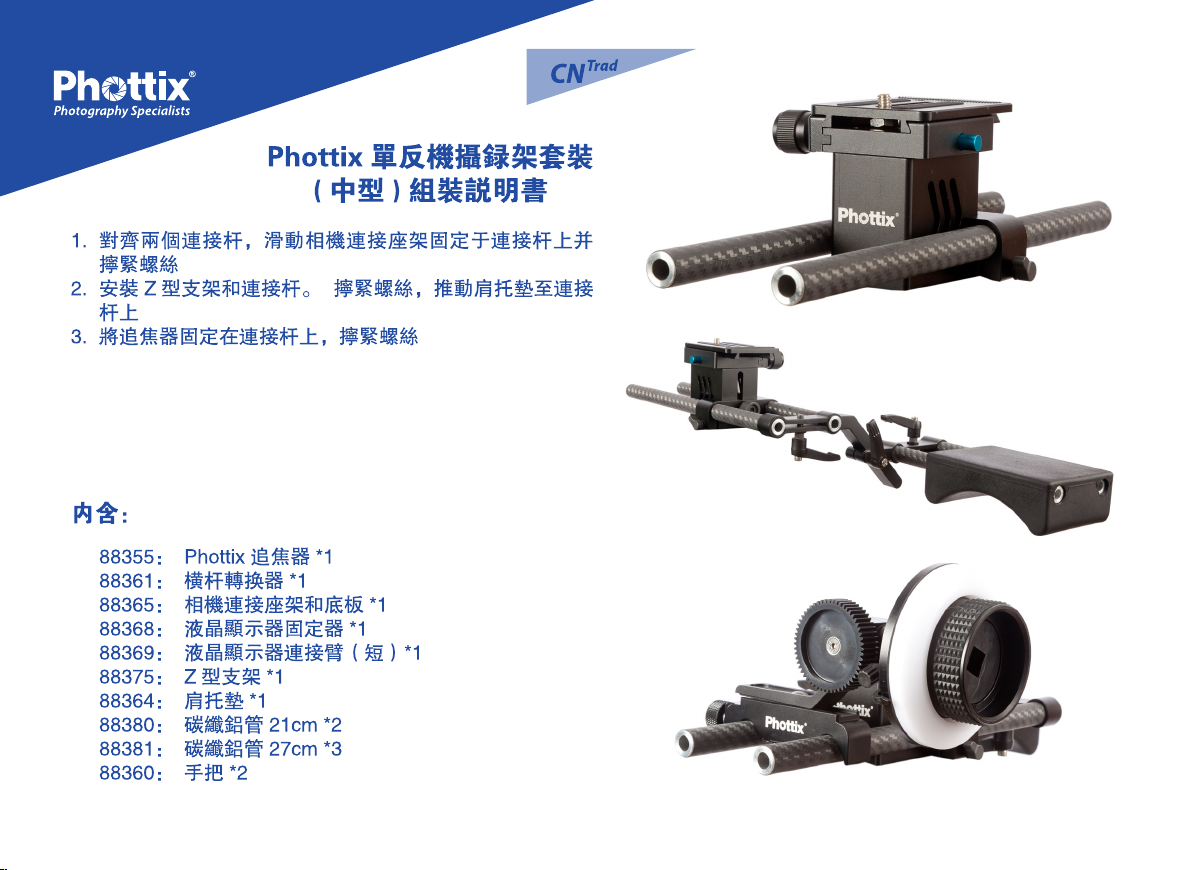
1. Align two rods. Slide Camera Mount onto rods and tighten
screws
2. Attach Z Bracket and rods. Tighten screws. Push Shoulder
Pad onto the rods
3. Snap Follow Focus assembly onto rods and tighten screw.
Included Parts:
88355 Phottix Trafo Follow Focus System x1
88361 Crossbar Adapter x1
88365 Camera Mount and Plate x1
88368 LCD Attachment Adapter x1
88369 LCD Attachment Arm (Short) x1
88375 Z bracket x1
88364 Shoulder Pad x1
88380 Carbon Fiber-AL Rods 21cm x2
88381 Carbon Fiber-AL Rods 27cm x3
88360 Front Handles x2
1
2
3
2
Page 4
EN
Trafo Assembly Instructions
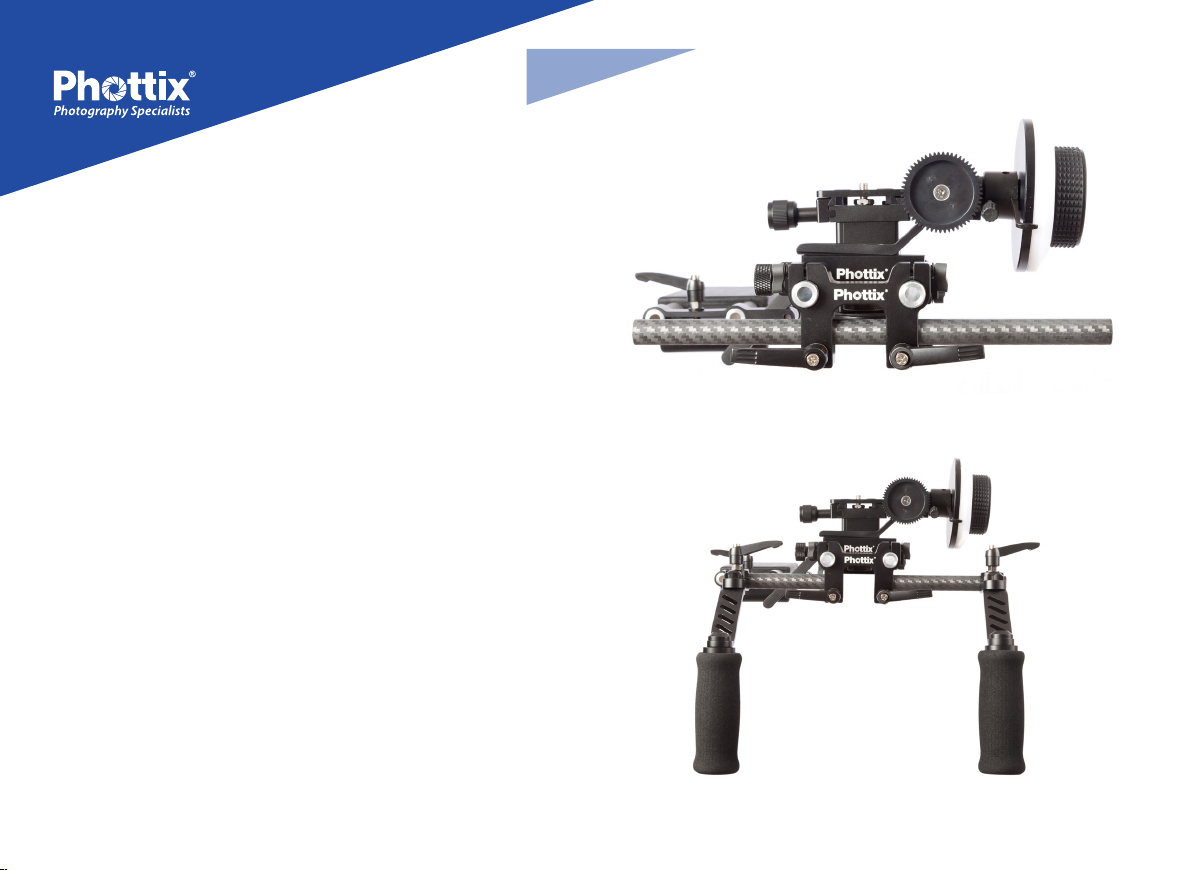
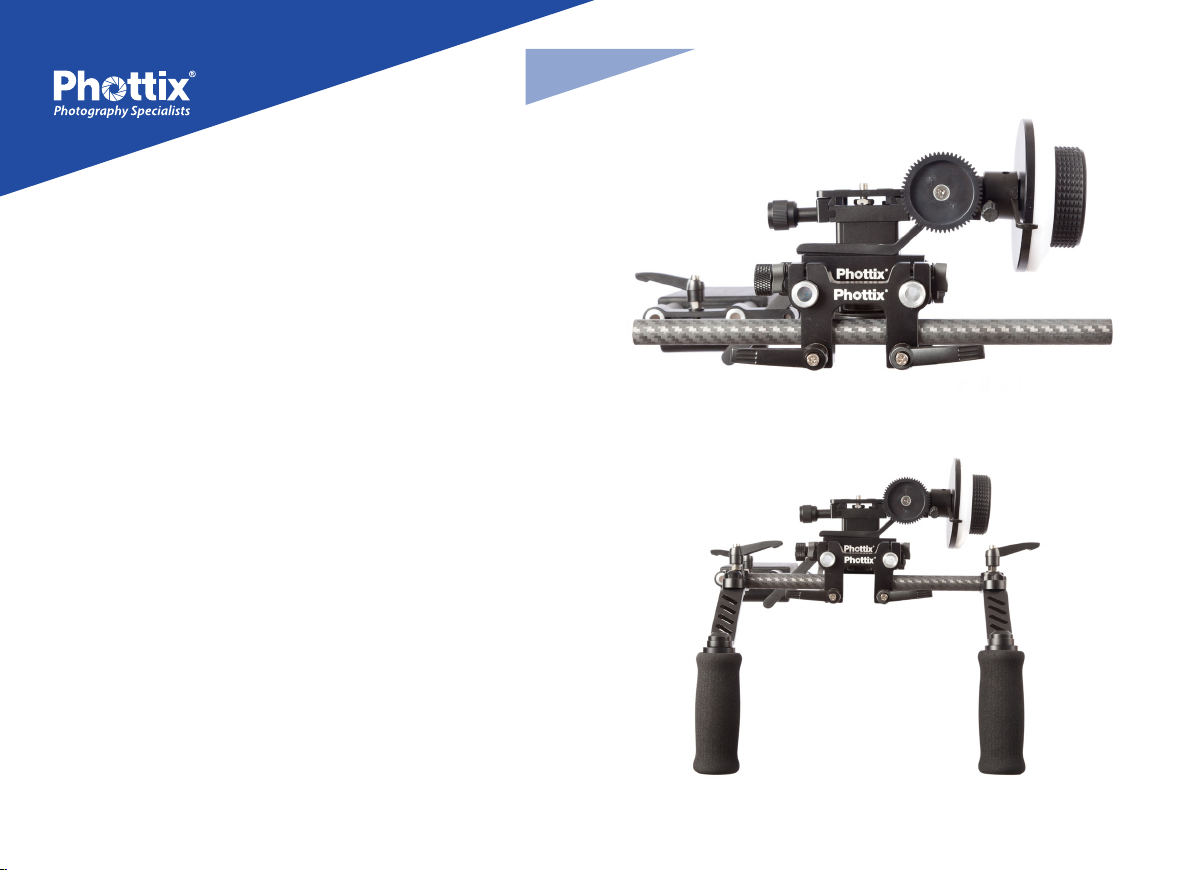
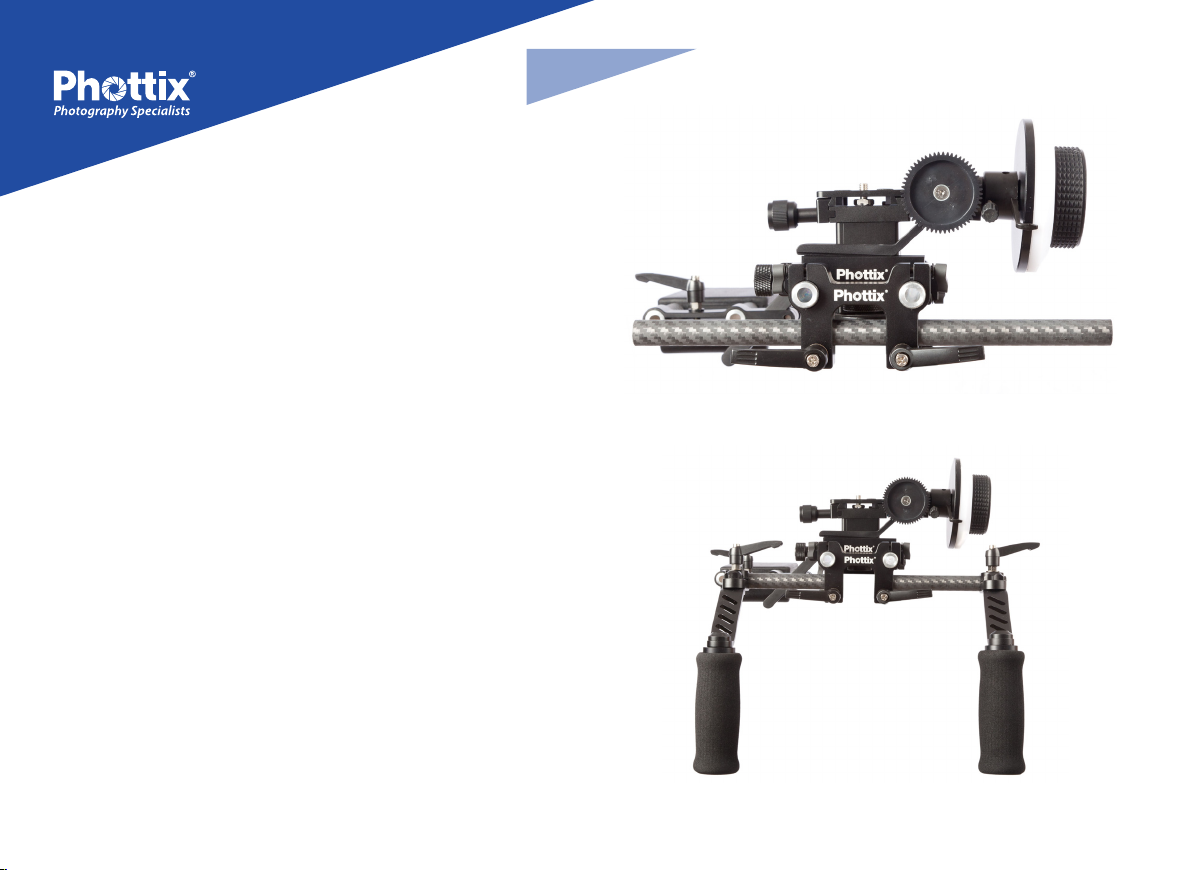
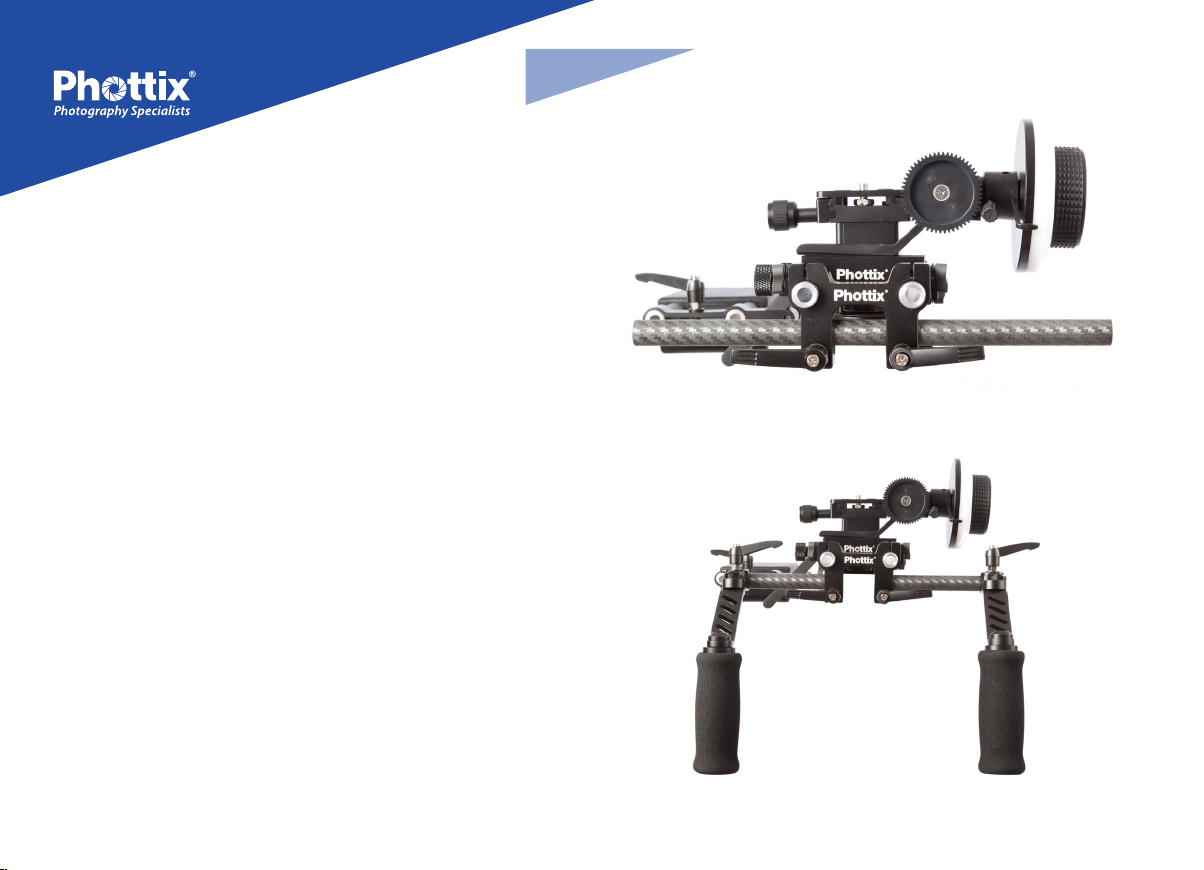
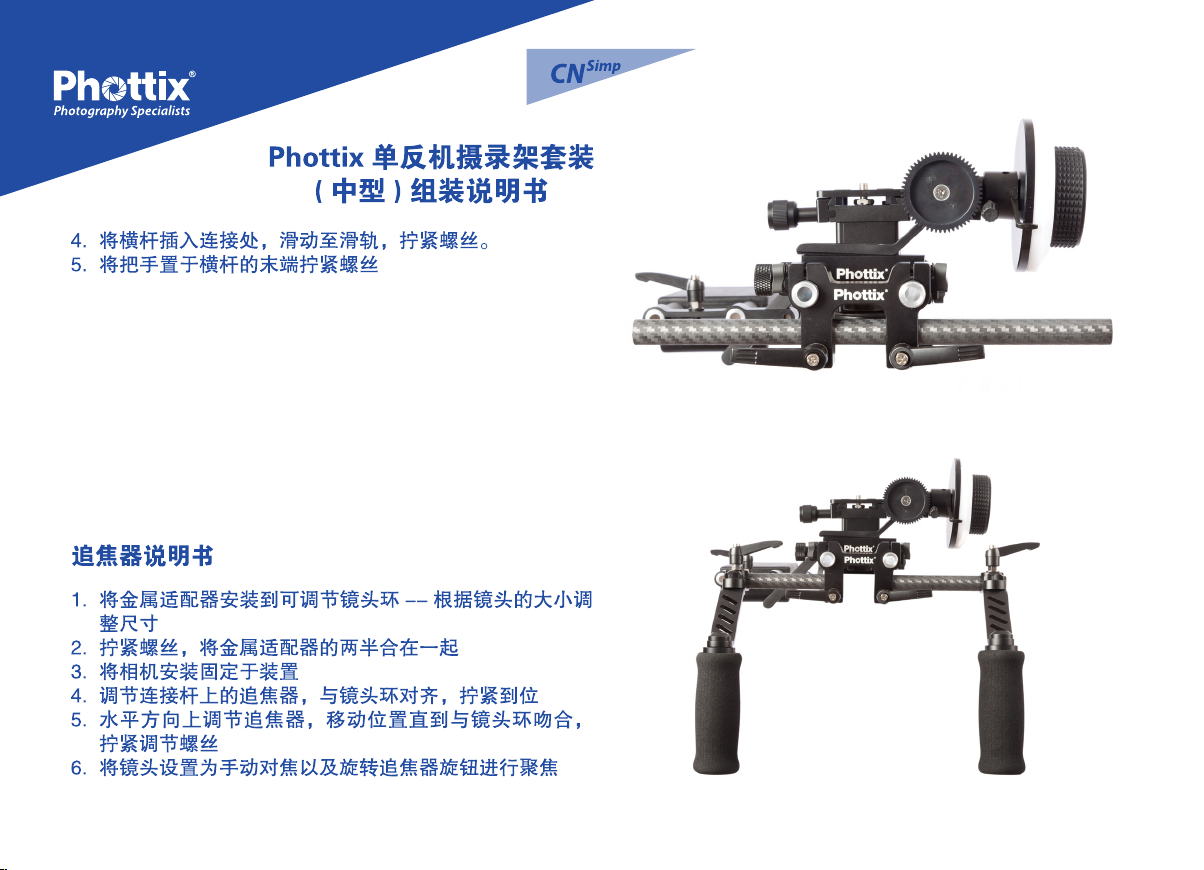
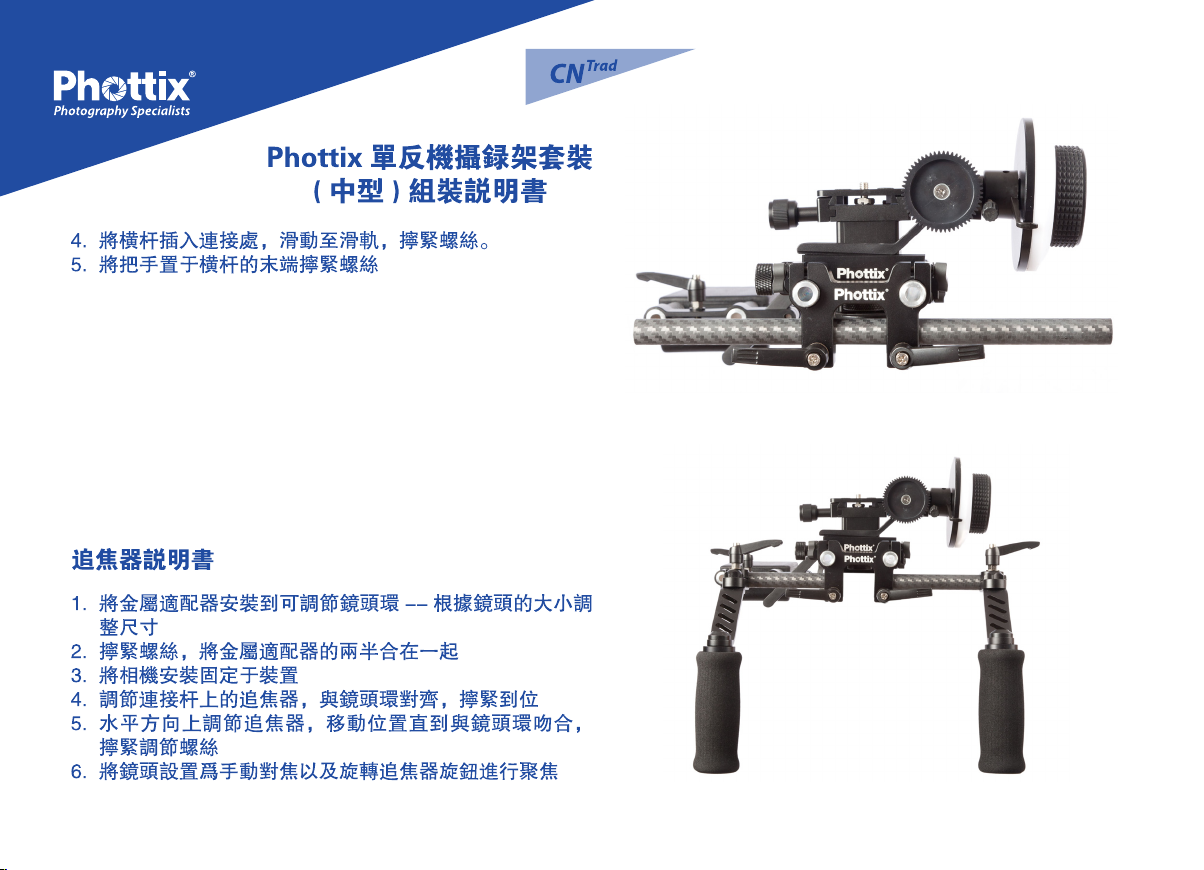
4. Insert Crossbar into Crossbar Rods Attachment, slide onto
rails and tighten screws.
5. Place handles onto the end of the crossbar and tighten
screws.
4
Follow Focus Instructions:
1. Attached the metal adapter to the flexible lens ring change the size as needed to the lens.
2. Tighten the screw, joining the two halves of the metal
adapter.
3. Mount the camera on the rig.
4. Adjust the Follow Focus unit on the rods so it aligns with
the lens ring. Tighten in place.
5. Adjust the Follow Focus horizontally, moving it until it ts
with the lens ring. Tighten the adjustment screw.
6. Set the lens on manual focus and rotate the Follow Focus
knob to achieve focus.
5
3
Page 5
EN
Trafo Jr Assembly Instructions
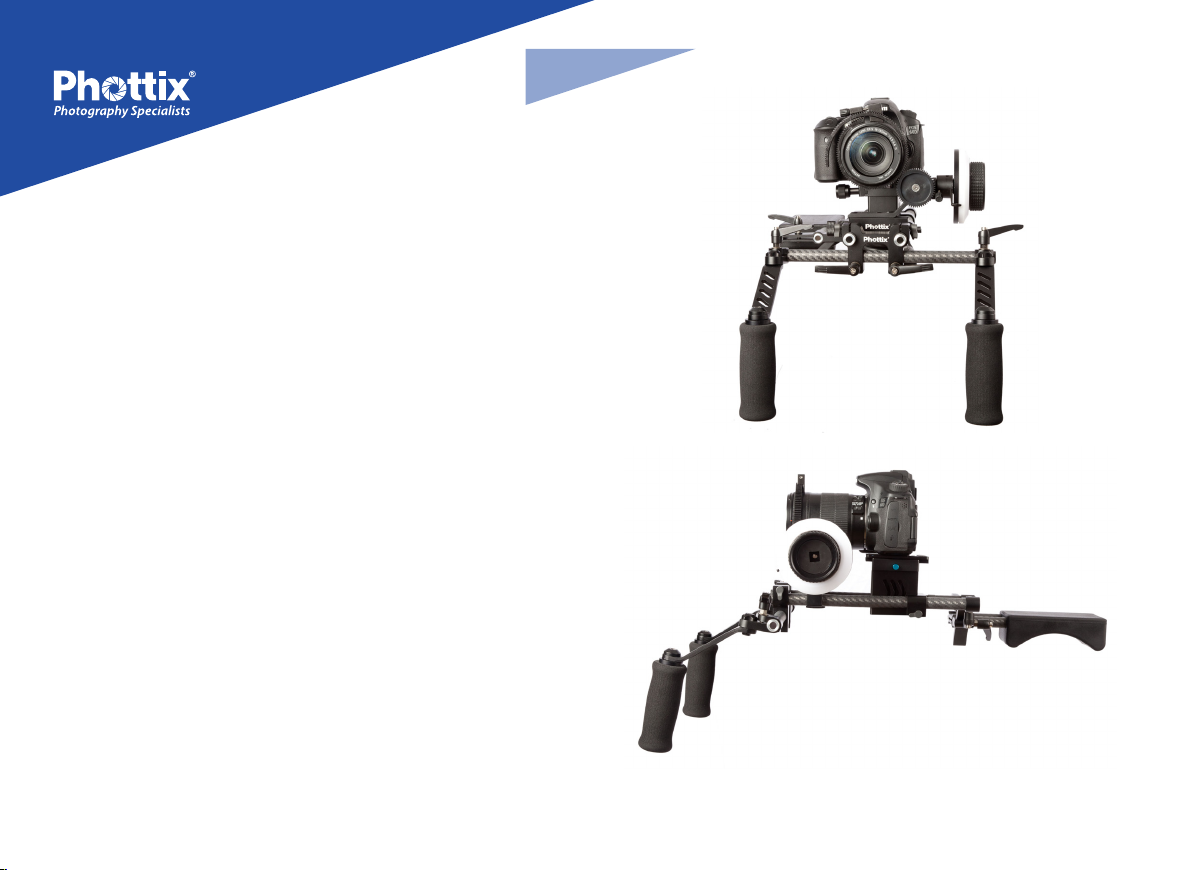
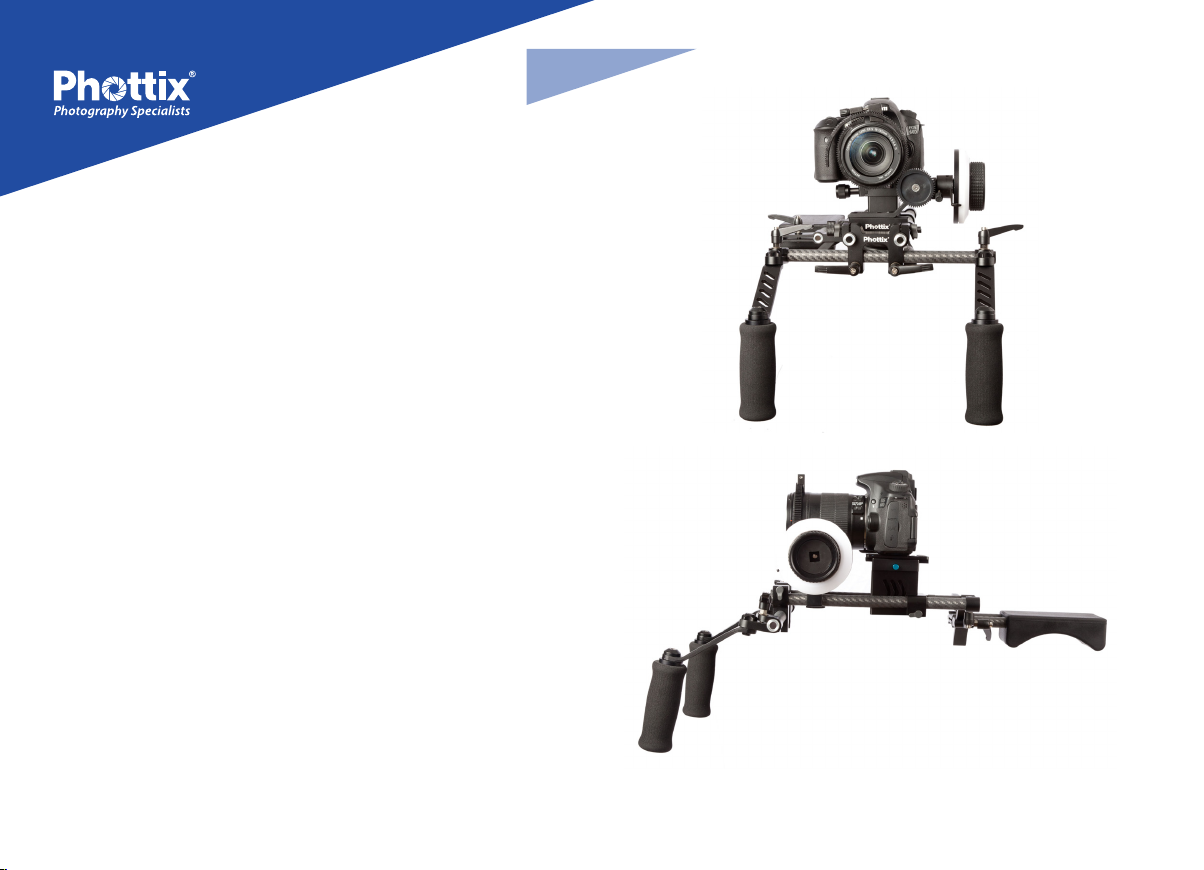
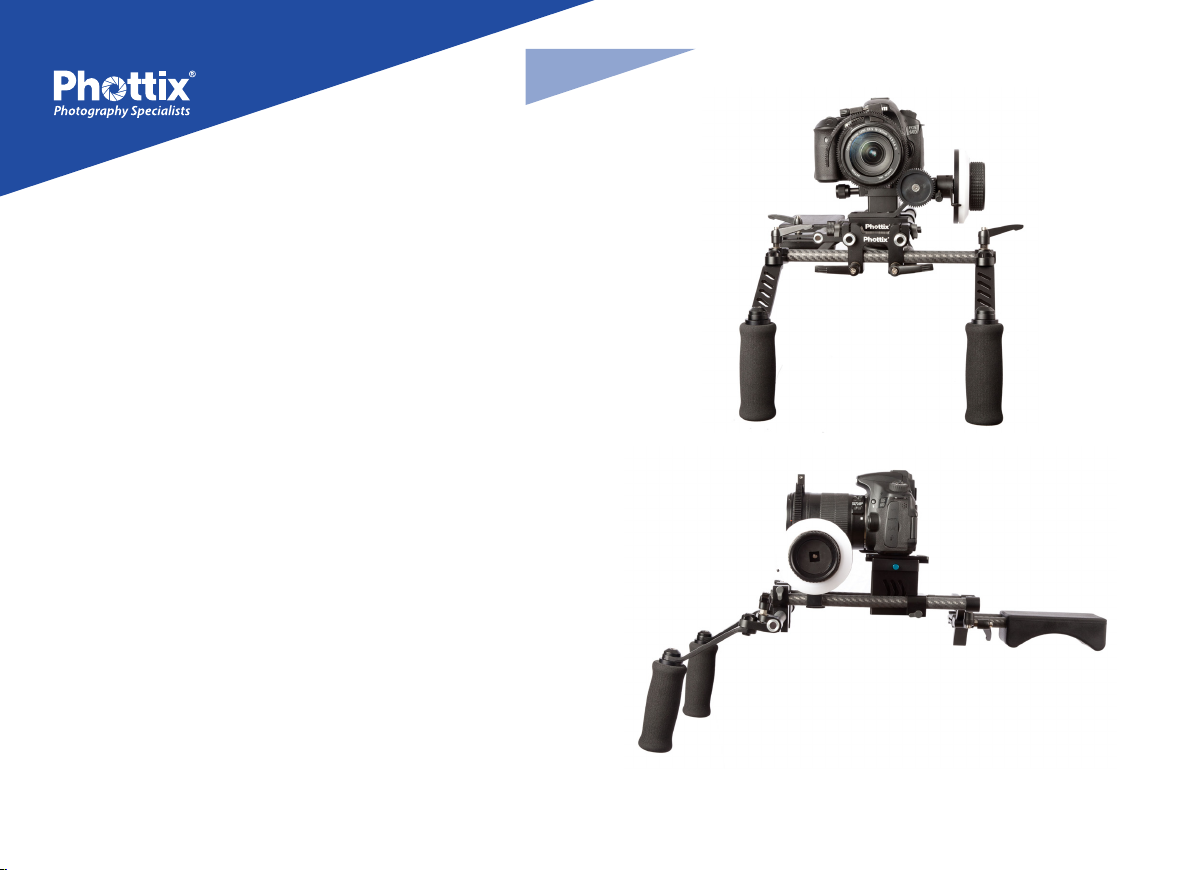
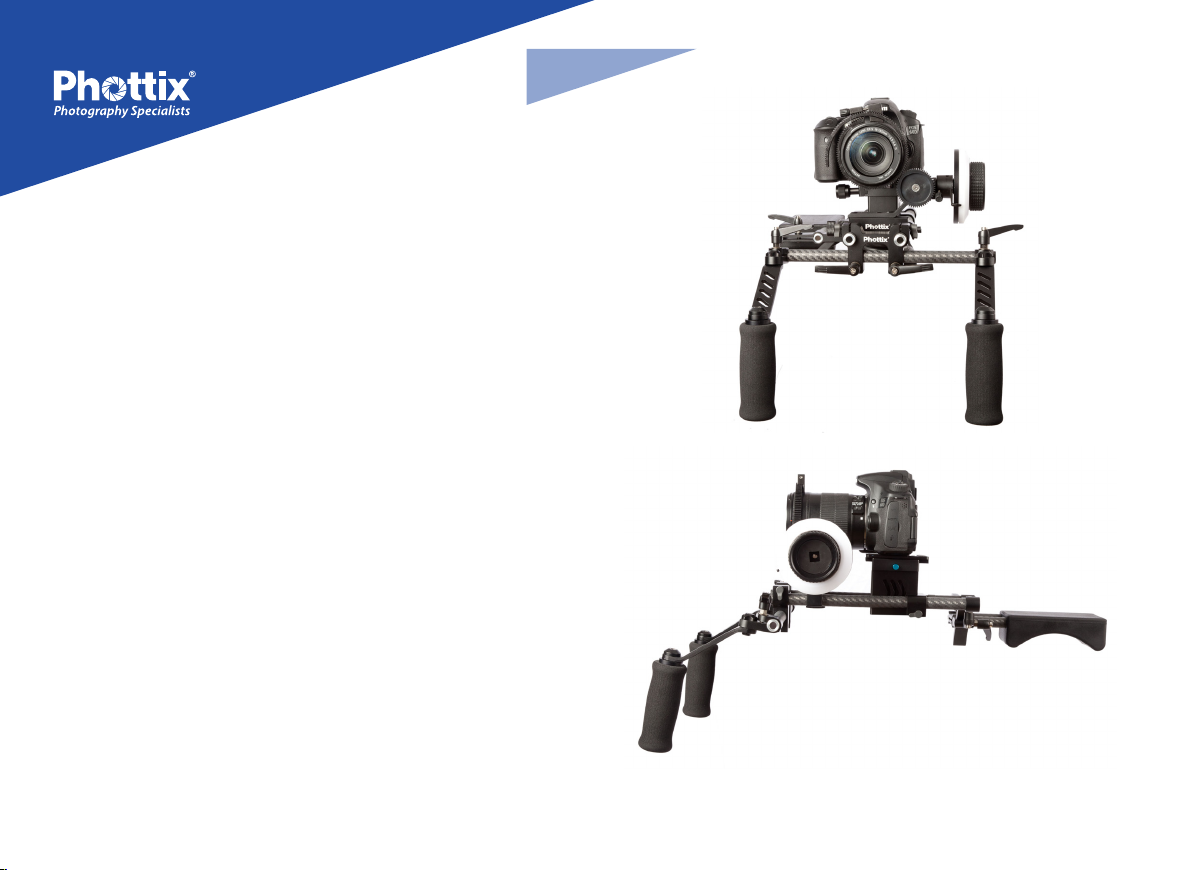
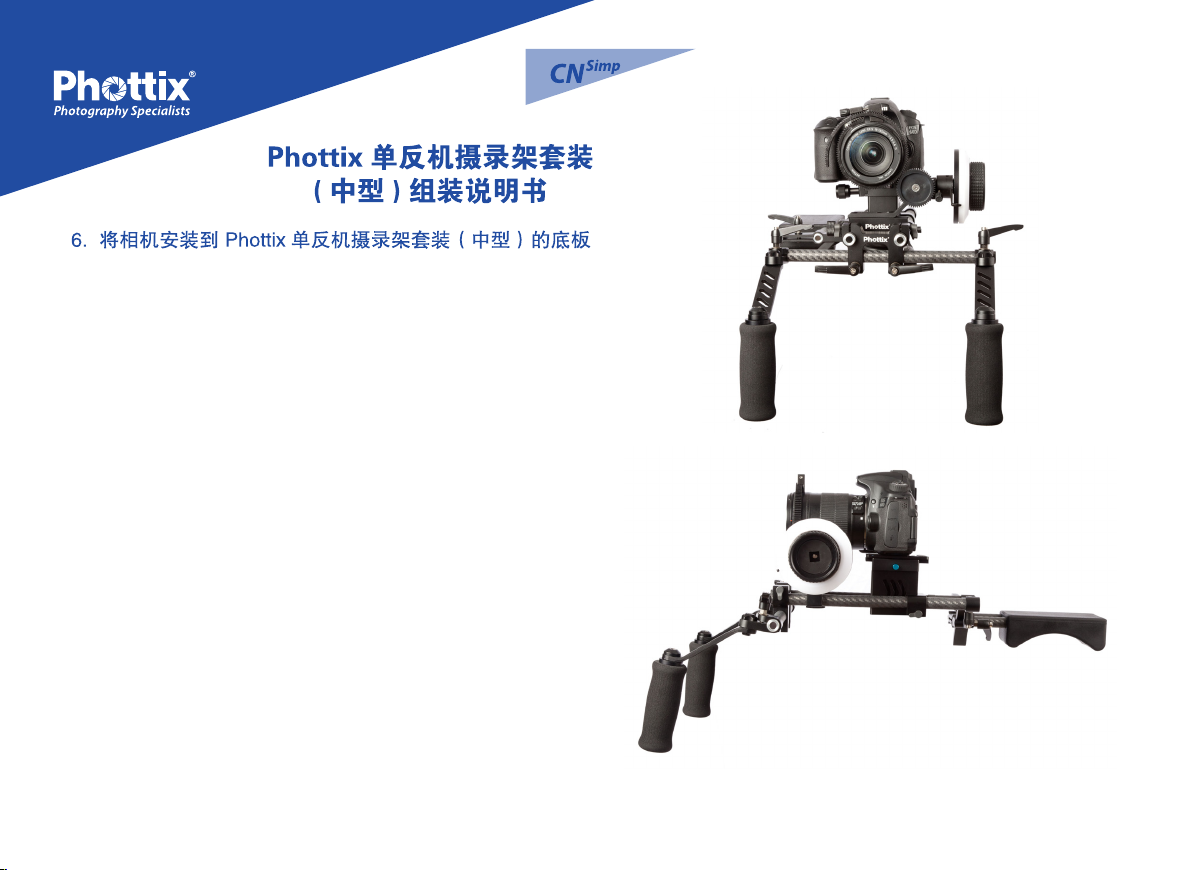
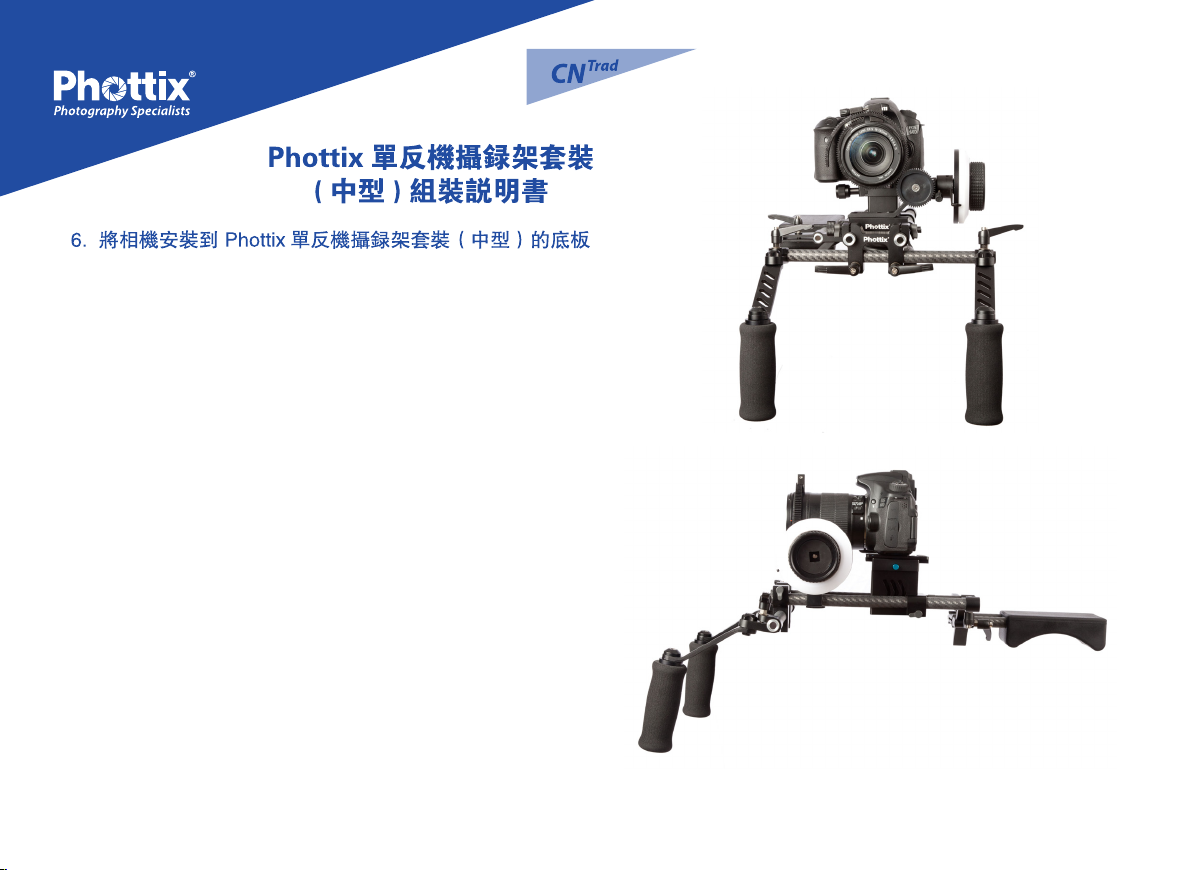
6. Attach camera to base plate and mount to Trafo Jr rig.
6
7
4
Page 6
DE
Trafo Junior Montageanleitung
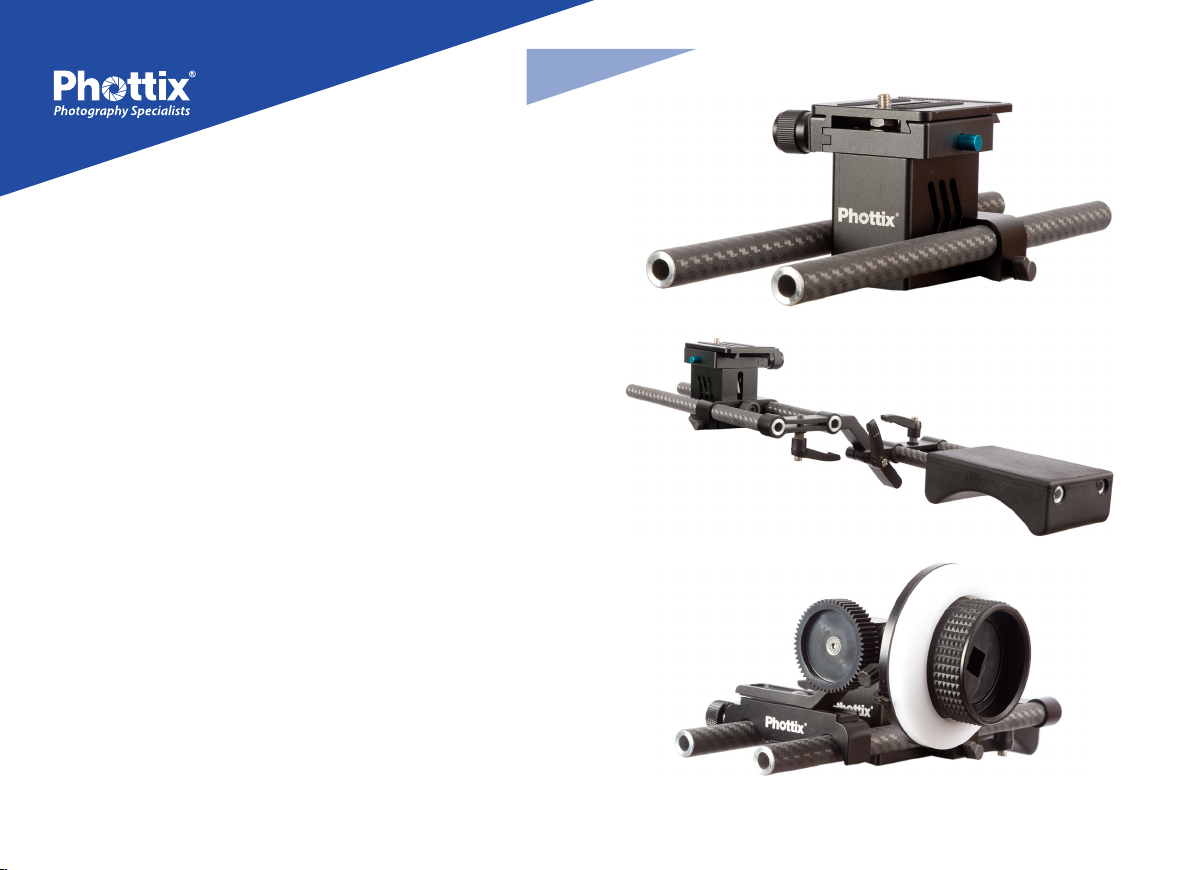
1. Schieben Sie zwei 27cm Rohre in die Kamerahalterung und
ziehen Sie die Schrauben fest.
2. Befestigen Sie das Z Bracket und die beiden 21cm Rohre
wie abgebildet. Schieben Sie das Schulter-Pad auf die
Rohre.
3. Klipsen Sie das Follow Focus System auf die Rohre. Die
Schraube muss erst später festgezogen werden.
Lieferumfang
88355 1x Phottix Trafo Follow Focus System
88361 1x Adapter für Querstange
88365 1x Kamerahalterung mit Wechselplatte
88368 1x LCD Befestigungsadapter
88369 1x LCD Befestigungsarm (kurz)
88375 1x Z Bracket
88364 1x Schulter-Pad
88380 2x Carbon/Fiber-AL Rohre 21cm
88381 3x Carbon/Fiber-AL Rohre 27cm
88360 2x Handgrie
1
2
3
5
Page 7
DE
Trafo Junior Montageanleitung
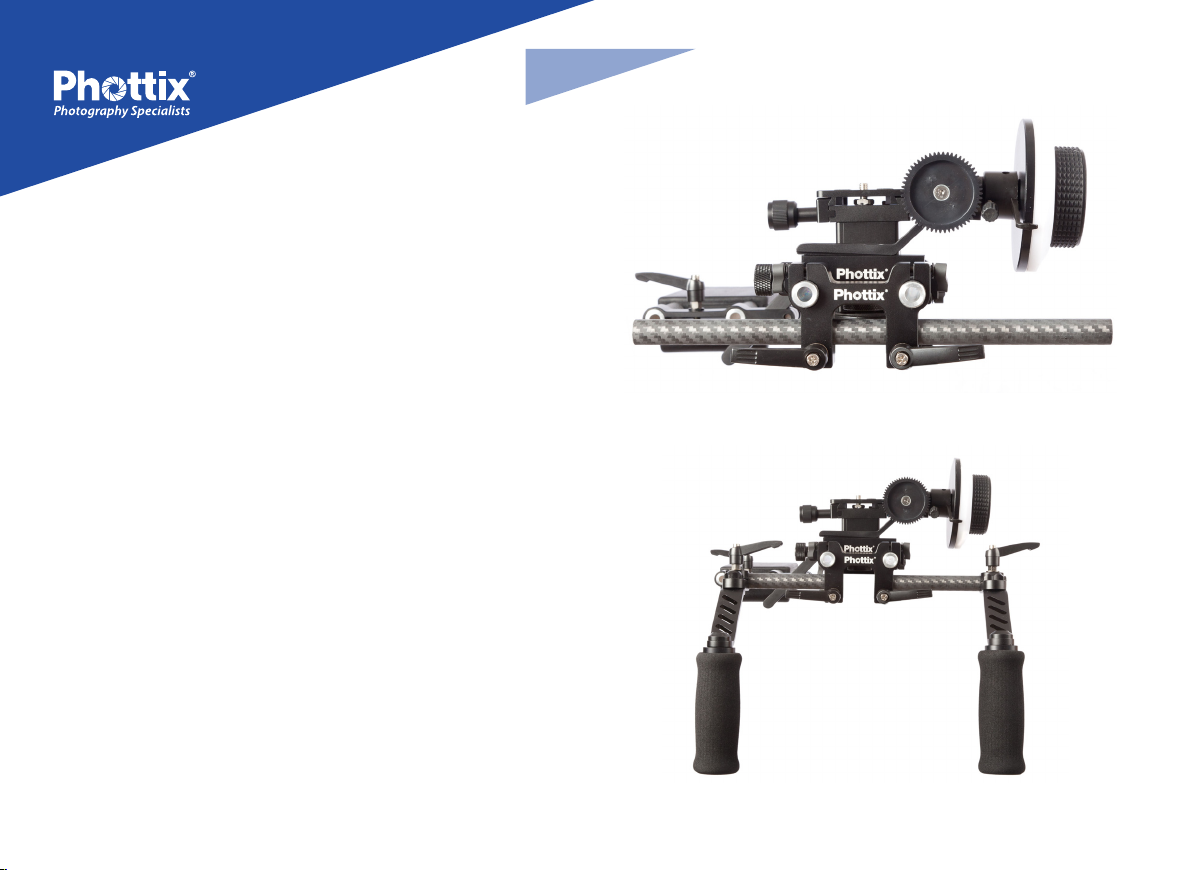
4. Schieben Sie die Querstange in die Querstangen-Halterung
und montieren Sie dann die Querstange mit Halterung auf
den beiden 27cm Rohren.
5. Platzieren Sie die Handgrie an den Enden der Querstange
und ziehen Sie die Schrauben fest.
Follow Focus System
1. Stecken Sie ein Ende des gezahnten Objektivrings in den
zweiteiligen Metalladapter. Legen Sie den Objektivring
so um Ihr Objektiv, dass zwischen den beiden Hälften des
Metalladapters ein Abstand zum Spannen vorhanden ist.
2. iehen Sie die Schraube des Adapters fest, um den
Objektivring um das Objektiv zu spannen. Der Ring muss
auf dem Fokusring des Objektivs sitzen.
3. Befestigen Sie die Kamera.
4. Richten Sie das Follow Focus System so aus, dass die
Zahnung des Objektivrings genau in die Zähne des
Zahnrades des Systems fässt.
5. Befestigen Sie nun die Schrauben des Follow Focus
Systems.
6. Das Objektiv muss auf manuelle Fokussierung gestellt
werden, damit Sie das Follow Focus System nutzen können.
Drehen Sie am Rad des Follow Focus Systems, um scharf zu
stellen.
4
5
6
Page 8
DE
Trafo Junior Montageanleitung
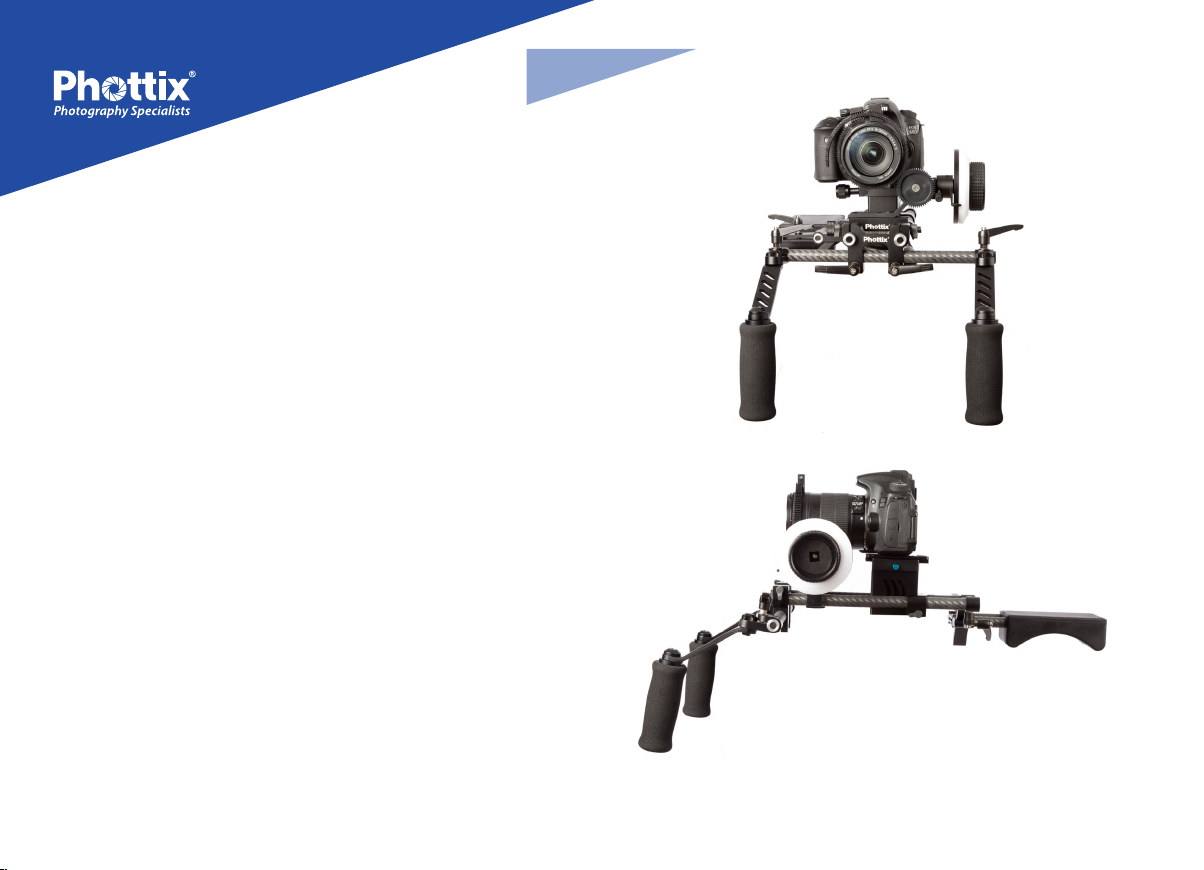
6. Schrauben Sie die Wechselplatte an Ihre Kamera und
platzieren Sie dann die Kamera auf der Kamerahalterung
des Trafo Junior Rigs.
6
7
7
Page 9
FR
Trafo Jr Instructions de montage
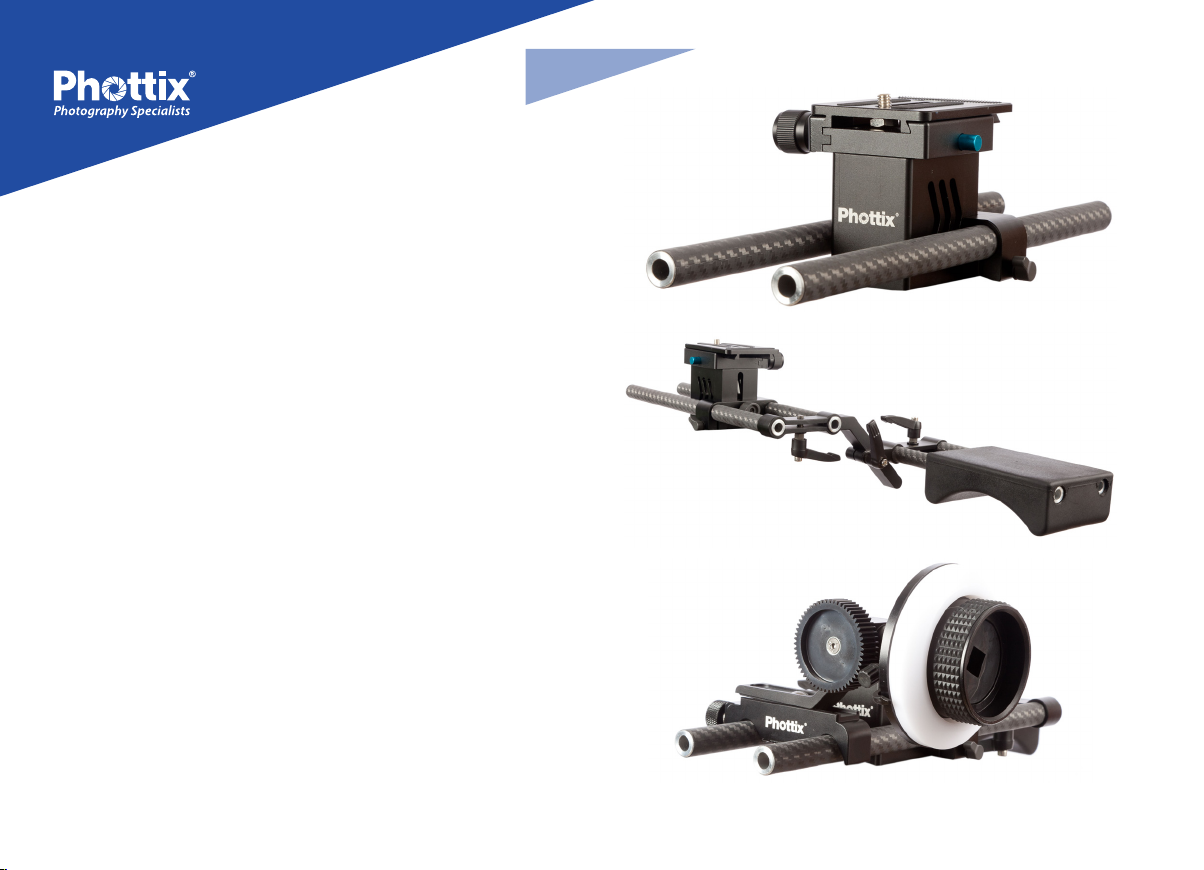
1. Alignez les deux rails. Glissez le support pour le boitier sur
les rails et serrez les vis.
2. Attachez le support Z et les rails. Serrez les vis. Glissez
l'épaulière sur les rails.
3. Glissez le système de follow-focus sur les rails et serrez les
vis.
Eléments
88355 Système de follow-focus: molette pour réglage
manuel du focus à distance x1
88361 Rail perpendiculaire x1
88365 Plateau support pour le boitier x1
88368 Adaptateur pour l'écran x1
88369 Rail pour l'écran (court) x1
88375 Support Z x1
88364 Epaulière x1
88380 Rails de 21 cm en aluminium et bres de carbone x2
88381 Rails de 27 cm en aluminium et bres de carbone x3
88360 Poignées de maintien x2
1
2
3
8
Page 10
FR
Trafo Jr Instructions de montage
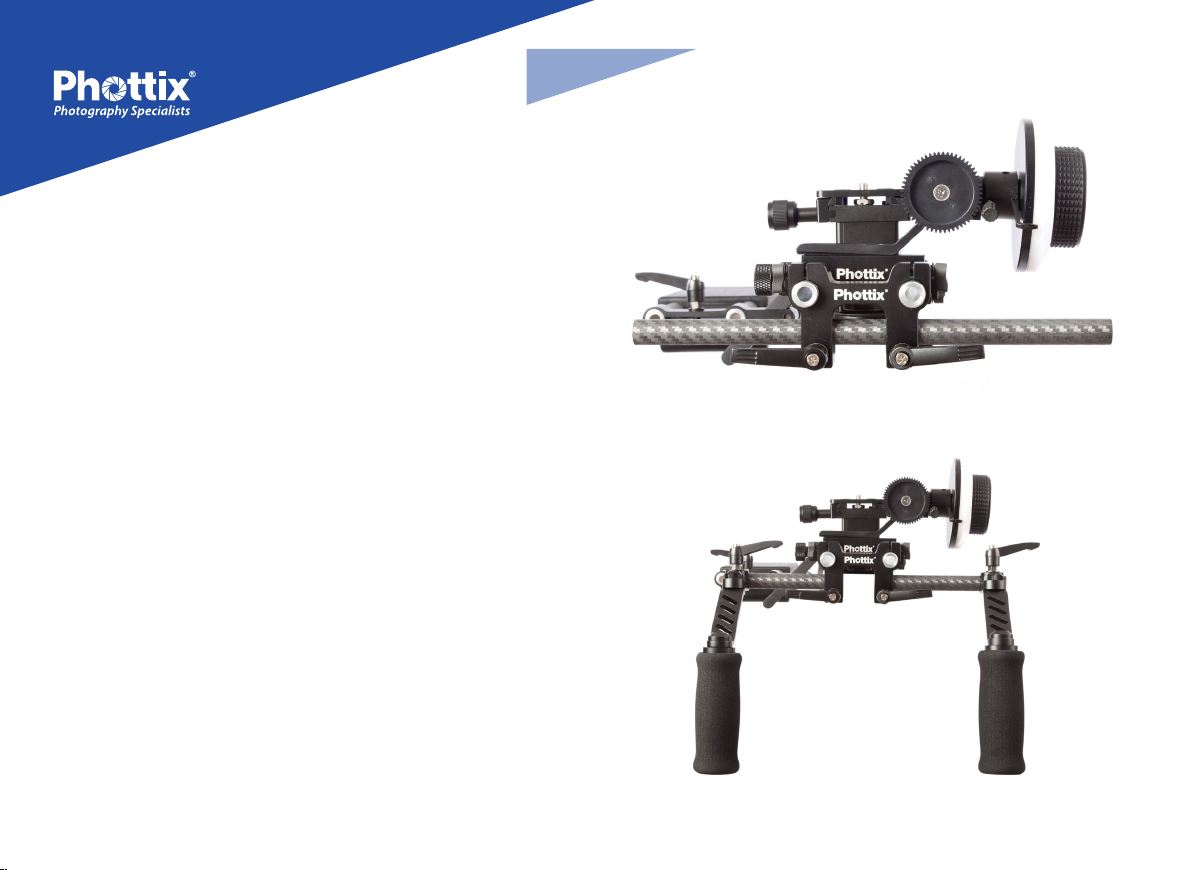
4. Montez le rail perpendiculaire sur l'adaptateur pour le rail
perpendiculaire, glissez l'ensemble sur les rails et serrez les
vis.
5. Attachez les poignées aux deux rails et serrez les vis de
montage.
Système de follow-focus Instructions de montage
4
1. Montez l'adaptateur en métal à la bague ajustable –
choisissez la bague conforme à l'objectif.
2. Serrez les vis en reliant les deux parties de l'adaptateur en
métal.
3. Montez l'appareil sur le support.
4. Réglez la position du système de follow-focus sur les rails
pour qu'elle soit ajustée à l'objectif. Serrez les vis.
5. Réglez la position du système de follow-focus
horizontalement pour qu'elle soit ajustée à l'objectif. Serrer
les vis de réglage.
6. Choisissez la mise au point manuelle et tournez le followfocus pour régler la mise au point de façon professionnelle
pendant le tournage.
5
9
Page 11
FR
Trafo Jr Instructions de montage
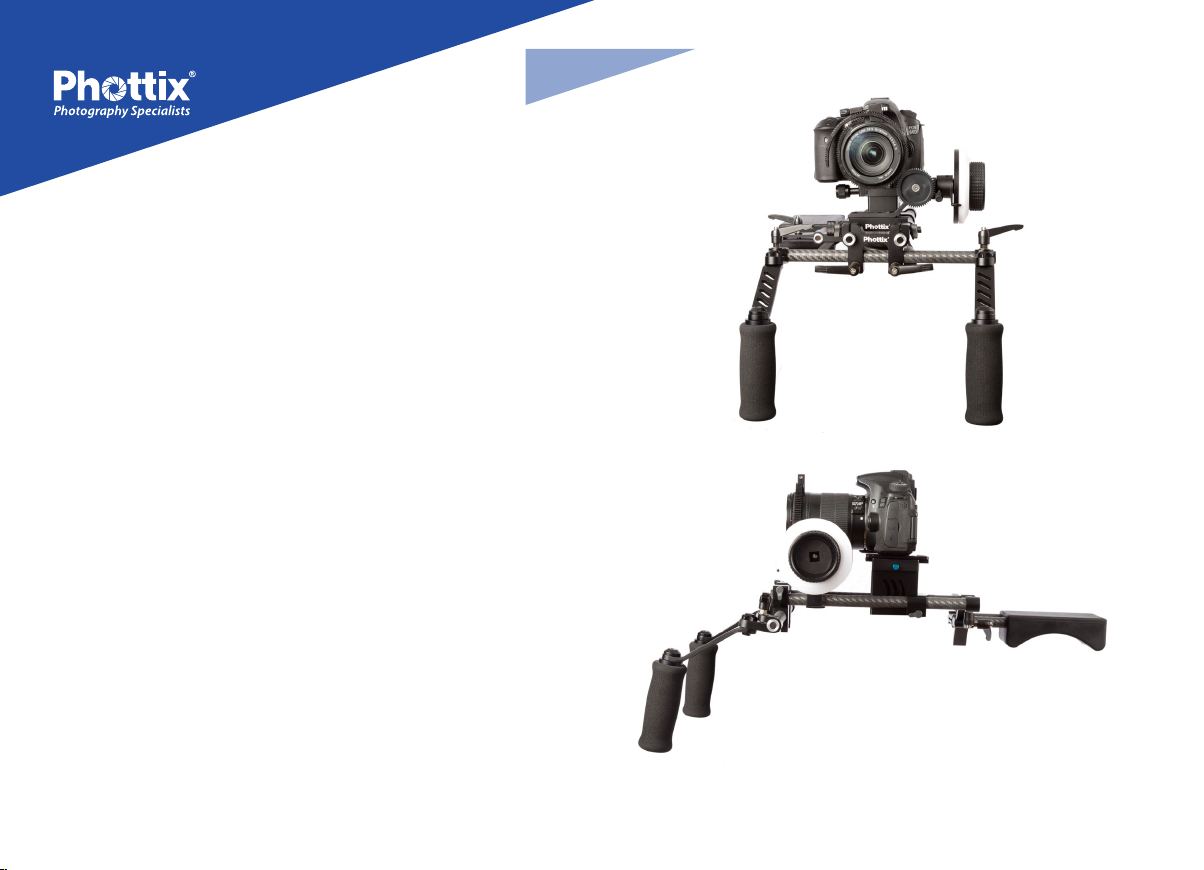
6. Montez le boitier sur le support pour le boitier et montez
l'ensemble sur la structure Trafo Jr.
6
7
10
Page 12
ES
Phottix Trafo Jr DSLR Vídeo
Rig Manual de Instrucciones
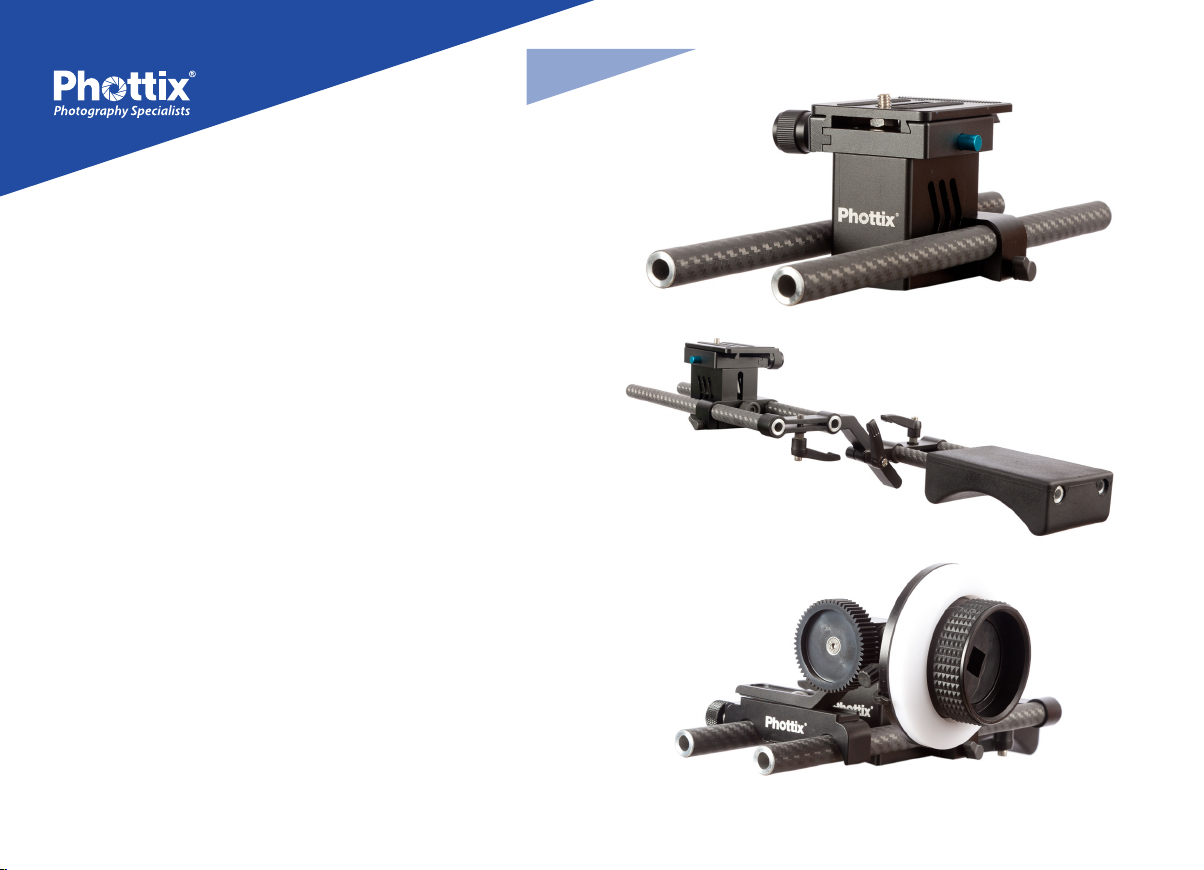
1. Alinear las dos barras. Deslizar el soporte base para cámara
en las barras y apretar los tornillos.
2. Montar el soporte Z y las barras. Apretar los tornillos.
Deslizar la apoya-hombro acolchado en las barras.
3. Deslizar el Follow Focus en las barras y apretar los tornillos
de montaje.
Partes
88355 Follow Focus: sistema de enfoque manual x1
88361 Barra perpendicular x1
88365 Soporte base para cámara x1
88368 Adaptador para monitor x1
88369 Barra para monitor (corta) x1
88375 Soporte Z x1
88364 Apoya-hombro acolchado x1
88380 Barras de 21 cm de aluminio y bra de carbono x2
88381 Barras de 27 cm de aluminio y bra de carbono x2
88360 Agarres x2
1
2
3
11
Page 13
ES
Phottix Trafo Jr DSLR Vídeo
Rig Manual de Instrucciones
4. Colocar la barra perpendicular al adaptador para barra
perpendicular y colocar el conjunto en las barras. Apretar
los tornillos.
5. Colocar los agarres en las dos barras y apretar los tornillos.
Sistema Follow Focus Manual de Instrucciones
1. Colocar el anillo adecuado al objetivo en el anillo de
enfoque. Cambiar el anillo si necesario.
2. Apretar los tornillos uniendo las dos partes de el adaptador
de metal.
3. Montar la cámara en el rig.
4. Ajustar la posición de Follow Focus en las barres para que
sea ajustado perfectamente con el anillo ya montado.
Apretar los tornillos
5. Ajustar la posición de Follow Focus horizontalmente para
que encaje perfectamente con el anillo de enfoque. Apretar
los tornillos.
6. Ajustar el enfoque manual del objetivo y girar el Follow
Focus para controlar el enfoque.
12
4
5
Page 14
ES
Phottix Trafo Jr DSLR Vídeo
Rig Manual de Instrucciones
6. Montar la cámara al soporte base para cámara y colocar el
conjunto en la estructura de Trafo Jr.
6
7
13
Page 15
PL
Instrukcja montażu Phottix Trafo JR
1. Umieść dwie prowadnice obok siebie. Wsuń płytkę
mocowania aparatu na prowadnice i dokręć śrubki.
2. Zamocuj uchwyt typu Z z prowadnicami. Wsuń poduszkę
naramienną na prowadnice.
3. Zamocuj Follow Focus na prowadnicach i dokręć śrubki.
W zestawie
88355 Phottix Follow Focus x1
88361 Prostopadły uchwyt x1
88365 Płytka mocująca x1
88368 Adapter uchwytu LCD x1
88369 Ramię krótkie do LCD x1
88375 Łącznik typu Z x1
88364 Podkładka naramienna x1
88380 Prowadnice Alu-Karbon 21cm x2
88381 Prowadnice Alu-Karbon 27cm x3
88360 Rączki dolnego chwytu x2
1
2
3
14
Page 16
PL
Instrukcja montażu Phottix Trafo JR
4. Wsuń uchwyt prostopadły na mocowanie, a następnie
całość wsuń na prowadnice i dokręć śrubki.
5. Umieść rączki na końcach uchwytu prostopadłego i dokręć
śrubki.
4
Używanie Follow Focus'a
1. Zamocuj metalowy adapter wraz z elastyczną opaską na
pierścieniu ostrości obiektywu.
2. Dokręć śrubki na pierścieniu, aby nie występował luz.
3. Zamocuj aparat na rig'u.
4. Dopasuj pozycję Follow Focus'a na prowadnicach tak aby
dopasował się do zamocowanego wcześniej pierścienia.
Dokręć śrubki.
5. Dopasuj pozycję Follow Focus'a w poziomie, aż dopasuje
się ściśle do pierścienia ostrości. Dokręć śrubki.
6. Ustaw obiektyw w tryb ręcznego ustawiania ostrości
(M) i przekręcaj pokrętłem Follow Focus'a aby sterować
ostrością.
15
5
Page 17
PL
Instrukcja montażu Phottix Trafo JR
6. Zamocuj szybkozłączkę do aparatu i umieść na płytce
bazowej.
6
7
16
Page 18
RU
Инструкции по установке плечевой
опоры/навесу Phottix Trafo Jr.
1. Расположите рядом паралельно две направляющие.
Наденьте и плавно задвиньте крепление для
фотоаппарата на стержни, затяните винты.
2. Закрепите Z-образный кронштейн на направляющих
стержнях. Наденьте и закрепите плечевой упор на
стержни.
3. Закрепите блок механизма ручной фокусировки на
стержнях до щелчка и затяните винты.
Компоненты:
88355 Phottix Trafo система ручного управления
фокусом Follow Focus x 1
88361 Насадка для поперечной перекладины х 1
88365 крепление и подставка для камеры х 1
88368 крепление для монитора LCD х 1
88369 рукоятка (короткая) для крепления монитора
LCD x 1
88375 Z-образный кронштейн
88364 плечевой упор х 1
88380 карбоновые направляющие стержни 21см х 2
88381 карбоновые направляющие стержни 27см х 3
88360 передние рукоятки х 2
17
1
2
3
Page 19
RU
Инструкции по установке плечевой
опоры/навесу Phottix Trafo Jr.
4. Вставьте поперечную перекладину в насадку, наденьте и
плавно задвиньте её на стержни, затяните винты.
5. Установите две рукоятки по краям перекладины и
затяните винты.
Инструкции по установке и использованию
ручного фокуса
1. Прикрепите специальный металический держатель
к универсальному кольцу для объектива – измените
размер кольца в соответствии с размером вашего
объектива.
2. Затяните винт, соединяя две половины металического
держателя.
3. Установите камеру на навес.
4. Установите механизм ручного фокуса на стержнях
таким образом, чтобы он выровнялся с кольцом для
объектива. Зафиксируйте механизм.
5. Отрегулируйте горизонтальное положение механизма
ручного фокуса, передвигая его до тех пор, пока он не
войдёт в кольцо для объектива. Затяните крепительный
винт.
6. Установите объектив в режим ручной фокусировки
и поверните колесо механизма ручного фокуса для
достижения необходимой фокусировки.
18
4
5
Page 20
RU
6. Установите фотоаппарат/камеру на подставке для
камеры и закрепите к навесу Trafo Jr.
6
7
19
Page 21
1
2
3
20
Page 22
4
5
21
Page 23
6
7
22
Page 24
1
2
3
23
Page 25
4
5
24
Page 26
6
7
25
 Loading...