

Phonic Sound Ambassador 35 Deluxe, SA35D-UM30-D, SA35D-UM30-2-D, SA35D-UM40-D, SA35D-UM30-M User Manual
Page 1

Sound Ambassador 35 Deluxe
Wireless Portable Sound System
ON
Page 2

1. Re ad the se ins tr uc ti on s be fore o pe ra ti ng t hi s
apparatus.
2. Keep these instructions for future reference.
3. Heed all warnings to ensure safe operation.
4. Follow all instructions provided in this document.
5. Do not use this apparatus near water or in locations
where condensation may occur.
6. Clean only with dry cloth. Do not use aerosol or liquid
cleaners. Unplug this apparatus before cleaning.
7. Do not block any of the ventilation openings. Install
in accordance with the manufacturer’s instructions.
8. Do not install near any heat sources such as radiators,
heat registers, stoves, or other apparatus (including
.
9. Do not defeat the safety purpose of the polarized or
grounding-type plug. A polarized plug has two blades
with one wider than the other. A grounding type plug
has two blades and a third grounding prong. The wide
blade or the third prong is provided for your safety. If
the provided plug does not into your outlet, consult
an electrician for replacement of the obsolete outlet.
10. Protect the power cord from being walked on or
pinched particularly at plug, convenience receptacles,
and the point where they exit from the apparatus.
11. Only use attachments/accessories by the
manufacturer.
12. Use only with a cart, stand , tripod, bracket, or
table by the manufacturer, or sold with
the apparatus. When a cart is used, use caution
wh en mov in g the cart/apparatus
combination to avoid injury from tipover.
13. Unplug this apparatus during lighting
st or ms or when unused for lon g
periods of time.
14. Refer all servicing to service personnel.
Servicing is required when the apparatus has been
damaged in any way, such as power-supply cord or
plug is damaged, liquid has been spilled or objects
have fallen into the apparatus, the apparatus has
been exposed to rain or moisture, does not operate
normally, or has been dropped.
IMPORTANT SAFETY INSTRUCTIONS
CAUTION: TO REDUCE THE RISK OF ELECTRIC SHOCK,
DO NOT REMOVE COVER (OR BACK)
NO USER SERVICEABLE PARTS INSIDE
REFER SERVICING TO QUALIFIED PERSONNEL
The lightning flash with arrowhead symbol, within an
equilateral triangle, is intended to alert the user to the
presence of uninsulated “dangerous voltage” within the
product
’
magnitude to constitute a risk of electric shock to persons.
The exclamation point within an equilateral triangle is in-
tended to alert the user to the presence of important operat-
ing and maintenance (servicing) instructions in the literature
accompanying the appliance.
WARNING: To reduce the risk of or electric shock, do
not expose this apparatus to rain or moisture.
CAUTION: Use of controls or adjustments or performance
of procedures other than those may result in
hazardous radiation exposure.
The apparatus shall not be exposed to dripping or splashing and that no objects with liquids, such as vases,
shall be placed on the apparatus. The MAINS plug is used as the disconnect device, the disconnect device shall
remain readily operable.
Warning: the user shall not place this apparatus in the area during the operation so that the mains switch
can be easily accessible.
CAUTION
RISK OF ELECTRIC SHOCK
DO NOT OPEN
Page 3

Sound Ambassador 35 Deluxe
Phonic preserves the right to improve or alter any information within this document without prior notice.
V1.1 OCT 19th,2007
Wireless Portable Sound System
INTRODUCTION...............................................................................................................................4
FEATURES........................................................................................................................................4
OPTIONAL ACCESSORIES.............................................................................................................5
BASIC SETUP...................................................................................................................................5
PRODUCT OVERVIEW....................................................................................................................6
WIRELESS MICROPHONE RECEIVER.........................................................................................8
CD PLAYER......................................................................................................................................8
MP3 RECORDER.............................................................................................................................9
IMPORTANT INSTRUCTIONS.........................................................................................................11
OTHER IMPORTANT FEATURES.................................................................................................12
OPERATING HINTS........................................................................................................................13
APPLICATION.................................................................................................................................14
SPECIFICATIONS...........................................................................................................................15
DIMENSIONS..................................................................................................................................16
BLOCK DIAGRAM...........................................................................................................................17
Page 4

4 Sound Ambassador 35 Deluxe
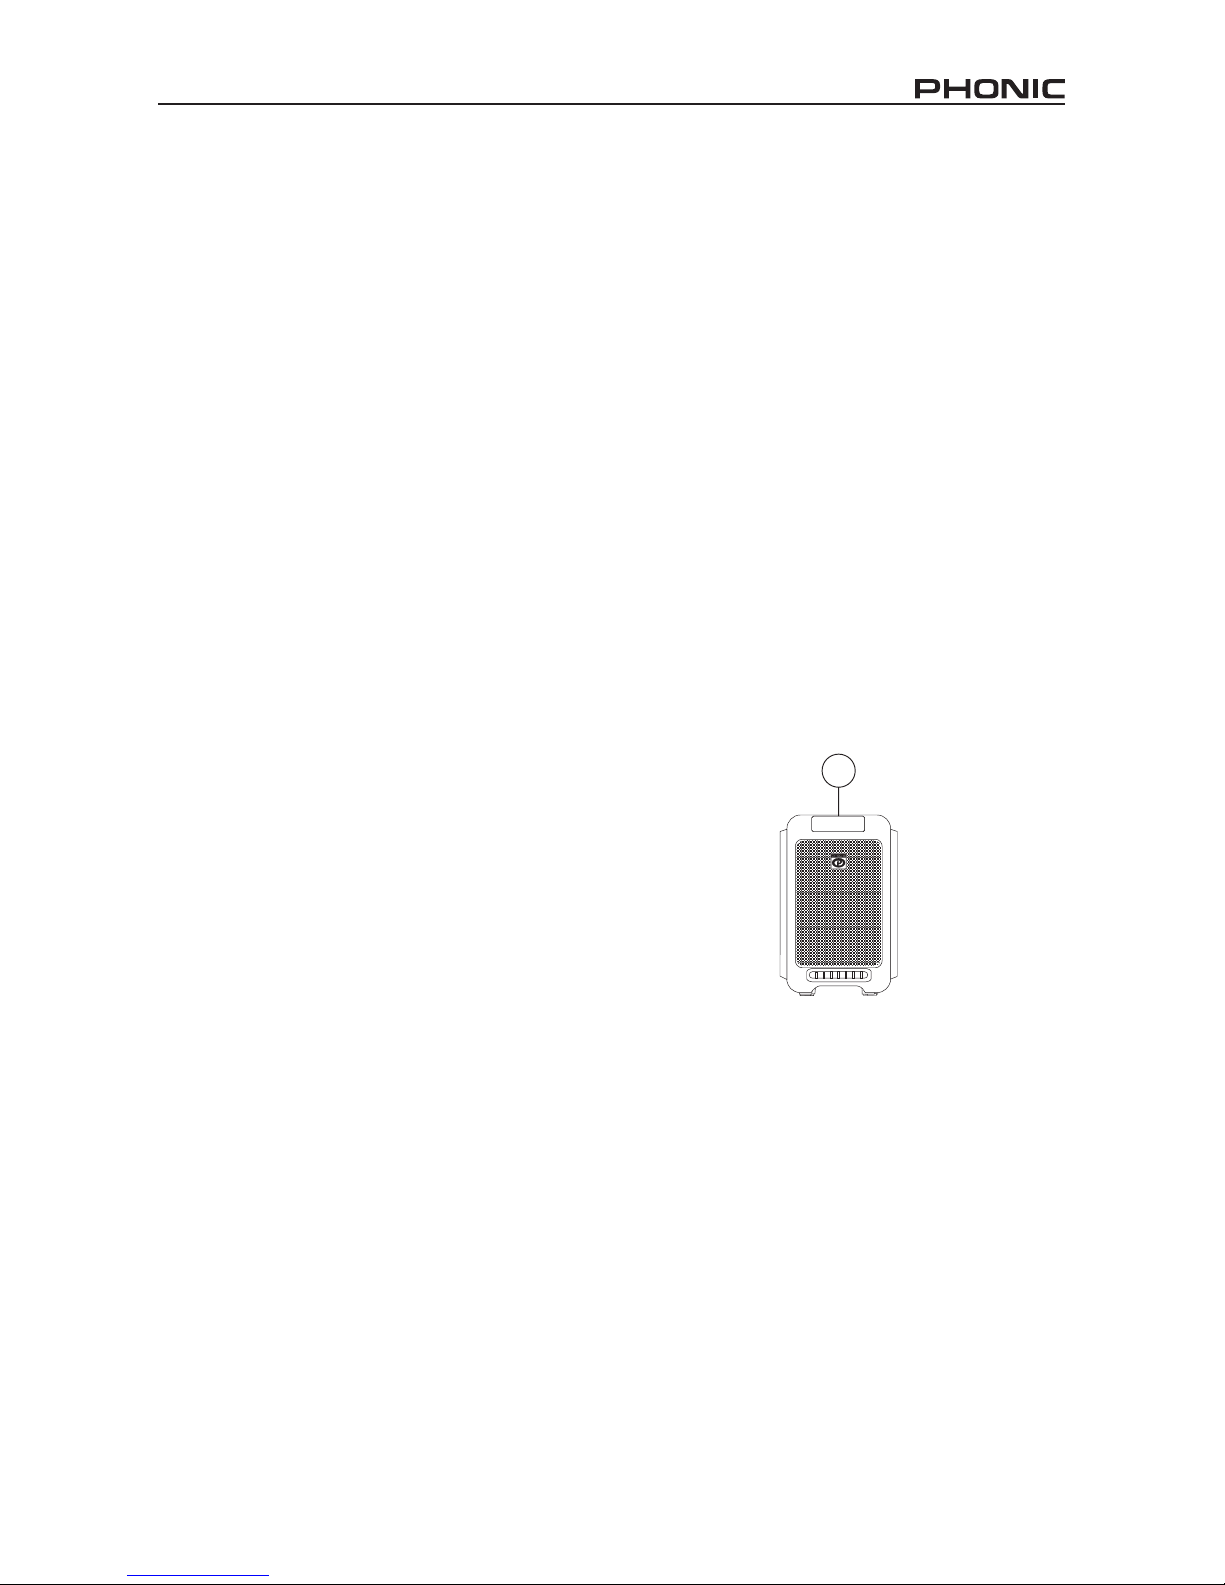
INTRODUCTION
We at Phonic would like to congratulate you on
your purchase of our Sound Ambassador 35 Deluxe
wireless portable sound system. This extremely stylish
system will allow you to carry all the gear you need
to set up a moderate front of house sound system
anywhere you go without lugging around chunky
mixers, speakers and cords.
Including microphone and line inputs, the Sound
Ambassador 35 Deluxe provides enough for a solo
performer, DJ or other small-scale performer to
give their audience crystal clear sound. The Sound
Ambassador can be further customized to include
wireless microphones (UHF or infrared) and a CD
player with MP3 playback or MP3 recorder/player,
further adding to the versatility of these great units.
The built-in amplier pumps 35 Watts of power
through the 6.5” speaker – all of which is built right
into the cabinet!
This owner’s manual was designed to give you a clear
picture of all the features and functions of the Sound
Ambassador 35 Deluxe. It is strongly advised that you
read this manual carefully before storing it in an easily
accessible for future reference.
FEATURES
All-in-one compact mobile wireless sound system
6.5” full range speaker and 35 watts power
amplier built-in
Optional UHF or Infrared wireless microphones
Optional CD player with anti-shock and MP3
playback or MP3 recorder/player
Built-in DC charging circuit
12 VDC supply from built-in, maintenance-free
lead acid type rechargeable batteries, 2.7Ah
DC inlet for external power supply
Slot for choice of two UHF PLL synthesized
diversity or Infrared wireless receiver modules
Built-in diversity receiving antennas
One 1/4” phone jack for wired microphone input
1/4” phone jack jacks for line-level input and
output
Built-in limiter and protection circuitry to minimize
distortion and overload
Individual volume control for wired and wireless
microphones
Echo effect with level and time/repeat controls
25mm diameter tripod stand adapter included
MODEL LIST
SA35D-UM30-D includes the UM30 wireless handheld mic, CD player with MP3 playback and 12V/2.7A
rechargeable battery.
SA35D-UM30-2-D includes two UM30 handheld wireless mic, CD player with MP3 playback and
12V/2.7A rechargeable battery.
SA35D-UM40-D includes the UM40 wireless lavalier mic, CD player with MP3 playback and 12V/2.7A
rechargeable battery.
SA35D-UM30-M includes the UM30 wireless handheld mic, MP3 recorder/player and 12V/2.7A
rechargeable battery.
Page 5

5
Sound Ambassador 35 Deluxe
OPTIONAL ACCESSORIES
UM30: 16 channel UHF Wireless Handheld
Microphone System, includes 1 x HT-100 handheld
microphone with built-in transmitter and 1 x UMR10 UHF receiver
UM40: 16 channel UHF Wireless Lavalier
Microphone System, includes 1 x BT-200 bodypack
transmitter, 1x ML-10 microphone and 1x UM-R10
receiver
UM50: 16 channel UHF Wireless Headset
Microphone System, includes 1 x BT-200 bodypack
transmitter, 1x MH-20 microphone and 1x UM-R10
receiver
Infrared wireless microphone
CD Player with MP3 playback
MP3 recorder/player
Carry bag
S3 tripod stand
Wired microphone
BASIC SETUP
1. Ensure all power is turned off on the Sound
Ambassador Deluxe.
2. All level controls should be set at the lowest level
to ensure no sound is inadvertently sent through
the outputs when the device is switched on. All
levels can be adjusted to acceptable degrees after
the device is turned on.
3. Plug all necessary instruments and/or equipment
into the Sound Ambassador’s various inputs as
required.
4. Though it is not required (as the Sound Ambassador
Deluxe’s speaker is built-in), you may wish to
connect another device to the Sound Ambassador
Deluxe’s line output, which could further enhance
your set up.
5. Plug the supplied DC power supply into an
appropriate AC power socket, and the DC head of
the power supply into the DC power socket of the
Sound Ambassador 35 Deluxe. This is, of course,
not really vital as the Sound Ambassador Deluxe
has an internal battery.
6. Turn the power switch on, and you should be ready
to go.
Page 6

6 Sound Ambassador 35 Deluxe
1. Wireless Microphone Module Slots
These two slots are for the addition of wireless
microphone modules to your Sound Ambassador.
They allow users to use microphones from
various locations without a cord getting in the
way. For information on purchasing the wireless
microphone kit, please contact your nearest
Phonic dealer.
Please Note: The wireless modules act as their
own, individual channel, with its own volume
control – the signal of which is sent to the main
mix.
2. CD Player / MP3 Recorder Module Slot
This slot is for the addition of an optional
Compact Disc player or MP3 recorder/player to
the Sound Ambassador 35 Deluxe. By adding
the CD player users are able to feed the audio
from CDs to the built-in mixer; the MP3 recorder/
player allows users to record the audio received
by their Sound Ambassador.
3. Mic Level Control
This controls the level of the 1/4” microphone
input, allowing users to adjust the level of the
audio that is sent to the main mix.
PRODUCT OVERVIEW
ON
2
1
15
3
4 6 8 11 12 13 14
5
7
9
10
17
Page 7
7
Sound Ambassador 35 Deluxe
4. Microphone Input
This 1/4” Phone Jack is for the addition of
high impedance microphone to the Sound
Ambassador Deluxe.
5. AUX Level Control
This controls the level of the 1/4” auxiliary input,
allowing users to adjust the level of the audio
that is sent to the main mix.
6. AUX Input
This input accepts typical 1/4” TS inputs for
unbalanced signals, best suited for input of
all kinds of gear, including electric guitars,
bass guitars, keyboards, or even other Sound
Ambassador units.
7. CD/MP3 Level Control
This controls the level of audio that is received by
the optional CD player or MP3 recorder. Turning
the control all the way to the left will affectively
mute the CD player or MP3 recorder.
8. Line Outputs
This 1/4” output sends the main signal of the
Sound Ambassador Deluxe to external devices.
Users are able to send the signal to other sound
systems, allowing the signal to be incorporated
in other mixes, or to an amplier, allowing other
speakers to output the signal in addition to the
built-in speaker, as well as link to other Sound
Ambassadors Deluxe.
9. Echo Effect
These two controls adjust the different properties
of the built-in echo effect. The level control allows
users to determine the amount of the microphone
(both wired and wireless) signal will be affected
by the echo effect, and the time/repeat control
adjusts the intensity of both the time and repeat
parameters. Turning the level control to the
-
∞
position affectively mutes the effect.
10. Tone Control
This control allows users to adjust the high and
low frequency sounds of the main signal; turning
the control to the left will add more treble to their
audio, whereas turning it to the right will increase
the bass. Keeping it perfectly centered will
affectively disable the tone function.
11. Power Indicators
The LED indicators just to the left of the fuse
holder allow users to see the status of the battery.
The uppermost indicator, Batt. Low, illuminates
red when the battery power is low and needs
to be charged. When at full capacity, the lower
LED will illuminate green. This same indicator
will ash red when the unit’s built-in battery is in
the process of charging. When the battery level
is low, the Power LED will ash for a few minutes
before shutting the device down. Depending on
the volume of the unit, it may last for longer in
low battery mode.
12. Fuse Holder
If for some reason the Sound Ambassador 35
Deluxe’s fuse blows, use a coin to unscrew the
fuse holder and replace with another appropriate
fuse.
13. DC Power Input
This inlet is for the connection of a DC power
source, allowing power to be supplied to the unit.
Please use the DC power supply provided along
with this unit only, as using another supply could
damage the unit and void any warranty.
14. Power Switch and Indicator
Flicking this switch turns the Sound Ambassador
on and off. If no external power source is
connected to the device, power will be supplied
by the built-in battery. When the power is turned
on, the blue Power LED will illuminate.
15. Handle
This feature was provided to allow users to carry
the Sound Ambassador 35 Deluxe much more
easily.
16. IR Receiver
This unit comes with the Infrared receiver already
installed if bought with the infrared microphone
kit.
17. Battery Power and Charging Switch
When this switch is set to ON, the Sound
Ambassador Deluxe’s internal battery can be
either charged or used to power the unit. If it’s
set to OFF, the battery is effectively cut off from
the rest of the unit. Users are advised to set
this switch to OFF if the Sound Ambassador will
be without operation for an extended period of
time.
16
Page 8

8 Sound Ambassador 35 Deluxe
Wireless Microphone Receiver
1. Frequency Select – Use this to select the fre-
quency at which the wireless module will receive
signals. The wireless microphone should be set
to the same frequency.
2. A Indicator – Depending which antennae is
being used, either the A or B indicators will illuminate.
3. AF Indicator – AF Indicator - This will illuminate when a wireless microphone audio signal
is received.
4. B Indicator – Depending which antennae is
being used, either the A or B indicators will illuminate.
5. PWR Indicator – When the volume control is
not in the off position, this LED will light up.
6. Volume Control – The volume of the microphone signal can be adjusted using this. Turning
this control all the way to the left will effectively
turn the wireless microphone module off.
Information on the Infrared Microphone was unavailable at the time of this publication. For information on
this unit, please visit www.phonic.com.
For more information on the usage and operation of
the UM Wireless microphone sets, please consult
their individual operation manuals.
CD Player
1. CD Slot – Insert your CD here. Ensure the
CD’s label is facing upwards. This CD player
accepts 12cm CDs.
2. Digital Display – View the track number and
elapsed time here.
3. Pitch Control – Turn this control to increase
and decrease the tempo of your audio from the
audio or MP3 CD. Turn the control to the left
to slow the music down, turn it to the right to
speed it up.
4. Program – Press the ‘PROG’ button and
use the FWD and REV buttons to select tracks
. Press ‘REP/SHUF-ENTER’ to record your
selected tracks. If you wish to add more tracks,
repeat the proceedure above. ‘PLAY/PAUSE’
will conrm and play the tracks.
5. Folder – When playing an MP3 CD, pushing
this button wiill allow you to use the Forwards
and Reverse buttons to skip through the next
folders / directories.
6. Stop/Eject – When a CD is loaded, press this
button to stop the audio from playing. Press it
again to remove the CD.
7. Pause/Play – Push this button to play or pause
the selected track.
8. Power – Push this button to turn the CD
player on. Make sure the CD/MP3 control is
not in the off position
9. Repeat/Shufe – When a CD is inserted, it
will automatically play with repeat mode active.
Pushing this button allows the CD player to play
tracks at random, and pushing it again will turn
repeat mode back on.
10. Reverse – Push this button to go back
through the tracks. Hold it down to rewind an
individual track.
11. Forwards – Pushing this button skips forward
through the tracks. Holding it down will allow you
to skip forward through an individual track.
1
6
2 4
3 5
CD Player
2
1
7
11
8
3 9 10
4
5
6
Wireless Microphone Receiver
Page 9

9
Sound Ambassador 35 Deluxe
MP3 Recorder and Player
1. Power key – Push to turn the digital recorder
on and off.
2. Up key – When wanting to select a track,
push this button to scroll through the tracks in
ascending order. Hold it down for two seconds
to run through the track numbers faster (this
function will not work in MP3 mode).
3. Down key – When wanting to select a track,
push this button to scroll through the tracks in
descending order. Hold it down for two seconds to run through the track numbers faster
(this function will not work in MP3 mode).
4. Record key – Select track number when in
VOC mode and push REC key to record on
the current track. Push the stop button to stop
recording. If the track you want to record on
is already used, the LCD will show “≣≣”and
you must delete the content of the track before recording. When the in-built memory only
has 30 seconds left, the LCD will start to count
down the remaining time. You can use a microphone, a line in audio source or a mixture of
both as your recording source.
Note: If you want to record to an SD card or
Flash memory, you must push Mode and stop
button together to switch from C to F (as indicated in front of the time).
5. Play/Pause key – Select the track you want
to play then push this key to play. Push this
key again during play to pause the track.
6. Stop key – Push the key to stop all functions, for example recording, play back, track
selection, etc.
7. Forward key – Pushing this key will skip forward through the track currently playing. The
track will resume as normal when the key is
released.
8. Rewind key – Pushing this key will rewind
through the track currently playing. The track
will resume as normal when the key is released.
9. A-B repeat key – While playing, push this
key to indicate any point as start point (A point)
and push again to indicate a nish point (B
point). The device will repeat from A to B point
until you push the key again to release the
function and continue to play.
10. Repeat key – When playing in MP3 mode,
push this key once to simply repeat a single
track. Press repeat a second time to repeat all
tracks. Push the key at the third time to release repeat function. This function can not be
used in VOC mode.
11. Volume controls – There are two main vol-
ume controls. The Mic input controls the microphone input level, whereas the remaining
volume control adjusts the output level.
This device offers the following inputs/outputs:
12. Earphone jack – for connecting head-
phones
13. USB – for connecting to a PC
14. SD card – for an SD memory card up to 1
GB
(When a 512 MB SD card is used, the recording time available is over 8 hours.)
15. Microphone – Connect up to two micro-
phones. If only one microphone is used, use
the left input.
1
12 13 14
11
6
15
3249108
7
5
16
Page 10

10 Sound Ambassador 35 Deluxe
16. Mode Key – Push the MODE key together
with another key for special function selections.
The LCD will show “MODE” when pushed. If
you do not push another function key within 5
seconds, the machine will return to idle mode.
The following are the details of special function
keys.
1. MODE + Up: LCD will show “LINE IN”, and
select line in audio source as recording
source.
2. MODE + A-B: allows you to use different
EQ presents. EQ functions will arrive in
the following sequence: Normal, Classic,
Pop, Rock, Jazz.
3. MODE + Rewind: Use this select VOC mode
(allowing you to record from microphone or
LINE IN source) or MP3 mode (allowing
you to download mp3 les from PC).
4. MODE + Forward: When these two keys
are pushed, the LCD will show “DEL.” Push
Forward (ie. Del) key again to delete the
track. The LCD will show “DEL” until the
delete process is nished.
5. MODE + Stop: Change between the ash
and SD card when in play or idle mode.
MP3 Player’s USB Connection
You can easily copy MP3 les from computer to
the machine through USB connection. Connect
the machine to your computer with an appropriate USB cable. You computer will recognize a
new removable storage device automatically.
You can now add, delete, copy and preview les.
If using Windows 98 or below a USB driver will
need to be installed.
When connecting to a PC through the USB port,
the computer will take the device as two remov-
able disks (the rst disk being the built-in ash
memory, the second disk is the SD card). You
can start to copy music from the computer to either of these discs, or copy any of your previ-
ously recorded les from the device to computer.
As the recorded les from the device has been
compressed to MP3 format, it is easy to play-
back the les without any re-encoding.
The device will playback the MP3 les you down-
load from computer in MP3 mode and playback
any sound les you recorded from the Mic or
Line inputs in the VOC mode. However, the play
sequence of the music les in MP3 mode is decided by the sequence the music was copied to
the SD card, thus is not xed. If you want MP3
music to play in a xed sequence – or playback
in VOC mode – you will need to change the le
name of the MP3 les to M_INT.xx.MP3 (where
“xx” is the track number you wish to store the le
as) for on the built-in ash memory, or M_EXT_
xx.MP3 (where “xx” is the track number you wish
to store the le as) for use on an SD card. The
le format must be MP3 for this to work.
Page 11

11
Sound Ambassador 35 Deluxe
IMPORTANT INSTRUCTIONS
Turn the power off when you do not use this
unit for a period of time.
In order to keep stable data transmission,
please do not twist, pull or manipulate the
USB cord.
Do not remove the USB cable during data
transmission.
Make sure the USB is safely ‘removed’ on
your computer before you unplug the USB
cable from the machine or computer.
Do not apply excessive pressure to the LCD
monitor or touch it with ngers or sharp instruments.
Make every effort to ensure this unit does not
get wet.
Do not take SD cards out while data is being
transmitted.
Do not bend, strike, drop or take apart SD
cards.
Do not place the SD card in areas of high
temperature, high humidity, dusty place, or
an area with static electricity or other electri-
cal eld.
Please ensure the SD card has been format-
ted before use.
Make sure the write protection switch of the
SD card is released before attempting to record.
Our product will transmit large amounts of
data while recording and playing. We strongly
suggest using a high quality, high speed SD
card as your extension memory card.
We have extensively tested and approve of
the following SD cards for use with this devices:
Toshiba SD-M51225R2W 512MB / Apacer
SD 120X 1GB / Apacer SD 256MB
We do not guarantee the function, operation,
or life of any SD card as used in this device.
We do not also take any responsibility for the
damage of SD cards used within this device.
Like all other digital products, users must
back up their les from time to time. We do
not take responsibility for any documents lost
while an SD card is used within this device.
Page 12

12 Sound Ambassador 35 Deluxe
Other Important Features
Built-in Battery
The Sound Ambassador 35 Deluxe features
a built-in maintenance-free lead acid type
rechargeable battery, which provides 12V of
direct current to the unit. When fully charged,
the battery can run up to 2 to 4 hours. To remove
the battery, simply push down on the two clips at
the top of the battery cover and remove.
Tripod Stand Socket
Flip the Sound Ambassador 35 Deluxe over.
On the bottom, you will nd a hole, ideal for
use with the Phonic S3 tripod stands (25mm in
diameter).
OPEN OPEN
Page 13

13
Sound Ambassador 35 Deluxe
OPERATING HINTS
1. Before or after use of this unit, users should
charge the battery for approximately 8 hours.
The battery pack loses charge while in storage,
so it’s important to charge the unit before storing,
and do so every 3 months while the unit is being
stored.
2. If the battery remains uncharged for long peri-
ods of time, permanent damage could be caused
and the battery will no longer be covered by warranty.
3. If you use battery power, there is no need
to connect to the unit’s DC power source. The
Sound Ambassador 35 Deluxe can last for 2 - 4
hours on battery power.
4. You can run the unit on DC power and charge
the internal battery simultaneously.
5. If the power LED ashes, connect the DC
power supply as soon as possible, as the battery
is low and the unit will soon shut down.
6. Before you turn the Sound Ambassador on,
turn all volume controls to a minimum. Set them
to an appropriate level after turning the unit on.
7. Each sound source can be used simultaneously, and each source’s volume is controlled
independently.
8. If you use the MP3 recorder/playback unit, you
can use the system and record simultaneously.
9. Please refer to the operating manual for any
wireless microphones you may use for any
safety and usage information in regards to these
modules.
10. Avoid pointing any microphone towards the
speaker, as this will cause feedback.
11. When the operating life of the battery becomes shorter, the battery is old and should thus
be replaced. In normal operation, the battery
should have a life of about 1 year, and is covered
by warranty with consideration to any conditions
that may apply.
Page 14

14 Sound Ambassador 35 Deluxe
APPLICATION
ON
GUITAR EFFECT
GUITAR
MICROPHONE
SOUND AMBASSADOR 35 DELUXE
Page 15
15
Sound Ambassador 35 Deluxe
SPECIFICATIONS
Speaker 6.5” full range
Amplier (watts) 35 watts
Mixer
1 mic, 1 line inputs, CD/MP3 volume control, and tone
control, echo time & repeat
Frequency response (-10dB point) 60Hz~18KHz
Indicator
Battery Low Red
Charging LED bi-color, Red: Charging - ash; Green: battery full- steady
Power LED Blue
Appearance
Handle on top
Mount standable 25mm tripod stand socket
Optional components
CD player or Digital voice recorder/player ; Wireless mic
(UHF, or Infrared); Rechargeable Battery
Built-In limiter Yes
Protection circuitry
thermal, subsonic, RF protection, Output DC offset, Power
on/off muting and short circuit protection
Power Requirement
Optional rechargeable battery or External power supply
15VDC, 100-240VAC, 50/60Hz
Dimensions (HxWxD) 336 x 220 x 216 mm (13.2” x 8.7” x 8.5”)
Weight Less than 7 kg including battery, CD player
Page 16

16 Sound Ambassador 35 Deluxe
DIMENSIONS
* All measurements are shown in mm/inches.
Page 17

17
Sound Ambassador 35 Deluxe
BLOCK DIAGRAM
MP3 RECORDER
Page 18

6103 Johns Road #7
Page 19

 Loading...