

Page 1
ACUMEN 6A
ACUMEN 8A
User's Manual
Manual del Usuario
Page 2

English Español
ACUMEN 6A
ACUMEN 8A
STUDIO MONITOR
MONITOR DE ESTUDIO
ENGLISH .....................................I
ESPAÑOL .....................................II
V1.1 07/02/2015
Page 3

USER'S MANUAL
CONTENTS
INTRODUCTION..............................................................................1
FEATURES.....................................................................................1
CROSSOVER...........................................................................1
AMPLIFIERS...................................................................................1
MOUNTING THE MONITOR.......................................................1
VERTICAL / HORIZONTAL MONITOR...........................................1
CONSOLE TOP MOUNTING.......................................................1
INSTALLATION...........................................................................2
SETTING THE VOLUME.............................................................2
English
SETTING THE HF CONTROL.....................................................2
OVERVIEW..............................................................................2
SPECIFICATIONS........................................................................3
Phonic preserves the right to improve or alter any information within this
document without prior notice
Page 4

IMPORTANT SAFETY INSTRUCTIONS
English
The apparatus shall not be exposed to dripping or splashing and that no objects
with liquids, such as vases,
shall be placed on the apparatus. The MAINS plug is used as the disconnect device, the disconnect device shall
remain readily operable.
Warning: the user shall not place this apparatus in the
area during the operation so that the mains switch
can be easily accessible.
1. Read these instructions before operating this
apparatus.
2. Keep these instructions for future reference.
CAUTION
RISK OF ELECTRIC SHOCK
DO NOT OPEN
3. Heed all warnings to ensure safe operation.
4. Follow all instructions provided in this document.
5. Do not use this apparatus near water or in locations
where condensation may occur.
CAUTION: TO REDUCE THE RISK OF ELECTRIC SHOCK,
DO NOT REMOVE COVER (OR BACK)
NO USER SERVICEABLE PARTS INSIDE
REFER SERVICING TO QUALIFIED PERSONNEL
6. Clean only with dry cloth. Do not use aerosol or liquid
cleaners. Unplug this apparatus before cleaning.
7. Do not block any of the ventilation openings. Install
’
in accordance with the manufacturer
s instructions.
8. Do not install near any heat sources such as radiators,
The lightning flash with arrowhead symbol, within an
equilateral triangle, is intended to alert the user to the
“
presence of uninsulated
product
’
magnitude to constitute a risk of electric shock to persons.
dangerous voltage” within the
heat registers, stoves, or other apparatus (including
.
9. Do not defeat the safety purpose of the polarized or
grounding-type plug. A polarized plug has two blades
with one wider than the other. A grounding type plug
The exclamation point within an equilateral triangle is in-
tended to alert the user to the presence of important operat-
ing and maintenance (servicing) instructions in the literature
accompanying the appliance.
has two blades and a third grounding prong. The wide
blade or the third prong is provided for your safety. If
the provided plug does not
into your outlet, consult
WARNING: To reduce the risk of or electric shock, do
not expose this apparatus to rain or moisture.
an electrician for replacement of the obsolete outlet.
10. Protect the power cord from being walked on or
pinched particularly at plug, convenience receptacles,
and the point where they exit from the apparatus.
11. Only use attachments/accessories
by the
manufacturer.
12. Use only with a cart, stand, tripod, bracket, or
table
by the manufacturer, or sold with
the apparatus. When a cart is used, use caution
when moving the cart/apparatus
combination to avoid injury from tipover.
13. Unplug this apparatus during lighting
storms or wh en unused for long
periods of time.
14. Refer all servicing to
service personnel.
Servicing is required when the apparatus has been
damaged in any way, such as power-supply cord or
plug is damaged, liquid has been spilled or objects
have fallen into the apparatus, the apparatus has
been exposed to rain or moisture, does not operate
normally, or has been dropped.
CAUTION: Use of controls o r adjustments or performance
of procedures other than those
may result in
hazardous radiation exposure.
Page 5
INTRODUCTION
Congratulations on your purchase of another great
product from Phonic. The bi-amplied Acumen 6A and
Acumen 8A are two-way active monitors designed for
high output and unsurpassed clarity.
The Acumen 6A offers a 6” woofer and 82 Watts
of power while the Acumen 8A is an 8” model with
98 Watts of power. The paper cone woofers offer
extended low frequency response and higher output
level.
The Acumen’s compact size, excellent dispersion
and precise stereo imaging make it ideal for near
eld monitoring, mobile vans, broadcast, TV control
rooms and home studios.
Designed as an active speaker, this unit contains
drivers, power ampliers, active crossover ltering
and protection circuitry. The directivity control system
used provides excellent frequency balance even in
difcult acoustic environments.
FEATURES
Acumen 6A
Acumen 8A
4
Long-throw custom-engineered woofer generates
stunningly deep bass response
4
1” silk dome tweeter with neodymium magnet
provides highly transparent and airy highs
4
Reliable and accurate sound signature; true to
source material
4
Adjustable HF onboard equalizers
4
Exceptional HF dispersion provides excellent
detail and sound stage
4
Magnetic shielding allows placement near other
electronic devices
4
Balanced XLR input and 1/4” TRS phone jack
inputs, unbalanced RCA inputs
4
4th Order active Linkwitz-Riley crossover design
4
Electronic speaker protection works to prevent
transducer damage
4
Voltage switchable between 115V and 230V
4
Available in Piano Black, Phonic Red or Crystal White
– 6” Active Studio Monitor
– 8” Active Studio Monitor
MOUNTING THE MONITOR
Vertical / Horizontal Mounting
The speakers are normally delivered for vertical
mounting. Designed for near field monitoring,
this studio monitor requires shorter distance than
traditional monitors from its location to your ears,
which means the reverberation time and general
acoustics of the listening room are less critical. Hard
surfaces will, however, reect the higher frequencies,
therefore try to avoid putting this monitor close to
side walls.
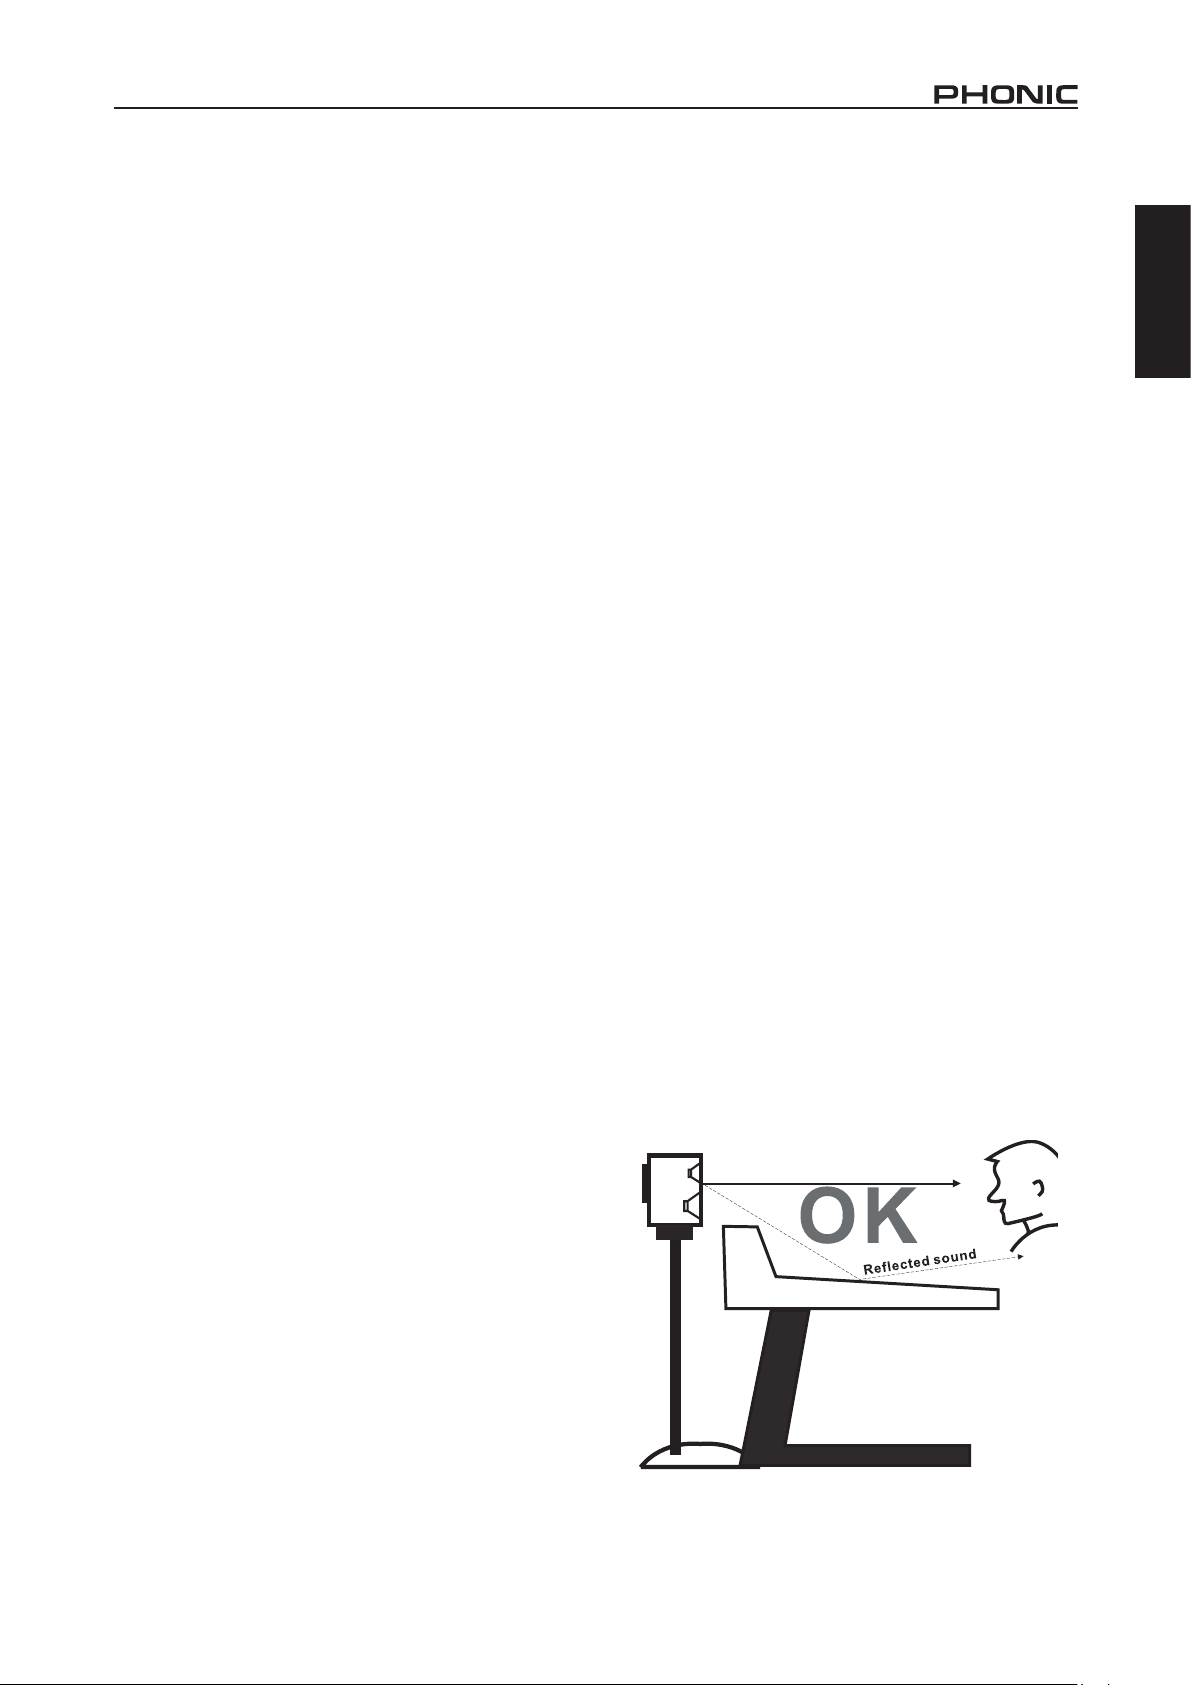
The control surface of your mixing console may
also pose a problem. To minimize control surface
reections, position your monitor as shown in the
gure below, using the meter bridge or rear panel to
block sound from both drivers reaching the control
surface. Make sure that there is nothing between
your ears and the speakers.
If your console has no meter bridge, try positioning
the monitor higher or further behind the desk. Active
series is designed to be used in both the upright and
horizontal position. If you want to place two Active
series horizontally, it is recommended you put the
HF drivers on the outer edge. The low frequencies
of this unit will generally sound better if the cabinet
is against a wall. If possible, provide a rigid surface
(eg. shelf) that is separate from the mixing console
and other equipment. The speakers should roughly
form a 60 degree angle at the listening position, and
should be angled towards the listener.
Console Top Mounting
If the active studio monitor series are used for
console top mounting, it is recommended not to
mount the speakers directly on the console; instead,
position the speaker slightly behind the console by
using oor stand or wall mount behind the console.
This prevents the reection from the console surface
from coloring the sound.
English
CROSSOVER
The active crossover network consists of two
parallel band pass lters. Acoustically the lters are
complementary and the slopes are 24dB / octave.
The crossover frequency is set to 1.7kHz.
AMPLIFIERS
The amplier unit is mounted to the rear panel of
the speaker with damping material, to ensure rattle
free operation and long term reliability. The unit
incorporates special protection circuitry as well,
for driver overload protection and amplier thermal
overload protection. Variable input sensitivity allows
for accurate level matching to the mixing console.
1Acumen 6A / Acumen 8A
Page 6

INSTALLATION
1
2
3
5
4
6
Each active studio monitor is supplied with an
English
integrated amplifier unit, a mains cable and an
operating manual. Once unpacked, place the
loudspeaker in its required listening axis. Before
connecting up, ensure that the mains switch is off.
Audio input is made via a balanced XLR and ¼”
TRS phone jacks, which operate in parallel. Once
connection has been made, the speakers are ready
to be powered-up. Before turning the unit on, make
sure the mains needed is identical with the AC outlet.
Setting the Volume
Adjustment of the volume of each speaker can be
made to match that of the mixing console or other
source, by using the input sensitivity control on the
rear panel. Turning the control counter-clockwise will
reduce the level and clockwise will boost the signal.
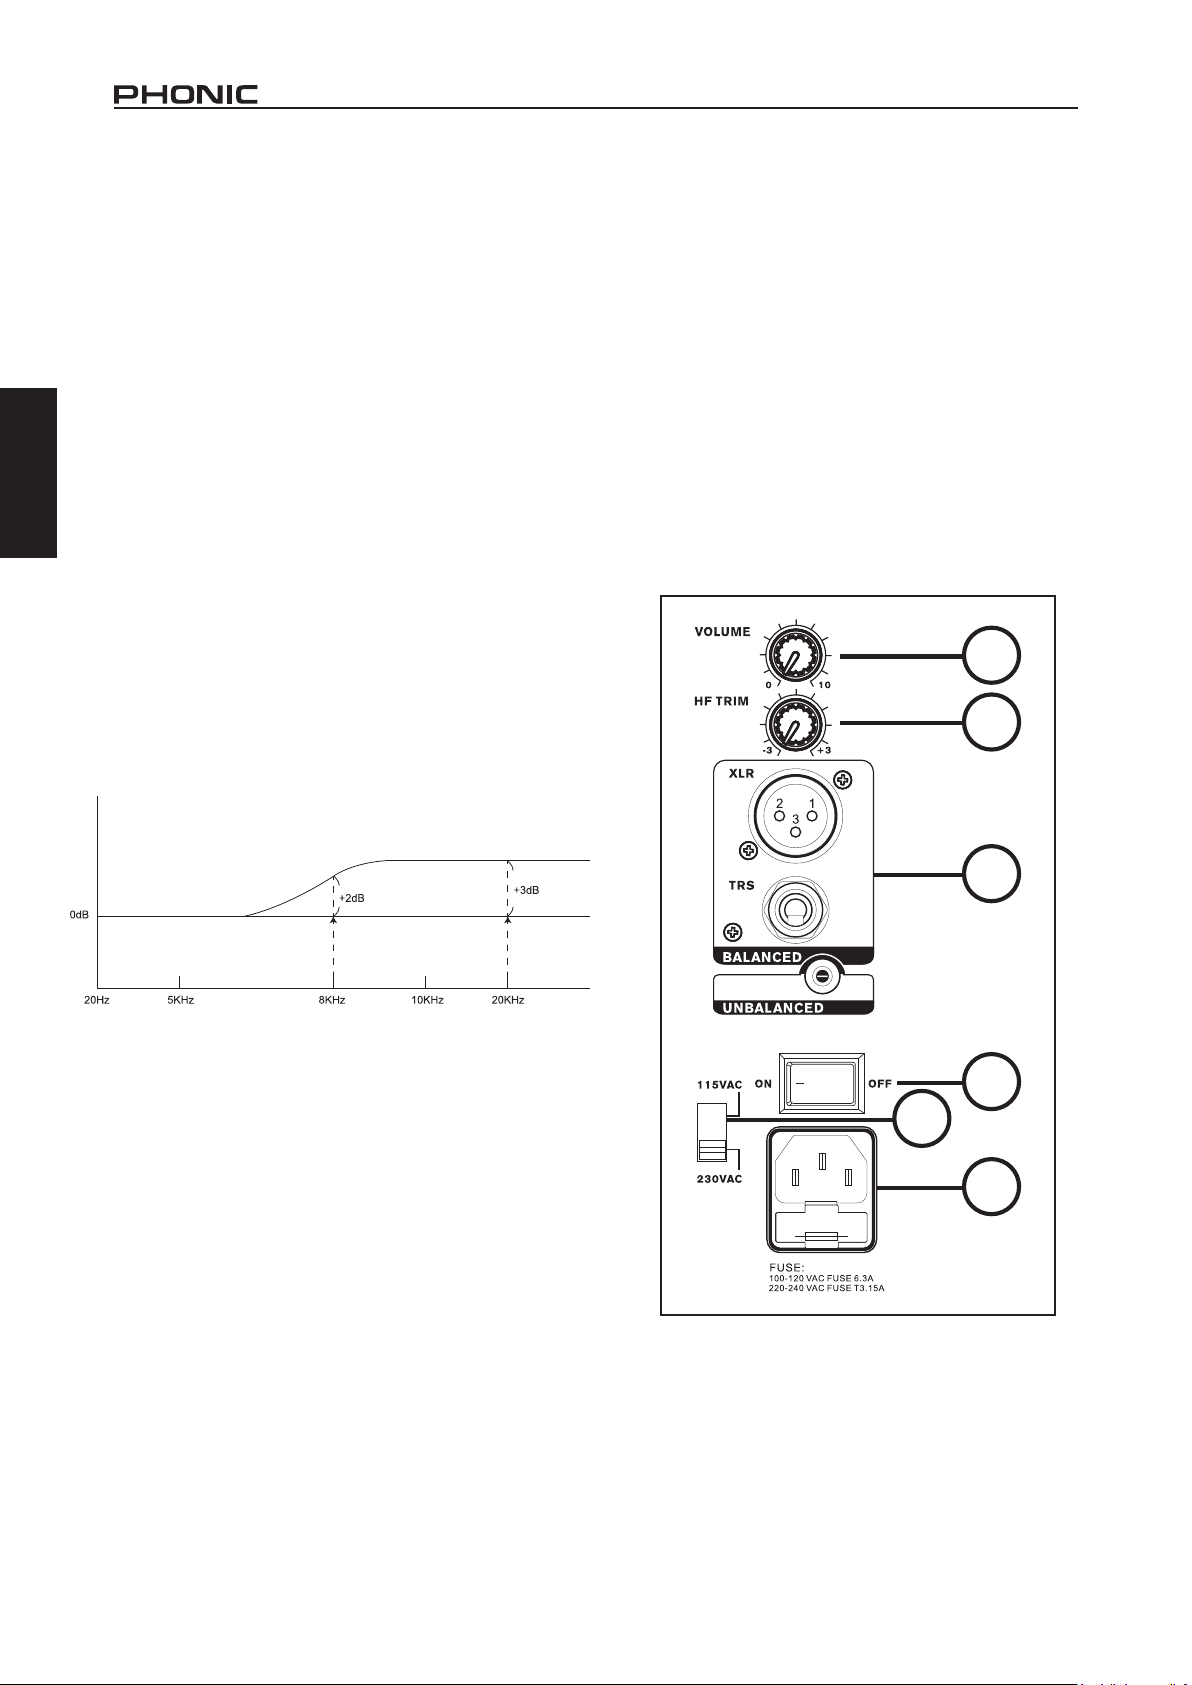
Setting the HF Control
The acoustic response of the system may also have
to be adjusted to match the acoustic environment.
The adjustment is done by setting the HF control
on the rear of the speaker. This will adjust high
frequencies on a curve between 8KHz and 20KHz,
resulting in an overall boost to high frequency sounds.
Set rotary control to the left to cut high frequency
sounds, and to the right to boost them.
4. Voltage Select Switch
This switch allows you to adjust the operating voltage
of the Acumen between 115VAC and 230VAC. When
set to 115VAC, the Acumen can be used with voltages
between 100V and 120V. When set to 230VAC, any
voltages between 220V and 240V. Please be sure
to check your local voltage levels before using the
Acumen speaker.
5. Power Switch
This switch allows users to turn the Acumen on and
off.
6. AC Power Connector
This AC power connector is for a suitable AC power
cable. Connect the power cable to a suitable AC
power source. Be sure to check the local voltage
levels and the voltage select switch before use.
OVERVIEW
1. Volume Control
This rotary control allows users to adjust the input
sensitivity of the Acumen.
2. HF Control
This control adjusts high frequency audio between
-3dB and +3dB.
3. Input Connectors
The balanced ¼” and XLR inputs are available
for users to connect various output devices to the
Acumen studio monitors. In addition to these inputs,
the Acumen also features an unbalanced RCA input
connector.
2 Acumen 6A / Acumen 8A
Page 7

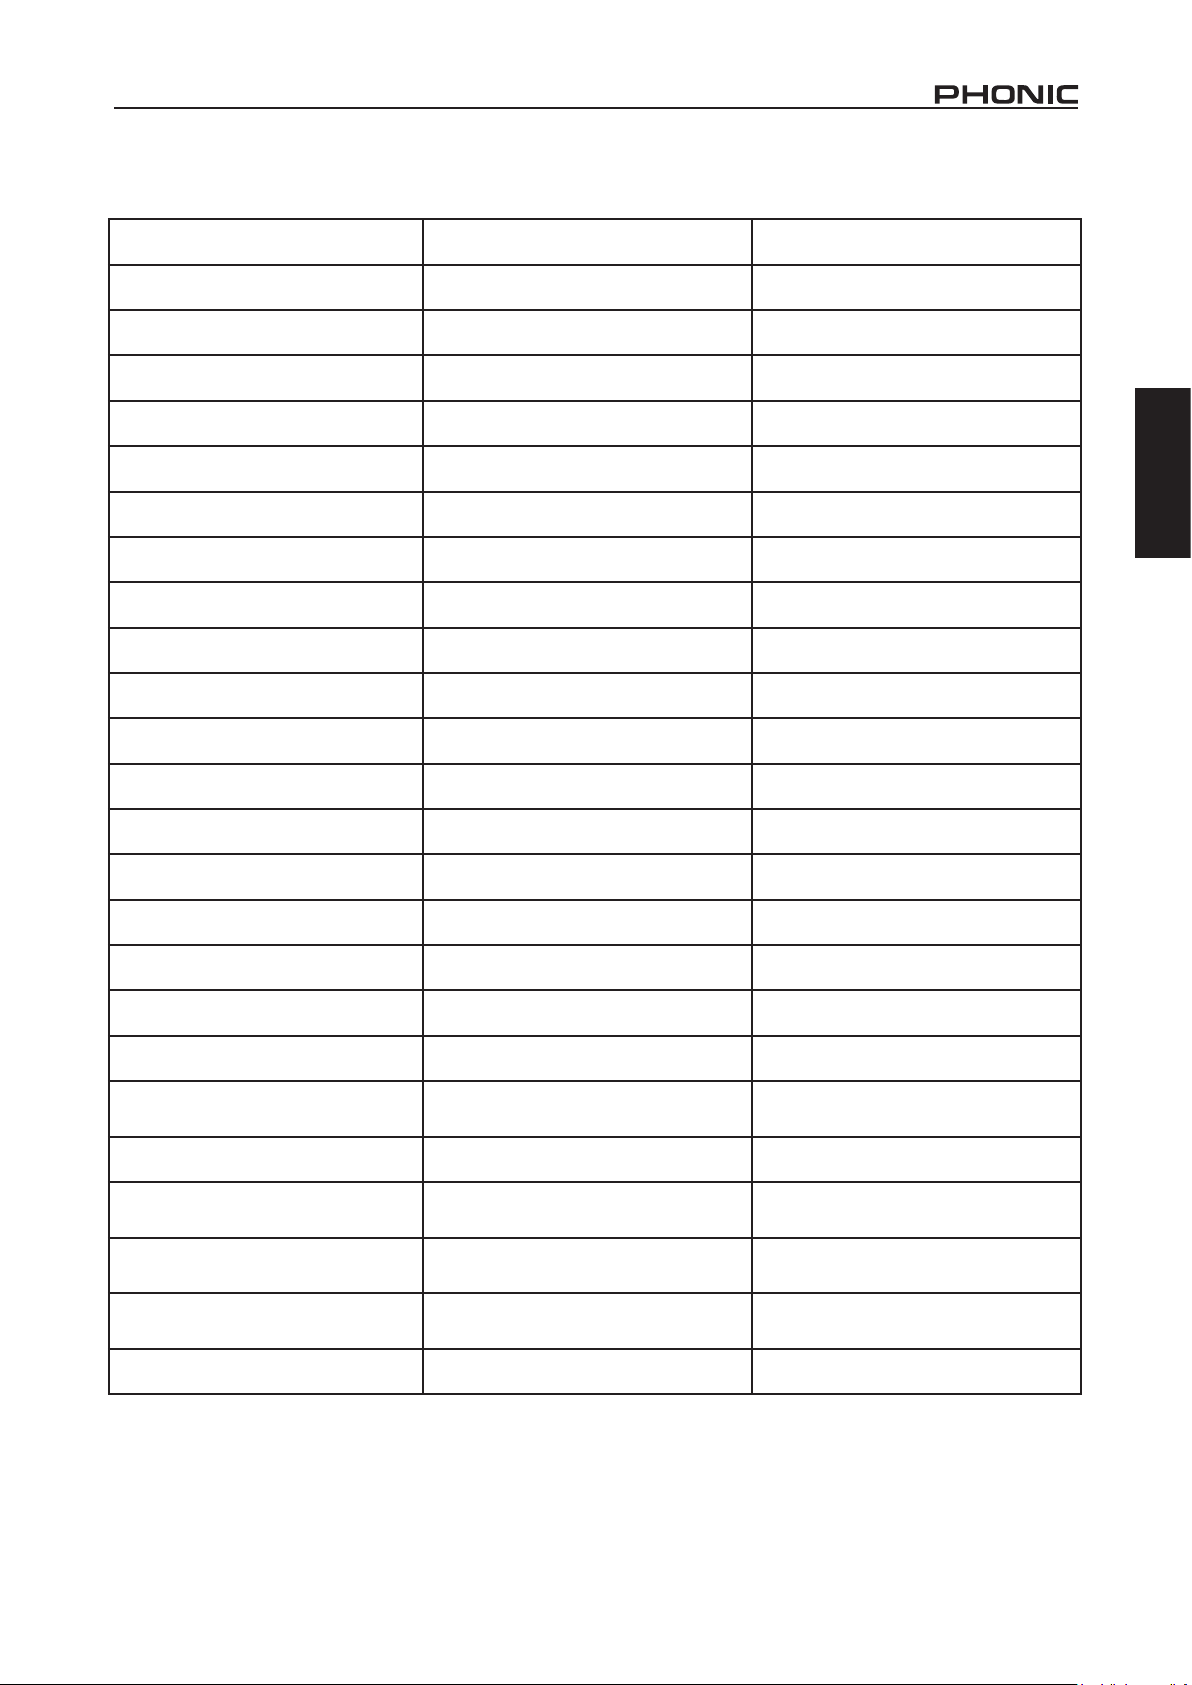
SPECIFICATIONS
Acumen 6A Acumen 8A
Amplier Bi-Amplied Bi-Amplied
High Frequency 35 Watts 42 Watts
Low Frequency 47 Watts 56 Watts
Total Power (RMS) 82 Watts 98 Watts
Total Power (Continuous) 164 Watts 196 Watts
Total Power (Peak) 328 Watts 392 Watts
THD (1 kHz) 0.1% 0.1%
Woofer 6" 8"
Woofer Cone Material Paper Cone Paper Cone
Tweeter 1'' 1"
Tweeter Material Silk Dome Silk Dome
Tweeter Magnet Neodymium Neodymium
English
Frequency Response 35 Hz - 30 kHz 30 Hz - 30 kHz
Maximum SPL 107 dB 110 dB
Adjustable Controls HF level adjustment & compensation HF level adjustment & compensation
Crossover 4th Order L-R active crossover 4th Order L-R active crossover
Crossover Frequency 1.7 kHz 1.7 kHz
Inputs XLR, 1/4" TRS, RCA XLR, 1/4" TRS, RCA
Input Impedance
Indicators Phonic Logo Phonic Logo
Power Requirements
Fuse Requirements
Dimensions (H x W x D)
Weight 7.5 kg (16.5 lbs) 10.9 kg (24 lbs)
Balanced: 20kohm
Unbalanced: 10kohm
Switchable: 115VAC, 230VAC,
50/60Hz
100V - 120V: 6.3A
220V - 240V: T3.15A
338 x 219 x 259 mm
(13.3" x 8.6" x 10.2")
Balanced: 20kohm
Unbalanced: 10kohm
Switchable: 115VAC, 230VAC,
50/60Hz
100V - 120V: 6.3A
220V - 240V: T3.15A
425 x 275 x 300 mm
(16.7" x 10.8" x 11.8")
3Acumen 6A / Acumen 8A
Page 8

English
SERVICE AND REPAIR
For replacement parts, service and repairs please contact the Phonic distributor in your
country. Phonic does not release service manuals to consumers, and advice users to not
attempt any self repairs, as doing so voids all warranties. You can locate a dealer near you at
http://www.phonic.com/where/.
WARRANTY INFORMATION
Phonic stands behind every product we make with a no-hassles warranty. Warranty coverage
may be extended, depending on your region. Phonic Corporation warrants this product for a
minimum of one year from the original date of purchase against defects in material and
workmanship under use as instructed by the user’s manual. Phonic, at its option, shall repair
or replace the defective unit covered by this warranty. Please retain the dated sales receipt as
evidence of the date of purchase. You will need it for any warranty service. No returns or repairs
will be accepted without a proper RMA number (return merchandise authorization). In order to
keep this warranty in effect, the product must have been handled and used as prescribed in the
instructions accompanying this warranty. Any tampering of the product or attempts of self repair
voids all warranty. This warranty does not cover any damage due to accident, misuse, abuse,
or negligence. This warranty is valid only if the product was purchased new from an authorized
Phonic dealer/distributor. For complete warranty policy information, please visit
http://www.phonic.com/warranty/.
CUSTOMER SERVICE AND TECHNICAL SUPPORT
We encourage you to visit our online help at http://www.phonic.com/support/. There you can find
answers to frequently asked questions, tech tips, driver downloads, returns instruction and other
helpful information. We make every effort to answer your questions within one business day.
support@phonic.com
http://www.phonic.com
4 Acumen 6A / Acumen 8A
Page 9

MANUAL DEL USUARIO
CONTENTS
INTRODUCCIÓN..............................................................................1
CARACTERÍSTICAS.......................................................................1
CROSSOVER...........................................................................1
AMPLIFICADORES.......................................................................1
MONTAJE DEL MONITOR..................................................1
MONTAJE VERTICAL / HORIZONTAL..........................................1
CONSOLA DE MONTAJE SUPERIOR..........................................1
INSTALACIÓN...........................................................................2
AJUSTE DEL VOLUMEN.............................................................2
AJUSTE DEL CONTROL DE HF.....................................................2
English Español
DESCRIPCIÓN GENERAL............................................................2
ESPECIFICACIONES.....................................................3
Phonic se reserva el derecho de mejorar o alterar cualquier información
provista dentro de este documento sin previo aviso
Page 10

English Español
Page 11

INTRODUCCIÓN
Felicitaciones por la compra de otro gran producto de
Phonic. El bi-amplicado Acumen 6A y 8A Acumen
son monitores de dos vías activas diseñadas para una
mayor potencia y claridad sin igual. El Acumen 6A ofrece
un woofer 6” y 82 vatios de potencia mientras que el
Acumen 8A es un modelo 8” con 98 vatios de potencia.
Los woofers en cono ofrecen extendida respuesta de
baja frecuencia y el nivel de salida más alto. El tamaño
compacto del Acumen, ofrece una excelente dispersión
y la imagen estéreo precisa, lo hacen ideal para el
monitoreo de campo cercano, unidades móviles, de
radiodifusión, salas de control de televisión y estudios
caseros. Diseñado como un altavoz activo, esta unidad
contiene controladores, amplicadores de potencia, ltros
crossover activo y circuitos de protección. El sistema de
control de directividad utilizado proporciona un excelente
equilibrio de frecuencias, incluso en ambientes acústicos
difíciles.
CARACTERÍSTICAS
Acumen 6A - Monitor activo para estudio 6“
Acumen 8A - Monitor activo para estudio 8“
4Woofer de largo alcance, con ingeniería personalizada
genera una respuesta de bajos increíblemente
profundos
4Tweeter de cúpula de seda 1“ con imán de neodimio
proporciona máximos muy transparentes y luminosas
4Firma de sonido able y preciso; el al material original
4Ecualizadores bordo HF ajustable
4Dispersión HF excepcional proporciona un excelente
detalle y estudio de sonido
4La protección magnética permite la colocación cerca
de otros dispositivos electrónicos
4Entrada XLR simétricas y TRS de 6.35mm , conexiones
de entradas asimétricas RCA
4Diseño activo cruce Linkwitz-Riley 4º Orden
4Protección de los altavoces Electrónico previene el
daño transductor
4Tensión conmutable entre 115VAC y 230VAC
4Disponible en Negro Piano, Phonic Red o Cristal Blanco
MONTAJE DEL MONITOR
Montaje Vertical / Horizontal
Los altavoces se entregan normalmente para montaje
vertical. Diseñado para la monitorización de campo
cercano, este monitor de estudio requiere distancia más
corta que los monitores tradicionales, lo que signica que
el tiempo de reverberación y la acústica generales de
la sala de escucha son menos críticos. Las supercies
duras serán, sin embargo, reejan las frecuencias más
altas, por lo tanto, tratan de evitar poner este monitor
cerca de las paredes laterales.
La supercie de control de la consola de mezcla también
puede suponer un problema. Para minimizar los reejos
de la supercie de control, coloque el monitor como se
muestra en la gura siguiente, utilizando el panel trasero
para bloquear el sonido de los dos pilotos que llegan a
la supercie de control. Asegúrese de que no hay nada
entre los oídos y los altavoces.
Si la consola no tiene panel trasero, intente colocar el
monitor más alto o más detrás del escritorio. Esta serie
está diseñado para ser utilizado tanto en la posición
vertical y horizontal. Si desea colocar dos series activa
horizontalmente, se recomienda que usted ponga
el sonido del tweeter en el borde exterior. Las bajas
frecuencias de esta unidad por lo general suenan mejor
si el mueble exterior está en contra de una pared. Si es
posible, proporcionar una supercie rígida (por ejemplo,
plataforma) que es independiente de la consola de
mezcla y otros equipos. Los altavoces deben formar
aproximadamente un ángulo de 60 grados en la posición
de escucha, y deben ser en ángulo hacia el oyente.
Consola De Montaje Superior
Si el estudio de este monitor activo se utilizan para la
consola de montaje superior, se recomienda no montar
los altavoces directamente en la consola; en su lugar,
colocar el altavoz ligeramente detrás de la consola
mediante el uso de soporte de suelo o en la pared detrás
de la consola. Esto evita que la reexión de la supercie
de la consola de colorear el sonido.
English Español
CROSSOVER
La red de crossover activo consiste en dos ltros de
paso de bandas paralelas. Acústicamente los ltros son
complementarios con pendientes de 24dB/octava. La
frecuencia de transición está ajustada a 1.7KHz.
AMPLIFICADORES
El amplicador se monta en el panel trasero del altavoz
con material de amortiguación, para asegurar un
funcionamiento libre de traqueteo y abilidad a largo
plazo. La unidad incorpora circuitos de protección
especial, además, para la protección de sobrecarga
del conductor y la protección de sobrecarga térmica del
amplicador. Sensibilidad de entrada variable permite
para el nivel de precisión de acoplamiento a la mesa de
mezclas.
Acumen 6A / Acumen 8A
1
Page 12
INSTALACIÓN
1
2
3
5
4
6
Cada monitor de estudio activo se suministra con una uni-
English Español
dad de amplicador integrado, un cable de alimentación y
un manual de instrucciones. Una vez desembalado, coloque el altavoz en su eje de escucha. Antes de conectar,
asegúrese de que el interruptor principal está apagado.
La entrada de audio se realiza mediante conexiones XLR
simétricas y conexiones TRS de 6.35mm, que funcionan
en paralelo. Una vez que la conexión se ha hecho, los
altavoces están listos para ser alimentado-up. Antes de
encender la unidad, asegúrese de que la red necesita es
idéntica a la toma de CA.
Ajuste del volumen
Ajuste del volumen de cada altavoz se puede hacer para
que coincida con la de la consola de mezcla o de otra
fuente, utilizando el control de sensibilidad de entrada en
el panel posterior. Si gira el control hacia la izquierda reducirá el nivel y hacia la derecha aumentará la señal.
Ajuste del control de HF
La respuesta acústica del sistema también puede tener
que ser ajustada para que coincida con el entorno acústico. El ajuste se realiza ajustando el control HF en la parte
posterior del altavoz. Esto ajustará altas frecuencias en
una curva entre 8 KHz y 20 KHz, lo que resulta en un impulso general a los sonidos de alta frecuencia. Coloque el
control giratorio a la izquierda para cortar los sonidos de
alta frecuencia, y hacia la derecha para aumentar ellos.
4. Selector de voltaje
Este interruptor permite ajustar el voltaje de funcionamiento del Acumen entre 115VAC y 230VAC. Cuando se
ajusta a 115VAC, el Acumen se puede utilizar con voltajes entre 100V y 120V. Cuando se ajusta a 230VAC,
cualquier voltaje entre 220V y 240V. Por favor, asegúrese
de revisar sus niveles de tensión locales antes de usar el
altavoz Acumen.
5. Interruptor de encendido
Este interruptor permite a los usuarios convertir los Acumen encendido y apagado.
6. Conector de alimentación de CA
Este conector de alimentación de CA es para un cable
de alimentación de CA adecuada. Conecte el cable de
alimentación a una fuente de alimentación de CA adecuada. Asegúrese de revisar los niveles de tensión local y el
conmutador de selección de voltaje antes de usar.
DESCRIPCIÓN GENERAL
1. Control de volumen
Este control giratorio permite al usuario ajustar la sensibilidad de entrada del Acumen.
2. Control de HF
Este control ajusta el audio de alta frecuencia de entre
-3dB y 3 dB.
3. Conectores de entrada
Los conectores de 6.35mm y XLR simétricos están disponibles para que los usuarios conecten varios dispositivos de salida a los monitores de estudio Acumen.
Además de estas entradas, el Acumen también cuenta
con un conector de entrada RCA desequilibrado.
2
Acumen 6A / Acumen 8A
Page 13
ESPECIFICACIONES
Acumen 6A Acumen 8A
Amplicador Bi-Amplicado Bi-Amplicado
Frecuencia alta
Baja frecuencia
Potencia Total (RMS)
Potencia Total (Continua)
Potencia Total (Pico)
THD (1 kHz) 0.1% 0.1%
Woofer 6" 8"
Woofer Material del cono Cono papel Cono papel
Tweeter 1'' 1''
Tweeter de material Domo de seda Domo de seda
Imán Tweeter Neodimio Neodimio
35
47
82
164
328
vatios
vatios
vatios
vatios
vatios
42
56
98
196
392
vatios
vatios
vatios
vatios
vatios
English Español
Respuesta de frecuencia 35 Hz - 30 kHz 30 Hz - 30 kHz
SPL máximo 107 dB 110 dB
Controles ajustables Ajuste del nivel de HF y compensación Ajuste del nivel de HF y compensación
Crossover Cuarto de pedido L-R crossover activo Cuarto de pedido L-R crossover activo
Frecuencia de cruce 1.7 kHz 1.7 kHz
Entradas XLR, TRS 6.35mm, RCA XLR, TRS 6.35mm, RCA
Impedancia de entrada
Indicadores Phonic Logo (Encendido) Phonic Logo (Encendido)
Requisitos de alimentación
Requisitos de fusibles
Dimensiones (H x W x D)
Peso 7.5 kg (16.5 lbs) 10.9 kg (24 lbs)
Simetrico: 20kohm
Asimetrico: 10kohm
Conmutable a: 115VAC, 230VAC,
50/60Hz
100V - 120V: 6.3A
220V - 240V: T3.15A
338 x 219 x 259 mm
(13.3" x 8.6" x 10.2")
Simetrico: 20kohm
Asimetrico: 10kohm
Conmutable a: 115VAC, 230VAC,
50/60Hz
100V - 120V: 6.3A
220V - 240V: T3.15A
425 x 275 x 300 mm
(16.7" x 10.8" x 11.8")
Acumen 6A / Acumen 8A
3
Page 14

English Español
SERVICIO Y REPARACIÓN
Para refacciones de reemplazo y reparaciones, por favor póngase en contacto con nuestro
distribuidor de Phonic en su país. Phonic no distribuye manuales de servicio directamente a los
consumidores y, avisa a los usuarios que no intenten hacer cualquier reparación por si mismo,
haciendo ésto invalidará todas las garantías del equipo. Puede encontrar un distribuidor cerca
de usted en http://www.phonic.com/where/.
INFORMACIÓN DE LA GARANTIA
Phonic respalda cada producto que hacemos con una garantía sin enredo. La cobertura de
garantía podría ser ampliada dependiendo de su región. Phonic Corporation garantiza este
producto por un mínimo de un año desde la fecha original de su compra, contra defectos en
materiales y mano de obra bajo el uso que se instruya en el manual del usuario. Phonic, a su
propia opinión, reparará o cambiará la unidad defectuosa que se encuentra dentro de esta
garantía. Por favor, guarde los recibos de venta con la fecha de compra como evidencia de la
fecha de compra. Va a necesitar este comprobante para cualquier servicio de garantía. No se
aceptarán reparaciones o devoluciones sin un número RMA apropiado (return merchandise
autorization). En orden de tener esta garantía válida, el producto deberá de haber sido
manejado y utilizado como se describe en las instrucciones que acompañan esta garantía.
Cualquier atentado hacia el producto o cualquier intento de repararlo por usted mismo,
cancelará completamente esta garantía. Esta garantía no cubre daños ocasionados por
accidentes, mal uso, abuso o negligencia. Esta garantía es válida solamente si el producto fue
comprado nuevo de un representante/distribuidor autorizado de Phonic. Para la información
completa acerca de la política de garantía, por favor visite http://www.phonic.com/warranty/.
SERVICIO AL CLIENTE Y SOPORTE TÉCNICO
Le invitamos a que visite nuestro sistema de ayuda en línea en www.phonic.com/support/. Ahí
podrá encontrar respuestas a las preguntas más frecuentes, consejos técnicos, descarga de
drivers, instrucciones de devolución de equipos y más información de mucho interés. Nosotros
haremos todo el esfuerzo para contestar sus preguntas lo antes posible.
support@phonic.com
http://www.phonic.com
4
Acumen 6A / Acumen 8A
Page 15

NOTES
Appendix Apéndice
Aumen 6A / Acumen 8A
1
Page 16

 Loading...