

Page 1

SuperPower and UltraPower
hearing aid
User Guide
Page 2

2
1. Welcome 5
2. Important safety information:
Please read before operating your hearing
aid for the first time 6
Hazard warnings 6
Information on product safety 8
3. Hearing aid description 10
4. Step-by-step instructions for using
the hearing aid 13
Step 1. Getting to know your hearing aid 13
Step 2. Battery preparation 15
Step 3. Inserting the battery 15
Step 4. Turning on the hearing aid 16
Step 5. Inserting the hearing aid 17
Step 6. Adjusting the volume control
behind the ear 21
Step 7. Selecting the hearing program
behind the ear 22
Contents
Page 3

3
Step 8. Removing the hearing aid 23
Step 9. Turning off the hearing aid 24
Step 10. Changing the battery 25
Step 11. Changing the battery in hearing
aid with a secured battery compartment 26
5. Care and maintenance 28
6. Troubleshooting 31
7. Wireless accessories 32
8. FM systems 33
FM system description 34
Option A: Design-integrated FM receiver 34
Option B: Audio shoe with universal FM receiver 36
9. Service and warranty 40
10. Compliance information 41
11. Information and explanation of symbols 44
Page 4

Page 5

5
1. Welcome
Your new hearing aid is a premium Swiss quality product.
It was developed by Phonak, one of the world‘s leading
companies in hearing technology. Your hearing aid offers
the most modern digital hearing technology currently
available on the market.
Please read these user instructions thoroughly in order
to benefit from all the possibilities your new hearing
aid has to offer. With proper use and care, you will be
able to enjoy your hearing aid for many years to come.
If you have any questions, please consult your hearing
care professional.
Phonak - life is on www.phonak.com
0459
Page 6

6
Please read the information on the following pages
before using your hearing aid.
A hearing aid will not restore normal hearing and
will not prevent or improve a hearing impairment
resulting from organic conditions. Infrequent use
of a hearing aid does not permit a user to attain full
benefit from it. The use of a hearing aid is only
part of hearing habilitation and may need to be
supplemented by auditory training and instruction
in lipreading.
2.1 Hazard warnings
Use only hearing aids that have been specially pro-
grammed for you by your hearing care professional.
Other systems may be ineffective and may, in
certain cases, damage your hearing.
Changes or modifications to the hearing aid that
were not explicitly approved by Phonak are not
permitted. Such changes may damage your ear or
the hearing aid.
2. Important safety information
Page 7

7
Hearing aid batteries are toxic if they are swallowed!
Keep out of reach of children and pets. If batteries
are swallowed, consult your physician immediately!
If you feel pain in or behind your ear, if it is inflamed
or if skin irritation and accelerated accumulations
of ear wax occur, please check with your hearing care
professional or physician.
Hearing programs in the directional microphone
mode reduce background noises. Please be aware
that warning signals or noises coming from behind,
e. g. cars, are partially or entirely suppressed.
The hearing aid contains small parts which can be
swallowed by children.
External devices may only be connected if they
have been tested in accordance with corresponding
IECXXXXX standards. Only use accessories approved
by Phonak AG.
Page 8

8
2.2 Information on product safety
Never immerse your hearing aid in water! Protect
it from excessive moisture. Always remove your
hearing aid before showering, bathing, or swimming.
Protect your hearing aid from heat (never leave it
near a window or in the car). Never use a microwave
or other heating devices to dry your hearing aid.
Ask your hearing care professional about suitable
drying methods.
When you are not using your hearing aid, leave
the battery compartment open so that any
moisture can evaporate. Make sure that you always
completely dry your hearing aid after use. Store
the hearing aid in a safe, dry and clean place.
Do not drop your hearing aid! Dropping onto a hard
surface can damage your hearing aid.
Always use new batteries for your hearing aid.
You can return used batteries to your hearing care
professional.
2. Important safety information
Page 9

9
Remove the battery if you are not using your hearing
aid for a long period of time.
X-ray radiation (e. g. CT scans, MRI scans) may
adversely affect the correct functioning of your
hearing aid. We recommend that you remove
them before undergoing X-ray procedures and keep
them outside the room.
Do not use your hearing aid in areas where electronic
equipment is prohibited.
Page 10

10
The following user instructions describe two hearing
aid models: The SuperPower and the UltraPower
hearing aid.
The SuperPower and the UltraPower hearing aid can
be adapted with a variety of earmolds.
On the following pages use the labeled drawings to
identify the hearing aid and the earmold that you
use.
Your hearing care professional will tell you what size
of battery you need for your hearing aid.
3. Hearing aid description
Page 11

11
SuperPower and UltraPower model
Option A: with classic earmold
a Right or left indicator (right=red, left=blue)
b Battery compartment with ON / OFF switch
c Volume control
d Program button
e Microphone input with Wind and Weather Protector
f Hook / sound output
g Hearing tube
h Classic earmold
c
d
e f
g
h
b
a
Page 12

12
3. Hearing aid description
SuperPower and UltraPower model
Option B: Power SlimTube with classic earmold
a Right or left indicator (right=red, left=blue)
b Battery compartment with ON / OFF switch
c Volume control
d Program button
e Microphone input with Wind and Weather Protector
f Power SlimTube
g Classic earmold
c
d
e f
g
b
a
Page 13

13
The following chapter provides step-by-step instructions
on how to use your hearing aid. Please follow
these steps carefully. In the drawings, the parts that
are particularly important for each step are shown
in green.
Step 1. Getting to know your hearing aid
Take the hearing aid in your hand and try out the
hearing aid controls. This will make it easier for you to
feel and operate the controls later on when wearing
the hearing aid.
4. Step-by-step instructions for using
the hearing aid
Page 14

14
SuperPower and UltraPower model
To increase the volume, press the volume control
upwards. To decrease the volume, press the volume
control downwards (Fig. 1a).
In order to change a hearing program, press the program
button displayed (Fig. 1b).
Fig. 1a
Fig. 1b
4. Using the hearing aid
Decrease volume
Increase volume
Page 15

15
Step 2. Battery preparation
Remove the protective foil from the new battery (Fig. 2).
Wait for two minutes before inserting to activate the
battery.
Step 3. Inserting the battery
Take the hearing aid in your hand (Fig. 3a) and open
the battery door. Insert the battery so that you see the
+ symbol on the battery (Fig. 3b).
Fig. 2
Fig. 3a Fig. 3b
Page 16

16
Step 4. Turning on the hearing aid
Switch on the hearing aid by closing the battery
compartment (Fig. 4).
Open and close the battery compartment gently
and carefully.
Check if you feel resistance when closing the
battery compartment. Check to make sure the
battery is correctly inserted and in the correct
direction. If the battery is inserted the wrong
way, the hearing aid will not work and the
battery compartment can be damaged.
Fig. 4
4. Using the hearing aid
Page 17

17
The hearing aid is now switched on. It can take up to
15 seconds before it starts.
(When you wear the hearing aid, you will hear an
acoustic signal).
Step 5. Inserting the hearing aid
This step shows you how to correctly insert the hearing
aid. The instructions apply for both SuperPower and
UltraPower hearing aid. The type of earmold determines
how the hearing aid is inserted.
Each hearing aid is individually programmed
for your right or left ear. For the first step
identify right and left so you will be able to insert
your hearing aid in the correct ear.
Page 18

18
Step 5.1 Identifying the hearing aid for the
right and left ear
Color indicator:
right = red
left = blue
Fig. 5a
4. Using the hearing aid
Page 19
19
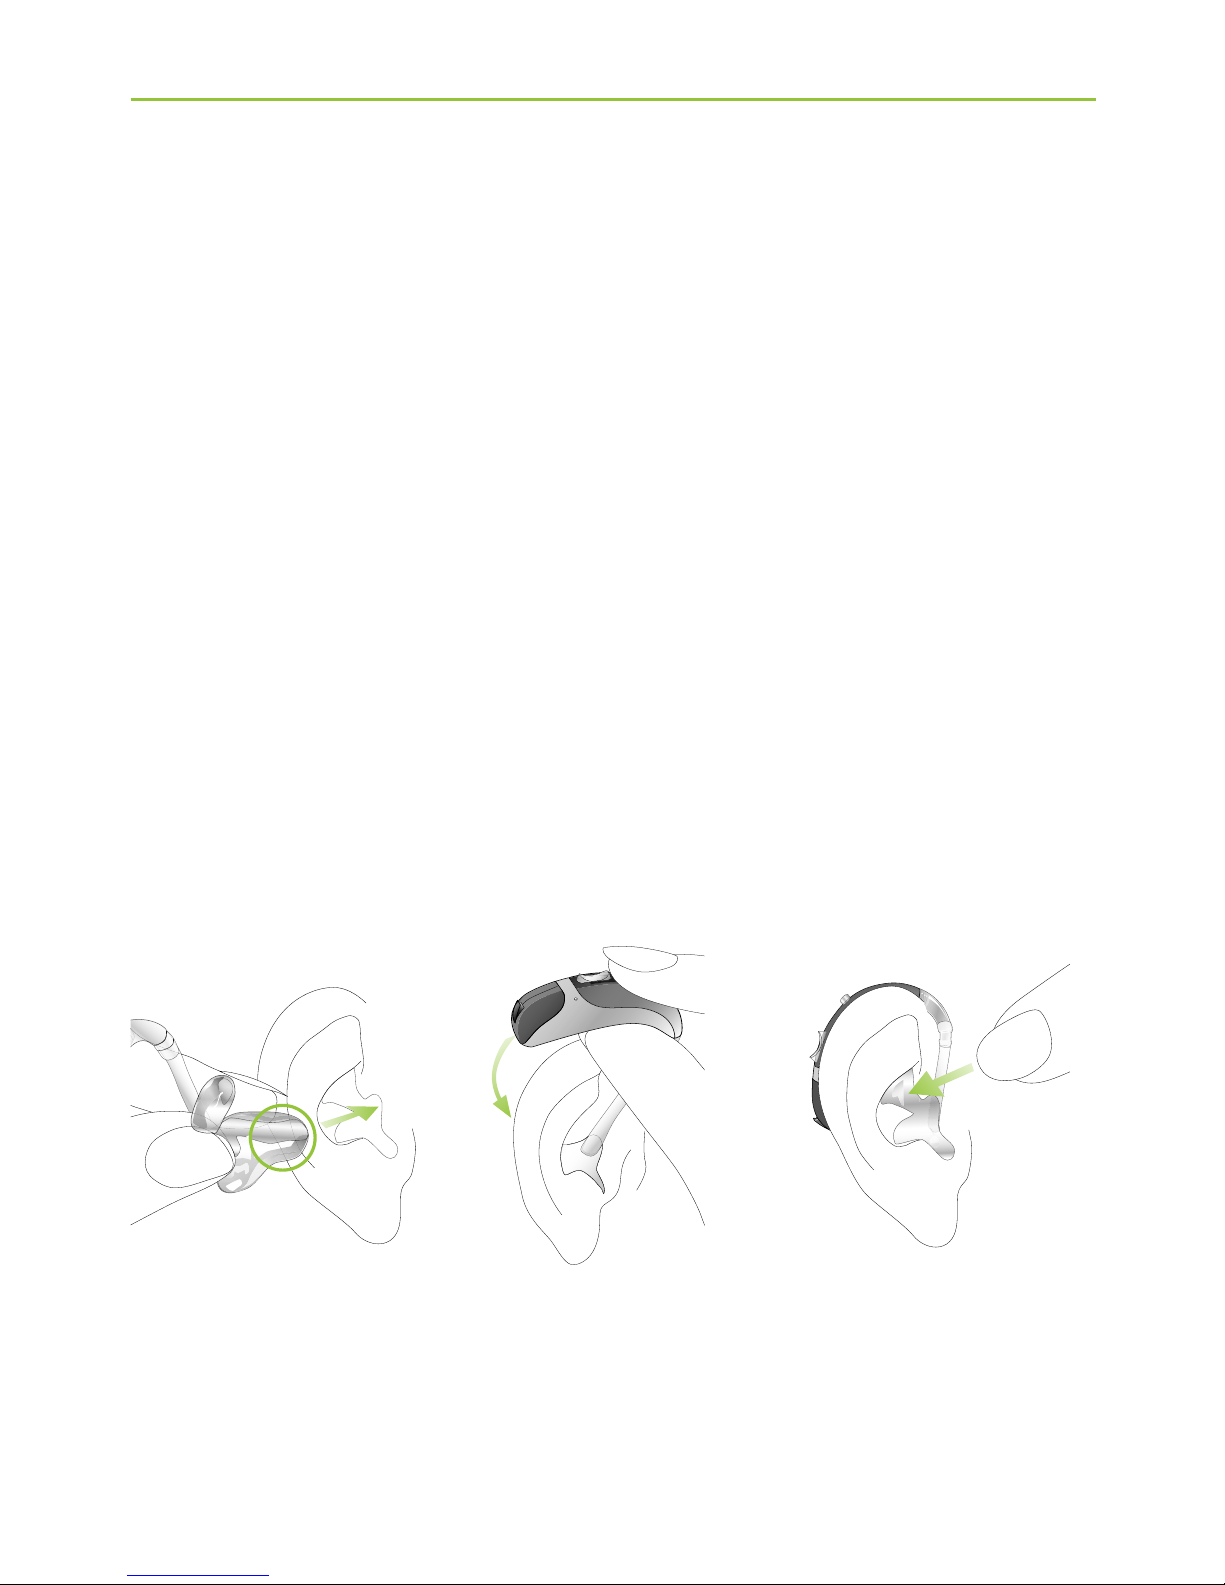
Step 5.2 Inserting the hearing aid with classic earmold
With your right hand, take your earmold for the
right ear (red mark on the hearing aid, see step 5.1)
between your thumb and forefinger (Fig. 5b).
Take the earmold up to your ear (Fig. 5b). Place the ear
canal part of the earmold into your ear canal (see the
part circled in green (Fig. 5b)). Next place the
hearing aid behind your ear (Fig. 5c). Then insert the
upper part of the earmold into the upper part of the
bowl of your ear (Fig. 5d).
Fig. 5b
Fig. 5dFig. 5c
Page 20
20
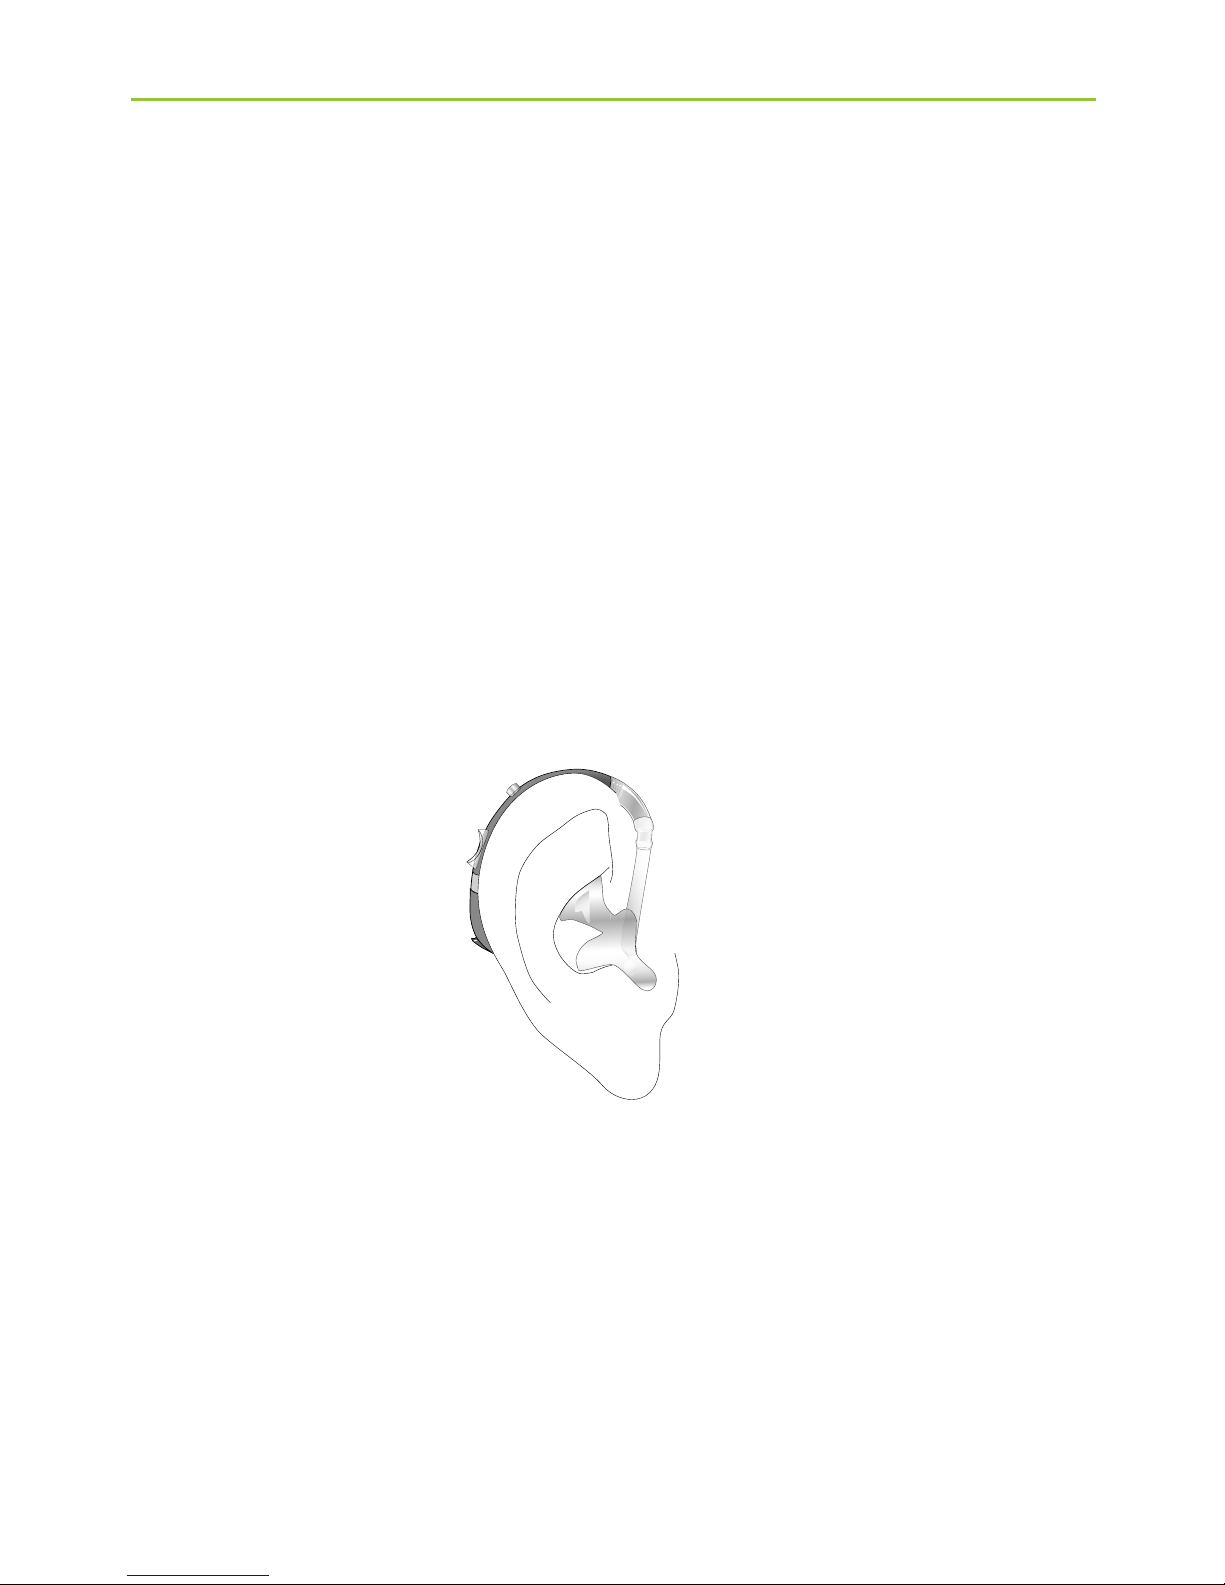
If you have problems inserting the hearing aid, use your
other hand to gently pull your earlobe downwards. This
opens the ear canal a little more and you can rotate
the earmold until it fits correctly.
Check the fit by running your finger over the bowl of
the ear. You know it fits correctly if, when doing so, you
feel the contour of the bowl of the ear and not the
hearing aid (Fig. 5e). In the beginning, please use a mirror
to check.
You have now successfully inserted the right hearing
aid. Now insert your left hearing aid in the same way
(marked in blue, see step 5.1).
Fig. 5e
4. Using the hearing aid
Page 21
21
Step 5.3 Inserting the hearing aid with Power SlimTube
and classic earmold
Follow the instructions in Step 5.2, as this procedure is
identical.
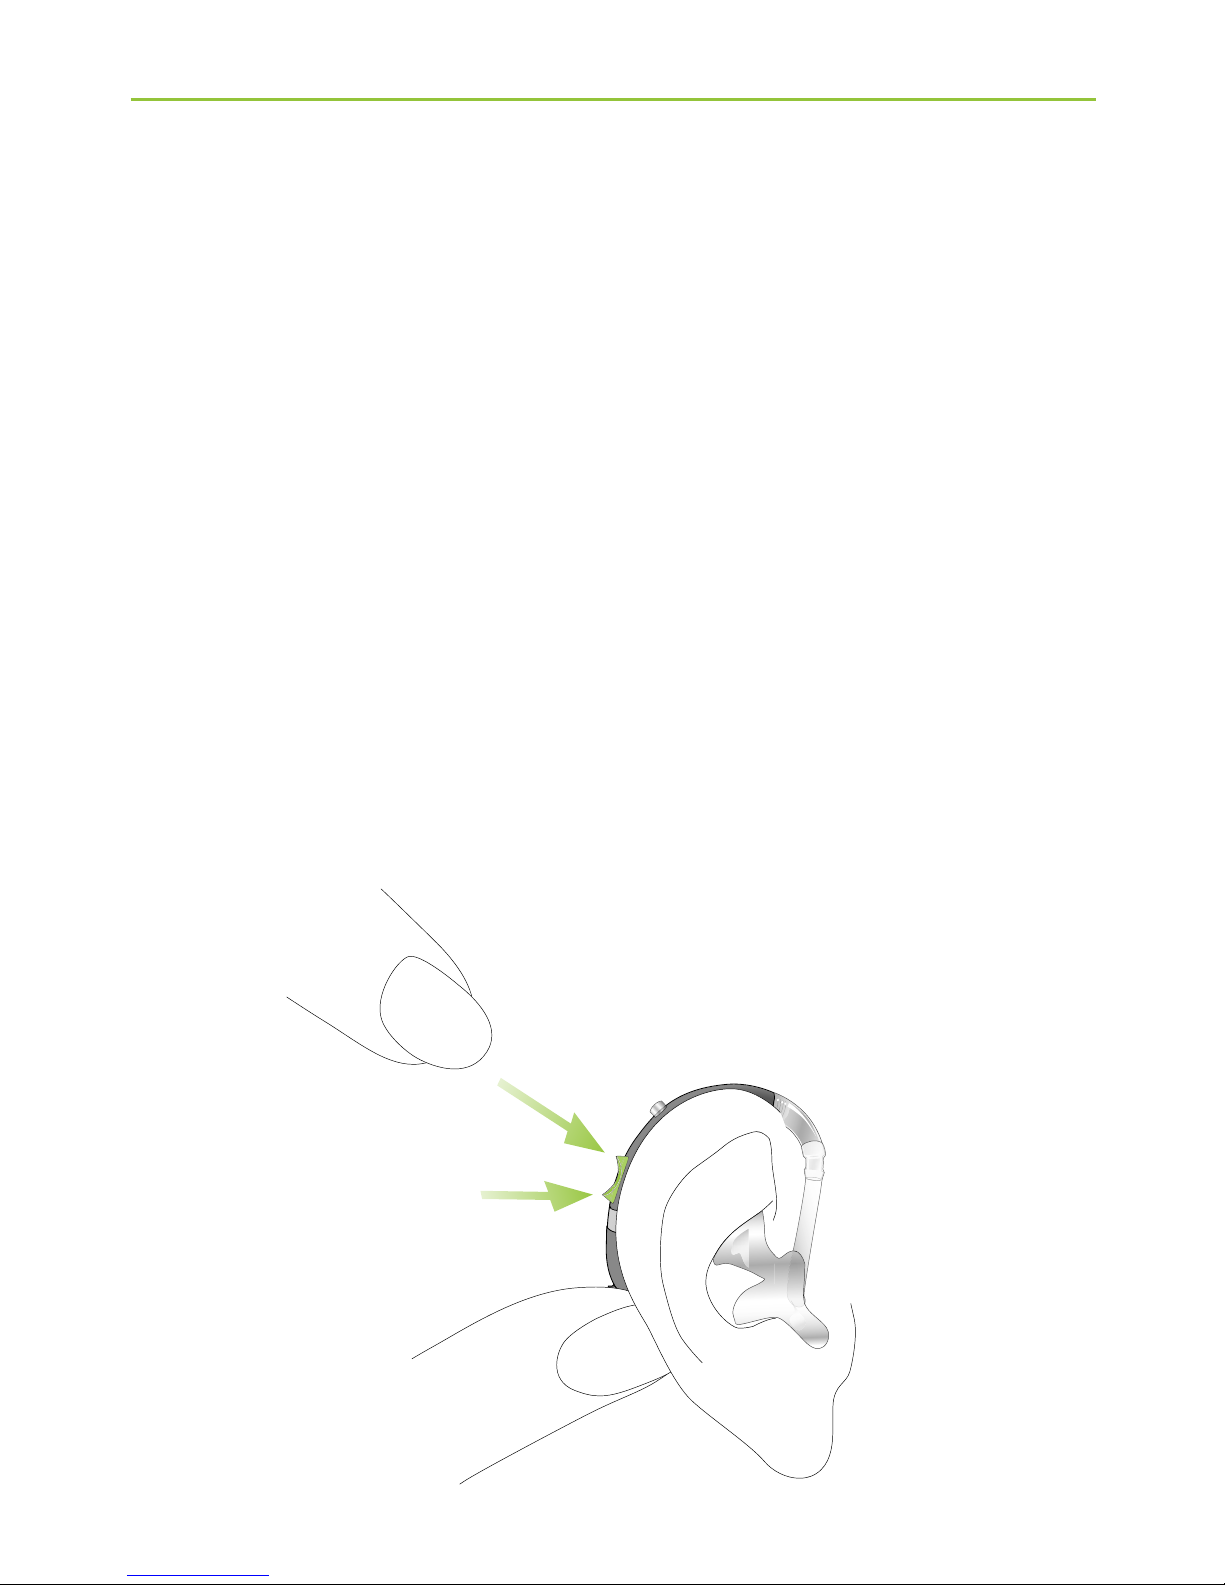
Step 6. Adjusting the volume control behind the ear
To increase the volume on a SuperPower and UltraPower
model press the volume control upwards. To decrease
it, press the volume control downwards using your
forefinger. Use your thumb to lightly support the hearing
aid (Fig. 6).
Fig. 6
Increase volume
Decrease volume
Page 22
22
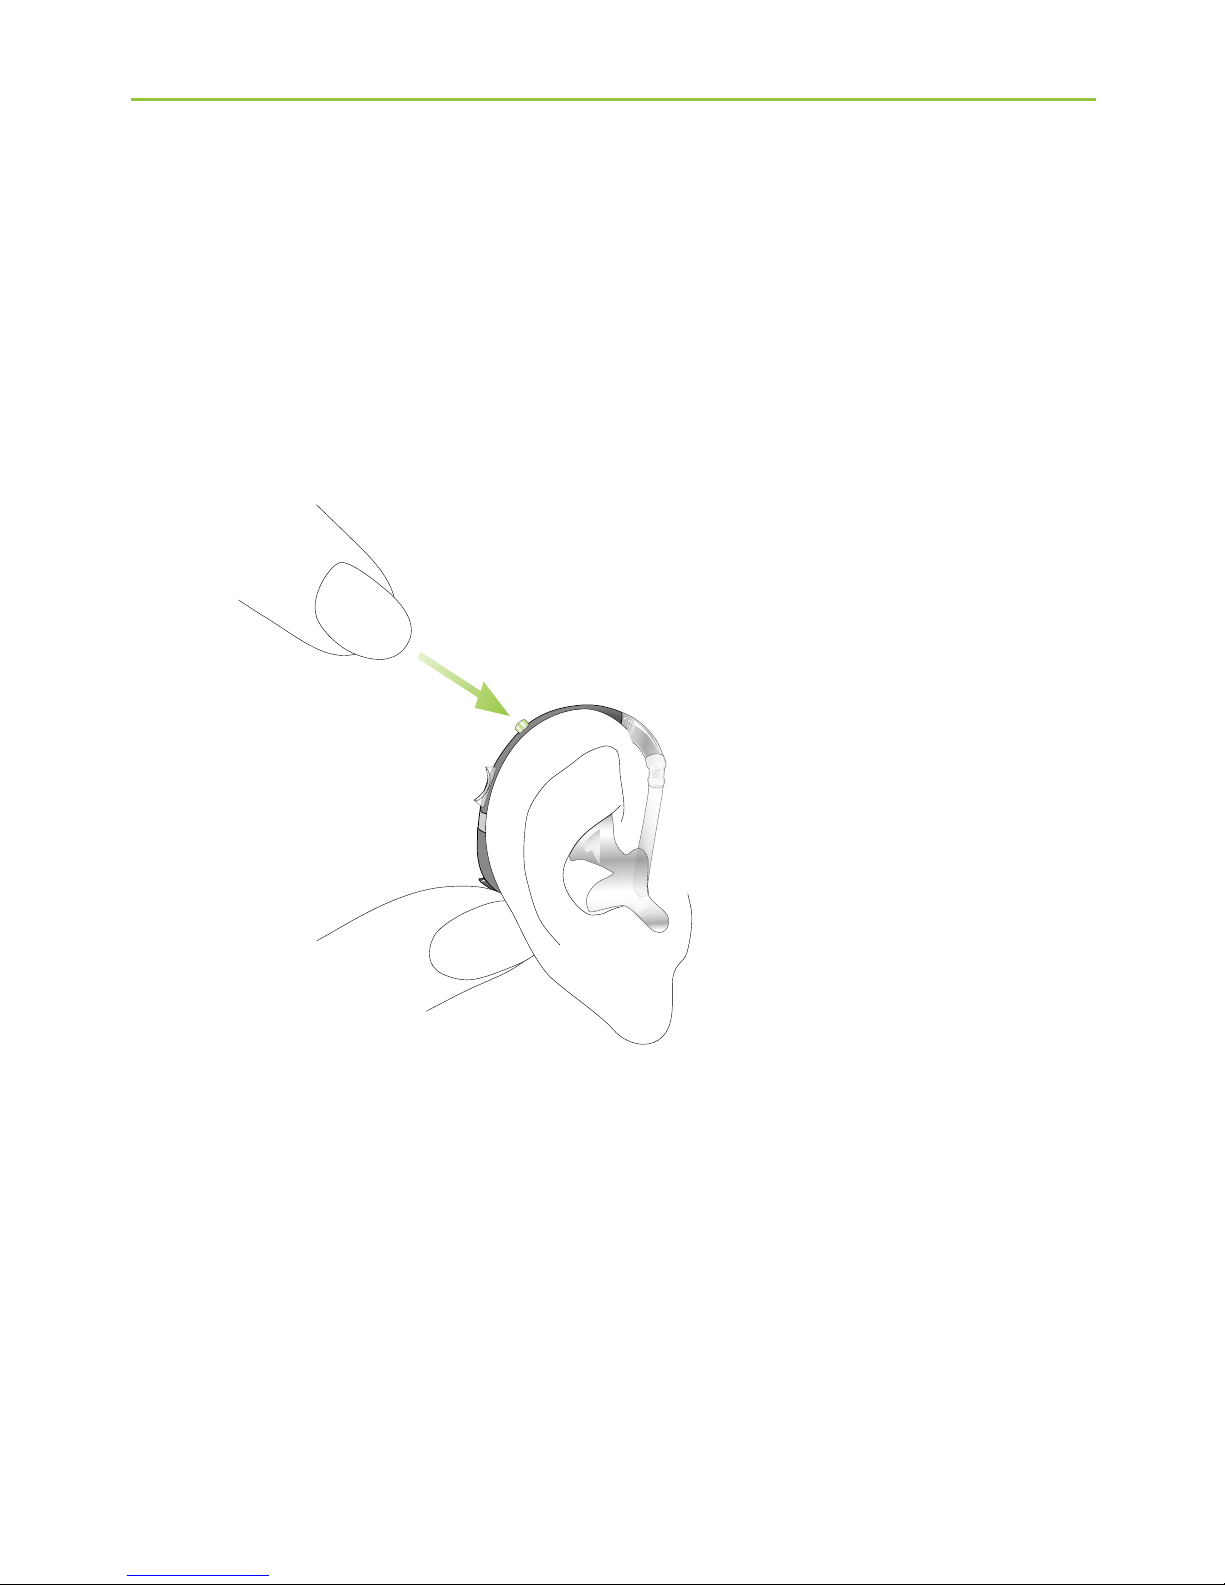
Step 7. Selecting the hearing program behind the ear
In order to select or change a hearing program with
the SuperPower and UltraPower hearing aid, press the
program button displayed (Fig. 7).
If you press it again, you change to the next program.
A signal indicates the change.
A signal tone can only be easily heard if you have
turned on the hearing aid and you are wearing it
correctly behind the ear.
4. Using the hearing aid
Fig. 7
Page 23
23
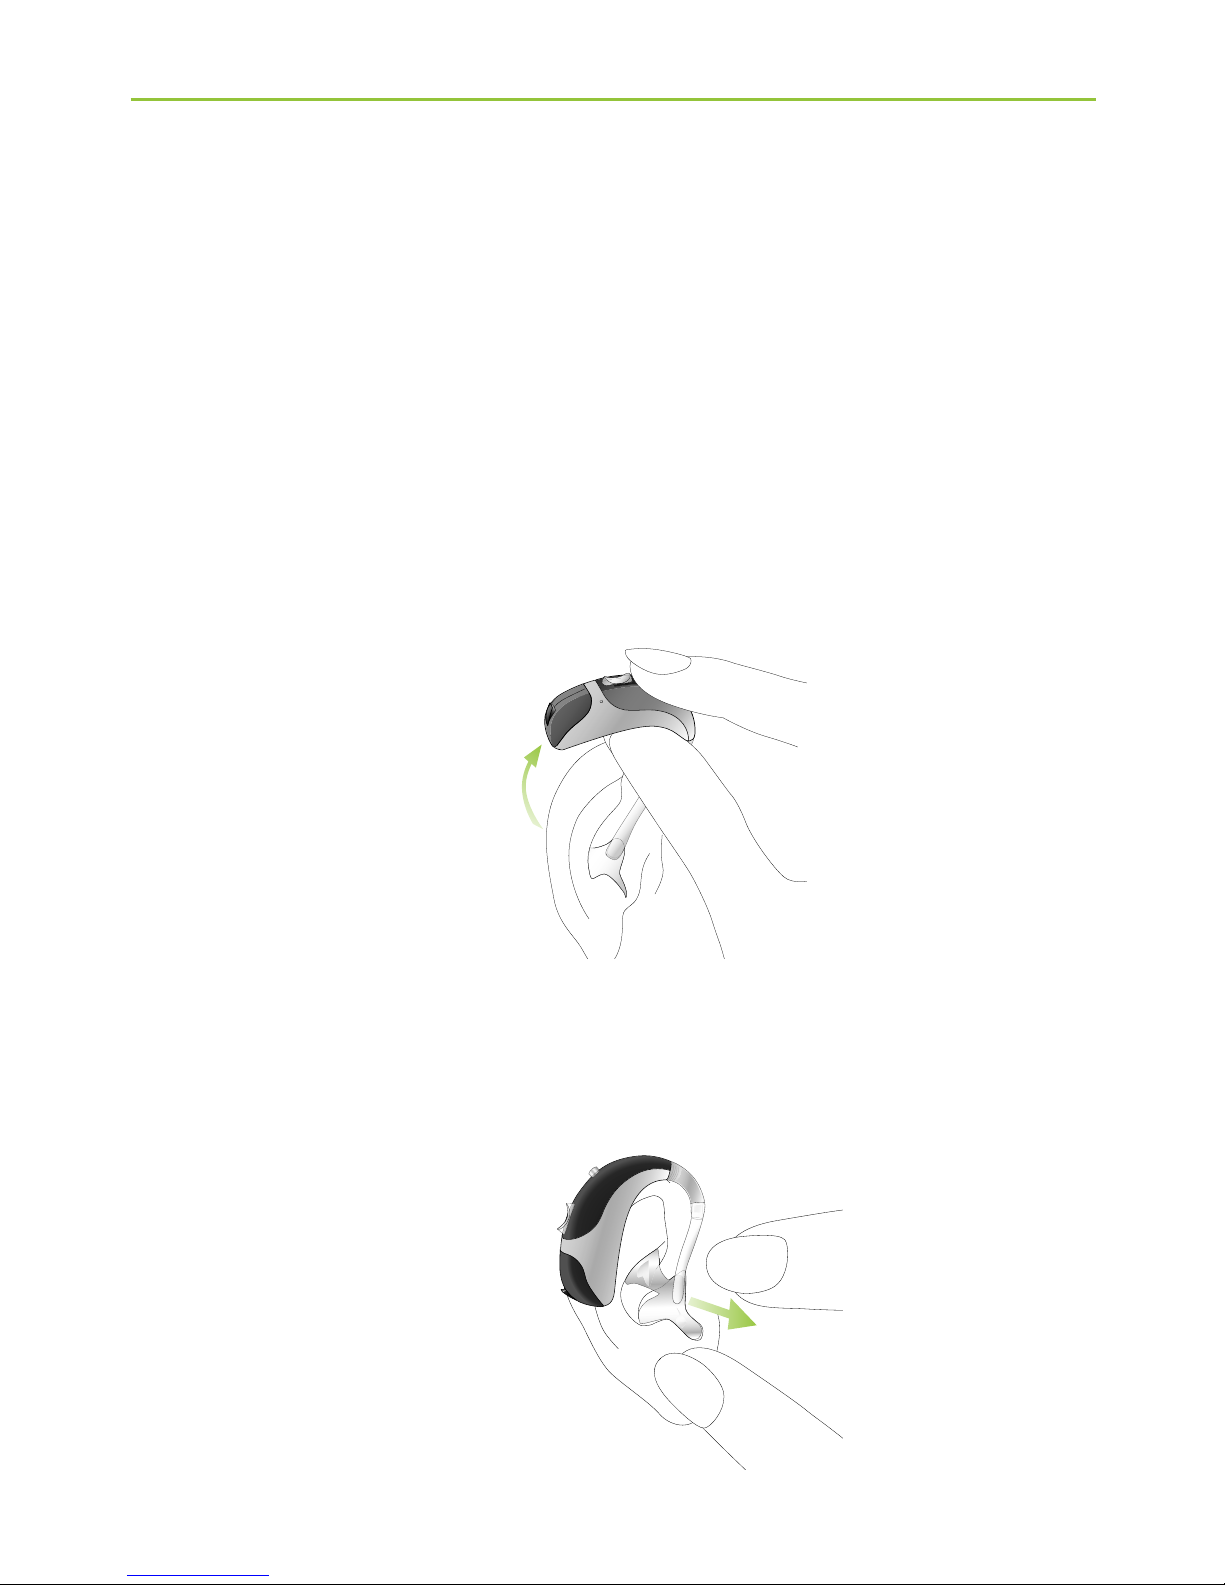
Step 8. Removing the hearing aid
Step 8.1 Removing the hearing aid with classic
earmold
Take the hearing aid behind your ear (do not touch
the tube!) and lift it above the upper part of your ear
and then gently let go (Fig. 8a).
Use your thumb and forefinger to grasp the earmold
in your ear (not the tube!) and gently remove it from
your ear (Fig. 8b).
Fig. 8a
Fig. 8b
Page 24
24
4. Using the hearing aid
Step 8.2 Removing the hearing aid with Power SlimTube
with classic earmold
Follow the instructions in Step 8.1, as this procedure
is identical.
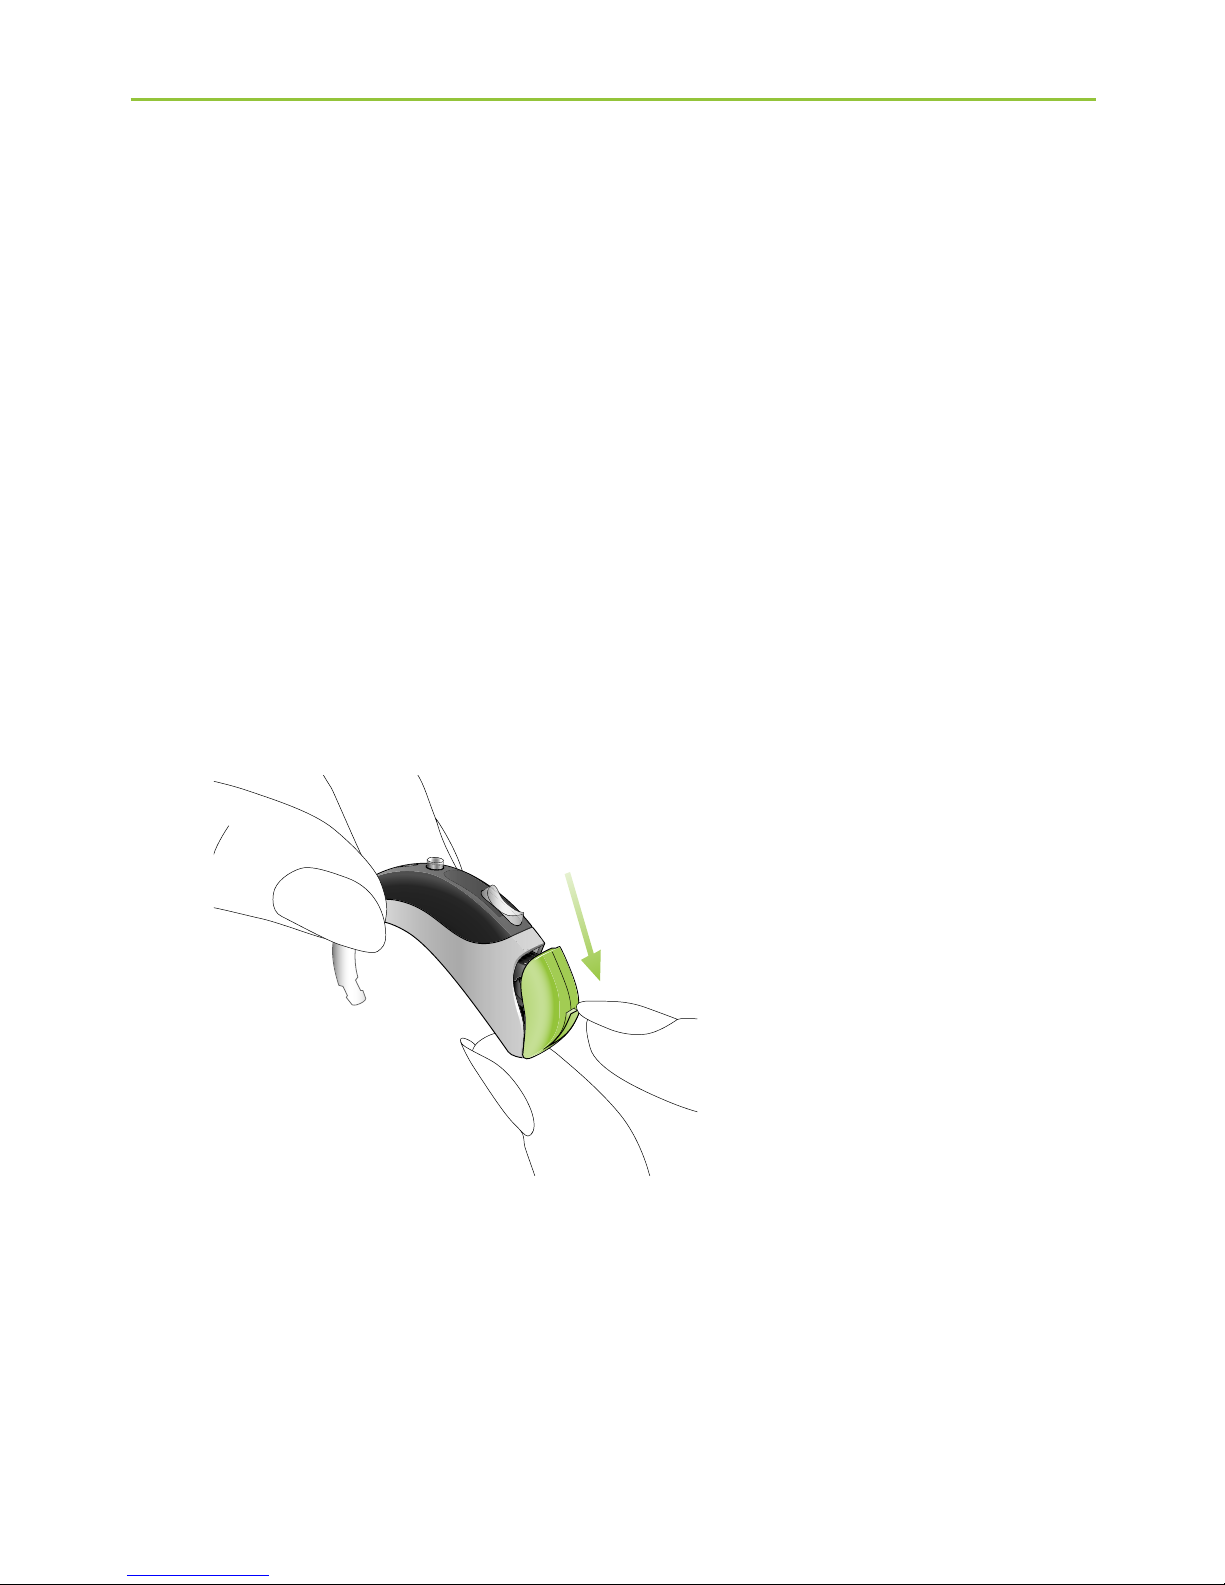
Step 9. Turning off the hearing aid
You can turn off your hearing aid by opening the battery
compartment (Fig. 9).
Fig. 9
Page 25

25
Step 10. Changing the battery
Before the battery is completely empty, your hearing
aid will indicate to you that the battery soon needs to
be changed with an acoustic signal. Once this
happens, you have about 30 minutes (in some cases
longer) to change the battery. The battery warning
signal is repeated every half hour. We recommend that
you always keep a spare battery on hand.
Contrary to customary practice, particularly for
pediatric consumers and for wearers of SuperPower
and UltraPower products, the use of battery
testers is not recommended. The battery tester
may indicate that the battery is still viable while
the voltage level has dropped below what the
hearing aid requires for consistent function.
For optimal use of the batteries, we recommend
you to test and estimate the reserve time
individually when you start using your hearing
aid.
Page 26
26
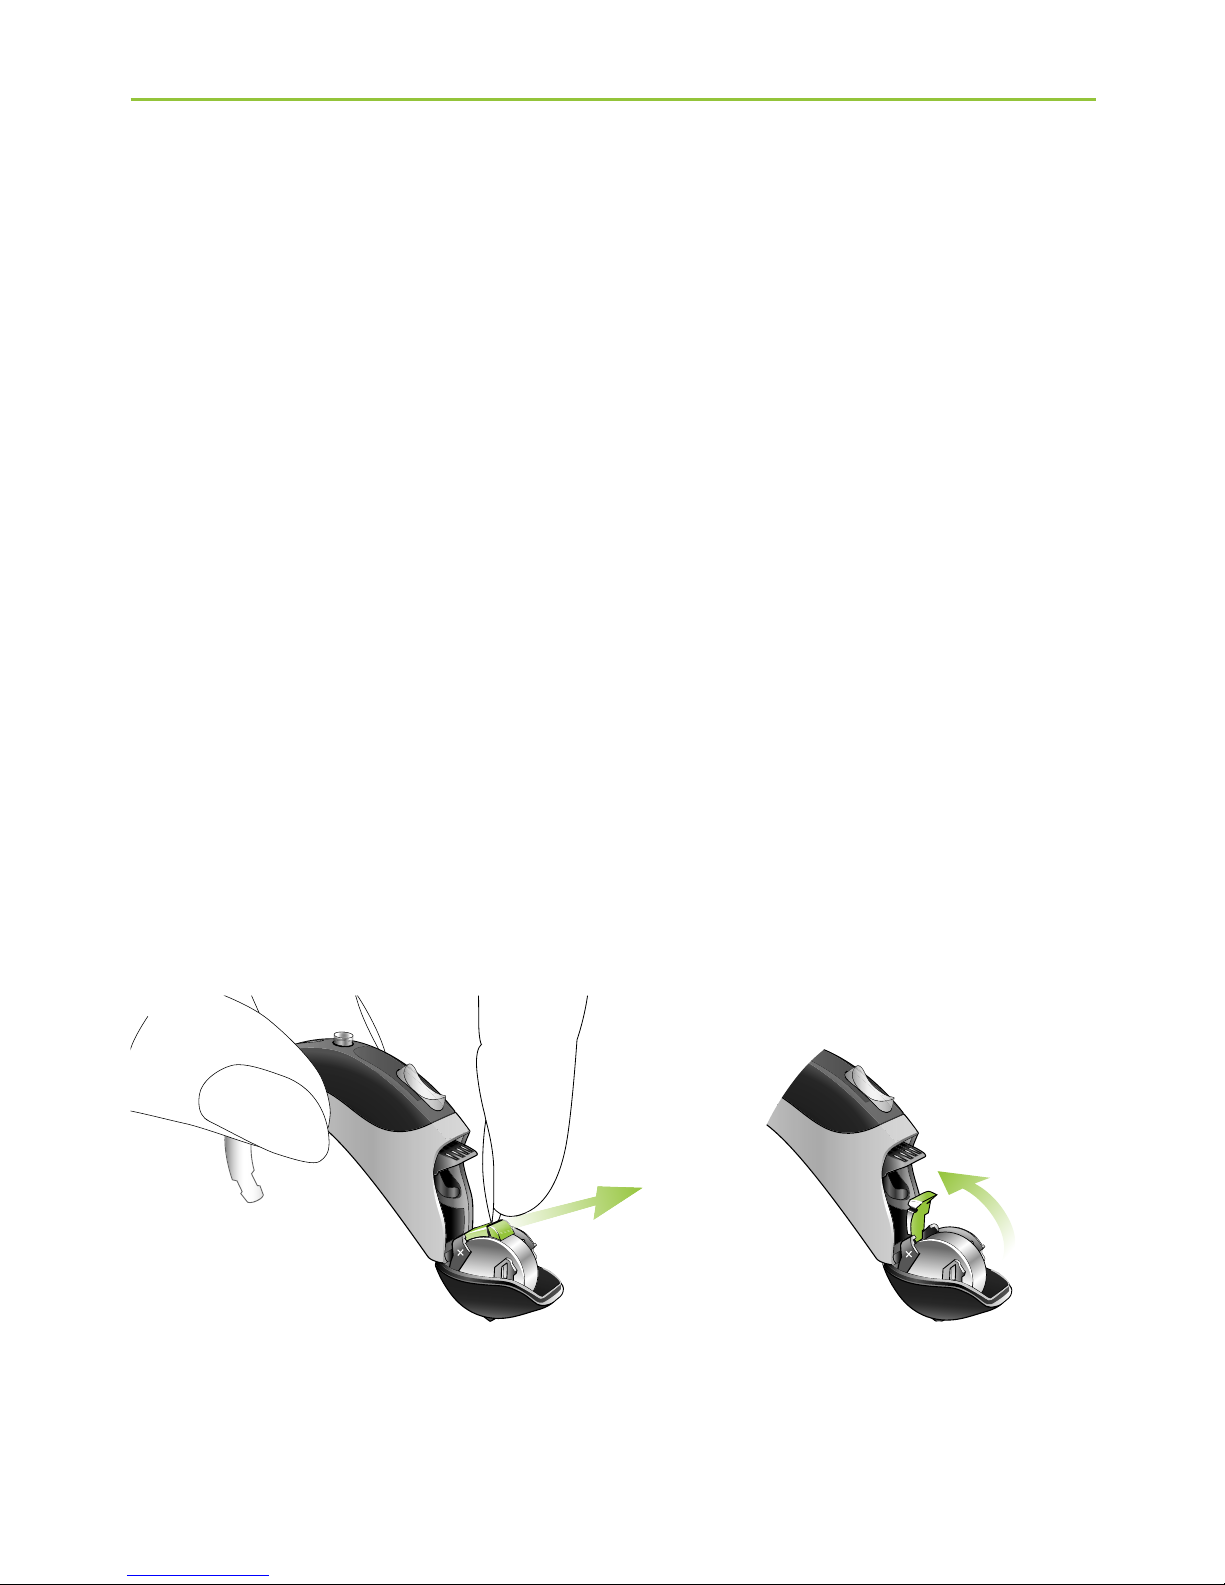
Step 11. Changing the battery in hearing aids with a
secured battery compartment
The SuperPower and UltraPower models have
the option to be fitted with a tamper proof battery
compartment if needed for safety reasons. The
SuperPower and UltraPower hearing aid use the same
type of tamperproof battery compartment.
After you have opened the battery compartment, pull
the green plastic tab with the fingernail (Fig. 11a)
and push it upwards (Fig. 11b). The battery can only be
inserted when the plastic tab is in upwards position
(Fig. 11b).
Fig. 11a Fig. 11b
4. Using the hearing aid
“click”
Page 27

27
The old battery can now be replaced and a new one
inserted (Fig. 11c).
Fig. 11c
Move the plastic tab over the inserted battery (Fig. 11d)
so that it lies against it. Lock the battery by pushing
towards the hearing aid with your finger (Fig. 11e).
Before you close the battery compartment, check that
the plastic tab is locked in position and the battery
cannot be removed.
Fig. 11d Fig. 11e
“click”
Page 28

28
5. Care and maintenance
Diligent and routine care of your hearing aid
contributes to outstanding performance and a long
service life.
Please use the following specifications as a guideline:
General information
Before using hair spray or applying cosmetics, you
should remove your hearing aid from your ear, because
these products may damage it.
Never wash or clean the Wind and Weather Protector
(see chapter 3). Doing so could cause it to lose its
special acoustic features.
Naída S is WaterResistant!
Naída S hearing aids, including the design-integrated
FM receiver, are resistant to water, sweat and dirt under
the conditions listed below:
J Battery compartment and programming cover are
fully closed.
J All Wind and Weather Protectors are mounted
correctly.
Page 29
29
J The hearing aid is used and maintained as described
in this user guide.
Never immerse your hearing aid in water or other
liquids!
Always remove your hearing aid before showering,
bathing or swimming. They are not designed for
any kind of swimming or diving activities.
After perspiration or contact with water, the
hearing aid must be cleaned.
Naída S hearing aids modified with the special battery
compartment (allowing use of the audio shoe and
connected universal FM receivers), are no longer water
resistant.
In case the hearing aid stops working after accidental
immersion in water, please take the following actions:
open the battery compartment, dry the casing and
the inside of the battery compartment with a soft cloth
or tissue and replace the battery.
Page 30

30
Daily
Inspect the earmold and tube for earwax and moisture
deposits. Clean the surfaces with a lint-free cloth.
Never use cleaning agents such as household detergents,
soap, etc. for cleaning your hearing aid. If you need
to clean your hearing aid intensively, ask your hearing
care professional for advice and information on filters
or drying capsules.
Weekly
Clean the earmold with a soft, damp cloth or with
a special cleaning cloth for hearing aids. For more
in depth maintenance instructions or for more than
basic cleaning, please see your hearing care professional.
Monthly
Inspect your hearing tube for color changes, hardening,
or cracks. In the case of such changes, the hearing
tube has to be replaced. Please see your hearing care
professional.
5. Care and maintenance
Page 31

31
Hearing aids sound softer than usual / no sound
First check whether you can adjust and make the
sound louder with the volume control. Then check the
hearing tube and earmold for earwax residue and
clean if necessary. Check whether the battery is correctly
inserted and properly fitted, adjust the fit if necessary.
If there is no improvement, change the battery. If the
problem persists, contact your hearing care professional.
Battery discharges too quickly
Insert a new battery and make note of exactly how
long it lasts. Contact your hearing care professional
with this information, they will be able to help and
advise you.
Crackling or buzzing noises
Check the hearing tube and earmold for earwax residue.
Check the hearing tube for damage (color changes,
hardening, or cracks) and contact your hearing care
professional if necessary for replacement.
6. Troubleshooting
Page 32

32
Whistling
Check whether the earmold is correctly and firmly
fitted. If this is the case, but the problem persists,
please consult with your hearing care professional.
Pain or inflammation in your ear
Remove the hearing aid and consult with your hearing
care professional. If the problem is serious, please
contact your physician.
7.1 Wireless accessories
Phonak has developed a broad range of wireless
accessories that allow you to best use and discreetly
control your hearing aid. These include, for example,
remote controls, wireless connection modules to the
TV and computer, and much more. Programs and
accessories that can help you make phone calls simply
and more comfortably are also included in this product
range.
7. Wireless accessories and FM systems
6. Troubleshooting
Page 33

33
FM systems are wireless communication systems
consisting of a radio transmitter and a radio receiver.
The transmitter is placed close to the sound source
(e. g. TV/Radio/lectern). The sound is transmitted clearly
and directly to the hearing aid in the form of radio
signals – without disruptive background noises or
echoes.
Phonak is a leader in FM communication. In order to
take advantage of the benefits of these high-tech radio
systems, consult with your hearing care professional.
If you already have an FM system and need additional
information on using this system, please consult the
relevant user instructions on the FM transmitter or the
FM receiver.
For more information, please visit www.phonak.com,
or ask your hearing care professional.
8. FM systems
Page 34
34
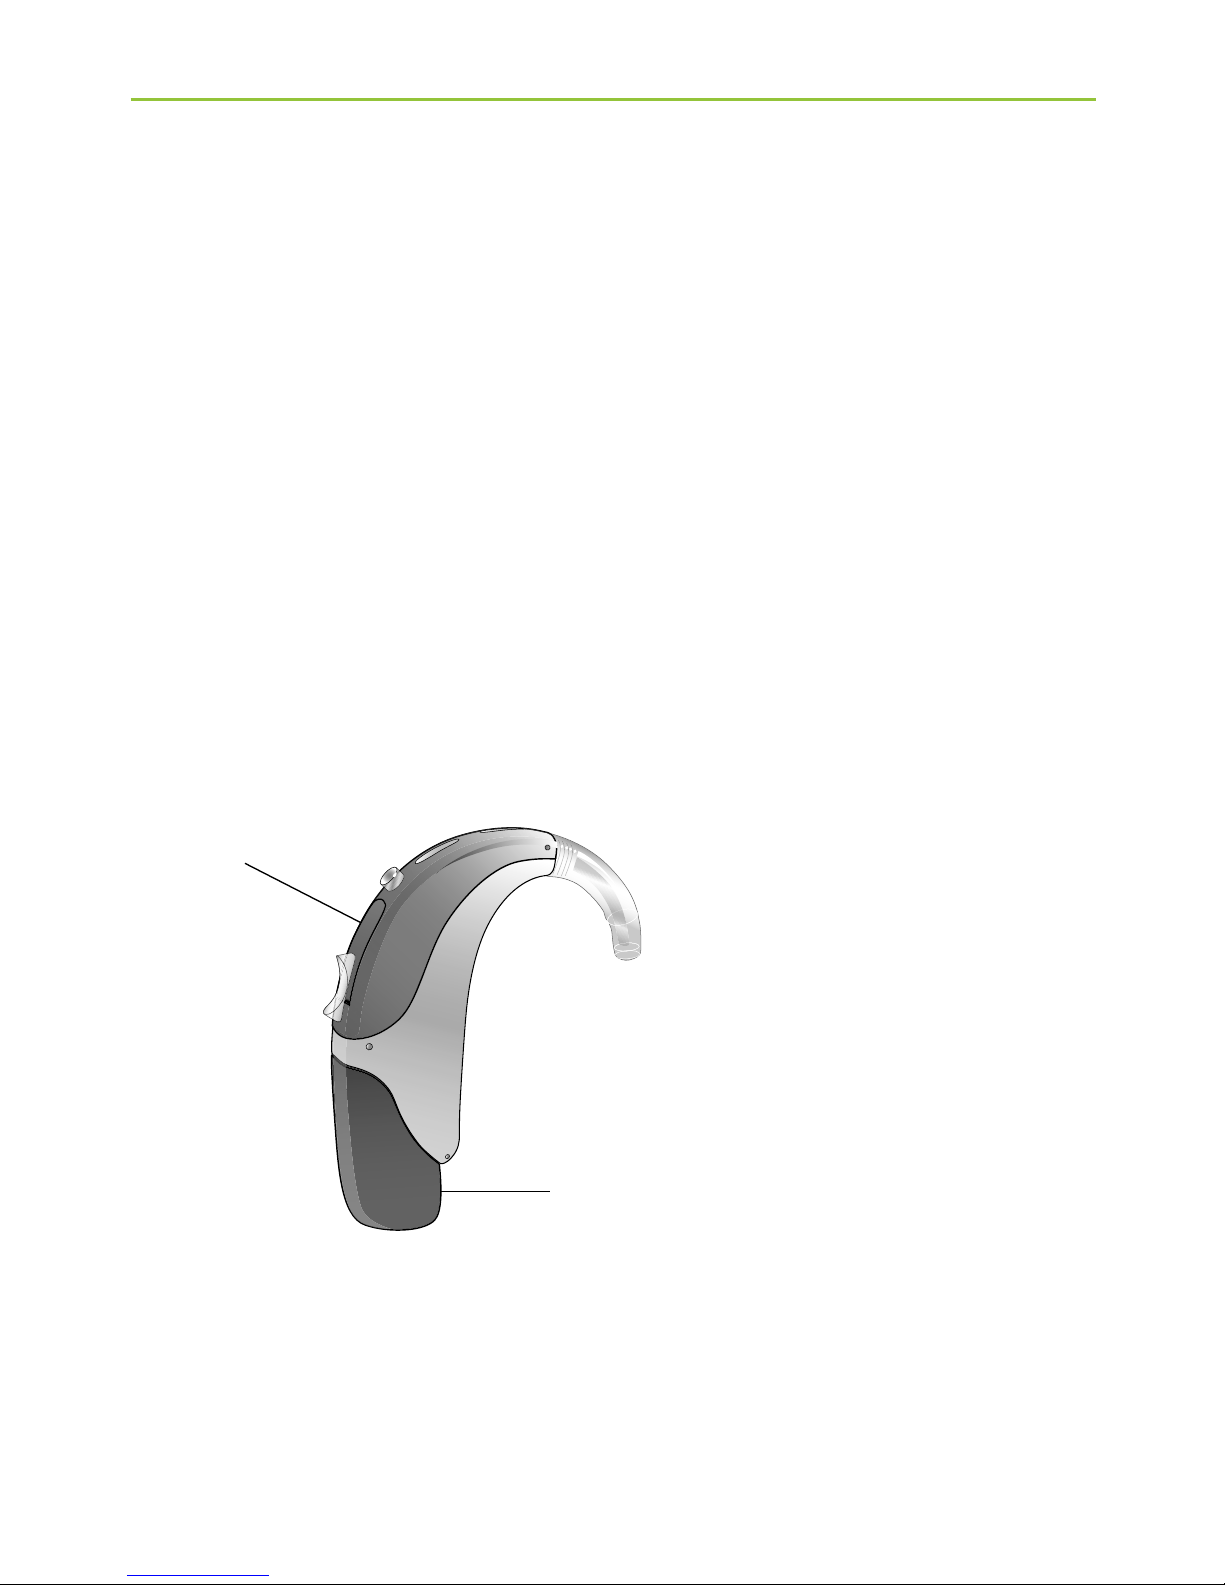
8.1 FM system description
The following pages describe the two FM receiver
models: the design-integrated FM receiver and the
audio shoe with universal FM receiver.
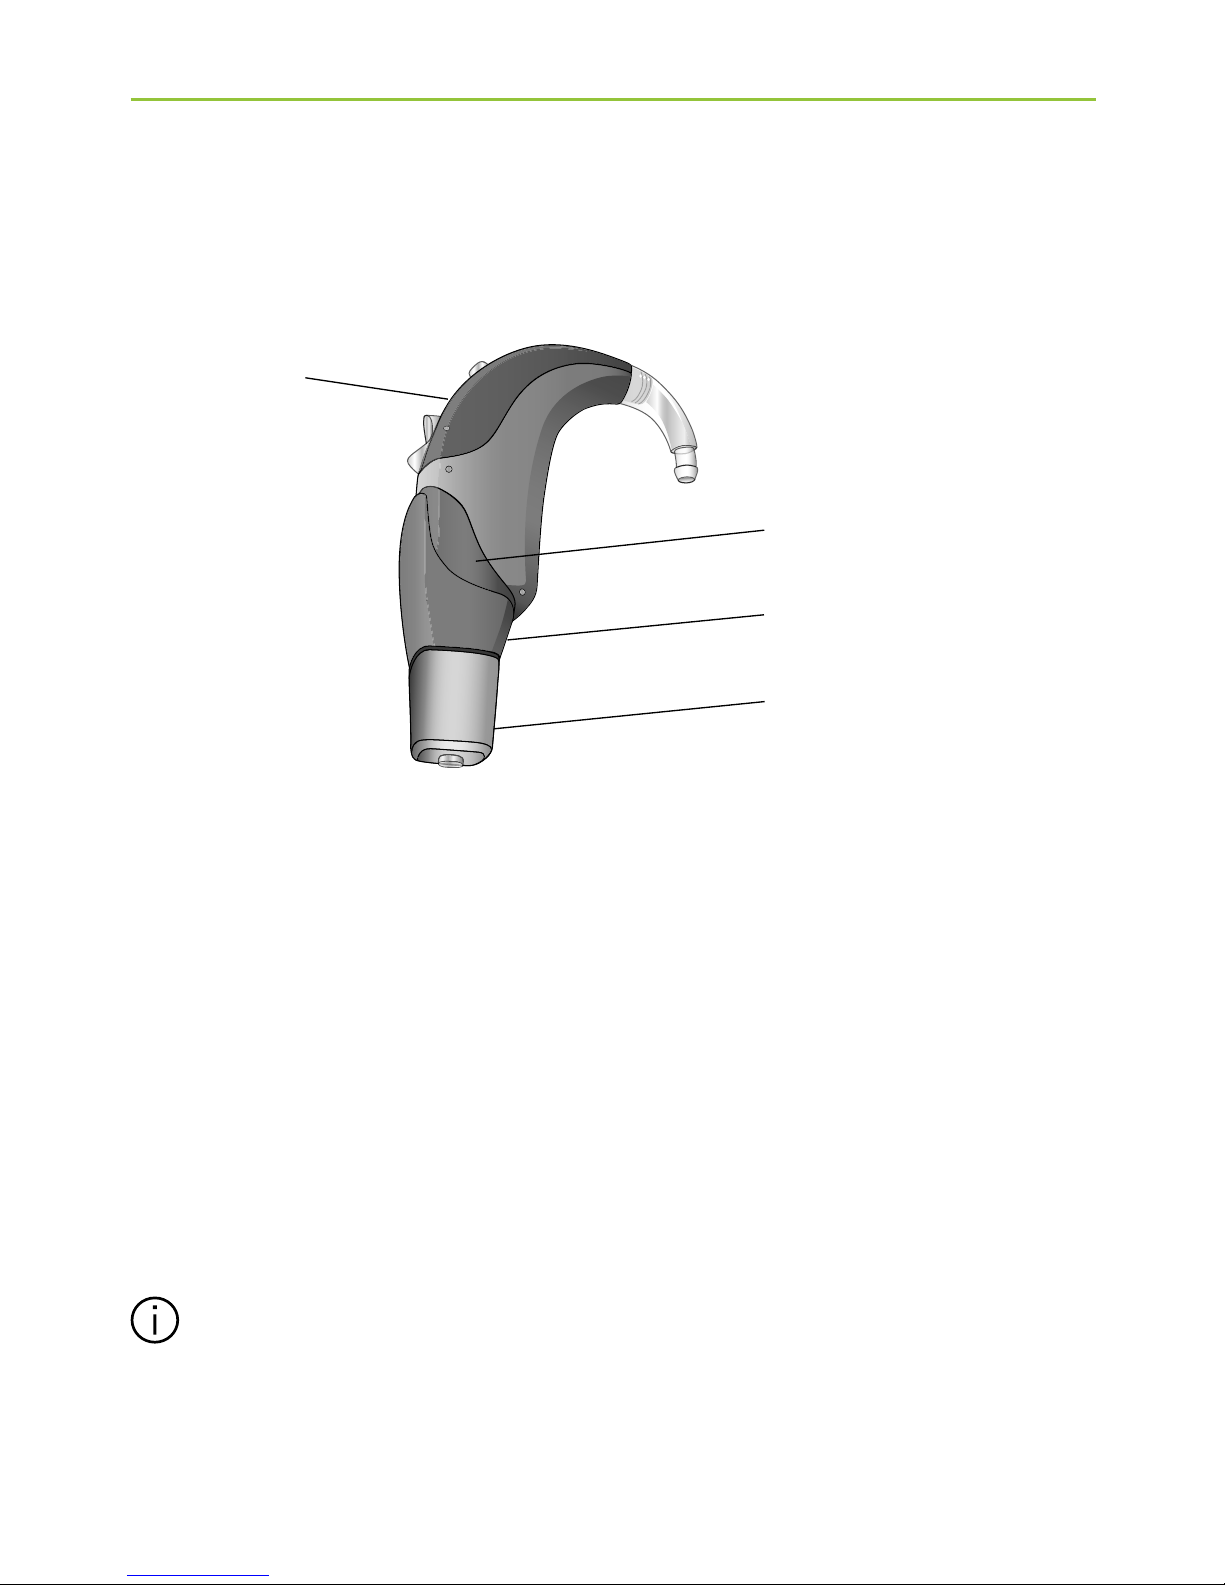
On the following pages use the labeled drawings to
identify the FM system that you use.
Option A: Design-integrated FM receiver
a Hearing aid
b Design-integrated FM receiver
8. FM-systems
b
a
Page 35

35
With the design-integrated FM receiver attached
the hearing aid offers all functionalities and usability
as without the FM receiver. (see chapter 4)
Your hearing care professional has already
prepared your hearing aid for use with the
design-integrated FM receiver. The designintegrated FM receiver can not be removed.
Please ask you hearing care professional for
further information.
Naída S with the design-integrated FM receiver is
WaterResistant. For more information on the WaterResistant properties of the Naída S housing, please
see chapter 5.
Page 36
36
8. FM-systems
Option B: Audio shoe with universal FM receiver
a Hearing aid
b Battery compartment
c Audio shoe for universal FM receiver
d Universal FM receiver
With the universal FM receiver attached the hearing
aid offers all functionalities and usability as without
the FM receiver (see chapter 4).
Naída S with the audio shoe and the universal
FM receiver is not WaterResistant. Please ask you
hearing care professional for further information.
a
b
c
d
Page 37
37
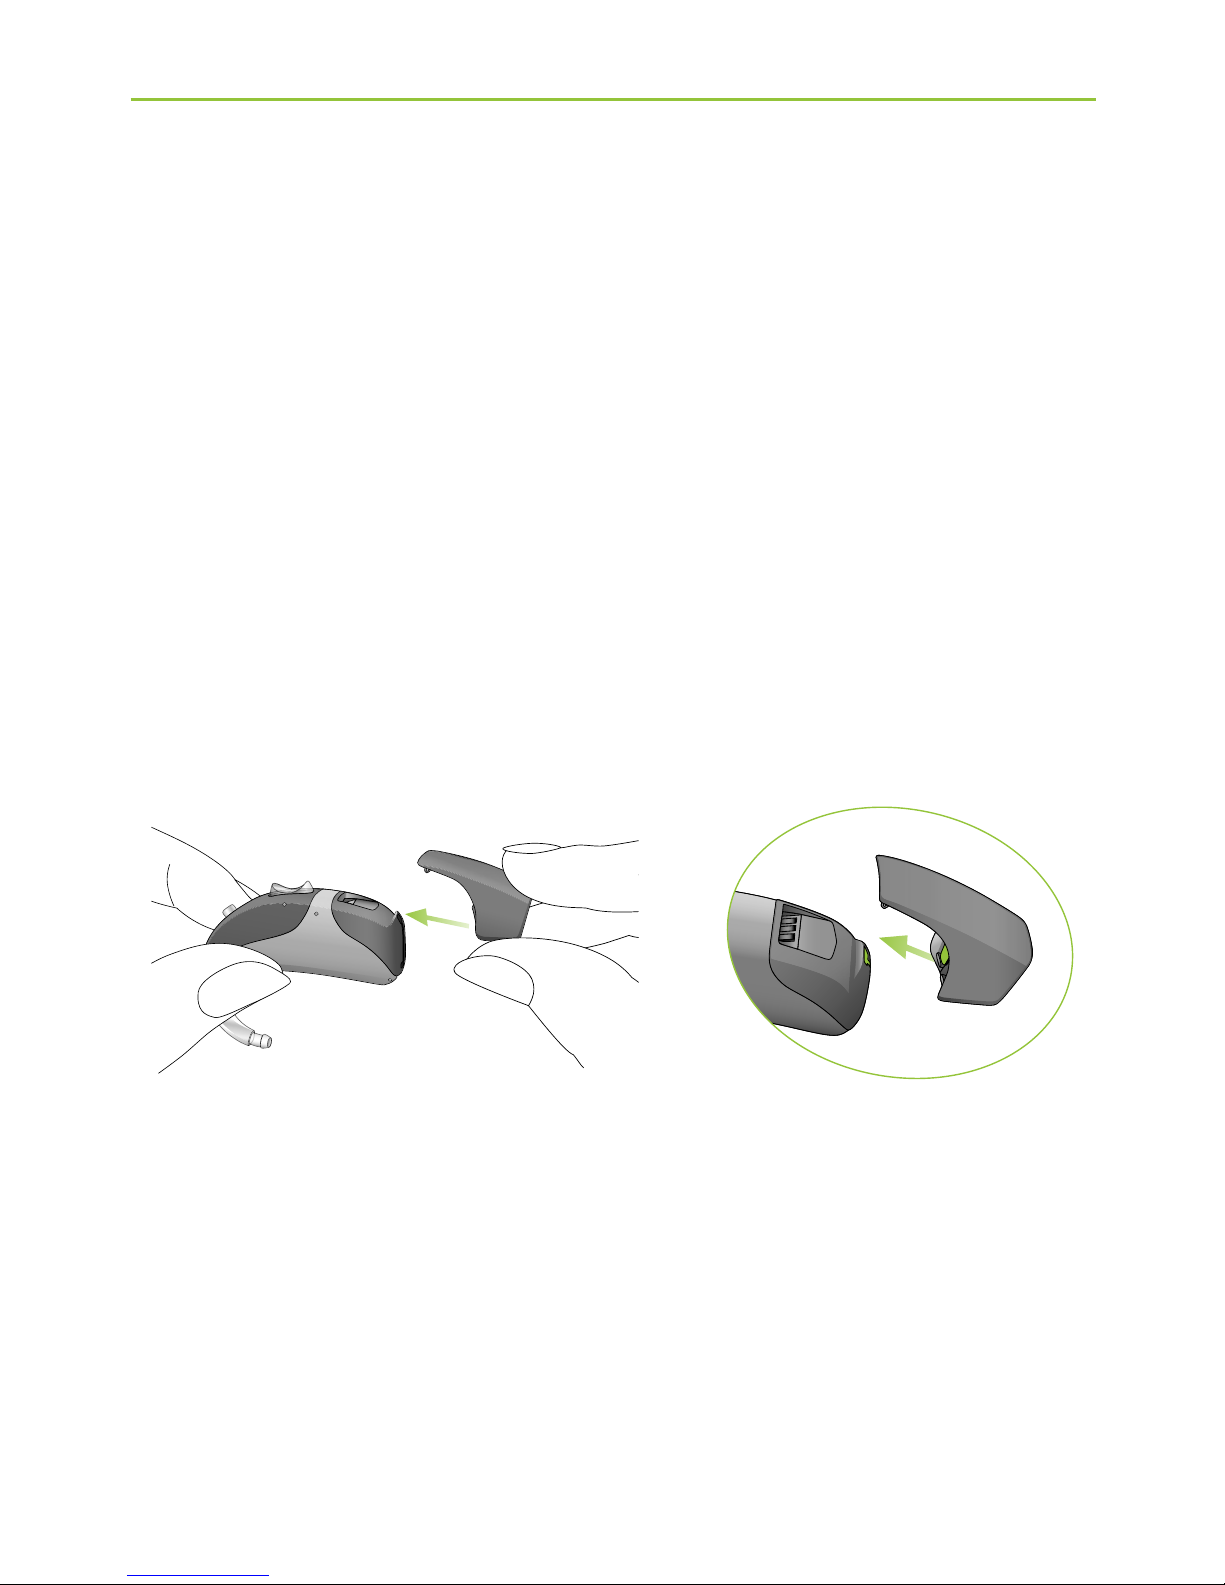
Attaching the audio shoe to the hearing aid
Your hearing care professional has already prepared
your hearing aid for use with a universal FM receiver.
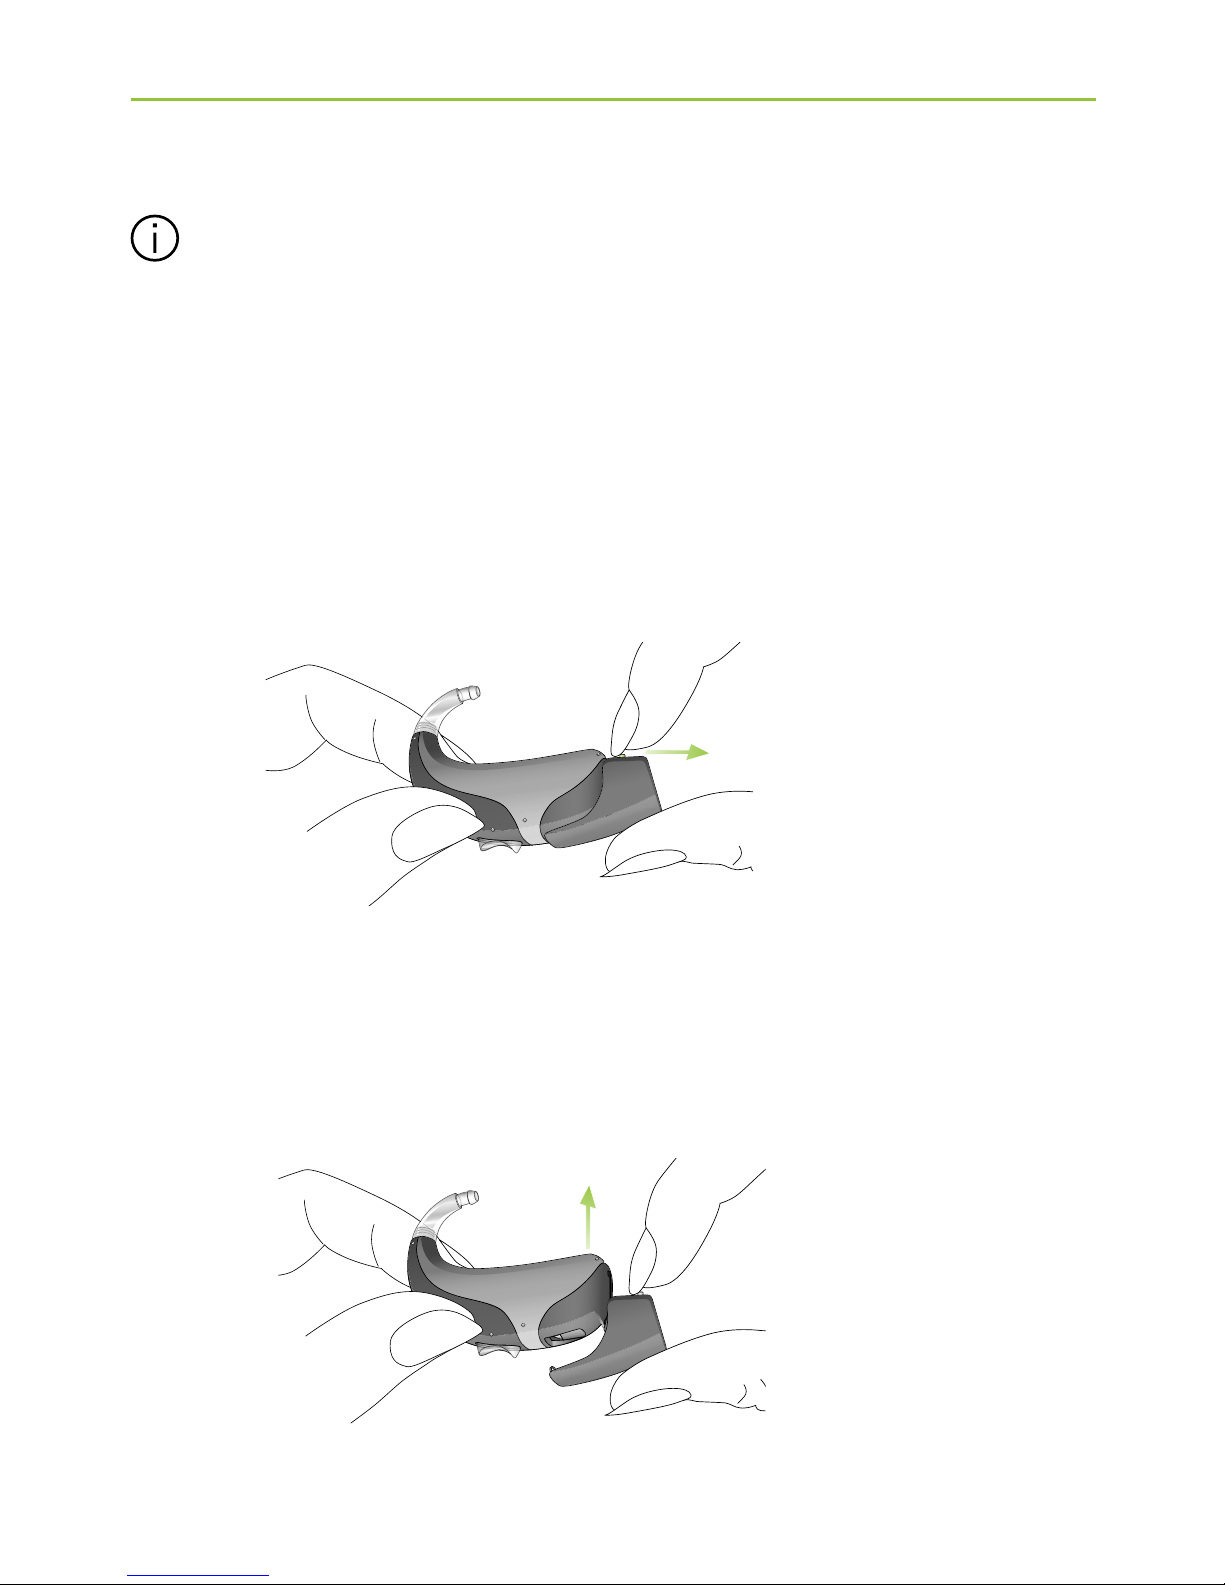
To attach the audio shoe, hold the hearing aid between
the thumb and forefinger of one hand and the audio
shoe in the other hand. Push the audio shoe towards
the bottom of the hearing aid. Match the grooves of
the hearing aid with those of the audio shoe (Fig. 8.1).
Fig. 8.1
Push the hearing aid down until it snaps into place
(Fig. 8.2). The audio shoe is now properly attached to
Page 38
38
the hearing aid. A universal FM receiver can now be
attached.
Fig. 8.2
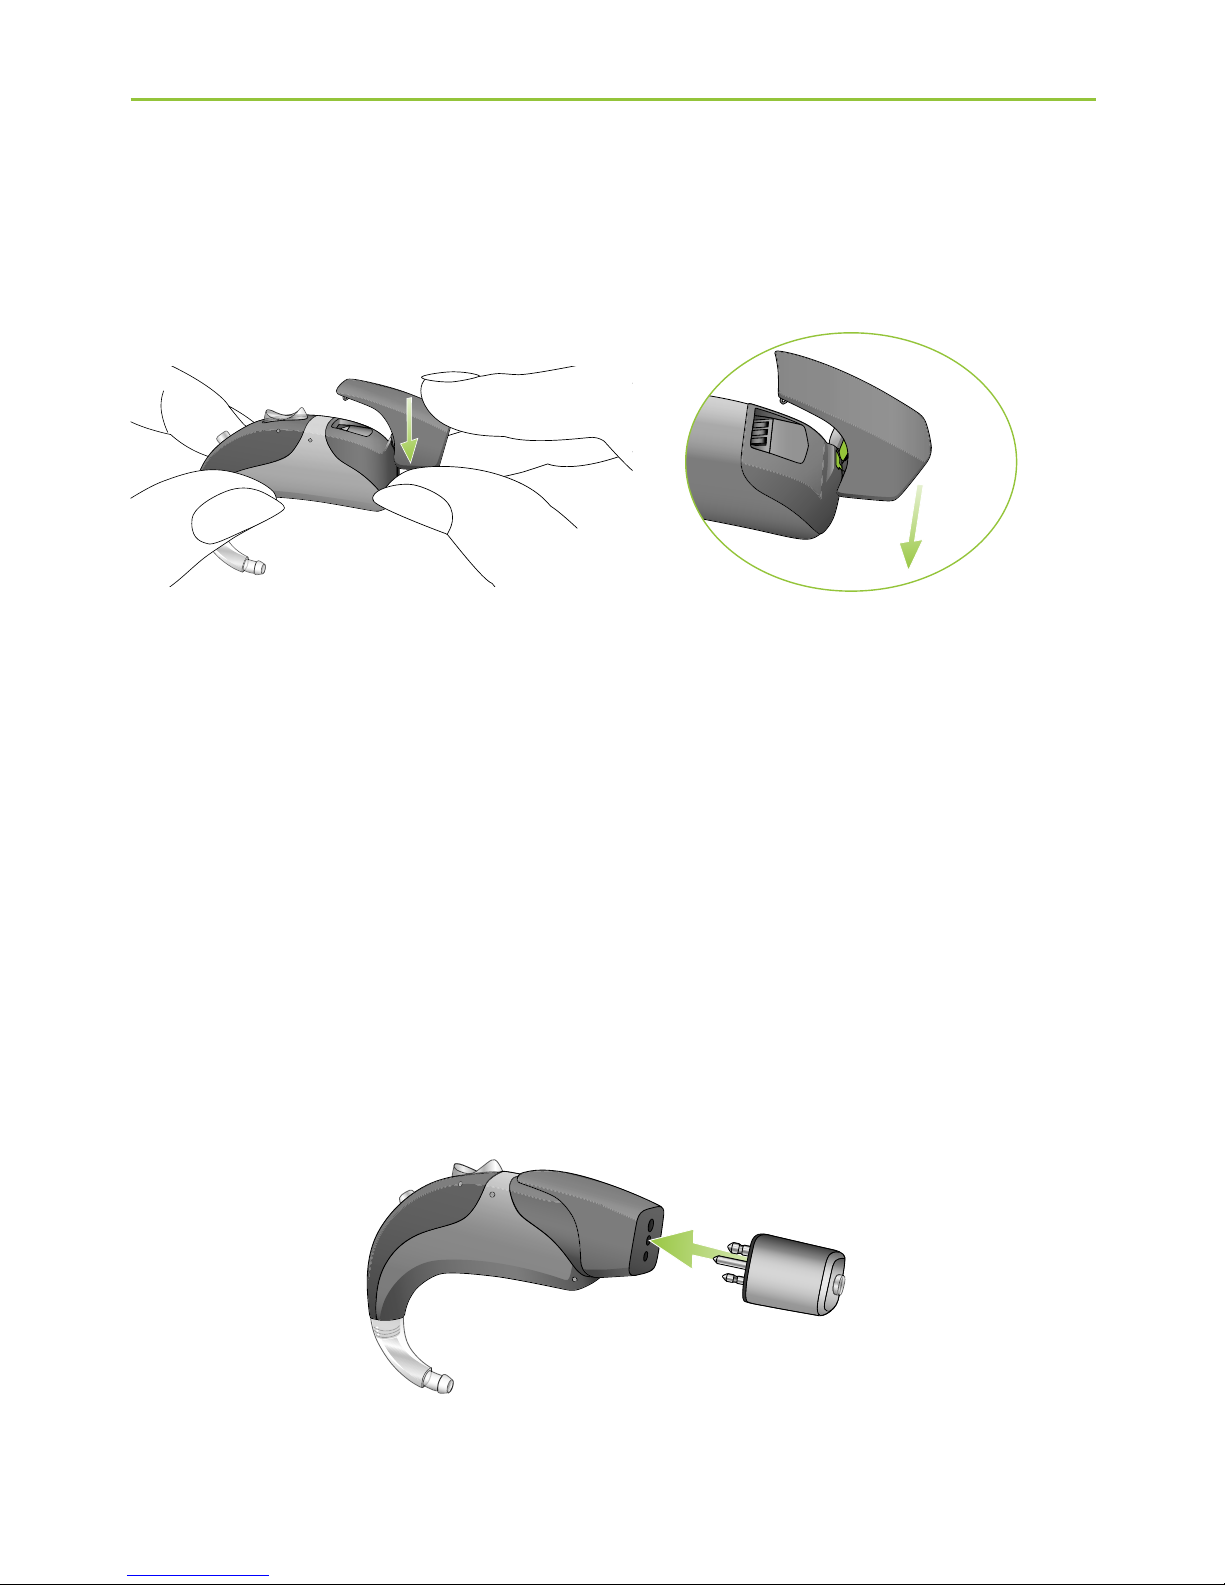
Attaching the universal FM receiver to the audio shoe
Connect the universal FM receiver to the audio shoe by
pushing the three pins of the universal FM receiver
into the three sockets of the audio shoe. The universal
FM receiver is correctly connected to the audio shoe
once it is clicked in place (Fig. 8.3). Please refer to the
specific FM receiver user instruction.
Fig. 8.3
8. FM-systems
Page 39
39
To have FM immediately active when required,
Phonak recommends to leave the universal
FM receiver attached when not in use.
Remove the audio shoe from the hearing aid
To remove the audio shoe, take the hearing aid between
your thumb and forefinger. Pull the locking system on
the audio shoe back (Fig. 8.4).
Fig. 8.4
At the same time pull the hearing aid upwards with
the other hand (Fig. 8.5). The audio shoe is now removed
from the hearing aid.
Fig. 8.5
Page 40

40
9. Service and warranty
Phonak offers you a comprehensive, worldwide
warranty, valid starting from the date of purchase.
Please ask your hearing care professional about
the term of the warranty valid in the country of
purchase. The warranty covers repairs in case of
processing and material errors*.
No warranty claims will be considered if the hearing
aid shows normal wear and tear, improper handling
or care, exposure to chemicals, immersion in water or
undue stress. In case of damage caused by third parties or
non-authorized service, the Phonak warranty is null and
void. This warranty does not cover services performed by
a hearing care professional at his or her workplace.
Serial number of the Serial number of the
left hearing aid right hearing aid
Purchase date:
*Contact your hearing care professional
Page 41
41
Europe:
Declaration of Conformity
Hereby Phonak AG declares that this Phonak product
meets the requirements of the Medical Devices Directive
93/42/EEC as well as the Radio and Telecommunications
Terminal Equipment Directive 1999/5/EC. The full text of
the Declaration of Conformity can be obtained from
the manufacturer.
Australia:
Supplier Code Number 15398
New Zealand:
Supplier Code Number Z1285
10. Compliance information
Page 42

42
The hearing aid described in this user guide is certified
under:
USA FCC ID: KWC-WHSBTE1U
Canada IC: 2262A-WHSBTE1U
Notice 1:
This device complies with Part 15 of the FCC Rules and
with RSS-210 of Industry Canada. Operation is subject
to the following two conditions:
1) this device may not cause harmful interference, and
2) this device must accept any interference received,
including interference that may cause undesired
operation.
Notice 2:
Changes or modifications made to this device not
expressly approved by Phonak may void the FCC
authorization to operate this device.
10. Compliance information
Page 43

43
Notice 3:
This device has been tested and found to comply
with the limits for a Class B digital device, pursuant to
Part 15 of the FCC Rules and ICES-003 of Industry
Canada. These limits are designed to provide reasonable
protection against harmful interference in a residential
installation. This device generates, uses and can
radiate radio frequency energy and, if not installed
and used in accordance with the instructions, may
cause harmful interference to radio communications.
However, there is no guarantee that interference will
not occur in a particular installation. If this device
does cause harmful interference to radio or television
reception, which can be determined by turning the
equipment off and on, the user is encouraged to try to
correct the interference by one or more of the following
measures:
J Reorient or relocate the receiving antenna.
J Increase the separation between the device and
receiver.
J Connect the device into an outlet on a circuit
different from that to which the receiver is connected.
J Consult the dealer or an experienced radio / TV
technician for help.
Page 44
44
11. Information and explanation
of symbols
With the CE symbol, Phonak AG
confirms that this Phonak product –
including accessories – meets the
requirements of the Medical Devices
Directive 93/42/EEC as well as the
R&TTE Directive 1999/5/EC on radio
and telecommunications transmitters.
The numbers after the CE symbol
correspond to the code of certified
institutions that were consulted
under the above-mentioned directives.
This symbol indicates that the
products described in these user
instructions adhere to the
require-ments for an application
part of Type BF of EN 60601-1.
The surface of the hearing aid is
specified as application part of
Type BF.
XXXX
Page 45
45
EMC and Radio communications
compliance label Australia.
This symbol indicates that it is
important for the user to read and
take into account the relevant
information in these user guides.
This symbol indicates that it is
important for the user to pay
attention to the relevant warning
notices in these user guides.
Important information for handling
and product safety.
The product is designed such that
it functions without problems
or restrictions if used as intended,
unless otherwise noted in these
user guides.
Operating
conditions
Page 46
46
11. Information and description of symbols
During transport or storage, the
temperature should not exceed the
limit values of –20°/60° Celsius
and relative humidity of 65% for a
long period of time. The air pressure
range between 500 and 1100 hPa
is appropriate.
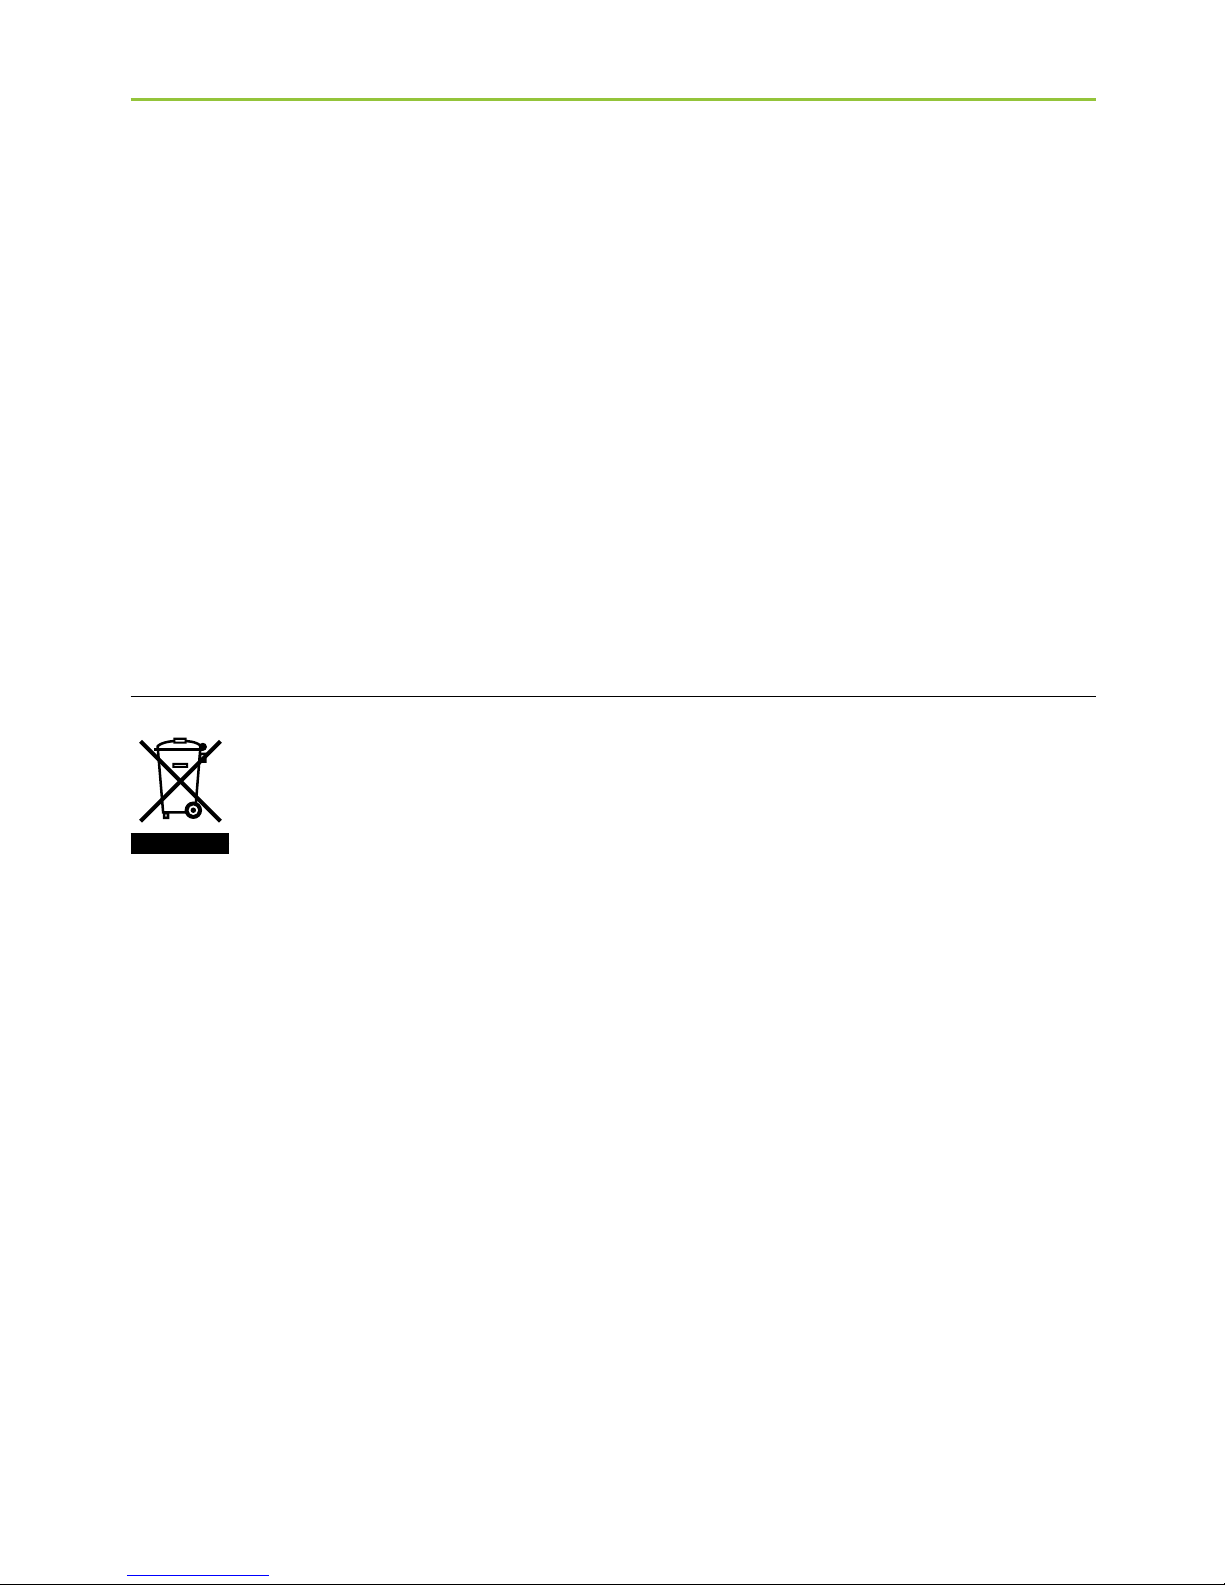
The symbol with the crossed-out
garbage bin is to make you aware
that this hearing aid may not be
thrown away as normal household
waste. Please dispose of old or unused
hearing aids, at waste disposal sites
intended for electronic waste, or
give your hearing aid to your hearing
care professional for disposal. Proper
disposal protects the environment
and health.
Transport
and storage
conditions
Page 47

Page 48
Manufacturer:
Phonak AG
Laubisrütistrasse 28
CH-8712 Stäfa
Switzerland
EU Representative:
Phonak GmbH
D-70736 Fellbach-Oeffingen
Germany
www.phonak.com
0459
029-0719-02/2011-03/A+W/FO Printed in Switzerland
© Phonak AG All rights reserved
 Loading...