

Philips YS536, YS527, YS505, YS526, YS523 User Manual

User manual / 用户手册
Question?
有疑问?
Contact Philips
请联系飞利浦
YS536
YS527
YS526
YS523
YS505
1


YS536, YS527, YS526, YS523, YS505
ENGLISH 6
한국어 26
繁體中文 46
简体中文 63
6
Introduction
Congratulations on your purchase and welcome to
Philips! To fully benet from the support that Philips
offers, register your product at www.philips.com/
welcome.
For additional functionality you can buy click-on/off
attachments at www.philips.com/shop.
Important
Read this user manual carefully before you use the
appliance and save it for future reference.
Danger
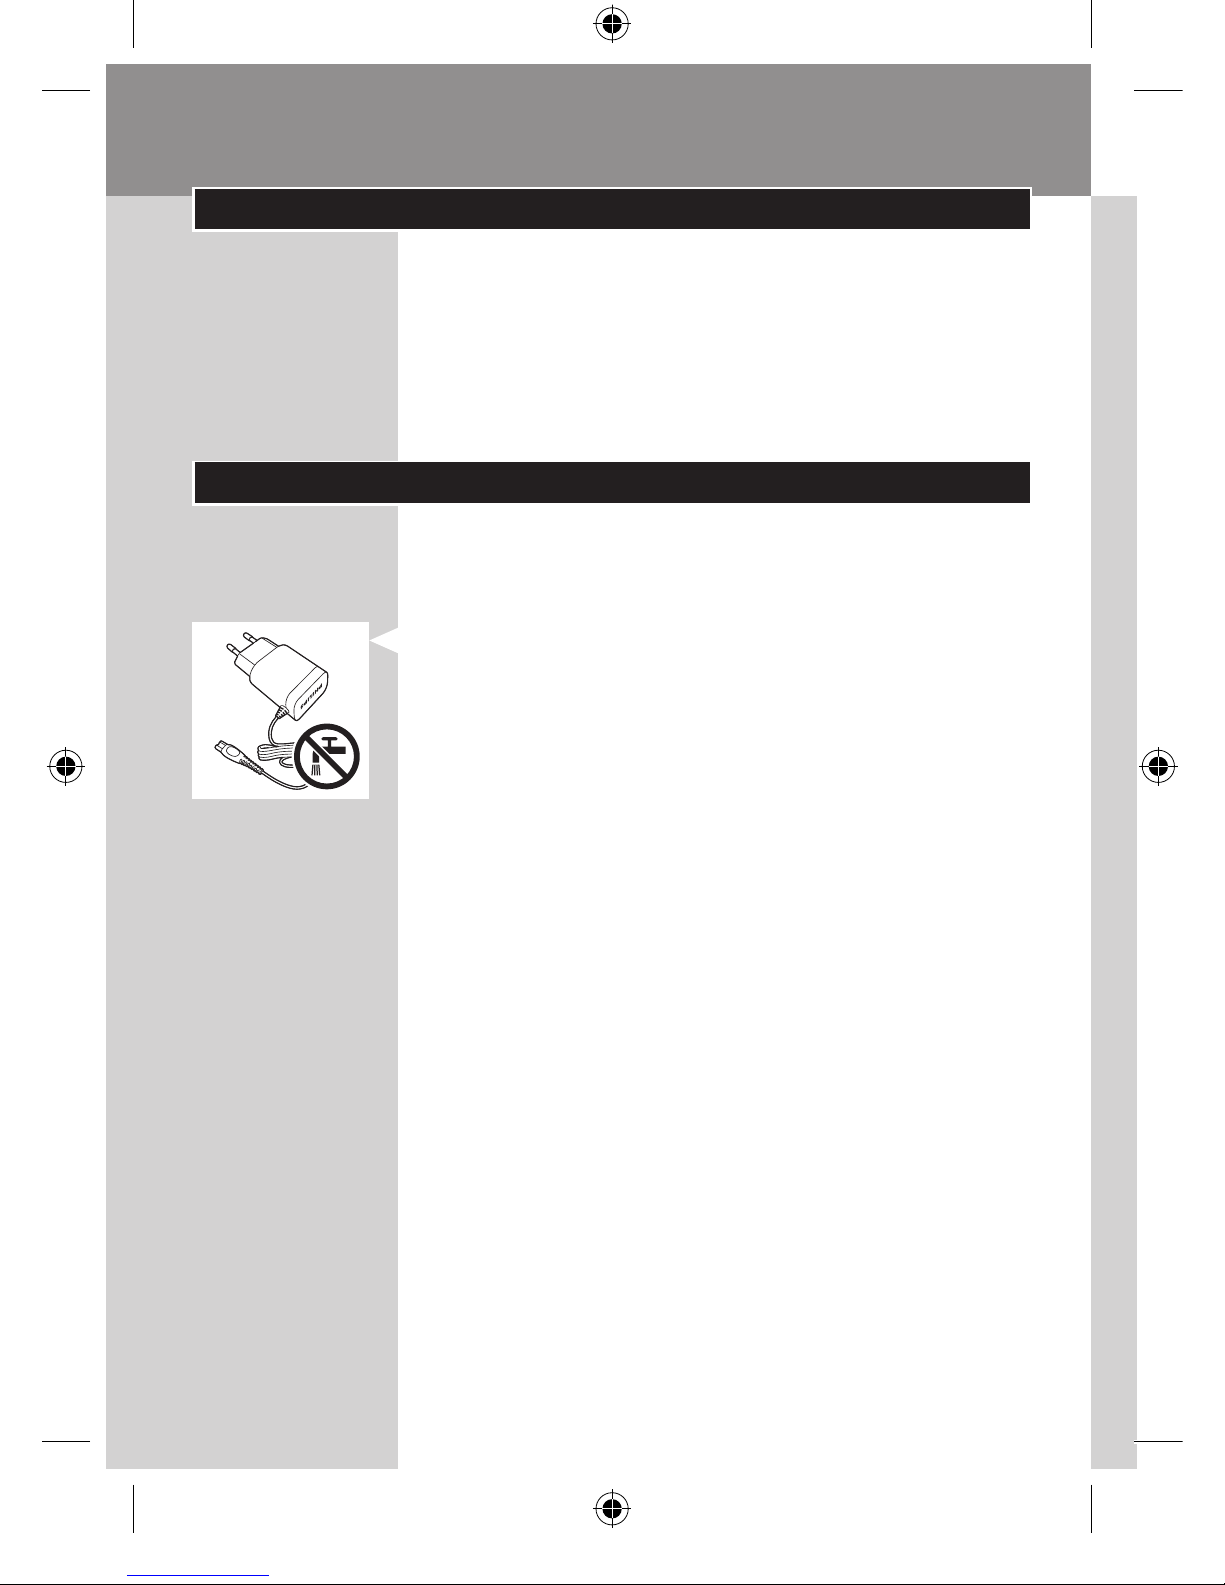
- Make sure the adapter does not get wet.
- The adapter contains a transformer. Do not cut
off the adapter to replace it with another plug,
as this causes a hazardous situation.
Warning
- This appliance is not intended for use by persons
(including children) with reduced physical, sensory
or mental capabilities, or lack of experience
and knowledge, unless they have been given
supervision or instruction concerning use of the
appliance by a person responsible for their safety.
- Keep the appliance, the attachments and the
adapter out of the reach of children.
- Before you use an attachment, always check it for
damage or wear. If the attachment is damaged or
worn, do not use it, as injury may occur. Replace a
damaged attachment before you use it again
(see chapter ‘Replacement’).
- Be careful with hot water when you clean the
appliance and the attachments. Always check if the
water is not too hot, to prevent your hands from
getting burnt.
ENGLISH
Caution
-
Charge, use and store the appliance and the
attachments at a temperature between 5°C and 35°C.
- Do not use the attachment to style body hair or
scalp hair.
- Do not use the brush attachment on chapped
skin, open wounds, or if you suffer from skin
diseases or skin irritations, such as severe acne,
sunburn, skin infection, etc.
- Do not use the brush attachment with self-made
cleansers or cleansers containing harsh chemicals
or rough particles.
- Only use the beard styler attachment to trim facial
hair (beard, moustache and sideburns).
- Always put the protection cap on the shaver
to protect the shaving heads when you are travelling.
- The appliance and the attachments are not
dishwasher-proof.
- Never use water hotter than 80°C to rinse the
appliance and the attachments.
- Only use the adapter supplied.
- Do not use the appliance, the attachments or the
adapter if they are damaged.
- If the adapter or an attachment is damaged, always
have it replaced with one of the original type in
order to avoid a hazard.
- Water may leak from the socket at the bottom of
the appliance when you rinse it. This is normal and
not dangerous because all electronics are enclosed
in a sealed power unit inside the appliance.
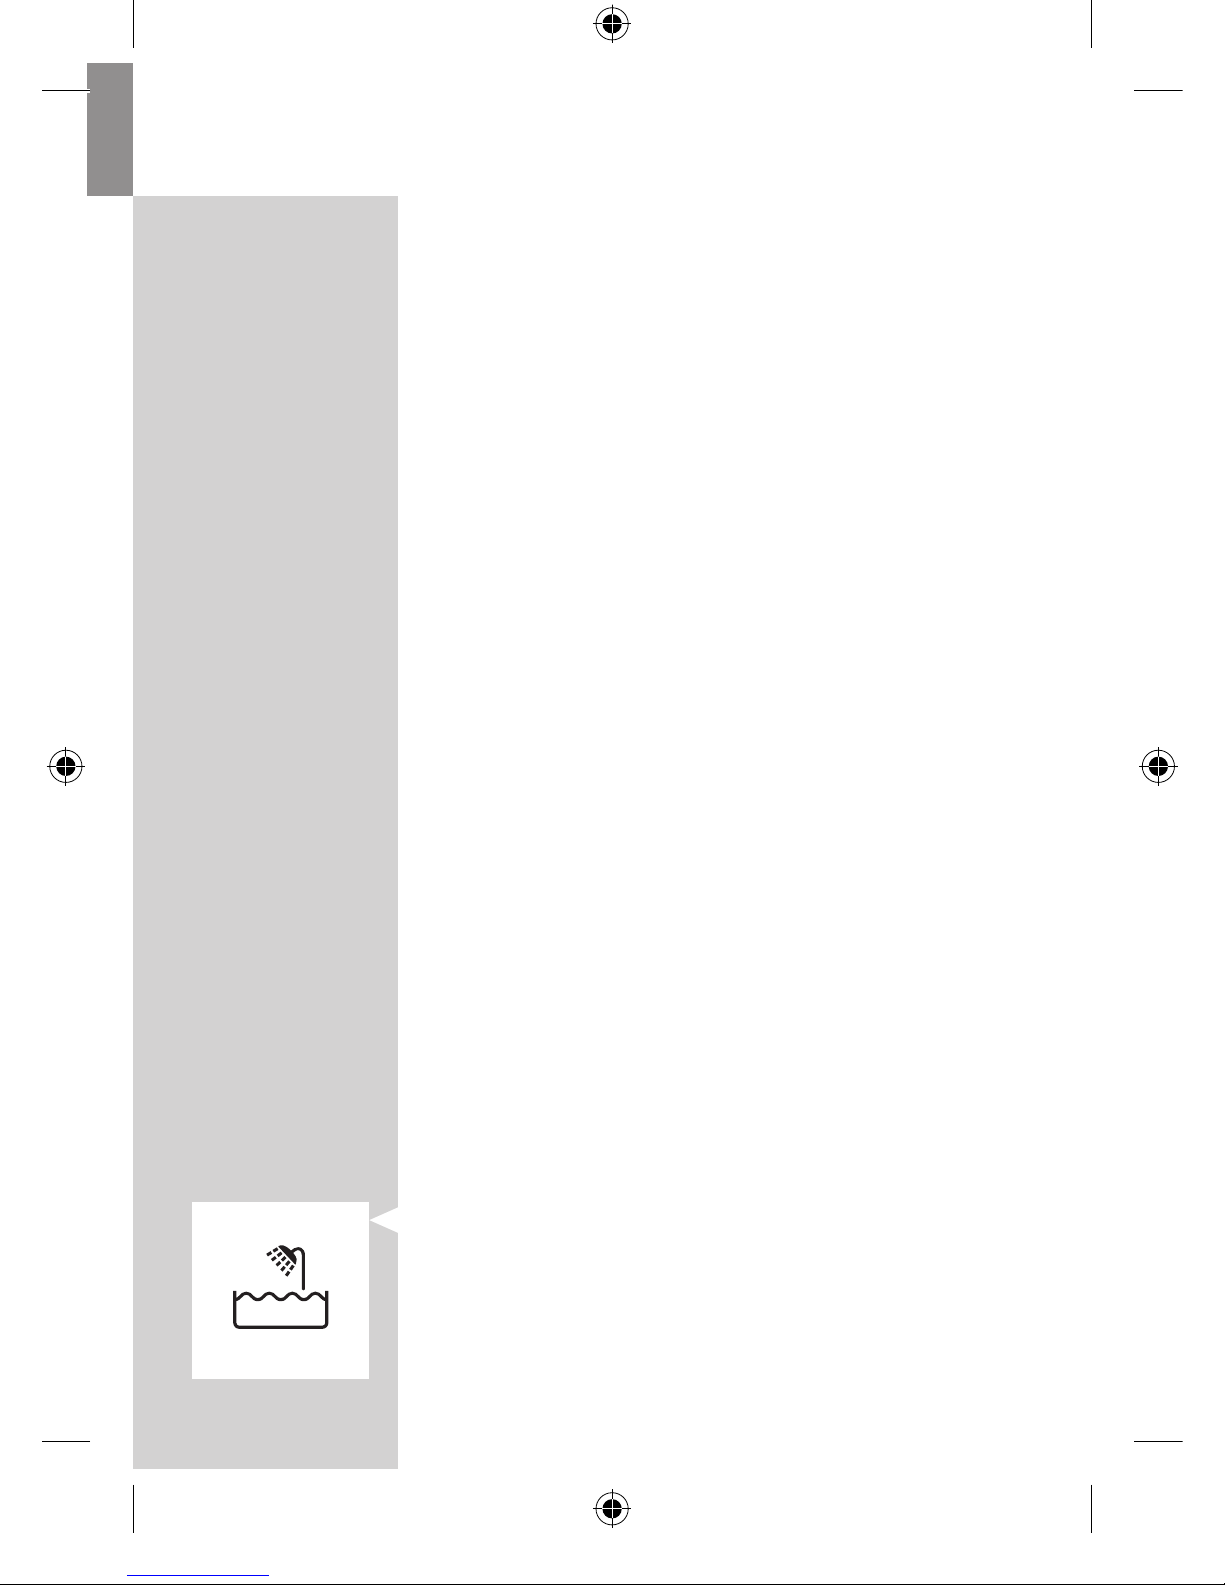
Compliance with standards
- This appliance complies with the internationally
approved safety regulations and can be safely used
in the bath or shower and cleaned under the tap.
ENGLISH 7
- This Philips appliance complies with all standards
regarding electromagnetic elds (EMF). If handled
properly and according to the instructions in this
user manual, the appliance is safe to use based on
scientic evidence available today.
General
- The adapter transforms 100-240 volts to a safe
low voltage of less than 24 volts.
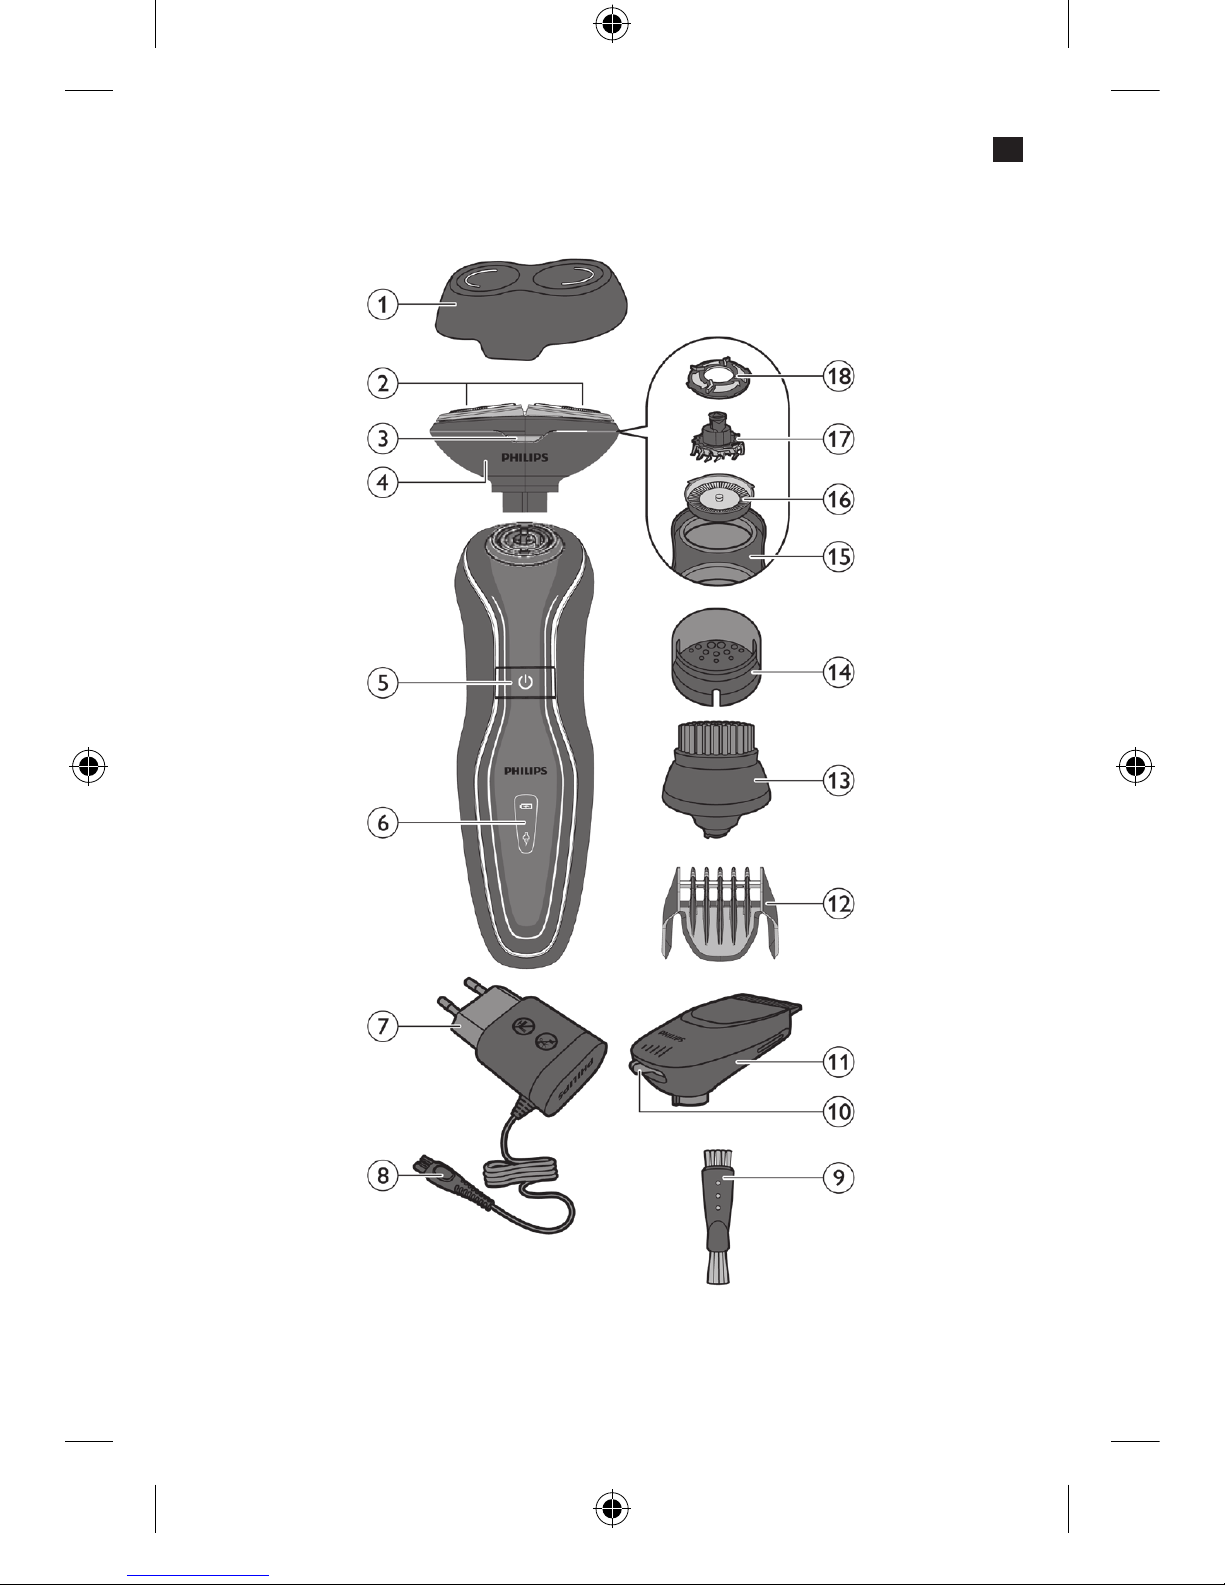
General description (Fig. 3)
1 Protection cap
2 Shaving unit
3 Shaving unit release buttons
4 Shaving attachment
5 On/off button
6 Display
7 Adapter
8 Small plug
9 Cleaning brush
10 Hair length selector (YS536, YS523 only)
11 Beard styler attachment (YS536, YS523 only)
12 Beard styler trimming comb (YS536, YS523 only)
13 Brush attachment (YS536, YS527, YS526 only)
14 Protection cap for brush attachment
(YS536, YS527, YS526 only)
15 Shaving head holder
16 Guard
17 Cutter
18 Retaining ring
ENGLISH8
Charging
It takes approx. 60 minutes to fully charge the battery.
When you charge the appliance for the rst time or
after a long period of disuse, let it charge for 90 minutes.
A fully charged appliance provides up to
40 operating minutes.
The operating minutes of your appliance may
vary over time, depending on your shaving/styling
behaviour, cleaning habits, beard type and whether
or not you use shaving gel or shaving foam.
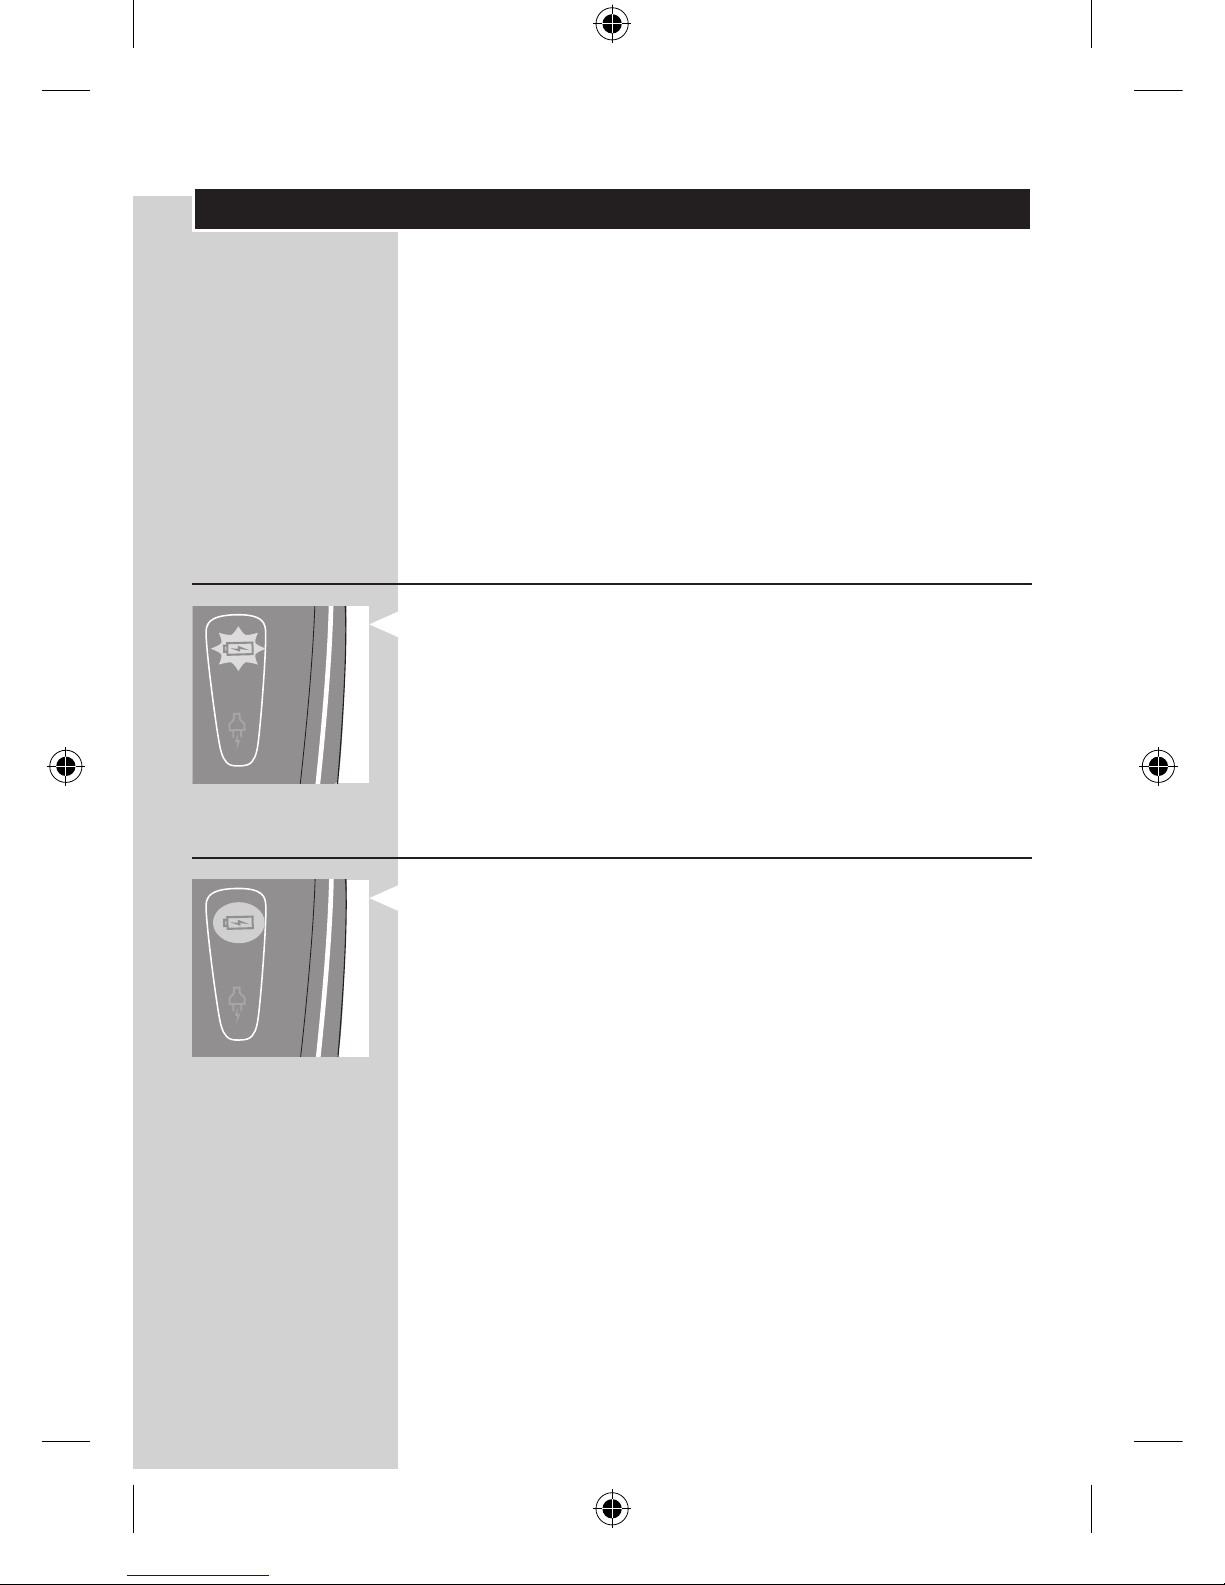
’Charging’ indication
- When the appliance is charging, the battery
symbol ashes green. When the battery is low or
empty, the battery symbol and the plug symbol
ash green and orange alternately during the rst
few minutes of charging to indicate quick charging.
’Battery fully charged’ indication
- When the battery is fully charged, the battery
symbol lights up green continuously.
- If you leave the appliance connected to the mains,
the battery symbol goes out after 30 minutes.
ENGLISH 9
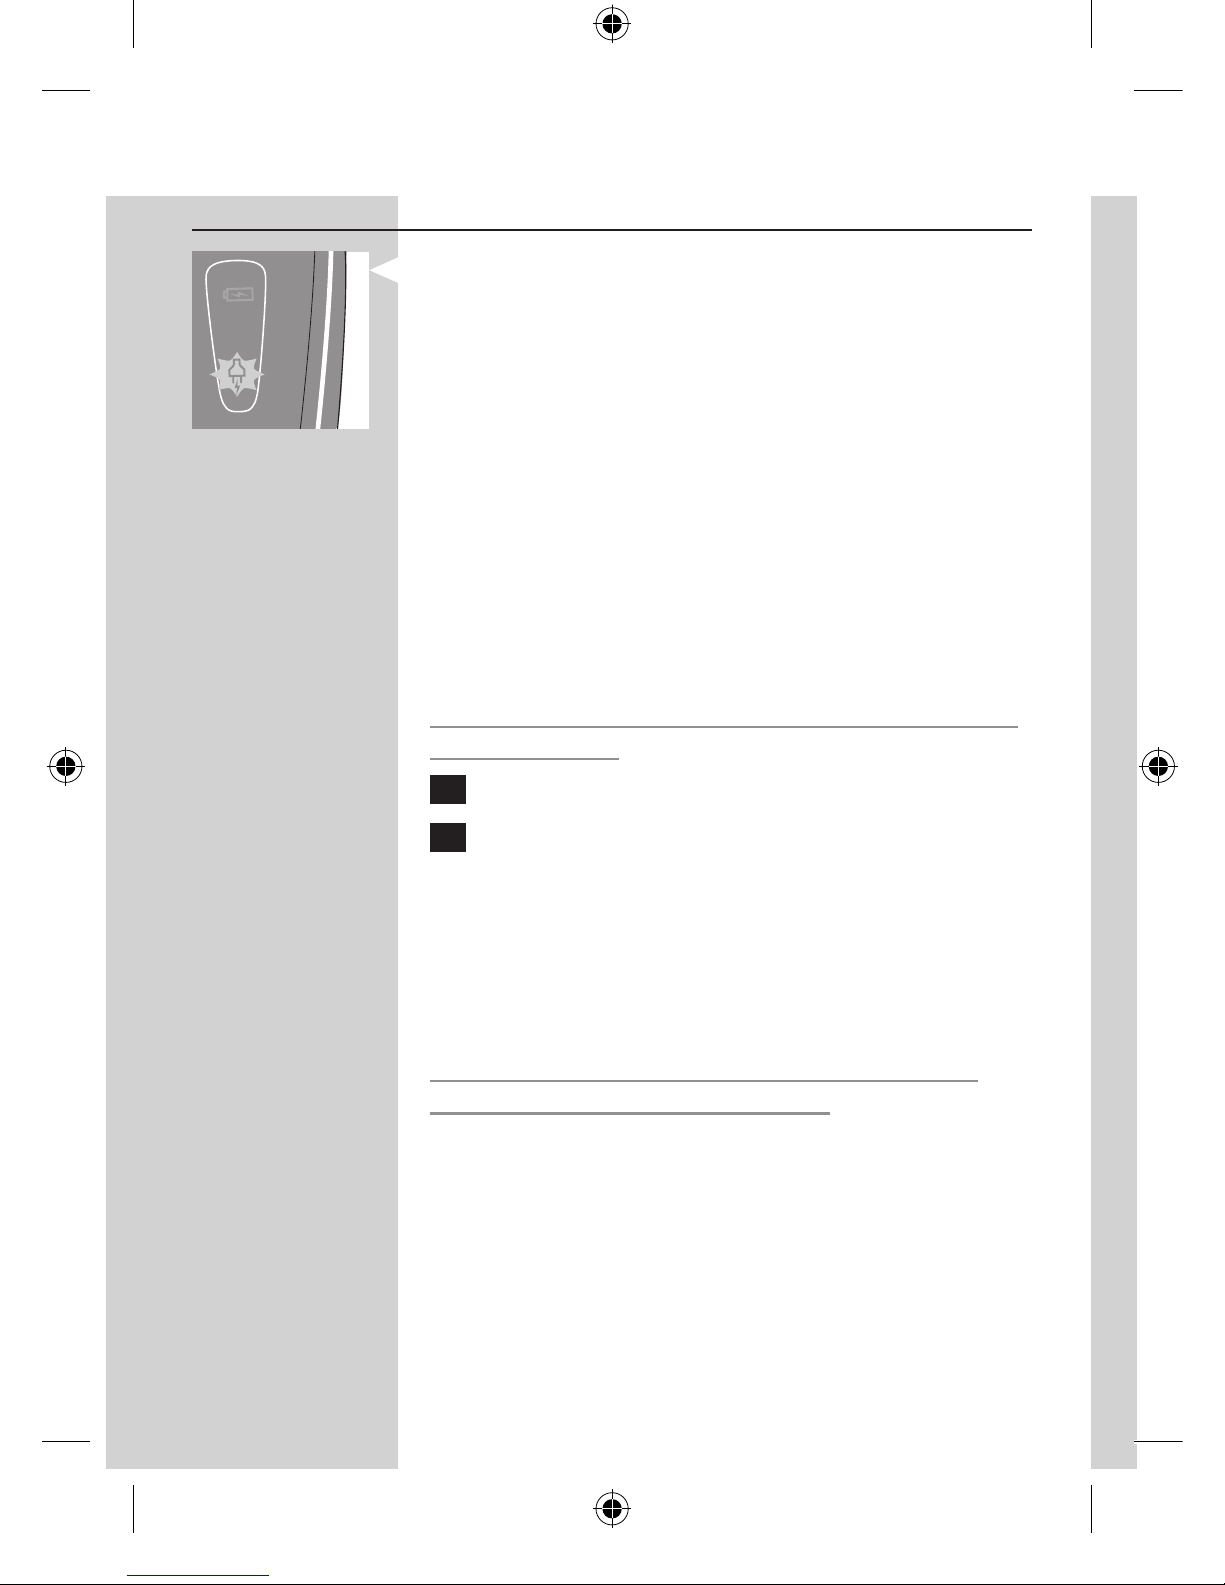
’Battery low’ indication
- When the battery is almost empty, the plug
symbol starts ashing orange.
- When you switch off the appliance, the plug
symbol continues to ash orange for a few more
seconds.
Quick charge
The quick charge is indicated by the battery
symbol and plug symbol ashing green and orange
alternately. When the plug symbol stops ashing
orange after approximately 5 minutes, the appliance
contains enough energy for a touch up.
Charging
Do not charge the appliance in a closed pouch or
in the packaging.
1 Put the small plug in the appliance.
2 Put the adapter in the wall socket.
, The battery symbol on the appliance ashes to
show that the appliance is charging (see chapter 4).
When you remove the adapter from the wall socket
and leave the small plug in the appliance, the
appliance may not work for a few seconds.
Caution: It is not possible to use the appliance
while it is connected to the mains.
ENGLISH10
Shaving
Skin adaptation period
Your rst shaves may not bring you the result you
expect and your skin may even become slightly
irritated. This is normal. Your skin and beard need
time to adapt to any new shaving system.
We advise you to shave regularly (at least 3 times
a week) for a period of 3 weeks to allow your skin
to adapt to the new shaver. During this period, use
your new electric shaver exclusively and do not use
other shaving methods. If you use different shaving
methods, it is more difcult for your skin to adapt to
the new shaving system.
- Only use this shaving attachment to shave facial
hair. You can use this attachment wet or dry
with shaving gel or shaving foam. Do not use
this attachment to shave body hair or scalp hair.
The different attachments of this appliance are
designed for specic types of hair and your facial
hair differs from body hair or scalp hair.
Note: The appliance does not work from the mains for
safety reasons.
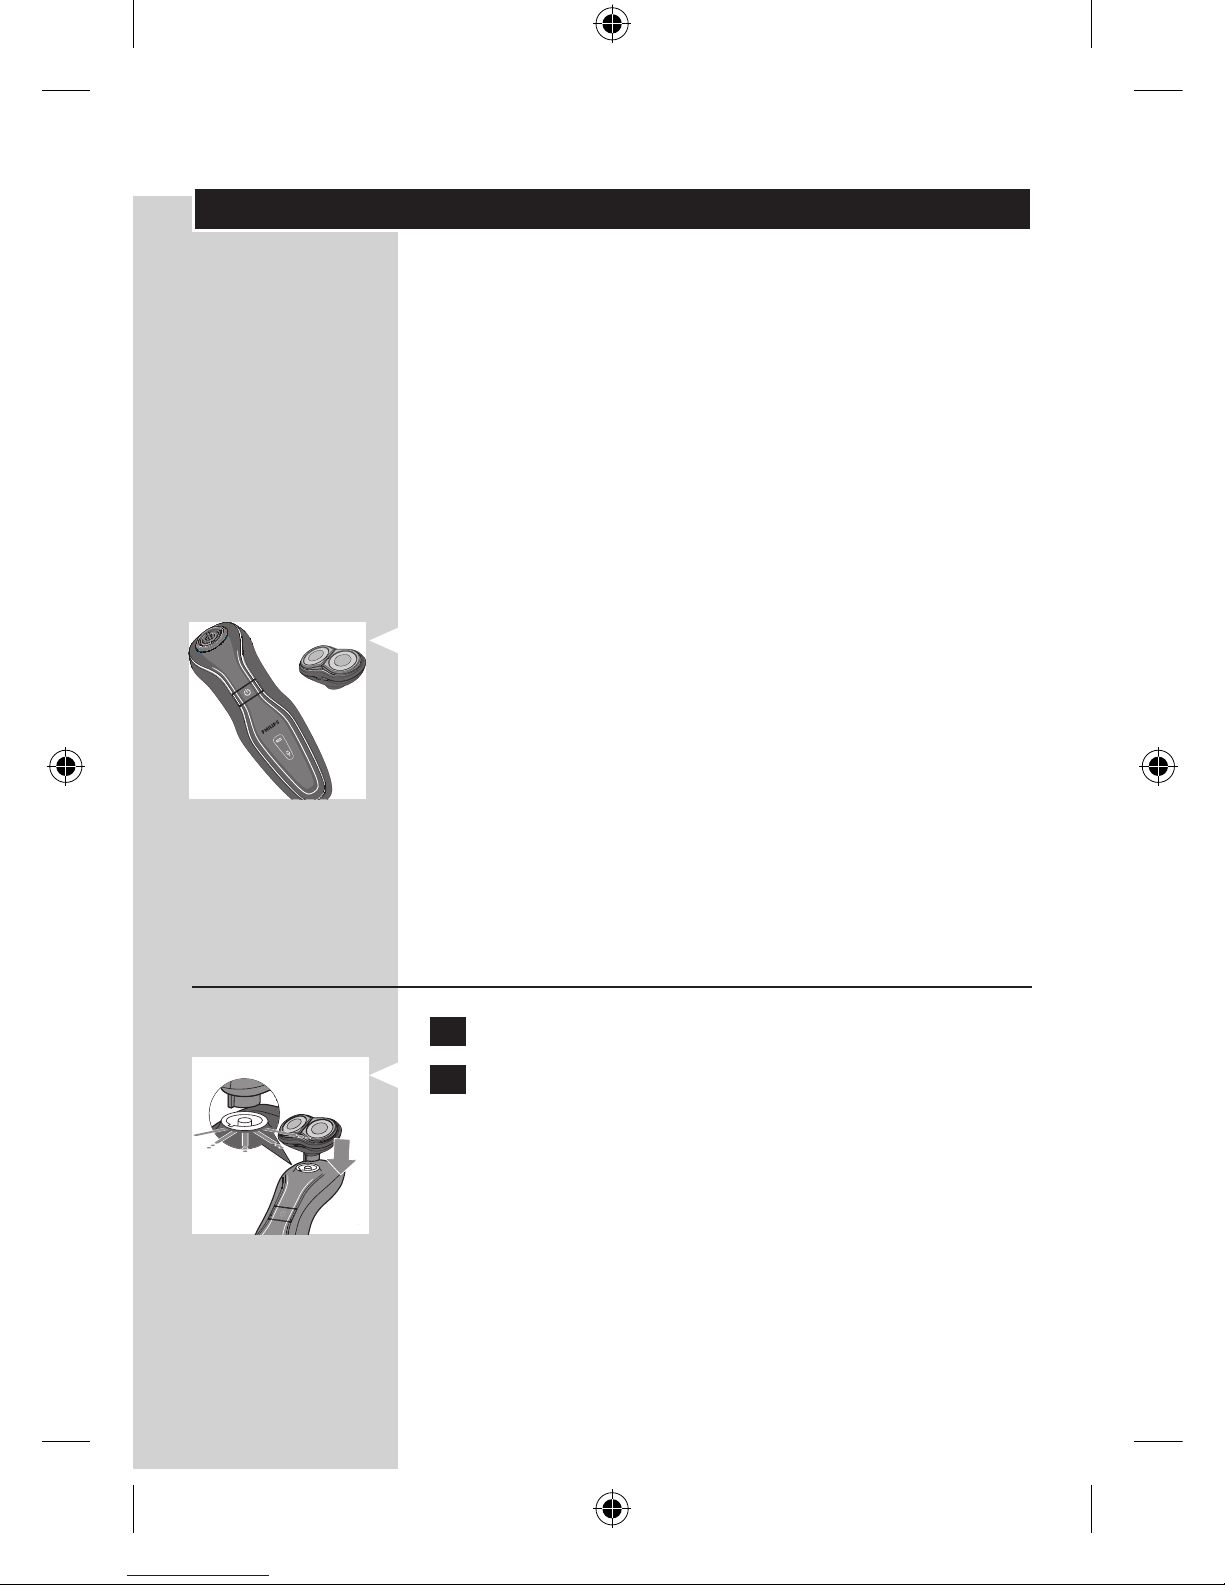
Attaching the shaving attachment
1 Make sure the appliance is switched off.
2 Insert the lug of the shaving attachment into
the slot in the top of the appliance. Press it
downwards to attach it to the appliance.
Do not twist the shaving attachment while you place it
on the appliance.
ENGLISH 11
Using the shaver
1 Press the on/off button to switch on the
appliance.
2 Move the shaving unit over your skin.
To ensure the best result move the appliance in
circular motion over your skin.
3
Press the on/off button to switch off the appliance.
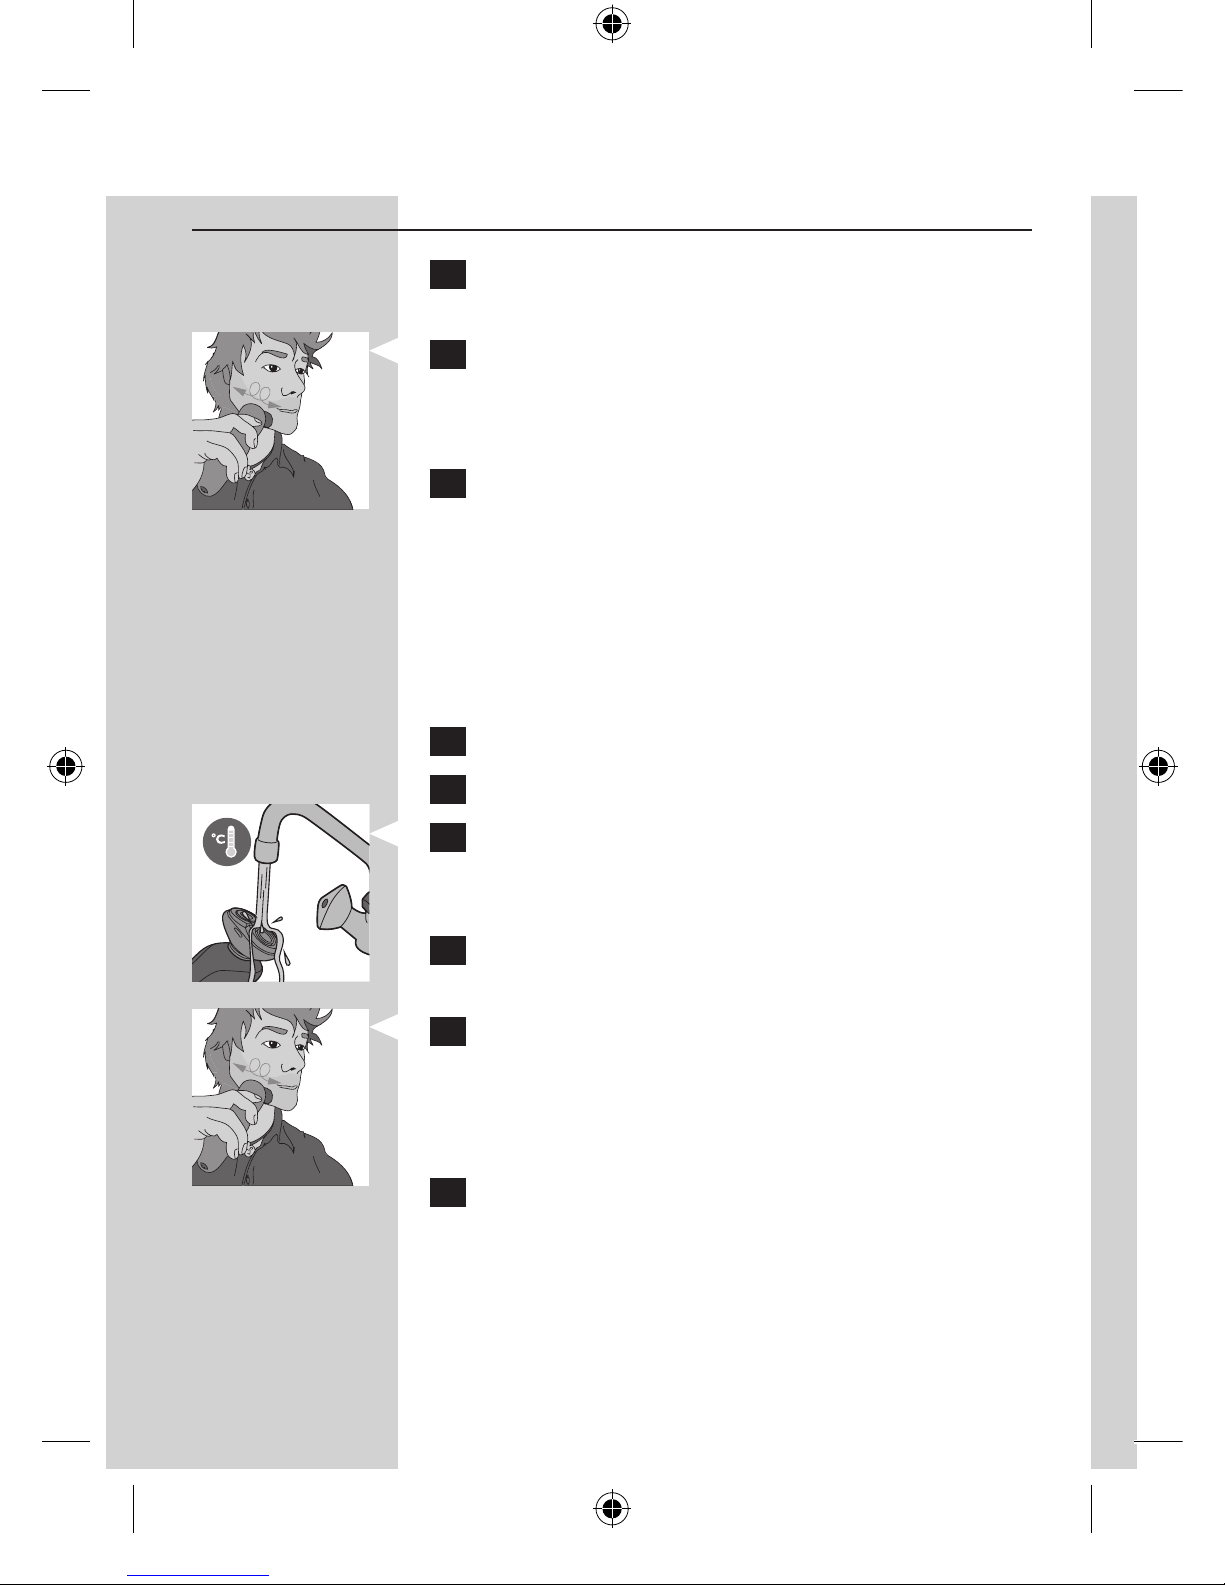
Wet shaving
To achieve better shaving results you can also use
this shaver on a wet face with shaving foam or
shaving gel.
To shave with shaving foam or shaving gel, follow the
steps below:
1 Apply some water to your skin.
2 Apply shaving foam or shaving gel to your skin.
3 Rinse the shaving unit under the tap to ensure
that the shaving unit glides smoothly over your
skin.
4
Press the on/off button to switch on the appliance.
5 Move the shaving unit over your skin. Make
circular movements.
Rinse the shaving unit under the tap regularly to ensure
that it continues to glide smoothly over your skin.
6 Dry your face and thoroughly rinse the shaving
unit with a sufcient amount of water after
every shave. Make sure you rinse all foam
or shaving gel off the shaving unit (see also
chapter 9).
ENGLISH12
Beard styling (YS536, YS523 only)
- Only use this beard styler attachment to style facial
hair. Do not use this attachment to style body
hair or scalp hair. The different attachments of this
appliance are designed for specic types of hair and
your facial hair differs from body hair or scalp hair.
The appliance does not work from the mains for safety
reasons.
Attaching the beard styler attachment
1 Make sure the appliance is switched off.
2 Pull the shaving attachment straight off the
appliance.
Do not twist the shaving attachment while you pull it
off the appliance.
3 Insert the lug of the beard styler
attachment into the slot in the top of the
appliance. Press it downwards to attach it to
the appliance.
Using the beard styler attachment with comb
- You can use the beard styler attachment with the
comb attached to trim your beard at one xed
setting, but also at different length settings. You can
choose any setting between 1 and 5mm.
ENGLISH 13

1 Press the length selector (1) and then push it
to the left or right (2) to select the desired
hair length setting.
2 Press the on/off button to switch on the
appliance.
3 You can now start styling your beard.
Make sure that the front of the comb is fully in contact
with the skin and move the appliance against the
direction of hair growth. You may want to try different
positions (upwards, downwards, or across), depending
on the direction of hair growth.
Using the beard styler attachment without
comb
You can use the beard styler attachment without
comb to contour or cut shapes in beard hair.
1 Pull the comb off the beard styler attachment.
2 Press the on/off button to switch on the
appliance.
3 You can now start contouring your beard.
Be careful, the appliance cuts hair very close to
the skin, at a length of 1mm.
Facial cleansing with brush (YS536, YS527,
YS526 only)
Use the rotating brush with your daily cleansing
cream. The cleansing effect removes oil and dirt,
contributing to a healthy and oil free skin.
ENGLISH14
Attaching the cleansing brush
1 Pull the shaving attachment straight off the
appliance.
Do not twist the shaving attachment while you pull it
off the appliance.
2 Insert the lug of the brush attachment into
the slot in the top of the appliance. Press it
downwards to attach it to the appliance.
Using the cleansing brush attachment
1 Moisten the cleansing brush and your face with
warm water and cleansing cream.
Tip: Use the brush attachment before shaving for an
easier shaving and a more hygienic shaving result.
2 Press the on/off button to switch on the
appliance.
3 Start cleaning the T-zone with the brush
attachment.
Note: Make circular motions no more than 3 times in
one spot.
4 Start cleaning the rest of your face
Tip: Treat your face with the brush attachment for
about one minute.
Caution: Do not clean the sensitive area around
your eyes.
ENGLISH 15
Cleaning and maintenance
Never use scouring pads, abrasive cleaning agents
or aggressive liquids such as petrol or acetone to
clean the shaver and its accessories.
Be careful with hot water. Always check if the
water is not too hot, to prevent your hands from
getting burned.
Note: To prevent inammation of your skin, you should
clean the appliance thoroughly on a regular basis.
- Clean the appliance and the attachments after
every use to prevent pollution of the shaver and
blockages.
- You can clean the outside of the appliance with
a damp cloth. Do not clean an attachment with a
cloth.
Cleaning the shaving attachment
- Clean the shaving heads frequently with Philips
Shaving Head Cleaning Spray (HQ110) for
optimal shaving performance.
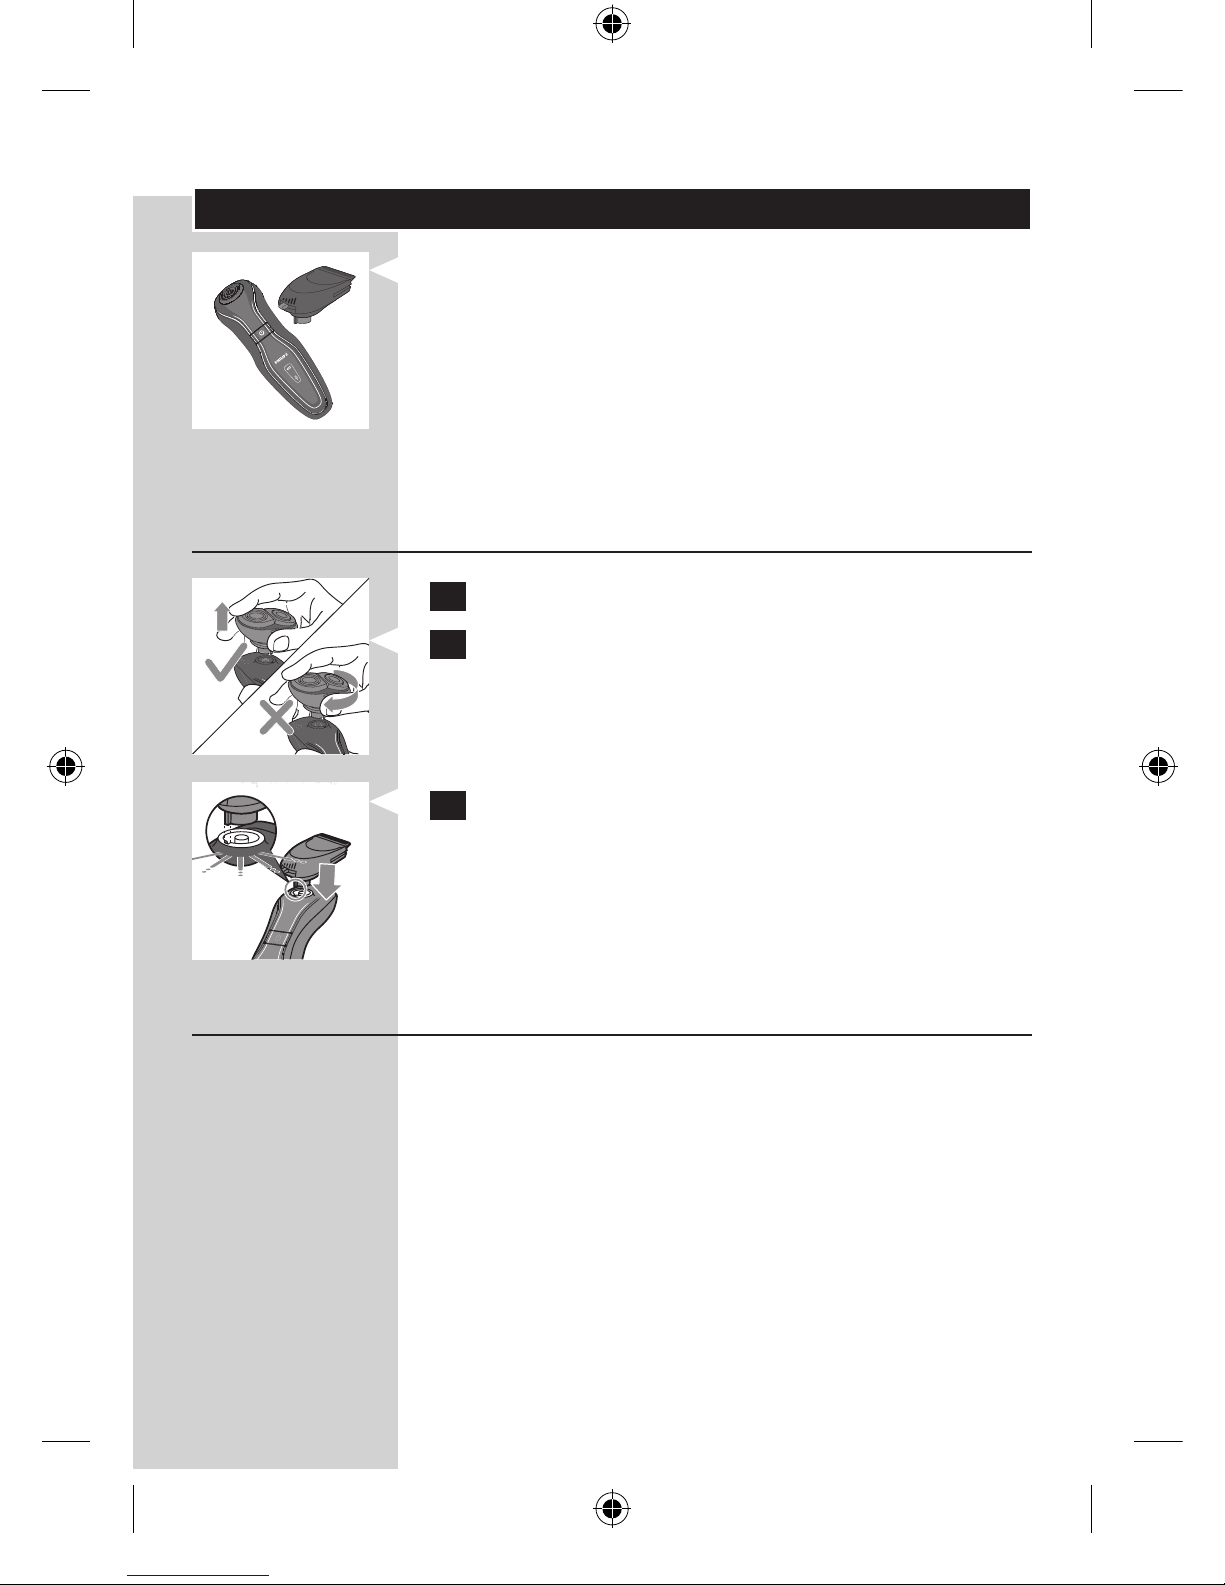
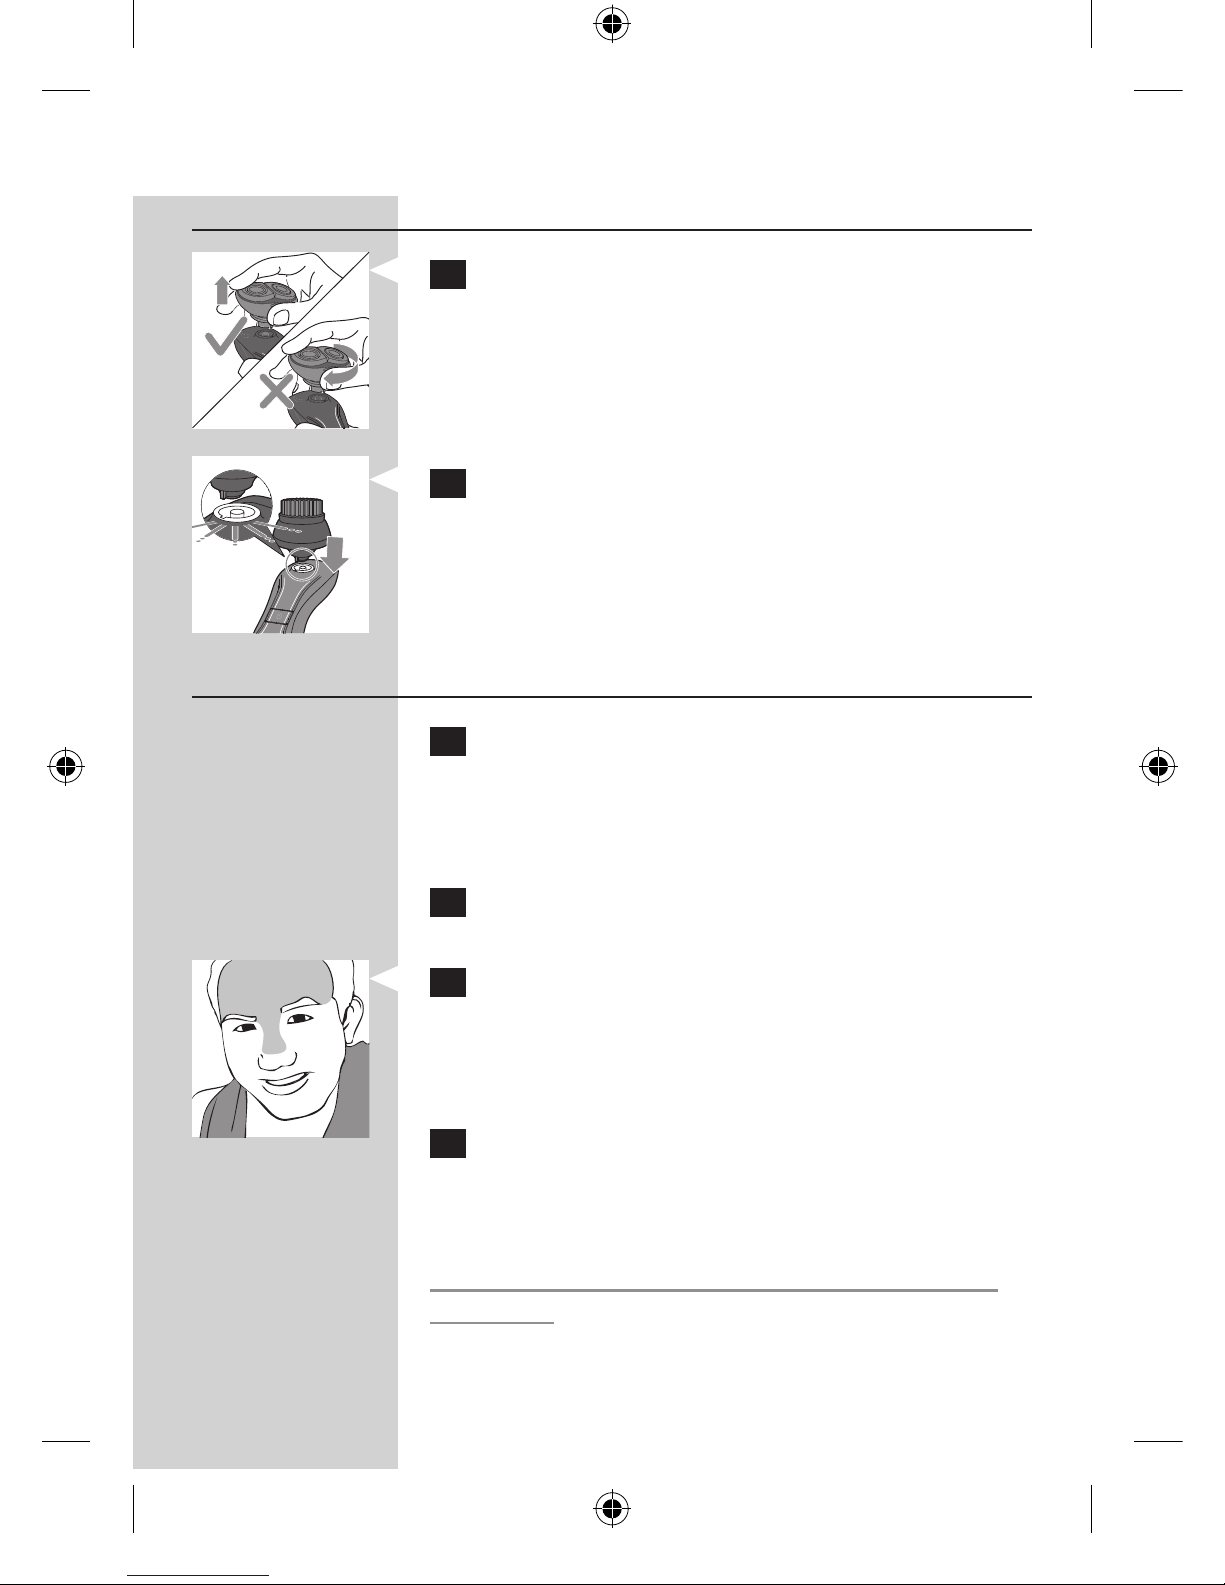
1 Switch off the appliance.
2 Press the release buttons on the shaving
attachment (1) and pull the shaving unit off the
shaving attachment (2).
3 To unlock the orange retaining ring, turn it in
the direction of the arrows indicated in and on
the retaining ring.
ENGLISH16
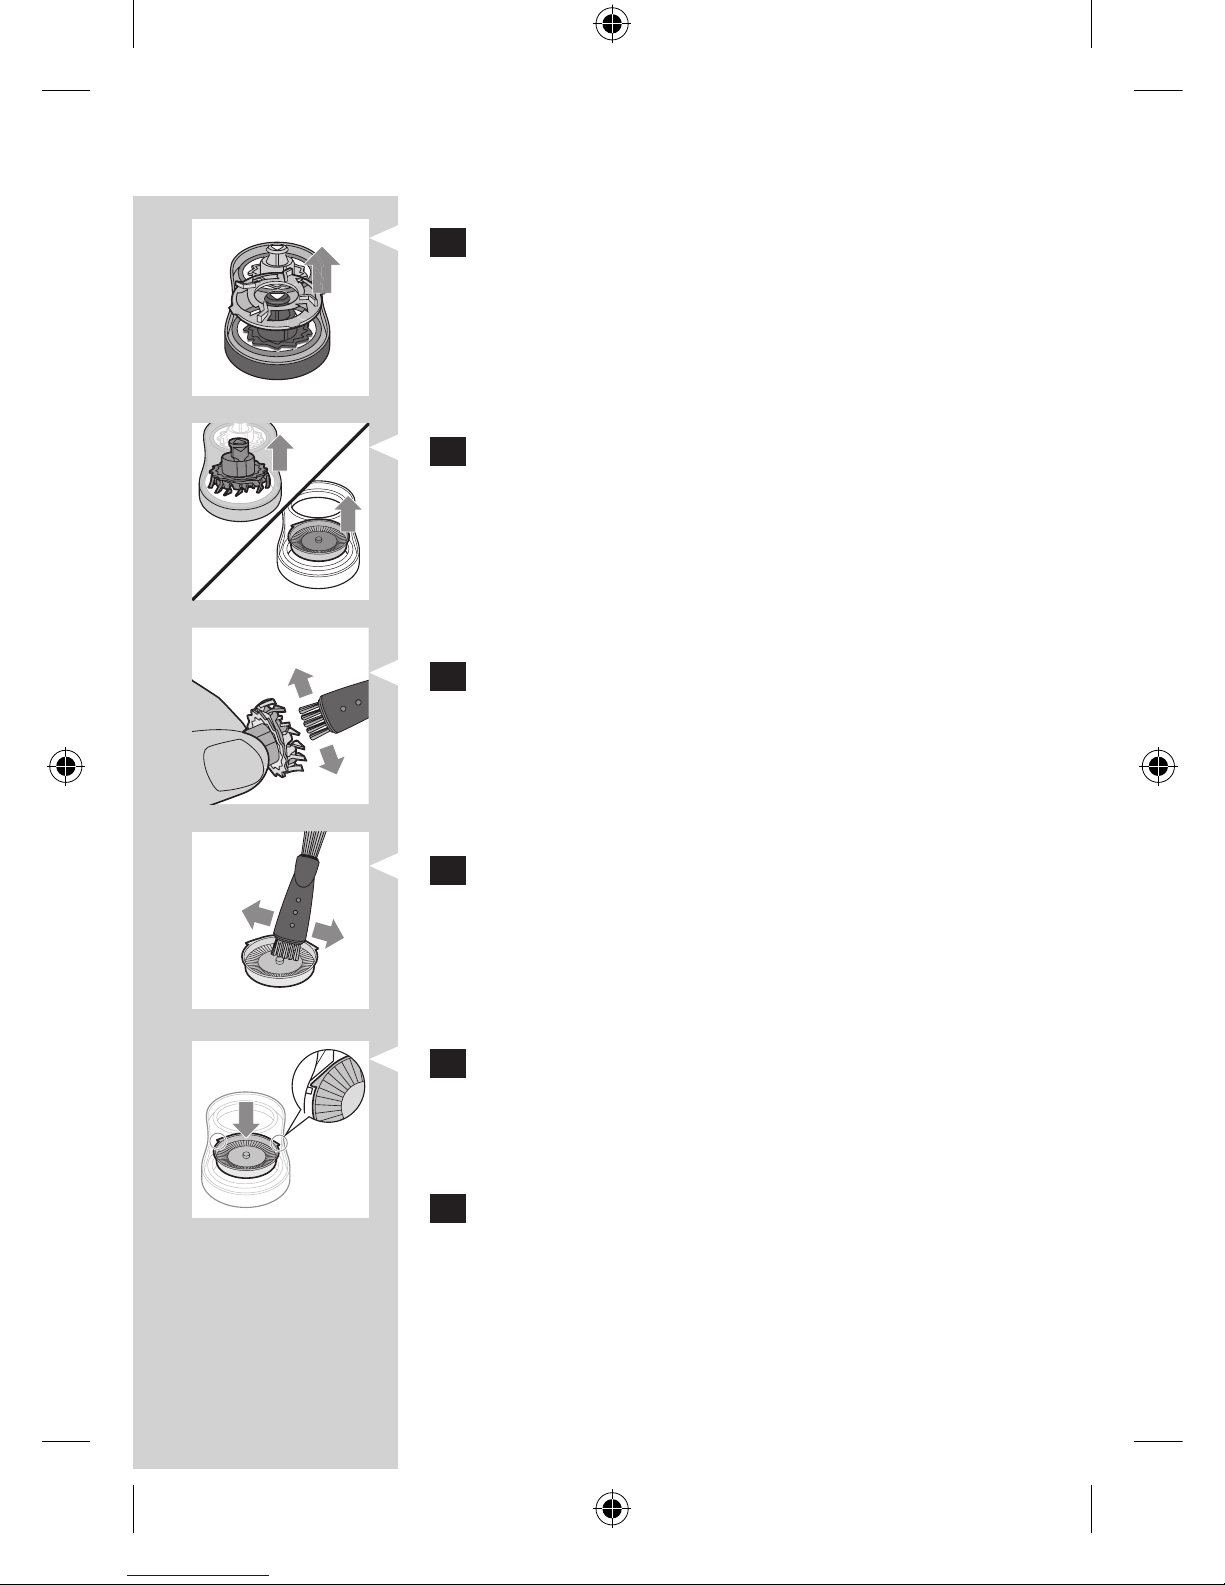
4 Lift the retaining ring out of the shaving head
holder.
5 Remove one cutter and its shaving guard.
Do not clean more than one cutter and shaving guard
at a time, since they are all matching sets. If you
accidentally put a cutter in the wrong shaving guard,
it may take several weeks before optimal shaving
performance is restored.
6 Clean the cutter with the cleaning brush
supplied.
7 Clean the inside of the shaving guard.
You can also clean the cutter and its guard under a
tap of hot water.
8 After cleaning, place the shaving guard back
into the shaving head holder. Make sure the
two wings t exactly into the recesses of the
shaving head holder.
9 Place the cutter back into the shaving guard
with the cutter legs pointing downwards.
ENGLISH 17
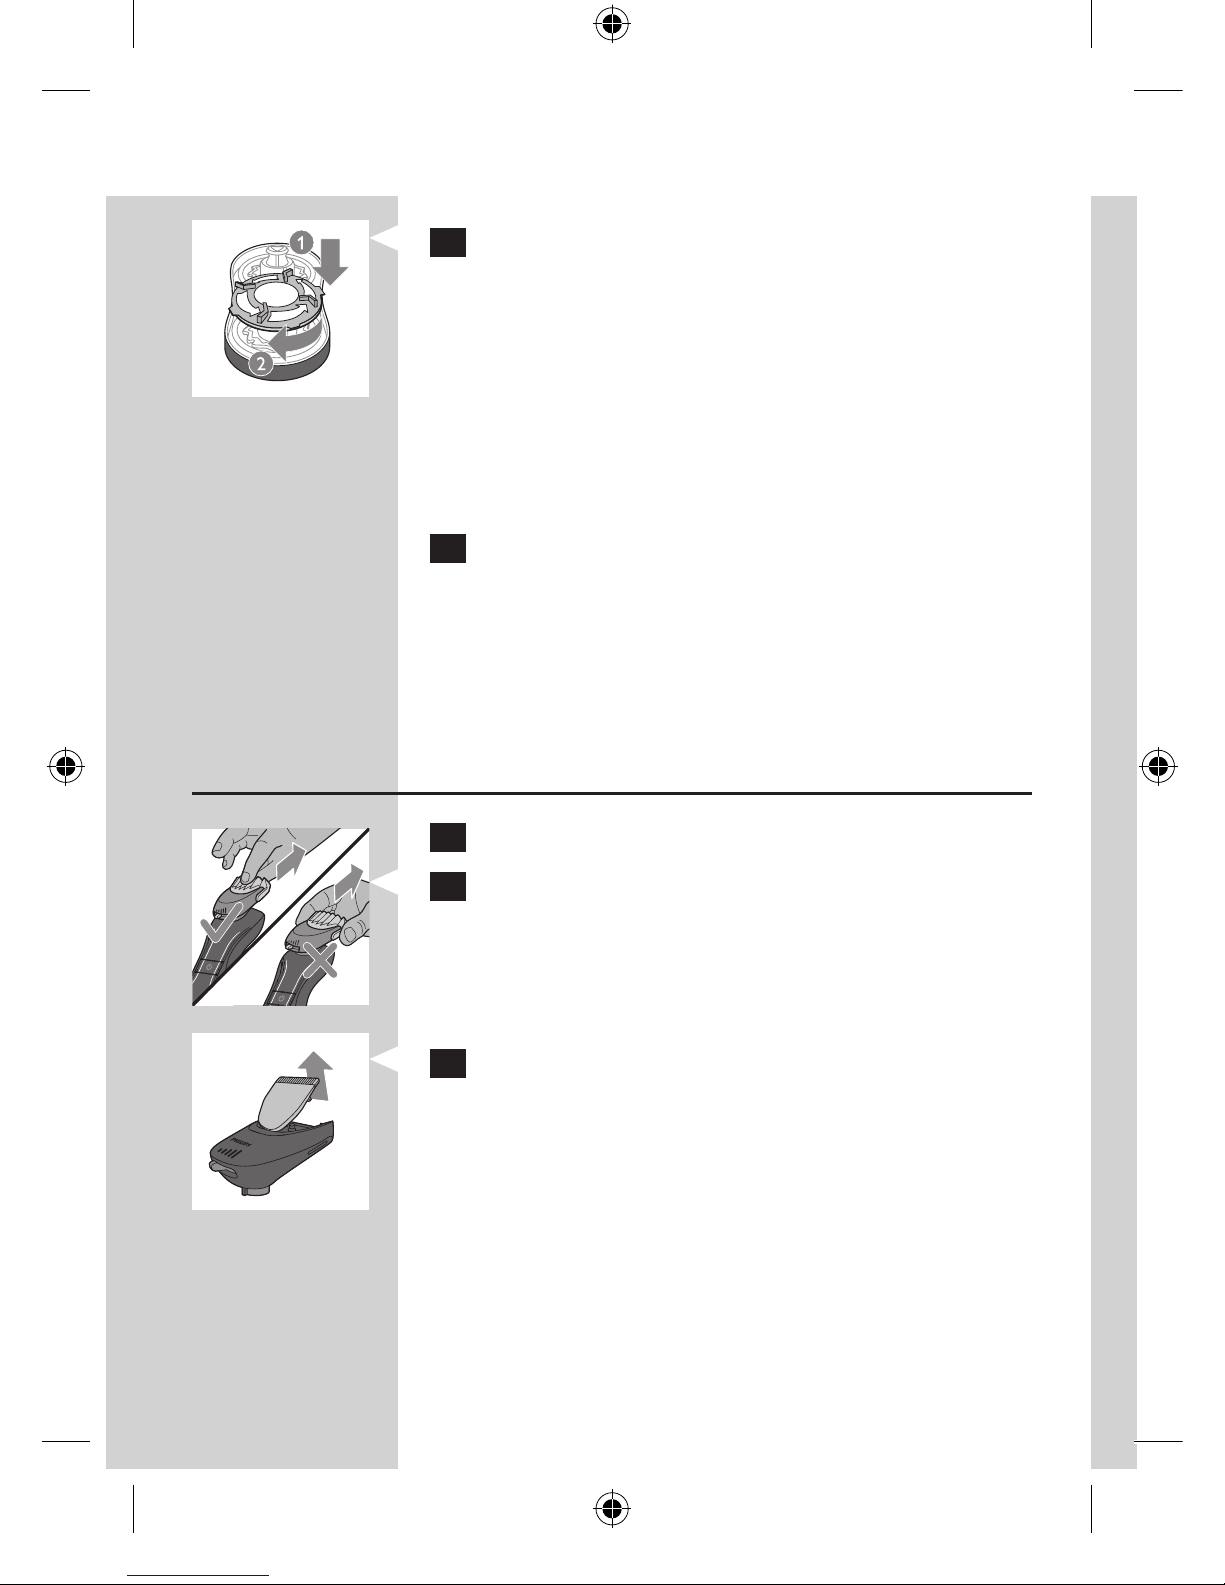
10 Place the retaining ring back onto the shaving
head holder (1). To reattach the retaining ring,
turn it against the direction of the arrows
indicated in and on the retaining ring (2).
Make sure the retaining ring is xed properly. The four
wings of the retaining ring have to be located exactly
under the recesses of the shaving head holder.
Repeat steps 5-10 for the other shaving heads.
11 Reattach the shaving unit to the shaving
attachment.
If the shaving unit cannot be reattached smoothly,
check if you have positioned the shaving heads
properly and if the retaining rings are xed properly.
Cleaning the beard styler attachment
(YS536, YS523 only)
1 Switch off the appliance.
2 Pull the comb off the beard styler attachment.
3 Open the beard styler attachment.
Dispose of the hairs in the garbage bin.
ENGLISH18

4 Rinse the beard styler attachment and the
comb separately under a hot tap for some
time.
5 Lubricate the trimmer teeth with a drop of
sewing machine oil every six months.
Cleaning the cleansing brush attachment
(YS536, YS527, YS526 only)
1 Switch off the appliance.
2 Detach the brush head from the brush base.
3
Clean them thoroughly with warm water and soap.
4 Dry the brush attachment with a towel.
Storage
Note: Make sure the appliance and the attachments
are dry before you store them.
1 Put the protection cap on the shaver after
use to prevent damage and to avoid dirt
accumulation in the shaving heads.
2 Put the protection cap on the cleansing brush
to protect it from dirt accumulation.
ENGLISH 19
Replacement
Replacing the shaving heads
For maximum shaving performance, we advise
you to replace the shaving heads every two years.
Replace damaged shaving heads right away.
Only replace the shaving heads with original RQ32
Philips shaving heads. See also chapter ‘Ordering
accessories’.
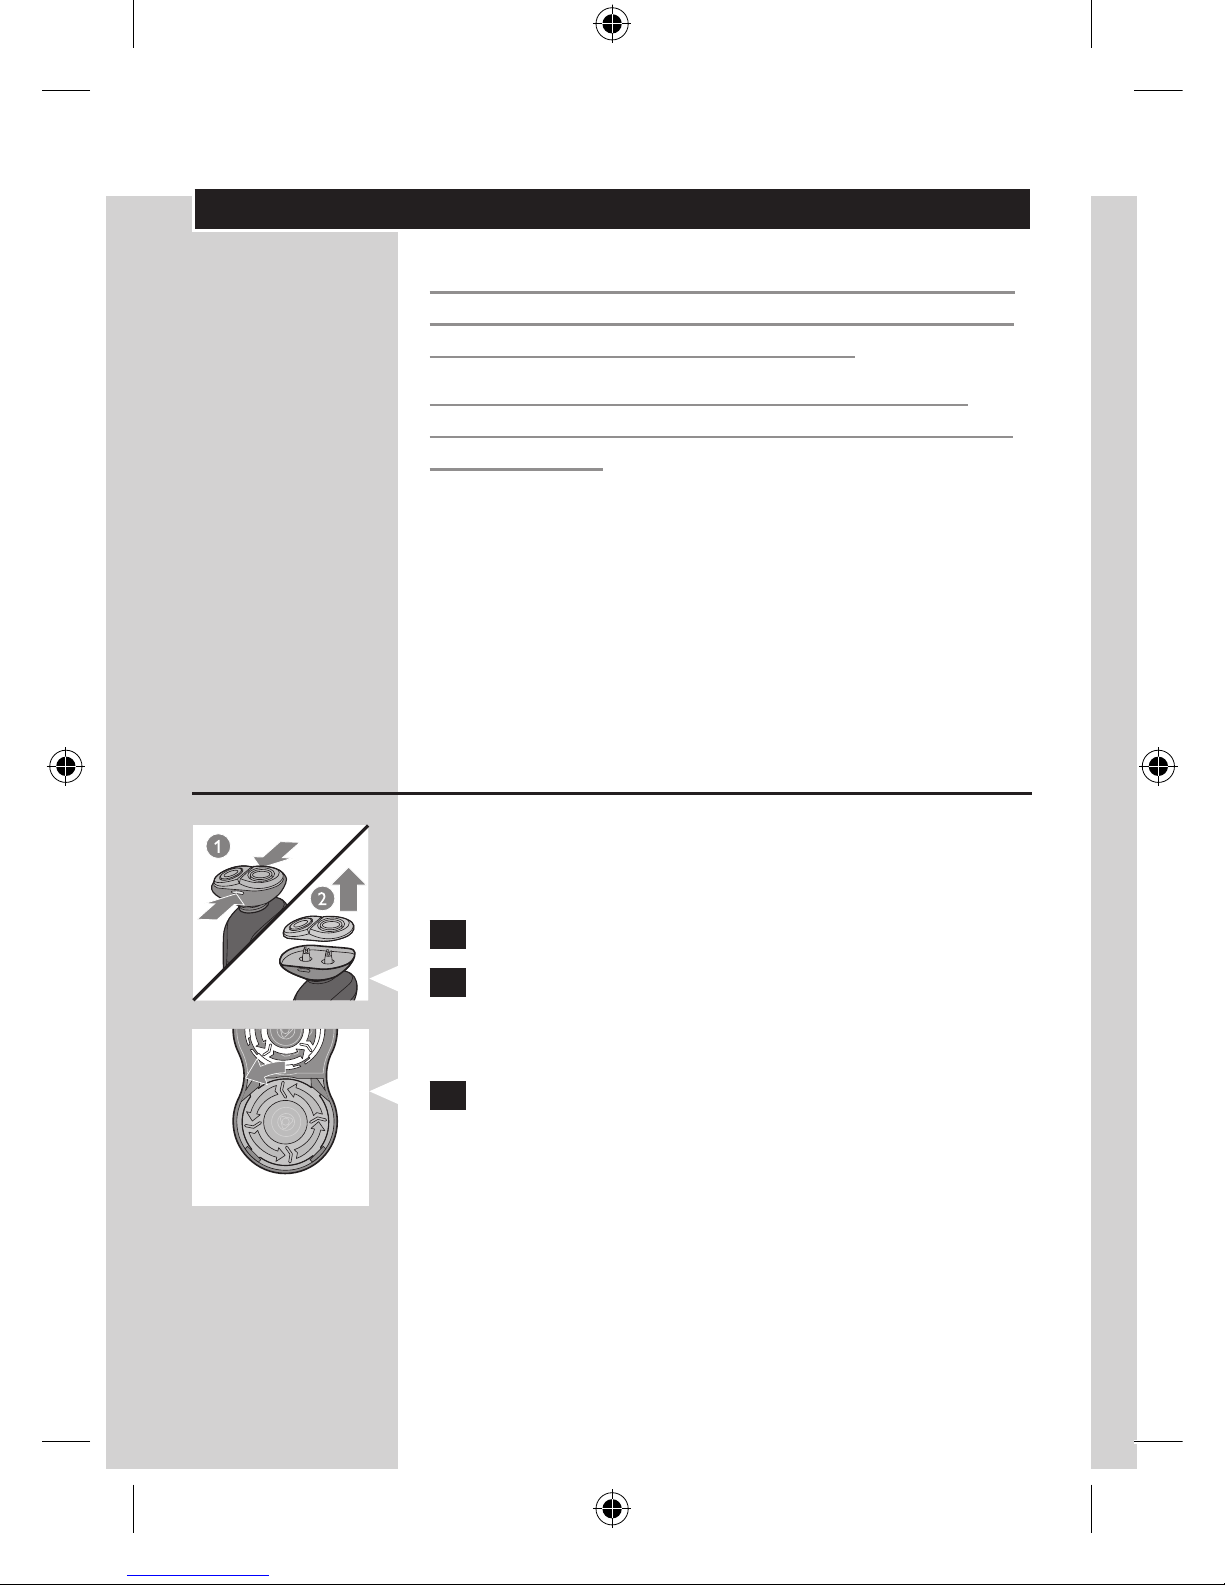
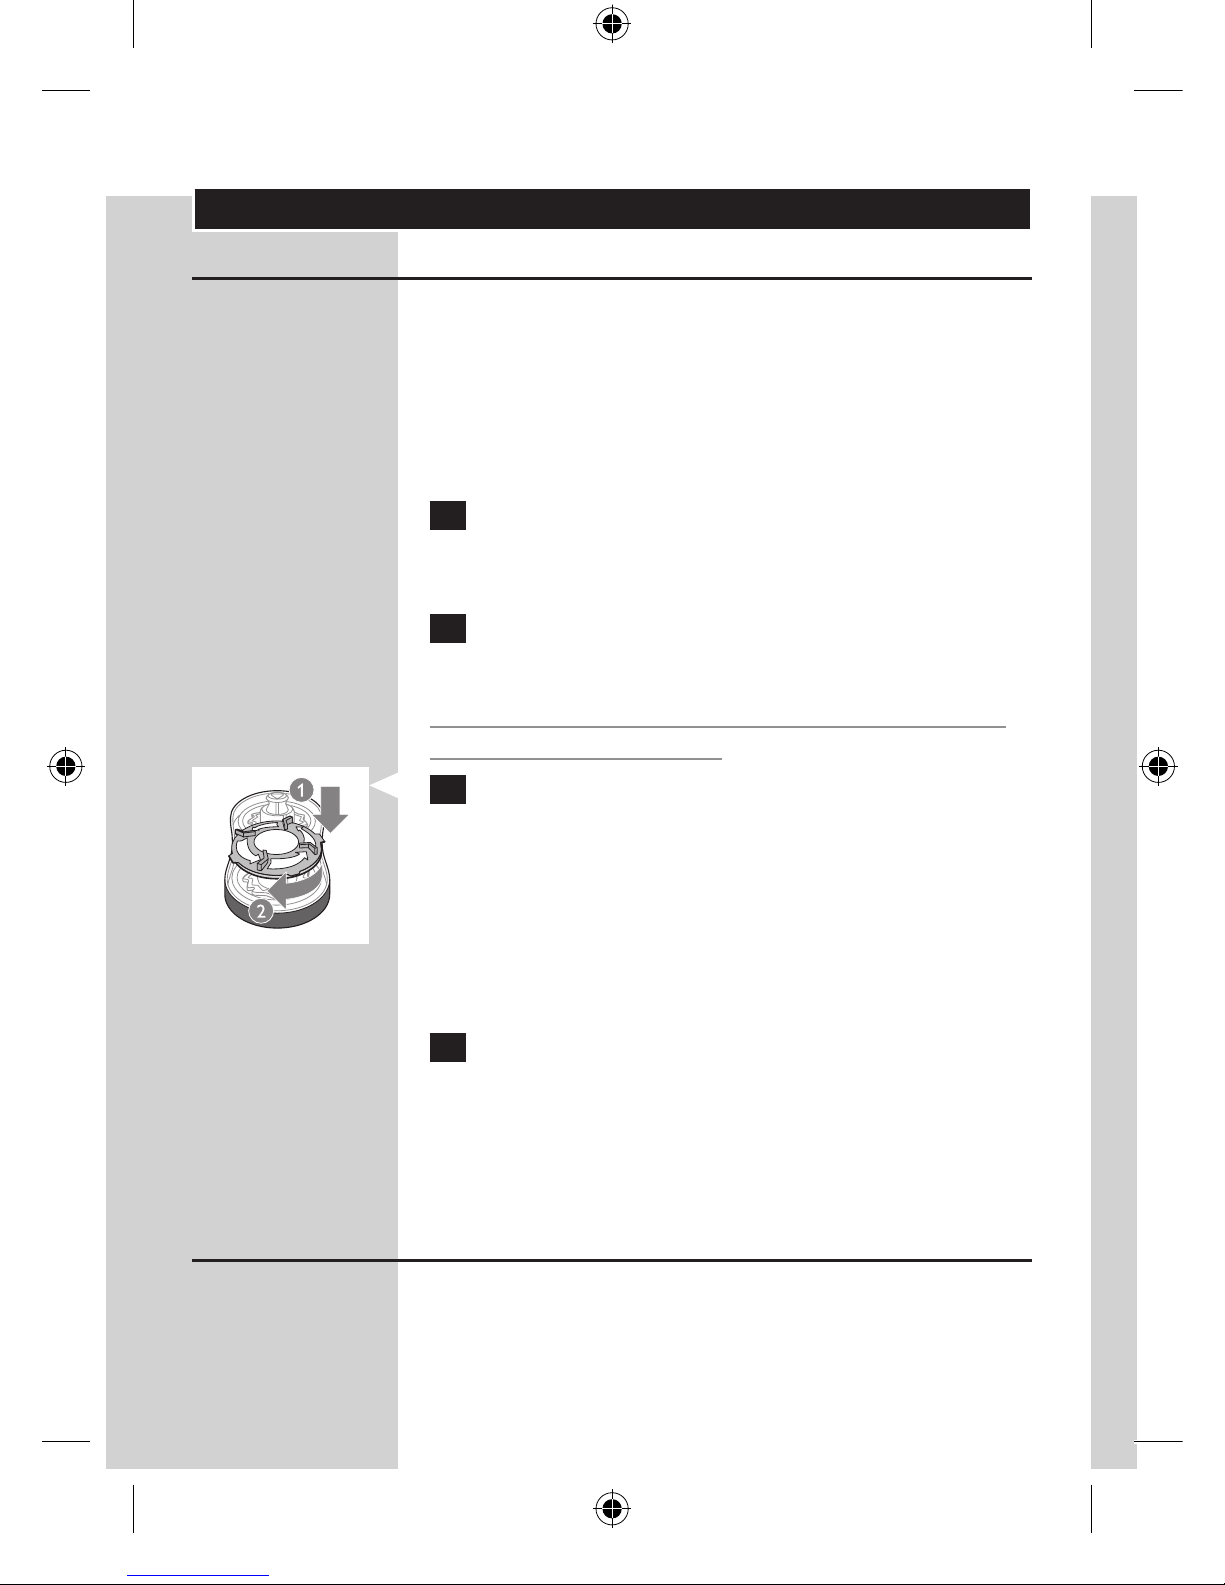
1 Follow steps 1-4 from chapter ‘Cleaning and
maintenance’ under ‘Cleaning the shaving
attachment’.
2 Remove the shaving heads and place new ones
in the shaving unit.
Make sure the two wings of the shaving heads t
exactly into the recesses.
3 Place the retaining rings back onto the shaving
unit (1). To reattach the retaining rings, turn it
against the direction of the arrows indicated in
and on the retaining rings (2).
Make sure the retaining rings are xed properly. The
four wings of the retaining ring have to be located
exactly under the recesses of the shaving head holder.
4 Reattach the shaving unit to the shaving
attachment.
If the shaving unit cannot be reattached smoothly,
check if you have positioned the shaving heads
properly and if the retaining rings are xed properly.
Replacing the cleansing brush
The brush head replacement should be replaced
every 3 months or earlier if the laments are
deformed or damaged.
ENGLISH20
Ordering accessories
To buy accessories or spare parts, visit
www.shop.philips.com/service or go to your
Philips dealer. You can also contact the Philips
Consumer Care Centre in your country (see the
worldwide guarantee leaet for contact details).
The following accessories are available:
- RQ32 Philips shaving heads
- YS511 Philips beard styler attachment
- HQ110 Philips Shaving Head Cleaning Spray
- RQ560 Philips cleansing brush head replacement
- RQ575 Philips cleansing brush attachment
For replacement combs, please also visit
www.shop.philips.com/service.
Environment
- Do not throw away the appliance with the normal
household waste at the end of its life, but hand
it in at an ofcial collection point for recycling. By
doing this, you help to preserve the environment.
- The built-in rechargeable battery contains
substances that may pollute the environment.
Always remove the battery before you discard or
hand in the appliance at an ofcial collection point.
Dispose of the battery at an ofcial collection
point for batteries. If you have trouble removing
the battery, you can also take the appliance to a
Philips service centre. The staff of this centre will
remove the battery for you and will dispose of it
in an environmentally safe way.
ENGLISH 21
Removing the rechargeable battery
Only remove the rechargeable battery when you
discard the appliance. Make sure the rechargeable
battery is completely empty when you remove it.
Be careful, the battery strips are sharp.
1 Undo the screw in the back panel of the
appliance with a screwdriver (1) and remove
the back panel (2).
2 Bend the hooks aside and remove the power
unit.
3 Break the snap hooks (1) and remove the front
panel of the power unit (2).
4 Take out the battery holder (1) and cut the
battery tags with a pair of cutting pliers (2).
5 Remove the rechargeable battery.
Guarantee and service
If you need information or support, visit
www.philips.com/support or the separate
worldwide guarantee leaet.
Guarantee restrictions
The shaving heads (cutters and guards) are not
covered by the terms of the international guarantee
because they are subject to wear.
ENGLISH22

Troubleshooting
This chapter summarises the most common
problems you could encounter with the appliance.
If you are unable to solve the problem with the
information below, visit www.philips.com/
support for a list of frequently asked questions or
contact the Consumer Care Centre in your country.
Problem Possible cause Solution
The
appliance
does not
work, even
though it is
connected
to the mains.
This appliance is not
designed to be used
directly from the mains.
Remove the adapter from
the wall socket and the small
plug from the appliance.
You can now switch on the
appliance again.
The
appliance
does not
shave as well
as it used to.
The shaving heads are
damaged or worn.
Replace the shaving heads.
See chapter ‘Replacement’.
The shaving heads are
dirty.
Clean the cutters and
guards with the cleaning
brush supplied. See chapter
‘Cleaning and maintenance’.
Long hairs obstruct the
shaving heads.
Clean the cutters and
guards with the cleaning
brush supplied. See chapter
‘Cleaning and maintenance’.
Shaving foam or shaving
gel has accumulated in
the shaving heads.
Rinse the shaving heads
thoroughly with a sufcient
amount of water.
ENGLISH 23

Problem Possible cause Solution
The
appliance
does not
work when I
press the on/
off button.
The rechargeable
battery is empty.
Recharge the battery. See
chapter ‘Charging’.
The temperature of the
appliance is too high. In
this case, the appliance
does not work.
Let the appliance cool down.
As soon as the temperature
of the appliance has
dropped sufciently, you
can switch on the appliance
again.
When you remove
the adapter from the
wall socket and leave
the small plug in the
appliance, the appliance
does not work for a few
seconds.
Remove the small plug from
the appliance.
My skin is
irritated after
shaving.
Your skin needs time to
get used to the Philips
shaving system.
Skin irritation during the rst
2-3 weeks of use is possible.
After this period, the skin
irritation usually disappears.
The shaving heads are
damaged or worn.
Replace the shaving heads.
See chapter ‘Replacement’.
ENGLISH24

Problem Possible cause Solution
The rotation
speed of
the shaving
heads is
lower than
usual.
Too much dirt has
collected in the shaving
heads.
Clean the shaving heads.
See chapter ‘Cleaning and
maintenance’.
The rechargeable
battery is low.
Recharge the battery. See
chapter ‘Charging’.
The shaving
heads do not
stay in place.
You did not x the
retaining rings properly.
The retaining ring is xed
properly if the four wings of
the retaining ring are located
exactly under the recesses
of the shaving head holder.
After fully
charging the
appliance,
it provides
less than 40
operating
minutes.
If you have a heavy
beard, the appliance may
provide less than 40
operating minutes. The
number of operating
minutes may also vary
over time, depending on
your styling behaviour,
cleaning habits and
beard type.
Reduced
grooming
performance
You have not attached
the comb properly.
Remove the comb and
reattach it.
ENGLISH 25
 Loading...