

Philips VPZ210AT, VPZ215AT User Manual

Owner’s Manual
Important!
Return your Warranty Registration
Card within 10 days. See why inside.
Video Cassette Player
VPZ210AT
VPZ215AT
PHOTOGRAPH OF VPZ210
PHOTOGRAPH OF VPZ215
VPZ210/VPZ215 4/3/99 3:16 PM Page 1
Once your PHILIPS MAGNAVOX purchase is registered, you’re eligible to receive all the privileges
of owning a PHILIPS MAGNAVOX product. So complete and return the Warranty Registration
Card enclosed with your purchase at once. And take advantage of these important benefits.
Return your Warranty Registration card today to
ensure you receive all the
benefits
you’re entitled to.
For Customer Use
Enter below the Serial No.
which is located on the rear
of the cabinet. Retain this
information for future reference.
Model No. ______________
Serial No. ______________
Congratulations on your purchase, and
welcome to the “family!”
Dear PHILIPS MAGNAVOX product owner:
Thank you for your confidence in PHILIPS MAGNAVOX. You’ve
selected one of the best-built, best-backed products available
today. And we’ll do everything in our power to keep you happy
with your purchase for many years to come.
As a member of the PHILIPS MAGNAVOX “family,” you’re entitled to protection by one of the most comprehensive warranties
and outstanding service networks in the industry.
What’s more, your purchase guarantees you’ll receive all the
information and special offers for which you qualify, plus easy
access to accessories from our convenient home shopping network.
And most importantly you can count on our uncompromising
commitment to your total satisfaction.
All of this is our way of saying welcome-and thanks for investing
in a PHILIPS MAGNAVOX product.
Sincerely,
Robert Minkhorst
President and Chief Executive Officer
P.S. Remember, to get the most from your PHILIPS
MAGNAVOX product, you must return your
Warranty Registration Card within 10 days. So
please mail it to us right now!
Know these
safetysymbols
This “bolt of lightning” indicates
uninsulated material within your
unit may cause an electrical shock. For
the safety of everyone in your household, please do not remove product
covering.
The “exclamation point” calls
attention to features for which
you should read the enclosed literature closely to prevent operating
and maintenance problems.
WARNING: TO PREVENT FIRE OR
SHOCK HAZARD, DO NOT
EXPOSE THIS EQUIPMENT TO RAIN
OR MOISTURE.
CAUTION: To prevent electric
shock, match wide blade of plug to
wide slot, and fully insert.
ATTENTION: Pour éviter les chocs
électriques, introduire la lame la plus
large de la fiche dans la borne correspondante de la prise et pousser
jusqu’au fond.
CAUTION
RISK OF ELECTRIC SHOCK
DO NOT OPEN
CAUTION: TO REDUCE THE RISK OF ELECTRIC SHOCK,
DO NOT REMOVE COVER (OR BACK).
NO USER-SERVICEABLE PARTS INSIDE. REFER
SERVICING TO QUALIFIED SERVICE PERSONNEL.
R
E
G
I
S
T
R
A
T
I
O
N
N
E
E
D
E
D
W
I
T
H
I
N
1
0
D
A
Y
S
Hurry!
t
s
Warranty
Verification
Registering your product within
10 days confirms your right to maximum protection under the
terms and conditions of your
PHILIPS MAGNAVOX warranty.
Owner
Confirmation
Your completed Warranty
Registration Card serves as
verification of ownership in the
event of product theft or loss.
Model
Registration
Returning your Warranty
Registration Card right away guarantees you’ll receive all the information and special offers which you
qualify for as the owner of your
model.
Visit our World Wide Web Site at http://www.philipsmagnavox.com
VPZ210/VPZ215 4/3/99 3:16 PM Page 2
Introduction 3
Features
• AC/DC Power System (VPZ215AT only)
• Automatic Head Cleaner
• Automatic Operation Features
• Automatic Tracking Adjustment
• Dew Sensor (VPZ215AT only)
• Display Panel
• Picture Control
• Remote Control
• Repeat Playback
• Special Effects Playback: Forward and Reverse Searching; Still
Safety Precautions
Warning: To prevent fire or shock hazard, do not expose
this equipment to rain or moisture.
FCC Warning: Any unauthorized changes or modifications to this equipment void the user’s authority to operate it.
This VCP, equipped with a High Quality (HQ) system, is compatible with existing Video Home System (VHS) equipment.
Philips Consumer Electronics Company recommends that you use
only video cassette tapes that have been tested and inspected for
use in two, four, six, and eight hour VCRs, and which are labeled
with the mark. The use of tapes that have not been inspected
for use in two, four, six, and eight hour VCRs may result in poor
picture quality and excessive deposits on the video heads, which
may not be covered by the warranty if damage occurs.
Note to the Cable TV System Installer: This reminder is
provided to call the Cable TV system installer’s attention to
Article 820-40 of the National Electrical Code, which provides
guidelines for proper grounding – in particular, specifying that the
cable ground shall be connected to the grounding system of the
building, as close to the point of cable entry as possible.
Copyright 1998 Philips Consumer Electronics Company. All rights
reserved.
Welcome to your Video Cassette Player owner’s manual. This manual describes two Video Cassette
Players: the VPZ210AT and the VPZ215AT. These two players are exactly the same, except the VPZ215AT
has a DC power system and a dew sensor. The illustrations in this manual are of the VPZ215AT. The
VPZ210AT will not have the DC13.2V jack or the AC/DC POWER SYSTEM label shown in the illustrations.
This manual has four sections: Setting Up Your VCP; Description of Controls; Operations; and Information
You May Need. The instructions explain all of the VCP’s features, which are listed below.
• Before doing anything else, record
the VCP’s model and serial numbers
in the spaces provided on page two.
These numbers will help us assist
you if you ever call for help.
Helpful Hint
VPZ210/VPZ215 4/3/99 3:16 PM Page 3

4 Table of Contents
Setting Up Your VCP
Introduction . . . . . . . . . . . . . . . . . . . . . . . . . . . . . . . . . . . . . . . . . . . . . . . . . . . . . . . . . .3
Table of Contents . . . . . . . . . . . . . . . . . . . . . . . . . . . . . . . . . . . . . . . . . . . . . . . . . . . . . .4
Before Using Your VCP . . . . . . . . . . . . . . . . . . . . . . . . . . . . . . . . . . . . . . . . . . . . . . . . .5
Hookups Without a Cable Box . . . . . . . . . . . . . . . . . . . . . . . . . . . . . . . . . . . . . . . . . .6-7
Hookups With a Cable Box . . . . . . . . . . . . . . . . . . . . . . . . . . . . . . . . . . . . . . . . . . . . . 8-9
Hookups With a Stereo TV . . . . . . . . . . . . . . . . . . . . . . . . . . . . . . . . . . . . . . . . . . . . .10
Mobile Connections (VPZ215AT only) . . . . . . . . . . . . . . . . . . . . . . . . . . . . . . . . . . . . .11
Description of Controls
Remote Control Buttons . . . . . . . . . . . . . . . . . . . . . . . . . . . . . . . . . . . . . . . . . . . . . . . 12
Display Panel . . . . . . . . . . . . . . . . . . . . . . . . . . . . . . . . . . . . . . . . . . . . . . . . . . . . . . . . .13
Front Panel . . . . . . . . . . . . . . . . . . . . . . . . . . . . . . . . . . . . . . . . . . . . . . . . . . . . . . . . . . 14
Rear Panel . . . . . . . . . . . . . . . . . . . . . . . . . . . . . . . . . . . . . . . . . . . . . . . . . . . . . . . . . . .15
Operations
Playing . . . . . . . . . . . . . . . . . . . . . . . . . . . . . . . . . . . . . . . . . . . . . . . . . . . . . . . . . . . . . .16
Playback Options . . . . . . . . . . . . . . . . . . . . . . . . . . . . . . . . . . . . . . . . . . . . . . . . . . . . .17
Playback Features . . . . . . . . . . . . . . . . . . . . . . . . . . . . . . . . . . . . . . . . . . . . . . . . . . . . .18
Information You May Need
Helpful Hints . . . . . . . . . . . . . . . . . . . . . . . . . . . . . . . . . . . . . . . . . . . . . . . . . . . . . . . . .19
Limited Warranty . . . . . . . . . . . . . . . . . . . . . . . . . . . . . . . . . . . . . . . . . . . . . . . . . . . . .20
Specifications/Glossary . . . . . . . . . . . . . . . . . . . . . . . . . . . . . . . . . . . . . . . . . . . . . . . . .21
Index . . . . . . . . . . . . . . . . . . . . . . . . . . . . . . . . . . . . . . . . . . . . . . . . . . . . . . . . . . . . . . .23
Supplied Accessories . . . . . . . . . . . . . . . . . . . . . . . . . . . . . . . . . . . . . . . . . . . . . . . . . . .24
VPZ210/VPZ215 4/3/99 3:16 PM Page 4
• In this VCP, use only tapes with the mark.
• Make sure any light adhesive stick-on notes are
removed from the video cassette tape before
putting the tape in the VCP. Removable labels like
these can jam the VCP.
Helpful Hints
Before Using Your VCP 5
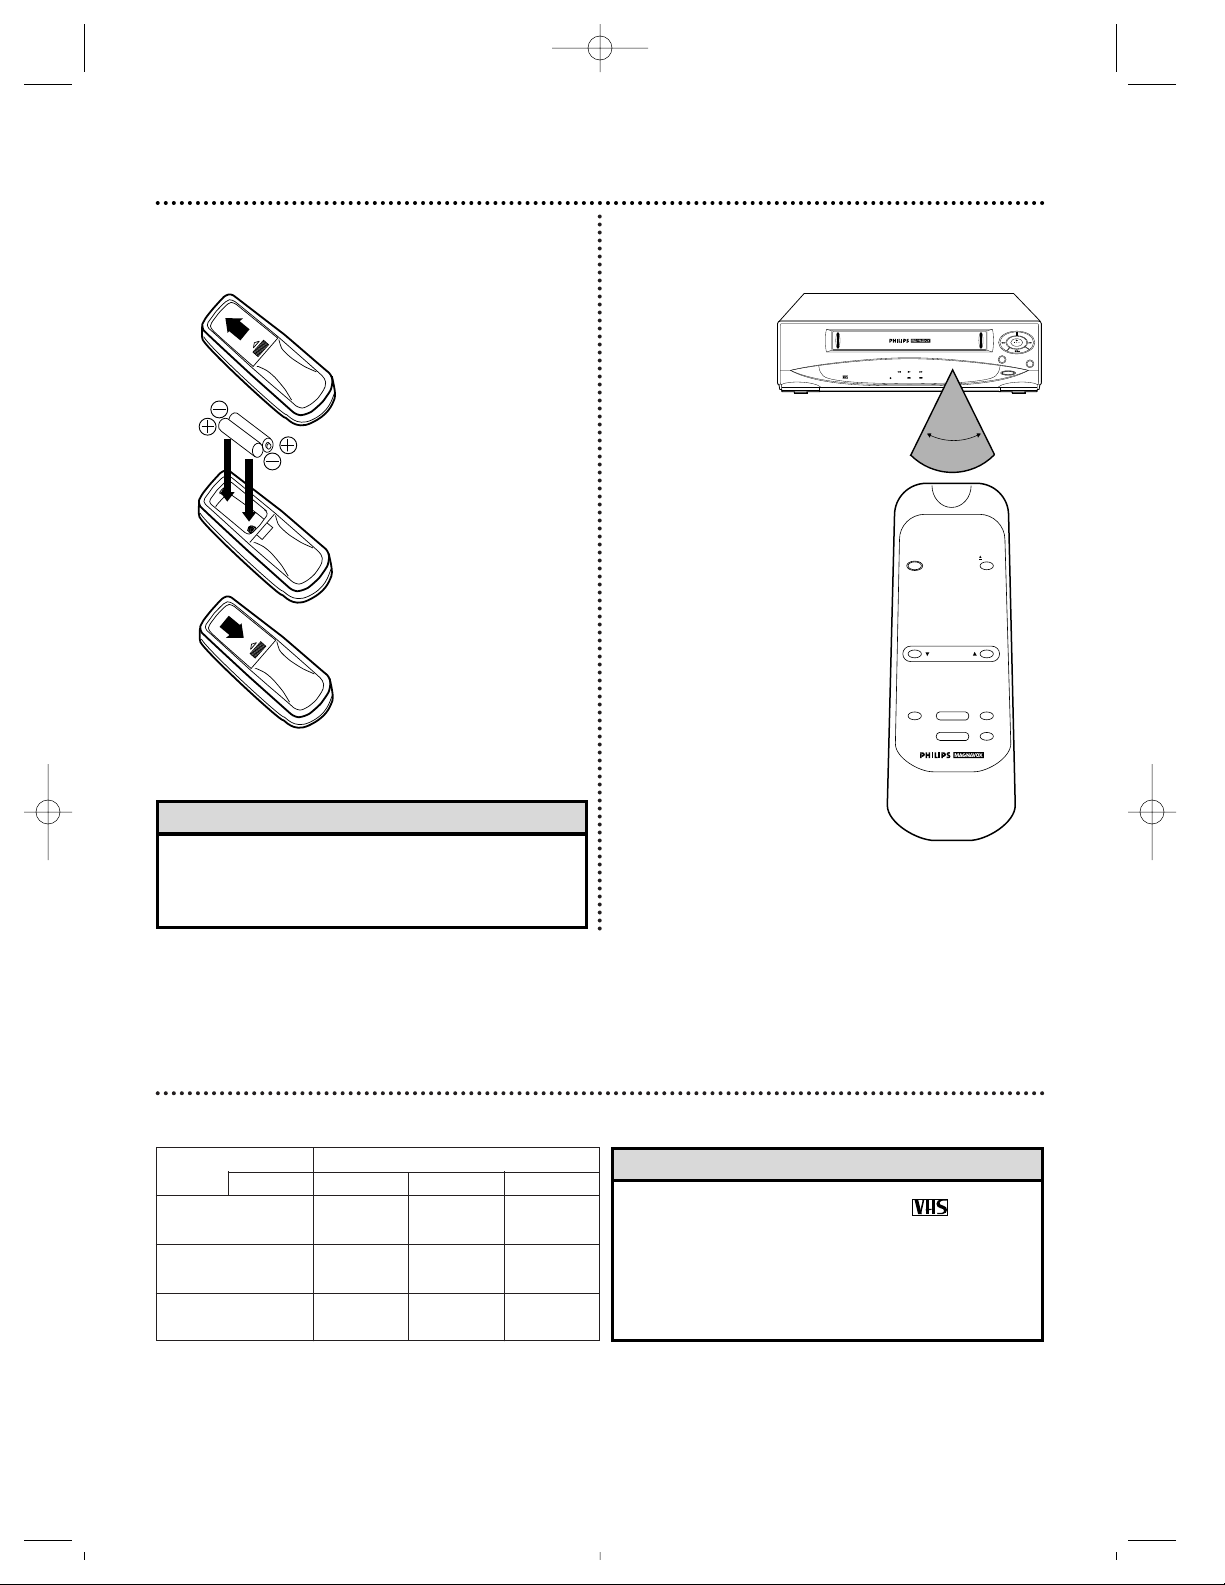
Putting Batteries
in the Remote Control
1
Remove the battery
compartment lid on
the bottom of the
remote control by
sliding the lid in the
direction of the arrow.
2
Insert two AA batteries inside the battery
compartment with
their +and – ends
aligned as indicated.
3
Replace the battery
compartment lid.
Using the Remote Control
Point the remote
control at the
VCP’s remote
sensor, making
sure to stay within
the angle shown.
Do not put
objects between
the remote con-
trol and the VCP.
Types of Video Cassette Tapes and Tape Speeds
• The remote control and its batteries are supplied.
• Do not mix alkaline and manganese batteries.
• Do not mix old and new batteries.
Helpful Hints
PICT.CONT
POWER
REPEAT
STOP/EJECT
PICT.
CONTROL
REW FF
PLAY
POWER REPEAT
REW PLAY FF
VIDEO CASSETTE PLAYER
DIGITAL AUTO TRACKING
FULL AUTO SYSTEM
AUTO HEAD CLEANER
AC/DC POWER SYSTEM
POWER
EJECT
REW/SEARCH PLAY FF/SEARCH
STOP PAUSE/STILL
TRACKING
VCP
Remote
Control
60˚
Tape Speed Maximum Record/Playback Time
Type T160 T120 T60
SP 2 hrs.
2 hrs. 1 hr.
(Standard Play) 40 mins.
LP 5 hrs.
4 hrs. 2 hrs.
(Long Play) 20 mins.
SLP
8 hrs. 6 hrs. 3 hrs.
(Super Long Play)
VPZ210/VPZ215 4/3/99 3:16 PM Page 5
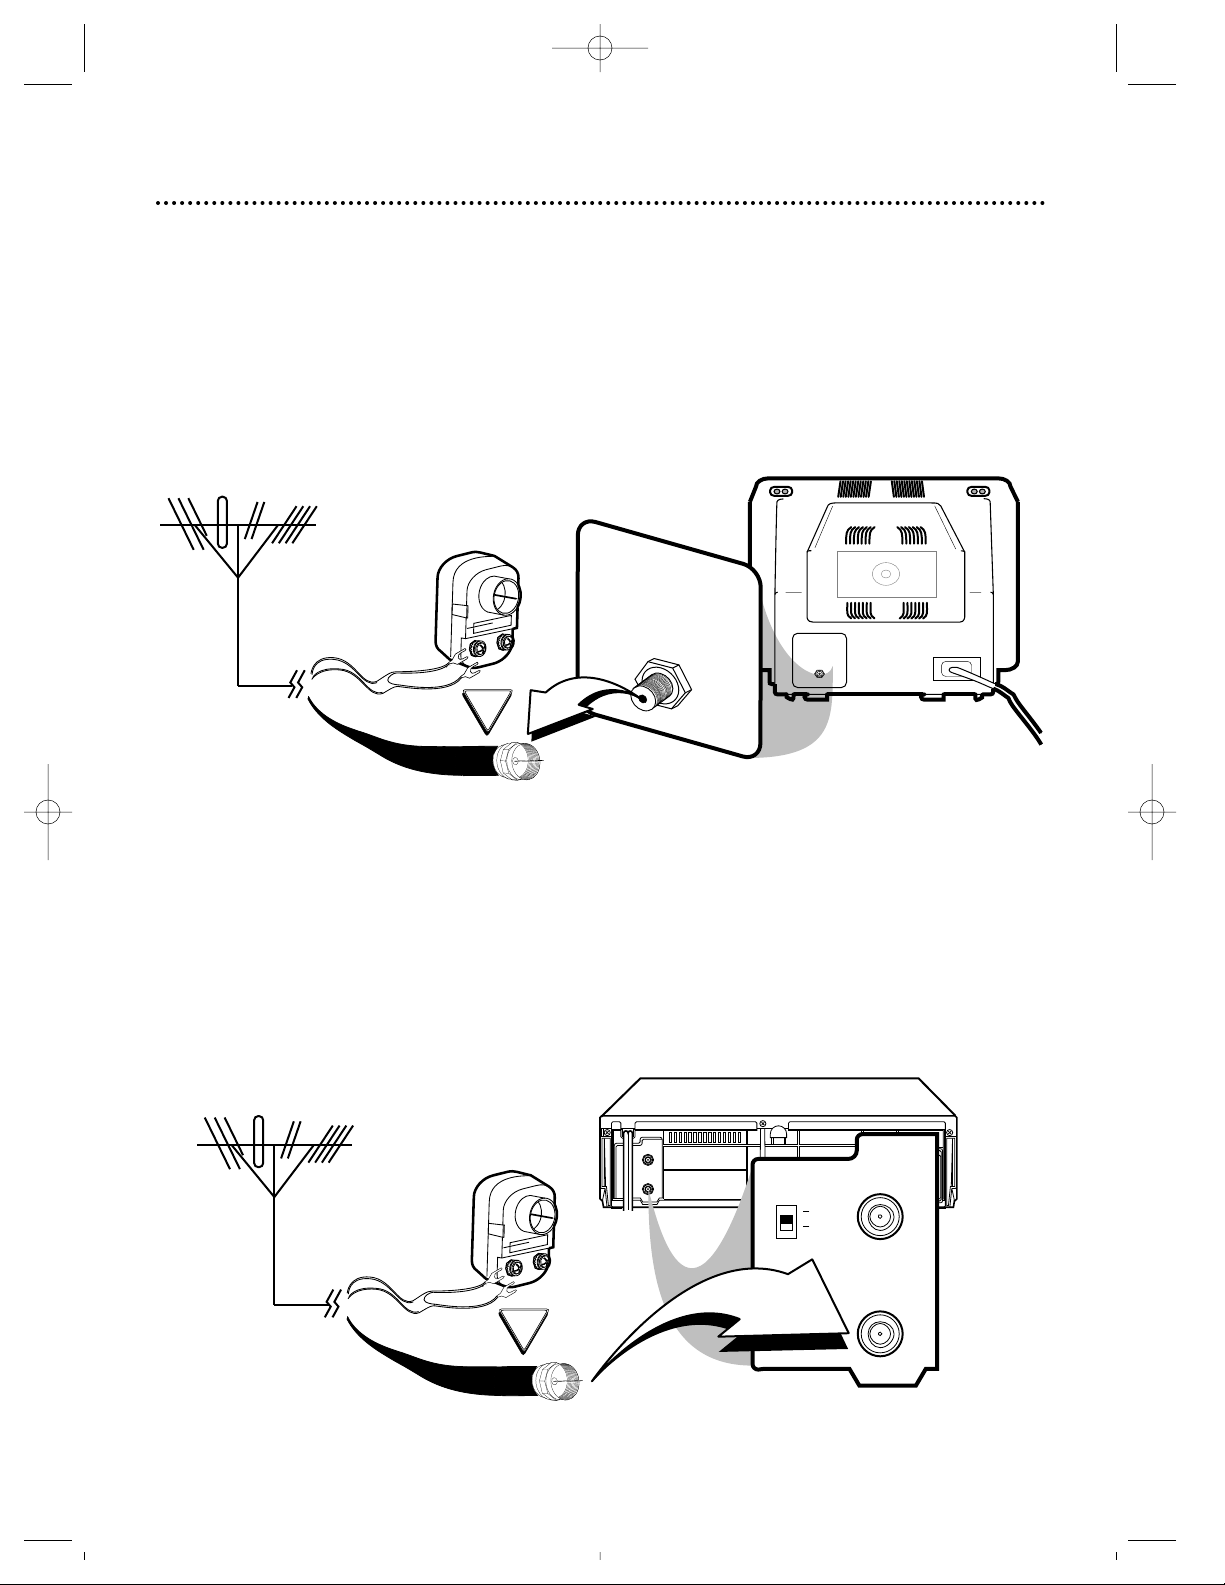
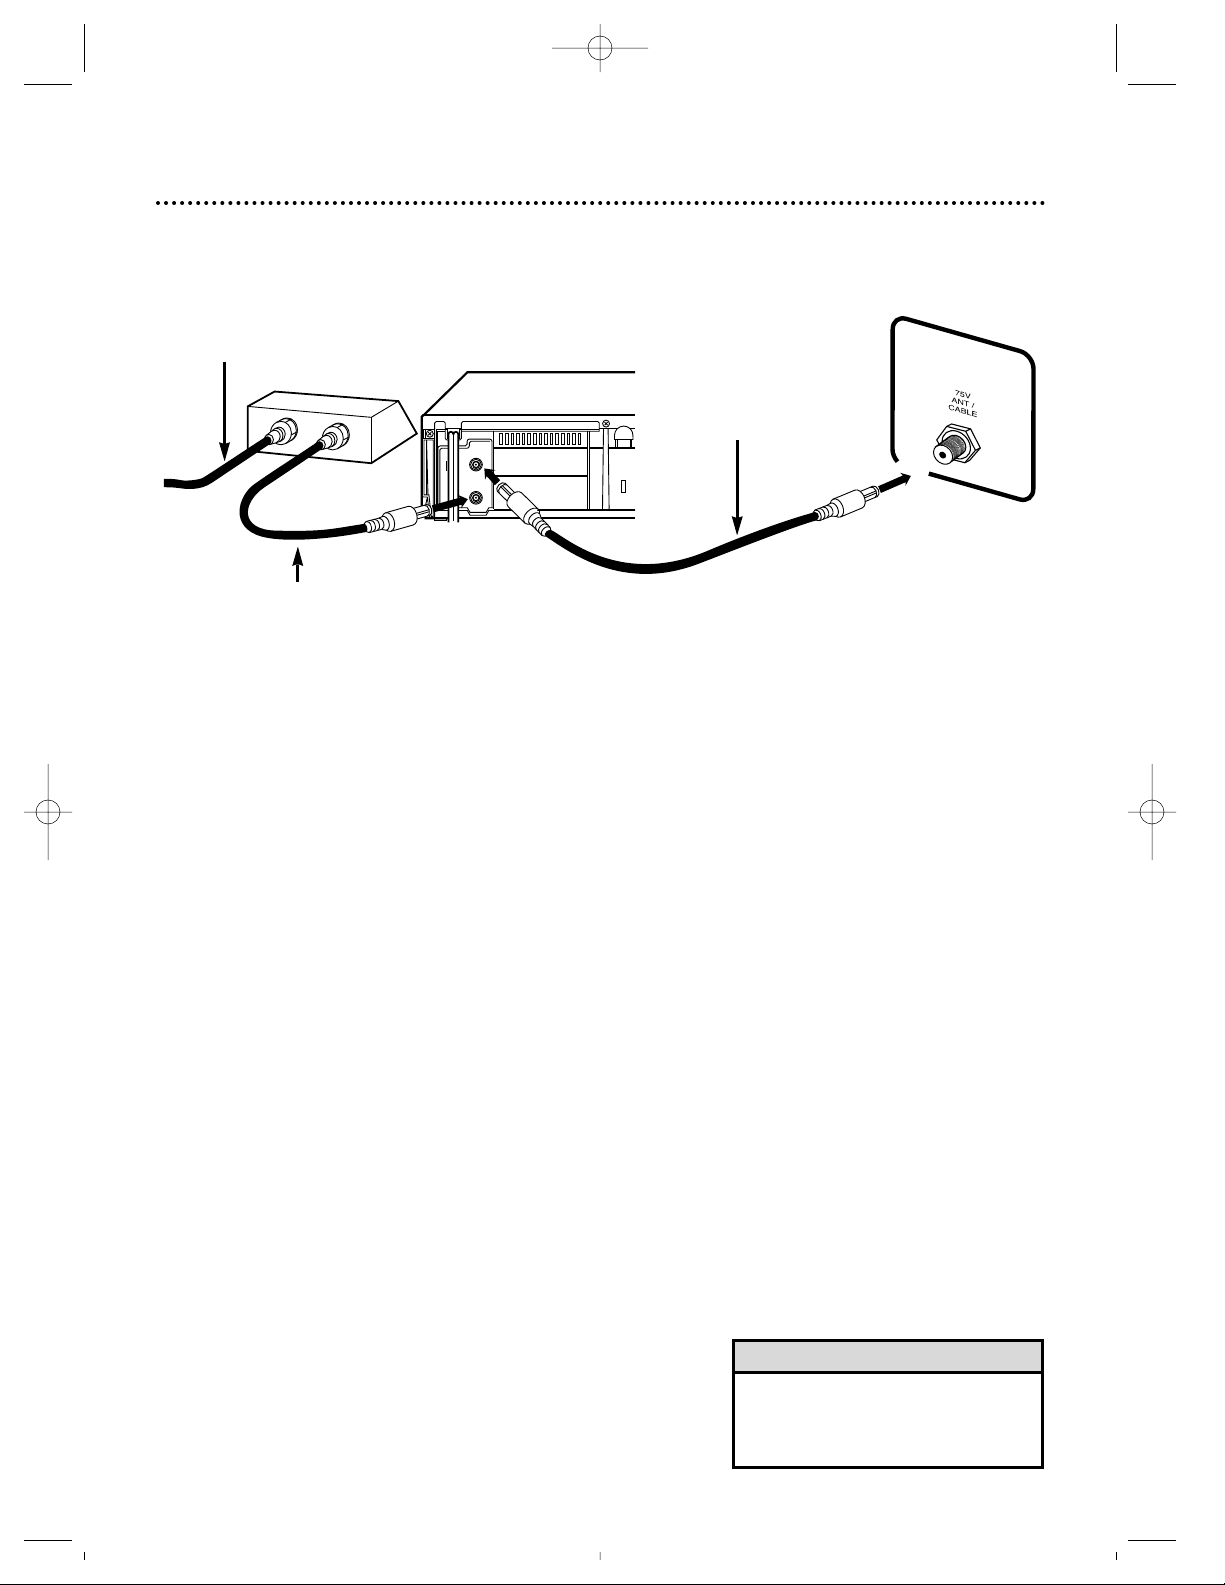
6 Hookups Without a Cable Box
The basic VCP/TV connection – antenna/cable to VCP to TV – is shown below. If you have a
Cable Box or a descrambler box, please refer to pages eight-nine. If you have a Stereo TV,
please go to page 10. To use the VCP in an automobile, go to page 11. (Only the VPZ215AT
may be used in an automobile. You can not use the VPZ210AT in an automobile.)
75V
ANT /
CABLE
OR
75Ω
ANT /
CABLE
1
Disconnect the antenna or cable from your TV.
2
Connect the antenna or cable to the ANT(enna) IN jack of your VCP.
OR
CH3
CH4
ANT OUT
ANT IN
AUDIO
OUTPUT
VIDEO
DC13.2V
CH3
CH4
ANT OUT
ANT IN
ANTENNA IN
Jack
(on back of TV)
Cable
(75 ohm)
Antenna
Indoor/Outdoor
(300 ohm)
Back of VCP
Cable
(75 ohm)
Antenna
Indoor/Outdoor
(300 ohm)
VPZ210/VPZ215 4/3/99 3:16 PM Page 6
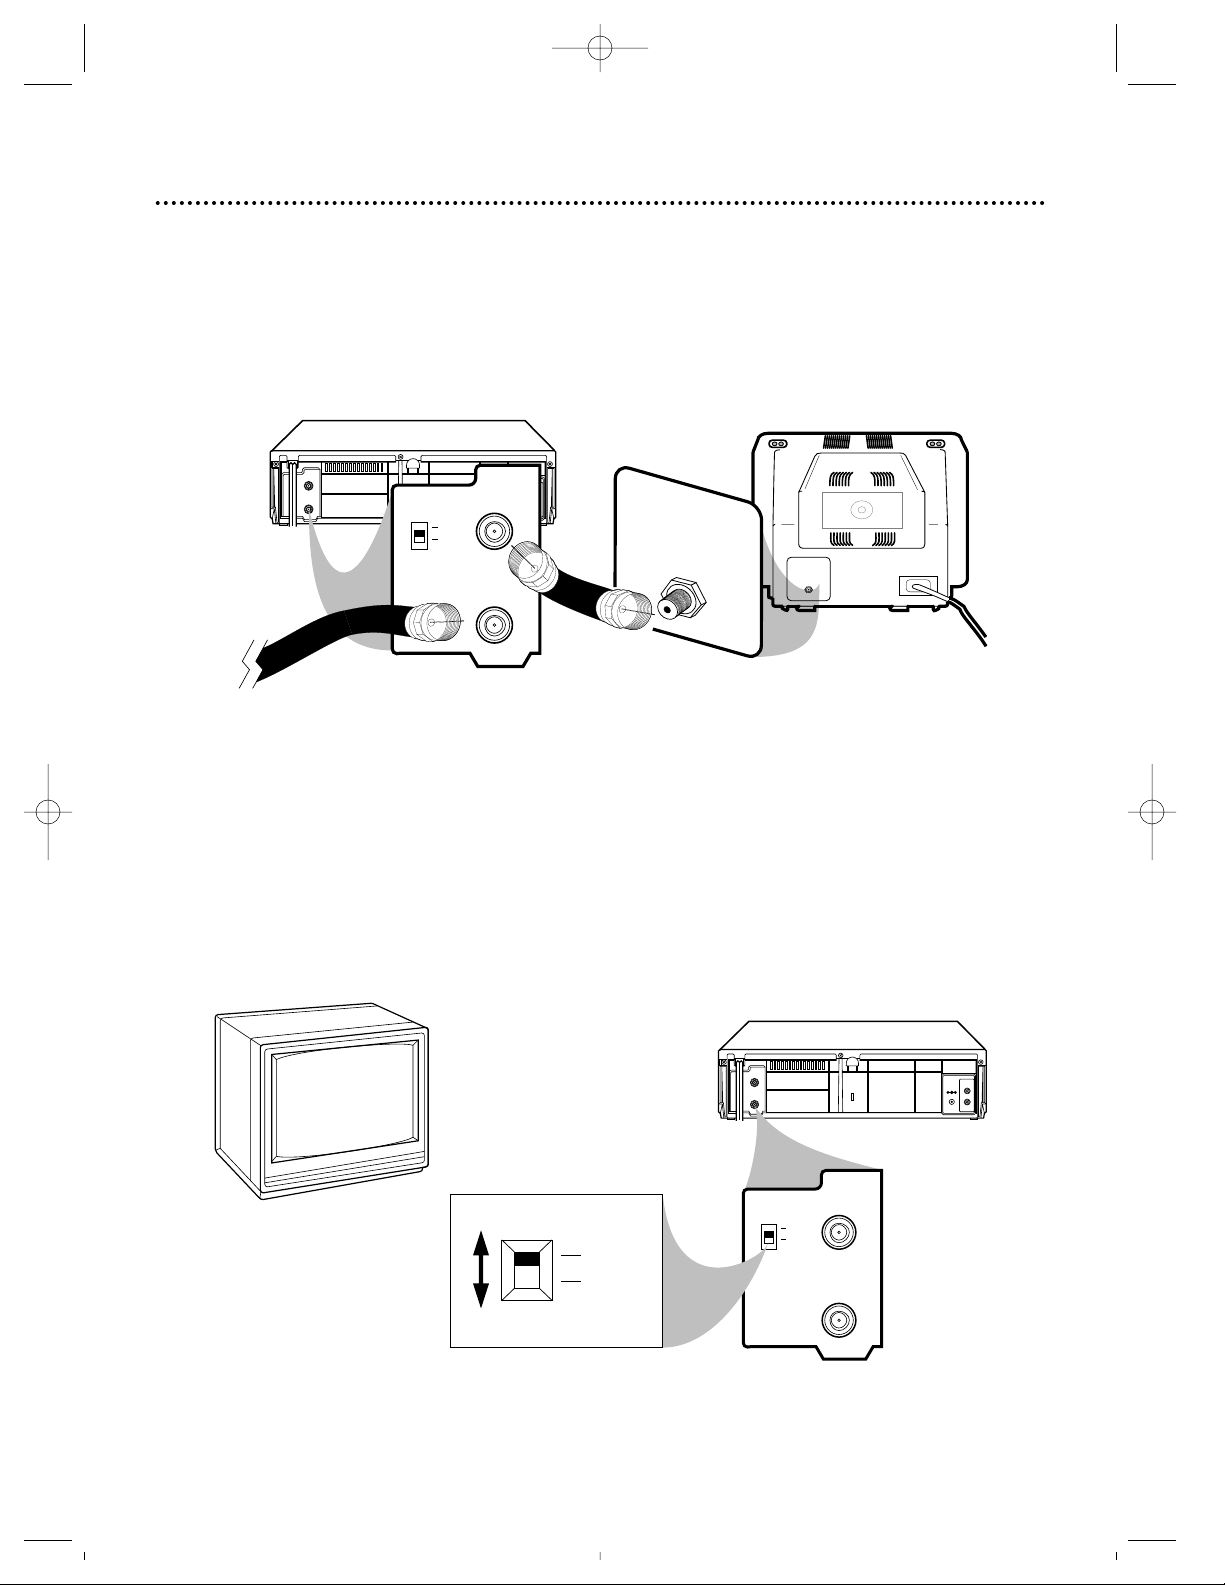
Hookups Without a Cable Box (cont’d) 7
CH 4
or
CH 3
CH3 / CH4
Switch
CH3
CH4
ANT OUT
ANT IN
AUDIO
OUTPUT
VIDEO
DC13.2V
CH3
CH4
ANT OUT
ANT IN
CH3
CH4
75V
ANT /
CABLE
CH3
CH4
ANT OUT
ANT IN
AUDIO
OUTPUT
VIDEO
DC13.2V
CH3
CH4
ANT OUT
ANT IN
75Ω
ANT /
CABLE
RF coaxial cable
Antenna
or Cable
3
Connect the RF coaxial cable (supplied) to the ANT(enna) OUT jack on the
back of the VCP and to the ANTENNA IN Jack on the TV. (You may use either
a snap-on type or screw-on type of coaxial cable, whichever you prefer. A snap-on type
is supplied.)
5
Set the CH3/CH4 switch on the back of the VCP to CH3 or CH4, whichever
channel is not used or least used in your area. To operate your VCP with your TV, set
the TV to the same channel. For example, when playing a tape, if the CH3/CH4
switch is set to CH3, the TV should be on channel 3.
ANTENNA IN Jack
(on back of TV)
example only
4
Plug in the TV and the VCP.
6
You are ready to turn on the VCP.
TV
VPZ210/VPZ215 4/3/99 3:16 PM Page 7
8 Hookups With a Cable Box
This connection allows you to view any channel. After you connect the Cable Box, VCP, and
TV as shown below, the features described on this page will be available.
OUT
IN
CH3
CH4
ANT OUT
ANT IN
ANTENNA IN Jack
Back of TV
(example only)
1. Connect Cable signal to
IN Jack on Cable Box.
3. Use a second RF
coaxial cable to connect the ANT(enna)
OUT jack on the
VCP to the TV’s
ANTENNA IN Jack.
Watching TV With the VCP Off
1
Use the TV channel selector to set the TV to the Cable
Box output channel (channel 3 or 4).
2
Select the channel you want to watch at the Cable Box.
Playing a Tape
1
Use the TV channel selector to put the TV on the VCP
output channel (channel 3 or 4, whichever the CH3/CH4
switch is set to).
2
Press the PLAY button to play the tape.
• With this hookup, channels cannot
be selected at the TV. You must
select channels at the Cable Box.
2. Use RF coaxial cable (supplied) to
connect OUT Jack on Cable Box to
ANT(enna) IN Jack on VCP.
Helpful Hint
VPZ210/VPZ215 4/3/99 3:16 PM Page 8
 Loading...