

Page 1

DVD-Video Recorder DVD+RW Basic Engine
VAD8041
Contents Page
1 Technical Specifications 2
2 Safety Instructions, Warnings and Notes 3
3 Directions for Use(No DFU necessary) 4
4 Mechanical Instructions 5
5 Service Modes, Error Codes and Fault Finding 8
6 Block Diagrams, Waveforms, Wiring Diagram 13
Block Diagram 13
Testpoints Overview 14
7 Electrical Diagrams and Print-Layouts Diagram
Servo Board: OPU Interface (Diagram 1) 15
Servo Board: Cheetah (Diagram 2) 16
Servo Board: Laconic (Diagram 3) 17
Servo Board: Drivers (Diagram 4) 18
Servo Board: Centaurus (Diagram 5) 21
Servo Board: Power, Connectors (Diagram 6) 26
Servo Board: Tray Motor Conn. (Diagram 7) 27
8 Alignments (No alignments necessary) 31
9 Circuit-, IC Descriptions and List
of Abbreviations 33
10 Electrical Parts List 47
©
Copyright 2004 Philips Consumer Electronics B.V. Eindhoven, The Netherlands.
All rights reserved. No part of this publication may be reproduced, stored in a
retrieval system or transmitted, in any form or by any means, electronic,
mechanical, photocopying, or otherwise without the prior permission of Philips.
Published by GH03 0495 Service PaCE Printed in the Netherlands Subject to modification EN 3122 785 14850
Page 2
EN 2 VAD80411.
Technical Specifications and Connection Facilities
1. Technical Specifications and Connection Facilities
1.1 VAD8041 functionality:
• Loading of 8 cm and 12 cm discs by a motorized tray
• Disc type recognition and in case of a DVD+RW disc laser
power calibration
• Servo control for disc rotation, sledge movements, tilt,
focus and actuator position
• EFM+ encoding / decoding for DVD, and EFM decoding for
CD
• Writes and read DVD+RW discs and reads DVD, CD and
CD-R/RW discs
• Linking control, header insertion and sector number
updating at record
• Interfacing to the MPEG back-end for control and for data
• The back-end has to provide MPEG data processing, data
buffering, construction of logical format for Lead-in, Data
area and Lead-out part of the DVD+RW disc
1.2 Connections
The following interfaces are provided for connecting the drive
to the MPEG back-end Application:
• Power Connector: 4-pin supply interface
• IDE Connector: 40-pin command and data transfer
interface
IDE Bus selection:
• Jumper Selection: 6-pin IDE Bus selector
1.3 Read and Write Speeds
Type of Disc (Function) Disc Rotation Speed
Read Speed CD CAV 7x
Read Speed DVD CAV 4x
Write Speed DVD+RW ZCAV 2.4x
Write Speed DVD+R ZCAV 2.4x
Page 3
Safety Instructions, Warnings and Notes
2. Safety Instructions, Warnings and Notes
EN 3VAD8041 2.
2.1 Safety Instructions
2.1.1 General Safety
Safety regulations require that during a repair:
• Connect the unit to the mains via an isolation transformer.
• Replace safety components, indicated by the symbol ,
only by components identical to the original ones. Any
other component substitution (other than original type) may
increase risk of fire or electrical shock hazard.
Safety regulations require that after a repair, you must return
the unit in its original condition. Pay, in particular, attention to
the following points:
• Route the wires/cables correctly, and fix them with the
mounted cable clamps.
• Check the insulation of the mains lead for external
damage.
• Check the electrical DC resistance between the mains plug
and the secondary side:
1. Unplug the mains cord, and connect a wire between
the two pins of the mains plug.
2. Set the mains switch to the 'on' position (keep the
mains cord unplugged!).
3. Measure the resistance value between the mains plug
and the front panel, controls, and chassis bottom.
4. Repair or correct unit when the resistance
measurement is less than 1 MΩ.
5. Verify this, before you return the unit to the customer/
user (ref. UL-standard no. 1492).
6. Switch the unit ‘off’, and remove the wire between the
two pins of the mains plug.
2.1.2 Laser Safety
This unit employs a laser. Only qualified service personnel may
remove the cover, or attempt to service this device (due to
possible eye injury).
2.2 Warnings
2.2.1 General
• All ICs and many other semiconductors are susceptible to
electrostatic discharges (ESD, symbol ). Careless
handling during repair can reduce life drastically. Make
sure that, during repair, you are at the same potential as
the mass of the set by a wristband with resistance. Keep
components and tools at this same potential. Available
ESD protection equipment:
– Complete kit ESD3 (small tablemat, wristband,
connection box, extension cable and earth cable) 4822
310 10671.
– Wristband tester 4822 344 13999.
• Be careful during measurements in the live voltage section.
The primary side of the power supply (pos. 1005), including
the heatsink, carries live mains voltage when you connect
the player to the mains (even when the player is 'off'!). It is
possible to touch copper tracks and/or components in this
unshielded primary area, when you service the player.
Service personnel must take precautions to prevent
touching this area or components in this area. A 'lightning
stroke' and a stripe-marked printing on the printed wiring
board, indicate the primary side of the power supply.
• Never replace modules, or components, while the unit is
‘on’.
2.2.2 Laser
• The use of optical instruments with this product, will
increase eye hazard.
• Only qualified service personnel may remove the cover or
attempt to service this device, due to possible eye injury.
• Repair handling should take place as much as possible
with a disc loaded inside the player.
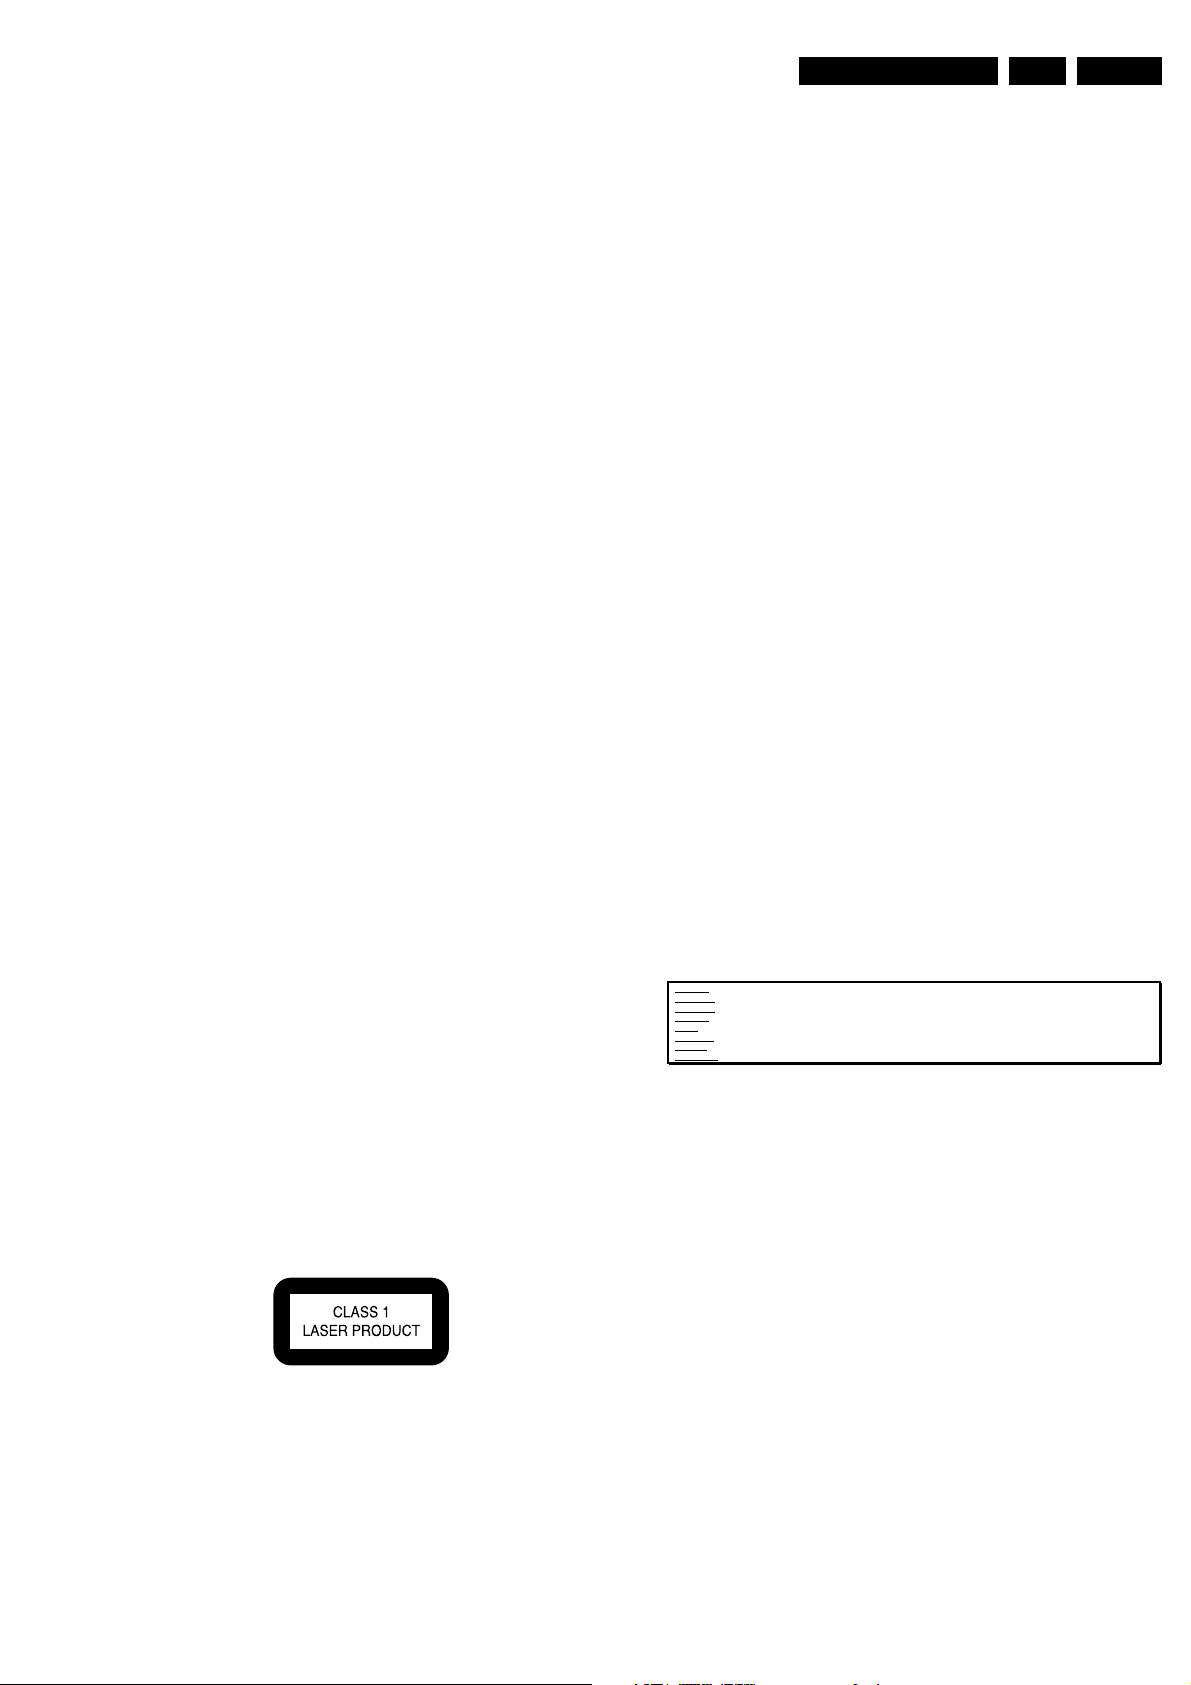
• Text below is placed inside the unit, on the laser cover
shield:
Laser Device Unit
Type : Semiconductor laser
GaAlAs
Wavelength : 650 nm (DVD)
: 780 nm (VCD/CD)
Output Power : 20 mW (DVD+RW
writing)
: 0.8 mW (DVD
reading)
: 0.3 mW (VCD/CD
reading)
Beam divergence : 60 degree
Figure 2-1 Class 1 Laser Product
Note: Use of controls or adjustments or performance of
procedure other than those specified herein, may result in
hazardous radiation exposure. Avoid direct exposure to beam.
CAUTION VISIBLE AND INVISIBLE LASER RADIATION WHEN OPEN AVOID EXPOSURE TO BEAM
ADVARSEL SYNLIG OG USYNLIG LASERSTRÅLING VED ÅBNING UNDGÅ UDSÆTTELSE FOR STRÅLING
ADVARSEL SYNLIG OG USYNLIG LASERSTRÅLING NÅR DEKSEL ÅPNES UNNGÅ EKSPONERING FOR STRÅLEN
VARNING SYNLIG OCH OSYNLIG LASERSTRÅLNING NÄR DENNA DEL ÄR ÖPPNAD BETRAKTA EJ STRÅLEN
VARO! AVATTAESSA OLET ALTTIINA NÄKYVÄLLE JA NÄKYMÄTTÖMÄLLE LASER SÄTEILYLLE. ÄLÄ KATSO SÄTEESEEN
VORSICHT SICHTBARE UND UNSICHTBARE LASERSTRAHLUNG WENN ABDECKUNG GEÖFFNET NICHT DEM STRAHL AUSSETSEN
DANGER VISIBLE AND INVISIBLE LASER RADIATION WHEN OPEN AVOID DIRECT EXPOSURE TO BEAM
ATTENTION RAYONNEMEN T LASER VISIBLE ET INVISIBLE EN CAS D'OUVERTURE EXPOSITION DANGEREUSE AU FAISCEAU
!
Figure 2-2 Warning text
Page 4

EN 4 VAD80413.
3. Directions For Use
Not applicable
Directions For Use
Page 5
4. Mechanical Instructions
Note that exploded views can be found in chapter 10
4.1 General
Follow the dismantling instructions in described order.
Never touch the lens of the OPU.
Take sufficient ESD measures during handling.
4.2 Dismantling
You can divide the Basic Engine into the following parts:
1. Loader (frame and tray)
2. PWB
3. DVD-Mechanism (OPU, traverse with turntable motor and
sledge-motor assy)
4. Encasing
4.3 Cabinet
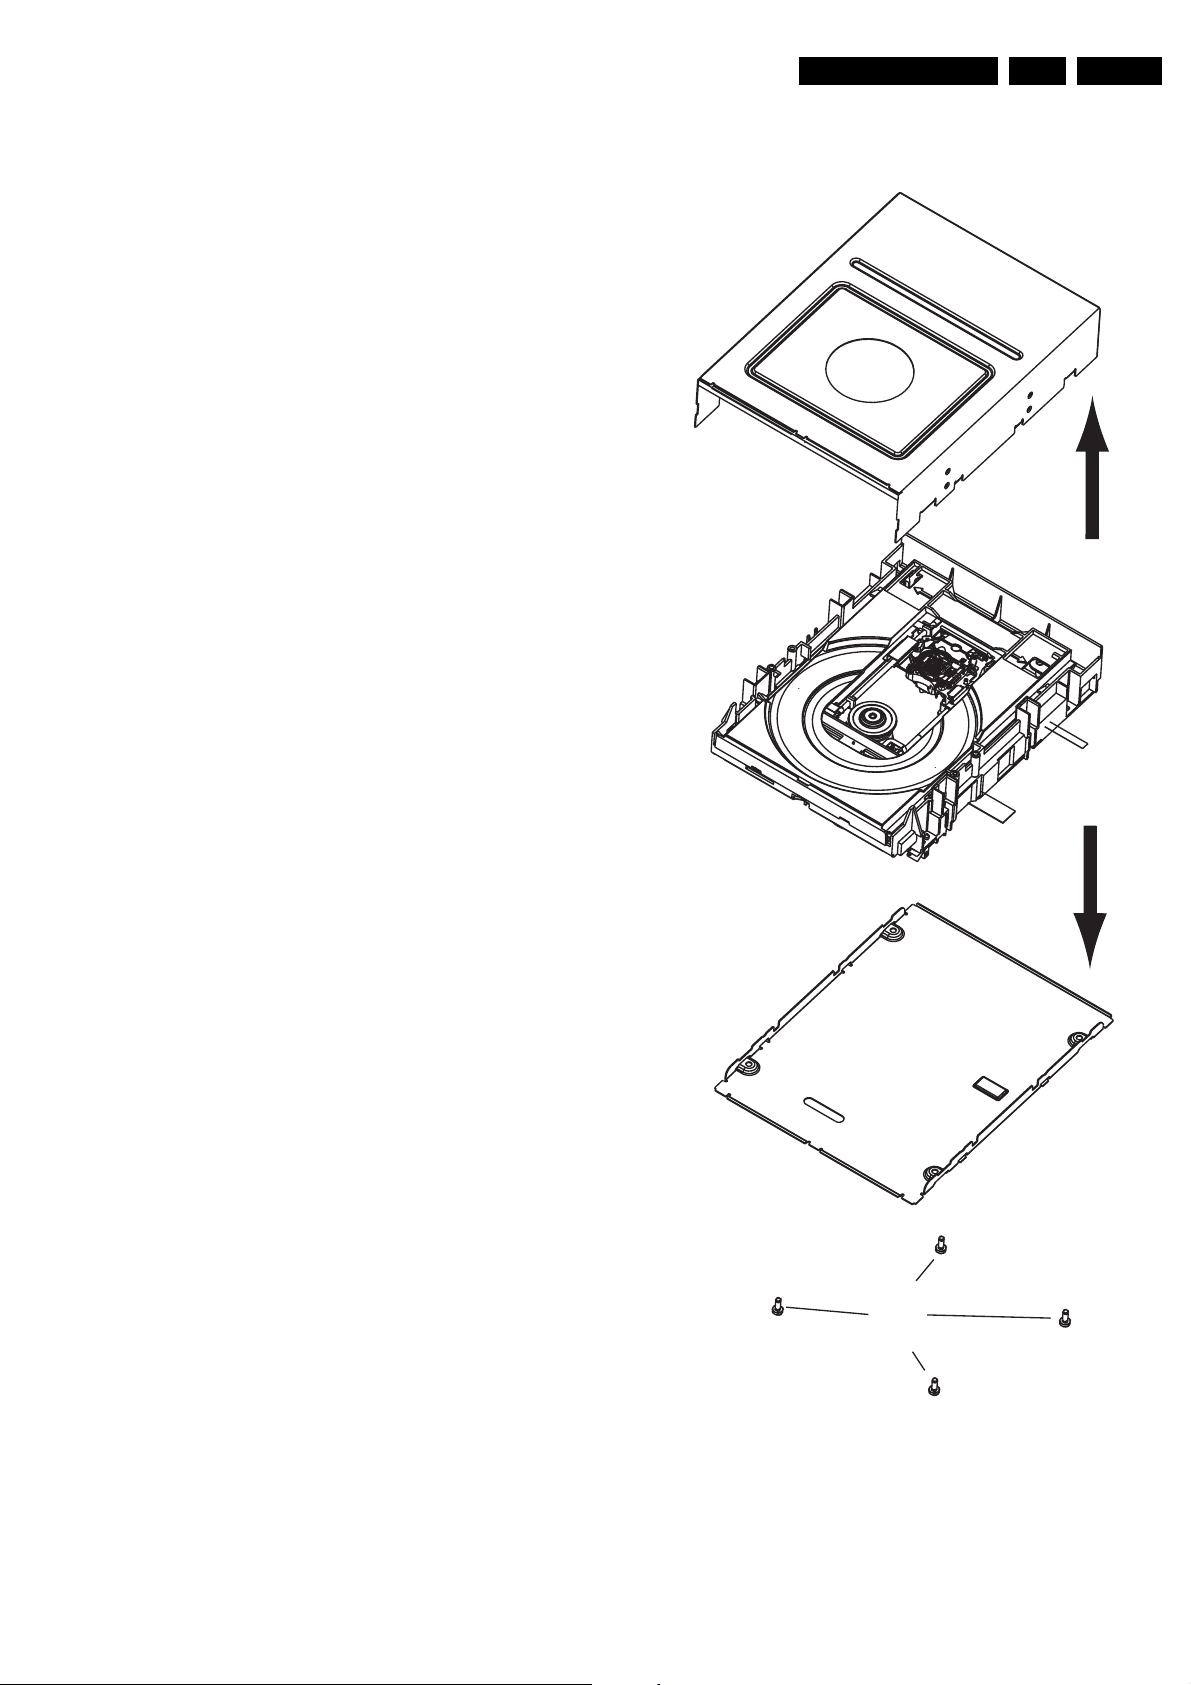
– Remove the encasing by releasing the four screws at the
underside of the drive, see figure 4-1
– Make sure that you do not lose the 5 heat paths (gray
rubber pieces that conduct the heat from the ICs to the
case)!
– If you need to measure on the PCB while a disc is inserted,
the top case should be applied again onto the drive. In this
way the clamping mechanism is established.
Mechanical Instructions
EN 5VAD8041 4.
2
1
Figure 4-1 Basic Engine dismantling (part1)
2
Page 6
EN 6 VAD80414.
4.4 Tray
– Remove encasing as as described in 4.3
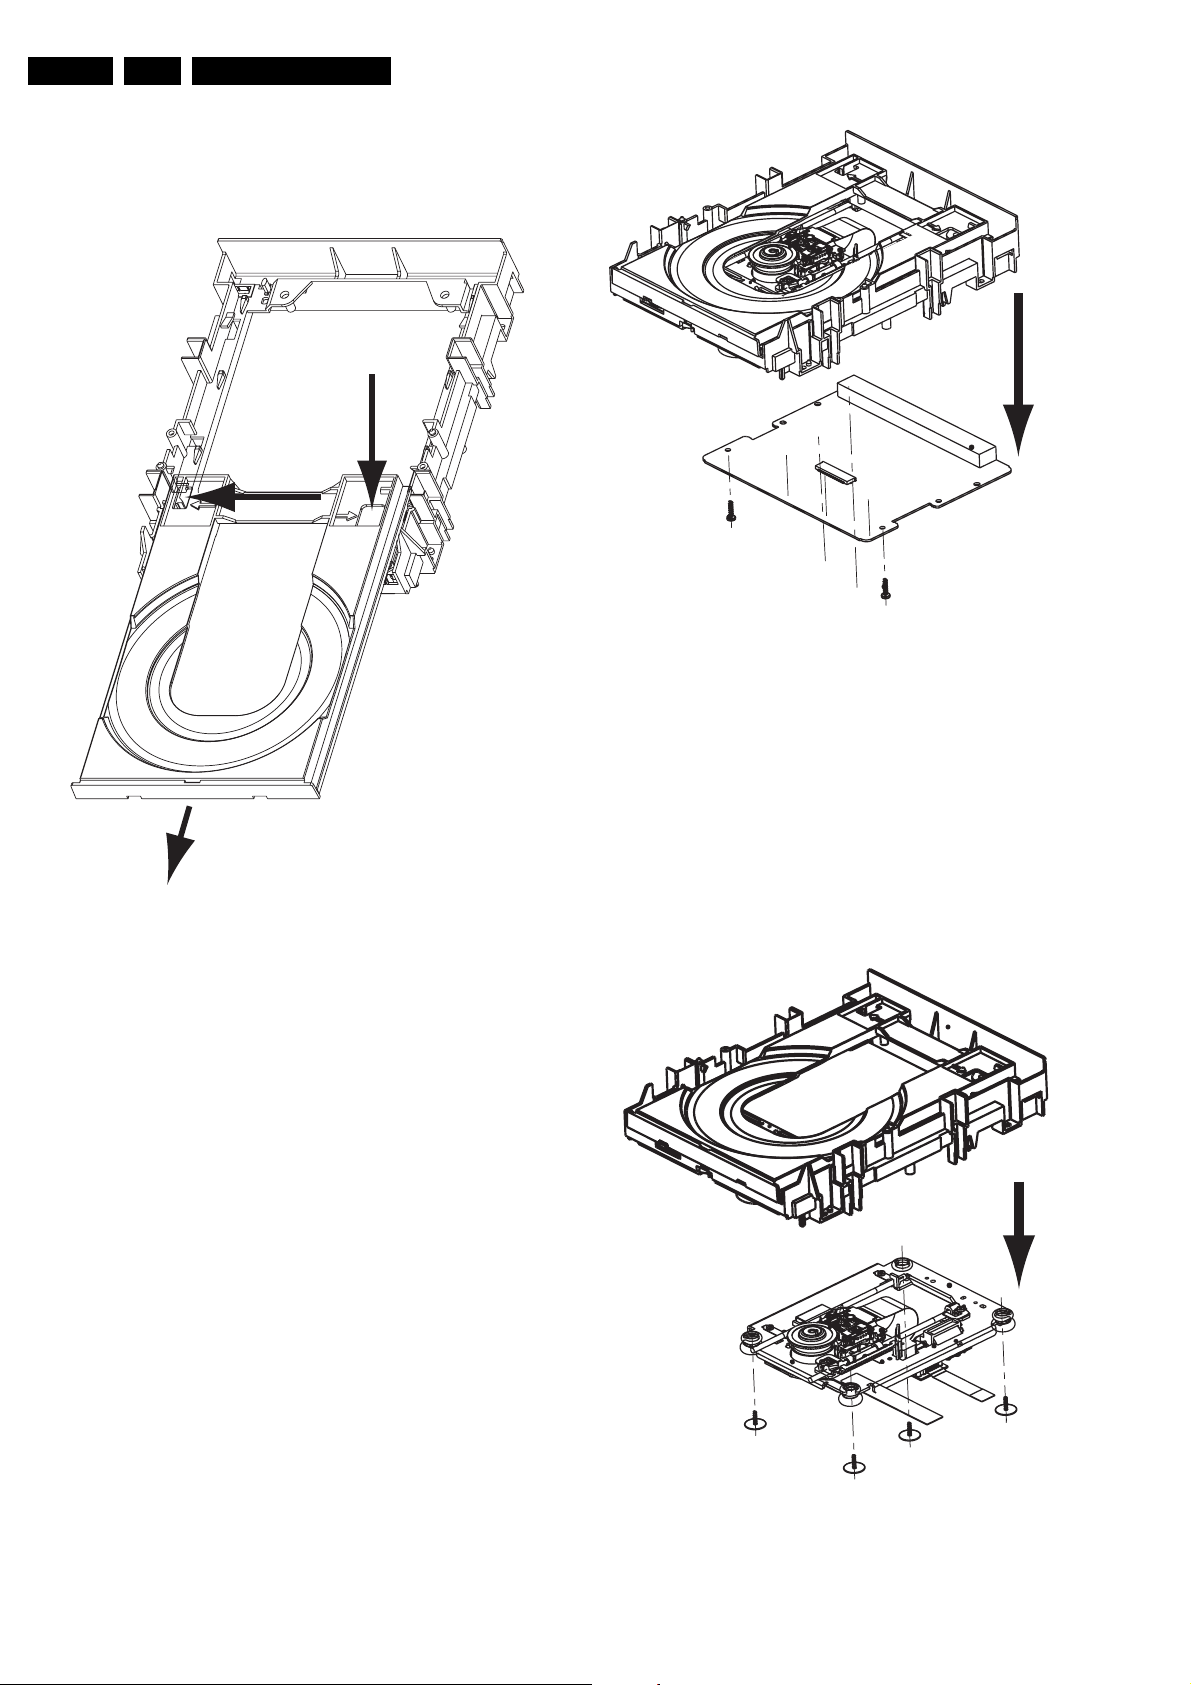
– Disengage the two holders that fix the tray [1], see figure 4-
2, and pull out the tray [2]
1
1
Mechanical Instructions
2
1
1
2
Figure 4-2 Remove Tray
4.5 Printed Board
Note: After exchanging the PWB (or the DVD-M) the complete
drive has to be adjusted! Run command 931 of DSW
(AdjustLaserControl). Refer to chapter 8 for adjustment
instructions!
– Remove encasing as described in 4.3
– Disconnect the 2 flex foils from the PWB connectors and
the OPU flex
– Remove the 2 screws that hold the PWB, see figure 4-3
– Remove the PCB
– Remove the yellow plate if needed by releasing the 2 snap
hooks
Figure 4-3 Remove PWB
4.6 DVD-M
Caution: Never try to align or repair the DVD-Module itself!
Only the factory can do this properly. Service engineers are
only allowed to exchange the sledge motor assy.
After Exchanging the DVD-M (or the PWB) the complete drive
has to be adjusted! Run command 931 of DSW
(AdjustLaserControl). Refer to chapter 8 for adjustment
instructions!
– Remove PCB as described in 4.5
– Remove the four screws [1], see figure 4-4.
– Now you can remove the DVDM
2
1
1
Figure 4-4 Remove DVDM
1
1
Page 7
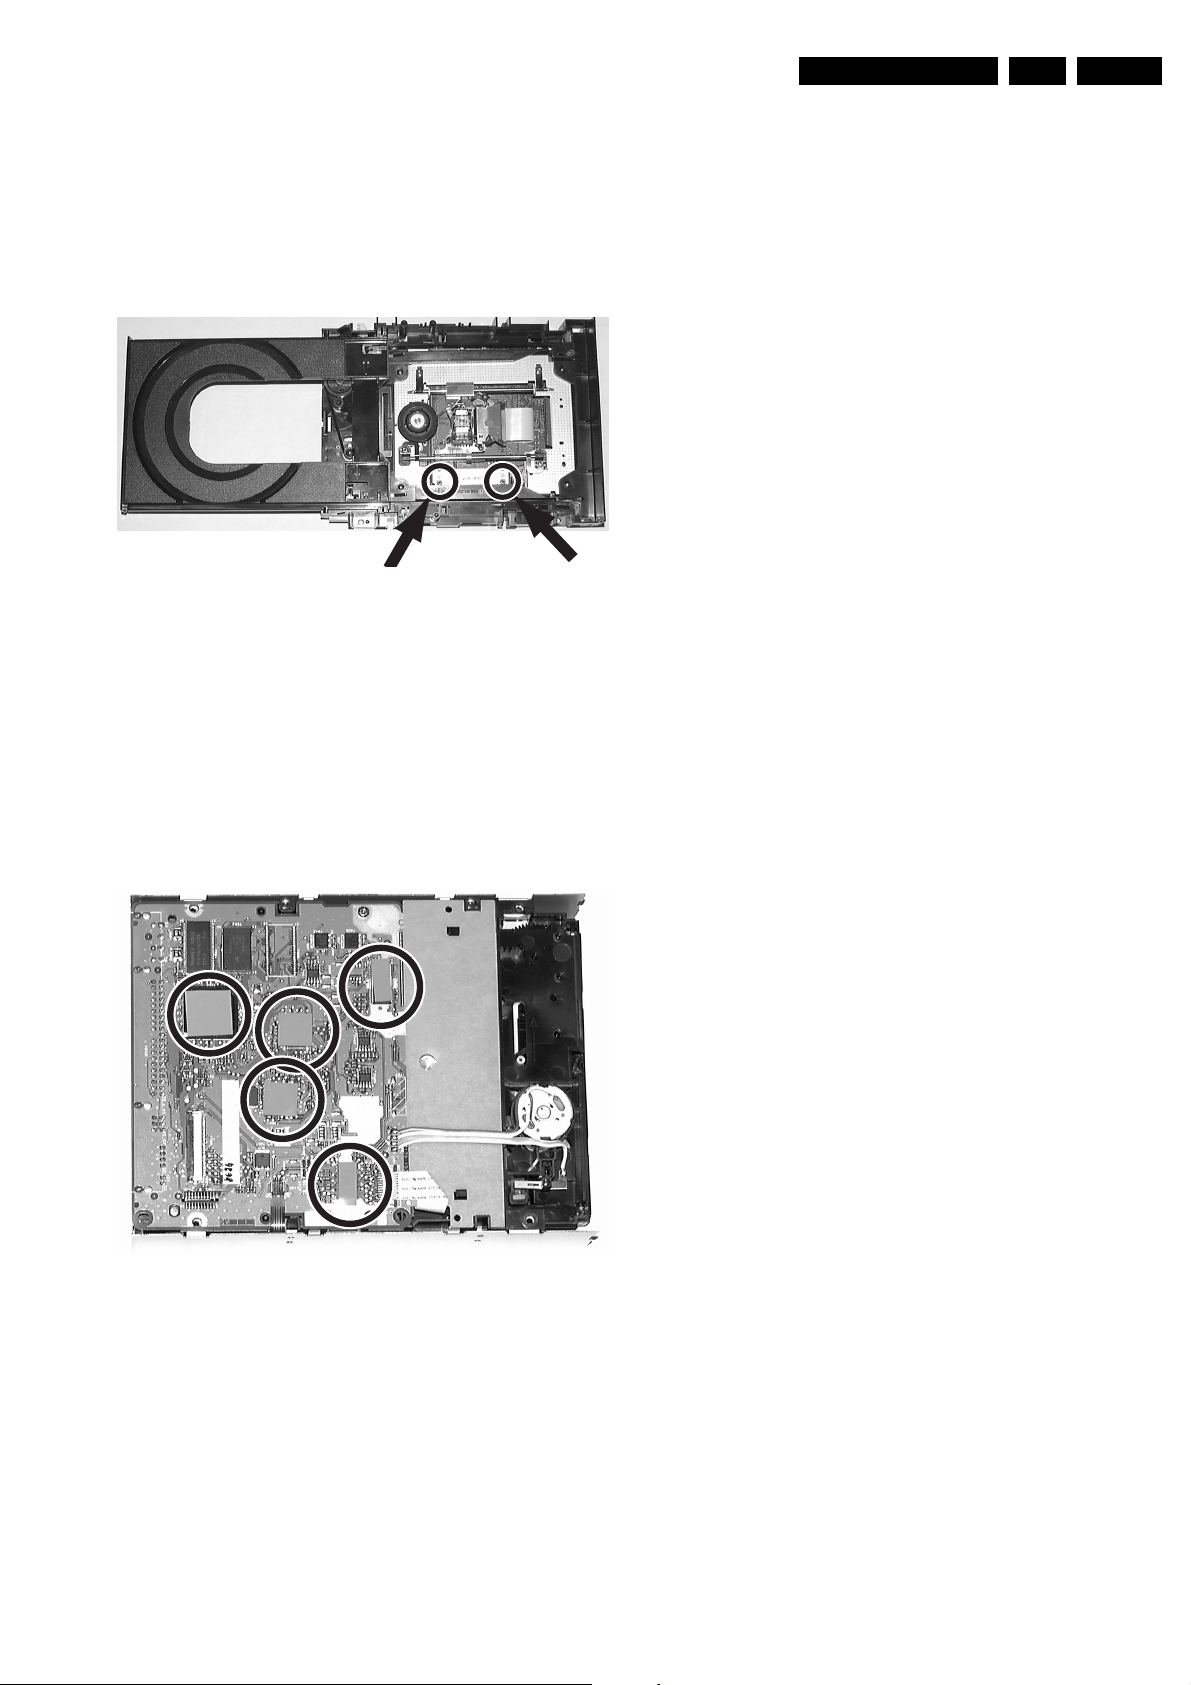
4.7 Sledge Motor Assembly
Caution: Never try to align or repair the DVD-Module itself!
Only the factory can do this properly. Service engineers are
only allowed to exchange the sledge motor assy.
– Eject the tray.
– Remove the 2 screws that hold the sledge motor, see
figure 4-5
– Remove the sledge motor
Figure 4-5 Remove Sledge Motor Assy
Mechanical Instructions
EN 7VAD8041 4.
4.8 Re-assembly
To re-assemble the module, do all processes in reverse order.
Take care of the following:
• Complete module: Place all wires/cables in their original
position
• Heat Paths: Put the 5 heat paths (gray rubber pieces) back
to their position on the ICs, see figure 4-6.
• Emergency opening slot: Be sure that the slot for the
emergency tray opener is covered by adhesive tape!
• Jumper selection: Jumper has to be in position "Master"!
Figure 4-6 Heat Path
Page 8
EN 8 VAD80415.
Service Modes, Error Codes and Fault Finding
5. Service Modes, Error Codes and Fault Finding
5.1 General
Please refer to the service manual of the recorder for a
description of the complete Diagnostics Software. In this
manual only drive specific error codes are explained.
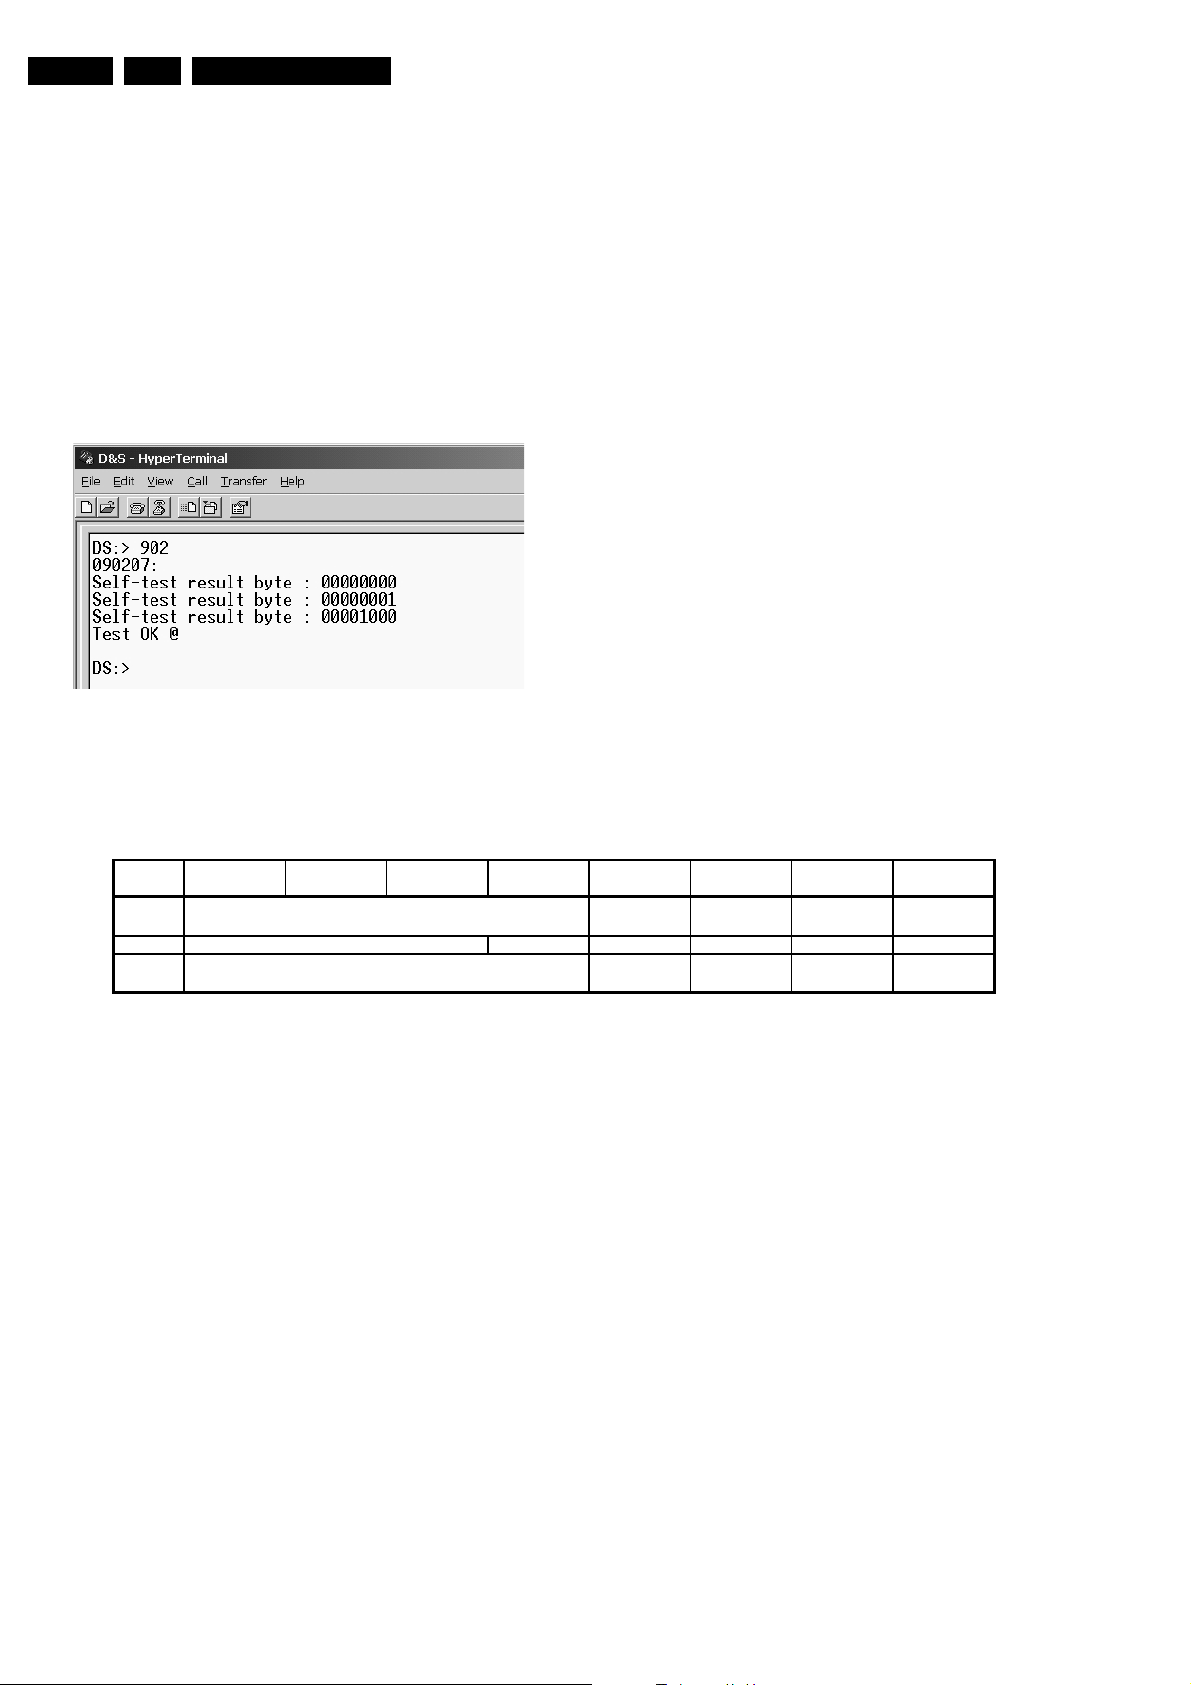
5.2 Self test
A power on self-test is incorporated in the software of this drive.
With DSW command 902 (Chrysalis Mpeg Codec) the set
software can retrieve the result of the self-test.
Figure 5-1 Example, nucleus 902 showing no communication with
the OPU
Following table gives the output format of this nucleus.
Bit
Byte
0 tray* ttm* pcs*
1 real dsp* hdr80 cheetah laconic elantec
2 eeprom
7654
Reserved
Reserved
Reserved
*error code not detected in VAD8031/VAD8041
Forward Sense Tests if the forward sense value measured during drive startup is within normal range
HDR80 Performs a read/write test on a register (HDR 80 is an internal module of Centaurus)
Cheetah Performs a read/write test on a register
Laconic Read the IC version (fixed) and checks if it's ok
Elantec Performs a read/write test on a register
Eeprom Performs a read/write test on an address
I2C Tries addressing all I2C devices in the system - if one fails, this test fails
Please note that if the I2C test fails, most other IC tests will fail as well.
Figure 5-2 Self test Results
3210
laser forward
sense
eeprom
checksum*
eeprom empty* iic
Page 9
Service Modes, Error Codes and Fault Finding
EN 9VAD8041 5.
5.3 Error Codes
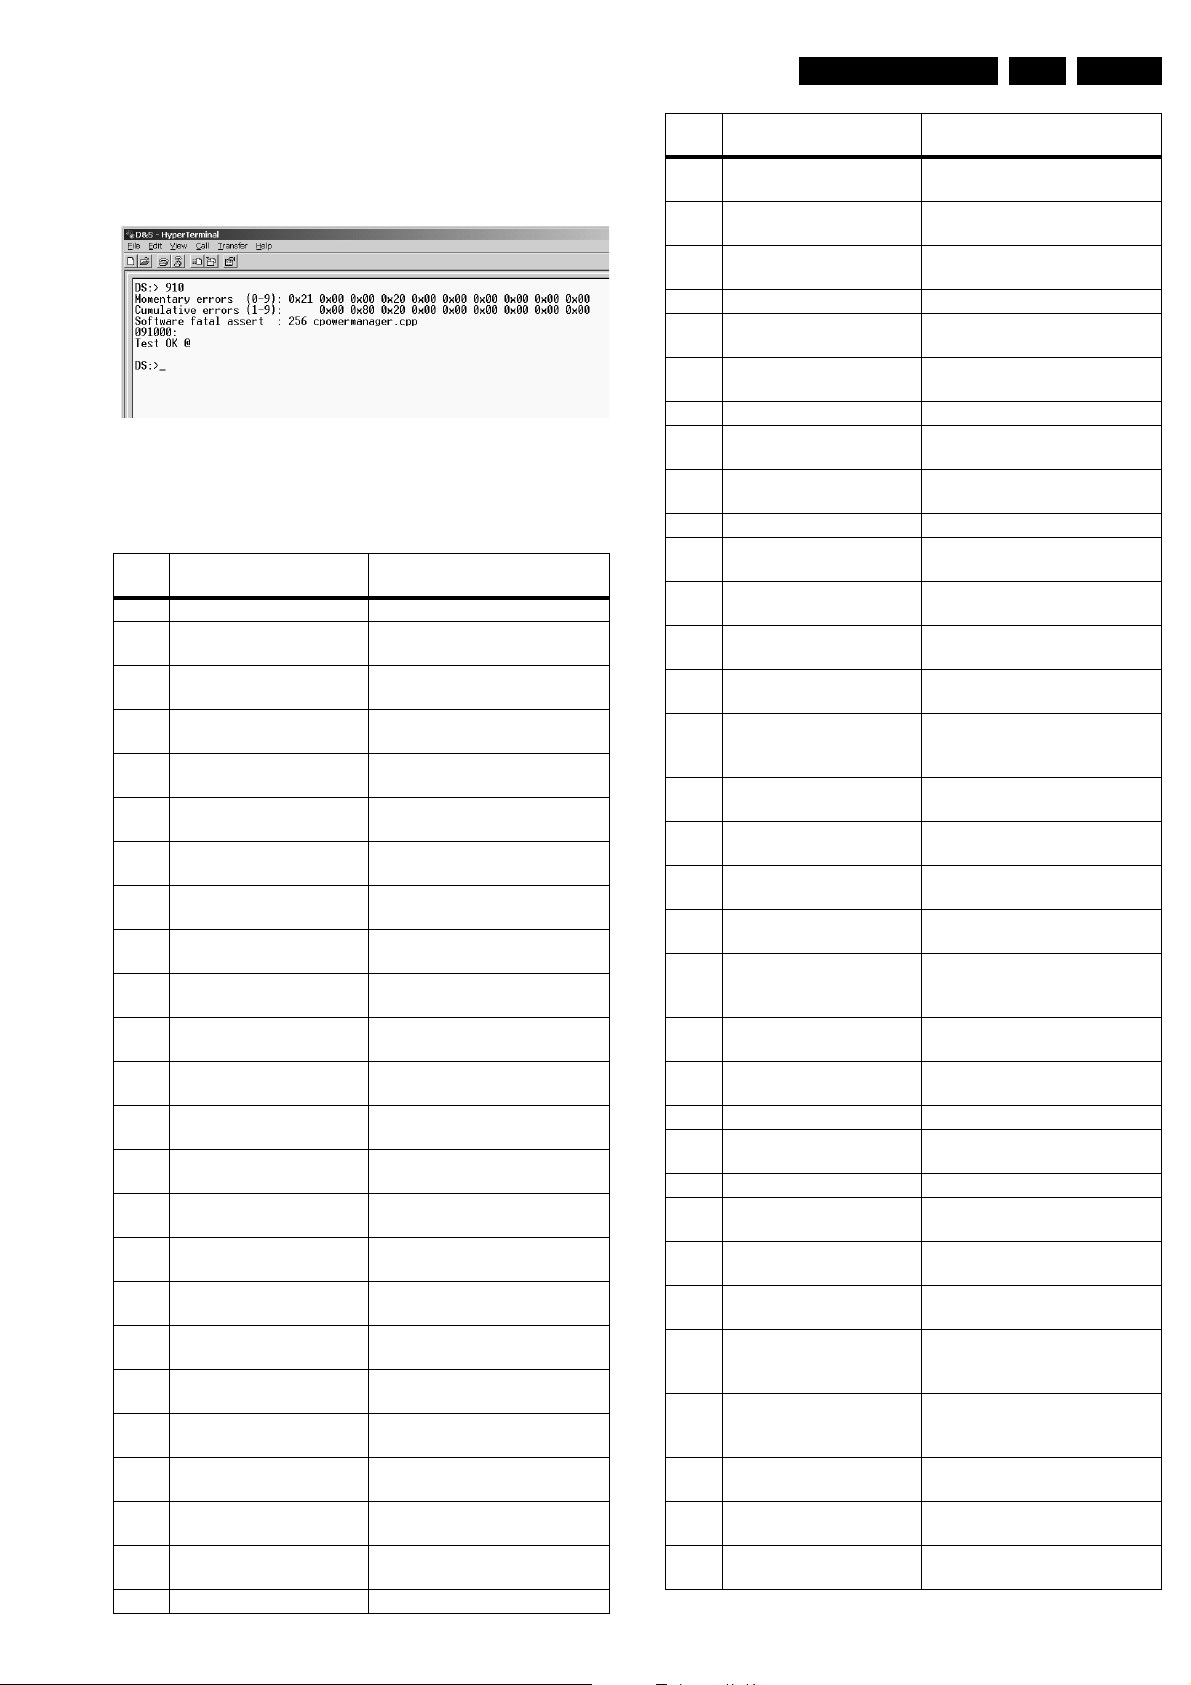
With DSW command 910 (Digital Board Chrysalis) the set
software can retrieve an overview of all occurred engine errors.
5.3.1 Momentary Errors
Byte 0: latest error:
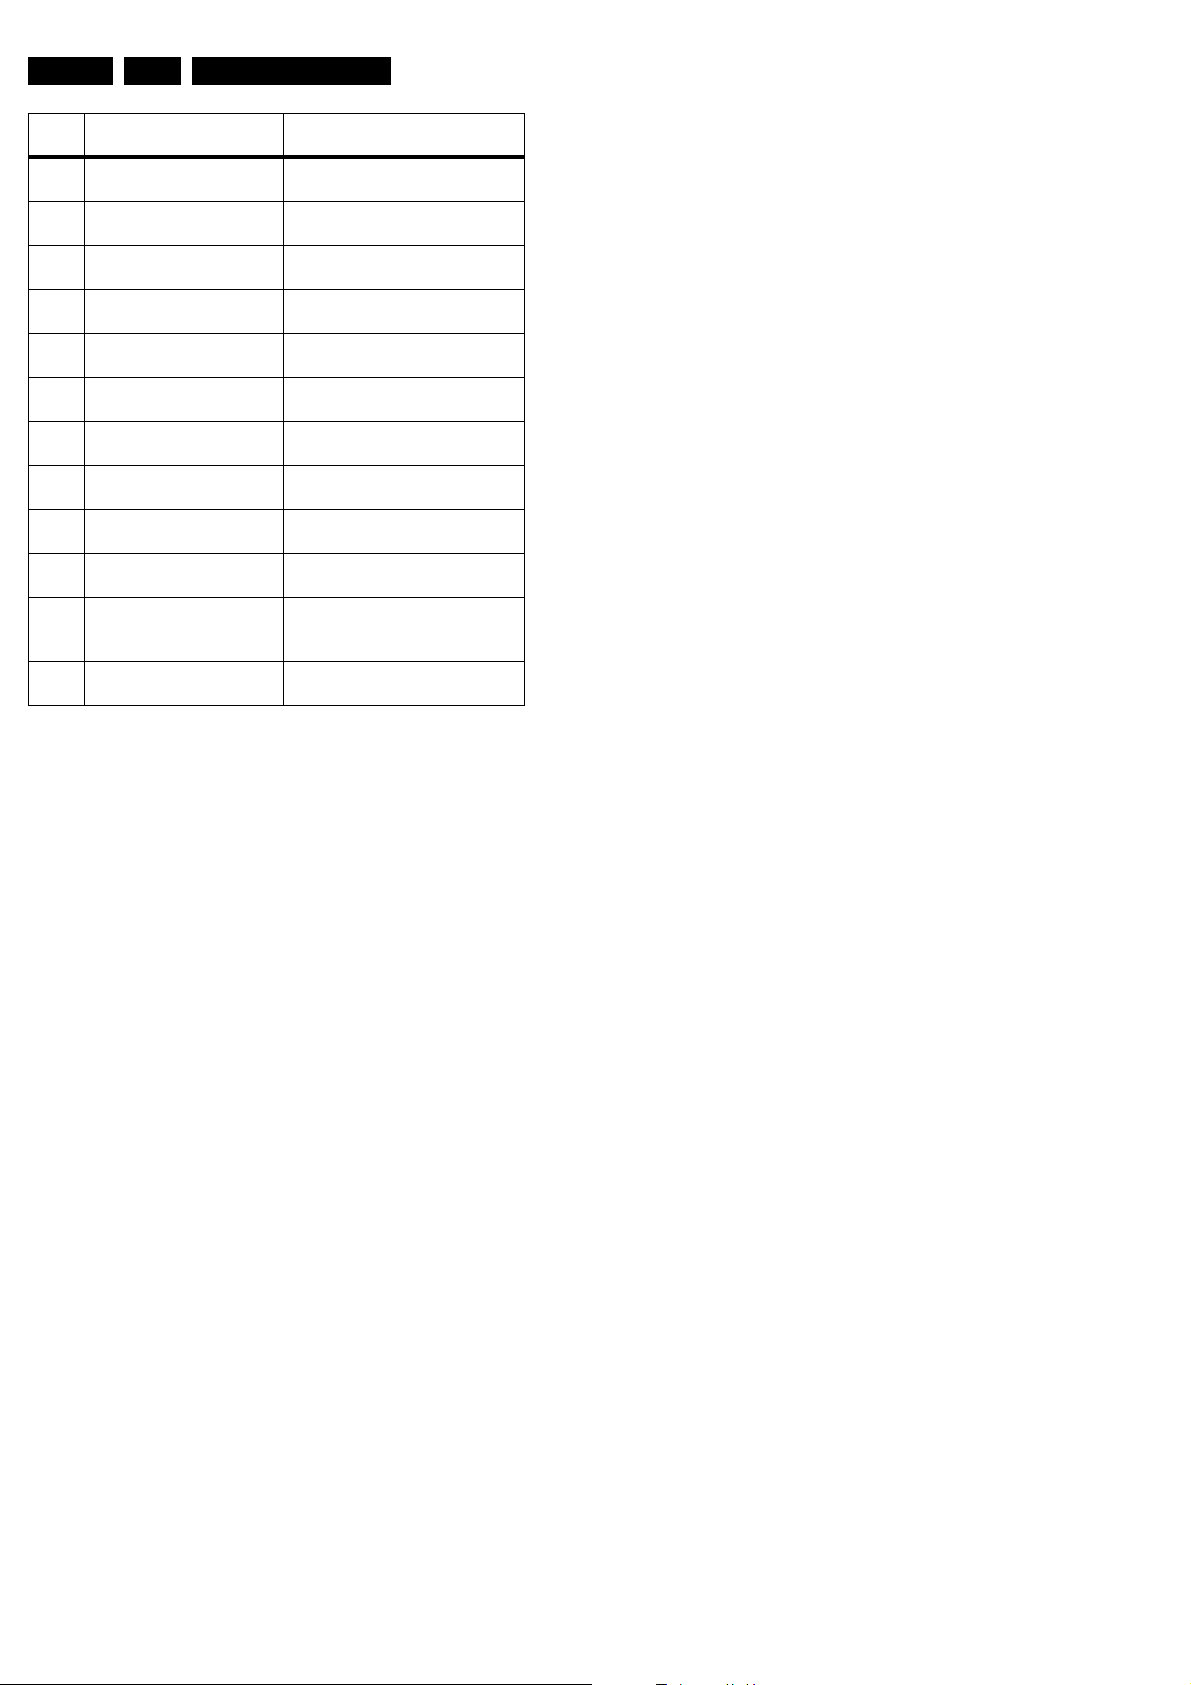
Overview of the BE error codes.
error
error meaning
code
0x00 no_error No error has occurred
0x01 illegal_command_error Command not allowed in this
state or unknown command
0x02 illegal_parameter_error Parameter(s) not valid for this
0x03 command_timeout_error The maximum execution time for
0x04 sledge_home_error The sledge could not be moved
0x05 sledge_calibration_error An error occurred during calibra-
0x06 sledge_unstable_error The sledge detected unstable
0x07 speed_timeout_error Spindle motor could not reach its
0x08 speed_window_error Measured spinning speed is not
0x09 focus_timeout_error Focus could not be achieved
0x0A focus_retries_error The amount of focus retries ex-
0x0B focus_agc_error The focus agc results are out of
0x0C radial_timeout_error Servo didn’t get on track within
0x0D radial_retries_error Servo didn’t get on track after
0x0E radial_agc_error The radial agc results are out of
0x0F radial_init_error Unreliable signal scaling after the
0x10 hf_pll_error HF-decoder pll could not lock to
0x11 wobble_pll_error Wobble pll could not lock to wob-
0x12 subcode_timeout_error Subcode information could not
0x13 subcode_notfound_error Requested subcode item could
0x14 header_timeout_error Header information could not be
0x15 adip_timeout_error Adip information could not be
0x16 adip_window_error Adip add ress was not within ex-
0x17 adip_sync_error No adip sync was detected
command
the command has exceeded
home
tion of the sledge
control
target speed within timeout
within expected window
within the timeout
pired
range
the timeout
several retries
range
radial initialisation
HF signal
ble signal
be read
not be found
read
read
pected window
error
error meaning
code
0x18 atip_timeout_error Atip information could not be
read
0x19 atip_notfound_error Requested atip item could not be
found
0x1A atip_window_error Atip address was not within ex-
0x1B atip_sync_error No atip sync was detected
0x1C tray_error Tray could not be closed or
0x1D seek_error The requested seek couldn’t be
0x1E no_hf_present_error Attempt to read from a blank area
0x1F record_error An error occurred during the re-
0x20 illegal_stopaddress_error The requested stopaddress with
0x21 no_disc_error No disc is detected
0x22 not_initialised_error The system is not initialised (e.g.
0x23 illegal_medium_error BE detected an unsupported me-
0x24 cd_frequency_error Measured HF frequency is not
0x25 dvd_frequency_error Measured HF frequency is not
0x26 re-
served(non_existing_bca_
error)
0x27 reserved(bca_read_error) An error occurred during reading
0x28 selftest_error An error occurred during the self-
0x29 i2c_error The I2C interface does not oper-
0x2A laser_pll_error Laser control pll did not lock or
0x2B laser_forward_sense_errorForward sense value didn’t
0x2C jitter_optimisation_error An error occurred during optimis-
0x2D tilt_calibration_error An error occurred during calibra-
0x2E reserved
0x2F frontend_offset_calib_errorThe offset in the frontend couldn’t
0x30 reserved
0x31 wsg_calculation_error An error occurred in the calcula-
0x32 buffer_overrun_error The buffer input stream overran
0x33 return_value_invalid_error The reque sted information is not
0x34 illegal_recording_speed_e
rror
0x35 opc_media_parameter_errorThe media parameters (info in
0x36 opc_record_power_error The final optimum power was not
0x37 opc_start_power_low_errorOPC start power too low (opti-
0x38 opc_start_power_high_errorOPC start power too high (opti-
pected window
opened within the timeout
performed within the timeout
cording
modify-stop-address is not valid
seek on unknown disctype)
dium during disc recognition
within CD frequency range
within DVD frequency range
Attempt to read non-existing bca
information
of bca information
test of the BE
ate
lost lock on write clock
change with changing laser power
ation of the jitter
tion of the tilt frame
be calibrated
tion of the write strategy
the buffer output stream
available for this inquiry
The selected speed is not al-
lowed for a recording on this medium
ATIP/ADIP) are invalid or not
read
reached
mum power is higher)
mum power is lower)
Page 10
EN 10 VAD80415.
error
error meaning
code
0x39 opc_power_calculation_er
ror
0x3A opc_test_zone_full_error OPC can’t be performed because
0x3B opc_bad_jitter_measurem
ent_error
0x3C opc_read_samples_error An error occurred during OPC
0x3D ropc_alpha_overflow_error The determined value for the op-
0x3E ropc_alpha_ref_current_er
ror
0x3F ropc_alpha_gain_error The alpha measurement alpha
0x40 beta_over_under_flow_errorDuring the walking OPC a beta
0x41 not_enough_calib_points_
error
0x42 not_enough_power_error The calculated power during re-
0x43 illegal_reading_speed_errorThe selected speed is not al-
0x44 servo_fatal_error The actuator dissipation became
Error during OPC power calculation (samples are wrong)
test zone is full
The jitter measurement during
OPC samples readback failed
readback sampling
timum power is too high
The alpha measurement refer-
ence current is wrong (IAN)
gain is wrong
over-/under-flow was detected
Not enough valid calibration
points available for re-calibration
calibration exceeds max power
lowed for the requested command
too high during a servo recovery
Service Modes, Error Codes and Fault Finding
This error is overwritten by the next player / inquiry command.
Page 11
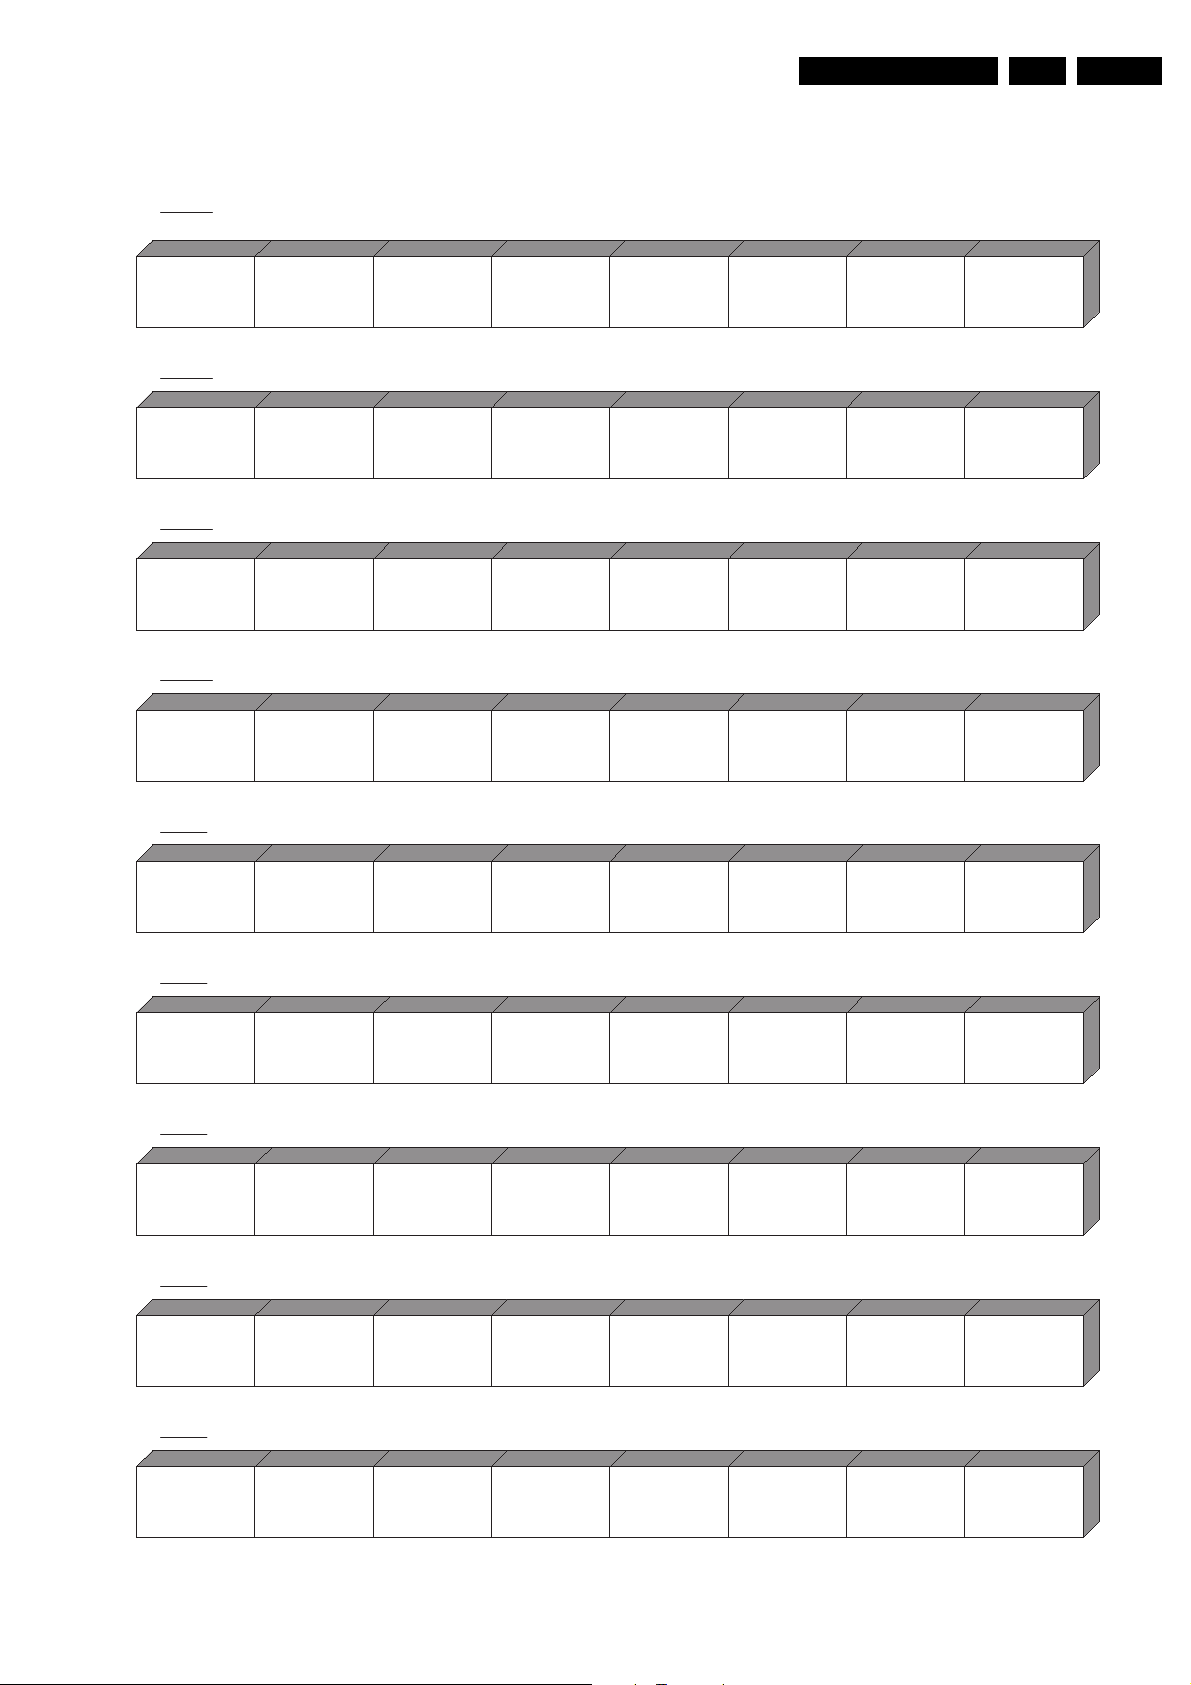
Service Modes, Error Codes and Fault Finding
EN 11VAD8041 5.
Byte 1 - 9: cumulative errors of previous error occurences.
Format of the BE error bytes.
Every individual error has its own bit in the 9-byte structure as
described in the drawing below:
byte 1
b7 b6 b5 b4 b3 b2 b1 b0
reserved
FOCUS
AGC
ERROR
FOCUS
RETRIES
ERROR
FOCUS
TIMEOUT
ERROR
RADIAL
AGC
ERROR
RADIAL
RETRIES
ERROR
RADIAL
TIMEOUT
ERROR
byte 2
TRAY
ERROR
reserved
JITTER
OPTIMIZATION
ERROR
SLEDGE
HOME
ERROR
SLEDGE
UNSTABLE
ERROR
SLEDGE
CALIBRATION
ERROR
TILT SENSOR
OFFSET
CALIBRATION
ERROR
byte 3
RECORD
ERROR
SEEK
ERROR
NO DISC
ERROR
NOT
INITIALISED
ERROR
ILLEGAL
STOPADDRESS
ERROR
ILLEGAL
PARAMETER
ERROR
ILLEGAL
COMMAND
ERROR
byte 4
RADIAL
INIT
ERROR
TILT
CALIBRATION
ERROR
COMMAND
TIMEOUT
ERROR
SERVO
FATA L
ERROR
byte5
WOBBLE PLL
ERROR
byte6
WSG
CALCULATION
ERROR
byte7
LASER
FORWARD
SENSE
ERROR
byte8
reserved reserved
ADIP
SYNC
ERROR
DVD
FREQUENCY
ERROR
NVRAM
CHECKSUM
UPDATE
ERROR
WINDOW
ERROR
FREQUENCY
ERROR
FRONTEND
OFFSET
CALIBRATION
ERROR
ADIP
CD
HF PLL
ERROR
ADIP
TIMEOUT
ERROR
ILLEGAL
RECORDING
SPEED
ERROR
LASER PLL
ERROR
NO HF
PRESENT
ERROR
ATIP
NOTFOUND
ERROR
SPEED
WINDOW
ERROR
ILLEGAL
READING
SPEED
ERROR
HEADER
TIMEOUT
ERROR
ATIP
SYNC
ERROR
SPEED
TIMEOUT
ERROR
ILLEGAL
MEDIUM
ERROR
SUBCODE
NOTFOUND
ERROR
ATIP
WINDOW
ERROR
NON
EXISTING
BCA
ERROR
SELFTEST
ERROR
SUBCODE
TIMEOUT
ERROR
ATIP
TIMEOUT
ERROR
BCA
READ
ERROR
I2C
ERROR
OPC
READ
SAMPLES
ERROR
OPC
BAD JITTER
MEASUREMENT
ERROR
OPC
TEST ZONE
FULL
ERROR
OPC
POWER
CALCULATION
ERROR
byte9
RETURN
VALUE
INVALID
ERROR
BUFFER
OVERRUN
ERROR
These errors are kept in memory until a power down of the
drive (e.g. when recorder goes to standby) or reset of the drive.
BETA
OVER/UNDER
FLOW
ERROR
NOT ENOUGH
CALIB POINTS
ERROR
OPC
START
POWER HIGH
ERROR
NOT ENOUGH
POWER
ERROR
OPC
START
POWER LOW
ERROR
ROPC
ALPHA
GAIN
ERROR
OPC
RECORD
POWER
ERROR
ROPC
ALPHA
REF CURRENT
ERROR
OPC
MEDIA
PARAMETER
ERROR
ROPC
ALPHA
OVERFLOW
ERROR
Page 12

EN 12 VAD80415.
5.3.2 Cumulative errors
These errors are stored in EEPROM and are thus non-volatile
showing the complete error history of the drive.
Byte 1 - 9: cumulative errors of previous player / inquiry error
occurences. These bytes are the same as the nine bytes (1-9)
of the Momentary errors
5.3.3 Software fatal assert
Gives row number and file name in the source code of the
firmware of the data path of the AV3
Service Modes, Error Codes and Fault Finding
Page 13
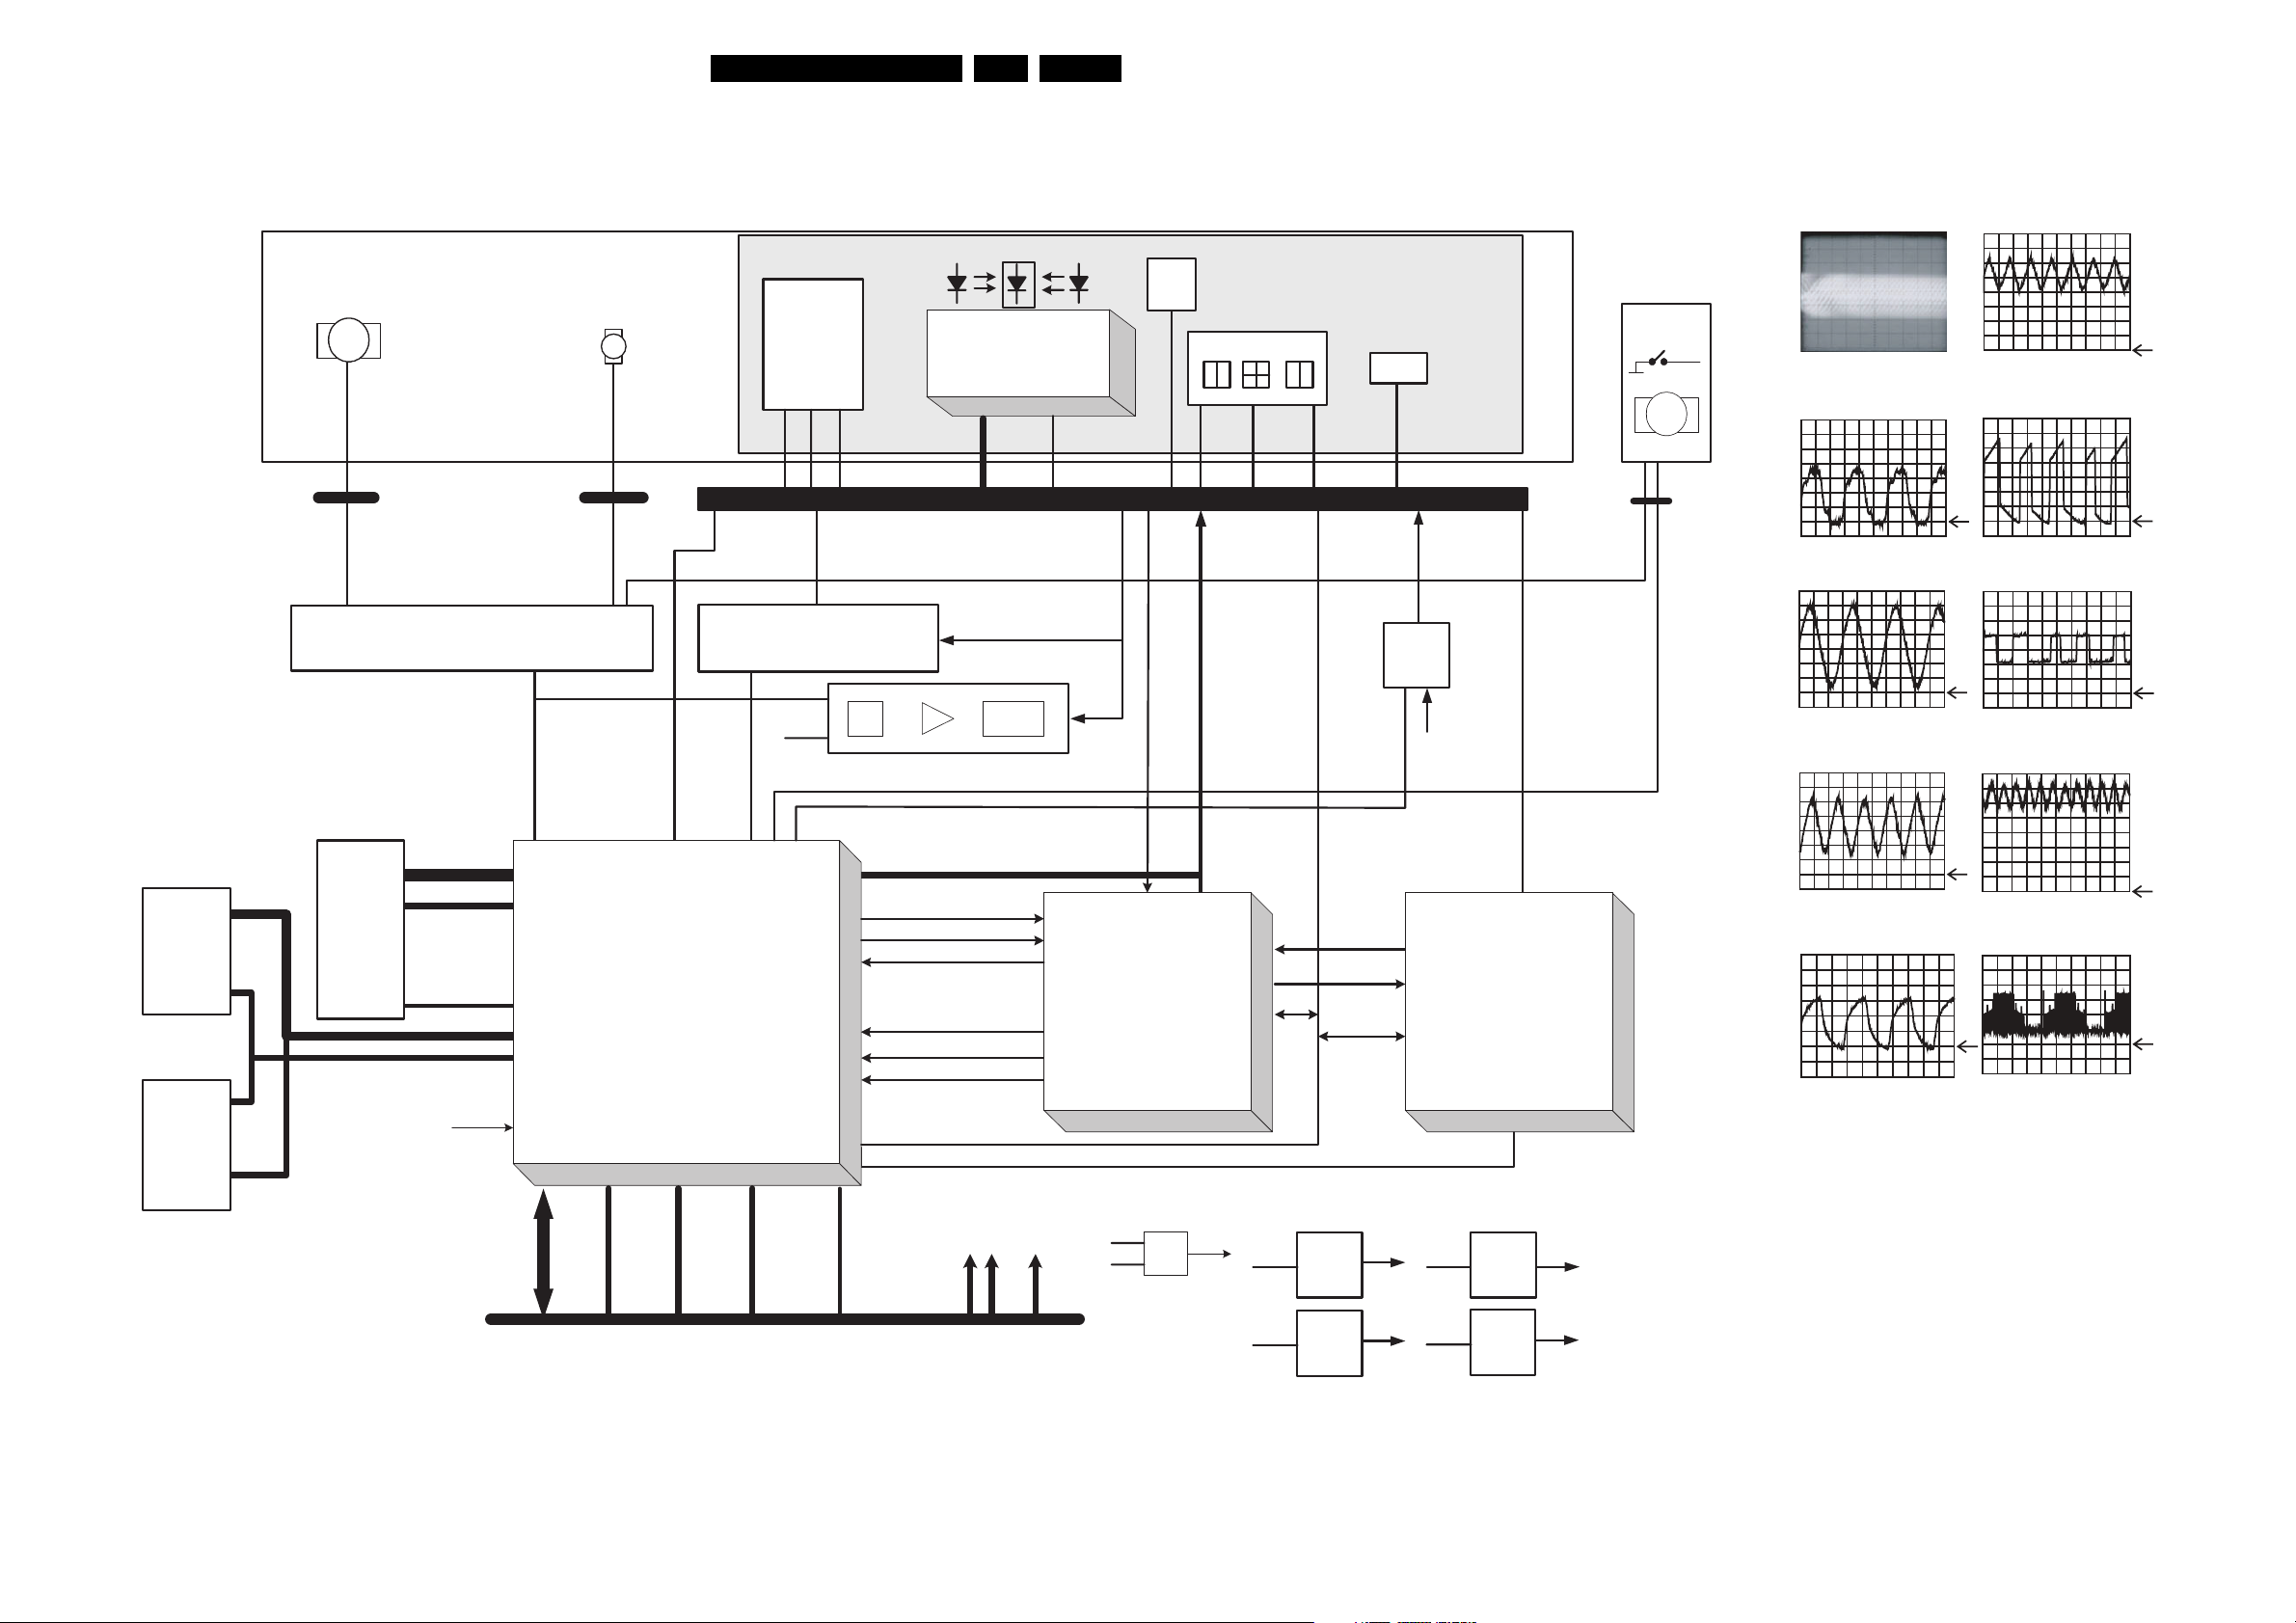
Block Diagrams, Waveforms, Wiring Diagram.
6. Block Diagrams, Waveforms, Wiring Diagram.
EN 13VAD 8041 6.
Block Diagram
option
SRAM
7503
1401
7402
Disc Motor
M
7504
SDRAM
16MB
11P
U,V,W coil
U+,UV+,VW+,WHall+,Hall-
Disc, Tray, Sledge Motor Driver
SA56202
VMOTO10
MOTOR-ON
DRIVER-ON
TEMP_WARNING
XDD0..15
XDA0..11
XWR
XRAS
SDCK
XCA SL
XCASH
DATA_MASK
DA0..15
AD0..19
MOTO1
7500
LOADER
1400
STEP-SIN
STEP-COS
SLSL+
TRAY-INOUT
Sledge
Stepper
M
OUTSLD1+
OUTSLD1OUTSLD2+
OUTSLD2-
4P
TEMP_SENSE
CENTAURUS
7409
ROHM
FO+
FO-
DRIVER-ON
RAD MUTE
RFN3 / RFP3, IC7201 Pin 38/39
A1,2
CALF
XDN
FTC
D1..4
PPNO
FS diode
Elantec 6915
SCLK
SDIO
SEN
offset
gain
TRAYSW
laser 780nm
650nm PD
EFM
R/W
SERVO-MEAS
SERVO-COMM
RAD
FOCFOC+
TEMP_SENSE
OPU66
Tem p.
Sensor
PAE D I C
VIA..H RFP,RFN
VIA..H
RFP
RFN
EFMDATAP
EFM_DATA
EFMCLKN
EFMCLKP
EFM_RWN
7201
TZA 1045
CD-MODE
HIGH-GAIN
highpower
IIC
LASP
ALFA
EEprom
7104
IIC
PAEDIC
power
7300
4V6
5V
OPU Flex 45p
LACONICCHEETAH
1100
Iodel
IOthr
IAPC
WSB
SCLK
SDIO
SEN
RW-Del
Vdel
VREF
Vthr
HIGH-GAIN
CD-MODE
Tray Switch
Tray Motor
TR+
TR-
M
4P
1702
A: AC, 50m V/Di v,
A: DC, 1 V/Di v, 20ns/Di v
A: DC, 500mV/Div, 20ns/ Div
A: DC, 500mV/Div, 5ns/ Div
A: DC, 1 V/Div, 20ns/Div
50ns/Div
IC7300 Pin 4
IC7300 Pin 5
IC7504 Pin 38
I502
level
DC
laser 650nm
Actuator
RADIAL
FOCU S
TILT
FOC+
FOCRAD
Servo Driver
BA5995FM
1V65
RA
7405
SIDA, SILD, SICL
RFREF
RFN3,RFP3
I417
A: DC, 500mV/Div, 50ns/Div
I430
A: DC, 2 V/Div, 2us/Div
I432
A: DC, 5 V/Div, 2us/Div
U, V, W
A: DC, 200mV/Div, 5ms/Div
U,V,W coil
A: DC, 5 V/Div, 1ms/Div
FLASH
PROM
1600
PORN
HD0..15
HDASPN
CS0
CS1
HA0
HA1
HA2
IDE
HPDIAGN
HIRQ
HDACKN
IORDY
HDRN
HRWN
HDRQ
RX1_MASTER
TX1
TX2
DEBUG11
AUD IOR
AUDIOL
IEC958
5V
From/To DVD Recorder application
GND
12V
MRN, HRESET
IRQN,OS TR,EFM_RWN
5V, 12V
RESET
7506
PORN
12V
7603
5V
3v3 1V8
5V25
7607
5V
TOSTOCEN
7608
1V65
7401
TR 22004_001
300603
Page 14
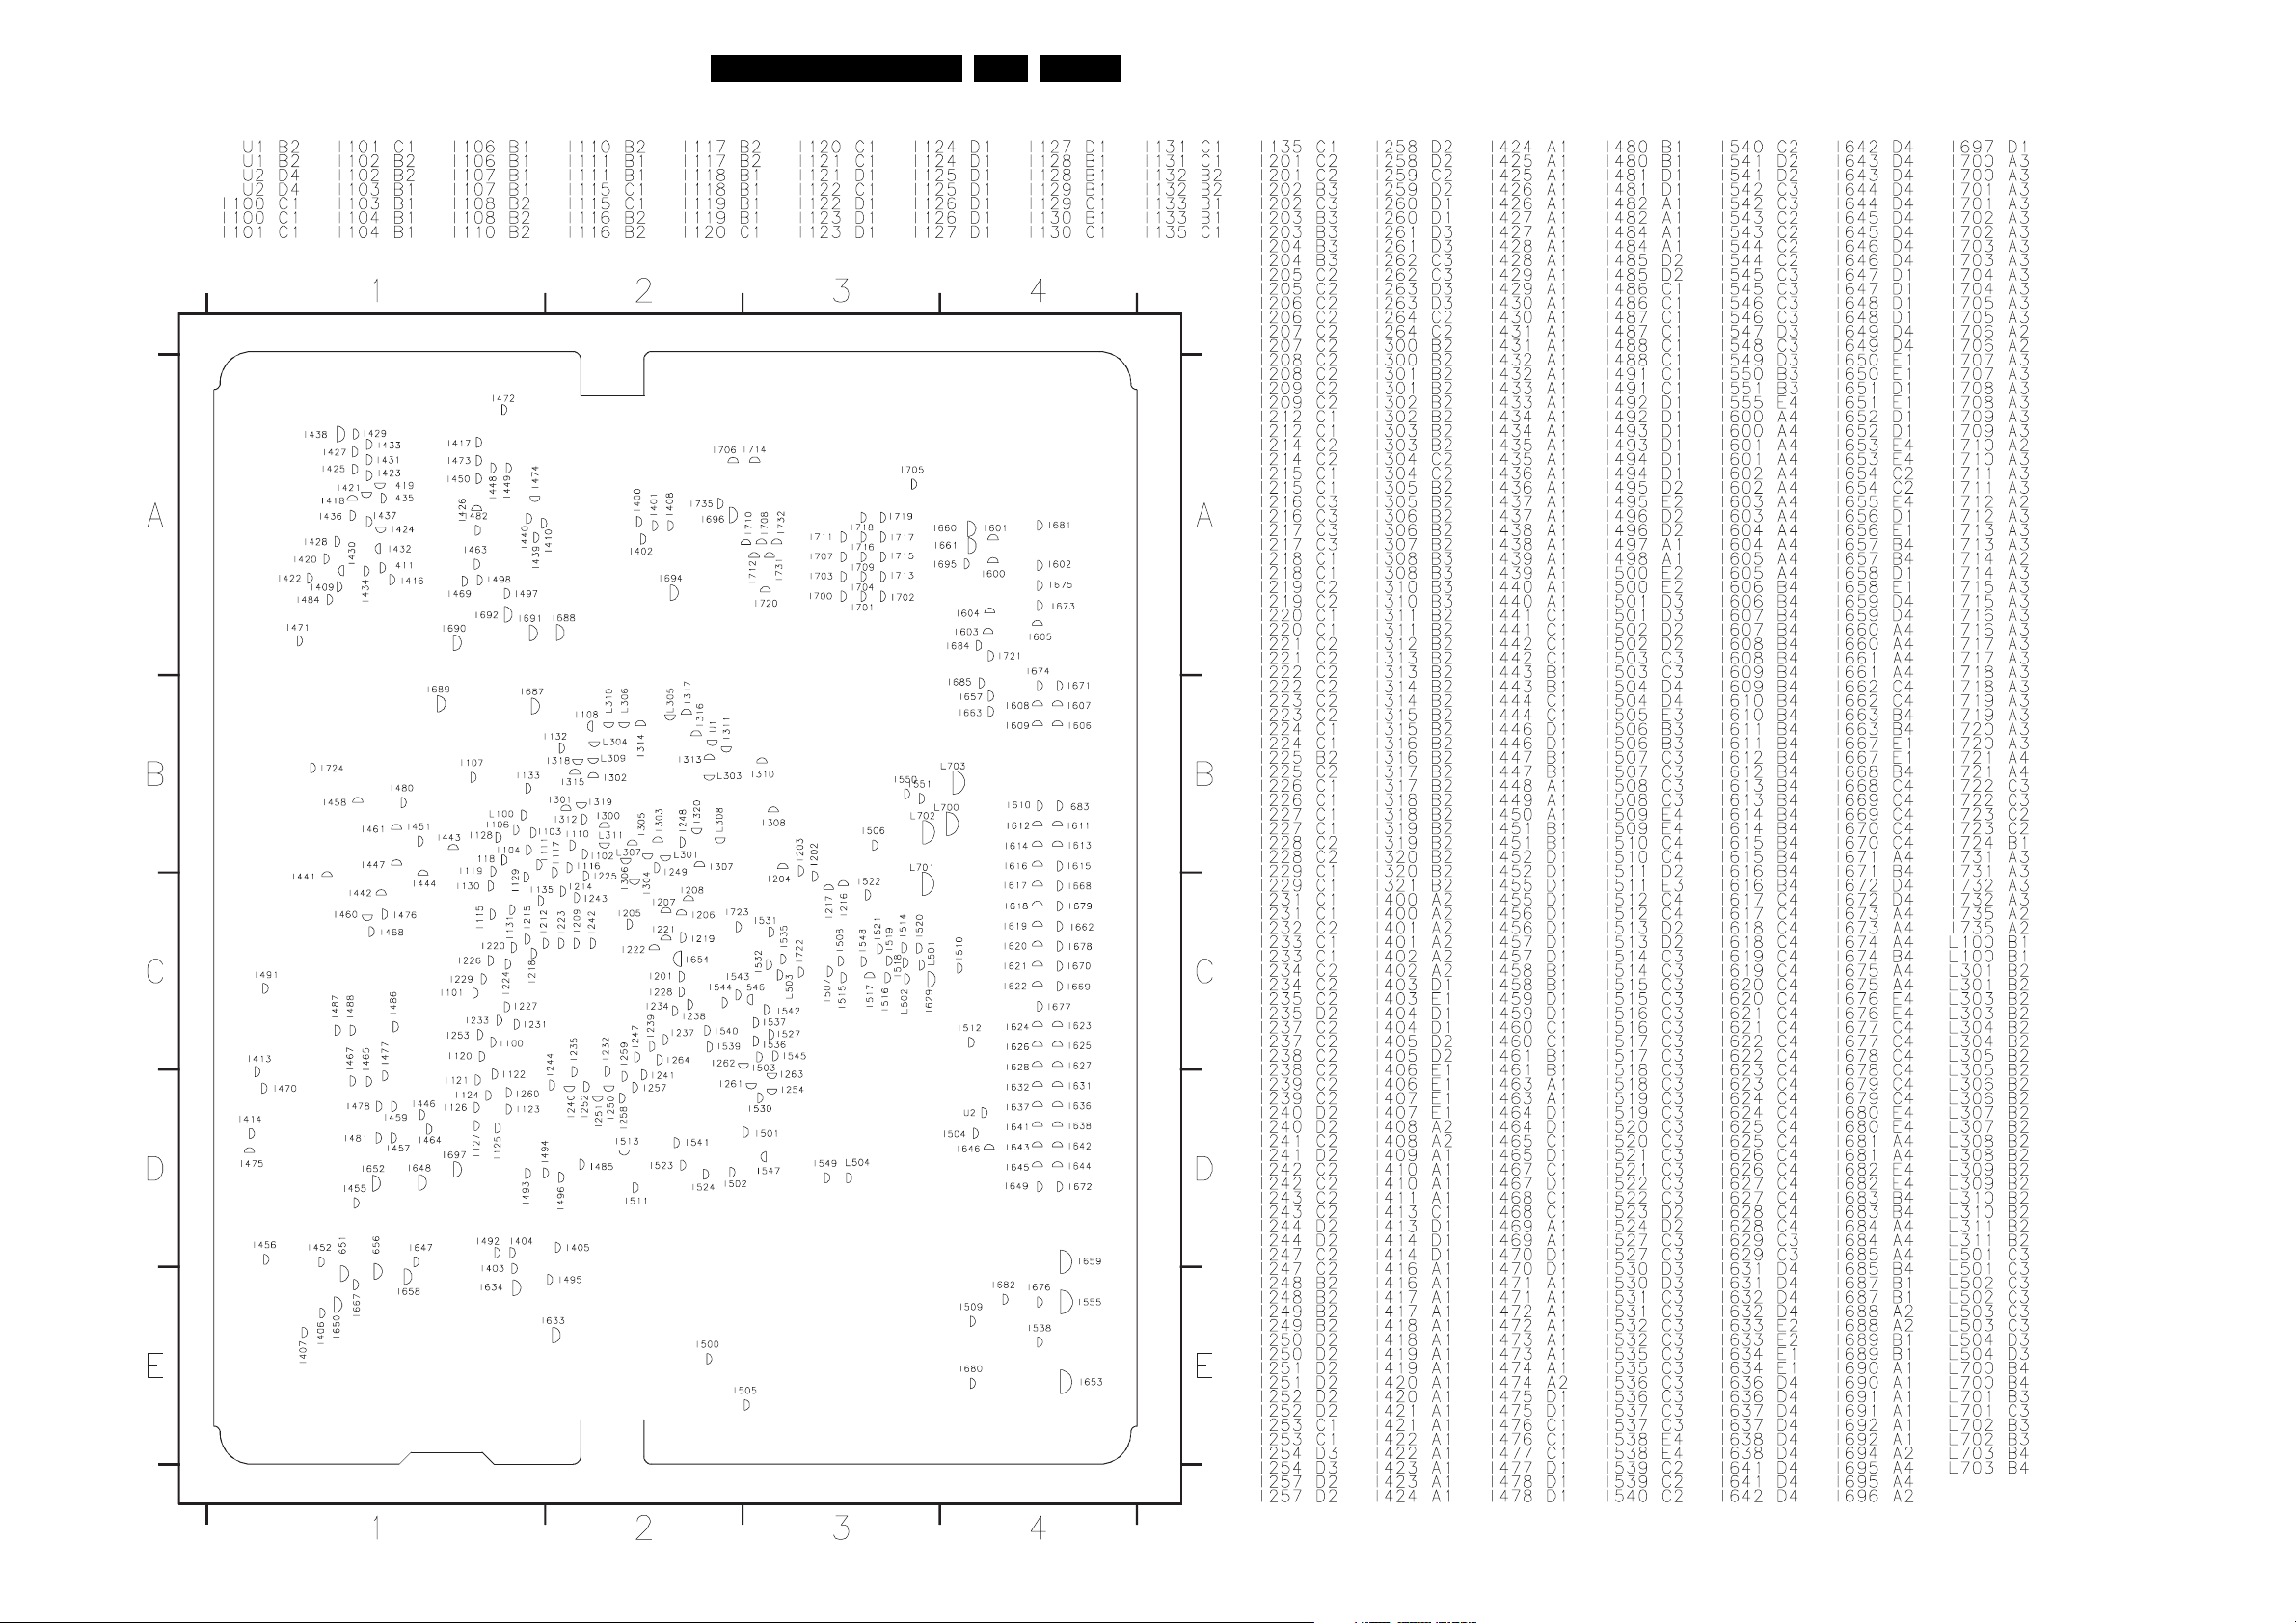
Block Diagrams, Waveforms, Wiring Diagram.
Testpoints Overview
EN 14VAD 8041 6.
TR 22005_001
070704
Page 15
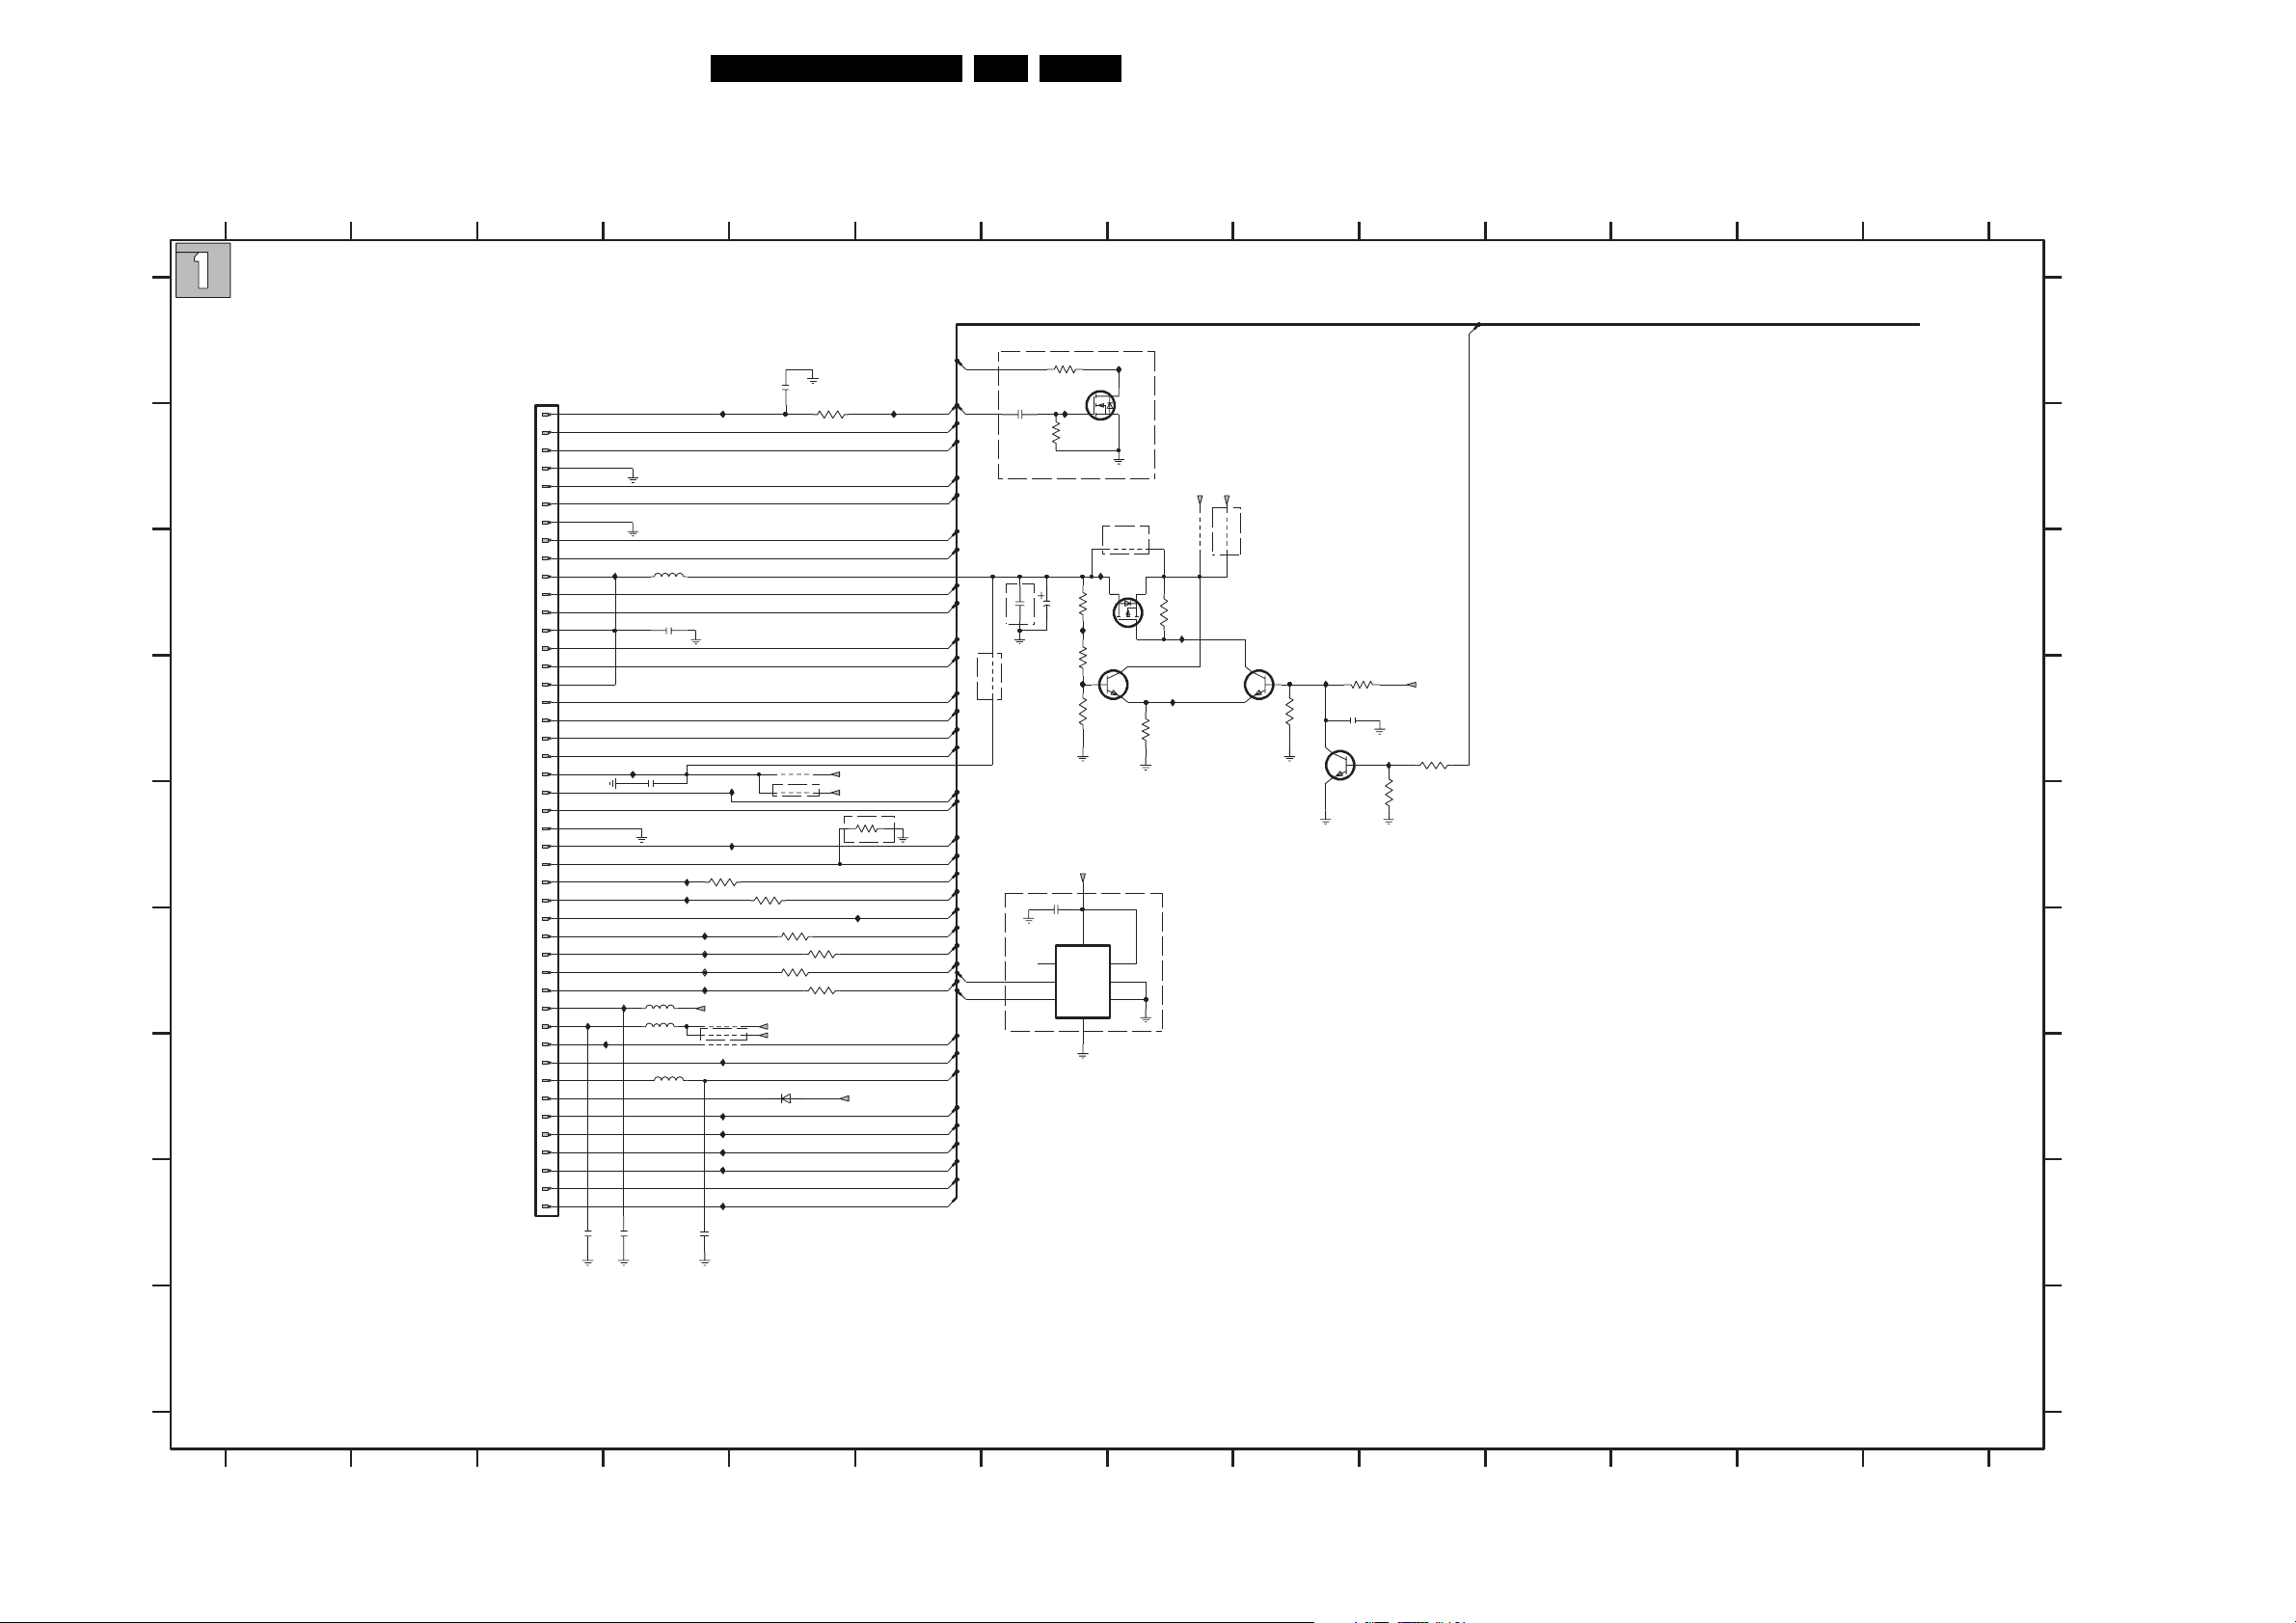
Electrical Diagrams and Print-Layouts
7. Electrical Diagrams and Print-Layouts
Servo Board: OPU Interface
EN 15VAD 8041 7.
12 14
345
6
7
8910
11
12 13
TO CHEETAH_QD/DRIVERS/CENTAURUS-DRAM-FLASHROM/DEBUG-AND-FLASH
{SERVO-MEAS,VREF,Vdel,Vthr,RW-Del,HIGH-GAIN,CD-MODE,VIG,VIE,VIA,VID,RFP,RFN,VIB,VIC,VIH,VIF,SERVO-COMM,FOC-,FOC+,RAD,IOthr,EFM-DATAP,EFM-DATAN,EFM-CLKP,EFM-CLKN,EFM_RWN,SCLK,SDIO,SEN,IoDel,WSB,SCL,SDA,HIGHPOWER,TEMP_SENSE}
A
IOthr
1100
AF3
45
44
43
B
C
D
E
F
G
H
42
41
40
39
38
37
I120
36
35
34
33
32
31
30
29
28
27
26
25
24
23
22
21
20
19
18
17
16
15
14
13
12
11
10
9
8
7
6
5
4
3
2
1
I129
2104
I135
100n
I128
2105
I115
2102
100n
5102
5103
100n
5101
2100
100n
OPTIONB
5104
10u
I100
I130
I131
I110
3101
I111
82R
I116
I117
I118
I119
D3V3
4111
4112
4105
I108
I104
I103
I106
L100
I107
2101
220p
3100
82R
2103
+5V
+5V25
6100
BAS316
4109
4110
3103
3106
100p
3104
100R
OPTIONB
OPTIONB
1K
3105
1K
3107
1K
1K
+5V
+5V25
I102
+12V
3102
I101
RW-Del
VIG
VIE
VID
VIA
RFN
RFP
VIC
VIB
VIH
VIF
CD-MODE
HIGH-GAIN
SCL
SDA
VREF
Vdel
3K3
Vthr
SEN
SDIO
SCLK
EFM_RWN
EFM-DATAP
EFM-DATAN
EFM-CLKN
EFM-CLKP
WSB
IOthr
IoDel
FOC-
FOC+
RAD
TEMP_SENSE
SERVO-MEAS
SERVO-COMM
RW-Del
SDA
SCL
4100
2110
1n0
OPTIONB
2109
OPTIONB
OPTIONB
OPTIONB
22u
2107
0.7V/
1.7V
2108
100n
LM75ADP
3
1
2
3119
220R
3120
I133
2V/4.6V
22u
7105
OS
SDA
SCL
I132
HIGHPOWER
7107
2N7002E
18K
+5V
+5V25
D3V3
3116
3117
I124
3118
+VS
GND
8
4
OPTIONB
I121
1K5
7104
I122
220R
1K
A0
A1
A2
4106
BSH205
7103
BC847B
7
6
5
3114
3115
820R
4108
4107
OPTIONB
3K3
I123
5.3V/4.3V
I125
0V/1.7V
7101
BC847B
I126
0.2V/1V
3112
1K
7102
BC847B
2106
100n
3V3
3113
1K0
3.3V/
0V
0.7V/
I127
0V
NOTE:
3110
10K
10K
3111
OPTIONA: DENOTES COMPONENT(S) WILL BE MOUNTED BEFORE MASS PRODUCTION
OPTIONB: DENOTES COMPONENT(S) WILL BE MOUNTED WHEN NEEDED
1100 A3
2100 C4
2101 H4
2102 E4
2103 A5
2104 H3
2105 H4
2106 D9
2107 C7
2108 E7
2109 C7
2110 B7
A
3100 E5
3101 E4
3102 E6
3103 F5
3104 B5
3105 F5
3106 F5
3107 F5
3110 D10
3111 E10
3112 D9
3113 D10
B
3114 D8
3115 C8
3116 C7
3117 D7
3118 D7
3119 B7
3120 A7
4100 D7
4105 G4
4106 C8
4107 C8
C
4108 C8
4109 D5
4110 E5
4111 F4
4112 G4
5101 C4
5102 F4
5103 F4
5104 G4
6100 G5
7101 D9
7102 D9
D
7103 D8
7104 C7
7105 F7
7107 B8
I100 A4
I101 A6
I102 E6
I103 G4
I104 G4
I106 G4
I107 H4
I108 G5
E
I110 E4
I111 E4
I115 D4
I116 F4
I117 F4
I118 F4
I119 F4
I120 C4
I121 C8
I122 C7
I123 C8
F
I124 D7
I125 D9
I126 D8
I127 D10
I128 F4
I129 F3
I130 D5
I131 E5
I132 A8
I133 A7
I135 F4
L100 G4
G
H
12
I
TR 22006_001
300604
3
45
6
78
91011
12
13 14
Page 16
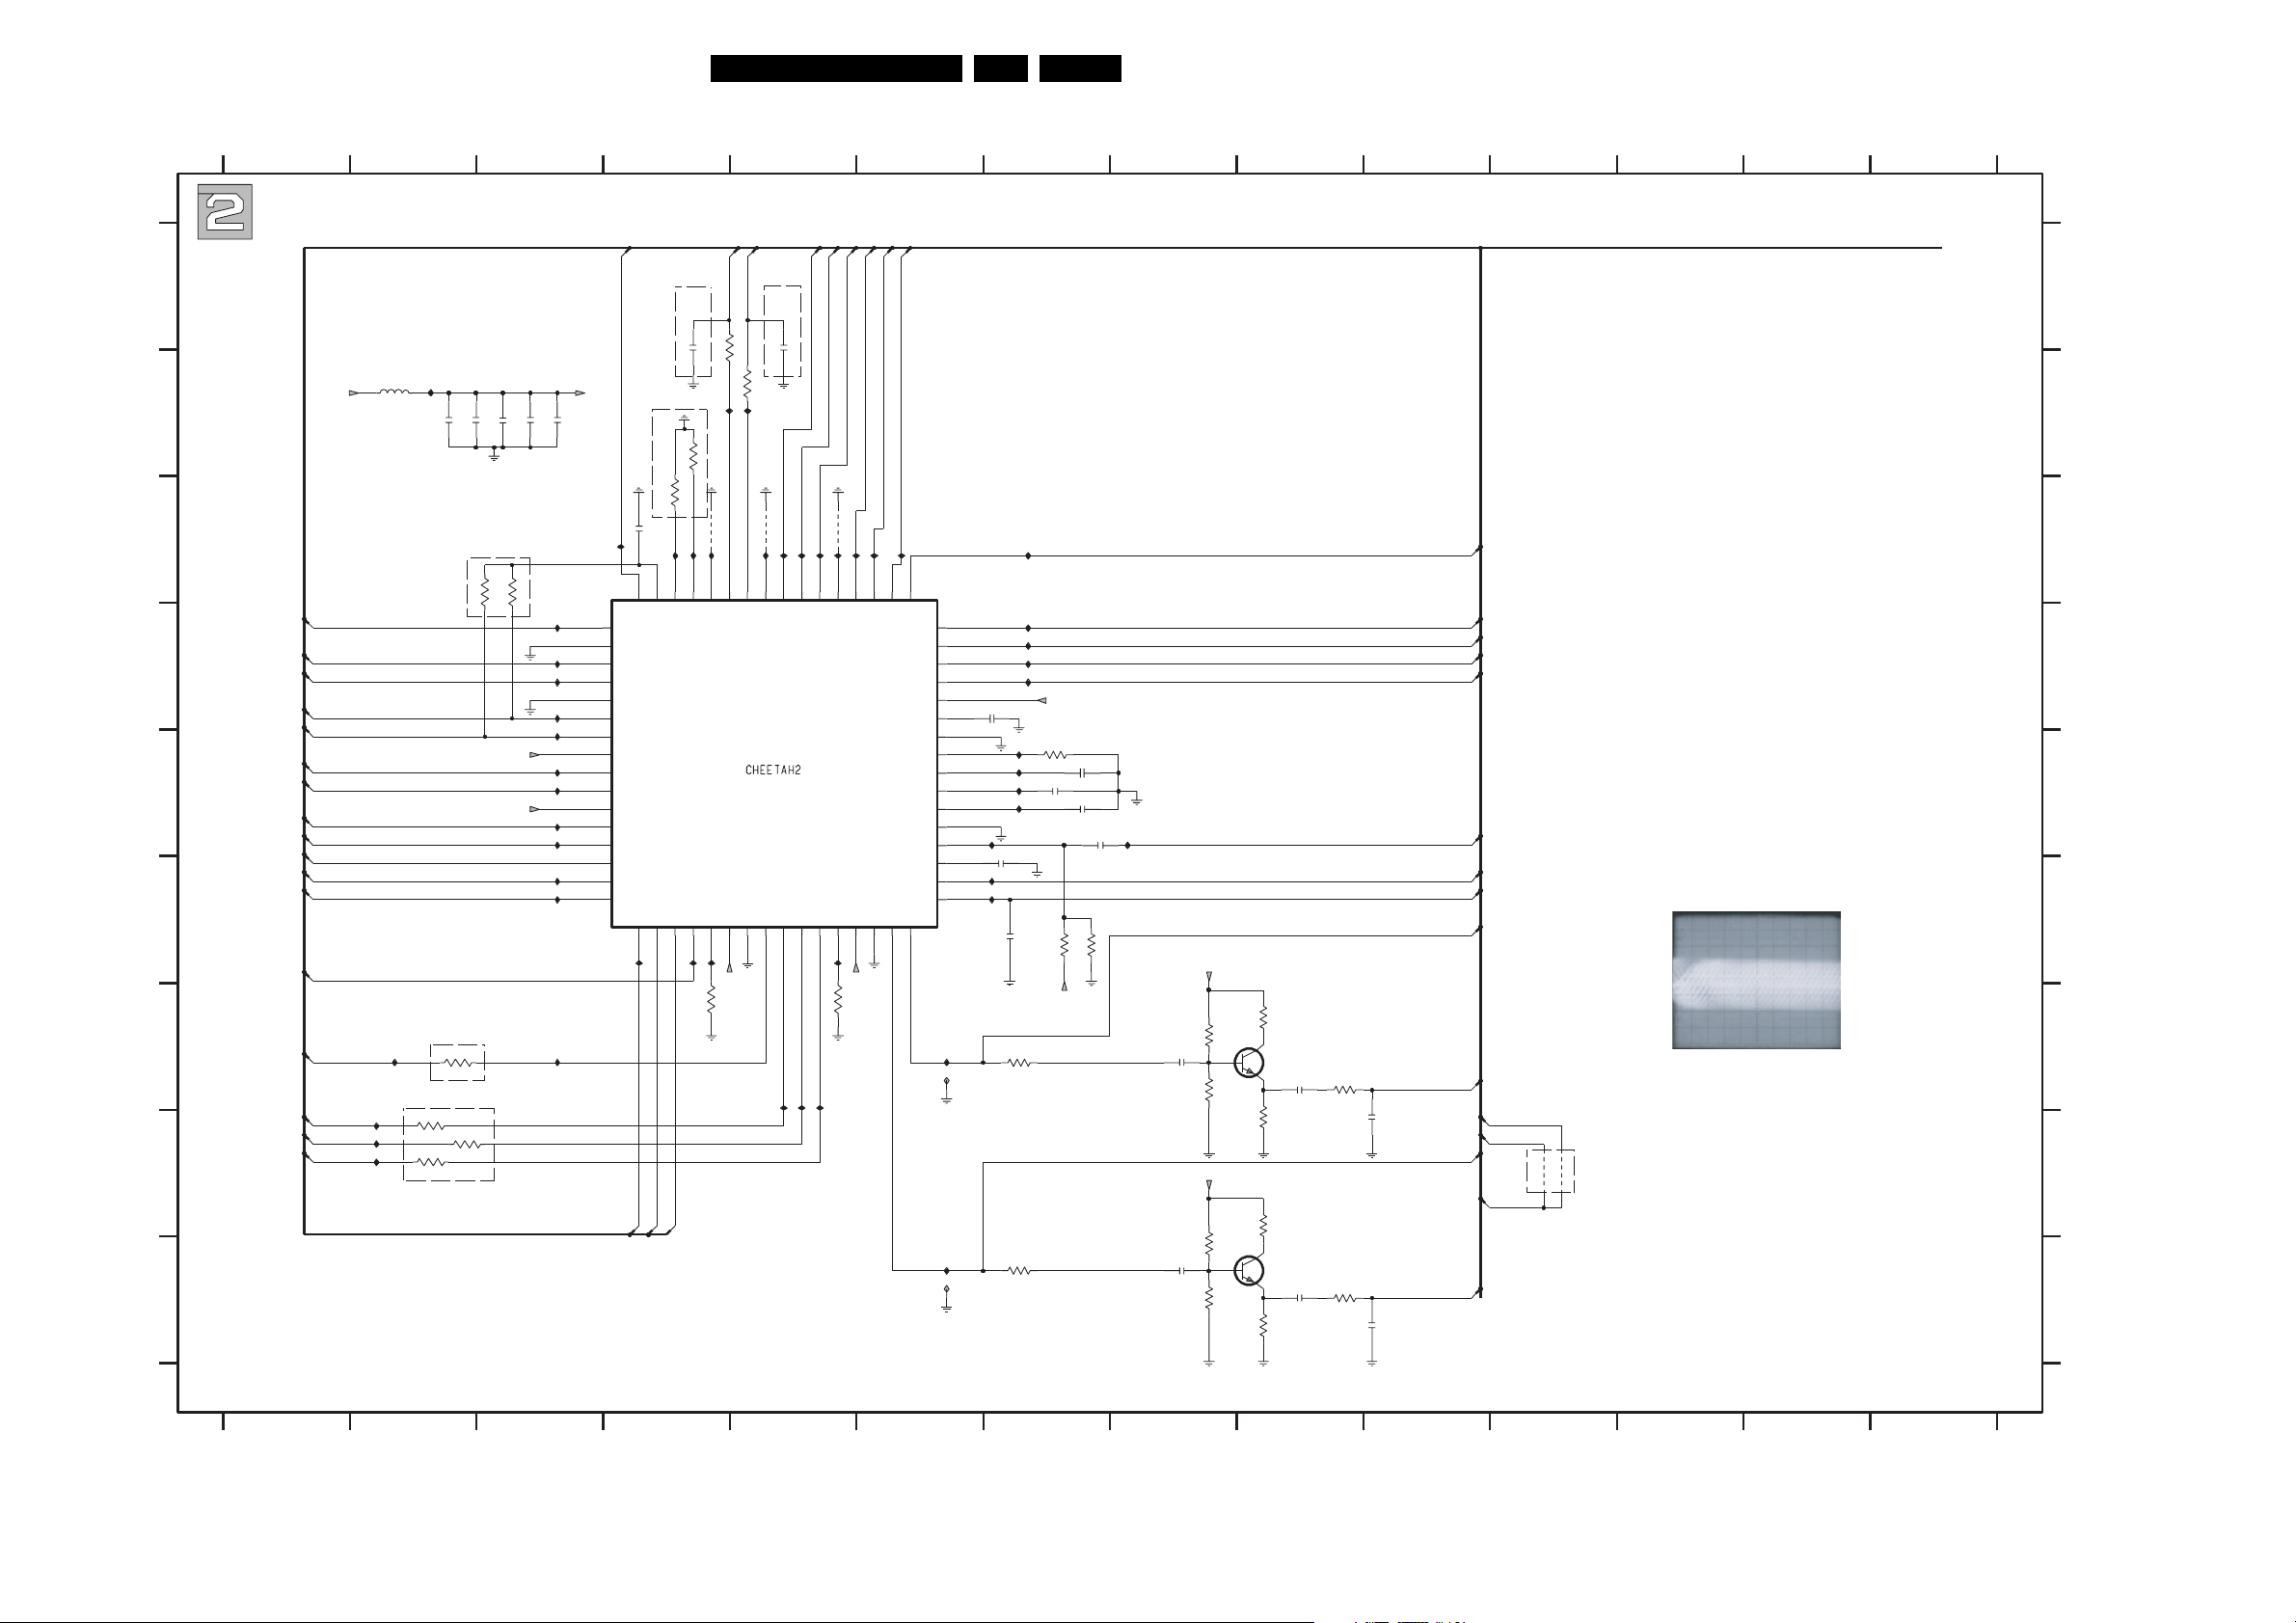
Servo Board: Cheetah
1
5VA
VIH
VIC
VIB
RFN
RFP
VID
VIA
VIE
VIG
RW-Del
SDA
SCL
TIMOUT
G
EFM-CLKN
EFM-CLKP
EFM-DATAN
EFM-DATAP
12
Electrical Diagrams and Print-Layouts
6
EN 16VAD 8041 7.
78910
11 13 14
122345
{TIMOUT,RFP,RFN,VIA,VIB,VIC,VID,VIE,VIF,VIG,VIH,EFM-CLKP,EFM-CLKN,EFM-DATAP,EFM-DATAN,LASP,PPNO,RFP3,RFN3,RFREF,CALF,A1,A2,S2-XDN,D1_TILTN,D2_TLN,D3_REN,D4_FEN,S1_MIRN,MON1,MON2,SIDA,SICL,SILD,SDA,SCL,ALFA,FTC,RW-Del,EFM_RWN,RFP5,RFN5}
A1
A2
CALF
D2_TLN
D3_REN
D1_TILTN
6n8
2205
I208
56
SROUT
REF_ECN
25
I252
55
A1
RS_ECP
26
I207
I251
I206
54
A2
TH1_EDN
27
I250
4202
I205
53
CALF
TH2_EDP
28
I232
3208
I204
52
IDDQTST
SERTST
29
+5Vd
10K
D1
VDD2
I203
51 50
D2_TLN
GND2
30
31
I202
49
D3_REN
S1_MIRN
RFP
32
D4_FEN
S2_XDN
MON2
MON1
VDD1C
CMPP
GND1D
RREF
CCALF
GND1C
CFTC
RFREF
RFN
48
47
46
45
44
43
42
2.2V
41
1.1V
40
2.2
39
CA2
2.2V
38
CA1
37
36
FTC
35
34
PPN
33
I257
I258
2228
10n
I247
I238
I241
2217
2223
I216
I217
I219
I221
I222
+5Vd
3206
I228
I234
1%
47K
2214
10n
27n
2215
10n
2213
2218
I264
I237
I239
10n
47n
100n
3217
33K
3213
18K
+5Vd
+5Vd
22K
3220
3218
100R
2229
560p
3222
39K
+5Vd
22K
3225
I259
I260
56 8
3219
100R
7
2232
560p
3227
39K
TO OPU/EPLD-LADIC-CON/LACONIC_IC/CENTAURUS
D4_FEN
S1_MIRN
S2-XDN
MON2
MON1
FTC
PPNO
3221
3223
3226
3228
22R
7202
BFS20
820R
22R
7203
BFS20
820R
2230
6n8
2233
6n8
3224
100R
3229
100R
2231
2234
RFREF
RFN3
RFN5
RFP3
RFP5
EFM_RWN
TIMOUT
RW-Del
4201
4200
OPTIONB
8p2
8p2
RFN3 / RFP3, IC7201 Pin 38/39
A:AC, 50mV/Div
NOTE:
OPTIONA: DENOTES COMPONENT(S) WILL BE MOUNTED BEFORE MASS PRODUCTION
OPTIONB: DENOTES COMPONENT(S) WILL BE MOUNTED WHEN NEEDED
9101112
50ns/Div
5202
I254
I261
I262
I263
I201
100n
2209
2210
CLOSE TO IC7500
3209
1K8
CLOSE TO IC7500
3210
3211
1K8
3212
1K8
1K8
VIF
100n
OPTIONB
3215
2211
75R
3216
+5Vd
+5Vd
100n
2212
75R
100n
I215
I218
I220
I224
I226
I227
I229
I231
I233
I249
I248
2219
+5Vd
100n
OPTIONB
100n
2221
I212
7201
64
63
VIF
VIH
GND1A
VIC
VIB
GND1B
RFNIN
RFPIN
VDD1A
VID
VIA
VDD1B
VIE
VIG
RWOUT
SDA
SCL
VREF
SIDA
SILD
18
17
1
2
3
4
5
6
7
8
9
10
11
12
13
14
15
16
I244
I240
SILD
SIDA
34
ALFA
LASP
OPTIONB OPTIONB
3n3
3201
2204
100R
3200
100R
I242
I243
10K
3202
10K
3204
4203
4204
I223
I214
62 57
60
61
RRF
WRF
I209
TEST
I225
59
58
ALFA
LASP
TZA1047
VSSD
TIMOUT
R_W
SICL
VDDD
23
20
22
21
19
I253
SICL
I235
3207
24
+5Vd
10K
13
TR 22007_001
14
300604
2204 A4
2205 A5
2209 B2
2210 B2
2211 B3
2212 B3
2213 E7
2214 E7
2215 E7
2217 E7
2218 E7
2219 B3
2221 C4
A
2223 F7
2228 D7
2229 G8
2230 G9
2231 H10
2232 I8
2233 I9
2234 I10
3200 B5
3201 A4
3202 B4
3204 C4
B
3206 E7
3207 G4
3208 G5
3209 G2
3210 H2
3211 H2
3212 H2
3213 F7
3215 C3
3216 C3
3217 F7
C
3218 G7
3219 I7
3220 G8
3221 G9
3222 G8
3223 H9
3224 G9
3225 I8
3226 H9
3227 I8
3228 I9
3229 I9
D
4200 H11
4201 H11
4202 C5
4203 C4
4204 C5
5202 B2
7201 C4
7202 G9
7203 I9
I201 B2
I202 C6
I203 C6
E
I204 C5
I205 C5
I206 C5
I207 C5
I208 C5
I209 C4
I212 C4
I214 C4
I215 D3
I216 C7
I217 D7
F
I218 D3
I219 D7
I220 D3
I221 D7
I222 D7
I223 C4
I224 D3
I225 C5
I226 D3
I227 E3
I228 E7
I229 E3
G
I231 E3
I232 F5
I233 E3
I234 E7
I235 F4
I237 E7
I238 F7
I239 E7
I240 G3
I241 F7
I242 B5
I243 B4
H
I244 F4
I247 E7
I248 F3
I249 F3
I250 G5
I251 G5
I252 G5
I253 F4
I254 G2
I257 G6
I258 G6
I
I259 I6
I260 I6
I261 H2
I262 H2
I263 H2
I264 E8
Page 17
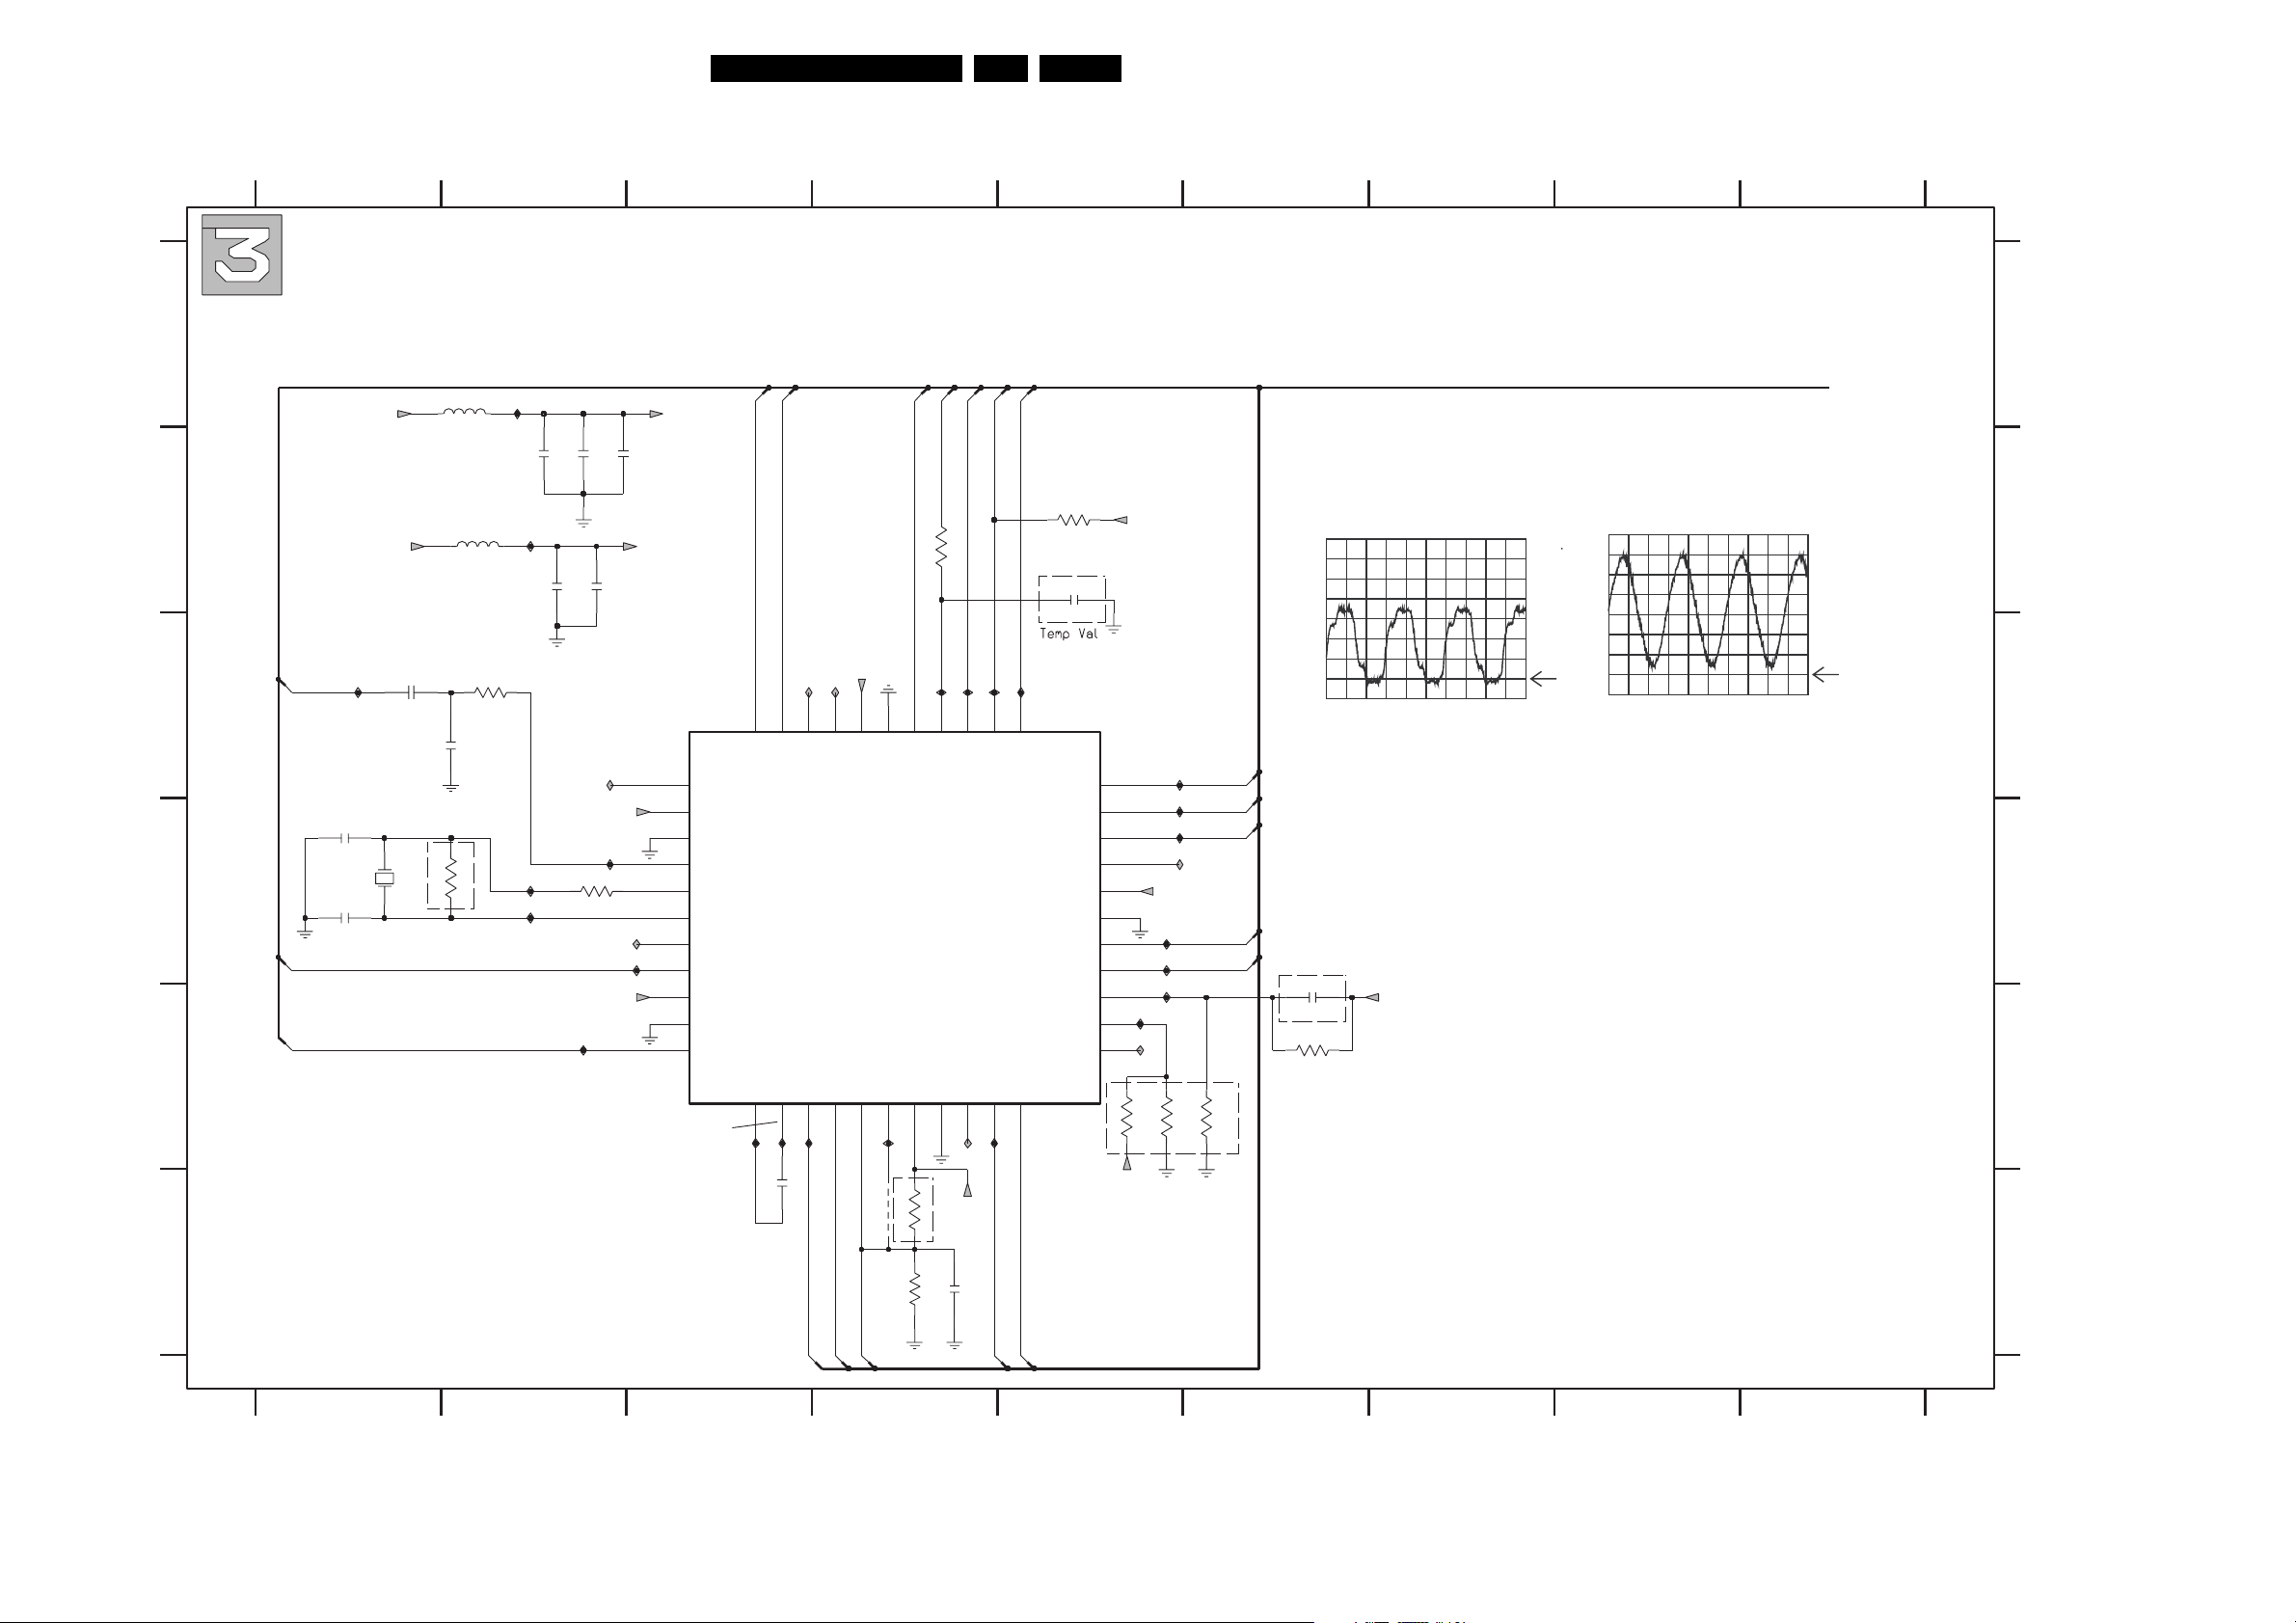
Electrical Diagrams and Print-Layouts
Servo Board: Laconic
EN 17VAD 8041 7.
A
B
C
D
E
123456789
TO OPU/EPLD/CENTAURUS
{WSB,RW-Del,OSC_IN,PORN,SCL,SDA,SCLK,SDIO,SEN,HIGH-GAIN,CD-MODE,ALFA,LASP,Vdel,Vthr,VREF,IOthr,CD-MODE,HIGH-GAIN,IRQN,OSTR,SDA,SCL,IoDel}
5300
5301
3303
150R
15p
1M
I303
I313
I308
OPTIONB
I310
2301
2306
100n
2302
100n
3315
33R
U1
100n
2307
3V3D
I320
3V3A
2300
100n
L308
L303
I311
100n
3V3AA3V3
3V3D
1
2
3
4
5
6
7
8
9
10
11
AEZ
Vddd3
Vssd3
ClckOut
Osco
Osci
Test1d
Ameas
Vdda1
Vssa1
LasP
1.2V
0V
SCL
44
SCL
VRefL
12
I316
SDA
43
SDA
VRefH
13
I317
2305
3V3D
L301
L307
42
41
Bank
Test2d
LACONIC
TZA1042HL
VDel
VThr
14
15
L305
22n
RW-Del
40
39
Vssd2
Vddd2
7300
Vopuref16Vrefin
17
I314
4303
3308
PORN
3302
I304
38
RWn
Vdda2
18
10K
OSTR
1R
I305
36
37
OSTR
Resetn
Vssa2
Test1a
19
20
L306
3V3A
OPTIONB
IRQN
I306
35
IRQn
IoDel
21
L310
WSB
L311
34
WSB
IoThr
22
3316
10K
OPTIONB
2308
100n
SCLK
SDIO
SEN
Busy
Vddd1
Vssd1
HiLo
DvdCd
EnR1
EnR2
Test2a
OPTIONB
3V3D
IC7300 Pin 4
A: DC, 1 V/Div, 20ns/Div
L309
L304
3304
10K
3V3D
3V3D
I302
I315
I318
3305
I300
I312
I301
I319
HIGH-GAIN
CD-MODEALFA
10K
3306
SCLK
SDIO
SEN
10K
OPTIONB
2309
100n
3301
10K
3V3D
33
32
31
30
29
28
27
26
25
24
23
IC7300 Pin 5
A: DC, 500mV/Div, 20ns/Div
OSC_IN
2303
LASP
I307
15p
2304
15p
D3V3
1302
2311
1n0
CX-16F
2312
3300
16M93
A
B
C
D
E
U1 E2
1302 D1
2300 B2
2301 B2
2302 B2
2303 D1
2304 D1
2305 F3
2306 B2
2307 B2
2308 B5
2309 E6
2310 F4
2311 C1
2312 C2
3300 D2
3301 E6
3302 B4
3303 C2
3304 E5
3305 E5
3306 E6
3308 F4
3309 F4
3315 D2
3316 B5
4303 F4
5300 A2
5301 B2
7300 D4
I300 C5
I301 D5
I302 D5
I303 A2
I304 C4
I305 C4
I306 C4
I307 C1
I308 D2
I310 D2
I311 D3
I312 C5
I313 B2
I314 E4
I315 D5
I316 E3
I317 E3
I318 D5
I319 D5
I320 D2
L301 C3
L303 D3
L304 E5
L305 E3
L306 E4
L307 C4
L308 C3
L309 E5
L310 E4
L311 C5
F
NOTE:
OPTIONA: DENOTES COMPONENT(S) WILL BE MOUNTED BEFORE MASS PRODUCTION
OPTIONB: DENOTES COMPONENT(S) WILL BE MOUNTED WHEN NEEDED
TR 22008_001
300604
Vdel
Vthr
VREF
3309
1K8
2310
100n
IoDel
IOthr
123456789
F
Page 18
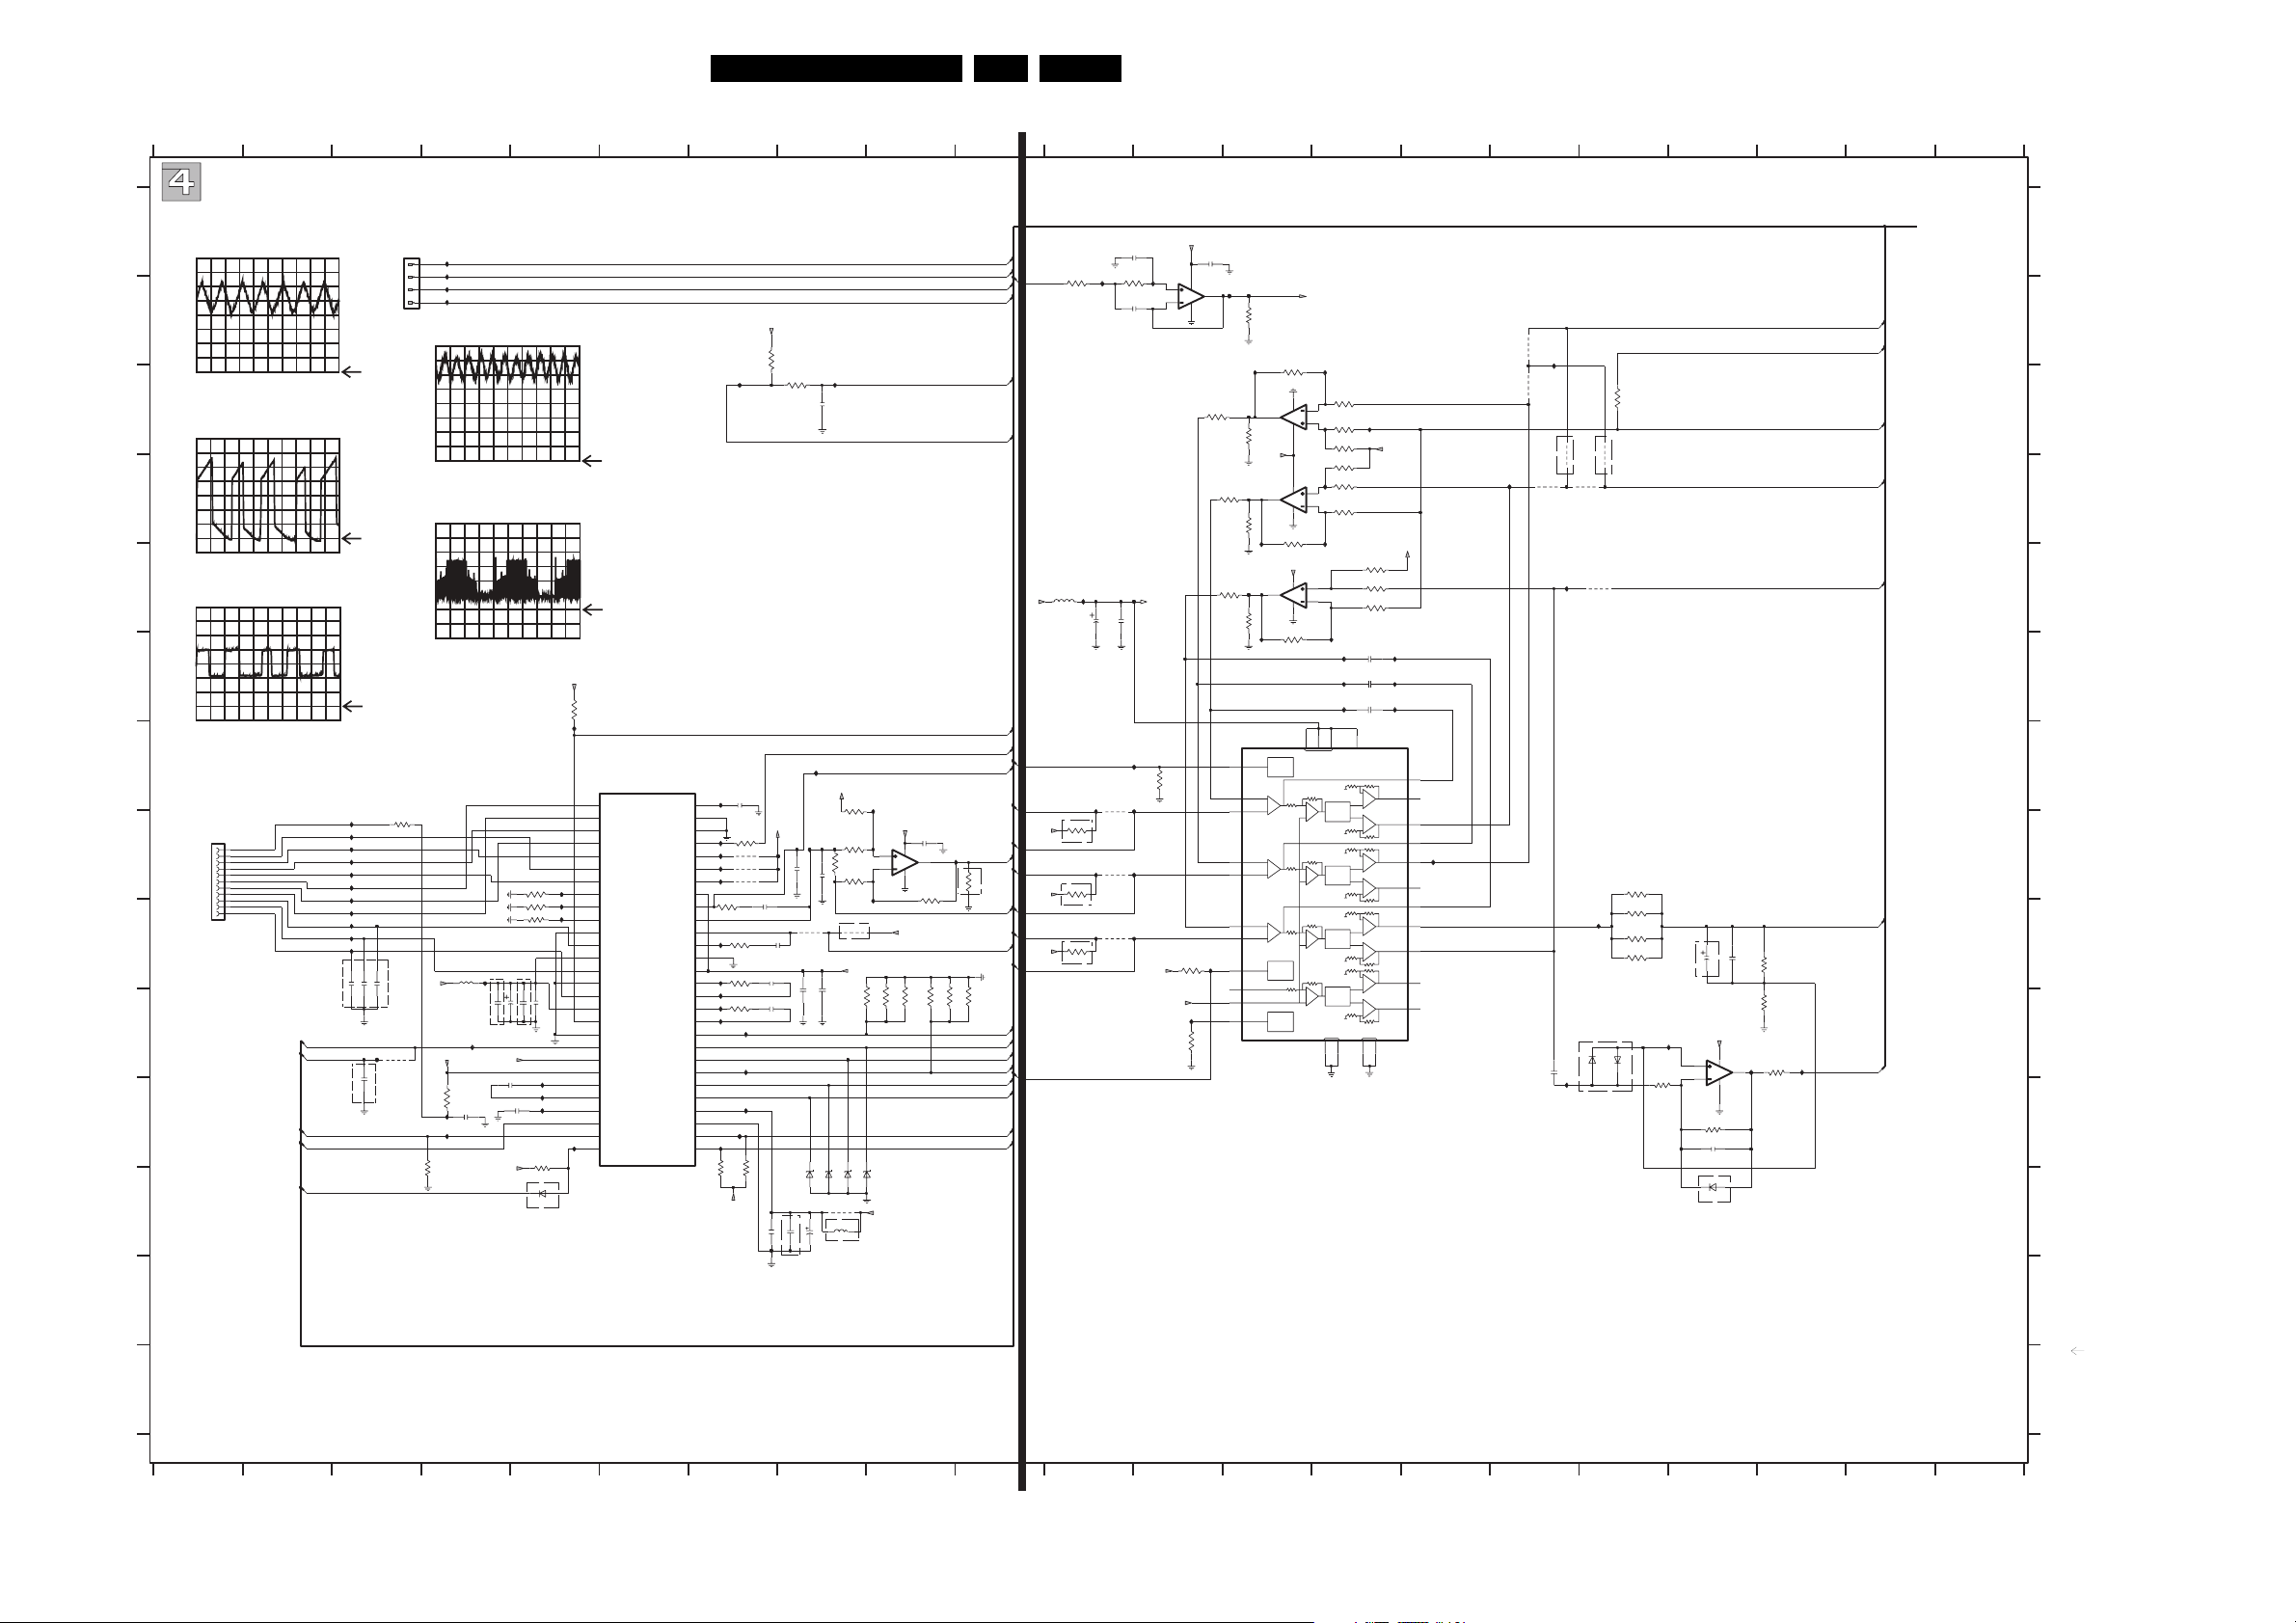
Electrical Diagrams and Print-Layouts
Servo Board: Drivers (Overview)
1
A: DC, 500mV/Div, 50ns/Div
A: DC, 2 V/Div, 2us/Div
A: DC, 5 V/Div, 2us/Div
1401
Top Contact
23 67 13
I417
SFW..R
1400
Top Contact
45
I400
4
I401
3
I402
2
I408
1
U, V, W
I430
A: DC, 200mV/Div, 5ms/Div
U,V,W coil
I432
A: DC, 5 V/Div, 1ms/Div
3425
I420
HALL+
I423
W-
11
10
9
8
7
6
5
4
3
2
1
W+
V+
HALL-
U+
V-
U-
UCOIL
VCOIL
WCOIL
VMOTO1O
MOTO1
MOTOR-ON
DRIVER-ON
TEMP_WARNING
150R
I425
I427
I428
I429
I431
I433
I435
I436
I437
2n2
2n2
2420
2418
I484
4u7
2444
2419
OPTIONB
BIAS_VH
3421
3420
3422
5400
2n2
OPTIONB
4402
I438
+12V
10u
22u
22u
100u
2442
2443
2416
OPTIONB
I409
+5V
1R
3418
I422
I416
10K
3465
OPTIONB
S1V65
2414
10n
2415
2412
22n
100n
+5V
OPTIONB
2345
I430
I432
I434
3411
47K
6429
BAS16
EN 18VAD 8041 7.
I434 K5
8 9 10 11 12
14 15
16 17
{AUXPW,SERVO-COMM,SERVO-MEAS,TR+,TR-,FO+,FO-,SL,RA,DRIVER-ON,FOC-,FOC+,RAD,TRAY-SW,TRAY-INOUT,VFOO-,VFOO+,VRAOO,SL-,SL+,STEP-SIN,STEP-COS,OUTSLD1+,OUTSLD1-,OUTSLD2+,OUTSLD2-,TOSTOCEN,TRAYSW,MOTOR-ON,T1,VMOTO1O,MOTO1,RAD_MUTE,ACT_EMF,TEMP_WARNING}
+5V
OUTSLD1+
OUTSLD1-
OUTSLD2+
OUTSLD2-
D3V3
10K
3403
I407
I406
3406
1K
2407
100n
TRAY-SW
TRAYSW
TOSTOCEN
3405
10K
2421
4n7
I403
3404
10K
2406
82n
Par t 1
I452
5405
+12V
10u
100n
2430
2431
D3V3
10K
3423
I424
7402
TW
sa56202
1
HU+
2
HU-
3
HV+
4
HV-
5
HW+
6
HW-
7
HBIAS
I418
8
47K
12K
20K
100n
2417
RREF
I419
9
REMF
I421
10
RLIM
11
GNDSPN1
12
U
13
VDDSPN1
14
V
15
GNDSPN2
16
W
17
VDDSPN2
18
FG
19
GNDDIG
20
INSPN
21
REF
22
VDDANA
23
CP1
24
CP2
18.3V
25
CAPY
26
CTL1
27
CTL2
I411
28
TEMP
OUTLD+
OUTLD-
OUTFCS+
OUTFCS-
GNDACT
VDDACT
OUTTRK+
OUTTRK-
OUTTLT+
OUTTLT-
CURSLD1
OUTSLD1+
OUTSLD1-
CURSLD2
OUTSLD2+
OUTSLD2-
VDDSLD
GNDANA
VDDLD
INSLD2
INSLD1
2411
I417
56
COSC
100p
55
IC2
54
IC1
3481
I473
53
INLD
I448
52
51
50
49
48
47
46
45
44
43
42
41
40
39
38
37
36
35
34
33
32
31
30
29
1.65V
1.65V
4420
I449
4421
I450
4423
3495
2400
10R
I440
3496
10R
I426
3497
2436
I410
10R
I439
3498
2409
I482
10R
I471
I469
I463
I498
I497
10K
3493
3494
S1V65
INFCS
INTRK
INTLT
67
I472
S1V65
I486
3480
S1V65
1R
10n
2405
10n
10n
10n
10K
100n
2432
OPTIONB
10K
+12Va
2441
3482
2440
100n
100n
2445
6401
PMEG2010EA
16V
22u
OPTIONB
3483
10K
1R
3484
10K
4417
OPTIONB
6402
PMEG2010EA
4408
5406
10u
I488
+12V
PMEG2010EA
1.2V
8
100n
3
1
2
1.64V
7403-1
LM358D
4
1.2V
3486
10K
+5V
1R5
1R5
1R5
3459
6403
PMEG2010EA
+12V
1R5
3472
3460
3475
I474
2438
100n
4416
10u
2413
6400
22u
2446
2433
89
I487
3476
TRAY-INOUT
1K
3488
OPTIONB
SERVO-COMM
1R5
1R5
3487
OUTSLD1+
OUTSLD1-
OUTSLD2+
OUTSLD2-
STEP-COS
STEP-SIN
AUXPW
T1
DRIVER-ON
TR+
FO-
3474
S1V65
OPTIONB
VFOO-
FO+
3477
S1V65
OPTIONB
VFOO+
TR-
RA
3478
S1V65
OPTIONB
VRAOO
SL+
SL-
RAD_MUTE
10
I455
I457
I459
4427
12K
I467
I465
4419
12K
I491
I470
4422
12K
11 12
I405
+12Va
2401
100n
1.65V
8
3
1.65V
I404
1
2
7401-1
LM358D
4
1.65V
10K
3473
3479
+5V
S1V65
I475
3492
I441
3446
12K
1%
1.65V
3455
3461
12K
1%
3456
3463
12K
3458
7409
BA5995FM
STBY120
3.3V
1.65V
OPIN3-
1.65V
OPIN3+24
1.65V
OPIN4-26
1.65V
27 OPIN4+
1.65V
OPIN1-3
1.65V
OPIN1+2
I485
MUTE6
10K
IN25
BIASIN1
STBY2
7
0V
10K
3485
1K0
7405-1
LM358D
1K0
+12Va
7405-2
LM358D
1K0
I458
7403-2
LM358D
1.65V
1K0
I468
1
7
1.65V
7
CH1/3/4
+
+
+
STBY
MUTE
STBY
S1V65
4400
I442
3440
12K
1%
3444
2.7V
4
2
39K
1%
3
I451
I444
3447
2.7V
8
39K
1%
3452
S1V65
1%
12K
3454
12K
1%
3457
I447
8
5
39K
1%
2.7V
6
3462
4
2.7V
39K
3464
12K
+12Va
8
4
3410
12K
CH1
CH2
1%
28
2439
120p
2434
120p
2435
120p
PREVCC
29
S1V65
3445
1%
12K
3450
39K
1%
3453
39K
1%
I414
I478
I481
1.7V
OPOUT3 22
-
18
VO3-23
+
+
-
+
+
-
+
+
-
+
+
-
MTGND
30
OPOUT4 25
VO4- 1 6
VO4+ 15
OPOUT1 4
VO1- 1 3
VO1+ 14
VO2- 1 1
VO2+ 12
6.3V
17VO3+
1.7V
I464
5.8V
1.6V
6V
6V
1%
I461
5
2.6V
6
2.6V
I460
1%
I413
I477
I480
9
10
19
VCC
-
LEVEL
+
SHIFT
-
LEVEL
+
SHIFT
-
LEVEL
+
SHIFT
-
LEVEL
+
SHIFT
21
8
I443
4403
OPTIONB
I446
4406
2426
4413
220R
4410
4411
OPTIONB
4407
I476
4404
3489
27R
3491
I456
27R
3471
27R
3490
27R
6426
6427
1u0
1N4148WS
OPTIONB
1N4148WS
I495
Par t 2
NOTE:
OPTIONA: DENOTES COMPONENT(S) WILL BE MOUNTED BEFORE MASS PRODUCTION
OPTIONB: DENOTES COMPONENT(S) WILL BE MOUNTED WHEN NEEDED
13 14
15 16 171 19 20 21
OPTIONB
I496
1V
1V
3426
5K6
I494
18 19
OPU /CENTAURUS/POWER-CONN-AUDIO/DEBUG CONN
1206
V
16
1u0
2448
2447
3429
100u
3430
+5V
8
5
I493
7
6
1V
4
7401-2
LM358D
3427
180K
2427
2n7
6428
BAS16
OPTIONB
18
20 21
TO CENTAURUS/DEBUG-AND-FLASH
FOC+
SERVO-COMM
SERVO-MEAS
FOC-
RAD
SERVO-COMM
180K
39K
I492
3428
5K6
ACT_EMF
TR 22009_001
300604
100903
1400 A3
1401 H1
I435 I3
2400 I7
I436 I3
I437 I3
2401 A12
I438 I4
2405 I7
I439 J7
2406 B12
I440 I7
2407 C8
I441 B13
2409 J7
I442 B14
2411 G7
I443 B16
2412 K4
I444 C14
2413 J8
I446 D16
2414 J5
A
B
C
D
E
F
G
H
I
J
K
L
M
N
2415 K5
2416 J4
2417 J5
2418 J3
2419 J3
2420 J3
2421 A12
2426 J16
2427 K18
2430 E11
2431 E11
2432 L7
2433 L8
2434 F14
2435 F14
2436 I7
2438 H8
2439 F14
2440 H8
2441 H9
2442 J5
2443 J4
2444 K3
2445 J8
2446 L8
2447 I18
2448 I18
3403 B7
3404 B12
3405 B11
3406 C8
3410 F13
3411 K5
3418 K4
3420 I5
3421 H5
3422 I5
3423 F5
3425 H3
3426 K17
3427 K18
3428 J19
3429 I19
3430 J19
3440 C13
3444 C14
3445 E14
3446 C12
3447 C14
3450 E14
3452 C14
3453 E14
3454 D14
3455 C13
3456 D13
3457 D14
3458 E13
3459 J8
3460 J9
3461 D13
3462 D14
3463 E13
3464 D13
3465 L4
3471 I17
3472 J9
3473 G12
3474 H11
3475 J9
3476 J9
3477 H11
3478 I11
3479 I12
3480 G8
3481 H7
3482 H8
3483 H8
3484 H8
3485 J12
3486 H9
3487 J10
3488 H10
3489 H17
3490 I17
3491 I17
3492 B13
3493 L7
3494 L7
3495 I7
3496 I7
3497 I7
3498 J7
4400 B16
4402 J3
4403 C16
4404 E17
4406 D16
4407 D17
4408 L8
4410 D16
4411 D17
4413 C17
4416 I8
4417 I8
4419 H11
4420 H7
4421 H7
4422 I11
4423 H7
4427 G11
5400 I4
5405 E11
5406 L8
6400 L8
6401 L8
6402 L8
6403 L8
6426 J17
6427 J17
6428 L18
6429 L5
7401-1 B12
7401-2 K18
7402 G6
7403-1 H9
7403-2 E13
7405-1 C13
7405-2 D13
7409 G13
I400 A4
I401 A4
I402 B4
I403 A11
I404 B13
I405 B12
I406 C8
I407 C7
I408 B4
I409 J4
I410 I7
I411 K5
I413 F14
I414 F14
I416 K4
I417 G7
I418 H5
I419 I5
I420 H3
I421 I5
I422 K4
I423 H3
I424 G5
I425 H3
I426 I7
I427 H3
I428 H3
I429 H3
I430 K5
I431 H3
I432 K5
I433 I3
I447 D14
I448 H7
I449 H7
I450 H7
I451 C14
I452 E11
I455 G12
I456 I17
I457 G11
I458 E13
I459 G12
I460 F14
I461 E14
I463 K7
I464 H15
I465 H11
I467 H12
I468 F13
I469 J7
I470 I12
I471 J7
I472 G8
I473 H7
I474 H8
I475 J12
I476 E16
I477 F14
I478 F14
I480 F14
I481 F14
I482 J7
I484 J3
I485 I12
I486 G9
I487 H10
I488 H8
I491 I11
I492 J19
I493 J18
I494 K18
I495 K16
I496 J17
I497 K7
I498 K7
Page 19
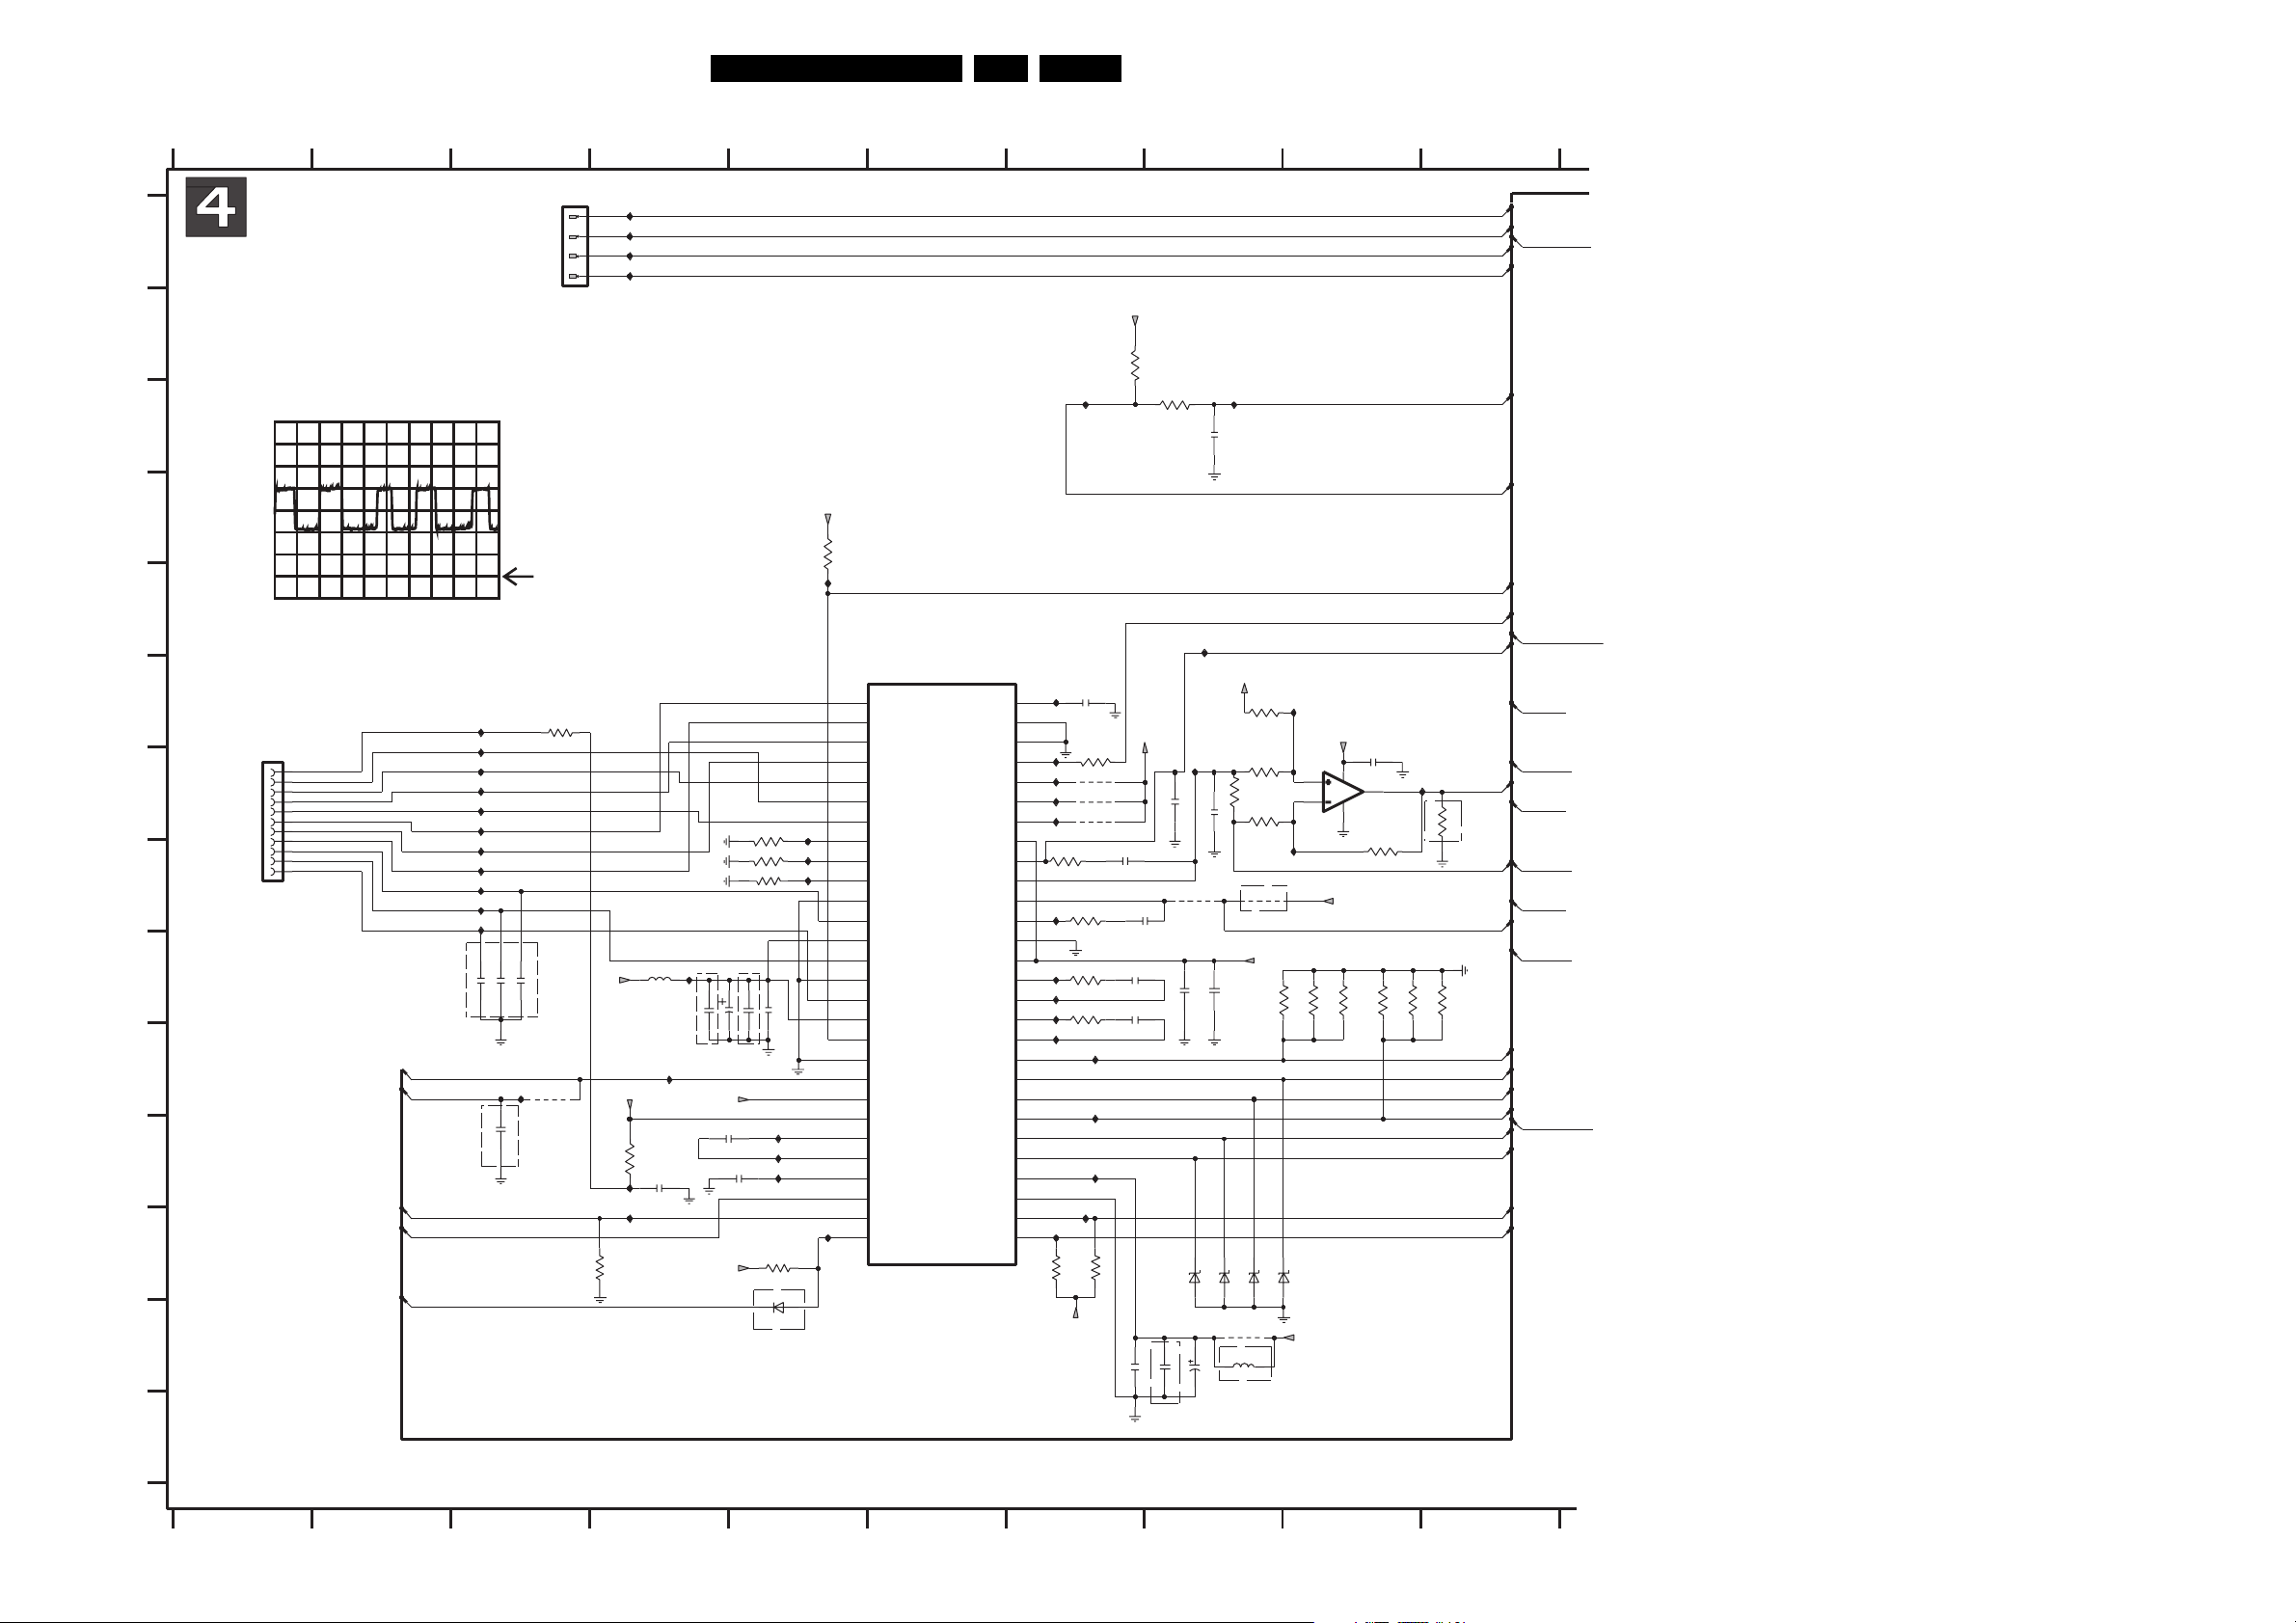
Electrical Diagrams and Print-Layouts
Servo Board: Drivers (Left page)
23 67
A
B
I432
C
SFW..R
1400
Top Contact
45
I400
4
I401
3
I402
2
I408
1
Part 1
EN 19VAD 8041 7.
89101
OUTSLD1+
I407
D3V3
3403
10K
3406
1K
2407
I406
100n
OUTSLD1-
OUTSLD2+
OUTSLD2-
TRAY-SW
TOSTOCEN
3476
I487
1R5
TRAYSW
TRAY-INOUT
TR+
AUXP W
1K
3488
OPTIONB
TR-
SERVO-COMM
1R5
3487
SL+
OUTSLD1+
OUTSLD1-
SL-
OUTSLD2+
OUTSLD2-
STEP-COS
STEP-SIN
T1
DRIVER-ON
FO-
VFOO-
FO+
VFOO+
RA
VRAOO
RAD_MUTE
D
D3V3
3423
10K
I424
E
F
G
H
Top Contact
I
J
K
L
M
A: DC, 5 V/Div, 2us/Div
1401
11
10
9
8
7
6
5
4
3
2
1
I420
HALL+
I423
W-
I425
W+
I427
V+
I428
HALL-
I429
U+
I431
V-
I433
U-
I435
UCOIL
I436
VCOIL
I437
WCOIL
VMOTO1O
MOTO1
MOTOR-ON
DRIVER-ON
TEMP_WARNING
2418
2n2
2444
2420
2n2
I484
4u7
2n2
2419
OPTIONB
3425
150R
OPTIONB
4402
BIAS_VH
+12V
I422
I416
3465
10K
+5V
3418
1R
5400
10u
I409
2412
100n
I438
22u
2443
OPTIONB
S1V65
2414
10n
+5V
3421
3420
3422
100u
2416
OPTIONB
2415
22n
2442
22u
I430
I432
I434
3411
47K
6429
BAS16
OPTIONB
47K
12K
20K
100n
2417
I418
I419
I421
18.3V
I411
7402
sa56202
1
HU+
2
HU-
3
HV+
4
HV-
5
HW+
6
HW-
7
HBIAS
8
RREF
9
REMF
10
RLIM
11
GNDSPN1
12
U
13
VDDSPN1
14
V
15
GNDSPN2
16
W
17
VDDSPN2
18
FG
19
GNDDIG
20
INSPN
21
REF
22
VDDANA
23
CP1
24
CP2
25
CAPY
26
CTL1
27
CTL2
28
TEMP
TW
COSC
INFCS
INTRK
INTLT
VDDLD
OUTLD+
OUTLD-
OUTFCS+
OUTFCS-
GNDACT
VDDACT
OUTTRK+
OUTTRK-
OUTTLT+
OUTTLT-
CURSLD1
OUTSLD1+
OUTSLD1-
CURSLD2
OUTSLD2+
OUTSLD2-
VDDSLD
GNDANA
INSLD2
INSLD1
INLD
I472
S1V65
2411
I417
56
100p
55
IC2
54
IC1
I473
53
I448
52
I449
51
I450
50
49
3495
48
10R
47
46
I440
3496
45
44
43
I426
3497
42
I410
41
I439
3498
40
I482
39
38
37
36
35
34
33
32
31
1.65V
30
I497
29
1.65V
10K
3493
3481
4420
4421
4423
10R
10R
10R
I471
I469
I463
I498
S1V65
2400
3494
1R
2436
2409
10K
10n
2405
S1V65
10n
10n
2432
10n
100n
2438
22u
2433
OPTIONB
4416
2413
I474
100n
6400
2446
2440
10u
2445
6401
PMEG2010EA
16V
22u
1R
3482
100n
OPTIONB
100n
6402
PMEG2010EA
4408
5406
10u
OPTIONB
3480
10K
3483
10K
3484
10K
I488
4417
+12V
PMEG2010EA
I486
3459
6403
+12Va
1.2V
3
2
1.2V
1R5
1R5
3460
PMEG2010EA
+12V
+5V
3472
8
4
2441
100n
7403-1
LM358D
3486
10K
1R5
1
3475
1.64V
1R5
N
2345
67
TR 22009a_001
300604100903
89
101
Page 20
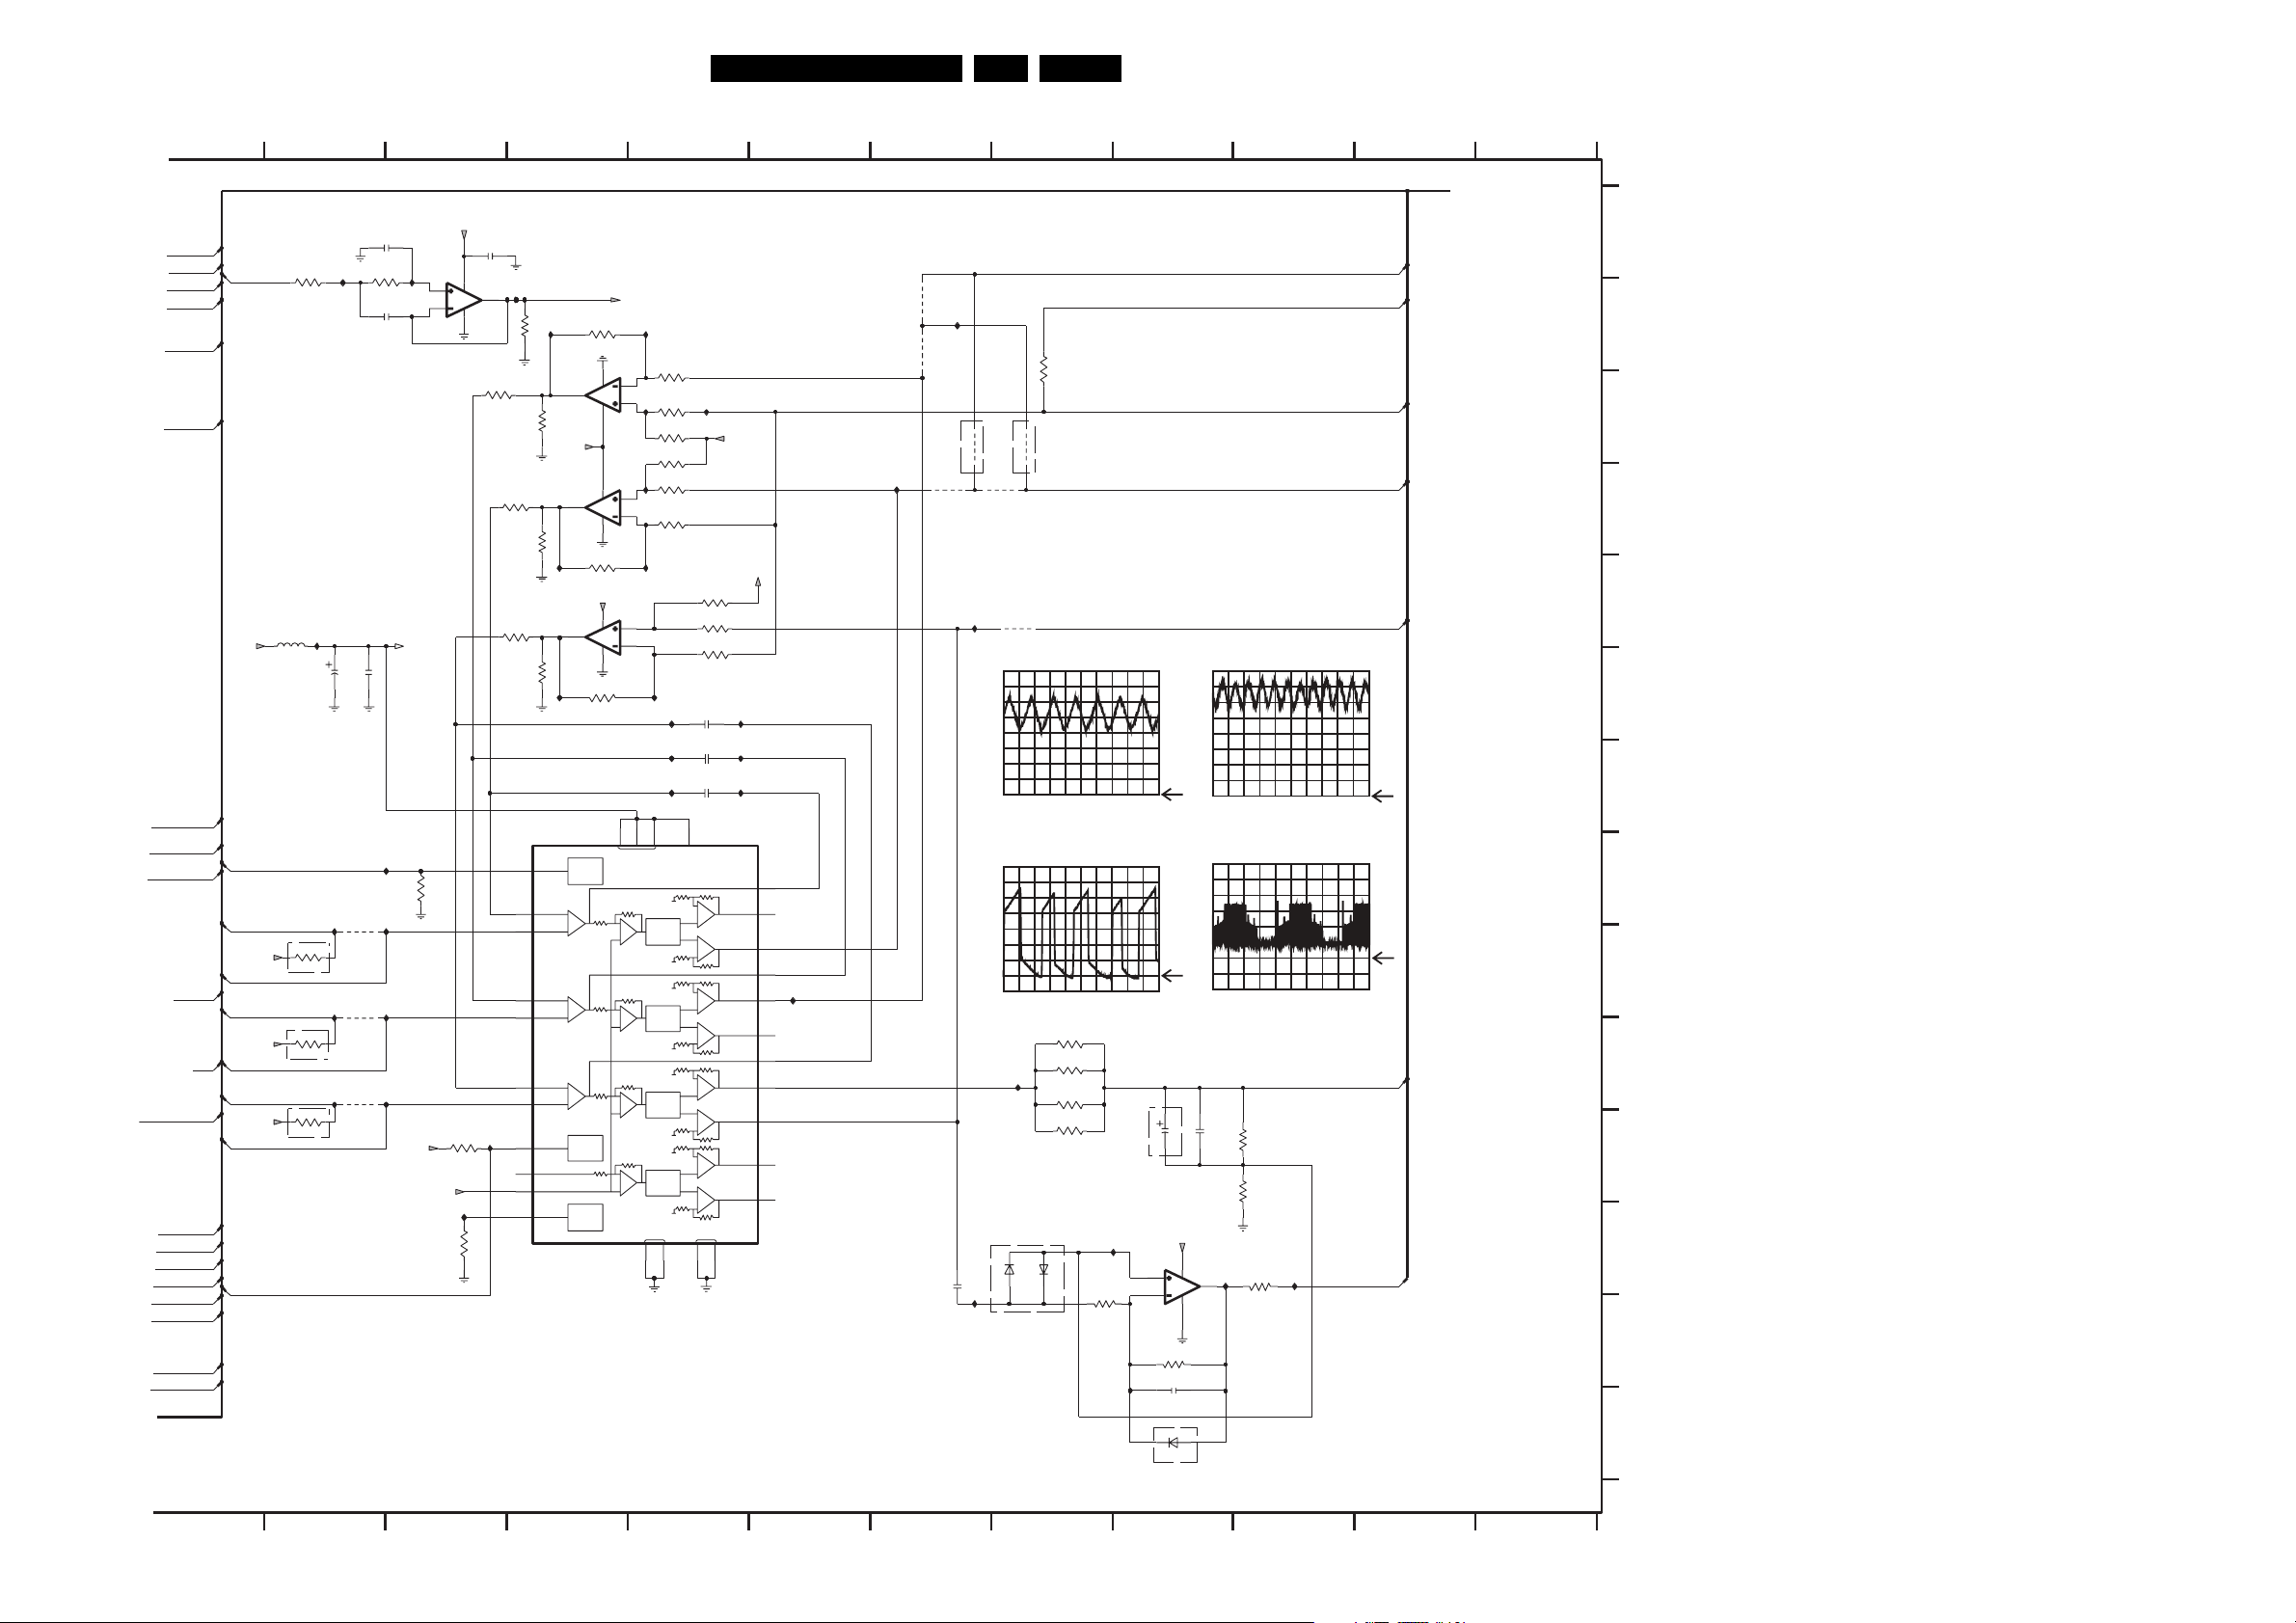
Electrical Diagrams and Print-Layouts
Servo Board: Drivers (Right page)
10 11 12
13
14 15
16 17
EN 20VAD 8041 7.
18 19
20 21
OUTSLD1+
OUTSLD1-
OUTSLD2+
OUTSLD2-
TRAY-SW
TRAYSW
TRAY-INOUT
TR+
AUXPW
SERVO-COMM
OUTSLD1+
OUTSLD1-
OUTSLD2+
OUTSLD2-
STEP-COS
STEP-SIN
SL+
TR-
SL-
T1
TOSTOCEN
+12V
DRIVER-ON
FO-
S1V65
VFOO-
FO+
S1V65
VFOO+
RA
S1V65
VRAOO
RAD_MUTE
5405
OPTIONB
3405
10K
3474
12K
OPTIONB
3477
12K
3478
12K
OPTIONB
I452
2431
I457
I465
I491
I403
TO CENTAURUS/DEBUG-AND-FLASH
OPU /CENTAURUS/POWER-CONN-AUDIO/DEBUG CONN
4413
220R
4411
OPTIONB
4407
Part 2
4404
I417
1206
V
16
1u0
2448
100u
+5V
8
I493
7
1V
4
3427
2427
2n7
A: DC, 200mV/Div, 5ms/Div
A: DC, 5 V/Div, 1ms/Div
3429
180K
39K
3430
3428
5K6
A: DC, 500mV/Div, 50ns/Div
A: DC, 2 V/Div, 2us/Div
3489
27R
3491
I456
27R
3471
27R
3490
27R
6426
6427
1N4148WS
1N4148WS
OPTIONB
I430
I496
2447
OPTIONB
1V
5
1V
6
3426
5K6
7401-2
LM358D
180K
I494
U, V, W
U,V,W coil
I492
FOC+
SERVO-COMM
SERVO-MEAS
FOC-
SERVO-COMM
ACT_EMF
A
B
C
D
E
RAD
F
G
H
I
J
K
L
M
I405
+12Va
+5V
1.65V
1.65V
3473
3
2
10K
S1V65
+5V
3479
10K
I475
3485
8
1.65V
7401-1
LM358D
4
10K
2401
100n
1.65V
1.65V
I485
3446
12K
1.65V
1.65V
1.65V
1.65V
1
0V
I404
3492
1%
3461
12K
1%
3463
12K
3.3V
27 OPIN4+
7
I441
1K0
7405-1
LM358D
1.65V
1K0
3455
+12Va
7405-2
LM358D
1K0
3456
I458
7403-2
LM358D
1K0
3458
I468
7409
BA5995FM
STBY120
OPIN3-
OPIN3+24
OPIN4-26
OPIN1-3
OPIN1+2
MUTE6
IN25
BIASIN1
STBY2
1
7
1.65V
7
1.65V
CH1/3/4
+
+
+
STBY
MUTE
CH1
STBY
CH2
3440
12K
4
8
8
4
3464
12K
+12Va
8
4
3410
12K
1%
1%
9
S1V65
1%
2.7V
2
3
2.7V
I447
5
6
2.7V
2.6V
2.6V
VCC
+
+
+
+
4400
4403
4406
I443
2426
4410
OPTIONB
I476
1u0
I495
I442
3444
1%
39K
LEVEL
LEVEL
LEVEL
LEVEL
21
I460
19
SHIFT
SHIFT
SHIFT
SHIFT
3447
39K
3452
12K
3454
12K
3457
39K
3462
39K
I413
I477
I480
8
1%
1%
1%
1%
1%
28
I451
S1V65
I446
S1V65
3445
1%
12K
3450
39K
1%
3453
39K
1%
I414
2439
120p
I478
2434
120p
I481
2435
120p
PREVCC
+
+
-
+
+
-
+
+
-
+
+
-
MTGND
29
30
1.7V
OPOUT3 22
18
VO3-23
6.3V
17VO3+
1.7V
OPOUT4 25
I464
VO4- 16
5.8V
VO4+ 15
1.6V
OPOUT1 4
6V
VO1- 13
6V
VO1+ 14
VO2- 11
VO2+ 12
NOTE:
OPTIONA: DENOTES COMPONENT(S) WILL BE MOUNTED BEFORE MASS PRODUCTION
OPTIONB: DENOTES COMPONENT(S) WILL BE MOUNTED WHEN NEEDED
I444
2.7V
I461
5
6
10
2421
4n7
3404
10K
2406
82n
10u
100n
2430
I455
I459
4427
I467
4419
I470
4422
10
11 12
13 14
6428
BAS16
OPTIONB
TR 22009b_001
15 16 17 19 20 21
18
N
300604
Page 21
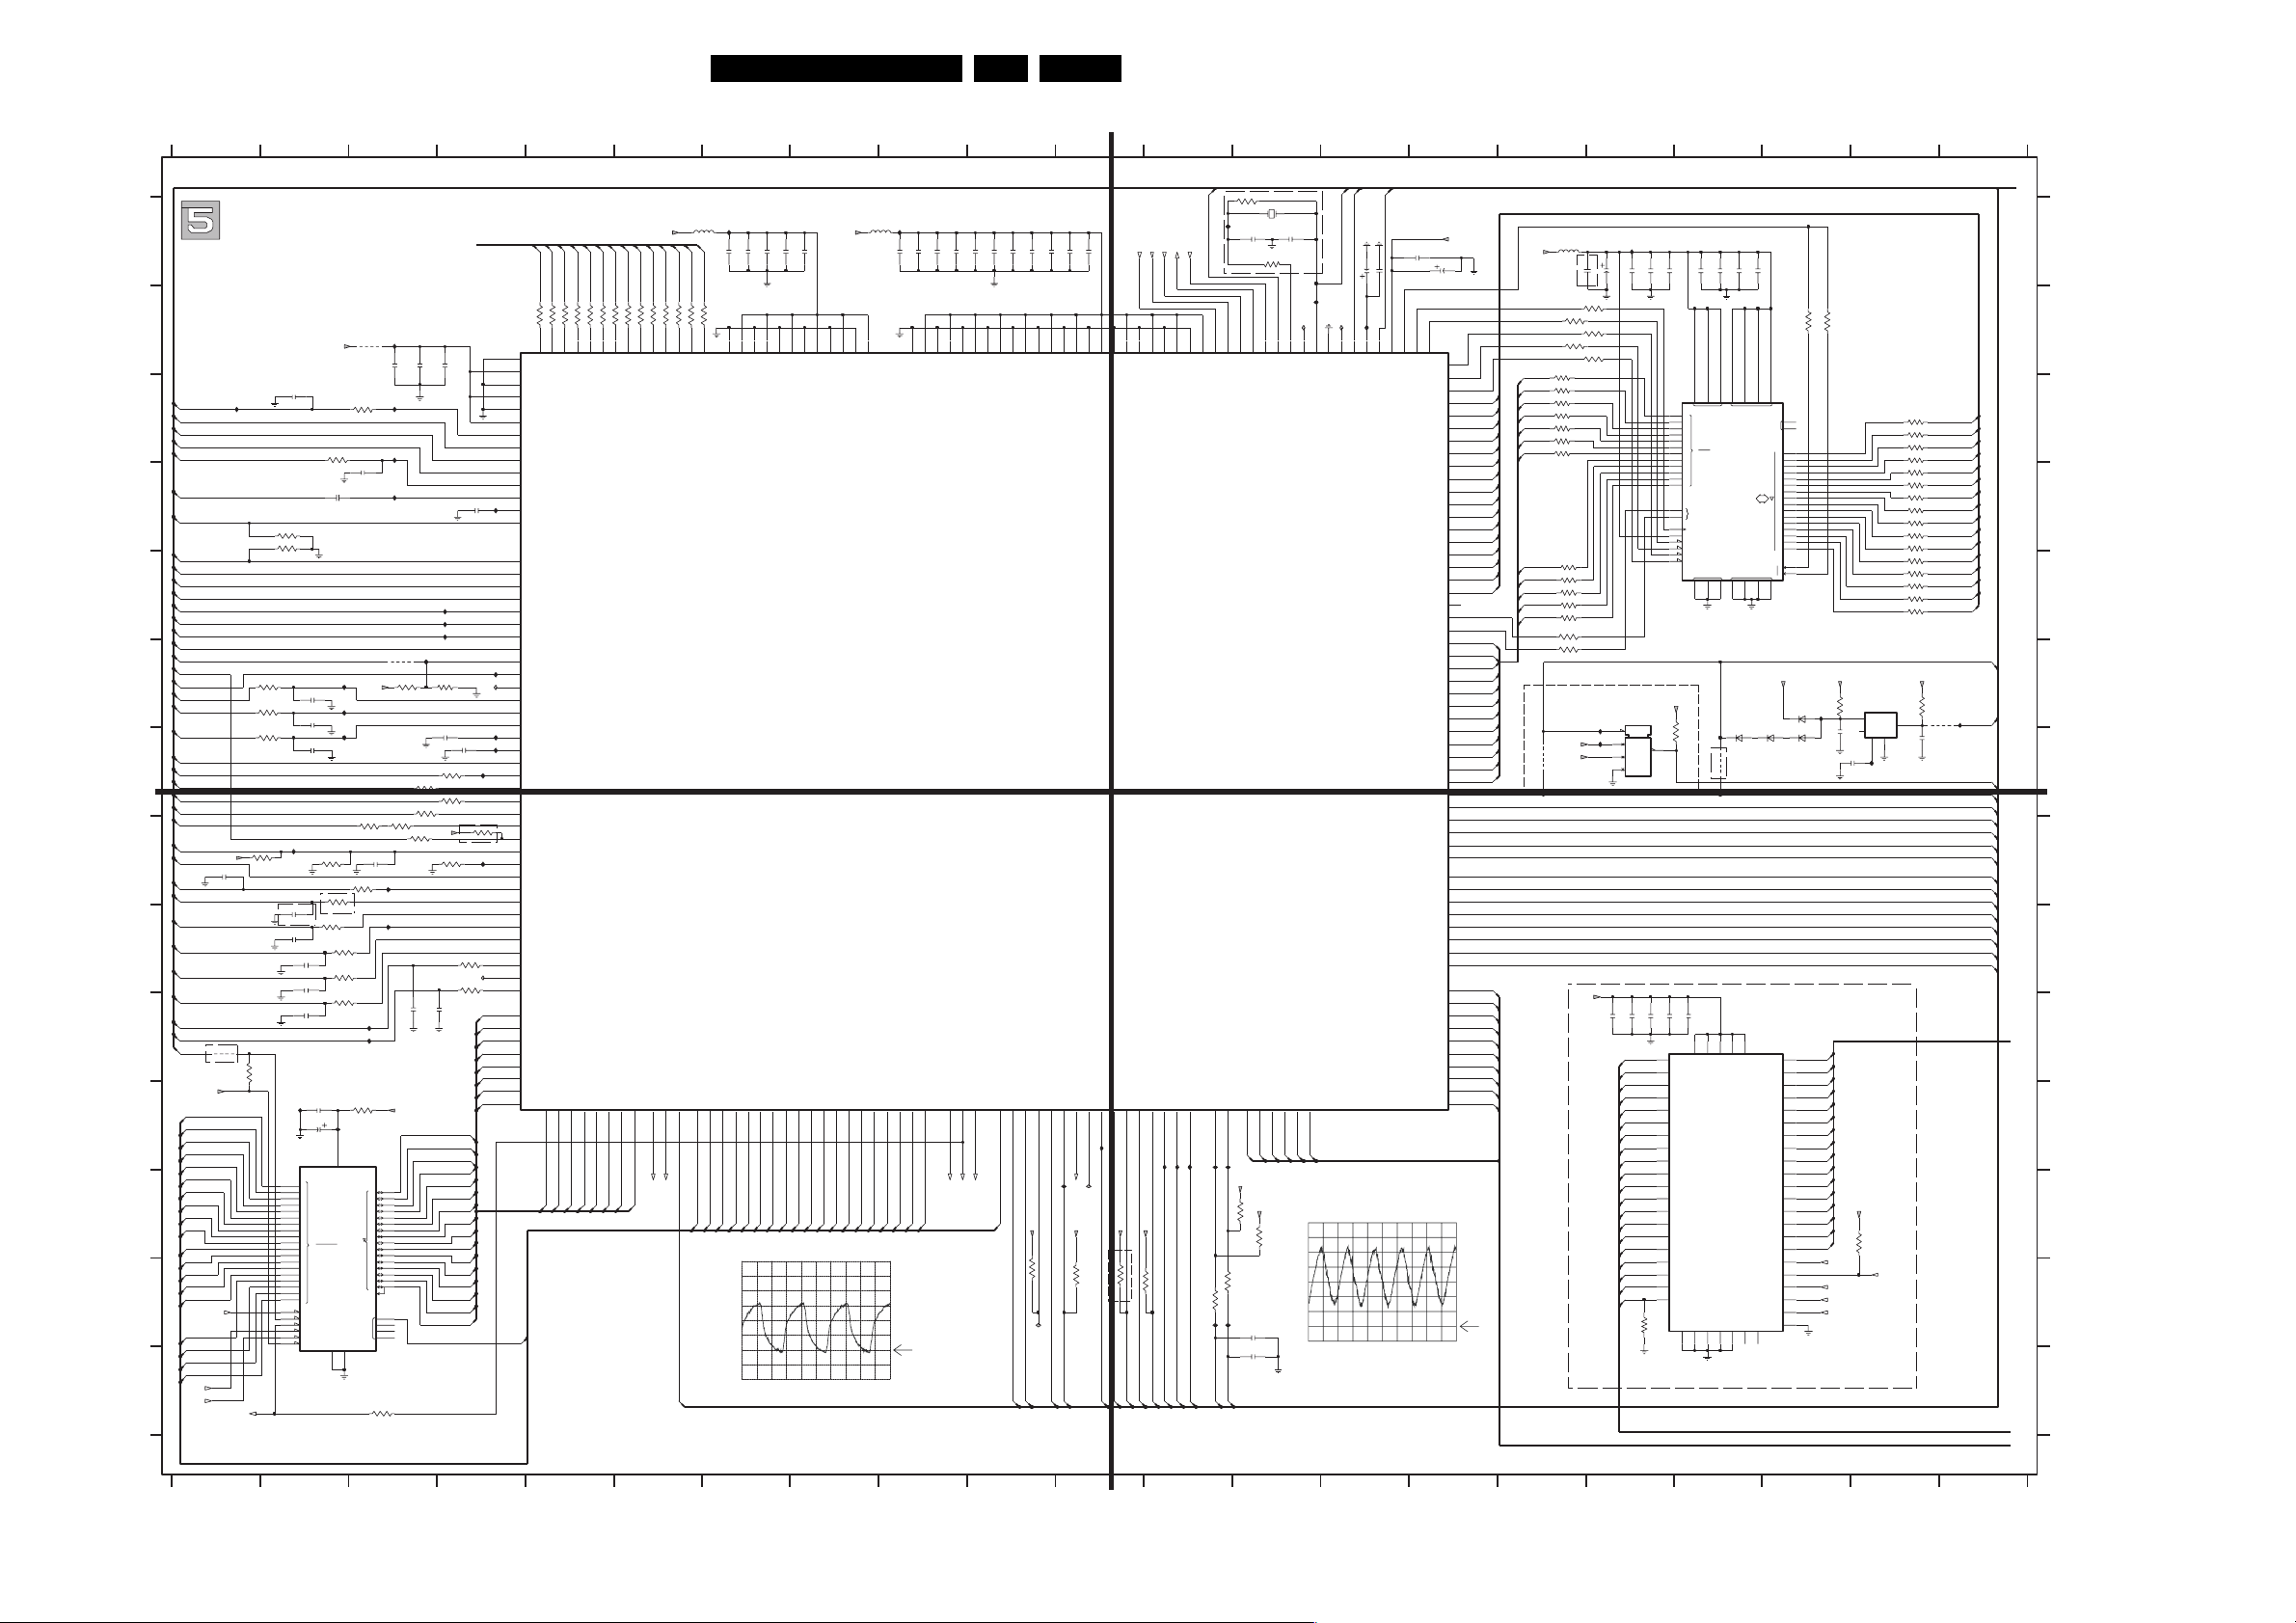
Electrical Diagrams and Print-Layouts
Servo Board: Centaurus (Overview)
{AUXPW,TOSTOCEN,MRN,HIGHPOWER,RX2,OSC_IN,PORN,FO-,STEP-COS,STEP-SIN,FO+,SL,RA,FTC,S1_MIRN,D1_TILTN,D2_TLN,D3_REN,D4_FEN,OSTR,CALF,A2,A1,S2-XDN,TEMP_WARNING,EFM-DATAN,EFM-DATAP,EFM-CLKN,EFM-CLKP,PPNO,RFREF,RFP3,RFN3,T1,MOTO1,AUDIOL,AUDIOR,HRESET,HDASPN,CS1,CS0,HA2,HA0,HA1,HPDIAGN,HIRQ,HDACKN,IORDY,HRDN,HRWN,HDRQ,SDA,SCL,SILD,SICL,SIDA,RX2,TX2,TX1,RX1_MASTER,DRIVER-ON,MOTOR-ON,IRQN,TRAY-SW,TRAY-INOUT,VRIN,IEC958,EFM_RWN,RAD_MUTE,ACT_EMF,TEMP_SENSE}
A
B
C
D
E
F
G
H
I
J
K
L
M
N
A3V3
2503
I513
MOTO1
T1
RFN3
RFP3
RFREF
220n
100R
PPNO
EFM-DATAN
EFM-DATAP
EFM-CLKN
EFM-CLKP
MOTOR-ON
HIGHPOWER
T1
TEMP_WARNING
AUXPW
TEMP_SENSE
S2-XDN
ACT_EMF
A1
A2
CALF
OSTR
D1_TILTN
D2_TLN
D3_REN
D4_FEN
S1_MIRN
VRIN
FTC
RA
SL
FO+
TRAY-INOUT
STEP-SIN
STEP-COS
FO-
TOSTOCEN
PORN
D3V3
AD(0)
AD(1)
AD(2)
AD(3)
AD(4)
AD(5)
AD(6)
AD(7)
AD(8)
AD(9)
AD(10)
AD(11)
AD(12)
AD(13)
AD(14)
JTAG_RY_BY
AD(15)
AD(16)
AD(17)
AD(18)
OE
CE
A3V3
2509
470p
4519
OPTIONB
JTAG_WE
3524
3503
3504
3507
3508
3509
OPTIONB
10K
1K
1K
1K
4K7
4K7
I506
4K73501
OPTIONB
2577
6n8
2511
470p
2579
100n
2582
6n8
2583
6n8
I555
7503
M29W160ET-70N6
25
0
24
1
23
2
22
3
21
4
20
5
19
6
18
7
8
8
7
9
6
10
11
4
12
3
13
2
14
1
15
48
16
17
17
16
18
15
RB
12
RP
11
WE
28
OE
26
CE
47
BYTE
2505
10n
2506
10n
2507
6n8
2515
3519
2514
100n
10u
EPROM
2Mx8/1Mx16
A
8M-1
3502
2K7
10K
0
27
12345
I512
4502
2500
100n
3500
I503
5K6
I507
3560
2550
10n
2504
I508
1n0
4525
D3V3
3521
2K2
I514
I516
I518
3514
3579
100K
22K
2562
47n
I527
3517
10K
3574
10K
I530
3578
3K3
3535
10K
3536
10K
2512
I532
I535
3522
D3V3
1R
I505
37
29
0
31
1
33
2
35
3
38
4
40
5
42
6
44
7
D
30
8
32
9
345
10
36
11
39
12
41
13
43
14
45
15
A-1
9
FLASH ROM
10
NC
13
14
46
3586
0R
PREPARED FOR 16MBit
100n
2501
2502
100n
2561
47n
I545
I550
I551
I548
3523
1%
47K
1%
2536
2540
100n
100n
3510
3511
6K8
6K8
3512
3513
6K8
6K8
3547
D3V3
3515
330K
6K8
OPTIONB
3516
24K
1%
3520
10K
3577
10K
33n
2578
470p
DA(0)
DA(1)
DA(2)
DA(3)
DA(4)
DA(5)
DA(6)
DA(7)
DA(8)
DA(9)
DA(10)
DA(11)
DA(12)
DA(13)
DA(14)
DA(15)
DEBUG(0:13)
I515
I517
I519
I520
I521
I522
I531
L503
DA(0)
DA(1)
DA(2)
DA(3)
DA(4)
DA(5)
DA(6)
DA(7)
7500
PNX7850E
L5
M5
J5
K5
G5
H5
U7
T7
N1
N2
N3
M1
M2
U8
T8
U9
T9
R6
R7
J4
J3
J2
J1
H4
H3
H2
H1
G1
G2
G3
G4
K2
K1
L1
L2
L3
L4
M4
N4
M3
R5
T5
U6
R8
K4
K3
R4
R3
P5
R14
P14
N14
L16
L14
K14
P16
N16
AD(19)
DEBUG(13)
DEBUG(12)
33R
33R
3541-C
3541-D
36
45
D3
D4
VSSA1
VDDA1
ADBG12
ADBG13
VSSA2
VDDA2
VSSA3
VDDA3
MOTO1
T1
HFIN_N
HFIN_P
VCOM
WIN
WREFLO
EFMDATN_LASERON
EFMDAT
EFMCLKN
EFMCLK
GPIO30_LDGR
GPIO31_HRW
SINPHI_PCSA
COSPHI_PCSB
AUX_PW
XDN
ACT_EMFP
ACT_EMFN
A1
A2
CALF
UOPB
UOPT
ALPHA0_STEPA0
D1_TILTN
D2_TLN
D3_REN
D4_FEN
S1_MIRN
S2_PW
VRIN
IREF
FTC
RA
SL
FO
RAC_SW
REFSIN_PCSC
REFCOS_PCSD
GPIO32_TOS
GPIO33_TOC
GPIO34_TOSTOCEN
MIU_D0
MIU_D1
MIU_D2
MIU_D3
MIU_D4
MIU_D5
MIU_D6
MIU_D7
MIU_D8
P15
N15
DA(8)
DA(9)
561234
DEBUG(9)
DEBUG(8)
DEBUG(11)
DEBUG(10)
33R
33R
33R
3541-B
3541-A
3543-C
3543-D
36
18
45
27
C5
D1
D2
ADBG10
ADBG11
MIU_D9
MIU_D10
MIU_D11
MIU_D12
M15
L15
K15
DA(10)
DA(11)
DA(12)
7 8 9 10 11 12 13 14 15
I504
5501
D1V8 D3V3
100n
DEBUG(7)
DEBUG(6)
DEBUG(5)
DEBUG(4)
33R
33R
33R
33R
3543-A
3542-A
3543-B
3542-D
18
45
18
27
C2
ADBG7C3ADBG8C4ADBG9
DEBUG(2)
DEBUG(1)
DEBUG(3)
33R
33R
33R
3546
3542-B
3542-C
36
ADBG2B3ADBG3B4ADBG4B5ADBG5C1ADBG6
2516
DEBUG(0)
33R
33R
3545
27
B2
E10
ADBG0B1ADBG1
VSS18C5
E11
2517
VDD18C5
100n
E13
VSS18C4
2518
F13
VDD18C4
100n
2519
K13
VSS18C3
100n
L13
VDD18C3
2520
N11
VSS18C2
Par t 1
TR 22010a_001
Par t 3
TR 22010c_001
MIU_A2
GPIO36_MIULBN
GPIO37_MIUA0
R13
LB
DRIVER-ON
AD(0)
U10
MIU_A1
MIU_A3
MIU_A4
MIU_A5
MIU_A6
T10
U11
T11
U12
T12
AD(3)
AD(4)
AD(5)
AD(1)
AD(2)
A: DC, 1 V/Div, 20ns/Div
AD(6)
MIU_A7
MIU_A8
MIU_A9
U13
U14
T14
AD(7)
AD(8)
AD(9)
I502
MIU_D13
MIU_D14
MIU_D15
GPIO35_MIUUBN
R17
P17
N17
R11
P12
UB
DA(13)
DA(14)
DA(15)
678
U2
5502
100n
N10
VDD18C2
P7
VSS18C1
N7
VDD18C1
E5
VSS18C6
D5
VDD18C6
100n
2521
2522
100n
E6
E7
VSS3P12
VDD3P12
2523
E8
100n
VSS3P11
E9
2524
VDD3P11
100n
D11
VSS3P10
2526
100n
2525
D12
D13
VSS3P9
VDD3P10
CENTAURUS
MIU_A15
MIU_A16
MIU_A17
MIU_A18R9MIU_A19
MIU_WEN
MIU_OEN
MIU_A10
MIU_A11
MIU_A12
MIU_A13
MIU_A14
U17
T17
U16
AD(11)
T16
AD(12)
AD(13)
AD(14)
R12
AD(15)
U15
T15
AD(10)
NOTE:
OPTIONA: DENOTES COMPONENT(S) WILL BE MOUNTED BEFORE MASS PRODUCTION
OPTIONB: DENOTES COMPONENT(S) WILL BE MOUNTED WHEN NEEDED
MIU_CS3
T13
P10
R16
R15
P11
CE
OE
WE
AD(16)
AD(17)
AD(18)
910
EN 21VAD 8041 7.
2527
100n
100n
100n
2529
2528
100n
J14
J13
E12
H13
G13
VSS3P7
VSS3P8
VDD3P7
VDD3P8
VDD3P9
GPIO14_SILD2
GPIO10_MIUA20T3GPIO11_CKET4GPIO12_IEC958U3GPIO13_SHOCKIN
T2
U4
I547
AD(19)
D3V3
10K
3527
I546
IRQN
IEC958
EFM_RWN
TRAY-SW
JTAG_TMS
JTAG_TDO_CENT
JTAG_TCK
JTAG_TDI_CENT
JTAG_TRST_CENT
100n
2531
2530
100n
F5
P8
P9
P13
N13
N12
M13
VSS3P4
VSS3P5
VSS3P6
VDD3P5
VDD3P6
N9
VDD3P4
VSS3P3
N8
VDD3P3
VSS3P2
E4
VDD3P2
N6
VSS3P1
N5
VDD3P1
TR 22010b_001
1.5
TR 22010d_001
GPIO15_MIURDY
GPIO16_MIUCS0
GPIO17_MIUCS1
GPIO20_MIUCS2
GPIO21_TXD1R2GPIO22_RXD1R1GPIO23_TXD2
M17
L504
D3V3
OPTIONB
10K
3528
RX1_MASTER
TX1
GPIO24_RXD2P1GPIO25_SIDAU2GPIO26_SICLU1GPIO27_SILD
P2
I542
D3V3
10K
3551
TX2
RX2
SIDA
I543
SICL
T1
I544
SILD
M14
R10
M16
I549
CE1
D3V3
10K
3518
RAD_MUTE
11 12 13
3534
1M
PORN
I501
2563
15p
OPTIONB
A4
A3
A5
TCK
TDOA2TMS
TRST
Par t 2
Par t 4
SCL
SDA
DD0C6DD1
T6
U5
HD(0)
HD(1)
I536
I537
D3V3
2K2
3530
2K2
47R
3532
47R
3531
I539
I540
2551
150p
2552
150p
SCL
SDA
1500
16M93
CX-16F
2564
15p
3581
33R
I502
L501
F2
P6
P4
P3
A1
TDI
OSC_IN
OSC_OUT
POR_NEG
DAC_HP_L
DD2C8DD3C9DD4
DD5
C10
C11
C7
HD(2)
HD(3)
HD(4)
HD(5)
D3V3
3529
A: DC, 500mV/Div, 5ns/Div
16
17 18 19
POWER-CONN-AUDIO/DEBUG AND FLASH/DRIVERS/CHEETAH_QD
AUDIOL
OSC_IN
2533
L502
I510
F3
F4
E3
DAC_LO_L
DAC_HP_R
DAC_VNEG
IC7504 Pin 38
F1
10u
2581
DAC_VREF
AUDIOR
100n
E2
E1
DAC_LO_R
DAC_VPOS
2534
100n
C15
G17
XCASH_SDCAS
DATA_MASK
DMACK_GREQ
DMARQ_GACK
G14
SDCK
XCASL_SDCS
XDD15
XDD14
XDD13
XDD12
XDD11
XDD10
XDA14_BS2
XDA13_BS1
XDA12_BS0
XDA11
XDA10
HRESET
DA2_GRD
DA0_GFB
PDIAG
DA1_GWR
INTRQ
IORDY
A3V3
2538
10u
J15
H14
XRAS
H15
XWR
XDD(15)
D17
XDD(14)
C16
XDD(13)
D16
XDD(12)
E17
XDD(11)
E16
XDD(10)
F17
XDD(9)
F16
XDD9
XDD(8)
C17
XDD8
XDD(7)
G16
XDD7
XDD(6)
H17
XDD6
XDD(5)
L17
XDD5
XDD(4)
K16
XDD4
XDD(3)
K17
XDD3
XDD(2)
J16
XDD2
XDD(1)
J17
XDD1
XDD(0)
H16
XDD0
F14
G15
B17
XDA(11)
A16
XDA(10)
F15
XDA(9)
B15
XDA9
XDA(8)
A15
XDA8
XDA(7)
B14
XDA7
XDA(6)
A14
XDA6
XDA(5)
B13
XDA5
XDA(4)
A13
XDA4
XDA(3)
D15
XDA3
XDA(2)
D14
XDA2
XDA(1)
E15
XDA1
XDA(0)
E14
XDA0
A12
B6
DASP
A6
CS1
B7
CS0
A7
B8
A8
B9
A9
A10
B10
B11
DIOR
A11
DIOW
B12
HD(15)
D6
DD15
HD(14)
D7
DD14
HD(13)
D8
DD13
HD(12)
D9
DD12
HD(11)
D10
DD11
HD(10)
C12
DD10
HD(9)
C14
DD9
HD(8)
A17
DD8
HD(7)
B16
DD7
HD(6)
C13
DD6
D3V3
XDA(0)
XDA(1)
XDA(2)
XDA(3)
XDA(4)
XDA(5)
XDA(6)
XDA(7)
XDA(8)
XDA(9)
XDA(10)
XDA(11)
5504
3592
150R
150R
3587-2
3587-3
3587-4
3588-1
3588-2
3588-3
3589-1
3588-4
3589-2
3589-3
3587-1
3589-4
3597
3596
OPTIONB
D3V3
D1V8
4520
OPTIONB
150R
150R
150R
150R
150R
150R
150R
150R
150R
150R
150R
150R
150R
150R
D3V3
2513
OPTIONB
22u
3591
150R
3594
150R3595
3593
150R
I541
I500
22u
2580
MAX6352SVUK-T
3
5
4
2
100n
2572
I509
2565
100n
2566
MT48LC4M16A2TG-7E
7502
MR
VCC5
RST
VCC3
GND
2573
100n
2574
AD(0)
AD(1)
AD(2)
AD(3)
AD(4)
AD(5)
AD(6)
AD(7)
AD(8)
AD(9)
AD(10)
AD(11)
AD(12)
AD(13)
AD(14)
AD(15)
AD(16)
AD(17)
AD(18)
AD(19)
3548
14 15 16 17 18
2569
100n
100n
2568
VDD
0
1M-1
VSS
100n
3943
Φ
DRAM
1M X 16 X 4
2570
2571
100n
49
VDDQ
NC
0
1
2
3
4
5
6
7
D
8
9
10
11
12
13
14
15
H
DQM
L
VSSQ
52
46
100n
2567
23
24
25
26
29
30
31
32
33
34
22
35
20
21
38
37
19
18
17
16
100n
11427
0
1
2
3
4
5
A
6
7
8
9
10
11
0
BA
1
CLK
CKE
CS
RAS
CAS
WE
284154612
7504
SDRAM
PREPARED FOR 256MBit (MAX)
+12V
D3V3
PMLL414BL
6503
BAS16 BAS16
4504
OPTIONB
VCC5
7505
NC1
SRAM 16MB
6502
50
IO1
IO2
IO3
IO4
IO5
IO6
IO7
IO8
IO9
IO10
IO11
IO12
IO13
IO14
IO15
IO16
12
UB
13
CS
15
WE
42
OE
39
LB
40
NC2
IC
16
43
4K7
3580
1
100n
2575
2576
100n
100n
2
7
A0
8
A1
VCC114VCC223VCC329VCC4
9
A2
10
A3
11
A4
17
A5
uPD4416016
18
A6
19
A7
20
A8
21
A9
34
A10
35
A11
36
A12
37
A13
38
A14
44
A15
45
A16
46
A17
47
A18
48
A19
GND1
GND232GND341GND453GND5
10K
5
26
20
3599
3598
150R
150R
36
40
10
11
13
42
44
45
47
48
50
51
53
39
15
22
24
25
27
28
30
31
33
49
51
52
54
1
3
4
6
2
4
5
7
8
6501
BAS16
+5V
3108
6500
I511
2584
100n
2585
330n
DA(0)
DA(1)
DA(2)
DA(3)
DA(4)
DA(5)
DA(6)
DA(7)
DA(8)
DA(9)
DA(10)
DA(11)
DA(12)
DA(13)
DA(14)
DA(15)
UB
WE
OE
LB
1K
D3V3
3582
7506
PST3642NR
2
INP
4
NC
CD GND
5
I523
10K
OUTP
RESET
3584-2
XDD(0)
150R
3584-1
XDD(1)
150R
3583-4
XDD(2)
150R
3583-3
XDD(3)
150R
3583-2
XDD(4)
150R
3583-1
XDD(5)
150R
3584-3
XDD(6)
150R
3584-4
XDD(7)
150R
3562-4
XDD(8)
150R
3585-1
XDD(9)
150R
3585-2
XDD(10)
150R
3585-3
XDD(11)
150R
3585-4
XDD(12)
150R
3562-1
XDD(13)
150R
3562-3
XDD(14)
150R
3562-2
XDD(15)
150R
D3V3
4K7
3561
I524
4503
1
2586
100n
3
CE1
19 20 21
21
A
B
C
D
E
MRN
F
PORN
PORN
HRESET
HDASPN
HPDIAGN
HIRQ
HDACKN
IORDY
HRDN
HRWN
HDRQ
DA(0:15)
CS1
CS0
HA2
HA0
HA1
G
H
I
J
K
L
M
N
AD(0:19)
HD(0:15)
TR 22010_001
060704
U2 A9
1500 A13
2500 B3
2501 B3
2502 B4
2503 C2
2504 D2
2505 F2
2506 F2
2507 G2
2509 H1
2511 I2
2512 J3
2513 A16
2514 K2
2515 K2
2516 A7
2517 A7
2518 A7
2519 A7
2520 A8
2521 A9
2522 A9
2523 A9
2524 A9
2525 A10
2526 A10
2527 A10
2528 A10
2529 A10
2530 A11
2531 A11
2533 A14
2534 A15
2536 G4
2538 A15
2540 G4
2550 D3
2551 M13
2552 N13
2561 D4
2562 H3
2563 A13
2564 A13
2565 A17
2566 A17
2567 A17
2568 A18
2569 A18
2570 A18
2571 A18
2572 J17
2573 J17
2574 J17
2575 J17
2576 J18
2577 I2
2578 J3
2579 I2
2580 A17
2581 A14
2582 I2
2583 J2
2584 G19
2585 G20
2586 G20
3108 F19
3500 C3
3501 H1
3502 H2
3503 D2
3504 D2
3507 F2
3508 F2
3509 G2
3510 G4
3511 G3
3512 G4
3513 G3
3514 H3
3515 H3
3516 H4
3517 H3
3518 M11
3519 I2
3520 I4
3521 F3
3522 K3
3523 F4
3524 J1
3527 M10
3528 M11
3529 L13
3530 L13
3531 M12
3532 M12
3534 A13
3535 I2
3536 J2
3541-A B5
3541-B B5
3541-C B5
3541-D B5
3542-A B6
3542-B B6
3542-C B6
3542-D B6
3543-A B6
3543-B B5
3543-C B5
3543-D B5
3545 B6
3546 B6
3547 H4
3548 M17
3551 M12
3560 C2
3561 F20
3562-1 E20
3562-2 E20
3562-3 E20
3562-4 D20
3574 H2
3577 I4
3578 I2
3579 H3
3580 G17
3581 A13
3582 L20
3583-1 D20
3583-2 D20
3583-3 C20
3583-4 C20
3584-1 C20
3584-2 C20
3584-3 D20
3584-4 D20
3585-1 D20
3585-2 D20
3585-3 E20
3585-4 E20
3586 N3
3587-1 E16
3587-2 C16
3587-3 C16
3587-4 C16
3588-1 C16
3588-2 C16
3588-3 C16
3588-4 E16
3589-1 C16
3589-2 E16
3589-3 E16
3589-4 E16
3591 B17
3592 B16
3593 B17
3594 B17
3595 B16
3596 F16
3597 E16
3598 B19
3599 B19
4502 B3
4503 F20
4504 G18
4519 J1
4520 G16
4525 F3
5501 A7
5502 A9
5504 A16
6500 F19
6501 G19
6502 G19
6503 G18
7500 B4
7502 F17
7503 K2
7504 E17
7505 K18
7506 F20
I500 G17
I501 A12
I502 B14
I503 C3
I504 A7
I505 K2
I506 H2
I507 C3
I508 D3
I509 A17
I510 B14
I511 F19
I512 B3
I513 C1
I514 F2
I515 D4
I516 F2
I517 F4
I518 G2
I519 F4
I520 G4
I521 G4
I522 G4
I523 G20
I524 F21
I527 H3
I530 I3
I531 H4
I532 J3
I535 J3
I536 K12
I537 K12
I539 M12
I540 M12
I541 F17
I542 K12
I543 K12
I544 K12
I545 E4
I546 M10
I547 L11
I548 F3
I549 L11
I550 E4
I551 E4
I555 K2
L501 B13
L502 B14
L503 I4
L504 K11
Partlist ver: 4.2
Page 22
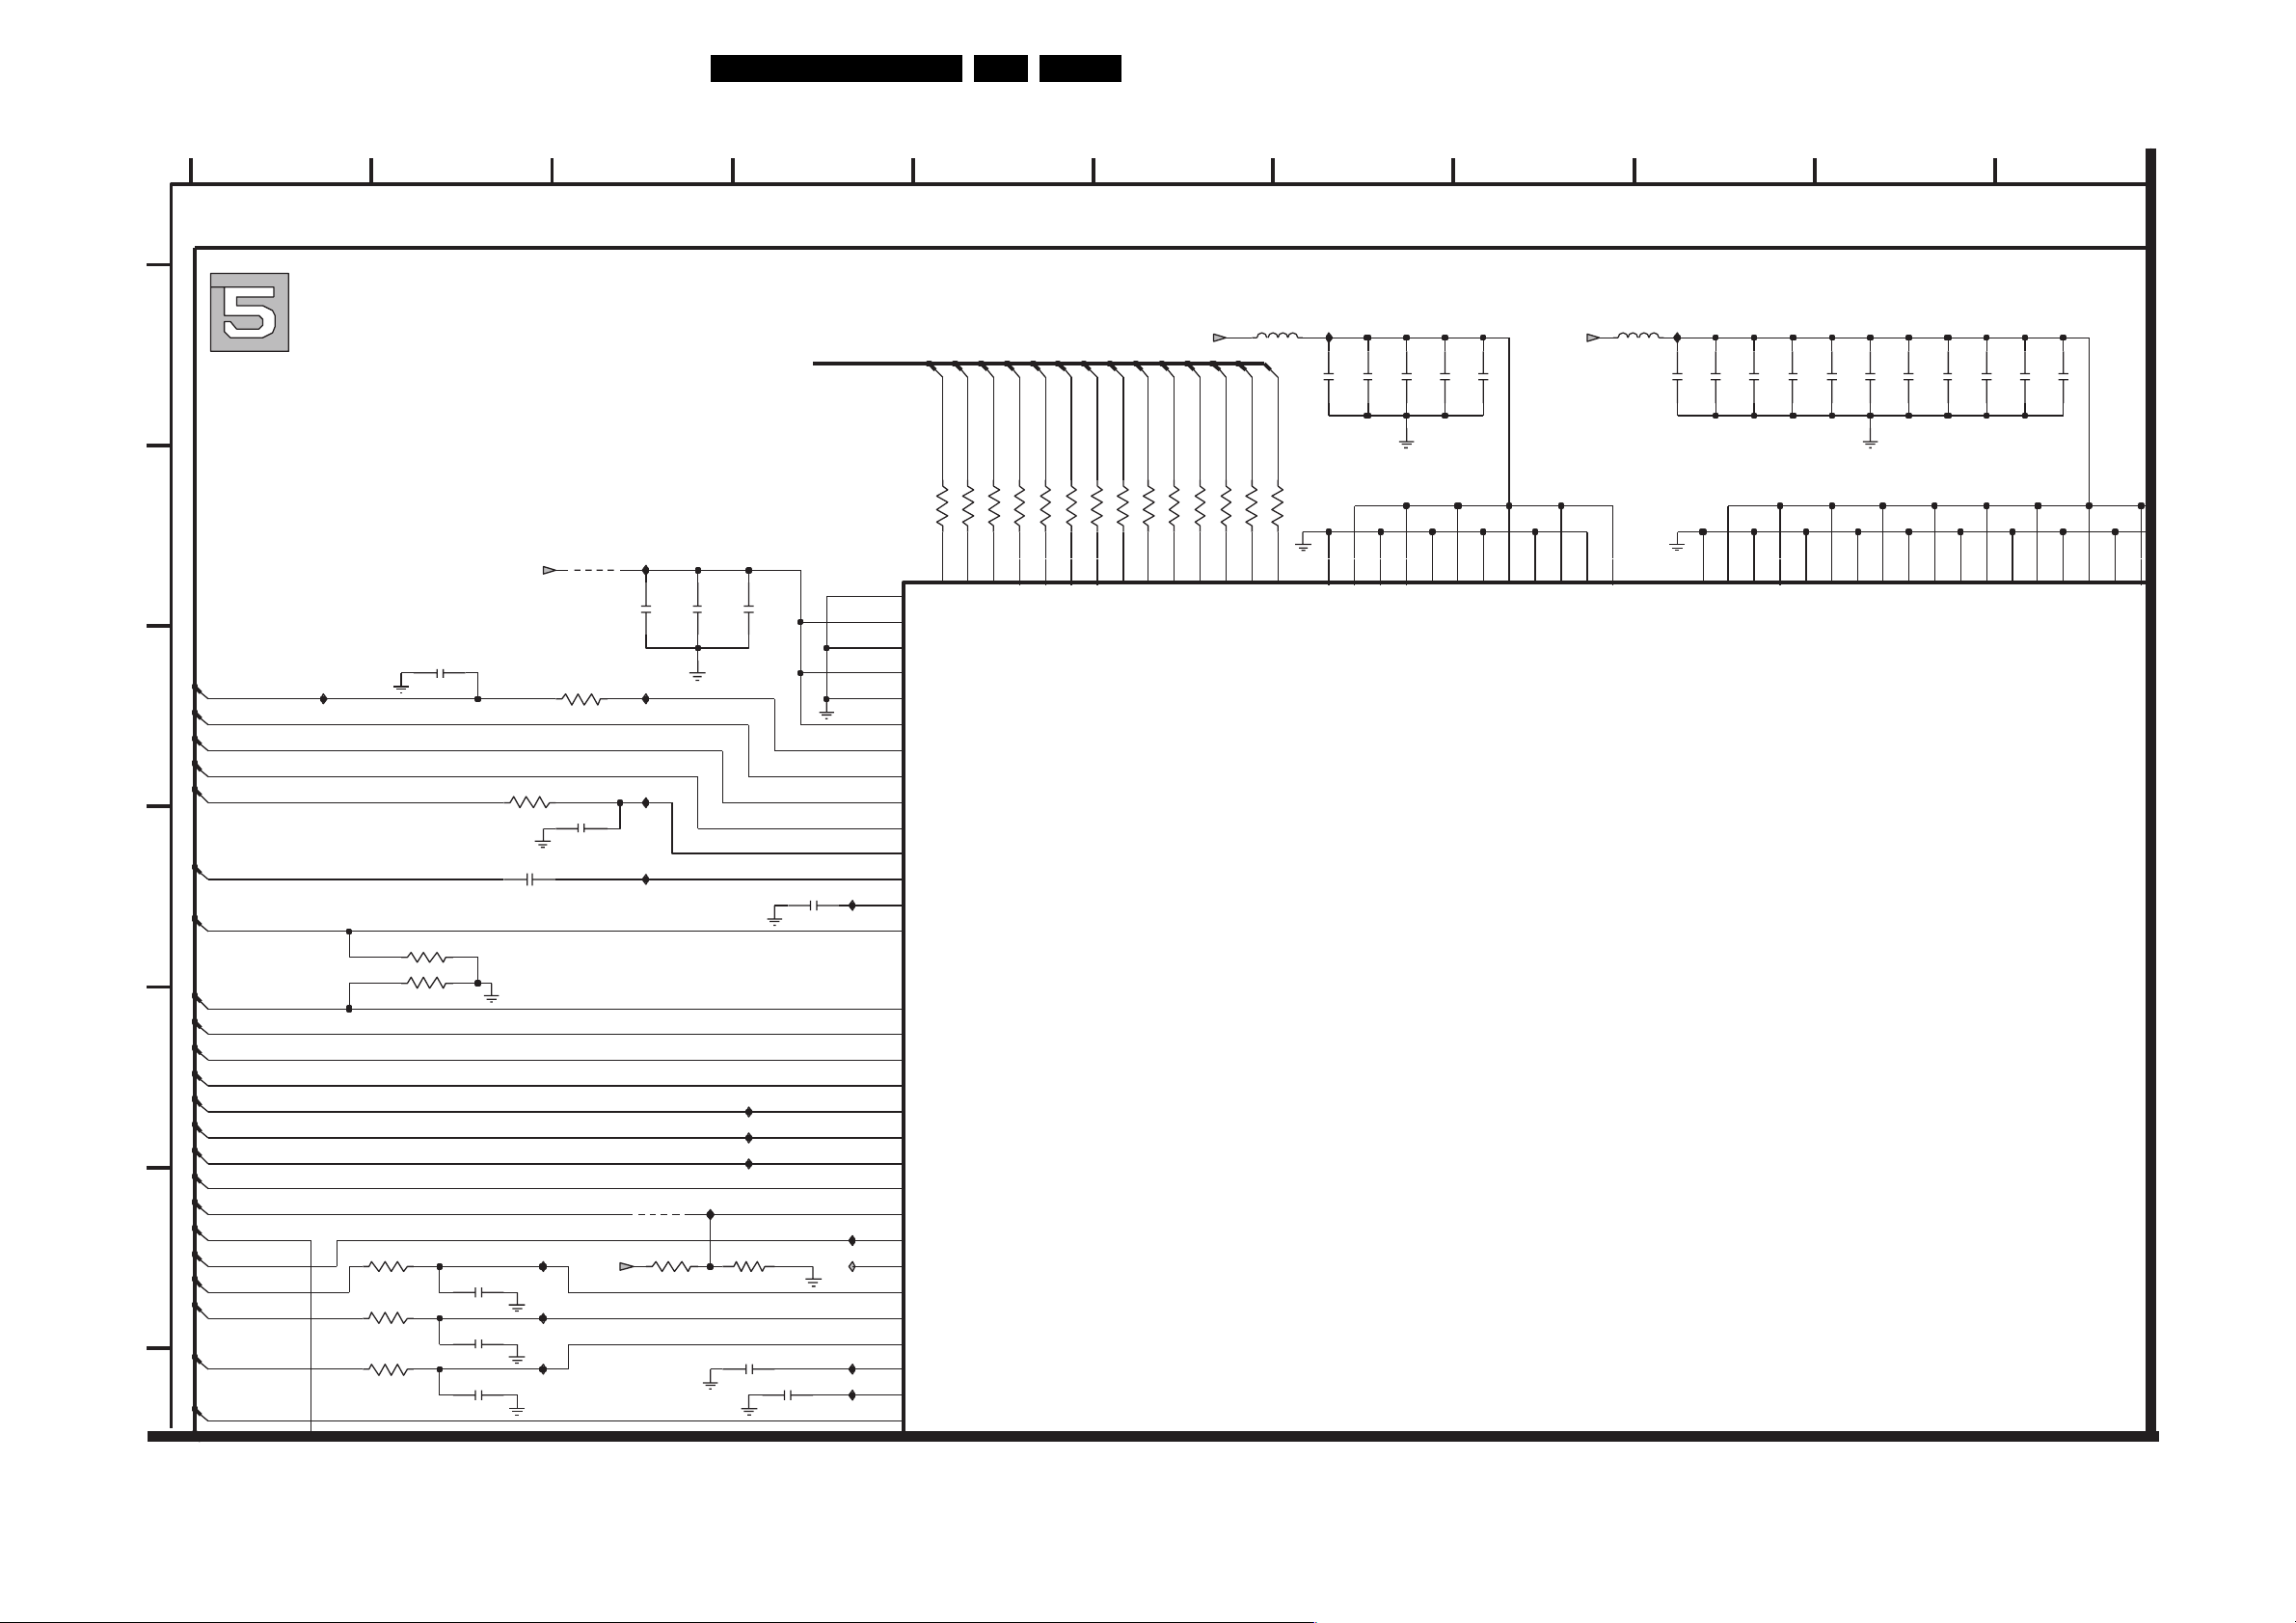
Electrical Diagrams and Print-Layouts
Servo Board: Centaurus Part1
EN 22VAD 8041 7.
A
B
C
D
E
F
MOTO1
I513
T1
RFN3
RFP3
RFREF
PPNO
EFM-DATAN
EFM-DATAP
EFM-CLKN
EFM-CLKP
MOTOR-ON
HIGHPOWER
T1
TEMP_WARNING
AUXPW
TEMP_SENSE
S2-XDN
ACT_EMF
A1
A2
CALF
OSTR
3503
3504
3507
1K
3508
1K
3509
1K
2503
220n
4K7
4K7
2505
10n
2506
10n
2507
6n8
A3V3
3560
100R
2504
1n0
561234
7 8 9 10 11
{AUXPW,TOSTOCEN,MRN,HIGHRESET,HDASPN,CS1,CS0,HA2,HA0,HA1,HPDIAGN,HIRQ,HDACKN,IORDY,HRDN,HRWN,HDRQ,SDA,SCL,SILD,SICL,SIDA,RX2,TX2,TX1,RX1_MASTER,DRIVER-ON,MOTOR-ON,IRQN,TRAY-SW,TRAY-INOUT,VRIN,IEC958,
5501
I504
5502
U2
D1V8 D3V3
DEBUG(0:13)
100n
100n
H13
VDD3P8
2528
100n
J13
VSS3P7
2529
J14
VDD3P7
3500
5K6
2550
10n
4502
I512
2500
I503
I507
I508
100n
2501
100n
2502
100n
2561
47n
7500
PNX7850E
I515
L5
VSSA1
M5
VDDA1
J5
VSSA2
K5
VDDA2
G5
VSSA3
H5
VDDA3
U7
MOTO1
T7
T1
N1
HFIN_N
N2
HFIN_P
N3
VCOM
M1
WIN
M2
WREFLO
U8
EFMDATN_LASERON
DEBUG(13)
DEBUG(12)
33R
33R
3541-C
3541-D
36
45
D3
D4
ADBG12
ADBG13
DEBUG(9)
DEBUG(11)
DEBUG(10)
33R
33R
3541-B
3541-A
3543-D
27
18
D1
D2
ADBG10
ADBG11
DEBUG(8)
DEBUG(7)
DEBUG(6)
DEBUG(5)
33R
33R
3543-C
36
45
C4
C5
ADBG8
ADBG9
33R
33R
3543-A
3542-A
3543-B
18
18
27
C2
C3
C1
ADBG7
ADBG5
ADBG6
DEBUG(4)
DEBUG(2)
DEBUG(1)
DEBUG(3)
33R
33R
33R
33R
3546
3542-B
3542-C
3542-D
36
45
B5
ADBG4
27
B2
B3
B4
ADBG1
ADBG2
ADBG3
DEBUG(0)
33R
3545
B1
33R
ADBG0
2516
E10
VSS18C5
100n
2517
E11
VDD18C5
2518
100n
E13
VSS18C4
100n
F13
VDD18C4
2519
L13
K13
VSS18C3
2520
100n
N11
VSS18C2
VDD18C3
100n
N10
VDD18C2
P7
VSS18C1
N7
VDD18C1
E5
D5
VSS18C6
VDD18C6
2521
100n
2522
E6
VSS3P12
2523
100n
E7
E8
VDD3P12
100n
2524
E9
VSS3P11
VDD3P11
2525
100n
D11
VSS3P10
100n
D12
VDD3P10
2526
D13
VSS3P9
100n
E12
VDD3P9
2527
G13
VSS3P8
Part 1
T8
EFMDAT
U9
EFMCLKN
T9
EFMCLK
R6
GPIO30_LDGR
R7
GPIO31_HRW
J4
SINPHI_PCSA
J3
COSPHI_PCSB
J2
AUX_PW
J1
XDN
H4
ACT_EMFP
H3
ACT_EM FN
H2
A1
H1
A2
G1
CALF
G2
UOPB
G3
UOPT
G4
ALPHA0_STEPA0
CENTAURUS
1.5
TR 22010a_001
I514
I516
I518
D3V3
4525
3521
2K2
1%
I548
I545
I550
I551
3523
47K
2536
100n
1%
2540
100n
I517
I519
I520
I521
2531
2530
100n
P13
N13
M13
VSS3P5
VSS3P6
VDD3P6
060704
100n
N12
VDD3P5
P9
VSS3P4
N9
VDD3P4
Page 23
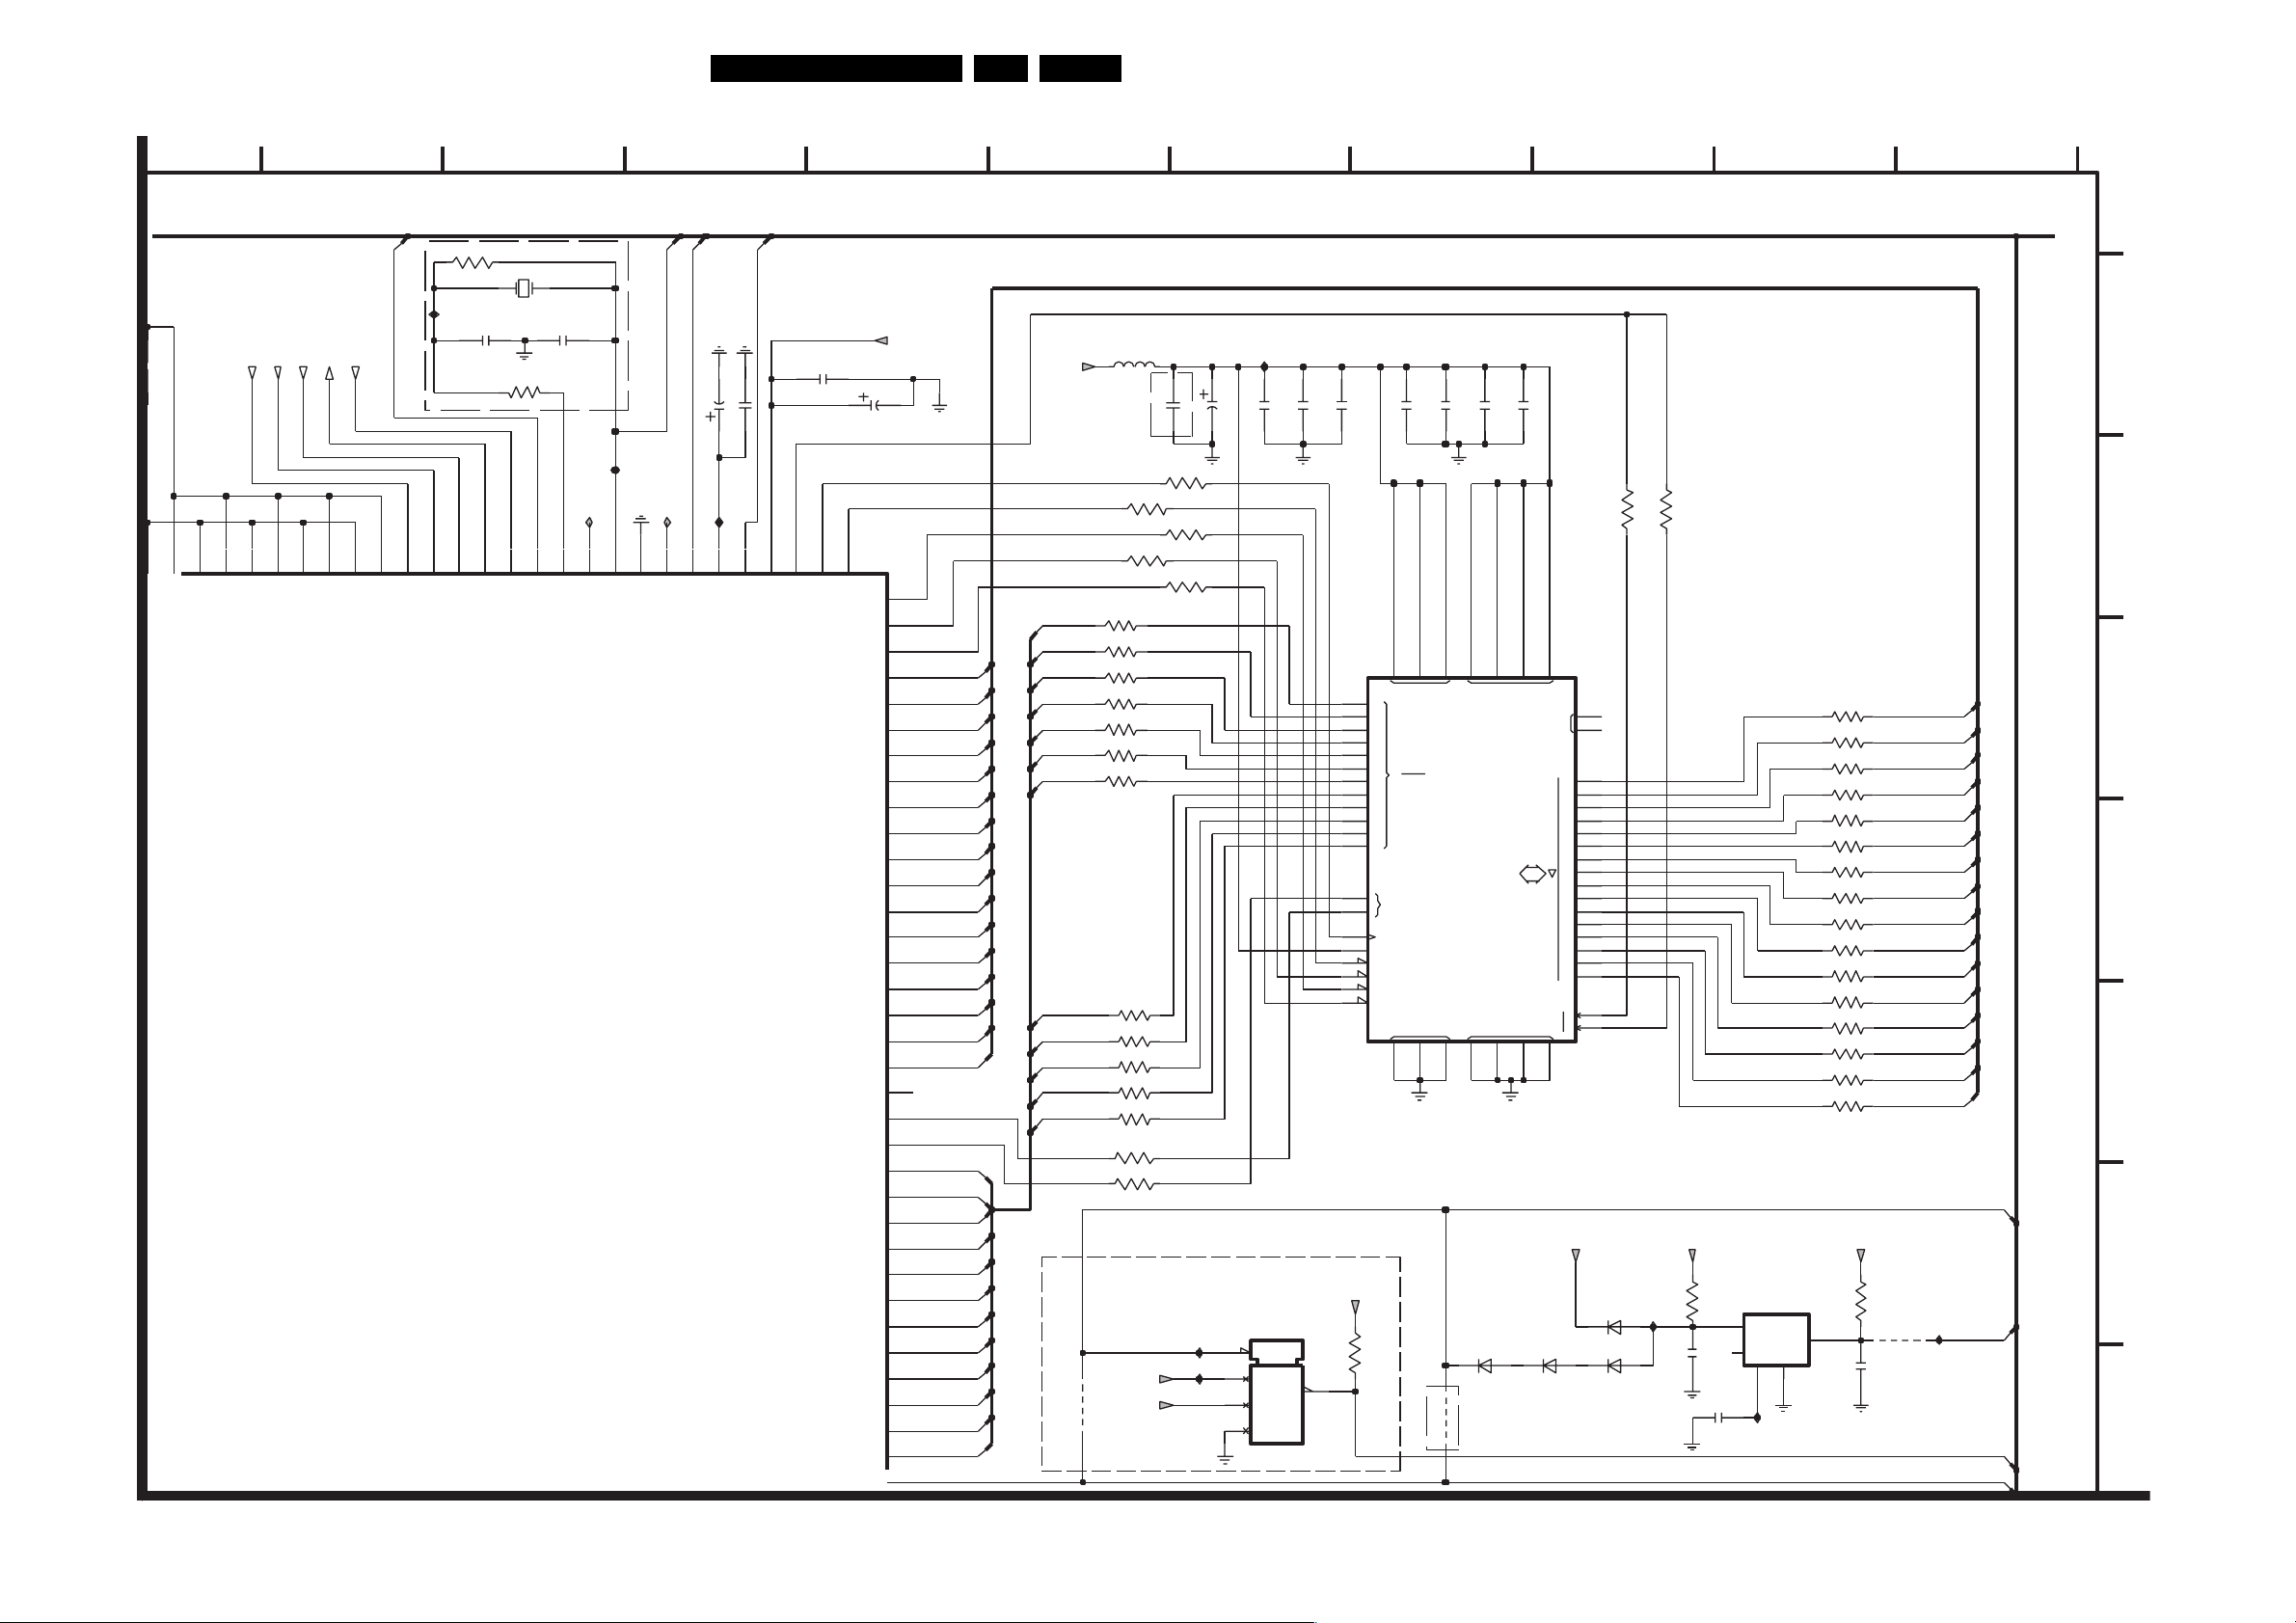
Electrical Diagrams and Print-Layouts
EN 23VAD 8041 7.
Servo Board: Centaurus Part 2
16 2111 12 13 14 15 20
RFP3,RFN3,T1,MOTO1,AUDIOL,AUDIOR,HRESET,HDASPN,CS1,CS0,HA2,HA0,HA1,HPDIAGN,HIRQ,HDACKN,IORDY,HRDN,HRWN,HDRQ,SDA,SCL,SILD,SICL,SIDA,RX2,TX2,TX1,RX1_MASTER,DRIVER-ON,MOTOR-ON,IRQN,TRAY-SW,TRAY-INOUT,VRIN,IEC958,EFM_RWN,RAD_MUTE,ACT_EMF,TEMP_SENSE}
17 18 19
100n
N12
VDD3P5
P9
VSS3P4
JTAG_TRST_CENT
P8
N9
VSS3P3
VDD3P4
JTAG_TCK
N8
VDD3P3
JTAG_TMS
JTAG_TDO_CENT
F5
E4
VSS3P2
VDD3P2
PORN
JTAG_TDI_CENT
A5
N6
N5
TRST
VSS3P1
VDD3P1
3534
1500
1M
CX-16F
I501
2563
15p
3581
OPTIONB
A4
TCK
A3
TMS
33R
A1
A2
TDO
Part 2
TDI
16M93
2564
15p
P3
P6
POR_NEG
L501
F2
OSC_OUT
DAC_HP_L
I502
P4
OSC_IN
OSC_IN
L502
F4
DAC_VNEG
E3
DAC_HP_R
AUDIOL
F3
DAC_LO_L
2533
I510
F1
DAC_VREF
10u
2581
AUDIOR
100n
E2
DAC_LO_R
E1
DAC_VPOS
2534
100n
C15
G17
XCASH_SDCAS
SDCK
DATA_MASK
XDA14_BS2
XDA13_BS1
XDA12_BS0
HRESET
A3V3
2538
10u
G14
XRAS
XCASL_SDCS
XWR
XDD15
XDD14
XDD13
XDD12
XDD11
XDD10
XDD9
XDD8
XDD7
XDD6
XDD5
XDD4
XDD3
XDD2
XDD1
XDD0
XDA11
XDA10
XDA9
XDA8
XDA7
XDA6
XDA5
XDA4
XDA3
XDA2
XDA1
XDA0
J15
H14
H15
D17
C16
D16
E17
E16
F17
F16
C17
G16
H17
L17
K16
K17
J16
J17
H16
F14
G15
B17
A16
F15
B15
A15
B14
A14
B13
A13
D15
D14
E15
E14
A12
XDD(15)
XDD(14)
XDD(13)
XDD(12)
XDD(11)
XDD(10)
XDD(9)
XDD(8)
XDD(7)
XDD(6)
XDD(5)
XDD(4)
XDD(3)
XDD(2)
XDD(1)
XDD(0)
XDA(11)
XDA(10)
XDA(9)
XDA(8)
XDA(7)
XDA(6)
XDA(5)
XDA(4)
XDA(3)
XDA(2)
XDA(1)
XDA(0)
D3V3
XDA(0)
XDA(1)
XDA(2)
XDA(3)
XDA(4)
XDA(5)
XDA(6)
XDA(7)
XDA(8)
XDA(9)
XDA(10)
XDA(11)
4520
5504
3587-2
3587-3
3587-4
3588-1
3588-2
3588-3
3589-1
3588-4
3589-2
3589-3
3587-1
3589-4
D3V3
D1V8
OPTIONB
3592
150R
150R
150R
150R
150R
150R
150R
150R
150R
3597
3596
OPTIONB
2513
150R
150R
150R
150R
150R
150R
150R
POWER-CONN-AUDIO/DEBUG AND FLASH/DRIVERS/CHEETAH_QD
I509
22u
22u
2565
100n
2566
100n
2567
100n
2568
2569
100n
2571
100n
2570
100n
100n
2580
3591
150R
3594
3599
150R
150R
3598
150R3595
3593
150R
3
9
43
1
0
1
2
3
4
5
6
7
8
9
10
11
0
1
CKE
CS
RAS
CAS
WE
CLK
VDD
0
A
1M-1
BA
VSS
28
23
24
25
26
29
30
31
32
33
34
22
35
20
21
38
37
19
18
17
16
7504
MT48LC4M16A2TG-7E
14
27
Φ
DRAM
1M X 16 X 4
6
41
54
VDDQ
VSSQ
12
49
36
40
NC
2
0
4
1
5
2
7
3
8
4
10
5
11
6
13
7
D
46
DQM
42
8
44
9
45
10
47
11
48
12
50
13
51
14
53
15
39
H
15
L
52
SDRAM
PREPARED FOR 256MBit (MAX)
MAX6352SVUK-T
I541
3
I500
5
4
2
7502
MR
VCC5
VCC3
GND
RST
1
D3V3
3580
4K7
6503
BAS16 BAS16
4504
OPTIONB
6502
+12V
PMLL414BL
BAS16
6500
6501
I511
+5V
3108
2584
1K
100n
2585
330n
7506
PST3642NR
2
INP
OUTP
RESET
4
NC
CD GND
5
I523
A
B
3584-2
3584-1
3583-4
3583-3
3583-2
3583-1
3584-3
3584-4
3562-4
3585-1
3585-2
3585-3
3585-4
3562-1
3562-3
3562-2
D3V3
150R
150R
150R
150R
150R
150R
150R
150R
150R
150R
150R
150R
150R
150R
150R
150R
XDD(0)
XDD(1)
XDD(2)
XDD(3)
XDD(4)
XDD(5)
XDD(6)
XDD(7)
XDD(8)
XDD(9)
XDD(10)
XDD(11)
XDD(12)
XDD(13)
XDD(14)
XDD(15)
C
D
E
MRN
F
4K7
3561
1
3
2586
4503
100n
I524
PORN
PORN
HRESET
G
TR 22010b_001
060704
Page 24
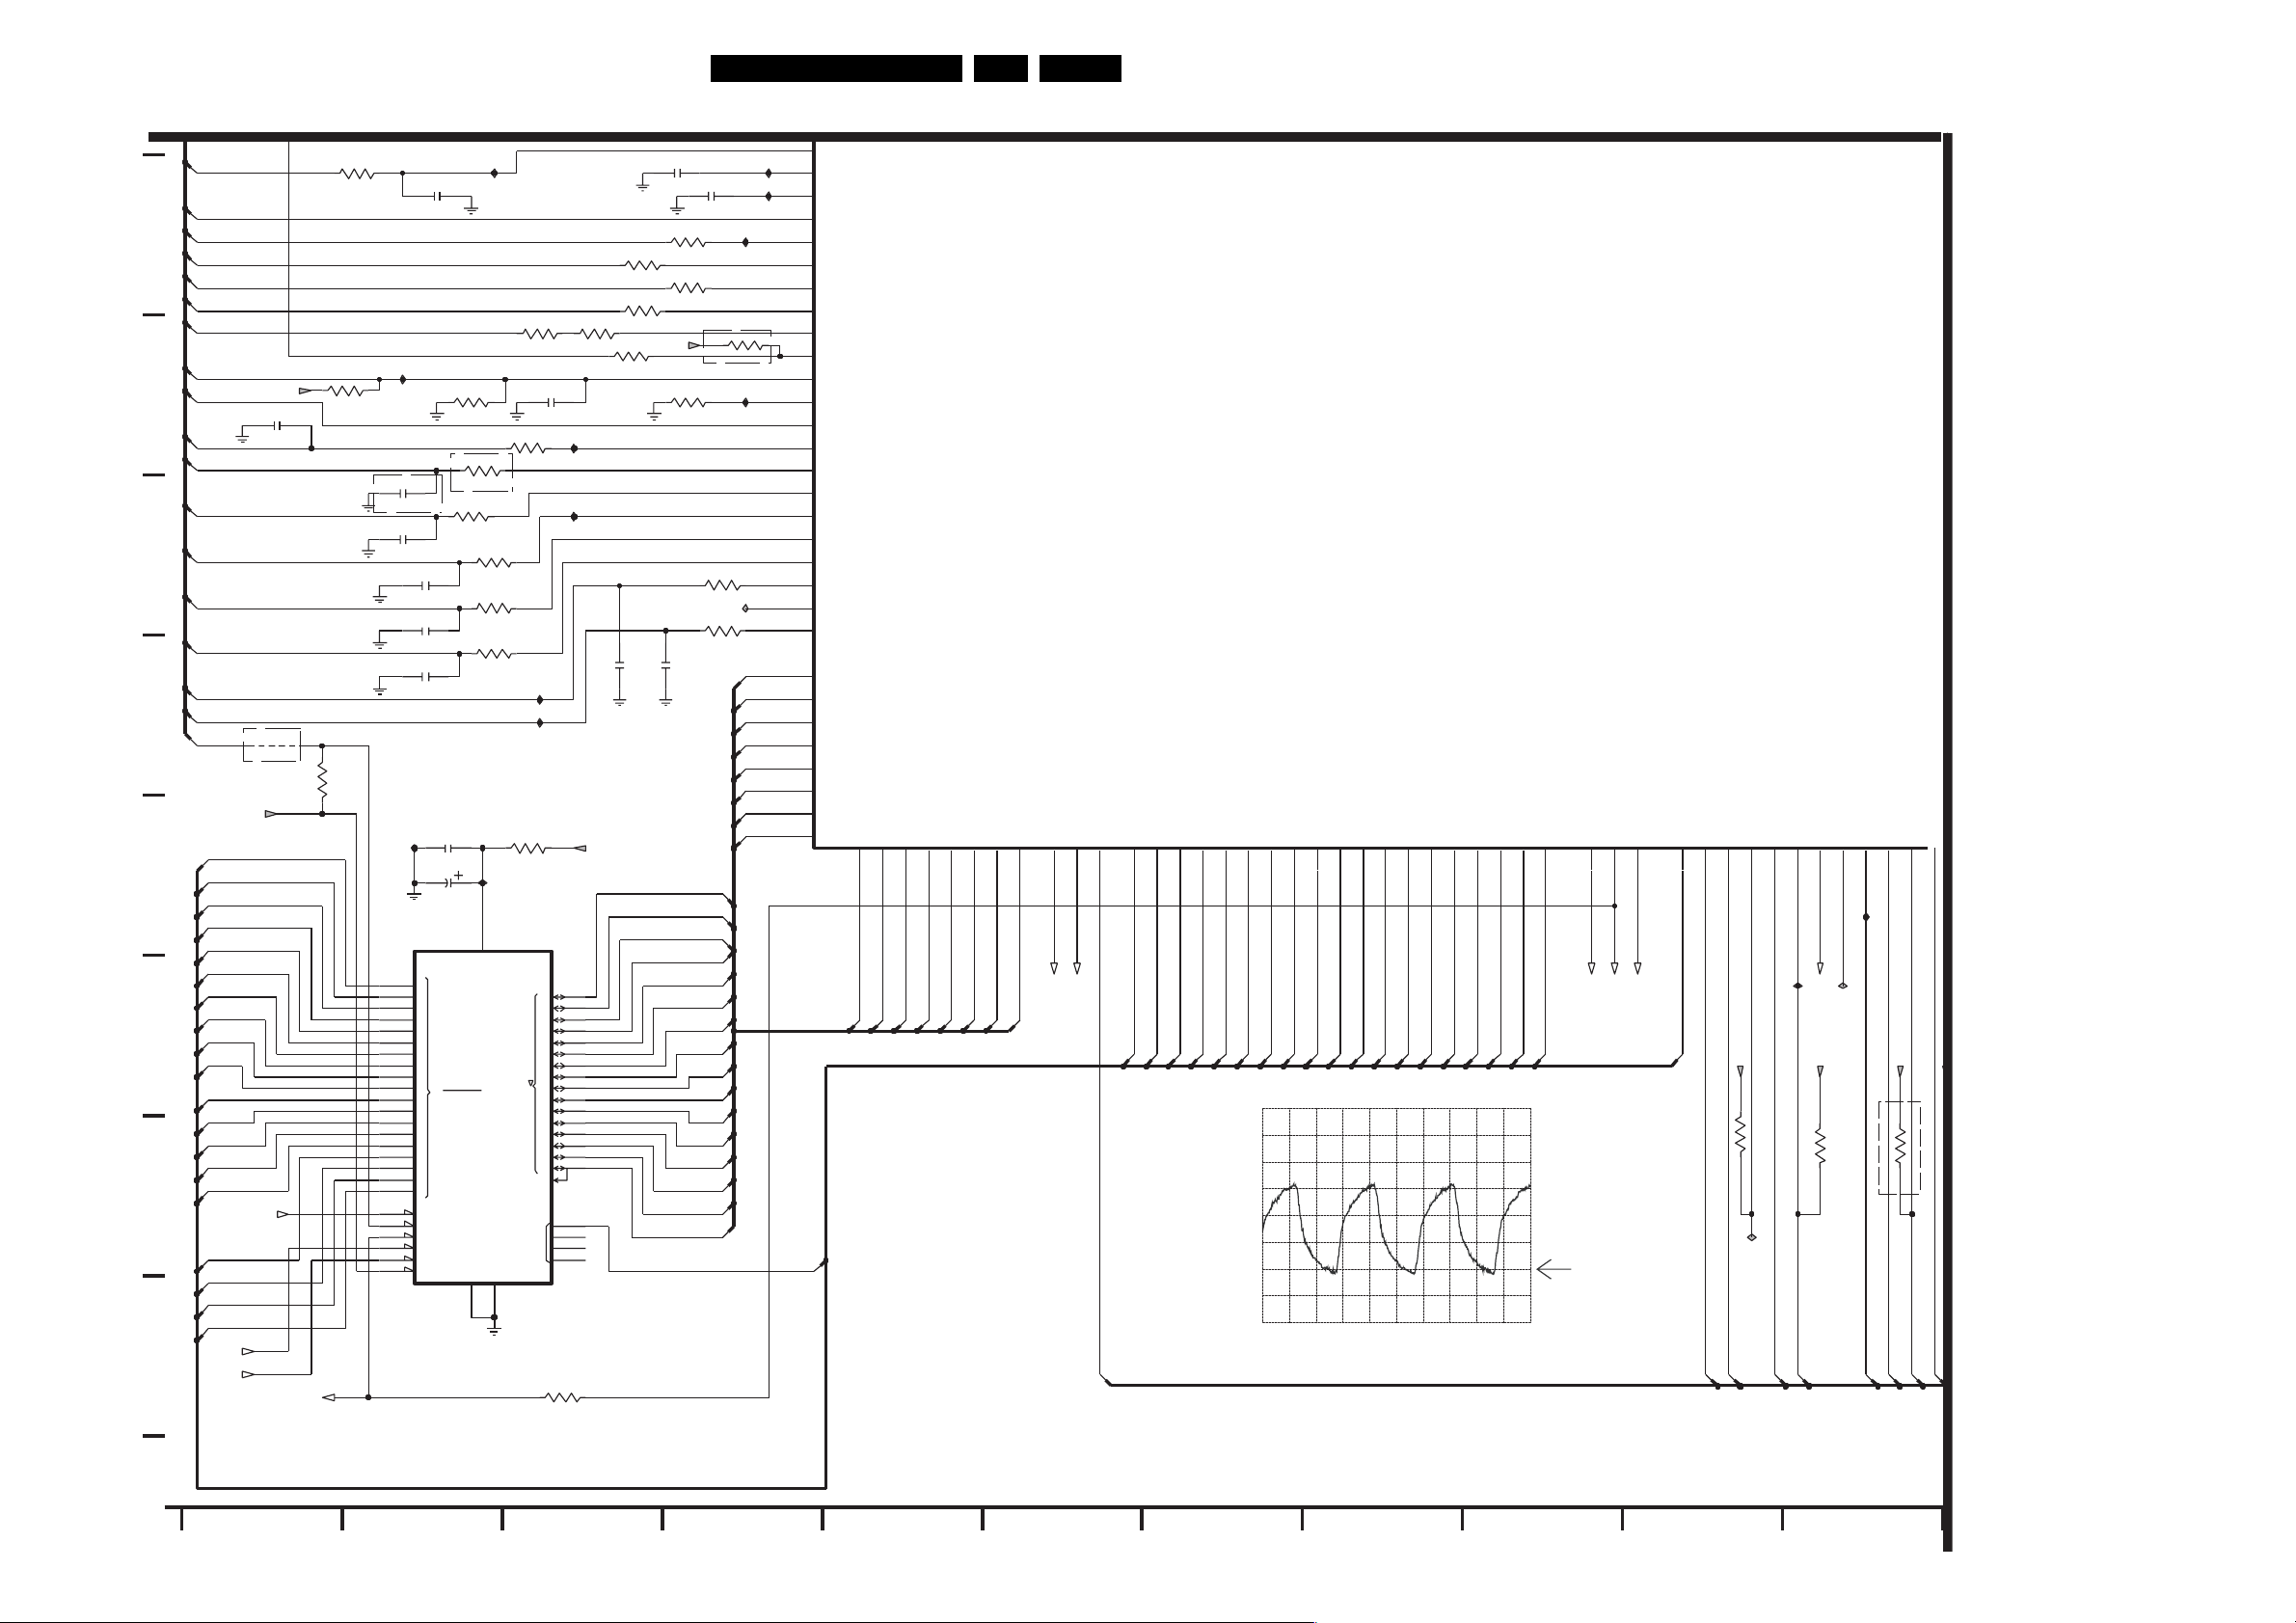
Electrical Diagrams and Print-Layouts
Servo Board: Centaurus Part 3
3524
3509
1K
4K73501
OPTIONB
10K
I506
2577
6n8
2511
470p
I555
7503
M29W160ET-70N6
25
24
23
22
21
20
19
18
8
7
6
4
3
2
1
48
17
16
15
12
11
28
26
47
CALF
OSTR
D1_TILTN
D2_TLN
D3_REN
D4_FEN
S1_MIRN
VRIN
FTC
RA
A3V3
2509
470p
SL
FO+
I
TRAY-INOUT
STEP-SIN
STEP-COS
FO-
TOSTOCEN
PORN
4519
OPTIONB
D3V3
AD(0)
AD(1)
AD(2)
AD(3)
AD(4)
AD(5)
AD(6)
AD(7)
L
AD(8)
AD(9)
AD(10)
AD(11)
AD(12)
AD(13)
AD(14)
JTAG_RY_BY
AD(15)
AD(16)
AD(17)
AD(18)
OE
CE
JTAG_WE
2507
6n8
OPTIONB
2579
100n
2582
6n8
2583
6n8
2515
0
1
2
3
4
5
6
7
8
9
10
11
12
13
14
15
16
17
18
RB
RP
WE
OE
CE
BYTE
3502
2K7
3574
10K
3519
10K
2514
100n
10u
EPROM
2Mx8/1Mx16
0
A
8M-1
27
I518
3511
6K8
3513
22K
3514
100K
6K8
3515
3579
6K8
2562
47n
I527
3517
10K
I530
3578
3K3
3535
10K
3536
10K
I532
2512
470p
I535
3522
1R
D3V3
I505
37
29
0
31
1
33
2
35
3
38
4
40
5
42
6
44
7
D
30
8
32
9
345
10
36
11
39
12
41
13
43
14
45
15
A-1
FLASH ROM
46
9
10
NC
13
14
3586
0R
PREPARED FOR 16MBit
2536
100n
D3V3
2578
3510
6K8
3512
6K8
3516
24K
33n
2540
100n
3547
1%
DA(0)
DA(1)
DA(2)
DA(3)
DA(4)
DA(5)
DA(6)
DA(7)
DA(8)
DA(9)
DA(10)
DA(11)
DA(12)
DA(13)
DA(14)
DA(15)
330K
OPTIONB
3520
10K
3577
10K
I522
I531
L503
DA(0)
DA(1)
DA(2)
DA(3)
DA(4)
DA(5)
DA(6)
DA(7)
I520
I521
G1
G2
G3
G4
K2
K1
L1
L2
L3
L4
M4
N4
M3
R5
T5
U6
R8
K4
K3
R4
R3
P5
R14
P14
N14
L16
L14
K14
P16
N16
AD(19)
CALF
UOPB
UOPT
ALPHA0_STEPA0
D1_TILTN
D2_TLN
D3_REN
D4_FEN
S1_MIRN
S2_PW
VRIN
IREF
FTC
RA
SL
FO
RAC_SW
REFSIN_PCSC
REFCOS_PCSD
GPIO32_TOS
GPIO33_TOC
GPIO34_TOSTOCEN
MIU_D0
MIU_D1
MIU_D2
MIU_D3
MIU_D4
MIU_D5
MIU_D6
MIU_D7
MIU_D8
MIU_D9
P15
N15
DA(8)
DA(9)
MIU_D10
M15
DA(10)
MIU_D11
L15
DA(11)
MIU_D12
K15
DA(12)
MIU_D13
R17
DA(13)
MIU_D14
P17
DA(14)
MIU_D15
N17
DA(15)
EN 24VAD 8041 7.
GPIO35_MIUUBN
GPIO36_MIULBN
R11
P12
R13
LB
UB
DRIVER-ON
Part 3
MIU_WEN
MIU_A4
MIU_A5
MIU_A6
MIU_A7
MIU_A8
U13
AD(6)
U14
AD(7)
MIU_A9
T14
AD(8)
MIU_A10
U15
AD(9)
MIU_A11
T15
AD(10)
MIU_A12
U16
AD(11)
MIU_A13
T16
AD(12)
MIU_A14
U17
AD(13)
MIU_A15
T17
AD(14)
MIU_A16
R12
AD(15)
MIU_A17
T13
AD(16)
MIU_A18R9MIU_A19
P10
AD(17)
AD(18)
MIU_A1
GPIO37_MIUA0
MIU_A2
MIU_A3
T11
U12
AD(3)
AD(4)
T12
AD(5)
U10
AD(0)
T10
AD(1)
U11
AD(2)
I502
A: DC, 1 V/Div, 20ns/Div
NOTE:
OPTIONA: DENOTES COMPONENT(S) WILL BE MOUNTED BEFORE MASS PRODUCTION
OPTIONB: DENOTES COMPONENT(S) WILL BE MOUNTED WHEN NEEDED
MIU_CS3
P11
CE
R16
WE
MIU_OEN
R15
OE
AD(19)
GPIO10_MIUA20T3GPIO11_CKET4GPIO12_IEC958
GPIO13_SHOCKIN
U3
U4
GPIO14_SILD2
T2
D3V3
10K
3527
I546
IRQN
IEC958
EFM_RWN
TR 22010c_001
GPIO15_MIURDY
M14
I547
TRAY-SW
GPIO16_MIUCS0
GPIO17_MIUCS1
GPIO20_MIUCS2
R10
M16
M17
I549
CE1
D3V3
10K
3518
RAD_MUTE
060704
GPIO21_TXD1R2GPIO22_RXD1
GPIO23_TXD2
R1
P2
L504
D3V3
OPTIONB
10K
3528
RX1_MASTER
TX2
TX1
3551
12345
678
910
11
Page 25
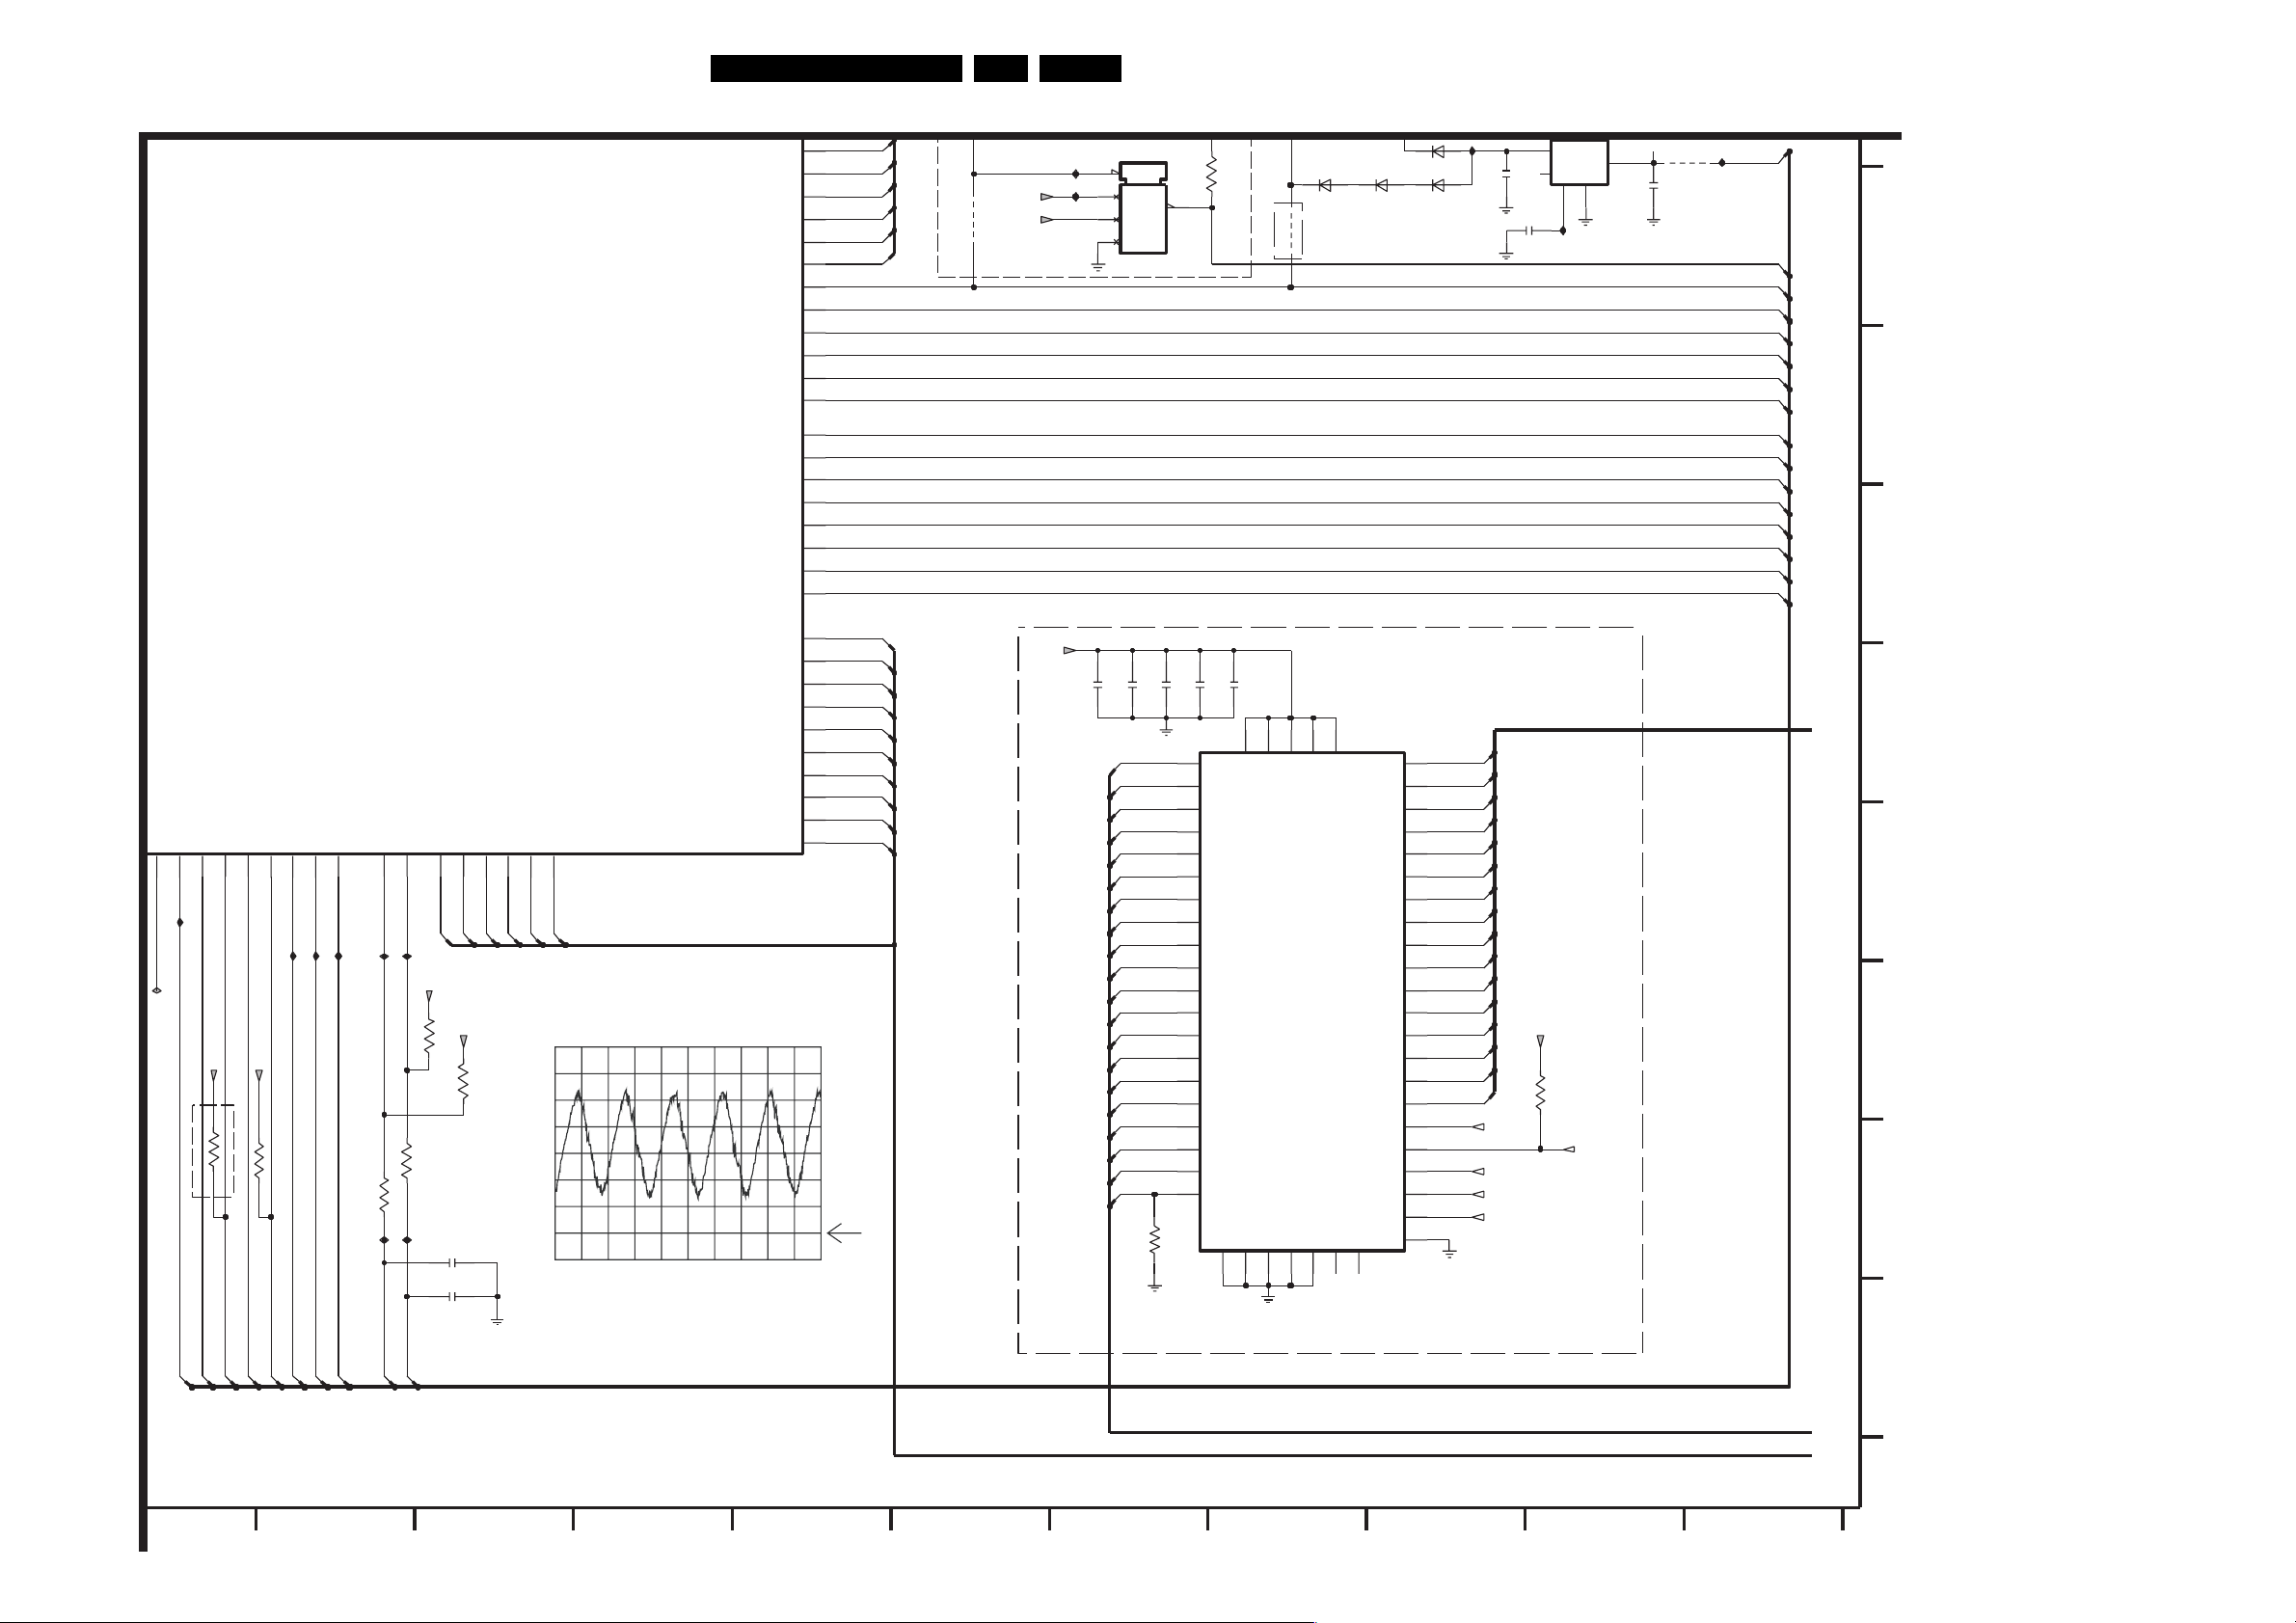
Electrical Diagrams and Print-Layouts
EN 25VAD 8041 7.
Servo Board: Centaurus Part 4
SCL
T6
I536
3531
I539
SCL
U5
3532
47R
I540 I537
SDA
SDA
HD(0)
D3V3
3530
47R
GPIO17_MIUCS1
GPIO20_MIUCS2
M16
M17
L504
I549
OPTIONB
RAD_MUTE
TX1
GPIO21_TXD1R2GPIO22_RXD1
D3V3
3528
GPIO24_RXD2
GPIO23_TXD2
P1
R1
P2
D3V3
10K
10K
3551
RX1_MASTER
TX2
RX2
GPIO25_SIDAU2GPIO26_SICLU1GPIO27_SILD
T1
I544
I542
I543
SIDA
SICL
SILD
Part 4
DD2C8DD3C9DD4
DD0C6DD1
C10
HD(3)
HD(4)
C11
HD(5)
2K2
2551
150p
2552
150p
C7
HD(1)
D3V3
2K2
HD(2)
3529
HRESET
DA2_GRD
DA0_GFB
DA1_GWR
DMACK_GREQ
DMARQ_GACK
DD5
IC7504 Pin 38
A: DC, 500mV/Div, 5ns/Div
XDA5
XDA4
XDA3
XDA2
XDA1
XDA0
DASP
CS1
CS0
PDIAG
INTRQ
IORDY
DIOR
DIOW
DD15
DD14
DD13
DD12
DD11
DD10
DD9
DD8
DD7
DD6
D15
D14
D10
C12
C14
C13
B13
A13
E15
E14
A12
A10
B10
B11
A11
B12
A17
B16
6500
PMLL414BL
6501
BAS16
I511
2584
100n
2585
330n
2
INP
4
NC
CD GND
I523
OUTP
RESET
5
1
2586
3
100n
PORN
PORN
G
I524
4503
XDA(5)
XDA(4)
XDA(3)
XDA(2)
XDA(1)
XDA(0)
4520
D3V3
D1V8
MAX6352SVUK-T
I541
3
I500
5
4
2
7502
MR
VCC5
VCC3
GND
RST
6503
4K7
3580
1
BAS16 BAS16
4504
OPTIONB
6502
HRESET
B6
A6
B7
A7
B8
A8
B9
A9
HDASPN
CS1
CS0
HA2
HA0
HPDIAGN
HA1
HIRQ
H
HDACKN
IORDY
HRDN
HRWN
HDRQ
D3V3
OPTIONB
2572
100n
AD(0)
AD(1)
AD(2)
AD(3)
AD(4)
AD(5)
AD(6)
AD(7)
AD(8)
AD(9)
AD(10)
AD(11)
AD(12)
AD(13)
AD(14)
AD(15)
AD(16)
AD(17)
AD(18)
AD(19)
2573
100n
3548
2574
10K
100n
7
8
9
10
11
17
18
19
20
21
34
35
36
37
38
44
45
46
47
48
2575
A0
A1
A2
A3
A4
A5
A6
A7
A8
A9
A10
A11
A12
A13
A14
A15
A16
A17
A18
A19
100n
2576
GND1
5
100n
2
VCC114VCC223VCC329VCC4
7505
uPD4416016
GND232GND341GND453GND5
26
50
VCC5
NC1
16
NC2
43
IO1
IO2
IO3
IO4
IO5
IO6
IO7
IO8
IO9
IO10
IO11
IO12
IO13
IO14
IO15
IO16
WE
UB
CS
OE
DA(0:15)
DA(0)
22
DA(1)
24
DA(2)
25
DA(3)
27
DA(4)
28
DA(5)
30
DA(6)
31
DA(7)
33
DA(8)
49
DA(9)
51
DA(10 )
52
DA(11 )
54
DA(12 )
1
DA(13 )
3
DA(14 )
4
DA(15 )
6
12
13
15
42
39
LB
40
IC
UB
WE
OE
D3V3
10K
3582
CE1
LB
HD(15)
D6
HD(14)
D7
HD(13)
D8
HD(12)
D9
HD(11)
HD(10)
HD(9)
HD(8)
HD(7)
HD(6)
I
J
K
L
M
SRAM 16MB
N
11 12 13 14 15 16 17 18
AD(0:19)
HD(0:15)
TR 22010d_001
060704
19 20 21
Page 26
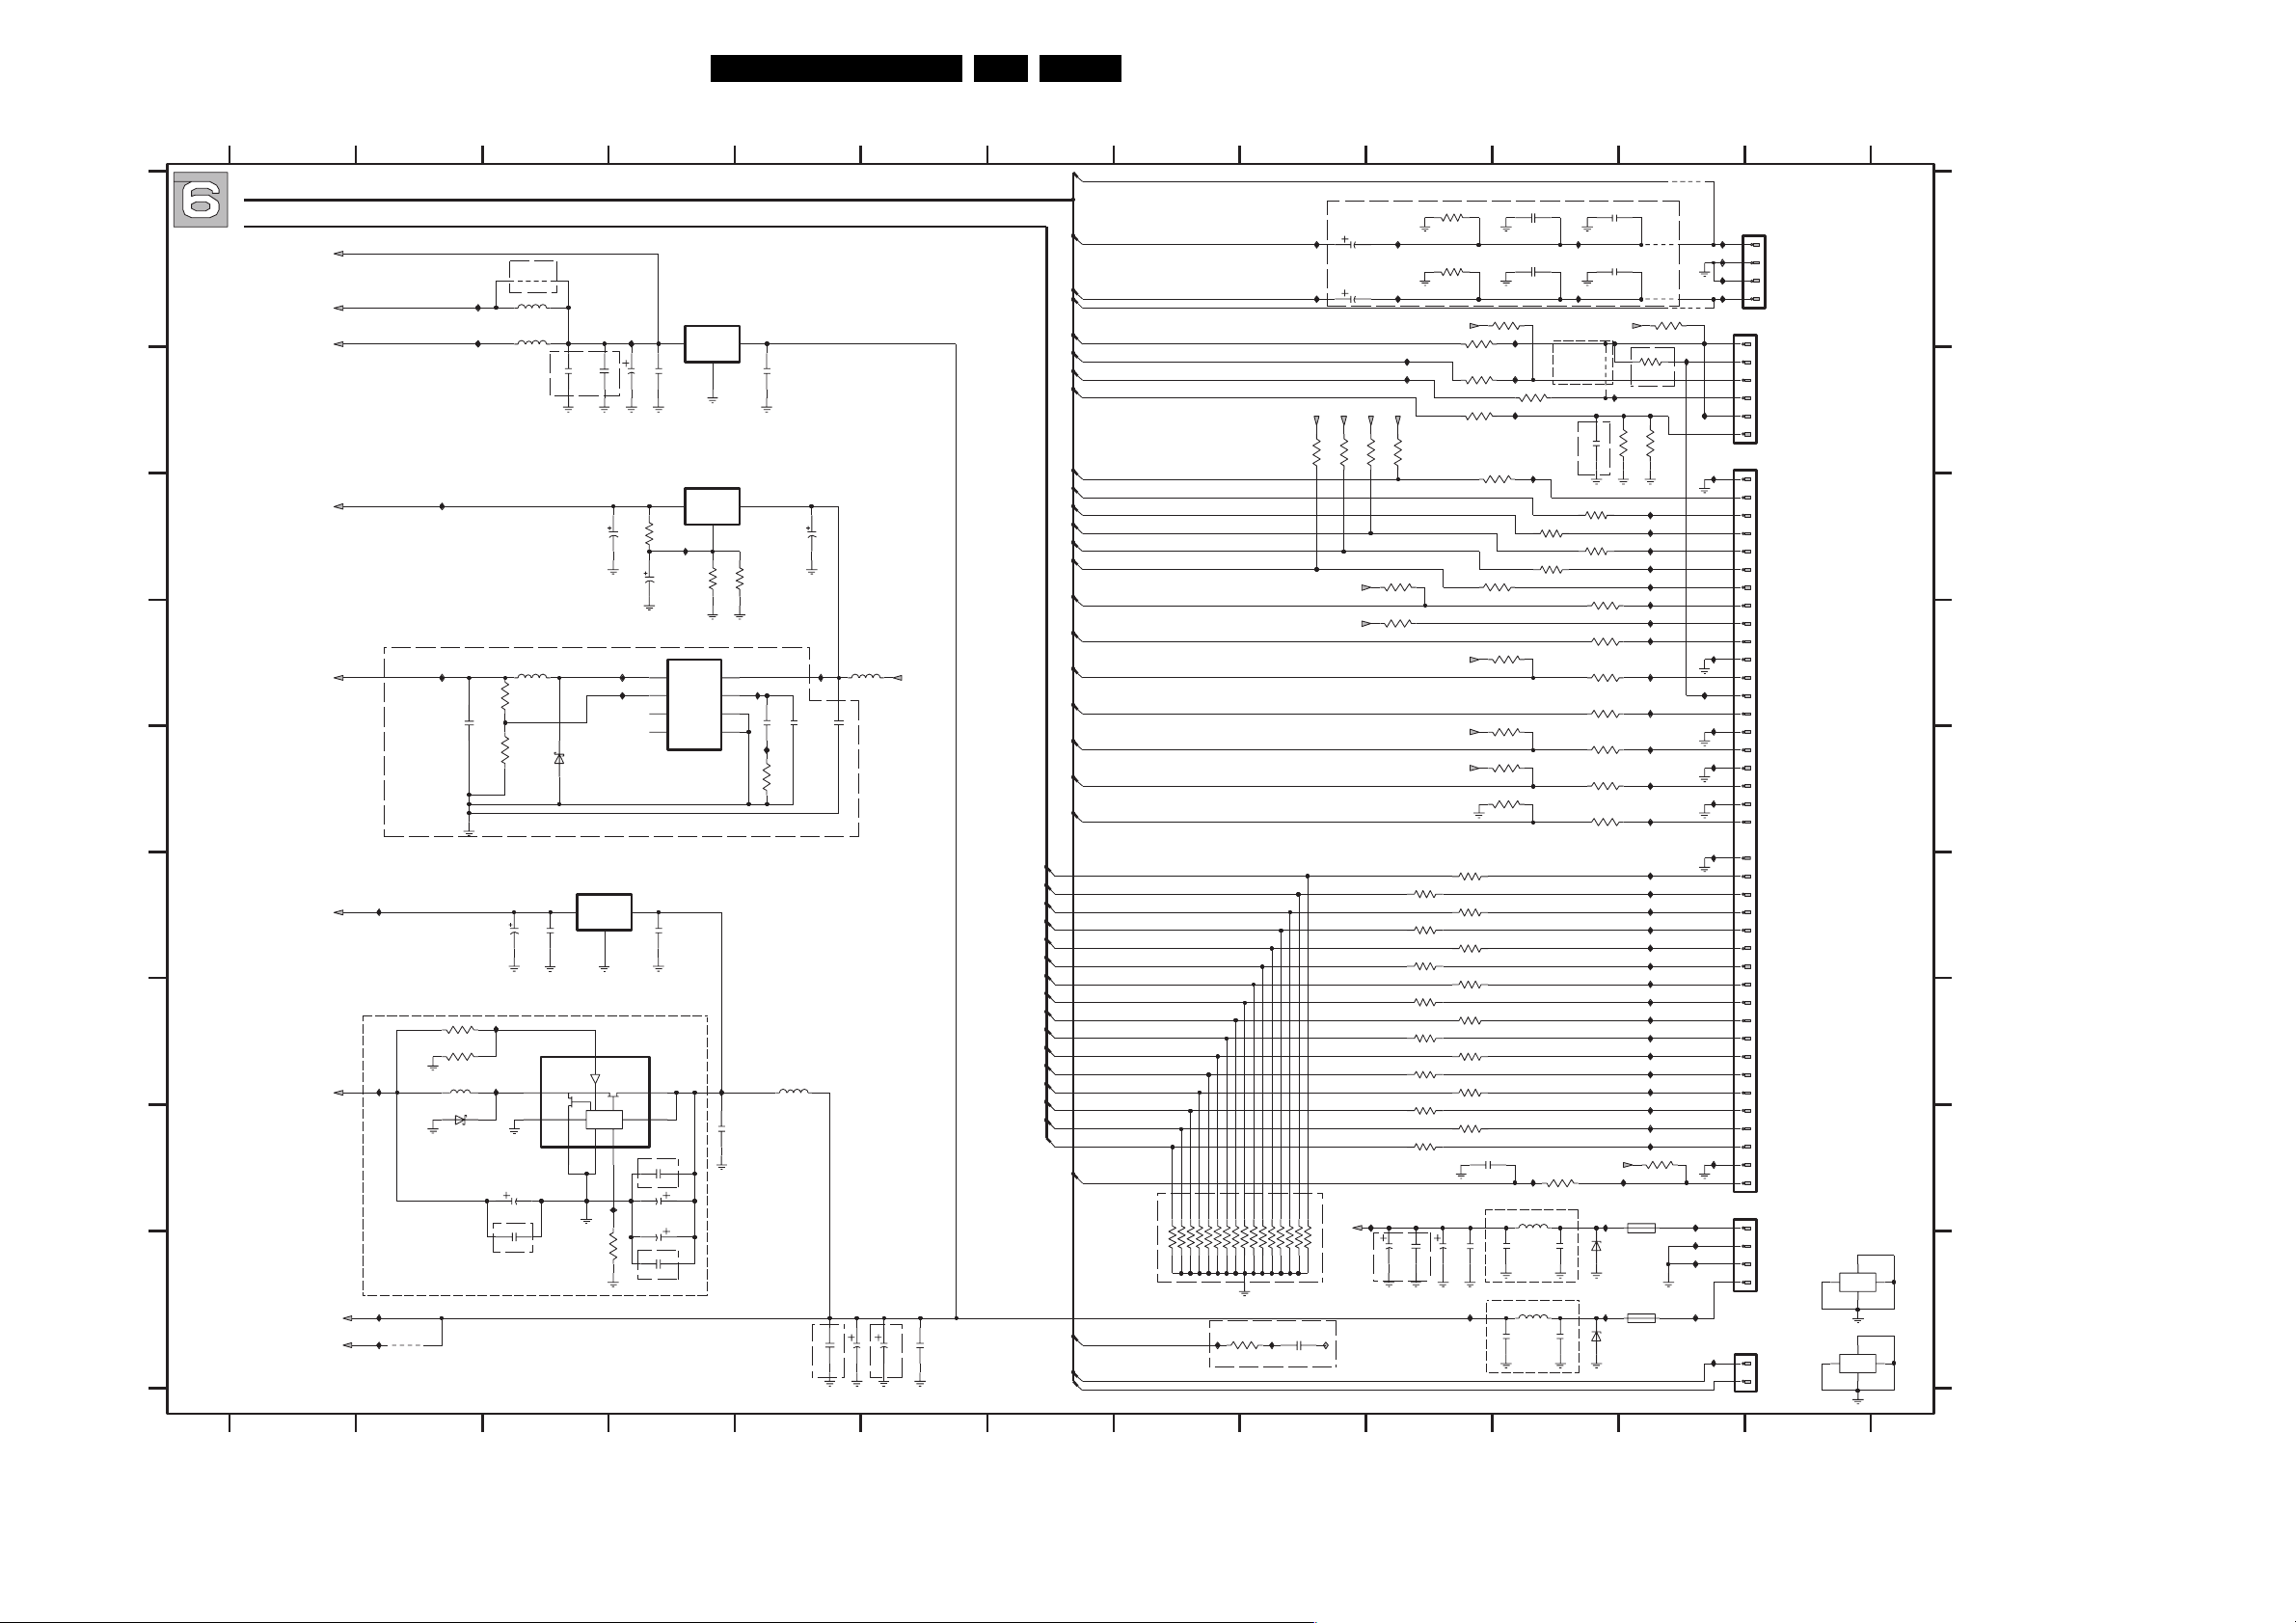
Electrical Diagrams and Print-Layouts
EN 26VAD 8041 7.
Servo Board: Power, Connectors
12345678910
CENTAURUS-DRAM-FLASHROM
{AUDIOL,AUDIOR,RX1_MASTER,DEBUG(11),TX1,TX2,HDASPN,CS0,CS1,HA0,HA1,HA2,HPDIAGN,HIRQ,HDACKN,IORDY,HRDN,HRWN,HDRQ,HRESET,IEC958,RX2,RFP5,RFN5}
HD(0:15)
A
B
C
D
E
F
G
H
I
3V3
A3V3
D3V3
+5V25
+5V25
D1V8
D1V8
I697
I648
I650
+5V
I654
5VA
I694
OPTIONB: OPTIONAL +5V25 REGULATOR CIRCUIT
I687
OPTIONB: OPTIONAL D1V8 REGULATOR CIRCUIT
4604
NOTE:
1 2 3 4 5 6 7 8 9 10111213
OPTIONB
4605
I629
5602
I633
5603
2655
OPTIONB
5617
47u
3K9
3694
22u
2665
1K2
3693
6607
16V10u
2669
100n
2670
I652
3660
68K
3661
150K
I647
5609
10u
6603
SK14
OPTIONA: DENOTES COMPONENT(S) WILL BE MOUNTED BEFORE MASS PRODUCTION
OPTIONB: DENOTES COMPONENT(S) WILL BE MOUNTED WHEN NEEDED
4
LX I|O
SYNC
5
2615
22u
2673
22u
OPTIONB
2
SL12
GND
6
22u
LD1117
OUT
7608
2672
GND
1
CTRL
I634
22u
2612
2666
10u 16V
I688
I690
DT18
IN
7
FB
ILIM
OFF
8
2
I656
3686
330R
3
DNIN
U_|D
22u
2611
3695
2667
7606
L5970D
1
5
2
6
2671
7604
TEA1207T
OPTIONB
2674
22u
2651
22u
2659
22u
2675
22u
OPTIONB
120R
16V10u
7603
DT33
LD1117
2
OUT
IN
1
100n
7607
(ADJUSTABLE)
LD1117
DT
2
IN
OUT
ADJ
1
1%
I696
1%
3696
560R
OUT
VCC
COMP
FB
INH
SYNC
VREF
GND
100n
I667
3
1
2618
3697
100n
11 12 13
+5V
3618
1K0
OPTIONB
3609
220R
I611
I612
I613
I614
I615
I616
I668
I617
I618
I619
I620
I621
I622
I623
I624
I625
I626
I627
I628
I631
I632
I636
I637
I638
I641
I642
I643
I644
I645
1601
F 1.1A
16Vdc
SMD1812
1602
F 1.1A
6Vdc
4610
4611
3647
10K
3604
10K
220R
4612
I674
4613
1600-3
I602
50
I675
49
I673
48
I605
47
1600-5
46
45
44
43
I671
42
41
1600-1
I683
40
39
38
37
36
35
34
33
32
31
I679
30
29
I662
28
27
I678
26
25
I670
24
23
I669
22
21
I677
19
18
17
16
15
14
13
12
11
10
9
8
7
6
5
4
3
I672
2
1
1600-2
I653
+12V
I676
53
54
I538
55
56
I659
+5V
1600-4
I681
51
52
1600-7
AA3E1A-G2K2L
61
1600-6
AA3E1A-G2K2L
57
62
64
63
58
60
59
RX2
AUDIOR
AUDIOL
TX2
3
2610
100n
3
16V
2668
1%
1K2
8
I691
4
3
7
2664
10u
I689
5616
+12V
22n
2663
220p
2662
22u
I692
4K7
3692
5614
22u
2677
OPTIONB
22u
2654
OPTIONB
2614
100u
2608
100n
RX1_MASTER
TX2
TX1
DEBUG(11)
HDASPN
CS1
CS0
HA2
HA0
HPDIAGN
HA1
HIRQ
HDACKN
IORDY
HRDN
HRWN
HDRQ
HD(15)
HD(0)
HD(14)
HD(1)
HD(13)
HD(2)
HD(12)
HD(3)
HD(11)
HD(4)
HD(10)
HD(5)
HD(9)
HD(6)
HD(8)
HD(7)
HRESET
IEC958
RFN5
RFP5
OPTIONB
3650-4
3650-1
3650-2
3650-3
3651-3
18
27
36
45
36
10K
10K
10K
10K
3651-2
3651-1
3651-4
7
18
2
45
10K
10K
10K
I660
3665
100R
OPTIONB
3653-2
3653-3
3653-4
5
36
27
4
10K
10K
10K
I695
I684
I685
3652-2
3653-1
3652-4
3652-1
3652-3
18
45
18
36
27
10K
10K
10K
10K
10K
2661
100n
+5V
3614
10K
I661
OPTIONB
+5V
10K
3613
+5V
+5V
+12V
2621
2622
10K
47u
47u
+5V
I651
3612
OPTIONB
3605
3606
470R
3608
2602
10n
10n
3617
470R
1K
I606
I607
3607
I609
470R
1K
I610
3689
82R
3615-3
82R
3615-1
82R
3690
22R
3624
10K
3627
10K
3629
10K
3684
10K
2605
I646
10p
5615
100n
100n
2623
EMI-FILTER
5607
2626
100n
EMI-FILTER
3602
100K
I600
3603 2603
100K
I603
+5V
I657
I663
+5V
10K
10K
3611
3620
10K
3621
10K
+5V
+5V
+5V
3631-4
33R
3631-3
3631-2
33R
3631-1
33R
33R
3635-4
3635-3
33R
33R
3635-2
33R
3635-1
3639-4
33R
33R
3639-3
3639-1
33R
33R
3639-2
33R
3643-3
3643-4
33R
33R
3643-2
3643-1
33R
33R
22u
22u
2607
2676
47u
2609
2653
I658
ON BOTTOM
SIDE PCB
OPTIONB
3648
82R
2624
2625
I601
I604
OPTIONB
3615-4
3615-2
100n
100n
82R
82R
6604
6605
2604
2600
33p
2601
33p
4615
I608
100n
3619
82R
3622
22R
3623
82R
3625
22R
3626
82R
3628
82R
3630
22R
+5V
I680
BZX384-C15
I682
MM3Z6V2
3610
I649
SMD1812
1600-1 B12
1600-2 H12
1600-3 A12
1600-4 I12
1600-5 A12
1600-6 I13
1600-7 I13
1601 H12
1602 I12
2600 A11
2601 A11
2602 A11
A
2603 A11
2604 B11
2605 H10
2607 I10
2608 I6
2609 I10
2610 B5
2611 B4
2612 B4
2614 I6
2615 H3
2618 H4
2621 A9
2622 A9
B
2623 I11
2624 I11
2625 I11
2626 I11
2651 H4
2653 I10
2654 I5
2655 B3
2659 H4
2661 I9
2662 D5
C
2663 D5
2664 D5
2665 D2
2666 C3
2667 C4
2668 C5
2669 F3
2670 F3
2671 F4
2672 B3
2673 H3
2674 H4
D
2675 I4
2676 I10
2677 I5
3602 A10
3603 A10
3604 A12
3605 A10
3606 B10
3607 B11
3608 B10
3609 B12
3610 B11
E
3611 B10
3612 B9
3613 B9
3614 B9
3615-1 C11
3615-2 C11
3615-3 C11
3615-4 C11
3617 A11
3618 B12
3619 D11
F
3620 C10
3621 D10
3622 D11
3623 D11
3624 D11
3625 D11
3626 E11
3627 E11
3628 E11
3629 E11
3630 E11
3631-1 F10
G
3631-2 F10
3631-3 F10
3631-4 F10
3635-1 G10
3635-2 G10
3635-3 F10
3635-4 F10
3639-1 G10
3639-2 G10
3639-3 G10
3639-4 G10
3643-1 H10
H
3643-2 H10
3643-3 G10
3643-4 H10
3647 H12
3648 H11
3650-1 H8
3650-2 H8
3650-3 H8
3650-4 H8
3651-1 H8
3651-2 H8
3651-3 H8
3651-4 H8
I
3652-1 H9
3652-2 H9
3652-3 H9
3652-4 H9
3653-1 H9
3653-2 H9
3653-3 H9
3653-4 H9
3660 G2
3661 G2
3665 I9
3684 E11
3686 I3
3689 C11
3690 C11
3692 E5
3693 E3
3694 D3
3695 C4
3696 C4
3697 C4
4604 I2
4605 A3
4610 A12
4611 A12
4612 A12
4613 A12
4615 B11
5602 A3
5603 A3
5607 I11
5609 G2
5614 G5
5615 H11
5616 D6
5617 D3
6603 H2
6604 I11
6605 I11
6607 E3
7603 A4
7604 G4
7606 D4
7607 C4
7608 F3
I538 I12
I600 A10
I601 A11
I602 A12
I603 A10
I604 A11
I605 A12
I606 B11
I607 B11
I608 B11
I609 B11
I610 B11
I611 C12
I612 C12
I613 C12
I614 C12
I615 C12
I616 C12
I617 D12
I618 D12
I619 D12
I620 E12
I621 E12
I622 E12
I623 F12
I624 F12
I625 F12
I626 F12
I627 F12
I628 F12
I629 A2
I631 F12
I632 G12
I633 A2
I634 A4
I636 G12
I637 G12
I638 G12
I641 G12
I642 G12
I643 G12
I644 H12
I645 H12
I646 H11
I647 G3
I648 G2
I649 H12
I650 I2
I651 H10
I652 G3
I653 H12
I654 I2
I656 H3
I657 B10
I658 I10
I659 I12
I660 I8
I661 I9
I662 D12
I663 B10
I667 G4
I668 D12
I669 E12
I670 E12
I671 B12
I672 H12
I673 A12
I674 B12
I675 A12
I676 I12
I677 E12
I678 D12
I679 D12
I680 H11
I681 I12
I682 I11
I683 B12
I684 A9
I685 A9
I687 D2
I688 D4
I689 D5
I690 D4
I691 D5
I692 E5
I694 C2
I695 I9
I696 C4
I697 F2
TR 22011_001
300604
Page 27
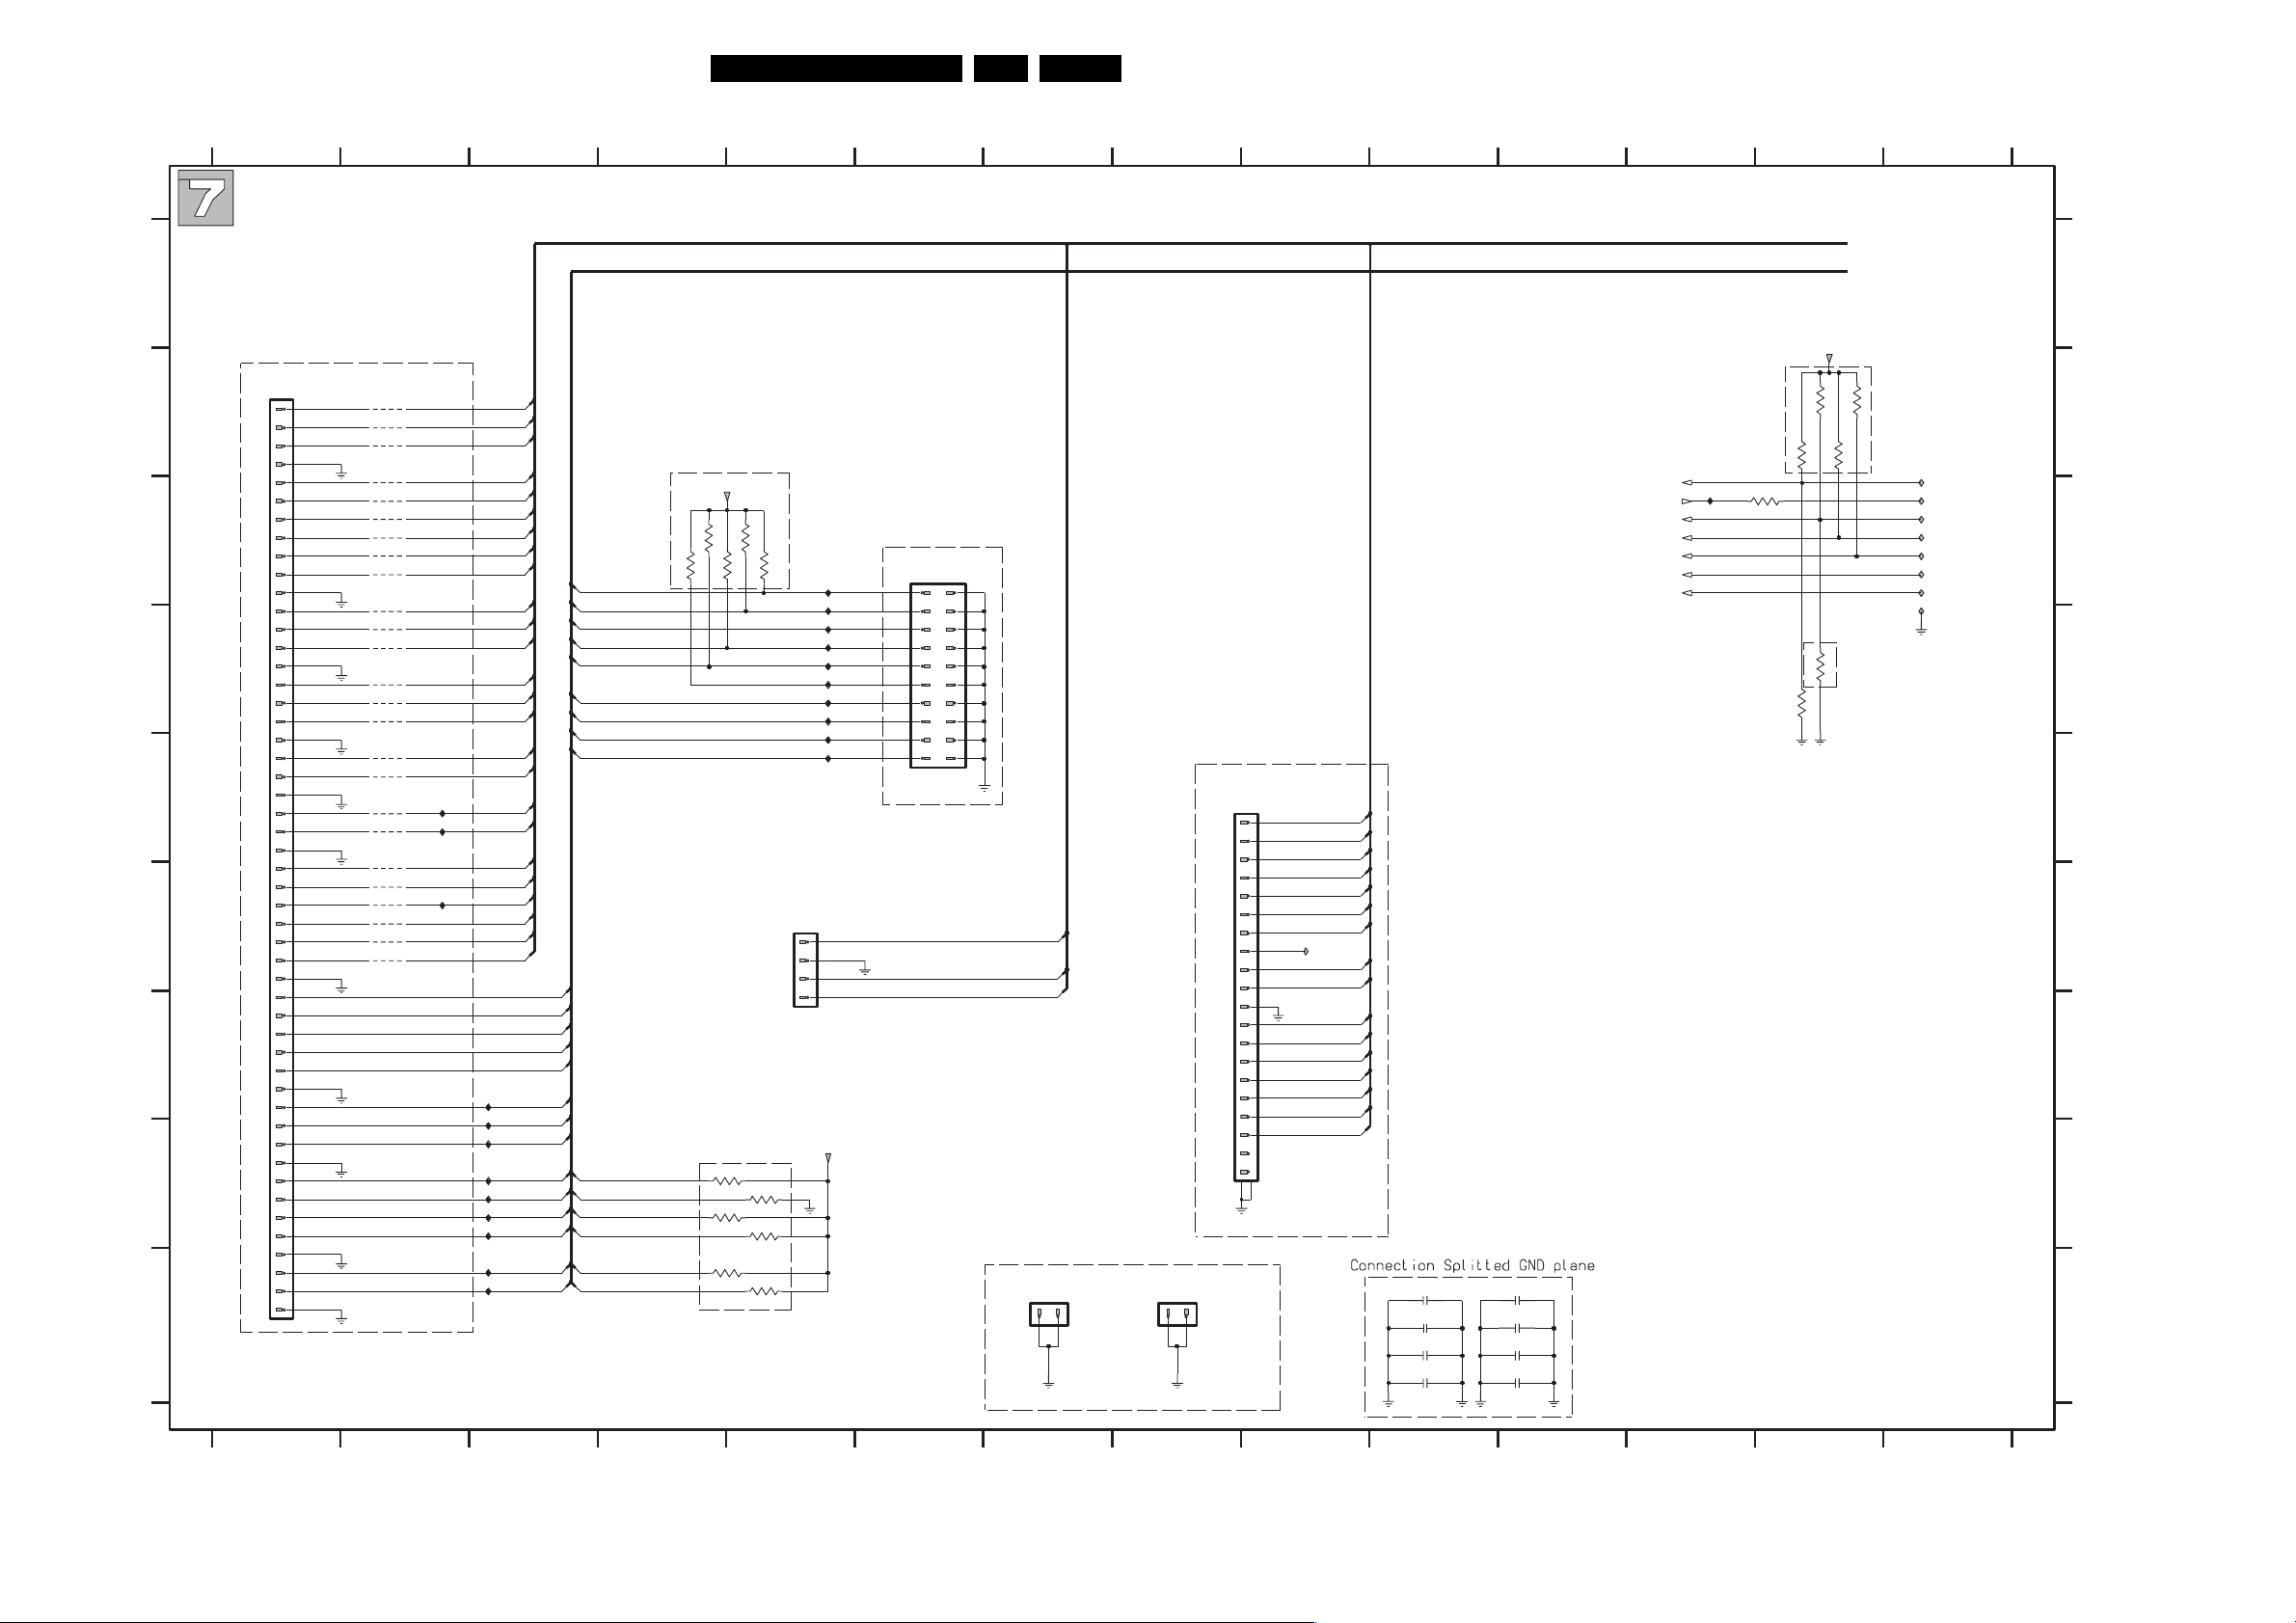
Electrical Diagrams and Print-Layouts
2
2
2
2
2
2
2
2
2
2
2
2
2
2
2
2
2
2
2
2
2
2
2
2
Servo Board: Tray Motor Connections
12
{RAD,SERVO-COMM,MOTO1,MRN,RX1_MASTER,TX1,A1,A2,CALF,VRIN,D1_TILTN,D2_TLN,D3_REN,D4_FEN,S1_MIRN,S2,FTC,MON1,MON2,RX2,TX2,PPNO,IRQN,PORN,T1,SCL,SDA,S2-XDN,DRIVER-ON,FO-,FO+,VFOO-,VFOO+,RA,VRAOO,SL+,SL-,FOC+,FOC-,TR+,TR-,TRAYSW,SL,VMOTO1O}
A
OPTIONA
1700
B
C
D
E
F
G
H
1
2
3
4
5
6
7
8
9
10
11
12
13
14
15
16
17
18
19
20
21
22
23
24
25
26
27
28
29
30
31
32
33
34
35
36
37
38
39
40
41
42
43
44
45
46
47
48
49
50
I
12
4701-118
4701-227
4701-336
4701-445
4702-3
36
4702-227
4702-118
4703-445
4703-336
4703-227
4703-118
45
4702-4
4705-118
5
4706-44
4704-336
45
4704-4
18
4704-1
454705-4
4704-227
4705-227
18
4706-1
4705-336
4706-227
4707
36
4706-3
I721
I722
I723
S2-XDN
D1_TILTN
D2_TLN
D3_REN
D4_FEN
S1_MIRN
MON1
MON2
PPNO
RX1_MASTER
PORN
L700
L701
L702
I715
L703
I716
I717
I718
I719
3456
CALF
A2
A1
OPTIONB
3711
D3V3
3709
10K
OPTIONB
3702
10K
3704
10K
3706
10K
10K
3710
3708
10K
10K
3712
10K
I700
I701
I702
I703
I704
I705
I707
I709
I711
I713
OPTIONB
1703
DV
1
34
56
78
9
11 12
13 14
15 16
17 18
19
Solder Pads
1702
1
2
3
4
D3V3
3703
10K
3705
10K
3707
10K
56
2
10
20
VRIN
DEBUG(4)
DEBUG(0)
S2
FTC
TX1
TX2
RX2
IRQN
MRN
T1
SCL
SDA
DEBUG(4)
DEBUG(0)
DEBUG(1)
DEBUG(2)
DEBUG(3)
DEBUG(5)
DEBUG(6)
DEBUG(7)
DEBUG(10)
DEBUG(8)
DEBUG(12)
DEBUG(13)
DEBUG(9)
DEBUG(11)
DEBUG(1)
DEBUG(2)
DEBUG(3)
DEBUG(6)
DEBUG(7)
DEBUG(8)
DEBUG(5)
DEBUG(10)
DEBUG(8)
DEBUG(12)
DEBUG(13)
DEBUG(9)
DEBUG(11)
34
TRAYSW
Mechanical holes
EN 27VAD 8041 7.
78
OPTIONA
1705
TR-
TR+
2122
0001
1
2
7
0002
1
2
8
2700
2702
2704
2706
10
10n
10n
10n
10n
1
2
3
4
5
6
7
8
9
10
11
12
13
14
15
16
17
18
19
20
9
FO-
VFOO-
FO+
VFOO+
VRAOO
I724
MOTO1
VMOTO1O
SL+
FOC+
FOC-
RAD
SERVO-COMM
DRIVER-ON
RA
SL
SL-
910
11 12 13 14
OPU/CHEETAH_QD/DRIVERS/CENTAURUS/POWER-CONN
DEBUG(0:13)
D3V3
10K
3714
3713
10K
10K
3716
3715
3717
33R
OPTIONB
3718
3719
10K
10K
OPTIONB
2701
2703
2705
2707
JTAG_TRST_CENT
JTAG_TDO_CENT
JTAG_TDI_CENT
JTAG_TMS
JTAG_TCK
JTAG_WE
JTAG_RY_BY
NOTE:
10n
10n
10n
10n
11
I720
OPTIONA: DENOTES COMPONENT(S) WILL BE MOUNTED BEFORE MASS PRODUCTION
OPTIONB: DENOTES COMPONENT(S) WILL BE MOUNTED WHEN NEEDED
12 13 14
10K
I706
I714
I710
I712
I708
I731
I732
I735
JTAG CONECTION
TR 22012_001
300604
0001 I7
0002 I8
1700 B1
1702 F5
1703 C6
1705 E9
2700 I10
2701 I11
2702 I10
2703 I11
2704 I10
2705 I11
2706 I10
A
2707 I11
3702 H5
3703 H5
3704 H5
3705 H5
3706 I5
3707 I5
3708 C5
3709 C4
3710 C4
3711 C4
3712 C5
B
3713 B13
3714 B13
3715 B13
3716 B13
3717 C13
3718 D13
3719 D13
4701-1 B
4701-2 B
4701-3 B
4701-4 C
4702-1 C
C
4702-2 C
4702-3 C
4702-4 D
4703-1 D
4703-2 D
4703-3 C
4703-4 C
4704-1 E
4704-2 E
4704-3 D
4704-4 E
D
4705-1 D
4705-2 F
4705-3 F
4705-4 E
4706-1 F
4706-2 F
4706-3 F
4706-4 D
4707 F2
I700 C5
I701 C5
I702 D5
E
I703 D5
I704 D5
I705 D5
I706 B14
I707 D5
I708 C14
I709 D5
I710 C14
I711 D5
I712 C14
I713 E5
I714 C14
F
I715 H3
I716 H3
I717 H3
I718 I3
I719 I3
I720 C12
I721 E2
I722 E2
I723 F2
I724 F9
I731 C14
G
I732 C14
I735 C14
L700 G3
L701 G3
L702 H3
L703 H3
H
I
Page 28
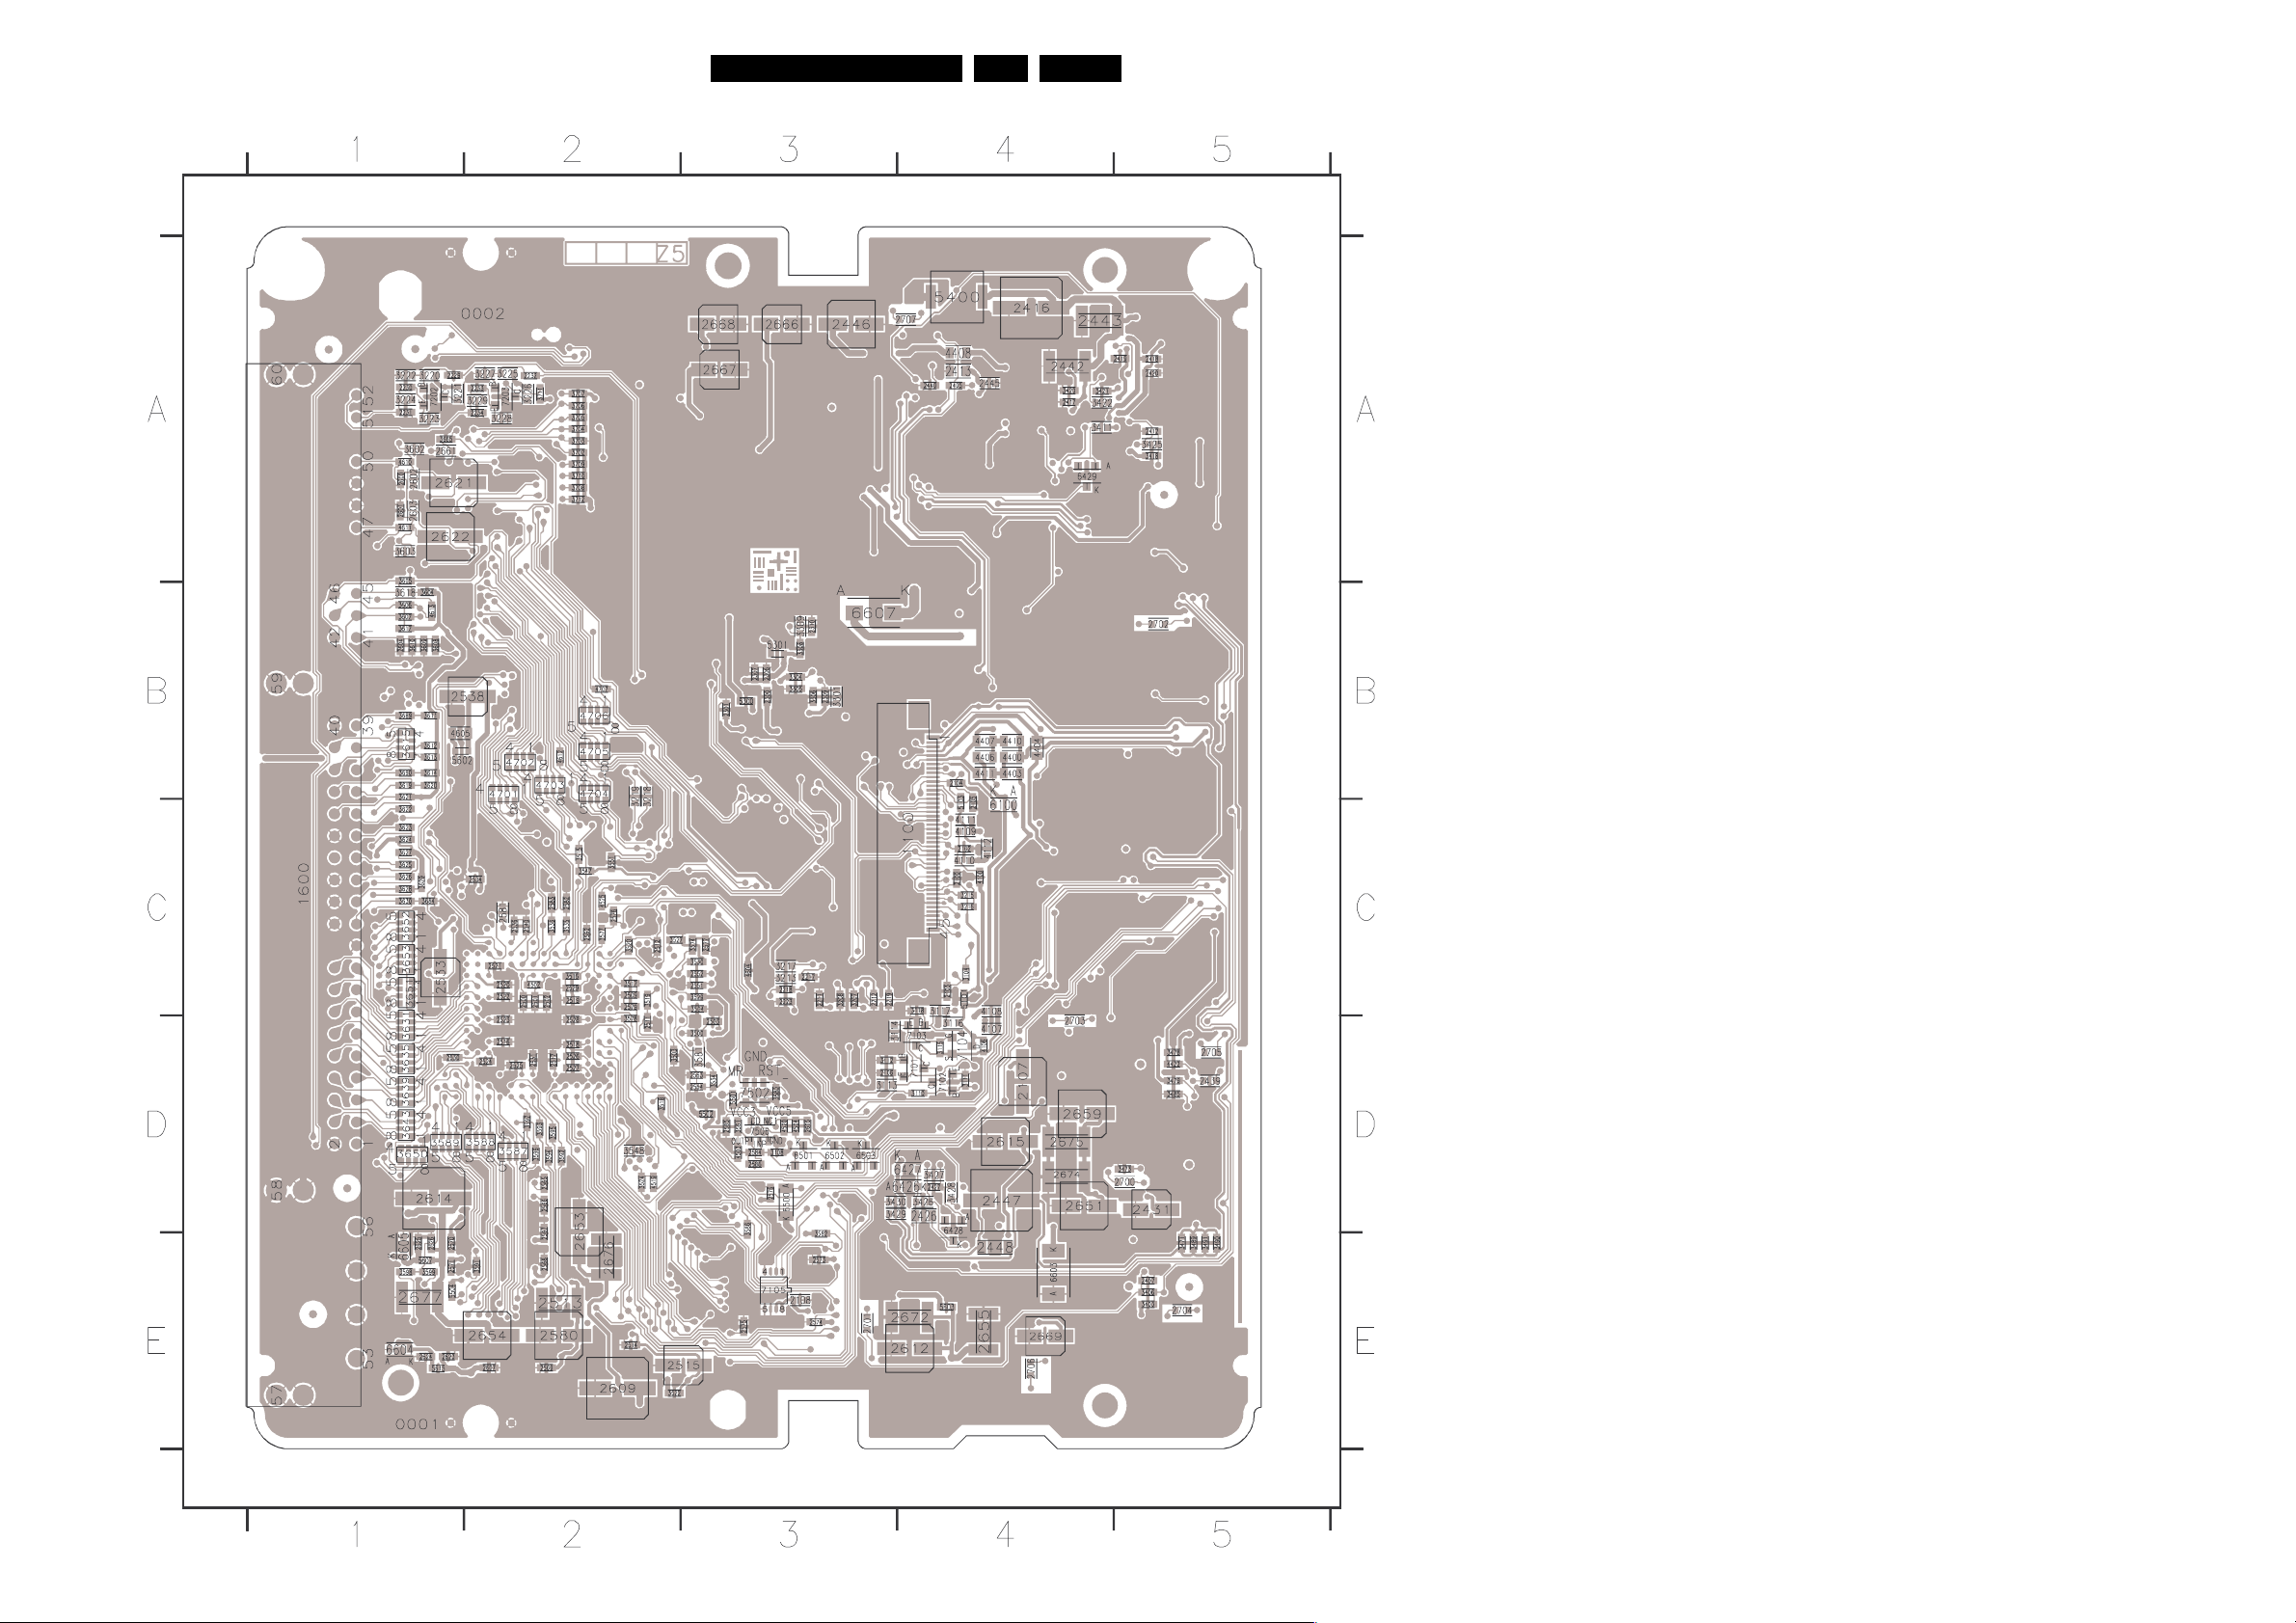
Electrical Diagrams and Print-Layouts
Layout Servo Board (Top Side)
EN 28VAD 8041 7.
TR 22013_001
070704
1100 C4
1600 C1
2100 C4
2102 C4
2103 C4
2104 B4
2105 C4
2106 D3
2107 D4
2108 E3
2211 C3
2212 C3
2217 C3
2218 C3
2219 C3
2223 C3
2229 A1
2230 A1
2231 A1
2232 A2
2233 A2
2234 A2
2300 B3
2301 B3
2306 B3
2307 B3
2309 B3
2310 B3
2405 A4
2407 E5
2412 A5
2413 A4
2416 A4
2417 A4
2418 A5
2419 A5
2420 A5
2426 D4
2427 D4
2431 D5
2439 D5
2440 A4
2442 A4
2443 A4
2445 A4
2446 A3
2447 D4
2448 E4
2500 C2
2501 C2
2502 C2
2503 D3
2509 C2
2511 D2
2512 C2
2513 E2
2514 E2
2515 E3
2516 D2
2517 D2
2518 D2
2519 C2
2520 C2
2521 C2
2522 C2
2523 D2
2524 D2
2525 D2
2526 D2
2527 D2
2528 D2
2529 C2
2530 D1
2531 D2
2533 C1
2534 C2
2536 C2
2538 B2
2540 C2
2551 C3
2552 C3
2562 C2
2563 D3
2564 D3
2565 D2
2566 D2
2567 E2
2568 E2
2569 E2
2570 E1
2571 E1
2573 E3
2574 E3
2575 E3
2576 D3
2577 C3
2578 C2
2579 C2
2580 E2
2581 C2
2582 C2
2583 C2
2584 D3
2585 D3
2586 D3
2600 A1
2601 A1
2602 A1
2603 A1
2604 B1
2605 D3
2607 E2
2609 E2
2612 E4
2614 D1
2615 D4
2621 A1
2622 A1
2623 E1
2624 E1
2625 E1
2626 E1
2651 D4
2653 D2
2654 E2
2655 E4
2659 D4
2661 A1
2666 A3
2667 A3
2668 A3
2669 E4
2672 E4
2674 D4
2675 D4
2676 E2
2677 E1
2700 D5
2701 E3
2702 B5
2703 D4
2704 E5
2705 D5
2706 E4
2707 A4
3104 C4
3108 D3
3110 D4
3111 D4
3112 D3
3113 D3
3114 D3
3115 D4
3116 D4
3117 C4
3118 C4
3207 C3
3208 C3
3213 C3
3215 C4
3216 C4
3217 C3
3218 B2
3219 B2
3220 A1
3221 A1
3222 A1
3223 A1
3224 A1
3225 A2
3226 A2
3227 A2
3228 A2
3229 A2
3301 B3
3304 B3
3305 B3
3306 B3
3308 B3
3309 B3
3403 E5
3406 E5
3411 A4
3418 A5
3420 A4
3421 A4
3422 A4
3425 A5
3426 04
3427 04
3428 04
3429 03
3430 03
3471 E5
3473 05
3478 05
3479 05
3485 05
3489 E5
3490 E5
3491 E5
3500 03
3503 02
3504 C3
3515 C2
3516 C2
3517 C2
3518 02
3519 C2
3520 C2
3522 E2
3524 02
3527 C2
3529 C3
3530 C3
3534 03
3535 C2
3536 C2
3547 C2
3548 02
3551 C2
3561 03
3574 C3
3577 C2
3578 02
3580 03
3581 03
3582 E3
3586 03
3587 02
3588 02
3589 01
3591 E2
3592 02
3593 02
3594 02
3595 02
3596 02
3597 02
3598 E1
3599 E1
3602 A1
3603 A1
3604 B1
3605 A1
3606 B1
3607 B1
3608 B1
3609 B1
3610 B1
3611 B1
3612 B1
3613 B1
3614 B1
3615 B1
3617 B1
3618 B1
3619 B1
3620 B1
3621 B1
3622 C1
3623 C1
3624 C1
3625 C1
3626 C1
3627 C1
3628 C1
3629 C1
3630 C1
3631 01
3635 D1
3639 D1
3643 D1
3650 D1
3651 C1
3652 C1
3653 C1
3665 A1
3684 C1
3689 B1
3690 B1
3702 A2
3703 A2
3704 A2
3705 A2
3706 A2
3707 A2
3708 A2
3709 A2
3710 A2
3711 A2
3712 A2
4100 C4
4106 04
4107 D4
4108 C4
4109 C4
4110 C4
4111 C4
4112 C4
4400 B4
4403 B4
4404 B4
4406 B4
4407 B4
4408 A4
4410 B4
4411 B4
4422 D5
4502 C2
4503 03
4504 D3
4519 D2
4520 D3
4525 C2
4604 C3
4605 B1
4610 A1
4611 A1
4612 B2
4613 B1
4701 B2
4702 B2
4703 B2
4704 B2
4705 B2
4706 B2
4707 B2
5101 C4
5103 C4
5300 B3
5301 B3
5400 A4
5501 D3
5502 03
5504 E1
5602 B1
5603 E4
5607 E1
5615 E1
6100 C4
6426 04
6427 D4
6428 D4
6429 A4
6500 D3
6501 D3
6502 D3
6503 D3
6603 E4
6604 E1
6605 E1
6607 B3
7101 D4
7102 D4
7103 D4
7104 D4
7105 E3
7202 A1
7203 A2
7502 D3
7506 D3
Page 29
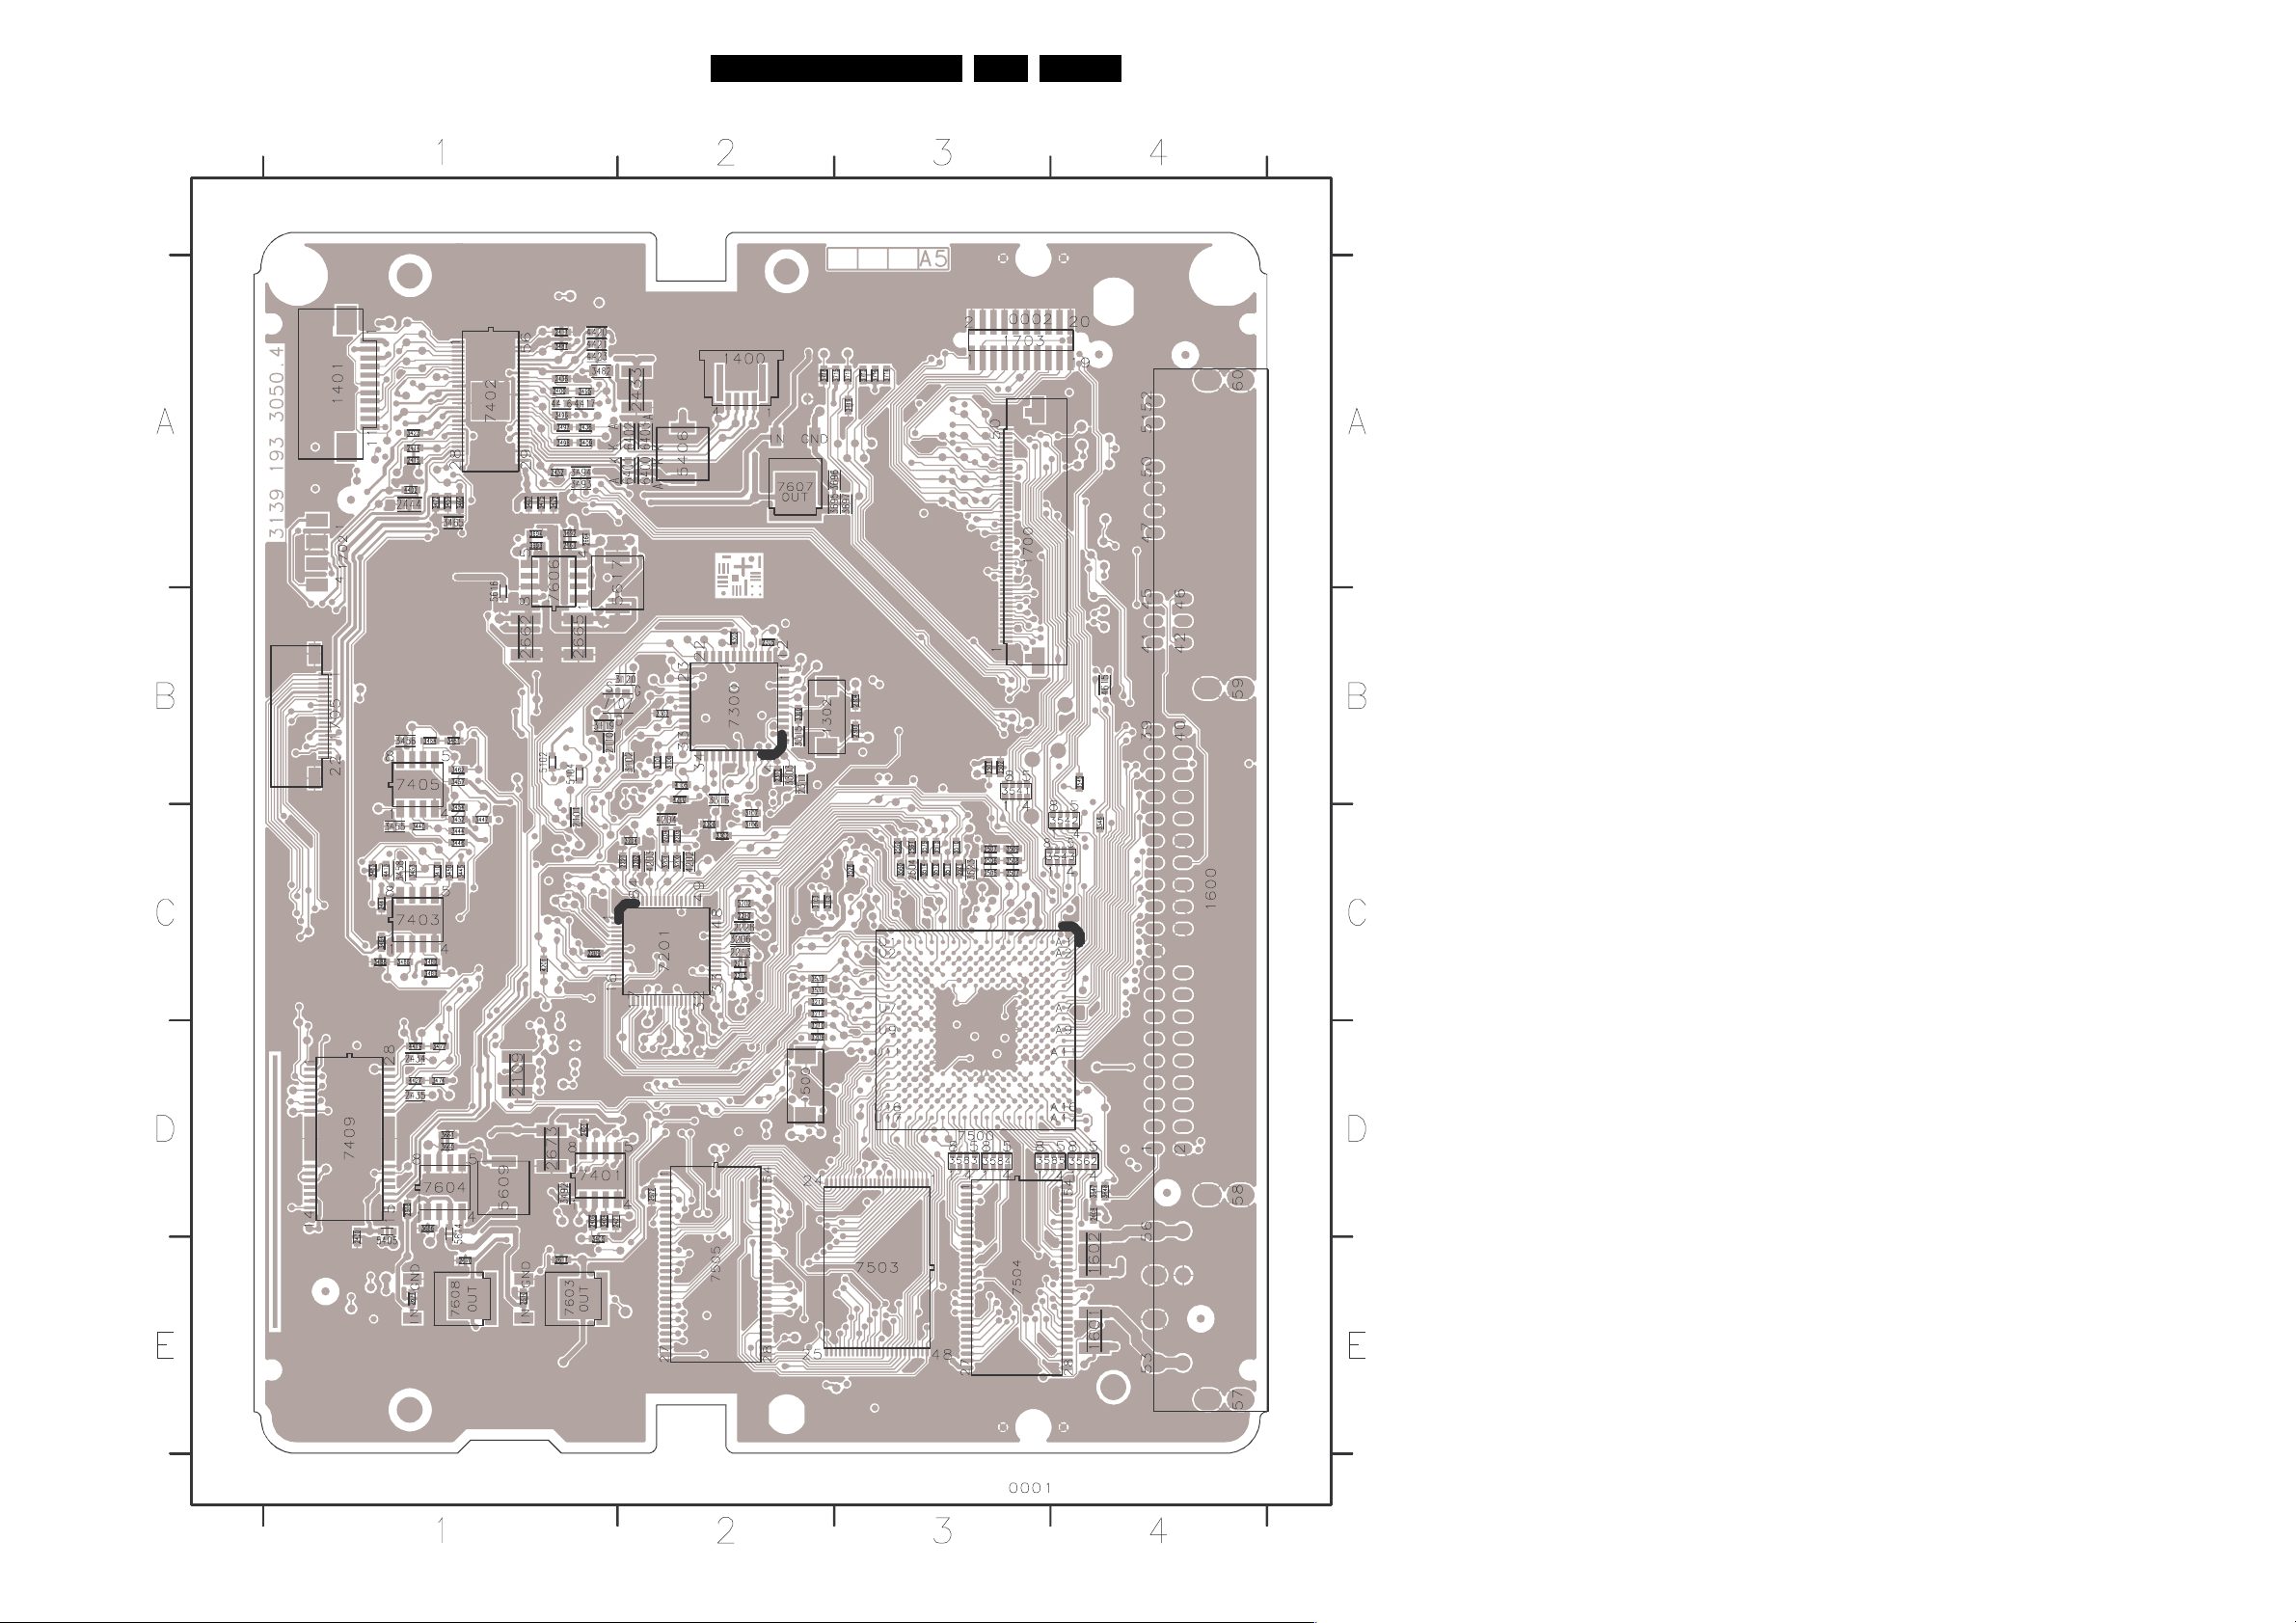
Electrical Diagrams and Print-Layouts
Layout Servo Board (Bottom Side)
EN 29VAD 8041 7.
TR 22014_001
260704
1302 B2
1400 A2
1401 A1
1500 D2
1601 E4
1602 E4
1700 A3
1702 A1
1703 A3
1705 B1
2101 C1
2109 D1
2110 B1
2204 C2
2205 C2
2209 C1
2210 C2
2213 C2
2214 C2
2215 C2
2221 C2
2228 C2
2302 B2
2303 B3
2304 B3
2305 B2
2308 C2
2311 B2
2312 B2
2400 A1
2401 D1
2406 D1
2409 A1
2411 A1
2414 A1
2415 A1
2421 D1
2430 E1
2432 A1
2433 A2
2434 D1
2435 D1
2436 A1
2438 A1
2441 C1
2444 A1
2504 C3
2505 C3
2506 C3
2507 C3
2550 C3
2561 C3
2572 D2
2608 D4
2610 E1
2611 E1
2618 D1
2662 B1
2663 A1
2664 A1
2665 B1
2670 E1
2671 E1
2673 D1
3100 B2
3101 B2
3102 B2
3103 C2
3105 C2
3106 C2
3107 C2
3119 B1
3120 B2
3200 C2
3201 C2
3202 C2
3204 C2
3206 C2
3209 D2
3210 D2
3211 C2
3212 C2
3300 B2
3302 C2
3303 B2
3315 B2
3316 B2
3404 D1
3405 E1
3410 C1
3423 A1
3440 C1
3444 C1
3445 C1
3446 C1
3447 C1
3450 C1
3452 C1
3453 C1
3454 C1
3455 C1
3456 B1
3457 B1
3458 C1
3459 A1
3460 A1
3461 B1
3462 B1
3463 C1
3464 B1
3465 A1
3472 A1
3474 D1
3475 A1
3476 A1
3477 D1
3480 C1
3481 A1
3482 A1
3483 C1
3484 C1
3486 C1
3487 A1
3488 C1
3492 D1
3493 A1
3494 A1
3495 A1
3496 A1
3497 A1
3498 A1
3501 B3
3502 B3
3507 C3
3508 C3
3509 C3
3510 C3
3511 C3
3512 C3
3513 C3
3514 C3
3521 C3
3523 C3
3528 C3
3531 C2
3532 C2
3541 B3
3542 C4
3543 C4
3545 B4
3546 C4
3560 C3
3562 D4
3579 C3
3583 D3
3584 D3
3585 D4
3647 D4
3648 D4
3660 D1
3661 D1
3686 D1
3692 A1
3693 A1
3694 A1
3695 A2
3696 A2
3697 A3
3713 A3
3714 A3
3715 A3
3716 A3
3717 A3
3718 A2
3719 A3
4105 B2
4200 B2
4201 C1
4202 C2
4203 C2
4204 C2
4303 B2
4402 A1
4413 C1
4416 A1
4417 A1
4419 D1
4420 A1
4421 A1
4423 A1
4427 D1
4615 B4
5102 B1
5104 B1
5202 C2
5405 E1
5406 A2
5609 D1
5614 D1
5616 B1
5617 A1
6400 A2
6401 A2
6402 A2
6403 A2
7107 B1
7201 C2
7300 B2
7401 D1
7402 A1
7403 C1
7405 B1
7409 D1
7500 D3
7503 E3
7504 E3
7505 E2
7603 E1
7604 D1
7606 A1
7607 A2
7608 E1
Page 30

Electrical Diagrams and Print-Layouts
EN 30VAD 8041 7.
Page 31
Alignments, Test Procedures
8. Alignments, Test Procedures
EN 31VAD8041 8.
8.1 Adjust Laser Control
In case of exchanging DVD-M or PWB an adjustment to align
OPU and PWB to each other is necessary.
8.1.1 Adjustment Procedure
– Connect the Digital Board to a PC via serial cable (3122
785 90017)
– Start up Hyperterminal or any other terminal program with
the correct settings (19200 8-N-1)
– Power on the set
– Call up nucleus 931 of the DSW. The adjustment takes
about 30 seconds
Example:
DS:> 931
93100
Test OK @
– Now data within the OPU EEPROM and the FLASH of the
PWB are aligned.
8.2 Drive Test
8.2.1 Short Term Test Procedure
Test 1: Disc LVP 12.01 (7104 099 91731) test layer change on
track 28 ->31
Duration: 1 minute
In case no defect is found during the “Short Term Test
Procedure” the test has to be extended with a burn in test “Long Term Test Procedure”.
The burn in test described herein should be done with a
DVD+RW disc.
Make a recording of 1 to 2 hours on M1/HQ and M2/SP mode.
Remark:
Attention! To prevent scratches the discs should be treated
very carefully!
Heavily scratched discs have a bad influence on the test
performance and should be replaced.
The technician has to decide by visual inspection the reliability
of his test material.
The pictures below show a bad example of discs used too long.
When the LVP12.01 disc is loaded and accepted the next steps
are:
– Skip to track 29.
– Press next to chapter 30.
– Fast forward to halfway track 30
– Play track 30 till track 31 halfway
– When this part of the disc is played without any still pictures
or freeze frames the beamlanding of the OPU is good (the
track transition at the beginning of track 31 gives a short
still picture but this is normal.)
– Stop the disc.
Test 2: DVD+R blank disc type Ricoh 4X (7104 099 94261)
Duration: 4 minutes
– Record 1 minute
–Press stop
– Open / close
– Play back recorded track
Remark: When this disc is used for 30 recordings the disc
appears to be full. But physically the disc is not full and to use
also the remaining space on the disc you can do this by
deleting the index pictures.
Test 3: CD-RW low reflection audio disc. (7104 099 96581)
Duration: 1 minute
– Play a few seconds from track 1
– Skip to the last track
– Play a few seconds of the last track.
– Stop the disc
Figure 8-1
Figure 8-2
8.2.2 Long Term Test Procedure
Following the steps to be taken for all DVD recorders coming in
for service to the workshop related to a DVDM failure and which
have “No Defect Found”, NDF after a Short Term Test.
Page 32
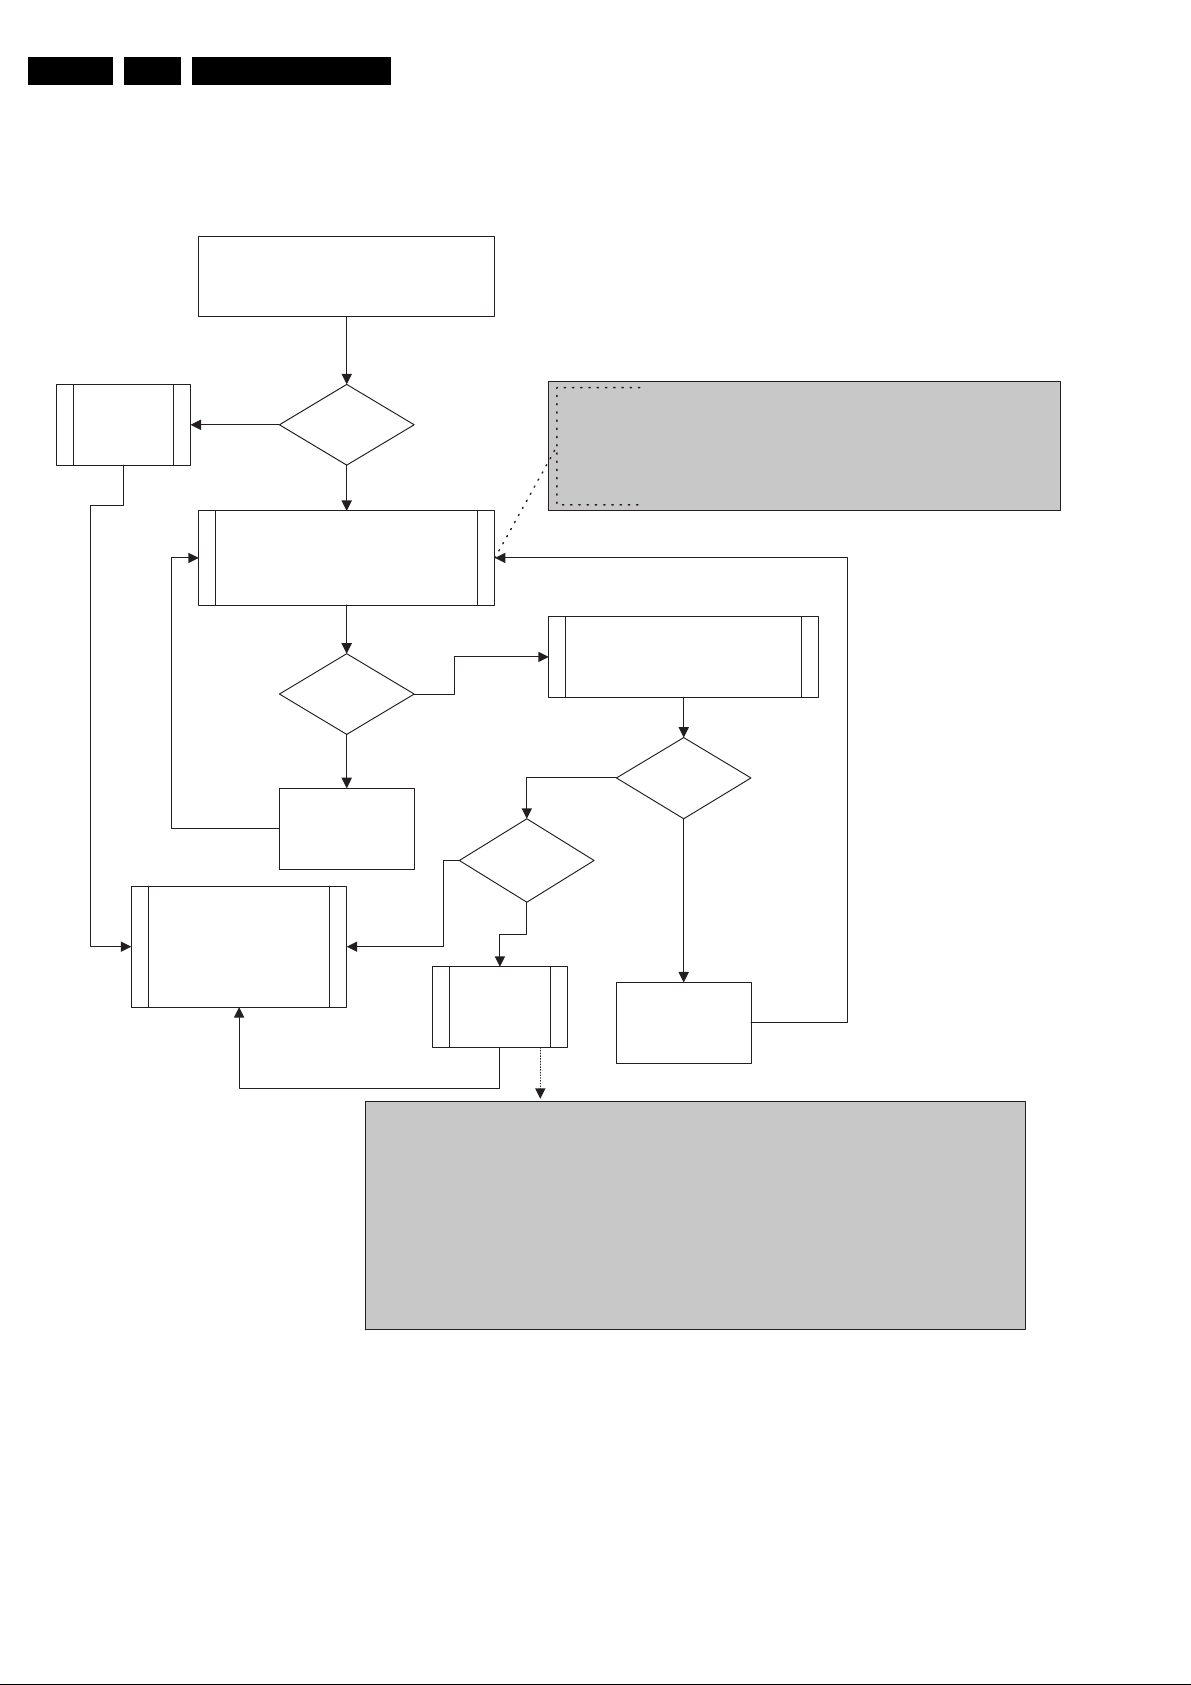
EN 32 VAD80418.
Alignments, Test Procedures
Flowchart for test instruction
In the flowchart below it is described how and when the burn in
test has to be carried out.
incoming DVDR set for repair
normal repair
process
NO
DVDM related
short term test procedure
(see REMARK1):
CD-RW low reflection
DVDM Fails?
exchange DVDM
finalize repair/
general functional test of
complete set
YES
LVP12.01
DVD+R
Yes
Yes
No
Exchanged
DVDM?
Remark 1:
LVP 12.01: 7104 099 91731 track 28 --> 31 : 1 min.
DVD+R: record 1 min./stop/open/close/
playback recorded track : 4 min.
CD-RW low refl.: 7104 099 96581
check readability of TOC : 1 min.
long term test procedure:
DVD+RW burn in recording
1h - 2h
(M1/HQ - M2/SP)
No
DVDM Fails?
Yes
No
NFF process
Remark 2:
NFF process:
- 1st step: contact the customer directly by phone or e-mail to discuss the problem of the set
- 2nd step: if contact with the customer is not possible then add a paper with the returned set,
informing the customer about the possibility to contact the technician directly.
Following information should be mentioned on the paper:
- name of the technician
- company telephone number (extension) of the technician (for direct contact)
- jobsheet number
- information that the set was tested and found to be within the specs. and no failure occured
during the quality and functional check
exchange DVDM
Figure 8-3
Page 33
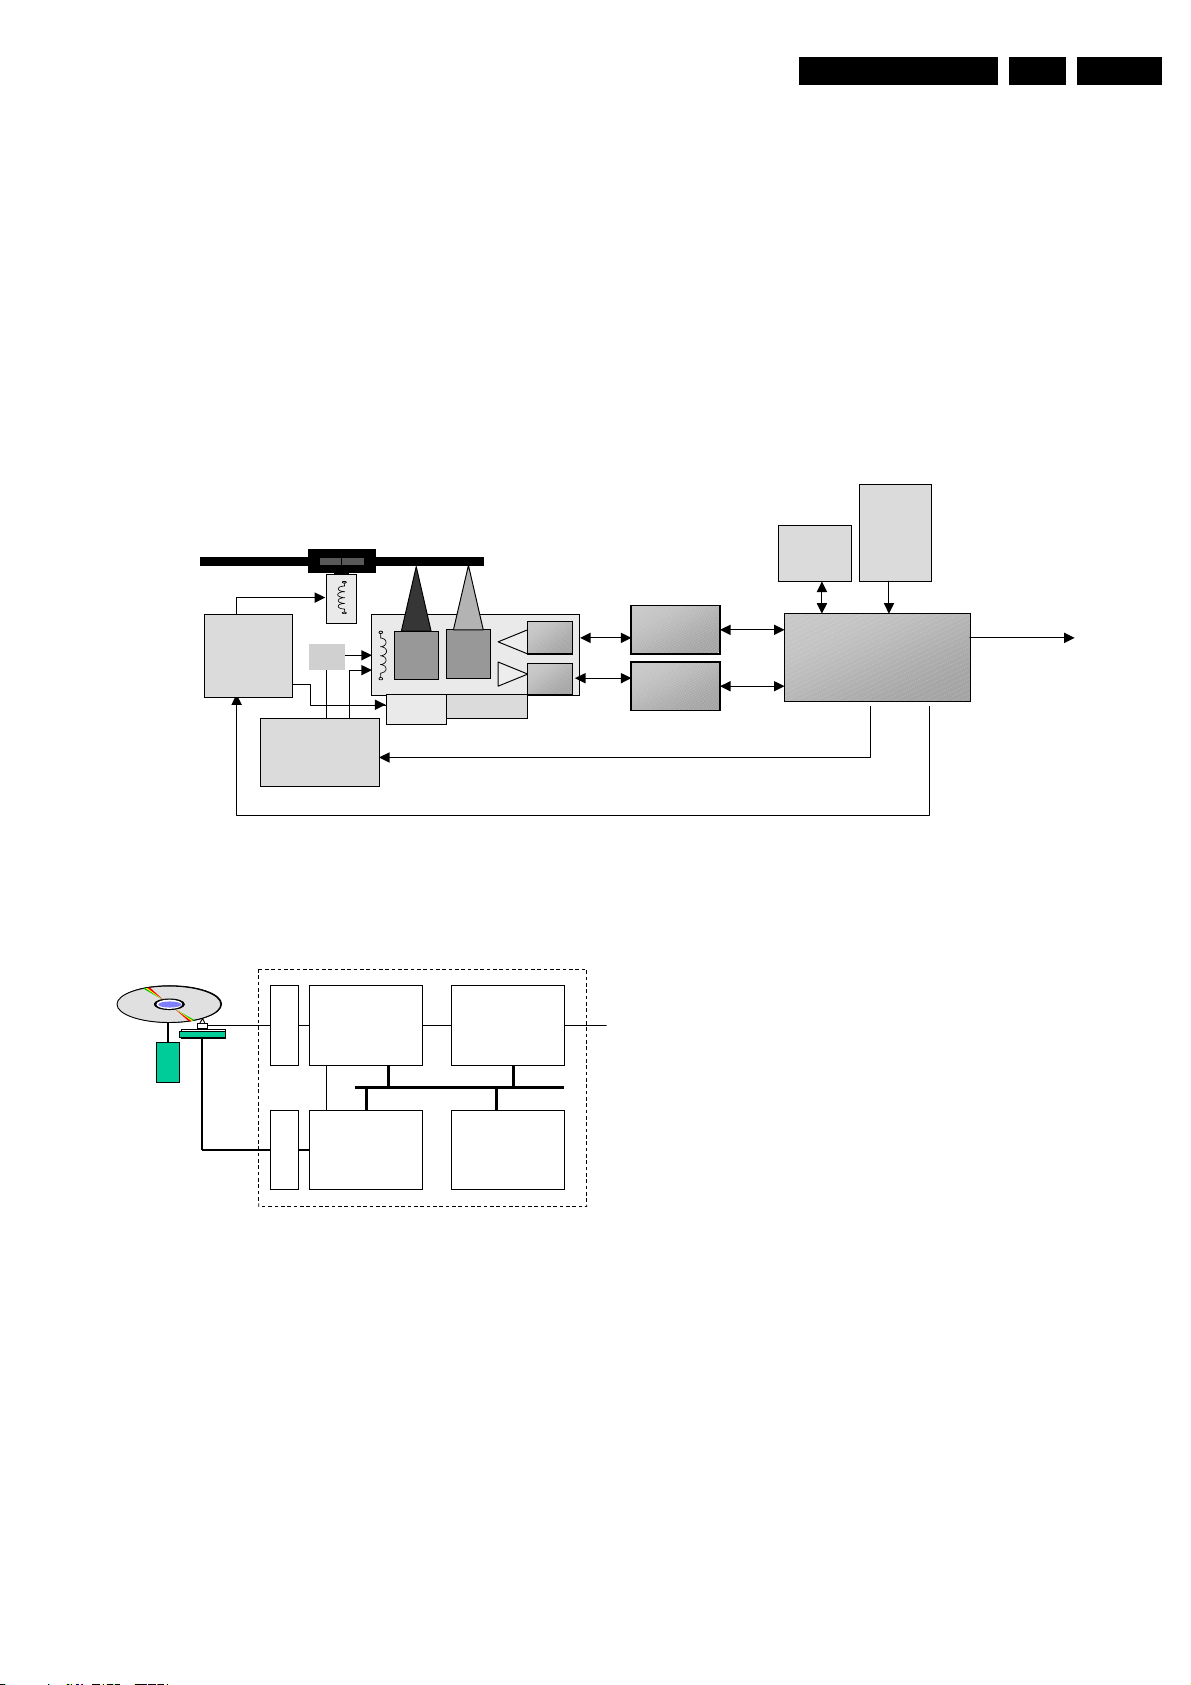
Circuit Descriptions, Abbreviation List, and Data Sheets
9. Circuit Descriptions, Abbreviation List, and Data Sheets
EN 33VAD8041 9.
9.1 General
The VAD8041 module, also known as “AV3.5”, is a Video
Recorder Drive with an IDE interface intended for use in a
consumer DVD+RW/+R video recorder.
The video recorder engine performs all basic servo tasks. It
reads data from and writes data to the disc and controls all
functions like tray control, start/stop the disc, tracking, jumping
and communicating to the host.
9.2 Overall Block Diagram DVDM & Frontend
OPU 66
Laser driver
SA56202
Brush-less
Motordriver
3D
BA5995FM
BA5995FM
Laser
DVD
Stepper
Laser
CD
EEPROM
EL6915
PAEDIC
Laconic
Cheetah
Mechanically, the module consists of a motorized tray loader
that contains the dual laser optical pickup unit and a PCBA that
contains all the electronics needed to control the drive and
interfacing to the MPEG encoder/decoder back-end
application.
There is a temperature sensor included in the drive that
prevents malfunction or destruction of the drive in case the
temperature inside the drive gets too high.
Flash
Sync
ROM
DRAM
Digital Backend
IDE
CENTAURUS
9.3 Centaurus
Centaurus Basic Functions Block Diagram
Channel
Codec
Analogue
Servo
Controller
Analogue
Figure 9-2
The Centaurus, IC7500 is a highly integrated IC that controls all
the functions of the drive. It interfaces via the IDE to the MPEG
back-end and incorporates the following functions:
• CD/DVD channel decoder/encoder
• CD/DVD data block decoder/encoder
• Buffer Manager
• Digital Servo processor using digital signal processor.
• Drive System microprocessor based on MIPS core.
The MIPS microcontroller uses Flash ROM for the firmware
and SRAM to execute the program. SDRAM is provided for the
encoding/decoding function block of centaurus. 2 MBytes of
data buffer size is available inside the IC for data storage.
Manager
Control
Processor
Buffer
Figure 9-1
9.4 Cheetah
The Cheetah, IC7201 is an analogue pre-processing for the
diode signals coming from the OPU. It contains an amplifier
with programmable gain that amplifies the RF signal to adapt
the output for the different reflectivity of the various discs. The
tracking signals are filtered and normalized. In addition the IC
contains a timing circuit for the sample and hold circuits and for
switching the various blocks between read and write.
Supporting functions such as laser control and offset control
are incorporated. Communication to and from the IC is based
on a fast two-wire serial bus that works according to the I2C
interface protocol.
9.5 Laconic
The main function of the LACONIC, IC7300 is to control the
laser power. The IC forms a closed control loop in combination
with the Elantec located on the OPU. It compensates aging and
temperature of the laser. Furthermore it forms a fingerprint
correction loop. It also acts as bridge between IIC and serial
bus of the Elantec laser driver on the OPU.
9.6 Optical Pick-up Unit
The OPU66 is a dual laser Optical Pick-up Unit for DVD+RW/
+R. It consists of a 3-D actuator for focusing, redial tracking and
tilt correction.
• 650nm laser for DVD
• 780nm laser for CD
On the interconnecting flex several electrical components are
mounted.
• Elantec programmable laser diode power
driver
Page 34

EN 34 VAD80419.
• Paedic integrated photo detector with
programmable gain pre-amplifier
• Eeprom containing a number of values
representing adjustments belonging to the OPU.
The laser control and diode signal processor ICs together with
an EEPROM are mounted on the OPU flex.
The laser control IC generates the DVD laser read and writing
signals needed for reading DVD discs and writing DVD+RW /
+R discs (write strategies of DVD+RW / +R discs).
The diode signal processor is an analogue pre-processor
adapted for the CD and CD-R / RW read function.
The EEPROM contains information about writing current,
writing strategies and other parameters belonging to the OPU.
9.7 Motor and Servo drivers
The SA56202 is a one-chip motor driver IC that is capable to
drive all motors of CD or DVD systems: spindle, sled and
loading motors. The driver for the 3-phase, brushless, hallcommutated spindle motor uses True-Silent PWMTM. This
proprietary technology ensures that all 3-phase motor currents
are sinusoidal resulting in an optimally silent and powerefficient driver. Internal compensation of the spindle motor's
back-EMF enables the driver to operate in current-steering
mode without using external power-dissipating sense resistors.
The driver for the 2-phase sled stepper motor operates in
current-steering PWM mode. In addition the IC contains four
full-bridge linear channels that are used to drive the loading
motor.
The 3D actuators (focus, tracking and tilt) are driven by IC
7409, BA5995FM.
Circuit Descriptions, Abbreviation List, and Data Shee ts
Page 35
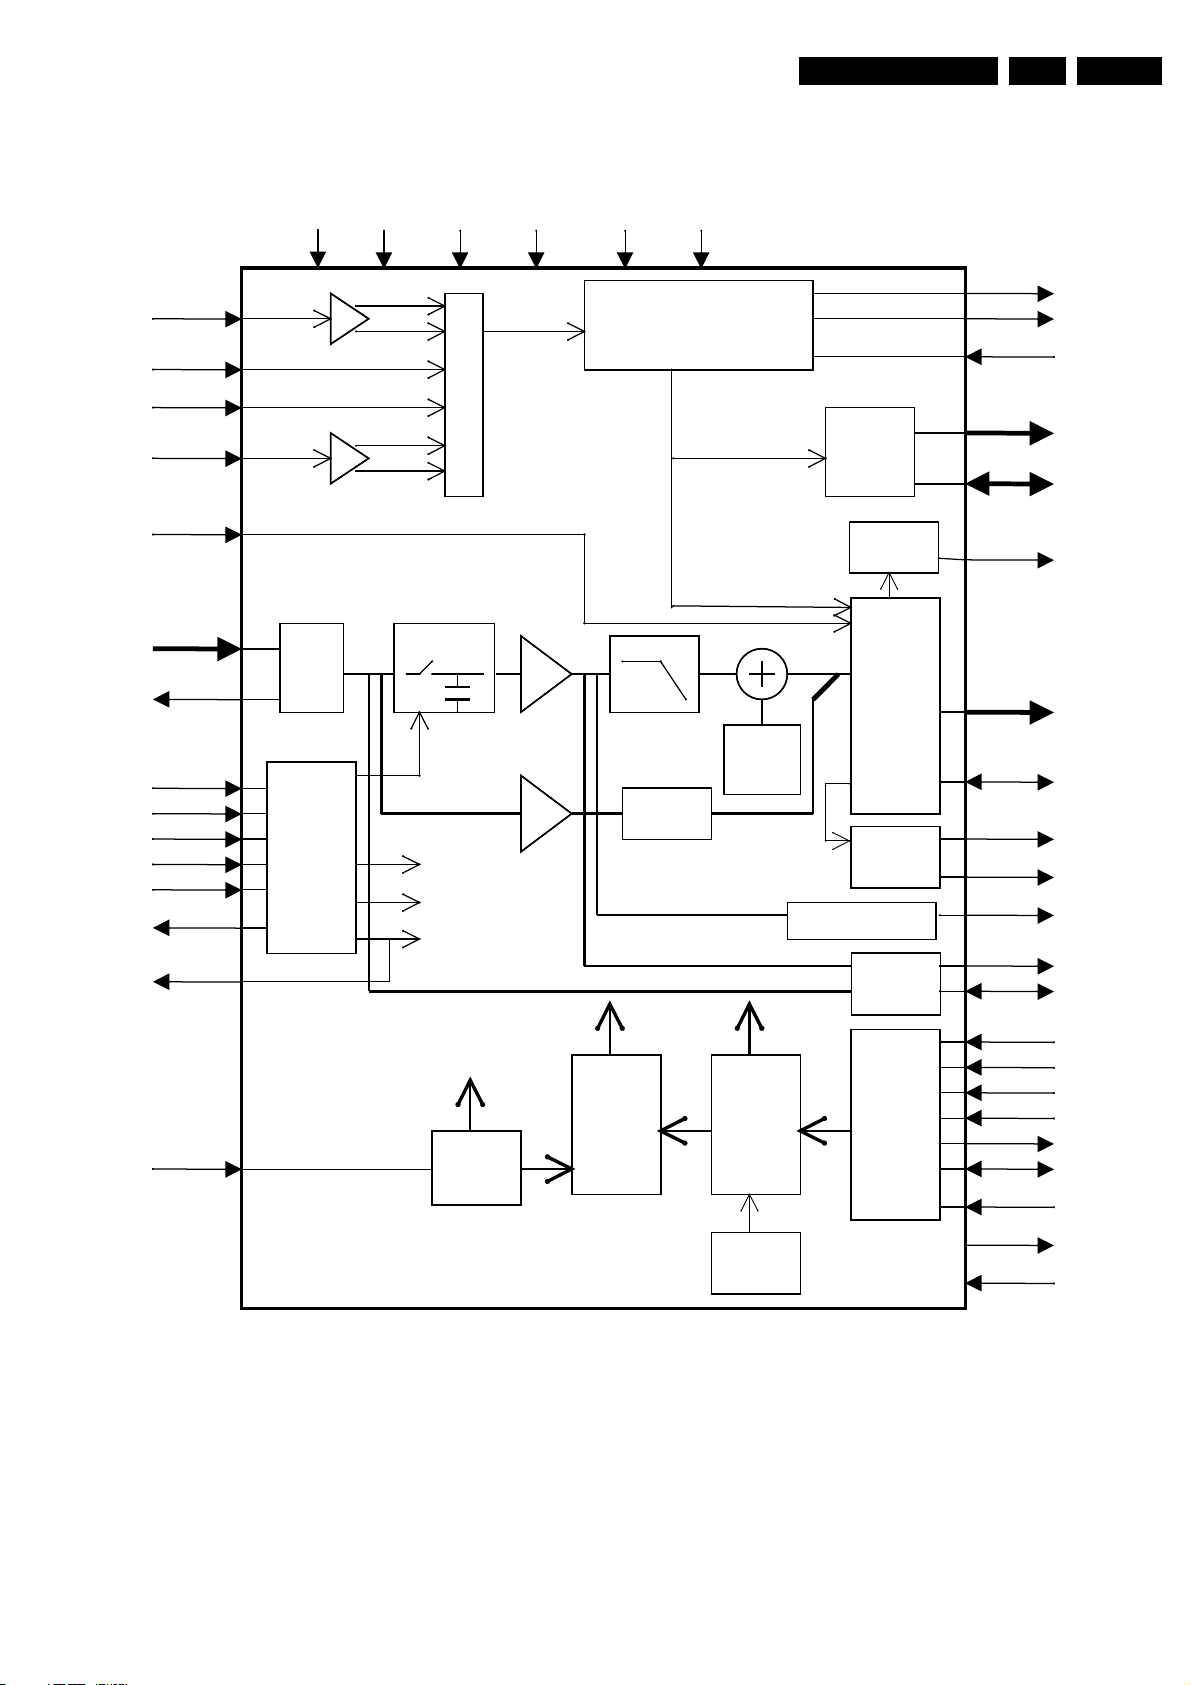
Circuit Descriptions, Abbreviation List, and Data Sheets
:5)
95()
9,$9,+
/$63
55)
5)1,1
5)3,1
5()(&1
56(&3
7+('1
7+('3
5:
7,0287
55()
5)3
5)1
5)5()
$$&$/)
$/)$
'
'7/1
'5(1
')(1
60,1
6;'1
&033
&$&$&&$/)
331
021
021
)7&
&)7&
6,'$
6,&/
6,/'
6(5767
65287
6'$
6&/
7(67
,''4767
9''
9'' *1' *1' 9''' *1''
VG
VG
5)$03
%(7$
33 3URFHVVRU
,QSXW
FLUFXLW
6+
1250
9,
2IIVHW
&RQWURO
()0
7,0
7R$/)$
7R1250
UZ
'3'
*DLQ
325
)7&
%XV
,QWHUIDFH
5HJLVWHUV
DQG
ORJLF
021
'$&V
%DQGJDS
UHIHUHQFH
$/)$
5:287
44
9.8 IC Servo Board
IC7201, TZA1047: Servo Board, Analogue PReprocessor
EN 35VAD8041 9.
Page 36

EN 36 VAD80419.
Table 1: Pin description
Circuit Descriptions, Abbreviation List, and Data Shee ts
Symbol Pin Description
VIH 1 Satellite segment H input
GND1 2 Ground
VIC 3 Central segment C input
VIB 4 Central segment B input
GND1 5 Ground
RFNIN 6 Inverse differential RF input /
Single-ended RF read input
RFPIN 7 Differential RF input/
Single-ended RF write input
VDD1 8 Positive supply
VID 9 Central segment D input
VIA 10 Central segment A input
VDD1 11 Positive supply
VIE 12 Satellite segment E input
VIG 13 Satellite segment G input
RWOUT 14 R/W signal output
SDA 15 Data input/output
SCL 16 Clock input I
I2C
2
C
SILD 17 Strobe line of serial bus interface
SIDA 18 Data line of serial bus interface
SICL 19 Clock line of serial bus interface
TIMOUT 20 EFMTIM test output
R/W 21 External Read/Write signal input
VDDD 22 Positive supply digital part
VSSD 23 digital ground
REF/ECN 24 Reference input for timing signals in EFMTIM bypass mode
[1]
[2]
/
[1]
[1]
/
/
[2]
Inverse EFM clock input
RS/ECP 25 RF sampling signal
EFM clock input
[2]
TH1/EDN 26 Segment sampling timing signal
Inverse EFM data input
TH2/EDP 27 Segment sampling timing signal
EFM data input
[2]
[1]
/
SERTST 28 Enable test mode (Tie to GND or leave open for normal operation)
VDD2 29 Positive supply voltage
Page 37

Circuit Descriptions, Abbreviation List, and Data Sheets
GND2 30 Supply ground
RFP 31 RF output voltage, positive
RFN 32 RF output voltage, negative
RFREF 33 Reference voltage for differential RF output common mode level
PPN 34 Output PP voltage
CFTC 35 FTC high pass filter capacitor
FTC 36 FTC output
GND1 37 Supply ground
CA1 38 Beta circuit external capacitor
CA2 39 Beta circuit external capacitor
CCALF 40 Beta circuit external capacitor
RREF 41 Reference resistor to ground
GND1 42 Supply ground
CMPP 43 MPP external capacitor
VDD1 44 Positive supply
MON1 45 Monitor output voltage
MON2 46 Monitor output voltage
S2/XDN 47 Servo output current
S1/MIRN 48 Servo output current
D4/FEN 49 Servo output current
D3/REN 50 Servo output current
D2/TLN 51 Servo output current
D1 52 Servo output current
IDDQTST 53 Select zero dissipation mode (tie to GND for normal operation)
CALF 54 RF average level signal
A2 55 RF bottom level signal
A1 56 RF top level signal
SROUT 57 shift register output for register test mode
ALFA 58 alfa output current
LASP 59 laser power setpoint signal
TEST 60 Test output
RRF 61 Single ended RF read input voltage
Symbol Pin Description
EN 37VAD8041 9.
Page 38

EN 38 VAD80419.
Symbol Pin Description
WRF 62 Single ended RF write input voltage
VREF 63 PDIC reference voltage output
VIF 64 Satellite segment F input
[1] Only in EFM bypass mode
[2] EFM clock and data when not in EFM bypass mode.
Circuit Descriptions, Abbreviation List, and Data Shee ts
Page 39
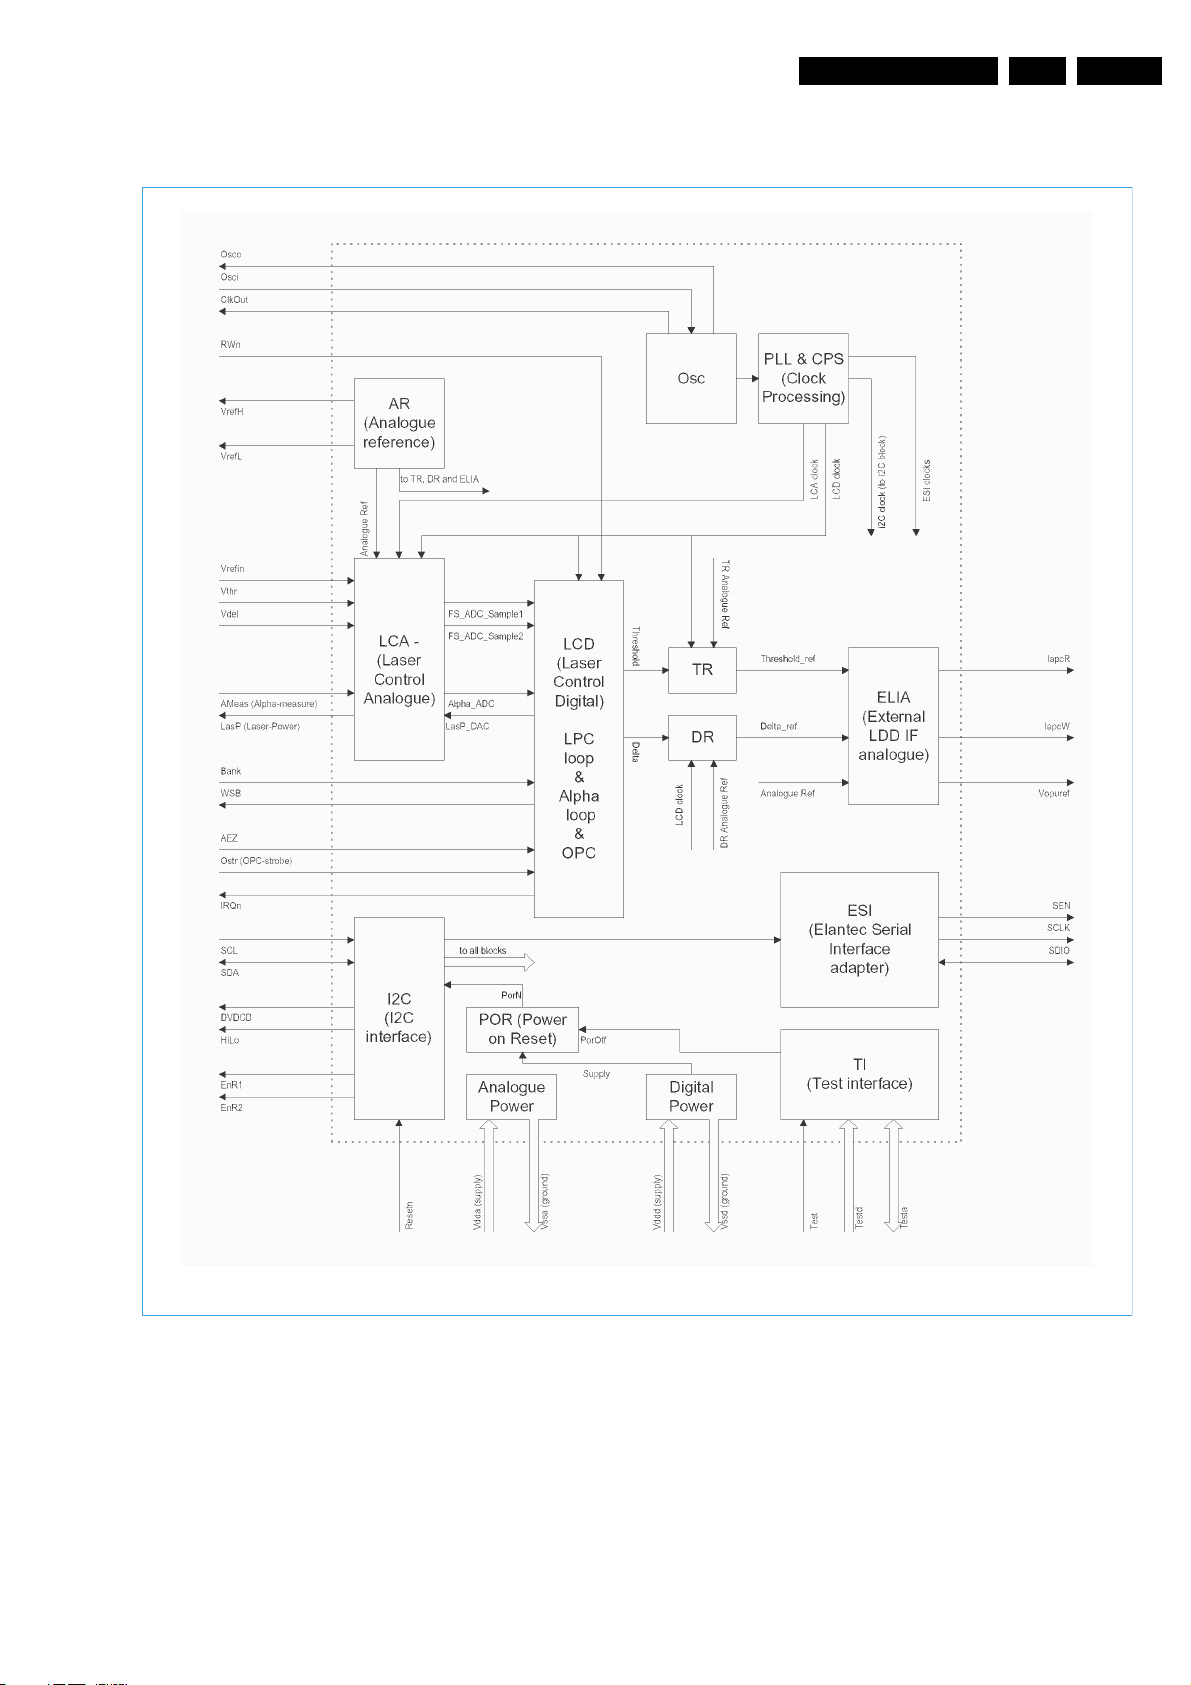
Circuit Descriptions, Abbreviation List, and Data Sheets
IC7300, TZA1042: Servo Baord, Laser Power Controller
Block diagram
EN 39VAD8041 9.
DRAFT
Page 40
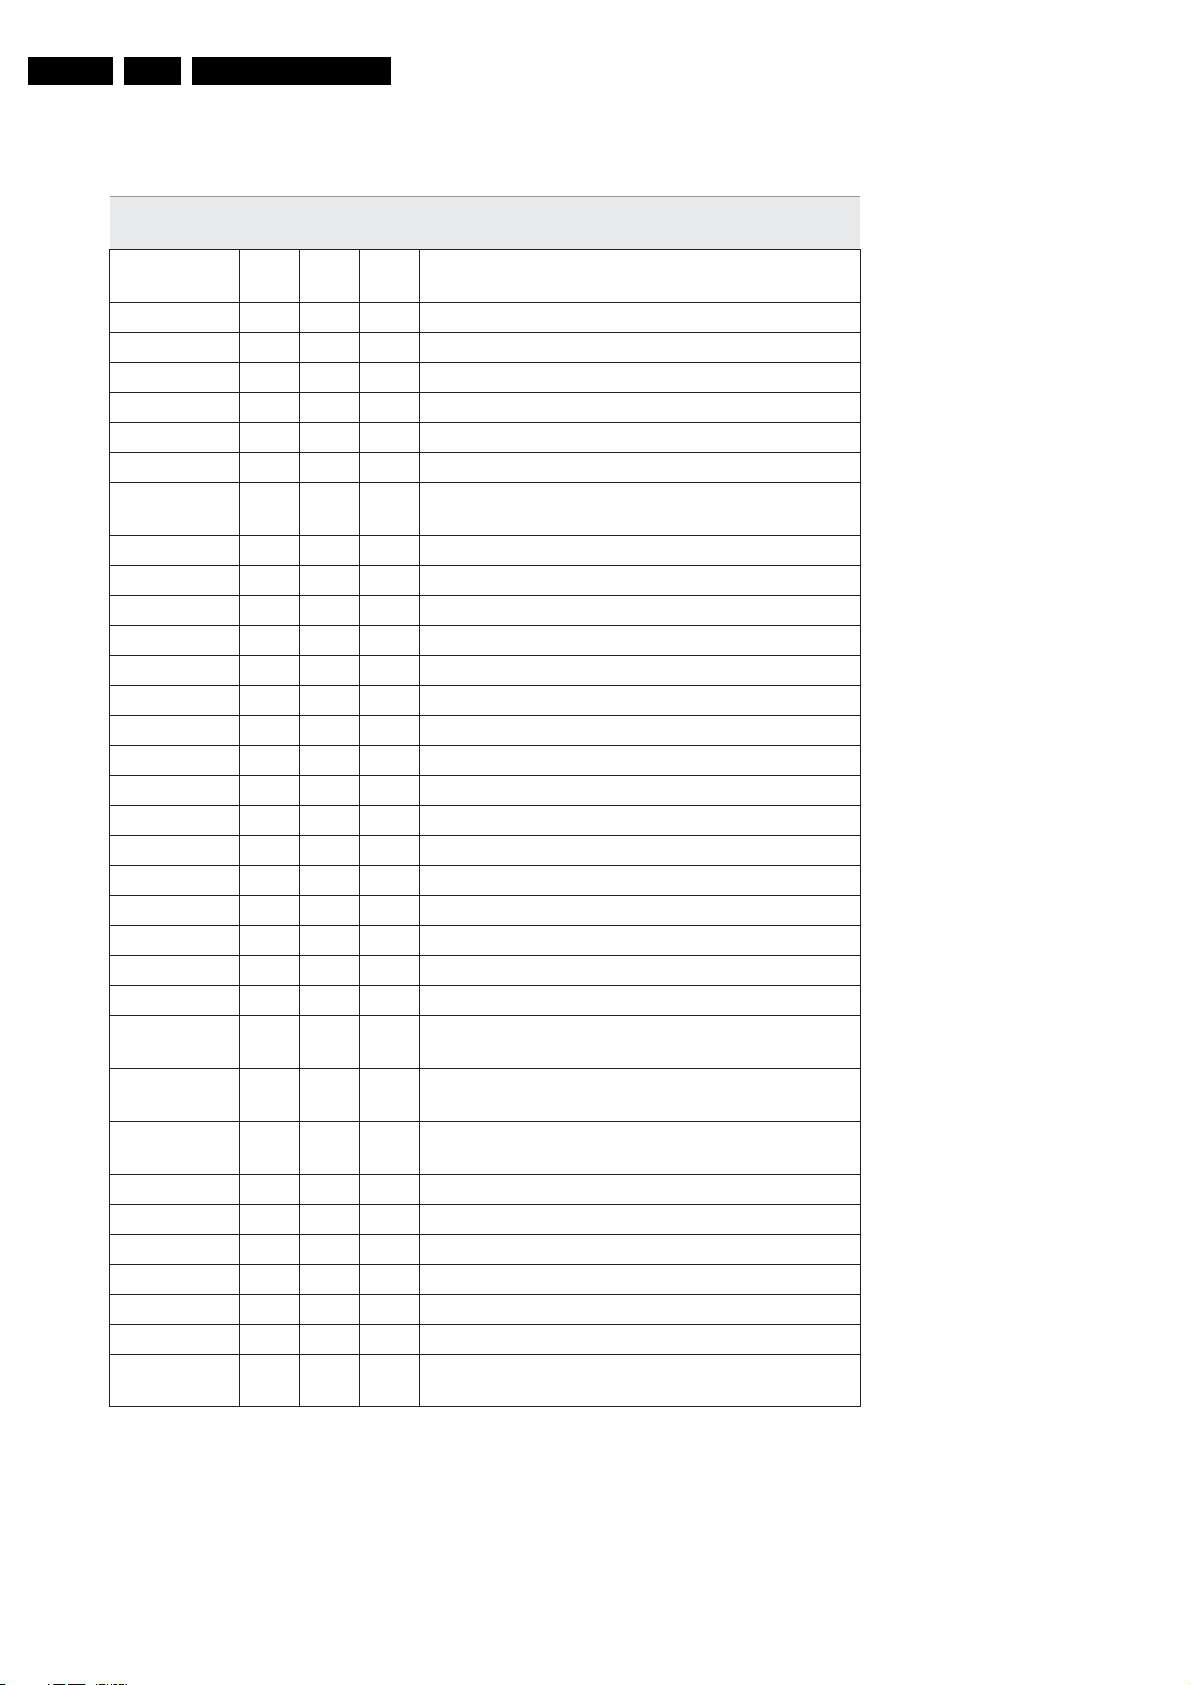
EN 40 VAD80419.
Pin description
Symbol Pin Type Drive
AEZ 1 I hypdT Alpha Error Zero/Alpha Set Zero
Circuit Descriptions, Abbreviation List, and Data Shee ts
Description
/Thr.
V
V
DDD3
SSD3
2 P - Digital Pad Supply
3 P - Digital Pad Supply
CLOCKOUT 4 T M Buffered Oscillator Output
OSCO 5 AO A Output of inverting Amplifier that forms oscillator
OSCI 6 AI A Input of inverting Amplifier that forms oscillator
TEST1D 7 I pd T Test pin
AMEAS 8 AI A Alpha M easure – value of measured disk wri ting
quality
V
V
DDA1
SSA1
9 P - Analogue Supply
10 P - Analogue Supply
LASP 11 AO A Laser Power – indicates power level
VREFL 12 AO A Bandgap Vol tage Reference ground connection
VREFH 13 AO A Bandgap Voltage Reference output
VDEL 14 AI A Volt age input for Delta “laser power”
VTHR 15 AI A Voltage input for Threshold “laser power”
VOPUREF 16 AO A Reference Voltage for OPU
VREFIN 17 AI A Input Reference Voltage for Vthr and Vdel
V
V
DDA2
SSA2
18 P - Analogue Supply
19 P - Analogue Supply
TEST1A 20 AB A Test pin
IAPCW 21 AO A Current Output of Delta Reference
IAPCR 22 AO A Current Output of Threshol d Reference
TEST2A 23 AB A Test pin
ENR2 24 T M Programmable Output Flag
ENR1 25 B pd M/T Device Initialisation/Programmable Output Flag (must
be driven to VDDduring reset)
DVDCD 26 T M Programmable Output Flag for indicating DVD/CD
mode
HILO 27 T M Programmable Output Flag forindicating High/Low
reflectivity
V
V
SSD1
DDD1
28 P - Digital Pad Supply
29 P - Digital Pad Supply
BUSY 30 B M/T Busy Enable input fromElantec / Board test IO
SEN 31 B M/T Serial Enable output to Elantec / Board test IO
SDIO 32 B M/T Serial data input output from/to Elantec / Board testI O
SCLK 33 B M/T Busy Enable input from Elantec / Board test IO
WSB 34 B M/T Write StrategyBank – output controls OPU write
switching / Board test IO
Page 41
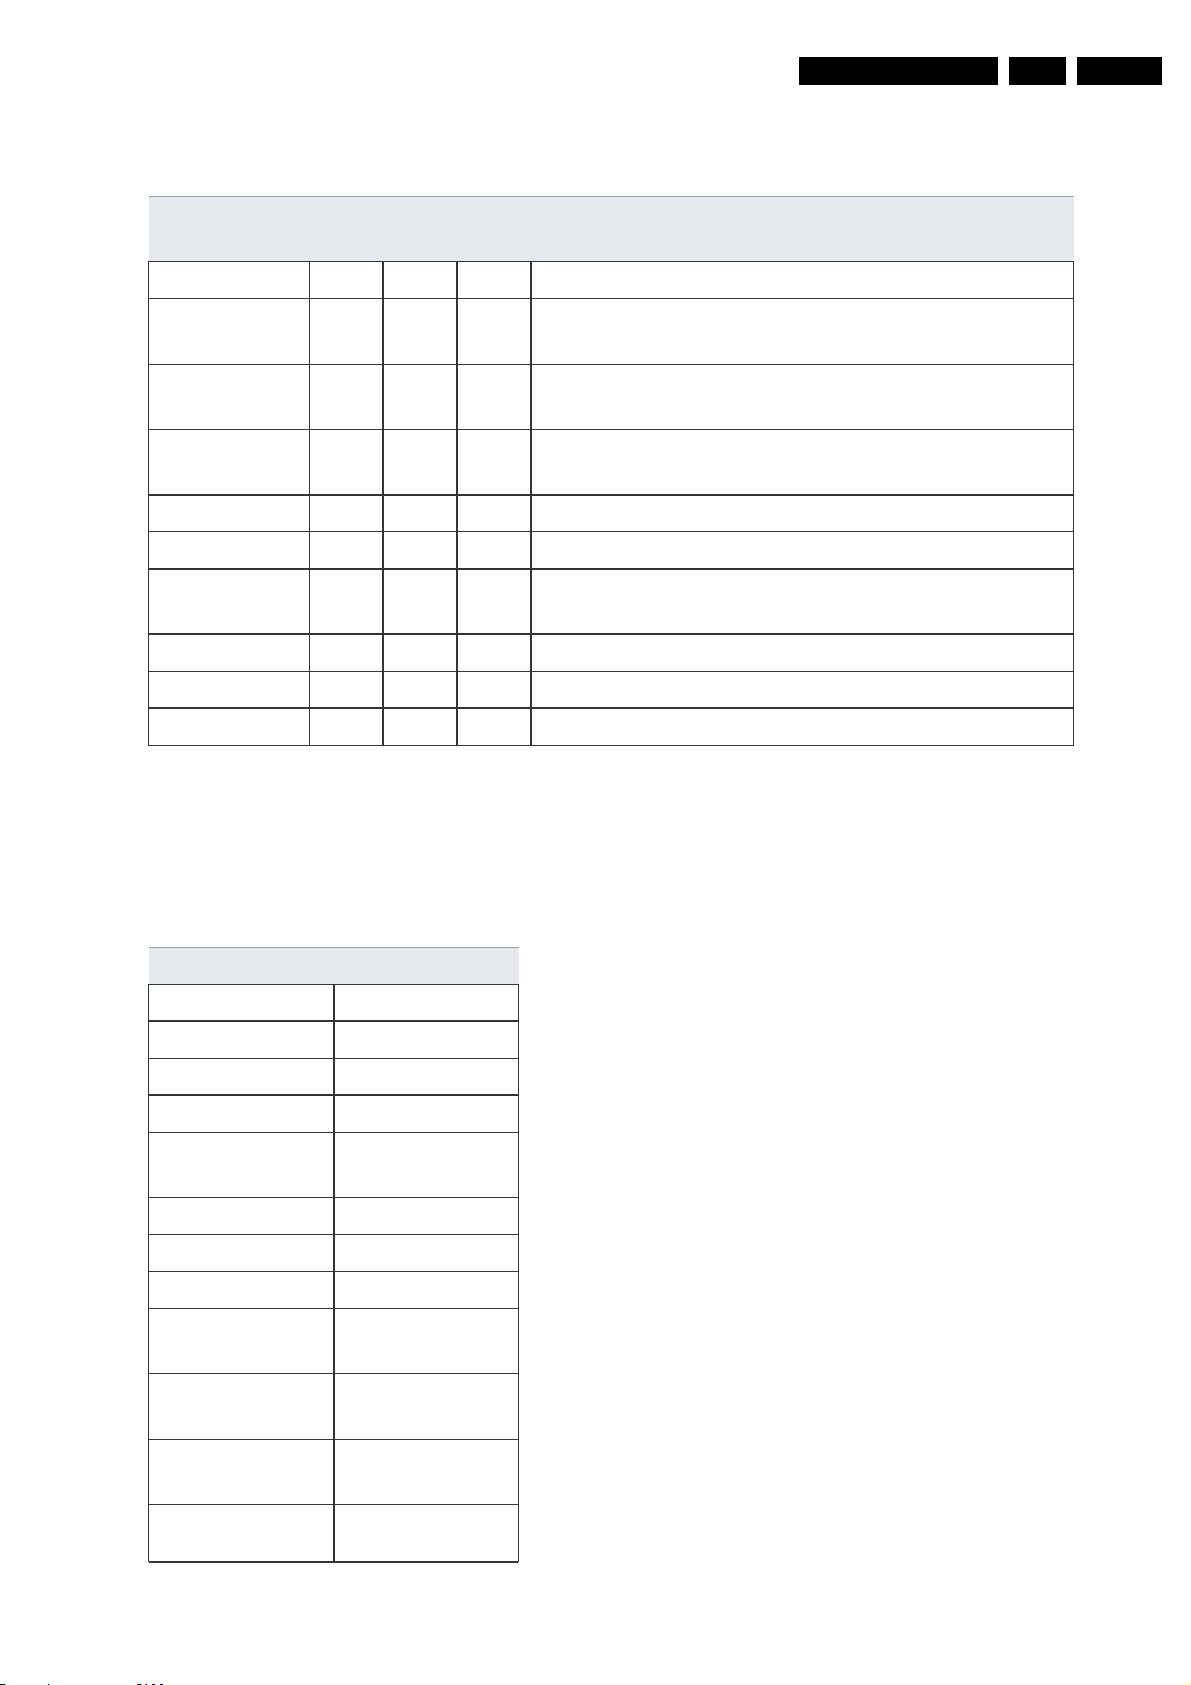
Circuit Descriptions, Abbreviation List, and Data Sheets
p
EN 41VAD8041 9.
Pin description
Symbol Pin Type Drive
…continued
Description
/Thr.
IRQN 35 OD M Interrupt Request Not – active low interrupt request
OSTR 36 I hypdT OPC Strobe – request step in alpha setpoint / Board
test input
RESETN 37 I hypdT Reset Not – active low reset input
RWN 38 B M/T Read/Write not – indicates power setpoints/Board test
IO
V
V
SSD2
DDD2
39 P - Digital Core Supply
40 P - Digital Core Supply
BANK 41 I hypdT CAV setpoint switching input signal / Board test IO
TEST2D 42 I pd T Test pin
SDA 43 BOD M/T
SCL 44 I T
I2C
Serial Data
I2C
Serial Clock
[1] All supply pins must be connected to the same external power supply voltage
[2] All inputs are 5V tolerant – i.e. they will drive the supply voltage (3.0-3.6V), but will work correctly
when interface to a 5V drive device
[3] The pin type definition is given below:
PinType Definition Table
Type Definition
I input
O output
OD open drain
B bi-directional
BOD bi-directional
open drain
T tri-state output
AI analog input
AO analog output
AB analog
bi-directional
Ppower
connection
hy hysteresis on
input
pd hysteresis on
out
ut
Page 42
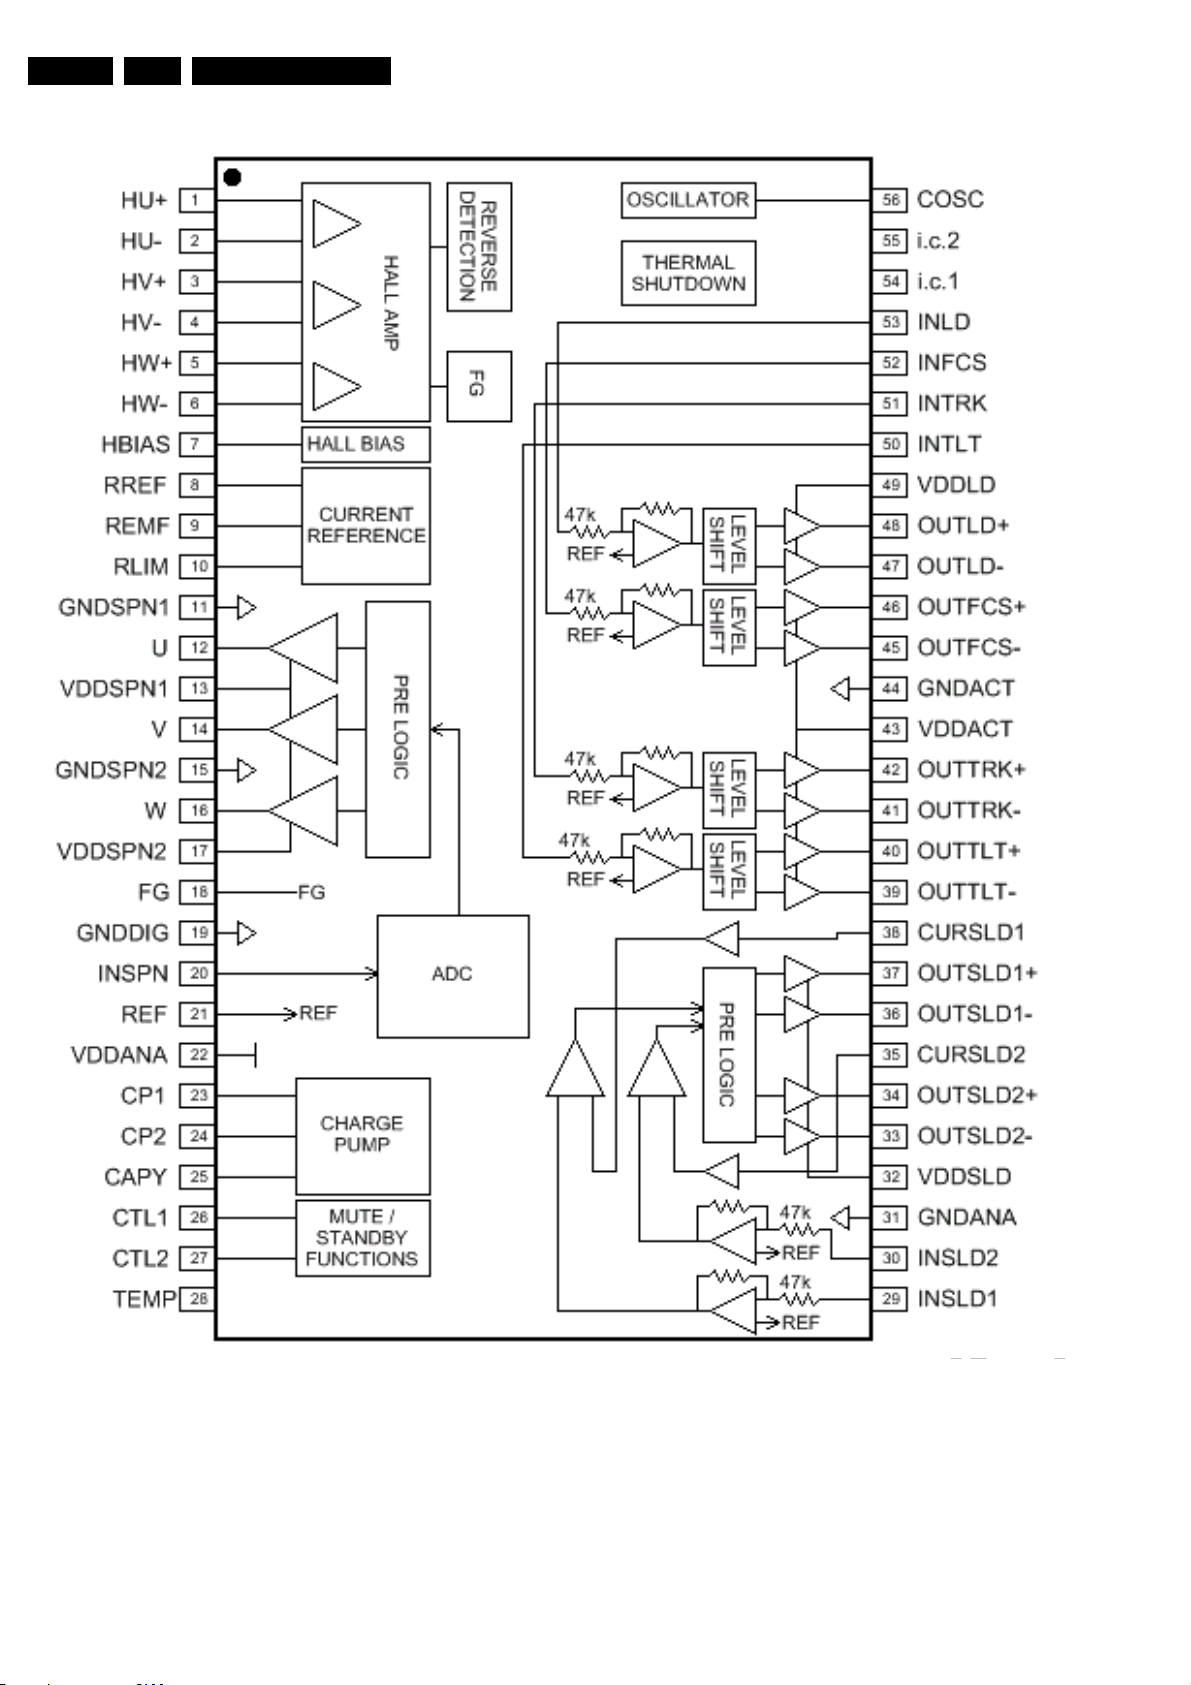
EN 42 VAD80419.
IC7402, SSA56202: Servo Board, Motor Driver
Circuit Descriptions, Abbreviation List, and Data Shee ts
Page 43
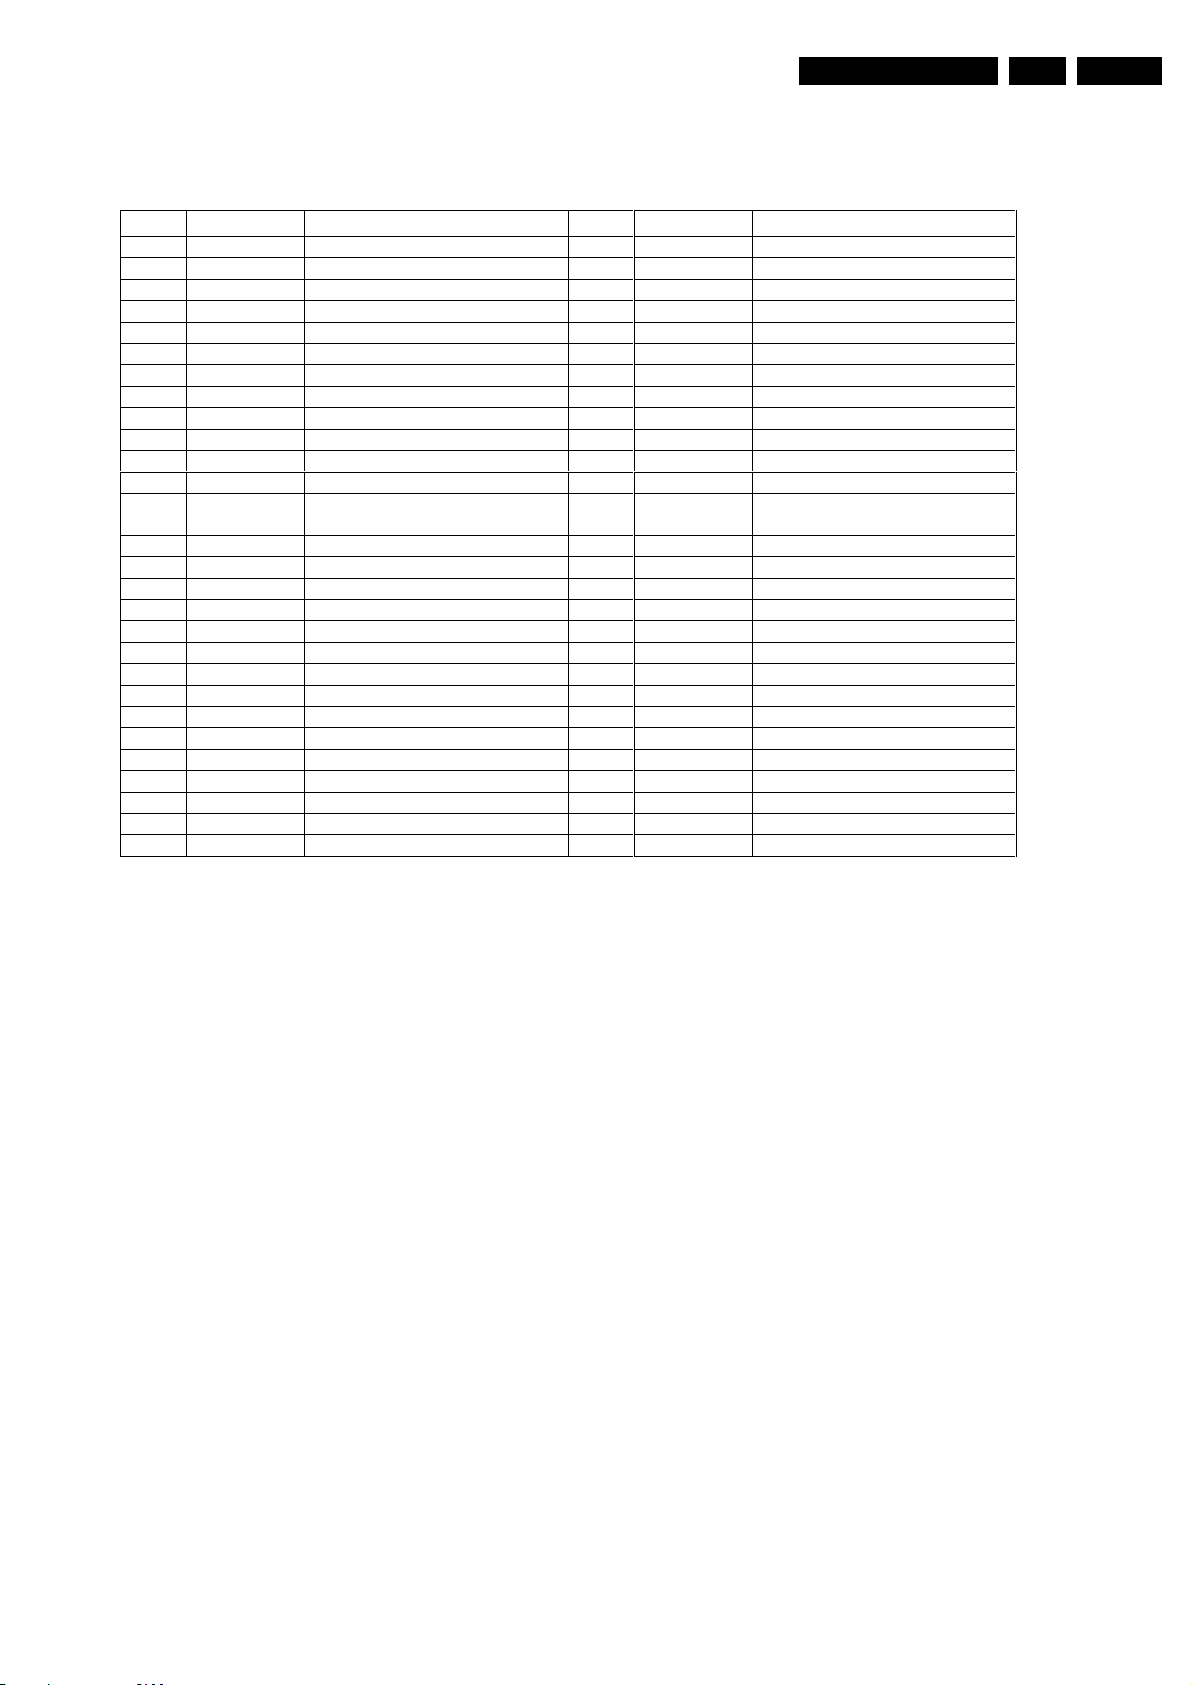
Circuit Descriptions, Abbreviation List, and Data Sheets
EN 43VAD8041 9.
PIN DESCRIPTION
PIN SYMBOL DESCRIPTION
1
2
3
4
5
6
7
8
9
10
11
12
13
14
15
16
17
18
19
20
21
22
23
24
25
26
27
28
HU+
HU
HV+
HV
HW+
HW
HBIAS
RREF
REMF
RLIM
GNDSPN1 spindle driver power ground 1 46
U
VDDSPN1 spindle driver power supply 1 44
V
GNDSPN2 spindle driver power ground 2 42
W
VDDSPN2 spindle driver power supply 2 40
FG
GNDDIG
INSPN
REF
VDDANA
CP1
CP2
CAPY
CTL1
CTL2
TEMP
positive Hall input U
negative Hall input U
po
sitive Hall input V
negative Hall input V
positive Hall input W
negative Hall input W
Hall element bias
ext. res. for current reference 49
ext. res. for EMF regeneration
ext. res. for current limit
spindle driver output U
spindle dri
spindle driver output W
frequency generator output
ground supply
spindle driver input
reference in
system supply voltage
charge pump cap. conn. 1
charge pump cap. conn. 2
charge pump output voltage 32
driver logic control input 1
driver logic control input 2
thermal warning
ver output V
put voltage
PIN SYMBOL DESCRIPTION
56
COSC
55
i.c.2
54
i.c.1
53
INLD
52
INFCS
51
INTRK
50
I
NTLT
VDDLD
48
OUTLD+
47
OUTLD
OUTFCS+ focus driver positive output
45
OUTFCS
GNDACT
43
VDDACT
OUTTRK+ tracking driver pos. output
41
OUTTRK
OUTTLT+ tilting driver pos. output
39
OUTTLT
38
CURSLD1 sled driver 1 current sense
37
OUTSLD1+ sled driver 1 positive output
36
OUTSLD1- sled driver 1 negative output
35
CURSLD2 sled driver 2 current sense
34
OUTSLD2+ sled driver 2 positive output
33
OUTSLD2- sled drive
VDDSLD
31
GNDANA
30
INSLD2
29
INSLD1
ext. capacitor for int. oscillator
internally connected
internally connected
loading driver input
focus driver input
tracking driver input
tilting driver input
loading driver power supply
loading driver positive output
-
loading driver negative ou
-
focus driver negative output
actuator drivers power
ground
actuator drivers power supply
-
tracking driver neg. output
-
tilting driver neg. output
sled driver power supply
ground supply
sled driver 2 input
sled driver 1 input
r 2 negative output
tput
Page 44
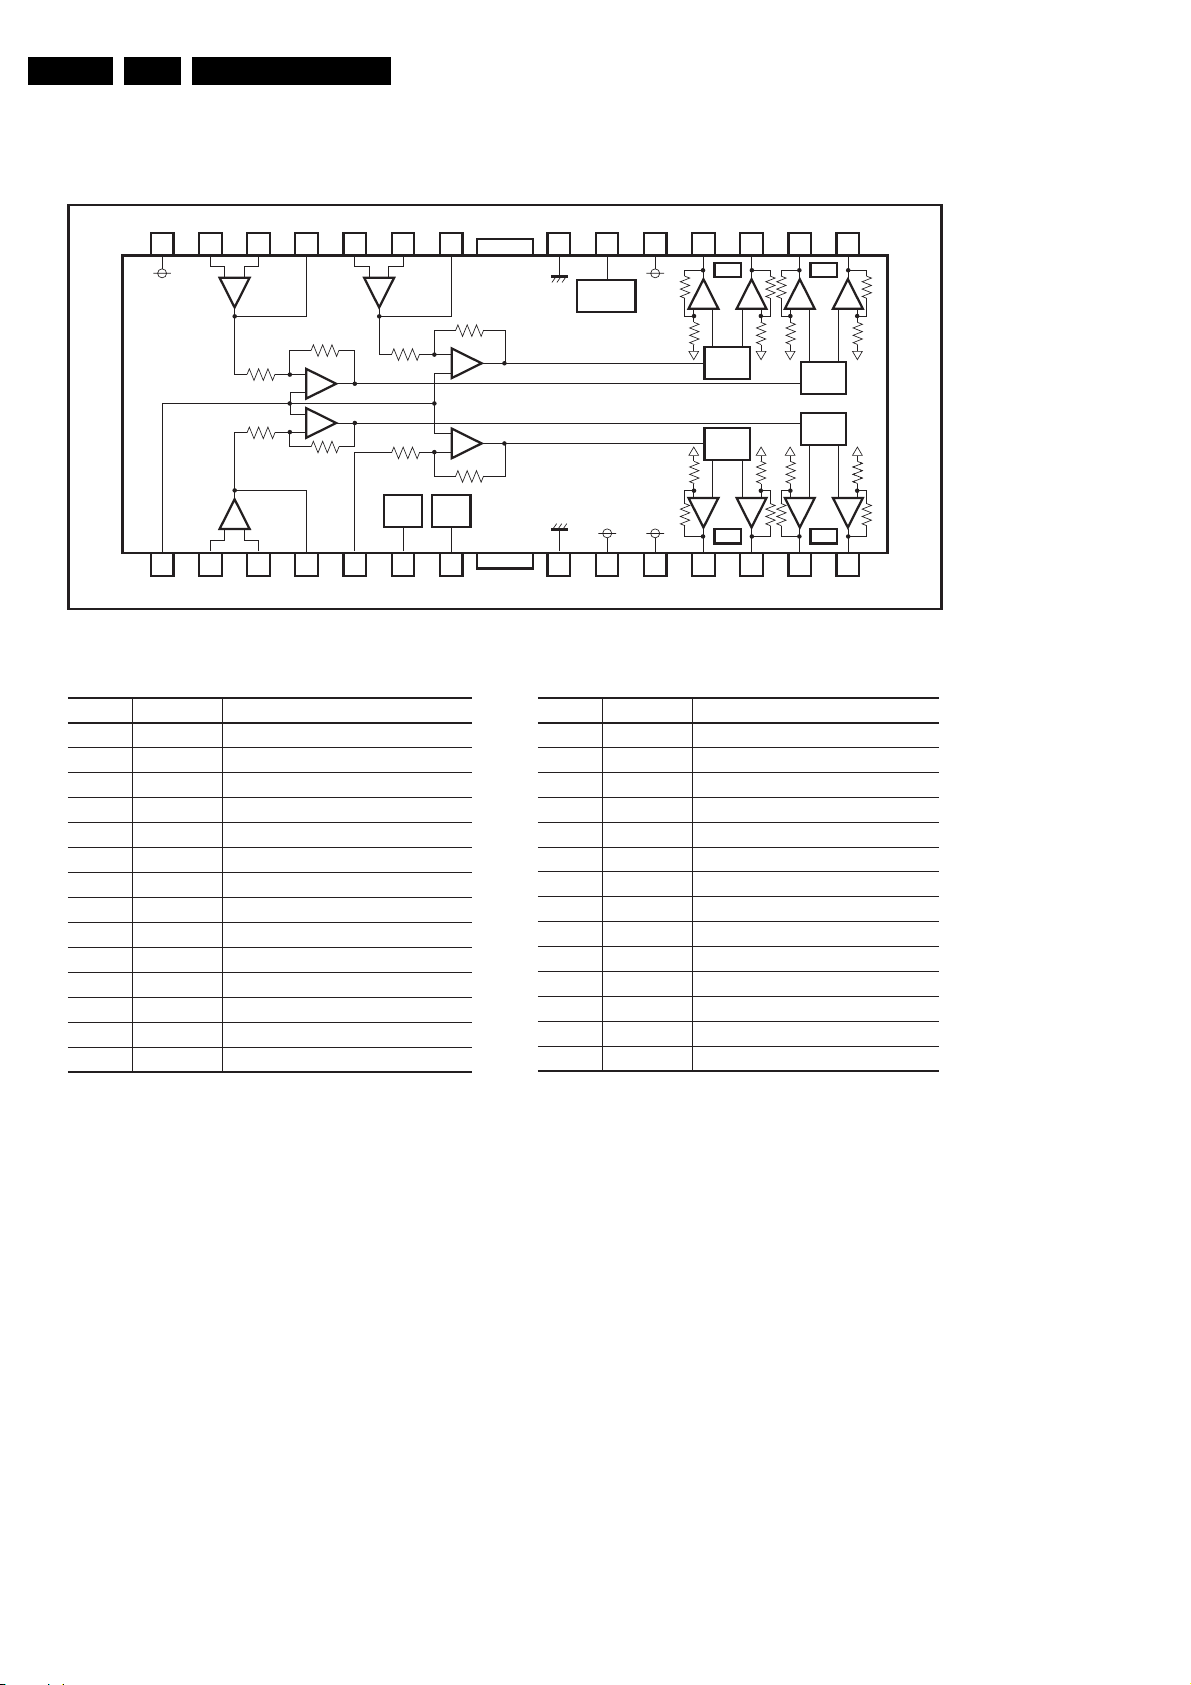
EN 44 VAD80419.
Circuit Descriptions, Abbreviation List, and Data Shee ts
IC7408,7409 BA5995: Servo Board, 4-channel BTL driver IC actuator and motor drive
23
24
25
26
27
28
PreV
CC
+
20k
10k
+
+
10k
22
20k
+
21
STAND BY
ch1 / 3 / 4
PowV
(ch3 / 4)
10k 10k10k10k
ch3
CC
+
LEVEL
SHIFT
+
10k
10k
ch4
+
LEVEL
SHIFT
+
10k10k
15
16
17
18
19
20
+
10k
+
3
2
1
20k
4
10k
MUTE
ch1
5
Pin No.
Note) Symbol of + and (output of drivers) means polarity to input pin.
(For example if voltage of pin4 high, pin14 is high.)
Pin name
BIAS IN
1
OPIN1 (+)
2
OPIN1 ( )
3
OPOUT1
4
IN2
5
MUTE
6
STBY2
7
GND
8
PowV
9
10
PowV
11
V
O2
()
12
V
O2
(+)
13
V
O1
()
14
O1
(+)
V
Input for bias-amplifier
Non inverting input for CH1 OP-AMP
Inverting input for CH1 OP-AMP
Output for CH1 OP-AMP
Input for CH2
Input for CH1 mute control
Input for CH2 stand by control
Substrate ground
CC
1
V
CC
for CH1 power block
CC
2
CC
for CH2 power block
V
Inverted output of CH2
Non inverted output of CH2
Inverted output of CH1
Non inverted output of CH1
Function
LEVEL
+
20k
STBY
ch2
7
6
8
Pin No.
15
16
17
18
19
20
21
22
23
24
25
26
27
28
PowV
PowV
CC
(ch2)
(ch1)
10
9
Pin name Function
V
O4
(+)
V
O4
()
O3
(+)
V
V
O3
()
PowV
STBY1
GND
OPOUT3
OPIN3 ( )
OPIN3 (+)
OPOUT4
OPIN4 ( )
OPIN4 (+)
PreV
CC
LEVEL
SHIFT
+
CC
ch2
12
11
Non inverted output of CH4
Inverted output of CH4
Non inverted output of CH3
Inverted output of CH3
V
CC
CC
for CH3/4 power block
3
Input for CH1/3/4 stand by control
Substrate ground
Output for CH3 OP-AMP
Inverting input for CH3 OP-AMP
Non inverting input for CH3 OP-AMP
Output for CH4 OP-AMP
Inverting input for CH4 OP-AMP
Non inverting input for CH4 OP-AMP
V
CC
for pre block
SHIFT
10k
10k
+
+
10k 10k10k10k
13
10k10k
+
ch1
14
Resistor unit : [ ]
Page 45
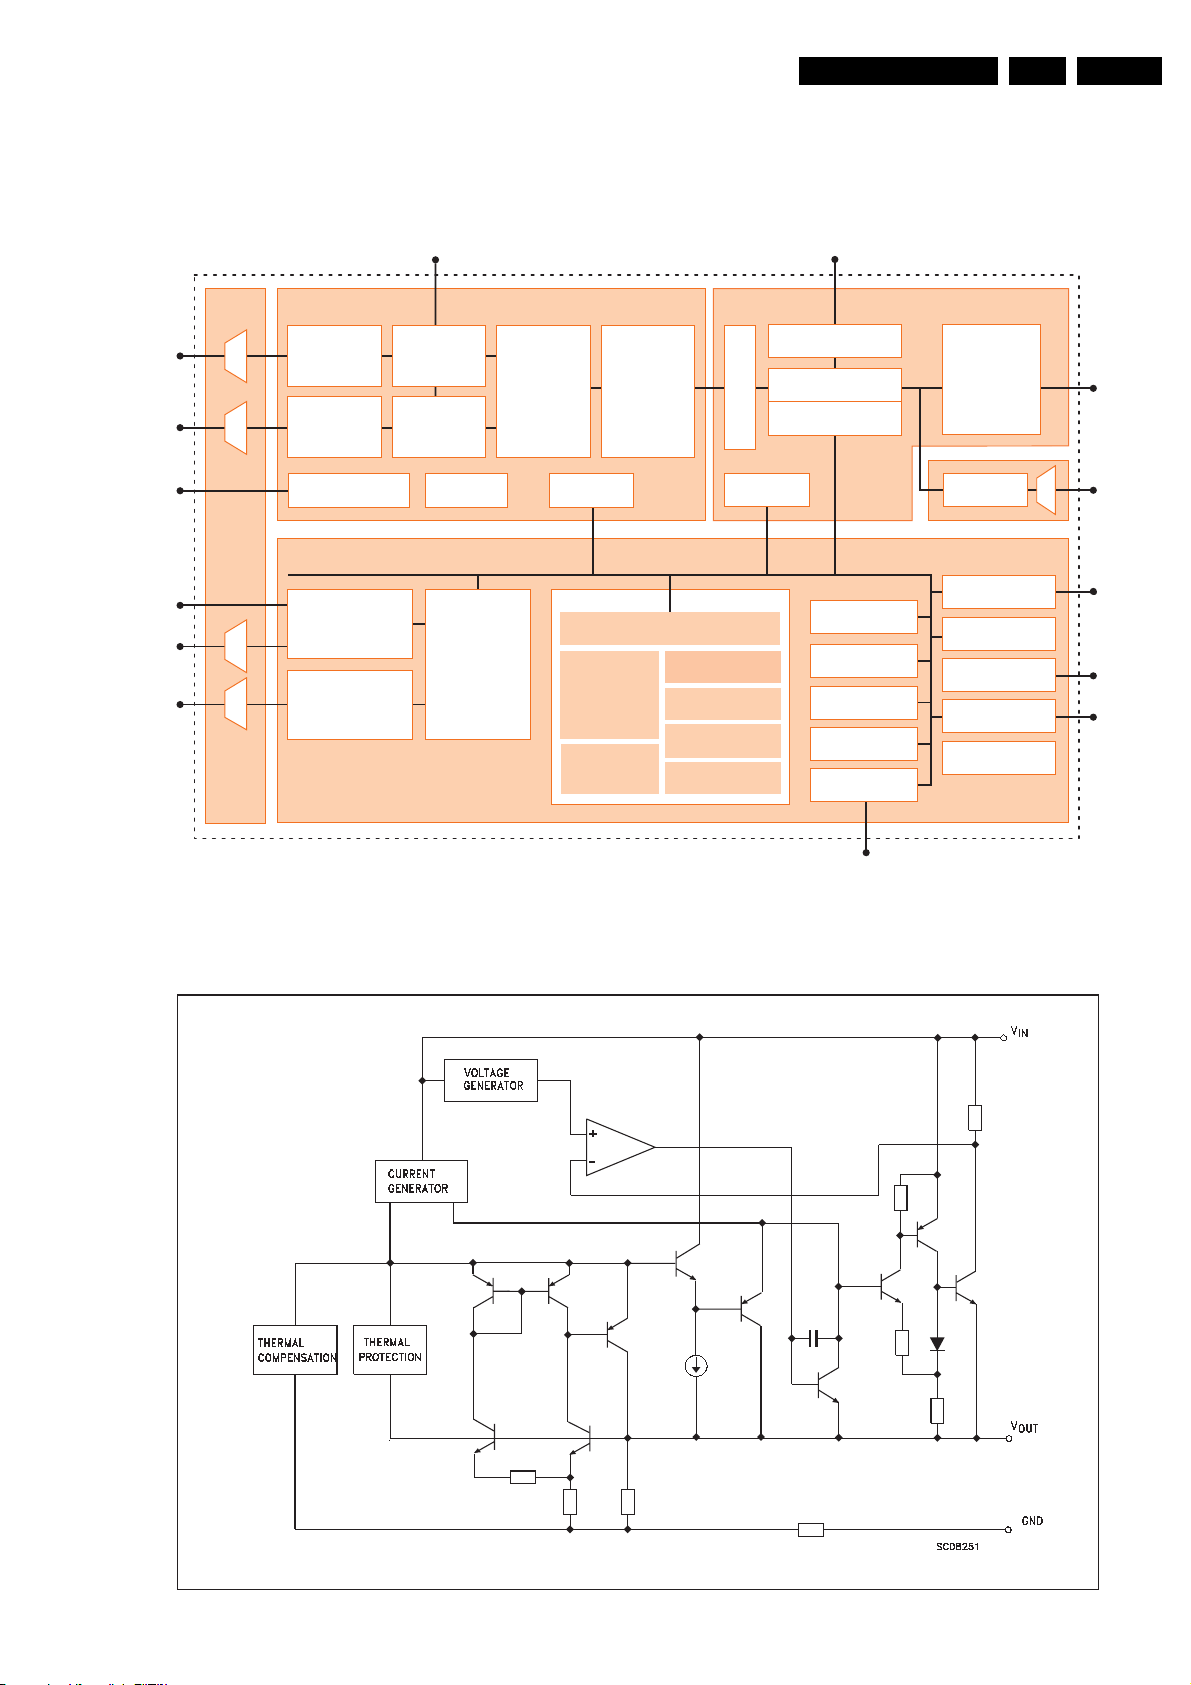
Circuit Descriptions, Abbreviation List, and Data Sheets
M
m
IC7500, PNX7850: Servo Board, Channel Codec/Buffer Manager/Servo Processor and Controller
Nexperia PNX7850 conceptual block diagra
EN 45VAD8041 9.
wobble
HF
motor
actuators
LF input
OPC input
ANALOG
EF
CHANNEL CODEC BUFFER
CD/DVD
WOBBLE
PROCESSOR
SIGNAL
CONDITION.
TACHO/MOTOR
CONTROL
SERVO DSP AND CONTROL PROCESSOR
SERVO
ACCELERATORS
OPC
EFM WRITE
CLOCK/DATA
GENERATOR
BIT
DETECTION
AND
DEMOD.
TELEMETRY
SERVO
DSP
CD/DVD
CHANNEL
ENCODE/
DECODE
WITH
ERROR
CORRECTION
DATA BLOCK
MICRO
INTERFACE
MIPS PR1910
INSTRUCTION
EXECUTION
UNIT
COPROCESSOR
ENCODE/
DECODE
PI-bus
INTERFACE
MANAGER
DRIVE INTERFACE
MICRO
INTERFACE
POWER
MANAGEMENT
CACHE
DEBUG SUPPORT
DEEPLY EMBEDDED
MEMORY
SDRAM
SDRAM
CONTROLLER
MEMORY
PROCESSOR
AUTOMATION
INTERRUPT
CONTROLLER
STATIC MEMORY
INTERFACE
ROM
EJTAG
CSS
UDMA66
HOST
INTERFACE
AUDIO
PROCESSOR
UART
CONFIG
GPIO
I2C
POWER CONTROL
AND RESET
host
audio
UART
GPIO
I2C
IC7603, LD1117: Servo Board, Voltage Regulator
BLOCK DIAGRAM
Flash
Page 46

EN 46 VAD80419.
Circuit Descriptions, Abbreviation List, and Data Shee ts
9.9 Abbreviation list
ADC Analogue to Digital Converter
ADIP ADdress In Pre-groove
AGC Automatic Gain Control
CD Compact Disc
CLV Constant Linear Velocity
DROPPI Dvd Rewritable Opu Pre-Processor IC
AM Amplitude Modulation
BE Basic Engine
ComPair Computer aided rePair
CD-DA CD Digital Audio
CS Chip Select
DAC Digital to Analogue Converter
DAIO Digital Audio Input Output
DENC Digital Encoder
DFU Direction For Use: description for the
end user
DNR Dynamic Noise Reduction
DRAM Dynamic RAM
DSD Direct Stream Digital
DSP Digital Signal Processing
DVD Digital Versatile Disc
EEPROM Electrical Erasable Programmable
ROM
EFM Eight to Fourteen bit Modulation
FDS Full Diagnostic Software
HF High Frequency
I2C Integrated Ic bus (signals at 5V level)
I2S Integrated Ic Sound bus (signals at
3.3V level)
IC Integrated Circuit
IF Intermediate Frequency
IRQ Interrupt ReQuest
LADIC LAser Driver IC
LLD Loss Less Decoder
LPCM Linear Pulse Code Modulation
LRCLK Left/Right CLocK
MACE Mini All Cd Engine
MPEG Motion Pictures Experts Group
NC Not Connected
NVM Non Volatile Memory: IC containing
DVD related data e.g. alignments
OPC Optimum Power Calibration
OPU Optical Pickup Unit
PCB Printed Circuit Board (see PWB)
PCS Position Control Sledge
PLL Phase Locked Loop
PCM Pulse Code Modulation
PCM_CLK Audio system clock for DAC
PCM_OUTx Audio serial output data
PSU Power Supply Unit
PWB Printed Wiring Board (see PCB)
RAM Random Access Memory
RGB Red, Green and Blue colour space
ROM Read Only Memory
RF Radio Frequency
S2B Serial to Basic engine, communication
bus between host- and servo
processor
SCL Serial Clock I2C
SCLK Audio serial bit clock
SDA Serial Data I2C
SDRAM Synchronous DRAM
SMC Surface Mounted Components
S/PDIF Sony Philips Digital InterFace
SPIDRE Signal Processing Ic for Dvd
REwritable
SRAM Static Random Access Memory
STBY STandBY
SVCD Super Video CD
SW SoftWare
THD Total Harmonic Distortion
TTL Transistor Transistor Logic (5V logic)
uP Microprocessor
VCD Video CD
Y/C Luminance (Y) and Chrominance (C)
signal
YUV Component video
Page 47
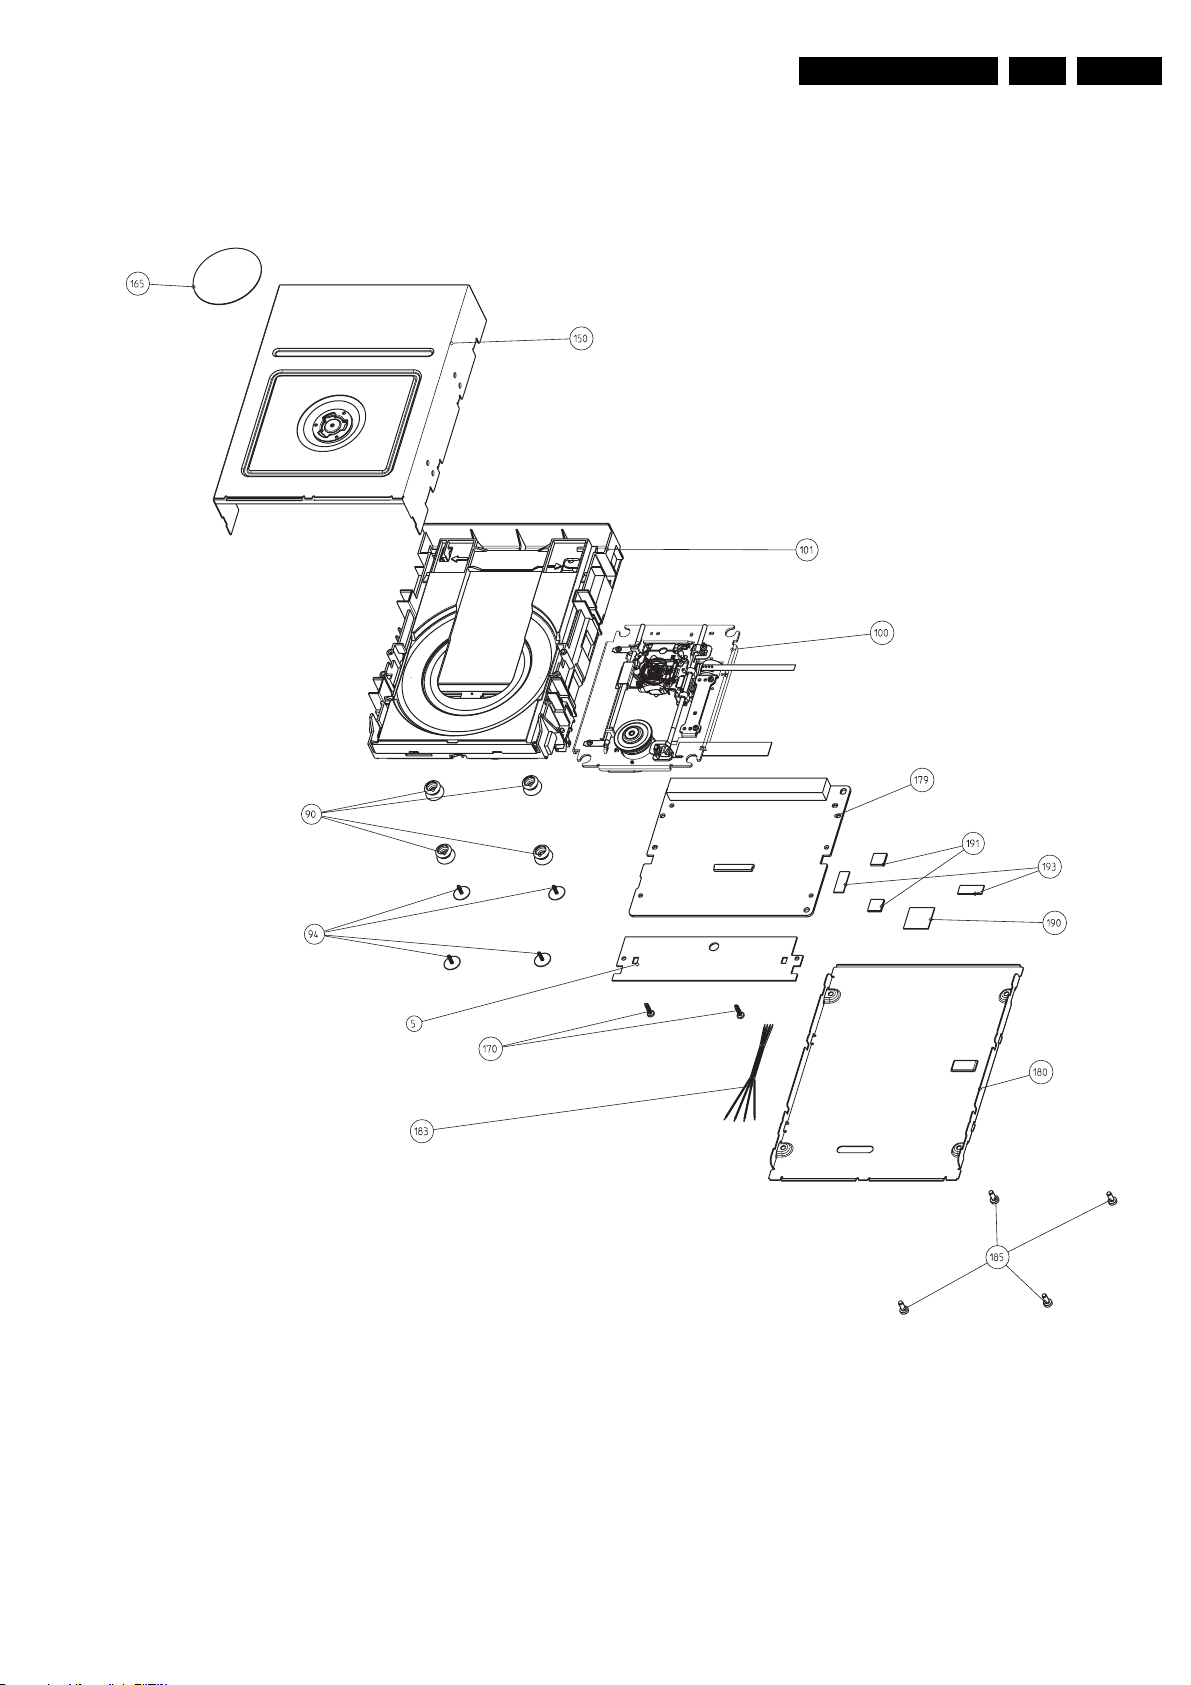
10. Spareparts List
10.1 Exploded Views
Basic Engine
Spareparts List
EN 47VAD8041 10.
TR 22001_001
300604
Page 48
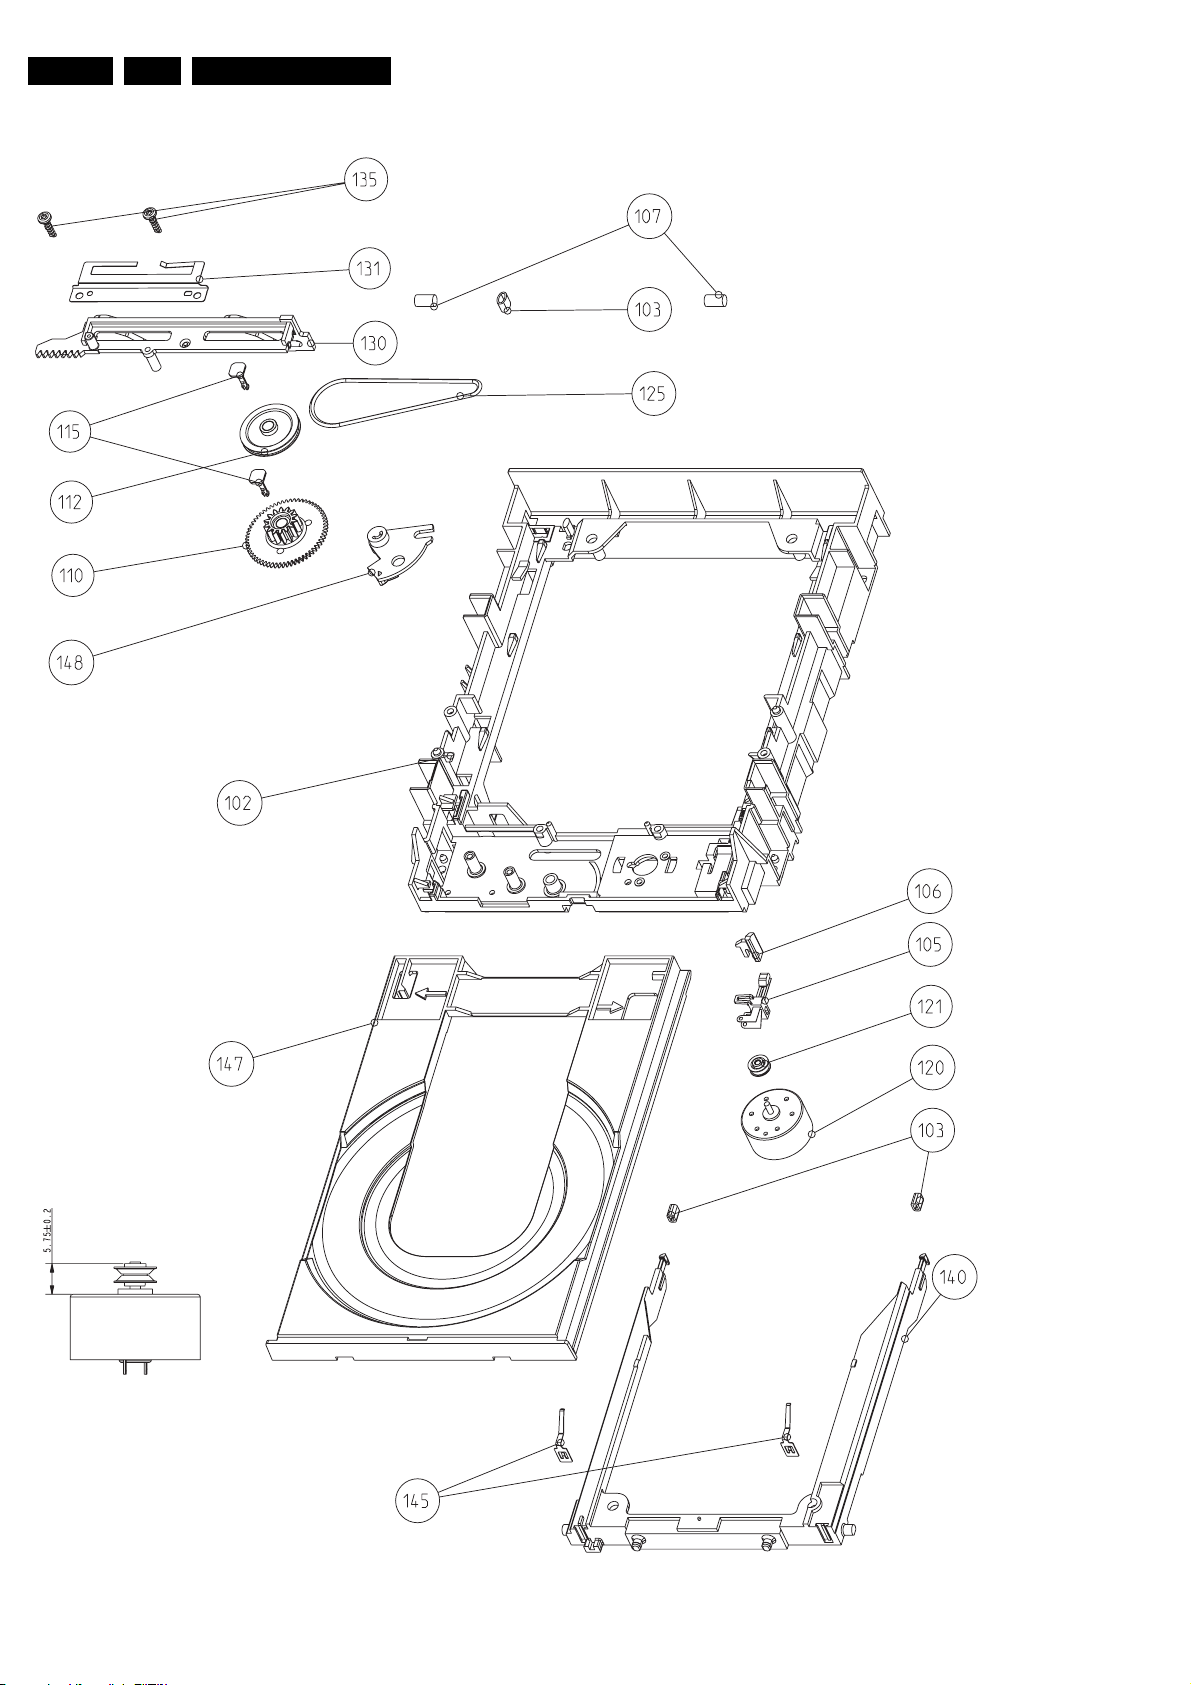
EN 48 VAD804110.
Loader
Spareparts List
* Height control for
assemby of
pos 120 + 121
*
*
AV3.5 Loader Assy_3139-197-60291-110 dd 2004-02-13 (POS)
Page 49
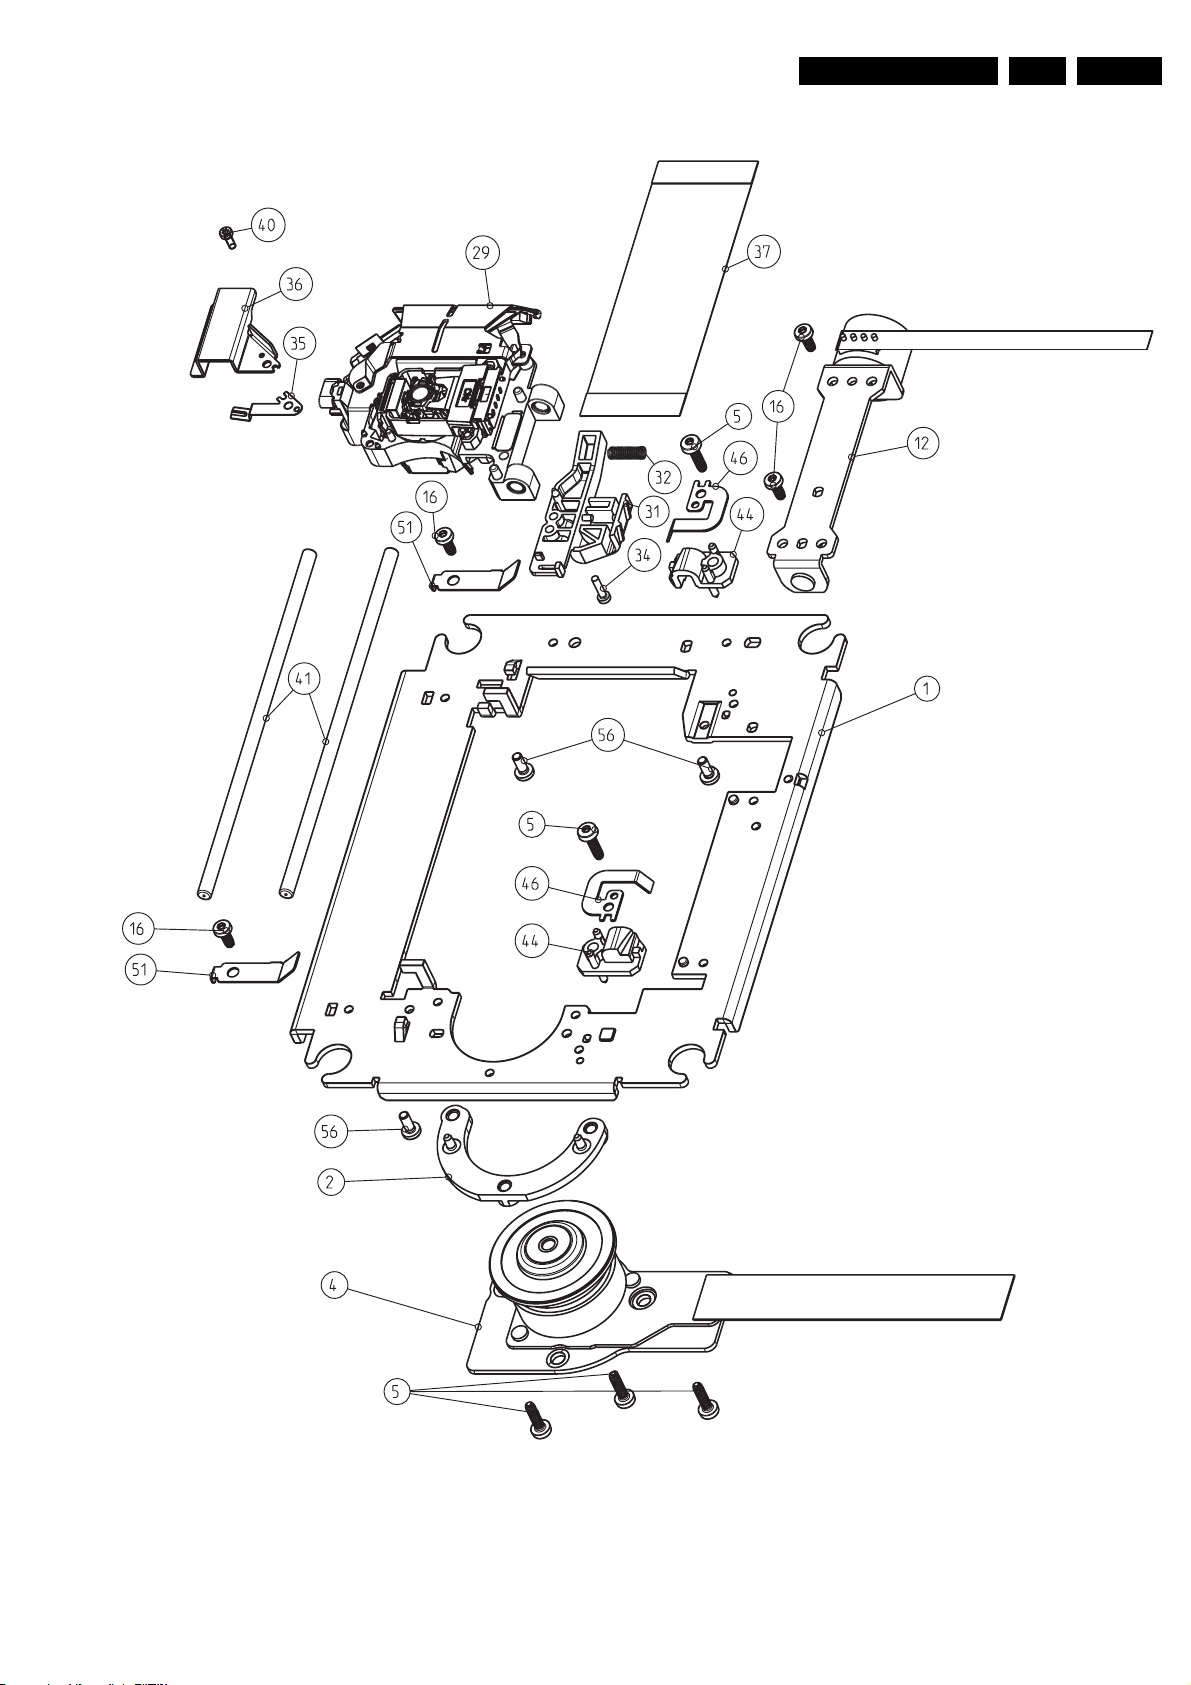
DVD-M
Spareparts List
EN 49VAD8041 10.
TR 22003_001
300604
Page 50
EN 50 VAD804110.
Spareparts List
Mechanical
Various
0001 7104 099 91851 LVP12.01
0002 7104 099 96581 CD-RW LOW REFLECTION
0003 7104 099 94261 RICOH +R (4 SPEED)
0005 3139 194 01581 SEALING STRIP
0090 3104 144 10730 SUSPENSION
0095 3139 198 80010 TRAY SWITCH
0100 9305 022 84101 VAM8041/01
100/12 3104 148 01950 SLEDGE MOTOR
100/37 3104 143 30780 OPU FLEX CABLE 45P 0.5
0101 3104 144 04272 TRAY
0120 3139 198 00620 TRAY MOTOR
0121 3104 144 04980 MOTOR PULLEY, TRAY
0125 3104 144 10121 TRAY MOTOR BELT
0183 3139 191 00200 4-WAY CABLE
0190 3139 194 01541 HEAT SINK PAD
0191 3139 194 01551 HEAT SINK PAD
0193 3139 194 01561 HEAT SINK PAD (DRIVER)
AUDIO DISC
BLANK DISC
(CENTAURUS)
(CHEETAH)
Printed Board
Various
1100 2422 025 17821 CON H 45P F 0.50
1302 2422 543 01025 Crystal 16.93 MHz
1400 2422 025 05548 CON H 4P F 1.00
1401 2422 025 18382 CON H 11P F 1.00
1500 2422 543 01025 Crystal 16.93 MHz
1600 2422 033 00396 SOC COMBI H 56P
1601 2122 662 00152 0.18Ω PTC 1812 16V
1602 2122 662 00136 0.21Ω PTC 1812 6V
1700 2422 025 17909 CON BM H 50P F 0.5
1703 3139 190 20051 CON V 2X 10P M 1.27
1705 2422 025 05544 CON H 20P F 0.50
2100 2238 586 59812 100nF 20-80% 50V 0603
2101 4822 126 13883 220pF 5% 50V
2102 2238 586 59812 100nF 20-80% 50V 0603
2103 2020 552 94427 100pF 5% 50v 0603
2104 2238 586 59812 100nF 20-80% 50V 0603
2105 2238 586 59812 100nF 20-80% 50V 0603
2106 2238 586 59812 100nF 20-80% 50V 0603
2107 5322 124 41945 22µF 20% 35V SMD
2108 2238 586 59812 100nF 20-80% 50V 0603
2109 2022 552 05635 22µF 16V X5R 10%
2110 3198 016 31020 1nF 10% 25V 0603
2204 5322 126 11579 3.3nF 10% 63V
2205 5322 126 11582 6.8nF 10% 63V
2209 2238 586 59812 100nF 20-80% 50V 0603
2210 2238 586 59812 100nF 20-80% 50V 0603
2211 2238 586 59812 100nF 20-80% 50V 0603
2212 2238 586 59812 100nF 20-80% 50V 0603
2213 2238 786 56642 27nF 16V 0603 X7R 10%
2214 5322 126 11583 10nF 10% 50V 0603
2215 5322 126 11583 10nF 10% 50V 0603
2217 3198 017 34730 47nF 16V 0603
2218 5322 126 11583 10nF 10% 50V 0603
2219 2238 586 59812 100nF 20-80% 50V 0603
2221 2238 586 59812 100nF 20-80% 50V 0603
2223 2238 586 59812 100nF 20-80% 50V 0603
2228 5322 126 11583 10nF 10% 50V 0603
2229 4822 126 14249 560pF 10% 50V 0603
2230 5322 126 11582 6.8nF 10% 63V
2231 4822 126 14487 8.2pF 0.5% 50V 0603
2232 4822 126 14249 560pF 10% 50V 0603
2233 5322 126 11582 6.8nF 10% 63V
2234 4822 126 14487 8.2pF 0.5% 50V 0603
2300 2238 586 59812 100nF 20-80% 50V 0603
2301 2238 586 59812 100nF 20-80% 50V 0603
2302 2238 586 59812 100nF 20-80% 50V 0603
2303 4822 122 33752 15pF 5% 50V
2304 4822 122 33752 15pF 5% 50V
2305 2238 916 15641 22nF 10% 25V 0603
2306 2238 586 59812 100nF 20-80% 50V 0603
2307 2238 586 59812 100nF 20-80% 50V 0603
2308 2238 586 59812 100nF 20-80% 50V 0603
2309 2238 586 59812 100nF 20-80% 50V 0603
2310 2238 586 59812 100nF 20-80% 50V 0603
2311 5322 126 11578 1nF 10% 50V 0603
2312 4822 122 33752 15pF 5% 50V
2400 5322 126 11583 10nF 10% 50V 0603
2401 2238 586 59812 100nF 20-80% 50V 0603
2405 5322 126 11583 10nF 10% 50V 0603
2406 2238 786 55648 82nF 10% 16V 0603
2407 2238 586 59812 100nF 20-80% 50V 0603
2409 5322 126 11583 10nF 10% 50V 0603
2411 2020 552 94427 100pF 5% 50v 0603
2412 2238 586 59812 100nF 20-80% 50V 0603
2413 2020 552 96637 10µF 6.3V 0805 X5R
2414 5322 126 11583 10nF 10% 50V 0603
2415 2238 916 15641 22nF 10% 25V 0603
2416 4822 124 12095 100µF 20% 16V
2417 2238 586 59812 100nF 20-80% 50V 0603
2418 4822 126 14238 2.2nF 50V 0603
2419 4822 126 14238 2.2nF 50V 0603
2420 4822 126 14238 2.2nF 50V 0603
2421 4822 126 13193 4.7nF 10% 63V
2426 4822 126 14043 1µF 20% 16V
2427 2238 586 15628 2.7nF 10% 50V 0603
2430 2238 586 59812 100nF 20-80% 50V 0603
2431 4822 124 23002 10µF 20% 16V
2432 2238 586 59812 100nF 20-80% 50V 0603
2433 2022 552 05635 22µF 16V X5R 10%
2434 5322 122 33861 120pF10% 50V
2435 5322 122 33861 120pF10% 50V
2436 5322 126 11583 10nF 10% 50V 0603
2438 2238 586 59812 100nF 20-80% 50V 0603
2439 5322 122 33861 120pF10% 50V
2440 2238 586 59812 100nF 20-80% 50V 0603
2441 2238 586 59812 100nF 20-80% 50V 0603
2442 2022 552 05635 22µF 16V X5R 10%
2443 2022 552 05635 22µF 16V X5R 10%
2444 2022 552 05616 4.7µF 6.3V 0805 X5R
2445 2238 586 59812 100nF 20-80% 50V 0603
2446 5322 124 41945 22µF 20% 35V SMD
2447 4822 124 12095 100µF 20% 16V
2448 2020 552 95812 1µF 1206 X7R 16V 10%
2500 2238 586 59812 100nF 20-80% 50V 0603
2501 2238 586 59812 100nF 20-80% 50V 0603
2502 2238 586 59812 100nF 20-80% 50V 0603
2503 4822 126 13879 220nF 20% 16V
2504 3198 016 31020 1nF 10% 25V 0603
2505 5322 126 11583 10nF 10% 50V 0603
2506 5322 126 11583 10nF 10% 50V 0603
2507 5322 126 11582 6.8nF 10% 63V
2509 4822 126 13881 470pF 5% 50V
2511 4822 126 13881 470pF 5% 50V
2512 4822 126 13881 470pF 5% 50V
2513 2022 552 05635 22µF 16V X5R 10%
2514 2238 586 59812 100nF 20-80% 50V 0603
2515 4822 124 23002 10µF 20% 16V
2516 2238 586 59812 100nF 20-80% 50V 0603
2517 2238 586 59812 100nF 20-80% 50V 0603
2518 2238 586 59812 100nF 20-80% 50V 0603
2519 2238 586 59812 100nF 20-80% 50V 0603
2520 2238 586 59812 100nF 20-80% 50V 0603
2521 2238 586 59812 100nF 20-80% 50V 0603
2522 2238 586 59812 100nF 20-80% 50V 0603
2523 2238 586 59812 100nF 20-80% 50V 0603
2524 2238 586 59812 100nF 20-80% 50V 0603
2525 2238 586 59812 100nF 20-80% 50V 0603
2526 2238 586 59812 100nF 20-80% 50V 0603
2527 2238 586 59812 100nF 20-80% 50V 0603
2528 2238 586 59812 100nF 20-80% 50V 0603
2529 2238 586 59812 100nF 20-80% 50V 0603
2530 2238 586 59812 100nF 20-80% 50V 0603
2531 2238 586 59812 100nF 20-80% 50V 0603
2533 4822 124 23002 10µF 20% 16V
2534 2238 586 59812 100nF 20-80% 50V 0603
2536 2238 586 59812 100nF 20-80% 50V 0603
2538 4822 124 23002 10µF 20% 16V
2540 2238 586 59812 100nF 20-80% 50V 0603
2550 5322 126 11583 10nF 10% 50V 0603
2551 3198 016 31510 150pF 10% 50V 0603
2552 3198 016 31510 150pF 10% 50V 0603
2561 3198 017 34730 47nF 16V 0603
2562 3198 017 34730 47nF 16V 0603
2563 4822 122 33752 15pF 5% 50V
2564 4822 122 33752 15pF 5% 50V
2565 2238 586 59812 100nF 20-80% 50V 0603
2566 2238 586 59812 100nF 20-80% 50V 0603
2567 2238 586 59812 100nF 20-80% 50V 0603
2568 2238 586 59812 100nF 20-80% 50V 0603
2569 2238 586 59812 100nF 20-80% 50V 0603
2570 2238 586 59812 100nF 20-80% 50V 0603
2571 2238 586 59812 100nF 20-80% 50V 0603
2572 2238 586 59812 100nF 20-80% 50V 0603
2573 2238 586 59812 100nF 20-80% 50V 0603
2574 2238 586 59812 100nF 20-80% 50V 0603
2575 2238 586 59812 100nF 20-80% 50V 0603
2576 2238 586 59812 100nF 20-80% 50V 0603
2577 5322 126 11582 6.8nF 10% 63V
2578 3198 017 33330 CER2 0603 X7R 16V 33N
2579 2238 586 59812 100nF 20-80% 50V 0603
2580 5322 124 41945 22µF 20% 35V SMD
2581 2238 586 59812 100nF 20-80% 50V 0603
2582 5322 126 11582 6.8nF 10% 63V
2583 5322 126 11582 6.8nF 10% 63V
2584 2238 586 59812 100nF 20-80% 50V 0603
2585 2020 552 96899 330nF 0603 X5R 16V 10%
2586 2238 586 59812 100nF 20-80% 50V 0603
2600 2222 867 15339 33pF 5% 50V 0603
2601 2222 867 15339 33pF 5% 50V 0603
2602 5322 126 11583 10nF 10% 50V 0603
2603 5322 126 11583 10nF 10% 50V 0603
2604 2238 586 59812 100nF 20-80% 50V 0603
2605 4822 122 33741 10pF 10% 50V
2607 2238 586 59812 100nF 20-80% 50V 0603
2608 2238 586 59812 100nF 20-80% 50V 0603
2609 4822 124 80151 47µF 20% 16V
2610 2238 586 59812 100nF 20-80% 50V 0603
2611 2238 586 59812 100nF 20-80% 50V 0603
2612 5322 124 41945 22µF 20% 35V SMD
2614 4822 124 12095 100µF 20% 16V
2615 5322 124 41945 22µF 20% 35V SMD
2618 2238 586 59812 100nF 20-80% 50V 0603
2621 4822 124 11131 47UF 6.3V
2622 4822 124 11131 47UF 6.3V
2623 2238 586 59812 100nF 20-80% 50V 0603
2624 2238 586 59812 100nF 20-80% 50V 0603
2625 2238 586 59812 100nF 20-80% 50V 0603
2626 2238 586 59812 100nF 20-80% 50V 0603
2651 5322 124 41945 22µF 20% 35V SMD
2653 5322 124 41945 22µF 20% 35V SMD
2654 5322 124 41945 22µF 20% 35V SMD
2655 2022 552 05635 22µF 16V X5R 10%
2659 5322 124 41945 22µF 20% 35V SMD
2661 2238 586 59812 100nF 20-80% 50V 0603
2662 2022 552 05635 22µF 16V X5R 10%
2663 4822 126 13883 220pF 5% 50V
2664 2238 916 15641 22nF 10% 25V 0603
2665 2022 552 05635 22µF 16V X5R 10%
2666 4822 124 23002 10µF 20% 16V
2667 4822 124 23002 10µF 20% 16V
2668 4822 124 23002 10µF 20% 16V
2669 4822 124 23002 10µF 20% 16V
2670 2238 586 59812 100nF 20-80% 50V 0603
2671 2238 586 59812 100nF 20-80% 50V 0603
2672 2022 552 05635 22µF 16V X5R 10%
2673 2022 552 05635 22µF 16V X5R 10%
2674 2022 552 05635 22µF 16V X5R 10%
2675 2022 552 05635 22µF 16V X5R 10%
2676 2022 552 05635 22µF 16V X5R 10%
2677 2022 552 05635 22µF 16V X5R 10%
2700 5322 126 11583 10nF 10% 50V 0603
2701 5322 126 11583 10nF 10% 50V 0603
2702 5322 126 11583 10nF 10% 50V 0603
2703 5322 126 11583 10nF 10% 50V 0603
2704 5322 126 11583 10nF 10% 50V 0603
2705 5322 126 11583 10nF 10% 50V 0603
2706 5322 126 11583 10nF 10% 50V 0603
2707 5322 126 11583 10nF 10% 50V 0603
3100 2322 702 60829 82Ω 5% 0603
3101 2322 702 60829 82Ω 5% 0603
3102 4822 051 30332 3.3kΩ 5% 0.062W
3103 4822 051 30102 1kΩ 5% 0.062W
3104 4822 051 30101 100Ω 5% 0.062W
3105 4822 051 30102 1kΩ 5% 0.062W
3106 4822 051 30102 1kΩ 5% 0.062W
3107 4822 051 30102 1kΩ 5% 0.062W
3108 4822 051 30102 1kΩ 5% 0.062W
3110 4822 051 30103 10kΩ 5% 0.062W
3111 4822 051 30103 10kΩ 5% 0.062W
3112 4822 051 30102 1kΩ 5% 0.062W
3113 4822 051 30102 1kΩ 5% 0.062W
3114 4822 117 12968 820Ω 5% 0.62W
3115 4822 051 30332 3.3kΩ 5% 0.062W
3116 4822 051 30152 1.5kΩ 5% 0.062W
3117 4822 051 30221 220Ω 5% 0.062W
3118 4822 051 30102 1kΩ 5% 0.062W
3119 4822 051 30183 18kΩ 5% 0.062W
3120 4822 051 30221 220Ω 5% 0.062W
3200 4822 051 30101 100Ω 5% 0.062W
3201 4822 051 30101 100Ω 5% 0.062W
3202 4822 051 30103 10kΩ 5% 0.062W
3204 4822 051 30103 10kΩ 5% 0.062W
3206 4822 117 12925 47kΩ 1% 0.063W 0603
3207 4822 051 30103 10kΩ 5% 0.062W
3208 4822 051 30103 10kΩ 5% 0.062W
3209 4822 117 12903 1.8kΩ 1% 0.063W 0603
3210 4822 117 12903 1.8kΩ 1% 0.063W 0603
3211 4822 117 12903 1.8kΩ 1% 0.063W 0603
3212 4822 117 12903 1.8kΩ 1% 0.063W 0603
3213 4822 051 30183 18kΩ 5% 0.062W
3215 4822 051 30759 75Ω 5% 0.062W
Page 51
Spareparts List
EN 51VAD8041 10.
3216 4822 051 30759 75Ω 5% 0.062W
3217 4822 051 30333 33kΩ 5% 0.062W
3218 4822 051 30101 100Ω 5% 0.062W
3219 4822 051 30101 100Ω 5% 0.062W
3220 4822 051 30223 22kΩ 5% 0.062W
3221 4822 117 12139 22Ω 5% 0.062W
3222 4822 051 30393 39kΩ 5% 0.062W
3223 4822 117 12968 820Ω 5% 0.62W
3224 4822 051 30101 100Ω 5% 0.062W
3225 4822 051 30223 22kΩ 5% 0.062W
3226 4822 117 12139 22Ω 5% 0.062W
3227 4822 051 30393 39kΩ 5% 0.062W
3228 4822 117 12968 820Ω 5% 0.62W
3229 4822 051 30101 100Ω 5% 0.062W
3300 4822 051 30105 1MΩ 5% 0.062W
3301 4822 051 30103 10kΩ 5% 0.062W
3302 4822 117 12917 1Ω 5% 0.062W 0603
3303 4822 051 30151 150Ω 5% 0.062W
3304 4822 051 30103 10kΩ 5% 0.062W
3305 4822 051 30103 10kΩ 5% 0.062W
3306 4822 051 30103 10kΩ 5% 0.062W
3308 4822 051 30103 10kΩ 5% 0.062W
3309 4822 117 12903 1.8kΩ 1% 0.063W 0603
3315 4822 051 30339 33Ω 5% 0.062W
3316 4822 051 30103 10kΩ 5% 0.062W
3403 4822 051 30103 10kΩ 5% 0.062W
3404 4822 051 30103 10kΩ 5% 0.062W
3405 4822 051 30103 10kΩ 5% 0.062W
3406 4822 051 30102 1kΩ 5% 0.062W
3410 5322 117 13028 12kΩ 1% 0.063W 0603
3411 4822 117 12925 47kΩ 1% 0.063W 0603
3418 4822 117 12917 1Ω 5% 0.062W 0603
3420 4822 051 30123 12kΩ 5% 0.062W
3421 4822 117 12925 47kΩ 1% 0.063W 0603
3422 4822 051 30203 20K00 5% 0,062W
3423 4822 051 30103 10kΩ 5% 0.062W
3425 4822 051 30151 150Ω 5% 0.062W
3426 4822 051 30562 5.6kΩ 5% 0.063W 0603
3427 2322 702 60184 180kΩ 5% 0603
3428 4822 051 30562 5.6kΩ 5% 0.063W 0603
3429 2322 702 60184 180kΩ 5% 0603
3430 4822 051 30393 39kΩ 5% 0.062W
3440 5322 117 13028 12kΩ 1% 0.063W 0603
3444 5322 117 13064 39kΩ 1% 0.063W 0603
3445 5322 117 13028 12kΩ 1% 0.063W 0603
3446 5322 117 13028 12kΩ 1% 0.063W 0603
3447 5322 117 13064 39kΩ 1% 0.063W 0603
3450 5322 117 13064 39kΩ 1% 0.063W 0603
3452 5322 117 13028 12kΩ 1% 0.063W 0603
3453 5322 117 13064 39kΩ 1% 0.063W 0603
3454 5322 117 13028 12kΩ 1% 0.063W 0603
3455 4822 051 30102 1kΩ 5% 0.062W
3456 4822 051 30102 1kΩ 5% 0.062W
3457 5322 117 13064 39kΩ 1% 0.063W 0603
3458 4822 051 30102 1kΩ 5% 0.062W
3459 2322 702 60158 1.5Ω 0603 5%
3460 2322 702 60158 1.5Ω 0603 5%
3461 5322 117 13028 12kΩ 1% 0.063W 0603
3462 5322 117 13064 39kΩ 1% 0.063W 0603
3463 4822 051 30123 12kΩ 5% 0.062W
3464 5322 117 13028 12kΩ 1% 0.063W 0603
3465 4822 051 30103 10kΩ 5% 0.062W
3471 2322 702 60279 27Ω 5% 0.1W 0603
3472 2322 702 60158 1.5Ω 0603 5%
3473 4822 051 30103 10kΩ 5% 0.062W
3474 4822 051 30123 12kΩ 5% 0.062W
3475 2322 702 60158 1.5Ω 0603 5%
3476 2322 702 60158 1.5Ω 0603 5%
3477 4822 051 30123 12kΩ 5% 0.062W
3478 4822 051 30123 12kΩ 5% 0.062W
3479 4822 051 30103 10kΩ 5% 0.062W
3480 4822 051 30103 10kΩ 5% 0.062W
3481 4822 117 12917 1Ω 5% 0.062W 0603
3482 4822 051 20108 1Ω 5% 0.1W
3483 4822 051 30103 10kΩ 5% 0.062W
3484 4822 051 30103 10kΩ 5% 0.062W
3485 4822 051 30103 10kΩ 5% 0.062W
3486 4822 051 30103 10kΩ 5% 0.062W
3487 2322 702 60158 1.5Ω 0603 5%
3488 4822 051 30102 1kΩ 5% 0.062W
3489 2322 702 60279 27Ω 5% 0.1W 0603
3490 2322 702 60279 27Ω 5% 0.1W 0603
3491 2322 702 60279 27Ω 5% 0.1W 0603
3492 4822 051 30102 1kΩ 5% 0.062W
3493 4822 051 30103 10kΩ 5% 0.062W
3494 4822 051 30103 10kΩ 5% 0.062W
3495 4822 051 30109 10Ω 5% 0.062W
3496 4822 051 30109 10Ω 5% 0.062W
3497 4822 051 30109 10Ω 5% 0.062W
3498 4822 051 30109 10Ω 5% 0.062W
3500 4822 051 30562 5.6kΩ 5% 0.063W 0603
3501 4822 051 30472 4.7kΩ 5% 0.062W
3502 4822 051 30272 2.7kΩ 5% 0.062W
3503 4822 051 30472 4.7kΩ 5% 0.062W
3504 4822 051 30472 4.7kΩ 5% 0.062W
3507 4822 051 30102 1kΩ 5% 0.062W
3508 4822 051 30102 1kΩ 5% 0.062W
3509 4822 051 30102 1kΩ 5% 0.062W
3510 4822 051 30682 6.8kΩ 5% 0.062W
3511 4822 051 30682 6.8kΩ 5% 0.062W
3512 4822 051 30682 6.8kΩ 5% 0.062W
3513 4822 051 30682 6.8kΩ 5% 0.062W
3514 4822 117 13632 100kΩ 1% 0603 0.62W
3515 4822 051 30682 6.8kΩ 5% 0.062W
3516 4822 117 13525 24kΩ 1% 0.62W 0603
3517 4822 051 30103 10kΩ 5% 0.062W
3518 4822 051 30103 10kΩ 5% 0.062W
3519 4822 051 30103 10kΩ 5% 0.062W
3520 4822 051 30103 10kΩ 5% 0.062W
3521 2322 704 62202 2.2kΩ 0603 1%
3522 4822 117 12917 1Ω 5% 0.062W 0603
3523 4822 117 12925 47kΩ 1% 0.063W 0603
3524 4822 051 30103 10kΩ 5% 0.062W
3527 4822 051 30103 10kΩ 5% 0.062W
3528 4822 051 30103 10kΩ 5% 0.062W
3529 4822 051 30222 2.2kΩ 5% 0.062W
3530 4822 051 30222 2.2kΩ 5% 0.062W
3531 4822 051 30479 47Ω 5% 0.062W
3532 4822 051 30479 47Ω 5% 0.062W
3534 4822 051 30105 1MΩ 5% 0.062W
3535 4822 051 30103 10kΩ 5% 0.062W
3536 4822 051 30103 10kΩ 5% 0.062W
3541 3198 031 13390 1206 4X 33R PM5 COL
3542 3198 031 13390 1206 4X 33R PM5 COL
3543 3198 031 13390 1206 4X 33R PM5 COL
3545 4822 051 30339 33Ω 5% 0.062W
3546 4822 051 30339 33Ω 5% 0.062W
3547 4822 051 30334 330kΩ 5% 0.062W
3548 4822 051 30103 10kΩ 5% 0.062W
3551 4822 051 30103 10kΩ 5% 0.062W
3560 4822 051 30101 100Ω 5% 0.062W
3561 4822 051 30472 4.7kΩ 5% 0.062W
3562 4822 117 13526 150Ω 5% 0.63W
3574 4822 051 30103 10kΩ 5% 0.062W
3577 4822 051 30103 10kΩ 5% 0.062W
3578 4822 051 30332 3.3kΩ 5% 0.062W
3579 4822 051 30223 22kΩ 5% 0.062W
3580 4822 051 30472 4.7kΩ 5% 0.062W
3581 4822 051 30339 33Ω 5% 0.062W
3582 4822 051 30103 10kΩ 5% 0.062W
3583 4822 117 13526 150Ω 5% 0.63W
3584 4822 117 13526 150Ω 5% 0.63W
3585 4822 117 13526 150Ω 5% 0.63W
3586 4822 051 30008 Jumper 0603
3587 4822 117 13526 150Ω 5% 0.63W
3588 4822 117 13526 150Ω 5% 0.63W
3589 4822 117 13526 150Ω 5% 0.63W
3591 4822 051 30151 150Ω 5% 0.062W
3592 4822 051 30151 150Ω 5% 0.062W
3593 4822 051 30151 150Ω 5% 0.062W
3594 4822 051 30151 150Ω 5% 0.062W
3595 4822 051 30151 150Ω 5% 0.062W
3596 4822 051 30151 150Ω 5% 0.062W
3597 4822 051 30151 150Ω 5% 0.062W
3598 4822 051 30151 150Ω 5% 0.062W
3599 4822 051 30151 150Ω 5% 0.062W
3602 4822 117 13632 100kΩ 1% 0603 0.62W
3603 4822 117 13632 100kΩ 1% 0603 0.62W
3604 4822 051 30103 10kΩ 5% 0.062W
3605 4822 051 30102 1kΩ 5% 0.062W
3606 4822 051 30471 470Ω 5% 0.062W
3607 4822 051 30471 470Ω 5% 0.062W
3608 4822 051 30102 1kΩ 5% 0.062W
3609 4822 051 30221 220Ω 5% 0.062W
3610 4822 051 30221 220Ω 5% 0.062W
3611 4822 051 30103 10kΩ 5% 0.062W
3612 4822 051 30103 10kΩ 5% 0.062W
3613 4822 051 30103 10kΩ 5% 0.062W
3614 4822 051 30103 10kΩ 5% 0.062W
3615 2350 035 10829 ARV24 4X 82R PM5
3617 4822 051 30471 470Ω 5% 0.062W
3618 4822 051 30102 1kΩ 5% 0.062W
3619 2322 702 60829 82Ω 5% 0603
3620 4822 051 30103 10kΩ 5% 0.062W
3621 4822 051 30103 10kΩ 5% 0.062W
3622 4822 117 12139 22Ω 5% 0.062W
3623 2322 702 60829 82Ω 5% 0603
3624 4822 051 30103 10kΩ 5% 0.062W
3625 4822 117 12139 22Ω 5% 0.062W
3626 2322 702 60829 82Ω 5% 0603
3627 4822 051 30103 10kΩ 5% 0.062W
3628 2322 702 60829 82Ω 5% 0603
3629 4822 051 30103 10kΩ 5% 0.062W
3630 4822 117 12139 22Ω 5% 0.062W
3631 3198 031 13390 1206 4X 33R PM5 COL
3635 3198 031 13390 1206 4X 33R PM5 COL
3639 3198 031 13390 1206 4X 33R PM5 COL
3643 3198 031 13390 1206 4X 33R PM5 COL
3647 4822 051 30103 10kΩ 5% 0.062W
3648 2322 702 60829 82Ω 5% 0603
3650 3198 031 11030 1206 4X 10K PM5 COL R
3651 3198 031 11030 1206 4X 10K PM5 COL R
3652 3198 031 11030 1206 4X 10K PM5 COL R
3653 3198 031 11030 1206 4X 10K PM5 COL R
3660 4822 051 30683 68kΩ 5% 0.062W
3661 4822 051 30154 150kΩ 5% 0.062W
3665 4822 051 30101 100Ω 5% 0.062W
3684 4822 051 30103 10kΩ 5% 0.062W
3686 4822 051 30331 330Ω 5% 0.062W
3689 2322 702 60829 82Ω 5% 0603
3690 4822 117 12139 22Ω 5% 0.062W
3692 4822 051 30472 4.7kΩ 5% 0.062W
3693 4822 117 11817 1.2kΩ 1% 1/16W
3694 4822 051 30392 3.9kΩ 5% 0.063W 0603
3695 2322 704 61201 120Ω 0603 1%
3696 2322 704 65601 560Ω 1% 0603
3697 5322 117 13036 1.2kΩ 1% 0.063W 0603
3702 4822 051 30103 10kΩ 5% 0.062W
3703 4822 051 30103 10kΩ 5% 0.062W
3704 4822 051 30103 10kΩ 5% 0.062W
3705 4822 051 30103 10kΩ 5% 0.062W
3706 4822 051 30103 10kΩ 5% 0.062W
3707 4822 051 30103 10kΩ 5% 0.062W
3708 4822 051 30103 10kΩ 5% 0.062W
3709 4822 051 30103 10kΩ 5% 0.062W
3710 4822 051 30103 10kΩ 5% 0.062W
3711 4822 051 30103 10kΩ 5% 0.062W
3712 4822 051 30103 10kΩ 5% 0.062W
3713 4822 051 30103 10kΩ 5% 0.062W
3714 4822 051 30103 10kΩ 5% 0.062W
3715 4822 051 30103 10kΩ 5% 0.062W
3716 4822 051 30103 10kΩ 5% 0.062W
3717 4822 051 30339 33Ω 5% 0.062W
3718 4822 051 30103 10kΩ 5% 0.062W
3719 4822 051 30103 10kΩ 5% 0.062W
4100 4822 051 30008 Jumper 0603
4105 4822 051 30008 Jumper 0603
4106 4822 051 30008 Jumper 0603
4107 4822 051 30008 Jumper 0603
4108 4822 051 30008 Jumper 0603
4109 4822 051 30008 Jumper 0603
4110 4822 051 30008 Jumper 0603
4111 4822 051 30008 Jumper 0603
4112 4822 051 30008 Jumper 0603
4200 4822 051 30008 Jumper 0603
4201 4822 051 30008 Jumper 0603
4202 4822 051 30008 Jumper 0603
4203 4822 051 30008 Jumper 0603
4204 4822 051 30008 Jumper 0603
4303 4822 051 30008 Jumper 0603
4400 4822 051 20008 Jumper 0805
4402 4822 051 30008 Jumper 0603
4403 4822 051 20008 Jumper 0805
4404 4822 051 20008 Jumper 0805
4406 4822 051 20008 Jumper 0805
4407 4822 051 20008 Jumper 0805
4408 4822 051 20008 Jumper 0805
4410 4822 051 20008 Jumper 0805
4411 4822 051 20008 Jumper 0805
4413 4822 051 30221 220Ω 5% 0.062W
4416 4822 051 30008 Jumper 0603
4417 4822 051 30008 Jumper 0603
4419 4822 051 30008 Jumper 0603
4420 4822 051 30008 Jumper 0603
4421 4822 051 30008 Jumper 0603
4422 4822 051 30008 Jumper 0603
4423 4822 051 30008 Jumper 0603
4427 4822 051 30008 Jumper 0603
4502 4822 051 30008 Jumper 0603
4503 4822 051 30008 Jumper 0603
4504 4822 051 30008 Jumper 0603
4519 4822 051 30008 Jumper 0603
4520 4822 051 30008 Jumper 0603
4525 4822 051 30008 Jumper 0603
4604 4822 051 30008 Jumper 0603
4605 4822 051 20008 Jumper 0805
4610 4822 051 30008 Jumper 0603
4611 4822 051 30008 Jumper 0603
4612 4822 051 30008 Jumper 0603
4613 4822 051 30008 Jumper 0603
4615 4822 051 30008 Jumper 0603
4707 4822 051 30008 Jumper 0603
4xxx 2350 035 91001 ARV24 4X JUMPER
5101 2422 549 44991 0603 EMI 100MHZ 600R
5102 2422 549 44991 0603 EMI 100MHZ 600R
5103 2422 549 44991 0603 EMI 100MHZ 600R
5104 3198 018 51090 10µH 10% 0603
5202 2422 549 44991 0603 EMI 100MHZ 600R
Page 52
EN 52 VAD804110.
5300 2422 549 44991 0603 EMI 100MHZ 600R
5301 2422 549 44991 0603 EMI 100MHZ 600R
5400 2422 536 00501 D62LCB 10µF PM20
5405 2422 549 44991 0603 EMI 100MHZ 600R
5406 2422 536 00501 D62LCB 10µF PM20
5501 2422 549 44991 0603 EMI 100MHZ 600R
5502 2422 549 44991 0603 EMI 100MHZ 600R
5504 2422 549 44991 0603 EMI 100MHZ 600R
5602 2422 549 44991 0603 EMI 100MHZ 600R
5603 2422 549 44991 0603 EMI 100MHZ 600R
5607 2422 549 45322 0603 EMI 100MHZ 150R
5609 2422 536 00501 D62LCB 10µF PM20
5614 2422 549 44991 0603 EMI 100MHZ 600R
5615 2422 549 45322 0603 EMI 100MHZ 150R
5616 2422 549 44991 0603 EMI 100MHZ 600R
5617 2422 536 00593 D62LCB 47µF 20%
6100 4822 130 11397 BAS316
6400 9340 571 37115 PMEG1020EA
6401 9340 571 37115 PMEG1020EA
6402 9340 571 37115 PMEG1020EA
6403 9340 571 37115 PMEG1020EA
6426 9965 000 20150 1N4148WS SOD-323
6427 9965 000 20150 1N4148WS SOD-323
6428 5322 130 31928 BAS16
6429 5322 130 31928 BAS16
6500 4822 130 81637 PMLL4148L
6501 5322 130 31928 BAS16
6502 5322 130 31928 BAS16
6503 5322 130 31928 BAS16
6603 9322 168 86685 SK14
6604 4822 130 11522 UDZ15B
6605 9322 159 72685 MM3Z6V2
6607 9322 189 14668 SL12
Spareparts List
7101 5322 130 60159 BC846B
7102 5322 130 60159 BC846B
7103 5322 130 60159 BC846B
7104 9340 547 21215 BSH205
7105 9352 697 76118 LM75ADP
7107 9965 000 17814 2N7002E
7201 9352 713 79557 TZA1047HL
7202 5322 130 42718 BFS20
7203 5322 130 42718 BFS20
7300 9352 713 77157 TZA1042HL
7401 5322 209 82941 LM358D
7402 9352 735 89118 SA56202TW
7403 5322 209 82941 LM358D
7405 5322 209 82941 LM358D
7409 9322 164 64668 BA5995FM
7500 9352 737 02557 PNX7850E_Z_M2A
7502 9322 186 84685 MAX6352SVUK
7503 3139 198 00790 PB AV3.5
7504 9322 166 67668 MT48LC4M16A2TG-7E
7505 9322 205 94671 UPD4416016G5-A15-9JF
7506 9322 184 07685 PST3642N
7603 4822 209 17398 LD1117DT33
7604 9352 610 38118 TEA1207T_N1
7606 9322 191 07668 L5970D
7607 9322 144 97668 LD1117DT
7608 9322 197 17668 LD1117-1.8V-A
 Loading...