

Page 1
TSU9300
Starter’s Guide
Installing and configuring
EN
Page 2

Concept and realisation of the Guide:
Human Interface Group, De Regenboog 11, 2800 Mechelen (Belgium)
www.higroup.com
Page 3

ENGLISH
TSU9300 Starter’s Guide
Starter’s Guide
Installing and Configuring
TSU9300
Page 4
Before You Start
Based on a long experience and successful business in the custom installation market, the Pronto
TSU9300 is the third generation of Home Theater Control Panels. It belongs to the same
family as the Pronto TSU9400, TSU9600 and TSU9800 and all panels are fully compatible (except
for ProntoScript; this is not supported in the TSU9300).
The Pronto TSU9300 has been designed based on input from installers. It includes all technology
and features that are needed to operate any Home Theater in an easy and intuitive way.
The system is IP-based and can work wirelessly with the Pronto Extenders. With ProntoEdit
Professional, you can create any graphical configuration but you can also use the default
configuration files as a starting point to save time.
1
TSU9300 Starter’s Guide
TSU9300 Starter’s Guide
Contents
Before You Start ...............................................................................................................................1
Unpacking the Pronto Control Panel
................................................................................................3
Preparing for Configuration
..............................................................................................................5
Preparing the Power Adapter.........................................................................................................5
Charging the Control Panel............................................................................................................5
Installing ProntoEdit Professional...................................................................................................5
Configuring the Pronto Control Panel
...............................................................................................6
Customizing the Project.................................................................................................................6
Downloading the Project to the Control Panel
.................................................................................8
Support
.............................................................................................................................................9
Replacing the Batteries.................................................................................................................9
Troubleshooting
............................................................................................................................9
Key Combinations.......................................................................................................................11
FAQ Information and Latest Updates ............................................................................................11
Specifications
.................................................................................................................................12
Page 5
2
TSU9300 Starter’s Guide
ENGLISH
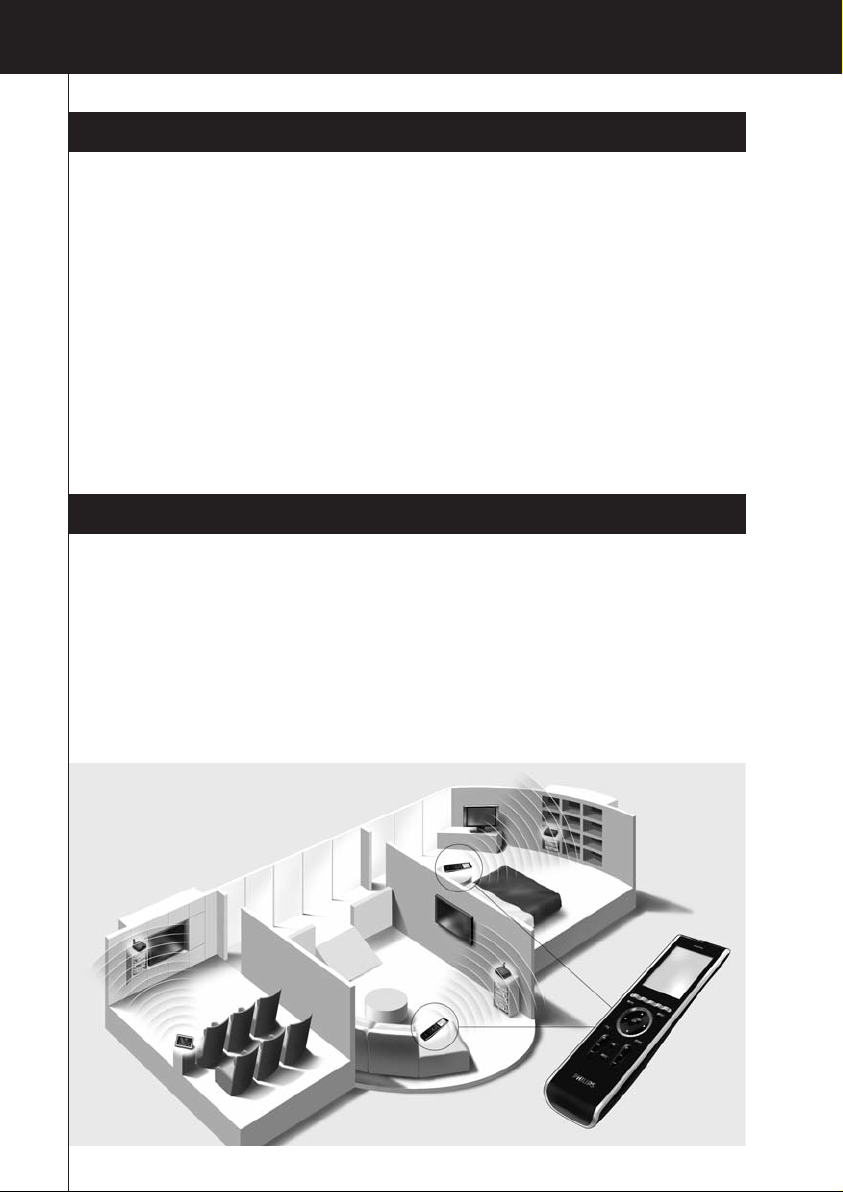
The Pronto System
The Pronto System contains a variety of equipment that is connected and configured to interact
with each other. The scheme below shows a possible way to connect several A/V
components.
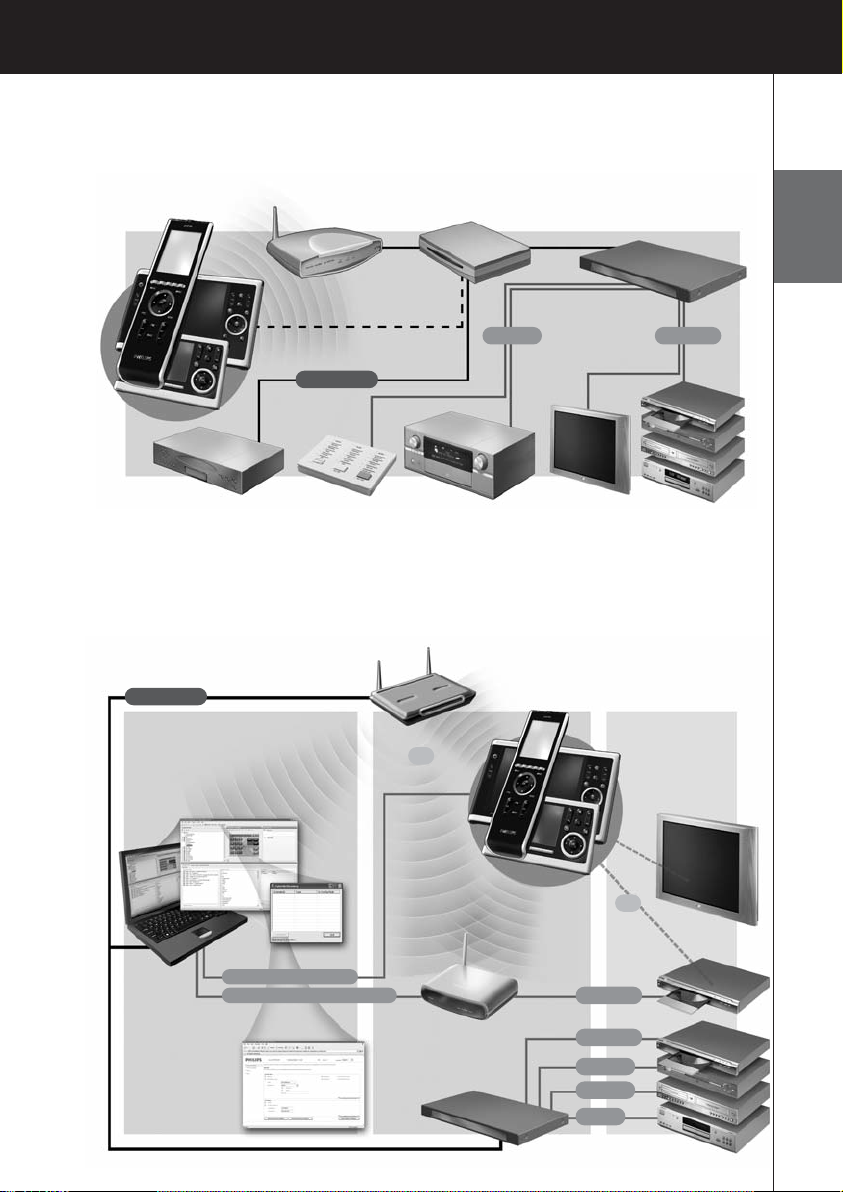
Configuration of the Pronto Control Panel
To set up a Pronto System and configure the Control Panel as the central unit of the system, you
need different tools. The scheme below indicates the different tools, their significance in the
configuration of the Pronto system and their mutual connection.
Wireless
Access Point
Router Pronto Serial Extender
Pronto
Control Panels
Multimedia
Server
Lutron
light system A/V receiver TV A/V equipment
A/V equipment
• Install and wire
the components
Ethernet IP
RS-232
Ethernet IP
Wireless Access
Point/ Router
Pronto Control Panels
• Set Control Panel Settings
Configuration
Tool
• Configure
Extenders Network
Settings
• Update Extenders
firmware
Extenders
• Set hardware switches
• Connect to A/V equipment
and/or Wireless Access
Point/Router
TV
IR
Wired IR
Wired IR
Sensor
RS-232
Relay
Download USB cable
Configure Crossed Ethernet
ProntoEdit Professional
• Customize configuration file
• Assign or learn codes
• Match extenders to devices
• Set Control Panel Settings
Discovery
Tool
RF
Wired IR
Page 6

3
TSU9300 Starter’s Guide
More information is available:
• In the ProntoEdit Professional Online Help of ProntoEdit Professional for TSU9300:
• On how to customize a project;
• On how to incorporate Extenders in the project;
• In the Starter’s Guides for the RFX9400 and RFX9600 Extenders:
• On how to configure and install an Extender in the Pronto System.
Unpacking the Pronto Control Panel
Learning eye
Control Panel
QVGA touch screen
Firm keys
Hard keys
Rotary wheel
Cursor keys
USB connector
Power switch
Backlight key
Page + / Page – keys
Page 7

4
TSU9300 Starter’s Guide
ENGLISH
Activity name
Is the label
you give to
the activity in
the editor.
Battery level
USB
CD with the following content
• ProntoEdit Professional
• Dedicated projects for the various Pronto Control Panels
• Image galleries
• Acrobat Reader
• Starter’s Guides in various languages (PDF)
• For the various Control Panels,
• For the various extenders.
Touch Screen
Docking Station
Panel connector
Adapter connector
Power Adapter
USB Cable
WiFi activity
No icon
Presence and/or
strength network
No IP address
No connection
Icon disabled in the
Settings – or –
No network: Control
Panel is configured to
work with IR
Wireless
Communication
present
Page 8

5
TSU9300 Starter’s Guide
Preparing for Configuration
Preparing the Power Adapter
• Pull out the contacts and use the adapter with the standard power plug.
-or-
• Place one of the add-ons over the standard power plug and use the adapter with the add-on.
Charging the Control Panel
It is advised to charge the Control Panel to its maximum before you start configuring it.
This can take up to 3 hours.
1 Activate the Control Panel by switching the Power switch
on the left side of the Control Panel to ‘1’.
2 Place the Control Panel in the docking station.
The docking station glows when it is powered.
A red LED on the docking station will light up while the
Control Panel is charging.
Installing ProntoEdit Professional
In the box you find a CD with which you install ProntoEdit Professional. You can also check for
updates on http://www.pronto.philips.com
in the Downloads section (PC Software).
Insert the CD in the PC and follow the on screen instructions to install the editor.
Notes Although ProntoEdit Professional can be installed together with older Philips Pronto editors,
we strongly recommend using this integrated editor for all your configuring.
If you want to update ProntoEdit Professional and you have inserted personal images in the
Gallery, you can make a back up of the gallery. You will be noted to do so in the installation
wizard.
Page 9

6
TSU9300 Starter’s Guide
ENGLISH
Configuring the Pronto Control Panel
Customizing the Project
In ProntoEdit Professional, the Quick Start Wizard helps you to build new projects
(configuration files). This wizard guides you through:
• Identification of the project;
• Definition of the components in the project;
• Definition of the activities in the project.
When you finish the wizard, you have a basic project. You can further customize this project by
following these 4 steps:
1 Adjust the layout pages of the different activities
Delete or add buttons to create a personal layout for every customer individually.
Tip The projects contain Favorites pages, where you can group the favorite TV and radio
channels of your customer in categories. Position the logo on the placeholder and assign the
correct channel macros via the Add Channel Macro Action.
2 Adjust the codes
Before you adjust the codes in the project, you add the codes of the specific A/V component of
the customer in My Database.
Read more about the use of My Database in the ProntoEdit Professional Online Help.
To add codes to My Database:
• In the Philips Database, search the device, based on its model number and add it
to My Database via the button .
Page 10

7
TSU9300 Starter’s Guide
-Or-
• In My Database, learn the codes from the original remote control of the
A/V component.
1 Connect the Control Panel to the PC with the USB cable.
2 Place the original remote 1 to 4 inches (2,5 - 10 cm) from the Control Panel in
line with its learning eye.
Check if both the batteries are sufficiently charged.
3 Press and hold the key of the original remote for more than 1 second.
Tip s • Cover the remotes with your hand or a cloth during learning.
Do not learn codes under fluorescent light or sunlight. Intensive light sources
affect the ability to learn codes successfully.
• With the Control Panel connected to the PC, you can test newly added codes via
the editor. On the page Component Functions, you press the Test button and
the code will be sent to the A/V equipment.
To assign codes to the buttons:
1 In the Building Blocks panel, select the Equipment & Codes tab.
2 Select the code from the Component functions list and drag-and-drop the code to
the button.
3 Configure the Extenders used in the Pronto System
1 In the Building Blocks – Equipment & Codes, select the number of Extenders and
define the type.
2 Select the way the Control Panel will work together with the Extenders in the
System Properties on the tab Wireless (Stand-Alone or Network) and insert the
requested settings.
Notes • The wireless time out can be set from 15 minutes to 24 hours, depending on
the preference of the customer to optimize battery saving and response time when
a button is pressed.
• When the Extenders are used in a network, you need to configure the extenders
with the Extender Configuration Tool. For more information, please refer to the
Starter’s Guides for the RFX9400 and RFX9600 Extenders.
1 to 4 inches
(2,5 - 10 cm)
Page 11

ENGLISH
8
TSU9300 Starter’s Guide
4 Configure the Settings for the Control Panel
Set time & date and define the activation method, time outs and screen brightness in the
Activity Properties of the configuration file on the Settings tabs.
Downloading the Project to the Control Panel
To download the project to the Control Panel, connect it to your PC with the USB cable enclosed and
click the icon in ProntoEdit Professional.
When you connect the Control Panel to the PC, the Control Panel displays a USB icon in the upper
right corner of the screen.
The PC recognizes the Control Panel as a removable disk and adds
it in the folder list of your Windows Explorer as ‘TSU9300’. In the
right corner of your Windows taskbar, the following icon
appears.
If the Control Panel is not recognized, try the following options:
• Unplug the Control Panel and try again a few seconds later.
• Unplug the Control Panel, reset it and try again.
• Check the USB settings on the PC.
Note The Control Panel uses default Windows drivers for recognition. If the problem is not solved
with the options described above, try installing the latest Service Pack for your Windows
version or check the troubleshooting section of your operating system.
Warning Do not pull the USB cable out of the PC during transition of the configuration file.
Page 12

9
Support
Replacing the Batteries
The batteries in the Control Panel are Lithium polymer batteries. It is advised to change the
batteries when the autonomy of the Control Panel becomes noticeably less.
If you want to order new batteries, contact the Philips Service Center or your distributor.
For more information about the Service Center, please refer to Support on
http://www.pronto.philips.com
.
Warning Replace the batteries only with original Philips Pronto TSU9300 batteries; otherwise the
guarantee is no longer valid and hazardous situations could occur.
Battery safety instructions
1 Lithium polymer batteries have a soft aluminium foil package, therefore:
• Do not strike the batteries with any sharp edged parts.
• Make sure the worktable is clean so that no sharp particles can damage the foil.
• Do not bend or fold battery tabs, battery body or sealing edges.
2 Never dispose the cells in fire. This may cause the cells to explode.
3 Do not spill liquids such as water or coffee on the cells.
4 To prevent damage, use a tool to remove the batteries and do not pull the wires.
Troubleshooting
Macros do not work
• Make sure you have defined the correct codes for your A/V equipment.
• Insert sufficient delays in the macros to allow the equipment to start up properly.
• Verify that the button has not been reprogrammed. Ensure that the Action List contains the
appropriate commands for the A/V equipment.
Pronto will not learn codes
• Make sure the USB cable is inserted properly.
• Make sure the Control Panel and the original remote control are positioned correctly.
• Intensive light sources affect the ability to learn code successfully. Therefore do not learn codes
under fluorescent light or sunlight and cover the remotes with your hand or a cloth during
learning.
• Make sure the batteries of the Control Panel and the original remote are sufficiently charged.
• Press and hold the key on the original remote for more than one second.
The A/V equipment does not respond to commands from the Control Panel
• Make sure you have defined the correct codes for your A/V equipment.
• If you want to use RF signals for the equipment on different locations, you need to use multiple
Extenders in the Pronto Network. You need to configure the Extenders:
TSU9300 Starter’s Guide
Page 13

ENGLISH
10
• On the Extender hardware by assigning an ID with the Extender ID switch.
• In ProntoEdit Professional by defining the number of Extenders in the System Properties
and matching the Extender to the A/V component in the Device Properties.
• When the Extenders work in a network, you need to configure the Network Settings in the
Configuration Tool.
For more information, check the Starter’s Guides for the RFX9400 and RFX9600 Extenders and the
ProntoEdit Professional Online Help.
• When the Control Panel works in a wireless environment, bear in mind that it may take the
Pronto Network a few seconds to wake up and start transmitting codes.
• Make sure you defined the parameters of the network correctly in ProntoEdit Professional on the
tab Network.
• Not all Wireless Access Points are working equally well in combination with the Control Panel.
Make sure you use a quality access point.
The transmission of the signals over the wireless network is slow
Depending on the Settings you made for the Network Settings, it takes longer for the Pronto
Network to transmit signals. Facts that influence the speed are:
• The location of the Wireless Access Point: To test if the Wireless Access Point and the
Control Panel are too far apart, take the Control Panel and stand closer to the Wireless Access
Point.
If the transition is significantly faster, place the Wireless Access Point closer to where the
Control Panel will be used or add an extra Wireless Access Point in the Pronto Network.
• Encryption: The encryption used by the Extenders and the Control Panel slows the transition of
the signal down.
• The chipset of your Wireless Access Point.
• The DHCP server settings.
The Control Panel shows one of the following icons:
The WiFi icon is not shown on the screen of the Control Panel
You cannot see the WiFi icon:
• When the extenders and the Control Panel are configured in Stand-Alone.
• When you disabled the system item WiFi Level in the ProntoEdit Professional.
The Control Panel behaves erratically
Normally, resetting the Control Panel is not necessary. However, if the touch screen freezes or if you
notice unusual behavior, you need to perform a reset to get it running again.
You reset the Control Panel by switching the Power switch to 0, waiting a few seconds and
switching the Power switch back to 1.
TSU9300 Starter’s Guide
No connection
• The Wireless Access Point is powered down.
• The Control Panel is out of range of the Wireless Access point.
• There is an encryption problem.
No IP address
• There is no IP address received.
• An IP conflict is detected.
Page 14

11
TSU9300 Starter’s Guide
Key Combinations
To access the Reset function for the Control Panel:
• First press Page Up, then also press
Menu and Home.
To access the Calibration Mode:
• First press Backlight, then also press
Menu and firm key 1.
To access the Diagnostics Mode:
• First press Backlight, then also press
Menu and firm key 2.
FAQ Information and Latest Updates
You can find more information on www.pronto.philips.com.
Navigate to the Support section for more FAQ Information.
Navigate to the Downloads section for the following updates:
• TSU9300 Control Panel Firmware;
Download this on the Control Panel when it does not start up or when the screen stays black
after resetting.
• RFX9400 and RFX9600 Extender Firmware;
• ProntoEdit Professional Software.
Note Installing the latest update of the ProntoEdit Professional software will overwrite all files and
delete the personal images you added to the gallery. Make sure to update the gallery when
requested in the wizard to copy your personal images to the new gallery.
Backlight
Menu
Page Up
Firm key 2
Firm key 1
Home
Page 15

12
Specifications
Display 2.8” TFT color display with touch screen
QVGA (320 x 240 pixels) resolution portrait LCD
65,536 colors
Interface USB 2.0 port connector
Drivers Default Windows drivers
Infrared (IR) Operating distance = max 36 ft (12 m)
Learning distance = 1 - 4 inch (25 - 100 mm) at 0-40 degrees
Operating angle = 45º at max 15 ft (5 m)
Operating/ learning frequency range = 17 kHz – 500 kHz carrier freq
Wireless System WiFi based technology operating at 2.4 GHz
Memory 64 MB SDRAM
48 MB Flash memory
Power Management Power on by tilting, tapping the screen, pressing the backlight button or tapping
the keys
Power off automatically by time out
Battery status indication
Dimensions Control Panel: 8.5 x 2.4 x 0.9 inch (215 x 60 x 24 mm)
Docking Station: 8 x 3 x 1.1 inch (202 x 76 x 28 mm)
Operating Temperature 41° F – 113° F (5° C – 45° C)
Storage Temperature -13° F – 158° F (-25° C – 70° C)
Battery Lithium polymer battery, 1700 mAh
Power Adapter 100 V-240 V AC / 50-60 Hz Power adapter (5 V DC/2A output)
Accessories • USB cable
• Power adapter
• Docking station
• CD-ROM with ProntoEdit Professional, Starter’s Guides for the Control Panel
and Extenders (PDF), Acrobat Reader
• End user Starter’s Guide
ProntoEdit Professional Supported operating systems
• Windows XP
• Windows Vista
Minimum requirements:
• 1.2 GHz Intel Pentium IV workstation or equivalent
• 1 GB physical memory
• 512 MB of free disk space
Recommended requirements:
• 2.4 GHz Intel Pentium IV workstation or equivalent
• 2 GB physical memory
• 1 GB of free disk space
IR code database information Designed with UEI Technology
Licensed under U.S. Patent 5,689,353
Portions © UEI 1999
TSU9300 Starter’s Guide
ENGLISH
Pronto Control Panel Starter’s Guide
© Copyright 2008 Royal Philips Electronics, Interleuvenlaan 74-76, 3001 Leuven (Belgium)
Remarks:
All rights are reserved. Reproduction in whole or in part is prohibited without prior consent of the copyright owner.
Royal Philips Electronics is not liable for omissions or for technical or editorial errors in this manual or for damages
directly or indirectly resulting from the use of the Pronto Control Panel.
The information in this Starter’s Guide may be subject to change without prior notice. All brand or product names are
trademarks or registered trademarks of their respective companies or organizations.
Page 16

 Loading...