

Page 1

Clock Radio
3000 Series
R3205
User manual
Register your product and get support at
www.philips.com/support
Page 2

Contents
1 Important 2
Safety 2
2
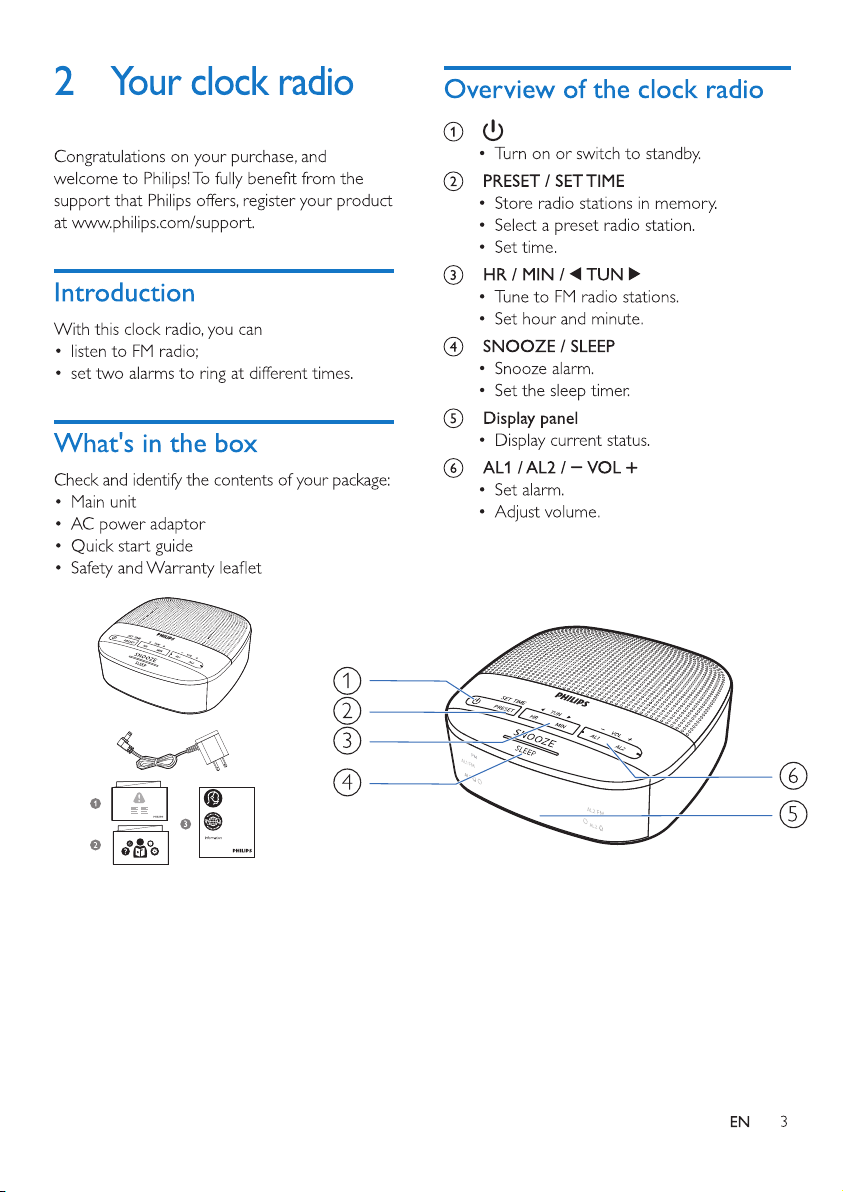
Your clock radio 3
Introduction 3
What's in the box 3
Overview of the clock radio 3
3 Get started 4
Install batteries 4
Connect power 4
Set time 4
4 Listen to FM radio 5
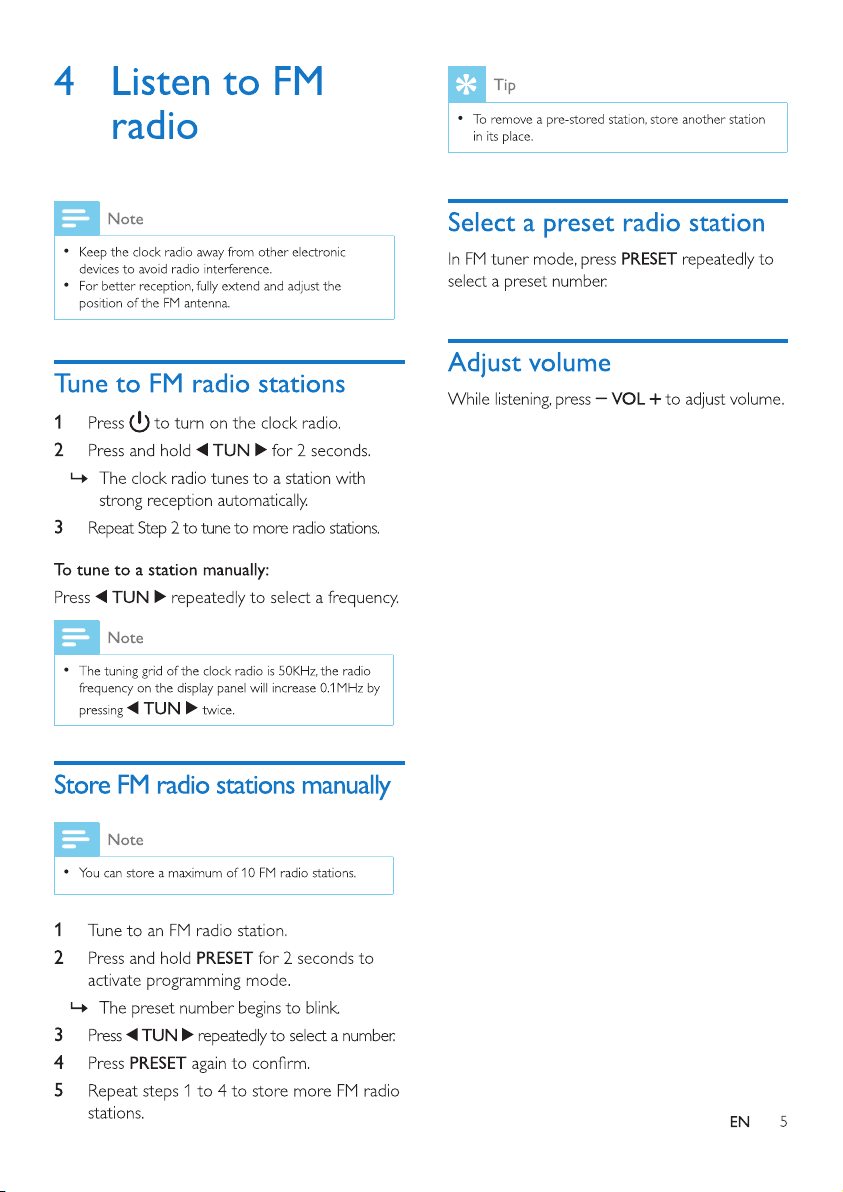
Tune to FM radio stations 5
Store FM radio stations manually 5
Select a preset radio station 5
Adjust volume 5
5 Other features 6
Set alarm time 6
Set sleep timer 6
6 Product information 7
7 T
roubleshooting 7
8 Notice 8
EN
1
Page 3
1 Important
Safety
Warning
• Never remove the casing of this clock radio.
• Never lubricate any part of this clock radio.
• Never place this clock radio on other
electrical equipment.
• Keep this clock radio away from direct
• Make sure that you always have easy access
to the power cord, plug or adaptor to
disconnect the clock radio from the power.
• Read these instructions.
• Heed all warnings.
• Follow all instructions.
• Do not block any ventilation openings. Install in
accordance with the manufacturer’s instructions.
• Do not install near any heat sources such as
radiators, heat registers, stoves, or other apparatus
• Install all batteries correctly, + and - as
marked on the unit.
• Remove batteries when the unit is not
used for a long time.
• The battery shall not be exposed to
the like.
• This clock radio shall not be exposed to
dripping or splashing.
• Do not place any sources of danger on the
• Where the plug of the Direct Plug-in
Adapter is used as the disconnect device,
the disconnect device shall remain readily
operable.
• Protect the power cord from being walked on
or pinched, particularly at plugs, convenience
receptacles, and the point where they exit
from the clock radio.
•
the manufacturer.
• Unplug this apparatus during lightning storms
or when unused for long periods of time.
•
personnel. Servicing is required when the
apparatus has been damaged in any way, such
as power-supply cord or plug is damaged,
liquid has been spilled or objects have fallen
into the apparatus, the apparatus has been
exposed to rain or moisture, does not operate
normally, or has been dropped.
• Battery usage CAUTION - To prevent battery
leakage which may result in bodily injury,
property damage, or damage to the clock radio:
2 EN
Page 4
Page 5
3 Get started
Always follow the instructions in this chapter in
sequence.
Install batteries
The batteries can only back up clock and alarm
settings.
Caution
Risk of explosion! Keep the batteries away from heat,
•
• Batteries contain chemical substances, so they should
be disposed of properly.
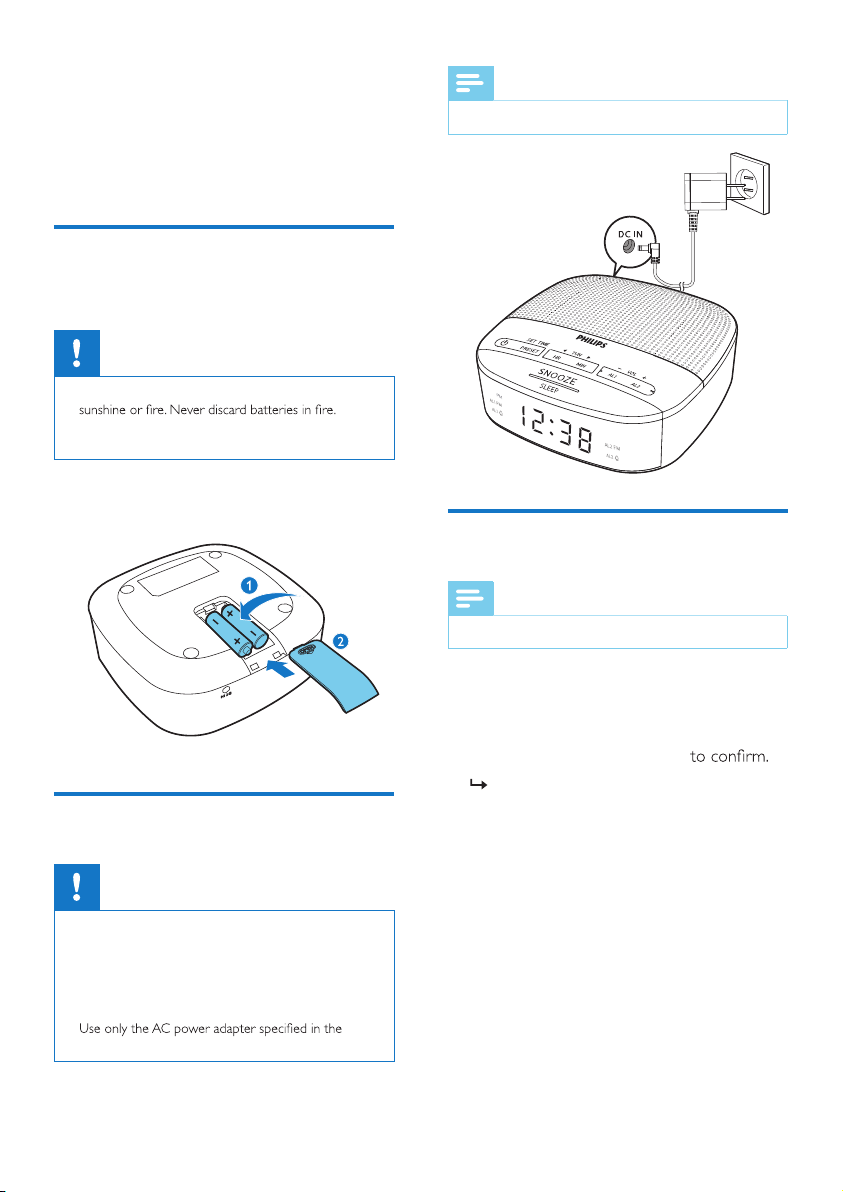
Insert 2 AAA batteries (not provided) with
correct polarity (+/-) as illustrated.
Note
The type plate is located at the bottom of the clock radio.
•
Set time
Note
•
You can only set time in standby mode.
Connect power
Caution
Risk of product damage! Make sure that the power
•
voltage corresponds to the voltage printed on the back
or underside of the clock radio.
• Risk of electrical shock! When you unplug the power
adaptor, always pull the plug from the socket. Never
pull the cord.
•
manufacturer or sold with this unit.
4 EN
1 In standby mode, press and hold SET TIME
for 2 seconds.
2 Press HR to set hour and MIN to set
minute, then press SET TIME
The time is set.
Page 6
Page 7
5 Other features
The alarm repeats ringing for the next day.
To stop the alarm, press the coresponding
AL1 or AL2.
Set alarm time
Set alarm
Note
You can only set the alarm in standby mode.
•
• Make sure that you have set the clock correctly.
1 In standby mode, press and hold AL1 or
AL2 for 2 seconds to set alarm time.
2 Press HR to set hour and MIN to set
minute, then press AL1 or AL2
Tip
The unit exits alarm setting mode when being idle for 10
•
seconds.
Select alarm source
You can select FM radio or buzzer as the alarm
source by pressing AL1 or AL2 in standby
mode.
The corresponding alarm icon lights up.
Snooze the alarm
When the alarm sounds, press SNOOZE.
The alarm snoozes and repeats ringing 9
minutes later.
Set sleep timer
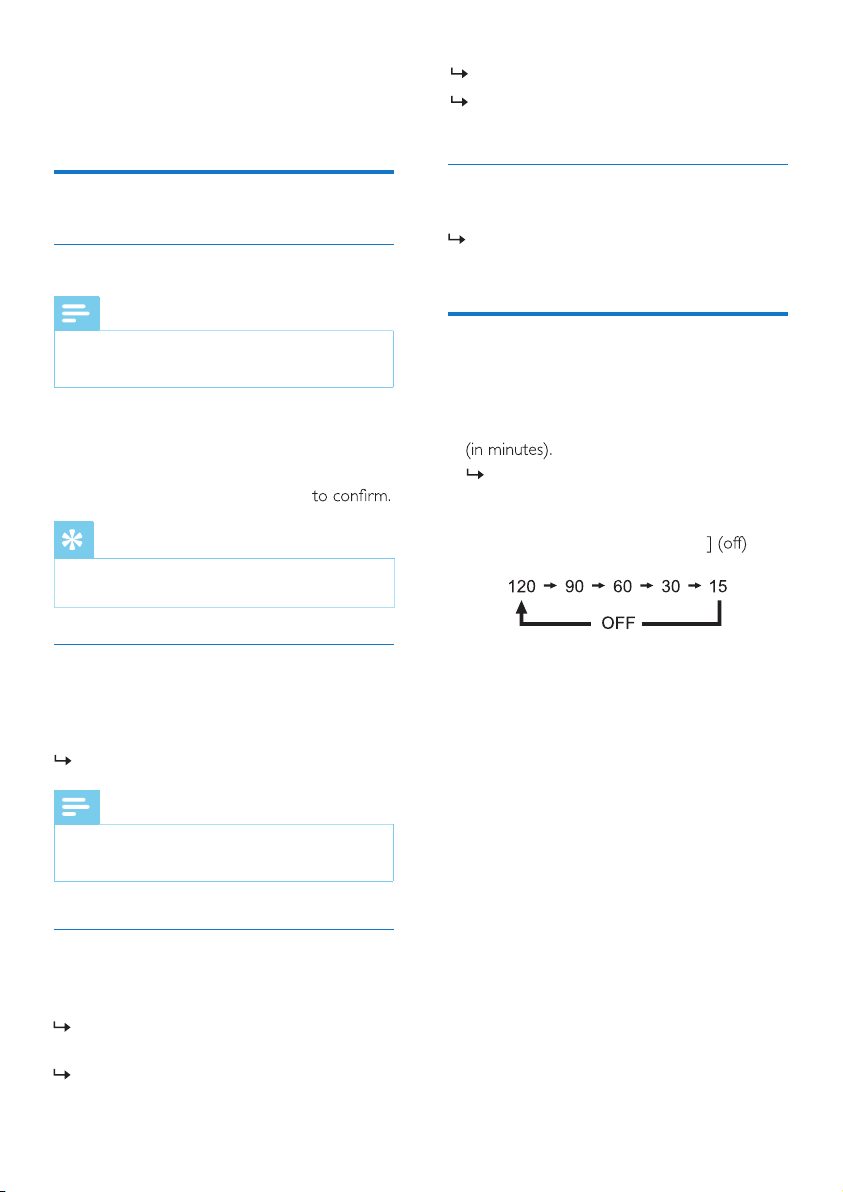
This clock radio can switch to standby mode
automatically after a preset period.
• Press SLEEP repeatedly to select a period
The clock radio switches to standby mode
automatically after the preset period.
To deactivate the sleep timer :
• Press SLEEP repeatedly until [OFF
appears.
Note
The gentle wake-up function is designed for FM radio
•
source only.
Activate/deactivate alarm timer
Press AL1 or AL2 repeatedly to activate or
deactivate the alarm timer.
If the alarm timer is activated, the alarm
indicator turns on.
If the alarm timer is deactivated, the alarm
indicator turns off.
6 EN
Page 8
6 Product
information
Note
Product information is subject to change without prior notice.
•
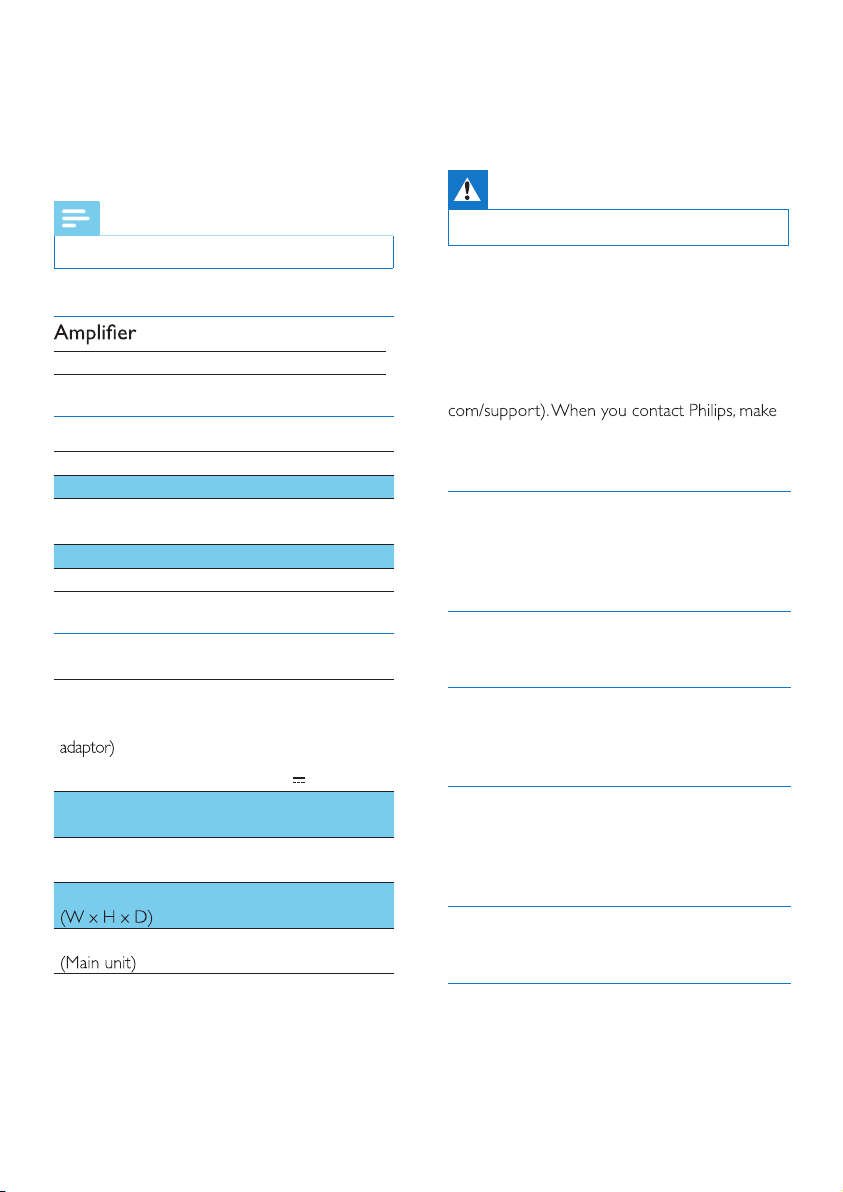
Rated Output Power 200mW RMS
7 T
• Never remove the casing of the product
To keep the warranty valid, never try to repair
the device yourself.
If you encounter problems when using this
device, check the following points before
requesting service. If the problem remains
unsolved, go to the Philips webpage (ww.philips.
roubleshooting
Warning
Tuner (FM)
Tuning Range 87.5-108 MHz
Tuning Grid 50 KHz
Sensitivity
- Mono, 26 dB S/N Ratio
Total Harmonic Distor tion <3%
Signal to Noise Ratio >50 dBA
<22 dBf
General information
Brand: Philips;
AC Power (power
Operation Power
Consumption
Standby Power
Consumption
Dimensions
Weight
Model: AS030-050-EE060
Input: 100-240V~
50/60 Hz; 0.15A
Output: 5V
<3 W
<1 W
131 x 54 x 131 mm
198.9 g
0.6A
sure that the device is nearby and the model
number and serial number are available.
No power
• Make sure that the AC power plug of the unit
is connected properly.
• Make sure that there is power at the AC outlet.
No sound
• Adjust the volume.
No response from the unit
• Disconnect and reconnect the AC power
plug, then turn on the unit again.
Poor radio reception
• Keep the clock radio away from other
electronic devices to avoid radio interference.
• Fully extend and adjust the position of the antenna.
Alarm does not work
• Set the clock/alarm correctly.
Clock/alarm setting erased
• Power has been interrupted or the power
plug has been disconnected.
• Reset the clock/alarm.
EN
7
Page 9
8 Notice
device that are not expressly approved by
MMD Hong Kong Holding Limited may void
the user’s authority to operate the product.
Hereby, TP Vision Europe BV declares that
this product is in compliance with the essential
requirements and other relevant provisions
Declaration of Conformity on
www. philips.com/support.
This product complies with the radio
interference requirements of the
European
This product is designed and manufactured
with high-quality materials and components,
which
This symbol means the product must not be
discarded as household waste and should be
delivered to an appropriate collection facility for
recycling. Follow local rules and never dispose
of the product and rechargeable batteries with
normal household waste. Correct disposal
of old products and rechargeable batteries
helps prevent negative consequences for the
environment and human health.
This symbol means that the product contains
batteries covered by European Directive
2013/56/EU which cannot be disposed of with
normal household waste.
Inform yourself about the the local separate
collection system for electrical and electronic
products and batteries. Follow local rules and
never dispose of the product and batteries
with normal household waste. Correct disposal
of old products and batteries helps prevent
negative consequences for the environment and
human health.
Removing the disposal batteries
To remove the disposable batteries, see battery
install section.
8 EN
Community.
can be recycled and reused.
FCC INFORMATION
NOTE: This equipment has been tested
and found to comply with the limits for
a Class B digital device, pursuant to
Part 15 of the FCC Rules. These limits
are designed to provide reasonable
protection against harmful interference
in a residential installation. This
equipment generates, uses and can
radiate radio frequency energy and, if
not installed and used in accordance
with the instructions, may cause harmful
interference to radio communications.
However, there is no guarantee that
interference will not occur in a particular
installation. If this equipment does
cause harmful interference to radio
or television reception, which can be
determined by turning the equipment
off and on, the user is encouraged to
try to correct the interference by one or
more of the following measures:
• Reorient or relocate the receiving
antenna.
• Increase the separation between the
equipment and receiver.
• Connect the equipment into an
outlet on a circuit different from that
to which the receiver is connected.
• Consult the dealer or an experienced
radio / TV technician for help.
This device complies with part 15 of the FCC
Rules, Operation is subjuect to the following
two conditions: (1) this device may not cause
harmful interference, and (2) this device must
accept any interference received, including
interference that may cause undesired
operation
IC-Canada : CAN ICES-3(B)/NMB-3(B)
This device contains licence-exempt
transmitter(s)/receiver(s) that comply
with Innovation, Science and Economic
Development Canada’s licence-exempt
RSS(s). Operation is subject to the
following two conditions:
1. This device may not cause interference.
2. This device must accept any interference,
including interference that may cause
undesired operation of the device.
Page 10

2020 © Philips and the Philips Shield Emblem are registered trademarks
of Koninklijke Philips N.V. and are used under license. This product has been
manufactured by and is sold under the responsibility of MMD Hong Kong
Limited is the warrantor in relation to this product.
TAR3205_37_UM_V1.0
 Loading...