


EnglishPortuguês
TYPE SUP 018M
OPERATING INSTRUCTIONS
INSTRUCÇOES E MODO DE EMPREGO

2
16
11
13
10
7
6
8
3
12
4
2
1
14
9
5 23 18 19 20 21
17 22
15

3
+
-

4

GENERAL INFORMATION - TECHNICAL DATA
5
1
GENERAL INFORMATION
The coffee machine is suitable to make espresso coffee using coffee beans and is equipped with a device
for the distribution of steam and hot water.
Warning. No liability is assumed for any
damage caused by:
• incorrect use not in accordance with the intended
uses;
• repairs not carried out by Authorized Service
Centres;
• tampering with the power cable;
• tampering with any part of the machine;
• the use of non-original spare parts and
accessories.
In these cases, the warranty is not valid.
1.1 To facilitate reading
A warning triangle draws the attention to
all the instructions that are important for
the user’s safety.
Please carefully follow these instructions to
avoid serious injury.
(Fig. 2) - Reference to fi gures, parts of the machine
and controls is indicated by numbers or letters, like
the reference to fi gure 2 in this section.
This symbol is used to highlight the
information that is particularly important
for ensuring an optimal use of the machine.
1.2 How to use these operating
instructions
Keep these operating instructions in a safe place
and make them available to anyone else who
would use the coffee machine.
For further information or in case of problems that
are not included or not completely explained in these
instructions, please contact the Authorized Service
Centres.
2 TECHNICAL DATA
• Nominal voltage - Power rating - Power supply
See label on the equipment
• Shell material
Thermoplastic
• Size (mm)
337 x 325 x 377
• Weight (kg)
8,5
• Cable length (mm)
1200
• Control panel
Front
• Water tank
1,7 (l) - Removable
• Coffee bean hopper capacity (g)
350 g of coffee beans
• Pump pressure (bar)
15
• Boiler
Stainless steel
• Safety devices
Boiler pressure safety valve;
safety thermostat.
English
Subject to engineering and manufacturing changes due to technological developments.

6
SAFETY REGULATIONS
O I L
sizes in millimeter

SAFETY REGULATIONS
7
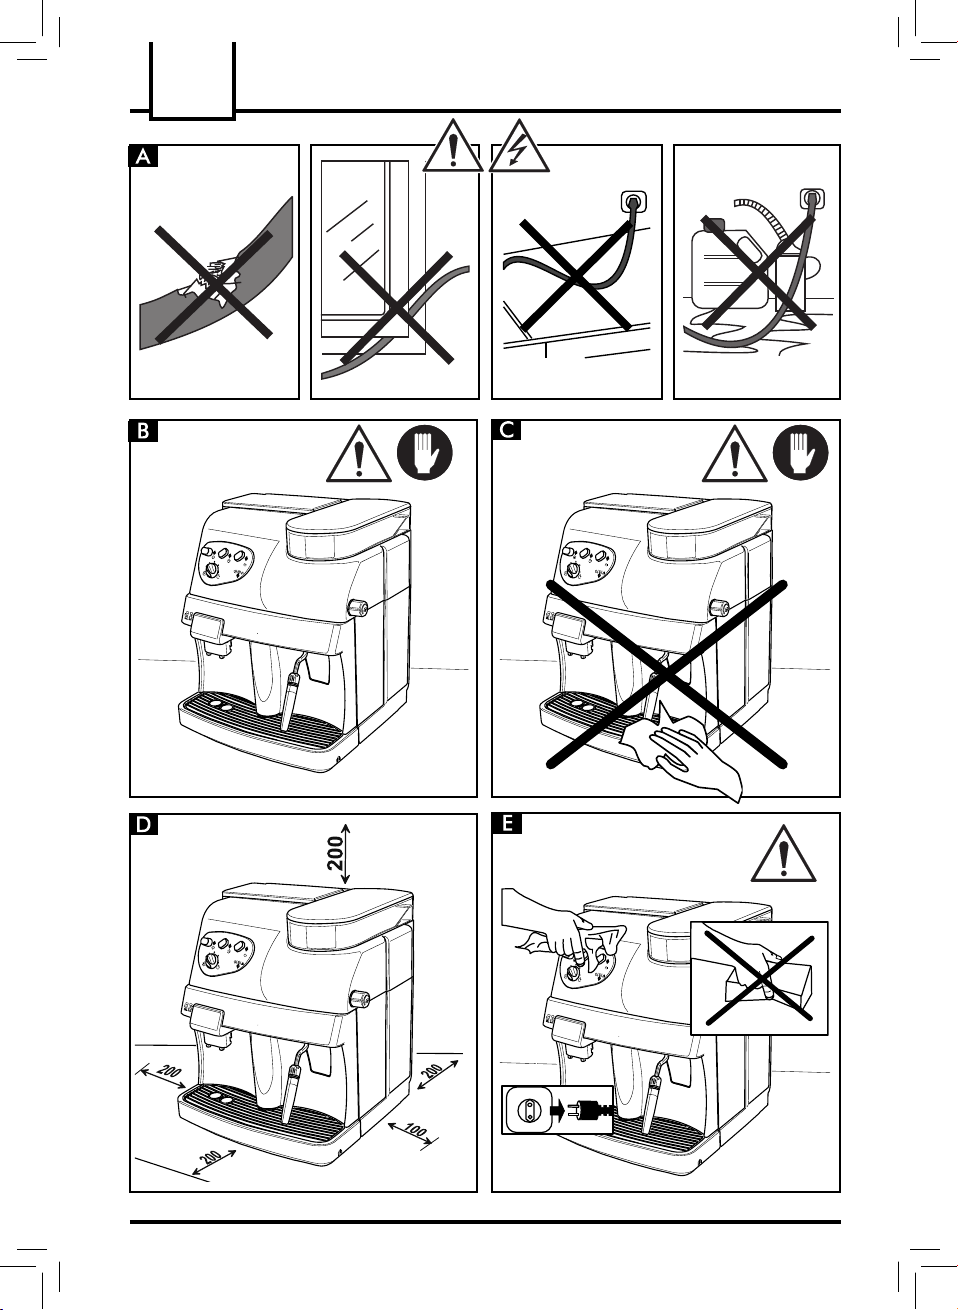
3 SAFETY REGULATIONS
Never place live parts in contact with water: danger
of short circuit! Steam and hot water may cause
scalding! Do not direct the steam or hot water jet
toward parts of the body; handle the steam/hot
water spout with care: danger of scalding!
Intended use
Do not make any technical changes or use the machine for unauthorized purposes since this would create serious hazards! The equipments is not to be used
by persons with reduced physical, mental or sensory
abilities or with scarce experience and/or expertise,
unless they are supervised by a person responsible
for their safety, or they are instructed by this person
on how to properly use the machine.
Power supply
Only connect the coffee machine to a suitable power
socket. The voltage must correspond to the indication
on the machine’s label.
Power cable
Never use the coffee machine if the power cable is
defective.
If damaged, the power cable must be replaced by the
manufacturer or its customer service department.
Do not pass the cable around corners, over sharp
edges or over hot objects and keep it away from oil.
Do not use the power cable to carry or pull the coffee
machine. Do not pull out the plug by pulling on the
power cable or touch it with wet hands.
Do not let the power cable hang freely from tables
or shelves.
Protecting others
Make sure that the coffee machine is use for operator
instructed by person on how to properly use equipments.
Danger of burning
Never direct the jet of hot steam and/or hot water towards yourself and/or others: danger of scalding!
Always use the handles or knobs provided.
Location
Position the coffee machine in a safe place, where
nobody may overturn it or be injured.
Do not use the coffee machine outdoors.
Do not place the machine on hot surfaces and close
to open fl ames to prevent the body from melting or
being damaged.
Cleaning
Before cleaning the machine, the main power button
(5) must be switched to the -0- position and the plug
must be removed from the socket.
Then wait for the machine to cool down.
Never immerse the machine in water!
It is strictly forbidden to tamper with the inside of the
machine.
Space for use and maintenance
To ensure that the coffee machine works properly
and effi ciently, the following conditions are recom-
mended:
• Choose a level surface;
• Select a location that is suffi ciently well-lit, clean
and near an easily reachable socket;
• Allow for a minimum distance from the sides of the
machine as shown in the fi gure.
Storing the machine
If the machine is to remain out of use for a long time,
turn it off and unplug it. Store it in a dry place, keep it
protected from dust and dirt.
Servicing / Maintenance
In case of failure, faults or a suspected fault after dropping, immediately remove the plug from the socket.
Never attempt to operate a faulty machine.
Servicing and repairs may only be carried out by
Authorized Service Centres.Repairs must only be
carried out by an Authorised Service Centre.
All liability for damages caused by works not carried
out in a professional manner is declined.
Fire safety
In case of fi re, use Carbon Dioxide extinguishers (CO2).
Do not use water or dry-powder extinguishers.
English

8
SAFETY REGULATIONS - INSTALLATION
Key to machine components
Coffee bean hopper
Coffee bean hopper cover
Grinder adjustment knob
Coffee dose adjustment knob
Main power button (ON/OFF)
Water tank cover
Water tank
Grounds drawer
Power cable
Drip tray + grill
Height-adjustable dispensing spout
Steam/hot water spout with pannarello
Front door
Steam knob
Coffee Brew Group
Cleaning brush
Control panel
Coffee dose per cup adjustment knob
Coffee button
Temperature ready / coffee function light
Steam function button
Steam temperature light
Alarm light
Machine on light
4 INSTALLATION
For your safety and other people's safety, carefully
follow the "Safety Regulations" in section 3.
4.1 Packaging
The original packaging has been designed and constructed to protect the machine during transport.
We recommend keeping the packaging material for
possible future transport.
4.2.Preliminary Operations
• Remove the drip tray (10) with grill from the packaging.
• Remove the coffee machine from the packaging
and position it in a proper place in compliance with
the requirements described in the safety regulations
(section 3).
• Insert the drip tray (10) into the appropriate seat.
Make sure that the drip tray, the coffee grounds
drawer (8) and the coffee brew unit (15) are
correctly placed and that the front door (13) is
closed.
• Fit the cover of the coffee bean hopper (2) onto the
coffee bean hopper (1). Keep the cleaning brush
(16) to hand.
• Before plugging in the machine, make sure that the
power button (5) is switched to -0-.
If the red light (22) fl ashes when the machine is turned
on, it means that one of the above mentioned parts is
not placed correctly.
Important Note: Carefully read the explana-
tion of all the warnings displayed by the
machine to the user by means of the lights on the
control panel (section 13).
• (Fig.25) - Lift and extract the water tank (7) and
remove the cover (6). Rinse and fi ll it with fresh
water taking care not to overfi ll it. Reinsert the water
tank into the appropriate seat and replace the cover
(6) on top of it.

INSTALLATION
9
Always use only fresh, non-sparkling water
to fi ll the tank (7). Hot water or any other
liquid may damage the tank and/or the machine.
Do not turn on the machine without water: make
sure there is enough water in the tank.
• (Fig.24) - Remove the cover (2) and add the coffee
beans.
Always add only coffee beans in the coffee
bean hopper (1). Ground coffee, instant
coffee or any other object may damage the
machine.
• Replace the cover (2) on the coffee bean hopper (1).
• Insert the plug into a suitable socket.
4.3 Circuit Priming
In the beginning, after dispensing steam or when the
water tank is empty, the machine’s water circuit must
be primed.
• The power button (5) is switched to -0-. Press but-
ton (5) to turn on the machine. The light (23) on the
control panel will turn on.
• (Fig.26) - Place a container beneath the steam
wand (Pannarello)(12) to prime the circuit. Turn the
knob (14) counter-clockwise and wait until water
fl ows steadily out of the steam wand (Pannarello).
Turn the knob (14) clockwise to stop water dispensing.
• The circuit is now primed.
4.4 Using the machine for the
fi rst time or after a period of
inactivity
This simple operation ensures optimum brewing and
must be performed:
- At fi rst start-up;
- When the machine remains inactive for a long time
(more than 2 weeks).
Dispensed water must be emptied into an
adequate drain. It is not suitable for food
use. If the container fi lls up, stop dispensing water
during the cycle and empty it before resuming
the operation.
1 (Fig.25) - Make sure that the water tank (7) is fi lled
with drinking water; otherwise, empty the tank and
replace with fresh water.
2 Place a container beneath the steam wand
(Pannarello) (12) and turn the knob (14) counterclockwise.
3 After 30 seconds (or when the container is full)
stop dispensing water by turning the knob (14)
clockwise.
4 Wait about 60 seconds. Repeat the operations from
step 2 until emptying out the tank.
5 (Fig.25) - Once run out of water, fi ll the tank again
(7) and carry out a new cycle from step (2) as previously mentioned.
6 Once emptied the tank for the second time, fi ll it
again with water; the machine is now ready for
use.
English
Note: if required, prime the circuit.
• To brew coffee, dispense hot water or steam, and
for a proper use of the machine, carefully follow the
instructions provided.

10
COFFEE GRINDER - COFFEE BREWING
5 COFFEE GRINDER
Caution! The grinder adjustment knob, inside
the coffee bean hopper, must be turned only
when the grinder is working. Do not pour ground and/
or instant coffee into the bean hopper.
Do not insert any material other than coffee
beans into the hopper. The grinder contains
moving parts that may be dangerous. Therefore,
do not insert fi ngers and/or other objects. Turn the
main power button to off and remove the plug from
the socket before carrying out any type of operation
inside the bean hopper. Do not pour coffee beans
when the grinder is working.
The quality and fl avour of coffee depend on the grind,
as well as on the blend used. The machine has a knob
(3) to adjust the coffee grind. Turn the knob when the
grinder is working to adjust the grind. The digits on
the knob indicate the grind.
The manufacturer confi gures each equipment on an
intermediate grind setting: if the grind is too fi ne, rotate
the knob to a higher setting; if the grind is too coarse,
turn the knob to a lower setting.
The variation in grind will only be seen when three/
four coffees have been brewed.
6 COFFEE DOSE
ADJUSTMENT KNOB
(Fig. 24) - The desired coffee quantity (dose) to be
ground may be set in the machine.
The dose is set by the manufacturer to a medium value
that meets all tastes. Reference (A) in correspondence
with reference (B). By turning the knob (4) inside the
coffee bean hopper counterclockwise the quantity of
ground coffee is increased; by turning the knob clockwise the quantity of ground coffee is decreased.
The dose adjustment must be performed before pressing the coffee button.
This system allows an optimal brewing with any kind of
coffee on the market.
7 COFFEE BREWING
Note: If the machine does not brew coffee,
make sure that the water tank contains
enough water by verifying the water level on the
left side of the machine.
Before brewing coffee, make sure that
the green temperature ready light (19) is
permanently on and that the water tank and the
coffee hopper are full.
Note: If the value has been changed
excessively - by turning the knob to very
low settings - the "no coffee" alarm might be
activated. Press the coffee brew button again to
reactivate the machine and to complete the coffee
grinding cycle.
Use coffee bean blends for espresso machines. Try
not to use very high or very low grind settings (e.g.
1 - 16). Use different coffee blends for different settings. Keep coffee in a fresh place in a sealed, airtight
container.
The grind must only be regulated if coffee is not
brewed properly:
Too fast brewing = too coarse grind > Rotate the knob
to a lower setting;
Drip and/or absent brewing = too fi ne grind > Rotate
the knob to a higher setting.
• (Fig. 27 - 28) - Place 1 or 2 cups beneath the
dispensing spout (11). You may adjust the height
of the dispensing spout to your cups.
• Adjust the desired quantity of coffee to be brewed
by means of the knob (17): by turning the knob
clockwise the quantity of coffee to be brewed is
increased; by turning the knob counterclockwise
the quantity of coffee to be brewed is decreased.
• Press the button (18) to brew coffee. The brewing
cycle starts: press the button (18) once to brew 1
coffee. Press it twice to brew 2 coffees.
In this operation mode, the machine
grinds and measures automatically the
right quantity of coffee. Two coffees require two
grinding and brewing cycles that are automatically
managed by the machine.
• After the prebrewing cycle, coffee begins to come out
HOT WATER DISPENSING - CAPPUCCINO
11
of the dispensing spout (11).
• On reaching the dose programmed with the knob
(17), the machine will automatically stop brewing. It
is nevertheless possible to interrupt coffee brewing
by pressing the button (18).
8 HOT WATER
DISPENSING
Warning: at the beginning, short spurts of
hot water may come out: danger of scalding.
The hot water spout may reach high temperatures:
do not touch it with bare hands.
• Before dispensing hot water, make sure that the
green temperature ready light (19) is on.
When the machine is ready to brew coffee, proceed
as follows:
• Place a cup and/or a container beneath the hot
water/steam spout (12).
• (Fig. 29) - Open the knob (14) by turning it coun-
terclockwise.
• When the desired quantity of hot water has been
dispensed, turn the knob (14) clockwise to stop
dispensing. The machine returns to the normal
operating mode.
9 STEAM EJECTION
/ PREPARING A
CAPPUCCINO
Steam may be used to froth milk for cappuccino and
to heat beverages.
Danger of scalding! At the beginning, short
spurts of hot water may come out. The
steam spout may reach high temperatures: do
not touch it with bare hands.
• (Fig. 26) - Place a container beneath the steam
spout (pannarello) (12) and open the “hot water/
steam” knob (14) for a few seconds so as to let
the remaining water come out of the steam spout
(pannarello). In a short time, only steam will come
out of the spout.
• Close the knob (14).
• Fill 1/3 of the container you wish to use to prepare
the cappuccino with cold milk.
Use cold milk and a cold cup for better
results when preparing a cappuccino.
• (Fig. 30) - Immerse the steam spout (pannarello)
in the milk to be heated and open the knob (14).
Move the container gently up and down to level the
foam formation.
• After using the steam for the desired time, close
the knob (14).
• The same system may be used to heat other beverages.
After using the steam spout (pannarello), clean it
as described in the “Cleaning and Maintenance"
section.
9.1 Steam/coffee switchover
• Press the button (20) to brew coffee.
• During the switchover from steam to coffee brewing, the lights (19) and (21) fl ash simultaneously
showing the machine’s overtemperature. Coffee
may not be brewed.
• Discharge water to brew coffee. Place a container
beneath the steam spout (pannarello) (12). Turn
the steam knob (14) counterclockwise and wait
until only the green temperature ready light (19) is
permanently on. Then close the knob by turning it
clockwise.
English
• When the machine is ready to brew coffee, press
the button (20). The machine needs a heating
phase.
• Before steam ejection, wait until the green temperature ready light (21) is permanently on.

12
CLEANING AND MAINTENANCE
10 CLEANING AND
MAINTENANCE
General cleaning
• Maintenance and cleaning operations may only be
carried out when the machine has cooled down and
has been disconnected from the power supply.
• Do not immerse the machine in water or place any
of its parts in a dishwasher.
• Do not use sharp objects or harsh chemical products (solvents) for cleaning.
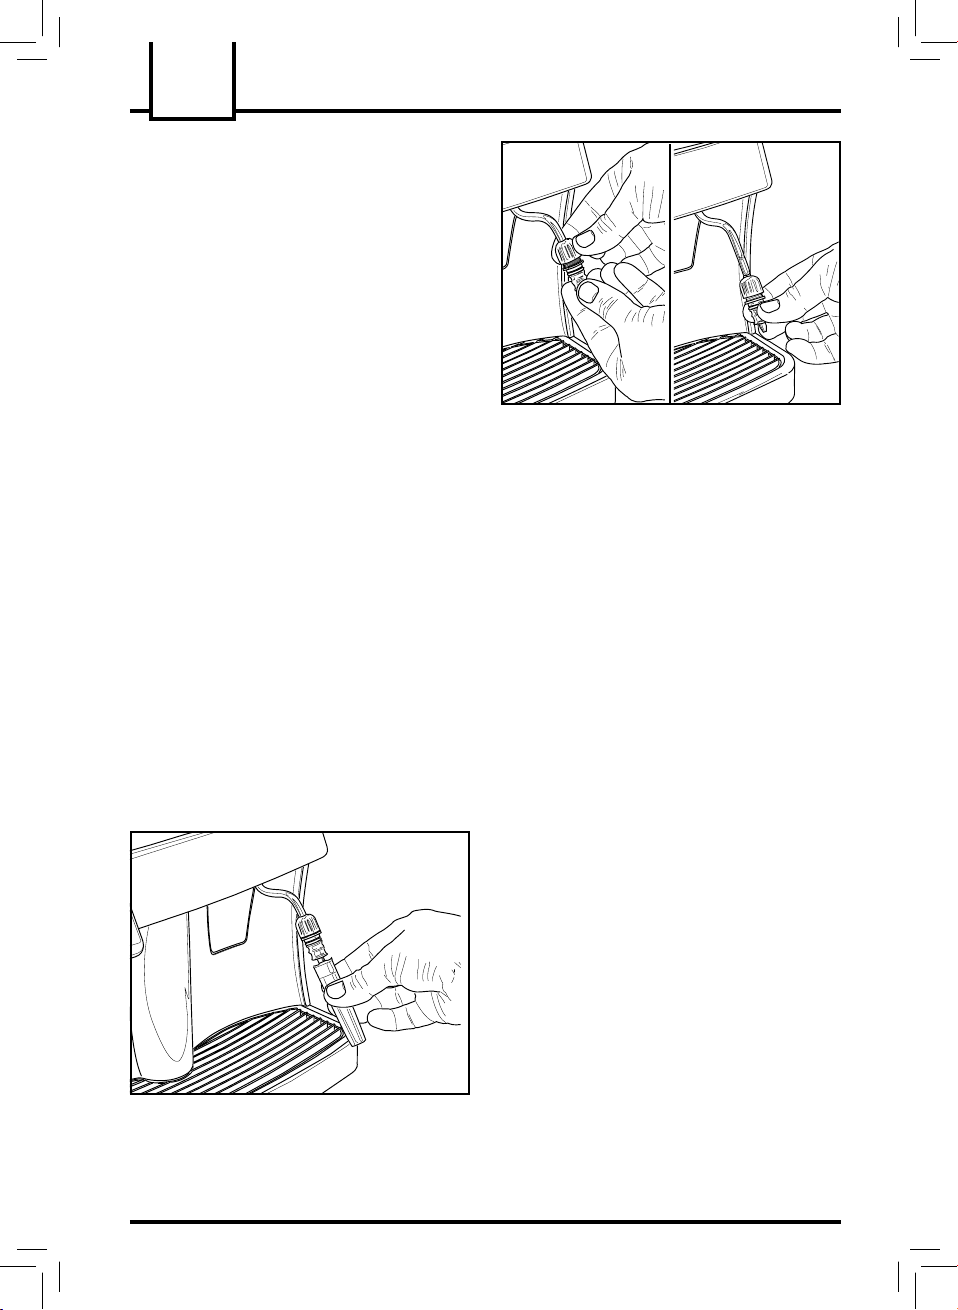
• Clean the pannarello after every use. Remove the
external part of the pannarello.
Wash the external part of the pannarello under
running water.
• For a thorough cleaning, remove the pannarello
from the steam spout.
Loosen the ring nut and remove the internal part
of the pannarello. After washing it thoroughly, reassemble it taking care to position it as shown in the
fi gure.
(Fig. 25) - Clean the water tank on a daily basis.
- Remove the fi lter in the water tank and wash it
under drinking running water.
- Reinsert the fi lter into its seat by gently pressing
and turning it.
- Fill the tank with fresh drinking water.
• Use a soft cloth moistened with water to clean the
equipment.
• Do not dry the machine and/or its components using
a microwave and/or conventional oven.
• (Fig.32) - Remove the dispensing spout by pulling
it outwards and wash it with lukewarm water. After
washing it, fi t it back in its seat by pushing it to its
limit stop.
• (Fig.31-34) - Clean the dispensing outlet.
We recommend emptying and cleaning (on a daily
basis):
- the grounds drawer (8)
- the drip tray (10)
10.1 Brew Group
• The Brew Group (15) must be cleaned every time
the coffee bean hopper is fi lled or at least once a
week.
• Turn off the machine by pressing the main power
button (5) to -0- and remove the plug from the
socket.
• (Fig.31-34) - Open the service door (13) and remo-
ve the coffee grounds drawer (8), and then remove
the drip tray (12) as well.
• (Fig. 35) - Remove the Brew Group (15) by the
handle and press the «PRESS» key. The Brew
Group must be cleaned only with warm water and
no detergents.
• (Fig. 36) - Wash the Brew Group with lukewarm
water and carefully clean the upper fi lter.
• Thoroughly wash and dry all the parts of the Brew
Group.
• Thoroughly clean the dispensing outlet.
• Reinsert the Brew Group in the dispensing outlet clicking it into place without pressing the “PRESS" key.
• Close the door, insert the grounds drawer and the
drip tray.

DESCALING - DISPOSAL
13
11 DESCALING
Limescale normally forms with the use of the appliance. Descaling is necessary every 1 - 2 months or if
you notice a reduction in water fl ow.
In case of confl ict, priority must be given to
what is indicated in the operation and maintenance manual over the instructions provided on
separately sold accessories and materials.
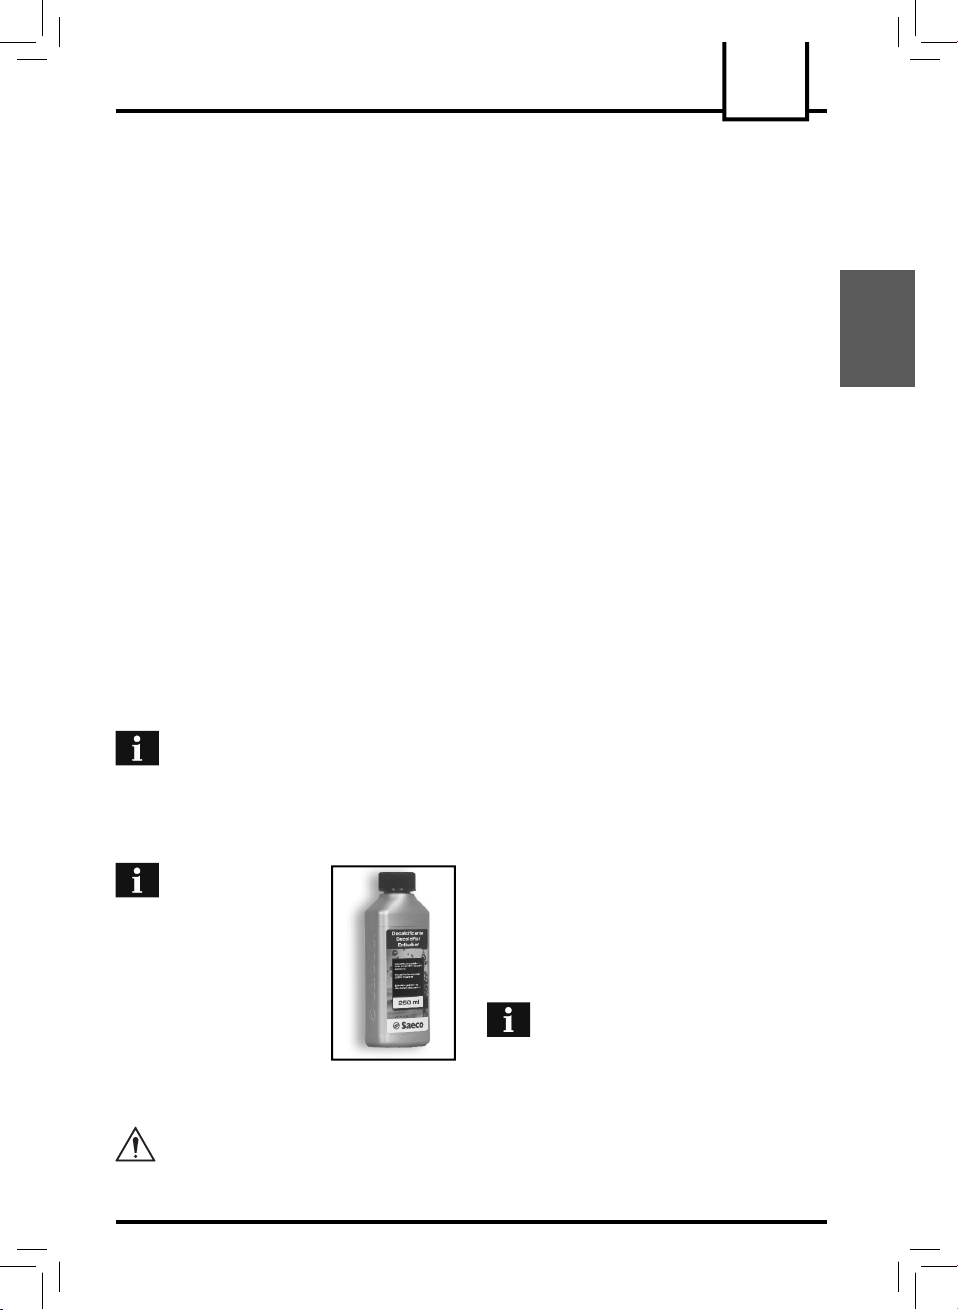
Use the Saeco descal-
ing product. Its formula
has been designed to ensure
better machine performance
and operation for its whole
operating life. If correctly
used, it also avoids alterations
in the brewed product.
Warning! Never drink
the descaling solution or any products dispensed until the cycle has been carried out to the
end. Never use vinegar as a descaling solution.
Before descaling, remove the Pannarello from the
steam wand as described in the “Cleaning and Maintenance" section.
1 Pour the entire content of the Saeco concentrated
descaling solution into the water tank (7), and then
fi ll the tank with fresh drinking water up to the MAX
level.
2 Turn on the machine at the main power button (5).
3 (Fig.26) - Using the steam wand, (12) brew 2 cups
of descaling solution (approx. 150 ml each) as
described in section 8 "HOT WATER DISPENS-
ING".
4 Disconnect the machine at the main power but-
ton (5).
5 Allow the descaling solution to take effect for about
15-20 minutes.
6 Repeat steps 2, 3 and 4 at intervals of 3 minutes,
until there is no descaling solution left in the water
tank.
7 Make sure the machine is on.
8 (Fig.25) -Rinse the water tank (7) and fi ll it with
fresh water.
9 (Fig.26) - Rinse the appliance circuits with fresh
water until the tank (7) is empty, by dispensing the
water through the steam wand (12) as described
in section 8 "HOT WATER DISPENSING".
10Repeat the rinse cycle (step 8 and 9) twice con-
secutively.
Only once reached this step, the descaling cycle is
complete.
Note: if required, prime the circuit (Section 4.3).
The descaling solution must be disposed of according to the manufacturer's instructions and/or
regulations in force in the country of use.
12 DISPOSAL
This product complies with EU Directive 2002/96/
EC.
The symbol
aging indicates that this product may not be treated
as commons waste. Instead it shall be handed over
to the applicable collection point for the recycling of
electrical and electronic equipment.
By ensuring this product is disposed of correctly, you
will help prevent potential negative consequences
for the environment and human health, which could
otherwise be caused by inappropriate waste handling
of this product. For more detailed information about
recycling of this product, please contact your local
city offi ce.
on the product or on its pack-
English

14
CONTROL PANEL LIGHTS
13 CONTROL PANEL LIGHTS
Warnings Causes Solutions
Green light (23) The machine is on.
Fixed green light (19) The machine has reached the right
temperature and is now ready:
- for coffee brewing;
- for hot water dispensing.
Flashing green light (19) The machine is warming up to
brew coffee and dispense hot
water.
Fixed green light (21) The machine has reached the
right temperature to eject steam.
Flashing green light (21) The machine is warming up to
eject steam.
Green light (19) and
green light (21)
are fl ashing simultaneously
Fixed red light (22) The water in the tank is
Flashing red light (22) The Brew Group, the grounds
Machine’s overtemperature:
coffee may not be brewed.
insuffi cient.
The coffee bean hopper is empty. Fill the hopper with coffee beans
drawer, the drip tray and the front
door are in a wrong position for
the machine’s operation.
Discharge water into the drip tray
by turning the steam knob (14)
until the green temperature ready
light (19) is permanently on and
green light (21) turns off.
Fill the tank with fresh drinking
water, prime the circuit and start
the procedure again.
and start the procedure again.
Make sure that all components
have been correctly inserted and
closed. The fi xed red light will
now turn off.
PROBLEMS - CAUSES - SOLUTIONS
Problems Causes Solutions
The machine does not
turn on
Coffee is not hot enough The cups are cold. Warm the cups.
No hot water or steam is
dispensed
Coffee has little foam The coffee blend is unsuitable,
The machine takes a long
time to warm up or the
amount of water dispensed
from the spout is too little.
The Brew Group does not
come out.
Coffee is not brewed There is no water. Fill the water tank and prime the circuit
Coffee is brewed slowly The dose setting is high. Decrease the dose setting (section 6).
Coffee leaks out of the
dispensing spout
The machine is not connected to
the power supply.
The service door is open. Close the service door.
The hole of the steam spout is
clogged.
the coffee is not freshly roasted
or the grind is too coarse.
The machine’s circuit is obstructed by limescale.
The Brew Group is out of place. Turn on the machine. Close the service
The grounds drawer is inserted. Remove the grounds drawer before
The Brew Group is dirty. Clean the Brew Group (section 10.1).
The dose setting is high. Decrease the dose setting (section 6).
The circuit is not primed. Prime the circuit again (section 4.3).
The coffee is too fi ne. Change coffee blend or adjust the grind
The circuit is not primed. Prime the circuit again (section 4.3).
The Brew Group is dirty. Clean the Brew Group (section 10.1).
The dispensing spout is in a
wrong position.
The dispensing spout is clogged. Clean the dispensing spout and its
Connect the machine to the power
supply.
Clean the hole of the steam spout
using a pin.
Change coffee blend or adjust the grind
(section 5). Increase the dose (section 6).
Descale the machine.
door. The Brew Group is automatically
placed in the correct position.
removing the Brew Group.
again (section 4.3).
(section 5). Decrease the dose setting
(section 6).
Replace the dispensing spout in its
correct position.
holes.
15
English
Please contact an Authorized Service Centre for any faults not covered in the above table or when the
suggested solutions do not solve the problem.

16

GENERALIDADES - DADOS TÉCNICOS
17
1 GENERALIDADES
A máquina de café é indicada para a preparação de
café expresso, utilizando café em grãos e possui
um dispositivo para o fornecimento de vapor e de
água quente.
Atenção. Não assumimos qualquer respon-
sabilidade para danos eventuais em caso
de:
• uso errado ou não conforme com as fi nalidades
previstas;
• consertos não realizados nos centros de assis-
tência autorizados;
• alteração do cabo de alimentação;
• alteração de qualquer componente da máqui-
na;
• uso de peças sobresselentes e acessórios não
originais.
Esses casos invalidarão a garantia.
1.1 Para facilitar a leitura
O triângulo de advertência indica todas as
instruções importantes para a segurança
do utilizador.
Siga atentamente estas indicações para
evitar ferimentos graves!
(Fig.2) - A referência a ilustrações, partes da máquina
e órgãos de comando acontece através de números
e letras, como, por exemplo, a referência à ilustração
2 deste parágrafo.
Este símbolo evidencia as informações a
ter em vista, para uma melhor utilização da
máquina.
1.2 Utilização dessas instruções
de uso
Guarde estas instruções de uso em lugar seguro
e anexe-as à máquina de café se por acaso uma
outra pessoa precisar utilizá-la.
Para mais informações ou em caso de problemas
não tratados totalmente ou apenas insufi cientemente
nas presentes instruções, contacte os Centros de
Assistência Autorizados.
2 DADOS TÉCNICOS
• Tensão nominal - Potência nominal - Alimentação
Veja plaqueta posicionada no aparelho
• Material do corpo
Termoplástico
• Dimensões (mm)
337 x 325 x 377
• Peso (Kg)
8,5
• Comprimento do cabo (mm)
1200
• Painel de comando
Frontal
• Reservatório de água
1,7 (l) - Extraível
• Capacidade do recipiente de café (g)
350 de café em grãos
• Pressão da bomba (bares)
15
• Caldeira
Aço inox
• Dispositivos de segurança
Válvula de segurança de pressão da caldeira;
termóstato de segurança
Português
Sob reserva de alterações de construção e realização devidas ao progresso tecnológico.
18
NORMAS DE SEGURANÇA
O I L
Medida em Milímetros

NORMAS DE SEGURANÇA
3
NORMAS DE SEGURANÇA
Nunca ponha em contato com água as partes
sob tensão: perigo de curto-circuito! O vapor
sobreaquecido e a água quente podem provocar
queimaduras! Nunca dirija o jato de vapor ou a
água quente para as partes do corpo, toque com
cuidado no bico do vapor/água quente: perigo
de queimaduras!
Destino de uso
É proibido efectuar modifi cações técnicas e qualquer
utilização ilícita, devido aos riscos que pode causar!
O aparelho não se destina a ser utilizado por pessoas com reduzidas capacidades físicas, mentais ou
sensoriais ou com experiência e/ou competências
insufi cientes, a não ser que estejam sob a supervisão
de uma pessoa responsável pela sua segurança ou
que sejam ensinados por essa mesma pessoa a
utilizar o equipamento.
Alimentação de corrente
Ligue a máquina de café só numa tomada de corrente
apropriada. A tensão deve corresponder àquela
indicada na plaqueta do equipamento.
Cabo de alimentação
Nunca use a máquina de café se o cabo de alimentação estiver defeituoso.
Se o cabo de alimentação estiver danifi cado, deverá
ser substituído pelo fabricante ou pelo seu serviço de
assistência aos clientes.
Não faça passar o cabo de alimentação por ângulos
e cantos vivos, acima de objectos muito quentes e
proteja-o contra o óleo.
Não carregue ou puxe a máquina de café segurando-a
pelo cabo. Não tire a fi cha puxando-a pelo cabo ou
toque nela com as mãos molhadas. Não deixe pender
o cabo de alimentação de mesas ou estantes.
Protecção de outras pessoas
Certifi que-se de que todos os operadores tenham
instruções ou manual de operação ao seu dispor.
19
Perigo de queimaduras
Evite dirigir contra si mesmo e/ou outros o jacto de
vapor sobreaquecido e/ou água quente. Perigo de
queimaduras!
Utilize sempre as pegas ou os botões apropriados.
Colocação
Coloque a máquina de café em um lugar seguro,
onde ninguém possa virá-la ou ferir-se por causa da
própria máquina.
Não use a máquina de café em lugar aberto.
Não coloque a máquina acima de superfícies muito
quentes e perto de chamas vivas para evitar que a
carcaça funda ou de qualquer maneira se danifi que.
Limpeza
Antes de limpar a máquina, é indispensável posicionar
o interruptor geral (5) sobre -0- e desligar após o
plugue da tomada de corrente.
Além disso, aguarde a máquina se esfriar.
Nunca mergulhe a máquina na água!
É severamente proibido procurar intervir no interior
da máquina.
Espaço para o uso e a manutenção
Para um correto e bom funcionamento da máquina
de café aconselha-se a:
• Escolher uma superfície de apoio bem nivelada;
• Escolher um ambiente sufi cientemente iluminado,
higiénico e com uma tomada de corrente facilmente
acessível;
• Prever uma distância mínima das paredes da
máquina como indicado na fi gura.
Custódia da máquina
Quando a máquina fi car inutilizada por um período
prolongado, desligue-a e tire o plugue da tomada.
Guarde-a em um lugar seco e proteja-a contra o pó
e a sujeira.
Consertos / Manutenção
Em caso de avarias, defeitos ou suspeito de defeito
após uma queda, tire logo o plugue da tomada. Nunca
ponha a funcionar uma máquina defeituosa.
Só os Centros de Assistência Autorizados poderão
realizar intervenções e consertos. Os consertos de-
Português

20
NORMAS DE SEGURANÇA - INSTALAÇÃO
vem ser realizados exclusivamente em um centro de
assistência autorizado. Em caso de intervenções não
realizadas corretamente, declina-se toda e qualquer
responsabilidade para danos eventuais.
Anti-incêndio
Em caso de incêndio utilize extintores de dióxido
de carbono (CO2). Não utilize água ou extintores
de pó.
Legenda componentes da máquina
Recipiente de café em grãos
Tampa recipiente de café em grãos
Botão de ajuste da moagem
Botão de ajuste da dose
Interruptor geral (ON/OFF)
Tampa do reservatório de água
Reservatório de água
Gaveta de recolha das borras
Cabo de alimentação
Bandeja de limpeza + grade
Sistema de distribuição de café ajustável em
altura
Tubo de vapor/água quente com pannarello
Portinhola anterior
Botão de distribuição de vapor
Grupo de distribuição de café
Pincel de limpeza
Painel de comando
4 INSTALAÇÃO
Para a sua segurança e a de terceiros, siga
escrupulosamente as "Normas de segurança"
indicadas no cap. 3.
4.1 Embalagem
A embalagem original foi projectada e realizada para
proteger a máquina durante a expedição.
Aconselha-se conservá-la para um eventual futuro
transporte.
4.2 Operações preliminares
• Retire da embalagem a bandeja de limpeza (10)
com grade.
• Retire da embalagem a máquina de café e
posicione-a em um lugar apropriado de acordo
com os requisitos pedidos e descritos nas normas
de segurança (cap.3).
• Introduza a bandeja de limpeza (10) na sede
apropriada na máquina; certifi que-se de que a
própria bandeja, a gaveta de recolha das borras
(8) e o grupo de distribuição de café (15) estejam
introduzidos correctamente e que a portinhola
dianteira (13) esteja encerrada.
• Posicione a tampa do recipiente de café em grãos
(2) no recipiente de café em grãos (1). Guarde ao
alcance da mão o pincel de limpeza (16).
• Antes de introduzir a fi cha na tomada de corrente
assegure-se de que o interruptor geral (5) esteja
sobre a posição -0-.
Botão de ajuste da quantidade de café na
xícara
Botão de distribuição de café
Indicador luminoso led de temperatura pronta
/ função café
Botão de selecção função vapor
Indicador luminoso led de temperatura
função vapor
Indicador luminoso led de sinalização
alarmes
Indicador luminoso led de máquina ligada
Se durante a ligação da máquina o indicador luminoso
led vermelho (22) piscar, signifi ca que uma das partes
acima descritas não foi posicionada correctamente.
Nota importante: É importante ler quanto
indicado no Capítulo 13, onde é explicado
pormenorizadamente o significado de todos
os avisos que a máquina mostra ao utilizador,
mediante as luzes posicionadas no painel de
comando.
• (Fig.25) - Retire o reservatório de água (7)
levantando-o e tire a tampa (6). Lave-o e encha-o
com água fresca; aconselha-se a não encher o
reservatório de maneira excessiva. Reintroduza
INSTALAÇÃO
21
o reservatório na sede apropriada e reposicione a
tampa (6) sobre ele.
Deite no reservatório (7) sempre e só água
fresca sem gás. Água quente e outros
líquidos podem danifi car o reservatório e/ou a má-
quina. Não coloque a máquina em funcionamento
sem água: assegure-se de que há água sufi ciente
dentro do reservatório.
• (Fig.24) - Tire a tampa (2) e deite o café em
grãos.
Deite no recipiente (1) sempre e só café
em grãos. Café moído, solúvel, ou outros
produtos danifi cam a máquina.
• Reposicione a tampa (2) no recipiente de café (1).
• Introduza a fi cha numa tomada apropriada.
4.3 Carregamento do circuito
No início, depois de ter distribuído vapor ou após
a fi nalização da água no reservatório, o circuito da
máquina deve ser recarregado.
• A máquina encontra-se com o interruptor geral
(5) sobre a posição -0-; para ligá-la é sufi ciente
pressionar o botão (5); o indicador luminoso led
(23) do painel de comando iluminar-se-á.
• (Fig.26) - Para carregar o circuito, ponha um
recipiente debaixo do tubo de vapor (Pannarello)
(12); vire o botão (14) no sentido contrário ao dos
ponteiros do relógio e aguarde até sair água de
maneira regular pelo tubo de vapor (Pannarello);
para interromper a distribuição de água, vire o
botão (14) no sentido dos ponteiros do relógio.
• A este ponto o circuito é carregado.
4.4 Primeira utilização ou após
um período de inutilização
Esta simples operação assegura-lhe uma óptima
distribuição e deve ser realizada:
- na primeira utilização;
- quando a máquina permanecer inutilizada por
um longo período de tempo (por mais de 2 semanas).
A água distribuída deve ser esvaziada
em uma apropriada descarga e não pode
ser utilizada para a alimentação. Se o recipiente
se enche, durante o ciclo, pare a distribuição e
esvazie-o antes de recomeçar a operação.
1 (Fig.25) - Certifi que-se de que o reservatório de
água (7) esteja cheio de água fresca potável; no
caso contrário deite a água presente e substitua-a
por água fresca.
2 Introduza um recipiente debaixo do tubo de vapor
(Pannarello)(12) e vire o botão (14) no sentido
contrário ao dos ponteiros do relógio.
3 Aguarde cerca de 30 segundos ou o enchimento
do recipiente e interrompa a distribuição de água
ao virar o botão (14) no sentido dos ponteiros do
relógio.
4 Aguarde cerca de 60 segundos. Repita as opera-
ções desde o ponto 2 até o completo esvaziamento
do reservatório.
5 (Fig.25) - Depois de terminada a água, encha
novamente o reservatório (7) e realize um novo
ciclo partindo do ponto (2), conforme realizado
precedentemente.
6 Depois de terminado o segundo reservatório,
encha-o novamente com água; a este ponto a
máquina está pronta para o uso.
Obs.: se necessário proceda com o carre-
gamento do circuito.
Português
• Para distribuir café, água quente ou vapor e utilizar
correctamente a máquina, siga atentamente as
instruções a seguir.
22
MOINHO DE CAFÉ - DISTRIBUIÇÃO DE CAFÉ
5 MOINHO DE CAFÉ
Atenção! O botão de ajuste da moagem, posi-
cionado dentro do recipiente de café, deverá
ser virado só quando o moinho de café estiver a
funcionar. Não introduza café moído e/ou solúvel
no recipiente de café em grãos.
É proibido introduzir qualquer material que
não seja café em grãos. O moinho de café
contém componentes em movimento que podem
ser perigosos; é proibido introduzir os dedos e/ou
outros objectos. Antes de trabalhar, por qualquer
motivo, no interior do recipiente de café, desligue
o interruptor geral e desligue o plugue da tomada
de corrente. Não coloque café em grãos quando
o moinho de café estiver funcionando.
A qualidade e o gosto do café dependem, além da
mistura utilizada, também do grau de moagem. A
máquina está equipada com um botão (3) para o
ajuste do grau de moagem. Para variar o grau de
moagem vire o botão graduado quando o moinho de
café está a funcionar; os algarismos imprimidos no
botão indicam o grau de moagem.
Cada aparelho é programado, na fábrica, para um
grau de moagem médio: se a moagem for muito fi na
será necessário virar o botão para valores maiores;
se a moagem for muito grossa será necessário virar
o botão para valores menores.
A variação do grau de moagem notar-se-á só depois
da distribuição de três/quatro cafés.
Obs.: Se o valor for modifi cado de forma
demasiado excessiva, ao rodar a alavanca para números demasiado baixos, é possível
ocorrer o alarme de falta de café; para reactivar a
máquina e completar o ciclo de moagem do café é
sufi ciente pressionar de novo a tecla de café.
Utilize misturas de café em grãos para máquinas
expresso. Evite de utilizar grãos de moagem sobre
posições extremas (Es.1 – 16); nesses casos utilize
misturas de café diferentes. Guarde o café em lugar
fresco, num recipiente fechado hermeticamente.
A moagem deve ser ajustada quando o café é distribuído de uma forma não óptima:
Distribuição demasiado rápida = moagem demasiado
grossa > Vire o botão para números menores;
Distribuição às pingas e/ou ausente = moagem demasiado fi na > Vire o botão para números maiores.
6 AJUSTE DA DOSE DE
CAFÉ
(Fig.24) - Na máquina é possível ajustar a quantidade
desejada de café (dose) a ser moído.
A dose é programada, pelo fabricante, sobre um valor
médio que satisfaz a maioria das exigências; referência (A) em correspondência da marca (B). Ao virar o
botão (4), posicionado no interior do recipiente de
café, no sentido anti-horário será aumentada a dose
de café moído; ao virar o botão no sentido horário
será diminuída a dose de café moído.
O ajuste da dose deve ser realizada antes de pressionar o botão de distribuição de café.
Este sistema permite obter uma distribuição ótima
com todos os tipos de cafés presentes à venda.
7 DISTRIBUIÇÃO DE
CAFÉ
Nota: Se a máquina não distribuir café,
certifique-se de que o reservatório de
água contenha água; no lado esquerdo da
máquina é possível verifi car o nível de água no
reservatório.
Antes de distribuir café certifi que-se de
que o indicador luminoso led verde de
temperatura pronta (19) esteja aceso e fi xo, que o
reservatório de água e o do café estejam cheios.
• (Fig.27 - 28) - Posicione 1 ou 2 xícaras por baixo
dos bicos do grupo de distribuição (11); é possível
ajustar a altura do grupo de distribuição de maneira
a se adaptar às suas xícaras.
• Ajuste a quantidade de café desejado na xícara
mediante o botão (17): ao virá-lo no sentido horário será aumentada a quantidade de café a ser
distribuído; ao virá-lo no sentido anti-horário será
diminuída a quantidade de café a ser distribuído.
• Para distribuir o café será preciso pressionar o
botão (18), sucessivamente iniciará o ciclo de
distribuição: para distribuir 1 café pressione uma
vez o botão (18); para distribuir 2 cafés pressione
2 vezes o botão (18).

DISTRIBUIÇÃO DE ÁGUA QUENTE - PREPARAÇÃO DO CAPPUCCINO
23
Nesta modalidade de funcionamento, a
máquina providenciará automaticamente
a moagem e a dosagem da quantidade certa de
café; a preparação de dois cafés precisa de dois
ciclos de moagem e dois ciclos de distribuição
geridos automaticamente pela máquina.
• Depois de concluído o ciclo de pré-infusão, o café
começará a sair do bico de distribuição (11).
• A distribuição de café parará automaticamente
quando for alcançado o nível programado com
o botão (17); de qualquer maneira é possível
interromper a distribuição de café pressionando o
botão (18).
8 DISTRIBUIÇÃO DE
ÁGUA QUENTE
Atenção: no começo podem verifi car-se
breves jatos de água quente: perigo de
queimaduras. O tubo de distribuição de água
quente pode alcançar temperaturas elevadas: não
toque nele diretamente com as mãos.
• Antes de distribuir água quente certifi que-se de
que a luz verde de temperatura pronta (19) esteja
acesa.
Com a máquina pronta para distribuir café, prossiga
da maneira seguinte:
• Ponha uma xícara e/ou um recipiente por baixo do
tubo de água quente/vapor (12).
• (Fig.29) – Abra no sentido anti-horário o botão
(14).
• Distribua a quantidade desejada de água quente;
para parar a distribuição de água quente vire no
sentido horário o botão (14). A máquina voltará ao
funcionamento normal.
9
DISTRIBUIÇÃO DE VA-
POR / PREPARAÇÃO DO
CAPPUCCINO
O vapor pode ser utilizado para bater o leite para o
cappuccino, mas também para aquecer as bebidas.
Perigo de queimaduras! Durante o início
da distribuição podem-se verifi car breves
salpicos de água quente. O tubo de distribuição
pode alcançar temperaturas elevadas: não toque
nele diretamente com as mãos.
• Com a máquina pronta para distribuir café, pressio-
ne o botão (20). A máquina necessita de um tempo
de pré-aquecimento.
• Antes de distribuir vapor aguarde a luz verde de
temperatura pronta (21) se acender de forma
fi xa.
• (Fig.26) - Introduza um recipiente por baixo do tubo
vapor (pannarello) (12); abra o botão (14) “Água
quente/vapor” por uns segundos, para fazer sair
a água restante do tubo vapor (pannarello); em
pouco tempo começará a sair apenas vapor.
• Feche o botão (14).
• Encha com leite frio 1/3 do recipiente desejado a
ser utilizado para preparar o cappuccino.
Para garantir um resultado melhor na preparação do cappuccino, o leite e a xícara
utilizada devem estar frios.
• (Fig.30) - Mergulhe o tubo vapor (pannarello) no
leite a ser aquecido e abra a torneira (14); rode
lentamente o recipiente e, ao mesmo tempo, mexao com movimentos verticais para tornar uniforme
a formação de creme.
• Depois de utilizado o vapor para o tempo desejado,
feche o botão (14).
• É possível utilizar o mesmo sistema para aquecer
outras bebidas.
Depois de utilizado o tubo vapor (pannarello), lave-o
como descrito no capítulo “Limpeza e Manutenção”.
Português
24
PREPARAÇÃO DO CAPPUCCINO - LIMPEZA E MANUTENÇÃO
9.1 Passar de vapor para café
• Para poder distribuir café é necessário pressionar
o botão (20).
• Durante a passagem da distribuição de vapor para
a distribuição de café, os indicadores luminosos led
(19) e (21) piscarão ao mesmo tempo, indicando
que a máquina está em sobreaquecimento e não
pode distribuir café.
• Para poder distribuir café, será necessário descarregar uma quantidade de água. Ponha um
recipiente por baixo do tubo vapor (pannarello) (12)
e vire o botão Vapor (14) no sentido anti-horário;
aguarde até o indicador luminoso led de temperatura pronta (19) estiver aceso e fi xo. Feche após
o botão virando-o no sentido horário.
10 LIMPEZA E MANUTEN-
ÇÃO
Limpeza geral
• A manutenção e a limpeza podem ser realizadas
só quando a máquina estiver fria e desligada da
rede elétrica.
• Não mergulhe a máquina na água e não introduza
os componentes na máquina de lavar louça.
• Não utilize objetos pontiagudos ou produtos químicos agressivos (solventes) para a limpeza.
• Limpe o pannarello depois de cada utilização; retire
a parte externa do pannarello
Afrouxe o anel e retire a parte interna do panna-
rello. Depois de lavado cuidadosamente, volte a
montá-lo cuidando de introduzi-lo como mostrado
na fi gura.
(Fig.25) – Aconselha-se a limpar periodicamente o
reservatório de água:
- Retire o fi ltro posicionado no interior do reser-
vatório e limpe-o com água corrente potável.
- Reposicione o filtro no seu compartimento
pressionando levemente e, ao mesmo tempo,
realizando uma leve rotação.
- Encha o reservatório com água fresca potável.
• Para a limpeza do aparelho utilize um pano macio
humedecido com água.
• Não seque a máquina e/ou os seus componentes
utilizando um forno microondas e/ou um forno
convencional.
• (Fig.32) - Retire o distribuidor de café, puxando-o
para o exterior, e lave-o com água morna. Depois
da lavagem monte-o novamente no seu local
empurrando-o até ao fi nal.
• (Fig.31-34) - Limpe o compartimento de serviço;
aconselha-se, a cada 9 cafés, a esvaziar e limpar:
- a gaveta de recolha das borras (8)
- a bandeja de limpeza (10)
Lave a parte externa do pannarello com água
corrente.
• Para uma limpeza mais cuidadosa desmonte o
pannarello do tubo vapor.
10.1 Grupo de distribuição
• O grupo de distribuição (15) deve ser limpo toda vez que
encher o recipiente de café em grãos ou, de qualquer
maneira, pelo menos uma vez por semana.
• Desligue a máquina pressionando o interruptor (5)
sobre a posição -0- e tire o plugue da tomada de
corrente.
LIMPEZA E MANUTENÇÃO - DESCALCIFICAÇÃO
25
• (Fig.31-34) - Abra a portinhola de serviço (13) e re-
tire a gaveta de recolha das borras (8); de seguida
remova também a bandeja de limpeza (12).
• (Fig.35) - Retire o grupo de distribuição (15) segu-
rando-o com a pega apropriada e pressionando a
tecla «PRESS». Lave o grupo de distribuição só
com água quente sem detergente.
• (Fig.36) - Lave o grupo de distribuição com água
morna; lave com cuidado o fi ltro superior.
• Lavar e secar cuidadosamente todas as partes do
grupo de distribuição.
• Limpe cuidadosamente o compartimento.
• Introduza de novo o grupo de distribuição no
compartimento apropriado até engatá-lo sem
pressionar a tecla “PRESS”.
• Feche após a portinhola, introduza a gaveta de
recolha das borras e a bandeja de limpeza.
11 DESCALCIFICAÇÃO
A formação de calcário é uma consequência natural
da utilização do aparelho; a descalcifi cação é neces-
sária a cada 1-2 meses ou quando se verifi ca uma
redução da capacidade de água.
O indicado no manual de uso e manutenção
tem prioridade com relação às indicações
descritas nos acessórios e/ou materiais de
uso vendidos separadamente, onde exista um
problema.
Utilize o produto des-
calcificante Saeco.
Ele foi concebido especificamente para manter da
melhor forma o desempenho
e o funcionamento da máquina durante toda a sua vida,
assim como para evitar, se
for utilizado correctamente,
qualquer alteração do produto
distribuído.
Atenção! Não beba a solução descalcifi cante e os produtos distribuídos até a
conclusão do ciclo. Nunca utilize, baixo nenhuma
circunstância, o vinagre como descalcifi cante.
Antes de realizar a descalcifi cação remova o Pan-
narello do tubo vapor como descrito no capítulo
"Limpeza e Manutenção".
1 Deite todo o conteúdo da garrafa de descalcifi cante
concentrado Saeco no reservatório de água (7) do
aparelho e encha-o com água fresca potável até
alcançar o nível MÁX.
2 Ligue a máquina pressionando o interruptor geral (5).
3 (Fig.26) - Através do tubo de vapor (12) distribua 2
chávenas de solução descalcifi cante (aproximada-
mente 150 ml cada uma) como descrito no capítulo
8 "DISTRIBUIÇÃO DE ÁGUA QUENTE".
4 Desligue a máquina pressionando o interruptor
geral (5).
5 Deixe o descalcifi cante actuar por aproximadamen-
te 15-20 minutos.
6 Repita o procedimento indicado nos pontos 2, 3 e
4 a cada 3 minutos, até esgotar completamente a
solução contida no reservatório de água.
7 Certifi que-se que a máquina esteja ligada.
8 (Fig.25) - Enxagúe o reservatório (7) com água
limpa e encha-o completamente.
9 (Fig.26) - Realize o enxagúe dos circuitos do
aparelho com água fresca esgotando o conteúdo
do reservatório (7) através do tubo de vapor (12),
como descrito no capítulo 8 "DISTRIBUIÇÃO DE
ÁGUA QUENTE".
10Repita a operação de enxagúe (ponto 8 e 9) duas
vezes consecutivas.
Somente a este ponto o ciclo de descalcifi cação é
concluído.
Obs.: se necessário proceda com o carregamento do circuito (Par.4.3)
A solução descalcifi cante deverá ser eliminada de
acordo com o previsto pelo fabricante e/ou pelas
normas vigentes no país de utilização.
Português
26
DESMANTELAMENTO - INDICADORES LUMINOSOS DO PAINEL DE COMANDO
12 DESMANTELAMENTO
Este produto está conforme a directiva EU 2002/96/EC.
O simbolo
como lixo normal. Este produto deve ser entregue num ponto de recolha de equipamentos elétricos e eletrônicos para reciclagem. Ao assegurar-se que este produto é eliminado corretamente, estará a ajudar a evitar
possiveis consequências negativas para o ambiente e saúde pública que resultariam se este produto não fosse
manipulado de forma adequada. Para obter informações mais detalhadas sobre a reciclagem deste produto,
por favor contate o gabinete da câmara municipal da sua cidade ou a loja onde comprou o produto.
impresso no produto ou na sua embalagem indica que este produto não se pode tratar
13 INDICADORES LUMINOSOS DO PAINEL DE COMANDO
Sinalizações Causas Soluções
Luz verde (23) Máquina ligada
Luz verde (19) fi xa Máquina a temperatura pronta:
- para distribuir café;
- para distribuir água quente.
Luz verde (19) a piscar Máquina em fase de aquecimento
para a distribuição de café e água
quente.
Luz verde (21) fi xa Máquina em temperatura pronta
para a distribuição de vapor
Luz verde (21) a piscar Máquina em fase de aquecimento
para a distribuição de vapor
Luz verde (19)
a piscar
Luz verde (21)
a piscar ao mesmo tempo
Máquina em superaquecimento;
nesta modalidade a máquina não
pode distribuir o café.
É necessário descarregar água
na bandeja de limpeza virando o
botão Vapor (14) até a luz verde de
temperatura pronta (19) se tornar
fi xa e a luz verde (21) se apagar.
Luz vermelha (22) fi xa Quantidade de água insufi ciente
no reservatório.
Recipiente de café vazio. Encha o recipiente com café
Luz vermelha (22) a piscar Grupo de distribuição, gaveta
de recolha das borras, bandeja
de limpeza, portinhola anterior
em posição incorrecta para o
funcionamento da máquina.
Encha o reservatório com água
fresca potável, carregue o circuito
e inicie novamente o processo.
em grãos e inicie novamente o
processo.
Para apagar a luz vermelha,
certifique-se de que todos os
componentes estejam introduzidos
ou fechados de maneira correta.
PROBLEMAS - CAUSAS - SOLUÇÕES
27
Problemas Causas Soluções
A máquina não se liga A máquina não está ligada à rede
elétrica
A portinhola de serviço está aberta Feche a portinhola
O café não é bastante quente As xícaras estão frias Aqueça as xícaras
Não sai água quente ou vapor O furo do tubo vapor está entupido Limpe o furo do tubo vapor com um
O café tem pouca espuma A mistura não é apropriada ou o café
não é fresco de torrefação ou é moído
demasiado grosso
A máquina precisa de muito tempo
para se aquecer ou a quantidade de
água a sair pelo tubo é limitada
O grupo de distribuição não pode
ser extraído
O café não sai Falta a água Encha o reservatório de água e recarregue
O café sai lentamente Dose alta Diminua a dose (Par.6)
O café sai fora do grupo de distribuição
O circuito da máquina está entupido
pelo calcário
Grupo de distribuição fora da posição Ligue a máquina. Feche a portinhola de
Gaveta de recolha das borras intro-
duzida
Grupo sujo Limpe o grupo de distribuição (Par. 10.1)
Dose alta Diminua a dose (Par.6)
Circuito não carregado Recarregue o circuito (Par. 4.3)
Café demasiado fi no Troque a mistura de café ou seleccione
Circuito não carregado Recarregue o circuito (Par. 4.3)
Grupo de distribuição sujo Limpe o grupo de distribuição (Par. 10.1)
Grupo de distribuição em posição
incorrecta
Grupo de distribuição entupido Limpe o grupo de distribuição e os seus
Ligue a máquina à rede elétrica
alfi nete
Troque a mistura de café ou ajuste a
moagem como no par. 5 Aumente a
dose par. 6
Descalcifi que a máquina
serviço. O grupo de distribuição voltará
automaticamente para a posição inicial.
Retire a gaveta de recolha das borras
antes de tirar o grupo de distribuição
o circuito (Par. 4.3)
a moagem como no par. 5. Diminua a
dose par. 6
Coloque de novo em posição o grupo de
distribuição
furos de saí da
Português
Para as avarias não incluídas na tabela acima indicada ou problemas não resolvidos, contacte um
centro de assistência.

The manufacturer reserves the right to change the features of the product without prior notice.
O fabricante reserva-se o direito de efetuar qualquer alteração sem aviso prévio.
www.saeco.com
Type SUP018M Cod.15002709 Rev.00 del 15-10-10
 Loading...