

Page 1

SRU6080
Owner’s Manual
Page 2

IntroductionTable of Contents
Introduction .......................................................... 3
Button Functions ................................................... 4
DVD/SAT Functions ........................................ 6
VCR/DVD Punch-Through Feature ...................... 6
Tivo/Replay Functions ...................................... 7
TV/VCR/DVR ................................................ 7
Setup ................................................................... 8
Battery Installation ........................................... 8
Battery Saver ................................................... 8
Code Saver ..................................................... 8
Power-On default ............................................ 8
Liquid Crystal Display (LCD) ........................... 8
Code Setup ..................................................... 8
Setup ................................................................... 9
Code Entry ......................................................... 10
Direct Code Entry .......................................... 10
Code Search ................................................. 10
Brand Search ..................................................11
Code Identification Feature ................................. 12
Programming Combo Device Codes ................... 12
Controlling Combo Devices ................................ 12
Volume/Mute Control Feature ............................. 13
Setting Volume/Mute Control, Punch-Through ..... 13
Setting any Mode to use its own Volume/Mute .... 14
Resetting Mute/Volume Control to defaults .......... 14
Setting Time of Day ............................................ 15
Setting the Date .................................................. 15
Setting the Backlight Delay .................................. 16
Full Reset to factory defaults ............................... 16
Sleep Timer ........................................................ 17
Timer Setup ........................................................ 17
Code Learning .................................................... 20
Tips on Learning ............................................ 20
Learning Commands ........................................... 22
Clearing Commands ........................................... 23
Clearing Learned commands for a mode ......... 23
Master Clear ................................................. 23
Macros .............................................................. 24
Macro Setup ................................................. 24
Deleting Macros ............................................ 25
Troubleshooting .................................................. 26
Instrucciones en Español ..................................... 28
Manuel d’instruction ........................................... 54
Congratulations on your purchase of Philips Universal
Remote Control. Philips Universal Remotes let you replace a
broken or lost remote or combine more than one remote into
one. In addition, this remote is equipped with a command
learning feature which lets the remote learn commands from
your original equipment remote control!
This remote control operates the common features of most
but not all models and brands of IR Infrared Controlled
Video Equipment. This remote may provide functions that
are not available on your equipment. Some functions of
your particular equipment (e.g. menu functions) may not be
controlled by this remote. In such cases, use the original
remote control for your equipment. Please use this manual
to become familiar with your Philips Universal Remote. After
you are familiar with your remote the first thing you need to
do is to install batteries and setup your remote for your
particular product and brand.
We focused on making this remote consumer friendly. This
remote has dedicated DVD and DVR buttons. We have
highlighted the DVD buttons in blue for easy referencing.
We have also highlighted the DVR (Tivo/Replay) buttons in
yellow for easy referencing on the remote keypad. In
addition to DVD and DVR, we have included Satellite
functionality by adding the Controls, MENU, GUIDE, PAGE
UP/DOWN/LEFT/RIGHT, ENTER, QUIT, INFO, and OK
buttons right on the keypad. If there is a function on one of
your original remotes that isn’t on this remote, we’ve added
the easy learning feature that allows you to “learn” favorite
functions from your original remote right on to this one.
We’ve even taken this one step further and added eight
Macro functions. A Macro allows you to program a series of
steps in one keystroke. For example, with one keystroke,
you can program your remote to turn on all your
components.
Thank you for buying a Philips remote and we hope it will
give you many years of service.
32
Page 3

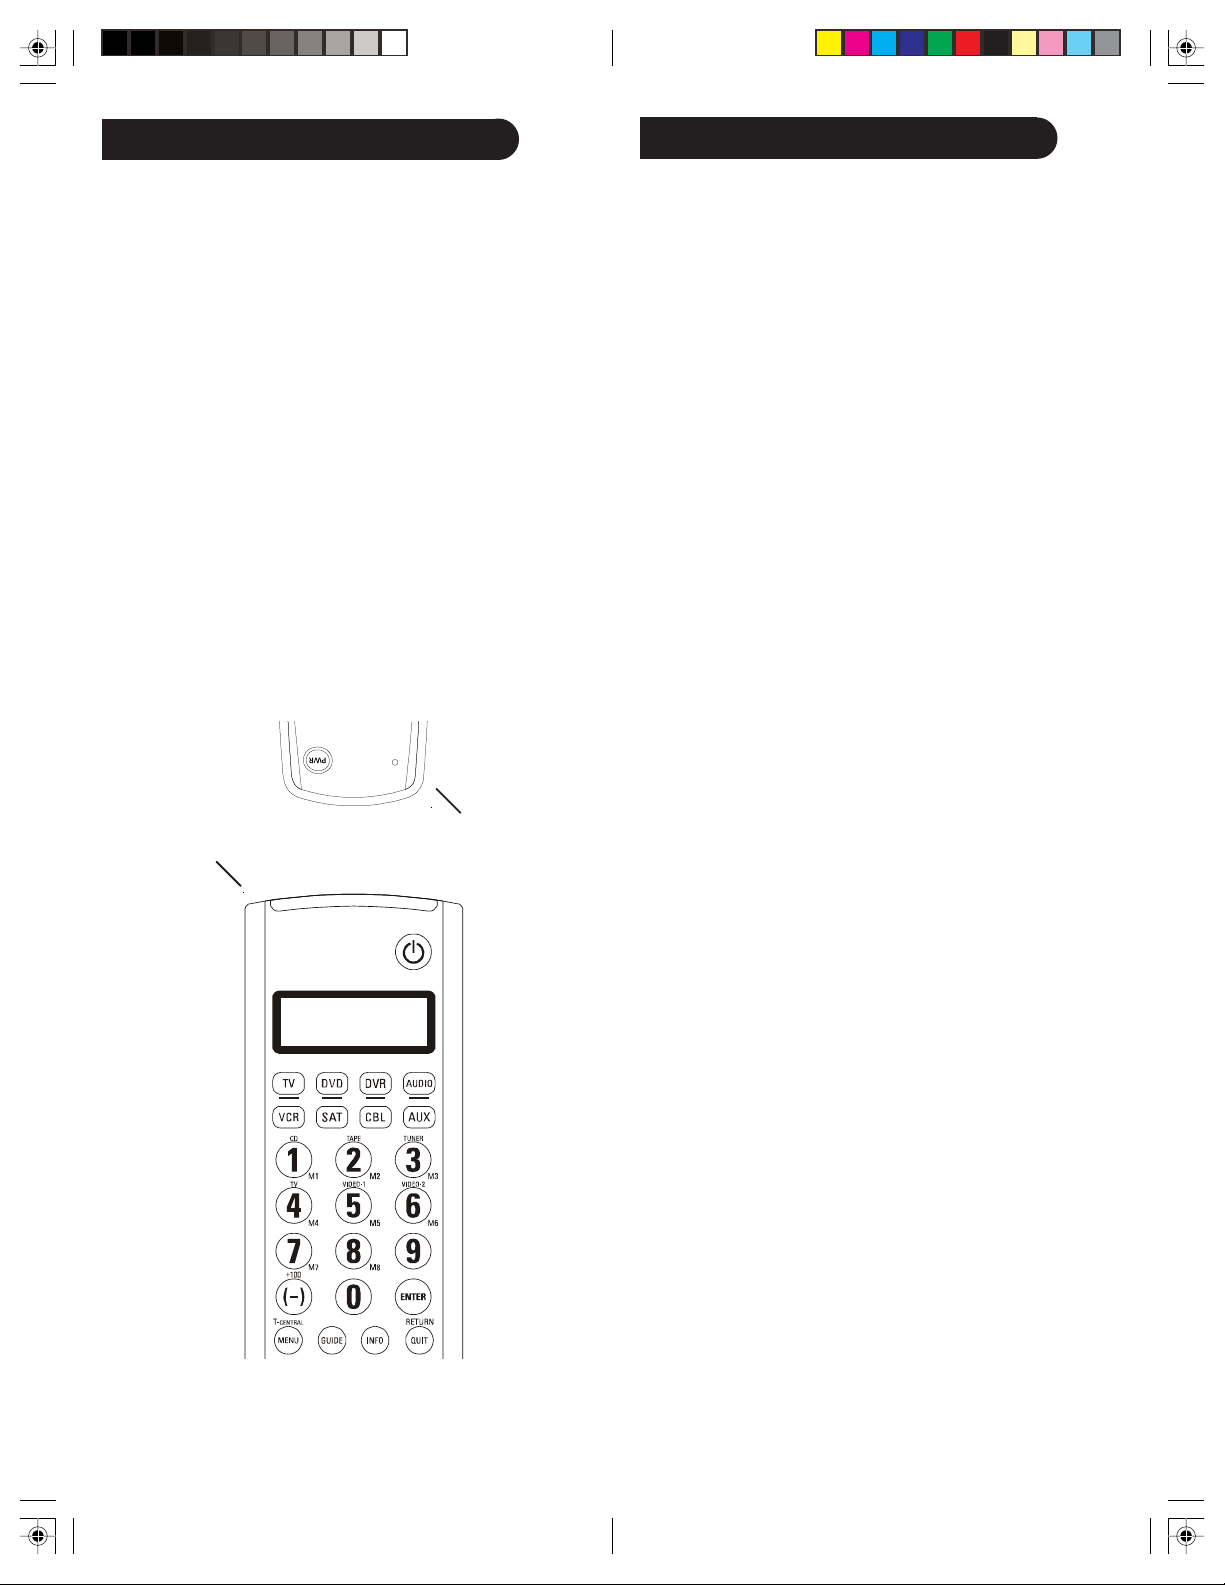
Button Functions
1.
2.
3.
4.
5.
6.
7.
8.
9.
10.
11.
12.
13.
14.
15.
31.
30.
29.
28.
27.
26.
25.
24.
23.
22.
21.
20.
19.
18.
17.
16.
Note: The REC button must be pressed TWICE to record from
your VCR. For some brands of VCRs, you might need to press the
REC button once, then press it again for three seconds.
Some buttons on the remote might have functions that are referred
to by different names on the device you are controlling. E.G.
LAST may be called RECALL, or ENTER may be called
DISPLAY. These differences depend on the brand and model of
your product. Also, this remote can only operate features that
exist on your product. E.G., your product must have LAST ability
for the LAST button to operate this feature.
Button Functions, cont.
1. Liquid Crystal Display (LCD): Helps with setup and
displays the Mode the remote is in, and time, etc.
2. TV, VCR, DVD, etc.: Selects product to be operated.
3. GUIDE: Displays on-screen program or channel guides.
4. +100: Used for channels greater than 100.
(-): Used for digital channels, e.g. 2-3.
5. MENU: Brings up the DVD disc Menu screen - use with
the UP, DOWN, LEFT & RIGHT navigation buttons.
6. OK/SELECT: Selects menu items for the device you
are controlling.
7. UP, DOWN, LEFT & RIGHT: Navigation buttons.
8. VOLUME UP/DOWN: Changes the volume level of the
product, normally the TV.
9. THUMBS DOWN: Sets your Thumbs ratings.
10. MUTE: Turns off the TV sound while the picture
remains.
11. REPLAY: Replays the last 8 seconds of a program.
12. INPUT: Brings up the DVD Player’s Setup Menu.
13 . RECORD, PLAY, STOP, REW, FF, PAUSE: VCR control
buttons operate your VCR even when the remote is set to
operate the TV. Also operates DVD Scan -/+.
14. SLEEP: Turns off the TV after a period of time.
15. CC (SUBTITLE): TV Closed Caption (if your TV has
this feature) or DVD Subtitle toggle.
16. SETUP: Used for setup.
17. MACRO: Works with digits 1 thru 8, to program and
store up to 8 button sequences of your choice.
18. SAP: Selects Secondary Audio Program channel if
available.
19. ZOOM: Zooms or enlarges a specific area of the screen.
ARC: Aspect Ratio Control selects viewing format for
the displayed picture, e.g., Wide, Zoom, etc.
20. SWAP: Swaps TV PIP screens.
21. PIP: TV Picture-in- Picture control.
22. ADVANCE: Catches you up to the live broadcast.
23. TV/VCR/DVR: For some TVs, press repeatedly to
select available viewing sources (antenna, cable box,
VCR, etc.).
24. LAST - Returns to the previously selected channel, or
DVD repeat toggle.
25. THUMBS UP: Sets your Thumbs ratings.
26. CHANNEL UP/DOWN: Changes the channels.
CHAPTER +/- controls DVD/CD track selection i.e.
DVD/CD Track Skip Up/Down (in DVD and SAT
modes). Note the VCR buttons also control DVD when
in DVD Mode.
27. QUIT/RETURN - Exits On-Screen Menus/Returns to
previous On-Screen selection.
28. ENTER: Used after direct channel number entry to
immediately change to the selected channel.
29. INFO: Displays/selects on-screen channel information,
etc.
30. NUMBERS: Enter numbers for direct channel
selection. Some products require Enter to be pressed
after channel selection.
31. POWER: Turns product On or Off.
54
Page 4

Button Functions, cont.
Button Functions, cont.
DVD Functions (labeled in Blue)
SCAN+ and SCAN- buttons control the speed of Fast
Forward and Reverse Playback respectively.
CHAPTER+ and CHAPTER- buttons respectively locate
the succeeding or preceding Chapters or Tracks on a disc.
SUBTITLE ON/OFF button turns the subtitles on or off.
INFO button brings up DVD Display or Control Menu for
Chapter/Track/Title number, Time remaining/elapsed
indication, system information, etc.
MENU brings up the DVD disc Menu screen - use with the
UP, DOWN, LEFT & RIGHT navigation buttons.
OK button is used for on-screen Menu selection. Note
some DVD players require the Play button to be used.
QUIT/RETURN - Exits On-Screen Menus/Returns to
previous On-Screen selection.
ZOOM: Zooms or enlarges a specific area of the screen.
ARC: Aspect Ratio Control selects viewing format for the
displayed picture, e.g., Wide, Zoom, etc.
PLAY button is used to start Disc playback and for Menu
selection on some DVD players.
STOP button stops Disc playback.
PAUSE button pauses Disc playback - press PLAY to
resume.
INPUT button activates the DVD Player’s SETUP Menu.
SAT Functions
Tivo/Replay Functions (labeled in Yellow)
TiVo (code is 0738)
T.CENTRAL - the TiVo button - for TiVo Central.
GUIDE - TiVo Live Guide - the TiVo Program Guide.
INFO - brings up the Channel Banner.
REPLAY - Replays the last 8 seconds of a program.
ADVANCE - Catches you up to the live broadcast.
LIVE TV - goes to Live TV broadcast.
OK - Select key.
THUMBS UP/DOWN - set your Thumbs ratings.
Replay (code is 0938)
GUIDE - Channel Guide - Displays TV listings.
REPLAY - Plays your recorded shows.
MENU - Displays ReplayTV Main Menu.
ΛΛ
P
Λ and PV - Page Up/Down - Moves one screen at a time
ΛΛ
up or down in ReplayTV guides and menus.
REPLAY - Returns 7 seconds and replays a segment.
ADVANCE - Return to Live - Catches you up to Live
Broadcast.
OK - Select - Chooses an on-screen option; displays
channel surfing display while watching live TV.
INFO - Shows program information about current show.
GUIDE button displays on-screen Satellite Channel Guide.
CHAPTER+ and CHAPTER- buttons perform the “Page+”
and “Page-” function for on-screen Guide Menus used by
some Satellite systems.
INFO button brings up Satellite Display screen for current
Channel and system information.
MENU brings up the Satellite Menu screen - use with the
UP, DOWN, LEFT & RIGHT navigation buttons.
QUIT button is used to Exit or Clear on-screen Menu
displays.
INPUT button performs the Satellite TV/SAT function.
VCR/DVD Punch-Through Feature. This remote allows
the 6 VCR buttons (i.e. PLAY, PAUSE, STOP, FF, REWIND,
and REC) to Punch-Through from any Mode programmed
with TV, SAT or Cable codes to the last VCR or DVD
programmed Mode you used. This feature will not operate
if the programmed TV, SAT or Cable code has its own VCR
control e.g. a TV Combo, SAT/PVR, etc.
VCR Record The VCR Record button must be pressed
twice in all Modes before the IR command is sent.
TV/VCR/DVR
When in TV mode the TV/VCR/DVR button performs the
INPUT source switch function.
When in a mode that has been programmed for VCR the TV/
VCR/DVR button performs the TV/VCR antenna switch
function.
When in a mode that has been programmed for Cable the
TV/VCR/DVR button performs the A.B switch function.
When in a mode that has been programmed for SAT the TV/
VCR/DVR button performs the TV/SAT switch function.
When in a mode that has been programmed for DVD the
TV/VCR/DVR button performs the DVD Setup function.
Tivo and Replay are registered trade marks of their respective owners.
76
Page 5
Setup
Setup, cont.
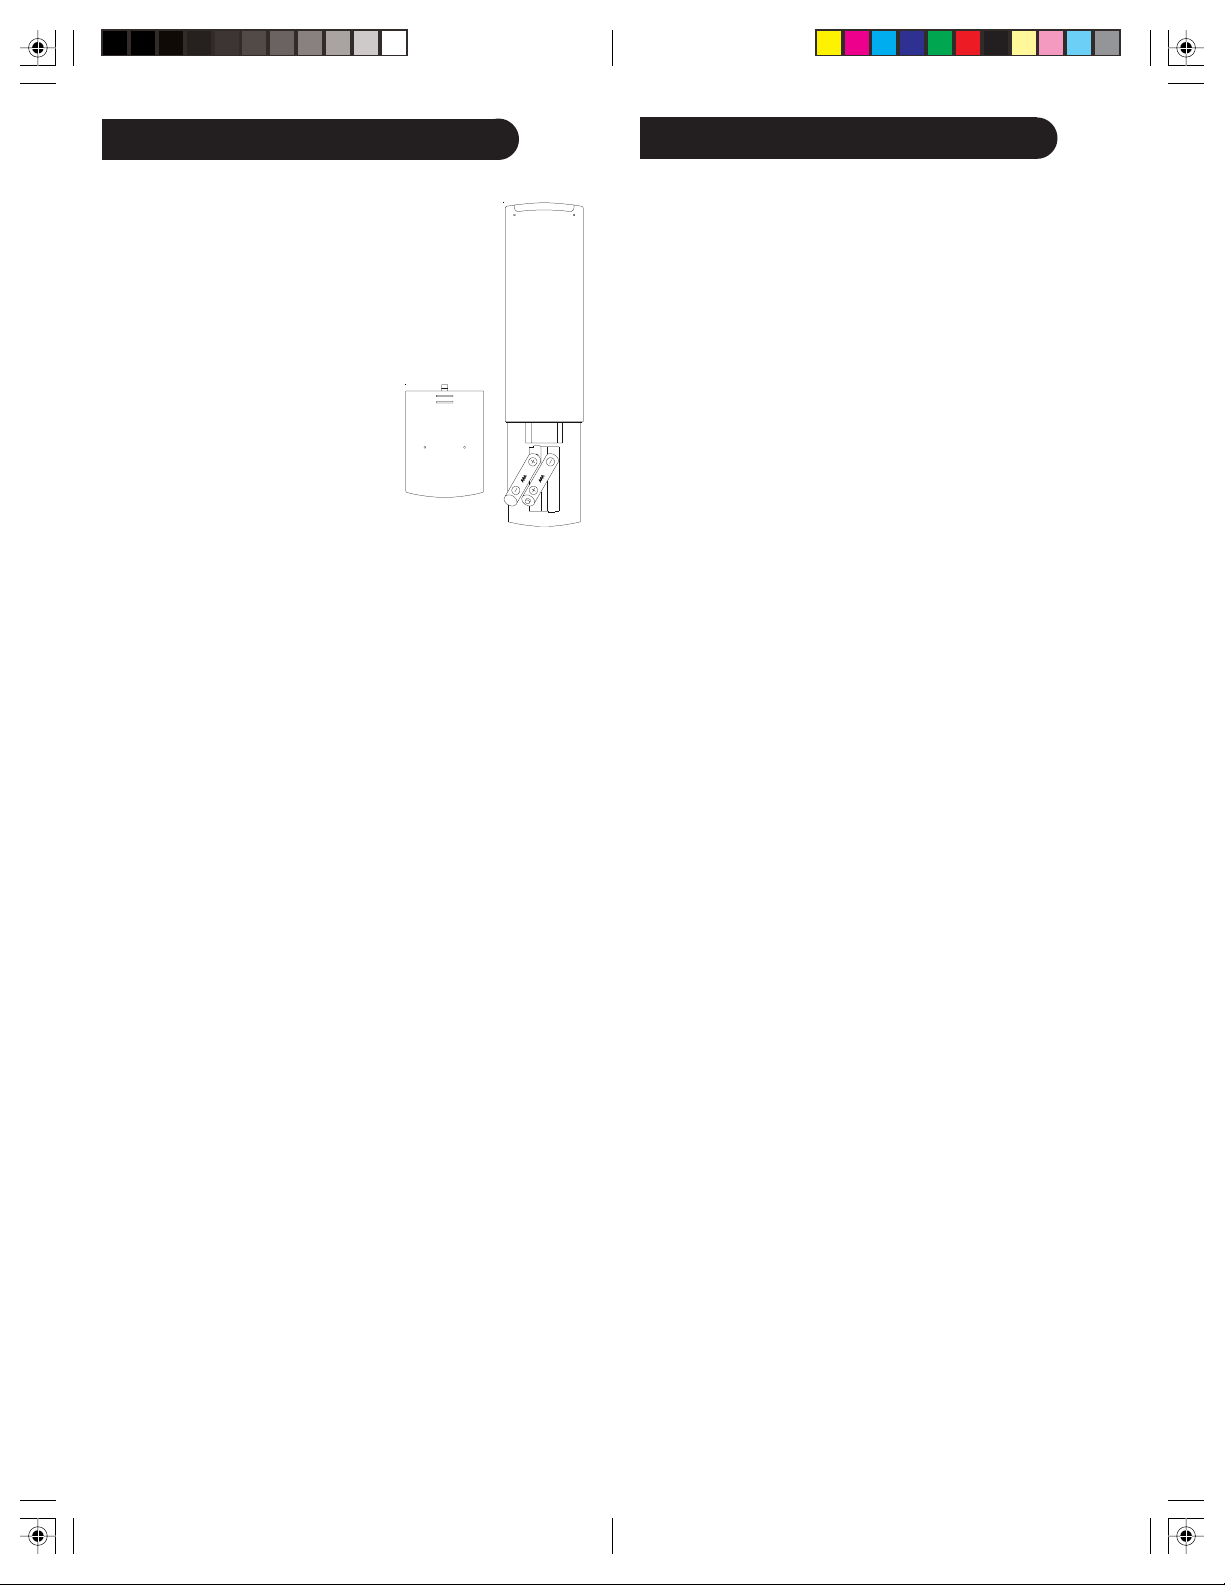
Battery Installation
1. On the back of the remote, push down on
the tab and lift the cover off.
2. Match the batteries to the + and - marks
inside the battery case, then insert 2 AAA
Alkaline batteries.
3. Press the battery cover back into place.
Battery Saver
Your remote automatically turns off if the buttons are
depressed more than 30 seconds. This will save your
batteries should your remote get stuck in a place where the
buttons remain depressed (e.g., between the sofa
cushions).
Code Saver
All user programmed settings, except Time, Day, Date, and
Macros will be stored in permanent memory while you are
changing batteries, so you will not lose any codes stored in
the remote while you are changing batteries. Time, Day,
Date, and Macros will be cleared to the factory defaults
when the batteries are replaced.
Power-On Default
The remote powers on in TV mode.
Liquid Crystal Display (LCD) The LCD lets you see at a
glance what mode the remote is in. It also includes a clock
that displays the time and day, and a visual indication that
the remote is transmitting when you press a button.
Code Setup
The SETUP button is used to setup the remote. You can
either setup the remote using the code for your brand of
product, from the code tables (on separate sheet), or you
can search through the library of codes until you find a
code that works for your product.
You can store any kind of code under any mode (except
TV). I.E. you can store a VCR code under the CBL button,
or a DVD code under the VCR button, etc. However, you
can only store TV codes under the TV button.
The SETUP button is used for programming the remote and
accessing any additional features - e.g. Shifted functions,
see below. To enter setup mode, press and hold the SETUP
button until “CODE SETUP” appears in the display. The
“SET” symbol will always be shown when the remote is in
Setup. Successive presses of the SETUP button shows
available Setup options in the order shown below.
1. CODE SETUP – press OK here to program a Mode e.g.
Code Entry, Search, etc. See Code Setup options below.
2. SYSTEM SETUP – press OK here to set Time, Date,
Volume Control, etc.
3. TIMER SETUP – press OK here to set Timer events.
4. LEARN SETUP – press OK here to program a Mode
with Learned commands.
5. MACRO SETUP – press OK here to set Macro key
sequences.
6. EXIT SETUP – press OK here to Exit Setup routines and
return to normal operation.
Press OK to select the desired programming step required.
Exit from Setup occurs automatically after approximately 15
seconds if no buttons is pressed. TIMEOUT is displayed.
When the remote is busy processing in Setup routines,
“Please Wait” is displayed.
Setup Screen Navigation Use the SETUP, OK, and Up,
Down, Left and Right navigation buttons for Setup screen
navigation and selection. To exit the Setup routines and
return to normal operation, press the QUIT button or
navigate to the “EXIT SETUP” screen and press OK.
Completion of some Setup routines will automatically return
the remote to normal operation.
Mode button press Display Pressing and holding a Mode
button changes to that Mode and displays the active
Mode and its code, e.g., DVD and the programmed 4-digit
code e.g., 0768. The display returns to normal when you
release the button.
SETUP (Shift) Display Pressing and releasing the Setup
button displays the active Mode of the remote e.g. DVD,
the Date e.g. 3:26 (Month:Day) and indicates “Shift”
operation with “(S)”. Press and release Exit to return to
normal display. To use the SETUP button for Shift - Press
and release SETUP followed by the desired secondary
function button.
98
Page 6

Code Entry , cont.Code Entry
Code Setup Options: Pressing OK at the CODE SETUP screen
presents 3 options for programming a Mode with codes. These
are ENTER CODES, (lets you enter a 4 digit code directly from
the printed code list) SEARCH CODES, (lets you search
through the codes stored in the remote to find the correct one
for your device), and BRAND CODES, (lets you search
through the codes (just for your brand of device) stored in
the remote to find the correct one for your device).
Direct Code Entry
1. Manually turn on the device to be controlled.
2. Press and hold the SETUP button until CODE SETUP is
displayed (takes about 3 seconds), then release the
SETUP button.
3. Press and release OK. ENTER CODES is displayed.
4. Press and release OK. MODE KEY? is displayed.
5. Press and release the desired mode button (TV, VCR,
etc.). The Mode is displayed along with its currently
programmed code.
6. Enter the 4 digit code from the code tables (on separate
sheet). After the 4th digit is entered SUCCESS is
displayed and the remote returns to normal operation.
If an invalid code is entered, CODE ERROR is shown in the
display and the remote returns to normal operation.
7. With your device on, press CHANNEL UP. If the device
responds, no further programming is required. Note: If
some buttons do not operate your equipment, try one of
the other codes for your brand of device.
Searching for Codes
If your product does not respond after you have tried all
the codes for your brand, or if your brand is not listed, try
searching for your code by following these steps.
1. Manually turn on the device (TV, VCR, etc.) to be
controlled.
2. Press and hold the SETUP button until CODE SETUP is
displayed (takes about 3 seconds), then release the
SETUP button.
3. Press and release OK. ENTER CODES is displayed.
4. Press the down navigation button until SEARCH
CODES is displayed.
5. Press and release OK. MODE KEY is displayed.
6. Press and release the desired mode button (TV, VCR,
etc.). DEVICE? TV is displayed.
7. Using the Up/Down keys, select the Device type to be
programmed (TV, VCR, DVD, etc. Note - For TV Mode,
only a TV Device can be selected.
8. Press and release OK to confirm selection. SEARCH
KEY? is displayed.
9. Press the Channel Up button (or POWER, or PLAY for
VCRs/DVDs) repeatedly (up to 300 times) until the
Device to be controlled changes channel, turns off or
responds accordingly. SEARCHING is displayed (along
with the Device selection) during the search process. If
the required Code is accidentally passed then press the
Channel Down button to backtrack through the Library.
Press Channel Up (or Power or Play) to change
direction forward again.
10. Press and release OK to install the Code. SUCCESS is
displayed and the remote returns to normal operation.
Notes:
1. If the Device does not have a CHANNEL UP button, use
PLAY (VCR/DVD) or the POWER button instead.
2. Code Search starts from the currently stored 4-digit
number under that Mode.
3. When all codes have been searched SEARCH END is
displayed and remote returns to normal operation.
Searching for Codes by Brand
Lets you search for a code for a specific Brand within the
Code Library for a particular manufacturer.
1. Turn on the device (TV, VCR, etc.) to be controlled.
2. Press and hold the SETUP button until CODE SETUP is
displayed (takes about 3 seconds), then release the
SETUP button.
3. Press and release OK. ENTER CODES is displayed.
4. Press the down navigation button until BRAND CODES
is displayed.
5. Press and release OK. MODE KEY? is displayed.
6. Press and release the desired mode button (TV, VCR,
etc.). DEVICE? TV is displayed.
7. Using the Up/Down keys, select the Device type to be
programmed (TV, VCR, DVD, etc. Note - For TV Mode,
only a TV Device can be selected.
8. Press and release OK to confirm selection. BRAND
KEY? is displayed.
9. Press and release the numeric key (1-8) corresponding
to desired Manufacturer. (See table on separate sheet
for code list). SEARCH KEY is displayed.
10. Press the Channel Up button (or POWER, or PLAY for
VCRs/DVDs) repeatedly until the Device to be
controlled changes channel, turns off or responds
accordingly. “Searching” is displayed (along with the
Device selection) during the search process.
1110
Page 7

Setup, cont.Code Identification Feature
If the required Code is accidentally passed then press the
Channel Down button to backtrack through the Library.
Press Channel Up (or Power or Play) to change direction
forward again.
11. Press and release OK to install the Code. SUCCESS is
displayed and the remote returns to normal operation.
Code Identification
Press and hold the respective Mode key in normal
operation to display the programmed code for that Mode
e.g., DVD Code 0768.
Programming Combo Device Codes
Some Combo devices (e.g. TV/VCR, TV/DVD, DVD/VCR,
etc.) will require you to set up two different Mode buttons
to control both parts of the Combo device. For example, if
you have a TV/DVD Combo, you might need to set up one
code under the TV button to control the TV part AND a
separate code (under any other Mode button) to control
the DVD part.
Controlling Combo Devices
System Setup Options
Pressing OK at the SYSTEM SETUP screen accesses the
System Setup Options for Volume Punch-Through control
Setup, Time Setup, Date Setup, Backlight Setup and System
Reset.
Volume/Mute Control and Punch-Through Feature
This remote lets you select which device Mode controls
your Volume/Mute buttons. The remote is initially set
(factory default) for all device Modes programmed with
“Visual” codes (e.g. TV, VCR, DVD, DVR, SAT & CABLE)
and “Audio” codes (e.g. CD & AUDIO) to use their own
Volume/Mute control if present. If the programmed
“Visual” code has no Volume/Mute operation of its own
then those buttons will punch-through control to the TV
Mode device without needing to change to TV Mode.
Setting ALL Volume/Mute Control to any one Mode (ALL
VOL. SET)
This routine can set all Modes to “punch-through” to any
one chosen Mode for Volume/Mute button control without
the needing to change to that Mode.
Some Combo devices (e.g. TV/VCR, TV/DVD, DVD/VCR,
etc.) have separate buttons on the original remote to select
the part of the Combo device to be controlled. For example,
if your Combo device is a DVD/VCR then its original remote
might have separate DVD and VCR buttons for selection of
the Combo part you would control. The equivalent button
functions can be found on your Philips remote by using the
device Mode and SETUP buttons.
Referring to “Searching for Codes” on page 10, setup a
device Mode (e.g. DVD) with the correct code for your
Combo device. Assuming the DVD/VCR Combo device is
the example and its code is programmed under DVD Mode,
press and hold the DVD Mode button for more than one
second to send the DVD button command. To send the
VCR button command, quickly press and release the SETUP
button followed by pressing and releasing the DVD Mode
button. This method can be applied similarly to all Combo
devices (e.g. TV/VCR, TV/DVD, DVD/VCR, etc.) and is
available for all Modes. Note this feature is not supported
by all codes.
1. Press and hold the SETUP button until CODE SETUP is
displayed (takes about 3 seconds), then release the
SETUP button.
2. Press the down navigation button until SYSTEM
SETUP is displayed.
3. Press and release OK. VOL/MUTE SETUP is displayed.
4. Press and release OK. ALL VOL. SET is displayed.
5. Press and release OK. ALL VOL. MODE? is displayed.
6. Press and release desired Mode key (TV, VCR, DVD,
etc.) for Volume/Mute control. “Please Wait” is briefly
displayed, followed by SUCCESS and the remote
returns to normal operation.
All Modes will now punch-through to your chosen Mode for
Volume/Mute control. If the chosen Mode has no Volume/
Mute commands of its own, “Volume Error” is shown in the
display and the remote returns to normal operation.
1312
Page 8

Setup, cont.Setup, cont.
Setting any Mode to use its own Volume/Mute Control
(MODE VOL. SET)
This sets any Mode to use only its own Volume/Mute
control, i.e. Volume/Mute punch-through is disabled for
this Mode. Note - If your chosen Mode has no Volume/
Mute functions of its own then the Volume/Mute buttons
will do nothing.
1. Press and hold the SETUP button until CODE SETUP
is displayed (takes about 3 seconds), then release the
SETUP button.
2. Press the down navigation button until SYSTEM
SETUP is displayed.
3. Press and release OK. VOL/MUTE SETUP is
displayed.
4. Press and release OK. ALL VOL. SET is displayed.
5. Press the down navigation button until MODE VOL.
SET is displayed
6. Press and release OK. MODE VOL. SET? is displayed.
7. Press and release OK. MODE VOL. MODE? is
displayed.
8. Press and release desired Mode key (TV, VCR, DVD,
etc.) to be disabled for Volume/Mute punch-through
control. PLEASE WAIT is briefly displayed, followed
by SUCCESS and the remote returns to normal
operation.
The chosen Mode will now use its own Volume/Mute control.
Resetting Volume/Mute Control to Factory Defaults
(VOL/MUTE RESET)
This resets Volume/Mute control back to its Factory
default settings.
1. Press and hold the SETUP button until CODE SETUP
is displayed (takes about 3 seconds), then release the
SETUP button.
2. Press the down navigation button until SYSTEM
SETUP is displayed.
3. Press and release OK. VOL/MUTE SETUP is
displayed.
4. Press and release OK. ALL VOL. SET is displayed.
5. Press the down navigation button until VOL/MUTE
RESET is displayed
6. Press and release OK. CONFIRM RESET is displayed.
7. Press and release OK. PLEASE WAIT is briefly
displayed, followed by SUCCESS and the remote
returns to normal operation.
Volume/Mute control is now rest to its Factory default
settings.
Setting the Time of Day (TIME SETUP)
To set the Time of day for normal LCD time display.
1. Press and hold the SETUP button until CODE SETUP is
displayed (takes about 3 seconds), then release the
SETUP button.
2. Press the down navigation button until SYSTEM
SETUP is displayed.
3. Press and release OK. VOL/MUTE SETUP is displayed.
4. Press the down navigation button until TIME SETUP is
displayed.
5. Press and release OK. TIME? is displayed showing
current format (12 or 24 hour) flashing and current time.
6. Use the Up/Down navigation buttons to set the format
(12Hr or 24Hr) then press and release OK.
7. The “hours” will be flashing. Use the Up/Down buttons
to set the hours then press and release OK.
8. The “minutes” will be flashing. Use the Up/Down buttons
to set the minutes then press and release OK.
9. SUCCESS is displayed. The remote remains in Setup
Mode, returning to the CODE SETUP screen. Press QUIT
then OK to exit Setup Mode.
Setting the Date (DATE SETUP)
To set the Month, Date and Day.
1. Press and hold the SETUP button until CODE SETUP is
displayed (takes about 3 seconds), then release the SETUP
button.
2. Press the down navigation button until SYSTEM SETUP
is displayed.
3. Press and release OK.
4. Press the down navigation button until DATE SETUP is
displayed.
5. Press and release OK. YEAR? is displayed with the last 2
year digits flashing.
6. Use the Up/Down buttons to set the Year then press and
release OK.
7. MONTH? is displayed with the Month digits flashing.
Use the Up/Down buttons to set the Month then press
and release OK.
8. DATE? is displayed with the Date digits flashing. Use
the Up/Down buttons to set the Date then press and
release OK.
9. DAY? is displayed with the Day flashing. Use the Up/
Down buttons to set the Day then press and release OK.
10. SUCCESS is displayed and the remote remains in Setup
Mode, returning to the CODE SETUP screen. Press QUIT
then OK to exit Setup Mode.
1514
Page 9

Setup, cont. Setup, cont.
Setting the Backlighting On time (BACKLIGHT SETUP)
To set the length of time the Backlighting remains on after
you stop pressing buttons. The Backlight button toggles
backlighting off and on.
1. Press and hold the SETUP button until CODE SETUP is
displayed (takes about 3 seconds), then release the SETUP
button.
2. Press the down navigation button until SYSTEM SETUP
is displayed. Press and release OK.
3. Press the down navigation button until BACKLIGHT
SETUP is displayed. Press and release OK.
4. BACKLIGHT TIME? is displayed with the current
Backlight On time digits flashing. Use the Up/Down
buttons to set the Backlight On time in increments of 5
seconds up to a maximum of 60 seconds. The default
Backlight On time is 10 seconds. To turn the Backlighting
feature off, set the time to “00” (zero). Press and release
OK.
5. SUCCESS is displayed and the remote remains in Setup
Mode, returning to the CODE SETUP screen. Press QUIT
then OK to exit Setup Mode.
Reset the LCD Remote to Factory Defaults (SYSTEM
RESET)
To reset the remote back to factory default settings. All
User programmed settings, e.g. code settings, learned
commands, Macros, etc., are cleared to their respective
default settings.
Timer Setup
Pressing OK at TIMER SETUP accesses the available
Timer Options. These are a TV Sleep Timer and 4 Timers
that can send a sequence of up to 3 key commands at the
preset time.
Setting and Clearing a TV Sleep Timer (TV Sleep Setup)
The remote can be programmed with a TV Sleep Timer. At
the end of the set Timer period, the remote sends the Power
command for the TV Mode device. The TV Sleep Timer can
be set for a period of 1-90 minutes. The “Zzz” symbol is
displayed when a TV Sleep Timer is set.
To set a TV Sleep Timer (no “Zzz” in normal display)
1. Turn on the TV Mode device.
2. Press and hold the SETUP button until CODE SETUP is
displayed (takes about 3 seconds), then release the SETUP
button.
3. Press the down navigation button until TIMER SETUP is
displayed. Press and release OK.
4. TV SLEEP SETUP is displayed. Press and release OK.
5. TV SLEEP SET is displayed. Press and release OK.
6. TV SLEEP TIME? is displayed with “minutes” flashing.
Use the Up/Down buttons to set the minutes then press
and release OK.
7. SUCCESS is displayed and the remote remains in Setup
Mode, returning to the CODE SETUP screen. Press QUIT
then OK to exit Setup Mode.
1. Press and hold the SETUP button until CODE SETUP is
displayed (takes about 3 seconds), then release the SETUP
button.
2. Press the down navigation button until SYSTEM SETUP
is displayed. Press and release OK.
3. Press the down navigation button until SYSTEM RESET
is displayed. Press and release OK.
4 CONFIRM RESET is displayed. Press and release OK.
5. PLEASE WAIT is displayed while all settings are Reset
then the remote exits Setup and returns to normal
operation.
To clear a TV Sleep Timer (“Zzz” in normal display)
1. Press and hold the SETUP button until CODE SETUP is
displayed (takes about 3 seconds), then release the SETUP
button.
2. Press the down navigation button until TIMER SETUP is
displayed. Press and release OK.
3. TV SLEEP SETUP is displayed. Press and release OK.
4. TV SLEEP CLEAR is displayed. Press and release OK.
5. CONFIRM CLEAR is displayed. Press and release OK.
6. SUCCESS is displayed and the remote remains in Setup
Mode, returning to the CODE SETUP screen. Press QUIT
then OK to exit Setup Mode.
1716
Page 10

Setup, cont.
Setup, cont.
Setting and Clearing Timers (TIMER SETUP)
The remote can be programmed with up to 4 Timers (Timer
1, 2, 3 & 4). Each Timer can be assigned up to 4 keys (4 if
Macros enabled, 2 if Macros disabled) to activate at the set
time. The first key must always be a Mode key.
Subsequent keys cannot include Up, Down, Left, Right,
OK, Exit, Macro, Setup or any Mode key. Timers can only
activate within the following 24-hour period. Timers are
automatically cleared after activation. The “Timer Bell”
symbol is displayed when any Timer is set.
To set a Timer (Note, the Timer must be cleared first if it was
previously set – see To Clear a Timer below)
1. Press and hold the SETUP button until CODE SETUP is
displayed (takes about 3 seconds), then release the SETUP
button.
2. Press the down navigation button until TIMER SETUP is
displayed.
3. Press and release OK. TV SLEEP SETUP is displayed.
4. Press the down navigation button until TIMER X SETUP
is displayed (where “X” is 1, 2, 3 or 4). Press and release
OK.
5. TIMER X SET is displayed. Press and release OK.
6. TIMER X TIME?” is displayed with the “hours” flashing.
Use the Up/Down buttons to set the hours then press
and release OK.
7. The “minutes” will be flashing. Use the Up/Down buttons
to set the minutes then press and release OK.
8. TIMER X MODE? is displayed. Press and release the
desired Mode key (TV, VCR, DVD, etc.).
9. TIMER X Key1? is displayed. Press and release the first
key required. If only one key is required, press and release
OK at this point – go to Step 12 below. If Macros are
disabled, go to Step “l” below.
10. “Timer X Key2? is displayed. Press and release the second
key required. If only two keys are required, press and
release OK at this point – go to Step 12 below.
11. TIMER X Key3? is displayed. Press and release the third
key required.
12. SUCCESS is displayed and the remote remain in Setup
Mode, returning to the CODE SETUP screen. Press QUIT
then OK to exit Setup Mode.
To clear a Timer (“Timer Bell” in normal display)
1. Press and hold the SETUP button until CODE SETUP is
displayed (takes about 3 seconds), then release the SETUP
button.
2. Press the down navigation button until TIMER SETUP is
displayed.
3. Press and release OK. TV SLEEP SETUP is displayed.
4. Press the down navigation button until the desired TIMER
X SETUP is displayed (where “X” is 1, 2, 3 or 4) screen.
Press and release OK.
5. TIMER X CLEAR is displayed. Press and release OK.
6. CONFIRM CLEAR is displayed. Press and release OK.
7. SUCCESS is displayed and the remote remains in Setup
Mode, returning to the CODE SETUP screen. Press QUIT
then OK to exit Setup Mode.
1918
Page 11

Code Learning
Tips On Learning, cont.
Tips On Learning
You can only learn one device type under any one Mode
button e.g. only learn TV codes under the TV Mode, VCR
codes under the VCR Mode, etc. If you are trying to learn
from a “Universal” remote, it might have more than one
code type stored under a Mode. Try learning from another
remote to see if there’s a problem with the type or brand of
remote you are trying to learn from.
a. Some functions from some types of remotes might not
be able to be learned.
b. No functions may be stored under the SETUP or
MACRO button.
c. Only one original device type can be learned per
individual Mode.
d. Use fresh batteries for both the Learning Remote and
the Original Remote.
e. Do not attempt to Learn directly under an incandescent
or low-energy light as these can cause interference with
the IR transmissions. Keep at least 3 feet away from
any such light sources.
f. Perform a Master Clear (see page 23) before learning
and try learning 2 or 3 commands initially. Then carry
out a Master Clear before completely learning your
original remote’s commands.
g. Carry out a “Mode Clear” before learning a Mode to make
sure there are no previously learned commands for that
Mode.
h. Place the original remote end-to-end with the Learning
Remote so the IR transmitters on both remotes are
directly in line with each other. You may need to adjust
the height of either remote to achieve this.
i. Keep the distance between the two remotes to
approximately 1 inch and do not move or change the
distance between the two remotes until you have
learned all the required buttons for that Mode.
j. Avoid learning your original remote Volume/Mute
buttons unless you are sure these operate the same
device e.g. some original DVD remotes include TV
Volume/Mute button control and can be two different
types of code.
k. Avoid learning your original remote VCR buttons unless
you are sure these operate the same device e.g. some
original TV remotes include VCR button control and can
be two different types of code.
l. Learning a button can take up to 3 seconds. Do not release
the button being Learned until SUCCESS or LEARN
ERROR has been displayed.
m. If learning the first or second buttons for a Mode
results in continuous errors then try the following:
i. End the Learn session by pressing the QUIT button.
ii. Clear out the learned commands for that Mode.
iii. Check the IR transmitters are correctly aligned between
the two remotes.
iv. Adjust the distance between the two remotes to be
closer (e.g. half an inch) or a further away (e.g. 2 inches)
from each other.
v. Try learning the original remote for that Mode again.
If problems reoccur with the same button check the original
remote button being learned – does it transmit? Does it
operate the target device? Try learning that button under a
different clear Mode. If it learns okay then it is likely to be
a different code type from the others and cannot be learned
under the same Mode.
Learning Notes
1. You cannot learn under the Setup or Macro button.
2. All learned commands for a Mode are deleted if the same
or a new 4-digit code is entered for that Mode (includes
Direct Code Entry, Code Search and Brand Search entries).
3. The Backlighting is turned off for Learning.
2120
Page 12
Learning Commands
Clearing Commands
1. Press and hold the SETUP button until CODE SETUP is
displayed (takes about 3 seconds), then release the SETUP
button.
2. Press the down navigation button until LEARN SETUP is
displayed. Press and release OK.
3. MODE LEARN is displayed. Press and release OK.
4. MODE KEY? is displayed. Press and release the desired
Mode button (TV, VCR, DVD, etc.).
5. LEARN KEY? is displayed. Press and release the remote
key to be taught with original remote code.
6. LEARNING is displayed. Press and hold the original
remote key until the SUCCESS or LEARN ERROR is
displayed (see Tips on Learning, page 20) followed by
the LEARN MORE? (this process can take up to 2 or 3
seconds to complete). Release the original remote button.
7. LEARN MORE? is still displayed. To learn more buttons,
press and release OK and repeat from step 5. To exit at
this point, press and release the QUIT.
8. PLEASE WAIT is displayed briefly and the remote exits
Setup Mode and returns to normal operation.
To Clear all Learned Commands under a mode
Clearing learned commands is helpful if, for example, you
replace your CD player with another brand or model. If
you had learned a feature from your old CD player’s
original remote on to this remote (such as RANDOM
PLAY), that feature would no longer work for your new
CD player. Should you wish to remove or clear one or
more “learned” commands, follow the steps below:
1. Press and hold the SETUP button until CODE SETUP is
displayed (takes about 3 seconds), then release the
SETUP button.
2. Press the down navigation button until LEARN SETUP
is displayed. Press and release OK. MODE LEARN is
displayed.
3. Press the down navigation button until MODE CLEAR
is displayed. Press and release OK.
4. MODE KEY? is displayed. Press and release the desired
Mode button (TV, VCR, DVD, etc.).
5. CONFIRM CLEAR is displayed. Press and release OK.
6. PLEASE WAIT is briefly displayed and the remote exits
Setup Mode and returns to normal operation.
Line up your remotes (that you’re learning from) in front of the
Learning remote, on a hard surface approx. 1 inch apart.
Master Clear - To Clear all Learned
Commands under all modes (recommended on
first time Learning)
1. Press and hold the SETUP button until CODE SETUP is
displayed (takes about 3 seconds), then release the
SETUP button.
2. Press the down navigation button until LEARN SETUP
is displayed. Press and release OK. MODE LEARN is
displayed.
3. Press the down navigation button until ALL LEARN
CLEAR is displayed. Press and release OK.
4. CONFIRM CLEAR is displayed. Press and release OK.
5. PLEASE WAIT is briefly displayed and the remote exits
Setup Mode and returns to normal operation.
2322
Page 13
Macros, cont.Macros
The MACRO button, in conjunction with digits 1 through 8,
lets you to program and store up to 8 sequences of IR
Commands (button-presses) of your choice. One press of
the respective Macro digit button results in that sequence
of IR commands being sent. Any sequence of commands
that you regularly perform can be reduced to two button
presses (MACRO button followed by digit 1 through 8
button). For example pressing MACRO followed by a
single button can turn on your TV, turn on your cable box,
change to your favorite channel, turn on your VCR, and tell
it to record, etc. A total of 20 button presses can be stored
under each of the 8 Macro digits.
To Setup a Macro
1. Press and hold the SETUP button until CODE SETUP is
displayed (takes about 3 seconds), then release the SETUP
button.
2. Press the down navigation button until MACRO SETUP
is displayed. Press and release OK.
3. MACRO SET is displayed. Press and release OK.
4. MACRO KEY? is displayed. Press and release digit button
1 thru 8 where you want to store the Macro.
5. MACRO X MODE? (where “X” is 1, 2, …, 7, 8) is displayed.
Press and release the desired Mode button (TV, VCR, DVD,
etc.). The first button in a Macro sequence must always
be a Mode button.
6. MACRO X KEY? is displayed along with the button count
(initially 02). Press and release the buttons you want to
be included in the Macro, in the order you want them to
be sent (up to 20).
7. To store the Macro at any point, press and release the
Macro button. Note the Macro will be stored automatically
on the 20th button press.
8. SUCCESS is displayed and the remote exits Setup Mode
and returns to normal operation.
MACRO
button
In normal operation, to activate the Macro press and
release the MACRO button followed (within 20 seconds)
by the digit button 1 thru 8. MACRO X is displayed while
the Macro sequence is being carried out then remote
returns to normal operation. If no Macro is stored under the
chosen digit key then MACRO X VOID is briefly displayed
and the remote returns to normal operation.
Macro Notes
1. You might want to add “delays” in a Macro sequence
(e.g. to allow for your TV warm-up time). Delays can be
added by using the PAUSE button followed by the
number of seconds delay required. For example, to enter
a delay of 3 seconds, press and release PAUSE followed
by 3 (in step 6 of “To Setup a Macro” on the previous
page). Maximum delay is 9 seconds. It is not possible
to have a “0” digit entered after Pause i.e. there is no
zero delay.
2. There is an automatic delay of half a second between
each IR transmission in a Macro sequence.
3. * The first button in a Macro sequence MUST be a
Mode button (TV, VCR, etc.).
4. Setup and Macro buttons cannot be included in a
Macro.
5. Press SETUP to quit Macro Setup.
To Delete a Macro
1. Press and hold the SETUP button until CODE SETUP is
displayed (takes about 3 seconds), then release the SETUP
button.
2. Press the down navigation button until MACRO SETUP
is displayed. Press and release OK.
3. Press the down navigation button until MACRO CLEAR
is displayed. Press and release OK.
4. MACRO KEY? is displayed. Press and release digit key
1, 2, …7 or 8 for the Macro you want to delete.
5. CONFIRM CLEAR is displayed. Press and release OK.
6. PLEASE WAIT is briefly displayed and the remote exits
Setup Mode and returns to normal operation.
2524
Page 14

Troubleshooting
Limited Lifetime Warranty
Remote does not operate your product.
• Press the mode button of the product you want to
control.
• Program the remote with a new code.
• Install new batteries. (You might have to reprogram
your remote after installing new batteries.)
• Remote may not be compatible with your product.
Remote does not operate some features of your
product.
• Program remote with a new code.
• Remote may not be able to operate all features of your
product or button names might be different than your
product.
For help with setup, please call: 919-573-7854.
The manufacturer warrants that this product shall be free
from defects in material, workmanship and assembly, under
normal use, in accordance with the specifications and
warnings, for as long as you own this product. This
warranty extends only to the original purchaser of the
product, and is nontransferable. Defective products,
together with the dated proof of purchase, must be returned
to the place of purchase for repair or replacement. THERE
ARE NO OTHER EXPRESS WARRANTIES. Incidental and
consequential damages are disclaimed where permitted by
law. This warranty gives you specific legal rights, and you
may also have other rights which vary from state to state.
Made in China. Quality Assured in USA.
Ledgewood, NJ 07852
2726
Page 15

IntroducciónContenido
Introducción ......................................................................29
Funciones de los botones .................................................30
Funciones de DVD/SAT ..............................................32
Característica de traspaso de control de vídeo/DVD ........32
Funciones de TiVo/Replay ........................................... 33
TV/VCR/DVR ...............................................................33
Configuración ....................................................................34
Cómo colocar las pilas ................................................. 34
Ahorro de energía ........................................................34
Almacenamiento de códigos........................................34
Encendido predeterminado ..........................................34
Pantalla de cristal líquido (LCD) ..................................34
Configuración de códigos ............................................ 34
Configuración ....................................................................35
Introducción de códigos ................................................... 36
Introducción directa de códigos ..................................36
Búsqueda de códigos ..................................................36
Búsqueda de marcas ....................................................37
Característica de identificación de códigos ....................... 38
Programación de códigos de dispositivos combinados ....38
Control de dispositivos combinados.................................38
Característica de control de volumen/silenciamiento ........39
Configuración de control de volumen/silenciamiento,
traspaso de control ......................................................39
Configuración de cualquier modo para que utilice su propio
nivel de sonido/silenciamiento ....................................40
Restablecimiento del control de volumen/silenciamiento a
los valores predeterminados ........................................40
Configuración de la hora ................................................... 41
Configuración de la fecha ..................................................41
Configuración del retardo de retroiluminación ..................42
Restablecimiento completo a los ajustes de fábrica ..........42
Temporizador de desconexión automática .........................43
Configuración de temporizadores ......................................43
Aprendizaje de códigos .....................................................46
Consejos para el aprendizaje........................................46
Aprendizaje de comandos .................................................48
Eliminación de comandos ..................................................49
Eliminación de comandos aprendidos para un modo ..49
Eliminación general ......................................................49
Macros ...............................................................................50
Configuración de macros .............................................50
Eliminación de macros ..................................................51
Solución de problemas ...................................................... 52
Manuel d’instruction .........................................................54
Le felicitamos por haber comprado un mando a
distancia universal de Philips. Los mandos universales
de Philips le permiten sustituir cualquier mando
averiado o que haya perdido, o combinar varios
mandos a distancia en uno solo. Además, este mando
está equipado con una característica de aprendizaje de
comandos que le permite aprender los comandos del
mando a distancia de su equipo original.
Este mando a distancia cuenta con las características
habituales de la mayoría de los modelos y marcas de
dispositivos controlados por infrarrojos (IR), aunque
no de todos. El mando puede ofrecer funciones que no
estén disponibles en su equipo. Algunas funciones de
su equipo concreto (por ejemplo, las funciones de
menús) tal vez no puedan controlarse con este mando.
En ese caso, utilice el mando a distancia original para
el equipo. Utilice este manual para familiarizarse con
el mando universal de Philips. Tras haberse
familiarizado con el mando, lo primero que ha de
hacer es colocar las pilas y configurar el mando para
la marca y el producto concretos.
Nos hemos centrado en hacer que este mando sea
fácil de utilizar. El mando posee botones de DVD y
DVR específicos. Hemos resaltado los botones de
DVD en azul para que sea fácil localizarlos. Hemos
resaltado también los botones de DVR (TiVo/Replay)
en amarillo para que sea fácil localizarlos en el mando.
Además de DVD y DVR, hemos incluido la
funcionalidad de receptor de satélite añadiendo los
botones de controles MENU, GUIDE, PAGE UP/
DOWN/LEFT/RIGHT, ENTER, QUIT, INFO y
OK en el propio teclado. Por si hubiera alguna
función de uno de los mandos originales que no esté
en este mando, hemos añadido una función de
aprendizaje fácil que le permite “aprender” las
funciones favoritas del mando original en este universal.
Incluso hemos ido más allá y hemos añadido ocho
funciones de macros. Una macro permite programar
una serie de pasos en un solo botón. Por ejemplo, con
pulsar un solo botón, podrá programar el mando para
encender todos los componentes.
2928
Page 16

Funciones de los botones
1.
2.
3.
4.
5.
6.
7.
8.
9.
10.
11.
12.
13.
14.
15.
31.
30.
29.
28.
27.
26.
25.
24.
23.
22.
21.
20.
19.
18.
17.
16.
Nota: Debe pulsarse el botón REC DOS VECES para grabar
desde el vídeo. En el caso de algunas marcas de vídeo, tal vez
tenga que pulsar el botón REC una vez y, después, volver a
pulsarlo durante tres segundos.
Algunos botones del mando podrían tener funciones que se
denominen de manera diferente en el dispositivo que vaya a
controlar. Por ejemplo, tal vez LAST se denomine RECALL, o
ENTER se denomine DISPLAY. Estas diferencias dependerán de
la marca y del modelo del producto. Además, este mando sólo
puede utilizar funciones que existan ya en el producto. Así, por
ejemplo, el producto debe tener la capacidad LAST para que el
botón LAST utilice dicha función.
Funciones de los botonescontinuación)
1. Pantalla de cristal líquido (LCD): ayuda con el proceso de
configuración y muestra el modo en el que se encuentra el
mando, así como la hora, etc.
2. TV, VCR, DVD, etc.: selecciona el producto que se va a
utilizar.
3. GUIDE: muestra guías de canales o de programación en
pantalla.
4. +100: se utiliza para canales superiores a 100.
(-): se utiliza para canales digitales, por ejemplo, 2-3.
5. MENU muestra la pantalla de menú del disco DVD (utilice los
botones de navegación hacia ARRIBA, ABAJO, IZQUIERDA y
DERECHA para desplazarse por la pantalla de menú).
6. OK/SELECT: selecciona elementos del menú del dispositivo
que se esté controlando.
7. ARRIBA, ABAJO, IZQUIERDA y DERECHA: botones de
navegación.
8. VOL +/-: modifica el nivel de sonido del producto,
normalmente el televisor.
9. PULGAR HACIA ABAJO: ajusta las calificaciones sobre
gustos.
10 . MUTE: desactiva el sonido del televisor, mientras que la imagen
sigue viéndose.
11. REPLAY: reproduce los últimos 8 segundos de un programa.
12. INPUT: hace aparecer el menú de configuración del
reproductor de DVD.
13 . RECORD, PLAY, STOP, REW, FF, PAUSE: botones de control
del vídeo que hacen funcionar el vídeo incluso cuando el mando
está configurado para controlar el televisor. También activa la
función de escaneado del DVD, Scan -/+.
14. SLEEP: apaga el televisor después de un tiempo determinado.
15. CC (SUBTITLE): alterna entre subtítulos ocultos del televisor
(si el televisor dispone de esta característica) o subtítulos del
DVD.
16. SETUP: se utiliza para la configuración.
17. MACRO: funciona con los números del 1 al 8 para programar
y guardar secuencias de hasta 8 botones que elija.
18. SAP: selecciona un canal de programación de sonido dual, si
está disponible.
19. ZOOM: aplica el zoom o amplía una zona específica de la
pantalla.
ARC: el control de la relación de aspecto (del inglés, Aspect
Ratio Control) selecciona el formato de visualización de la
imagen mostrada, por ejemplo, panorámico, zoom, etc.
20. SWAP: cambia las pantallas PIP del televisor.
21. PIP: control de la función Picture-in-Picture (PIP) del
televisor.
22. ADVANCE: le pone al tanto de la emisión en directo.
23. TV/VCR/DVR: en algunos televisores, púlselo varias veces
para seleccionar las fuentes de visualización disponibles
(antena, receptor por cable, vídeo, etc.).
24 . LAST: vuelve al canal seleccionado previamente o alterna la
repetición del DVD.
25. PULGAR HACIA ARRIBA: ajusta las calificaciones sobre
gustos.
26. CH +/-: cambia de canal. CHAPTER +/- controla la selección
de pistas del DVD/CD, es decir, salta pistas del DVD/CD hacia
delante o hacia atrás (en los modos DVD y SAT). Tenga en
cuenta que los botones de VCR también controlan el DVD en
el modo DVD.
27. QUIT/RETURN: con este botón puede salir de los menús en
pantalla o regresar a la selección anterior en pantalla.
28. ENTER: se utiliza después de haber introducido directamente el
número del canal para cambiar de forma inmediata al canal
seleccionado.
29. INFO: muestra o selecciona la información de los canales en
pantalla, etc.
30. NÚMEROS: utilícelos para seleccionar directamente un canal.
En algunos productos, habrá que pulsar Enter después de haber
seleccionado el canal.
31. POWER: enciende o apaga el producto.
3130
Page 17

Funciones de los botonescontinuación) Funciones de los botonescontinuación)
Funciones del DVD (en azul)
Los botones SCAN+ y SCAN- controlan la velocidad de avance
rápido y de reproducción inversa respectivamente.
Los botones CHAPTER+ y CHAPTER- localizan respectivamente
los capítulos o pistas siguientes o anteriores de un disco.
El botón SUBTITLE ON/OFF activa o desactiva los subtítulos.
El botón INFO muestra el menú de control o la pantalla del DVD
para ver el número de capítulo, pista o título, una indicación del
tiempo restante o transcurrido, información del sistema, etc.
MENU muestra la pantalla de menú del disco DVD (utilice los
botones de navegación hacia ARRIBA, ABAJO, IZQUIERDA y
DERECHA para desplazarse por la pantalla de menú).
El botón OK se emplea para aceptar una selección en los menús
en pantalla. Tenga en cuenta que algunos reproductores de DVD
requieren el uso del botón Play.
QUIT/RETURN: con este botón puede salir de los menús en
pantalla o regresar a la selección anterior en pantalla.
ZOOM: aplica el zoom o amplía una zona específica de la pantalla.
ARC: el control de la relación de aspecto (del inglés, Aspect
Ratio Control) selecciona el formato de visualización de la imagen
mostrada, por ejemplo, panorámico, zoom, etc.
El botón PLAY se utiliza para iniciar la reproducción de discos y
para la selección dentro de menús en algunos reproductores de DVD.
El botón STOP detiene la reproducción del disco.
El botón PAUSE hace una pausa en la reproducción del disco
(para reanudarla, pulse PLAY).
El botón INPUT activa el menú SETUP del reproductor de DVD.
Funciones de SAT
El botón GUIDE muestra la guía de canales por satélite en pantalla.
Los botones CHAPTER+ y CHAPTER- realizan la función de
“página siguiente” y “página anterior” con los menús de la guía en
pantalla utilizados por algunos sistemas por satélite.
El botón INFO muestra la pantalla de visualización por satélite
con información del sistema y del canal actual.
MENU muestra la pantalla de menú del satélite (utilice los
botones de navegación hacia ARRIBA, ABAJO, IZQUIERDA y
DERECHA para desplazarse por la pantalla de menú).
El botón QUIT se emplea para borrar las visualizaciones de
menús en pantalla o para salir de ellas.
El botón INPUT activa la función TV/SAT de recepción de satélite.
Característica de traspaso de control de vídeo/DVD Este
mando permite que 6 botones de vídeo (a saber, PLAY, PAUSE,
STOP, FF, REWIND y REC) puedan traspasar el control de
cualquier modo programado con códigos del televisor, del
receptor de satélite o del receptor por cable al último modo
programado del vídeo o DVD que haya utilizado. Esta
característica no funcionará si el código del televisor, del receptor
de satélite o del receptor por cable posee su propio control de
vídeo, por ejemplo, un televisor combinado, SAT/PVR, etc.
Funciones de TiVo/Replay (en amarillo)
TiVo (el código es 0738)
T-CENTRAL: el botón de TiVo (para TiVo Central).
GUIDE: guía en directo de TiVo (la guía de programación de
TiVo).
INFO: muestra el rótulo informativo del canal.
REPLAY: reproduce los últimos 8 segundos de un
programa.
ADVANCE: este botón le pone al tanto de la emisión en
directo.
LIVE TV: pasa a la emisión de televisión en directo.
OK: botón de selección.
PULGAR HACIA ARRIBA/ABAJO: ajusta las
calificaciones sobre gustos.
Replay (el código es 0938)
GUIDE: guía de canales (muestra la programación
televisiva).
REPLAY : reproduce los programas grabados.
MENU: muestra el menú principal de ReplayTV.
ΛΛ
P
Λ y PV: página siguiente y anterior: avanza o retrocede
ΛΛ
una pantalla cada vez en las guías y los menús de
ReplayTV.
REPLAY: retrocede 7 segundos y reproduce un segmento.
ADVANCE: vuelve al directo: le pone al tanto de la emisión
en directo.
OK: sirve para seleccionar: elige una opción en pantalla;
muestra la pantalla de navegación por los canales mientras
se ve la televisión en directo.
INFO: muestra información sobre el programa actual.
TV/VCR/DVR
En el modo de televisor, el botón TV/VCR/DVR realiza la
función de conmutación de la fuente de entrada.
En un modo programado para vídeo, el botón TV/VCR/
DVR realiza la función de conmutación de la antena de TV/
VCR.
En un modo programado para el receptor por cable, el
botón TV/VCR/DVR realiza la función de conmutación A-
B.
En un modo programado para el receptor de satélite, el
botón TV/VCR/DVR realiza la función de conmutación TV/
SAT.
En un modo programado para el DVD, el botón TV/VCR/
DVR realiza la función de configuración del DVD.
VCR Record El botón VCR Record deberá pulsarse dos veces en
todos los modos antes de que se envíe el comando IR.
TiVo y Replay son marcas comerciales registradas de sus
respectivos propietarios.
3332
Page 18

Configuración
Configuración (continuación)
Cómo colocar las pilas
1. En la parte posterior del mando, presione
sobre la pestaña y quite la cubierta.
2. Coloque las pilas de acuerdo con las
marcas + y - que hay dentro del
compartimento de las pilas. A continuación,
inserte 2 pilas alcalinas AAA.
3. Presione la tapa del
compartimento de las pilas para
colocarla de nuevo en su sitio.
Ahorro de energía
El mando se apaga automáticamente si los botones se
mantienen pulsados durante más de 30 segundos. De esta
forma, se ahorrará energía de las pilas en el caso de que el
mando se quede encajado en un lugar en el que se
mantengan pulsados los botones (por ejemplo, entre los
cojines del sofá).
Almacenamiento de códigos
Todos los ajustes programados por el usuario, salvo la
hora, el día, la fecha y las macros se guardarán en la
memoria permanente mientras se cambian las pilas, por lo
que no perderá ningún código guardado en el mando
mientras lo hace. Cuando se cambien las pilas, la hora, el
día, la fecha y las macros se eliminarán y se sustituirán por
los ajustes predeterminados de fábrica.
El botón SETUP se emplea para programar el mando y acceder a
cualquier función adicional, por ejemplo, funciones desplazadas.
Siga leyendo. Para acceder al modo de configuración, mantenga
pulsado el botón SETUP hasta que aparezca “CODE SETUP” en la
pantalla. Cuando el mando esté en el modo de configuración,
aparecerá siempre el símbolo “SET”. Si se pulsa sucesivamente el
botón SETUP, se muestran las opciones de configuración disponibles
en el orden que aparecen a continuación.
1. CODE SETUP: pulse OK aquí para programar un modo, por
ejemplo, la introducción o búsqueda de códigos, etc. Consulte
más adelante las opciones de Code Setup.
2. SYSTEM SETUP: pulse OK aquí para ajustar la hora, la
fecha, el control de volumen, etc.
3. TIMER SETUP: pulse OK aquí para configurar eventos del
temporizador.
4. LEARN SETUP: pulse OK aquí para programar un modo
con comandos aprendidos.
5. MACRO SETUP: pulse OK aquí para configurar secuencias
de botones de macros.
6. EXIT SETUP: pulse OK aquí para salir de rutinas de
configuración y volver al funcionamiento normal.
Pulse OK para seleccionar el paso de programación deseado que sea
necesario.
Después de unos 15 segundos, si no se pulsa ningún botón, se
saldrá automáticamente de la configuración. Aparecerá
TIMEOUT.
Cuando el mando esté ocupando procesando rutinas de
configuración, aparecerá “Please Wait.”
Encendido predeterminado
El mando se enciende en el modo de televisor.
Pantalla de cristal líquido (LCD) La LCD le permite ver
rápidamente en qué modo está el mando. También incluye
un reloj que muestra la hora y el día, así como una
indicación visual de que el mando está transmitiendo
cuando se pulsa un botón.
Configuración de códigos
El botón SETUP se emplea para configurar el mando. Podrá
configurar el mando utilizando el código relativo a la marca
de su producto (de las tablas de códigos incluidas en una
hoja aparte), o podrá buscar en las bibliotecas de códigos
hasta encontrar un código que funcione con el producto.
Podrá guardar cualquier tipo de código en cualquier modo
(salvo en el modo de televisor). Es decir, podrá guardar un
código de vídeo en el botón CBL, o un código de DVD en
el botón VCR, etc. No obstante, sólo podrá guardar
códigos del televisor dentro en el botón TV.
Navegación por la pantalla Setup Utilice los botones SETUP,
OK y los botones de navegación hacia arriba, abajo, izquierda y
derecha para realizar selecciones y desplazarse en la pantalla
Setup. Para salir de las rutinas de configuración y volver al
funcionamiento normal, pulse el botón QUIT o desplácese a la
pantalla “EXIT SETUP” y pulse OK. Al completar algunas
rutinas de configuración, el mando volverá de forma automática al
funcionamiento normal.
Pantalla de pulsación del botón de modo Al mantener
pulsando un botón de modo se cambia a dicho modo y aparece el
modo activo junto con su código, por ejemplo, DVD y el código
de 4 dígitos programado, por ejemplo, 0768. La pantalla vuelve a
su estado normal al soltar el botón.
Pantalla SETUP (conmutación) Al pulsar y soltar el botón
Setup aparece el modo activo del mando, por ejemplo, DVD, la
fecha, por ejemplo 3:26 (mes:día) e indica la operación de
“conmutación” con una “(S)”. Pulse y suelte Exit para volver a la
pantalla normal. Para utilizar el botón SETUP para la
conmutación, pulse y suelte SETUP seguido del botón de función
secundaria deseado.
3534
Page 19

Introducción de códigos
Introducción de códigos (continuación)
Opciones de Code Setup: al pulsar OK en la pantalla CODE
SETUP aparecen 3 opciones para programar un modo con
códigos. Se trata de las siguientes: ENTER CODES (permite
introducir un código de 4 dígitos directamente desde la lista
de códigos impresa); SEARCH CODES (permite buscar en
los códigos guardados en el mando el código correcto para el
dispositivo); y BRAND CODES (permite buscar en los
códigos -relativos sólo a la marca del dispositivo- guardados
en el mando el que es correcto para su dispositivo).
Introducción directa de códigos
1. Encienda manualmente el dispositivo que se va a
controlar.
2. Mantenga pulsado el botón SETUP hasta que aparezca
CODE SETUP (tarda unos 3 segundos), después suelte
el botón SETUP.
3. Pulse y suelte OK. Aparecerá ENTER CODES.
4. Pulse y suelte OK. Aparecerá “MODE?”.
5. Pulse y suelte el botón de modo deseado (TV, VCR,
etc.). Aparecerá el modo, junto con su código
programado en ese momento.
6. Introduzca el código de 4 dígitos de las tablas de
códigos (en una hoja aparte). Tras haber introducido el
cuarto dígito, aparecerá SUCCESS y el mando volverá a
su funcionamiento normal.
Si se introduce un código no válido, aparecerá CODE
ERROR en la pantalla y el mando volverá al funcionamiento
normal.
7. Con el dispositivo encendido, pulse CH +. Si el
dispositivo responde, no será necesaria ninguna
programación adicional. Nota: Si algunos botones no
accionan su equipo, pruebe uno de los otros códigos
para su marca de dispositivo.
Búsqueda de códigos
Si el producto no responde después de haber probado con
todos los códigos correspondientes a la marca, o si no
aparece la marca en la lista, pruebe a buscar el código
siguiendo estos pasos.
1. Encienda manualmente el dispositivo (TV, VCR, etc.)
que se va a controlar.
2. Mantenga pulsado el botón SETUP hasta que aparezca
CODE SETUP (tarda unos 3 segundos), después suelte
el botón SETUP.
3. Pulse y suelte OK. Aparecerá ENTER CODES.
4. Pulse el botón de navegación hacia abajo hasta que
aparezca en pantalla SEARCH CODES.
5. Pulse y suelte OK. Aparecerá MODE KEY.
6. Pulse y suelte el botón de modo deseado (TV, VCR,
etc.). Aparecerá “DEVICE? TV.”
7. Utilizando los botones hacia arriba o hacia abajo,
seleccione el tipo de dispositivo que se va a programar
(TV, VCR, DVD, etc.). Nota: En el modo de televisor,
sólo se podrá seleccionar un televisor como
dispositivo.
8. Pulse y suelte OK para confirmar la selección.
Aparecerá “SEARCH KEY?”.
9. Pulse el botón CH + (o bien POWER o PLAY para
vídeos o reproductores de DVD) varias veces (hasta 300
veces) hasta que el dispositivo que se va a controlar
cambie de canal, se apague o responda como sea
oportuno. Aparecerá SEARCHING (junto con la
selección del dispositivo) durante el proceso de
búsqueda. Si por accidente se pasa el código
necesario, pulse el botón CH - para retroceder dentro de
la biblioteca. Pulse CH + (o bien Power o Play) para
cambiar de nuevo la dirección hacia delante.
10. Pulse y suelte OK para instalar el código. Aparecerá
SUCCESS y el mando volverá a su funcionamiento
normal.
Notes:
1. Si el dispositivo no tiene un botón CH +, utilice el botón
PLAY (VCR/DVD) o POWER en su lugar.
2. La búsqueda de códigos se iniciará desde el número de
4 dígitos guardado en ese momento dentro de dicho
modo.
3. Cuando se haya buscado en todos los códigos, aparecerá
SEARCH END y el mando volverá a su funcionamiento
normal.
Búsqueda de códigos por marca
Podrá buscar un código correspondiente a una marca
específica dentro de la biblioteca de códigos de un
fabricante concreto.
1. Encienda el dispositivo (televisor, vídeo, etc.) que se va
a controlar.
2. Mantenga pulsado el botón SETUP hasta que aparezca
CODE SETUP (tarda unos 3 segundos), después suelte
el botón SETUP.
3. Pulse y suelte OK. Aparecerá ENTER CODES.
4. Pulse el botón de navegación hacia abajo hasta que
aparezca en pantalla BRAND CODES.
5. Pulse y suelte OK. Aparecerá “MODE?”.
6. Pulse y suelte el botón de modo deseado (TV, VCR,
etc.). Aparecerá “DEVICE? TV”.
7. Utilizando los botones hacia arriba o hacia abajo,
seleccione el tipo de dispositivo que se va a programar
(TV, VCR, DVD, etc.). Nota: En el modo de televisor,
sólo se podrá seleccionar un televisor como
dispositivo.
3736
Page 20

Code Identification Feature
Configuración (continuación)
8. Pulse y suelte OK para confirmar la selección.
Aparecerá “BRAND KEY?”.
9. Pulse y suelte el botón numérico (1-8) correspondiente
al fabricante que desee. (Consulte la lista de códigos en
la tabla de la hoja aparte.) Aparecerá SEARCH KEY.
10. Pulse el botón CH + (o bien POWER o PLAY para
vídeos o reproductores de DVD) varias veces hasta que
el dispositivo que se va a controlar cambie de canal, se
apague o responda como sea oportuno. Aparecerá
“Searching” (junto con la selección del dispositivo)
durante el proceso de búsqueda.
Si por accidente se pasa el código necesario, pulse el botón
CH - para retroceder dentro de la biblioteca. Pulse CH + (o
bien Power o Play) para cambiar de nuevo la dirección hacia
delante.
11. Pulse y suelte OK para instalar el código. Aparecerá
SUCCESS y el mando volverá a su funcionamiento
normal.
Identificación de códigos
Mantenga pulsado el botón de modo correspondiente en
funcionamiento normal para ver el código programado para
dicho modo, por ejemplo, DVD Code 0768.
Programación de códigos de dispositivos combinados
Algunos dispositivos combinados (por ejemplo televisor/
vídeo, televisor/DVD, DVD/vídeo, etc.) necesitarán que se
configuren dos botones de modo diferentes para controlar
ambas partes del dispositivo combinado. Por ejemplo, si
tiene usted un televisor/DVD combinado, tal vez tenga que
configurar un código en el botón TV para controlar la parte
del televisor Y un código aparte (en cualquier otro botón de
modo) para controlar la parte del DVD.
Control de dispositivos combinados
Algunos dispositivos combinados (por ejemplo, televisor/
vídeo, televisor/DVD, DVD/vídeo, etc.) tienen botones
separados en su mando original para seleccionar la parte
del dispositivo combinado que se va a controlar. Por
ejemplo, si su dispositivo combinado es un DVD/vídeo, su
mando original podría tener botones de DVD y de vídeo
separados para seleccionar la parte del combinado que se
controlaría. En el mando Philips, las funciones de botón
equivalentes pueden encontrarse utilizando los botones de
modo de dispositivo y SETUP.
Consulte el apartado “Programación con búsqueda de
código” de la página 36, para configurar un modo de
dispositivo (por ejemplo, DVD) con el código correcto del
dispositivo combinado. Suponiendo que el dispositivo
combinado DVD/vídeo sea el ejemplo y que el código se
programe en el modo DVD, mantenga pulsado el botón de modo
DVD durante más de un segundo para enviar el comando del
botón DVD. Para enviar el comando del botón VCR, pulse y
suelte rápidamente el botón SETUP y, a continuación, pulse y
suelte el botón de modo DVD. Este método puede aplicarse de la
misma forma a todos los dispositivos combinados (por ejemplo,
televisor/vídeo, televisor/DVD, DVD/vídeo, etc.) y está
disponible en todos los modos. Tenga en cuenta que no todos los
códigos admiten esta función.
Opciones de configuración del sistema
Al pulsar OK, en la pantalla SYSTEM SETUP se accede a las
opciones de configuración del sistema para configurar el control de
traspaso del control del volumen, la hora, la fecha, la retroiluminación
y el restablecimiento del sistema.
Función de control de volumen/silenciamiento y traspaso
de control
Este mando le permite seleccionar qué modo de dispositivo
controla los botones Volume/Mute. El mando está configurado
inicialmente (ajuste de fábrica) para que todos los modos de
dispositivo programados con códigos “visuales” (por ejemplo,
televisor, vídeo, DVD, DVR, receptor de satélite y receptor por
cable) y códigos de “audio” (por ejemplo, CD y AUDIO) utilicen
su propio control de volumen/silenciamiento, si está disponible.
Si el código “visual” programado no posee su propio
accionamiento del nivel de sonido/silenciamiento, dichos botones
traspasarán el control al dispositivo en modo TV sin necesidad de
cambiar al modo TV.
Configuración del control de volumen/silenciamiento de
TODOS para cualquier modo (ALL VOL. SET)
Esta rutina puede configurar todos los modos para que
“traspasen el control” a cualquier modo elegido para controlar el
botón Volume/Mute sin necesidad de cambiar a dicho modo.
1. Mantenga pulsado el botón SETUP hasta que aparezca CODE
SETUP (tarda unos 3 segundos), y después suelte el botón
SETUP.
2. Pulse el botón de navegación hacia abajo hasta que aparezca en
pantalla SYSTEM SETUP.
3. Pulse y suelte OK. Aparecerá VOL/MUTE SETUP.
4. Pulse y suelte OK. Aparecerá ALL VOL. SET.
5. Pulse y suelte OK. Aparecerá “ALL VOL. MODE?”.
6. Pulse y suelte el botón de modo deseado (TV, VCR, DVD, etc.)
para el control de volumen/silenciamiento. Aparecerá brevemente
“Please Wait”, seguido de SUCCESS y el mando volverá a su
funcionamiento normal.
Todos los modos traspasarán ahora el control al modo elegido para
el control del volumen/silenciamiento. Si el modo elegido no tiene
comandos de nivel de sonido/silenciamiento propios, aparecerá
“Volume Error” en la pantalla y el mando volverá al funcionamiento
normal.
3938
Page 21

Configuración (continuación)Configuración (continuación)
Configuración de cualquier modo para que utilice su propio
control de volumen/silenciamiento (MODE VOL. SET)
Esto ajusta cualquier modo para que utilice sólo su propio
control de volumen/silenciamiento, es decir, se desactiva el
traspaso de control de volumen/silenciamiento para este
modo. Nota: Si ha elegido un modo que no tenga las
funciones de nivel de sonido/silenciamiento, los botones
Volume/Mute no harán nada.
1. Mantenga pulsado el botón SETUP hasta que aparezca
CODE SETUP (tarda unos 3 segundos), y después
suelte el botón SETUP.
2. Pulse el botón de navegación hacia abajo hasta que
aparezca en pantalla SYSTEM SETUP.
3. Pulse y suelte OK. Aparecerá VOL/MUTE SETUP.
4. Pulse y suelte OK. Aparecerá ALL VOL. SET.
5. Pulse el botón de navegación hacia abajo hasta que
aparezca en pantalla MODE VOL. SET.
6. Pulse y suelte OK. Aparecerá “MODE VOL. SET?”.
7. Pulse y suelte OK. Aparecerá “MODE VOL. MODE?”.
8. Pulse y suelte el botón del modo deseado (TV, VCR,
DVD, etc.) que se va a desactivar en relación con el
traspaso del control del volumen/silenciamiento.
Aparecerá brevemente PLEASE WAIT, seguido de
SUCCESS y el mando volverá a su funcionamiento
normal.
El modo elegido utilizará ahora su propio control de volumen/
silenciamiento.
Restablecimiento del control de volumen/silenciamiento a
los ajustes de fábrica (VOL/MUTE RESET)
Esto restablece el control de volumen/silenciamiento de
nuevo a los ajustes de fábrica.
1. Mantenga pulsado el botón SETUP hasta que aparezca
CODE SETUP (tarda unos 3 segundos), y después
suelte el botón SETUP.
2. Pulse el botón de navegación hacia abajo hasta que
aparezca en pantalla SYSTEM SETUP.
3. Pulse y suelte OK. Aparecerá VOL/MUTE SETUP.
4. Pulse y suelte OK. Aparecerá ALL VOL. SET.
5. Pulse el botón de navegación hacia abajo hasta que
aparezca en pantalla VOL/MUTE RESET.
6. Pulse y suelte OK. Aparecerá CONFIRM RESET.
7. Pulse y suelte OK. Aparecerá brevemente PLEASE
WAIT, seguido de SUCCESS y el mando volverá a su
funcionamiento normal.
Ahora se restablecerá el control de volumen/silenciamiento
a los ajustes de fábrica.
Configuración de la hora (TIME SETUP)
Para configurar la hora que se visualizará en la pantalla LCD normal:
1. Mantenga pulsado el botón SETUP hasta que aparezca
CODE SETUP (tarda unos 3 segundos), y después suelte
el botón SETUP.
2. Pulse el botón de navegación hacia abajo hasta que
aparezca en pantalla SYSTEM SETUP.
3. Pulse y suelte OK. Aparecerá VOL/MUTE SETUP.
4. Pulse el botón de navegación hacia abajo hasta que
aparezca en pantalla TIME SETUP.
5. Pulse y suelte OK. Aparecerá “TIME?” mostrando el
formato actual (12 ó 24 horas) parpadeando y la hora actual.
6. Utilice los botones de navegación hacia arriba o abajo para
ajustar el formato (12 ó 24 horas); luego pulse y suelte OK.
7. Las “horas” parpadearán. Utilice los botones de
navegación hacia arriba o abajo para ajustar las horas y,
después, pulse y suelte OK.
8. Los “minutos” parpadearán. Utilice los botones de
navegación hacia arriba o abajo para ajustar los minutos y,
después, pulse y suelte OK.
9. Aparecerá SUCCESS. El mando permanecerá en el modo
de configuración y volverá a la pantalla CODE SETUP.
Pulse QUIT y después OK para salir del modo de
configuración.
Configuración de la fecha (DATE SETUP)
Para ajustar el mes, la fecha y el día:
1. Mantenga pulsado el botón SETUP hasta que aparezca
CODE SETUP (tarda unos 3 segundos), y después suelte
el botón SETUP.
2. Pulse el botón de navegación hacia abajo hasta que
aparezca en pantalla SYSTEM SETUP.
3. Pulse y suelte OK.
4. Pulse el botón de navegación hacia abajo hasta que
aparezca en pantalla DATE SETUP.
5. Pulse y suelte OK. Aparecerá “YEAR?” con los 2 últimos
dígitos del año parpadeando.
6. Utilice los botones de navegación hacia arriba o abajo
para ajustar el año; después pulse y suelte OK.
7. Aparecerá “MONTH?” con los dígitos del mes
parpadeando. Utilice los botones hacia arriba o abajo para
ajustar el mes; después pulse y suelte OK.
8. Aparecerá “DATE?” con los dígitos de la fecha
parpadeando. Utilice los botones hacia arriba o abajo para
ajustar la fecha; después pulse y suelte OK.
9. Aparecerá “DAY?” con el día parpadeando. Utilice los
botones hacia arriba o abajo para ajustar el día; pulse y
suelte OK.
10. Aparecerá SUCCESS, el mando permanecerá en el modo
de configuración y volverá a la pantalla CODE SETUP.
Pulse QUIT y después OK para salir del modo de
configuración.
4140
Page 22

Configuración (continuación)Configuración (continuación)
Configuración del tiempo de activación de la
retroiluminación (BACKLIGHT SETUP)
Para ajustar el período de tiempo que se mantiene activada
la retroiluminación después de haber dejado de pulsar los
botones. El botón Backlight activa y desactiva la
retroiluminación.
1. Mantenga pulsado el botón SETUP hasta que aparezca
CODE SETUP (tarda unos 3 segundos), y después suelte
el botón SETUP.
2. Pulse el botón de navegación hacia abajo hasta que
aparezca en pantalla SYSTEM SETUP. Pulse y suelte OK.
3. Pulse el botón de navegación hacia abajo hasta que
aparezca en pantalla BACKLIGHT SETUP. Pulse y suelte
OK.
4. Aparecerá “BACKLIGHT TIME?” con los dígitos del
tiempo de activación de la retroiluminación parpadeando.
Utilice los botones hacia arriba o abajo para ajustar el
tiempo de activación de la retroiluminación en incrementos
de 5 segundos hasta un máximo de 60 segundos. El tiempo
de activación de la retroiluminación predeterminado es de
10 segundos. Para desactivar la función de
retroiluminación, ajuste el tiempo a “00” (cero). Pulse y
suelte OK.
5. Aparecerá SUCCESS, el mando permanecerá en el modo
de configuración y volverá a la pantalla CODE SETUP.
Pulse QUIT y después OK para salir del modo de
configuración.
Restablecimiento del mando LCD a los ajustes de fábrica
(SYSTEM RESET)
Para restablecer el mando a los ajustes de fábrica. Todos
los ajustes programados por el usuario, como los ajustes de
códigos, los comandos aprendidos, las macros, etc. son
eliminados y sustituidos por los ajustes de fábrica
correspondientes.
1. Mantenga pulsado el botón SETUP hasta que aparezca
CODE SETUP (tarda unos 3 segundos), y después suelte
el botón SETUP.
2 Pulse el botón de navegación hacia abajo hasta que
aparezca en pantalla SYSTEM SETUP. Pulse y suelte OK.
3. Pulse el botón de navegación hacia abajo hasta que
aparezca en pantalla SYSTEM RESET. Pulse y suelte OK.
4. Aparecerá CONFIRM RESET. Pulse y suelte OK.
5. Aparecerá PLEASE WAIT mientras se restablecen todos
los ajustes y, a continuación, el mando saldrá del modo de
configuración y volverá a su funcionamiento normal.
Configuración de temporizadores
Al pulsar OK en TIMER SETUP, se accede a las opciones
de temporizadores disponibles. Hay un temporizador de
desconexión automática del televisor y 4 temporizadores
que pueden enviar una secuencia de hasta 3 comandos de
botones a la hora preestablecida.
Configuración y eliminación de un temporizador de
desconexión automática del televisor (TV Sleep Setup)
El mando se puede programar con un temporizador de
desconexión automática del televisor. Al final del período
ajustado en el temporizador, el mando envía el comando de
encendido/apagado al dispositivo en modo televisor. El
temporizador de desconexión automática del televisor se
puede ajustar para un período de 1-90 minutos. Cuando se
ha configurado un temporizador de desconexión automática
del televisor, aparecerá el símbolo “Zzz”.
Para ajustar un temporizador de desconexión automática del
televisor (sin “Zzz” en la pantalla normal)
1. Encienda el dispositivo en el modo televisor.
2. Mantenga pulsado el botón SETUP hasta que aparezca
CODE SETUP (tarda unos 3 segundos), y después suelte
el botón SETUP.
3. Pulse el botón de navegación hacia abajo hasta que
aparezca en pantalla TIMER SETUP. Pulse y suelte OK.
4. Aparecerá TV SLEEP SETUP. Pulse y suelte OK.
5. Aparecerá TV SLEEP SET. Pulse y suelte OK.
6. Aparecerá “TV SLEEP TIME?” con los “minutos”
parpadeando. Utilice los botones de navegación hacia
arriba o abajo para ajustar los minutos y, después, pulse y
suelte OK.
7. Aparecerá SUCCESS, el mando permanecerá en el modo
de configuración y volverá a la pantalla CODE SETUP.
Pulse QUIT y después OK para salir del modo de
configuración.
Para eliminar un temporizador de desconexión automática
del televisor (“Zzz” en la pantalla normal)
1. Mantenga pulsado el botón SETUP hasta que aparezca
CODE SETUP (tarda unos 3 segundos), y después suelte
el botón SETUP.
2. Pulse el botón de navegación hacia abajo hasta que
aparezca en pantalla TIMER SETUP. Pulse y suelte OK.
3. Aparecerá TV SLEEP SETUP Pulse y suelte OK.
4. Aparecerá TV SLEEP CLEAR. Pulse y suelte OK.
5. Aparecerá CONFIRM CLEAR. Pulse y suelte OK.
6. Aparecerá SUCCESS, el mando permanecerá en el modo
de configuración y volverá a la pantalla CODE SETUP.
Pulse QUIT y después OK para salir del modo de
configuración.
4342
Page 23

Configuración (continuación)Configuración (continuación)
Configuración y eliminación de temporizadores (TIMER
SETUP)
El mando se puede programar hasta con 4 temporizadores
(temporizador 1, 2, 3 y 4). Se pueden asignar a cada
temporizador hasta 4 botones (4 si las macros están
activadas y 2 si las macros están desactivas) para que se
activen a la hora establecida. El primer botón siempre debe
ser un botón de modo. Los botones siguientes no pueden
incluir el botón hacia arriba, abajo, izquierda y derecha, OK,
Exit, Macro, Setup ni ningún botón de modo. Los
temporizadores sólo pueden activarse dentro de las 24
horas siguientes. Los temporizadores se eliminan
automáticamente tras su activación. Cuando se ha
ajustado un temporizador, aparecerá el símbolo de
“campana del temporizador.”
Para ajustar un temporizador (Nota: Si se ha configurado
con anterioridad, primero habrá que eliminar el
temporizador; consulte el apartado “Para eliminar un
temporizador” más adelante)
1. Mantenga pulsado el botón SETUP hasta que aparezca
CODE SETUP (tarda unos 3 segundos), y después suelte
el botón SETUP.
2. Pulse el botón de navegación hacia abajo hasta que
aparezca en pantalla TIMER SETUP.
3. Pulse y suelte OK. Aparecerá TV SLEEP SETUP.
4. Pulse el botón de navegación hacia abajo hasta que
aparezca en pantalla TIMER X SETUP (donde “X” es 1, 2,
3 ó 4). Pulse y suelte OK.
5. Aparecerá TIMER X SET. Pulse y suelte OK.
6. Aparecerá “TIMER X TIME?” con las “horas”
parpadeando. Utilice los botones de navegación hacia
arriba o abajo para ajustar las horas y, después, pulse y
suelte OK.
7. Los “minutos” parpadearán. Utilice los botones de
navegación hacia arriba o abajo para ajustar los minutos
y, después, pulse y suelte OK.
8. Aparecerá “TIMER X MODE?”. Pulse y suelte el botón
de modo deseado (TV, VCR, DVD, etc.).
9. Aparecerá “TIMER X Key1?”. Pulse y suelte el primer
botón necesario. Si sólo es necesario un botón, pulse y
suelte OK en este momento (vaya al paso 12 siguiente).
Si las macros están desactivadas, consulte el paso “l”
siguiente.
10. Aparecerá “TIMER X Key2?”. Pulse y suelte el segundo
botón necesario. Si sólo son necesarios dos botones,
pulse y suelte OK en este momento (vaya al paso 12
siguiente).
11. Aparecerá “TIMER X Key3?”. Pulse y suelte el tercer
botón necesario.
12. Aparecerá SUCCESS, el mando permanecerá en el modo
de configuración y volverá a la pantalla CODE SETUP.
Pulse QUIT y después OK para salir del modo de
configuración.
Para eliminar un temporizador (“campana de temporizador”
en la pantalla normal)
1. Mantenga pulsado el botón SETUP hasta que aparezca
CODE SETUP (tarda unos 3 segundos), y después suelte
el botón SETUP.
2. Pulse el botón de navegación hacia abajo hasta que
aparezca en pantalla TIMER SETUP.
3. Pulse y suelte OK. Aparecerá TV SLEEP SETUP.
4. Pulse el botón de navegación hacia abajo hasta que
aparezca en pantalla TIMER X SETUP (donde “X” es 1, 2,
3 ó 4). Pulse y suelte OK.
5. Aparecerá TIMER X CLEAR. Pulse y suelte OK.
6. Aparecerá CONFIRM CLEAR. Pulse y suelte OK.
7. Aparecerá SUCCESS, el mando permanecerá en el modo
de configuración y volverá a la pantalla CODE SETUP.
Pulse QUIT y después OK para salir del modo de
configuración.
4544
Page 24

Aprendizaje de códigos
Aprendizaje de códigos (continuación)
Consejos para el aprendizaje
Sólo podrá aprender un tipo de dispositivo en cualquier
botón de modo. Por ejemplo, en el modo TV, deberá
aprender sólo códigos de televisores, en el modo VCR,
deberá aprender sólo códigos de vídeo, etc. Si está
tratando de aprender de un mando “universal”, podría
haber más de un tipo de código guardado en un modo.
Pruebe a aprender de otro mando para ver si existe un
problema con el tipo o marca de mando del que está
tratando de aprender.
a. Tal vez no se puedan aprender algunas funciones de
algunos tipos de mandos.
b. No se pueden guardar funciones en el botón SETUP o
MACRO.
c. Sólo se puede aprender un tipo de dispositivo original
por modo individual.
d. Utilice pilas nuevas para el mando de aprendizaje y para
el mando original.
e. No trate de aprender directamente bajo una luz
incandescente o de bajo consumo, ya que pueden
provocar interferencias en las transmisiones por
infrarrojos. Manténgase al menos a 1 metro de
distancia de cualquier fuente de luz de dichos tipos.
f. Elimine todos los ajustes con la opción Master Clear
(consulte la página 49) antes de aprender y pruebe a
aprender inicialmente 2 ó 3 comandos. Después, utilice
Master Clear y borre todos los ajustes antes de
aprender por completo los comandos del mando
original.
g. Elimine un modo con “Mode Clear” antes de aprender un
modo para asegurarse de que no quede ningún comando
aprendido previamente para dicho modo.
h. Coloque el mando original y el mando de aprendizaje
con sus extremos enfrentados, de forma que los
transmisores de infrarrojos de ambos mandos estén
alineados de forma directa. Tal vez necesite ajustar la
altura de alguno de los mandos para lograrlo.
i. Mantenga una distancia de aproximadamente 2,5 cm
entre ambos mandos y no mueva ni modifique esa
distancia hasta que haya aprendido todos los botones
necesarios para dicho modo.
j. Procure no aprender los botones Volume/Mute del
mando original a menos que esté seguro de que activan
el mismo dispositivo, por ejemplo, algunos mandos
originales de DVD incluyen el control del botón Volume/
Mute del televisor y pueden tener dos tipos de código
diferentes.
k. Procure no aprender los botones VCR del mando
original a menos que esté seguro de que activan el
mismo dispositivo, por ejemplo, algunos mandos
originales de televisores incluyen el control del botón
VCR y pueden tener dos tipos de código diferentes.
l. El aprendizaje de un botón puede tardar hasta 3 segundos.
No suelte el botón que se esté aprendiendo hasta que
aparezca SUCCESS o LEARN ERROR en la pantalla.
m. Si el aprendizaje del primer o del segundo botón de un
modo provoca errores continuos, pruebe lo siguiente:
i. Ponga fin a la sesión de aprendizaje pulsando el botón
QUIT.
ii. Borre los comandos aprendidos para dicho modo.
iii. Compruebe que los transmisores de infrarrojos de
ambos mandos estén correctamente alineados.
iv. Ajuste la distancia entre ambos mandos para que sea
inferior (por ejemplo 1,25 cm) o superior (por ejemplo 5
cm) entre ellos.
v. Pruebe a aprender de nuevo el mando original para
dicho modo.
Si tiene problemas con el mismo botón, compruebe el botón
del mando original que esté aprendiendo: ¿transmite?
¿Funciona el dispositivo de destino? Pruebe a aprender
ese botón dentro de un modo vacío diferente. Si se
aprende correctamente, es posible que sea un tipo de
código diferente de los demás y no se pueda aprender en el
mismo modo.
Notas sobre el aprendizaje
1. No se puede aprender nada en el botón Setup o Macro.
2. Todos los comandos aprendidos para un modo se
eliminarán si se introduce el mismo código o un nuevo
código de 4 dígitos para dicho modo (incluso las entradas
de la introducción directa de códigos, búsqueda de
códigos y búsqueda de marcas).
3. La retroiluminación se desactiva durante el proceso de
aprendizaje.
4746
Page 25

Aprendizaje de comandos
Eliminación de comandos
1. Mantenga pulsado el botón SETUP hasta que aparezca
CODE SETUP (tarda unos 3 segundos), y después suelte
el botón SETUP.
2. Pulse el botón de navegación hacia abajo hasta que
aparezca en pantalla LEARN SETUP. Pulse y suelte OK.
3. Aparecerá MODE LEARN. Pulse y suelte OK.
4. Aparecerá “MODE?”. Pulse y suelte el botón de modo
deseado (TV, VCR, DVD, etc.).
5. Aparecerá “LEARN KEY?”. Pulse y suelte el botón del
mando que se va a enseñar con el código del mando original.
6. Aparecerá LEARNING. Mantenga pulsado el botón del
mando original hasta que aparezca SUCCESS o LEARN
ERROR en pantalla (consulte la sección “Consejos para
el aprendizaje”, en la página 46) seguido de “LEARN
MORE?” (este proceso puede tardar hasta 2 ó 3 segundos
en finalizar). Suelte el botón del mando original.
7. Aparecerá “LEARN MORE?”. Para aprender más botones,
pulse y suelte OK y repita el proceso desde el paso 5.
Para salir llegados a este punto, pulse y suelte el botón
QUIT.
8. Aparecerá PLEASE WAIT brevemente, el mando saldrá
del modo de configuración y volverá a su funcionamiento
normal.
Para eliminar todos los comandos aprendidos
dentro de un modo
La eliminación de los comandos aprendidos es útil si, por
ejemplo, sustituye su reproductor de CD por otro de otra
marca o modelo. Si había aprendido una función del
mando original de su antiguo reproductor de CD en este
mando (como, por ejemplo, la reproducción en orden
aleatorio), dicha prestación ya no funcionará en su nuevo
reproductor de CD. Si desea borrar o eliminar uno o más
comandos “aprendidos”, siga los pasos que se exponen a
continuación:
1. .Mantenga pulsado el botón SETUP hasta que aparezca
CODE SETUP (tarda unos 3 segundos), y después suelte
el botón SETUP.
2. Pulse el botón de navegación hacia abajo hasta que
aparezca en pantalla LEARN SETUP. Pulse y suelte OK.
Aparecerá MODE LEARN.
3. Pulse el botón de navegación hacia abajo hasta que
aparezca en pantalla MODE CLEAR. Pulse y suelte OK.
4. Aparecerá “MODE?”. Pulse y suelte el botón de modo
deseado (TV, VCR, DVD, etc.).
5. Aparecerá CONFIRM CLEAR. Pulse y suelte OK.
6. Aparecerá PLEASE WAIT brevemente, el mando saldrá
del modo de configuración y volverá a su funcionamiento
normal.
Alinee los mandos (de los que se está aprendiendo) delante del
mando de aprendizaje, sobre una superficie rígida con una
separación de aproximadamente 2,5 cm.
Master Clear: para borrar todos los comandos
aprendidos en todos los modos (recomendado
durante el aprendizaje por primera vez)
1. Mantenga pulsado el botón SETUP hasta que aparezca
CODE SETUP (tarda unos 3 segundos), y después suelte
el botón SETUP.
2. Pulse el botón de navegación hacia abajo hasta que
aparezca en pantalla LEARN SETUP. Pulse y suelte OK.
Aparecerá MODE LEARN.
3. Pulse el botón de navegación hacia abajo hasta que
aparezca en pantalla ALL LEARN CLEAR. Pulse y suelte
OK.
4. Aparecerá CONFIRM CLEAR. Pulse y suelte OK.
5. Aparecerá PLEASE WAIT brevemente, el mando
saldrá del modo de configuración y volverá a su
funcionamiento normal.
4948
Page 26

Macros (continuación)Macros
El botón MACRO, junto con los dígitos del 1 a 8, le permite
programar y guardar hasta 8 secuencias de comandos por
infrarrojos (pulsaciones de botones) que elija. Una
pulsación del botón numérico de la macro correspondiente
provocará el envío de dicha secuencia de comandos por
infrarrojos. Cualquier secuencia de comandos que emplee
con regularidad podrá reducirse a dos pulsaciones de
botones (botón MACRO seguido de un botón del 1 a 8).
Por ejemplo, pulsando MACRO seguido de un solo botón
podrá encender el televisor, el receptor por cable, cambiar a
su canal favorito, encender el vídeo e indicarle que grabe,
etc. Se puede guardar un total de 20 pulsaciones de
botones en cada uno de los 8 dígitos de macro.
Para configurar una macro
1. Mantenga pulsado el botón SETUP hasta que aparezca
CODE SETUP (tarda unos 3 segundos), y después suelte
el botón SETUP.
2. Pulse el botón de navegación hacia abajo hasta que
aparezca en pantalla MACRO SETUP. Pulse y suelte OK.
3. Aparecerá MACRO SET. Pulse y suelte OK.
4. Aparecerá “MACRO KEY?”. Pulse y suelte un botón
numérico del 1 a 8, según en el que desee guardar la macro.
5. Aparecerá “MACRO X MODE?” (donde “X” es 1, 2, …, 7,
8). Pulse y suelte el botón de modo deseado (TV, VCR,
DVD, etc.). El primer botón de una secuencia de macro
siempre debe ser un botón de modo.
6. Aparecerá “MACRO X KEY?” junto con el número de
botones (inicialmente 02). Pulse y suelte los botones que
desee que se incluyan en la macro, en el orden en el que
desee que se envíen (hasta 20).
7. Para guardar la macro en cualquier momento, pulse y suelte
el botón Macro. Tenga en cuenta que la macro se guardará
automáticamente con la vigésima pulsación de botón.
8. Aparecerá SUCCESS, el mando saldrá del modo de
configuración y volverá a su funcionamiento normal.
MACRO
Botón
Durante el funcionamiento normal, para activar la macro
pulse y suelte el botón MACRO seguido (en un plazo de 20
segundos) del botón numérico del 1 a 8. Aparecerá
MACRO X mientras se está realizando la secuencia de
macro y después el mando volverá al funcionamiento
normal. Si no hay ninguna macro guardada en el botón
numérico elegido, aparecerá brevemente MACRO X VOID y
el mando volverá al funcionamiento normal.
Notas sobre las macros
1. Tal vez desee añadir “retardos” en una secuencia de
macro (por ejemplo, para dejar un tiempo de
calentamiento del televisor). Se pueden añadir retardos
utilizando el botón PAUSE seguido del número de
segundos de retardo necesarios. Por ejemplo, para
introducir un retardo de 3 segundos, pulse y suelte
PAUSE seguido del 3 (en el paso 6 de “Para configurar
una macro” de la página anterior). El retardo máximo es
de 9 segundos. No es posible introducir un dígito “0”
después de una pausa, es decir, no hay ningún retardo
cero.
2. Existe un retardo automático de medio segundo entre
cada transmisión por infrarrojos de una secuencia de
macro.
3. * El primer botón de una secuencia de macro DEBE ser
un botón de modo (TV, VCR, etc.).
4. Los botones Setup y Macro no se pueden incluir en una
macro.
5. Pulse SETUP para salir de la configuración de macros.
Para eliminar una macro
1. Mantenga pulsado el botón SETUP hasta que aparezca
CODE SETUP (tarda unos 3 segundos), y después suelte
el botón SETUP.
2. Pulse el botón de navegación hacia abajo hasta que
aparezca en pantalla MACRO SETUP. Pulse y suelte OK.
3. Pulse el botón de navegación hacia abajo hasta que
aparezca en pantalla MACRO CLEAR. Pulse y suelte OK.
4. Aparecerá “MACRO KEY?”. Pulse y suelte el botón
numérico 1, 2, …7 u 8 correspondiente a la macro que
desee eliminar.
5. Aparecerá CONFIRM CLEAR. Pulse y suelte OK.
6. Aparecerá PLEASE WAIT brevemente, el mando saldrá
del modo de configuración y volverá a su funcionamiento
normal.
5150
Page 27

Resolución de problemas
Garantía de duración limitada
El mando no acciona el producto.
• Pulse el botón de modo del producto que desee
controlar.
• Programe el mando con un nuevo código.
• Ponga pilas nuevas. (Podría tener que volver a
programar el mando tras haber colocado pilas nuevas.)
• El mando podría no ser compatible con el producto.
El mando no acciona algunas funciones del
producto.
• Programe el mando con un nuevo código.
• Es posible que el mando no accione todas las funciones
del producto o que los nombres de los botones sean
diferentes a los de su producto.
Para obtener ayuda con la configuración, llame al: 919-573-
7854.
El fabricante le garantiza que este producto no tendrá
ningún tipo de defecto de material, trabajo o montaje, si se
utiliza de forma normal siguiendo las especificaciones y
advertencias, mientras posea este producto. Esta garantía
sólo le corresponde al comprador original del producto y
no es transferible. Los productos defectuosos, junto con
una prueba de compra que incluya la fecha, deberán
devolverse al lugar donde se compraron para su reparación
o sustitución. NO EXISTE NINGUNA OTRA GARANTÍA
EXPRESA. Siempre que la ley lo permita, se eximirá de
responsabilidad por daños accidentales y emergentes. Esta
garantía le otorga derechos legales específicos y podría
tener también otros derechos dependiendo del estado en el
que se encuentre.
Fabricado en China. Control de calidad en EE.UU.
Ledgewood, NJ 07852
5352
Page 28

T ab le des matières
Introduction
Introduction ...............................................................55
Fonctions des boutons ...............................................56
Fonctions DVD/SAT ........................................... 58
Fonction de perçage VCR/DVD ..............................58
Fonctions Tivo/Replay .........................................59
TV/VCR/DVR ....................................................59
Réglage .....................................................................60
Installation des piles .............................................60
Économiseur de piles ...........................................60
Sauvegarde de code ............................................60
Mise sous tension par défaut ...............................60
Écran à cristaux liquides (écran ACL)................60
Réglage de code ..................................................60
Réglage .....................................................................61
Saisie de code ........................................................... 62
Saisie de code directe ..........................................62
Recherche de code.............................................. 62
Recherche de marque .........................................63
Fonction d’identification de code ..............................64
Programmation des codes d’appareils combinés .....64
Commande des appareils combinés.......................... 64
Fonction de commande du volume / de la discrétion 65
Réglage de la commande du volume / de la sourdine,
du perçage ...........................................................65
Réglage de tout mode avec son propre volume / sa
propre sourdine ....................................................66
Retour aux valeurs par défaut de la sourdine / du
volume ..................................................................66
Réglage de l’heure.................................................... 67
Réglage de la date ....................................................67
Réglage de la durée de rétroéclairage...................... 68
Retour complet aux valeurs par défaut ....................68
Minuteur de mise en veille ........................................69
Réglage du minuteur .................................................69
Apprentissage des codes .......................................... 72
Conseils sur l’apprentissage ................................ 72
Apprentissage des commandes ................................74
Suppression des commandes ....................................75
Suppression des commandes apprises pour un
mode .................................................................... 75
Réinitialisation complète ...................................... 75
Macros ......................................................................76
Réglage de macros .............................................. 76
Suppression de macros ........................................77
Dépannage ................................................................78
Félicitations! Vous venez de faire l’acquisition d’une
télécommande universelle Philips. La télécommande
universelle Philips permet de remplacer une télécommande
endommagée ou perdue et de combiner plusieurs
télécommandes en une seule. De plus, cette télécommande
est équipée d’une fonction d’apprentissage de commandes,
qui vous permet de copier les commandes de votre
télécommande d’origine!
Cette télécommande reprend les fonctions communes à la
plupart des marques et modèles d’appareils à commande
par infrarouge (IR). Il se peut qu’elle propose également
des fonctions non offertes sur votre appareil, mais il se
peut aussi qu’elle ne maîtrise pas certaines fonctions de
votre appareil (par exemple, les fonctions des menus). Dans
ce cas, veuillez employer la télécommande d’origine de
votre appareil. Veuillez utiliser ce manuel pour vous
familiariser avec la télécommande universelle Philips. Après
vous être familiarisé avec votre télécommande, la première
chose à faire sera d’installer les piles et de la programmer
selon les particularités de votre appareil et sa marque.
Nous avons conçu cette télécommande avec la convivialité
pour objectif premier. Cette télécommande possède des
touches dédiées au lecteur DVD et à l’enregistreur vidéo
numérique DVR. Nous avons surligné les boutons DVD en
bleu pour vous permettre de vous y référer facilement.
Nous avons aussi surligné les boutons DVR (Tivo/Replay)
en jaune pour vous permettre de vous y référer facilement
sur la télécommande. En plus des fonctions DVD et DVR,
nous avons inclus la fonctionnalité Satellite en ajoutant les
réglages MENU, GUIDE, PAGE VERS LE HAUT / VERS LE
BAS / GAUCHE / DROITE, ENTER, QUIT, INFO et OK
directement sur la télécommande. Pour toute fonction
existante sur une de vos télécommandes d’origine mais ne
figurant pas sur la télécommande universelle, nous avons
ajouté la fonction d’apprentissage facile, qui permet à la
télécommande universelle « d’apprendre » vos fonctions
préférées sur votre télécommande d’origine.
Nous avons d’ailleurs perfectionné cette étape grâce à
l’ajout de huit fonctions macros. Une macro vous permet de
programmer une série d’étapes en une seule frappe. Par
exemple, vous pouvez programmer votre télécommande de
façon à allumer toutes vos composantes d’une seule
frappe.
Merci d’avoir acheté cette télécommande Philips; nous
espérons qu’elle vous procurera de nombreuses années de
service.
5554
Page 29

Fonctions des boutons
1.
2.
3.
4.
5.
6.
7.
8.
9.
10.
11.
12.
13.
14.
15.
31.
30.
29.
28.
27.
26.
25.
24.
23.
22.
21.
20.
19.
18.
17.
16.
Remarque : il faut appuyer sur le bouton REC À DEUX REPRISES
pour enregistrer à partir de votre magnétoscope. Pour certaines
marques de magnétoscopes, vous devrez peut-être appuyer sur la
touche REC une fois, puis une deuxième fois pendant 3 secondes.
Certaines touches sur la télécommande peuvent porter des noms qui
diffèrent des noms de fonctions sur l’appareil configuré. Par
exemple : LAST peut aussi porter le nom RECALL, ENTER peut
aussi porter le nom DISPLAY. Ces différences dépendent de la
marque et du modèle de votre appareil. De plus, la télécommande
universelle peut faire fonctionner uniquement les fonctions offertes
par votre appareil. Par exemple, votre appareil doit être doté de la
fonctionnalité LAST pour que le bouton LAST puisse activer cette
fonction.
Fonctions des boutons (suite)
1. Écran à cristaux liquides (écran SCL) : Pour un réglage
plus facile et pour afficher le mode dans lequel se trouve la
télécommande, ainsi que l’heure, etc.
2. TV, VCR, DVD, etc. : Pour choisir l’appareil à utiliser.
3. GUIDE : Pour afficher à l’écran le guide des canaux ou des
émissions.
4. +100 : Pour les canaux au-delà de 100.
(-) : Pour les canaux numériques, par exemple : 2-3.
5. MENU : Pour afficher l’écran Menu du DVD, dans lequel
vous utiliserez les touches de navigation HAUT, BAS,
GAUCHE et DROITE.
6. OK / SELECT : Pour sélectionner les options des menus de
l’appareil que vous voulez utiliser.
7. HAUT, BAS, GAUCHE et DROITE : Boutons de naviga-
tion.
8. VOLUME +/- : Pour changer l’intensité du volume de
l’appareil (le téléviseur généralement).
9. POUCE VERS LE BAS - Pour entrer votre cote
d’appréciation.
10. MUTE : Sourdine pour couper le son du téléviseur; l’image
demeure.
11. REPLAY : Reprise des 8 dernières secondes d’une émission.
12. INPUT : Pour afficher le menu de réglage du lecteur DVD.
13. RECORD, PLAY, STOP, REW, FF, PAUSE : Boutons de
commande du magnétoscope qui font fonctionner votre
magnétoscope même lorsque la télécommande est en mode TV. À
utiliser également pour les fonctions Scan -/+ d’un DVD.
14. SLEEP : Pour éteindre le téléviseur après un certain temps.
15. CC (SUBTITLE) : Sous-titrage codé (si votre téléviseur
offre cette fonction) ou menu des sous-titres d’un DVD.
16. SETUP : Pour le réglage.
17. MACRO : Fonctionne à l’aide des chiffres de 1 à 8 et permet
de programmer et sauvegarder jusqu’à 8 séquences de
boutons au choix.
18. SAP : Pour sélectionner la seconde piste audio, si celle-ci est
offerte.
19. ZOOM : Pour zoomer sur une partie de l’écran.
ARC : Pour sélectionner le format de visualisation de l’image
affichée, dont le format large, le zoom, etc.
20. SWAP : Pour échanger les écrans image sur image.
21. PIP : Pour maîtriser toute image sur image télévisée.
22. ADVANCE : Pour passer à la diffusion en direct.
23. TV/VCR/DVR : Sur certains téléviseurs, il suffit d’appuyer
sur cette touche à répétition pour choisir parmi les sources de
diffusion offertes (antenne, décodeur de câble, magnétoscope,
etc.)
24. LAST : Pour revenir à la chaîne précédemment sélectionnée ou
activer la bascule de répétition du DVD.
25. POUCE VERS LE HAUT : Pour saisir votre cote
d’appréciation.
26. CHANNEL +/- : Pour changer de chaîne. CHAPTER +/- :
Permet de passer à la piste précédente ou suivante du DVD/
CD (en mode DVD ou SAT). Veuillez remarquer que les
boutons VCR permettent aussi d’opérer le lecteur DVD
lorsqu’en mode DVD.
27. QUIT/RETURN : Pour fermer les menus à l’écran ou revenir
à la sélection précédente à l’écran.
28. ENTER : Pour changer la chaîne sélectionnée immédiatement
après avoir entré directement un numéro de chaîne.
29. INFO : Pour afficher ou sélectionner les infos sur les chaînes.
30. CHIFFRES : Pour sélectionner une chaîne directement. Pour
certains appareils, il faut appuyer sur Enter après avoir saisi
le numéro de la chaîne désirée.
31. POWER : Pour allumer ou éteindre l’appareil.
5756
Page 30

Fonctions des boutons (suite)Fonctions des boutons (suite)
Fonctions DVD (en bleu)
SCAN+ et SCAN-: permettent de contrôler la vitesse de l’avance
rapide et du rembobinage respectivement.
CHAPTER+ et CHAPTER-: permettent de localiser les
chapitres ou pistes suivantes et précédentes sur un disque.
SUBTITLE ON/OFF (CC): Tourne les sous-titres sur ou de.
INFO: permet d’afficher l’information du lecteur DVD, le menu
de sélection des scènes, plages ou titres, l’indication de la durée
qui reste ou qui s’est écoulée, l’information sur le système, etc.
MENU: permet d’afficher le menu du disque. À utiliser avec les
touches de déplacement Up, Down, Left et Right.
OK: permet de sélectionner une option de menu à l’écran. Dans
le cas de certains lecteurs de DVD, on doit aussi utiliser la touche
Play.
QUIT/RETURN: Permet de quitter le menu affiché ou de revenir
à l’affichage précédent.
ZOOM: Permet d’élargir la taille de l’écran ou un champ
spécifique.
ARC: Pour sélectionner le format de visualisation de l’image
affichée : large, zoom, etc.
PLAY: permet de lancer la lecture du disque. Permet aussi, sur
certains lecteurs de DVD, de sélectionner une option de menu.
STOP: permet d’interrompre la lecture du disque.
PAUSE: permet d’interrompre momentanément la lecture du
disque.
INPUT/SETUP: Permet d’afficher le menu de programmation des
lecteurs de DVD.
Fonctions SAT
GUIDE : Pour afficher à l’écran le guide des canaux offerts par
satellite.
CHAPTER+ et CHAPTER- : Servent de touches Page Suivante
et Page Précédente pour les menus à l’écran utilisés par certains
systèmes de télévision par satellite.
INFO: Pour faire apparaître l’écran par satellite affichant les
renseignements actuels sur la chaîne et le système.
MENU: Pour afficher à l’écran le menu de la télévision par
satellite, dans lequel vous utiliserez les touches de navigation
HAUT, BAS, GAUCHE et DROITE.
QUIT: Pour quitter ou faire disparaître tout menu affiché à
l’écran.
INPUT: Pour passer du mode Satellite au mode TV (TV/SAT).
Fonction de perçage VCR/DVD Cette télécommande permet
aux 6 touches magnétoscope (c.-à-d. PLAY, PAUSE, STOP, FF,
REWIND et REC) de percer tout mode programmé avec les
codes TV, SAT ou Câble pour passer au plus récent mode
magnétoscope ou DVD programmé que vous avez employé.
Cette option ne fonctionnera pas si le code TV, SAT ou Câble
programmé possède sa propre commande magnétoscope, par
exemple, un appareil combiné TV, SAT/PVR, etc.
Fonctions Tivo/Replay (surlignées en jaune)
TiVo (code 0738)
T-CENTRAL : Touche TiVo correspondant à TiVo Central.
GUIDE : TiVo Live Guide - Guide de programmation TiVo.
INFO : Pour afficher le bandeau des canaux.
REPLAY : Reprise des 8 dernières secondes d’une
émission.
ADVANCE : Pour passer à la diffusion en direct.
LIVE TV : Pour passer à la diffusion télévisuelle en direct.
OK : Touche de sélection.
POUCE VERS LE HAUT / VERS LE BAS : Pour saisir
votre cote d’appréciation.
Replay (code 0938)
GUIDE : Guide des chaînes - Pour afficher la programmation
télévisée.
REPLAY : Pour lancer la lecture de vos émissions
enregistrées.
MENU : Pour afficher le menu principal ReplayTV.
PL et PV : Page précédente / suivante – Pour passer d’un
écran à l’autre, soit vers l’avant, soit vers l’arrière, dans les
guides et menus ReplayTV.
REPLAY : Reprise des 7 dernières secondes diffusées.
ADVANCE : Retour en direct – Pour passer à la diffusion
en direct.
OK : Pour effectuer des choix – Sert à choisir une option à
l’écran; affiche les chaînes offertes pendant que vous
regardez la télévision en direct.
INFO : Pour afficher de l’information sur l’émission
diffusée actuellement.
TV/VCR/DVR
En mode TV, la touche TV/VCR/DVR assure la fonction
d’échange de source d’entrée INPUT.
Lorsque vous êtes dans le mode programmé pour le
magnétoscope, la touche TV/VCR/DVR assure la fonction
d’échange d’antenne TV/VCR.
Lorsque vous êtes dans le mode programmé pour le câble,
la touche TV/VCR/DVR assure la fonction d’échange A.B.
Lorsque vous êtes dans le mode programmé pour la
télévision par satellite, la touche TV/VCR/DVR assure la
fonction d’échange TV/SAT.
Lorsque vous êtes dans le mode programmé pour le lecteur
DVD, la touche TV/VCR/DVR permet de régler le DVD.
VCR Record : Il faut appuyer deux fois sur la touche VCR
Record pour envoyer la commande IR, peu importe le mode dans
lequel vous vous trouvez.
Tivo et Replay sont des marques déposées enregistrées et
appartiennent à leurs propriétaires respectifs.
5958
Page 31

Préparation
Préparation (suite)
Installation des piles
1. À l’arrière de la télécommande, appuyez sur la
languette et enlevez le couvercle.
2. Insérez 2 piles alcalines AAA dans le boîtier, en
les alignant selon les indications + et -.
3. Remettez le couvercle en place.
Économiseur de piles
Votre télécommande s’éteint automatiquement dès qu’une touche
demeure enfoncée pendant plus de 30 secondes. Ceci vous
permettra d’économiser vos piles si jamais votre télécommande
reste coincée à un endroit où les touches demeurent enfoncées
(entre les coussins du divan par exemple).
Sauvegarde de code
Tous les paramètres programmés par l’utilisateur, sauf l’heure, le
jour, la date et les macros seront sauvegardés dans la mémoire
permanente tandis que vous changerez de piles. Ainsi, vous ne
perdrez aucun des codes enregistrés dans la télécommande en
cours de changement de piles. L’heure, le jour, la date et les
macros reviendront cependant à leurs valeurs par défaut lorsque
vous changerez vos piles.
Mise sous tension par défaut
La télécommande s’allume en mode TV.
Écran à cristaux liquides (écran ACL) : L’écran à cristaux
liquides vous permet d’afficher instantanément le mode dans
lequel se trouve la télécommande. Il comprend aussi une horloge
qui affiche l’heure et le jour, ainsi qu’une indication visuelle de la
transmission par télécommande lorsque vous appuyez sur un
bouton.
Réglage des codes
Le bouton SETUP sert à régler la télécommande. Vous pouvez
soit régler la télécommande grâce au code de marque de votre
appareil figurant aux tableaux de codes (sur une feuille séparée),
soit chercher dans la bibliothèque de codes jusqu’à ce que vous
trouviez un code qui fonctionne avec votre appareil.
Vous pouvez enregistrer tout code dans tout mode désiré (sauf le
mode TV). À savoir, vous pouvez enregistrer un code
magnétoscope sous la touche CBL, un code DVD sous la touche
VCR, etc. Cependant, seuls les codes de télévision sont
enregistrables sous la touche TV.
La touche SETUP sert à programmer la télécommande et à accéder
à toute fonction additionnelle, dont les fonctions s’effectuant par
l’entremise de la touche Shift - veuillez voir ci-dessous. Pour accéder
au mode de réglage, appuyez sur la touche SETUP et maintenez-la
enfoncée jusqu’à ce que « CODE SETUP » s’affiche. Le symbole
« SET » apparaît toujours lorsque la télécommande est en mode de
réglage. En appuyant plusieurs fois de suite sur la touche SETUP,
les options de réglage offertes apparaissent dans l’ordre suivant.
1. CODE SETUP: Appuyez sur OK ici pour programmer un
mode, par exemple : saisie de code, recherche, etc. Voir les
options de réglage de code ci-dessous.
2. SYSTEM SETUP: Appuyez sur OK ici pour régler l’heure, la
date, la commande du volume, etc.
3. TIMER SETUP: Appuyez sur OK ici pour régler tout
évènement par minuterie.
4. LEARN SETUP: Appuyez sur OK ici pour programmer un
mode avec commandes apprises.
5. MACRO SETUP: Appuyez sur OK ici pour régler des
séquences de touches macros.
6. EXIT SETUP: Appuyez sur OK ici pour quitter les routines
de réglage et retourner aux opérations ordinaires.
Appuyez sur OK pour choisir l’étape de programmation requise.
Le système quitte le mode réglage automatiquement si aucune
touche n’est appuyée pendant à peu près 15 secondes. La
mention « TIMEOUT » s’affiche.
Lorsque la télécommande est en train de traiter des routines de
réglage, la mention « Please Wait » s’affiche.
Navigation dans l’écran de réglage Veuillez vous servir des
boutons de navigation SETUP, OK, Haut, Bas, Gauche et Droite
pour naviguer dans l’écran de réglage et y effectuer des sélections.
Pour quitter les routines de réglage et retourner aux opérations
habituelles, appuyez sur la touche QUIT ou naviguez jusqu’à
l’écran EXIT SETUP et appuyez sur OK. Lorsque vous
terminez le réglage de certaines routines, la télécommande
retourne automatiquement en mode opératoire ordinaire par la
suite.
Appui et affichage par la touche Mode En appuyant et en
gardant enfoncée une touche de mode, la télécommande passe à ce
mode et affiche le mode actif ainsi que son code, par exemple,
DVD et son code programmé de 4 chiffres, qui pourrait être
0768. L’affichage revient à la normale lorsque vous relâchez le
bouton.
Affichage par la touche SETUP (au moyen de Shift) En
appuyant et en relâchant le bouton Setup, le mode actif dans
lequel se trouve la télécommande s’affiche, par exemple : DVD, et
la date, par exemple :3:26 (mois:jour). La lettre « S » s’affiche
aussi pour indiquer qu’il s’agit d’une opération secondaire au
moyen de Shift. Appuyez sur la touche Exit et relâchez-la pour
retourner à l’affichage normal. Pour vous servir de la touche
SETUP afin d’effectuer une fonction par l’entremise de Shift,
appuyez sur le bouton SETUP et relâchez-le, puis appuyez sur
la touche de fonction secondaire désirée.
6160
Page 32

Saisie de code (suite)Saisie de code
Options de réglage de code : en appuyant sur OK à l’écran
CODE SETUP, 3 options vous sont offertes pour programmer un
mode par des codes. Il s’agit de ENTER CODES, qui vous permet
de saisir un code de 4 chiffres directement de la liste imprimée de
codes, SEARCH CODES, qui vous permet de parcourir les codes
enregistrés dans la télécommande jusqu’à ce que vous trouviez le
code correspondant à votre appareil, et enfin de BRAND CODES,
qui vous permet d’explorer uniquement parmi les codes de même
marque que votre appareil enregistrés dans la télécommande jusqu’à
ce que vous trouviez le code correspondant à votre appareil.
Saisie de code directe
1. Allumez manuellement l’appareil à configurer.
2. Appuyez sur la touche SETUP et maintenez-la enfoncée
jusqu’à ce que CODE SETUP apparaisse (délai d’environ 3
secondes), puis relâchez-la.
3. Appuyez sur la touche OK et relâchez-la. ENTER CODES
s’affiche.
4. Appuyez sur la touche OK et relâchez-la. MODE KEY?
s’affiche.
5. Appuyez sur la touche de mode désirée (TV, VCR, etc.) et
relâchez-la. Le mode s’affiche avec son code actuellement
programmé.
6. Saisissez le code à 4 chiffres tiré des tableaux de codes (sur
feuille séparée). Après la saisie du 4e chiffre, SUCCESS
s’affiche et la télécommande retourne à la normale.
Si vous saisissez un code non valide, CODE ERROR s’affiche et
la télécommande retourne à la normale.
7. Une fois l’appareil allumé, appuyez sur CHANNEL +. Si
l’appareil réagit, sa programmation est complète. Remarque :
si votre appareil ne réagit pas à certaines touches, essayez un
des autres codes correspondant à la marque de votre appareil.
Recherche de code
7. Au moyen des touches Haut / Bas, choisissez le type
d’appareil à programmer (TV, magnétoscope, DVD, etc.).
Remarque : seul un téléviseur peut être configuré en mode TV.
8. Appuyez sur la touche OK et relâchez-la pour confirmer
votre sélection. SEARCH KEY? s’affiche.
9. Appuyez sur la touche Channel + (ou sur POWER ou PLAY
pour les magnétoscopes / lecteurs DVD) plusieurs fois
(jusqu’à 300 fois), jusqu’à ce que l’appareil à configurer
change de chaîne, s’éteigne ou réagisse en conséquence.
Pendant le processus de recherche, SEARCHING s’affiche
(ainsi que l’appareil choisi). Si le code requis est sauté
accidentellement, appuyez sur la touche Channel Down pour
retourner en arrière dans la bibliothèque. Appuyez sur
Channel + (ou bien sur Power ou Play) pour changer de
nouveau de direction et parcourir les chiffres en ordre
croissant.
10. Appuyez sur la touche OK et relâchez-la pour mémoriser le
code. SUCCESS s’affiche et la télécommande retourne à la
normale.
Remarques :
1. Si l’appareil n’a pas de touche CHANNEL +, appuyez sur
PLAY (pour un magnétoscope ou un lecteur DVD) ou bien sur
POWER à la place.
2. La recherche de code commence à partir du numéro à 4
chiffres actuellement enregistré sous ce mode.
3. Lorsque tous les codes ont été recherchés, SEARCH END
s’affiche et la télécommande retourne à la normale.
Recherche de code selon la marque
La recherche de code selon la marque vous permet de chercher, au
sein de la bibliothèque de codes, un code spécifique à une marque
/ un fabricant en particulier.
Si votre appareil ne réagit toujours pas après que vous avez
essayé tous les codes correspondant à sa marque ou si votre
marque ne figure pas sur la liste, essayez de trouver votre code en
parcourant les étapes suivantes.
1. Allumez manuellement l’appareil (téléviseur,
magnétoscope, etc.) à configurer.
2. Appuyez sur la touche SETUP et maintenez-la enfoncée
jusqu’à ce que CODE SETUP apparaisse (délai d’environ 3
secondes), puis relâchez-la.
3. Appuyez sur la touche OK et relâchez-la. ENTER CODES
s’affiche.
4. Maintenez le bouton de navigation enfoncé jusqu’à ce que
SEARCH CODES s’affiche.
5. Appuyez sur la touche OK et relâchez-la. MODE KEY
s’affiche.
6. Appuyez sur la touche de mode désirée (TV, VCR, etc.) et
relâchez-la. DEVICE? TV s’affiche.
1. Allumez manuellement l’appareil (téléviseur, magnétoscope,
etc.) à configurer.
2. Appuyez sur la touche SETUP et maintenez-la enfoncée
jusqu’à ce que CODE SETUP apparaisse (délai d’environ 3
secondes), puis relâchez-la.
3. Appuyez sur la touche OK et relâchez-la. ENTER CODES
s’affiche.
4. Maintenez le bouton de navigation enfoncé jusqu’à ce que
BRAND CODES s’affiche.
5. Appuyez sur la touche OK et relâchez-la. MODE KEY?
s’affiche.
6. Appuyez sur la touche de mode désirée (TV, VCR, etc.) et
relâchez-la. DEVICE? TV s’affiche.
7. Au moyen des touches Haut / Bas, choisissez le type
d’appareil à programmer (TV, magnétoscope, DVD, etc.).
Remarque : seul un téléviseur peut être configuré en mode TV.
8. Appuyez sur la touche OK et relâchez-la pour confirmer
votre sélection. BRAND KEY? s’affiche.
9. Appuyez sur la touche numérique (de 1 à 8) correspondant
au fabricant désiré et relâchez-la. (Voir la liste de codes dans le
tableau de la feuille jointe.) SEARCH KEY s’affiche.
6362
Page 33

Code Identification Feature
Préparation (suite)
10. Appuyez sur la touche Channel + (ou sur POWER ou PLAY
pour les magnétoscopes / lecteurs DVD) plusieurs fois,
jusqu’à ce que l’appareil à configurer change de chaîne,
s’éteigne ou réagisse en conséquence. Pendant le processus
de recherche, SEARCHING s’affiche (ainsi que l’appareil
choisi).
Si le code requis est sauté accidentellement, appuyez sur la
touche Channel Down pour retourner en arrière dans la
bibliothèque. Appuyez sur Channel + (ou bien sur Power ou
Play) pour changer de nouveau de direction et parcourir les
chiffres en ordre croissant.
11. Appuyez sur la touche OK et relâchez-la pour mémoriser le
code. SUCCESS s’affiche et la télécommande retourne à la
normale.
Identification de code
Appuyez sur la touche de mode respective en mode opérationnel
normal et maintenez-la enfoncée afin d’afficher le code
programmé pour ce mode, par exemple : DVD, code 0768.
Programmation des codes des appareils combinés
Certains appareils combinés (par exemple TV/magnétoscope, TV/
DVD, DVD/magnétoscope, etc.) exigent le réglage de deux
touches de mode différentes pour qu’il soit possible de commander les deux parties de l’appareil combiné. Si, par exemple,
vous avez un appareil combiné TV/DVD, il peut être nécessaire
de configurer un code sous la touche TV pour commander la
partie TV, et un autre code (sous n’importe quelle autre touche de
mode) pour commander la partie DVD.
Commande des appareils combinés
Certains appareils combinés (par exemple, TV/magnétoscope,
TV/DVD, DVD/magnétoscope, etc.) ont des touches différentes
sur la télécommande d’origine permettant de choisir la partie de
l’appareil combiné à commander. Par exemple, si votre appareil
combiné est un lecteur DVD / magnétoscope, il se peut que sa
télécommande d’origine ait des touches séparées permettant de
sélectionner soit la partie DVD, soit la partie magnétoscope. Vous
pouvez trouver les touches de fonction équivalentes sur votre
télécommande Philips en ayant recours aux touches Device Mode
(mode de l’appareil) et SETUP (réglage).
En vous référant à la partie « Recherche de code » de la page 62,
programmez un mode d’appareil (DVD, par exemple) avec le
code correspondant à votre appareil combiné. Prenons l’exemple
d’un appareil combiné lecteur DVD / magnétoscope dont le code
est programmé sous le mode DVD : appuyez sur la touche de
mode DVD et maintenez-la enfoncée pendant plus d’une seconde
pour transmettre la commande DVD. Pour transmettre la
commande VCR (magnétoscope), appuyez rapidement sur la
touche SETUP et relâchez-la, puis appuyez sur la touche de
mode DVD et relâchez-la. Cette méthode peut être appliquée de
manière similaire à tous les appareils combinés (par exemple, TV/
magnétoscope, TV/lecteur DVD, lecteur DVD/magnétoscope,
etc.). Elle est d’ailleurs applicable sous tous les modes. Veuillez
noter que cette option ne fonctionne pas sous tous les codes.
Options de réglage système
En appuyant sur OK à l’écran SYSTEM SETUP, vous accéderez
aux options de réglage système pour la commande du volume et du
perçage, la programmation de l’heure, de la date, du rétroéclairage et
de la réinitialisation système.
Commande du volume / de la sourdine et fonction de
perçage
Cette télécommande vous permet de choisir le mode d’appareil
sous lequel commander les touches Volume/Mute (volume/
sourdine). Par défaut, la télécommande est initialement
programmée pour que tous les modes d’appareil programmés
sous un code « visuel » (à savoir TV, VCR, DVD, DVR, SAT et
CÂBLE) et ceux sous un code « audio » (à savoir CD et AUDIO)
utilisent leur propre commande de volume/sourdine, si cette
dernière est présente. Si un code « visuel » programmé n’a pas sa
propre commande de volume/sourdine, les touches concernées
pénétreront dans le mode TV sans passer au mode TV.*
Réglage GLOBAL des commandes volume/sourdine sous
un seul mode (ALL VOL. SET)
Cette routine permet de régler tous les modes de façon à ce qu’ils
percent à travers le mode actuel pour passer au mode qui
commande le volume / la sourdine, sans avoir à passer à ce mode
en tant que tel.
1. Appuyez sur la touche SETUP et maintenez-la enfoncée
jusqu’à ce que CODE SETUP apparaisse (délai d’environ 3
secondes), puis relâchez-la.
2. Maintenez le bouton de navigation enfoncé jusqu’à ce que
SYSTEM SETUP s’affiche.
3. Appuyez sur la touche OK et relâchez-la. VOL/MUTE
SETUP s’affiche.
4. Appuyez sur la touche OK et relâchez-la. ALL VOL. SET
s’affiche.
5. Appuyez sur la touche OK et relâchez-la. ALL VOL.
MODE? s’affiche.
6. Appuyez sur la touche du mode sous lequel vous aimeriez
commander le volume / la sourdine (TV, VCR, DVD, etc.),
puis relâchez-la. Le message « Please Wait » s’affiche
rapidement, suivi de la mention SUCCESS, puis la
télécommande retourne à la normale.
Dorénavant, tous les modes perceront à travers le mode actuel pour
passer au mode choisi lorsqu’il s’agira de commander le volume / la
sourdine. Si le mode choisi n’est pas doté de sa propre fonctionnalité
de commande volume/sourdine, « Volume Error » s’affiche et la
télécommande retourne à la normale.
6564
Page 34

Préparation (suite) Préparation (suite)
Réglage INDIVIDUEL de la commande volume/sourdine
sous tout mode (MODE VOL. SET)
Ce réglage permet de programmer tout mode de manière à ce
qu’il ait uniquement recours à sa propre commande volume/
sourdine, c’est-à-dire que la fonction de perçage volume/sourdine
sera désactivée sous ce mode. Remarque : si le mode choisi n’est
pas doté de sa propre fonctionnalité volume/sourdine, les
touches volume/sourdine ne réagiront pas.
1. Appuyez sur la touche SETUP et maintenez-la enfoncée
jusqu’à ce que CODE SETUP apparaisse (délai d’environ 3
secondes), puis relâchez-la.
2. Maintenez le bouton de navigation enfoncé jusqu’à ce que
SYSTEM SETUP s’affiche.
3. Appuyez sur la touche OK et relâchez-la. VOL/MUTE
SETUP s’affiche.
4. Appuyez sur la touche OK et relâchez-la. ALL VOL. SET
s’affiche.
5. Maintenez le bouton de navigation enfoncé jusqu’à ce que
MODE VOL. SET s’affiche.
6. Appuyez sur la touche OK et relâchez-la. MODE VOL.
SET? s’affiche.
7. Appuyez sur la touche OK et relâchez-la. MODE VOL.
MODE? s’affiche.
8. Appuyez sur la touche du mode pour lequel vous aimeriez
désactiver la fonction de perçage volume/sourdine (TV, VCR,
DVD, etc.), puis relâchez-la. PLEASE WAIT s’affiche
rapidement, suivi de la mention SUCCESS, puis la
télécommande retourne à la normale.
Dorénavant, le mode choisi aura recours à sa propre commande
volume/sourdine.
Réinitialisation de la commande volume/sourdine à son
état initial (VOL/MUTE RESET)
Ce réglage permet de remettre la commande volume/sourdine à
son état initial.
1. Appuyez sur la touche SETUP et maintenez-la enfoncée
jusqu’à ce que CODE SETUP apparaisse (délai d’environ 3
secondes), puis relâchez-la.
2. Maintenez le bouton de navigation enfoncé jusqu’à ce que
SYSTEM SETUP s’affiche.
3. Appuyez sur la touche OK et relâchez-la. VOL/MUTE
SETUP s’affiche.
4. Appuyez sur la touche OK et relâchez-la. ALL VOL. SET
s’affiche.
5. Maintenez le bouton de navigation enfoncé jusqu’à ce que
VOL/MUTE RESET s’affiche.
6. Appuyez sur la touche OK et relâchez-la. CONFIRM
RESET s’affiche.
7. Appuyez sur la touche OK et relâchez-la. PLEASE WAIT
s’affiche rapidement, suivi de la mention SUCCESS, puis la
télécommande retourne à la normale.
La commande volume/sourdine est désormais de retour à son état
d’origine.
Réglage de l’heure (TIME SETUP)
Cette procédure permet de fixer l’heure qui s’affichera à l’écran à
cristaux liquides.
1. Appuyez sur la touche SETUP et maintenez-la enfoncée
jusqu’à ce que CODE SETUP apparaisse (délai d’environ 3
secondes), puis relâchez-la.
2. Maintenez le bouton de navigation enfoncé jusqu’à ce que
SYSTEM SETUP s’affiche.
3. Appuyez sur la touche OK et relâchez-la. VOL/MUTE
SETUP s’affiche.
4. Maintenez le bouton de navigation enfoncé jusqu’à ce que
TIME SETUP s’affiche.
5. Appuyez sur la touche OK et relâchez-la. TIME? s’affiche
dans le format actuel (cycle de 12 ou de 24 heures) en
clignotant, ainsi que l’heure actuelle.
6. Réglez le format (cycle de 12 ou de 24 heures) grâce aux boutons
de navigation Haut/Bas, puis appuyez sur la touche OK et
relâchez-la.
7. La zone « heures » clignote. Réglez la zone « heures » grâce aux
boutons de navigation Haut/Bas, puis appuyez sur la touche
OK et relâchez-la.
8. La zone « minutes » clignote. Réglez la zone « minutes » grâce
aux boutons de navigation Haut/Bas, puis appuyez sur la touche OK et relâchez-la.
9. SUCCESS s’affiche. La télécommande demeure en mode réglage;
elle retourne à l’écran CODE SETUP. Appuyez sur QUIT, puis
sur OK pour quitter le mode réglage.
Réglage de la date (DATE SETUP)
Cette procédure permet de fixer le mois, la date et le jour.
1. Appuyez sur la touche SETUP et maintenez-la enfoncée jusqu’à
ce que CODE SETUP apparaisse (délai d’environ 3 secondes),
puis relâchez-la.
2. Maintenez le bouton de navigation enfoncé jusqu’à ce que SYSTEM SETUP s’affiche.
3. Appuyez sur la touche OK et relâchez-la.
4. Maintenez le bouton de navigation enfoncé jusqu’à ce que
DATE SETUP s’affiche.
5. Appuyez sur la touche OK et relâchez-la. YEAR? s’affiche
tandis que les 2 derniers chiffres de l’année clignotent.
6. Réglez l’année grâce aux boutons de navigation Haut/Bas, puis
appuyez sur la touche OK et relâchez-la.
7. MONTH? s’affiche tandis que les chiffres représentant le mois
clignotent. Réglez le mois grâce aux boutons de navigation Haut/
Bas, puis appuyez sur la touche OK et relâchez-la.
8. DATE? s’affiche tandis que la date clignote. Réglez la date
grâce aux boutons de navigation Haut/Bas, puis appuyez sur la
touche OK et relâchez-la.
9. DAY? s’affiche tandis que le jour de la semaine clignote. Réglez le
jour de la semaine grâce aux boutons de navigation Haut/Bas, puis
appuyez sur la touche OK et relâchez-la.
10. SUCCESS s’affiche et la télécommande demeure en mode réglage;
elle retourne à l’écran CODE SETUP. Appuyez sur QUIT, puis
sur OK pour quitter le mode réglage.
6766
Page 35

Préparation (suite) Préparation (suite)
Réglage de la durée du rétroéclairage (BACKLIGHT
SETUP)
Cette procédure permet de régler la durée pendant laquelle
le rétroéclairage demeure allumé lorsque vous arrêtez
d’appuyer sur des boutons. La touche Backlight permet
d’allumer et d’éteindre le rétroéclairage.
1. Appuyez sur la touche SETUP et maintenez-la enfoncée
jusqu’à ce que CODE SETUP apparaisse (délai d’environ
3 secondes), puis relâchez-la.
2. Maintenez le bouton de navigation enfoncé jusqu’à ce
que SYSTEM SETUP s’affiche. Appuyez sur la touche
OK et relâchez-la.
3. Maintenez le bouton de navigation enfoncé jusqu’à ce
que BACKLIGHT SETUP s’affiche. Appuyez sur la touche OK et relâchez-la.
4. BACKLIGHT TIME? s’affiche et la durée actuelle du
rétroéclairage clignote. Grâce aux boutons de navigation
Haut/Bas, réglez la durée de fonctionnement du
rétroéclairage par segments de 5 secondes, jusqu’à concurrence de 60 secondes. La durée d’allumage du
rétroéclairage par défaut est de 10 secondes. Pour
désactiver le rétroéclairage, fixez la durée à « 00 » (zéro).
Appuyez sur la touche OK et relâchez-la.
5. SUCCESS s’affiche et la télécommande demeure en mode
réglage; elle retourne à l’écran CODE SETUP. Appuyez
sur QUIT, puis sur OK pour quitter le mode réglage.
Réinitialisation de la télécommande à écran à cristaux
liquides à son état initial (SYSTEM RESET)
Ce réglage permet de réinitialiser la télécommande à son
état initial par défaut. Tous les paramètres configurés par
l’utilisateur, dont les codes programmés, les commandes
apprises, les macros, etc., sont ainsi supprimés et remis
dans leur état initial.
1. Appuyez sur la touche SETUP et maintenez-la enfoncée
jusqu’à ce que CODE SETUP apparaisse (délai d’environ
3 secondes), puis relâchez-la.
2. Maintenez le bouton de navigation enfoncé jusqu’à ce
que SYSTEM SETUP s’affiche. Appuyez sur la touche
OK et relâchez-la.
3. Maintenez le bouton de navigation enfoncé jusqu’à ce
que SYSTEM RESET s’affiche. Appuyez sur la touche
OK et relâchez-la.
4. CONFIRM RESET s’affiche.Appuyez sur la touche OK et
relâchez-la.
5. PLEASE WAIT (veuillez attendre) s’affiche pendant la
réinitialisation de tous les paramètres, puis la
télécommande quitte le mode réglage et retourne à la
normale.
Réglage du minuteur
C’est en appuyant sur OK sous TIMER SETUP qu’on accède
aux options de minuteur offertes. Il s’agit d’un minuteur de veille
et de 4 autres minuteurs qui peuvent déclencher une séquence
d’un maximum de 3 commandes clés à un moment réglé
préalablement.
Réglage et annulation du minuteur de veille TV (TV Sleep
Setup)
Il est possible de programmer un minuteur de veille TV au moyen
de la télécommande. À la fin de la durée de fonctionnement réglée
préalablement, la télécommande envoie la commande de mise hors
tension à l’appareil configuré sous le mode TV. Le minuteur de
veille TV peut être programmé pour une durée allant de 1 à 90
minutes. Le symbole « Zzz » s’affiche lorsque le minuteur de
veille TV est programmé.
Pour régler un minuteur de veille TV (lorsque « Zzz »
n’apparaît pas à l’écran normal)
1. Allumez l’appareil programmé sous le mode TV.
2. Appuyez sur la touche SETUP et maintenez-la enfoncée jusqu’à
ce que CODE SETUP apparaisse (délai d’environ 3 secondes),
puis relâchez-la.
3. Maintenez le bouton de navigation enfoncé jusqu’à ce que
TIMER SETUP s’affiche. Appuyez sur la touche OK et
relâchez-la.
4. TV SLEEP SETUP s’affiche. Appuyez sur la touche OK et
relâchez-la.
5. TV SLEEP SET s’affiche. Appuyez sur la touche OK et
relâchez-la.
6. TV SLEEP TIME? s’affiche et la zone « minutes » clignote.
Réglez la zone « minutes » grâce aux boutons de navigation
Haut/Bas, puis appuyez sur la touche OK et relâchez-la.
7. SUCCESS s’affiche et la télécommande demeure en mode réglage;
elle retourne à l’écran CODE SETUP. Appuyez sur QUIT, puis
sur OK pour quitter le mode réglage.
Comment annuler un minuteur de veille TV (lorsque « Zzz »
apparaît à l’écran normal)
1. Appuyez sur la touche SETUP et maintenez-la enfoncée jusqu’à
ce que CODE SETUP apparaisse (délai d’environ 3 secondes),
puis relâchez-la.
2. Maintenez le bouton de navigation enfoncé jusqu’à ce que
TIMER SETUP s’affiche. Appuyez sur la touche OK et
relâchez-la.
3. TV SLEEP SETUP s’affiche. Appuyez sur la touche OK et
relâchez-la.
4. TV SLEEP CLEAR s’affiche. Appuyez sur la touche OK et
relâchez-la.
5. CONFIRM CLEAR s’affiche. Appuyez sur la touche OK et
relâchez-la.
6. SUCCESS s’affiche et la télécommande demeure en mode réglage;
elle retourne à l’écran CODE SETUP. Appuyez sur QUIT,
puis sur OK pour quitter le mode réglage.
6968
Page 36

Préparation (suite) Préparation (suite)
Réglage et annulation des minuteurs (TIMER SETUP)
Vous pouvez programmer jusqu’à 4 minuteurs dans la
télécommande (minuteurs 1, 2, 3 et 4). Chaque minuteur
peut se voir assigner jusqu’à 4 touches (4 touches si les
macros sont activées, 2 touches si les macros sont
désactivées) qui seront déclenchées à un moment
prédéterminé. La première touche doit toujours être une
touche de mode. Les touches subséquentes ne peuvent
comprendre aucune des touches suivantes : Haut, Bas,
Gauche, Droite, OK, Exit (sortie), Macro, Setup (réglage) ou
tout bouton de mode. Les minuteurs ne peuvent être
déclenchés que dans les 24 heures suivant leur
programmation. Les minuteurs sont automatiquement
supprimés après leur lancement. Le symbole « Timer Bell »
(sonnette de minuteur) s’affiche dès que vous programmez
tout minuteur.
Comment régler un minuteur (veuillez noter que le minuteur
doit d’abord être annulé s’il avait déjà été réglé - voir « Comment annuler un minuteur » ci-dessous)
1. Appuyez sur la touche SETUP et maintenez-la enfoncée
jusqu’à ce que CODE SETUP apparaisse (délai d’environ
3 secondes), puis relâchez-la.
2. Maintenez le bouton de navigation enfoncé jusqu’à ce
que TIMER SETUP s’affiche.
3. Appuyez sur la touche OK et relâchez-la. TV SLEEP
SETUP s’affiche.
4. Appuyez sur la touche de navigation jusqu’à ce que
TIMER X SETUP (réglage du minuteur x) s’affiche (« X »
étant 1, 2, 3 ou 4). Appuyez sur la touche OK et relâchezla.
5. TIMER X SET (minuteur x réglé) s’affiche.Appuyez sur la
touche OK et relâchez-la.
6. TIMER X TIME? (heure du minuteur x?) s’affiche et la
zone des « heures » clignote. Réglez la zone « heures »
grâce aux boutons de navigation Haut/Bas, puis appuyez
sur la touche OK et relâchez-la.
7. La zone « minutes » clignote. Réglez la zone « minutes »
grâce aux boutons de navigation Haut/Bas, puis appuyez
sur la touche OK et relâchez-la.
8. TIMER X MODE? (mode du minuteur x?) s’affiche.
Appuyez sur la touche de mode désirée (TV, VCR, DVD,
etc.) et relâchez-la.
9. TIMER X Key1? (touche 1 du minuteur x?) s’affiche.
Appuyez sur la première touche requise et relâchez-la. Si
seule une touche est requise, appuyez sur la touche OK à
présent et relâchez-la, puis passez à l’étape 12 ci-dessous.
Si les macros sont désactivées, passez à l’étape l cidessous.
10. Timer X Key2? (touche 2 du minuteur x?) s’affiche.
Appuyez sur la deuxième touche requise et relâchez-la. Si
seules deux touches sont requises, appuyez sur la touche
OK à présent et relâchez-la, puis passez à l’étape 12 cidessous.
11. TIMER X Key3? (touche 3 du minuteur x?) s’affiche.
Appuyez sur la troisième touche requise et relâchez-la.
12. SUCCESS s’affiche et la télécommande demeure en mode
réglage; elle retourne à l’écran CODE SETUP. Appuyez
sur QUIT, puis sur OK pour quitter le mode réglage.
Pour annuler un minuteur (lorsque le symbole « Timer Bell
» (sonnette de minuteur) apparaît à l’écran normal)
1. Appuyez sur la touche SETUP et maintenez-la enfoncée
jusqu’à ce que CODE SETUP apparaisse (délai d’environ
3 secondes), puis relâchez-la.
2. Maintenez le bouton de navigation enfoncé jusqu’à ce
que TIMER SETUP s’affiche.
3. Appuyez sur la touche OK et relâchez-la. TV SLEEP
SETUP s’affiche.
4. Appuyez sur la touche de navigation jusqu’à ce que la
mention TIMER X SETUP (réglage du minuteur x) s’affiche
pour le minuteur que vous désirez annuler (« x » étant 1, 2,
3 ou 4). Appuyez sur la touche OK et relâchez-la.
5. TIMER X CLEAR (minuteur x annulé) s’affiche.Appuyez
sur la touche OK et relâchez-la.
6. CONFIRM CLEAR s’affiche. Appuyez sur la touche OK
et relâchez-la.
7. SUCCESS s’affiche et la télécommande demeure en mode
réglage; elle retourne à l’écran CODE SETUP. Appuyez
sur QUIT, puis sur OK pour quitter le mode réglage.
7170
Page 37

Apprentissage des codes
Conseils sur l’apprentissage (suite)
Conseils sur l’apprentissage
Chaque touche de mode ne peut apprendre que les codes
propres à un type d’appareil, c.-à-d. que seuls des codes
TV peuvent être appris sous le mode TV et que seuls des
codes de magnétoscope peuvent être appris sous le mode
VCR (magnétoscope), etc. Si vous essayez d’apprendre les
codes d’une télécommande « universelle », il se peut que
cette dernière ait enregistré plus d’un type de code par
mode. Essayez d’apprendre les codes d’une autre
télécommande pour voir s’il y a un problème avec le type
ou la marque de télécommande de laquelle vous essayez
d’apprendre les codes.
a. Il se peut que l’apprentissage de certaines fonctions
provenant de certains types of télécommandes soit
impossible.
b. Aucune fonction ne peut être enregistrée sous la
touche SETUP ou MACRO.
c. Chaque mode individuel ne peut apprendre qu’un seul
type d’appareil d’origine.
d. Utilisez des piles neuves tant dans la télécommande qui
fait l’apprentissage que dans la télécommande
d’origine.
e. Ne tentez pas d’effectuer l’apprentissage des codes
directement sous une lumière incandescente ou à faible
consommation d’énergie, car ces dernières peuvent
causer des interférences avec les transmissions IR.
Restez à au moins un mètre de distance de toute lumière
de ce genre.
f. Effectuez une réinitialisation complète (voir page 75)
avant l’apprentissage, puis commencez par essayer
d’apprendre 2 ou 3 commandes, pour commencer. Par la
suite, refaites une réinitialisation complète avant
d’effectuer l’apprentissage exhaustif de votre
télécommande originale.
g. Effectuez une réinitialisation du mode avant de passer à
l’apprentissage des commandes pour ce dernier, afin de
vous assurer qu’il n’y a pas déjà des commandes
enregistrées au préalable sous ce mode.
h. Placez la télécommande d’origine directement derrière la
télécommande qui fait l’apprentissage, de façon que les
transmetteurs IR des deux télécommandes soient
directement alignés. À cette fin, il se peut que vous
ayez à ajuster la hauteur d’une des télécommandes.
i. Laissez un espace d’environ 3 cm entre les deux
télécommandes et conservez la même distance sans
déplacer les télécommandes pendant l’apprentissage de
toutes les touches nécessaires pour le mode concerné.
j. Évitez d’apprendre les touches volume/sourdine de
votre télécommande originale à moins d’être certain que
ces dernières commandent le même appareil. Par
exemple, certaines télécommandes originales pour
lecteur DVD comprennent des touches volume/sourdine
pour le téléviseur, c’est-à-dire qu’il s’agit de deux types
de code différents.
k. Évitez d’apprendre les touches magnétoscope de votre
télécommande originale à moins d’être certain que ces
dernières commandent le même appareil. Par exemple,
certaines télécommandes originales pour téléviseur
comprennent des touches magnétoscope, c’est-à-dire
qu’il s’agit de deux types de code différents.
l. L’apprentissage d’une touche peut prendre jusqu’à 3
secondes. Ne relâchez pas la touche à apprendre à moins
que SUCCESS ou LEARN ERROR s’affiche à l’écran.
m. Si l’apprentissage de la première ou de la deuxième
touche entraîne sans cesse des erreurs, essayez ce qui
suit :
i. Quittez la session d’apprentissage en appuyant sur la
touche QUIT.
ii. Annulez les commandes apprises pour ce mode.
iii. Assurez-vous que les transmetteurs IR sont bien
alignés entre les deux télécommandes.
iv. Rapprochez (1 cm, par exemple) ou éloignez (5 cm, par
exemple) les deux télécommandes.
v. Réessayez d’apprendre la télécommande originale pour
ce mode.
Si le problème persiste avec la même touche, faites l’essai
de cette touche sur la télécommande d’origine : transmetelle la commande en question? Réussit-elle à commander
l’appareil visé? Essayez d’apprendre cette touche sous un
mode réinitialisé différent. Si elle s’apprend à ce momentlà, il s’agit sûrement d’un code de type différent des autres
qui ne peut être appris sous le même mode.
Remarques sur l’apprentissage
1. Il n’est pas possible d’apprendre sous la touche Setup ou
Macro.
2. Toutes les commandes apprises pour un mode sont
supprimées si une nouvelle saisie de code à 4 chiffres est
effectuée pour ce mode (y compris la saisie de code directe,
la recherche de code et les saisies de recherche de marque).
3. Le rétroéclairage s’éteint lors de l’apprentissage.
7372
Page 38

Apprentissage des commandes
Suppression des commandes
1. Appuyez sur la touche SETUP et maintenez-la enfoncée
jusqu’à ce que CODE SETUP apparaisse (délai d’environ
3 secondes), puis relâchez-la.
2. Maintenez le bouton de navigation enfoncé jusqu’à ce
que LEARN SETUP s’affiche. Appuyez sur la touche OK
et relâchez-la.
3. MODE LEARN s’affiche.Appuyez sur la touche OK et
relâchez-la.
4. MODE KEY? s’affiche. Appuyez sur la touche de mode
désirée (TV, VCR, DVD, etc.) et relâchez-la.
5. LEARN KEY? s’affiche. Appuyez sur la touche de
télécommande à apprendre avec le code de télécommande
original, puis relâchez-la.
6. LEARNING s’affiche. Appuyez sur la touche de la
télécommande originale et maintenez-la enfoncée jusqu’à
ce que SUCCESS ou LEARN ERROR s’affiche (voir «
Conseils sur l’apprentissage », page 72) suivi de la mention LEARN MORE? (Ce processus peut prendre jusqu’à
2 ou 3 secondes.) Relâchez la touche sur la télécommande
originale.
7. LEARN MORE? s’affiche toujours. Pour apprendre
d’autres touches, appuyez sur la touche OK et relâchezla, puis reprenez à partir de l’étape 5. Pour quitter à ce
stade-ci, appuyez sur la touche QUIT et relâchez-la.
8. PLEASE WAIT s’affiche, la télécommande quitte la mode
réglage et retourne à la normale.
Comment supprimer toutes les commandes
apprises sous un mode
La suppression de commandes apprises s’avère pratique
lorsque vous remplacez votre lecteur de CD par un
nouveau modèle, par exemple. Si vous aviez appris une
fonction de la télécommande originale de votre ancien
lecteur CD sur cette télécommande (par exemple, RANDOM PLAY (lecture aléatoire)), cette fonction ne
fonctionnerait plus sur votre nouveau lecteur de CD. Si
jamais vous désirez supprimer ou annuler une ou
plusieurs commandes « apprises », suivez les étapes cidessous :
1. Appuyez sur la touche SETUP et maintenez-la enfoncée
jusqu’à ce que CODE SETUP apparaisse (délai d’environ
3 secondes), puis relâchez-la.
2. Maintenez le bouton de navigation enfoncé jusqu’à ce
que LEARN SETUP s’affiche. Appuyez sur la touche
OK et relâchez-la. MODE LEARN s’affiche.
3. Maintenez le bouton de navigation enfoncé jusqu’à ce
que MODE CLEAR s’affiche. Appuyez sur la touche OK
et relâchez-la.
4. MODE KEY? s’affiche. Appuyez sur la touche de mode
désirée (TV, VCR, DVD, etc.) et relâchez-la.
5. CONFIRM CLEAR s’affiche. Appuyez sur la touche OK
et relâchez-la.
6. PLEASE WAIT s’affiche, la télécommande quitte la mode
réglage et retourne à la normale.
Disposez vos télécommandes (celles que vous désirez apprendre)
devant la télécommande effectuant l’apprentissage sur une surface
dure, approximativement à 3 cm de distance les unes des autres.
Réinitialisation complète – Comment
supprimer toutes les commandes apprises, tous
modes confondus (démarche recommandée
lorsque vous apprenez pour la première fois)
1. Appuyez sur la touche SETUP et maintenez-la enfoncée
jusqu’à ce que CODE SETUP apparaisse (délai d’environ
3 secondes), puis relâchez-la.
2. Maintenez le bouton de navigation enfoncé jusqu’à ce
que LEARN SETUP s’affiche. Appuyez sur la touche
OK et relâchez-la. MODE LEARN s’affiche.
3. Maintenez le bouton de navigation enfoncé jusqu’à ce
que ALL LEARN CLEAR s’affiche. Appuyez sur la touche OK et relâchez-la.
4. CONFIRM CLEAR s’affiche Appuyez sur la touche OK
et relâchez-la.
5. PLEASE WAIT s’affiche, la télécommande quitte la
mode réglage et retourne à la normale.
7574
Page 39

Macros (suite)Macros
La touche MACRO, conjointement avec les touches
numériques de 1 à 8, vous permet de programmer et
d’enregistrer jusqu’à 8 séquences de commandes IR
(boutons à appuyer) au choix. En appuyant sur une touche
Macro, la séquence correspondante de commandes IR est
envoyée. Toute séquence de commandes que vous
effectuez régulièrement peut être réduite à deux seules
touches à appuyer (touche MACRO suivie d’une touche
numérique de 1 à 8). Par exemple, vous pourriez appuyer
sur la touche MACRO et sur une autre touche pour allumer
votre téléviseur, allumer votre boîte de câble, choisir votre
chaîne préférée, allumer votre magnétoscope et le faire
enregistrer, etc. Jusqu’à 20 touches à appuyer peuvent être
sauvegardées sous chacune des 8 touches Macro.
Comment régler une macro
1. Appuyez sur la touche SETUP et maintenez-la enfoncée
jusqu’à ce que CODE SETUP apparaisse (délai d’environ
3 secondes), puis relâchez-la.
2. Maintenez le bouton de navigation enfoncé jusqu’à ce
que MACRO SETUP s’affiche. Appuyez sur la touche
OK et relâchez-la.
3. MACRO SET s’affiche.Appuyez sur la touche OK et
relâchez-la.
4. MACRO KEY? s’affiche. Appuyez sur la touche numérique
de 1 à 8 sous laquelle vous aimeriez enregistrer la macro,
puis relâchez-la.
5. MACRO X MODE? (mode de la macro x?) s’affiche (X
étant 1, 2, 3, 4, 5, 6, 7 ou 8). Appuyez sur la touche de
mode désirée (TV, VCR, DVD, etc.) et relâchez-la. La
première touche d’une séquence macro doit toujours être
une touche de mode.
6. MACRO X KEY? (touche de la macro x?) s’affiche, ainsi
que le nombre de touches (02, initialement). Appuyez sur
les touches que vous aimeriez inclure dans la macro, puis
relâchez-les, dans l’ordre exact (maximum de 20 touches).
7. Pour enregistrer la macro n’importe quand, appuyez sur la
touche Macro et relâchez-la. Veuillez noter que la macro
sera enregistrée automatiquement rendue à la 20e touche.
8. SUCCESS s’affiche, la télécommande quitte la mode
réglage et retourne à la normale.
Touche
Macro
Pour lancer une macro en cours d’opération normale de la
télécommande, il suffit d’appuyer sur la touche MACRO et
de la relâcher, suivie (dans les 20 prochaines secondes) de
la touche numérique de 1 à 8 correspondante. MACRO X
s’affiche pendant le lancement de la séquence macro, puis
la télécommande retourne à la normale. Si aucune macro
n’est enregistrée sous la touche numérique choisie,
MACRO X VOID (macro x nulle) s’affiche, puis la
télécommande retourne à la normale.
Remarques sur les macros
1. Vous pouvez ajouter un « décalage » à toute séquence
macro (pour permettre à votre téléviseur de s’échauffer,
par exemple). Un décalage peut être ajouté au moyen de
la touche PAUSE suivie du nombre de secondes de
décalage requis. Par exemple, pour saisir un décalage de
3 secondes, appuyez sur la touche PAUSE et relâchez-
là, puis appuyez sur 3 (voir étape 6 du réglage de
macros sur la page précédente). Le décalage maximal
est de 9 secondes. Il n’est pas possible de saisir la
touche numérique « 0 » après la touche Pause, c.-à-d.
qu’il n’existe pas de décalage de zéro seconde.
2. Un décalage d’une demi-seconde est automatiquement
inséré entre chaque transmission IR dans une séquence
macro.
3. * La première touche d’une séquence macro DOIT être
une touche de mode (TV, VCR, etc.).
4. Les touches Setup et Macro ne peuvent pas être
incluses dans une macro.
5. Appuyez sur la touche SETUP pour quitter le réglage
des macros.
Comment supprimer une macro
1. Appuyez sur la touche SETUP et maintenez-la enfoncée
jusqu’à ce que CODE SETUP apparaisse (délai d’environ
3 secondes), puis relâchez-la.
2. Maintenez le bouton de navigation enfoncé jusqu’à ce
que MACRO SETUP s’affiche. Appuyez sur la touche
OK et relâchez-la.
3. Maintenez le bouton de navigation enfoncé jusqu’à ce
que MACRO CLEAR s’affiche. Appuyez sur la touche
OK et relâchez-la.
4. MACRO KEY? s’affiche. Appuyez sur la touche numérique
de 1 à 8 correspondant à la macro que vous désirez
supprimer, puis relâchez-la.
5. CONFIRM CLEAR s’affiche. Appuyez sur la touche OK
et relâchez-la.
6. PLEASE WAIT s’affiche, la télécommande quitte la mode
réglage et retourne à la normale.
7776
Page 40

Dépannage
Garantie à vie limitée
La télécommande ne commande pas votre
produit.
• Appuyez sur la touche de mode correspondant à
l’appareil que vous désirez commander.
• Programmez un nouveau code dans la télécommande.
• Installez des piles neuves. (Il se peut que vous ayez à
reprogrammer votre télécommande lorsque vous
installez des piles nouvelles.)
• Il se peut que la télécommande ne puisse pas faire
fonctionner votre appareil.
La télécommande ne commande pas certaines
fonctions de votre produit.
• Programmez un nouveau code dans la télécommande.
• Il se peut que la télécommande ne soit pas capable de
commander toutes les fonctions de votre produit ou que
le nom des touches soit différent de celui de votre
produit.
Pour obtenir de l’aide sur le réglage, composez le 919-573-
7854.
Le fabricant garantit que ce produit n’est affecté par aucun
défaut de matériau, de main-d’œuvre ou de fabrication,
dans des conditions normales d’utilisation conformes aux
spécifications et aux avertissements, aussi longtemps que
vous serez en possession du produit. Cette garantie
s’applique uniquement à l’acquéreur initial du produit et
n’est pas cessible. Tout produit défectueux, accompagné
de la preuve d’achat datée, doit être retourné à l’endroit où
il a été acheté à des fins de réparation ou de remplacement.
IL N’EXISTE AUCUNE AUTRE GARANTIE EXPRESSE OU
IMPLICITE. Philips décline toute responsabilité quant aux
dommages accidentels ou induits, lorsque la loi l’autorise.
Cette garantie vous octroie des droits juridiques
spécifiques. Vous pouvez également bénéficier d’autres
droits qui varient d’un État à l’autre.
Fabriqué en Chine. Qualité assurée aux États-Unis.
Ledgewood, NJ 07852
sru6080(4d)_h14442_290507
7978
Page 41

SRU6080
Back Cover
Made in China. Quality Assured in USA.
Ledgewood, NJ 07852
SRU6080-5/07
 Loading...