

Philips SRU4205 User Manual

SRU4205/27
Owner’s Manual

IntroductionTable of Contents
Introduction ...................................................... 3
Button Functions ............................................... 4
DVD/SAT Functions .................................... 6
Setup ............................................................... 7
Battery Installation ....................................... 7
Battery Saver ...............................................7
Code Saver ................................................. 7
Power-On Default ....................................... 7
Code Setup ................................................. 7
Direct Code Entry ............................................ 8
Code Search .................................................... 8
Brand Search ................................................... 9
Code Identification Feature ............................... 9
Setting Favorites ............................................. 10
Adjusting Delay Between Digits ...................... 11
Setup ............................................................. 12
Programming Combo Device Codes .......... 12
VCR/DVD/DVR Punch-Through Feature .. 12
Volume/Mute Control Feature ....................12
Setting Volume/Mute Punch-Through .......... 13
Setting Mode to Use Own Volume/Mute ....13
Code Learning ................................................ 14
Tips on Learning ........................................ 14
IR Transmitter Finder ...................................... 16
Learning Commands .......................................17
Clearing Commands ....................................... 18
Clearing Learned Commands ..................... 18
Master Clear .................................................. 18
INPUT ........................................................... 19
Troubleshooting .............................................. 20
Lifetime Warranty ...........................................21
Instrucciones en Español ................................. 22
Manuel d’instruction ....................................... 42
Congratulations on your purchase of this Philips
Universal Remote Control. You are now the
proud owner of a revolutionary remote that
remembers your favorite channels for you! Press
an icon button and you’re instantly taken to your
favorite channel!
Universal Remotes let you replace a broken or
lost remote or combine more than one remote into
one. In addition, this remote is equipped with a
command learning feature which lets the remote
learn commands from your original equipment
remote control!
This remote control operates the common features
of most but not all models and brands of IR
Infrared Controlled Video Equipment. This
remote may provide functions that are not
available on your equipment. Some functions of
your particular equipment (e.g. menu functions)
may not be controlled by this remote. In such
cases, use the original remote control for your
equipment. Please use this manual to become
familiar with your Universal Remote. After you are
familiar with your remote the first thing you need
to do is to install batteries and setup your remote
for your particular product and brand.
Thank you for buying this remote and we hope it
will give you many years of service.
32
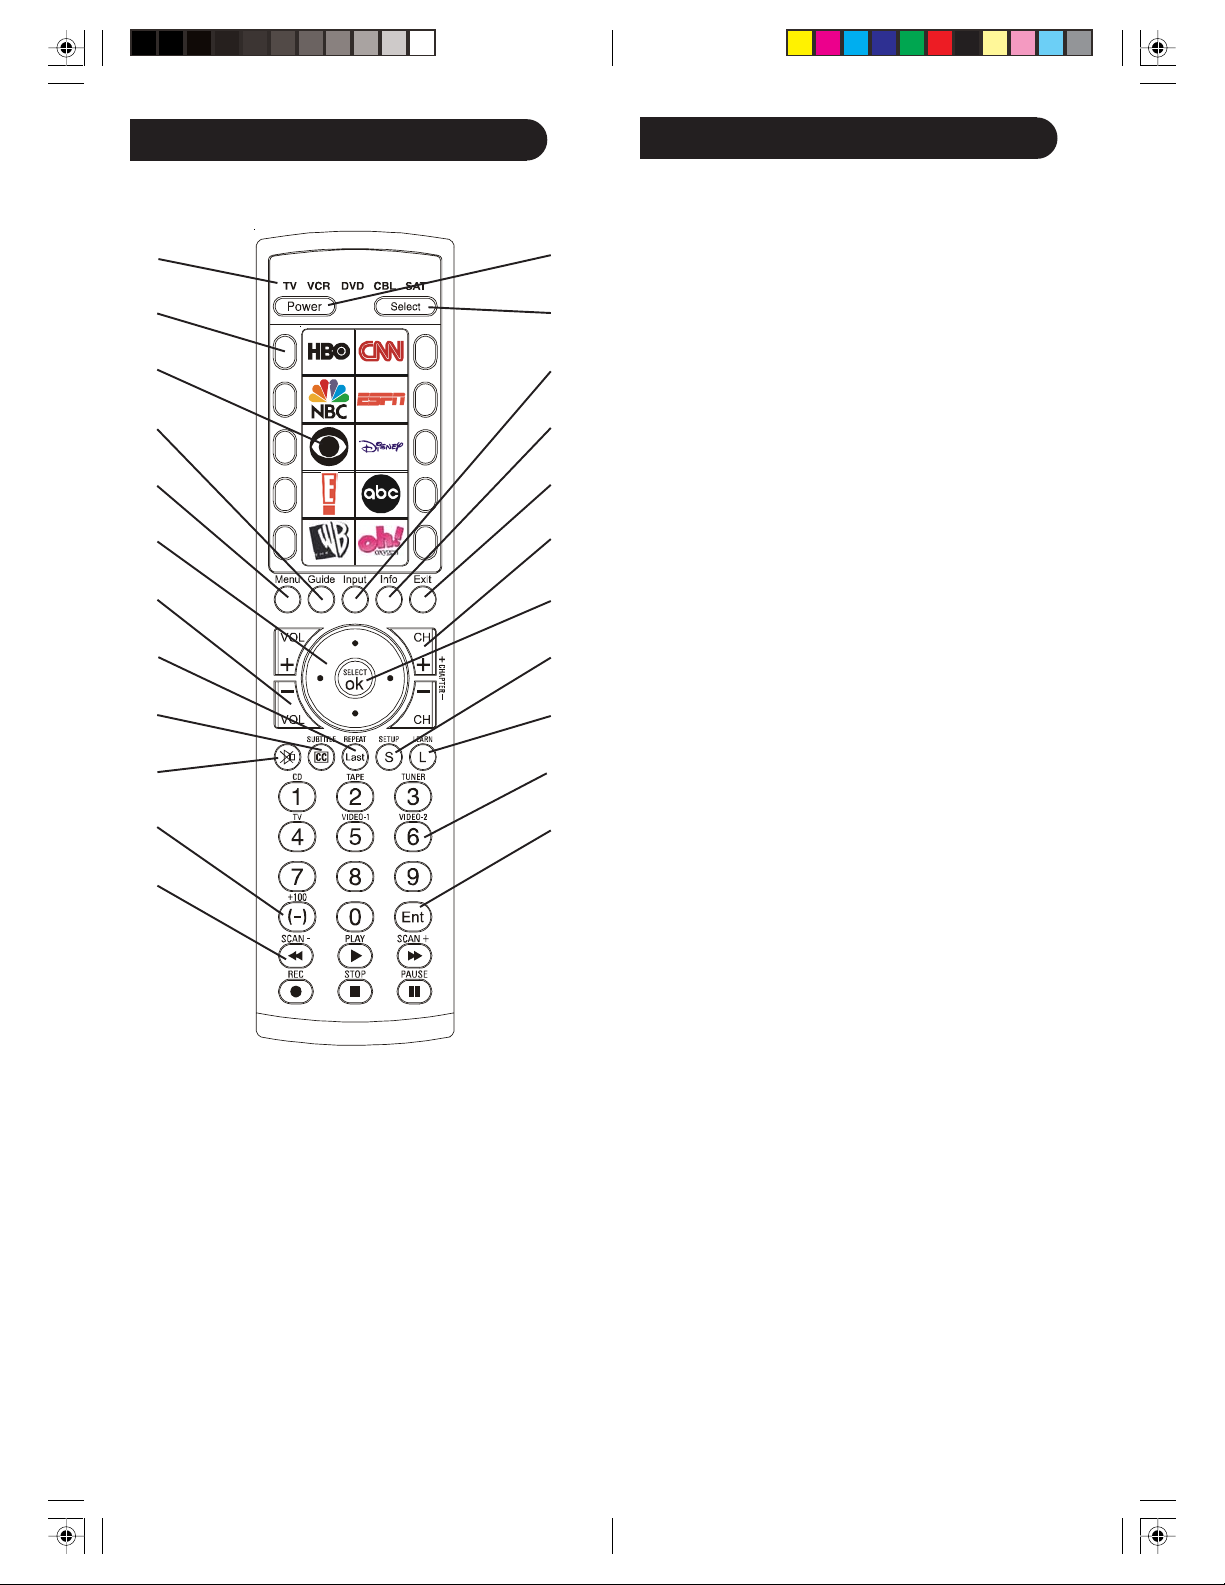
Button Functions
1.
2.
3.
4.
5.
6.
7.
8.
9.
10.
11.
23.
22.
21.
20.
19.
18.
17.
16.
15.
14.
13.
12.
Note: REC must be pressed twice to record from your
VCR. For some VCR brands, you might need to press
REC once, then press it again for 3 seconds.
Some buttons on the remote might have functions that
are referred to by different names on the device you are
controlling. These differences depend upon the brand
and model of your product. Also, this remote can only
operate features that exist on your product.
Button Functions (cont.)
1. TV, VCR, DVD, CBL, SAT: Indicates which
equipment is operating; press SELECT for mode
(from SAT to TV, TV to VCR, etc.).
2. FAVORITES BUTTONS: Allow you to choose your
favorite channels. (Key feature & benefit!)
3. FAVORITES ICONS: Display icons of your
favorite channels. (Key feature & benefit!)
4. GUIDE: Displays on-screen program or channel
guides. Displays DVD Title Menu screen.
5. MENU: Brings up the device Menu screen (if
available) - use with UP, DOWN, LEFT, and RIGHT
navigation buttons.
6. UP, DOWN, LEFT, RIGHT: Navigation buttons.
7. VOLUME UP/DOWN: Changes the volume level of
the product, normally the TV.
8. LAST (REPEAT): Returns to the previously
selected channel or DVD repeat toggle.
9. CC (SUBTITLE): TV Closed Caption (if your TV
has this feature) or DVD Subtitle toggle.
10. MUTE: Turns off the TV sound while the picture
remains.
11. +100: Used for channels greater than 100. (-) used
for digital channels like 2-3.
12. REC, STOP, PAUSE, PLAY: VCR controls.
SCAN+ (FAST FORWARD): Fast-forwards
through a chapter or title. SCAN- (REVERSE)
Reverses through a chapter or title.
13. ENT: Used after direct channel number entry to
change to the selected channel immediately.
14. NUMBERS: Enter numbers for direct channel
selection. Some products require ENT to be pressed
after channel selection.
15. LEARN: Used to setup learning functions.
16. SETUP: Initializes setup of remote and devices.
17. OK: Selects menu items for the device you are
controlling.
18. CHANNEL UP/DOWN: Changes the channels.
CHAPTER +/-: controls DVD/CD track selection.
Note: VCR buttons also control DVD when in DVD
mode.
19. EXIT: Exits on-screen menus/returns to previous
on-screen selection.
20. INFO: Displays/selects on-screen channel
information, etc.
21. INPUT: For some TVs, press repeatedly to select
from available viewing sources (antenna, cable box,
VCR, etc.).
22. SELECT: For TV, VCR, DVD, Cable (CBL), or
Auxiliary device.
23. POWER: Turns device on or off.
54

Button Functions (cont.)
Setup
DVD Functions
SCAN+ and SCAN- control fast forward and reverse.
CHAPTER+ and CHAPTER- locate chapters or tracks
on a disc.
LAST (REPEAT) performs “A-B Repeat” (or RPT A.B)
for repeat play of current chapter or track.
INFO brings up DVD Display or Control Menu for
chapter/track/title number, time remaining/elapsed
indication, system information, etc.
MENU brings up the DVD disk menu screen; use with
UP, DOWN, LEFT, and RIGHT.
OK is used for on-screen Menu selection.
SUBTITLE (CC) Turns subtitles on or off.
EXIT Exit on-screen menus and/or return to previous on-
screen selection.
Note: Not all DVD Players support all functions described above. Your remote operates most (but not all)
models and brands of infrared (IR) controlled video
equipment. This remote might provide functions not
available on your equipment. Some functions (like
menus) might not be controlled by this remote. In such
cases, use the original remote control for your equipment.
SAT Functions
Battery Installation
1. On the back of the remote,
push down on the tab and lift
the cover off.
2. Match the batteries to the +
and - marks inside the battery
case, then insert 2 AAA
Alkaline batteries.
3. Press the battery cover back
into place.
+
A
A
A
-
Battery Saver
Your remote automatically turns off if the buttons are
depressed more than 30 seconds. This will save your
batteries should your remote get stuck in a place where
the buttons remain depressed (e.g., or for instance,
between the sofa cushions).
Code Saver
Codes are stored in permanent memory while you are
changing batteries so that you will not lose any codes
stored in the remote while you are changing batteries.
-
A
A
A
+
GUIDE displays on-screen Satellite Channel Guide.
CHAPTER+ and CHAPTER- perform the “Page+” and
“Page-” function for on-screen guide menus used by
some satellite systems.
INFO brings up Satellite Display screen for current
channel and system information.
MENU brings up the Satellite Menu screen; use with the
UP, DOWN, LEFT, and RIGHT navigation buttons.
OK is used for on-screen menu selection.
EXIT is used to exit or clear on-screen menu displays.
Power-On Default
The remote powers on in TV mode.
Code Setup
Please refer to “Code Search” on p. 8 for more information using the code search feature to learn how to search
through the library of codes for your products.
Note: You can store any kind of code under any mode
(except TV). You can store a VCR code under the CBL
button, or a DVD code under the VCR button, etc.
However, you can only store TV codes under the TV
button.
76

Direct Code Entry
Code Search by Brand
1. Press and hold SETUP until the indicator remains on,
then release SETUP.
2. Repeatedly press SELECT to select the desired
mode (TV, VCR, etc.), unless the desired mode is
already selected.
3. Enter the 4-digit code from the code tables (on
separate sheet). Note: After a valid code entry, the
indicator turns off. For an invalid code, the indicator
flashes.
4. Press CHANNEL UP. If the device responds, no further
programming is required. Note: If some buttons do not
operate your equipment, try one of the other codes for
your brand.
Code Search
If your product does not respond after you have tried all
the codes for your brand or if your brand is not listed,
try searching for your code by following these steps.
1. Turn on the device (TV, VCR, etc.) to be controlled.
2. Press and hold SETUP until the indicator remains
on, then release SETUP.
3. Repeatedly press SELECT to select the desired
mode (TV, VCR, etc.), unless the desired mode is
already selected.
4. Press CHANNEL UP repeatedly (up to 300 times)
until the device to be controlled changes channels.
The indicator blinks off with each button press.
5. Press and release MUTE to install the code.
Most users store VCR codes under VCR. Cable codes
appear under CBL (Cable), etc.
If you want to store a VCR code under CBL, first follow
the procedure for Direct Code Entry and select CBL in
Step 2 of Direct Code Entry. Then enter any VCR code in
Step 3 of Direct Code Entry. Then follow the steps above
for Code Search.
Note: If the device does not have a CHANNEL UP
button, use PLAY (VCR only) or POWER instead.
Code search begins from the currently stored 4-digit
number under that mode.
Lets you search for a code for a specific Brand within
the Code Library for a particular manufacturer.
1. Turn on the device (TV, VCR, etc.) to be controlled.
2. Press and hold SETUP until the indicator remains on,
then release SETUP.
3. Repeatedly press SELECT to select the desired
mode (TV, VCR, etc.), unless the desired mode is
already selected.
4. Press and release the numeric button (0-9)
corresponding to desired Manufacturer (see table
on code list sheet). The green indicator blinks off
once. Note, pressing “0” performs a full library
search same as normal Code Search Method on
previous page.
5. Press the CHANNEL UP button ((or POWER or
PLAY (VCR only)) repeatedly until the device to be
controlled changes channel. The green indicator
blinks off with each button press. If you accidentally
overshoot the code required, press the CHANNEL
DOWN button to backtrack through the library until
the device changes channel. Pressing CHANNEL
UP changes direction to forward again.
6. Press and release MUTE to install the code.
Brand Search Method entry is now complete.
Note: When all codes under a Brand have been
searched the indicator flashes rapidly for 3 seconds.
Code Identification Feature
The Code Identification Feature lets you identify the 4digit library code stored under your device key.
If you want to find what 4-digit code is stored under any
device mode, follow these steps.
1. Press and hold SETUP until the indicator remains on,
then release SETUP.
2. Repeatedly press SELECT to select the desired
mode (TV, VCR, etc.), unless the desired mode is
already selected.
3. Press and release SETUP. The indicator blinks.
4. To find the first digit for the code stored under the
mode selected in Step 2, press each number button
(0-9). When the indicator blinks off, the number you
pressed is the first code digit you are searching for.
5. To find the second digit, repeat Step 4. When the
indicator blinks off, this is the second digit.
6. Repeat Step 4 to find the third and fourth digits.
98

Setting Favorites
Setting Favorites (cont.)
The Favorites feature is what really sets this remote
apart from other remotes. It lets you go to your favorite
channel(s) by simply pressing a button next to a sticker
(or label) that represents that favorite channel.
1. Flip the switch on the back of the remote to either
position (in this case, we’ll call this position User 1).
2. Press and hold SETUP until the indicator remains on,
then release SETUP.
3. Repeatedly press SELECT to select the desired
mode (TV, VCR, etc.), unless the desired device is
already selected. This sets the device that this
favorite button controls.
4. Press one of the 10 FAVORITE buttons to set up a
favorite channel. Let’s say we select the top righthand FAVORITE button.
5. Enter the channel number for this favorite channel.
Note: You can use up to 5 buttons, including 0 through
9, OK, and - to enter your favorite channel: 550,
472Enter, 162OK, 5-7, etc., are examples.
6. Press SETUP when you’ve finished entering the
channel.
To switch from User 1 to User 2 or vice versa, move the
switch on the back of the remote. Doing so “flips” the
stickers for the appropriate set of 10 FAVORITES, for
either User 1 or User 2, into view.
Flip switch in
either direction
for User 1 or
User 2
FAVORITE
buttons
FAVORITE
icons
After setting up your favorite, do the following.
7. Attach the sticker that represents the favorite
channel you set up above to the location next to
that FAVORITE button. (In the example on p. 11,
we’ve used an ABC sticker.)
Follow Steps 1 through 7 to set up more favorites, each
time selecting a different FAVORITE button in Step 4,
and entering a different channel number in
Step 5. Then place the appropriate sticker next to the
FAVORITE button, as in Step 7.
After you’ve set up all 10 favorites (or fewer if you
don’t want to set all of them up), you can set the switch
on the back of the remote to the other position (e.g., or
for instance, User 2) and then repeat Steps 1 through 7
to set up another group of favorites for another user.
To go to your favorite channel, simply press the
FAVORITE button next to the sticker that represents
the icon for that channel.
Note: If you can’t find a sticker for one of your
favorites, go to www.wikipedia.org to find labels for
your favorites. Do a search by using the key words
television logos. Find the logo you need. Right-click the
logo and save this logo somewhere on your computer.
Print the logo. If the logo needs adjustment, you can
use Microsoft Paint, etc. Cut out the logo and paste it
next to your FAVORITE button.
Adjusting the Delay Between Digits
You might need to adjust the time between digits sent
for a favorite channel. If the delay is too long you might
point the remote away from your device before all the
digits have been sent. If the delay is too short your
device might not respond.
1. Press and hold SETUP until the indicator remains
on, then release SETUP.
2. Press and release PLAY. The indicator blinks, then
stays on.
3. Press and release a number from 0 to 9. 0 is no delay
and 9 is the longest delay.
1110

Setup
Setup (cont.)
Programming Combo Device Codes
Some combo (combination) devices (TV/VCR, TV/DVD,
DVD/VCR, etc.) require you to set up 2 different modes
to control both parts of the combo.
For example, if you have a TV/DVD combo, you might
need to set up one code under the TV mode to control
the TV and a separate code (under other modes) to
control the DVD.
VCR/DVD/DVR Punch-Through Feature
This remote allows the 6 VCR buttons (PLAY, PAUSE,
STOP, SCAN+, SCAN-, and REC) to “punch-through”
(transmit or hand-over) control from any mode programmed with TV or Cable codes to the last VCR, DVD,
or DVR mode used.
For example, if you have 2 DVD, VCR, or DVR devices
programmed into this remote, the last device you used
controls the 6 VCR buttons.
Note: This feature will not operate if the programmed
TV, SAT or Cable code has its own VCR transport
button control e.g. a TV Combo, SAT/PVR, etc.
Setting ALL Volume/Mute Controls to Any
Mode
You can set all modes to “punch-through” to any mode
for Volume/Mute control without needing to change to
that mode by doing the following.
1. Press and hold SETUP until the indicator remains on,
then release SETUP.
2. Press and hold MUTE until the indicator blinks off,
then release the button.
3. Press and release SELECT to select the desired
mode (TV, VCR, etc.) for Volume/Mute control; the
indicator blinks, then stays on.
4. Press and release MUTE; the indicator turns off.
Note: The indicator will blink rapidly for 3 seconds if
the mode you have selected does not have Volume/
Mute control.
5. All other modes will now “punch-through” to your
chosen mode for Volume/Mute control.
Setting Any Mode to Use its Own Volume/
Mute Control
You can set any mode to use only its own Volume/Mute
control.
Volume/Mute Control and Punch-Through
Feature
Your remote allows you to select which device mode
controls VOLUME and MUTE.
This remote is initially set for all device modes to use
their own Volume/Mute control if present.
If the programmed code does not have Volume/Mute
operation, then VOLUME and MUTE will “punchthrough” (hand-over) control to the TV-mode device
without you needing to change to TV mode. Note: Any
mode chosen for Volume/Mute control must have its
own Volume/Mute function or else VOLUME and MUTE
will not function.
Note: If your chosen mode does not have Volume/Mute
functions, then this remote’s VOLUME and MUTE will
not operate.
1. Press and hold SETUP until the indicator remains on,
then release SETUP.
2. Press and hold MUTE until the indicator blinks off,
then release the button.
3. Press and release SELECT to select the desired
mode (TV, VCR, etc.); the indicator blinks, then
stays on.
4. Press and release VOLUME- (down); the indicator
blinks, then stays on.
5. Press and release MUTE; the indicator turns off.
6. All modes will now “punch-through” to the
respective modes you have chosen for Volume/
Mute control.
1312

Code Learning
Tips On Learning (cont.)
Your remote is equipped with an easy “learning” feature
that lets it “learn” features (such as RANDOM PLAY
from your original CD remote).
Tips On Learning
You can only learn one device type under any one mode
button e.g. only learn TV codes under the TV mode,
VCR codes under the VCR mode, etc. If you are trying
to learn from a “universal” type original remote, it might
have more than one code type stored under a mode. Try
learning from another remote to see if there’s a problem
with the type or band of remote you are trying to learn
from.
Keep the following in mind about learning codes.
• Some functions from some types of remotes might
not be able to be learned.
• No functions may be learned under the LEARN,
SETUP, and SELECT keys.
• Use fresh batteries for both your new remote and
your original remote.
• Keep at least 3 feet away from incandescent or lowenergy lights when learning.
• Place the original remote end-to-end with your new
remote so the IR transmitter (at the top) on your
original remote points at the IR learning device on
the bottom of your new remote.
• Keep the distance between the two remotes to
approximately 1 inch.
• Line up the remotes and then press the key you
want to learn. To get the correct range, press the key
on the remote you are learning. Do not change the
distance between the two remotes until you have
learned all the required keys.
• When Learning, do not release the button being
Learned until the indicator has blinked off for half a
second. However, some keys might be learned
multiple times if you do this. If this happens, just
“tap” the key you want to learn rather than press
and hold it. For example, keys that you normally
hold down for awhile (like volume up or down) will
likely require a long press when learning.
• Keys that you normally give a quick press (like the
numbers, and channel up/down) will likely require a
quick press when learning. If after learning, say, the
channel-up key, you find that it changes multiple
channels when pressed once, try relearning it with a
short key press.
• If learning the first or second keys results in
continuous errors, then try the following:
1. Check that the IR transmitters/sensors are correctly
aligned between the two remotes (see next page).
2. Adjust the distance between the two remotes to be
closer (1/2 an inch) or further away (2 inches) from
each other.
3. Try learning the original remote keys again.
4. If problems reoccur with the same button, check the
original remote key being learned – does it transmit?
Does it operate the target device?
5. Clear all learned settings and try learning again.
If problems reoccur with the same button, check the
original remote button being learned to see if there is
transmission.
Try learning that button under a different cleared mode,
if necessary.
If the remote learns, then this situation is likely a
different code type from others and cannot be learned
under the same mode.
1514

IR Transmitter Finder
Learning Commands
This feature assists you in identifying where your
original remote’s infrared (IR) transmitter is located.
This feature is particularly useful if your original
remote’s IR transmitter is hidden behind a lens.
1. Point your remotes so that the top of your existing
remote faces the bottom of your new remote and the
remotes are about 1 inch apart (see picure on next
page).
2. Press and hold SETUP until the indicator remains on,
then release SETUP.
3. Repeatedly press and release SELECT to select the
desired mode (TV, VCR, etc.).
4. Press and release LEARN; the indicator blinks, then
stays on.
5. Press and hold any original remote button and move
the original remote to the left and right and/or up
and down in front of the IR transmitter.
Note1: The indicator will remain on if there is not any IR
from the original remote. The indicator will blink on and
off more rapidly when the IR transmitters are lining up.
The point where the indicator blinks most rapidly is
where the two IR transmitters are aligned.
Note2: Some original remotes only transmit IR on the
initial button press and then stop transmitting IR.
Quickly press and release the original remote button
repeatedly during this procedure in such cases.
The learning feature lets your remote “learn” functions
from your original remote control.
1. Press and hold SETUP until the indicator remains on,
then release SETUP.
2. Repeatedly press and release SELECT to select the
desired mode (TV, VCR, etc.).
3. Press and release LEARN; the indicator blinks, then
stays on.
4. Press and release the button that you want to learn
(for instance, POWER).
5. Point your original remote at the bottom of your new
remote until they are about 1 inch apart.
6. Press and hold the original remote button (for
instance, Power) until the indicator blinks once, then
stays on. If there is a learning problem, the indicator
blinks for 3 seconds and stays on. If this happens,
repeat Steps 4 to 6.
7. Repeat Steps 4-6 for other buttons you want your
remote to learn.
8. Press and release SETUP when all desired remote
commands are learned. Code learning is now
complete.
4.
2.
1.
3.
Line up your remotes (that you’re learning from) in front of
the learning remote on a hard surface approx. 1-inch apart.
6.
1716

Clearing Commands
INPUT
To Clear All Learned Commands Under a
Mode
Clearing learned commands is helpful if you replace
your CD player with another brand or model, for
example. If your remote had learned a feature (such as
RANDOM PLAY) from your old CD player’s original
remote, that feature would no longer work for your new
CD player.
If you want to remove or clear one or more learned
commands, do the following.
1. Press and hold SETUP until the indicator remains
on, then release SETUP.
2. Press and release SELECT to select the mode you
want to clear (TV, VCR, etc.).
3. Press and release LEARN twice. The indicator blinks
off.
4. Press and release SETUP. The indicator turns off. All
learned commands under that mode are now cleared.
Master Clear
When in TV mode, INPUT performs the INPUT sourceswitch function.
When in a mode that has been programmed for VCR,
INPUT performs the TV/VCR antenna-switch function.
When in a mode that has been programmed for Cable,
INPUT performs the A.B-switch function.
When in a mode that has been programmed for DVD,
INPUT performs the DVD-setup function.
When in a mode that has been programmed for SAT,
INPUT performs theTV/SAT switch function.
Master Clear - To Clear All Learned
Commands Under All Modes
1. Press and hold SETUP until the indicator remains
on, then release SETUP.
2. Press and release LEARN twice. The indicator blinks
off.
3. Press and release SETUP. The indicator turns off. All
learned commands in the remote are now cleared.
1918
 Loading...