

Philips SPD5121, SPD5125, SPD5130 User Manual

External hard disk
EN
User manual 2
FR
Manuel d’instructions 15
D
Benutzerhandbuch 28
NL
Gebruikershandleiding 41
ES
Manual del usuario 54
I
Manuale utente 67
PT
Manuel do utilizador 80
TR
Kurulum Kılavuzu 93
SPD5121
SPD5125
SPD5130

EN
Contents
3 What’s in the box?
4 How to connect this external hard disk to
your computer?
5 How to safely disconnect and shut down using
the Safe-Shutdown button?
6 How to make a back-up using the One-Click
Back-Up button?
10 How to restore a back-up?
13 Warranty, Environment and Safety
14 Specifications
Important note
To use the One-Click Back-Up button and Safe-Shutdown button
(works only via USB connection), first install the Nero BackItUp software. For
instructions and more information, see page 5-6.
2
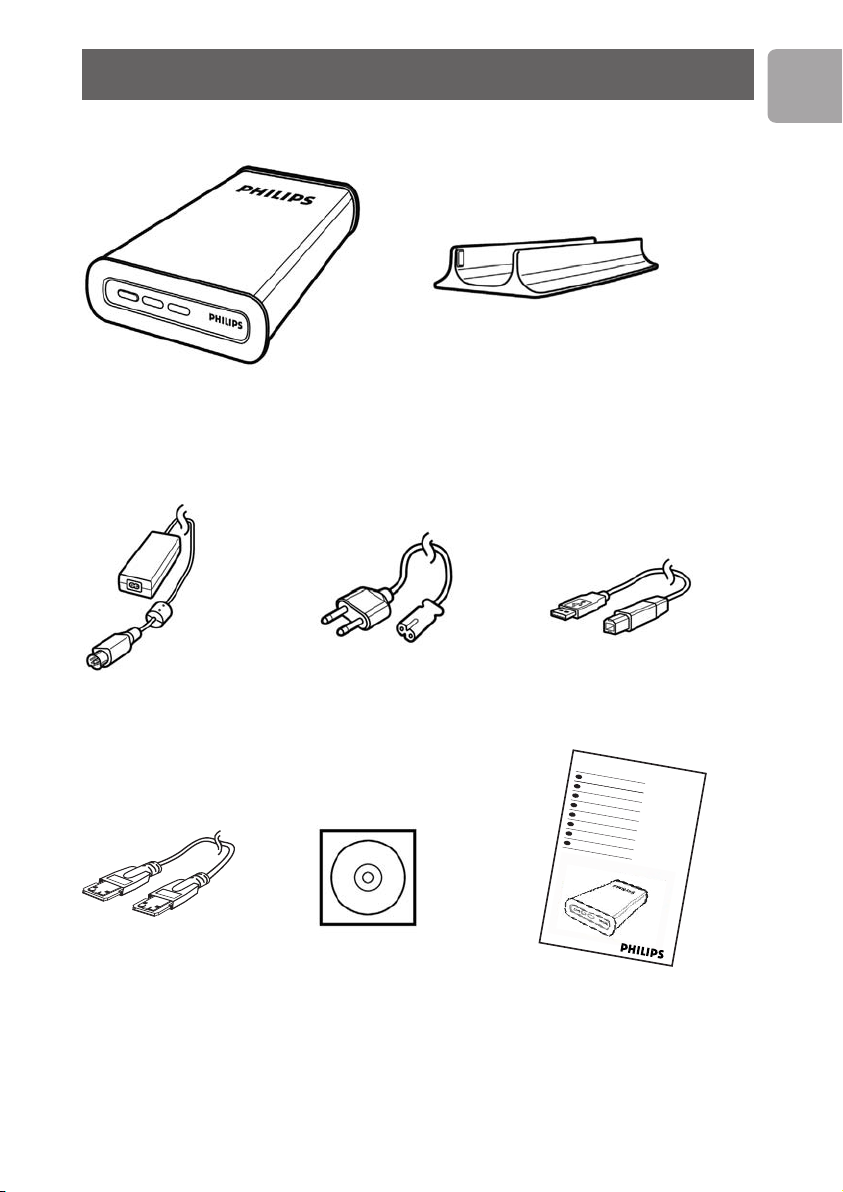
What’s in the box?
External hard disk SPD5110CC
SPD5115CC
User manual 3
Manuel d’instructions 15
Benutzerhandbuch 27
Gebruikershandleiding 39
Manual del usuario 51
Manuale utente 63
Manuel do utilizador 75
Kurulum Kılavuzu 87
TR
PT
I
ES
NL
D
F
EN
A : External hard disk B : Vertical stand
EN
C : Power adapter
F : eSATA cable G: Installation CD H : User manual
D : Power cord E : USB cable
3
EN
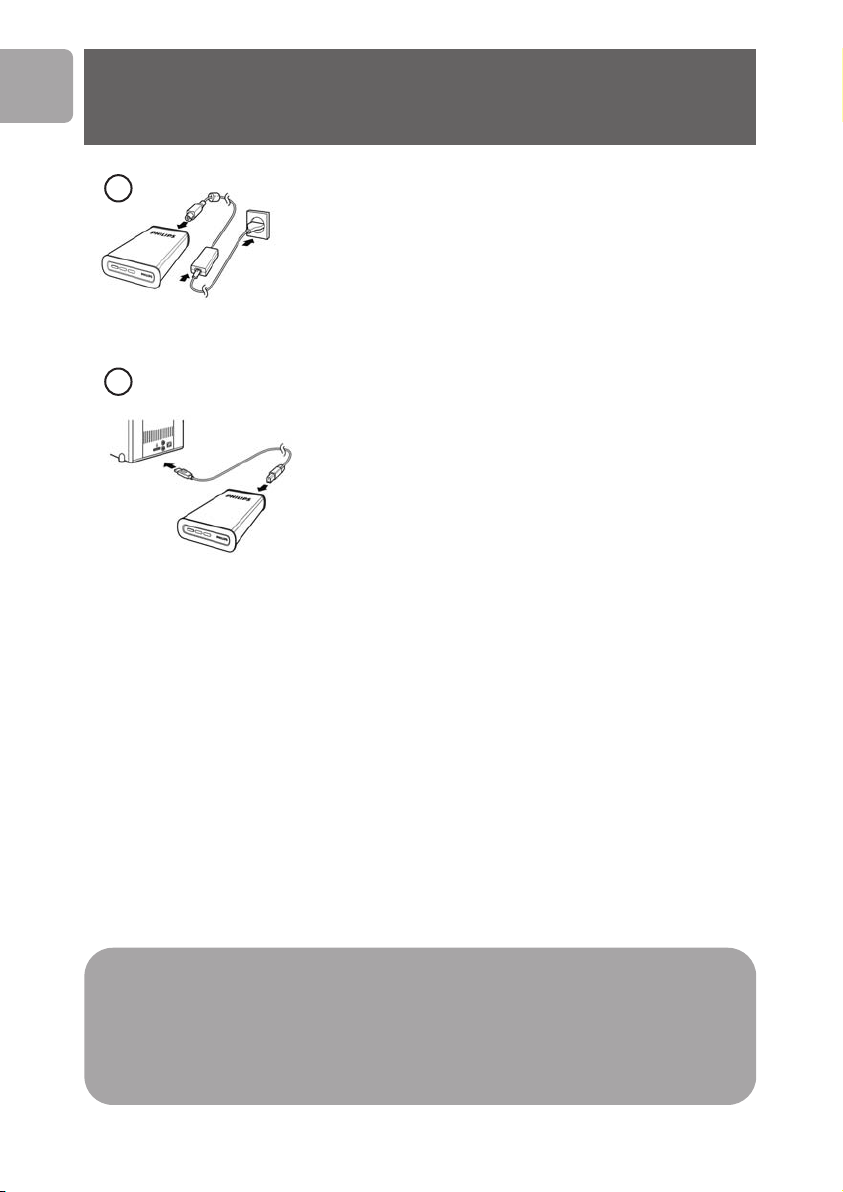
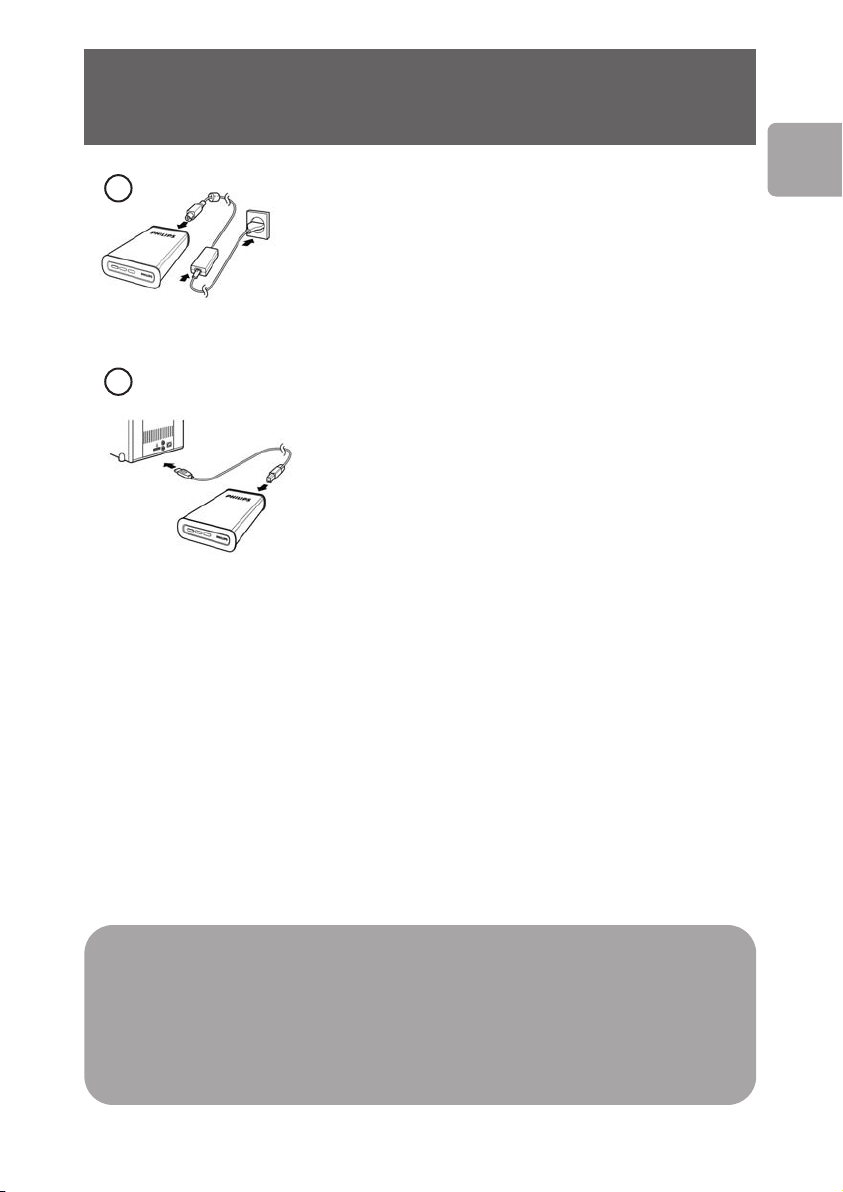
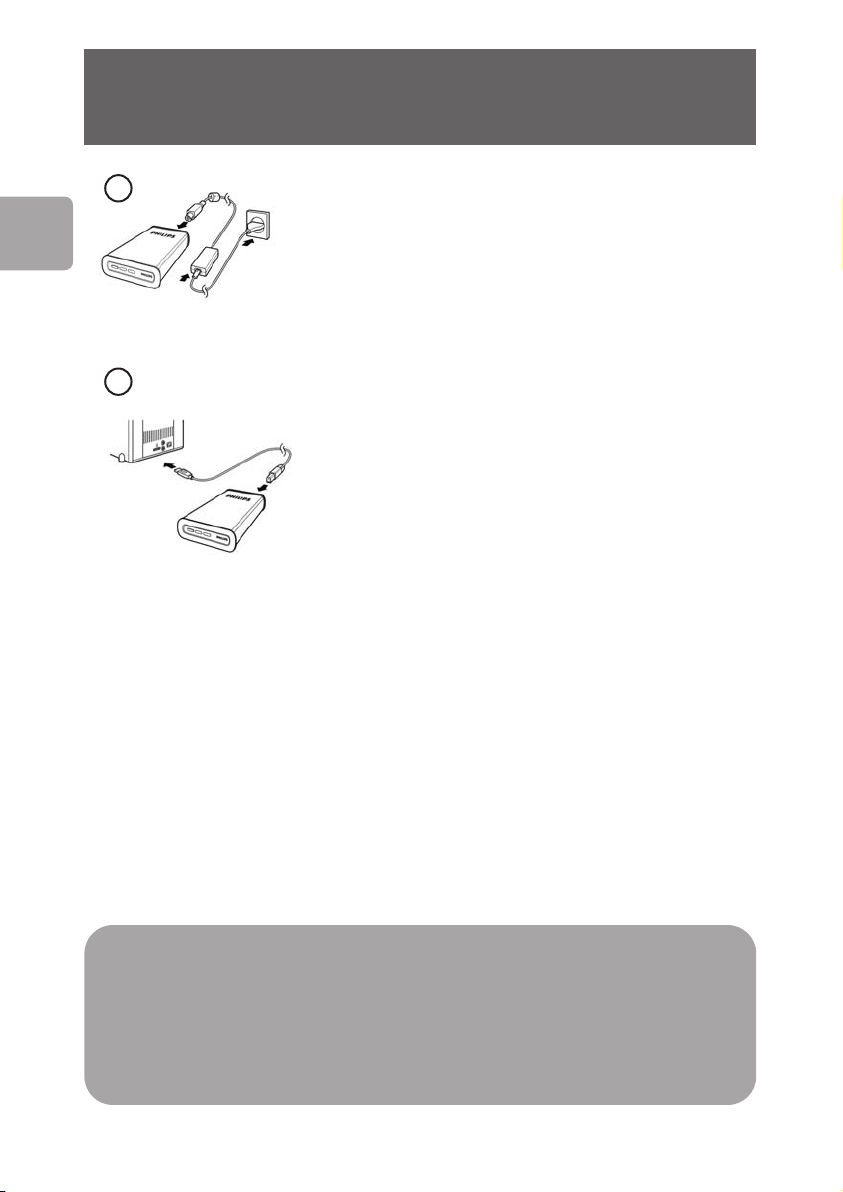
How to connect this external hard disk to your system?
1
2
USB or
eSATA
A drive icon, Philips External Hard Disk, appears in Windows Explorer and the blue light
should light up. (The computer sometimes needs to be restarted, before you can use the
new hardware).
Your hard disk is now ready to use and you can save and copy data on the drive by
moving files and folders to the drive, just as you do when using your internal hard disk.
Put the Power adapter (C) and the Power cord (D)
together and connect them to the external hard disk and
a power outlet.
- For USB: Connect the USB cable (E) to your external
hard disk. Connect the other side of the USB cable to
an empty USB port of your computer.
- For eSATA: Plug the eSATA cable (F) in a eSATA port
of the external disk. Connect the other side of the
eSATA cable to an empty eSATA port of your
computer.
Important note
To use the One-Click Back-Up button and Safe-Shutdown button
(works only via USB connection), first install the Nero BackItUp software. For
instructions and more information, see page 5-6.
4

How to safely disconnect and shut down using the Safe-Shutdown button?
How to use the Safe-Shutdown button?
(Works only via USB connection)
The Nero software, supplied together with this product, has to be installed to enable the
Safe-Shutdown functionality.
To install Nero BackItUp, insert the Nero installation CD, wait for a pop-up to appear
and select Nero from the list of options.
When the pop-up screen doesn’t appear, click on the Setup.exe file from the CD in the
Windows Explorer to start the installation.
1
Please close Windows Explorer and Nero BackItUp.
2
Press the Safe-Shutdown button .
3
Wait until the blue light on front of the hard disk is not functioning anymore.
4
You can now safely disconnect the hard disk from your computer.
How to safely disconnect without using the
Safe-Shutdown button?
EN
1 Double-click the Safely Remove Hardware icon
in the task bar in the lower right part of the screen.
In the window that appears, select the name of the device that is to be removed,
2
Stop
then click the
3
When the
information is displayed, and then click the
4
When the message
the computer’s USB port.
Stop a hardware device
button.
Safe
screen appears, make sure the correct
OK
to
remove hardware
button.
appears, remove the drive from
5
EN
How to make a back-up, using the One-Click Back-Up button?
(Works only via USB connection)
The Nero software, supplied together with this product, has to be installed to enable the
One-Click Back-Up functionality.
To install Nero BackItUp, insert the Nero installation CD, wait for a pop-up to appear
and select Nero from the list of options.
When the pop-up screen doesn’t appear, click on the Setup.exe file on the CD in the
Windows Explorer to start the installation.
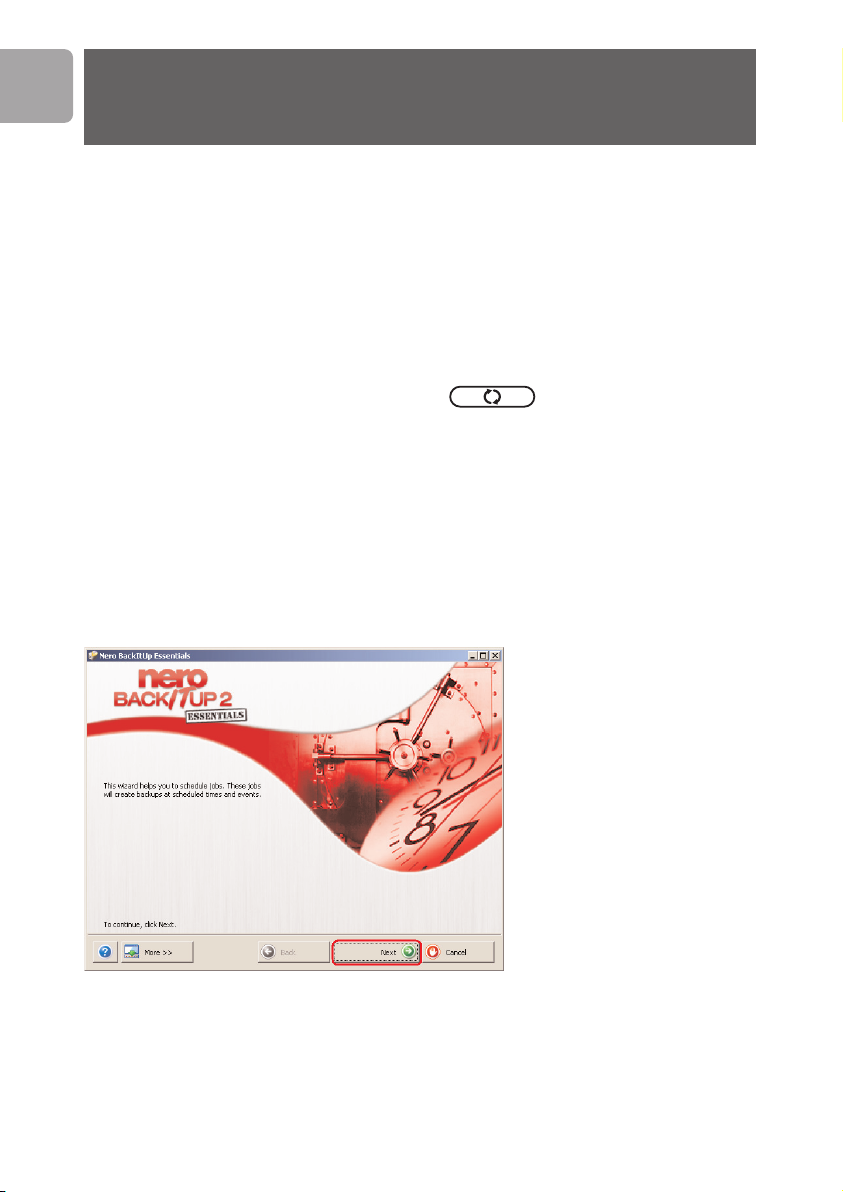
If you push the One-Click Back-Up button for the first time after
installation of the Nero software the following screen will appear:
1
Click on the
6
Next
button to start the Job Wizard.
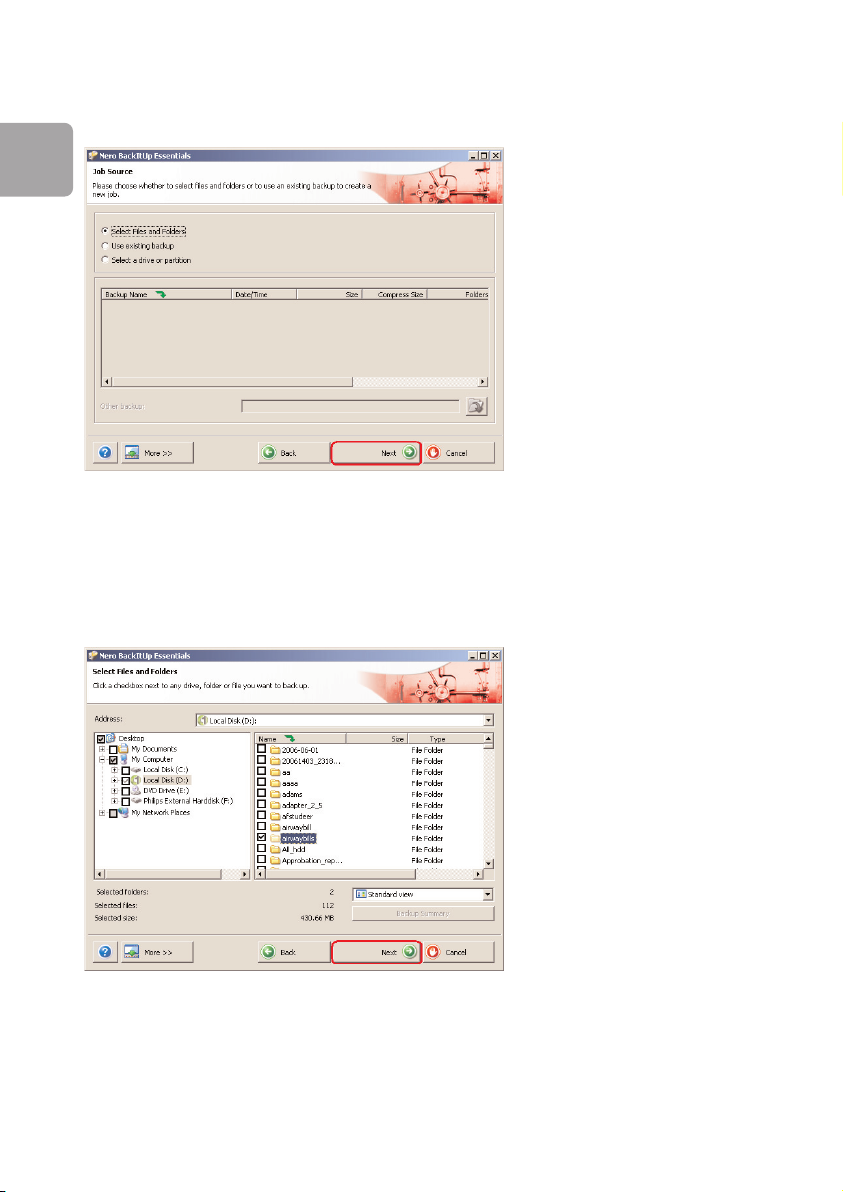
2
Click on the
of.
Next
button in order to select the files you want to make a back-up
EN
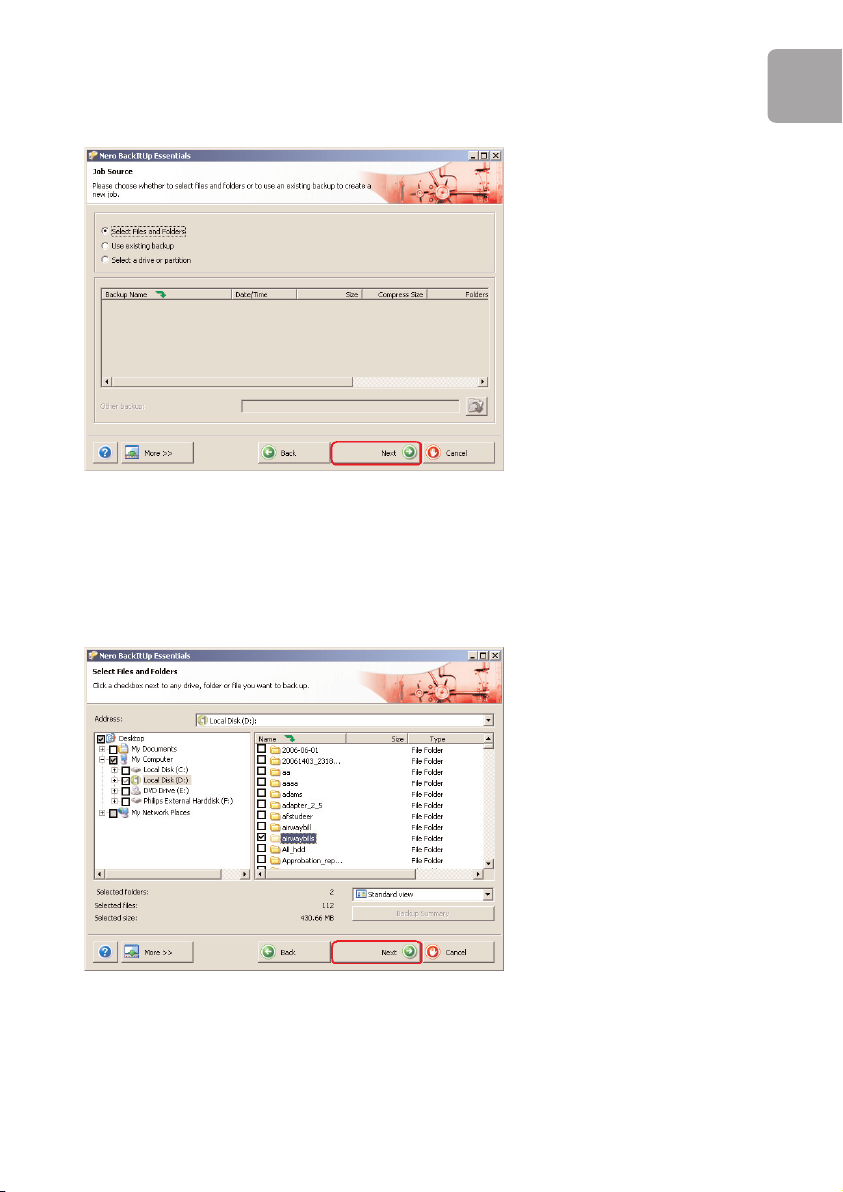
3
Select the files and folders you want to backup and click the
Next
button.
7
EN
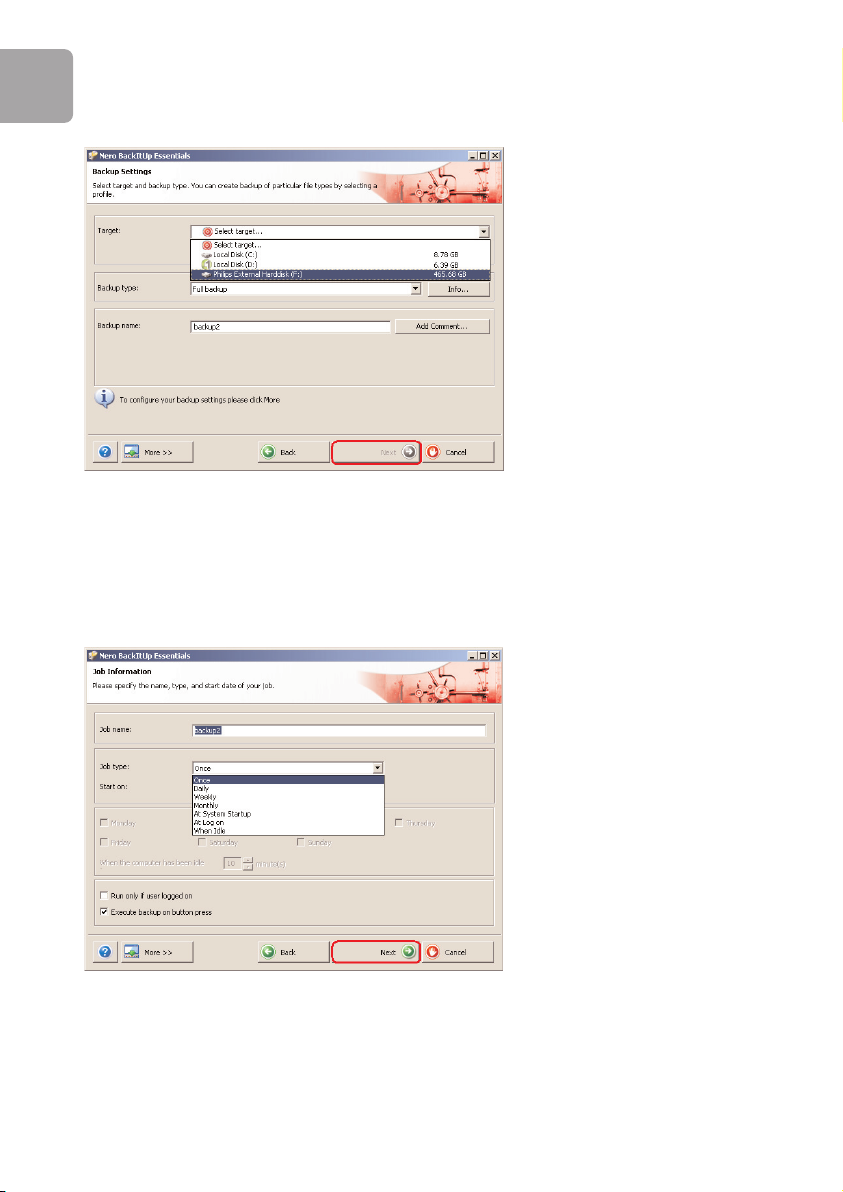
4
Select the Philips External Hard Disk as target using the dropdown function, then
click the Next button.
5
To execute the job only by using the One-Click Back-Up button, select Job type
Once using the dropdown function.
8
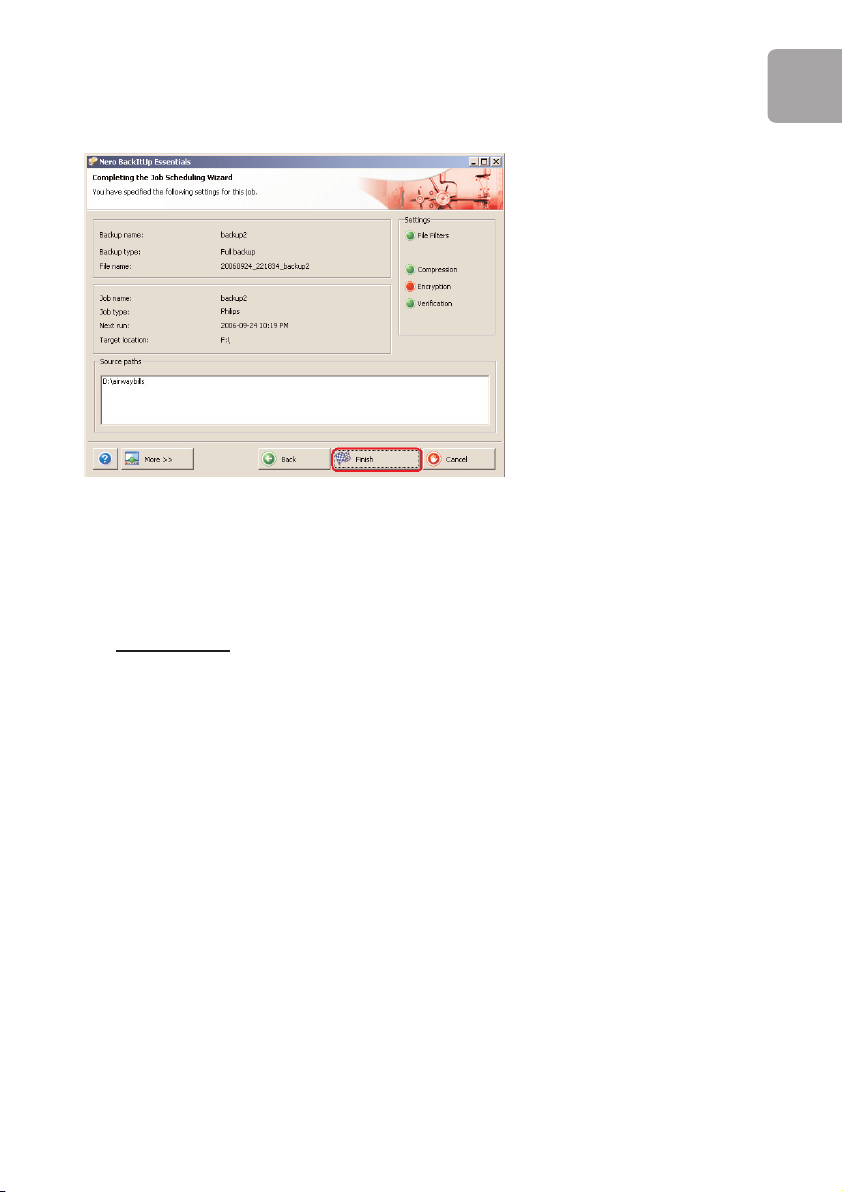
6
This screen gives you an overview of the job you have added. Click the Finish
button to complete the wizard.
The next time you push the One-Click Back-Up button
the back-up will start automatically.
See www.nero.com for additional information on Nero BackItUp
EN
9

EN
How to restore a back-up?
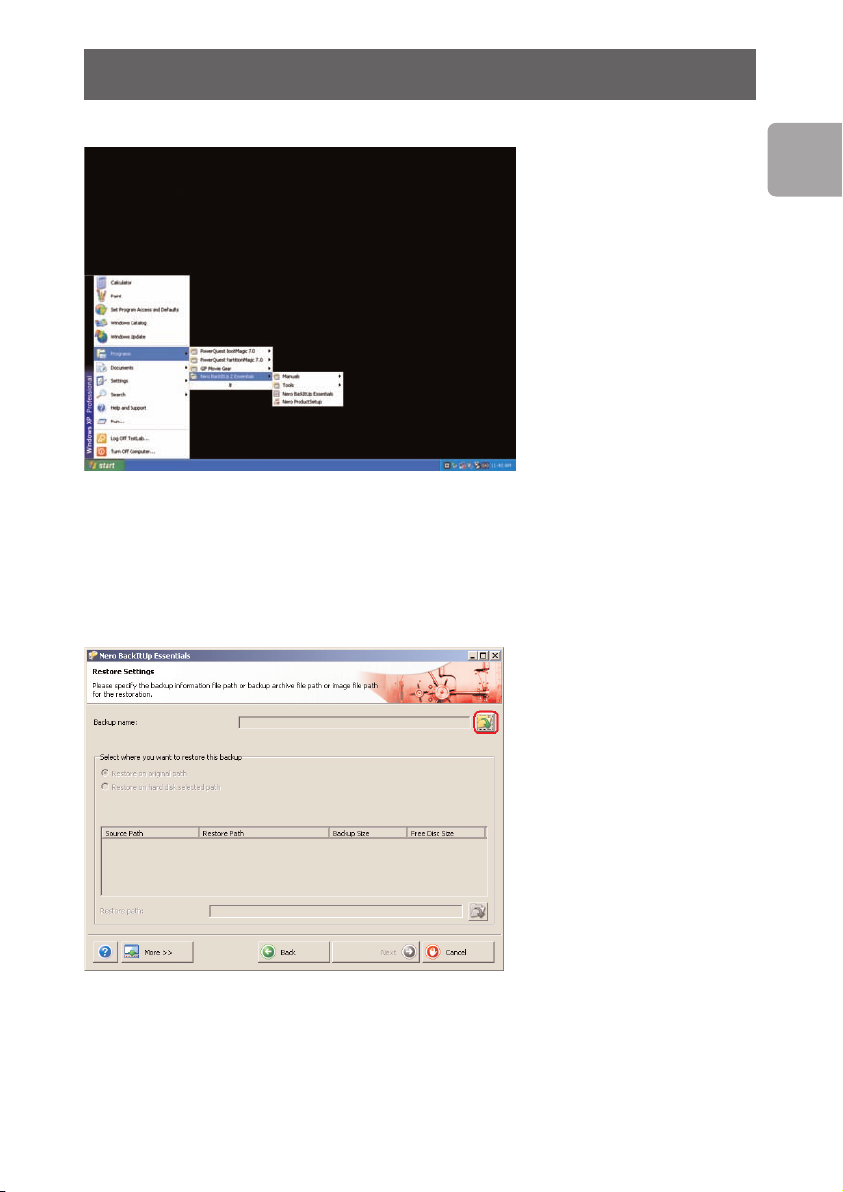
1
Start the Nero BackItUp software.
When the main screen of Nero BackItUp opens, click on
button.
Restore back-up
10
2
Select the file source and restore path.
Next
Click on the
button.
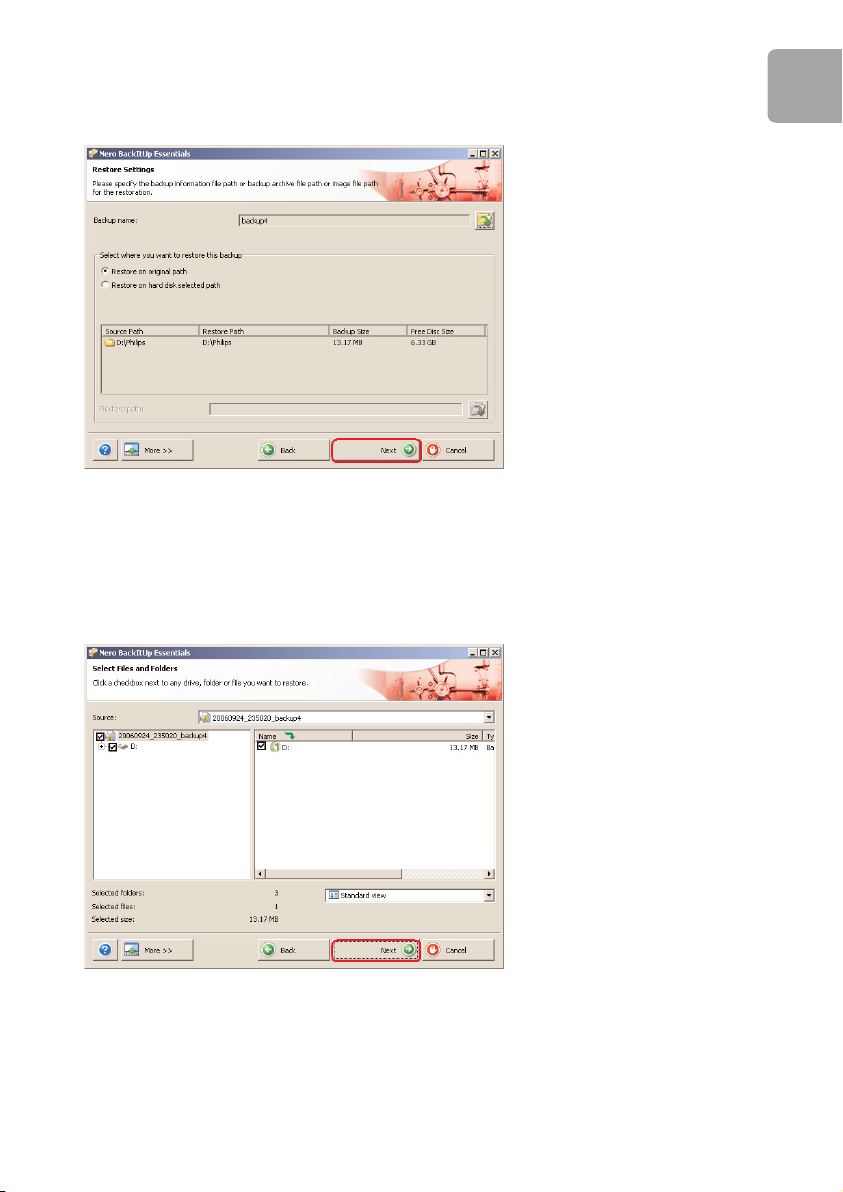
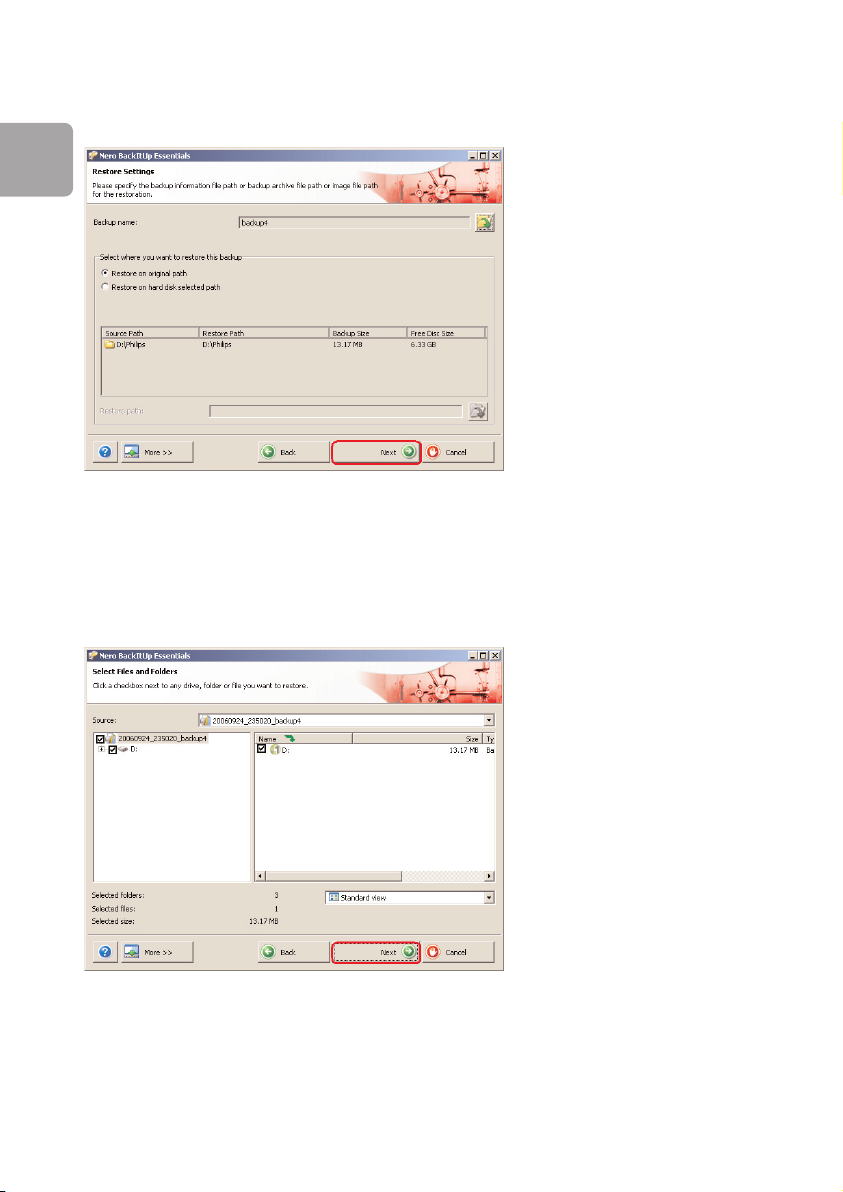
3
Click the
Next
EN
button.
4
Click the
Next
button.
11
EN
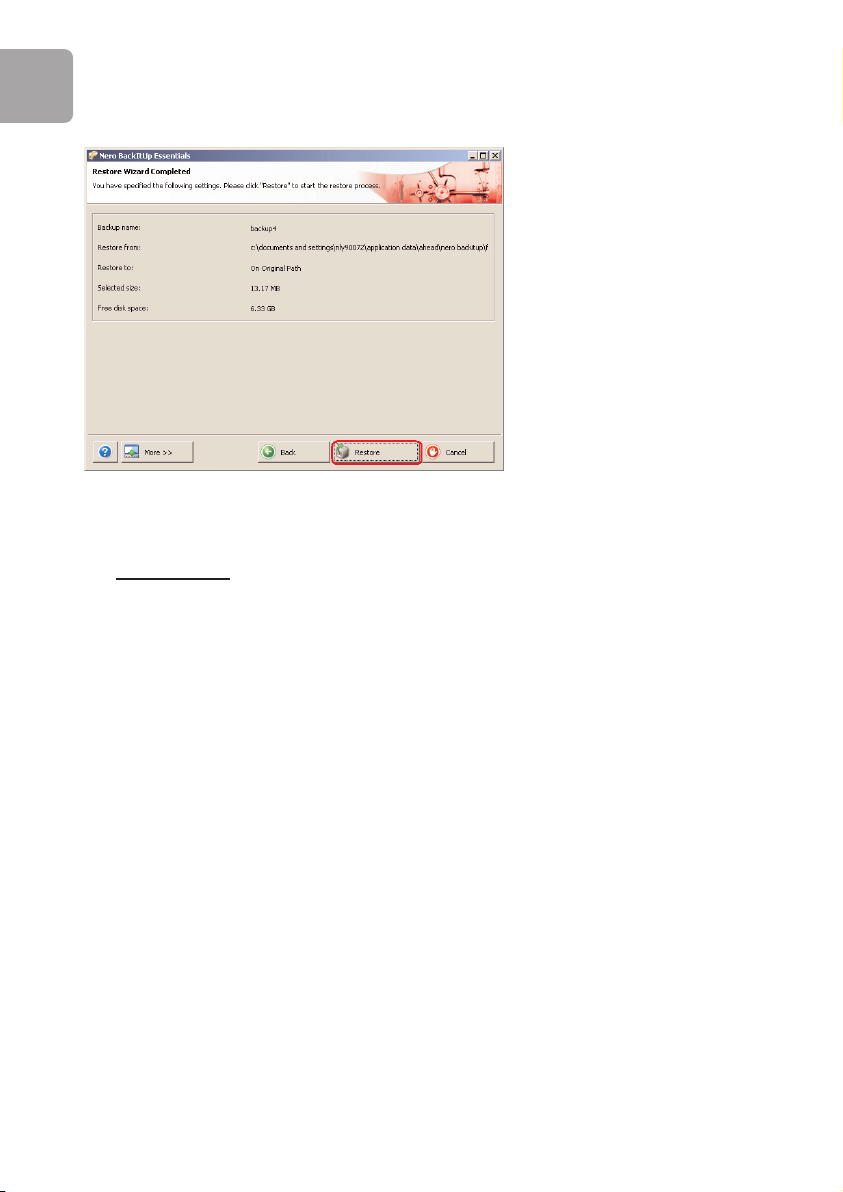
5
Click on the
restored your back-up.
Restore
button to finish the wizard.You now have successfully
See www
.nero.com for additional information on Nero BackItUp.
12

Warranty, Environment and Safety
How to find warranty information?
Additional warranty information is available in the “Philips Warranty”
folder on the Nero software disc.
You need Adobe Reader software to open these files. If you don’t have Adobe Reader,
you can download it for free on www
The Philips warranty may not apply if damage is caused by accidents, shock, misuse or
neglect.
“The making of unauthorized copies of copy-protected material including computer
programmes, files, broadcasts and sound recordings, may be an infringement of copyrights
and constitute a criminal offence.This equipment should not be used for such purposes.”
WEEE mark: “Information to the Consumer”.
Disposal of your old product
Your product is designed and manufactured with high quality materials and components,
which can be recycled and reused. Please inform yourself about the local separate
collection system for electrical and electronic products, including those marked by the
crossed-out wheel bin symbol. Please act according to your local rules and do not
dispose of your old products with your normal household waste.
.adobe.com.
EN
WARNING
Plastic bags can be dangerous
To avoid danger of suffocation, keep this bag away from babies and small children.
Although this product has been designed with utmost care for long-lasting performance.
Philips does advise you to handle electronics with good care:Avoid contact with water,
exposure to extreme forces.
Please make sure you place the device in a well-ventilated environment, to ensure longest
possible lifetime and optimal performance.
Philips does not provide any data recovery services and cannot under any circumstance
be held responsible for loss of data. It is the customer’s responsibility to back-up all data
stored on the Philips disk.All data will be deleted when offering the product to Philips
for service.
13

EN
Specifications
Technical Specifications:
Capacity Depending on model
Interface Hi-Speed USB 2.0 and eSATA
Transfer speed USB 2.0 480 Mb/s, eSATA 2400 Mb/s
Rotational speed 7200 rpm
Cache memory Depending on model
System requirements USB 1.1 (USB 2.0 for max. transfer speed)
Windows 2000,Windows XP, Vista
Additional information available at our website:
.philips.com/support
www
www.philips.com/storage
14

Table des matières
16 Contenu de l'emballage
17 Comment raccorder ce disque dur externe à
votre système ?
18 Comment déconnecter et arrêter le système
en toute sécurité avec le bouton Safe Shutdown ?
19 Comment effectuer une sauvegarde à l'aide du
bouton One-Click Backup ?
23 Comment restaurer une sauvegarde ?
26 Garantie, environnement et sécurité
27 Caractéristiques techniques
FR
Note importante
Pour utiliser les boutons One-Click Back-Up (sauvegarde en un seul
clic) et Safe-Shutdown (arrêt sécurisé) (fonctionne uniquement via une
connexion USB), installez d’abord le logiciel Nero BackItUp. Pour connaître les
instructions et en savoir plus, consultez la page 18-19.
15

FR
External hard disk SPD5110CC
SPD5115CC
User manual 3
Manuel d’instructions 15
Benutzerhandbuch 27
Gebruikershandleiding 39
Manual del usuario 51
Manuale utente 63
Manuel do utilizador 75
Kurulum Kılavuzu 87
TR
PT
I
ES
NL
D
F
EN
Contenu de l'emballage
A : Disque dur externe B : Support vertical
C : Adaptateur secteur
F : Câble eSATA G : CD-ROM d'installation H : Manuel d’instructions
D : Cordon d'alimentation E : Câble USB
16
Comment raccorder ce disque dur externe à votre système ?
1
Branchez le cordon d'alimentation (D) sur l'adaptateur
secteur (C) et raccordez l'ensemble au disque dur
externe et à une prise de courant.
FR
2
USB ou
eSATA
Une icône de lecteur Philips External Hard Disk apparaît dans l'Explorateur de Windows.
Le témoin bleu doit également s'allumer. (Pour utiliser le nouveau matériel, il peut être
nécessaire de redémarrer l'ordinateur.)
Le disque dur est prêt à l'emploi.Vous pouvez donc y enregistrer et y copier des
données en déplaçant les fichiers et les dossiers sur le disque, comme avec un disque dur
interne.
- Pour USB : Connectez le câble USB (E) à votre disque
dur externe. Raccordez l'autre extrémité du câble
USB à un port USB libre de l'ordinateur.
Pour eSATA : Branchez le câble eSATA (F) dans le
port eSATA du disque externe. Branchez l’autre
extrémité du câble eSATA à un port eSATA libre de
votre ordinateur.
Note importante
Pour utiliser les boutons One-Click Back-Up (sauvegarde en un seul
clic) et Safe-Shutdown (arrêt sécurisé) (fonctionne uniquement via une
connexion USB), installez d’abord le logiciel Nero BackItUp. Pour connaître les
instructions et en savoir plus, consultez la page 18-19.
17

FR
Comment déconnecter et arrêter le système en toute sécurité avec le bouton Safe Shutdown ?
Comment utiliser le bouton Safe Shutdown ?
(fonctionne uniquement via une connexion USB)
Le logiciel Nero, fourni avec ce produit, doit être installé pour activer la fonction SafeShutdown.
Pour installer Nero BackItUp, insérez le CD d’installation de Nero, attendez l’affichage
d’une fenêtre contextuelle puis sélectionnez Nero dans la liste des options.
Si la fenêtre contextuelle ne s’affiche pas, cliquez sur le fichier Setup.exe du CD à partir
de l'Explorateur de Windows pour lancer l’installation.
1
Fermez l'Explorateur de Windows et Nero BackItUp.
2
Appuyez sur le bouton Safe-Shutdown .
3
Attendez que le voyant bleu à l’avant du disque dur s’éteigne.
4
Vous pouvez maintenant déconnecter le disque dur de votre ordinateur.
Comment déconnecter en toute sécurité sans utiliser
le bouton Safe Shutdown ?
1 Double-cliquez sur l'icône Safely Remove Hardware
(Retirer le périphérique en toute sécurité) dans la barre
des tâches, dans l'angle inférieur droit de l'écran.
Dans la fenêtre qui apparaît, sélectionnez le nom du périphérique à retirer,
2
puis cliquez sur le bouton Stop (Arrêter).
3
Lorsque l'écran Stop a hardware device (Arrêt d'un périphérique matériel)
s'affiche, vérifiez si les informations sont correctes, puis cliquez sur le bouton OK.
4
Lorsque le message Safe to remove hardware (Le matériel peut être retiré en
toute sécurité) apparaît, débranchez le lecteur du port USB de l'ordinateur.
18

Comment effectuer une sauvegarde à l'aide du bouton One-Click Backup ?
(fonctionne uniquement via une connexion USB)
Le logiciel Nero, fourni avec ce produit, doit être installé pour activer la fonction OneClick Back-Up.
Pour installer Nero BackItUp, insérez le CD d’installation de Nero, attendez l’affichage
d’une fenêtre contextuelle puis sélectionnez Nero dans la liste des options.
Si la fenêtre contextuelle ne s’affiche pas, cliquez sur le fichier Setup.exe du CD à partir
de l'Explorateur de Windows pour lancer l’installation.
Lorsque vous appuyez sur le bouton One-Click Back-Up pour la
première fois après l’installation du logiciel Nero, la fenêtre suivante s’affiche:
FR
1
Cliquez sur le bouton Next (Suivant) pour démarrer le Job Wizard (Assistant de
création des tâches).
19
FR
2
Cliquez sur le bouton Next (Suivant) pour sélectionner les fichiers à sauvegarder.
20
3
Choisissez les fichiers et les dossiers à sauvegarder, puis cliquez sur Next (Suivant).

4
Sélectionnez le disque dur externe Philips en tant que cible dans la liste déroulante,
puis cliquez sur Next (Suivant).
FR
5
Pour exécuter la tâche uniquement à l'aide du bouton de sauvegarde en un clic,
sélectionnez le type de tâche once (Une fois) dans la liste déroulante.
21

FR
6
Cet écran récapitule les données de la sauvegarde créée. Cliquez sur le bouton
Finish (Terminer) pour fermer l’assistant.
La prochaine fois que vous appuierez sur le bouton
One-Click Back-Up, la sauvegarde démarrera automatiquement.
Rendez-vous sur www.nero.com pour en savoir plus sur Nero BackItUp.
22
Comment restaurer une sauvegarde ?
1
Démarrez le logiciel Nero BackItUp.
Lorsque l’écran principal de Nero BackItUp s’ouvre, cliquez sur le bouton Restore
back-up (Restaurer la sauvegarde).
FR
2
Sélectionnez le répertoire source et de restauration du fichier.
Cliquez sur le bouton Next (Suivant).
23
FR
3
Cliquez sur le bouton Next (Suivant).
24
4
Cliquez sur le bouton Next (Suivant).

5
Cliquez sur le bouton Restore (Restaurer) pour fermer l’assistant.Vous avez
restauré votre sauvegarde avec succès.
FR
Rendez-vous sur www
.nero.com pour en savoir plus sur Nero BackItUp
25

Garantie, environnement et sécurité
FR
Où trouver les informations relatives à la garantie ?
Pour plus d’informations concernant la garantie, consultez le dépliant « Garantie Philips »
du disque Nero.
Vous aurez besoin du logiciel Adobe Reader pour ouvrir ces fichiers. Si vous disposez pas
d'Adobe Reader, vous pouvez le télécharger gratuitement du site www
La garantie Philips peut ne pas s'appliquer si le périphérique est endommagé à la suite
d'un accident, d'un choc, d'un usage impropre ou d'une négligence.
« La création de copies illégales de contenu protégé contre la copie, y compris les
programmes informatiques, les fichiers, les diffusions et les enregistrements sonores, peut
constituer une violation des droits d'auteur et de copie (copyrights) ainsi qu'un délit. Cet
équipement ne doit en aucun cas être utilisé à de telles fins. »
Marque WEEE : “Informations pour le consommateur”.
.adobe.com.
Mise au rebut d'un périphérique usagé
Votre appareil est conçu et fabriqué avec des matériaux et des composants de haute
qualité qui peuvent être recyclés et réutilisés. Renseignez-vous au sujet du système de
collecte et de tri sélectif de votre région en ce qui concerne les produits électriques et
électroniques, y compris ceux caractérisés par le symbole de la poubelle à roulettes
marquée d'une croix.
Veuillez procéder conformément aux règlements locaux et ne pas mettre au rebut vos
appareils usagés avec les ordures ménagères ordinaires.
AVERTISSEMENT
Les sacs en plastique peuvent être dangereux.
Pour écarter tout risque d'étouffement, conservez ce sac hors de portée des bébés et
des enfants en bas âge.
Ce produit a été conçu avec un soin extrême pour des performances durables. Philips
vous recommande cependant de manipuler tout appareil électronique avec soin. En
particulier, il convient d'éviter tout contact avec l'eau et toute exposition à des forces
extrêmes.
Veillez à installer l'appareil dans un endroit bien ventilé, afin de lui garantir une durée de
vie la plus longue possible et des performances optimales.
26

Philips n’offre aucun service de récupération de données et ne peut en aucun cas être
tenue pour responsable de la perte de données. Il relève de la responsabilité du
consommateur de sauvegarder toutes les données stockées sur le disque Philips.Toutes
les données seront effacées lorsque vous transmettez le produit à Philips pour une
maintenance.
Caractéristiques techniques
Capacité Selon le modèle
Interface USB 2.0 (haute vitesse) et eSATA
Vitesse de transfert USB 2.0 480 Mb/s, eSATA 2400 Mb/s
Vitesse de rotation 7200 tr/mn
Mémoire cache Suivant le modèle
Configuration requise USB 1.1 (USB 2.0 pour la vitesse de transfert maximale)
Windows 2000,Windows XP,Vista
Vous trouverez de plus amples informations sur notre site Internet :
.philips.com/support
www
www.philips.com/storage
FR
27

DE
Inhalt
29 Packungsinhalt
30 Anschließen der externen Festplatte an Ihr
System
31 Sicheres Trennen und Abschalten mithilfe der
Schaltfläche „Safe-Shutdown“
32 Durchführen einer Datensicherung mithilfe der
Schaltfläche „One-Click Back-Up“
36 Wiederherstellen einer Sicherungskopie
39 Garantie, Umwelt und Sicherheit
40 Spezifikationen
28
Wichtiger Hinweis
Um die Schaltflächen One-Click Back-Up und Safe-Shutdown
verwenden zu können (funktioniert nur über USB-Anschluss), müssen Sie erst
die Software Nero BackItUp installieren.
Nähere Informationen finden Sie auf Seite 31-32.

Packungsinhalt
External hard disk SPD5110CC
SPD5115CC
User manual 3
Manuel d’instructions 15
Benutzerhandbuch 27
Gebruikershandleiding 39
Manual del usuario 51
Manuale utente 63
Manuel do utilizador 75
Kurulum Kılavuzu 87
TR
PT
I
ES
NL
D
F
EN
A : Externe Festplatte B : Vertikaler Ständer
DE
C :Netzteil
F : eSATA-Kabel G : Installations-CD H : Benutzerhandbuch
D : Netzkabel E : USB-Kabel
29
Anschließen der externen Festplatte an Ihr System
DE
1
2
USB oder
eSATA
Im Windows Explorer wird das Laufwerksymbol „Philips External Hard Disk“ angezeigt
und die blaue Leuchte leuchtet auf.
(Zur Verwendung der neuen Hardware muss der Computer ggf.neu gestartet werden).
Ihre Festplatte ist jetzt einsatzbereit und Sie können Daten auf der Festplatte speichern
und kopieren, so wie Sie es bei Ihrer internen Festplatte gewohnt sind, indem Sie Dateien
und Ordner auf die Festplatte verschieben.
Verbinden Sie das Netzteil (C) und Netzkabel (D)
miteinander und schließen Sie sie an die externe
Festplatte und an eine Netzsteckdose an.
- Bei USB: Schließen Sie das USB-Kabel (E) an Ihre
externe Festplatte an. Schließen Sie das andere Ende
des USB-Kabels an einen freien USB-Anschluss an
Ihrem PC an.
- Bei eSATA: Stecken Sie das eSATA-Kabel (F) in den
eSATA-Anschluss Ihrer externen Festplatte. Schließen
Sie das andere Ende des Esata-Kabels an einen freien
Esata-Anschluss an Ihrem PC an.
30
Wichtiger Hinweis
Um die Schaltflächen One-Click Back-Up und Safe-Shutdown
verwenden zu können (funktioniert nur über USB-Anschluss), müssen Sie erst
die Software Nero BackItUp installieren.
Nähere Informationen finden Sie auf Seite 31-32
 Loading...