

Page 1

SM6080/SM6081/SM7080/SM7081
USER MANUAL
SAECO.COM/CARE
EN USER MANUAL
SM7581, SM7580
4219.460.4139.1 SM7581, SM7580 FUTURA GOOD_WE_COVER_A5_FC.indd 1 08-06-17 16:04
SAECO.COM/CARE
Page 2
12
11
10
9
8
7
6
5
4
3
2
1
32
1
21 3 4
31
30
29
28
27
24
23
25
26
5
6
10
7
9 8
11
12
13
14
15
16
22
21
18
17
7
18
20
Page 3
5 sec.
234
5
6
7
2
8910
11
rAm
12
13
14
12
11
10
9
8
7
6
5
4
3
2
1
15161718192021
22232425262728
AQUACLEAN
WATER HARDNESSS
STAND-BY TIME
Espresso
6 More drinks
Clean Settings
ESPRESSO
AMERICANO *
CAPPUCCINO*
Americano
ESPRESSO 2X
COFFEE
Aroma strengt h select
ericano
COFFEE
AMOUNT
ericano
GROUND
COFFEE
Cappuccino Latte Macchiato
110 ML
60 ML
Aroma strength selec t
Cappuccino Latte Macchiato
Aroma strength selec t
Caè Latte
Caè Latte
1
Hot Water
Hot Water
ericano
GROUND
COFFEE
Cappuccino Latte Macchiato
Aroma strength selec t
Caè Latte
Hot Wate
LATTE MACCHIATO
TO START
TO SAVE
OK
1
2
Page 4

29
303132
Page 5

English 6
Deutsch 19
Español 34
Français 49
Italiano 64
Nederlands 79
Português 94
Page 6

6
English
Contents
Machine overview (Fig. 1)__________________________________________________________ 6
Introduction ____________________________________________________________________ 7
First installation__________________________________________________________________ 7
AquaClean filter__________________________________________________________________ 7
Measuring water hardness_________________________________________________________ 8
Using the control panel____________________________________________________________ 8
Brewing drinks___________________________________________________________________ 9
Personalizing drinks and creating profiles_____________________________________________ 10
Adjusting grinder settings__________________________________________________________ 10
Handling the brew group__________________________________________________________ 11
Cleaning and maintenance_________________________________________________________ 11
Descaling procedure______________________________________________________________ 14
Error codes______________________________________________________________________ 14
Ordering accessories______________________________________________________________ 15
Troubleshooting_________________________________________________________________ 15
Technical specifications___________________________________________________________ 18
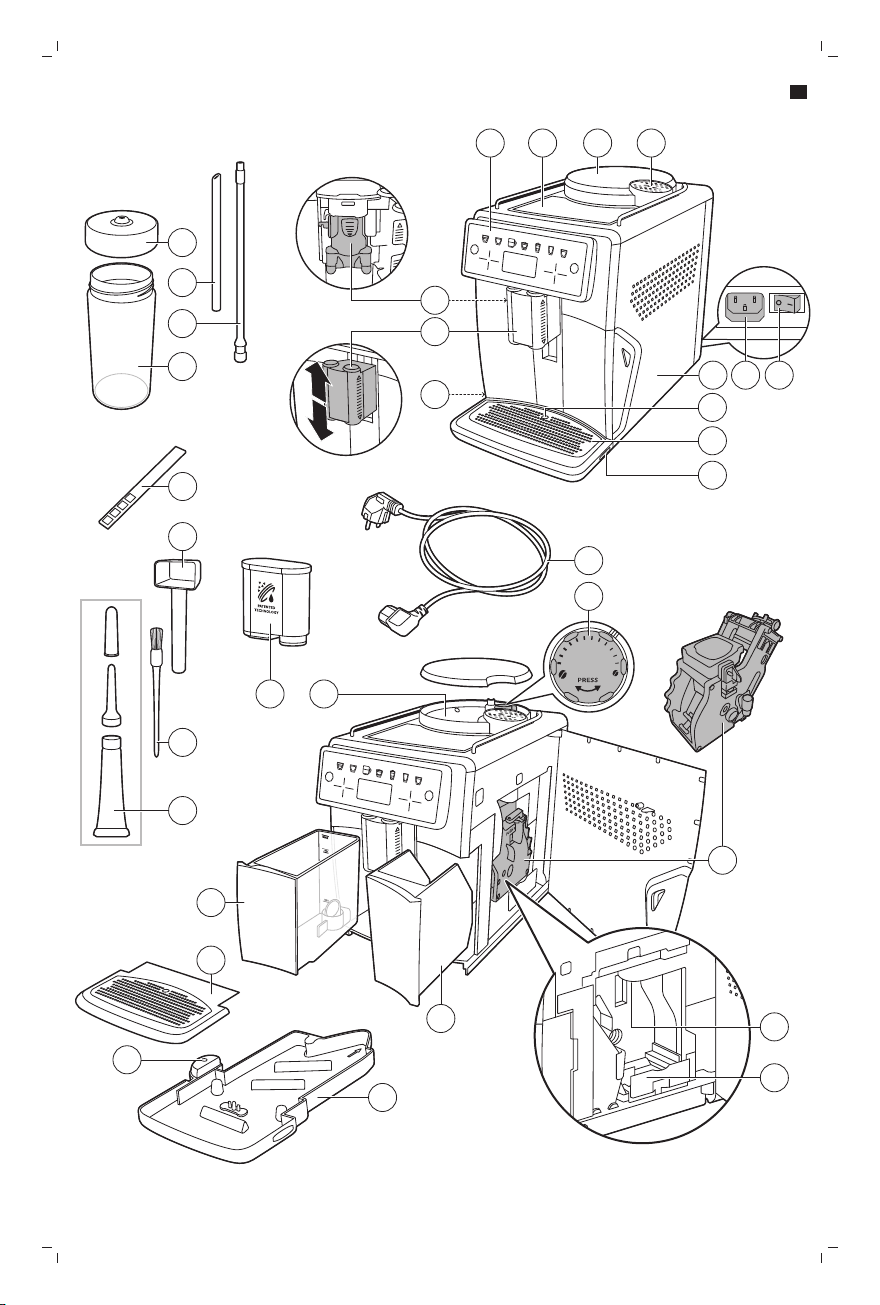
Machine overview (Fig. 1)
1 Control panel 18 Coffee residues drawer
2 Cup holder 19 Coffee grounds container
3 Lid of bean hopper 20 Drip tray
4 Lid of pre-ground coffee compartment 21 Drip tray cover
5 Internal cappuccinatore 22 Water tank
6 Adjustable coffee and milk dispensing
spout
7 Milk tube holder 24 Cleaning brush
8 Main switch 25 AquaClean filter
9 Socket for cord 26 Bean hopper
10 Service door 27 Measuring scoop
11 'Drip tray full' indicator 28 Water hardness test strip
12 Drip tray 29 Milk container
13 Drip tray release grip 30 Flexible milk tube
14 Mains cord with plug 31 Metal milk tube
15 Grind setting knob 32 Lid of milk container
16 Brew group
17 Coffee funnel
23 Grease tube with application tip and cap
Page 7

English
Introduction
Congratulations on your purchase of a Saeco full-automatic coffee machine! To fully benefit from the
support that Saeco offers, please register your product at www.saeco.com/care.
Read the separate safety booklet carefully before you use the machine for the first time and save it for
future reference.
To help you get the best out of your coffee machine, Saeco offers full support in 3 different ways:
1 The separate quick start guide for first installation and first use.
2 This user manual for more detailed information.
3 Online support and movies: scan the QR code on the front page or visit www.saeco.com/care
Note: This machine has been tested with coffee. Although it has been carefully cleaned, there may be
some coffee residues left. We guarantee, however, that the machine is absolutely new.
First installation
To prepare your coffee machine for use, you need to perform a few simple steps such as filling the
water circuit and activating the AquaClean filter. These steps are shown in the separate quick start
guide.
For the best-tasting coffee, you need to brew 5 coffees initially to allow the machine to complete its
self-adjustment.
The machine has been set up to get the best taste out of your coffee beans. Therefore we advise you
not to adjust the grinder settings until you have brewed 100-150 cups (approx. 1 month of usage).
7
AquaClean filter
The AquaClean filter is designed to reduce limescale deposits in your coffee machine and provide
filtered water to preserve the aroma and flavor of each cup of coffee. If you use a series of 8
AquaClean filters as indicated by the machine and in this user manual, you don't have to descale your
machine for up to 5000 cups. With each filter you can enjoy up to 625 cups, depending on the
selected coffee varieties and the rinsing and cleaning frequencies.
Preparing the AquaClean filter for activation
Before you place the AquaClean filter in the water tank, you need to prepare it for use:
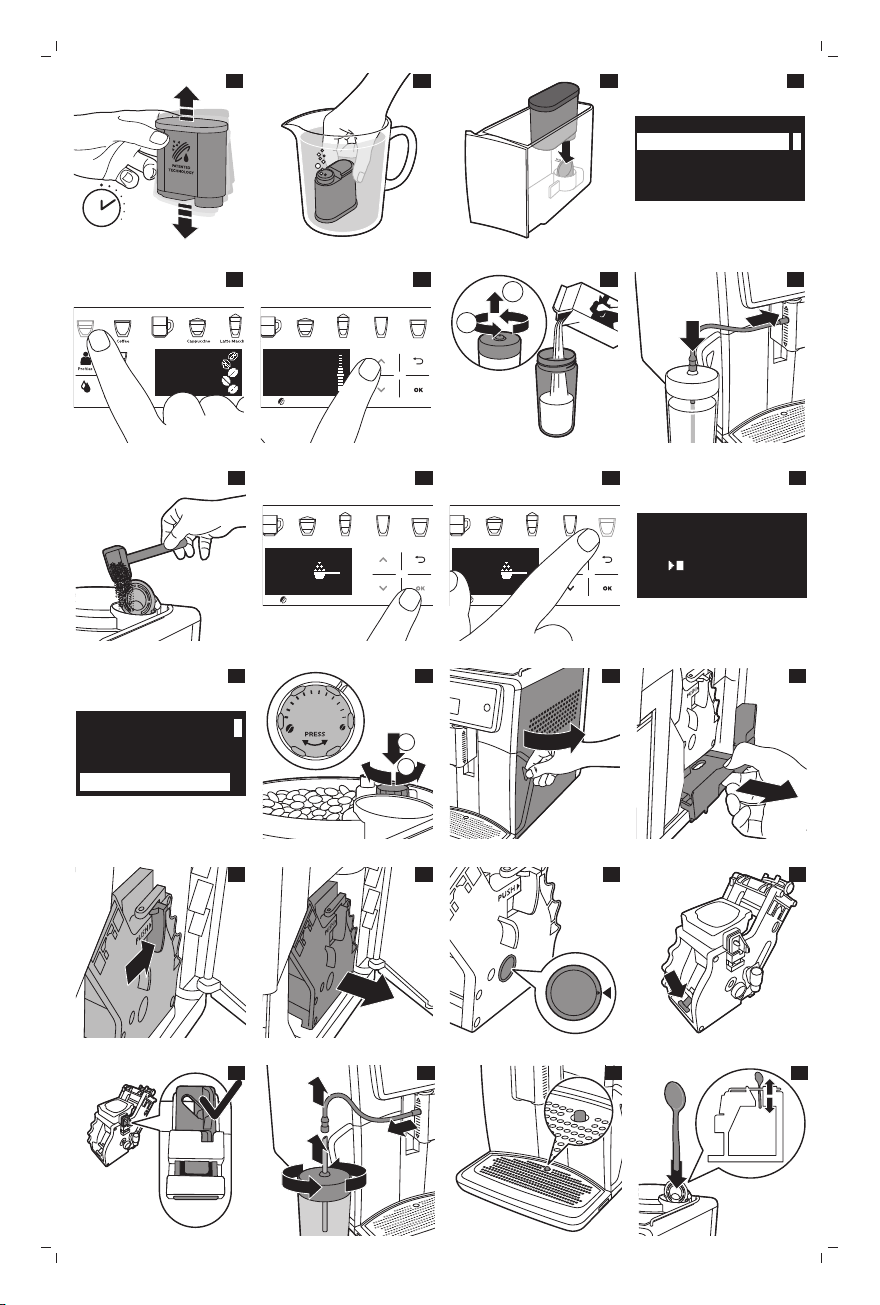
1 Shake the filter for about 5 seconds (Fig. 2).
2 Immerse the filter upside down in a jug with cold water and wait until no more air bubbles come
out (Fig. 3).
3 Push the filter onto the filter connection to the lowest possible point (Fig. 4).
Activating the AquaClean filter
You need to activate every new AquaClean filter that you use. By activating the AquaClean filter, the
machine monitors the capacity of the AquaClean filter and the number of filters used. There are 3
ways to activate the AquaClean filter.
Page 8
Proles
Aroma s trength sel ect
Clean Setting s
6 More dr inks
Espres so Coee Cappuccin o La tte Macchia to
Caè Latte
Hot WaterAmeri cano
1 43
5789 6
2
8
English
1. Activating the AquaClean filter during first installation
After switching on for the first time, the machine guides you through the first installation steps such as
filling the water tank, filling the water circuit and activating the AquaClean filter. Simply follow the
instructions on the screen.
2. Activating the AquaClean filter when prompted
Replace the AquaClean filter when the screen shows the message 'Replace AquaClean filter?'. Then
follow the instructions on the screen to activate the filter properly.
3. Activating the AquaClean filter at any other time
You can start (re)using the AquaClean filter at any time by following the instructions below.
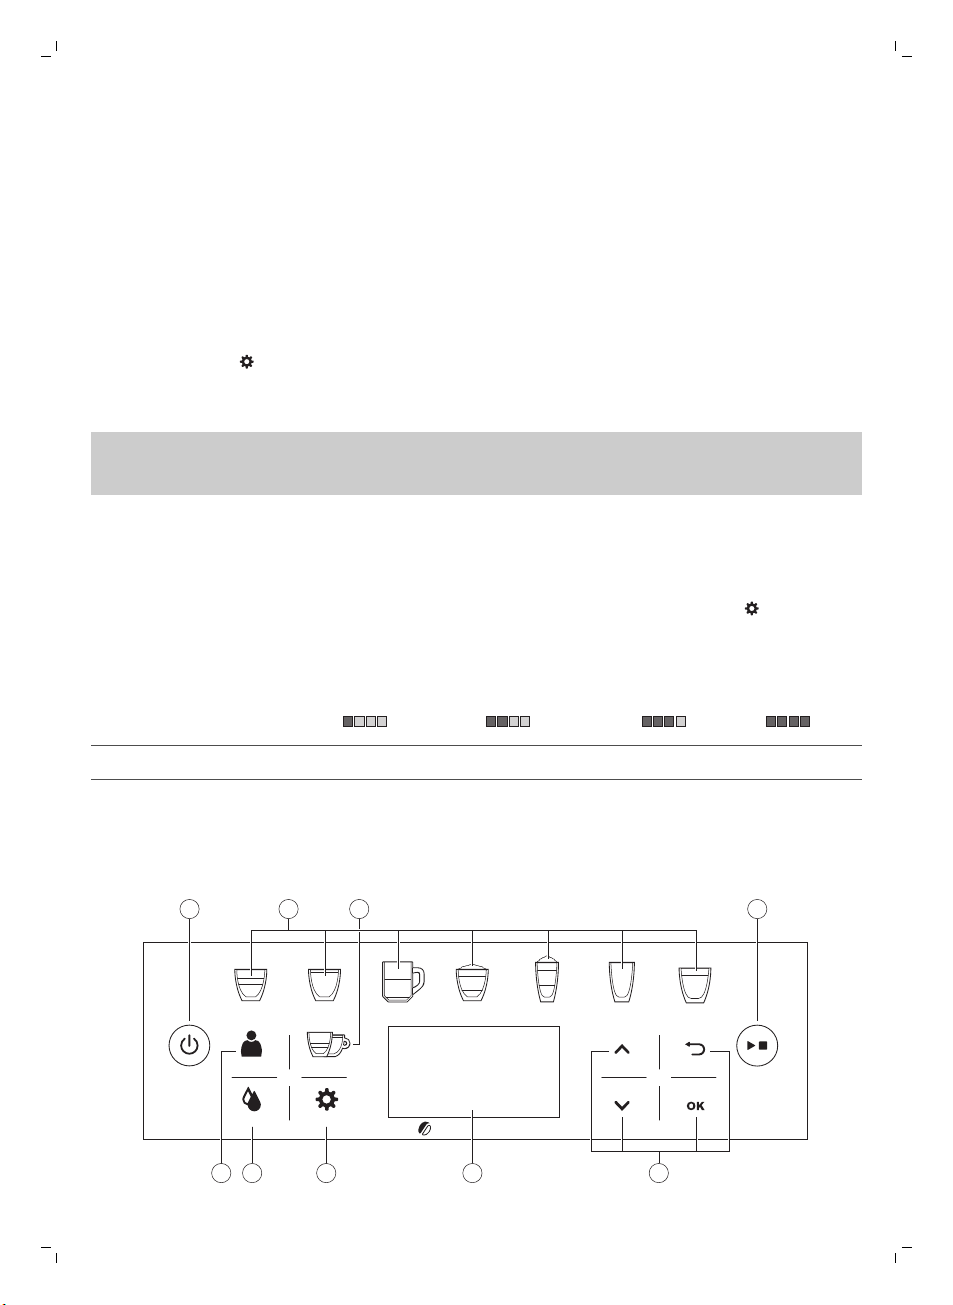
1 Tap the Settings
icon and use the up and down icons to select 'AquaClean' (Fig. 5).
2 Tap the OK icon. When the activation screen appears, tap the OK icon again.
3 Follow the instructions on the screen.
Note: In some situations the machine will tell you that you need to descale the machine before you
can install and activate a new AquaClean filter. This is because your machine has to be completely
limescale-free before you start to use the AquaClean filter. Follow the instructions on the screen.
Measuring water hardness
During first installation, you have to set the water hardness. Follow the steps on the screen and use
the water hardness test strip supplied. To set the water hardness later, tap the Settings icon and
select 'water hardness'.
1 Immerse the water hardness test strip in tap water for 1 second. Then wait for 1 minute.
2 Check how many squares have turned red.
3 Select the appropriate water hardness setting and tap the OK icon to confirm.
Number of red squares:
Value to be set 1 2 3 4
Using the control panel
Below you find an overview and description of the control panel of the machine. Use the up and
down arrows to scroll through the display and tap the OK icon to select or confirm your choices.
Page 9
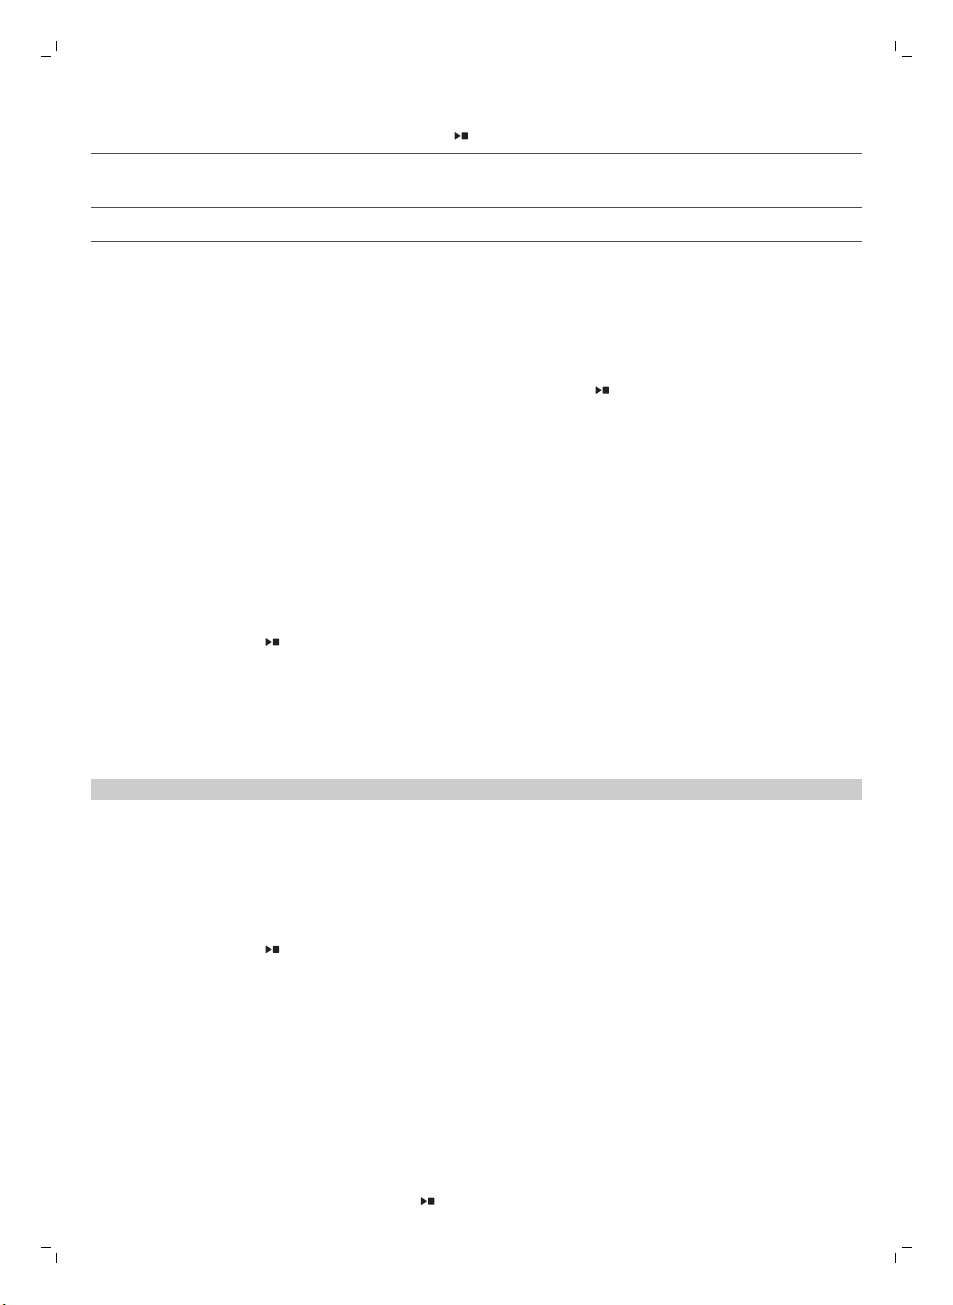
1. On/off button 4. Start/stop button 7. Machine settings
English
9
2. One-touch drink icons 5. Navigation icons (up,
down, back, ok)
3. Menu with 6 more drinks 6. Display 9. Personal profiles
8. Cleaning menu
Brewing drinks
You can select a drink by tapping one of the one-touch drink icons (Fig. 6) or by selecting another
drink in the menu by tapping the '6 more drinks' icon. After selecting a drink, you can personalize it by
adjusting the settings,
-
To brew two cups, first tap a drink and then press the start/stop
two cups by tapping a one-touch drink icon twice. The machine automatically carries out two
grinding cycles in sequence. This is possible for most drinks.
-
Slide the dispensing spout up or down to adjust the height to the size of the cup or glass you are
using.
Brewing coffee
1 Fill the water tank with tap water and fill the bean hopper with beans.
2 Tap one of the one-touch drink icons (Fig. 6) or tap the '6 more drinks' icon to select another drink.
3 Tap the OK icon if you want to adjust the settings. You can adjust the settings to your preference
with the up and down arrows (Fig. 7).
4 Press the start/stop
settings tap the OK icon if you want to save your settings to a profile (see 'Creating a profile').
button at any time to start brewing the selected drink or after adjusting all
Brewing milk-based drinks
1 Fill the water tank with tap water and fill the bean hopper with beans.
2 Unscrew the lid of the milk container and fill the milk container with milk (Fig. 8).
Always use milk coming directly from the fridge for optimal results.
3 Place the milk tube in the container and open the door of the internal cappuccinatore to check if
the tube is connected properly (Fig. 9).
4 Tap one of the one-touch drink icons (Fig. 6) or tap the '6 more drinks' icon to select another drink.
5 Tap the OK icon if you want to adjust the settings. You can adjust the settings to your preference
with the up and down arrows (Fig. 7). Tap the OK icon to confirm. Then you can adjust the next
setting.
6 Press the start/stop button at any time to start brewing the selected drink or after adjusting all
settings tap the OK icon if you want to save your settings to a profile (see 'Creating a profile').
7 Directly after dispensing the milk, the screen shows 'Auto Steam Shoot'. The machine now
automatically cleans the internal milk system with steam.
You can also use a regular milk carton to brew your milk-based drinks. Place the milk tube in directly
into the milk carton.
button twice. You can also brew
Brewing coffee with pre-ground coffee
1 Open the lid and pour one measuring scoop of pre-ground coffee into the pre-ground coffee
compartment. Then close the lid (Fig. 10).
2 After selecting a drink, tap the OK icon and use the up and down arrows to select pre-ground
coffee (Fig. 11). Then press the start/stop
button.
Page 10

10
English
Note: If you select ground-coffee, you cannot adjust the coffee strength and brew more than one
drink at the same time.
Dispensing hot water
1 Press the one-touch 'Hot water' icon (Fig. 12).
2 Press the start/stop button to start dispensing hot water.
Personalizing drinks and creating profiles
This machine allows you to adjust the settings of a drink to your own preference and to save the
adjusted drink in a personal profile. The different profiles have different colours. There are two ways to
create a profile:
1 When brewing a drink: Press the OK icon to adjust the settings of the selected drink and after
adjusting all settings tap the OK icon to save the personalized drink to a profile.
2 Via the 'Profiles' menu: Select a profile and then personalize the drinks one by one.
Personalizing your drinks
You can adjust the settings to your own preference:
1 Tap one of the one-touch drink icons or tap the '6 more drinks' icon to select your preferred drink
(Fig. 6).
2 Tap the OK icon to adjust the settings. The screen shows the settings you can adjust to your
preference. Depending on the type of drink, you can adjust strength, volume of coffee, milk and
foam, temperature, the taste and the order of brewing milk-based drinks.
3 Use the up and down arrows to set your preferred level (Fig. 7) and tap the OK icon to confirm.
Depending on the type of drink, the next adjustable setting appears on the screen.
4 After customizing all settings, tap the OK icon to save these settings to your profile (Fig. 13) and
follow the instructions on the screen.
Creating a profile
1 Tap the Profiles
You can also use the up and down icons to select your profile.
2 Tap the OK icon to customize the profile.
3 Use the up and down arrows to select the drink you want to customize and tap the OK icon to
confirm.
4 Use the up and down arrows to adjust the settings to your preference and tap the OK icon to
confirm. Customized drinks are marked with an asterisk (*) (Fig. 14).
icon repeatedly to select one of the profiles. All profiles have different colors.
Adjusting grinder settings
You can adjust the grinder settings by using the grind setting knob inside the bean container. There
are 12 different grind settings you can choose from. The lower the setting, the stronger the coffee.
Note: You can only adjust the grind settings when the machine is grinding coffee beans. You need to
brew 2 to 3 drinks before you can taste the full difference.
Caution: Do not turn the grind setting knob more than one notch at a time to prevent damage to the
grinder.
1 Place a cup under the coffee dispensing spout.
Page 11

English
2 Open the lid of the bean hopper.
3 Tap the ESPRESSO icon. Then press the start/stop button.
4 When the grinder starts grinding, press down the grind setting knob and turn it to the left or right.
Handling the brew group
Go to www.saeco.com/care for detailed video instructions on how to remove, insert and clean the
brew group.
Removing the brew group from the machine
1 Switch off the machine by pressing the main switch on the back of the machine.
2 Remove the coffee grounds container.
3 Open the service door (Fig. 16).
4 Remove the coffee residue drawer (Fig. 17).
5 Press the PUSH button (Fig. 18) and pull at the grip of the brew group to remove it from the
machine (Fig. 19).
Reinserting the brew group
Before you slide the brew group back into the machine, make sure it is in the correct position.
1 Check if the arrow on the yellow cylinder on the side of the brew group is aligned with the black
arrow and N (Fig. 20).
-
If they are not aligned, push down the lever until it is in contact with the base of the brew group
(Fig. 21).
2 Make sure that the yellow locking hook on the other side of the brew group is in the correct
position.
-
To position the hook correctly, push it upwards until it is in uppermost position (Fig. 22).
3 Slide the brew group back into the machine along the guiding rails on the sides until it locks into
position with a click. Do not press the PUSH button.
4 Place back the coffee residues drawer and close the service door. Then place back the coffee
grounds container.
11
Cleaning and maintenance
Regular cleaning and maintenance keeps your machine in top condition and ensures good-tasting
coffee for a long time, a steady coffee flow and a perfect milk froth.
Consult the table on when and how to clean all detachable parts of the machine. You can find more
detailed information and video instructions on www.saeco.com/care.
Cleaning table
Part description
Brew group Weekly Remove the brew group and rinse it under the
When to clean How to clean
tap.
Page 12
12
English
Part description When to clean How to clean
Monthly Perform the 'Brew group clean' procedure with
the Philips coffee oil remover tablet. Select 'Brew
group clean' in the cleaning menu and follow the
instructions on the screen. Go to
www.saeco.com/care for detailed video
instructions.
Lubrication of the
brew group
Milk
system/internal
cappuccinatore
Milk container Weekly Disassemble the milk container and remove the
Drip tray Empty the drip tray as soon
Depending on the type of
usage. Consult the
lubrication table (see
'Lubricating the brew group').
After every day of use Perform the HYGIESTEAM program in the
Weekly Remove and disassemble the internal
Monthly Perform the 'DEEP MILK CLEAN' procedure with
as the red 'drip tray full'
indicator pops up through
the drip tray (Fig. 24). Clean
the drip tray when it suits
you.
Lubricate the brew group with the Philips grease.
Go to www.saeco.com/care for detailed video
instructions.
cleaning menu. Select HYGIESTEAM in the
cleaning menu and follow the instructions on the
screen.
cappuccinatore (see 'Cleaning the internal
cappuccinatore under the tap'). Rinse all parts
under the tap.
the Philips milk circuit cleaner. Select 'DEEP MILK
CLEAN' in the cleaning menu and follow the
instructions on the screen. Go to
www.saeco.com/care for detailed video
instructions.
milk tube (Fig. 23). Rinse all parts under the tap or
in the dishwasher.
Remove the drip tray and rinse it under the tap
with some washing-up liquid.
Coffee grounds
container
Water tank When it suits you. Rinse the water tank under the tap
Coffee funnel Check the coffee funnel
Empty the coffee grounds
container when prompted by
the machine. Clean it when it
suits you.
weekly to see if it is clogged.
Remove the coffee grounds container while the
machine is switched on and rinse it under the tap
with some washing-up liquid.
Unplug the machine and remove the brew group.
Open the lid of the pre-ground coffee
compartment and insert the spoon handle into
the coffee funnel. Move the handle up and down
until the clogged ground coffee falls down (Fig.
25). Go to www.saeco.com.care for detailed
video instructions.
Page 13
English
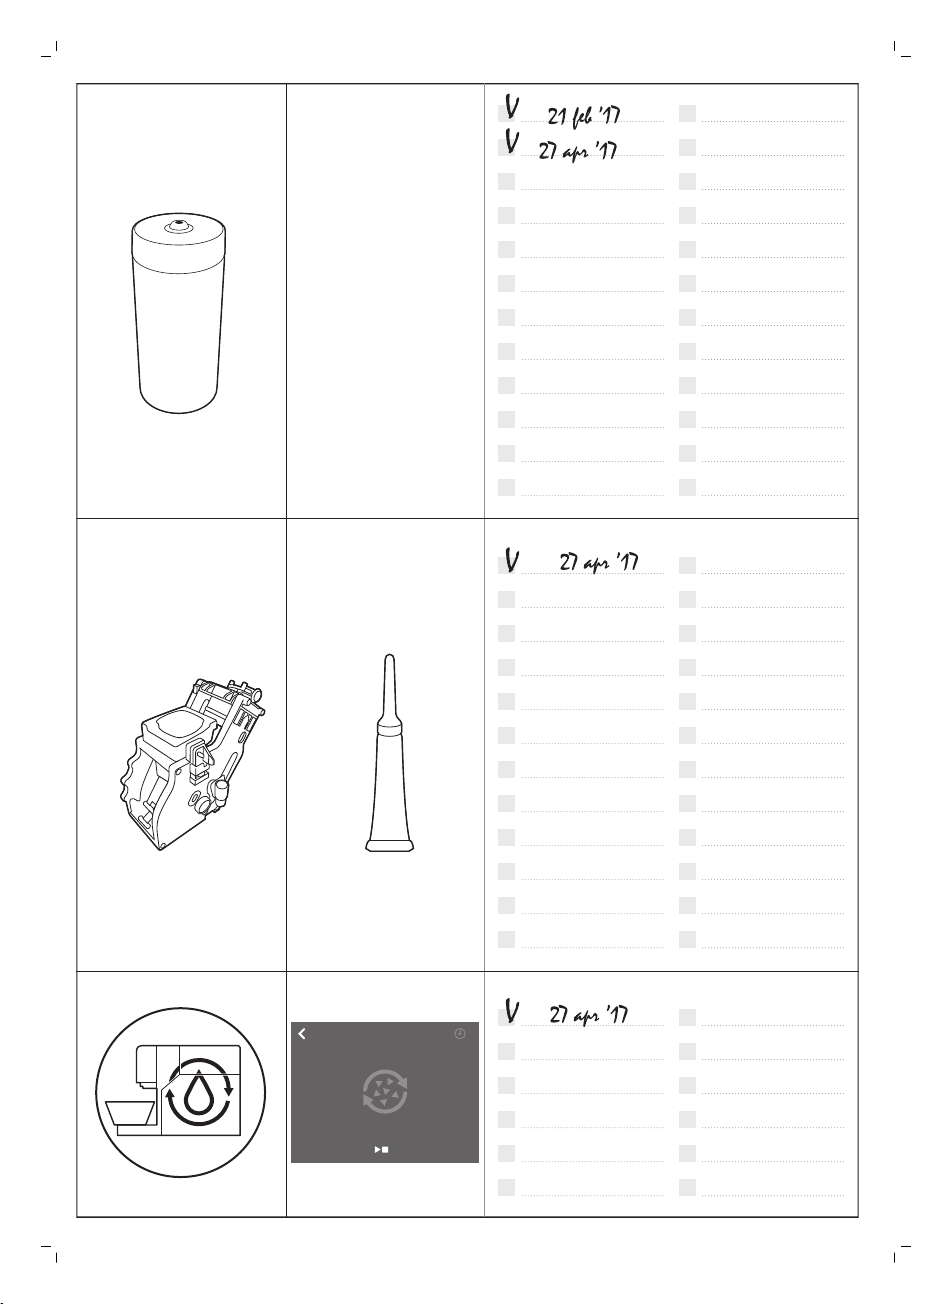
Tip: There is a cleaning calender on the last page of this user manual. Write down the dates on which
you have performed a cleaning action.
Cleaning the brew group
Regular cleaning of the brew group prevents coffee residues from clogging up the internal circuits.
Visit www.saeco.com/care for support videos on how to remove, insert and clean the brew group.
Cleaning the brew group under the tap
1 Remove the brew group.
2 Rinse the brew group thoroughly with water. Carefully clean the upper filter (Fig. 26).
3 Let the brew group air-dry before you place it back. Do not dry the brew group with a cloth to
prevent fibers from collecting inside the brew group.
Cleaning the brew group with the coffee oil remover tablets
Only use Philips coffee oil remover tablets. Tap the Clean icon and select 'Brew group clean'. Then
follow the instructions on the screen. Visit www.saeco.com/care for detailed video instructions.
Lubricating the brew group
Lubricate the brew group regularly to ensure that the moving parts continue to move smoothly. See
the table below for the lubrication frequency. Visit www.saeco.com/care for detailed video
instructions.
Usage frequency
Low 1-5 Every 4 months
Nr of drinks brewed daily Lubrication frequency
13
Normal 6-10 Every 2 months
Heavy >10 Every month
Cleaning programs for the internal cappuccinatore
The machines has three programs to clean the internal cappuccinatore. The Auto Steam Shoot
cleaning program is automatically performed by the machine after brewing a milk-based drink. You
can select the HYGIESTEAM or DEEP MILK CLEAN program by tapping the Clean icon and scrolling
through the cleaning menu. Then follow the instructions on the screen.
-
Auto Steam Shoot: the machine shoots steam through the internal cappuccinatore to quickly clean
it.
-
HYGIESTEAM: The machine thoroughly cleans the internal milk system with steam. Place the milk
tube on the milk tube holder (Fig. 27) and follow the instructions on the screen.
-
DEEP MILK CLEAN: Perform the 'DEEP MILK CLEAN' procedure with the Philips milk circuit cleaner
for a thorough cleaning of the internal milk system.
Cleaning the internal cappuccinatore under the tap
1 Open the door of the internal cappuccinatore (Fig. 28).
2 Remove the internal cappuccinatore by pulling it down (Fig. 29).
3 Disassemble the internal cappuccinatore by pulling the bottom part off the top part (Fig. 30).
4 Disassemble all parts (Fig. 31) and clean them under the tap.
5 Reassemble the internal cappuccinatore.
Page 14

14
English
6 To place back the internal cappuccinatore, put it in upright position and make sure the holes are
aligned with the two tubes on the machine. Then move the internal cappuccinatore upwards until it
locks into place (Fig. 32).
7 Close the door.
Visit www.saeco.com/care for detailed video instructions.
Descaling procedure
Please use Philips descaler only. Under no circumstances should you use a descaler based on sulfuric
acid, hydrochloric acid, sulfamic or acetic acid (vinegar) as this may damage the water circuit in your
machine and not dissolve the limescale properly. Not using the Philips descaler will void your
warranty. Failure to descale the appliance will also void your warranty. You can buy Philips descaling
solution in the online shop at www.saeco.com/care.
1 When the machine asks you to descale it, press the start/stop
without being prompted by the machine, tap the Clean icon and select 'Descale'.
2 Remove the drip tray and the coffee grounds container, empty them and put them back into place.
3 Remove the water tank and empty it. Then remove the AquaClean filter.
4 Pour the whole bottle of Philips descaler in the water tank and then fill it with water up to the CALC
CLEAN level. Then place it back into the machine.
5 Place a large container (1.5 l) under the coffee dispensing spout.
6 Place the milk spout on the milk spout holder.
7 Follow the instructions on the screen to start the descaling procedure. The descaling procedure
lasts approx. 30 minutes and consists of a descaling cycle and a rinsing cycle.
8 Once the descaling cycle is finished, you need to rinse the water tank and water circuit. Follow the
instructions on the screen.
9 Place a new AquaClean filter in the water tank.
Tip: Using the AquaClean filter reduces the need for descaling!
button to start. To start descaling
What to do if the descaling procedure is interrupted
You can exit the descaling procedure by pressing the on/off button on the control panel. If the
descaling procedure is interrupted before it is completely finished, do the following:
1 Empty and rinse the water tank thoroughly.
2 Fill the water tank with fresh water up to the CALC CLEAN level indication and switch the machine
back on. The machine will heat up and perform an automatic rinsing cycle.
3 Before brewing any beverages, perform a manual rinsing cycle. To perform a manual rinsing cycle,
first dispense half a water tank of hot water and then brew 2 cups of pre-ground coffee without
adding ground coffee.
Note: If the descaling procedure was not completed, the machine will require another descaling
procedure as soon as possible.
Error codes
Below you find a list of the error codes showing problems that you can solve yourself. Video
instructions are available on www.saeco.com/care. If another error code appears, please contact the
Philips Consumer Care Center in your country. For contact details, see the warranty leaflet.
Page 15
English
15
Error
Problem Possible solution
code
01 The coffee funnel is
03 The brew group is dirty
04 The brew group is not
05 There is air in the water
clogged.
or not well-greased.
positioned correctly.
circuit.
The AquaClean filter
was not prepared
properly before
installation or it is
clogged.
Switch off the machine and unplug it. Remove the brew group.
Then open the lid of the pre-ground coffee compartment and
insert the spoon handle. Move the handle up and down until
the clogged ground coffee falls down (Fig. 25). Visit
www.saeco.com/care for detailed video instructions.
Switch off the machine with the main switch. Rinse the brew
group with fresh water, let it air-dry and then lubricate it.
Consult chapter 'Cleaning the brew group' or visit
www.saeco.com/care for detailed video instructions. Then
switch the machine on again.
Switch off the machine with the main switch. Remove the brew
group and reinsert it. Make sure that the brew group is in the
correct position before you insert it. Consult chapter 'Handling
the brew group or visit www.saeco.com/care for detailed
video instructions. Then switch the machine on again.
Restart the machine by switching it off and on again with the
main switch. If this works, dispense 2-3 cups of hot water.
Descale the machine if you have not done so for a longer
period of time.
Remove the AquaClean filter and try again to brew a coffee. If
this works, make sure that the AquaClean filter is prepared
properly before you place it back (see 'Preparing the
AquaClean filter for activation'). Put the AquaClean filter back
into the water tank. If this still does not work, the filter is
clogged and needs to be replaced.
14 The machine is
overheated.
Switch the machine off and switch it back on again after 30
minutes.
Ordering accessories
To clean and descale the machine, only use the Philips maintenance products. These products can be
purchased from your local retailer, from the authorized service centers or online at
www.saeco.com/care.
Maintenance products and type numbers:
-
Descaling solution CA6700
-
AquaClean filter CA6903
-
Brew group grease HD5061
-
Coffee oil remover tablets CA6704
-
Milk circuit cleaner CA6705
-
Maintenance kit CA6707
Troubleshooting
This chapter summarizes the most common problems you could encounter with the machine. Support
videos and a complete list of frequently asked questions are available on www.saeco.com/care. If
Page 16
16
English
you are unable to solve the problem, contact the Consumer Care Center in your country. For contact
details, see the warranty leaflet.
Problem
The drip tray fills up
quickly.
Cause Solution
This is normal. The machine
uses water to rinse the internal
circuit and brew group. Some
water flows through the internal
system directly into the drip
tray.
Empty the drip tray when the 'drip tray
full' indicator pops up through the drip
tray cover (Fig. 24). Place a cup under
the dispensing spout to collect rinsing
water.
The machine is in DEMO
mode.
The 'coffee grounds
container full' icon
remains displayed.
I cannot remove the
brew group.
You have not removed the
I cannot insert the brew
group.
You pressed the standby
button for more than 8
seconds.
You emptied the coffee
grounds container while the
machine was switched off.
You placed back the coffee
grounds container too fast.
The brew group is not in the
correct position.
coffee grounds container.
The brew group is not in the
correct position.
Switch the machine off and then on
again with the main switch on the back
of the machine.
Always empty the coffee grounds
container while the machine is switched
on. If you empty the coffee grounds
container when the machine is switched
off, the coffee cycle counter is not reset.
Do not place back the coffee grounds
container until the screen prompts you
to put it back.
Reset the machine in the following way:
place back the drip tray and the coffee
grounds container. Then close the
service door and switch the machine off
and back on again. Try again to remove
the brew group.
Remove the coffee grounds container
before you remove the brew group.
Reset the machine in the following way:
place back the drip tray and the coffee
grounds container. Leave the brew
group out. Close the service door and
switch the machine on and off. Then put
the brew group in the correct position
(see 'Reinserting the brew group') and
reinsert it into in the machine.
The machine is still in the
descaling procedure.
The coffee is watery. The grinder is set to a too
coarse setting.
The coffee exit duct is clogged. Clean the coffee exit duct with the
You cannot remove the brew group
when the descaling procedure is in
progress. First complete the descaling
procedure and then remove the brew
group.
Set the grinder to a finer (lower) setting.
spoon handle. Then switch the machine
off and on again.
Page 17
Problem Cause Solution
The machine is performing its
self-adjustment procedure.
Brew a few cups of coffee.
English
17
The brew group is dirty or
The coffee is not hot
enough.
The temperature is set too low.
You added milk. Whether the milk you add is warm or
Coffee does not come
out or coffee comes out
slowly.
The brew group is dirty. Clean the brew group.
The coffee dispensing spout is
needs to be lubricated.
The cups you use are cold. Preheat the cups by rinsing them with
Check the menu settings.
The AquaClean filter was not
prepared properly for
installation or it is clogged.
The grinder is set to a too fine
setting.
dirty.
The machine circuit is blocked
by limescale.
Clean and lubricate the brew group.
hot water.
Set the temperature to 'high' in the
menu.
cold, it always decreases the
temperature of the coffee to some
extent.
Remove the AquaClean filter and try to
brew a coffee again. If this works, make
sure the AquaClean filter is prepared
properly before you place it back. Place
back the prepared filter. If this still does
not work, the filter is clogged and needs
to be replaced.
Set the grinder to a coarser (higher)
setting.
Clean the coffee dispensing spout and
its holes with a needle.
Descale the machine.
The milk does not froth. The internal cappuccinatore is
The type of milk used is not
The milk is splashing. The milk you use is not cold
The machine seems to
be leaking.
dirty or not inserted correctly.
suitable for frothing.
enough.
The machine uses water to
rinse the internal circuit and
brew group. Some water flows
through the internal system
directly into the drip tray.
Clean the internal cappuccinatore and
make sure that you position and insert it
correctly.
Different types of milk result in different
amounts of froth and different froth
qualities. We have tested the following
milk types which proved to deliver a
good milk froth result: semi-skimmed or
full-fat cow's milk, soy milk and lactosefree milk.
Make sure you use cold milk coming
directly from the fridge.
Empty the drip tray when the 'drip tray
full' indicator pops up through the drip
tray cover (Fig. 24). Place a cup under
the dispensing spout to collect rinsing
water.
Page 18
18
English
Problem Cause Solution
The drip tray is too full and has
overflowed which makes it look
like the machine is leaking.
Empty the drip tray when the 'drip tray
full' indicator pops up through the drip
tray cover (Fig. 24). Place a cup under
the dispensing spout to collect rinsing
water.
The machine is not placed on a
I cannot activate the
AquaClean filter and the
machine asks for
descaling.
You did not install the
The new water filter does
not fit.
The machine is making a
noise.
horizontal surface.
The filter has not been replaced
in time after the AquaClean
filter icon flashed and the
capacity dropped to 0%.
AquaClean filter during first
installation, but after having
brewed approx. 25 coffees
(based on 100ml cups). The
machine has to be completely
limescale-free before you
install the AquaClean filter.
You are trying to install another
filter than the AquaClean filter.
It is normal that your machine
makes noise during use.
Place the machine on a horizontal
surface so that the 'drip tray full'
indicator works properly.
Descale your machine first and then
install the AquaClean filter.
First descale the machine and then
install a new AquaClean filter. After
descaling, the filter counter is reset to
0/8. Always confirm filter activation in
the machine menu. Also do this after
filter replacement.
Only the AquaClean filter fits into the
machine.
If the machine starts to make a different
kind of noise, clean the brew group and
lubricate it (see 'Lubricating the brew
group').
Technical specifications
The manufacturer reserves the right to improve the technical specifications of the product. All the
preset quantities are approximate.
Description
Size (w x h x d) 283 x 393 x 489 mm
Value
Weight 10.8 - 12.2 kg
Power cord length 1200 mm
Water tank 1.7 litres, removable
Coffee bean hopper capacity 450 g
Coffee grounds drawer capacity 15 pucks
Milk carafe capacity 600 ml
Adjustable spout height 75-148 mm
Nominal voltage - Power rating - Power supply See data plate on inside of service door
Page 19
Milk
circuit
cleaner
DESCALING
press to star t
15 min
Page 20
4219.460.4139.1 (6/2017) rev.01
www.saeco.com/care
>75% recycled paper
>75% papier recyclé
 Loading...