


Single/Double
electric breast pump
Advanced/Tire-lait
électrique simple/
double Avancé
SCF393/71
SCF391/71
www.philips.com/mybreastpump


D
C
B
A
B1
B2
B3
B4
B5
B6
C5
C3 C4
C2
C1
A1
A2
A3
A4
A5
D7
D1 D3 D5
D4 D6
D8
D2


English
Contents
Introduction __________________________________________________________________________________________ 5
General description __________________________________________________________________________________ 6
Indications for use____________________________________________________________________________________ 6
Important safety information ________________________________________________________________________ 7
Before first use _______________________________________________________________________________________ 10
Cleaning and disinfecting ____________________________________________________________________________ 10
Using the breast pump _______________________________________________________________________________ 13
Using the breast pump when you have symptoms of engorgement _______________________________ 17
After use ______________________________________________________________________________________________ 17
Feeding breast milk with the bottle__________________________________________________________________ 18
Compatibility _________________________________________________________________________________________ 21
Ordering accessories _________________________________________________________________________________ 21
Disposal_______________________________________________________________________________________________ 21
Full Two-Year Warranty ______________________________________________________________________________ 21
Troubleshooting ______________________________________________________________________________________ 21
Undesirable side effects _____________________________________________________________________________ 23
Storage conditions ___________________________________________________________________________________ 23
Electromagnetic fields (EMF) ________________________________________________________________________ 23
Technical information ________________________________________________________________________________ 23
Explanation of symbols ______________________________________________________________________________ 26
5
English
Introduction
Congratulations on your purchase and welcome to Philips Avent! To fully benefit from the support
that Philips Avent offers, register your breast pump at www.philips.com/welcome.
The Philips Avent single/double electric breast pump Advanced is inspired by babies and their natural
suction movement. The soft silicone cushion stimulates the nipple with gentle massaging movements,
helping you to express milk comfortably and effectively. The combination of suction and nipple
stimulation triggers fast milk flow. The no-lean-forward design enables you to sit in a relaxed, upright
position while expressing.
Healthcare professionals and the World Health Organization recommend to exclusively feed children
with breast milk during the first six months of life and to continue giving them breast milk for two years
next to offering additional nutritious foods. This is because your breast milk is specially adapted to
your baby’s needs and helps to protect your baby against infection and allergies. To breastfeed
longer, you can express and store your milk so that your baby can still enjoy the benefits of it, even if
you cannot be there to provide it yourself. As the pump is compact, quiet and discrete to use, you can
take it with you anywhere, allowing you to express milk at your own convenience and to maintain your
milk supply.
If breastfeeding goes well, it is advisable (unless recommended otherwise by your healthcare
professional) to wait until your milk supply and breastfeeding schedule are established (normally at
least 2 to 4 weeks after giving birth) before you start expressing.

6
English
General description
Note: The numbers mentioned below refer to the numbers on the figure of the front foldout page
of this user manual.
Note: The double breast pump comes with two pieces of the items shown in Figures B and C.
Product description (Fig. A)
A1 Motor unit
A2 Breast pump kit
A3 Bottle
A4 Adapter*
Breast pump kit (Fig. B)
B1 Silicone tube and cap
B2 Silicone diaphragm
B3 Pump body
Philips Avent Natural bottle (Fig. C)
C1 Bottle cap
C2 Screw ring
C3 Feeding nipple
A5 Double breast pump
* The adapter supplied may vary for different
countries.
B4 Cover
B5 Cushion
B6 White valve
C4 Sealing disc
C5 Bottle
Motor unit part description (Fig. D)
D1 USB power inlet
D2 On/off button with pause/play function
D3 Mode selection button
D4 'Level down' button
D5 'Level up' button
D6 Indicator lights for modes and levels
D7 Tubing port for single breast pump
D8 Tubing ports for double breast pump
Accessories
There are multiple versions of this breast pump package, which all come with a different combination
of the following Philips Avent accessories:
-
Breast pads
-
Travel bag
-
Insulation pouch
-
Cleaning brush
* For these accessories, a separate user manual is provided.
-
Storage cups with adapter*
-
Breast milk storage bags*
-
Natural bottles
-
Breast pump belt*
Indications for use
The Philips Avent single/double electric breast pump Advanced is intended to express and collect
milk from the breast of a lactating woman, and to alleviate engorgement of the breast. Thedevice is
intended for a single user.
English
Important safety information
Read this user manual carefully before you use the breast pump and save it for future reference.
This user manual can also be found online on the Philips Avent website: www.philips.com/avent.
This product is operated by the lactating woman herself.
You can use this breast pump in an everyday environment.
Contraindications
- Never use the breast pump while you are pregnant, as pumping
can induce labor.
Warnings
Warnings to avoid choking, strangulation and injury:
- Do not allow children or pets to play with the motor unit, the
adapter, packaging materials or accessories.
- Always unplug the breast pump after use. Store the breast
pump when not in use.
7
English
-
This breast pump is not intended for use by persons (including
children) with reduced physical, sensory or mental capabilities, or
lack of experience and knowledge. Such persons can only use this
breast pump if they are supervised by or have received proper
instruction concerning use of the appliance by a person
responsible for their safety.
Warning to prevent transmitting infectious diseases:
-
If you are a mother who is infected with Hepatitis B, Hepatitis C or
Human Immunodeficiency Virus (HIV), expressing breast milk will
not reduce or remove the risk of transmitting the virus to your
baby through your breast milk.
Warnings to avoid electric shock:
-
Inspect the breast pump, including the adapter, for signs of
damage before each use. Do not use the breast pump if the
adapter or plug is damaged, if it does not work properly or if it has
been dropped or submerged in water.

8
English
-
Only use the adapter (S009AHz050yyyy) provided with this
breast pump.
-
Always ensure that it is easy to disconnect the device from the
mains in case of malfunction. The adapter is considered the
disconnection device.
Warnings to avoid contamination and to ensure hygiene:
-
For hygienic reasons, the breast pump is only intended for
repeated use by a single user.
-
Clean and disinfect all parts before first use and after each use.
-
Do not use antibacterial or abrasive cleaning agents to clean the
breast pump parts as this may cause damage.
-
Wash your hands thoroughly with soap and water before you
touch breast pump parts and breasts to prevent contamination.
Avoid touching the inside of containers or lids.
Warnings to avoid breast and nipple problems including pain:
-
Do not use the breast pump if the silicone diaphragm appears to
be damaged or broken. See chapter ‘Ordering accessories’ for
information on how to obtain replacement parts.
-
Only use accessories and parts recommended by Philips Avent.
-
There are no user serviceable parts inside the motor unit of the
breast pump.
-
No modification of the breast pump is allowed. If you do so, your
warranty becomes invalid.
-
Never use the breast pump while you are sleepy or drowsy to
avoid lack of attention during use.
-
Always switch off the breast pump before you remove the pump
body from your breast, in order to release the vacuum.
-
If the vacuum is uncomfortable or causes pain, switch off and
remove the breast pump from your breast.
-
Do not continue pumping for more than five minutes at a time if
you do not succeed in expressing any milk. Try to express at
another time during the day.

English
-
If the process becomes very uncomfortable or painful, stop using
the pump and consult your healthcare professional.
9
Warnings to prevent damage and malfunction of the breast pump:
-
Portable radio frequency (RF) communications equipment
(including mobile phones and peripherals such as antenna cables
and external antennas) should not be used closer than 30cm
(12in) to any part of the breast pump, including adapter. This
could have a negative effect on the performance of the breast
pump.
-
Use of this equipment adjacent to or stacked with other
equipment should be avoided because it could result in improper
operation.
Warning to avoid increased electromagnetic emissions or
decreased electromagnetic immunity of this device, resulting in
improper operation:
-
Do not use any other adapter or charging cable than supplied
with the device.
Cautions
English
Cautions to prevent damage to and malfunctioning of the breast
pump:
-
Prevent the adapter and motor unit from coming into contact with
water.
-
Never put the motor unit or the adapter in water or in a
dishwasher, as this causes permanent damage to these parts.
-
Keep the adapter and the silicone tubes away from heated
surfaces to avoid overheating and deformation of these parts.
SAVE THESE INSTRUCTIONS.

10
English
Before first use
Disassemble, clean and disinfect all parts that come into contact with breast milk before you use the
breast pump for the first time and after every use.
Cleaning and disinfecting
Overview
Clean and disinfect the parts that come into contact with the breast and breast milk as described
below:
When How
Clean and disinfect before first use
and after every use.
The following parts do not come into contact with the breast and breast milk; clean them as described
below:
When How
Clean when needed. Wipe with a clean, damp cloth with
Disassemble all parts and then
clean them as described in chapter
'Cleaning' and disinfect them as
described in chapter 'Disinfecting'.
water and mild detergent.
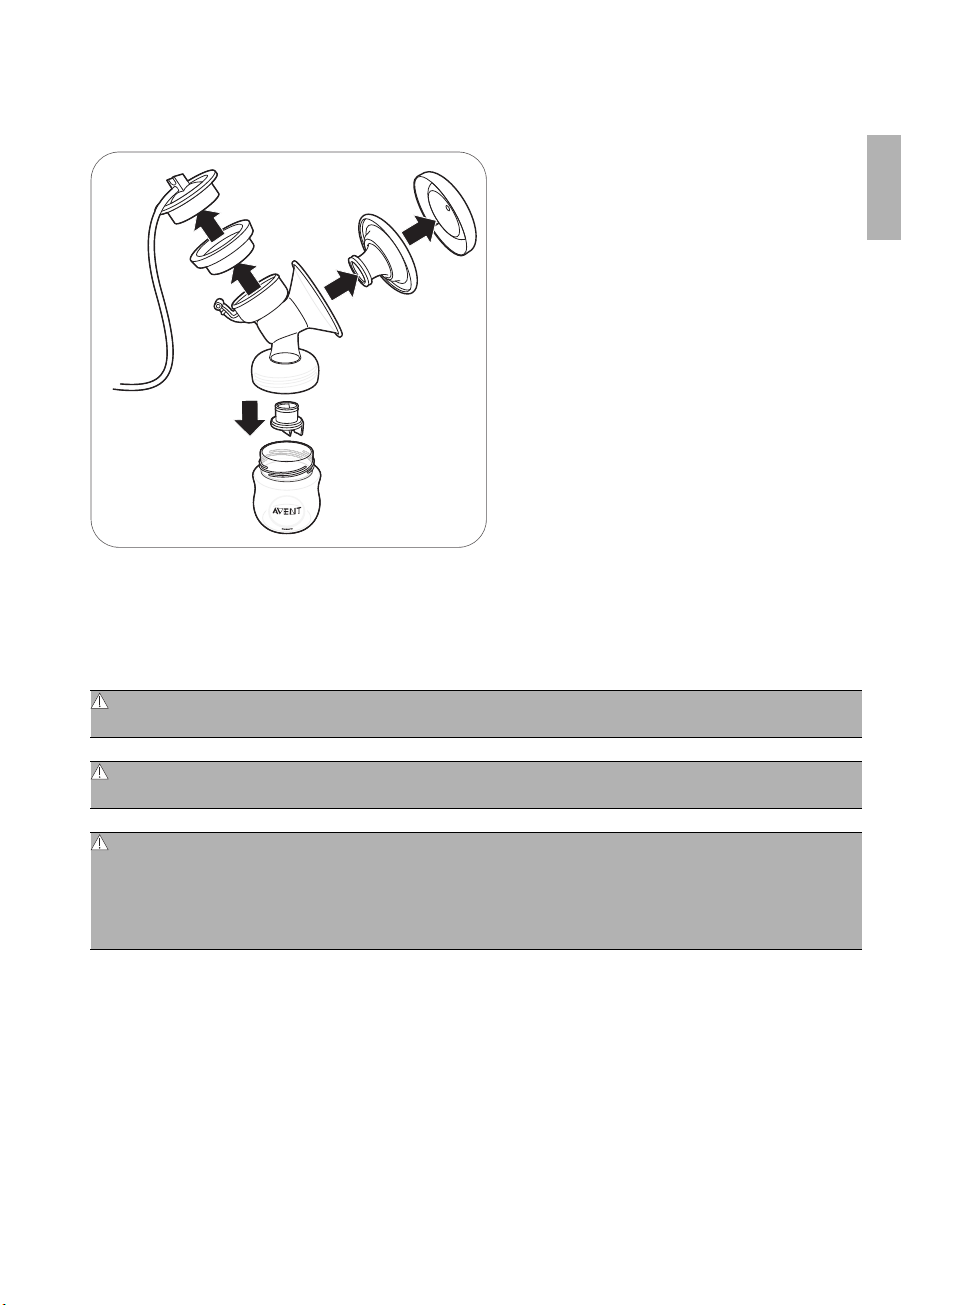
Step 1: Disassembling
Disassemble the breast pump, bottle and storage cup completely.
Also remove the white valve from the breast pump.
Step 2: Cleaning
The parts that come in contact with milk can be cleaned manually or in the dishwasher.
English
11
English
Warning: Do not use antibacterial or abrasive cleaning agents to clean the breast
pump parts as this may cause damage.
Caution: Never put the motor unit or the adapter in water or in a dishwasher, as this
causes permanent damage to these parts.
Caution: Be careful when you remove and clean the white valve. If it gets damaged,
your breast pump does not function properly. To remove the white valve, gently pull at
the ribbed tab on the side of the valve. To clean the white valve, rub it gently between
your fingers in warm water with some dishwashing liquid. Do not insert objects into the
white valve, as this may cause damage.
5 min.
12
English
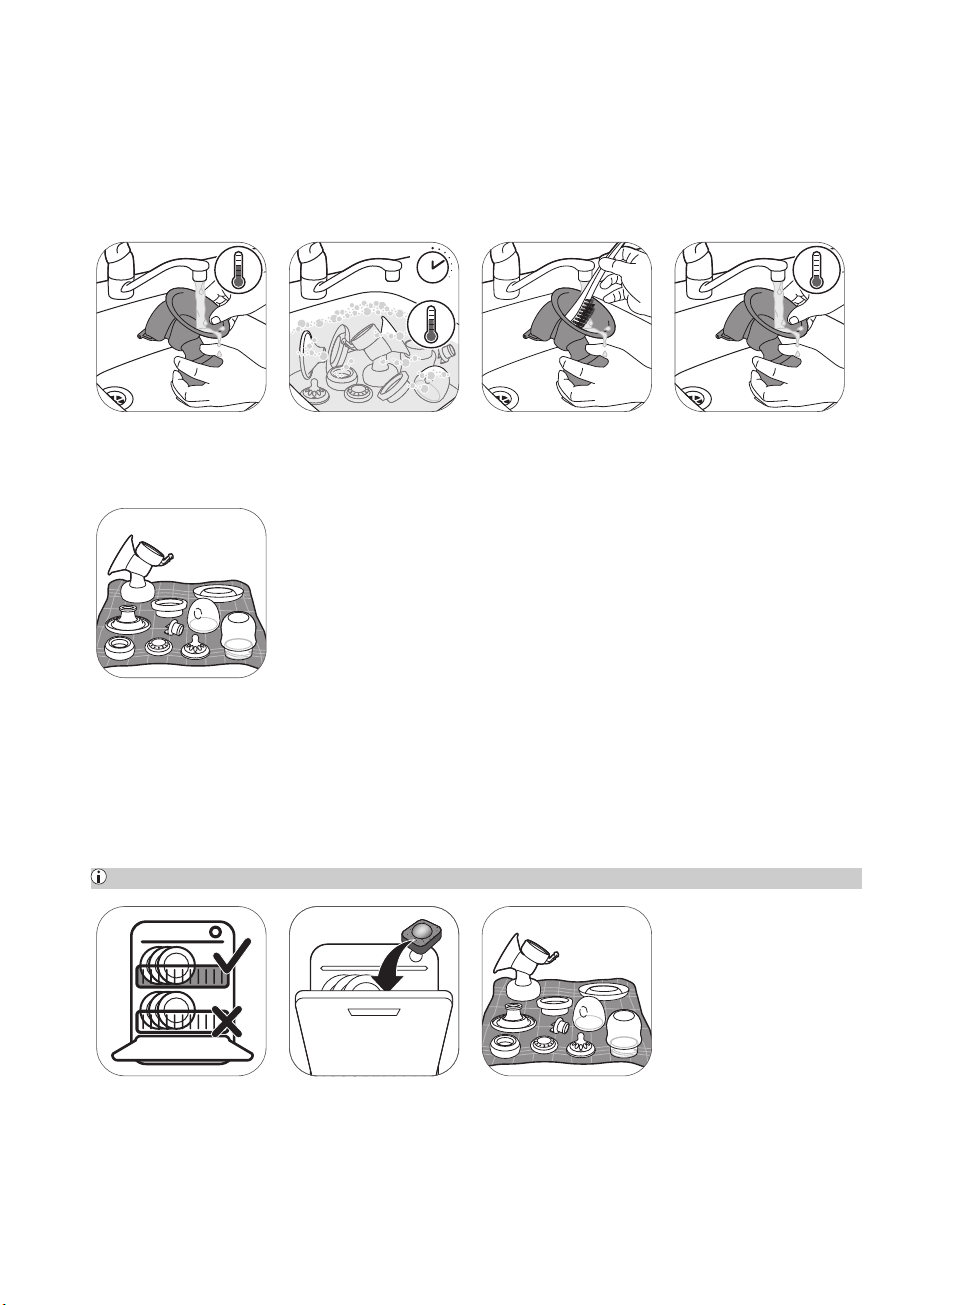
Step 2A: Manual cleaning
Supplies needed:
-
Mild dishwashing liquid
-
Drinking-quality water
-
Soft, clean brush
-
Clean tea towel or drying rack
-
Clean sink or bowl
1. Rinse all parts under
a running tap with
lukewarm water.
5. Leave all parts to airdry on a clean tea towel
or drying rack.
2. Soak all parts for
5minutes in warm
water with some mild
dishwashing liquid.
Step 2B: Cleaning in the dishwasher
Supplies needed:
-
Mild dishwashing liquid or a dishwashing tablet
-
Drinking-quality water
Note: Food colorings may discolor parts.
3. Clean all parts with a
cleaning brush.
4. Thoroughly rinse all
parts under a running
tap with cold clear
water.
1. Place all parts on the
top rack of the
dishwasher.
2. Put dishwashing
liquid or a tablet in the
machine and run a
standard program.
3. Leave all parts to airdry on a clean tea towel
or drying rack.

5 min.
English
Step 3: Disinfecting
Supplies needed:
-
A household pot
-
Drinking-quality water
Caution: During disinfection with boiling water, prevent the bottle or other parts from
touching the side of the pot. This can cause irreversible product deformation or damage
that Philips cannot be held liable for.
13
English
1. Fill a household pot
with enough water to
cover all parts and
place all parts in the
pot. Let the water boil
for 5minutes. Make
sure the parts do not
touch the side of the
pot.
2. Allow the water to
cool down.
3. Gently remove the
parts from the water.
Place the parts on a
clean surface/tea towel
or drying rack to air-dry.
4. Store the dry items in
a clean, dry and
covered container.
Using the breast pump
Cushion size
The Philips Avent single/double electric breast pump Advanced has a soft, active cushion. There is
only one cushion size. It gently stimulates your nipple to trigger milk flow. The cushion is made of
flexible silicone, fitting nipple sizes up to 30mm/1.18in.
Assembling the breast pump
Make sure you have cleaned and disinfected the parts of the breast pump that come into contact with
milk.
Warning: Be careful, when you have disinfected the breast pump parts by boiling
them, they can be very hot. To prevent burns, only start assembling the breast pump
when disinfected parts have cooled down.
Warning: Wash your hands thoroughly with soap and water before you touch breast
pump parts and breasts to prevent contamination. Avoid touching the inside of
containers or lids.
Check the breast pump kit parts for wear or damage before use and replace them if necessary.
14
English
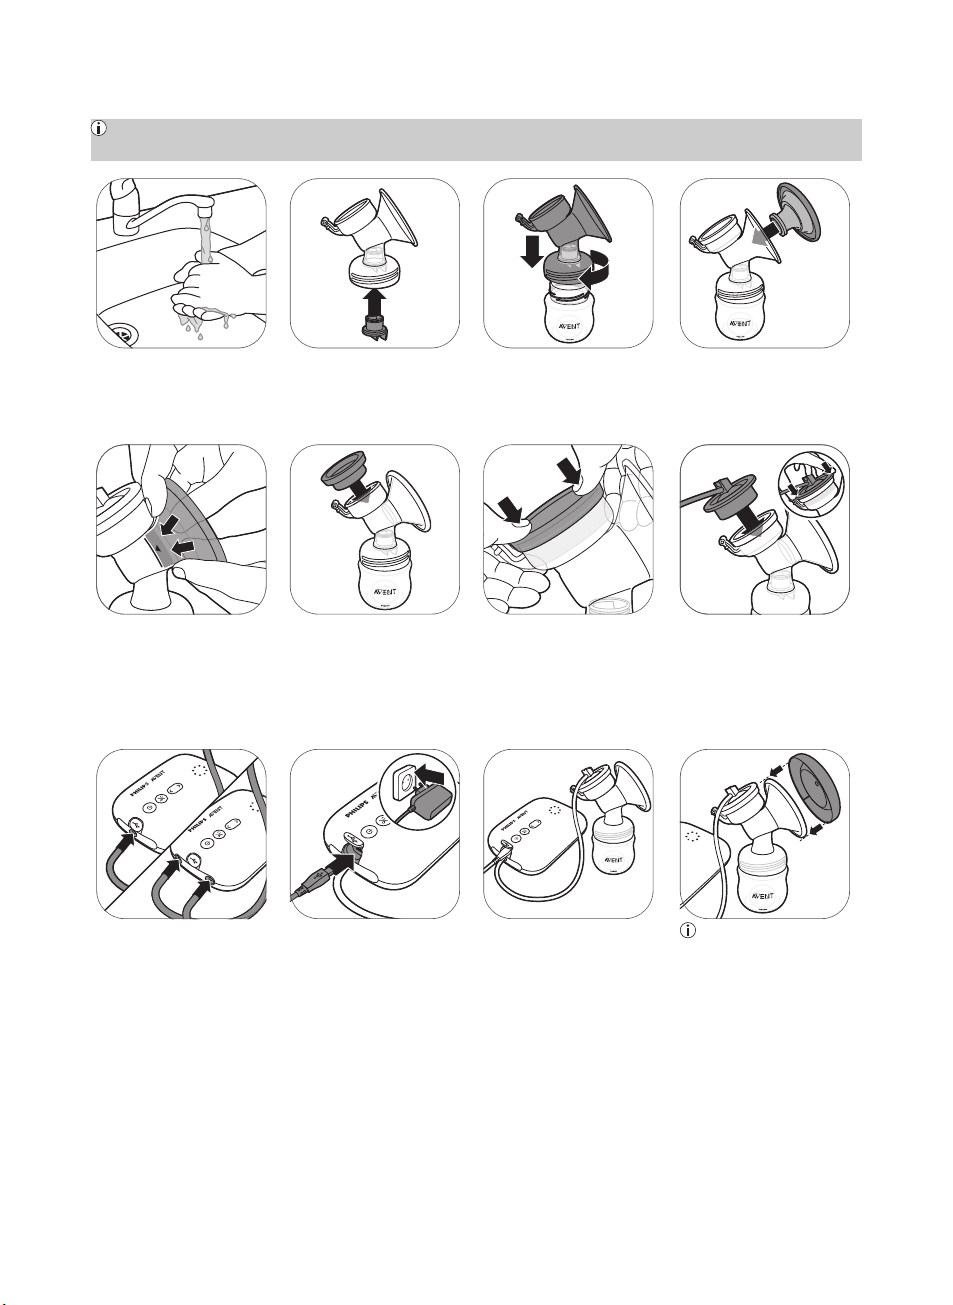
Note: Correct placement of the cushion, silicone diaphragm and silicone tube is essential for the
breast pump to form a proper vacuum.
1. Wash your hands
thoroughly with soap
and water.
4A. Push the inner part
of the cushion into the
funnel against the line
(indicated with an
arrow).
7. Connect the tube(s)
to the motor unit.
2. Push the white valve
in the pump body as far
as possible.
5. Place the silicone
diaphragm in the pump
body.
8. Insert the adapter
into the power outlet
and insert the small
plug at the other end
into the motor unit.
3. Screw the pump body
onto the bottle.
5A. Make sure that the
silicone diaphragm fits
securely around the rim
by pressing it down with
your thumbs.
9. The breast pump is
now ready for use.
4. Place the cushion in
the pump body and
make sure that the rim
covers the pump body.
6. Attach the silicone
tube and cap onto the
silicone diaphragm.
Push down the cap
until it is securely in
place.
Note: You can place
the cover over the
cushion to keep the
breast pump clean
when you take it with
you and while you are
preparing for
expressing.

Motor unit part description
7
1 3 5
4 6
8
2
1 USB power inlet
2 On/off button with
pause/play function
3 Mode selection button
4 'Level down' button
5 'Level up' button
6 Indicator lights for modes
and levels
7 Tubing port for single
breast pump
8 Tubing ports for double
breast pump
Mode indicator lights
The breast pump has two modes. Below you find an explanation of these modes.
Indicator
lights
Mode Explanation No. of suction levels
Stimulation
mode
Mode to stimulate the breast to start
up the milk flow.
8 suction levels
English
15
English
Expression
mode
Note: When you change the suction level, the display shows the selected suction level for a few
seconds and then shows the selected mode again.
Mode for efficient milk removal after
milk has started flowing. After 90 sec. of
stimulation, the device automatically
switches to the expression mode.
16 suction levels
Suction level indicator lights
Suction level 1:
Bottom light
flashes
Note: Every time the level increases, the next light starts flashing or the flashing light becomes solid.
Suction level 2:
Bottom light
steady on
Suction level 3:
Bottom light
steady on +
next light
flashes
Suction level 4:
2 lights steady
on.
Suction level 5:
2 lights steady
on + next light
flashes.
Suction level
16: all lights are
on

3 sec.
90 sec.
16
English
Pumping instructions
Warning: Before you remove the pump body from your breast, always switch off the
breast pump to release the vacuum.
Warning: Do not continue pumping for more than 5 minutes at a time if you do not
succeed in expressing any milk. Try to express at another time during the day.
Warning: If the process becomes very uncomfortable or painful, stop using the pump
and consult your healthcare professional.
Note: If you regularly express more than 125ml/4floz per session, you can purchase and use a
260ml/9floz Philips Avent Natural bottle to prevent overfilling and spillage.
1. Wash your hands
thoroughly with soap
and water and make
sure that your breast is
clean.
5. Use the 'level up' and
'level down' buttons to
change the suction
level to your
preference.
2. Place the breast
pump kit onto your
breast. Make sure that
you center your nipple.
6. After 90 seconds the
breast pump will switch
smoothly to expression
mode and slowly
increase its vacuum to
the last used
expression suction level
(or level 11 when used
for the first time).
3. Press and hold the
on/off button until the
device switches on. The
indicator lights go on to
indicate that the device
is in stimulation mode.
7. If your milk starts
flowing earlier or if you
want to switch from
expression to
stimulation mode, you
can switch modes with
the mode selection
button.
4. The breast pump
starts in stimulation
mode and slowly
increases its vacuum to
the last used
stimulation suction
level (or level 5 when
used for the first time).
8. Briefly press the
on/off button if you
want to pause. To
continue, briefly press
the on/off button
again.

3 sec.
1
2
English
17
English
9. Press and hold the
on/off button to switch
off.
Tip: For optimal expression, choose the highest setting that still feels comfortable. This setting may
differ across different sessions.
Tip: You can use the double breast pump as a single breast pump by connecting only the tube of
one pump kit to the motor unit.
10. Unplug the adapter
from the power outlet
and pull the small plug
out of the motor unit.
Using the breast pump when you have symptoms
of engorgement
Breast engorgement means your breasts are overfilled with milk. This is a painful and unpleasant
condition. Frequent extraction of milk and completely emptying the breasts of milk can reduce
engorgement. When you have symptoms of engorgement, make sure you use a lower vacuum level to
minimize stretching of breast tissue.
Note: When symptoms of engorgement are present, make sure you empty your breasts completely
during each expression session.
After use
1. Unscrew the bottle. 2A. To store the breast
milk: close the bottle
with the sealing disc
and screw ring.
2B. To prepare the
bottle for feeding your
baby: place a nipple in
a screw ring and screw
the assembled screw
ring onto the bottle.
Seal the nipple with the
bottle cap (see
'Assembling the bottle').
3. Remove the silicone
tube and cap from the
breast pump kit.
 Loading...