

Page 1

Single/Double
Electric Breast Pump
SCF397, SCF395
www.philips.com/mybreastpump
Page 2

A
C
A
B1
B2
A1
A2
A3
A5
A4
CB
C1
B3
B4
B7
B5 B6
C2
C3 C4
C5
Page 3

Introduction
Congratulations on your purchase and welcome to Philips Avent! To fully benet from the support that Philips Avent oers,
register your breast pump at www.philips.com/welcome.
The Philips Avent single/double electric breast pump is inspired by babies and their natural suction movement. The soft silicone
cushion stimulates the nipple with gentle massaging movements, helping you to express milk comfortably and eectively. The
combination of suction and nipple stimulation triggers fast milk ow. The no-lean-forward design enables you to sit in a relaxed,
upright position while expressing.
Healthcare professionals and the World Health Organization recommend to exclusively feed children with breast milk during the
rst six months of life and to continue giving them breast milk for two years next to oering additional nutritious foods. This is
because your breast milk is specially adapted to your baby’s needs and helps to protect your baby against infection and allergies.
To breastfeed longer, you can express and store your milk so that your baby can still enjoy the benets of it, even if you cannot be
there to provide it yourself. As the pump is compact, quiet and discrete to use, you can take it with you anywhere, allowing you to
express milk at your own convenience and to maintain your milk supply.
If breastfeeding goes well, it is advisable (unless recommended otherwise by your healthcare professional) to wait until your milk
supply and breastfeeding schedule are established (normally at least 2 to 4 weeks after giving birth) before you start expressing.
General description
Note: The numbers mentioned below refer to the numbers on the gure of the front foldout page of this user manual.
Note: The double breast pump comes with two pieces of the items shown in Figures B and C.
Product description (Fig. A)
A1 Motor unit
A2 Breast pump kit
A3 Bottle
A4 Adapter*
A5 Double breast pump
* The adapter supplied may vary for dierent countries.
Breast pump kit (Fig. B)
B1 Cap
B2 Silicone tube
B3 Silicone diaphragm
B4 Pump body
B5 Cushion
B6 Cover
B7 White valve
Philips Avent Natural bottle (Fig. C)
C1 Bottle cap
C2 Screw ring
C3 Teat
C4 Sealing disc
C5 Bottle
Accessories
There are multiple versions of this breast pump package, which all come with a dierent combination of the following Philips Avent
accessories:
- Travel bag
- Cleaning brush
- Storage cups with adapter*
* For these accessories, a separate user manual is provided.
- Breast milk storage bags*
- Natural bottles
- Thermo pads*
Intended use
The Philips Avent single/double electric breast pump is intended to express and collect milk from the breast of a
lactating woman.
The device is intended for a single user.
Important safety information
Read this user manual carefully before you use the breast pump and save it for future reference.
This user manual can also be found online on the Philips Avent website: www.philips.com/avent.
Warnings
- Never use the breast pump while you are pregnant, as pumping can induce labor.
Page 4

Warnings to avoid choking, strangulation and injury:
- Do not allow children or pets to play with the motor unit, the adapter, packaging materials or accessories.
- Always unplug the breast pump after use. Store the breast pump when not in use.
- This breast pump is not intended for use by persons (including children) with reduced physical, sensory or mental capabilities,
or lack of experience and knowledge. Such persons can only use this breast pump if they are supervised by or have received
proper instruction concerning use of the appliance by a person responsible for their safety.
Warning to prevent transmitting infectious diseases:
- If you are a mother who is infected with Hepatitis B, Hepatitis C or Human Immunodeciency Virus (HIV), expressing breast milk
will not reduce or remove the risk of transmitting the virus to your baby through your breast milk.
Warnings to avoid electric shock:
- Inspect the breast pump, including the adapter, for signs of damage before each use. Do not use the breast pump if the adapter
or plug is damaged, if it does not work properly or if it has been dropped or submerged in water.
- Only use the adapter (S009AHz050yyyy) provided with this breast pump.
- Always ensure that it is easy to disconnect the device from the mains in case of malfunction. The adapter is considered the
disconnection device.
Warnings to avoid contamination and to ensure hygiene:
- For hygienic reasons, the breast pump is only intended for repeated use by a single user.
- Clean and disinfect all parts before rst use and after each use.
- Do not use antibacterial or abrasive cleaning agents to clean the breast pump parts as this may cause damage.
- Wash your hands thoroughly with soap and water before you touch breast pump parts and breasts to prevent contamination.
Avoid touching the inside of containers or lids.
Warnings to avoid breast and nipple problems including pain:
- Do not use the breast pump if the silicone diaphragm appears to be damaged or broken. See chapter ‘Ordering accessories’ for
information on how to obtain replacement parts.
- Only use accessories and parts recommended by Philips Avent.
- No modication of the breast pump is allowed. If you do so, your warranty becomes invalid.
- Never use the breast pump while you are sleepy or drowsy to avoid lack of attention during use.
- Always switch o the breast pump before you remove the pump body from your breast, in order to release the vacuum.
- If the vacuum is uncomfortable or causes pain, switch o and remove the breast pump from your breast.
- Do not continue pumping for more than ve minutes at a time if you do not succeed in expressing any milk. Try to express at
another time during the day.
- If the process becomes very uncomfortable or painful, stop using the pump and consult your healthcare professional.
Warnings to prevent damage and malfunction of the breast pump:
- Portable radio frequency (RF) communications equipment (including mobile phones and peripherals such as antenna cables
and external antennas) should not be used closer than 30 cm (12 in) to any part of the breast pump, including adapter. This
could have a negative eect on the performance of the breast pump.
- Use of this equipment adjacent to or stacked with other equipment should be avoided because it could result in improper
operation.
Cautions
Cautions to prevent damage to and malfunctioning of the breast pump:
- Prevent the adapter and motor unit from coming into contact with water.
- Never put the motor unit or the adapter in water or in a dishwasher, as this causes permanent damage to these parts.
- Keep the adapter and the silicone tubes away from heated surfaces to avoid overheating and deformation of these parts.
Before rst use
Disassemble, clean and disinfect all parts that come into contact with breast milk before you use the breast pump for the rst time
and after every use.
Page 5

Cleaning and disinfecting
Overview
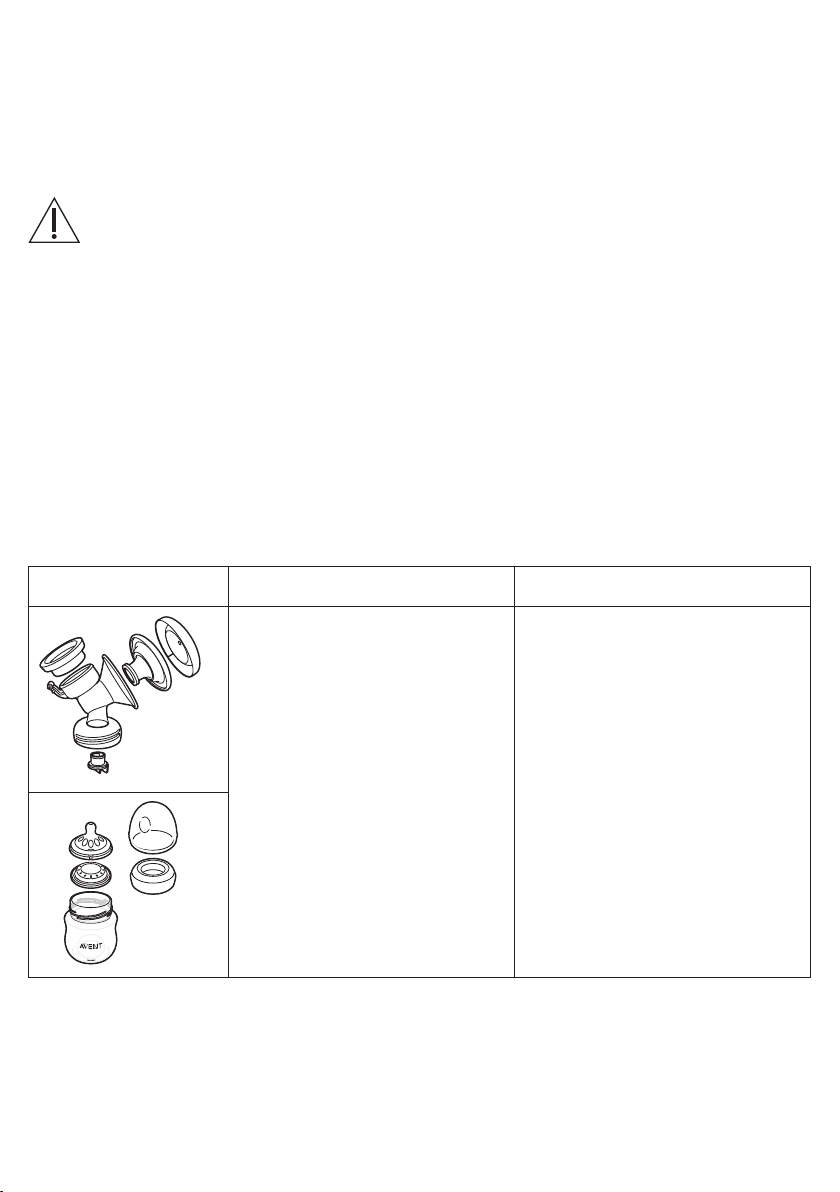
Clean and disinfect the parts that come into contact with the breast and breast milk as described below:
When How
Clean and disinfect before rst use and after
every use.
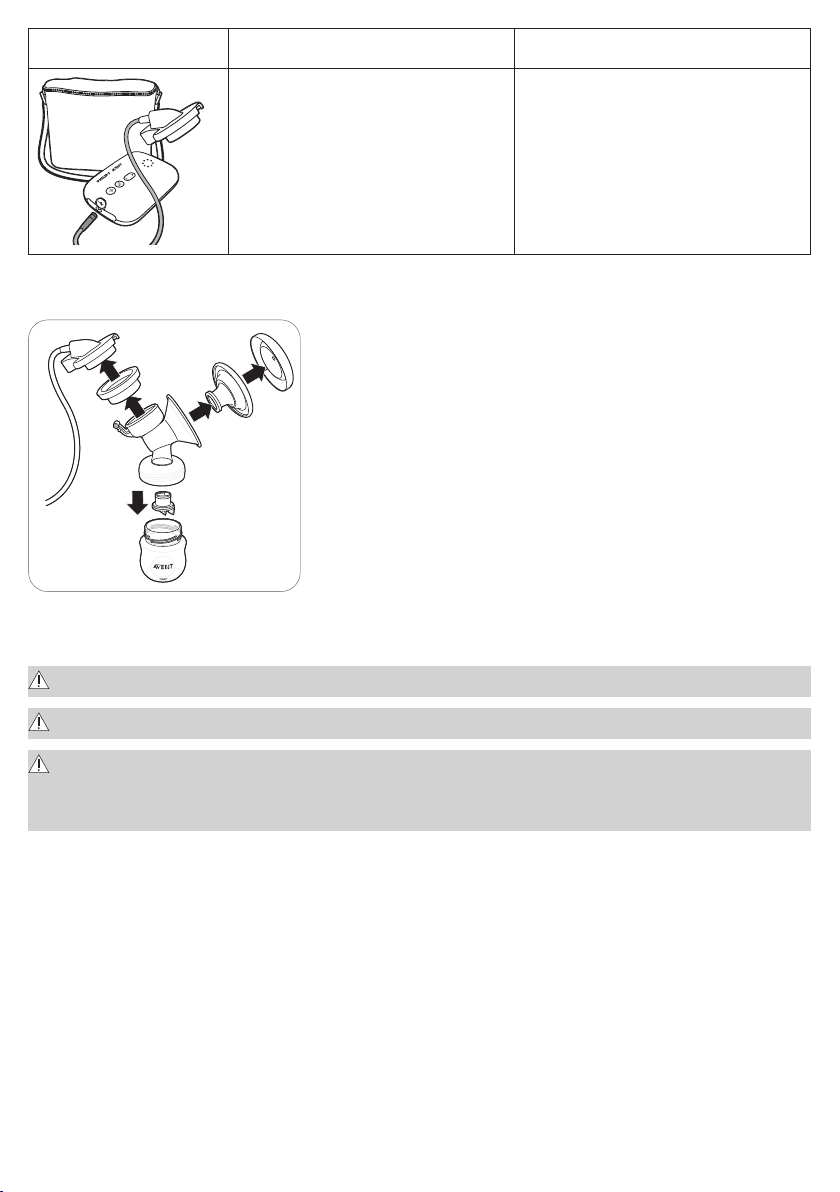
The following parts do not come into contact with the breast and breast milk. Clean them as described below.
These parts do not need disinfection.
When How
Clean when needed.
Disassemble all parts and then clean them as
described in chapter 'Cleaning' and disinfect
them as described in chapter 'Disinfecting'.
Wipe with a clean, damp cloth with water and
mild detergent.
Step 1: Disassembling
Disassemble the breast pump, bottle and storage cup completely.
Also remove the white valve from the breast pump.
Page 6

Step 2: Cleaning
5 min.
The parts that come in contact with milk can be cleaned manually or in the dishwasher.
Warning: Do not use antibacterial or abrasive cleaning agents to clean the breast pump parts as this may cause
damage.
Caution: Never put the motor unit or the adapter in water or in a dishwasher, as this causes permanent damage to
these parts.
Caution: Be careful when you remove and clean the white valve. If it gets damaged, your breast pump does not
function properly. To remove the white valve, gently pull at the ribbed tab on the side of the valve. To clean the white
valve, rub it gently between your ngers in warm water with some dishwashing liquid. Do not insert objects into the
white valve, as this may cause damage.
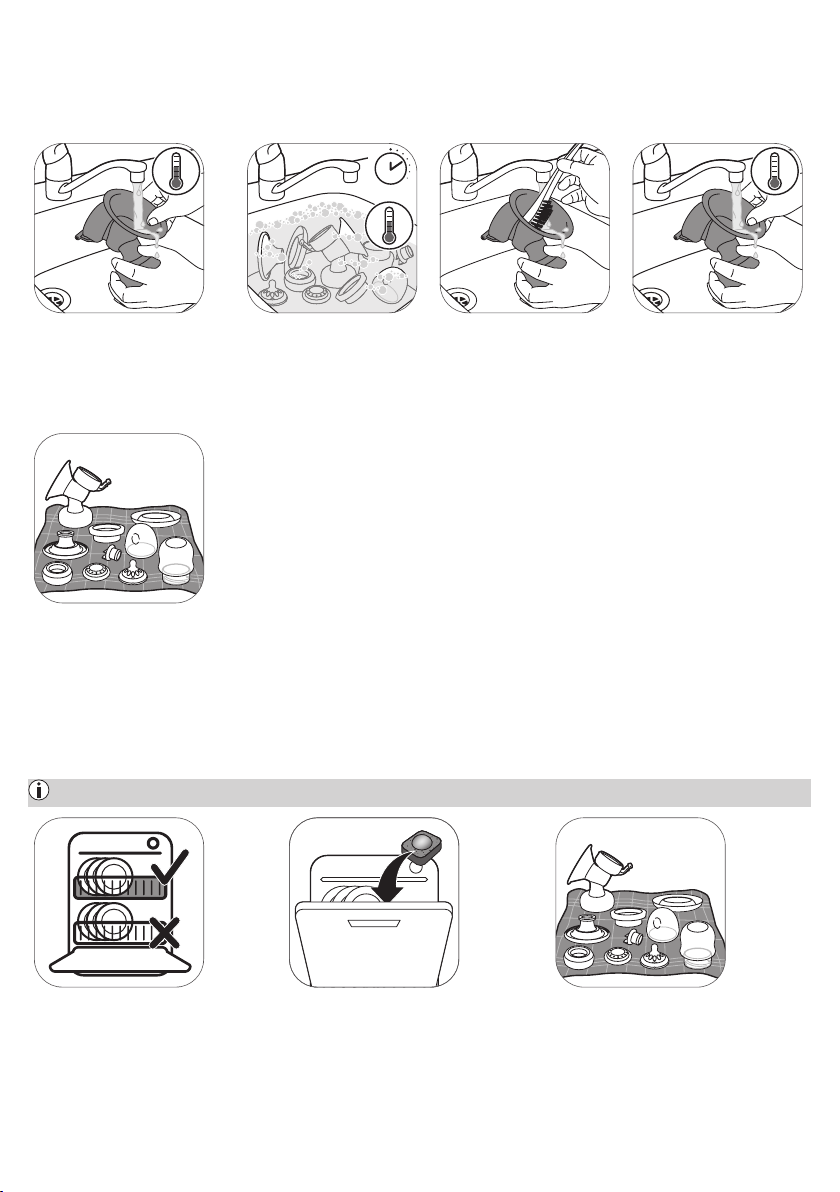
Step 2A: Manual cleaning
Supplies needed:
- Mild dishwashing liquid
- Drinking-quality water
- Soft, clean brush
- Clean tea towel or drying rack
- Clean sink or bowl
1. Rinse all parts under a
running tap with lukewarm
water.
5. Leave all parts to air-dry on a
clean tea towel or drying rack.
2. Soak all parts for 5 minutes
in warm water with some mild
dishwashing liquid.
Step 2B: Cleaning in the dishwasher
Supplies needed:
- Mild dishwashing liquid or a dishwashing tablet
- Drinking-quality water
Note: Food colorings may discolor parts.
1. Place all parts on the top
rack of the dishwasher.
2. Put dishwashing liquid or a
tablet in the machine and run
a standard program.
3. Clean all parts with a
cleaning brush.
3. Leave all parts to air-dry on a
clean tea towel or drying rack.
4. Thoroughly rinse all parts
under a running tap with cold
clear water.
Page 7

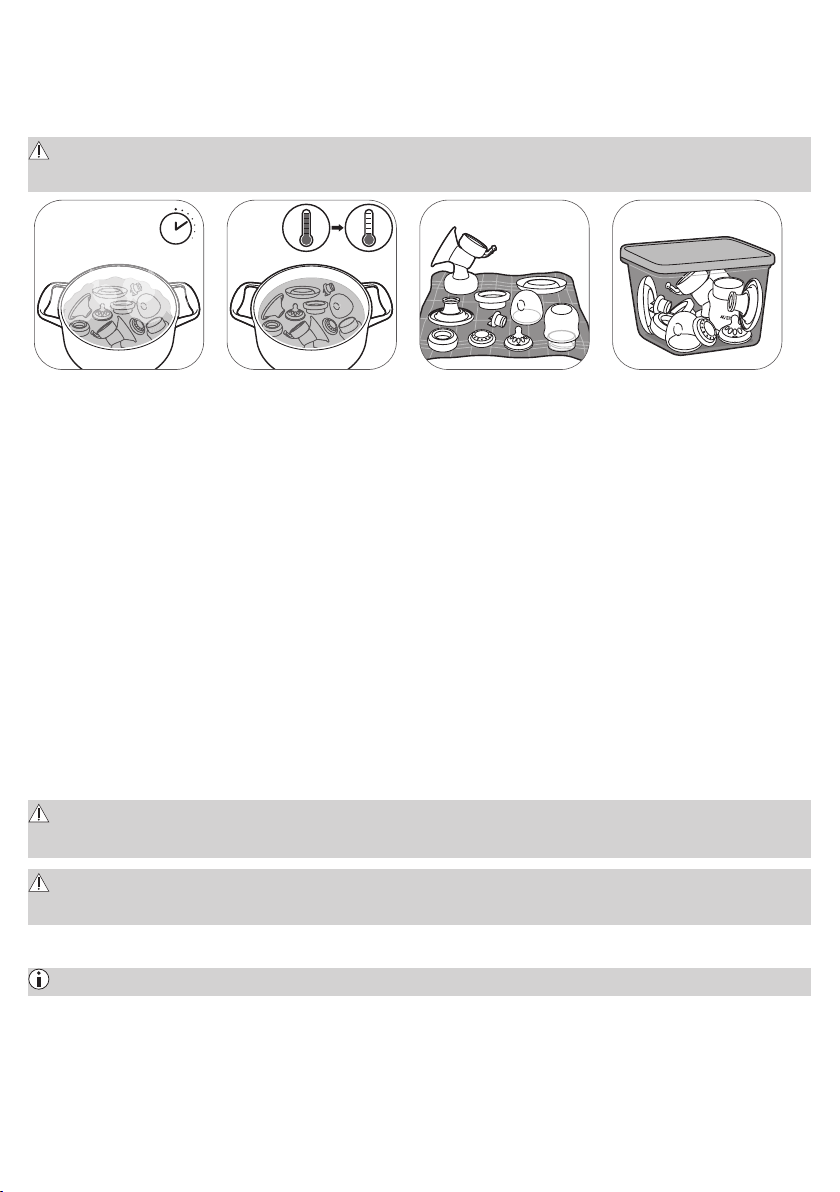
Step 3: Disinfecting
Supplies needed:
- A household pot
- Drinking-quality water
Caution: During disinfection with boiling water, prevent the bottle or other parts from touching the side of the pot.
This can cause irreversible product deformation or damage that Philips cannot be held liable for.
5 min.
1. Fill a household pot with
enough water to cover all parts
and place all parts in the pot.
Let the water boil for 5 minutes.
Make sure the parts do not
touch the side of the pot.
2. Allow the water to cool
down.
3. Gently remove the parts
from the water. Place the
parts on a clean surface/tea
towel or drying rack to air-dry.
4. Store the dry items in
a clean, dry and covered
container.
Using the breast pump
Cushion size
The Philips Avent single/double electric breast pump has a soft, active cushion. It gently stimulates your nipple to trigger milk ow.
The cushion is made of exible silicone, that adapts to up to 99.98 % of women, tting nipple sizes up to 30 mm.
Assembling the breast pump
Make sure you have cleaned and disinfected the parts of the breast pump that come into contact with milk.
Warning: Be careful, when you have disinfected the breast pump parts by boiling them, they can be very hot.
To prevent burns, only start assembling the breast pump when disinfected parts have cooled down.
Warning: Wash your hands thoroughly with soap and water before you touch breast pump parts and breasts to
prevent contamination. Avoid touching the inside of containers or lids.
Check the breast pump kit parts for wear or damage before use and replace them if necessary.
Note: Correct placement of the cushion, silicone diaphragm and silicone tube is essential for the breast pump to form a
proper vacuum.
Page 8

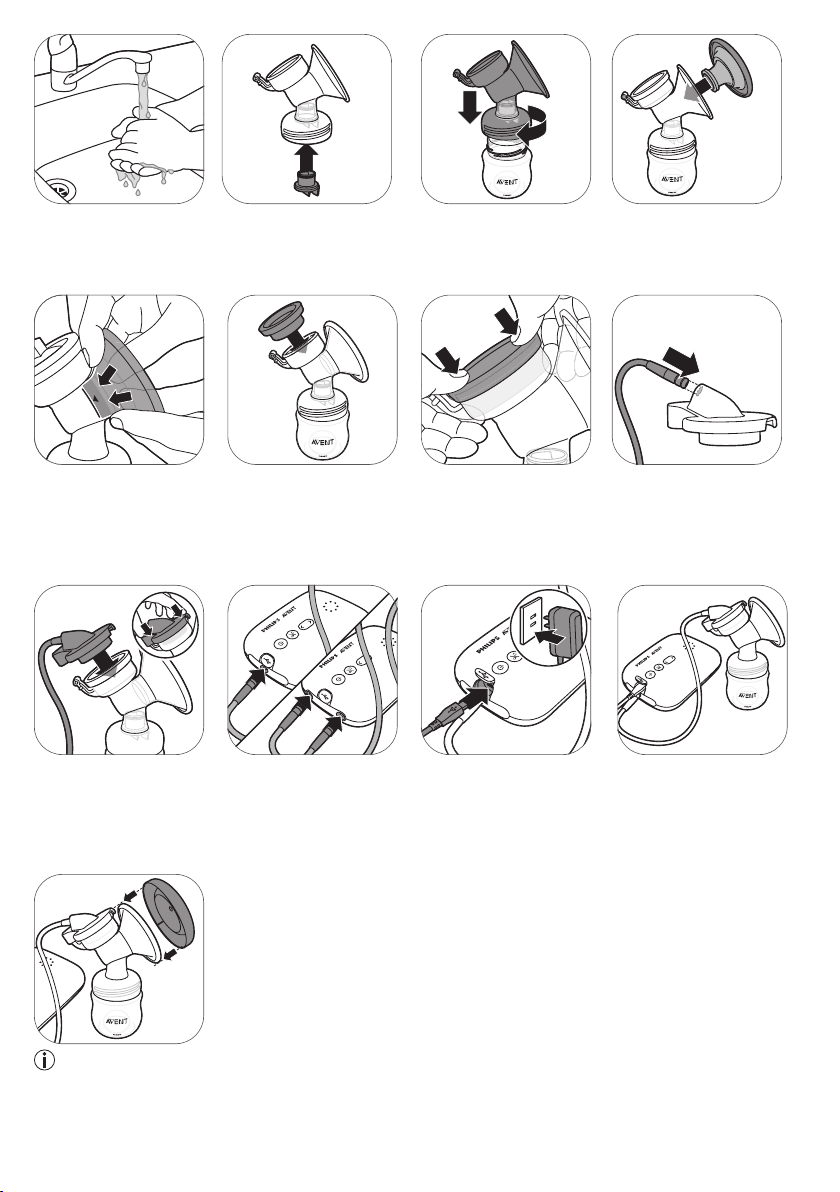
1. Wash your hands thoroughly
with soap and water.
2. Push the white valve in the
pump body as far as possible.
3. Screw the pump body onto
the bottle.
4. Place the cushion in the
pump body and make sure that
the rim covers the pump body.
4A. Push the inner part of
the cushion into the funnel
against the line (indicated
with an arrow).
7. Attach the silicone tube
and cap onto the silicone
diaphragm. Push down the
cap until it is securely in place.
Note: You can place the
cover over the cushion to
keep the breast pump clean
when you take it with you and
while you are preparing for
expressing.
5. Place the silicone
diaphragm in the pump body.
8. Connect the tube(s) to the
motor unit.
5A. Make sure that the silicone
diaphragm ts securely around
the rim by pressing it down
with your thumbs.
9. Insert the adapter into the
wall socket and insert the
small plug at the other end
into the motor unit.
6. Push the silicone tube into
the cap.
10. The breast pump is now
ready for use.
Page 9

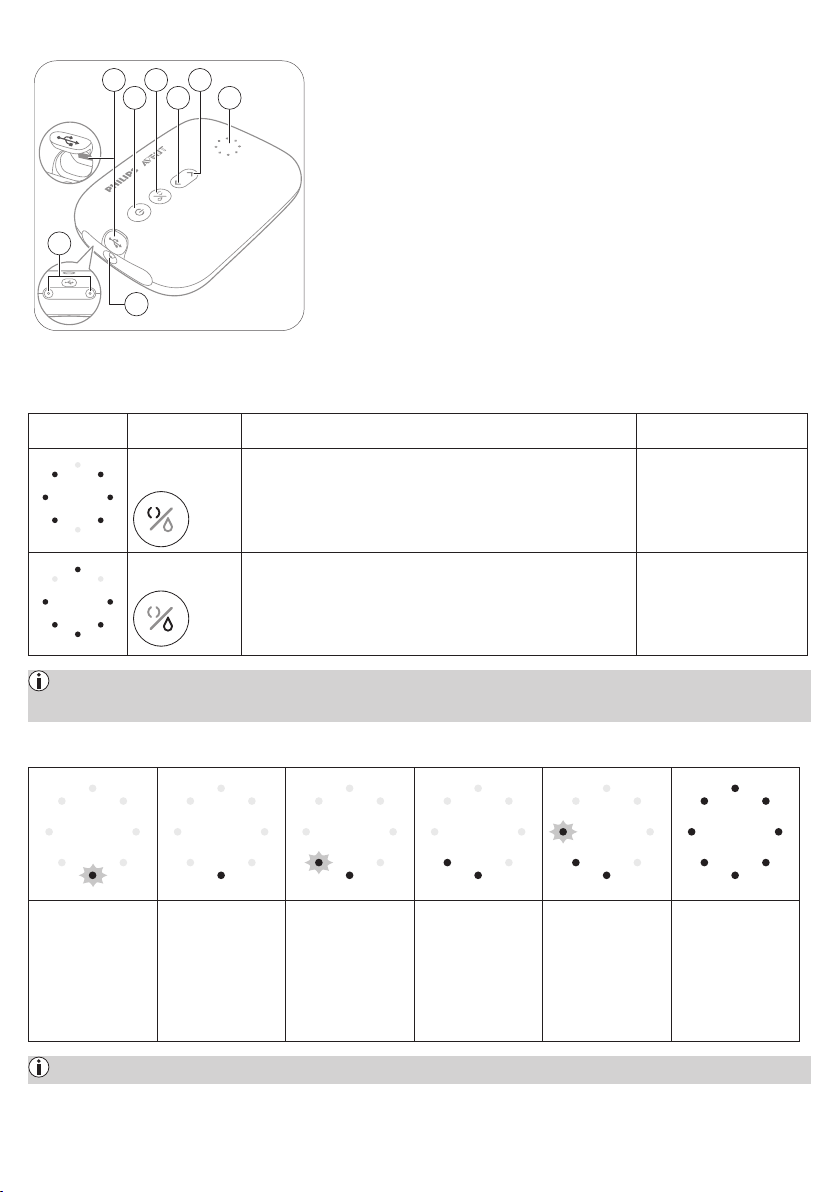
Motor unit part description
1 USB power inlet
2 On/o button with pause/play function
3 Mode selection button
4 'Level down' button
5 'Level up' button
6 Indicator lights for modes and levels
7 Tubing port for single breast pump
8 Tubing ports for double breast pump
8
1 3 5
4 6
2
7
Mode indicator lights
The breast pump has two modes. Below you nd an explanation of these modes.
Indicator
lights
Mode Explanation No. of suction levels
Stimulation
mode
Expression mode
Mode to stimulate the breast to start up the milk ow. 8 suction levels
Mode for ecient milk removal after milk has started owing.
After 90 sec. of stimulation, the device automatically switches to
the expression mode.
16 suction levels
Note: When you change the suction level, the display shows the selected suction level for a few seconds and then
shows the selected mode again.
Suction level indicator lights
Suction level 1:
Bottom light
ashes
Suction level 2:
Bottom light
steady on
Suction level 3:
Bottom light steady
on + next light
ashes
Suction level 4:
2 lights steady on.
Suction level 5:
2 lights steady on
+ next light ashes.
Suction level 16:
all lights are on
Note: Every time the level increases, the next light starts ashing or the ashing light becomes solid.
Page 10

Pumping instructions
Warning: Before you remove the pump body from your breast, always switch o the breast pump to release the vacuum.
Warning: Do not continue pumping for more than 5 minutes at a time if you do not succeed in expressing any milk.
Try to express at another time during the day.
Warning: If the process becomes very uncomfortable or painful, stop using the pump and consult your healthcare
professional.
Note: If you regularly express more than 125 ml/4 oz per session, you can purchase and use a 260 ml/9 oz Philips
Avent Natural bottle to prevent overlling and spillage.
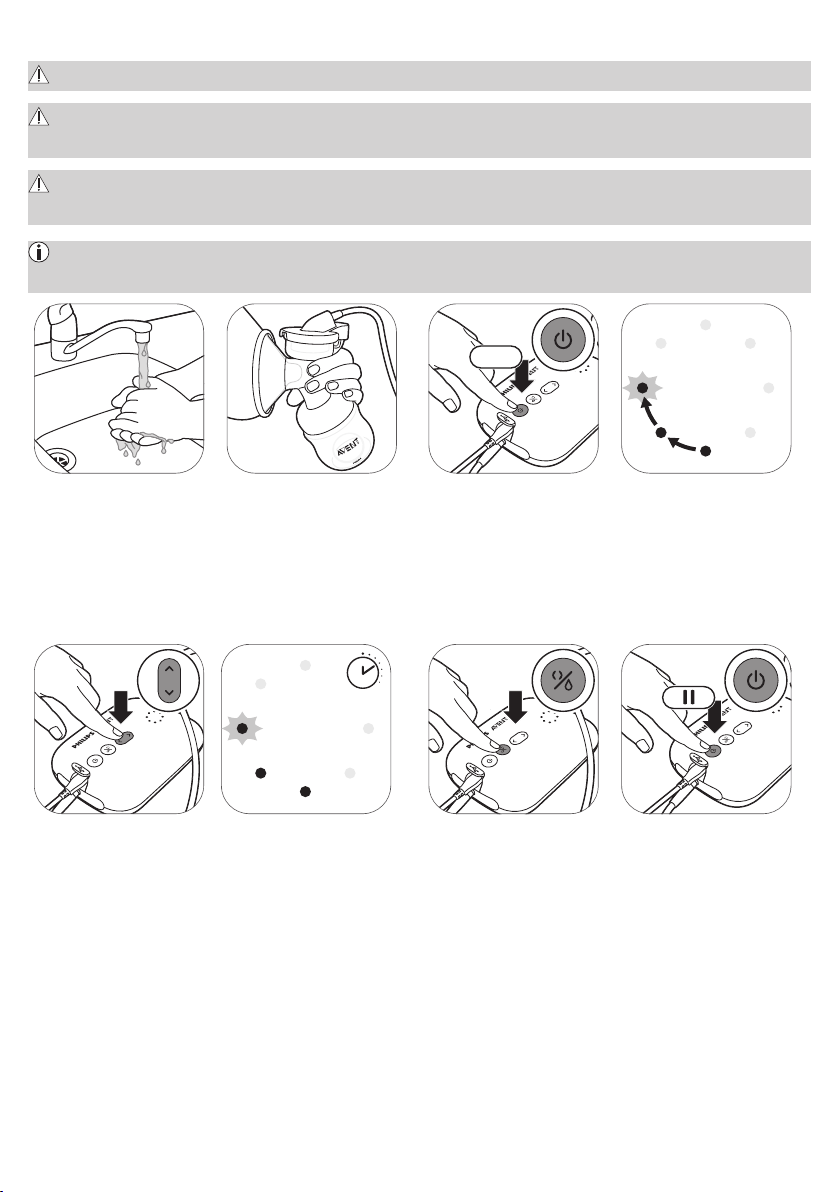
3 sec.
1. Wash your hands thoroughly
with soap and water and
make sure that your breast
is clean.
5. Use the 'level up' and 'level
down' buttons to change
the suction level to your
preference.
3 sec.
2. Place the breast pump kit
onto your breast. Make sure
that you center your nipple.
90 sec.
6. After 90 seconds the breast
pump will switch smoothly to
expression mode and slowly
increase its vacuum to the last
used expression suction level
(or level 11 when used for the
rst time).
3. Press and hold the on/
o button until the device
switches on. The indicator
lights go on to indicate that the
device is in stimulation mode.
7. If your milk starts owing
earlier or if you want to switch
from expression to stimulation
mode, you can switch modes
with the mode selection
button.
4. The breast pump starts in
stimulation mode and slowly
increases its vacuum to the
last used stimulation suction
level (or level 5 when used for
the rst time).
8. Briey press the on/o
button if you want to pause.
To continue, briey press the
on/o button again.
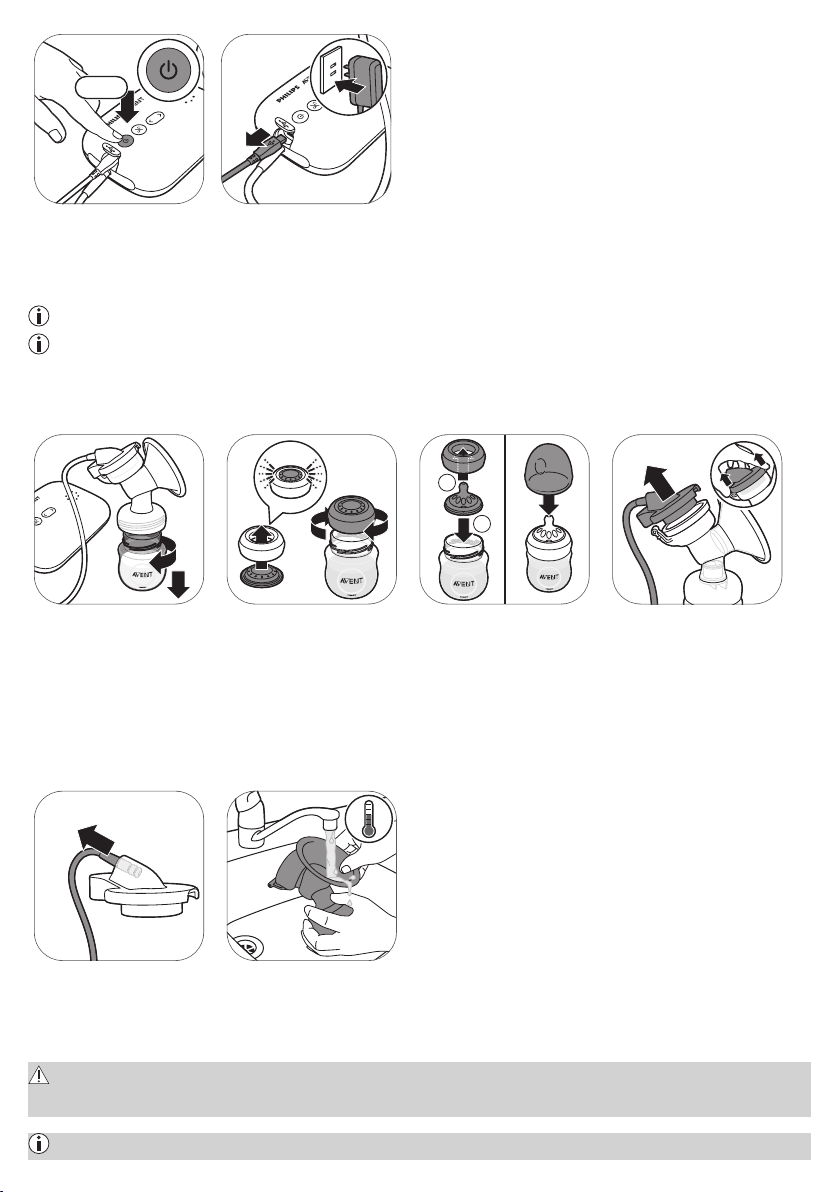
9. Press and hold the on/o
button to switch o.
Tip: For optimal expression, choose the highest setting that still feels comfortable. This setting may dier across dierent sessions.
Tip: You can use the double breast pump as a single breast pump by connecting only the tube of one pump kit to the motor unit.
10. Unplug the adapter from the
wall socket and pull the small
plug out of the motor unit.
Page 11

After use
1
2
1. Unscrew the bottle. 2A. To store the breast milk:
4. Pull the silicone tube out of
the cap.
close the bottle with the
sealing disc and screw ring.
5. Disassemble and clean
all parts that have been in
contact with breast milk (see
'Cleaning and disinfecting').
2B. To prepare the bottle
for feeding your baby: place
a teat in a screw ring and
screw the assembled screw
ring onto the bottle. Seal the
teat with the bottle cap (see
'Assembling the bottle').
3. Remove the silicone tube and
cap from the breast pump kit.
Warning: Refrigerate or freeze expressed milk immediately or keep it at a temperature of 16-29 °C (60-85 °F) for a
maximum of 4 hours before you feed your baby.
For more information about the breast pump and tips for expressing milk, visit www.philips.com/avent.
Storing breast milk
Below you nd guidelines for storing breast milk:
Storage location Temperature Max. storage duration
Room 16-29 °C (60-85 °F) 4 hours
Refrigerator 4 °C (39 °F) 4 days
Freezer < -4 °C (25 °F) 6 months
Warning: Never refreeze thawed breast milk to avoid a decrease in milk quality.
Warning: Never add fresh breast milk to frozen breast milk to avoid a decrease in milk quality and unintended
thawing of the frozen milk.
Page 12

Feeding breast milk with the bottle
For your child’s safety and health
WARNING!
- Continuous and prolonged sucking of uids will cause tooth decay.
- Always check food temperature before feeding.
- Throw away at the rst signs of damage or weakness.
- Keep components not in use out of the reach of children.
- Never attach to cords, ribbons, laces or loose parts of clothing. The child can be strangled.
- Never use feeding teats as a soother.
- Always use this product with adult supervision.
- Keep the bottle cap away from children to avoid suocation.
- Do not allow children to play with small parts or walk/run while using bottles.
- Inspect all parts before use and pull the feeding teat in all directions. Throw away any part at the rst signs of damage or weakness.
- Always discard any breast milk that is left over at the end of a feed.
Caution: To avoid damage to the bottle
- Do not place in a heated oven, plastic can melt.
- Plastic material properties may be aected by disinfection and high temperatures. This can aect the t of the bottle cap.
- Do not leave a feeding teat in direct sunlight or heat, or leave in disinfectant for longer than recommended because this may
damage the product.
Before using the bottle
- Inspect the bottle and feeding teat before each use and pull the feeding teat in all directions to prevent a choking hazard.
Throw away at the rst signs of damage or weakness.
- Clean and disinfect the bottle before rst use and after every use (see ‚Cleaning and disinfecting‘).
Assembling the bottle
1. The teat is easier to assemble
if you move it back-and-forth
while pulling it upwards instead
of pulling it up in a straight line.
5. To remove the cap, place your
hand over the cap and your
thumb in the dent of the cap.
2. Make sure you pull the teat
through until its lower part is
aligned with the screw ring.
3. Make sure you place the
cap vertically onto the bottle
so that the teat sits upright.
4. Screw the screw ring with
teat and cap on the bottle.
Page 13
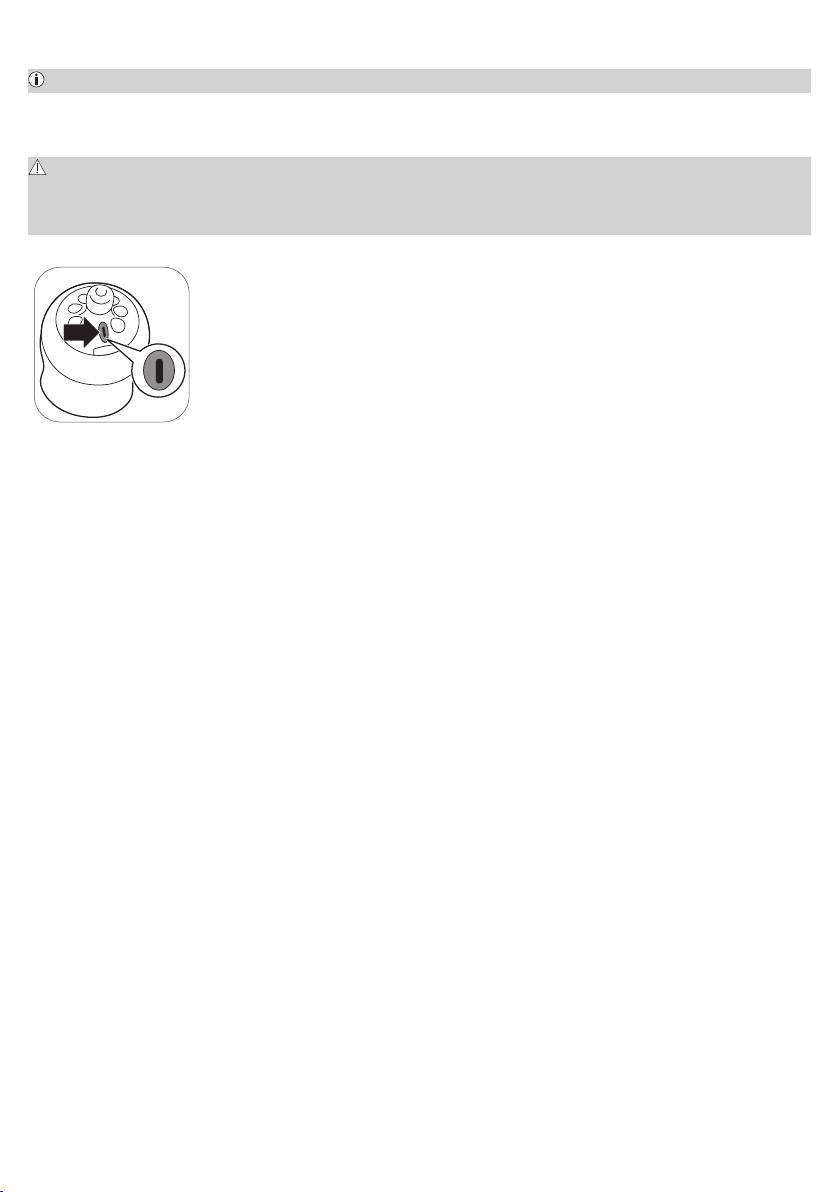
Heating breast milk
If you use frozen breast milk, let it defrost completely before you heat it.
Note: If you need to feed your baby quickly, you can defrost the milk in a bowl of hot water.
Heat the bottle with defrosted or refrigerated breast milk in a bowl of hot water or in a bottle warmer. Remove the screw ring and
sealing disc from the bottle.
Always stir heated breast milk to ensure even heat distribution and test the temperature before serving.
Warning: It is not recommended to use a microwave to warm up breast milk. Microwaves might alter the quality of
breast milk and destroy some valuable nutrients and may produce localized high temperatures. If you heat up breast
milk in the microwave, only place the container without screw ring, teat and cap in microwave. Always stir heated
breast milk to ensure even heat distribution and check the temperature before serving.
Choosing the right teat for your baby
Philips Avent teats are available with dierent ow rates. The breast pump comes with teat
number 1. This is a 0m+ teat, ideal for newborn and breastfed babies of all ages.Use a lower ow
rate if your baby chokes often, if milk drips out of its mouth during feeding or if it has trouble
adjusting to the drinking speed. Use a higher ow rate if your baby falls asleep during feeding,
gets frustrated or if feeding takes very long.
Philips Avent teats are clearly numbered on the side, to indicate ow rate. For more information, see www.philips.com/avent.
Storing the bottles
- Store all parts in a dry, clean and covered container.
- Do not leave a feeding teat in direct sunlight or heat, or leave in disinfectant for longer than recommended because this may
damage the product.
- For hygiene reasons, we recommend replacing the teats after 3 months.
Compatibility
The Philips Avent single/double electric breast pump is compatible with all baby bottles in the Philips Avent Natural range and
Philips Avent storage cups with adapter. We do not recommend using the Philips Avent Natural Glass bottles with the breast pump.
Ordering accessories
To buy accessories or spare parts, visit www.philips.com/parts-and-accessories or go to your Philips dealer. You can also contact
the Philips Consumer Care Center in your country.
When you order spare teats, make sure that you use a teat with the correct ow rate for your baby (see ‚Choosing the right teat for
your baby‘) and do not mix Philips Avent Anti-colic bottle parts and teats with parts of the Philips Avent Natural bottles. They do
not t and could cause leakage or other issues.
Recycling
- Do not throw away the product with the normal household waste at the end of its life, but hand it in at an ocial collection
point for recycling. By doing this, you help to preserve the environment.
- Follow your country‘s rules for the separate collection of electrical and electronic products. Correct disposal helps prevent
negative consequences for the environment and human health.
Warranty and support
If you need information or support, please visit www.philips.com/support or read the international warranty leaet.
Page 14
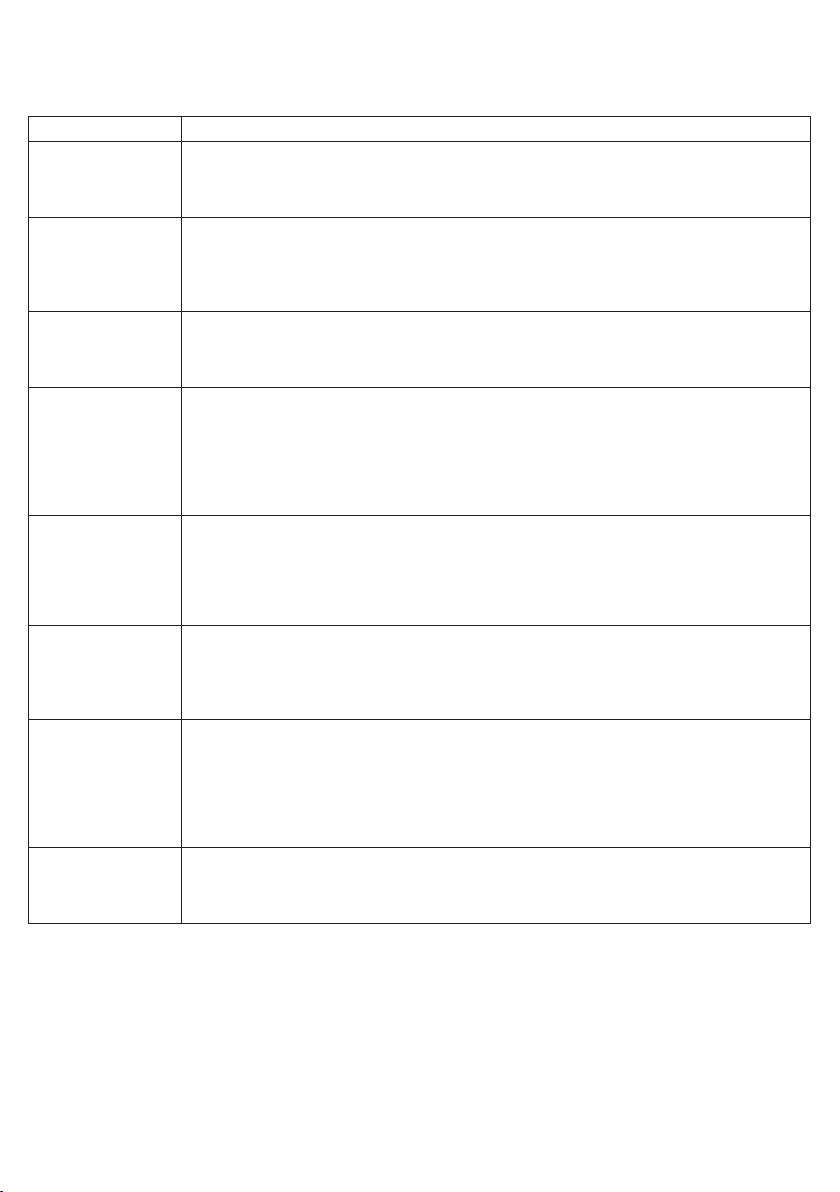
Troubleshooting
This chapter summarizes the most common problems you could encounter with the breast pump. If you are unable to solve
the problem with the information below, visit www.philips.com/support for a list of frequently asked questions or contact the
Consumer Care Center in your country.
Problem Solution
I experience pain when
I use the breast pump.
The breast pump does
not switch on (indicator
lights do not go on).
All indicator lights
on the motor unit are
ashing and device
shuts o automatically.
I do not feel any
suction/the suction
level is too low.
The suction of the
breast pump is too
strong.
I express little/no milk
when I use my breast
pump.
The breast pump is
cracked/discolored.
The silicone tube is
too loose when it is
plugged into the motor
unit or cap.
- Choose a suction level that is comfortable for you.
- Check if the silicone diaphragm is not damaged (does not have small cracks, holes etc.).
- Make sure that your nipple is placed in the center of the cushion.
- If the pain persists, stop using the breast pump and consult your healthcare professional.
- Only use the adapter supplied.
- Check if you are using the adapter that was supplied with the device and that the adapter is
connected correctly to the motor unit and wall socket.
- Connect the adapter to another wall socket and check if the breast pump can be switched on.
- If the problem persists, contact the Consumer Care Center via www.philips.com/support.
- Try to switch on the motor unit again.
- Check if you are using the adapter that was supplied with the device.
- If the problem persists, contact the Consumer Care Center via www.philips.com/support.
- If possible, try a higher suction level.
- Check if the silicone diaphragm is assembled correctly (see 'Assembling the breast pump').
- Check if the white valve is not damaged and is assembled correctly (see 'Assembling the breast pump').
- Check if the other parts of breast pump are intact and assembled correctly (see 'Assembling the breast pump').
- Make sure that the pump is positioned correctly on the breast to allow a seal between breast pump and breast.
- If you still do not feel any suction, please contact the Consumer Care Center via
www.philips.com/support.
- If possible, try a lower suction level. When you express for the rst time, start with the default suction
level (level 5 in stimulation mode, level 11 in expression mode) and increase/decrease the level when
needed. During dierent expression sessions, dierent levels may feel most comfortable for you.
- Make sure that you only use the breast pump parts provided with this breast pump.
- Check if the silicone diaphragm is not damaged (does not have small cracks, holes etc.).
- If the problem persists, contact the Consumer Care Center via www.philips.com/support.
- If you do not feel enough suction, please check Troubleshooting item 'I do not feel any suction/the
suction level is too low'.
- If you are using the Philips Avent breast pump for the rst time, you may need some practice before
you are able to express any milk. More expressing tips can be found on the Philips Avent website
www.philips.com/avent.
- Make sure that the breast pump does not come into contact with antibacterial or abrasive
detergents/cleaners. Combinations of detergents, cleaning products, sterilization solution, softened
water and temperature uctuations may cause the plastic to crack. If any crack is found, stop
using the breast pump immediately. Contact the Philips Avent Consumer Care Center for spare
components.
- Food colorings can discolor components, but this does not aect usage of these components.
- Keep all components away from sources of heat or direct sunlight as they can discolor components.
Replace the silicone tube connector. Contact the Consumer Care Center via
www.philips.com/support for spare components.
Page 15

Supplemental information
Below some common breastfeeding-related conditions are described. If you experience any of these symptoms, contact a
healthcare professional or breastfeeding specialist.
Common
breastfeeding-related
condition
Pain sensation Pain felt on the breast or nipple, or felt as a response to the suction being above a comfortable level.
Sore nipples Persistent pain in the nipples at the beginning of the pumping session, or that lasts throughout the
Engorgement Swelling of the breast. The breast may feel hard, lumpy and tender. May include erythema (redness) of
Bruise A reddish-purple discoloration that does not fade when pressed. When a bruise fades,
Thrombus Thrombus can result into tenderness, pain, redness, swelling and/or heat.
Injured tissue on nipple
(nipple trauma)
Clogged mammary ducts A red, tender lump on the breast. May include erythema (redness) of the breast area.
Description
entire pumping session, or pain between sessions.
the breast area and fever. Usually occurs during the rst days of lactation.
it may become green and brown.
- Fissures or cracked nipples.
- Skin tissue peeling o the nipple. Normally occurs in combination with cracked nipples and/or blisters.
- Nipple tear.
- Blister. Looks like small bubbles on the surface of the skin.
- Bleeding. Cracked or torn nipples can lead to bleeding of the aected area.
Can lead to mastitis (breast inammation) and fever if left untreated.
Storage conditions
Keep the breast pump out of direct sunlight as prolonged exposure may cause discoloration. Store the breast pump and its
accessories in a safe, clean and dry place.
If the device has been stored in a hot or cold environment, place it in an environment with a temperature of 20 °C (68 °F) for
30 minutes to let it reach a temperature within the usage conditions (5 °C to 40 °C/41 °F to 104 °F) before you use it.
Electromagnetic elds (EMF)
This Philips device complies with all applicable standards and regulations regarding exposure to electromagnetic elds.
Page 16
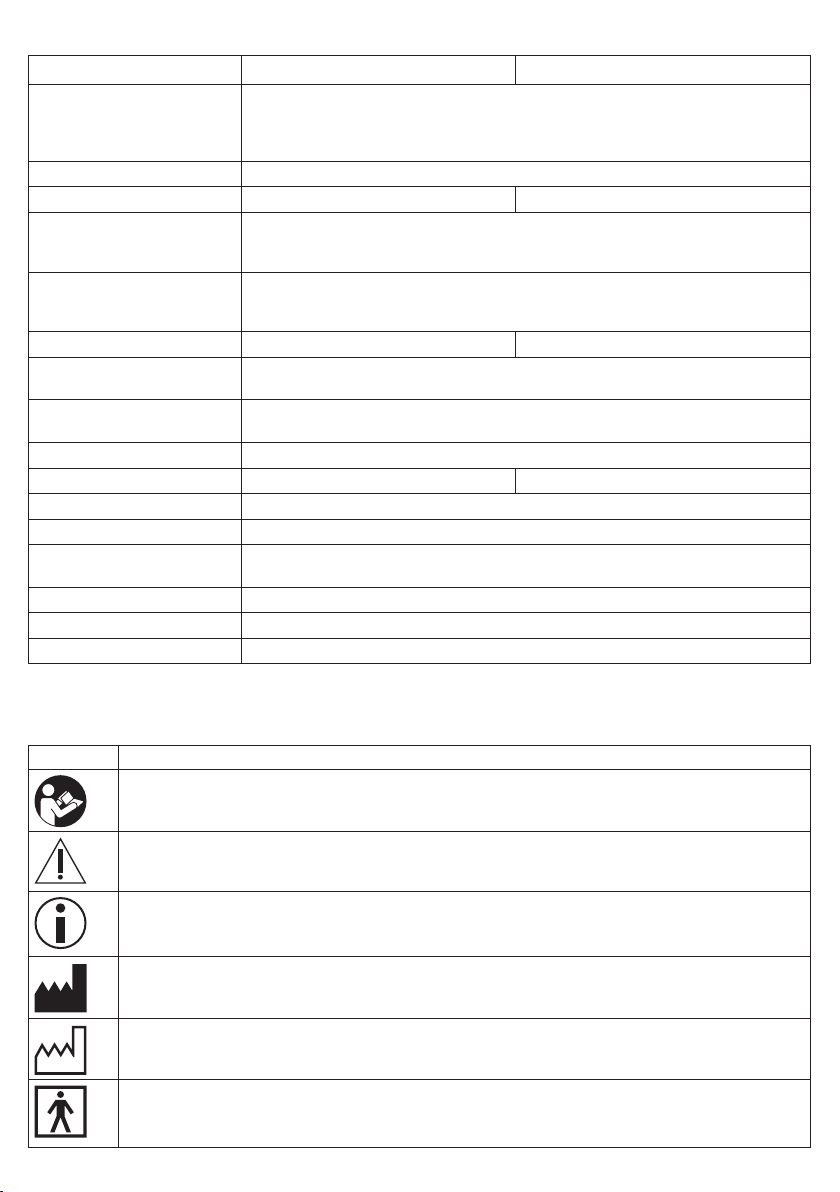
Technical information
Single electric breast pump Double electric breast pump
Vacuum level Stimulation: -60 to -200 hPa (-45 to -150 mmHg)
Cycle speed 53-120 cycles/min.
Motor unit rated input 5 V d.c. / 1.1 A 5 V d.c. / 1.8 A
Mains adapter rated input External mains adapter 100-240 V a.c.
Adapter type number S009AHz050yyyy The letters "yyyy" represent the output current from 0100 (1000 mA) to
Mains adapter rated output 5 V d.c. / 1.1 A 5 V d.c. / 1.8 A
Operating conditions Temperature: 5 °C to 40 °C (41 °F to 104 °F)
Storage and transportation
conditions
Operating pressure 700-1060 hPa (<3000 m altitude)
Net weight 230 g 310 g
External dimensions Motor unit: 145 mm x 95 mm x 45 mm (LxWxH)
Device classication IEC 60335-1: System: Class II; motor unit: Class III Construction
Materials ABS, silicone (motor unit)
Service life 500 hours
Mode of operation Continuous operation
Ingress protection IP22 (motor unit), IP20 (adapter)
Expression: -60 to -360 hPa (-45 to -270 mmHg)
Adjustable in steps of 20 hPa
Intermittent vacuum
50/60 Hz
400 mA
0180 (1800 mA), increments in steps of 100 mA. The letter "z" denotes type of plug, it can be:
U, V, B, S, C, A, D, K, T, I, E, F.
Relative humidity: 15 to 90 % (non-condensing)
Temperature: -25 °C to 70 °C (-13 °F to 158 °F)
Relative humidity: up to 90 % (non-condensing)
Polypropylene, silicone (other parts)
Explanation of symbols
The warning signs and symbols are essential to ensure that you use this device safely and correctly and to protect you and others
from injury. Below you nd the meaning of the warning signs and symbols on the label and in the user manual.
Symbol Explanation
Indicates to follow the instructions for use.
Indicates important information such as warnings and cautions.
Indicates usage tips, additional information or a note.
Indicates the manufacturer.
Indicates the manufacturing date.
Indicates that the part of the appliance that comes into physical contact with the user (also known as
the applied part) is of type BF (Body Floating) according to IEC 60601-1. The applied part is the breast pump kit.
Page 17
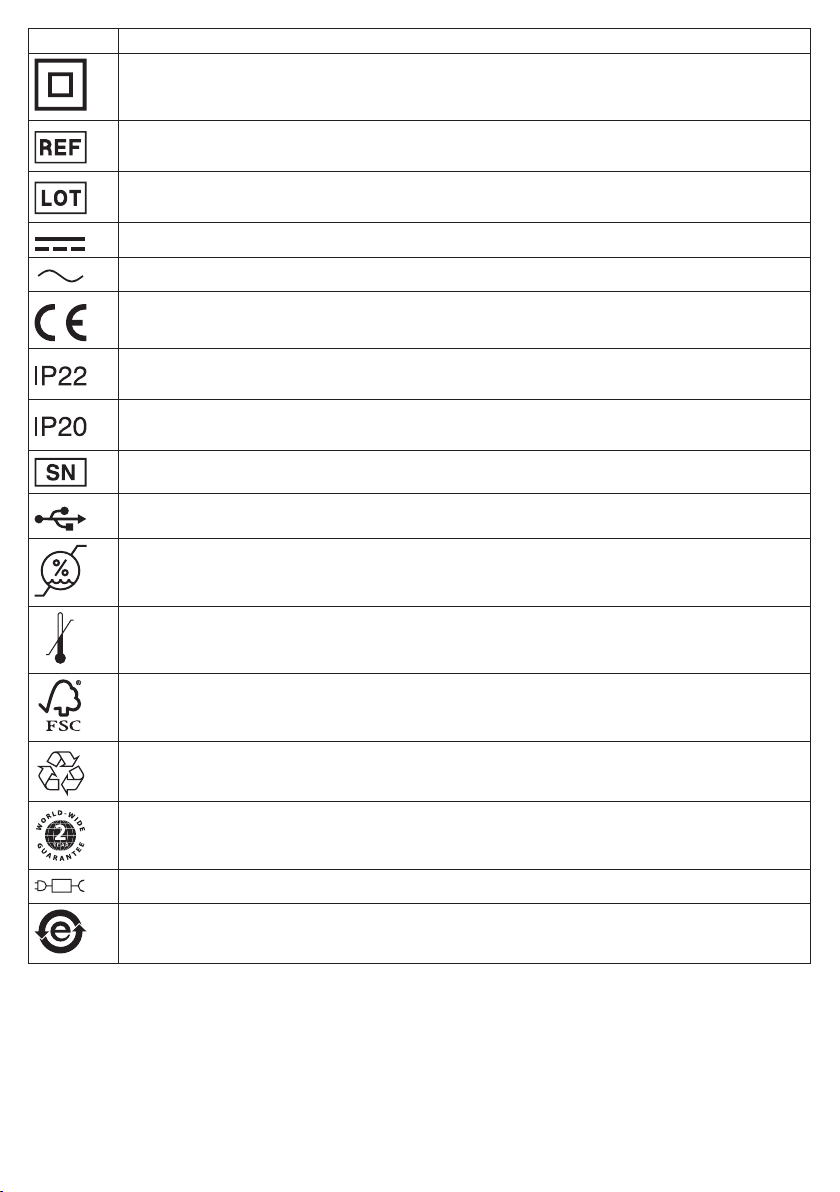
Symbol Explanation
Indicates 'Class II Equipment'. The adapter is double-insulated (Class II).
Indicates manufacturer's catalog number of the breast pump.
Indicates the batch number of the breast pump.
Indicates 'direct current'.
Indicates 'alternating current'.
Indicates that the manufacturer has taken all necessary measures to ensure that the device complies with the
applicable safety legislation for distribution within the European Community.
Indicates the protection against ingress of solid foreign objects greater than 12.5 mm and against harmful eects
due to the ingress of dripping water when tilted at 15 degrees.
Indicates the protection against ingress of solid foreign objects greater than 12.5 mm and no protection against
ingress of water.
Indicates the manufacturer's serial number of the breast pump.
Indicates USB.
Indicates the relative humidity upper limits to which the device can be safely exposed: up to 90 %.
Indicates the storage and transportation temperature limits to which the device can be safely exposed: -25 °C to
70 °C/-13 °F to 158 °F.
Indicates Forest Stewardship Council. The FSC trademarks enable consumers to choose products that support
forest conservation, oer social benets, and enable the market to provide an incentive for better forest
management.
Indicates that an object is capable of being recycled - not that the object has been recycled or will be accepted in
all recycling collection systems.
Indicates 2-year Philips worldwide guarantee.
Indicates that a specic adapter is required for connecting the breast pump.
Indicates compliance with China RoHS 2.
Page 18

说明
感谢您的惠顾,欢迎来到飞利浦新安怡! 为了使您能充分享受飞利浦新安怡提供的支
持,请在 www.philips.com/welcome 上注册您的吸乳器。
飞利浦新安怡单边/双边电动吸乳器的灵感来自婴儿及其自然吮吸, 柔软的硅胶垫通
过轻柔的按摩动作刺激乳头,有助于舒适有效地吸乳。 吮吸和乳头刺激相结合可使乳
汁快速流出。 吸乳器的无需前倾设计,使您可以在吸乳时使用放松的姿势。
专业医护人员和世界卫生组织建议在婴儿出生后六个月内进行纯母乳喂养,同时继续
喂养母乳到两岁,并添加更多营养食物。 这是因为母乳特别适合宝宝的需要,并可以
保护您的宝宝不感染疾病和发生过敏。 为了延长母乳喂养时间,您可以将乳汁吸出并
储存起来,即使无法亲自哺乳,宝宝仍可以享用您的乳汁。 由于吸乳器紧凑小巧,吸
乳时非常隐蔽,所以您可以随身携带,在方便的时候吸乳,为宝宝提供乳汁。
如果母乳喂养非常顺利,建议(除非专业医护人员另有建议)等到乳汁分泌和哺乳时
间成为规律之后(一般至少在宝宝出生后 2 至 4 周)再开始吸乳。
基本说明
注意: 下文提及的数字是指本用户手册前折页图上的数字。
注意: 双边吸乳器随附两套图 B 和 C 中所示的部件。
产品说明(图 A)
A1 马达组件
A2 吸乳器套件
A3 奶瓶
A4 适配器*
A5 双边吸乳器
* 随附的适配器可能因国家/地区而异。
吸乳器套件(图 B)
B1 护盖
B2 硅胶管
B3 硅胶隔膜
B4 吸乳器主体
B5 软垫
B6 上盖
B7 鸭嘴阀
飞利浦新安怡自然原生系列奶瓶(图 C)
C1 奶瓶盖
C2 螺旋盖
C3 奶嘴
C4 密封垫
C5 奶瓶
附件
此吸乳器包装有多种款式,所有款式均带有以下飞利浦新安怡附件的不同组合:
- 旅行袋
- 清洁刷
- 带适配器的存储杯*
* 对于这些附件,提供了单独的用户手册。
- 母乳储存袋*
- 自然原生系列奶瓶
- 热垫*
适合用途
飞利浦新安怡单边/双边电动吸乳器专门用于吸乳和收集哺乳期妇女的乳汁。
本设备适合由一位用户使用。
Page 19

重要安全信息
使用吸乳器之前,请仔细阅读本用户手册,并妥善保管以供日后参考。
本用户手册也可以在飞利浦新安怡网站上获得: www.philips.com/avent.
警告
- 怀孕期间切勿使用吸乳器,因为吸乳可能会导致流产。
关于避免憋闷、窒息和受伤的警告:
- 切勿让儿童或宠物玩耍马达组件、适配器、包装材料或附件。
- 请务必在使用后拔掉吸乳器插头。 不使用吸乳器时将其存放好。
- 本吸乳器不适合由肢体不健全、感觉或精神上有障碍或缺乏相关经验和知识的人(
包括儿童)使用。 此类人员只能在以下条件下使用本吸乳器,即有专人对他们使
用本产品进行监督或指导,以确保他们的安全。
关于预防传染病传播的警告:
- 如果母亲感染了乙型肝炎、丙型肝炎或人类免疫缺陷病毒(HIV),吸乳不会降低
或消除通过母乳将病毒传播给宝宝的风险。
关于防止触电的警告:
- 每次使用前先检查吸乳器(包括适配器)是否存在明显破损。 如果适配器或插头
损坏、无法正常工作、曾被跌落或浸入水中,请勿使用吸乳器。
- 请仅使用此吸乳器随附的适配器 (S009AHz050yyyy)。
- 请务必确保在发生故障时可以轻松地将设备与电源断开。 该适配器被视为断开连
接设备。
关于防止污染以及确保卫生的警告:
- 出于卫生考虑,吸乳器仅限于一位母亲重复使用。
- 首次使用之前和每次使用之后,请清洁和消毒所有部件。
- 请勿使用抗菌或研磨性清洁剂清洁吸乳器部件,因为这可能会造成损坏。
- 在接触吸乳器部件和乳房之前,用肥皂和水彻底洗净双手,以防污染。 请避免触
摸容器或盖子的内部。
关于预防乳房和乳头问题及疼痛的警告:
- 如果硅胶隔膜出现损坏或破损,请勿使用吸乳器。 请参阅“订购附件”章节,
了解如何订购替换部件的信息。
- 请仅使用飞利浦新安怡推荐的附件和部件。
- 不得改装吸乳器。 如果您这样做,本产品的保修将会失效。
- 当您昏昏欲睡或困倦时,请勿使用吸乳器,以避免在使用过程中分散注意力。
- 从乳房上取下吸乳器主体之前,请务必关闭吸乳器以释放真空。
- 如果真空不舒服或引起疼痛,请关闭吸乳器并从乳房上取下吸乳器。
- 如果未成功吸出乳汁,请勿一次持续吸乳超过五分钟。 请尝试在当天的其他时间吸乳。
- 如果在使用吸乳器过程中感觉非常不适或疼痛,请停止使用吸乳器并咨询专业医护人员。
Page 20
关于预防吸乳器损坏和发生故障的警告:
- 便携式射频 (RF) 通信设备(包括手机以及天线电缆和外部天线等外设)应在距离
包括适配器在内的任何吸乳器部件 30 厘米(12 英寸)以外的地方使用。 这可能
会对吸乳器的性能产生负面影响。
- 应避免将此设备与其他设备相邻或堆叠使用,因为这可能会导致不当操作。
注意
关于防止吸乳器损坏和发生故障的注意事项:
- 防止适配器和马达组件与水接触。
- 切勿将马达组件或适配器放入水中或洗碗机中,否则可能导致这些部件永久损坏。
- 将适配器和硅胶管远离高温表面,以防止这些部件过热和变形。
首次使用之前
首次使用吸乳器之前以及每次使用后,请拆卸与母乳接触的所有部件并对其进行清洁
和消毒。
清洁和消毒
一般说明
如下所述,对与乳房和乳汁接触的部件进行清洁和消毒:
时间 方法
首次使用之前以及每次使用
后,请清洁并消毒。
以下部件不会接触乳房和母乳。 如下所述,进行清洁。 这些部件不需要消毒。
拆卸所有部件,然后按照“清
洁”一章中的说明进行清洁,并
按照“消毒”一章中的说明进行
消毒。
Page 21
时间 方法
需要时进行清洁。
用干净的湿布蘸水和中性清洁
剂擦拭。
第 1 步: 拆卸
完全拆卸吸乳器、奶瓶和存储杯。
也要从吸乳器上取下白色阀门。
第 2 步: 清洁
接触乳汁的部件可以手动清洁,也可以在洗碗机中清洁。
警告: 请勿使用抗菌或研磨性清洁剂清洁吸乳器部件,因为这可能会造成损坏。
警告: 切勿将马达组件或适配器放入水中或洗碗机中,否则可能导致这些部件永久损坏。
警告: 取下和清洁白色阀门时要非常小心。 如果阀门受损,吸乳器将无法正常工作。
要取下白色阀门,请轻轻拉动阀门侧的棱纹片。 要清洁白色阀门,请在滴有几滴洗碗液
的温水中用手指轻轻揉搓。 切勿将任何物件插入白色阀门,这样可能会造成损坏。
Page 22
第 2A 步: 手动清洁
5 min.
所需用品:
- 温和洗碗液饮用品质的水柔软干净的刷子
- 干净的抹布或干燥架清洁水槽或碗
1. 在水龙头下用温水
冲洗所有部件。
2. 在已加入少许
温和洗碗液的温水
3. 用清洁刷清洁所
有部件。
中将所有部件浸泡
5 分钟。
5. 将所有部件放在干净的抹布或干燥架上风干。
第 2B 步: 用洗碗机清洁
所需用品:
- 温和的洗碗液或片状除垢剂
- 饮用品质的水
注意: 食品的颜色可能会使部件变色。
4. 在水龙头下用
冷清水彻底冲洗所
有部件。
1. 将所有部件放在洗碗机
的上搁架上。
2. 将洗碗液或片状除垢剂
放入机器中,然后运行标
准程序。
3. 将所有部件放在干净的
抹布或干燥架上风干。
Page 23
第 3 步: 消毒
所需用品:
- 家用锅
- 饮用品质的水
警告: 在用沸水消毒期间,防止奶瓶或其他部件接触锅壁。 这可能会导致不可逆
的产品变形或损坏,对此飞利浦概不负责。
5 min.
1. 在家用锅内注入
充足的水,使其能
够浸没所有部件,
并将所有部件放入
锅中。 将水烧开
5 分钟。 确保部件
不接触锅壁。
2. 让水冷却。 3. 轻轻地从水中取
出部件。 将部件放
在干净的表面/抹布
或干燥架上风干。
4. 将干燥的物品存
放在干净、干燥且
有盖的容器中。
使用吸乳器
软垫尺寸
飞利浦新安怡单边/双边电动吸乳器有一个实用的软垫。 它会轻柔地刺激乳头以使乳
汁流出。 软垫由柔软的硅胶制成,适用于多达 99.98% 的女性,适合的乳头大小最
大为 30 毫米。
组装吸乳器
请确保已对与乳汁接触的吸乳器部件进行清洁和消毒。
警告: 请注意,当您采用煮沸的方法对吸乳器部件进行消毒时,这些部件可能非
常烫。 为防止烫伤,请仅在已消毒部件冷却后开始组装吸乳器。
警告: 在接触吸乳器部件和乳房之前,用肥皂和水彻底洗净双手,以防污染。
请避免触摸容器或盖子的内部。
使用前检查吸乳器套件部件是否磨损或损坏,并在必要时进行更换。
注意: 正确放置软垫、硅胶隔膜和硅胶管对于吸乳器形成适当的真空至关重要。
Page 24
1. 用肥皂和水彻底
洗净双手。
2. 将白色阀门尽量推
入到吸乳器主体内。
3. 将吸乳器主体拧
到奶瓶上。
4. 将软垫放在吸乳
器主体中,并确保边
缘覆盖吸乳器主体。
4A. 靠着指示线(
如箭头所示)将软
垫内部推入漏斗。
7. 将硅胶管和护
盖安装到硅胶隔膜
上。 向下按护盖,
直至其固定到位。
注意: 当您随身
携带吸乳器和准备
吸乳时,可以将盖
子放在软垫上以使
吸乳器保持清洁。
5. 将硅胶隔膜放在
吸乳器主体中。
8. 将管子连接到马
达组件。
5A. 用拇指向下压
硅胶隔膜,以确保
其牢固地固定在边
缘周围。
9. 将适配器的一端
插入电源插座,并
将另一端的小插头
插入马达组件。
6. 将硅胶管推入到
护盖中。
10. 现在可以使用
吸乳器了。
Page 25
马达组件部件说明
1 3 5
2
4 6
1 USB 电源插孔
2 具有暂停/运行功能的开/关按钮
3 模式选择按钮
4 “下一级”按钮
5 “上一级”按钮
6 模式和级别的指示灯
8
7
7 单边吸乳器的导管端口
8 双边吸乳器的导管端口
模式指示灯
吸乳器有两种模式。 下面列出了这些模式的说明。
指示灯 模式 说明 吸力等级数
刺激模式
吸乳模式
刺激乳房以开始分泌乳汁的模式。 8 个吸力等级
乳汁开始流出后有效吸乳的模式。 刺激
16 个吸力等级
90 秒后,设备会自动切换为吸乳模式。
注意: 当您更改吸力等级时,显示屏将显示选定的吸力等级几秒钟,然后再次显
示所选的模式。
吸力等级指示灯
吸力等级
1: 底部指
示灯闪烁
吸力等级
2: 底部指
示灯常亮
吸力等级
3: 底部指
示灯常亮并
且下一个指
示灯闪烁
吸力等级
4: 2 个指
示灯常亮。
吸力等级
5: 2 个指
示灯常亮并
且下一个指
示灯闪烁。
吸力等级
16: 所有指
示灯都亮
注意: 每次等级增加时,下一个指示灯都会开始闪烁或闪烁的指示灯变为常亮状态。
Page 26
吸乳说明
警告: 从乳房上取下吸乳器主体之前,请务必关闭吸乳器以释放真空。
警告: 如果未成功吸出乳汁,请勿一次持续吸乳超过 5 分钟。 请尝试在当天的其
他时间吸乳。
警告: 如果在使用吸乳器过程中感觉非常不适或疼痛,请停止使用吸乳器并咨询
专业医护人员。
注意: 如果您每次的吸乳量经常超过 125 毫升/4 液量盎司,为防止溢漏,您可以
购买并使用 260 毫升/9 液量盎司的飞利浦新安怡自然原生系列奶瓶。
3 sec.
1. 用肥皂和水彻底
洗净双手,并确保
乳房清洁。
5. 使用“上一级”和“
下一级”按钮,根据
您的喜好更改吸力
等级。
2. 将吸乳器套件放
在乳房上。 确保将
乳头放在中心位置。
90 sec.
6. 90 秒钟后,吸乳器
将平稳切换到吸乳模
式,并缓慢将其真空
度增加到上次使用的
吸乳吸力等级(首次
使用时为 11 级)。
3. 按住开/关按钮,
直到设备打开。 指
示灯亮起,表示设
备处于刺激模式。
7. 如果您的乳汁较
早开始流出,或者
您想从吸乳模式切
换到刺激模式,可
以使用模式选择按
钮来切换模式。
4. 吸乳器在刺激模
式下启动,并缓慢
将其真空度增加至
上次使用的刺激吸
力等级(首次使用
时为 5 级)。
8. 如果要暂停,
请短按开/关按钮。
要继续,请再次短
按开/关按钮。
Page 27
3 sec.
9. 按住开/关按钮
关闭。
10. 从电源插座上拔
出适配器,并从马达
组件上拔出小插头。
提示: 为了实现最佳吸乳,请选择仍然感觉舒适的最高设置。 此设置可能因过程而异。
提示: 只需将一个吸乳器套件的管子连接到马达组件,就可以将双边吸乳器用作单边
吸乳器。
使用后
1
2
1. 拧开奶瓶。 2A. 储存母乳: 用
密封垫和螺旋盖将
奶瓶密封。
2B. 准备好奶瓶为
婴儿喂奶: 将奶嘴
放在螺旋盖中,然
后将组装好的螺旋
盖拧到奶瓶上。 用
瓶盖密封住奶嘴 (请
参见 '组装奶瓶')。
3. 从吸乳器套件
中卸下硅胶管和盖
子。
4. 从盖子中拉出硅
胶管。
5. 拆卸并清洁与乳汁
接触过的所有部件
(请参见 '清洁和消毒')。
警告: 请立即冷藏或冷冻吸出的乳汁,或先在 16-29 °C (60-85 °F) 的温度下
保存,然后再哺喂宝宝,但这种情况下最多只能保存 4 个小时。
有关吸乳器和吸乳技巧的更多信息,请访问 www.philips.com/avent。
Page 28
存放母乳
下面列出了母乳存储准则:
存储位置 温度 最长存储期
房间
16-29 ⁰C (60-85 ⁰F)
4 小时
冰箱
冰柜
警告: 切勿重新冷冻解冻的母乳,以免降低乳汁质量。
警告: 切勿向冷冻母乳中添加新鲜母乳,以免降低乳汁质量及意外融化冷冻母乳。
4 ⁰C (39 ⁰F)
< -4 ⁰C (25 ⁰ F)
4 天
6 个月
用奶瓶喂母乳
为了您孩子的安全和健康
警告!
- 长时间吸吮将会导致龋病。
- 喂食前请务必检查食物的温度。
- 若有明显破损或缺陷,请立即丢弃。
- 将不用的组件放置在儿童无法接触到的地方。
- 切勿系在绳索、丝带、蕾丝或衣服的松动部分, 以免使孩子窒息。
- 不应将奶嘴作为安抚奶嘴使用。
- 应在成人监护下使用本产品。
- 请让儿童远离瓶盖,以免发生窒息。
- 切勿让儿童玩耍小零件,或让儿童在行走或奔跑时使用奶瓶。
- 保持所有不使用的部件放在儿童可触及范围之外,使儿童不能接触,以免被儿童入
口误吞或发生其他危险的意外。不应将奶瓶及奶瓶任何部件作为玩具使用。
- 使用之前检查所有部件,并朝各个方向拉伸奶嘴。 若部件有任何明显破损或缺陷,
请立即丢弃。
- 务必丢弃哺喂后剩余的母乳。
警告: 避免损坏奶瓶
- 切勿置于发热炉具内,这会导致塑料融化。
- 消毒和高温可能会影响塑料材质属性。这可能会影响瓶盖的贴合度。
- 请勿将奶嘴置于阳光直射处或热源附近,置于消毒剂中的时间也不要超过建议时
间,否则可能会损坏产品。
使用奶瓶之前
- 每次使用之前,请检查奶瓶和奶嘴,并朝各个方向拉伸奶嘴,以避免窒息的危险。
一旦出现明显破损或缺陷,请立即丢弃。
- 首次使用之前和每次使用前后,都要对奶瓶进行清洁和消毒。为保证卫生,首次使用
前在沸水中消毒5min,煮沸消毒时水量应足够,避免产品因长时间接触到温度较高
的锅底或锅沿而导致变形 (请参见 ‚清洁和消毒‘)。
Page 29
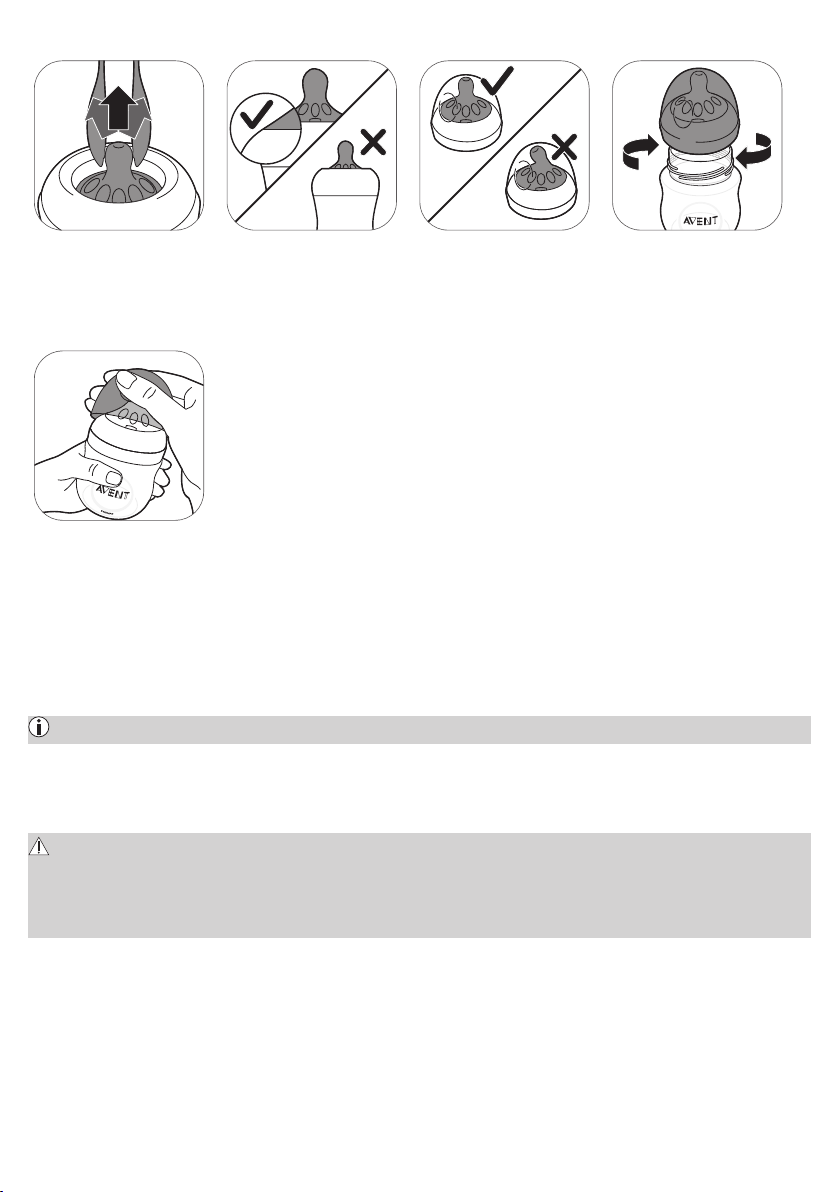
组装奶瓶
1. 将奶嘴向上拉的
同时来回移动,这
种组装方式比沿直
线向上拉更轻松。
5. 要取下瓶盖,
请将手放在瓶盖上
方,拇指放入瓶盖
的凹陷处。
2. 确保将奶嘴提拉
至其下半部分与螺
旋盖对齐。
3. 确保将瓶盖垂直
置于瓶上,以使奶
嘴竖直放置。
4. 将螺旋盖(带有
奶嘴和瓶盖)拧到
奶瓶上。
为母乳加热
如果使用冷冻的母乳,需在加热前让其完全解冻。
注意: 如果您需要快速哺喂宝宝,可以用一碗热水解冻母乳。
将装有已解冻或冷藏母乳的奶瓶放在一碗热水或奶瓶加热器中加热。 从奶瓶上取下螺
纹盖和密封垫。
请务必搅拌加热后的母乳,以确保热量均匀分布并在喂食之前测量温度。
警告: 不建议使用微波炉加热母乳。 微波炉可能会影响母乳的质量,造成一些重
要的营养成分流失,同时会在局部产生高温。 如果在微波炉中加热母乳,请仅将不
带螺旋盖、奶嘴和瓶盖的容器放到微波炉中。 请务必搅拌加热后的母乳,以确保热
量分散均匀并在喂食之前测量温度。
Page 30

为宝宝选择合适的奶嘴
飞利浦新安怡奶嘴有不同的流量可供选择。 吸乳器随附 1 号奶
嘴,为 0m+ 奶嘴,是新生儿以及各个年龄段的母乳喂养宝宝的
理想之选。如果宝宝经常噎住,喂奶过程中从嘴里漏出乳汁,
或者无法调节吸吮速度,请使用较小的流量。 如果宝宝在哺喂
期间睡着、发脾气或哺喂时间过长,请使用较大的流量。
飞利浦新安怡奶嘴侧面有清晰的数字显示流量。 有关详细信息,请访问
www.philips.com/avent。
存放奶瓶
- 将所有部件存放在干燥、干净且有盖的容器中。
- 不要将奶嘴置于阳光直射处、直接置于热源处或长期置于消毒剂中,这将导致奶嘴
老化。
- 出于卫生考虑,建议您每 3 个月更换一次奶嘴。
兼容性
飞利浦新安怡单边/双边电动吸乳器与飞利浦新安怡自然原生系列中的所有婴儿奶瓶
以及带有适配器的飞利浦新安怡存储杯兼容。 我们不建议将飞利浦新安怡自然原生系
列玻璃奶瓶与吸乳器一起使用。
订购配件
如需购买附件或备件,请访问 www.philips.com/parts-and-accessories 或联系您
的飞利浦经销商。 您还可以与所在国家/地区的飞利浦客户服务中心联系。
订购备用奶嘴时,请确保使用流量适合宝宝的奶嘴 (请参见 ‚为宝宝选择合适的奶嘴‘)
,请勿将飞利浦新安怡防胀气奶瓶的部件和奶嘴与飞利浦新安怡自然原生系列奶瓶的
部件混用。 它们不配套,可能会导致泄漏或其他问题。
回收
- 弃置本产品时,请不要将其与一般生活垃圾放在一起,应将其交给政府指定的回收
中心。 这样做将有利于环保。
- 请遵守您所在国家/地区的电器和电子产品专门回收规定。 正确处置废弃产品有助
于避免对环境和人类健康造成不良后果。
保修和支持
如需信息或支持,请访问 www.philips.com/support 或阅读保修卡。
故障处理方法
本章归纳了使用吸乳器时最常见的一些问题。 如果您无法根据以下信息解决问题,请
访问 www.philips.com/support 查阅常见问题列表,或联系您所在国家/地区的客
户服务中心。
Page 31

问题 解决方法
使用吸乳器时有疼
痛感。
吸乳器无法打开
(指示灯不亮)。
马达组件上的所有
指示灯均闪烁,并
且设备自动关闭。
我没有感觉到任何
吸力/吸力等级太
低。
吸乳器的吸力太
强。
使用吸乳器时,我
吸出的乳汁很少或
者没有。
吸乳器破裂/变
色。
将硅胶管插入马达
组件或盖子后,硅
胶管太松。
- 选择感觉舒适的吸力等级。
- 检查硅胶隔膜是否未损坏(没有小裂纹、小孔等)。
- 确保将乳头放在软垫中心。
- 如果仍感到疼痛,请停止使用吸乳器,并咨询您的专业医护人员。
- 只能使用随附的适配器。
- 检查使用的是否为设备随附的适配器,并且适配器是否已正确
连接至马达组件和电源插座。
- 将适配器连接到另一个电源插座,并检查是否可以打开吸乳器。
- 如果问题仍然存在,请通过 www.philips.com/support 与客
户服务中心联系。
- 尝试再次打开马达组件。
- 检查使用的是否为设备随附的适配器。
- 如果问题仍然存在,请通过 www.philips.com/support 与
客户服务中心联系。
- 如果可能,请尝试较高的吸力等级。
- 检查是否已正确组装硅胶隔膜 (请参见 '组装吸乳器')。
- 检查白色阀门是否未损坏并已正确组装 (请参见 '组装吸乳器')。
- 检查吸乳器的其他部件是否完好并已正确组装 (请参见 '组装吸
乳器')。
- 确保将吸乳器正确放在乳房上,以在吸乳器和乳房之间保持密封。
- 如果您仍感受不到吸力,请通过 www.philips.com/support
与客户服务中心联系。
- 如果可能,请尝试较低的吸力等级。 首次吸乳时,请从默认
吸力等级开始(刺激模式下为 5 级,吸乳模式下为 11 级),
并在需要时增加/降低该等级。
- 在不同的吸乳过程中,可能需要选择不同的等级让您感到最
舒适。确保仅使用此吸乳器随附的吸乳器部件。
- 检查硅胶隔膜是否未损坏(没有小裂纹、小孔等)。
- 如果问题仍然存在,请通过 www.philips.com/support 与
客户服务中心联系。
- 如果感觉不到足够的吸力,请检查故障排除项目“我感觉不到
任何吸力/吸力等级太低”。
- 如果您是第一次使用飞利浦新安怡吸乳器,可能需要先进行
一 些练习,然后才能吸出乳汁。 请访问飞利浦新安怡网站
www.philips.com/avent 了解更多吸乳技巧。
- 确保吸乳器不与抗菌或研磨性清洁剂接触。 清洁剂、清洁产
品、消毒溶液、软化水和温度波动等因素合在一起可能会导致塑
料破裂。 如果发现任何裂缝,请立即停止使用吸乳器。 请与飞
利浦新安怡客户服务中心联系,以获取备用组件。
- 食物的颜色可能会使组件变色,但这不会影响这些组件的使用。
- 使所有组件远离热源或避免阳光直射,因为这会使组件变色。
更换硅胶管接头。 请联系客户服务中心 www.philips.com/
support 获取备用组件
Page 32

补充信息
下文介绍了与母乳喂养有关的常见情况。 如果您出现以下任何症状,请联系专业医护
人员或母乳喂养专家。
常见的母乳喂
养相关疾病
疼痛感 乳房或乳头上感到疼痛,或者由于吸力超过舒适水平而感到疼痛。
乳头疼痛 在吸乳过程开始时,乳头持续疼痛,或者在整个吸乳过程中一直疼
充血 乳房肿胀。 可能感觉乳房较硬、有结块和疼痛。 可能包括乳房部位
淤伤 用手按下紫红色变色部分时颜色不会消退。 当淤伤褪去后,淤伤部
淤血 淤血可导致压痛、疼痛、发红、肿胀和/或发热。
乳头组织损伤
(乳头创伤)
乳腺管堵塞 乳房上出现红色的疼痛结块。 可能包括乳房部位的红斑(发红)。
说明
痛,或者在两个过程之间持续疼痛。
的红斑(发红)和发热。 通常发生在哺乳期的头几天。
分可能会变为绿色和褐色。
- 乳头裂伤或皲裂。
- 乳头上的皮肤组织脱落。 乳头皲裂和/或起泡通常会同时出现。
- 乳头撕裂。
- 起泡。 在皮肤表面看起来像一些小泡泡。
- 出血。 乳头皲裂或撕裂会导致受影响的部位出血。
如果不及时治疗,可能会导致乳腺炎(乳房炎症)。
存储条件
将吸乳器远离阳光直射,阳光暴晒可能造成变色。 将吸乳器及其附件存放在安全、
洁净且干燥的地方。
如果将设备存放在高温或低温环境下,在使用之前,请将其放在温度为 20 °C
(68 °F) 的环境中 30 分钟,让它在使用环境下达到符合使用条件的温度(5 °C 至
40 °C/41 °F 至 104 °F)。
电磁场 (EMF)
本飞利浦设备符合所有有关暴露于电磁场的适用标准和法规。
Page 33
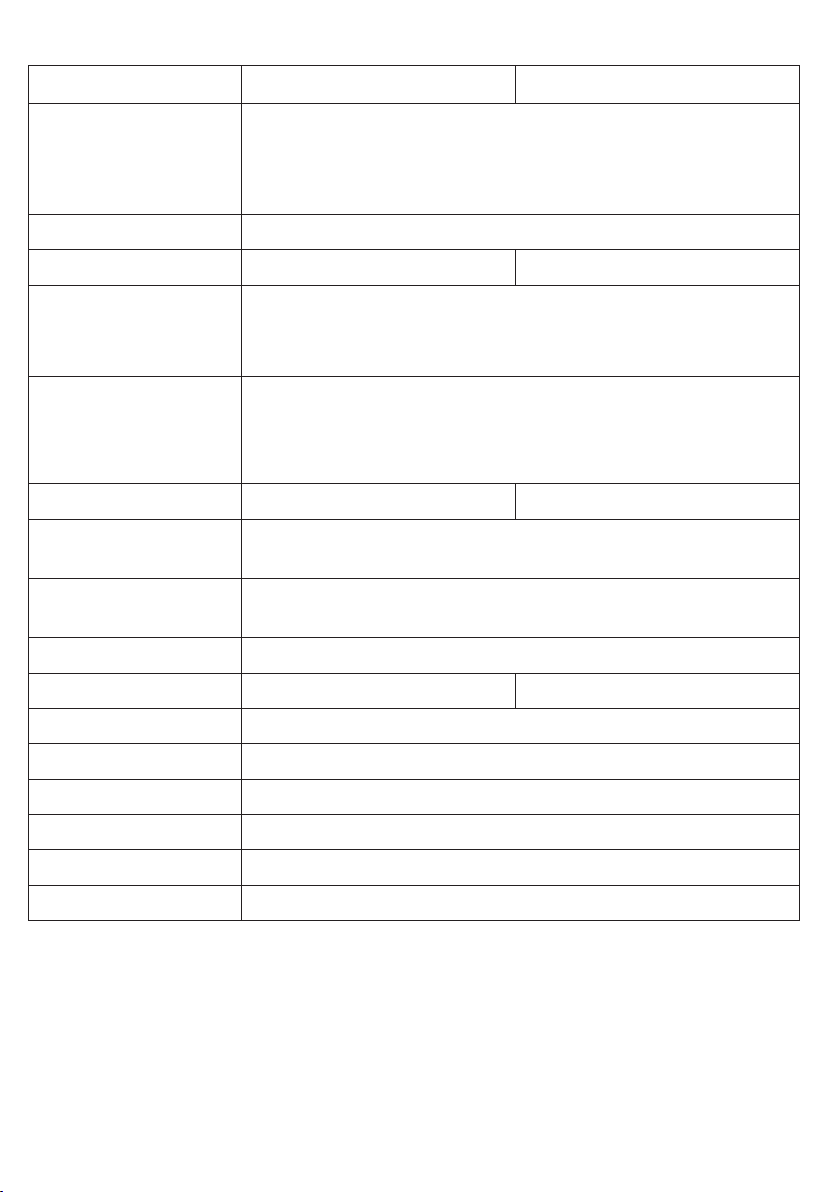
技术信息
单边电动吸乳器 双边电动吸乳器
真空度 刺激: -60 至 -200 百帕(-45 至 -150 毫米汞柱)
吸乳: -60 至 -360 百帕(-45 至 -270 毫米汞柱)
能够以 20 百帕的幅度进行调节
间歇真空
循环速度 53-120 次循环/分钟
马达组件额定输入 5 伏(直流)/1.1 安 5 伏(直流)/1.8 安
电源适配器额定输入 外部电源适配器 100-240 伏(交流)
50/60 赫兹
400 毫安
适配器型号 S009AHz050yyyy 字母“yyyy”代表介于 0100 (1000 毫
安)到 0180 (1800 毫安)之间的输出电流,其递增幅
度为 100 毫安。 字母“z”表示插头的类型,它可以是:
U、V、B、S、C、A、D、K、T、I、E、F。
电源适配器额定输出 5 伏(直流)/1.1 安 5 伏(直流)/1.8 安
使用条件 温度: 5 °C 至 40 °C(41 °F 至 104 °F)
相对湿度: 15 至 90 %(非冷凝)
存放和运输条件 温度: -25 °C 至 70 °C(-13 °F 至 158 °F)
相对湿度: 最高 90 %(非冷凝)
运行压力 700-1060 百帕(高度 <3000 米)
净重 230 克 310 克
外部尺寸 马达组件: 145 毫米 x 95 毫米 x 45 毫米(长 x 宽 x 高)
设备类别 IEC 60335-1: 系统: II 级;马达组件: III 级构造
材料 ABS、硅胶(马达组件)聚丙烯、硅胶(其他部件)
使用寿命 500 小时
操作模式 连续操作
防护等级 IP22(马达组件),IP20(适配器)
Page 34
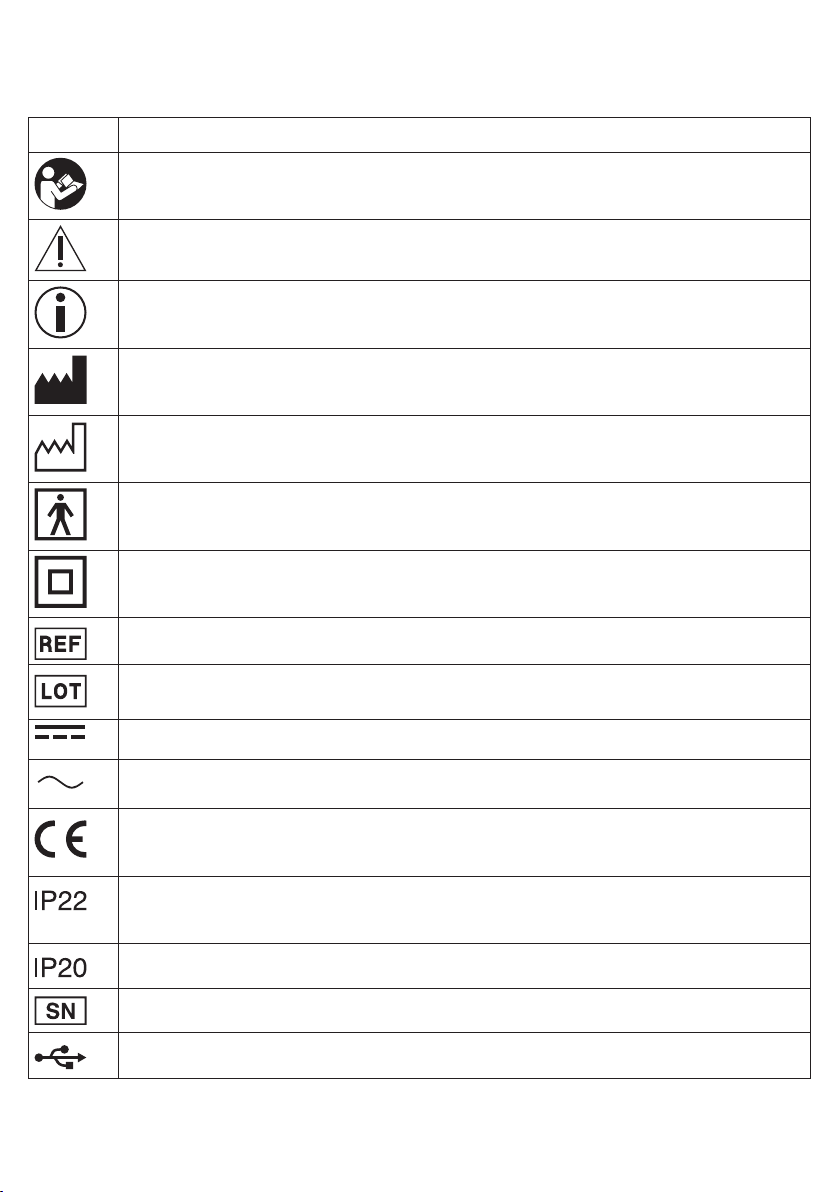
符号说明
警告标志和符号对于确保您安全且正确地使用本设备是必不可少的,让您和其他人远
离危险。 下面您将了解在标签上和用户手册中警告标签和符号的含义。
符号 说明
表示应遵循使用说明。
表示重要信息,例如警告和注意事项。
表示使用提示、其他信息或备注。
表示制造商。
表示制造日期。
表示与用户有身体接触的产品部件(也称为应用部件)为符合 IEC
60601-1 标准的 BF 型(浮体)。 应用部件是吸乳器套件。
表示“II 级设备”。 此适配器双重绝缘(II 级)。
表示制造商的吸乳器目录编号。
表示吸乳器的批号。
表示“直流电”。
表示“交流电”。
表示制造商已采取所有必要措施来确保设备符合适用的安全法规以在欧洲
共同体内分销。
表示可防止大于 12.5 毫米的固体异物进入,并且在倾斜 15 度时仍可免受
水滴进入所造成的有害影响。
表示可防止大于 12.5 毫米的固体异物进入,但无防水性。
表示制造商的吸乳器序列号。
表示 USB。
Page 35
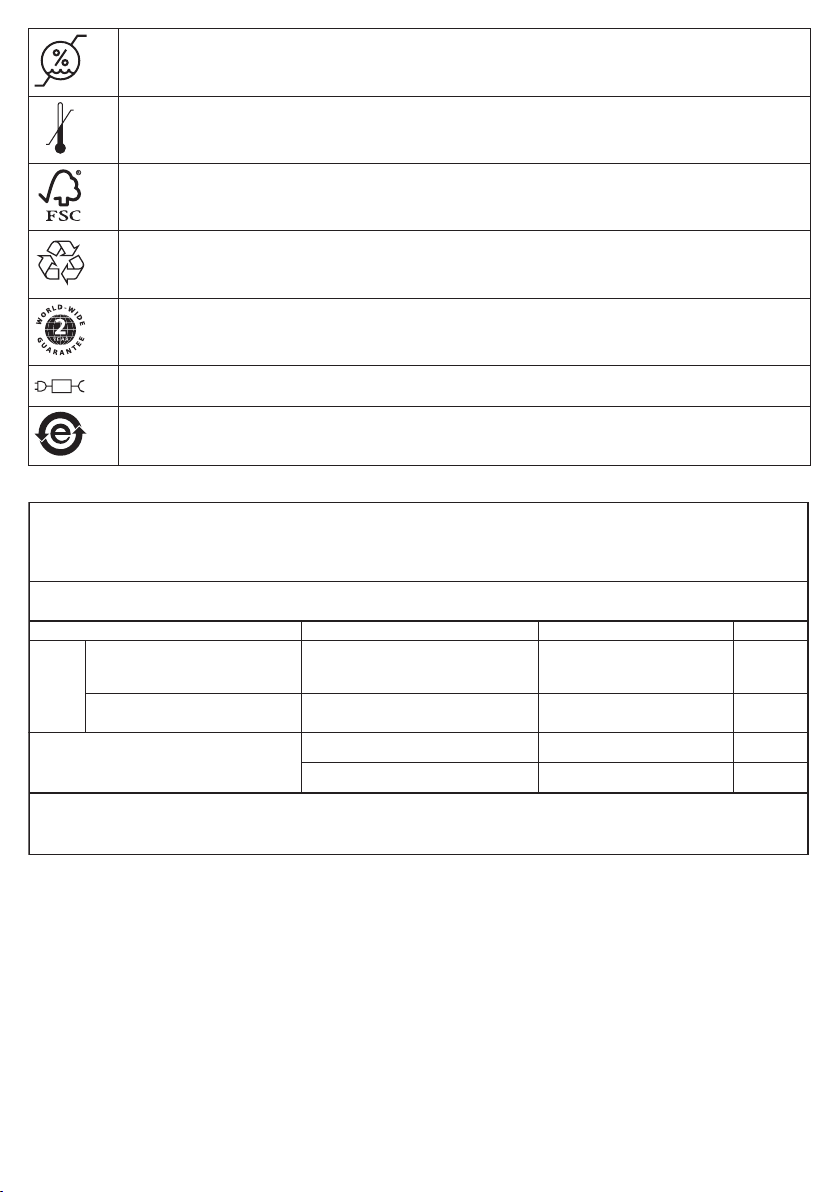
表示本设备可以安全暴露的相对湿度上限: 最高 90%。
表示本设备可以安全暴露的存放和运输温度限制范围: -25 °C 至
70 °C/-13 °F 至 158 °F。
表示森林管理委员会。 FSC 商标使消费者能够选择支持森林保护和产生社
会效益的产品,并让市场能够提供更好的森林管理激励机制。
说明能够回收的物品:并不指在所有回收收集系统中已经回收过或将接受
回收的物品。
表示飞利浦 2 年全球保修。
表示连接吸乳器需要使用特定的适配器。
表示符合中国 RoHS 2。
下ݖ⊓Ⴖᕎࢂ䓦⩢ߕΠக4$'
下ݖ⊓Ⴖᕎࣹ䓦⩢ߕΠக4$'
丌৮ᣒ㼓⩕ᱽԎᖜ
䄤ᵦᢛ䄡ᬻΓ㺮Ⅿₐ፥Ҭ⩕᱙ϔ৮ȡ
᱙ϔ৮丌৮ᣒ㼓⩕ᱽࣷ䘕Уこ(#হⰥᏁ丌৮Ⴖڕపუᴴ۳㺮Ⅿ喑ڤҀԎᖜຯ喟
丌৮ᣒ㼓⩕ᱽ 䘕У ប㵹ᴴ۳ ิ∕
㖇☜
☜Ά☜⮱㖇➖喑☜ࢍᰭ๔䉕䛼
ൾ
ܳ喍$"4/P
㖇Ά☜喍Ά☜ڞ㖇➖喎
$"4/P
ᾎ㘣
ิ∕
∕喟ϔ৮҉ღக䪬ႅו丌৮ȡ
∕喟᱙㈨݄ϔ৮࠲В丌৮ᣒ㼓ᱽ喑䘕ܳᱧಸ㘪ݘᱽ喑В䭲ϔ৮۳喆
ΠகҀȠΠகᄮⰃȠຣ⨣Ƞຣ⨣ⰃȠ
Ⰳ
ჳᄮ
ᾎ㘣䯁㛉Ƞ博ୡ䬭Ƞᠶᦖ䒜
ຣୡ
GB 4806.7-2016
GB 4806.7-2016
GB 4806.11-2016
GB 4806.2-2015
Page 36
ϔ৮喟下ݖ⊓Ⴖᕎࢂ䓦⩢ߕΠக
ಸ喟4$'
䷊Ⴧ⩢ࢸ喟7嗣
䷊Ⴧ䶾⢴喟)[
䷊Ⴧ⩢≮喟N"
⩌ϔᬒ喟䄤㻮ϔ৮᱙Ҁ
ϔౝ喟࠵➆ݖ
下ݖ⊓喍ప喎ែ䉱ᰶ䭽ڙ
⊤ጯ䲆Ⴖࡧ▢ⴠ䌜"ᎏ
ڕప䶫ߎ☚㏬
ϔ৮喟下ݖ⊓Ⴖᕎࣹ䓦⩢ߕΠக
ಸ喟4$'
䷊Ⴧ⩢ࢸ喟7嗣
䷊Ⴧ䶾⢴喟)[
䷊Ⴧ⩢≮喟N"
⩌ϔᬒ喟䄤㻮ϔ৮᱙Ҁ
ϔౝ喟࠵➆ݖ
下ݖ⊓喍ప喎ែ䉱ᰶ䭽ڙ
⊤ጯ䲆Ⴖࡧ▢ⴠ䌜"ᎏ
ڕప䶫ߎ☚㏬
᱙ϔ৮ᵦᢛపᴴ(#ݣ䕍
ϔ৮ຣ⨣⮱Ԋႅ䭽Ꭱ
ຣ⨣⨣䏘ȠຣୡȠຣ⨣ⰃȠⰃȠ
ჳᄮ㏱ຣ⨣喑䔯⩕λᰵࣷВྡᎩ٬喑
こ(#
保留备用
发行日期: 11/10 /2021
᱙ϔ৮ᵦᢛపᴴ(#ݣ䕍
ϔ৮ຣ⨣⮱Ԋႅ䭽Ꭱ
ຣ⨣⨣䏘ȠຣୡȠຣ⨣ⰃȠⰃȠ
ჳᄮ㏱ຣ⨣喑䔯⩕λᰵࣷВྡᎩ٬喑
こ(#
Page 37

Philips Consumer Lifestyle B.V.
Tussendiepen 4, 9206 AD Drachten, The Netherlands
www.philips.com/avent
Trademarks are the property of Koninklijke Philips N.V.
商标归 Koninklijke Philips N.V.
© 2021 Koninklijke Philips N.V.
All rights reserved.
保留所有权利。
3000.053.7109.3 (2021-10-11)
FSC
 Loading...