

Page 1
User manual
SCF356
Always here to help you
Register your product and get support at
www.philips.com/welcome
Specications are subject to change without notice
© 2016 Koninklijke Philips N.V.
All rights reserved
4213.354.3667.4
Page 2
22 23 24 25
1
2 3 4 5
26
27
6
10 11 12 13
14 15 16 17
18 19 20 21
7 8 9
Page 3
ENGLISH 6
DEUTSCH 20
FRANÇAIS 36
ITALIANO 52
NEDERLANDS 67
SCF356
Page 4

6
ENGLISH
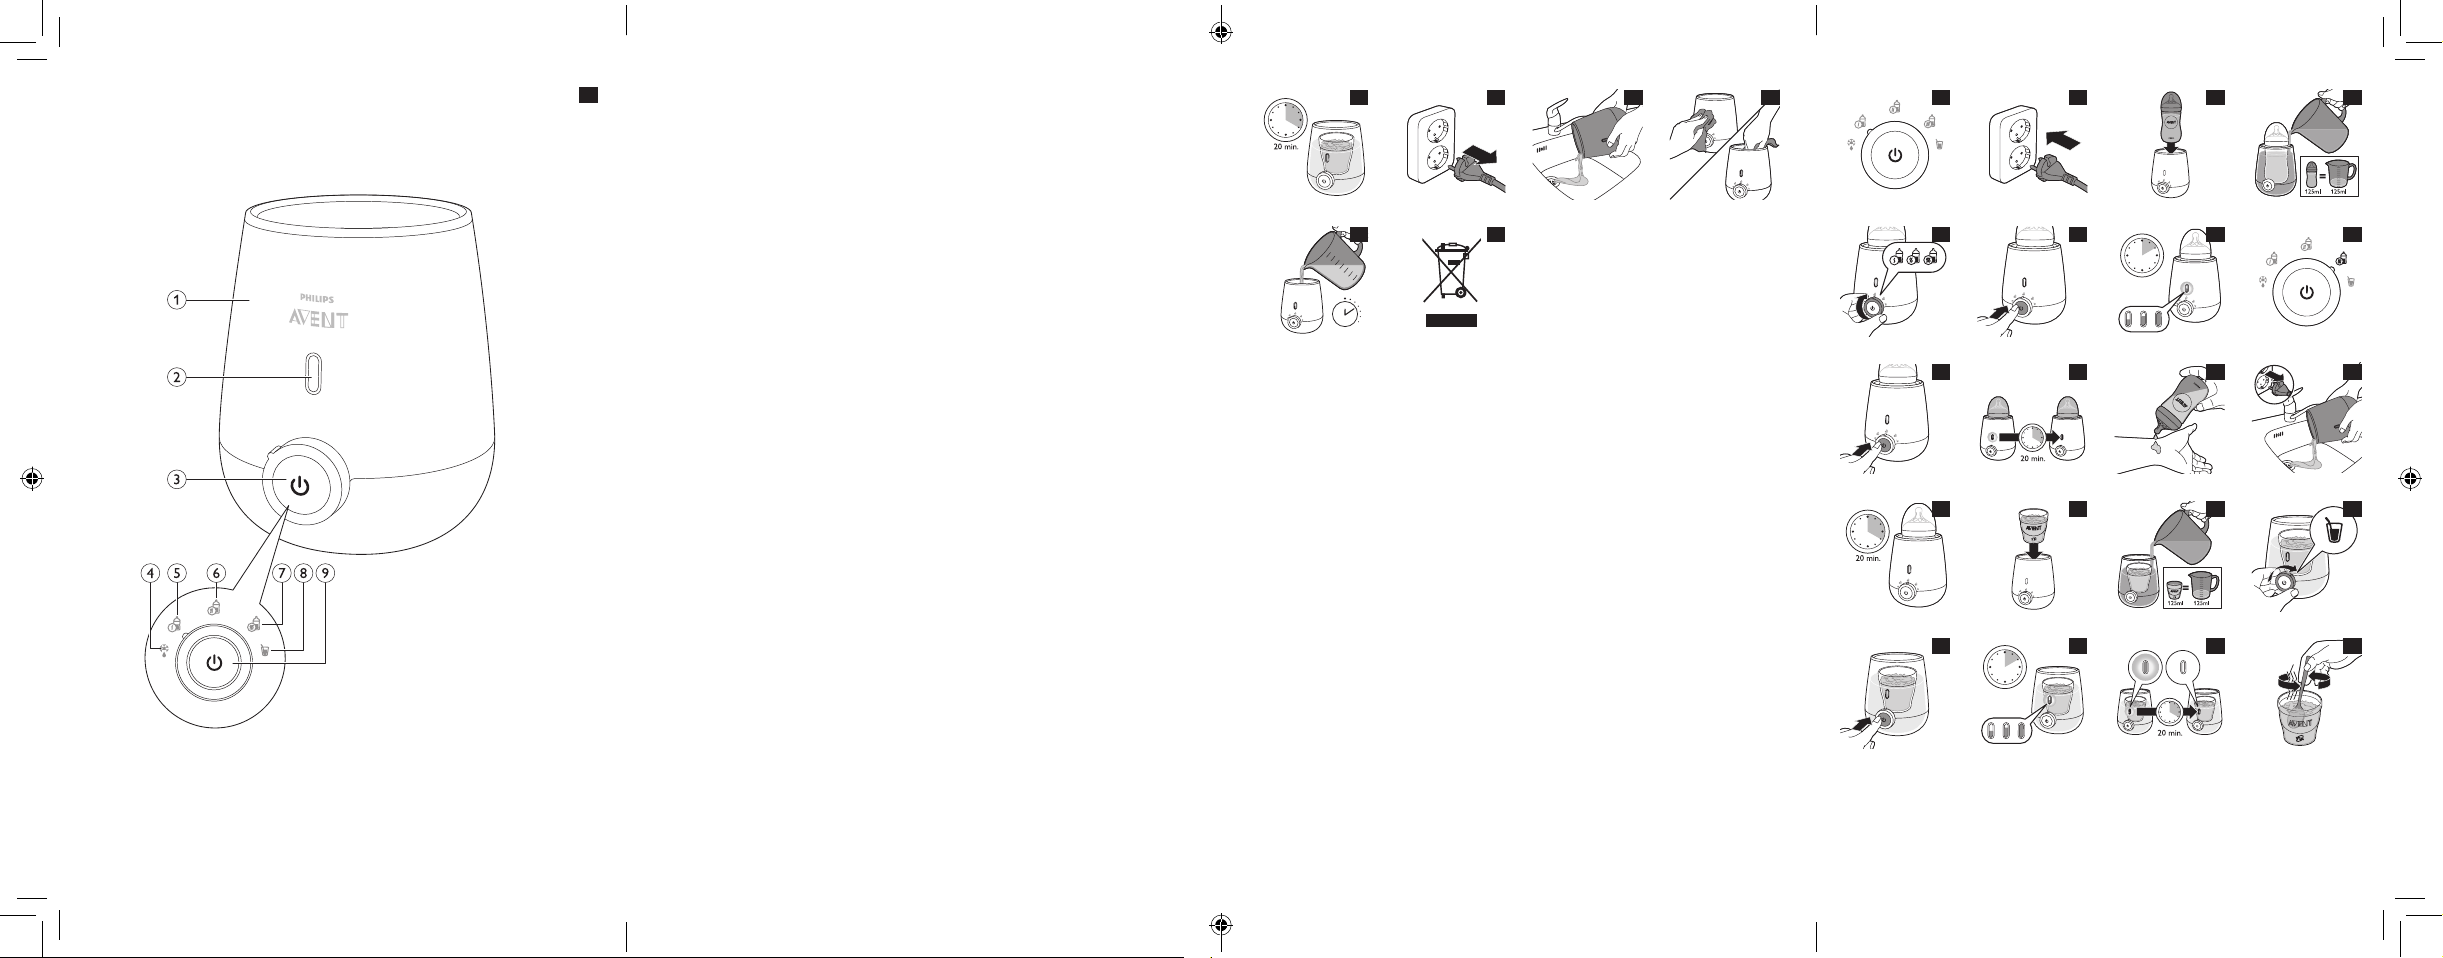
General description (Fig. 1)
1. Baby bottle warmer
2. Progress indicator
3. Settings and on/o knob
4. Defrost setting
5. Milk warming setting 1
6. Milk warming setting 2
7. Milk warming setting 3
8. Baby food warming setting
9. On/o button
Important
To fully benet from the support that Philips
oers,
register your appliance at
www.philips.com/welcome.
Read this user manual carefully before you
use the baby bottle warmer and save it for
future reference.
Danger
- Never immerse the appliance in water or
any other liquid, nor rinse it under the tap.
Warning
- Only use the appliance indoors.
- This appliances can be used by persons
with reduced physical, sensory or mental
capabilities or lack of experience and
knowledge if they have been given
supervision or instruction concerning use
of the appliance in a safe way and
understand the hazards involved.
Page 5

ENGLISH 7
- Cleaning and user maintenance shall not
be made by children.
- This appliance shall not be used by
children. Keep the appliance and its cord
out of reach of children.
- Children shall not play with the appliance.
- Do not immerse the cord, plug or
appliance in water or any other liquid.
- Do not let the mains cord hang over the
edge of a table or worktop. Excess cord
can be stored in the base of the baby
bottle warmer to ensure stability of the
appliance.
- Keep the mains cord away from hot
surfaces.
- Only connect the appliance to an earthed
wall socket. Always make sure that the
plug is inserted into the wall socket
properly.
- Check if the voltage indicated on the
bottom of the appliance corresponds to
the local mains voltage before you
connect the appliance.
- If you need to use an extension cord,
make sure it is an earthed extension cord
with a rating of at least 13 amperes.
Page 6

ENGLISH8
- Do not use the appliance if the plug, the
mains cord or the appliance itself is
damaged. If the mains cord is damaged,
you must have it replaced by Philips,
a service centre authorised by Philips or
similarly qualied persons in order to
avoid a hazard.
- Do not place the appliance on or near a
hot gas or electric cooker, or in a heated
oven.
- Do not preheat the appliance.
- Always place a fully assembled bottle
with cap in the baby bottle warmer before
you add water.
- Make sure you add water before you
switch on the baby bottle warmer.
- Hot water can cause serious burns. Be
careful when the baby bottle warmer
contains hot water.
- The accessible surfaces of the appliance
may become hot during use.
- Do not move the appliance when it
contains hot water.
- Always check the baby food temperature
before you feed your child.
Caution
- This appliance is intended to be used in
household and similar applications such
Page 7

ENGLISH 9
as farm houses, bed and breakfast type
environments, sta kitchen areas in
shops, oces and other working
environments, and by clients in hotels,
motels and other residential type
environments.
- Unplug the appliance when it is not in
use.
- Store any excess mains cord in the base
to ensure stability of the baby bottle
warmer.
- Let the appliance cool down before you
clean it.
- Follow the descaling instructions to avoid
irreparable damage.
- Do not try to open or repair the appliance
yourself. You can contact the Philips
Consumer Care Centre
in your country
(see www.philips.com/support).
- The food should not be heated for too
long.
- Only use the appliance as described in
the user manual to avoid potential injury
due to misuse.
- The surface of the heating element is
subject to residual heat after use.
Page 8
ENGLISH10
Electromagnetic elds (EMF)
This Philips appliance complies with all applicable standards
and regulations regarding exposure to electromagnetic elds.
Using the baby bottle warmer
With this baby bottle warmer, you can safely warm and
defrost milk in Philips Avent feeding bottles and milk or baby
food in containers.
The baby bottle warmer helps to preserve the valuable
nutrients and vitamins in breast milk because it never
overheats the milk. If milk becomes too warm, nutrients and
vitamins are damaged. To help preserve the quality of your
breast milk, it is important to heat the milk in a safe and
controlled way. The baby bottle warmer is designed to warm
gently and evenly and to avoid hot spots, as the milk
circulates during warming. The built-in sensor tracks and
controls the milk temperature, to avoid overheating at all
times.
Note: Philips Avent breast milk bags and Philips Avent
2oz/60ml bottles cannot be used in this baby bottle
warmer.
Explanation of settings
- You can choose between the following settings: (Fig. 2)
- Defrost setting: To defrost a bottle or container with frozen
milk or frozen baby food. No warming occurs.
- Milk warming settings: Select one of these settings when
you want to warm a bottle of milk to a safe temperature.
Setting 2 warms your milk to approximately body
temperature. Setting 1 warms your milk to a slightly lower
temperature and setting 3 warms your milk to a slightly
higher temperature.
- Baby food warming setting: Select this setting when you
want to warm a container or jar with baby food.
Page 9
ENGLISH 11
Using the baby bottle warmer to warm milk
1 Put the mains plug in the wall socket (Fig. 3).
2 Place a bottle centrally in the baby bottle warmer (Fig. 4).
Note: To warm milk in a milk storage container, follow the
same steps as indicated for warming milk in a bottle.
3 Fill the baby bottle warmer with the same amount of
drinking water as the amount of milk you want to warm
up (for example, to warm up 125ml/4oz of milk, you need
to use 125ml/4oz of drinking water). If you want to heat
up a large amount of milk (>180ml/6oz), the maximum
water level is approximately 1cm/0.4 inches under the
rim of the baby bottle warmer (which corresponds to
adding 160ml/4.5oz of drinking water). An accurate water
level ensures correct warming performance. (Fig. 5)
4 Select the desired setting (Fig. 6).
Note: Experience teaches that babies may have a
preference for a specific milk temperature. This can be due
to personal preference or external factors (e.g. environment
temperature). All three settings ensure that the milk is
warmed to a safe temperature which is comfortable for your
child and helps to preserve the nutrients and vitamins in the
milk.
5 Press the on/o button to switch on the appliance. The
light in the button lights up to indicate that the baby
bottle warmer is on (Fig. 7).
Note: The baby bottle warmer starts warming up right after
you press the button.
6 The progress indicator starts to ll up gradually with
white light to show the progress of the milk warming
process (Fig. 8).
Page 10
ENGLISH12
Note: The progress indicator shows the progress of the milk
warming process. The progress indicator starts flashing
when the appliance is on. When the first warming phase has
been completed, the bottom segment lights up continuously
and the next segment starts flashing to show that the
second warming phase is in progress. These steps continue
until the third warming phase has been completed. Then the
entire progress indicator lights up continuously.
Note: During the warming process, the milk circulates to
ensure even warming. It takes about 10 minutes to warm
90ml/3oz of room-temperature milk. It takes slightly longer
to warm cold milk or a large amount of milk.
Caution: Do not take the bottle out of the baby bottle
warmer while the progress indicator is ashing.
7 When the entire progress indicator lights up
continuously, the milk has reached the set temperature.
- When the milk is warm, you can either take the bottle out
of the baby bottle warmer to feed your baby right away
(see section ‘Feeding your baby immediately’) or you can
keep it warm in the baby bottle warmer (see section
‘Keeping milk warm’).
Increasing the milk temperature
1 If you want the milk to be warmer, you can increase the
milk temperature gradually after it is ready by switching
to milk warming setting 3 and leaving the bottle in the
appliance at the keep-warm mode (Fig. 9).
2 If you just switched o the baby bottle warmer or if it just
switched o automatically, switch it back on without
removing the warm water from it, and follow the above
step (Fig. 10).
3 The baby bottle warmer switches o automatically after
20 minutes of keep-warm mode (Fig. 11).
Page 11
ENGLISH 13
Feeding your baby immediately
1 Press the on/o button to switch o the appliance and
take out the milk bottle (Fig. 10).
2 Always check the temperature of the milk before you feed
your baby. Gently swirl the milk in the bottle and check
the temperature of the milk by sprinkling a few drops on
the inside of your wrist (Fig. 12).
3 Unplug the appliance and empty the baby bottle
warmer (Fig. 13).
Keeping milk warm
1 When the milk has reached the desired temperature, the
baby bottle warmer automatically switches to the keepwarm mode. In this mode, the milk is kept at the set
temperature for 20 minutes (Fig. 14).
2 The baby bottle warmer switches o automatically after
20 minutes. The progress indicator switches o to
indicate that the milk is not kept at the desired
temperature anymore (Fig. 11).
Note: If you want to feed your baby with milk at the set
temperature, you need to take the milk bottle out of the
baby bottle warmer and feed it to your baby right after the
baby bottle warmer switches o, otherwise the milk cools
down.
Note: You cannot prolong the keep-warm mode of the baby
bottle warmer for more than 20 minutes.
Caution: It is not recommended to reheat breast milk twice,
as bacteria start to develop in the milk.
3 Always check the temperature of the milk before you
feed your baby. Gently swirl the milk in the bottle or milk
storage container and check the temperature of the milk
by sprinkling a few drops on the inside of your
wrist (Fig. 12).
Page 12
ENGLISH14
4 Unplug the appliance and empty the baby bottle
warmer (Fig. 13).
Re-using the baby bottle warmer right away for
another bottle
If you want to heat up another bottle right away, let the baby
bottle warmer cool down for a few minutes. To speed up this
process, ll the baby bottle warmer with fresh cold water.
When you switch on the baby bottle warmer, the progress
indicator starts ashing from bottom to top to indicate that
the appliance is heating up again.
Note: If the progress indicator is on but does not flash, the
baby bottle warmer is still too warm to heat up another
bottle. Please switch o the baby bottle warmer, let it cool
down for a few minutes and make sure you fill it with fresh
cold water.
Using the baby bottle warmer to warm baby food
1 Put the mains plug in the wall socket (Fig. 3).
2 Place a baby food container or jar centrally in the baby
bottle warmer (Fig. 15).
Note: You can leave o the lid of the food container or jar,
so you can stir the baby food during heating.
3 Fill the baby bottle warmer with the same amount of
drinking water as the amount of baby food you want to
warm up (for example, to warm up 125ml/4oz of baby
food, you need to use 125ml/4oz of drinking water). If
you want to warm up a large amount of baby food, the
maximum water level is approximately 1cm/0.4 inches
under the rim of the baby bottle warmer
(which corresponds to adding 160ml/4.5oz of drinking
water).
performance. (Fig. 16)
4 Select the baby food warming setting (Fig. 17).
An accurate water level ensures correct warming
Page 13
ENGLISH 15
5 Press the on/o button to switch on the appliance. The
light in the progress indicator shows that the baby bottle
warmer is on (Fig. 18).
Note: The baby bottle warmer starts warming up right after
you press the button. Due to the large variety of baby food
consistencies, it is not possible for the appliance to detect
exactly how long the baby food should be warmed.
6 The progress indicator starts to ll gradually with white
light to show the progress of the warming process. During
the warming process, do not take the jar or container out
of the baby bottle warmer but stir the baby food while
the jar or container is still in the baby bottle
warmer (Fig. 19).
Note: You can start stirring the baby food once the second
segment of the progress indicator lights up continuously.
Stirring before this moment is not eective as the
temperature of the baby food is still too low.
Caution: Do not take the food container or jar out of the
baby bottle warmer during warming.
7 When the entire progress indicator lights up
continuously, the baby food has reached the desired
temperature.
Note: Due to the large variety of baby food consistencies, it
is strongly recommended that you continuously stir the
baby food and check its temperature while it is heating up
for an optimal result.
- When the baby food is warm, you can either take the baby
food container or jar out of the baby bottle warmer to feed
your baby right away (see section ‘Feeding your baby
immediately’) or you can keep it warm in the baby bottle
warmer (see section ‘Keeping baby food warm’).
Page 14
ENGLISH16
Increasing the baby food temperature
1 Always taste the baby food after warming it up to make
sure it is not too hot. If you want the baby food to be
warmer, put the container back into the baby bottle
warmer and leave it in there at the keep warm-mode for
some time. Keep stirring the baby food (Fig. 15).
2 If you just switched o the baby bottle warmer or if it just
switched o automatically, switch it back on without
removing the warm water from it, and follow the above
step (Fig. 18).
3 The baby bottle warmer switches o automatically after
20 minutes of keep-warm mode (Fig. 20).
Feeding your baby immediately
1 Press the on/o button to switch o the appliance and
take out the baby food container or jar (Fig. 18).
2 After warming, taste the baby food to ensure it is not too
hot (Fig. 21).
3 Unplug the appliance and empty the baby bottle
warmer (Fig. 13).
Keeping baby food warm
1 When the baby food has reached the desired
temperature, the baby bottle warmer automatically
switches to the keep-warm mode. In this mode, the baby
food is kept at the desired temperature for 20
minutes (Fig. 22).
2 The baby bottle warmer switches o automatically after
20 minutes. The progress indicator switches o to
indicate that the baby food is not kept at the desired
temperature anymore (Fig. 20).
Note: If you want to feed your baby with the baby food at
the set temperature, you need to take the baby food out of
the baby bottle warmer and feed it to your baby right after
the baby bottle warmer switches o. If you do not do this,
the baby food slowly cools down.
Page 15
ENGLISH 17
Note: You cannot prolong the keep-warm mode of the baby
bottle warmer for more than 20 minutes.
3 Always check the temperature of the baby food before
you feed your baby. Gently stir the baby food in the baby
food container or jar and taste the baby food to ensure it
is not too hot (Fig. 21).
4 Unplug the appliance and empty the baby bottle
warmer (Fig. 13).
Re-using the baby bottle warmer right away for another
container of baby food
If you want to heat up another container or jar with baby food
right away, let the baby bottle warmer cool down for a few
minutes. To speed up this process, ll the baby bottle warmer
with fresh cold water. When you switch on the baby bottle
warmer, the progress indicator starts ashing from bottom to
top to indicate that the appliance is heating up again.
Note: If the progress indicator is on but does not flash, the
baby bottle warmer is still too warm to heat up another
container or jar with baby food. Please switch o the baby
bottle warmer, let it cool down for a few minutes and make
sure you fill it with fresh cold water.
Defrost setting
At this setting, you can defrost frozen milk or baby food.
Follow the steps indicated in sections ‘Using the baby bottle
warmer to warm milk’ or ‘Using the baby bottle warmer to
warm baby food’.
The progress indicator starts ashing when the appliance is
on the defrost setting. The progress indicator gradually lls
with white light to show the progress of the defrosting
process. The milk or baby food has defrosted completely
when the entire progress indicator lights up continuously.
Page 16

ENGLISH18
The defrost setting defrosts the milk or baby food but does
not warm it up. If you want to warm up milk or baby food after
defrosting it, rst switch o the appliance, then select the
desired warming setting and switch the appliance back on.
Cleaning and descaling
Cleaning
1 After each use, unplug the baby bottle warmer and let it
cool down (Fig. 23).
2 Remove the water from the baby bottle warmer for
hygienic reasons (Fig. 24).
3 Wipe the outside and inside of the baby bottle warmer
with a moist cloth (Fig. 25).
Do not use abrasive, anti-bacterial cleaning agents,
chemical solvents or sharp tools to clean the baby bottle
warmer.
Note: If you used the baby bottle warmer to warm
containers with baby food, make sure that no spilled baby
food remains on the bottom of the baby bottle warmer.
Descaling
It is recommended to descale the baby bottle warmer every
four weeks to ensure it continues to work eciently.
1 Mix 50ml/1.7oz of white vinegar with 100ml/3.4oz of cold
water to descale the baby bottle warmer. First select the
defrost setting, then switch on the baby bottle warmer
and let the appliance operate for 10 minutes. Leave the
solution in the baby bottle warmer until all scale has
dissolved. (Fig. 26)
Note: You can also use citric acid based descalers.
Note: Do not use other types of descalers.
2 Unplug the baby bottle warmer before you empty
it (Fig. 23).
Page 17
ENGLISH 19
3
Empty the baby bottle warmer and rinse its inside
thoroughly. If you still see traces of scale after rinsing, repeat
the descaling procedure (Fig. 24).
Recycling
- This symbol on a product means that the product is
covered by European Directive 2012/19/EU. Inform
yourself about the local separate collection system for
electrical and electronic products. Follow local rules and
never dispose of the product with normal household
waste. Correct disposal of old products helps prevent
negative consequences for the environment and human
health. (Fig. 27)
Guarantee and support
If you need information or support,
please visit www.philips.com/support or read the separate
worldwide guarantee leaet.
Page 18

DEUTSCH20
Allgemeine Beschreibung (Abb. 1)
1. Baby-Fläschchenwärmer
2. Fortschrittsanzeige
3. Stufen - und Ein-/Ausschalter
4. Auftau-Stufe
5. Stufe 1 zum Erwärmen von Milch
6. Stufe 2 zum Erwärmen von Milch
7. Stufe 3 zum Erwärmen von Milch
8. Stufe zur Erwärmung von Babynahrung
9. Ein-/Ausschalter
Wichtig
Um das Kundendienstangebot von Philips
vollständig nutzen zu können, sollten Sie Ihr
Gerät unter www.philips.com/welcome
registrieren.
Lesen Sie diese Bedienungsanleitung vor
dem Gebrauch des Flaschenwärmers
aufmerksam durch, und bewahren Sie sie für
eine spätere Verwendung auf.
Gefahr
- Tauchen Sie das Gerät niemals in Wasser
oder andere Flüssigkeiten; spülen Sie es
auch nicht unter ießendem Wasser ab.
Warnung
- Verwenden Sie das Gerät nur im Haus.
- Dieses Gerät kann von Personen mit
verringerten physischen, sensorischen
oder psychischen Fähigkeiten oder
Mangel an Erfahrung und Kenntnis
Page 19
DEUTSCH 21
verwendet werden, wenn sie bei der
Verwendung beaufsichtigt wurden oder
Anweisung zum sicheren Gebrauch des
Geräts erhalten und die Gefahren
verstanden haben
- Die Reinigung und Wartung darf nicht von
Kindern durchgeführt werden.
- Dieses Gerät sollte nicht von Kindern
verwendet werden. Halten Sie das Gerät
und das Netzkabel außerhalb der
Reichweite von Kindern.
- Kinder dürfen nicht mit dem Gerät
spielen.
- Tauchen Sie das Kabel, den Stecker oder
das Gerät nicht in Wasser oder andere
Flüssigkeiten.
- Lassen Sie das Netzkabel nicht über den
Rand des Tisches oder der Arbeitsäche
hängen. Das Kabel lässt sich im Sockel
des Flaschenwärmers verstauen, um die
Stabilität des Geräts zu gewährleisten.
- Achten Sie darauf, dass das Netzkabel
nicht in der Nähe heißer Flächen verläuft.
- Schließen Sie das Gerät nur an eine
geerdete Steckdose an. Achten Sie stets
darauf, dass der Stecker richtig in der
Steckdose sitzt.
Page 20
DEUTSCH22
- Prüfen Sie vor Inbetriebnahme, ob die
Spannungsangabe auf der Unterseite des
Geräts mit der örtlichen Netzspannung
übereinstimmt.
- Wenn Sie ein Verlängerungskabel
verwenden, muss dieses geerdet und auf
mindestens 13 A ausgelegt sein.
- Verwenden Sie das Gerät nicht, wenn der
Stecker, das Netzkabel oder das Gerät
selbst beschädigt ist. Wenn das Netzkabel
beschädigt ist, darf es nur von einem
Philips Service-Center, einer von Philips
autorisierten Werkstatt oder einer ähnlich
qualizierten Person ausgetauscht
werden, um Gefährdungen zu vermeiden.
- Stellen Sie das Gerät nicht auf den heißen
Gas- oder Elektroherd oder in den
beheizten Ofen.
- Wärmen Sie das Gerät nicht vor.
- Stellen Sie immer eine vollständig
zusammengesetzte Flasche mit Kappe in
den Flaschenwärmer, bevor Sie Wasser
hinzufügen.
- Vergewissern Sie sich, dass Sie vor dem
Einschalten des Flaschenwärmers Wasser
hinzufügen.
Page 21

DEUTSCH 23
- Heißes Wasser kann Verbrühungen
verursachen. Gehen Sie vorsichtig mit
dem Flaschenwärmer um, wenn er heißes
Wasser enthält.
- Die zugänglichen Oberächen des Geräts
können während des Gebrauchs heiß
werden.
- Bewegen Sie das Gerät nicht, wenn es
heißes Wasser enthält.
- Bevor Sie Ihr Kind füttern, sollten Sie die
Temperatur der Babynahrung überprüfen.
Achtung
- Dieses Gerät ist für die Verwendung im
Haushalt und in Einrichtungen wie
Bauernhöfen, Frühstückspensionen,
Mitarbeiterküchen in Geschäften, Büros
und anderen Arbeitsumgebungen sowie
für Kunden in Hotels, Motels und anderen
Einrichtungen vorgesehen.
- Stecken Sie das Gerät aus, wenn es nicht
in Gebrauch ist.
- Verstauen Sie das Kabel im Sockel des
Geräts, um die Stabilität des
Flaschenwärmers zu gewährleisten.
- Lassen Sie das Gerät abkühlen, bevor Sie
es reinigen.
Page 22

DEUTSCH24
- Befolgen Sie die Anweisungen zum
Entkalken, um irreparable Schäden zu
vermeiden.
- Versuchen Sie nicht, das Gerät selbst zu
önen oder zu reparieren. Wenden Sie
sich an ein Philips Service-Center in Ihrem
Land (siehe www.philips.com/support).
- Die Speisen sollten nicht zu lange erhitzt
werden.
- Verwenden Sie das Gerät nur wie in der
Bedienungsanleitung beschrieben, um
mögliche Verletzungen durch falsche
Bedienung zu vermeiden.
- Die Oberäche des Heizelements kann
nach der Verwendung Abwärme abgeben.
Elektromagnetische Felder
Dieses Philips Gerät erfüllt sämtliche Normen und
Regelungen bezüglich der Exposition in elektromagnetischen
Feldern.
Page 23
DEUTSCH 25
Den Flaschenwärmer verwenden
Mit diesem Flaschenwärmer können Sie sicher Muttermilch in
Philips Avent Flaschen sowie Milch oder Babynahrung in
Behältern erwärmen und auftauen.
Der Flaschenwärmer trägt zum Schutz der wertvollen
Nährstoe und Vitamine in der Muttermilch bei, weil die Milch
darin nie überhitzt wird. Wenn die Milch zu heiß wird, gehen
Nährstoe und Vitamine verloren. Um die Qualität Ihrer
Muttermilch zu bewahren, ist es wichtig, die Milch auf sichere
und kontrollierte Weise aufzuwärmen. Der Flaschenwärmer
wurde speziell dazu entwickelt, die Milch schonend und
gleichmäßig zu erwärmen und heiße Stellen zu vermeiden, da
die Milch während des Aufwärmens zirkuliert. Der integrierte
Sensor erfasst und steuert die Milchtemperatur, um eine
Überhitzung stets zu vermeiden.
Hinweis: Philips Avent Milchaufbewahrungsbeutel sowie
Philips Avent 60 ml Flaschen können in diesem
Flaschenwärmer nicht verwendet werden.
Erklärung der Einstellungen
- Sie können zwischen den folgenden Einstellungen
wählen: (Abb. 2)
- Auftau-Stufe: Auftauen einer Flasche oder eines Behälters
mit gefrorener Milch oder Babynahrung. Es ndet keine
Erwärmung statt.
- Stufen zur Erwärmung von Milch: Wählen Sie eine dieser
Stufen, wenn Sie eine Flasche Milch auf eine sichere
Temperatur erwärmen möchten. Stufe 2 erwärmt die Milch
etwa auf Körpertemperatur, Stufe 1 erwärmt die Milch auf
eine etwas geringere Temperatur, und Stufe 3 erwärmt die
Milch auf eine etwas höhere Temperatur.
- Stufe zur Erwärmung von Babynahrung: Wählen Sie diese
Stufe aus, wenn Sie einen Behälter oder ein Gläschen mit
Babynahrung erwärmen möchten.
Page 24
DEUTSCH26
Den Flaschenwärmer zum Erwärmen von Milch
verwenden
1 Stecken Sie den Netzstecker in eine Steckdose (Abb. 3).
2 Stellen Sie eine Flasche mittig in den
Flaschenwärmer (Abb. 4).
Hinweis: Um Milch in einem Milchaufbewahrungsbehälter
zu erwärmen, folgen Sie denselben Schritten wie für die
Erwärmung von Milch in einer Flasche.
3 Füllen Sie den Flaschenwärmer mit der gleichen Menge
Trinkwasser wie die Milchmenge, die Sie erwärmen
möchten (z. B. benötigen Sie zum Aufwärmen von 125 ml
Milch 125 ml Trinkwasser). Wenn Sie eine große Menge
Milch erwärmen möchten (>180 ml), beträgt der
maximale Wasserstand ca. 1 cm unter dem Rand des
Flaschenwärmers (das entspricht 160 ml Trinkwasser).
Der richtige Wasserstand stellt eine ordnungsgemäße
Erwärmung sicher. (Abb. 5)
4 Wählen Sie die gewünschte Stufe aus (Abb. 6).
Hinweis: Die Erfahrung zeigt, dass Babys möglicherweise
eine gewisse Milchtemperatur bevorzugen. Dies kann eine
persönliche Vorliebe sein oder von äußeren Umständen
abhängen (z. B. Umgebungstemperatur). Alle drei Stufen
stellen sicher, dass die Milch auf eine sichere Temperatur
erwärmt wird, die angenehm für Ihr Kind ist und dazu
beiträgt, dass die Nährstoe und Vitamine in der Milch
bewahrt werden.
5 Drücken Sie den Ein-/Ausschalter, um das Gerät
einzuschalten. Das Licht in den Tasten leuchtet auf und
zeigt an, dass der Flaschenwärmer eingeschaltet
ist (Abb. 7).
Hinweis: Der Flaschenwärmer beginnt mit der
Aufwärmphase sofort, nachdem Sie die Taste gedrückt
haben.
Page 25
DEUTSCH 27
6 Die Fortschrittsanzeige füllt sich langsam mit weißem
Licht, um den Erwärmungsfortschritt der Milch
anzuzeigen (Abb. 8).
Hinweis: Der Fortschrittsbalken informiert Sie über den
Erwärmungsfortschritt der Milch. Die Fortschrittsanzeige
blinkt, wenn das Gerät eingeschaltet ist. Wenn die erste
Erwärmungsphase abgeschlossen wurde, leuchtet das
untere Segment kontinuierlich, und das nächste Segment
blinkt, um anzuzeigen, dass die zweite Erwärmungsphase
durchgeführt wird. Diese Schritte werden durchgeführt, bis
die dritte Erwärmungsphase abgeschlossen wurde. Der
gesamte Fortschrittsbalken leuchtet dann kontinuierlich.
Hinweis: Während der Erwärmungsphase zirkuliert die
Milch, um eine gleichmäßige Erwärmung sicherzustellen. Es
dauert ca. 10 Minuten, um 90 ml Milch, die Raumtemperatur
hat, zu erwärmen. Wenn Sie kalte Milch oder eine größere
Menge Milch erwärmen, dauert es etwas länger.
Achtung: Nehmen Sie die Flasche nicht aus dem
Flaschenwärmer, während die Fortschrittsanzeige blinkt.
7 Wenn die gesamte Fortschrittsanzeige kontinuierlich
leuchtet, hat die Milch die eingestellte Temperatur
erreicht.
- Wenn die Milch warm ist, können Sie die Flasche
entweder aus dem Flaschenwärmer nehmen, um Ihr Baby
sofort zu füttern (siehe Abschnitt “Ihr Baby sofort füttern”),
oder Sie können die Milch im Flaschenwärmer warm
halten (siehe Abschnitt “Milch warm halten”).
Temperatur der Milch erhöhen
1 Wenn Sie eine höhere Milchtemperatur erzielen
möchten, können Sie die Temperatur der Milch nach dem
Erwärmungsvorgang langsam erhöhen, indem Sie auf
Stufe 3 schalten und die Flasche im Warmhaltemodus im
Gerät lassen (Abb. 9).
Page 26

DEUTSCH28
2 Wenn Sie den Flaschenwärmer gerade erst ausgeschaltet
haben oder wenn er sich automatisch ausgeschaltet hat,
schalten Sie ihn wieder ein, ohne das warme Wasser zu
entfernen, und befolgen Sie den oben angegebenen
Schritt (Abb. 10).
3 Der Flaschenwärmer schaltet sich automatisch nach
20 Minuten im Warmhaltemodus aus (Abb. 11).
Ihr Baby sofort füttern
1 Drücken Sie den Ein- /Ausschalter, um das Gerät
auszuschalten, und nehmen Sie die Flasche
heraus (Abb. 10).
2 Prüfen Sie stets die Temperatur der Milch, bevor Sie Ihr
Baby damit füttern. Schwenken Sie die Milch vorsichtig in
der Flasche, und prüfen Sie die Temperatur der Milch,
indem Sie ein paar Tropfen auf die Innenseite Ihres
Handgelenks geben (Abb. 12).
3 Ziehen Sie den Netzstecker aus der Steckdose, und
leeren Sie den Flaschenwärmer (Abb. 13).
Milch warm halten
1 Wenn die Milch die gewünschte Temperatur erreicht hat,
wechselt der Flaschenwärmer automatisch in den
Warmhaltemodus.
In diesem Modus wird die eingestellte Temperatur der
Milch 20 Minuten lang gehalten (Abb. 14).
2 Der Flaschenwärmer schaltet sich automatisch nach
20 Minuten aus. Die Fortschrittsanzeige erlischt und zeigt
damit an, dass die gewünschte Temperatur der Milch nicht
mehr gehalten wird (Abb. 11).
Hinweis: Wenn Sie Ihr Baby mit Milch in der eingestellten
Temperatur füttern möchten, müssen Sie die Flasche aus
dem Flaschenwärmer nehmen und Ihr Baby direkt mit der
Milch füttern, sobald sich der Flaschenwärmer
ausgeschaltet hat, da die Milch sonst abkühlt.
Page 27
DEUTSCH 29
Hinweis: Sie können keine Verlängerung des
Warmhaltemodus des Flaschenwärmers um mehr als 20
Minuten einstellen.
Achtung: Es wird nicht empfohlen, Muttermilch zweimal
aufwärmen, da sich Bakterien in der Milch entwickeln.
3 Prüfen Sie stets die Temperatur der Milch, bevor Sie Ihr
Baby damit füttern. Schwenken Sie die Milch vorsichtig in
der Flasche oder im Milchaufbewahrungsbehälter, und
prüfen Sie die Temperatur der Milch, indem Sie ein paar
Tropfen auf die Innenseite Ihres Handgelenks
geben (Abb. 12).
4 Ziehen Sie den Netzstecker aus der Steckdose, und
leeren Sie den Flaschenwärmer (Abb. 13).
Den Flaschenwärmer sofort für eine weitere Flasche
verwenden
Wenn Sie sofort eine weitere Flasche erwärmen wollen,
lassen Sie den Flaschenwärmer ein paar Minuten lang
abkühlen. Um diesen Vorgang zu beschleunigen, füllen Sie
den Flaschenwärmer mit frischem, kaltem Wasser. Wenn Sie
den Flaschenwärmer einschalten, beginnt die
Fortschrittsanzeige von unten nach oben zu blinken, um
anzuzeigen, dass das Gerät wieder aufgeheizt wird.
Hinweis: Wenn die Fortschrittsanzeige leuchtet, statt zu
blinken, ist der Flaschenwärmer noch zu warm, um eine
weitere Flasche zu erwärmen. Schalten Sie den
Flaschenwärmer aus, lassen Sie ihn einige Minuten lang
abkühlen und stellen Sie sicher, dass Sie ihn mit frischem,
kaltem Wasser füllen.
Den Flaschenwärmer zum Erwärmen von Babynahrung
verwenden
1 Stecken Sie den Netzstecker in eine Steckdose (Abb. 3).
2 Stellen Sie einen Behälter oder ein Gläschen mit
Babynahrung mittig in den Flaschenwärmer (Abb. 15).
Page 28
DEUTSCH30
Hinweis: Sie können den Deckel des Behälters oder
Gläschens abnehmen, damit Sie die Babynahrung während
des Erwärmens umrühren können.
3 Füllen Sie den Flaschenwärmer mit der gleichen Menge
Trinkwasser wie die Babynahrungsmenge, die Sie
erwärmen möchten (z. B. benötigen Sie zum Aufwärmen
von 125 ml Babynahrung 125 ml Trinkwasser). Wenn Sie
eine große Menge Babynahrung erwärmen möchten
(>180 ml), beträgt der maximale Wasserstand ca. 1 cm
unter dem Rand des Flaschenwärmers
(das entspricht 160 ml Trinkwasser). Der richtige
Wasserstand stellt eine ordnungsgemäße Erwärmung
sicher. (Abb. 16)
4 Wählen Sie die Stufe zur Erwärmung von
Babynahrung (Abb. 17).
5 Drücken Sie den Ein-/Ausschalter, um das Gerät
einzuschalten. Das Licht in der Fortschrittsanzeige zeigt
an, dass der Flaschenwärmer eingeschaltet ist (Abb. 18).
Hinweis: Der Flaschenwärmer beginnt sofort, nachdem Sie
die Taste gedrückt haben, mit dem Erwärmen. Aufgrund der
unterschiedlichen Konsistenz von Babynahrung kann das
Gerät nicht erkennen, wie lange die Babynahrung erwärmt
werden muss.
6 Die Fortschrittsanzeige füllt sich langsam mit weißem
Licht, um den Erwärmungsfortschritt anzuzeigen.
Nehmen Sie während der Erwärmung das Gläschen oder
den Behälter nicht aus dem Flaschenwärmer. Rühren Sie
die Babynahrung um, während sich das
Behälter noch im Flaschenwärmer benden (Abb. 19).
Hinweis: Sie können die Babynahrung umrühren, sobald das
zweite Segment der Fortschrittsanzeige kontinuierlich
aufleuchtet. Ein Umrühren vor dem Erreichen dieses
Segments ist nicht eektiv, da die Temperatur der
Babynahrung noch zu gering ist.
Gläschen oder der
Page 29
DEUTSCH 31
Achtung: Nehmen Sie den Behälter oder das Gläschen mit
Babynahrung während des Erwärmens nicht aus dem
Flaschenwärmer.
7 Wenn die gesamte Fortschrittsanzeige kontinuierlich
leuchtet, hat die Babynahrung die gewünschte
Temperatur erreicht.
Hinweis: Aufgrund der unterschiedlichen Konsistenz von
Babynahrung empfiehlt es sich, die Babynahrung
kontinuierlich umzurühren und die Temperatur während des
Erwärmens zu prüfen, um ein optimales Ergebnis zu
erzielen.
- Wenn die Babynahrung warm ist, können Sie den Behälter
oder das Gläschen mit Babynahrung entweder aus dem
Flaschenwärmer nehmen, um Ihr Baby sofort zu füttern
(siehe Abschnitt “Ihr Baby sofort füttern”), oder Sie können
die Babynahrung im Flaschenwärmer warm halten (siehe
Abschnitt “Babynahrung warm halten”).
Die Temperatur der Babynahrung erhöhen
1 Probieren Sie nach dem Erwärmen die Babynahrung, um
sicherzustellen, dass sie nicht zu heiß ist. Wenn die
Babynahrung wärmer sein soll, stellen Sie den Behälter
zurück in den Flaschenwärmer, und lassen Sie ihn dort
für einige Zeit im Warmhaltemodus. Rühren Sie die
Babynahrung weiterhin um (Abb. 15).
2 Wenn Sie den Flaschenwärmer gerade erst ausgeschaltet
haben oder wenn er sich automatisch ausgeschaltet hat,
schalten Sie ihn wieder ein, ohne das warme Wasser zu
entfernen, und befolgen Sie den oben angegebenen
Schritt (Abb. 18).
3 Der Flaschenwärmer schaltet sich automatisch nach
20 Minuten im Warmhaltemodus aus (Abb. 20).
Page 30

32 DEUTSCH32
Ihr Baby sofort füttern
1 Drücken Sie den Ein- /Ausschalter, um das Gerät
auszuschaltenund nehmen Sie den Behälter oder das
Gläschen mit der Babynahrung heraus (Abb. 18).
2 Probieren Sie nach dem Erwärmen die Babynahrung, um
sicherzustellen, dass sie nicht zu heiß ist (Abb. 21).
3 Ziehen Sie den Netzstecker aus der Steckdose, und
leeren Sie den Flaschenwärmer (Abb. 13).
Babynahrung warm halten
1 Wenn die Babynahrung die gewünschte Temperatur
erreicht hat, wechselt der Flaschenwärmer automatisch
in den Warmhaltemodus. In diesem Modus wird die
gewünschte Temperatur der Babynahrung 20 Minuten
lang gehalten (Abb. 22).
2 Der Flaschenwärmer schaltet sich automatisch nach
20 Minuten aus. Die Fortschrittsanzeige erlischt und
zeigt damit an, dass die gewünschte Temperatur der
Babynahrung nicht mehr gehalten wird (Abb. 20).
Hinweis: Wenn Sie Ihr Baby mit Babynahrung in der
eingestellten Temperatur füttern möchten, müssen Sie die
Babynahrung aus dem Flaschenwärmer nehmen und Ihr
Baby direkt füttern, sobald sich der Flaschenwärmer
ausgeschaltet hat, da die Babynahrung sonst abkühlt.
Hinweis: Sie können keine Verlängerung des
Warmhaltemodus des Flaschenwärmers um mehr als 20
Minuten einstellen.
3 Prüfen Sie stets die Temperatur der Babynahrung, bevor
Sie Ihr Baby damit füttern. Rühren die Babynahrung
vorsichtig im entsprechenden Behälter oder Gläschen
um, und probieren Sie die Babynahrung, um
sicherzustellen, dass sie nicht zu heiß ist (Abb. 21).
4 Ziehen Sie den Netzstecker aus der Steckdose, und
leeren Sie den Flaschenwärmer (Abb. 13).
Page 31

DEUTSCH 33
Den Flaschenwärmer sofort für weitere Behälter mit
Babynahrung verwenden
Wenn Sie sofort einen weiteren Behälter bzw. ein Gläschen
mit Babynahrung erwärmen wollen, lassen Sie den
Flaschenwärmer ein paar Minuten lang abkühlen. Um diesen
Vorgang zu beschleunigen, füllen Sie den Flaschenwärmer
mit frischem, kaltem Wasser. Wenn Sie den Flaschenwärmer
einschalten, beginnt die Fortschrittsanzeige von unten nach
oben zu blinken, um anzuzeigen, dass das Gerät wieder
aufgeheizt wird.
Hinweis: Wenn die Fortschrittsanzeige leuchtet statt zu
blinken, ist der Flaschenwärmer noch zu warm, um einen
weiteren Behälter bzw. ein Gläschen mit Babynahrung zu
erwärmen. Schalten Sie den Flaschenwärmer aus, lassen Sie
ihn einige Minuten lang abkühlen, und stellen Sie sicher, dass
Sie ihn mit frischem, kaltem Wasser füllen.
Auftau-Stufe
Mit dieser Einstellung können Sie gefrorene Milch oder
Babynahrung auftauen. Befolgen Sie die Schritte im Abschnitt
“Den Flaschenwärmer zum Erwärmen von Milch verwenden”
oder “Den Flaschenwärmer zum Erwärmen von Babynahrung
verwenden”.
Die Fortschrittsanzeige blinkt, wenn das Gerät in der
Auftaufunktion eingeschaltet ist. Die Fortschrittsanzeige füllt
sich langsam mit weißem Licht, um den Auftaufortschritt
anzuzeigen. Die Milch oder Babynahrung ist vollständig
aufgetaut, wenn die gesamte Fortschrittsanzeige
kontinuierlich leuchtet.
Die Auftaufunktion taut Milch oder Babynahrung auf, erwärmt
sie aber nicht. Wenn Sie Milch oder Babynahrung nach dem
Auftauen erwärmen möchten, schalten Sie zuerst das Gerät
aus, wählen Sie dann die gewünschte Einstellung zum
Aufwärmen, und schalten Sie das Gerät dann wieder ein.
Page 32

DEUTSCH34
Reinigen und Entkalken
Pege
1 Stecken Sie den Flaschenwärmer nach jedem Gebrauch
aus, und lassen Sie ihn abkühlen (Abb. 23).
2 Entfernen Sie das Wasser aus hygienischen Gründen aus
dem Flaschenwärmer (Abb. 24).
3 Wischen Sie die Außen- und Innenseite des
Flaschenwärmers mit einem feuchten Tuch ab (Abb. 25).
Verwenden Sie niemals Scheuermittel, antibakterielle
Reiniger, chemische Lösungsmittel oder scharfe Werkzeuge,
um den Flaschenwärmer zu reinigen.
Hinweis: Wenn Sie den Flaschenwärmer zum Erwärmen von
Behältern mit Babynahrung verwenden, sollten Sie
sicherstellen, dass keine Reste von Babynahrung auf dem
Boden des Flaschenwärmers haften.
Entkalken
Es wird empfohlen, den Flaschenwärmer alle vier Wochen zu
entkalken, um sicherzustellen, dass er weiter ordnungsgemäß
funktioniert.
1 Mischen Sie 50 ml Haushaltsessig mit 100 ml kaltem
Wasser, um den Flaschenwärmer zu entkalken. Wählen
Sie zunächst die Auftaufunktion, und schalten Sie dann
den Flaschenwärmer ein, und lassen Sie das Gerät 10
Minuten in Betrieb. Lassen Sie die Lösung im
Flaschenwärmer, bis jeglicher Kalk aufgelöst
ist. (Abb. 26)
Hinweis: Sie können auch Entkalker auf Zitronensäurebasis
verwenden.
Hinweis: Verwenden Sie keine anderen Arten von Entkalkern.
Page 33

DEUTSCH 35
2 Stecken Sie den Flaschenwärmer aus, bevor Sie ihn
entleeren (Abb. 23).
3 Entleeren Sie den Flaschenwärmer, und spülen Sie ihn
gründlich aus. Wenn nach dem Ausspülen noch Kalkreste
vorhanden sind, wiederholen Sie den
Entkalkungsvorgang (Abb. 24).
Recycling
- Bendet sich dieses Symbol auf dem Gerät, gilt für dieses
Gerät die Europäische Richtlinie 2012/19/EU. Informieren
Sie sich über die örtlichen Bestimmungen zur getrennten
Entsorgung von elektrischen und elektronischen Produkten.
Befolgen Sie die örtlichen Bestimmungen, und entsorgen Sie
Ihr Gerät niemals über den normalen Hausmüll. Durch die
korrekte Entsorgung von Altgeräten werden Umwelt und
Menschen vor negativen Folgen geschützt. (Abb. 27)
Garantie und Support
Für Unterstützung und weitere Informationen besuchen Sie
die Philips Website unter www.philips.com/support, oder
lesen Sie die internationale Garantieschrift.
Page 34

FRANÇAIS36
Description générale (g. 1)
1. Chaue-biberon
2. Indicateur de progression
3. Bouton de réglages et marche/arrêt
4. Fonction de décongélation
5. Fonction de réchauage du lait 1
6. Fonction de réchauage du lait 2
7. Fonction de réchauage du lait 3
8. Fonction de réchauage des aliments pour bébé
9. Bouton marche/arrêt
Important
Pour proter pleinement de l’assistance
oerte par Philips, enregistrez votre appareil
à l’adresse suivante :
www.philips.com/welcome.
Avant d’utiliser le chaue-biberon, lisez
attentivement ce mode d’emploi et
conservez-le pour un usage ultérieur.
Danger
- Ne plongez jamais l’appareil dans l’eau, ni
dans d’autres liquides et ne le rincez pas
sous le robinet.
Avertissement
- Les appareils doivent être utilisés
uniquement en intérieur.
- Ces appareils peuvent être utilisés par
des personnes dont les capacités
physiques, sensorielles ou intellectuelles
sont réduites ou des personnes
Page 35

FRANÇAIS 37
manquant d’expérience et de
connaissances, à condition que ces
personnes soient sous surveillance ou
qu’elles aient reçu des instructions quant
à l’utilisation sécurisée de l’appareil et
qu’elles aient pris connaissance des
dangers encourus.
- Le nettoyage et l’entretien ne doivent pas
être eectués par des enfants.
- Cet appareil ne doit pas être utilisé par
des enfants. Tenez l’appareil et son
cordon hors de portée des enfants.
- Les enfants ne doivent pas jouer avec
l’appareil.
- Ne plongez pas le cordon d’alimentation,
la che électrique ni l’appareil dans l’eau
ou dans un autre liquide.
- Ne laissez pas le cordon d’alimentation
pendre de la table ou du plan de travail.
L’excédent de cordon peut être rangé
dans la base du chaue-biberon pour
garantir la stabilité de l’appareil.
- Tenez le cordon d’alimentation à l’écart
des surfaces chaudes.
- Branchez l’appareil sur une prise murale
mise à la terre. Assurez-vous que la che
est correctement insérée dans la prise.
Page 36

FRANÇAIS38
- Avant de brancher l’appareil, vériez que
la tension indiquée sur la base
correspond à la tension secteur locale.
- Si vous avez besoin d’utiliser une rallonge,
assurez-vous qu’elle est reliée à la terre
et d’une puissance d’au moins
13 ampères.
- Si la che électrique, le cordon
d’alimentation ou l’appareil est
endommagé, n’utilisez pas l’appareil. An
d’éviter tout accident, si le cordon
d’alimentation est endommagé, faites-le
remplacer par Philips, un
Centre Service Agréé Philips ou un
technicien qualié.
- Ne placez pas l’appareil sur une cuisinière
à gaz ou électrique chaude ni dans un
four chaud.
- Ne préchauez pas l’appareil.
- Avant de mettre de l’eau dans le chauebiberon, placez-y toujours un biberon
entièrement assemblé avec couvercle.
- Avant de mettre le chaue-biberon en
marche, veillez à y ajouter de l’eau.
- L’eau chaude peut provoquer de graves
brûlures. Soyez prudent lorsque le
chaue-biberon contient de l’eau
chaude.
Page 37

FRANÇAIS 39
- Les surfaces accessibles de l’appareil
peuvent devenir chaudes pendant
l’utilisation.
- Ne déplacez pas l’appareil lorsqu’il
contient de l’eau chaude.
- Vériez toujours la température des
aliments destinés à bébé avant de
commencer à nourrir votre enfant.
Attention
- Cet appareil est destiné à un usage
domestique ou assimilé : utilisation dans
des gîtes, chambres d’hôtes, cuisines
destinées aux employés dans les
magasins, les entreprises et autres
environnements de travail, ou utilisation
par les clients d’hôtels, d’auberges ou
d’autres résidences hôtelières.
- Débranchez l’appareil lorsque vous ne
l’utilisez pas.
- Si le cordon d’alimentation est trop long,
rangez l’excédent dans la base pour
garantir la stabilité du chaue-biberon.
- Avant de nettoyer l’appareil, laissez-le
refroidir.
- Pour éviter tout dommage irréparable,
suivez les instructions de détartrage.
Page 38

FRANÇAIS40
- N’essayez pas d’ouvrir ni de réparer
l’appareil vous-même. Contactez le
Service Consommateurs Philips de votre
pays (www.philips.com/support).
- Les aliments ne doivent pas être chaués
pendant trop longtemps.
- Utilisez l’appareil uniquement comme
décrit dans le mode d’emploi an d’éviter
tout risque de blessure due à une
utilisation inappropriée.
- Après utilisation, la surface de l’élément
chauant reste chaude pendant un
certain temps.
Champs électromagnétiques (CEM)
Cet appareil Philips est conforme à toutes les normes et à
tous les règlements applicables relatifs à l’exposition aux
champs électromagnétiques.
Utilisation du chaue-biberon
Avec ce chaue-biberon, vous pouvez décongeler et chauer
en toute sécurité du lait contenu dans des biberons Philips
Avent et du lait ou de la nourriture pour bébé dans des pots.
Le chaue-biberon aide à préserver les nutriments et
vitamines contenu dans le lait maternel car il ne surchaue
jamais le lait. Si le lait est trop chaud, il perd nutriments et
vitamines. Pour préserver la qualité de votre lait maternel, il
est important de chauer le lait de manière sûre et contrôlée.
Le chaue-biberon est conçu pour un chauage doux et
uniforme. Pas de points chauds : le lait est mélangé
uniformément lors du chauage. Le capteur intégré suit et
contrôle la température du lait, pour éviter qu’il ne soit trop
chaud.
Page 39
FRANÇAIS 41
Remarque : Les sachets de conservation Philips Avent pour
le lait maternel et les biberons Philips Avent 60 ml ne
peuvent pas être utilisés dans ce chaue-biberon.
Explication des réglages
- Vous avez le choix entre les réglages suivants : (g. 2)
- Fonction de décongélation : pour décongeler un biberon
ou un récipient contenant du lait congelé ou des aliments
congelés pour bébés. Ne réchaue pas.
- Fonctions de réchauage du lait : sélectionnez l’un de ces
réglages pour réchauer un biberon de lait à une
température sûre. Le réglage 2 chaue votre lait à
température corporelle environ. Le réglage 1 chaue votre
lait à une température légèrement plus basse et le
réglage 3 chaue votre lait à une température légèrement
plus élevée.
- Fonction de réchauage des aliments pour bébé :
sélectionnez cette fonction pour réchauer un récipient
ou petit pot contenant des aliments pour bébé.
Utilisation du chaue-biberon pour chauer du lait
1 Branchez le cordon d’alimentation sur la prise
secteur (g. 3).
2 Placez un biberon au centre du chaue-biberon (g. 4).
Remarque : Pour chauer du lait contenu dans un pot de
conservation du lait, suivez les mêmes étapes que celles
indiquées pour le réchauage du lait dans un biberon.
3 Remplissez le chaue-biberon avec la même quantité
d’eau potable que la quantité de lait à réchauer (par
exemple, pour chauer 125 ml de lait, vous devez utiliser
125 ml d’eau potable). Si vous voulez faire chauer une
grande quantité de lait ( >180 ml), le niveau d’eau
maximum est d’environ 1 cm sous le bord du chauebiberon (ce qui correspond à ajouter 160 ml d’eau
potable). Un niveau d’eau approprié garantit un
réchauage ecace. (g. 5)
Page 40

FRANÇAIS42
4 Sélectionnez le réglage souhaité (g. 6).
Remarque : L’expérience a montré que les bébés peuvent
avoir une préférence concernant la température de leur lait.
Ceci peut être dû à des préférences personnelles ou à des
facteurs externes (par ex. température ambiante). Les
trois réglages garantissent que le lait est chaué à une
température sûre qui convienne à votre enfant et aider à
préserver les nutriments et vitamines du lait.
5 Appuyez sur le bouton marche/arrêt pour mettre
l’appareil en marche. Le voyant du bouton s’allume pour
indiquer que le chaue-biberon est en marche (g. 7).
Remarque : Le chaue-biberon commence à chauer dès
que vous avez appuyé sur le bouton.
6 L’indicateur de progression commence à se remplir
progressivement de lumière blanche pour acher la
progression du processus de réchauage du lait (g. 8).
Remarque : L’indicateur de progression indique la
progression du processus de réchauage du lait.
L’indicateur de progression commence à clignoter lorsque
l’appareil est allumé. Lorsque la première phase de
réchauage est terminée, le segment inférieur reste allumé
et le segment suivant commence à clignoter pour indiquer
que la deuxième phase de réchauage est en cours. Ces
étapes se poursuivent jusqu’à ce que la troisième phase de
réchauage soit terminée. L’ensemble de l’indicateur de
progression reste alors allumé.
Remarque : Lors du réchauage, le lait est mélangé et
chaue uniformément. Il faut environ 10 minutes pour
chauer 90 ml de lait à température ambiante. Il faut plus
de temps pour chauer du lait froid ou une grande quantité
de lait.
Attention : Ne retirez pas le biberon du chaue-biberon
lorsque la barre de progression clignote.
7 Une fois que l’ensemble de l’indicateur de progression
reste allumé, le lait a atteint la température souhaitée.
Page 41

FRANÇAIS 43
- Lorsque le lait est chaud, vous pouvez enlever le biberon
du chaue-biberon pour nourrir votre bébé
immédiatement (voir la section « Nourrir votre bébé
immédiatement ») ou vous pouvez le conserver au chaud
dans le chaue-biberon (voir la section
« Maintien du lait au chaud » ).
Augmentation de la température du lait
1 Si vous souhaitez que le lait soit plus chaud, vous pouvez
augmenter progressivement la température du lait dès
qu’elle est atteinte en sélectionnant le réglage 3 de
réchauage du lait et en laissant le biberon dans
l’appareil en mode de maintien au chaud (g. 9).
2 Si vous venez d’éteindre le chaue-biberon ou s’il vient
de s’éteindre automatiquement, rallumez-le sans retirer
l’eau chaude de l’appareil et procédez à l’étape cidessus (g. 10).
3 Le chaue-biberon s’éteint automatiquement au bout de
20 minutes de mode de maintien au chaud (g. 11).
Nourrir votre bébé immédiatement
1 Appuyez sur le bouton marche/arrêt pour éteindre
l’appareil et retirez le biberon (g. 10).
2 Vériez toujours la température du lait avant de nourrir
votre bébé. Secouez légèrement le lait dans le biberon et
vériez la température du lait en faisant couler quelques
gouttes sur l’intérieur de votre poignet (g. 12).
3 Débranchez l’appareil et videz le chaue-
biberon (g. 13).
Maintien du lait au chaud
1 Lorsque le lait a atteint la température souhaitée, le
chaue-biberon passe automatiquement en mode de
maintien au chaud. Dans ce mode, le lait est maintenu à
la température programmée pendant 20 minutes (g. 14).
Page 42
FRANÇAIS44
2 Le chaue-biberon s’éteint automatiquement au bout
de 20 minutes. L’indicateur de progression s’éteint pour
indiquer que le lait n’est plus maintenu à la température
souhaitée (g. 11).
Remarque : Si vous souhaitez nourrir votre bébé avec du lait
à une certaine température, vous devez enlever le biberon
de lait du chaue-biberon et le donner à votre bébé
immédiatement après que le chaue-biberon s’est éteint.
Dans le cas contraire, le lait refroidit.
Remarque : Vous ne pouvez pas prolonger le mode de
maintien au chaud du chaue-biberon pendant plus de
20 minutes.
Attention : Il n’est pas recommandé de réchauer du lait
maternel deux fois car les bactéries commencent à se
développer dans le lait.
3 Vériez toujours la température du lait avant de nourrir
votre bébé. Secouez légèrement le lait dans le biberon
ou le pot de conservation du lait et vériez la
température du lait en faisant couler quelques gouttes
sur l’intérieur de votre poignet (g. 12).
4 Débranchez l’appareil et videz le chaue-
biberon (g. 13).
Réutilisation immédiate du chaue-biberon pour
un autre biberon
Si vous voulez chauer un autre biberon immédiatement,
laissez le chaue-biberon refroidir pendant quelques
minutes. Pour accélérer le processus, remplissez le chauebiberon d’eau froide fraîche. Lorsque vous allumez le
chaue-biberon, l’indicateur de progression commence à
clignoter du bas vers le haut pour indiquer que l’appareil
chaue à nouveau.
Page 43

FRANÇAIS 45
Remarque : Si l’indicateur de progression est allumé mais ne
clignote pas, le chaue-biberon est encore trop chaud pour
chauer un autre biberon. Éteignez le chaue-biberon,
laissez-le refroidir pendant quelques minutes et veillez à le
remplir d’eau froide fraîche.
Utilisation du chaue-biberon pour réchauer des
aliments pour bébé
1 Branchez le cordon d’alimentation sur la prise
secteur (g. 3).
2 Placez un récipient ou un petit pot pour bébé au centre
du chaue-biberon (g. 15).
Remarque : Vous pouvez retirer le couvercle du récipient ou
du petit pot pour bébé afin de pouvoir remuer les aliments
pour bébés pendant qu’ils chauent.
3 Remplissez le chaue-biberon avec la même quantité
d’eau potable que la quantité d’aliments pour bébé à
réchauer
(par exemple, pour réchauer 125 ml d’aliments pour
bébé, vous devez utiliser 125 ml d’eau potable). Si vous
voulez faire chauer une grande quantité d’aliments
pour bébé, le niveau d’eau maximum est d’environ 1 cm
sous le bord du chaue-biberon (ce qui correspond à
ajouter 160 ml d’eau potable). Un niveau d’eau approprié
garantit un réchauage ecace. (g. 16)
4 Sélectionnez la fonction de réchauage des aliments pour
bébé (g. 17).
5 Appuyez sur le bouton marche/arrêt pour mettre
l’appareil en marche. La lumière de l’indicateur de
progression indique que le chaue-biberon est en
marche (g. 18).
Page 44

FRANÇAIS46
Remarque : Le chaue-biberon commence à chauer
immédiatement après que vous avez appuyé sur le bouton.
En raison de la grande variété d’aliments pour bébé, il n’est
pas possible pour l’appareil de détecter exactement
combien de temps les aliments doivent être chaués.
6 L’indicateur de progression commence à se remplir
progressivement de lumière blanche pour acher la
progression du processus de réchauage. Lors du
processus de réchauage, ne retirez pas le petit pot ou le
récipient du chaue-biberon, mais mélangez les aliments
pour bébé pendant que le petit pot ou le récipient est
toujours dans le chaue-biberon (g. 19).
Remarque : Vous pouvez commencer à mélanger les
aliments pour bébé dès que le deuxième segment de
l’indicateur de progression reste allumé. Mélanger avant ce
moment n’est pas ecace car la température des aliments
est encore trop basse.
Attention : Ne retirez pas le pot de conservation ou le petit
pot du chaue-biberon lors du réchauage.
7 Une fois que l’ensemble de l’indicateur de progression
reste allumé, les aliments ont atteint la température
souhaitée.
Remarque : En raison de la grande variété d’aliments pour
bébé, il est fortement recommandé de mélanger en continu
les aliments pour bébés et de vérifier leur température
pendant qu’ils chauent pour un résultat optimal.
- Lorsque les aliments de bébé sont chauds, vous pouvez
enlever le récipient ou le petit pot du chaue-biberon
pour nourrir votre bébé immédiatement (voir la section
« Nourrir votre bébé immédiatement ») ou vous pouvez le
conserver au chaud dans le chaue-biberon (voir la
section « Maintien des aliments pour bébé au chaud »).
Page 45

FRANÇAIS 47
Augmentation de la température des aliments pour
bébés
1 Goûtez toujours les aliments pour bébés après le
réchauage pour vous assurer qu’ils ne sont pas trop
chauds. Si vous souhaitez qu’ils soient plus chauds,
remettez le récipient dans le chaue-biberon et laissezle en mode de maintien au chaud pendant un certain
temps. Continuez à remuer les aliments pour
bébés (g. 15).
2 Si vous venez d’éteindre le chaue-biberon ou s’il vient
de s’éteindre automatiquement, rallumez-le sans retirer
l’eau chaude de l’appareil et procédez à l’étape cidessus (g. 18).
3 Le chaue-biberon s’éteint automatiquement au bout de
20 minutes de mode de maintien au chaud (g. 20).
Nourrir votre bébé immédiatement
1 Appuyez sur le bouton marche/arrêt pour éteindre
l’appareil et retirez le biberon ou le récipient (g. 18).
2 Après le réchauage, goûtez la nourriture destinée à
bébé an de vous assurer qu’elle n’est pas trop
chaude (g. 21).
3 Débranchez l’appareil et videz le chaue-
biberon (g. 13).
Maintien des aliments pour bébé au chaud
1 Lorsque les aliments destinés à bébé ont atteint la
température souhaitée, le chaue-biberon passe
automatiquement en mode de maintien au chaud. Dans
ce mode, les aliments pour bébé sont maintenus à la
température programmée pendant 20 minutes (g. 22).
2 Le chaue-biberon s’éteint automatiquement au bout de
20 minutes. L’indicateur de progression s’éteint pour
indiquer que les aliments ne sont plus maintenus à la
température souhaitée (g. 20).
Page 46
FRANÇAIS48
Remarque : Si vous souhaitez nourrir votre bébé avec les
aliments à une certaine température, vous devez les enlever
du chaue-biberon et les donner à votre bébé
immédiatement après que le chaue-biberon s’est éteint.
Dans le cas contraire, les aliments refroidissent.
Remarque : Vous ne pouvez pas prolonger le mode de
maintien au chaud du chaue-biberon pendant plus de
20 minutes.
3 Vériez toujours la température des aliments pour bébés
avant de nourrir votre bébé. Remuez doucement les
aliments pour bébés dans le récipient ou le petit pot et
goûtez-les pour vous assurer qu’ils ne sont pas trop
chauds (g. 21).
4 Débranchez l’appareil et videz le chaue-
biberon (g. 13).
Réutilisation immédiate du chaue-biberon pour un
autre récipient d’aliments pour bébé
Si vous voulez chauer immédiatement un autre récipient ou
petit pot contenant des aliments pour bébés, laissez le
chaue-biberon refroidir pendant quelques minutes. Pour
accélérer le processus, remplissez le chaue-biberon d’eau
froide fraîche. Lorsque vous allumez le chaue-biberon,
l’indicateur de progression commence à clignoter de bas en
haut pour indiquer que l’appareil chaue à nouveau.
Remarque : Si l’indicateur de progression est allumé mais ne
clignote pas, le chaue-biberon est encore trop chaud pour
chauer un autre récipient ou petit pot contenant des
aliments pour bébés. Éteignez le chaue-biberon, laissez-le
refroidir pendant quelques minutes et veillez à le remplir
d’eau froide fraîche.
Page 47
FRANÇAIS 49
Fonction de décongélation
Avec ce réglage, vous pouvez décongeler du lait ou des
aliments congelés. Suivez les étapes indiquées aux sections
« Utilisation du chaue-biberon pour chauer du lait » ou
« Utilisation du chaue-biberon pour réchauer des aliments
pour bébés ».
L’indicateur de progression commence à clignoter lorsque
l’appareil est réglé sur la fonction de décongélation.
L’indicateur de progression se remplit progressivement de
lumière blanche pour acher la progression de la
décongélation. Le lait ou les aliments sont entièrement
décongelés lorsque l’ensemble de l’indicateur de progression
reste allumé.
La fonction de décongélation permet de décongeler le lait ou
les aliments pour bébés, mais pas de les réchauer. Si vous
voulez réchauer du lait ou des aliments pour bébés après
les avoir décongelés, commencez par éteindre l’appareil, puis
sélectionnez la fonction de réchauage souhaitée et
remettez l’appareil en marche.
Nettoyage et détartrage
Nettoyage
1 Après chaque utilisation, débranchez le chaue-biberon
et laissez-le refroidir (g. 23).
2 Pour des raisons d’hygiène, videz l’eau du chaue-
biberon (g. 24).
3 Essuyez l’extérieur et l’intérieur du chaue-biberon à
l’aide d’un chion humide (g. 25).
N’utilisez pas d’abrasifs, de produits de nettoyage
antibactériens, de produits chimiques ni d’outils tranchants
pour nettoyer le chaue-biberon.
Page 48

FRANÇAIS50
Remarque : Si vous avez utilisé le chaue-biberon pour
réchauer des récipients contenant des aliments, assurezvous qu’aucune nourriture n’est allée se loger sous le
chaue-biberon.
Détartrage
Pour que le chaue-biberon fonctionne ecacement, il est
recommandé de le détartrer toutes les quatre semaines.
1
Mélangez 50 ml de vinaigre blanc et 100 ml d’eau froide
pour détartrer le chaue-biberon. Sélectionnez tout d’abord
la fonction de décongélation, puis allumez le chauebiberon et laissez l’appareil fonctionner pendant
10 minutes. Laissez la solution dans le chaue-biberon
jusqu’à ce que tous les dépôts de calcaire aient
disparu. (g. 26)
Remarque : Vous pouvez également utiliser des détartrants
à base d’acide citrique.
Remarque : N’utilisez aucun autre type de détartrant.
2 Avant de vider le chaue-biberon, débranchez-
le (g. 23).
3 Videz le chaue-biberon et rincez-en soigneusement
l’intérieur. S’il reste des dépôts de calcaire après le
rinçage, répétez l’opération de détartrage (g. 24).
Recyclage
- La présence de ce symbole sur un produit indique que ce
dernier est conforme à la directive européenne 2012/19/
UE. Renseignez-vous sur les dispositions en vigueur dans
votre région concernant la collecte séparée des appareils
électriques et électroniques. Respectez les
réglementations locales et ne jetez pas le produit avec les
ordures ménagères ordinaires. La mise au rebut correcte
d’anciens produits permet de préserver l’environnement
et la santé. (g. 27)
Page 49

FRANÇAIS 51
Garantie et assistance
Si vous avez besoin d’une assistance ou d’informations
supplémentaires, consultez le site Web
www.philips.com/support ou lisez le dépliant séparé sur la
garantie internationale.
Page 50

ITALIANO52
Descrizione generale (g. 1)
1. Riscalda biberon
2. Indicatore di avanzamento
3. Impostazioni e manopola on/o
4. Impostazione scongelamento
5. Impostazione riscaldamento del latte 1
6. Impostazione riscaldamento del latte 2
7. Impostazione riscaldamento del latte 3
8. Impostazione riscaldamento pappe
9. Pulsante on/o
Importante
Per trarre il massimo vantaggio
dall’assistenza fornita da Philips, registrate il
vostro apparecchio sul sito www.philips.
com/welcome.
Prima di utilizzare lo scaldabiberon, leggete
attentamente il presente manuale
dell’utente e conservatelo per eventuali
riferimenti futuri.
Pericolo
- Non immergete l’apparecchio nell’acqua
o in altri liquidi e non risciacquatelo sotto
l’acqua corrente.
Avviso
- Utilizzate l’apparecchio solo in ambienti
chiusi.
Page 51

ITALIANO 53
- Questo apparecchio può essere usato da
persone con capacità mentali, siche o
sensoriali ridotte, prive di esperienza o
conoscenze adatte a condizione che tali
persone abbiano ricevuto assistenza o
formazione per utilizzare l’apparecchio in
maniera sicura e capiscano i potenziali
pericoli associati a tale uso.
- Le operazioni di pulizia e manutenzione
non devono essere eseguite da bambini.
Questo apparecchio non deve essere
usato dai bambini. Tenere l’apparecchio e
il cavo di alimentazione fuori dalla portata
dei bambini.
- Evitate che i bambini giochino con
l’apparecchio.
- Non immergete il cavo, la spina o
l’apparecchio in acqua o altri liquidi.
- Assicuratevi che il cavo di alimentazione
non penda dal bordo di un tavolo o del
piano di lavoro. Il cavo in eccesso può
essere avvolto attorno alla base dello
scaldabiberon per la massima stabilità
dell’apparecchio.
- Tenete il cavo lontano da superci
incandescenti.
Page 52

ITALIANO54
- Collegate l’apparecchio a una presa
dotata di messa a terra. Controllate che la
spina sia inserita correttamente nella
presa.
- Prima di collegare l’apparecchio,
controllate che la tensione indicata sulla
parte inferiore dell’apparecchio
corrisponda a quella locale.
- Se dovete utilizzare una prolunga,
assicuratevi che sia dotata di messa a
terra con una potenza nominale di
almeno 13 ampere.
- Non usate l’apparecchio se la spina, il
cavo di alimentazione o lo stesso
apparecchio è danneggiato. Se il cavo di
alimentazione è danneggiato, occorre
farlo sostituire da Philips, un rivenditore
specializzato Philips o da personale
qualicato per evitare situazioni
pericolose.
- Non posizionate l’apparecchio sopra o
vicino a fornelli a gas o elettrici, né in un
forno caldo.
- Non preriscaldate l’apparecchio.
- Posizionate sempre il biberon montato
con il tappo all’interno dello
scaldabiberon prima di aggiungere
l’acqua.
Page 53

ITALIANO 55
- Assicuratevi di aggiungere l’acqua prima
di accendere lo scaldabiberon.
- L’acqua calda può causare gravi ustioni.
Prestate attenzione quando lo
scaldabiberon contiene acqua calda.
- Durante l’uso, le superci accessibili
dell’apparecchio potrebbero diventare
calde.
- Non spostate l’apparecchio quando
contiene acqua calda.
- Controllate sempre la temperatura degli
alimenti per bambini prima di darli al
vostro bambino.
Attenzione
- Questo apparecchio è destinato
esclusivamente ad un uso domestico e
applicazioni simili, ad esempio aree
ristoro per il personale di negozi, uci e
altri ambienti di lavoro, aziende agricole,
servizi oerti ai clienti di alberghi, hotel e
altri luoghi residenziali, bed and breakfast
e ambienti analoghi.
- Scollegate l’apparecchio
dall’alimentazione quando non è in uso.
- Riponete il cavo di alimentazione in
eccesso all’interno della base per la
massima stabilità dello scaldabiberon.
Page 54
ITALIANO56
- Lasciate rareddare l’apparecchio prima
di pulirlo.
- Seguite le istruzioni per la pulizia
anticalcare per evitare danni irreparabili.
- Non tentate di aprire o riparare
l’apparecchio da soli. Potete contattare il
centro assistenza clienti Philips nel vostro
paese (consultare la pagina www.philips.
com/support).
- Il cibo non deve essere riscaldato troppo
a lungo.
- Utilizzate l’apparecchio esclusivamente
nel modo descritto dal manuale
dell’utente per evitare possibili lesioni
causate da errato utilizzo.
- La supercie della resistenza è soggetta a
calore residuo dopo l’uso.
Campi elettromagnetici (EMF)
Questo apparecchio Philips è conforme a tutti gli standard e
alle norme relativi all’esposizione ai campi elettromagnetici.
Utilizzo dello scaldabiberon
Con questo scaldabiberon, potete riscaldare e scongelare in
modo sicuro il latte nei biberon Philips Avent e il latte e gli
alimenti per bambini nei recipienti.
Lo scaldabiberon aiuta a preservare le preziose sostanze
nutritive e le vitamine del latte materno perché non
surriscalda mai il latte. Se il latte diventa troppo caldo, le
sostanze nutritive e le vitamine vengono danneggiate. Per
preservare la qualità del latte materno, è importante
Page 55
ITALIANO 57
riscaldare il latte in maniera sicura e controllata. Lo
scaldabiberon è progettato per scaldare il latte a temperatura
moderata e in modo uniforme, evitando zone più calde,
grazie alla circolazione del latte durante il riscaldamento. Il
sensore integrato registra e controlla la temperatura del latte
per evitare che si surriscaldi.
Nota: i sacchetti per il latte materno Philips Avent e i
biberon Philips Avent da 60 ml non possono essere utilizzati
con questo scaldabiberon.
Spiegazione delle impostazioni
- Potete scegliere tra le seguenti impostazioni: (g. 2)
- Impostazione scongelamento: per scongelare un biberon
o un contenitore con latte o alimenti per bambini surgelati.
Non si verica alcun riscaldamento.
- Impostazioni di riscaldamento del latte: selezionate una di
queste impostazioni per riscaldare un biberon di latte a
una temperatura sicura. L’impostazione 2 consente di
riscaldare il latte raggiungendo all’incirca la temperatura
corporea. L’impostazione 1 consente di riscaldare il latte a
una temperatura leggermente più bassa, mentre
l’impostazione 3 consente di riscaldare il latte a una
temperatura leggermente superiore.
- Impostazione riscaldamento pappe: selezionate questa
impostazione quando desiderate riscaldare un recipiente
o un vasetto di alimenti per bambini.
Uso dello scaldabiberon per riscaldare il latte
1 Inserite la spina nella presa di corrente a muro (g. 3).
2 Posizionate un biberon centralmente nello
scaldabiberon (g. 4).
Nota: per riscaldare il latte in un recipiente del latte, seguite
gli stessi passaggi indicati per il riscaldamento del latte in
un biberon.
Page 56

ITALIANO58
3 Riempite lo scaldabiberon con una quantità di acqua
potabile pari a quella del latte da riscaldare (ad esempio,
per riscaldare 125 ml di latte, è necessario utilizzare 125
ml di acqua potabile). Se volete riscaldare una grande
quantità di latte ( >180 ml), il livello massimo dell’acqua
è di circa 1 cm sotto il bordo dello scaldabiberon (che
corrisponde all’aggiunta di 160 ml di acqua potabile). Il
giusto livello di acqua assicura ecienti prestazioni di
riscaldamento. (g. 5)
4 Selezionate l’impostazione desiderata (g. 6).
Nota: l’esperienza ci insegna che i bimbi possono avere una
preferenza di temperatura specifica per il latte. Questo
potrebbe essere dovuto alle preferenze personali o a fattori
esterni (ad esempio la temperatura dell’ambiente). Tutte e
tre le impostazioni assicurano che il latte venga riscaldato a
una temperatura sicura, adatta al vostro bimbo,
preservando le sostanze nutritive e le vitamine del latte.
5 Premete il pulsante on/o per accendere l’apparecchio.
La spia del pulsante si illumina per indicare che lo
scaldabiberon è acceso (g. 7).
Nota: lo scaldabiberon inizia a riscaldare non appena
premete il pulsante.
6 L’indicatore di avanzamento inizia a riempirsi
gradualmente con la spia bianca per indicare lo stato di
avanzamento del processo di riscaldamento del
latte (g. 8).
Nota: l’indicatore di avanzamento mostra lo stato di
avanzamento del processo di riscaldamento del latte e
inizia a lampeggiare quando l’apparecchio è acceso.
Quando la prima fase di riscaldamento è stata completata,
il segmento inferiore lampeggia in maniera continua e il
segmento successivo inizia a lampeggiare per indicare che
è in corso la seconda fase di riscaldamento. Questi
passaggi continuano finché la terza fase di riscaldamento
non è stata completata. Infine, l’intero indicatore di
avanzamento lampeggia in maniera continua.
Page 57
ITALIANO 59
Nota: durante il processo di riscaldamento, il latte viene
fatto circolare per garantire un riscaldamento uniforme.
Sono necessari circa 10 minuti per riscaldare 90 ml di latte a
temperatura ambiente. Occorre leggermente più tempo per
scaldare il latte freddo o una grande quantità di latte.
Attenzione: non estraete il biberon dallo scaldabiberon
quando l’indicatore di avanzamento lampeggia.
7 Quando l’intero indicatore di avanzamento lampeggia in
maniera continua, il latte ha raggiunto la temperatura
impostata.
- Quando il latte è caldo, potete prendere il biberon dallo
scaldabiberon e darlo subito al vostro bambino (vedere la
sezione “Dare subito la pappa/il latte al bambino”) o potete
mantenerlo caldo nello scaldabiberon (vedere la sezione
“Mantenere il latte caldo”).
Aumento della temperatura del latte
1 Se desiderate che il latte sia più caldo, è possibile
aumentare la temperatura del latte gradualmente dopo
che è pronto passando all’impostazione riscaldamento
del latte 3 e lasciando il biberon nell’apparecchio in
modalità di mantenimento della temperatura (g. 9).
2 Se avete appena spento lo scaldabiberon o se si è
spento automaticamente, riaccendetelo senza rimuovere
l’acqua calda e seguite il passaggio riportato
sopra (g. 10).
3 Lo scaldabiberon si spegne automaticamente dopo 20
minuti in modalità di mantenimento della
temperatura (g. 11).
59
Page 58

60
ITALIANO60
Dare subito la pappa/il latte al bambino
1 Premete il pulsante on/o per spegnere l’apparecchio ed
estrarre il biberon (g. 10).
2 Controllate sempre la temperatura del latte prima di
darlo al bambino. Mescolate il latte delicatamente nel
biberon e controllate la temperatura del latte versandone
qualche goccia sulla parte interna del polso (g. 12).
3 Scollegate l’apparecchio e svuotate lo
scaldabiberon (g. 13).
Mantenere il latte caldo
1 Quando il latte ha raggiunto la temperatura desiderata,
lo scaldabiberon passa automaticamente alla modalità
di mantenimento della temperatura. In questa modalità,
il latte si mantiene alla temperatura impostata per 20
minuti (g. 14).
2 Lo scaldabiberon si spegne automaticamente dopo 20
minuti. L’indicatore di avanzamento si spegne per
indicare che il latte non è più mantenuto alla
temperatura desiderata (g. 11).
Nota: se desiderate dare al bambino il latte alla
temperatura impostata, dovete estrarre il biberon dallo
scaldabiberon e darlo al bambino subito dopo lo
spegnimento dello scaldabiberon, altrimenti il latte si
raredda.
Nota: non è possibile prolungare la modalità di
mantenimento della temperatura dello scaldabiberon per
più di 20 minuti.
Attenzione: Si sconsiglia di riscaldare il latte materno due
volte, poiché i batteri iniziano a svilupparsi nel latte.
3 Controllate sempre la temperatura del latte prima di
darlo al bambino. Mescolate il latte delicatamente nel
biberon o nel recipiente del latte e controllate la
temperatura del latte versandone qualche goccia sulla
parte interna del polso (g. 12).
Page 59
ITALIANO 61
4 Scollegate l’apparecchio e svuotate lo
scaldabiberon (g. 13).
Riutilizzare subito lo scaldabiberon per un altro biberon
Se volete riscaldare subito un altro biberon, lasciate che lo
scaldabiberon si rareddi per alcuni minuti. Per velocizzare il
processo, riempite lo scaldabiberon con acqua fredda.
Quando accendete lo scaldabiberon, l’indicatore di stato
inizia a lampeggiare dal basso verso l’alto per indicare che
l’apparecchio si sta scaldando di nuovo.
Nota: se l’indicatore di avanzamento è acceso ma non
lampeggia, lo scaldabiberon è ancora troppo caldo per
riscaldare un altro biberon. Spegnete lo scaldabiberon,
lasciatelo rareddare per alcuni minuti e assicuratevi di
riempirlo con acqua fredda.
Uso dello scaldabiberon per riscaldare alimenti
per bambini
1 Inserite la spina nella presa di corrente a muro (g. 3).
2 Posizionate al centro dello scaldabiberon un recipiente o
un vasetto di alimenti per bambini (g. 15).
Nota: durante il riscaldamento, potete togliere il coperchio
dal recipiente o dal vasetto per mescolare gli alimenti per
bambini.
3 Riempite lo scaldabiberon con una quantità di acqua
potabile pari a quella della pappa da riscaldare (ad
esempio, per riscaldare una pappetta da 125 ml, è
necessario utilizzare 125 ml di acqua potabile).
Se volete riscaldare una pappetta di quantità maggiore, il
livello massimo dell’acqua è di circa 1 cm sotto il bordo
dello scaldabiberon (che corrisponde all’aggiunta di 160 ml
di acqua potabile). Il giusto livello di acqua assicura
ecienti prestazioni di riscaldamento. (g. 16)
4 Selezionate l’impostazione per riscaldare le
pappette (g. 17).
61
Page 60
62
ITALIANO62
5 Premete il pulsante on/o per accendere l’apparecchio.
La spia dell’indicatore di avanzamento mostra che lo
scaldabiberon è acceso (g. 18).
Nota: lo scaldabiberon inizia a riscaldare non appena
premete il pulsante. Data la grande varietà di consistenza
degli alimenti per bambini, l’apparecchio non è in grado di
rilevare esattamente per quanto tempo gli alimenti
debbano essere riscaldati.
6 L’indicatore di avanzamento inizia a riempirsi
gradualmente con la spia bianca per indicare lo stato di
avanzamento del processo di riscaldamento. Durante il
processo di riscaldamento, non estraete il recipiente o il
vasetto dallo scaldabiberon, ma mescolate gli alimenti
mentre il recipiente o il contenitore è ancora nello
scaldabiberon (g. 19).
Nota: potete iniziare a mescolare gli alimenti per bambini o
il latte non appena il secondo segmento dell’indicatore di
avanzamento lampeggia in maniera continua. Mescolare
prima di questo momento non ha alcuna ecacia poiché la
temperatura è ancora troppo bassa.
Attenzione: Non estraete il recipiente o il vasetto dallo
scaldabiberon durante il riscaldamento.
7 Quando l’indicatore di avanzamento lampeggia in
maniera continua, gli alimenti per bambini hanno
raggiunto la temperatura desiderata.
Nota: Data la grande varietà di consistenze degli alimenti
per bambini, vi raccomandiamo di mescolare
continuamente gli alimenti e controllarne la temperatura
durante la fase di riscaldamento per ottenere un risultato
ottimale.
- Quando la pappa o il latte si sono riscaldati, potete
estrarre il recipiente o il vasetto di alimenti per bambini
dallo scaldabiberon per dare subito da mangiare al
bambino (vedere la sezione “Dare subito la pappa/il latte
Page 61

ITALIANO 63
al bambino”) o potete mantenerlo caldo nello
scaldabiberon (vedere la sezione “Mantenere la
temperatura della pappa e del latte”).
Aumento della temperatura degli alimenti per bambini
1 Assaggiate sempre gli alimenti per bambini o il latte
dopo il riscaldamento per assicurarvi che non siano
troppo caldi. Se desiderate scaldarli più a lungo, riponete
nuovamente il recipiente nello scaldabiberon e lasciatelo
nella modalità di mantenimento della temperatura per
un breve periodo di tempo. Continuate a mescolare gli
alimenti per bambini (g. 15).
2 Se avete appena spento lo scaldabiberon o se si è
spento automaticamente, riaccendetelo senza rimuovere
l’acqua calda e seguite il passaggio riportato
sopra (g. 18).
3 Lo scaldabiberon si spegne automaticamente dopo 20
minuti in modalità di mantenimento della
temperatura (g. 20).
Dare subito la pappa/il latte al bambino
1 Premete il pulsante on/o per spegnere l’apparecchio ed
estrarre il recipiente o il vasetto con gli alimenti per
bambini (g. 18).
2 Dopo il riscaldamento, assaggiate gli alimenti per
bambini per assicurarvi che non siano troppo
caldi (g. 21).
3 Scollegate l’apparecchio e svuotate lo
scaldabiberon (g. 13).
Mantenere la temperatura della pappa e del latte
1 Quando gli alimenti per bambini o il latte hanno
raggiunto la temperatura desiderata, lo scaldabiberon
passa automaticamente alla modalità di mantenimento
della temperatura. In questa modalità, gli alimenti per
bambini si mantengono alla temperatura desiderata per
20 minuti (g. 22).
63
Page 62
64
ITALIANO64
2 Lo scaldabiberon si spegne automaticamente dopo 20
minuti. L’indicatore di avanzamento si spegne per
indicare che gli alimenti per bambini non saranno più
mantenuti alla temperatura desiderata (g. 20).
Nota: se desiderate dare al bambino alimenti alla
temperatura impostata, dovete estrarli dallo scaldabiberon
e darli al bambino subito dopo lo spegnimento dello
scaldabiberon, per evitare che gli alimenti si rareddino.
Nota: non è possibile prolungare la modalità di
mantenimento della temperatura dello scaldabiberon per
più di 20 minuti.
3 Controllate sempre la temperatura degli alimenti prima
di darli al vostro bambino. Mescolate delicatamente gli
alimenti per bambini nel recipiente o nel vasetto e
assaggiateli per assicurarvi che non siano troppo
caldi (g. 21).
4 Scollegate l’apparecchio e svuotate lo
scaldabiberon (g. 13).
Riutilizzo immediato dello scaldabiberon con un altro
contenitore di alimenti per bambini
Se volete riscaldare immediatamente un altro recipiente o
vasetto con alimenti per bambini, lasciate che lo
scaldabiberon si rareddi per alcuni minuti. Per velocizzare il
processo, riempite lo scaldabiberon con acqua fredda.
Quando accendete lo scaldabiberon, l’indicatore di stato
inizia a lampeggiare dal basso verso l’alto per indicare che
l’apparecchio si sta scaldando di nuovo.
Nota: se l’indicatore di avanzamento è acceso ma non
lampeggia, lo scaldabiberon è ancora troppo caldo per
riscaldare un altro recipiente o il vasetto con gli alimenti per
bambini. Spegnete lo scaldabiberon, lasciatelo rareddare
per alcuni minuti e assicuratevi di riempirlo con acqua fredda.
Page 63

ITALIANO 65
Impostazione scongelamento
A questa impostazione, potete scongelare latte o pappe
surgelate. Seguite i passaggi indicati nelle sezioni “Uso dello
scaldabiberon per riscaldare il latte” o “Uso dello
scaldabiberon per riscaldare le pappe”.
Quando l’apparecchio è impostato sul programma di
scongelamento, l’indicatore di avanzamento inizia a
lampeggiare e si riempie gradualmente di luce bianca, per
indicare lo stato di avanzamento del processo di
scongelamento. Il latte e gli alimenti per bambini sono
completamente scongelati quando l’intero indicatore di
avanzamento lampeggia in maniera continua.
Il programma di scongelamento consente di scongelare il
latte e gli alimenti per bambini, ma non di riscaldarli. Se
desiderate scaldare il latte o gli alimenti per bambini dopo lo
scongelamento, spegnete innanzitutto l’apparecchio, quindi
selezionate l’impostazione di riscaldamento desiderata e
riaccendete l’apparecchio.
Pulizia ed eliminazione del calcare
Pulizia
1 Dopo ogni uso, scollegate lo scaldabiberon
dall’alimentazione e lasciatelo rareddare (g. 23).
2 Rimuovete l’acqua dallo scaldabiberon per motivi
igienici (g. 24).
3 Pulite l’esterno e l’interno dello scaldabiberon con un
panno umido (g. 25).
Per la pulizia dello scaldabiberon, non utilizzate detergenti
abrasivi, antibatterici, solventi chimici o utensili appuntiti.
Nota: se avete utilizzato lo scaldabiberon per riscaldare
pappe in un recipiente, assicuratevi che non ci siano residui
sul fondo dello scaldabiberon.
65
Page 64

66
ITALIANO66
Rimozione del calcare
Vi consigliamo di eseguire la procedura di rimozione del
calcare dallo scaldabiberon ogni quattro settimane per
assicurarvi sempre prestazioni ecienti.
1 Mescolate 50 ml di aceto bianco con 100 ml di acqua
fredda per eseguire la procedura di rimozione del calcare
dallo scaldabiberon. Come prima cosa, selezionate il
programma di scongelamento, quindi accendete lo
scaldabiberon e lasciate l’apparecchio in funzione per 10
minuti. Lasciate agire la soluzione nello scaldabiberon
no a quando il calcare non si è sciolto. (g. 26)
Nota: potete anche utilizzare degli agenti decalcificanti a
base di acido citrico.
Nota: non utilizzate altri tipi di agenti anticalcare.
2 Scollegate lo scaldabiberon dall’alimentazione prima di
svuotarlo (g. 23).
3 Svuotate lo scaldabiberon e risciacquate l’interno a
fondo. Se notate ancora tracce di calcare dopo il
risciacquo, ripetete la procedura di rimozione del
calcare (g. 24).
Riciclaggio
- Questo simbolo indica che il prodotto è conforme alla
Direttiva Europea 2012/19/UE. Informatevi sulle normative
locali relative alla raccolta dierenziata dei prodotti
elettrici ed elettronici e attenetevi a quest’ultime. Non
smaltite mai questi prodotti con gli altri riuti domestici. Lo
smaltimento corretto dei vostri prodotti usati contribuisce
a prevenire potenziali eetti negativi sull’ambiente e sulla
salute. (g. 27)
Garanzia e assistenza
Per assistenza o informazioni, visitate il sito Web all’indirizzo
www.philips.com/support oppure leggete l’opuscolo della
garanzia internazionale.
Page 65

NEDERLANDS 67
Algemene beschrijving (g. 1)
1. Babyessenwarmer
2. Voortgangsindicator
3. Instellingen en aan-uitknop
4. Ontdooistand
5. Melkopwarmstand 1
6. Melkopwarmstand 2
7. Melkopwarmstand 3
8. Opwarmstand babyvoeding
9. Aan-uitknop
Belangrijk
Wilt u volledig proteren van de
ondersteuning die Philips u kan bieden?
Registreer het apparaat dan op
www.philips.com/welcome.
Lees deze gebruiksaanwijzing zorgvuldig
door voordat u de babyessenwarmer gaat
gebruiken. Bewaar de gebruiksaanwijzing
om deze zo nodig te kunnen raadplegen.
Gevaar
- Dompel het apparaat nooit in water of een
andere vloeistof en spoel het ook niet af
onder de kraan.
Waarschuwing
- Gebruik het apparaat alleen binnenshuis.
- Dit apparaat kan worden gebruikt door
personen met verminderde lichamelijke,
zintuiglijke of geestelijke capaciteiten of
weinig ervaring en kennis, mits zij toezicht
Page 66

68
NEDERLANDS
of instructie hebben ontvangen
aangaande veilig gebruik van het
apparaat, en zij de gevaren van het
gebruik begrijpen.
- Reiniging en onderhoud dienen niet door
kinderen te worden uitgevoerd.
- Dit apparaat buiten bereik van kinderen
houden. Houd het apparaat en het snoer
buiten bereik van kinderen.
- Kinderen mogen niet met het apparaat
spelen.
- Dompel het snoer, de stekker en het
apparaat niet in water of in een andere
vloeistof.
- Laat het netsnoer niet over de rand van
een tafel of aanrecht hangen. Overtollig
snoer kan in de voet van de
babyessenwarmer worden opgeborgen
om de stabiliteit van het apparaat te
garanderen.
- Houd het netsnoer uit de buurt van hete
oppervlakken.
- Sluit het apparaat alleen aan op een
geaard stopcontact. Zorg er altijd voor dat
de stekker goed in het stopcontact zit.
- Controleer of het voltage aangegeven op
de onderkant van het apparaat
overeenkomt met de plaatselijke
Page 67

NEDERLANDS 69
netspanning voordat u het apparaat
aansluit.
- Zorg bij het gebruik van een verlengsnoer
voor een geaard verlengsnoer met een
bereik van minimaal 13 A.
- Gebruik het apparaat niet als de stekker,
het netsnoer, of het apparaat zelf
beschadigd is. Als het netsnoer
beschadigd is, moet u het laten
vervangen door Philips, een door Philips
geautoriseerd servicecentrum of
personen met vergelijkbare kwalicaties
om gevaar te voorkomen.
- Plaats het apparaat niet op of in de buurt
van een
gasfornuis of elektrisch fornuis of in
een warme oven.
- Verwarm het apparaat niet voor.
- Plaats altijd een volledig in elkaar gezette
es met dop in de babyessenwarmer
voordat u water toevoegt.
- Voeg water toe voordat u de
babyessenwarmer inschakelt.
- Heet water kan ernstige brandwonden
veroorzaken. Wees voorzichtig met de
babyessenwarmer wanneer deze heet
water bevat.
Page 68

NEDERLANDS70
- De aanraakbare oppervlakken van het
apparaat kunnen tijdens gebruik heet
worden.
- Verplaats het apparaat niet wanneer het
heet water bevat.
- Controleer altijd de temperatuur van de
babyvoeding voordat u uw kind gaat
voeden.
Let op
- Dit apparaat is bedoeld voor
huishoudelijk en soortgelijk gebruik zoals:
in boerderijen; in Bed & Breakfast-achtige
omgevingen; in keukens
(voor personeel) in winkels, kantoren en
andere werkomgevingen; door gasten in
hotels, motels en andere
verblijfsaccommodaties.
- Haal de stekker van het apparaat uit het
stopcontact wanneer het niet in gebruik
is.
- Berg overtollig snoer op in de voet om de
stabiliteit van de babyessenwarmer te
garanderen.
- Laat het apparaat afkoelen voordat u het
schoonmaakt.
- Volg de ontkalkingsinstructies om
onherstelbare schade te voorkomen.
Page 69

NEDERLANDS 71
- Probeer het apparaat niet zelf te openen
of te repareren. Neem contact op met het
Philips Consumer Care Centre in uw land
(zie www.philips.com/support).
- Het voedsel mag niet te lang worden
verwarmd.
- Gebruik het apparaat alleen zoals
beschreven in de gebruiksaanwijzing om
mogelijk letsel door verkeerd gebruik te
voorkomen.
- Het oppervlak van het
verwarmingselement is na gebruik niet
meteen afgekoeld.
Elektromagnetische velden (EMV)
Dit Philips-apparaat voldoet aan alle toepasbare richtlijnen
en voorschriften met betrekking tot blootstelling aan
elektromagnetische velden.
De babyessenwarmer gebruiken
Met deze babyessenwarmer kunt u veilig melk in Philips
Avent-voedingsessen ontdooien en verwarmen maar ook
melk of babyvoeding in bewaarbekers.
Met de babyessenwarmer kunnen belangrijke
voedingsstoen en vitaminen in de moedermelk bewaard
blijven omdat de melk niet oververhit raakt. Als melk te warm
wordt, raken voedingsstoen en vitaminen beschadigd. Om
de kwaliteit van uw moedermelk te bewaren, is het belangrijk
dat de melk op een veilige en gecontroleerde manier wordt
opgewarmd. Met de babyessenwarmer kan de melk
geleidelijk en gelijkmatig worden opgewarmd en wordt
Page 70

NEDERLANDS72
voorkomen dat er zich hete plekken vormen. Deze ontstaan
doordat de melk tijdens het opwarmen circuleert. De
ingebouwde sensor houdt de temperatuur van de melk bij en
regelt deze, zodat oververhitting altijd wordt voorkomen.
Opmerking: Philips Avent-moedermelkzakken en Philips
Avent-flessen van 60 ml kunnen niet in deze
babyflessenwarmer worden gebruikt.
Uitleg over de standen
- U kunt uit de volgende standen kiezen: (g. 2)
- Ontdooistand: ontdooi een es of bewaarbeker met
ingevroren melk of babyvoeding. Er vindt geen opwarming
plaats.
- Melkopwarmstanden: selecteer een van de volgende
standen wanneer u een es melk wilt verwarmen tot een
veilige temperatuur. Stand 2 verwarmt de melk tot
ongeveer lichaamstemperatuur. Stand 1 verwarmt de melk
tot een iets lagere temperatuur stand 3 verwarmt de melk
tot een iets hogere temperatuur.
- Opwarmstand babyvoeding: kies deze stand als u een
bewaarbeker of potje met babyvoeding wilt verwarmen.
De babyessenwarmer gebruiken om melk te
verwarmen
1 Steek de stekker in het stopcontact (g. 3).
2 Plaats een es in het midden van de
babyessenwarmer (g. 4).
Opmerking: Voor het verwarmen van melk in een
bewaarbeker volgt u dezelfde stappen als aangegeven voor
het verwarmen van melk in een fles.
3 Vul de babyessenwarmer met dezelfde hoeveelheid
drinkwater als de hoeveelheid melk die u wilt verwarmen
(voor het verwarmen van bijvoorbeeld 125 ml melk moet
u 125 ml drinkwater gebruiken). Als u een grote
hoeveelheid melk wilt verwarmen (>180 ml), het
maximale waterniveau is ongeveer 1 cm onder de rand
Page 71

NEDERLANDS 73
van de babyessenwarmer (dit komt overeen met 160 ml
drinkwater). Een nauwkeurig waterniveau zorgt voor de
juiste opwarming. (g. 5)
4 Stel de gewenste stand in (g. 6).
Opmerking: Ervaring leert dat baby’s een voorkeur kunnen
hebben voor een bepaalde melktemperatuur. Dit kan
worden veroorzaakt door persoonlijke voorkeur of externe
factoren (bijvoorbeeld omgevingstemperatuur). Alle drie de
standen zorgen ervoor dat de melk wordt verwarmd tot een
veilige temperatuur die aangenaam is voor uw kind en die
zorgt dat voedingsstoen en vitaminen in de melk
behouden blijven.
5 Druk op de aan-uitknop om het apparaat in te schakelen.
Het lampje in de knop gaat branden om aan te geven dat
de babyessenwarmer is ingeschakeld (g. 7).
Opmerking: De babyflessenwarmer begint met opwarmen
meteen nadat u op de knop drukt.
6 De voortgangsindicator wordt geleidelijk gevuld met wit
licht waarmee de voortgang van het verwarmingsproces
van de melk wordt aangegeven (g. 8).
Opmerking: De voortgangsindicator toont de voortgang van
het verwarmingsproces van de melk. De
voortgangsindicator knippert wanneer het apparaat is
ingeschakeld. Wanneer de eerste verwarmingsfase is
voltooid, brandt het onderste segment ononderbroken en
het volgende segment begint te knipperen om aan te geven
dat de tweede verwarmingsfase aan de gang is. Dit proces
gaat door tot de derde verwarmingsfase is voltooid. De
volledige voortgangsindicator blijft vervolgens
ononderbroken branden.
Page 72

NEDERLANDS74
Opmerking: Tijdens het verwarmingsproces circuleert de
melk voor een gelijkmatige opwarming. Het duurt ongeveer
10 minuten om 90 ml melk op kamertemperatuur te
verwarmen. Het duurt langer om koude melk of een grote
hoeveelheid melk te verwarmen.
Let op: Neem de es niet uit de babyessenwarmer terwijl
de voortgangsindicator knippert.
7 Wanneer de gehele voortgangsindicator ononderbroken
brandt, heeft de melk de ingestelde temperatuur bereikt.
- Wanneer de melk warm is, kunt u de es uit de
babyessenwarmer nemen om uw baby direct te voeden
(zie ‘Baby direct voeden’) of u kunt de melk langer warm
houden in de (zie ‘Melk warm houden’).
De melktemperatuur verhogen
1 Als u de melk warmer wilt hebben, kunt u de temperatuur
van de melk geleidelijk verhogen nadat deze klaar is
door over te schakelen naar melkopwarmstand 3. Laat de
es vervolgens in het apparaat staan in de
warmhoudmodus (g. 9).
2 Als u de babyessenwarmer al hebt uitgeschakeld of als
deze al automatisch is uitgeschakeld, schakel de
essenwarmer dan weer in zonder het warme water eruit
te halen en volg de bovenstaande stap (g. 10).
3 De babyessenwarmer schakelt automatisch uit na 20
minuten in de warmhoudmodus (g. 11).
Uw baby direct voeden
1 Druk op de aan-uitknop om het apparaat uit te
schakelen en verwijder de es (g. 10).
2 Controleer altijd de temperatuur van de melk voordat u
uw baby voedt. Schud de es voorzichtig zodat de melk
langzaam ronddraait en controleer de temperatuur van
de melk door een paar druppels op de binnenkant van
uw pols te sprenkelen (g. 12).
Page 73
NEDERLANDS 75
3 Haal de stekker uit het stopcontact en leeg de
babyessenwarmer(g. 13).
Melk warm houden
1 Wanneer de melk de gewenste temperatuur heeft
bereikt, schakelt de babyessenwarmer automatisch
over naar de warmhoudmodus. In deze modus wordt de
melk gedurende 20 minuten op de ingestelde
temperatuur gehouden (g. 14).
2 De babyessenwarmer schakelt na 20 minuten
automatisch uit. De voortgangsindicator schakelt uit om
aan te geven dat de melk niet langer op de gewenste
temperatuur wordt gehouden (g. 11).
Opmerking: Als u uw baby wilt voeden met melk op de
ingestelde temperatuur, moet u de fles uit de
babyflessenwarmer halen en uw baby direct voeden nadat
de babyflessenwarmer is uitgeschakeld, anders koelt de
melk af.
Opmerking: U kunt de warmhoudmodus van de
babyflessenwarmer niet langer maken dan 20 minuten.
Let op: Het wordt afgeraden moedermelk twee keer te
verwarmen omdat zich in de melk bacteriën beginnen te
ontwikkelen.
3 Controleer altijd de temperatuur van de melk voordat u uw
baby voedt. Schud de es of de bewaarbeker voorzichtig
zodat de melk langzaam ronddraait en controleer de
temperatuur van de melk door een paar druppels op de
binnenkant van uw pols te sprenkelen (g. 12).
4 Haal de stekker uit het stopcontact en leeg de
babyessenwarmer (g. 13).
Page 74

NEDERLANDS76
De babyessenwarmer meteen opnieuw gebruiken voor
een andere es
Als u meteen een andere es wilt opwarmen, laat u de
babyessenwarmer enkele minuten afkoelen. Om dit proces
te versnellen, vult u de babyessenwarmer met vers, koud
water. Wanneer u de essenwarmer inschakelt, knippert de
voortgangsindicator van beneden naar boven om aan te
geven dat het apparaat weer aan het opwarmen is.
Opmerking: Als de voortgangsindicator brandt maar niet
knippert, dan is de babyflessenwarmer nog steeds te warm
om een andere fles te verwarmen. Schakel de
babyflessenwarmer uit, laat deze enkele minuten afkoelen en
vul deze met vers, koud water.
De babyessenwarmer gebruiken om babyvoeding te
verwarmen
1 Steek de stekker in het stopcontact (g. 3).
2 Zet een bewaarbeker voor babyvoeding of een potje in
het midden in de babyessenwarmer (g. 15).
Opmerking: U kunt het deksel van de bewaarbeker of het
potje verwijderen zodat u de babyvoeding kunt doorroeren
tijdens het opwarmen.
3 Vul de babyessenwarmer met dezelfde hoeveelheid
drinkwater als de hoeveelheid babyvoeding die u wilt
verwarmen (voor het verwarmen van bijvoorbeeld 125 ml
babyvoeding moet u 125 ml drinkwater gebruiken). Als u
een grote hoeveelheid babyvoeding wilt verwarmen
(>180 ml), het maximale waterniveau is ongeveer
1 cm onder de rand van de babyessenwarmer (dit komt
overeen met 160 ml drinkwater). Een nauwkeurig
waterniveau zorgt voor de juiste opwarming. (g. 16)
4 Selecteer de opwarmstand voor babyvoeding (g. 17).
Page 75

NEDERLANDS 77
5 Druk op de aan-uitknop om het apparaat in te schakelen.
Het lampje in de voortgangsindicator gaat branden om
aan te geven dat de babyessenwarmer is
ingeschakeld (g. 18).
Opmerking: Nadat u op de knop drukt, begint de
babyflessenwarmer meteen met verwarmen. Vanwege de
grote variatie in de samenstelling van babyvoeding, is het
apparaat niet in staat precies vast te stellen hoe lang de
babyvoeding moet worden verwarmd.
6 De voortgangsindicator wordt geleidelijk gevuld met wit
licht waarmee de voortgang van het verwarmingsproces
wordt aangegeven. Neem tijdens het verwarmingsproces
het potje of de bewaarbeker niet uit de
babyessenwarmer maar roer de babyvoeding door
terwijl het potje of de bewaarbeker in de
babyessenwarmer staat (g. 19).
Opmerking: U kunt beginnen met roeren zodra het tweede
segment van de voortgangsindicator ononderbroken
brandt. Eerder roeren is niet eectief omdat de temperatuur
van de babyvoeding dan nog te laag is.
Let op: Neem tijdens het verwarmen de bewaarbeker of het
potje niet uit de babyessenwarmer.
7 Wanneer de gehele voortgangsindicator ononderbroken
brandt, heeft de babyvoeding de gewenste temperatuur
bereikt.
Opmerking: Vanwege de grote variatie in de samenstelling
van babyvoeding, is het raadzaam dat u de babyvoeding
voortdurend roert en tijdens het verwarmen ervan de
temperatuur controleert voor een optimaal resultaat.
- Wanneer de babyvoeding warm is, kunt u de bewaarbeker
of het potje met babyvoeding uit de essenwarmer
nemen om uw baby direct te voeden (zie ‘Baby direct
voeden’) of kunt u de voeding langer warm houden in de
babyessenwarmer (zie ‘Babyvoeding warm houden’ ).
Page 76

NEDERLANDS78
De temperatuur van de babyvoeding verhogen
1 Proef de babyvoeding na het opwarmen altijd om te
controleren of deze niet te heet is. Als u de babyvoeding
warmer wilt hebben, plaatst u de bewaarbeker weer
terug in de babyessenwarmer en laat u deze enige tijd
in de warmhoudmodus staan. Blijf in de babyvoeding
roeren (g. 15).
2 Als u de babyessenwarmer al hebt uitgeschakeld of als
deze al automatisch is uitgeschakeld, schakel de
essenwarmer dan weer in zonder het warme water eruit
te halen en volg de bovenstaande stap
(g. 18).
3 De babyessenwarmer schakelt automatisch uit na 20
minuten in de warmhoudmodus (g. 20).
Uw baby direct voeden
1 Druk op de aan-uitknop om het apparaat uit te
schakelen en de bewaarbeker of het potje met
babyvoeding te verwijderen (g. 18).
2 Proef na het opwarmen de babyvoeding om te
controleren of deze niet te heet is (g. 21).
3 Haal de stekker uit het stopcontact en leeg de
babyessenwarmer (g. 13).
Babyvoeding warm houden
1 Wanneer de babyvoeding de gewenste temperatuur
heeft bereikt, schakelt de babyessenwarmer
automatisch over naar de warmhoudmodus. In deze
modus wordt de babyvoeding gedurende 20 minuten op
de gewenste temperatuur gehouden (g. 22).
2 De babyessenwarmer schakelt na 20 minuten
automatisch uit. De voortgangsindicator schakelt uit om
aan te geven dat de babyvoeding niet langer op de
gewenste temperatuur wordt gehouden (g. 20).
Page 77

NEDERLANDS 79
Opmerking: Als u uw baby wilt voeden met babyvoeding op
de ingestelde temperatuur, moet u de babyvoeding uit de
babyflessenwarmer nemen en uw baby direct voeden nadat
de babyflessenwarmer is uitgeschakeld. Als u dit niet doet,
koelt de babyvoeding langzaam af.
Opmerking: U kunt de warmhoudmodus van de
babyflessenwarmer niet langer maken dan 20 minuten.
3 Controleer de temperatuur van de babyvoeding altijd
voordat u uw baby gaat voeden. Roer de babyvoeding in
de bewaarbeker of het potje met babyvoeding
voorzichtig en proef de babyvoeding om te controleren
of deze niet te heet is (g. 21).
4 Haal de stekker uit het stopcontact en leeg de
babyessenwarmer (g. 13).
De babyessenwarmer meteen opnieuw gebruiken voor
een andere bewaarbeker of babyvoeding
Als u meteen een andere bewaarbeker of een ander potje
met babyvoeding wilt opwarmen, laat u de
babyessenwarmer enkele minuten afkoelen. Om dit proces
te versnellen, vult u de babyessenwarmer met vers, koud
water. Wanneer u de essenwarmer inschakelt, knippert de
voortgangsindicator van beneden naar boven om aan te
geven dat het apparaat weer aan het opwarmen is.
Opmerking: Als de voortgangsindicator brandt maar niet
knippert, dan is de babyflessenwarmer nog steeds te warm
om een andere bewaarbeker of een ander potje met
babyvoeding te verwarmen. Schakel de babyflessenwarmer
uit, laat deze enkele minuten afkoelen en vul deze met vers,
koud water.
Page 78

NEDERLANDS80
Ontdooistand
Met deze instelling kunt u melk of babyvoeding ontdooien.
Volg de stappen in ‘De babyessenwarmer gebruiken om
melk te verwarmen’ of ‘De babyessenwarmer gebruiken om
babyvoeding te verwarmen’.
De voortgangsindicator gaat knipperen als het apparaat in de
ontdooistand staat. De voortgangsindicator vult zich
geleidelijk met wit licht om de voortgang van het ontdooien
aan te geven. De melk of babyvoeding is volledig ontdooid
wanneer de gehele voortgangsindicator ononderbroken
brandt.
In de ontdooistand wordt de melk of babyvoeding ontdooid
maar niet opgewarmd. Als u de melk of babyvoeding wilt
opwarmen nadat u deze hebt ontdooid, schakelt u het
apparaat uit, selecteert u vervolgens de gewenste
opwarmstand en schakelt u het apparaat weer in.
Schoonmaken en ontkalken
Schoonmaken
1 Haal na elk gebruik de stekker uit het stopcontact en laat
de babyessenwarmer afkoelen (g. 23).
2 Verwijder om hygiënische redenen het water uit de
babyessenwarmer (g. 24).
3 Veeg de buitenkant en binnenkant van de
babyessenwarmer schoon met een vochtige
doek (g. 25).
Gebruik geen schuurmiddelen, antibacteriële
schoonmaakmiddelen, chemische oplosmiddelen of scherpe
voorwerpen om de babyessenwarmer schoon te maken.
Opmerking: Als u de babyflessenwarmer hebt gebruikt om
bewaarbekers met babyvoeding op te warmen, controleer
dan of er geen gemorste babyvoeding op de bodem van de
babyflessenwarmer is achtergebleven.
Page 79

NEDERLANDS 81
Ontkalken
U wordt aangeraden de babyessenwarmer elke vier weken
te ontkalken om ervoor te zorgen dat het apparaat goed blijft
werken.
1 Meng 50 ml blanke azijn met 100 ml koud water om de
babyessenwarmer te ontkalken. Selecteer eerst de
ontdooistand, schakel vervolgens de babyessenwarmer
in en laat het apparaat 10 minuten werken. Laat de
oplossing in de babyessenwarmer staan tot alle kalk is
opgelost. (g. 26)
Opmerking: U kunt ook ontkalkers op basis van citroenzuur
gebruiken.
Opmerking: Gebruik geen andere typen ontkalker.
2 Haal de stekker uit het stopcontact voordat u de
babyessenwarmer leegt (g. 23).
3 Leeg de babyessenwarmer en spoel de binnenkant
grondig schoon. Herhaal de ontkalkingsprocedure als u
na het schoonspoelen nog kalksporen ziet (g. 24).
Recycling
- Dit symbool op een product betekent dat het product
voldoet aan EU-richtlijn 2012/19/EG. Win inlichtingen in
over de gescheiden inzameling van afval van elektrische
en elektronische producten. Volg de lokale regels en gooi
het product nooit weg bij het gewone huishoudelijke afval.
Door u op de juiste manier van oude producten te
ontdoen, voorkomt u negatieve gevolgen voor het milieu
en de volksgezondheid. (g. 27)
81
Garantie en ondersteuning
Als u informatie of ondersteuning nodig hebt, ga dan naar
www.philips.com/
vouwblad.
support of lees het ‘worldwide guarantee’-
Page 80

828384
Page 81

Page 82

 Loading...