

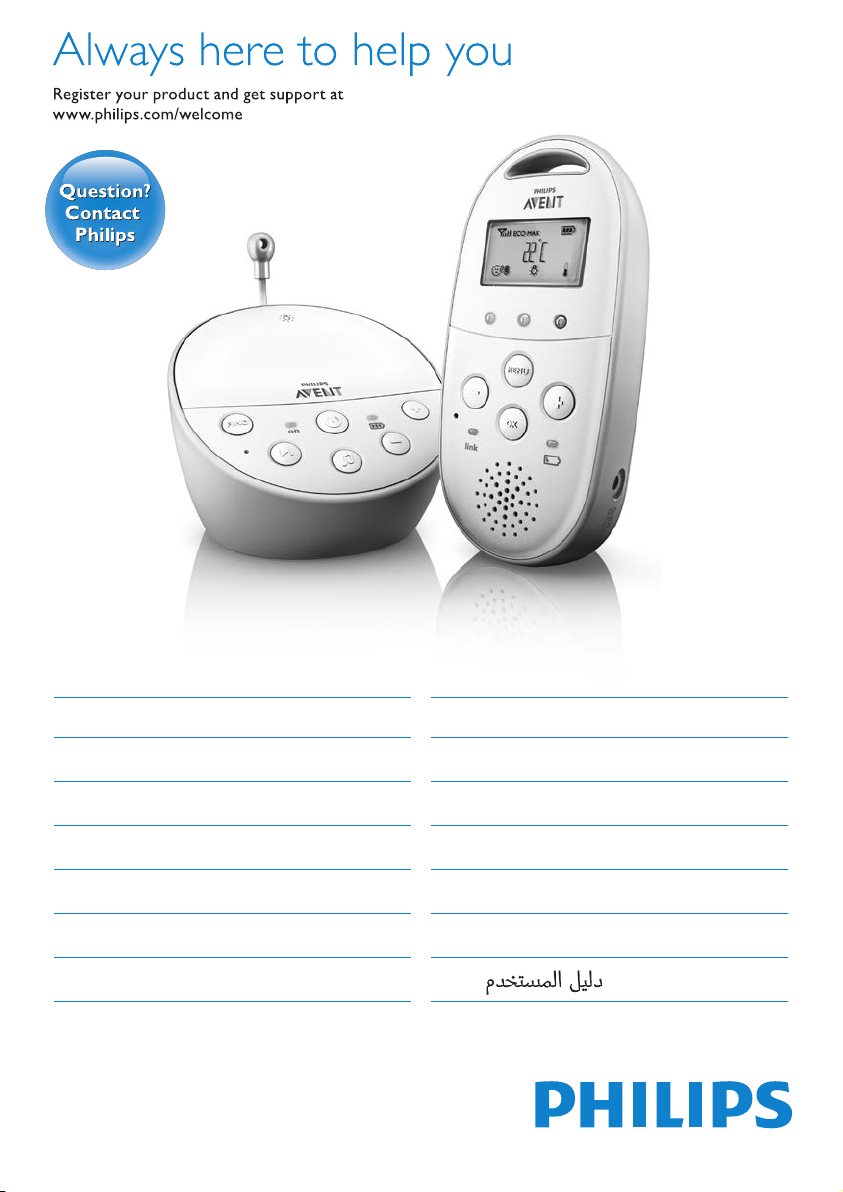
Page 1
SCD580
EN User manual 3
DA Brugervejledning 30
DE Benutzerhandbuch 58
EL Εγχειρίδιοχρήσης 88
ES Manual del usuario 121
FI Käyttöopas 150
FR Mode d’emploi 177
IT Manuale utente 206
NL Gebruiksaanwijzing 235
NO Brukerhåndbok 264
PT Manual do utilizador 291
SV Användarhandbok 320
TR Kullanımkılavuzu 348
AR 398
Page 2
2
Page 3

Table of contents
1 Introduction 3
8 Neck strap 25
9 Cleaning and maintenance 26
ENGLISH
10 Storage 26
2 Overview 4
3 Preparing for use 4
3.1 Baby unit 4
3.2 Parent unit 6
4 Using the baby monitor 7
4.1 Positioning the baby monitor 7
4.2 Linking parent unit and baby unit 7
5 Functions and feedback on the
baby unit 9
5.1 Nightlight 9
5.2 Lullaby function 9
5.3 Projector 10
5.4 Paging the parent unit 10
5.5 Battery status light 11
6 Functions and feedback on the
parent unit 11
6.1 Soothing menu 11
6.2 Volume 14
6.3 Talk function 15
6.4 Night dim mode 15
6.5 Baby unit battery low alert 16
6.6 Battery status indications 16
6.7 Signal strength indicator 18
6.8 Reset 18
7 Menu of the parent unit 18
7.1 Navigating the menu 18
7.2 Sensitivity 19
7.3 Eco Max mode 20
7.4 Feed timer 21
7.5 Temperature 22
7.6 Humidity 23
7.7 Cry alert 24
7.8 Clock 24
7.9 Language 24
7.10 Key lock 25
11 Ordering accessories 26
12 Guarantee and support 26
13 Frequently asked questions 27
1 Introduction
Congratulations on your purchase and welcome
to Philips AVENT! To fully benet from the
support that Philips AVENT offers, register your
product at www.philips.com/welcome.
Philips AVENT is dedicated to producing
caring, reliable products that give parents the
reassurance they need. This Philips AVENT baby
monitor provides round-the-clock support
by ensuring you can always hear your baby
clearly without any distracting noise. The DECT
technology guarantees zero interference and a
crystal clear sound between the baby unit and the
parent unit.
The temperature sensor enables you to monitor
the temperature in your baby’s room, and offers
you personalised settings to help keep your baby’s
room comfortable.
This baby monitor has a baby unit with a
projector and a parent unit with a special soothing
screen that allows you control the soothing
options (nightlight, lullabies and projector) on the
baby unit from a distance.
3
Page 4

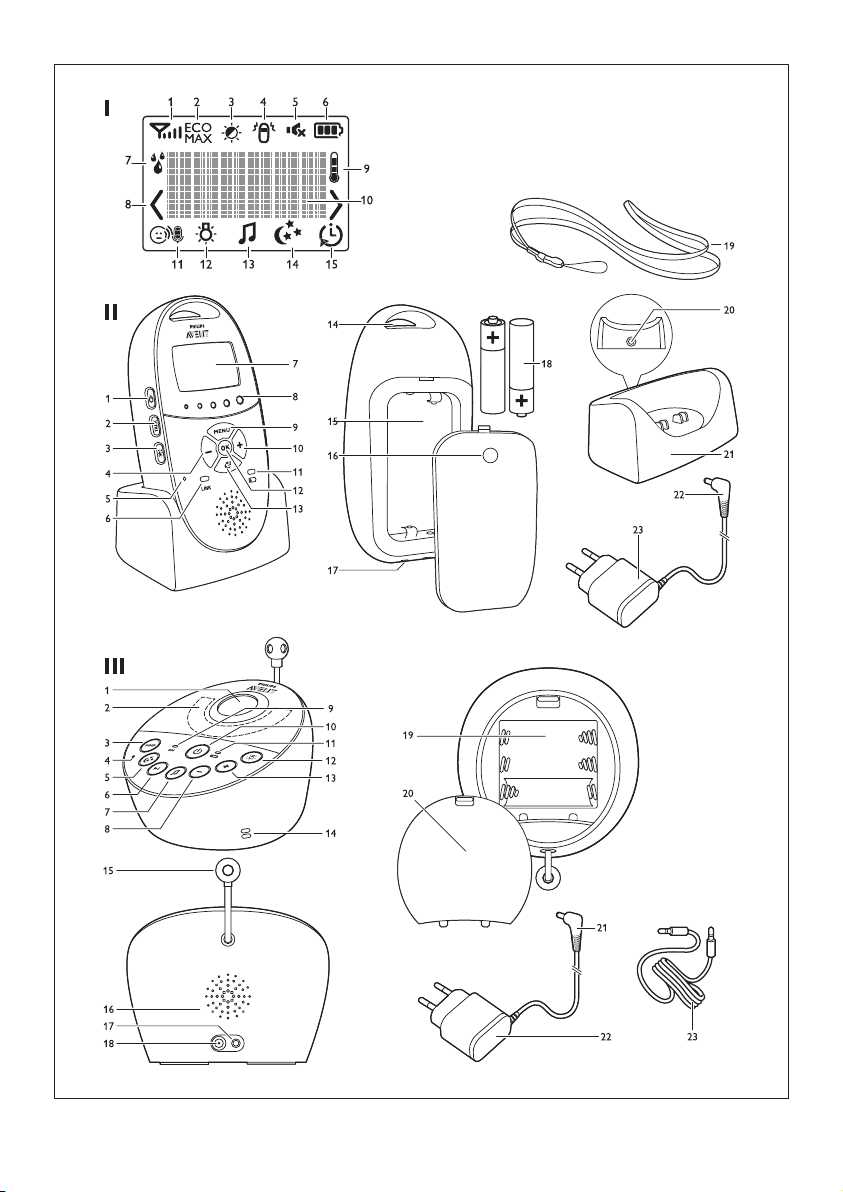
2 Overview
• I Display
1 Signal strength indicator
2 Eco Max indicator
3 Night dim mode symbol
4 Cry alert indicator
5 Mute symbol
6 Battery status indicator
7 Humidity alert symbol
8 Navigation arrow
9 Temperature symbol
10 Message eld
11 Microphone sensitivity indicator
12 Nightlight symbol
13 Lullaby symbol
14 Projector symbol
15 Timer or timer repeat symbol
• II Parent unit
1 On/off button
2 TALK button
3 Night dim button
4 - button to scroll backwards
5 Microphone
6 ’link’ light
7 Display
8 Sound level lights
9 MENU button
10 + button to scroll forwards
11 Battery status light
12 OK button
13 Soothing button
14 Handgrip/attachment hole for neck strap
15 Compartment for rechargeable batteries
16 Lid of compartment for rechargeable
batteries
17 Connection points for charging
18 Rechargeable batteries
19 Neck strap
20 Socket for small plug of adapter
21 Charger
22 Small plug of adapter
23 Adapter
• III Baby unit
1 Projector
2 Nightlight
3 FIND button
4 Microphone
5 Projector on/off button
6 Next lullaby button
7 Lullaby play/stop button
8 Volume - button
9 Power-on light
10 On/off button
11 Battery status light
12 Nightlight on/off button
13 Volume + button
14 Humidity sensor
15 Temperature sensor
16 Loudspeaker
17 Socket for audio appliance
18 Socket for small plug of adapter
19 Compartment for non-rechargeable
batteries
20 Lid of compartment for non-rechargeable
batteries
21 Small plug of adapter
22 Adapter
23 Auxiliary cable
3 Preparing for use
IMPORTANT: Read the safety instructions
carefully before you use the baby monitor
and keep them for future reference.
3.1 Baby unit
Use the baby unit from the mains. To guarantee
automatic power backup in case of mains failure,
we advise you to insert non-rechargeable batteries.
4
Page 5
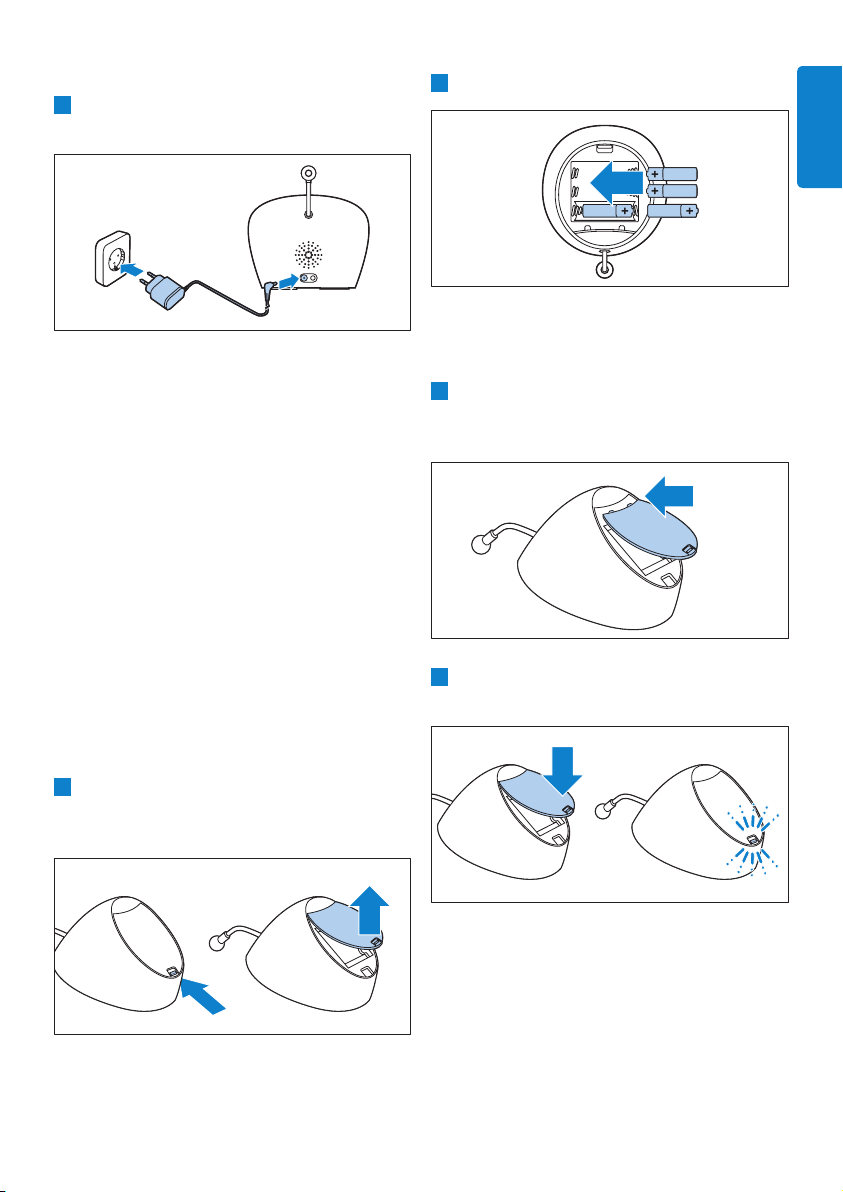
3.1.1 Mains operation
1 Put the adapter in a wall socket and insert the
small appliance plug into the baby unit.
3.1.2 Placing the non-rechargeable batteries
In case of mains failure the baby unit can run on
four 1.5V R6 AA alkaline batteries (not included).
Do not use rechargeable batteries. The baby
unit does not have a charging function and
rechargeable batteries discharge slowly when they
are not in use.
B
Warning:
Unplug the baby unit and make sure your hands
and the unit are dry when you insert nonrechargeable batteries.
D
Note:
We advise you to use the baby unit on mains
power, as the baby unit has a limited operating
time when you use it on non-rechargeable alkaline
batteries. The operating time on non-rechargeable
batteries is 24 hours.
1 Push the lock to release the lid of the
compartment for non-rechargeable batteries
and remove the lid.
2 Inser t four non-rechargeable batteries.
D
Note:
Make sure the + and - poles point in the right
direction.
3 To reattach the lid, rst inser t the lugs into the
openings in the rim of the compartment for
non-rechargeable batteries.
4 Then push down the lid until the lock closes
with a click.
ENGLISH
5
Page 6
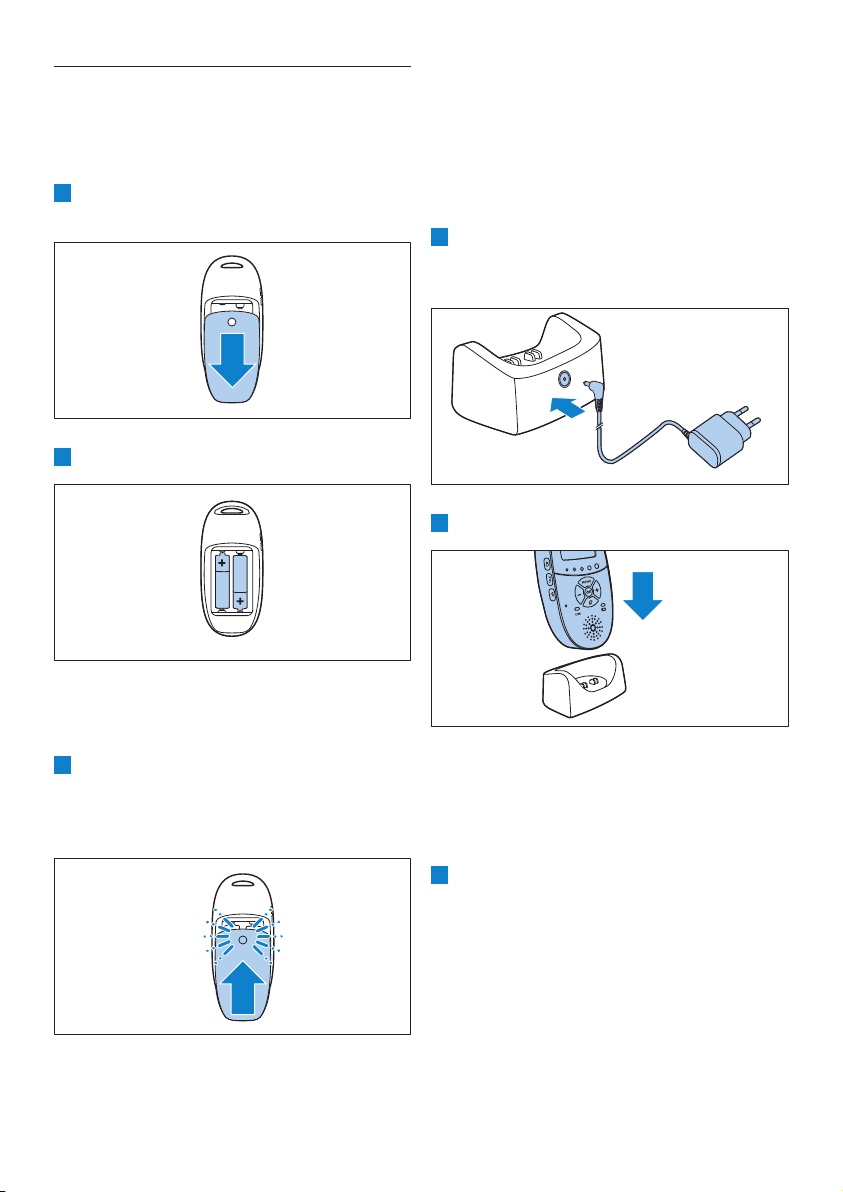
3.2 Parent unit
The parent unit runs on two rechargeable
batteries that are supplied with the baby monitor.
3.2.1 Inserting the rechargeable batteries
1 Slide the lid of the compar tment for the
rechargeable batteries off the parent unit.
2 Inser t the rechargeable batteries.
3.2.2 Charging the parent unit
Charge the parent unit before you use it for the
rst time or when the parent unit indicates that
the batteries are low.
Important: You have to charge the parent
unit for the full 10 hours to have a cordless
operating time of 18 hours.
1 Inser t the small appliance plug of the adapter
in the socket on the back of the charger. Put
the adapter in a wall socket.
2 Put the parent unit in the charger.
D
Note:
Make sure the + and - poles of the batteries
point in the right direction.
3 Slide the lid of the compar tment for the
rechargeable batteries back onto the parent
unit. Push the lid home until it locks into place
with a click.
6
• The display goes on and the battery status
indications show that the parent unit is
charging. For battery status indications,
see ‘Battery charge indications’ in chapter
‘Functions and feedback on the parent unit’.
3 Leave the parent unit in the plugged-in
charger until the rechargeable batteries
are fully charged.
D
Note:
When you start using the baby monitor, it takes
four charge and discharge cycles before the
rechargeable batteries reach their full capacity.
Page 7
4 Using the baby
monitor
4.1 Positioning the baby
monitor
B Warning:
Keep the baby unit out of the reach of the baby.
Never place the baby unit inside the baby’s bed
or playpen.
1 Because the cord of the baby unit presents a
potential strangulation hazard, make sure that
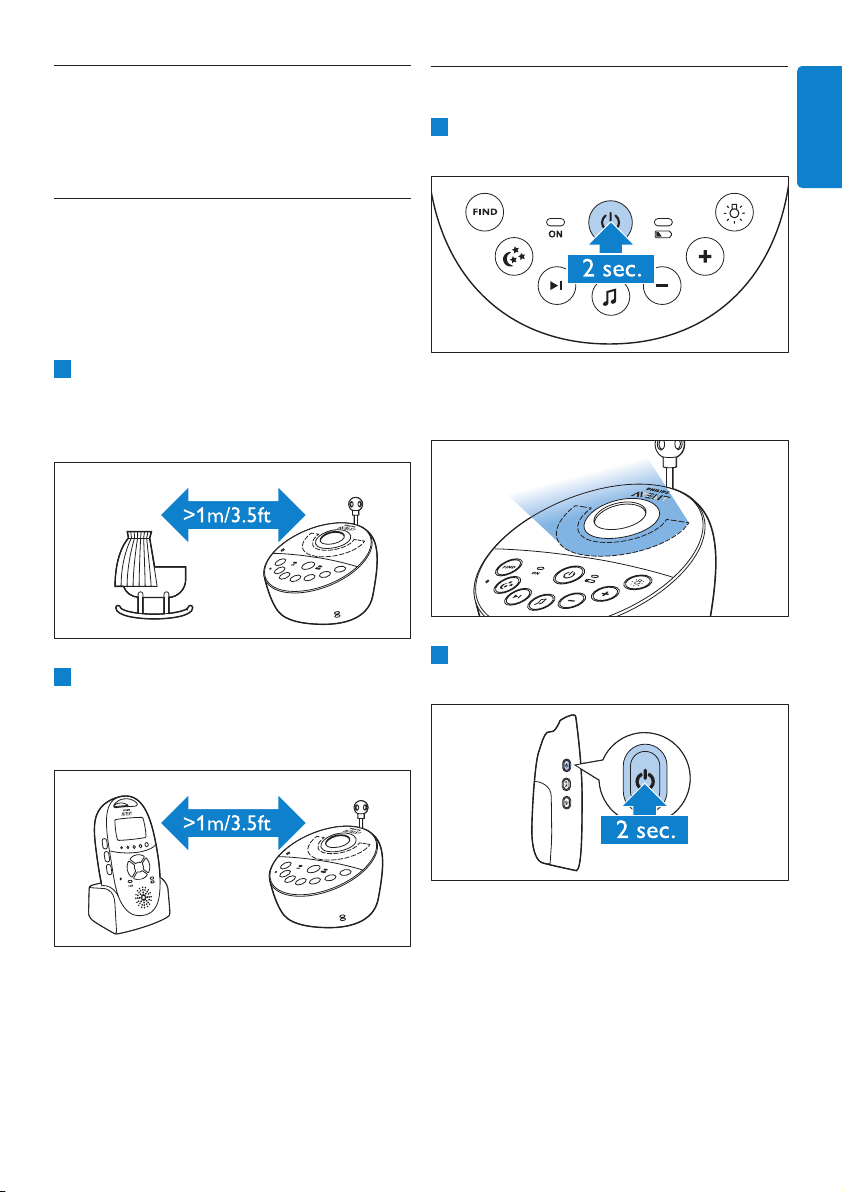
the baby unit and its cord are at least
1 metre/3.5 feet away from your baby.
2 To prevent a high-pitched sound from one
or both units, make sure the parent unit is at
least 1 metre/3.5 feet away from the baby
unit.
4.2 Linking parent unit and
baby unit
1 Press and hold the on/off button 3 on the
baby unit for 2 seconds.
• The nightlight, the battery status light and
the power-on light go on briey.
2 Press and hold the on/off button 3 on the
parent unit for 2 seconds.
ENGLISH
• The display goes on and briey displays all
indicators and symbols. Then the indicators
and symbols fade out and the battery status
indicator appears.
7
Page 8
D Note:
When you switch on the parent unit for
the rst time or after a reset, you have to
select your preferred display language (see
‘Language’ in chapter ‘Menu of the parent
unit’).
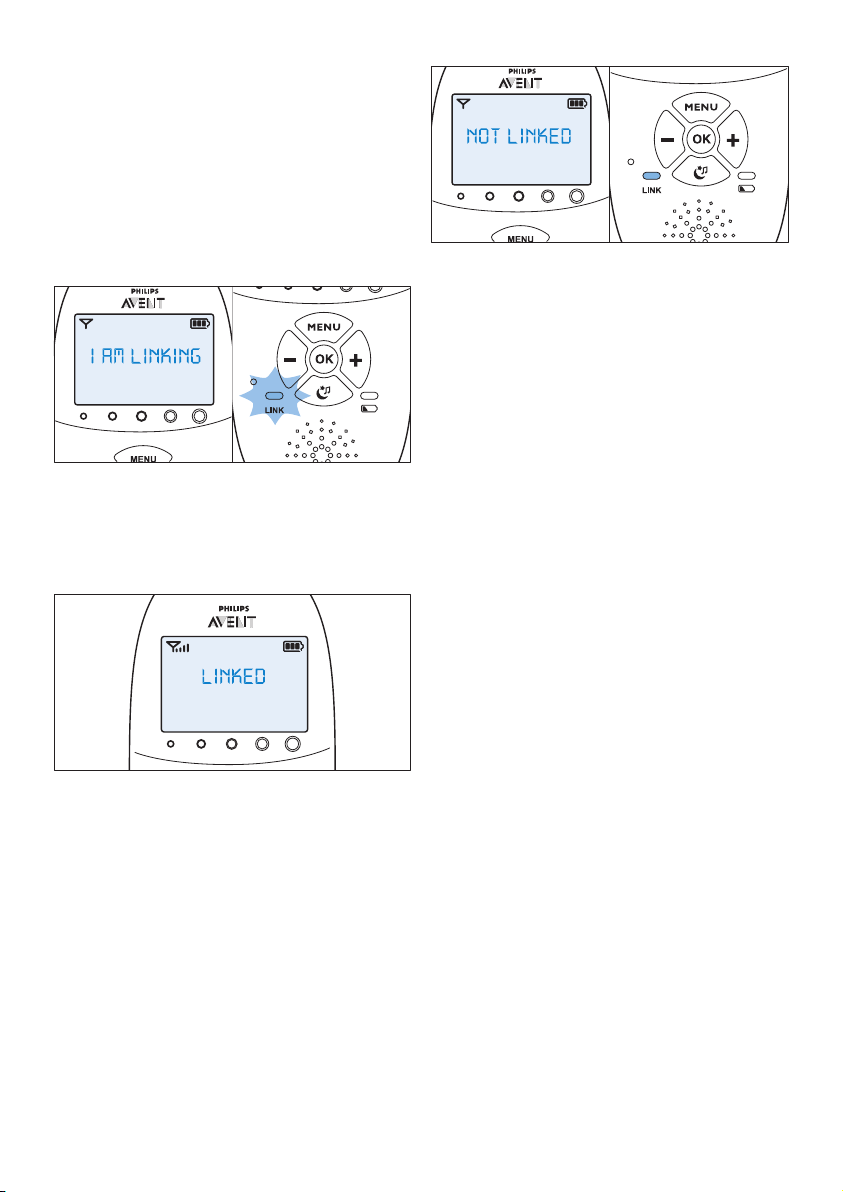
• The ‘link’ light on the parent unit starts
ashing red and the message ‘I AM
LINKING’ appears on the display.
• When the parent unit and baby unit are
linked, the ‘link’ light turns solid green. The
signal strength indicator and the message
‘LINKED’ appear on the display.
• If no connection is established within
10 seconds, the message ‘NOT LINKED’ on
the display alternates with ‘I AM LINKING’.
If still no connection is established after
30 seconds, the parent unit starts to beep
and only the message ‘NOT LINKED’ is shown.
What to do if no link is established
• The parent unit may be out of range
of the baby unit. Place the parent unit
closer to the baby unit, but not closer
than 1 metre/3.5 feet.
• The baby unit or the parent unit may
lose connection because it is too
close to another DECT appliance
(e.g. a cordless phone). Switch off this
DECT appliance or place the unit
further away from this appliance.
• The baby unit may be switched off.
Switch on the baby unit.
4.2.1 Operating range
• In both standard operating mode with Smart
Eco and in Eco Max mode, the operating
range is 330 metres/1000 feet outdoors and
up to 50 metres/150 feet indoors.
• The operating range of the baby monitor
varies depending on the surroundings and
factors that cause interference. Wet and moist
materials cause so much interference that
the range loss is up to 100%. For interference
from dry materials, see table below
8
Page 9
Dry materials Material
thickness
Wood, plaster, cardboard,
glass (without metal,
wires or lead)
Brick, plywood < 30cm
Reinforced concrete < 30cm
Metal grilles or bars < 1cm
Metal or aluminium
sheets
< 30cm
(12in)
(12in)
(12in)
(0.4in)
< 1cm
(0.4in)
Loss of
range
0-10%
5-35%
30-100%
90-100%
100%
5 Functions and
feedback on the
baby unit
5.1 Nightlight
The nightlight produces a soft glow that comforts
your baby.
1 Press the nightlight on/off button on the baby
unit to switch on the nightlight.
5.2 Lullaby function
1 Press the lullaby play/stop button K on the
baby unit to play the last selected lullaby.
• The selected lullaby repeats for the set time.
• If no lullaby was selected before, lullaby 1
is played.
2 Press the next lullaby button to select
another lullaby from the list.
• If no lullaby is playing, the last selected
lullaby starts playing when you press the
next lullaby button
• When you press the next lullaby button
while a lullaby is playing, the next
lullaby starts playing.
3 To adjust the sound level of the lullaby, press
the volume + or the volume – button on the
baby unit.
.
ENGLISH
• Q appears on the display of the parent unit.
2 Press the nightlight on/off button again to
switch off the nightlight.
• The nightlight dims gradually before it goes
out completely.
• Q disappears from the display of the parent
unit.
9
Page 10

D Note:
You can only set the loudspeaker volume on the
baby unit when a lullaby is playing. If you have
set the volume for the lullaby higher on the baby
unit, the sound will also be louder when you use
the talk function on the parent unit.
4 To stop lullaby playing before the set time has
elapsed, press the lullaby play/stop button K
on the baby unit.
5.3 Projector
You can soothe your baby with coloured light
patterns projected on the ceiling by switching on
the projector.
1 Press the projector on/off button to switch
on the projector.
• The projector symbol appears on the display
of the parent unit.
• The rst pattern from the projector fades in
to full intensity in 2 seconds. It is projected
for 8 seconds and then fades out for 2
seconds while the next pattern fades in.
• There are six different patterns and
each pattern is projected for 10 seconds.
When all six patterns have been shown,
the projector starts with pattern 1 again.
The patterns are repeated for the set time
(see ‘Projector’ in chapter ‘Functions and
feedback on the parent unit’).
2 To switch off the projector before the set
time has elapsed, press the projector on/off
button again.
• The pattern projected fades out and the
projector switches off.
• The projector symbol disappears from the
display.
5.4 Paging the parent unit
If you have lost the parent unit, you can use the
FIND button on the baby unit to locate the
parent unit.
D
Note:
The paging function only works when the parent
unit is switched on.
1 Press the FIND button on the baby unit.
10
Page 11

• The message ‘PAGING’ appears on the
display of the parent unit and the parent
unit produces a paging alert tone.
2 To stop the paging alert tone, press the FIND
button on the baby unit again or press any
button on the parent unit.
• Replace the batteries when they run low.
• If the batteries run out of power while the
baby unit is running on battery power, the
baby unit switches off and the parent unit
loses connection with the baby unit.
D
Note:
We advise you to use the baby unit on mains
power, as the baby unit has a limited operating
time when you use it on non-rechargeable alkaline
batteries. The operating time on non-rechargeable
batteries is 24 hours.
6 Functions and
ENGLISH
D
Note:
The paging alert tone stops automatically after
2 minutes.
5.5 Battery status light
1 The batter y status light is solid green when
the baby unit runs on battery power and the
batteries contain enough energy.
2 The batter y status light ashes red quickly
when the batteries run low while the baby
unit is running on battery power.
feedback on the
parent unit
6.1 Soothing menu
The parent unit has a separate soothing menu
for all soothing features: nightlight, lullaby and
projector. To open this menu, press the soothing
button. This menu allows you to operate the
nightlight, the lullabies and the projector on the
baby unit remotely.
1 To open the soothing menu, press the
soothing button.
11
Page 12
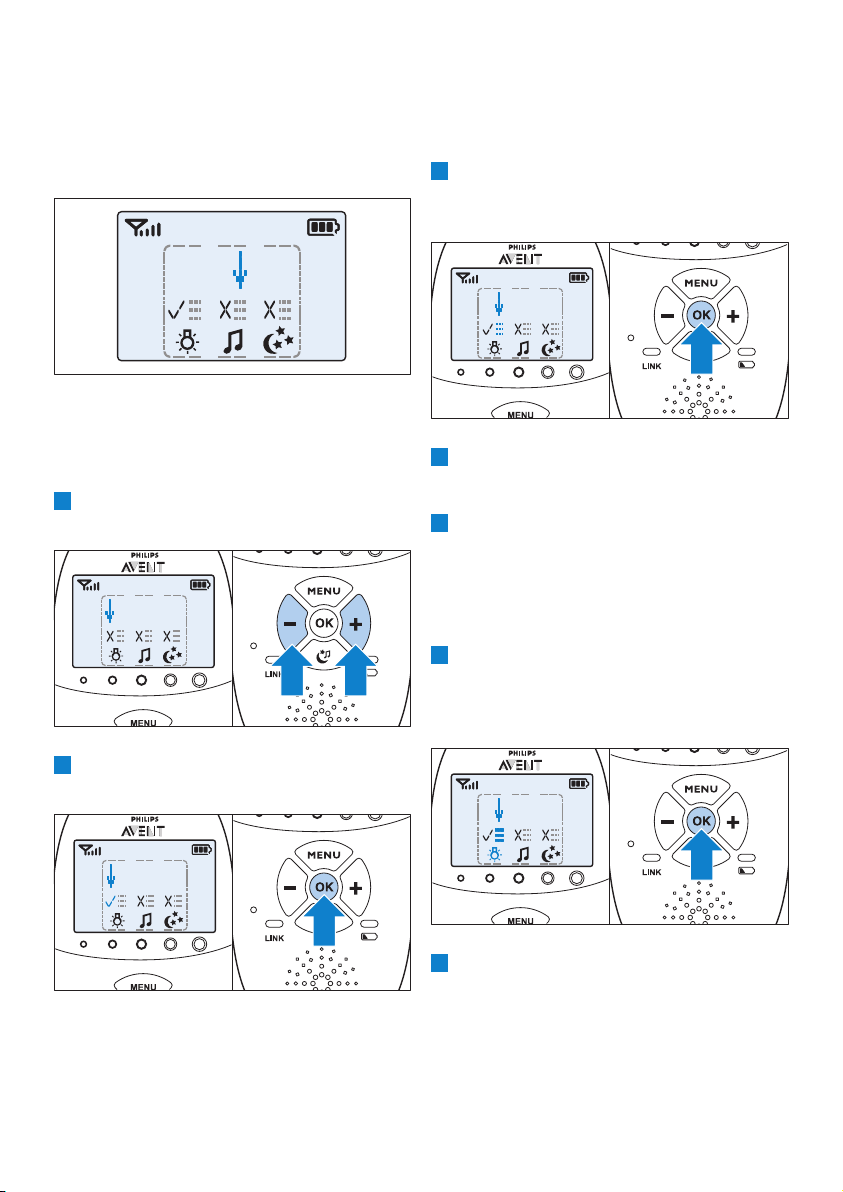
• The soothing menu screen appears. This
screen shows three features on the baby
unit: nightlight, lullaby and projector. For each
feature there are two segments: the on/off
selection eld and the options menu eld.
D
Note:
If you do not press any button within
7 seconds, the soothing menu closes and
the display returns to normal.
2 Use the + and - buttons to point the arrow
to a soothing feature.
• If a feature is on, there is a tick above the
feature symbol.
• If a feature is off, there is a cross above the
feature symbol.
4 To open the menu with options for the
feature, move the arrow over the options
menu eld and press OK.
5 Use the - and + buttons to navigate through
the list of options and press OK to select an
option.
6 To leave the soothing menu, press the
soothing button.
6.1.1 Nightlight
This soothing feature allows you to switch the
nightlight on or off and to set the nightlight timer.
1 To select the nightlight feature, use the + and
- buttons to move the arrow to above the
nightlight symbol and press OK to switch the
nightlight on or off.
3 To switch on a soothing feature when it is off
or to switch it off when it is on, press OK.
12
2 To open the menu with nightlight options,
point the arrow at the options menu eld and
press OK to conrm.
Page 13

3 You can set the nightlight timer for 5 to
20 minutes or you can switch the nightlight
on continuously. Press OK to conrm.
• If you switched on the nightlight, the
nightlight symbol is visible on the parent unit
display when you press the soothing button
to leave the soothing screen.
• If you set the nightlight timer, the nightlight
switches off automatically and the nightlight
symbol disappears from the parent unit
display after the time set.
• If you switch on the nightlight continuously,
you can switch off the nightlight in the
soothing screen of the parent unit or by
pressing the nightlight button on the
baby unit.
6.1.2 Lullaby
This soothing feature allows you to select the
lullaby playing options and set the lullaby timer.
1 To select the lullaby feature, use the + and
- buttons to move the arrow to above the
lullaby symbol and press OK to play or stop
playing lullabies.
2 To open the menu with lullaby options, point
the arrow at the options menu eld and press
OK to conrm.
3 In the menu, you can choose a number of
options:
• Select a lullaby from the list of pre-stored
lullabies. The most recently played lullaby
is preselected. If no selection was made
before, lullaby 1 is preselected.
• You can also select ‘Play all’ to play all pre-
stored lullabies.
• Select ‘Aux’ and select a track if you want
to play music from an external audio
player. To play music from an external
audio player, you have to connect this
player to the socket for audio appliances
on the back of the baby unit (Aux-in)
with the auxiliary cable supplied. You have
to adjust the volume on the audio player,
as the volume + and - buttons on the
baby unit do not work for external audio
appliances.
• Press OK to conrm your selection.
4 You can set the lullaby timer for 5 to
20 minutes or you can choose to play
lullabies continuously. Press OK to conrm
the timer setting.
ENGLISH
13
Page 14

• If you selected lullaby playing, the lullaby
symbol is visible on the parent unit display
when you press the soothing button to leave
the soothing screen. The lullaby played is
shown on the second line of the message
eld for 2 seconds.
• If you set the lullaby timer, the lullaby
function switches off and the lullaby symbol
disappears from the parent unit display
after the time set.
• If you choose to play lullabies continuously,
switch off lullaby playing in the soothing
screen or by pressing the lullaby play/stop
button K on the baby unit.
6.1.3 Projector
This soothing feature allows you to switch on
the projector on the baby unit and program the
duration of projection.
1 To select the projector feature, use the + and
- buttons to move the arrow to above the
projector symbol and press OK to switch the
projector on or off.
3 You can set the projector timer for 5 to
20 minutes or you can switch the projector
on continuously. Press OK to conrm.
• If you switched on the projector, the
projector symbol is visible on the parent unit
display when you leave the soothing screen
by pressing the soothing button.
• If you set the projector timer, the projector
switches off automatically and the projector
symbol disappears from the parent unit
display after the time set.
• If you switch on the projector continuously, you
have to switch off the projector in the soothing
screen. This makes the projector symbol
disappear from the parent unit display.
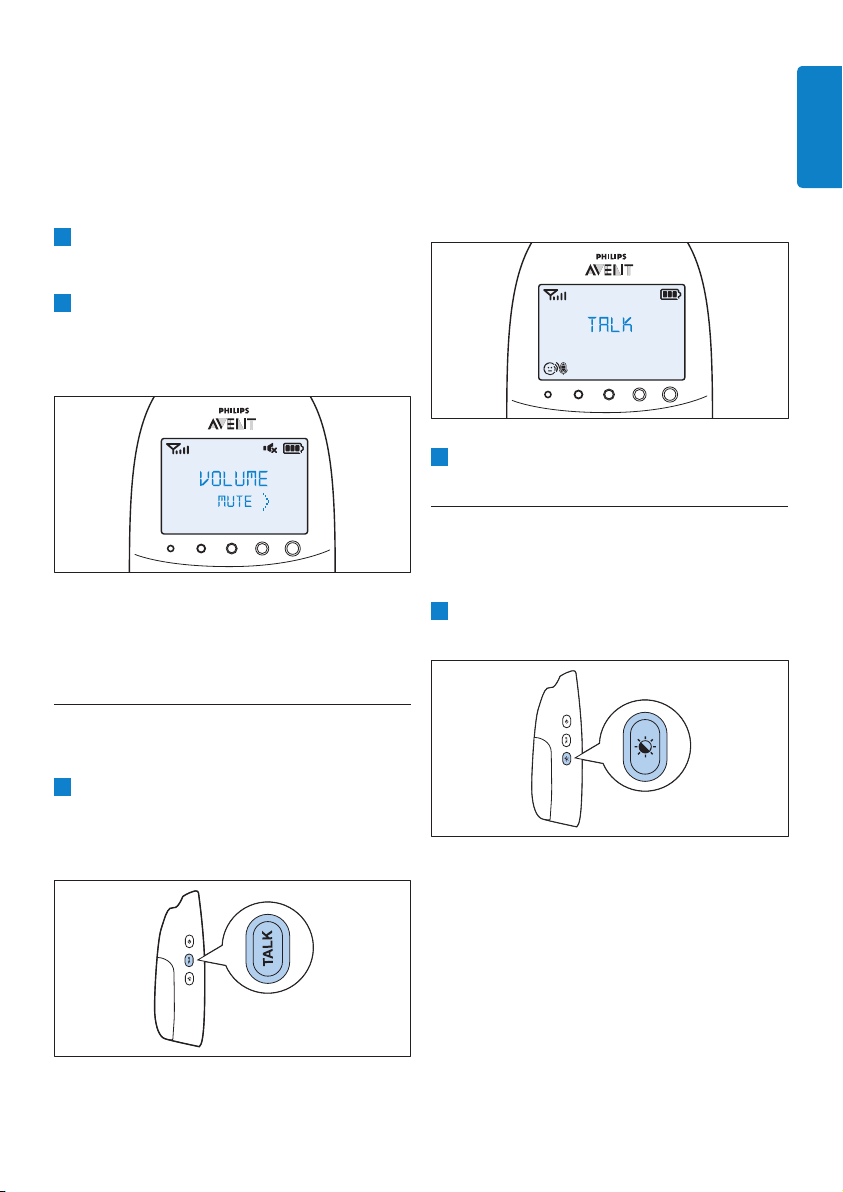
6.2 Volume
The volume can be set if the menu is not active.
There are seven volume levels and a ‘volume off’
setting.
6.2.1 Setting the volume level
1 Press the + button or the - button once.
• The current volume level appears on the
display.
2 Press the + button to increase the volume or
press the - button to decrease the volume.
• The parent unit beeps at every volume step
• At maximum volume, the parent unit gives
two beeps.
2 To open the menu with projector options,
point the arrow at the options eld and press
OK to conrm.
14
Page 15
• If no button is pressed for more than
2 seconds, the volume level indication
disappears and the volume setting is saved.
6.2.2 Volume off
Below the lowest volume setting, there is a
‘volume off’ setting.
1 Press the + button or the - button once.
• The current volume level appears on the
display.
2 Press and hold the - button for more than
2 seconds to set the volume to off.
• The message ‘MUTE’ and the mute symbol
appear on the display.
D
Note:
If the volume is off, only the sound level
lights show that the baby produces
sounds.
D Note:
If you have set the volume for the lullaby
higher on the baby unit, the sound will also be
louder when you use the talk function on the
parent unit.
• The ‘link’ light starts ashing green and the
message ‘TALK’ appears on the display.
2 Release the TALK button when you have
nished talking.
6.4 Night dim mode
In night dim mode, the light intensity of the lights
and the display is reduced and the volume of alert
sounds is decreased.
1 Press the night dim button to activate the
night dim mode.
ENGLISH
6.3 Talk function
You can use the TALK button on the parent unit
to talk to your baby (e.g. to comfort your baby).
1 Press and hold the TALK button and talk
clearly into the microphone on the front of
the parent unit from a distance of 15-30cm
(0.5-1ft).
• The night dim mode symbol appears on the
display.
• The sound level lights and the link light are
dimmed.
• The backlight of the display is dimmed.
• The volume of any sound alerts set on the
parent unit is reduced.
15
Page 16
2 To switch back to normal operating mode,
press the night dim button again.
• The night dim mode symbol disappears
from the display.
• The sound level lights and the link light
return to their normal brightness.
• The backlight of the display lights up fully
again.
• The sound alerts go off at the normal sound
level.
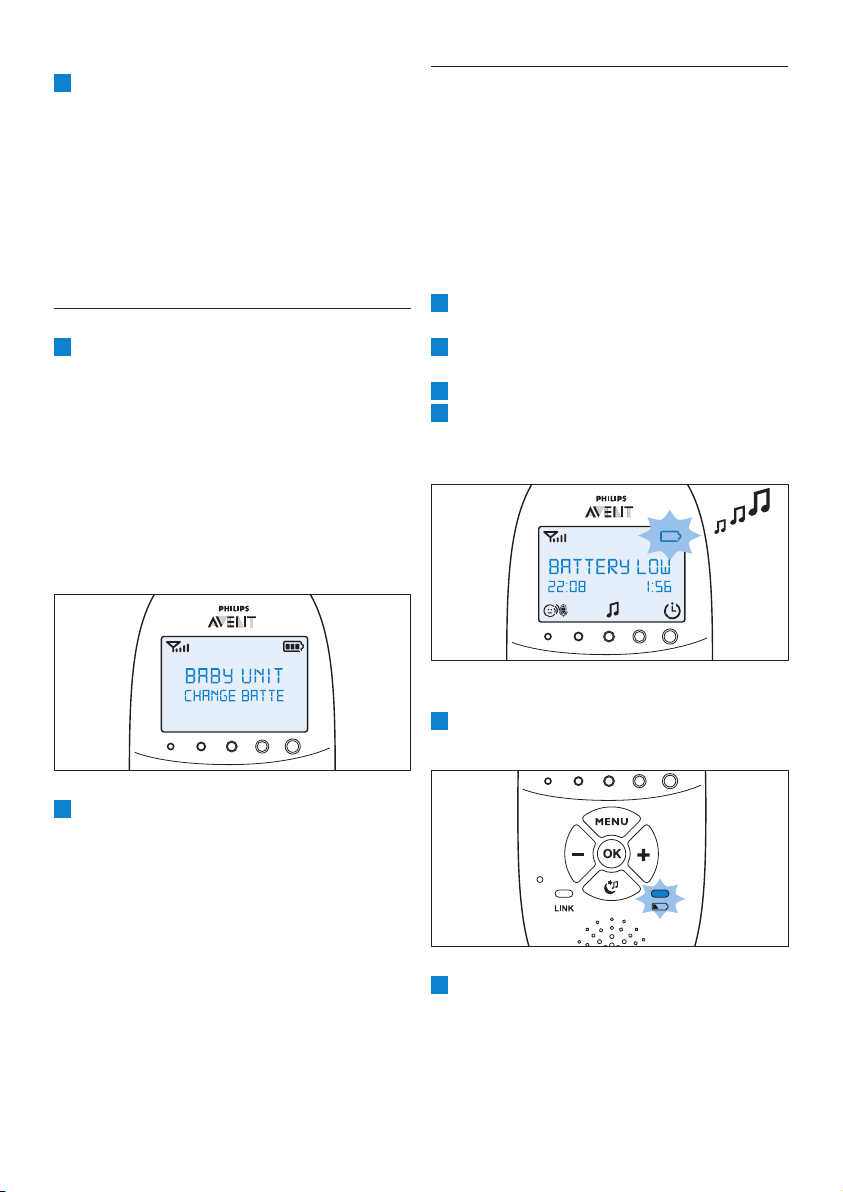
6.5 Baby unit battery low alert
1 When the baby unit runs on battery power
and its batteries are low, the parent unit gives
the following signals:
• The text ‘BABY UNIT’ appears on the rst
line of the message eld in the display.
• The message ‘Change batteries’ scrolls
across the screen on the second line.
• The parent unit beeps every 10 seconds
during the rst 3 minutes. After these
3 minutes, the parent unit beeps every
minute.
6.6 Battery status indications
The battery charge status is indicated on the
display by the battery status indicator and by text
messages.
6.6.1 Battery low
When the rechargeable batteries are low, the
remaining operating time is at least 30 minutes if
the baby monitor works in normal mode at the
highest settings.
1 The batter y status indicator on the display is
empty and ashes.
2 The message ‘BATTERY LOW’ appears on the
display.
3 The batter y status light ashes red slowly.
4 The parent unit beeps every 10 seconds in
the rst 3 minutes. Then it continues to beep
every minute.
2 If you do not replace the batteries in time, the
link with the baby unit will be lost.
• The message ‘Not linked’ alternates with the
message ‘Change batteries’ on the second
line of the message eld.
D
Note:
If both the batteries of the parent unit
and the baby unit run low at the same
time, rst the battery low message of the
parent unit is shown on the display. When
the parent unit is charged, the battery low
message of the baby unit appears on the
parent unit display.
16
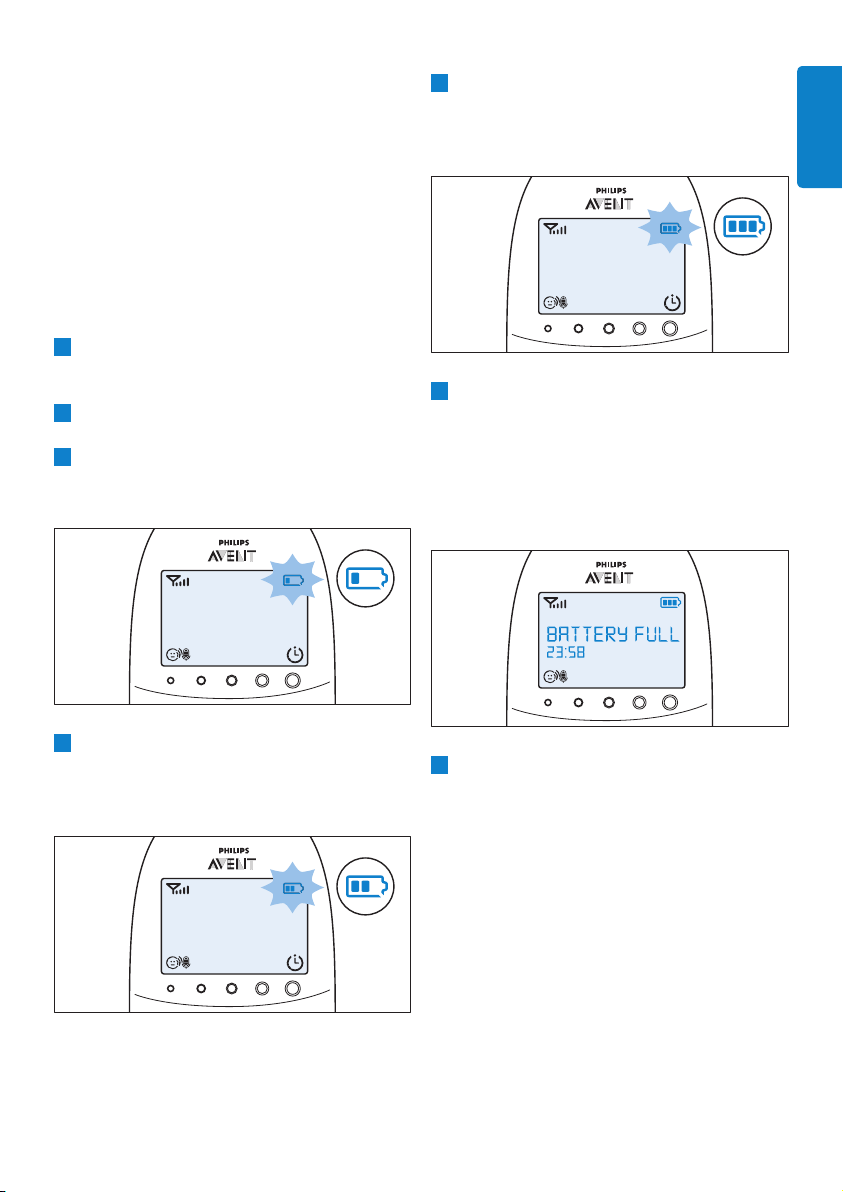
6.6.2 Battery empty
1 If the rechargeable batteries are almost empty,
the battery status light ashes red quickly.
2 If you do not connect the parent unit to the
mains, the following happens in succession:
1 The link with the baby unit is lost.
2 The display goes out.
3 The parent unit switches off.
Page 17
D Note:
If you switch on the parent unit when its
rechargeable batteries are almost empty, the
display goes on. The message ‘BATTERY LOW’
appears on the display for 2 seconds before the
parent unit switches off.
6.6.3 Charging
Insert the small plug into the charger and put
the adapter in a wall socket. Place the parent unit
in the charger. When the parent unit charges, the
following happens in succession:
1 The display goes on for 4 seconds and the
text ‘CHARGING’ appears on the screen for
2 seconds.
2 The batter y status is solid green when the
parent unit is connected to the mains.
3 The rst segment in the battery status
indicator starts ashing to indicate that the
rechargeable batteries are charging.
5 The third segment in the batter y status
indicator starts ashing when the rechargeable
batteries are charged to more than 50% of
their capacity.
6 When the rechargeable batteries are full, the
following happens:
• The third segment in the battery status
indicator stops ashing.
• The display goes on for 4 seconds and the
message ‘BATTERY FULL’ appears on the
display.
ENGLISH
4 The second segment in the batter y status
indicator starts ashing when the rechargeable
batteries are charged to more than 30% of
their capacity.
7 Disconnect the parent unit from the mains. It
is now ready for cordless use.
D
Note:
You can charge the parent unit when it is
switched off. In that case, the display is off. The
battery status light is on, but does not indicate
the charging status. This light remains on and solid
green as long as the parent unit is connected to
the mains.
D
Note:
If the rechargeable batteries run low very quickly,
they have reached the end of their life and you
have to replace them. To order new rechargeable
batteries, see chapter ‘Ordering accessories’.
17
Page 18
6.7 Signal strength indicator
6.7.1 In Smart Eco mode
Smart Eco mode is the standard operating mode.
In this mode, the strength of the DECT signal
depends on the distance between the baby unit
and the parent unit.
• If the signal strength indicator has 4 bars, the
connection between the baby unit and the
parent unit is excellent.
• If the signal strength indicator has 1 bar or no
bar at all, the signal from the baby unit is very
weak or not available. Take the parent unit
closer to the baby unit to get a better signal.
6.7.2 In Eco Max mode
In this mode the DECT signal from the baby unit
to the parent unit is switched off.
• The signal strength indicator has no bar at all
when the DECT signal is off, even when the
parent unit is within range of the baby unit
• When the baby unit starts to transmit a
DECT signal because the baby is making a
sound, the display goes on and the signal
strength indicator shows the quality of the
connection between baby unit and parent
unit.
• For more information on the Eco Max mode,
see ‘Eco Max mode’ in chapter ‘Menu of the
parent unit’.
6.8 Reset
This function allows you to reset the parent unit
and the baby unit to the factory default settings.
1 Switch off the unit.
2 Press and hold the - button.
3 Switch on the unit again while holding
the - button.
• ‘Temperature low’ alert: 14°C (57°F)
• ’Temperature high’ alert: 35°C (95°F)
• Temperature scale: Celsius
• Humidity alert: off
• Eco Max mode: off
• Feed timer: 02:00
• Feed timer: Stop
• Vibration alert: off
• Cry alert vibration: off
• Clock: hidden
• Lullaby timer: 15 min.
• Projector timer: 15 min.
Baby unit
• Loudspeaker volume: 4
• Nightlight: off
• Projector: off
• Nighlight setting: manual
• Lullaby: off (lullaby 1 selected)
7 Menu of the parent
unit
All functions described in the following sections can
be operated through the menu of the parent unit.
7.1 Navigating the menu
D Note:
Some menu functions only work when the baby
unit and the parent unit are linked.
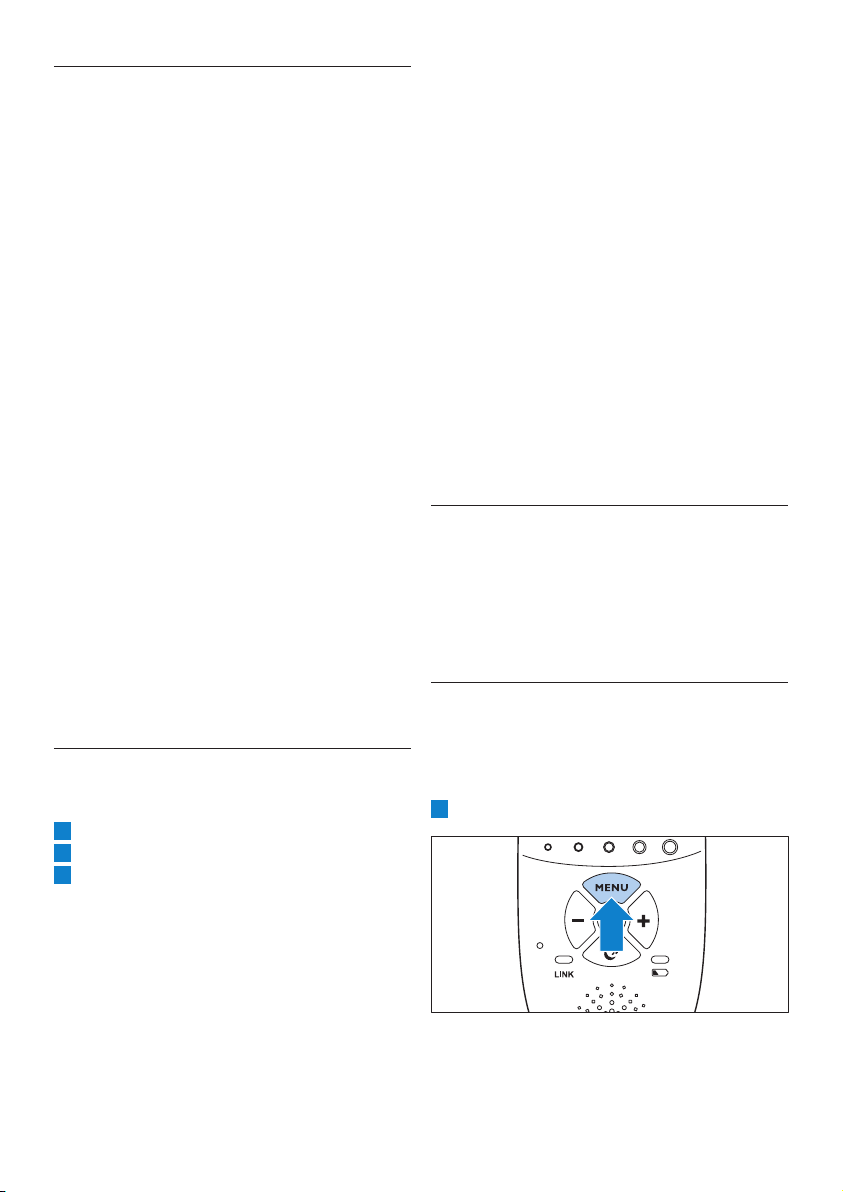
1 Press the MENU button to open the menu.
6.8.1 Default settings
Parent unit
• Language: English
• Loudspeaker volume: 3
• Microphone sensitivity: 3
• Night dim mode: off
• Temperature alert: off
18
• The rst menu option appears on the
display.
Page 19
2 Use the + button to go to the next option or
the - button to go to the previous option.
• If all four segments are lled, the sensitivity
is at its highest level.
ENGLISH
D
Note:
The arrow on the display indicates in which
direction you can navigate.
3 Press the OK button to conrm your
selection.
D
Note:
Press the MENU button if you want to leave the
menu without making any changes. If there is no
input in the menu for more than 20 seconds, the
menu closes automatically.
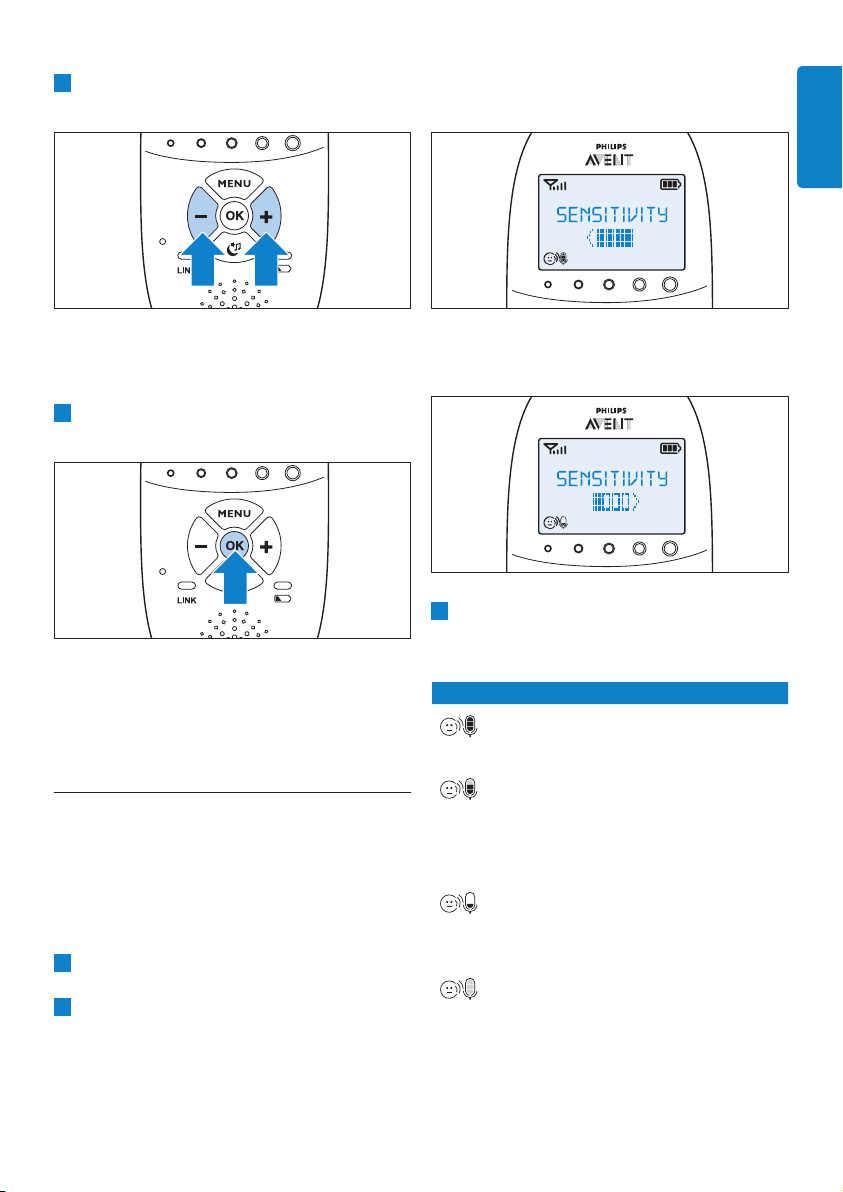
7.2 Sensitivity
This option in the parent unit menu allows you to
set the microphone sensitivity on the baby unit.
The microphone sensitivity determines what noise
level the baby unit picks up, e.g. you will want to
hear when your baby cries, but you may be less
interested in its babbling
1 Select ‘Sensitivity’ in the menu with the + and
- buttons and press OK to conrm.
2 Use the + and - buttons to increase or
decrease the microphone sensitivity. The
sensitivity indication on the display has four
segments.
• If all segments are empty, the sensitivity is
at its lowest.
3 Press OK to conrm the setting.
7.2.1 Sensitivity levels and indications
Icon Sensitivity Description
highest Hear everything from your
baby. The speaker of the parent
unit is continuously on.
high Hear all sounds from soft
babbling and louder. If your
baby does not make any
sound, the speaker of the
parent unit is off.
medium Hear sounds from soft cries
and louder. If your baby makes
softer sounds, the speaker of
the parent unit does not go on.
low The speaker of the parent unit
only goes on if the baby makes
loud sounds, for instance
because it is crying.
19
Page 20

7.3 Eco Max mode
This baby monitor has Smart Eco that
automatically reduces the DECT signal from the
baby unit as the distance between parent unit
and baby unit becomes shorter. By reducing radio
transmission, it helps to save energy.
If you want to save even more energy and to stop
radio transmission, activate the Eco Max mode
in the menu of the parent unit. In this mode, the
DECT signal of the baby unit is switched off. As
soon as the baby makes a sound, the DECT signal
of the baby unit automatically switches on again.
C
Caution:
In Eco Max mode, the parent unit receives
feedback from the baby unit with a delay. When
yourbabymakesasound,thebabyunitrsthas
to reactivate radio transmission before it can
send feedback to the parent unit.
7.3.1 Please note the following:
• Before you select the Eco Max mode in the
menu of the parent unit, make sure that the
parent unit and baby unit are within operating
range, see section ‘Operating range’ in chapter
‘Using the baby monitor’. In Eco Max mode
you do not receive feedback when the parent
unit is out of range of the baby unit. You can
check the link by pressing any button on the
parent unit.
• If there is no radio transmission from the baby
unit to the parent unit in Eco Max mode, the
sound level lights are off. The sound level lights
go on when the baby unit reactivates radio
transmission because the baby makes a sound
above the selected sensitivity level.
• If you want to operate the baby monitor in
Eco Max mode, make sure the microphone
sensitivity is set between level 1 and level 3.
If the microphone sensitivity is set at level
4, the baby unit does not switch off radio
transmission in Eco Max mode.
7.3.2 Activating Eco Max mode
1 Select ‘Eco Max’ in the menu with the + and -
buttons and press OK to conrm.
2 When the display shows ‘Turn On’, press OK
to switch on the Eco Max mode.
3 The warning message ‘!No aler t if out of
range, OK?’ appears on the display. Press OK
to conrm.
D
Note:
The warning message scrolls across the display
twice. If you do not press OK, the parent
unit leaves the menu and the Eco Max mode
remains off.
• The Eco Max indication ashes on the
display. The ‘link’ light ashes green slowly.
• When the parent unit receives a signal from
the baby unit because the baby makes a
sound, the ‘link’ light turns solid green again.
7.3.3 Deactivating Eco Max mode
1 Press the MENU button
2 Use the + and - buttons to select ‘Eco Max’
and press OK to conrm.
3 Use the + and - buttons to select ‘Turn Off ’
and press OK to conrm.
20
Page 21

7.4 Feed timer
You can set the feed timer to alert you that it is
time to feed your baby. The timer can be set from
1 minute to 23 hours and 59 minutes.
7.4.1 Setting and using the feed timer
1 Select ‘Feed Timer’ in the menu with the +
and - buttons and press OK to conrm.
2 Select ‘Set Timer’ with the + and - buttons and
press OK to start setting the timer.
• The hour indication starts ashing on the
display.
3 Set the hour and press OK to conrm.
• The minutes indication starts ashing on the
display.
4 Set the minutes and press OK to conrm.
5 Select ‘xx:xx Start’ with the + and - buttons.
Press OK to conrm.
• The timer symbol appears on the display.
• The timer starts counting down.
7.4.2 Setting the feed timer alert
1 After step 5 in ‘Setting and using the feed
timer’, select ‘Timer Alert’ with the + and -
buttons. Press OK to conrm.
2 Use the + and - buttons to choose one of the
alert options. The options available are sound
only, sound and vibration and vibration only.
Press OK to conrm.
3 Select ‘xx:xx Start’ with the + and - buttons
and press OK to activate the feed timer
function.
4 When the feed timer alert goes off, press any
key to stop the feed timer and the feed timer
alert.
7.4.3 Repeat the feed timer
1 After step 5 in ‘Setting and using the feed
timer’ or after setting the feed timer alert,
select ‘Timer repeat’ with the + and - buttons.
Press OK to conrm.
2 Choose ‘Repeat ON’ or ‘Repeat OFF’ and
press OK to conrm.
3 Select ‘xx:xx Start’ with the + and - buttons
and press OK to activate the feed timer
repeat function.
• Instead of the normal timer symbol, the
timer repeat on symbol appears on the
display.
ENGLISH
6 When the timer has reached 00:00, the feed
timer alert goes off, the timer symbol star ts
ashing on the display and the message
‘TIMER END’ scrolls across the display.
7 Press any key to stop the alert. If you do not
stop the alert, it stops automatically after
2 minutes.
4 When you press any key to stop the feed
timer alert or if the alert stops automatically
after 2 minutes, the feed timer starts counting
down again.
21
Page 22
7.4.4 Stopping the timer
1 Press the menu button and select ‘Feed Timer’.
2 Use the + and - buttons to select ‘Stop &
Reset’ and press OK to conrm.
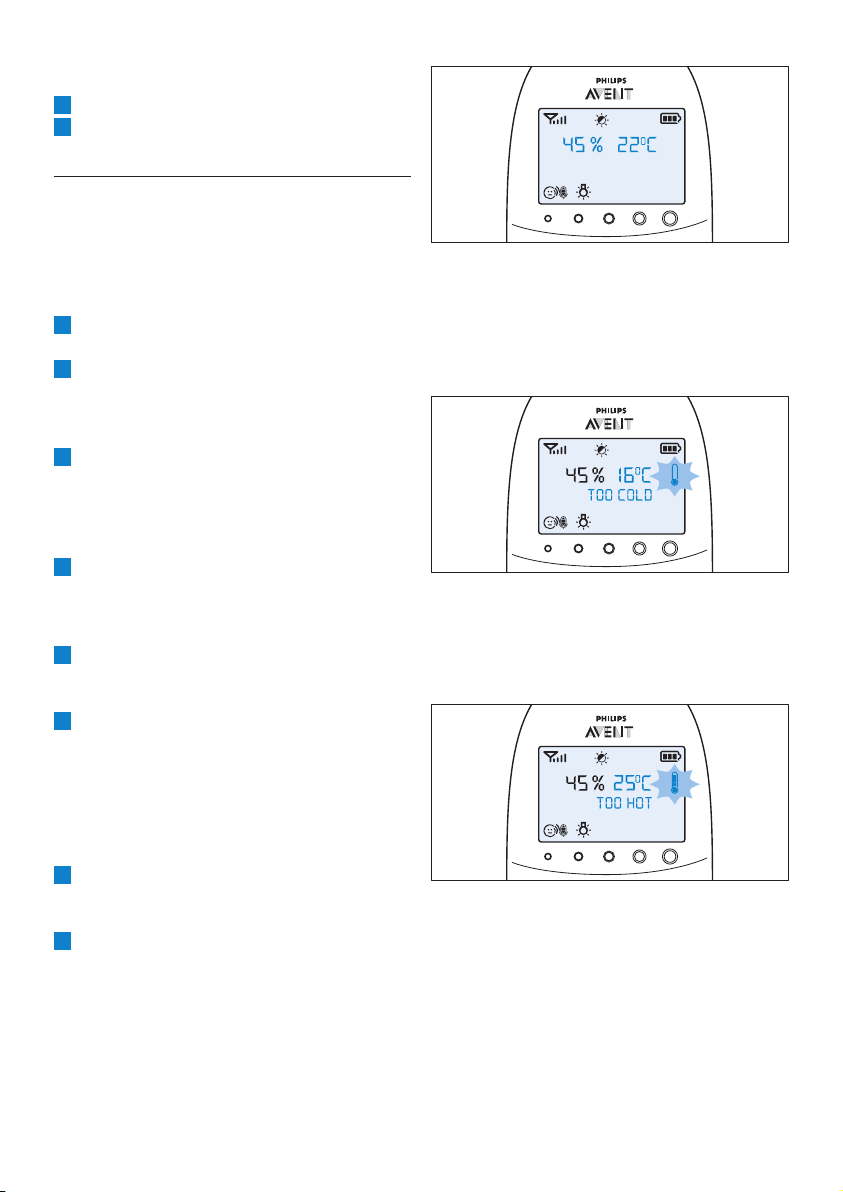
7.5 Temperature
A baby sleeps comfortably at a temperature range
between 16°C/61°F and 20°C/68°F. You can set
a minimum and maximum temperature range
and an alert to warn you that the temperature is
outside the set minimum and maximum range.
1 Select ‘Temperature’ in the menu with the +
and - buttons and press OK to conrm.
2 Select ‘Temp Range’ with the + and - buttons
and press OK to conrm.
• The minimum temperature indication starts
ashing on the display.
3 Use the + and - buttons to set the minimum
temperature range between 10°C/50°F and
19°C/66°F. Press OK to conrm.
• The maximum temperature indication starts
ashing on the display.
4 Use the + and - buttons to set the
maximum temperature range between
22°C/72°F and 37°C/99°F. Press OK to
conrm.
5 Select ‘Alert’ with the + and - buttons. Press
OK to conrm and to start setting the
temperature alert option.
6 Use the + and - buttons to select one of the
alert options. The options available are sound
only, sound and vibration, vibration only and
display only. Press OK to conrm.
• After you have conrmed your choice of the
alert option, the temperature alert symbol
appears on the display.
7 Select ‘Temp Scale’ with the + and - buttons.
Press OK to conrm and to start setting the
temperature scale.
8 Select ‘Celsius’ or ‘Fahrenheit’ and press OK to
conrm.
• The temperature in the set scale appears
on the display. If the temperature is within
the set range, the temperature alert symbol
has two segments.
• If the temperature is below the set range,
the temperature alert symbol on the
display has only one segment and ashes.
The message ‘TOO COLD’ appears on the
display.
• If the temperature is above the set range,
the temperature alert symbol on the
display has three segments and ashes. The
message ‘TOO HOT’ appears on the display.
22
Page 23
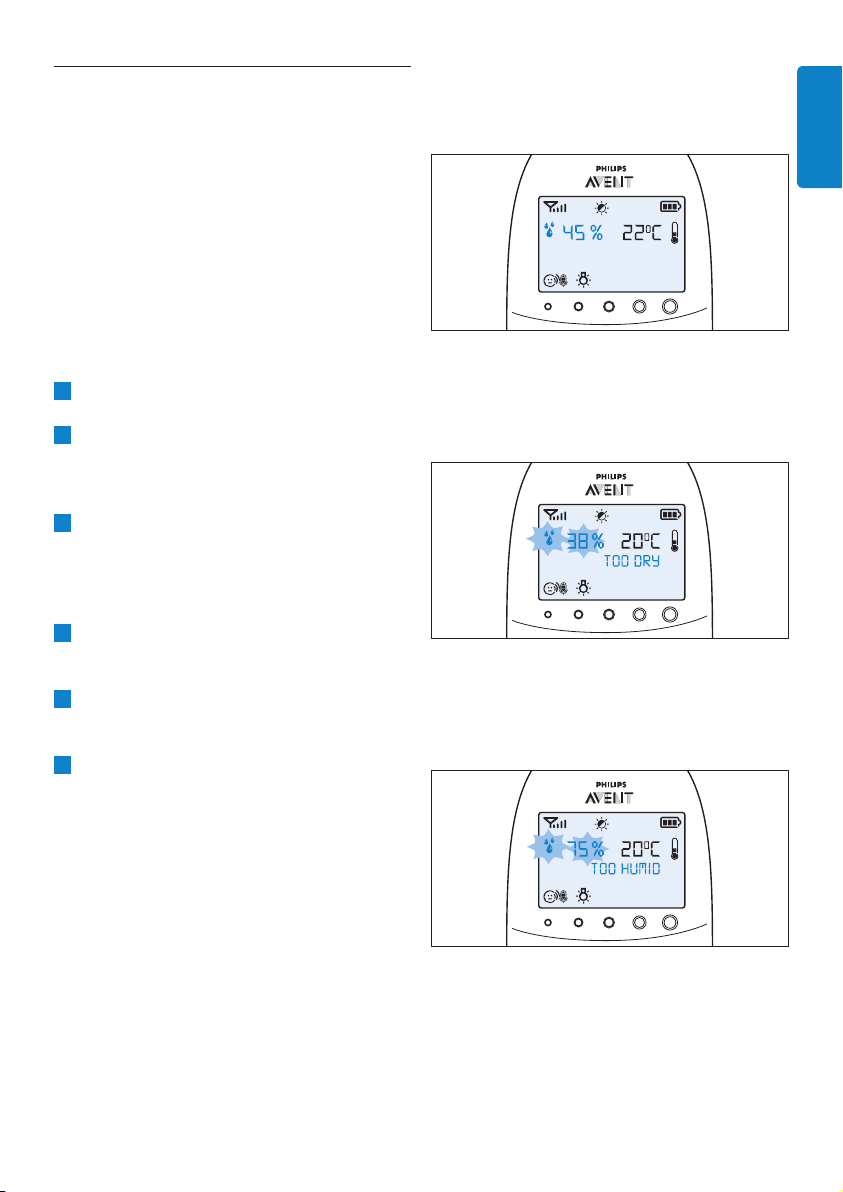
7.6 Humidity
The optimal humidity level is between 40%
and 60%. It is very important to maintain the
correct humidity level as it helps to protect your
baby from irritation of the mucous membranes,
dry and itchy skin, chapped lips and a dry, sore
throat. When the mucous membranes do not
function optimally, they cannot give your baby full
protection from all kinds of germs. This increases
the chance of your baby catching a cold or the
u, and reduces its resistance to infections from
mould and bacteria. You can set a humidity range
and an alert to warn you that the humidity is
outside the set range.
1 Select ‘Humidity’ in the menu with the + and -
buttons and press OK to conrm.
2 Select ‘Hum Range’ with the + and - buttons
and press OK to conrm.
• The minimum humidity indication starts
ashing on the display.
3 Use the + and - buttons to set the minimum
humidity range between 20% and 50%. Press
OK to conrm.
• The maximum humidity indication starts
ashing on the display.
4 Use the + and - buttons to set the
maximum humidity range between 51% and
70%. Press OK to conrm.
5 Select ‘Alert’ with the + and - buttons. Press
OK to conrm and to start setting the
humidity alert option.
6 Use the + and - buttons to select one of the
alert options. The options available are sound
only, sound and vibration, vibration only and
display only. Press OK to conrm.
• After you have conrmed your choice of
the alert option, the humidity alert symbol
appears on the display.
ENGLISH
• If the humidity is below the set range, the
humidity alert symbol and the humidity
measured ash on the display. The message
‘TOO DRY’ appears on the display.
• If the humidity is above the set range, the
humidity alert symbol and the humidity
measured ash on the display. The message
‘TOO HUMID’ appears on the display.
23
Page 24
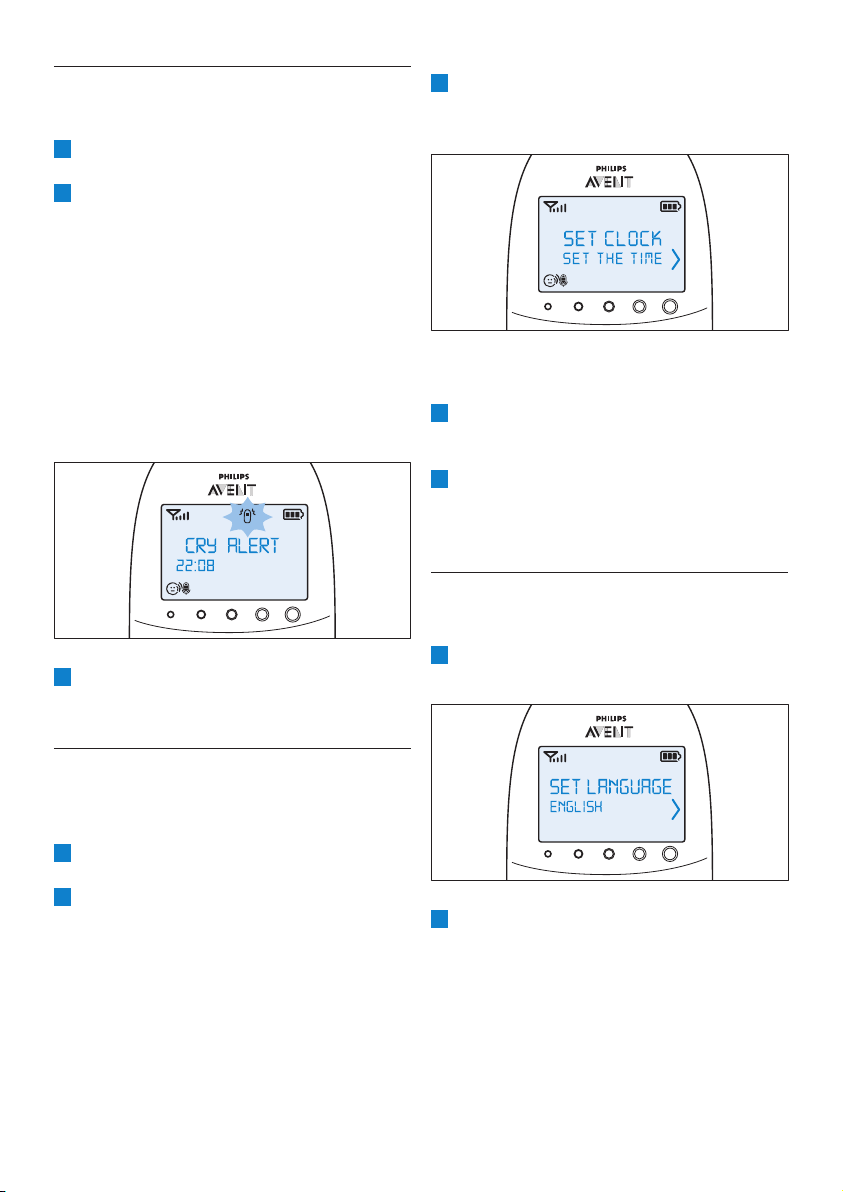
7.7 Cry alert
You can set a cry alert to warn you that the baby
is crying.
1 Select ‘Cry alert’ in the menu with the + and -
buttons and press OK to conrm.
2 Select ‘Vibration ON’ with the + and -
buttons. Press OK to conrm.
• The cry alert indicator appears on the
display.
• The cry alert goes off when the sound in
the baby room is loud enough to make the
fourth sound level light go on. The parent
unit vibrates and the message ‘Cry alert’
appears on the display for 4 seconds. The
cry alert repeats every 8 seconds until the
sound becomes less loud or you deactivate
the cry alert.
3 To deactivate the cry alert, select ‘Cry alert’ in
the menu and select ‘Vibration OFF’ with the
+ and - buttons.
3 Select ‘Set the time’ with the + and - buttons.
Press OK to conrm and to start setting
the clock.
• The hour indication starts ashing on the
display.
4 Set the hour and press OK to conrm.
• The minutes indication starts ashing on the
display.
5 Set the minutes and press OK to conrm.
• The clock time alternates with other
indications in the message eld of the
display.
7.9 Language
You can use this menu option to change the
language setting.
1 Select ‘Set language’ in the menu with the +
and - buttons and press OK to conrm.
7.8 Clock
The default setting for the clock is hidden. You can
choose to show the clock and set the clock time
in the menu of the parent unit.
1 Select ‘Set clock’ in the menu with the + and -
buttons and press OK to conrm.
2 Use the + or - button to select ‘Show Time’
and press OK to conrm.
24
2 Use the + and - buttons to select your
language and press OK to conrm.
D
Note:
This option automatically appears on the
display when you switch on the parent unit
for the rst time and after a reset.
Page 25

7.10 Key lock
You can activate the key lock to prevent the
buttons from being pressed accidentally while you
carry the parent unit around.
1 To activate the key lock, press OK.
2 Press the + button within 2 seconds.
D
Note:
If you do not press the + button within
2 seconds, the instruction remains on the
display.
• After you have pressed the + button, the
message ‘Keys locked’ appears on the
display instead of the temperature and
humidity indications.
7.10.1 Notes
• When you press a button other than OK
while the key lock is active, the display goes
on and the second line on the display tells you
how to deactivate the key lock.
• When you press OK while the key lock is
active, the second line on the display tells you
what second step is necessary to unlock the
buttons.
• When the key lock is active, you can stop the
paging and feed timer alert by pressing OK. In
that case the key lock remains active.
• When the cry alert, the temperature alert or
the humidity alert go off while the key lock is
active, rst deactivate the key lock and then
deactivate the cry aler t or the temperature
alert through the menu.
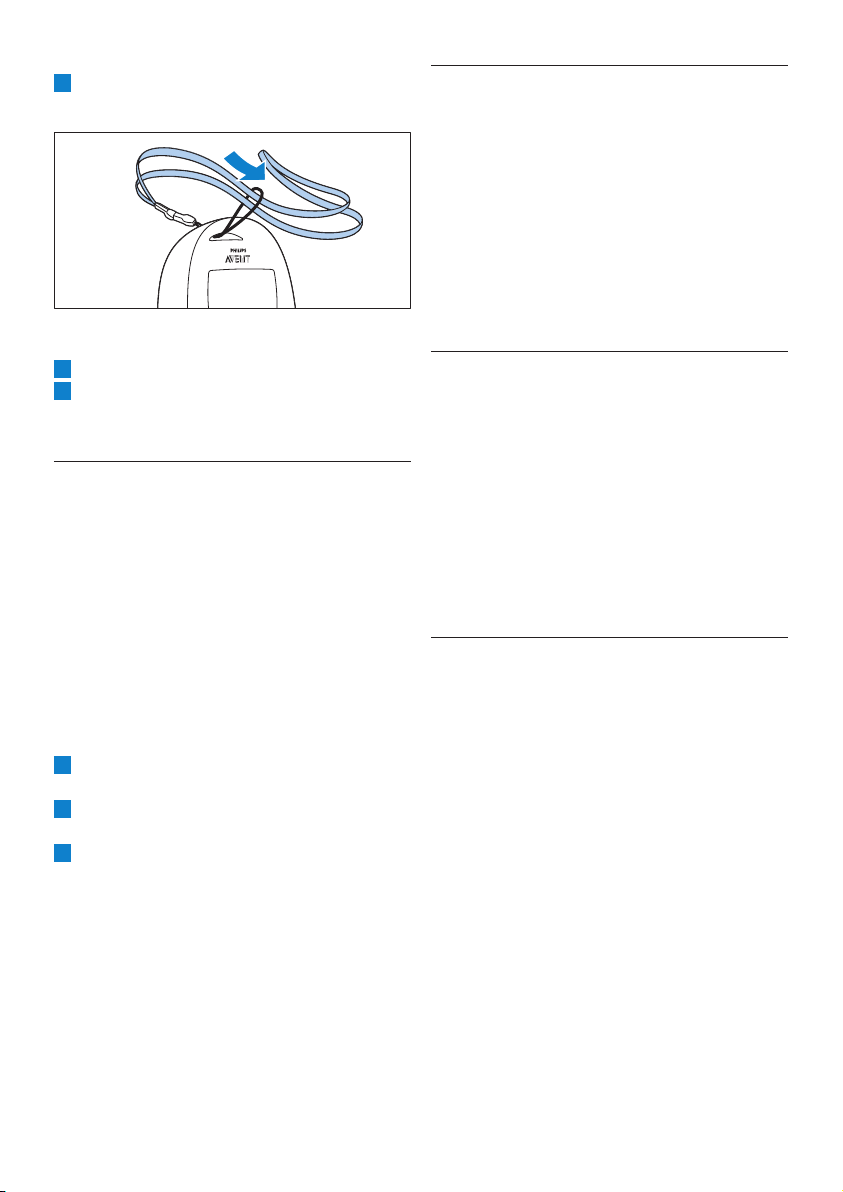
8 Neck strap
A convenient neck strap is supplied with the baby
monitor. It allows you to carry the parent unit
around with you.
8.0.1 Connecting the neck strap
1 Inser t the end loop of the neck strap through
the opening at the top of the parent unit.
ENGLISH
3 To deactivate the key lock, press OK. When
the display shows the instruction message,
press the + button within 2 seconds.
25
Page 26
2 Thread the neck strap through the end loop
and pull the neck strap tight.
8.0.2 Disconnecting the neck strap
1 Pass the neck strap though the end loop.
2 Pull the end loop out of the opening at the
top of the parent unit.
9 Cleaning and
maintenance
B Warning:
Do not immerse the parent unit, the baby unit
and the charger of the parent unit in water and
do not clean them under the tap.
10 Storage
If you are not going to use the baby monitor for
some time, do the following:
• Remove the non-rechargeable batteries from
the baby unit.
• Remove the rechargeable batteries from the
parent unit.
• Store the parent unit, the baby unit and the
adapters in a cool and dry place.
11 Ordering accessories
To buy accessories or spare parts, visit
www.shop.philips.com/service or go to your
Philips dealer. You can also contact the Philips
Consumer Care Centre in your country (see the
worldwide guarantee leaet for contact details).
If there is no Consumer Care Centre in your
country, go to your local Philips dealer or a
Philips service centre.
12 Guarantee and
B
Warning:
Do not use cleaning spray or liquid cleaners.
1 Unplug the baby unit and the charger if they
are connected to the mains.
2 Clean the parent unit, the charger and the
baby unit with a dry cloth.
3 Clean the adapters with a dry cloth.
26
support
If you need information or support, please visit the
Philips website at www.philips.com/support
or contact the Philips Consumer Care Centre in
your country (see the worldwide guarantee leaet
for contact details). If there is no Consumer Care
Centre in your country, go to your local Philips
dealer or a Philips service centre.
Page 27

13 Frequently asked
questions
This chapter lists the questions most frequently
asked about the appliance. If you cannot nd the
answer to your question, visit www.philips.com/
support for more frequently asked questions
or contact the Consumer Care Centre in your
country.
What is Eco Max mode? How does this mode
help the environment?
• The Eco Max mode has been developed to
enable you to reduce the energy consumption
of your baby monitor. When you monitor your
baby from a small distance, you can activate the
Eco Max mode. By switching on the Eco Max
mode, your baby monitor uses less energy and
is therefore more environment-friendly.
Why don’t the power-on light of the baby unit
and the ‘link’ light of the parent unit come on
when I press the on/off buttons of the units?
• Perhaps the rechargeable batteries of the
parent unit are empty and the parent unit is not
plugged in. Insert the small appliance plug into
the parent unit and put the adapter in a wall
socket. Then press the on/off button to establish
connection with the baby unit.
• Perhaps the non-rechargeable batteries of the
baby unit are empty and the baby unit is not
connected to the mains. Replace the nonrechargeable batteries or connect the baby unit
to the mains. Then press the on/off button to
establish connection with the parent unit.
• If the ‘link’ light on the parent unit still does not
start ashing red, use the reset function to reset
the units to their default settings.
Whydoesthe‘link’lightontheparentunitash
red continuously and why is the message ‘NOT
LINKED’ or ‘I AM LINKING’ shown on the
display?
• The baby unit and the parent unit are out
of range of each other. Move the parent unit
closer to the baby unit.
• The baby unit may be switched off. Switch on
the baby unit.
Why does the battery status light on the baby
unitashred?
• The non-rechargeable batteries of the baby unit
are running low. Replace the non-rechargeable
batteries or connect the baby unit to the mains
(see chapter ‘Preparing for use’).
Why does the parent unit beep?
• If the parent unit beeps while the ‘link’ light
ashes red continuously and the message ‘NOT
LINKED’ or ‘I AM LINKING’ is shown on the
display, the connection with the baby unit is lost.
Move the parent unit closer to the baby unit or
switch the baby unit on, if it was off.
• If the parent unit beeps and the battery symbol
on the display is empty, the rechargeable
batteries of the parent unit are running low.
Recharge the batteries.
• If you have set the room temperature range on
the parent unit and the temperature alert is on,
the parent unit beeps when the temperature
drops below the set minimum temperature
range or when the temperature rises above the
set maximum temperature range.
• If you have set the humidity range on the
parent unit and the humidity alert is on, the
parent unit beeps when the humidity drops
below the set minimum humidity range
or when the humidity rises above the set
maximum humidity range.
• The baby unit may be switched off. Switch on
the baby unit.
ENGLISH
27
Page 28

Why does the appliance produce a high-pitched
noise?
• The units may be too close to each other. Make
sure the parent unit and the baby unit are at
least 1 metre/3.5 feet away from each other.
• The volume of the parent unit may be too high.
Decrease the volume of the parent unit.
Why don’t I hear a sound/Why can’t I hear
my baby cry?
• The volume of the parent unit may be too low
or may be switched off. Increase the volume of
the parent unit.
• The microphone sensitivity level of the baby
unit may be too low. Set the microphone
sensitivity level to a higher level in the menu of
the parent unit.
• The baby unit and the parent unit may be out
of range of each other. Reduce the distance
between the units.
Why does the parent unit react too quickly to
other sounds?
• The baby unit also picks up other sounds than
those of your baby. Move the baby unit closer
to the baby (but observe the minimum distance
of 1 metre/3.5 feet).
• The microphone sensitivity level of the baby
unit may be too high. Decrease the microphone
sensitivity level in the menu of the parent unit.
Why does the parent unit react slowly to the
baby’s crying?
• The microphone sensitivity level of the baby
unit may be too low. Increase the microphone
sensitivity level of the baby unit in the menu of
the parent unit.
• The Eco Max mode is on and the baby unit
only switches on the DECT signal when the
baby makes sounds. Switch off the Eco Max
mode to make the baby unit transmit DECT
signals continuously and to make the parent unit
respond more quickly to your baby’s sounds.
Why do the non-rechargeable batteries of the
baby unit run low quickly?
• The microphone sensitivity level of the baby
unit may be too high, which causes the baby
unit to transmit more often. Decrease the
microphone sensitivity level in the menu of the
parent unit.
• The volume on the baby unit may be too high,
which causes the baby unit to consume a lot of
energy. Decrease the volume of the baby unit.
• You may have set a maximum temperature
range that is lower than the actual room
temperature or a minimum temperature range
that is higher than the actual room temperature.
The baby unit continues to send data to the
parent unit and therefore uses more power.This
causes the non-rechargeable batteries of the
baby unit to run low quickly.
• You may have set a maximum humidity range
that is lower than the actual humidity level or
a minimum humidity range that is higher than
the actual humidity level in the room. The baby
unit continues to send data to the parent unit
and therefore uses more power.This causes the
non-rechargeable batteries of the baby unit to
run low quickly.
• Perhaps you switched on the nightlight. If you
want to use the nightlight, we advise you to run
the baby unit on mains power.
Why does the charging time of the parent unit
exceed 10 hours?
• The parent unit may be switched on during
charging. Switch off the parent unit during
charging.
Thespeciedoperatingrangeofthebaby
monitor is 330 metres/1000 feet. Why does my
baby monitor manage a much smaller distance
than that?
• The specied range is only valid outdoors in
open air. Inside your house, the operating range
is limited by the number and type of walls and/
or ceilings in between. Inside the house, the
operating range is up to 50 metres/150 feet.
28
Page 29

Why is the connection lost every now and then?
Why are there sound interruptions?
• The baby unit and the parent unit are probably
close to the outer limits of the operating
range. Try a different location or decrease the
distance between the units. Please note that
it takes about 30 seconds each time before a
connection between the units is established.
• You may have placed the unit next to a
transmitter or other DECT appliance, such as
a DECT telephone or other 1.8GHz/1.9GHz
baby monitor. Move the unit away from the
other appliances until the connection is reestablished.
What happens during a power failure?
• If the parent unit is sufciently charged,
it continues to operate during a power failure.
If there are batteries in the baby unit, it also
continues to operate during a power failure.
Is my baby monitor secure from eavesdropping
and interference?
• The DECT technology of this baby monitor
guarantees no interference from other
equipment and no eavesdropping.
Why does it take some time for the battery
status indicator to appear on the display when
I start charging the parent unit while it is off?
• This is normal. The parent unit needs a few
seconds to wake up when you connect it to
the mains while it is switched off. When it is
connected, the parent unit rst needs to detect
that it is charging and it has to measure the
battery charge level before the battery status
indicator can be displayed.
Why do the rechargeable batteries of the parent
unit run low quickly?
• The rechargeable batteries have reached the
end of their life. You have to replace them. To
order new rechargeable batteries, see chapter
‘Ordering accessories’.
ENGLISH
The operating time of the parent unit is
supposed to be up to 18 hours. Why is
the operating time of my parent unit shorter?
• When the parent unit has been charged for the
rst time, the operating time is less than
18 hours. The rechargeable batteries only reach
their full capacity after you have charged and
discharged them at least four times.
• The volume of the parent unit may be too high,
which causes the parent unit to consume a lot
of energy. Decrease the volume of the parent
unit
• The microphone sensitivity level of the baby
unit may be too high, which causes the parent
unit to consume a lot of energy. Decrease the
microphone sensitivity level in the menu of the
parent unit.
29
Page 30

Indholdsfortegnelse
1 Introduktion 30
2 Oversigt 31
3 Klargøring 31
3.1 Babyenhed 31
3.2 Forældreenhed 33
4 Brug af babyalarmen 34
4.1 Placering af babyalarmen 34
4.2 Oprettelse af forbindelse mellem
forældre- og babyenhed 34
7.9 Sprog 52
7.10 Knaplås 53
8 Halsstrop 53
9 Rengøring og vedligeholdelse 54
10 Opbevaring 54
11 Bestilling af tilbehør 54
12 Sikkerhed og support 54
13 Ofte stillede spørgsmål 55
5 Funktioner og feedback på
babyenheden 36
5.1 Natlampe 36
5.2 Vuggevisefunktion 36
5.3 Projektor 37
5.4 Søgning efter forældreenheden 37
5.5 Batteristatusindikator 38
6 Funktioner og feedback på
forældreenheden 38
6.1 Beroligende menu 38
6.2 Lydstyrke 42
6.3 Talefunktion 42
6.4 Natdæmpningstilstand 43
6.5 Alarm for lavt batteriniveau på
babyenheden 43
6.6 Batteristatusindikatorer 44
6.7 Indikator for signalstyrke 45
6.8 Nulstilling 45
7 Forældreenhedens menu 46
7.1 Navigering i menuen 46
7.2 Følsomhed 47
7.3 Eco Max-tilstand 47
7.4 Madningstimer 48
7.5 Temperatur 49
7.6 Luftfugtighed 50
7.7 Grådalarm 52
7.8 Ur 52
1 Introduktion
Tillykke med dit køb, og velkommen til Philips
AVENT! For at få fuldt udbytte af den support,
Philips AVENT tilbyder, skal du registrere dit
produkt på www.philips.com/welcome.
Philips AVENT udvikler og producerer pålidelige
produkter, der kan give forældre den tryghed,
de har brug for. Denne Philips AVENTbabyalarm hjælper dig døgnet rundt ved at sikre,
at du altid kan høre din baby klart og tydeligt
uden forstyrrende støj. DECT-teknologien
garanterer, at der ikke forekommer interferens, og
den giver et krystalklart signal mellem babyenhed
og forældreenhed.
Temperatursensoren gør det muligt for dig at
holde øje med temperaturen i børneværelset, og
sensorens personlige indstillinger hjælper dig med
at holde børneværelset behageligt.
Denne babyalarm har en babyenhed med en
projektor og en forældreenhed med et særligt
beroligende skærmbillede, som giver dig mulighed
styre de beroligende funktioner (natlampe,
vuggeviser og projektor) på babyenheden på
afstand.
30
Page 31

2 Oversigt
• I Display
1 Indikator for signalstyrke
2 Eco Max-indikator
3 Symbol for natdæmpningstilstand
4 Indikator for grådalarm
5 Lydløs-symbol
6 Batteristatusindikator
7 Symbol for luftfugtighedsalarm
8 Navigationspil
9 Temperatursymbol
10 Meddelelsesfelt
11 Indikator for mikrofonens følsomhed
12 Natlampesymbol
13 Vuggevisesymbol
14 Projektorsymbol
15 Symbol for timer eller gentaget timer
• II Forældreenhed
1 On/off-knap
2 TALK-tast (Tale)
3 Natdæmpningsknap
4 - knap til at rulle bagud
5 Mikrofon
6 Forbindelsesindikator
7 Display
8 Lys, som indikerer lydniveau
9 MENU-knap
10 + knap til at rulle fremad
11 Batteristatusindikator
12 OK-knap
13 Beroligende knap
14 Håndgreb/fastgørelseshul til halsstrop
15 Rum til genopladelige batterier
16 Låg på rum til genopladelige batterier
17 Tilslutningspunkter til opladning
18 Genopladelige batterier
19 Halsstrop
20 Stik til lille stik på adapteren
21 Oplader
22 Lille stik på adapteren
23 Adapter
• III Babyenhed
1 Projektor
2 Natlampe
3 FIND-knap
4 Mikrofon
5 On/off-knap til projektor
6 Næste vuggevise-knap
7 Afspil/stop-knap til vuggevise
8 Lydstyrkeknap
9 Strømindikator
10 On/off-knap
11 Batteristatusindikator
12 On/off-knap til natlampe
13 Lydstyrke + knap
14 Fugtighedssensor
15 Temperatursensor
16 Højttaler
17 Stik til lydapparat
18 Stik til lille stik på adapteren
19 Rum til ikke-genopladelige batterier
20 Dæksel til rum til ikke-genopladelige
batterier
21 Lille stik på adapteren
22 Adapter
23 Eksternt kabel
3 Klargøring
VIGTIGT: Læs sikkerhedsinstruktionerne
grundigt, før du tager babyalarmen i brug,
og gem dem til senere brug.
3.1 Babyenhed
Brug babyenheden fra lysnettet. For at garantere
automatisk back-up i tilfælde af strømsvigt
anbefaler vi, at du isætter ikke-genopladelige
batterier.
DANSK
31
Page 32

3.1.1 Brug via lysnet
1 Sæt adapteren i en stikkontakt, og sæt det lille
apparatstik i babyenheden.
3.1.2 Placering af ikke-genopladelige
batterier
I tilfælde af strømsvigt kan babyenheden køre
på re 1,5 V R6 AA alkaline-batterier (medfølger
ikke).
Brug ikke genopladelige batterier. Babyenheden
har ikke har nogen ladefunktion, og genopladelige
batterier aades langsomt, når de ikke er i brug.
B
Advarsel:
Tag babyenheden ud af stikkontakten, og sørg
for, at dine hænder og enheden er tørre, når du
isætter ikke-genopladelige batterier.
D
Bemærk:
Vi anbefaler, at du tilslutter babyenheden til
lysnettet, da babyenheden har begrænset brugstid,
når den bruges med ikke-genopladelige alkalinebatterier. Brugstiden på ikke-genopladelige
batterier er 24 timer.
1 Skub låsen for at frigøre låget over rummet
til de ikke-genopladelige batterier, og fjern
derefter låget.
2 Isæt re ikke-genopladelige batterier.
D
Bemærk:
Sørg for, at polerne (- og +) vender rigtigt.
3 Sæt låget på igen ved først at indsætte
tapperne i åbningerne i kanten af rummet til
de ikke-genopladelige batterier.
4 Skub derefter låget ned, indtil låsen lukker
med et klik.
32
Page 33

3.2 Forældreenhed
Forældreenheden benytter to genopladelige
batterier, der leveres sammen med babyalarmen.
3.2.1 Isætning af de genopladelige batterier
1 Skub låget over rummet til de genopladelige
batterier af forældreenheden.
2 Sæt de genopladelige batterier i.
3.2.2 Opladning af forældreenheden
Oplad forældreenheden, før du tager den i brug
første gang, eller når batteriet er ved at løbe tør.
Vigtigt: Du skal oplade forældreenheden
i 10 timer for at få en ledningsfri brugstid
på 18 timer.
1 Sæt det lille apparatstik på adapteren ind
i stikket på bagsiden af opladeren. Sæt
adapteren i en stikkontakt.
DANSK
2 Sæt forældreenheden i opladeren.
D
Bemærk:
Sørg for, at batteriernes poler (+ og -) vender
den rigtige vej.
3 Skub låget over rummet til de genopladelige
batterier tilbage på forældreenheden. Skub
låget ind, indtil det låses på plads med et klik.
• Displayet tænder, og
batteristatusindikatorerne viser,
at forældreenheden oplader. Se
“Batteriopladningsindikator” i
kapitlet “Funktioner og feedback på
forældreenheden” for at få ere oplysninger
om batteristatusindikationer.
3 Lad forældreenheden stå i opladeren, indtil
batterierne er fuldt opladet.
D
Bemærk:
Når du begynder at anvende babyalarmen, tager
det re ganges opladning og aadning, før de
genopladelige batterier når først op på deres fulde
kapacitet.
33
Page 34

4 Brug af babyalarmen
4.1 Placering af babyalarmen
B Advarsel:
Sørg for, at barnet ikke kan nå babyenheden.
Placer ikke babyenheden i barnets seng eller
kravlegård.
1 Da ledningen til babyenheden udgør en
potentiel risiko for kvælning, skal du sørge for,
at babyenheden og dens ledning er mindst 1
meter væk fra barnet.
2 For at undgå en skinger tone lyd fra én
eller begge enheder, skal du sørge for, at
forældreenheden er mindst 1 meter væk fra
babyenheden.
4.2 Oprettelse af forbindelse
mellem forældre- og
babyenhed
1 Tryk på on/off-knappen 3 på babyenheden,
og hold den nede i 2 sekunder.
• Natlampe, batteristatuslys og
strømindikatoren tændes kortvarigt.
2 Tryk på on/off-knappen 3 på
forældreenheden, og hold den nede i 2
sekunder.
• Displayet tænder og viser kortvarigt
alle indikatorer og symboler. Derefter
tones indikatorer og symboler ud, og
batteristatusindikatoren vises.
34
Page 35

D Bemærk:
Når du tænder for forældreenheden for
første gang eller efter en nulstilling, skal
du vælge dit foretrukne displaysprog (se
“Sprog” i kapitlet “Forældreenhedens
menu”).
• Forbindelsesindikatoren på forældreenheden
blinker rødt, og meddelelsen “I AM LINKING”
(Jeg opretter forbindelse) vises på displayet.
• Når forældreenheden og babyenheden
har forbindelse med hinanden, lyser
“link”-indikatoren konstant grønt.
Signalstyrkeindikatoren og meddelelsen
“LINKED” (Forbindelse oprettet) vises i
displayet.
• Hvis der ikke oprettes forbindelse inden
for 10 sekunder, vises meddelelserne “NOT
LINKED” (Ingen forbindelse) og “I AM
LINKING” (Jeg opretter forbindelse) skiftevis
på displayet. Hvis der stadig der ikke er
oprettet forbindelse efter 30 sekunder,
begynder forældreenheden at bippe, og
meddelelsen “NOT LINKED” vises.
Hvad gør man, hvis der ikke
oprettes forbindelse
• Forældreenheden er muligvis uden
for babyenhedens rækkevidde.
Anbring forældreenheden tættere på
babyenheden, men ikke tættere end
1 meter.
• Babyenheden eller forældreenheden
kan miste forbindelsen, fordi den er
for tæt på et andet DECT-apparat
(f.eks. en mobiltelefon). Sluk for
DECT-apparatet, eller placer enheden
længere væk fra apparatet.
• Babyenheden er muligvis slukket. Tænd
for den.
4.2.1 Senderækkevidde
• I begge standarddriftstilstande med
Smart Eco- og i Eco Max-tilstand er
senderækkevidden 330 meter udendørs og op
til 50 meter indendørs.
• Babyalarmens rækkevidde varierer afhængig
af omgivelserne og faktorer, der kan forårsage
interferens. Våde og fugtige materialer
forårsager så meget interferens, at det kan
betyde op til 100 % tab af rækkevidde. Se
tabellen nedenfor for at få oplysninger om
interferens forårsaget af tørre materialer.
DANSK
35
Page 36

Tørre materialer Materialets
tykkelse
Træ, gips, pap, glas
(uden metal, ledninger
eller bly)
Mursten, krydsner < 30 cm 5-35 %
Armeret beton < 30 cm 30-100 %
Metalgitter eller
-stænger
Metal- eller
aluminiumsplader
< 30 cm 0-10 %
< 1 cm 90-100 %
< 1 cm 100 %
Tab af
rækkevidde
5 Funktioner og
feedback på
babyenheden
5.1 Natlampe
Natlampen giver et blødt skær, der beroliger din
baby.
1 Tryk på tænd/sluk-knappen for natlampen på
babyenheden for at tænde natlampen.
5.2 Vuggevisefunktion
1 Tryk på afspil/stop-tasten K på babyenheden
for at afspille den sidst valgte vuggevise.
• Den valgte vuggevise gentages i det angivne
tidsrum.
• Hvis der ikke er valgt en vuggevise, afspilles
vuggevise 1.
2 Tryk på den næste vuggevise for at vælge
en anden vuggevise på listen.
• Q vises i displayet på forældreenheden.
2 Tryk på tænd/sluk-knappen for natlampen igen
for at slukke natlampen.
• Natlampen dæmpes gradvist, før den
slukkes helt.
• Q forsvinder fra displayet på
forældreenheden.
36
• Hvis der ikke afspilles en vuggevise, bliver
den sidst valgte vuggevise afspillet, når du
trykker på den næste vuggeviseknap
• Når du trykker på den næste
vuggeviseknap
afspilles, afspilles den næste vuggevise.
3 Hvis du vil justere lydniveauet for vuggevisen,
skal du trykke på + eller – tasten for lydstyrke
på babyenheden.
, mens en vuggevise
.
Page 37

D Bemærk:
Lydstyrken for babyenheden kan kun indstilles,
når der afspilles en vuggevise. Hvis du har
indstillet lydstyrken for vuggevisen højere på
babyenheden, vil lyden også være højere, når
du bruger talefunktionen på forældreenheden.
4 Hvis du vil stoppe afspilningen af vuggevisen
før den indstillede tid er gået, skal du trykke
på vuggevise play/stop-knappen K på
babyenheden.
5.3 Projektor
Du kan berolige din baby med farvede lysmønstre
på loftet ved at tænde for projektoren.
1 Tænd projektoren ved at trykke på on/off-
knappen.
• Projektorsymbolet vises på forældreenhedens
display.
• Det første mønster fra projektoren tones
op på fuld intensitet på 2 sekunder. Det
vises i 8 sekunder og tones derefter ud på 2
sekunder, mens det næste mønster tones op.
• Der er seks forskellige mønstre og
hvert mønster vises i 10 sekunder. Når
alle seks mønstre er blevet vist, starter
projektoren med mønster 1 igen. Mønstrene
gentages i den valgte tid (se “Projektor”
i kapitlet “Funktioner og feedback på
forældreenheden”).
2 Hvis du vil slukke projektoren, før den
indstillede tid er gået, skal du trykke på
projektorens on/off-knap igen.
• Det projicerede mønster forsvinder, og
projektoren slukkes.
• Projektorsymbolet forsvinder fra displayet.
5.4 Søgning efter
forældreenheden
Hvis forældreenheden er blevet væk, kan du
søge efter den ved hjælp af FIND-tasten på
babyenheden.
D
Bemærk:
Søgefunktionen fungerer kun, når forældreenheden
er tændt.
1 Tryk på FIND-tasten på babyenheden.
DANSK
37
Page 38

• Meddelelsen “PAGING” (Søger) vises
i displayet på forældreenheden, og
forældreenheden afgiver en søgealarmtone.
2 Du kan stoppe søgealarmen ved at trykke på
FIND-tasten igen eller på en vilkårlig tast på
forældreenheden.
• Udskift batterierne, når de er ved at løbe tør.
• Hvis batterierne løber tør, mens
babyenheden kører på batteristrøm,
slukkes babyenheden, og forældreenheden
mister forbindelsen til babyenheden.
D
Bemærk:
Vi anbefaler, at du tilslutter babyenheden til
lysnettet, da babyenheden har begrænset brugstid,
når den bruges med ikke-genopladelige alkalinebatterier. Brugstiden på ikke-genopladelige
batterier er 24 timer.
6 Funktioner og
D
Bemærk:
Søgealarmtonen stopper automatisk efter
2 minutter.
5.5 Batteristatusindikator
1 Batteristatusindikatoren lyser konstant
grønt, når babyenheden kører på batteri, og
batterierne har tilstrækkelig energi.
2 Batteristatusindikatoren blinker hurtigt rødt,
når batterierne er ved at løbe tør, mens
babyenheden kører på batterier.
feedback på
forældreenheden
6.1 Beroligende menu
Forældreenheden har en separat beroligende
menu med alle de beroligende funktioner. For at
åbne denne menu skal du trykke på knappen for
beroligende funktioner. Denne menu giver dig
mulighed for at betjene natlampe, vuggeviser og
projektoren på babyenheden via fjernbetjening.
1 Tryk på knappen for beroligende funktioner
for at åbne den beroligende menu.
38
Page 39

• Det beroligende menuskærmbillede vises.
Denne skærm viser tre funktioner på
babyenheden: natlampen, vuggevisen og
projektoren. For hver funktion er der to
segmenter: tænd/sluk-feltet og menufeltet
med indstillinger.
D
Bemærk:
Hvis du ikke trykker på en knap inden for
7 sekunder, lukker den beroligende menu,
og displayet vender tilbage til normal.
2 Brug knapperne + og - til at rette pilen mod
en beroligende funktion.
• Hvis en funktion er slået til, er der et
ueben over symbolet for funktionen.
• Hvis en funktion er slået fra, er der et kryds
over symbolet for funktionen.
4 Placer pilen over menufeltet med indstillinger,
og tryk på OK for at åbne menuen med
indstillinger for funktionen.
DANSK
5 Brug knapperne + og - for at navigere
gennem listen med indstillinger, og tryk på OK
for at vælge en indstilling.
6 Tryk på knappen for beroligende funktioner
for at lukke den beroligende menu.
6.1.1 Natlampe
Denne beroligende funktion giver dig mulighed
for at tænde eller slukke natlampen og indstille
natlampetimeren.
1 Du kan slå natlampefunktionen til eller fra ved
at bruge knapperne + og - til at ytte pilen
hen over natlampesymbolet og trykke på OK.
3 Hvis du vil slå en beroligende funktion til, når
den er slået fra, eller slå den fra, når den er
slået til, skal du trykke på OK.
2 Hvis du vil åbne menuen med
natlampeindstillinger, skal du pege pilen mod
menufeltet med indstillinger og trykke på OK
for at bekræfte.
39
Page 40

3 Du kan indstille natlampetimeren til mellem 5
og 20 minutter, eller du kan tænde natlampen
konstant. Tryk på OK for at bekræfte.
• Hvis du har aktiveret natlampen, vises
natlampesymbolet på forældreenhedens
display, når du trykker på den beroligende
knap for at forlade det beroligende
skærmbillede.
• Hvis du indstiller natlampetimeren, slukkes
natlampen automatisk, og natlampesymbolet
forsvinder fra forældreenhedens display efter
det angivne tidsrum.
• Hvis du tænder natlampen konstant, kan
du slukke natlampen på det beroligende
skærmbillede på forældreenheden eller
ved at trykke på natlampeknappen på
babyenheden.
6.1.2 Vuggevise
Denne beroligende funktion giver dig mulighed
for at vælge indstillinger for afspilning af vuggevise
samt indstille vuggevisetimeren.
1 Hvis du vil vælge vuggevisefunktionen, skal du
bruge knapperne + og - til at ytte pilen hen
over vuggevisesymbolet og trykke på OK for
at afspille eller stoppe afspilning af vuggeviser.
2 Hvis du vil åbne menuen med
vuggeviseindstillinger, skal du pege pilen mod
menufeltet med indstillinger og trykke på OK
for at bekræfte.
3 I menuen kan du vælge en række indstillinger:
• Vælg en vuggevise på listen med
vuggeviser, som er oprettet på forhånd.
Den senest afspillede vuggevise er valgt.
Hvis der ikke foretages et valg, vælges
vuggevise 1.
• Du kan også vælge “Play all” (Afspil alle)
for at afspille alle de gemte vuggeviser.
• Vælg “Aux”, og vælg et spor, hvis du vil
afspille musik fra en ekstern lydafspiller. For
at afspille musik fra en ekstern lydafspiller
skal du tilslutte denne afspiller til stikket til
lydenheder på bagsiden af babyenheden
(Aux-in) med det medfølgende kabel
til eksterne enheder. Du skal justere
lydstyrken på lydafspilleren, da + og lydstyrketasterne på babyenheden ikke
virker for eksterne enheder.
• Tryk på OK for at bekræfte valget.
4 Du kan indstille vuggevisetimeren til mellem
5 og 20 minutter, eller du kan vælge at afspille
vuggeviser kontinuerligt. Tryk på OK for at
bekræfte timerindstillingen.
40
Page 41

• Hvis du har valgt afspilning af
vuggevise, vises vuggevisesymbolet på
forældreenhedens display, når du trykker
på den beroligende knap for at forlade
det beroligende skærmbillede. Vuggevisen,
der afspilles, vises på den anden linje i
meddelelsesfeltet i 2 sekunder.
• Hvis du indstiller vuggevisetimeren, slukker
vuggevisefunktionen, og vuggevisesymbolet
forsvinder fra forældreenhedens display efter
det angivne tidsrum.
• Hvis du vælger at afspille vuggeviser
kontinuerligt, skal du slukke for
vuggeviseafspilning på det beroligende
skærmbillede eller ved at trykke på
vuggevise afspil/stop-knappen K på
babyenheden.
6.1.3 Projektor
Denne beroligende funktion giver dig mulighed
for at tænde for projektoren på babyenheden og
programmere varighed af projektionen.
1 Du kan slå projektorfunktionen til eller fra ved
at bruge knapperne + og - til at ytte pilen
hen over projektorsymbolet og trykke på OK.
2 Hvis du vil åbne menuen med
projektorindstillinger, skal du pege pilen
mod indstillingsfeltet og trykke på OK for at
bekræfte.
3 Du kan indstille projektor timeren til mellem
5 og 20 minutter, eller du kan tænde
projektoren konstant. Tryk på OK for at
bekræfte.
DANSK
• Hvis du har tændt projektoren, vises
projektorsymbolet på forældreenhedens
display, når du forlader det beroligende
skærmbillede ved at trykke på den
beroligende knap.
• Hvis du indstiller projektortimeren,
slukker projektoren automatisk, og
projektorsymbolet forsvinder fra
forældreenhedens display efter det angivne
tidsrum.
• Hvis du tænder projektoren konstant,
skal du slukke for projektoren på det
beroligende skærmbillede. Derved forsvinder
projektorsymbolet fra forældreenhedens
display.
41
Page 42

6.2 Lydstyrke
Lydstyrken kan indstilles, hvis menuen ikke er
aktiveret. Der er syv lydstyrkeniveauer og en
lydløs-indstilling.
6.2.1 Indstilling af lydstyrken
1 Tryk én gang på + eller - knappen.
• Det aktuelle lydstyrkeniveau vises på
displayet.
2 Tryk på + knappen for at øge lydstyrken eller
på - knappen for at sænke lydstyrken.
• Forældreenheden bipper for hvert
lydstyrketrin
• Ved den maksimale lydstyrke afgiver
forældreenheden to bip.
• Hvis der ikke trykkes på nogen knap
i mere end 2 sekunder, forsvinder
lydstyrkeangivelsen, og lydstyrkeindstillingen
gemmes.
2 Hold - knappen nede i mere end 2 sekunder
for at slå lydstyrken fra.
• Meddelelsen “MUTE” (Lydløs) og lydløs-
symbolet vises på displayet.
D
Bemærk:
Hvis lyden er slået fra, er det kun
lydniveauindikatorerne, som viser, at
babyen siger lyde.
6.3 Talefunktion
Du kan bruge TALK-tasten (Tale) på
forældreenheden, hvis du vil snakke med barnet
(f.eks. for at trøste det).
1 Hold TALK-tasten nede, og tal tydeligt ind i
mikrofonen på forsiden af forældreenheden
på en afstand af 15-30 cm.
6.2.2 Lydløs
Under den laveste lydstyrkeindstilling er der en
“lydstyrke fra”-indstilling.
1 Tryk én gang på + eller - knappen.
• Det aktuelle lydstyrkeniveau vises på
displayet.
42
D
Bemærk:
Hvis du har indstillet lydstyrken for vuggevisen
højere på babyenheden, vil lyden også være
højere, når du bruger talefunktionen på
forældreenheden.
Page 43

• Forbindelseslyset begynder at blinke grønt,
og meddelelsen “TALK” (Tale) vises på
displayet.
2 Slip TALK-tasten (Tale), når du er færdig med
at tale.
6.4 Natdæmpningstilstand
I natdæmpningstilstand reduceres lampernes og
displayets lysintensitet, og lydstyrken for alarmlyde
dæmpes.
1 Tryk på natdæmpningsknappen for at aktivere
natdæmpningstilstand.
• Displayets baggrundsbelysning lyser med
fuld styrke igen.
• Lydalarmerne går i gang ved det normale
lydniveau.
6.5 Alarm for lavt batteriniveau
på babyenheden
1 Når babyenheden kører på batteristrøm,
og batterierne er ved at løbe tør, giver
forældreenheden følgende signaler:
• Teksten “BABY UNIT” (Babyenhed) vises
på den første linje i meddelelsesfeltet på
displayet.
• Meddelelsen “Change batteries” (Udskift
batterierne) ruller henover skærmen på
den anden linje.
• Forældreenheden bipper hver 10. sekund
i løbet af de første 3 minutter. Efter disse
3 minutter bipper forældreenheden hvert
minut.
DANSK
• Symbolet for natdæmpningstilstand vises på
displayet.
• Indikatorerne for lydstyrke og
forbindelsesindikatoren dæmpes.
• Displayets baggrundslys dæmpes.
• Lydstyrken for lydalarmer på
forældreenheden reduceres.
2 Hvis du vil skifte tilbage til normal tilstand, skal
du trykke på natdæmpningsknappen igen.
• Symbolet for natdæmpningstilstand
forsvinder fra displayet.
• Indikatorerne for lydstyrke og
forbindelsesindikatoren vender tilbage til
deres normale lysstyrke.
2 Hvis du ikke udskifter batterierne i tide, mistes
forbindelsen til babyenheden.
• Meddelelserne “Not linked” (Ingen
forbindelse) og “Change batteries” (Skift
batterier) vises skiftevis på den anden linje i
meddelelsesfeltet.
D
Bemærk:
Hvis både batterierne i forældreenheden
og babyenheden er ved at løbe
tør på samme tid, vises den første
meddelelse om lav batterikapacitet
for forældreenheden på displayet.
Når forældreenheden oplades, vises
meddelelsen om lav batterikapacitet for
babyenheden på forældreenhedens display.
43
Page 44

6.6 Batteristatusindikatorer
Batteriopladningsstatus angives på displayet af
batteristatusindikatoren og via tekstbeskeder.
6.6.1 Lavt batteriniveau
Når de genopladelige batterier er ved at løbe tør,
er den resterende brugstid mindst 30 minutter,
hvis babyalarmen fungerer i normal tilstand med
de højeste indstillinger.
1 Batteristatusindikatoren på displayet er tom
og blinker.
2 Meddelelsen “BATTERY LOW” (Lavt
batteriniveau) vises på displayet.
3 Batteristatusindikatoren blinker langsomt rødt.
4 Forældreenheden bipper hver 10. sekund i
de første 3 minutter. Derefter fortsætter den
med at bippe hvert minut.
D Bemærk:
Hvis du tænder forældreenheden, når de
genopladelige batterierne er næsten tomme,
tændes displayet. Meddelelsen “BATTERY LOW”
(Lavt batteriniveau) vises på displayet i 2 sekunder,
før forældreenheden slukker.
6.6.3 Opladning
Sæt det lille stik i opladeren, og sæt adapteren i
en stikkontakt. Sæt forældreenheden i opladeren.
Når forældreenheden oplader, sker følgende i den
angivne rækkefølge:
1 Displayet tænder i 4 sekunder, og teksten
“CHARGING” (Oplader) vises på skærmen i
2 sekunder.
2 Batteristatus lyser grønt, når forældreenheden
er sluttet til stikkontakten.
3 Det første segment i batteristatusindikatoren
begynder at blinke for at angive, at de
genopladelige batterier oplades.
6.6.2 Tomt batteri
1 Hvis de genopladelige batterier er næsten
tomme, blinker batteristatusindikatoren rødt
hurtigt.
2 Hvis du ikke tilslutter forældreenheden
til lysnettet, sker følgende i den angivne
rækkefølge:
1 Forbindelsen til babyenheden mistes.
2 Displayet slukker.
3 Forældreenheden slukker.
44
4 Det andet segment i batteristatusindikatoren
begynder at blinke, når de genopladelige
batterier er opladet til mere end 30 % af
deres kapacitet.
Page 45

5 Det tredje segment i batteristatusindikatoren
begynder at blinke, når de genopladelige
batterier er opladet til mere end 50 % af
deres kapacitet.
D Bemærk:
Hvis de genopladelige batterier løber tør meget
hurtigt, har de nået afslutningen på deres levetid,
og du skal udskifte dem. Se kapitlet “Bestilling af
tilbehør” for at få oplysninger om bestilling af nye
genopladelige batterier.
6.7 Indikator for signalstyrke
6 Når de genopladelige batterier er fuldt
opladet, sker følgende:
• Det tredje segment i
batteristatusindikatoren holder op med
at blinke.
• Displayet tænder i 4 sekunder, og
meddelelsen “BATTERY FULL” (Fuldt
opladet batteri) vises i displayet.
7 Frakobl forældreenheden fra lysnettet. Den er
nu klar til brug uden ledning.
D
Bemærk:
Du kan oplade forældreenheden, når den
er slukket. I så fald er displayet slukket.
Batteristatusindikatoren er tændt, men angiver ikke
opladningsstatus. Denne indikator forbliver tændt
og grøn, så længe forældreenheden er sluttet til
stikkontakten.
6.7.1 I Smart ECO-tilstand
Smart ECO-tilstand er standarddriftstilstanden.
I denne tilstand afhænger DECT-signalstyrken af
afstanden mellem babyenhed og forældreenhed.
• Hvis signalstyrkeindikatoren har 4
bjælker, er forbindelsen mellem baby- og
forældreenheden god.
• Hvis signalstyrkeindikatoren har 1 bjælke,
eller hvis der ikke er nogen bjælke, er signalet
fra babyenheden meget svagt eller ikke
tilgængeligt. Placer forældreenheden tættere
på babyenheden for at få et bedre signal.
6.7.2 I Eco Max-tilstand
I denne tilstand er DECT-signalet fra babyenheden
til forældreenheden slukket.
• Signalstyrkeindikatoren viser ingen bjælker, når
babyenhedens DECT-signal er slukket, selvom
forældreenheden er inden for babyenhedens
rækkevidde
• Når babyenheden begynder at sende en
DECT-signal, fordi babyen siger en lyd,
aktiveres displayet, og signalstyrkeindikatoren
angiver kvaliteten af forbindelsen mellem
babyenheden og forældreenheden.
• Se “Eco Max mode” i kapitlet
“Forældreenhedens menu” for at få ere
oplysninger om Eco Max-tilstanden.
6.8 Nulstilling
Denne funktion giver dig mulighed for at nulstille
forældre- og babyenheden til fabriksindstillingerne.
1 Sluk for enheden.
2 Hold - knappen nede.
3 Tænd for enheden igen, mens du holder -
knappen nede.
DANSK
45
Page 46

6.8.1 Standardindstillinger
Forældreenhed
• Sprog: Engelsk
• Højttalerlydstyrke: 3
• Mikrofonfølsomhed: 3
• Natdæmpningstilstand: slukket
• Temperaturalarm: Slukket
• Alarmen “Temperature low” (Lav temperatur):
14°C
• Alarmen “Temperature high” (Høj
temperatur): 35°C
• Temperaturskala: Celsius
• Luftfugtighedsalarm: slukket
• Eco Max-tilstand: slukket
• Madningstimer: 02:00
• Madningstimer: stop
• Vibrationsalarm: Fra
• Grådalarmvibration: slukket
• Ur: skjult
• Vuggevisetimer: 15 min.
• Projektortimer : 15 min.
Babyenhed
• Højttalerlydstyrke: 4
• Natlampe: slukket
• Projektor: slukket
• Indstilling af natlampe: manuel
• Vuggevise: slukket (vuggevise 1 valgt)
1 Tryk på MENU-tasten for at åbne menuen.
• Den første menuindstilling ses på displayet.
2 Brug knappen + for at gå til den næste
indstilling eller knappen - for at gå til den
forrige indstilling.
D
Bemærk:
Pilen på displayet angiver, hvilken retning du
kan navigere i.
3 Tryk OK for at bekræfte dit valg.
7 Forældreenhedens
menu
Alle funktioner, som beskrives i det følgende afsnit,
kan betjenes via forældreenhedens menu.
7.1 Navigering i menuen
D Bemærk:
Nogle menufunktioner virker kun, når
babyenheden og forældreenheden har forbindelse
med hinanden.
46
D
Bemærk:
Tryk på knappen MENU, hvis du vil forlade
menuen uden at foretage nogen ændringer.
Hvis der ikke indtastes noget i menuen i mere
end 20 sekunder, lukkes menuen automatisk.
Page 47

7.2 Følsomhed
Denne indstilling i forældreenhedens menu giver
dig mulighed for at indstille mikrofonfølsomheden
på babyenheden. Mikrofonens følsomhed afgør,
hvilket lydniveau babyenheden registrerer, f.eks.
vil du gerne kunne høre, når barnet græder, men
du er mindre interesseret i at høre, når barnet
pludrer
1 Vælg “Sensitivity” (Følsomhed) i menuen
med knapperne + og -, og tryk på OK for at
bekræfte.
2 Brug knapperne + og - til at skrue op
eller ned for mikrofonens følsomhed.
Følsomhedsindikatoren på displayet har re
segmenter.
• Hvis alle re segmenter er fyldt, er
følsomheden på sit højeste niveau.
• Hvis alle segmenter er tomme, er
følsomheden på sit laveste niveau.
7.2.1 Følsomhedsniveau og -indikationer
Ikon Følsomhed Beskrivelse
højeste Hør alt, hvad barnet
siger. Højttaleren på
forældreenheden er konstant
tændt.
høj Hør alle lyde helt ned til blød
pludren. Hvis din baby ikke
giver lyd fra sig, er højttaleren
på forældreenheden slukket.
mellem Hør lav gråd og højere lyde.
Hvis din baby siger lavere
lyde, tænder højttaleren på
forældreenheden ikke.
lav Højttaleren på
forældreenheden tændes
først, hvis barnet siger høje
lyde, f.eks. fordi det græder.
7.3 Eco Max-tilstand
Denne babyalarm har Smart ECO, der automatisk
reducerer DECT-signalet fra babyenheden, når
afstanden mellem forældre- og babyenheden
bliver kortere. Ved at reducere radiotransmission
opnås der energibesparelser.
Hvis du vil spare endnu mere energi og stoppe
radiotransmissionen, kan du aktivere Eco Maxtilstanden i menuen på forældreenheden. I denne
tilstand slukkes DECT-signalet fra babyenheden. Så
snart barnet laver en lyd, tændes DECT-signalet til
babyenheden automatisk igen.
DANSK
3 Tryk på OK for at bekræfte indstillingen.
C
Forsigtig:
I Eco Max-tilstand modtager forældreenheden
feedback fra babyenheden med forsinkelse. Når
babyen siger en lyd, skal babyenheden først
genaktivere radiotransmission, før den kan sende
feedback til forældreenheden.
47
Page 48

7.3.1 Du skal være opmærksom på følgende:
• Før du vælger Eco Max-tilstand i
forældreenhedens menu, skal du sørge for,
at forældre- og babyenheden bender sig
inden for senderækkevidden - se afsnittet
“Senderækkevidde” i kapitlet “Brug af
babyalarmen”. I Eco Max-tilstand får du ikke
feedback, når forældreenheden er uden for
babyenhedens rækkevidde. Du kan kontrollere
forbindelsen ved at trykke på en vilkårlig knap
på forældreenheden.
• Hvis der ikke er nogen radiotransmission
fra babyenheden til forældreenheden i Max
ECO-tilstand, er indikatorerne for lydstyrke
slukket. Indikatorerne for lydstyrke tændes, når
babyenheden genaktiverer radiotransmission,
fordi babyen siger en lyd, som overskrider det
valgte følsomhedsniveau.
• Hvis du vil bruge babyalarmen i Eco
Max-tilstand, skal du sørge for, at
mikrofonfølsomheden er angivet til en
indstilling mellem niveau 1 og niveau
3. Hvis mikrofonfølsomheden er sat til
niveau 4, slukker babyenheden ikke for
radiotransmissionen i Eco Max-tilstand.
7.3.2 Aktivering af Eco Max-tilstand
1 Vælg “Eco Max” i menuen med knapperne +
og -, og tryk på OK for at bekræfte.
2 Når displayet viser “Turn On” (Tænd), skal
du trykke på OK for at aktivere Eco Maxtilstanden.
3 Advarselsmeddelelsen “!No alert if out
of range, OK?” (Ingen alarm, hvis uden for
rækkevidde, OK?) vises på displayet. Tryk på
OK for at bekræfte.
D
Bemærk:
Advarselsmeddelelsen ruller hen over
displayet to gange. Hvis du ikke trykker på OK,
forlader forældreenheden menuen, og Eco
Max-tilstanden forbliver slukket.
• Eco Max-indikatoren blinker på displayet.
Forbindelsesindikatoren blinker langsomt
grønt.
• Når forældreenheden modtager et signal fra
babyenheden, fordi babyenheden laver en lyd,
lyser forbindelsesindikatoren konstant grønt.
7.3.3 Deaktivering af Eco Max-tilstand
1 Tryk på MENU-knappen.
2 Brug knappen + og - for at vælge “Eco Max”,
og tryk på OK for at bekræfte.
3 Brug knappen + og - for at vælge “Turn Off”
(Slå fra), og tryk på OK for at bekræfte.
7.4 Madningstimer
Du kan indstille madningstimeren til at give dig
besked, når det er tid til at made barnet. Timeren
kan indstilles fra 1 minut til 23 timer og 59
minutter.
7.4.1 Indstilling og brug af madningstimer
1 Vælg “Feed Timer” (Madningstimer) i menuen
med knapperne + og -, og tryk på OK for at
bekræfte.
2 Vælg “Set Timer” (Indstil timer) med
knapperne + og -, og tryk på OK for at starte
indstilling af timeren.
• Timeangivelsen begynder at blinke på
displayet.
3 Indstil timer, og tryk på OK for at bekræfte.
• Minutangivelsen begynder at blinke på
displayet.
4 Indstil minutter, og tryk på OK for at bekræfte.
48
Page 49

5 Vælg “xx:xx Star t” med knapperne + og -. Tryk
på knappen OK for at bekræfte.
• Timersymbolet vises på displayet.
• Timeren starter nedtællingen.
6 Når timeren har nået 00:00, går alarmen for
madningstimeren i gang, timer-symbolet begynder
at blinke på displayet, og meddelelsen “TIMER
END” (Timer slut) ruller hen over displayet.
7.4.3 Gentag madningstimeren
1 Efter trin 5 i “Indstilling og brug af
madningstimer” skal du vælge “Timer repeat”
(Gentag timer) med knapperne + og -. Tryk
på OK for at bekræfte.
2 Vælg “Repeat ON” (Gentag TIL) eller “Repeat
OFF” (Gentag FRA), og tryk på OK for at
bekræfte.
3 Vælg “xx:xx Start” ved hjælp af knapperne +
og -, og tryk på OK for at aktivere funktionen
gentagelse af madningstimer.
• I stedet for det normale timersymbol vises
symbolet for gentagelse af timeren.
4 Når du tr ykker på en vilkårlig tast for at
stoppe madningstimeralarmen, eller hvis
alarmen stopper automatisk efter 2 minutter,
begynder madningstimeren at tælle ned igen.
DANSK
7 Tryk på en vilkårlig tast for at stoppe alarmen.
Hvis du ikke stopper alarmen, stopper den
automatisk efter 2 minutter.
7.4.2 Indstilling af alarm for madningstimer
1 Efter trin 5 i “Indstilling og brug af
madningstimer” skal du vælge “Timer alert”
(Timeralarm) med knapperne + og -. Tryk på
OK for at bekræfte.
2 Brug knapperne + og - til at vælge en
af alarmindstillingerne. De tilgængelige
valgmuligheder er kun lyd, lyd og vibration
eller kun vibration. Tryk på OK for at bekræfte.
3 Vælg “xx:xx Start” ved hjælp af knapperne
+ og -, og tryk på OK for at aktivere
madningstimer-funktionen.
4 Når madningstimer-alarmen går i gang, kan du
stoppe madningstimeren og -alarmen ved at
trykke på en vilkårlig tast.
7.4.4 Stop timeren
1 Tryk på menuknappen, og vælg “Feed Timer”
(Madningstimer).
2 Brug knapperne + og - til at vælge “Stop &
Reset” (Stop og nulstil), og tryk på OK for at
bekræfte.
7.5 Temperatur
En baby sover behageligt ved en temperatur
mellem 16 °C og 20 °C. Du kan indstille et
minimum- og maksimumtemperaturområde og en
alarm for at få besked, når temperaturen er uden
for det angivne minimum- og maksimumområde.
1 Vælg “Temperature” (Temperatur) i menuen
med knapperne + og -, og tryk på OK for at
bekræfte.
49
Page 50

2 Vælg “Temp Range” (Temperaturområde)
med knapperne + og -, og tryk på OK for at
bekræfte.
• Angivelsen af minimumstemperatur
begynder at blinke på displayet.
3 Brug knapperne + og - for at angive
minimumtemperaturområdet mellem 10°C og
19°C. Tryk på OK for at bekræfte.
• Angivelsen af maksimal temperatur
begynder at blinke på displayet.
4 Brug knapperne + og - for at angive
maksimumtemperaturområdet mellem 22°C
og 37°C. Tryk på OK for at bekræfte.
5 Vælg “Alert” (Alarm) med knapperne + og -.
Tryk på OK for at bekræfte og for at indstille
temperaturalarmen
6 Brug knapperne + og - til at vælge en
af alarmindstillingerne. De tilgængelige
valgmuligheder er kun lyd, lyd og vibration, kun
vibration eller kun display. Tryk på OK for at
bekræfte.
• Når du har bekræftet dit
valg af alarmindstilling, vises
temperaturalarmsymbolet på displayet.
7 Vælg “Temp scale” (Temperaturskala) med
knapperne + og -. Tryk på OK for at bekræfte
og for at starte indstilling af temperaturskalaen.
8 Vælg “Celsius” eller “Fahrenheit”, og tryk på
OK for at bekræfte.
• Temperaturen i den angivne skala
vises på displayet. Hvis temperaturen
er inden for det angivne område, har
temperaturalarmsymbolet to segmenter.
• Hvis temperaturen er under det angivne
område, har temperaturalarmsymbolet
på displayet kun ét segment og blinker.
Meddelelsen “TOO COLD” (For koldt) vises
på displayet.
• Hvis temperaturen er over det angivne
område, har temperaturalarmsymbolet
på displayet tre segmenter og blinker.
Meddelelsen “TOO HOT” (For varmt) vises
på displayet.
7.6 Luftfugtighed
Det optimale luftfugtighedsniveau er mellem
40 % og 60 %. Det er meget vigtigt at bevare
det rette luftfugtighedsniveau, da det er med til
at beskytte din baby mod irriterede slimhinder,
tør og kløende hud, sprukne læber og ondt i
halsen. Når slimhinderne ikke fungerer optimalt,
yder de ikke optimal beskyttelse mod forskellige
bakterier. Dette øger risikoen for, at dit barn bliver
forkølet eller får inuenza og nedsætter barnets
modstandsdygtighed over for svamp og bakterier.
Du kan indstille et luftfugtighedsområde og en
advarselsmeddelelse om, at luftfugtigheden er
uden for det angivne område.
50
Page 51

1 Vælg “Humidity” (Luftfugtighed) i menuen
med knapperne + og -, og tryk på OK for at
bekræfte.
2 Vælg “Hum Range” (Luftfugtighedsområde)
med knapperne + og -, og tryk på OK for at
bekræfte.
• Angivelsen af minimal luftfugtighed
begynder at blinke på displayet.
3 Brug knapperne + og - til at indstille det
minimale luftfugtighedsområde mellem 20 %
og 50 %. Tryk på OK for at bekræfte.
• Angivelsen af maksimal luftfugtighed
begynder at blinke på displayet.
4 Brug knapperne + og - til at indstille det
maksimale luftfugtighedsområde mellem 51 %
og 70 %. Tryk på OK for at bekræfte.
5 Vælg “Alert” (Alarm) med knapperne + og -.
Tryk på OK for at bekræfte og for at indstille
luftfugtighedsalarmen
6 Brug knapperne + og - til at vælge en
af alarmindstillingerne. De tilgængelige
valgmuligheder er kun lyd, lyd og vibration, kun
vibration eller kun display. Tryk på OK for at
bekræfte.
• Når du har bekræftet dit valg af
alarmindstilling, vises symbolet for
luftfugtighedsalarmen på displayet.
• Hvis luftfugtigheden er under det
angivne område, blinker symbolet for
luftfugtighedsalarmen og den målte
luftfugtighed på displayet. Meddelelsen
“TOO DRY” (For tørt) vises på displayet.
•
Hvis luftfugtigheden er over det
angivne område, blinker symbolet for
luftfugtighedsalarmen og den målte
luftfugtighed på displayet. Meddelelsen “TOO
HUMID” (For fugtigt) vises på displayet.
DANSK
51
Page 52

7.7 Grådalarm
Du kan indstille en grådalarm, som gør dig
opmærksom på, at barnet græder.
1 Vælg “Cry alert” (Grådalarm) i menuen ved
hjælp af knapperne + og -, og tryk på OK for
at bekræfte.
2 Vælg “Vibration ON” med knappen + eller -.
Tryk på OK for at bekræfte.
• Grådalarm-indikatoren vises på displayet.
• Grådalarmen går i gang, når lyden i
børneværelset er høj nok til at aktivere den
fjerde lydniveauindikator. Forældreenheden
vibrerer, og meddelelsen “Cry alert” (Grådalarm)
vises på displayet i 4 sekunder. Grådalarmen
gentages hvert 8. sekund, indtil lyden bliver
mindre høj, eller du deaktiverer grådalarmen
3 Hvis du vil deaktivere grådalarmen, skal
du vælge “Cry aler t” i menuen og vælge
“Vibration OFF” med knappen + eller -.
3 Vælg “Set the time” (Indstil tid) med
knapperne + og -. Tryk på OK for at bekræfte
og for at starte indstilling af uret.
• Timeangivelsen begynder at blinke på
displayet.
4 Indstil timer, og tryk på OK for at bekræfte.
.
• Minutangivelsen begynder at blinke på
displayet.
5 Indstil minutter, og tryk på OK for at bekræfte.
• Klokkeslættet vises på skift med andre
angivelser i meddelelsesfeltet på displayet.
7.9 Sprog
Du kan bruge dette menupunkt til at ændre
sprogindstillingen.
1 Vælg “Set language” (Indstil sprog) i menuen
ved hjælp af knapperne + og -, og tryk på OK
for at bekræfte.
7.8 Ur
Standardindstillingen for uret er skjult. Du
kan vælge at vise uret og indstille uret i
forældreenhedens menu.
1 Vælg “Set clock” (Indstil ur) i menuen ved
hjælp af knapperne + og -, og tryk på OK for
at bekræfte.
2 Brug knapperne + eller - til at vælge “Show
Time” (Vis tid), og tryk på OK for at bekræfte.
52
2 Brug knapperne + og - til at vælge dit sprog,
og tryk på OK for at bekræfte.
D
Bemærk:
Denne indstilling vises automatisk på displayet,
når du tænder forældreenheden for første
gang, eller efter en nulstilling.
Page 53

7.10 Knaplås
Du kan aktivere tastelåsen for at undgå, at der
trykkes på knapperne ved et uheld, når du bærer
rundt på forældreenheden.
1 Tryk på OK for at aktivere tastelåsen.
2 Tryk på knappen + inden for 2 sekunder.
D
Bemærk:
Hvis du ikke trykker på knappen + for inden
for 2 sekunder, forbliver vejledningen på
displayet.
• Når du har trykket på knappen +, vises
meddelelsen “Keys locked” (Taster låst)
på displayet i stedet for temperatur- og
luftfugtighedsangivelse.
7.10.1 Bemærk
• Hvis du trykker på en anden knap end OK,
mens tastelåsen er aktiv, tændes displayet, og
den anden linje i displayet viser, hvordan låsen
deaktiveres.
• Hvis du trykker på OK, mens tastelåsen
er aktiv, viser den anden linje på displayet,
det andet nødvendige trin for oplåsning af
knapperne.
• Når låsen er aktiv, kan du stoppe søgeren og
madningstimeralarmen ved at trykke på OK.
I så fald forbliver låsen aktiv.
• Når grådalarmen, temperaturalarmen eller
luftfugtighedsalarmen går i gang, mens
låsen er aktiv, skal du først deaktivere låsen
og derefter deaktivere grådalarmen eller
temperaturalarmen via menuen.
8 Halsstrop
En praktisk halsstrop følger med babyalarmen. Det
giver dig mulighed for at tage forældreenheden
med rundt.
8.0.1 Montering af halsstroppen
1 Før halsstroppens endeløkke gennem
åbningen øverst på forældreenheden.
DANSK
3 Tryk på OK for at deaktivere tastelåsen. Når
displayet viser instruktionsmeddelelsen, skal du
trykke på knappen + inden for 2 sekunder.
53
Page 54

2 Før halsstroppen gennem endeløkken, og
stram halsstroppen til.
8.0.2 Afmontering af halsstroppen
1 Før halsstroppen gennem endeløkken.
2 Træk endeløkken ud igennem åbningen øverst
på forældreenheden.
9 Rengøring og
vedligeholdelse
B Advarsel:
Forældreenheden, babyenheden og opladeren til
forældreenheden må ikke nedsænkes i vand eller
skylles under vandhanen.
B
Advarsel:
Anvend aldrig rengøringsmidler i spraydåse eller
ydenderengøringsmidler.
1 Tag stikket ud af babyenheden og opladeren,
hvis de er tilsluttet til lysnettet.
2 Rengør forældreenheden, opladeren og
babyenhed med en tør klud.
3 Tør adapterne med en tør klud.
10 Opbevaring
Hvis du ikke skal bruge babyalarmen et stykke tid,
skal du gøre følgende:
• Fjern de ikke-genopladelige batterier fra
babyenheden.
• Fjern de genopladelige batterier fra
forældreenheden.
• Opbevar forældreenheden, babyenheden og
adapterne på et køligt og tørt sted.
11 Bestilling af tilbehør
Hvis du vil købe tilbehør eller reservedele, skal
du besøge www.shop.philips.com/service
eller kontakte din Philips-forhandler. Du kan
også kontakte det lokale Philips Kundecenter
(se folderen “World-Wide Guarantee for at
få kontaktoplysninger). Hvis der ikke ndes
et kundecenter i dit land, bedes du kontakte
din lokale Philips-forhandler eller et Philipsservicecenter.
12 Sikkerhed og
support
Hvis du brug for hjælp eller support, kan du
besøge Philips’ websted på www.philips.com/
support eller kontakte Philips Kundecenter i
dit land (se folderen “World-Wide Guarantee”
for at få kontaktoplysninger). Hvis der ikke ndes
et kundecenter i dit land, bedes du kontakte
din lokale Philips-forhandler eller et Philipsservicecenter.
54
Page 55

13 Ofte stillede
spørgsmål
Dette kapitel indeholder de mest almindeligt
forekommende spørgsmål om apparatet. Hvis
du ikke kan nde svar på dit spørgsmål, kan du
gå ind på www.philips.com/support og se ofte
stillede spørgsmål eller kontakte det lokale Philips
Kundecenter.
Hvad er Eco Max-tilstand? Hvordan beskytter
den miljøet?
• Eco Max-tilstand er udviklet for at reducere
babyalarmens energiforbrug. Når du bender
dig på kort afstand af babyen, kan du aktivere
Eco Max-tilstand. Hvis du aktiverer Eco Maxtilstand, bruger din babyalarm mindre energi og
er derfor mere miljøvenlig.
Hvorfor lyser strømindikatoren på babyenheden
og forbindelses-indikatoren på forældreenheden
ikke, når jeg trykker på enhedernes on/offknapper?
• Måske skyldes det, at forældreenhedens
genopladelige batterier er løbet tør for strøm,
og at forældreenheden ikke er tilsluttet lysnettet.
Sæt det lille apparatstik i forældreenheden, og
slut adapteren til en stikkontakt. Tryk derefter
på on/off-tasten for at etablere forbindelse til
babyenheden.
• Det kan evt. skyldes, at de ikke-genopladelige
batterier i babyenheden er aadede, og
babyenheden ikke er sluttet til lysnettet. Udskift
de ikke-genopladelige batterier, eller slut
babyenheden til lysnettet. Tryk derefter på
on/off-tasten for at etablere forbindelse til
forældreenheden.
• Hvis forbindelsesindikatoren på
forældreenheden stadig ikke blinker rødt, skal
du bruge nulstillingsfunktionen til at nulstille
enhederne til deres standardindstillinger.
Hvorfor blinker forbindelsesindikatoren på
forældreenheden konstant rødt, og hvorfor vises
meddelelsen “NOT LINKED” (Ingen forbindelse)
eller “I AM LINKING” (Jeg opretter forbindelse)
på displayet?
• Baby- og forældreenheden er placeret for langt
fra hinanden. Flyt forældreenheden tættere på
babyenheden.
• Babyenheden er muligvis slukket. Tænd for den.
DANSK
Hvorfor blinker batteristatusindikatoren på
babyenheden rødt?
• De ikke-genopladelige batterier i babyenheden
er ved at være tomme. Udskift de ikkegenopladelige batterier, eller slut babyenheden
til lysnettet (se kapitlet “Klargøring”).
Hvorfor bipper forældreenheden?
• Hvis forældreenheden bipper, mens
forbindelsesindikatoren blinker rødt, og
meddelelsen “NOT LINKED” (Ingen
forbindelse) eller “I AM LINKING” (Jeg opretter
forbindelse) vises på displayet, er forbindelsen
til babyenheden afbrudt. Flyt forældreenheden
tættere på babyenheden, eller slå babyenheden
til, hvis den er slukket.
• Hvis forældreenheden bipper, og
batterisymbolet i displayet er tomt, er de
genopladelige batterier i forældreenheden ved
at være aadede. Genoplad batterierne.
• Hvis du har indstillet rumtemperaturniveauet
på forældreenheden, og temperaturalarmen
er aktiveret, bipper forældreenheden, når
temperaturen falder til under det angivne
minimumtemperaturområde, eller hvis
temperaturen stiger til over det angivne
maksimumtemperaturområde.
• Hvis du har indstillet luftfugtighedsniveauet
på forældreenheden, og luftfugtighedsalarmen
er aktiveret, bipper forældreenheden, når
luftfugtigheden falder til under det angivne
minimale luftfugtighedsområde, eller hvis
temperaturen stiger til over det angivne
maksimale luftfugtighedsområde.
• Babyenheden er muligvis slukket. Tænd for den.
55
Page 56

Hvorfor afgiver apparatet en skinger tone?
• Enhederne er muligvis placeret for tæt
på hinanden. Kontroller, at forældre- og
babyenheden er mindst 1 meter fra hinanden.
• Lydstyrken på forældreenheden er muligvis
indstillet for højt. Skru ned for lydstyrken på
forældreenheden.
Hvorfor hører jeg ingen lyde/Hvorfor kan jeg
ikke høre mit barn græde?
• Lydstyrken på forældreenheden er muligvis
indstillet for lavt eller er slukket. Skru op for
lydstyrken på forældreenheden.
• Mikrofonfølsomheden på babyenheden
er måske indstillet for lavt. Indstil
mikrofonfølsomheden til et højere niveau på
forældreenhedens menu.
• Baby- og forældreenheden er muligvis placeret
for langt fra hinanden. Gør afstanden mellem
enhederne mindre.
Hvorfor reagerer forældreenheden alt for
hurtigt på lyde fra omgivelserne?
• Babyenheden opfanger også andre lyde
end dem fra dit barn. Flyt babyenheden
tættere på barnet (men vær opmærksom på
minimumsafstanden på mindst 1 meter).
• Følsomheden på babyenhedens mikrofon
er måske indstillet for lavt. Indstil
mikrofonens følsomhed til et højere niveau i
forældreenhedens menu.
Hvordan kan det være, at forældreenheden
reagerer så langsomt på barnets lyde?
• Følsomheden på babyenhedens mikrofon er
måske indstillet for lavt. Indstil mikrofonens
følsomhed på babyenheden til et højere niveau
i forældreenhedens menu.
• Eco Max-tilstand er aktiveret, og babyenheden
aktiverer kun DECT-signalet, når barnet siger
lyde. Sluk for Eco Max-tilstanden for at få
babyenheden til at sende DECT-signaler
konstant og få forældreenheden til at reagere
hurtigere på babyens lyde.
Hvorfor løber de ikke-genopladelige batterier i
babyenheden så hurtigt tør for strøm?
• Følsomheden på babyenhedens mikrofon er
muligvis for høj. Dette bevirker at babyenheden
sender oftere. Nedsæt mikrofonens følsomhed i
forældreenhedens menu.
• Lydstyrken på babyenheden er muligvis for
høj, hvilket får babyenheden til at bruge meget
strøm. Nedsæt lydstyrken på babyenheden.
• Du har muligvis indstillet et maksimalt
temperaturområde, der er lavere end den
faktiske rumtemperatur, eller et minimalt
temperaturområde, der er højere end den
faktiske rumtemperatur. Babyenheden sender
hele tiden data til forældreenheden, og den
bruger derfor mere strøm. Det medfører, at
babyenhedens ikke-genopladelige batterier
bruges meget hurtigt.
• Du har muligvis indstillet et maksimalt
luftfugtighedsområde, der er lavere end det
faktiske luftfugtighedsniveau, eller et minimalt
luftfugtighedsområde, der er højere end
det faktiske luftfugtighedsniveau i rummet.
Babyenheden sender hele tiden data til
forældreenheden, og den bruger derfor mere
strøm. Det medfører, at babyenhedens ikkegenopladelige batterier bruges meget hur tigt.
• Du har muligvis tændt natlampen. Hvis du vil
bruge natlampen, anbefaler vi, at du tilslutter
babyenheden til lysnettet.
Hvorfor overstiger forældreenhedens
opladningstid 10 timer?
• Forældreenheden er muligvis tændt under
opladningen. Sluk for forældreenheden under
opladningen.
Denspecicerederækkeviddepåbabyalarmen
er 330 meter. Hvorfor kan min babyenhed kun
klare en meget kortere afstand?
• Den specicerede rækkevidde gælder kun
udendørs under åben himmel. Inde i huset
begrænses rækkevidden af antallet og typen
af vægge og/eller lofter mellem enhederne.
Indendørs vil rækkevidden være op til 50 meter.
56
Page 57

Hvorfor bliver forbindelsen afbrudt fra tid til
anden? Hvorfor er der lydafbrydelser?
• Baby- og forældreenheden er sandsynligvis lige
på grænsen af rækkevidden. Forsøg med en
anden placering eller gør afstanden mellem
enhederne mindre. Bemærk, at det hver gang
tager ca. 30 sekunder, før forbindelsen mellem
enhederne genetableres.
• Du har måske anbragt enheden ved siden af
en sender eller et andet DECT-apparat, f.eks.
en DECT-telefon eller en anden 1,8 GHz/1,9
GHz babyalarm. Flyt enheden væk fra de andre
apparater, indtil forbindelsen genoprettes.
Hvad sker der ved strømsvigt?
• Hvis forældreenheden er tilstrækkeligt opladet,
vil den fortsætte med at fungere under et
strømsvigt. Hvis der er batterier i babyenheden,
vil den automatisk fortsætte med at fungere i
tilfælde af strømsvigt.
Erminbabyalarmsikretmodaytningog
interferens?
• DECT-teknologien i denne babyalarm
garanterer, at der ikke vil forekomme interferens
fra andet udstyr eller aytning.
Hvorfor tager det lidt tid, før
batteristatusindikatoren vises på displayet, når
jeg begynder at oplade forældreenheden, mens
den er slukket?
• Dette er normalt. Forældreenheden skal
bruge et par sekunder til at vågne op, når
den tilsluttes til lysnettet, mens den er slukket.
Når forældreenheden tilsluttes, skal den først
registrere, at den er ved at oplade, og den skal
måle batteriniveauet, før batteristatusindikatoren
kan vises.
Hvorfor løber de genopladelige batterier i
babyenheden så hurtigt tør for strøm?
• De genopladelige batterier har udtjent af
deres levetid. Du skal udskifte dem. Se kapitlet
“Bestilling af tilbehør” for at få oplysninger om
bestilling af nye genopladelige batterier.
DANSK
Brugstiden for forældreenheden skulle være
op til 18 timer. Hvorfor er brugstiden på min
forældreenhed kortere?
• Efter første opladning af forældreenheden er
brugstiden mindre end 18 timer. Batterierne
når først op på deres fulde kapacitet, når de er
blevet opladet og aadet mindst re gange.
• Lydstyrken på forældreenheden er muligvis
for høj, hvilket får forældreenheden til at
bruge meget strøm. Nedsæt lydstyrken på
forældreenheden.
• Følsomheden på babyenhedens mikrofon er
måske for høj. Dette bevirker, at babyenheden
sender oftere. Nedsæt mikrofonens følsomhed i
forældreenhedens menu.
57
Page 58

Inhaltsangabe
1 Einführung 58
2 Überblick 59
3 Für den Gebrauch vorbereiten 59
3.1 Babyeinheit 59
3.2 Elterneinheit 61
4 Verwenden des Babyphones 62
4.1 Aufstellen des Babyphones 62
4.2 Verbinden der Elterneinheit mit der
Babyeinheit 62
7.9 Sprache 81
7.10 Feststelltaste 82
8 Halstrageband 83
9 Reinigung und Wartung 83
10 Aufbewahrung 83
11 Zubehör bestellen 84
12 Garantie und Support 84
13 HäuggestellteFragen 84
5 Funktionen und Signale der
Babyeinheit 64
5.1 Nachtlicht 64
5.2 Schlaied-Funktion 64
5.3 Projektor 65
5.4 Die Elterneinheit rufen 66
5.5 Batteriestandanzeige 66
6 Funktionen und Signale der
Elterneinheit 67
6.1 Beruhigungsmenü 67
6.2 Lautstärke 70
6.3 “Talk”-Funktion (Sprechfunktion) 71
6.4 Nachtmodus 71
6.5 Alarm bei niedrigem Batteriestand
der Babyeinheit 72
6.6 Akkustandanzeigen 72
6.7 Signalstärkeanzeige 74
6.8 Zurücksetzen 74
7 Menü der Elterneinheit 75
7.1 Navigation durch das Menü 75
7.2 Empndlichkeit 75
7.3 Eco Max-Modus 76
7.4 Feed-Timer 77
7.5 Temperatur 78
7.6 Luftfeuchtigkeit 79
7.7 Weinalarm 80
7.8 Uhr 81
1 Einführung
Herzlichen Glückwunsch zu Ihrem Kauf und
willkommen bei Philips AVENT! Um den Suppor t
von Philips AVENT optimal zu nutzen, registrieren
Sie Ihr Produkt bitte unter www.philips.com/
welcome.
Philips AVENT hat es sich zur Aufgabe gemacht,
den Eltern von Babys und Kleinkindern
zuverlässige Produkte zu bieten, die ihnen
die beruhigende Gewissheit verschaffen, die
sie brauchen. Sie können diesem Babyphone
vertrauen – es unterstützt Sie rund um die Uhr
und gewährleistet, dass Sie Ihr Baby stets ohne
ablenkende Geräusche hören können. Die DECTTechnologie garantiert absolute Störungsfreiheit
und einen glasklaren Klang zwischen Eltern- und
Babyeinheit.
Der Temperatursensor ermöglicht Ihnen die
Überwachung der Raumtemperatur im Zimmer
Ihres Babys und bietet Ihnen persönliche
Einstellungen, um die Raumtemperatur im Zimmer
Ihres Babys angenehm zu halten.
Dieses Babyphone bietet eine Babyeinheit mit
einem Projektor und eine Elterneinheit mit einem
speziellen Beruhigungsbildschirm, mit dem Sie
die Beruhigungsoptionen (Nachtlicht, Schlaieder
und Projektor) auf der Babyeinheit per Fernzugriff
steuern können.
58
Page 59

2 Überblick
• I Display
1 Signalstärkeanzeige
2 Eco Max-Anzeige
3 Symbol für Nachtmodus
4 Weinalarmanzeige
5 Symbol für Stummschaltung
6 Akkustandanzeige
7 Symbol für Luftfeuchtigkeitsalarm
8 Navigationspfeil
9 Temperatursymbol
10 Nachrichtenfeld
11 Mikrofonempndlichkeitsanzeige
12 Nachtlichtsymbol
13 Schlaiedsymbol
14 Projektorsymbol
15 Timer- oder Timer-Wiederholungs-Symbol
• II Elterneinheit
1 Ein-/Ausschalter
2 TALK-Taste (Sprechtaste)
3 Nachtmodus-Taste
4 Taste “-” zum Rückwärtsblättern
5 Mikrofon
6 ”Link”-Anzeige
7 Anzeige
8 Geräuschpegelanzeigen
9 MENU-Taste (Menütaste)
10 Taste “+”zum Vorwär tsblättern
11 Batteriestandanzeige
12 OK-Taste (Bestätigungstaste)
13 Beruhigungstaste
14 Handgriff/Befestigungsloch für
Halstrageband
15 Akkufach
16 Akkufachabdeckung
17 Anschlüsse zum Auaden
18 Wiederauadbare Akkus
19 Halstrageband
20 Anschluss für den kleinen Adapterstecker
21 Ladegerät
22 Gerätestecker des Adapters
23 Adapter
• III Babyeinheit
1 Projektor
2 Nachtlicht
3 Taste FIND (Finden)
4 Mikrofon
5 Ein-/Ausschalter für Projektor
6 Taste für das nächste Schlaied
7 Wiedergabe-/Stopptaste für das Schlaied
8 Taste Lautstärke “-”
9 Betriebsanzeige
10 Ein-/Ausschalter
11 Batteriestandanzeige
12 Ein-/Ausschalter für Nachtlicht
13 Taste Lautstärke “+”
14 Feuchtigkeitssensor
15 Temperatursensor
16 Lautsprecher
17 Anschluss für Audiogerät
18 Anschluss für den kleinen Adapterstecker
19 Batteriefach
20 Batteriefachabdeckung
21 Gerätestecker des Adapters
22 Adapter
23 AUX-Kabel
3 Für den Gebrauch
vorbereiten
WICHTIG: Lesen Sie die
Sicherheitshinweise genau durch,
bevor Sie das Babyphone verwenden,
und bewahren Sie sie zur späteren
Verwendung auf.
3.1 Babyeinheit
Verwenden Sie die Babyeinheit im Netzbetrieb.
Um die automatische Stromsicherung im Fall eines
Stromausfalls zu garantieren, empfehlen wir Ihnen,
nicht wiederauadbare Batterien einzusetzen.
DEUTSCH
59
Page 60

3.1.1 Netzbetrieb
1 Stecken Sie den Adapter in die Steckdose und
den kleinen Gerätestecker in die Buchse der
Babyeinheit.
3.1.2Einsetzendernichtwiederauadbaren
Batterien
Bei einem Stromausfall kann die Babyeinheit mit
vier 1,5 V R6 AA-Alkalibatterien betrieben werden
(nicht im Lieferumfang enthalten).
Verwenden Sie keine Akkus. Die Babyeinheit
hat keine Ladefunktion, und wiederauadbare
Batterien entladen sich mit der Zeit, wenn sie
nicht in Gebrauch sind.
B
Warnhinweis:
Trennen Sie die Babyeinheit vom Stromnetz,
und achten Sie darauf, dass Ihre Hände und
die Einheit beim Einsetzen der Batterien
vollkommen trocken sind.
2 Setzen Sie vier nicht wiederauadbare
Batterien ein.
D
Hinweis:
Achten Sie darauf, dass die Polung (+ bzw. -)
mit der Markierung im Batteriefach
übereinstimmt.
3 Um den Deckel wieder zu befestigen, setzen
Sie zunächst die Laschen in die Öffnungen im
Rand des Batteriefachs ein.
D
Hinweis:
Wir empfehlen Ihnen, die Babyeinheit mit
Netzstrom zu betreiben, da die Babyeinheit eine
begrenzte Betriebsdauer hat, wenn Sie sie mit
Alkalibatterien verwenden. Die Betriebszeit bei
nicht auadbaren Batterien beträgt 24 Stunden.
1 Drücken Sie auf die Verriegelung, um den
Deckel des Batteriefachs zu öffnen, und
entfernen Sie den Deckel.
60
4 Drücken Sie dann den Deckel herunter, bis er
hörbar einrastet.
Page 61

3.2 Elterneinheit
Die Elterneinheit wird mit zwei Akkus betrieben,
die im Lieferumfang des Babyphones enthalten
sind.
3.2.1 Einlegen der Akkus
1 Schieben Sie die Abdeckung des Akkufachs
der Elterneinheit ab.
2 Legen Sie die Akkus ein.
3.2.2AuadenderElterneinheit
Laden Sie die Elterneinheit vor der ersten
Inbetriebnahme auf oder wenn die Ladeanzeige
an der Elterneinheit anzeigt, dass der Akku fast
leer ist.
Wichtig: Bitte beachten Sie, dass Sie die
Elterneinheit mindestens 10 Stunden
langauadenmüssen,umeinekabellose
Betriebszeit von 18 Stunden zu
gewährleisten.
1 Schließen Sie den kleinen Gerätestecker des
Adapters an die Buchse auf der Rückseite des
Ladegeräts an. Stecken Sie den Adapter in
eine Steckdose.
DEUTSCH
2 Stellen Sie die Elterneinheit in das Ladegerät.
D
Hinweis:
Achten Sie darauf, dass die Polung (+) bzw. (-)
auf den Batterien mit den Markierungen im
Batteriefach übereinstimmt.
3 Schieben Sie die Abdeckung des Akkufachs
wieder auf die Elterneinheit. Drücken Sie die
Abdeckung auf das Gerät, bis sie mit einem
Klicken einrastet.
• Das Display wird aktiviert, und die
Akkustandanzeige zeigt an, dass die
Elterneinheit aufgeladen wird. Informationen
zur Akkustandanzeige erhalten Sie im
Abschnitt “Akkustandanzeige” im Kapitel
“Funktionen und Signale der Elterneinheit”.
3 Lassen Sie die Elterneinheit im eingesteckten
Ladegerät, bis die Akkus voll aufgeladen sind.
61
Page 62

D Hinweis:
Wenn Sie das Babyphone verwenden, erreicht der
Akku seine volle Kapazität erst nach viermaligem
Laden und Entladen.
4 Verwenden des
Babyphones
4.1 Aufstellen des Babyphones
B Warnhinweis:
Stellen Sie die Babyeinheit außerhalb der
Reichweite Ihres Babys auf. Positionieren Sie die
Babyeinheit nie im Babybett oder Laufstall.
1 Da durch das Kabel der Babyeinheit eine
potenzielle Gefahr des Strangulierens besteht,
sollten Sie sicherstellen, dass die Babyeinheit
und das Kabel mindestens 1 Meter von Ihrem
Baby entfernt sind.
4.2 Verbinden der Elterneinheit
mit der Babyeinheit
1 Drücken Sie den Ein-/Ausschalter 3 an der
Babyeinheit, und halten Sie ihn 2 Sekunden
lang gedrückt.
• Das Nachtlicht, die Akkustandanzeige und
die Betriebsanzeige leuchten kurz auf.
2 Um einen schrillen Ton von einer oder beiden
Einheiten zu vermeiden, stellen Sie sicher, dass
sich die Elterneinheit mindestens 1 Meter von
der Babyeinheit entfernt bendet.
62
2 Drücken Sie den Ein-/Ausschalter 3 an der
Elterneinheit, und halten Sie ihn 2 Sekunden
lang gedrückt.
• Das Display wird aktiviert und zeigt kurz
alle Anzeigen und Symbole an. Dann werden
die Anzeigen und die Symbole ausgeblendet
und die Akkustandanzeige erscheint.
Page 63

D Hinweis:
Wenn Sie die Elterneinheit zum ersten
Mal oder nach einer Zurücksetzung
einschalten, müssen Sie Ihre gewünschte
Displaysprache auswählen (Siehe
Abschnitt “Sprache” im Kapitel “Menü der
Elterneinheit”).
• Die LINK-Anzeige (Verbindungsanzeige) an
der Elterneinheit beginnt, rot zu blinken, und
die Nachricht “I AM LINKING” (Verbindung
wird hergestellt) wird auf dem Display
angezeigt.
• Wenn die Elterneinheit und die Babyeinheit
verbunden sind, leuchtet die LINKAnzeige (Verbindungsanzeige) grün. Die
Signalstärkeanzeige und die Nachricht
“LINKED” (Verbunden) erscheinen auf dem
Display.
So gehen Sie vor, wenn keine
Verbindung hergestellt wurde
• Baby- und die Elterneinheit haben
möglicherweise keine Verbindung
zueinander. Verringern Sie den
Abstand zwischen Eltern- und
Babyeinheit, beachten Sie dabei
jedoch einen Mindestabstand von
1 Meter.
• Die Babyeinheit oder die Elterneinheit
verlieren möglicherweise ihre
Verbindung, weil sie sich zu nah an
einem anderen DECT-Gerät (z. B.
ein schnurloses Telefon) benden.
Schalten Sie dieses DECT-Gerät aus,
oder positionieren Sie das Gerät
weiter weg von diesem Gerät.
• Die Babyeinheit ist möglicherweise
ausgeschaltet. Schalten Sie sie wieder
ein.
DEUTSCH
• Wenn innerhalb von 10 Sekunden keine
Verbindung hergestellt wurde, wechselt
die Nachricht “NOT LINKED” (Nicht
verbunden) auf dem Display zu “I AM
LINKING” (Verbindung wird hergestellt).
Wenn nach 30 Sekunden immer noch
keine Verbindung hergestellt wurde, fängt
die Elterneinheit an zu piepsen, und es wird
nur die Nachricht “NOT LINKED” (Nicht
verbunden) angezeigt.
4.2.1 Empfangsbereich
• Sowohl im normalen Betriebsmodus mit
Smart Eco- als auch im Eco Max-Modus
beträgt der Betriebsbereich im Außenbereich
330 Meter und im Haus bis zu 50 Meter.
• Der Empfangsbereich des Babyphones ändert
sich abhängig von der Umgebung und den
Faktoren, die Störung verursachen. Nasse
und feuchte Materialien verursachen so viel
Störung, dass der Empfangsverlust bis zu
100 % beträgt. Für Störungen durch trockene
Materialien nden Sie Informationen und der
Tabelle unten.
63
Page 64

Trockene
Materialien
Holz, Gips, Pappe,
Glas (ohne Metall,
Drähten oder
Blei)
Ziegel, Sperrholz < 30 cm 5 - 35 %
Stahlbeton < 30 cm 30 - 100 %
Metallgitter oder
-stangen
Metall- oder
Aluplatten
Materialstärke Empfangsverlust
< 30 cm 0 - 10 %
< 1 cm 90 - 100 %
< 1 cm 100 %
5.2Schlaied-Funktion
1 Drücken Sie die Taste zum Wiedergeben/
Anhalten des Schlaieds K an der Babyeinheit,
um das aktuell ausgewählte Schlaied
wiederzugeben.
5 Funktionen
und Signale der
Babyeinheit
5.1 Nachtlicht
Das Nachtlicht erzeugt ein sanftes Licht, das Ihr
Baby beruhigt.
1 Drücken Sie an der Babyeinheit die Ein-/Aus-
Taste, um das Nachtlicht einzuschalten.
• Q wird auf dem Display der Elterneinheit
angezeigt.
2 Drücken Sie zum Ausschalten des Nachtlichts
erneut die Ein-/Aus-Taste.
• Das Nachtlicht wird langsam dunkler, bevor
es sich ganz ausschaltet.
• Q wird nicht mehr auf dem Display der
Elterneinheit angezeigt.
• Das ausgewählte Schlaied wird über die
eingestellte Zeit wiederholt.
• Wenn zuvor kein Schlaied ausgewählt
wurde, wird Schlaied 1 wiedergegeben.
2 Drücken Sie die Taste für das nächste
Schlaied
der Liste auszuwählen.
• Wenn kein Schlaied wiedergegeben
wird, beginnt die Wiedergabe mit dem
zuletzt ausgewählten Schlaied, wenn Sie
die Taste für das nächste Schlaied
drücken.
• Wenn Sie die Taste für das nächste
Schlaied
Schlaied wiedergegeben wird, beginnt
das nächste Schlaied zu spielen.
, um ein anderes Schlaied von
drücken, während ein
64
Page 65

3 Um den Geräuschpegel des Schlaieds
einzustellen, drücken Sie die Taste Lautstärke
“+” oder Lautstärke “-” an der Babyeinheit.
D
Hinweis:
Sie können die Lautstärke an der Babyeinheit
nur einstellen, während ein Schlaied
abgespielt wird. Wenn Sie die Lautstärke
für das Schlaied auf der Babyeinheit höher
eingestellt haben, steigert sich auch die
Lautstärke bei Verwendung der Sprechfunktion
auf der Elterneinheit.
4 Um die Wiedergabe von Schlaiedern vor
Ablauf der eingestellten Zeit zu beenden,
drücken Sie die Wiedergabe-/Stopptaste für
das Schlaied K auf der Babyeinheit.
5.3 Projektor
Sie können Ihr Baby mit farbigen Lichtmustern
beruhigen, die auf die Zimmerdecke projiziert
werden, wenn Sie den Projektor einschalten.
1 Drücken Sie zum Einschalten des Projektors
den Ein-/Ausschalter.
• Das erste Muster des Projektors wird
2 Sekunden lang allmählich bis zur vollen
Intensität eingeblendet. Es wird 8 Sekunden
projiziert und anschließend 2 Sekunden
lang allmählich ausgeblendet, während das
nächste Muster eingeblendet wird.
• Es stehen sechs verschiedene Muster
zur Verfügung, und jedes Muster wird
10 Sekunden lang projiziert. Wenn alle
sechs Muster gezeigt wurden, beginnt der
Projektor erneut mit Muster 1. Die Muster
werden über die eingestellte Zeit wiederholt
(siehe Abschnitt “Projektor” in Kapitel
“Funktionen und Signale der Elterneinheit”).
DEUTSCH
• Auf dem Display der Elterneinheit wird das
Projektorsymbol angezeigt.
2 Um den Projektor vor Ablauf der eingestellten
Zeit auszuschalten, drücken Sie erneut den
Ein-/Ausschalter des Projektors.
• Das projizierte Muster wird ausgeblendet
und der Projektor ausgeschaltet.
• Das Projektorsymbol wird nicht mehr auf
dem Display angezeigt.
65
Page 66

5.4 Die Elterneinheit rufen
Wenn Sie die Elterneinheit verloren haben,
können Sie die Taste FIND (Finden) an der
Babyeinheit verwenden, um die Elterneinheit zu
suchen.
D
Hinweis:
Die Suchfunktion funktioniert nur, wenn die
Elterneinheit eingeschaltet ist.
1 Drücken Sie die Taste FIND (Finden) an der
Babyeinheit.
• Die Nachricht “PAGING” (Paging) erscheint
auf dem Display der Elterneinheit, und die
Elterneinheit stellt ein akustisches Rufsignal
her.
5.5 Batteriestandanzeige
1 Die Batteriestandanzeige leuchtet
ununterbrochen grün, wenn die Babyeinheit
auf mit Batterien betrieben wird und die
Batterien genug Energie enthalten.
2 Die Batteriestandanzeige leuchtet schnell
rot, wenn die Batteriekapazität zur Neige
geht, während die Babyeinheit mit Batterien
betrieben wird.
2 Um dieses zu stoppen, drücken Sie erneut die
Taste FIND (Finden) an der Babyeinheit. Sie
können aber auch jede beliebige Taste an der
Elterneinheit drücken.
D
Hinweis:
Das akustische Rufsignal hört automatisch
nach 2 Minuten auf.
66
• Ersetzen Sie die Batterien, wenn sie zur
Neige gehen.
• Wenn die Batteriekapazität zur Neige
geht, während die Babyeinheit mit
Batterien betrieben wird, schaltet sich
die Babyeinheit aus und die Elterneinheit
verliert die Verbindung zur Babyeinheit.
D
Hinweis:
Wir empfehlen Ihnen, die Babyeinheit mit
Netzstrom zu betreiben, da die Babyeinheit eine
begrenzte Betriebsdauer hat, wenn Sie sie mit
Alkalibatterien verwenden. Die Betriebszeit bei
nicht auadbaren Batterien beträgt 24 Stunden.
Page 67

6 Funktionen
und Signale der
Elterneinheit
6.1 Beruhigungsmenü
Die Elterneinheit hat ein separates
Beruhigungsmenü für alle Beruhigungsfunktionen:
Nachtlicht, Schlaieder und Projektor. Um das
Menü zu öffnen, drücken Sie die Beruhigungstaste.
Über dieses Menü können Sie das Nachtlicht, die
Schlaieder und den Projektor auf der Babyeinheit
aus der Ferne zu steuern.
1 Um das Beruhigungsmenü zu öffnen, drücken
Sie die Beruhigungstaste.
D Hinweis:
Wenn Sie innerhalb von 7 Sekunden keine
Taste drücken, wird das Beruhigungsmenü
geschlossen, und das normale Display wird
angezeigt.
2 Verwenden Sie die Tasten “-” und “+”, um den
Pfeil auf eine Beruhigungsfunktion zu richten.
DEUTSCH
3 Um eine Beruhigungsfunktion ein- oder
auszuschalten, drücken Sie OK.
• Der Bildschirm des Beruhigungsmenüs
wird angezeigt. Dieser Bildschirm zeigt drei
Funktionen auf der Babyeinheit: Nachtlicht,
Schlaied und Projektor. Für jede Funktion
gibt es zwei Teile: Das Feld zum Ein-/
Ausschalten und das Feld für Menüoptionen.
• Wenn eine Funktion eingeschaltet ist, wird
ein Häkchen über dem Symbol der Funktion
angezeigt.
• Wenn eine Funktion ausgeschaltet ist, wird
ein Kreuz über dem Symbol der Funktion
angezeigt.
4 Um das Menü mit Optionen für die Funktion
zu öffnen, bewegen Sie den Pfeil über das
Menüoptionsfeld, und drücken Sie OK.
67
Page 68

5 Verwenden Sie die Tasten “-” und “+”, um
durch die Liste der Optionen zu navigieren,
und drücken Sie zur Auswahl einer Option
auf OK.
6 Um das Beruhigungsmenü zu beenden,
drücken Sie die Beruhigungstaste.
6.1.1 Nachtlicht
Diese Beruhigungsfunktion ermöglicht Ihnen,
das Nachtlicht ein- oder auszuschalten und den
Nachtlicht-Timer einzustellen.
1 Um die Nachtlichtfunktion auszuwählen,
bewegen Sie den Pfeil mit den Tasten “+”
und “-” zum Nachtlichtsymbol, und drücken
Sie OK, um das Nachtlicht ein- oder
auszuschalten.
2 Um das Menü mit den Nachtlichtoptionen
zu öffnen, richten Sie den Pfeil auf das
Optionsfeld, und drücken Sie zur Bestätigung
auf OK.
3 Sie können den Nachtlicht-Timer auf 5 bis
20 Minuten stellen oder das Nachtlicht
ununterbrochen einschalten. Drücken Sie zur
Bestätigung auf OK.
• Wenn Sie das Nachtlicht eingeschaltet
haben, wird das Nachtlichtsymbol auf dem
Display der Elterneinheit angezeigt, sobald
Sie die Beruhigungstaste drücken, um den
Beruhigungsbildschirm zu schließen.
• Wenn Sie den Nachtlicht-Timer einstellen,
wird das Nachtlicht automatisch
ausgeschaltet, und das Nachtlichtsymbol
wird nach der eingestellten Zeit nicht mehr
auf dem Display der Elterneinheit angezeigt.
• Wenn Sie das Nachtlicht ununterbrochen
einschalten, können Sie das Nachtlicht auf
dem Beruhigungsbildschirm der Elterneinheit
oder durch Drücken der Nachtlicht-Taste
auf der Babyeinheit ausschalten.
6.1.2Schlaied
Diese Beruhigungsfunktion ermöglicht Ihnen, die
Optionen für die Wiedergabe von Schlaiedern
auszuwählen und den Schlaied-Timer
einzustellen.
1 Um die Schlaiedfunktion auszuwählen,
bewegen Sie den Pfeil mit den Tasten “+” und
“-” auf das Schlaiedsymbol, und drücken Sie
OK, um die Wiedergabe von Schlaiedern zu
starten oder zu beenden.
2 Um das Menü mit den Schlaiedoptionen
zu öffnen, richten Sie den Pfeil auf das
Optionsfeld, und drücken Sie zur Bestätigung
auf OK.
68
Page 69

3 Im Menü können Sie aus einer Reihe von
Optionen auswählen:
• Wählen Sie ein Schlaied aus der Liste
der werksseitig gespeicherten Schlaieder
aus. Das zuletzt gespielte Schlaied
ist vorgewählt. Wenn im Vorfeld keine
Auswahl getroffen wurde, ist Schlaied
1 vorgewählt.
• Wenn Sie die Wiedergabe von Schlaiedern
ausgewählt haben, wird das SchlaiedSymbol auf dem Display der Elterneinheit
angezeigt, sobald Sie die Beruhigungstaste
drücken, um den Beruhigungsbildschirm zu
schließen. Das wiedergegebene Schlaied
wird 2 Sekunden lang in der zweiten Zeile
des Nachrichtenfelds angezeigt.
DEUTSCH
• Sie können auch “Play all” (Alle
wiedergeben) auswählen, um alle
werksseitig gespeicherten Schlaieder
wiederzugeben.
• Wählen Sie “Aux” aus, und rufen Sie
einen Titel auf, wenn Sie Musik von
einem externen Audiogerät wiedergeben
wollen. Um Musik von einem externen
Audiogerät wiederzugeben, müssen Sie
diesen Player über das mitgelieferte AUXKabel mit dem Anschluss für Audiogeräte
auf der Rückseite der Babyeinheit (Aux-in)
verbinden. Sie müssen die Lautstärke
auf dem Audiogerät einstellen, da die
Lautstärketasten “+” und “-” auf der
Babyeinheit nicht für externe Audiogeräte
verwendet werden können.
• Drücken Sie OK, um Ihre Auswahl zu
bestätigen.
4 Sie können den Schlaied-Timer auf 5 bis
20 Minuten stellen oder die kontinuierliche
Wiedergabe von Schlaiedern auswählen.
Drücken Sie OK, um die Timer-Einstellung zu
bestätigen.
• Wenn Sie den Schlaied-Timer einstellen,
wird die Schlaiedfunktion automatisch
ausgeschaltet, und das Schlaiedsymbol wird
nach der eingestellten Zeit nicht mehr auf
dem Display der Elterneinheit angezeigt.
• Wenn Sie möchten, dass die Schlaieder
ununterbrochen wiedergegeben werden,
schalten Sie die Schlaiedwiedergabe
auf dem Beruhigungsbildschirm aus, oder
drücken Sie die Wiedergabe-/Stopptaste für
das Schlaied K auf der Babyeinheit.
6.1.3 Projektor
Diese Beruhigungsfunktion ermöglicht Ihnen, den
Projektor auf der Babyeinheit einzuschalten und
die Dauer der Projektion einzustellen.
1 Um die Projektorfunktion auszuwählen,
bewegen Sie den Pfeil mit den Tasten “+” und
“-” zum Projektorsymbol, und drücken Sie OK,
um den Projektor ein- oder auszuschalten.
69
Page 70

2 Um das Menü mit den Projektoroptionen
zu öffnen, zeigen Sie mit dem Pfeil auf das
Optionsfeld, und drücken Sie zur Bestätigung
auf OK.
3 Sie können den Projektor-Timer auf 5 bis
20 Minuten stellen oder den Projektor
ununterbrochen einschalten. Drücken Sie zur
Bestätigung auf OK.
• Wenn Sie den Projektor eingeschaltet haben,
wird das Projektorsymbol auf dem Display
der Elterneinheit angezeigt, sobald Sie den
Beruhigungsbildschirm durch Drücken der
Beruhigungstaste schließen.
• Wenn Sie den Projektor-Timer einstellen,
wird der Projektor automatisch
ausgeschaltet, und das Projektorsymbol wird
nach der eingestellten Zeit nicht mehr auf
dem Display der Elterneinheit angezeigt.
• Wenn Sie den Projektor ununterbrochen
einschalten möchten, müssen Sie den
Projektor auf dem Beruhigungsbildschirm
ausschalten. Dadurch wird das
Projektorsymbol nicht mehr auf dem Display
der Elterneinheit angezeigt.
2 Drücken Sie zur Erhöhung der Lautstärke die
Taste “+” bzw. zur Reduzierung der Lautstärke
die Taste “-”.
• Die Elterneinheit piepst bei jeder
Lautstärkenstufe.
• Bei der maximalen Lautstärke gibt die
Elterneinheit zwei Pieptöne aus.
• Wenn für mehr als 2 Sekunden keine
Taste gedrückt wird, verschwindet
die Lautstärkenanzeige und die
Lautstärkeneinstellung ist gespeichert.
6.2.2 Stummschaltung
Nach der niedrigsten Lautstärkeneinstellung gibt
es die Einstellung “Stummschaltung”.
1 Drücken Sie die Taste “+” oder “-” einmal.
• Die aktuelle Lautstärke wird auf dem
Display angezeigt.
2 Halten Sie die Taste “-” länger als
2 Sekunden gedrückt, um die Lautstärke
auf Stummschaltung zu setzen.
• Die Nachricht “MUTE” (Stumm) und das
Symbol für Stummschaltung werden auf
dem Display angezeigt.
6.2 Lautstärke
Die Lautstärke kann eingestellt werden, wenn das
Menü nicht aktiv ist. Es gibt sieben Lautstärken
und die Einstellung “Stummschaltung”.
6.2.1 Einstellen der Lautstärke
1 Drücken Sie die Taste “+” oder “-” einmal.
• Die aktuelle Lautstärke wird auf dem
Display angezeigt.
70
D
Hinweis:
Wenn die Lautstärke stumm geschaltet ist,
zeigen nur die Geräuschpegelanzeigen an,
dass das Baby Töne von sich gibt.
Page 71

6.3 “Talk”-Funktion
(Sprechfunktion)
Über die TALK-Taste (Sprechtaste) an der
Elterneinheit können Sie mit Ihrem Kind sprechen
(um es beispielsweise zu trösten).
1 Halten Sie die TALK-Taste gedrückt, und
sprechen Sie aus einer Entfernung von 15
bis 30 cm deutlich ins Mikrofon auf der
Vorderseite der Elterneinheit.
6.4 Nachtmodus
Im Nachtmodus werden die Helligkeit der
Anzeigen und des Displays sowie die Lautstärke
der akustischen Signale verringert.
1 Drücken Sie die Taste für den Nachtmodus,
um den Nachtmodus einzuschalten.
D
Hinweis:
Wenn Sie die Lautstärke für das Schlaied auf
der Babyeinheit höher einstellen, wird der Ton
auch dann lauter, wenn Sie die Sprechfunktion
auf der Elterneinheit verwenden.
• Die LINK-Anzeige beginnt grün zu blinken,
und die Nachricht “TALK” (Sprechen) wird
auf dem Display angezeigt.
2 Lassen Sie die TALK-Taste (Sprechtaste) nach
dem Sprechen wieder los.
• Das Nachtmodus-Symbol wird auf dem
Display angezeigt.
• Die Lautstärkeanzeigen und die LINK-
Anzeige sind gedimmt.
• Die Hintergrundbeleuchtung des Displays ist
gedimmt.
• Die Lautstärke der auf der Elterneinheit
eingestellten Signaltöne ist verringert.
2 Um zum normalen Betriebsmodus
zurückzukehren, drücken Sie die NachtmodusTaste erneut.
• Das Nachtmodus-Symbol wird nicht mehr
auf dem Display angezeigt.
• Die Lautstärkeanzeigen und die LINK-
Anzeige leuchten wieder mit normaler
Helligkeit.
• Die Hintergrundbeleuchtung des Displays
leuchtet wieder mit voller Intensität.
• Die Signaltöne werden mit normaler
Lautstärke ausgegeben.
DEUTSCH
71
Page 72

6.5 Alarm bei niedrigem
Batteriestand der
Babyeinheit
1 Wenn die Babyeinheit mit Akkus betrieben
wird und der Akkustand niedrig ist, gibt die
Elterneinheit die folgenden Signale aus:
• Der Text “BABY UNIT” (Babyeinheit) wird
in der ersten Zeile des Nachrichtenfelds
auf dem Display angezeigt.
• Die Nachricht “Change batteries” (Akkus
auswechseln) läuft in der zweiten Zeile
über den Bildschirm.
• Die Elterneinheit piept in den ersten
3 Minuten alle 10 Sekunden. Danach piept
die Elterneinheit jede Minute.
2 Wenn Sie die Akkus nicht rechtzeitig
ersetzen, wird die Verbindung zur Babyeinheit
unterbrochen.
• Die Nachricht “Not linked” (Nicht
verbunden) und die Nachricht “Change
batteries (Akkus auswechseln) werden
abwechselnd in der zweiten Zeile des
Nachrichtenfelds angezeigt.
6.6 Akkustandanzeigen
Der Akkuladestatus wird auf dem Display durch
die Akkustandanzeigen und durch Textmeldungen
angezeigt.
6.6.1 Akku fast leer
Wenn der Akkustand niedrig ist, beträgt
die verbleibende Betriebsdauer mindestens
30 Minuten, wenn das Babyphone in normalem
Modus in den höchsten Einstellungen betrieben wird.
1 Die Akkustandanzeige auf dem Display ist leer
und blinkt.
2 Die Nachricht “BATTERY LOW” (Akku leer)
wird auf dem Display angezeigt.
3 Die Akkustandanzeige blinkt langsam rot.
4 Die Elterneinheit piepst in den ersten
3 Minuten alle 10 Sekunden. Dann piepst sie
jede weitere Minute.
6.6.2 Akku leer
1 Wenn die Akkus fast leer sind, leuchtet die
Akkustandanzeige schnell rot auf.
D
Hinweis:
Wenn der Akkustand sowohl bei der
Elterneinheit als auch der Babyeinheit
niedrig ist, wird zuerst die Nachricht zum
niedrigen Akkustand der Elterneinheit
auf dem Display angezeigt. Sobald die
Elterneinheit aufgeladen ist, wird die
Nachricht zum niedrigen Akkustand
der Babyeinheit auf dem Display der
Elterneinheit angezeigt.
72
2 Wenn Sie die Elterneinheit nicht an
das Stromnetz anschließen, geschieht
nacheinander das Folgende:
Page 73

1 Die Verbindung mit der Babyeinheit geht
verloren.
2 Das Display geht aus.
3 Die Elterneinheit schaltet sich aus.
D
Hinweis:
Wenn Sie die Elterneinheit einschalten, während
die Akkus fast leer sind, geht das Display an. Die
Nachricht “BATTERY LOW” (Akku leer) wird
2 Sekunden auf dem Display angezeigt, bevor sich
die Elterneinheit ausschaltet.
6.6.3 Laden
Stecken Sie den kleinen Stecker in das Ladegerät
und den Adapter in eine Steckdose. Stellen Sie
die Elterneinheit in das Ladegerät. Beim Auaden
der Elterneinheit geschieht Folgendes in dieser
Reihenfolge:
1 Das Display wird für 4 Sekunden aktiviert, und
der Text “CHARGING” (Laden) erscheint für
2 Sekunden auf dem Bildschirm.
2 Die Akkustandanzeige leuchtet dauerhaft
grün, wenn die Elterneinheit mit der
Stromversorgung verbunden ist.
3 Das erste Segment der Akkustandanzeige
beginnt zu blinken und zeigt somit an, dass die
Akkus aufgeladen werden.
5 Das dritte Segment der Akkustandanzeige
beginnt zu blinken, wenn die Akkus zu über
50 % aufgeladen sind.
6 Wenn die Akkus vollständig aufgeladen sind,
geschieht Folgendes:
• Das dritte Segment der Akkustandanzeige
hört auf zu blinken.
• Das Display wird für 4 Sekunden
aktiviert, und die Nachricht “BATTERY
FULL” (Akku voll) wird auf dem Display
angezeigt.
DEUTSCH
4 Das zweite Segment der Akkustandanzeige
beginnt zu blinken, wenn die Akkus zu über
30 % aufgeladen sind.
7 Trennen Sie die Elterneinheit vom Netz. Es ist
jetzt kabellos verwendbar.
D
Hinweis:
Sie können die Elterneinheit auaden, wenn sie
ausgeschaltet ist. In diesem Fall ist das Display
ausgeschaltet. Die Akkustandanzeige leuchtet, zeigt
jedoch nicht den Ladestatus an. Diese Anzeige
leuchtet dauerhaft grün, solange die Elterneinheit
mit der Stromversorgung verbunden ist.
D
Hinweis:
Wenn die Akkus sehr schnell leer werden, haben
sie das Ende ihrer Lebensdauer erreicht und
müssen ersetzt werden. Informationen zum
Bestellen neuer Akkus erhalten Sie im Kapitel
“Zubehör bestellen”.
73
Page 74

6.7 Signalstärkeanzeige
6.7.1 Intelligenter Eco-Modus
Der intelligente Eco-Modus ist der
Standardbetriebsmodus. In diesem Modus hängt
die Stärke des DECT-Signals von der Entfernung
zwischen der Babyeinheit und der Elterneinheit ab.
• Wenn die Signalstärkeanzeige 4 Balken anzeigt,
ist die Verbindung zwischen der Babyeinheit
und der Elterneinheit hervorragend.
• Wenn die Signalstärkeanzeige 1 oder
keinen Balken anzeigt, ist das Signal von der
Babyeinheit sehr schwach oder nicht verfügbar.
Platzieren Sie die Elterneinheit näher an
der Babyeinheit, um ein besseres Signal zu
erhalten.
6.7.2 Eco Max-Modus
In diesem Modus ist das DECT-Signal zwischen
der Babyeinheit und der Elterneinheit
ausgeschaltet.
• Die Signalstärkeanzeige zeigt keinen Balken
an, wenn das DECT-Signal der Babyeinheit
ausgeschaltet ist, selbst wenn sich die
Elterneinheit innerhalb des Empfangsbereichs
der Babyeinheit bendet.
• Wenn die Babyeinheit ein DECT-Signal
sendet, weil Ihr Baby ein Geräusch von
sich gibt, wird das Display aktiviert, und die
Signalstärkeanzeige zeigt die Qualität der
Verbindung zwischen der Babyeinheit und der
Elterneinheit an.
• Weitere Informationen zum Eco Max-Modus
erhalten Sie im Abschnitt “Eco Max-Modus”
im Kapitel “Menü der Elterneinheit”.
6.8 Zurücksetzen
Diese Funktion ermöglicht Ihnen, die Elterneinheit
und die Babyeinheit auf die werkseitigen
Standardeinstellungen zurückzusetzen.
1 Schalten Sie das Gerät aus.
2 Halten Sie die Taste “-” gedrückt.
3 Schalten Sie, während Sie die Taste “-”
gedrückt halten, das Gerät wieder ein.
6.8.1 Standardeinstellungen
Elterneinheit
• Sprache: Englisch
• Lautsprecherlautstärke: 3
• Mikrofonempndlichkeit: 3
• Nachtmodus: aus
• Temperatursignal: aus
• Warnsignal “Temperatur zu niedrig”: 14 °C
• Warnsignal “Temperatur zu hoch”: 35 °C
• Temperaturskala: Celsius
• Feuchtigkeitsalarm: aus
• Eco Max-Modus: ausgeschaltet
• Feed-Timer: 02:00
• Feed-Timer: Stopp
• Vibrationsalarm: aus
• Vibration bei Weinalarm: aus
• Uhr: ausgeblendet
• Schlaied-Timer: 15 Minuten
• Projektor-Timer: 15 Minuten
Babyeinheit
• Lautsprecherlautstärke: 4
• Nachtlicht: Aus
• Projektor: aus
• Nachtlichteinstellung: manuell
• Schlaied: ausgeschaltet (Schlaied 1
ausgewählt)
74
Page 75

7 Menü der
Elterneinheit
Die in den folgenden Abschnitten beschriebenen
Funktionen können über das Menü der
Elterneinheit verwendet werden.
7.1 Navigation durch das Menü
D Hinweis:
Einige Menüfunktionen funktionieren nur, wenn
die Babyeinheit und die Elterneinheit miteinander
verbunden sind.
1 Drücken Sie zum Öffnen des Menüs die
MENU-Taste (Menütaste).
• Auf dem Display erscheint die erste
Menüoption.
2 Verwenden Sie die Taste “+”, um zur nächsten
Option zu wechseln, oder die Taste “-”, um zur
vorherigen Option zu wechseln.
3 Bestätigen Sie Ihre Wahl mit der OK-Taste.
D
Hinweis:
Drücken Sie die Taste MENU, wenn Sie das
Menü verlassen möchten, ohne Änderungen
vorzunehmen. Wenn länger als 20 Sekunden keine
Eingabe im Menü vorgenommen wurde, wird das
Menü automatisch geschlossen.
7.2Empndlichkeit
Mit dieser Option im Menü der Elterneinheit
können Sie die Mikrofonempndlichkeit
der Babyeinheit einzustellen. Die
Mikrofonempndlichkeit bestimmt, welchen
Geräuschpegel die Babyeinheit wahrnimmt, z. B.
möchten Sie zwar hören, wenn Ihr Baby weint,
nicht aber, wenn es brabbelt.
1 Wählen Sie im Menü mithilfe der Tasten
“+” und “-” die Option “Sensitivity”
(Empndlichkeit) aus, und drücken Sie zur
Bestätigung auf “OK”.
2 Verwenden Sie die Tasten “+” und
“-” zur Erhöhung/Reduzierung
der Mikrofonempndlichkeit. Die
Empndlichkeitsanzeige auf dem Display
verfügt über vier Segmente.
• Wenn alle vier Segmente ausgefüllt sind, ist
die Empndlichkeit am höchsten.
DEUTSCH
D
Hinweis:
Der Pfeil auf dem Display zeigt an, in welche
Richtung Sie navigieren können.
75
Page 76

• Wenn alle Segmente leer sind, ist die
Empndlichkeit am niedrigsten.
3 Drücken Sie auf “OK”, um die Einstellung zu
bestätigen.
7.2.1EmpndlichkeitsstufenundAnzeigen
Symbol Empndlichkeit Beschreibung
sehr hoch Sie hören alles von Ihrem
Baby. Der Lautsprecher
der Elterneinheit ist
ständig eingeschaltet.
hoch Sie hören alle Geräusche:
leises Brabbeln sowie
lautere Geräusche.
Wenn Ihr Baby kein
Geräusch von sich gibt,
ist der Lautsprecher
der Elterneinheit
ausgeschaltet.
mittelhoch Sie hören leises Weinen
sowie lautere Geräusche.
Wenn Ihr Baby leisere
Geräusche von sich gibt,
wird der Lautsprecher
der Elterneinheit nicht
aktiviert.
niedrig Der Lautsprecher der
Elterneinheit wird nur
aktiviert, wenn das Baby
laute Geräusche von sich
gibt, zum Beispiel, weil es
weint.
7.3 Eco Max-Modus
Dieses Babyphone hat einen eingebauten
intelligenten Eco-Modus, der automatisch das
DECT-Signal von der Babyeinheit reduziert,
wenn die Entfernung zwischen Elterneinheit und
Babyeinheit verringert wird. Durch die geringere
Funkübertragung wird Energie gespart.
Wenn Sie noch mehr Energie sparen und die
Funkübertragung beenden möchten, aktivieren Sie
den Eco Max-Modus im Menü der Elterneinheit.
In diesem Modus ist das DECT-Signal der
Babyeinheit ausgeschaltet. Sobald das Baby
Geräusche macht, schaltet sich das DECT-Signal
der Babyeinheit automatisch wieder ein.
C
Achtung:
Im Eco Max-Modus empfängt die Elterneinheit
das Signal der Babyeinheit mit einiger
Verzögerung. Wenn Ihr Baby ein Geräusch von
sich gibt, muss die Babyeinheit zunächst die
Funkübertragung wieder aktivieren, bevor sie ein
Signal an die Elterneinheit senden kann.
7.3.1 Bitte beachten Sie Folgendes:
• Bevor Sie den Eco Max-Modus im Menü der
Elterneinheit auswählen, vergewissern Sie sich,
dass sich die Elterneinheit und die Babyeinheit
in entsprechender Reichweite benden. Lesen
Sie dazu den Abschnitt “Reichweite” im Kapitel
“Verwenden des Babyphones”. Im Eco MaxModus erhalten Sie kein Signal, wenn sich die
Elterneinheit außerhalb des Empfangsbereichs
der Babyeinheit bendet. Sie können die
Verbindung durch Drücken auf eine beliebige
Taste an der Elterneinheit überprüfen.
• Wenn im Eco Max-Modus keine
Funkübertragung von der Babyeinheit zur
Elterneinheit erfolgt, ist die Lautstärkeanzeige
ausgeschaltet. Die Lautstärkeanzeige
wird aktiviert, wenn die Babyeinheit die
Funkübertragung wieder aktiviert, weil Ihr
Baby ein Geräusch oberhalb der ausgewählten
Empndlichkeitsstufe von sich gibt.
• Wenn Sie das Babyphone im Eco Max-Modus
betreiben wollen, vergewissern Sie sich, dass
die Mikrofonempndlichkeit auf einen Wert
76
Page 77

zwischen Stufe 1 und 3 eingestellt ist. Wenn
die Mikrofonempndlichkeit auf Stufe 4
eingestellt wird, schaltet die Babyeinheit die
Funkübertragung im Eco Max-Modus nicht
aus.
7.3.2 Aktivieren des Eco Max-Modus
1 Wählen Sie mit den Tasten “+” und “-” “Eco
Max” im Menü aus, und drücken Sie “OK” zur
Bestätigung.
2 Wenn das Display “Turn On” (Einschalten)
anzeigt, drücken Sie auf “OK”, um den Eco
Max-Modus einzuschalten.
3 Die Warnung “No alert if out of range, OK?”
(Kein Alarm außer Reichweite, OK?) wird
auf dem Display angezeigt. Drücken Sie zur
Bestätigung auf OK.
D
Hinweis:
Die Warnung läuft zwei Mal über das Display.
Wenn Sie nicht “OK” drücken, verlässt die
Elterneinheit das Menü, und der Eco MaxModus bleibt ausgeschaltet.
• Die Eco Max-Anzeige leuchtet auf dem
Display auf, und die “Link”-Anzeige blinkt
langsam grün.
• Wenn die Elterneinheit ein Signal von der
Babyeinheit empfängt, weil das Baby ein
Geräusch von sich gibt, leuchtet die “Link”-
Anzeige wieder kontinuierlich grün.
7.3.3 Deaktivieren des Eco Max-Modus
1 Drücken Sie die Taste MENU.
2 Verwenden Sie die Tasten “+” und “-”, um
“Eco Max” auszuwählen, und drücken Sie
“OK” zur Bestätigung.
3 Verwenden Sie die Tasten “+” und “-”, um
“Turn Off” (Ausschalten) auszuwählen, und
drücken Sie “OK” zur Bestätigung.
7.4 Feed-Timer
Sie können den Feed-Timer einstellen, der Sie
benachrichtigt, dass es Zeit ist, Ihr Baby zu füttern.
Der Timer kann von 1 Minute bis 23 Stunden und
59 Minuten eingestellt werden.
7.4.1 Einstellen und Verwenden des FeedTimers
1 Wählen Sie mit den Tasten “+” und “-” “Feed-
Timer” im Menü aus, und drücken Sie “OK”
zur Bestätigung.
2 Wählen Sie mit den Tasten “+” und “-” “Set
Timer” (Timer einstellen) aus. Drücken Sie
OK, um die Einstellung des Timers zu starten.
• Die Stundenanzeige leuchtet auf dem
Display auf.
3 Stellen Sie die Stunde ein, und drücken Sie zur
Bestätigung die Taste OK.
• Die Minutenanzeige leuchtet auf dem
Display auf.
4 Stellen Sie die Minuten ein, und drücken Sie
zur Bestätigung die Taste OK.
5 Wählen Sie mit den Tasten “+” und “-” “xx:
xx Start” aus. Drücken Sie zur Bestätigung die
Taste OK.
• Das Timersymbol wird im Display angezeigt.
• Der Timer beginnt damit, die eingestellte
Zeit herunterzuzählen.
DEUTSCH
77
Page 78

6 Wenn der Timer 00:00 erreicht hat, wird der
Feed-Timer-Alarm ausgelöst, das Timersymbol
leuchtet auf dem Display auf, und die
Nachricht “TIMER END” (Timer-Ende) läuft
über das Display.
7 Drücken Sie eine beliebige Taste, um den
Alarm auszuschalten. Wenn Sie den Alarm
nicht ausschalten, hört er automatisch nach
2 Minuten auf.
2 Wählen Sie “Repeat ON” (Wiederholen EIN)
oder “Repeat OFF (Wiederholen AUS) aus,
und drücken Sie zur Bestätigung die Taste OK.
3 Wählen Sie mit den Tasten “+” und “-” “xx: xx
Start” aus, und drücken Sie die Taste OK, um
die Wiederholungsfunktion für den FeedTimer zu aktivieren.
• Statt des normalen Timer-Symbols wird auf
dem Display das Symbol für die TimerWiederholung angezeigt.
7.4.2 Einstellen des Feed-Timer-Alarms
1 Nach Schritt 5 von “Einstellen und Verwenden
des Feed-Timers” wählen Sie mit den Tasten
“+” und “-” “Timer Alert” (Timer-Alarm) aus.
Drücken Sie zur Bestätigung die Taste OK.
2 Wählen Sie mit den Tasten “+” und “-” eine
der Alarmeinstellungen aus. Die verfügbaren
Optionen sind: Nur Ton, Ton und Vibration
sowie nur Vibration. Drücken Sie zur
Bestätigung die Taste OK.
3 Wählen Sie mit den Tasten “+” und “-” “xx: xx
Start” aus, und drücken Sie die Taste OK, um
den Feed-Timer zu aktivieren.
4 Wenn der Feed-Timer-Alarm ausgelöst wird,
können Sie den Feed-Timer und den FeedTimer-Alarm durch Drücken einer beliebigen
Taste beenden.
7.4.3 Wiederholen des Feed-Timers
1 Nach Schritt 5 von “Einstellen und Verwenden
des Feed-Timers” oder nach dem Einstellen
des Feed-Timer-Alarms wählen Sie mit den
Tasten “+” und “-” die Option “Timer repeat”
(Timer-Wiederholung) aus. Drücken Sie zur
Bestätigung die Taste OK.
4 Wenn Sie eine beliebige Taste drücken, um
den Feed-Timer-Alarm auszuschalten, oder
wenn der Alarm automatisch nach 2 Minuten
aufhört, beginnt der Feed-Timer erneut mit
dem Rückwärtszahlen der Zeit.
7.4.4 Ausschalten des Timers
1 Drücken Sie die Menütaste, und wählen Sie
“Feed-Timer” aus.
2 Wählen Sie mit den Tasten “+” und “-”
die Option “Stop & Reset” (Beenden &
Zurücksetzen) aus, und drücken Sie zur
Bestätigung die Taste OK.
7.5 Temperatur
Ihr Baby schläft am besten, wenn die Temperatur
zwischen 16 °C und 20 °C beträgt. Sie
können einen minimalen und einen maximalen
Temperaturbereich einstellen oder einen Alarm
festlegen, wenn die Temperatur außerhalb
des eingestellten minimalen und maximalen
Temperaturbereichs liegt.
1 Wählen Sie im Menü mit den Tasten + und “-”
“Temperature” (Temperatur) aus, und drücken
Sie zur Bestätigung die Taste OK.
78
Page 79

2 Wählen Sie mit den Tasten “+” und “-” “Temp
Range” (Temperaturbereich) aus, und drücken
Sie zur Bestätigung die Taste OK.
• Die Mindesttemperaturanzeige leuchtet auf
dem Display auf.
3 Verwenden Sie die Tasten “+” und “-”, um den
Mindesttemperaturbereich zwischen 10 °C
und 19 °C einzustellen. Drücken Sie zur
Bestätigung die Taste OK.
• Die maximale Temperaturanzeige leuchtet
auf dem Display auf.
4 Verwenden Sie die Tasten “+” und “-”, um
den maximalen Temperaturbereich zwischen
22 °C und 37 °C einzustellen. Drücken Sie zur
Bestätigung die Taste OK.
5 Wählen Sie mit den Tasten “+” und “-” “Aler t”
(Alarm) aus. Drücken Sie zur Bestätigung die
Taste OK, und beginnen Sie mit dem Einstellen
der Optionen für das Temperatursignal.
6 Wählen Sie mit den Tasten “+” und “-” eine
der Alarmeinstellungen aus. Die verfügbaren
Optionen sind: Nur Ton, Ton und Vibration, nur
Vibration sowie nur Anzeige. Drücken Sie zur
Bestätigung die Taste OK.
• Nachdem Sie Ihre Alarmeinstellung
bestätigt haben, wird das Symbol für
den Temperaturalarm auf dem Display
angezeigt.
7 Wählen Sie mit den Tasten “+” und “-” “Temp
Scale” (Temp.Skala) aus. Drücken Sie zur
Bestätigung die Taste OK, und beginnen Sie
mit dem Einstellen der Temperaturskala.
8 Wählen Sie “Celsius” oder “Fahrenheit” aus,
und drücken Sie zur Bestätigung die Taste OK.
• Die Temperatur in der eingestellten Skala
wird auf dem Display angezeigt. Wenn die
Temperatur innerhalb des eingestellten
Bereichs liegt, besteht das Symbol für den
Temperaturalarm aus zwei Teilen.
• Wenn die Temperatur unter dem
eingestellten Bereich liegt, besteht das
Symbol für den Temperaturalarm auf dem
Display nur aus einem Teil und blinkt. Die
Nachricht “TOO COLD” (Zu kalt) wird auf
dem Display angezeigt.
• Wenn die Temperatur über dem
eingestellten Bereich liegt, besteht das
Symbol für den Temperaturalarm auf dem
Display aus drei Teilen und blinkt. Die
Nachricht “TOO HOT” (Zu warm) wird auf
dem Display angezeigt.
7.6 Luftfeuchtigkeit
Die optimale Luftfeuchtigkeit liegt zwischen
40 % und 60 %. Daher ist der richtige
Luftfeuchtigkeitsgrad im Kinderzimmer besonders
wichtig, um Reizungen der Schleimhäute, trockene
und juckende Haut, rissige Lippen und einen
trockenen, gereizten Hals bei Ihrem Kind zu
vermeiden. Wenn die Schleimhäute nicht richtig
arbeiten, können sie Ihr Kind nicht wirksam gegen
die unterschiedlichsten Krankheitserreger schützen.
Das wiederum erhöht die Gefahr einer Erkältung
oder Grippe und verringert die Widerstandskraft
des Kindes gegen Pilz- und Bakterieninfektionen.
Sie können einen Luftfeuchtigkeitsalarm einstellen,
um Sie zu warnen, wenn die Luftfeuchtigkeit
außerhalb des eingestellten Bereichs liegt.
79
DEUTSCH
Page 80

1 Wählen Sie im Menü mit den Tasten “+” und
“-” “Humidity” (Luftfeuchtigkeit) aus, und
drücken Sie zur Bestätigung die Taste OK.
2 Wählen Sie mit den Tasten “+” und “-” “Hum
Range” (Luftfeuchtigkeitsbereich) aus, und
drücken Sie zur Bestätigung die Taste OK.
• Die Anzeige für die minimale
Luftfeuchtigkeit leuchtet auf dem Display
auf.
3 Stellen Sie mit den Tasten “+” und “-” die
minimale Luftfeuchtigkeit auf einen Wert
zwischen 20 % und 50 %. Drücken Sie zur
Bestätigung die Taste OK.
• Die Anzeige für die maximale
Luftfeuchtigkeit leuchtet auf dem Display
auf.
4 Stellen Sie mit den Tasten “+” und “-” die
maximale Luftfeuchtigkeit auf einen Wert
zwischen 51 % und 70 %. Drücken Sie zur
Bestätigung die Taste OK.
5 Wählen Sie mit den Tasten “+” und “-” “Aler t”
(Alarm) aus. Drücken Sie zur Bestätigung die
Taste OK, und beginnen Sie mit dem Einstellen
der Optionen des Feuchtigkeitsalarms.
6 Wählen Sie mit den Tasten “+” und “-” eine
der Alarmeinstellungen aus. Die verfügbaren
Optionen sind: Nur Ton, Ton und Vibration, nur
Vibration sowie nur Anzeige. Drücken Sie zur
Bestätigung die Taste OK.
• Nachdem Sie Ihre Alarmeinstellung
bestätigt haben, wird das Symbol für
den Feuchtigkeitsalarm auf dem Display
angezeigt.
• Wenn die Luftfeuchtigkeit unter dem
eingestellten Bereich liegt, blinken das
Symbol für den Luftfeuchtigkeitsalarm sowie
die gemessene Luftfeuchtigkeit auf dem
Display. Die Nachricht “TOO DRY” (Zu
trocken) wird auf dem Display angezeigt.
• Wenn die Luftfeuchtigkeit über dem
eingestellten Bereich liegt, blinken das
Symbol für den Luftfeuchtigkeitsalarm sowie
die gemessene Luftfeuchtigkeit auf dem
Display. Die Nachricht “TOO HUMID” (Zu
feucht) wird auf dem Display angezeigt.
7.7 Weinalarm
Sie können einen Weinalarm einstellen, um Sie
beim Weinen des Babys zu warnen.
1 Wählen Sie mit den Tasten “+” und “-” im
Menü “Cry aler t” (Weinalarm) aus. Drücken
Sie zur Bestätigung auf OK.
2 Wählen Sie mit den Tasten “+” und “-” die
Option “Vibration ON” (Vibration EIN) aus.
Drücken Sie zur Bestätigung die Taste OK.
• Die Anzeige für den Weinalarm wird auf
dem Display angezeigt.
80
Page 81

• Der Weinalarm wird ausgelöst, wenn der
Geräuschpegel im Kinderzimmer so hoch
ist, dass die vierte Geräuschpegelanzeige
aktiviert wird. Die Elterneinheit vibriert, und
die Nachricht “Cry alert” (Weinalarm) wird
4 Sekunden lang auf dem Display angezeigt.
Der Weinalarm wird alle 8 Sekunden
wiederholt, bis der Geräuschpegel leiser wird
oder Sie den Weinalarm deaktivieren.
3 Um den Weinalarm zu deaktivieren, wählen
Sie im Menü “Cry aler t” (Weinalarm) und mit
den Tasten “+” und “-” die Option “Vibration
OFF” (Vibration AUS) aus.
7.8 Uhr
Standardmäßig ist die Uhr ausgeblendet. Sie
können auswählen, dass die Uhr angezeigt wird,
und die Uhrzeit im Menü der Elterneinheit
einstellen.
1 Wählen Sie mit den Tasten “+” und “-” im
Menü “Set clock” (Uhr stellen) aus. Drücken
Sie zur Bestätigung auf OK.
2 Verwenden Sie die Taste “+” oder “-”, um
“Show Time” (Zeit anz.) auszuwählen, und
drücken Sie zur Bestätigung die Taste OK.
3 Wählen Sie “Set the time” (Uhrzeit stellen)
mit den Tasten “+” und “-” aus. Drücken Sie
zur Bestätigung die Taste OK, um mit der
Einstellung der Uhrzeit zu beginnen.
• Die Stundenanzeige leuchtet auf dem
Display auf.
4 Stellen Sie die Stunde ein, und drücken Sie zur
Bestätigung die Taste OK.
• Die Minutenanzeige leuchtet auf dem
Display auf.
5 Stellen Sie die Minuten ein, und drücken Sie
zur Bestätigung die Taste OK.
• Die Uhrzeit wechselt mit anderen Anzeigen
im Nachrichtenfeld des Displays ab.
7.9 Sprache
Sie können diese Menüoption verwenden, um die
Spracheinstellung zu ändern.
1 Wählen Sie mit den Tasten “+” und “-” im
Menü “Set language” (Sprache einstellen) aus.
Drücken Sie zur Bestätigung auf OK.
2 Verwenden Sie die Tasten “+” und “-”, um Ihre
Sprache auszuwählen, und drücken Sie zur
Bestätigung die Taste OK.
D
Hinweis:
Diese Option erscheint automatisch auf dem
Display, wenn Sie die Elterneinheit zum ersten
Mal und nach einem Zurücksetzen einschalten.
DEUTSCH
81
Page 82

7.10 Feststelltaste
Sie können die Feststelltaste aktivieren, um
das versehentliche Betätigen der Tasten beim
Mitführen der Elterneinheit zu verhindern.
1 Um die Feststelltaste zu aktivieren, drücken Sie
auf OK.
2 Drücken Sie die Taste “+” innerhalb von
2 Sekunden.
D
Hinweis:
Wenn Sie die Taste “+” nicht innerhalb von
2 Sekunden drücken, bleibt die Anweisung auf
dem Display.
• Nachdem Sie die Taste “+” gedrückt
haben, wird anstatt der Temperatur- oder
Feuchtigkeitsanzeige die Nachricht “Keys
locked” (Tasten gesperrt) auf dem Display
angezeigt.
3 Um die Feststelltaste zu deaktivieren,
drücken Sie auf OK. Wenn auf dem Display
die Anweisung angezeigt wird, drücken Sie
innerhalb von 2 Sekunden die Taste “+”.
7.10.1 Bemerkungen
• Wenn Sie bei aktivierter Feststelltaste eine
andere Taste als die OK-Taste drücken, wird
das Display eingeschaltet und in der zweiten
Zeile wird angezeigt, wie Sie die Feststelltaste
deaktivieren.
• Wenn Sie bei aktivierter Feststelltaste die OK-
Taste drücken, wird in der zweiten Zeile des
Displays der zweite Schritt angezeigt, der zum
Entsperren der Tasten notwendig ist.
• Wenn die Feststelltaste aktiviert ist, können
Sie die Suchfunktion und den Feed-TimerAlarm durch Drücken der Taste OK anhalten.
Die Feststelltaste bleibt in diesem Fall aktiviert.
• Wenn der Weinalarm, das Temperatursignal
oder der Feuchtigkeitsalarm ausgelöst wird,
während die Feststelltaste aktiviert ist,
deaktivieren Sie zuerst die Feststelltaste, und
deaktivieren Sie dann den Weinalarm oder
das Temperatursignal über das Menü.
82
Page 83

8 Halstrageband
9 Reinigung und
Ein bequemes Halstrageband ist im Lieferumfang
des Babyphones enthalten. Es ermöglicht Ihnen,
die Elterneinheit bei sich zu tragen.
8.0.1 Das Halstrageband anbringen
1 Stecken Sie die Endschlaufe des
Halstragebands durch die Öffnung oben an
der Elterneinheit.
2 Fädeln Sie das Halstrageband durch die
Endschlaufe, und ziehen Sie das Halstrageband
fest.
8.0.2 Das Halstrageband abnehmen
1 Fädeln Sie das Halstrageband durch die
Endschlaufe.
2 Ziehen Sie die Endschlaufe aus der Öffnung
oben an der Elterneinheit.
Wartung
B Warnhinweis:
Tauchen Sie die Elterneinheit, die Babyeinheit
und das Ladegerät der Elterneinheit nicht
in Wasser, und reinigen Sie sie nicht unter
ießendemWasser.
B
Warnhinweis:
Verwenden Sie weder Reinigungsspray noch
üssigeReinigungsmittel.
1 Ziehen Sie die Babyeinheit und das Ladegerät
aus der Steckdose, sofern sie eingesteckt sind.
2 Reinigen Sie die Elterneinheit, das Ladegerät
und die Babyeinheit mit einem trockenen Tuch.
3 Reinigen Sie die Adapter mit einem trockenen
Tuch.
10 Aufbewahrung
Wenn Sie vorhaben, das Babyphone längere Zeit
nicht zu benutzen, tun Sie Folgendes:
• Nehmen Sie die nicht Batterien aus der
Babyeinheit heraus.
• Nehmen Sie die Akkus aus der Elterneinheit
heraus.
• Bewahren Sie die Elterneinheit, die
Babyeinheit und die Adapter an einem kühlen
und trockenen Ort auf.
DEUTSCH
83
Page 84

11 Zubehör bestellen
Um Zubehör oder Ersatzteile zu kaufen, gehen
Sie auf www.shop.philips.com/service, oder
besuchen Sie Ihren Philips Händler. Sie können
auch den Philips Kundendienst in Ihrem Land
kontaktieren (die Kontaktdaten entnehmen Sie
der internationalen Garantieschrift). Sollte es in
Ihrem Land keinen Philips Kundendienst geben,
wenden Sie sich bitte an Ihren Philips Händler
oder an ein Philips Service-Center.
12 Garantie und
Support
Wenn Sie Hilfe oder Informationen benötigen,
besuchen Sie bitte die Philips Website unter
www.philips.com/support, oder kontaktieren
Sie das Philips Kundencenter in Ihrem Land (die
Kontaktdetails entnehmen Sie der internationalen
Garantieschrift). Wenn es kein Kundencenter
in Ihrem Land gibt, gehen Sie zu Ihrem Philips
Händler vor Ort oder einem Philips ServiceCenter.
13Häuggestellte
Fragen
Was ist der Eco Max-Modus? Wie trägt dieser
Modus zum Schutz der Umwelt bei?
• Der Eco Max-Modus wurde entwickelt, damit
Sie den Energieverbrauch Ihres Babyphones
verringern können. Wenn Sie Ihr Baby aus
kleiner Entfernung überwachen, können
Sie den Eco Max-Modus aktivieren. Durch
Einschalten des Eco Max-Modus verbraucht
Ihr Babyphone weniger Energie und ist daher
umweltfreundlicher.
Warum leuchten die Betriebsanzeige
der Babyeinheit und die LINK-Anzeige
(Verbindungsanzeige) der Elterneinheit nicht auf,
wenn ich den Ein-/Ausschalter an den Einheiten
drücke?
• Möglicherweise sind die Akkus der
Elterneinheit leer, und die Elterneinheit ist
nicht angeschlossen. Stecken Sie den kleinen
Gerätestecker in die Buchse der Elterneinheit
und den Adapter in eine Steckdose. Drücken
Sie dann den Ein-/Ausschalter, um die
Verbindung mit der Babyeinheit herzustellen.
• Möglicherweise sind die Batterien der
Babyeinheit leer, und die Babyeinheit ist nicht
an das Stromnetz angeschlossen. Ersetzen Sie
die Batterien, oder schließen Sie die Babyeinheit
an das Stromnetz an. Drücken Sie dann den
Ein-/Ausschalter, um die Verbindung mit der
Elterneinheit herzustellen.
• Wenn die LINK-Anzeige an der Elterneinheit
noch immer nicht rot blinkt, verwenden Sie
die Reset-Funktion, um die Geräte auf ihre
Standardeinstellungen zurückzusetzen.
Dieses Kapitel enthält die am häugsten gestellten
Fragen zum Gerät. Wenn Sie die Antwort auf
Ihre Frage nicht nden, besuchen Sie die Seite
www.philips.com/support für weitere häug
gestellte Fragen oder kontaktieren Sie ein
Service-Center in Ihrem Land.
84
Warum leuchtet die LINK-Anzeige an der
Elterneinheit durchgehend rot, und warum wird
die Meldung “NOT LINKED” (Nicht verbunden)
oder “I AM LINKING” (Verbindung wird
hergestellt) auf dem Display angezeigt?
• Die Reichweite zwischen Eltern- und
Babyeinheit ist überschritten. Bringen Sie die
Elterneinheit näher zur Babyeinheit.
• Die Babyeinheit ist möglicherweise
ausgeschaltet. Schalten Sie sie wieder ein.
Page 85

Warum blinkt die Batteriestandanzeige an der
Babyeinheit rot?
• Die Batterien der Babyeinheit sind fast leer.
Tauschen Sie sie aus, oder schließen Sie die
Babyeinheit an das Stromnetz an (siehe Kapitel
“Für den Gebrauch vorbereiten”).
Warum ertönt an der Elterneinheit ein
akustisches Signal?
• Wenn an der Elterneinheit ein akustisches
Signal ertönt, während die LINK-Anzeige
durchgehend rot aueuchtet, und die Nachricht
“NOT LINKED” (Nicht verbunden) oder “I AM
LINKING” (Verbindung wird hergestellt) auf
dem Display angezeigt wird, ist die Verbindung
mit der Babyeinheit unterbrochen. Bewegen Sie
die Elterneinheit näher an die Babyeinheit oder
schalten Sie die evtl. ausgeschaltete Babyeinheit
ein.
• Ertönt das Signal an der Elterneinheit, und das
Batteriesymbol auf dem Display ist leer, sind die
Akkus der Elterneinheit fast leer. Laden Sie sie
auf.
• Wenn Sie an der Elterneinheit die
Zimmertemperatur eingestellt haben und
das Temperatursignal eingeschaltet ist, er tönt
an der Elterneinheit ein akustisches Signal,
sobald die Temperatur unter den eingestellten
Mindesttemperaturbereich sinkt oder über den
eingestellten maximalen Temper aturbereich
steigt.
• Wenn Sie an der Elterneinheit den
Feuchtigkeitsbereich eingestellt haben und der
Feuchtigkeitsalarm eingeschaltet ist, ertönt an
der Elterneinheit ein akustisches Signal, sobald
die Luftfeuchtigkeit unter den eingestellten
Bereich sinkt oder über den eingestellten
maximalen Wert steigt.
• Die Babyeinheit ist möglicherweise
ausgeschaltet. Schalten Sie sie wieder ein.
Warum ertönt aus dem Gerät ein Pfeifton?
• Möglicherweise stehen die beiden Einheiten
zu nah beieinander. Vergewissern Sie sich, dass
Sie den Mindestabstand von 1 Meter zwischen
Eltern- und Babyeinheit eingehalten haben.
• Möglicherweise ist die Lautstärke der
Elterneinheit zu hoch. Verringern Sie die
Lautstärke.
Warum höre ich kein Geräusch/Warum kann ich
nicht hören, ob mein Kind weint?
• Die Lautstärke der Elterneinheit ist
möglicherweise zu niedrig oder völlig
ausgeschaltet. Erhöhen Sie die Lautstärke an der
Elterneinheit.
• Die Mikrofonempndlichkeit der Babyeinheit
ist möglicherweise zu niedrig. Stellen Sie die
Mikrofonempndlichkeit über das Menü der
Elterneinheit auf einen höheren Wert ein.
• Baby- und Elterneinheit haben möglicherweise
keine Verbindung zueinander. Verringern Sie den
Abstand zwischen den beiden Einheiten.
Warum reagiert die Elterneinheit zu schnell auf
Umgebungsgeräusche?
• Die Babyeinheit nimmt auch andere Geräusche
als die Ihres Kinds wahr. Stellen Sie die
Babyeinheit näher zum Kind hin auf (achten
Sie dabei aber auf den Mindestabstand von
1 Meter).
• Die Mikrofonempndlichkeit der Babyeinheit
ist möglicherweise zu hoch. Stellen Sie die
Mikrofonempndlichkeit über das Menü der
Elterneinheit auf einen niedrigeren Wer t ein.
DEUTSCH
85
Page 86

Warum reagiert die Elterneinheit zu langsam,
wenn mein Kind weint?
• Die Mikrofonempndlichkeit der Babyeinheit
ist möglicherweise zu niedrig. Stellen Sie die
Mikrofonempndlichkeit der Babyeinheit über
das Menü der Elterneinheit auf einen höheren
Wert ein.
• Der Eco Max-Modus ist eingeschaltet, und
die Babyeinheit schaltet das DECT-Signal nur
ein, wenn das Kind Geräusche von sich gibt.
Schalten Sie den Eco Max-Modus aus, sodass
die Babyeinheit ununterbrochen DECT-Signale
überträgt und die Elterneinheit schneller auf
Geräusche Ihres Kindes reagiert.
Weshalb entleeren sich die Batterien in der
Babyeinheit so schnell?
• Die Mikrofonempndlichkeit der Babyeinheit ist
möglicherweise zu hoch, was dazu führt, dass
die Babyeinheit häuger sendet. Stellen Sie die
Mikrofonempndlichkeit über das Menü der
Elterneinheit auf einen niedrigeren Wer t ein.
• Möglicherweise ist die Lautstärke an der
Babyeinheit zu hoch, wodurch die Einheit
viel Energie verbraucht. Verringern Sie die
Lautstärke an der Babyeinheit.
• Sie haben u. U. einen maximalen
Temperaturbereich eingestellt, der
niedriger als die tatsächliche ist, oder einen
Mindesttemperaturbereich, die höher ist als
die tatsächliche Temperatur. Die Babyeinheit
sendet weiterhin Daten an die Elterneinheit,
wodurch sich der Stromverbrauch erhöht. Aus
diesem Grund entleeren sich die Batterien der
Babyeinheit schneller.
• Sie haben u. U. einen maximalen
Feuchtigkeitsbereich eingestellt, der niedriger
als der tatsächliche Wert ist, oder einen
Mindestfeuchtigkeitsbereich, der höher ist als
die tatsächliche Luftfeuchtigkeit. Die Babyeinheit
sendet weiterhin Daten an die Elterneinheit,
wodurch sich der Stromverbrauch erhöht. Aus
diesem Grund entleeren sich die Batterien der
Babyeinheit schneller.
• Möglicherweise haben Sie das Nachtlicht
eingeschaltet. Wenn Sie das Nachtlicht
verwenden möchten, empfehlen wir, die
Babyeinheit am Netz zu betreiben.
Warum braucht die Elterneinheit länger als
10StundenzumAuaden?
• Möglicherweise ist die Elterneinheit während
des Ladevorgangs eingeschaltet. Schalten Sie sie
während des Ladens aus.
Für das Babyphone wird ein Empfangsbereich
von 330 Metern angegeben. Warum funktioniert
mein Babyphone nur in einem erheblich
kleineren Bereich?
• Der angegebene Empfangsbereich gilt nur für
den Betrieb im Freien. Innerhalb des Hauses ist
der Empfang durch Anzahl und Beschaffenheit
der Wände bzw. Decken begrenzt, die zwischen
den beiden Einheiten liegen. Daher beträgt der
Empfangsbereich im Haus maximal 50 Meter.
Warum geht die Verbindung manchmal
verloren? Warum ist der Ton hin und wieder
unterbrochen?
• Die Baby- und die Elterneinheit stehen
möglicherweise nahe an der äußeren Grenze
des Empfangsbereichs. Versuchen Sie es mit
einem anderen Aufstellungsort oder verringern
Sie den Abstand zwischen den Einheiten.
Beachten Sie bitte auch, dass die Einheiten
immer etwa 30 Sekunden brauchen, um eine
Verbindung zueinander herzustellen.
• Eventuell haben Sie die Einheit neben einem
Funksender oder einem anderen DECT-Gerät,
beispielsweise einem DECT-Telefon oder
anderen Babyphone mit 1,8 GHz/1,9 GHz,
aufgestellt. Vergrößern Sie den Abstand
zwischen der Einheit und den anderen Geräten,
bis die Verbindung wiederhergestellt wurde.
86
Page 87

Was passiert bei einem Stromausfall?
• Wenn die Elterneinheit ausreichend aufgeladen
ist, funktioniert sie auch bei Stromausfall.
Benden sich in der Babyeinheit Batterien,
schaltet sie ebenfalls bei Stromausfall
automatisch auf Batteriebetrieb um.
Ist mein Babyphone abhör- und störungssicher?
• Dank der DECT-Technologie ist dieses
Babyphone abhörsicher und unempndlich
gegen Störungen durch andere Geräte.
Die Betriebsdauer der Elterneinheit wird mit
bis zu 18 Stunden angegeben. Warum ist dieser
Zeitraum bei meiner Elterneinheit kürzer?
• Nach dem erstmaligen Laden der Akkus in der
Elterneinheit beträgt die Betriebsdauer weniger
als 18 Stunden. Die Akkus erreichen ihre volle
Kapazität erst nach mindestens vier Lade- und
Entladevorgängen.
• Möglicherweise ist die Lautstärke an der
Elterneinheit zu hoch, wodurch sie viel Energie
verbraucht. Verringern Sie die Lautstärke an der
Elterneinheit.
• Die Mikrofonempndlichkeit der Babyeinheit
ist möglicherweise zu hoch, wodurch die
Elterneinheit viel Energie verbraucht. Stellen Sie
die Mikrofonempndlichkeit über das Menü der
Elterneinheit auf einen niedrigeren Wer t ein.
Weshalb entleeren sich die Akkus in der
Elterneinheit so schnell?
• Die Akkus haben das Ende ihrer Lebensdauer
erreicht und müssen ersetzt werden.
Informationen zum Bestellen neuer Akkus
erhalten Sie im Kapitel “Zubehör bestellen”.
DEUTSCH
Warum dauert es einige Zeit, bis die
Batteriestandanzeige auf dem Display erscheint,
wenn ich beginne, die Elterneinheit aufzuladen,
während sie ausgeschaltet ist?
• Das ist normal. Die Elterneinheit benötigt einige
Sekunden, um den Ruhemodus zu verlassen,
wenn Sie sie ans Stromnetz anschließen,
während sie ausgeschaltet ist. Wenn die
Elterneinheit angeschlossen ist, muss sie
zunächst erkennen, dass sie aufgeladen wird,
und sie muss den Akkuladestand messen, bevor
die Akkustandanzeige angezeigt werden kann.
87
Page 88

Πίνακαςπεριεχομένων
7.8 Ρολόι 113
7.9 Γλώσσα 114
7.10 Κλείδωμαπλήκτρων 114
1 Εισαγωγή 88
2 Επισκόπηση 89
3 Προετοιμασίαγιαχρήση 90
3.1 Μονάδαμωρού 90
3.2 Μονάδαγονέα 91
4 Χρήσητουβρεφικούμόνιτορ 92
4.1 Τοποθέτησητουβρεφικούμόνιτορ 92
4.2 Σύνδεσημονάδαςγονέακαιμονάδας
μωρού 93
5 Λειτουργίεςκαισχόλιαγιατη
μονάδαμωρού 95
5.1 Νυχτερινόφως 95
5.2 Λειτουργίανανουρίσματος 95
5.3 Προβολέας 96
5.4 Εντοπισμόςτηςμονάδαςγονέα 97
5.5 Λυχνίακατάστασηςμπαταρίας 97
6 Λειτουργίεςκαισχόλιαγιατη
μονάδαγονέα 98
6.1 Μενούλειτουργιώνχαλάρωσης 98
6.2 Έντασηήχου 101
6.3 ΛειτουργίαTalk(Ομιλίας) 102
6.4 Λειτουργίαμείωσηςτηςέντασης
τουφωτόςτηνύχτα 102
6.5 Ειδοποίησηχαμηλήςισχύος
μπαταρίαςμονάδαςμωρού 103
6.6 Ενδείξειςκατάστασηςμπαταρίας 103
6.7 Ένδειξηισχύοςσήματος 105
6.8 Επαναφορά 106
7 Μενούμονάδαςγονέα 106
7.1 Πλοήγησηστομενού 106
7.2 Ευαισθησία 107
7.3 ΛειτουργίαEcoMax 108
7.4 Χρονοδιακόπτηςταΐσματος 109
7.5 Θερμοκρασία 110
7.6 Υγρασία 112
7.7 Ειδοποίησηκλάματος 113
88
8 Λουράκιλαιμού 115
9 Καθαρισμόςκαισυντήρηση 115
10 Συστήματααποθήκευσης 116
11 Παραγγελίαεξαρτημάτων 116
12 Εγγύησηκαιυποστήριξη 116
13 Συχνέςερωτήσεις 116
1 Εισαγωγή
Συγχαρητήρια για την αγορά σας και καλώς
ήρθατε στη Philips AVENT! Για να επωφεληθείτε
πλήρως από την υποστήριξη που παρέχει η
Philips AVENT, δηλώστε το προϊόν σας στη
σελίδα www.philips.com/welcome.
Η Philips AVENT είναι αφοσιωμένη στη
δημιουργία αξιόπιστων προϊόντων φροντίδας
που προσφέρουν στους γονείς τη σιγουριά
που χρειάζονται. Αυτό το βρεφικό μόνιτορ
της Philips AVENT παρέχει διαρκή υποστήριξη,
εξασφαλίζοντας ότι μπορείτε πάντα να ακούτε
το μωρό σας καθαρά και χωρίς παρεμβολές.
Η τεχνολογία DECT εξασφαλίζει μηδενικές
παρεμβολές και πεντακάθαρο σήμα ανάμεσα
στη μονάδα μωρού και τη μονάδα γονέα.
Ο αισθητήρας θερμοκρασίας σάς δίνει
τη δυνατότητα να παρακολουθείτε τη
θερμοκρασία στο δωμάτιο του μωρού σας και
να ορίζετε προσωπικές ρυθμίσεις έτσι ώστε να
εξασφαλίζετε την άνεση του μωρού σας στο
δωμάτιό του.
Αυτό το βρεφικό μόνιτορ διαθέτει μονάδα
μωρού με προβολέα και μονάδα γονέα με
ειδική οθόνη λειτουργιών χαλάρωσης, που
σας επιτρέπει να ελέγχετε από απόσταση
τις επιλογές χαλάρωσης (φως νύχτας,
νανουρίσματα και προβολέας) της μονάδας
μωρού.
Page 89

2 Επισκόπηση
• IΟθόνη
1 Ένδειξη ισχύος σήματος
2 Ένδειξη Eco Max
3 Σύμβολο λειτουργίας μείωσης της
έντασης του φωτός κατά τη διάρκεια
της νύχτας
4 Ένδειξη ειδοποίησης κλάματος
5 Σύμβολο σίγασης
6 Ένδειξη κατάστασης μπαταρίας
7 Σύμβολο ένδειξης υγρασίας
8 Βέλος πλοήγησης
9 Σύμβολο θερμοκρασίας
10 Πεδίο μηνυμάτων
11 Ένδειξη ευαισθησίας μικροφώνου
12 Σύμβολο νυχτερινού φωτός
13 Σύμβολο νανουρίσματος
14 Σύμβολο προβολέα
15 Χρονοδιακόπτης ή σύμβολο
επανάληψης χρονοδιακόπτη
• IIΜονάδαγονέα
1 Κουμπί ενεργοποίησης/
απενεργοποίησης
2 Κουμπί TALK (Ομιλία)
3 Κουμπί μείωσης έντασης του φωτός
κατά τη διάρκεια της νύχτας
4 - κουμπί μετακίνησης προς τα πίσω
5 Μικρόφωνο
6 λυχνία σύνδεσης
7 Οθόνη
8 Λυχνίες στάθμης ήχου
9 Κουμπί MENU (Μενού)
10 + κουμπί μετακίνησης προς τα εμπρός
11 Λυχνία κατάστασης μπαταρίας
12 Κουμπί OK
13 Κουμπί χαλάρωσης
14 Λαβή/οπή σύνδεσης για το λουράκι
λαιμού
15 Θήκη για επαναφορτιζόμενες
μπαταρίες
16 Καπάκι θήκης για επαναφορτιζόμενες
μπαταρίες
17 Σημεία σύνδεσης για τη φόρτιση
18 Επαναφορτιζόμενες μπαταρίες
19 Λουράκι λαιμού
20 Υποδοχή μικρού βύσματος ή
μετασχηματιστή
21 Βάση φόρτισης
22 Μικρό βύσμα ή μετασχηματιστής
23 Τροφοδοτικό
• IIIΜονάδαμωρού
1 Προβολέας
2 Νυχτερινό φως
3 Κουμπί FIND (Εύρεση)
4 Μικρόφωνο
5 Κουμπί ενεργοποίησης/
απενεργοποίησης προβολέα
6 Κουμπί επόμενου νανουρίσματος
7 Κουμπί αναπαραγωγής/διακοπής
νανουρίσματος
8 Κουμπί μείωσης (-) έντασης του ήχου
9 Λυχνία λειτουργίας
10 Κουμπί ενεργοποίησης/
απενεργοποίησης
11 Λυχνία κατάστασης μπαταρίας
12 Κουμπί ενεργοποίησης/
απενεργοποίησης νυχτερινού φωτός
13 Κουμπί αύξησης (+) έντασης του ήχου
14 Αισθητήρας υγρασίας
15 Αισθητήρας θερμοκρασίας
16 Ηχείο
17 Υποδοχή για συσκευή ήχου
18 Υποδοχή μικρού βύσματος ή
μετασχηματιστή
19 Θήκη για μη επαναφορτιζόμενες
μπαταρίες
20 Καπάκι θήκης για μη
επαναφορτιζόμενες μπαταρίες
21 Μικρό βύσμα ή μετασχηματιστής
22 Τροφοδοτικό
23 Βοηθητικό καλώδιο
ΕΛΛΗΝΙΚΑ
89
Page 90

3 Προετοιμασίαγια
χρήση
ΣΗΜΑΝΤΙΚΟ:Πρινχρησιμοποιήσετετο
βρεφικόμόνιτορ,διαβάστεπροσεκτικά
τιςσημαντικέςοδηγίεςπροφύλαξηςκαι
κρατήστετιςγιαμελλοντικήαναφορά.
3.1Μονάδαμωρού
Να χρησιμοποιείτε τη μονάδα μωρού
με ρεύμα. Για να έχετε εφεδρική ισχύ σε
περίπτωση διακοπής ρεύματος, συνιστούμε
να τοποθετήσετε μη επαναφορτιζόμενες
μπαταρίες στη μονάδα.
3.1.1Λειτουργίαμερεύμα
1 Τοποθετήστε τον μετασχηματιστή σε μια
πρίζα και εισαγάγετε το μικρό βύσμα
συσκευής στη μονάδα μωρού.
BΠροειδοποίηση:
Αποσυνδέστετημονάδαμωρούαπότην
πρίζακαιβεβαιωθείτεότιταχέριασαςκαιη
μονάδαείναιστεγνάόταντοποθετείτετιςμη
επαναφορτιζόμενεςμπαταρίες.
D
Σημείωση:
Σας συνιστούμε να χρησιμοποιείτε τη μονάδα
μωρού με ρεύμα, καθώς η μονάδα μωρού
έχει περιορισμένο χρόνο λειτουργίας με μη
επαναφορτιζόμενες μπαταρίες. Ο χρόνος
λειτουργίας με μη επαναφορτιζόμενες
μπαταρίες είναι 24 ώρες.
1 Πιέστε την ασφάλεια για να
απασφαλίσετε το καπάκι της θήκης των
μη επαναφορτιζόμενων μπαταριών και
αφαιρέστε το.
3.1.2Τοποθέτησημηεπαναφορτιζόμενων
μπαταριών
Σε περίπτωση διακοπής του ρεύματος, η
μονάδα μωρού μπορεί να λειτουργήσει με
τέσσερις αλκαλικές μπαταρίες R6 AA 1,5 V (δεν
περιλαμβάνονται).
Μην χρησιμοποιείτε επαναφορτιζόμενες
μπαταρίες. Η μονάδα μωρού δεν διαθέτει
λειτουργία φόρτισης και οι επαναφορτιζόμενες
μπαταρίες αποφορτίζονται αργά όταν δεν
χρησιμοποιούνται.
90
2 Τοποθετήστε τέσσερις μη
επαναφορτιζόμενες μπαταρίες.
D
Σημείωση:
Βεβαιωθείτε ότι οι πόλοι + και - δείχνουν
προς τη σωστή κατεύθυνση.
Page 91

3 Για να επανατοποθετήσετε το καπάκι,
εισαγάγετε πρώτα τις προεξοχές στα
ανοίγματα που υπάρχουν στα άκρα
της θήκης των μη επαναφορτιζόμενων
μπαταριών.
4 Στη συνέχεια, πιέστε το καπάκι προς τα
κάτω μέχρι να κλείσει ασφάλεια και να
ακουστεί ένα “κλικ”.
2 Τοποθετήστε τις επαναφορτιζόμενες
μπαταρίες.
D
Σημείωση:
Βεβαιωθείτε ότι οι πόλοι + και - των
μπαταριών δείχνουν προς τη σωστή
κατεύθυνση.
3 Σύρετε το καπάκι της θήκης
επαναφορτιζόμενων μπαταριών και
επανατοποθετήστε το στη μονάδα γονέα.
Πιέστε το καπάκι έως ότου ασφαλίσει στη
θέση του και ακουστεί ένα “κλικ”.
ΕΛΛΗΝΙΚΑ
3.2Μονάδαγονέα
Η μονάδα γονέα λειτουργεί με δύο
επαναφορτιζόμενες μπαταρίες που παρέχονται
με το βρεφικό μόνιτορ.
3.2.1Τοποθέτησητωνεπαναφορτιζόμενων
μπαταριών
1 Σύρετε το καπάκι της θήκης των
επαναφορτιζόμενων μπαταριών και
αφαιρέστε το από τη μονάδα γονέα.
3.2.2Φόρτισητηςμονάδαςγονέα
Φορτίστε τη μονάδα γονέα πριν την
χρησιμοποιήσετε για πρώτη φορά ή όταν
εμφανιστεί στη μονάδα γονέα ένδειξη ότι η
ισχύς των μπαταριών είναι χαμηλή.
Σημαντικό:Πρέπειναφορτίσετετη
μονάδαγονέαγια10ώρες,ώστεναέχετε
πλήρηαυτονομία18ωρών.
91
Page 92

1 Τοποθετήστε το μικρό βύσμα συσκευής
του μετασχηματιστή στην υποδοχή που
υπάρχει στο πίσω μέρος της βάσης
φόρτισης. Συνδέστε τον μετασχηματιστή
στην πρίζα.
2 Τοποθετήστε τη μονάδα γονέα στη βάση
φόρτισης.
4 Χρήσητουβρεφικού
μόνιτορ
4.1Τοποθέτησητουβρεφικού
μόνιτορ
BΠροειδοποίηση:
Τοποθετήστετημονάδαμωρούσεσημείο
όπουδενέχειπρόσβασητομωρό.Μην
τοποθετείτεποτέτημονάδαμωρούμέσαστο
κρεβάτιήστοπάρκοτουμωρού.
1
Επειδή το καλώδιο της μονάδας μωρού
ενέχει κίνδυνο πνιγμού, βεβαιωθείτε ότι η
μονάδα μωρού και το καλώδιό της απέχουν
τουλάχιστον 1 μέτρο από το μωρό σας.
• Η οθόνη ενεργοποιείται και οι ενδείξεις
κατάστασης μπαταρίας υποδεικνύουν
ότι η μονάδα γονέα φορτίζεται. Για τις
ενδείξεις κατάστασης των μπαταριών,
ανατρέξτε στην ενότητα “Ενδείξεις
φόρτισης μπαταρίας” στο κεφάλαιο
“Λειτουργίες και σχόλια για τη μονάδα
γονέα”.
3 Αφήστε τη μονάδα γονέα στη βάση
φόρτισης, με τη βάση συνδεδεμένη στην
πρίζα, μέχρι να φορτιστούν πλήρως οι
μπαταρίες.
D
Σημείωση:
Όταν αρχίσετε να χρησιμοποιείτε το
βρεφικό μόνιτορ, θα χρειαστούν τέσσερις
κύκλοι φόρτισης και αποφόρτισης
μέχρι να επιτευχθεί η πλήρης απόδοση
των επαναφορτιζόμενων μπαταριών.
92
2 Για να μην ακούγονται παράσιτα
(διαπεραστικός ήχος) από τη μία ή και από
τις δύο μονάδες, βεβαιωθείτε ότι η μονάδα
γονέα απέχει τουλάχιστον 1 μέτρο από τη
μονάδα μωρού.
Page 93

4.2Σύνδεσημονάδαςγονέα
καιμονάδαςμωρού
1 Πατήστε το κουμπί ενεργοποίησης/
απενεργοποίησης 3 της μονάδας μωρού
επί 2 δευτερόλεπτα.
• Το νυχτερινό φως, η λυχνία κατάστασης
μπαταρίας και η λυχνία λειτουργίας θα
ανάψουν στιγμιαία.
DΣημείωση:
Όταν ενεργοποιείτε τη μονάδα γονέα
για πρώτη φορά ή μετά από επαναφορά
ρυθμίσεων, θα πρέπει να επιλέξετε τη
γλώσσα οθόνης που προτιμάτε (βλ.
ενότητα “Γλώσσα” στο κεφάλαιο
“Μενού μονάδας γονέα”).
• Η λυχνία σύνδεσης στη μονάδα γονέα
αρχίζει να αναβοσβήνει με κόκκινο χρώμα
και στην οθόνη εμφανίζεται το μήνυμα
“I AM LINKING” (Γίνεται σύνδεση).
2 Πατήστε το κουμπί ενεργοποίησης/
απενεργοποίησης 3 της μονάδας γονέα
επί 2 δευτερόλεπτα.
• Η οθόνη ανάβει και εμφανίζει για λίγο
όλες τις ενδείξεις και τα σύμβολα.
Κατόπιν, οι ενδείξεις και τα σύμβολα
σβήνουν και εμφανίζεται η ένδειξη
κατάστασης μπαταρίας.
• Μόλις συνδεθεί η μονάδα γονέα με τη
μονάδα μωρού, η λυχνία σύνδεσης ανάβει
σταθερά με πράσινο χρώμα. Η ένδειξη
ισχύος σήματος και το μήνυμα “LINKED”
(Συνδέθηκε) εμφανίζονται στην οθόνη.
ΕΛΛΗΝΙΚΑ
93
Page 94

• Αν δεν επιτευχθεί σύνδεση μέσα σε
10 δευτερόλεπτα, στην οθόνη
εμφανίζονται εναλλάξ τα μηνύματα
“I AM LINKING” (Γίνεται σύνδεση) και
“NOT LINKED” (Δεν συνδέθηκε). Αν
δεν επιτευχθεί σύνδεση μετά από 30
δευτερόλεπτα, θα αρχίσει να ακούγεται
ένα ηχητικό σήμα από τη μονάδα γονέα
και θα εμφανιστεί μόνο το μήνυμα
“NOT LINKED” (Δεν συνδέθηκε).
4.2.1Εμβέλειαλειτουργίας
• Στη βασική λειτουργία με Smart Eco και στη
λειτουργία Eco Max, η εμβέλεια λειτουργίας
είναι 330 μέτρα σε εξωτερικούς και έως 50
μέτρα σε εσωτερικούς χώρους.
• Η εμβέλεια λειτουργίας του βρεφικού
μόνιτορ διαφέρει ανάλογα με το
περιβάλλον και τους παράγοντες που
προκαλούν παρεμβολές. Τα υγρά υλικά
προκαλούν παρεμβολές που δημιουργούν
απώλεια εμβέλειας έως 100%. Για τις
παρεμβολές από στεγνά υλικά, ανατρέξτε
στον παρακάτω πίνακα.
Τινακάνετεεάνδενεπιτευχθεί
σύνδεση
• Η μονάδα γονέα μπορεί να είναι
εκτός της εμβέλειας της μονάδας
μωρού. Τοποθετήστε τη μονάδα
γονέα πιο κοντά στη μονάδα μωρού,
αλλά όχι σε απόσταση μικρότερη
από 1 μέτρο.
• Η μονάδα μωρού ή η μονάδα γονέα
μπορεί να χάσουν τη σύνδεση
επειδή βρίσκονται πολύ κοντά σε
άλλη συσκευή DECT (π.χ. ασύρματο
τηλέφωνο). Απενεργοποιήστε αυτήν
τη συσκευή DECT ή τοποθετήστε
τη μονάδα πιο μακριά από αυτή τη
συσκευή.
• Ενδέχεται η μονάδα μωρού να είναι
απενεργοποιημένη. Ενεργοποιήστε
τη μονάδα μωρού.
Στεγνά υλικά Πάχος
υλικών
Ξύλο, γύψος, χαρτόνι,
< 30 εκ. 0-10%
Απώλεια
εμβέλειας
γυαλί (χωρίς μέταλλο,
καλώδια ή μόλυβδο)
Τούβλο, κοντραπλακέ < 30 εκ. 5-35%
Ενισχυμένο τσιμέντο < 30 εκ. 30-100%
Μεταλλικές γρίλιες ή
< 1 εκ. 90-100%
μπάρες
Φύλλα μετάλλου ή
< 1 εκ. 100%
αλουμινίου
94
Page 95

5 Λειτουργίεςκαι
σχόλιαγιατη
μονάδαμωρού
5.1Νυχτερινόφως
Το νυχτερινό φως εκπέμπει απαλή λάμψη που
ηρεμεί το μωρό σας.
1 Πατήστε το κουμπί ενεργοποίησης/
απενεργοποίησης νυχτερινού φωτός στη
μονάδα μωρού για να ανάψετε το νυχτερινό
φως.
• Στην οθόνη της μονάδας γονέα
εμφανίζεται η ένδειξη Q.
2 Πατήστε ξανά το κουμπί ενεργοποίησης/
απενεργοποίησης νυχτερινού φωτός για να
σβήσετε το νυχτερινό φως.
• Το νυχτερινό φως εξασθενεί σταδιακά
πριν σβήσει εντελώς.
• Q εξαφανίζεται από την οθόνη της
μονάδας γονέα.
• Το επιλεγμένο νανούρισμα
επαναλαμβάνεται για το καθορισμένο
χρονικό διάστημα.
• Αν δεν έχετε επιλέξει νανούρισμα ποτέ
πριν, θα αναπαραχθεί το νανούρισμα 1.
2 Πατήστε το κουμπί για το επόμενο
νανούρισμα
νανούρισμα από τη λίστα.
• Αν δεν αναπαράγεται το νανούρισμα,
μόλις πατήσετε το κουμπί για το
επόμενο νανούρισμα
αναπαράγεται το τελευταίο νανούρισμα
που είχατε επιλέξει την προηγούμενη
φορά που πατήσατε το κουμπί.
• Αν πατήσετε το κουμπί για το επόμενο
νανούρισμα
νανούρισμα, θα ξεκινήσει το επόμενο
νανούρισμα.
3 Για να ρυθμίσετε το επίπεδο ήχου του
νανουρίσματος, πατήστε το κουμπί αύξησης
(+) ή το κουμπί μείωσης (–) έντασης ήχου
στη μονάδα μωρού.
, για να επιλέξετε άλλο
, ξεκινά να
ενώ αναπαράγεται ένα
ΕΛΛΗΝΙΚΑ
5.2Λειτουργίανανουρίσματος
1 Πατήστε το κουμπί έναρξης/διακοπής
νανουρίσματος K στη μονάδα μωρού για να
παίξει το νανούρισμα που έχετε επιλέξει.
95
Page 96

DΣημείωση:
Μπορείτε να ρυθμίσετε την ένταση του
ηχείου στη μονάδα μωρού μόνο όταν
γίνεται αναπαραγωγή ενός νανουρίσματος.
Αν έχετε ρυθμίσει υψηλότερα την ένταση
ήχου για το νανούρισμα στη μονάδα
μωρού, ο ήχος θα ακούγεται επίσης πιο
δυνατά όταν χρησιμοποιείτε τη λειτουργία
ομιλίας στη μονάδα γονέα.
4 Για να διακόψετε το νανούρισμα πριν
τελειώσει ο καθορισμένος χρόνος, πατήστε
το κουμπί αναπαραγωγής/διακοπής
νανουρίσματος K στη μονάδα μωρού.
5.3Προβολέας
Μπορείτε να ηρεμείτε το μωρό σας με
έγχρωμα μοτίβα φωτός που προβάλλονται στο
ταβάνι, ενεργοποιώντας τον προβολέα.
1 Πιέστε το κουμπί ενεργοποίησης/
απενεργοποίησης για να ενεργοποιήσετε
τον προβολέα.
• Υπάρχουν έξι διαφορετικά μοτίβα και το
καθένα προβάλλεται επί 10 δευτερόλεπτα.
Όταν εμφανιστούν και τα έξι μοτίβα, ο
προβολέας ξεκινά πάλι με το 1ο μοτίβο.
Τα μοτίβα επαναλαμβάνονται κατά
τον καθορισμένο χρόνο (βλ. ενότητα
“Προβολέας” στο κεφάλαιο “Λειτουργίες
και σχόλια για τη μονάδα γονέα”).
• Το σύμβολο του προβολέα εμφανίζεται
στην οθόνη της μονάδας γονέα.
• Το πρώτο μοτίβο από τον προβολέα
φτάνει σταδιακά σε πλήρη ένταση μέσα
σε 2 δευτερόλεπτα. Προβάλλεται επί
8 δευτερόλεπτα και μετά σβήνει επί 2
δευτερόλεπτα, ενώ αρχίζει να εμφανίζεται
σταδιακά το επόμενο μοτίβο.
96
2 Για να απενεργοποιήσετε τον προβολέα
προτού παρέλθει ο καθορισμένος χρόνος,
πατήστε ξανά το κουμπί ενεργοποίησης/
απενεργοποίησης του προβολέα.
• Το μοτίβο σβήνει και ο προβολέας
απενεργοποιείται.
• Το σύμβολο του προβολέα εξαφανίζεται
από την οθόνη.
Page 97

5.4Εντοπισμόςτηςμονάδας
γονέα
Αν δεν μπορείτε να βρείτε τη μονάδα γονέα,
μπορείτε να χρησιμοποιήσετε το κουμπί
FIND (Εύρεση) στη μονάδα μωρού για να την
εντοπίσετε.
D
Σημείωση:
Η λειτουργία εντοπισμού είναι εφικτή μόνο
όταν η μονάδα γονέα είναι ενεργοποιημένη.
1 Πατήστε το κουμπί FIND (Εύρεση) στη
μονάδα μωρού.
• Στην οθόνη της μονάδας γονέα
εμφανίζεται το μήνυμα “PAGING”
(Εντοπισμός) και η μονάδα γονέα εκπέμπει
ένα ηχητικό σήμα εντοπισμού.
5.5Λυχνίακατάστασης
μπαταρίας
1 Όταν η μονάδα μωρού λειτουργεί με την
ισχύ των μπαταριών και οι μπαταρίες
έχουν αρκετή ενέργεια, η λυχνία
κατάστασης μπαταρίας ανάβει σταθερά με
πράσινο χρώμα.
2 Όταν οι μπαταρίες έχουν αρχίσει να
αποφορτίζονται ενώ η μονάδα μωρού
λειτουργεί με ενέργεια από τις μπαταρίες, η
λυχνία κατάστασης μπαταρίας αναβοσβήνει
γρήγορα με κόκκινο χρώμα.
ΕΛΛΗΝΙΚΑ
2 Για να διακόψετε το ηχητικό σήμα
εντοπισμού, πατήστε ξανά το κουμπί FIND
(Εύρεση) ή οποιοδήποτε άλλο κουμπί στη
μονάδα γονέα.
D
Σημείωση:
Το ηχητικό σήμα εντοπισμού σταματά
αυτόματα μετά από 2 λεπτά.
• Αντικαταστήστε τις μπαταρίες όταν
αποφορτιστούν.
• Αν οι μπαταρίες αποφορτιστούν ενώ η
μονάδα μωρού λειτουργεί με ενέργεια
από τις μπαταρίες, η μονάδα μωρού
απενεργοποιείται και η μονάδα γονέα
αποσυνδέεται από τη μονάδα μωρού.
D
Σημείωση:
Σας συνιστούμε να χρησιμοποιείτε τη μονάδα
μωρού με ρεύμα, καθώς η μονάδα μωρού
έχει περιορισμένο χρόνο λειτουργίας με μη
επαναφορτιζόμενες μπαταρίες. Ο χρόνος
λειτουργίας με μη επαναφορτιζόμενες
μπαταρίες είναι 24 ώρες.
97
Page 98

6 Λειτουργίεςκαι
σχόλιαγιατη
μονάδαγονέα
6.1Μενούλειτουργιών
χαλάρωσης
Η μονάδα γονέα διαθέτει χωριστό μενού με
όλες τις λειτουργίες χαλάρωσης: νυχτερινό
φως, νανουρίσματα και προβολέας. Για να το
ανοίξετε, πατήστε το κουμπί χαλάρωσης. Από
αυτό το μενού μπορείτε να χειρίζεστε από
απόσταση το νυχτερινό φως, τα νανουρίσματα
και τον προβολέα της μονάδας μωρού.
1 Για να ανοίξετε το μενού λειτουργιών
χαλάρωσης, πατήστε το κουμπί χαλάρωσης.
DΣημείωση:
Αν δεν πατηθεί κανένα κουμπί εντός
7 δευτερολέπτων, το μενού χαλάρωσης
κλείνει και η οθόνη επανέρχεται στην
κανονική κατάσταση.
2 Χρησιμοποιήστε τα κουμπιά + και - για να
υποδείξετε μια λειτουργία χαλάρωσης με
το βέλος.
3 Για να ενεργοποιήσετε μια λειτουργία
χαλάρωσης ενώ είναι απενεργοποιημένη ή
το αντίστροφο, πατήστε OK.
• Εμφανίζεται το μενού χαλάρωσης, το
οποίο περιλαμβάνει τρεις λειτουργίες της
μονάδας μωρού: το νυχτερινό φως, τα
νανουρίσματα και τον προβολέα. Για κάθε
δυνατότητα υπάρχουν δύο τμήματα: το
πεδίο ενεργοποίησης/απενεργοποίησης και
το μενού επιλογών.
98
• Αν η λειτουργία είναι ενεργοποιημένη,
υπάρχει ένα σημάδι “νι” πάνω από το
σύμβολο της λειτουργίας.
• Αν η λειτουργία είναι απενεργοποιημένη,
υπάρχει ένας σταυρός πάνω από το
σύμβολο της λειτουργίας.
4 Για να ανοίξετε το μενού με τις επιλογές
της λειτουργίας, μετακινήστε το βέλος στο
πεδίο επιλογών και πατήστε OK.
Page 99

5 Χρησιμοποιήστε τα κουμπιά - και + για
να περιηγηθείτε στη λίστα επιλογών και
πατήστε OK για να ορίσετε μια επιλογή.
6 Για να βγείτε από το μενού λειτουργιών
χαλάρωσης, πατήστε το κουμπί χαλάρωσης.
6.1.1Νυχτερινόφως
Αυτή η λειτουργία χαλάρωσης σας επιτρέπει
να ενεργοποιείτε ή να απενεργοποιείτε
το νυχτερινό φως και να ρυθμίζετε το
χρονοδιακόπτη νυχτερινού φωτός.
1 Για να επιλέξετε τη λειτουργία νυχτερινού
φωτός, χρησιμοποιήστε τα κουμπιά +
και - για να μετακινήσετε το βέλος πάνω
από το σύμβολο νυχτερινού φωτός και
πατήστε OK για να ενεργοποιήσετε ή να
απενεργοποιήσετε το νυχτερινό φως.
2 Για να ανοίξετε το μενού επιλογών
νυχτερινού φωτός, στρέψτε το βέλος
στο πεδίο επιλογών και πατήστε OK για
επιβεβαίωση.
3 Μπορείτε να ρυθμίσετε το χρονοδιακόπτη
νυχτερινού φωτός για λειτουργία από 5
έως 20 λεπτά ή μπορείτε να έχετε συνεχώς
ενεργοποιημένο το νυχτερινό φως. Πατήστε
OK για επιβεβαίωση.
• Αν έχετε ενεργοποιήσει το νυχτερινό φως,
το σύμβολο νυχτερινού φωτός θα είναι
ορατό στην οθόνη μονάδας γονέα όταν
πατήσετε το κουμπί χαλάρωσης για να
εγκαταλείψετε την οθόνη λειτουργιών
χαλάρωσης.
• Αν ρυθμίσετε το χρονοδιακόπτη
νυχτερινού φωτός, το νυχτερινό φως
απενεργοποιείται αυτόματα και το
σύμβολο νυχτερινού φωτός εξαφανίζεται
από την οθόνη της μονάδας γονέα μετά
την παρέλευση του καθορισμένου χρόνου.
• Αν έχετε συνεχώς ενεργοποιημένο
το νυχτερινό φως, μπορείτε να το
απενεργοποιήσετε στην οθόνη λειτουργιών
χαλάρωσης της μονάδας γονέα ή να
πατήσετε το κουμπί νυχτερινού φωτός
στη μονάδα μωρού.
6.1.2Νανούρισμα
Αυτή η λειτουργία χαλάρωσης σας επιτρέπει
να ορίζετε τις επιλογές αναπαραγωγής
νανουρίσματος και να ρυθμίζετε το
χρονοδιακόπτη νανουρίσματος.
1 Για να επιλέξετε τη λειτουργία
νανουρίσματος, χρησιμοποιήστε τα κουμπιά
+ και - για να μετακινήσετε το βέλος
πάνω από το σύμβολο νανουρίσματος και
πατήστε ΟΚ για αναπαραγωγή ή διακοπή
των νανουρισμάτων.
ΕΛΛΗΝΙΚΑ
2 Για να ανοίξετε το μενού επιλογών
νανουρίσματος, στρέψτε το βέλος στο πεδίο
επιλογών και πατήστε OK για επιβεβαίωση.
99
Page 100

3 Από το μενού, μπορείτε να ορίσετε
πολυάριθμες επιλογές:
• Επιλέξτε ένα νανούρισμα από τη λίστα
αποθηκευμένων νανουρισμάτων.
Θα προεπιλεγεί το νανούρισμα που
ακούστηκε πιο πρόσφατα. Αν δεν έχει
γίνει καμία επιλογή στο παρελθόν,
προεπιλέγεται το νανούρισμα 1.
• Επίσης, μπορείτε να επιλέξετε “Play
all” (Αναπαραγωγή όλων) για να
αναπαραχθούν όλα τα αποθηκευμένα
νανουρίσματα.
• Πατήστε AUX και επιλέξτε ένα κομμάτι
αν θέλετε να αναπαραγάγετε μουσική
από μια εξωτερική συσκευή ήχου.
Για να ακούσετε μουσική από μια
εξωτερική συσκευή ήχου, πρέπει να
συνδέσετε τη συσκευή στην υποδοχή
για συσκευές ήχου στο πίσω μέρος
της μονάδας μωρού (Aux-in) με το
παρεχόμενο βοηθητικό καλώδιο. Θα
πρέπει να ρυθμίσετε την ένταση του
ήχου στη συσκευή αναπαραγωγής,
όπως τα κουμπιά έντασης ήχου + και στη μονάδα μωρού δεν λειτουργούν για
εξωτερικές συσκευές ήχου.
• Πατήστε OK για να επιβεβαιώσετε την
επιλογή σας.
4 Μπορείτε να ρυθμίσετε το χρονοδιακόπτη
νανουρίσματος για λειτουργία από 5 έως
20 λεπτά ή μπορείτε να επιλέξετε συνεχή
αναπαραγωγή των νανουρισμάτων.
Πατήστε OK για να επιβεβαιώσετε τη
ρύθμιση του χρονοδιακόπτη.
• Αν επιλέξατε ένα νανούρισμα, το σύμβολο
νανουρίσματος θα είναι ορατό στην οθόνη
της μονάδας γονέα όταν πατήσετε το
κουμπί χαλάρωσης για να εγκαταλείψετε
την οθόνη λειτουργιών χαλάρωσης.
Το νανούρισμα που αναπαράγεται
εμφανίζεται στη δεύτερη γραμμή του
πεδίου μηνυμάτων για 2 δευτερόλεπτα.
• Αν ρυθμίσετε το χρονοδιακόπτη
νανουρίσματος, η λειτουργία
νανουρίσματος απενεργοποιείται και το
σύμβολο νανουρίσματος εξαφανίζεται από
την οθόνη της μονάδας γονέα μετά την
παρέλευση του καθορισμένου χρόνου.
• Αν επιλέξατε τη συνεχή αναπαραγωγή
νανουρισμάτων, διακόψτε το νανούρισμα
που αναπαράγεται στην οθόνη
λειτουργιών χαλάρωσης ή πατήστε
το κουμπί αναπαραγωγής/διακοπής
νανουρίσματος K στη μονάδα μωρού.
6.1.3Προβολέας
Αυτή η λειτουργία χαλάρωσης σας επιτρέπει
να ενεργοποιείτε τον προβολέα που υπάρχει
στη μονάδα μωρού και να προγραμματίζετε τη
διάρκεια της προβολής.
100
 Loading...