

Page 1
Register your product and get support at
www.philips.com/welcome
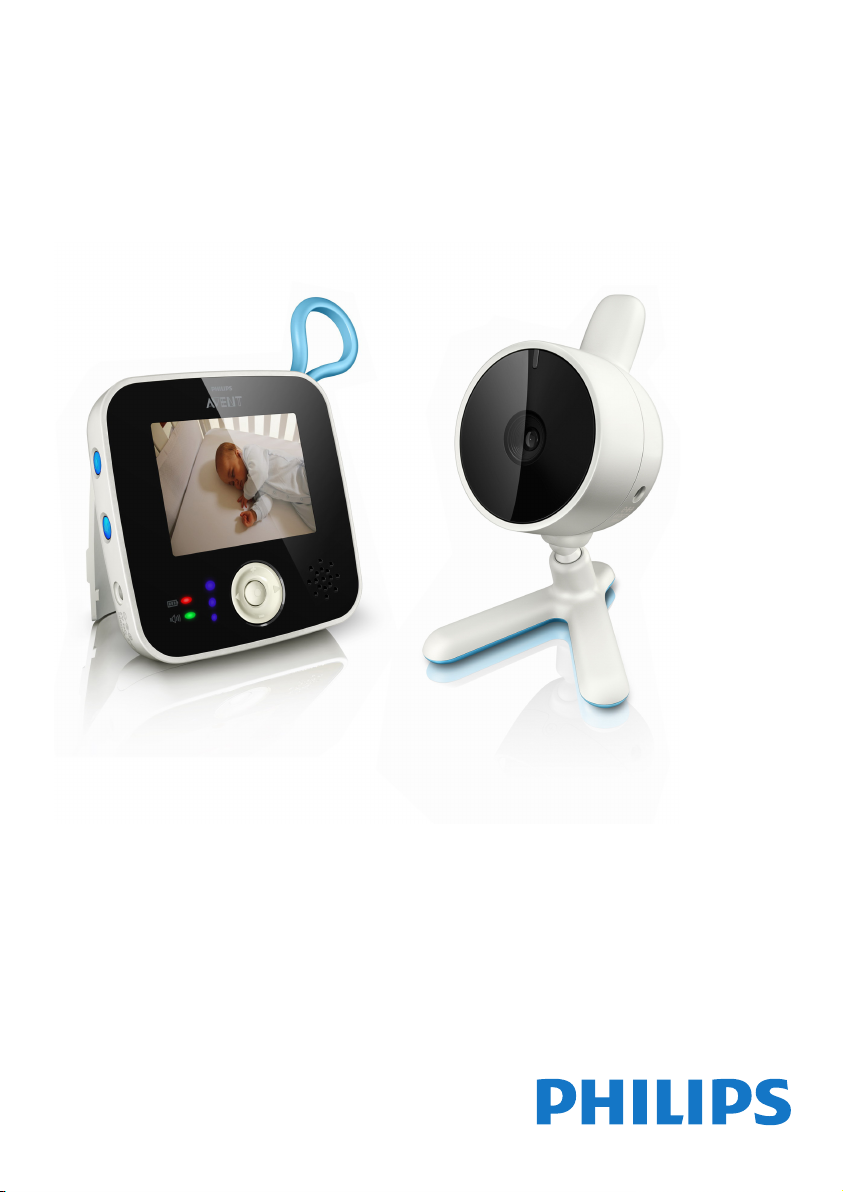
SCD610
SCD609
User manual
Page 2

Page 3

Contents
1 Introduction 24
2 Important Safety Instructions 26
Electromagnetic elds (EMF) 27
Recycling 27
3 Overview 28
Parent unit 28
Baby unit 28
4 Get started 30
Charge the parent unit 30
Set up the baby unit 31
Wall mount the baby unit 31
5 Use your baby monitor 33
Operating range 33
6 Menu 34
Zoom & Pan 34
Voice activation 34
Adjust brightness 34
Add/delete cameras 34
Change the language 35
Reset 35
7 Optimize the battery life of the
parent unit 36
8 Guarantee and service 36
9 Frequently asked questions 37
3EN
Page 4
1 Introduction
Congratulations on your purchase and welcome
to Philips AVENT! To fully benet from the
support that Philips AVENT offers, register your
product at www.philips.com/AVENT.
Philips AVENT is dedicated to producing caring
and reliable products that give parents the
reassurance that they need. This Philips AVENT
baby monitor provides round-the-clock support
by ensuring that you can see and hear your
baby in perfect clarity.
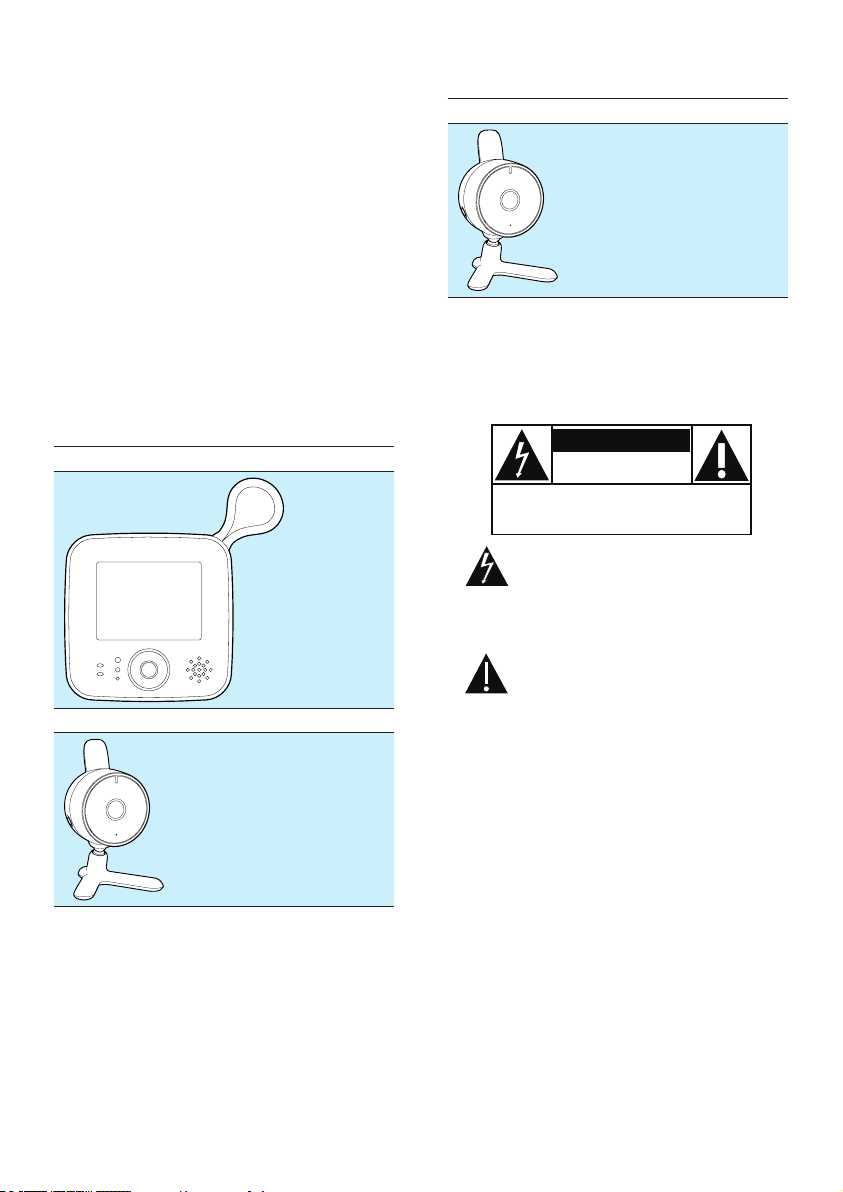
The instructions are intended for both SCD610
and SCD609.
• SCD610
Parent unit
Baby unit
• SCD609
Baby unit
Know these
safety
CAUTION: TO REDUCE THE RISK OF ELECTRIC SHOCK, DO NOT
REMOVE COVER (OR BACK). NO USER-SERVICEABLE PARTS
INSIDE. REFER SERVICING TO QUALIFIED SERVICE PERSONNEL.
This “bolt of lightning” indicates unin-
sulated material within your unit may
cause an electrical shock. For the safety of
everyone in your household, please do not
remove product covering.
The “exclamation point” calls atten-
tion to features for which you should
read the enclosed literature closely to prevent operating and maintenance problems.
WARNING: To reduce the risk of fire or
electric shock, this apparatus should not be
exposed to rain or moisture and objects
filled with liquids, such as vases, should not
be placed on this apparatus.
CAUTION: To prevent electric shock,
match wide blade of plug to wide slot, fully
insert.
symbols
CAUTION
RISK OF ELECTRIC SHOCK
DO NOT OPEN
4 EN
Page 5

Compliance information
The FCC ID number is located on the casing
bottom of the parent unit and in the battery
compartment of the baby unit.
The term ‘IC’ before the certication number
signies that Industry Canada technical
specications were met.This certication
means that the equipment meets certain
radio communications and operational
requirements. This device complies with
Part 15 of the FCC Rules and RSS-210 of
Industry Canada. Operation is subject to the
following two conditions: (1) this device may
not cause harmful interference, and (2) this
device must accept any interference received,
including interference that may cause undesired
operation.
Radio interference
This equipment has been tested and found
to comply with the limits for a Class B digital
device,pursuant to Par t 15 of the FCC Rules
and ICES-003 of Industry Canada. These limits
are designed to provide reasonable protection
against harmful interference in a residential
installation. This equipment generates, uses
and can radiate radio frequency energy and, if
not installed and used in accordance with the
instructions, may cause harmful interference
to radio communications.However, there is
no guarantee that interference will not occur
in a particular installation. If this equipment
does cause harmful interference to radio or
television reception, which can be determined
by turning the equipment off and on, the user is
encouraged to try to correct the interference
by one or more of the following measures:
-- Reorient or relocate the receiving antenna.
-- Increase the separation between the
equipment and receiver.
-- Connect the equipment to an outlet on a
circuit different from that to which the receiver is
connected.
RF Radiation Exposure Statement
This equipment complies with FCC RF radiation
exposure limits set forth for an uncontrolled
environment. This equipment should be installed
and operated with a minimum distance of 7 3/4
inches / 20 centimeters between the radiator
and your body. For handheld operation, this
equipment has been tested and meets the
FCC RF exposure guidelines. For body-worn
operation,this product has been tested and
meets the FCC RF exposure guideline when
used with the belt clip supplied with this
product. This transmitter must not be co-located
or operating in conjunction with any other
antenna or transmitter. Use of other accessories
may not ensure compliance with FCC RF
exposure guidelines. This equipment also complies
with Industry Canada RSS-102 with respect
to Canada’s Health Code 6 for Exposure of
Humans to RF Fields.
Do not attempt to repair or modify this
equipment
Any repairs or alterations made by the user
to the equipment may void the warranty
and compliance of the equipment. Changes
or modications made to this equipment
not expressly approved by Philips AVENT
may void the FCC authorization to operate
this equipment. For assistance visit our
website www.philips.com/AVENT or call
1-800-54-AVENT (1-800-542-8368).
5EN
Page 6

2 Important Safety
Instructions
Read this user manual carefully before you use
the baby monitor and save the user manual for
future reference.
Warning
• To prevent strangulation with the power cord, always
keep the baby unit and the power cord out of baby's
reach, at least 1 meter/3.5 feet away. Do not use
extension cords.
Caution: Risk of explosion, electric shock,
short circuit, or leakage
• The apparatus shall not be exposed to
dripping or splashing and no objects lled
with liquids, such as vases, shall not be
placed on the apparatus.
• Before you connect the baby monitor
to the mains, make sure that the voltage
indicated on the adapters of the baby
monitor corresponds to the local mains
voltage.
• Where the MAINS plug is used as the
disconnect device, the disconnect device
shall remain readily operable.
• Use the supplied adapter to connect the
baby unit to the mains.
• Use the supplied adapter to charge the
parent unit.
• To prevent electric shock, do not open
the housing of the baby unit or parent unit
except for the battery compar tments.
• Make sure that your hands are dry when
you insert or replace batteries (battery
pack).
• For the parent unit, use only the
rechargeable battery pack supplied with
the baby monitor. Charge the rechargeable
battery pack as described in this user
manual.
• To avoid a risk of explosion, replace the
battery with a correct type.
• Dispose of used batteries according to
instructions.
• To prevent battery explosion or leakage,
which can damage the baby monitor and
cause burns and skin or eye irritation:
• do not recharge non-rechargeable
batteries,
• insert batteries in the right direction
(+/-),
• remove batteries if you are not going to
use the product for more than 30 days,
• keep the battery away from excessive
heat such as sunshine, re or the like,
• To prevent the battery from heating up or
releasing toxic materials, hydrogen, or oxygen,
do not:
• overcharge,
• short circuit,
• reverse charge, or
• mutilate batteries.
• To handle damaged or leaked batteries, wear
protective gloves to protect your skin.
Adult supervision
• This baby monitor is intended as an aid. It is
not a substitute for responsible and proper
adult supervision and should not be used as
such.
• Never place the baby unit inside the baby
bed or playpen.
• To prevent overheating, do not cover the
baby monitor with a towel, blanket, or any
other items.
• When your baby monitor uses a power
outlet, make sure that you can easily access
the power outlet.
• For their safety, do not allow children to play
with the baby monitor.
Storage precautions
• Use and store the baby monitor between
10°C (50°F) and 35°C (95°F). Keep the baby
monitor out of direct sunlight.
Replacement
• If you need to replace the adapters, use the
type of adapters specied in this user manual.
• If you need to replace the battery, please
contact the customer care center.
6 EN
Page 7

Electromagnetic elds (EMF)
This Philips AVENT appliance complies with all
standards regarding electromagnetic elds (EMF). If
handled properly and according to the instructions
in this user manual, the appliance is safe to use
based on scientic evidence available today.
Recycling
Your product is designed and manufactured
with high quality materials and components,
which can be recycled and reused.
When you see the crossed-out wheel bin
symbol attached to a product, it means the
product is covered by the European Directive
2002/96/EC:
Never dispose of your product with other
household waste. Please inform yourself about the
local rules on the separate collection of electrical
and electronic products. The correct disposal
of your old product helps prevent potentially
negative consequences on the environment and
human health.
Your product contains batteries covered by the
European Directive 2006/66/EC, which cannot be
disposed of with normal household waste.
When you see the crossed-out wheel bin symbol
with the chemical symbol 'Pb', it means that the
batteries comply with the requirement set by the
directive for lead:
Please inform yourself about the local rules on
separate collection of batteries. The correct
disposal of batteries helps prevent potentially
negative consequences on the environment and
human health.
7EN
Page 8
3 Overview
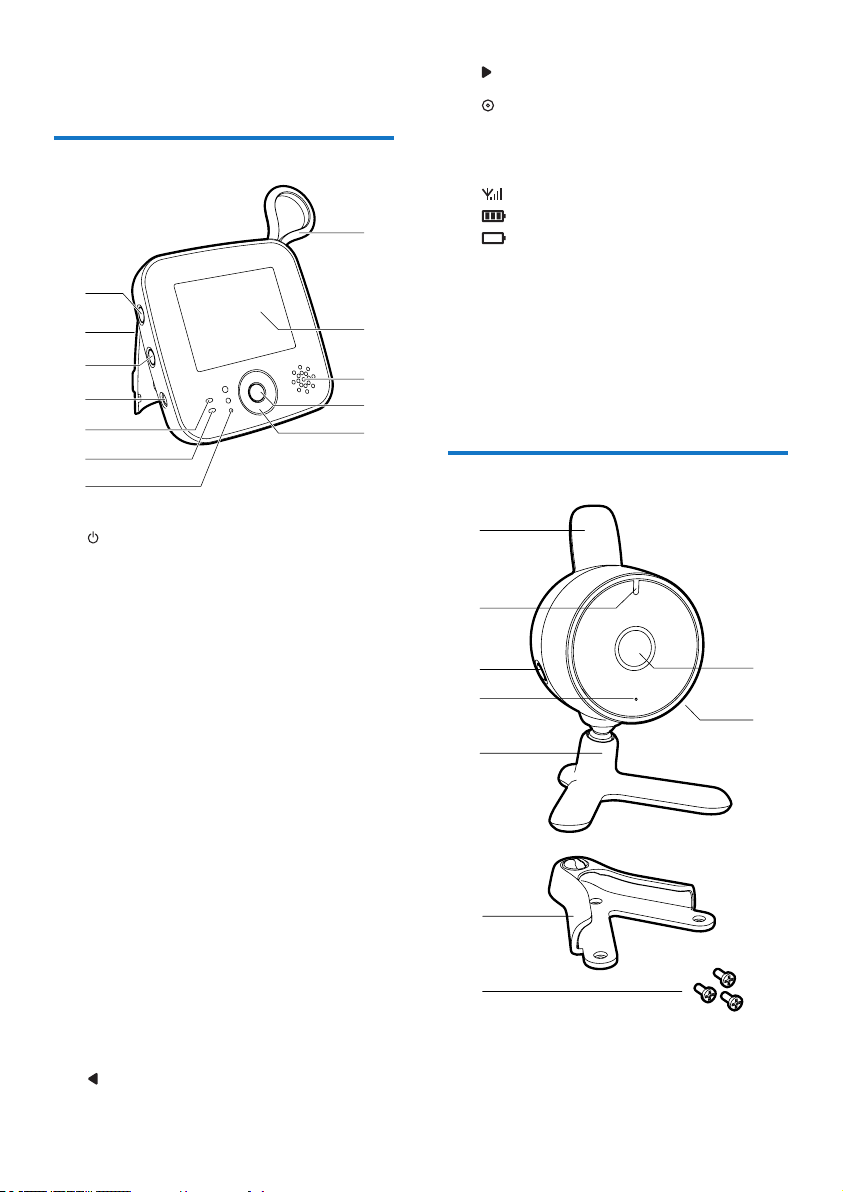
Parent unit
a
b
c
d
e
f
g
l
k
j
i
h
[RIGHT]
i Menu
j Speaker
k Video display
Signal strength indicator
Battery power indicator
Low battery power indicator
l Antenna
Connector for the supplied AC/DC adapter
• Input: 100-240V AC
• Output: 6.0V DC, 500 mA
• Model number: For UK, SSW-
1920UK-2; For the other European
countries, SSW-1920EU-2
Baby unit
a ON/OFF switch
• Press and hold to turn the parent unit
on or off
b Stand
c Voice activation button
• Press and hold to turn voice activation
on or off
d Connector for the supplied DC adapter
e Power on/off light
• Flashing red: The rechargeable battery
is low in power.
• Flashing green: The rechargeable
battery is in charging mode.
• Solid green: The unit is running.
f Voice activation light
g Sound level lights
• Indicate the level of sound in your
baby's room
h Key
+ [UP]
- [DOWN]
[LEFT]
a
b
c
d
e
h
i
a Antenna
b Power-on light
f
g
8 EN
Page 9

• In green: The baby unit is turned on
c ON/OFF switch
• Press and hold to turn the baby unit
on or off
• Short press to pair the parent unit
while the baby unit is on.
d Microphone
e Stand
f Lens
g Connector for the supplied DC adapter
h Wall mount
i Wall mount screws
Connector for the supplied AC/DC adapter
• Input: 100-240V AC
• Output: 6.0V DC, 500 mA
• Model number: For UK, SSW1920UK-2; For the other European
countries, SSW-1920EU-2
9EN
Page 10
4 Get started
Charge the parent unit
Note
• Make sure your hands and the unit are dry when you
insert and remove the rechargeable battery.
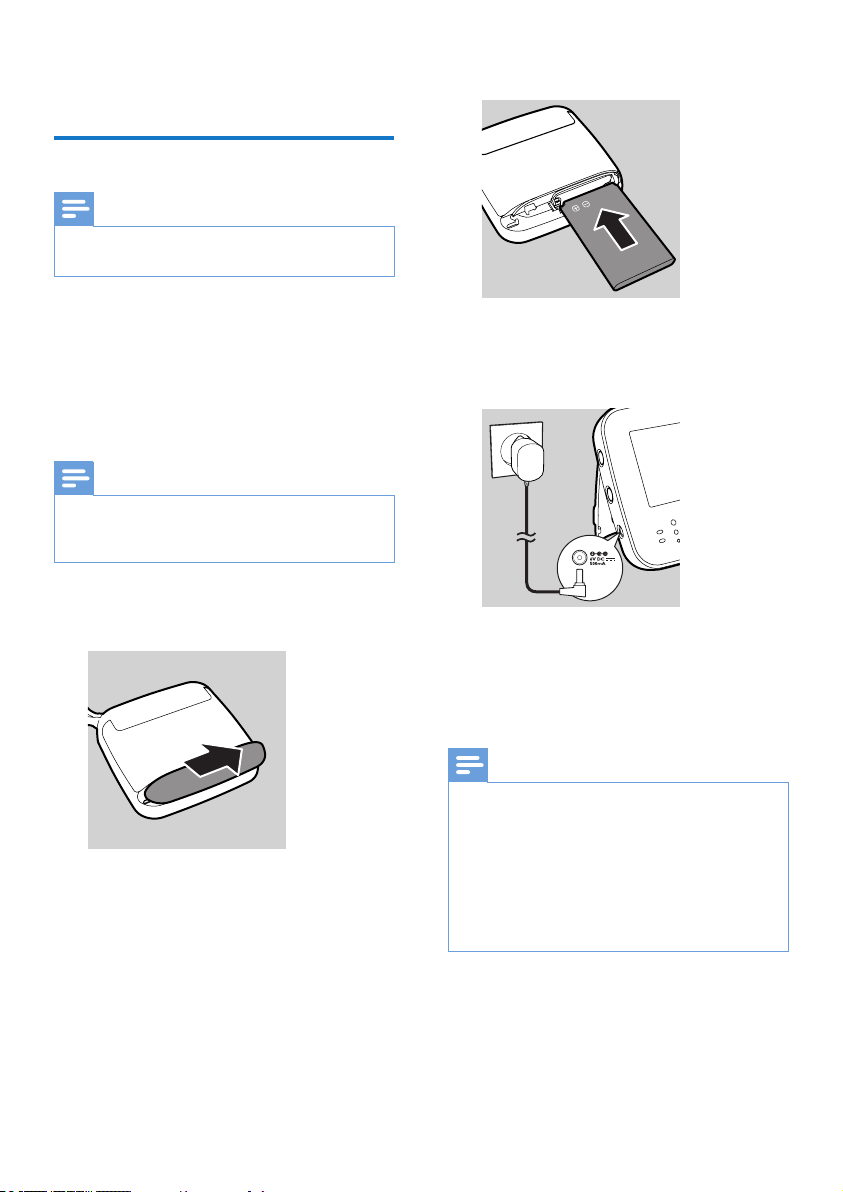
Do as follows to charge the parent unit before
you use it for the rst time or when the parent
unit indicates that the battery is low.
» The empty battery symbol ashes on
the video display and the battery on/
off light on the parent unit ashes red.
Note
• If the battery is completely empty, the parent unit
automatically switches off.
• The batter Model No. is BL-5C, 1050mAh.
2 Insert the rechargeable batter y.
3 Reattach the lid.
4 Insert the plug into parent unit and put the
adapter in a wall socket.
1 To remove the battery door, slide to the
right.
10 EN
» The battery on/off light on the parent
unit ashes green.
» When the battery is fully charged, the
battery light turns solid green.
Note
• When you charge the parent unit for the rst time or
after a long time not being used, switch it off and let it
charge continuously for at least 8 hours.
• When the parent unit has been charged for the rst
time, the operating time is less than 7 hours. The
rechargeable battery only reaches its full capacity after
you have charged and discharged it three times.
• The battery gradually discharges, even when the parent
unit is switched off.
Page 11
Tip
• Charging normally takes 5 hours, but it takes longer
when the parent unit is switched on during charging. To
keep the charging time as short as possible, switch off
the parent unit during charging.
• When the battery is fully charged, the parent unit can
be used cordlessly for approximately 7 hours if it is in
voice activation mode. If the video is on continuously,
the parent unit can be used cordlessly for approx. 5
hours.
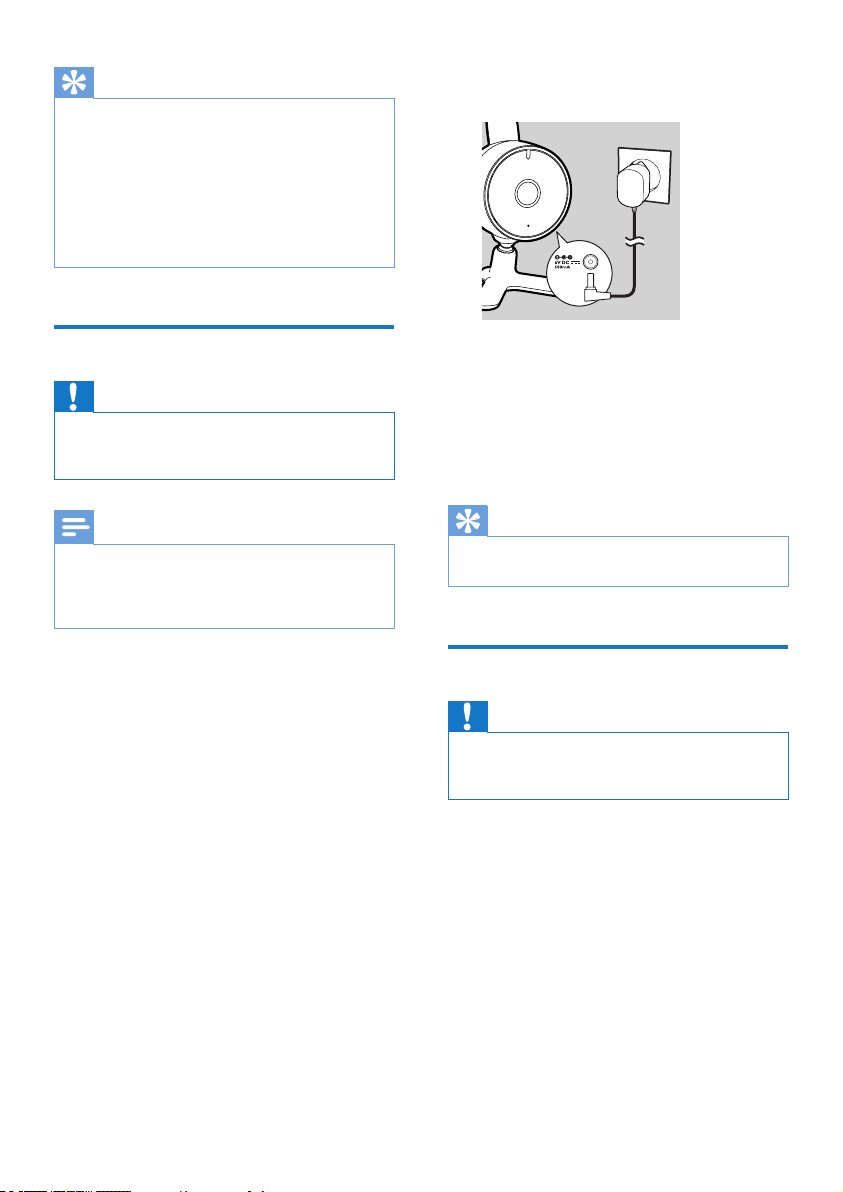
4 Insert the plug into the baby unit and put
the adapter in a wall socket.
Set up the baby unit
Caution
• Keep the baby unit out of the reach of the baby. Never
place the baby unit inside or mount it on the baby's
bed or playpen.
Note
• If you use wireless devices, microwave oven or a DECT-
system and you experience interference on either the
parent unit or baby unit, move the parent unit further
away until there is no more interference.
1 Place the baby unit at least 1 meter/3.5
feet away from your baby.
2 Place the baby unit on a stable surface.
You may also mount the baby unit on a
wall mount which is provided. For more
information, please refer to the next
section.
3 Adjust the position of the baby unit in a
way that ensures the best visibility of your
baby.
5 Place the parent unit within the operation
range of the baby unit. Make sure it is at
least 1.5 metre/5 feet away from the baby
unit to avoid acoustic feedback.
6 For more information on the operating
range, see section "Operating range" below.
Tip
• Position the baby unit at a higher level to get a good
overview of the baby's bed or playpen.
Wall mount the baby unit
Caution
• When the baby unit is wall mounted, manage the
cord of the baby unit so that it is xed on the wall, not
accessible by the baby.
1 Use the paper template to mark the
positions of the three screws to wall
mount your baby unit.
2 Drill holes at the three positions.
3 Place wall plugs in the wall.
11EN
Page 12
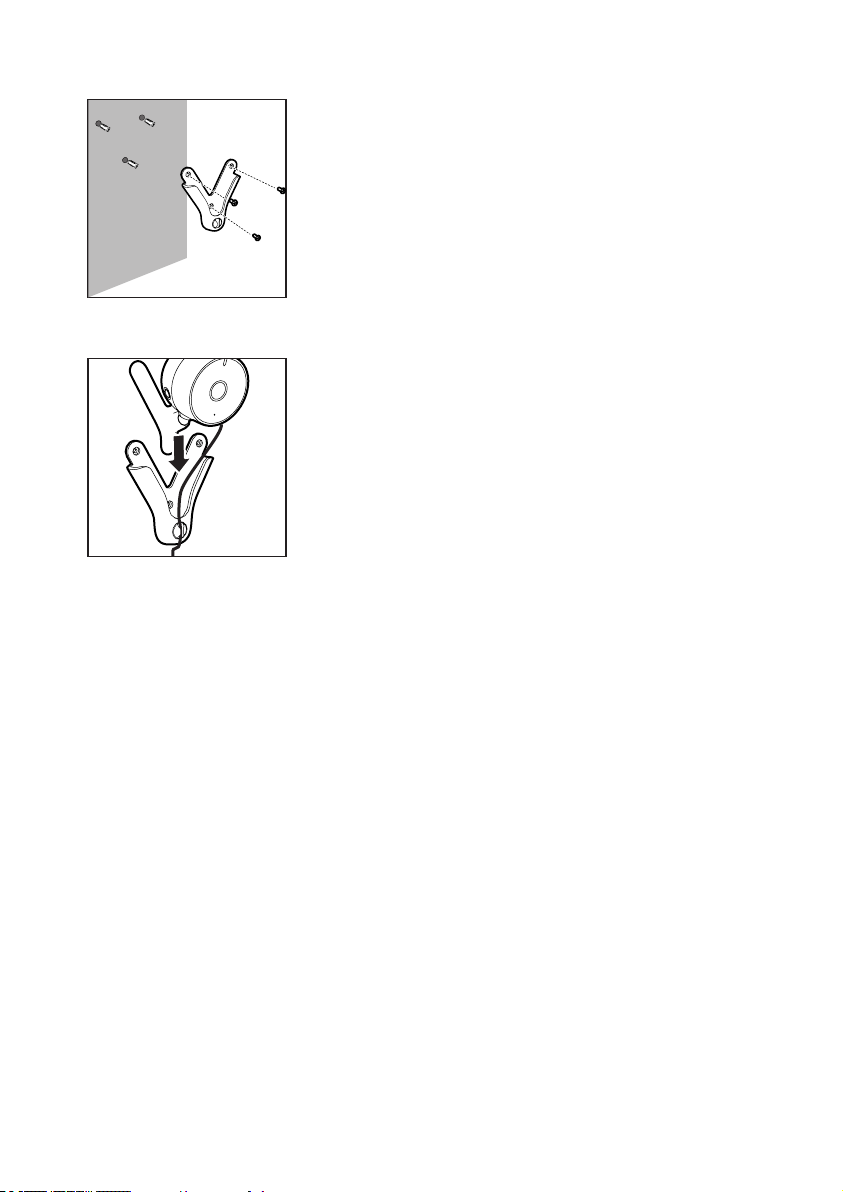
4 Screw in the wall-mount.
5 Put the baby unit into the wall-mount.
6 Place the cable into the holder at the wall-
mount.
7 Adjust the baby unit so that you can get a
best view of your baby.
12 EN
Page 13
5 Use your baby
monitor
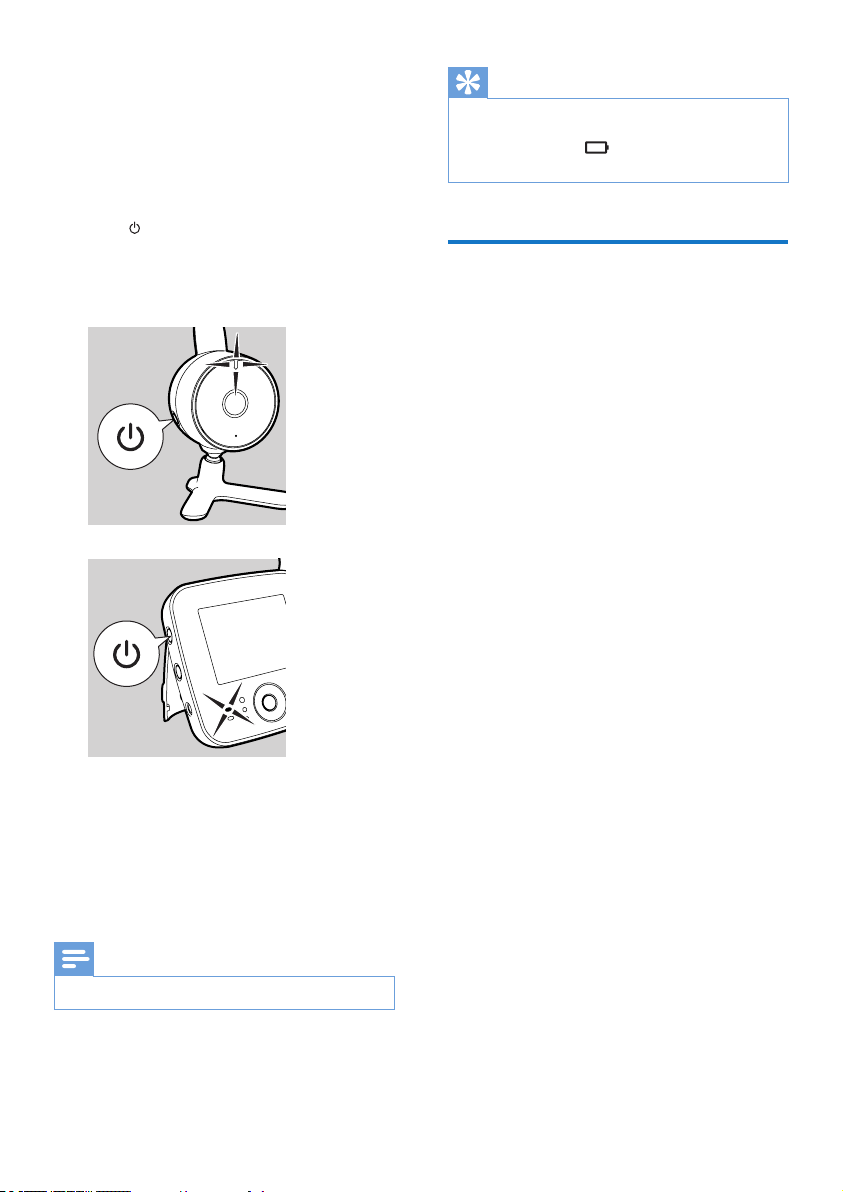
To see your baby,
1 Press on the parent/baby unit.
» The parent/baby unit turns on, and all
indicators on the parent/baby unit light
up briey.
Tip
• It takes about 15 seconds to establish the link between
the parent unit and the baby unit.
• The battery symbol ashes before the battery
runs out of power.
Operating range
The operating range of the baby monitor is
150 metres/490 feet in open air. The range
varies depending on the surroundings and other
disturbing factors.
This monitor is designed to operate at its
best within a 150m range, suitable for most
household environments. The operating range
and quality of the connection varies depending
on the number of obstructions, like walls or
buildings, in between the two units.
» Philips AVENT logo appears on the
display briey.
» If no link is established, a [NOT
LINKED!CAM1 OUT OF RANGE]
message is ashing on screen. The
parent unit beeps from time to time.
Note
• The CAM1 refers to the default camera.
13EN
Page 14
6 Menu
1 Press menu button on the parent unit.
» Menu is displayed.
2 Press +/- to move up or down the memu/
submenu, and press / to move left or
right across menu/submenu.
3 To conrm, press the center key or
4 To exit, press .
Zoom & Pan
Turn on voice activation
Press the button on the side of the parent
unit, and the voice activation indicator slowly
blinks.
Change voice activation level
1 Press menu button on the parent unit.
2 Select [VOICE ACTIVATION LEVEL] of
the baby unit.
Menu option Description
[HIGH] High voice activation level
[MID] Medium voice activation
level
[LOW] Low voice activation level
1 Press menu button.
2 Select [ZOOM & PAN] from the menu to
zoom in and out the view, and pan your
view.
Menu option Description
[ZOOM+] Zoom in the view
[PAN] Pan the view to adjust
the focus of the view
[ZOOM-] Zoom out the view
Voice activation
Voice activation
When the voice activation mode is on, the
video display only switches on when the baby
unit picks up a sound. As long as no sound is
detected, the video display is off to save power.
When you press a key or a sound is detected,
the parent unit is activated, and will be off again
after 20 seconds time-out. The timer is reset
each time when:
• A sound exceeds the set voice
activation level
• One button on parent unit (menu, +, -,
, ) is pressed on.
Note
• When voice activation is active, the LOOP ALL CAMs
in the switch CAM dialogue is not available.
• When the LOOP ALL CAMs is active, the VOICE
ACTIVATION function is not available. An info screen
will be shown when you press the VOX button.
Adjust brightness
1 Press menu button on the parent unit.
2 Select [ADJUST BRIGHTNESS].
3 Press +/- to adjust the brightness of the
video display.
Add/delete cameras
Add a new camera
A maximum of 4 cameras can be paired to a
parent unit. The menu has 4 positions named
CAM1 up to CAM4. Your default setting will be
at CAM1. You can select any of the positions
in the list to assign a camera. It is up to you to
decide which camera is which item in the list.
14 EN
Page 15
Note
• Only when a position is empty in the list, a new camera
can be paired.
Note
• When only one camera is in the paired list, the camera
identication bar, i.e. pressing and will not be
displayed.
1 Press menu button on the parent unit.
2 Select [ADD/DEL CAM].
» The paired CAM list is displayed.
Note
• A paired CAM cannot be paired again on another
position when it is assigned to a position.
3 Select [ADD CAM].
» An info screen will indicate that the
parent unit is searching for the new
camera. You are prompted to shor tly
press of the baby unit, with the baby
unit being on.
4 Short press of the baby unit, less than 1
second.
» An info screen will conrm when the
pairing process is successful.
Delete a camera
1 From the paired CAM list, select the
camera to be deleted.
» The dialog [DELETE CAM1 FROM
LIST?] is displayed.
2 Press or menu button to conrm, or
press to return.
For example, when "CAM1 DELETE" is
highlighted and selected, CAM1 will be deleted.
Select other cameras
When multiple CAMs are listed in the paired
camera list, you may switch between different
cameras.
1 Press or to show the CAM
identication bar indicating which camera is
currently linked to the parent unit.
2 Press and to navigate this bar to select
other CAMs in the list, i.e. parent unit tries
to connect to camera.
Loop all cameras
Switch on the tab LOOP ALL cameras to check
what is going on through all paired cameras.
Note
• When VOICE ACTIVATION is active, the LOOP ALL
function is not selectable.
Change the language
1 Press menu button on the parent unit
2 select [LANGUAGE] to dene your
desired language.
Menu option Description
GB English
FR French
Reset
To reset the parent unit:
1 Press and hold to turn off the parent
unit.
2 Press and hold - on the parent unit.
3 When you hold -, turn on the parent unit.
» The parent unit is reset.
15EN
Page 16

7 Optimize the
8 Guarantee and
battery life of
the parent unit
• Recharge the parent unit when
you see the low battery icon. Fully
recharge the parent unit before you
use it again, as completely draining the
rechargeable battery may reduce its
life.
• Remove the rechargeable battery pack
from the parent unit if you are not
going to use if for a week or longer.
• Always fully recharge the parent after a
long period of time.
• If you experience any issue while
charging your battery, you may contact
your dealer or a Philips service centre.
service
If you need service or information or if you
have a problem, please visit the Philips AVENT
website at www.philips.com/AVENT welcome
or contact the Philips Consumer Care Centre
in your country. You can nd the phone number
of the Philips Consumer Care Centre in the
worldwide guarantee leaet. If there is no
Philips Consumer Care Centre in your country,
please visit the local Philips dealer.
16 EN
Page 17

9 Frequently
asked questions
If you don't nd the solution you need in this
section, you can get support at
www.philips.com/AVENT or contact the Philips
Consumer Care Center in your country.
Problems Possible causes Solutions
My parent/baby unit will not
switch on.
My baby unit will not switch on. The unit is not connected to a
I cannot establish a connection.
The parent unit beeps and the a
"NOT LINKED! CAMx OUT OF
RANGE" message is ashing on.
I get interference. I can only hear
intermittently.
I cannot hear anything through
my parent unit.
My range is less than 150 metres/
490 feet.
The unit is not connected to the
power supply.
The battery is empty. Replace the battery and make
power supply.
The units are out of range. Move the units closer (see
Parent and baby units are too far
apart.
The baby unit is switched off. Switch on the baby unit.
The units are out of range. Move the units closer.
The parent unit picks up signals
from other appliances or baby
monitors.
The volume of parent unit is set
too low or it is on mute.
The units are out of range. Move the units closer.
You have switched on the
automatic voice activation.
The voice activation level is set
too high.
Environmental obstructions may
be affecting your range.
Connect the unit to a power
supply.
sure that it is correctly inserted.
Connect the unit to a power
supply.
"Operating range" )
Move the parent unit at least
1.5 metres/ 5 feet away from
the baby unit.
Move the parent unit away
from other 2.4GHz wireless
appliances such as telephones.
Increase the volume of the
parent unit.
When it is activated, the video
is displayed on when the baby
unit picks up a sound. As long
as no sound is detected, the
video display is off to save
power.
Increase the voice activation
level.
Move the units closer.
17EN
Page 18

The battery light on the parent
unit ashes red.
The battery of the parent unit
runs low quickly.
Is my baby unit secure from
eavesdropping?
The rechargeable battery of the
parent unit is running low.
The volume is set too high and
the unit consumes more power.
The video display is switched
on continuously and the unit
consumes more energy.
Recharge the battery.
Decrease the volume.
Activate the automatic voice
activation mode to increase the
operating time.
The 2.4GHz digital technology
of this baby monitor guarantees
no eavesdropping.
I hear other sounds from my
parent unit.
The baby unit is too far from the
baby
Move the baby unit closer to
your baby with a minimum
distance of 1 metre/ 3.5 feet.
The charging of the parent unit
takes a long time.
The video monitor makes some a
high-pitched noise.
The voice activation level is set
too low.
The baby unit is close to other
sound source.
The unit is used for the rst time
or after a long period of disuse.
The parent unit is switched on
during charging
The units may be too close to
each other.
Increase the voice activation
level.
Move the baby unit away from
the sound source.
Allow at least 8 hours of
charging time.
Switch off the parent unit
during charging.
Move the parent unit at least
1.5 metres/ 5 feet away from
the baby unit.
The parent unit makes a buzzing
The volume of the parent unit
may be set too high.
The units are out of range. Move the units closer.
Decrease the volume of the
parent unit.
sound.
The parent unit picks up signals
from other appliances or baby
monitors.
The rechargeable battery of the
Move the parent unit away
from other 2.4GHz wireless
appliances such as telephones.
Recharge the battery.
parent unit may be low.
The video display ickers. The units are nearly out of range. Move the units closer.
The parent unit picks up signals
from other appliances or baby
monitors.
The rechargeable battery of the
Move the parent unit away
from other 2.4GHz wireless
appliances such as telephones.
Recharge the battery.
parent unit may be low.
There is no image on the video
display when the power on light
is on.
The image on the video display
is unclear.
The parent unit may be in the
automatic voice activation mode.
The display brightness may be set
too low or too high.
Press the automatic voice
activation button again to
switch on the video display.
Adjust the display brightness.
18
Page 19

The image on the video display is
unclear in night vision.
The distance between the baby
and the baby unit may be too
long.
The parent unit does not charge
when I have plugged it in.
The night vision LED is still ON
when the ambient condition is
bright enough.
The rechargeable battery may
have reached the end of its life.
The baby unit's light sensor
(located on top of the housing
near the antenna) is blocked
from the ambient light.
Tip
• Product information is subject to change without prior
notice.
Make sure that the baby unit is
placed 1 to 1.5 metres/ 3.5 to
5 feet away from the baby.
Replace the rechargeable
battery.
Relocate the baby unit or leave
it as it is. It will not affect the
picture of the display.
19
Page 20
In US manufactured for Philips Consumer Lifestyle,
A division of Philips Electronics North America Corporation,
P.O. Box 10313, Stamford, CT 06904
In Canada imported for Philips Electronics Ltd,
281 Hillmount Road, Markham, ON L6C2S3
Call TOLL-FREE 1.800.54.AVENT
En EE.UU. faricado para Philips Consumer Lifestyle,
Una división de Philips Electronics North America Corporation,
P.O. Box 10313,, Stamford, CT 06904
En Canadá importado para Philips Electronics Ltd,
281 Hillmount Road, Markham, ON L6C2S3
Llame gratuítamente: 1.800.54.AVENT
Aux États-Unis fabriqué pour: Mode de Vie/ Consommateurs Philips,
une division de Philips Electronics North America Corporation,
P.O. Box 10313, Stamford, CT 06904
Au Canada importé pour Philips Électronique Ltée,
281 Hillmount Road, Markham, ON L6C2S3
Appelez SANS FRAIS: 1.800.54.AVENT
SCD610_609
100% papel reciclado
 Loading...