

PHILIPS SBC-HD1500 User Manual
Instructions for use
English 5
Mode d'emploi
Français 33
Bedienungsanleitung
Deutsch 61
Gebruiksaanwijzing
Nederlands 89
Instrucciones de manejo
Español 117
Manual de utilização
Português 145
Instruzioni per l'uso
Italiano 173
Bruksanvisning
Svenska 201
SBC HD1500U

2
☎
Helpline (www.p4c.philips.com)
België/Belgien/Belgique
32-2-525.81.11
Danmark
45 33 29 33 33
Deutschland
49-40-28990
España
34-91-4042200
France
33 1 47 28 10 00
ŒÏÏËÓ·˜
30-1-4894911
Ireland
353-1-764 0000
Italia
39.039.203.1
Nederland
0900-8406
Norge
47-22-748 000
Österreich
43-1-601 01
Portugal
+351-21-416 33 33
Schweiz/ Suisse/ Svizzera
41-1-48 82 211
Suomi
358-9-615 800
Sverige
468 598 520 00
UK (United Kingdom)
44-208-689 2166
‘Dolby’,‘Pro Logic’ and the double-D symbol
are trademarks of Dolby Laboratories.
‘DTS’ and ‘DTS Virtual’ are trademarks of
Digital Theater Systems, Inc .
3
9
$
8
1
7654
32
@@
!00!#
%
^
&
*
)
(
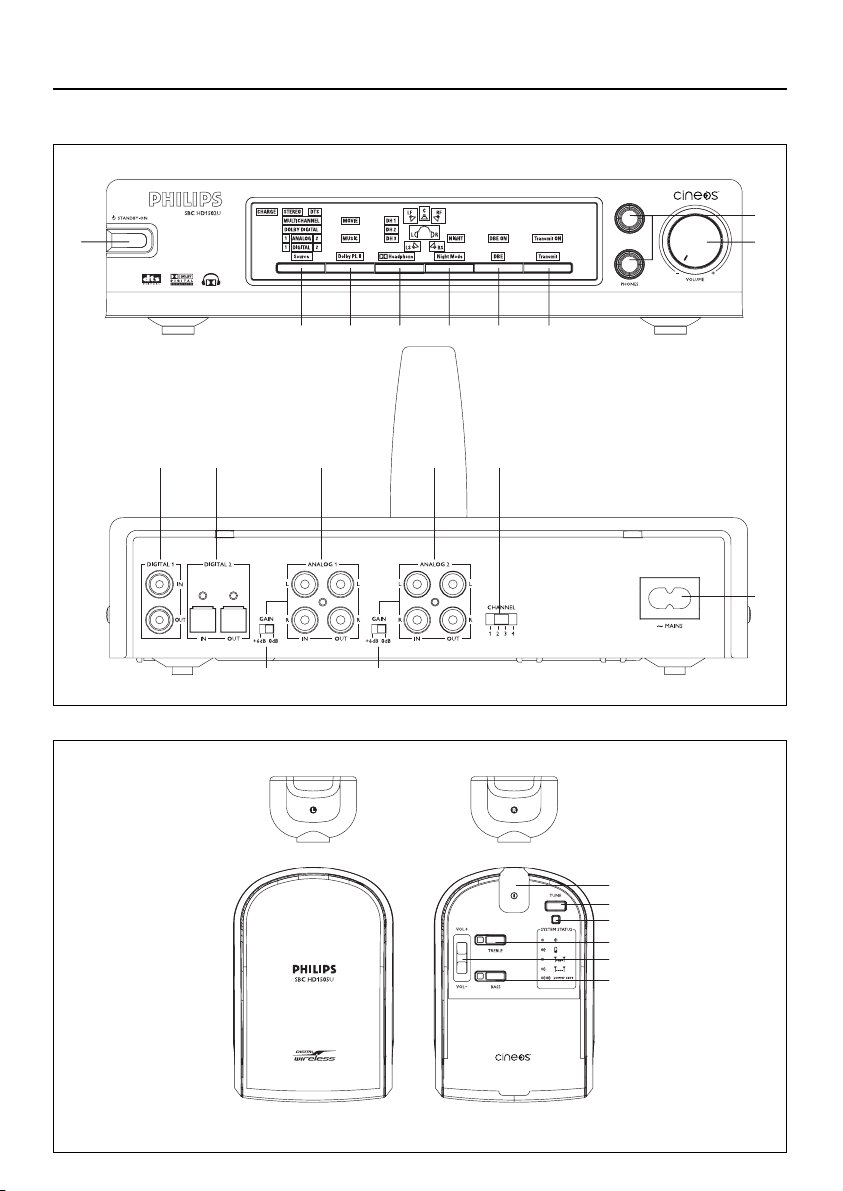
Functional Overview (see section on page 19-27)

4
¡
≥™
•
ª
£
º
≤
∞
§
⁄
¤
‹
›

ENGLISH
5
Index
Introduction............................................................................................................6-7
General.....................................................................................................................................................6
Dolby Headphone.........................................................................................................................6-7
Dolby Pro Logic II..............................................................................................................................7
Important information .........................................................................................7-8
Recognizable digital audio formats...........................................................................................7
Multiple headphones with one transmitter.........................................................................8
Safety precautions..............................................................................................................................8
Getting Your HD1500U Digital Wireless
Headphone System Ready................................................................................9-10
Power Supply........................................................................................................................................9
Base station power supply............................................................................................................9
Headphone power supply.....................................................................................................9-10
Audio connections ...........................................................................................11-14
Option 1: Analog connection...................................................................................................11
Option 2: Digital connections (S/PDIF)..............................................................................12
Option 3: Optical Digital Connection ................................................................................13
Connecting SACD player to HD1500U.....................................................................13-14
How to read the intelligent user interface of the HD1500U...............................14
Using Your HD1500U Digital Wireless Headphone System..................15-18
Functional Overview........................................................................................19-27
Base station (front panel)....................................................................................................19-24
Base station (back panel).....................................................................................................24-25
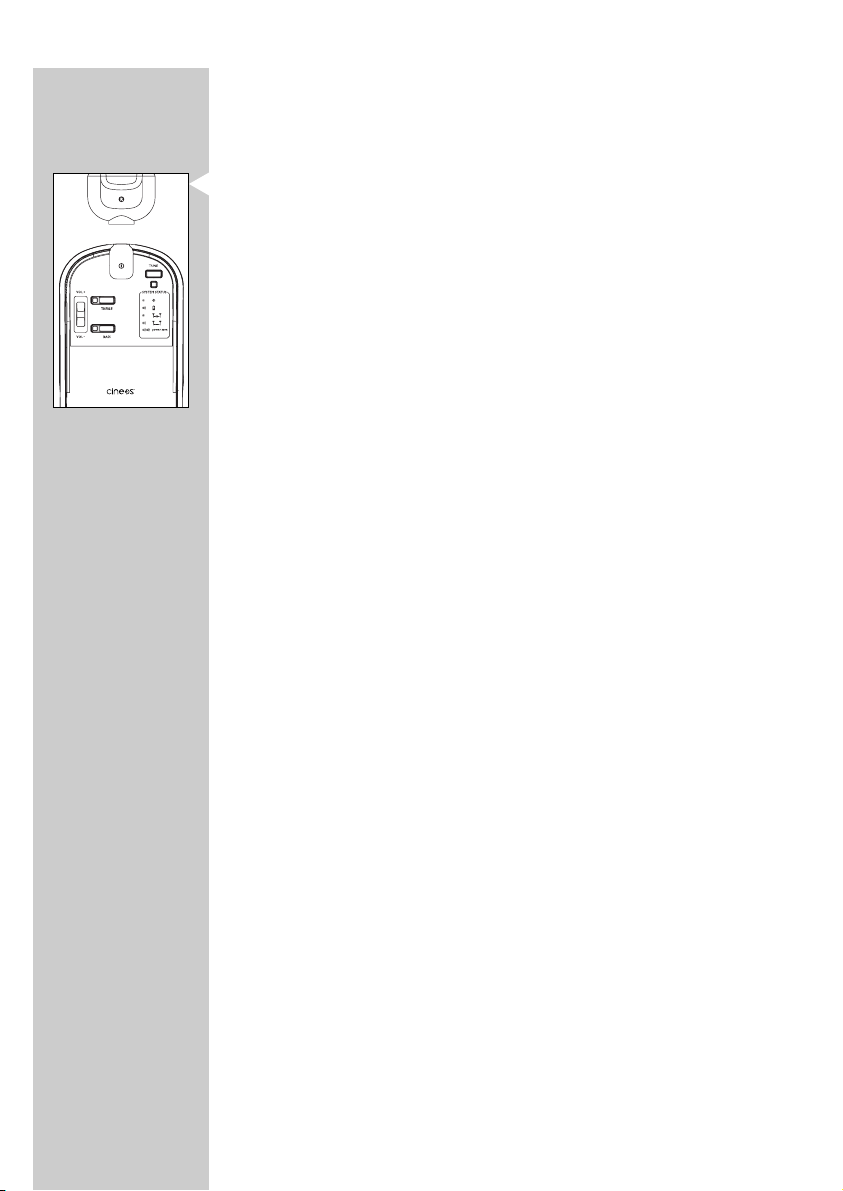
Headphone..................................................................................................................................25-26
Remote control.........................................................................................................................26-27
Tr oubleshooting................................................................................................28-29
Glossary....................................................................................................................30
Technical Specifications .........................................................................................31
European Regulations............................................................................................32

Introduction
General
You have just bought one of the most sophisticated digital wireless
headphone systems.This system uses state of the art digital wireless
technology, offering you the freedom of enjoying your favourite music or
movies in the purest digital quality, without the hassle of cables. Even silent
passages in classical music and plain silence in between two music tracks are
reproduced as pure silence. Never before has a wireless headphone
sounded so close to a corded headphone! With Dolby headphone, you can
now completely indulge yourself in an overwhelming private home
entertainment experience. And all this at the volume level that you
personally prefer without running the risk of disturbing the neighbours or
the family!
To ensure you get the best performance from your digital wireless
headphone system please read this manual carefully.
Dolby Headphone
Dolby Digital and DTS provide discrete left and right surround channels,
for more precise localization of sound and a more convincing, realistic
ambience. Discrete means that each channel contains its own particular
audio information and plays a unique role in creating a realistic surround
sound experience.
Up until now all this was reserved to speaker set-ups, but thanks to Dolby
Headphone, the ultimate experience in home theatre surround with
five (left, right, centre, rear-left and rear-right) discrete channels of digital
sound quality is now also available to headphones.
Dolby Headphone is a revolutionary signal processing system that works
not only with multi channel audio but also with conventional stereo signals.
In case of multi channel audio signals, Dolby Headphone technology will
process these signals in such a way that you will experience the sound
through your headphone as if it were coming from an actual five-speaker
home entertainment set-up. And even when listening to conventional stereo
signals, Dolby Headphone will give you a much more natural and less
fatiguing listening experience, equivalent to a good two-speaker playback
system in a room with good acoustics.
ENGLISH
6

ENGLISH
7
Dolby Headphone technology can model the sound of a playback system in
up to three different listening environments, based on acoustic
measurements of real rooms:
• DH1 is a small, well-damped room appropriate for both movies and
music-only recordings.
• DH2 is a more acoustically live room particularly suited to music
listening, but also great for movies.
• DH3 is a larger room, more like a concert hall or movie theatre.
You can easily switch between these room modes and select whichever one
suits the particular program material and your own preferences.
Dolby Pro Logic II
Dolby Pro Logic II is a signal processing technology which processes any
stereo audio signal (Left/ Right) into 5.1 playback channels (Front Left, Front
Right, Center, Rear Left, Rear Right, Low Frequency Effects).The highly
sophisticated processing uses a matrix surround decoding technology to
detect the directional cues in the stereo signal and creates a 5.1 surround
sound experience.
Important Information
Please read the following instructions carefully, and retain this booklet for
future reference. All the safety and operating instructions should be read
before using the digital wireless headphone system.
Recognizable Digital audio formats
The device will recognize the following digital input signals:
– Stereo LPCM with sample frequencies 44.1 kHz and 48kHz
– Dolby® Digital, up to 5.1 channels
– DTS®, with 5.1 channels
In case no signal is detected, or an invalid digital signal is detected - for
example a digital MP3 data stream - the ‘DIGITAL’ indication LED will be
illuminated in red.
In case a valid digital signal is detected - for example a digital DTS data
stream - the ‘DIGITAL’ indication LED will be illuminated in green.

Multiple headphones with one transmitter
It is technically possible to use an additional number of digital wireless
headphones with a single transmitter if they all*:
– operate in the 864 MHz band
–work according to the same modulation scheme
–work according to the same coding/decoding scheme
Please consult the appliances’ electrical specification sheets for confirmation
on compatibility.
* This statement is to be interpreted from a technical point of view only
and does therefore not constitute any guarantee nor obligation
whatsoever regarding the commercial availability of single digital wireless
headphone compatible with SBC HD1500U.
Safety precautions
• Prevent fire or shock hazard: do not expose this equipment to humidity,
rain, sand or excessive heat caused by heating equipment or direct
sunlight.
• Radio equipment for wireless audio applications is not protected against
disturbance from other radio services.
• Do not use this product in damp places or close to water.
• Do not expose this product to extreme heat or direct sunlight.
• Do not disassemble this product. In the event of technical difficulties take
it to your Philips retailer.
• Do not cover this product.
• Inadequately protected or sensitive electronic equipment may be affected
by the use of this product. This interference may lead to damage to
either equipment. Please check whether or not this product may affect
surrounding equipment before you start using it.
• Do not use cleansing agents containing alcohol, spirits, ammonia or
abrasives as they may harm the housing. Use a slightly dampened
chamois cloth to clean the housing
• If fluid spills into the headphone system, remove the batteries
immediately and consult an authorized dealer.
• Hearing Safety! Continuous use at high volume may permanently damage
your hearing.
ENGLISH
8

ENGLISH
9
Getting Your HD1500U Digital Wireless Headphone
System Ready
Power supply
Base station power supply
1 Check if the voltage indicated on the type plate (located at the bottom of
the set) corresponds to the local mains voltage before connecting to the
mains power supply.
2 Connect the AC mains cable to the AC mains socket at the rear of the base
station.
3 In order to disconnect the basestation from the AC mains power, the AC
mains cable needs to be unplugged from the AC mains power wall socket.
The AC mains power wall socket should be easily accessible in normal
operating conditions.
Headphone power supply
A) Before using the Digital headphone for the first time, please ensure that the
batteries are fully charged.This will guarantee a longer operating lifetime of
the batteries.
1 To charge/ recharge the headphone’s rechargeable battery pack, put it into
the battery recharging compartment, which is on top of the base station.
2 The charging indicator on the panel of base station will be illuminated in
RED, indicating that batteries are in the progress of charging.
3 When batteries are fully charged, the dual color charging indicator will
switch from red to GREEN, indicating that the battery pack is ready for use.
B) Inserting batteries into the headphone
1 Make sure that the power button of the headphone is in position ‘off’.
2 Open the headphone’s battery compar tment door located on the RIGHT
earshell.
3 Insert battery pack, and make sure it is correctly positioned as indicated by
the engraved symbols.
4 Close the battery compartment door.
IMPORTANT!
• Use only the original rechargeable battery pack (SBC EH2412/00) that
came with the HD1500U set. It contains 2 pieces of Philips R06/AA
NiMH batteries (1200 mAh).
• Do not use other NiMH batteries, NiCd batteries or alkaline batteries as
these may damage your Digital wireless system!
• Completely flat batteries need approximately 16 hours to recharge.
• The charging process is of the so-called ‘low-rate’ class, resulting in
increased life span of batteries.
• The battery pack cannot be overcharged, as soon as the batteries are
fully charged, the charging circuitry switches to ‘trickle charge’ in order to
keep the batteries in excellent condition.
•Always remove the battery pack from the headphone if the headphone
is not to be used for a long period of time.
• The battery pack slowly loses its charge when not used for a longer
period of time, even when left outside the battery compartment.This is
normal for rechargeable batteries.
• Batteries contain chemical substances, so they should be disposed
properly.
•To prevent battery leakage which may result in bodily injury, proper ty
damage or damage to the unit, install ALL batteries correctly, + and - as
marked on the unit.
• Do not mix batteries: (OLD and NEW or CARBON and ALKALINE
etc.).
ENGLISH
10

ENGLISH
11
Audio connections
Option 1:Analog connection
Connecting the digital wireless base station to:
– Stereo TV
– Stereo VCR
– (S) VCD player
– CD/DVD player
–Tape recorder
– Etc.
Note: Dolby® Digital and DTS® are not available via analog connections,
please refer to Option 2/ Option 3: Digital connections
1 Connect one side of the RCA stereo audio cable (included) to the line
output of the audio source and the other side to one of the analog inputs
(ANALOG 1 IN/ ANALOG 2 IN) of the base station.
2 (Optional) Take the RCA stereo cable that most likely came with your audio
source. Connect one side of this second RCA stereo audio cable
(not included) to the line input of your amplifier or home cinema receiver
and the other side to the analog output of the HD1500U base station.
When connecting your audio equipment in this way, you will be able to
benefit from the Automatic Audio Signal Routing (AASR) feature.
For graphical illustration, please refer to the Quick Startup / Reference
Guide. For benefits of AASR, please refer to glossary.
IMPORTANT!
Make sure the red RCA plug (right channel) is connected to the red
connector (right channel) of the audio source.The white RCA plug (left
channel) must be connected to the white connector (left channel) of the
audio source.

Option 2: Coaxial Digital connections (also referred
to as S/PDIF)
Connecting the digital wireless base station to:
– CD/ DVD player
– Stereo amplifier
Note: Some amplifiers do not have Dolby® Digital and DTS® capability on their
Digital or S/PDIF output
1 Connect one side of the S/PDIF digital audio cable (included) to the
S/PDIF output of the audio source and the other side to the S/PDIF input
(Digital 1 -IN) of the base station.
2 (Optional) Take the S/PDIF cable that most likely came with your audio
source. Connect one side of this 2nd S/PDIF digital audio cable (not
included) to the S/PDIF input of your amplifier or home cinema receiver
and the other side to the S/PDIF output (Digital 1 - OUT) of the base
station.When connecting your audio equipment in this way, you will be able
to benefit from the Automatic Audio Signal Routing (AASR) feature. For
graphical illustration, please refer to the Quick Startup / Reference Guide.
For benefits of AASR, please refer to glossary.
IMPORTANT!
• In case of connecting an audio CD player to the HD1500U base station
making use of the CD player’s digital outputs, do not up sample the
Audio CD digital output signal higher than 44.1 kHz.
• When connecting a DVD player to the HD1500U base station making
use of the DVD player’s digital output, do not up sample the DVD digital
output signal higher than 48 kHz.
ENGLISH
12

ENGLISH
13
Option 3: Optical Digital Connection (also referred
to as TOS link)
Connecting the digital wireless base station to:
– CD/ DVD player with Optical digital output available
1 Connect one side of the optical digital audio cable (included) to the output
of the audio source and the other side to the optical digital input
(Digital 2 - IN) of the base station.
2 (Optional) Take the optical digital cable that most likely came with your
audio source. Connect one side of this 2nd optical digital audio cable (not
included) to the optical input of your amplifier or home cinema receiver
and the other side to the optical output (Digital 2 – OUTPUT) of the base
station.When connecting your audio equipment in this way, you will be able
to benefit from the Automatic Audio Signal Routing (AASR) feature. For
graphical illustration, please refer to the Quick Startup / Reference Guide.
For benefits of AASR, please refer to glossary.
IMPORTANT!
• In case of connecting an audio CD player to the HD1500U base station
making use of the CD player’s digital outputs, do not up sample the
Audio CD digital output signal higher than 44.1 kHz.
• When connecting a DVD player to the HD1500U base station making
use of the DVD player’s digital output, do not upsample the DVD digital
output signal higher than 48 kHz.
Connecting SACD player to HD1500U
Analog connection
1 Philips SACD players come with six analog audio output connectors
(5.1 output). Only connect the Front Left and Front Right outputs.
(Audio cable most likely supplied with your SACD player)
2 Select the Stereo mode or the Dolby Pro Logic mode through the
SACD player menu. Follow the instruction manual of your SACD player to
get access to the TV on screen menu.

S/PDIF Digital connection (Digital 1)/ Optical Digital connection
(Digital 2)
Follow the installation procedures described in Option 2 and Option 3
respectively.This allows you to enjoy stereo audio through your SACD
player. Or, with HD1500U Dolby Pro Logic II option can convert this stereo
signal in to virtual 5.1 channels.
IMPORTANT!
• Some SACD players allow for audio CDs to be upsampled from
44.1kHz/ 16bit to various higher sampling rates. When connecting SACD
player to HD1500U, make sure you do not up sample the Super Audio
CD digital output signal to higher than 44.1 kHz.
How to Read the Intelligent User Interface of
HD1500U
1 Function of each individual menu bar button is illuminated in yellow, above
each corresponding button.
2 If no yellow indication light is on above a particular menu bar button, it
means this particular processing function is not relevant to the current
choice of source application.
3 Provided a processing function is an applicable option, pressing the menu
bar button continuously allows user to toggle between available choices.
And your choice will be indicated in green on the display.
ENGLISH
14

ENGLISH
15
Using Your HD1500U Digital Wireless Headphone
System
To begin using your HD1500U digital wireless headphone system, start from
the left side of the base station. Follow instructions below and gradually
read from left to right of the user interface.
1 Power on your audio source.
2 (For analog connection) In case the RCA output level of your audio source
is adjustable, adjust the output to the highest acceptable undistorted level.
Note: Also, make sure the GAIN button, located at the back of the panel, under
each Analog input jack, is set to the appropriate level. For details, please
refer to the ‘Functional Overview’ section.
3 Power on the HD1500U base station.The power indication of the base
station will change from red to green.
4 The source menu light is illuminated in yellow, meaning that you could
choose the input source you would like to play.
5 Select the input source you wish to listen to by pressing the ‘source’ button.
You have a choice between:
– Analog source (ANALOG 1, ANALOG 2)
– Digital source (S/PDIF – DIGITAL1, Optical digital – DIGITAL 2)
6 Once a valid audio signal is detected, the green ‘Transmit On’ indicator lights
up. Pressing the ‘transmit’ button can disable the transmitter function.
Note: The ‘Transmit’ menu is always illuminated in yellow, indicating that the
function is always available.
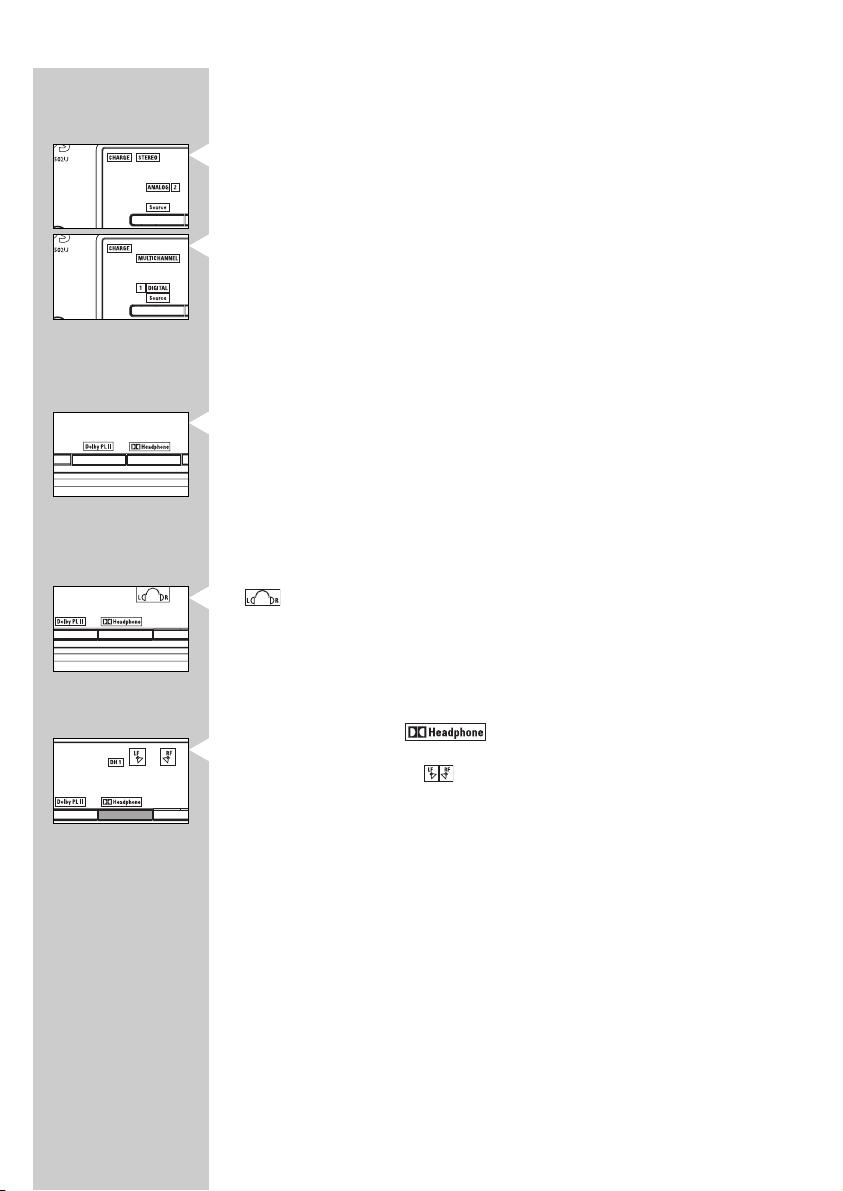
7 The signal format (stereo/ multichannel) will be analyzed automatically and
indicated on the display panel:
Stereo
– when you select the Analog signal source
– when you select the digital signal source which is stereo, for example
playing a CD/ VCD.
Multichannel
– most common digital source, for example playing DVD
8 Depending on the signal format HD1500U is playing, different processing/
sound enhancement features will be activated.With intelligent user interface,
the menu light will be illuminated in yellow if that particular feature is
available for use.
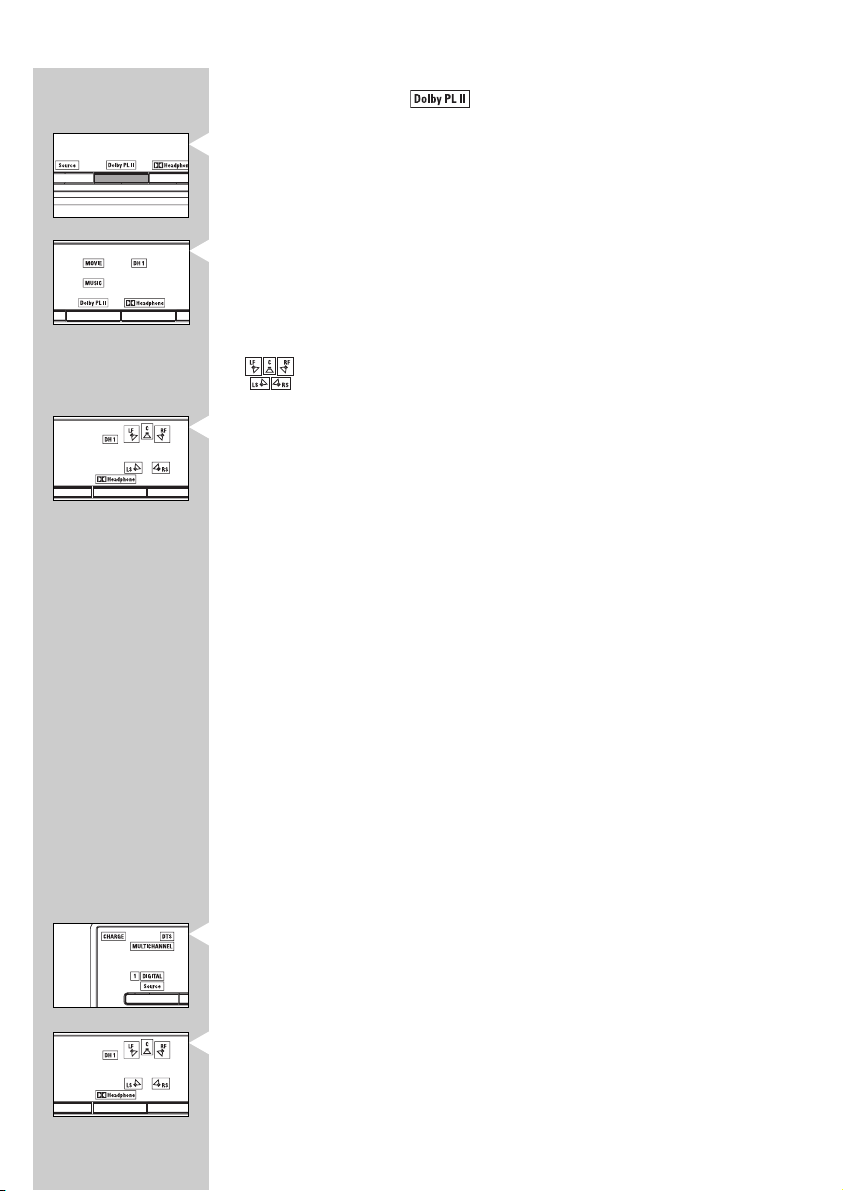
9a In case you are listening to Stereo signal, the ‘Dolby Headphone’ indicator
and the ‘Dolby Pro Logic II’ indicator will both be on.This indicates that both
processing features are available.
You are now offered with the following 3 choices of audio
performance experience:
Basic Stereo
is illuminated, indicating you are now listening to normal stereo signal,
which is the basic setting.
(Optional) If you would like to enhance the stereo sound experience, you
could select Dolby Headphone.
Dolby headphone ( )
Press the ‘Dolby headphone’ button to enjoy Dolby Headphone stereo
sound reproduction.The indicator will be illuminated. Now, the audio
experience is equivalent to a good 2-speaker playback system in a room
with good acoustics.
(Optional) If you would like to further enhance the experience by
processing the stereo signal into virtual 5.1-channel surround experience,
then you could select Dolby Pro Logic II:
ENGLISH
16
ENGLISH
17
Dolby Pro Logic II ( )
i Press the ‘Dolby Pro Logic II button’ to activate processing.
ii Press the ‘Dolby Pro Logic II’ button repeatedly will allow you to toggle
between ‘MUSIC’,‘MOVIE’ and bypass modes, with the corresponding green
indicator lights on.
iii ‘Dolby Headphone’ will also be activated automatically, illustrated by the
indicator.
iv Press the ‘Dolby Headphone’ button repeatedly will allow you to toggle
between different DH rooms and the bypass mode.You have the following
choices:
– DH1 – small room mode
– DH2 – large room mode
– DH3 – cinema mode
– Bypass – DH1, DH2, and DH3 green indicators are all off
Note: Deactivating ‘Dolby Headphone’ will automatically disable
‘Dolby Pro Logic II’ processing.
For details in using Dolby Pro Logic II and Dolby Headphone,
please refer to ‘Functional Overview’ section.
IMPORTANT!
In case of multilingual NICAM transmissions, you should select the
appropriate language in your TV’s menu. In that case the audio signal will no
longer be stereo but only mono and the effect of Dolby Pro Logic II or
Dolby Headphone will be very limited.
9b In case you are listening to Multichannel signal:
i The base station automatically detects the encoded format of the signal.
One of the following indication will light up in green:
– DTS
– Dolby Digital
ii Press ‘Dolby Headphone’ to activate the different DH rooms.
iii Pressing the ‘Dolby Headphone’ button repeatedly will allow you to toggle
between different DH rooms, and the bypass mode.You have the following
choices:
– DH1 – small room mode
– DH2 – large room mode
– DH3 – cinema mode
– Bypass – stereo downmixing
For details in using Dolby Headphone, please refer to ‘Functional Overview’
section.
iv The ‘Dolby Pro Logic II’ indication will not be illuminated, since this is not a
valid option.There is no need to further process a multichannel signal.
10a Listening to wireless headphone (included):
• Switch on the wireless headphone.
The system status light will be illuminated in green.
• The headphone will tune automatically to the most recently used
transmission channel.
• In case the headphone does not tune properly to the transmitter, then
press the tuning button.
• Adjust the volume to the desired level with the headphone volume
control.
• For Bass and Treble enhancement, press the buttons on the right earshell
of the wireless headphones. Pressing repeatedly will activate/deactivate
the Bass and Treble enhancement.
Important!
Adjusting the volume control and DBE button on the base station has no
impact on the HD1500U wireless headphones.These functions only work
with corded headphones. (not included)
10b Listening to corded headphone (not included):
•You can connect up to 2 corded headphones to the base station.
• Adjust the volume on the base station (this has no effect on wireless
headphones)
• Enjoy bass enhancement by pressing the DBE button on the base station
(this has no effect on wireless headphones)
11 Most of the actions described above could be executed using the remote
control which is provided. For details, please refer to Functional Overview
section that follows.
ENGLISH
18

ENGLISH
19
Functional Overview
Base station (front panel)
1 STANDBY – ON
By holding the STANDBY-ON button for 1.5 seconds or longer, the demo
mode can be activated.
• Pink noise is used to simulate the position of the 5 virtual speakers in the
headphone
• The corresponding speaker indicator on the display panel will go on
indicating which speaker is being simulated.
• The demo mode can be deactivated by pressing any control button on
the base station.
Mode indication
– Red = Base station in standby mode
– Green = Base station in active mode
2 SOURCE
•Yellow indication
• Push the SOURCE button to select signal source: ANALOG 1,
ANALOG 2, DIGITAL 1 (P/SDIF), DIGITAL 2 (Optical Digital)
ANALOG 1 / ANALOG 2
• When analog sources being selected, the green indicator light is on.
DIGITAL 1/ DIGITAL 2
– Red = no signal received, or invalid signal detected (for recognizable
digital format, please refer to Important Information section)
– Green = valid signal detected
CHARGE indicator
– Red = low-rate charging+in progress
– Green = trickle charging++in progress
– Off = battery compar tment empty
+
This charging process will result in an increased lifespan of the batteries.
++
When the batteries are fully charged, the charging circuitry switches to
‘trickle charging’ in order to keep the batteries in fully charged
condition, but without overcharging it.
STEREO indicator
– an analog source is selected, OR
–a digital stereo signal source is detected

MULTICHANNEL indicator
•a digital multi channel audio signal source is detected
DTS indicator
• the encoded format of the signal detected is DTS
DOLBY DIGITAL indicator
• the encoded format of the signal detected is Dolby Digital
3 Dolby Pro Logic II
When listening to Stereo signals
• ‘Dolby Pro Logic II’ indicator light will be illuminated in yellow, indicating
that Dolby Pro Logic II processing is available for use.
• Press the ‘Dolby Pro Logic II button’ to activate processing. (This feature
processes stereo signal to virtual multi channel surround signals)
• Pressing this button repeatedly will allow you to toggle between ‘MUSIC’,
‘MOVIE’ and bypass modes, with the corresponding green indicator lights
up.
• The previously selected mode will always be activated as default.
• Choosing ‘Dolby Pro Logic II’ also automatically activates ‘Dolby
Headphone’.
• Similarly, deactivating ‘Dolby Headphone’ will automatically disable ‘Dolby
Pro Logic II’ processing.
When listening to Multichannel signals
• The ‘Dolby Pro Logic II’ indication will not be illuminated, since this is not
a valid option.
For all possible Dolby Pro Logic II and Dolby Headphone combinations/
indications, please refer to the summary table on page 22.
ENGLISH
20

ENGLISH
21
4 Dolby Headphone
•To activate Dolby Headphone processing, press the ‘Dolby Headphone’
button and the green indicator will be illuminated, indicating which room
mode you are in.
• Press the ‘Dolby Headphone’ button repeatedly will allow you to toggle
between different DH rooms and the bypass mode.You have the
following choices:
– DH1 – small room mode
– DH2 – large room mode
– DH3 – cinema mode
– Bypass – DH1, DH2, and DH3 green indicators are all off
In case of Stereo input signal
If Dolby Headphone is on, and:
– Dolby Pro Logic II off – the indicator will be illuminated
– Dolby Pro Logic II on – Dolby Headphone activated automatically, with
the indicator illuminated.
If Dolby Headphone is deactivated,‘Dolby Pro Logic II’ processing will be
automatically deactivated.This is indicated by , meaning that you are
listening to normal stereo signal.
In case of Multichannel signal
– Dolby Headphone is activated automatically, with the indicator
illuminated.
– Dolby Headphone off is not an option.
For all possible Dolby Pro Logic II and Dolby Headphone combinations/
indications, please refer to the summary table which follows.
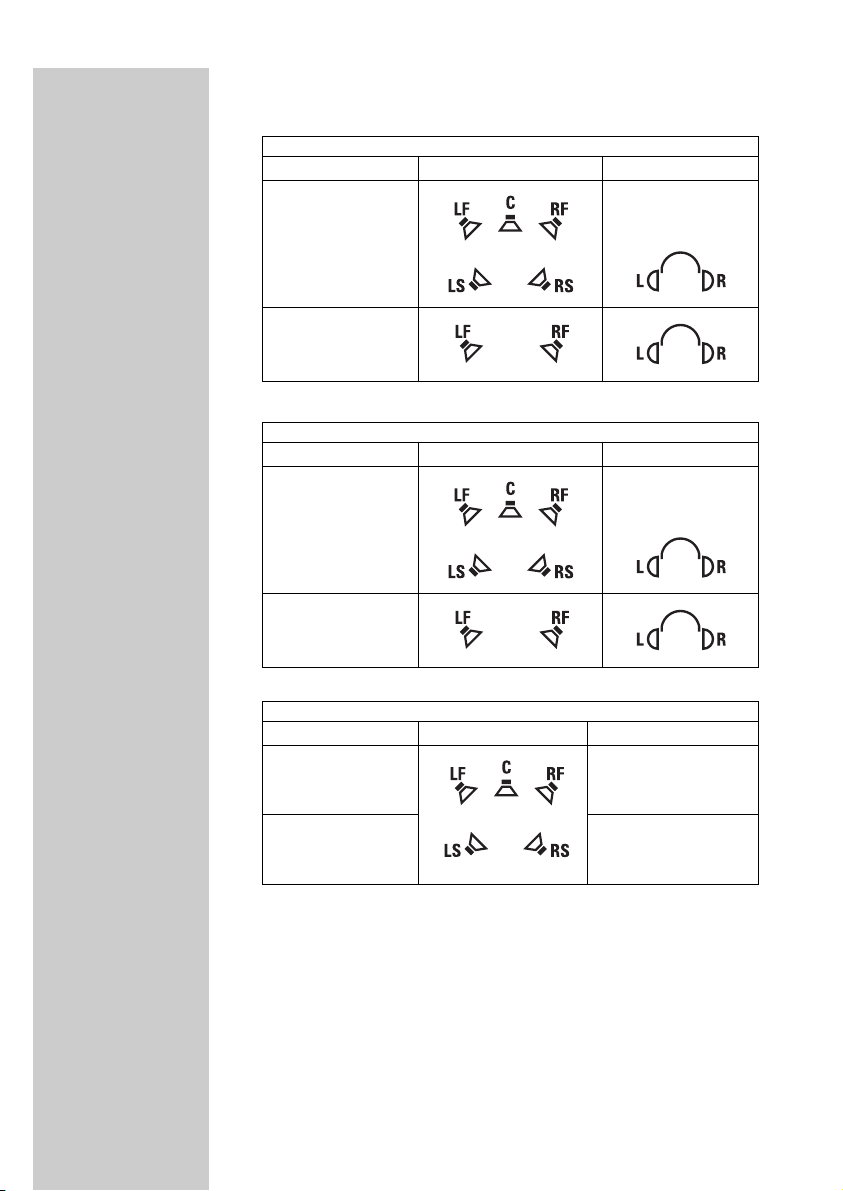
Summary of all possible combinations of Dolby Pro Logic II and Dolby
Headphone:
DIGITAL MULTICHANNEL AUDIO INPUT
Dolby Headphone offDolby Headphone on
Impossible
Impossible
Dolby Digital on
DTS on
DIGITAL STEREO AUDIO INPUT
Dolby Headphone offDolby Headphone on
Dolby Pro Logic II
will automatically be
switched off
Dolby Pro Logic II on
Dolby Pro Logic II off
ANALOG STEREO AUDIO INPUT
Dolby Headphone offDolby Headphone on
Dolby Pro Logic II
will automatically
be switched off
Dolby Pro Logic II on
Dolby Pro Logic II off
ENGLISH
22

ENGLISH
23
5 NIGHT mode
The audio signals on a DVD movie disc have large dynamics, i.e. the
difference in loudness between the loudest and most silent signal can be
very large. In order to hear both the loudest and most silent signal you
normally would have to turn up the volume of the headphone.
In case however you would prefer to listen at lower volume levels, it could
result in the most silent signals, becoming difficult to hear. By making use of
the night mode this can be resolved.
Night mode will reduce the dynamics of the audio signal.This will result in
both the loudest and the most silent audio signals becoming clearly audible,
even at lower volume levels.
• NIGHT mode menu indicator lights up in yellow whenever this option is
available.
• when Night mode is activated, the green indicator will be displayed.
IMPORTANT!
NIGHT mode is only available when you are listening to digital multichannel
sources. (S/PDIF or Optical digital)
6 Dynamic Bass Enhancement (DBE)
Dynamic Bass Enhancement uses an advanced electronic circuit that boosts
lower-end bass frequencies to achieve consistent sound reproduction, even
when the speaker volume is set at a lower level.This ensures that you enjoy
excellent bass boost across the range of volume settings.
• push the DBE button to activate and deactivate the function
• the green indicator will be displayed when DBE is activated
IMPORTANT!
DBE is only applicable to corded headphones. Activating DBE has no effect
on HD1500U wireless headphone.To enjoy treble/ bass enhancement with
HD1500U wireless headphone, press the TREBLE, or BASS button on the
right ear shell.

7 TRANSMIT
• The TRANSMIT indicator is illuminated in green when digital wireless
transmission is activated
•To deactivate the function, press the TRANSMIT button
• The default setting is ON
8 PHONES
2 x 6.3mm headphone output sockets allowing you to connect up to
2 corded headphones
9 VOLUME
Volume dial allows you to adjust volume level when you are using corded
headphones.
IMPORTANT!
Adjusting the volume level at the base station has no effect to the
HD1500U wireless headphone.To alter the volume level of HD1500U
wireless headphone, adjust the dial on the right ear shell.
Base station (Back Panel)
0 DIGITAL 1 / DIGITAL 2
DIGITAL 1 – S/PDIF input/ output
DIGITAL 2 – Optical digital input/ output
* Output connectors providing AASR function
! ANALOG 1/ ANALOG 2
•RCA stereo input (L/R)
•RCA stereo output (L/R) providing AASR function
@ GAIN
2- position slide switch to select the analog input gain (+ 6dB/ 0dB)
If your audio source’s output signal is relatively weak, the sensitivity switch
provides the necessary additional amplification to the audio input signal
prior to processing.
• Set to +6dB in case of weak audio input signals
• Set to 0 dB in case of distorted audio input signals
Note: Both Analog 1 and Analog 2 have their own Gain switch.
ENGLISH
24

ENGLISH
25
# CHANNEL
Select one of the 4 available transmission channels for optimal reception
quality.
$ ~ MAINS
AC power connector for AC mains cable
Headphone
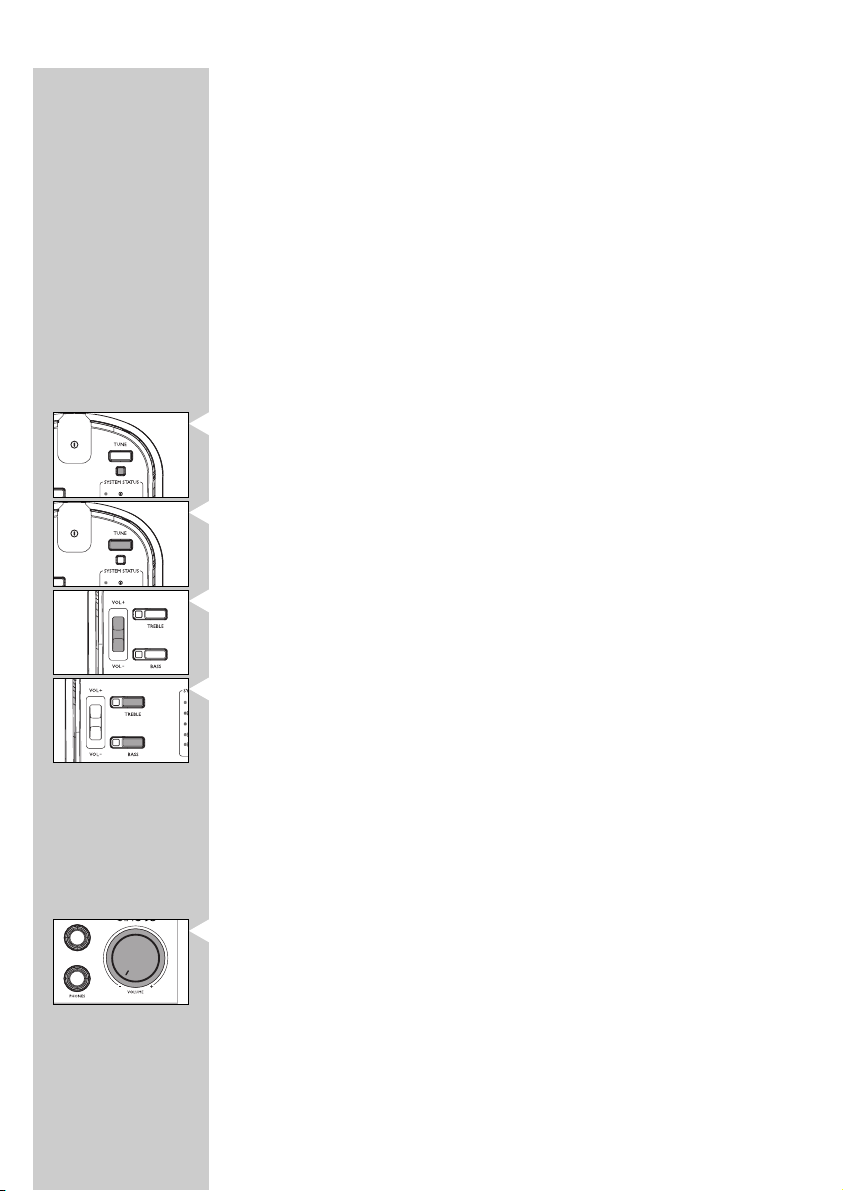
% POWER
–Power on the headphone by pushing the Power button.
–Power status is indicated by SYSTEM STATUS light
^ TUNE
Automatic transmission channel search by pushing the button
& SYSTEM STATUS indicator
The SYSTEM STATUS indicator on the control panel will indicate the status
of the headphone by means of different colors and different blinking modes.
Some of these modes also have an audible alarm.
RED on – Power on but no radio signal
Suggested action: Press tuning button on headphone or change transmission
channel on base station or switch on transmission function on base station
GREEN on – Power on and tuned
GREEN blinking – tuning / searching
RED blinking + series of (5 x 50ms) beeps – Battery running low
•You have a limited time to replace batteries before the headphone will
go in power save mode

RED blinking (2 secs) + short GREEN burst + all other indicators on the
headphone are off - Power save mode
The power save mode is initiated when there is no valid radio signal
available or after digital silence for 1 minute. In the ‘power save mode’, the
headphone is in fact still operational but not continuously. It will restart
every 2 seconds to look if in the meantime it can receive a valid radio
signal. During the power save mode, the system status LED will turn green
when the headphone starts searching for a valid radio signal and will be off
for the rest of the power save mode. As soon as a useful radio signal is
detected, the other functions, peripherals and indicators are re-enabled
again. Only from that moment onwards, the system status indicator will
return to green.
Series of (5 x 200ms) beeps – Out of range
•Move closer to the base station
* TREBLE
Treble enhancement (on/off) for high tones boost.When activated, the
indicator will be illuminated in yellow.
( VOLUME
Volume up/down tumble push-button
) BASS
Dynamic Bass Enhancement (on/off) for deep bass boost.When activated,
the indicator will be illuminated in yellow
Remote Control
¡ STANDBY-ON
• Red = base station in standby mode
• Green = base station in active mode
™ MOVIE
Press to select the MOVIE mode of Dolby Pro Logic II
£ ROOM1
Press to select ROOM 1 mode (small room) of Dolby Headphone.
≤ ROOM2
Press to select ROOM 2 mode (large room) of Dolby Headphone.
ENGLISH
26

ENGLISH
27
∞ DIGITAL1
Press to select DIGITAL1 as the audio source.
§ ANALOG1
Press to select ANALOG1 as the audio source.
≥ MUSIC
Press to select the MUSIC mode of Dolby Pro Logic II
• PLII ON. OFF
Activates/ Deactivates Dolby Pro Logic II.Your HD1500U base station
analyzes the input audio source automatically, and selects the suitable Dolby
Pro Logic II mode, either the MOVIE or the MUSIC mode.
ª
Press to deactivate Dolby Headphone Room Modes
º ROOM3
Press to select ROOM 3 mode (cinema) of Dolby Headphone.
⁄ DIGITAL2
Press to select DIGITAL2 as the audio source.
¤ NIGHT MODE
Press to select NIGHT MODE.
‹ DBB
Press to activate Dynamic Bass Boost.
Note: This feature works only with corded headphone(s) (not provided) with
HD1500U base station.To activate the bass boost feature of the wireless
headphone, press the BASS button on the right ear shell of the
headphone.
› ANALOG2
Press to select ANALOG2 as the audio source.

Tr oubleshooting
If a fault occurs, first check the points listed below. If you are unable to
remedy a problem by following these hints, contact the helpline or consult
your dealer. Never try to open the set yourself as this will void the
guarantee.
First, check all cables to ensure that they are connected correctly.
In case of no sound:
• Check if the audio source is switched on and tuned to a channel with
audio.
• In case of an audio source with adjustable output level: adjust the output
level of the audio source to a higher and non-distorted level.
•Volume on base station or headphone is set too low.
• Adjust the volume on the base station/headphone to a higher level.
• Adjust the headphone’s tuning frequency. Press and hold the tuning
control button for about 1 second.
• Make use of the HD1500U transmitter. Some transmitters already built
into other equipment may not be compatible with the HD1500U
headphone because of the advanced technologies used in the HD1500U
headphone.
• The audio signal from your SACD player is upsampled. Lower the
sampling rate through the SACD player’s menu to 44.1 kHz
• The audio signal from your DVD player is upsampled: lower the PCM
sampling rate through the DVD player’s menu to 48 kHz.
•Invalid digital audio signal: the ‘DIGITAL’ indication LED in the HD1500U
display window will be illuminated in red. Change the digital audio signal
(for exampling: by changing from MP3 to audio CD) or switch to the
analog input signal of the HD1500U base station.
• Check whether the audio output connector of your audio source is
connected to the correct audio input connector of the HD1500U base
station.
In case of distorted sound:
• In case of an audio source with adjustable output level: adjust the output
level of the audio source to a higher and non-distorted level.
•Volume on base station or headphone is set too high. Adjust the volume
on the base station/headphone to a lower level.
• Adjust the headphone’s tuning frequency. Press and hold the tuning
control button for about 1 second. Repeat if necessary until the system
status LED turns green.
• Adjust the transmitter’s frequency. Select any of the 4 channels of the
transmitter. Next adjust the headphone’s frequency by pressing the tuning
button.
ENGLISH
28

ENGLISH
29
• Headphone batteries empty. Recharge the headphone’s batteries
(SBC EH2412/00).
• Distance from the transmitter is too large. Move closer to the
transmitter.
• Interference from fluorescent lamps/ other radio sources. Move
transmitter or headphone elsewhere/ change the transmitter’s channel.
• Make use of the HD1500U transmitter. Some transmitters already built
into other equipment may not be compatible with the 1500 because of
the advanced technologies used in the HD1500U headphone.
• Check whether the audio output connector of your audio source is
connected to the correct audio input connector of the HD1500U base
station.
• Check whether the output connector of your audio source is connected
to the correct audio input connector of the HD1500U base station.

Glossary
Automatic Audio Signal Routing (AASR)
The Automatic Audio Signal Routing (AASR) feature of the HD1500U base
station allows for audio sources to be connected to its audio inputs and at
the same time it can pass those same audio signals on to – for example –
your Home Cinema receiver.This allows for permanent audio connections
to be made without the need for swapping cables.Whether you want to
listen to your wireless headphone or your existing speaker set-up, it no
longer involves tiresome swapping of cables: the choice is yours at the flick
of a switch. For graphical illustration of AASR, please refer to the
Quick Startup / Reference Guide.
Digital Wireless Transmission
Digital wireless transmission provides a wireless audio connection with
digital quality specification.The digital audio link has an improved robustness
compared to analog wireless systems. It will offer the highest possible level
of wireless audio quality.
High frequency radio system
The digital wireless headphone system makes use of ultra high radio
frequency (UHF) as signal carrier, ensuring a very clear, sharp reception.
Even silent passages in classical music and plain silence in between two
music tracks are reproduced as pure silence. Never before has a wireless
headphone sounded so close to a corded headphone!
Double Phase Locked Loop (PLL) system
Not only the transmitter but also the digital wireless headphone is equipped
with a Phase Locked Loop (PLL) system providing the ultimate in
transmission and reception frequency stability.
Antenna diversity
The digital RF headphone is provided with a patent pending antenna
diversity system that can cope with changing receiving conditions when
walking around.This automatic system extends the operating range and
minimizes the dropouts experienced with analog wireless headphones.
ENGLISH
30
 Loading...