

Philips RQ1200 User Manual [kk]
Always here to help you
RQ1200 series
User manual
1

ENGLISH 4
БЪЛГАРСКИ 28
ČEŠTINA 54
EESTI 78
HRVATSKI 102
MAGYAR 126
ҚАЗАҚША 149
LIETUVIŠKAI 174
LATVIEŠU 198
POLSKI 222
ROMÂNĂ 246
РУССКИЙ 271
SLOVENSKY 296
SLOVENŠČINA 320
SRPSKI 344
УКРАЇНСЬКА 368
RQ1200 series

4
ENGLISH
Introduction
Congratulations on your purchase and welcome to Philips! To fully benet
from the support that Philips offers, register your product at
www.philips.com/welcome.
Please read this user manual, as it contains information about the features
of this shaver as well as some tips to make shaving easier and more
enjoyable.
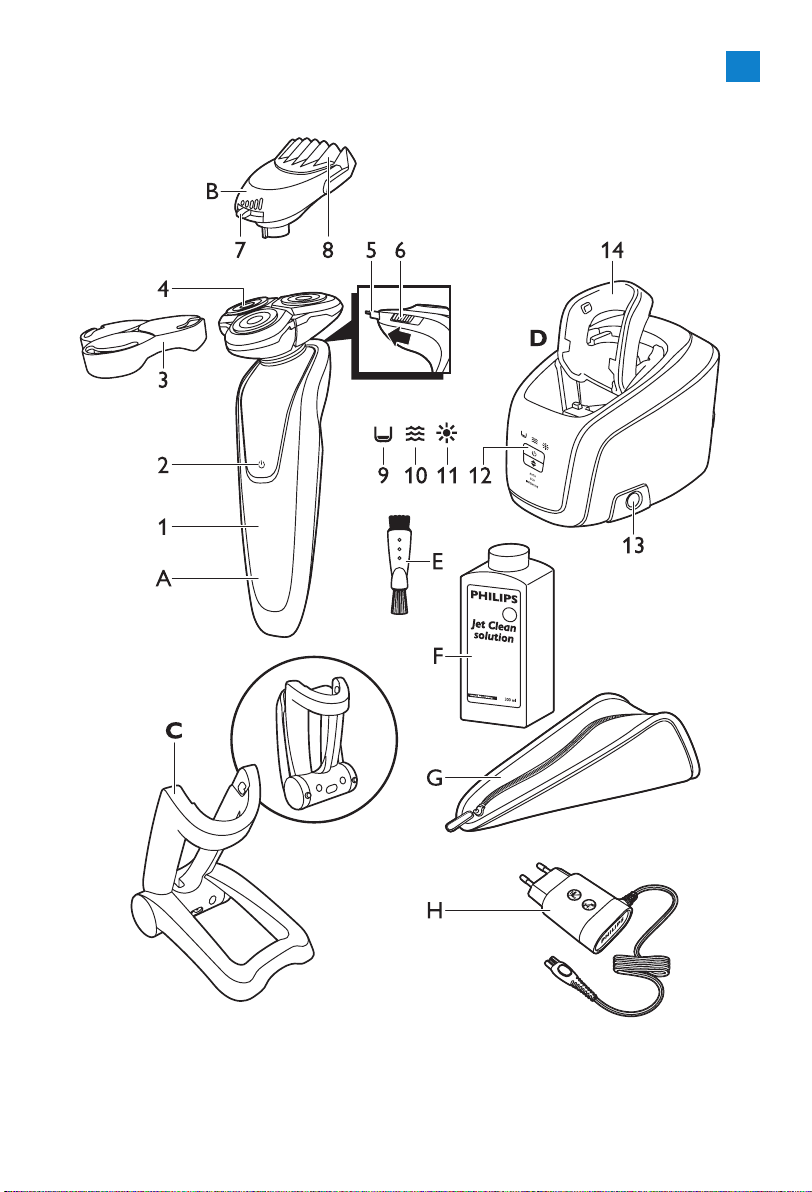
General description (Fig. 1)
A Shaver
1 Display
2 Shaver on/off button
3 Protection cap
4 RQ12 Shaving unit
5 Trimmer
6 Trimmer on/off slide
B RQ111 Beard Styler attachment (RQ1296, RQ1295, RQ1286, RQ1285,
RQ1275, RQ1265 only)
7 Hair length selector
8 Comb of Beard Styler attachment
C Foldable charger
D Jet Clean System (RQ1296CC, RQ1295CC, RQ1290CC, RQ1286CC,
RQ1285CC, RQ1284CC, RQ1280CC, RQ1275CC, RQ1265CC,
RQ1260CC, RQ1252CC, RQ1251CC, RQ1250CC only)
9 ’Cleaning chamber empty’ symbol
10 Cleaning symbol
11 Drying symbol
12 Jet Clean System on/off button (RQ1008 only: and up/down button
for program selection)
13 Cleaning chamber release button
14 Shaver holder
E Cleaning brush
F HQ200 Cleaning uid (RQ1296CC, RQ1295CC, RQ1290CC,
RQ1286CC, RQ1285CC, RQ1284CC, RQ1280CC, RQ1275CC,
RQ1265CC, RQ1260CC, RQ1252CC, RQ1251CC, RQ1250CC only)
G Pouch
H Adapter
Important
Read this important information carefully before you use the shaver,
the Jet Clean system (RQ1296CC, RQ1295CC, RQ1290CC, RQ1286CC,
RQ1285CC, RQ1284CC, RQ1280CC, RQ1275CC, RQ1265CC,
RQ1260CC, RQ1252CC, RQ1251CC, RQ1250CC only) and the charging
stand. Save this leaet for future reference.
ENGLISH 5
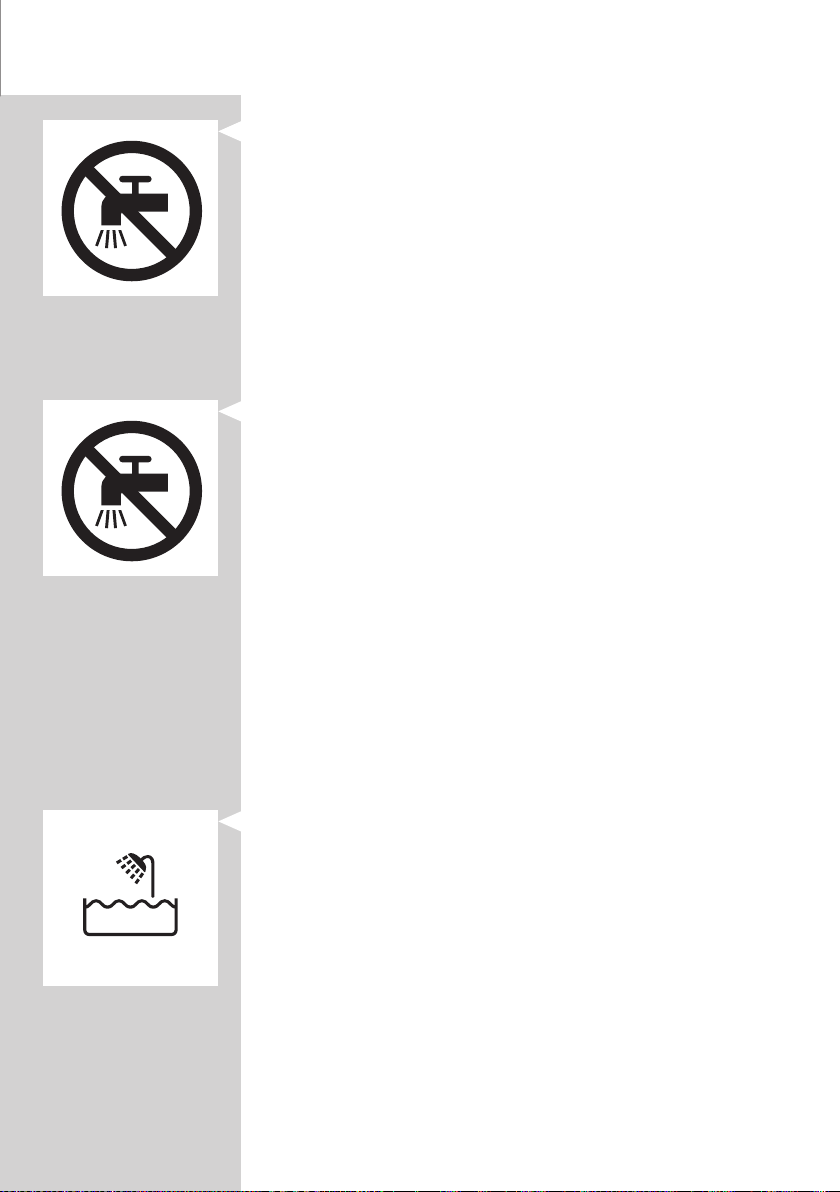
Danger
- Keep the adapter dry.
Warning
- The adapter contains a transformer. Do not cut off the adapter to
replace it with another plug, as this causes a hazardous situation.
- The shaver, the Jet Clean system and the charging stand are not
intended for use by persons (including children) with reduced physical,
sensory or mental capabilities, or lack of experience and knowledge,
unless they have been given supervision or instruction concerning use
of these appliances by a person responsible for their safety.
- Children should be supervised to ensure that they do not play with
the shaver, the Jet Clean system and the charging stand.
- Always unplug the shaver before you clean it under the tap.
Caution
- Never immerse the Jet Clean system or the charging stand in water
nor rinse it under the tap.
- Never use water hotter than 80°C to rinse the shaver.
- Do not use the shaver, Jet Clean system, adapter, charging stand or any
other part if it is damaged, as this may cause injury. Always replace a
damaged adapter, charging stand or part with one of the original type.
- Only use the Jet Clean system with the original HQ200 Jet Clean
solution.
- Always place the Jet Clean system on a stable, level and horizontal
surface to prevent leakage.
- When the Jet Clean system is ready for use, do not move it to prevent
leakage of cleaning uid.
- The Jet Clean system thoroughly cleans but does not disinfect your
shaver, therefore do not share the shaver with others.
- Never use compressed air, scouring pads, abrasive cleaning agents or
aggressive liquids such as petrol or acetone to clean the appliance.
- Water may leak from the socket at the bottom of the shaver when you
rinse it. This is normal and not dangerous because all electronics are
enclosed in a sealed power unit inside the shaver.
Compliance with standards
- This shaver is waterproof and complies with the internationally
approved safety regulations. It is suitable for use in the bath or shower
and for cleaning under the tap. For safety reasons, the shaver can
therefore only be used cordlessly.
- The shaver and the Jet Clean system comply with all applicable
standards and regulations regarding exposure to electromagnetic elds.
General
- The adapter is equipped with an automatic voltage selector and is
suitable for mains voltages ranging from 100 to 240 volts.
- The adapter transforms 100-240 volts to a safe low voltage of less than
24 volts.
- Maximum noise level: Lc = 69dB(A)
ENGLISH6
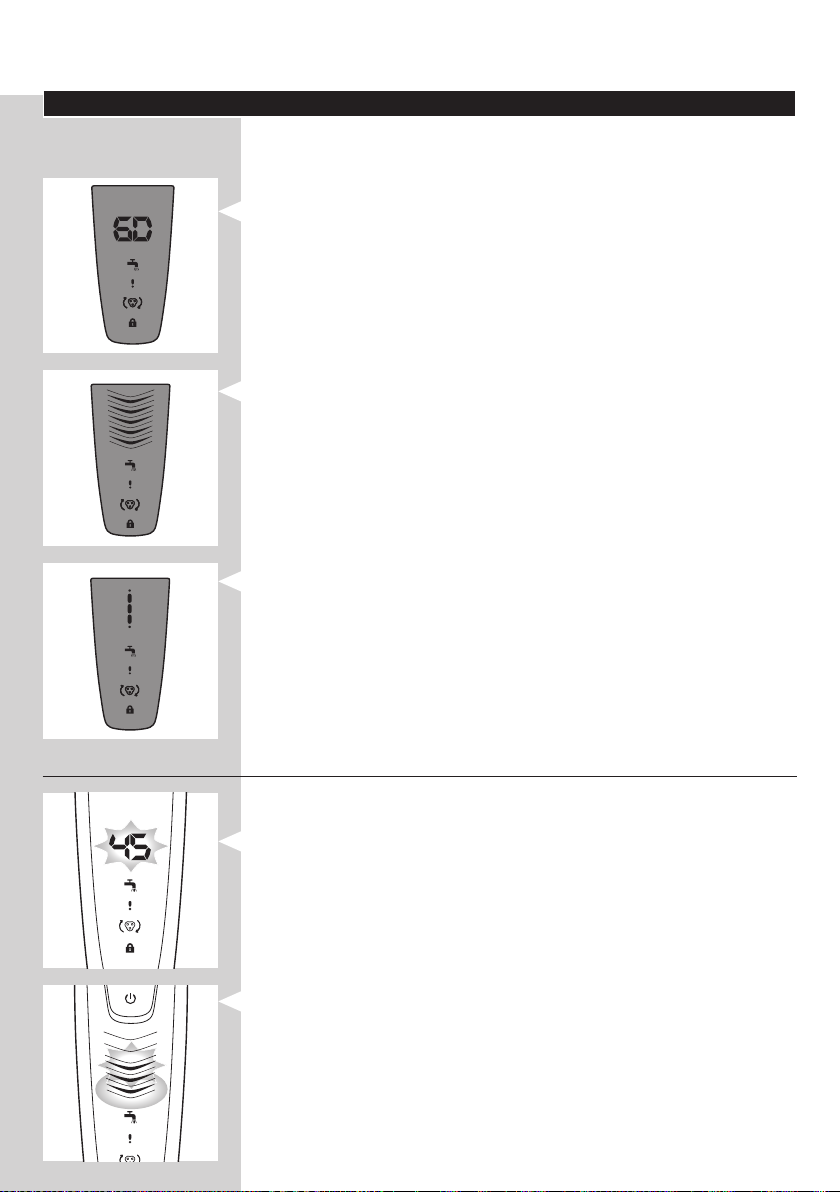
The display
Note: Before you use the shaver for the rst time, remove the protective foil
from the display.
The various shaver types have different displays, which are shown in the
MINUTES LEFT
MINUTES LEFT
gures below.
- RQ1296, RQ1295, RQ1290, RQ1286, RQ1285, RQ1280
- RQ1275, RQ1265, RQ1261, RQ1260
- RQ1273, RQ1252, RQ1251, RQ1250
MINUTES LEFT
MINUTES LEFT
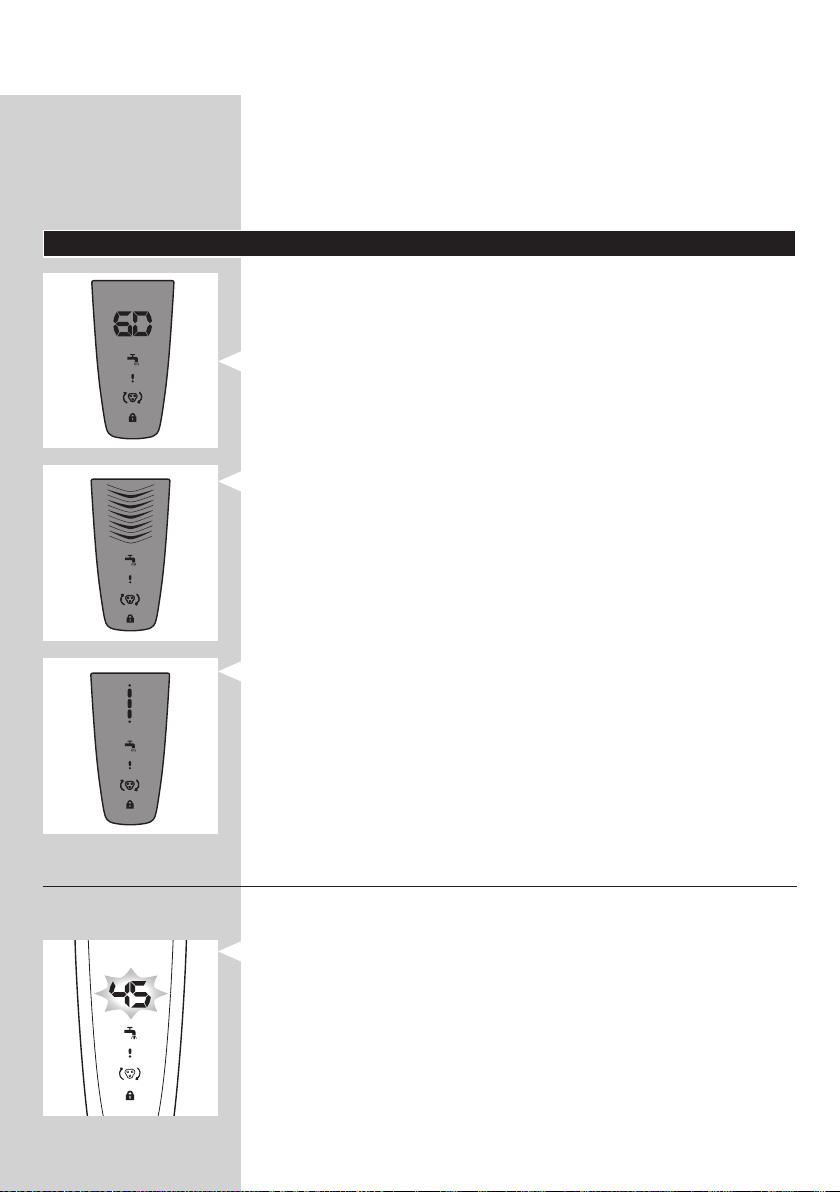
Charging
- Charging takes approx. 1 hour.
RQ129x, RQ128x
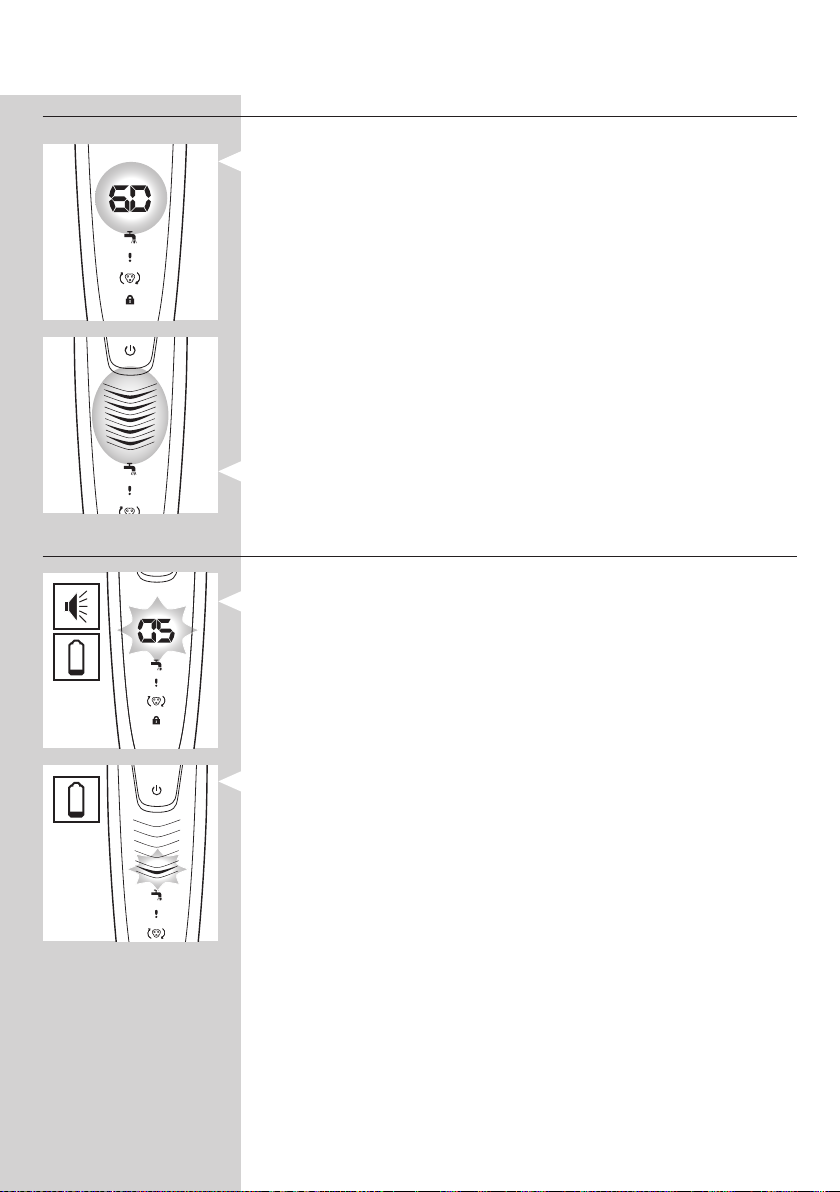
- When the shaver is charging, the minutes indication ashes.
- The shaving minutes increase until the shaver is fully charged.
- Quick charge: When the shaver contains enough energy for one shave,
the display shows 5 minutes in red.
RQ127x, RQ126x, RQ125x
Note: The displays of the various shaver types look different, but the charging
lights work in the same way.
- When the shaver is charging, rst the bottom charging light ashes, then
the second charging light, and so on until the shaver is fully charged.
- Quick charge: When the shaver contains enough energy for one shave,
the bottom charging light alternately ashes orange and white.
MINUTES LEFT
MINUTES LEFT
MINUTES LEFT
MINUTES LEFT
ENGLISH 7
Battery fully charged
RQ129x, RQ128x
- When the battery is fully charged, the minutes indication lights up
continuously. After approx. 30 minutes, the display automatically
switches off again.
Note: The shaver is equipped with an intelligent self-learning system that
monitors the shaver’s energy consumption and converts the remaining battery
capacity into shaving minutes. The energy consumption and therefore the
remaining number of shaving minutes depend on your skin and beard type
and your shaving behaviour (e.g. the use of shaving gel). If the number of
shaving minutes of the fully charged shaver is less than 60 minutes, this is
completely normal and does not mean that the battery capacity of the shaver
has diminished.
RQ127x, RQ126x, RQ125x
Note: The displays of the various shaver types look different, but the charging
lights work in the same way.
- When the battery is fully charged, all charging lights light up
continuously. After approx. 30 minutes, the display automatically
switches off again.
Battery low
RQ129x, RQ128x
- When the battery is almost empty (when there are only 5 or fewer
shaving minutes left), the minutes indication starts to ash.
- When you switch off the shaver, the shaving minutes continue to ash
for a few more seconds. You hear a beep when there are no shaving
minutes left.
RQ127x, RQ126x, RQ125x
Note: The displays of the various shaver types look different, but the charging
lights work in the same way.
- When the battery is almost empty (when there are only 5 or fewer
shaving minutes left), the bottom charging light ashes orange.
- When you switch off the shaver, the bottom charging light continues to
ash orange for a few seconds.
ENGLISH8
Remaining battery capacity
RQ129x, RQ128x
MINUTES LEFT
MINUTES LEFT
MINUTES LEFT
MINUTES LEFT
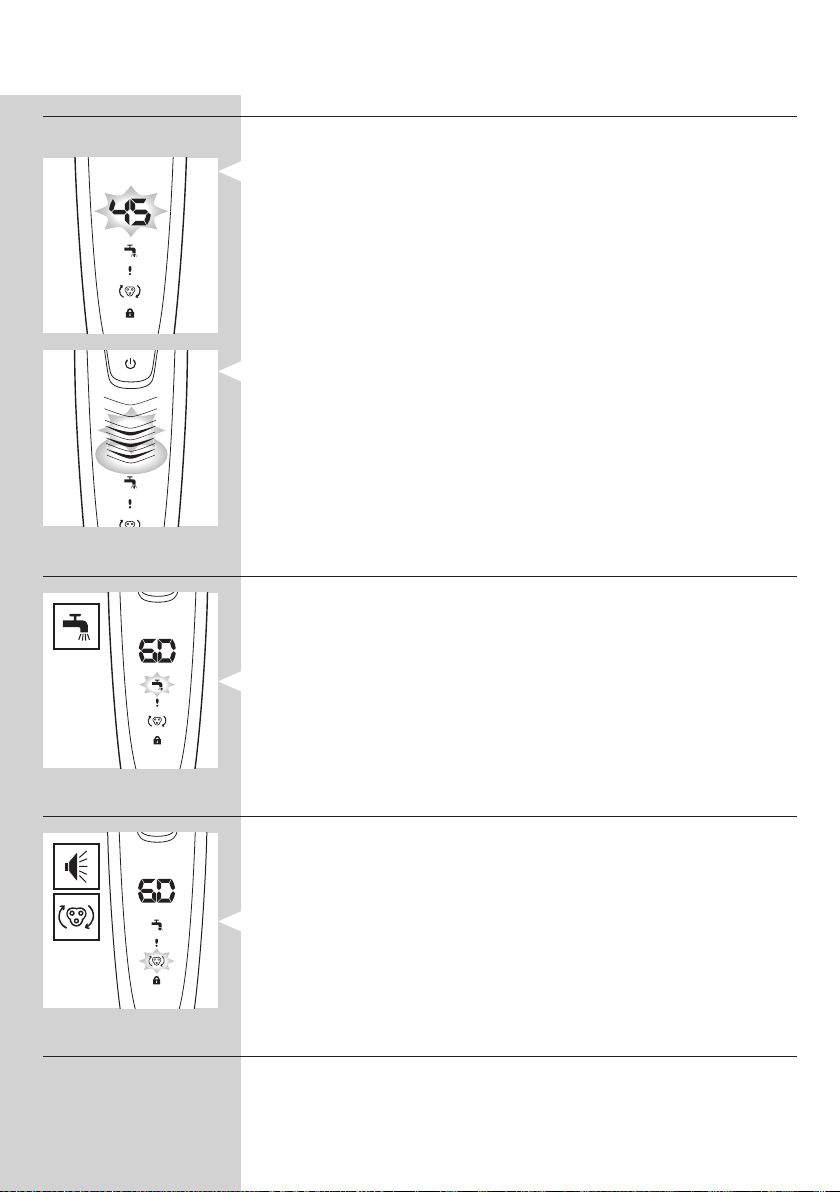
- The remaining battery capacity is indicated by the number of shaving
minutes shown on the display.
RQ127x, RQ126x, RQ125x
Note: The displays of the various shaver types look different, but the charging
lights work in the same way.
- The remaining battery capacity is indicated by the ashing charging
lights.
Clean shaver
For optimal shaving performance, we advise you to clean the shaver after
every use.
Note: The displays of the various shaver types look different, but show the
same symbol.
- The tap symbol ashes to remind you to clean the shaver.
MINUTES LEFT
MINUTES LEFT
Replace shaving unit
For maximum shaving performance, we advise you to replace the shaving
unit every two years.
Note: The displays of the various shaver types look different, but show the
same symbol.
- To remind you to replace the shaving unit, the appliance is equipped
with a replacement reminder which is activated automatically after
approx. two years. The replacement reminder is repeated at 9
successive shaves(RQ128x, RQ127x, RQ126x, RQ125x only) or until
you reset the shaver.
Travel lock (RQ128x, RQ127x, RQ126x, RQ125x only)
You can lock the shaver when you are going to travel. The travel lock
prevents the shaver from being switched on by accident.
Note: The displays of the various shaver types look different, but show the
same symbol.
ENGLISH 9
Activating the travel lock
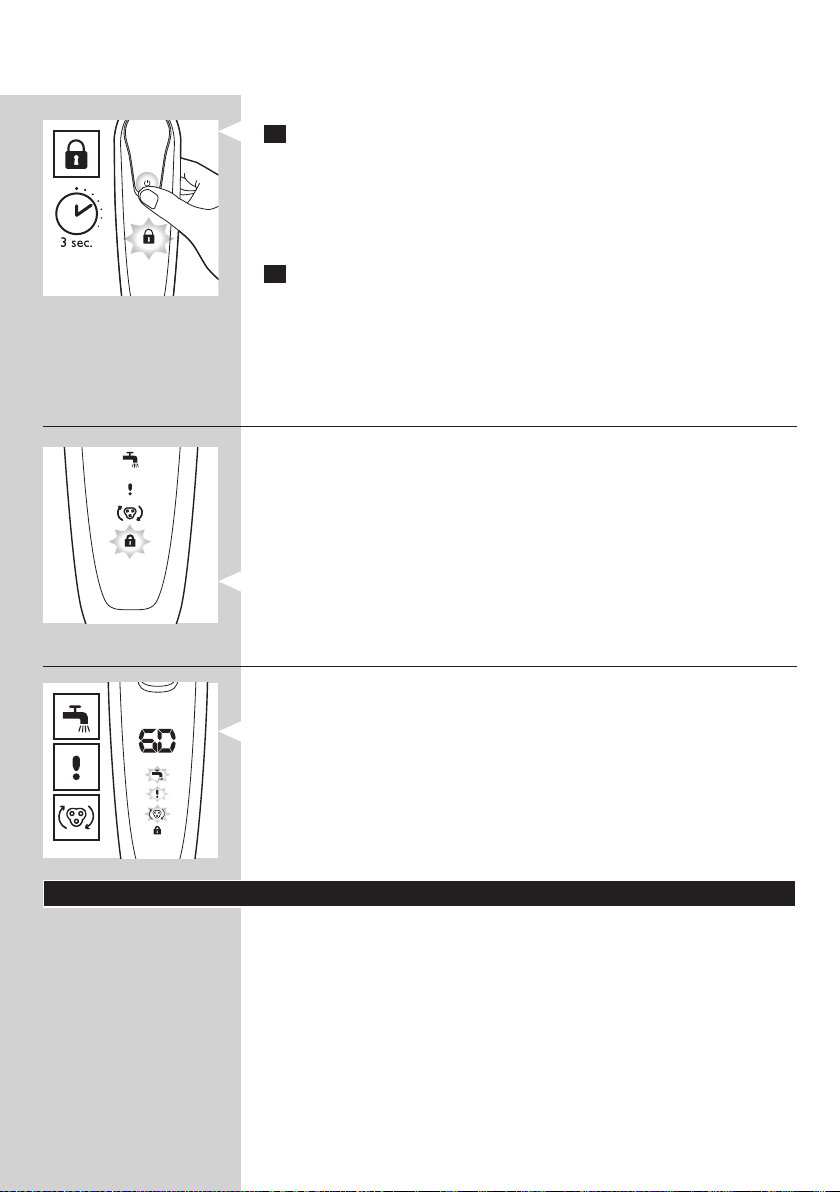
1 Press the on/off button for 3 seconds to enter the travel lock mode.
, RQ128x: The display starts to count down from 3. At 1, the appliance
beeps to indicate that it is locked.
, The lock symbol lights up on the display. After a few seconds it goes
out.
Deactivating the travel lock
1 Press the on/off button for 3 seconds.
, The motor starts running to indicate that the travel lock has been
deactivated.
The shaver is now ready for use again.
Note: When you place the shaver in the plugged-in charger or Jet Clean System,
the travel lock is automatically deactivated.
Power-saving mode (RQ129x only)
The appliance is equipped with an automatic power-saving mode. When
the shaver enters the power-saving mode, the light in the on/off button
goes out to save energy.
- When the appliance is switched off but detects movement for 5
minutes (for instance when you are travelling with the shaver in your
suitcase), it automatically goes into power-saving mode. This mode
prevents the shaver from being switched on by accident.
, The lock symbol ashes on the display to indicate that the appliance
is in power-saving mode.
- To deactivate the power-saving mode, simply press the on/off button.
Blocked shaving heads
MINUTES LEFT
MINUTES LEFT
Note: The displays of the various shaver types look different, but show the
same symbol.
- If the shaving heads are blocked, the shaving unit symbol, the tap
symbol and the exclamation mark ash. In this case, the motor cannot
run because the shaving heads are soiled or damaged.
- When this happens, you have to clean the shaving unit or replace it.
- The shaving unit symbol, the tap symbol and the exclamation mark
continue to ash until you unblock the shaving heads.
Charging
Charging takes approx. 1 hour.
RQ129x, RQ128x, RQ127x, RQ126x: A fully charged shaver has a shaving
time of up to 60 minutes.
Note: RQ129x, RQ128x: When the battery is fully charged, the display shows
the actual remaining shaving minutes (see section ‘Battery fully charged’ in
chapter ‘The display’).
RQ125x: A fully charged shaver has a shaving time of up to 50 minutes.
Charge the shaver before you use it for the rst time and when the display
indicates that the battery is almost empty (see section ‘Battery low’ in
chapter ‘The display’).
ENGLISH10
Quick charge
After the shaver has charged for 3 minutes, it contains enough energy for
one shave.
Charging in the charger
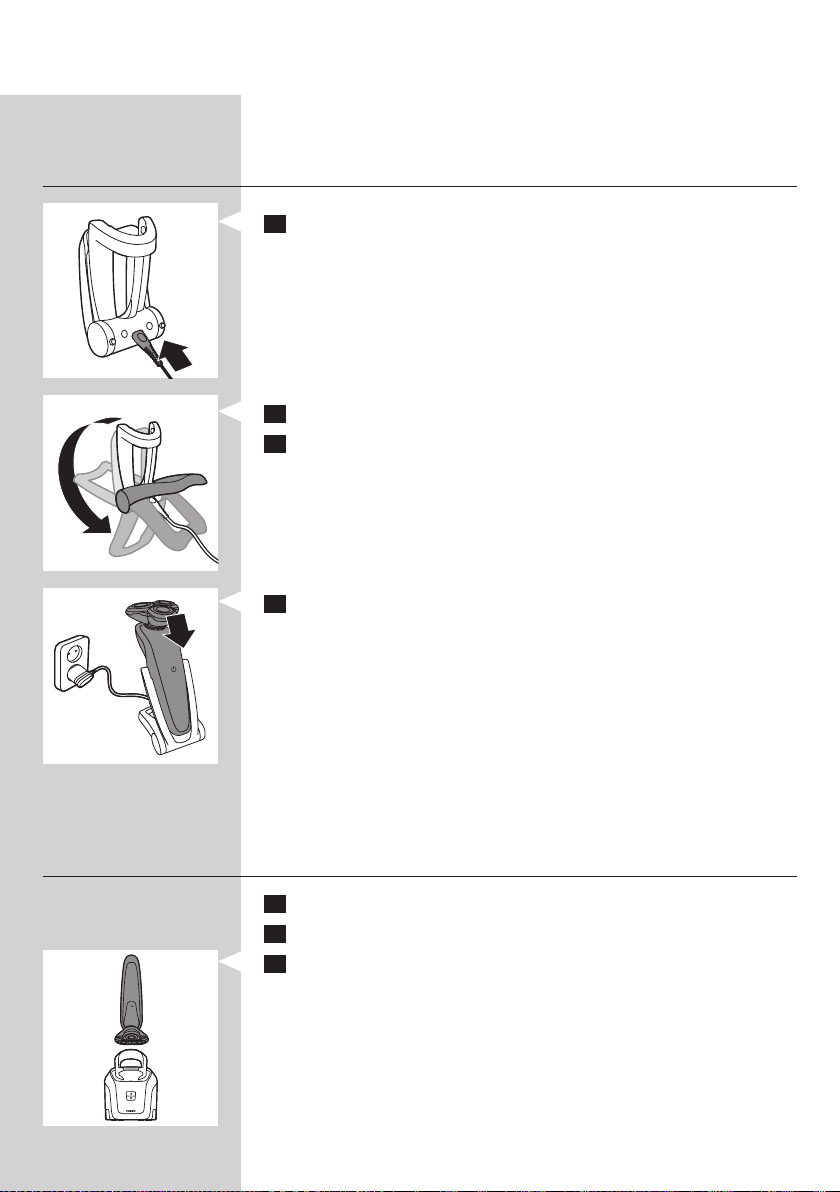
1 Insert the small plug into the charger.
2 Unfold the charger (‘click’).
3 Put the adapter in the wall socket.
4 Put the shaver in the charger.
, The display shows that the shaver is charging (see chapter ‘The
display’).
Charging in the Jet Clean System (RQ1296CC, RQ1295CC,
RQ1290CC, RQ1286CC, RQ1285CC, RQ1284CC, RQ1280CC,
RQ1275CC, RQ1265CC, RQ1260CC, RQ1252CC, RQ1251CC,
RQ1250CC only)
1 Put the small plug in the Jet Clean System.
2 Put the adapter in the wall socket.
3 Hold the shaver upside down above the holder with the back of the
shaver pointing towards the holder.
Note: The shaver cannot be placed in the Jet Clean System when the protection
cap is on the shaving unit.
Note: RQ129x only: when you turn the shaver upside down, the minutes
indication on the display is also turned upside down so you can still see to what
level the battery is charged.
ENGLISH 11
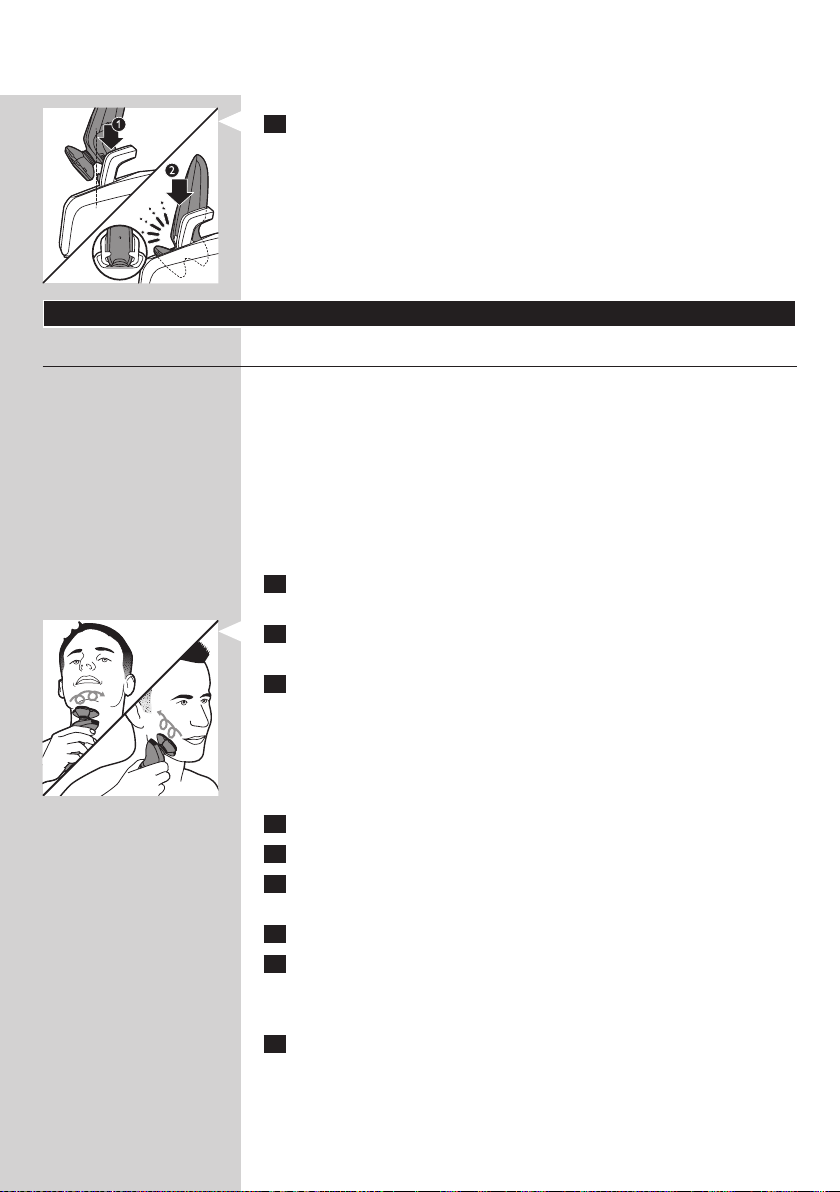
4 Place the shaver body in the holder behind the two clips (1) and
press it down until it locks into place (2).
, The display shows that the shaver is charging (see section ‘Charging’
in chapter ‘The display’).
Using the shaver
Shaving
Skin adaptation period
Your rst shaves may not bring you the result you expect and your skin
may even become slightly irritated. This is normal. Your skin and beard need
time to adapt to any new shaving system.
We advise you to shave regularly (at least 3 times a week) for a period of
3 weeks to allow your skin to adapt to the new shaver. During this period,
use your new electric shaver exclusively and do not use other shaving
methods. If you use different shaving methods, it is more difcult for your
skin to adapt to the new shaving system.
1 Press the on/off button once to switch on the shaver.
, The display lights up for a few seconds.
2 Move the shaving heads over your skin in circular movements.
- Do not make straight movements.
3 Press the on/off button once to switch off the shaver.
, The display lights up for a few seconds and then shows the remaining
battery capacity.
Wet shaving
You can also use this shaver on a wet face with shaving foam or shaving gel.
To shave with shaving foam or shaving gel, follow the steps below:
1 Apply some water to your skin.
2 Apply shaving foam or shaving gel to your skin.
3 Rinse the shaving unit under the tap to ensure that the shaving unit
glides smoothly over your skin.
4 Press the on/off button once to switch on the shaver.
5 Move the shaving heads over your skin in circular movements.
Note: Rinse the shaver under the tap regularly to ensure that it continues to
glide smoothly over your skin.
6 Dry your face and thoroughly clean the shaver after use (see chapter
‘Cleaning and maintenance’).
Note: Make sure you rinse all foam or shaving gel off the shaver.
ENGLISH12
Trimming
You can use the trimmer to groom your sideburns and moustache.
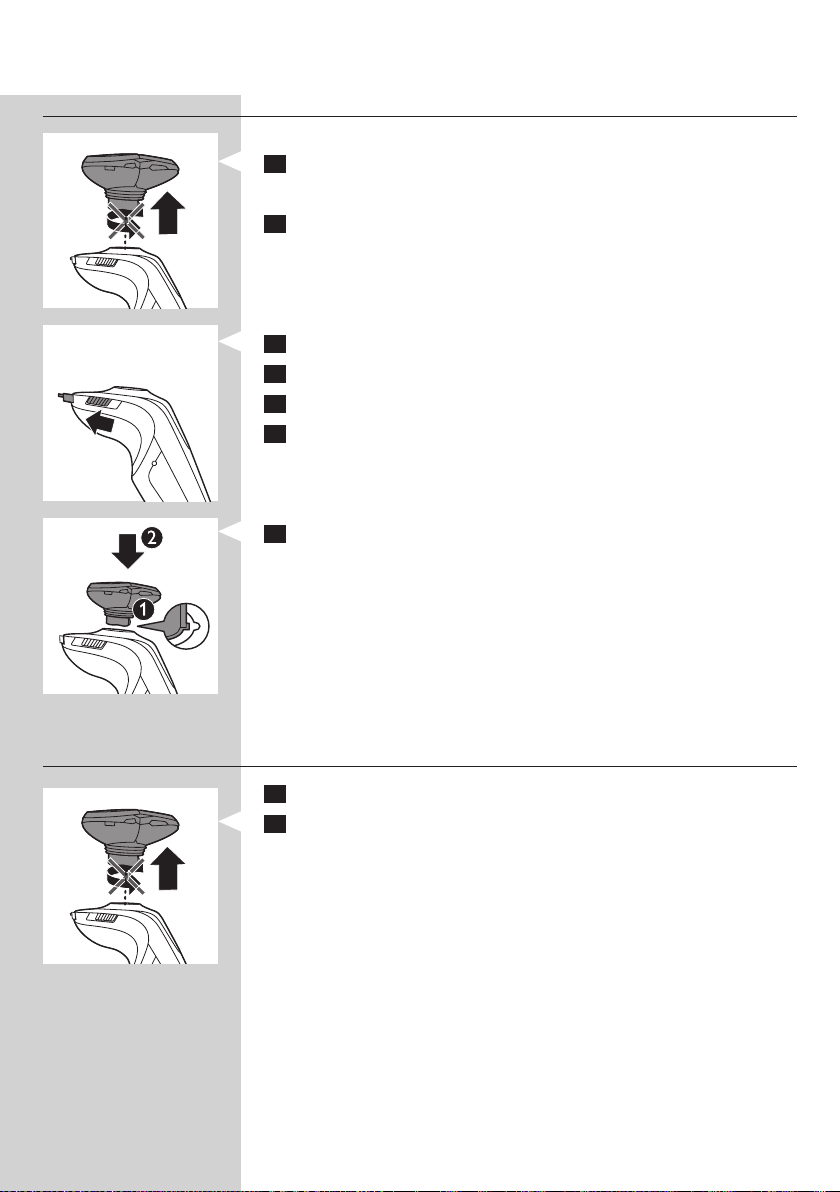
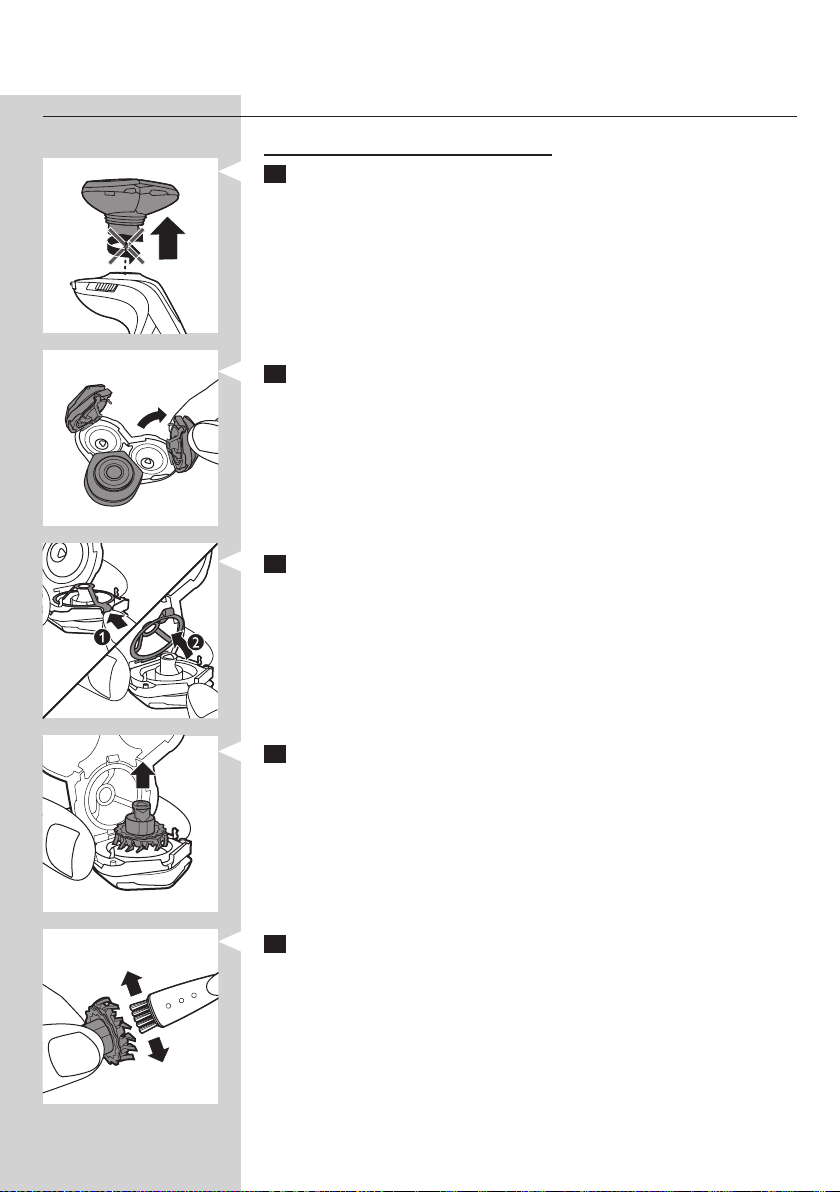
1 Pull the shaving unit straight off the shaver.
Note: Do not twist the shaving unit while you pull it off the shaver.
2 Press the on/off button once to switch on the shaver.
, The display lights up for a few seconds.
3 Slide the trimmer slide forwards to slide out the trimmer.
4 You can now start trimming.
5 Slide the trimmer slide backwards to retract the trimmer.
6 Press the on/off button once to switch off the shaver.
, The display lights up for a few seconds and shows the remaining
battery capacity.
7 Insert the lug of the shaving unit into the slot in the top of the shaver
(1). Then press down the shaving unit (2) to attach it to the shaver
(‘click’).
Using the Beard Styler attachment (RQ1296, RQ1295, RQ1286,
RQ1285, RQ1275, RQ1265 only)
1 Make sure the shaver is switched off.
2 Pull the shaving unit straight off the shaver.
Note: Do not twist the shaving unit while you pull it off the shaver.
ENGLISH 13
3 Insert the lug of the Beard Styler attachment into the slot in the top
of the shaver (1). Then press down the beard styler attachment (2)
to attach it to the shaver (‘click’).
Using the Beard Styler attachment with comb
You can use the Beard Styler attachment with the comb attached to style
your beard at one xed setting, but also at different length settings. The
hair length settings on the Beard Styler attachment correspond to the
remaining hair length after cutting and range from 1 to 5mm.
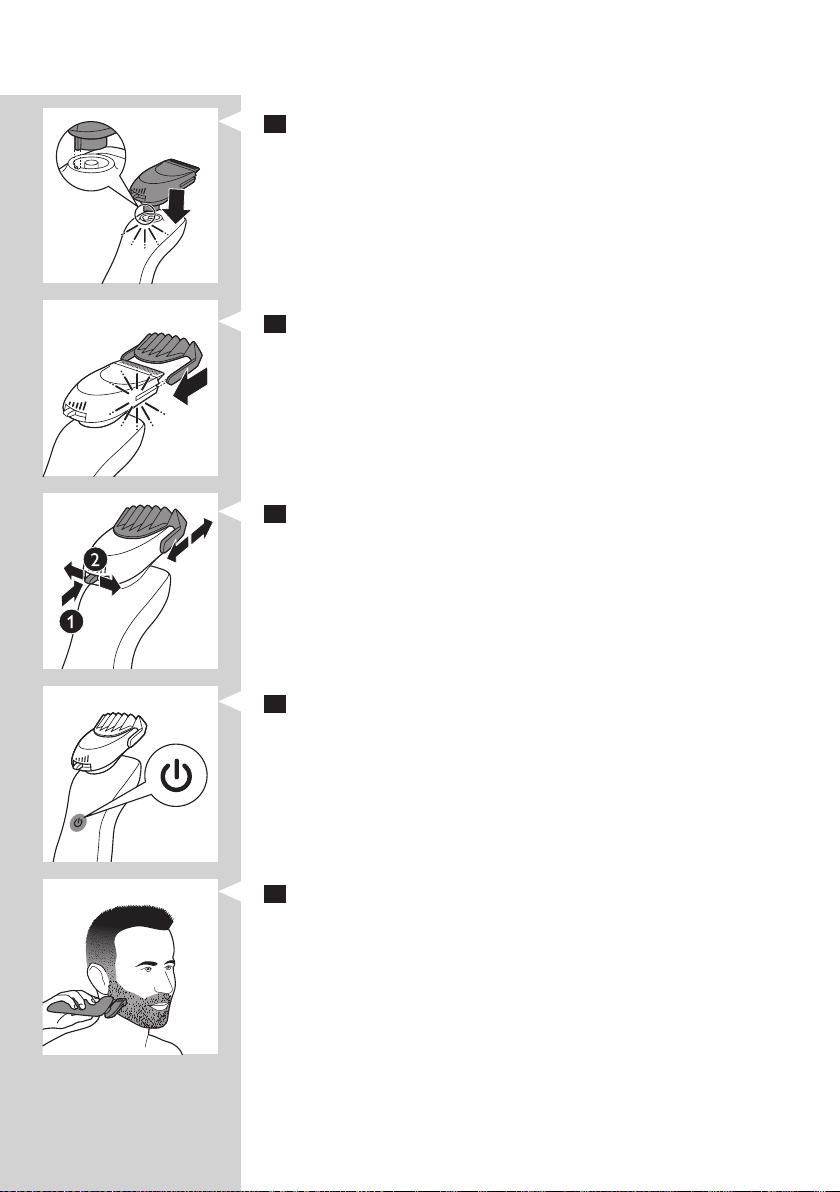
1 Slide the comb straight into the guiding grooves on both sides of the
beard styler attachment (‘click’).
2 Press the length selector (1) and then push it to the left or right (2)
to select the desired hair length setting.
3 Press the on/off button on the shaver to switch it on.
4 You can now start styling your beard.
Using the Beard Styler attachment without comb
You can use the Beard Styler attachment without the comb to contour
your beard, moustache or sideburns.
ENGLISH14
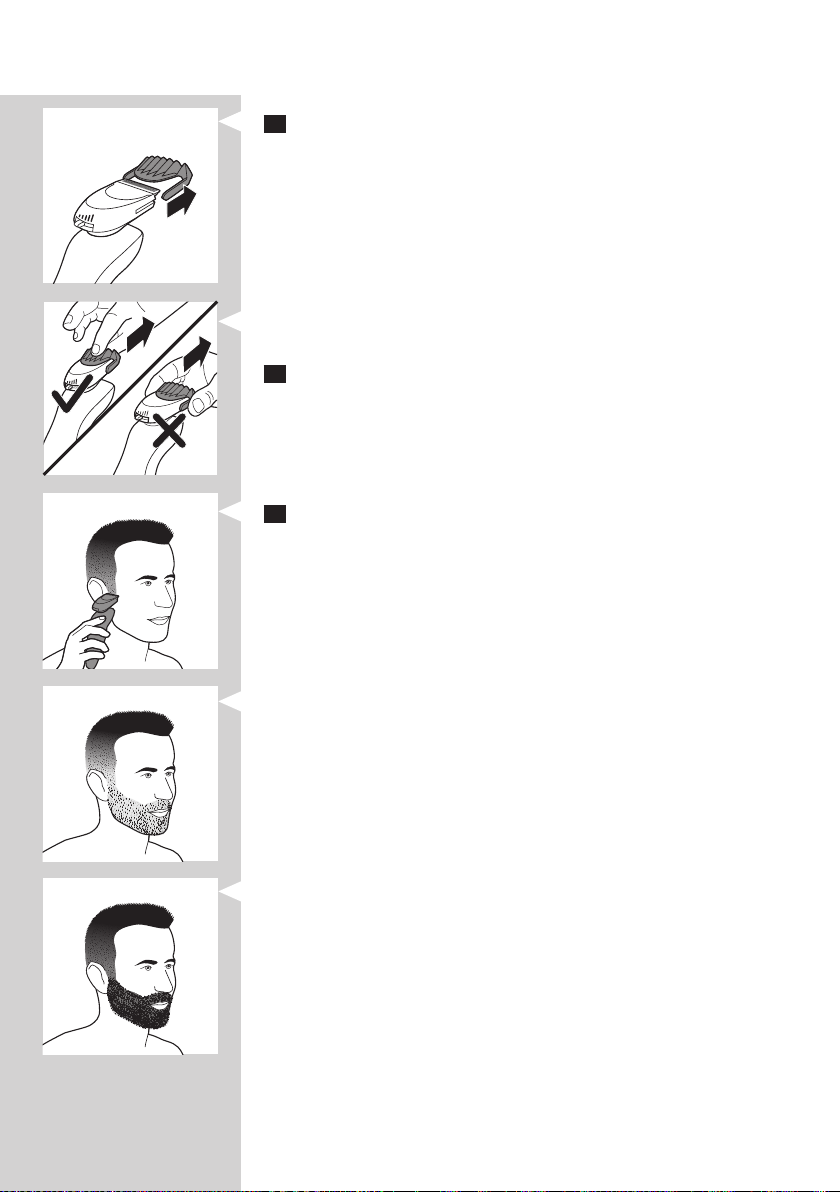
1 Pull the comb off the Beard Styler attachment.
Note: Grab the comb in the centre to pull it off the Beard Styler attachment.
Do not pull at the sides of the comb.
2 Press the on/off button to switch on the shaver.
3 You can now start contouring your beard, moustache, sideburns or
neckline.
Beard styles
Below you nd some examples of beard styles you can create.
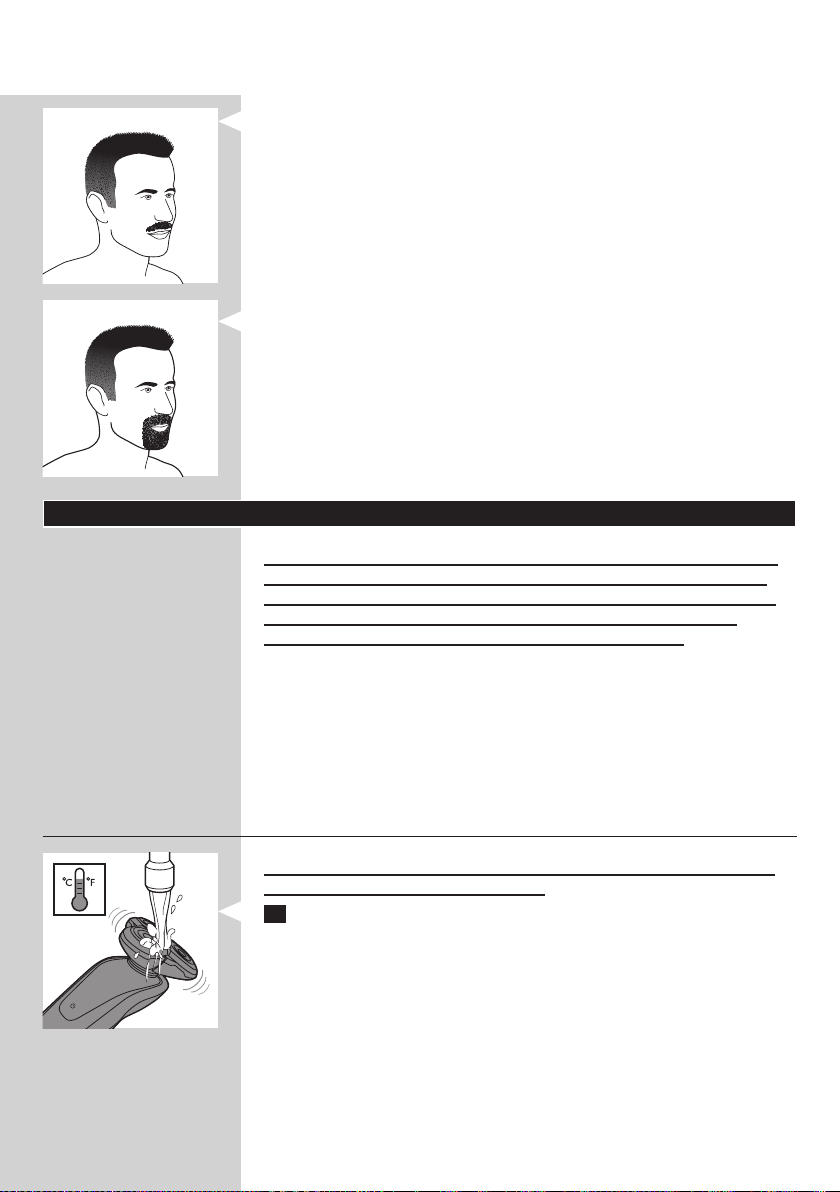
- A stubble look
- A full beard
ENGLISH 15
- A moustache
- A goatee
Cleaning and maintenance
Never use scouring pads, abrasive cleaning agents or aggressive liquids
such as petrol or acetone to clean the shaver, its accessories and the
Jet Clean System (RQ1296CC, RQ1295CC, RQ1290CC, RQ1286CC,
RQ1285CC, RQ1284CC, RQ1280CC, RQ1275CC, RQ1265CC,
RQ1260CC, RQ1252CC, RQ1251CC, RQ1250CC only).
- The best and most hygienic way to clean the shaver is in the Jet Clean
System. You can also rinse the shaver under the tap or clean it with the
cleaning brush supplied.
- Be careful with hot water. Always check if the water is not too hot, to
prevent your hands from getting burnt.
- Clean the shaver after every shave for optimal shaving performance.
- You can clean the outside of the shaver with a damp cloth.
- Regular cleaning guarantees better shaving performance.
Cleaning the shaving unit
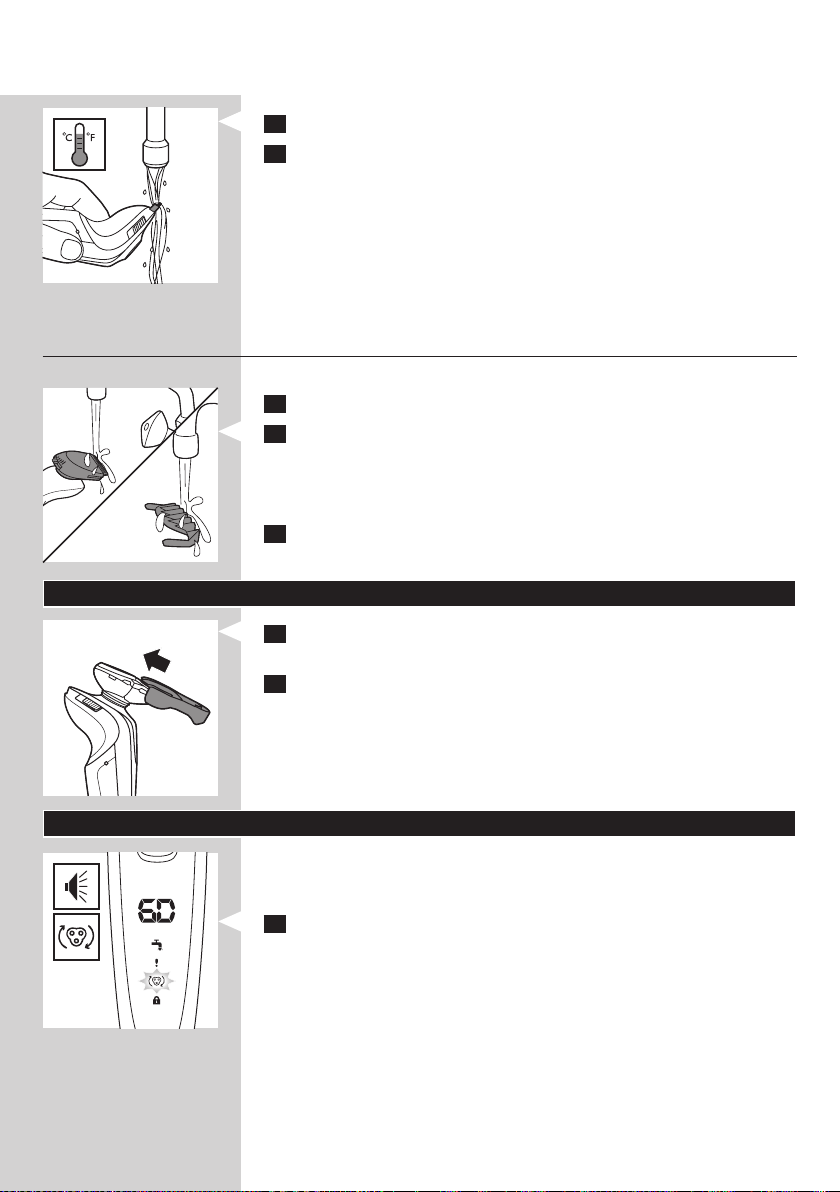
Be careful with hot water. Always check if the water is not too hot, to
prevent your hands from getting burnt.
1 Rinse the shaving unit under a hot tap for some time.
ENGLISH16
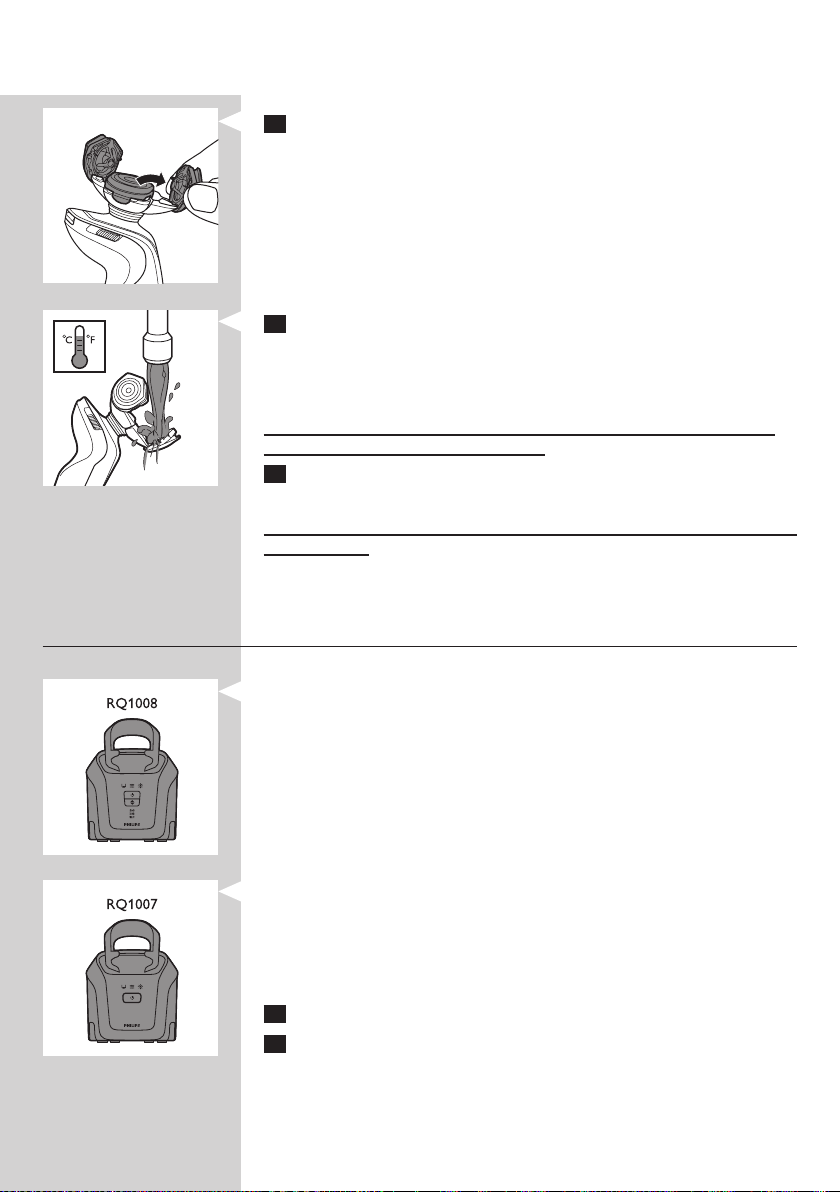
2 Pull open the three shaving heads one by one.
3 Rinse all three shaving heads and all three hair chambers under a hot
tap for 30 seconds.
Note: You can also brush the shaving heads and hair chambers with the
cleaning brush supplied.
Be careful with hot water. Always check if the water is not too hot, to
prevent your hands from getting burnt.
4 Carefully shake off excess water and leave the shaving heads open to
let the shaving unit dry completely.
Never dry the shaving unit with a towel or tissue, as this may damage the
shaving heads.
Cleaning the shaving unit in the Jet Clean System (RQ1296CC,
RQ1295CC, RQ1290CC, RQ1286CC, RQ1285CC, RQ1284CC,
RQ1280CC, RQ1275CC, RQ1265CC, RQ1260CC, RQ1252CC,
RQ1251CC, RQ1250CC only)
The Jet Clean System comes in two types:
- Type RQ1008 has three cleaning programs: the eco program, the auto
program and the intensive program. Press the up/down button to
select the cleaning program you prefer.
Note: The eco program has a shorter drying time, to save energy. The intensive
program is a more thorough cleaning program.
- Type RQ1007 has one automatic cleaning program. When you
press the on/off button, the Jet Clean System starts cleaning in the
automatic cleaning program.
Preparing the Jet Clean System for use
Fill the cleaning chamber before rst use.
1 Put the small plug in the Jet Clean System.
2 Put the adapter in the wall socket.
, The holder automatically moves to the highest position.
ENGLISH 17
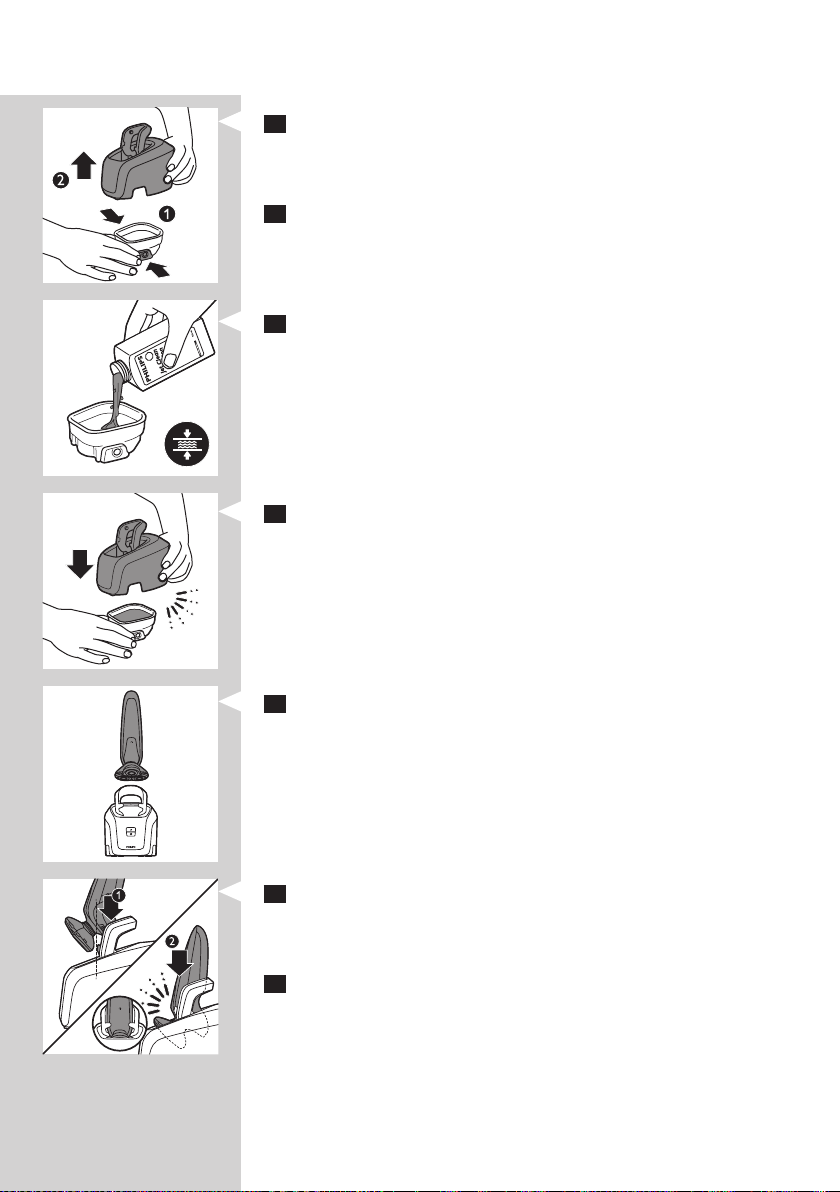
3 Simultaneously press the release buttons on both sides of the
cleaning chamber (1). Then lift the Jet Clean System off the cleaning
chamber (2).
, The cleaning chamber remains behind.
4 Unscrew the cap from the bottle with HQ200 cleaning uid.
5 Fill the cleaning chamber with HQ200 cleaning uid to a level
between the two lines.
6 Place the Jet Clean System back onto the cleaning chamber.
Make sure the release buttons click back into place.
Using the Jet Clean System
Note: If you use the shaver with shaving foam or shaving gel, we advise you
to rinse it under the hot tap before you clean it in the Jet Clean System. This
guarantees an optimal lifetime for the cleaning uid.
1 Hold the shaver upside down above the holder with the back of the
shaver pointing towards the holder.
2 Place the shaver body in the holder behind the two clips (1) and
press it down until it locks into place (2).
, The display shows that the shaver is charging (see chapter ‘The
display’).
3 RQ1008: Press the up/down button to select a cleaning program.

ENGLISH18
4 Press the on/off button on the Jet Clean System to start the cleaning
program.
, The shaver display stops showing the charging indication.
, The cleaning light starts to ash and the shaver is automatically
lowered into the cleaning uid.
, The cleaning light ashes throughout the cleaning program, which
takes a few minutes.
Note: RQ1007: The cleaning program takes 4 to 6 minutes.
Note: RQ1008: The auto and eco cleaning programs take 4 to 6 minutes. The
intensive program takes approx. 35 minutes.
, During the rst phase of the cleaning program, the shaver
automatically switches on and off several times and moves up and
down.
, During the second phase of the cleaning program, the shaver is
placed in the drying position, indicated by the ashing drying symbol.
This phase takes approx. 2 hours. The shaver stays in this position
until the end of the program.
Note: RQ1008: The drying phase takes 1 hour when you have selected the eco
program.
, After the cleaning program, the charging indication appears on the
shaver display (see chapter ‘The display’).
Note: If you press the on/off button of the Jet Clean System during the cleaning
program, the program aborts. In this case, the cleaning or drying light stops
ashing and the holder moves to the highest position.
Note: If you remove the adapter from the wall socket during the cleaning
program, the program aborts. The holder remains in its current position. When
you put the adapter back into the wall socket, the holder moves to the highest
position.
- When the cleaning uid drops below the minimum level, the ‘cleaning
chamber empty’ symbol star ts to ash and the holder returns to its
starting position.
- If you use the Jet Clean System to clean your shaver every day, you
need to rell the cleaning chamber approx. every 15 days.
Cleaning the Jet Clean System
Clean the cleaning chamber every 15 days.
You can wipe the outside of the Jet Clean System with a damp cloth.
ENGLISH 19
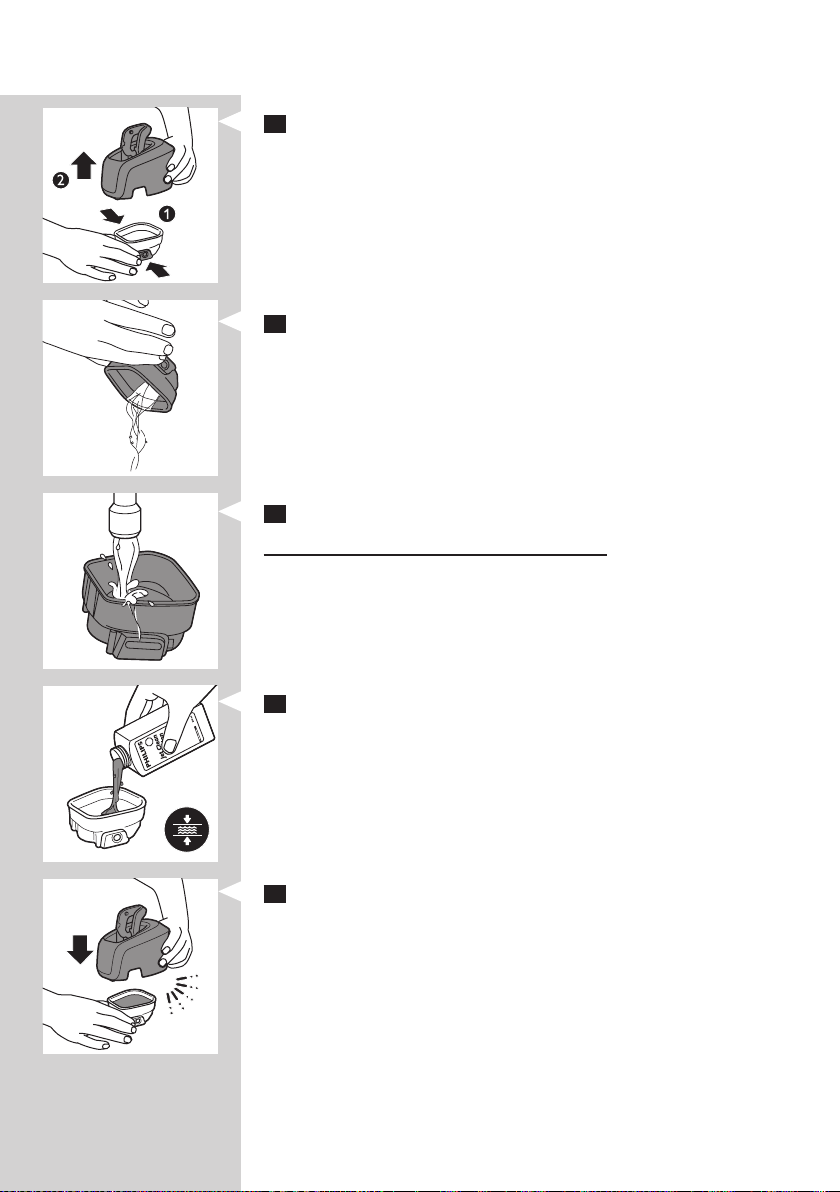
1 Simultaneously press the release buttons on both sides of the Jet
Clean System (1). Then lift the Jet Clean System off the cleaning
chamber (2).
, The cleaning chamber remains behind.
2 Pour any remaining cleaning uid out of the cleaning chamber.
You can simply pour the cleaning uid down the sink.
3 Rinse the cleaning chamber under the tap.
The cleaning chamber is not dishwasher-proof.
4 Fill the cleaning chamber with HQ200 cleaning uid to a level
between the two lines.
5 Place the Jet Clean System back onto the cleaning chamber.
Make sure the release buttons click back into place.
ENGLISH20
Extra-thorough cleaning method
Make sure the appliance is switched off.
1 Pull the shaving unit straight off the shaver.
Note: Do not twist the shaving unit while you pull it off the shaver.
2 Pull open the three shaving heads one by one.
3 Press the retainer release tab (1) until the retainer opens (2).
Note: Do not clean more than one cutter and shaving guard at a time, since
they are all matching sets. If you accidentally put a cutter in the wrong shaving
guard, it may take several weeks before optimal shaving performance is
restored.
4 Remove the cutter from the shaving guard.
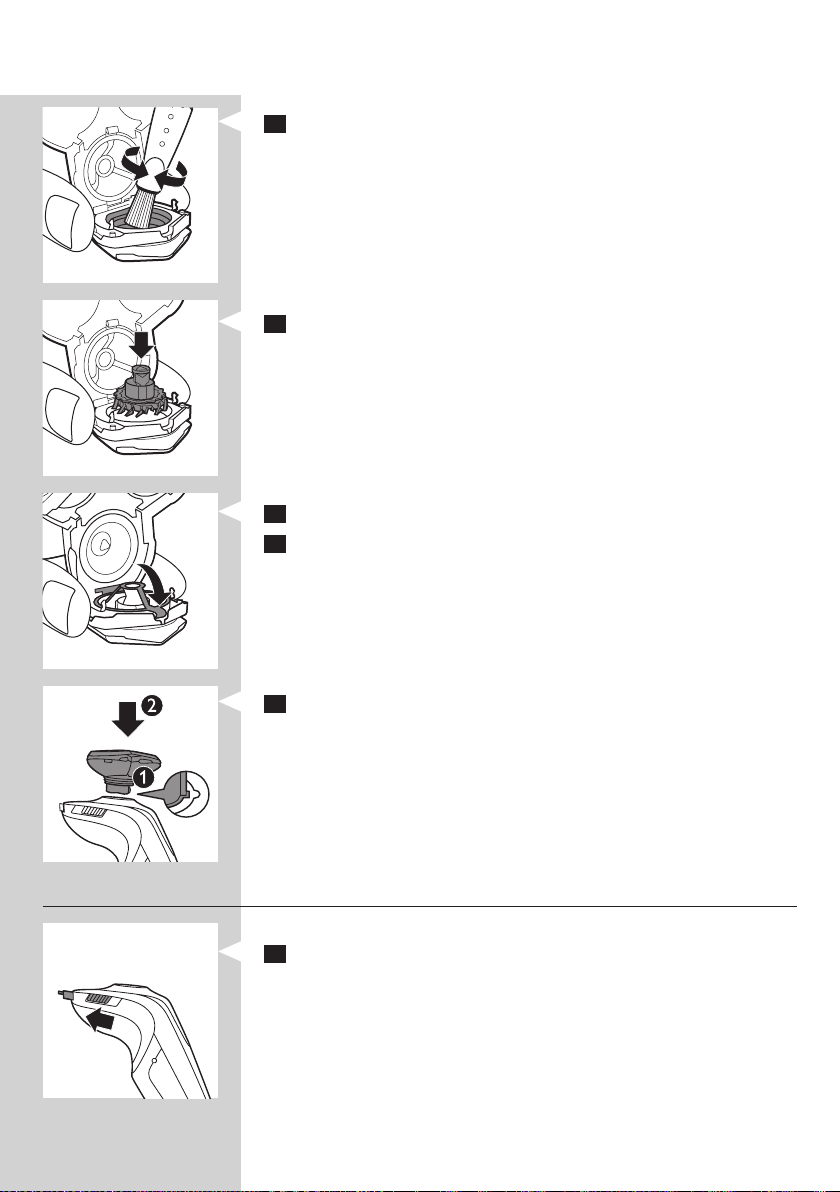
5 Clean the cutter with the cleaning brush supplied.
ENGLISH 21
6 Clean the inside of the shaving guard.
7 After cleaning, place the cutter back into the shaving guard with the
cutter legs pointing downwards.
8 Press down the retainer over the cutter.
9 Close the shaving heads.
10 Insert the lug of the shaving unit into the slot in the top of the shaver
(1). Then press the shaving unit downwards (2) to attach it to the
shaver (‘click’).
Cleaning the trimmer
Clean the trimmer every time you have used it.
1 Slide the trimmer slide forwards to slide out the trimmer.
ENGLISH22
2 Rinse the trimmer under a hot tap for some time.
3 Slide the trimmer slide backwards to retract the trimmer.
Tip: For optimal trimmer performance, lubricate the trimmer teeth with a drop
of sewing machine oil every six months.
Cleaning the Beard Styler attachment (RQ1296, RQ1295,
RQ1286, RQ1285, RQ1275, RQ1265 only)
Clean the Beard Styler attachment every time you have used it.
1 Pull the comb off the Beard Styler attachment.
2 Rinse the Beard Styler attachment and the comb separately under a
hot tap for some time.
Note: You can also clean the Beard Styler attachment and the comb with the
cleaning brush supplied.
3 Lubricate the trimmer teeth with a drop of sewing machine oil every
six months.
Storage
MINUTES LEFT
MINUTES LEFT
1 Slide the protection cap onto the shaving unit to prevent damage to
the shaving heads.
2 Store the shaver in the pouch supplied.
Replacement
For maximum shaving performance, we advise you to replace the shaving
unit every two years.
Only replace the shaving unit with an original RQ12 Philips Shaving unit.
1 The shaving unit symbol ashes (all types) and you hear a beep
(RQ129x, RQ128x only) when you switch off the shaver .
Note: The displays of the different types look different, but show the same
symbol.
ENGLISH 23
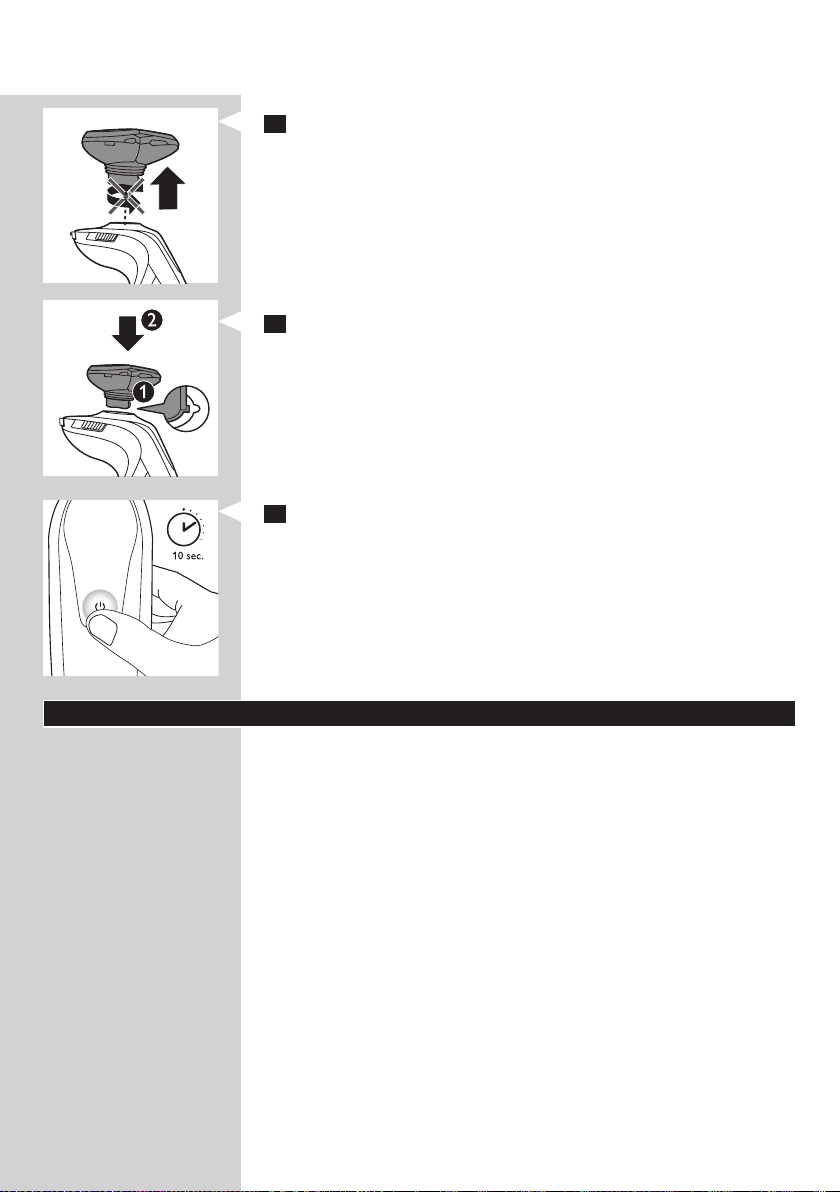
2 Pull the old shaving unit straight off the shaver.
Note: Do not twist the shaving unit while you pull it off the shaver.
3 Insert the lug of the new RQ12 shaving unit into the slot in the top
of the shaver (1). Then press down the shaving unit (2) to attach it to
the shaver (‘click’).
4 RQ128x/RQ127x/RQ126x/RQ125x: To reset the shaver, press and
hold the on/off button for approx. 10 seconds.
Note: If you do not reset the shaver at the rst replacement reminder, it
continues to beep (RQ128x only) and show the shaving unit symbol at 8 more
shaves or until you reset the shaver.
Note for RQ129x: You do not need to reset the shaver. After 3 shaves,
the replacement reminder (ashing shaving unit symbol and beeping) is
deactivated automatically.
Ordering accessories
To purchase accessories for this appliance, please visit our online shop at
www.shop.philips.com/service. If the online shop is not available in
your country, go to your Philips dealer or a Philips service centre. If you
have any difculties obtaining accessories for your appliance, please contact
the Philips Consumer Care Centre in your country. You nd its contact
details in the worldwide guarantee leaet.
The following parts are available:
- HQ8505 adapter
- RQ12 Philips Shaving Unit
- HQ110 Philips Shaving Head Cleaning Spray
- HQ200 Philips Cleaning Fluid
- RQ111 Beard Styler attachment

ENGLISH24
Shaving heads
- We advise you to replace your shaving heads every two years. Always
replace the shaving unit with an original RQ12 Philips Shaving Unit.
Cleaning
- Specic types only: use Jet Clean Solution (HQ200) for regular cleaning
of the shaving heads.
Environment
- Do not throw away the appliances with the normal household waste
at the end of their life, but hand them in at an ofcial collection point
for recycling. By doing this, you help to preserve the environment.
- The built-in rechargeable shaver battery contains substances that
may pollute the environment. Always remove the battery before you
discard or hand in the shaver at an ofcial collection point. Dispose
of the battery at an ofcial collection point for batteries. If you have
trouble removing the battery, you can also take the appliance to a
Philips service centre. The staff of this centre will remove the battery
for you and will dispose of it in an environmentally safe way.
Removing the rechargeable shaver battery
Only remove the rechargeable battery when you discard the shaver.
Make sure the battery is completely empty when you remove it.
Be careful, the battery strips are sharp.
1 Remove the back panel of the shaver with a screwdriver.
2 Remove the rechargeable battery.

Guarantee and support
If you need support or if you have a problem, please visit
www.philips.com/support or read the separate worldwide guarantee
leaet.
Guarantee restrictions
The shaving heads (cutters and shaving guards) are not covered by the
terms of the international guarantee because they are subject to wear.
Troubleshooting
This chapter summarises the most common problems you could
encounter with the appliance. If you are unable to solve the problem with
the information below, visit www.philips.com/support for a list of frequently
asked questions or contact the Consumer Care Centre in your country.
Problem Possible cause Solution
ENGLISH 25
The shaver does not
shave as well as it
used to.
The shaver does not
work when I press
the on/off button.
The shaving heads are damaged or worn. Replace the shaving unit (see
Long hairs obstruct the shaving heads. Clean the shaving heads by
Specic types only: The Jet Clean System has
not cleaned the shaver properly, because
the cleaning uid in the cleaning chamber is
soiled or the cleaning uid level is too low.
The rechargeable battery is empty. Recharge the battery (see
Specic types only: The travel lock
is activated.
The shaving unit is soiled or damaged to
such an extent that the motor cannot run.
In this case, the shaving unit symbol, the tap
symbol and the exclamation mark ash.
The temperature of the shaver is too high. In
this case, the shaver does not work and the
exclamation mark on the display ashes.
chapter ‘Replacement’).
following the steps of the
extra-thorough cleaning method
(see chapter ‘Cleaning and
maintenance’).
Clean the shaver thoroughly
before you continue shaving. If
necessary, clean and rell the
cleaning chamber (see chapter
‘Cleaning and maintenance’).
chapter ‘Charging’).
Press the on/off button for
3 seconds to deactivate the
travel lock.
Clean the shaving unit or replace
it (see chapters ‘Cleaning and
maintenance’ and ‘Replacement’).
Switch off the shaver and let
it cool down. As soon as the
temperature of the shaver has
dropped sufciently, you can
switch on the shaver again.

ENGLISH26
Problem Possible cause Solution
RQ1296CC,
RQ1295CC,
RQ1290CC,
RQ1286CC,
RQ1285CC,
RQ1284CC,
RQ1280CC,
RQ1275CC,
RQ1265CC,
RQ1260CC,
RQ1252CC,
RQ1251CC,
RQ1250CC only: The
shaver is not entirely
clean after I clean it in
the Jet Clean System.
The Jet Clean System
does not work when
I press the on/off
button.
The shaver is not fully
charged after I charge
it in the charger/Jet
Clean System.
The cleaning uid in the cleaning chamber
is soiled.
The cleaning uid level is too low. If the
uid volume in the cleaning chamber drops
below the minimum level during the cleaning
program, the program aborts.The cleaning
light and the ‘cleaning chamber empty’
symbol ash at intervals and the holder
returns to its starting position.
You have used another cleaning uid than
the original Philips cleaning uid.
The Jet Clean System is not connected to
the mains.
You have not placed the shaver in the
Jet Clean System properly, so there is no
electrical connection between the Jet Clean
System and the shaver.
You have not placed the shaver in the
charger/Jet Clean System (specic types
only) properly.
Empty and rinse the cleaning
chamber and rell it with new
cleaning uid.
Rell the cleaning chamber with
cleaning uid to a level between
the two lines (see chapter
‘Cleaning and maintenance’).
Only use HQ200
Philips Cleaning Fluid.
Put the small plug in the Jet
Clean System and put the
adapter in the wall socket.
Press the shaver tightly into the
holder to lock it into place.
Make sure you press the shaver
until it locks into place.

Problem Possible cause Solution
ENGLISH 27
RQ129x/RQ128x:
The shaver is fully
charged, but the
display shows less
than 60 shaving
minutes.
RQ1008: The
operating time of
the Jet Clean System
is suddenly shorter
or longer than it used
to be.
The shaver is equipped with an intelligent
self-learning system that monitors the
shaver’s energy consumption and converts
the remaining battery capacity into shaving
minutes. The energy consumption and
therefore the remaining number of shaving
minutes depend on your skin and beard type
and your shaving behaviour (e.g. the use of
shaving gel).
You have selected another cleaning program.
The Jet Clean System has three cleaning
programs: the eco program, the normal
program and the intensive program. Each
of these programs has a different operating
time.
If the number of shaving minutes
of the fully charged shaver is
less than 60 minutes, this is
completely normal and does not
mean that the battery capacity
of the shaver has diminished.
Press the up/down button
on the Jet Clean System to
select the cleaning program of
your preference (see chapter
‘Cleaning and maintenance’).

28
БЪЛГАРСКИ
Въведение
Поздравления за вашата покупка и добре дошли във Philips! За
да се възползвате изцяло от предлаганата от Philips поддръжка,
регистрирайте продукта си на адрес www.philips.com/welcome.
Прочетете внимателно това ръководство за експлоатация, тъй като
то съдържа информация за функциите на тази самобръсначка, а също
и някои съвети, които ще направят бръсненето ви по-бързо и поприятно.
Общо описание (фиг. 1)
A Самобръсначка
1 Дисплей
2 Бутон за вкл./изкл. на самобръсначката
3 Предпазна капачка
4 RQ12 бръснещ блок
5 Машинка за подстригване
6 Плъзгач вкл./изкл. на приставката за подстригване
B RQ111 Приставка за оформяне на брада (само при RQ1296,
RQ1295, RQ1286, RQ1285, RQ1275, RQ1265)
7 Селектор за дължина на косъма
8 Гребен на приставката за оформяне на брада
C Сгъваемо зарядно устройство
D Система Jet Clean (само при RQ1296CC, RQ1295CC, RQ1290CC,
RQ1286CC, RQ1285CC, RQ1284CC, RQ1280CC, RQ1275CC,
RQ1265CC, RQ1260CC, RQ1252CC, RQ1251CC, RQ1250CC)
9 Символ “празна почистваща камера”
10 Символ на почистване
11 Символ на сушене
12 Бутон за вкл./изкл. на системата Jet Clean (само за RQ1008: и бутон
нагоре/надолу за избор на програма)
13 Бутон за освобождаване на почистващата камера
14 Поставка на самобръсначката
E Четка за почистване
F Течност за почистване HQ200 (само при RQ1296CC, RQ1295CC,
RQ1290CC, RQ1286CC, RQ1285CC, RQ1284CC, RQ1280CC,
RQ1275CC, RQ1265CC, RQ1260CC, RQ1252CC, RQ1251CC,
RQ1250CC)
G Торбичка
H Адаптер
Важно
Преди да използвате самобръсначката, системата Jet Clean (само
при RQ1296CC, RQ1295CC, RQ1290CC, RQ1286CC, RQ1285CC,
RQ1284CC, RQ1280CC, RQ1275CC, RQ1265CC, RQ1260CC,
RQ1252CC, RQ1251CC, RQ1250CC) и зарядната поставка, прочетете
внимателно тази важна информация. Запазете брошурата за справка в
бъдеще.
БЪЛГАРСКИ 29
Опасност
- Пазете адаптера сух.
Предупреждение
- В адаптера има трансформатор. Не отрязвайте адаптера, за да го
замените с друг щепсел, тъй като това крие опасности.
- Самобръсначката, системата Jet Clean и зарядната поставка
не са предназначени за ползване от хора (включително деца)
с намалени физически възприятия или с умствени недъзи или
без опит и познания, ако са оставени без наблюдение и не са
инструктирани от страна на отговарящо за тяхната безопасност
лице относно начина на използване на тези уреди.
- Наглеждайте децата, за да не си играят със самобръсначката,
системата Jet Clean и зарядната поставка.
- Винаги изключвайте щепсела от контакта, преди да измиете
самобръсначката с течаща вода.
Внимание
- Никога не потапяйте системата Jet Clean или зарядната поставка
във вода и не ги мийте с течаща вода.
- Никога не изплаквайте самобръсначката с вода, по-гореща от
80°C.
- Не използвайте самобръсначката, системата Jet Clean, адаптера,
зарядната поставка и която и да било друга част, ако тя е
повредена, тъй като това може да причини наранявания. Винаги
заменяйте повредените адаптер, зарядна поставка или част с
оригинални такива.
- Използвайте системата Jet Clean само с оригиналния почистващ
разтвор HQ200 Jet Clean.
- Поставяйте системата Jet Clean винаги върху стабилна, равна и
хоризонтална повърхност, за да предотвратите разливане.
- Когато системата Jet Clean е готова за употреба, не я местете, за
да предотвратите разливане на почистващата течност.
- Системата Jet Clean измива щателно, но не дезинфекцира
самобръсначката, така че не давайте самобръсначката ви да се
ползва от други хора.
- Никога не почиствайте уреда с въздух под налягане, абразивни
гъби, абразивни почистващи препарати или агресивни течности,
като бензин или ацетон.
- От гнездото отдолу на самобръсначката може да тече вода,
когато я изплаквате. Това е нормално и не е опасно, тъй като
цялата електроника е затворена в капсулован захранващ блок
вътре в самобръсначката.
Съответствие със стандартите
- Тази самобръсначка е водоустойчива и съответства на
международно одобрената нормативна уредба за безопасност.
Подходяща е за употреба във ваната или под душа, както и за
измиване с течаща вода. Поради тази причина, от съображения за
сигурност самобръсначката може да се използва само на батерии.
- Самобръсначката и системата Jet Clean отговарят на всички
приложими стандарти и разпоредби относно излагането на
електромагнитни полета.
БЪЛГАРСКИ30
Общи положения
- Адаптерът е съоръжен с автоматичен селектор на напрежение и е
подходящ за напрежения на мрежата от 100 до 240 волта.
- Адаптерът преобразува 100-240 волта в безопасно ниско
напрежение под 24 волта.
- Максимално ниво на шума: Lc = 69 dB(A)
Дисплеят
MINUTES LEFT
MINUTES LEFT
Забележка: Преди да използвате самобръсначката за пръв път,
махнете предпазното фолио от дисплея.
Различните модели самобръсначки имат различни дисплеи, показани
на фигурите по-долу.
- RQ1296, RQ1295, RQ1290, RQ1286, RQ1285, RQ1280
- RQ1275, RQ1265, RQ1261, RQ1260
- RQ1273, RQ1252, RQ1251, RQ1250
MINUTES LEFT
MINUTES LEFT
Зареждане
- Зареждането отнема около 1 час.
RQ129x, RQ128x
- Когато самобръсначката се зарежда, мига индикаторът за минути.
- Минутите за бръснене нарастват, докато самобръсначката се
зареди напълно.
- Бързо зареждане: Когато самобръсначката има достатъчно заряд
за едно бръснене, на дисплея се показват 5 минути в червено.
 Loading...