

Page 1
QC5045
1
11
14
2
5
6
98
15
43
7
10
1312
Page 2

ENGLISH
4222.002.8008.1
2/9
Introduction
Congratulations on your purchase and welcome
to Philips! To fully benet from the support that
Philips offers, register your product at www.philips.
com/welcome.
Your new Philips Professional Power hair clipper
enables comfortable clipping of even the toughest
hair. To enjoy using the hair clipper, we advise you
to read the following information.
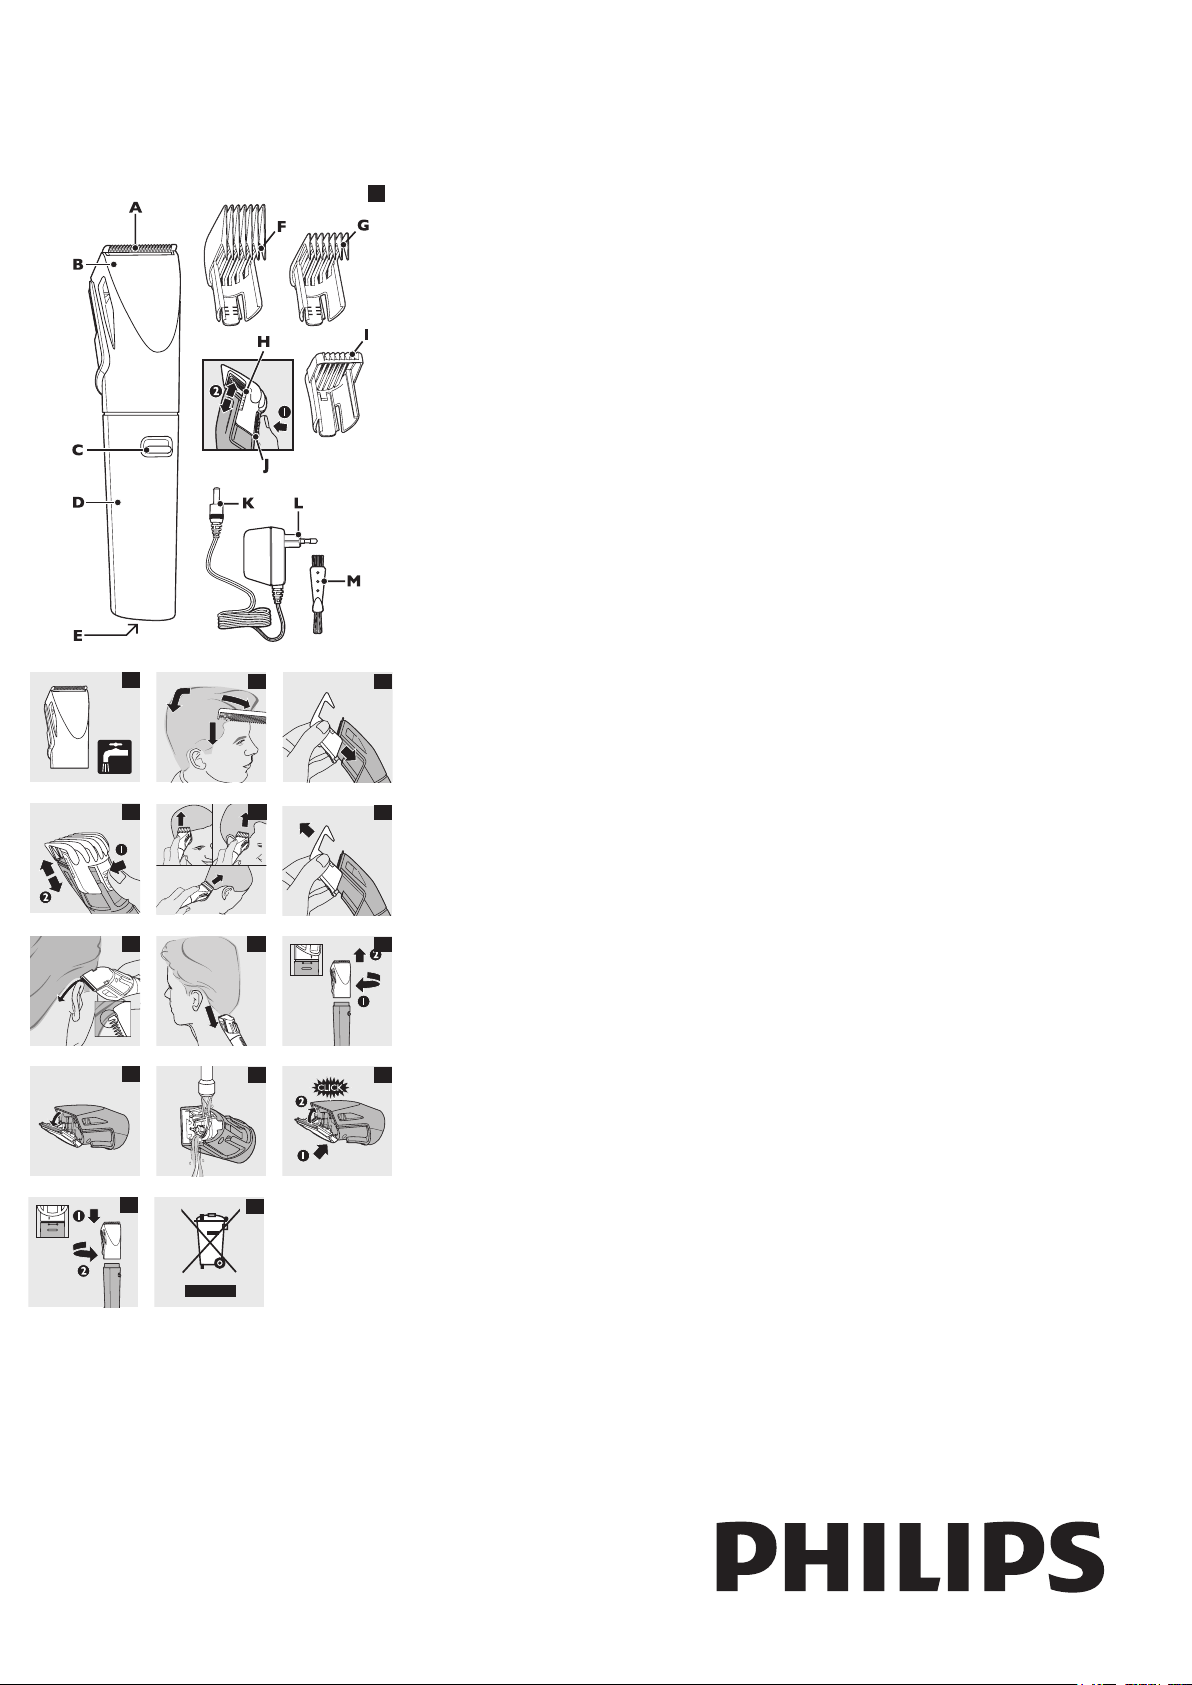
General description (Fig. 1)
A Cutting element
B Clipping attachment
C On/off slide
D Handle
E Socket for appliance plug
F Large comb
G Small comb
H Setting indications
I Stubble comb
J Setting selector
K Appliance plug
L Adapter
M Cleaning brush
Important
Read this user manual carefully before you use the
appliance and save it for future reference.
Danger
Make sure the adapter does not get wet.
-
Warning
Check if the voltage indicated on the adapter
and on the appliance corresponds to the
local mains voltage before you connect the
appliance.
The adapter contains a transformer. Do not cut
off the adapter to replace it with another plug,
as this causes a hazardous situation.
This appliance is not intended for use by
persons (including children) with reduced
physical, sensory or mental capabilities, or lack
of experience and knowledge, unless they
have been given supervision or instruction
concerning use of the appliance by a person
responsible for their safety.
Children should be supervised to ensure that
they do not play with the appliance.
Remove the clipping attachment from
the handle before you clean the clipping
attachment under the tap.
Caution
Never immerse the handle in water or any
other liquid, nor rinse it under the tap.
Do not use the appliance in the bath or in the
shower.
The clipping attachment of the appliance
complies with the internationally approved IEC
safety regulations and can be safely cleaned
under a tap (Fig. 2).
Use and store the appliance at a temperature
between 15°C and 35°C.
Only use the adapter supplied.
If the adapter is damaged, always have it
replaced with one of the original type in order
to avoid a hazard.
Do not use the appliance when the clipping
attachment or one of the combs is damaged or
broken as this may cause injury.
This appliance is only intended for clipping
human scalp hair. Do not use it for any other
purpose.
Compliance with standards
This Philips appliance complies with all standards
regarding electromagnetic elds (EMF). If handled
properly and according to the instructions in this
user manual, the appliance is safe to use based on
scientic evidence available today.
Using the appliance
Preparing for hair clipping
Only use the appliance on clean, dry hair. Do not
use it on freshly washed hair.
1 Make sure that the head of the person whose
hair you intend to cut is at the same level as
your chest. This ensures that all parts of the
head are clearly visible and within easy reach.
2 Comb the hair in the growth direction (Fig. 3).
Clipping with comb
The appliance comes with three combs for 15
different hair lengths.
The minimum remaining hair length is 1.6mm and
the maximum remaining hair length is 41mm.
1 Select the comb you want to use.
The table shows how long the hair will be after
clipping at the different settings of the small comb
and large comb.
Settings of the small and large comb and
large
Setting Hair length
after clipping
with small
comb
Hair length
after clipping
with large
comb
1 3mm 23mm
2 6mm 26mm
3 9mm 29mm
4 12mm 32mm
5 15mm 35mm
6 18mm 38mm
7 21mm 41mm
Tip: Write down the settings you have used to create
a certain hairstyle as a reminder for future clipping
sessions.
Stubble comb for a ‘stubble look’
To create a ‘stubble look’, clip with the small
-
comb set to setting 1 (3mm) rst.
Then clip the hair with the stubble comb for a
hair length of 1.6mm.
2 Slide the selected comb into the guiding
grooves on both sides of the handle
(‘click’) (Fig. 4).
3 To set the comb to the desired setting, press
the setting selector (1) and slide the comb to
the desired hair length setting (2) (Fig. 5).
The setting indications on the comb show the
,
selected setting.
4 Put the adapter into the wall socket.
5 Switch on the appliance.
6 Move the appliance through the hair slowly.
To clip in the most effective way, move the
appliance against the direction of hair growth.
Since all hair does not grow in the same
direction, you need to move the appliance in
different directions (upward, downward or
across) (Fig. 6).
Make sure that the at part of the comb is
always fully in contact with the scalp to obtain
an even result.
Make overlapping passes over the head to
ensure that you cut all the hair that needs to
be cut.
To achieve a good result with curly, sparse or
long hair, use a hand comb to guide the hair
towards the appliance.
7 Regularly remove cut hair from the comb.
If a lot of hair has accumulated in the comb,
remove the comb from the appliance and blow
and/or shake the hair out of it.
Contouring without comb
You can use the appliance without comb to clip
hair very close to the skin (0.6mm) or to contour
the neckline and the area around the ears.
Be careful when you clip without comb because
the cutting element removes every hair it
touches.
1 Pull the comb off the appliance (Fig. 7).
2 Before you start to contour the hairline
around the ears, comb the hair ends over the
ears.
3 Tilt the appliance in such a way that only one
edge of the cutting element touches the hair
ends when you shape the contours around
the ears (Fig. 8).
Only cut the hair ends. The hairline should be close
to the ear.
4 To contour the neckline and sideburns,
turn the appliance and make downward
strokes (Fig. 9).
Move the appliance slowly and smoothly. Follow
the natural hairline.
Cleaning
Never use compressed air, scouring pads, abrasive
cleaning agents or aggressive liquids such as
petrol or acetone or ethereal oils to clean the
appliance.
Note: The appliance does not need any lubrication.
Clean the appliance every time you have used it.
1 Make sure the appliance is switched off and
disconnected from the mains.
2 Remove the comb from the appliance.
3 To remove the clipping attachment, turn
it anticlockwise until the open dot on the
handle is aligned with the arrow on the
attachment (1). Then lift the attachment off
the handle (2) (Fig. 10).
4 Push the centre top end of the cutting
element upwards with your thumb
until it opens and then pull it off the
appliance (Fig. 11).
Be careful that the cutting element does not fall on
the oor.
5 Clean the cutting element with warm water
(max. 40°C).
6 Clean the clipping attachment under warm
running water to ush out the cut hair that
has accumulated in the attachment (Fig. 12).
7 After cleaning, place the lug of the cutting
element in the slot of the clipping attachment
and push the cutting element back onto the
clipping attachment (Fig. 13).
8 Clean the handle and the adapter with the
cleaning brush supplied or a dry cloth.
Note: The handle and the adapter are not waterproof.
9 Let the cutting element and the clipping
attachment dry completely before you
reassemble the appliance.
Page 3

Note: Make sure the electrical contacts of the
4222.002.8008.1
3/9
clipping attachment are dry before you reattach the
attachment to the handle.
10 To attach the clipping attachment, put it on
the handle in such a way that the open dot
on the handle is aligned with the arrow on
the clipping attachment (1). Then turn the
clipping attachment clockwise until the arrow
is aligned with the solid dot on the handle
(2) (Fig. 14).
Replacement
If the adapter is damaged, always have it replaced
with one of the original type in order to avoid a
hazard.
Only replace a damaged or worn attachment
or comb with an original Philips replacement
attachment or comb.
Philips replacement parts (clipping attachment,
cutting element, combs, handle and adapter) are
available from your Philips dealer and authorised
Philips service centres.
If you have any difculties obtaining replacement
parts for the appliance, contact the Philips
Consumer Care Centre in your country (you nd
its phone number in the worldwide guarantee
leaet).
Environment
Do not throw away the appliance with the
normal household waste at the end of its life,
but hand it in at an ofcial collection point for
recycling. By doing this, you help to preserve
the environment (Fig. 15).
Guarantee & service
If you need service or information or if you have a
problem, please visit the Philips website at
www.philips.com or contact the Philips Consumer
Care Centre in your country (you nd its phone
number in the worldwide guarantee leaet). If
there is no Consumer Care Centre in your country,
go to your local Philips dealer.
Page 4

DEUTSCH
4222.002.8008.1
4/9
Einführung
Herzlichen Glückwunsch zu Ihrem Kauf und
willkommen bei Philips! Um den Support von
Philips optimal zu nutzen, registrieren Sie Ihr
Produkt bitte unter www.philips.com/welcome.
Mit dem neuen Pro-Power-Haarschneider von
Philips lässt sich auch das widerspenstigste Haar
einfach und bequem schneiden. Damit Sie viel
Freude an Ihrem Haarschneider haben, lesen Sie
bitte die nachstehenden Informationen sorgfältig
durch.
Allgemeine Beschreibung (Abb. 1)
A Schneideeinheit
B Schneideaufsatz
C Ein-/Ausschalter
D Griff
E Buchse für Gerätestecker
F Großer Kammaufsatz
G Kleiner Kammaufsatz
H Einstellungsanzeigen
I Stoppel-Kammaufsatz
J Wahlschalter
K Gerätestecker
L Adapter
M Reinigungsbürste
Wichtig
Lesen Sie diese Bedienungsanleitung vor dem
Gebrauch des Geräts aufmerksam durch und
bewahren Sie sie für eine spätere Verwendung auf.
Gefahr
Achten Sie darauf, dass der Adapter nicht nass
wird.
Warnhinweis
Prüfen Sie vor Inbetriebnahme, ob die
Spannungsangabe am Adapter und am Gerät
mit der örtlichen Netzspannung übereinstimmt.
Der Adapter enthält einen Transformator.
Ersetzen Sie den Adapter keinesfalls durch
einen anderen Stecker, da dies den Benutzer
gefährden kann.
Dieses Gerät ist für Benutzer (einschl. Kinder)
mit eingeschränkten physischen, sensorischen
oder psychischen Fähigkeiten bzw. ohne
jegliche Erfahrung oder Vorwissen nur dann
geeignet, wenn eine angemessene Aufsicht
oder ausführliche Anleitung zur Benutzung
des Geräts durch eine verantwortliche Person
sichergestellt ist.
Achten Sie darauf, dass Kinder nicht mit dem
Gerät spielen.
Entfernen Sie den Schneideaufsatz vor der
-
Reinigung unter ießendem Wasser vom Griff.
Achtung
Tauchen Sie den Griff niemals in Wasser oder
andere Flüssigkeiten; spülen Sie ihn auch nicht
unter ießendem Wasser ab.
Benutzen Sie das Gerät nicht in der Badewanne
oder Dusche.
Der Schneideaufsatz des Geräts erfüllt die
internationalen IEC-Sicherheitsvorschriften und
kann ohne Bedenken unter ießendem Wasser
gereinigt werden (Abb. 2).
Benutzen und verwahren Sie das Gerät bei
Temperaturen zwischen 15 °C und 35 °C.
Verwenden Sie ausschließlich den
mitgelieferten Adapter.
Wenn der Adapter defekt oder beschädigt
ist, darf er nur durch ein Original-Ersatzteil
ausgetauscht werden, um Gefährdungen zu
vermeiden.
Um Verletzungen zu vermeiden, benutzen Sie
das Gerät nicht, wenn die Schneideeinheit oder
ein Kammaufsatz beschädigt oder defekt ist.
Das Gerät ist ausschließlich zum Schneiden
von menschlichem Kopfhaar vorgesehen.
Verwenden Sie es nicht für andere Zwecke.
Normerfüllung
Dieses Philips Gerät erfüllt sämtliche Normen
bezüglich elektromagnetischer Felder (EMF).
Nach aktuellen wissenschaftlichen Erkenntnissen
ist das Gerät sicher im Gebrauch, sofern
es ordnungsgemäß und entsprechend den
Anweisungen in dieser Bedienungsanleitung
gehandhabt wird.
Das Gerät benutzen
Den Haarschnitt vorbereiten
Verwenden Sie den Haarschneider nur bei
sauberem, trockenem Haar. Das Haar sollte nicht
frisch gewaschen sein.
1 Der Kopf der Person, deren Haare Sie
schneiden wollen, sollte sich auf Brusthöhe
vor Ihnen benden, damit der gesamte Kopf
uneingeschränkt sichtbar und leicht zugänglich
ist.
2 Kämmen Sie das Haar in
Wuchsrichtung (Abb. 3).
Haare mit Kammaufsatz schneiden
Das Gerät wird mit drei Kammaufsätzen für 15
unterschiedliche Haarlängen geliefert.
Die verbleibende Haarlänge beträgt mindestens
1,6 mm und höchstens 41 mm.
1 Wählen Sie einen Kamm aus.
Aus der Tabelle können Sie ersehen, welche
Länge das Haar nach dem Schneiden mit den
verschiedenen Einstellungen des kleinen und des
großen Kammaufsatzes haben wird.
Einstellungen des großen und des kleinen
Kammaufsatzes
Einstellung Haarlänge nach
Schneiden mit
dem kleinen
Kammaufsatz
Haarlänge nach
Schneiden mit
dem großen
Kammaufsatz
1 3 mm 23 mm
2 6 mm 26 mm
3 9 mm 29 mm
4 12 mm 32 mm
5 15 mm 35 mm
6 18 mm 38 mm
7 21 mm 41 mm
Tipp: Notieren Sie die für eine bestimmte Frisur
gewählten Einstellungen, um sie für spätere
Haarschnitte wieder zur Verfügung zu haben.
Kammaufsatz für Stoppelschnitt
Für einen Stoppelschnitt schneiden Sie Ihr Haar
zunächst mit dem kleinen Kammaufsatz auf
Einstellung 1 (3 mm).
Schneiden Sie anschließend das Haar mit dem
speziellen Stoppelaufsatz für eine Haarlänge
von 1,6 mm.
2 Schieben Sie den gewählten Kammaufsatz in
die Rillen an beiden Seiten des Griffs, bis er
hörbar einrastet (Abb. 4).
3 Drücken Sie für die gewünschte Einstellung
des Kammaufsatzes den Wahlschalter (1), und
schieben Sie den Kamm in die gewünschte
Schnittlängeneinstellung (2) (Abb. 5).
Die Anzeige am Kamm zeigt die gewählte
,
Einstellung.
4 Stecken Sie den Adapter in die Steckdose.
5 Schalten Sie das Gerät ein.
6 Führen Sie das Gerät langsam durch das Haar.
Die besten Ergebnisse erzielen Sie, wenn Sie
das Gerät gegen die Haarwuchsrichtung führen.
Da das Haar nicht überall in dieselbe Richtung
wächst, müssen Sie das Gerät in verschiedene
Richtungen führen (nach oben, unten oder
quer) (Abb. 6).
Die ache Seite des Kammaufsatzes muss
-
immer auf dem Kopf auiegen, um einen
gleichmäßigen Schnitt zu erzielen.
Führen Sie das Gerät mehrmals über jede
Haarpartie, damit alle Haare erfasst werden, die
Sie schneiden möchten.
Um auch bei lockigem, schütterem oder
langem Haar gute Ergebnisse zu erzielen,
können Sie die Haare mit einem Handkamm in
Richtung des Geräts führen.
7 Entfernen Sie zwischendurch die
abgeschnittenen Haare vom Kammaufsatz.
Wenn sich viel Haar im Kammaufsatz angesammelt
hat, nehmen Sie diesen ab und pusten oder
schütteln Sie die Haare heraus.
Konturen ohne Kammaufsatz
Sie können das Gerät auch ohne Kammaufsatz
verwenden, um Ihr Haar ganz kurz (0,6 mm) zu
schneiden oder die Konturen im Nacken und um
die Ohren zu denieren.
Seien Sie vorsichtig, wenn Sie ohne Kammaufsatz
arbeiten, da die Schneideeinheit sofort alle Haare
schneidet, mit denen sie in Berührung kommt.
1 Ziehen Sie den Kammaufsatz vom
Gerät (Abb. 7).
2 Kämmen Sie das Haar über die Ohren, bevor
Sie die Konturen um die Ohren herum
schneiden.
3 Neigen Sie bei der Formgebung der Konturen
um die Ohren herum das Gerät so, dass
nur die Kante des Aufsatzes die Haarspitzen
berührt (Abb. 8).
Schneiden Sie nur die Haarspitzen. Die Haarlinie
sollte dicht am Ohr enden.
4 Drehen Sie das Gerät und führen Sie es nach
unten, um die Konturen im Nacken und an
den Koteletten zu schneiden (Abb. 9).
Bewegen Sie das Gerät langsam und gleichmäßig.
Folgen Sie dabei der natürlichen Haarlinie.
Reinigung
Benutzen Sie zum Reinigen des Geräts keine
Druckluft, Scheuerschwämme und -mittel oder
aggressive Flüssigkeiten wie Benzin, Azeton oder
ätherische Öle.
Hinweis: Das Gerät braucht nicht geölt oder
geschmiert zu werden.
Reinigen Sie das Gerät nach jedem Gebrauch.
1 Achten Sie darauf, dass das Gerät
ausgeschaltet und nicht an das Netz
angeschlossen ist.
2 Nehmen Sie den Kammaufsatz vom Gerät ab.
3 Um einen Aufsatz abzunehmen, drehen Sie
ihn gegen den Uhrzeigersinn, bis der offene
Punkt auf dem Griff auf den Pfeil am Aufsatz
ausgerichtet ist (1). Ziehen Sie den Aufsatz
dann vom Griff ab (2) (Abb. 10).
4 Drücken Sie mit dem Daumen oben auf
die Mitte der Schneideeinheit, bis sie sich
öffnet und nach oben vom Gerät abheben
lässt (Abb. 11).
Lassen Sie die Schneideeinheit nicht fallen.
5 Reinigen Sie die Schneideeinheit mit warmem
Wasser (max. 40°C).
Page 5

6 Reinigen Sie den Schneideaufsatz
4222.002.8008.1
5/9
unter warmem, ießendem Wasser, um
abgeschnittene Haare abzuspülen, die sich
möglicherweise im Aufsatz angesammelt
haben (Abb. 12).
7 Schieben Sie nach der Reinigung die
Führung der Schneideeinheit in den
Schlitz des Schneideaufsatzes, und drücken
Sie die Schneideeinheit wieder auf den
Schneideaufsatz (Abb. 13).
8 Reinigen Sie den Griff und den Adapter mit
der beiliegenden Reinigungsbürste oder
einem trockenen Tuch.
Hinweis: Der Griff und der Adapter sind nicht
wasserfest.
9 Lassen Die die Schneideeinheit und den
Schneideaufsatz vollständig trocknen, bevor
Sie das Gerät wieder zusammensetzen.
Hinweis: Überprüfen Sie, ob die elektrischen Kontakte
des Schneideaufsatzes trocken sind, bevor Sie den
Aufsatz wieder an dem Griff befestigen.
10 Um einen Schneideaufsatz zu befestigen,
setzen Sie ihn so auf den Griff, dass der
offene Punkt auf dem Griff auf den Pfeil am
Schneideaufsatz ausgerichtet ist (1). Drehen
Sie den Aufsatz dann im Uhrzeigersinn, bis
der Pfeil am ausgefüllten Punkt auf dem Griff
ausgerichtet ist (2) (Abb. 14).
Ersatz
Wenn der Adapter defekt oder beschädigt ist, darf
er nur durch ein Original-Ersatzteil ausgetauscht
werden, um Gefährdungen zu vermeiden.
Abgenutzte und beschädigte Aufsätze oder
Kammaufsätze dürfen nur durch Original-PhilipsErsatzaufsätze ausgetauscht werden.
Ersatzteile von Philips (Schneideaufsatz,
Schneideeinheit, Kammaufsätze, Griff und Adapter)
sind bei Ihrem Philips-Händler oder einem Philips
Service-Center erhältlich.
Falls Sie Schwierigkeiten haben sollten, Ersatzteile
für das Gerät zu nden, wenden Sie sich bitte
an das Philips Service-Center in Ihrem Land
(Telefonnummer siehe Garantieschrift).
Umweltschutz
Werfen Sie das Gerät am Ende der
Lebensdauer nicht in den normalen Hausmüll.
Bringen Sie es zum Recycling zu einer ofziellen
Sammelstelle. Auf diese Weise tragen Sie zum
Umweltschutz bei (Abb. 15).
Garantie und Kundendienst
Benötigen Sie weitere Informationen oder
treten Probleme auf, setzen Sie sich bitte mit
einem Philips Service-Center in Ihrem Land in
Verbindung (Telefonnummer siehe Garantieschrift),
oder besuchen Sie die Philips Website
(www.philips.com). Sollte es in Ihrem Land kein
Service-Center geben, wenden Sie sich bitte an
Ihren Philips-Händler.
Page 6

FRANÇAIS
4222.002.8008.1
6/9
Introduction
Félicitations pour votre achat et bienvenue dans
l’univers Philips ! Pour proter pleinement de
l’assistance Philips, enregistrez vos produits sur le
site à l’adresse suivante : www.philips.com/welcome.
Votre nouvelle tondeuse Philips Professional Power
permet une coupe tout en douceur, même sur les
cheveux les plus rebelles. Avant de l’utiliser, nous
vous conseillons de consulter les informations
ci-dessous.
Description générale (fig. 1)
A Bloc tondeuse
B Sabot pour cheveux
C Bouton coulissant marche/arrêt
D Poignée
E Prise pour la che de l’appareil
F Grand sabot
G Petit sabot
H Indications de coupe
I Sabot « barbe de 3 jours »
J Sélecteur
K Fiche de l’appareil
L Adaptateur
M Brosse de nettoyage
Important
Lisez attentivement ce mode d’emploi avant
d’utiliser l’appareil et conservez-le pour un usage
ultérieur.
Danger
Veillez à ce que l’adaptateur ne soit pas en
contact avec de l’eau.
Avertissement
Avant de brancher l’appareil, vériez que la
tension indiquée sur l’adaptateur et l’appareil
correspond à la tension secteur locale.
L’adaptateur contient un transformateur.
-
N’essayez pas de remplacer la che de
l’adaptateur pour éviter tout accident.
Cet appareil n’est pas destiné à être utilisé
par des personnes (notamment des enfants)
dont les capacités physiques, sensorielles
ou intellectuelles sont réduites, ou par des
personnes manquant d’expérience ou de
connaissances, à moins que celles-ci ne soient
sous surveillance ou qu’elles aient reçu des
instructions quant à l’utilisation de l’appareil par
une personne responsable de leur sécurité.
Veillez à ce que les enfants ne puissent pas
jouer avec l’appareil.
Retirez le sabot pour cheveux de la poignée
avant de le nettoyer sous le robinet.
Attention
Ne plongez jamais la poignée dans de l’eau, ni
dans d’autres liquides et ne la rincez pas sous
le robinet.
N’utilisez jamais l’appareil dans le bain ni sous
la douche.
Le sabot pour cheveux de l’appareil est
conforme aux normes internationales
CEI et peut être nettoyé à l’eau en toute
sécurité (g. 2).
Conservez l’appareil à une température
comprise entre 15 °C et 35 °C.
Utilisez exclusivement l’adaptateur fourni.
Si l’adaptateur est endommagé, remplacez-le
toujours par un adaptateur de même type
pour éviter tout accident.
An d’éviter tout accident, n’utilisez pas
l’appareil si le sabot pour cheveux ou l’un des
sabots est endommagé ou cassé.
Cet appareil a été conçu uniquement pour
tondre les cheveux. Ne l’utilisez jamais à
d’autres ns.
Conformité aux normes
Cet appareil Philips est conforme à toutes les
normes relatives aux champs électromagnétiques
(CEM). Il répond aux règles de sécurité établies sur
la base des connaissances scientiques actuelles s’il
est manipulé correctement et conformément aux
instructions de ce mode d’emploi.
Utilisation de l’appareil
Préparation
Utilisez l’appareil uniquement sur des cheveux
secs et propres. Évitez de couper des cheveux qui
viennent d’être lavés.
1 Avant de commencer, assurez-vous que la
tête de la personne à qui vous allez couper
les cheveux se trouve au niveau de votre
poitrine, an que toutes les parties de sa tête
soient bien visibles et facilement accessibles.
2 Peignez les cheveux dans le sens de la
pousse (g. 3).
Utilisation du sabot
L’appareil est livré avec trois sabots correspondant
à 15 longueurs de cheveux différentes.
La longueur minimum de coupe est de 1,6 mm et
la longueur maximum est de 41 mm.
1 Choisissez le sabot que vous souhaitez
utiliser.
Le tableau indique les longueurs de coupe
correspondant aux différents réglages du petit et
du grand sabot.
Réglages du petit sabot et du grand sabot
Réglage Longueur
obtenue avec le
petit sabot
Longueur
obtenue avec le
grand sabot
1 3 mm 23 mm
2 6 mm 26 mm
3 9 mm 29 mm
4 12 mm 32 mm
5 15 mm 35 mm
6 18 mm 38 mm
7 21 mm 41 mm
Conseil : Notez à quel type de coupe correspondent
les réglages utilisés en vue des prochaines utilisations.
Sabot « barbe de 3 jours » pour un look
décontracté
Pour obtenir un effet « barbe de 3 jours »,
utilisez tout d’abord le petit sabot réglé en
position 1 (3 mm).
Utilisez ensuite le sabot « barbe de 3 jours »
pour obtenir une longueur de 1,6 mm.
2 Faites glisser le sabot dans les rainures situées
des deux côtés de la poignée, jusqu’à ce que
vous entendiez un clic (g. 4).
3 Pour régler le sabot, appuyez sur le sélecteur
(1) et faites glisser le sabot jusqu’à la longueur
de coupe souhaitée (2) (g. 5).
Le réglage sélectionné est indiqué sur le
,
sabot.
4 Branchez l’adaptateur sur la prise secteur.
5 Allumez l’appareil.
6 Déplacez lentement l’appareil.
Pour obtenir des résultats optimaux, déplacez
l’appareil dans le sens inverse de la pousse des
cheveux.
Dans la mesure où les poils ne poussent pas
tous dans le même sens, vous devez adapter
vos mouvements (vers le haut, le bas ou en
travers) (g. 6).
Assurez-vous que la partie plate du sabot est
toujours bien en contact avec le cuir chevelu
pour obtenir une coupe régulière.
Effectuez plusieurs passages au même endroit
de façon à obtenir une longueur homogène.
Pour obtenir un résultat optimal sur des
cheveux ondulés, longs ou clairsemés, guidez
les cheveux vers l’appareil à l’aide d’un peigne.
7 Retirez régulièrement les cheveux coupés de
l’appareil.
Si des poils se sont accumulés dans le sabot,
retirez-le et enlevez les poils en soufant et/ou en
le secouant.
Contours sans sabot
Vous pouvez utiliser l’appareil sans le sabot an de
couper les cheveux au plus près du cuir chevelu
(0,6 mm) ou pour dessiner les contours de la
nuque et le tour des oreilles.
Faites attention lorsque vous procédez à la tonte
sans sabot car les cheveux sont coupés à la
racine.
1 Retirez le sabot de l’appareil (g. 7).
2 Avant de tondre le contour de l’oreille,
peignez les cheveux vers celle-ci.
3 Inclinez l’appareil de manière à ce que seul un
côté du bloc tondeuse touche les pointes des
cheveux lorsque vous dessinez le contour des
oreilles (g. 8).
Coupez uniquement le bout des cheveux en
suivant le contour de l’oreille.
4 Pour tondre la nuque et les favoris, retournez
l’appareil et déplacez-le vers le bas (g. 9).
Déplacez l’appareil lentement en suivant
l’implantation des cheveux.
Nettoyage
N’utilisez jamais d’air comprimé, de tampons à
récurer, de produits abrasifs ou de détergents
agressifs tels que de l’essence, de l’acétone ou de
l’éther pour nettoyer l’appareil.
Remarque:L’appareiln’apasbesoind’êtrelubrié.
Nettoyez l’appareil après chaque utilisation.
1 Assurez-vous que l’appareil est éteint et
débranché.
2 Retirez le sabot de l’appareil.
3 Pour retirer le sabot pour cheveux, tournez-
le dans le sens inverse des aiguilles d’une
montre jusqu’à ce que le point vide de la
poignée soit aligné avec la èche imprimée
sur le sabot (1). Ensuite, retirez le sabot de la
poignée (2) (g. 10).
4 Appuyez sur l’extrémité supérieure centrale
du bloc tondeuse avec votre pouce et faites-
le glisser vers le haut pour le retirer (g. 11).
Veillez à ne pas laisser tomber le bloc tondeuse.
5 Nettoyez le bloc tondeuse à l’eau chaude
(40° C max.).
6 Passez le sabot pour cheveux sous le robinet
d’eau chaude pour éliminer les poils coupés
accumulés dans l’accessoire (g. 12).
7 Une fois le nettoyage terminé, insérez la
languette du bloc tondeuse dans la fente du
sabot pour cheveux prévue à cet effet, puis
remettez le bloc tondeuse en place (vous
devez entendre un clic) (g. 13).
8 Nettoyez la poignée et l’adaptateur à l’aide de
la brosse de nettoyage fournie ou d’un chiffon
sec.
Page 7

Remarque : La poignée et l’adaptateur ne sont pas
4222.002.8008.1
7/9
étanches.
9 Attendez que le bloc tondeuse et le sabot
pour cheveux soient complètement secs
avant de remonter l’appareil.
Remarque : Assurez-vous que les composants
électriques du sabot pour cheveux sont bien secs
avantdexerl’accessoireàlapoignée.
10 Pour xer le sabot pour cheveux, placez-le
sur la poignée de manière à aligner le point
vide de la poignée avec la èche imprimée sur
le sabot (1). Ensuite, faites tourner le sabot
dans le sens des aiguilles d’une montre jusqu’à
ce que le point vide soit aligné avec le point
plein de la poignée (2) (g. 14).
Remplacement
Si l’adaptateur est endommagé, remplacez-le
toujours par un adaptateur de même type pour
éviter tout accident.
Remplacez toujours un accessoire ou un sabot
endommagé ou usé par un accessoire ou un sabot
Philips d’origine.
Vous trouverez les pièces de rechange Philips
(sabot pour cheveux, bloc tondeuse, sabots,
poignée et adaptateur) chez votre revendeur
Philips et dans les Centres Service Agréés Philips.
En cas de difculté pour obtenir des pièces de
rechange pour cet appareil, contactez le Ser vice
Consommateurs Philips de votre pays (vous
trouverez le numéro de téléphone dans le dépliant
de garantie internationale).
Environnement
Lorsqu’il ne fonctionnera plus, ne jetez pas
l’appareil avec les ordures ménagères, mais
déposez-le à un endroit assigné à cet effet, où il
pourra être recyclé. Vous contribuerez ainsi à la
protection de l’environnement (g. 15).
Garantie et service
Si vous souhaitez obtenir des informations
supplémentaires ou si vous rencontrez un
problème, rendez-vous sur le site Web de Philips à
l’adresse www.philips.com ou contactez le Service
Consommateurs Philips de votre pays (vous
trouverez le numéro de téléphone correspondant
sur le dépliant de garantie internationale). S’il
n’existe pas de Service Consommateurs Philips
dans votre pays, renseignez-vous auprès de votre
revendeur Philips local.
Page 8

ITALIANO
4222.002.8008.1
8/9
Introduzione
Congratulazioni per l’acquisto e benvenuti
in Philips! Per trarre il massimo vantaggio
dall’assistenza Philips, registrate il vostro prodotto
su www.philips.com/welcome.
Il nuovo regolacapelli professionale Philips vi
consente di rinire facilmente anche i capelli più
ribelli. Leggete attentamente le informazioni che
seguono per utilizzare al meglio l’apparecchio.
Descrizione generale (fig. 1)
A Gruppo lame
B Accessorio regolacapelli
C Cursore on/off
D Impugnatura
E Presa per spinotto
F Pettine grande
G Pettine piccolo
H Indicazioni delle impostazioni
I Pettine per capelli corti
J Selettore delle impostazioni
K Spinotto
L Adattatore
M Spazzolina per la pulizia
Importante
Prima di utilizzare l’apparecchio, leggete
attentamente il presente manuale e conservatelo
per eventuali riferimenti futuri.
Pericolo
Evitate assolutamente il contatto della spina
con l’acqua.
Avvertenza
Prima di collegare l’apparecchio, controllate
che la tensione indicata sull’adattatore e
sull’apparecchio corrisponda a quella locale.
L’adattatore contiene un trasformatore. Non
tagliate l’adattatore per sostituirlo con un’altra
spina onde evitare situazioni pericolose.
L’apparecchio non è destinato a persone
-
(inclusi bambini) con capacità mentali, siche
o sensoriali ridotte, fatti salvi i casi in cui
tali persone abbiano ricevuto assistenza o
formazione per l’uso dell’apparecchio da una
persona responsabile della loro sicurezza.
Adottate le dovute precauzioni per evitare che
i bambini giochino con l’apparecchio.
Rimuovete il regolacapelli dall’impugnatura
prima di pulirlo sotto l’acqua corrente.
Attenzione
Non immergete l’impugnatura nell’acqua o in
altri liquidi e non risciacquatelo sotto l’acqua
corrente.
Non utilizzare l’apparecchio nella vasca da
bagno o nella doccia.
L’accessorio regolacapelli è conforme alle
normative di sicurezza IEC approvate a livello
internazionale e può essere pulito senza
problemi sotto l’acqua corrente (g. 2).
Utilizzate e riponete l’apparecchio a una
temperatura compresa tra 15 °C e 35 °C .
Utilizzate esclusivamente l’adattatore in
dotazione.
Nel caso in cui l’adattatore fosse danneggiato,
dovrà essere sostituito esclusivamente con un
adattatore originale al ne di evitare situazioni
pericolose.
Non utilizzate l’apparecchio quando il
regolacapelli o uno dei pettini è danneggiato o
rotto, per evitare il rischio di lesioni.
Questo apparecchio è stato realizzato
unicamente per tagliare i capelli delle persone.
Non utilizzatelo per altri scopi.
Conformità agli standard
Questo apparecchio Philips è conforme a tutti gli
standard relativi ai campi elettromagnetici (EMF).
Se utilizzato in modo appropriato seguendo le
istruzioni contenute nel presente manuale utente,
l’apparecchio consente un utilizzo sicuro come
confermato dai risultati scientici attualmente
disponibili.
Modalità d’uso dell’apparecchio
Preparazione del taglio dei capelli
Utilizzate l’apparecchio sempre e solo sui capelli
asciutti. Non utilizzatelo sui capelli appena lavati.
1 Prima di iniziare a tagliare i capelli, controllate
che la testa della persona alla quale volete
tagliare i capelli si trovi alla stessa altezza
del vostro torace, in modo da poter vedere
chiaramente tutta la testa e poter utilizzare
l’apparecchio con maggior facilità.
2 Pettinate i capelli in direzione della
crescita (g. 3).
Rinitura tramite pettine
L’apparecchio è dotato di tre pettini per 15
lunghezze diverse di capelli.
La lunghezza minima dei capelli dopo il taglio è di
1,6 mm, quella massima di 41 mm.
1 Selezionate il pettine che desiderate utilizzare.
La tabella mostra la lunghezza dei capelli dopo la
rinitura alle varie gradazioni del pettine piccolo e
di quello grande.
Impostazioni del pettine piccolo e grande
Impostazione Lunghezza dei
capelli dopo
la rinitura
con il pettine
Lunghezza dei
capelli dopo la
rinitura con il
pettine grande
piccolo
1 3 mm 23 mm
2 6 mm 26 mm
3 9 mm 29 mm
4 12 mm 32 mm
5 15 mm 35 mm
6 18 mm 38 mm
7 21 mm 41 mm
Consiglio Prendete nota delle impostazioni di
lunghezza utilizzate per realizzare un determinato
taglio in modo da poterle riutilizzare in futuro.
Pettine per capelli corti per un look “effetto
crespo”
Per creare l’effetto ispido, innanzitutto rinite i
capelli con il pettine piccolo all’impostazione 1
(3 mm).
Successivamente, rinite i capelli con il pettine
per capelli corti per ottenere una lunghezza di
1,6 mm.
2 Fate scivolare il pettine selezionato
nelle scanalature poste su entrambi i
lati dell’impugnatura no a bloccarlo in
posizione (g. 4).
3 Per impostare la lunghezza desiderata
del pettine, premere il selettore delle
impostazioni (1) e fate scivolare il pettine
sull’impostazione desiderata (2) (g. 5).
Le indicazioni sul pettine mostrano la
,
lunghezza selezionata.
4 Inserite l’adattatore nella presa a muro.
5 Accendete l’apparecchio.
6 Passate l’apparecchio con movimenti lenti.
Per ottenere un risultato ottimale, utilizzate
l’apparecchio in senso opposto rispetto alla
crescita dei peli.
Poiché non tutti i peli crescono dalla stessa
parte, è necessario che l’apparecchio segua più
direzioni (in alto, in basso o trasversalmente)
(g. 6).
Controllate che la parte piatta del pettine sia
sempre perfettamente a contatto con il cuoio
capelluto, per ottenere un risultato uniforme.
Passate più volte sullo stesso punto in modo da
tagliare tutti i capelli della lunghezza desiderata.
In caso di capelli ricci, radi o lunghi, si consiglia
di utilizzare un pettine normale per avvicinare i
capelli all’apparecchio.
7 Rimuovete i capelli tagliati dal
pettine regolarmente.
Se sul pettine si è accumulata una quantità
eccessiva di capelli, estraetelo dall’apparecchio ed
eliminate i capelli sofandoli via o scuotendo il
pettine.
Rinitura senza pettine
Potete utilizzare l’apparecchio senza il pettine per
tagli molto corti (0,6 mm) o rinire i contorni della
nuca e la zona intorno alle orecchie.
Prestate attenzione quando eseguite la rinitura
senza il pettine poiché il blocco lame taglia tutti i
capelli con cui viene a contatto.
1 Estraete il pettine dall’apparecchio (g. 7).
2 Prima di iniziare a rinire i contorni intorno
alle orecchie, pettinate le punte sulle orecchie.
3 Inclinate l’apparecchio in modo che solo un
angolo del blocco lame sori l’estremità dei
capelli quando procedete alla rinitura della
zona attorno alle orecchie (g. 8).
Tagliare solo le punte dei capelli, denendo il
contorno vicino alle orecchie.
4 Per rinire il contorno della nuca e le basette,
ruotate l’apparecchio e passatelo dall’alto
verso il basso (g. 9).
Effettuate movimenti lenti e uniformi seguendo la
linea naturale dei capelli.
Pulizia
Non usate aria compressa, prodotti o sostanze
abrasive o detergenti aggressivi, come benzina,
acetone o oli eterei per pulire l’apparecchio.
NotaL’apparecchiononnecessitadilubricazione.
Pulite l’apparecchio dopo ogni utilizzo.
1 Assicuratevi che l’apparecchio sia spento e
scollegato dalla presa.
2 Rimuovete il pettine dall’apparecchio.
3 Per scollegare l’accessorio
regolacapelli, ruotatelo in senso antiorario
nché il segno “Open” sull’impugnatura non
risulti allineato con la freccia corrispondente
dell’accessorio (1). Inne estraete
l’accessorio dall’impugnatura (2) (g. 10).
4 Con il pollice, premete la parte centrale
superiore del blocco lame verso l’alto
no a quando si apre, quindi estraetelo
dall’apparecchio (g. 11).
Fate attenzione a non far cadere il blocco coltelli
per terra.
5 Pulite il blocco lame con acqua calda (max.
40°C).
6 Pulite l’accessorio regolacapelli sotto l’acqua
corrente calda per rimuovere i capelli
tagliati che vi si sono accumulati (g. 12).
7 Dopo la pulizia, inserite il blocco lame nella
scanalatura dell’accessorio regolacapelli
e spingete il blocco indietro verso
l’accessorio (g. 13).
Page 9

8 Pulite l’impugnatura e l’adattatore con la
4222.002.8008.1
9/9
spazzola per la pulizia in dotazione o con un
panno asciutto.
Nota L’impugnatura e l’adattatore non sono
impermeabili.
9 Lasciate asciugare completamente il blocco
lame e l’accessorio regolacapelli prima di
riassemblarli.
Nota Assicuratevi che i contatti elettrici dell’accessorio
regolacapelli siano asciutti prima di inserirli
nuovamente sull’impugnatura.
10 Per collegare l’accessorio regolacapelli,
inseritelo nell’impugnatura nché il segno
“Open” sull’impugnatura non risulti
allineato con la freccia corrispondente
dell’accessorio (1). Successivamente, ruotate
l’accessorio in senso orario nché la
freccia non è allineata con il segno in rilievo
sull’impugnatura (2) (g. 14).
Sostituzione
Nel caso in cui l’adattatore fosse danneggiato, dovrà
essere sostituito esclusivamente con un adattatore
originale al ne di evitare situazioni pericolose.
Sostituite gli eventuali accessori o pettini
danneggiati o usurati solo con parti di ricambio
originali Philips.
Le parti di ricambio Philips (accessori
regolacapelli, blocco lame, pettini, impugnatura e
adattatore) sono disponibili presso il rivenditore
Philips o un centro assistenza autorizzato Philips.
In caso di difcoltà nel reperire una parte di
ricambio per l’apparecchio, contattate il Centro
Assistenza Clienti Philips del vostro paese (i numeri
di telefono sono reperibili sull’opuscolo della
garanzia internazionale).
Tutela dell’ambiente
Per contribuire alla tutela dell’ambiente,
-
non smaltite l’apparecchio insieme ai riuti
domestici ma consegnatelo a un centro di
raccolta ufciale (g. 15).
Garanzia e assistenza
Per assistenza o informazioni e in caso di
problemi, visitate il sito Web Philips all’indirizzo
www.philips.com oppure contattate il Centro
Assistenza Clienti Philips del vostro paese (per
conoscere il numero di telefono consultate
l’opuscolo della garanzia). Se nel vostro paese non
esiste un Centro Assistenza Clienti, rivolgetevi al
vostro rivenditore Philips.
 Loading...