

Philips PRI39IXI User Manual

Instructions for use
3135 015 104O1
_vox

Once your PHILIPS MAGNAVOX purchase is registered, you're eligible to receive all the privileges of
owning a PHILIPS MAGNAVOX product. So complete and return the Warranty Registration Card
enclosed with your purchase at once. And take advantage of these important benefits.
Congratulations on your purchase,
and welcome to the "familyF'
Dear PHILIPS MAGNAVOX product owner:
Thank you for your confidence in PHILIPS MAGNAVOX. You've selected one of the best-built, best-
backed products available today. And we'll do everything in our power to keep you happy with your
purchase for many years to come.
As a member of the PHILIPS MAGNAVOX "family," you're entitled to protection by one of the most
comprehensive warranties and outstanding service networks in the industry.
What's more, your purchase guarantees you'll receive all the information and special offers for which
you qualify, plus easy access to accessories from our convenient home shopping network.
And most importantly you can count ORour uncompromising commitment to your total satisfaction.
All of this is our way of saying welcome-and thanks for investing in a PHILIPS MAGNAVOX product.
Sincerely,
Robert Minkhorst
President and Chief Executive Officer
PHILIPS
P,S, Remember, to get the most from your PHILIPS
MAGNAVOX product, you must return your
Warranty Registration Card within 10 days. So
please mail it to us right now!
Know these
safetysyrnbo/s
_. This "bolt of lightning"indicates uninsulated material within your unit may cause an electrical
shock. For the safety of everyone in your household, please do not remove product covering.
,_The "exclamation point" calls attention to features for which you should read the enclosed lit-
erature closely to prevent operating and maintenance problems.
WARNING: TO PREVENT FIRE OR SHOCK HAZARD, DO NOT EXPOSE THIS EQUIPMENT
TO RAIN OR MOISTURE.
CAUTION: To prevent electric shock, match wide blade of plug to wide slot, and fully insert.
ATTENTION: Pour eviter les cbocs electriques, introduire la lame la plus large de la fiche dans la
borne corresdondante de la prise et pousser jusqu'au fond.
SAFETYINSTRUCTIONS- Readbeforeoperatingequipment
This product was designed and manufactured to meet strict quality and 11. Power-Cord Protection - Power supply cords should be routedso
safety standards. Thereare, however, some installation andoperation pre- that they are not likely to be walked on or pinched by items placed
cautions which you should be particularly aware of. upon or against them, paying particular attention to cordsand plugs,
1. Read Instructions - All thesafety and operating instructionsshould
be read before the appliance is operated.
2. Retain Instructions - The safety and operating instructions should
be retained for future reference.
3. Reed Warnings - All warnings on the appliance and in the operating
instructions should be adhered to.
4. Follow Instruclions - All operating and use instructions should be
followed.
5. Water and Moisture - Theappliance should not be used near water
- for example, near a bathtub, washbowl, kitchen sink, laundry tub,
in a wet basement or near a swimming pool, etc.
6. CartsandStands - The appliance should be used only with a cart or
stand that is recommended bythe manufacturer.
6A. A An appliance and cart combination should be moved
with care.Quick stops, excessiveforce, anduneven sur-
faces may cause the appliance and cart combination to
overturn.
66. Till/Stability - All televisions must comply with recommended inter-
national global safety standards for tilt and stability properties of its
cabinet design.
Do not compromise these design standards by applying exces-
sive pull forceto the front, or top, of the cabLnetwhich could
ultimately overturn the product.
Also, do not endanger yourself, or children, by placing elec-
tronic equipment/toys on the top of the cabinet. Such items
could unsuspectingly fall from the top of the set and cause
product damage and/or personal injury.
7. Wall or Ceiling Mounting- The appliance should be mounted to a
wall or ceiling only as recommended by the manufacturer.
8. Ventilation - The appliance should be situated sothat its location or
position does not interfere with its properventilation. For example,
the appliance should not be situated on a bed, sofa, rug, or similar
surface that may block the ventilation openings; or, placed in a built-
in installation, such as a bookcase or cabinet that may impede the
flow of air through the ventilation openings.
9. Heat - The appliance should be situated away from heat sources
such as radiators, heatregisters, stoves, or other appliances (includ-
ing amplifiers) that produce heat.
10. Power Sources- Theappliance should be connectedto a powersup-
ply only of the type described in the operating instructionsor as
marked on the appliance.
convenience receptacles, and the point where they exit from the
appliance.
12. Cleaning- The appliance should be cleaned only as recommended
bythe manufacturer.
13. Power Lines - An outdoor antenna should be located away from
power lines.
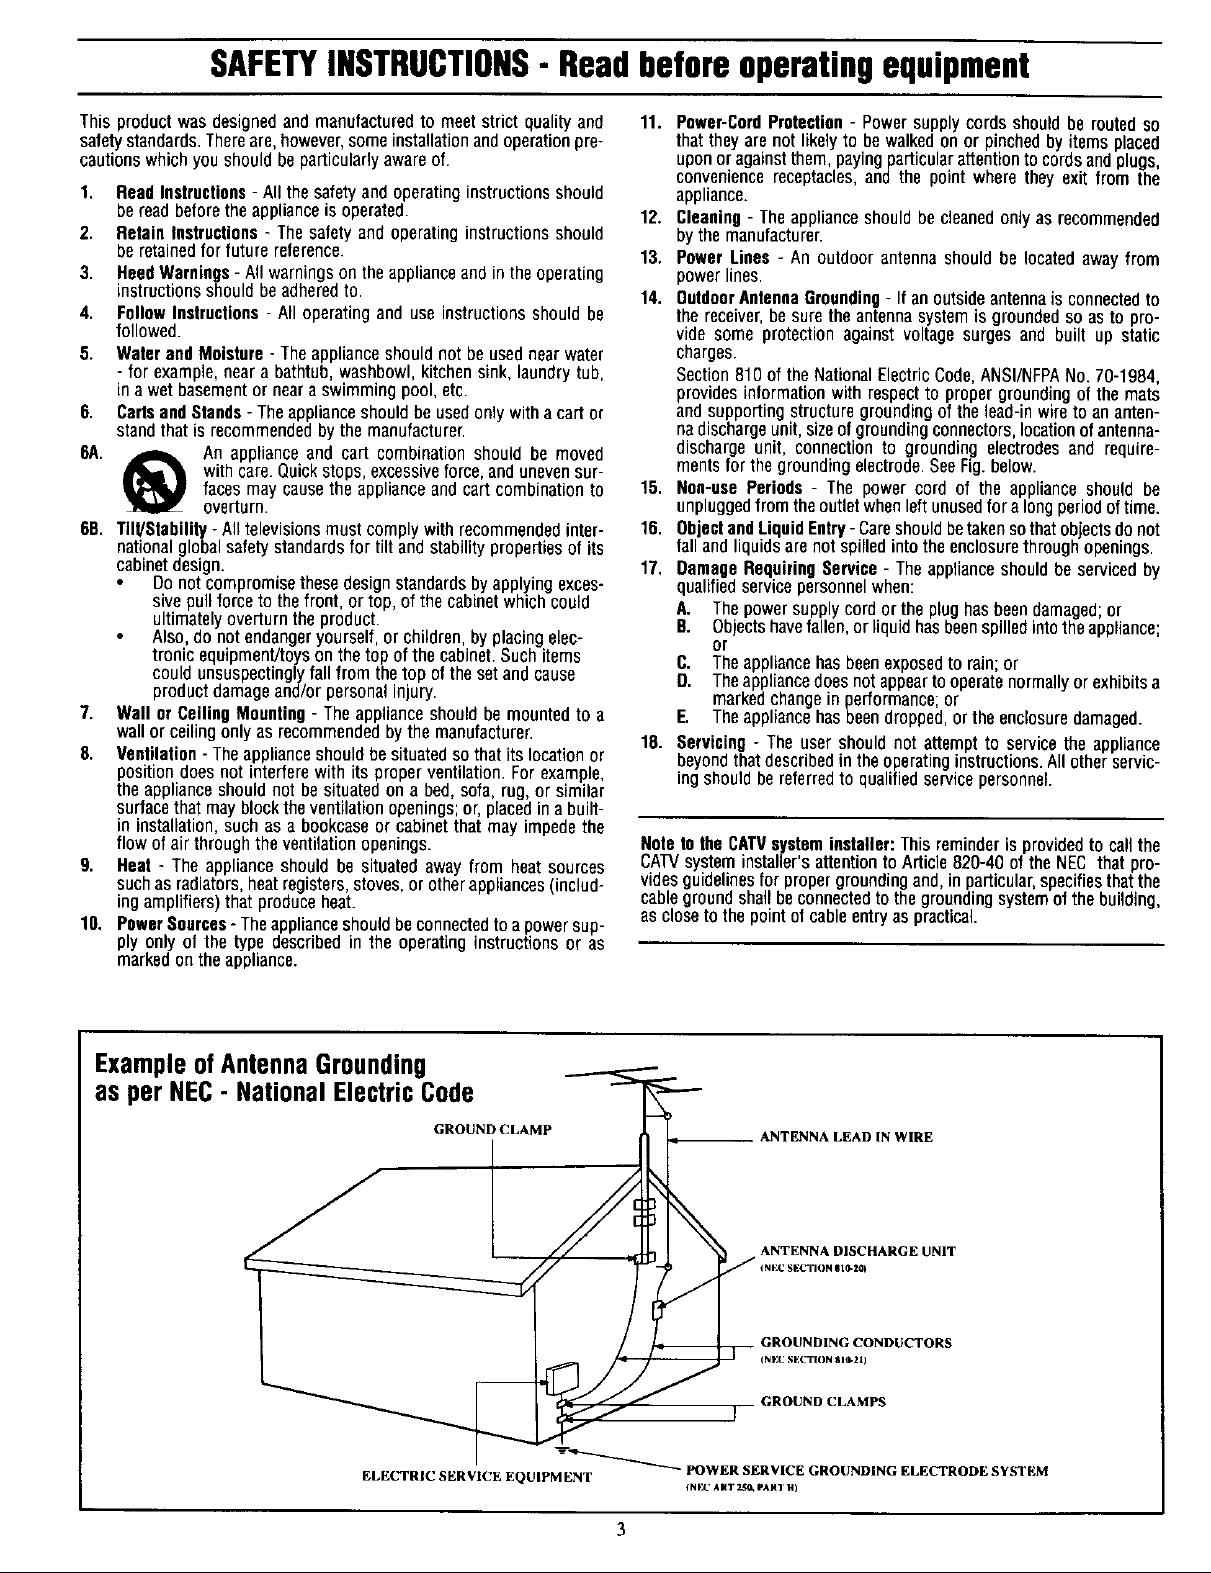
14. OutdoorAntennaGrounding- If an outside antennais connected to
the receiver,be sure the antenna system isgrounded so as to pro-
vide some protectionagainst voltage surges and built up static
charges.
Section 810 of the National Electric Code,ANSI/NFPANo. 70-1984,
providesinformationwith respect to propergrounding of the mats
andsupporting structure grounding of the lead-inwire to an anten-
nadischarge unit, sizeof grounding connectors,locationofantenna-
discharge unit, connectionto grounding electrodesand require-
ments for the grounding electrode.See Fig.below.
15. Non-use Periods - The power cord of the appliance should be
unpluggedfromtheoutlet whenleftunusedfora longperiodoftime.
16. Objectand LiquidEntry- Careshouldbetakensothatobjectsdonot
fall andliquidsare not spilled into theenclosurethroughopenings.
17. Damage Requiring Service - The applianceshould be serviced by
qualified service personnelwhen:
A. Thepower supply cordor the plughasbeen damaged; or
B. Objectshavefallen,or liquidhasbeenspilled intotheappliance;
or
C. Theappliance has beenexposedto rain;or
D. Theappliancedoes not appeartooperatenormally or exhibitsa
marked changein performance;or
E. Theappliance has beendropped, or the enclosuredamaged.
18. Servicing - The user should not attempt to servicethe appliance
beyond thatdescribed in the operatinginstructions.All other servic-
ingshould be referredto qualified servicepersonnel.
Note to the CATVsysteminstaller: Thisreminder is providedto callthe
CATVsysteminstaller'sattentionto Article 820-40 of the NEC thatpro-
rides guidelines for propergrounding and, inparticular,specifies that the
cableground shallbeconnectedtothe grounding system of the building,
ascloseto the pointofcableentryas practical.
ExampleofAntennaGrounding
as per NEC- NationalElectricCode
GROUND CLAMP ANTENNA LEAD IN WIRE
ELECTRIC SERVICE EQUIPMENT
ANTENNA DISCHARGE UNIT
INEC SECTION eL0-10)
GROUNDING CONDUCTORS
(N I'_CSECTION 810-21)
GROUND CLAMPS
-----_-"_ POWER SERVICE GROUNDING ELECTRODE SYSTEM
tN_(' ART _ PAl(3 H)
Introduction
Welcome/Registration of Your TV ............................ 2
Safety/Precautions ..................................................... 3
Table of Contents ....................................................... 4
Features ...................................................................... 4
Basic Cable TV Hookups .......................................... 5
Basic Antenna Hookups ............................................. 6
Basic TV to VCR Hookup ......................................... 7
Basic TV and Remote Operations ............................. 8
TV Remote Buttons ................................................... 9
[] Onscreen MENU
¢, Setting the Language Control ................. 10
Using the Tuner Control ................................... I1
<_Using the Auto Program Control ..................... 12
How to Add and Delete Channels .................... 13
_" Setting the External Control (Input Naming)..14
_" Adjusting the TV Picture ................................. 15
Activating Contrast Plus (Black Stretch) ......... 16
_- Activating Noise Reduction (Picture) Control 17
_" Setting the TV's Clock ..................................... 18
Activating the Timer Control ........................... 19
¢, Activating the Start-Up Channel ...................... 20
<>Setting the TV's StartTime Control ................ 20
<_Setting the TV for Closed Caption .................. 21
<_Using the Sleep Timer Control ........................ 22
SmartLock TM
_ Understanding the SmartLock Feature......23
"0-Setting the SmartLock Access Code ................ 24
+ Setting the SmartLock to Block Channels .......25
¢, Setting SmartLock's Blocking Options ........... 26
_- Blocking Using the Movie/TV Ratings .....27-28
+ Using the SmartLock Review Screen ............... 29
Here are a few of the special features built into this
new Color Television:
SmartLock TM feature allows you to block the view-
ing of certain channel or external audio/video con-
nections where you might not want your children
viewing inappropriate material.
Infrared Remote Control works your TV set.
Standard broadcast (VItF/UHF) or Cable TV
CATV) channel capability.
Closed Captioning allows the viewer to read TV
program dialogue or voice conversations as onscreen
text.
Automatic Programming of Channels for quick
and easy selection of favorite stations available in
?our area.
Onscreen Features (in either English, French, or
Spanish) show helpful messages for setting of TV
controls.
Sleeptimer automatically turns the TV OFF at preset
times.
SmartPicture TM allows you to set the picture color,
tint, contrast, etc. for various types of programming
such as Personal (picture controls the way you set
them), Sports. Movies, or Weak Signals with the push
of one button.
SmartSound TM controls allow you to set the sound
controls for various types of listening programs such
as Personal (sound controls the way you set them),
Theater, Music, or Voice with the push of one button.
+ Using the Bass & Treble Boost Controls..,30
+ Using the Volume Bar Control ......................... 31
_" Using the Volume Limiter Control .................. 31
+ Using the Input control with the Audio/Video
Input Jacks ....................................................... 32
Remote Cpntrol Operation
Using the SmartPicture TM Control ................ 33
SmartPicture TM, SmartSound TM, SmanSurf TM, and SmaaLock TM are all
registered trademarks of Philips Consumer Electronics Company.
Copyright © 1999 Philips Consumer Electronics Company. All rights reserved.
4
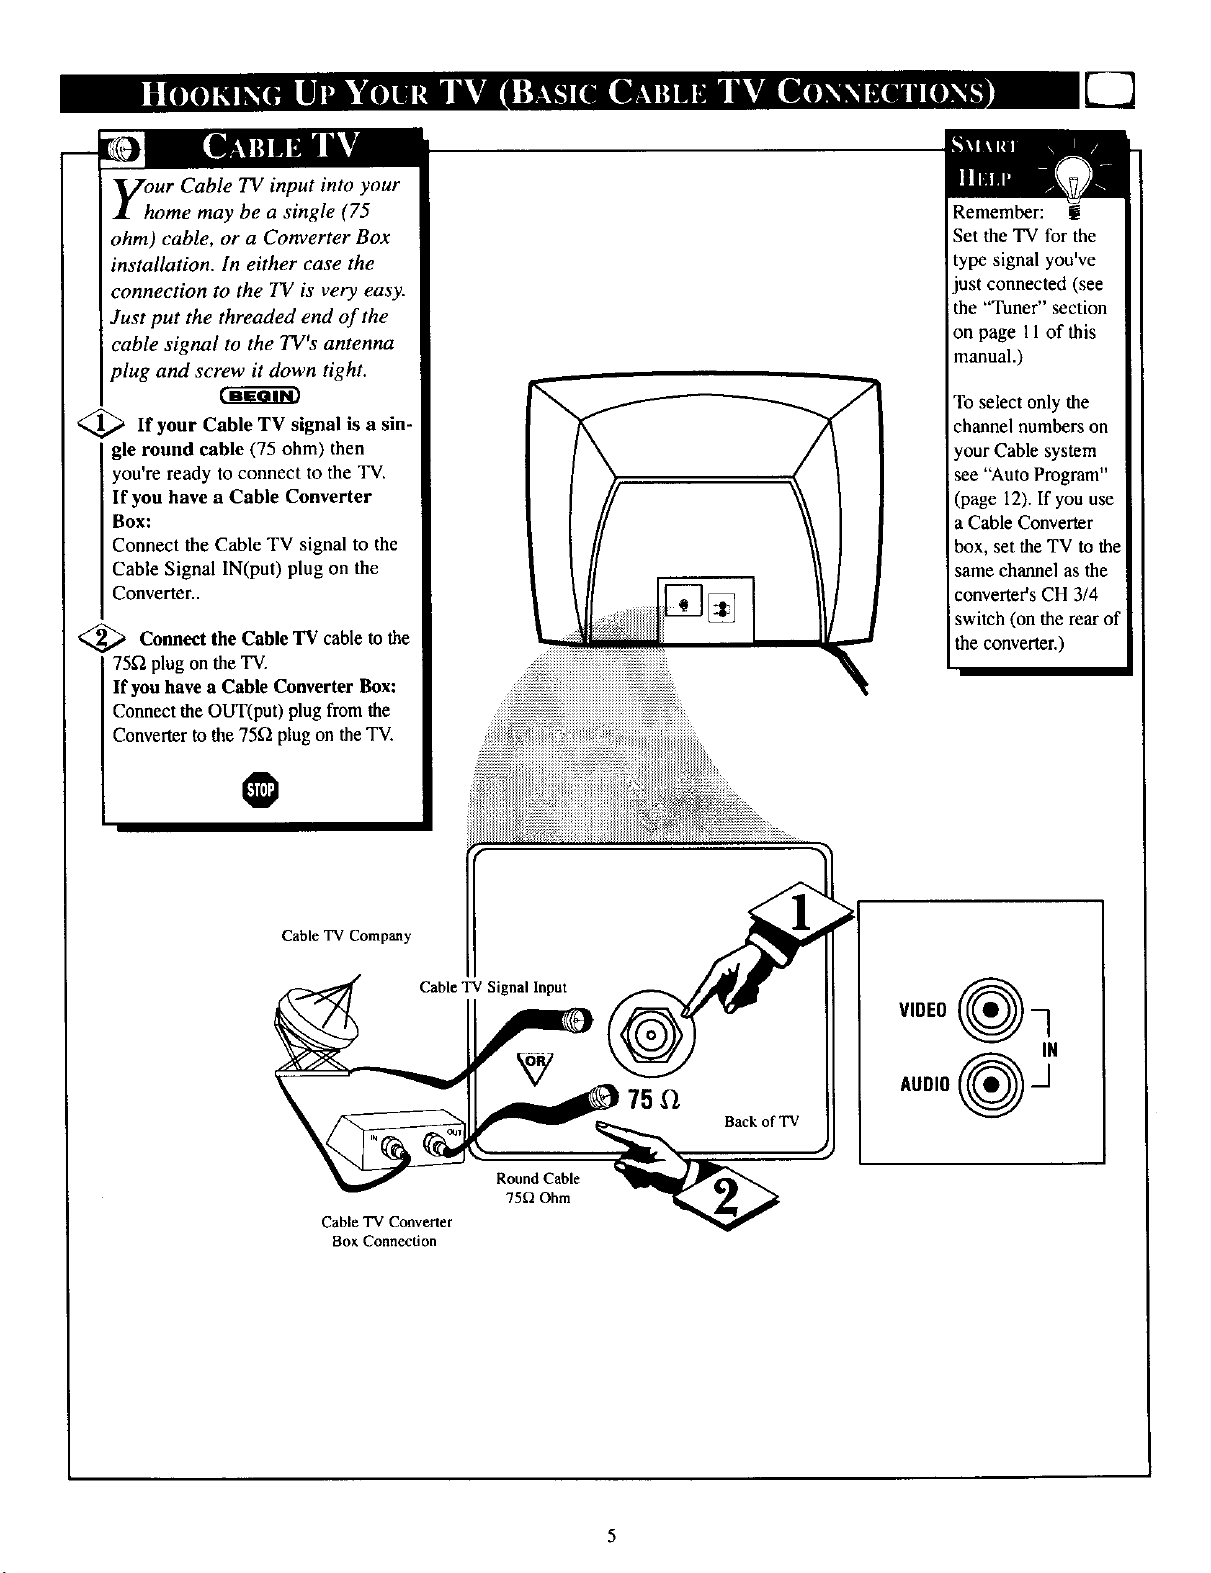
yhur Cable TV input into your
ome may be a single (75
ohm) cable, or a Converter Box
installation. In either case the
connection to the 71/is very easy.
Just put the threaded end of the
cable signal to the TV's antenna
plug and screw it down tight.
<_Ifyour Cable TV signal a
gle round cable (75 ohm) then
you're ready to connect to the TV.
If you have a Cable Converter
Box:
Connect the Cable TV signal to the
Cable Signal IN(pu0 plug on the
Converter..
<_ the Cable TV cable the
Connect to
75_1plug on the TV.
If you have a Cable Converter Box:
Connect the OUT(pat) plug fromthe
Converter to the 75'_ plug on the TV.
is sin-
Remember: !
Set the TV for the
type signal you've
just connected (see
the "Tuner section
on page 11 of this
manual.)
To select only the
channel numbers on
your Cable system
see "Auto Program"
(page 12). If you use
a Cable Converter
box, set the TV to the
same channel as the
converter's CH 3/4
switch (on the rear of
the converter.)
i
I
O
Cable TV Company
v,0E0
IN
Auolo _1
75,Q
75_) Ohm
Cable TV Converter
Box Connection
U-3
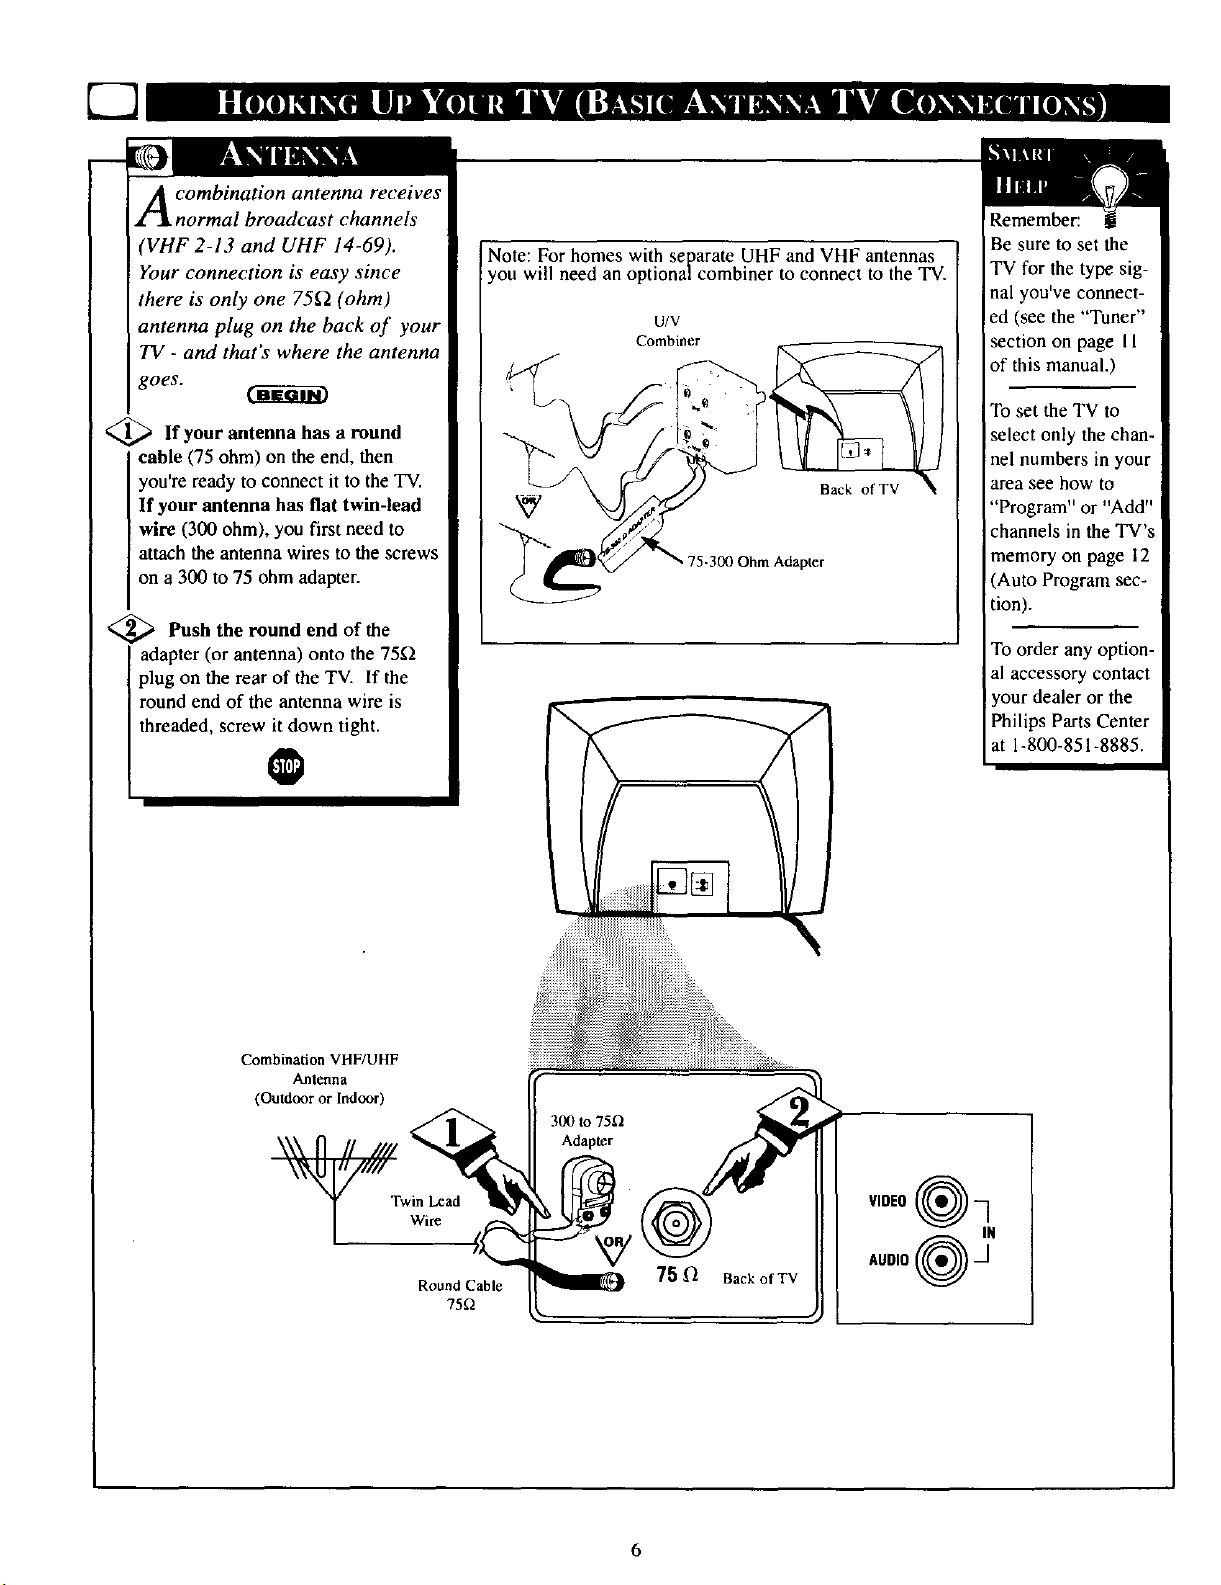
combination antenna receives
Lnormal broadcast channels
(VHF 2-13 and UHF 14-69).
Your connection is easy since
there is only one 75f2 (ohm)
antenna plug on the back of your
TV - and that's where the antenna
goes.
<_ lfyour antenna has a
cable (75 ohm) on the end, then
you're ready to connect it to the TV.
If your antenna has flat twin-lead
wire (300 ohm), you first need to
attach the antenna wires to the screws
on a 300 to 75 ohm adapter.
<_ Push the round end of the
adapter (or antenna) onto the 75sq
plug on the rear of the TV. If the
round end of the antenna wire is
threaded, screw it down tight.
@
round
Note: For homes with separate UHF and VHF antennas
you will need an optionalcombiner to connect to the TV.
u/v
Combiner
<.
Remember:
Be sure to set the
TV for the type sig-
nal you've connect-
ed (see the "Tuner"
section on page I 1
of this manual.)
To set the TV to
Iselect only the chan-
nel numbers in your
area see how to
"Program" or "Add"
channels in the TV's
memory on page 12
(Auto Program sec-
tion).
To order any option-
al accessory contact
your dealer or the
Philips Parts Center
at 1-800-851-8885.
Combination VHF/UHF
Antenna
(Outdoor or Indoor)
Twin Lead
Wire
Round Cable
75f2
VIDEO_(_ _N
AUDIO
6

TTv,he basic Antenna, or Cable
to VCR to TV connection
is shown to the right. For more
information on other hookups
(possible when Cable
Converter/Descrambler boxes are
included) refer to your accessory
VCR and Cable Converter
Owner's Manual for details.
_ Connect your Antenna or Cable
TV signal to the IN FROM
ANT(enna) plug on the VCR.
<_ Connect the plug
OUT TO TV
on the VCR to the 75£2 plug on the
TV (connecting cable supplied with
the VCR.)
300 to 75f2
Outdoor Ohm Adapter
VHF/UHF
ix
Cable TV signal _"
! !i!i!i!i!i!i!i!i!i!i!i!i!i!i!iiiii!i!iii!i!iiii iiiii
VCR
Back of TV
Round Cable
75f2 Supplied with VCR
7-7
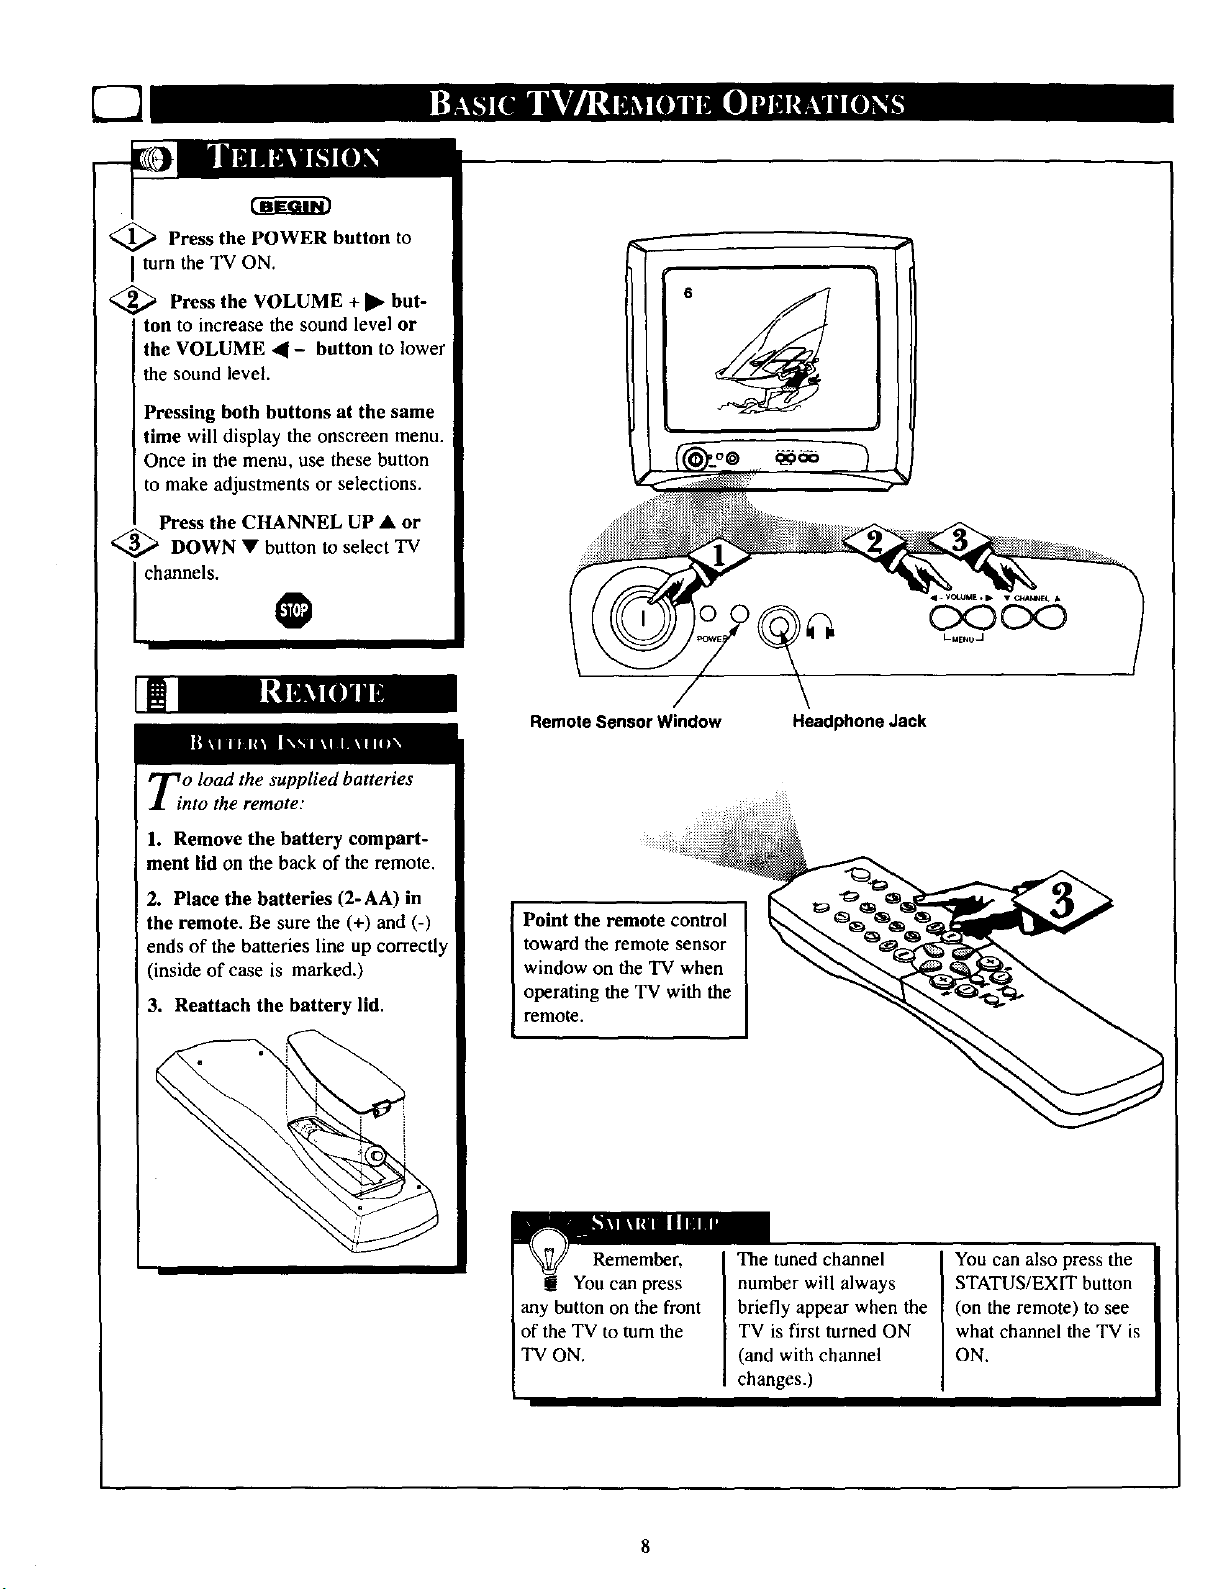
_ Press the POWER to
turn the TV ON.
Press the VOLUME + •
ton to increase the sound level or
the VOLUME 41- button to lower
the sound level.
Pressing both buttons at the same
time will display the onscreen menu.
Once in the menu, use these button
to make adjustments or selections.
Press the CHANNEL UP • or
<
DOWN • button to select TV
channels.
button
but-
@
Ti o load the supplied batteries
nto the remote."
Remote Sensor Window Headphone Jack
Cx:3Cx3
LMENO_
1. Remove the battery compart-
ment lid on the back of the remote.
2. Place the batteries (2-AA) in
the remote. Be sure the (+) and (-)
ends of the batteries line up correctly
(inside of case is marked.)
3. Reattach the battery lid.
Point the remote control
toward the remote sensor
window on the TV when
operating the TV with the
remote.
Remember,
You can press
any button on the front
of the TV to turn the
TV ON.
The tuned channel
number will always
briefly appear when the
TV is first turned ON
(and with channel
changes.)
I
You can also press the
STATUS/EXIT button
(on the remote) to see
what channel the TV is
ON.
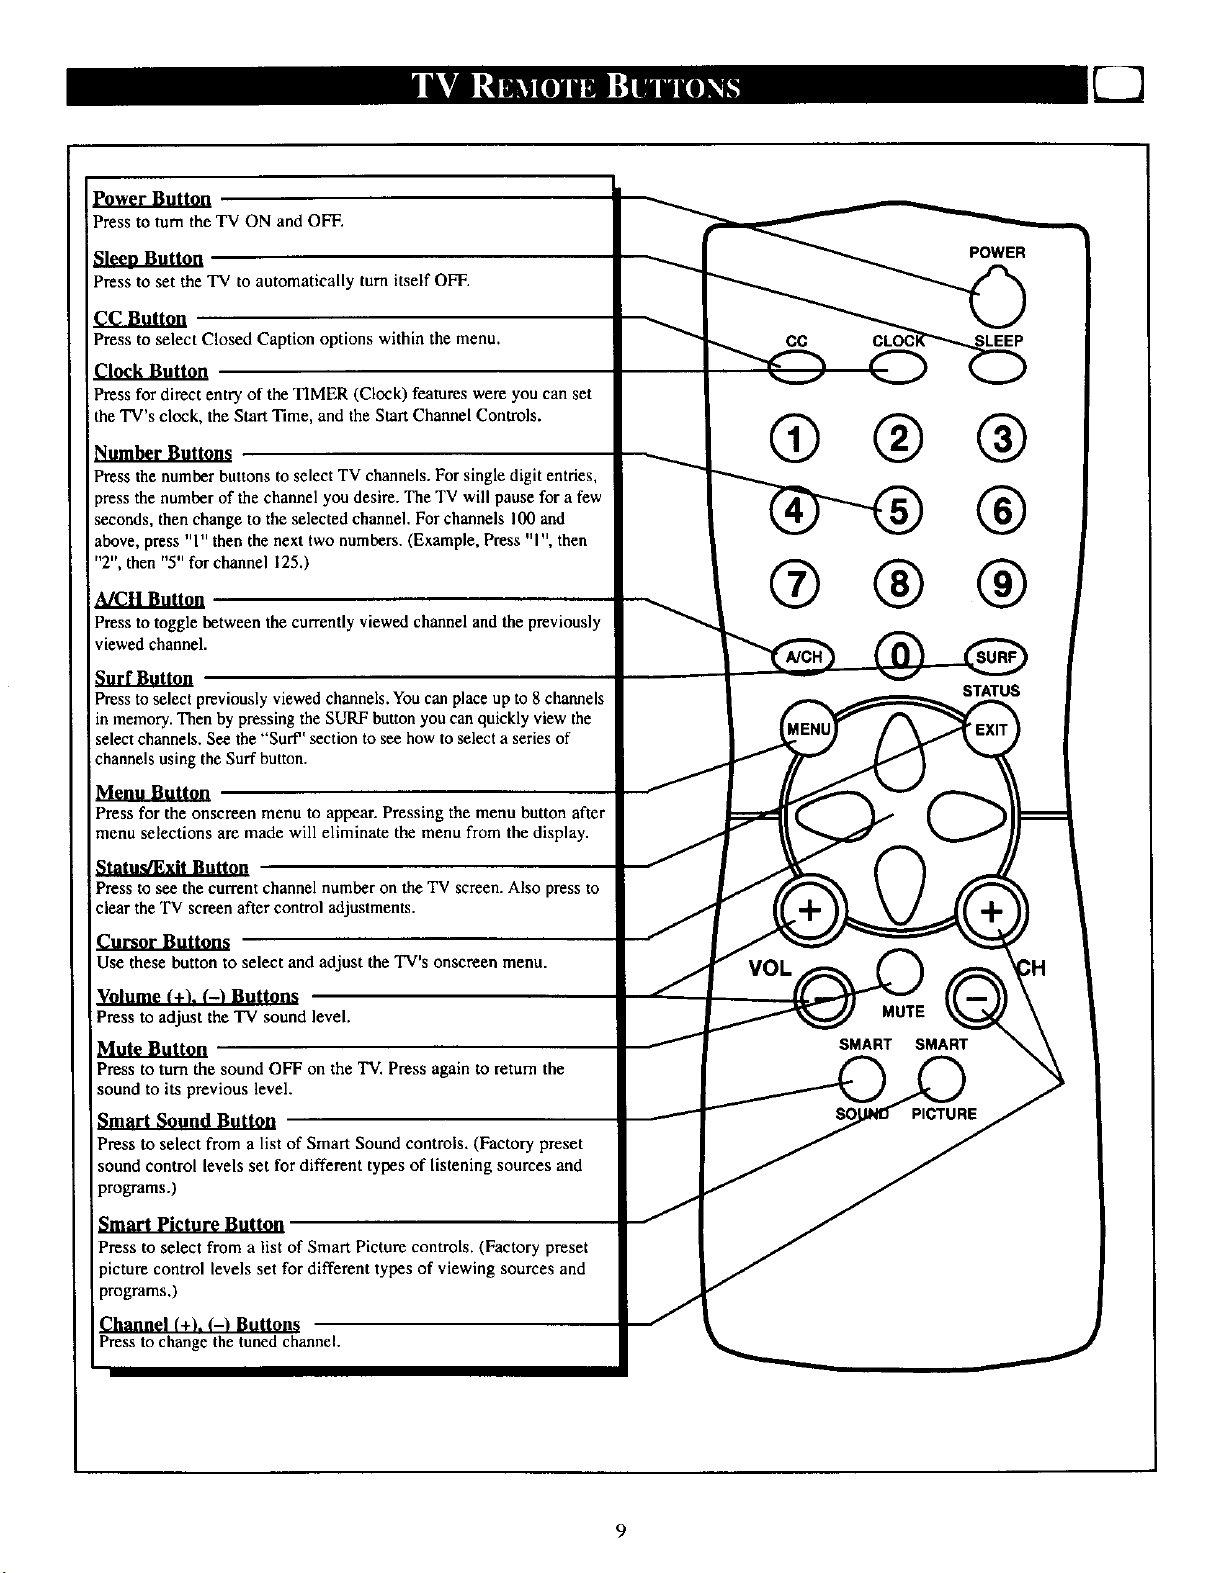
Power Button
Pressto turnthe TV ON and OFF.
Press to set the TV to automatically turn itself OFF.
cc Button
Press to select Closed Caption options within the menu.
Clock Button
Press for direct entry of the TIMER (Clock) features were you can set
the TV's clock, the Start Time, and the Start Channel Controls.
Number Buttons
Press the number buttons to select TV channels. For single digit entries,
)tess the number of the channel you desire. The TV will pause for a few
seconds, then change to the selected channel. For channels 100 and
above, press "l" then the next two numbers. (Example, Press "l ", then
"2", then "5" for channel 125.)
Press to toggle between the currently viewed channel and the previously
viewed channel.
Press to select previously viewed channels. You can place up to 8 channels
m memory. Then by pressing the SURF button you can quickly view the
select channels. See the "Surf' section to see how to select a series of
channels using the Surf button.
Menu Button
Press for the onscreen menu to appear. Pressing the menu button after
menu selections are made will eliminate the menu from the display.
® ® @
® ® ®
Press to see the current channel number on the TV screen. Also press to
clear the TV screen after control adjustments.
Cursor Buttons
Use these button to select and adjust the TV's onscreen menu.
Volume (+L (-) Buttons
Press to adjust the TV sound level.
Mute Button
Press to turn the sound OFF on the TV. Press again to retum the
sound to its previous level.
Smart Sound Button
Press to select from a list of Smart Sound controls. (Factory preset
sound control levels set for different types of listening sources and
programs.)
Press to select from a list of Smart Picture controls. (Factory preset
_icture control levels set for different types of viewing sources and
programs.)
Channel (+L (-I Buttons
Press to change the tuned channel.
SMART SMART
J
9

7q
F_n r our Spanish and French speak-
g TV owners an onscreen LAN-
GUAGE option is present. With the
LANGUAGE control you can set the
TV's onscreen menu to be shown in
either English, Spanish, or French.
<_ Press the MENU button on the
I remote to show the onscreen menu,
_ Press the CURSOR UP • or
DOWN • buttons to scroll through
the onscreen menu until the word
SETUP s high ghted.
_,_ Press the CURSOR RIGHT •
button to display the SETUP menu
features.
<_ Press CURSOR UP • or
DOWN • buttons to scroll the
Setup features until the word LAN-
GUAGE s high ghted.
<_ Press the CURSOR RIGHT •
button repeatedly to select ENG-
LISH, ESPANOL (Spanish), or
FRANCAIS (French).
I_uP • I
SmactLock[:_AEW •
BFIK:_Tf,ESS 1.....-. 30
168_
I®@@
I®®@
_®
TUNER CABLE
AUTOPROGRAM •
Iu_'u,_E F_V,r_SI
or
IL_GUAGE ESP_D-I
Remember: The Language
!control only makes the TV's
onscreen MENU items appear in
English, Spanish, or French text.
It does not change the other onscreen
text features such as Closed Caption
(CC) TV shows.
The ooscreen menu will time out and
disappear from the screen when you
finish, or you can press the STA-
TUS/EXIT button to clear the menu
from the screen.
I0
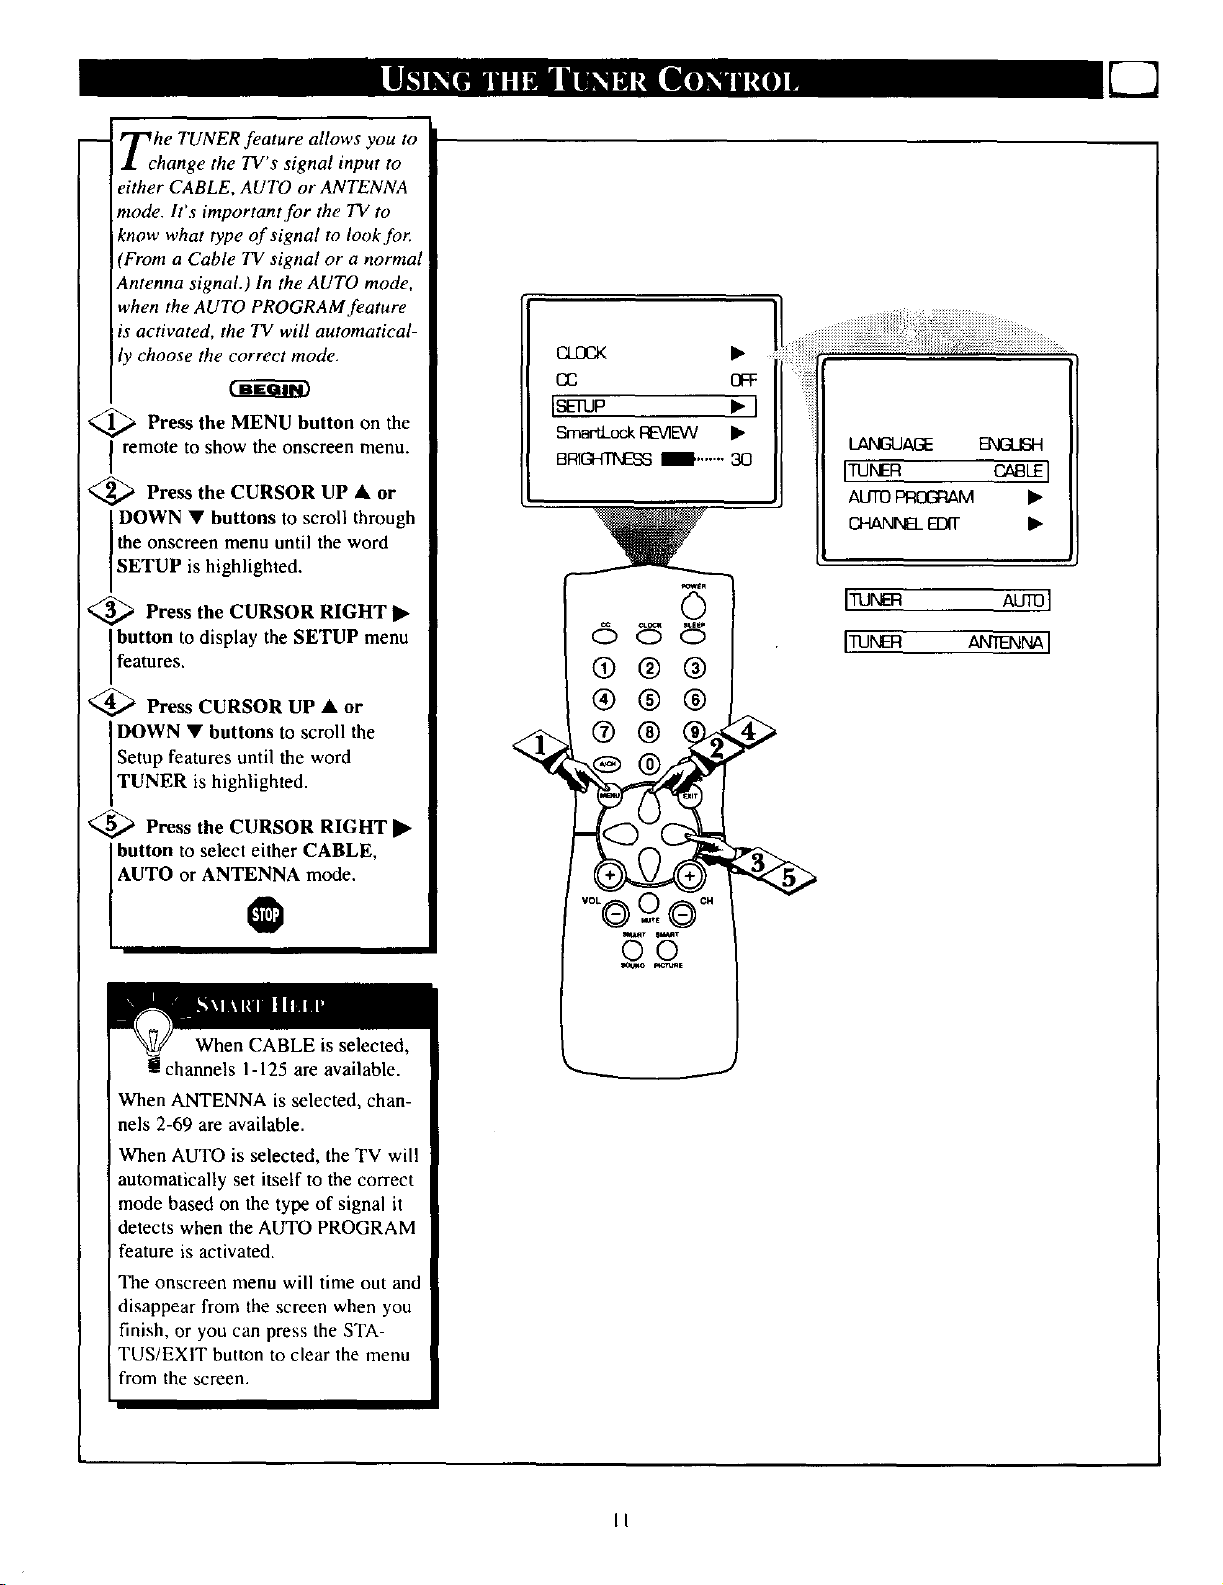
Tche TUNER feature allows you to
hange the TV s signal input to
either CABLE, AUTO or ANTENNA
mode. It's important for the TV to
know what type of signal to look for:
(From a Cable TV signal or a normal
Antenna signal.) In the AUTO mode,
when the AUTO PROGRAM feature
is activated, the TV will automatical-
ly choose the correct mode.
_ Press the MENU button the
remote to show the onscreen menu.
_ Press the CURSOR UP • or
DOWN • buttons to scroll through
the onscreen menu until the word
SETUP is highlighted.
on
_ Press the CURSOR RIGHT •
button to display the SETUP menu
features.
_ Press CURSOR UP • or
DOWN • buttons to scroll the
Setup features until the word
TUNER s h gh ghted.
_ Press the CURSOR RIGHT •
button to select either CABLE,
o_ OFF
IsEtup •1
Sma-t:LockREVIEW •
BIRIGHTNES8l'....... 30
LANGUAGE
ITUNm I
AUTOPROG_ •
GHANNS__ _-
ITUN AUT01
ITUNm AN NNAI
AUTO or ANTENNA_ mode.
When CABLE is selected,
hannels 1-125 are available.
When ANTENNA is selected, chan-
nels 2-69 are available.
When AUTO is selected, the TV will
automatically set itself to the correct
mode based on the type of signal it
detects when the AUTO PROGRAM
feature is activated.
The onscreen menu will time out and
disappear from the screen when you
finish, or you can press the STA-
TUS/EXIT button to clear the menu
i from the screen.
II
7-3
1.
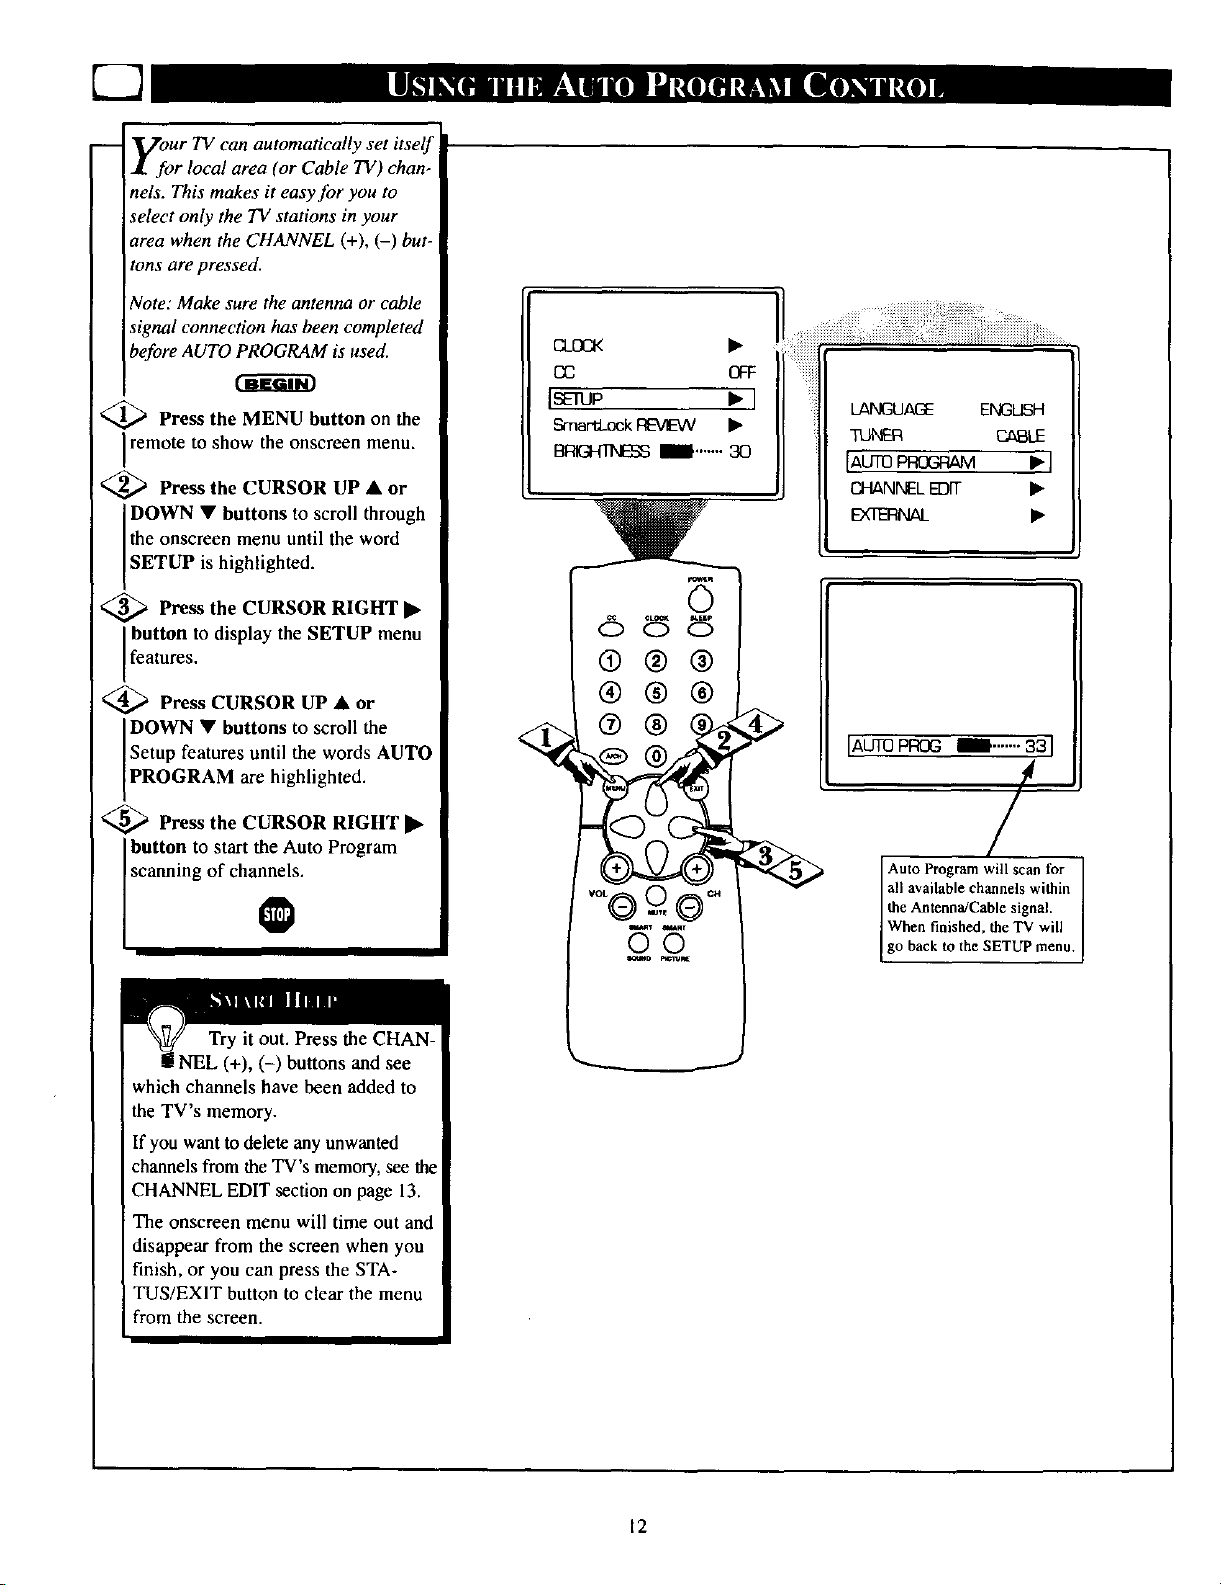
-- Vour TV can automatically set itself|
for local area (or Cable TV) chan- |
nels. This makes it easy for you to I
select only the TV stations in your 1
area when the CHANNEL (+), (-) but-|
tons are pressed, l
Note: Make sure the antenna or cable I
signal connection has been completed [
before AUTO PROGRAM is used. I O_OOK •
cc Gq:
I
<_ Press the MENU button on the ] ]SEIUO • I
remote to show the onscreen menu. • SmartLock[:r_MIEVV •
I
'_ Press the CURSOR UP • or I _ --
DOWN • buttons to scroll through |
the onscreen menu until the word |
[SETUP is highlighted. I
,_ Press the CURSOR RIGHT •
Press the CURSOR RIGHT • I
button to display the SETUP menu [
I
13_ Ira-,,,,, 30
[features' I I 0 @ @
@ Press CURSOR UP • or
Press CURSOR UP•or I I (_) (_) (_
DOWN • buttons to scroll the I _"_ _ _(_) (_ _
[PROGRAM are highlighted. I
'_ Press the CURSOR RIGHT 1_
i_ Press the CURSOB RIGH'I |
Setup features until the words AUTO I __
button to start the Auto Program 1
scanning of cha_s. I voLQ=_) ,_ _
Try it out. Press the CHAN-
g NEL (+), (-) buttons and see
which channels have been added to
the TV's memory.
If you want to delete any unwanted
channels from the TV's memory, see the
CHANNEL EDIT section on page 13.
The onscreen menu will time out and
disappear from the screen when you
finish, or you can press the STA-
TUS/EXIT button to clear the menu
from the screen.
IAUTOPROG _i.,.,.,. 33 I
/
Auto Program will scan for
all available channels within
the Amenna!Cable signal.
go back to the SETUP menu.
When finished, the TV will ]
12
 Loading...