

Page 1

ProntoEdit
Version 4
User Manual
Page 2

User Manual ProntoEdit
Version 4
Copyright 2002 PHILIPS, PHILIPS INDUSTRIAL ACTIVITIES LOUVAIN,
Interleuvenla a n 74- 76, 3001 Louvain, Belgium
Note
The information in this manual is copyright-pro te c ted . No part of this manual
may be copied or reproduced in any form without prior wr itten consent from
PHILIPS.
PHILIPS shall not be held liable for omissio n s or for te c hnic al or ed ito rial
errors contained in this manual. PHILI PS shall not be he ld liable for inc idental
or consequential damages resulting fr om the supplying or use of this
information. PHILIPS shall not be held liable for incidental or consequential
damages resulting from the performance or use of the materials described in
this manual.
The information in this manual may be subject to changes without prior
notice.
The PHILIPS mark and logo are trademarks of PHILIPS.
All other brand or product names are trademarks or registered trademarks of
their respective companies or organizations .
version March, 2002
http:/www.philips.com
Documentation concept and development:
The Human Interface Group
De Regenboog 11, 2800 Mechelen
http://www.higroup.com/
Page 3

Table of Contents
Introduction...........................................................................................5
Installation ............................................................................................6
System Requirements..............................................................7
Installation.............................................................................7
Updating Your Pronto...............................................................8
About
ProntoEdit
About CCFs...........................................................................................11
Basic CCF Actions.................................................................................13
Starting ProntoEdit................................................................... 14
Opening a CCF .......................................................................... 16
Loading a CCF into ProntoEdit.................................................16
Uploading a CCF from Your Pronto...........................................17
Creating a new CCF...............................................................18
Modifying a CCF........................................................................ 19
Opening and Closing Panels....................................................19
Creating Devices and Macro Groups.........................................21
Creating Panels.....................................................................24
Creating Frames and Buttons..................................................27
Using the Gallery ..................................................................30
Using Bitmaps ......................................................................33
Using Grids ..........................................................................36
Viewing and Testing a CCF........................................................ 40
Previewing with ProntoEmulator..............................................40
Downloading a CCF into Your Pronto........................................4 2
Saving a CCF............................................................................. 44
Saving a CCF........................................................................44
Exporting a CCF....................................................................45
Saving a CCF as an EXE file....................................................46
Replacing and Merging a CCF..................................................47
...................................................................................9
Configuring a CCF ................................................................................48
Properties................................................................................. 49
System Properties.................................................................49
Frame Properties...................................................................51
Button Properties ..................................................................52
Device Properties ..................................................................53
Macro Group Properties..........................................................55
Programming............................................................................ 57
Actions ................................................................................57
Jumps..................................................................................65
RF Settings ..........................................................................66
Hard Key Actions ..................................................................67
Macros.................................................................................69
Modifying Frames and Buttons ................................................. 70
Identifying Frames and Buttons ..............................................70
PHILIPS Page 3 of 85
Page 4

Designing Frames and Buttons................................................74
Setting the System Properties for the Pronto ........................... 76
Write-protecting a CCF ..........................................................76
Automatically creating device aliases.......................................76
Troubleshooting...................................................................................77
List of Shortcuts...................................................................................79
Glossary ...............................................................................................80
Index....................................................................................................83
PHILIPS Page 4 of 85
Page 5

Introduction
ProntoEdit is a visual editor for creating and configuring screens of both the
Pronto and ProntoPro. In this User Manual, ‘Pronto’ will be used as global
name for both devices.
With ProntoEdit you have complete control over the user interface of your
Pronto as ProntoEdit can perform a range of powerf ul tas ks : c rea ting and
modifying all screen elements, importing new graphics, previewing and
testing your screens on the ProntoEmulator, communicating with the Pronto
for exchanging configuration files, and so on.
ProntoEdit is the tool that really allows you to optimize the use and the layout of your Pronto. We advise you to carefully read this user manual in order
to benefit from all possibilities this sof tw are pa ckage provides.
PHILIPS Page 5 of 85
Page 6

Installation
Contents of this chapter
System Requirements..............................................................7
Installation.............................................................................7
Updating Your Pronto...............................................................8
PHILIPS Page 6 of 85
Page 7

ProntoEdit
Version 4 - User Manual Installation
System Requirements
PC with a Pentium 166 MHz or higher processor
Windows 95, Windows 98, Windows NT 4.0 or higher operating system
16 megabytes of RAM (recommended: 32 MB)
30 megabytes of free disk space
CD-ROM player
Super VGA or higher graphics card and monitor
Available serial port which supports 115 20 0 baud
Installation
Note
We recommend that you close all programs before installing ProntoEdit.
Installing from the CD-ROM
1 Place the ProntoEdit CD-ROM in your computer.
The Pronto setup will start. If not, you can install ProntoEdit by doubleclicking the EXE file in Windows Explorer.
2 Follow the instructions on screen that w ill g uide you through the
installation procedure.
The first time you run ProntoEdit, you have to accept the lice ns e
agreement. Otherwise ProntoEdit will not run.
Installing from the web site
1 Open your internet browser.
2 Browse to the PHILIPS website: www.pronto.philips.com
3 Download the ProntoEdit EXE file.
4 Double-click the ProntoEdit EXE file.
5 Follow the instructions on screen that w ill g uide you through the
installation procedure.
The first time you run ProntoEdit, you have to accept the lice ns e
agreement. Otherwise ProntoEdit will not run.
PHILIPS Page 7 of 85
Page 8

ProntoEdit
Version 4 - User Manual Installation
Updating Your Pronto
ProntoEdit is distributed with a standard Pronto Update File for all supported
types with the latest available Pronto softwar e . This sof tw are c an easily be
updated to a later version.
You can check the version information of yo ur Pro nto in the third panel in
Setup mode. Please refer to the Pronto User Manual for more information
about the Setup panels.
Future updates are available on the PHILIPS webs ite at
www.pronto.philips.com. You need to store the Pronto update files in the
Update folder in the directory where ProntoEdit is installed.
Note
It is best not to touch your Pronto’s touch scree n or us e any of your Pro nto’s
direct access buttons, while updating is in progress.
1 Copy the Pronto update files to the Update folder in the directory where
ProntoEdit is installed.
2 Go to Start > Programs > ProntoEdit > ProntoEdit.
ProntoEdit opens.
3 Select Update Firmware from the Tools m en u and select the update
file you want to use from the list.
The ‘Firmware Update’ window appears.
4 Plug one end of the Pronto serial cable in the s eri al po rt of your Pronto.
5 Plug the other end of the Pronto serial cable in the serial port of your
computer.
6 Click Start.
After connecting to your Pronto the updating pro ces s starts.
7 Follow the instructions on screen.
It is possible that after updating your Pronto , yo u will b e aske d to
calibrate the touch screen.
Please refer to your Pronto User’s Manual for detailed instructions o n
calibration.
Note
You can also run update files directly from the website . Double-click the
update file and follow the instructions on scr een.
PHILIPS Page 8 of 85
Page 9

About
ProntoEdit
ProntoEdit is the visual editor for creating and configuring CCFs. A CCF or
configuration file defines the user interface on the Pronto. As ProntoEdit can
be used to customize Pronto as well as Pronto Pro , you hav e to se lect the typ e
of Pronto you wish to configure w he n you s tart ProntoEdit for the first time or
when you create a new configuration file.
Pronto: only supports configurations in black &white .
TS1000 (1mb): for the USA, a Philips database is included.
TSU2000 (2mb): fo r the USA, a universal database is included.
RU890 (1mb): for Europe , a Philips da tab as e is inc luded.
RU940 (2mb): for Europ e , a univers a l datab as e is include d.
ProntoPro: supports color configurations.
TSU6000 (8mb): fo r the USA, a universal database is included.
RU970 (8mb): for Europ e , a univers a l datab as e is include d.
Note
For the type of your Pronto, please ref er to the package or to the label on the
back of your Pronto.
ProntoEdit allows you to personalize y our Pronto and to perform a range of
powerful tasks:
Uploading CCFs from your Pronto;
Adding, deleting, modifying and rearranging panels, devices, macro
groups, frames and buttons;
Importing new graphics, crea ting yo ur own custom devices, using your
own bitmaps, replacing the home panels with your own panels;
Letting any button take you to any panel, making any button into a
macro, creating macros within macros;
Saving, duplicating and sharing CCF files, codes or devices with ano the r
Pronto;
Previewing new CCF files on ProntoEmulator;
Personalizing CCF files to optimize the use of your Pro nto;
Downloading CCFs into your Pronto.
PHILIPS Page 9 of 85
Page 10

ProntoEdit
ProntoEdit main window provides two views.
views
Configuration view
Panel view
Configuration view: displays the overall structure of the current CCF
with its most important elements in a tree view:
HOME
DEVICES
MACRO GROUPS
Panel view: displays the contents of a panel as it is defined in the
current CCF.
Panel views provide an up-to-date view o n the current CCF: changes are
immediately incorporated into the c urrent CCF.
PHILIPS Page 10 of 85
Page 11

About CCFs
A CCF or a configuration file stores a Pronto config uratio n. It fully defines the
Pronto user interface:
devices and macro groups;
panel layouts and button appearances;
the behavior of all buttons, direct-acc e s s keys and action buttons
(including all IR codes).
CCFs are files with the extension ‘ccf’. When you create a new conf ig uratio n
file or open an existing file, you have to select the type of device the
configuration will be used for.
HOME, DEVICES and MACRO GROUPS are the three major building blocks
to define CCFs. They consist of a number of panels and an action list.
HOME
In most cases the Home pa n el is used to access the most frequently used
devices and macros. The Home panel contains a number of buttons that jump
to specific panels of devices and macros.
DEVICES
A device usually contains a number of panels with different buttons to
execute commands on the actual device. By tapping the buttons on the
Pronto IR codes are sent out to operate your devices.
MACRO GROUPS
A macro Group can contain macros and timers.
A macro allows you to execute a sequence of commands, for instance IR
commands, using one single button. A macro can also contain severa l
macros.
With a timer you can activate a device or a macro at the time you
prefer.
PHILIPS Page 11 of 85
Page 12
ProntoEdit
Version 4 - User Manual About CCFs
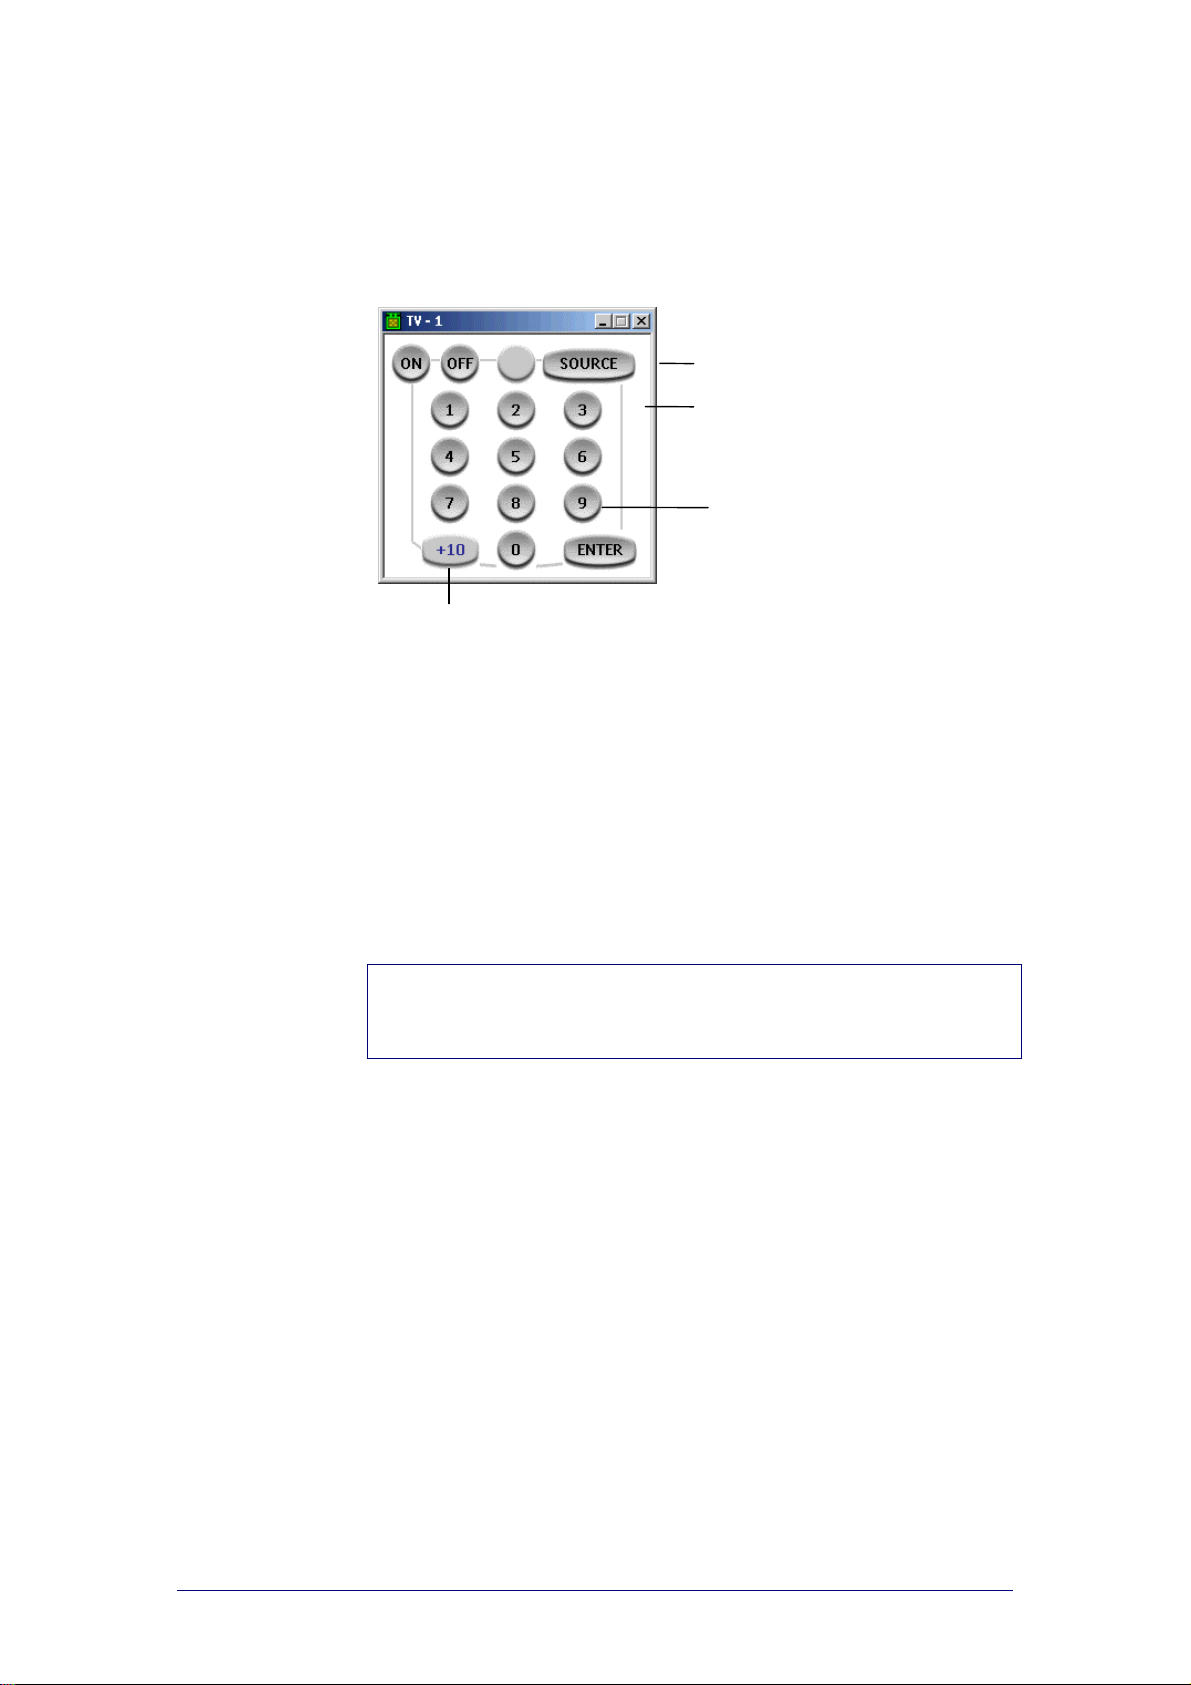
Panels
A panel defines the rectangular area of your Pronto’s touch screen betwee n
the system area at the top of the touch screen and the bar at the bottom of
the touch screen.
A panel consists of up to 255 frames or buttons . Eve ry frame can contain up
to 255 frames or buttons.
Panel
Frame
Button:
containing an action
Frames are inactive user interface elements. They contain a background
color or a bitmap, and a name. Frames can be tapped, but they never
contain an action. Frames are primarely used for grouping buttons and
other frames.
Buttons are active user interface elements. They contain a background
color or a bitmap for each of four different states, and a name. A button
can contain an action that is executed when you tap it.
An action can be a delay, an IR code, or an alias (a shortcut) to another
action list (see “Programming” on p. 57 for more d e tails ).
An action list is a list of up to 255 actions. The last action to execute
can be a jump to a specific panel.
Button:
not containing an action
Note
For each Pronto type, a template CCF is provided for the Home module as
well as for devices and macros. The CCFs are stored in a folder with the
name of the Pronto type in the path where you installed ProntoEdit.
PHILIPS Page 12 of 85
Page 13

Basic CCF Actions
Contents of this chapter
Starting ProntoEdit................................................................... 14
Opening a CCF .......................................................................... 16
Loading a CCF into ProntoEdit.................................................16
Uploading a CCF from Your Pronto...........................................17
Creating a new CCF...............................................................18
Modifying a CCF........................................................................ 19
Opening and Closing Panels....................................................19
Creating Devices and Macro Groups.........................................21
Creating Panels.....................................................................24
Creating Frames and Buttons..................................................27
Using the Gallery ..................................................................30
Using Bitmaps ......................................................................33
Using Grids ..........................................................................36
Viewing and Testing a CCF........................................................ 40
Previewing with ProntoEmulator..............................................40
Downloading a CCF into Your Pronto........................................4 2
Saving a CCF............................................................................. 44
Saving a CCF........................................................................44
Exporting a CCF....................................................................45
Saving a CCF as an EXE file....................................................46
Replacing and Merging a CCF..................................................47
PHILIPS Page 13 of 85
Page 14

Starting ProntoEdit
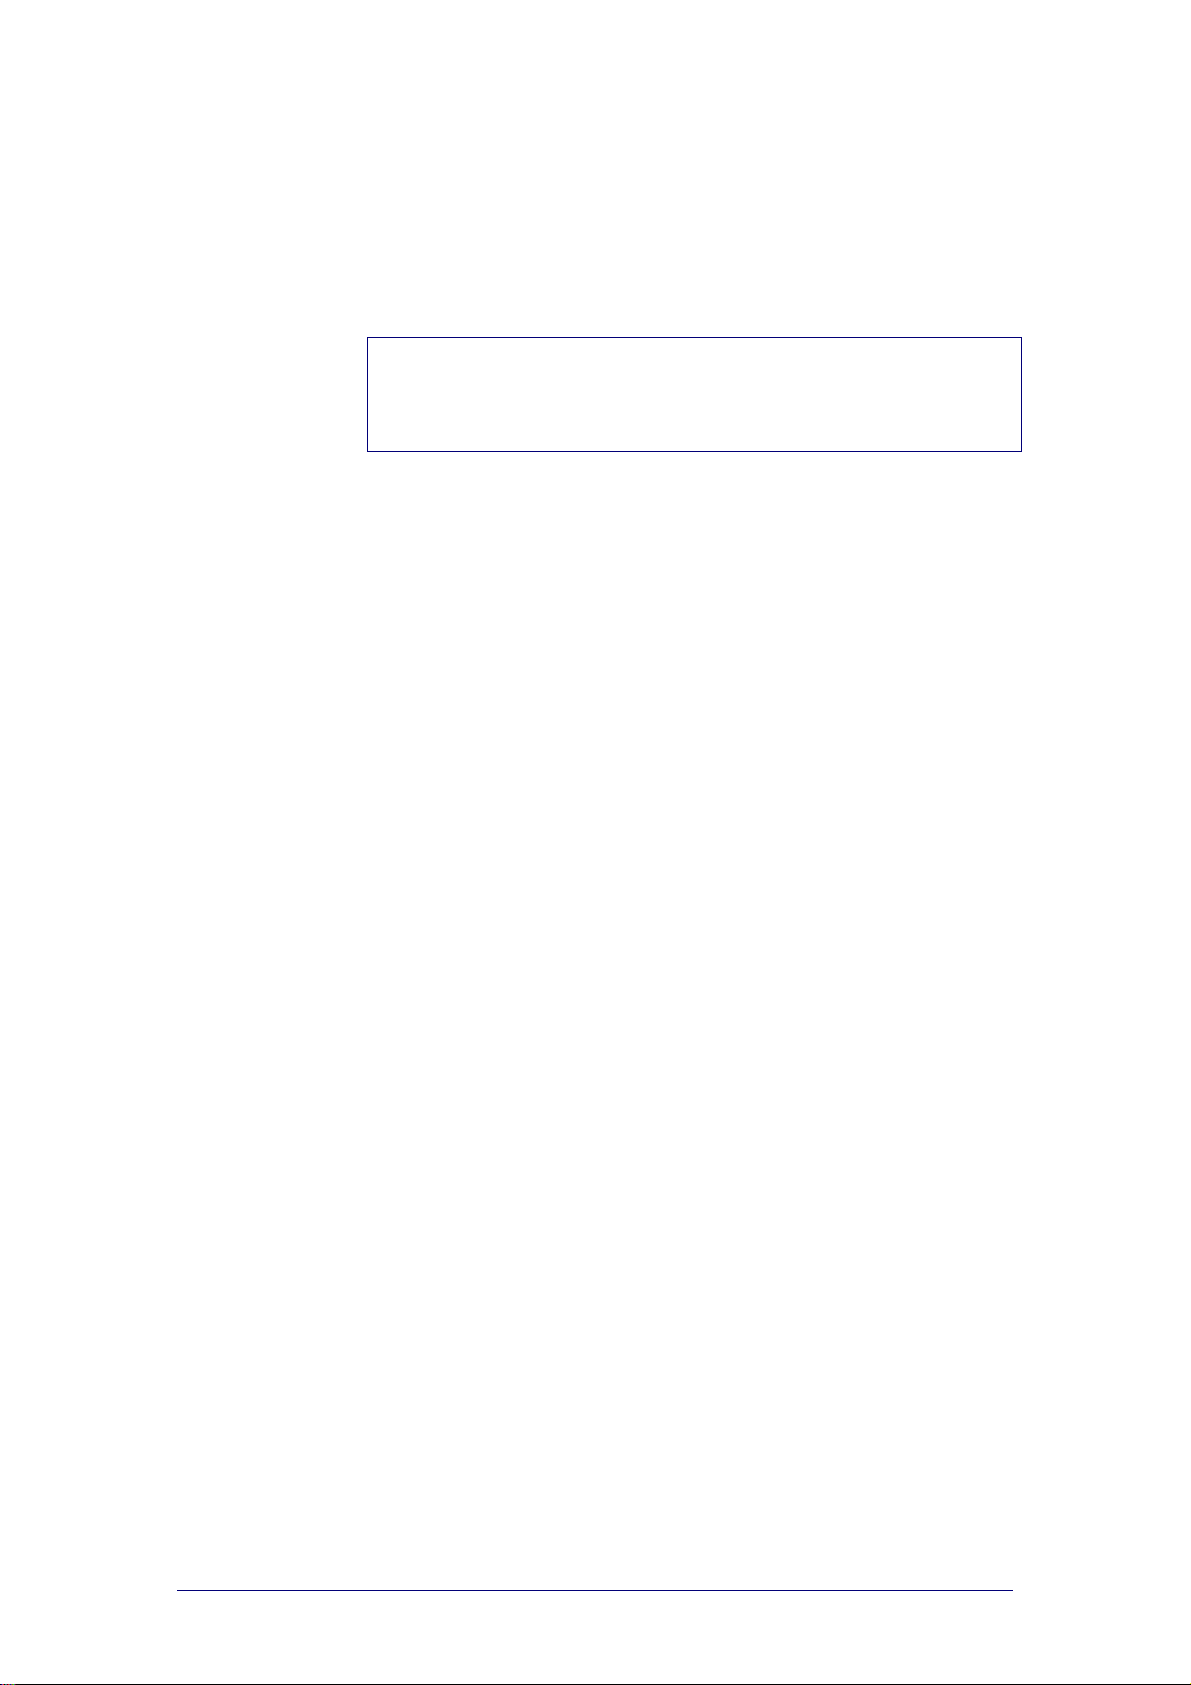
Before you can start creating or e d iting CCFs, you have to select the type of
your Pronto. You select the type in the Create New Configuration window.
USA B&W: for Pronto in the USA (only supports blac k&white).
TS1000 a Philips database is included.
TSU2000 a universal database is included
USA Color: for ProntoPro in the USA (als o s uppo rts color).
TSU6000 a universal database is included.
EUR B&W: for Pronto in Europe (only supports black&white).
RU890 a Philips database is included.
RU940 a universal database is included.
EUR Color: for ProntoPro in Europe (also supports color ) .
RU970 a universal database is included.
Note
For the correct type of your Pronto , p le ase ref er to the package or to the labe l
on the back of your Pronto.
PHILIPS Page 14 of 85
Page 15
ProntoEdit
Version 4 - User Manual Basic CCF Actions
Starting ProntoEdit
1 Go to Start > Programs > ProntoEdit > ProntoEdit.
ProntoEdit opens and the Create New Configuration window appears.
2 Select the tab containing your Pro nto typ e .
3 Sele ct your type of Pronto and clic k OK.
You can now start working with ProntoEdit.
Note
If you always edit configuration f ile s for the s ame typ e of Pronto , de s e le c t the
Show this dialog at startup check box.
ProntoEdit will use the type of Pronto you sele cted as default and the Create
New Configuration window will not appear at startup.
PHILIPS Page 15 of 85
Page 16

ProntoEdit
Version 4 - User Manual Basic CCF Actions
Opening a CCF
ProntoEdit comes with 9 default CCFs:
color_ph2_default.ccf: CCF in color that can be used for TSU6000 or
RU970.
color_xt1_default.ccf: CCF in color that can be used for TSU6000 or
RU970.
john_corkery.ccf: fancy design in color.
ph1_RU970_default.ccf: default CCF for RU970.
ph1_TSU6000_default.ccf: default CCF for TSU6000.
RU890default.ccf: default CCF for RU890.
RU940default.ccf: default CCF for RU940.
TS1000default.ccf: default CCF for TS1000.
TSU2000default.ccf: default CCF for TSU6000.
These CCFs are located in the Samples folder in the directory where
ProntoEdit is installed.
Note
For each Pronto type, a factory default CCF is provided. In this User Manual
the ph1_RU970_default.ccf will be used for examples and screenshots .
When you want to create your own user inte rface, it is advised to start from
an existing CCF and modify the panels. When starting from a new and empty
CCF, you will have to define all devices, macro groups and panels from
scratch.
Loading a CCF into
Loading a CCF into ProntoEdit means that you open a file that is located on
your computer.
1 Go to Start > Programs > ProntoEdit > ProntoEdit.
ProntoEdit opens.
2 Select Open Configuration from the File menu.
-orClick
The ‘Open’ window appears.
3 Browse to the Samples folder in the directory where ProntoEdit is
installed.
4 Select the default CCF for your typ e of Pronto (or any other CCF).
5 Click Open.
When ProntoEdit cannot detect for which type of Pronto the configuration
file is created, the Select Configuration win dow appears.
6 Select the tab containing your Pro nto typ e .
7 Select the type and click OK.
ph1_default.ccf is loaded into ProntoEdit.
in the toolbar.
ProntoEdit
PHILIPS Page 16 of 85
Page 17
ProntoEdit
Version 4 - User Manual Basic CCF Actions
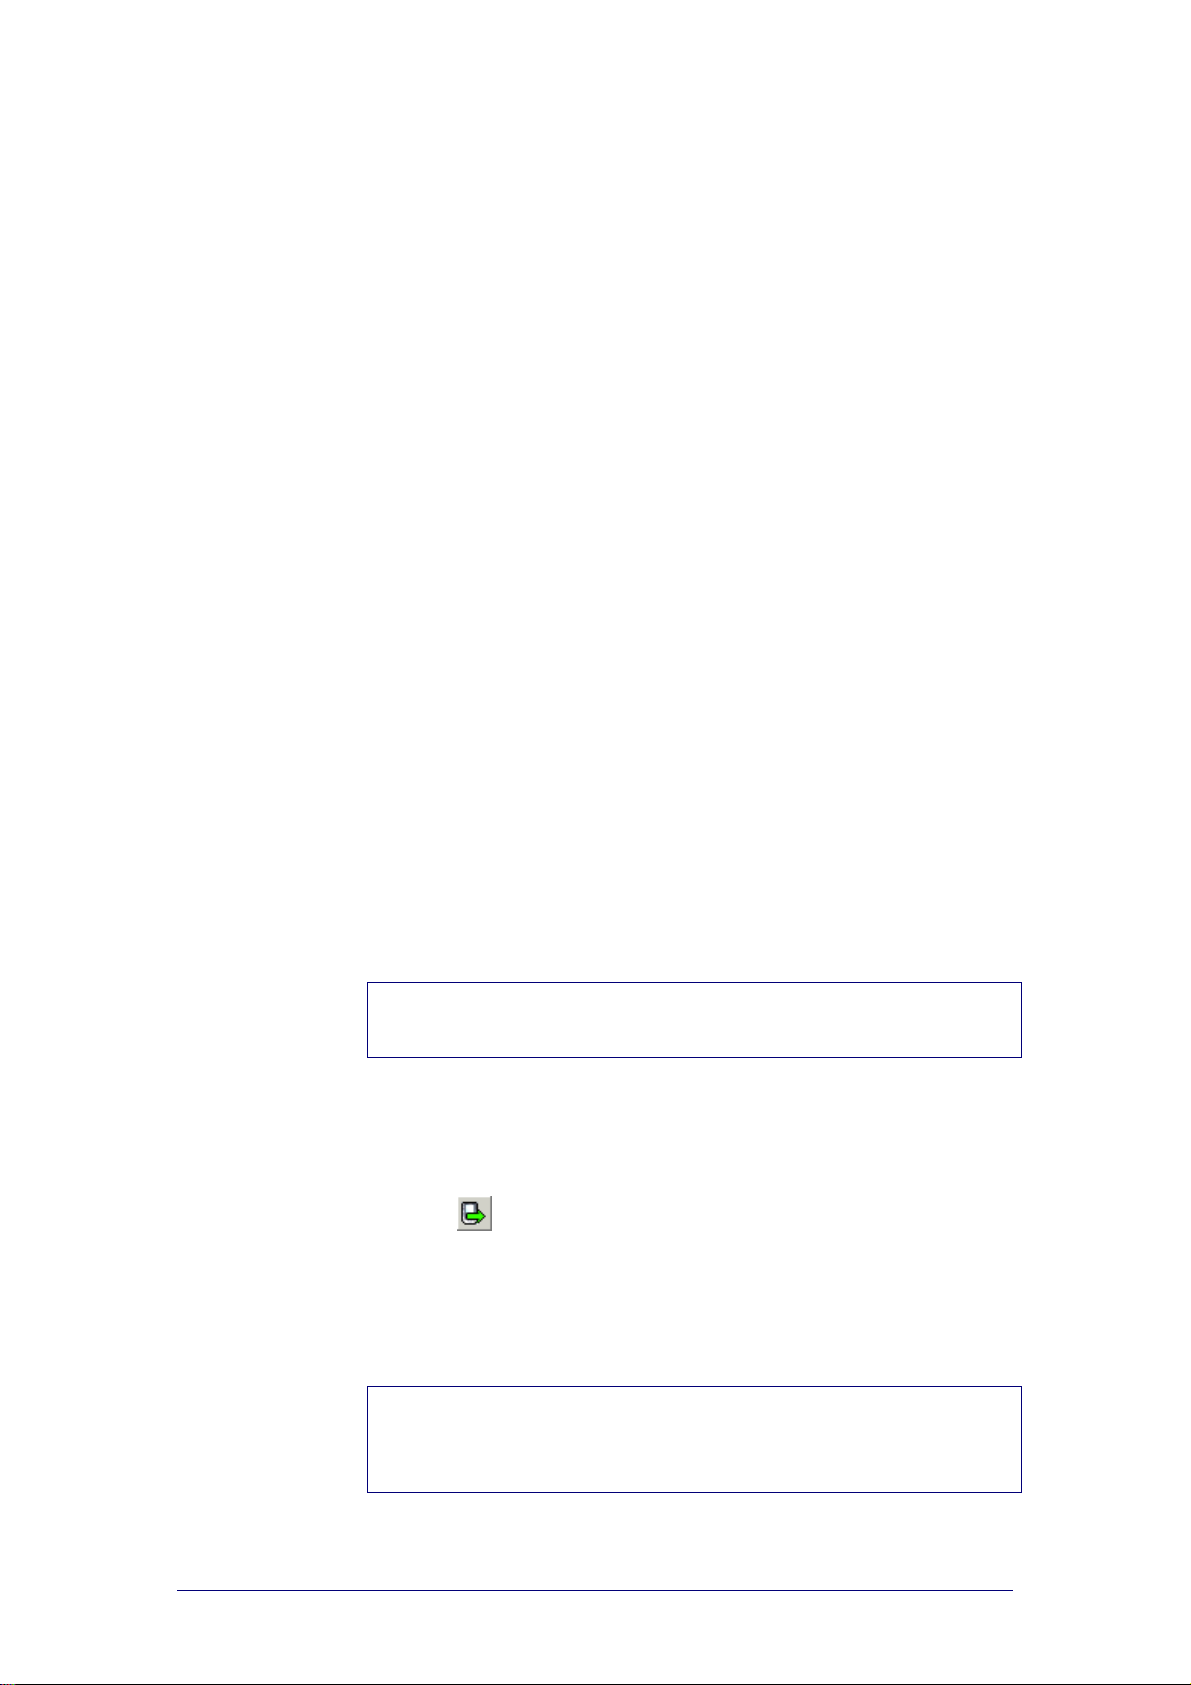
If another CCF is already loaded in ProntoEdit when you want to load a new
CCF, the following message appears: “Merge with current configuration or
replace it?”.
Click Merge to add all home panels, devi ces and macro group s from the
loaded CCF to the current CCF. You will merge both CCFs.
Click Replace to remove the curr e nt CCF and replac e it with the loaded
CCF. You will replace one CCF by the other.
If the current CCF has been modified, you will be allo wed to sav e it f irs t
before it is replaced with the loaded CCF.
If you load a CCF in black&white when you have selected a Pronto device that
supports color, the following message appears: “You are loading a 4-colors
based ccf-file. Would you like to modify these 4 colors?”.
Click Skip to load the CCF without converting the colors. The CCF will be
loaded with the default grayscale colors.
Click Modify to convert the default gray scale co lors. A panel collapses
with the 4 default grayscale colors and a button pr evie w.
Converting the colors
1 Click the grayscale color you want to conver t.
A context menu with 44 colors appears. With the More butto n you can
pick from 216 websaf e col ors.
2 Select the color you want to use.
When you move your mouse over the colors, the color in the field and in
the button preview changes dynamically.
3 Click OK to accept the changes.
The CCF will be loaded with the colors you selected .
-orClick Cancel to return witho ut c hanging the colors.
The CCF will be loaded with the default grayscale co lors.
Uploading a CCF from Your Pronto
Uploading a CCF from your Pronto means co py ing the CC F from your Pronto
to your computer and displaying it in ProntoEdit.
Note
It is advised not to touch your Pronto’s touch scr een or use any of your
Pronto’s direct access buttons while up load ing is in pro gr e s s.
1 Plug one end of the Pronto serial cable in the ser ial po rt on your Pronto.
2 Plug the other end of the Pronto serial cable in the serial port o n yo ur
computer.
3 Select Upload from RC device from the File menu.
-or-
Click
When ProntoEdit cannot detect for which type of Pronto the configuration
file is created, the Select Configuration win dow appears.
4 Select the tab containing your Pro nto typ e .
5 Select the type and click OK.
ProntoEdit detects yo ur Pro n to .
Note
If ProntoEdit cannot detect your Pronto, the following message appears:
“Pronto not connected or not re s po n d ing”.
See “Troubleshooting ” on page 77 fo r co nne c t io n pro blems.
in the toolbar.
PHILIPS Page 17 of 85
Page 18
ProntoEdit
Version 4 - User Manual Basic CCF Actions
If there is another CCF loaded in ProntoEdit when you want to upload the CCF
from your Pronto, the following message appears: “Merge with current
configuration or replace it?”.
Click Merge to add all home panels, dev i ces and macro groups uploaded
from your Pronto to the current CCF. You will merge both CCFs.
Click Replace to remove the current CCF and replace it with the CCF
uploaded from your Pronto. You will replace one CCF by the other.
If the current CCF has been modified, you will be allo wed to sav e it f irs t
before it is replaced with the CCF upload ed fro m your Pronto.
Creating a new CCF
1 Go to Start > Programs > ProntoEdit > ProntoEdit.
ProntoEdit opens.
2 Select New Configuration from the File menu.
The Create New Configuration window appears.
3 Select the tab containing the Pronto type for which yo u want to cre a te a
CCF.
4 Select the type and click OK.
A new CCF is created.
Note
If you click the icon in the toolbar to create a new CCF, ProntoEdit will
not prompt you for the Pronto type and automatically create a CCF for the
type of Pronto you last selected.
PHILIPS Page 18 of 85
Page 19
Modifying a CCF
The scenario to modify a CCF includes several steps:
Creating devices and macro groups;
Creating panels;
Creating frames and buttons;
Using bitmaps.
When you have created or modified all the elements, you can start
configuring them as described in “Configuring a CCF” on page 48.
Opening and Closing Panels
The buttons of the devices and the macro groups on your Pronto are
organised into panels:
Home panels;
Panels for the different devices;
Panels for the different macro groups.
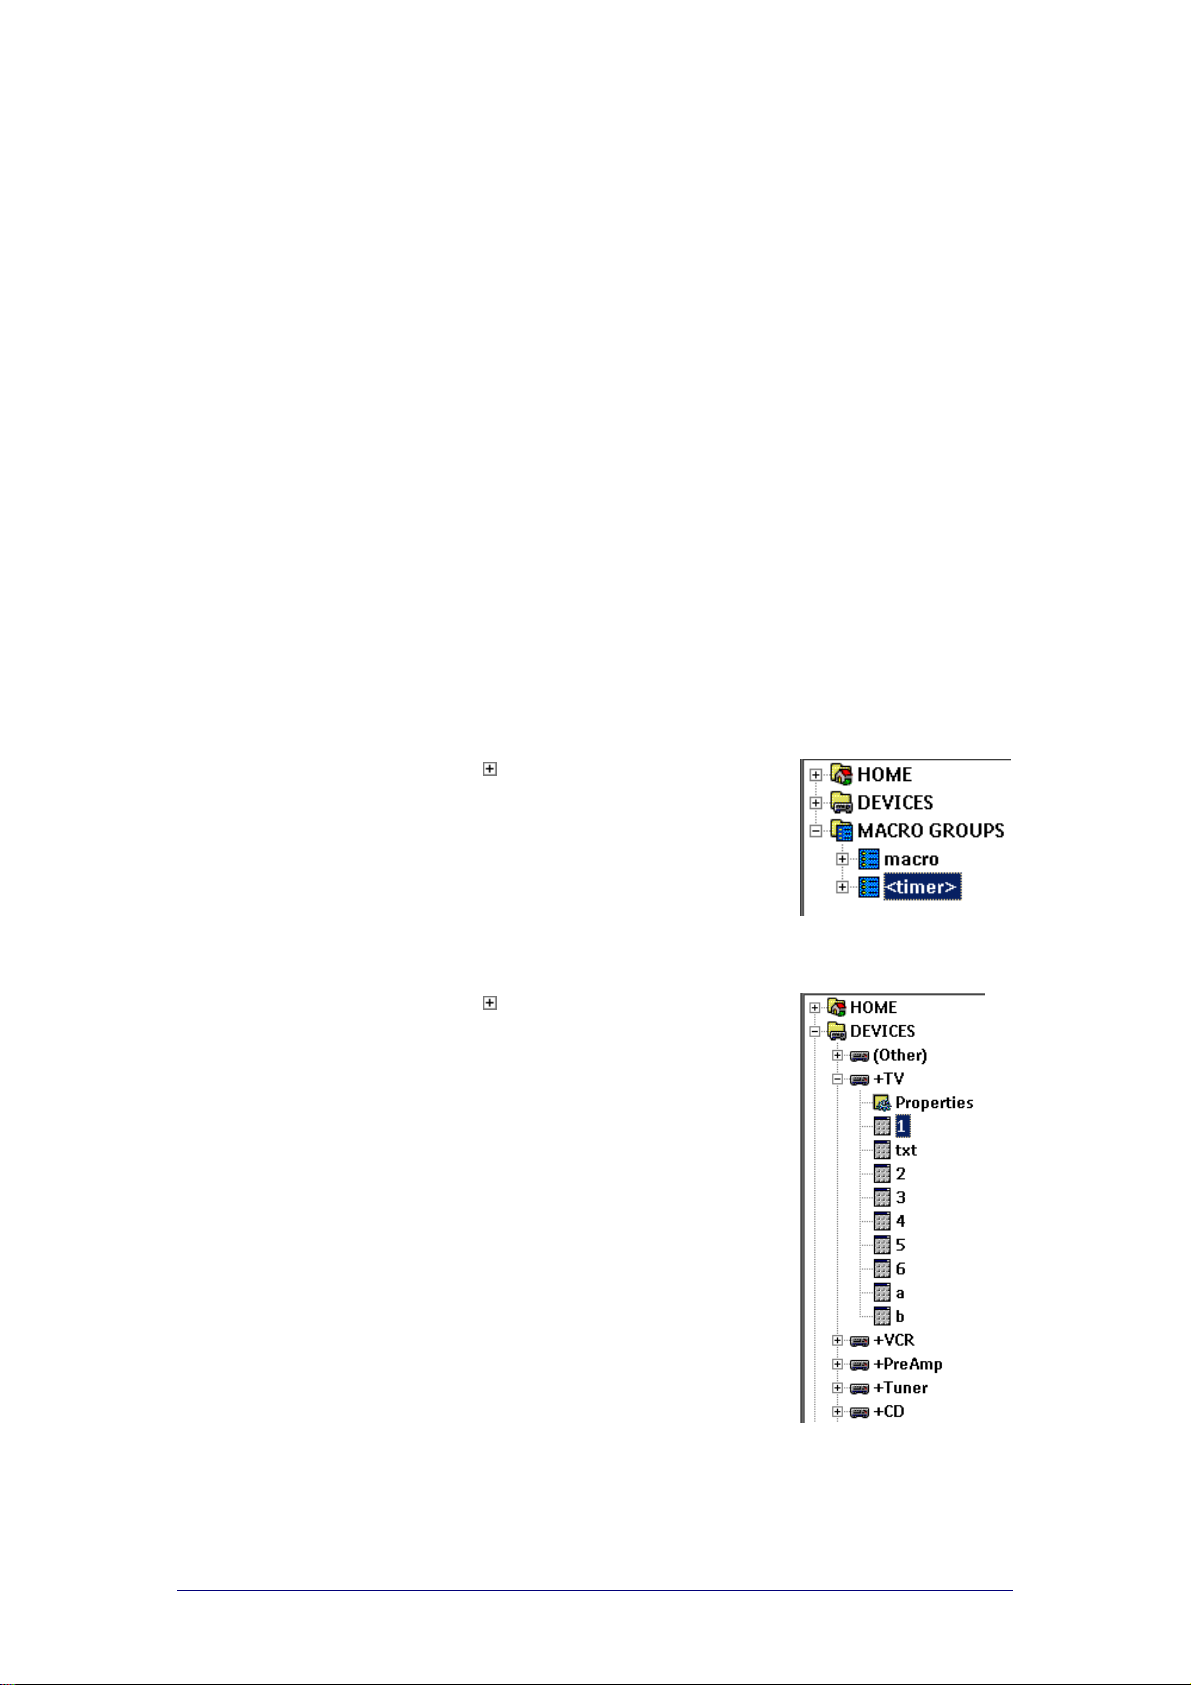
Opening the list of DEVICES and MACRO GROUPS
Click on next to DEVICES or MACRO
GROUPS in the Configuration view on the
left side of the ProntoEdit window.
The list of all devices or macro groups is
displayed.
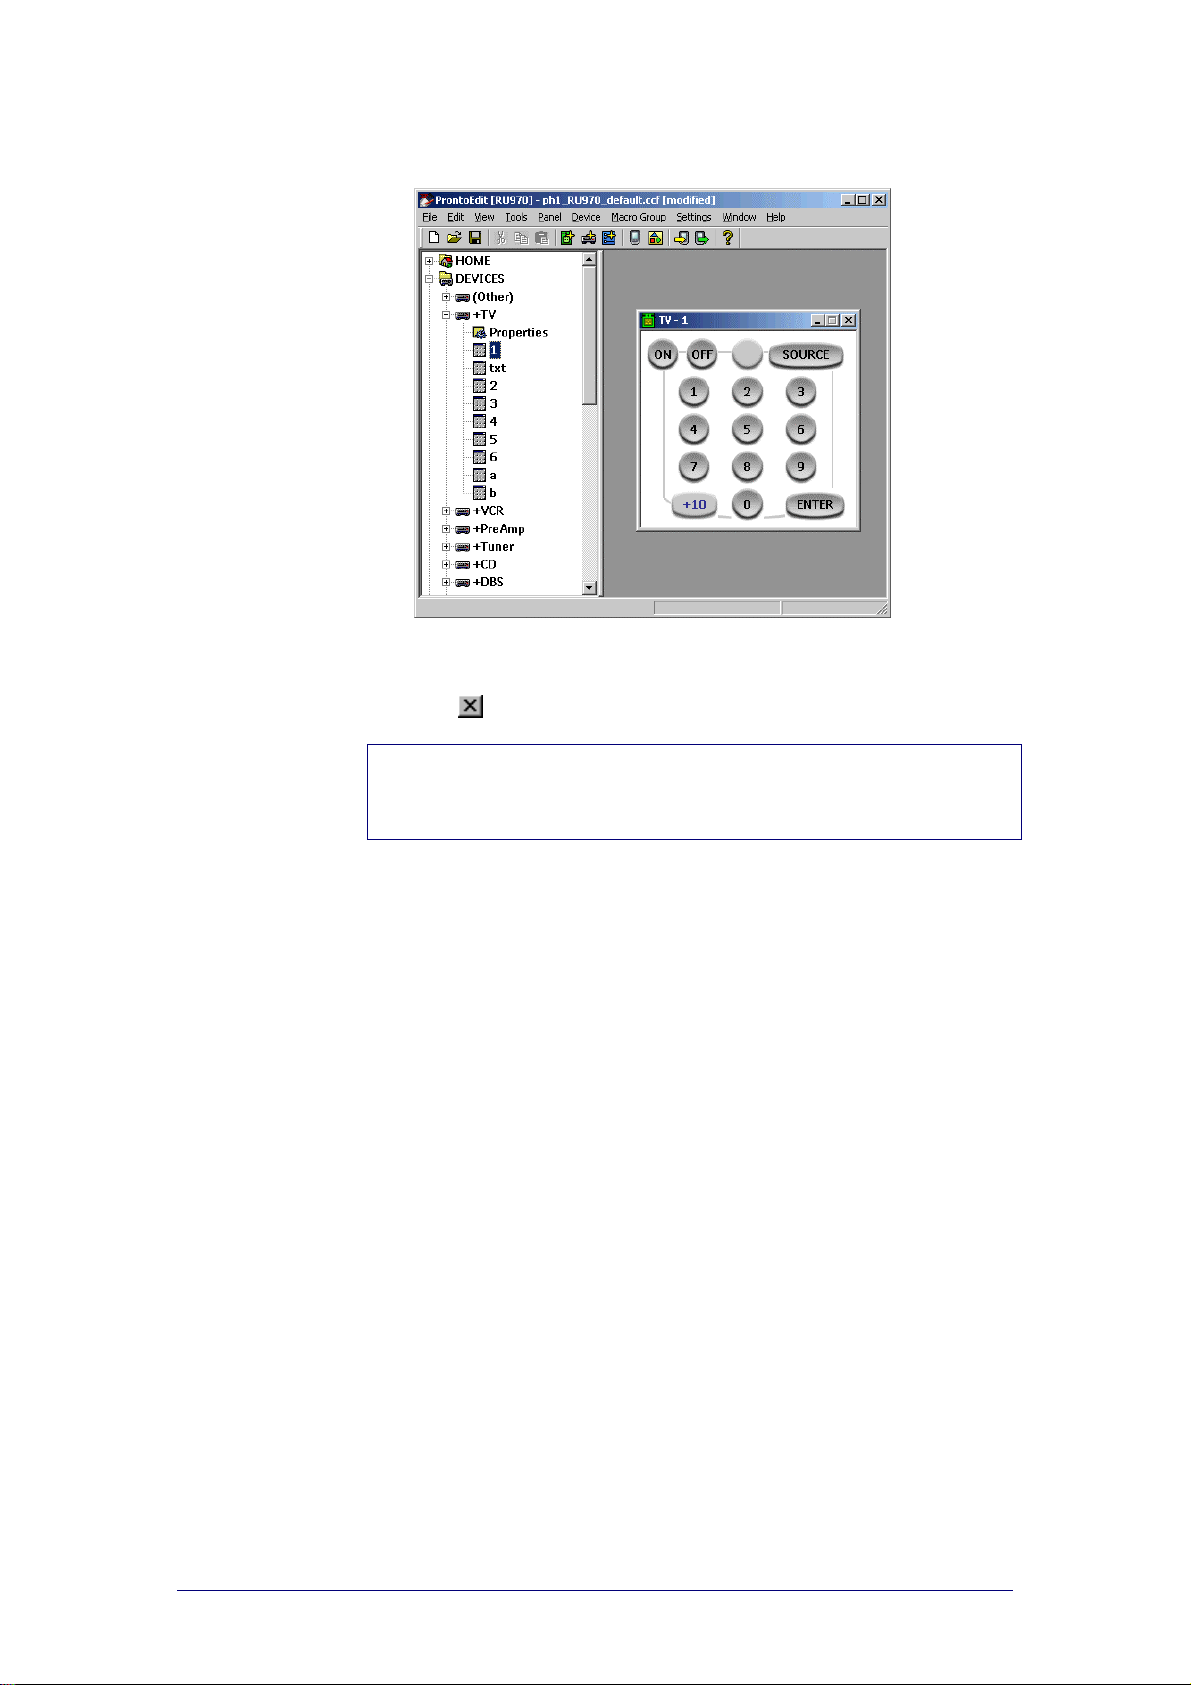
Opening a panel
1 Click on next to HOME, or a device or
macro group in the Configuration view.
The list of panels is displayed.
2 Double-click the panel you want to ope n.
-orRight-click the panel and select Open Panel
from the context menu.
-orSelect the panel in the Configuration view
and select Open Panel fro m the Panel
menu.
PHILIPS Page 19 of 85
Page 20
ProntoEdit
Version 4 - User Manual Basic CCF Actions
The panel appears in the Panel view on the right side of the ProntoEdit
window.
Closing a panel
Click to close the panel.
Note
Closing a panel will not undo any changes made to that panel. A panel is
merely a view on the current CCF: changes are immediately incorporated into
the current CCF.
PHILIPS Page 20 of 85
Page 21
ProntoEdit
Version 4 - User Manual Basic CCF Actions
Creating Devices and Macro Groups
A device in ProntoEdit, for instance a TV, usually contains a number of
panels with different buttons to exe c ute command s on the actual de v ice.
A macro group allows you to execute a sequence of commands, for instance
IR commands, using one single button.
In ProntoEdit d evic e s and macro groups are essentially equal. It is the
location, in the list of DEVICES or in the list of MACRO GROUPS, which
distinguishes a device from a macro group. You can move a device from
DEVICES to MACRO GROUPS to turn that device into a macro group, and
vice versa.
Note
Both the devices and the macro groups contain panels . You have to crea te
and organise devices and macro groups before you start creating panels,
frames and buttons.
Indicators
ProntoEdit uses indica tor s in the list of DEVIC ES and MACRO GROUPS to
provide information on the status of the device or macro group . Yo u canno t
type the indicators in the labels of the dev ic e s or mac ro gr oup s .
+
The device needs programming.
When you download the configuration into the Pro nto and you use the
device for the first time, you will have to define the brand fo r the
selected device.
( )
The device is a template. A template does not appear in the Device menu
on the Pronto but it is available when you add a new device on your
Pronto.
-
The device or macro group has a separator. The separator is displayed in
the Device menu or Macro menu, above the selected device or macro
group.
Separator indicators o nly occur in black&white CCFs.
< >
The macro grou p is a timer group. With a tim er you define one or more
actions that have to be executed at a predefined day and time.
*
The device is Read Only. It cannot be modified, renamed, learned or
deleted on your Pronto.
Copying a device or macro group
1 Select the device or macro group you want to copy in the Configuration
view.
2 Select Copy from the Edit menu.
The selected device or macro group is copied onto the clipboard.
3 Select DEVICES or MACRO GROUPS.
4 Select Paste from the Edit menu.
The selected device or macro group is copied into DEVICES or MACRO
GROUPS.
Note
ProntoEdit does not support copying from one running copy of ProntoEdit to
another.
PHILIPS Page 21 of 85
Page 22

ProntoEdit
Version 4 - User Manual Basic CCF Actions
Moving a device or macro group
1 Select the device or macro group you want to move in the Configuration
view.
2 Drag and drop the selected device or macro group to its new location.
If you drop a device or macro group on another device or macro group, it
will be inserted before that device or macro gro up.
If you drop a device or macro group on DEVICES or MACRO GROUPS,
it will be appended to the list of devices or macro gro ups.
-orPress and hold CTRL and use the UP or DOWN key to the move the
selected device or macro group up or down its current list.
Renaming a device or macro group
1 Select the device or macro group and select Rename from the Edit
menu.
-orRight-click the device or macro group and select Rename from the
context menu.
2 Type the new name for the device or macro group in the text field.
-orUse the keyboard on screen to edit the name for the device or macro
group:
To display a keyboard with capital le tte rs or symbols, click Shift.
To enter a character or sy mbol, c lic k the character or symbol you
want to use.
3 Click OK to save the new name.
Removing a device or macro group
1 Select the device or macro group you want to remove in the
Configuration view.
2 Press DELETE to remove the selected device or macro group.
Adding a device
Select Add Device from the Device menu.
-or-
Click
An empty device is added.
in the toolbar.
Changing a device into a template
Select the device and select Is Template from the Device menu.
-orRight-click the device and select Is Template from the context menu.
The name of the device is displayed between ( ) brackets indicating that
the device has been changed into a template.
You can change the template back to a ‘regular’ device at any time.
PHILIPS Page 22 of 85
Page 23
ProntoEdit
Version 4 - User Manual Basic CCF Actions
Removing a te mplate
If you use ProntoEdit instead of your Pronto to add new devices, you can
remove all templates. This speeds up saving and loading and leaves more
space in your Pronto’s memory.
Note
Make sure not to overwrite your CCF when yo u have de le ted all your
templates. So you can always restore the templates.
Adding a macro group
Select Add Macro Group from the Macro Group menu.
-or-
Click
An empty macro gr oup is added.
in the toolbar.
Changing a macro group into a timer group
Select the m acro group and se l ect Is TimerGroup from the Macro
Group menu.
-orRight-click the macro group and select Is TimerGroup from the context
menu.
The name of the macro grou p is displayed between < > brackets
indicating that the macro group has been changed into a timer group.
You can change the timer group back to a macro group at any time.
PHILIPS Page 23 of 85
Page 24

ProntoEdit
Version 4 - User Manual Basic CCF Actions
Creating Panels
Panels are the basic elements of a CCF. They are used to organise the
buttons and actions of the devices and the macro groups on your Pronto.
Copying a panel
1 Select the panel you want to copy in the Configuration view.
2 Select Copy from the Edit menu.
The selected panel is copied onto the clipbo ard .
3 Select HOME, or the device or macro group where you want to copy
the panel to.
4 Select Paste from the Edit menu.
The selected panel is pasted into HOME, the device or the macro
group you selected.
Note
ProntoEdit does not suppor t copying fro m one running copy of ProntoEdit to
another.
Moving a panel
1 Select the panel you want to move in the Configuratio n view.
2 Drag and drop the selected panel to its new locatio n.
If you drop a panel on another panel, it will be inserted b efore that panel.
If you drop a panel on HOME, a device or a macro group, it will be
appended to the list of panels of HOME, that device or that macro group.
-orPress and hold CTRL and use the UP or DOWN key to the move the
selected panel up or down its current list.
Renaming a panel
1 Select the panel and select Rename from the Edit menu.
-orRight-click the panel and select Rename Panel from the context menu.
2 Type the new name for the panel in the text field.
-orUse the keyboard on screen to edit the name for the panel:
To display a keyboard with capital le tte rs or symbols, click Shift.
To enter a character or symbol, c lic k the character or symbol you
want to use.
3 Click OK to save the new name.
Hiding a panel
If you do not want a panel to be displayed whe n you scroll on your Pronto,
you can hide the panel. For instance, it might be useful to hide a panel
containing a number of frequently used commands. You can use these
‘hidden’ commands by creating aliases (shortcuts) from other panels. The
hidden panel can only be viewed by creating a jump to it from w ithin ano ther
panel.
Select the panel (in HOME, of a device or a macro group) and select Is
Hidden from the Panel menu.
The panel is hidden. The panel name is displayed between [ ].
PHILIPS Page 24 of 85
Page 25
ProntoEdit
Version 4 - User Manual Basic CCF Actions
Adding a panel
1 Select HOME, a device or a macro group to which you want to add a
panel. You can also select a panel where you want to add a new panel.
2 Select Add Panel from the Panel menu.
-or-
Click
A new panel is added.
New panels have the default contents of a HOME, DEVICE or MACRO
GROUP panel. ProntoEdit loads default panels from one of these CCFs:
home.ccf
device.ccf
macro.ccf
Note
To add an empty panel, press and hold SHIFT while adding the panel.
in the toolbar.
Changing the default panels
1 Load one of t he f ollowing CCF s:
home.ccf to change the default Home panel;
device.ccf to c hange the d efault de vice panel;
macro.ccf to change the de f ault macro panel.
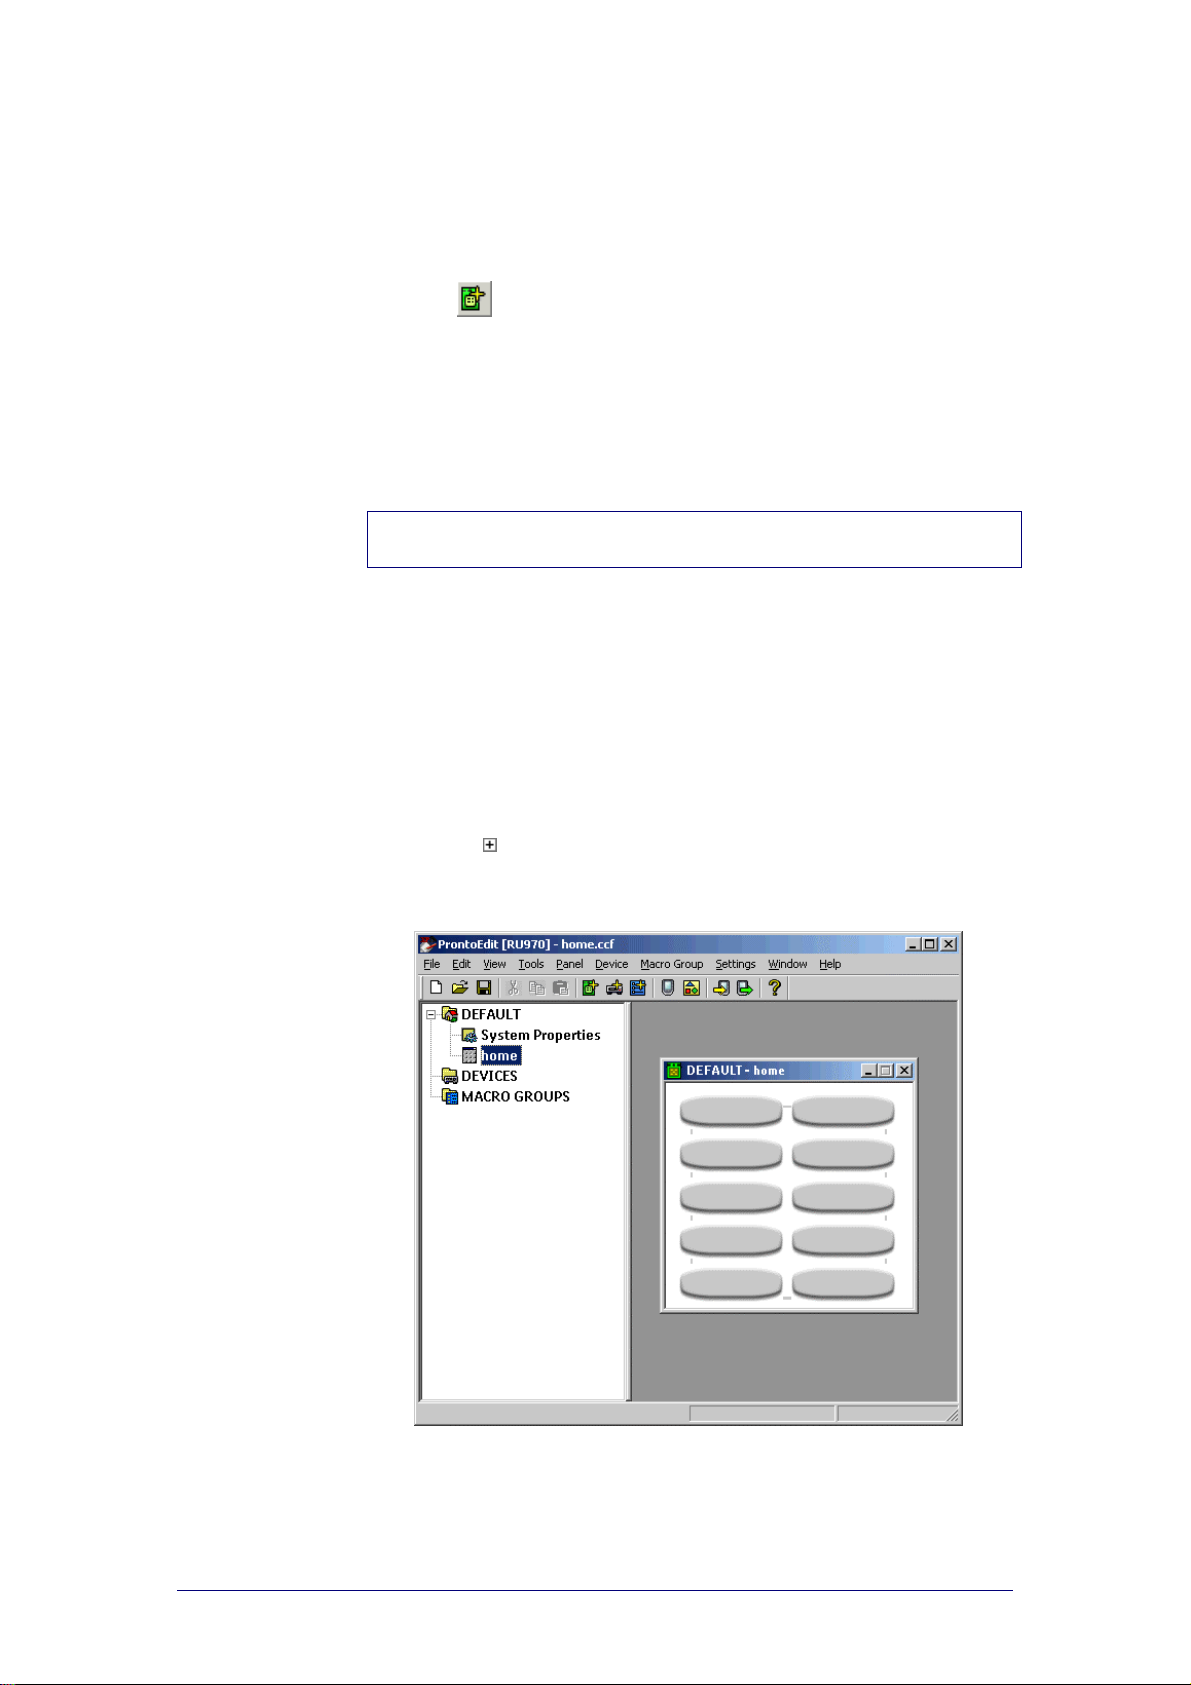
The selected CCF is loaded in ProntoEdit. HOME has been renamed into
DEFAULT in the default panel CCFs.
2 Click on
3 Open the panel.
The panel is called home, device or macro depending on the default
CCF you loaded.
next to DEFAULT in the Configuration view.
PHILIPS Page 25 of 85
Page 26
ProntoEdit
Version 4 - User Manual Basic CCF Actions
4 Modify the panel as you want.
5 Save the modified CCF with the same name.
ProntoEdit ignores all but the first DEFAULT pa n el of a default pan el
CCF.
6 Restart ProntoEdit.
The next time you add a panel ProntoEdit uses the modified default panel
as you defined it.
Warning
Do not delete macro.ccf. If you delete this file you canno t add macro s to the
device anymore.
Note
The default macro panel will not only be used in ProntoEdit to add a default
macro panel, but also on your Pronto to add a new macro group.
When adding devices on your Pronto, templates are used. See “Changing a
device into a template” on page 23 for more information abo ut te mp late s.
Creating your own Home panels
By default, Pronto’s Home panels contain aliase s to all devic e s in the Device
menu on the Pronto. The Pronto automatically adds aliase s to all devices on
the Home panels if all of the following conditions are met:
There is at least one Home panel.
The first Home panel is named ‘home’ (all lowercase).
The Home panels are write-protected.
If you want to create your own Home panels, you have to make sur e that at
least one of these conditions is not met so that the automatic alias creation is
disabled.
Rename the first Home panel
Rename the first Home panel into something other than ‘home’
(lowercase), for instance to ‘Main’.
See ‘Renaming a panel’ on p. 24.
If you rename the first Home panel to ‘Main’ and leave the ‘wr iteprotected’ option enabled, the Pr onto will boot up to the first Home
panel.
If you don’t rename the first Home panel ProntoEdit will automatically
add aliases to all devices on the Home panels. ProntoEdit will generate its
own Home panels based on your buttons.
Remove the write-protection of the Home panels
Deselect “The Home panels are write-protected” check box in the
‘System Properties’ of the Home p a nels.
If you remove the ‘write-protectio n’ of the Ho me panels, the Pronto will
boot up to the first Home panel of the first device, no matter what the
Home panel is labeled. ProntoEdit will not add alias es automatica lly .
Note
When creating your own Home panel buttons , make sure to ad d alias e s to the
devices and to create a page jump to a panel in the device.
PHILIPS Page 26 of 85
Page 27
ProntoEdit
Version 4 - User Manual Basic CCF Actions
Creating Frames and Buttons
Frames are primarily used for grouping buttons and other frames. When you
group frames and buttons in a parent frame it is much easier to arrange your
panels and to move groups of buttons, such as a numeric pad.
Next to grouping, frames also enhance the visual design of your panels.
Frames can be used as backgrounds as they contain a default background
color. You can insert a bitmap to change the look and shape of the frame. To
create your own frames see ‘Using the galle ry’ on p. 30 and ‘Using Bitmaps’
on p. 33.
Buttons can contain actions that are executed when you tap them. They
contain a default text and background colo r for each of four different states.
You can insert a bitmap to change the look and shape of the button. To
create your own buttons see ‘Using the gallery’ on p. 30 and ‘Using Bitmaps’
on p. 33.
Note
Press and hold the SHIFT button to select sever al butto ns at the same time.
You can edit the buttons you selected at once.
Adding frames to a panel
1 Open a panel to which you want to add a frame.
2 Select Add Frame from the Panel menu.
-orRight-click the panel and select Add Frame from the context menu.
A default frame is added.
Adding buttons to a panel
1 Open a panel to which you want to add a button.
2 Select Add Button from the Panel menu.
-orRight-click the panel and select Add Button from the context menu.
A default button is added.
Resi zing frames and butt ons
Note
Frames and buttons can only be resized if they do not have any bitmaps. See
“Using Bitmaps” on page 33 for more details about the size of frames and
buttons.
1 Click the frame or button you want to resize .
A red frame appears around the selected frame or button.
2 Move the pointer over the edge of the frame or button until the Resize
cursor with the desired orientation appears.
3 Move the Resize cursor to drag the edge and resize the frame or button.
The status bar shows the current size of the selected frame or button.
–orUse the arrow keys to resize the frame or button:
Press and hold SHIFT to move the top or left edge.
Press and hold CTRL to move the bo tto m or rig ht ed ge .
Press the SPACE bar in combination with SHIFT or CTRL and the
arrow keys to resize an edge faster.
PHILIPS Page 27 of 85
Page 28
ProntoEdit
Version 4 - User Manual Basic CCF Actions
Moving frames and buttons in a panel
1 Open the panel with the frame or button you want to move.
2 Click the frame or button you want to move.
A red frame appears around the selected frame or button.
3 Drag and drop the selected frame or button to its new loc a tion.
The status bar shows the current location of the selected frame or
button.
-orUse the arrow keys to move the frame or button.
To move it faster, press and hold the SPACE bar while movi ng the frame
or button with the arrow keys.
Copying frames and buttons
1 Open the panel with the frame or button you want to copy.
2 Press and hold CTRL and select the frame or button you want to copy.
Drag and drop the selected frame or button where you want to copy it.
If you want to copy a frame or button to another pa ne l, open the p ane l
to which you want to copy a frame or button.
-or-
1 Open the panel with the frame or button you want to copy.
2 Select the frame or button you want to copy.
3 Select Copy from the Edit menu.
The selected frame or button is copied onto the clip bo ard.
4 Go to the location where you want to copy the panel to.
5 Select Paste from the Edit menu.
The selected frame or button is pasted.
Note
ProntoEdit does not suppor t copying fro m one running copy of ProntoEdit to
another.
When copying frames with a bitmap, the bitmap will also be copied. When
copying buttons with a bitmap, the bitmap and the action list will also be
copied. See “Using Bitmaps” on page 33 for more info rmation about bitmaps.
Removing frames and buttons from a panel
1 Open the panel with the frame or button you want to remov e .
2 Click the frame or button you want to remove .
A red frame appears around the selected frame or button.
3 Press DELETE.
The selected frame or button is removed.
PHILIPS Page 28 of 85
Page 29
ProntoEdit
Version 4 - User Manual Basic CCF Actions
Grouping frames or buttons
You can group frames or buttons in a parent frame. When you group frames
and buttons it is much easier to arrange the frames and buttons in a pane l.
For example:
1 Open a panel and select the frame you want to use as the parent.
2 Press ALT + A to add a frame.
A child frame is added.
-orPress ALT + K to add a button.
A child button is added.
You can create a complete structure of grouped frames and buttons.
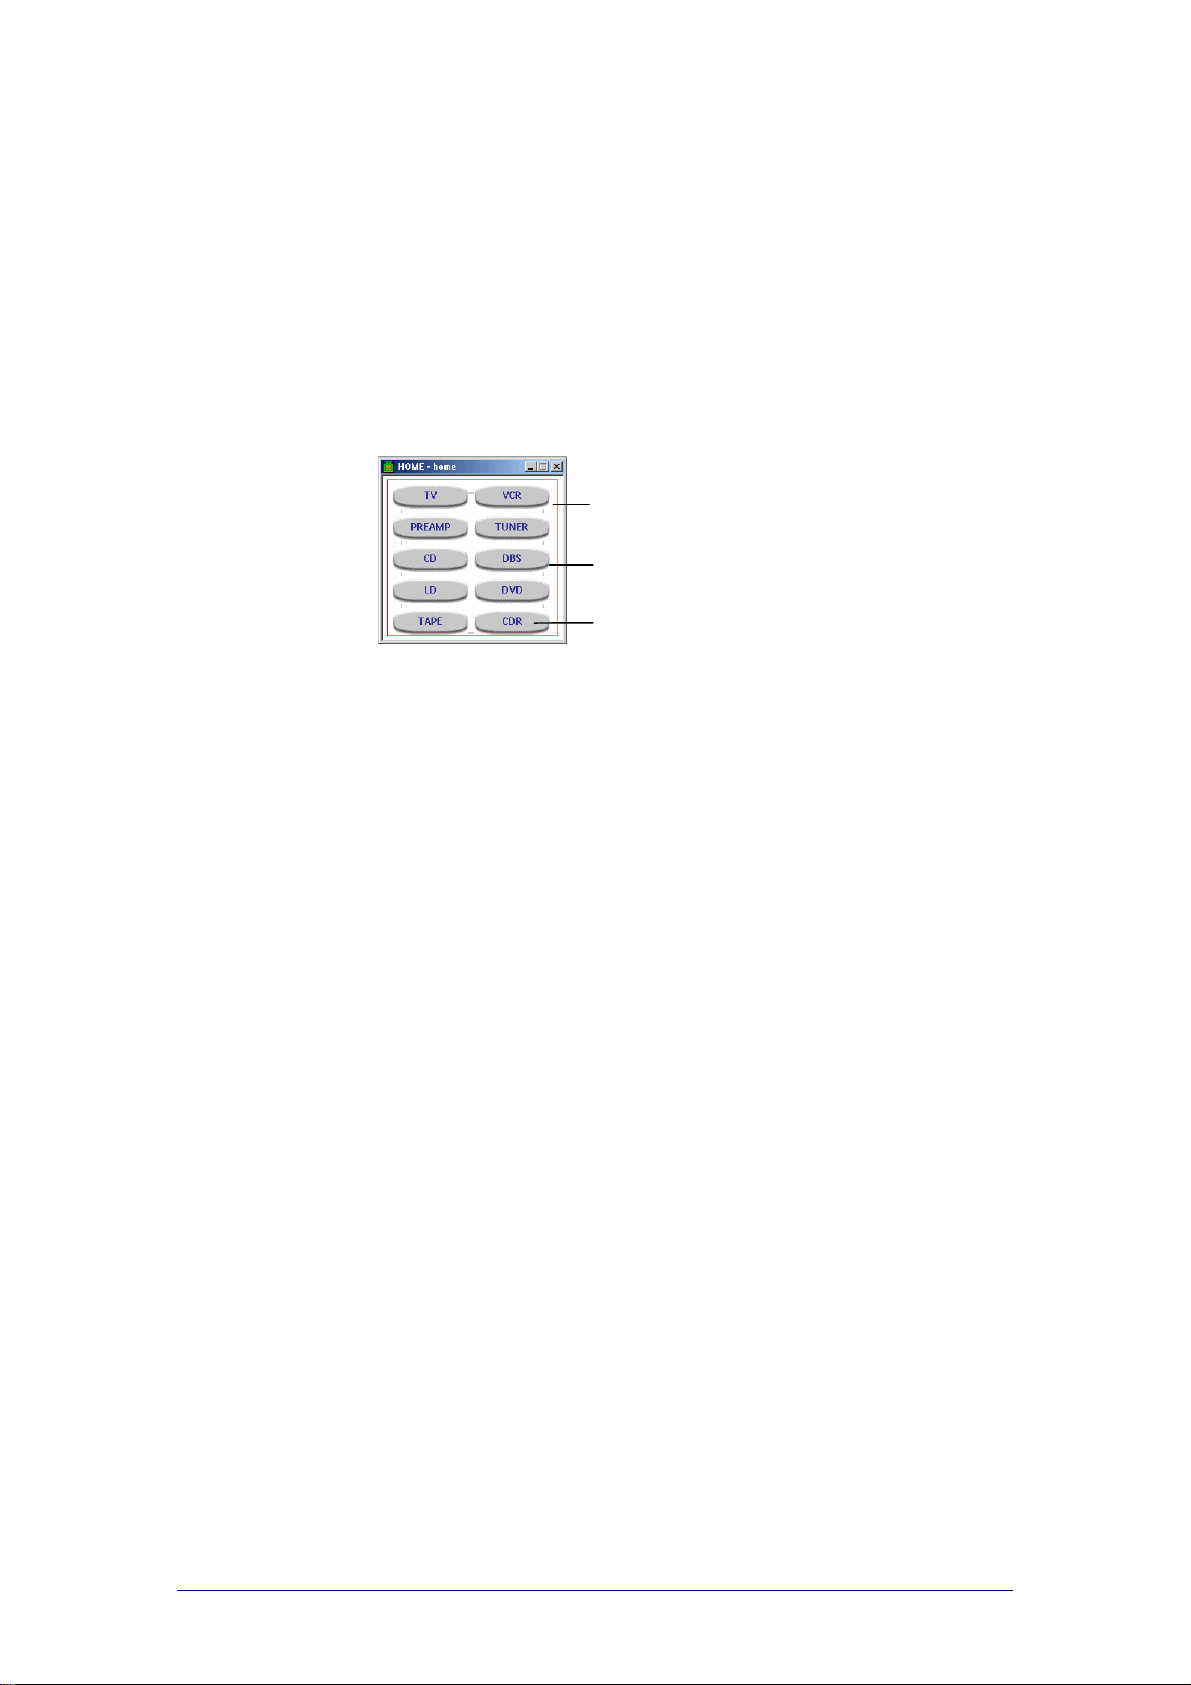
For example, the Home panel in ph1_RU970_default.ccf:
Parent
First child
Sibling of the first child
Parent: a frame on level 1;
First child: a frame or a button on level 2;
Sibling: other frames and buttons on level 2.
You can create a parent on every level (level x). The firs t child and siblings
are created on the level x+1. This means that a frame or a button can be a
first child or sibling and a parent at the same time.
Selecting frames and buttons in a panel
Frames and buttons in a panel are selectable. With grouped frames and
buttons it is sometimes difficult to select the correct frame or button.
Click the frame or button you want to selec t.
The Move cursor appears: you have selected a parent frame.
The Move cursor and a red selection frame appear: you have
selected a frame or button.
Select Select from the Panel menu.
-orRight-click in the panel and select Select from the context menu.
You can choose the following opti on s:
Parent: select a frame with the grouped frames and buttons;
First Child: select the grouped frame or button;
Next Sibling: jump to the next frame or button;
Previous Sibling: jump to the previous frame or button.
Press ALT + O to select the parent and ALT + C to select the first child.
Press TAB to select the next sibling of the selected frame or button.
Press SHIFT + TAB to select the previous sibling of the selected frame
or button.
Press ESC to deselect the current selection.
Use the zoom feature (select Panel Zoom from the Panel menu or by
right-clicking) to get a better vie w of what yo u are selecting.
PHILIPS Page 29 of 85
Page 30
ProntoEdit
Version 4 - User Manual Basic CCF Actions
Using the Gallery
Instead of adding default frames and bu t t on s (wi t h a gray background and
without bitmaps), you can add frames and buttons from a gallery. In that
case you add a frame or a button with a bitmap. A gallery contains the
bitmaps for frames and buttons used in a CCF.
Displaying the gallery
1 Select Gallery from the Tools menu.
-or-
Click
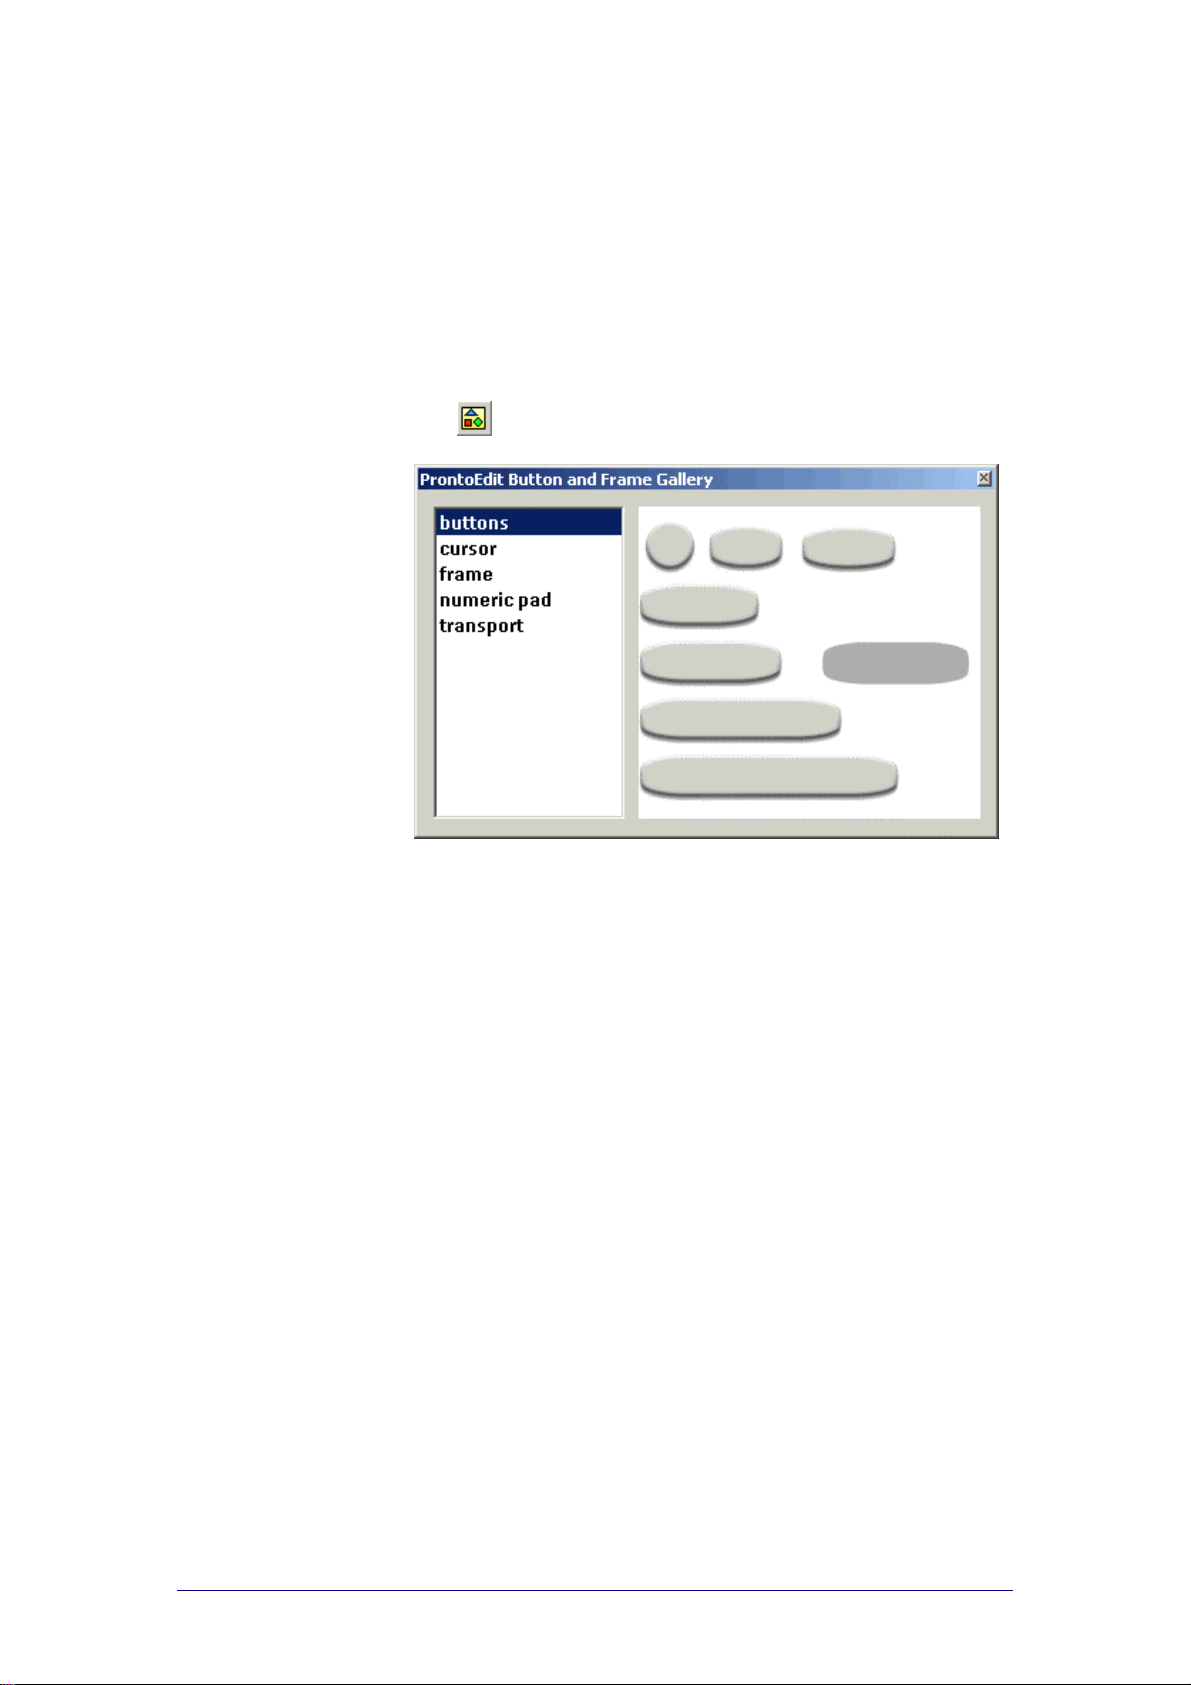
The ‘ProntoEdit Button and Frame Gallery’ window appears.
2 Select a group of frames and buttons in the list on the left side of the
window.
The frames and buttons in the group are displayed o n the right s ide of
the window.
in the toolbar.
Adding frames or butto n s to the panel
1 Open the panel to which you want to add a frame or button.
2 Click the frame or button you want to add in the ‘ProntoEdit Button and
Frame Gallery’ window.
If the frame or button you want to add is grouped, clicking that fr ame or
button will select the parent frame.
Press and hold SHIFT when clicking the frame or button to select only
the first child or the sibling.
3 Drag and drop the selected frame or button to the pane l wher e you w ant
to add it.
A selected frame or button is added.
PHILIPS Page 30 of 85
Page 31
ProntoEdit
Version 4 - User Manual Basic CCF Actions
Selecting another gallery
If you select a CCF as a gallery, you can use frames and buttons from other
CCFs.
Note
For each Pronto type, a CCF is provided that contains fr ames and b utto ns
designed specifically for the type . The CCF is sto re d in the fold e r for the
specific Pronto type with the filename g alle ry.ccf, as well as in the Galleries
folder with as filename the name of the Pronto type.
1 Select Select Gallery from the Tools menu.
The ‘Select Gallery’ window appears.
2 Browse to the folder where the CCFs are stored.
3 Select the CCF you want to use.
4 Click Open.
The CCF is selected as a gallery.
Creating your own g allery
You can create your own gallery by modifying the frames and buttons of a
CCF.
Note
For each Pronto type, a CCF is provided that contains fr ames and b utto ns
designed specifically for the type . The CCF is sto re d in the fold e r for the
specific Pronto type with the filename ga lle ry .c cf , as well as in the Galle ries
folder with as filename the name of the Pronto type.
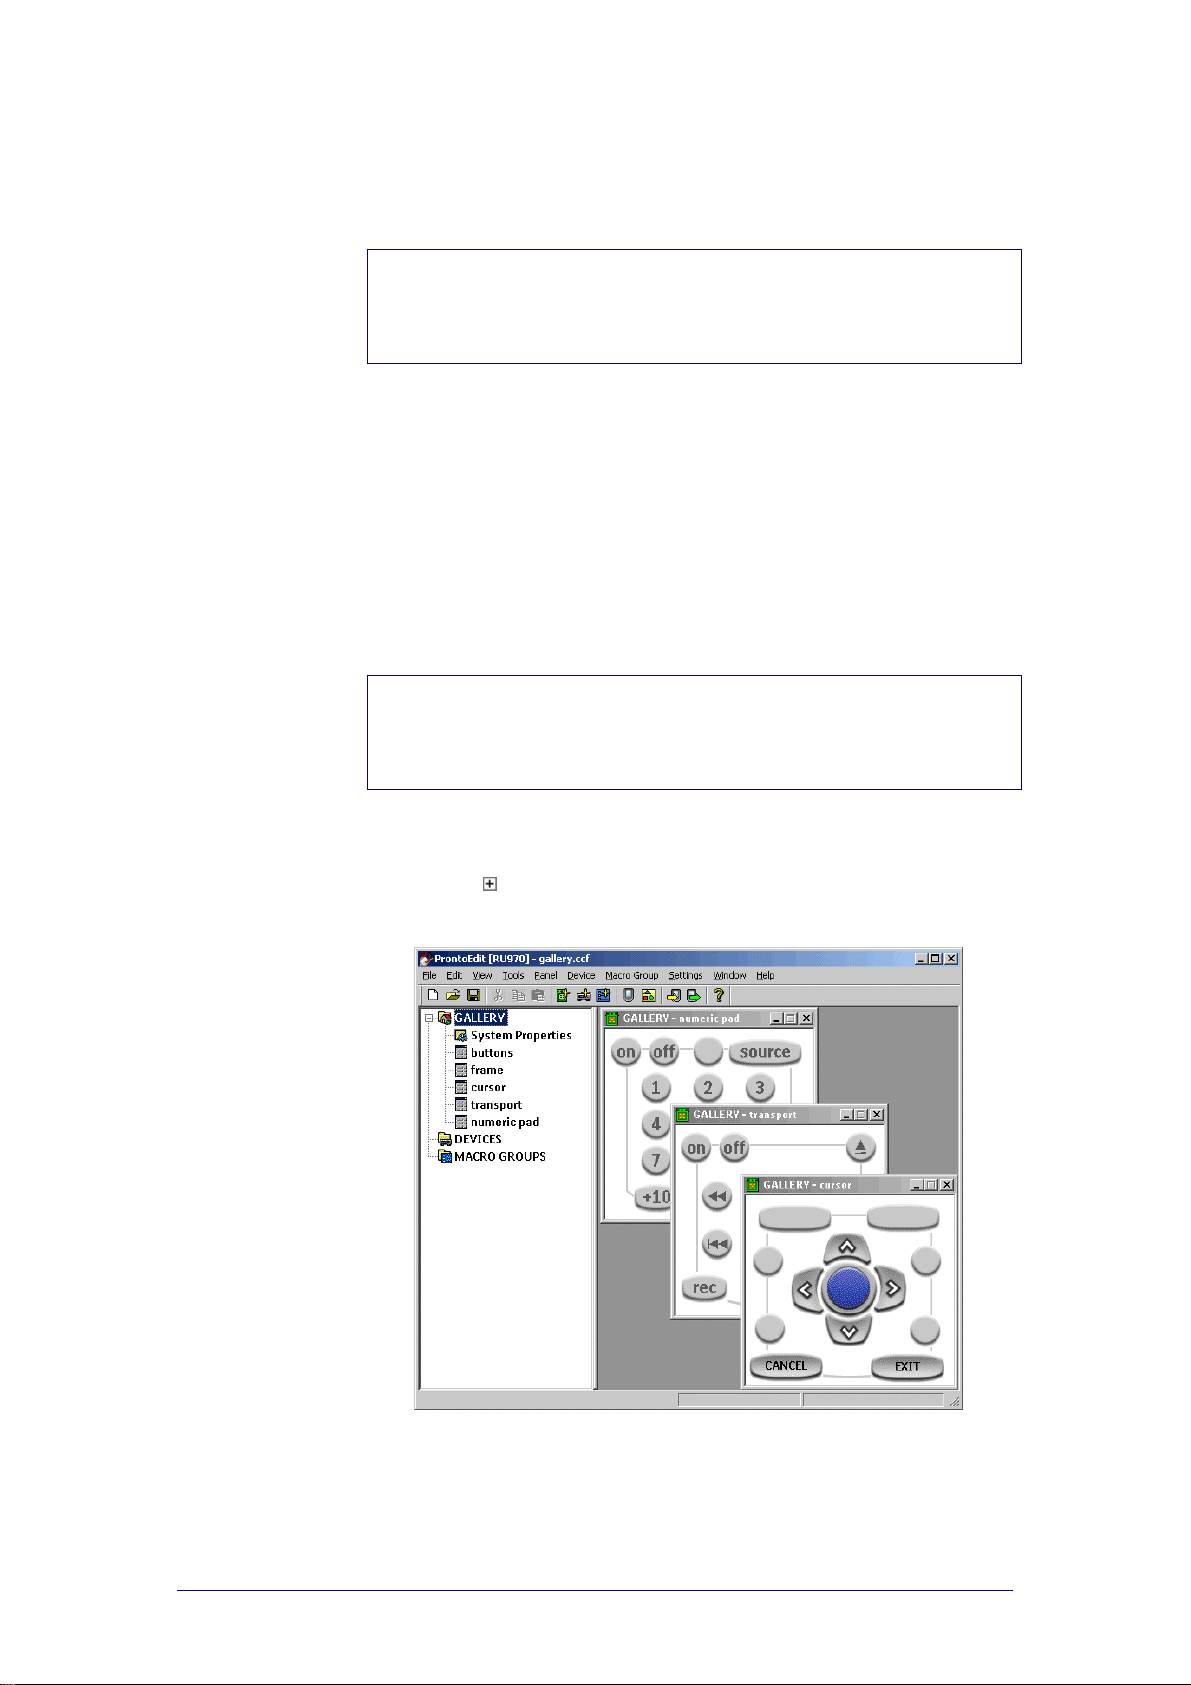
1 Load gallery.ccf into ProntoEdit.
The selected CCF is loaded in ProntoEdit. HOME has been renamed into
GALLERY in gallery.ccf.
2 Click on
3 Open the panel with the frames, buttons and bitmaps you want to
modify.
next to GALLERY in the Configuration view.
PHILIPS Page 31 of 85
Page 32

ProntoEdit
Version 4 - User Manual Basic CCF Actions
4 Modify the panels with the frames, buttons and bitmaps as you want.
5 Save the modified CCF back as gallery.ccf.
ProntoEdit ignores all but the GALLERY panels of gallery.ccf.
6 Restart ProntoEdit.
The next time you select a gallery you can use the frames and b utto ns
from the modified gallery.
PHILIPS Page 32 of 85
Page 33
ProntoEdit
Version 4 - User Manual Basic CCF Actions
Using Bitmaps
Bitmaps or icons can be used to change the look of frames and buttons .
ProntoEdit can load any Windows bitmap file with 1, 4 or 8 bits per pixel and
with maximum dimensions of 240 by 219 pixels (the size of a panel).
ProntoEdit will automatically convert and optimize a color bitmap using the
four grayscale colors for black&white CCFs o r th e web-safe palet te of 216
colors for color CCFs. This allows an ide ntic al display of the bitmaps on all
systems.
Every frame or button can have its own unique icon. A frame c a n have only
one icon. A button can have up to four icons, one for each of its states.
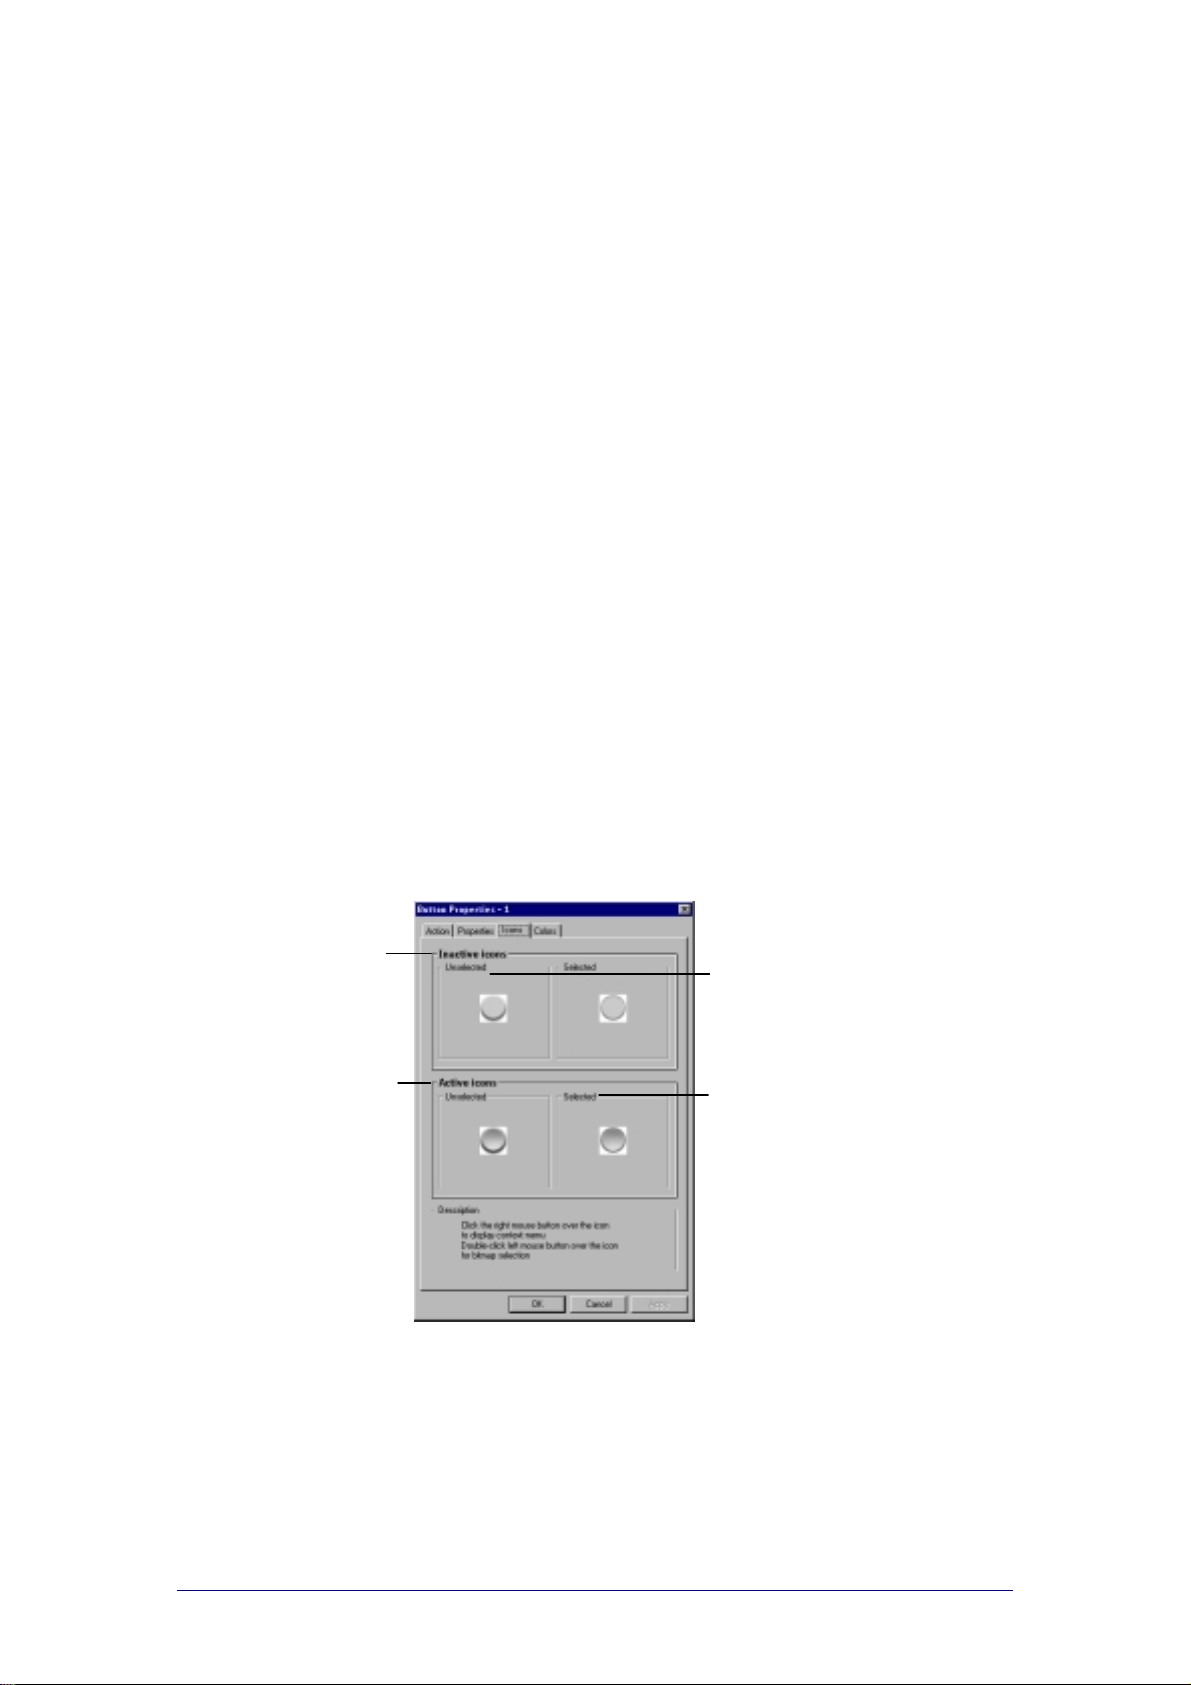
The four states of a button are:
inactive and unselected;
inactive and selected;
active and unselected;
active and selected.
Bitmaps take up memory and having many different bitmaps means less
space for other data, like IR codes. You can minimize the memory bitmaps
require by reusing bitmaps, where possibl e, on your frames and butt on s .
ProntoEdit checks for equal bitmaps when saving a CCF by looking at the
actual bitmap contents, and only saves unique bitmaps.
A button is inactive when
its action list is empty.
It is not visible in Use
mode, only in Learn mode
and Label mode.
A button is active when one
or more actions are
programmed.
Inserting bitmaps
1 Select the frame or button and select Properties from the Edit menu.
-orDouble-click the frame or button.
The ‘Frame properties’ or ‘Button properties’ window appears.
2 Select the Icons tab.
A button is unselected when it can
be tapped.
A button is selected when you
tap on it on the Pronto.
3 Right-click the icon and select Load from the context menu.
-orDouble-click the icon.
The ‘Open’ window appears.
PHILIPS Page 33 of 85
Page 34

ProntoEdit
Version 4 - User Manual Basic CCF Actions
4 Browse to the folder where the bitmaps are stored and select a new
bitmap.
5 Click OK.
The new bitmap is displayed.
6 Click OK to accept the new bitmap.
-orClick Cancel to kee p the default frame or button.
Notes
Bitmaps are displayed in the ‘Frame Properties’ or ‘Button Properties’ window
with the same size as on the panel.
When bitmaps are too large and do not fit the icon area, they are sca led.
Click the bitmap to see what the size of the bitmap will be on the panel.
The size of a frame on the panel is defined by the bitmap.
The size of a button on the panel is defined by the smallest of the bitmaps
used for the different states.
Saving bitmaps
You can save the bitmaps to use them for other purp oses, in other CCFs or to
edit them.
1 Select the frame or button and select Properties from the Edit menu.
-orDouble-click the frame or button for which you want to insert a bitmap.
The ‘Frame properties’ or ‘Button properties’ window appears.
2 Select the Icons tab.
3 Right-click in the group box and select Save from the context menu.
The ‘Save as’ wi ndow appears.
4 Browse to the folder where you want to sa ve the b itmap .
5 Type the name of the bitmap in the File Name text field.
6 Click Save.
The bitmap is saved in the folder you selected.
Copying bitmaps from one frame or button to another
You can insert bitmaps for the existing frames and buttons in y our CCF one
by one as described above. But when you want to use a bitmap for several
frames or buttons you can easily do this by copying all bitmaps from one
frame or button to another.
1 Open the panel with the frame or button to which you w a nt to copy
bitmaps.
To copy bitmaps from a frame or a butto n in another panel, open the
To copy bitmaps from a frame or a butto n in the ga lle ry, open the
2 Press and hold ALT and select the frame or the button from which you
want to copy the bitmaps.
3 Drag and drop the selected frame or button to w her e yo u want to copy
the bitmaps.
When you drag and drop the frame or button holding dow n ALT, the
label icons appears next to the cursor. This indic a tes yo u are o nly
copying the bitmaps on the frame or button and not the frame or button
itself.
panel.
gallery.
See “Selecting frames and buttons in a panel” on page 30 for
instructions on how to open the ga lle ry.
PHILIPS Page 34 of 85
Page 35

ProntoEdit
Version 4 - User Manual Basic CCF Actions
Modifying bitmaps
If you want to replace a bitmap that is used on several frames or buttons
(even in different panels) by another bitmap, yo u do not have to c hange it
manually. With the Bitmap Picker you can change the bitmaps on all frames
or buttons at once.
1 Select Modify Bitmap from the Tools menu.
The ‘Bitmap picker’ window appears.
2 Double-click the bitmap you want to modify .
The ‘Open’ window appears.
3 Browse to the folder where the bitmaps are stored and select a new
bitmap.
4 Click Open.
The new bitmap is displayed in the panel in the ‘Bitmap picker ’ window.
5 Click OK.
All original bitmaps are replaced by the selected bitmap.
-orClick Cancel to keep the orig inal bitmap .
PHILIPS Page 35 of 85
Page 36
ProntoEdit
Version 4 - User Manual Basic CCF Actions
Using Grids
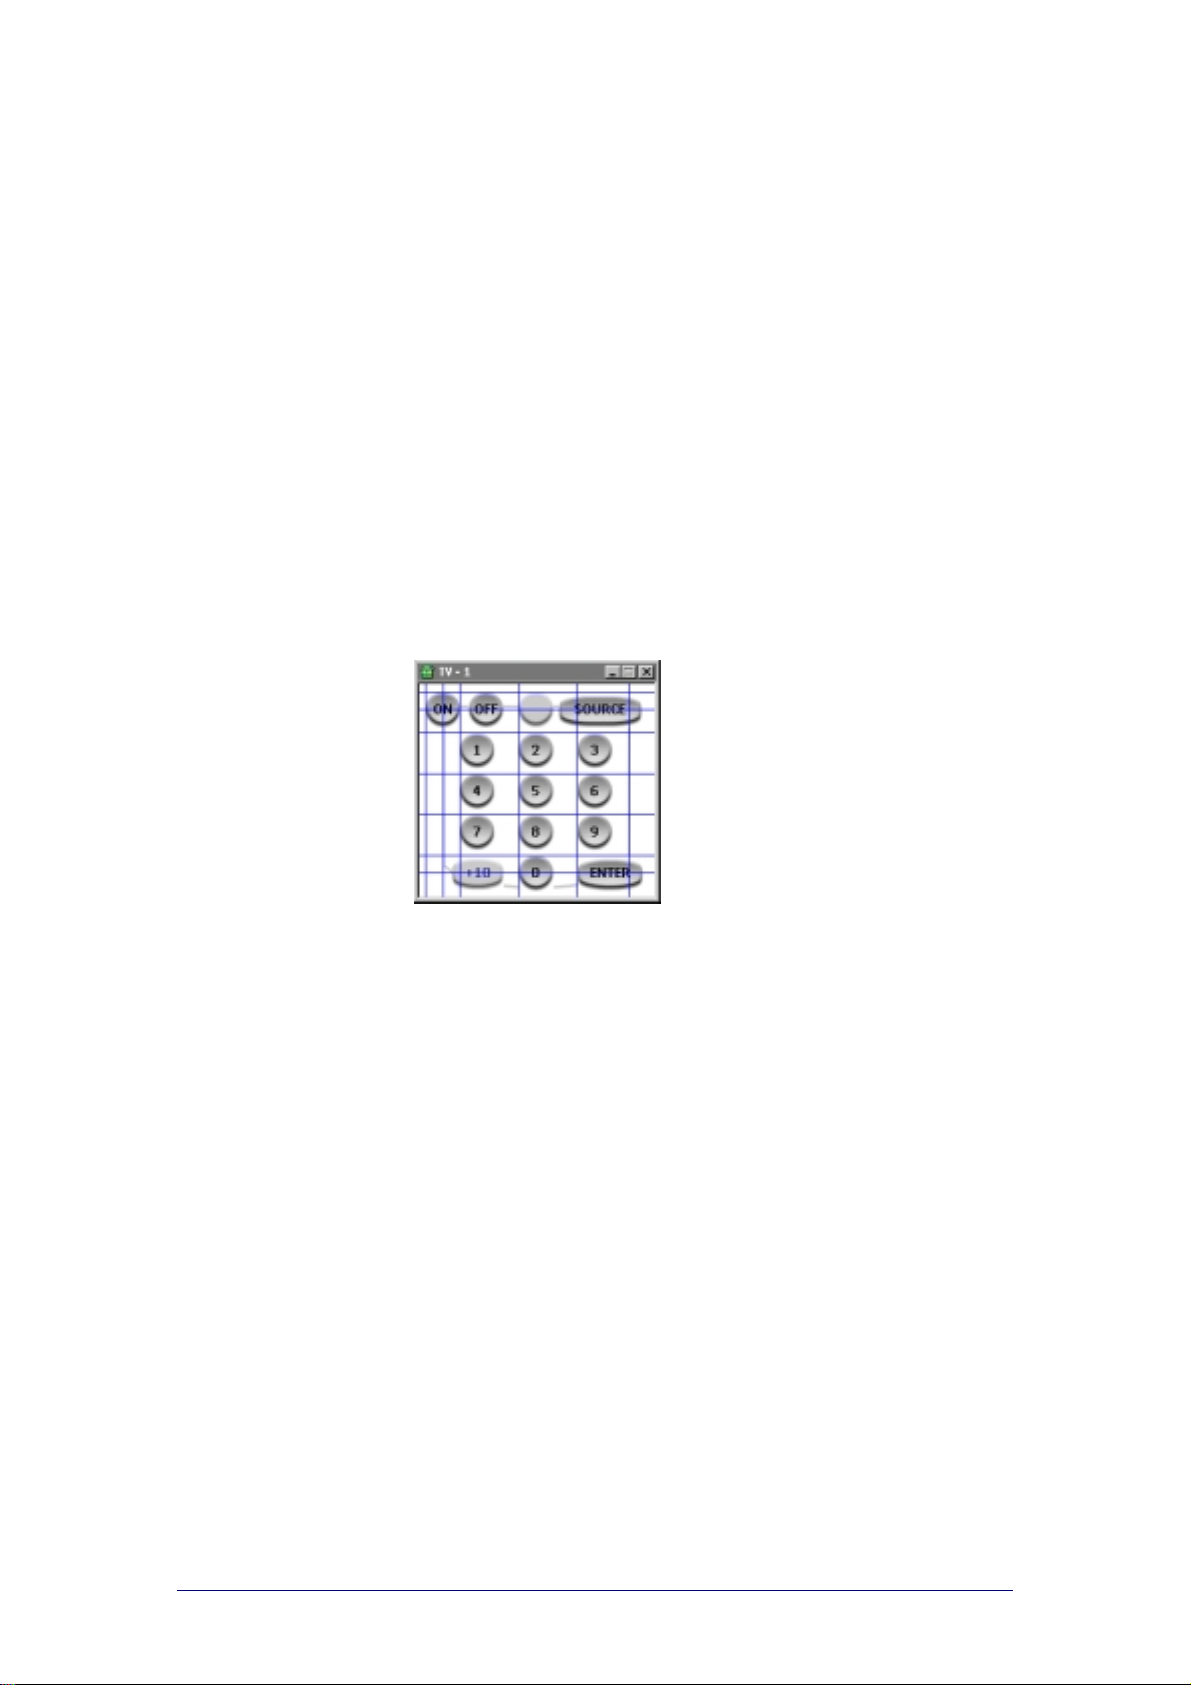
Grids are a helpful tool to arrange frames and buttons in a panel. A grid is a
set of up to 64 horizontal and 64 vertical line segments. The grid line s ar e
used to position and outline frames and buttons.
ProntoEdit stores 10 different default grids. The default grid is automatically
assigned to a panel when it is opened.
You can use the grid settings on two levels:
When you use the options in the context menu you change the grid
settings per panel.
When you use the options in the Settings menu you change the grid
settings globally for all panels.
Displaying a grid
To display the grid for one panel
1 Open the panel.
2 Right-click in the panel, select Grid > Display Grid from the context
menu.
Blue grid lines appear.
3 Position the frame or button as you want using the grid lines.
To change the position of the grid lines, see “Editing a grid” on page 37.
To change the way the frames and buttons snap to the grid lines, see
“Snapping to a grid” on page 38.
To display the grid for all panels
Select Display Grid from the Settings menu.
For every panel you open the grid will be displayed.
Selecting a grid
1 Open the panel.
2 Right-click in the panel, select Grid > Select Grid from the context
menu.
3 Select one of the grids (grid 0 to grid 9) you want to use.
The selected grid appears.
If you do not see the blue grid lines you have to display the grid as
described in “Displaying a grid” on page 36.
PHILIPS Page 36 of 85
Page 37
ProntoEdit
Version 4 - User Manual Basic CCF Actions
Editing a grid
1 Open the panel and display the grid of the panel as described in
“Displaying a grid” on page 36.
The option Edit Grid is only enabled if the grid is displayed.
2 Right-click in the panel and select Grid > Edit Grid from the context
menu.
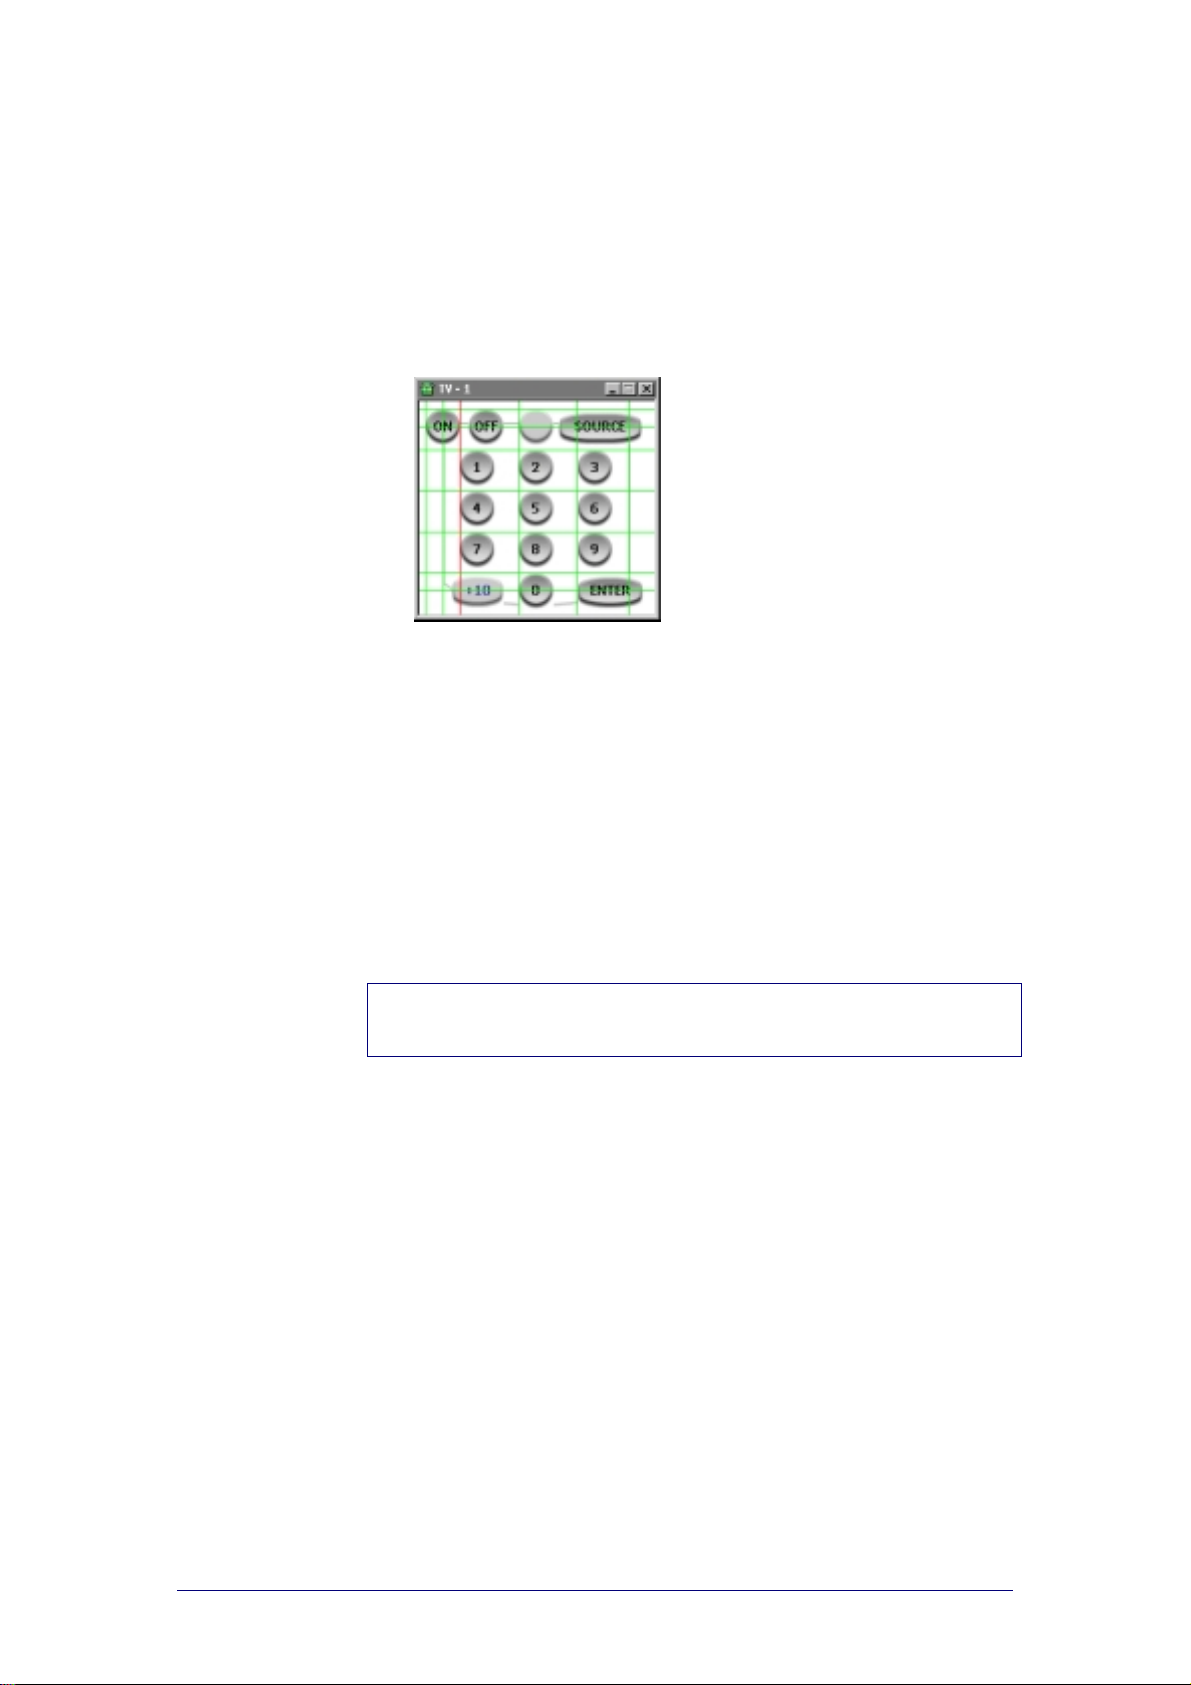
The blue grid lines change into green grid lines.
3 Select the grid line you want to edit.
The selected grid line turns red.
4 Edit the grid:
Drag the selec ted gr id line and move it to the position you want.
Press CTRL while dragging to add a grid line.
Press CTRL w hile pres sing the arrow keys to add a grid line at the
same distance of two other gri d lines.
Press DELETE to remove a grid line.
Every grid must contain at least one horizontal and one vertical grid
line. Therefore, the last remaining horizo ntal and ver tic al grid line
cannot be deleted.
Press SHIFT and use the mouse or the arrow keys to move an
entire grid.
When you put a grid line on top of another grid line and deselect the
grid line, the two grid lines are merged.
Note
Positioning frames and buttons is not possible in E dit Grid mode. You have to
disable this mode and work in Display Grid mode.
Creating an evenly spaced grid
1 Open the panel and display the grid of the panel as described in
“Displaying a grid” on page 36.
The option Auto Grid is only enabled if the grid is displayed.
2 Right-click in the panel, select Grid > Auto Grid from the context menu.
The ‘Auto Grid Settings’ window app e ar s .
3 Select the number of pixels from the Horizontal Spacing and Vertical
Spacing drop-down list.
The distance between the grid lines is defined.
4 Click OK.
The grid lines you defined are displayed.
PHILIPS Page 37 of 85
Page 38

ProntoEdit
Version 4 - User Manual Basic CCF Actions
Copying a grid from one panel to another panel
The grids can be modified per panel without affe c ting the default grids. You
have to make use of the global grid settings to copy the gr id from one panel
to another:
First you set the current grid of a panel as the default grid.
Then you assign that default grid to another panel.
To copy the grid
1 Open the panel with the grid you want to copy to another panel.
2 Select Set Default Grid from the Settings menu.
3 Select any unused grid as default grid, for example grid 9.
The following message appears: “Cop ied current grid of active panel into
default grid 9”.
4 Click OK.
5 Open the panel to which you want to assign the grid.
6 Right-click in the panel, select Grid > Select Grid from the con t ext
menu.
7 Select grid 9.
The default grid 9 is displayed in the active panel.
Snapping to a grid
With grid snapping the locations of the frame s and butto ns are res tric te d to
the grid locations. These grid locations are situated where the grid lines
intersect. Grid snapping affects:
moving a frame or a button;
dragging and dropping a frame or a button from the gallery into a panel
or from one panel to another;
resizing a default frame or button.
To activate grid snapping
1 Open the panel with the frames and buttons you want to positio n.
2 Right-click in the panel, select Grid > Snap to Grid from the context
menu.
By default ProntoEdit snaps the top left corner of a frame or button to
the nearest grid location.
3 Right-click again, select Grid > Snap Mode from the context menu.
Select one of the following opti on s to change the way the frames and
buttons snap to the grid locations:
Top Left;
Top Right;
Bottom Left;
Bottom Right;
Center.
4 Move or copy the frames and buttons.
They will snap to the nearest grid location depending on the Snap Mode
you selected.
PHILIPS Page 38 of 85
Page 39

ProntoEdit
Version 4 - User Manual Basic CCF Actions
Resetting all grids
1 Select Reset All Grids from the Settings menu.
The following message appears: “Are yo u s ure yo u want to rese t to the
factory default grids?”
2 Click OK to reset all grids you modified and customized to their default
pattern.
-orClick Cancel to keep the modified grids.
Saving grids
Grids are not stored in CCFs. You can export or impor t the default grids to or
from a text file. This allows you to keep your grids with yo ur CCFs and makes
it easier to make changes to your CCFs afterwards.
Select Export Grids from the File menu to export the grid to a text file.
Select Import Grids from the File menu to import the grid from a text
file.
PHILIPS Page 39 of 85
Page 40
ProntoEdit
Version 4 - User Manual Basic CCF Actions
Viewing and Testing a CCF
Previewing with
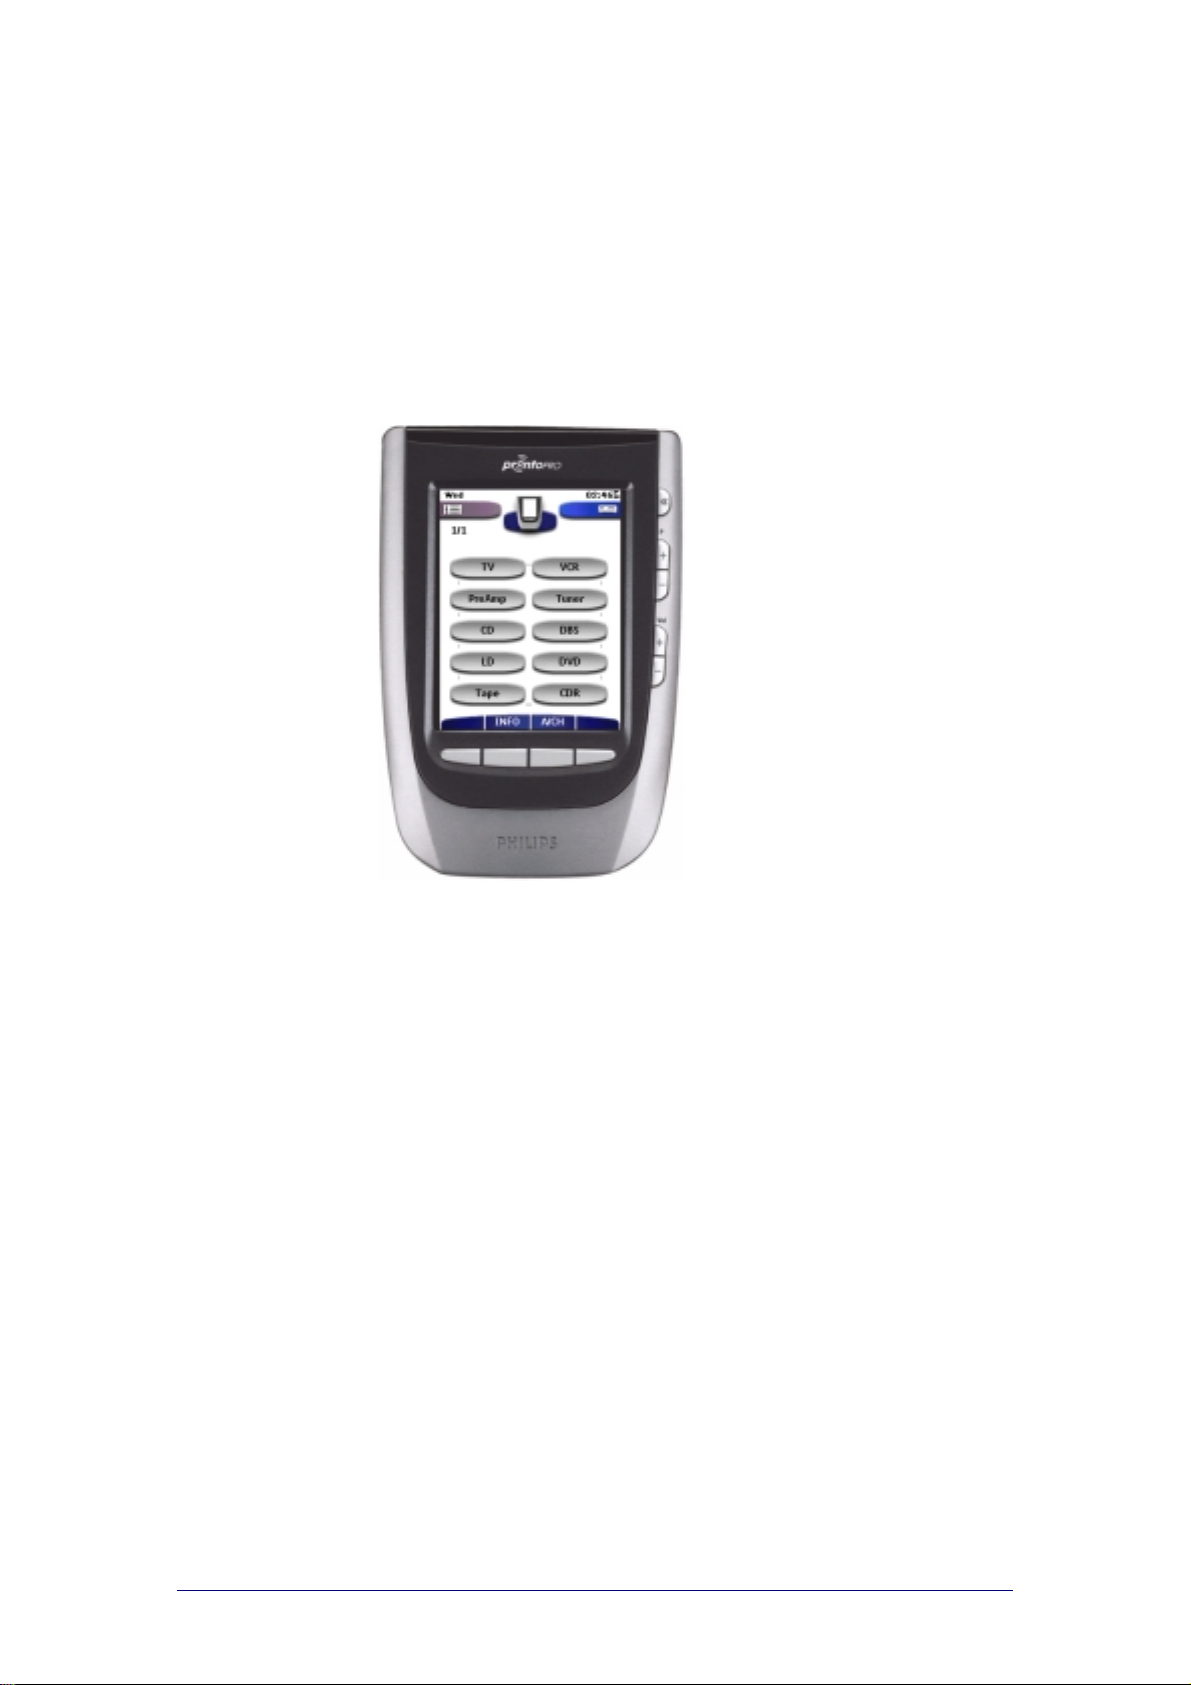
Though part of the ProntoEdit package, ProntoEmulator is a separate
application that emulates every aspect of your Pronto.
You can use ProntoEmulator to tes tdr ive your CCF without the need to
download it to your Pronto. At any time you can launch ProntoEmulator to
preview the CCF you created in ProntoEdit.
ProntoEmulator
If you connect the Pronto to your compute r us ing the Pro nto serial cable:
You can learn the ProntoEmulator.
You have to switch the ProntoEmulator to LEARN Mode and the Pronto to
USE Mode. The ProntoEmulator can now learn commands without
uploading the entire CCF from your Pronto. Please refer to the Pronto
Owner’s Manual for more information on learning commands.
You can learn the Pronto.
You have to switch the Pronto to LEARN Mode and the ProntoEmulator to
USE Mode. The Pronto can now learn commands without downlo ading the
entire CCF into your Pronto. Please ref er to the Pro nto Owner’s Manual
for more information on learning commands.
You can send IR commands from the ProntoEmulator.
If both ProntoEmulator and the Pronto are in USE Mode, you can use
ProntoEmulator to test commands directly on your devices.
PHILIPS Page 40 of 85
Page 41
ProntoEdit
Version 4 - User Manual Basic CCF Actions
Launching
Select Run Emulator from the Tools menu.
-or-
Click
ProntoEdit saves the current configuration. The ProntoEmulator is
launched and the CCF is displayed.
The speed of the ProntoEmulator depends on your PC and the CCF. It may
differ from the speed on your Pronto.
When you right-click on the ProntoEmulator a context menu is displayed with
the following options:
Help: to explain how to use the hard keys on the ProntoEmulator.
About: to provide information about the version of the ProntoEmulator.
Transparent: to change the shape of ProntoEmulator ’s window into a
rectangle. Disabling the opt i o n Transparant makes the ProntoEmulator
slightly faster.
Minimize: to minimize the ProntoEmulator’s window and add a program
button to the Windows
Close: to close the ProntoEmulator.
Making a screenshot in
Press the PRINT SCREEN button.
The currently displayed screen of ProntoEmulator is saved as a Windows
bitmap file.
A message appears with the location where the screenshot is saved. If
ProntoEdit is installed in C:\Progr am File s \, the scre e ns hots will be saved
in C:\Prontoscreens.
ProntoEmulator saves up to 100 screenshots before it starts using the same
filenames again.
ProntoEmulator
in the toolbar.
TM
taskbar.
ProntoEmulator
PHILIPS Page 41 of 85
Page 42
ProntoEdit
Version 4 - User Manual Basic CCF Actions
Downloading a CCF into Your Pronto
1 Load a CCF into ProntoEdit (see “Loading a CCF into ProntoEdit ” on page
16).
-orUpload a CCF from your Pronto (see “Uploading a CCF from Your Pronto”
on page 17).
2 Plug one end of the Pronto serial cable in the ser ial po rt on your Pronto.
3 Plug the other end of the Pronto serial cable in the serial port o n yo ur
computer.
4 Select Download to RC device from the File menu.
-or-
Click
ProntoEdit sends the CCF to the Pronto over the serial cable.
If the resulting CCF does not fit in your Pronto’s availab le memory, ProntoEdit
will tell you it is too large and cancel the download. A possible so lution is to:
delete some elements;
reuse bitmaps on your frames and buttons, where possible. ProntoEdit
only saves unique bitmaps.
use aliases (shortcuts) to replace identical series of commands.
remove all templates. This speeds up saving and loading and leaves
more space in your Pronto’s memory. Make sure not to overwrite
ph1_default.ccf so you can always restore the templates.
ProntoEdit
If ProntoEdit cannot connect to your Pronto, the following message appears:
“Pronto not connected or not re s ponding”. Click Details to open a w indow
listing all the serial ports on your PC.
If another application is using the ser ial por t to w hich your Pronto is
connected:
try another serial port;
have the other application release the serial port.
If ProntoEdit was able to open the serial port to which your Pronto is
connected but still could not connect, c he ck if:
both ends of the serial cable are properly plugged in;
the Pronto’s batte ries have not run out.
Wait a few seconds and try again.
If after a number of attempts ProntoEdit s till c annot connect, reset your
Pronto.
Wait until it beeps twice and try again.
in the toolbar.
will try to connect to your Pront o
PHILIPS Page 42 of 85
Page 43

ProntoEdit
Version 4 - User Manual Basic CCF Actions
ProntoEdit
If your Pronto does not contain a valid CCF, the fo llow ing mes s age app e ars :
“Failed to get valid information from Pronto, do you want to overwrite any
CCF currently in Pronto?”.
If your Pronto contains a modified CCF , ProntoEdit will display a message with
the creation date and time of this CCF and ask you if you want to overwrite it.
Click No if you don’t want to overwrite the CCF in yo ur Pronto.
Click Yes to continue downloading.
Click Cancel to abort the download .
Cancelling the download may result in a corrupted CCF in your Pronto. You
can fix this by fully downloading a CCF.
Note
It is best to not touch your Pronto’s touch scree n or us e any of your Pro nto’s
direct access buttons, while downloading is in progress.
ProntoEdit
After downloading, your Pronto will tell you when it is ready to be used
again by beeping twice.
will check the CCF in your Pronto
will download the CCF into your Pronto
PHILIPS Page 43 of 85
Page 44

Saving a CCF
Saving a CCF
When you save the configuration file you edite d in ProntoEdit, it is
automatically saved as a .ccf file for the Pronto typ e you selecte d. If you want
to save the CCF for a different type of Pronto, you have to use the ‘Export
Configuration As’ function. See “Expo rting a CCF” on page 45.
If a saved CCF does not fit in your Pronto, Pro nto Edit w ill tell y ou it is too
large and cancel the save. To reduce the size of the CCF you can try to:
delete some elements;
reuse bitmaps on your frames and buttons, where possible. ProntoEdit
only saves unique bitmaps.
use aliases (shortcuts) to identical series of commands.
remove all templates. This speeds up saving and loading and leaves
more space in your Pronto’s memory. Make sure not to overwrite
ph1_default.ccf so you can always restore the templates.
Saving a CCF
Select Save Configuration from the File menu.
The current CCF is saved as a CCF file with the same file name.
Saving a CCF as …
1 Select Save Configuration As fr om th e File menu.
The ‘Save as’ wi ndow appears.
2 Browse to the folder where you want to save the CCF.
3 Type the name of the CCF in the File name text field.
4 Click Save.
The current CCF is saved with a new file name.
PHILIPS Page 44 of 85
Page 45
Exporting a CCF
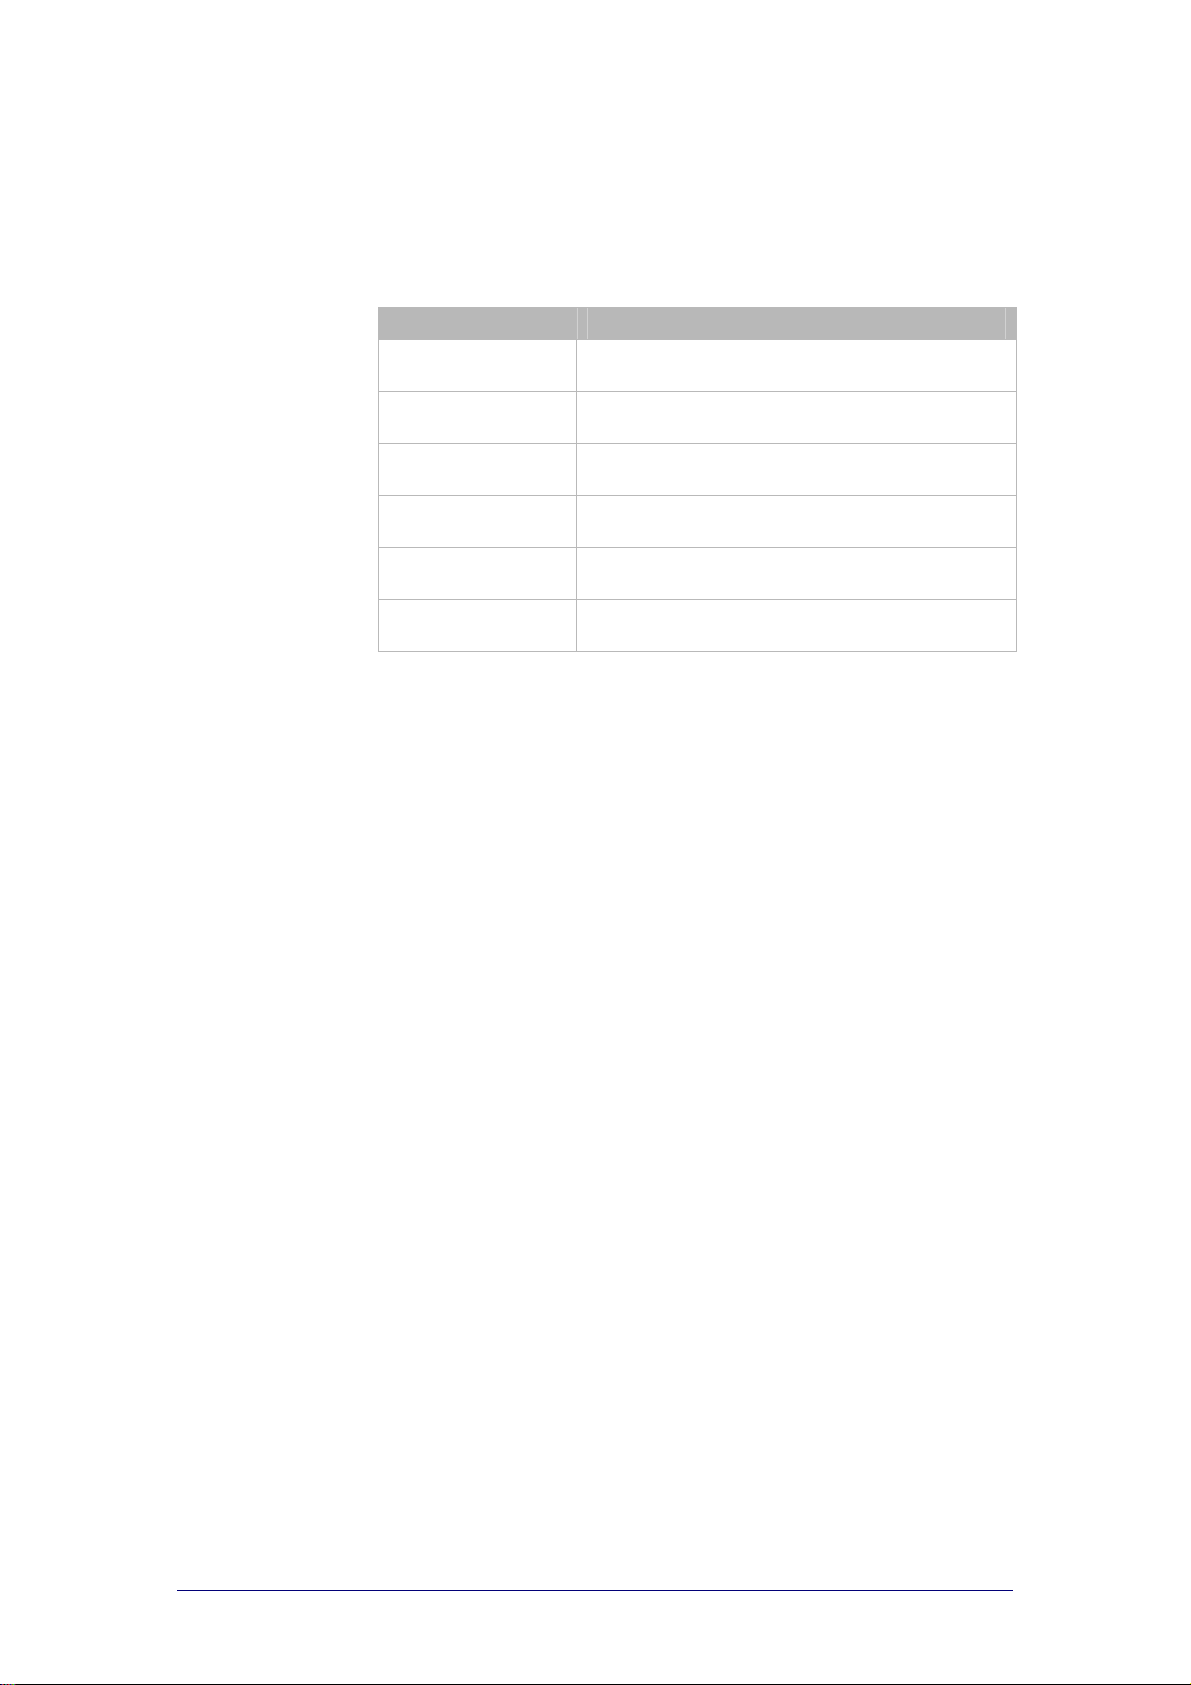
You can save a CCF file for a different Pronto type by using the Export
Configuration As function. You can select one of the following types:
Pronto type Description
TS1000 (no db)
Configuration Files
TSU2000
Configuration Files
TSU6000 (color)
Configuration Files
RU890 (no db)
Configuration Files
RU940 Configuration
Files
RU970 (color)
Configuration Files
CCF for Pronto TS1000
CCF for Pronto TSU2000
CCF fo r Pron toPro TSU6000
CCF for Pronto RU890
CCF for Pronto RU940
CCF for ProntoPro RU970
Exporting a CCF
1 Select Export Configuration As from the File menu.
The ‘Export File’ window appears.
2 Browse to the folder where you want to save the CCF.
3 Type the name of the CCF in the File name text field.
4 Select the type from the Save as type drop-down list.
5 Click Save.
The CCF is saved for the selected Pronto type .
PHILIPS Page 45 of 85
Page 46
Saving a CCF as an EXE file
You can save the current CCF in ProntoEdit as an EXE file. This EXE file is
used to download a CCF into your Pronto witho ut opening Pro nto Edit.
Instead of saving the current CCF as an EXE file, you can also browse and
select another CCF to make an EXE file.
Saving the current CCF file as an EXE file (Pack-and-Go)
1 Select Pack-and-Go from the File menu.
The ‘Pack-and-Go’ window appears.
2 Browse to the folder where you want to save the EXE file.
3 Type the name of the CCF in the File name text field.
4 Select a type from the Save as type drop-down list.
For a list of possible types, see ‘Exporting a CCF’ on page 45.
5 Select the Save CCF-file check box if you also want to save the
configuration as a CCF file.
The path and file name appear in the CCF-filename text field.
6 Type the name of the distributor in the Distributor text field.
7 Type additional information in the Comments text field.
8 Click Save.
The current CCF is saved as an EXE file.
Saving another CCF as an EXE file
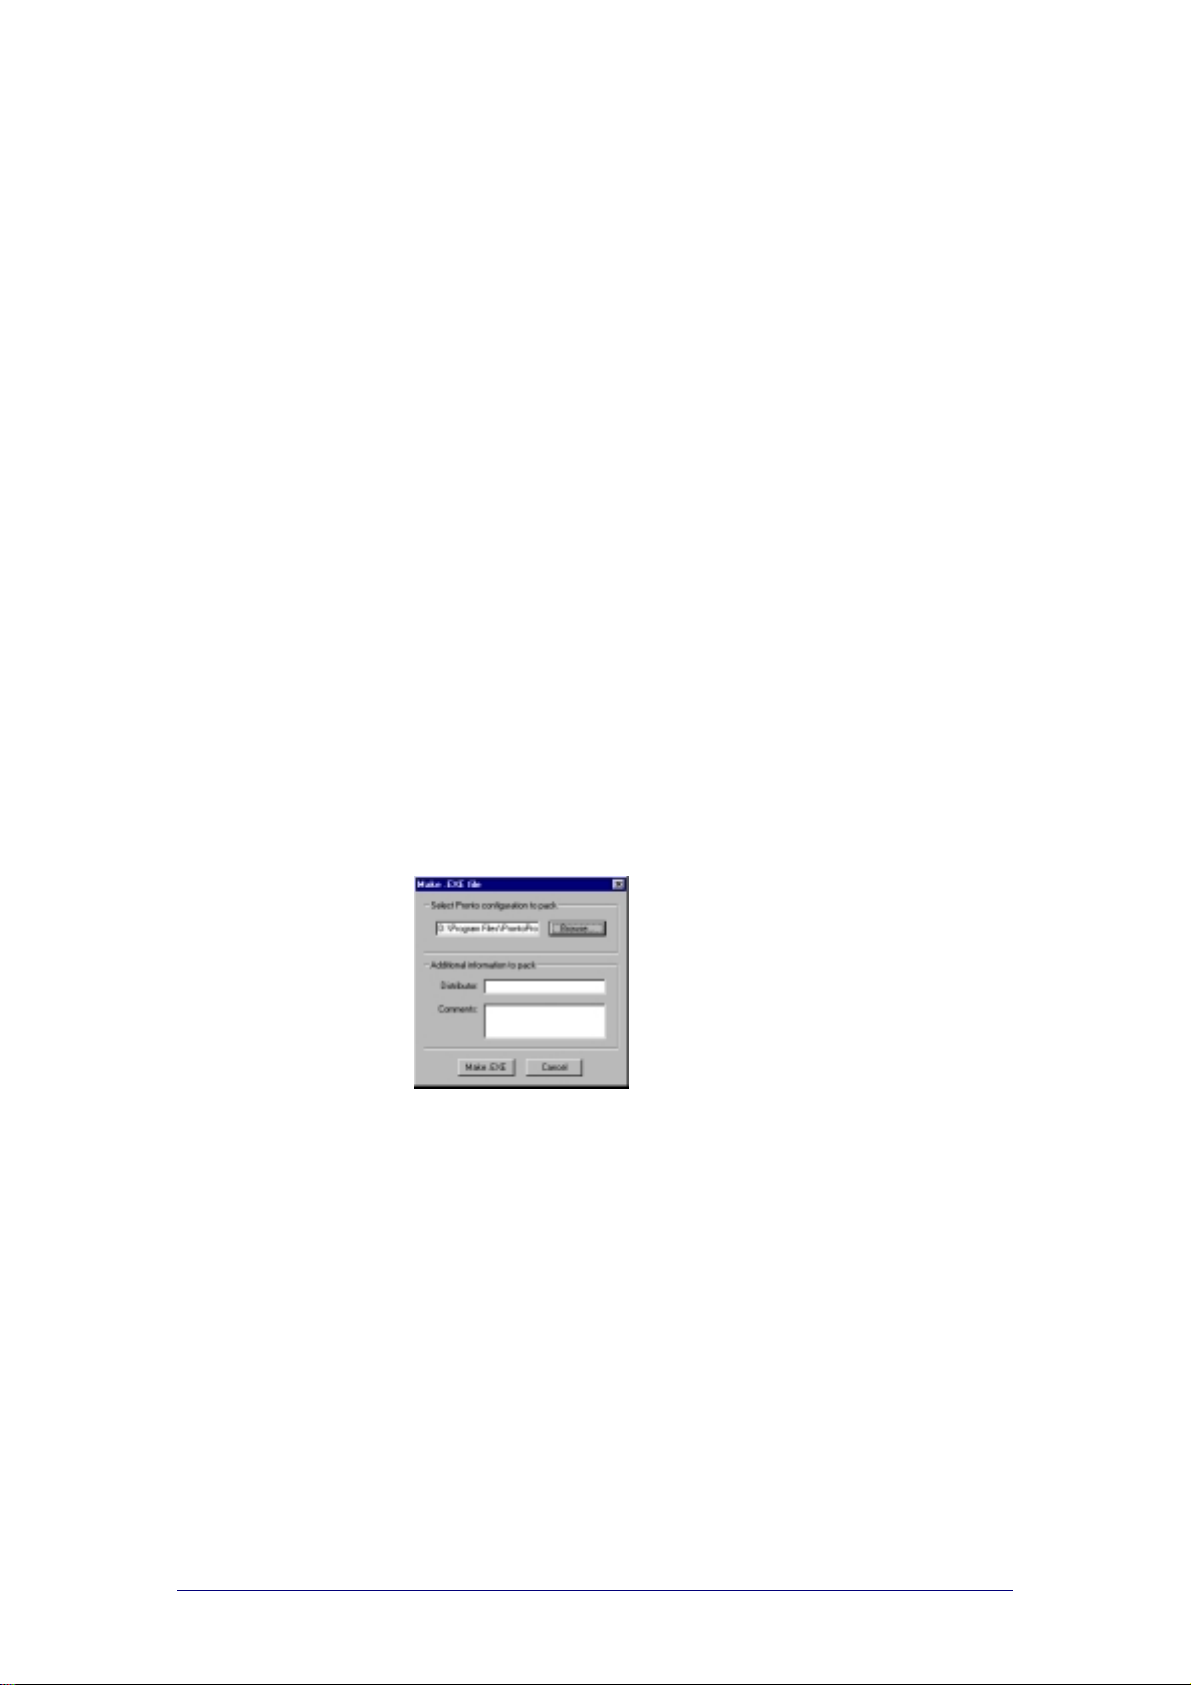
1 Select Make.EXE file from the Tools menu.
The ‘Make.EXE file’ window appears.
2 Click Browse.
The ‘Open’ window appears.
3 Browse to the folder where the CCFs are stored and select a CCF you
want to save as EXE file.
4 Click Open.
The path of the selected CCF is displayed.
5 Type the name of the distributor in the Distributor text field.
6 Type additional information in the Comments text field.
7 Click Make.EXE.
The ‘Save Pronto.CCF-file as.EXE-file’ w indo w appears .
8 Browse to the folder where you want to save the EXE file.
9 Type the name of the EXE file in the File Name text field.
PHILIPS Page 46 of 85
Page 47

ProntoEdit
Version 4 - User Manual Basic CCF Actions
10 Click Save.
11 Click OK when the following messages appears: “The.EXE file has been
successfully created!”.
12 Repeat the instructions 2 to 11 to save other CCFs as an EXE file.
-orClick Cancel to close the ‘ Make .EX E file’ window.
Replacing and Merging a CCF
Opening another CCF
If another CCF is already loaded in ProntoEdit when you want to load a new
CCF, the following message appears: “Merge with current configuration or
replace it?”.
Click Merge to add all home panels, devi ces and macro group s from the
loaded CCF to the current CCF. You will merge both CCFs.
Click Replace to remove the curr e nt CCF and replac e it with the loaded
CCF. You will replace one CCF by the other.
If the current CCF has been modified, you will be allo wed to sav e it f irs t
before it is replaced with the loaded CCF.
Copying a device to anothe r CC F
Simultaneously running copies of ProntoEdit do not share a clipboard. This
means that you cannot copy a device from one CCF to another by running
two copies of ProntoEdit. You have to merge two CCFs.
1 Load the CCF from which you want to copy a device.
2 Delete everything but the device you want to copy .
3 Load the other CCF to which you want to copy the device, and merge it
with the current CCF.
Save the merged CCF.
PHILIPS Page 47 of 85
Page 48

Configuring a CCF
Contents of this chapter
Properties................................................................................. 49
System Properties.................................................................49
Frame Properties...................................................................51
Button Properties ..................................................................52
Device Properties ..................................................................53
Macro Group Properties..........................................................55
Programming............................................................................ 57
Actions ................................................................................57
Jumps..................................................................................65
RF Settings ..........................................................................66
Hard Key Actions ..................................................................67
Macros.................................................................................69
Modifying Frames and Buttons ................................................. 70
Identifying Frames and Buttons ..............................................70
Designing Frames and Buttons................................................74
Setting the System Properties for the Pronto ........................... 76
Write-protecting a CCF ..........................................................76
Automatically creating device aliases.......................................76
PHILIPS Page 48 of 85
Page 49
ProntoEdit
Version 4 - User Manual Configuring a CCF
Properties
After you have created the devices, macro groups, panels, frames and
buttons you want to use in your CCF, you can star t co nfig uring the CCF by
using the Properties windows .
System Properties
The System Properties enable you to change the general features of the
Pronto. You can configure the hard key actions globally . The availab le
featares depend on your type of Pront o.
Black&White
You can define the following functions in the d iffe rent tabs:
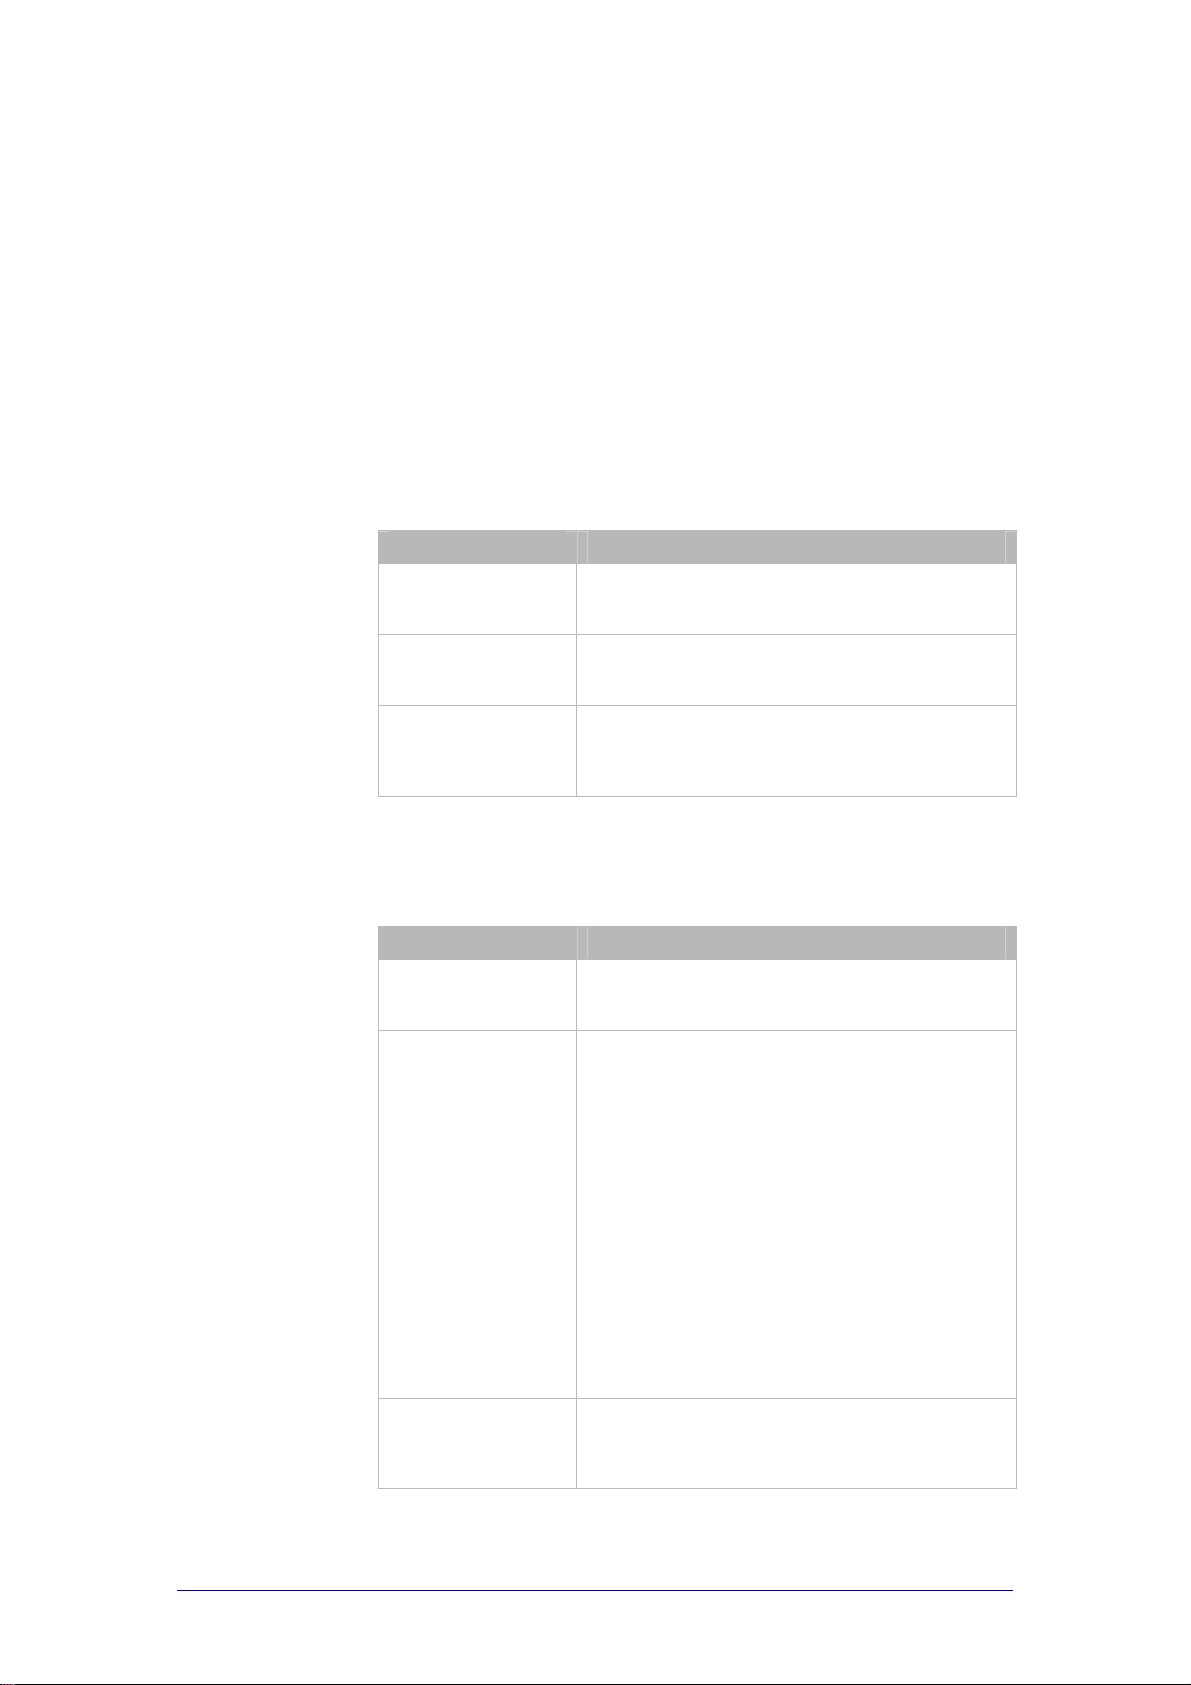
Tab Functions
RC device System
Properties
Home Icon To assign an icon for the Home panel. For more
Hard Keys To configure the hard key actions globally. For
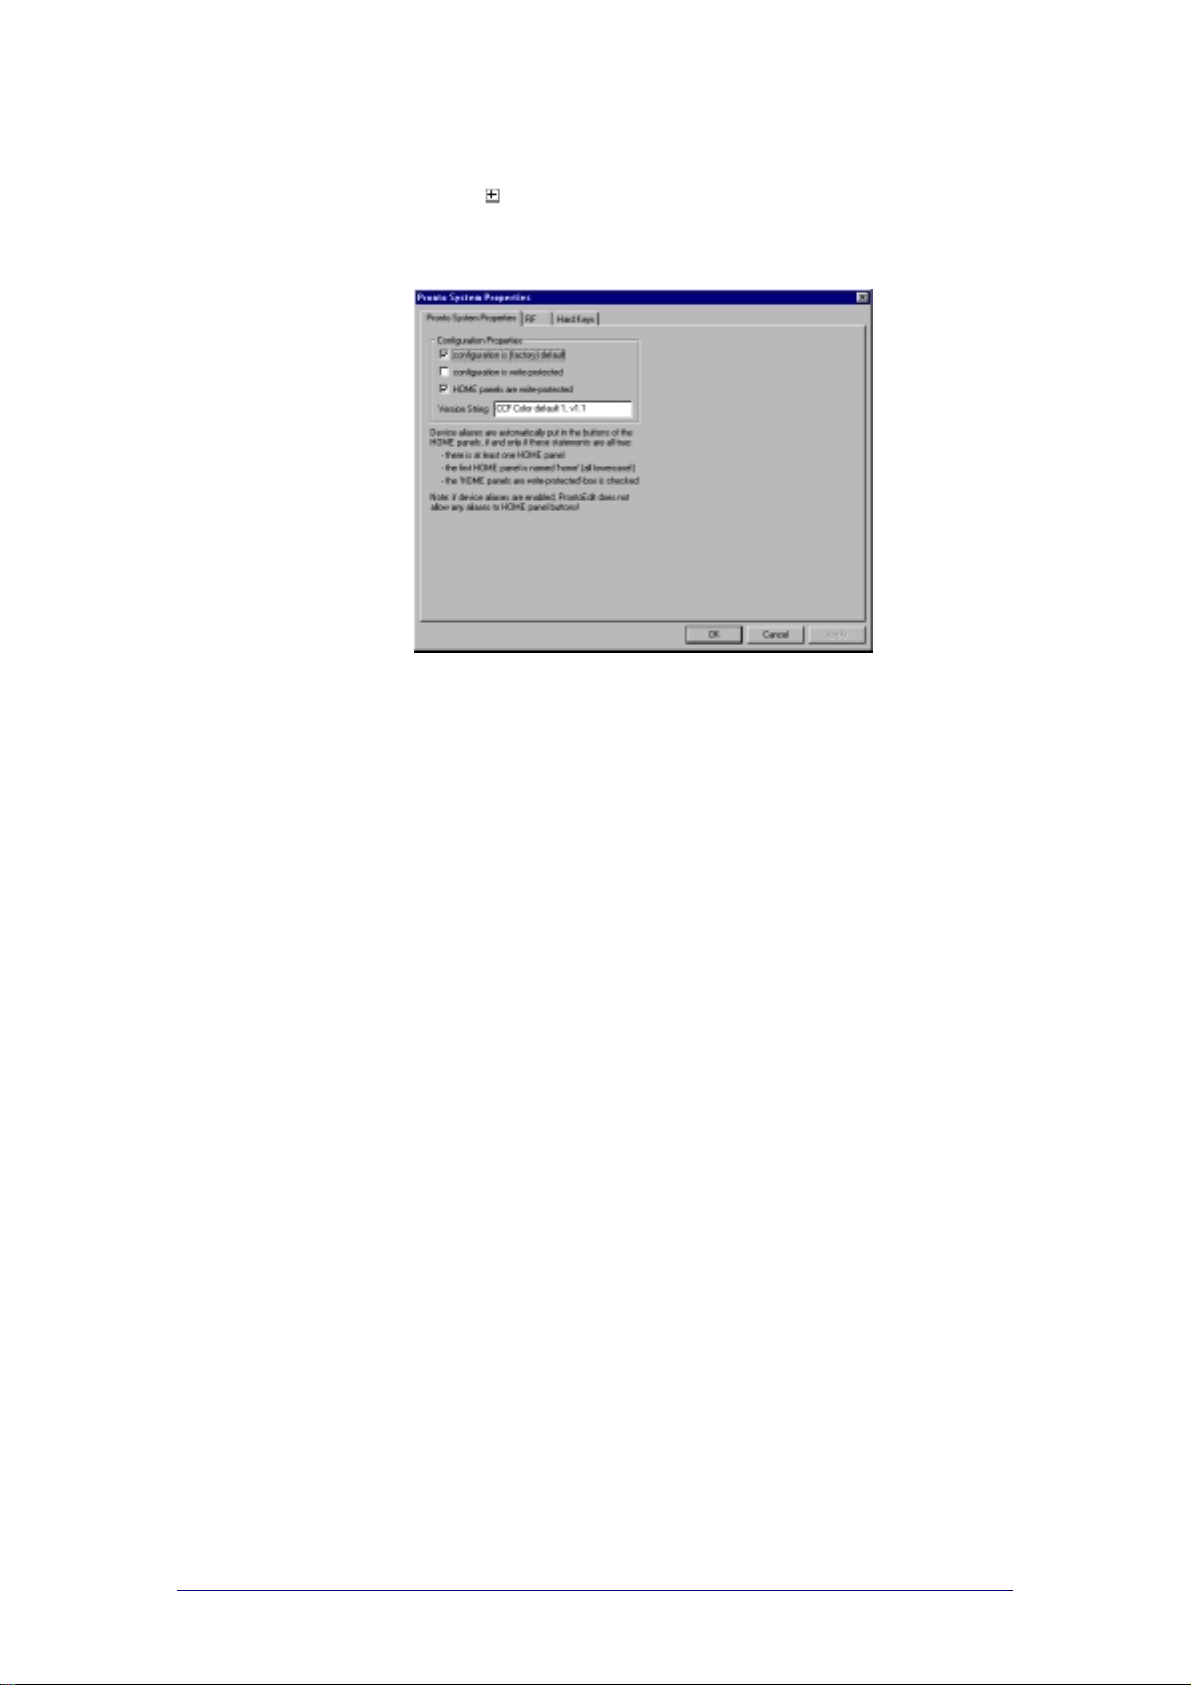
To set the (factory) default CCF, to write-protect
the CCF and the Home panels, to create device
aliases and to enter the version string.
information on how to insert an icon, please refer
to Inserting bitmap s on page 33.
each hardkey you can create an alias to another
command, set a delay, assign IR codes, add a
beep, add a timer, create a jump.
Color
You can define the following functions in the d iffe rent tabs:
Tab Functions
RC device System
Properties
RF To enable RF transmission, to select an RF Channel
Hard Keys To configure the hard key actions globally. For
To set the (factory) default CCF, to write-protect
the CCF and the Home panels, to create device
aliases and to enter the version string.
for the Pronto and to select an Extender ID for the
Home panel.
The Pronto can be set to transmit radio fr equency
(RF) signals, which allows you to operate your
devices inside closets or in an adjacent room. To
receive these RF signals and convert them to
infrared signals, you need an RF Extender
(optional). You need several RF Extender s if yo u
want to operate different devices on different
locations. To each device you have to assign a
unique Extender ID. When you notice RF
interference, you have to choose another RF
Channel (from 0 to 3) on your Pronto and your RF
Extender.
Refer to the RF Extender User Manual for more
details.
each hardkey you can create an alias to another
command, set a delay, assign IR codes, add a
beep, add a timer, create a jump.
PHILIPS Page 49 of 85
Page 50
ProntoEdit
Version 4 - User Manual Configuring a CCF
Opening the System Properties
1 Click on next to HOME in the Configuration view.
A list of panels appears.
2 Double-click the panel System Properties.
The ‘RC device System Properties’ window appears.
See “Programming” on page 57 for instructions for programming macro
groups and hard keys.
See “Setting the System Proper ties for the Pronto” on page 76 for
instructions for setting the system pr operties.
See “RF Settings” on page 66 for instructions for selecting an RF
Channel.
PHILIPS Page 50 of 85
Page 51
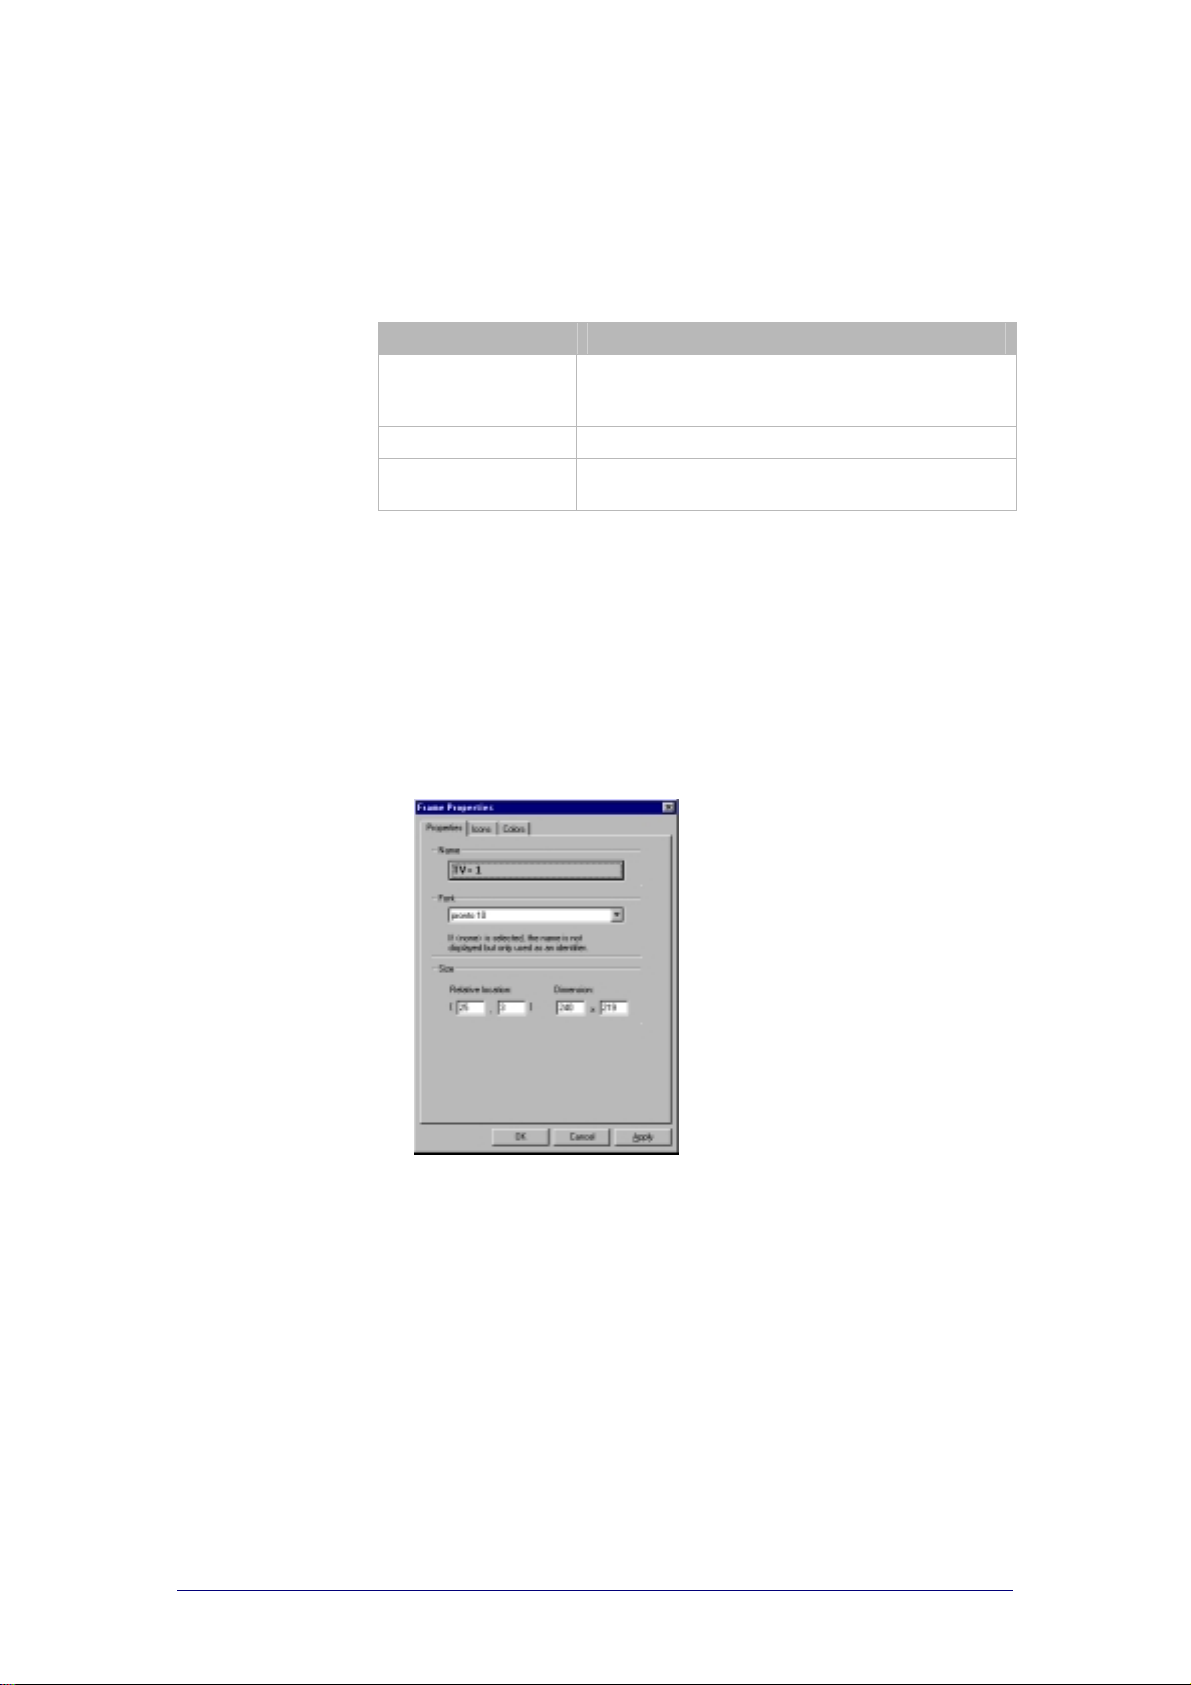
ProntoEdit
Version 4 - User Manual Configuring a CCF
Frame Properties
The Frame Properties enable you to change the features of the frames in the
CCF. You can only configure the look of the fr ame s , you c annot program
actions for a frame.
You can define the following functions in the d iffe rent tabs:
Tab Functions
Properties To enter a name for the frame, define the font for
Icons To load, save and delete the bitmap for the frame.
Colors To set the backgroud color and text color for the
Opening the Frame Properties
1 Open the panel with the frame you want to configure.
2 Select the frame and select Properties from the Edit menu.
-orRight-click the frame and select Properties from the context menu.
-orDouble-click the frame.
–orSelect t h e f rame and pre ss INSERT.
The ‘Frame Properties’ window appears.
the name and set the position for the frame in the
panel.
frame.
See “Modifying Frames and Buttons” o n page 70 for ins tructio ns for setting
the frame properties.
PHILIPS Page 51 of 85
Page 52
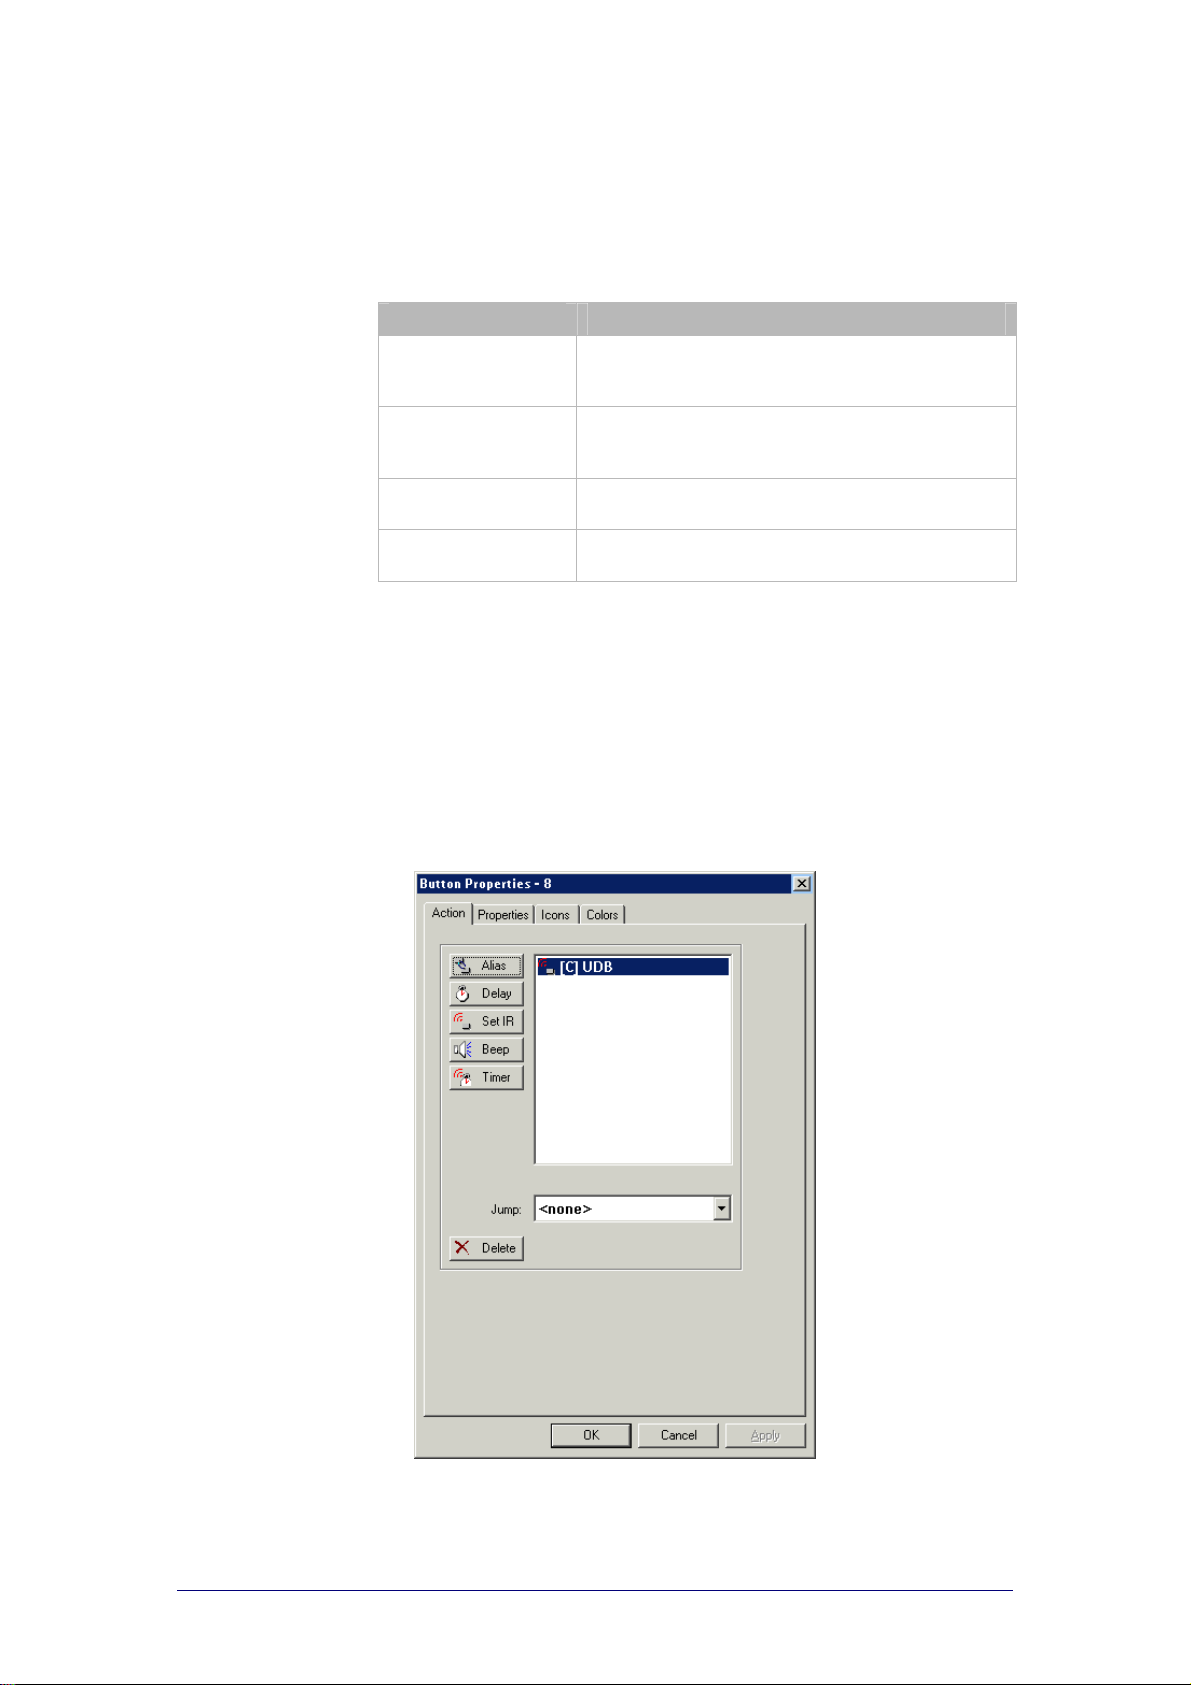
ProntoEdit
Version 4 - User Manual Configuring a CCF
Button Properties
The Button Properties enable you to change the features of the buttons in the
CCF. You can configure the actions and the look of the buttons .
You can define the following functions in the d iffe rent tabs:
Tab Functions
Action To create an alias to another command, to set a
Properties To enter a name for the button, define the font for
Icons To load, save and delete the bitmaps for four
Colors To set the background color and tex t co lor for the
Opening the Button Properties
delay, to assign IR codes, to add a beep, to add a
timer, to create a jump.
the name, set the position for the button in the
panel, to assign an ID to a button.
different states of the button .
button.
1 Open the panel with the button you want to configure.
2 Select the button and select Properties fr o m the Edit menu.
-orRight-click the button and select Properties from the context menu.
-orDouble-click the button.
-orSelect the button and press INSERT.
The ‘Button Properties’ window appears.
See “Programming” on page 57 for instructio ns for progr a mming buttons.
See “Modifying Frames and Buttons” o n page 70 for ins tructio ns for setting
the button properties.
PHILIPS Page 52 of 85
Page 53
ProntoEdit
Version 4 - User Manual Configuring a CCF
Device Properties
The Device Properties enable you to change the features of the devices in the
CCF. You can configure device actions, select an RF Extender for the device
and configure hard key actions per device. Device actions are executed
whenever the device is selected in the Device menu or the Home panel on
your Pronto.
You can define the following functions in the d iffe rent tabs:
Tabs Functions
Action To create an alias to another command, to set a
RF To enable RF transmission for the device, to select
Hard Keys To configure the hard key actions for the selected
delay, to assign IR codes, to add a beep, to add a
timer, to create a jump.
an RF Channel for the Pronto and to select an
Extender ID for the device.
The Pronto can be set to transmit radio fr equency
(RF) signals, which allows you to operate your
devices inside closets or in an adjacent room. To
receive these RF signals and convert them to
infrared signals, you need an RF Extender
(optional). You need several RF Extender s if yo u
want to operate different devices on different
locations. To each device you have to assign a
unique Extender ID. When you notice RF
interference, you have to choose another RF
Channel (from 0 to 3) on your Pronto and your RF
Extender.
Refer to the RF Extender User Manual for more
details.
device. For each hard key you can create an alias
to another command, set a delay, assign IR codes,
add a beep, add a timer and create a jump.
PHILIPS Page 53 of 85
Page 54
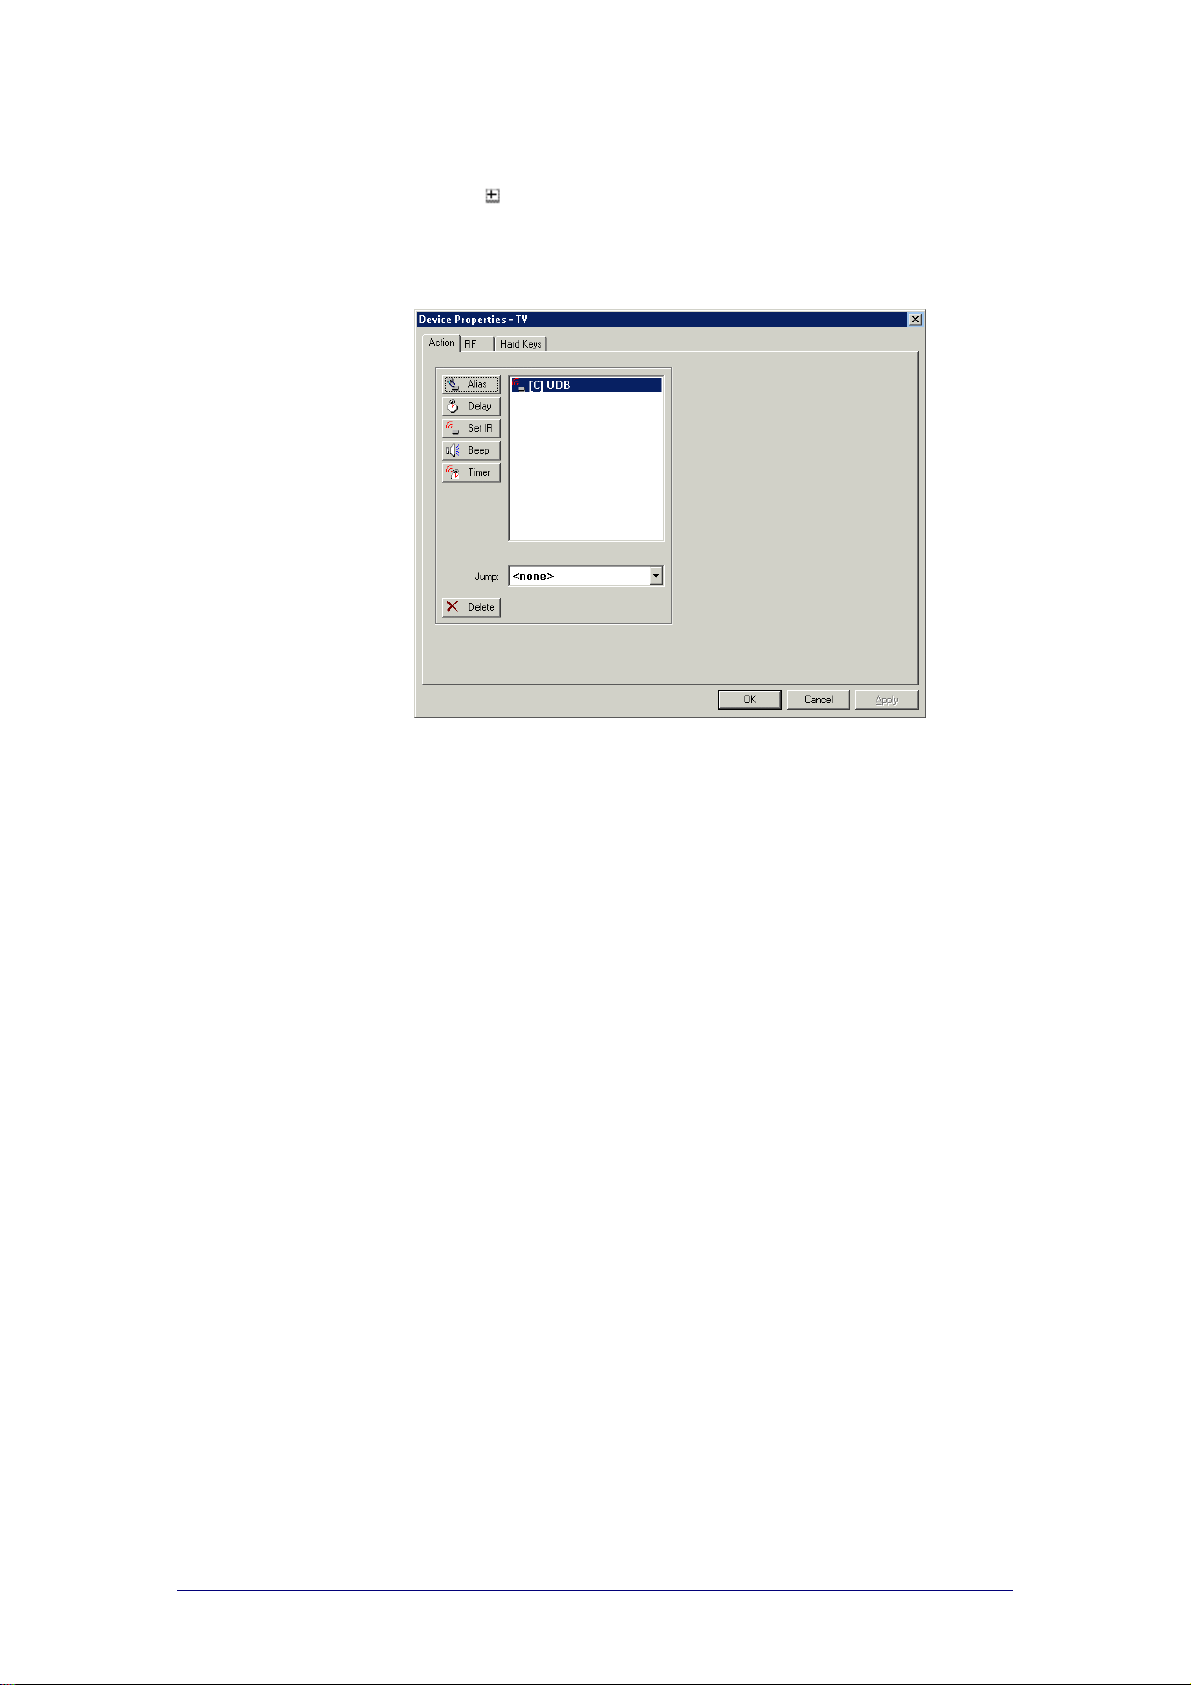
ProntoEdit
Version 4 - User Manual Configuring a CCF
Opening the Device Properties
1 Click on next to the device you want to configure in the Configuration
view.
A list of panels appears.
2 Double-click the panel Properties.
The ‘Device Properties’ window appears.
See “Programming” on page 57 for instructions for programming devices and
hard keys.
See “RF Settings” on page 66 for instructions for selecting an Extender ID.
PHILIPS Page 54 of 85
Page 55
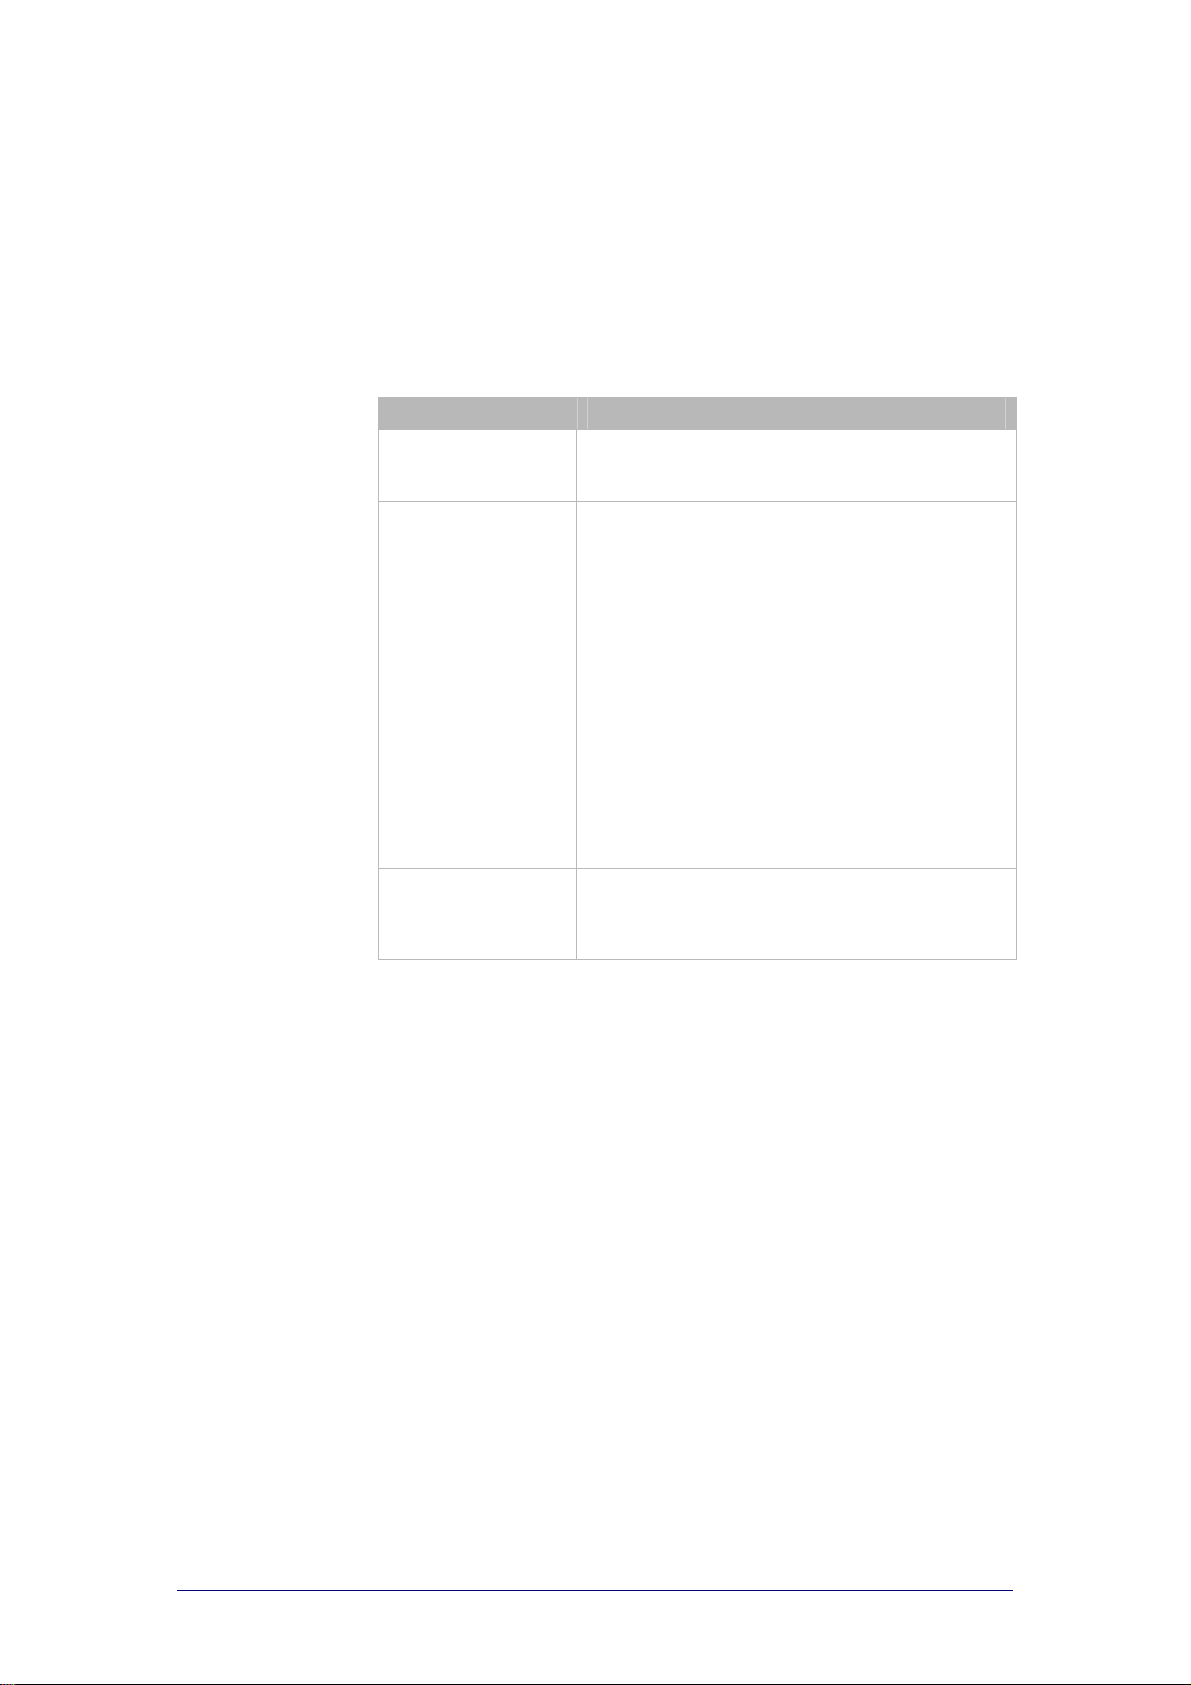
ProntoEdit
Version 4 - User Manual Configuring a CCF
Macro Group Properties
The Macro Group Properties enable you to change the features of the macro
groups in the CCF. You can configure macro group actions, select an RF
Extender for the macro group and configure hard k ey actions per macro
group. Macro groups can contain up to 255 macros and are used to execute a
list of commands instead of a single command.
You can define the following functions in the d iffe rent tabs:
Tab Functions
Action To create an alias to another command, to set a
RF To enable RF transmission for a macro group, to
Hard Keys To configure the hard key actions for the selected
delay, to assign IR codes, to add a beep, to add a
timer, to create a jump.
select an RF Channel for the Pronto and to select
an Extender ID for a macro group.
The Pronto can be set to transmit radio fr equency
(RF) signals, which allows you to operate your
devices inside closets or in an adjacent room. To
receive these RF signals and convert them to
infrared signals, you need an RF Extender
(optional). You need several RF Extender s if yo u
want to operate different devices on different
locations. To each device you have to assign a
unique Extender ID. When you notice RF
interference, you have to choose another RF
Channel (from 0 to 3) on your Pronto and your RF
Extender.
Refer to the RF Extender User Manual for more
details.
macro group. For each hard key you can create an
alias to another command, set a delay, assign IR
codes, add a beep , add a timer, create a jump.
PHILIPS Page 55 of 85
Page 56
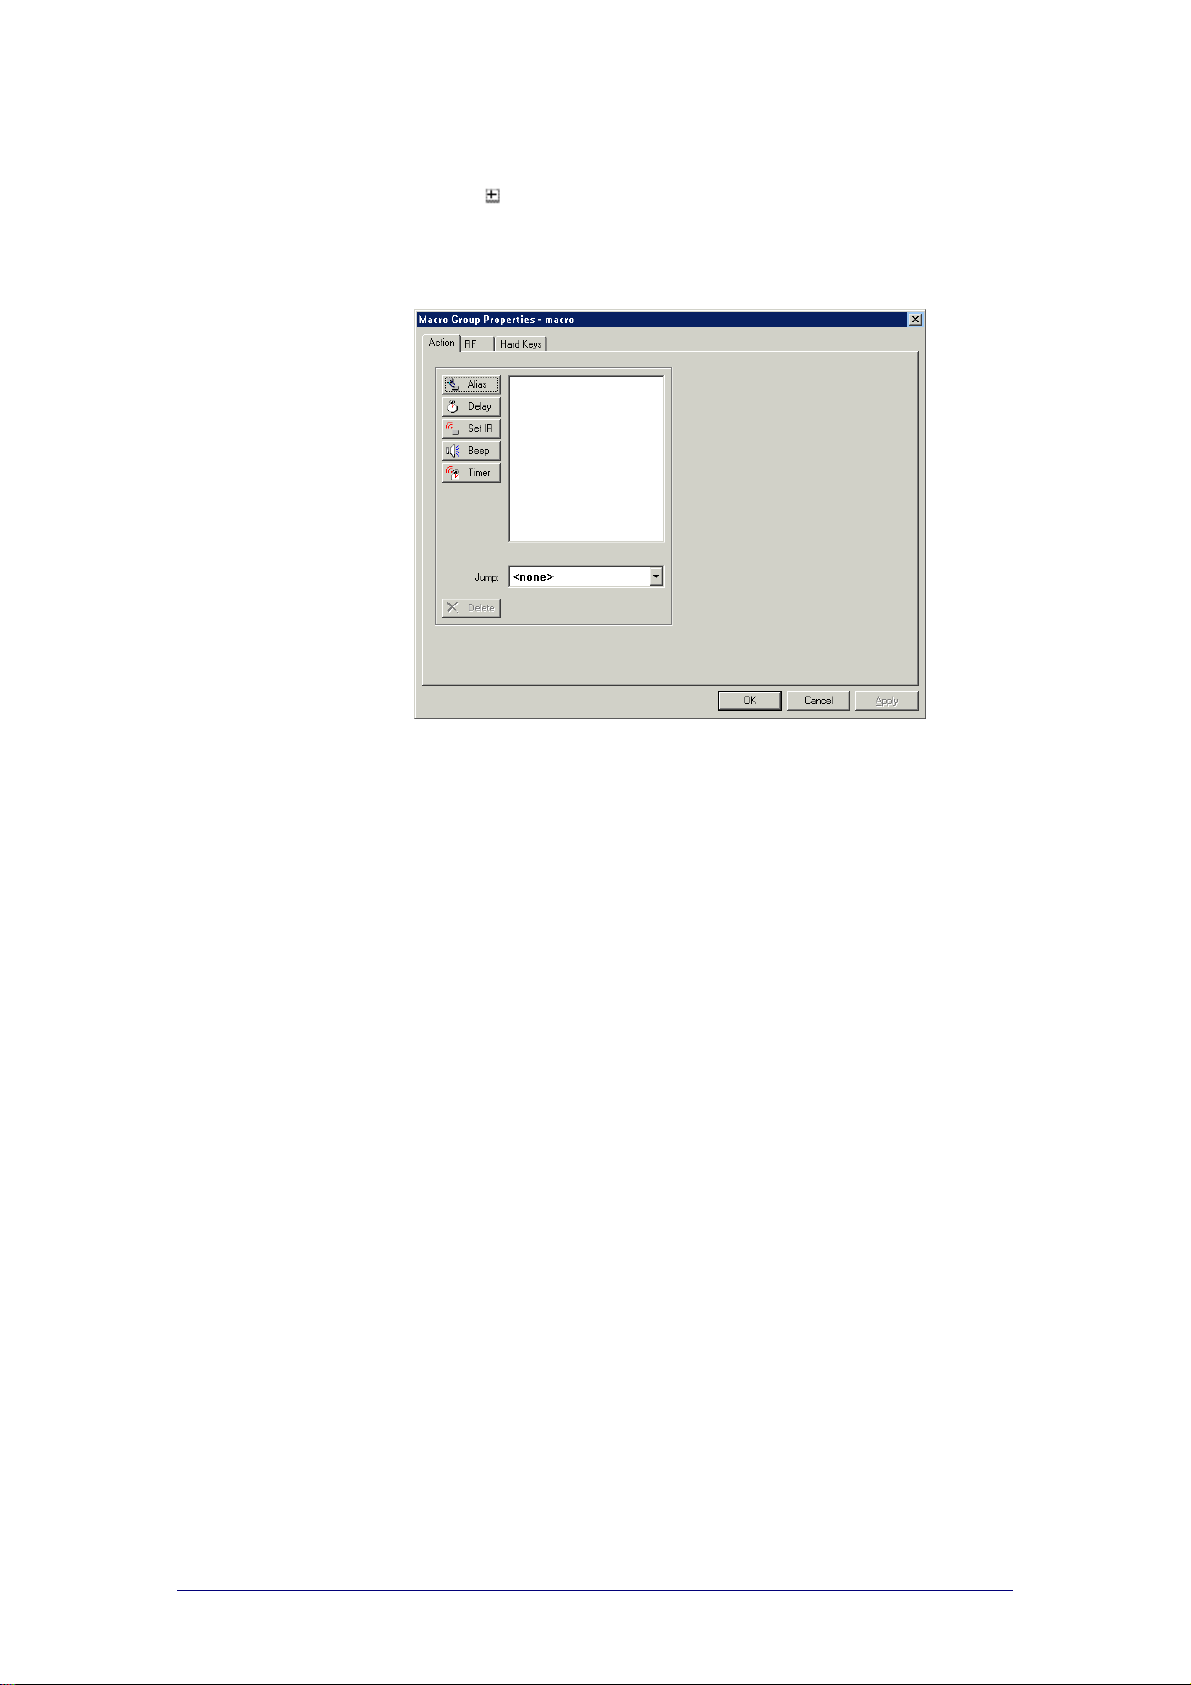
ProntoEdit
Version 4 - User Manual Configuring a CCF
Opening the Macro Group Properties
1 Click on next to the macro group you want to configure in the
Configuration view.
A list of panels appears.
2 Double-click the panel Properties.
The ‘Macro Group Properties’ window appears.
See “Programming” on page 57 for instructions for programming macro
groups and hard keys.
See “RF Settings” on page 66 for instruc tions for selecting an Extender ID
PHILIPS Page 56 of 85
Page 57
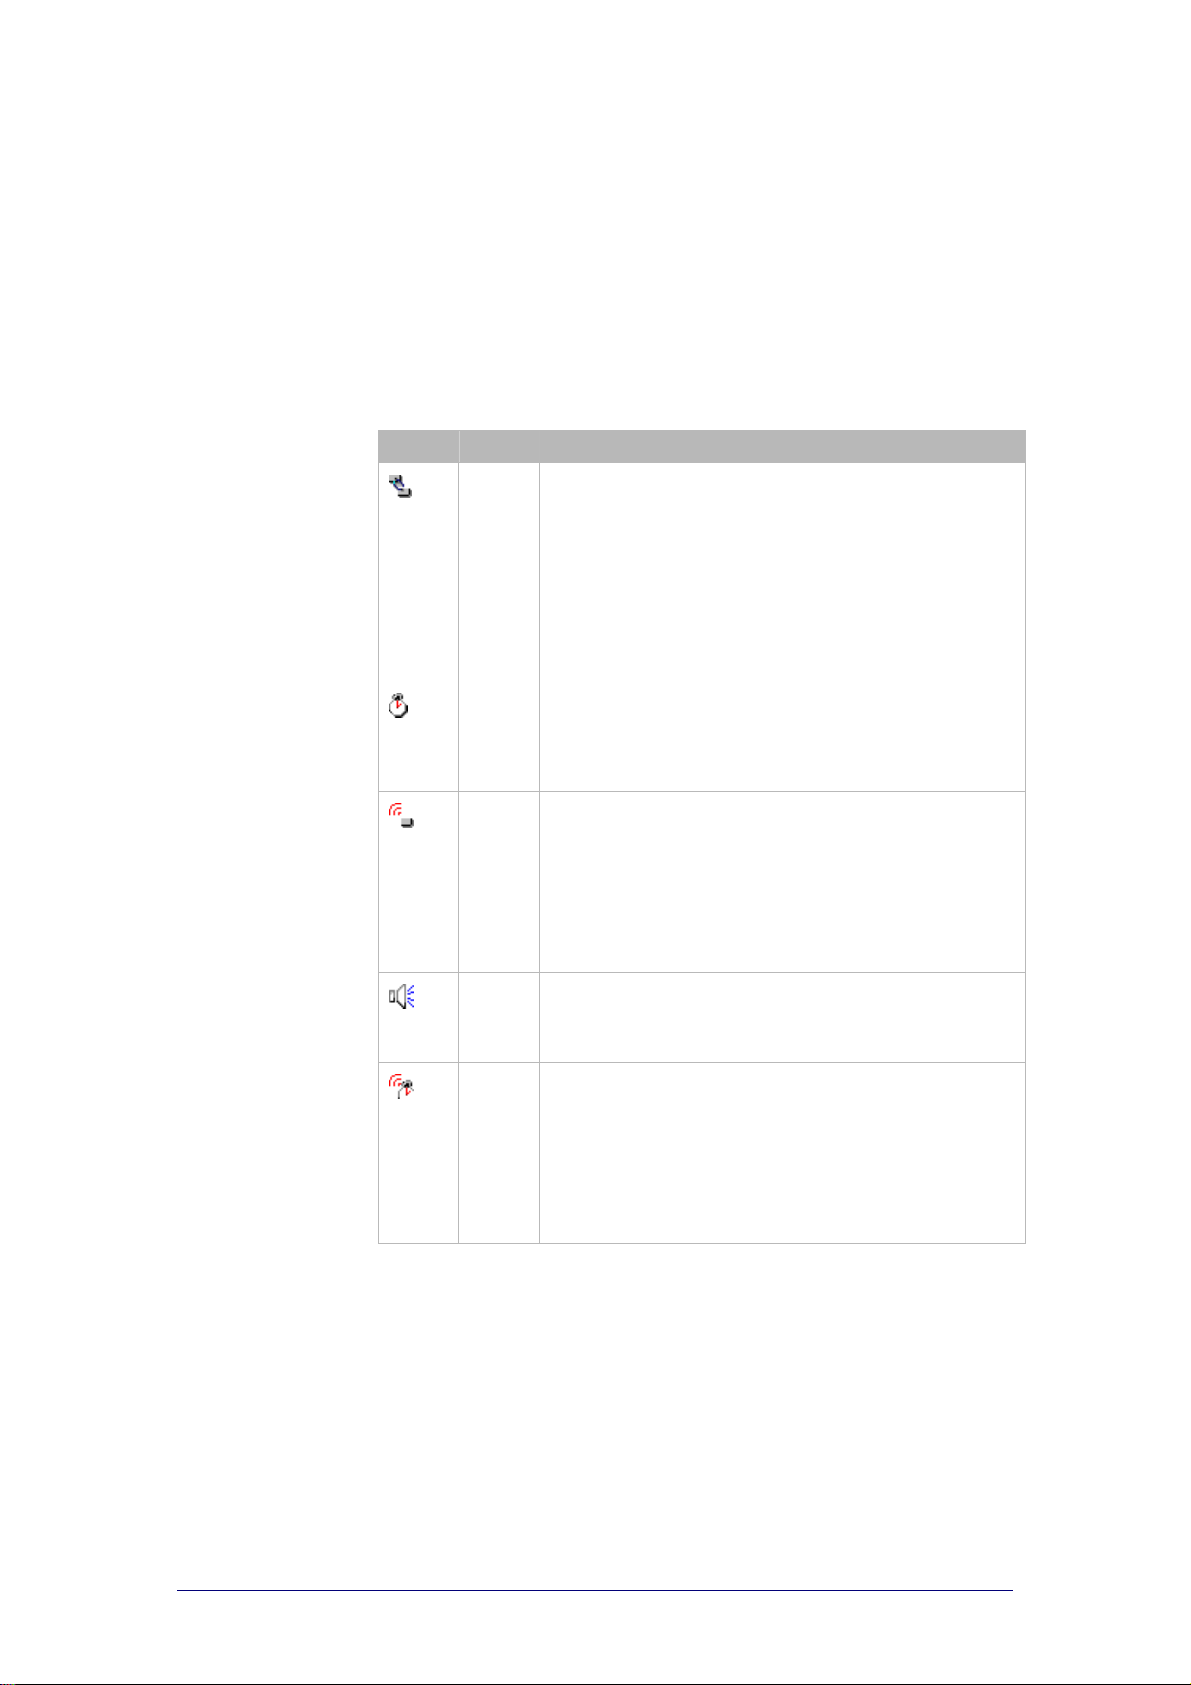
Programming
Actions
In every Properties window, exept for the Frame Properties window, you can
add actions to the action list. You can program the following ac tions by
clicking the different butto ns :
Icon Action Description
Alias With an alias you create a ‘shortcut’ to another
Actions can be moved up or down the action list by:
selecting the action to be moved, holding down CTRL and using the UP
dragging the actions up or down the action list.
An action can be removed from the action list by selec ting it and c licking
Delete.
Delay
[D]
Set IR
[C]
Beep
[S]
Timer
[T]
or DOWN keys.
command. You can create an alias to a button action, to
a device or macro group action, to an action of a directaccess key or an action button. When your Pro nto is
executing an action list and comes across an alias, the
action list referred to by that alias is executed. This
allows you to re-use commands and save memory.
[A]: Device Alias
[K]: Direct-access key or action button Alias
[B]: Button Alias
To insert a short pause before a command or between
two commands, you can add a delay. You may have to
add delays between the different commands in a macro.
A device needs time to receive and execute the
command.
Lots of IR codes for dif ferent devices and bra n d s a re
stored in a universal database. By selecting IR codes and
assigning them to panels, buttons and key s , you c a n
program your Pronto to operate your devices.
In case the brand or the functions of your device are not
present in the database you can learn the IR codes from
the existing remote control of yo ur de vice. Refer to the
Pronto User Manual for more details.
With ProntoEdit you can add beeps to a panel or a button
on your Pronto so that every time you select the pa ne l or
the button you hear a beep. You can enter the
frequency, volume and duration.
ProntoEdit allows you to add a timer to every butto n,
device or macro group that is defined. You have to select
the time and day to start the action and to stop the
action.
On your Pronto, however, timer s can only be edited in
macro buttons. This means that you can add a ‘hidden’
timer to a device button, which cannot be edited o n your
Pronto.
PHILIPS Page 57 of 85
Page 58
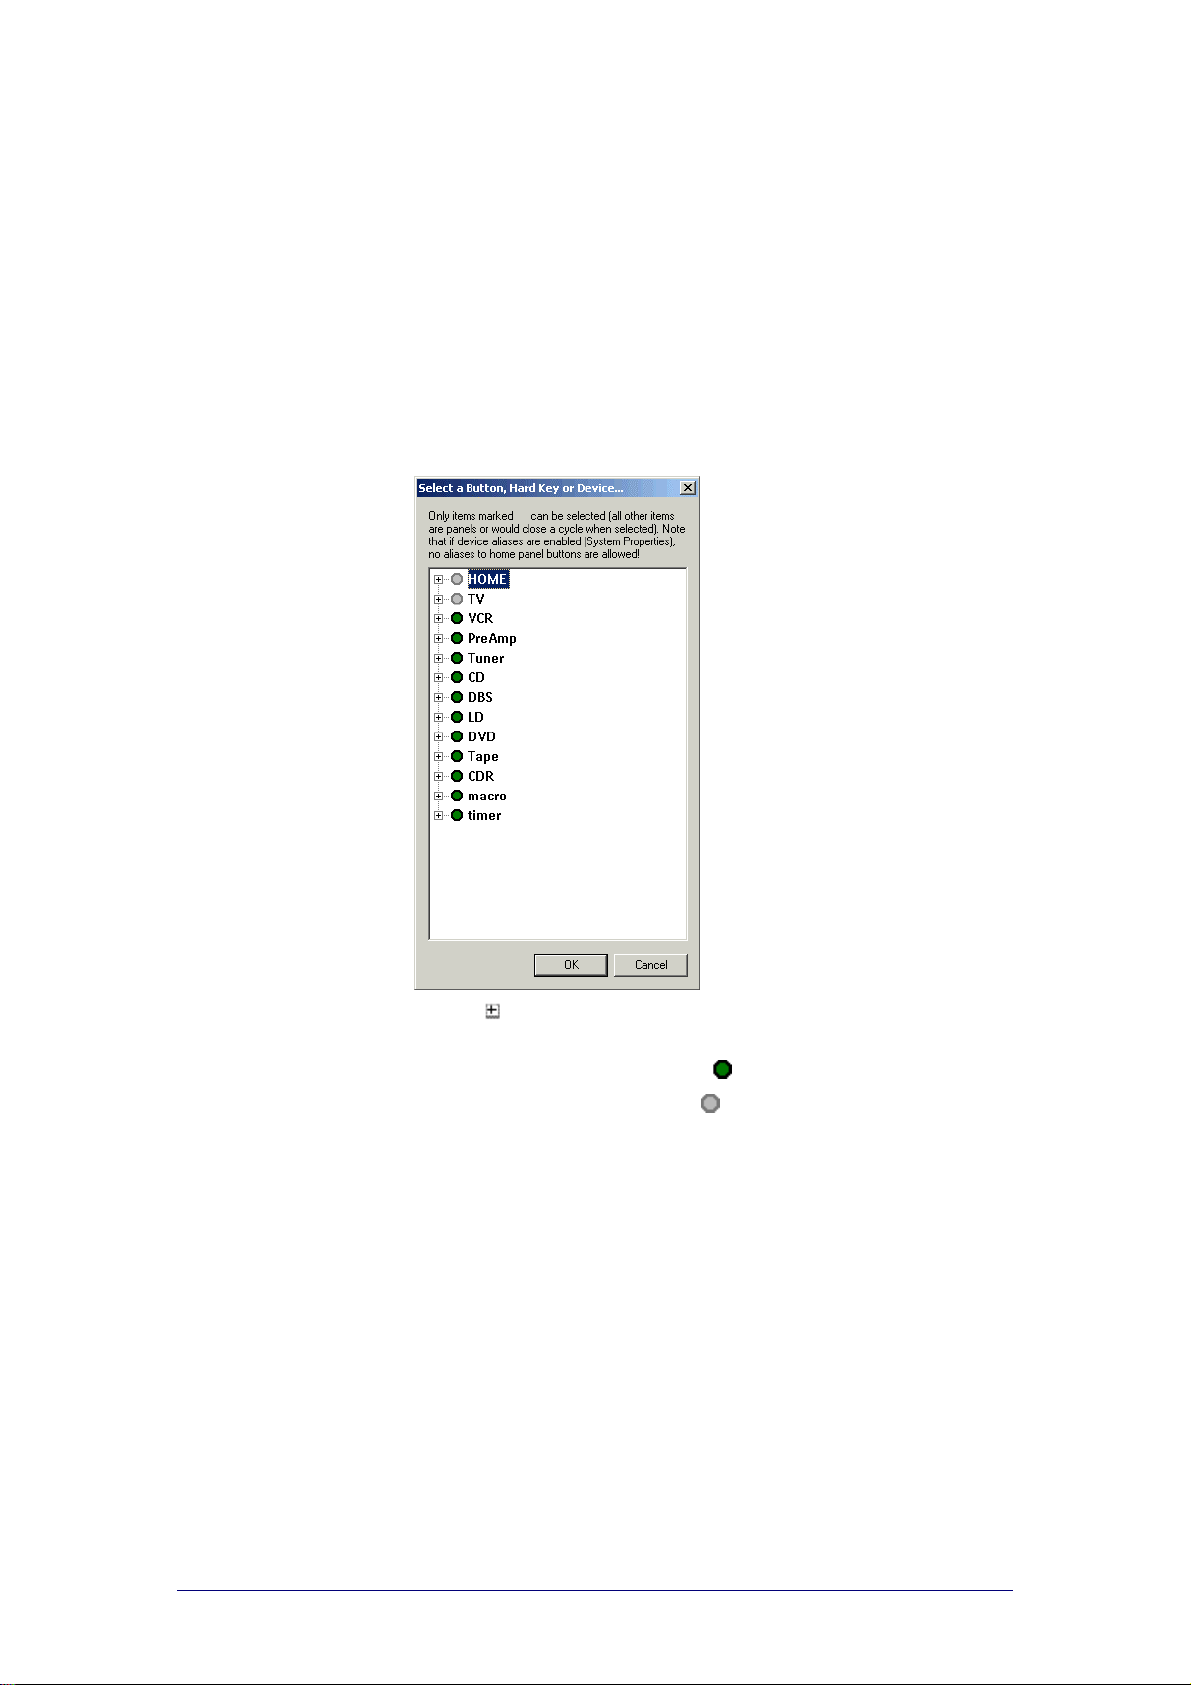
ProntoEdit
Version 4 - User Manual Configuring a CCF
Creating an alias
With an alias you create a ‘shortcut’ to anothe r command. To create an alias
it is necessary that the other command is programmed.
The Pronto will refer to the alias and execute the command programmed for
the selected item. When the alias is executed , only the ac tion of the selected
panel or hard key is executed. The Pronto ignores the jump when executing
an alias.
1 Open the Button Properties, Device Properties or Macro Group
Properties.
2 Select the Action tab.
3 Click Alias.
The ‘Select a Button, Hard key or Device’ window appears .
A tree view with HOME, all devices and macro groups is displayed here.
4 Click on
The list of hard keys, panels and buttons is displayed.
Items marked with a green disc
Items marked with a gray dis c
next to HOME, the device or macro group.
can be selected.
cannot be selected.
PHILIPS Page 58 of 85
Page 59
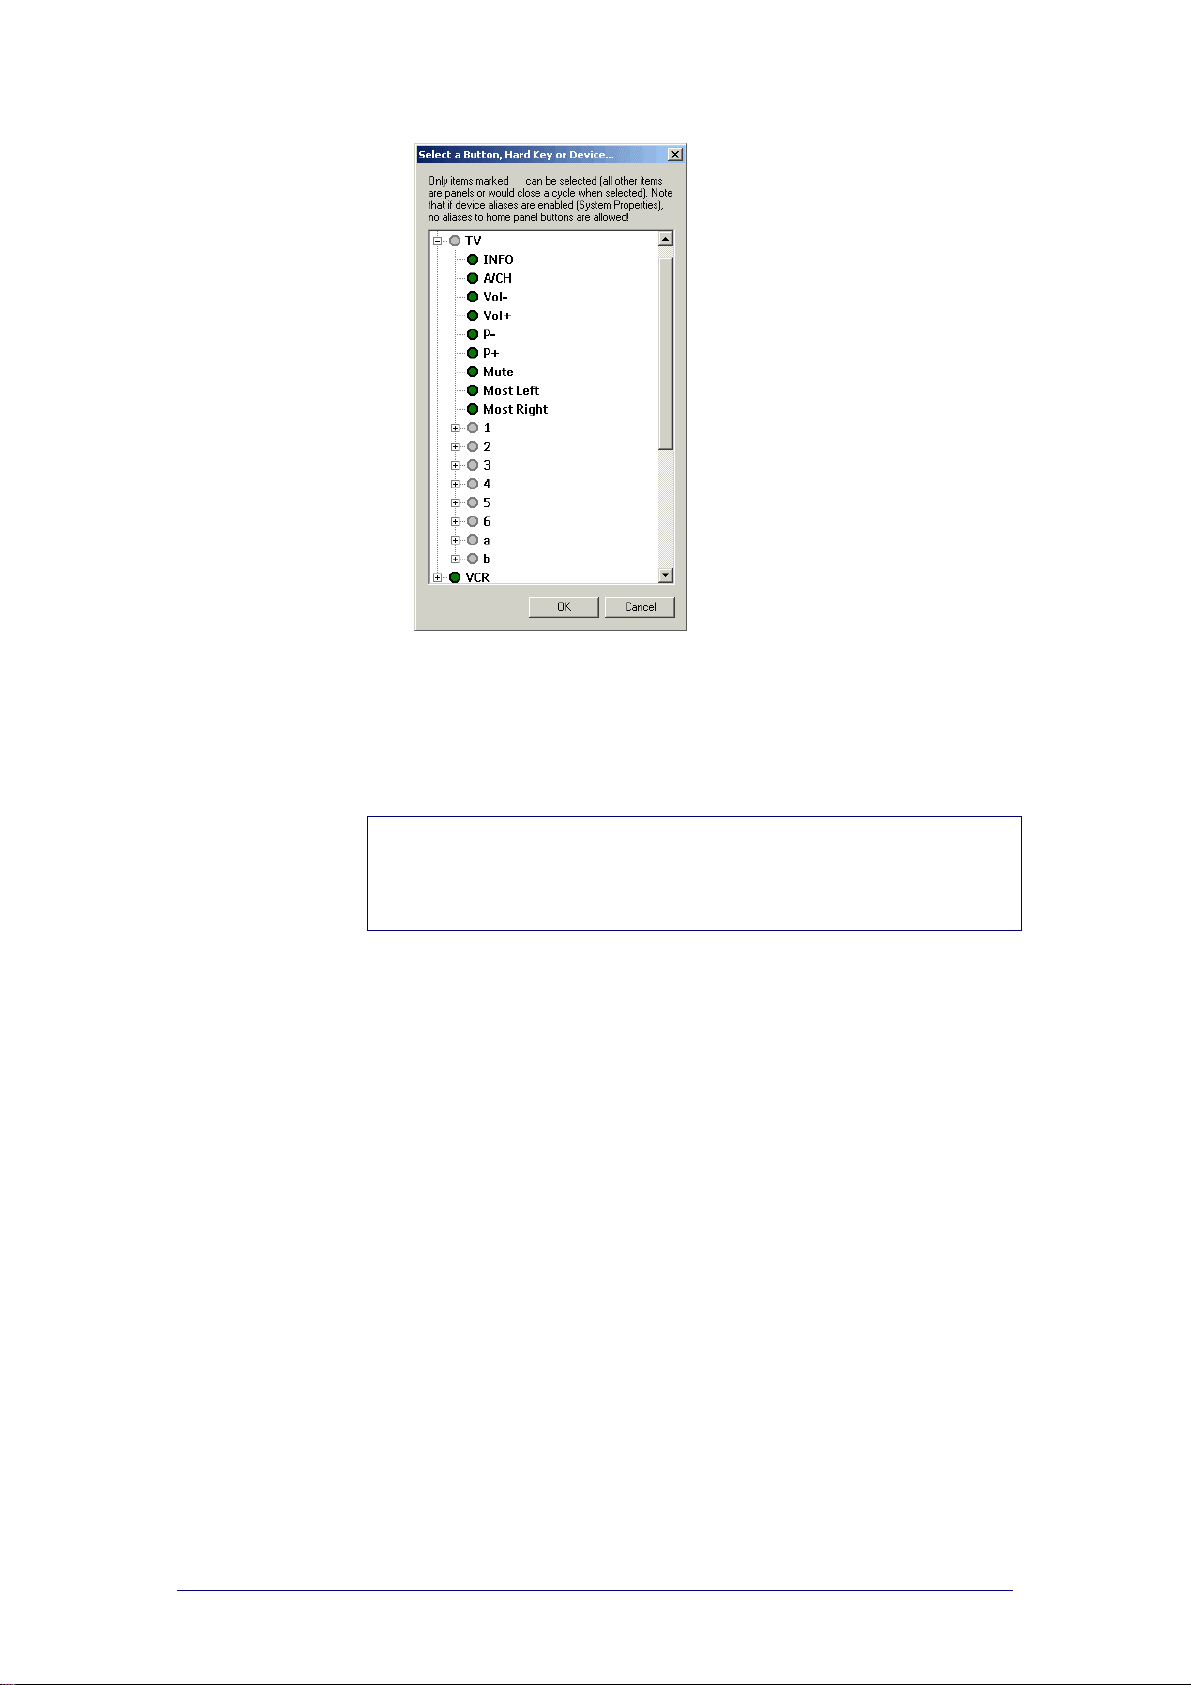
ProntoEdit
Version 4 - User Manual Configuring a CCF
5 Select the item to which you want to refer.
6 Click OK in the ‘Select a Button, Hard key or Device’ wind ow.
The alias is added to the action list.
7 Click OK to accept the properties.
-orClick Cancel to return witho ut c hanging the properties.
Note
When device aliases are made from the Home panel, you will not be able to
create aliases to the Home panel. In that case you would be creating a loop.
For more information about devices aliases in the Home panel, see
“Automatically creating device aliase s ” o n page 76.
Setting a delay
You may have to add delays between the different commands in a macro. A
device needs time to receive and execute the command. For example, whe n a
devices receives the Power on command, it takes some time to start up. So
the device will not be able to receive the next command.
1 Open the Button Properties, Device Properties or Macro Group
Properties.
2 Select the Action tab.
3 Click Delay.
The ‘Default delay’ window appears.
4 Enter the delay duration in the Delay text field.
A short pause will be inserted before the command is exec uted.
5 Click OK in the ‘Default delay’ window.
The delay is added to the action list.
6 Click OK to accept the properties.
-orClick Cancel to return witho ut c hanging the properties.
PHILIPS Page 59 of 85
Page 60
ProntoEdit
Version 4 - User Manual Configuring a CCF
Assigning an IR code
You can assign a function to a button, a device or a macro group. Each
function contains an IR code. When you tap a button or select a device fro m
the Device menu or a macro group from the Macro menu on your Pronto the
IR code is sent out to the device and the command is executed.
The IR codes are stored in the database. However, you can also assign
functions to buttons, device s or macro gro ups for which the IR cod e is not
contained in the database. The following ico ns ind ic ate if the IR code is stored
in the database or not:
IR code is stored in the database and is immediately active.
IR code is not stored in the database. This is an advanced option
that allows you to prepare your Pronto for o ther br ands . B ef or e
you can use the IR code, you have to indicate that the device
needs programming (see “Indicators ” o n page 21) and yo u have
to select the brand that uses this code on your Pronto.
1 Open the Button Properties, Device Properties or Macro Group
Properties.
2 Select the Action tab.
3 Click Set IR.
The ‘Add IR’ dialog box appears.
4 Go through one of the scenarios to assign IR codes:
selecting an IR code from the universal database;
learning an IR code from another remote control;
pasting an IR code in the IR Code text box.
To assign an IR code from the IR database
1 Select the device for which you want to s e t the IR code s from the
Device drop-down list.
2 Select the brand of the device from the Brand drop-do wn list.
Note
You can also select Non Applicable from the Brand drop-down list.
This allows you to create buttons and assign an IR code for a
function that is not available for your current brand. This function
can be used later on when you change the brand for a new device.
For some brands the IR codes are divided into different code sets.
3 Select, if necessary, the appropriate set from the Code Set drop-
down list.
4 Select which function has to be performed from the Functions list.
By selecting the function from the lis t yo u pro gr am the command
from the button, hard key, device or macro group .
5 Click View IR to display the IR code associated with the s e lected
function.
The IR code text box expands at the bottom of the window. The
button changes into Hide IR.
6 Connect your Pronto to your computer as described in “Uploading a
CCF from Your Pronto” on page 17.
7 To try the selected function on your Pro nto, click Test IR.
As long as you press the button, the IR code is sent out to the
device.
8 Click OK in the ‘Add IR’ window.
The IR code is added to the action list of the selected button.
9 Click OK to accept the properties.
-orClick Cancel to return witho ut c h ang ing the properties.
PHILIPS Page 60 of 85
Page 61

ProntoEdit
Version 4 - User Manual Configuring a CCF
To assign an IR code by learning it
1 Plug one end of the Pronto serial cable in the s er ial po rt on your
Pronto.
2 Plug the other end of the Pronto serial cable in the serial port on
your computer.
3 Point the device’s original remote co ntro l to the Pronto’s learning
eye.
Please refer to the Pronto Owner’ s Manual f or more infor m ation on
learning commands.
4 Click Learn IR.
The ‘Learn IR code’ window appears with the following message:
“Waiting for Pronto to learn IR code”.
5 Press and hold the corresponding button on your dev ice’ s r emote
control.
One of the following messages appears:
Learning completed successfully. The learned code has
been added in the list of actions.
Click OK to assign the code to the selected butto n and to c lose
the ‘Button Properties’ window.
Learning failed (timeout). ProntoEdit successfully connected
to your Pronto, but somehow couldn’t le arn the code. Try again.
Please refer to the Pronto Owner ’ s Manual f or troubleshooting
about learning commands.
Pronto not connected or not responding. ProntoEdit cannot
connect to your Pronto.
Click Details to open a window listing all the serial ports on
your PC.
6 To try the selected function on your Pro nto, click Test IR.
As long as you press the button, the IR code is sent out to the
device.
7 Click OK to accept the properties.
-orClick Cancel to return witho ut c h ang ing the properties.
Note
See “Troubleshooting ” on page 77 fo r co nne c t io n pro blems.
To paste an IR code in the IR Code text box
It is possible to assign IR codes from a brand that is not listed in the
universal database. These IR codes might be obtained from another CCF, a
text file, on the internet, etc….
After you select a brand and a function from the database, you can paste the
IR codes directly into the IR code text box. Take into account that you will
overwrite the old IR codes. So you will no longe r be able to use that br and
and its functions.
1 Select the device for which you want to set the IR codes from the
Device drop-down list.
2 Select the brand you want to replace from the Brand drop-down list.
For some brands the IR codes are divided into different code sets.
3 Select, if necessary, the appropriate set from the Code Set drop-
down list.
4 Select which function is going to be replaced from the Functions
list.
5 Click View IR to display the IR code associated with the s e lected
function.
The IR code text box expands at the bottom of the window. The
button changes into Hide IR.
6 Copy and paste the code into the IR code text box.
PHILIPS Page 61 of 85
Page 62
ProntoEdit
Version 4 - User Manual Configuring a CCF
7 Connect your Pronto to your computer as described in “Uploading a
CCF from Your Pronto” on page 17.
8 To try the selected function on your Pro nto, click Test IR.
As long as you press the button, the IR code is sent out to the
device.
9 Click OK in the ‘Add IR’ window.
The IR code is added to the action list of the selected button.
10 Click OK to accept the properties.
-orClick Cancel to return witho ut c h ang ing the properties.
Adding a beep
1 Open the Button Properties, Device Properties or Macro Group
Properties.
2 Select the Action tab.
3 Click Beep.
The ‘Define Beep Action’ wind ow appears.
4 Enter a value in the Frequency text field.
-or–
Use the Frequency slider.
The higher the value for the frequency, the higher the tone of the beep
is.
5 Indicate the beep volume with the Volume slider.
The higher the value, the louder the volume of the beep is.
6 Enter a value in the Duration text field (in milliseconds).
The higher the value for the duration, the longer the beep is executed.
7 To try out the frequency and the duration of the beep, click
8 Click OK in the ‘Define Beep Action’ window.
The beep is added to the action list.
9 Click OK to accept the properties.
-orClick Cancel to return witho ut c hanging the properties.
.
Adding a timer
A timer can be added in an action list of a button, a hard key, a device or
macro group.
A timer can have a start and a stop action, each with their own time and day
of execution. Only an alias action can be assigned as the start and stop action
of a timer.
1 Open the Button Properties, Device Properties or Macro Group
Properties.
2 Select the Action tab.
3 Click Timer.
The ‘Define Timer Action’ window appears.
PHILIPS Page 62 of 85
Page 63

ProntoEdit
Version 4 - User Manual Configuring a CCF
To start the timer
1 Click the Start action button.
The ‘Select a Button, Hard key or Device’ window appears .
2 Select the command the timer has to execute.
See the procedure in “Creating an alias” on page 58.
The action to start the timer is defined.
3 Enter the Start time.
ProntoEdit uses a 24-hour c lock.
4 Select the check boxes for the days of the week to define on which
days the timer has to be executed.
5 To repeat the start action of the timer weekly, select the Wkly check
box.
To stop the timer
1 Click the Stop action button.
The ‘Select a Button, Hard key or Device’ window appears .
2 Select the command the timer has to execute.
See the procedure in “Creating an alias” on page 58.
The action to stop the timer is defined.
3 Enter the Stop time.
ProntoEdit uses a 24-hour c lock.
4 Select the check boxes for the days of the week to define on which
days the timer has to be stopped.
5 To repeat the stop action of the timer weekly, select the Wkly check
box.
4 Click OK in the ‘Define Timer Action’ window.
The timer is added to the action list of the selected butto n.
5 Click OK to accept the properties.
-orClick Cancel to return witho ut c hanging the properties.
Deleting an action
1 Open the Button Properties, Device Properties or Macro Group
Properties.
2 Select the Action tab.
3 Select an action in the list.
4 Click Delete.
The action is deleted from the action list.
5 Click OK to accept the properties.
-orClick Cancel to return witho ut c hanging the properties.
PHILIPS Page 63 of 85
Page 64

ProntoEdit
Version 4 - User Manual Configuring a CCF
Copying the action list from one button to another
You can define the action list of the buttons in your CCF one by one as
described above. But whe n you want to us e the s a me ac tions for several
buttons you can easily do this by copying the list of buttons from one button
to another.
1 Open the panel with the button of which you want to copy the actio n lis t.
2 Open the panel with the button you want to copy the action list to (if the
button is part of anot her panel) .
3 Press and hold SHIFT and select the button from which you want to copy
the action list.
4 Drag and drop the selected button to where you want to co py the actio n
list.
When you drag a nd drop the button holding down SHIFT, the label
actions appears next to the cursor. This indicates you are only copying
the actions of the button and not the button itself.
PHILIPS Page 64 of 85
Page 65

ProntoEdit
Version 4 - User Manual Configuring a CCF
Jumps
For every button, device and macro group, direct-access key and action
button you can create a jump to another panel.
Jumps are not part of an action list. A jump is executed when the Pronto
finished executing the actions in the action list. Whe n cre ating an alias to a
certain panel, only the action list is executed, not the jump.
You can create jumps:
from the buttons on the Home panel to the devices and macro groups;
from the first panel of a device to the next and scro ll through the
different pages (Page Up and Page Down);
to a panel of another device;
to a hidden panel.
Jumping to another panel
Any button can jump to any panel (or be a link to that panel). This is a very
powerful feature that allows you to cre a te yo ur own Pronto user interface
structure.
There are a couple of special options in the Jump drop-down list:
MOUSE MODE switches your Pronto into a mous e mode in which yo ur
Pronto's touch screen acts as a touch pad to operate compatible
interactive devices.
SCROLL UP scrolls up to the previous panel, exactly like the scroll
button at the top of your Pronto's touch screen do e s .
SCROLL DOWN scrolls down to the next panel, exactly like the scro ll
button at the bottom of your Pronto's touc h scre en does.
★
To create a jump 1 Open the Button Properties, Device Properties or Macro Group
Properties.
2 Select the Action tab.
3 Select one of the following options to jump to in the Jump drop-down
list:
<none>;
Mouse mode;
Scroll up;
Scroll dow n;
any panel of HOME, the different devices or macro groups.
The jump is created. When you tap the button, select the device or
macro group the Pronto will jump to the selected panel.
4 Click OK to accept the properties.
-orClick Cancel to return witho ut c hanging the properties.
★
compatible with Philips DVX8000, May 2001
PHILIPS Page 65 of 85
Page 66
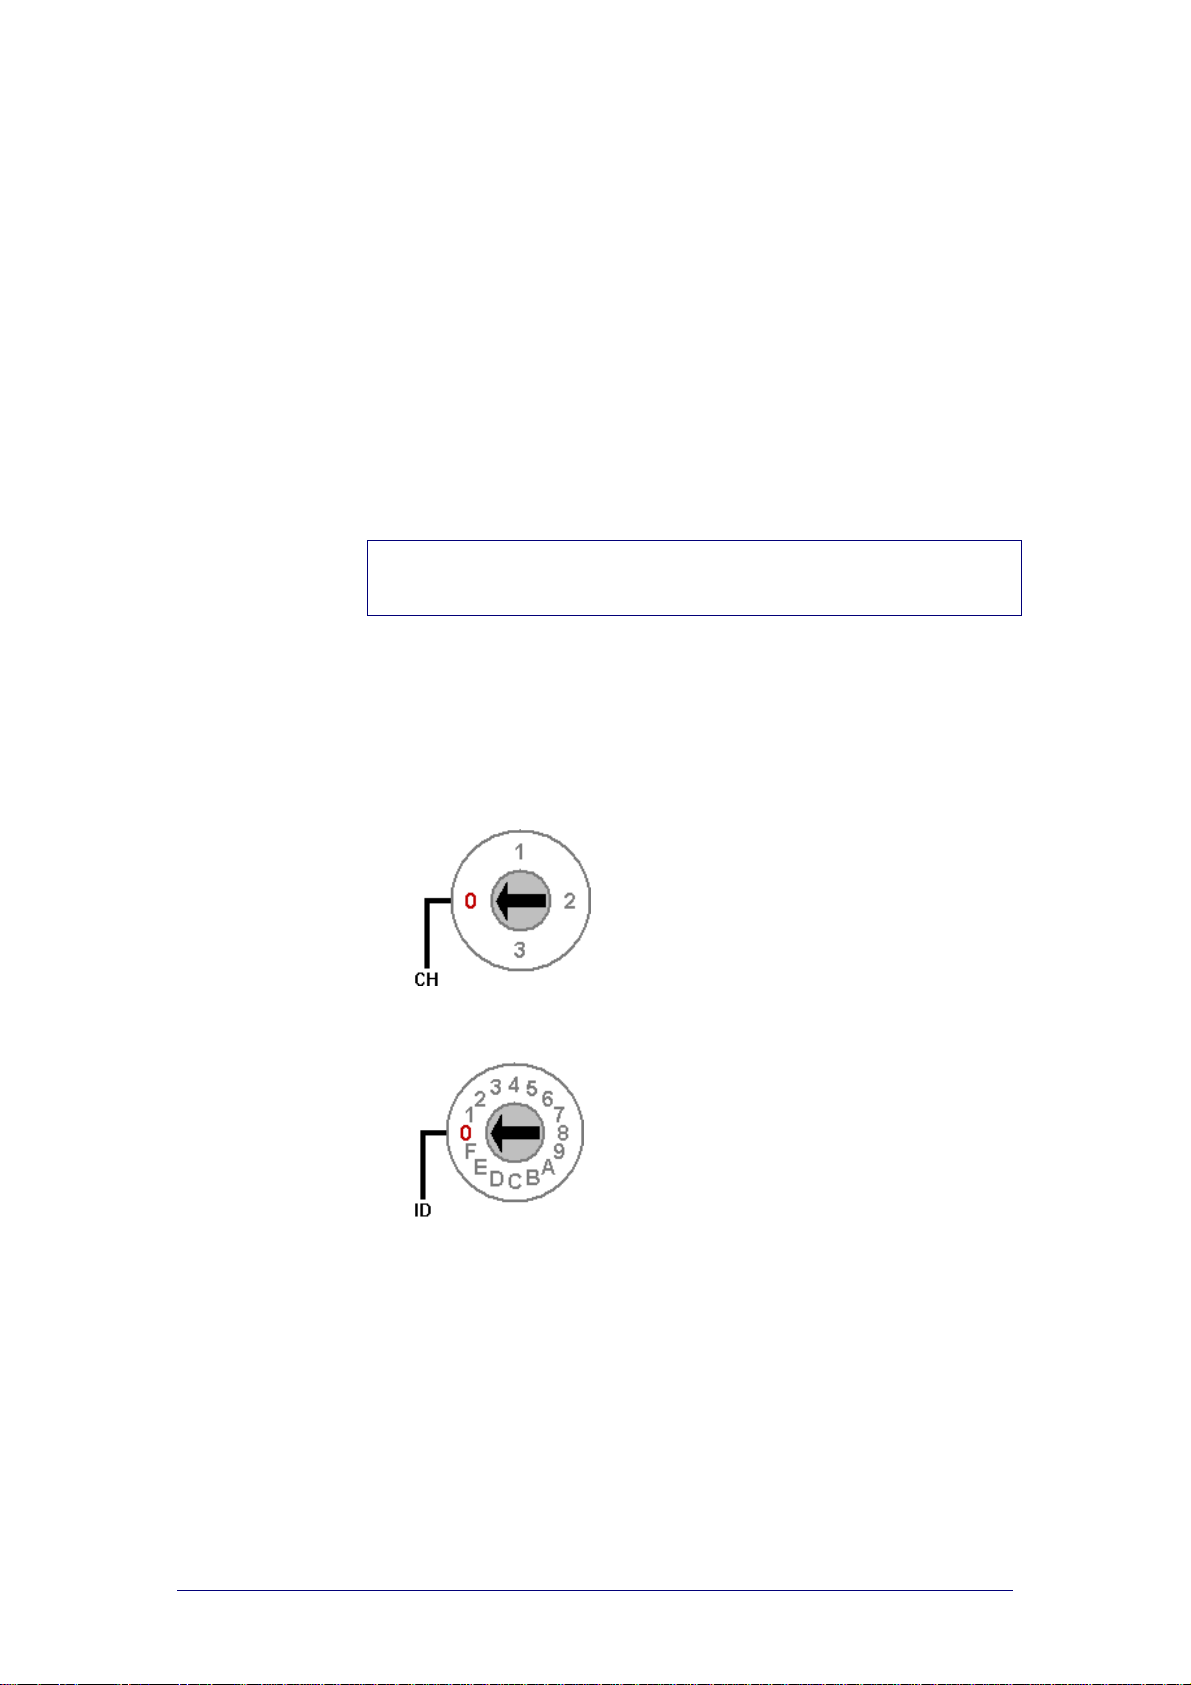
ProntoEdit
Version 4 - User Manual Configuring a CCF
RF Settings
The Pronto can be set to transmit RF signals. These signals can only be
received and translated by an RF Extender (optional). The settings on both
the Pronto and the RF Extender have to match. You can define the RF setting s
for the Pronto in ProntoEdit. Refer to the Pronto User Manual and the RF
Extender User Manual for more details.
If your devices are not responding to co mmands or if the red LED on the RF
Extender is blinking without sending commands, it mig ht be poss ible that
there is RF interference. This can be the case when other RF appliances are
operated nearby, for instance by your neighbours. When you notice RF
interference you have to adjust the RF Channel (from 0 to 3).
If you want to operate several of your devices independently, e.g. grouped on
different locations, you will need multiple RF Extenders. You can also assign
an extender ID at the Home level. When using several RF Extenders , it is
important to assign a unique Extender ID to each RF Extender. 16 Extender
IDs (from 0 to 9 and from A to F) can be assigned.
Note
When you change the RF Channel, the channel settings are automatically
adjusted for all devices and macros in your CCF.
Defining RF settings
1 Open the System Properties, Device Propert ies or Macro Group
Properties.
2 Select the RF tab.
3 To enable RF transmission, select the RF enabled check box.
4 Select an RF Channel by clicking the number or by turning the arro w .
Make sure the RF Channel in ProntoEdit matches the Channe l (C H) on
your RF Extender.
5 Select an Extender ID by clicking the number or by turning the arrow.
Make sure the Extender ID in ProntoEdit matches the Exte nder ID on
your RF Extender.
6 Click OK to accept the properties.
-orClick Cancel to return witho ut c hanging the properties.
PHILIPS Page 66 of 85
Page 67
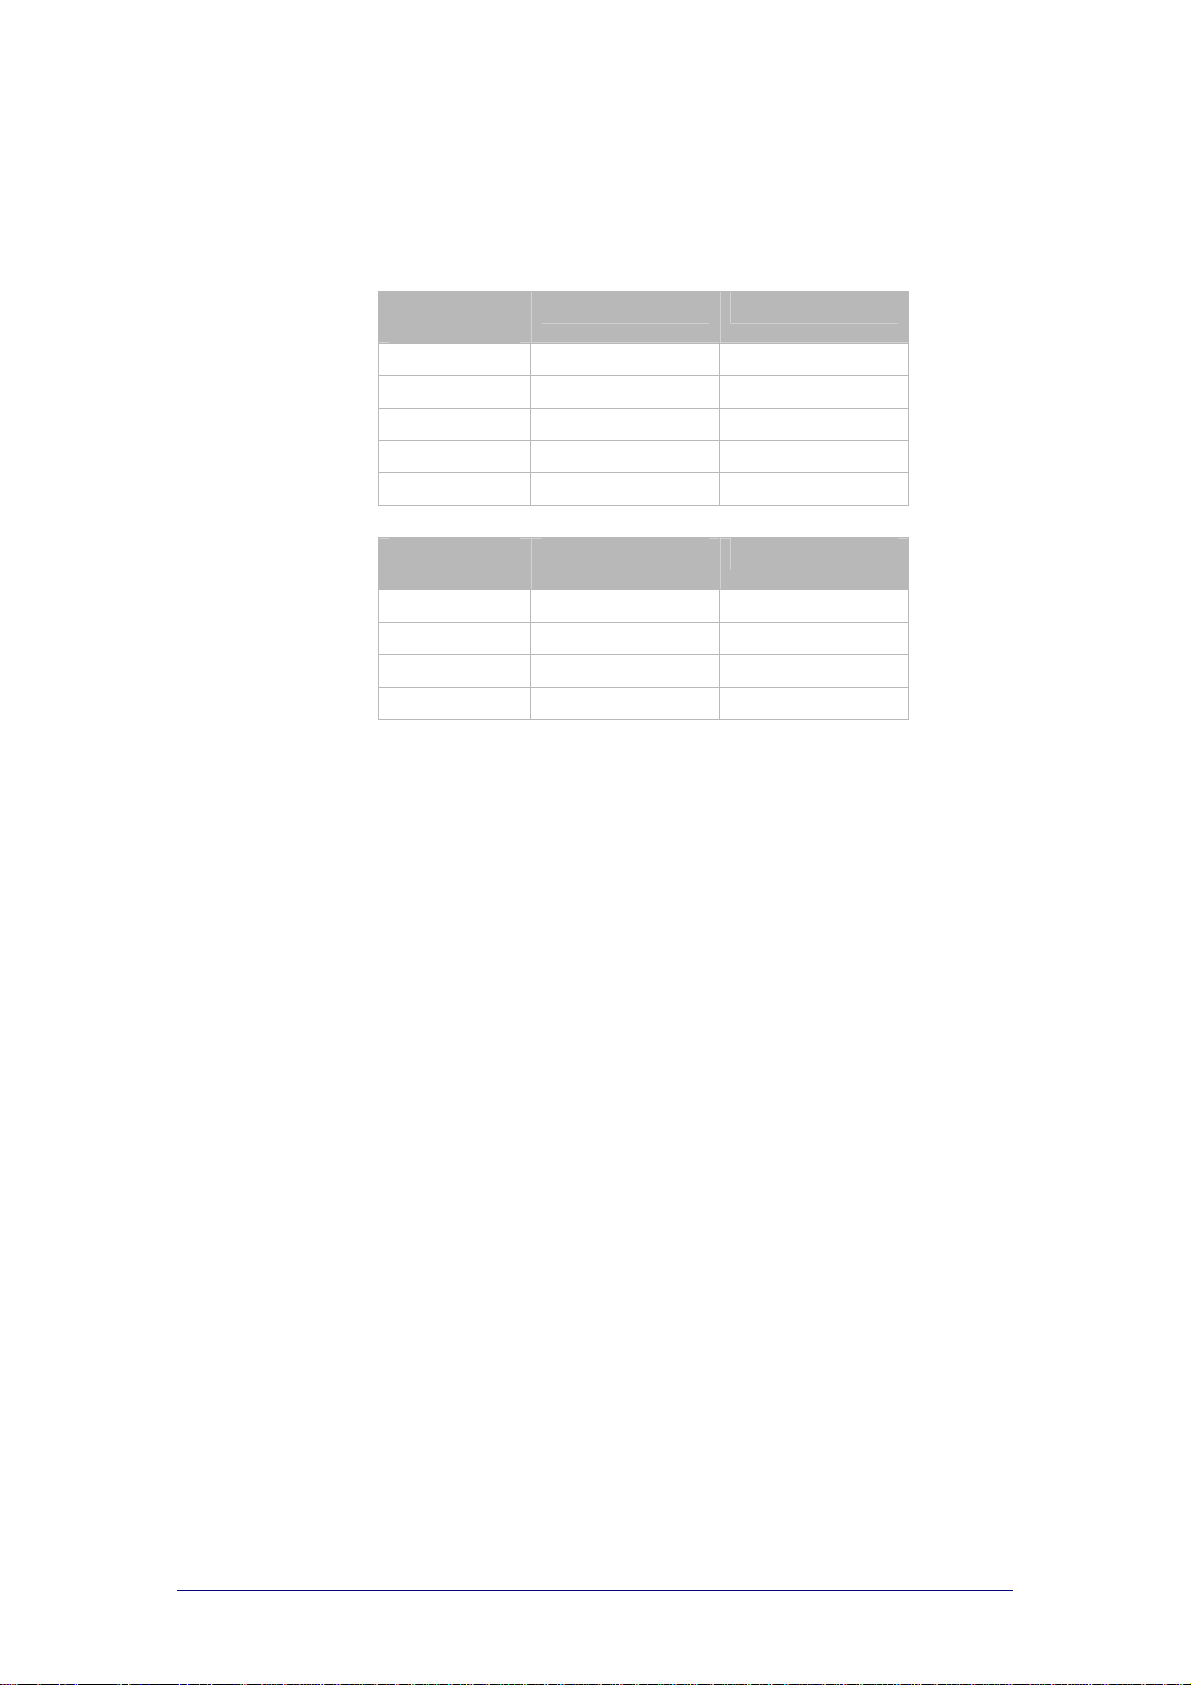
Hard Key Actions
Hard keys on the Pronto
Direct-access
keys
Mute Available Available
Vol + Available Available
Vol - Available Available
P + Available Available
P - Available Available
Action
buttons
Page Up Not available Available
Left Action Available Available
Right Action Available Available
Page Down Not available Available
Pronto ProntoPro
Pronto ProntoPro
Programming hard keys
You can program the hard keys on the Pronto just like yo u program buttons,
devices and macro groups. You configure the action list and create jumps for
the hard keys:
for each device or macro group on your Pronto;
globally.
The actions and jumps globally defined will be execute d when yo u did not
configure the hard key actions for a device or macro group. You cannot
program the Action buttons for the macro groups.
To configure the hard keys per device or macro group
Open the Device Properties or Macro Group Properties.
To configure the hard keys globally
Open the RC device System Properties.
PHILIPS Page 67 of 85
Page 68

ProntoEdit
Version 4 - User Manual Configuring a CCF
To program a hard key
1 Select the Hard Keys tab.
2 On the Pronto image click the hard key to which you want to add actio ns .
The selected hard key is highlighte d .
3 Configure the action list for the s e lected hard key with one or more of the
following actions:
“Creating an alias” on page 58;
“Setting a delay” on page 59;
“Assigning an IR code” on page 60;
“Adding a beep” on page 62;
“Adding a timer” on page 62;
“Deleting an action” on page 63;
“Jumping to another pane l” on page 65.
4 Click OK to accept the properties.
-orClick Cancel to return witho ut c hanging the properties.
Warning
By default, the Action buttons ‘Page Up’ and ‘Page Down’ are used for
scrolling on your Pronto. Make sure to provide alternative (soft) buttons to
scroll if you reprogram these Actio n b uttons.
PHILIPS Page 68 of 85
Page 69
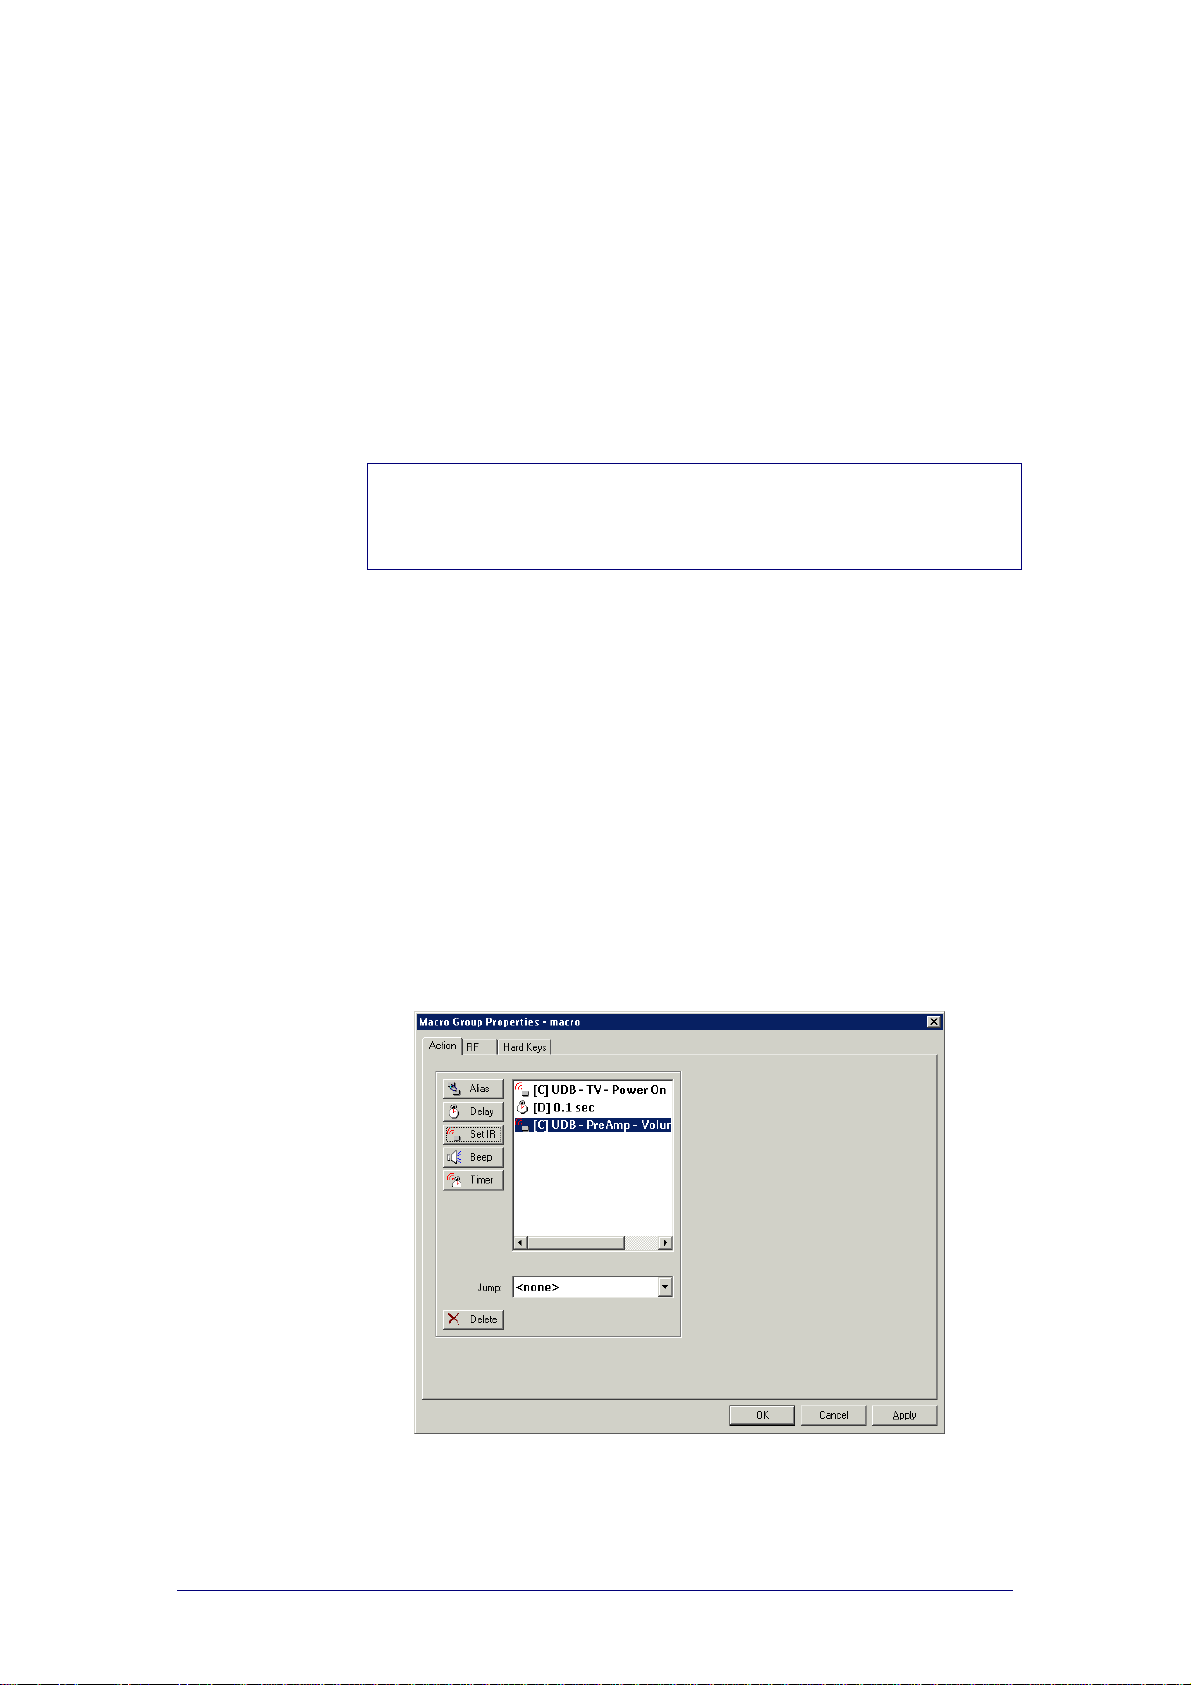
ProntoEdit
Version 4 - User Manual Configuring a CCF
Macros
Macros on your Pronto and in
On your Pronto there is a clear distinctio n b e twe e n:
Buttons, direct-access keys and action buttons that can only
perform a single command.
Macros that perform a series of commands.
In ProntoEdit this distinction does not exist. Every button, device, directaccess key or action button can perform a single action or be a macro and
perform a series of comm ands.
Note
All macros can be used on your Pronto, but only macro buttons in a macro
group panel can be edited on your Pronto.
You cannot define macros for the action butto ns of your Pronto.
ProntoEdit
Creating a macro
1 Open the Button Properties, Device Properties or Macro Group
Properties.
2 Select the Action tab.
3 Configure the action list for the s e lecte d b utton, device or macro group
with following actions:
“Creating an alias” on page 58;
“Setting a delay” on page 59;
“Assigning an IR code” on page 60;
“Adding a beep” on page 62;
“Adding a timer” on page 62;
“Deleting an action” on page 63;
“Jumping to another pane l” on page 65.
When selecting the button, device or macro group on your Pronto the list
of commands will be executed.
You can add up to 255 actions to the action list.
PHILIPS Page 69 of 85
Page 70
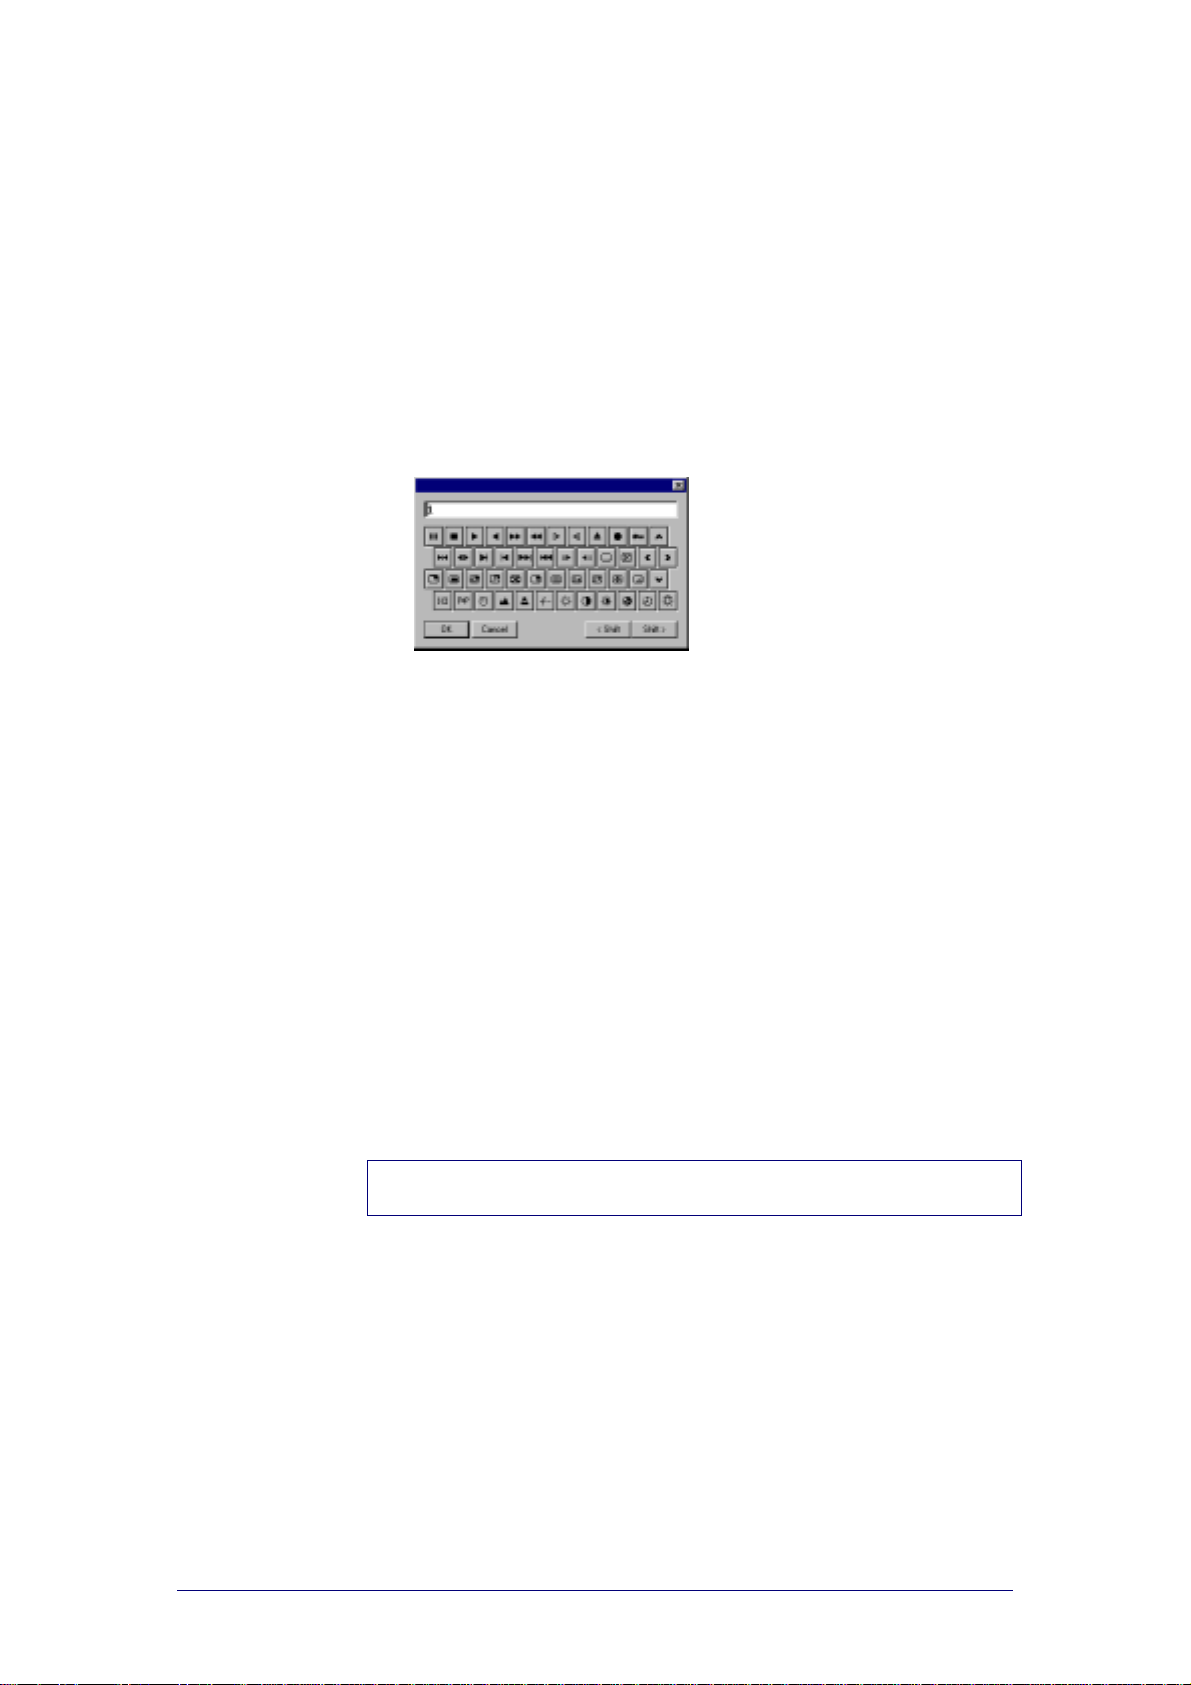
ProntoEdit
Version 4 - User Manual Configuring a CCF
Modifying Frames and Buttons
Identifying Frames and Buttons
Naming a frame or a button
1 Open the Frame Properties or Button Properties.
2 Select the Properties tab.
3 Click the button in the Name group box.
A keyboard appears.
4 Type the name for the frame or button in the text field.
-or-
Use the keyboard on screen:
To display a keyboard with capital le tte rs or symbols, click Shift.
To enter a character or sy mbol, c lic k the character or symbol you
want to use.
5 Click OK to save the name.
6 Select a font size from the Font drop-down list.
Select one of the following options:
<none>
When you select <none>, the name of the frame or button will not
be displayed on the Pronto. It will be used as an identif ie r only .
Pronto 10
Pronto 14
Pronto 18
7 Click OK to accept the properties.
-or-
Click Cancel to return witho ut c hanging the properties.
Note
You can also rename frames or buttons by selecting them and pre ssing F2.
PHILIPS Page 70 of 85
Page 71
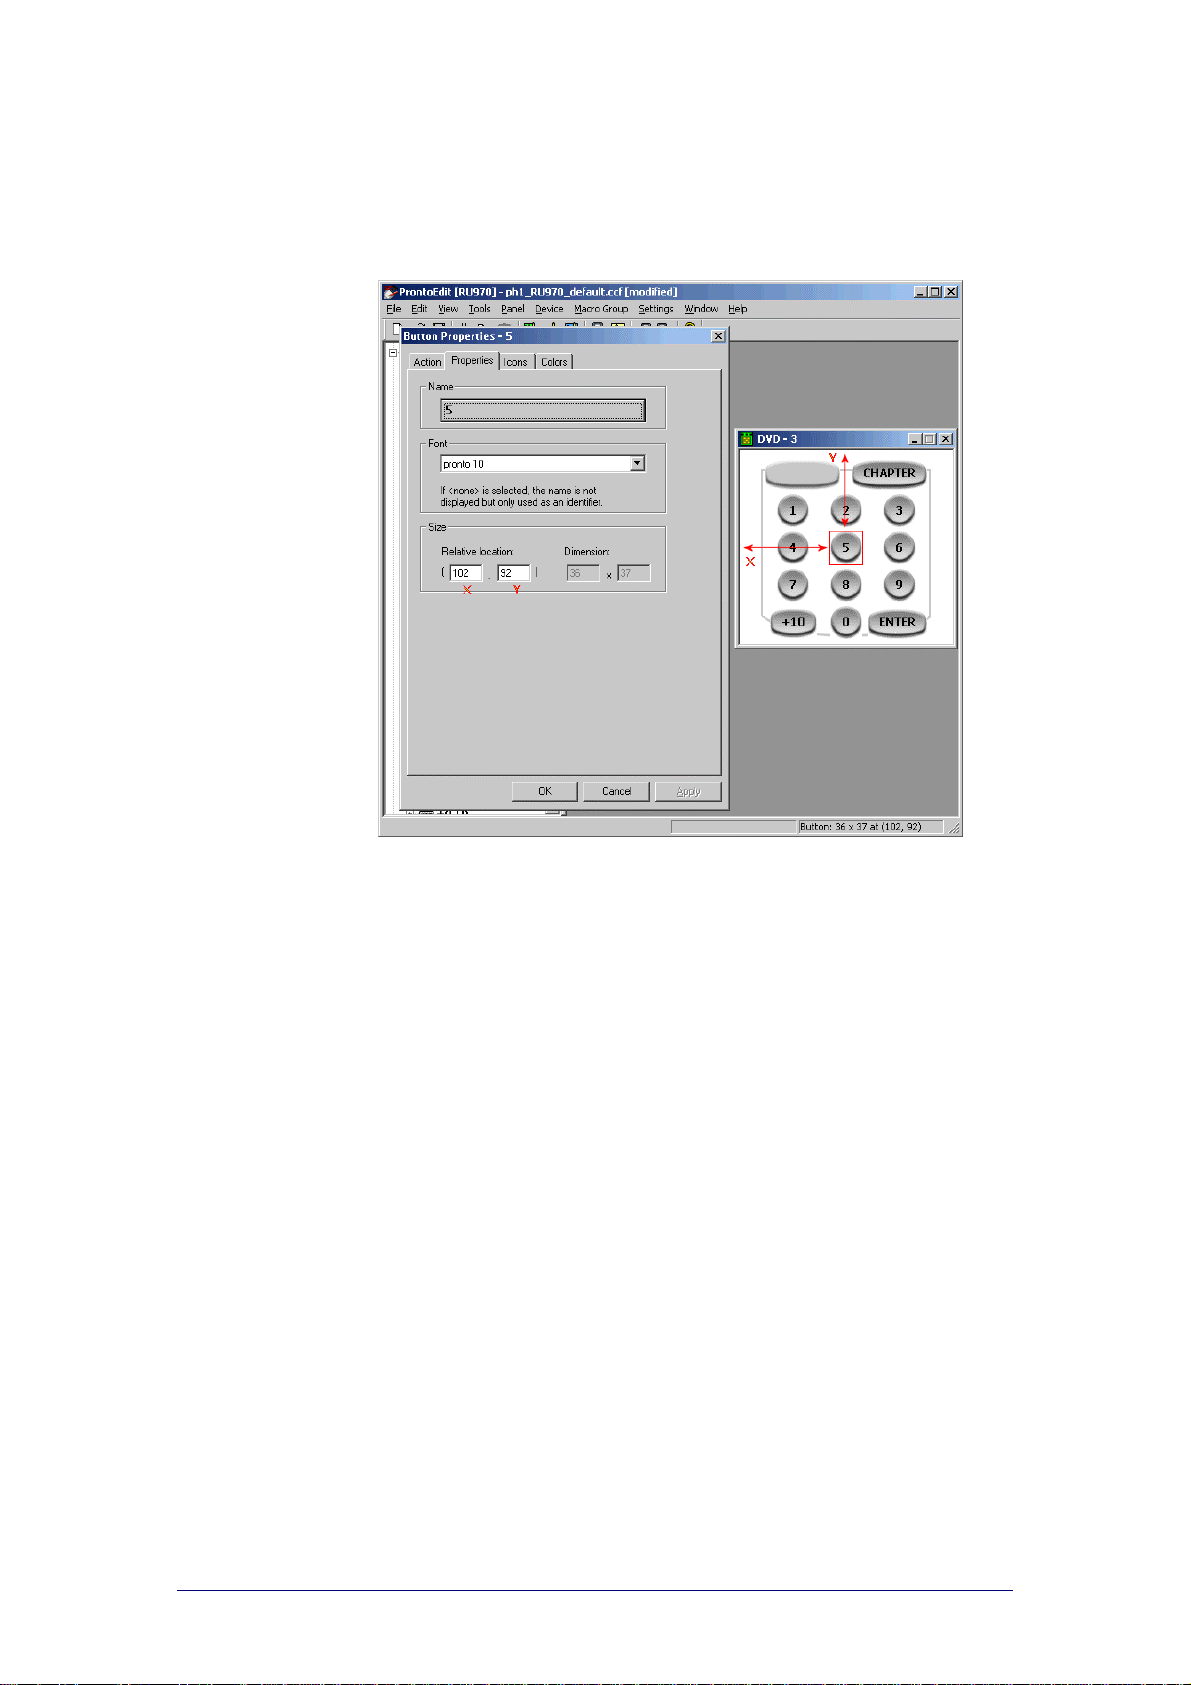
ProntoEdit
Version 4 - User Manual Configuring a CCF
Entering the location and dimensions of a frame or a button
1 Open the Frame Properties or Button Properties.
2 Select the Properties tab.
3 Enter the position in the Relative Location text fields.
X is the distance between the left edge of the panel or the parent frame
and the left edge of the frame or button.
Y is the distance between the top of the pane l or the pare nt frame and
the top edge of the frame or button.
4 Enter the width and the height of the frame or button in the Dimension
text fields.
The Dimension option is only enabled for resizing default frames and
buttons. When the frame or button contains a bitmap, you cannot resize
it.
5 Click OK to accept the properties.
-or-
Click Cancel to return witho ut c hanging the properties.
Displaying the location of frames and buttons
When selecting a frame or button in a panel, the dimensions and location are
displayed in the status bar.
The location of grouped frames and buttons can be displayed as:
Relative location: the location of the selected frame or button in
relation to the top left corner of the parent.
Absolute location: the location of the selected frame or button in
relation to the top left corner of the panel.
When frames and buttons are not grouped there is no difference between the
relative and absolute location. The loc ation always refers to the top left corner
of the panel.
By default the relative location of fr ames and buttons is d isplayed.
PHILIPS Page 71 of 85
Page 72
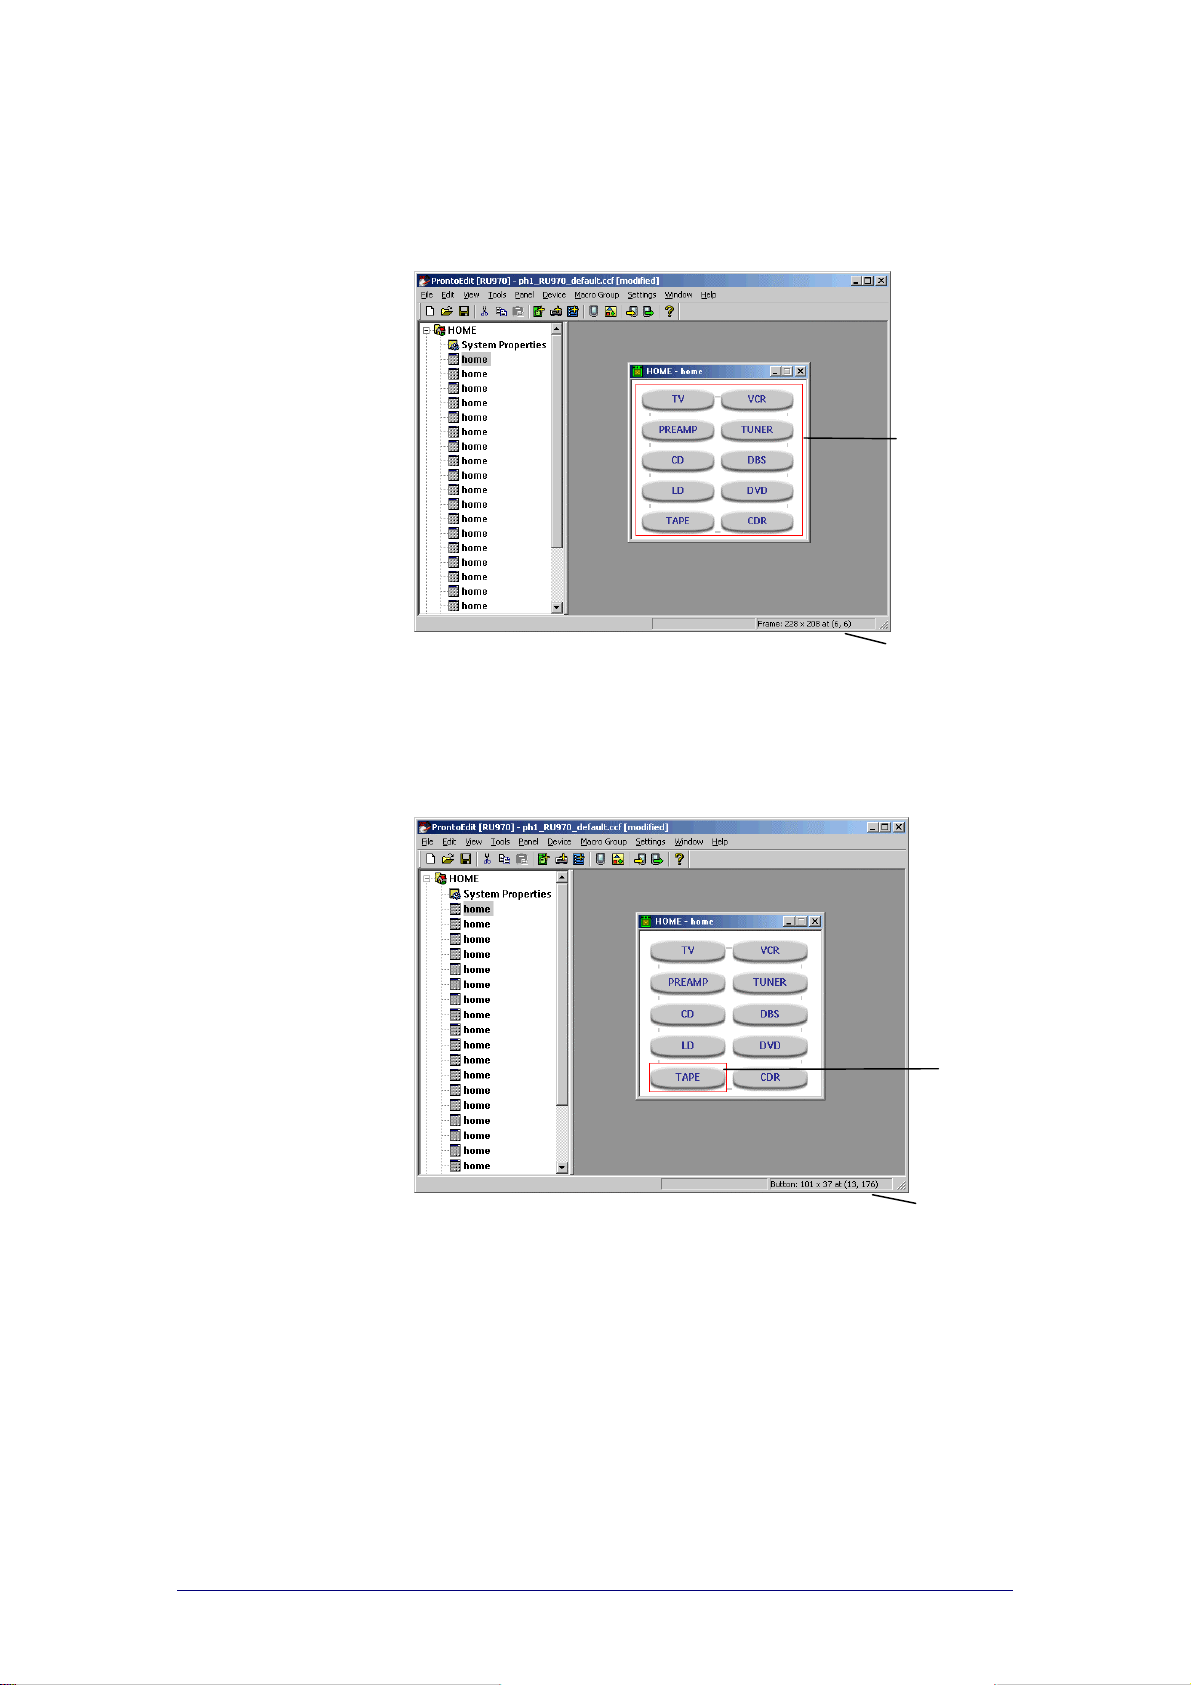
ProntoEdit
Version 4 - User Manual Configuring a CCF
To switch from relative location to absolute location
1 Open a panel.
2 Select a parent frame.
The dimensions and the location of the parent frame are displayed in the
status bar.
Parent frame
The location of a frame or button on the first level is always an abso lute
location and refers to the top left cor ner of the p ane l.
3 Select the first child.
The dimensions and the location of the first child are disp laye d in the
status bar.
The + sign indicates that the relative location of the child in relation to
the top left corner of the parent is displayed .
Dimensions and location
of the selected parent frame
First child
Dimensions and relative
location of the selected
first child
PHILIPS Page 72 of 85
Page 73
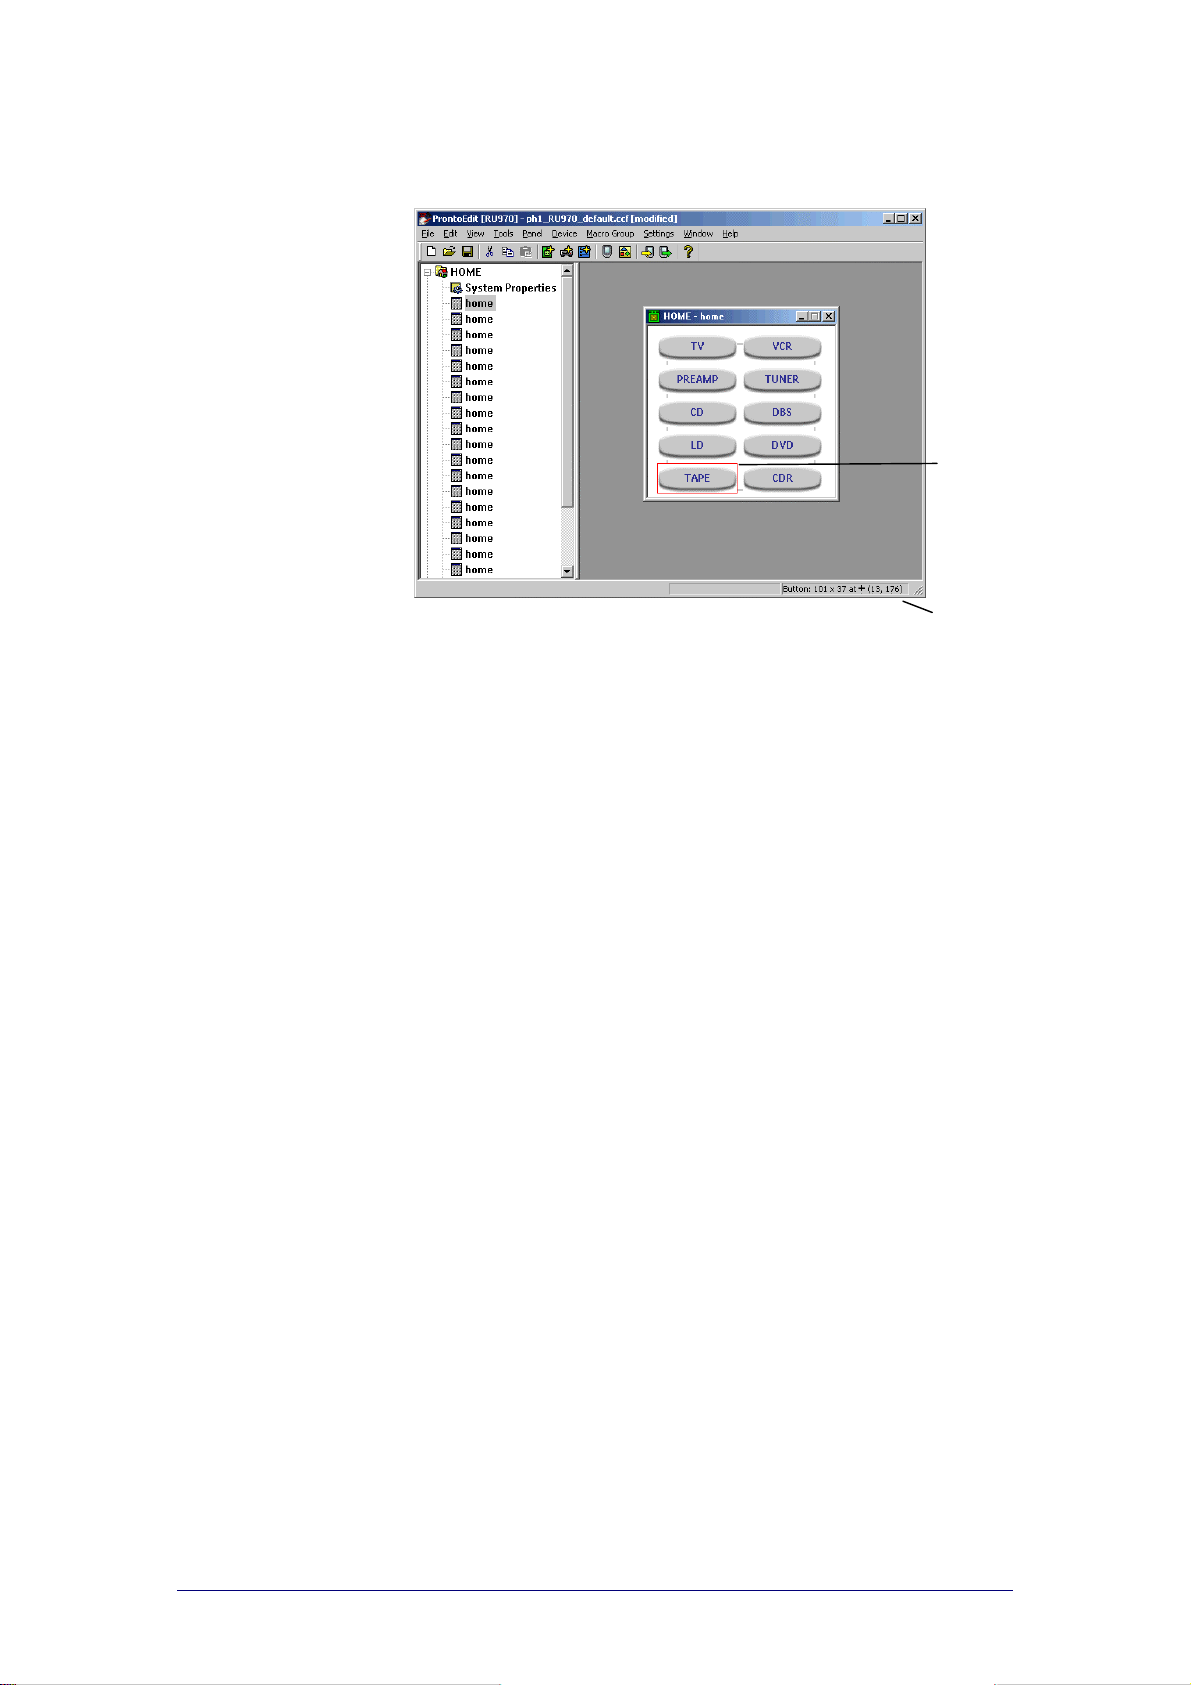
ProntoEdit
Version 4 - User Manual Configuring a CCF
4 Select Absolute location from the Settings menu.
The relative location of the first child in the status bar changes into the
absolute location.
First child
The + sign disappears indicating that the absolute location of a child in
relation to the top left corner of the panel is dis played.
Dimensions and absolute
location of the selected
first child
PHILIPS Page 73 of 85
Page 74

ProntoEdit
Version 4 - User Manual Configuring a CCF
Designing Frames and Buttons
Adding bitmaps to a frame
1 Open the Frame Properties.
2 Select the Icons tab.
When you selected a default frame, No Icon is displayed in the Icon
group box.
When you selected a frame with a bitmap, the bitmap is displayed in the
Icon group box.
3 Right-click in the Icon group box and select Load from the context
menu.
-or-
Double-click in the Icon group box.
The ‘Open’ window appears.
4 Browse to the folder where the bitmaps are stored and select a new
bitmap.
5 Click OK.
The selected bitmap is displayed in the Icon group box.
6 Right-click the button and select Save from the context menu to save
the bitmap.
7 Click OK to accept the properties.
-or-
Click Cancel to return witho ut c hanging the properties.
Adding bitmaps to a but ton
1 Open the Button Properties.
2 Select the Icons tab.
When you selected a default button, No Icon is displayed in the
Inactive icons and the Active icons group boxes.
When you selected a button with a bitmap, the bitmaps are displayed in
the Inactive icons and the Active icons group boxes.
3 Right-click in the group box for the Inactive-Unselected state and
select Load from the context menu.
-or-
Double-click in the Icon group box.
The ‘Open’ window appears.
4 Browse to the folder where the bitmaps are stored and select a new
bitmap.
5 Click OK.
The selected bitmap is displayed in the group box for the Unselected –
Inactive state.
6 Right-click the button and select Save from the context menu to save
the bitmap.
7 Repeat the instructions 3 to 6 for the other states:
Unselected– Active
Selected– Inactive
Selected– Active
8 Click OK to accept the properties.
-or-
Click Cancel to return witho ut c hanging the properties.
PHILIPS Page 74 of 85
Page 75

ProntoEdit
Version 4 - User Manual Configuring a CCF
Setting the colors of a frame
1 Open the Frame Properties.
2 Select the Colors tab.
3 Click the field to change the text color.
Right-click the field to change the background color.
If you edit a black&white CCF, a context menu with the four grayscale
colors appers.
If you edit a color CCF, a context menu with 44 colors appears. With the
More button you can pick from 216 websafe colors.
4 Select the color you want to use.
When you move your mouse over the colors, the color in the field
changes dynamically.
5 Click OK to accept the properties.
-or-
Click Cancel to return witho ut c hanging the properties.
Setting the colors of the button
1 Open the Button Properties.
2 Select the Colors tab.
You can select the text color and the background color for the four states
of the button.
3 Click the field to change the text color.
Right-click the field to change the background color.
If you edit a black&white CCF, a context menu with the four grayscale
colors appers.
If you edit a color CCF, a context menu with 44 colors appears. With the
More button you can pick from 216 websafe colors.
4 Select the color you want to use for the Unselected – Inactive state.
When you move your mouse over the colors, the color in the field
changes dynamically.
5 Repeat the instructions 3 and 4 for the other states:
Unselected– Active
Selected– Inactive
Selected– Active
6 Click OK to accept the properties.
-or-
Click Cancel to return witho ut c hanging the properties.
PHILIPS Page 75 of 85
Page 76
ProntoEdit
Version 4 - User Manual Configuring a CCF
Setting the System Properties for the Pronto
Write-protecting a CCF
A write-protected CCF cannot be chang e d o n your Pronto. This is useful if you
want to set up a CCF with ProntoEdit and don’t want anyone to inadvertently
make changes to it when they use your Pronto.
Note
After loading a write-protec ted CCF in yo ur Pro nto, you can only access USE
mode on your Pronto. Write-protecting a CCF does not aff ect any ProntoEdit
operations.
1 Open the RC device System Properties.
2 Select the RC device System Properties tab.
3 Select the Configuration is write-pr ote cte d check box.
4 Click OK to accept the properties.
-or-
Click Cancel to return witho ut c hanging the properties.
Automatically creating device aliases
ProntoEdit automatically ad ds device aliase s to the Home panel whe n thre e
conditions are met:
There has to be at least one Home panel.
The first Home panel has to be called ‘home’ in lowercase.
The Home panels have to be write-protected.
Note
When one of these conditions is not met, you can create your own personal
Home panel. See ‘Creating your own Home panels’ on p. 22.
1 Select the first Home panel and press F2.
The ‘Rename Panel’ appears.
2 Type in lowercase the name home in the field.
3 Open the RC device System Properties.
4 Select the RC device System Properties tab.
5 Select the HOME panels are write-protected check box.
6 Click OK to accept the properties.
-or-
Click Cancel to return witho ut c hanging the properties.
When you create a new device on your Pronto or in ProntoEdit, an alias
to this device will automatically be added to the Home panel.
PHILIPS Page 76 of 85
Page 77

Troubleshooting
The Pronto does not connect to the serial port
1 If the following message appears: “Pro nto no t co nnecte d or not
responding”, click Details.
A panel appears listing all the serial ports on your PC.
2 Check if another application, e.g. a synchronization program for a PDA or
a wireless mouse device, is using the serial port.
If this is the case:
try another serial port;
have the other application release the serial port.
ProntoEdit
was able to open the serial port to which my
Pronto is connected but still cannot communicate
Check if both e n ds of the serial cable are properly plugged in.
Check if the Pronto’s batteries hav e no t run out.
Wait a few seconds and try again.
If after a number of attempts ProntoEdit s till c annot communicate, reset
your Pronto.
Wait until it beeps twice and try again.
The Home panel on the Pronto looks different from the way
you designed it in
You can create your own Home panel when at least one of the following
conditions is met:
The first Home panel is not named ‘home’ (all lowercase).
The Home panels are not write-protect ed.
When the first Home panel is not named ‘home’ and the Home panels are
write-protected, the Pronto w ill bo ot up and display the first Home panel.
When the Home panels are not write-protected , the Pro nto will boot up and
display the first panel of the first device.
If the first Home panel is named ‘home’ and the Home panels are writeprotected, aliases to all devices will automatically be added to the Home
panel.
ProntoEdit
New panels, buttons and frames appear in the loaded CCF
You have opened a new CCF while another CCF was still loaded in ProntoEdit.
You have merged the two CCFs.
If you open a CCF when another CCF is already loaded when you want to load
a new CCF, you have two possibilities:
Merge both CCFs: this means adding all devices, macro groups and
panels from the CCF you are loading to the curr e nt CCF .
Replace one CCF by another: this means removing the current CCF
and replace it with the loaded CCF.
You can use this feature to copy devices, macro groups and panels from one
CCF to another. You edit the CCF with the devices, macro groups and pa ne ls
you want to copy and merge it in another CCF.
PHILIPS Page 77 of 85
Page 78

ProntoEdit
Version 4 - User Manual Troubleshooting
Macros seem to be programmed correctly in
ProntoEdit
but
are not working on the Pronto
You may have to add delays between the different commands in the macro. A
device needs time to receive and execute the command. For example, whe n a
devices receives the Power on command, it takes some time to start up. So
the device will not be able to receive the next command.
See “Setting a delay” on page 59.
The function Test IR does not work properly
When you want to try out the IR code you have assigned, you have to
connect the Pronto to your computer.
The function Test IR works best when the Pronto’s touch screen is
active.
The function Test IR may not work optimally with timer actions or when
ProntoEmulator is running.
The CCF on your Pronto is invalid or corrupt
“Invalid Configuration File Version”
“File is not a valid configuration”
“CCF file is invalid or corrupt”
See “Downloading a CCF into Your Pronto” on pag e 42 to download the CCF
from ProntoEdit again.
Pronto sends out 4 beeps and cannot be activated
The Pronto software is corrupt.
See “Updating Your Pronto” on page 8 to upda te the software on your Pronto.
The bitmap of a butt on is truncated
You can add four bitmaps to a button, one for each state:
inactive – unselected;
inactive – selected;
active – unselected;
active – selected.
The size of the button is defined by the smallest of the bi tmaps used fo r
different states of the button. You cannot resize a button that contains
bitmaps. The best way to avoid the problem is using bitmaps with the same
size per button.
Buttons without bitmaps can be resized.
PHILIPS Page 78 of 85
Page 79
List of Shortcuts
Shortcut Key Function
CTRL + U Upload fro m the Pr o nto
CTRL + D Download into Pronto
CTRL + R Run Emulator
CTRL + G Ope n Galle ry
ALT + P Add Panel
ALT + A Adding a frame to a panel
ALT + K Adding a button to a panel
ALT + F Mov e to Fr ont
ALT + B Move to Back
ALT + D Display Grid
ALT + G Edit Grid
ALT + S Snap to Grid
ALT + O Select a parent frame
ALT + C Select the first child of the selected fr ame or butto n
TAB Select the next sibling of the selected frame or
SHIFT + TAB Select the previous sibling of the selected frame or
Insert Opens the properties of a button, a frame, a macro
CTRL + drag and
drop
ALT + drag and
drop
SHIFT + drag and
drop
F2 Renaming a panel, a macr o g r oup or a de vice
CTRL + UP or
DOWN
button
button
group or a device when selected.
Copy the frame with the bitmap (icon) or copy the
button with the bitmaps (icons) and the action list.
Copy only the icons of a button without the action
list.
Copy only the action list of a button without the
icons.
Move the selected panel, macro group or devic e up
or down its current list.
PHILIPS Page 79 of 85
Page 80

Glossary
Action
An action is a command that will be executed by the Pronto. An action can be
an alias, a delay, an IR code, a beep or a timer. You can assign one or more
actions to:
tapping a button;
selecting a device;
selecting a macro group;
pressing an Action button (Page Up, left and right Actio n button, Page
pressing a direct-access key (Mute, Vol+, Vol-, P+, P-).
When using one of these elements on the Pronto the list of actio ns w ill be
executed. An action list can contain up to 255 actions.
Alias (shortcut)
An alias is a shortcut to another command. You can create an alias to a
button action, to a device or a macro group action, to an action of a dire c taccess key or an action button. When your Pronto is exe c uting an ac tio n list
and comes across an alias, the action list referred to by that alias is executed.
Working with aliases saves memory.
Down);
Button
A button is a user interface element on the Pronto us e d to exe c ute
commands. A button with at least one action in the action list appears on the
Pronto, a button with an empty action list does not appear on the Pronto until
an action is assigned to it.
A button can be displayed with a label, several bitmaps and colors. You can
change the look of a button by adding bitmaps. A button can have up to four
bitmaps, one for each of its states:
inactive and unselected;
inactive and selected;
active and unselected;
active and selected.
CCF
A CCF or configuration file defines and stores the Pro nto user interface:
devices and macro groups;
panel layouts and button appearances;
the behavior of all buttons, direct-acc e s s keys and action buttons
(including all IR codes).
Device
A device appears in the Device menu on the Pronto. A device can co ntain up
to 255 panels.
PHILIPS Page 80 of 85
Page 81

ProntoEdit
Version 4 - User Manual Glossary
Device action (source switching)
A device action is an action assigned to selecting a device, e.g. turning on the
device.
The moment you select the device in the Device menu or on the Home panel
on your Pronto, the action is executed and the Pro n to s w itc hes to the first
panel of the selected device.
Frame
A frame is a user interface element on the Pronto used to display a
background image, text messages or labels. Frames and buttons c an be
grouped in a parent frame. It is much easier to move and arrange grouped
frames and buttons in a panel.
A frame cannot be programmed, it never contains an action list. You can
change the look of the frame by adding a bitmap.
Gallery
A gallery is a collection of frames and buttons. I ns te a d of add ing default
frames and buttons to a panel, you can add frames and buttons from a
gallery. A gallery contains the bitmaps for frames and buttons used in a CCF.
Grid
A grid is a set of up to 64 horizontal and 64 vertical grid lines . A grid is used
to align frames and buttons in a panel. After editing the grid, you can let the
frames and buttons snap to the grid.
Icon (bitmap)
An icon is used to change the look of the frames and buttons in the panels.
ProntoEdit can load any Windows bitmap file with 1, 4 or 8 bits per pixel and
with maximum dimensions of 240 by 219 pixels (the size of a panel).
IR code
The Pronto sends out in frared (IR) co des to operate devices.
IR codes to activate different brands for all kinds of video and audio devices
are stored in the Pronto’s universal database. By selecting IR codes and
assigning them to panels, buttons and keys, you can program your Pronto to
operate your devices.
When IR codes are not present in the database you can always learn them
from the existing remote control of the device .
Jump
With a jump the Pronto navigates from one panel to another panel. Fo r ev er y
button, action button and direct-access key, device and macro group a jump
can be created. With jumps you can scroll through the d iff er e nt panels of a
device or jump to a hidden panel.
Macro
A macro is a se quence of IR commands exe cuted when sel ecting a single
button on the Pronto.
On your Pronto there is a clear distinction between buttons that can only
perform a single command and macros that perform a list of commands.
In ProntoEdit this distinction does not exist. Every button, device, directaccess key or action button can perform a single action or act as a macro and
perform a list of commands.
Macro group
A macro group appears in the Macro menu on the Pronto. Every macro group
can contain up to 255 panels.
PHILIPS Page 81 of 85
Page 82

ProntoEdit
Version 4 - User Manual Glossary
Panel
A panel is the area of 240 * 219 pixels co nta ining frames and buttons
displayed on your Pronto. There are 3 kind of panels:
Home panel;
Panel of a device;
Panel of a macro group.
System area
The system area is the area on the Pronto’s touch scree n that is prede fined
for the system navigation: it cannot be changed by the user.
Template
You can define the panels, buttons and frames for a device in a template.
The template is created in ProntoEdit and used on the Pronto when adding a
new device in the Pronto. A template is not visible on the Pronto.
Please refer to the Pronto Owner’ s manual fo r information on how to add
devices on the Pronto.
Timer
With a timer you can operate a device at the time you prefer. A timer can be
created for every button, macro, device or macro group. To define a timer
you have to select the time and day to start the timer action and to stop the
timer action. A timer action can be repeated weekly.
On your Pronto timers can only be edited in macro b uttons. The ‘hidden’
timers to a button, macro or device cannot be edited in the Pronto.
UDB
The Universal DataBase stores IR codes to activate different brands for all
kinds of video and audio devices. When configuring a CCF you can assign IR
codes from the universal database to the buttons and devices in ProntoEdit.
With the option Non Applicable the brand for the device is not
preprogrammed. This allows you to prepare your CCF for functions that are
not available on your current device. In case you replace the existing device
with a new one and the functions are available in the database, the IR codes
assigned to the functions will be used.
PHILIPS Page 82 of 85
Page 83

Index
A
absolute location, 72
action, 57, 63, 80
action list, 80
active button, 33
adding
beep, 62
bitmap to a button, 74
bitmap to a frame, 74
button, 27
button from a gallery, 30
device, 22
frame, 27
frame from a gallery, 30
macro group, 23
panel, 25
timer, 62
alias, 58, 80
assigning IR code, 60
B
beep, 62
bitmap, 33, 81
adding to a button, 74
adding to a frame, 74
copying, 35, 64
inserting, 33
modifying, 35
saving, 34
button, 80
active, 33
adding, 27, 30
adding bitmap, 74
changing, 70
copying, 28
creating, 27
designing, 74
dimensions, 71
grouping, 29
identifying, 70
inactive, 33
location, 71
modifying, 70
moving, 28
naming, 70
removing, 28
resizing, 27
selected, 33
selecting, 30
setting color, 75
unselected, 33
Button Properties, 52
C
CCF, 9, 11, 80
basic actions, 13
changing, 19
configuring, 48
downloading, 42
emulating, 41
formats, 44
loading, 16
making EXE, 46
merging, 47
modifying, 19
opening, 16, 47
previewing, 40
replacing, 47
saving, 44
saving as, 44
saving as EXE, 46
testing, 40
uploading, 17
viewing, 40
write-protecting, 76
changing
button, 70
CCF, 19
frame, 70
changing default panel, 25
child, 29
closing panel, 20
color
button, 75
converting, 17
frame, 75
configuration file. See CCF
configuration view, 10
configuring CCF, 48
converting colors, 17
copying
bitmap, 35, 64
button, 28
device, 21, 47
frame, 28
grid, 38
macro group, 21
panel, 24
creating
alias, 58
automatic device alias, 76
button, 27
device, 21
evenly spaced grid, 37
frame, 27
gallery, 32
Home panel, 26
macro, 69
macro group, 21
panel, 24
D
default CCF, 16
default panel, 25
delay, 59
deleting action, 63
designing
button, 74
frame, 74
device, 80
adding, 22
alias, 76
PHILIPS Page 83 of 85
Page 84

ProntoEdit
Version 4 - User Manual Index
changing into template, 23
copying, 21, 47
creating, 21
moving, 22
removing, 22
renaming, 22
device action, 81
Device Properties, 53
DEVICES, 11
dimensions
button, 71
frame, 71
displaying
gallery, 30
grid, 36
downloading CCF, 42
E
editing grid, 37
emulating CCF, 41
EXE
making, 46
saving CCF as, 46
F
firmware update, 8
frame, 81
adding, 27, 30
adding bitmap, 74
changing, 70
copying, 28
creating, 27
designing, 74
dimension, 71
grouping, 29
identifying, 70
location, 71
modifying, 70
moving, 28
naming, 70
removing, 28
resizing, 27
selecting, 30
setting color, 75
Frame Properties, 51
G
gallery, 30, 81
adding button, 30
adding frame, 30
creating, 32
displaying, 30
selecting, 31
grid, 36, 81
copying, 38
displaying, 36
editing, 37
evenly spaced, 37
resetting, 39
saving, 39
selecting, 36
snapping, 38
grouping
button, 29
frame, 29
H
hard key program m i n g, 67
hiding panel, 24
HOME, 11
Home panel, 26
I
icon, 33, 81
identifying
button, 70
frame, 70
inactive button, 33
indicator, 21
inserting bitmap, 33
installation, 7
IR code, 60, 81
J
jump, 65, 81
L
launching ProntoEmulator, 41
loading CCF, 16
location
absolute, 72
button, 71
frame, 71
relative, 72
M
macro, 69, 81
macro group, 81
adding, 23
changing into timer group, 23
copying, 21
creating, 21
moving, 22
removing, 22
renaming, 22
Macro Group Properties, 55
MACRO GROUPS, 11
making EXE, 46
merging CCF, 47
modifying
bitmap, 35
button, 70
CCF, 19
frame, 70
moving
button, 28
device, 22
frame, 28
macro group, 22
panel, 24
N
naming
button, 70
frame, 70
O
opening
Button Properties, 52
CCF, 16, 47
Device Properties, 54
Frame Properties, 51
Macro Group Properties, 56
panel, 19
PHILIPS Page 84 of 85
Page 85

ProntoEdit
Version 4 - User Manual Index
System Properties, 50
P
Pack and Go, 46
panel, 12, 82
adding, 25
closing, 20
copying, 24
creating, 24
default, 25
hiding, 24
Home, 26
moving, 24
opening, 19
renaming, 24
panel view, 10
parent, 29
PHILIP S w e bsite, 7
position. See location
previewing CCF, 40
programming, 57
action, 57
hard key, 67
jump, 65
Pronto
downloading into, 42
software update, 8
type, 9
uploading from, 17
version information, 8
ProntoEdit, 9
configuration view, 10
panel view, 10
ProntoEmulator, 40
launching, 41
screenshot, 41
properties, 49
Button, 52
Device, 53
Frame, 51
Macro Group, 55
System, 49
RF, 49, 53, 55
Extender ID, 53, 55
RF Channel, 49
RF Extender, 66
S
saving
bitmap, 34
CCF, 44
CCF as, 44
CCF as EXE, 46
grid, 39
screenshot, 41
selected button, 33
selecting
button, 30
frame, 30
gallery, 31
grid, 36
serial cable, 8
serial port, 8
setting delay, 59
shortcut. See alias
sibling, 29
snapping grid, 38
sound. See beep
source switching. See device action
symbol. See indicator
system area, 82
System Properties, 49
system requirements, 7
T
template, 23, 82
testing CCF, 40
timer, 62, 82
timer action, 82
timer group, 23
tree view, 10
tree view indicator, 21
type of Pronto, 9
R
radio frequency. See RF
relative location, 72
removing
button, 28
device, 22
frame, 28
macro group, 22
template, 23
renaming
device, 22
macro group, 22
panel, 24
replacing CCF, 47
requirements, 7
resetting grid, 39
resizing
button, 27
frame, 27
U
universal database, 82
unselected button, 33
update firmware, 8
updating Pronto software, 8
uploading CCF from Pronto, 17
V
view
configuration view, 10
panel view, 10
tree view, 10
viewing CCF, 40
W
write-protection, 76
PHILIPS Page 85 of 85
 Loading...