

PPX1020
Register your product and get support at
www.philips.com/welcome
DE Bedienungsanleitung 2
EN User Manual 5
FR Guide d’utilisation 8
IT Manuale d’istruzioni 11
NL Handleiding 14
ES Manual del usuario 17
PT Manual de Instruções 20
SE Bruksanvisning 23
FI Käyttöohje 26
HU Használati útmutató 29
PL Instrukcja obsługi 32
RO Manual de utilizare 35
CZ Návod k obsluze 38
SK Užívateľský manuál 41
TR Kullanma kılavuzu 44
GR Οδηγίες Χρήσης 47
RU Руководство пользователя 50
DE
1 Übersicht
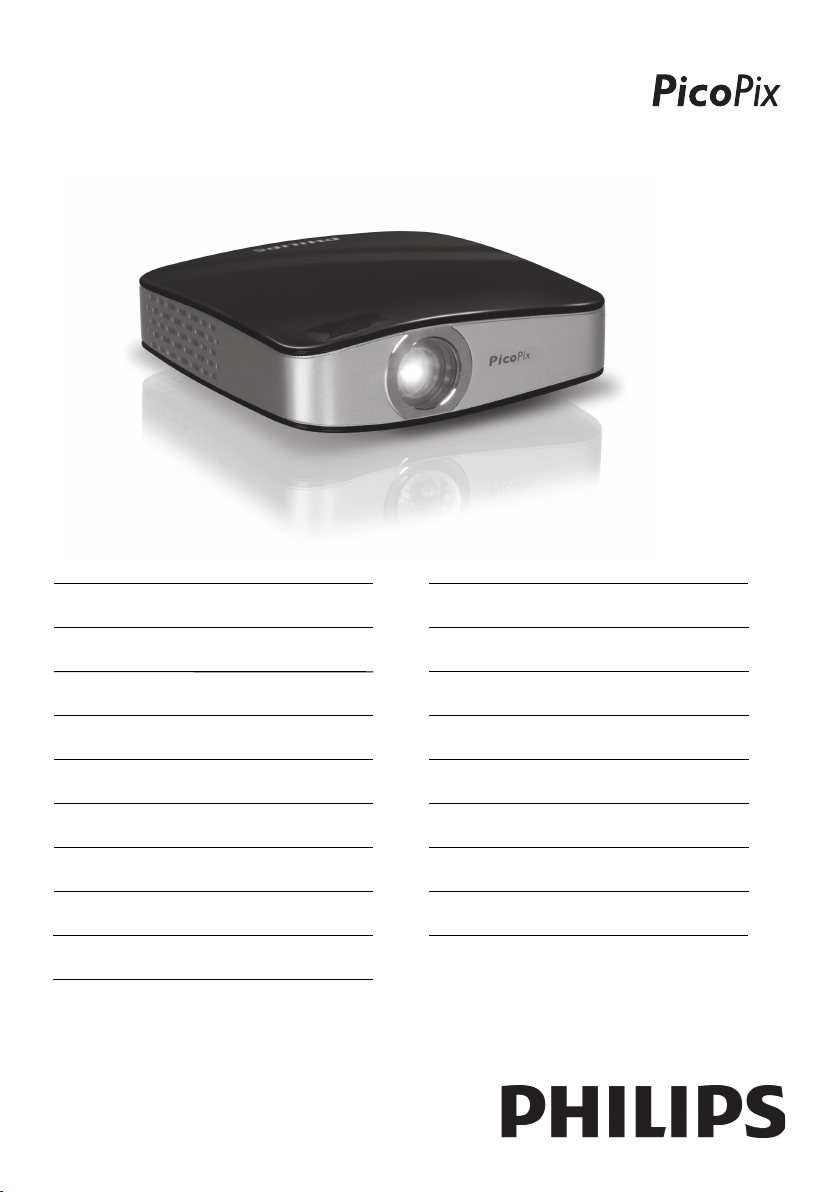
Sehr geehrter Kunde
Vielen Dank, dass Sie sich für unseren Pocket Projektor
entschieden haben.
Viel Spaß mit Ihrem Gerät und seinen vielfältigen Funktionen!
Allgemeine Sicherheitshinweise
Einleitung 2
Nehmen Sie keine Einstellungen und Veränderungen
vor, die nicht in dieser Bedienungsanleitung beschrieben
sind. Durch unsachgemäße Handhabung können körperliche Verletzungen oder Schäden, Geräteschäden
oder Datenverlust entstehen. Beachten Sie alle gegebenen Warn- und Sicherheitshinweise.
Gerät aufstellen
Schützen Sie das Gerät vor direkter Sonneneinstrahlung
Schützen Sie das Gerät vor direkter Sonneneinstrahlung, Hitze, großen Temperaturschwankungen und
Feuchtigkeit. Stellen Sie das Gerät nicht in die Nähe von
Heizungen oder Klimaanlagen. Beachten Sie die Angaben zu Temperatur und Luftfeuchtigkeit in den technischen Daten.
Wird das Gerät zu heiß, oder kommt Rauch au s dem Gerät (USB)
Wird das Gerät zu heiß, oder kommt Rauch aus dem
Gerät, trennen Sie das Gerät sofort vom USBAnschluss. Lassen Sie Ihr Gerät von einer technischen
Servicestelle untersuchen. Um das Ausbreiten von
Feuer zu vermeiden, sind offene Flammen von dem
Gerät fernzuhalten.
Schließen Sie das Gerät nicht in Feuchträumen an.
Schließen Sie das Gerät nicht in Feuchträumen an.
Berühren Sie weder Netzstecker noch Netzanschluss
mit nassen Händen.
Feuchtigkeitsbeschlag
Unter folgenden Bedingungen kann ein Feuchtigkeitsbeschlag im Inneren des Gerätes entstehen, der zu Fehlfunktionen führt:
· wenn das Gerät von einem kalten in einen warmen
Raum gebracht wird;
· nach Aufheizen eines kalten Raumes;
· bei Unterbringung in einem feuchten Raum.
Gehen Sie wie folgt vor, um Feuchtigkeitsbeschlag zu
vermeiden:
1 Verschließen Sie das Gerät in einem Plastikbeutel,
bevor Sie es in einen anderen Raum bringen um es
an die Raumbedingung anzupassen.
2 Warten Sie ein bis zwei Stunden, bevor Sie das Gerät
aus dem Plastikbeutel herausnehmen.
Das Gerät darf nicht in einer stark staubbelasteten Umgebung eingesetzt werden.
Das Gerät darf nicht in einer stark staubbelasteten
Umgebung eingesetzt werden. Staubpartikel und andere
Fremdkörper könnten das Gerät beschädigen.
Setzen Sie das Gerät nicht extremen Vibrationen aus
Setzen Sie das Gerät nicht extremen Vibrationen aus.
Interne Bauelemente können dadurch beschädigt werden.
Lassen Sie Kinder n icht unbeaufsic htigt am Gerät ha ntieren.
Lassen Sie Kinder nicht unbeaufsichtigt am Gerät hantieren. Die Verpackungsfolien dürfen nicht in Kinderhände gelangen.
Reparaturen
Reparaturen
Nehmen Sie keine Reparaturarbeiten am Gerät vor.
Unsachgemäße Wartung kann zu Personen- oder Geräteschäden führen. Lassen Sie Ihr Gerät ausschließlich
von einer autorisierten Servicestelle reparieren.
Entfernen Sie nicht das Typenschild von Ihrem Gerät,
anderenfalls erlischt die Garantie.
Hochleistungs LED
Dieses Gerät ist mit einer Hochleistungs LED (Light
Emitting Diode) ausgestattet, die sehr helles Licht aussendet. Schauen Sie nicht direkt in das Objektiv des Projektors um Augenschäden oder Irritationen zu vermeiden.
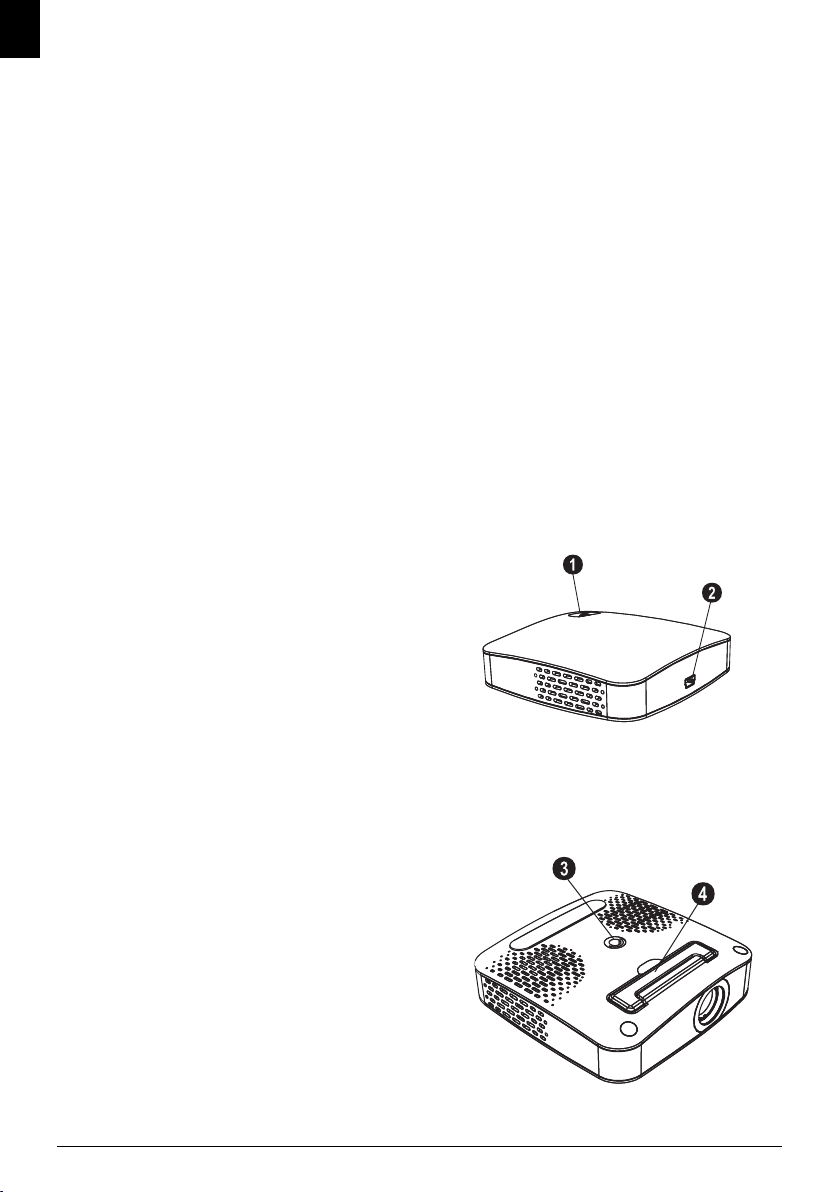
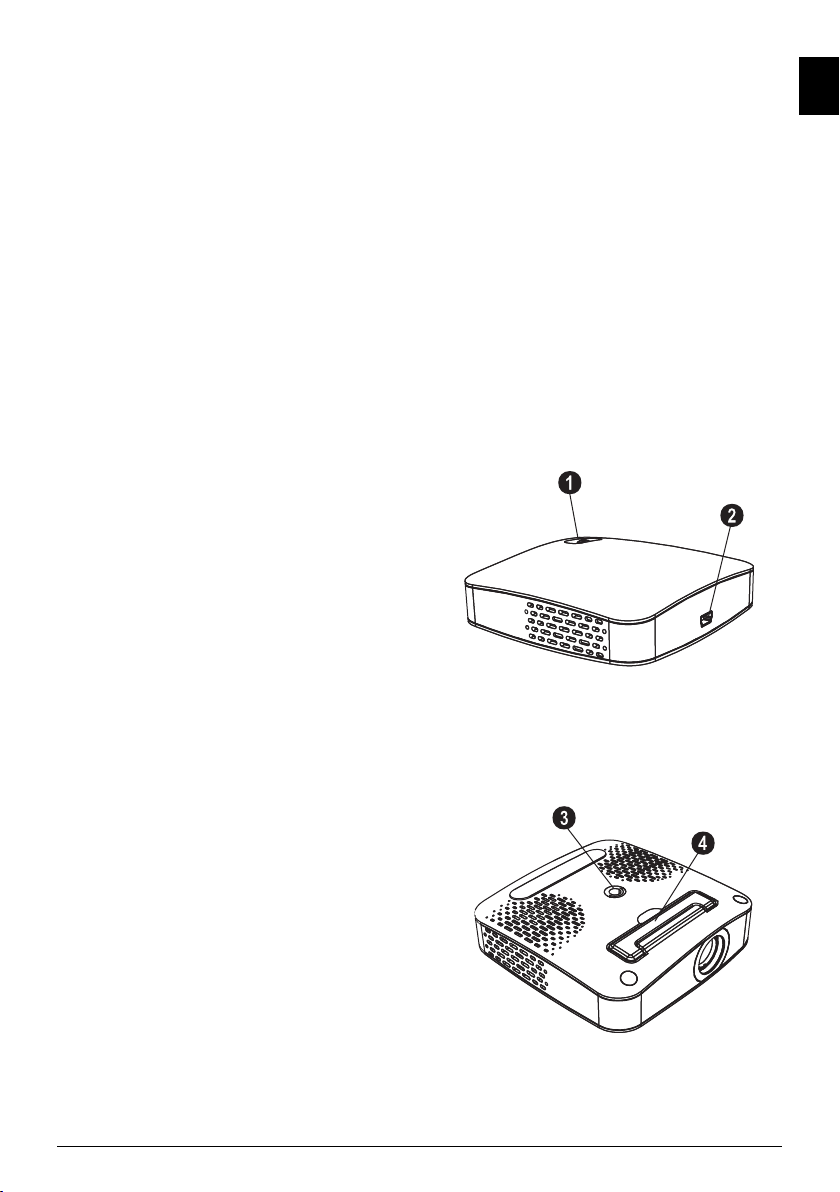
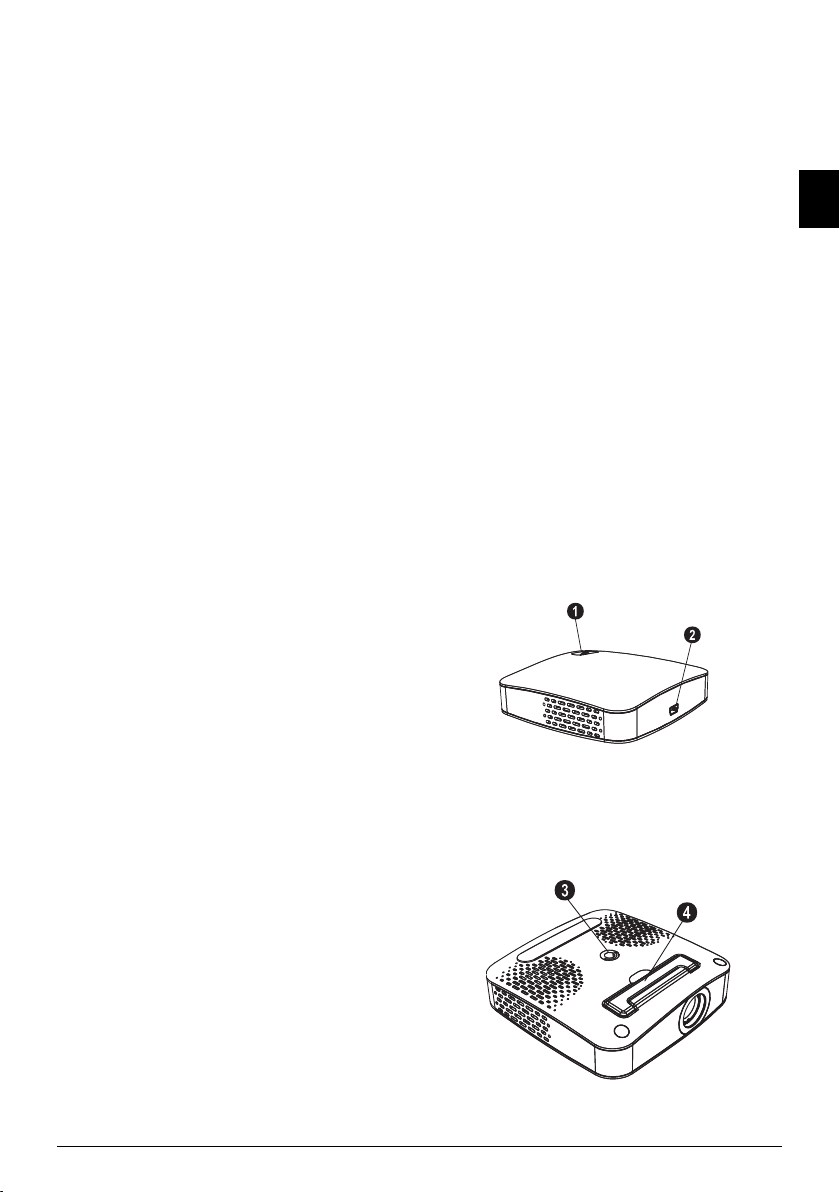
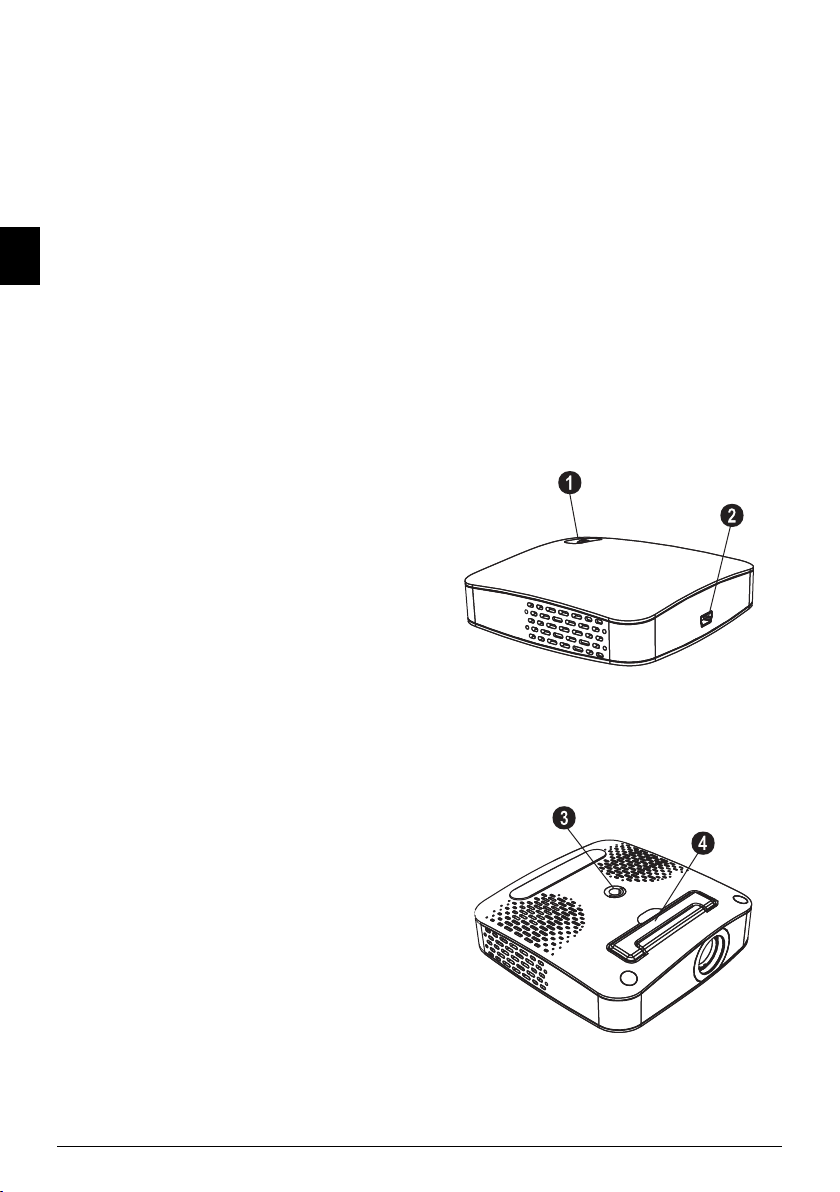
Geräteoberseite
‚ Einstellung der Schärfe
ƒ Mini-USB Anschluss
PicoPix P1 oben
Geräteunterseite
„ Stativgewinde
… Ausklappbarer Fuß
PicoPix P1 unten
2 Philips · PPX1020
2 Inbetriebnahme
Hinweis
Hinweis
Hinweis
Hinweis
DE
Verpackungsinhalt
Pocket Projektor
USB Kabel
Stativ
Tasche
Bedienungsanleitung
Bedienungsanleitung
Garantiekarte
Fehlender Verpackungsinhalt
Fehlender Verpackungsinhalt
Sollte eines der Teile fehlen oder Beschädigungen aufweisen, wenden Sie sich bitte an
Ihren Fachhändler oder an unseren Kundendienst.
Software installieren
1 Schließen Sie alle laufenden Programme und Anwen-
dungen, bevor Sie die Installation starten.
2 Schließen Sie den Pocket Projektor an einen freien
USB 2.0 Anschluss an.
3 Wählen Sie im Windows-Explorer PicoPix 1020
viewer als Laufwerk aus, und starten Sie das Pro-
gramm PicoPix viewer Install.exe mit einem Doppelklick.
4 Ihr Computer bereitet den Installationsprozess vor.
Folgen Sie den weiteren Anweisungen des Installationsassistenten, und starten Sie abschließend den
Computer neu.
Gerät vom Computer trennen
Trennen Sie das Gerät vor dem Neustart
vom Computer. Der Computer könnte
sonst versuchen vom Pocket Projektor,
der als USB Speichermedium erkannt
wurde, zu starten.
Gerät einrichten
1 Schließen Sie das Gerät mit dem mitgelieferten Y-
USB Kabel an zwei USB Buchsen Ihres Computers
an, da die Stromaufnahme 1A beträgt.
2 Starten Sie das Programm PicoPix viewer. In der
Statusleiste erscheint ein Symbol.
3 Der Pocket Projektor wird eingeschaltet und das
Bild des Computers projiziert.
4 Stellen Sie die Schärfe mit dem Einstellrad ein.
5 Entfernen Sie nach der Präsentation die USB Kabel
vom Computer um Strom zu sparen und PicoPix
viewer zu beenden.
Programm PicoPix viewer beenden
1) Klicken Sie mit der rechten Maustaste
auf das PicoPix viewer-Symbol in der
Windows-Taskleiste.
2) Klicken Sie auf Beenden.
Software deinstallieren
1 Schließen Sie alle laufenden Programme und Anwen-
dungen, bevor Sie die Deinstallation starten. Rufen
Sie das Deinstallationsprogramm auf, indem Sie im
Startmenü auf PicoPix viewer > Uninstall PicoPix
viewer klicken. Ihr Computer bereitet die Deinstallation vor.
2 Folgen Sie den Anweisungen auf dem Bildschirm.
3 Zum Abschluss der Deinstallation müssen Sie Ihren
Computer neu starten.
4 Nachdem Ihr Computer neu gestartet wurde, ist die
Deinstallation von PicoPix viewer beendet.
Technische Daten
Technologie / Optik
Display Technologie ..........................................0,37" LCoS
Lichtquelle...............................................................RGB LED
Auflösung ....................................................... 800¦x¦600¦Pixel
Unterstützte Auflösungen...............SVGA/XGA/WXGA
Lichtstärke (Bright Mode)....................... bis zu 20¦Lumen
Kontrastverhältnis ........................................................400:1
Projizierte Bildgröße ........................................5,2¦–¦81¦Zoll
Abstand zur Projektionsfläche ..................... 0,2¦m bis 3¦m
Abtastrate Horizontal....................................... 31¦–¦69¦kHz
Abtastrate Vertikal .............................................. 56¦–¦85¦Hz
Stromversorgung ...............................über USB Anschluss
Abmessungen
Abmessungen (B¦×¦H¦×¦T) .........................88¦×¦25¦×¦88¦mm
Gewicht
Gewicht........................................................................ 0,15¦kg
Empfohlene Geräteumgebung
Empfohlene Geräteumgebung..............................5¦–¦40¦ºC
Relative Luftfeucht igkeit
Relative Luftfeuchtigkeit20¦–¦80¦% (nicht kondensierend)
Bildschirmauflösung des Computers
Die beste Bildqualität erhalten Sie, wenn
die Bildschirmauflösung des Computers
auf 800¦x¦600¦Pixel eingestellt ist.
Inbetriebnahme 3
DE
Mindest PC-Anforderungen
Prozessor .................Intel Pentium M oder AMD Athlon
Taktfrequenz .......................................... 2GHz oder höher
Betriebssystem............ Windows XP Professional (SP2),
..............................................................Vista, Windows 7
Arbeitsspeicher.................................... 1GB DDR SDRAM
Freier Speicherplatz ................................................... 40 MB
USB Anschluss...........................................................USB 2.0
Alle Daten dienen nur als Richtbestimmung. Sagem-
com behält sich das Recht vor, ohne vorhergehende
Ankündigungen Änderungen vorzunehmen.
Das CE-Zeichen gewährleistet, dass dieses Produkt hinsichtlich Sicherheit und Gesundheit des Benutzers
sowie elektromagnetischer Interferenz der Richtlinie
1999/5/CE des Europäischen Parlaments und des Rates
zu Telekommunikationsendgeräten entspricht.
Die Einhaltungserklärung können Sie auf der Internetseite www.sagem-ca.at/doc nachlesen.
Die Erhaltung der Umwelt im Rahmen eines Konzepts
nachhaltiger Entwicklung liegt Sagemcom sehr am Herzen. Sagemcom ist bestrebt, umweltfreundliche Systeme zu betreiben. Daher hat Sagemcom beschlossen,
der ökologischen Leistung in allen Produktphasen, von
der Herstellung über die Inbetriebnahme bis hin zum
Gebrauch und zur Entsorgung, einen hohen Stellenwert
beizumessen.
Verpackung: Das Logo (Grüner Punkt) drückt aus,
dass eine anerkannte nationale Organisation eine Beitragszahlung erhält, um die Verpackungserfassung und
die Recycling-Infrastrukturen zu verbessern. Bitte halten Sie sich bei der Entsorgung dieser Verpackung an die
bei Ihnen geltenden Vorschriften zur Mülltrennung.
Batterien: Sollte Ihr Produkt Batterien enthalten, müssen diese an den dafür vorgesehenen Sammelstellen
entsorgt werden.
Produkt: Der durchgestrichene Mülleimer auf dem
Produkt bedeutet, dass es sich bei diesem Produkt um
ein elektrisches oder elektronisches Gerät handelt. Die
europäische Gesetzgebung schreibt hierfür eine gesonderte Entsorgung vor:
• An Verkaufsstellen, falls Sie ein ähnliches Gerät kaufen.
• An den örtlichen Sammelstellen (Wertstoffhof, Sonderabholdienste etc.).
So können auch Sie Ihren Beitrag zu Wiederverwendung und Recycling von elektronischen und elektrischen
Altgeräten leisten, was sich auf die Umwelt und die
Gesundheit der Menschen auswirken kann.
Die verwendeten Verpackungen aus Papier und Karton
können wie Altpapier entsorgt werden. Die Plastikfolien und Styroporverpackungen geben Sie zum Recycling
oder in den Restmüll, je nach den Anforderungen Ihres
Landes.
Warenzeichen: Die im vorliegenden Handbuch
genannten Referenzen sind Warenzeichen der jeweili-
gen Firmen. Das Fehlen der Symbole É und Ë recht-
fertigt nicht die Annahme, dass es sich bei den entsprechenden Begriffen um freie Warenzeichen handelt.
Andere im vorliegenden Dokument verwendete Produktnamen dienen lediglich Kennzeichnungszwecken
und können Warenzeichen der jeweiligen Inhaber sein.
Sagemcom lehnt jegliche Rechte an diesen Marken ab.
Weder Sagemcom noch angeschlossene Gesellschaften
sind gegenüber dem Käufer dieses Produktes oder Dritten haftbar in Bezug auf Schadenersatzansprüche, Verluste, Kosten oder Ausgaben, die dem Käufer oder
Dritten in Folge eines Unfalles, des falschen Gebrauches
oder Missbrauches dieses Produktes oder nicht autorisierten Modifikationen, Reparaturen, Veränderungen
des Produktes oder der Nichteinhaltung der Betriebsund Wartungshinweise von Sagemcom erwachsen.
Sagemcom übernimmt keine Haftung für Schadensersatzansprüche oder Probleme in Folge der Verwendung
jeglicher Optionen oder Verbrauchsmaterialien, die
nicht als Originalprodukte von Sagemcom oder von
Sagemcom genehmigte Produkte gekennzeichnet sind.
Sagemcom übernimmt keine Haftung für Schadensersatzansprüche in Folge elektromagnetischer Interferenzen bedingt durch den Einsatz von Verbindungskabeln,
die nicht als Produkte von Sagemcom gekennzeichnet
sind.
Alle Rechte vorbehalten. Kein Teil dieser Publikation
darf ohne vorherige schriftliche Zustimmung durch
Sagemcom vervielfältigt, in einem Archivsystem gespeichert oder in irgendeiner Form oder auf sonstigem
Wege – elektronisch, mechanisch, durch Fotokopie,
Aufnahme oder anderweitige Möglichkeit – übertragen
werden. Die im vorliegenden Dokument enthaltenen
Informationen sind ausschließlich zur Verwendung mit
diesem Produkt gedacht. Sagemcom übernimmt keine
Verantwortung, wenn diese Informationen auf andere
Geräte angewendet werden.
Diese Bedienungsanleitung ist ein Dokument ohne Vertragscharakter.
Irrtümer, Druckfehler und Änderungen vorbehalten.
Copyright © 2010 PHILIPS
4 Philips · PPX1020
1Overview
EN
Dear Customer
Thank you for purchasing our Pocket Projector.
We hope you enjoy your device and its many functions!
General Safety Information
Introduction 2
Do not make any changes or settings that are not
described in this user manual. Physical injury or damage
to the device or loss of data can result from improper
handling. Take note of all warning and safety notes indicated.
Setting Up the Device
Protect the device against direct sunlight
Protect the device against direct sunlight, heat, large
temperature fluctuations and moisture. Do not place
the device in the vicinity of heaters or air conditioners.
Observe the information on temperature and humidity
in the technical data.
In the event that the device becomes too hot, or if you see smoke coming fro m the device (USB)
In the event that the device becomes too hot, or if you
see smoke coming from the device, you must immediately disconnect the device from the USB socket. Have
your device examined by trained professionals at a technical service location. To prevent the spread of fire,
open flames should be kept away from the device.
Do not plug in the device in moist rooms.
Do not plug in the device in moist rooms. Never touch
the mains cable or the mains connection with wet
hands.
Moisture build-up
Under the following conditions, a layer of moisture can
appear inside the device which can lead to malfunctions:
· if the device is moved from a cold to a warm area;
· after a cold room is heated;
· when this device is placed in a damp room.
Proceed as follows to avoid any moisture build-up:
1 Seal this device in a plastic bag before moving it to
another room, in order for it to adapt to room conditions.
2 Wait one to two hours before you take the device
out of the plastic bag.
The device should not be used in a very d usty environment.
The device should not be used in a very dusty environment. Dust particles and other foreign objects may
damage the unit.
Do not expose the device to extreme vibrations
Do not expose the device to extreme vibrations. It may
damage the internal components.
Do not allow children to handle the device without supervision.
Do not allow children to handle the device without
supervision. The packing materials should be kept out of
the hands of children.
Repairs
Repairs
Do not make any repairs to the device yourself.
Improper maintenance can result in injuries or damage
to the device. Only have your device repaired by an
authorised service centre.
Do not remove the type label from your device; this
would void the warranty.
High Power LED
This device is equipped with an high power LED (Light
Emitting Diode), which emits very bright light. Do not
stare directly into the projector lens to avoid eyes
injury or irritations.
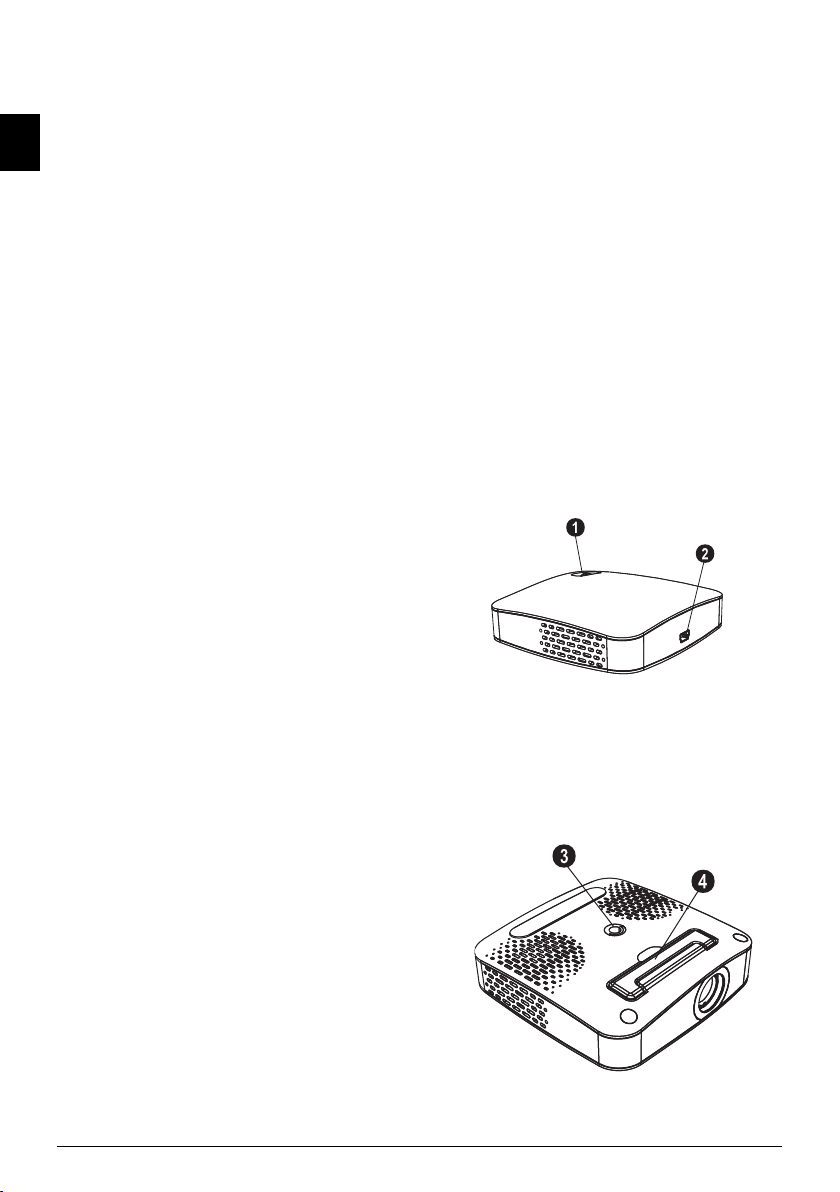
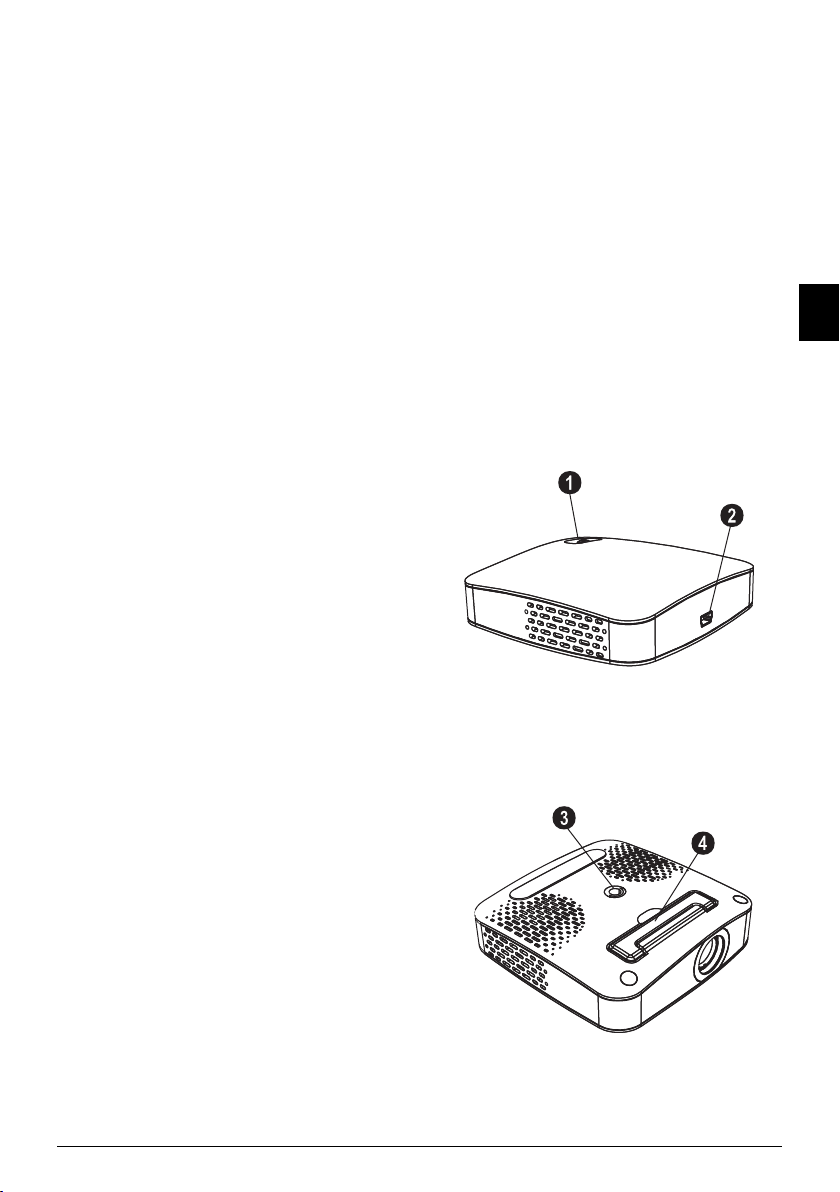
Top of the Device
‚ Focus setting
ƒ Mini USB connection
PicoPix P1 oben
Bottom of the Device
„ Tripod socket
… Fold-out base
PicoPix P1 unten
Overview · Dear Customer 5
2 Basic Operation
Notice
Notice
Notice
Notice
EN
Packing Contents
Pocket Projector
USB Cable
Tripod
Pouch
User Manual
User Manual
Warranty Card
Missing Package Contents
Missing Package Contents
If one of the parts is missing or damaged,
please contact your retailer or our customer
service.
Installing the Software
1 Close all open programs and applications before
beginning the installation process.
2 Connect the Pocket Projector to an available USB
2.0 port.
3 Select PicoPix 1020 viewer as drive in the Win-
dows Explorer and start the program PicoPix
viewer Install.exe with a double-click.
4 Your computer will now prepare for the installation
process. Follow the instructions of the installation
wizard and restart the computer.
Disconnect the Device from the
Computer
Disconnect the device from the computer
before restarting. The computer may try
to boot from the Pocket Projector, which
was recognized as a USB storage medium.
Set up the Device
1 Connect the device to your computer on two USB
sockets by means of the Y-USB cable because the
current consumption is 1A.
2 Start the program PicoPix viewer. In the Statusbar
appears a symbol.
3 The Pocket Projector is switched on and projects
the image from the computer.
5 Disconnect the USB cable from the computer if you
finish the presentation to save energy and exit
PicoPix viewer.
Exit the Program PicoPix viewer
1) Click on the PicoPix viewer symbol in
the Windows task bar using the right
mouse key.
2) Click on Exit.
Uninstalling the Software
1 Close all open programs and applications before
beginning the uninstall process. Load the uninstall
program by clicking on PicoPix viewer > Uninstall
PicoPix viewer in the Start menu. Your computer
will now prepare for the uninstall process.
2 Follow the instructions on the screen.
3 At the conclusion of the uninstall process you must
restart your computer.
4 After rebooting has occurred, removal of PicoPix
viewer from your computer will be complete.
Technical Data
Technology / Optical
Display technology.............................................0,37" LCoS
Light source............................................................RGB LED
Resolution...................................................... 800¦x¦600¦pixel
Supported Resolutions ....................SVGA/XGA/WXGA
Brightness (Bright Mode) .......................... up to 20¦lumen
Contrast ratio................................................................400:1
Projected image size.........................................5,2¦–¦81¦inch
Screen distance........................................... 0,2¦m up to 3¦m
Horizontal Scan Rate ........................................ 31¦–¦69¦kHz
Vertical Scan Rate ................................................ 56¦–¦85¦Hz
Power Supply ....................................................via USB plug
Dimensions
Dimensions (L¦×¦H¦×¦W)............................88¦×¦25¦×¦88¦mm
Weight
Weight.......................................................................... 0,15¦kg
Recommended Ambient
Recommended Ambient........................................5¦–¦40¦ºC
Relative Humidity
Relative Humidity.................. 20¦–¦80¦% (non-condensing)
Screen Resolution of the Computer
The best picture quality can be reached, if
the screen resolution of the computer is
set to 800¦x¦600¦pixel.
4 Adjust the focus using the focus wheel.
6 Philips · PPX1020
Minimum PC Requirements
Processor ..................... Intel Pentium M or AMD Athlon
Clock rate ...................................................2GHz or higher
Operating System....... Windows XP Professional (SP2),
..............................................................Vista, Windows 7
RAM........................................................ 1GB DDR SDRAM
Free Hard Drive Space ............................................. 40 MB
USB Port.....................................................................USB 2.0
All data are provided for reference purposes only.
Sagemcom reserves the right to make any changes
without prior notice.
The CE marking certifies that the product meets the
main requirements of the European Parliament and
Council directive 1999/5/CE on telecommunications
terminal equipment, regarding safety and health of users
and regarding electromagnetic interference.
The declaration of compliance can be consulted on the
site www.sagem-ca.at/doc
Preservation of the environment as part of a sustainable
development logic is an essential concern of Sagemcom.
The desire of Sagemcom is to operate systems observing the environment. The desire of Sagemcom is to
operate systems observing the environment and consequently it has decided to integrate environmental performances in the life cycle of this products, from manufacturing to commissioning use and elimination.
Packaging: The presence of the logo (green dot)
means that a contribution is paid to an approved
national organisation to improve package recovery and
recycling infrastructures to facilitate. Please respect the
sorting rules set up locally for this kind of waste.
Batteries:If your product contains batteries, they must
be disposed of at appropriate collection points.
In this way you can participate in the re-use and upgrading of Electrical and Electronic Equipment Waste, which
can have an effect on the environment and human
health.
The paper and cardboard packaging used can be disposed of as recyclable paper. Have the plastic wrapping
and Styrofoam packaging recycled or dispose of it in the
non-recyclable waste, depending on the requirements
in your country.
Trademarks: The references mentioned in this manual are trademarks of the respective companies. The
lack of the trademarks É and Ë does not justify the
assumption that these dedicated terminologies are free
trademarks. Other product names used herein are for
identification purposes only and may be trademarks of
their respective owners. Sagemcom disclaims any and all
rights in those marks.
Neither Sagemcom nor its affiliates shall be liable to the
purchaser of this product or third parties for damages,
losses, costs, or expenses incurred by the purchaser or
third parties as a result of accident, misuse, or abuse of
this product or unauthorized modifications, repairs, or
alterations to this product, or failure to strictly comply
with Sagemcom operating and maintenance instructions.
Sagemcom shall not be liable for any damages or problems arising from the use of any options or any consumable materials other than those designated as original
Sagemcom products or Sagemcom approved products.
Sagemcom shall not be held liable for any damage resulting from electromagnetic interference that occurs from
the use of any interface cables other than those designated as Sagemcom products.
All rights reserved. No part of this publication may be
reproduced, stored in a retrieval system or transmitted
in any form or by any means, electronic, mechanical,
photocopying, recording, or otherwise, without the
prior written permission of Sagemcom. The information
contained herein is designed only for use with this product. Sagemcom is not responsible, if this information is
applied to other devices.
This user manual is a document that does not represent
a contract.
Errors, printing errors and changes are reserved.
Copyright © 2010 PHILIPS
EN
Product: The crossed-out waste bin stuck on the
product means that the product belongs to the family of
electrical and electronic equipment. In this respect, the
European regulations ask you to dispose of it selectively;
• At sales points in the event of the purchase of similar
equipment.
• At the collection points made available to you
locally(drop-off centre, selective collection, etc.).
Basic Operation · Technical Data 7
1Aperçu
Très cher client
FR
Nous nous remercions d’avoir choisi notre Projecteur
de poche.
Nous vous souhaitons bien du plaisir avec votre appareil
et ses multiples fonctions !
Informations générales sur la sécurité
Introduction 2
Ne procédez à aucun réglage et changement qui ne sont
pas décrits dans le présent mode d’emploi. Une application inadéquate peut entraîner des blessures corporelles, des dommages ou des pertes de données. Respectez toutes les indications de prévention et de sécurité
prescrites.
Installation de l’appareil
Protégez l’appareil du rayonnement s olaire direct
Protégez l’appareil du rayonnement solaire direct, de la
chaleur, des grandes variations de températures et de
l’humidité. Ne placez pas l’appareil à proximité d’un
chauffage ou d’une climatisation. Veillez aux indications
concernant la température et l’humidité de l’air dans les
caractéristiques techniques.
L’appareil est trop chaud ou il s'en échappe de la fumée (USB)
Si l'appareil est trop chaud ou qu'il s'en échappe de a
fumée, débranchez-le immédiatement de la connexion
USB. Laissez examiner votre appareil par un spécialiste.
Afin d’éviter la propagation d’un feu en cas d’incendie,
tenez cet appareil éloigné des flammes.
N’installez pas l’appareil dans des salles humides.
N’installez pas l’appareil dans des salles humides. Ne
touchez jamais les fiches/prises secteur avec les mains
humides.
Condensation
De la condensation peut se produire à l’intérieur de
l’appareil et entraîner des dysfonctionnements dans les
conditions suivantes:
lorsque cet appareil est directement déplacé d’une
pièce froide vers une chaude;
· après le réchauffement d’une pièce froide;
· lorsque cet appareil est placé dans une pièce humide.
Afin d’éviter toute condensation, nous vous recomman-
dons de suivre la procédure suivante:
1 Conservez l’appareil dans un sac en plastique avant
de le transporter dans une autre pièce pour qu’il
s’adapte aux conditions de la pièce.
2 Attendez 1-2 heures avant d’enlever l’appareil du
sac.
Evitez d’utiliser le scanner dans un environnement poussiéreux.
Evitez d’utiliser l’appareil dans un environnement poussiéreux. Les particules de poussière et autres corps
étrangers peuvent endommager l’appareil.
Ne pas exposer le scanner à de fortes vibrations
Ne pas exposer l’appareil à de fortes vibrations. Cela
pourrait endommager les composants internes.
Ne laissez pas les enfants sans surveillance autour de l’appareil.
Ne laissez pas les enfants sans surveillance autour de
l’appareil. Ne pas laisser les feuilles d’emballage à portée
des enfants.
Réparations
Réparations
Ne réparez pas vous-même l’appareil. Une maintenance
non conforme peut occasionner des dommages corporels ou matériels. Laissez examiner votre appareil exclusivement par un spécialiste agréé.
N’enlevez pas la plaque signalétique de votre appareil,
autrement la garantie s’éteint.
LED haute performance
Cet appareil est équipé d'un LED haute performance
(Light Emitting Diode) qui envoie une lumière très
claire. Ne regardez pas directement dans l’objectif du
projecteur pour éviter des dommages ou des irritations
oculaires.
Partie supérieure de l’appareil
‚ Réglage netteté
ƒ Connexion Mini-USB
PicoPix P1 oben
Partie inférieure de l’appareil
„ Filetage de trépied
… Pied pliant
PicoPix P1 unten
8 Philips · PPX1020
2 Mise en service
Remarque
Remarque
Remarque
Remarque
Contenu de l’emballage
Projecteur de poche
Câble USB
Trépied
Sac
Guide d’utilisation
Guide d’utilisation
Carte de garantie
Contenu de l’emballage incomplet
Contenu de l’emballage incomplet
S’il manquait un des composants ou si vous
constatiez des dommages, adressez-vous à
votre revendeur ou à notre service aprèsvente.
Installation du logiciel
1 Avant de lancer l’installation, fermez tous les pro-
grammes et applications en cours.
2 Connectez le projecteur de poche à un port USB 2.0
libre.
3 Sélectionnez avec Windows Explorer PicoPix 1020
viewer comme lecteur, et lancez le programme
PicoPix viewer Install.exe en double-cliquant.
4 Votre ordinateur prépare le processus d’installation.
Suivez les instructions de l’assistant d’installation et
redémarrez ensuite l’ordinateur.
Retirer l’appareil de l'ordinateur
Retirez l’appareil de l’ordinateur avant le
redémarrage de l’ordinateur. Autrement,
l’ordinateur pourrait essayer de démarrer
à partir du projecteur de poche qui a été
reconnu comme support d’enregistrement.
Installer l’appareil
1 Connectez l’appareil avec le câble Y-USB fourni à
deuxports USB de votre ordinateur, car la prise de
courant s’élève à 1A.
2 Lancez le programme PicoPix viewer. Dans la barre
de statut apparaît un symbole.
3 Le projecteur de poche est allumé et l’image de
l’ordinateur projetée.
4 Réglez la netteté avec la roue de réglage.
5 Après la présentation, retirez le câble USB de l’ordi-
nateur pour économiser de l’électricité et PicoPix
viewer pour terminer.
Terminer le programme PicoPix view-
er
1) Cliquez droit sur le symbole PicoPix
viewer- dans la barre de tâches Windows.
2) Cliquez sur Quitter.
Désinstallation du logiciel
1 Avant de lancer la désinstallation, fermez tous les
programmes et applications en cours. Appelez le
programme de désinstallation en cliquant sur,
PicoPix viewer > Uninstall PicoPix viewer dans le
menu Démarrer. Votre ordinateur prépare le processus de désinstallation.
2 Suivez les instructions qui s’affichent à l’écran.
3 Une fois la désinstallation terminée, vous devez
redémarrer votre ordinateur.
4 Une fois votre ordinateur redémarré, la désinstalla-
tion de PicoPix viewer est terminée.
Caractéristiques techniques
Technologie / Optique
Technologie d’affichage.....................................0,37" LCoS
Source de lumière.................................................RGB LED
Résolution...................................................... 800¦x¦600¦Pixel
Résolutions compatibles..................SVGA/XGA/WXGA
Contraste (mode éclairé)...................... Jusqu’à 20¦Lumen
Contraste........................................................................400:1
Taille d’image projetée ................................ 5,2¦–¦81¦Pouce
Distance de la surface de projection...0,2¦m jusqu'à 3¦m
Fréquence d’échantillonnage Horizontale.... 31¦–¦69¦kHz
Fréquence d’échantillonnage Verticale ........... 56¦–¦85¦Hz
Alimentation électrique.....................Sur connexion USB
Dimensions
Dimensions (L¦×¦H¦×¦P)..............................88¦×¦25¦×¦88¦mm
Poids
Poids.............................................................................. 0,15¦kg
Température ambiante recommandée :
Température ambiante recommandée :............5¦–¦40¦ºC
Humidité de l’air relative
Humidité de l’air relative.20¦–¦80¦% (sans condensation)
FR
Résolution d’écran de l’ordinateur
Vous obtenez la meilleure qualité d’image
si vous réglez la résolution de l'écran de
l'ordinateur à 800¦x¦600¦pixels.
Mise en service · Contenu de l’emballage 9
Exigences PC minimales
Processeur ...................Intel Pentium M ou AMD Athlon
Mesure ............................................................. 2GHz ou plus
Système d’exploitationWindows XP Professional (SP2),
FR
..............................................................Vista, Windows 7
Memoire vive (RAM) .......................... 1GB DDR SDRAM
Espace mémoire disponible...................................... 40 MB
Connexion USB ...................................USB 2.0 Haut débit
Toutes les données ne sont que des indications.
Sagemcom se réserve le droit d’effectuer des changements sans notification préalable.
Le symbole CE garantie que ce produit ne présente
aucun risque pour la sécurité et la santé de son utilisateur et qu’il est conforme à la directive CE 1999/5 relative au interférences électromagnétiques du Parlement
Européen et du Conseil de la radiodiffusion et de la télécommunication.
Vous pouvez consulter la déclaration de conformité sur
le site internet www.sagem-ca.at/doc.
La protection de l’environnement dans le cadre d’un
concept de développement durable est très importante
pour Sagemcom. Sagemcom s’efforce d’utiliser des systèmes écologiques. C’est pourquoi Sagemcom a décidé
d’accorder une grande valeur à la performance écologique à toutes les phases du produit, de la fabrication à la
mise en service, et de l’utilisation à l’élimination.
Emballage : Le logo (Point vert) signifie qu’une organisation nationale reconnue paie une cotisation pour
améliorer le mode d’emballage et les infrastructures de
recyclage. Veuillez respecter les procédures de tri de
déchets en vigueur dans votre pays l’élimination de cet
emballage.
Batteries : Si votre produit contient des batteries, ces
dernières doivent être éliminées au dépôt prévu à cet
effet.
Ainsi, vous pouvez également contribuer à la réutilisation et au recyclage de vieux appareils électroniques et
électriques et avoir un impact sur l’environnement et la
santé des gens.
Les emballages utilisés en papier et carton peuvent être
dépollués comme du papier usagé. Les feuilles en plastique et le polystyrène peuvent être recyclées ou déposées en déchets résiduels, selon les spécifications de
votre pays.
Marques déposées : Les références citées dans le
présent manuel sont des marques déposées des entre-
prises respectives. L’absence des symboles É et Ë ne
signifie pas que les termes utilisés sont des marques
libres. Les autres noms de produit utilisés dans le présent document servent uniquement à des fins de désignation et peuvent être des marques des propriétaires
respectifs. Sagemcom rejette tous droits sur ces marques.
Ni Sagemcom ni les sociétés affiliées ne sont responsables vis-à-vis de l’acheteur de ce produit ou de tiers en
rapport aux demandes de dommages et intérêts, pertes,
frais ou dépenses qui incombent à l’acheteur ou à des
tiers à la suite d’un accident, d’un usage erroné ou abusif
de ce produit ou à des modifications et réparations du
produit non autorisées ou au non respect des instructions de service et de maintenance de Sagemcom.
Sagemcom n’endosse aucune responsabilité pour les
demandes de dommages et intérêts ou les problèmes à
la suite de l’utilisation d’options ou de consommables
qui ne sont pas des produits d’origine de Sagemcom ou
de produits agréés par Sagemcom.
Sagemcom n’endosse aucune responsabilité pour les
demandes de dommages et intérêts à la suite d’interférences électromagnétiques dues à l’emploi de câbles de
connexion qui ne sont pas des produits de Sagemcom.
Tous droits réservés. Aucune partie de la présente
publication n’est autorisée à être reproduite, enregistrée dans un système d’archive ou sous quelque forme
que ce soit ou bien transmise par n’importe quel moyen
– électronique, mécanique, par photocopie, enregistrement ou autre. Les informations contenues dans le présent document sont destinées exclusivement à l’utilisation du produit décrit. Sagemcom n’endosse aucune
responsabilité si ces informations sont appliquées à
d’autres appareils.
Le manuel d’utilisation est un document n’ayant pas un
caractère contractuel.
Sous réserve d’erreurs, de fautes d’impression et de
modifications.
Copyright © 2010 PHILIPS
Produit : Le symbole poubelle barrée sur le produit
signifie que ce produit est un appareil électrique ou
électronique. La législation européenne prescrit donc
une élimination séparée :
• Sur les lieux de vente, si vous achetez un appareil similaire.
• Aux dépôts locaux (Déchetterie, service déchets spécial etc.)
10 Philips · PPX1020
1 Panoramica
Stimato cliente,
Grazie per aver scelto il nostro Proiettore Pocket.
Buon divertimento con il vostro nuovo apparecchio e le
sue numerose funzioni!
Indicazioni generali di sicurezza
Introduzione 2
Non apportare alcuna impostazione o modifica che non
sia descritta in queste istruzioni per l’uso. In caso di utilizzo scorretto dell'apparecchio si possono riportare
lesioni o danni fisici, provocare danni all'apparecchio o
perdere dati. Osservare tutte le avvertenze e le informazioni per la sicurezza fornite.
Posizionamento dell’apparecchio
Proteggere l’apparecchio dall’esposizio ne diretta ai raggi solari
Proteggere l’apparecchio dall’esposizione diretta ai raggi
solari, dal calore, da forti sbalzi termici e dall’umidità.
Non posizionare l’apparecchio nelle vicinanze di
impianti di riscaldamento o di climatizzazione. Osservare i dati riportati nel foglio delle caratteristiche tecniche relativi a temperatura e umidità dell’aria.
Qualora si riscontrasse un surriscalda mento dell’apparecchio o fuori uscita di fumo (USB)
Qualora si riscontrasse un surriscaldamento dell’apparecchio, fuoriuscita di fumo o odore di bruciato, scollegare immediatamente dalla presa USB. Far controllare
l’apparecchio da un centro di assistenza tecnica. Tenere
l’apparecchio lontano da fiamme libere per evitare la
formazione di incendi.
Non collegare mai l’apparecchio alla c orrente in ambienti particolarm ente umidi.
Non collegare mai l’apparecchio alla corrente in
ambienti particolarmente umidi. Non toccare mai la
spina elettrica o la presa di corrente con le mani
bagnate.
Condensa
Nelle seguenti condizioni all'interno dell'apparecchio si
può formare della condensa che può compromettere il
corretto funzionamento dell'apparecchio:
se l'apparecchio viene trasferito da un ambiente freddo
in una stanza riscaldata;
dopo aver riscaldato una stanza fredda;
in caso venga alloggiato in un ambiente umido.
Per evitare che si formi condensa procedere come
segue:
1 Prima di trasferire l'apparecchio in un'altra stanza
per riportarlo alle condizioni ambientali normali,
sigillarlo in una busta di plastica.
2 Attendere una o due ore prima di estrarre l'apparec-
chio dalla busta di plastica.
L'apparecchio non deve essere esposto ad ambienti in cui siano presenti elevate concentrazioni di polveri.
L'apparecchio non deve essere esposto ad ambienti in
cui siano presenti elevate concentrazioni di polveri. Le
particelle di polvere ed altri corpi estranei potrebbero
danneggiare l'apparecchio.
Non esporre l'apparecchio a vibrazioni estreme.
Non esporre l'apparecchio a vibrazioni estreme. Gli elementi costruttivi interni dell'apparecchio potrebbero
danneggiarsi.
Evitare che l’apparecchio venga manip olato da bambini non sorvegliat i.
Evitare che l’apparecchio venga manipolato da bambini
non sorvegliati. Tenere le pellicole utilizzate per
l’imballo lontano dalla portata dei bambini.
Riparazioni
Riparazioni
Non eseguire personalmente lavori di riparazione
sull’apparecchio. Una manutenzione inappropriata può
provocare ferite alle persone o danni all’apparecchio.
Far riparare l’apparecchio esclusivamente dai centri di
assistenza tecnica autorizzati.
Non rimuovere la targhetta di identificazione dall’apparecchio; in caso contrario decade la garanzia.
LED ad alto rendimento
Questo apparecchio è corredato di un LED (Light Emitting Diode) ad alto rendimento che emette una luce
molto chiara. Non fissare direttamente l’obiettivo del
proiettore per evitare possibili danni o irritazioni agli
occhi.
Lato superiore dell’apparecchio
‚ Regolazione della nitidezza
ƒ Presa mini USB
PicoPix P1 oben
Parte inferiore dell’apparecchio
„ Filetto per treppiedi
… Piede pieghevole
PicoPix P1 unten
IT
Panoramica 11

2 Messa in funzione
Nota
Nota
Nota
Nota
Contenuto dell’imballaggio
Proiettore Pocket
Cavo USB
IT
Treppiedi
Borsa
Manuale d’istruzioni
Manuale d’istruzioni
Tagliando di garanzia
Parti mancanti nell’imballo
Parti mancanti nell’imballo
Qualora una delle parti mancasse o presentasse dei difetti, rivolgersi al rivenditore o al
nostro servizio clienti.
Installazione del software
1 Prima di iniziare l’installazione, chiudere tutti i pro-
grammi e le applicazioni in corso.
2 Collegare il proiettore pocket a una delle prese USB
2.0 disponibili.
3 In Windows Explorer selezionare come drive
PicoPix 1020 viewer e lanciare il programma
PicoPix viewer Install.exe facendo doppio clic.
4 Il computer prepara il processo di installazione.
Seguire le istruzioni del programma di installazione
guidata e alla fine riavviare il computer.
Scollegare l’apparecchio dal computer
Scollegare l’apparecchio dal computer
prima di riavviare. In caso contrario, il
computer potrebbe tentare di eseguire
l’avvio dal proiettore pocket riconoscendolo come dispositivo di memoria USB.
Impostazione dell’apparecchio
1 Con il cavo Y-USB fornito, collegare l’apparecchio a
due prese USB del proprio computer considerando
che la corrente assorbita è di 1A.
2 Avviare il programma PicoPix viewer. Nella barra di
stato appare un’icona.
3 Il proiettore pocket si accende e proietta l'immagine
del computer.
Risoluzione dello schermo del proiettore
Per ottenere la migliore qualità dell'immagine, impostare la risoluzione dello
schermo del computer su 800¦x¦600 pixel.
4 Regolare la nitidezza con l’apposita ghiera.
5 Al termine della presentazione, staccare il cavo USB
dal computer per risparmiare corrente e per chiudere PicoPix viewer.
Chiudere il programma PicoPix viewer
1) Con il tasto destro del mouse, fare clic
sull‘icona PicoPix viewer nella barra delle
applicazioni di Windows.
2) Fare clic su Esci.
Disinstallazione del software
1 Prima di iniziare la disinstallazione, chiudere tutti i
programmi e le applicazioni in corso. Richiamare il
programma di disinstallazione facendo clic dal menu
iniziale su PicoPix viewer > Uninstall PicoPix
viewer . Il computer prepara il processo di disinstallazione.
2 Seguire le istruzioni su schermo.
3 Al termine della disinstallazione sarà necessario riav-
viare il computer.
4 Dopo il riavvio del computer, la disinstallazione di
PicoPix viewer sarà terminata.
Caratteristiche tecniche
Tecnologia / Ottica
Tecnologia del display .......................................0,37" LCoS
Fonte luminosa ......................................................RGB LED
Risoluzione .................................................... 800¦x¦600¦pixel
Risoluzioni supportate..................... SVGA/XGA/WXGA
Potenza luminosa (Bright Mode)...............fino a 20¦ lumi
Rapporto di contrasto.................................................400:1
Dimensioni immagine proiettata .............. 5,2¦–¦81¦ pollici
Distanza dalla distanza di proiezione.....0,2¦m fino a 3¦m
Frequenza di campionamento orizzontale ... 31¦–¦69¦kHz
Frequenza di campionamento verticale .......... 56¦–¦85¦Hz
Alimentazione .......................................Tramite presa USB
Dimensioni
Dimensioni (L¦×¦A¦×¦P)...............................88¦×¦25¦×¦88¦mm
Peso
Peso............................................................................... 0,15¦kg
Condizioni ambiente consigliate
Condizioni ambiente consigliate..........................5¦–¦40¦ºC
Umidità relativa
Umidità relativa ......................20¦–¦80¦% (senza condensa)
12 Philips · PPX1020
Requisiti minimi del PC
Processore.....................Intel Pentium M o AMD Athlon
Frequenza base ......................................2GHz o superiore
Sistema operativo.......Windows XP Professional (SP2),
..............................................................Vista, Windows 7
Memoria operativa.............................. 1GB DDR SDRAM
Spazio di memoria libero.......................................... 40 MB
Porta USB...................................................................USB 2.0
I dati sono forniti esclusivamente a scopo informativo.
Sagemcomsi riserva il diritto di apportare qualsiasi
modifica senza preavviso.
Il marchio CE certifica che il prodotto è conforme alla
direttiva 1999/5/CE emanata dal Consiglio della Comunità Europea in materia di apparecchiature terminali di
telecomunicazione, sulla sicurezza, sulla salute degli
utenti e sulle interferenze elettromagnetiche.
La dichiarazione di conformità può essere consultata sul
sito www.sagem-ca.at/doc.
La difesa dell’ambiente come parte di un processo di sviluppo sostenibile è di importanza fondamentale per
Sagemcom. Sagemcom si impegna a utilizzare sistemi
che rispettino l’ambiente. Pertanto Sagemcom ha deciso
di integrare i processi a tutela dell’ambiente all’interno
del ciclo di vita dei propri prodotti, dalla produzione alla
messa in funzione, all’utilizzo e allo smaltimento.
Imballagio: La presenza del logo (punto verde) indica
che viene versato un contributo ad una organizzazione
nazionale riconosciuta per il riciclo e il recupero degli
imballaggi. Si prega di rispettare le norme locali sullo
smaltimento differenziato per questo tipo di rifiuti.
Batterie: Se il vostro prodotto contiene batterie, queste devono essere smaltite presso un apposito punto di
raccolta.
Prodotto: Il simbolo del bidone barrato da una croce
indica che questo prodotto appartiene alla categoria
delle apparecchiature elettriche ed elettroniche. A tale
proposito le normative europee vi chiedono di smaltirlo
alternativamente;
• Presso i punti vendita dove vi rechiate per acquistare
apparecchiature analoghe.
• Presso i punti di raccolta a voi più vicini(centri di smaltimento rifiuti, raccolta differenziata, ecc.)
In questo modo si contribuisce al riutilizzo e alla valorizzazione dei vecchi apparecchi elettrici ed elettronici
che, altrimenti, avrebbero conseguenze negative
sull’ambiente e sulla nostra salute.
Gli imballaggi di carta e cartone possono essere smaltiti
come carta usata. Le pellicole di plastica e gli imballaggi
di polistirolo possono essere destinati al riciclaggio o
smaltiti con i rifiuti, secondo le indicazioni del rispettivo
paese.
Marchi di fabbrica: I riferimenti contenuti in questo
manuale di istruzioni si riferiscono a marchi di fabbrica
delle rispettive ditte. L’assenza dei simboli É e Ë non
giustifica il presupposto che i concetti interessati non
siano marchi di fabbrica di diritto. Altri nomi di prodotti
utilizzati in questo documento sono da intendersi a solo
scopo di designazione e possono essere marchi di fabbrica dei rispettivi proprietari. Sagemcom declina ogni
diritto su tali marchi.
Sagemcom e società correlate non sono responsabili nei
confronti degli acquirenti di questo prodotto o di terzi
in relazione a reclami di sostituzione, perdite, costi o
spese a cui l’acquirente o terzi dovessero essere soggetti in conseguenza di un incidente, di utilizzo non conforme o abuso di questo prodotto, oppure di modifiche,
riparazioni, variazioni non autorizzate apportate al prodotto, oppure del mancato rispetto delle istruzioni
d’uso e manutenzione di Sagemcom.
Sagemcom declina ogni responsabilità per reclami di
sostituzione o problemi derivanti dall’utilizzo di qualunque opzione o materiale di consumo che non sia designato come prodotto originale di Sagemcom o prodotto approvato da Sagemcom.
Sagemcom declina ogni responsabilità per reclami di
sostituzione derivanti da interferenze elettromagnetiche connesse all’uso di cavi di collegamento non originali Sagemcom.
Tutti i diritti riservati. La duplicazione di qualunque
parte di questa pubblicazione senza il consenso scritto
di Sagemcom, la memorizzazione in un archivio o in qualunque forma o altro mezzo di trasmissione, sia esso
elettronico, meccanico, ottenuto per fotocopiatura,
registrazione o altro. Le informazioni contenute nel
presente documento si riferiscono esclusivamente
all’utilizzo con questo prodotto. Sagemcom ünon si
assume alcuna responsabilità nel caso in cui queste
informazioni vengano applicate ad altri apparecchi.
Questo manuale di istruzioni è un documento che non
ha carattere contrattuale.
Salvo errori ed omissioni, con riserva di modifiche.
Copyright © 2010 PHILIPS
IT
Messa in funzione 13
1Overzicht
Geachte klant
Wij bedanken u hartelijk dat u voor onze Pocket Projector gekozen hebt.
Veel plezier met uw toestel en zijn veelvoudige functies!
Algemene
NL
veiligheidsinstructies
Inleiding 2
Breng geen instellingen en veranderingen aan die niet in
deze handleiding zijn beschreven. Door onoordeelkundig gebruik kan lichamelijk letsel of schade, apparaatschade of gegevensverlies optreden. Let op alle aangegeven waarschuwings- en veiligheidsinstructies.
Toestel opstellen
Bescherm het toestel tegen direct zonlicht
Bescherm het toestel tegen direct zonlicht, hitte, grote
temperatuurverschillen en vochtigheid. Zet het toestel
niet in de buurt van de verwarming of de airconditioning. Let op de informatie in de technische specificaties
met betrekking tot temperatuur en luchtvochtigheid.
Wordt het apparaat te heet, of komt er rook uit (USB)
Wordt het apparaat te heet, of komt er rook uit, verwijder het apparaat dan direct van de USB-aansluiting.
Laat uw toestel door een technische servicedienst
onderzoeken. Om te vermijden dat een brand uitbreidt,
moeten open vlammen uit de buurt van het toestel worden gehouden.
Sluit het toestel niet in vochtige ruimtes aan.
Sluit het toestel niet in vochtige ruimtes aan. Raak de
netstekker of de netaansluiting nooit met natte handen
aan.
Condensvorming
Onder de volgende omstandigheden kan condensvorming aan de binnenkant van het apparaat ontstaan, hetgeen tot onjuist functioneren leidt:
· als het apparaat vanuit een koude naar een warme
ruimte wordt gebracht;
· na het opwarmen van een koude ruimte;
· bij plaatsing in een vochtige ruimte.
Ga als volgt te werk om condensvorming te voorko-
men:
1 Doe het apparaat in een plastic zak voordat u het
naar een andere ruimte brengt, zodat het zich aan
het de temperatuur en vochtigheidsgraad in de
nieuwe ruimte kan aanpassen.
2 Wacht één tot twee uur voordat u het apparaat uit
de plastic zak haalt.
Het apparaat mag niet in een zeer stoffige omg eving worden gebruikt.
Het apparaat mag niet in een zeer stoffige omgeving
worden gebruikt. Stofdeeltjes en andere vreemde voorwerpen zouden het apparaat kunnen beschadigen.
Stel het apparaat niet bloot aan extreme trillingen
Stel het apparaat niet bloot aan extreme trillingen.
Interne onderdelen kunnen daardoor worden beschadigd.
Laat uw kinderen niet zonder toezicht met het toestel omgaan.
Laat uw kinderen niet zonder toezicht met het toestel
omgaan. De verpakkingsfolie mag niet in de handen van
kinderen geraken.
Reparaties
Reparaties
Repareer uw toestel niet zelf. Ondeskundig onderhoud
kan tot lichamelijke en materiële schade leiden. Laat uw
toestel uitsluitend door een geautoriseerde servicedienst repareren.
Verwijder het typeplaatje van uw toestel niet, anders
komt de garantie te vervallen.
Hoogenergetische LED
Dit apparaat is uitgerust met een hoogenergetische LED
(Light Emitting Diode) die een zeer fel licht uitstraalt.
Kijk niet direct in de lens van de projector om oogschade of irritatie te voorkomen.
Bovenzijde
‚ Scherpstellen
ƒ Mini-USB-aansluiting
PicoPix P1 oben
Onderzijde
„ Statiefaansluiting
… Uitklapbare voet
PicoPix P1 unten
14 Philips · PPX1020
2 Ingebruikneming
Opmerking
Opmerking
Opmerking
Opmerking
Inhoud verpakking
Pocket Projector
USB kabel
Statief
Draagtas
Handleiding
Handleiding
Garantiebewijs
Ontbrekende delen
Ontbrekende delen
Mocht een van de delen ontbreken of beschadigd zijn, neem dan contact op met uw vakhandelaar of met onze klantendienst.
Software installeren
1 Sluit alle lopende programma’s en toepassingen
voordat u de installatie start.
2 Sluit uw Pocket Projector aan op een vrije USB-2.0-
aansluiting.
3 Kies in Windows Explorer het station PicoPix 1020
viewer en start het programma PicoPix viewer
Install.exe door erop te dubbelklikken.
4 Uw computer bereidt het installatieproces voor.
Volg de overige instructies van de installatie-wizard
en start de computer tenslotte opnieuw.
Het apparaat van de computer loskoppelen
Koppel het apparaat los voordat u de computer opnieuw opstart. De computer zou
anders kunnen proberen om op te starten
vanaf de Pocket Projector, die als externe
data-opslag wordt gezien.
Het apparaat in gebruik nemen
1 Sluit het apparaat aan met de meegeleverde Y-USB-
kabel aan twee USB-aansluitingen van uw computer
aan, aangezien het apparaat een stroom van 1A nodig
heeft.
2 Start het programma PicoPix viewer. In de status-
balk verschijnt een symbool.
3 De Pocket Projector wordt ingeschakeld en het
beeld van de computer wordt geprojecteerd.
Beeldschermresolutie van de computer
De beste beeldkwaliteit wordt verkregen
wanneer de beeldschermresolutie van uw
computer op 800¦x¦600¦pixels is ingesteld.
4 Stel het beeld scherp met het daarvoor bestemde
wieltje.
5 Verwijder na de presentatie de USB-kabel van de
computer om stroom te besparen en PicoPix
viewer te beëindigen.
Het programma PicoPix viewer beëindigen
1) Klik met de rechter muisknop op het
PicoPix viewer-symbool in de taakbalk.
2) Klik op Afsluiten.
Software desinstalleren
1 Sluit alle lopende programma’s en toepassingen
voordat u de desinstallatie start. Het verwijderen
wordt gestart door in het Startmenu op PicoPix
viewer > Uninstall PicoPix viewer te klikken. Uw
computer bereidt de desinstallatie voor.
2 Volg de instructies op het scherm.
3 Ter beëindiging van de desinstallatie moet u uw com-
puter opnieuw opstarten.
4 Nadat uw computer opnieuw is opgestart, is het ver-
wijderen van PicoPix viewer voltooid.
Technische specificaties
Technologie / Objectief
Displaytechnologie.............................................0,37" LCoS
Lichtbron................................................................. RGB LED
Resolutie ...................................................... 800¦x¦600¦pixels
Ondersteunde resoluties ................SVGA/XGA/WXGA
Lichtsterkte (Bright-modus) ......................... tot 20¦lumen
Contrastverhouding .....................................................400:1
Geprojecteerde beeldgrootte........................ 5,2¦–¦81¦inch
Afstand tot het projectiescherm.................0,2¦m tot 3¦m
Horizontale beeldfrequentie ........................... 31¦–¦69¦kHz
Verticale beeldfrequentie ................................... 56¦–¦85¦Hz
Stroomverzorging ................................ via USB-aansluiting
Afmetingen
Afmetingen (B¦×¦H¦×¦D) .............................88¦×¦25¦×¦88¦mm
Gewicht
Gewicht........................................................................ 0,15¦kg
Aanbevolen toestelomgeving
Aanbevolen toestelomgeving ............................... 5¦–¦40¦ºC
Relatieve luchtvochtigheid
Relatieve luchtvochtigheid ................................... 20¦–¦80¦%
......................................................... (niet condenserend)
NL
Ingebruikneming 15
Minimale systeemeisen
Processor ......................Intel Pentium M of AMD Athlon
Processorfrequentie ...................................2GHz of hoger
Besturingssysteem...... Windows XP Professional (SP2),
..............................................................Vista, Windows 7
Werkgeheugen.....................................1GB DDR SDRAM
Vrij geheugen............................................................... 40 MB
USB-aansluting...........................................................USB 2.0
Alle gegevens worden uitsluitend ter informatie verstrekt. Sagemcom behoudt zich het recht voor om
zonder voorafgaande kennisgeving wijzigingen aan te
NL
brengen.
De CE-markering geeft aan dat het product voldoet aan
de hoofdvereisten op het gebied van consumentenveiligheid en elektromagnetische interferentie uit richtlijn
1999/5/EC van de Europese Raad betreffende eindapparatuur voor telecommunicatie.
De compatibiliteitsverklaring kan worden geraadpleegd
op de website www.sagem-ca.at/doc.
Sagemcom hecht grote waarde aan milieubescherming
in het kader van duurzame ontwikkeling. Sagemcom
streeft ernaar om milieuvriendelijke systemen op de
markt te brengen. Daarom heeft Sagemcom besloten de
ecologische prestaties in alle levensfasen van het product, van fabricage via ingebruikneming tot het gebruik
en de afvalverwerking een hoge prioriteit te geven.
Verpakking: Het logo met de groene stip geeft aan dat
er een bijdrage aan een erkende landelijke organisatie is
betaald om infrastructuren voor hergebruik en recycling van verpakkingen te verbeteren. Bied verpakkingsmateriaal altijd aan volgens de ter plaatse geldende
voorschriften voor gescheiden afvalinzameling.
Batterijen: Als het product batterijen bevat, levert u
deze aan het einde van de levensduur in bij een erkend
inzamelingspunt.
Produkt: Wanneer een product is voorzien van een
logo van een afvalcontainer met een kruis, betekent dit
dat het product behoort tot de categorie elektrische en
elektronische apparatuur. De Europese regelgeving
schrijft voor dat dergelijke apparatuur gescheiden moet
worden ingezameld:
• via verkooppunten wanneer tegelijkertijd soortgelijke
nieuwe apparatuur wordt aangeschaft
• via de plaatselijke systemen voor (gescheiden) afvalinzameling.
Op deze manier levert u een bijdrage aan hergebruik en
recycling van Afgedankte Elektrische en Elektronische
Apparatuur, en daarmee tevens aan een beter milieu en
een betere volksgezondheid.
De gebruikte papieren en kartonnen verpakkingen kunnen als oud papier worden aangeboden. De plastic en
Styropor verpakkingen biedt u als overig afval ter verwerking aan, afhankelijk van de in uw land geldende
richtlijnen.
Handelsmerken: De in deze handleiding genoemde
referenties zijn handelsmerken van de betreffende
firma’s. Het ontbreken van de symbolen É en Ë bete-
kent niet dat de betreffende begrippen vrije handelsmerken zijn. Andere in dit document gebruikte productnamen dienen alleen maar ter kenmerking en kunnen handelsmerken van de betreffende houder zijn.
Sagemcom weigert om het even welk recht op deze
merken.
Sagemcom en aanverwante bedrijven kunnen door de
koper van dit product of door derden niet aansprakelijk
worden gesteld voor eisen tot schadevergoeding, verlies of kosten en uitgaven tengevolge van een ongeval,
het verkeerde gebruik of misbruik van dit product of
niet toegelaten modificaties, reparaties, wijzingen van
het product of het niet in acht nemen van de gebruiksen onderhoudsinstructies van Sagemcom.
Sagemcom kan niet aansprakelijk worden gesteld voor
eisen tot schadevergoeding of problemen tengevolge
van het gebruik van om het even welke opties of verbruiksmaterialen die niet als originele producten van
Sagemcom of niet als door Sagemcom goedgekeurde
producten zijn gekenmerkt.
Sagemcom kan niet aansprakelijk worden gesteld voor
eisen tot schadevergoeding tengevolge van elektromagnetische interferenties veroorzaakt door het gebruik
van verbindingskabels die niet als producten van Sagemcom zijn gekenmerkt.
Alle rechten voorbehouden. Niets uit deze uitgave mag
zonder voorafgaande schriftelijke toestemming van
Sagemcom worden vermenigvuldigd, in een archiefsysteem worden opgeslagen of in welke vorm dan ook elektronisch, mechanisch, door middel van fotokopie,
opname of op een andere manier – worden gereproduceerd. De in dit document opgenomen informatie is uitsluitend bedoeld als ondersteuning bij het gebruik van
dit product. Sagemcom kan niet aansprakelijk worden
gesteld wanneer deze informatie op andere toestellen
wordt toegepast.
Deze gebruiksaanwijzing kan niet als contract worden
beschouwd.
Vergissingen, drukfouten en wijzingen voorbehouden.
Copyright © 2010 PHILIPS
16 Philips · PPX1020
1Esquema
Distinguido cliente:
Muchas gracias por haberse decidido por nuestro proyector de bolsillo.
¡Disfrute de su aparato y de su gran variedad de funciones!
Instrucciones generales de seguridad
Introducción 2
No realice ajustes ni modificaciones que no vengan descritos en este manual de usuario. Si no se maneja
correctamente el aparato pueden provocarse daños
corporales o desperfectos, daños en el aparato o pérdida de datos. Tenga en cuenta todos los avisos de precaución y seguridad.
Instalar el aparato
Proteja el aparato contra la exposición solar directa
Proteja el aparato contra la exposición solar directa, el
calor, las oscilaciones graves de temperatura y la humedad. No instale el aparato en las proximidades de radiadores o aparatos de aire acondicionado. Preste atención a la información acerca de la temperatura y la
humedad del aire que aparece en los datos técnicos.
Si el aparato se calienta en exceso o sale humo de él (USB)
Si el aparato se calienta en exceso o sale humo de él,
desco nécte lo inmedia tamen te de la con exión USB. Deje
que el servicio técnico revise su aparato. Para evitar que
se pueda extender un fuego, no exponga el aparato a un
fuego abierto.
No conecte el aparato en habitaciones húmedas.
No conecte el aparato en habitaciones húmedas. Nunca
toque el enchufe ni el conector de alimentación con las
manos húmedas.
Capa de vaho
En caso de que concurran las siguientes condiciones,
puede crearse una capa de vaho en el interior del aparato y provocar un error de funcionamiento
...en caso de que el aparato sea transportado de una
estancia fría a una caldeada;
... tras caldear una estancia fría;
...si se ubica en una estancia húmeda.
Para evitar dicha capa de vaho, proceda como se indica
a continuación:
1 Cierre el aparato dentro de una bolsa de plástico
antes de llevarlo a otra habitación, a fin de adaptarlo
a las circunstancias del entorno.
2 Espere una o dos horas antes de sacar el aparato de
dicha bolsa.
El aparato no debe co locarse en un en torno con mucho polvo.
El aparato no debe colocarse en un entorno con mucho
polvo. Las partículas de polvo, así como otros cuerpos
extraños podrían dañar el aparato.
No exponga el aparato a vibraciones extrem as.
No exponga el aparato a vibraciones extremas. En ese
caso, los módulos internos podrían dañarse.
No permita que haya niños que manejen el aparato sin ser vigilados.
No permita que haya niños que manejen el aparato sin
ser vigilados. No permita que los plásticos de embalaje
lleguen a manos de niños.
Reparaciones
Reparaciones
No realice reparaciones de ningún tipo en el aparato.
Un mantenimiento indebido puede provocar daños a
personas o en el aparato. Deje que únicamente el servicio técnico autorizado repare su aparato.
No retire la placa de características de su aparato, de lo
contrario se extinguirá la garantía.
LED de alto rendimiento
Este aparato está equipado con un LED (Light Emitting
Diode) de alto rendimiento que emite una luz muy clara.
No mire directamente al objetivo del proyector, a fin de
evitar irritaciones o daños en los ojos.
Parte superior del aparato
‚ Ajuste de la nitidez
ƒ Conexión de mini USB
PicoPix P1 oben
Parte inferior del aparato
„ Rosca del trípode
… Pata desplegable
PicoPix P1 unten
ES
Esquema 17
 Loading...