

Page 1

PCW227S/C
#3135-125-20861
Directions For Use
04/17/02
TELEVISION
3135-125-20861
Page 2

PCW227S/C DFU
#3135-125-20861
04/12/02
PCW227S / PCW227C
Description: 27" Millennium Widescreen Commercial Television with SmartCard, Smart PlugTM, Front
and Back A/V Jacks, and S-Video and Composite Video Inputs and Video Output
Color: Silver (PCW227S) or Charcoal (PCW227C)
Weight: 92.6 lbs.
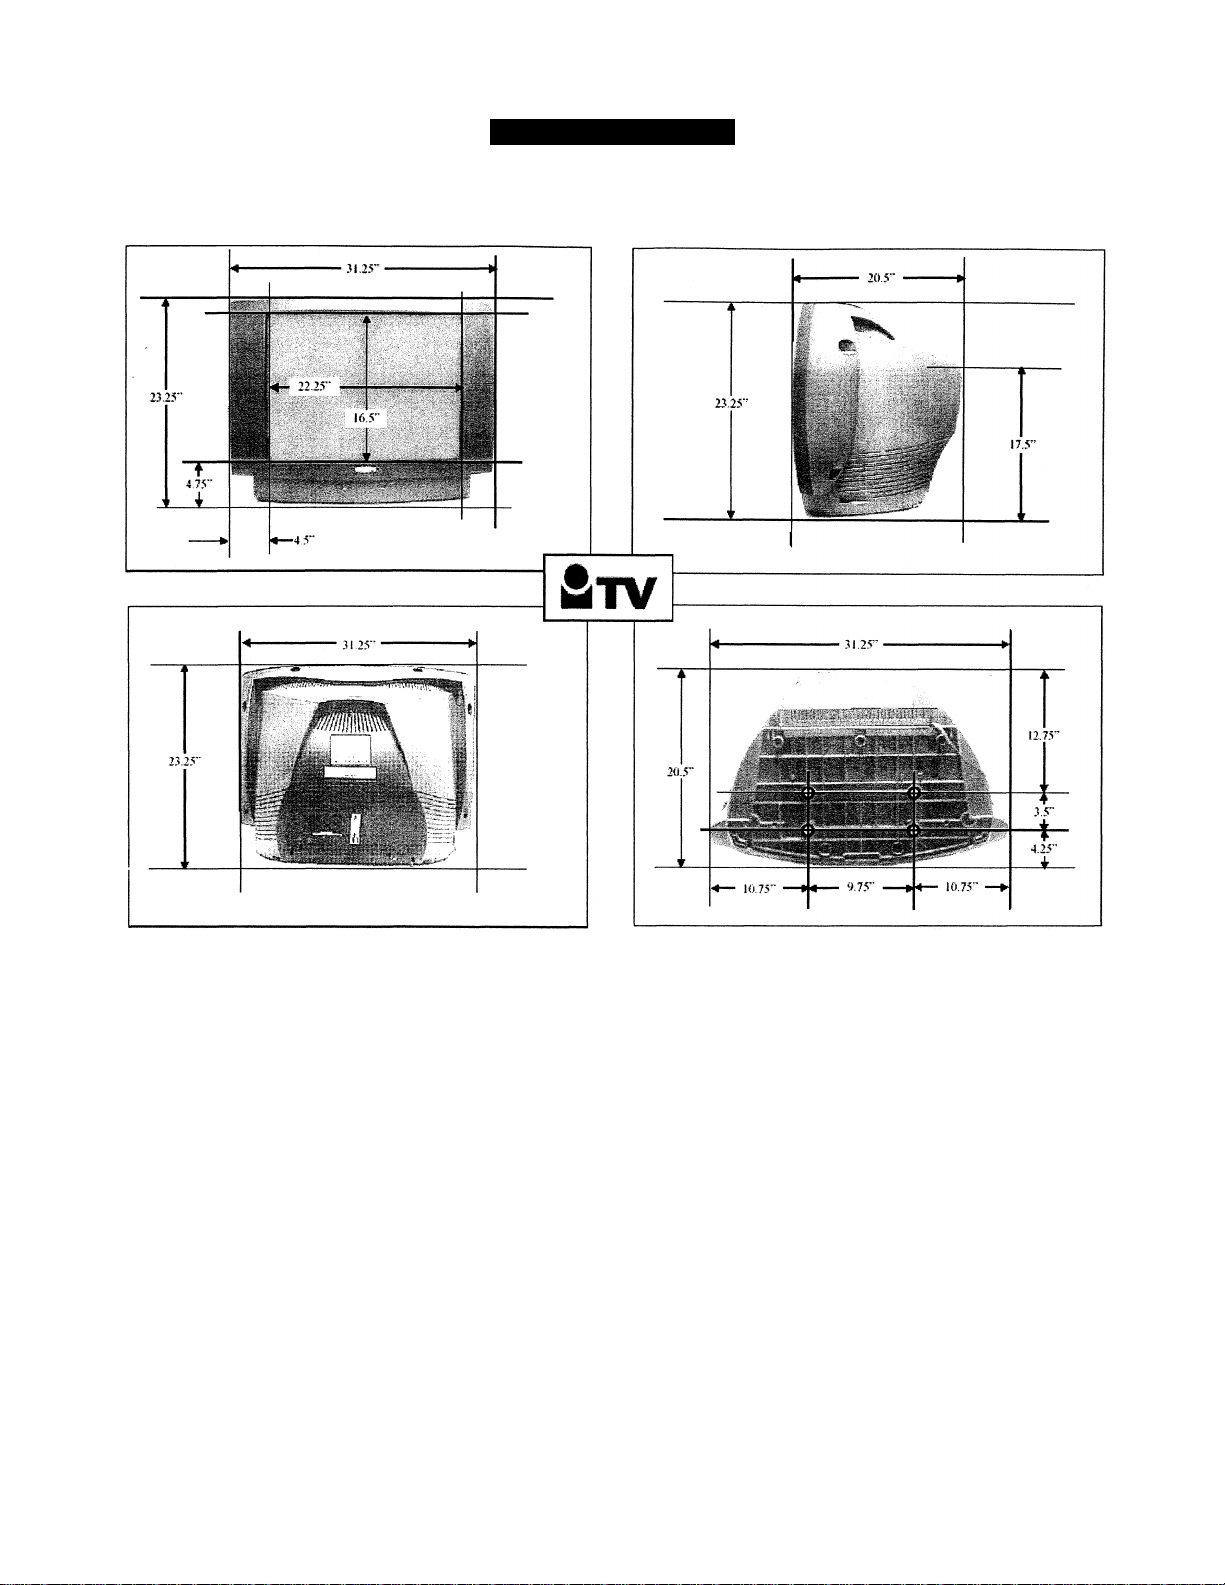
Dimensions: 30.75"W x 23.5"H x 20.5"D
PCW Series Key Product Features
Widescreen Design
SmartCard Integrated Expansion
Smart Plug™ Two-Way Addressable Port
Front AudioA/ideo Jacks
Back Audio/Video Jacks
S-Video and Composite Video Inputs
Video Output (switchable)
Spill-Resistant Cabinet
Stereo Sound
External Speaker Connection
Clone Programming Capability
Front Control Lockout
Auto Power On
ESP tm (Energy Saving Programmability) X
Volume Management
Marquee Channel™ X
AudioA/ideo Muting
SmartMute™
Local Preview™ - Channel Guide
Programmable Channel Blanking
SmartSound ™
Security Mountable X
Consumer Television Convertible
X
X
X
X
X
X
X
X
dbx®
X
X
X
X
X
X
X
X
X
X
X
Page 3
PCW227S/C DFU
#3135-125-20861 04/12/02
SAFETY INSTRUCTIONS - Read before operating equipment
This product was designed and manufactured to meet strict quality and
safety standards. There are, however, some installation and operation
precautions which you should be particularly aware of.
1.
Read Instructions - All the safety and operating instructions should
be read before the appliance is operated.
Retain instructions - The safety and operating instructions should
be retained for future reference.
3.
Heed Warnings - All warnings on the appliance and in the operating
Instructions should be adhered to.
4.
Follow Instructions - All operating and use instructions should be
followed.
Water and Moisture - The appliance should not be used near water
- for example, near a bathtub, washbowl, kitchen sink, laundry tub, in
a wet basement or near a swimming pool, etc.
Carts and Stands - The appliance should be used only with a cart or
6.
stand that is recommended by the manufacturer.
6A.
Tiit/Stability - All televisions must comply with recommended inter
6B.
national global safety standards for tilt and stability properties of its
cabinet design.
• Do not compromise these design standards by applying exces
sive pull force to the front, or top, of the cabinet which could ulti
mately overturn the product.
• Also, do not endanger yourself, or children, by placing electron
ic equipment/toys on the top of the cabinet. Such items could unsus
pectingly fall from the top of the set and cause product damage
and/or personal injury.
7.
Wall or Ceiling Mounting - The appliance should be mounted to a
wall or ceiling only as recommended by the manufacturer.
Ventilation - The appliance should be situated so that its location or
8.
position does not interfere with its proper ventilation. For example,
the appliance should not be situated on a bed, sofa, rug, or similar
surface that may block the ventilation openings; or, placed in a builtin installation, such as a bookcase or cabinet that may impede the
flow of air through the ventilation openings.
Heat - The appliance should be situated away from heat sources
such as radiators, heat registers, stoves, or other appliances (includ
ing amplifiers) that produce heat.
Power Sources - The appliance should be connected to a power
10.
supply only of the type described in the operating instructions or as
marked on the appliance.
An appliance and cart combination should be moved
with care. Quick stops, excessive force, and uneven sur
faces may cause the appliance and cart combination to
overturn.
11. Power-Cord Protection - Power supply cords should be routed so
that they are not likely to be walked on or pinched by items placed
upon or against them, paying particular attention to cords and plugs,
convenience receptacles, and the point where they exit from the
appliance.
12. Cleaning - The appliance should be cleaned only as recommended
by the manufacturer.
13. Power Lines - An outdoor antenna should be located away from
power lines.
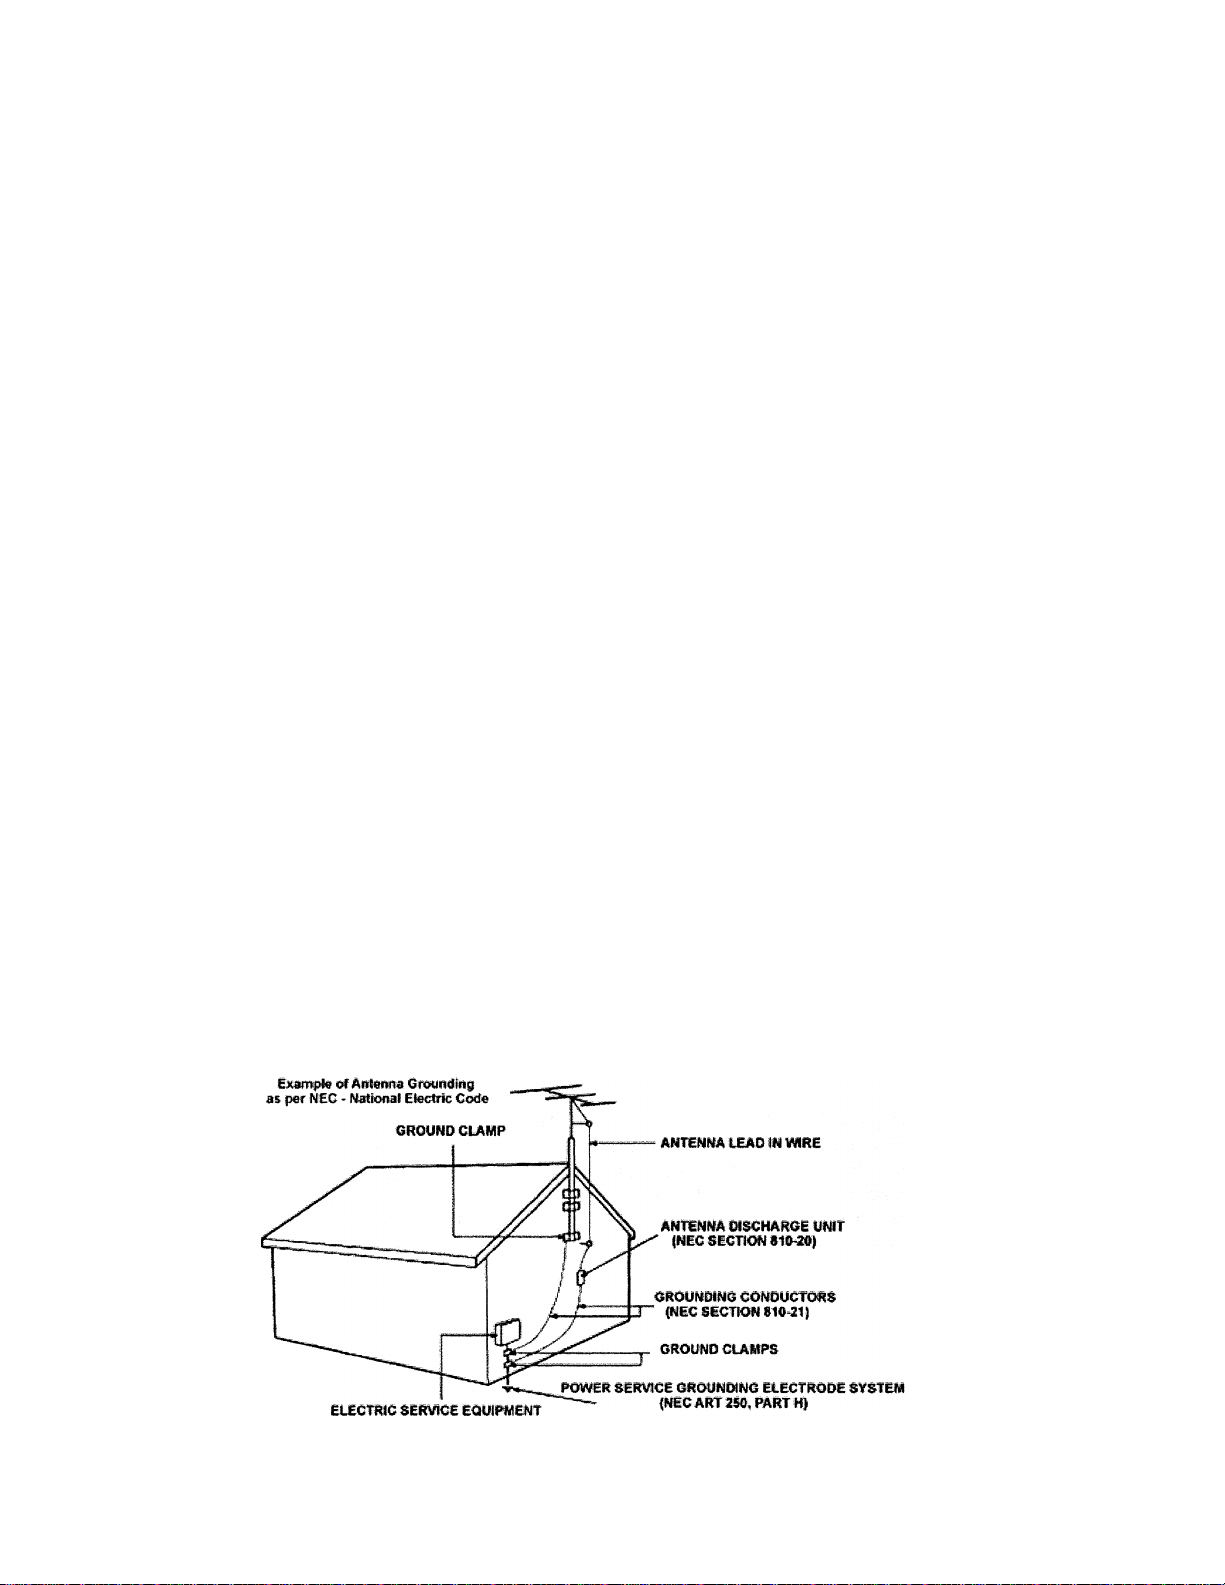
14. Outdoor Antenna Grounding - If an outside antenna is connected
to the receiver, be sure the antenna system is grounded so as to pro
vide some protection against voltage surges and built up static
charges.
Section 810 of the National Electric Code, ANSI/NFPA No. 70-1984.
provides information with respect to proper grounding of the mats
and supporting structure grounding of the lead-in wire to an antenna
discharge unit, size of grounding connectors, location of antenna-dis
charge unit, connection to grounding electrodes and requirements for
the grounding electrode. See Fig. below.
15. Non-use Periods - The power cord of the appliance should be
unplugged from the outlet when left unused for a long period of time.
16. Object and Liquid Entry - Care should be taken so that objects do
not fall and liquids are not spilled into the enclosure through open
ings.
17. Damage Requiring Service - The appliance should be serviced by
qualified service personnel when:
A. The power supply cord or the plug has been damaged; or
B. Objects have fallen, or liquid has been spilled into the appli
ance; or
C. The appliance has been exposed to rain; or
D. The appliance does not appear to operate normally or exhibits
a marked change In performance; or
E. The appliance has been dropped, or the enclosure damaged.
18. Servicing - The user should not attempt to service the appliance
beyond that described in the operating Instructions. All other servic
ing should be referred to qualified service personnel.
Note to the CATV system installer: This reminder is provided to call the
CATV system installer's attention to Article 820-40 of the NEC that pro
vides guidelines for proper grounding and, in particular, specifies that the
cable ground shall be connected to the grounding system of the building,
as close to the point of cable entry as practical.
Page 4

PCW227S/C DFU
#3135-125-20861 04/12/02
Introduction
Philips Institutional TV Software
Your Philips Institutional Television can be configured to operate in either "Consumer” or "Commercial" operational
modes.
Commercial Mode: Your Philips Institutional Television is configured at the Factory to operate in Commercial mode.
When the television is in Commercial mode, access to its operation from its front panel controls or from a guest-mode
remote can be limited, depending upon the settings of the Institutional TV features. For examples, the unit’s front panel
controls can be “locked-out” (rendered inoperable), only certain channels can be selected, and/or the volume can be lim
ited to a given range.
Consumer Mode: When in the Consumer mode, the unit operates as a standard TV, bypassing the Institutional
Television feature set, thus allowing normal initial power ON, channel selection, and volume control (as well as a vari
ety of selectable Menu features). When the TV is in Consumer mode. Philips RC-5 system 0 (guest-mode) remotes, such
as the RC2524BK and the RL9820BK (optional accessories) can access the Consumer-mode Main Menu, and configure
the television to the full extent offered in this mode. Guest-mode 21 -button remotes such as the RC2524BK use the Menu
button to access the Consumer menu. Guest-mode 20-button remotes such as the RL9820BK, which do not have a Menu
button, use the Sleep button to access the Consumer menu. Simultaneously pressing the front panel’s Volume - and
Volume + buttons also invokes the Consumer menu.
Identifying the Operational Mode: To identify the television’s operational mode, a system 7 (commercial setup mode)
master setup remote (RG4172BK, optional accessory) must be used. With the RG4172BK in setup mode (press TV
SETUP on the RG4172BK), press Recall. The following information will appear on-screen:
STATUS ITEM
SYSTEM STATUS (L01ITV-US4PV)
MODE
CHANNEL
DCM OFF / ON
CODES 209 222 1 33
SIGNAL TUNED / NOT TUNED
OP HRS
ERRORS
VERSION
n/a
COMMERCIAL / CONSUMER
CHANNEL, INPUT (CHANNEL, INPUT)
0031h
0 0 0 0 0
3.3
STATUS DATA
MEANING
Information title
Operational mode
Currently-tuned channel
Data communications module offline /
online
Internal data for factory / service use.
Signal present / absent
Number of cumulative hours unit has
been operated (hexadecimal)
Internal data for factory / service use.
Television software version.
Changing Operational Modes: To change the television’s mode between Consumer and Commercial modes, a system
7 (commercial setup mode) master setup remote must be used. With the RG4172BK in setup mode (press TV SETUP on
the RG4172BK), enter the following keystroke sequence: 0 2 4 9 9 5 Menu. Only the RG4172BK, when it is in setup
mode can change the television’s mode between Consumer and Commercial, and provide complete access to the televi
sion’s Institutional Features. The RG4172BK can be set to operate in either its master setup remote mode, or in guest
mode. The RG4172BK’s guest mode facilitates testing the desired Institutional / Commercial configuration.
Page 5

PCW227S/C DFU #3135-125-20861
04/12/02
Setting The Institutional TV Operational Mode
To change the operational mode of the Philips Institutional TV, use the RG4172BK in setup mode (press TV SETUP on
the RG4172BK), and enter the following keystroke sequence: 0 2 4 9 9 5 Menu. Select the desired mode from the
Operational Mode menu. IMPORTANT NOTE; If YOU CHANGE THE OPERATIONAL MODE, YOU MUST POWER THE
TELEVISION OFF AND BACK ON TO COMPLETE THE MODE CHANGE.
NOTE: Once the television is in consumer mode, do not use the setup remote to activate com
mercial FEATURES. Otherwise, the commercial features will affect consumer operation, it will
THEN BE NECESSARY TO PLACE THE TELEVISION BACK INTO COMMERCIAL MODE. THEN INTO CONSUMER MODE.
AND THEN POWERED OFF AGAIN TO PROPERLY PLACE THE TELEVISION BACK INTO CONSUMER MODE.
OPERATIONAL MODE
CURRENT MODE
CONSUMER MODE: PRESS 1
COMMERCIAL MODE:
EXIT WITHOUT CHANGING MODES: PRESS 0
COMMERCIAL / CONSUMER
PRESS 2
Philips Institutional TV Remote Controls
Remote controls (optional accessories) used with Philips Institutional televisions.
RC2524BK
Guest Remote
29-button guest remote
with menu button, addi
tional features (VCR con
trol, etc.)
RL9820B
Guest Remote
20-button guest remote.
RG4172BK
Setup Remote
Master setup remote.
Required to change
operational modes and
access Institutional fea
tures. Press TV SETUP
to place remote in
SETUP mode.
RC2573*
Future version of mas
ter setup remote. Fully
functionally equivalent
toRG4172BK. Put
switch in SETUP posi
tion to place remote in
setup mode. *Exact
model number subject
to change.
.If?, r
■ 7
Page 6

PCW227S/C DFU
#3135-125-20861
04/12/02
ITV Menu Items & Availability In Consumer & Commercial Modes {models PCW227S, PCW227C)
The following table summarizes the Commercial and Consumer menu items available on your Philips Institutional tele
vision. The functions of these menu items will be discussed in greater detail later in this booklet. Menu items denoted
with a “>” invoke sub-menus, which will also be discussed later in this booklet. The coliunn labeled CONSUMER indi
cates the Main Menu items that are available when the television is in Consumer mode, and Menu or Sleep is pressed on
a guest-mode remote (or RG4172BK master setup remote in guest mode). The column labeled COMMERCIAL indicates
the Setup Menu items available with the RG4172BK master setup remote whenever the setup remote is in setup mode.
MENU ITEM
MENU TITLE
LANGUAGE
CHANNEL INSTALL
CABLE TUNING
BRIGHTNESS
COLOR
CONTRAST —-1-- 0 - 63
SHARPNESS
TINT
NOISE REDUCTION
SOUND MODE
SAP
AUDIO OUT
BALANCE
TREBLE
BASS
INCRED STEREO
AVL ON / OFF
VOLUME BAR ON / OFF
MIN VOLUME *
MAX VOLUME *
SWITCH ON VOLUME *
SWITCH ON CHANNEL *
POWER ON * STANDARD / FORCED
CHANNEL DISPLAY * NUMBER / LABEL / ALL / NONE
KEYBOARD LOCK * ON/OFF
ESP*
AUDIOA/IDEO MUTE
EXTAUD/VID OUT
WELCOME MESSAGE *
CHANNEL GUIDE *
REMINDER ON / OFF
3 DIGIT ENTRY *
A/CH AA/ SWITCH * ON / OFF
CC
SAVE CC * ON / OFF
V-CHIP MENU ITEM *
SAVE V-CHIP *
V-CHIP SETUP
SLEEPTIMER OFF /15 / 30 / 45 / 60 / 90 /120 /180 / 240
SECURITY *
EXIT
>
ON/OFF
0 - 63
-—1— 0 - 63
-—1—- 0 - 63
..„1
--------
31 . +31
ON/OFF
MONO / STEREO
OFF / NO SAP / ON
FIXED / VARIABLE
--I-- 0
-—1
........
31 - +31
-—1
........
31 - +31
ON / OFF
0 - 63
. 0 - 63
—1-— 0 - 63 / STANDARD
Ch. 1-125 / FRONT / AUX / S-VIDEO / STANDARD
1-99/OFF
OFF / BLACK / BLUE
ON / OFF
>
POWER ON/OFF/ON
ON / OFF
OFF / CC-1 / CC-2 / CC ON MUTE
ON / OFF
ON / OFF
>
>
SETTINGS / OPTIONS |
SETUP MENU / MAIN MENU |
ENGLISH/ESPANOL/FRANQAIS |
STANDARD / HIGH |
1 COMMERCIAL
1 SETUP MENU
1 X
X
X
X
X
X
X
X
X
X
X
X
X
X
X
X
X X
X
X
X
X
X
X
X
X
X
X
X
X
X
X
X
X
X
X
X
X
X
X
1 ^
X
CONSUMER
MAIN MENU
X
X
X
X
X
X
X
X
X
X
X
X
X
X
X
X
X
X
X
X
X
X
X
X
* COMMERCIAL FEATURE
6
Page 7
PCW227S/C DFU
#3135-125-20861
04/12/02
ITV Menu Items & Availability In Commercial Mode (Features Menu) {models PRF227S, PLW225S)
The following menu is available on your Philips Institutional television when it is in Commercial mode. The Features
Menu items are limited to the following when pressing Menu or Sleep on a guest-mode remote (or RG4172BK master
setup remote in guest mode), or when pressing the front panel keyboard’s VOLUME + and VOLUME - simultaneously
(provided the television’s front panel keyboard has not been locked out, see KEYBOARD LOCK).
FEATURES MENU
cc
SLEEPTIMER
V-CHIP SETUP (see V-CHIP MENU ITEM)
OFF/CC-1/CC-2/CC ON MUTE
OFF/15/30/45/60/90/120/180/240 ~
>
EXIT
>
Notes:
> Regardless of whether the television is in Consumer or Commercial mode, if you press Menu on an RG4172BK
master setup remote when the setup remote is in setup mode, the television’s SETUP MENU described earlier will
appear.
> Certain features that are unique to commercial setup, such as POWER ON FORCED and KEYBOARD LOCK will
remain in effect immediately after the television is placed in Consumer mode if the television is not first pow
ered OFF. Such features are denoted in with a in the menu item summary and descriptions.
> The limited Features Menu appears when the television is in Commercial mode and a guest remote (or setup remote in
guest mode) Menu or Sleep button is pressed, or when the television’s front panel keyboard VOLUME - and VOLUME
+ are pressed simultaneously (provided the television’s front panel keyboard is not locked out, see KEYBOARD LOCK).
Front Panel Controls*
Refer also to the sections in this documentation regarding the use of the front panel controls, specifically front keyboard
lock-out*.
PCW227S/C: The PCW227S/C front panel consists of power on/off, volume, and channel controls. Channel - and
Channel + normally change the television’s channel or input to any of the channels or inputs currently in the Channel Ring
(see Channel Ring). Volume + and Volume - normally control the television’s audio volume. However, simultaneously
pressing Volume + and Volume - invokes a menu. This will be either the Features Menu (see Features Menu, if the tele
vision is in Commercial Mode, or the Main Menu, if the television is in Consumer Mode. Once either menu is active,
Channel + and Channel - navigate vertically to select a menu item, and Volume + and Volume - change the currentlyselected menu item.
* NOTE: Front panel controls are inoperative if the front keyboard has been locked out.
See Front
Keyboard Lockout.
Page 8

PCW227S/C DFU
#3135-125-20861
04/12/02
How To Use The On-Screen Menu
This section explains the Philips Institutional Television’s menu items. As described previously, the availabili
ty of each item depends upon the television’s current operational mode (Consumer or Commercial) and the
type of remote control command (guest or setup) issued.
LANGUAGE SETUP x CONSUMER x FEATURES MENU__
An on-screen LANGUAGE option is available. You may set the TV's onscreen menu to appear in either English, French,
or Spanish text. With the Main Menu onscreen press the Menu button repeatedly, or use the Cursor (s) Up and Down (t)
buttons, to select LANGUAGE with the TV’s highlight control bar. Press the Cursor Right (+>) or Left (<- ) button on
the remote to select English, French (FRANÇAIS), or Spanish (ESPAÑOL). Text in the onscreen Menu will appear in the
selected language. Remember, the Language control only makes the TV's onscreen Menu items appear in French or
Spanish text. It does not change the language of other onscreen text features, such as Closed Captioning.
CHANNEL INSTALL SETUP x CONSUMER x FEATURES MENU_
When highlighted, use Channel Up/Down, or enter the desired channel number using the Number buttons you wish to
edit. The following control items, contained within the Channel Installation menu, will affect the chosen channel.
CHANNEL INSTALLATION
CHANNEL
CHANNEL RING
INPUT
LABEL
VIDEO BLANK
AUDIO BLANK OFF / ON
AUTO PROGRAM
EXIT
FRONT / AUX / SVIDEO /1-125
SAVED / DELETED
(ANTENNA) / FRONT / AUX / SVIDEO
(- ■)
OFF / ON
CHANNEL - When highlighted, use Channel Up/Down, or enter the desired channel number using the Number buttons
you wish to edit. NOTE: A ^^channel” can be either an RF channel (1-125) or a video input (FRONT, AUX, SVIDEO). RF CHANNELS (1 - 125) can select ANTENNA (normal mode), or re-directed to (le. used to select)
A VIDEO INPUT. In other words, Channel 3 could select FRONT, Channel 4 could select S-VIDEO, etc.
However, video inputs can select only a video input (FRONT, AUX, S-VIDEO). Video inputs cannot be re
directed TO ANTENNA.
CHANNEL RING - When highlighted, press the Cursor Right (+>) or Left (<-) buttons on the remote to choose SAVED
(or DELETED). When SAVED is selected, the channel will remain or be added to the TV’s program memory. When
DELETED is selected, the channel will be dropped from the TV’s program memory and will not appear when the TV
channels are scanned (using the Channel +,- buttons).
INPUT - When highlighted, press the Cursor Right (+>) or Left (<- ) buttons on the remote to select ANTENNA,
FRONT, AUX, S-VIDEO input signal options. The Input control directs the TV to select the specific indicated input
whenever this channel is tuned.
See CHANNEL, above.
LABEL - When highlighted, press the Cursor Right (+>) button on the remote to select the first character space area.
Then press the Cursor Up and Down buttons to scroll through the list of available letter characters/numbers/& symbols
provided for your labeling use. Press the Cursor Right (+>) button to highlight the next character space and continue to
repeat the process until the complete label or channel title has been entered. The Channel Label will appear in the comer
of the TV screen beside the selected channel number.
VIDEO BLANK - When highlighted, press the Cursor Right (+>) or Left (<-) buttons to turn the VIDEO BLANK con
trol ON (or OFF). When ON, no video will be shown when this specific channel is tuned. When OFF, normal viewing of
video for this specific channel will take place.
AUDIO BLANK - When highlighted, press the Cursor Right (+>) or Left (<-) buttons to turn the AUDIO BLANK con
trol ON (or OFF). When ON, no sound will be heard through the TV speakers when the channel is tuned. When OFF,
normal sound playback will be heard for the selected channel.
AUTO PROGRAM - When highlighted, press the Cursor Right (+>) or Left (<-) buttons to begin an automatic chan
nel search for all available received signal programs. Any channels found will be SAVED in the TV’s program memory.
8 ~
Page 9

PCW227S/C DFU
#3135-125-20861
04/12/02
How To Use The On-Screen Menu (Continued)
CABLE TUNING (OFF / ON) SETUP x CONSUMER x FEATURES MENU__
Your Philips television can be configured to operate in either Cable TV or broadcast / off-air tuning modes. In other
words, the TV must be configured depending upon whether a a Cable TV signal or a normal antenna signal is applied to
its 75-ohm ANT/CABLE plug.
With the Menu onscreen, press the Menu button repeatedly, or use the Cursor Up and Down buttons, to select CABLE
TUNING with the TV's highlight control bar. Press the Cursor Right or Left button on the remote to select ON if you
DO have Cable TV connected to the TV. Channels 1-125 may then be selected. Select OFF if you have an Antenna con
nected to the TV, and then only channels 2-69 may be selected. Press STATUS/EXIT to remove the on-screen menu.
BRIGHTNESS, COLOR, CONTRAST, SHARPNESS, TINT SETUP x CONSUMER x FEATURES MENU_
Use the cursor-up and cursor-down buttons to select the picture parameter you wish to adjust. Use cursor left (<-) and
cursor right (+>) to adjust the picture parameter.
NOISE REDUCTION (ON/OFF) SETUP x CONSUMER x FEATURES MENU_
This feature reduces video noise in the displayed picture. Effectively reduces noise while having maximum peaking in
the bright parts of the picture. Differs from reducing Sharpness (see Sharpness) in that noise is reduced, but picture
detail is preserved.
SOUND MODE (MONO / STEREO) SETUP x CONSUMER x
Use cursor left (<-) and cursor right (+>) to select monaural or stereo audio mode.
SAP (OFF / NO SAP / ON) SETUP x CONSUMER x FEATURES MENU__
Second Audio Program (SAP) is part of the stereo broadcast system. Sent as an additional audio channel SAP can be
heard apart from the current TV program sound. TV stations are free to use SAP for any number of purposes, but may
be used for foreign language translations of TV shows (or for weather and news bulletins). If a SAP signal is not pres
ent with a selected program the SAP option cannot be selected
AUDIO OUT (FIXED / VARIABLE) SETUP x CONSUMER x FEATURES MENU_
When the FIXED audio out option is selected, the left and right audio outputs are fixed at a nominal 0.5vrms signal
level, and are unaffected by the television’s volume control setting. When the VARIABLE audio out option is selected,
the left and right audio outputs are controlled by the television’s volume control setting, and variable between 0.2vrms
and 2vrms nominal signal levels.
BALANCE / TREBLE / BASS (
Use the cursor-up and cursor-down buttons to select the audio parameter you wish to adjust. Use cursor left (<-) and
cursor right (+>) to adjust the audio parameter.
INCREDIBLE STEREO (ON / OFF) SETUP x CONSUMER x FEATURES MENU_
Processes the left and right audio channels to achieve a perceived increase in channel separation and spatial effect. Use
cursor left (<-) and cursor right (+>) to turn this feature on and off.
------
1|||| nn) SETUP x CONSUMER x FEATURES MENU_
FEATURES MENU
AVL (ON / OFF) SETUP x CONSUMER x FEATURES MENU_
Automatic volume leveling restricts the volume variation of audio signals to a relatively small range by boosting low-
level signals and reducing louder signals, thus maintaining a consistent volume level. Use cursor left (<-) and cursor
right (+>) to turn this feature on and off.
Page 10

PCW227S/C DFU
#3135-125-20861
Notes
04/12/02
10
Page 11

PCW227S/C DFU
#3135-125-20861
04/12/02
How To Use The On-Screen Menu (Continued)
MIN VOLUME / MAX VOLUME* (VOL |{|||— nn) SETUP jc CONSUMER _ FEATURES MENU_
Applicable / available only to the Commercial Mode / setup menu. Limits the range throughout which the television’s
volume can be adjusted by a guest mode remote control, or by the television’s front panel keyboard (provided the front
panel keyboard has not been locked out, see KEYBOARD LOCK).
VOLUME BAR (ON / OFF) SETUP x CONSUMER x FEATURES MENU_
The Volume Bar feature, when set to ON, causes a volume change verification (VOL |||{||— nn, where nn equals some
muneric value between 0 - 63) to appear on-screen whenever the volume is adjusted
SWITCH ON VOLUME* (||||||-— 0 - 63 / STANDARD) SETUP x CONSUMER _ FEATURES MENU_
Applicable / available only to the Commercial Mode / setup menu. This feature determines the television’s volume when
ever it is first turned on. A value (0 - 63) can be specified, or default to the television’s volume when last turned off
(STANDARD).
POWER ON* (STANDARD / FORCED) SETUP x CONSUMER _ FEATURES MENU_
Applicable / available only to the Commercial Mode / setup menu. POWER ON FORCED means that the television will
automatically power-up whenever it is supplied with mains power. When POWER ON is set to FORCED, the television
will remain powered on long as mains power is applied, and cannot be turned off by a guest-mode remote, or by the
front panel keyboard (even if it is not locked out). POWER ON STANDARD means that the television will not auto
matically power-on when mains power is applied.
CHANNEL DISPLAY* (NUMBER / LABEL / ALL / NONE) SETUP x CONSUMER _ FEATURES MENU_
Applicable / available only to the Commercial Mode / setup menu. CHANNEL DISPLAY determines the chaimel infor
mation (NUMBER and / or LABEL), if any, that is displayed briefly whenever the channel is changed. Also see LABEL
in CHANNEL INSTALLATION. Also see REMINDER.
KEYBOARD LOCK* (ON / OFF) SETUP x CONSUMER _ FEATURES MENU_
Applicable / available only to the Commercial Mode / setup menu. When KEYBOARD LOCK is OFF, the television’s
front panel keyboard will be accessible, but only to the extent depending upon the MIN VOLUME, MAX VOLUME,
POWER ON, and CHANNEL INSTALLATION. KEYBOARD LOCK, when ON, completely disables the television’s
front panel keyboard (Power, Volume -, Volume +, Channel -, Channel +).
ESP* (OFF /1-99) SETUP x CONSUMER _ FEATURES MENU_
Applicable / available only to the Commercial Mode / setup menu. ESP (Energy Savings Programmability), if not OFF,
determines the number of hours (1 - 99) the television will remain powered on after the most recent front panel keyboard
or remote control command. NOTE: If POWER ON (see POWER ON STANDARD / FORCED) is set to FORCED,
ESP has no effect.
AUDIO / VIDEO MUTE (OFF / BLACK / BLUE) SETUP x CONSUMER jl FEATURES MENU_
AUDIO / VIDEO MUTE, also known as “A/V muting” eliminates annoying “static” and “snow” when no tuner or exter
nal signal is present. When set to BLACK or BLUE, sets the screen set to a solid black or blue display, respectively, and
forces audio to be muted, when no valid tuner / video signal is present at the selected source.
EXTERNAL AUD/VID OUT (OFF / ON) SETUP x CONSUMER x_ FEATURES MENU_
To enable the Monitor Out jacks on the rear jack panel, set EXTERNAL AUD/VID to ON. When the Monitor Out jacks
are enabled, they provide the currently-selected source (tuner or video). When EXTERNAL AUD/VID is set to OFF, no
signals will be present at the Monitor Out jacks.
* COMMERCIAL FEATURE
11
Page 12

PCW227S/C DFU
#3135-125-20861
04/12/02
How To Use The On-Screen Menu (Continued)
WELCOME MESSAGE’*^ (>) SETUP x CONSUMER _ FEATURES MENU_
Applicable / available only to the Commercial Mode / setup menu. The Welcome Message feature makes it possible for
an on-screen message to appear whenever the television is first turned on. The message will remain until any front-panel
keyboard command or remote control command is received. The Welcome Message sub-menu is shown below.
WELCOME MESSAGE
MESSAGE
LINE 1
LINE 2
CLEAR
EXIT
Use cursor-up and cursor-down to select the Welcome Message sub-menu item. While Line 1 or Line 2 of the Welcome
Message message is highlighted, use cursor-left and cursor-right to enter message-edit mode and position the cursor with
in the line of the message content. Use cursor-up and cursor-down to change the character at the current position. Press
RECALL on the Setup Remote to exit the editing mode and resume Welcome Message sub-menu item selection.
> NOTE: WELCOME MESSAGE, when ON, overrides CHANNEL GUIDE at power-on, if the latter has been enabled.
OFF / ON
(20 characters)
(20 characters)
CHANNEL GUIDE* (OFF / ON / POWER ON) SETUP x CONSUMER __ FEATURES MENU_
Applicable / available only to the Commercial Mode / setup menu. CHANNEL GUIDE provides an on-screen list of all
channels / inputs currently saved in the channel ring (see CHANNEL INSTALL) and their corresponding labels (see
CHANNEL INSTALL), for any channels / inputs for which labels have been assigned. When CHANNEL GUIDE is ON,
the channel guide appears when a remote control CH GDE command is received. When CHANNEL GUIDE is set to
POWER ON, the channel guide appears when the television is first powered on, as well as when a remote control CH
GDE command is received. When CHANNEL GUIDE is OFF, the channel guide never appears.
REMINDER* (OFF / ON) SETUP x CONSUMER _ FEATURES MENU__
The REMINDER feature, when ON, causes the television to constantly display the currently-tuned channel / input and/or
its label (if one has been assigned, see CHANNEL INSTALLATION) in the upper-left-hand comer of the screen. When
REMINDER is OFF, the channel number / label will only appear briefly immediately after channel / input is selected.
NOTE: The REMINDER feature is available in the television’s commercial-mode TV SETUP and CONSUMER menus.
3-DIGIT ENTRY* (OFF / ON) SETUP x CONSUMER _ FEATURES MENU_
Applicable / available only to the Commercial Mode / setup menu. Determines whether two or three remote-control digit
commands initiate a channel-tune command. When OFF, tuning will occur upon the reception of two remote-control digit
commands. When ON, tuning will occur upon the reception of three remote-control digit commands.
COMMERCIAL FEATURE
12
Page 13

PCW227S/C DFU
#3135-125-20861
04/12/02
A/CH A/V SWITCH* (OFF / ON) SETUP x CONSUMER _ FEATURES MENU_
Available in / applicable to Commercial Setup Menu / Commercial Mode. Alternate channel Audio / Video switching.
When A/CH A/V SWITCH is OFF, the remote-control A / CH (alternate channel) command causes the television to select
the channel / input that was selected just prior to the currently-selected one. When A/CH A/V SWITCH is ON, the
remote-control A / CH (alternate channel) command causes the television to successively switch between all A/V inputs
currently saved in the Channel Ring and the television’s most-recently-tuned RF channel.
CC (OFF / CC-1 / CC-2 / CC ON MUTE) SETUP x CONSUMER ^ FEATURES MENU_
This feature activates closed-captioning mode 1 or mode 2 when CC-1 or CC-2, respectively, is selected. When CC ON
MUTE is selected, CC-1 is activated when the television receives a remote-control MUTE command.
SAVE CC* (OFF / ON) SETUP jl CONSUMER _ FEATURES MENU__
Applicable / available only to the Commercial Mode / setup menu. When SAVE CC is OFF, the television will always
power-up with closed-captioning turned off. When SAVE CC is ON, the television “remembers” the most recently-
selected closed-captioning mode. In other words, the television will always power-up with closed-captioning set to the
mode to which it was last set.
V-CHIP MENU ITEM * (OFF / ON) SETUP jl CONSUMER __ FEATURES MENU_
Available in / applicable to Commercial Setup Menu / Commercial Mode. Determines whether the V-CHIP SETUP menu
item appears when the television is in COMMERCIAL MODE and is displaying the FEATURES MENU (see COM
MERCIAL MODE / FEATURES MENU).
SAVE V-CHIP (OFF / ON) SETUP jl CONSUMER _ FEATURES MENU_
Available in / applicable to Commercial Setup Menu / Commercial Mode. When SAVE V-CHIP is ON, the television
“remembers” the most recently-selected V-CHIP configuration. In other words, the television will power-up with VCHIP in the state in which it was last configured.
V-CHIP SETUP (>)
SETUP X CONSUMER x FEATURES MENU x
V-Chip setup menu.
SLEEPTIMER (OFF / 15 / 30 / 45 / 60 / 90 / 120 / 180 / 240) SETUP jl CONSUMER ^ FEATURES MENUjl
Determines the amount of time, in minutes, subsequent to the selection of the specified interval, that the television will
remain powered-on before automatically powering off.
SECURITY * (STANDARD / HIGH) SETUP jl CONSUMER _ FEATURES MENU_
Available in / applicable to Commercial Setup Menu / Commercial Mode. When SECURITY is set to STANDARD,
access to the television’s Commercial Setup Menu is possible with a guest-mode remote control, by means of the fol
lowing remote-control keystrokes: 3 1 9 7 5 3 MUTE.
! NOTE: The SECURITY item itself does not appear when the Commercial Setup Menu is invoked in this manner. This
feature, as with all Commercial Setup features, can only be changed with a Master Setup Remote.
COMMERCIAL FEATURE
13
Page 14
PCW227S/C DFU
#3135-125-20861
Jack Panels
04/12/02
Rear Jack Panel
ExtSpkr.
75 Q
0
Smart
Plug
Jack Panel Information
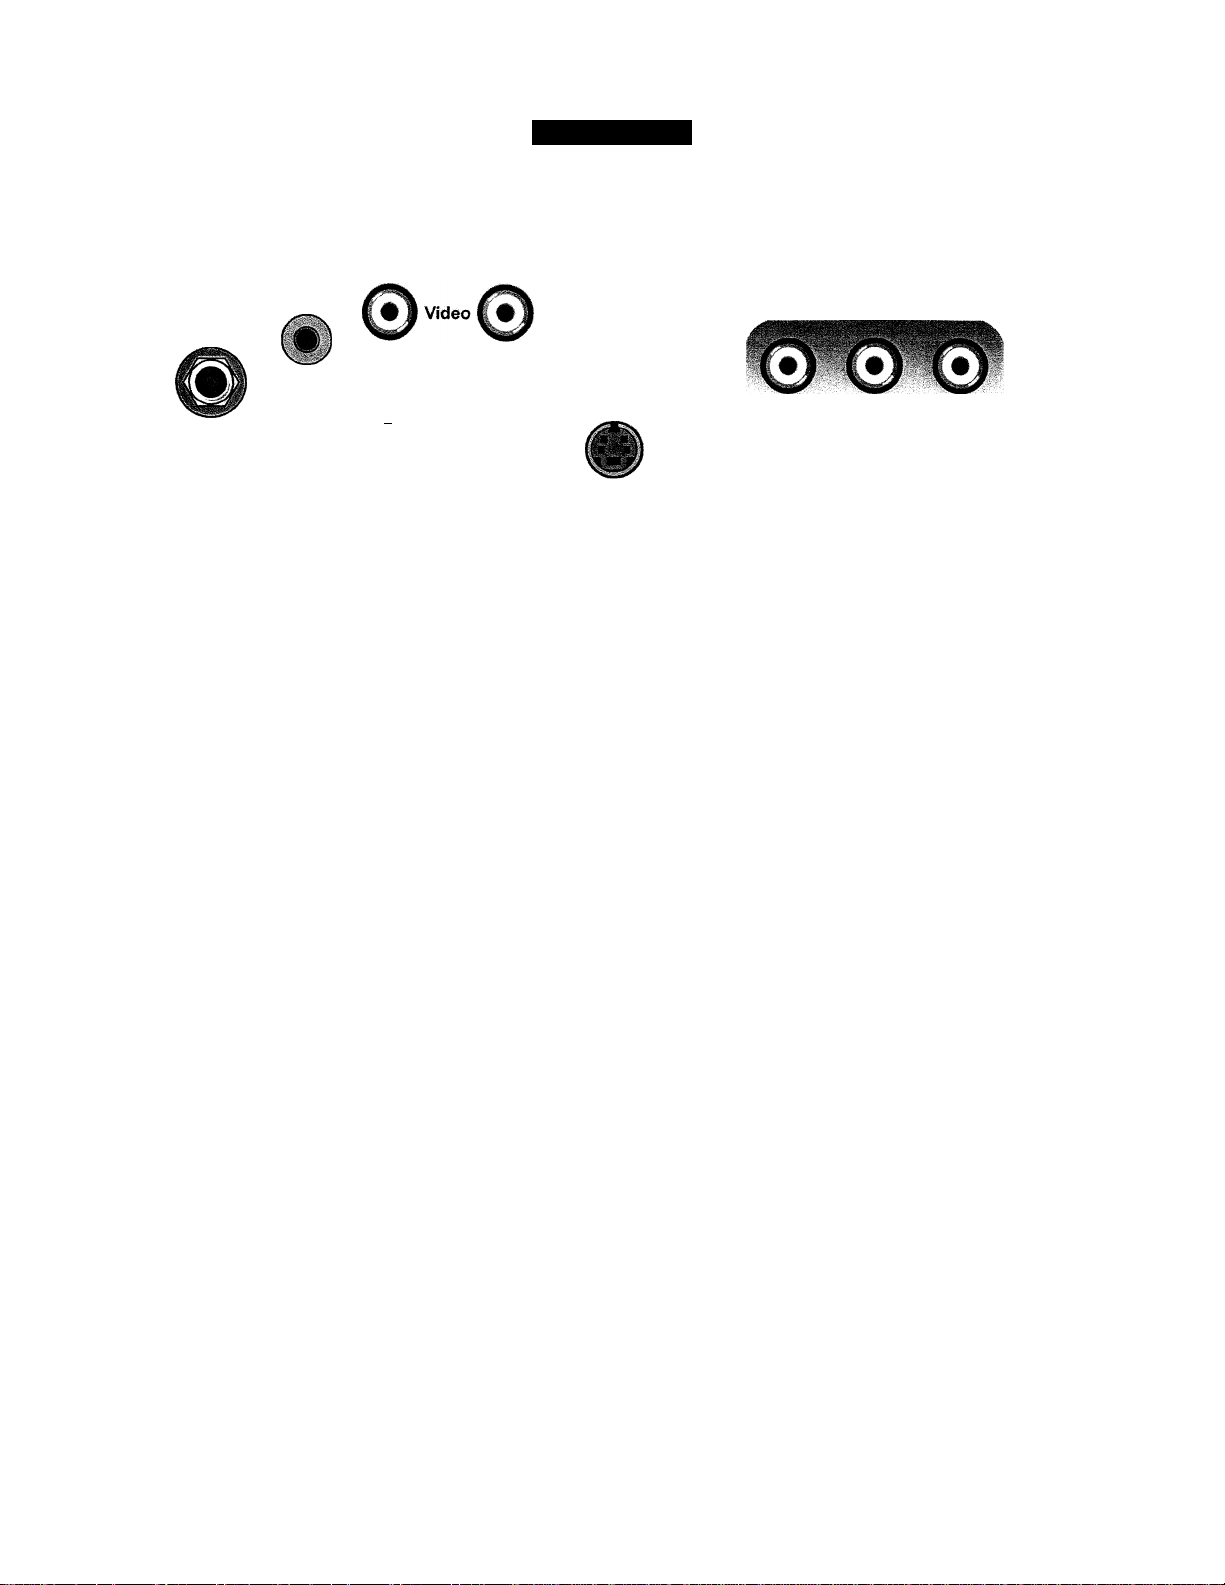
> The setting of the Commercial menu item EXT AUD/VID OUT determines whether or not signals will be
present at the rear jack panel’s Monitor Out jacks. If EXT AUD/VID OUT is set to OFF, no signals will be pres
ent at these jacks.
> The rear jack panel's left and right audio inputs are shared among all rear jack-panel external video inputs.
Thus, regardless of which rear jack-panel video input is selected (Video, S-Video), the audio signals present at
the audio inputs will be heard.
0" 0
_ Audio
Out
0
In
S-Video
Front Jack Panel
Video L Audio R
14
Page 15

PCW227S/C DFU
#3135-125-20861
04/12/02
LIMITED WARRANTY
COLOR TELEVISION
One Year Free Labor
One Year Free Service on Parts (Two Years Free Service on Color Picture Tube)
This product can be repaired in-home.
WHO IS COVERED?
You must have proof of purchase to receive warranty service. A
sales receipt or other document showing that you purchased the
product is considered proof of purchase.
WHAT IS COVERED?
Warranty coverage begins the day you buy your product. For
one year thereafter, all parts will be repaired or replaced, and
labor is free. From one to two years from the dav of purchase,
you pay for the replacement or repair of all parts except the pic
ture tube, and for all labor charges. After two years from the dav
of purchase, you pay for the replacement or repair of all parts,
and for all labor charges. All parts. Including repaired and
replaced parts, are covered only for the original warranty period.
When the warranty on the product expires, the warranty on all
replaced and repaired parts also expires.
WHAT IS EXCLUDED?
Your warranty does not cover:
• labor charges for installation or setup of the product, adjust
ment of customer controls on the product, and installation or
repair of antenna systems outside of the product.
• product repair and/or part replacement because of misuse,
accident, unauthorized repair or other cause not within the
control of Philips Consumer Electronics Company.
• reception problems caused by signal conditions or cable or
antenna systems outside the unit.
• a product that requires modification or adaptation to enable it
to operate in any country other than the country for which it
was designed, manufactured, approved and/or authorized, or
repair of products damaged by these modifications.
• incidental or consequential damages resulting from the prod
uct. (Some states do not allow the exclusion of incidental or
consequential damages, so the above exclusion may not
apply to you. This includes, but Is not limited to, prerecorded
material, whether copyrighted or not copyrighted.)
MAKE SURE YOU KEEP...
Please keep your sales receipt or other document showing proof
of purchase. Attach it to this owner’s manual and keep both
nearby. Also keep the original box and packing material in case
you need to return your product.
BEFORE REQUESTING SERVICE...
Please check your owner’s manual before requesting service.
Adjustments of the controls discussed there may save you a serv
ice call.
TO GET WARRANTY SERVICE IN U.S.A.,
PUERTO RICO OR U.S. VIRGIN ISLANDS...
Contact a Philips factory service center (see enclosed list) or
authorized service center to arrange repair.
(In U.S.A., Puerto Rico and U.S. Virgin Islands, all Implied war
ranties, including implied warranties of merchantability and fitness
for a particular purpose, are limited in duration to the duration of
this express warranty. But, because some states do not allow lim
itations on how long an implied warranty may last, this limitation
may not apply to you.)
TO GET WARRANTY SERVICE IN CANADA...
Please contact Philips at:
800-661-6162 (French Speaking) (within Canada only)
800-531-0039 (English Speaking)
(In Canada, this warranty is given in lieu of all other warranties.
No other warranties are expressed or Implied, Including any
implied warranties of merchantability or fitness for a particular
purpose. Philips is not liable under any circumstances for any
direct, indirect, special, incidental or consequential damages,
howsoever incurred, even if notified of the possibility of such
damages.)
WHERE IS SERVICE AVAILABLE?
Warranty service Is available in all countries where the product is
officially distributed by Philips Consumer Electronics Company.
In countries where Philips Consumer Electronics Company does
not distribute the product, the local Philips service organization
will attempt to provide service (although there may be a delay If
the appropriate spare parts and technical manual(s) are not read
ily available).
REMEMBER...
Please record the model and serial numbers found on the prod
uct below. Also, please fill out and mail your warranty registration
card promptly. It will be easier for us to notify you If necessary.
MODEL#
SERIAL#
__________________________________________________
15
Page 16

PCW227S/C DFU
Factory Default Settings
#3135-125-20861
04/12/02
INITIAL VOLUME SETTING (0 - 63)
AUX / S-VIDEO AVAILABLE
COMMERCIAL / CONSUMER
MONITOR-OUT JACKS
COMPONENT VIDEO IN
LANGUAGE (ENGLISH / FRANÇAIS / ESPAÑOL)
CHANNEL INSTALL (> ANY RINGS & ADD/DELETE)
PROPLUS SETUP (> EVENTS 1-7 ENABLED/DISABLED)
CABLE TUNING (ON / OFF)
BRIGHTNESS (0 - 63)
COLOR (0 - 63)
CONTRAST (0 - 63)
SHARPNESS (0 - 63)
TINT (-31 - +31)
NOISE REDUCTION (ON / OFF)
SOUND MODE (MONO / STEREO)
SAP
AUDIO OUT (FIXED/VARIABLE)
BALANCE (-31 - +31)
TREBLE (0 - 63)
BASS (0 - 63)
INCREDIBLE STEREO (ON / OFF)
AVL (OFF / ON)
VOLUME BAR (OFF / ON)
MIN VOLUME (0 - 63)
MAX VOLUME (0 - 63)
SWITCH ON VOLUME (STANDARD / 0 - 63) STANDARD
SWITCH ON CHANNEL (STD/FRONT/AUX/TV1-TV125) STANDARD
POWER ON (STANDARD / FORCED) STANDARD
CHANNEL DISPLAY (NONE / NUMBER / LABEL / ALL) ALL
KEYBOARD LOCK (ON / OFF)
ESP (OFF /1-99) OFF
A/V MUTE (OFF / BLACK / BLUE)
EXT AUD / VID OUT ON
WELCOME MESSAGE (> MESSAGE ON/OFF)
CHANNEL GUIDE (OFF / ON / POWER ON) OFF
REMINDER (OFF / ON) OFF
THREE DIGIT ENTRY (OFF/ON) OFF
A/CH A/V SWITCH (ON / OFF)
CC (OFF / CC-1 / CC-2 / CC ON MUTE / OFF) OFF
SAVE CC (OFF / ON) OFF
V-CHIP MENU ITEM (OFF / ON) OFF
SAVE V-CHIP (OFF / ON)
V-CHIP SETUP (>MASTER DISABLE OFF/ON) OFF
SLEEPTIMER (OFF/15-240)
SECURITY (STANDARD / HIGH) STANDARD
15
OFF
COMMERCIAL
YES
YES
ENGLISH
2-13
n/a
ON
28
22
57
25
0
OFF
STEREO
X
VARIABLE
0
31
31
OFF
OFF
OFF
0
63
OFF
OFF
OFF
ALT/CH
OFF
OFF
16
Page 17
PCW227S/C DFU #3135-125-20861 04/12/02
Dimension Drawings
PCW227S/C
17
Page 18

PCW227S/C DFU
#3135-125-20861
Index
04/12/02
3-DIGIT ENTRY
A/CH AN SWITCH
AUDIO BLANK.........................................................................8
AUDIO OUT (FIXED / VARIABLE)
AUDIO/VIDEO MUTE............................................................11
AUTO PROGRAM....................................................................8
AVL...........................................................................................9
BALANCE / TREBLE /BASS
BRIGHTNESS. COLOR. ETC
CABLE TUNING
CC..........................................................................................13
CHANGING OPERATIONAL MODES....................................4
CHANNEL DISPLAY
CHANNEL GUIDE.................................................................12
CHANNEL INSTALL...............................................................8
CHANNEL RING
COMMERCIAL MODE.............................................................4
CONSUMER & COMMERCIAL MODES
CONSUMER MODE
DCM.........................................................................................4
DIMENSION DRAWINGS
ESP
.......................................................................................
EXTERNAL AUD / VID OUT
FACTORY DEFAULT SETTINGS
FRONT PANEL CONTROLS..................................................7
GUEST MODE REMOTE
IDENTIFYING THE OPERATIONAL MODE
INCREDIBLE STEREO...........................................................9
INPUT
......................................................................................
INTRODUCTION
ITV MENU ITEMS....................................................................6
JACK PANELS......................................................................14
KEYBOARD LOCK...............................................................11
LABEL.....................................................................................8
LIMITED WARRANTY
LOCK-OUT. KEYBOARD
MENU ITEMS. COMMERCIAL & CONSUMER
MIN VOLUME/ MAX VOLUME.............................................11
NOISE REDUCTION...............................................................9
OPERATIONAL MODE, CHANGING.....................................4-5
.....................................................................
.................................................................
.........................................
..................................................
.................................................
......................................................................
............................................................
.....................................................................
................................
................................................................
.....................................................
................................................
........................................
........................................................
..........................
.....................................................................
..........................................................
....................................................
...................
12
13-PB 13
11
17
11
11
16
15
11
.6
OPERATIONAL MODE, IDENTIFYING...................................4
PHILIPS INSTITUTIONAL TVSOFTWARE.............................4
POWER ON* (STANDARD / FORCED)................................11
9
9
9
9
8
6
4
4
4
8
4
RC2524BK GUEST REMOTE
RC2573 ....................................................................................5
REMINDER............................................................................................3, 6, 11-12
RG4172BK SETUP REMOTE
RL9820B GUEST REMOTE
SAFETY / PRECAUTIONS
SAP...........................................................................................9
SAVE CC................................................................................13
SAVE V-CHIP.........................................................................13
SECURITY (STANDARD / HIGH)
SETTINGS, FACTORY DEFAULT
SETUP, ACCESS TO WITHOUT SETUP REMOTE . 13
SLEEPTIMER.........................................................................13
SOUND MODE (MONO / STEREO)
STATUS....................................................................................4
SWITCH ON VOLUME
V-CHIP MENU ITEM
V-CHIP SETUP.......................................................................13
VIDEO BLANK.........................................................................8
VOLUME BAR
WELCOME MESSAGE..........................................................12
..............................................................
.......................................................................
.................................................
..................................................
....................................................
.....................................................
............................................
........................................
........................................
..........................................................
5
4-7
5
3
6. 13, 16
16
9
11
13
11
18
 Loading...