

Philips PCVC740K99 User Manual

Contents
1 Introduction................................................................................................................... 2
2 Preparation .................................................................................................................... 3
3 Camera and software installation.............................................................................. 6
4 Using the applications................................................................................................. 8
5 Settings........................................................................................................................... 9
6 TWAIN applications ................................................................................................. 15
7 Tips and Frequently Asked Questions (FAQs) .................................................... 18
8 Technical specifications............................................................................................ 24
9 Regulations, Warnings & Maintenance................................................................. 27
10 Glossary..................................................................................................................... 28
All brand names and trademarks acknowledged.
Copyright © 2001 Philips Components BV
Please visit www.philips.com/pcstuff
for new or updated information
All data subject to change without notice.
1

1 Introduction
Brilliant images and blazing colours. That's what you get with the Philips USB PC Camera. Forget
about installing grabber cards and separate power supplies. You don't need them. Power is
supplied direct to the camera through the USB cable and the camera returns audio and video
straight to your PC!
The USB PC Camera has several unique features:
• The universal camera base supports both free-standing and hanging use (for laptops),
with perch included for stable footing on top of your monitor. It also features a 1/4" UNC
screw thread for tripod mounting
• Voice-controlled snapshot: Say 'Cheese!' into the built-in camera microphone or use the
snapshot button on top of the camera to take a picture
• Full Auto mode automatically optimizes your camera settings for you
• Option for high quality, full motion video at high frame rates (see Technical
Specifications for details)
• Full Plug & Play use of the USB port
• High resolution streaming video images (see Technical Specifications for details)
• Detailed still images in even higher resolutions (see Technical Specifications for
details)
• Several top-of-the-line software packages included on CD-ROM, so you can start using
the camera straightaway
Congratulations on purchasing the Philips USB PC Camera. This new digital camera is the most
advanced means of recording high quality movies or still pictures quickly and easily on your PC or
laptop computer. After installation, the new camera can be used for all sorts of applications, such
as:
• Video e-mail / Video capture: Create your own video presentations, video mail, product
demonstrations, training videos, Internet clips, etc.
• Webcam / web album: Show yourself on the web. Be out there for everyone to see...
• Snapshot images: Use images in presentations, create postcards, or send them via e-
mail or on diskette. The camera works with any application that uses the TWAIN or WIA
interface to capture images.
• Video Games: Amazing gaming interaction using your camera as a game controller.
• Video conferencing: Use the camera for network video conferencing or Internet video
conferencing.
• Editing and special effects: After recording the images with the Philips USB PC
Camera, they can easily be edited using image or video editing programs.
The following sections of this manual give a step-by-step description of the installation process
and explain how to use the USB PC Camera.
Visit our website at www.philips.com/pcstuff for new or updated information.
2

2 Preparation
This section describes how to install the hardware and software and how to get started in a few
easy steps.
2.1 Getting started in five easy steps
The best way to quick results is as follows:
1. Unpack the box.
2. Unplug all your USB devices (except USB keyboard and USB mouse) before you start.
3. Place the Philips installation CD-ROM in your CD-ROM player, let the Philips installation
4. Start the central camera application VLounge using its icon on your desktop.
5. Have fun!
2.2 Contents of the box
Check that the box contains the following items:
program install the driver software and the application software, and connect the camera
to the USB port (marked with the USB-logo:
program.
) when requested by the installation
• The Philips USB PC Camera;
• Base to support the camera on (including monitor perch);
• PCVC740K only! : A pouch for easy transportation of the camera and its base;
• A CD-ROM containing the Philips installation software, application software packages
and electronic software manuals.
Contact your supplier immediately if any item is missing.
3
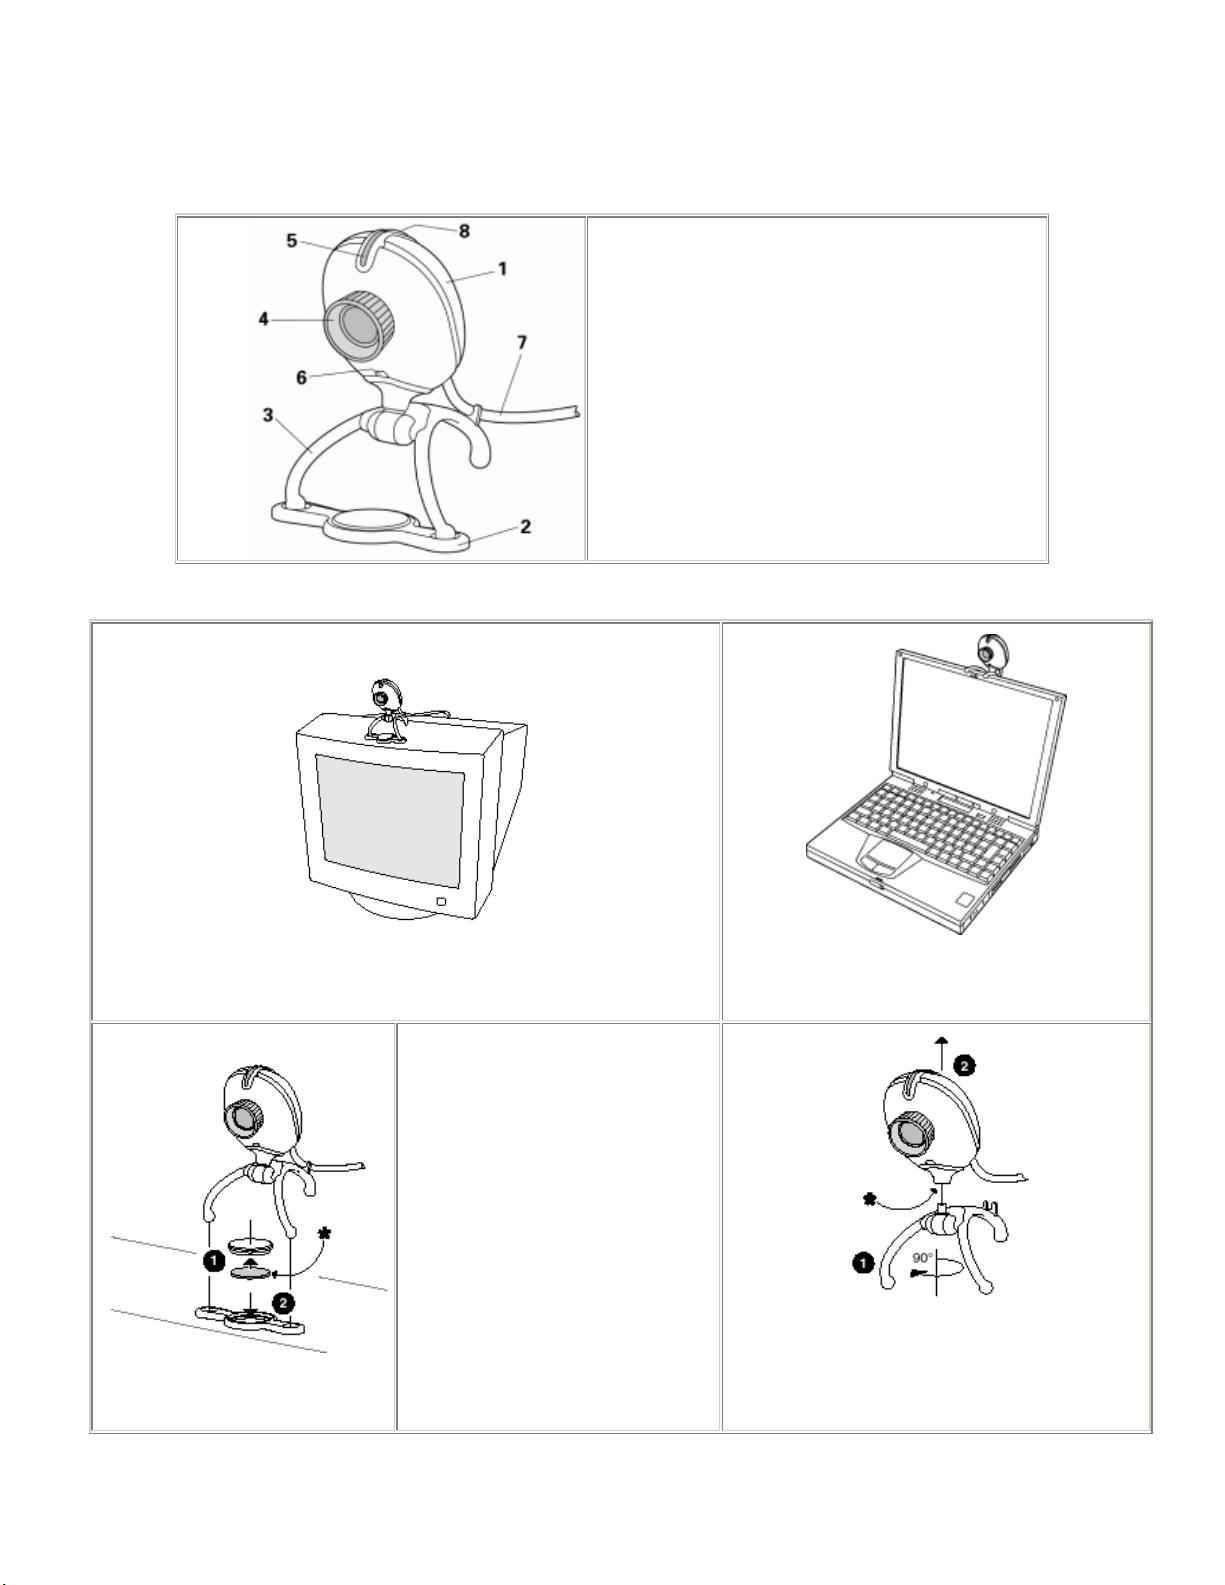
2.3 Parts of the camera
1. Camera
2. Perch (See below for instructions)
3. Base
4.
5. Indicator LED (on, off, flashing)
6.
7.
8.
2.4 Use of the camera base and the perch
Lens ring (turn to focus image)
Microphone
USB cable
Snapshot button
Place the camera on top of the monitor, or on a desk...
« How to mount the perch:
(Ensure that the supporting surface
is free of grease and dirt.)
Remove backing from
1.
* = Sticky tape
adhesive tape.
Place perch on top of
2.
monitor.
Push disc with adhesive
3.
tape down through central
perch hole.
4
or suspend the camera from your laptop
screen!
The camera base can be removed by turning it
through 90 degrees (1) and pulling it down out
of the camera (2).
* The camera features a 1/4" UNC screw
thread for tripod mounting.
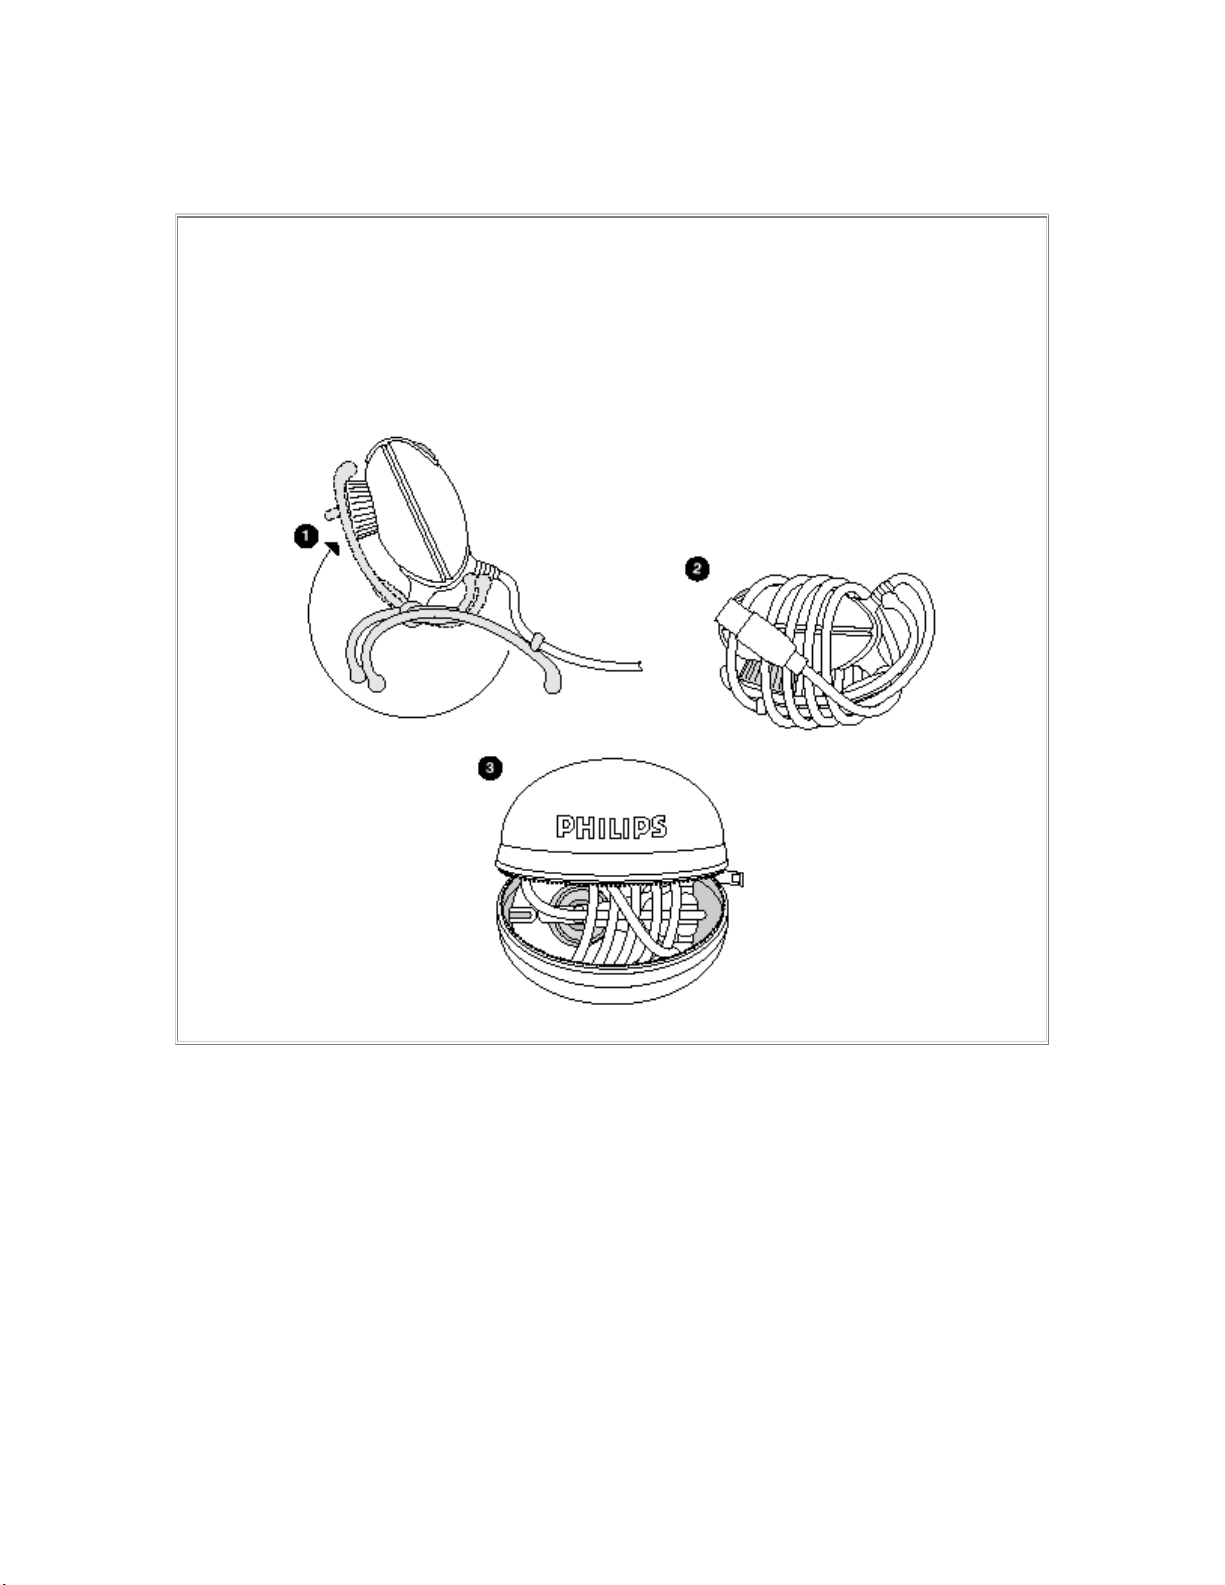
2.5 Use of the camera pouch
If you have purchased the PCVC740K, you will find a convenient carrying pouch included
with the packaging. This is used as follows:
1.
Fold camera base by rotating it along its length.
Run USB cable along camera, then wind cable around the camera.
2.
3. Place camera in pouch sideways to ensure best fit.
Using the pouch
5

3 Camera and software installation
In order to maximize the video and audio performance offered by your camera, we have included
a Philips installation program on CD-ROM. Please follow the directions for the camera installation
exactly, and make sure that you have your Windows CD-ROM to hand.
1. ! Unplug all your USB devices (except USB keyboard and USB mouse) before you
start.
! Do not plug in your USB camera yet.
! Please follow the instructions as they appear on the screen.
! You will have to restart your computer after installing new components.
2. Insert the Philips installation CD-ROM into the CD-ROM drive.
Setup should start automatically. If this does not happen: double-click the 'My Computer'
3.
icon in the top left corner of the screen (for Windows®XP: in the Start menu), then
double-click the 'ToUcam' icon and double-click 'Setup.exe' to start installation.
4. Let the Philips installation program guide you through the setup procedure. Mark the
different components you want to install (including the applications). You can always rerun this setup at a later time to add components to your installation or to re-install the
camera drivers.
When asked for the Windows CD-ROM, insert it into the drive and click 'OK'. Exit the
5.
Windows Setup screen if it appears.
After copying the camera software and the application software to your hard disk, the
6.
installation program will install the selected applications and then launch the camera
configuration program VCheck to install the camera drivers.
6

VCheck will ask you to connect the camera to the USB port at the appropriate time.
A test will then be performed. This test window confirms correct installation by showing
you the first 'live' pictures and audio from your USB PC Camera. Adjust the microphone
volume by moving the slider.
VCheck also gives tips for maximizing the camera's performance.
Exit VCheck. Restart your computer. You should now have:
7.
- Program Group called 'Philips ToUcam Camera' in the Windows Start menu.
- A camera settings icon
- A VLounge icon
Windows 2000 and XP.)
- A VLounge icon
- Installed applications, as selected by the user during the installation procedure.
on the Windows QuickLaunch menu on the taskbar. (Not on
on the desktop.
on the taskbar. (VProperty)
8. Plug in any USB devices that were disconnected during the first step of the installation.
You are now ready to start working with your Philips USB Camera. Go to the central camera
application VLounge
and... Have fun!
7

4 Using the applications
This section gives a brief description of how to use the video software packages included
on the CD-ROM. If you have not yet installed these applications, please read 'Camera and
software installation' for installation instructions.
4.1 General
VLounge is the central application for easy access to your Philips USB PC Camera and the video
applications installed during setup, together with access to one application of your choice. You
can start VLounge using the Windows QuickLaunch menu on the taskbar, through the program
group 'Philips ToUcam Camera', or by double-clicking the VLounge icon
The buttons to the right in the VLounge windows will start the applications. If you did not install all
the applications, some of these buttons will be greyed out and will not activate when the cursor
moves over them, indicating that the application is not available. Please re-run the Philips 'Setup'
installation program from the CD-ROM to install any missing applications.
The other buttons and the menus offer access to other useful camera options.
on the desktop.
Where to get help on the applications
For detailed information about the use of the software packages, please read the accompanying
information for the relevant software. Each software package usually creates its own program
group in the Windows Start menu, which is activated by clicking on the Windows Start button.
These program groups contain the application program icon and other items (Help files,
Electronic Manuals, Uninstall Wizards, Readme files, etc.) for the specific software package. All
available information is accessible via the software's program group, or through the Help options
within the program.
8
5 Settings
The camera properties (audio and video) can be changed from within an application, or
independently by clicking the VProperty icon
Windows taskbar at the bottom of your screen. Most applications can show a 'live preview' video
image on your monitor. Always use this option to see the effect of changed settings on your
screen. NOTE: Windows®XP may hide inactive icons. Hidden icons can be displayed by clicking
the Unhide button on the taskbar.
which can be found in the right hand part of the
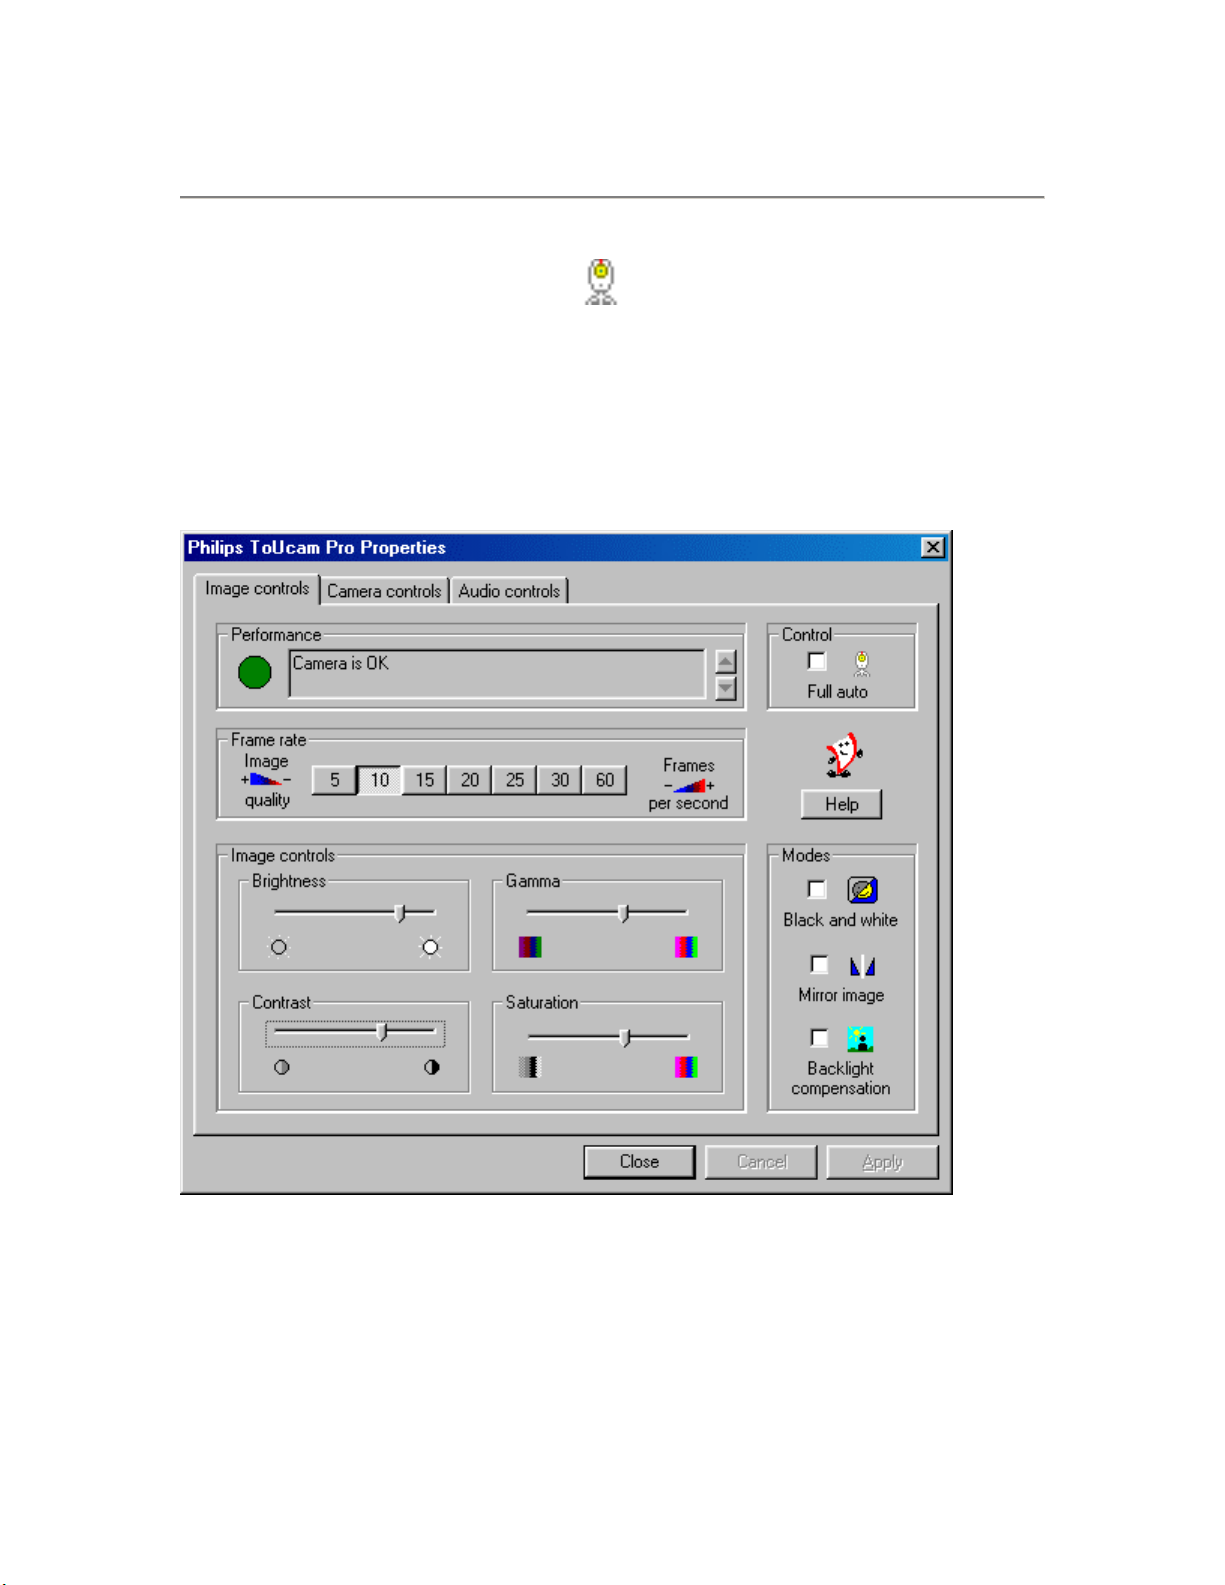
5.1 Image Controls
The first property tab is marked 'Image Controls'.
Performance
This text box is used to inform the user about camera settings, problems or special
circumstances. Important messages will show a flashing icon. The same icon also appears in the
'Camera controls' tab to indicate that an important message is displayed in the Performance text
box.
9
 Loading...