

Page 1
1 Introduction...................................................................................................................... 2
2 Preparation ....................................................................................................................... 3
3 Camera and software installation..................................................................................... 5
4 Using the applications...................................................................................................... 7
5 Settings............................................................................................................................. 8
6 TWAIN applications...................................................................................................... 14
7 Tips and Frequently Asked Questions (FAQs).............................................................. 17
8 Technical specifications................................................................................................. 22
9 Regulations, Warnings & Maintenance ......................................................................... 24
All brand names and trademarks acknowledged.
Copyright © 2001 Philips Components BV
All data subject to change without notice.
1
Page 2

1 Introduction
Brilliant images and blazing colours. That's what you get with the Philips USB PC Camera. Forget
about installing grabber cards and separate power supplies. You don't need them. Power is
supplied direct to the camera through the USB cable and the camera returns audio and video
straight to your PC!
This USB PC Camera has several unique features:
• The universal camera base supports both free-standing and hanging use (for laptops),
with perch included for stable footing on top of your monitor. It also features a 1/4" UNC
screw thread for tripod mounting
• Voice-controlled snapshot: Say 'Cheese!' into the built-in camera microphone or use the
snapshot button on top of the camera to take a picture
• Full Auto mode automatically optimizes your camera settings for you
• Option for high frame rates, up to 30 fps
• Full Plug & Play use of the USB port
• Video images in CIF resolution of 352x288 pixels, ideally suited for communication over
the Internet
• Detailed still images in resolutions of up to 640x480 pixels
• Several top-of-the-line software packages included on CD-ROM, so you can start using
the camera straightaway
Congratulations on purchasing the Philips USB PC Camera. This new digital camera is the most
advanced means of recording high quality movies or still pictures quickly and easily on your PC or
laptop computer. After installation, the new camera can be used for all sorts of applications, such
as:
• Video e-mail / Video capture: Create your own video presentations, video mail, product
demonstrations, training videos, Internet clips etc.
• Webcam / web album: Show yourself on the web. Be out there for everybody to enjoy...
• Snapshot images: Use images in presentations, create postcards, or send them via e-
mail or on diskette. The camera works with all applications that use the TWAIN interface
to acquire an image.
• Video Games: Amazing gaming interaction using your camera as a game controller.
• Video conferencing: Use the camera for network video conferencing or Internet video
conferencing.
• Editing and special effects: After recording the images you want with the Philips USB
PC Camera, the images can be easily edited using image or video editing programs.
The next sections of this manual give a step-by-step description of the installation process and
explain how to use the USB PC Camera.
2
Page 3
2 Preparation
This section describes how to install the hardware and software and how to get started in a few
easy steps.
2.1 Contents of the box
Check that the box contains the following items:
• The Philips USB PC Camera;
• Base to support the camera on (including monitor perch);
• A CD-ROM containing the Philips installation software, application software packages
The CD-ROM package contains a Quick Install Guide.
Contact your supplier immediately if any item is missing.
2.2 Getting started in five easy steps
The best way to quick results is as follows:
and electronic software manuals.
1. Unpack the box.
2. Unplug all your USB devices (except USB keyboard or USB mouse) before you start.
3. Place the Philips installation CD-ROM in your CD-ROM player, let the Philips installation
program install the driver software and the application software, and connect the camera
to the USB port (marked with the USB-logo:
program.
) when asked by the installation
4. Start the central camera application VLounge using its icon on your desktop.
Have fun !
5.
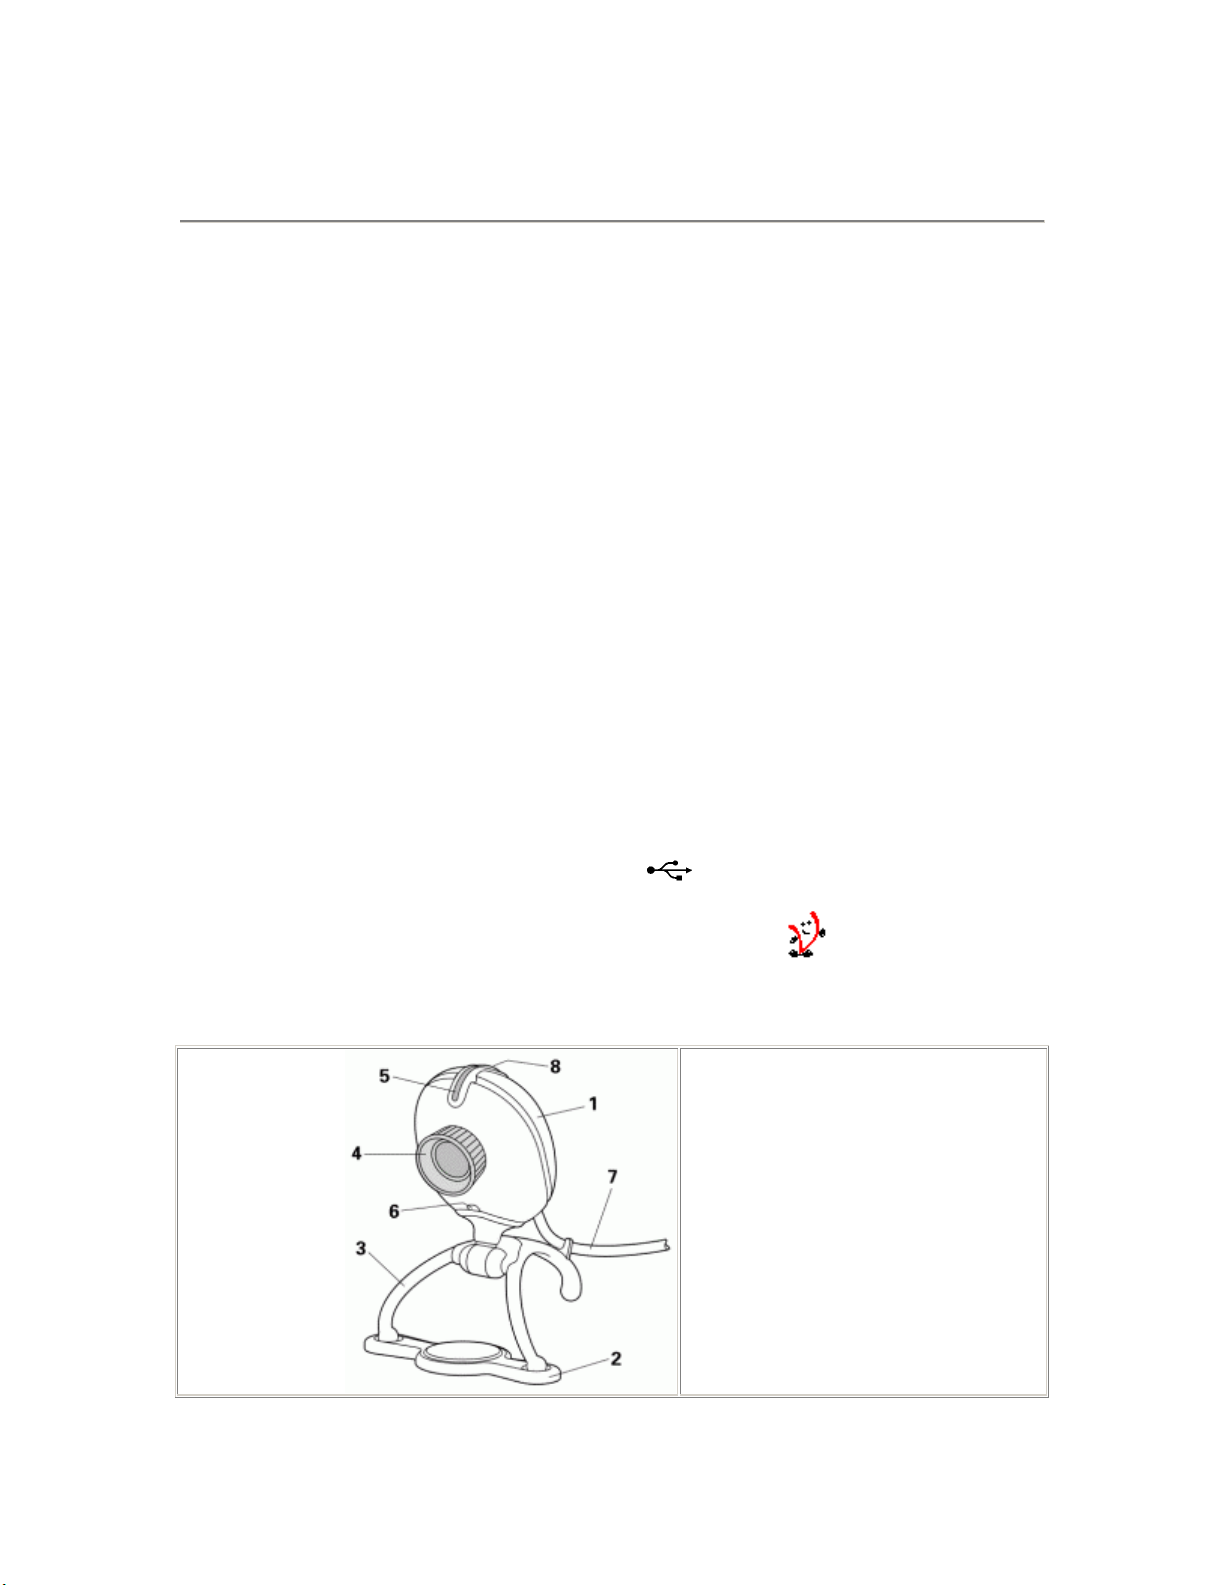
2.3 Camera parts, and use of the camera base, perch and pouch
1. Camera
2. Perch (See below for
instructions)
Base
3.
4.
Lens ring (turn to focus the
image)
Indicator LED (on, off, flashing)
5.
6.
Microphone
USB cable
7.
8. Snapshot button
3
Page 4

Put the camera on top of the monitor, or on a table or
desk...
«How to mount the
dirt.)
* = Sticky tape
perch:
(Ensure that the
supporting surface is
free of grease and
Remove
1.
backing from
adhesive tape.
2. Place perch on
top of monitor.
3. Push disc with
adhesive tape
down through
central perch
hole.
or suspend the camera from your laptop
screen !
The camera base can be removed by
turning it through 90 degrees (1) and
pulling it down out of the camera (2).
* The camera features a 1/4" UNC
screw thread for tripod mounting.
4
Page 5

3 Camera and software installation
In order to maximize the video and audio performance offered by your camera, we have included
a Philips installation program on CD-ROM. Please follow these directions for the camera
installation exactly, and make sure that you have your Windows CD-ROM to hand.
1. Unplug all your USB devices (except USB keyboard or USB mouse) before you
start. Do not plug in your USB camera yet. Please follow the instructions as they
appear on your screen. You will have to restart your computer after installing new
components.
2. Insert the Philips installation CD-ROM into the CD-ROM drive.
3. The installation program should start automatically. If not, click the Windows 'Start'
button, then click 'Run', and type: 'X:\Setup.exe', where X stands for the drive name of
your CD-ROM drive.
Let the Philips installation program guide you through the setup procedure. Mark the
4.
different components you want to install (including the applications). You can always rerun this setup at a later time to add components to your installation or to re-install the
camera drivers.
5.
When asked for the Windows CD-ROM, insert it into the drive and click 'OK'. Exit the
Windows Setup screen if it appears.
After copying the camera software and the application software to your hard disk, the
6.
installation program will install the selected applications and then launch the camera
configuration program VCheck to install the camera drivers.
5
Page 6
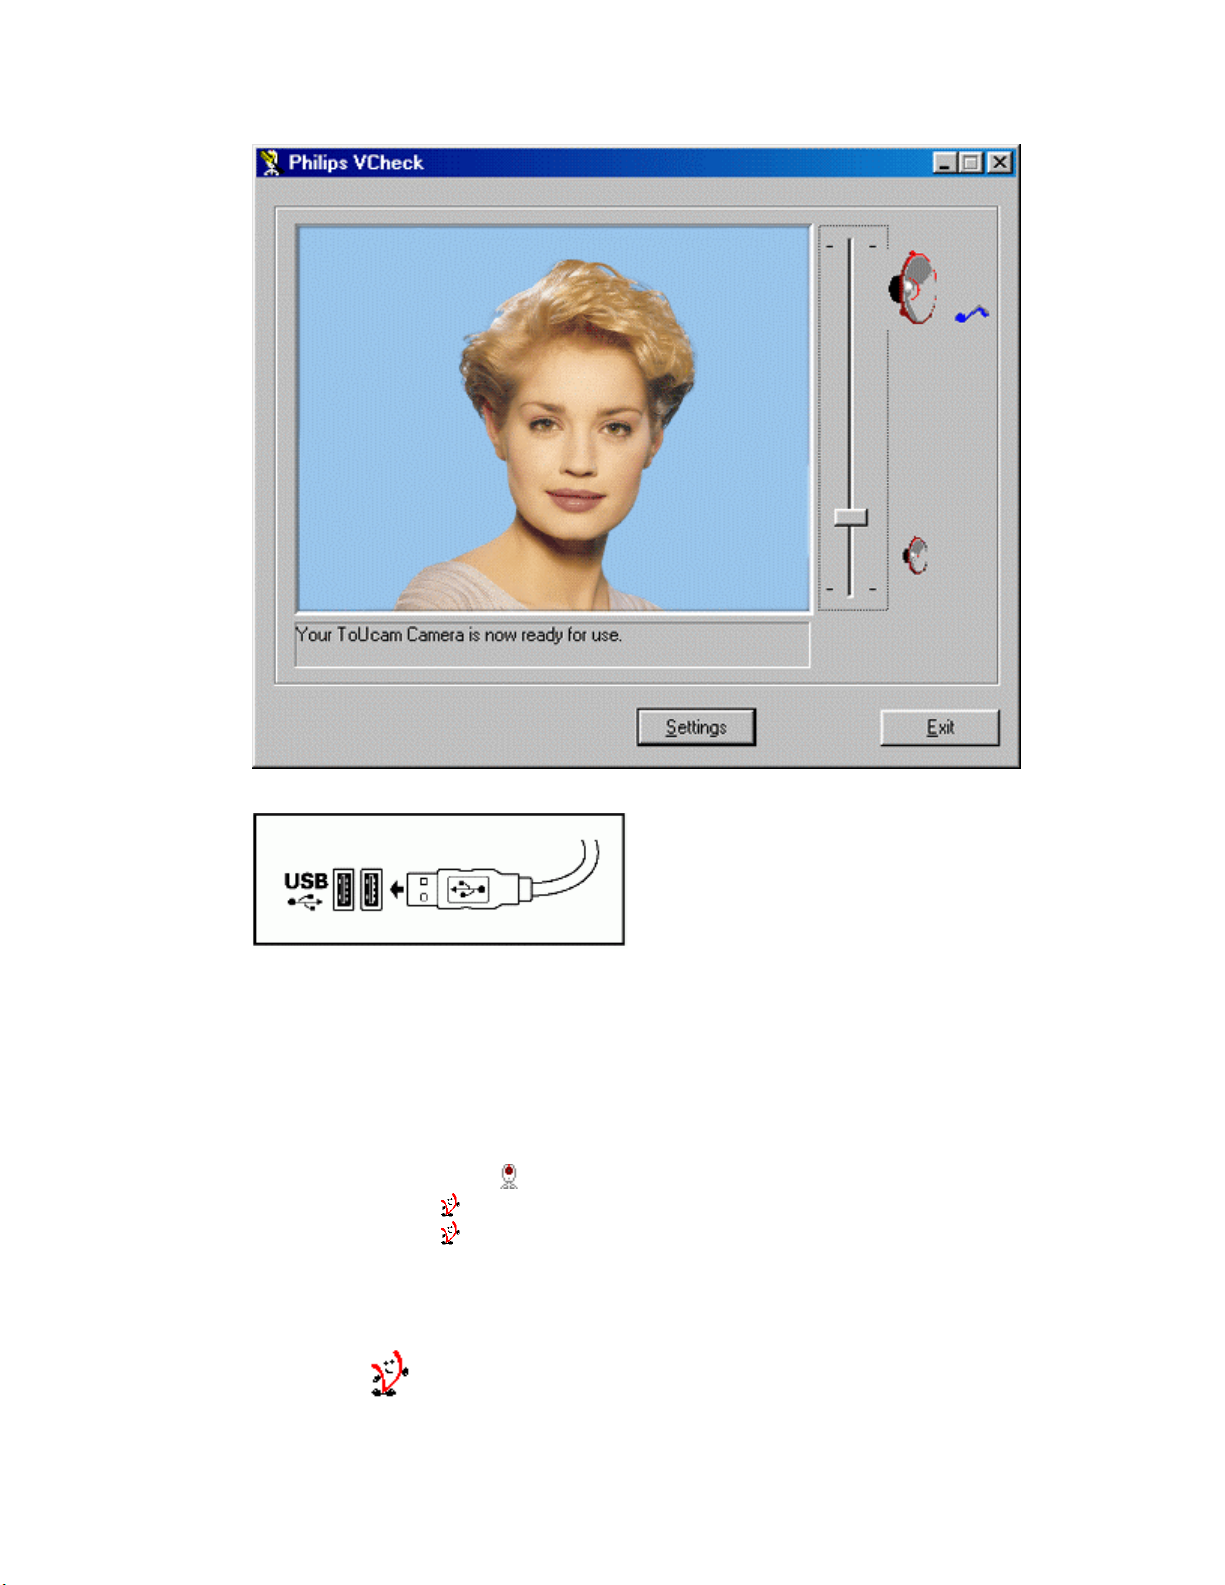
VCheck will ask you to connect the camera to the USB port at the appropriate time.
A test will then beperformed. This test window confirms the correct installation by
showing you the first 'live' pictures and audio from your USB PC Camera. Adjust the
microphone volume by moving the slider. The camera settings can be shown by clicking
the 'Settings' button.
VCheck also gives tips for maximizing the camera's performance.
7. Exit VCheck. You should now have:
- Program Group called 'Philips ToUcam Camera' in your Windows Start menu.
- One camera settings icon on your taskbar. (VProperty)
- One VLounge icon
- One VLounge icon
- Installed applications, as selected by the user during this installation procedure.
Plug in any USB devices you might have disconnected at the first step of the installation.
8.
You are now ready to start working with your Philips USB Camera. Go to the central camera
application VLounge
on the Windows QuickLaunch menu on your taskbar.
on your desktop.
and... Have fun!
6
Page 7

4 Using the applications
This section gives a brief description of how to use the video software packages included
on CD-ROM. If you haven't installed these applications yet, please read 'Camera and
software installation' for installation instructions.
4.1 General
VLounge is the central application for easy access to your Philips USB PC Camera and all video
applications installed during setup, together with access to one application of your choice. You
can start VLounge using the Windows QuickLaunch menu on your taskbar, through the program
group 'Philips ToUcam Camera', or by double-clicking the VLounge icon
The buttons to the right in the VLounge windows will start the applications. If you did not install all
of the applications, some of these buttons will be greyed out and will not activate when the cursor
moves over them, indicating that the application is not available. Please re-run the Philips
installation program 'Setup' from the CD-ROM to install any missing applications.
The other buttons and the menus offer access to other useful camera options.
on the desktop.
Where to get help on the applications?
For detailed information about the use of these software packages, please read the information
accompanying the individual software packages. Each software package usually creates its own
program group in the Windows Start Menu which is activated by clicking on the Windows Start
button. These program groups contain the application program icon and other items (Help files,
Electronic Manuals, Uninstall Wizards, Readme files, etc.) for that specific software package. All
available information is usually accessible via the software's program group, or through the Help
options within the program.
7
Page 8

5 Settings
The camera properties (audio and video) can be changed from within an application, or
independently by clicking the VProperty icon
Windows taskbar at the bottom of your screen. Most applications can show a 'live preview' video
image on your monitor. Always use this option to see the effect of changed settings on your
screen.
5.1 Image Controls
The first property tab is marked 'Image Controls'.
which can be found in the right hand part of the
Performance
This text box is used to inform the user about camera settings, problems or special
circumstances. Important messages will show a flashing icon. The same icon also appears in the
'Camera controls' tab to indicate that an important message is displayed in the Performance text
box.
8
Page 9

Control: Full Auto on/off
This Full Auto mode provides a very easy way to get the best out of your camera. Or you can
choose to have maximum manual control over the camera settings by switching the Full Auto
mode off. Full Auto 'on' is the preferred setting for normal use.
Functions activated in Full Auto mode are:
- Automatic exposure control and automatic white balance control, to provide the best video
source signal possible.
- Dynamic Noise Reduction (DNR) and automatic frame rate selection for improved camera
sensitivity in low light conditions.
Frame rate
The frame rate setting determines the number of images per second in the video stream.
The set of frame rates from which the user can choose depends on the currently selected video
format (resolution) and the available bandwidth on the USB bus (the number of devices
connected to your USB port and the amount of data they transport). The buttons for invalid frame
rates will be greyed out automatically and cannot be selected. To enable higher frame rates
choose a smaller video image format in your application. Applications will usually offer resolution
switching (image format setting) under menu items within the applications themselves.
Image Controls
Here you will find the slider controls for brightness, contrast, gamma correction and saturation.
Note that the contrast control is only available when the Auto Exposure setting is enabled on the
other tab (marked Camera controls).
Modes
The checkbox 'Black and white' is used to switch from colour images to black & white and back.
By clicking the checkbox 'Mirror Image', the image flips horizontally. This feature can be applied
in order to use the camera and monitor as a mirror, or for taking pictures of mirrored images.
Turn on the backlight compensation to improve the image quality when you have a scene
where the background has a high illumination level (for instance when you are sitting in front of a
bright light). Note that the backlight compensation option is only available when the Auto
Exposure setting is enabled on the other tab.
9
Page 10

5.2 Camera Controls
The next tab is marked 'Camera Controls'.
White Balance
In Auto mode the camera automatically controls the different colour components in the picture to
obtain the most natural colour reproduction. This setting is the preferred setting for normal use.
Switch off the automatic white balance control to enable Manual control. The current colour
setting will remain frozen and will not be influenced by the camera's internal controls. Put the
white balance setting in Manual mode when you have a colourful scene and stable lighting
conditions.
Indoor / FL / Outdoor: These settings compensate for the specific colour spectrum of these types
of lighting. However, these compensations are fixed, so under changing lighting conditions it is
better to use the Auto setting. Use the 'Red' and 'Blue' sliders to control the white balance
manually referencing to a fixed green setting.
Exposure
The exposure setting determines the amount of light that will fall onto the video sensor chip by
controlling the gain and shutter speed.
In Auto exposure mode the camera automatically adjusts the gain and shutter speed.
10
Page 11

In manual mode (no check mark in the Auto checkbox) you can control the gain and shutter
speed settings manually. The manual exposure mode disables the controls for contrast and
backlight compensation in the other property tab (marked Image Controls) and the flickerless
control in this tab.
Defaults
If you like a particular setting for particular lighting conditions, you can use the Save and Restore
buttons to save and restore this preferred setting. Should you wish to restore all standard
settings, then click on the Restore button under Factory.
Performance icon
The Performance text box on the 'Image Controls' tab is used to inform the user about camera
settings, problems or special circumstances. Important messages will show a flashing icon. The
same icon also appears in the 'Camera Controls' tab to indicate that an important message is
being displayed in the Performance text box on the 'Image Controls' tab.
Flickerless
The Flickerless option should only be used under flickering 50/60 Hz light conditions (e.g.
fluorescent or neon lamps) to prevent flickering or strangely coloured video images. If this option
is used under normal lighting conditions the video image will tend to be overexposed. Note that
the flickerless control is only available when the Auto Exposure setting is enabled on this tab.
Please indicate under Mains whether your mains power frequency is 50 Hz (Europe) or 60 Hz
(USA) so that the Flickerless control will work correctly.
11
Page 12

5.3 Audio Controls
The third tab is marked 'Audio Controls'.
Volume slider
This slider provides manual control over the microphone volume. The 'Volume Wizard' helps you
to choose the correct sound level setting for the slider control.
Balance slider
Not implemented since the camera microphone itself produces a mono audio signal.
Mute
Shuts off the microphone completely.
Volume Wizard (Automated volume setting)
By pressing the 'Volume Wizard' start button, an Automatic Gain Control cycle is started for the
camera microphone to determine the optimum volume setting. Speak into the microphone until
the Volume Wizard stops or until you press Cancel.
Audio Format
Audio format shows you the parameters of the audio data. You can change these parameters to
suit your application in the same way as the resolution setting, for example.
12
Page 13

Performance icon
The Performance text box on the 'Image controls' tab is used to inform the user about camera
settings, problems or special circumstances. Important messages will show a flashing icon. The
same icon also appears in this 'Audio controls' tab to indicate that an important message is being
displayed in the Performance text box on the 'Image controls' tab.
Set preferred recording device
Clicking this button makes the Philips ToUcam camera the preferred recording device. This
button will be disabled if the ToUcam audio device is already selected as your preferred recording
device. Windows stores the user's preferred recording device in its multimedia settings.
Applications can use this setting for selecting a user-preferred audio source.
Use preferred devices only
Use this option to enforce or stop using the preferred device only. For most camera applications it
is preferable to check this option.
5.4 Capture source
Some applications may offer you a fourth tab called 'Capture source'. Usually this setting has only
one option when the USB PC Camera is the only video source connected to your computer.
However, if more than one video source is connected to your system, then this is where you
switch between them. Applications that don't show this fourth tab will offer video source switching
under a different menu item within the application itself.
NOTE: If you have two or more Philips USB cameras connected to your computer, these
cameras can only be used one at a time.
13
Page 14

6 TWAIN applications
Use the voice control feature of the camera (say 'Cheese') to be sure to capture an image of you
smiling. The Philips USB PC Camera is TWAIN-compatible (like a scanner), so you can use the
camera as an input device for any application software that uses TWAIN as a data source (e.g.
photo editing software)
6.1 Capturing images from within applications
In TWAIN-compatible applications you will see the Philips USB PC Camera listed as an available
TWAIN data source among your other TWAIN sources (e.g. scanners). Just pick the USB PC
Camera as your source to acquire camera pictures directly into your application. Then choose
'Acquire' to launch the camera viewfinder, which displays the moving video picture.
Say 'Cheese' to capture a still image, or click on the 'Capture' option under the viewfinder or push
the snapshot button on top of the camera to do the same.
6.2 Capture settings
To the right of the 'Capture' button you will find the 'Adjustments...' button, which is used to
change the settings. Clicking the 'Adjustments...' button will bring up the following window.
14
Page 15

Camera source
Usually this setting features only one option when the USB PC Camera is the only video source
connected to your computer. However, if more than one video source is connected to your
system, then this is where you switch between them.
The 'Camera Controls' button will bring up the other camera setting tabs as described under
'Camera Settings’.
Image formats
Here you can select the size of the still image to be captured. To the right of the still image format
the streaming image format indicates the size of the preview window independently of the still
image format.
Single Image Capture - 'Voice Controlled' snapshot
(This option will be disabled (grayed out) when Auto Image Capturing is enabled)
The 'Voice Controlled' check box disables/enables voice controlled capturing. If this function has
been enabled the user can start capturing by saying 'Cheese'. (and also by pushing the 'Capture'
button in the Viewfinder or by pressing the camera's Snapshot button)
The countdown timer selection box sets the capture delay time between triggering the capturing
(pressing the 'Capture' button, the camera Snapshot button or saying 'Cheese') and the actual
capturing of a still image. During countdown, a countdown timer will be visible and the camera
indicator LED will start flashing.
15
Page 16

Auto Image Capture
• In the 'Auto Image Capture' section you can enable the Auto Capture function together
with an appropriate timer interval. This function triggers the capturing of images at
adjustable regular intervals. The 'Capture' button in the View Finder changes into an
'Auto Start' button to indicate this selection, and the Voice Control option will become
unavailable.
• Leave 'Incremental File Save' unchecked if you want to overwrite the previous image
when capturing a new one. If you do check this box, the picture data is saved under the
selected filename but extended with one or more digits. This digit is increased for each
new image so that the previous images will not be overwritten.
• You can enter a name for the captured images at 'File name', or browse until you find a
suitable name to use. Use 'File type' to choose between four supported file formats: BMP,
TIF, JPG, or FlashPix. Use the Options button to define file type specific save options for
the selected file type. (Only the file types BMP and JPG have options).
Shutter sound
• You can choose a sound file for the shutter sound that should be played when an image
is captured. Normally this is a clicking sound that resembles the sound of a camera
shutter. Uncheck the Play Shutter Sound box to disable the shutter sound
16
Page 17

7 Tips and Frequently Asked Questions (FAQs)
7.1 Tips
Installing/uninstalling the camera
• Always use the Philips installation CD-ROM to install the correct camera drivers as
described below. Do not connect the camera to a USB port before installing the Philips
drivers. If you do this, Windows will try to install its own drivers, which might be less
compatible with the camera than the Philips drivers. You must have Windows running
and have the Windows CD-ROM to hand.
• Your USB controller should be working correctly. You can check this in the Windows
Device Manager (Click on the My Computer icon on your desktop, right-click Properties,
then click on the Device Manager tab). An icon with the name 'Universal serial bus
controller' should be visible. Click on this icon and Windows will tell you if this part of your
computer system is operating correctly.
• Uninstall the driver software by using the Add/Remove option in the Start - Settings Control Panel - Software window.
• For the Windows 2000 operating system you will get a message to delete the camera
within the Device Manager manually before you will be able to reinstall the 'ToUcam
Drivers and Tools' by using the Setup program from the installation CD-ROM. The reason
for this is that the InstallShield cannot remove certain registry entries.
IMPORTANT NOTE :
If the installation program asks you to place a different CD-ROM in the CD-ROM drive,
for instance the installation CD-ROM or the Windows CD-ROM, always wait until:
• the 'busy' cursor icon (usually an hour-glass icon) has disappeared from your
screen, and
• the 'busy' LED on your CD-ROM drive extinguishes,
before you press the eject button on the CD-ROM drive.
This prevents the appearance of a blue screen Windows error message prompting you
to replace the last CD-ROM into the drive.
Should you encounter this Windows error message, correct the blue screen error by
replacing the CD-ROM you just removed and wait for Windows to stop reading from the
CD-ROM.
Camera performance and system requirements
In VGA resolution this digital USB PC Camera provides a very large data stream that needs to be
processed in real-time by the application you are using. Although the camera will perform
satisfactorily on a Pentium I at the lower resolutions, we recommend a more powerful computer,
e.g. a Pentium II with 32 MB RAM, for optimum performance at the highest resolution. We regret
that optimum camera performance cannot be guaranteed if the computer meets only the
minimum system requirements.
Using more than one camera
If two or more Philips cameras of the same type are connected to your computer, only one of
these cameras can be used at any one time.
17
Page 18

USB
You can connect the camera to any USB port on your computer. You do not have to switch off the
computer. USB ports are 'hot-swappable', which means that you do not have to restart Windows
every time you connect a new USB device. The USB driver will detect the camera as new
hardware. It can be used within a few seconds without the need to restart the computer.
If you unplug the camera while it is actively providing an audio or video stream to an application
on your computer, the computer may crash. To avoid problems, first close all applications that
use audio from the camera microphone or video from the camera before unplugging your Philips
USB PC Camera.
Driver software check
You can determine if the camera is
installed correctly, and if it is being
recognized by the operating system by
checking the Device Manager menu in
the System Properties.
1. Access this menu by right-
clicking the 'My Computer'
icon in the top left-hand corner
of your desktop, then click on
Properties. Alternatively, click
on Start / Settings / Control
Panel, then double-click on
System to access this menu.
Click the Device Manager tab
2.
to see the list of installed
devices.
If the USB PC Camera has been
installed correctly and it is plugged into
a USB port, you should see the
following devices in the list (doubleclick on the devices to see their
WEB SITE
If you have any other questions or problems, please visit our web site www.philips.com/pcstuff for
new or updated information.
specifications):
Imaging Device: Philips ToUcam (XS)
Camera; Video
Sound, video and game controllers:
Philips ToUcam (XS) Camera; Audio
(Microphone)
Universal serial bus controller:
Philips ToUCam (XS) Camera;
Composite A/V Device
If you unplug the camera from the
USB port, these devices will disappear
from the list (and can therefore not be
used by any application on your
computer until you reconnect the USB
camera).
18
Page 19

7.2 FAQs
Q: I can't control the volume of the camera audio device. There is no volume control
visible in the Volume Control recording properties.
A: Double-click the camera icon on the Windows taskbar. If there is no camera icon on the
taskbar, start VLounge and select 'Configuration - Icons', and enable 'Driver icon on taskbar', then
click the camera icon on the taskbar. Go to the Audio tab and make sure the microphone volume
has been turned up and that the camera microphone is the preferred recording device. See also
Camera Settings - Audio.
Q: Why can't I choose higher frame rates for the USB Camera?
A: As the digital camera is a USB device, it shares the bandwidth of the USB port with all the
other USB peripherals. If these USB devices are active (speakers providing sound or scanners
performing a scan), the remaining bandwidth may be restricted to frame rates lower than those
listed in the 'Technical specifications' as the maximum frame rate for that resolution.
Q: My PC will not start when the camera is connected.
A: It is highly likely that your BIOS is not compatible with the USB standard. Contact your PC
supplier for an updated BIOS.
Q: With additional USB peripherals installed my PC seems to be unstable (blue screens).
A: Check if Phoenix Plugworks is one of your applications. You need to have version 1.1 or
higher for correct operation with Windows.
Q: No USB Device: My Windows Device Manager reports 'No USB device' even though I
have a physical USB port. In the Windows Device Manager (right click on My Computer,
click on Properties, Device Manager), no section with the name 'Universal serial bus
controller' is visible.
A: Check whether your BIOS enables the USB port as follows: reboot your computer, enter your
BIOS setup and look for a text such as 'USB function'. This should be enabled.
Q: No Video: My application doesn't display any video.
A: There are several reasons for not having video:
1. Check whether the USB PC camera is connected to a USB port
Check whether 'Microsoft WDM Image Capture' is the current capture source. On
2.
systems with other devices, this other device may be the selected capture source.
If more than one USB capture device is connected to the PC, check whether the correct
3.
USB capture device has been selected.
Q: No 'Microsoft WDM Image Capture': 'Microsoft WDM Image Capture' is not available as
image capture source.
A: All USB Image devices need 'Microsoft WDM Image Capture' as the capture source. Check
whether this capture source is enabled. (Start, Settings, Control Panel, MultiMedia, Device tab,
Video Capture Devices entry. Double-click the 'Microsoft WDM Image Capture' entry. A property
page will pop up. The option 'Use the video capture device' should be selected).
Q: Why does my application crash when I unplug the camera from the USB port?
A: If you unplug the camera while it is providing an audio or video stream to an application on
your computer, the computer may crash. To avoid problems always close applications that use
audio from the camera microphone or video from the camera before unplugging your Philips USB
PC Camera.
19
Page 20

Q: The video works, but no audio is recorded: My application doesn't produce any audio.
A: There are several reasons for not having audio:
1.
The camera microphone can only produce a mono audio signal. Check whether the
application uses this setting. If not, adjust the audio setting to mono.
2. Check whether the USB PC camera microphone is selected as the current recording
device. (Start, Settings, Control Panel, MultiMedia, Audio tab. In the recording section,
the 'Philips VGA Digital camera, Audio (Microphone)' should be selected).
Check whether 'Mute' has been switched on (see Camera Settings - Audio). If so, switch
3.
it off.
Q: No audio (USB timer outside specification)
A: If you hear no audio, and have tried every troubleshooting tip in the user guide and the on-line
help to no avail, the USB hardware in your computer may be the cause of the problem. In most
cases it will be the USB timer clock that is not stable enough for streaming audio applications.
Q: System lockup: My camera stops responding (black or frozen picture or LED off) for no
obvious reason.
A: Switch off the Hardware Accelerator for your video card (click on: My computer, right mouse
button, Properties, Performance tab, Graphics button, Set 'Hardware Acceleration' to 'None').
Contact your video display card manufacturer to obtain the latest video card drivers. See the
video display card's documentation for more information.
Q: Picture Flicker: My video picture is flickering.
A: This may happen in office environments with 50 or 60 Hz fluorescent lighting when certain
frame rates are used. There are two solutions:
1.
Select the 'Flickerless' option. This option is located in the 'Image Controls' property
page. This property page is accessible from within the application you are using.
2. Deselect the 'Flickerless' option. The frame rates '5', '10' and '20' are always flickerless in
50 Hz lighting environments. Only the frame rates 15, 25 and 30 are affected by the
electronic 'Flickerless' control.
Q: 'Unable to draw this data format': The message 'Unable to draw this data format'
appears.
A: This can happen when the selected data stream format could not be processed due to a
missing codec. Re-install the camera driver software to install the missing codec.
Q: Why are frames dropped during the recording of a streaming video?
A: If a video clip is created at a high resolution such as VGA and high frame rate, a tremendous
amount of data is generated. For example, the amount of video data generated using VGA
resolution at 30 fps with 24 bit full colour is 640x480x30x24 = 221,184,000 bits (221 Mbit) or
27.65 Mbyte per second. Audio adds even more data on top of this. Hardly any computer system
and/or hard drive is capable of handling this kind of data stream. The result is that a number of
frames are dropped in order to match the data stream with the capabilities of your computer. This
effect can be reduced or completely eliminated by applying the following measures:
1.
changing to a lower resolution such as 320x240 or lower
2. changing to a lower frame rate
3. putting the hard drive in DMA mode
4. using a new file instead of overwriting an existing one
20
Page 21

Q: Why do I sometimes hear clicks in my audio during playback of a video clip?
A: During the recording phase the processor (CPU) has to process a lot of data and the
processing capacity will be limited by the maximum computing speed of your processor. This also
explains why the actual video result you can achieve strongly depends on the processor present
in your computer. The processor also has to control the timing for the transmission of video data
from the camera to your computer. This is done by giving the camera a command to send video
data every millisecond. If the processor load is high, commands will sometimes be missed,
resulting in gaps in the audio and video stream. With audio, this results in a 'click' sound. The
higher the processor load, the more clicks may be generated. This effect can be minimized and
even completely eliminated by reducing the processor load, for example by:
1. changing to a lower resolution, e.g. 320x240
2. changing to a lower frame rate
3. putting the hard drive in DMA mode
using a new file instead of overwriting an existing one
4.
Please bear in mind that the majority of video applications do not require high resolutions in
combination with high frame rates. In most cases, therefore, you will not encounter this
phenomenon at all.
Visit our website at www.philips.com/pcstuff for new or updated information.
21
Page 22

8 Technical specifications
Optical
Camera model number:
PCVC720K, lens ring colour: red
body colour: grey
Sensor CMOS
Pixels 352 (H) x 288 (V)
Still image resolution 640 (H) x 480 (V)
Illumination < 10 lux
Integrated lens F2.0
Resolution/performance
Output resolution Pixels (H x V) Frame rate in frames/sec [fps]
CIF 352 x 288 Up to 30
SIF 320 x 240 Up to 30
QCIF 176 x 144 Up to 30
QSIF 160 x 120 Up to 30
Data format
I420, IYUV
Camera adjustment parameters
Frame rate, contrast, brightness, saturation, sharpness, colour on/off, mirror image, backlight
compensation, white balance, exposure control, hue
Interfacing
USB cable 2.0 m
Minimum system requirements
Processor Pentium II 233 MHz
RAM 32 MB
OS Windows 98, Windows 2000 or higher (not NT4)
CD-ROM drive Required (for installation only)
USB interface Required
22
Page 23

Microphone, USB speakers or sound card with speakers
Internet connection
Software
Windows 98 / 2000 drivers by Philips
VRecord by Philips
VideoLink Mail by Smith Micro
NetMeeting by Microsoft
Photo Explorer by Ulead
SpotLife by SpotLife
GameCam by Reality Fusion
Audio
Microphone Integrated
Output Digital via USB
Supported audio formats mono, 16 bit, 8 / 11.025 / 22.05 / 44.1 kHz
Weight
110 g
Dimensions
84 x 67 x 47 mm (L x W x H)
Ambient temperature
Operating -10 to 55°C
Storage -35 to 70°C
Power supply
NOTE: Should you wish to connect this camera to a USB hub instead of your computer's
root hub, you will need to use a powered hub capable of delivering the operating power
specified below.
Power Supplied via the USB cable
Power compliance
Two modes for power
supply:
General USB specifications 1.1 for power
requirements
1. Suspend: max. 500 µA
2. Operating: max. 100 mA
23
Page 24

9 Regulations, Warnings & Maintenance
9.1 FCC compliance
This device complies with Part 15 of the FCC Rules. Operation is subject to the following
two conditions:
(1) this device may not cause harmful interference, and
(2) this device must accept any interference received, including interference that may
cause undesired operation.
NOTE: This equipment has been tested and found to comply with the limits for a Class B digital
device, pursuant to Part 15 of the FCC Rules. These limits are designed to provide reasonable
protection against harmful interference in a residential installation. This equipment generates,
uses and can radiate radio frequency energy and, if not installed and used in accordance with the
instructions, may cause harmful interference to radio communications. However, there is no
guarantee that interference will not occur in a particular installation. If this equipment does cause
harmful interference to radio or television reception, which can be determined by turning the
equipment off and on, the user is encouraged to try to correct the interference by one or more of
the following measures:
• Reorient or relocate the receiving antenna.
• Increase the separation between the equipment and receiver.
• Connect the equipment to an outlet on a circuit different from that to which the receiver is
connected.
• Consult the dealer or an experienced radio/TV technician for help.
Any unauthorized modification to this equipment could result in the revocation of the authorization
to operate the equipment.
9.2 Warnings & Maintenance
If you observe the following guidelines, you will prevent defects and the camera will
operate safely.
• To ensure that your camera does not fall off the surface on which it is mounted - e.g. your
monitor - always ensure that the adhesive tape for the camera perch is placed onto a
clean surface.
• Clean the outside of the camera with a soft cloth.
• Do NOT use cleaning fluids based on alcohol, methylated spirit, ammonia, etc.
• Avoid direct contact between the camera and water.
• If the lens has to be cleaned, use a special lens-cleaning tissue, available at any camera
store.
• The camera is for indoor use only.
• Protect the camera from oil, vapour, steam, moisture, and dust.
• Keep the camera away from heat sources, lights, and direct sunlight.
• Never point the lens of your camera at the sun.
All brand names and trademarks acknowledged.
Copyright © 2001 Philips Components BV
All data subject to change without notice.
24
Page 25

10 Glossary
Audio input device (recording device)
One of the Windows multimedia settings is the recording device setting. This setting determines
which audio hardware is being used to provide audio signals to audio applications. This setting is
accessible through: the Windows 'Start' menu, Settings, Control Panel, MultiMedia, Audio tab. In
the recording section, the USB digital camera microphone should be selected. (This selection will
only be available if the camera is connected to a USB port.)
AVI
The Microsoft standard file format for combined video and sound files on the PC. This is part of
the Video for Windows standard.
BMP / JPG / TIFF / FlashPix
These are various file formats for images. BMP files are the largest since they do not use
compression and retain full image quality. JPG uses 'lossy' compression which dramatically
reduces file size but the original image quality can never be restored. TIFF can use a 'lossless'
compression algorithm with less file size reduction but retaining full image quality. FlashPix is a
relatively new image format that uses minimal resolution within the application to speed up the
image processing. All accepted changes are processed afterwards, before writing to disk.
Codec (COding & DECoding)
This refers to a compression format for creating sound and video streams on the computer.
Compression
Term used to describe a process of compacting or squeezing video and sound information into a
smaller than normal size. For example, 2 to 1 compression would indicate that 2 pixels would now
only occupy the space of 1 pixel.
DirectX
The latest standard developed primarily by Microsoft to help establish a common method for
exchanging audio and video information between your hardware and software in the PC.
Frame
A single image in a video stream.
Frame Rate
Typically quoted in seconds (fps, frames per second), this refers to the number of single images
that will be displayed or captured in a video stream.
Gamma Correction
The characteristics of displays which use phosphors (such as computer monitors with cathode
ray tubes) are nonlinear. Nonlinear characteristics means that a small change in voltage when the
voltage level is low produces a change in the output display brightness level, but this same small
change in voltage at a high voltage level will not produce the same magnitude of change in the
brightness output. This effect is known as gamma. Computers like to process with linear RGB
data. Before being displayed, this linear RGB data will be processed (gamma corrected) to
compensate for the gamma of the display.
10 Glossary
25
Page 26

Audio input device (recording device)
One of the Windows multimedia settings is the recording device setting. This setting determines
which audio hardware is being used to provide audio signals to audio applications. This setting is
accessible through: the Windows 'Start' menu, Settings, Control Panel, MultiMedia, Audio tab. In
the recording section, the USB digital camera microphone should be selected. (This selection will
only be available if the camera is connected to a USB port.)
AVI
The Microsoft standard file format for combined video and sound files on the PC. This is part of
the Video for Windows standard.
BMP / JPG / TIFF / FlashPix
These are various file formats for images. BMP files are the largest since they do not use
compression and retain full image quality. JPG uses 'lossy' compression which dramatically
reduces file size but the original image quality can never be restored. TIFF can use a 'lossless'
compression algorithm with less file size reduction but retaining full image quality. FlashPix is a
relatively new image format that uses minimal resolution within the application to speed up the
image processing. All accepted changes are processed afterwards, before writing to disk.
Codec (COding & DECoding)
This refers to a compression format for creating sound and video streams on the computer.
Compression
Term used to describe a process of compacting or squeezing video and sound information into a
smaller than normal size. For example, 2 to 1 compression would indicate that 2 pixels would now
only occupy the space of 1 pixel.
DirectX
The latest standard developed primarily by Microsoft to help establish a common method for
exchanging audio and video information between your hardware and software in the PC.
Frame
A single image in a video stream.
Frame Rate
Typically quoted in seconds (fps, frames per second), this refers to the number of single images
that will be displayed or captured in a video stream.
Gamma Correction
The characteristics of displays which use phosphors (such as computer monitors with cathode
ray tubes) are nonlinear. Nonlinear characteristics means that a small change in voltage when the
voltage level is low produces a change in the output display brightness level, but this same small
change in voltage at a high voltage level will not produce the same magnitude of change in the
brightness output. This effect is known as gamma. Computers like to process with linear RGB
data. Before being displayed, this linear RGB data will be processed (gamma corrected) to
compensate for the gamma of the display.
Indicator LED
The LED on top of the camera will be illuminated when it is delivering video images to your
computer, and not illuminated when it is not. It will flash before a timed snapshot is taken. One
26
Page 27

second before the snapshot countdown ends, it will flash more rapidly to warn you of the
impending event.
Philips installation program
A standard installation program that runs from CD-ROM. Usually, this program starts
automatically after inserting the installation CD-ROM into your CD-ROM drive, and guides you
through the whole installation process. The program can be started manually by running
'setup.exe' from your CD-ROM drive.
Pixel
The smallest square or round element in an image. These are the 'building blocks' that are only
one colour in their individual state, but combine with others to form complete images.
Plug & Play
An operating system principle for connecting hardware to your computer. The idea is to recognize
the new hardware automatically and to load the appropriate drivers without restarting your
computer. With USB devices this usually means that you will have to perform an installation
procedure only once, i.e. the first time you connect the new hardware. After this first time, you will
not have to restart the computer when connecting the camera to the USB port. The USB driver
will detect the camera as newly connected hardware. It can be used within a few seconds without
the need to restart the computer.
Preview Window
The window within the capture application that is used to display live, or moving, video.
Property page
A window with camera setting tabs that appears when you click on a setting menu item within an
application. This setting menu item can have different names in different applications, but is
usually called 'Settings', 'Preferences', 'Video settings' or something similar.
Rebooting
Restarting your PC to initialize all original settings and finalize all settings changed during an
installation procedure.
Resolution
Typically given in the context of pixels, this is used to describe overall video size. This is related
to quality in that the higher the resolution, the better the quality and the more pixels.
Snapshot button
The hardware button on top of the camera which fulfils the same function as the software
'Capture' button in the TWAIN viewfinder window. If the viewfinder displays the camera's view on
your screen in the TWAIN viewfinder window, pressing this button will capture a still image.
TWAIN
Standard software interface for imaging applications. If a hardware device has a TWAIN driver, it
can be used as an image source for TWAIN-compatible imaging applications. Choose your
TWAIN source in the imaging application itself. Then choose 'Acquire' to start the TWAIN driver
for the TWAIN source.
USB
Universal Serial Bus, used for connecting external devices to the PC without having to restart
your PC.
27
Page 28

Video for Windows
Developed by Microsoft, this is a standard for displaying video on the Windows desktop. Windows
has this built in. This standard has now been succeeded by DirectShow, which is part of DirectX.
Video stream
A collection of images that combine to form motion - or moving - pictures (also known as movies
or video clips).
Indicator LED
The LED on top of the camera will be illuminated when it is delivering video images to your
computer, and not illuminated when it is not. It will flash before a timed snapshot is taken. One
second before the snapshot countdown ends, it will flash more rapidly to warn you of the
impending event.
Philips installation program
A standard installation program that runs from CD-ROM. Usually, this program starts
automatically after inserting the installation CD-ROM into your CD-ROM drive, and guides you
through the whole installation process. The program can be started manually by running
'setup.exe' from your CD-ROM drive.
Pixel
The smallest square or round element in an image. These are the 'building blocks' that are only
one colour in their individual state, but combine with others to form complete images.
Plug & Play
An operating system principle for connecting hardware to your computer. The idea is to recognize
the new hardware automatically and to load the appropriate drivers without restarting your
computer. With USB devices this usually means that you will have to perform an installation
procedure only once, i.e. the first time you connect the new hardware. After this first time, you will
not have to restart the computer when connecting the camera to the USB port. The USB driver
will detect the camera as newly connected hardware. It can be used within a few seconds without
the need to restart the computer.
Preview Window
The window within the capture application that is used to display live, or moving, video.
Property page
A window with camera setting tabs that appears when you click on a setting menu item within an
application. This setting menu item can have different names in different applications, but is
usually called 'Settings', 'Preferences', 'Video settings' or something similar.
Rebooting
Restarting your PC to initialize all original settings and finalize all settings changed during an
installation procedure.
Resolution
Typically given in the context of pixels, this is used to describe overall video size. This is related
to quality in that the higher the resolution, the better the quality and the more pixels.
Snapshot button
The hardware button on top of the camera which fulfils the same function as the software
'Capture' button in the TWAIN viewfinder window. If the viewfinder displays the camera's view on
your screen in the TWAIN viewfinder window, pressing this button will capture a still image.
28
Page 29

TWAIN
Standard software interface for imaging applications. If a hardware device has a TWAIN driver, it
can be used as an image source for TWAIN-compatible imaging applications. Choose your
TWAIN source in the imaging application itself. Then choose 'Acquire' to start the TWAIN driver
for the TWAIN source.
USB
Universal Serial Bus, used for connecting external devices to the PC without having to restart
your PC.
Video for Windows
Developed by Microsoft, this is a standard for displaying video on the Windows desktop. Windows
has this built in. This standard has now been succeeded by DirectShow, which is part of DirectX.
Video stream
A collection of images that combine to form motion - or moving - pictures (also known as movies
or video clips).
29
 Loading...