

Page 1
Subject to changes without notice.
© Philips Consumer Electronics BV 2000
3122 165 22022
Printed on recycled material
2
Vesta Pro Scan
Pagecam 2.1
Quick reference manual Manual de referencia rápida
Schnellübersicht Kvikkguide
Guide de référence rapide Lynreferencemanual
Manuale di riferimeno rapido Lathund
Verkorte handleiding Pikaopas
PCVC690K
PageCam 6/8/00 2:37 PM Pagina 1
Page 2

English page 2
Deutsch Seite 4
Français page 6
Italiano pagina 8
Nederlands pagina 10
Español página 12
Norsk side 14
Dansk side 16
Svenska sida 18
Suomi sivu 20
© Philips Consumer Electronics BV 2000
1
PageCam 6/8/00 2:37 PM Pagina 3
Page 3
CAMERA POSITIONING & LIGHTING REQUIREMENTS
Tripod
Screw the camera onto the tripod, then point it downwards for scanning printed material with PageCam.
• Extend the tripod legs to the appropriate length (see below) and spread them evenly apart.
• Point the camera straight down for best scanning results. Do this by tilting the tripod head fully
forward, and use the centre line on top of the camera for left/right correction.
• Aim the camera downward between two legs to avoid one of the legs showing in the scanned image.
• Turn the black ring to lock the head.
Camera height above desktop surface
Always choose the camera height above your document according to the text size of the scanned
material. Since PageCam uses a fixed scanning resolution of 640x480 pixels with this camera, OCR
results will improve if you zoom in on the text by retracting the tripod legs, thereby increasing the scan
resolution for the text.
FOR OPTIMUM OCR RESULTS
• Optimum height for scanning a normal office document is 15 cm from document to camera lens. This
will make it possible to capture approximately 1/4 of an A4 page.
• Alter the height as needed for your particular requirements, i.e. move camera closer for smaller
fonts, further away for large fonts / large area.
• Ensure image is well focused: after altering camera height, check and adjust focusing accordingly.
• Ensure good lighting conditions (see below).
TIP: OCR Quality
For maximum OCR quality, adjust the length of the tripod legs so that the column of interest fills the whole
image width.
Focus
Rotate the lens ring to focus the image. This will usually be necessary whenever you change the
camera’s height above the scanned material.
Lighting
The lighting of the original affects image quality. Always use bright, diffuse lighting and avoid creating
shadows and reflections on the original.
TO ACHIEVE GOOD LIGHTING
• Plenty of light
• Diffuse lighting (indirect daylight, light from multiple sources)
• No reflections on original
• Original evenly lit
• Avoid shadows
TIP: Camera Settings dialogue box
PageCam automatically adjusts the camera settings for resolution and frame rate to deliver maximum
image quality. However the brightness control under the Options|Camera Settings panel may sometimes
need adjustment.
TIP: Curved originals
Keep originals flat during scanning to ensure all parts of the image are in focus. Note that curved originals
may cause unwanted light reflections as well as loss of focus.
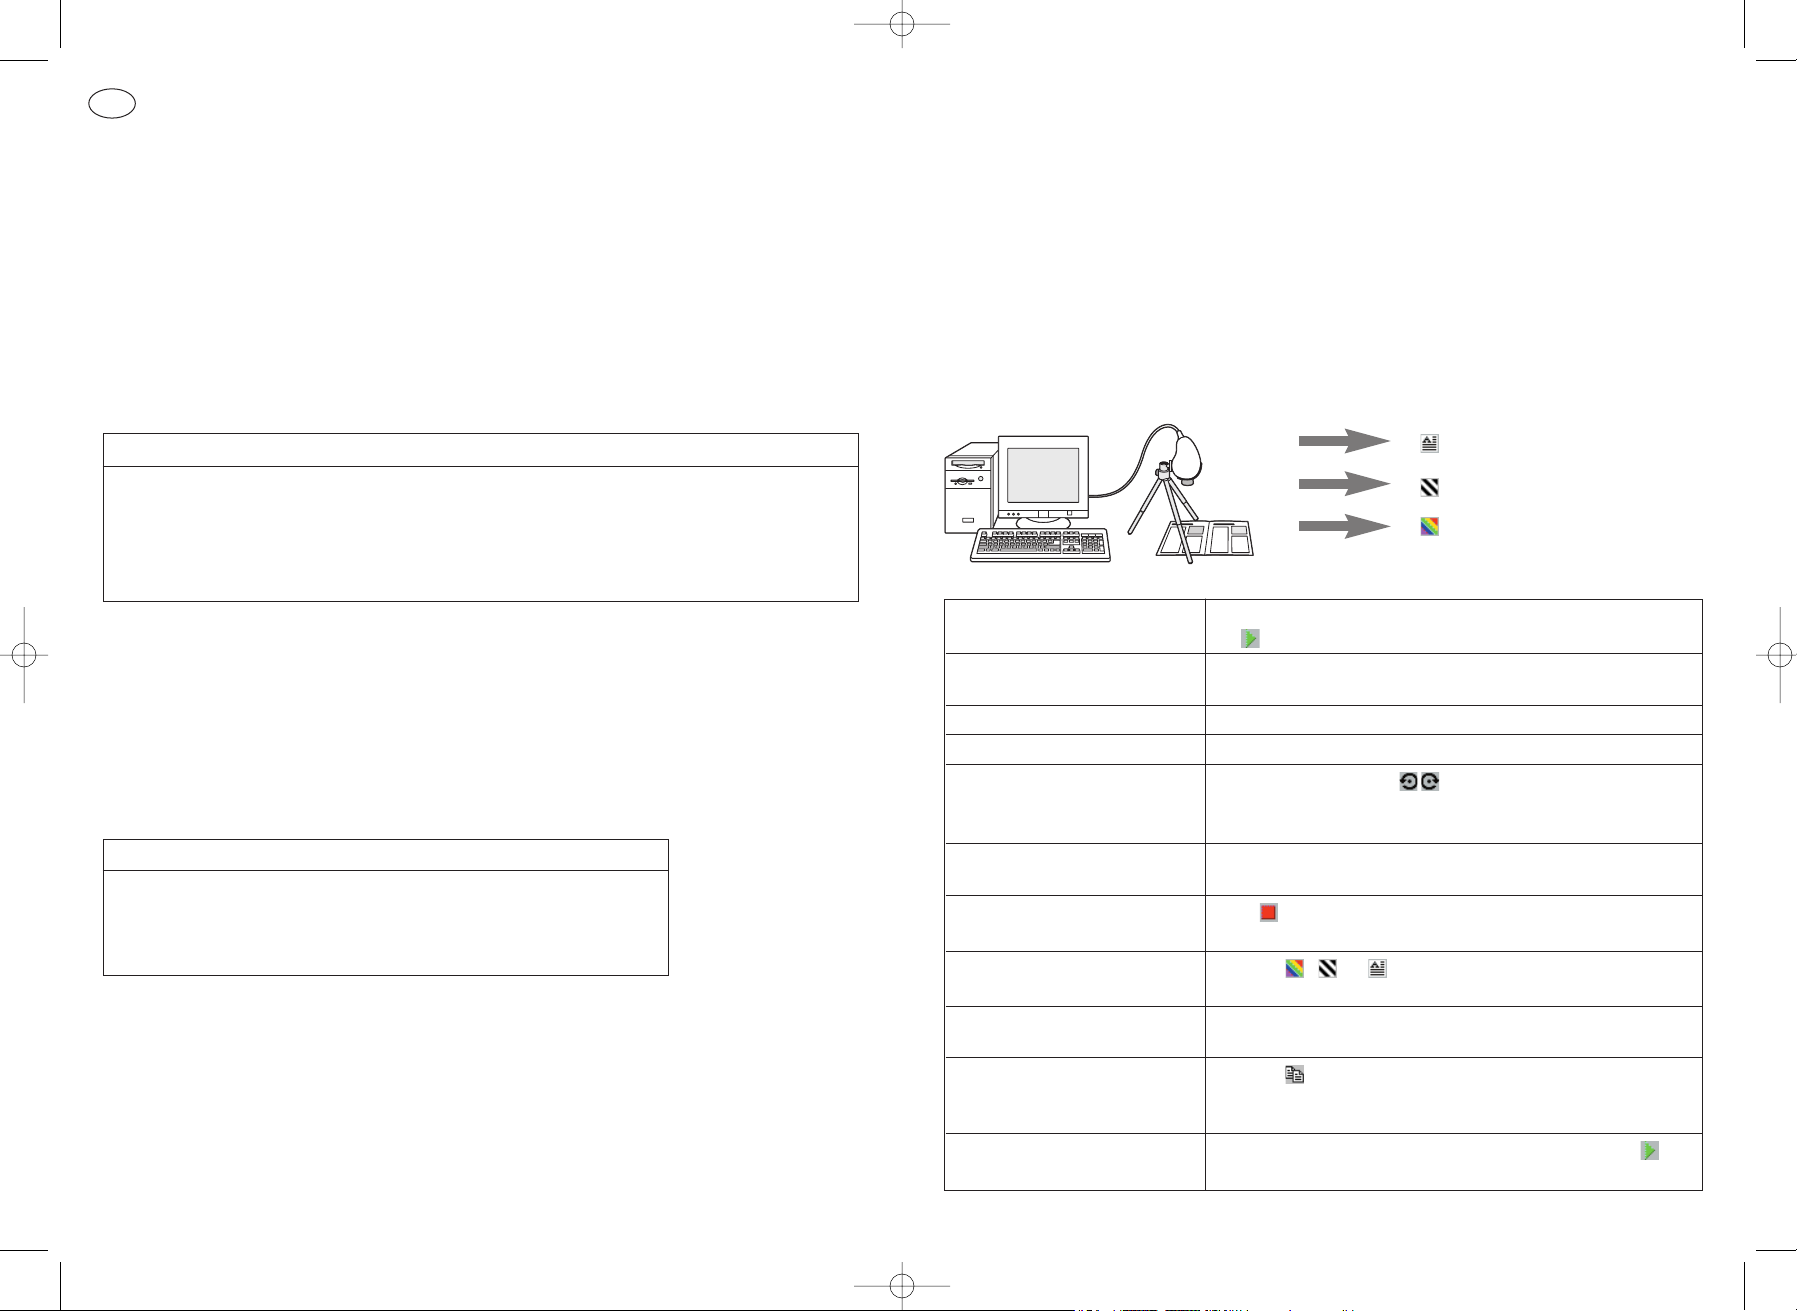
PageCam is a unique program that enables you to capture graphics and optically recognise text
and numbers straight off hardcopy pages into electronic documents and spreadsheets, using
your PC camera.
PageCam will copy a paragraph, a single word, a sentence, a short phrase, an illustration or the
entire window contents. Information is selected ‘word-to-word’, just as in a word processor or
image editor, by dragging across text or graphics. Once it’s selected, you just need to copy it,
by dragging or by pasting, into your preferred program.
And yes — all the textual information is already recognised for you by PageCam behind the
scenes!
OCR for Text copy
Line drawing
Colour Images
1. Start PageCam The live camera image is displayed at start-up. If not, click
on to unfreeze the image.
2. Aim the camera Point the camera (downwards) towards the object you want
to copy. Adjust the height if necessary.
3. Focus the live image Turn the lens ring to focus the image.
4. Check image quality Check the lighting and the resulting image quality.
5. Rotate Use the rotate buttons to rotate the image right side
up. Text can be optically recognised with a slant of up to
10 degrees left or right.
6. Set language Set the appropriate language for text recognition in the
Options menu.
7. Freeze the camera image Click to freeze the camera image and to start processing
the image and OCRing the text.
8. Colour, B&W or Text Click on , or to select your copy mode for colour
images, line drawings or text.
9. Select words or image Drag your mouse over the text or select part of the image
you want to copy.
10. Copy&Paste or Drag&Drop Click on to copy your selection, or Drag & Drop the
selection to your preferred application. Hold down the Ctrl
key to Drag & Drop images.
11. Repeat, or go live again Select another part of the image for copying, or click to
go live for capturing the next image.
USING PAGECAM
GB
2 3
PageCam 6/8/00 2:37 PM Pagina 5
Page 4
KAMERAAUSRICHTUNGS- UND BELEUCHTUNGSVORAUSSETZUNGEN
Stativ
Schrauben Sie die Kamera auf das Stativ und richten Sie sie dann nach unten, um gedruckte Unterlagen
mit PageCam zu scannen.
• Verlängern Sie die Stativfüße auf die entsprechende Länge (siehe unten) und stellen Sie sie in
gleichmäßigen Abständen auf.
• Richten Sie die Kamera zum optimalen Scannen gerade nach unten. Neigen Sie dazu den Stativkopf
ganz nach vorne und verwenden Sie die Mittellinie oben auf der Kamera für die Links/Rechtskorrektur.
• Richten Sie die Kamera nach unten zwischen zwei der Stativfüße aus, um zu vermeiden, daß ein
Stativfuß in dem eingescannten Bild erscheint.
• Drehen Sie zum Feststellen des Kopfes an dem schwarzen Ring.
Kamerahöhe über der Schreibtischoberfläche
Wählen Sie die Kamerahöhe über Ihrem Dokument immer entsprechend der Textgröße des
eingescannten Materials. Da PageCam bei dieser Kamera eine feste Abtastauflösung von 640x480 Pixel
verwendet, erzielen Sie bessere OCR-Ergebnisse, wenn Sie den Text vergrößern, indem Sie die
Stativfüße verkürzen und so die Abtastauflösung für den Text erhöhen.
FÜR OPTIMALE OCR-ERGEBNISSE
• Die optimale Höhe zum Scannen eines normalen Bürodokuments beträgt 15 cm zwischen dem
Dokument und dem Kameraobjektiv. Damit kann ca. 1/4 einer A4-Seite erfaßt werden.
• Ändern Sie die Höhe nach Bedarf entsprechend Ihren jeweiligen Anforderungen, d.h. bewegen Sie
die Kamera bei kleineren Schriften näher an das Dokument heran und bei großen Schriften/einem
großen Bereich weiter von dem Dokument weg.
• Achten Sie darauf, daß das Bild scharf eingestellt ist: überprüfen Sie nach dem Ändern der
Kamerahöhe die Schärfe und stellen Sie sie entsprechend ein.
• Achten Sie auf gute Lichtverhältnisse (siehe unten).
TIP: OCR-Qualität
Stellen Sie für eine optimale OCR-Qualität die Länge der Stativfüße so ein, daß die Spalte, die für Sie
von Interesse ist, die gesamte Bildbreite füllt.
Schärfe
Drehen Sie zur Scharfeinstellung des Bildes an dem Objektivring. Das ist normalerweise immer nötig,
wenn Sie die Höhe der Kamera über der gescannten Unterlage ändern.
Beleuchtung
Die Beleuchtung des Originals wirkt sich auf die Bildqualität aus. Verwenden Sie immer helles, diffuses
Licht und vermeiden Sie Schatten und Reflektierungen auf dem Original.
ZUM ERZIELEN EINER GUTEN BELEUCHTUNG
• Viel Licht
• Diffuses Licht (indirektes Tageslicht, Licht aus mehreren Quellen)
• Keine Reflektierungen auf dem Original
• Original gleichmäßig ausgeleuchtet
• Schatten vermeiden
TIP: Dialogfeld "Kameraeinstellungen"
PageCam stellt die Auflösung und die Bildfolgefrequenz der Kamera automatisch für eine optimale
Bildqualität ein. In manchen Fällen muß jedoch die Helligkeit in dem Feld 'Options|Camera Settings'
eingestellt werden.
TIP: Unebene Originale
Achten Sie darauf, daß die Originale beim Scannen flach aufliegen, damit alle Teile des Bildes scharf
eingestellt sind. Beachten Sie, daß unebene Originale ungewünschte Lichtreflektierungen sowie
Schärfeverluste verursachen können.
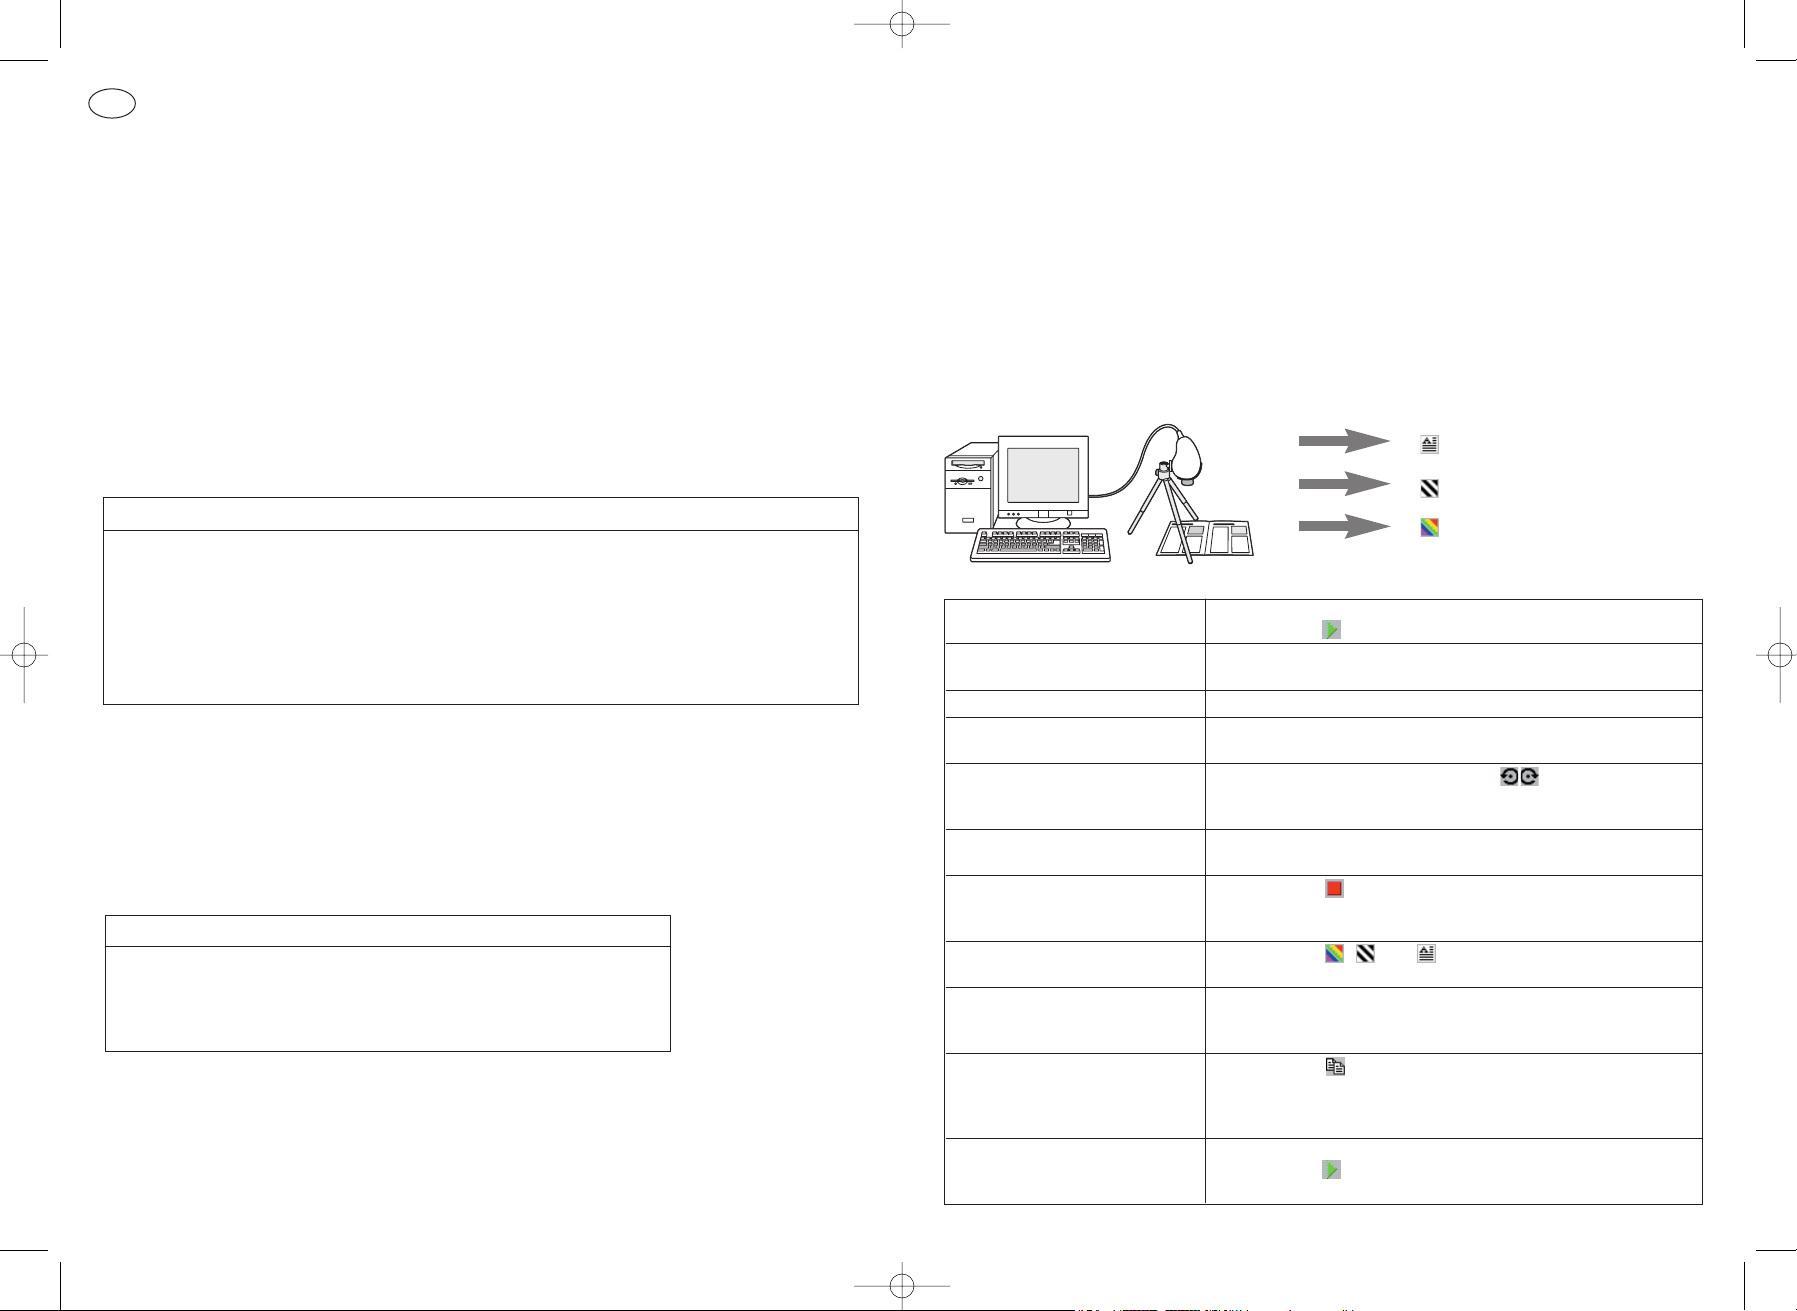
PageCam ist ein einzigartiges Programm, mit dem Sie mit Ihrer Kamera Grafiken sowie Texte
und Zahlen optisch erkennen und direkt von Hardcopyseiten in elektronische Dokumente und
Tabellenkalkulationen übernehmen können.
PageCam kopiert einen Abschnitt, ein einzelnes Wort, einen Satz, einen Satzteil, eine Abbildung
oder den gesamten Fensterinhalt. Die Informationen werden genau wie in einer Textverarbeitung oder einem Bildeditor 'Wort für Wort' durch Ziehen über den Text bzw. die Grafik
ausgewählt. Nach dem Auswählen brauchen Sie sie nur in Ihr bevorzugtes Programm zu
kopieren, indem Sie sie dorthin ziehen oder in dieses einfügen.
Stimmt genau - alle Textinformationen werden schon von PageCam für Sie 'hinter den Kulissen'
erkannt!
OCR zum Kopieren von Text
Strichzeichnungen
Farbbilder
1. PageCam starten Beim Starten wird das Livekamerabild angezeigt. Wenn nicht,
klicken Sie auf , um das Bild freizugeben.
2. Kamera ausrichten Richten Sie die Kamera (nach unten) auf das Objekt, das Sie
kopieren möchten. Stellen Sie gegebenenfalls die Höhe ein.
3. Livebild scharf einstellen Drehen Sie zur Scharfeinstellung des Bildes an dem Objektivring.
4. Bildqualität prüfen Überprüfen Sie die Belichtung und die daraus resultierende
Bildqualität.
5. Drehen Drehen Sie das Bild mit den Drehtasten so, daß die rechte
Seite nach oben zeigt. Der Text kann mit einer Neigung von bis zu
10 Grad links und rechts optisch erkannt werden.
6. Sprache einstellen Stellen Sie die entsprechende Sprache für die Texterkennung in
dem Menü "Optionen" ein.
7. Standbild einstellen Klicken Sie auf , um das Kamerabild in den Standbildmodus zu
bringen und mit der Schwarzweiß- und OCR-Bearbeitung des
Bildtextes zu beginnen.
8. Farbe, Schwarzweiß oder Text Klicken Sie auf , oder , um den gewünschten Kopiermodus
für Farbbilder, Strichzeichnungen oder Text auszuwählen.
9. Wörter oder Bild auswählen Ziehen Sie die Maus über den Text (wie in Word für Windows) oder
wählen Sie den Teil des Bildes aus, den Sie kopieren möchten,
indem Sie einen Rahmen um diesen Teil ziehen.
10. Kopieren und Einfügen Klicken Sie auf , um Ihre Auswahl zu kopieren, oder ziehen Sie
oder Drag&Drop das ausgewählte Objekt zu Ihrer bevorzugten Anwendung und legen
Sie es dort ab. Wenn Sie ein Bild zu einer Arbeitsdatei ziehen, muß
die Strg-Taste [Ctrl] beim Ziehen gedrückt sein.
11. Wiederholen oder Wählen Sie einen anderen Teil des Bildes zum Kopieren aus oder
Livebild einschalten klicken Sie auf , um das Livebild zum Erfassen des nächsten
Bildes wiedereinzuschalten.
VERWENDUNG VON PAGECAM
D
4 5
PageCam 6/8/00 2:37 PM Pagina 7
Page 5

PLACEMENT DE LA CAMÉRA & CONDITIONS D'ÉCLAIRAGE
Trépied
Vissez la caméra sur le trépied, puis orientez-la vers le bas pour numériser un document imprimé avec
PageCam.
• Réglez les pieds du trépied à la longueur appropriée (voir ci-dessous) et écartez-les de façon égale.
• Orientez la caméra vers le bas à la verticale pour obtenir les meilleurs résultats de numérisation
possibles. Pour ce faire, inclinez la tête du trépied entièrement vers l'avant, puis utilisez la ligne
centrale située au sommet de la caméra pour ajuster sa position vers la gauche ou vers la droite.
• Orientez la caméra vers le bas entre deux pieds du support afin d'éviter l'apparition des pieds dans
l'image numérisée.
• Faites tourner la bague noire pour bloquer la tête.
Hauteur de la caméra par rapport à la surface du bureau
Déterminez toujours la hauteur de la caméra par rapport à votre document en fonction de la taille du texte
du document à numériser. Comme PageCam utilise une résolution de numérisation fixe de 640 x 480
pixels avec cette caméra, les résultats de la reconnaissance optique de caractères (ROC) seront
meilleurs si vous approchez la caméra du texte en rétractant les pieds du trépied, car vous augmentez
ainsi la résolution de numérisation du texte.
POUR DES RÉSULTATS OPTIMAUX EN RECONNAISSANCE DE CARACTÈRES
• La hauteur optimale pour numériser un document classique de bureau est de 15 cm (entre le document
et l'objectif de la caméra). Cela permet de saisir approximativement un quart d'une page A4.
• Ajustez la hauteur en fonction de vos besoins particuliers : rapprochez la caméra pour les polices de
caractères plus petites ou éloignez-la en présence de grands caractères ou en cas de surface plus
étendue.
• Veillez à ce que l'image soit bien nette : ajustez la hauteur de la caméra, puis vérifiez et réglez la mise
au point.
• Assurez de bonnes conditions d'éclairage (voir ci-dessous).
CONSEIL : Qualité de la reconnaissance optique de caractères
Pour obtenir une qualité de reconnaissance de caractères maximale, réglez la longueur des pieds du
trépied de façon à ce que la partie voulue remplisse toute la largeur de l'image.
Mise au point
Faites tourner la bague de l'objectif pour mettre au point l'image. Cette opération est généralement
nécessaire chaque fois que vous changez la hauteur de la caméra par rapport au document à numériser.
Éclairage
De l'éclairage du document original dépend la qualité de l'image. Utilisez toujours une lumière claire et
diffuse. Évitez de créer des ombres et des reflets sur l'original.
POUR UN BON ÉCLAIRAGE
• Beaucoup de lumière
• Lumière diffuse
• Pas de reflet sur l'original
• Éclairage uniforme de l'original
• Pas d'ombre
CONSEIL : Boîte de dialogue Réglages de la caméra
PageCam règle automatiquement les valeurs de résolution et de fréquence image de la caméra afin de
fournir une qualité d'image maximale. Cependant, la luminosité peut parfois nécessiter un réglage
spécifique. Pour ce faire, accédez au panneau de configuration via Options|Réglages de la caméra.
CONSEIL : Originaux incurvés
Veillez à ce que le document original soit bien à plat pendant la numérisation, afin que toutes les parties
de l'image soient nettes. Un document original incurvé peut entraîner des reflets lumineux indésirables
ainsi qu'une perte de netteté.
PageCam est un programme unique qui vous permet, à l'aide de votre caméra PC, de saisir des
images et d'effectuer des reconnaissances optiques de textes et de chiffres à partir de pages
papier converties en documents électroniques et en feuilles de calcul.
PageCam peut copier un paragraphe, un seul mot, une phrase, une courte expression, une
illustration ou le contenu d'une fenêtre entière. L'information peut être sélectionnée « mot à
mot », comme dans n'importe quel traitement de texte ou éditeur d'image, en faisant glisser le
pointeur de la souris sur du texte ou une image. Une fois la sélection effectuée, il vous suffit de
la transférer dans votre programme préféré par copier-coller ou par glisser-déposer.
Lorsque la sélection est transférée dans votre programme, le texte est déjà reconnu par
PageCam, sans intervention de votre part !
ROC pour une sélection
Dessin de lignes
Images en couleur
1. Lancez PageCam L'image en direct de la caméra s'affiche au démarrage. Si ce n'est
pas le cas, cliquez sur pour faire défiler normalement l'image.
2. Orientez la caméra Orientez la caméra vers l'objet à copier (vers le bas). Si nécessaire,
réglez la hauteur.
3. Mettez au point l'image en direct Faites tourner la bague de l'objectif pour mettre au point l'image.
4. Vérifiez la qualité de l'image Vérifiez le niveau d'éclairement et la qualité d'image résultante.
5. Redressez l'image Utilisez les boutons de rotation pour redresser l'image. Le
texte ne peut faire l'objet d'une reconnaissance optique que s'il
présente une inclinaison inférieure à 10 degrés vers la gauche ou
vers la droite.
6. Définissez la langue Définissez la langue de reconnaissance du texte dans le menu
Options.
7. Figez l'image de la caméra Cliquez sur pour figer l'image de la caméra et pour commencer
le traitement de l'image : mise en noir & blanc, puis reconnaissance
optique du texte.
8. Couleur, N&B ou Texte Cliquez sur le bouton , ou pour sélectionner le mode de
copie approprié : images en couleur, dessins de lignes ou texte.
9. Sélectionnez des mots ou Faites glisser la souris sur le texte (comme dans Word pour une
une image Windows) ou sélectionnez une partie de l'image que vous souhaitez
copier, en dessinant un cadre tout autour.
10. Copier-coller ou Glisser- Cliquez sur pour copier la sélection, ou effectuez un glisserdéposer déposer vers l'application appropriée. Si vous faites glisser une
image vers un fichier de travail, la touche Ctrl doit être maintenue
enfoncée pendant l'opération.
11. Recommencez ou revenez Sélectionnez une autre partie de l'image à copier ou cliquez sur
à l'image en direct pour revenir à l'image affichée en direct par la caméra afin de saisir
une autre image.
UTILISATION DE PAGECAM
F
6 7
PageCam 6/8/00 2:37 PM Pagina 9
Page 6

POSIZIONE DELLA VIDEOCAMERA E ILLUMINAZIONE
Treppiedi
Avvitare la videocamera sul treppiedi, puntarla verso il basso per effettuare la scansione di materiali
stampati con PageCam.
• Scegliere la lunghezza adeguata delle tre gambe del treppiedi (vedi sotto) e allargare il treppiedi per
assicurare la stabilità.
• Assicurarsi che la videocamera punti direttamente verso il basso per ottenere i migliori risultati di
scansione. A tale scopo portare la testina del treppiedi completamente in avanti e utilizzare la linea
centrale sulla parte superiore della videocamera per la correzione sinistra/destra.
• Puntare la videocamera verso il basso tra due delle gambe per evitare che una delle gambe appaia
nella scansione.
• Ruotare la ghiera nera per bloccare la testina.
Altezza della videocamera rispetto alla superficie della scrivania
Scegliere l'altezza della videocamera rispetto al documento in base alla dimensione del testo del
materiale da sottoporre a scansione. Poiché PageCam utilizza una risoluzione di scansione fissa di
640x480 pixel con questa videocamera, i risultati dell'OCR saranno migliori se si aumenta l'ingrandimento
del testo ritraendo le gambe del treppiedi e aumentando così la risoluzione di scansione.
PER OTTENERE I MIGLIORI RISULTATI DI RICONOSCIMENTO (OCR)
• L'altezza migliore per la scansione di un normale documento d'ufficio è 15 cm dal documento
all'obiettivo della videocamera. Ciò permetterà di catturare circa 1/4 di una pagina formato A4.
• Regolare l'altezza in base alle proprie esigenze, es. avvicinare la videocamera in caso di caratteri più
piccoli e allontanare in caso di caratteri o documenti di dimensioni maggiori.
• Assicurarsi che l'immagine sia a fuoco: modificata l'altezza, controllare e regolare la messa a fuoco.
• Assicurarsi che le condizioni di illuminazione siano adeguate (vedi sotto).
CONSIGLIO: Qualità OCR
Per la massima qualità di riconoscimento ottico dei caratteri (OCR), regolare la lunghezza delle gambe
del treppiedi in modo che la colonna richiesta riempia l'intera larghezza dell'immagine.
Messa a fuoco
Ruotare la ghiera dell'obiettivo per mettere a fuoco l'immagine. L'operazione è necessaria quando si
modifica l'altezza della videocamera rispetto al testo da sottoporre a scansione.
Illuminazione
L'illuminazione dell'originale determina la qualità dell'immagine. Utilizzare sempre illuminazione forte e
diffusa ed evitare di creare ombre e riflessi sull'originale.
PER OTTENERE UN'ILLUMINAZIONE ADEGUATA
• La luce deve essere abbondante
• Deve essere diffusa (luce solare indiretta, sorgenti multiple)
• Non ci devono essere riflessi sull'originale
• L'originale deve essere illuminato in modo uniforme
• Si devono evitare ombre
CONSIGLIO: Finestra di dialogo Camera Settings (Impostazione videocamera)
PageCam regola automaticamente le impostazioni della videocamera relative a risoluzione e frequenza
di quadro per ottenere la migliore qualità dell'immagine. Tuttavia, a volte è necessario regolare la
luminosità nel pannello Options|Camera Settings (Opzioni|Impostazioni videocamera).
CONSIGLIO: Originali curvi
Mantenere gli originali piatti durante la scansione per garantire che tutte le parti siano a fuoco. Gli originali
curvi possono causare riflessi indesiderati e perdita di messa a fuoco.
PageCam è un programma originale che permette di catturare grafici e di effettuare il
riconoscimento ottico di testi e numeri trasformando direttamente supporti cartacei in documenti
elettronici e fogli di calcolo, tramite la videocamera per PC.
PageCam può copiare un paragrafo, una singola parola, un periodo, una breve frase,
un'illustrazione o l'intero contenuto della finestra. Le informazioni vengono selezionate 'parola
per parola', come in un programma di elaborazione testi o in un editor di immagini, con il
passaggio del puntatore su testi o grafici. Effettuata la selezione, è possibile copiarla,
trascinandola e inserendola nel programma preferito.
E, proprio come immaginavate, tutte le informazioni testuali verranno riconosciute da PageCam
dietro le quinte!
OCR per testi
Disegni in b/n
Immagini a colori
1. Avviare PageCam All'avvio viene visualizzata l'immagine "in diretta" ripresa dalla
videocamera. Se ciò non accade, fare clic su per sbloccare
l'immagine.
2. Puntare la videocamera Puntare la videocamera (verso il basso) in direzione dell'oggetto
che si desidera copiare. Regolare l'altezza se necessario.
3. Mettere a fuoco l'immagine Mettere a fuoco l'immagine ruotando la ghiera dell'obiettivo.
in presa "diretta"
4. Verificare la qualità Controllare l'illuminazione e la qualità dell'immagine prodotta.
dell'immagine
5. Ruotare Utilizzare i pulsanti di rotazione per ruotare verso l'alto il lato
destro dell'immagine. È possibile eseguire il riconoscimento ottico di
testo con un'inclinazione massima di 10 gradi verso sinistra o destra.
6. Impostare la lingua Nel menu Options (Opzioni), impostare la lingua per il
riconoscimento del testo.
7. Bloccare l'immagine Fare clic su per bloccare l'immagine della videocamera e per
della videocamera avviarne l'elaborazione per il B/N e l'OCR del testo.
8. Colori, B/N o testo Selezionare la modalità di copia (immagini a colori, disegni
monocromatici o testo) facendo clic su , o .
9. Selezionare parole o immagine Trascinare il mouse all'interno del testo (come nel programma Word
di Windows) oppure selezionare la parte dell'immagine dhe si
desidera copiare circondandola con un riquadro.
10. Copia-e-incolla e Per copiare la selezione, fare clic su , oppure trascinare la
trascinamento selezione nell'applicazione desiderata. Per trascinare un'immagine
in un file di lavoro, tenere premuto il tasto Ctrl durante il
trascinamento.
11. Ripetere, oppure tornare Selezionare un'altra porzione dell'immagine da copiare, oppure
alla ripresa diretta tornare in presa diretta per catturare un'altra immagine facendo clic
su .
COME SI USA PAGECAM
I
8 9
PageCam 6/8/00 2:37 PM Pagina 11
Page 7

DE CAMERA RICHTEN & EISEN m.b.t. DE VERLICHTING
Statief
Schroef de camera vast aan het statief, en richt de lens omlaag om met het programma PageCam
gedrukte teksten te kunnen scannen.
• Schuif de poten van het statief tot de juiste lengte uit (zie hieronder) en spreid ze.
• Voor het beste scanresultaat moet de camera recht omlaag wijzen. Kantel daartoe de kop van het
statief volledig naar voren, en kijk of de naad boven op de camera recht naar beneden loopt en niet
schuin naar links of naar rechts.
• Richt de camera tussen twee poten van het statief door zodat deze poten niet in het gescande beeld
te zien zullen zijn.
• Draai aan het zwarte ringetje om de kop vast te zetten.
Hoogte van de camera boven het bureauoppervlak
Pas de hoogte van de camera boven het document altijd aan de tekstgrootte van het te scannen
materiaal aan. Omdat PageCam voor het scannen een vaste cameraresolutie gebruikt van 640x480
beeldpunten, zal het tekstherkenningsresultaat verbeteren als u inzoomt op de tekst door de poten van
het statief in te korten, zodat de scanresolutie van de tekst omhoog zal gaan.
OPTIMALE TEKSTHERKENNING
• Voor het scannen van een normaal document is de optimale afstand tussen het document en de
cameralens circa 15 cm. Hierbij is ongeveer een kwart A4 in beeld van de camera.
• Pas de hoogte van de camera aan uw specifieke omstandigheden aan, dus lager voor kleine
lettertypen en hoger voor grotere lettertypen of een groter oppervlak.
• Stel het beeld scherp: controleer de beeldscherpte na het aanpassen van de hoogte en stel zo nodig
opnieuw scherp door aan de lensring te draaien.
• Zorg voor goede verlichting van het origineel (zie hieronder).
TIP: Kwaliteit van de tekstherkenning (OCR)
Stel voor maximale tekstherkenningskwaliteit de lengte van de statiefpoten zodanig in dat de te scannen
tekstkolom de gehele breedte van het camerabeeld vult.
Scherpstellen
Draai aan de lensring om het beeld scherp te stellen. Meestal is dit nodig als u de afstand tussen de camera
en het te scannen origineel verandert.
Verlichting
De verlichting van het origineel heeft grote invloed op de beeldkwaliteit. Zorg altijd voor heldere, diffuse
verlichting en vermijd schaduwvorming en reflecties in het origineel.
WAT IS GOEDE VERLICHTING?
• Veel licht
• Diffuus licht (indirect daglicht, kunstlicht vanuit meerdere bronnen)
• Geen lichtreflecties in het origineel
• Een gelijkmatig verlicht origineel
• Geen schaduw in beeld
TIP: Het dialoogvenster "Camera-instellingen"
De camera-instellingen voor resolutie en beeldfrequentie worden door PageCam automatisch aangepast,
zodat de beeldkwaliteit maximaal is. Maar soms moet u misschien de helderheidsinstelling aanpassen in
het menu Opties|Camera-instellingen.
TIP: Gebogen originelen
Houd uw originelen plat tijdens het scannen zodat het hele beeld scherp is. Gebogen originelen zorgen
voor reflecties en kunnen niet overal scherp in beeld worden genomen.
PageCam is een uniek programma om met behulp van uw PC-camera afbeeldingen te kopiëren
en voor het optisch herkennen van gedrukte teksten en getallen om er in elektronische
documenten en rekenbladen verder mee te kunnen werken.
Met PageCam kunt u een alinea, een woord, een zin, een uitdrukking, een tekening of het hele
camerabeeld kopiëren. U kunt de gewenste tekst of afbeelding 'woord-voor-woord' selecteren
door er net zoals in een tekstverwerker of in een beeldbewerkingsprogramma met de muis
overheen te slepen. Daarna kopieert u de selectie door deze te slepen naar, of te plakken in
het betreffende toepassingsprogramma.
En jazeker -- alle herkenbare tekst wordt ondertussen door PageCam omgezet in elektronisch
formaat!
OCR voor het kopiëren van tekst
Lijntekeningen
Kleurenafbeeldingen
1. Start de PageCam-software Na het starten van de software ziet u direct het 'live' camerabeeld.
Is dit niet het geval, klik dan op om de actuele camerabeelden
te zien.
2. Richt de camera Richt de camera (omlaag) op hetgeen u wilt opnemen. Stel de juiste
hoogte in.
3. De camera scherpstellen Draai aan de lensring om het beeld scherp te stellen.
4. Controleer de beeldkwaliteit Controleer of er voldoende licht op de afbeelding valt en of de
beeldkwaliteit goed genoeg is.
5. Roteer het beeld Gebruik de rotatie-toetsen om het beeld rechtop te zetten.
Tekstherkenning werkt ook met beelden die maximaal 10 graden
naar links of naar rechts scheef staan.
6. Stel de juiste taal in Stel via het menu Opties de juiste taal in waarmee de tekst zal
worden herkend.
7. Leg het camerabeeld vast Klik op om het camerabeeld vast te leggen en er een zwart/witafbeelding van te maken, en om de tekstherkenning te starten.
8. Kies: kleur, zwart/wit of tekst Klik op , of om te selecteren wat u wilt kopiëren: een
kleurenafbeelding, een lijntekening of tekst.
9. Selecteer een deel van de Sleep met uw muis over de te kopiëren tekst (zoals in Windows
tekst of het beeld Word), of selecteer het te kopiëren deel van het beeld door er een
kader omheen te slepen.
10. Kopiëren&Plakken of Klik op om de selectie te kopiëren, of Klik&Sleep de selectie
Klikken&Slepen direct naar uw toepassingsprogramma. Wilt u een afbeelding
slepen? Houd dan tijdens het slepen de Ctrl-toets ingedrukt.
11. Kopieer nog een keer, of maak Selecteer een ander deel van het beeld om te kopiëren, of klik op
een nieuwe opname om weer de actuele camerabeelden te zien en een nieuwe
opname te kunnen maken.
HET GEBRUIK VAN PAGECAM
NL
10 11
PageCam 6/8/00 2:37 PM Pagina 13
Page 8

COLOCACIÓN DE LA CÁMARA Y REQUISITOS DE ILUMINACIÓN
Trípode
Atornille la cámara en el trípode y apúntela hacia abajo para escanear el material impreso con PageCam.
• Extienda las patas del trípode a la longitud deseada (consulte la sección siguiente) y separe las patas
de forma equidistante.
• Apunte la cámara directamente hacia abajo para obtener los mejores resultados. Hágalo inclinando
la cabeza del trípode totalmente hacia adelante y utilice la línea central en la parte superior de la
cámara para corregir las desviaciones a la derecha / izquierda.
• Apunte la cámara hacia abajo entre dos de las patas del trípode para evitar que alguna de las patas
aparezca en la imagen escaneada.
• Gire la arandela negra para bloquear la cabeza.
Altura de la cámara sobre la superficie de la mesa
Elija siempre la altura de la cámara sobre el documento según el tamaño del texto del material a
escanear. Puesto que PageCam utiliza una resolución de escaneado de 640x480 píxeles con esta
cámara, los resultados del reconocimiento óptico de caracteres (OCR) mejorarán si hace zoom en el
texto replegando las patas del trípode, aumentando de esta forma la resolución de escaneado del texto.
CÓMO OBTENER LOS MEJORES RESULTADOS DEL OCR
• La altura óptima de escaneado de un documento normal de oficina es 15 cm desde el documento
hasta la óptica de la cámara. Esto permitirá capturar aproximadamente 1/4 de un folio A4.
• Modifique la altura según los requerimientos particulares de sus documentos, es decir, acerque la
cámara para tipos de letra más pequeños, aléjela para tipos de letra más grandes o zonas mayores.
• Asegúrese de que la imagen quede bien enfocada: después de cambiar la altura de la cámara,
compruebe y ajuste el enfoque correctamente.
• Asegúrese de tener buenas condiciones de iluminación (consulte la sección correspondiente más
adelante).
SUGERENCIA: calidad del OCR
Para obtener la calidad óptima con el OCR, ajuste la longitud de las patas del trípode, de modo que la
columna de interés rellene toda la anchura de la imagen.
Enfoque
Gire la arandela de la óptica para enfocar la imagen. Esto será necesario normalmente cada vez que
cambie la altura de la cámara sobre el material a escanear.
Iluminación
La iluminación del original afecta a la calidad de la imagen. Utilice siempre luz brillante y difusa, y evite
que haya sombras y reflejos en el original.
COMO OBTENER UNA BUENA ILUMINACIÓN
• Mucha luz
• Luz difusa (luz de día indirecta, luz de varias fuentes)
• Sin reflejos en el original
• Original iluminado de forma pareja
• Evite sombras
SUGERENCIA: cuadro de diálogo de configuración de la cámara
PageCam ajusta de forma automática la configuración de la cámara para una resolución y frecuencia de
cuadros que permitan obtener una imagen de máxima calidad. Sin embargo, el control de brillo en el
panel Opciones | configuración de Cámara a veces puede requerir algún ajuste.
SUGERENCIA: originales doblados
Mantenga los originales planos durante el escaneado para asegurarse de que toda la imagen esté
enfocada. Observe que los originales doblados podrían producir reflejos no deseados, así como pérdida
de enfoque.
PageCam es un programa exclusivo que permite capturar gráficos y reconocer ópticamente
textos y números directamente de folios impresos en documentos electrónicos y hojas de
cálculo utilizando su cámara de PC.
PageCam copiará un párrafo, una palabra sola, una oración, una frase corta, una ilustración o
todo el contenido de una ventana. La información se selecciona 'palabra por palabra', como en
un procesador de textos o editor de imágenes, arrastrando a lo largo del texto o el gráfico. Una
vez hecha la selección, sólo hay que copiarla arrastrando o pegando en el programa que se
desee.
Y...¡sí, toda la información de texto queda reconocida por PageCam de forma automática!
OCR de textos
Dibujos lineales
Imágenes en color
1. Inicie el programa Al iniciar la aplicación aparece la imagen en vivo de la cámara. Si
no es así, haga clic en para descongelar la imagen.
2. Apunte la cámara Apunte la cámara (hacia abajo) mirando al objeto que desea copiar.
Ajuste la altura si fuera necesario.
3. Enfoque la imagen Gire la arandela de la lente para enfocar la imagen.
4. Compruebe la calida de la imagen Compruebe la iluminación y la imagen en pantalla.
5. Gire Utilice los botones para girar la imagen hacia arriba. El texto
puede reconocerse ópticamente con una inclinación de 10 grados a
la izquierda derecha.
6. Elija el idioma Fije el idioma deseado para el reconocimiento óptico en el menú
Options (Opciones).
7. Congele la imagen Haga clic en para congelar la imagen de la cámara e iniciar el
procesamiento de la imagen en blanco y negro y el reconocimiento
del texto.
8. Color, B/N o texto Haga clic en , o para seleccionar el modo de copia para
imágenes en color, dibujos o texto.
9. Seleccione palabras o imagen Arrastre el puntero con el ratón sobre el texto (como en Word) o
seleccione la parte de la imagen que desea copiar arrastrando un
cuadro alrededor de ella.
10. Copie, pegue o arrastre y suelte Haga clic en para copiar la selección o arrastre y pegue la
selección a la aplicación que desee. Si arrastra una imagen a un
archivo de trabajo, deberá pulsar el botón Ctrl durante el arrastre.
11. Repita o cambie a modo en Seleccione otra parte de la imagen a copiar o haga clic en para
vivo nuevamente cambiar al modo en vivo y poder así capturar la siguiente imagen.
UTILIZACIÓN DE PAGECAM
E
12 13
PageCam 6/8/00 2:37 PM Pagina 15
Page 9

OPPSETTING AV KAMERAET OG KRAV TIL LYSFORHOLD
Tripod
For å skanne inn trykte dokumenter ved hjelp av PageCam skrur du kameraet fast på tripoden, deretter
stiller du det inn slik at det peker nedover.
• Trekk ut benene på tripoden til ønsket lengde (se nedenfor) og fold dem jevnt ut.
• Best resultat av skanningen oppnås når kameraet peker loddrett ned. Vipp hodet på tripoden
fremover og bruk senterlinjen på toppen av kameraet for korrigere det til venstre/høyre side.
• Kameraet rettes loddrett inn mellom to av benene for å unngå at ett av dem vises på det innskannede
bildet.
• Vri den svarte ringen for å låse hodet på tripoden.
Kameraets høyde over originaldokumentet
Avstanden mellom dokumentet og kameraet velges alltid utfra tekststørrelsen i dokumentet som skal
skannes inn. Ettersom PageCam gjør bruk av en fast oppløsning på 640x480 bildepunkter (pixels) ved
skanning med dette kameraet, vil OCR-resultatet bli bedre hvis du zoomer inn på teksten ved å trekke
inn benene på tripoden slik at oppløsningen på teksten økes ved skanningen.
FOR OPTIMALE RESULTATER VED OPTISK TEGNGJENKJENNING (OCR)
• Optimal avstand for skanning av et vanlig dokument er 15 cm mellom dokument og kameralinse. Dette
gir et utsnitt på ca. 1/4 A4-side.
• Høyden endres etter behov og avhengig av dine egne krav, dvs. kameraet flyttes nærmere ved mindre
skrifttyper, lengre vekk ved større skrifttyper / større utsnitt.
• Forsikre deg om at bildet er i fokus: etter å ha innstilt kamerahøyden, kontrolleres og justeres
fokuseringen.
• Forsikre deg om at lysforholdene er de best mulige (se nedenfor).
TIPS: OCR kvalitet
For å oppnå best mulig kvalitet på OCR-resultatet, justeres lengden på benene på tripoden slik at det
aktuelle tekstfeltet fyller hele bildeutsnittet.
Fokus
Drei ringen på linsen for å fokusere bildet. Dette vil vanligvis være nødvendig hver gang du endrer
kameraets avstand til dokumentet som skal skannes inn.
Lysforhold
Belysningen av originaldokumentet har stor betydning for bildekvaliteten. Bruk alltid kraftig, diffus
belysning og unngå skygger og reflekser på originalen.
SLIK OPPNÅR DU GOD BELYSNING
• Rikelig lys
• Diffus belysning (indirekte dagslys, lys fra flere lyskilder)
• Ingen reflekser på originalen
• Jevn belysning av originalen
• Unngå skygger
TIPS: Dialogboksen Kamerainnstillinger
PageCam justerer automatisk kamerainnstillingene for oppløsning og bildefrekvens slik at optimal
bildekvalitet oppnås. Det kan imidlertid være nødvendig å justere lysstyrken som du finner under
Alternativer|Kamerainnstillinger.
TIPS: Krummede originaler
Hold originalene plant under skanning for å sikre at alle deler av bildet er i fokus. Merk at krummede
originaler kan forårsake uønskede reflekser og uskarphet.
PageCam er et unikt program som gjør at du ved hjelp av PC-kameraet ditt kan gjøre opptak av
grafikk og deretter gjenkjenne tekst og tall fra papirkopier og importere disse direkte inn i
elektroniske dokumenter og regneark.
PageCam kan kopiere ett avsnitt, ett enkelt ord, en setning, en kort frase, en illustrasjon eller
hele utsnittet i vinduet. Utvelgelsen av informasjonen foregår 'ord-for-ord' ved å bruke Dra og
Slipp funksjonen på tekst eller grafikk, på samme måte som i tekstbehandlings- eller
bildebehandlingsprogram. Når ønsket utsnitt er valgt, kopierer du det til ønsket applikasjon ved
hjelp av Dra og Slipp eller Lim inn.
Jo, forresten - i mellomtiden har PageCam allerede behandlet og gjenkjent all tekst!
OCR for tekst
Linjediagram
Fargebilder
1. Start PageCam Ved oppstart vises det levende kamerabildet. Hvis bildet er frosset,
klikker du på for å vise det levende bildet.
2. Still inn kameraet Rett kameraet (nedover) mot objektet du ønsker å kopiere. Still om
nødvendig inn høyden.
3. Fokuser bildet Vri på linsen for å få bildet i fokus.
4. Kontroller bildekvaliteten Kontroller lysinnstillingen og kvaliteten på det gjengitte bildet.
5. Roter Bruk roteringsknappene for å rotere bildet slik at det vises
korrekt. Teksten må ikke helle mer enn 10 grader på høyre eller
venstre side for at OCR-programmet skal gjenkjenne teksten optisk.
6. Velg språk Angi angjeldende språk i programmet for tegngjenkjenning i menyen
Alternativer.
7. Frys kamerabildet Klikk på for å fryse kamerabildet og starte behandlingen av
teksten i bildet med bruk av funksjonene svarthitt og OCR.
8. Farge, svarthvitt eller tekst Klikk på , eller for å velge ønsket modus for fargebilde,
linjediagram eller tekst.
9. Velg tekst eller bilde Dra markøren over teksten (på samme måte som i Windows Word),
eller velg et utsnitt av bildet du ønsker å kopiere ved å trekke opp
en boks rundt det.
10. Kopier og Lim inn eller Klikk på for å kopiere det valgte utsnittet, eller bruk Dra og
Dra og Slipp Slipp funksjonen for å importere utsnittet til ønsket applikasjon. Hvis
du bruker Dra og Slipp funksjonen for å importere bildet til en
arbeidsfil, må du holde Ctrl-knappen nede mens du drar.
11. Gjenta prosedyren eller gå Velg et annet utsnitt av bildet, eller klikk på for å starte opptak
tilbake til levende bilde av neste bilde.
SLIK BRUKER DU PAGECAM
N
14 15
PageCam 6/8/00 2:37 PM Pagina 17
Page 10

PLACERING AF KAMERAET & BELYSNING
Fotostativ
Skru kameraet fast på fotostativet, og ret det nedad for at scanne trykt materiale med PageCam.
• Udtræk fotostativets ben til en passende længde (se herunder), og sæt dem med ensartet afstand.
• Ret kameraet lige ned for at opnå de bedste resultater ved scanning. Dette gøres ved at vippe
fotostativets top helt forover og bruge midterlinien på toppen af kameraet til venstre/højre-tilretning.
• Ret kameraet ned mellem to ben for at undgå, at et af benene kommer med på det scannede billede.
• Drej den sorte ring for at låse toppen.
Kamerahøjde over dokumentet
Vælg altid kamerahøjde over dokumentet ud fra det scannede materiales tekststørrelse. Da PageCam
bruger en fast scanningsopløsning på 640x480 pixels med dette kamera, vil OCR-resultater blive bedre,
hvis du zoomer ind på teksten ved at trække fotostativets ben ind og dermed forøger tekstens
scanningsopløsning.
FOR OPTIMALE RESULTATER MED OCR
• Den optimale højde til scanning af et normalt dokument er 15 cm fra dokument til kameralinse. Dette
gør det muligt at indfange ca. 1/4 af en A4-side.
• Juster højden efter dine specifikke behov - ryk kameraet tættere på ved små skrifttyper og længere
væk ved store skrifttyper eller store områder.
• Kontroller, at billedet er i fokus, også efter at kamerahøjden er blevet ændret.
• Kontroller, at der er gode lysforhold (se herunder).
TIP: OCR-kvalitet
For at opnå maks. OCR-kvalitet justeres fotostativets benlængde, så interesseområdet fylder hele
billedbredden.
Fokus
Drej objektivringen for at fokusere på billedet. Dette er normalt nødvendigt, hver gang du ændrer
kameraets højde over materialet, der skal scannes.
Belysning
Originalens belysning har indvirkning på billedkvaliteten. Brug altid stærk og spredt belysning - undgå
skyggedannelse og reflekser på originalen.
SÅDAN OPNÅS GOD BELYSNING
• Masser af lys
• Spredt belysning (indirekte dagslys, lys fra flere kilder)
• Ingen reflekser på original
• Jævnt fordelt belysning på original
• Undgå skygger
TIP: Dialogboksen Kameraindstillinger
PageCam justerer automatisk kameraindstillinger for opløsning og framerate for at give maks.
billedkvalitet. Lysstyrkekontrollen i Options|Kameraindstillinger skal af og til justeres.
TIP: Krøllede originaler
Kontroller, at originaler er flade under scanning for at sikre, at alle dele af billedet er i fokus. Bemærk, at
Krøllede originaler kan forårsage såvel uønskede lysreflekser som tab af fokus.
PageCam er et unikt program, som sætter dig i stand til at indfange grafik og optisk genkende
tekst og tal direkte fra scannede hardcopy-sider til elektroniske dokumenter og regneark med
dit PC-kamera.
PageCam kopierer et afsnit, et enkelt ord, en sætning, del af en sætning, en tegning eller hele
vinduets indhold. Informationen vælges 'ord-til-ord' ligesom i et tekstbehandlings- eller
billedredigeringsprogram ved at trække hen over tekst eller grafik. Når først det er valgt, skal du
bare kopiere det ved at trække eller indsætte det ind i dit foretrukne program.
Og ja - PageCam har allerede genkendt al tekstinformationen for dig!
OCR til tekst
Stregtegninger
Farvebilleder
1. Start PageCam Det "live" kamerabillede vises, når der tændes. Hvis ikke, klikker du
på for at frigive billedet.
2. Peg kameraet Peg kameraet (nedad) mod det, du vil kopiere. Juster højden efter
behov.
3. Bring "live"-billedet i fokus Drej objektivringen for at bringe billedet i fokus.
4. Kontroller billedkvaliteten Kontroller belysningen og den resulterende billedkvalitet.
5. Roter billedet Brug rotationsknapperne til at rotere billedet,så højre side
vender opad. Tekst kan genkendes optisk med en hældning på op
til 10˚ til venstre eller højre.
6. Vælg sprog Vælg det relevante sprog til tekstgenkendelse i "Options"-menuen.
7. Frys kamerabilledet Klik på for at fryse kamerabilledet og starte behandling af
billedet til sort/hvid og OCR af teksten.
8. Farve, sort/hvid eller tekst Klik på , eller for at vælge kopieringsmetode til
farvebilleder, stregtegning eller tekst.
9. Vælg ord eller billede Træk musen hen over teksten (som i Windows Word), eller vælg en
del af det billede, du vil kopiere, ved at trække en kasse rundt om
den.
10. Copy&Paste eller Drag&Drop Klik på for at kopiere dit valg, eller "Drag & Drop" valget til dit
foretrukne program. Hvis du trækker et billede til en arbejdsfil, skal
Ctrl-tasten være trykket ned imens.
11. Gentag denne frem-gangs- Vælg en anden del af billedet til kopiering, eller klik på for at
måde, eller gå tilbage til indfange det næste "live" billede.
"live" igen
SÅDAN BRUGES PAGECAM
DK
16 17
PageCam 6/8/00 2:37 PM Pagina 19
Page 11

KAMERAPLACERING OCH LJUSFÖRHÅLLANDEN
Stativ
Skruva fast kameran i stativet och rikta den nedåt för att skanna trycksaker med PageCam.
• Dra ut och sära på stativbenen så att kameran kan placeras på ett lämpligt avstånd (se nedan) från
bildobjektet.
• För bästa resultat riktar du kameran rakt nedåt. Detta kan du göra genom att vrida stativets övre del
framåt så långt det går och sedan använda mittlinjen på kamerans ovansida för att korrigera åt
vänster/höger.
• När du riktar kameran nedåt, se till att du gör detta mellan två ben, annars kan du få med ett av benen
i den skannade bilden.
• Dra åt den svarta ringen för att spärra stativhuvudet.
Kamerahöjden ovanför bordsytan
Anpassa alltid avståndet mellan kameran och papperet enligt textstorleken på materialet som ska
skannas. Eftersom PageCam använder en fast skanningsupplösning på 640x480 pixlar med denna
kamera, får du bättre resultat av teckenigenkänning (OCR) om du zoomar in på texten genom att
anpassa längden på stativbenen.
FÖR BÄSTA RESULTAT
• Bästa höjdinställning för skanning av ett vanligt ark är 15 cm mellan papper och lins. I detta läge kan
du fastlägga ca 1/4 av en A4.
• Det kan vara nödvändigt att anpassa höjden under andra förhållanden: flytta kameran närmare
papperet och texten är finstilt eller längre ifrån om texten är storstilt / större område.
• Kontrollera att skärpan är klar: kontrollera alltid skärpan om du ändrat avståndsinställningen.
• Se till att du har tillräckligt med ljus (se nedan).
TIPS: OCR-kvalitet
För bästa möjliga OCR-kvalitet (teckenigenkänning), justerar du stativbenen så att önskad kolumn fyller
hela bildbredden.
Fokus
Vrid på linsringen för att ställa in skärpan. Kolla alltid skärpan när du gjort någon form av avståndsjustering.
Ljus
Ljuset har alltid stor inverkan på bildkvaliteten. Använd helst en ljus, diffus ljuskälla och undvik skuggor
och reflektioner på originalet.
FÖR ATT ERHÅLLA BÄSTA LJUSFÖRHÅLLANDEN
• Förse med mycket ljus
• Använd diffust ljus (indirekt dagsljus, ljus från flera jämnstarka ljuskällor)
• Inga reflektioner från originalet
• Originalet ska vara jämnt belyst
• Undvik skuggpartier
TIPS: Dialogrutan för kamerainställningar
PageCam justerar automatiskt till de kamerainställningarna för upplösning och bildhastighet som ger
bästa bildkvalitet. Det kan dock vara värt att justera ljusstyrkan något på panelen för
Inställningar/kamerainställningar (Options|Camera Settings).
TIPS: Ej flata original
Se till att originalet ligger platt under skanningen annars kan vissa delar bli oskarpa. Observera också att
ljusreflektioner kan uppstå när originalet inte ligger platt mot underlaget.
PageCam i är ett unikt program som du kan använda med din PC-kamera för att fastlägga
grafiska bilder och avläsa tryckta tecken och siffror som sedan kan behandlas som text i ett
dokument eller som siffror i ett kalkylark.
PageCam kan kopiera ett stycke, ett ord, en mening, en kort fras, en bild eller hela innehållet i
bildfönstret. Informationen markeras ord för ord, precis som med ett ordbehandlingsprogram
eller en bildredigerare, genom att dra musen över texten eller bilden. När markeringen är gjord
kopierar du den genom att dra eller klistra in den i lämpligt program.
Och svaret är ja -- all textinformation känns redan igen av din PageCam bakom kulisserna!
OCR för Textkopiering
Linjeritningar
Färgbilder
1. Starta PageCam Den rörliga kamerabliden visas, om inkte klicka på för att få en
rörlig bild.
2. Rikta kameran Rikta kameran (nedåt) mot objektet som ska kopieras. Justera
höjden om nödvändigt.
3. Fokusera den rörliga bilden Vrid på linsringen för att ställa in skärpan.
4. Kontrollera bildkaliteten Kontrollera ljus och om du har en bra bildkvalitet.
5. Rotera Använd rotationsknapparna om du behöver rotera bilden.
Text kan kännas igen på optisk väg med en lutning på 10 grader åt
höger eller vänster.
6. Välj språk I inställningsmenyn (Options) ställer du in språket för
textigenkänningen.
7. Frys kamerabilden Klicka på för att fastlägga en stillbild och påbörja framställningen
för svart-vit (B&W) vit och teckenigenkänning (OCR) av texten.
8. Färg, svart-vit eller text Klicka på , eller för att välja kopieringslägen för
färgbilder, teckningar eller text.
9. Välj ord eller bild Dra musen över texten (på samma sätt som i Windows Word) eller
markera den del av texten som ska kopieras genom att dra en
markeringsruta till lämplig storlek.
10. Kopier&klistra in eller dra&släpp Klicka på för att kopiera det markerade området eller dra&släpp
markeringen till ett annat program. Om du drar en bild till en annan
fil, håll Ctrl-nedtryckt när du drar markering.
11. Upprepa eller återgå till Markera en annan del av bilden som ska kopieras eller klicka på
rörlig bild för att återgå till en rörliga kamerabild.
ANVÄNDA PAGECAM
S
18 19
PageCam 6/8/00 2:37 PM Pagina 21
Page 12

KAMERAN KOHDISTUS JA VALAISTUSVAATIMUKSET
Kolmijalka
Ruuvaa kamera kolmijalan päälle ja suuntaa se sitten alaspäin skannataksesi tulostettua materiaalia
PageCam-ohjelmalla.
• Säädä kolmijalan jalat sopivan pituisiksi (katso alla) ja levitä ne tasaisesti erilleen toisistaan.
• Parhaan skannaustuloksen saat, kun suuntaat kameran suoraan alaspäin. Kallista kolmijalan pää
kokonaan eteen ja käytä keskiviivaa kameran päällä asennon korjaamiseen vasemmalle/oikealle.
• Kohdista kamera alaspäin kahden jalan väliin, jotta yksi jaloista ei näkyisi skannatussa kuvassa.
• Lukitse pää paikalleen kääntämällä mustasta renkaasta.
Kameran korkeus työpöydän pintaan verrattuna
Valitse kameran korkeus asiakirjaasi verrattuna aina skannattavan materiaalin tekstin koon mukaan.
Koska PageCam käyttää tässä kamerassa kiinteää 640x480 kuvapisteen skannaustarkkuutta,
tekstintunnistus paranee, jos suurennat tekstiä vetämällä kolmijalan jalkoja takaisin sisään lisäten näin
tekstin skannaustarkkuutta.
HALUTESSASI PARHAAN TULOKSEN
• Ihanteellinen korkeus normaalin toimistoasiakirjan skannaukseen on 15 cm asiakirjasta kameran
linssiin. Tällöin saadaan siepattua noin 1/4 A4-sivusta.
• Muuta korkeutta tarvittaessa kulloisiakin tarpeitasi vastaavaksi, eli siirrä kameraa lähemmäksi, kun
fontti on pienempää, ja kauemmaksi, kun fontti on suurta / alue suuri.
• Varmista, että kuva on hyvin kohdistettu: muutettuasi kameran korkeutta tarkista ja säädä kohdistusta
tarpeen mukaan.
• Varmista hyvät valaistusolosuhteet (katso alla)
OHJE: tekstintunnistuksen laatu
Jotta tekstintunnistuksen laatu olisi mahdollisimman hyvä, säädä kolmijalan jalkoja siten, että
skannattava palsta täyttää koko kuvan leveyden.
Kohdistus
Kohdista kuva kääntämällä linssin rengasta. Tämä on yleensä tarpeen aina, kun muutat kameran korkeutta
skannattavaan materiaaliin verrattuna.
Valaistus
Alkuperäisen asiakirjan valaistus vaikuttaa kuvan laatuun. Käytä aina kirkasta hajavaloa ja vältä varjojen
ja heijastusten luomista alkuperäiselle asiakirjalle.
NÄIN SAAT HYVÄN VALAISTUKSEN
• Runsaasti valoa
• Hajavalaistus (epäsuoraa auringonvaloa, valoa monista lähteistä)
• Ei heijastuksia alkuperäiselle asiakirjalle
• Alkuperäinen asiakirja tasaisesti valaistu
• Vältä varjoja
OHJE: Camera Settings -valintaruutu (Kameran asetukset)
PageCam säätää kameran asetukset automaattisesti tarkkuuden ja kuvataajuuden osalta parhaan
mahdollisen kuvan laadun takaamiseksi. Valoisuuden säätö kohdasta Options / Camera Settings
(Asetukset / Kameran asetukset) voi kuitenkin joskus olla tarpeen.
OHJE: Ryppyiset alkuperäiset asiakirjat
Pidä alkuperäiset asiakirjat sileinä skannauksen ajan varmistaaksesi, että kaikki kuvan osat tulevat
mukaan. Huomaa, että rypyt voivat aiheuttaa ei-toivottuja valoheijastuksia sekä kohdistusongelmia.
PageCam on ainutlaatuinen ohjelma, jonka avulla voit siepata kuvia ja tunnistaa optisesti tekstiä
ja numeroita suoraan tulostetuilta sivuilta sähköisiin asiakirjoihin ja laskentataulukoihin
PC-kamerasi avulla.
PageCam kopioi kappaleen, yksittäisen sanan, lauseen, lyhyen sanonnan, piirroksen tai koko
ikkunan sisällön. Tiedot valitaan "sanasta sanaan", aivan kuten tekstin- tai
kuvankäsittelyohjelmassa, vetämällä hiiriosoitinta tekstin tai kuvan yli. Kun alue on valittu, sinun
tarvitsee vain kopioida se joko vetämällä tai liittämällä haluamaasi ohjelmaan.
Ja kyllä vain - kaikki tekstin sisältämä tieto on jo tunnistettu puolestasi PageCamin
työskennellessä taustalla!
Tekstintunnistus tekstin kopioimiseksi
Viivapiirrokset
Värikuvat
1. Käynnistä PageCam Kameran live-kuva näkyy ohjelman käynnistyessä. Ellei, napsauta
kaadaksesi kuvan liikkumaan.
2. Kohdista kamera Tähtää kameralla (alaspäin) kohti kohdetta, jonka haluat kopioida.
Säädä tarvittaessa korkeutta.
3. Tarkenna live-kuvaa Tarkenna kuvaa kääntämällä linssiä.
4. Tarkista kuvan laatu Tarkista valaistus ja tulokseksi saatava kuvan laatu.
5. Kierrä Käytä Kierrä-painikkeita kääntääksesi kuvan oikean sivun
ylös. Teksti voidaan lukea optisesti, kun se on kallellaan vasemmalle
tai oikealle enintään 10 astetta.
6. Valitse kieli Valitse haluamasi kieli tekstin lukemista varten Asetukset-valikosta
(Options).
7. Pysäytä kameran kuva Napsauta pysäyttääksesi kameran kuvan ja alkaaksesi kuvan
käsittelyn mustavalkoista kopiota ja tekstin optista lukemista varten.
8. Väri, mustavalkoinen tai teksti Napsauta , tai valitaksesi kopiointitavan värikuville,
viivapiirroksille tai tekstille.
9. Valitse sanat tai kuva Vedä hiiriosoitin tekstin yli (kuten Windows Wordissa) tai valitse
kuvan osa, jonka haluat kopioida, vetämällä laatikko sen ympärille.
10. Kopioi & liitä tai vedä & pudota Napsauta kopioidaksesi valintasi tai vedä ja pudota valintasi
haluamaasi sovellukseen. Jos vedät kuvan työtiedostoon, Ctrlnäppäintä on pidettävä alhaalla vetämisen ajan.
11. Toista tai siirry taas live-kuvan Valitse toinen kuvan osa kopioitavaksi tai napsauta siirtyäksesi
sieppaukseen sieppaamaan seuraavan live-kuvan.
PAGECAM-OHJELMAN KÄYTTÖ
SF
20 21
PageCam 6/8/00 2:37 PM Pagina 23
 Loading...