

Page 1
• Einbau dieses Laufwerks in den PC
Verwendung der Software mit diesem Laufwerk
• Comment installer cet appareil dans l’ordinateur ?
Comment utiliser les logiciels de cet appareil ?
• Come installare questa unità sul PC
Come usare il software con questa unità
• Hoe installeer ik dit station in mijn PC?
Hoe gebruik ik de programma's?
• ¿Cómo instalar esta unidad en su ordenador?
¿Cómo utilizar el software con esta unidad?
How to install this drive in your PC?
How to use the software with this drive?
For Internal ReWriters
using
Nero 5.5
Version 2.0
39608_Internal with Nero5,5.qxd 19-09-2003 12:25 Pagina 1
Page 2

Contents - Inhalt - Table des matières - Indice - Inhoud - Índice
2
Installation How to install this drive in my computer? 3
Copy How to copy a CD? 15
Data How to make a Data CD? 21
Music How to make an Audio CD? 29
Information How to find warranty 35
Installation Einbau dieses Laufwerks in den Computer 3
Kopieren Eine CD kopieren 15
Daten Eine Daten-CD erstellen 21
Musik Erstellen einer Audio-CD 29
Information How to find warranty 35
Installation Comment installer ce lecteur dans l’ordinateur? 3
Copie Comment copier un CD ? 15
Données Comment créer un disque de données ? 21
Musique Comment créer un CD audio? 29
Information How to find warranty 35
Installazione Come installare questa unità sul computer 3
Copia Come copiare un CD? 15
Dati Come creare un CD di dati? 21
Musica Come creare un CD Audio? 29
Informazione How to find warranty 35
Installeren Hoe installeer ik dit station in mijn computer? 3
Kopiëren Hoe kopieer ik een cd? 15
Data Hoe maak ik zelf een data-cd? 21
Muziek Hoe maak ik zelf muziek-cd's? 29
Informatie How to find warranty 35
Instalación ¿Cómo instalar esta unidad en el ordenador? 3
Copia ¿Cómo copiar un CD? 15
Datos ¿Cómo crear un CD de datos ? 21
Música ¿Cómo crear un CD de audio? 29
Información How to find warranty 35
UK
D
F
I
NL
E
39608_Internal with Nero5,5.qxd 19-09-2003 12:25 Pagina 2
Page 3
How to install this drive
in my computer?
Einbau dieses Laufwerks in den Computer
Comment installer ce lecteur dans l’ordinateur ?
Come installare questa unità sul computer
Hoe installeer ik dit station in mijn computer?
¿Cómo instalar esta unidad en el ordenador?
The next pages show how to install
your new DVD-ReWriter in the PC.
Since there are many brands and types
of PC's available, the next photographs
show only examples on how your drive
could be installed.
For specific information on your PC,
please refer to your PC manual or
contact your local dealer.
Auf den nächsten Seiten wird
beschrieben, wie Sie Ihren neuen DVDReWriter in den PC einbauen können.
Da es viele verschiedene PC-Marken
und –Typen gibt, zeigen die folgenden
Fotos nur Beispiele dafür, wie Ihr
Laufwerk eingebaut werden kann.
Für spezielle Informationen zu Ihrem PC
beachten Sie bitte Ihr PC-Handbuch,
oder wenden Sie sich an Ihren Händler
vor Ort.
Les pages qui suivent illustrent la
procédure d’installation de votre nouveau
DVD-ReWriter dans l’ordinateur.
Il existe un grand nombre de marques
et de modèles d’ordinateurs. Les photos
suivantes ne sont présentées qu’à titre
d’illustration de la procédure à suivre
pour installer l’appareil.
Pour des informations spécifiques sur
votre ordinateur, reportez-vous à son
mode d’emploi ou contactez votre
revendeur.
Nelle prossime pagine verranno date
informazioni su come installare DVDReWriter sul PC.
Poiché esistono molte marche e tipi di
PC, le prossime foto mostreranno solo
esempi di come l'unità possa essere
installata.
Per informazioni specifiche sul proprio
PC, fare riferimento al manuale PC o
rivolgersi al proprio rivenditore locale.
De volgende pagina's beschrijven het
installeren van de nieuwe DVDReWriter in uw PC.
Omdat er vele soorten en merken
computers zijn, zullen de hierna volgende
afbeeldingen hoogstwaarschijnlijk niet
exact overeenkomen met uw eigen
situatie. Ze dienen slechts ter illustratie
van het installeren.
Raadpleeg voor specifieke informatie
over uw eigen computer de handleiding
van uw PC, of neem contact op met uw
leverancier.
Las páginas siguientes muestran cómo
instalar su nueva regrabadora en el
DVD-PC.
Puesto que hay muchas marcas y tipos
de ordenadores personales disponibles,
las fotografías siguientes muestran sólo
algunos ejemplos de cómo podría
instalarse la unidad.
Para obtener información específica
sobre su ordenador personal, por favor
consulte el manual de su PC o póngase
en contacto con su distribuidor local.
UK D F
I NL E
3
39608_Internal with Nero5,5.qxd 19-09-2003 12:25 Pagina 3
Page 4
4
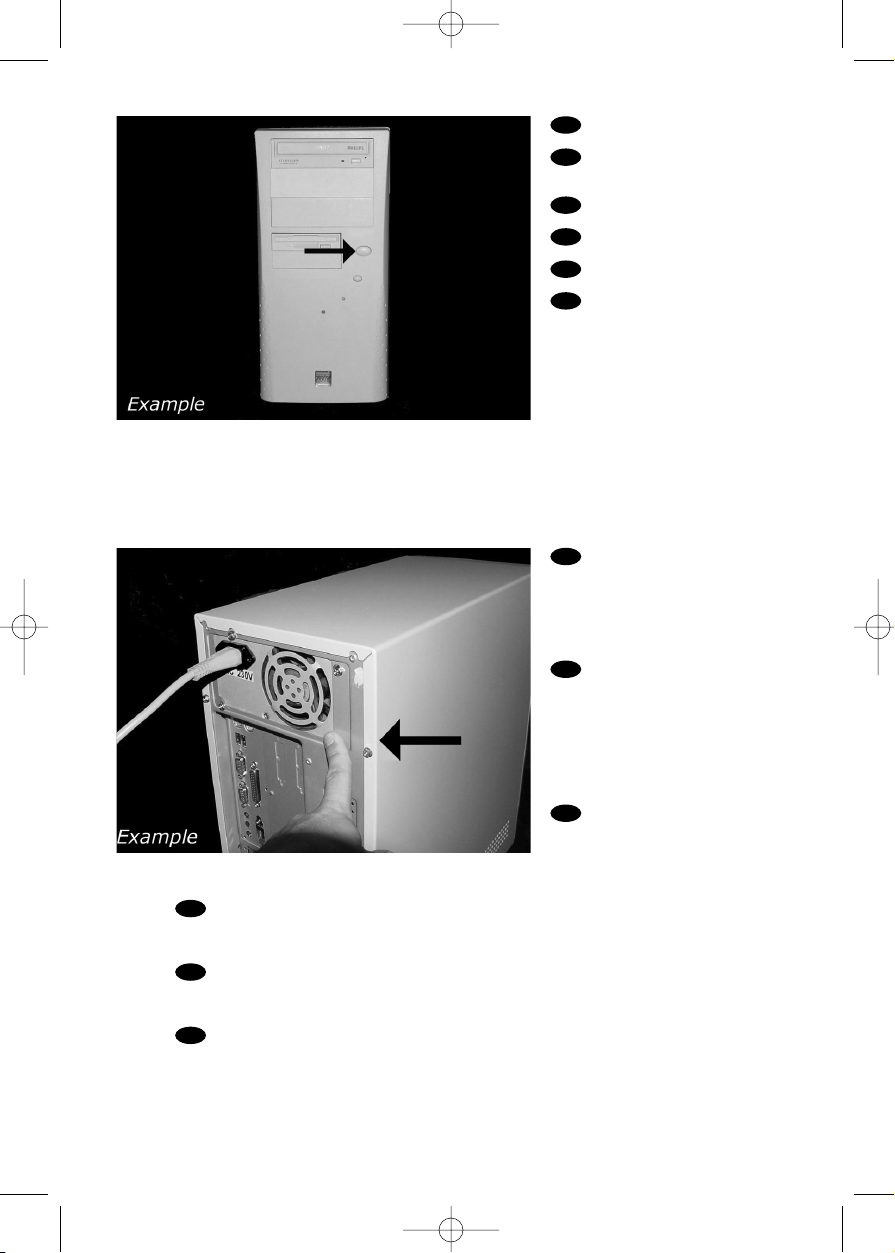
Tu rn your computer off.
Schalten Sie Ihren
Computer aus.
Éteignez l’ordinateur.
Spegnere il computer.
Schakel de computer uit.
Apague el ordenador.
Touch a unpainted
metal part (eg. your heating or
an unpainted part of your
computer case) to avoid any
damage to your computer by
electrostatic discharge.
Berühren Sie ein
unbemaltes Metallteil (z.B. Ihre
Heizung oder ein nicht
bemaltes Teil Ihres Computergehäuses), um zu vermeiden,
dass Ihr Computer durch
elektrische Entladung
beschädigt wird.
Touchez une partie
métallique non peinte (p.ex. le
radiateur ou une partie nue
du capot de votre ordinateur)
pour éviter tout risque de décharge électrostatique qu endommagerait l’ordinateur.
Toccare una parte di metallo non verniciata (ad es. il riscaldamento o una parte
non verniciata del telaio del computer) per evitare di danneggiare il computer con
scariche elettrostatiche.
Om uw te computer beschermen tegen elektrostatische ontladingen, moet u altijd
eerst een ongeverfd metalen deel aanraken (bijv. een verwarmingsbuis of het
computerframe) om uzelf te ontladen.
Toque alguna parte metálica sin pintar (por ejemplo: su calefacción o alguna parte
sin pintar de la carcasa del ordenador) para evitar producir daños al ordenador por
descargas electrostáticas.
UK
D
F
I
NL
E
2
1
UK
F
I
NL
E
D
39608_Internal with Nero5,5.qxd 19-09-2003 12:25 Pagina 4
Page 5
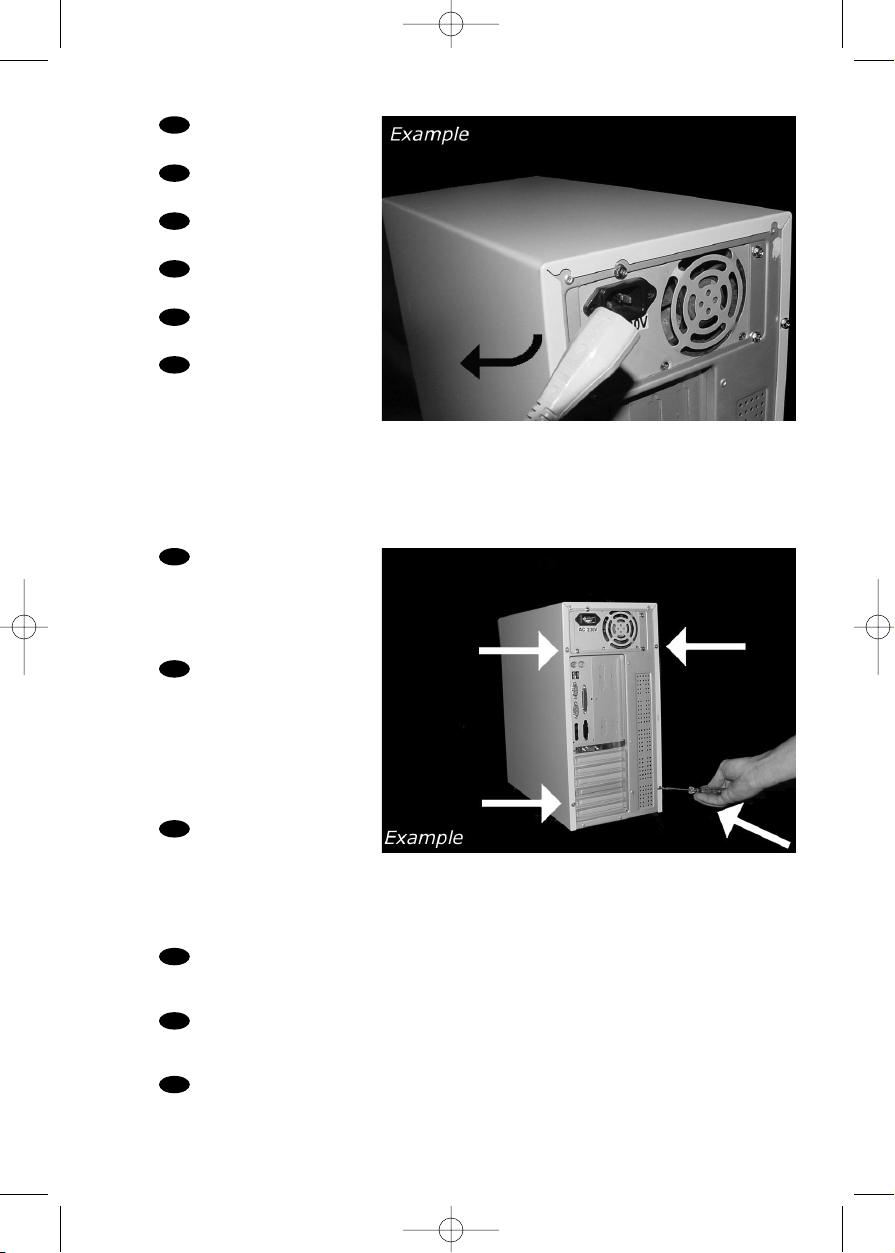
Disconnect the power
cable from the PC.
Ziehen Sie das Netzkabel
vom Computer ab.
Débranchez le câble
d’alimentation de l’ordinateur.
Disconnettere il cavo di
alimentazione dal PC.
Trek de netstekker uit de
PC.
Desconecte el cable de
alimentación del PC.
Open your computer.
You may have to unleash screws
which are mostly located at the
back of your computer.
➤ See your computer manual
for more details
Öffnen Sie Ihren
Computer. Eventuell müssen Sie
hierzu Schrauben
herausdrehen, die sich meistens
an der Rückseite Ihres
Computers befinden.
➤ Weitere Informationen
hierzu finden Sie in Ihrem
Computerhandbuch.
Ouvrez l’ordinateur. Pour
cela, il peut être nécessaire de
desserrer une ou plusieurs vis à
l’arrière de l’ordinateur.
➤ Pour plus de détail, reportezvous au mode d’emploi de
l’ordinateur.
Aprire il computer. È possibile che si dovranno svitare delle viti che in genere si
trovano sul pannello posteriore del computer.
➤ Per ulteriori informazioni fare riferimento al manuale del computer.
Maak uw computer open. Meestal moet u de schroeven aan de achterkant van uw
computer losschroeven.
➤ Raadpleeg de handleiding van uw PC voor details over het openen van de PC
Abra el ordenador. Tendrá que quitar los tornillos que suelen ir colocados en la
parte posterior del ordenador.
➤ Consulte el manual del ordenador donde econtrará más detalles
4
3
5
UK
F
I
NL
E
D
UK
F
I
NL
E
D
39608_Internal with Nero5,5.qxd 19-09-2003 12:25 Pagina 5
Page 6
6
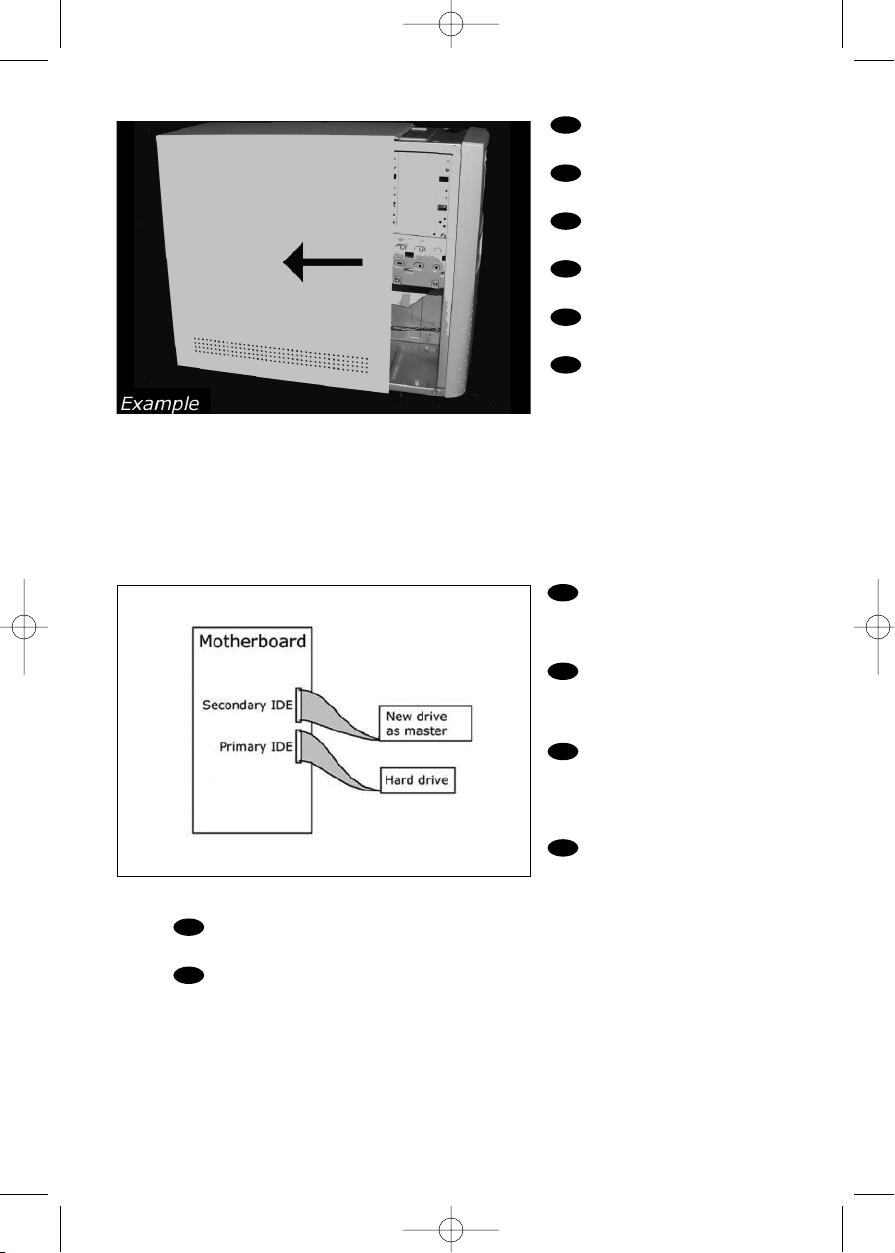
Ta ke off the cover of the
computer.
Nehmen Sie die
Abdeckung des Computers ab.
Retirez le capot de
l’ordinateur.
Togliere il coperchio del
computer.
Verwijder de kast van
de computer.
Quite la carcasa del
ordenador.
5
UK
F
I
NL
E
D
If you have no other or
you replace an old drive, you
will have to choose the
MASTER setting.
Wenn Sie kein anderes
haben oder ein altes Laufwerk
austauschen, müssen Sie die
Einstellung MASTER wählen.
Si vous n’en avez pas
d’autre ou si vous remplacez
un ancien lecteur, vous devez
choisir le mode maître
(MASTER).
Se non si dispone di
altre unità, o se è stata
sostituita un'unità esistente,
impostare l'unità su MASTER.
Hebt u geen ander station of vervangt u een bestaand station, dan moet u de
instelling MASTER kiezen.
Si no dispone de otra unidad o está sustituyendo una antigua, deberá configurarla
como MASTER.
6
F
I
NL
E
D
UK
39608_Internal with Nero5,5.qxd 19-09-2003 12:25 Pagina 6
Page 7
7
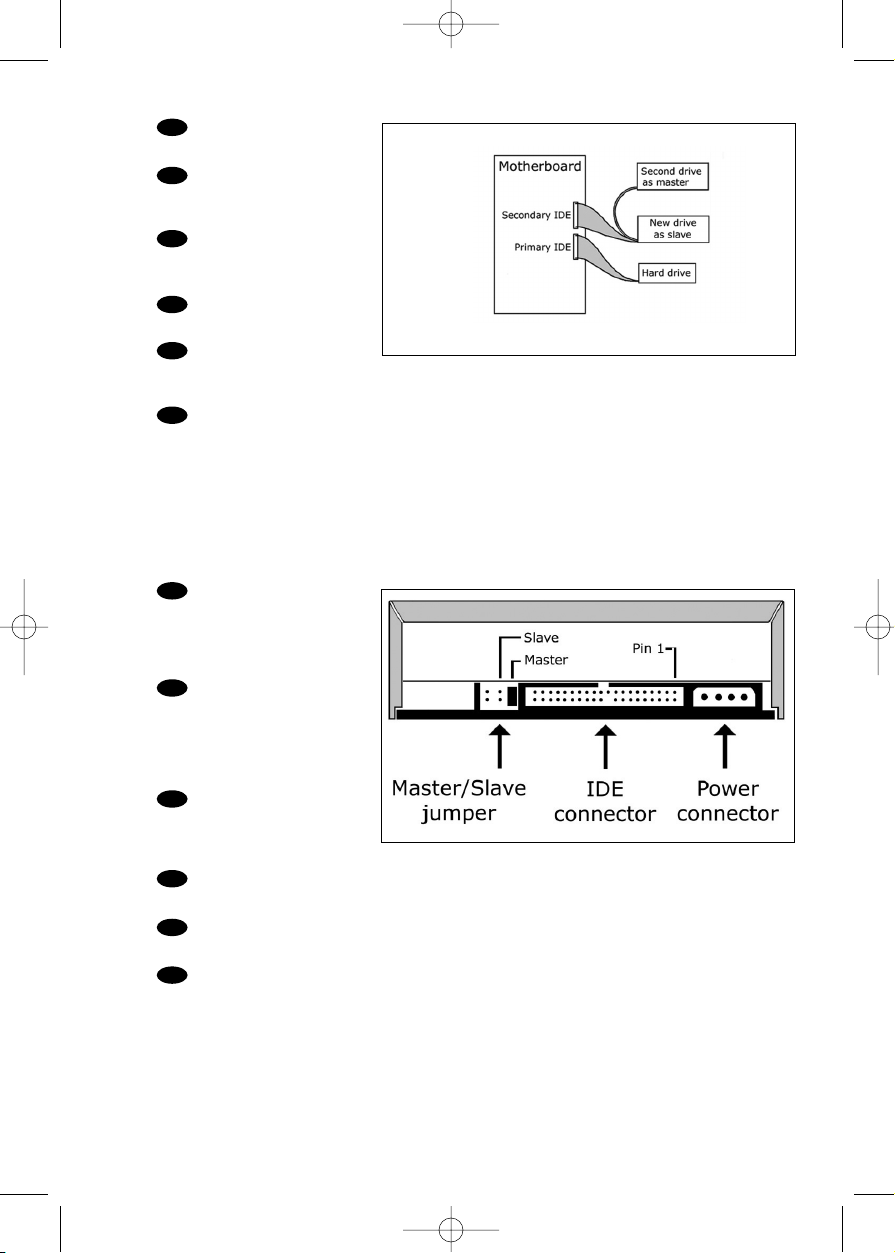
These are the
connections (on the back of
your drive) you will have to use
for connecting the drive to the
computer.
Das sind die Anschlüsse
(an der Rückseite Ihres
Laufwerks), die Sie für den
Anschluss Ihres Laufwerks an
den Computer verwenden
müssen.
Ce sont les connecteurs
(à l’arrière de votre appareil)
que vous devrez utiliser pour
raccorder l’unité à l’ordinateur.
Queste sono le connessioni (sul retro dell'unità) che dovranno essere utilizzate
per collegare l'unità al computer.
Dit zijn de aansluitingen (op de achterkant van het station) die u gebruikt om het
station op de computer aan te sluiten.
Estas son las conexiones (en la parte posterior de la unidad) que tendrá que
utilizar para desconectar la unidad del ordenador.
If you add a drive, the new
drive will be SLAVE.
Wenn Sie ein Laufwerk
hinzufügen, wird das neue
Laufwerk der SLAVE sein.
Si vous ajoutez un lecteur,
le nouveau doit être configuré
en mode esclave (SLAVE).
Aggiungendo un'unità, è
necessario impostarla su SLAVE.
Als u dit nieuwe station als
extra station toevoegt, kies dan
de instelling SLAVE.
Cuando añada una nueva unidad, se configurará como SLAVE.
UK
F
NL
E
D
UK
D
F
I
NL
E
I
8
7
39608_Internal with Nero5,5.qxd 19-09-2003 12:25 Pagina 7
Page 8
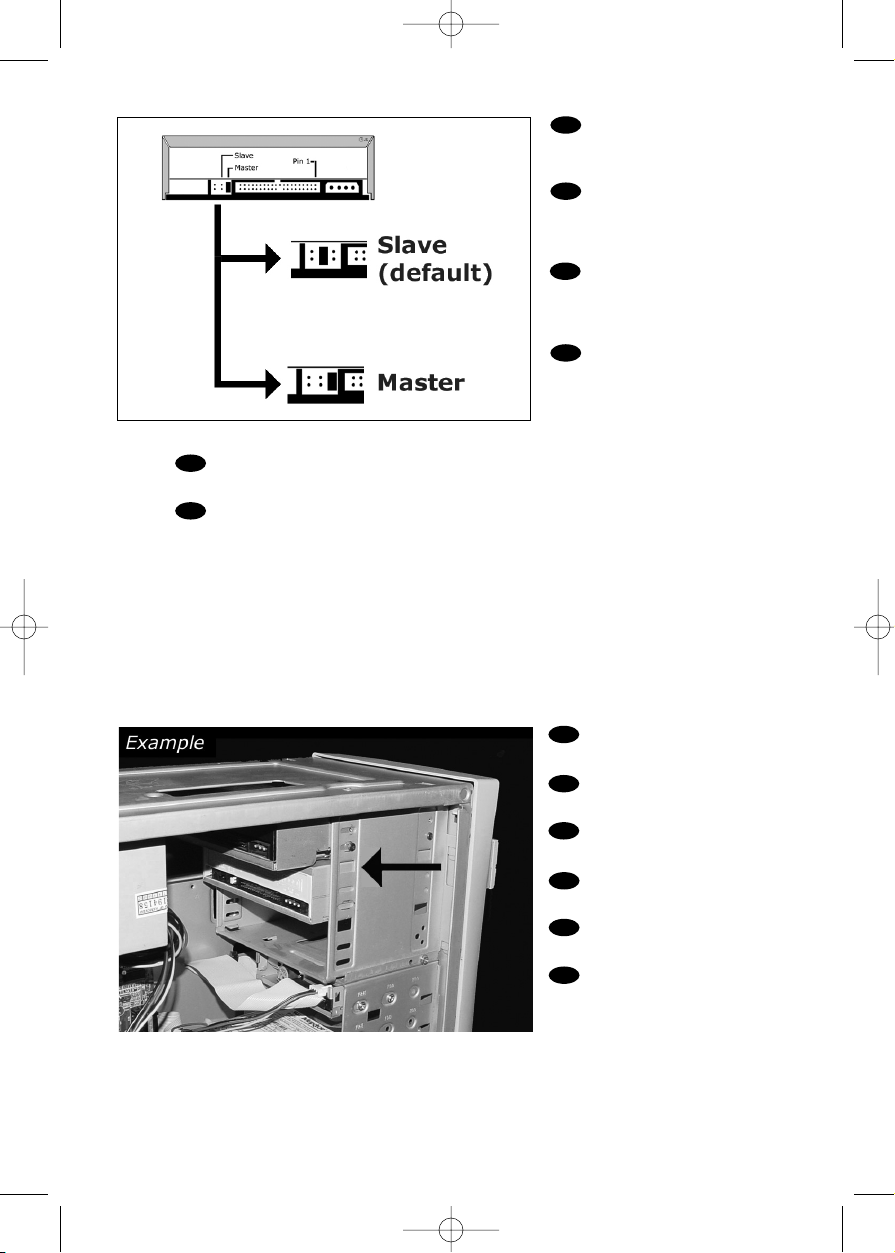
Put the drive into your
computer.
Schieben Sie das
Laufwerk in Ihren Computer.
Montez l’appareil dans
l’ordinateur.
Mettere l'unità nel
computer.
Schuif het station in uw
computer.
Ponga la unidad en el
ordenador.
Choose master or slave
for the jumper, as chosen in
steps 6 or 7.
Wählen Sie für den
Jumper Master oder Slave,
gemäß der Beschreibung in
Schritt 6 oder 7.
Placez le cavalier sur la
position maître ou esclave
selon l’option choisie aux
étapes 6 et 7.
Impostare il cavallotto
su master o slave, secondo la
configurazione specificata ai
passi 6 o 7.
Stel de jumper in op MASTER of op SLAVE,afhankelijk van de informatie in de
stappen 6 en 7.
Elija la configuración del puente en master o slave, como se explicó en el
paso 6 o 7.
8
10
9
UK
F
NL
E
D
UK
D
F
I
NL
E
I
39608_Internal with Nero5,5.qxd 19-09-2003 12:25 Pagina 8
Page 9
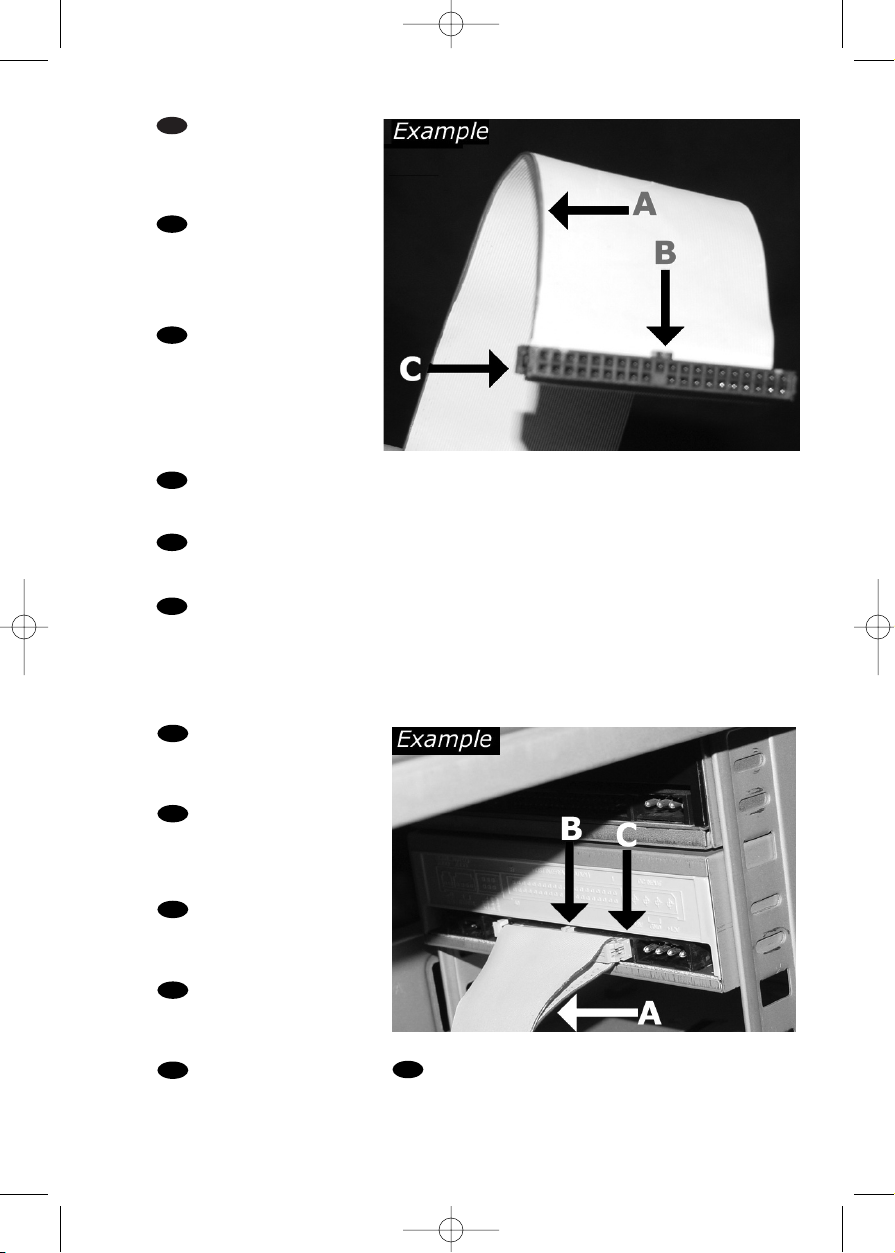
Find the IDE-cable which
may look like this example:
A: Coloured line.
B: Notch and closed hole.
C: Pin1.
Suchen Sie das IDE-Kabel,
das möglicherweise wie in
diesem Beispiel aussieht:
A: Farbige Leitung.
B: Kerbe und geschlossenes Loch.
C: Pin1.
Identifiez le câble IDE.
Celui-ci doit ressembler à celui
présenté dans l’illustration :
A : Ligne de couleur
B : Encoche et trou bouché
C : Broche 1
Individuare il cavo IDE,che potrebbe mostrare A: Linea colorata.
questi segni distintivi: B:Tacca e foro chiuso.
C: Piedino 1.
Zoek de IDE-kabel die lijkt op dit voorbeeld: A: Gekleurde lijn.
B: Nokje plus ontbrekend gat.
C: Pin 1.
Localice el cable IDE, cuya apariencia puede A: Línea de color.
ser la siguiente: B: Muesca y orificio cerrado.
C: Patilla 1.
UK
D
F
I
NL
E
Connect the IDE cable
A: Coloured line.
B: Notch and closed hole.
C: Pin1.
Schließen Sie das IDEKabel an.
A: Farbige Leitung.
B: Kerbe und geschlossenes Loch.
C: Pin1.
Raccordez le câble IDE
A : Ligne de couleur
B : Encoche et trou bouché
C : Broche 1
Collegare il cavo IDE
A: Linea colorata.
B:Tacca e foro chiuso.
C: Piedino 1.
De IDE-kabel aansluiten
A: Gekleurde lijn.
B: Nokje plus ontbrekend gat.
C: Pin 1.
12
11
9
UK
F
I
NL
E
D
Conecte el cable IDE
A: Línea de color.
B: Muesca y orificio cerrado.
C: Patilla 1.
39608_Internal with Nero5,5.qxd 19-09-2003 12:25 Pagina 9
Page 10
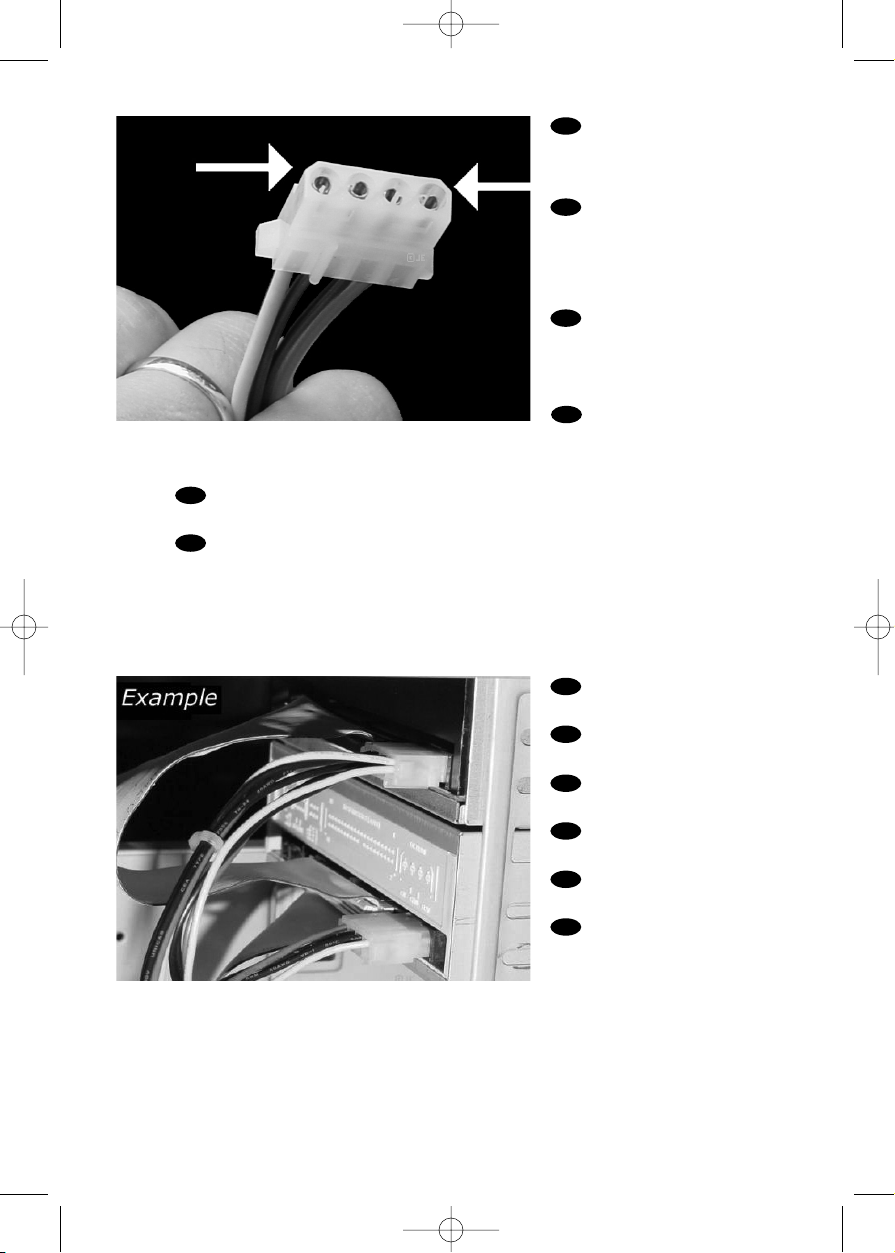
Find a free power cable
like this example.
Please note the edges of the
connector.
Suchen Sie ein freies
Stromversorgungskabel, das
häufig wie in diesem Beispiel
gezeigt aussieht.
Die Kanten des Anschlusses
sind abgerundet.
Recherchez un câble
d’alimentation disponible,
comme dans cet exemple.
Notez la position des bords du
connecteur.
Individuare un cavo di
alimentazione disponibile, come
quello nell'esempio.
Notare i bordi del connettori.
Zoek een vrije stroomkabel, zoals die in de afbeelding.
Let op de afgeschuinde hoekjes van de stekker.
13 Localice un cable de alimentación libre como el del ejemplo.
Observe los bordes del conector.
Connect the power cable
into your drive.
Schließen Sie das
Netzkabel an Ihr Laufwerk an.
Raccordez le câble
d’alimentation à l’appareil.
Connettere i cavo di
alimentazione nell'unità.
Sluit de stroomkabel aan
op het station.
Conecte el cable de
alimentación en la unidad.
14
13
UK
D
F
I
NL
E
10
UK
F
I
NL
E
D
39608_Internal with Nero5,5.qxd 19-09-2003 12:25 Pagina 10
Page 11
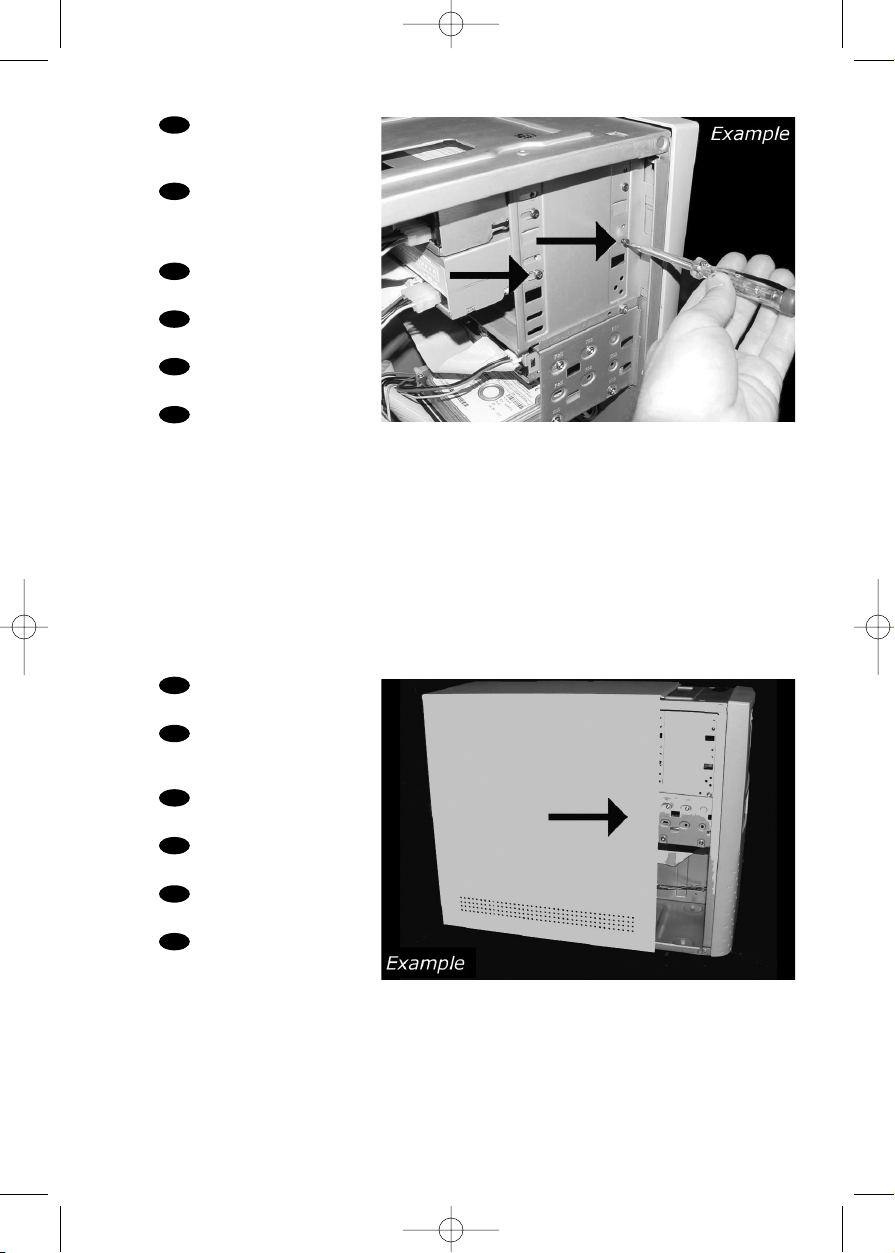
Secure the drive with the
screws (if possible on both
sides).
Befestigen Sie das
Laufwerk mit den Schrauben
(wenn möglich an beiden
Seiten).
Fixez l’appareil à l’aide des
vis (si possible des deux côtés).
Fissare l'unità con le viti
(se possibile su entrambi i lati).
Schroef het station vast
(zo mogelijk aan beide zijden).
Asegure la unidad con los
tornillos (si es posible en ambos
lados).
Put the cover you took
off in step 5 back on.
Setzen Sie die in Schritt 5
abgenommene Abdeckung
wieder auf.
Replacez le capot que
vous avez retiré à l’étape 5.
Rimettere il coperchio
tolto al punto 5.
Plaats de in stap 5
verwijderde kast weer terug.
Vuelva a instalar la carcasa
que quitó en el paso 5.
16
15
11
UK
F
I
D
N
E
UK
F
I
NL
E
D
39608_Internal with Nero5,5.qxd 19-09-2003 12:25 Pagina 11
Page 12
Restart your computer.
Starten Sie Ihren
Computer neu.
Allumez l’ordinateur.
Riavviare il computer.
Start uw computer
opnieuw op.
Reinicie el ordenador.
12
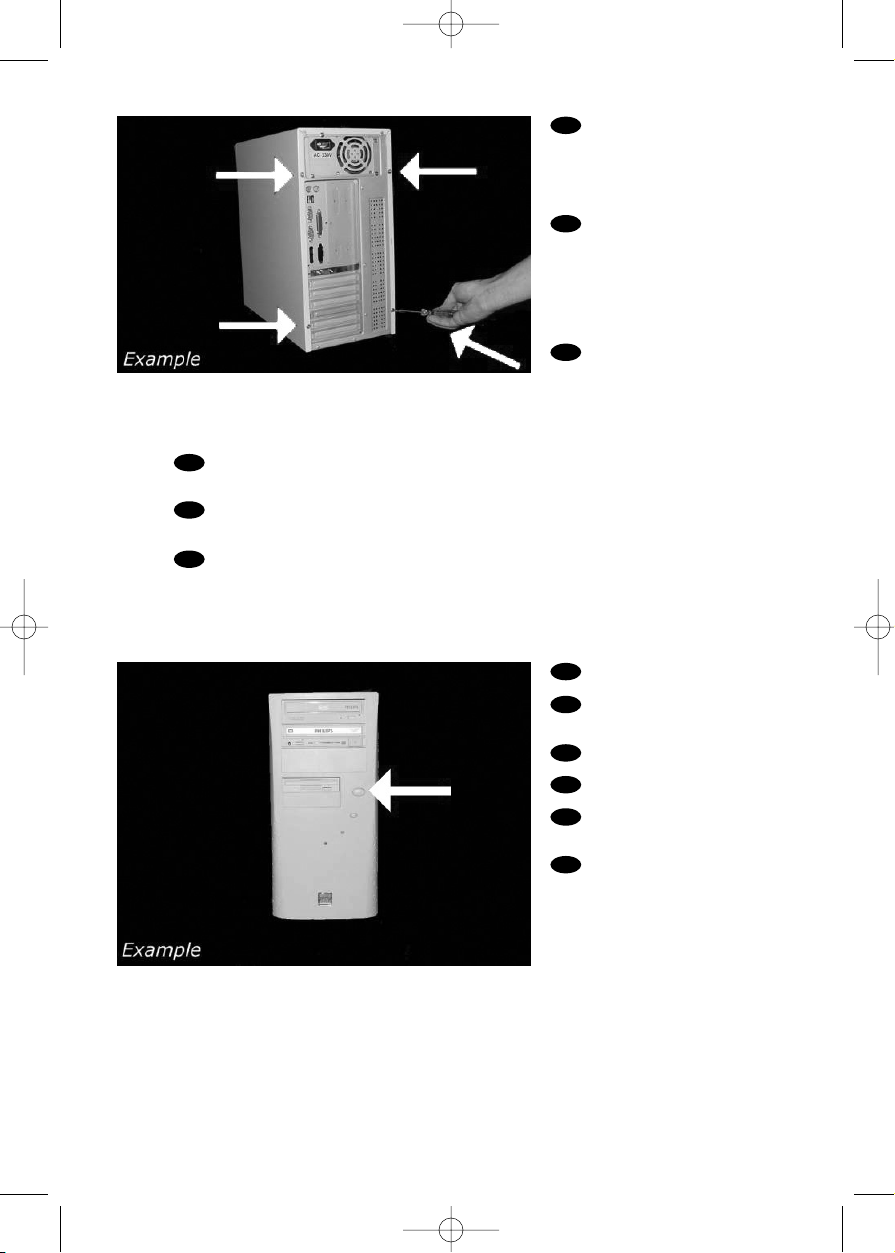
Put the screws (if there
were any) back in. Plug the
power cable back in. If you
disconnected other cables,
put these back in too.
Drehen Sie die Schrauben (wenn da welche waren)
wieder ein. Stecken Sie das
Netzkabel wieder ein.Wenn
Sie weitere Kabel abgezogen
haben, stecken Sie diese
ebenfalls wieder ein.
Resserrez la ou les vis,
le cas échéant. Rebranchez le
cordon d’alimentation. Si vous
avez débranché d’autres
câbles,rebranchez-les également.
Riavvitare le viti (se c'erano) al loro posto.Riconnettere il cavo di alimentazione.
Se sono stati staccati anche altri cavi, riconnetterli.
Draai (zo nodig) de schroeven weer vast.Sluit de netstekker weer aan.
Sluit ook de overige kabels weer aan,als u die had losgemaakt.
Ponga los tornillos (si los tenía puestos) nuevamente en su lugar. Vuelva a conectar
el cable de alimentación.Si ha desconectado otros cables, vuélvalos a conectar en su lugar.
18
17
UK
F
I
NL
E
D
UK
D
F
I
NL
E
39608_Internal with Nero5,5.qxd 19-09-2003 12:25 Pagina 12
Page 13

Choose "Nero".
Follow the instructions on the
screen.
Wählen Sie "Nero".
Befolgen Sie die Anweisungen
auf dem Bildschirm.
Choisissez « Nero ».
Suivez les instructions à l’écran.
Selezionare "Nero".
Seguire le istruzioni visualizzate
sullo schermo.
Selecteer "Nero".
Volg de instructies op het
scherm.
Elija "Nero".
Siga las instrucciones de la pantalla.
Insert the Nero disc
when Windows is loaded.
Legen Sie die Nero CD
ein, wenn Windows geladen ist.
Insérez le disque Nero
une fois que Windows a démarré.
Inserire il disco Nero dopo il caricamento di Windows.
Plaats de Nero-disc nadat
Windows is gestart.
Coloque el disco de Nero cuando se inicie Windows.
UK
D
I
NL
E
UK
D
F
I
NL
E
20
19
13
F
39608_Internal with Nero5,5.qxd 19-09-2003 12:25 Pagina 13
Page 14

At the end, you will need to reboot your computer.
Congratulations. Your Philips drive is now ready for use. How to use it and what software
applications you need to perform your tasks,is described in the next chapters of this
User Manual.
Zum Abschluss müssen Sie Ihren Computer neu booten.
Gratulation. Ihr Philips-Laufwerk ist jetzt einsatzbereit.Wie Sie es benutzen und welche
Software Sie für Ihre Aufgaben benötigen wird im nächsten Kapitel des
Benutzerhandbuchs beschrieben.
Une fois la procédure terminée, vous devez réinitialiser votre ordinateur.
Félicitations ! Vous pouvez maintenant utiliser votre graveur Philips. Les chapitres suivants
de ce mode d’emploi décrivent les différentes opérations que vous pouvez
réaliser ainsi que les applications que vous pouvez utiliser avec votre graveur.
Al termine, riavviare il computer.
Congratulazioni. L'unità Philips ora è pronta all'uso. Nei prossimi capitoli di questo
Manuale utente verranno descritte le applicazioni necessarie per l'esecuzione dei
compiti e come usarle.
Ten slotte moet u de computer opnieuw opstarten.
Gefeliciteerd! Het Philips-station is nu klaar voor gebruik. Hoe u het station kunt
gebruiken en welke programma's u voor welke toepassing gebruikt, staat beschreven in
de hierna volgende hoofdstukken van de gebruikershandleiding.
Al finalizar, deberá reiniciar el ordenador.
Felicitaciones. Su unidad Philips ahora está preparada para ser utilizada. La forma de
utilización y las aplicaciones de software que necesita para llevar a cabo las distintas
operaciones se describen en los siguientes capítulos de este Manual de usuario.
Ta ke the box in which your
drive came, and find the model
number. On this example it is
"DVDRW228".
Note it here for later reference
(see also chapter: How to find
more information).
Suchen Sie auf dem
Ver packungskarton für Ihr Laufwerk nach der Modellnummer.In
diesem Beispiel lautet die Nummer "DVDRW228".
Notieren Sie sich die Modellnummer für spätere Zwecke
(siehe auch im Kapitel: Mehr Informationen).
Recherchez le numéro du
modèle sur la boîte du lecteur.
Dans cet exemple, il s’agit de «
DVDRW228 ».Notez-le ici pour le retrouver ultérieurement si nécessaire (reportezvous également au chapitre : Pour en savoir plus).
Ricercare sulla confezione dell'unità il numero di modello.In questo esempio è
"DVDRW228".Annotarlo qui per averlo a por tata di mano in futuro (vedere anche il capitolo: Come reperire maggiori informazioni.
Op de verpakking waarin uw station is geleverd vindt u het typenummer.
In dit voorbeeld is dat nummer "DVDRW228". Noteer het hier, zodat u het later indien
nodig bij de hand hebt (zie ook hoofdstuk:Waar vind ik meer informatie).
Localice el número de modelo en la caja de la unidad. En este ejemplo es
"DVDRW228".Anótelo aquí para futura referencia (consulte también el capítulo: Cómo
encontrar más información).
22
21
UK
F
I
NL
E
D
UK
D
F
I
NL
E
14
39608_Internal with Nero5,5.qxd 19-09-2003 12:25 Pagina 14
Page 15

How to copy a disc?
Eine Disk kopieren
Comment copier un disque?
Come copiare un dischi?
Hoe kopieer ik een disc?
¿Cómo copiar un disco?
This manual shows an example of how
to copy a disc.
This product is for personal use only.
Unauthorized duplication and
distribution of copyrighted materials is a
violation of copyright law.
In diesem Handbuch wird an einem
Beispiel gezeigt, wie eine Disk kopiert
wird.
Dieses Produkt ist nur für den
persönlichen Gebrauch.
Die ungenehmigte Vervielfältigung und
der Vertrieb von urheberrechtlich
geschützten Materialien stellt eine
Verletzung des Urheberrechts dar.
Ce manuel illustre la procédure de copie d’un disque.
Ce produit est à usage personnel
exclusivement.
Toute duplication et diffusion non
autorisée de matières soumises au droit
d’auteur et de copie (copyright)
constituent une violation de la loi sur les
droits d’auteur et de copie (copyright).
Questo manuale contiene informazioni
su come copiare un dischi.
Questo prodotto è destinato ad un uso
esclusivamente personale.
La duplicazione e la distribuzione di
materiali protetti dal diritto d'autore
rappresentano una violazione della
legge sul copyright.
Deze handleiding beschrijft het
kopiëren van een disc.
Dit product is alleen bedoeld voor eigen
gebruik.
Het zonder toestemming vermenigvuldigen en verspreiden van
auteursrechtelijk beschermd materiaal
is wettelijk verboden.
Este manual muestra un ejemplo de
cómo copiar un disco.
Este producto es para uso personal
exclusivamente.
La duplicación y distribución no
autorizada de materiales con copyright
es una violación de las leyes del
copyright.
UK D F
I NL E
The application software used here is:
Nero - Burning Rom from Ahead Software
15
39608_Internal with Nero5,5.qxd 19-09-2003 12:25 Pagina 15
Page 16

16
Start "Nero - Burning
ROM" from the desktop.
Starten Sie "Nero Burning ROM" vom Desktop
aus.
Lancez Nero Burning
ROM à partir du bureau.
Avviare "Nero - Burning
ROM" dalla scrivania.
Start het programma
"Nero - Burning ROM" vanaf
het bureaublad.
Inicie "Nero - Burning
ROM" desde el escritorio.
Choose "CD" and click
"Next".
Wählen Sie "CD" und
klicken Sie auf "Weiter".
Choisissez CD et
cliquez sur "Suivant".
Scegliere "CD" e fare
clic su "Success".
Selecteer "CD" en klik
op "Volgende".
Elija "CD" y haga clic en
"Siguiente".
2
1
UK
F
NL
E
D
I
UK
F
I
NL
E
D
39608_Internal with Nero5,5.qxd 19-09-2003 12:25 Pagina 16
Page 17

17
Choose "Copy a CD" and
click "Next".
Wählen Sie "Eine CD
kopieren" und klicken Sie auf
"Weiter".
Choisissez "Copier un
CD" et cliquez sur "Suivant".
Scegliere "Copia un CD"
e fare clic su "Success".
Selecteer "Een CD
kopiëren" en klik op "Volgende".
Elija "Copiar un CD" y
haga clic en "Siguiente".
4
3
UK
F
I
NL
E
D
Choose the device in
which you want to put your
source disc.
Wählen Sie das Gerät, in
das Sie die Quell-Disk einlegen
möchten.
Choisissez le lecteur dans
lequel le disque source sera
introduit.
Scegliere il dispositivo su
cui si desidera inserire il disco
sorgente.
Selecteer het station dat
de disk met het bronmateriaal
bevat.
Elija el dispositivo en el
que va a colocar el disco
original.
UK
F
I
NL
E
D
39608_Internal with Nero5,5.qxd 19-09-2003 12:25 Pagina 17
Page 18

18
Mark the checkbox "fast
copy" if your source drive is
fast enough.
If you are not sure or if you
have a slow drive, unmark the
checkbox. Click "Next".
Kreuzen Sie das
Kästchen "Direktkopie" an,
wenn Ihr Quelllaufwerk
schnell genug ist.
Wenn Sie sich nicht sicher sind
oder wenn Sie ein langsames
Laufwerk haben, löschen Sie
das Kreuz in dem Kästchen.
Klicken Sie auf "Weiter".
Cochez l’option "Copie
rapide" si votre lecteur source
le permet.
Si vous n’en êtes pas sûr ou si
vous avez un lecteur plus lent,décochez cette option. Cliquez sur "Suivant".
Selezionare la casella "Copia veloce" se l'unità sorgente è sufficientemente veloce.
In caso di dubbi, o se l'unità è lenta, deselezionare questa casella. Fare clic su "Avanti".
Zet een vinkje in het vakje "Snelkopiëren" als het station met de CD met
bronmateriaal snel genoeg is.
Twijfelt u daaraan, verwijder dan de markering in dat vakje. Klik op "Volgende".
Marque la casilla "Copia rápida" si la velocidad de la unidad de origen permite esta
opción.
Si no está seguro o la unidad es lenta, no marque la casilla. Haga clic en "Siguiente".
6
5
UK
F
I
NL
E
D
Choose "Burn" twice.
Wählen Sie zweimal
"Brennen".
Choisissez "Graver"
deux fois de suite.
Selezionare "Scrivi" due
volte.
Selecteer twee keer
"Branden".
Elija "Grabar" dos veces.
UK
F
I
NL
E
D
39608_Internal with Nero5,5.qxd 19-09-2003 12:25 Pagina 18
Page 19

19
Insert the source disc in
the source drive (see step 5).
Insert an empty disc in your
ReWriter when requested.
Legen Sie die Quell-CD
in das Quelllaufwerk (siehe
Schritt 5).
Legen Sie eine leere CD in
Ihren ReWriter,wenn Sie dazu
aufgefordert werden.
Insérez le disque source
dans le lecteur source (voir
étape 5).
Insérez un disque vierge dans le
lecteur ReWriter lorsque vous
y êtes invité.
Inserire il disco sorgente
nell'unità sorgente (vedi passo 5).
Quando viene richiesto, inserire un disco vuoto nel ReWriter.
Leg de CD met bronmateriaal in het bronstation (zie stap 5).
Leg een lege disc in uw ReWriter zodra dat wordt gevraagd.
Coloque el disco original en la unidad de origen (consulte el paso 5).
Inserte un disco vacío en la regrabadora cuando se solicite.
7
UK
F
I
NL
E
D
Nero - Burning ROM" will
now burn your disc.
"Nero - Burning ROM"
wird jetzt die CD brennen.
Nero - Burning ROM
grave alors votre disque.
"Nero - Burning ROM"
inizierà a scrivere sul disco.
"Nero - Burning ROM"
gaat nu uw CD branden.
"Nero - Burning ROM"
grabará el disco.
8
UK
F
I
NL
E
D
39608_Internal with Nero5,5.qxd 19-09-2003 12:25 Pagina 19
Page 20

20
Click "OK". Your CD has
been copied successfully. Click
"Discard".
Klicken Sie auf "OK". Ihre
CD wurde erfolgreich kopiert.
Klicken Sie auf "Verwerfen".
Cliquez sur OK. La copie
du CD s’est déroulée
correctement. Cliquez sur
"Rejeter".
Fare click su "OK". Il CD
è stato copiato con successo.
Click en "Elimina".
Klik op "OK". Er is een
kopie gemaakt van de originele
cd. Klik op "Verwijderen".
Haga clic en "OK". Su
CD se ha copiado
correctamente. Click su
"Descatar".
9
UK
F
I
NL
E
D
39608_Internal with Nero5,5.qxd 19-09-2003 12:25 Pagina 20
Page 21

212121
How to make a Data CD?
Eine Daten-CD erstellen
Comment créer un disque de données ?
Come creare un CD di dati?
Hoe maak ik zelf een data-cd?
¿Cómo crear un CD de datos ?
This manual shows you an example of
how to make a Data CD.
This product is for personal use only.
Unauthorized duplication and
distribution of copyrighted materials is a
violation of copyright law.
In diesem Handbuch wird an einem
Beispiel gezeigt, wie eine
Daten-CD erstellt wird.
Dieses Produkt ist nur für den
persönlichen Gebrauch.
Die ungenehmigte Vervielfältigung und
der Vertrieb von urheberrechtlich
geschützten Materialien stellt eine
Verletzung des Urheberrechts dar.
Ce manuel illustre la procédure de
création d’un CD de données.
Ce produit est à usage personnel
exclusivement.
Toute duplication et diffusion non
autorisée de matières soumises au droit
d’auteur et de copie (copyright)
constituent une violation de la loi sur les
droits d’auteur et de copie (copyright).
Questo manuale contiene informazioni
su come creare un CD di dati.
Questo prodotto è destinato ad un uso
esclusivamente personale.
La duplicazione e la distribuzione di
materiali protetti dal diritto d'autore
rappresentano una violazione della
legge sul copyright.
Deze handleiding beschrijft het maken
van een data-cd.
Dit product is alleen bedoeld voor eigen
gebruik.
Het zonder toestemming
vermenigvuldigen en verspreiden van
auteursrechtelijk beschermd materiaal
is wettelijk verboden.
Este manual muestra un ejemplo de
cómo crear un CD de datos.
Este producto es para uso personal
exclusivamente.
La duplicación y distribución no
autorizada de materiales con copyright
es una violación de las leyes del
copyright.
UK D F
I NL E
The application software used here is:
Nero - Burning Rom from Ahead Software
21
39608_Internal with Nero5,5.qxd 19-09-2003 12:25 Pagina 21
Page 22

22
Start "Nero - Burning
ROM" from the desktop.
Starten Sie "Nero Burning ROM" vom Desktop
aus.
Lancez Nero Burning
ROM à partir du bureau.
Avviare "Nero - Burning
ROM" dalla scrivania.
Start het programma
"Nero - Burning ROM" vanaf
het bureaublad.
Inicie "Nero - Burning
ROM" desde el escritorio.
Choose "CD" and click
"Next".
Wählen Sie "CD" und
klicken Sie auf "Weiter".
Choisissez CD et cliquez sur "Suivant".
Scegliere "CD" e fare
clic su "Success".
Selecteer "CD" en klik
op "Volgende".
Elija "CD" y haga clic en
"Siguiente".
2
1
UK
F
I
NL
E
D
UK
F
I
NL
E
D
39608_Internal with Nero5,5.qxd 19-09-2003 12:25 Pagina 22
Page 23

23
Choose "Compile a new
CD" and click "Next".
Wählen Sie "Neue CD
erstellen" und klicken Sie auf
"Weiter".
Choisissez "Compiler un
nouveau CD" et cliquez sur
"Suivant".
Scegliere "Crea un nuovo
CD" e fare clic su "Success".
Selecteer "Een nieuwe
CD compileren" en klik op
"Volgende".
Elija "Compilar un CD
nuevo" y haga clic en "Siguiente".
3
Choose "Data CD" and
click "Next".
Wählen Sie "Daten-CD"
und klicken Sie auf "Weiter".
Choisissez "CD de
données" et cliquez sur
"Suivant".
Scegliere "CD dati" e fare
clic su "Success".
Selecteer "Data-CD" en
klik op "Volgende".
Elija "CD de datos" y haga
clic en "Siguiente".
4
UK
F
I
NL
E
D
UK
F
I
NL
E
D
39608_Internal with Nero5,5.qxd 19-09-2003 12:25 Pagina 23
Page 24

24
Choose " Create a new
data-CD?" and choose "Next".
Wählen Sie "Neue
Daten-CD zusammenstellen?"
und wählen Sie "Weiter".
Choisissez Compiler un
nouveau CD de données? et
cliquez sur "Suivant".
Scegliere "Crea un
nuovo CD dati?" e fare clic su
"Success".
Selecteer "Een nieuwe
data CD aanmaken?" en klik
op "Volgende".
Elija "¿ Compilar un
Nuevo CD de datos?" y elija
"Siguiente".
5
Choose "Finish".
Wählen Sie "Fertig".
Cliquez sur "Terminer".
Scegliere "Fini".
Klik op "Voltooien".
Elija "Finalizar".
6
UK
F
I
NL
E
D
UK
F
I
NL
E
D
39608_Internal with Nero5,5.qxd 19-09-2003 12:25 Pagina 24
Page 25

25
Drag the selected file(s)
and/or folder(s) you want to
have on your new CD to the
left side of the screen.
Ziehen Sie die
gewünschten Dateien und/oder
Ordner, die Sie auf Ihrer neuen
CD haben möchten, zur linken
Seite des Bildschirms.
Faites glisser le ou les
fichiers ou dossiers sélectionnés
que vous voulez copier sur le
nouveau CD dans la partie
gauche de l’écran.
Tr ascinare sulla parte
sinistra dello schermo il/i file e/o
cartella/e selezionati che si
desidera avere sul nuovo CD.
Sleep de door u geselecteerde bestanden en/of mappen die u op de cd wilt
branden naar het linkervenster.
Arrastre los archivos y/o carpetas seleccionados que desee grabar en su nuevo
CD a la izquierda de la pantalla.
7
Click on the "Write" icon.
Klicken Sie auf das
Symbol "Brennen".
Cliquez sur l'icône
"Graver".
Fare clic sull'icona "Scrivi".
Klik op het pictogram
voor "Branden".
Haga clic en el icono
"Grabar".
8
UK
F
I
NL
E
D
UK
F
I
NL
E
D
39608_Internal with Nero5,5.qxd 19-09-2003 12:25 Pagina 25
Page 26

26
9
Nero - Burning ROM"
will now burn your disc.
"Nero - Burning ROM"
wird jetzt die CD brennen.
"Nero - Burning ROM"
grave alors votre disque.
"Nero - Burning ROM"
inizierà a scrivere sul disco.
"Nero - Burning ROM"
gaat nu uw CD branden.
"Nero - Burning ROM"
grabará el disco.
10
Choose "Burn" twice.
Wählen Sie zweimal
"Brennen".
Choisissez la double
"Graver".
Scegliere di "Serivi" due
volte.
Selecteer twee keer
"Branden".
Elija la opción "Grabar"
dos veces.
UK
F
I
NL
E
D
UK
F
I
NL
E
D
39608_Internal with Nero5,5.qxd 19-09-2003 12:25 Pagina 26
Page 27

Click "OK".
Congratulations, your CD is
ready now.Choose "Discard".
Klicken Sie auf "OK".
Gratulation, Ihre CD ist jetzt
fertig.Wählen Sie "Verwerfen".
Cliquez sur OK. Le CD
est à présent terminé. Cliquez
sur "Rejeter".
Fare click su "OK".
Congratulazioni, il CD ora è
pronto.Scegliere "Elimina".
Klik op "OK". Na afloop
van het brandproces is uw
nieuwe cd klaar voor gebruik.
Klik op "Verwijderen".
Haga clic en "OK".
Felicitaciones, su CD está
preparado para ser utilizado.
Elija "Descabar".
UK
D
F
I
NL
E
11
27
39608_Internal with Nero5,5.qxd 19-09-2003 12:25 Pagina 27
Page 28

28
39608_Internal with Nero5,5.qxd 19-09-2003 12:25 Pagina 28
Page 29

29
How to make an
Audio CD?
Erstellen einer Audio-CD
Comment créer un CD audio ?
Come creare un CD Audio?
Hoe maak ik zelf muziek-cd's?
¿Cómo crear un CD de audio?
This manual shows you an example of
how to make an Audio
CD which can be played in any CDPlayer
This product is for personal use only.
Unauthorized duplication and
distribution of copyrighted materials is a
violation of copyright law.
n diesem Handbuch wird beschrieben,
wie eine Audio-CD
erstellt wird, die von jedem CD-Player
abgespielt werden kann.
Dieses Produkt ist nur für den
persönlichen Gebrauch.
Die ungenehmigte Vervielfältigung und
der Vertrieb von urheberrechtlich
geschützten Materialien stellt eine
Verletzung des Urheberrechts dar.
Ce manuel illustre la procédure de
création d’un CD audio qui pourra être
lu sur n’importe lecteur de CD.
Ce produit est à usage personnel
exclusivement.
Toute duplication et diffusion non
autorisée de matières soumises au droit
d’auteur et de copie (copyright)
constituent une violation de la loi sur les
droits d’auteur et de copie (copyright).
Questo manuale contiene informazioni
su come creare un CD Audio
che potrà essere letto da un CD-Player.
Questo prodotto è destinato ad un uso
esclusivamente personale.
La duplicazione e la distribuzione di
materiali protetti dal diritto d'autore
rappresentano una violazione della
legge sul copyright.
Deze handleiding beschrijft het maken
van een muziek-cd om in een normale
cd-speler af te spelen.
Dit product is alleen bedoeld voor eigen
gebruik.
Het zonder toestemming
vermenigvuldigen en verspreiden van
auteursrechtelijk beschermd materiaal
is wettelijk verboden.
Este manual muestra un ejemplo de
cómo crear un CD de audio
que se puede reproducir en cualquier
lector de compact disc.
Este producto es para uso personal
exclusivamente.
La duplicación y distribución no
autorizada de materiales con copyright
es una violación de las leyes del
copyright.
UK D F
I NL E
The application software used here is:
Nero - Burning Rom from Ahead Software
29
39608_Internal with Nero5,5.qxd 19-09-2003 12:25 Pagina 29
Page 30

30
Choose "CD" and click
"Next".
Wählen Sie "CD" und
klicken Sie auf "Weiter".
Choisissez CD et
cliquez sur "Suivant".
Scegliere "CD" e fare
clic su "Success".
Selecteer "CD" en klik
op "Volgende".
Elija "CD" y haga clic en
"Siguiente".
Start "Nero - Burning
ROM" from the desktop.
Starten Sie "Nero Burning ROM" vom Desktop
aus.
Lancez Nero Burning
ROM à partir du bureau.
Avviare "Nero - Burning
ROM" dalla scrivania.
Start het programma
"Nero - Burning ROM" vanaf
het bureaublad.
Inicie "Nero - Burning
ROM" desde el escritorio.
2
1
UK
F
NL
E
D
I
UK
F
I
NL
E
D
39608_Internal with Nero5,5.qxd 19-09-2003 12:25 Pagina 30
Page 31

31
Choose "Compile a new
CD" and click "Next".
Wählen Sie "Neue CD
erstellen" und klicken Sie auf
"Weiter".
Choisissez "Compiler un
nouveau CD" et cliquez sur
"Suivant".
Scegliere "Crea un nuovo
CD" e fare clic su "Success".
Selecteer "Een nieuwe
CD compileren" en klik op
"Volgende".
Elija "Compilar un CD
nuevo" y haga clic en "Siguiente".
UK
D
F
I
NL
E
Choose "Audio CD" and
click "Next".
Wählen Sie "Audio-CD
und klicken Sie auf "Weiter".
Choisissez "CD audio" et
cliquez sur "Suivant".
Scegliere "CD Audio" e
fare clic su "Success".
Selecteer "Audio-CD" en
klik op "Volgende".
Elija "CD de audio" y haga
clic en "Siguiente".
UK
D
F
I
NL
E
4
3
39608_Internal with Nero5,5.qxd 19-09-2003 12:25 Pagina 31
Page 32

32
Click "Finish".
Klicken Sie auf "Fertig".
Cliquez sur "Terminer".
Clic su "Fini".
Klik op "Voltooien".
Clic on "Finalizar".
Drag the audio files
(*.wav) you want to have on
your new audio disc to the left
side.
Ziehen Sie die
Audiodateien (*.wav),die Sie
auf Ihrer neuen Audio-CD
haben möchten, zur linken
Seite.
Effectuez un glisser–déposer pour transférer les
fichiers audio (*.wav) à
enregistrer sur le disque dans
la partie gauche de la fenêtre.
Tr ascinare sul lato
sinistro i file audio (*.wav) che
si desiderano avere sul nuovo
disco audio.
Sleep de geluidsbestanden (*.wav) die u op de cd wilt branden naar het
linkervenster.
Arrastre los archivos de audio (*.wav) que desee copiar en su nuevo disco de
audio a la izquierda.
6
5
UK
F
I
NL
E
D
UK
F
I
NL
E
D
39608_Internal with Nero5,5.qxd 19-09-2003 12:25 Pagina 32
Page 33

33
Click on the "Write" icon.
Klicken Sie auf das
Symbol "Brennen".
Cliquez sur l'icône
"Graver".
Fare clic sull'icona "Scrivi".
Klik op het pictogram
voor "Branden".
Haga clic en el icono
"Grabar".
Choose burn "Twice".
Wählen Sie zweimal
"Brennen".
Choisissez la double
"Graver".
Scegliere di "Scrivi" due
volte.
Selecteer twee keer
"Branden".
Elija la opción "Grabar" dos
veces.
8
7
UK
F
I
NL
E
D
UK
F
I
NL
E
D
39608_Internal with Nero5,5.qxd 19-09-2003 12:25 Pagina 33
Page 34

34
9
Click "OK".
Congratulations, your audio
disc is ready now.Click
"Discard" to finish the audio
disc creation process.
Klicken Sie auf "OK".
Gratulation, Ihre Audio-CD ist
jetzt fertig. Klicken Sie auf
"Verwerfen", um die Erstellung
der Audio-CD abzuschließen.
Cliquez sur OK. Le
disque audio est à présent
terminé. Cliquez sur "Rejeter"
pour clore le processus de
création de disque audionumérique.
Fare click su "OK". Congratulazioni, il CD Audio ora è pronto. click en "Elimina" per
terminare il processo di creazione del CD audio.
Klik op "OK". Na afloop van het brandproces is uw nieuwe audio-cd klaar voor
gebruik. Klik op "Verwijderen" om het brandproces af te sluiten.
Haga clic en "OK". Felicitaciones, su disco de audio está preparado para ser
utilizado.Click su "Descatar" para terminar el proceso de creación del disco de audio.
UK
D
F
I
NL
E
10
Nero - Burning Rom is
burning your Audio CD.
Nero - Burning Rom
brennt Ihre Audio-CD.
Nero Burning Rom
commence la gravure du CD
audionumérique.
Nero - Burning Rom sta
copiando il CD Audio.
Nero - Burning Rom zal
nu de Audio-cd voor u branden.
Nero - Burning Rom
está grabando su CD de audio.
UK
D
F
I
NL
E
39608_Internal with Nero5,5.qxd 19-09-2003 12:25 Pagina 34
Page 35

How to find warranty infor-
mation on the Nero disc?
Wie findet man Garantie-Informationen auf der Nero Disc?
Comment trouver les informations relatives
à la garantie sur le disque de Nero ?
Come si accede alle informazioni sulla garanzia
memorizzate sul disco di Nero?
Waar vind ik op de Nero-CD informatie over de garantie?
¿Cómo encontrar información sobre la garantía en el disco de Nero?
i
35
39608_Internal with Nero5,5.qxd 19-09-2003 12:25 Pagina 35
Page 36

36
Insert the Nero disc
again, and click "exit".
Legen Sie die Nero Disk
wieder ein und klicken Sie auf
"Exit".
Réinsérez le disque Nero et cliquez sur "Quitter".
Inserire nuovamente il
disco Nero e fare clic su "esci".
Leg de Nero-CD weer
in de lade en klik op "Sluiten".
Vuelva a colocar el disco
de Nero y haga clic en "salir".
2. Click on the "My
Computer" icon on your desktop (A)
or
click "Start", "My Computer" (B).
Klicken Sie auf das Symbol "My Computer" auf Ihrer
Oberfläche (A)
oder
klicken Sie auf "Start", "My
Computer" (B).
Cliquez sur l’icône 'Poste
de travail' de votre bureau (A)
ou
cliquez sur 'Démarrer' puis
'Poste de travail' (B).
Fare clic sull'icona "Risorse del computer" nel desktop (A)
oppure
fare clic su "Start", "Risorse del computer" (B)
Klik op het bureaublad op het pictogram "Deze computer" (A)
of
klik op "Start" en dan op "Deze computer" (B).
Haga clic en el icono "Mi PC" del escritorio (A)
o bien
haga clic en "Inicio" y "Mi PC" (B).
2
1
UK
F
I
NL
E
D
UK
F
I
NL
E
D
39608_Internal with Nero5,5.qxd 19-09-2003 12:25 Pagina 36
Page 37

37
Click with the right mouse button on the "N5510_54"
icon (A) and choose "Explore"
(B).
Klicken Sie mit der rechten Maustaste auf das Symbol
"N5510_54" (A) und wählen
Sie "Explore" (B).
Cliquez avec le bouton
droit sur l’icône "N5510_54"
(A) et choisissez "Explorer" (B).
Fare un clic destro sull'icona "N5510_54" (A) e selezionare "Esplora" (B).
Klik met de rechtermuisknop op het pictogram
"N5510_54" (A) en daarna op "Verkennen" (B).
Haga clic con el botón derecho del ratón en el icono "N5510_54" (A) y elija
"Explorar" (B).
D
F
I
NL
E
Choose the "Philips Warranty" folder and you will find the
warranty documents.
If you have no Adobe Acrobat
Reader, please download this for
free on http://www.adobe.com
Wählen Sie den Ordner
"Philips Warranty"; hier finden Sie
die Garantiedokumente.
Wenn Sie nicht über den Adobe
Acrobat Reader verfügen,
können Sie sich diese Software
kostenlos bei
http://www.adobe.com herunterladen.
Choisissez le dossier
"Philips Warranty": vous y trouverez les documents relatifs à la
garantie.
Si vous ne disposez pas d’Adobe Acrobat Reader,vous pouvez le télécharger gratuitement depuis le site http://www.adobe.com.
Selezionare la cartella "Philips Warranty" che contiene i documenti relativi alla
garanzia.
Se sul computer non è installato Acrobat Reader, è possibile scaricarlo gratuitamente dal
sito http://www.adobe.com.
Ga naar de map "Philips Warranty". Daar vindt u documentatie over de garantie.
Als u Adobe Acrobat Reader niet hebt, download dit programma dan gratis vanaf de site
http://www.adobe.com.
Seleccione la carpeta "Philips Warranty", en la que encontrará los documentos de
la garantía.
Si no dispone de Adobe Acrobat Reader,descárguelo gratuitamente desde
http://www.adobe.com.
4
3
UK
UK
F
I
NL
E
D
39608_Internal with Nero5,5.qxd 19-09-2003 12:25 Pagina 37
Page 38

38
Notes
39608_Internal with Nero5,5.qxd 19-09-2003 12:25 Pagina 38
Page 39

39
Notes
39608_Internal with Nero5,5.qxd 19-09-2003 12:25 Pagina 39
Page 40

Additional information available at our website:
www.philips.com/pcstuff
Specifications subject to change without notice.
All dimensions shown are approximate.
© 2003 Koninklijke Philips Electronics N.V.
All rights reserved.
Reproduction,copying, usage, modifying, hiring,renting,
public performance, transmission and/or broadcasting in whole or part
is prohibited without the written consent of Philips Electronics N.V.
3104 125 2472.2
39608_Internal with Nero5,5.qxd 19-09-2003 12:25 Pagina 40
 Loading...