

Page 1

OB TraceVue
System Administration and Configuration Guide
OB TraceVue
Patient Monitoring
M1381-9021N
4512 610 03991
Software revision D.01.10
Published in Germany 07.2004
internal code 20040728
1
Page 2

2
Page 3

1Table Of Contents
1 Introduction 1
What’s New in D.01.00 1
What’s New in D.01.10 2
Configuration 2
Support Tools 2
Login in as Windows Administrator 2
Magneto Optical Media 3
Using the Fax Facility 3
Preventive Maintenance 4
Manufacturer’s Information 4
2 Configuring Forms 7
Entering Configuration Mode 8
Selecting Pages to Include in Forms and Flow Charts 8
Configuring a Flow Chart 8
Configuring a Form 9
Configuring What’s on a Page 9
Adding a Label to the “Special” Field 10
Configuring Tables on a Page 10
Adjusting the Width of a Column 11
Restoring a Hidden Column 11
Calculated Fields 11
Pregnancy 12
OB History 15
Prenatal Visits 16
Summary 16
History 17
Antepartum Test 17
US Examination 18
Admission 18
Delivery 19
Value Ranges for Input 20
3 Using the Value Table Editor 23
Starting the Value Table Editor 23
Screen Layout 24
General Buttons 24
Folder Window 24
Item Window 25
Keyboard/mouse Commands 26
Intrapartum Medication Dialog 26
Seeing Your Changes 26
i
Page 4

Adding a Folder to the Folder Window 26
Adding an Item to a List 26
Importing and Exporting Value Table Lists 27
Exporting the Value Table Lists to a File 27
Loading a List from Another OB TraceVue System 27
Merging Two Lists Together 28
Importing Examination Lists from A.01.xx 28
Importing Medication Lists from A.01.00 28
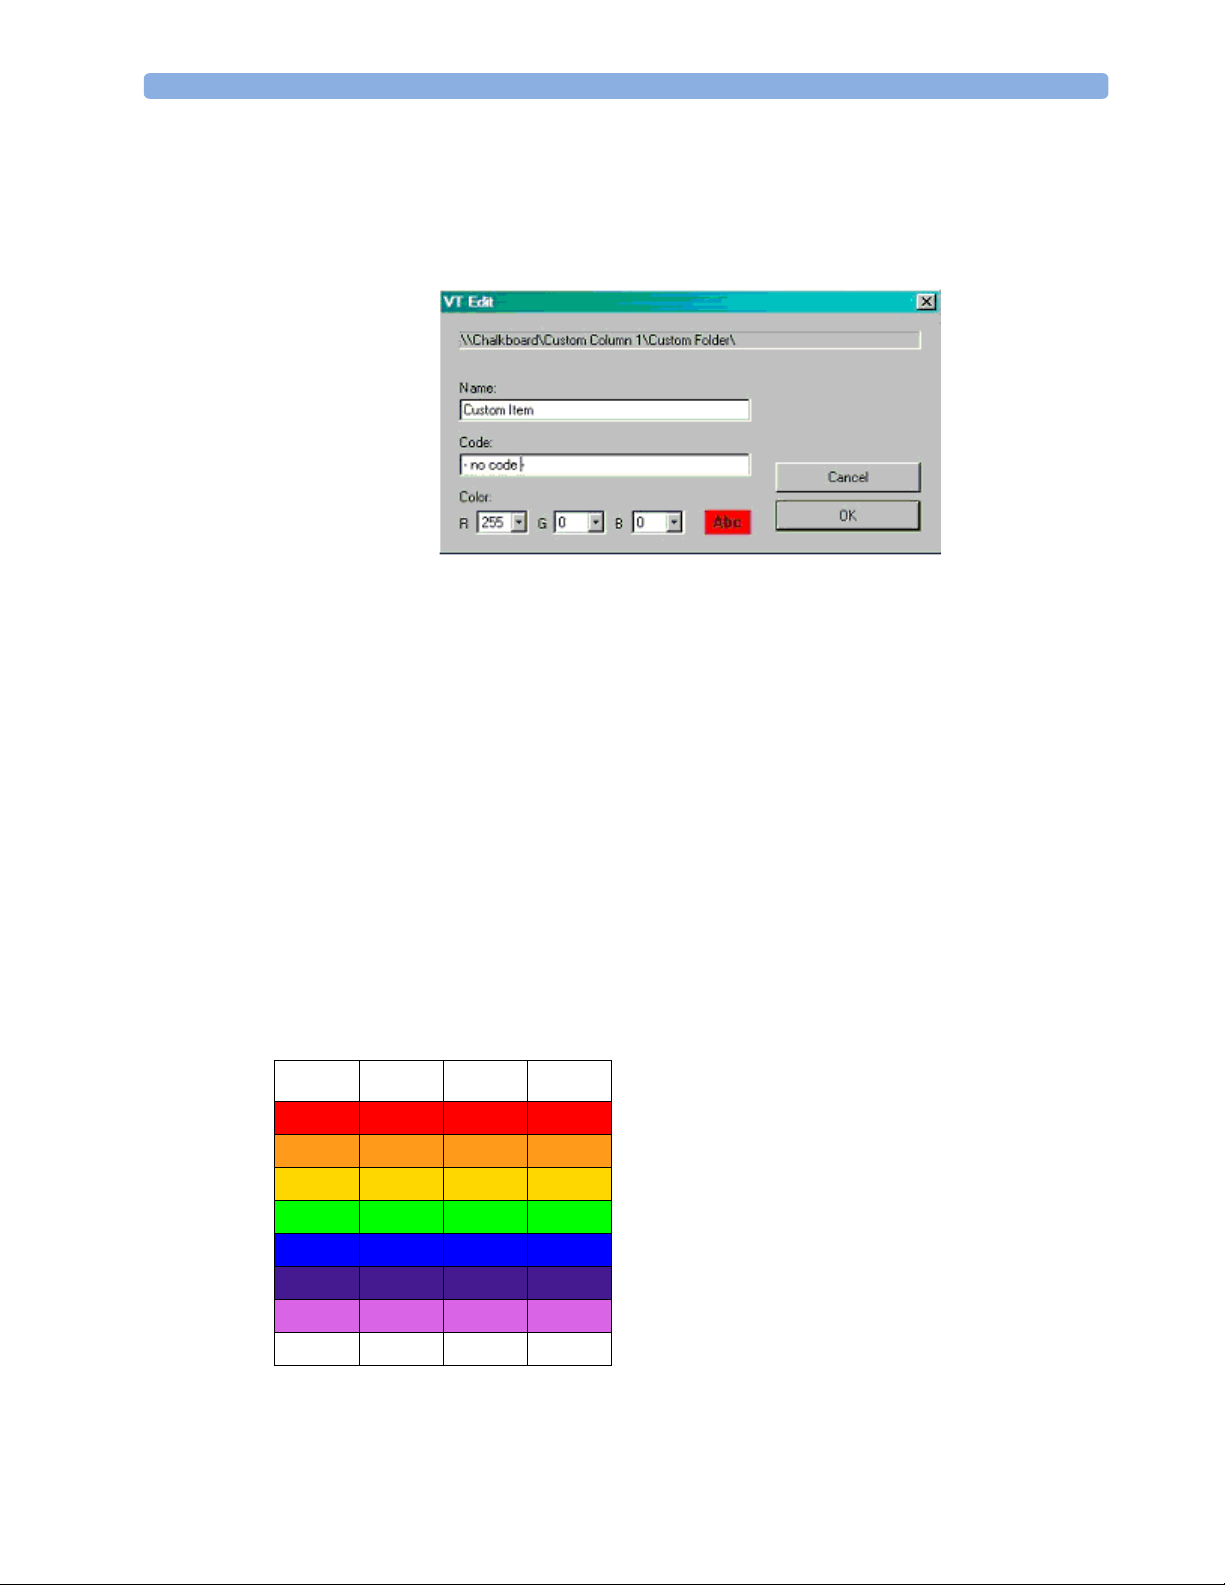
Color Coding the Chalkboard 29
Assigning a Color 29
Determining RGB Values 30
Input Mask Folders 30
Running the VTE on a non-OB TraceVue PC 31
4 Configuring Reports 33
Predefined Reports 33
Understanding Templates 34
Setting Macro Security 35
Customizing a Word Template 35
Inserting a Form Field 36
Inserting a “Notes Evaluation Period” Form Field 39
Inserting a Group Document Form Field 39
Inserting Items in a Header 39
Inserting Page Breaks 41
Creating Your Own Form Fields 41
Form Field Data Types 42
Autodetection 46
Available Views 46
Available Functions 46
Troubleshooting 47
System Interface 48
Using Report.vbs 48
Examples 49
Recustomizing Templates 49
5 Configuring Statistics and Logs 51
Data Export 51
About Excel Templates 51
Predefined Statistics and Logs 51
Customization Not Requiring SQL Knowledge 53
Modifying Constant Values in the Query Parameter 53
Specifying the Sort Order of Data in Logs 53
Changing the Start Position 53
Varying the Cell Position of the Date Phrase 54
Varying the Display Order of Columns 54
Changing the Time Format 54
ii
Page 5

Customization Requiring SQL Knowledge (Creating New Queries) 55
Supported Fields 56
Available Views 57
SQL Parsing 58
Functions You Can Use in SQL Statements 59
Updating the SQL in Excel Templates Manually 62
Updating Operators 63
Renaming Views (for Systems with Newborn option) 63
Database Model Changes for D.01 and Later Revisions 63
Discharge Date and Return Appointment Date 63
Recustomizing Templates 64
6 Pre-programming a Time Change 65
Setting the Time 65
7 OB TraceVue Shell 67
Switching on the OB TraceVue Shell 67
Switching Off the OB TraceVue Shell 68
Interrupting the Autostart 68
Using the Shell Dialog 69
8 Patient Data Administration Tool 71
Managing the Internal Database 71
Deleting Data 71
Using the Administration Tool 72
Tr a n s fe r F a i l u r e 74
What to do Next 74
Unlocking a Record 75
9 Patient Index Search Tool 77
10 System Overview Tool 79
Rebooting from the Server 82
Troubleshooting 82
11 Link Recovery Tool 83
What Does the Tool Do? 83
Using the Link Recovery Tool 83
12 External Database 85
External Database Administration Tool 85
Automatically Purging the External Database 86
Importance of Backup and Labeling 87
Backing up and Restoring the Highend External Database 87
Backing and Restoring the Standard External Database 87
Setting Backup Defaults 87
iii
Page 6

Creating Backup Files from the Standard External Database 89
Storing Backup Files to Tape Device 90
Restore Procedure 91
Restore Database Files from Tape 91
Replacing Database Files 93
Changing the Database User Password 94
External Database Emergency Tape Backup 94
Storing Backup Files to Tape Device 94
Restoring Backup Files From the Tape Device 96
Recovering the External Database 98
iv
Page 7

1
1Introduction
OB TraceVue is delivered with predefined forms, reports and statistics that you may configure to suit
the needs of your department if you have the appropriate permission rights and passwords. This guide
tells you how to
• configure the forms.
• edit the value tables.
• make templates and configure reports.
• use the tools that are needed to maintain the system.
• backup the external data base to tape.
The first three of these tasks require clinical understanding of the system; the last two are
administrative. It is your institution’s responsibility to ensure that the tasks are assigned to properly
trained personnel. Some configuration can be performed “online” whilst using the system (such as
changing the forms); other configuration aspects must be performed “off line” while the system is shut
down.
You must be familiar with the OB TraceVue system, know how to move around within the screens
using the icons and tabs, and understand how to pick from pull down lists. You must have at least basic
Windows 2000 knowledge. You must understand English.
What’s New in D.01.00
The new features for the System Administration and Configuration Guide in revision D.01 are:
• Two custom columns in the chalkboard, that can be color coded. See “Color Coding the
Chalkboard” on page 29
• Enhanced factory-provided customization tools for the Reports and Statistics. See “Configuring
Reports” on page 33 and “Configuring Statistics and Logs” on page 51.
• Enhanced functionality of the Link Recovery tool. See “Link Recovery Tool” on page 83.
• Automatic database purge means that you no longer have to manually purge the external database to
constrain its size. See “Automatically Purging the External Database” on page 86.
• New tool to recover missing data to the external database. See “Recovering the External Database”
on page 98.
• New features in reports. See “Configuring Reports” on page 33.
• New features in statistics. See “Configuring Statistics and Logs” on page 51.
1
Page 8

Introduction What’s New in D.01.10
What’s New in D.01.10
The report customisation is enhanced to allow you to include, in some cases, both maternal and
newborn data on the same report. This is documented in “Inserting a Form Field” on page 36.
New method of assigning permissions to use the fax service.
Configuration
Online, you can:
• configure the system, by setting up PCs, users, beds and so forth. Access to this configuration is via
the system manager icon in the system’s tool bar and is described in the system online help.
• configure the pages and fields that appear in forms.
• configure the contents of pick lists using the value table editor.
• configure Word reports.
• configure Excel statistical reports by designing SQL queries.
• configure the value table lists, using the Value Table Editor (VTE)
Support Tools
The tools covered in this guide, intended for use by the System administrator, and accessed using the
OB TraceVue Support menu, are:
Patient Data Administration Tool
Link Recovery Tool
System Overview Tool
Value Table Edito r
External Database Administration Tool
Additionally, you can access the Patient Index Search tool from the OB TraceVue menu. The other
tools are described in the Installation and Service Manual and are for use by qualified service
professionals.
Login in as Windows Administrator
For security reasons, some tasks require you to log in to the operating system as a member of the
administrator group. This is NOT the same as your OB TraceVue login, and is completely separate to
the permission rights you have with OB TraceVue. If the PC at which you are working has autostart
configured, you must use the following technique to log off and log on again, this time as
Administrator.
If administrator rights are required:
1 Shutdown OB TraceVue on the local PC.
2 Log off Windows:
a. Press Alt + Ctrl + Del to open the security window.
b. Press Log off.
2
Page 9

Magneto Optical Media Introduction
c. Press Shift while clicking Yes and keep it pressed.
3 Log on Windows as a user who is a member of the Windows Administrators user group (for
example, OBTV Administrator or Administrator)
4 Perform your task.
5 Log in again as User after you have finished your task.
6 Restart OB TraceVue on the local PC.
CAUTION Ensure that Explorer is not open when you log in as User; OB TraceVue may fail to start when
Explorer is open.
The tasks described within this guide that require administrator rights are changing the OB TraceVue
shell settings (if you have to run the OB TraceVue Setup program), and configuring templates for
reports and statistics.
Magneto Optical Media
The following table lists the approved MO optical drive combinations and media you can use with
your system.
1.3GB and 2.6GB optical drives are not supported by this release of the application software. If you
still have any data on 1.3GB media, you should copy it to a higher capacity media so that it can be read
with the 9.1 optical drive. See “Converting Optical Disks from 1.3GB to 5.2/9.1GB” in the chapter
“System Upgrades” in the Installation and Service Manual for details of how to copy disks.
Archive Drive (GB) Retrieve Drive (GB) Media you can use when
5.2 5.2 5.2 / 2.6
5.2 9.1 5.2 / 2.6
9.1 5.2 5.2 / 2.6
9.1 9.1 9.1 / 8.6 / 5.2 / 2.6
Using the Fax Facility
In order to use the Windows fax facility from within OB TraceVue, the system administrator must
assign .
1 Click Start, point to Programs, point to Accessories, point to Communications,
point to Fax, and then click Fax Service Management.
2 Right click Fax Service on Local Computer, and then click Properties.
3 Click the Security tab.
copying (GB)
4 In the Name box, click a user or group, and then click either Allow or Deny to change
permissions.
– Sumbit fax jobs: The user or group can send faxes.
– View fax jobs: The user or group can view jobs in the fax queue.
– View fax service: The user or group can view properties for Microsoft Fax.
3
Page 10

Introduction Preventive Maintenance
– View fax devices: The user or group can view properties for fax devices in Fax Service
Management.
– Manage fax jobs: The user or group can pause or cancel all jobs in the fax queue.
– Manage fax service: The user or gruop can change Fax service properties.
– Manage fax devices: The user or group can turn send and receive for a device on or off.
5 Click OK.
Preventive Maintenance
You are advised to shutdown and reboot the OB TraceVue network once a month.
Manufacturer’s Information
Manufacturer:
Philips Medizin Systeme Boeblingen GmbH
Hewlett-Packard-Str. 2
71034 Boeblingen, Germany
© Copyright 1996-2004 Koninklijke Philips Electronics N.V.
All rights are reserved. Reproduction in whole or in part is prohibited without the prior written
consent of the copyright holder.
WARNING A warning alerts you to a potential serious outcome, adverse event or safety hazard. Failure to observe a
warning may result in death or serious injury to the user or patient.
CAUTION A caution alerts you to circumstances where special care is necessary for the safe and effective use of the
product. Failure to observe a caution may result in minor or moderate personal injury, damage to the
product or other property, and possibly in a remote risk of more serious injury.
This sign on your system indicates that there is detailed information in this book that you
should read before proceeding.
These Instructions for Use refer to products made by manufacturers other than Philips.
Microsoft
company names mentioned may be the trademarks of their respective owners.
OB TraceVue should only be used by, or under the direct supervision of, a licensed physician. US law
restricts this device to sale by, or on the order of, a physician.
®
and Windows® are US registered trademarks of Microsoft Corp. All other products and
The system was developed in cooperation with the Massachusetts General Hospital, an affiliate of the
Harvard Medical School.
Philips makes no warranty of any kind with regard to this material, including, but not limited to, the
implied warranties of merchantability and fitness for a particular purpose. Philips shall not be liable for
errors contained herein or for incidental or consequential damages in connection with the furnishing,
performance or use of this material.
4
Page 11

Manufacturer’s Information Introduction
Before using any third party software with OB TraceVue, you must ensure that the conditions stated in
the Integration Guide are fulfilled.
The application software (M1381D) of the OB TraceVue system complies with the
requirements of the Council Directive 93/42/EEC of 14 June 1993 (Medical Device
0366
Directive).
WARNING An OB TraceVue PC used within the patient vicinity must be connected to an isolation transformer.
As with any electronic data management system, failure of system components may lead to loss of
stored data or loss of access to these data.
WARNING Failure of the responsible individual institution using this equipment to implement a satisfactory
maintenance schedule may cause undue equipment failure and possible health hazards.
5
Page 12

Introduction Manufacturer’s Information
6
Page 13

2
2Configuring Forms
You can configure the factory-provided OB TraceVue forms to hide complete pages and/or individual
elements of data on a page.
Antepartum (Prenatal visit) Record - antepartum information about the pregnancy before the
patient is admitted in your department, for example lab test, ultrasound scans and so forth.
Admission Record - information about the patient’s admission to hospital.
Labor, Delivery, Postpartum and Discharge Record - labor and delivery information.
Postpartum Follow Up Record - postpartum follow-up visits information.
Newborn Admission Record
Newborn Discharge Record
Newborn Flow Chart
Maternal Flow Chart
The data held in the forms is used by the reports and statistics. If you switch off an element that is
required by a report or statistic the resulting output will be incomplete. The SQL Queries Example
document indicates in which SQL queries the fields are used. Interpreting this document requires an
understanding of SQL and the OB TraceVue external database structure.
CAUTION Do not switch off any field, column or entire form unless you are certain that it does not contribute to
one of your reports or statistics.
7
Page 14

Configuring Forms Entering Configuration Mode
Each form consists of a number of pages. To get from one page to another you click on the tab at the
top of the page.
Click on this tab to change to this page...
Enter data into
fields on the page
When you configure the form, you select which of the available fields appear on each page. This way
you can adjust the form so that it reflects your existing data gathering process. Some data fields consist
of lists, where you either check a box beside the items in the list, or select one or more of the items.You
configure the items in a list using the Value Table Editor.
Entering Configuration Mode
You can configure the forms on any PC in the system. You cannot configure a form that is currently on
the screen. If you want to configure the current form, change to the single trace screen first.
1 Make sure you are logged in as a superuser or system manager.
2 Press and hold down the “Ctrl” and “Shift” keys.
3 Select the form you want to configure. Release the “Ctrl” and “Shift” keys after the form has
opened.
4 The colored outline around fields and tables indicates that you are in configuration mode and can
configure these items.
5 Leave the form by clicking on any other icon. Changes become active system-wide as soon as you
leave the form.
Selecting Pages to Include in Forms and Flow Charts
In configuration mode, each form and flow chart starts with a Page Configuration tab showing all the
pages that comprise this form. or chart. Here you select and deselect the pages you want to include in
the form. You cannot select or deselect the sub-pages of pages in a form at this level.
Configuring a Flow Chart
1 Click on the Page Config tab.
2 Click on the checkboxes beside the page names to choose whether a detail page is visible and
included in the global overview and data entry summary.
3 Click on the individual page tabs, and then against individual parameters to determine whether
these are available in the global overview, or data entry summary pages, as appropriate.
8
Page 15

Configuring What’s on a Page Configuring Forms
Any changes you make to the flow chart configuration are applied to all patient episodes, both existing
and retrieved.
Configuring a Form
1 Click on the Page Config tab.
2 Click on the checkboxes beside the page names to choose whether a page:
– appears in the form for editing (checked)
– appears in the form, but can only be read and not edited (greyed out)
– does not appear in the form (not checked)
Configuring What’s on a Page
1 Enter configuration mode.
2 Click on the tab of the page you want to configure. The fields that you can configure are outlined
in red, yellow or blue (depending on the status of the field):
Some of the fields contain lists from which you can select one of a number of elements. The
contents of these lists are defined in the value tables.
3 Click on the checkboxes at the top left of the field to choose whether the field
– appears on the page for editing.
9
Page 16

Configuring Forms Configuring What’s on a Page
– does not appear on the page.
– appears on the page, but can only be read and not edited (only applicable if the value in the field
can be calculated or taken from another field or page).
available, read-only (yellow frame)
available (red frame)
Some fields are “read-only. Some fields depend on data from other fields to calculate their value. You
must be aware of these dependencies (listed in “Calculated Fields” on page 11) when selecting fields for
a page and deciding whether to make them available, or available and read only.
Adding a Label to the “Special” Field
The use of one field (the “special” field) in the Patient Demographic form is entirely left to the
hospital. You can label it whatever you like and gather whatever data you want here.
With form configuration enabled, the text you can edit is shown on a white background on the form.
1 Click on the text you want to configure.
1. Type in the text you want to display on the page
With Config enabled:
click here and type your text.
not available (blue frame)
Configuring Tables on a Page
1 Click on the tab of the page with the table you want to configure. The tables that you can
configure are outlined in red:
Some cells in the table contain lists of values you can choose. To select which items appear in a list,
see “Adding an Item to a List” on page 26.
10
Page 17

Calculated Fields Configuring Forms
Adjusting the Width of a Column
1 Move the cursor over the line between the two column heads. The cursor changes from an arrow
to:
2 Hold down the left button on the mouse, or click and hold the light pen to the screen.Unless you
intend to hide a column, make sure that it is wide enough for the data that it will have to display.
3 Drag the column divider until the column is the width that you want, or reduced to nothing.
4 Release the mouse button or light pen.
Restoring a Hidden Column
If the width of a column has been reduced to nothing, the column’s presence is indicated by a red line
between the remaining columns in the table.To restore a hidden column:
1 Move the cursor close to the line between the two column heads. The cursor should change from
an arrow to.
2 Hold down the left button on the mouse, or click and hold the light pen to the screen.
3 Drag the column divider until the column is the width that you want.
4 Release the mouse button or light pen.
Calculated Fields
OB TraceVue calculates the values of some fields by adding together the values of other fields. For
example, a patient’s total number of abortions (shown in the Abortions field) equals the number in the
Spontaneous Abortions field plus the number in the Induced Abortions field. In the following tables:
• Field - shows a total value. This may be derived from two or more other fields.
• Calculated/Derived From - shows which fields supply the data contained by the “Field” column.
• UsedBy - shows which other fields use the “Field” value in their own calculations.
You must be aware of these dependencies when selecting or deselecting fields to include on a page. You
cannot deselect a field that is used by other fields that are still active.
Only read-only fields can contain calculated values. In this chapter’s tables:
• Fields with dark shading (such as “LMP EDD (calc)” below) are always read only.
11
Page 18

Configuring Forms Calculated Fields
• Fields with light shading (such as “Parity” below) can be configured either as read only or for
both reading and writing.
These tables specify context dependencies and calculation rules. The data items listed in the Data Item
column are calculated based on the rule stated in the Calculated content/availability column.
Pregnancy
If you do not enter the data required for the system to determine gestational age (GA), the default GA
used to detect accelerations is >= 32 weeks (>=15 sec, <10 min).
“Calc” indicates that this item is calculated automatically by the system.
Data Item Pick list content Calculated
content/
availability
LMP EDD (calc) n/a LMP+280d n/a
LMP GA(calc) n/a GA (LMP,now)
Empty if GA is
fixed (Delry docu
or close case)
US EDD (calc) n/a US GA, US date n/a
Embr. Xfer
EDD(calc)
Embr. Xfer
GA(calc)
US GA 0-50 weeks
Current GA 0-50 weeks
n/a transfer date+264d n/a
n/a GA (Embr.Xfer,
now)
Empty if GA is set
fix (Delivery
documented or
close case)
n/a n/a
0-6 days
Overwritten by
0-6 days
selection of “Based
on” buttons
CurrentEDD,
Also used by
n/a
n/a
Patient Panel
CTG Trace
Analysis
12
Current GA date
reset to today
Current GA date n/a Overwritten with
“Now date” by
selection of Based
on buttons
n/a
Page 19

Calculated Fields Configuring Forms
Data Item Pick list content Calculated
Also used by
content/
availability
Current EDD Min:Today-1year
Max:Today + 365d
Overwritten by
selection of “Based
on” buttons:
n/a
•Current GA date
reset to today if
not modified
Number of fetuses 1-8 n/a Newborn/Fetus
pages and
Flowchart
Gravida 0-25 n/a Patient Panel
Term 0-25 +1 on close
Parity
pregnancy if field in
Delivery/Newborn
page:
Date of delivery is
not blank AND
Preterm = ‘No’
Preterm 0-25 +1 on close
Parity
pregnancy if field in
Delivery/Newborn
page:
Date of delivery is
not blank AND
Preterm = ‘yes’
Parity 0-25 +1 on close
pregnancy if field in
Delivery/Newborn
page:
Date of delivery is
not blank AND GA
>= 20/0
On click calc
button: Term +
Preterm
Spontaneous
Abortions
0-25 +1 on close
pregnancy if field in
Delivery/Newborn
page:
Date of delivery is
not blank AND
Type of abortion =
“Spontaneous”
Patient Panel
Abortions
13
Page 20

Configuring Forms Calculated Fields
Data Item Pick list content Calculated
Also used by
content/
availability
Induced Abortions 0-25 +1 on close
Abortions
pregnancy if field in
Delivery/Newborn
page:
Date of delivery is
not blank AND
Type of abortion =
“Induced”
Abortions 0-25 +1 on close
n/a
pregnancy if field in
Delivery/Newborn
page:
Date of delivery is
not blank AND
Typ e of de li ver y =
“Abo rt io n”
Living 0-25 n/a n/a
Ectopics 0-25 n/a n/a
Born Alive 0-25 +1 on close
n/a
pregnancy if field in
Delivery/Newborn
page:
Date of delivery is
not blank AND
Live-born = “Yes”
Multiple Births 0-25 +1 on close
pregnancy if Date
of delivery is not
blank in more than
one Delivery/
Newborn page.
n/a
14
Page 21

Calculated Fields Configuring Forms
OB History
Data Item Pick list content Calculated
content/
availability
Gest Age 0-50 weeks
Route of delivery Configurable Delivery ->Type of
Birth Weight
Lb and oz
Sex Male/female/
Length of labor 0-999 hours
Anesthesia Configurable Delivery->vaginal
Place of Birth Free Text
Born Alive Yes/No/Nodata Delivery->Live
Preterm labor Yes/No/Nodata
Complications/
Comments
0-21 lb
0-15 oz
unknown/no data
Free text Delivery->Vaginal
Delivery-> date of
Birth
delivery + subtype
Delivery-> Birth
weight
Delivery->Infant
gender
Labor->Length of
labor
Anesthesia +
Anesthesia>Primary + >Secondary until
max. Chars of field
OBTV Hospital
Name (Config)
born
Labor->Preterm
labor
complications +
cesarean
complications +
comment +
Newborn
Comment until end
of field
Also used by
n/a
n/a
n/a
n/a
n/a
n/a
n/a
n/a
n/a
n/a
15
Page 22

Configuring Forms Calculated Fields
Prenatal Visits
Summary
Data Item Pick list content Calculated
content/
availability
Location n/a Patient location at
the time of the last
modification.
User n/a User of last
modification
Gest. Age n/a GA based on Date/
Time (updated on
save)
Weight Gain n/a Weight – Last
Weigh t
BP n/a n/a n/a
Dilation 0-10 n/a n/a
Effacement 0-100% n/a n/a
Station -5 to +5 n/a n/a
Also used by
n/a
n/a
n/a
n/a
Data Item Pick list content Calculated
content/
availability
Current Problems n/a Detailed list of
problems with the
flag “include in
current problem
list” set
Procedures n/a Detailed list of
procedures with the
flag “include in
current procedure
list” set
Also used by
n/a
n/a
16
Page 23

Calculated Fields Configuring Forms
History
Data Item Pick list content Calculated
content/
availability
Current
Medications
Allergies n/a Allergies with
Current pregnancy n/a All details of the
OBHistory n/a OBHistory table n/a
Data Item Pick list content Calculated
Past Medical
History
Screening n/a All entries other
Physical
examination
n/a Detailed list of
medications with
the flag “include in
current problem
list” set
details
pregnancy page
content/
availability
n/a All entries
Attention flag
visualized.
than UNKNOWN.
n/a Summary entries of
Exam. (Left context
grid of the Exam
page)
Also used by
n/a
n/a
n/a
Also used by
n/a
n/a
n/a
Antepartum Test
Data Item Pick list content Calculated
Te s t C S T /N S T n / a n / a
Test result Reactive/non
Also used by
content/
availability
n/a n/a
reactive
17
Page 24

Configuring Forms Calculated Fields
Data Item Pick list content Calculated
Date/Time n/a Entry date/time n/a
BPP n/a B, T, V, A 0/2
User n/a User of last
GA n/a GA based on Date/
US Examination
Data Item Pick list content Calculated
Date/Time n/a Entry date/time n/a
User n/a User of last
GA n/a GA based on Date/
Also used by
content/
availability
n/a
point,
NST
reactive=2points
n/a
modification
n/a
Time (updated on
save)
Also used by
content/
availability
n/a
modification
n/a
Time (updated on
save)
Admission
18
Data Item Pick list content Calculated
content/
availability
Referring Provider n/a Pre-filled with the
name of the first of
Providers->referring
flag
Also used by
n/a
Page 25

Calculated Fields Configuring Forms
Delivery
Data Item Pick list content Calculated
content/
availability
GA n/a GA (current GA,
Date of delivery)
Type of delivery Vaginal/ Cesarean/
Abortion/
No data
(Unknown)
Cesarean Order Primary/repeat n/a VBAC fields
VBAC candidate Yes/No/No data Enabled if Cesarean
Reason not
Candidate
VBAC Attempt Yes/No/No data Enabled if VBAC
Reason not
Attempt
Type of abortion Induced/
Configurable Enabled if VBAC
Configurable Enabled if VBAC
Spontaneous
n/a OBHistory
order = repeat
Cand = No
cand = Yes
Attempt = No
Available if type of
delivery = abortion
Also used by
n/a
Reason not
Cand.
Reason not Att.
n/a
Reason not
Attempt
n/a
OBHistory,
Pregnancy
history,
Indication for
induced
abortion
Indication for
induced abortion
Cause of
spontaneous
abortion
Cord blood
obtained
Preterm Yes/No/No data n/a Pregnancy
Apgar Score 0...10/0...10/0…10 n/a n/a
Configurable Enabled if Type of
abortion = induced
Configurable Enabled if Type of
abortion =
spontaneous
Yes/No/No data n/a n/a
n/a
n/a
history
19
Page 26

Configuring Forms Calculated Fields
Value Ranges for Input
Unless otherwise noted, the range of a date value on a form page can be anything from the current date
“Now” to a time up to twelve months in the past. This table outlines the exceptions.
Form Page Data Item Minimum value Maximum value
Demographics Date of Birth Now - 90 years Now – 10 years
Education Years 0 99
Pregnancy LMP Now - 12 months Now
US exam date Now - 12 months Now
Embryo Xfer date Now - 12 months Now
Current GA date Now - 12 months Now
Current / US GA 0 50.6
Menstrual Cycle
Length
OBHistory GA 0.0 50.6
Labor hours 0 99
Physical
Examination
Prenatal Visits,
Height 0 cm =
Weigh t/ Prep reg.
Weigh t
Fundal Height 0 cm 99 cm
Weigh t 0 lb =
042
302 cm =
0ft / 0inch
0 lb =
0 kg
9ft / 11 inch
999 lb
453 kg
999 lb
OB History,
PP Visit
APTesting /
US Measurements
Admission Date of admission Now - 12 months Now
Delivery Date of delivery Now - 12 months Now
Fund. Height 0 cm 99 cm
GA 0.0 49.6
Est. F. weight 0 grams 9951 grams
All measurements 0.0 cm 99.9 cm
GA at delivery 0 50.6
Baby xfer date Now - 12 months Now
Fetal death Now - 12 months Now
Placenta delivery Now - 12 months Now
Birth weight 0 grams 9951 grams =
Blood loss 0 ml 9999 ml
Measure 0.0 99.9
0 kg
453 kg
21 lb 15 oz
20
Page 27

Calculated Fields Configuring Forms
Form Page Data Item Minimum value Maximum value
Anesthesia Surg Level achieved Now - 12 months Now
Anesthesia end Now - 12 months Now‘
Cath Length 0 cm 99 cm
Discharge summary Date of discharge Now - 12 months Now
Rolodex (Identify/
Search Patient)
Search Filter:
Scheduled
n/a Prenatal Visits,
Discharge Record,
PostPartum Visits
->Next
appointment/
follow-up date.
Nearest in future.
21
Page 28

Configuring Forms Calculated Fields
22
Page 29

3
3Using the Value Table Editor
The Value Table Editor (VTE) is a separate program for editing the items in the lists used in the data
fields of the patient data forms, and the flow chart. You can work with the value table “online” with the
editor started on an OB TraceVue client PC, or off line so that you can use it on any Windows 2000
workstation. When the OB TraceVue Setup program is run, the factory defined folders are installed.
Therefore you are advised to back up any changes you make to the value table as you may want to
reinstall them after an upgrade or reinstallation due to system maintenance. You require at least
Superuser rights to edit the value table.
The value table lists are divided into maternal and newborn.
The instructions in this chapter tell you what steps you have to perform to edit your lists. You require
basic computer user/Windows 2000 knowledge to navigate to the location of lists and work with
standard dialog boxes and so forth.
The factory supplies some example contents for the value table lists for your guidance. For the
convenience of the different geographies using OB TraceVue, as far as possible these lists have been
translated (though not clinically validated). Some lists may contain a mixture of English and local
language.
It is the responsibility of the institution using OB TraceVue to configure the contents of the value table
lists in an appropriate manner for the institution.
Starting the Value Table Editor
To start the program:
1 Close or iconize OB TraceVue before running the value table editor. If you are running OB
TraceVue in its own “shell”, select Explorer from the Run menu of the shell dialog.
2 From the OB TraceVue Support menu, select Value Table Editor.
3 Enter your own password in the box and press OK.
You can now edit the lists and their contents. However it is recommended that you make a backup
copy of your list before you proceed by exporting it to another file (see “Exporting the Value Table
Lists to a File” on page 27).
23
Page 30

Using the Value Table Editor Screen Layout
Once you have started the Value Table Editor, you will see the folders and lists used by OB TraceVue
on the PC where you are running the program.
Folder Window Item Window
Path
Screen Layout
The main screen is split into two sections. The folder window contains the names of the lists, and the
item window containing the individual items within the selected list. The available buttons depend on
which window has the focus. The window’s header shows you the path to which data is stored when
you press OK.
General Buttons
• Import/Export - use this to save the editor contents to a file, or load data from a file.
• Cancel - exit the editor without saving the contents.
• OK - saves your changes to the database.
Folder Window
The folder window shows the folders that contain the OB TraceVue lists; the highest level structure is
fixed - you cannot add, delete or edit folders at this level. The buttons that are enabled depend on the
attributes of the folder. Not all folders allow you to add a subfolder.
• Sort - use this to sort the sub folders of the highlighted folder into alphabetical order.
• Add Folder - use this to add a subfolder to the highlighted folder. The new subfolder requires a
unique name. You can add a subfolder to any factory-defined folder that has a subfolder level greater
than 0.
24
Page 31

Screen Layout Using the Value Table Editor
• Delete Folder - use this to delete a folder.
• Edit Folder - use this to see the name of the current folder and its properties, and then type in
a new unique name. The folder edit dialog shows the attributes set for the selected folder.
gives further information about the type of entry a folder may
contain; may also show maximum length of input and input type
(for example, codestring30 shows that an item can be up to 30
characters long, and have a code).
Folder name; only
user-created
folders can be
deleted.
Factory defined folders
with a subfolder nestinglevel greater than 0 allow
you to create subfolders.
The user subfolder
nesting-level is
decremented on every level
of user-defined folders.
The folders on the last
level have a nesting
counter of 0, and do not
allow creation of
subfolders.
Item Window
This displays the contents of the current folder. It shows at least an empty <append> element which
allows you add an item to the end of a list. You can move items from one folder to another folder of the
same type using the mouse to drag and drop.
If the item window has the focus, the labels of the buttons change to the item-window specific buttons:
• Sort Item - sorts all items in alphabetical order.
• Add Item - adds a new item above the line you select. A data specific dialog allows you to enter
the details of the item. You cannot create a new item with the same name as an existing item in the
same folder.
Indicates maximum items possible in list, and
whether the items are editable.
• Edit Item - use this to open a dialog that shows data items, and then edit them. Names must be
unique.
• Delete Item - use this to delete an item.
25
Page 32

Using the Value Table Editor Adding a Folder to the Folder Window
Keyboard/mouse Commands
Some keys mimic the function of the buttons on screen:
• INS (insert) key - works like the Add button
• DEL key - works like the Delete button
• Double click - works like the Edit button.
Intrapartum Medication Dialog
When you add an intrapartum medication, you must enter the amount and volume details to the
corresponding list box as appropriate. The content of the unit fields determines whether amount, dose,
volume and rate fields are also enabled. OB TraceVue uses the first entry, at the top of the list, as the
default.
Seeing Your Changes
If your changes are not immediately visible, (because you edited lists on the screen that was displayed
when you iconized OB TraceVue) change to a different screen using an icon (for example, change to
the single trace display) then switch back to your original screen. The changes will now be accessible. It
is not sufficient to switch tabs on the same screen.
Adding a Folder to the Folder Window
1 Click on the folder to which you want to add a new subfolder. For example to add a list of post-
natal procedures, click on the Medical History folder. Not all folders permit you to add subfolders.
2 Click Add Folder.
3 Type in a unique name for the new folder.
Adding an Item to a List
1 In the folder window, click in the folder containing the list to which you want to add an item.
2 In the item window, click on the existing item above which you want to add the new item. Use
append to add the item at the bottom of the list.
3 Click Add Item.
4 Type in the name of the new item. This cannot be the same as the name of any of the items that
already exist in this list.
If you are entering a medication or fluid, you must select the appropriate dose unit, rate unit, and
route from the pre-defined lists. These fields are enabled or disabled, depending on the contents of
the corresponding unit fields.
In some cases you can enter both the name of the item, and an optional alphanumeric code up to
16 characters. You can define or use your own codes for use with the export database to generate
statistics.
26
For example, to add a language to the Demographics\language folder
a. Click on the “Language” folder in the “Demographics” folder.
b. Click on “append”.
Page 33

Importing and Exporting Value Table Lists Using the Value Table Editor
c. Click on the Add Item button.
d. Type in (for example) “Danish”
e. Click OK.
In some places you can enter both the name of the item and an optional alphanumeric code (for
example, Procedures or Diagnosis). OB TraceVue does not need or use this code. The hospital can
define and use its own codes in conjunction with the export database to generate statistics. The codes
of the folders “Race”, “Religion”, and “Marital Status” correspond with codes transmitted as part of an
admission, discharge, transfer (ADT) link to the hospital’s own information system (HIS). Valid code
entries for “Marital Status” are A (separated), M (married), S (single), D (divorced), and W (widowed).
See the Integration Guide, chapter ADT Link, section “Supported Message Segments” for further
information.
Importing and Exporting Value Table Lists
You can share lists between OB TraceVue systems. You can also merge the current contents of the
value table lists with data from a valid VTE file. When you reinstall your system software, the factorysupplied default lists are loaded. If you have customized your hospital’s lists you can then restore them.
Exporting the Value Table Lists to a File
Use this when you want to save your value table lists to a file, for example so that you can share it with
another system.
1 Click the Import/Export button.
2 Click beside Save to File.
3 Select a directory where you want to save it, and type in the name of the file.
Loading a List from Another OB TraceVue System
CAUTION Loading a list from another OB TraceVue system completely overwrites your current OB TraceVue
lists.
1 Copy the list from the other system to your system.
2 Click Import/Export.
27
Page 34

Using the Value Table Editor Importing and Exporting Value Table Lists
3
Click Load file.
4 Select the name of the file containing the list you want to import.
Merging Two Lists Together
You can merge the current contents of your value table with the contents of a valid value table file. You
can merge lists created with OB TraceVue revision D.xx.xx software. It is not recommended to merge
lists from software revisions previous to this. The lists, including any additional folders and subfolders
you have created, will be merged into the new structure.
1 Make sure the list with which you want to merge is on your system.
2 Click Import/Export.
3 Click Merge File.
4 Select the file to merge into the current VTE.
For your information, the system temporarily marks newly merged data items, which were not
previously present, with a light bulb icon. This goes away after you complete the merge.
5 After the merge, check for items or folders marked with an exclamation mark and edit these if
necessary. Marked items are not saved when you finish the merge.
If you merge lists that contain two items with the same name but different data, the item from
the merged file is marked with an exclamation mark. Items are also marked with this symbol if,
during the merge, the maximum capacity of the parent folder is exceeded.
The mark is removed if, after editing and closing the VTE, the item is now unique and does not exceed
the maximum number of items in permitted for its parent folder.
Folders that exceed the maximum number of subfolder of their parent folder are also marked with the
exclamation mark.
Importing Examination Lists from A.01.xx
To import your old examination list into the current AP/IP list:
1 Select the AP/IP folder (Flow Chart -> Events -> AP/IP).
2 Click Import/Export.
3 Click beside Merge TV 1.x data from file.
4 Type in or select the name of the OB TraceVue A.01.xx file you want to import (EXA_xxx.csv,
where xxx indicates your language code).
Importing Medication Lists from A.01.00
To import your old medication list into the current medications list:
1 Select the IP Specific folder (Medications -> Drugs -> IP Specific).
2 Click the Import/Export button.
3 Click beside Merge TV 1.x data from file.
28
4 Type in or select the name of the OB TraceVue A.01.xx file you want to import (MED_xxx.csv,
where xxx indicates your language code).
Page 35
Color Coding the Chalkboard Using the Value Table Editor
Color Coding the Chalkboard
You can determine the background color of both the customizable columns in the maternal and
newborn chalkboards. The color you assign to custom column 1 is used for the entire line. The color
you assign to custom column 2 is used only by this column and overrides the color set for column 1.
Assigning a Color
Use the VTE editing techniques described in this chapter to assign a color to a custom column:
1 Select Maternal (or Newborn) -> Chalkboard -> Custom Column 1 -> Custom Folder.
2 Add a folder with the name of the custom column. This appears as the column header on the
chalkboard.
3 Enter an item with a name and, optionally, a code. The code is available for use in customized SQL
queries.
4 Enter the color as a color value triplet (RGB). You must specify a value for R (red), G (green) and
B (blue), even if that value is 0. The color preview box shows you what this color will be in the
application itself.
5 Repeat these steps to define as many colors as you require. To be able to remove a color at the
chalkboard and return to “white”, you need to configure a “white” code as well.
The value of each of the R, G, B components of the RGB triplet ranges from 0 (no contribution) to
255 (full intensity), thus a total of 256x256x256 = 16.7+ million different colors can be specified with
an RGB triplet. The following table suggests some values.
Color R G B
Red 255 0 0
Orange 255 168 25
Yell ow 255 255 0
Green 0 255 0
Blue 0 0 255
Indigo 60 25 130
Violet 212 95 228
White 255 255 255
The colors displayed by a WEB client PC, where only 256 colors are available, may have a slightly
different hue to that same color on a regular client.
29
Page 36

Using the Value Table Editor Input Mask Folders
Determining RGB Values
1 Open MS Word.
2 Open a new document.
3 Select Format -> Font.
4 Select the drop down box for Font Color
5 Select More Colors (at the bottom).
6 Click on a color in the hexagon.
7 Select the Custom tab to display the RGB numbers associated with that color. You can use these
in the value table editor.
Input Mask Folders
For some fields, you can configure an input mask that forces users to enter data in the correct format
for your institution. These folders are prefixed by the word “Mask”:
Folder Mask Page
Mat/Demog Pat Ident Maternal Demographics
Mat/Demog MRN (medical record number) Maternal Demographics
Newborn Demographics
Mat/Demog SSN (social security number)
Maternal Demographics
(for USA this is factory configured as ###-#####)
Mat/Demog Code Maternal Demographics
New/Demog Code Newborn Demographics
Mat/Delivery NB-ID Maternal Delivery
Newborn Demographics
Mat/Delivery Sec-ID (security band IC) Maternal Delivery
Newborn Admission
When you append to the folder, use the mask characters to fix the format. The mask characters are also
the prompt characters that the system displays in the input field.
Mask
Character
# numeric data (0-9)
A alpha numeric data (0-9 and a-Z)
& Any ASCII character
Input type
30
Page 37

Running the VTE on a non-OB TraceVue PC Using the Value Table Editor
Mask
Character
? Alphabetic data (a-Z)
U Accepts a-Z, converts to uppercase
L Accepts a-Z, converts to lowercase
\ Escape character. Use if you want a mask character to be
Description Mask
Date ##/##/## 12/12/99
Time ##:## UU 12:34 AM
Social Security
Number
Phone (###) ###-####
Zip code + 4 #####-#### 13254-3645
First Name ???????????????? Bartholomew
Input type
interpreted as a literal character (that is, shown in the mask)
Example
###-##-### 142-92-1532
(919) 933-0867 [7]
[####]
Running the VTE on a non-OB TraceVue PC
You can run the value table editor on a non-OB TraceVue Windows PC. This allows you to administer
lists for several OB TraceVue systems away from OB TraceVue itself.
1 At the OB TraceVue internal server PC, log in as OBTV Administrator.
2 Copy the following files from C:\TV21\PROG to the local computer:
–MFC 70.dll
–MSVCR70.dll
–VT_Edit.exe
– VTED.dll
3 Launch the VTE editor by double clicking VT_Edit.exe from its location on your local computer.
The system displays the usual VTE login dialog.
4 Log into the VTE using the general administrator’s password.
5 Select the value table editor file you want to edit from the location in which it is stored on the local
computer.
6 Edit the value tables and save your edits in the normal way.
31
Page 38

Using the Value Table Editor Running the VTE on a non-OB TraceVue PC
32
Page 39

OB TraceVue stores patient data in a database on its internal server PC. It exports this data to the
external server PC so that third party applications, such as Word and Excel, can access the database
without interfering with the data acquisition and storage at the internal server.
This chapter looks at the reports you can print for the patient in focus using Microsoft Word. It tells
you how to work with the OB TraceVue-specific elements of this. It does not tell you how to use
Word.
Predefined Reports
OB TraceVue offers the following predefined reports for printing data of the patient in focus.
4
4Configuring Reports
Report Templates Evaluates Time
Range From
Printing Module for
Notes Form Fields
Admission.dot
Antepartum.dot
Discharge.dot
DischargeRecord.dot
DischargeSummary.dot
FCAssessByTime.dot
FCAssessByType.dot
Inpatient Postpartum.dot
Labor and
AlternateDelivery.dot
Labor and Delivery.dot
Labor&Delivery.dot
Nursery Admission.dot
Nursery Discharge.dot
Nursery FCAssessByTime.dot
Requires Newborn Charting Option
Nursery FCAssessByType.dot
33
Page 40

Configuring Reports Understanding Templates
Report Templates Evaluates Time
Range From
Printing Module for
Notes Form Fields
ObstetricAdmit.dot
PatientsPregnancyEpisodes.dot
PostpartumVisit/dot
PostpartumVisits.dot
ProgressNotes.dot
Te a c hi n g .d o t
TVReportM.dot
TVReportN.dot
EpTVRerpotM.dot
EpTVReportN.dot
If these predefined report templates do not meet your precise needs, you can customize the predefined
templates, or define new ones of your own, to print reports using the data in the external database.
Understanding Templates
Requires Newborn Charting Option
OB TraceVue is supplied with some pre-defined Word templates that allow you to print data about the
patient in focus. Each template is made up of a number of data elements called “form fields”. When
you ask OB TraceVue to print, it populates these form fields with data about the patient in focus.
Templates are stored on the internal server in
C:\Tv2_templates. This is shared across the system as
OBTVTemplates (which means when you are working at a
client PC, the directory path to reach the templates at the
internal server is \\<servername>\OBTVTemplates).
• auto - Automatic - prints straight from the system without
any user interaction
• manual - allows you to see the report on screen, and make
changes if necessary. Manual reports are indicated within the
OB TraceVue printing module by an asterisk (*).
The factory defined templates are stored in
C:\Tv2_Templates\factory. These cannot be
modified. At installation, these must be copied to the
appropriate “customer” directory, where they can be modified.
Store your modified templates in the appropriate newborn or
maternal directories in C:\Tv2_Templates\customer.
The printing module accesses this directory. Any entirely new
template you create must also be stored in the appropriate
customer directory.
34
Templates are normally started from the OB TraceVue printing module. To run the templates
standalone, you must open the document via Explorer. Only users with at least System Manager
permission rights may run the templates in standalone mode.
Page 41

Setting Macro Security Configuring Reports
Setting Macro Security
This icon indicates that the macro code for your template is loaded. If this icon is missing, or
doesn’t work, ensure that your macro security level is set to “low”.
1 In Word (and also in Excel).
1 On the Tools menu, point to Macro.
2 Click Security.
3 On the Security Level tab, ensure that “low” is selected for Word and Excel.
4 On the Trusted Sources tab, ensure that the checkboxes Trust all installed Add-ins
and templates, and Trust access to Visual Basic Projects are activated
for Word and Excel.
Customizing a Word Template
Use the following technique to create, or customize, a template.
1 Shutdown OB TraceVue at the local PC.
2 Login to the local PC as a user who is a member of the Windows Administrators user group. (See
“Login in as Windows Administrator” on page 2.)
3 Open Explorer.
4 Change to the folder containing the template you want to amend. Templates you have customized
previously should be in the customer directory. To amend a factory template, select the factory
directory.
• \\<servername>\OBTVTemplates\customer\maternal\Word\Manual
(or Auto)
• \\<servername>\OBTVTemplates\customer\newborn\Word\Manual (or
Auto
• \\<servername>\OBTVTemplates\factory\maternal\Word\Manual (or
Auto)
• \\<servername>\OBTVTemplates\factory\newborn\Word\Manual (or
Auto)
If no existing template is suitable, choose from
• TVReportM template (for maternal mode)
• EpTVReportM (for maternal mode)
• TVReportN template (for newborn mode)
• EpTVReportN (for newborn mode)
which are located in the factory Word folder. These are completely empty templates. See “Inserting
a “Notes Evaluation Period” Form Field” on page 39 for a description of “EpTVReport” type to
help you understand which you need to choose.
5 Copy the template that most closely reflects the result you want to achieve into a test environment,
for example in \\>server>\OBTVTemplates\Customer\Test\Word.
6 Remove the “Read only” attribute.
35
Page 42

Configuring Reports Customizing a Word Template
7 Customize the template using the techniques described in this chapter.
8 Save the template.
To make reports available for onscreen review prior to printing, move it into:
• OBTVTemplates\Customer\Maternal\Word\Manual
• OBTVTemplates\Customer\Newborn\Word\Manual
To send reports directly to the printer, save it into:
• OBTVTemplates\Customer\Maternal\Word\Auto
• OBTVTemplates\Customer\Newborn\Word\Auto
Some Excel templates MUST be saved in the ...\manual folder because they do not support
printing from the ...\auto folder.
9 Restore the “Read only” attribute.
10 Restart OB TraceVue at the local PC.
If you have any difficulty restarting OB TraceVue, it could be because there are still some open net
sessions. In this case, reboot the PC where the problem occurs and ensure that Explorer is closed.
11 Test the template to ensure it populates correctly.
When you save a new template in the template directory, OB
TraceVue automatically makes sure that it appears in the list of
available documents. This list is alphabetical. To force your
template to appear elsewhere in the list (for example, so that
your most frequently used templates appear towards the top of
the list), you need to add a sort criteria such as starting the
name with a number.
Any customization you make to templates is not backed up as
part of OB TraceVue’s automatic backup procedures.
CAUTION You are responsible to backup your customized templates and store your backup safely.
Inserting a Form Field
A form field is any item of information about a patient that appears on any of the OB TraceVue forms
(including calculated fields). You can include any of these fields in a Word template.
1 Open the template you want to amend. Open only one template at a time.
2 Position the cursor on the page at the location you want to insert a form field.
36
Page 43

Customizing a Word Template Configuring Reports
3
Click the data insertion icon in the Microsoft Word standard toolbar. The system displays the
Insert Form Field dialog. Click on a column header to sort the form fields by that column.
1
5432
9
8
7
6
Button Comment
1Mode Indicates whether the form field can be used in maternal templates only (M),
newborn templates only (N) or in both (M+N).
2Section Name of the OB TraceVue section in which the form field appears (for
example, “Demographics”).
3Form field
Name of the form field (for example, “PatientAdrStreet”)
name
4Type Data type. See “Form Field Data Types” on page 42 for more information.
5Description Abbreviated description of form field. (for example, “Street address of...”)
37
Page 44

Configuring Reports Customizing a Word Template
Button Comment
6Insert Form
Insert the form field into the template.
Field
7Full
Description
Complete description of highlighted form field (for example, “Patient’s Street
Address”).
8Active Template• Maternal Template/Newborn Template : The radio button
shows whether the report template is a maternal template or a newborn
template. This field is read-only.
• Name: shows the name of the current template (for example Labor and
Delivery.dot)
• Grouped By: shows the category of form field by which the report will be
grouped, if applicable (for example, postpartum records, or maternal delivery
records).
9Mode This shows whether the form field you have selected can be used in maternal
templates only (M), newborn templates only (N) or in both (M+N). If the form
field is common to both maternal and newborn records (for example, the last
name, or address) and can therefore be used in both M and N mode, then you
use the radio button to select whether you want maternal data, or newborn data
in your report. To include both, you must insert the field twice, once with the M
radio button selected, and again with the N radio button selected.
Not all form fields allow you to include both maternal and newborn data
simultaneously in one report. If you are unable to change the Mode (that is,
radio button is greyed out) the form field data that appears in your report will
be exclusively:
• maternal (if maternal is selected but greyed out)
• newborn (if newborn is selected but greyed out)
4
Select the form field you want and press Insert Form Field to insert it at the cursor
position.
For example, to include both the mother’s, and the newborn’s, last name on a report:
a. Highlight the form field “LastName”.
b. Click the Maternal Patient radio button.
c. Click Insert Form Field. This includes the mother’s last name in the report.
d. With LastName still highlighted, click the Newborn radio button.
e. Click Insert Form Field. The system includes the newborn’s last name in the same
report.
5 Reposition your cursor, and repeat these steps for each form field you want in your template.
6 Check the Word template’s consistency by clicking on the “Check Form Fields” icon in the
Word Menu. This looks to see if:
• text wrapping in a table is switched off if the form field is in a table
• the form field has a bookmark with a valid index
• an SQL statement is present for the form field
• a maximum of one “group document” category is inserted.
38
Page 45

Customizing a Word Template Configuring Reports
7
Fix any form field consistency errors.
8 When you have finished, click Close Dialog.
The data element you select appears at the current cursor location. You must use the Insert Form Field
dialog to add a form field to a template. You cannot copy and paste fields you have already inserted.
Fields that have been copied and pasted will not be filled.
Inserting a “Notes Evaluation Period” Form Field
When used in the templates that are enabled for this behavior, some form fields automatically take
their evaluation period (Ep) from the time range of the printing module. The FormField 'Contrac'
(from the Section “Notes-Contraction-Contraction”) is an example of this.
Not all templates use this feature. If, for example, you use the “Contrac” form field in a template that is
not enabled for this behavior, it does not take the range from the printing module. Instead the report
shows results for the entire episode in the normal way. The factory defined blank template
“EpTvReport” is enabled for this behavior.
Inserting a Group Document Form Field
Reports can be sorted using the “GroupBy” category. In the case of “GroupBy ID” in a form field’s
SQL statement, the macro code groups the whole report automatically by the “GroupByID”. For
example, the form field “DeliveryTSG” groups the report by the newborns.
You cannot insert form fields with more than one GroupBy category in the same template. For
example, if you have already inserted form fields with the “group by Child ID” category into a
template, you cannot also insert form fields with the “group by Record ID” category into the same
template.
All “Group documents” form fields are marked in the description column of the Insert Form Field
dialog.
Inserting Items in a Header
To insert a form field item into a header or footer you cannot use the data insertion tool. You must
make a cross reference to a form field that is already contained within the body of your template.
1 With the template header active, choose Table -> Insert -> Table.
You do not have to put this into a table. However cross references are not visible on screen and if
you need to change or delete them subsequently, it is much easier to locate them if each occupies
an individual table cell.
2 In the Insert Table Dialog, set up the table according to how much information you want to
include. Use one row per form field item. The example below shows a two column, five row table.
You can use Word’s layout and display features to size, position and enhance the table design.
Last Name
Middle Initial
First Name
ID#
Print date: 01/01/03
3 Type the first cell identification name as you want it to appear on your template. For example Last
Name.
39
Page 46

Configuring Reports Customizing a Word Template
4
Click cursor in the adjacent cell where you want the information to appear.
5 Now you need to insert a cross reference to the form field(s) in the body of the template. Select
Insert -> Field. Ensure that the field options are not checked.
6 Select Ref from the Field names list.
7 Select the bookmark name from the Bookmark name list.
8 Press OK.
Select Ref
Select the name of the
bookmark you require
40
Do not use Field options, Format, or Field
Codes. These are not tested for use within
your templates.
9 Repeat this for all the form fields you want to include.
10 Save the template into the required automatic and/or manual directory.
When you print this as a document for the patient in focus, the header will be filled in with the form
fields you cross-referenced. If you use this as a manual document, when you see it on screen the header
table remains blank (it WILL NOT show the form field information you have cross referenced) until
AFTER you have sent the document to the printer).
Page 47

Creating Your Own Form Fields Configuring Reports
Inserting Page Breaks
The macros within Word 2003 do not support the system automatically paginating reports. You must
do this manually.
Creating Your Own Form Fields
Using the Report Form Fields (Customized) work sheet of the SQLedit.xls workbook, you can build
your own customized template queries by assigning a form field name to a query and including it in
report using the usual form field insert dialog. Start this workbook from an MS-Office client PC, in the
directory \\<server>\OBTVTemplates\code\SQLedit.xls. You must have Windows
administrator rights. All templates must be closed while you are using this.
You can copy an SQL query from the worksheet “report form fields (factory)” to the customized
worksheet and adapt it to suit your needs, or create an entirely new SQL query.
When you have customized or created an SQL query, you assign a form field name to it. This form
field available in the Form field Insertion dialog for use in reports as described in “Inserting a Form
Field” on page 36.
SQLedit.xls treats the data as a list of records. Rows can be inserted or deleted. However you cannot
insert individual cells. Empty cells are not permitted in a record. Declare comment lines using “#” in
the column “Section”.
When creating an SQL query for a new form field, you must complete the following areas on the
Report Form Fields (Customized) worksheet:
– Section - enter the name of the OB TraceVue section in which the form field appears, for
example “Demographics (Age).”
– Form Field Name - enter your name for this form field. It must start with C_ and follow
the Microsoft conventions for form field names (for example, you cannot use a white space, plus
or minus and so forth). This is what will appear in the Insert Form Field dialog.
– Data Type - choose the category of your form field. This determines how they will be
displayed in the report. See “Form Field Data Types” on page 42 for further explanation and
examples.
– Mode - choose from:
• M - this form field is designed for use in maternal templates only
• N - this form field is designed for use in newborn templates only
• M + N - this form field is designed for use in both maternal and newborn templates.
– Description - this is the textual description that appears in the Insert Form Field dialog.
– SQL - write the SQL query that maps to the form field name. You can check the SQL syntax by
double clicking in the SQL cell.
Patient context can be:
• SubCaseID (for example, Subcase.SubcaseID=[SubcaseID])
• ChildID (for example, Child.ChildID=[Child.ChildID])
• RecordID (for example, Record.RecordID=[pRecord.RecordID])
Templates always take patients’ SubcaseID from OB TraceVue. Values for [ChildID] and
[pRecord.RecordID] in the SQL statement are generated by the macro code. In the case of
41
Page 48

Configuring Reports Creating Your Own Form Fields
[ChildID] or [pRecord.RecordID] in a template’s SQL statement, the macro code groups the
whole document automatically by maternal delivery records or postpartum records.
Evaluation period - [Date-phrase:Notes.DisplayTS] in the SQL-Where clause can be
used to create an “Evaluation Period Within Episode” form field.
Example: SELECT Notes.DisplayTS FROM Notes KEY JOIN SubCase WHERE Notes.NoteID =
162 AND [Date-phrase:Notes.DisplayTS] AND SubCase.SubCaseId = [SubcaseID].
See also “Updating the SQL in Excel Templates Manually” on page 62.
Form Field Data Types
The shading indicates that this form field can return multiple rows (in a column) when used in a
predefined table.
Ty pe Displayed
type in the
Insert Form
Field Dialog
NORMAL Text Input
Field
DATE Date Field X X - Displays a date format.
DATETIME Date Time
Field
DUALSTATE Standard
Checkbox
TRINORM Tristate
Checkbox
TRISTATE Tristate Field X X - Displays the result as a field showing -, or +, or ?
QUADSTATE Quadstate
Field
ASSESSMENT Assessment
State
SQL statement returns Comment
Single
value
X
X
X
X X-
One
column
X- Displays ordinary text.
X - Displays a date and time format.
X - Displays the result as a checkbox: or
More
than one
column
Displays the result as a checkbox: or or
X
X
X - Displays the result as a field showing -, or +, or O,
or ?
X - Displays the result as a field showing -, or +, or O
or
42
Page 49
Creating Your Own Form Fields Configuring Reports
Ty pe Displayed
type in the
Insert Form
Field Dialog
SQL statement returns Comment
Single
value
One
column
More
than one
column
TABLE Table X X X This generates a single table. The table is shown
in the report, even if there is no data to display in
it.
DTABLE Table, with
results only
X X X This generates a single table.
The full table is displayed if there is at least one
entry in the table. If there is no entry, the table is
not displayed in the report.
TBLGROUP Table Group X X X This generates one or more (a group) of tables.
The table is shown in the report, even if there is
no data to display in it
DTBLGROUP Table Group,
with results
only
X X X This generates one or more (a group) of tables.
For example, if there are no assessment notes, the
assessment note table will not appear in the
report. If there is only one assessment note, the
report shows one table. If more than one
assessment note exists, a table is created for each
assessment note.
NORMAL
Use this form field type to display ordinary text.
–Example: SELECT Patient.TextComment FROM Patient
– Possible Result: That is my comment!
DATE Conversion to Date format depends on the Windows configuration.
–Example: SELECT Patient.PatientDateOfBirth FROM Patient
– Possible Result: 6/23/2002
DATETIME Conversion to Date and Time format depends on Windows configuration.
–Example: SELECT Child.DeliveryTS FROM Child
– Possible Result: 6/24/2004 8:58:18:AM
DUALSTATE
Database result Displayed in the report as:
T
Other values
–Example: SELECT (CASE Pregnancy.GABaseIndex WHEN 0 THEN 'T' ELSE 'F' END) FROM
Pregnancy
–Possible Result:
43
Page 50
Configuring Reports Creating Your Own Form Fields
TRINORM
Database result Displayed in the report as:
F (false)
T (true)
Other values
–Example: SELECT Child.Liveborn FROM Child
TRISTATE
QUAD-
STATE
–Possible Result:
Database result Displayed in the report as:
F (false) -
T (true) +
Other values ?
–Example: SELECT Screening.Status FROM Screening
– Possible Result: +
Database result Displayed in the report as:
F (false) -
T (true) +
S (observe) O
Other values ?
–Example: SELECT Status FROM CaseCategory
–Possible Result: +
ASSESS-
MENT
TABLE A new table is created with default column names. Column names could be renamed and formatted.
44
Database result Displayed in the report as:
F (false) -
T (true) +
S (observe) O
Other values
–Example: SELECT Status FROM NotesCategory
–Possible Result: +
Autodetection determines the form field type of each column. You can assign the form field type
manually if autodetection fails, or another form field type is needed (see “Autodetection” on page 46).
Do not mix fonts within one table cell.
Page 51

Creating Your Own Form Fields Configuring Reports
– Example: SELECT Patientname_Last, Patientname_First FROM Patient
–Possible Result
Lastname Firstname
Miller Susanne
If you have appropriate SQL knowledge, you can delete columns, or change the column order, after
the factory provided form field is inserted into the customized document.
DTABLE Functions in the same way as ‘TABLE’, but the complete table is deleted if the SQL statement returns
no result (ie, if the table is empty).
TBL-
GROUP
Use this data type to display hierarchical data. One table is created for each item of the first data
hierarchy. Default column names and the table header can be renamed and formatted. Autodetection
determines the form field type of each column and each table attribute. Determinate form field type
manually if Autodetection failed or another form field type is needed (see section Autodetection
below). Do not mix fonts within one table cell.
The SQL statement must have the following format:
SELECT Data1, ... Data_n,
GROUP BY A, TableParaA1, [TableParaA2, ... TableParaAm,]
[GROUP BY B, TableParaB1, [TableParaB2, ... TableParaBm,]]
[GROUP BY C, TableParaC1, [TableParaC2, … TableParaCm,]]
‘GROUP BY A[, GROUP BY B[, GROUP BY C]]’
FROM ...
Data1, …Data n: - Data is displayed in table columns.
GROUP BY X: - Hierarchy column. Data is grouped by that column.
TableParaX1: - Name of the items of the corresponding hierarchies.
TableParaX2, …TableParaXm: Additional data of the hierarchies are displayed in separated table rows
(Optional).
‘GROUP BY X’ - String expression of hierarchy column numbers. Begin with the first hierarchy.
–Example: SELECT
NI.Status, NI.Name,
Notes.NoteHandle, N.Name, N.Status AS TRISTATE, Notes.DisplayTS,
N.TextComment,
NC.NotesCatID, NC.Name, '
3, 8'
FROM (NotesItem AS NI KEY JOIN NotesCategory AS NC) JOIN (NotesCategory AS N
KEY JOIN Notes) ON NC.ParentNotesCatID = N.NotesCatID
45
Page 52

Configuring Reports Creating Your Own Form Fields
Possible Result:
Hygiene Assessment
DTBL-
GROUP
Status Date
- 11.05.2004 12:00:00
Shower
Status Name
self
assist
Skin Assessment
Status Date Comment
? 29.009.2004 12:30:00
Te m p e ra t u r e
Status Name
warm
cold
The table is displayed providing there is at least one entry. If there is no entry, the table is not displayed
in the report. It has the same function as ‘TBLGROUP, but the table is deleted when SQL statement
returns no result.
Comment
Autodetection
Autodetection automatically determines the type of form field type in tables. If autodetection fails, or
anther form field type is required, you can assign the form field type manually. Choose between
NORMAL, DATE, DATETIME, TRISTATE, TRINORM, DUALSTATE or ASSESSMENT.
Examples:
SELECT Patient.TextComment AS NORMAL FROM Patient
SELECT Patientname_Last AS NORMAL1, Patientname_First AS NORMAL2 FROM Patient
SELECT Patient.PatientDateOfBirth AS DATE1 FROM Patient
SQL alias names in the statement must be unique.
Available Views
See “Available Views” on page 57.
Available Functions
See “Functions You Can Use in SQL Statements” on page 59.
46
Page 53

Troubleshooting Configuring Reports
Troubleshooting
Problem Cause Solution
When I try to make a new
template, the system can’t
find the pre-defined OB
TraceVue templates.
The system won’t let me
save my template changes.
Printout has unfilled gray
boxes
Form fields in my header/
footer don’t get filled in
I created a template but it
doesn’t show in the list
I’m sure I cross referenced
the data element in header
but it doesn’t show up in
my document on screen.
The templates aren’t installed correctly. Check that you have a directory called
\\<server>\\OBTVTemplates\Word and
Excel. Make sure that this directory has
subdirectories called “Manual” and “Auto”.
Check that these sub directories contain
the pre-defined templates. If not, refer to
the Installation and Service Guide.
The templates that were in the directory
have been erased.
The customer templates directory is
empty.
You do not have the correct permission
to save changes to these files.
You cut and pasted a form field within
the template. This is not allowed.
You added a form field to a Word
document.
The form field in the header/footer is
not correctly linked to the body of the
template.
Saved in wrong place. Make sure its in the correct directory. See
You’ve done nothing wrong. It will show up as soon as you press “Print”
Restore your templates from your back up.
Copy them from your backup into the
appropriate automatic or manual directory.
Copy the factory templates into the
customer templates directories.
Log in as OBTV Administrator.
Insert a data element using the Data
Insertion Tool each time you want it to
appear in the body of the template.
Make sure you edit a template, not a
document.
Cross reference the position in the header/
footer where you want the element to
appear to the corresponding data element
in the body of the document using the
bookmark cross reference. See “Inserting
Items in a Header” on page 39.
“When you save a new template in the
template directory, OB TraceVue
automatically makes sure that it appears in
the list of available documents. This list is
alphabetical. To force your template to
appear elsewhere in the list (for example,
so that your most frequently used
templates appear towards the top of the
list), you need to add a sort criteria such as
starting the name with a number.” on
page 36.
or “Print Preview”.
47
Page 54

Configuring Reports System Interface
Problem Cause Solution
The is missing or
doesn’t work
When printing a
document, data is exported
but Word is not opened or
the document is not
printed.
The print message dialog is
fixed on the screen and
won’t go away.
“Server busy” error message
might appear, or the system
will not react to your
inputs.
A message box appears
saying that one of the
following files are missing:
TVMacros.dot
MessageCatalog
Macrosstarter2.xla
Template directory
OB TraceVue could not
start after customizing
templates. File permissions
are denied, even though
you have Administrator
rights.
The macro security level is set incorrectly
for OB TraceVue’s Word or Excel
macros.
Word encountered a problem during
printing or when trying to open the
document.
There is probably an unacknowledged
error message box in the background,
hidden behind the Print dialog box, or
OB TraceVue itself.
Some files are missing or not in their
correct location.
There are still some open net sessions. Reboot the PC where the problem occurs
Check the security setting of your macros.
See “Setting Macro Security” on page 35.
Minimize OB TraceVue and then move the
print dialog so you can check behind it,
acknowledge and rectify the error.
All files must be properly installed in
correct location according to the
instructions in Installation and Service
Manual.
Run the update script for the customized
templates according to instructions in the
Installation and Service Manual.
and ensure that Explorer is closed.
System Interface
An interface to the Word template macros lets other applications initiate printing. These templates can
be started with the latest, or retrieved, episodes. Closed episodes must be less than 48 hours old; after
this time short term notes information is removed automatically from the external database and is no
longer available for querying.
Using Report.vbs
Copy <CD ROM>:\TraceVue\tools\Report.vbs tp \\<internal server>\OBTVTemplates from the
server CD ROM. Open command prompt and navigate to \\<internal server>\OBTVTemplates.
Start Report .vbs in the command prompt. Use Report name, SubcaseID, Username, User password
and Time Range as parameters.
Report.vbs “ReportName” “SubcaseID” “OBTVUsername” “User password” <“StartTimeRange”
“EndRimeRange”>
The following are prerequisites:
48
Page 55

Recustomizing Templates Configuring Reports
• The report name must exist in C:\Tv2_Templates\customer\maternal||newborn\word\auto||manual
on the internal server.
• You must use the external database function ConvertToLongGuide() to get the SubcaseID in the
long format.
• Values for the time ranges bust have the format: YYYYMMDDHHMM because some templates
evaluate the time range for the Notes Form Fields.
Examples
The following example opens the Antepartum.dot. Subcase data “SCID” is used:
Reports.vbs “\\<server>\OBTVTemplates\customer\word\manual\maternal\Antepartym” “SCID”
“OBTVSuperUser” “UserPassword”
This example opens FCAssessByTime.dot Subcase data “SCID” is used:
Reports.vbs “\\<server>\OBTVTemplates\customer\word\manual\maternal\FCAssessByTime” “SCID”
“OBTVSuperUser” “UserPassword “20000101000” “200212310000”
Recustomizing Templates
When new templates are installed, typically during an application software upgrade, it is the customer’s
responsibility to manually update the SQL statements of customized queries.
After upgrading, the customer should also verify that any customization previously made to template
paragraph styles, character styles, formatting and so forth is preserved, and reapply it if necessary.
49
Page 56

Configuring Reports Recustomizing Templates
50
Page 57

5Configuring Statistics and
This chapter looks at the predefined statistics and logs compiled in Microsoft Excel. If you understand
how to access the external database and use SQL, you can write your own queries to produce
customized logs and statistics. This chapter does not tell you how to create your own SQL queries.
Data Export
Data is exported to the external database on a regular basis. A new export is started 30 seconds after the
previous export cycle has finished. Data export and access to the external database is described in detail
in the Integration Guide. Read this section before attempting to design your own SQL queries.
5
Logs
About Excel Templates
Creating, testing and distributing new templates is described in detail in “Understanding Templates”
on page 34. These principles apply to Excel templates too.
An Excel template has the file extension .xlt. To use the predefined templates as the basis for your
customization, first copy the templates into the customer directory as described in “Use the following
technique to create, or customize, a template.” on page 35. Although the example uses Word, the
technique is the same for Excel (use Excel in the directory path instead of Word). Unlike in Word,
there are no blank Excel templates available.
You must log in as a Windows Administrator, using the administration password, to make changes to
Excel templates.
The Excel template for each statistic or log consists of two
pages. The first sheet (for example, Admission Log)
determines how the results are displayed. The second
(Queries) specifies the name of the query or queries that
comprise the log or statistic. These queries are accessed at the SQLedit.xls Statistic Queries (Factory)
workbook, or from the Statistic Queries (Customized) if you have created your own queries.
Predefined Statistics and Logs
OB TraceVue offers the following predefined statistics and logs. The file
\\<server>\OBTVTemplates\code\SQLedit.xls describes the queries and templates
behind the logs and statistics.
51
Page 58

Configuring Statistics and Logs Predefined Statistics and Logs
This symbol indicates that the statistic/log uses the evaluation time range from the Printing
Module; printing from the auto folder is possible if required.
Statistics/Logs Uses Excel dialog to
Comments
enter evaluation
range
STATISCTICS
Obstetric Statistics.xlt
Regular Admin Statistics.xlt
Yearly Admin Statistics.xlt Year evaluation dialog
LOGS
Admission log.xlt
ChalkboardM.xlt
ChalkboardN.xlt Requires newborn charting option
Discharge Log.xlt
Delivery Log.xlt
Fetal Death Log.xlt
Labor&Delivery Log.xlt
Live Birth Log.xlt
Newborn Creation Log.xlt Requires newborn charting option
Nursery Admission Log.xlt Requires newborn charting option
Nursery Discharge Log.xlt Requires newborn charting option
Open Cases 12 Month.xlt
Open Pregnancies.xlt GA evaluation dialog
Patient Creation Log.xlt
Perinatal Death Log.xlt
Providers Log.xlt
Scheduled Log.xlt
Stillborn Log.xlt
SystemAuditTrail.xlt System Audit Trail
dialog
Only data from
C:\TV2\usesraccessaudit\audit.csv is used.
SystemAuditTrail is accessible in the
printing module, in the category “statistics”.
Transfer Log.xlt
Undelivered Log.xlt
Zip Log.xlt Zip evaluation dialog
52
Page 59

Customization Not Requiring SQL Knowledge Configuring Statistics and Logs
Customization Not Requiring SQL Knowledge
Some customization does not require in depth SQL knowledge. This customization is made at the
queries worksheet for each template.
Modifying Constant Values in the Query Parameter
You can change constant values in the SQL statement. Adapt the cells in the column “Parameter” on
the query sheet to modify queries. For example, if you have defined your own delivery sites, using the
value table editor, you need to add these into the delivery site item otherwise they will not be counted
in the query.
When writing queries, text must be embedded between single quotation marks; for example
‘PatientRace’. However numbers must not be embedded between single quotation marks.
Specifying the Sort Order of Data in Logs
When writing your own queries, you must specify the order by which data in columns is sorted.
1 At the query worksheet, go to cell B2.
2 Enter the column number(s) by which you want to sort, separating them using a comma.
Changing the Start Position
You can change the row and column in which the query result is displayed (the “start” position).
1 In the query worksheet, go to cell D1 (Start filling at Row, Column).
2 Enter the row number where you want to display the result. (for example 1)
3 Enter a comma. (for example 1,)
4 Enter the column number where you want to display the result. (for example 1,2)
53
Page 60

Configuring Statistics and Logs Customization Not Requiring SQL Knowledge
Varying the Cell Position of the Date Phrase
The cell position of the datephrase is not fixed on cells D4/D5. You can cut and paste the Datephrase
anywhere you want within the template.
Varying the Display Order of Columns
To change the order in which the columns display in the logs:
1 Within the template you want to change, unmerge cells in the column.
2 Cut the column.
3 Paste the column to its new location.
4 Remerge the cells.
This is not available for the queries you write yourself, or if you change the start position as described
in “Changing the Start Position” on page 53.
Changing the Time Format
You may use standard Excel techniques to change the time shown on your logs statistics from the
default HHMM to your preferred display.
54
1 Select the column header (to change all time displays in that column) or the cell (to just change an
individual cell) which displays the time.
2 Right click -> Format Cells
3 Select Category “Time” and then click your preferred display format.
Page 61

Customization Requiring SQL Knowledge (Creating New Queries) Configuring Statistics and Logs
Customization Requiring SQL Knowledge (Creating New Queries)
You can use the predefined queries from the Statistics Queries (Factory) worksheet as
the basis for your customization by cutting and pasting the queries to the statistics queries (customized)
worksheet and adapting them there. Alternatively, you can create entirely new queries.
To begin your customization, use the file
\\<server>\OBTVTemplates\code\SQLedit.xls.
Figure 1 Factory defined queries
55
Page 62

Configuring Statistics and Logs Customization Requiring SQL Knowledge (Creating New Queries)
Figure 2 Worksheet for your customized queries
Each of your customized statistics queries requires a Query-Name, which you must reference in the
column “Query-Name” on the Statistics Queries (Customized) sheet. For logs, the query name must
appear in cell A2.
Supported Fields
SQLedit.xls supports the following fields:
• Section - the name of the OB TraceVue area to which the query belongs, for example if the query
counts admissions, you might enter “admissions” in this column.
• Query Name - the unique name of the query, up to 50 characters. It must start with C_ (which
indicates a customer-defined query). It must not contain commas, white space and so forth.
• Mode - choose this from the drop down box. Choose from
– M: query is designed for maternal mode only
– N: query is designed for newborn mode only
– M+N: query is designed for both maternal and newborn mode
• Datephrase - see “SQL Parsing” on page 58.
• Description - enter a textual description of your customized query.
• SQL - see SQL parsing.
56
Page 63

Customization Requiring SQL Knowledge (Creating New Queries) Configuring Statistics and Logs
SQLedit.xls treats the data as a list of records. You can insert and delete rows. But you cannot insert
individual cells. Empty cells are not permitted in a record. Declare comment lines using “#” in the
Section column.
You are advised in your queries not to use episodes that are due to be automatically purged from the
external database in your queries. These episodes are identifiable from their sub-case state:
Subcase.SubcaseStateID = ‘D’ (delete)
Available Views
The following views are available:
View Comment
EpisodeMaternal Evaluates all maternal episodes, including open episodes.
EpisodeNewborn Evaluates all newborn episodes, including open episodes.
LastEpiOfPregMaternal Evaluates the latest maternal episode, which can still be open.
LastEpiOfPregNewborn Evaluates the latest newborn episode, which can still be open.
NewbornByMother Use this view to get the latest subcase ID of newborn patients to a specific
maternal pregnancy. More than one newborn subcase can match to one
maternal subcase.
View columns: NBSCID, ChildID, MatSCID.
Example (returns the mother’s name, last name and delivery site of each
newborn patient. Data of mother “Miller” open pregnancy is used):
SELECT
PM.PatientName_last MotherName,
PN.PatientName_last NewbornName,
CH.DeliverySite
FROM
Patient PM key join MedicalCase MM key join Child CH
key join Subcase SM join NewbornByMother NM
on ( NM.ChildID = CH.ChildID ),
Patient PN key join MedicalCase MN key join Subcase SN
join NewbornByMother NM
on ( NM.NBSCID = SN.SubcaseID )
WHERE SM.SubcaseID =
(SELECT SubcaseID
FROM LastEpiOfPregMaternal
WHERE LastEpiOfPreg = 'T' and CaseStateID = 'O' and
PatientName_Last = 'Miller' )
ORDER BY CH.SeqNumber;
Note: Use function ‘GetMaternalSCID()’ for inverse functionality.
57
Page 64

Configuring Statistics and Logs SQL Parsing
SQL Parsing
Keywords Comments Example
MSLIKE Specifies one item in the multi-
selection dialog
CMSLIKE Specifies items in multi-selection
dialog
ISMSEMPTY Specifies empty multi-selection
dialogs
ISCMSEMPTY Specifies empty multi-selection
dialogs
Date-phrase Specifies evaluation range. Used
in the column “Datephrase”. Use
“Void” for query names assigned
to NoDateLogs, for example
OpenCases12MonthLog.
[Parameter]
This is case
sensitive
Declare parameters in the column
“Parameter” on the query sheet.
Initialize them using the following
format [Parameter]=Value
SELECT COUNT(*) FROM Anesthesia
WHERE Anesthesia.AnestheticType “MSLIKE”
‘MAC’
SELECT COUNT(*) FROM
NewbornCesDelivery WHERE
NewbornCesDelivery.Indication “CMSLIKE”
‘Fetal distress’
SELECT COUNT(*) FROM Anesthesia
WHERE Anesthesia.AnestheticType
“ISMSEMPTY” AND “Date-phrase”
SELECT COUNT(*) FROM
NewbornCesDelivery WHERE
NewbornCesDelivery.Indication
“ISCMSEMPTY”
Parameter initialization:
58
They are normally used as
constant values in the WHERE
clause of SQL statements.
Each parameter must also exist in
the SQL statement. If no
parameter is declared, the default
parameter [Para X] is used.
SELECT Username FROM DelAttendance
WHERE Category = [Para X] OR Category =
[Para Y]
will be parsed to:
SELECT Username FROM DelAttendance
WHERE Category = ‘M.D.’ OR Category =
‘D.O.’
Page 65

Functions You Can Use in SQL Statements Configuring Statistics and Logs
Functions You Can Use in SQL Statements
Category Function Parameter Comment
Common
TimeDiff (in ts1 timestamp, in ts2
timestamp)
Common GainPerCent (in in1 integer, in in2
integer)
Common divFormat (in Att integer,in Div
integer,in Separator char(1)
)
Common GetMaternalSCID (in NbSCID
T_UUID)
e.g.
1. Child.LastMembraneStatusTime
2. Child.DeliveryTS
e.g.
1. NewBorn.DeliveryWeight
2. Record.Weight
e.g.
1. APTest.GA
2. 7
3. ‘/’
e.g.
Subcase.SubcaseID
Difference between timestamps in hours,
minutes.
Example (retrieves duration between rupture
of membranes and delivery time stamp of all
newborns):
SELECT TimeDiff
(Child.LastMembraneStatusTime,
Child.DeliveryTS) FROM Child
Difference between parameters in %.
Example (retrieves discharge weight gain in %
compared with delivery weight of all
newborns):
SELECT GainPerCent (NB.DeliveryWeight,
RC.Weight)
FROM SubcaseRecord SR KEY JOIN Record
RC KEY JOIN MedicalCase KEY JOIN
Newborn NB WHERE RC.RecordTypeID =
‘C’
Formats a string expression.
Function returns the latest maternal subcase
ID of the pregnancy that belongs to a specific
newborn patient.
If the newborn patient belongs to a previous
pregnancy, the latest maternal subcase of this
previous pregnancy must be retrieved.
Function returns the subcase ID of this
retrieved maternal subcase (otherwise NULL
is returned).
Example (returns the maternal last name of
newborn patient “MillerJunior”):
SELECT
P.PatientName_Last MotherLastName
FROM
Patient P key join MedicalCase key join
Subcase
WHERE SubcaseID =
GetMaternalSCID ( (SELECT SubcaseID
FROM LastEpiOfPregNewborn
WHERE PatientName_Last =
'MillerJunior' ) );
Note: Use view ‘NewbornByMother’ for
inverse functionality
59
Page 66

Configuring Statistics and Logs Functions You Can Use in SQL Statements
Category Function Parameter Comment
Common GetMaternalChildID
(in NbSCID T_UUID)
Discharge /
Postpartum
Labor
DischargeTS (in RCID T_UUID,
in MCID T_UUID)
DischargeFolUpDate (in RCID
T_UUID, in MCID T_UUID)
DischargeLOSDays (in RCID
T_UUID)
PPWeekDays (in RCID T_UUID) Record.RecordID Postpartum days / weeks.
Labor1StageDur (in MCID
T_UUID)
Labor2StageDur (in CHID
T_UUID)
Labor2StageDurT (in MCID
T_UUID)
Labor3StageDur (in CHID
T_UUID)
Labor3StageDurTot (in MCID
T_UUID)
LaborDurTot (in MCID
T_UUID)
e.g.
Subcase.SubcaseID
Function returns the child ID of a specific
newborn patient.
Function use always the data of the database
tree structure (even when the maternal
subcase is retrieved). Do not join to patient
related tables because they may contain newer
data.
Example (returns the delivery type of
newborn patient “MillerJunior”):
SELECT
DT.Name DeliveryType
FROM
Child CH key join DeliveryType DT
WHERE CH.ChildID =
GetMaternalChildID ( (SELECT SubcaseID
FROM LastEpiOfPregNewborn
WHERE PatientName_Last =
'MillerJunior' ) );
Note: Be careful when function
‘GetMaternalSCID ()’ is used in the same
query.
1. Record.RecordID
2. MedicalCase.MedicalCaseID
1. Record.RecordID
2. MedicalCase.MedicalCaseID
Record.RecordID Length of stay (Discharge page).
MedicalCase.MedicalCaseID Duration of first labor stage.
Child.ChildID Duration of second labor stage.
MedicalCase.MedicalCaseID Total duration of second labor stage.
Child.ChildID Duration of third labor stage.
MedicalCase.MedicalCaseID Total duration of third labor stage.
MedicalCase.MedicalCaseID Total labor duration.
Date and time of Discharge.
Follow up date (Discharge page).
60
Page 67

Functions You Can Use in SQL Statements Configuring Statistics and Logs
Category Function Parameter Comment
Newborn
Patient
SexChild (in CHID T_UUID) Child.ChildID Newborn gender.
ApgarChild (in CHID T_UUID) Child.ChildID Apgar score.
NewbornAgeDays(in DoB
timestamp, in refDate timestamp)
NewbornAgeHours (in DoB
timestamp, in refDate timestamp)
APTestBBP (in Breathing integer,
in Tone integer, in FluidVol
integer, in Activity integer, in
TestResultID char(1))
MaternalAge (in DoB timestamp,
in refDate timestamp)
CurrentMaternalWeight (in SCID
T_UUID)
PatName (in LastName
T_PATNAMELAST, in
FirstName char(30), in AliasName
T_PATNAMELAST_N)
RecordWghtGain (in RECID
T_UUID)
BP (in Sys integer, in Dia integer)1. Record.PBSys
e.g.
1. Patient.PatientDateOfBirth
2. Record.EntryDate
e.g.
1. Patient.PatientDateOfBirth
2. Record.EntryDate
1. APTest.Breathing
2. APTest.Tone
3. APTest.FluidVol
4. APTest.Activity
5. APTest.TestResultID
e.g.
1. Patient.PatientDateOfBirth
2. Subcase.EndTS
Subcase.SubcaseID Current patient weight (Examination page).
1. Patient.PatientName_Last,
2. Patient.PatientName_First,
3. Patient.PatientName_Alias
Record.RecordID Record weight gain (Prenatal Visit,
2. Record.BPDia
Newborn age in days.
Newborn age in hours (refers to
NewbornAgeDays).
Calculates biophysical profile.
Patient age.
Patient name (alias name is returned instead
of last name, surname).
Postpartum Visit).
Blood pressure.
61
Page 68

Configuring Statistics and Logs Updating the SQL in Excel Templates Manually
Category Function Parameter Comment
Pregnancy
Unit
conversions
CurrentGA (in FrozenGA integer,
in CorrectedGA integer, in
CorrectedGADate T_Date, in
EpiEndTS timestamp)
CurrentGADate (in FrozenGA
integer, in IP3 timestamp, in
EpiEndTS timestamp)
EddUSExam (in US_ExamDate
timestamp, in US_GA integer)
EddLMP (in LMP timestamp)Pregnancy.LMP EDD based on LMP.
EddXfer (in EmbryoTransferDate
timestamp)
GaLMP (in LMP timestamp, in
FrozenGA integer, in EpiEndTS
timestamp)
GaXfer (in EmbryoTransferDate
timestamp, in FrozenGA integer,
in EpiEndTS timestamp)
convertGr2LbOz10 (in Gr integer) e.g. Child.NewbornWeight Converts gram to lb+oz+1/10oz.
convertCm2FtIn (in Cm integer) e.g. Patient.Height Converts cm to ft + in.
convertMm2In (in mm integer) e.g. Measure.ValueNum Converts mm to inch.
addLbOz2Gr (in Gr integer) e.g. Child.NewbornWeight Lb+oz is added to grams.
convertGr2Kg (in Gr integer) e.g. Pregnancy.PrePregWeight Converts g to kg.
convertGr2KgLb (in Gr integer) e.g. Pregnancy.PrePregWeight Converts g to kg and lb.
convertGr2Lb (in Gr integer) e.g. Pregnancy.PrePregWeight Converts g to lb.
convertGr2LbOz (in Gr integer) e.g. Child.NewbornWeight Converts g to lb+oz.
1. Pregnancy.FixGA
2. Pregnancy.CorrectedGA
3. Pregnancy.CorrectedGADate,
4. Subcase.EndTS
1. Pregnancy.FixGA
2. MedicalPhase.BeginTS
3. Subcase.EndTS
1. Pregnancy.US_ExamDate
2. Pregnancy.US_GA
Pregnancy.EmbryoTransferDate EDD based on Embryo Transfer.
1. Pregnancy.LMP
2. Pregnancy.FixGA
3. Subcase.EndTS
1. Pregnancy.EmbryoTransferDate
2. Pregnancy.FixGA
3. Subcase.EndTS
Current GA.
Date of current GA.
EDD based on Ultrasound.
GA based on LMP.
GA based on Embryo Transfer.
Updating the SQL in Excel Templates Manually
If you are upgrading from any previous software version, and have customized your statistics, to
preserve your customization you must manually update the SQL statements on each statistical query
sheet. The templates themselves are updated according to the instructions in the Installation and
Service Manual.
CAUTION It is the customer’s responsibility to update customized SQL statements.
62
Page 69
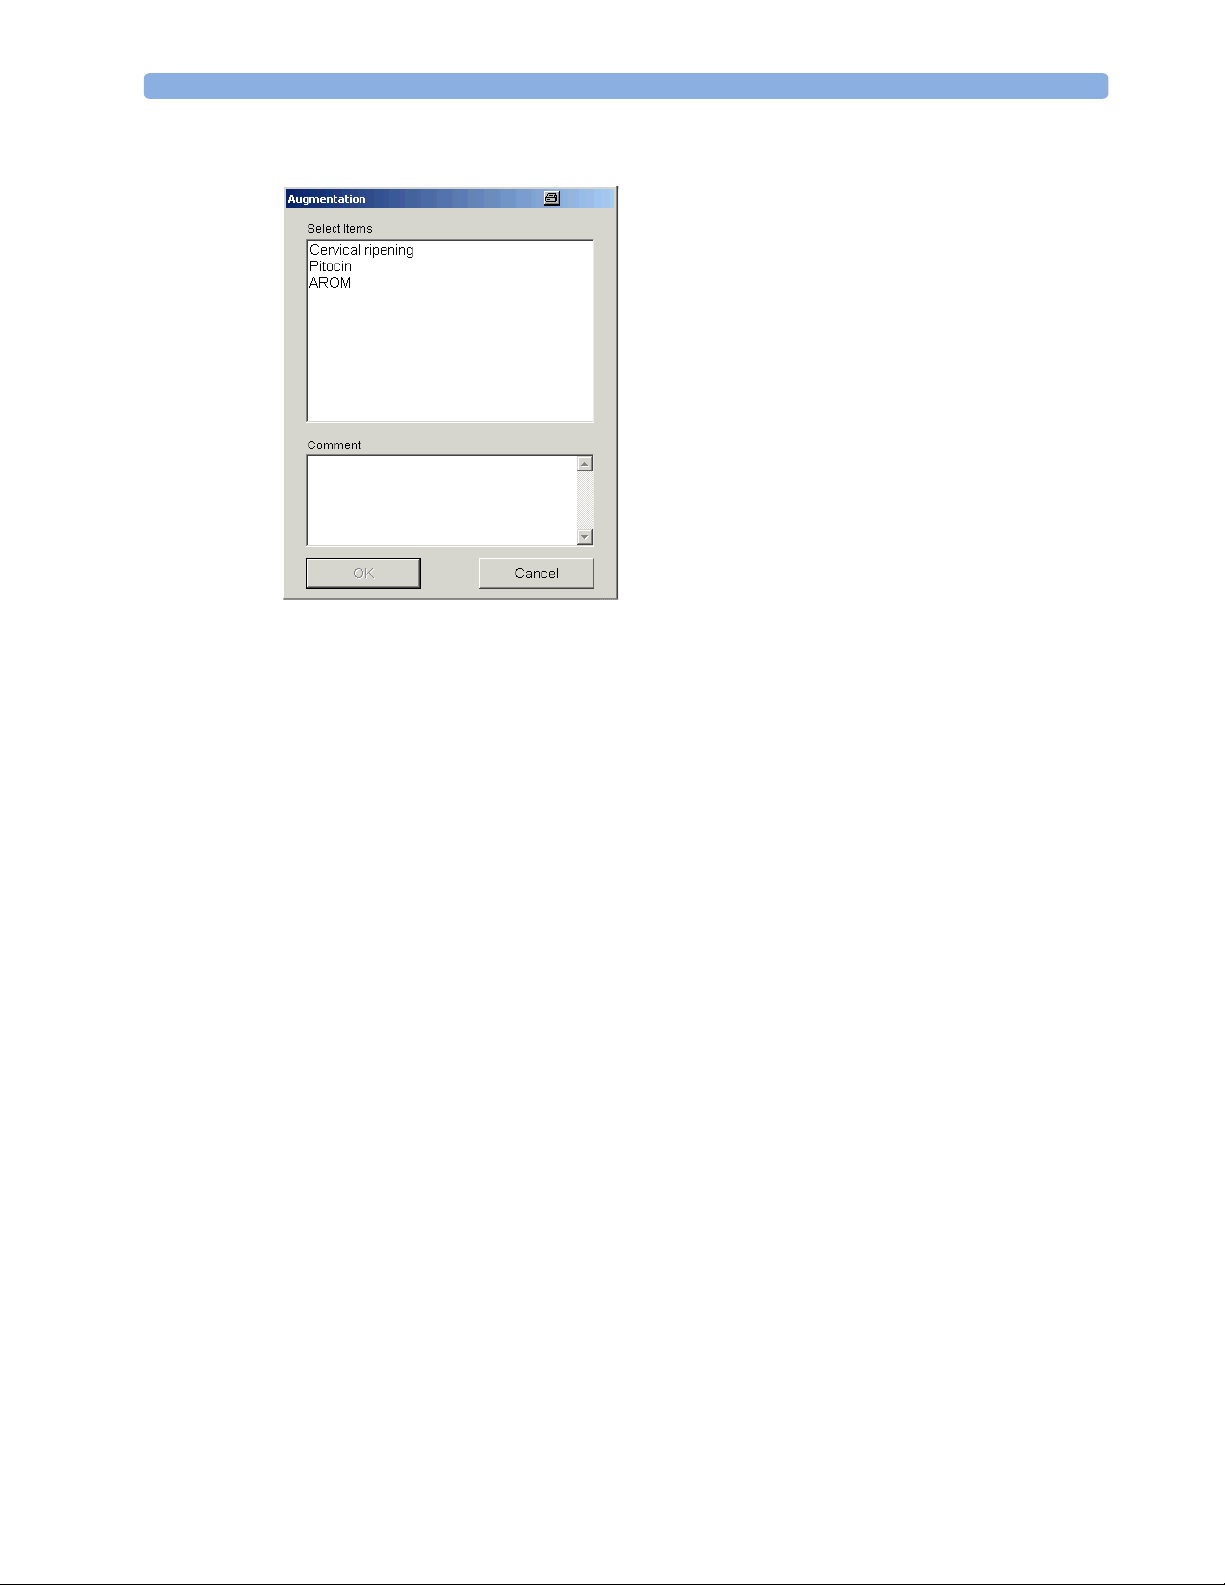
Updating the SQL in Excel Templates Manually Configuring Statistics and Logs
Updating Operators
In multiselection dialogs, such as this one, where
previously you used a “LIKE” operator you must now use
either MSLIKE or CMSLIKE. In multiselection dialogs
where you used an “IS NULL” operator, you must now
use MSEMPTY or CMSEMPTY. The list below
indicates the multiselection boxes that require you to use
CMSLIKE or CMSEMPTY. For all others, you should
use MSLIKE or MSEMPTY, as appropriate.
•Labor page -> Labor induction multi selection box.
•Labor page -> Augmentation.
•Delivery page (Newborn) -> Indication for CS.
•Delivery page (Newborn) -> Resuscitation.
•Delivery page (Newborn) -> Newborn Examination.
•Delivery page (Newborn) -> Placenta.
Renaming Views (for Systems with Newborn option)
From OB TraceVue software revision D.01.00 onwards, some views are divided into maternal and
newborn.You must rename this view in your SQL statement.
1 Rename LastEpiOfPreg to LastEpiOfPregMaternal
2 Rename LastEpiOfPregAll to LastEpiOfPregMaternal
3 Rename Episode to EpisodeMaternal
4 Rename EpisodeAll to EpisodeMaternal
Database Model Changes for D.01 and Later Revisions
With the new database model (see database dictionary M1381-9360B) the fields OrgSubCaseID,
OrgMedicalCaseID, and OrgPatientID are no longer available.
In your query, replace:
– OrgMedicalCaseID with MedicalCaseID.
– OrgPatientID with PatientID.
After making these changes, you must verify the SQL query is still working.
Discharge Date and Return Appointment Date
Use the external database function DischargeTS () to return discharge timestamp entered in the:
– Discharge page (OB TraceVue revision D.00.00 and later).
– Discharge Summary page (OB TraceVue revision C.01.01 and earlier).
Use the external database function DischargeFolUpDate () to return the date entered in the:
– Follow Up Date field of the Discharge page (OB TraceVue revision D.00.00 and later).
– Return Appointment field of the Discharge Summary page (OB TraceVue revision C.01.01 and
earlier).
63
Page 70

Configuring Statistics and Logs Recustomizing Templates
Recustomizing Templates
When new templates are installed, typically during an application software upgrade, it is the customer’s
responsibility to manually update the SQL statements of customized queries.
After upgrading, the customer should also verify that any customization previously made to template
paragraph styles, character styles, formatting and so forth is preserved, and reapply it if necessary.
64
Page 71

6Pre-programming a Time
You can preprogram a server time change using the “at” utility. The time change is automatically
distributed to all client PCs and fetal monitors. However, it is recommended that you use the system
time setting command, described in the System Configuration section of the Instructions for Use.
Setting the Time
1 Select Programs -> Accessories -> Command Prompt.
2 Start the MS-DOS Command Prompt as Administrator.
If you are not currently logged in as an administrator, right click+Shift, select 'Run As...’ and then
run the command as an administrator.
6
Change
3 Enter this command to program the next daylight saving time:
at xx:xx /next:yy CMD /c time zz:zz
where
– xx:xx is the time in hh:mm at which you want the change to occur (such as 02:00).
– yy is the day when the change should take place. For example, if you are using the “at” utility on
the first day of the month, but want the change to occur on the 28th day of that month, then you
should specify yy as 28. You can set this up to 30 days in advance.
– zz:zz is the new time that should be adopted by the server and distributed to the clients (for
example 03:00).
For example at 09:42 /next:21 cmd /c time 08:42
CAUTION Ensure that no one makes a manual time change at the same time as your “at” will be executed.
NEVER change the current local time zone on the server, or use any other Windows time change tools
to adjust the server clock.
65
Page 72

Pre-programming a Time Change Setting the Time
66
Page 73

7OB TraceVue Shell
The OB TraceVue shell is used at bedside PCs to prevent unauthorized access to other, non-OB
TraceVue software. It replaces the normal Windows NT shell, thereby restricting access to normal
Windows NT features. When the shell is installed only OB TraceVue may be started on the PC
without special permission. The shell settings for each PC should be determined during the original
OB TraceVue setup process. Use these instructions if you need to change an individual PC’s shell
setting or access an explorer window from a PC with shell enabled.
When the shell is installed on a PC you can:
•Start OB TraceVue
• Start OB TraceVue setup (password required)
• Start an explorer window for service (password required)
• Disable the shell (password required)
7
Switching on the OB TraceVue Shell
OB TraceVue cannot be running while you run the program to switch on the OB TraceVue shell. If it
is running, shut down OB TraceVue on the PC before proceeding.
1 Select OB TraceVue Setup from the OB TraceVue support menu.
2 Enter the System Administrator password. Click OK.
3 Click Next on the Welcome screen.
4 Click Next on the screen showing the revision number of your OB TraceVue software.
5 After the existing installation has been found, select Only Change Database Settings
or System Settings. Click Next.
6 On the Configure System Settings screen, select Do not change system
settings. Click Next.
7 On the PC Settings screen, make sure that
– Define OB TraceVue Shell Settings is selected.
– All other settings are not selected.
Click Next.
8 Press Next to skip the Server IP address screen.
9 On the Install OB TraceVue Shell screen
– make sure that Install OB TraceVue Shell is selected.
67
Page 74

OB TraceVue Shell Switching Off the OB TraceVue Shell
– make sure that Configure Autostart of OB TraceVue is selected (this ensures that
OB TraceVue starts automatically every time you reboot the PC). Click Next.
10 When the setup program has completed changing the settings, click on the Finish button.The
system automatically shuts down and restarts the PC. You may see the Shell dialog briefly but do
nothing, and after a few seconds OB TraceVue starts automatically.
Switching Off the OB TraceVue Shell
1 Iconize OB TraceVue.
2 At the same time, press down Ctrl + Shift + F1.
3 From the Shell-Setup menu of the OB TraceVue shell window, select Disable Shell.
4 Enter the OB TraceVue Shell Administrator Password in the password dialog box and click OK.
5 Restore OB TraceVue. At the next bootup, the shell is disabled.
Interrupting the Autostart
If you cannot stop OB TraceVue from autostarting as described in steps 1 to 3 in “Switching Off the
OB TraceVue Shell”, you must:
1 Restart the PC.
2 When you see the Windows screen, press the Shift key and hold it down.
3 Keep it pressed until you are asked to press Ctrl+Alt+Del.
4 Release the Shift key while you press Ctrl+Alt+Del. Windows displays the Logon
Information dialog.
5 Log in as user, with the password “user”. DO NOT PRESS OK YET.
6 Press Shift again.
7 Now click OK. This interrupts the automatic booting of OB TraceVue. The system displays the
OB TraceVue shell dialog, which remains on the screen, for you to use as described in “Using the
Shell Dialog” on page 69.
68
Page 75

Using the Shell Dialog OB TraceVue Shell
Using the Shell Dialog
For support and service reasons, it may be necessary to start programs other than OB TraceVue whilst
the shell is enabled. You do this from the Shell Dialog. To access this dialog, press down the three keys
Ctrl + Shift + F1 at the same time.
Shell setup menu
You can use the shell dialog to
• Disable Autostart of OB TraceVue
When you select this from the Shell-Setup menu, OB TraceVue does not automatically restart after
the next PC shutdown and reboot. The system waits at this dialog until you choose one of the menu
commands or press Start OB TraceVue.
• Start Explorer
When you select this from the Run menu, you can run Explorer.
• Start OB TraceVue setup
When you select this from the Run menu you can run OB TraceVue setup.
• Start OB TraceVue manually after logging in to the operating system with “Autostart OB TraceVue”
previous disabled from this dialog.
• Disable the use of the shell.
Run menu
69
Page 76

OB TraceVue Shell Using the Shell Dialog
70
Page 77

8Patient Data Administration
The Patient Data Administration Tool (Administration Tool) manages the patient, pregnancy, and
episode records in the internal database. It is sometimes called the internal database admin tool. It is
available at the internal server PC only. You require System Manager rights to use this tool.
Corrections made using the Patient Data Administration Tool are not included in the Audit Trail. You
cannot use this tool whilst archiving is in progress.
Managing the Internal Database
Use this tool to manage your internal database. Use it:
• to correct wrong patient entries or make modifications.
8
Tool
• after a training session, that is, after trainees have created “test patients” and you need to delete these
“patients” from the database.
• to gain “responsibility” for a patient, when the responsibility (token) has been assigned to another
server during record transfer in an OB TraceVue to OB TraceVue link, and the server is down or you
are not able to get the responsibility back via the usual methods.
• to enable or disable a patient’s record if an I/O conflict occurs.
• to set or break the HIS link on a patient’s record.
Deleting Data
To delete patient data on the internal server database you must stop OB TraceVue running. The length
of time the system will be unavailable depends on how many records for which you have to search and
subsequently delete. The delete process may require some seconds per patient. After closing an episode,
you must wait until archiving has occurred before you can delete an episode. This can take
approximately 10 minutes. If you delete a patient by mistake, you can use the Retrieve from Optical
tool (described in the Installation and Service Guide) to restore the data.
You cannot delete patient, current pregnancy, or newborn documentation data if an episode relating to
that pregnancy/newborn is still open. However, you can delete an older pregnancy or newborn
documentation even if a newer one still has an open episode.
When you erase patient data from the internal database you should also consider erasing the same data
from the external database, using the External Database Administration Tool, otherwise your statistical
data may be inaccurate.
71
Page 78

Patient Data Administration Tool Using the Administration Tool
Using the Administration Tool
Use this tool to delete data from the internal database, and (rarely) to correct errors in record locking
during patient data transfer from one OB TraceVue system to another.
If you plan to delete patient data you must use this tool offline (shutdown OB TraceVue at the internal
server PC). To use any of the other features of this tool, you can use it online (with OB TraceVue
running).
1 Shut down OB TraceVue if necessary.
2 Go to Start -> Programs -> TraceVue Support -> OBTV
Administration Tool. The Admin Tool user name and password selection window is
displayed.
3 Enter your name and your OB TraceVue log-in password. The Admin Tool main screen is
displayed.
72
4 Search for the patient. You can click either:
– Last Episode Close and enter dates to select complete patient records that had at least
one episode closed within the specified timeframe or
– Patient Identification and enter patient demographic data in the patient
identification fields, for example, last name, first name.
5 Click New Search. A list of patients matching the selection criteria is displayed. Click on the’+’
beside a patient’s name to list her pregnancy records. Check the box ( ) beside the pregnancy
records or patient records you want to select for deletion.
Page 79

Using the Administration Tool Patient Data Administration Tool
6
You can now select to:
Button Action
Clear
New Search
Check all possible
Patients
Check all possible
Pregnancies
Delete checked...
Unlock selected
Patient record
Erases any existing selection criteria.
Use this to initiate a search for patient records matching the search criteria.
Automatically selects (via the checkbox) all the patients available for deletion.
This deletes all patient, pregnancy, episode and newborn data.
result box can contain up to 5000 patients, pregnancies and newborn cases. If your
search results in more than 5000 records, you must repeat the search on the
remaining records.
The scrollable
Automatically selects (via the checkbox) all pregnancies available for deletion.
This deletes all pregnancy, episode and newborn data belonging to the selected
patient(s). The patient record, including her demographics, is not deleted. Note
that you cannot delete the last pregnancy record in a patient record, nor a
pregnancy that still has an open episode.
to 5000 patients and pregnancies. If your search results in more than 5000 records,
you must repeat the search on the remaining records.
The scrollable result box can contain up
Deletes the records you have checked. The system asks you to confirm the
deletion before allowing you to proceed.
When you delete a patient, retrieved episodes (which are not visible from this
tool) remain in the system for 48 hours. After this time they are automatically
deleted. You can delete them manually during this 48 hour period by discharging
them from the system.
Unlocks a patient record that was locked as a result of system error during patient
data transfer data from one OB TraceVue system to another. Highlight the
patient you want to unlock, and click this button. You cannot use this if an
episode remains open for this patient.
Lock selected
patient record
Disable selected
Patient record
Use this feature with caution. For a more detailed explanation of when to use this
feature, see“Transfer Failure” on page 74.
Locks an unlocked patient record. Highlight the patient you want to lock and
click this button. A locked record is identifiable by the lock icon . You cannot
use this if an episode remains open for this patient.
Use this only if you have incorrectly unlocked a patient, using the unlock feature
described above.
Disables/enables a patient record. Use this if you need to insert a second patient
record that has identical patient identification data. (Only one patient record at a
time may have the same Patient ID, Medical Record Number (MRN), or Social
Security Number (SSN). When you enable a patient record, a conflict may occur.
To resolve this, you may need to change the ID(s) of the patient, or disable any
conflicting patient records.)
73
Page 80
Patient Data Administration Tool Using the Administration Tool
Button Action
Set ADT Link
Expand complete
Tr ee
Collapse complete
Tr ee
Close
Tip
Click Expand Complete Tree before deleting to ensure that you have correctly identified the records
you want to remove. If you click All Possible Pregnancies by accident, but do not expand the tree you
WILL NOT SEE THAT ALL CLOSED PREGNANCIES FOR ALL PATIENTS LISTED ON
THE SCREEN ARE MARKED FOR DELETION.
Transfer Failure
When OB TraceVue transfers a record from one OB TraceVue system to another, it transfers:
Sets/breaks an ADT-link to a patient record. If you break the ADT link, no
further automatic update will be done for this record, and all previously HISowned data fields in the demographics page become writeable.
If you set the ADT-link for a patient’s record, her last name and the configured
ID-field for the ADT-link are set as ADT fields. Further ADT-link updates are
made automatically for this patient record.
Displays full details for all patients listed on screen. The example picture above
shows an expanded tree.
No longer displays episodes and details for all patients. Shows only patient name.
Exits internal database administration tool. It takes some minutes after you
request deletions for OB TraceVue to complete the task.
• current episode data (including tracing, forms and flow sheet data)
• current pregnancy data
• patient related data.
During a transfer, the originating system (System A) waits for the remote receiving system (System B)
to acknowledge successful delivery of the record. Until it receives this, System A does not transfer
responsibility for this patient to System B, and does not unlock the patient record for use at System B.
Although transfer failure is rare, if for any reason:
• System B does not send the acknowledgement, OR
• System A does not receive System B’s acknowledgement
the user will receive the following error message at System A:
Received no acknowledgement for transferring patient (name.....) to
remote system. Patient data state remains pending. Please contact
System Administrator.
What to do Next
Do not use the unlock feature until you check whether the transfer has really failed. It is possible that
System B may have received the record, but for some reason System A did not receive the
acknowledgement. In this case, the patient record will be available at System B and you must not use
the unlock feature.
74
1 Try to access the transferred record at System B.
2 Search for the patient and try to open a new episode for her.
Page 81

Using the Administration Tool Patient Data Administration Tool
– If you can open a new episode there is no problem with the transfer and you should not use the
unlock tool.
– If you cannot open a new episode, you should unlock her record as described below.
Unlocking a Record
If the transfer failed (you cannot access the record at System B), you will not be able to create a new
episode for this patient at either System A or System B. Her record is locked. You must use the unlock
patient record feature to unlock her record at the originating system. DO NOT UNLOCK A
RECORD IN ANY OTHER CIRCUMSTANCE.
1 Unlock the patient record at System A as described in this chapter.
2 Restart OB TraceVue at System A.
3 Create a new episode for this patient at System A.
You can chart, make notes and so forth in the normal way if necessary.
4 Transfer this episode to System B using the normal transfer procedure.
The original episode, whose transfer failed, together with its associated notes and tracing cannot be
transferred to System B a second time. Consider making a note at System B when you open a new
episode for this patient to explain the missing information.
75
Page 82

Patient Data Administration Tool Using the Administration Tool
76
Page 83
9
9 Patient Index Search Tool
Use this tool to search for patient data across different systems so that you can determine on which
linked systems the patient record is writable. You must be a configured user on the system running the
tool.
1 Run this from Start -> Programs -> OB TraceVue. You can run this at the same
time as using OB TraceVue.
A
B
C
2 Enter some patient details and press New Search.
The results list shows patients from all configured systems, together with the name of the system (A) on
which the patient record is writable. Normally, the list displays one record per patient (B). If a patient
record is writable on more than one system, the list is marked with an exclamation mark and there are
multiple entries for the patient (C). Use the Link Recovery Tool (preferred) or the internal database
Administration Tool to clean up the record status.
The buttons Configure Server List, and Save Server List to File are for use
only by trained service professionals when configuring the linked systems. This is described in the
Service and Installation Manual.
77
Page 84

Patient Index Search Tool
78
Page 85

10
10System Overview Tool
Any user can start the System Overview tool and view the system status. Only a System Manager can
reboot the system or start PCs remotely. Use the tool:
• To see an overview of all PCs on one OB TraceVue system.
• To start, stop and reboot a complete system from one PC.
• To start, stop and reboot individual clients (including remote clients) from one PC.
To use the tool:
1 From the OB TraceVue Support menu, select System Overview Tool.
2 Follow the onscreen instructions. Then you can remotely reboot PCs and restart OB TraceVue
from any OB TraceVue PC.
You can remotely manipulate a remote LAN client if the system overview tool runs on a PC that is
connected to the same network segment or, if IP routing to the remote LAN client is configured.
79
Page 86

System Overview Tool
1
C
B
A
E
D
F
G
H
2
3
4
5
6
80
Page 87

System Overview Tool
Button Effect Comment
Refresh Rereads content of table from the database.
1
Full System
2
Reboot
Start OB
3
Tr a c e V u e
on Server
and Clients
Stop OB
4
Tr a c e V u e
Start OB
5
Tr a c e V u e
Reboot Selected
6
Whole
system
Whole
system
Selected
PCs
Selected
PCs
PCs
Reboots the whole system. Run this from a client, but have immediate direct manual access
to the server in case problems occur. The client is excluded from reboot. Reboot the client
separately, once the system is running again.
All affected clients receive a dialog telling the user to exit all running applications but leave
OB TraceVue running. You can add your own text. The dialog offers a manual reboot
capability.
If you reboot from the server, the system overview tool exits and reboots the server. Use
“Start OB TraceVue on Server and Clients” to start the system again.
A progress window shows what is happening. A step’s progress is indicated by progress
icons. A step can be: in progress, successful, omitted, partially failed or failed. If a step fails
completely, carry out the advice offered in the comment field and then press “Continue”.
Starts OB TraceVue on server and on clients. It does not restart a PC that is already
running. PCs start one after another, with a short pause between to prevent startup system
overload.
Do not use this button when upgrading the system. During an upgrade, select and start
clients individually using “Start OB TraceVue”.
Stops OB TraceVue on the selected PCs. You can exclude the server.
If you use this on a client running the shell and autostart, the client shuts down and cannot
be restarted remotely by the System Overview tool. You must reboot manually at the client.
Tries to restart OB TraceVue on selected PCs. When starting clients after a server upgrade,
select client PCs one by one and start them with approximately one minute’s break between
to avoid system overload.
Stops OB TraceVue on selected PCs and reboots them. If the server was selected, wait until
it is up again and press “Start OB TraceVue on Server and Clients” to restart the system.
System Overview Tool
Handle the stop and start buttons with care in a running system, to avoid confusing a user who is
working at the PC.
System Overview Tool
APC name Shows the user-configurable name of the PC
B Connection Yellow (wait) - system overview tool could not establish a connection to the PC. If a client is
switched off or not connected to the network, this will remain yellow. PCs with yellow
communication status are excluded from any action you perform on the system.
Green (ready) - the PC is running and remote commands can be performed on this PC.
White - you cannot remotely manipulate terminal client PCs. This field remains white for them.
CRes Shows the result of the most recent command executed on this PC
Green - success
Yellow - command is still in progress
Red - an error occurred. Check the cell tooltip for a hint why the command failed.
DTV Green - shows that OB TraceVue is running or just starting.
Gray - shows that OB TraceVue is stopped.
81
Page 88
System Overview Tool
System Overview Tool
EUser Shows the most recently logged-in user. If the PC is switched off, this shows a dummy user.
FLocation Shows the most recent focus location. the PC is switched off, the focus location does not change.
G Patient in
focus
H Internal name Shows the hostname of the PC as it is used in the network.
Shows the current patient in focus. This is empty if the PC is switched off. If the patient in focus
has an alias name, only this alias is displayed. If the logged in user has no read permission, no
patient names are shown and the field is empty.
Once the system reboot process is started, a progress window reports the current state of the process.
The steps are performed in sequence and appear in the progress window. A step may be
in progress, successful, partially failed, failed, or omitted
Rebooting from the Server
If you perform a system reboot from the server, the system displays a message box before rebooting the
server. The system overview tool exits and then the server is rebooted. After the server is up again, press
Start OB TraceVue on Server and Clients to restart the system.
Troubleshooting
If a step fails completely, the process pauses and displays the Continue button in the lower left hand
of the dialog and tells you what to do. The process resumes when you press Continue. As the system
reboot concentrates on getting the server running again, you may have to take individual actions with
some client PCs afterwards if it cannot be handled correctly during the reboot.
The system overview shows you which PC is running and whether OB TraceVue is running on that
particular PC. In most cases you are able to start the system from any state. However, if a PC is
shutdown by another user during the reboot, it may be impossible to manipulate it remotely from the
system overview tool. You must restart the PC manually.
82
Page 89

11 Link Recovery Tool
This wizard-based tool helps to identify and repair inconsistent patient records on linked OB
TraceVue systems. It requires superuser or higher permission to run it.
What Does the Tool Do?
The link recovery tool:
• collects OB TraceVue link status from different systems.
• analyzes, reports and repairs inconsistent OB TraceVue link status.
• reports inconsistent usage of patient identifiers (MRN, SSN, PatID) (ie, it identifies patient records
that have the same unique patient identifier but are assigned to different patient records).
• reports medical case records that are open for more than 12 months which could potentially be
closed.
11
• distributes the close of a patient’s medical case amongst linked systems
If a patient’s medical case record is closed on a system other than the creating system, it is necessary
to distribute the newly closed state back to linked systems from which it was received so it can be
closed on all other systems where the case exists.
• reports double assigned patient identifiers.
Manually clean up patient identifier assignment to guarantee proper operation of OB TraceVue link.
Record transfer fails if a different patient record with the same “unique” identifier exists on a
destination system.
• reports different patient identifiers for the same patient.
You can view a list of patient records that have different unique patient identifiers on different
systems (different MRN, SSN or Pat ID, but with the same internal patient identifiers).
• avoids/suspends the pregnancy/newborn case limit performance (15,000 open cases) warning across
systems.
If you transfer a patient from one system to another, the pregnancy/newborn case on the originating
system is marked as “incomplete”. If this is subsequently closed on the linked system, running the
link recovery tool closes the case on the originating system too.
Using the Link Recovery Tool
See the Installation and Service Guide for details about how and where to use the Link Recovery tool.
83
Page 90

Link Recovery Tool Using the Link Recovery Tool
84
Page 91

12External Database
The external database offers export of patient-related database content and near real-time update of
export database content so that the external database can be connected by other applications from
outside the OB TraceVue network. It is discussed in depth in the Integration Guide.
External Database Administration Tool
The External Database Administration Tool allows you to purge “extraordinary” patient data, such as
data created for testing or training purposes, from the external database. Open episodes cannot be
deleted with this tool. This tool runs only at the external server PC, and can be used when OB
TraceVue is running.
At the OB TraceVue external server PC (standard or highend):
1 Go to Start -> Programs -> TraceVue Support -> Export Database
Administration Tool
12
2 Enter the appropriate passwords.
85
Page 92

External Database External Database Administration Tool
3
The program starts and displays this screen:
4 Select the option you require. Choose from:
– Purge by Export Date - Purge all episodes closed before the specified date. For example,
if you specify 11/11/1999 (11 November) all episodes exported up to and including the previous
day 11/10/1999 (10 November) will be deleted. The date on which the episode itself occurred is
irrelevant. It is the date on which an episode was exported from the internal database that
determines whether it is deleted.
– Purge by Patient Identification - Use this to delete individual episodes for a
patient. Enter some patient data into the patient identification fields and click Search.
Highlight the episode you want to delete or click Select All to select all the episodes of this
patient. (Click Unselect All to unselect these if necessary.) Use Ctrl + left mouse click to highlight
two or more episodes for simultaneous deletion. A maximum of 200 patient records can be
displayed for one search.
5 Click on Purge. In the resulting dialog, you can confirm or cancel your purge.
6 Click on Done.
Automatically Purging the External Database
To optimize the performance of the external database, OB TraceVue can automatically purge closed
episodes. The purge interval is in the System Manager’s configuration screens. See the Online help for
details.
86
Page 93

Importance of Backup and Labeling External Database
Importance of Backup and Labeling
It is very important to backup your external database. If you do not, and the database becomes corrupt,
you will not be able to print statistics. There is no manual export facility. Label your tape backups
clearly and accurately with the time and date of the backup. If you have to restore the external database
you will need the most recent backup to ensure you do not lose patient data.
It is the hospital’s responsibility to operate a backup schedule appropriate to its needs.
Backing up and Restoring the Highend External Database
At the highend External Server PC, customers must implement a backup solution such as installing an
external tape drive or backing up to a network share. However, it is not permitted to use any internal
device for the highend external server.
Backing and Restoring the Standard External Database
This describes the recommended backup procedure of the external database on the standard External
Database server PC. It tells you how to backup the external database files to a tape drive, and how to
restore these files in case you need to recover the external database. Ensure the drive is not in operation
before removing a tape from the drive.
It is intended only as a guideline for performing the backup of the external database and must be
adapted to your institution’s specific needs. Your institution is responsible for backups.
Setting Backup Defaults
The first time you work with the tape backup utility, you must set the defaults it will use subsequently.
1 Start the Backup utility using Start->Programs->Accessories->System Tools-
>Backup
2 Check that the correct defaults are selected (Tools->Options). You need to do this only once.
The settings should be as follows, leave other settings as they are.
87
Page 94

External Database Setting Backup Defaults
3
At the General tab:
4 At the Restore tab:
88
Page 95

Creating Backup Files from the Standard External Database External Database
5
At the Backup Type tab:
Creating Backup Files from the Standard External Database
Perform the following steps on the standard external database server PC. You do not need to shutdown
OB TraceVue.
1 Make sure that there is enough space available on the c: drive of the standard external database
2 Create an empty directory with the name c:\dbbackup.
3 Start the Sybase database administration tool.
4 Open an Explorer window and go to c:\tv2\sqlany\Sybase Central 4.1.
5 Double click on scjview.exe.
6 Connect to the export database:
a. Click on in the toolbar.
b. In the dialog, fill in the username tva and the password.
c. Select ODBC Data Source name and browse for TV20EXTDB.
d. Press OK to connect to the database.
7 In the left pane, select Sybase Central -> Adaptive Server Anywhere 8 ->
server PC. Free space should be at least as large as the current database file and log file together. You
can check this size in c:\Tv2\extdb.
Utilities.
8 Start the backup wizard by double clicking on Create Backup Images in the right pane.
The backup wizard guides you through creating a backup file.
9 On the first screen, select the database you want to back up. This is obtv_ext. Press Next.
10 Enter c:\dbbackup as the directory in which to store the backup files. Select Backup of
all database files. Press Next.
89
Page 96
External Database Storing Backup Files to Tape Device
11 Select Continue to use the same transaction log.
12 Press Finish.
CAUTION When you continue with the next step, existing files currently stored at this location are overwritten.
13 Close remaining windows when backup has finished.
Storing Backup Files to Tape Device
1 Insert the next scheduled tape into tape drive. This can be either a new tape, or more likely one
that you are using as part of your rotating tape backup strategy.
2 Start Backup utility Start->Programs->Accessories->System Tools->Backup
3 Select Backup tab
90
4 Mark checkbox for Desktop->My Computer->C: TRACEVUE->dbbackup folder (only
this folder) in the folder browser
5 Select Backup destination: Travan (or other storage medium).
6 Select Backup media or file name: New Media.
Page 97
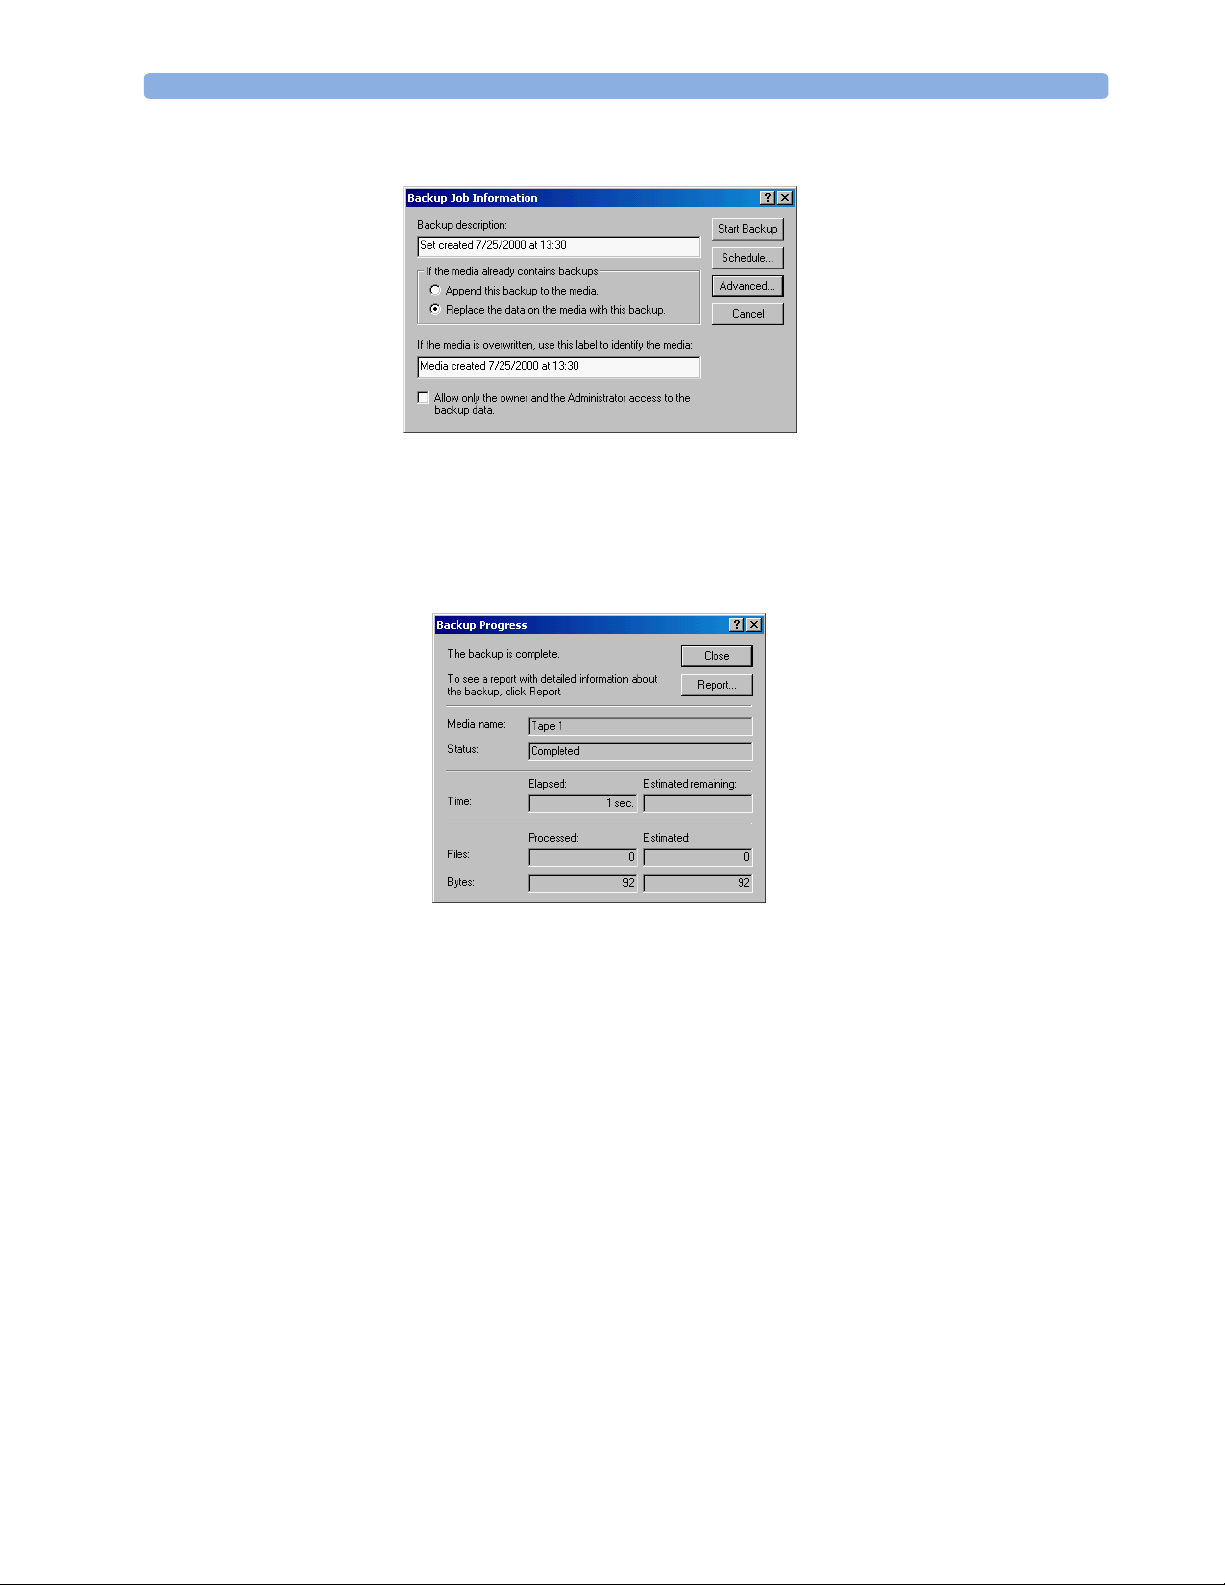
Restore Procedure External Database
7
Press Start Backup button. The following dialog will appear:
8 Make sure that Replace the data on the media with this backup is selected.
Press Start Backup and follow the onscreen instructions and confirm the dialog boxes as
appropriate for your backup (reusing a tape/ overwriting its contents/add tape to the media pool).
9 Wait until the backup completes. When it finishes, the following dialog appears with the
Status:completed field (other fields may vary):
10 Close this dialog and the Backup utility.
11 Remove the tape and label it.
12 Store it in a safe location.
Restore Procedure
The revision of the external database must match the revision of the OB TraceVue system. If, after
restoring the external database, OB TraceVue does not run, check the logdata file. If you see the
message “Wrong export database version” you must re-run OB TraceVue Setup to
upgrade the export database to the newest version. Remember to keep the existing database and files.
See the Installation and Service Guide for instructions on running OB TraceVue Setup.
Restore Database Files from Tape
1 Insert most recently used tape into drive.
2 Start Backup utility Start->Programs->Accessories->System Tools->Backup
91
Page 98
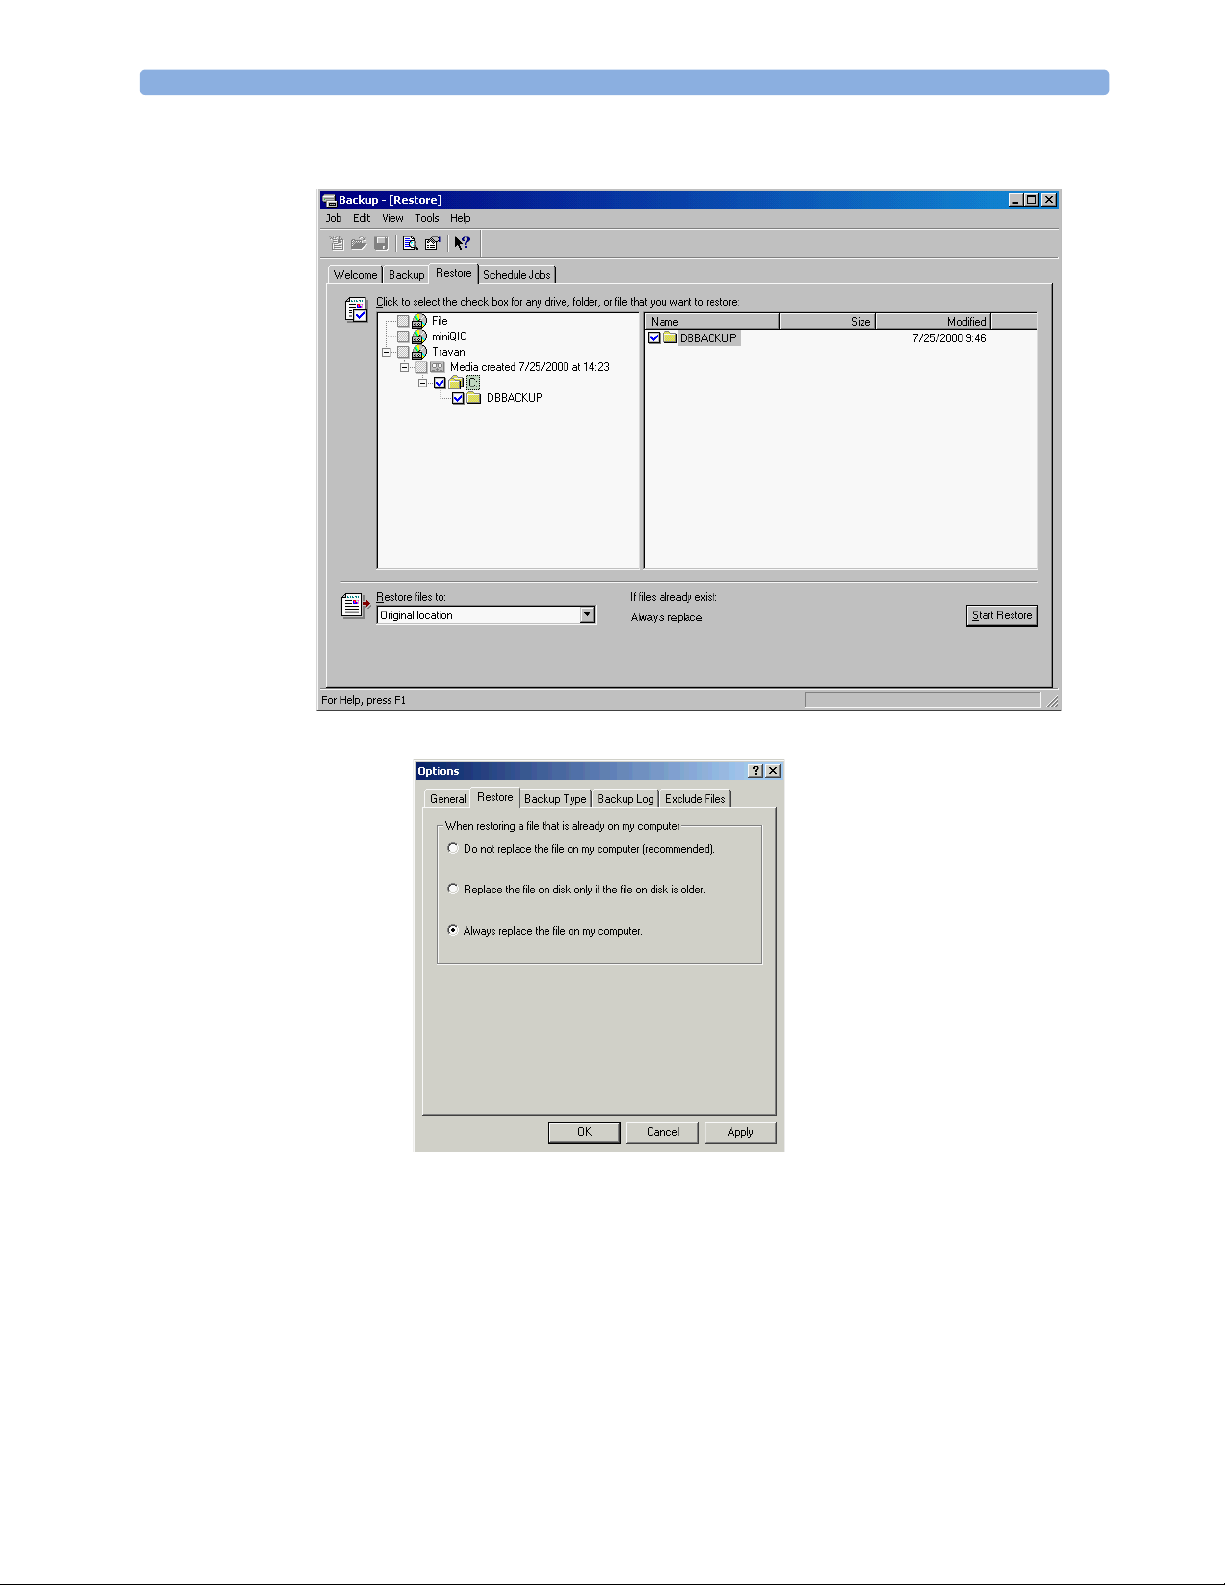
External Database Restore Procedure
3
Select Restore tab and look at the flag under “If files already exist”. It needs to say “Always
replace”.
If it does not go to Tools->Options and make the following selections at the Restore tab.
4 Mark checkbox on Travan (or other storage medium) ->Name of most recent
media->C:\dbbackup. Make sure you select the most recent media. This is identifiable by its
creation date.
5 Select Restore file to Original location.
92
Page 99
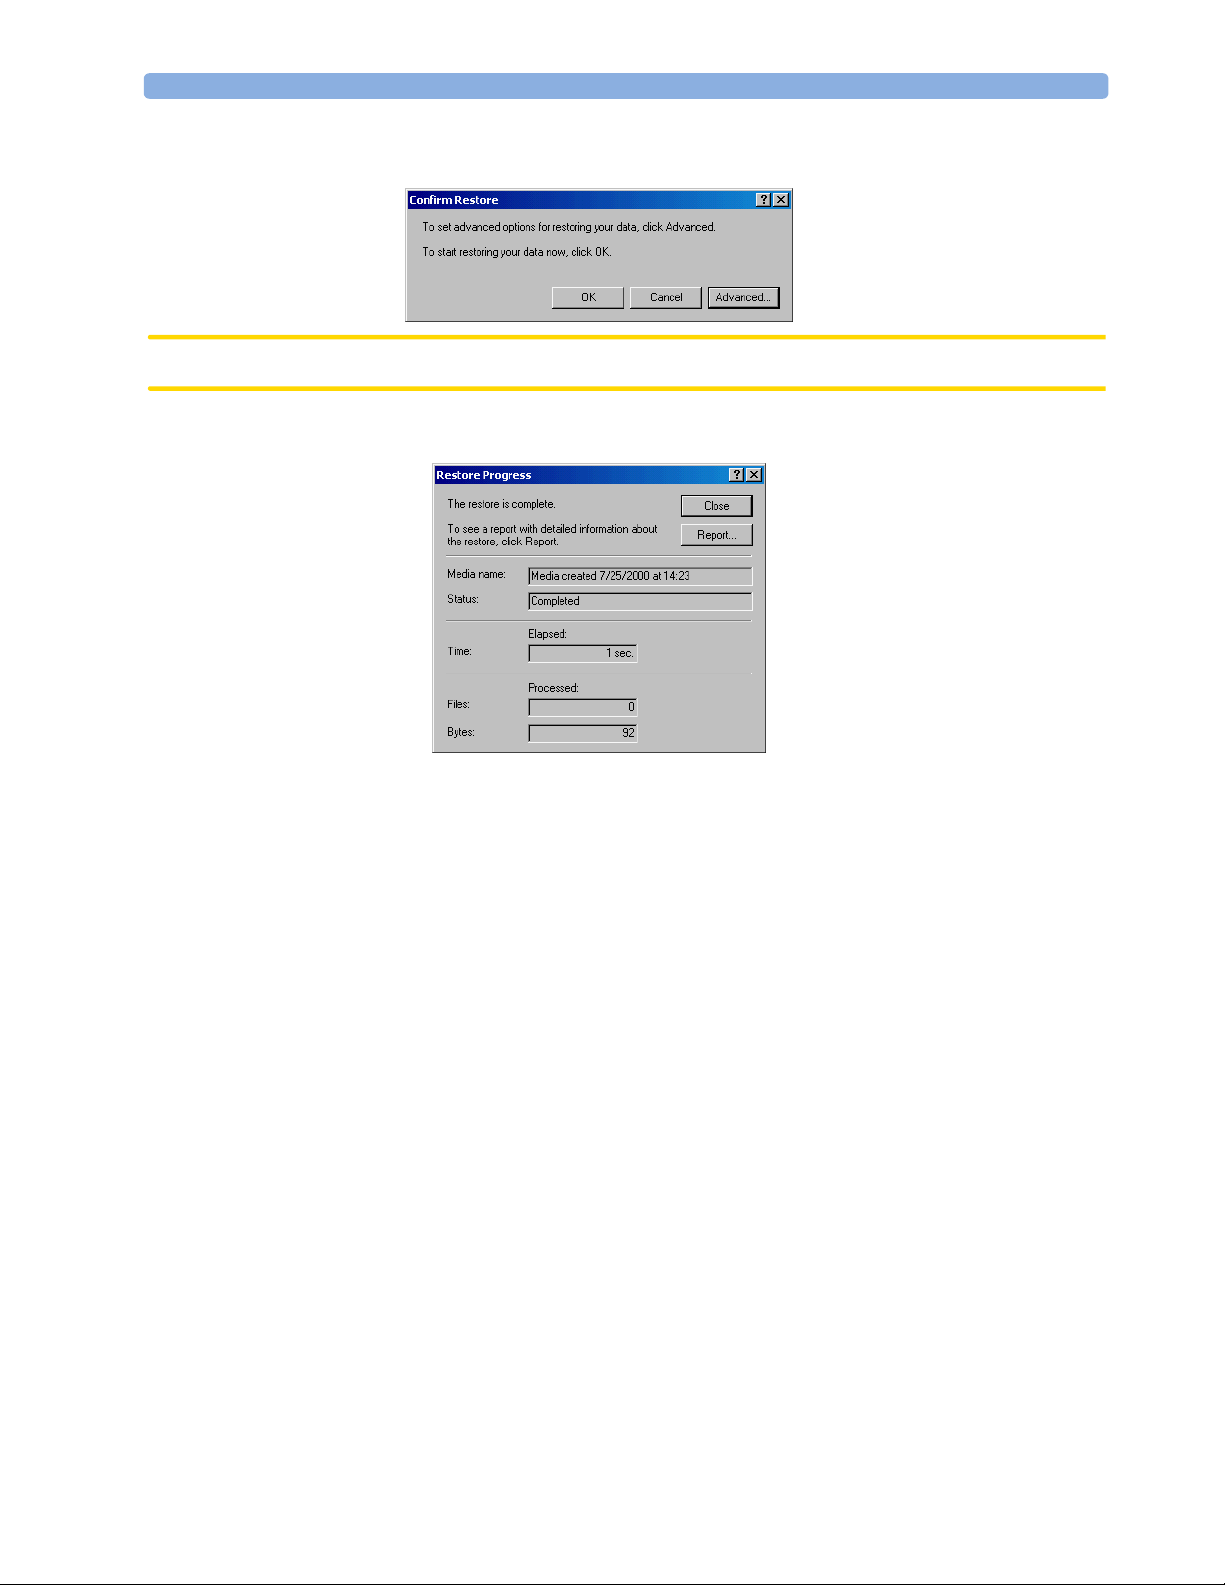
Restore Procedure External Database
6 Press Start Restore button. The following dialog appears.
CAUTION When you continue with the next step, existing files currently stored at this location are overwritten.
7 Press OK and wait for the Completion dialog.
8 Close the Completion dialog
9 At the Tools->Options -> Restore tab, set the restore option back to the installation
default Do not replace the file on my computer (recommended).
10 Close the Backup utility.
11 Remove the tape.
12 Store it in a safe location.
Replacing Database Files
You must shutdown the complete OB TraceVue system before replacing database files to prevent it
trying to write to the External Database server PC when it is not available.
1 Stop the database server service. You can use the database administration tool provided by Sybase.
2 Open an Explorer window, and go to c:\tv2\sqlany\Sybase Central 4.1.
3 Double click on scjview.exe.
a. In the left pane select Sybase Central -> Adaptive Server Anywhere 8 ->
Services.
b. In the right pane right click OBTV_EXTDB_SERVER and select Stop.
4 Copy files in c:\dbbackup to c:\tv2\extdb. Replace existing files if necessary.
5 Restart the database service:
a. In the left pane select Sybase Central -> Adaptive Server Anywhere 8->
Services.
93
Page 100

External Database Changing the Database User Password
b. In the right pane, right click OBTV_EXTDB_SERVER and select Start.
Changing the Database User Password
Use this procedure if you want to change the database user password.
1 Start the Sybase database administration tool.
2 Open an Explorer window and go to c:\tv2\sqlany\Sybase Central 4.1
3 Double click on scjview.exe.
4 Connect to the export database:
a. Click on in the toolbar.
b. In the dialog, fill in the username tva and the password.
c. Select ODBC Data Source name and browse for TV20EXTDB.
d. Press OK to connect to the database.
5 Expand the tree in the left pane.
6 Select obtv_ext - TVA -> Users & Groups
7 In the right pane, right click on the user TVA. and select properties.
8 On the first page of the dialog, type the new password and confirm it.
9 Click OK.
External Database Emergency Tape Backup
CAUTION Do not use this procedure for regular backups. It is for emergency use only.
This describes the emergency backup procedure of the external database on the External Database
server PC. It tells you how to backup the external database files directly to a tape drive, and how to
restore these files in case you need to recover the external database. This could happen if there is not
enough free disk space to run the standard procedure described above. Ensure the drive is not in
operation before removing a tape from it.
Storing Backup Files to Tape Device
You must shutdown OB TraceVue on the external database server before backing up the database files.
To stop the database server service using the database administration tool provided by Sybase:
94
1 Open an Explorer window, and go to c:\tv2\sqlany\Sybase Central 4.1.
2 Double click on scjview.exe.
a. In the left pane select Sybase Central -> Adaptive Server Anywhere 8 ->
Services.
b. In the right pane right click OBTV_EXTDB_SERVER and select Stop.
c. Close Sybase Central
 Loading...