

Page 1
Philips Streamium Network Music Player
NP2900
Quick start guide
Overview
1
Connect
2
Enjoy
3
Register
4
Page 2

Register your product and get support at
www.philips.com/welcome
Please read and accept our Streamium terms & conditions as well as the Software End
User License Agreement that are included in the User Manual.
Page 3
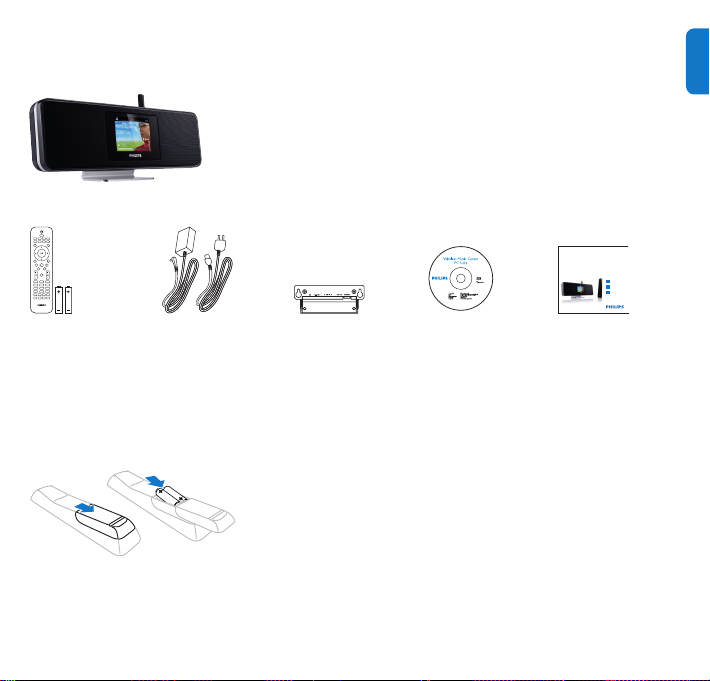
What’s in the box
Philips Streamium Network Music Player
Quick start guide
1
2
3
Overview
Connect
Enjoy
NP2500
Streamium Network Music Player NP2900
EN
Remote control
2 x AAA batteries
1 x AC power
adapter with cable
Before using the remote control:
Insert batteries as shown.
1 x Wall mounting
bracket
CD-ROM
containing user
manual and
software
Quick start guide
1
Page 4
2
Overview
1
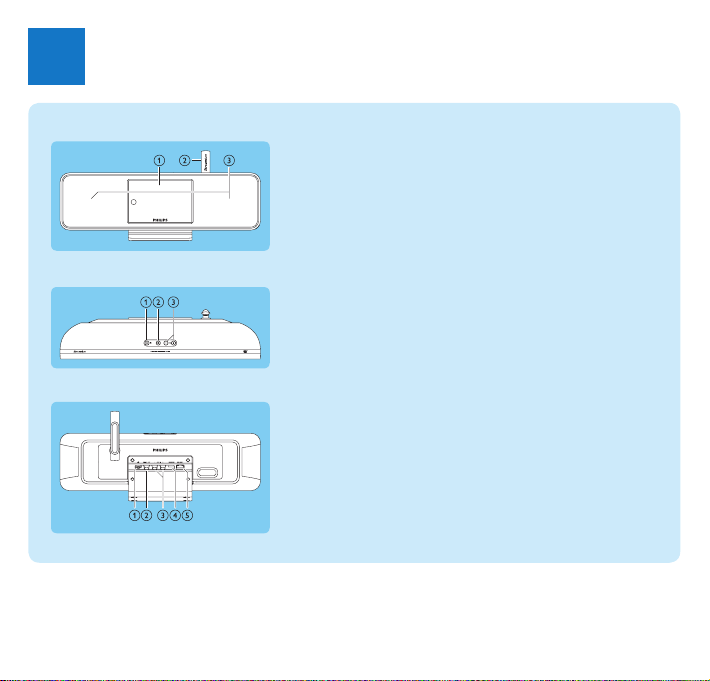
Front view
Top view
Rear view
Displaya
Wi-Fi antennab
Loudspeakersc
ya (On / Standby / Eco standby)
s
b (mute the sound)
+VOL-
c (adjust the volume)
pa jack
DIGITAL OUTb (black) jack
AUX IN L / R
c (red/white) jacks
POWER SUPPLY
d jack
ETHERNET
e jack
Page 5
3
EN
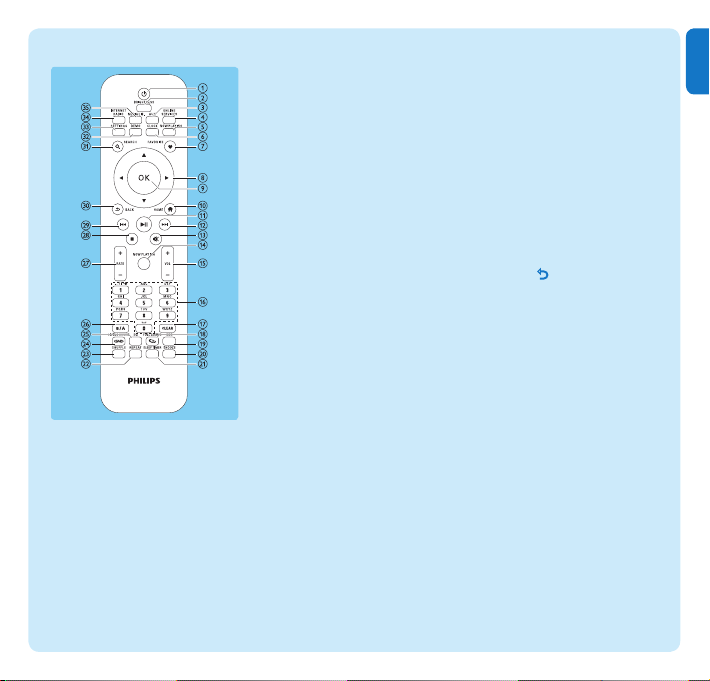
Remote control
a y (On / Standby)
b BRIGHTNESS (adjust the
display illumination)
c AUX (select the external
source)
d ONLINE SERVICES
(go to the optional online
services menu)
e NOW PLAYING (go to
the current play screen)
f CLOCK (activate the time
display)
g FAVORITE (mark the
current station as favorite)
h 1 234 (navigate)
i OK (conrm)
j HOME (go to the Home
menu)
k 2; (play/pause current le /
SuperPlay™ current list)
l )K (skip to the next le)
m s (mute/unmute the sound)
n NOW PLAYING (go to
current play screen)
o +VOL- (increase/decrease
the play volume)
p Alphanumeric buttons
q CLEAR (press to delete the
last character entry / press
and hold to delete the whole
line entry)
r FULLSOUND (activate/
deactivate FullSound™)
s DBB (activate/deactivate
Dynamic Bass Boost)
t SNOOZE (stop the alarm
sound for 15 minutes)
u SLEEP TIMER (toggle
through the sleep timer
options)
v REPEAT (toggle through
the repeat play options)
w SHUFFLE (activate/
deactivate the random order
play)
x LIVINGSOUND
(deactivate/activate
LivingSound™)
y EQ (toggle through the
preset equalizer options)
z a/A (change shift for the
alphanumeric entry)
{ +RATE- (increase/decrease
rating of current music)
| 9 (stop)
} J( (skip to the previous le /
clear last entry)
~ BACK
SEARCH (search les)
€ DEMO (activate the demo
SETTINGS (go to the
‚ INTERNET RADIO (go to
ƒ
O (go back to the
previous screen)
play)
Settings menu)
the Internet radio menu)
MEDIA LIB. (go to Media
Library)
Page 6
4
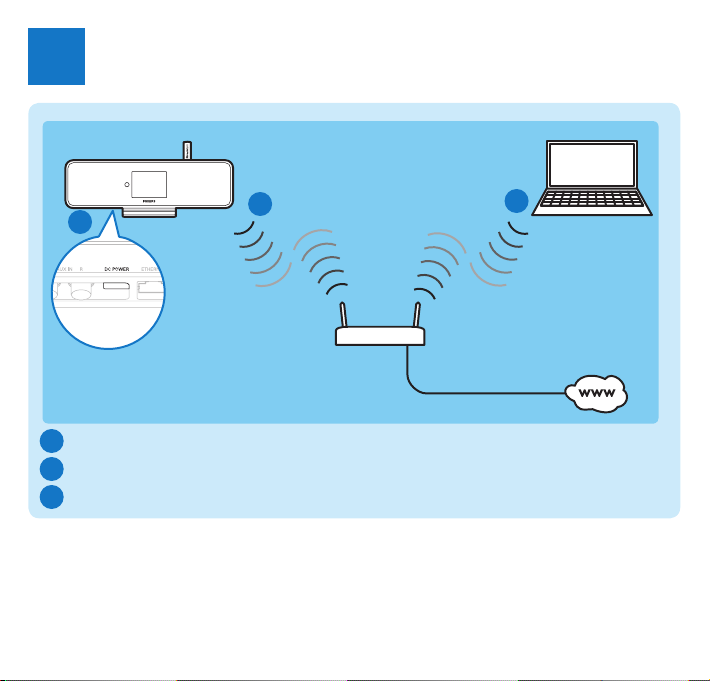
Connect
2
A
Connect the player to the power supply
A
Connect the player to a home network
B
Wirelessly stream music and pictures from a computer
C
B
C
Page 7

5
EN
START HERE…
This is how to navigate and select with the remote control:
Press • 3 or 4 to select a menu option.
Press • OK to confirm a selection.
Press • BACK O to go back to the previous screen.
Press • HOME to go to the Home menu.
The alphanumeric buttons of the remote control are multi-function buttons:
To select a number or an alphanumeric character, press a button once or more until you •
see the number or alphabetic character in the display of the player.
To cycle through the alphanumeric characters that are available, press a button repeatedly.•
To delete the last character entry from the display, press • CLEAR.
To delete the whole line entry, press and hold • CLEAR.
This section describes the most commonly used wireless home network setup.
(For instructions on how to create a ‘wired’ connection, refer to the user
manual.)
When you connect the player to a home network with broadband Internet access:
You can listen to Internet radio•
You can connect to the Internet for firmware updates•
Important! For rst-time setup, ensure your network name and network password or
the encryption key are available.
Page 8

6
Connect the player to the power supply
A
Connect the player to the power supply as shown in the diagram on page 4.
After a short introduction demo, the player prompts you to select the location.
Select the location / time zone and conrm.1
The player shows the prompt for the network connection. >
2 Select [Yes], to create a connection to the network.
The player shows the prompt for the network setup (if no network >
has been set up yet).
• Select [No] to exit the setup and go to the Home menu.
Connect the player to a home network
B
Here is how to create a wireless connection to your home network with
broadband Internet access
The onscreen display guides you through the process of connecting the player. This
section describes the typical wireless setup with automatic IP address. For information
on different setups, consult the user manual.
Ensure that your network name and network password or encryption key are 1
available.
Turn on your wireless access point or wireless router with broadband Internet access.2
3 Follow the steps in section (A) and select [Ye s ], to create a connection to the
network.
Select [4 Wireless (WiFi)] to start the network setup process.
For wireless routers with Wi-Fi protection system (WPS) that supports push •
button configuration (PBC): On the router, press the WPS PBC push button (often
displayed as ) to activate. On NP2900 press OK to confirm.
For wireless routers with Wi-Fi protection system (WPS) that supports a personal •
identification number (PIN): On NP2900 select WPS PIN, then enter the displayed
PIN on the router.
For other wireless routers:•
NP2900 searches for networks. >
Use the remote
control.
This icon indicates steps on your remote control!
Page 9

7
EN
Select your network from the list of found networks and confirm.5
Enter the encryption key (if required) and confirm.6
(press CLEAR to delete last character entry /
press hold CLEAR to delete line entry)
The player >
acquires the automatic IP address;
shows the conrmation for the connection to the network;
shows the prompt for the connection to the Internet.
Select [7 Yes] to connect to the Internet.
The player shows the conrmation for the connection to the Internet. >
You can go to section Enjoy and listen to Internet radio at this point.
Here is how to create a wireless connection any time ‘after’ the initial setup:
Ensure that your network name and network password or encryption key are available.1
Turn on the player.2
Turn on your wireless access point or wireless router with broadband Internet access.3
Press 4
SETTINGS, to go to the Settings menu.
Select [5 Wireless (WiFi)] to start the network setup process.
For wireless routers with Wi-Fi protection system (WPS) that supports push •
button configuration (PBC): On the router, press the WPS PBC push button (often
displayed as ) to activate. On NP2900 press OK to confirm.
For wireless routers with Wi-Fi protection system (WPS) that supports a personal •
identification number (PIN): On NP2900 select WPS PIN, then enter the displayed
PIN on the router.
For other wireless routers:•
NP2900 searches for networks. >
This icon indicates steps on your remote control!
Page 10

8
Select your network from the list of found networks and confirm.6
Enter the encryption key (if required) and confirm. 7
(press
CLEAR to delete last character entry /
press hold CLEAR to delete line entry)
The player >
acquires the automatic IP address;
shows the conrmation for the connection to the network;
shows the prompt for the connection to the Internet.
Select [8 Yes] to connect to the Internet.
The player shows the conrmation for the connection to the Internet. >
C
Wirelessly stream music and pictures from a computer
You can wirelessly stream music and pictures to NP2900 from a connected computer.
The following chapters show you how to
install the software on your computer•
configure the computer to share your music and pictures•
(If Media Browser for Philips or Twonky Media is already installed on the computer, you
can skip the installation section and continue with the conguration.
For any other media players, refer to the instructions of the player.)
On the computer, insert the supplied software CD.1
Installation starts. >
Follow the instructions on the computer to install the software.
This icon indicates steps on your remote control!
Page 11

9
EN
You can share music and pictures from a Mac or PC with NP2900. This
chapter shows you how to congure a PC for sharing. (For instructions on
how to congure a Mac for sharing, consult the NP2900 user manual.)
On the PC, click 1 Start > Programs > Media Browser > Run Media Browser.
Go to 2 Settings > Server Settings to check that you have selected the correct
server.
Choose 3 Basic Settings.
In the 4 Basic Settings of the Configuration Page,
to manually locate the music and pictures, click • Browse
to manually add a new content directory, click • Add
On the remote control of NP2900, press 5 MEDIA LIB..
The display shows [ > Searching for UPnP servers…].
Press 6 34 to select the server name and confirm with OK.
Use the remote
control.
This icon indicates steps on your remote control!
Page 12

10
Enjoy
3
Internet radio
A
Listen to Internet radio
Turn on the player.1
Ensure that the player is connected to broadband Internet.2
Press 3 INTERNET RADIO to view the options menu:
[• Presets] (lists the preset Internet radio stations)
[• Favorite stations] (lists the Internet radio stations that you have marked as
Favorite Station)
[• Recently played] (lists the most recently played Internet radio stations)
[• Search] (lets you search for Internet radio stations)
[• All stations] (lists all Internet radio stations, categorized by genres)
[• Recorded shows] (lists all recorded Internet radio shows)
[• My Media] (lists the Internet radio stations that you have entered at Club Philips
under Streamium Management)
Press 4 3 or 4, then 2 to select the option.
To listen to a specific Internet radio station, select option [• Search], then use the
alphanumeric buttons to enter the radio station name.
While you listen to Internet radio, press and hold an alphanumeric button (0 - 9) •
to save the current station to the preset of that number (this action overwrites the
previously stored preset).
Press 5 HOME to go to the Home menu.
Club Philips lets you select and manage favorite stations from a list of available
Internet radio stations under Streamium Management.
Internet radio features require broadband Internet access.
This icon indicates steps on your remote control!
Use the remote
control.
Page 13

11
EN
Register
4
Free software upgrade•
Manage your own favorite radio stations•
Receive Streamium Newsletter•
A
Online registration
Go to our website 1 www.philips.com/welcome and click on Register my product link
Follow the simple instructions to register your product.2
Page 14

12
Need help?
User Manual
See the user manual that came with your player.
On line
Go to www.philips.com/welcome
Hearing Safety
Listen at a moderate volume.
Using headphones at a high volume can impair your hearing. This product can produce sounds in •
decibel ranges that may cause hearing loss for a normal person, even for exposure less than a minute.
The higher decibel ranges are offered for those that may have already experienced some hearing loss.
Sound can be deceiving. Over time your hearing “comfort level” adapts to higher volumes of •
sound. So after prolonged listening, what sounds “normal” can actually be loud and harmful to
your hearing. To guard against this, set your volume to a safe level before your hearing adapts
and leave it there.
To establish a safe volume level:
Set your volume control at a low setting.•
Slowly increase the sound until you can hear it comfortably and clearly, without distortion.•
Listen for reasonable periods of time:
Prolonged exposure to sound, even at normally “safe” levels, can also cause hearing loss.•
Be sure to use your equipment reasonably and take appropriate breaks.•
Be sure to observe the following guidelines when using your headphones.
Listen at reasonable volumes for reasonable periods of time.•
Be careful not to adjust the volume as your hearing adapts.•
Do not turn up the volume so high that you can’t hear what’s around you.•
You should use caution or temporarily discontinue use in potentially hazardous situations.•
Do not use headphones while operating a motorized vehicle, cycling, skateboarding, etc.; it may •
create a trafc hazard and is illegal in many areas.
Page 15

13
EN
Important
Safety
Know these safety symbols
The ‘exclamation mark’ calls attention to features
for which you should carefully read the supplied
literature to prevent operating and maintenance
problems
The ‘lightening bolt’ symbol indicates uninsulated
components within the product that can cause an
electric shock.
To reduce the risk of re or electric shock, do
not expose the product to rain or moisture and
do not place any ojects lled with liquids, such as
vases, on the product.
Read these instructions.a
Keep these instructions.b
Heed all warnings.c
Follow all instructions.d
Do not use this product near water.e
Clean only with dry cloth.f
Do not block any ventilation openings. g
Install in accordance with the manufacturer’s
instructions.
Do not remove the casing of this product.h
Only use this product indoors. Do not i
expose the product to dripping / splashing
water, rain or high humidity.
Keep this product away from direct sunlight, j
naked ames or heat.
Do not install near any heat sources such k
as radiators, heat registers, stoves, or other
electrical equipment (including ampliers).
Do not place any other electrical equipment l
on the product.
Do not place any sources of danger on m
the product (e.g. objects containing liquids,
burning candles).
This product may include batteries. Please n
refer to safety and disposal instructions for
batteries in this user manual.
This product may contain lead and mercury. o
Disposal of these materials may be regulated
due to environmental considerations. Please
refer to disposal instructions in this user
manual.
Page 16

14
Hearing Safety
Listen at a moderate volume:
Using headphones at a high volume can impair
your hearing. This product can produce sounds
in decibel ranges that may cause hearing loss for
a normal person, even for exposure less than a
minute. The higher decibel ranges are offered for
those that may have already experienced some
hearing loss.
Sound can be deceiving. Over time your hearing
‘comfort level’ adapts to higher volumes of sound.
So after prolonged listening, what sounds ‘normal’
can actually be loud and harmful to your hearing.
To guard against this, set your volume to a safe
level before your hearing adapts and leave it
there.
To establish a safe volume level:
Set your volume control at a low setting.
Slowly increase the sound until you can hear it
comfortably and clearly, without distortion.
Listen for reasonable periods of time:
Prolonged exposure to sound, even at normally
‘safe’ levels, can also cause hearing loss.
Be sure to use your equipment reasonably and
take appropriate breaks.
Be sure to observe the following guidelines when
using your headphones.
Listen at reasonable volumes for reasonable
periods of time.
Be careful not to adjust the volume as your
hearing adapts.
Do not turn up the volume so high that you can’t
hear what’s around you.
You should use caution or temporarily discontinue
use in potentially hazardous situations.
Do not use headphones while operating a
motorized vehicle, cycling, skateboarding, etc.; it
may create a trafc hazard and is illegal in many
areas.
Environmental notice
Class II equipment symbol
This symbol indicates that the unit has a double
insulation system.
Modifications
Modications not authorized by the manufacturer
may void user’s authority to operate this product.
Disposal information for NP2900:
Your product is designed and manufactured with
high quality materials and components, which can
be recycled and reused.
When you see the crossed-out wheel bin symbol
Page 17

15
EN
attached to a product, it means the product is
covered by the European Directive 2002/96/EC.
Never dispose of your product with other
household waste. Please inform yourself about the
local rules on the separate collection of electrical
and electronic products. The correct disposal
of your old product helps prevent potentially
negative consequences on the environment and
human health.
Information about the use of batteries:
Caution
Risk of leakage. •
Only use the specied type of batteries. •
Do not mix new and used batteries. •
Do not mix different brands of batteries. •
Observe correct polarity. •
Remove batteries from products that are not in •
use for a longer period of time.
Store batteries in a dry place.
•
Risk of injury. •
Wear gloves when handling leaking batteries. •
Keep batteries out of reach of children and pets. •
Risk of explosion. •
Do not short circuit batteries. •
Do not expose batteries to excessive heat. •
Do not throw batteries into the re. •
Do not damage or disassemble batteries. •
Do not recharge non-rechargeable batteries. •
Battery disposal information:
Your product contains batteries covered by the
European Directive 2006/66/EC, which cannot be
disposed of with normal household waste.
Please inform yourself about the local rules on
separate collection of batteries. The correct
disposal of batteries helps prevent potentially
negative consequences on the environment and
human health.
Page 18

0984
16
Page 19

Specifications are subject to change without notice.
Trademarks are the property of Koninklijke Philips Electronics N.V. or
their respective owners
© 2009 Koninklijke Philips Electronics N.V.
All rights reserved.
www.philips.com
Printed in China
wk9125
 Loading...