

Page 1
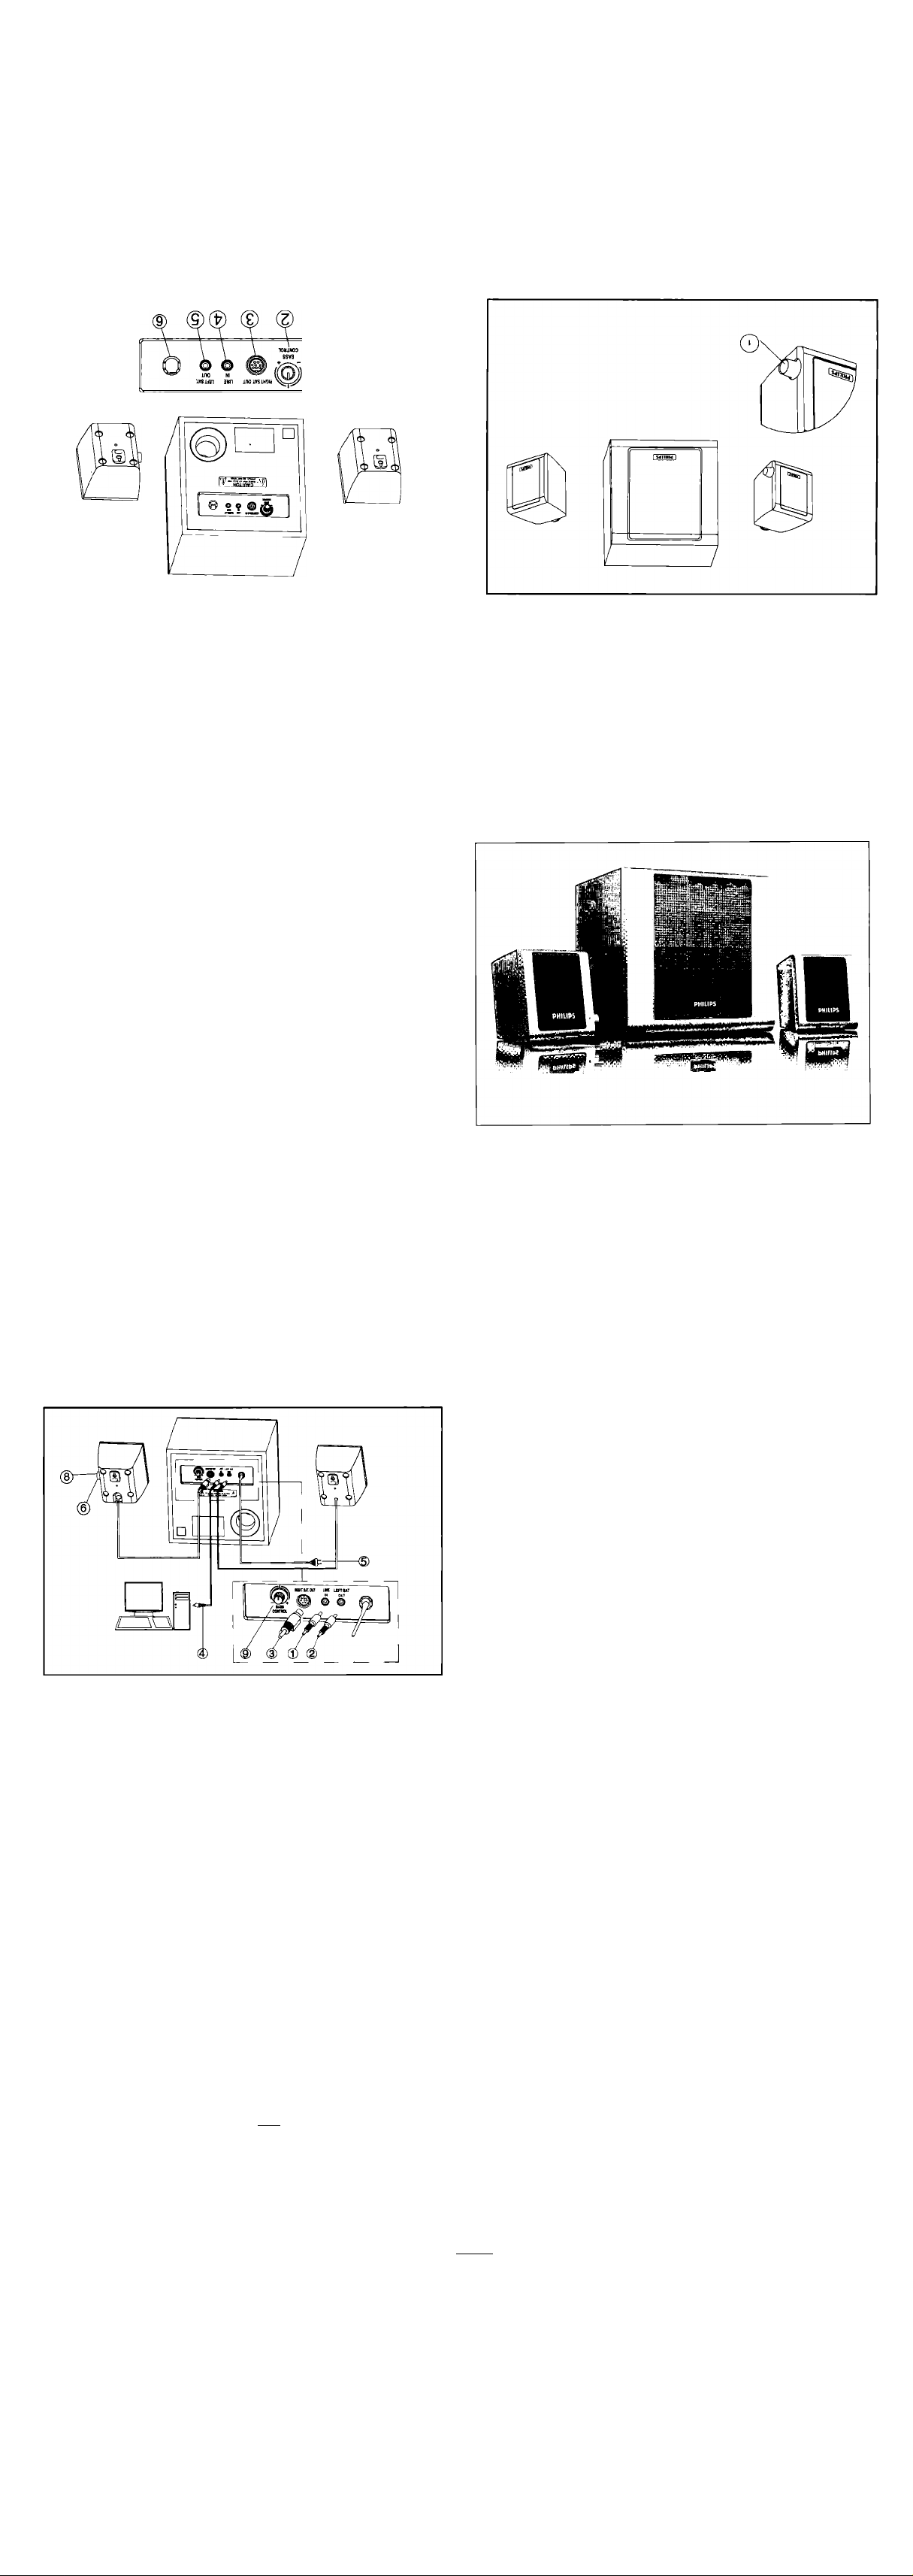
je>(Bads э;!ЦЭ}вз цэ| ащ joauuoo oi
»no íBSUai (D
ашп|ол pajjsap oj |эла| ssBq jsnfpB 01
lOJiuoosseg ф
jajdepB 0L|} pauuoo oi
U| JSAAOcJ
puños ЭЩ Ш04 aiqBO u| aun эщ »oauuoo 01
aojnos punos/pjBO
jopauuoo Mia lujuj ащ u¡ ßnid
»no »BS»4ß!d (g)
U|3Un 0
(uo s| jaMOd aqi jBqi sajBoipui
Q31 sniq ) jaMod jjo jo uo qojiMS 01
HO/UO JBmOd
jaMO| JO jaq6|q эшп|ол aqj isnfpB 01
|Oj)uoo эшп|Ол ÄJBjou Ф
~ NOIlVNVldX^ ~
For US/Canada only
IMPORTANT SAFETY INSTRUCTIONS - Read before operating equipment
This product was designed and manufactured to
meetstrict quality and safety standards. There are.
however, some installation and operation precautions
which you should be particularly aware of.
t.Read these Instructions • All the safety and
operating Instructions should be read before the
appliance is operated.
2. Keep these Instructions • The safety and operating
instructions should be retained for future reference.
3. Heed all warnings - /Ul warning on the appliance
and In the operating instructions should be adhered
5. Do not use this apparatus near water • for example,
near a bathtub, washbowl, kitchen sink, laundry tub.
in a wet basement or near a swimming pool, etc.
6. Clesn only with a damp cloth. The appliance
should be cleaned only as recommended by the
manufacturer.
7. Instaf in accordance with the manufacturers
Instructions. Do not block any of the ventilation
openings. For example, the appliar»ce should not be
situated on a bed, sofa, rug. or similar surface or
placed in a built-in installation, such as a bookcase
or cabinet that may impede the flow of air through the
ventilation openings.
6. Do not install near any heat sources such as
radiators, heat registers, stoves, or other apparatus
(including amplifiers) that produce heat.
The Socket outlet shall be installed near the equipment and shall be easily accessible.
9. Do not defeat the safety purpose of ^
the polarized or grounding-type plug.
A polarized plug has two blades with
one wider than the other. Match wide Poi»ri»d Ptug
blade of Plug to wide slot, fully insert. A grounding
type plug has two blades and a third grounding
prong.The wide blade or the third prong are provided
for your safety. When the provided plug does not fit
into your outlet, consult an electrician for
replacement of the obsolete outlet.
10. Protect the power cord from being walked on or
pinched particulary at plugs, conveniertce receptacles
and the point where they exit from the apparatus.
11. Only use attachments/accessories specified by the
manufacturer.
12. Use only with a cart, stand, tripod, bracket.
table specified by the manufacturer, or sold with
the apparatus. When a cart is used, use caution
when moving the cart/apparatus combination to avoid
injury from tip-over.
).
Unplug this apparatus during lightning storms or
when unused for long periods of time,
f.
Refer all servicing to qualified service personnel.
Servicing is required when the apparatus has been
damaged in any way. such as power-supply cord or
plug is damaged, liquid has been spilled or objects
have fallen into the apparatus, the apparatus has
been exposed to rain or moisture, does not operate
normally, or has been dropped.
Wamingl To reduce the risk of fire or electric shock,
do not expose this appliance to rain or moisture.
http://www.philips.com/pcstuff
Multimedia Speaker System
MMS 231
4340 704 50191
PHILIPS
Installation
Portuguese: Swedish:
1 -Ligue 0 cabo da tomada de 3.5mm verde ao conector “Line in”
2. Ligue o cabo da tomada de 3.5 mnt com a marca L ao conector
“Lefl SaL out"
3. Ligue o conector mini Din preto à entrada Din “Right Sat. out"
4. Ligue o cabo da tomada de 3.5nwn verde à placa de som do PC
ou a outra fonte de som
5. Ligue o cabo de alimentando à corrente eléctrica
ó.Ligue/desligue o sistema utilizando o botáo “Power” no painel
direito do satélite
T.Regule o sistema, utilizando aplaca de som do PC ou outra fon
№iKsom
8.Regule o volume, utilizando "+/-“ no painel central de satélite
9.0 nivel de subwoofe-pode ser regulado com o botáo "Bass control”.
Nota:
I .IntFoduza apenas a ficha na tomada de CA depoLs de efectuar todas
as ligaedes.
2.As entradas estáo de acordo com os códigos de cor do PC 2002
(verde para a entrada E/D)
Français:
1. Branchez la prise jack de 3.S mm verte au connecteur« Line in».
2. Branchez la priscjack de 3.5 mm L au connecteur « Left ^t. out ».
3. Branchez le connecteur mini-DIN noir à l'entrée DIN « Right Sat,
out ».
4. Brancbez la prise jack de 3.5 mm verte à la carte son du PC ou à une
source audio.
5. Branchez le câble d'alimentation à une prise secteur.
6. Menez le système sous tension en appuyant sur le bouton« Power»
du panneau de droite.
T.Réglez le système à partir de la carte son du PC ou d'une autre source
aumo.
8. Réglez le volume à l'aide de la louche «+/-» du panneau central.
9. \feus pouvez régler le volume du caisson de basses en appuyant sur
le bouton « Bass control ».
Remarque :
1 .Ne branchez pas le câble d'alimentation dans la prise secteur tant
que tous les branchements ne sontpas effectués.
2. Respectez le codage en couleur PC 2002 (vert pour l'enuée UR).
Hungary:
,Xeft Sat. out”csatlákozóba.
3. Csatlakoztassa a fekete mini DIN-csatlakozót a .JLight Sat. out”
DIN bemenetbe.
4. Csatlakoztassa a zôld 3.5 mm-es csatlakozókábeit a számítógép
6. A jobboldali egységen laláÍhaló „Power” gomh segitségével
kapesolja be / Kl a rendszert.
7. Vegezze el a rendszer hangolását PC-l»angkártya vagy egyéb
hangforrás segftségével.
S.ÁIlitsa be a hangerot a kozépsô egységen található .,+/•” gomb
segitségével.
9.Amélysugárzót a,3ass control” gomb segitségével állilhatja be.
Mcgje^zés:
1 ,Ne illessze a tápfeszüitség dugót a változó áramú ( AC)
dugaszoló-aljzaiba addig. amfg nem végezte el a szükséges
csatlakoztatasokat.
2. A bemenetek jelolése a PC 2002 szinkódolásnak mcgfelclóen
tórtént (zöld szin jelöli a bal / jobb becieneteket).
1 .Anslul kabeln med den gröna 3i mni-kontakten tili Line in-
anslutningen
J.jAnslut k^ln med den L-märkla 3.5 mm-koniaktcn ÜU Left Sat.
Out-anslutningen
3. Anslut den svarta mini-DlN-kontakten tili DlN-ingängen Right
Sat out
4. Anslut k^ln med den gröna 3.5 mm-kontakien tili PC-ljudkon
eilerannan Ijudkälla
5. Anslut nätenheten tillnätkontakten
6.Sli ptl'av sysiemet med Power-knqmen pä höger satellitpancl
7. Justera systemel genom ^ använda PC-Ijudkoif eilerannan Ijudkälla
8. Justera volymen genom att använda +/- ^ mittsatellitpanelen
9. Nivän pä Subwoofern kan justeras med raiten Bass control
Obs;
1. Anslut Inte nälkontaktcn tili växelströmsuttaget förrän alia
anslutningar har gjoits.
2. Ingäng har följande PC 2002-fargmärkning (grön för L/R-ingäng)
Czech:
l.Pfipojtezelenÿkabelskonektorem jack 3.5 do zdifky Line lo
inkovy vstup).
S
Hpojte kabel L s konektorem jack3.5 do zdifky Left Sat. Out
(wstup levého satelitniho reproduktoru).
3.Pfipojte éemy minikonekior Din do zdifky Din Righi Sai. Oui
Ivystup praveho satelitniho reproduktoru).
4.Pnpojtezeleiw kabelskonektoremjack3.5kpo6ìtaéové
zvukové kartè^nebo ìtnému zdrqji zvuku.
5.P^)jte napájecí kabel do zàsuvky.
b.Stisknutim tiaéitka Power (napàjeni) napandu stfedového
salelitniho reproduktoru za{Hiéte nebo vypoéte system.
7.Pomoci poéitaéové zvukové karty nebo jiného zttroje zvuku
systém wlaiTte,
8-Pomoci tleéitek + a na panelu stfedového satelitniho rqmxhiktoru
nastavte hiasitost.
9.Pomoci tlaéicka Bass Control (nastaveni hliiubky) Ize nastavit
hiasitost hloubkového reproduktoru.
Poznàmka:
1. N^)àjeci kabel pfipojte do zàsuvln ^ po provedeni vSech zapojeni.
2.Barcvné rozliSenl vsntpù o^vidà kódovanf PC 2002 (zelena.
pro vstup levého a pravého kanàlu).
Polski:
I -Podlqcz ziela^wrtxzke typu Í®:k 35 mm do gniazda .Jine in"
(sygnal wejáciowy).
2. PocBqcz wQczkq typujack 35 mm L market do gniazda wyjé
ciowego .júrfl Sat our (satclitamy lewy).
3. Ptxfl^ czam£( wtyctie mini Din do gniazda wyjáciowego Din
, Д1^ Sal ouf (satelitamy ртгтоу).
4. Po(fi^ zielcmwtyczloi typujack 3.5 mm do karty dzwi^cowej
w komputerze ^ lub inn^ zrócfia dzwi^.
5 PfyMiy-7 do gniazda sieciow^o.
6. Wt^wybpz system naciskaj^ zasilania .Poweri'
na panelu prawego gloénika saGentamego.
7. WvT^uj system za pemwett karty dzwqkowej w komputerze
PC lub ШПСШ zródla dzwiçku.
8-Wyreguliy ^oánoá(í. korzystaj^ zc^ji na panelu centralnego
satelitamy.
9.NaIqzenie dzwi^u w glosnikach niskotcnowych mozna re^owaé
ZI pomocqpoki^da „Bass сошгпГ (regulacja ffinów nidtiem.
Uwy:
1. Nie wkbui^ wtyezki do gniazda [x^du zmiennego p[zedpodl^:zeniem
wszystidch urz^dzeri.
2. Kola wtyczdc zgodny jea ze standaidem PC 2002 (zielony dia kanahi
lewy/prawy).
English:
I .Connect green 3.5mm jack cable to “line in ” connector
I.ConnectL market 3.5mtn jack cable to “Left Sat. out” connector
3. Connect black mini Din connector to “Right Sat. out “ Din input
4, Connect green 3.5mm jack cable to PC soundcard or other sound
source
5. Plug Power supply into mains plug
6, Switch on/of the system using the^'Power” button on the right
satellite panel
T.Tune system, using PC sound card or other sound source
X.Tune volume, using on the centre satellite panel
9, Subwoofer level can be tuned on “Bass control" knob.
Note:
1. Do not insert the power plug into AC outlet until ail connections
are made.
2. Input are following PC 2002 colour coding (green for UR input)
Finnish:
I.Kytke vihreflJ.S mm;n liitin Line in -liitantaan.
Z.Kyikc L-mcrkionailiVarustettu 3.5 min:n liitin Left Sat. uui -liitanil^.
t.Kytke musta Mini Din -liitin Right Sat. out -tuloliit^Uian.
4. (Cytke vihreS 3.5 mm:n liitin liefokoneen ainikorttiin tai muuhun
Sanil9hteeseen.
5. Kvtke virialiihde pistomsiaan.
« .....,.-1,
7.SS2dSjSrjestelmS kayttam&IIS tietokoneen aanikomia la
S.Voit saatia unenvoimakkuutta keskisaielliitiipaneelin '
9.Vuii saataa subwooferin tasoa Bass control -s^atimella.
Huvmautus:
1. Ali kytke vinalahdettapistorasiaan, ennen kuin kaikki kytkennai
2. Tuloliitannat on merkitty 2002 -varikoodijkijestelmln mukaisesti
..............,.................
aamlkhdetti.
on lehly.
fV/O-iulo on vihrea).
-----
'--=npSalk — r-
r-painikcna.
Ф>С;
2.М-Й' L i/jvidfi<J3,5mm
h
Din
1. тшт.5тпт PC h
9. “fÜ-ê-fëÆiJ”
?Т.Й-
2. WîfAiMfôM ГС 2002 mñfSkЩ l./K «î\)
Español:
¡.Conecte d cable eon clavija verde de 3.5 mm al conectw "Line in".
iConecte el cable en L con clavija de 3.5 mm al conector "Left Sal oi«".
3. Conecte el mmiconcctor DIN negro a la entrada DIN "Ri^l Sat out".
4. Conecte el cable coi clavija vade de 35 mm a la taijeia (te senido del
PC u («ra fuente de salido.
5. Conecte la tuenie de alimentacítxi a la red eléctrica.
6. Encienda'apague el sistema coi el botói “Power” del panel satélite
doecho.
7. Ajuste el sistema rttediante la taijeta de sonido dei PC u otra fuente
de sonido
8. Aju^ el volumen ntediante del panel satélite central.
9. F.l nivel del subwoofer se puede ajustar con el mando de control de bajos
“Bass eoitror.
Nota;
1 .No conecte el cable de alimentacíói a un oichufé de CA hasta (^ se
hayan realizado tedas las cotexicnes.
1 Las entradas siguen los códigos de cola PC 2002 (verde para entrada L/R).
Deutsch:
1 .Verbinden Sie das grüne Kabel mit 35-imn-Kliiikenstecker mit
dem Anschluss „Line in”.
2. Verbinden Sie das mit L gekennzeichnete Kabel mit 3.5-mmKlinkenstecker mit dem Anschluss “Left Sat. out”.
3. Verbinden Sie den schwarzen Mini-DIN-Steckverbinder mit dem
DIN-Eingang “Right Sat. out",
4. Verbinden Sie das grüne Kabel mit 3,5-mm-Klinkenstecker mit
der PC-Soundkarte oder einer anderen Tonsignalquelle.
5.Stecken Sie den Netzstecker in die Steckdose.
b.Schalten Sie das System mit der Taste “Power” auf dem rechten
Satellitenfeld ein bzw. aus.
7.Stimmen Sie das System mit Hilfe der PC-Soundkarte oder einer
anderen Tonsignafqueile ab.
8. Stellen Sie die Lautstärke mit Hilfe der Tasten ’H/-“ auf dem
mittlerer Satellitenfeld ein.
9. Der Subwoofer-Pegel kann mit dem Knopf “Bass control”
eingestellt werden.
Hinweis:
I .Schließen Sie das Gerät erst dann an die Stromversoiguog an.
wenn alle anderen Verbindungen hergestellt wurden.
1 .Die Eingänge entsprechen der folgenden PC 2002 Farbcodierung
(grün für den L/R-Eingang).
Slowaskia:
I .Z^jte zeleny kàbel s 3.5 mm jackom do konektaa .Xine in”.
2. Z^>qite kàberoznaóeny plsmcnom Ls 3.5 mm jackom do konektora
,Xeft Sat. out”.
3. ^jqjte f iemy mini Din konektor do Din vsnjpu, cznaòeného
..Rigni Sat-ouT.
4. Zapojte zclen^ kàbel s 3.5 mm jackom do zvukovq karty PC
al^ iného z^ja.
5. Zaslrfte siefoy^ zdroj do siefovej zàsuvky.
6.2f^3nile/vypnite systón ilatìdlom .i'ower'’, umiestnenym na
S.Nastavtc
O.Hlasitost’
Poznàmka:
1 .Nczasùvajte zástrücu do àsirvky. |фп oie sú
2,Vstupy zodpoved^ú làrebnému kódovaniu P
2,Vstupy zod|
onmzovy).
Norwegian:
I.Koblegronn 3.5 tnmpluggkabel til“Linein''-kontakt
iKoble L-metkel 3.5mm pfuggkabel til “Left Sat out”-koniakt
3. Koblcsvarl MiniDin-kontakttil “Right Sat. out" Din-inngang
4. KobIe grenn 3.5mm pluggkabcl til PC-lydkort eller annen lydkilde
5. Plugg stremforsyning inn 1 stromuttaket
6.S1Ö systemet pä/av med “PowcT”-knM»en pä hoyre satellittpanel
7.Finjuster Systeme! ved bnik av PC-lyokon eller annen lydkilde
ft.Finjuster volum ved bnik av “-i-/-“pö midtre satellitgianel
9.BasshöynaJemivl kan finjusteres med knotlen “Bass control”.
Meric:
I.Sett ikke stnsmstopselet iim i vekselstnimuttaket foralletilkoblinger
er Utfort.
.Inngang feiger PC 2002 fiirgekoding (gronn for LyR-inngang)
Italiano:
1 .Collegate il cavo jack da 3.5 mm verde al connettore “Line in”
2. Collegate il cavojackda 3.5 mm marcato con Lai cormettore
“Left Sat. out”
3. Collegató il connettore mini Din nero all'ingresso Din “Right Sat.
Out”
4. Collegate il cavo jack da 3.5 mm verde alla scheda audio del PC o
ad unaltra solente audio
5. Collegate l'alimentatore ad una presa elettrica
ò.Accendete/spe^ete il sistema tramite il pulsante di alimentazione
“Power” sul pannello satellite destro
7.Sintonizzate il sistema, con la scheda audio del PC od un'altra
sorgente audio
S.Regolate il volume, con "+/•“ sul pannello satei lite centrale
9.11 livello Subwoofer puff essere regolato sulla manopola perii
controllo dei bassi “Bass control”.
Nota:
1 .Non collegate la ^ina d'alimentazione alla presa CA prima di aver
realizzato mtte le connessioni.
2.Gli ingressi seguono la codifica colore PC 2002 (verde per
l'Ingresso L/R)
Nederlands;
I. Shiit de kabel met een groot ptugje van 3.5 mm аг
'Xine in".
2,Sluit de met een Lgemarkeode plug van 35 mm aan op de connecw
"LcflSaiout".
3.Sluit de zwartemini-DIN-plug aan ф de mini-DlN-bus "Ri^t Sal cput".
4. Sluit de kabel met een groen pmgie van 35 шт aan op de geluidskaart
van de FC of CTO een агшеге geluidsbron.
5. Steek de netsewker in een stepcontacL
ö.Schakel h« systeem in of uil Otet de Power-кгмр cp de lechter-
satelUctluidspnier.
7.Stel het systeem in me» behulp van de geluidskaart of een andere
zhiidsbiai.
tel het volume in metop de centrale satellietluidspreket
f
9. Het volume van de subwoofer is intaefeaar met de knop "Bass control".
Opmeiking:
I. Verbirxldenetkabejpasmeteen stcpcontactnadatualle
vcrbirxlii^cabeltjes nebt aangcslutcn.
Z De kleurcodering van coonectos voldoet aan de norm PC 2002
(groen voOT L/R-ingang).
Türkçe:
1. Ye§il 3.5 mm jak kablosunu "Hat giri?” (Line in) konektórUne takin
2, L i^arctli 3.5 mm jak kablosunu “Sol iiki?” (Left Sai out) kooektariljie
takm
3.Siyah mini Din konektOrtinU “Sag Uydu (^tki?” (Right Sat. out) Din
giri$ine takm
4. Ye?il 35 mmjak kablosunu PC ses kaitina veya digerses k^nagina takm
5. GU9 Kaynagini prize takm
6. indù paneii Uzerinddd “GQf” (Power) dOgmesini kullanarak sistemi
a^^iitii/kapalabilirsiniz
7. rc ses karti veya diger ses kaynagini kullanarak sistemi ayarlaym
8. Sesi orla uydu paneii Uzerindeki dtlgmesini kullanarak ayarlaym
9.Subwoofer dU^i “Bas kontrol” (Bass control) dUgmesiyle apilabilir.
Not;
Baglantilar tamamlanana kadar fl$i AC prizine takmaym.
Giri$ler PC 2002 renk kodlanni tzler (Sol/Sag girici i;in ye;il)
PHILIPS
ojené vSetky kàble.\
)02 (zeleny. iiemy.
Л de connecter
Important notes for users in the U.К.
Mains plug
This apparatus is fitted with an approved 13 Amp plug.
To change a fuse in this type of plug proceed as follows:
1 Remove fuse cover and fuse,
2 FixnewfusewhichshouldbeaBS1362 5Amp,A.S.T.Aor BSI approved type.
3 Refit the fuse cover.
if the fitted plug is not suitable for your socket outlets, it should be cut off and an appropriate plug fitted in its place.
If the mains plug contains a fose, this should have a value of 5 Amp. If a plug without a fuse is used, the fuse at
the distribution board should not be greater than 5 Amp.
Note: The several f^ug must be ésposed of to avoid a possitíe shock hazard should it be inserted into a 13 Amp socket
elsewhere.
How to connect a plug
The wres in the mains lead are coloured with the following code: blue =neutral (N), brown=live{L}.
As these colours may not corre^Tond with the colour markings identifying the terminals in your plug,
proceed as folkws;
• Connect the blue wire to the terminal marked N or coloured Wack.
• Connect the brown wire to the terminal marked Lor coloured red,
• Donotconnecteithervriretotheearthterminalinthep^ug,markedE(or=)orcolouredgreen(orgreen
and yellow)
Before replacing the plug cover, make certain that the cord grip is clamped over the sheath of the lead- not simply over
The two wires.
Copyright in the U. K.
Recording and playback of material may require consent. See copyright Act 1956 and The Performer's Protection Acts
1958 to 1972.
Norge
Typeskilt finnes pa apparatens miderside.
ObserverrNettbiyteren er sekundert innkoplet.
Den innebygde netdelen er derfor ikke frakoplet
nettet sâ lenge apparate! er tilsluttet nettkontakten.
For â redusere faren forbrann eller elektrisk
stot, skal apparate! ikke utsettes for regn eller
fuktighet.
Deutschland
Hiermit wird bescheinigt, daß dieses Gerät in
bereinstimmung mit den Bestimmungen der
iAmtsblattveriugung 1046/1984 fimkentstrt ist.
Der Deutschen Bundespost wurde das
Inverkehrbringen dieses Gerätes angezeigt
Und die Berechtigung zur berprflmg der
Serie auf Einhaltung der Bestimmungen
eigeräumt.
Русский:
1 .Подсоедиттге кабель с зе.леиым гнездом диам. 3.5 к соедиюпелю
“Line in “ (“Линейный вход”)
1 Похоедиикге левый кабе-ль с мфкнровкой "L" с гнездом диам. 35 к
соединителю “Left Sat. out” (“Левый доп. выход”)
3. Подсоедините черный малогабаритный соединитель Din к
соединителю Din“Right Sat. out“ (“Правый доп. вых.")
4. Подсоедините кабель с зеленым гнездом диа.ч. 3.5 к звуковой
плате ПК или к другому источнику звука
5. Подсоединяте вилку сетевого шнура к блок)’ электропитания
6. Включите/выключите систему кнопкой “Power" (“Питание”)
на правой вспомог ательной панели
Т.Настройге систему, используя звуковую плату ПК или другой
источник звука
З.Настройте громксклъ, используя кнопки на центральной
спомогательной синели
9,Уровень громкости суб-НЧ громкоговорителя можно настроить
ручкой “Bass control” (“Регулирование НЧ”),
Примечание.
1 .Не вставляйте вилку шнура питания в сетев)^ розетку до тех
пор, пока не будут выполнены все соединения.
2.Ввод осуществляется в соответствии с цветовой кодировкой
ПК 2002 (зеленый для левого [1]/правого [R] входа)
 Loading...