

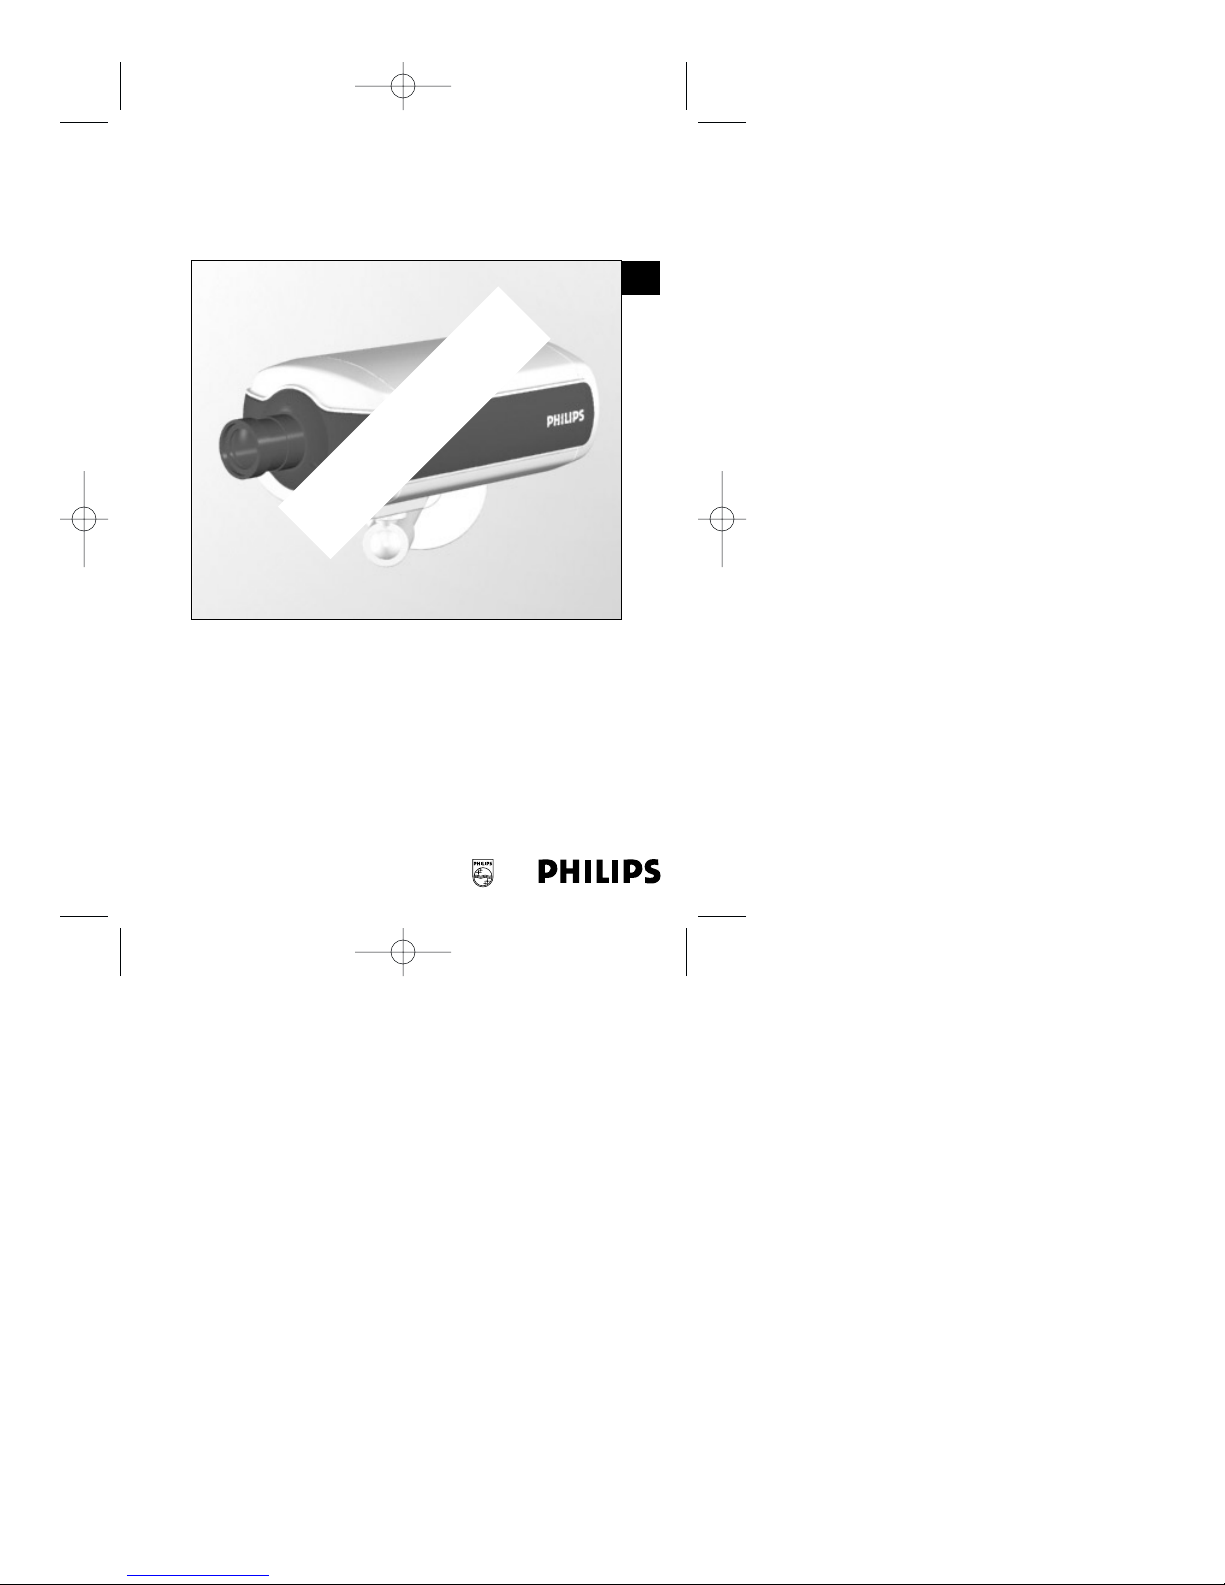
NetCam DVR
Installation Instructions
Eng
Draft Copy
DVR_NC_ii_98911_0047.qxd 12/13/00 1:53 PM Page 1
Philips
Communication,
Security & Imaging

IMPORTANT SAFEGUARDS
1. Read Instructions: All the safety and operating instructions should be read
before the unit is operated.
2. Retain Instructions: The safety and operating instructions should be
retained for future reference.
3. Heed Warnings: All warnings on the unit and in the operating instructions
should be adhered to.
4. Follow Instructions: All operating and use instructions should be followed.
5. Cleaning: Unplug the unit from the outlet before cleaning. Do not use
liquid cleaners or aerosol cleaners. Use a damp cloth for cleaning.
6. Power Sources: This unit should be operated only from the type of power
source indicated on the marking label. If you are not sure of the type of
power supply you plan to use, consult your appliance dealer.
7. Power-Cord Protection: Power-supply cords should be routed so that they
are not likely to be walked on or pinched by items placed upon or against
them, paying particular attention to cords and plugs, convenience
receptacles, and the point where they exit from the appliance.
8. Power Line: An outdoor system should not be located in the vicinity of
overhead power lines or other electric light or power circuits, or where it can
fall into such power lines or circuits.
9. Overloading: Do not overload outlets and extension cords as this can result
in a risk of fire or electric shock.
10. Object and Liquid Entry: Never push objects of any kind into this unit
through openings as they may touch dangerous voltage points or short-out
parts that could result in a fire or electrical shock. Never spill liquid of any
kind on the unit.
11. Servicing: Do not attempt to service this unit yourself as opening or
removing covers may expose you to dangerous voltage or other hazards.
Refer all servicing to qualified service personnel.
2
NetCam DVR Safety
DVR_NC_ii_98911_0047.qxd 12/13/00 1:53 PM Page 2

12. Damage Requiring Service: Unplug the unit from the outlet and refer
servicing to qualified service personnel under the following conditions.
If liquid has been spilled, or objects have fallen into the unit.
If the unit has been exposed to train or water.
If the unit does not operate normally by following the operating
instructions. Adjust only those controls that are covered by the operating
instructions, as an improper adjustment of other controls may result in
damage and will often require extensive work by a qualified technician to
restore the unit to its normal operation.
If the unit has been dropped or the cabinet has been damaged.
When the unit exhibits a distinct change in performance - this indicates a
need for service.
13. Replacement Parts: When replacement parts are required, be sure the
service technician has used replacement parts specified by the manufacturer
or have the same characteristics as the original part. Unauthorized
substitutions may result in fire, electric shock or other hazards.
14. Safety Check: Upon completion of any service or repairs to this unit, ask
the service technician to perform safety checks to determine that the unit is
in proper operating condition.
FCC INFORMATION
Caution: Any changes or modifications to construction of this device which are not
expressly approved by the party responsible for compliance could void the user’s
authority to operate the equipment.
Note: This equipment has been tested and found to comply with the limits for a Class B
digital device, pursuant to part 15 of the FCC Rules. These limits are designed to
provide reasonable protection against harmful interference in a residential installation.
This equipment generates, uses and can radiate radio frequency energy and, if not
installed and used in accordance with the instructions, may cause harmful interference
to radio communications. However, there is no guarantee that interference to radio or
television reception, which can be determined by turning the equipment off and on,
the user is encouraged to try to correct the interference by one or more of the following
measures:
Reorient or relocate the receiving antenna.
Increase the separation between the equipment and receiver.
Connect the equipment into an outlet on a circuit different from that to which the
receiver is connected.
Concult the dealer or an experienced radio/TV technician for help.
3
NetCam DVR Safety
DVR_NC_ii_98911_0047.qxd 12/13/00 1:53 PM Page 3
SAFETY PRECAUTIONS
This label may appear on the bottom of the unit due to space limitations.
The lightning flash with an arrowhead symbol, within an equilateral
triangle, is intended to alert the user to the presence of un-insulated "
dangerous voltage" within the product's enclosure that may be of
sufficient magnitude to constiuce a risk of electric shock to persons.
The exclamation point within an equilateral triangle is intended to alert
the user to presence of important operating and maintenance (servicing)
instructions in the literature accompanying the appliance.
Attention: Installation should be performed by qualified service
personnel only in accordance with the National Electrical Code or
applicable local codes.
4
NetCam DVR Safety
CAUTION:TO REDUCE THE RISK OF ELECTRICAL SHOCK,
DO NOT OPEN COVERS. NO USER SERVICEABLE PARTS
INSIDE. REFER SERVICING TO QUALIFIED SERVICE
PERSONNEL.
ATTENTION: INSTALLATION SHOULD BE PERFORMED BY
QUALIFIED SERVICE PERSONNEL ONLY IN ACCORDANCE
WITH THE NATIONAL ELECTRICAL CODE OR APPLICABLE
LOCAL CODES.
DVR_NC_ii_98911_0047.qxd 12/13/00 1:53 PM Page 4

TABLE OF CONTENTS
IMPORTANT SAFEGUARDS . . . . . . . . . . . . . . . . . . . . . . . . . . . . . . . . . . . . . . . . .2
FCC INFORMATION . . . . . . . . . . . . . . . . . . . . . . . . . . . . . . . . . . . . . . . . . . . . . .3
SAFETY PRECAUTIONS . . . . . . . . . . . . . . . . . . . . . . . . . . . . . . . . . . . . . . . . . . . .4
1 Introduction . . . . . . . . . . . . . . . . . . . . . . . . . . . . . . . . . . . . . . . . . . . . . . .7
1.1 Description . . . . . . . . . . . . . . . . . . . . . . . . . . . . . . . . . . . . . . . . . . . . . . . .7
1.2 Unpacking . . . . . . . . . . . . . . . . . . . . . . . . . . . . . . . . . . . . . . . . . . . . . . . .8
1.3 NetCam DVR Rear View and Descriptions . . . . . . . . . . . . . . . . . . . . . . . .8
2 Installation . . . . . . . . . . . . . . . . . . . . . . . . . . . . . . . . . . . . . . . . . . . . . . .11
2.1 Setup . . . . . . . . . . . . . . . . . . . . . . . . . . . . . . . . . . . . . . . . . . . . . . . . . . .11
2.1.1 Connecting . . . . . . . . . . . . . . . . . . . . . . . . . . . . . . . . . . . . . . . . . . . . . . .11
2.1.2 Location . . . . . . . . . . . . . . . . . . . . . . . . . . . . . . . . . . . . . . . . . . . . . . . . .11
2.2 Installing NetCam DVR Setup Program . . . . . . . . . . . . . . . . . . . . . . . . . .12
2.2.1 Installing for the first time . . . . . . . . . . . . . . . . . . . . . . . . . . . . . . . . . . . .12
2.2.2 Modifying, Repairing & Removing . . . . . . . . . . . . . . . . . . . . . . . . . . . . .12
2.3 Assigning IP address and Starting Configuration . . . . . . . . . . . . . . . . . . . .14
2.3.1 IP Address . . . . . . . . . . . . . . . . . . . . . . . . . . . . . . . . . . . . . . . . . . . . . . .14
2.3.2 Starting the setup program of NetCam DVR . . . . . . . . . . . . . . . . . . . . . .15
2.3.3 Assigning the IP address and setting up the NetCam DVR . . . . . . . . . . . .15
2.3.4 Assigning IP Address with ARP command . . . . . . . . . . . . . . . . . . . . . . . .18
3 Configuring NetCam DVR . . . . . . . . . . . . . . . . . . . . . . . . . . . . . . . . . .21
3.1 Opening the ‘NetCam DVR Viewer’ . . . . . . . . . . . . . . . . . . . . . . . . . . . .21
3.2 Configuring NetCam DVR . . . . . . . . . . . . . . . . . . . . . . . . . . . . . . . . . . .21
3.3 Configuring recording and system conditions . . . . . . . . . . . . . . . . . . . . . .23
3.4 Real-time image monitoring . . . . . . . . . . . . . . . . . . . . . . . . . . . . . . . . . .28
3.5 Recorded image replay . . . . . . . . . . . . . . . . . . . . . . . . . . . . . . . . . . . . . . .29
4 Adjusting Focus . . . . . . . . . . . . . . . . . . . . . . . . . . . . . . . . . . . . . . . . . . .33
5
NetCam DVR Contents
DVR_NC_ii_98911_0047.qxd 12/13/00 1:53 PM Page 5

6
NetCam DVR Contents
DVR_NC_ii_98911_0047.qxd 12/13/00 1:53 PM Page 6

1 INTRODUCTION
The NetCam DVR is a 4-channel camera style DVR all-in-one system with a
Web server, a networking device, a CCD module and a HDD (6GB standard
and changeable). The unit only needs a designated power supply and network in
order to operate.
1.1 Description
DVR with a built-in HDD
The NetCam DVR records images onto it’s own HDD at the maximum speed of
10 frames per second. Since the unit is equipped with a dedicated file system, it
prevents recorded data from being damaged or lost in course of sudden power
failure.
Powerful image compression
The NetCam DVR utilizes Wavelet compressing algorithm in addition to this, it
is equipped with a 32bit RISC CPU to make it more efficient in image
processing.
Simple installation and various functions
Functional firmware of the NetCam DVR is saved in the 8 MB flash memory
chip. For this reason, it’s firmware can be upgraded remotely through Internet or
Intranet. The NetCam DVR is designed to have a DB-15 port (RS-232 & RS-
485) to connect external devices such as alarm sensor, pan/tilt, zoom lens, and
other devices. The NetCam DVR also controls 4 external analogue CCTV
cameras by connecting them to the video input ports.
7
NetCam DVR Section 1
DVR_NC_ii_98911_0047.qxd 12/13/00 1:53 PM Page 7

1.2 Unpacking
Unpack carefully. This is electronic equipment and should be handled with care
to prevent damage to the unit. Check for the following items:
■■✓ NetCam DVR - 4-Channel Camera Style Network DVR
■■✓ AC Adapter & Power cable DC 12V, 1A
■■✓ Lens 8mm, f 1.3, C mount, already assembled
■■✓ 1 m crossover cable (Red)
■■✓ 2 m direct cable (White)
■■✓ Plug & cable clamp for DB-15
■■✓ Wrench 0.035” [0.89 mm]
■■✓ CD ROM with Software and Manual
■■✓ Manual
Note: The shipping carton is the safest container in which to transport the unit.
Save it and all packing materials for future use.
1.3 NetCam DVR Rear View and Descriptions
8
NetCam DVR Section 1
Video In/Out
Power
DB-15 port
RS-232/RS-485
DIP Switch
Ethernet
DVR_NC_ii_98911_0047.qxd 12/13/00 1:53 PM Page 8
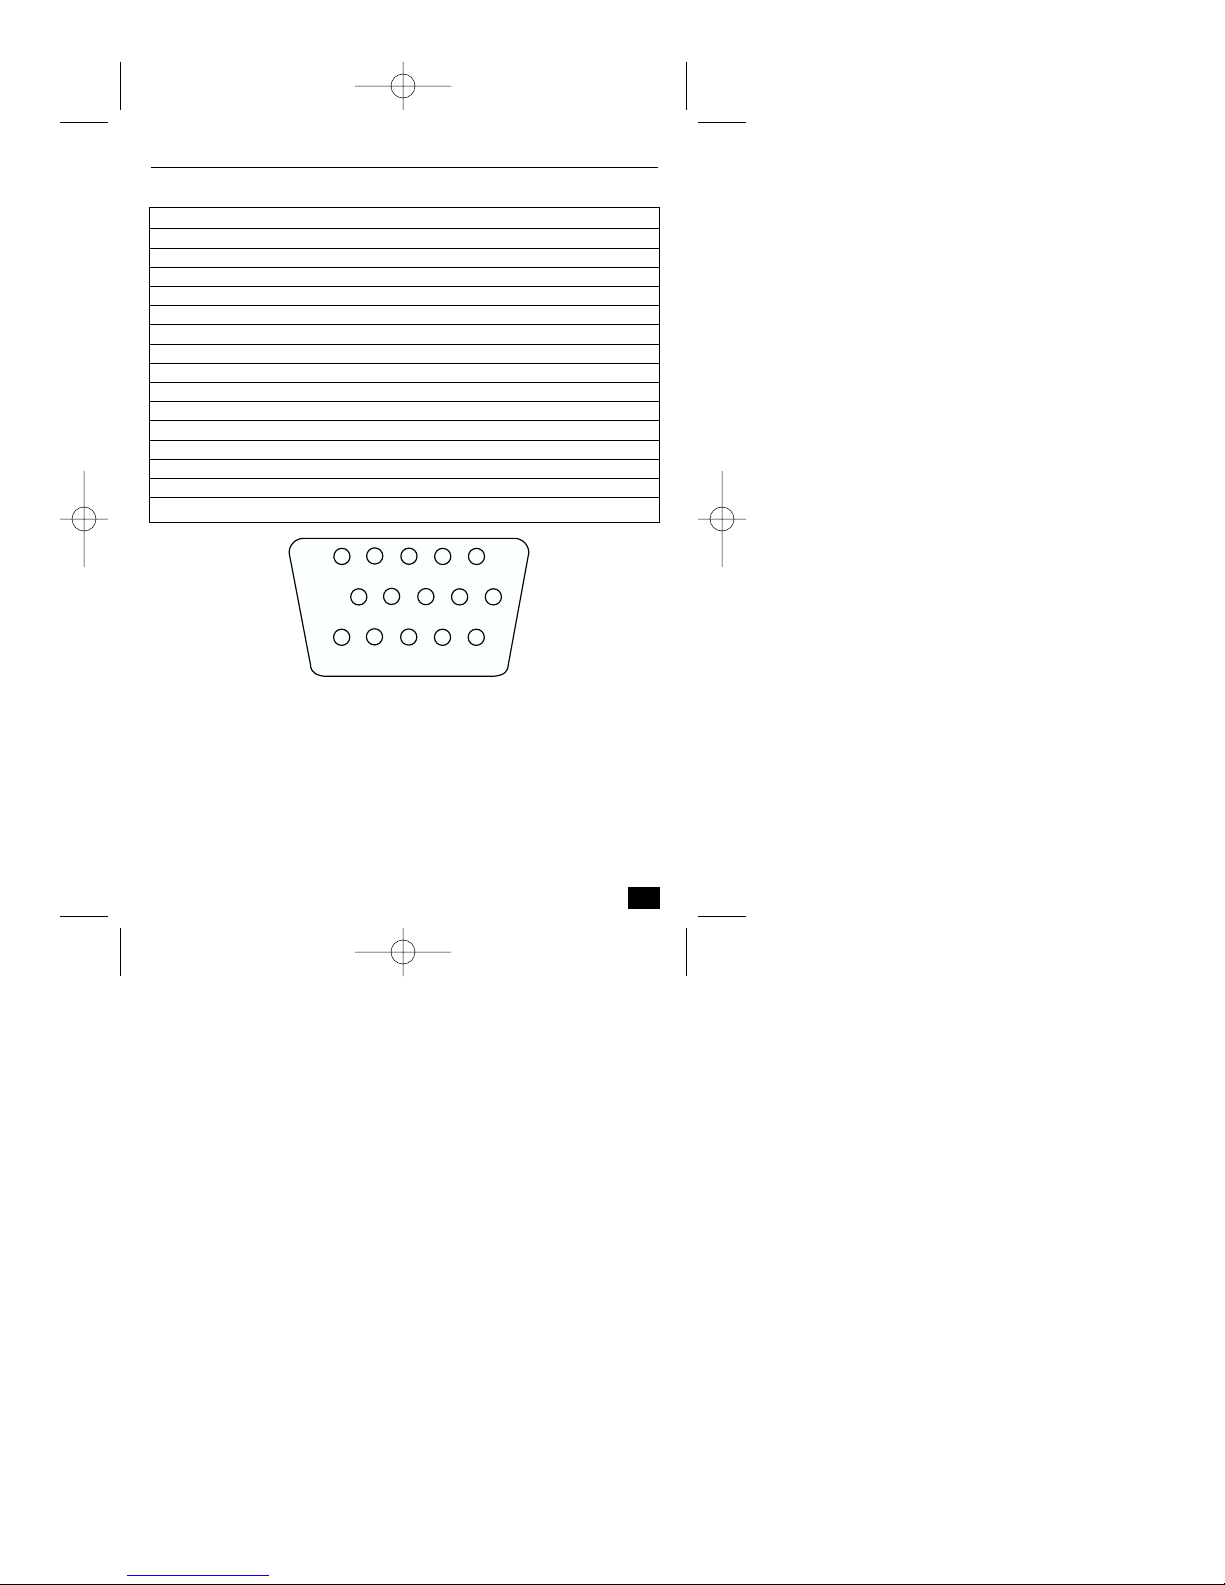
DB-15 port (RS-232 and RS-485)
9
NetCam DVR Section 1
Pin Connection Function
1 TXD RS-232 transmit.
2 RXD RS-232 receive.
3 S+ NetCam DVR RS-485. (half-duflex).
4 S- NetCam DVR RS-485. (half-duflex).
5 GND Ground
6 Input 1 + Isolated input port
7 Input 1 - Isolated input port
8 Input 2 + Isolated input port
9 Input 2 - Isolated input port
10 Output 1 + SSR output port
11 Output 1 - SSR output port
12 12 V + Power Supply
13 IRIS Not used
14 GND Ground
15 EM Not used
DVR_NC_ii_98911_0047.qxd 12/13/00 1:53 PM Page 9
4
5
GND S- S+ RXD TXD
15
EM GND IRIS +12V 01-
321
9
14
876
13
12
11
10
01+ 12- 12+ 11- 11+
DIP Switches
10
NetCam DVR Section 1
Switch Function
OUT/IN Configures NetCam DVR to accept input (IN) or output
(OUT) signal to the BNC connector.
1, 2, 3, 4 75 Ω (ON) or High impedance (OFF) (Loop through).
DVR_NC_ii_98911_0047.qxd 12/13/00 1:53 PM Page 10
OUT 1 2 3 4
IN
ON
75Ω
OFF

2 INSTALLATION
2.1 Setup
■ Connect Ethernet and Power to NetCam DVR on local network for
configuration.
■ Install the setup program for NetCam DVR.
■ Assign an IP address to NetCam DVR and configure administrator’s
condition.
■ Configure user’s condition.
■ Locate NetCam DVR, and re-connect power and Ethernet.
■ Adjust the Focus.
2.1.1 Connecting
■ Connect Ethernet line to the Ethernet port in the rear.
■ Connect the power supply to a power supply port in the rear.
■ Confirm that the green LED of the Ethernet port blinks
2.1.2 Location
■ Place NetCam DVR appropriately for your purpose
Wa rning: Do not expose the camera lens to direct sunlight. When you operate
NetCam DVR in the glaring light, we recommend using an auto iris lens.
11
NetCam DVR Section 2
DVR_NC_ii_98911_0047.qxd 12/13/00 1:53 PM Page 11

2.2 Installing NetCam DVR Setup Program
2.2.1 Installing for the first time
Copy the ‘NetCam DVR
Viewer’ program files onto
your PC. Click ‘setup.exe’
file. Follow the instructions.
It is recommended that you
reboot your PC after the
setup procedure is completed.
When prompted for “Locked
file” for MSFLXGRD.ocx,
MSCOMCT2.ocx and
COMCTL32.ocx select “Reboot”.
2.2.2 Modifying, Repairing & Removing
If you have already installed the NetCam DVR Viewer and select ‘setup.exe’, a
window is displayed showing the options ‘Modify’, ‘Repair’, and ‘Remove’.
The three options are to fix the already installed NetCam DVR Viewer as well as
to upgrade to a newer version. If you have a problem with the NetCam DVR
Viewer, you may modify manually, repair automatically, or remove and reinstall
again. However, it is recommended that you remove and reinstall the NetCam
DVR Viewer, if your software
does not work properly.
Modifying
Modify the existing NetCam
DVR Viewer manually by
selecting the file that you
want to modify.
■ Select ‘Modify’ mode.
12
NetCam DVR Section 2
DVR_NC_ii_98911_0047.qxd 12/13/00 1:53 PM Page 12

■ Select the files that you want
to modify. However, it is
recommended that you click
the ‘Next’ button to select all
directories. The whole
process will then be
automatically completed.
Repairing
Allows you to repair an already
installed NetCam DVR Viewer automatically using the setup program.
■ Select the ‘Repair’ mode and the whole process will be completed
automatically. However, there is a possibility that the repairing process may
not completed properly. In this case, it is to remove and reinstall NetCam
DVR Viewer.
Removing and re-installing
■ Select ‘Remove’ mode
■ The ‘Confirm File Deletion’ window is displayed. Press ‘Yes’ button.
■ During the deleting process, you are prompted to delete share files
MSFLXGRD.OCX, MSCOMCT2.OCX, COMCTL32.OCX. It is
recommended not to delete the files.
After completion, you should install the NetCam DVR Viewer again.
13
NetCam DVR Section 2
DVR_NC_ii_98911_0047.qxd 12/13/00 1:53 PM Page 13

2.3 Assigning IP address and Starting Configuration
To enable access to the NetCam DVR, first you have to assign an appropriate IP.
Terminology
■ IP Address: Acquire IP address from network administrator.
■ MAC Address: The 12digit number on the label at the bottom of NetCam
DVR.
■ Direct Cable: A common UTP cable to connect devices such as a PC or
NetCam DVR that has an Ethernet port (RJ-45 port).
■ Crossover Cable: A specially designed UTP cable to connect two devices
directly like connecting a PC and NetCam DVR through Ethernet port.
2.3.1 IP Address
Important
■ You must use a new assigned IP address, do not use the default or example
IP address.
■ It is highly recommended to assign an IP address before you connect the
NetCam DVR, otherwise conflicts may occur.
There are two methods to assign IP address to the NetCam DVR:
■ With setup program
■ With ARP command
Connecting with a Crossover Cable to assign an IP address
■ When you assign an IP address to the NetCam DVR, it is recommended to
connect the NetCam DVR and a PC with a crossover cable that is provided
with the NetCam DVR.
■ You may use a direct cable (UTP cable). In this case you should use a HUB
to connect the NetCam DVR and a PC to assign an IP address. Or you
should have a LAN cable to connect the NetCam DVR, and a PC that is
already connected with a LAN cable.
14
NetCam DVR Section 2
DVR_NC_ii_98911_0047.qxd 12/13/00 1:53 PM Page 14

2.3.2 Starting the setup program of NetCam DVR
Ensure that the NetCam DVR Viewer is installed.
■ Click the file ‘CamViewer.exe’.
The main frame of NetCam
DVR Viewer is displayed
■ Click the ‘setup’ button.
You can setup the NetCam DVR only
if it is connected on a local network.
2.3.3 Assigning the IP address and setting up the NetCam DVR
When the setup program is
selected, the window shows
every NetCam DVR
connected at the local
network.
From the NetCam DVRs list,
click the MAC address for the
one that you want to assign
an IP address and set up
When the NetCam DVR is
selected, an IP address is
displayed in the ‘Selected IP
Address’ box. (Default IP
address is 211. 53.133.92).
You should key in a password
in the ‘Admin’s Password’ box to set up the NetCam DVR or to change the IP
address. Default password is ‘admin’. You can change the IP address by clicking
the ‘Change IP Addr’ button or change the set up by clicking the ‘Start’ button.
15
NetCam DVR Section 2
DVR_NC_ii_98911_0047.qxd 12/13/00 1:53 PM Page 15

Assigning an IP address
■ Key in a new IP address in the ‘Change IP addr’ box.
■ When you key in a new IP address, the button is activated and you can click
the button.
Setting system information
■ Click the ‘Start’ button after keying in a password. The ‘Setup’ window in
which you can set up the NetCam DVR is displayed.
■ With ‘Initialize FlashInfo’, you can reset all the setting to the default values.
However, neither time nor network configurations are reset. Initialized
information is mainly for recording and management conditions.
■ You can define the name, location, and description of the NetCam DVR.
The model and serial number are fixed.
If the NetCam DVR has any problem, you can reboot without switching off the
power supply. Click the ‘Reboot Cam’ button.
Setting user account
You can change the administrator’s password. The default password is ‘admin’.
Change it with to a unique password for yourself.
Setting network information
You can set the IP address, Network Mask, Broadcast address, Gateway address,
and DNS addresses. When the addresses are not assigned correctly, you cannot
access the NetCam DVR remotely. If you do not assign an IP address to the
NetCam DVR, you cannot access the product regardless of the NetCam DVR’s
local network registration status.
16
NetCam DVR Section 2
DVR_NC_ii_98911_0047.qxd 12/13/00 1:53 PM Page 16

Setting IP security mode
You can restrict accessibility to the NetCam DVR with user’ IP address
registering. Only the users whose PC’s IP address is registered can access the
NetCam DVR.
You may stop a registered user accessing the NetCam DVR temporary with the
menu option on the right side of each IP address. You can change the IP
addresses to allow access.
If you inactivate the ‘Secure Mode’ (IP filtering) option, you can access the
NetCam DVR by installing the NetCam DVR Viewer into any PC.
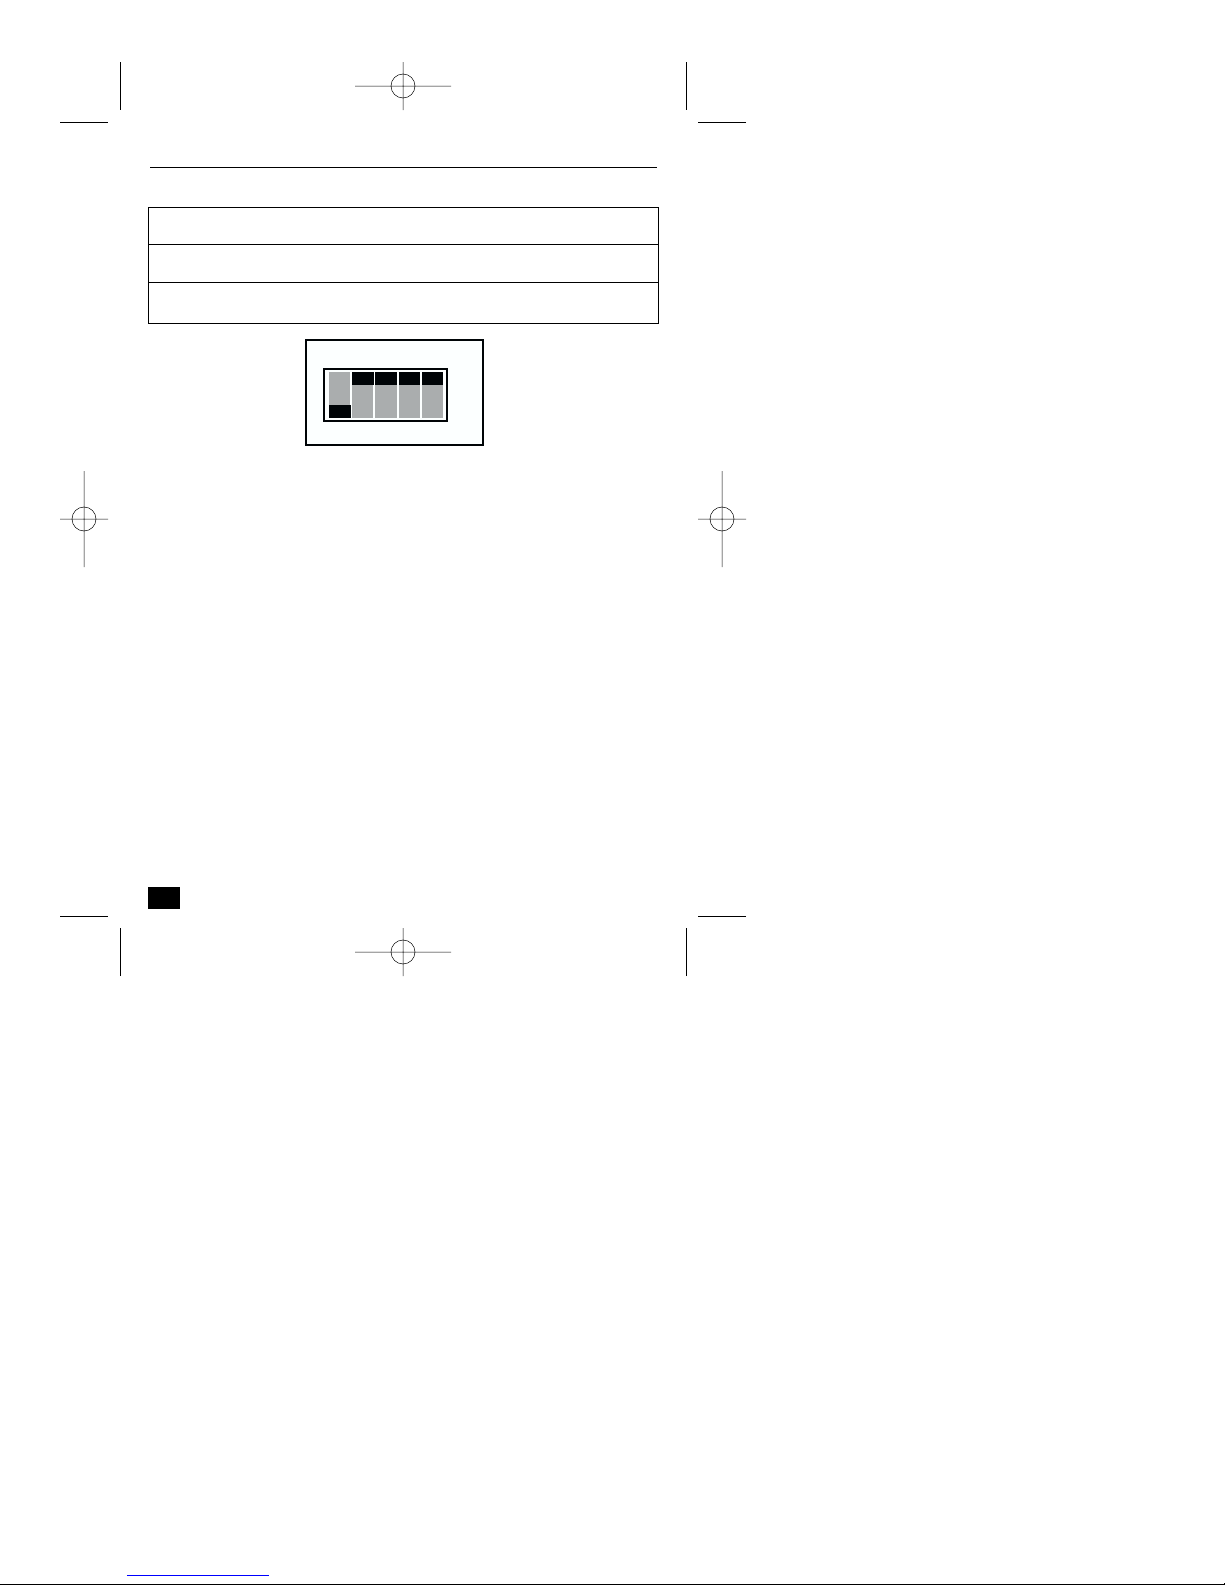
Setting information on channels and HDD
Channel U
se: You select the channels
to display live images and to record
them on the NetCam DVR’s selfcontained HDD. When you
connect an external CCD camera to
Ch1 port on the rear of the NetCam
DVR, you can select ‘External’ for
Channel 1. Otherwise, select
‘internal’. You can also select one or
more channels as a video source. For
external channels, it is very
important you should check only the
channels that are connected with
external cameras. Otherwise, all live
and recorded images may flicker.
Camera Config
: Define the CCD format of the NetCam DVR and CCD
cameras [‘NTSC’ or ‘PAL’]. You can rotate the image by 180°. If you rotate the
image that is sent from each camera, you can mount the NetCam DVR directly
on the ceiling [i.e. upside down].
17
NetCam DVR Section 2
DVR_NC_ii_98911_0047.qxd 12/13/00 1:53 PM Page 17

HDD Use: Click the ‘HDD Enable’ field to enable the NetCam DVR to record
images on it’s HDD. If not enabled, the NetCam DVR will not record nor
replay. (Default figure is set to HDD disable. In this case, every button on a
main frame that relates to recording and replaying is disabled.) You can format
the HDD with the ‘HDD Format’ button. When the HDD is formatted, all
recorded images will be deleted.
PTZ
The NetCam DVR can control
pan/tilt/zoom functions, if pan/tilt
driver and zoom lens are installed.
However, you need to install the
communication protocol onto the
NetCam DVR to control
pan/tilt/zoom.
The NetCam DVR has some protocols installed for specific models of
pan/tilt/zoom. The communication protocols vary for each manufacturer. It is
recommended to use a pan/tilt/zoom that has the protocol installed. If you want
to install a pan/tilt/zoom whose protocol is not registered, please contact Philips
for information.
2.3.4 Assigning IP Address with ARP command
If you do not assign an IP address with the setup program, you can set it using the
ARP command.
Using ARP in Windows 98 and NT
■ Start a DOS window and type the following commands.
■ Example
18
NetCam DVR Section 2
arp -s <NetCam DVR IP address> <NetCam DVR Ethernet address>
ping -t <NetCam DVR IP address>
arp -s 200.243.232.178 00-40-8c-10-00-86
ping -t 200.243.232.178
DVR_NC_ii_98911_0047.qxd 12/13/00 1:53 PM Page 18

Using ARP in Windows 95
■ Start a DOS window and type the following commands.
■ Example
Verifying installation
If the procedures are installed successfully, the following message or similar will
be displayed:
■ If you cannot receive the reply by the 'ping' command, try pressing 'F3' and
'Enter' keys again. Normally ‘Request timed out’ messages appear 7 times
before you receive a proper reply.
■ If you succeed in utilizing the above commands, you will receive a reply
continuously. You can stop the process by pressing <Ctrl>+<C> keys.
19
NetCam DVR Section 2
arp -s <NetCam DVR IP add.> <NetCam DVR Ethernet add.> <my PC IP
add.>
ping <NetCam DVR IP address>
arp -s 200.243.232.178 00-40-8c-10-00-86 200.243.232.130
ping 200.243.232.178
Request timed out
:
Request timed out
Reply from 200.243.232.178: bytes=32 time=2ms TTL=255
Reply from 200.243.232.178: bytes=32 time=2ms TTL=255
Ping statistics for 200.243.232.178:
Packets: Sent = 4, Received = 4, Lost = 0 (0% loss),
Approximate round trip times in milliseconds:
Minimum = 1ms, Maximum = 2ms, Average = 1ms
DVR_NC_ii_98911_0047.qxd 12/13/00 1:53 PM Page 19

■ When you stop receiving the reply using the <Ctrl>+<C> keys, data loss
may be from 0% to 99% statistically, meaning it is normal to get a reply.
This is the reply you would get normally. If the statistic shows ‘100% loss’,
you should check if the network line and connection status are stable; if the
assigned IP address is available, or if a PC (or notebook computer) has the
same local network’s IP address as the NetCam DVR. The same local IP
address of C grade network means that first 3 numbers are the same but the
fourth numbers are different. For example 203.243.232.111 and
203.243.232.112 are the same local network IP addresses. (If there is a
‘Network Mask’ on the network, it can be a different case.)
20
NetCam DVR Section 2
DVR_NC_ii_98911_0047.qxd 12/13/00 1:53 PM Page 20

3 Configuring NetCam DVR
After assigning an IP address to the NetCam DVR, you can configure the
NetCam DVR through the NetCam DVR Viewer.
3.1 Opening the ‘NetCam DVR Viewer’
■ Click the file ‘CamViewer.exe’, the monitoring screen is displayed.
3.2 Configuring NetCam DVR
Connect:
■ To connect the NetCam DVR, highlight the respective name and click the
‘Connect’ button.
Edit:
■ To add, remove, and edit the IP addresses of NetCam DVR, click the ‘Edit’
button. The “Resource Edit’ window is displayed.
21
NetCam DVR Section 3
DVR_NC_ii_98911_0047.qxd 12/13/00 1:53 PM Page 21

ADD: You can add a new NetCam DVR. You can also add a backup file as a
resource. All the backup files of the NetCam DVR can be only be accessed
through NetCam DVR Viewer.
■ Select ‘IP(Remote)’ button to add
a new NetCam DVR. Enter the
IP address and name.
■ Select‘File(Local)’ button to add a
backup file. Enter the file name
and path, then the designated
name.
REMO
VE & EDIT: You can
remove or edit an existing resource. Change the IP
address or the name of the NetCam DVR. You can
also remove the NetCam DVR.
Password:
After you connect, you may have to enter a
password if this option has been enabled. You can
change the password at the ‘Config’ menu.
22
NetCam DVR Section 3
DVR_NC_ii_98911_0047.qxd 12/13/00 1:53 PM Page 22

3.3 Configuring recording and system conditions
Update:
When connecting the NetCam DVR, you can update the recorded
data to monitor by clicking the ‘Update’ button.
Update changes from to
Option:
You can configure the recording options by clicking the ‘Option’
button.
M
otion Detect Channel:
You can select a channel
that detects motion.
When this option is
enabled the NetCam DVR can detect motion, but the source channel is
restricted to one. Therefore, you should select which channel is assigned to
detect motion and send signals to it’s CPU. You can set sensitivity of motion
detection via the ‘THR’ field. The range is from 1 to 999, where‘1’ is the
highest level, and ‘999’ is relatively the lowest.
N
ormal Save:
You can select the
standard recording levels
with frame rate, image
resolution and image
quality (compressing rate). The quality level of the live image may also be
adjusted.
23
NetCam DVR Section 3
DVR_NC_ii_98911_0047.qxd 12/13/00 1:53 PM Page 23

Event Save: You can
select the recording levels
of frame rate, image
resolution and image
quality (compressing
rate) when events occur.
E
vent: You can
configure which channel
sends video signals to
record on the HDD
when events occur. You
can activate the motion
detection function and two connected external sensors for any channel (see
‘Motion Detect Channel’ option for the respective channel that has the assigned
motion detection function). If you check channel 1 as a source channel in
relation to ‘Motion Detect’, the NetCam DVR records the video from channel 1
when the NetCam DVR detects motion through assigned motion detect
channel.
Config:
You can configure the NetCam DVR’s system settings for the
HDD; Time, Password, and Screen adjustment.
24
NetCam DVR Section 3
DVR_NC_ii_98911_0047.qxd 12/13/00 1:53 PM Page 24

HDD: Configures the self-contained
HDD:
- HDD Management: This shows
the status of the HDD. The left
side shows the same results in
graphic format. You can format
the HDD by clicking the ‘HDD
Format’ button, as well as via the
setup program.
Auto Delete: You can
automatically delete the data by
1,000, 2000, or 5000 frames
from the first frame when the HDD is full. You can also disable the
function.
Delete Files: You can delete
recorded images. There are
two methods of deleting.
■ You can select a
percentage of 20, 30, 50 and
80% of total data.
■ You can define the period
of data to delete by setting
date or number of frame.
- Time: You can set data and time into your
NetCam DVR.
25
NetCam DVR Section 3
DVR_NC_ii_98911_0047.qxd 12/13/00 1:53 PM Page 25

- Password: You can change the
password. Key in the old password,
then the new password twice. It is
very hard to repair the password if
you do not remember it. The only
way to repair, is to initialize with
special software developed by Philips.
However, this is not provided to end
users.
- Screen Adj.: You can adjust the screen
display for brightness, contrast, hue,
saturation, horizontal offset, and
vertical offset. Adjustments affect the
live image screen and the recorded
image screen. However, the recorded
screens are not affected directly. You
can see the change when you replay
the images that are recorded after the
initial live image adjustment.
Backup:
This allows you to backup the recorded images from the NetCam
DVR to your PC remotely via the network. There are two
methods for backing up, ‘Copy/Paste’ and ‘Cut/Paste’. If you click on
‘Cut/Paste’ button, you can only back up from the first frame that is recorded on
HDD.
There are two ways to define the data period for backup.
■ You can select a percentage of 20, 30, 50 and 100% of total data.
■ You can define the date/time period for data deletion.
26
NetCam DVR Section 3
DVR_NC_ii_98911_0047.qxd 12/13/00 1:53 PM Page 26

If you click the ‘CD (650M)’
option, the NetCam DVR will
back-up a file of 650MB. If
the selected data size is bigger
than 650MB, the NetCam
DVR will split the total data
into partitions of 650MB. You
can replay the data via the
NetCam DVR Viewer by
defining the data as local
source. However, the first file
of the split files will have the
index data for total backed-up
data files. It is necessary to
make a directory on your PC
and then copy all the files to
replay back-up data if the total size of the back-up data is bigger than a CD’s
capacity,
Save:
Allows you to save an image from a selected screen. The ‘Save’
option is for recorded images from channels 1,2,3 or 4. The
‘Save’ button is not activated when you choose multi screen mode.
Print:
Allows you to print an image from a selected screen. You can add
respective information about the selected images. When you
click the ‘Print’ button, a window ‘Memo’
appears. The ‘Print’ button is for recorded
images from channels 1,2,3 or 4. The ‘Print’
button is not activated when you choose multi
screen mode.
27
NetCam DVR Section 3
DVR_NC_ii_98911_0047.qxd 12/13/00 1:53 PM Page 27

About:
Allows you to view the information about the Viewer such as the
current NetCam DVR Viewer version, and contact point of
Philips to inquire about information.
Exit:
Exit from the Viewer. However, you have to disconnect first.
3.4 Real-time image monitoring
Channel selection and controlling
Channels that are receiving video signals are shown in
black, the others in gray. When you access the
NetCam DVR for the first time, all 4 channels are
viewed in gray. Therefore, you should setup the NetCam DVR before
connection.
When you enable any channel, it appears in black. You can then view live
images. Toggle the respective button to switch the image on/off.
Setting real-time image options
■ Click the right button of your mouse on a live image
screen.
You can adjust the live image resolution and frame
transmission speed. You can also change the screen’s form to
show a pan/tilt/zoom control box. (If you did not activate the pan/tilt/zoom
control function at setup stage, you cannot view the PTZ control panel.) The
image resolution can be toggled from ‘CIF’ to ‘QCIF’ by double clicking on the
live screen.
You can overcome the insufficient network
bandwidth by focusing on a selected area with
the ‘Quality Box option’.
■ Click the ‘New’ button to set a new focus
area. First, place and click your mouse
where you want to start and then click
again where to stop.
28
NetCam DVR Section 3
DVR_NC_ii_98911_0047.qxd 12/13/00 1:53 PM Page 28

■ Click the ‘Enable’ button to focus on an existing defined area.
■ Click the ‘Disable’ to return to full view option.
■ Click the ‘Attenuation’ button to change the unfocused area’s image quality.
Controlling pan/tilt/zoom
(Only available when the pan/tilt/zoom
option is enabled for the NetCam DVR.)
■ Zoom: To zoom in and out.
■ Accel: To set controlling speed of
pan/tilt/zoom.
■ Focus: To optimize the image focus.
■ Four arrows: To change direction by
panning and tilting the NetCam
DVR.
3.5 Recorded image replay
Selecting period of time or frame number to replay
Upper part: This part shows the current 1,000 frames being replayed.
Lower part: This part shows the total selected recorded data.
29
NetCam DVR Section 3
Upper 1 2 3
Lower 1 2 3
DVR_NC_ii_98911_0047.qxd 12/13/00 1:53 PM Page 29

Lower 1: Displays the NetCam DVR recording start date/time.
Lower 2: Displays the number of image frames recorded.
Lower 3: Displays the NetCam DVR recording finish date/time.
■ Click on the forward/backward buttons to extend the replay period forward
or backward by 1,000 frames for each click. The frame number panel
(Upper 2) also changes by a unit of 1,000 frames.
Upper 1: Displays the NetCam DVR recording start date/time of the current
1,000 frames.
Upper 2: Displays the exact frame number of the current image.
Lower 3: Displays the NetCam DVR recording finish date/time of the current
1,000 frames.
■ Click on the forward/backward buttons to skip the replay period forward or
backward by 100 frames for each click. The frame number panel (Upper 2)
also changes by a unit of 100 frames.
Search:
You can select a date and
time or frame number to
start replaying.
Selecting images of events:
All
: Select all images that are selected for
replay.
MD: Select the images that are recorded
when the NetCam DVR detected motion function operates.
S1 & S2
: Select the images that are recorded when the respective sensor detector
activates. You can install 2 external sensors such as a thermal sensor and
infrared sensor, and connect it to the NetCam DVR DB-15 port.
30
NetCam DVR Section 3
DVR_NC_ii_98911_0047.qxd 12/13/00 1:53 PM Page 30

Quad or full view options:
Q
uad: You can view a quad screen, each
screen corresponding to each channel.
F
ull: Yon can view a selected channel full
screen by clicking ‘1’, ‘2’, ‘3’, or ‘4’. When you want to see images of 720
by 486 resolution, you double click on the replay screen. Return to normal
resolution of 360 by 243 by double clicking on the image again.
Replay buttons:
Recorded Image Information Panel:
This panel shows the information of the current image being replayed.
31
NetCam DVR Section 3
Backward Stop Forward
Frame by frame
Backward Forward
Channel number Image size Date/time
Image quality
DVR_NC_ii_98911_0047.qxd 12/13/00 1:53 PM Page 31

Recorded Image Information Panel:
E
vent indicating: When you replay recorded images with selecting eventdetecting sources (‘MD’, ‘S1’, and ‘S2’), this panel shows the events that
occurred in a graphic form. You can search the exact time to search by dragging
the scroll bar.
32
NetCam DVR Section 3
Event (Motion Detection, Sensor)
DVR_NC_ii_98911_0047.qxd 12/13/00 1:53 PM Page 32

4 ADJUSTING FOCUS
1 First, adjust focus of the NetCam DVR by turning the front focus ring of
the lens.
2 If you cannot focus with the lens, loosen the three screws in the rear focus
ring.
3 Setting the lens at the middle range, focus by turning the rear focus ring.
4 When you have focused, tighten the three screws.
5 Complete the focus by turning the front focus ring of the lens.
33
NetCam DVR Section 4
Screws
DVR_NC_ii_98911_0047.qxd 12/13/00 1:53 PM Page 33

34
NetCam DVR Section 4
DVR_NC_ii_98911_0047.qxd 12/13/00 1:53 PM Page 34

3922 988 98911 00-47 2000 Philips Electronics N.V.
Data subject to change without notice
DVR_NC_ii_98911_0047.qxd 12/13/00 1:53 PM Page 35
 Loading...