

Philips MX990DHT User Manual

Addendum (English) FR965, FR975, MX960D, MX980D /17
Remote Contr
ol / Remote Control Buttons Page 8
The following should be read instead of the original text on page 8:
H MUTE .....................Mutes the sound of the receiver in all modes, except TV.
Mutes the sound of your Philips TV set if your remote control is in TV mode.
2 ................................Switches the source selected on your remote control (e.g. VCR, TV) to standby.
When pressed longer than 2 seconds, the receiver switches to standby.
Connections / Analog Audio Connections Page 11
Please read the following text as additional to the text on page 11:
DTS Digital Surround
TM
is a discrete 5.1-channel digital audio format available on CD, LD, and DVD software which consequently cannot
be decoded and played back inside most CD, LD, or DVD players. For this reason, when DTS-encoded software is played back through the
analog outputs of the CD, LD, or DVD player, excessive noise will be exhibited. To avoid possible damage to the audio system, proper precautions should be taken by the customer if the analog outputs are connected directly to the receiver.
Only for FR975 and MX980D: To enjoy DTS Digital Surround
TM
playback, a DTS-compatible player has to be connected to one of the digital
inputs of the receiver.
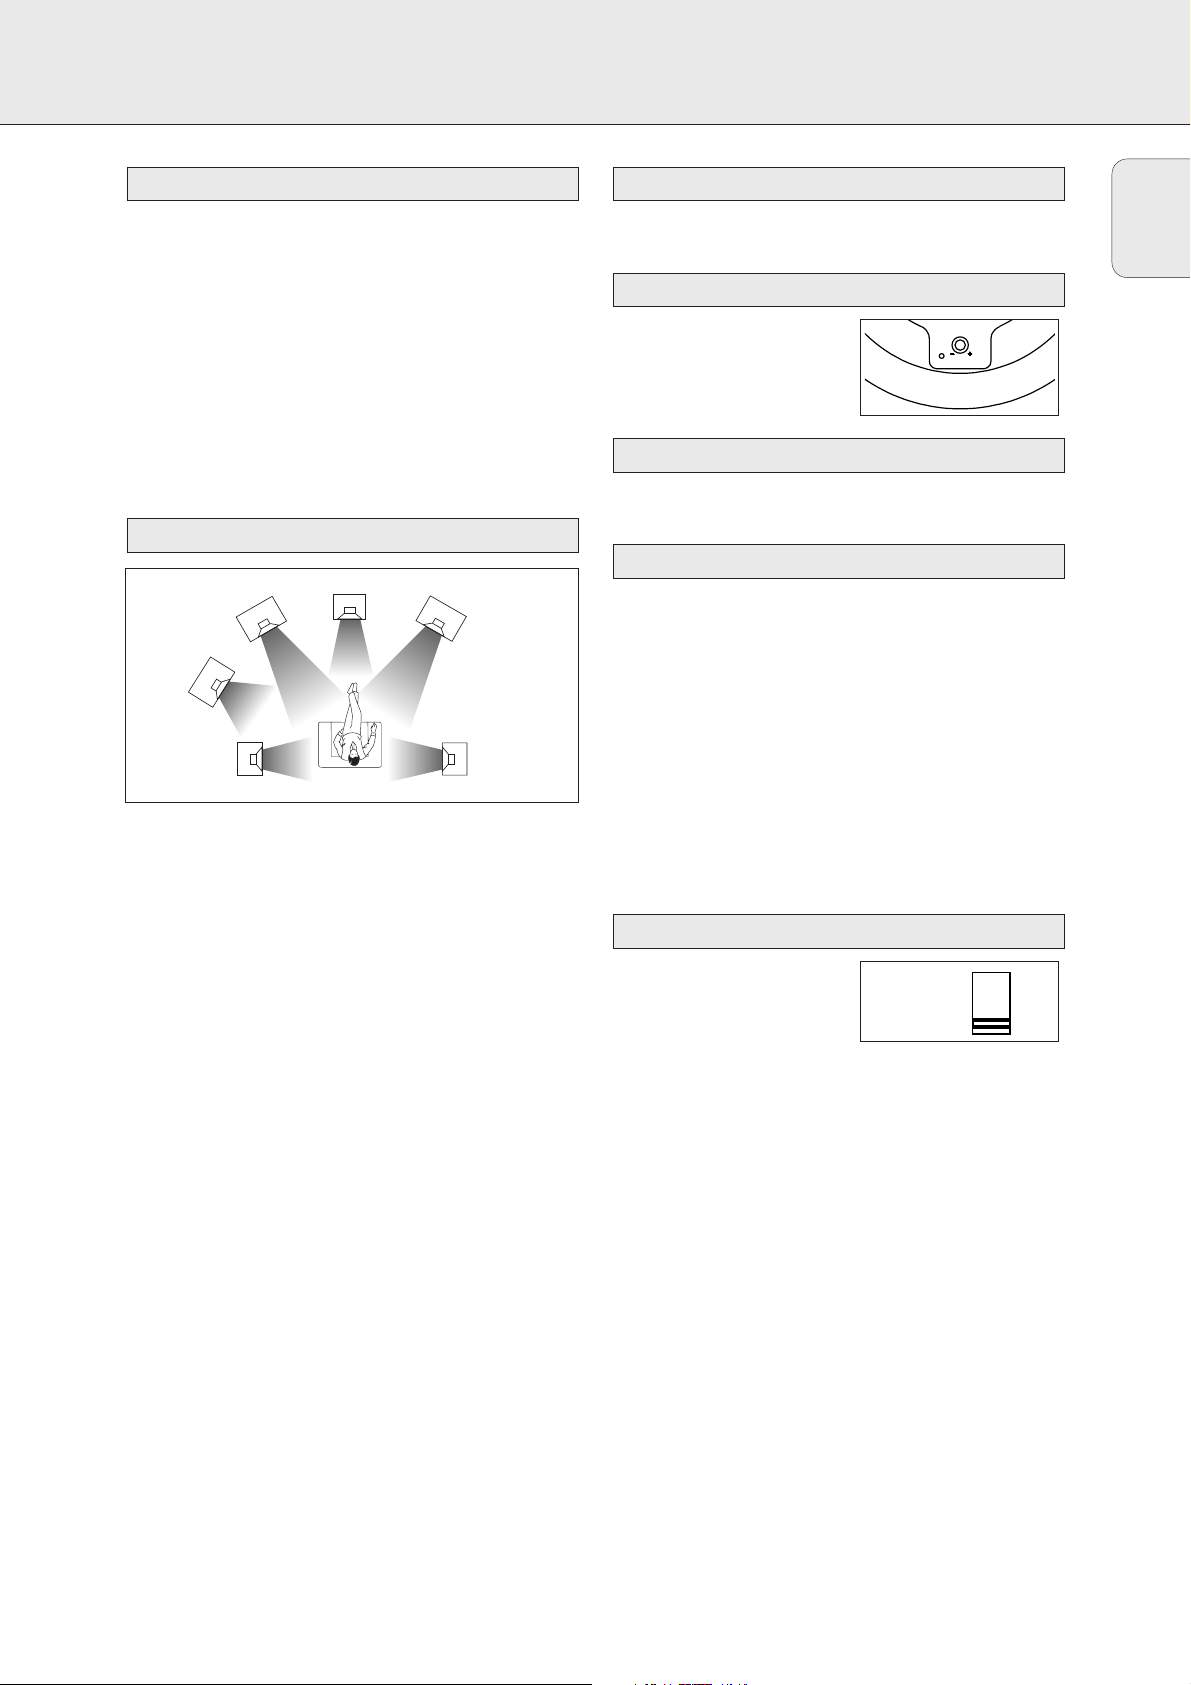
System Setup Page 14
Please read the following new chapter after the "Positioning the Speakers” chapter in this section:
Receiver Adjustment
Once the number and position of loudspeakers has been fixed, you can adjust the initial receiver settings for optimal surround sound with
the actual setup:
1 Set what speakers have been connected to the receiver (see “Menus / Speaker Setup” on page 17).
Note: The initial setting of your receiver is:
two front speakers left and right: present (cannot be altered)
center speaker: present
two rear speakers: present
subwoofer: present
2 Select the size of the speakers (SMALL or LARGE) (see “Menus: Speaker Sizes” on page 17).
Select SMALL if your speaker is able to reproduce low notes down to at least 80–100 Hz.
Select LARGE if your speaker is able to reproduce low notes down to at least 50 Hz.
(As a rule of thumb, a LARGE speaker has a cone diameter of at least 12 cms (5 inches).)
See the specification sheets of your loudspeakers.
Note: The initial setting of your receiver is:
FR965 and MX960D: Front speakers, left and right: LARGE
Center speaker: SMALL
Rear speakers left and right: LARGE
FR975 and MX980D: All speakers: LARGE
3 Set the distance from the speakers to the listener’s position (see “Menus: Speaker Distance” on page 17).
Note: The initial setting of your receiver is:
FR965 and MX960D: Front speakers, left and right: 13 feet (4 meters)
Center speaker: 10 feet (3 meters)
Rear speakers, left and right: 7 feet (2 meters)
FR975 and MX980D: All speakers: 10 feet (3 meters)
General note: If you prefer that your receiver does not correct automatically for speaker sizes and distances, you can re-progam it to a
neutral setting by:
Install all speakers: (Subwoofer present, Center and Rear loudspeakers: all YES)
Set Front, Center and Rear speaker sizes to LARGE
Set all loudspeaker distances (L/R, Center and Rear) to the same distance (e.g. 10ft).
Subwoofer / Adjustment Page 15
Please read the following as text addition to Point 3:
Turn SUBWOOFER LEVEL CONTROL to adjust the volume of the subwoofer. The recommended adjustment is the middle position.
Technical Data / Receiver / Amplifier part / FR 975, MX 980D Page 25
Please note correct value below, which supersedes original value:
Output power, stereo mode: FTC (40Hz–20kHz) .....2 x 80 W
FR 968, MX 990D ADDENDUM –
GENERAL INFORMATION / SUBWOOFER (MX 990D only)
English
Your receiver FR 968 basically has the same functions as the
FR 965 described in the supplied instruction manual.
However, please note the following differences:
– The FR 968 has S-Video connections like the FR 975 (see
instruction manual ”CONNECTORS”).
– The FR 968 has the power of the FR 975.
– The FR 968 has a different remote control than described in
the instruction manual. Please read the supplied addendum
sheet.
– The MX 990D package contains a different subwoofer than
described in the instruction manual. Please read the
following instructions for the subwoofer.
• Install the subwoofer wherever you like because with the
bass sound range reproduced from the subwoofer (below
150Hz) human hearing cannot detect the direction and
position where the sound is being produced.
• Also, since the feeling of stereo is lost with bass
frequencies, a single subwoofer is enough for reproducing
the bass of stereo channels.
• To obtain a better bass reproduction, we recommend that
you place the subwoofer on a solid floor where resonance
is unlikely to occur.
• Always place the subwoofer vertically, keeping a few
centimeters away from the wall.
• Do not place any object on the subwoofer or sit on it.
• If the subwoofer is placed in the center of a room, the bass
could be extremely weakened. This is due to the influence
of the standing wave of the room. If this happens, move
the subwoofer away from the center of the room or
eliminate the cause of the standing wave by installing a
bookshelf on the wall, etc.
Important!
Before you operate the subwoofer, complete the preparation
procedures. Switch on your receiver and select the sound
source.
After all other connections have been made, connect the
AC power cord to the receiver and to the wall outlet.
• Rotate SUBWOOFER VOLUME
clockwise until there is a click.
y The LED indicator lights up
in green.
• Rotate SUBWOOFER VOLUME clockwise until there is a click.
y The LED indicator light turns red.
You can adjust the subwoofer to suit the sound level of your
front speakers. Reinforcing the bass sound gives you a
greater sense of atmosphere.
1 Adjust the VOLUME on the receiver until the sound from
the front speakers is not distorted. If it is distorted, the
sound from the subwoofer will also be distorted.
2 Play your favourite songs. Male vocal tunes containing
bass sounds are most suitable for adjustment.
3 Adjust the SUBWOOFER VOLUME to determine the
loudness of the bass sound from the subwoofer.
• Use PHASE SELECTOR located
at the rear of the subwoofer to
select the phase polarity.
Selecting the polarity at either 0° or 180° may determine
better bass reproduction effect in certain listening
environments (depending on the type of front speakers and the
position of the subwoofer). It may also change the expense
and tightness of sound, and affect the feeling of sound field.
• Select the setting that provides the sound you prefer when
listening in your usual listening position. Repeat the
adjustment for volume and phase polarity to suit your
preference.
Once you have adjusted the subwoofer to the settings you
desire, use the VOLUME control on the receiver to adjust the
volume of the subwoofer and the other speakers. You do not
need to adjust the subwoofer settings again even when you
change the volume level of the receiver.
Phase selector
Volume adjustment
Switching the subwoofer to standby mode
Switching the subwoofer on
AC power supply
Subwoofer setup (MX 990D package only)
Receiver FR 968 – MX 990D package
CENTER
FRONT
LEFT
SUBWOOFER
SURROUND
(REAR)
LEFT
FRONT
RIGHT
RIGHT
SURROUND
(REAR)
VOLUME
STANDBY
PHASE
SELECTOR
0
0
180
0

FR 968, MX 990D ADDENDUM –
TECHNICAL DATA
EL6476T001 / VieUrs0038
Subject to modification without notice.
General
Power consumption .........................................................280 W
Standby power consumption............................................< 2 W
Dimensions, w × h × d ............................435 × 135 × 350 mm
17.12 × 5.31 × 13.78 inches
Weight.......................................................9.4 kg, 20.68 pounds
Amplifier part (0.7% THD, 6 Ω)
Output power, stereo mode: FTC (40 Hz–20 kHz).......2 × 80 W
Output power, surround mode (1 kHz)
Front ....................................................................2 × 100 W
Center ........................................................................100 W
Surround..............................................................2 × 100 W
Bass ..................................................................±9 dB at 100 Hz
Treble ................................................................±9 dB at 10 kHz
Loudness....+6 dB at 100 Hz (-30 dB); +3 dB at 10 kHz (-30 dB)
Total harmonic distortion..........................0.05% at 1 kHz, 5 W
Frequency response ..................................20–20,000 Hz, ±1 dB
S/N ratio ........................................................................≥ 82 dB
Stereo separation (1 kHz) ..............................................≥ 45 dB
Crosstalk (1 kHz) ...........................................................≤ -65 dB
Inputs
Linear inputs.......................................................250 mV/47 kΩ
6 CH......................................................................250mV/40 kΩ
Phono ......................................................................5 mV/47 kΩ
Digital coaxial ..............................................75 Ω acc. IEC 958
Digital optical...................................................................toslink
Outputs
Power supply AC outlets (switched) ...........totally max. 120 W
Linear outputs.......................................................250 mV/1 kΩ
Digital coaxial ..............................................75 Ω acc. IEC 958
Digital output sampling frequencies
Analog in .............................................................out 48 kHz
Digital in 32 kHz..................................................out 32 kHz
Digital in 44.1 kHz............................................out 44.1 kHz
Digital in 48 kHz..................................................out 48 kHz
Subwoofer pre-out....................................................0.8 V/1 kΩ
Center pre-out...........................................................0.8 V/1 kΩ
Headphones....................................8–600 Ω (3 V e.m.f., 60 Ω)
Speakers ...........................................................................≥ 6 Ω
Tuner part
Wave range
FM..............................................................87.5–108.0 MHz
AM................................................................530–1,700 kHz
Sensitivity
Stereo FM ..................................................................41 dBf
Mono FM....................................................................17 dBf
Total harmonic distortion
Stereo FM ....................................................................0.8%
Mono FM......................................................................0.9%
Frequency response ...................................63–12,500 Hz ±1 dB
S/N ratio
Stereo FM....................................................................55 dB
Mono FM.....................................................................60 dB
Channel separation.............................................27 dB at 1 kHz
Subject to modification without notice.
Front speakers
System................................................................2-way shielded
Impedance............................................................................6 Ω
Speaker drivers.........................................3" fullrange, 1" piezo
Dimensions, w × h × d ................................94 × 155 × 88 mm
3.8 × 6.2 × 3.5 inches
Weight ...............................................................0.45 kg, 0.98 lb
Center speaker
System................................................................2-way shielded
Impedance............................................................................6 Ω
Speaker drivers ..................................2 × 3" fullrange, 1" piezo
Dimensions, w × h × d ................................250 × 94 × 88 mm
10 × 3.8 × 3.5 inches
Weight ...............................................................0.92 kg, 2.03 lb
Surround speakers
System.................................................................2-way satelite
Impedance............................................................................6 Ω
Speaker drivers.........................................3" fullrange, 1" piezo
Dimensions, w × h × d ................................94 × 155 × 88 mm
3.8 × 6.2 × 3.5 inches
Weight ...............................................................0.45 kg, 0.98 lb
Active subwoofer (not magnetically shielded design)
Subwoofer ............................................................................6.5"
Standby power consumption.............................................< 6W
Output power ...................................................50 W (4 Ω, DIN)
THD .......................................................................10% at 55 Hz
Reproduction frequency response .......................45 Hz–150 Hz
Phase switch.................................................................0°, 180°
Input sensitivity (subwoofer in)................................460 mVrms
AC power ................................................................120 V/60 Hz
Power consumption.............................70 W (at
1
⁄8 rated power)
Dimensions, w × h × d ............................200 × 310 × 370 mm
7.87 × 12.20 × 14.57 inches
Weight..........................................................15.40 pounds, 7 kg
Speakers (supplied with MX 990D only)
Receiver
English
3103 306 1763.1 Printed in Hong Kong
Know these
ssaaffeettyy symbols
t
This “bolt of lightning” indicates
uninsulated material within your unit
may cause an electrical shock. For
the safety of everyone in your household,
please do not remove product covering.
s
The “exclamation point” calls attention
to features for which you should read
the enclosed literature closely to
prevent operating and maintenance problems.
WARNING: TO PREVENT FIRE OR
SHOCK HAZARD, DO NOT EXPOSE THIS
EQUIPMENT TO RAIN OR MOISTURE.
CAUTION: To prevent electric shock,
match wide blade of plug to wide slot, and
fully insert.
For Customer Use
Enter below the Serial No. which is located
on the rear of the cabinet. Retain this
information for future reference.
Model No. ___________________________
Serial No. ____________________________
• Once your Philips purchase is registered, you’re eligible to
receive all the privileges of owning a Philips product.
• So complete and return the Warranty Registration Card
enclosed with your purchase at once.And take advantage
of these important benefits.
Return your Warranty Registration card today to
ensure you receive all the benefits you’re entitled to.
Warranty
Verification
Registering your product within 10 days
confirms your right to maximum
protection under the terms and
conditions of your Philips warranty.
Owner
Confirmation
Your completed Warranty Registration
Card serves as verification of ownership
in the event of product theft or loss.
Model
Registration
Returning your Warranty Registration
Card right away guarantees you’ll
receive all the information and special
offers which you qualify for as the
owner of your model.
Congratulations on your purchase,
and welcome to the “family!”
Dear Philips product owner:
Thank you for your confidence in Philips.You’ve selected one of the best-built,
best-backed products available today.And we’ll do everything in our power to
keep you happy with your purchase for many years to come.
As a member of the Philips “family,” you’re entitled to protection by one of the
most comprehensive warranties and outstanding service networks in the industry.
What’s more, your purchase guarantees you’ll receive all the information and
special offers for which you qualify, plus easy access to accessories from our
convenient home shopping network.
And most importantly you can count on our uncompromising commitment to
your total satisfaction.
All of this is our way of saying welcome–and thanks for investing in a Philips product.
Sincerely,
Robert Minkhorst
President and Chief Executive Officer
P.S. Remember, to get the most from your Philips product, you must
return your Warranty Registration Card within 10 days. So please
mail it to us right now!
Visit our World Wide Web Site at http://www.philipsusa.com
MAC5097
T
I
A
R
T
S
I
G
E
R
•
S
Y
Hurry!
A
D
0
1
I
N
O
N
N
E
E
D
E
D
W
I
T
H
CAUTION
RISK OF ELECTRIC SHOCK
DO NOT OPEN
CAUTION: TO REDUCE THE RISK OF ELECTRIC SHOCK, DO NOT
REMOVE COVER (OR BACK). NO USER-SERVICEABLE PARTS
INSIDE. REFER SERVICING TO QUALIFIED SERVICE PERSONNEL.

3
English ....................................................2
Français.................................................28
Español .................................................53
EnglishFrançaisEspañol
English: This digital apparatus does not exceed the Class B
limits for radio noise emissions from digital apparatus as set
out in the Radio Interference Regulations of the Canadian
Department of Communications.
Français : Cet appareil numérique n'émet pas de bruits
radioélectriques dépassant les limites applicables aux
appareils numériques de Classe B prescrites dans le
Règlement sur le Brouillage Radioélectrique édicté par le
Ministère des Communications du Canada.
Canada
IMPORTANT SAFETY INSTRUCTIONS – Read before operating equipment
4
English
This product was designed and manufactured to meet strict
quality and safety standards. There are, however, some
installation and operation precautions which you should be
particularly aware of.
1. Read these instructions – All the safety and operating
instructions should be read before the appliance is
operated.
2. Keep these instructions – The safety and operating
instructions should be retained for future reference.
3. Heed all warnings – All warnings on the appliance
and in the operating instructions should be adhered to.
4. Follow all instructions – All operating and use
instructions should be followed.
5. Do not use this apparatus near water – for example,
near a bathtub, washbowl, kitchen sink, laundry tub, in a
wet basement or near a swimming pool, etc.
6. Clean only with a damp cloth. The appliance should
be cleaned only as recommended by the manufacturer.
7. Install in accordance with the manufacturers
instructions. Do not block any of the ventilation
openings. For example, the appliance should not be
situated on a bed, sofa, rug, or similar surface or placed
in a built-in installation, such as a bookcase or cabinet
that may impede the flow of air through the ventilation
openings.
8. Do not install near any heat sources such as
radiators, heat registers, stoves, or other apparatus
(including amplifiers) that produce heat.
9. Do not defeat the safety
purpose of the polarized or
grounding-type plug. A polarized
plug has two blades with one
wider than the other. A grounding type plug has two
blades and a third grounding prong. The wide blade or
the third prong are provided for your safety. When the
provided plug does not fit into your outlet, consult an
electrician for replacement of the obsolete outlet.
10. Protect the power cord from being walked on or
pinched particulary at plugs, convenience receptacles,
and the point where they exit from the apparatus.
11. Only use attachments/accessories specified by the
manufacturer.
12. Use only with a cart, stand, tripod, bracket,
or table specified by the manufacturer, or sold
with the apparatus. When a cart is used, use
caution when moving the cart/apparatus
combination to avoid injury from tip-over.
13. Unplug this apparatus during lightning storms or
when unused for long periods of time.
14. Refer all servicing to qualified service personnel.
Servicing is required when the apparatus has been
damaged in any way, such as power-supply cord or plug
is damaged, liquid has been spilled or objects have
fallen into the apparatus, the apparatus has been
exposed to rain or moisture, does not operate normally,
or has been dropped.
EL 4562-E004: 99/3
AC Polarized
Plug

5
English
GENERAL INFORMATION
This receiver is supplied including:
– an universal remote control
– 2 batteries for the remote control, size AA
– a coaxial cable for audio connection with a DVD player
– a system bus cable for the CINEMA LINK connection
– a loop antenna
– a wire antenna
– 5 loudspeakers including 5 speaker cables (MX 960D,
MX 980D only)
– a subwoofer including a connection cable and a power cable
(only with MX 960D, MX 980D)
– a quick installation card (MX 960D, MX 980D only)
– this instruction booklet
If you have stacked the components of your system, the
receiver must be on top. Place the receiver on a flat,
hard, stabile surface. Do not cover any vents and leave
50 cm (20 inches) above and 10 cm (4 inches) to the left
and right of the receiver clear for ventilation.
For good reception the loop antenna should not be placed on
top of or beneath VCRs, CD recorders, DVD players, TVs and
other radiation sources.
All redundant packing material has been omitted. We have
tried to make the packaging easy to separate into three mono
materials: cardboard (box), polystyrene foam (buffer) and
polyethylene (bags, protective foam sheet).
Your set consists of materials which can be recycled if
disassembled by a specialized company. Please observe the
local regulations regarding the disposal of packing materials,
dead batteries and old equipment.
Manufactured under license from Dolby Laboratories. “DOLBY”,
“DOLBY DIGITAL”, “PRO LOGIC” and the double-D symbol 2
are trademarks of Dolby Laboratories. Confidential unpublished
works. © 1992–1997 Dolby Laboratories. All rights reserved.
“DTS” and “DTS Digital Surround” are trademarks of Digital
Theater Systems, Inc. Copyright 1996 Theater Systems, Inc.
All Rights Reserved.
Trademark acknowledgement
Environmental information
Setup
Scope of supply
Safety instructions
Safety instructions......................................................................2 & 4
General information
Scope of supply..................................................................................5
Setup ..................................................................................................5
Environmental information.................................................................5
Trademark acknowledgement............................................................5
Controls .................................................................................................6
Remote control
Remote control use............................................................................7
Remote control buttons .....................................................................8
Programming the universal remote control.......................................9
Connectors..........................................................................................10
Connections
Analog audio connections ...............................................................11
Digital audio connections ................................................................11
System control bus, CINEMA LINK .................................................12
Video connections............................................................................12
Power ...............................................................................................13
Speaker connections........................................................................13
TV as the center speaker.................................................................13
Antenna connections .......................................................................13
FRONT AV /GAME cap (FR 975, MX 980D only).............................13
System setup
Positioning the speakers..................................................................14
Speaker setup and testing...............................................................14
Power handling ................................................................................14
Headphones .....................................................................................14
Maintenance ....................................................................................14
Subwoofer (MX 960D, MX 980D only)
Controls ............................................................................................15
Connectors .......................................................................................15
Connections......................................................................................15
Adjustment.......................................................................................15
Operation..........................................................................................15
Display.................................................................................................16
Menus
Receiver menu ...........................................................................17–18
TV menu ...........................................................................................18
Source selection
SOURCE SELECTOR..........................................................................19
6 CHANNEL / DVD INPUT selection................................................19
Reassigning a source selection.......................................................19
Using one source selection for two or more appliances ................19
About 6 CHANNEL / DVD INPUT.....................................................19
Playback, recording
Playing a source...............................................................................20
Adjusting the sound.........................................................................20
Recording from a source..................................................................20
Recording from the digital output ...................................................20
Surround sound
About surround sound......................................................................21
Switching surround sound ...............................................................21
Surround sound settings..................................................................22
Tuner
Tuning to radio stations...................................................................23
Switching FM sensitivity .................................................................23
Storing radio stations ......................................................................23
Tuning to stored radio stations........................................................24
Resorting stored radio stations .......................................................24
Naming radio stations .....................................................................24
Clearing station names....................................................................24
Technical data
Receiver............................................................................................25
Speakers (supplied with MX 960D, MX 980D only)........................25
Troubleshooting
Warning............................................................................................26
Troubleshooting................................................................................26
Limited warranty
Limited warranty..............................................................................27
As an ENERGY STAR®partner, Philips has determined that
this product meets the ENERGY STAR
®
guidelines for energy efficiency.
6
English
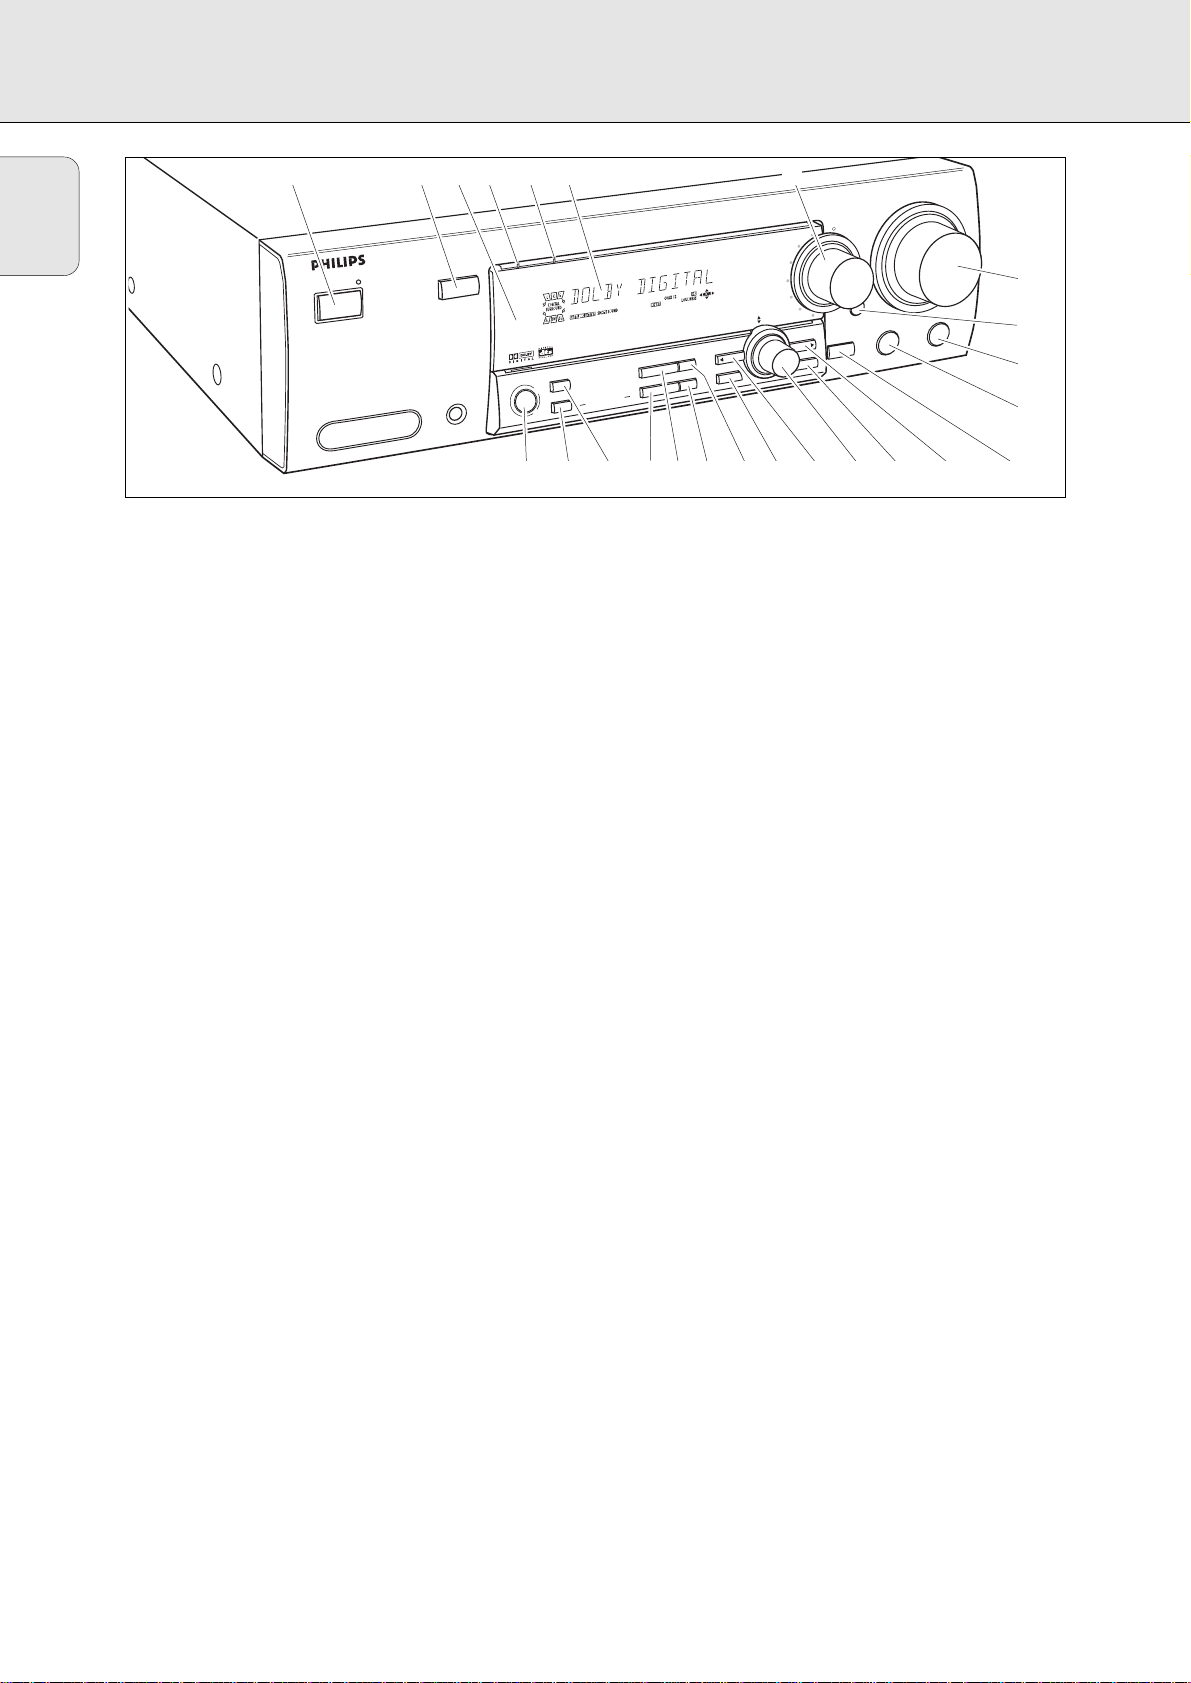
CONTROLS
1 POWER / STANDBY.......Switches the receiver on and off.
2 CINEMA LINK ................Switches on and off the system
control bus between the receiver
and the TV.
3 ..........................................Sensor for the infrared remote
control.
4 3D SURROUND ..............Control light for virtual
3D surround (FR 965, MX 960D
only).
VIRTUAL..........................Control light for virtual surround
(FR 975, MX 980D only).
5 HALL ................................Control light for HALL.
6 ..........................................Display
7 SOURCE SELECTOR ......Selects the different audio and
video connectors.
8 VOLUME..........................Increases and decreases the
volume level.
9 FRONT AV.......................Selects the FRONT AV / GAME
input (FR 975, MX 980D only).
0 TREBLE............................Adjusts the treble when used in
combination with VOLUME.
! BASS ...............................Adjusts the bass when used in
combination with VOLUME.
@ LOUDNESS .....................Switches LOUDNESS on and off.
# NEXT 2 ...........................TUNER: searches radio stations.
MENU: switches to the next
menu level.
$ ENTER / OK.....................Confirms selected menu values.
% TUNER PRESET X MENU NAVIGATOR
TUNER: switches to the next and
previous stored radio station.
MENU: moves upwards and
downwards.
^ 1 PREV. / EXIT TUNER: searches radio stations.
MENU: switches to the previous
menu level.
& SETUP MENU ................Switches the menu on and off.
* SENS. ..............................Switches between low and high
tuner sensitivity.
( DISPLAY..........................Switches the brightness of the
display.
) TUNER BAND ................Switches the wavebands of the
tuner.
¡ NAME/FREQUENCY ......Switches between name and
frequency display.
™ SURR. MODE..................Switches through the different
speaker configurations.
£ 3D SURROUND ..............Switches virtual 3D surround on
and off (FR 965, MX 960D only).
VIRT. MODE....................Scrolls through the different
virtual surround sound modes
(FR 975, MX 980D only).
≤ SURROUND ON/OFF .....Switches between the last
selected surround mode and
stereo.
1 234 56 7
HALL
POWER / ST
ANDBY
FRO
NT AV / GAME
CINEMA LINK
PHONES
VIRTUAL
SURROUND
SURR. MODE
VIRT. MODE
ON/OFF
VOLUME
TREBLE
DIGITAL CINEMA SOUND CENTER
TUNER BAND
NAME/FREQUENCY
PROCESSING
DIGITAL SOUND
TETRACORE
DISPLAY
SOURCE SELECTOR
DVD
PHONO
TUNER
CD
CDR /
TAPE
TV
VCR
T
SA
MENU
NER
VIGATOR
TU
NA
PRESET
PREV. / EXIT
SENS.
SETUP MENU
NEXT
TER / OK
AV
BASS
DNESS
LOU
^
8
9
0
!
@#$%&*()¡™£≤
English
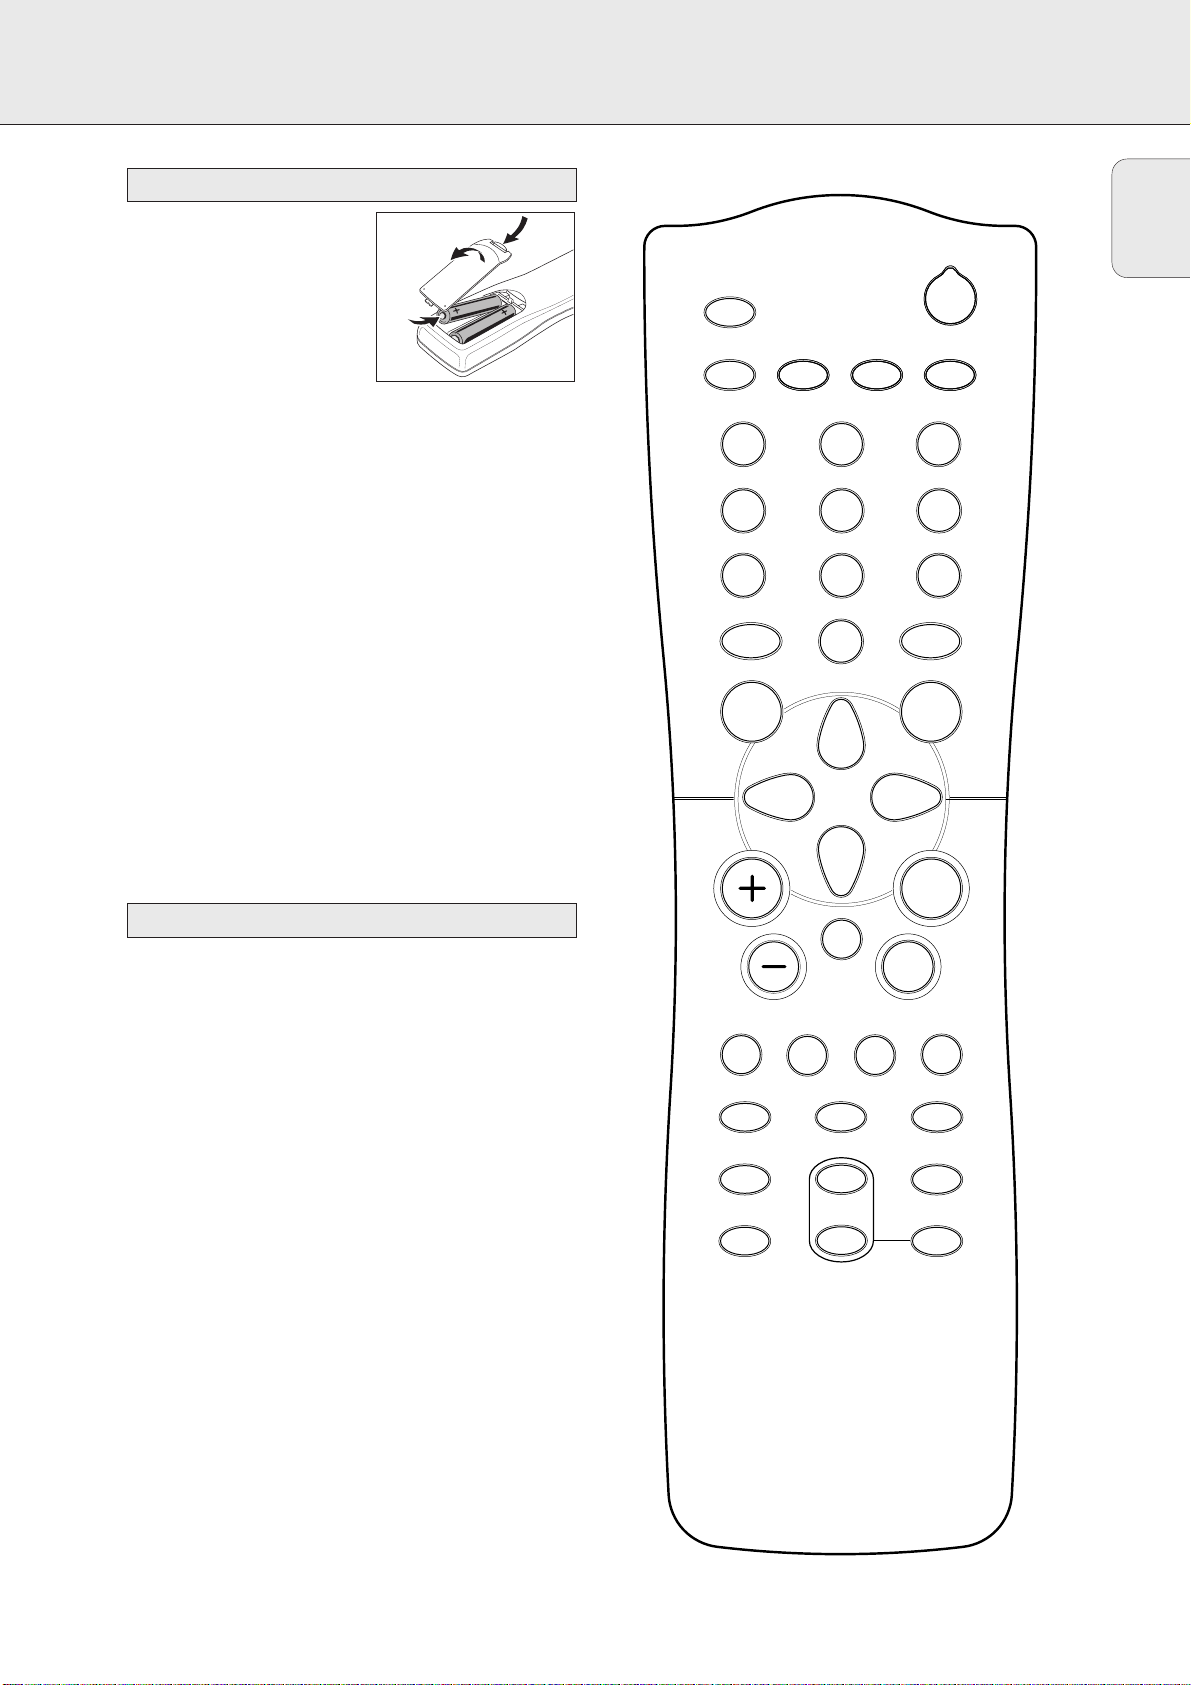
Open the battery compartment
of the remote control and insert
2 alkaline batteries, type AA
(R06, UM-3).
Remove batteries if they are flat
or if the remote control is not
going to be used for a long time.
Batteries contain chemical substances, so they should
be disposed of properly.
The buttons on the remote control work the same way as the
corresponding ones on the receiver.
Additional appliances can only be controlled if they are
working with the RC-5 and the RC-6 code system.
Important!
You have to press a source button for longer than 1 second to
switch the sound source on the receiver. Pressing a source
button for less than 1 second will only switch the remote
control to use the commands for the selected product.
The remote control remains tuned to the selected source until
another source button on the remote control is pressed.
This enables you to operate additional sources (i. e. winding
a tape) without changing the source on the receiver.
Battery usage CAUTION
– To prevent battery leakage
which may result in bodily injury or damage to the unit:
–
Install all batteries correctly, + and - as marked on the unit.
– Do not mix batteries (old and new or carbon and
alkaline, etc.).
–
Remove batteries when the unit is not used for a long time.
Important safety instructions
Remote control usage
FR 968, MX 990D ADDENDUM –
REMOTE CONTROL
TUNER
2
CD CDR/TAPE VCR TV
1
4
7
CINEMA LINK
2
5
8
3
6
9
DVD/6CH
0
GUIDE
MENU
AA
CHANNEL/TRACK
íëÅ
b
±
H
REAR
+
-
CHANNEL
OK
É
TV
Ç
FR.D/INDEXPAUSE
DISC
SURR. ON/OFFDISPLAY/T-C NEWS/TA
SURR. MODESMART SOUND
TEST TONELOUDNESS

English
FR 968, MX 990D ADDENDUM –
REMOTE CONTROL
2 ................................Switches the source selected on your
remote control (e.g. VCR, TV) to
standby. When pressed longer than
2 seconds, the receiver switches to
standby.
TUNER, CD, CDR/TAPE,
TV, VCR, DVD/6CH........Switches the remote control to the
commands of the different products.
Selects the sources if pressed longer
than 1 second.
1–0................................Keys in numbers for tracks, stations or
frequencies. Numbers consisting of
two figures must be keyed in within
2 seconds.
CINEMA LINK...............Switches the connection between the
receiver and the TV on and off.
MENU GUIDE ..............TUNER: Switches the receiver menu
on and off.
DVD, TV: Switches the DVD/TV menu
on and off.
OK.................................Confirms menu options.
Arrow buttons ..............TUNER: Moves in the menus.
Right/left arrows are tuning up/down.
CD, CDR: Left/right arrows are
searching backwards/forwards,
up/down arrows are selecting the
next/previous track.
+A...........................Increases the receiver volume.
-A...........................Decreases the receiver volume.
H MUTE .....................Mutes the sound of the receiver in all
modes, except TV.
Mutes the sound of your Philips TV set
if your remote control is in TV mode.
ÉATV ......................Increases the TV volume.
CD, CDR, VCR, DVD: Starts playback.
ÇATV ......................Decreases the TV volume.
CD, CDR, VCR, DVD: Stops playback.
í
CHANNEL/TRACK
...
Selects the previous preset tuner station.
VCR: Rewinds the tape.
CD, CDR, DVD: Selects the previous
track.
TV: Selects the previous channel.
ë
CHANNEL/TRACK
...Selects the next preset tuner station.
VCR: Fast forwards the tape.
CD, CDR, DVD: Selects the next
track.
TV: Selects the next channel.
Å PAUSE...................CD, CDR, VCR, DVD: Pauses
playback.
DISC FR.D./INDEX ........CD-, CDR-, DVD-Changers:
Switches to the next disc.
TUNER: Switches to FREQUENCY
DIRECT.
VCR: Switches the index search on
and off.
b DISPLAY/T-C...........TUNER: Switches between station
name, frequency and radio text.
CD, CDR: Switches between the
different time displays.
TV: Switches teletext on and off.
DVD: Switches between title and
chapter.
NEWS/TA.....................Switches the functions NEWS and
TRAFFIC ANNOUNCEMENT on and off.
SURR. ON/OFF..............Switches SURROUND SOUND on and
off.
±SMART SOUND ......Scrolls through the different smart
sounds.
+/- REAR ...............Increases/decreases the volume of the
rear speakers. While test tone is on,
the volume of the speakers you are
hearing can be increased/decreased
with these buttons.
SURR. MODE................Scrolls through the different surround
modes.
LOUDNESS ...................Switches LOUDNESS on and off.
TEST TONE ...................Switches the test tone on and off.
While test tone is on, the volume of
the speakers you are hearing can be
increased/decreased with
+/- REAR.
Remote control buttons
EL6477T001 / VieUrs0038
3103 306 1764.1 Printed in Hong Kong

9
English
REMOTE CONTROL
You can identify the universal remote control by the
inscription Multibrand/Universal.
The universal remote control must be programmed to use the
codes for your appliances of different brands. This is done by
keying in a 4-digit code or by scanning the codes until the
correct one is found. We recommend to using the 4-digit
code. This method is faster and more reliable. The code
scanning method should be used only if you cannot find the
code for one of your appliances. The codes are listed at the
end of this book.
Important!
Use the remote control buttons for programming, not the
buttons of the receiver or other appliances.
Programming with the 4-digit code
1 Keep the source button for the appliance which should be
controlled and2 pressed for 3 seconds.
2 Key in the 4-digit code for the appliance (codetable at the
end of the booklet).
Notes: – If more than 4 digits are entered, the remote control
will recognize only the ones keyed in first.
– If you do not key in a code within 30 seconds the
remote control will switch off the programming
function without changing the code.
– To program a new appliance, simply overwrite the
old code by entering a new one.
Scanning the codetable
1 Switch on the appliance which should be controlled.
2 Keep the source button for the appliance which should be
controlled and2 pressed for 3 seconds.
3 Press and release 2 again.
yThe remote control sends the codes for channel up or
standby (depending on the selected source) for one
brand after the other.
4 As soon as the appliance reacts – switches to the next
channel or to standby – press 2 to confirm the code.
yThe identified code will be used.
• If the set does not react within 2 minutes, the code for this
appliance is not stored in the remote control. The code of
the remote control will remain unchanged.
Note: When taking out the batteries of the remote control for
more than 1 minute the codes must be reprogrammed.
Once you have found and tested the codes for your various
appliances, you may want to write them down here.
PHONO..........................................
TUNER...........................................
CD .................................................
CDR/TAPE .....................................
TV..................................................
VCR ...............................................
SAT................................................
DVD...............................................
CABLE BOX ...................................
Resetting the remote control
1 Keep one of the source buttons and 2 pressed for
3 seconds.
2 Key in the 3-digit code 981.
yThe remote control is now reset to all its original Philips
codes.
Programming the universal remote control
 Loading...