

Page 1

Need help? Call us!
Philips representatives are ready to help you with any
questions about your new product. We can guide you
through Connections, First-time Setup, or any of the Features.
We want you to start enjoying your new product right away!
CALL US BEFORE YOU CONSIDER
RETURNING THE PRODUCT!
1-800-531-0039
or
Visit us on the web at www.philips.com
S
E
E
W
H
Y
I
N
S
I
D
E
I
M
P
O
R
T
A
N
T
!
Return
your Warranty
Registration Card
within 10 days
MX
6000i
MX
6000iWireless Home Entertainment System
Page 2

Registering your model with PHILIPS makes you eligible for all of the valuable benefits listed below, so
don't miss out. Complete and return your Product Registration Card at once to ensure:
Return your Product Registration Card today
to get the very most from your purchase.
For Customer Use
Enter below the Serial No. which is
located on the rear of the cabinet.
Retain this information for future
reference.
Model No. ____________________
Serial No. ____________________
Know these
safetysymbols
This “bolt of lightning” indicates
uninsulated material within your unit
may cause an electrical shock. For the safety of everyone in your household, please
do not remove product covering.
The “exclamation point” calls atten-
tion to features for which you
should read the enclosed literature closely
to prevent operating and maintenance
problems.
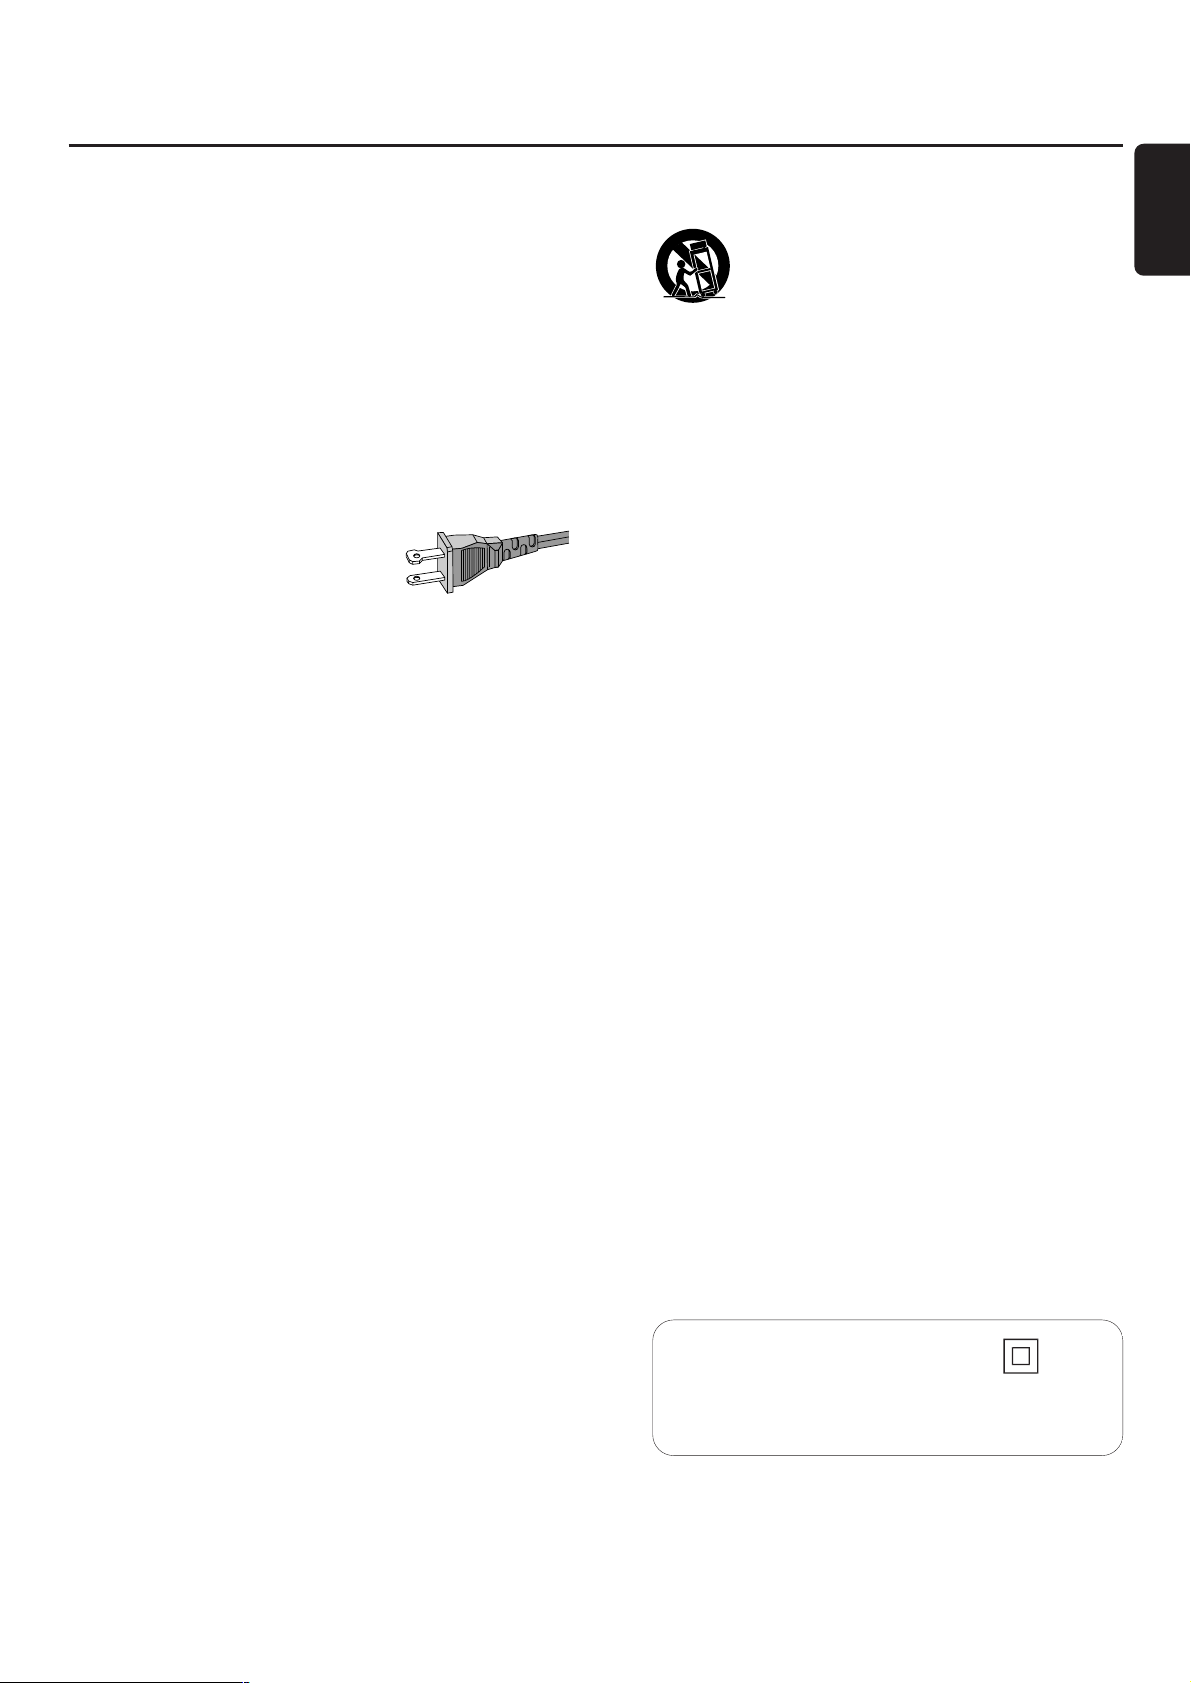
WARNING: To reduce the risk of fire or
electric shock, this apparatus should not be
exposed to rain or moisture, and objects
filled with liquids, such as vases, should not
be placed on this apparatus.
CAUTION: To prevent electric shock,
match wide blade of plug to wide slot, fully
insert.
ATTENTION: Pour éviter les choc électriques, introduire la lame la plus large de
la fiche dans la borne correspondante de la
prise et pousser jusqu’au fond.
*Proof of
Purchase
Returning the enclosed card guarantees that your date of purchase will
be on file, so no additional paperwork will be required from you to
obtain warranty service.
*Product Safety
Notification
By registering your product, you'll
receive notification - directly from
the manufacturer - in the rare case
of a product recall or safety defect.
*Additional Benefits
of Product
Ownership
Registering your product guarantees
that you'll receive all of the privileges
to which you're entitled, including
special money-saving offers.
Visit our World Wide Web Site at http://www.philips.com
t
s
Congratulations on your purchase,
and welcome to the “family!”
Dear PHILIPS product owner:
Thank you for your confidence in PHILIPS.You’ve selected one of the best-built, best-backed products available
today.We’ll do everything in our power to keep you
happy with your purchase for many years to come.
As a member of the PHILIPS “family,” you’re entitled to
protection by one of the most comprehensive warranties
and outstanding service networks in the industry.What’s
more, your purchase guarantees you’ll receive all the
information and special offers for which you qualify, plus
easy access to accessories from our convenient home
shopping network.
Most importantly, you can count on our uncompromising
commitment to your total satisfaction.
All of this is our way of saying welcome - and thanks for
investing in a PHILIPS product.
P.S. To get the most from your PHILIPS purchase, be sure to complete and return your
Product Registration Card at once.
Page 3
1. Read these instructions.
2. Keep these instructions.
3. Heed all warnings.
4. Follow all instructions.
5. Do not use this apparatus near water.
6. Clean only with dry cloth.
7. Do not block any ventilation openings.Install in
accordance with the manufacturer´s instructions.
8. Do not install near any heat sources such as
radiators, heat registers, stoves, or other apparatus
(including amplifiers) that produce heat.
9. Do not defeat the safety
purpose of the polarized or
grounding-type plug.A polarized plug
has two blades with one wider than
the other. A grounding type plug has two blades and a third
grounding prong.The wide blade or the third prong are
provided for your safety. If the provided plug does not fit
into your outlet, consult an electrician for replacement of
the obsolete outlet.
10.Protect the power cord from being walked on or
pinched, particularly at plugs, convenience receptacles, and
the point where they exit from the apparatus.
11.Only use attachments/accessories specified by the
manufacturer.
12. Use only with the cart, stand, tripod,
bracket, or table specified by the manufacturer
or sold with the apparatus.When a cart is used,
use caution when moving the cart/apparatus
combination to avoid injury from tip-over.
13.Unplug this apparatus during lightning storms or when
unused for long periods of time.
14.Refer all servicing to qualified service personnel.
Servicing is required when the apparatus has been
damaged in any way, such as power-supply cord or plug is
damaged, liquid has been spilled or objects have fallen into
the apparatus, the apparatus has been exposed to rain or
moisture, does not operate normally, or has been dropped.
15. Battery usage CAUTION – To prevent battery
leakage which may result in bodily injury, property damage,
or damage to the unit:
● Install all batteries correctly,+ and - as marked on the unit.
● Do not mix batteries (old and new or carbon and
alkaline, etc.).
● Remove batteries when the unit is not used for a long time.
16. Apparatus shall not be exposed to dripping or
splashing.
17. Do not place any sources of danger on the
apparatus (e.g. liquid filled objects,lighted candles).
18. This product may contain lead and mercury. Disposal of
these material may be regulated due to environment
considerations. For disposal or recycling information,
please contact your local authorities or the
Electronic Industries Alliance: www.eiae.org.
EL 6475-E005: 04/01
IMPORTANT SAFETY INSTRUCTIONS
3
English
Class II equipment symbol
This symbol indicates that the unit has a double
insulation system.
AC Polarized
Plug
Page 4
CAUTION
Use of controls or adjustments or performance of
procedures other than herein may result in hazardous
radiation exposure or other unsafe operation.
The unit complies with the FCC-Rules, Part 15 and
with 21 CFR 1040.10. Operation is subject to the
following two conditions:
1.This device may not cause harmful interference,
and
2.This device must accept any interference
received, including interference that may cause
undesired operation.
This equipment has been tested and found to comply with
the limits for a Class B digital device, pursuant to Part 15 of
the FCC Rules.These limits are designed to provide
reasonable protection against harmful interference in a
residential installation.This equipment generates, uses, and
can radiate radio frequency energy and, if not installed and
used in accordance with the instructions, may cause harmful
interference to radio communications. However, there is no
guarantee that interference will not occur in a particular
installation. If this equipment does cause harmful
interference to radio or television reception, which can be
determined by turning the equipment off and on, the user
is encouraged to try to correct the interference by one or
more of the following measures:
– Reorient or relocate the receiving antenna.
– Increase the separation between the equipment and the
receiver.
– Connect the equipment into an outlet on a circuit
different from that to which the receiver is connected.
– Consult the dealer or an experienced radio/TV
technician for help.
4
English
Canada
English:
This digital apparatus does not exceed the Class B limits
for radio noise emissions from digital apparatus as set
out in the Radio Interference Regulations of the
Canadian Department of Communications.
Français:
Cet appareil numérique n'émet pas de bruits
radioélectriques dépassant les limites applicables aux
appareils numériques de Classe B prescrites dans le
Règlement sur le Brouillage Radioélectrique édicté par
le Ministère des Communications du Canada.
Tested To Comply
With FCC Standards
FOR HOME OR OFFICE USE
Page 5

Important safety instructions ––––––––––––––––– 3
General information
Supplied accessories –––––––––––––––––––––––––––– 7
Setup –––––––––––––––––––––––––––––––––––––––– 7
Maintenance ––––––––––––––––––––––––––––––––––– 7
Disc handling –––––––––––––––––––––––––––––––––– 7
Environmental information –––––––––––––––––––––––– 7
Remote control
Inserting the batteries ––––––––––––––––––––––––––– 8
Using the remote control –––––––––––––––––––––––– 8
Using the remote control to control a Philips TV ––––––– 8
Controls ––––––––––––––––––––––––––––––––––– 10
Connections –––––––––––––––––––––––––––––––– 11
Connecting …
Assembling of the speakers –––––––––––––––––––––– 12
Attaching the front speakers to the subwoofers ––– 12
Attaching the mini speaker stands to
the rear speakers ––––––––––––––––––––––––––– 12
Attaching the rear speakers to the wall –––––––––– 12
Positioning of the speakers and the subwoofers –––––– 12
Connecting the speakers and the subwoofers –––––––– 13
How to use the click fit connectors ––––––––––––– 13
Connecting the tuner antennas ––––––––––––––––––– 13
Connecting the FM antenna ––––––––––––––––––– 13
Connecting the AM antenna –––––––––––––––––– 13
Connecting the TV ––––––––––––––––––––––––––––– 14
Using Component Video (PRPBY) –––––––––––––– 14
Using Composite Video (CVBS) –––––––––––––––– 14
Using S-Video –––––––––––––––––––––––––––––– 14
Connecting audio equipment ––––––––––––––––––––– 15
Connections for playback ––––––––––––––––––––– 15
Connection for digital or analog recordings ––––––– 15
Connecting to power supply ––––––––––––––––––––– 16
Switching on the system –––––––––––––––––––––––– 16
Selecting a source ––––––––––––––––––––––––––––– 16
Switching to Eco Power standby –––––––––––––––––– 16
Settings for the TV
Check if you see a picture ––––––––––––––––––––––– 17
No picture or distorted picture ––––––––––––––––––– 17
TV Shape –––––––––––––––––––––––––––––––––––– 17
Using the System Menu –––––––––––––––––––––– 18
Volume and sound
Adjusting the Volume ––––––––––––––––––––––––––– 19
Adjusting Bass,Treble, Loudness and ClearVoice –––––– 19
Listening through Headphones ––––––––––––––––––– 19
Adjusting the Surround Sound –––––––––––––––––––– 19
Internet and PC Link
General information on INTERNET and PC LINK ––––– 20
Requirements to use Internet media services ––––– 20
Requirements to use PC LINK ––––––––––––––––– 20
How to ensure a good wireless connection ––––––– 20
Network name (SSID) ––––––––––––––––––––––– 20
WEP encryption –––––––––––––––––––––––––––– 20
Before connecting ––––––––––––––––––––––––––––– 21
A) Wireless home network with
wireless router ––––––––––––––––––––––––––––– 21
B) PC with a wireless network card
or with a wireless USB adapter ––––––––––––––––– 23
C) Wired home network with a router ––––––––––––– 24
D) PC only with a network interface (Ethernet) card –– 25
Registration –––––––––––––––––––––––––––––––––– 26
About “My.Philips.com” ––––––––––––––––––––––––– 26
Reviewing and changing network settings ––––––––––– 26
Internet services –––––––––––––––––––––––––––––– 27
PC LINK ––––––––––––––––––––––––––––––––––––– 27
Using the colored multifunction buttons – SUBTITLE,
ANGLE, ZOOM and AUDIO –––––––––––––––––––– 28
INFO! ––––––––––––––––––––––––––––––––––––––– 28
FAVORITES –––––––––––––––––––––––––––––––––– 28
Adding a service to your favorites –––––––––––––– 28
Accessing your favorites –––––––––––––––––––––– 28
Recently used media services – RECENT ––––––––––– 29
Multiple users – USER –––––––––––––––––––––––––– 29
Adding a new user –––––––––––––––––––––––––– 29
Selecting a user –––––––––––––––––––––––––––– 29
Removing a user –––––––––––––––––––––––––––– 29
Disc
General Information –––––––––––––––––––––––––––– 30
Playable Discs ––––––––––––––––––––––––––––––––– 30
Region Codes –––––––––––––––––––––––––––––––– 30
Available disc Features –––––––––––––––––––––––––– 30
Disc Playback ––––––––––––––––––––––––––––––––– 31
Selecting next disc –––––––––––––––––––––––––– 31
Resume ––––––––––––––––––––––––––––––––––––– 31
Chapter Preview –––––––––––––––––––––––––––––– 31
Chapter/track selection ––––––––––––––––––––––––– 32
Forward and Reverse Searching ––––––––––––––––––– 32
Searching in the System Menu –––––––––––––––––––– 32
Time Search ––––––––––––––––––––––––––––––– 32
Fast, Slow ––––––––––––––––––––––––––––––––– 33
Still Picture/Frame-by-Frame Playback –––––––––––––– 33
Contents
5
English
Page 6

Disc
Repeat –––––––––––––––––––––––––––––––––––––– 33
Shuffle –––––––––––––––––––––––––––––––––––––– 33
Program ––––––––––––––––––––––––––––––––––––– 34
Programming tracks/chapters/titles –––––––––––––– 34
Playing a program ––––––––––––––––––––––––––– 34
Reviewing / Deleting programmed tracks –––––––– 34
Clearing the entire program ––––––––––––––––––– 34
Disc Menu ––––––––––––––––––––––––––––––––––– 35
Audio ––––––––––––––––––––––––––––––––––––––– 35
Subtitles ––––––––––––––––––––––––––––––––––––– 35
Camera Angle –––––––––––––––––––––––––––––––– 35
Zoom –––––––––––––––––––––––––––––––––––––– 35
Selecting the menu language, country,
audio language and subtitle language ––––––––––––––– 36
Menu Language –––––––––––––––––––––––––––– 36
Country –––––––––––––––––––––––––––––––––– 36
Default Audio –––––––––––––––––––––––––––––– 36
Default Subtitle –––––––––––––––––––––––––––– 36
Playback Control (PBC) ––––––––––––––––––––––––– 36
Switching PBC on/off –––––––––––––––––––––––– 36
Playing a (Super) Video CD with PBC ––––––––––– 36
Playing MP3 discs –––––––––––––––––––––––––––––– 37
Playing picture CDs –––––––––––––––––––––––––––– 38
Rotating a picture –––––––––––––––––––––––––––––– 38
Playing a slide show –––––––––––––––––––––––––––– 38
Access Control ––––––––––––––––––––––––––––– 39
Parental Level –––––––––––––––––––––––––––––– 39
Change Pin –––––––––––––––––––––––––––––––– 39
Disc Lock ––––––––––––––––––––––––––––––––– 39
If you forget your Pin –––––––––––––––––––––––– 39
System Menu – Picture settings
Adjusting the Picture Settings ––––––––––––––––––––– 40
Color Settings ––––––––––––––––––––––––––––– 40
Brightness ––––––––––––––––––––––––––––––––– 40
Contrast –––––––––––––––––––––––––––––––––– 40
Sharpness ––––––––––––––––––––––––––––––––– 40
Saturation ––––––––––––––––––––––––––––––––– 40
Video Shift –––––––––––––––––––––––––––––––– 40
System Menu – Audio settings
Night Mode –––––––––––––––––––––––––––––––––– 41
Analogue Output –––––––––––––––––––––––––––––– 41
Digital Output –––––––––––––––––––––––––––––––– 41
Speaker layout, speaker distances and volume balance –– 42
System Menu – Additional features
Help Line and Status window –––––––––––––––––––– 43
Sleep timer –––––––––––––––––––––––––––––––––– 43
Adjusting the display brightness ––––––––––––––––––– 43
Online upgrade ––––––––––––––––––––––––––––––– 43
Resetting the Streamium System –––––––––––––––––– 43
Tuner
Tuning to radio stations ––––––––––––––––––––––––– 44
Automatic Preset Programming ––––––––––––––––––– 44
Storing favorite radio stations manually ––––––––––––– 44
Selecting a favorite radio station –––––––––––––––––– 44
Deleting a favorite radio station ––––––––––––––––––– 45
Deleting all favorite radio stations ––––––––––––––––– 45
Changing the order of favorite radio stations ––––––––– 45
Troubleshooting ––––––––––––––––––––––––– 46–48
Technical data –––––––––––––––––––––––––––––– 49
Warranty –––––––––––––––––––––––––––––––––– 50
Contents
6
English
Page 7
Supplied accessories
Your Streamium DVD System is delivered with:
– 2 front, 1 center and 2 rear speakers
– 2 subwoofers built into the speaker stands
– 7 speaker cables
– 1 RCA-style audio cable (white and red plugs)
– 1 Composite Video (CVBS) cable (yellow)
– 1 Component Video cable (red/blue/green)
– 1 FM antenna
– 1 AM loop antenna
– 1 AC power cable
– 1 Category 5 Ethernet cable
– 1 remote control
– 2 batteries type AA
Setup
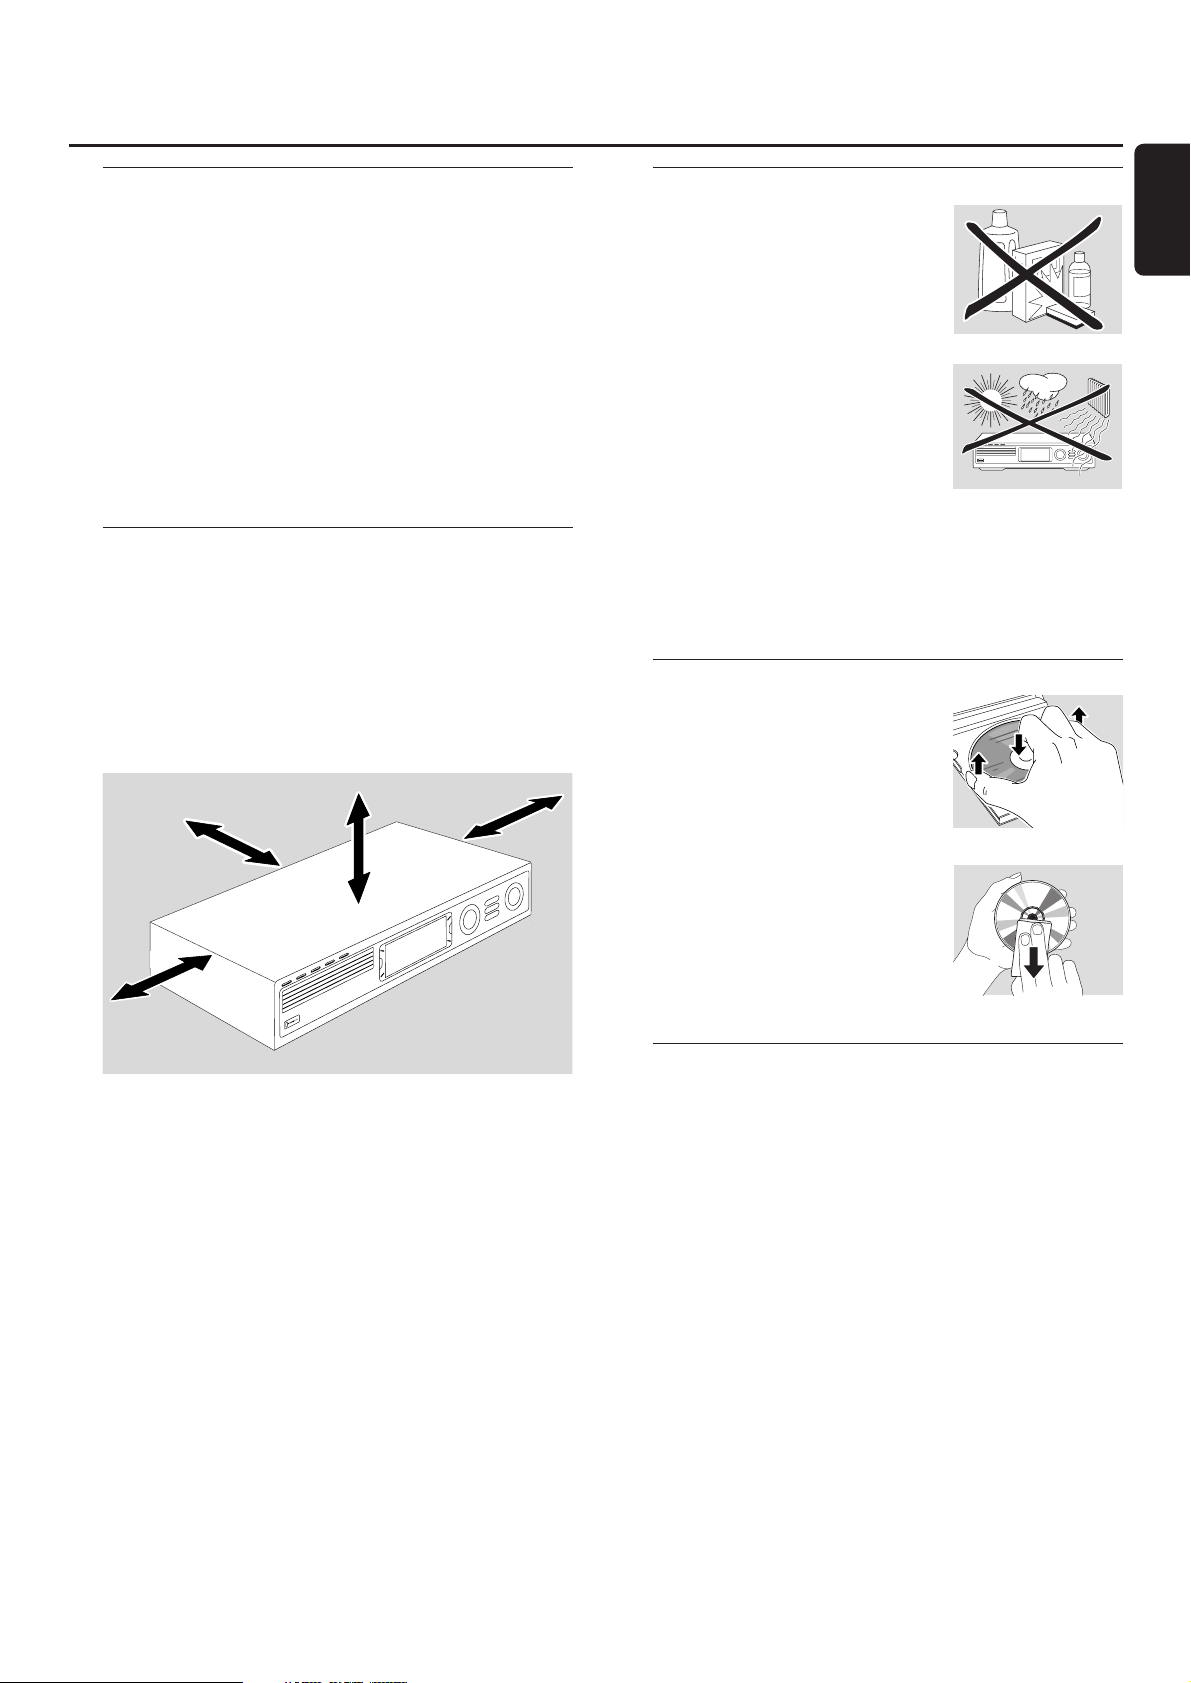
Place the unit on a flat, hard, and stable surface. Do not
place the unit on a carpet.
Do not position the unit on top of other equipment that
might heat it up (e.g. receiver or amplifier).
Do not put anything under the unit (e . g. CDs,magazines).
Allow at least 10 cm clearance from the rear and top of the
unit and 5 cm from the left and right to prevent overheating.
Do not block the ventilation openings.
Do not expose the unit to dripping or splashing.
Do not place any sources of danger (e. g.liquid filled
objects, lighted candles) on the unit.
Active mobile phones near the unit may cause
malfunctions.
Maintenance
Clean the unit with a soft, slightly
dampened, lint-free cloth. Do not
use any cleaning agents as they may
have a corrosive effect.
Do not expose the unit, batteries
or discs to humidity, rain, sand or
excessive heat (caused by heating
equipment or direct sunlight).
Always keep the trays of your unit
closed to protect the lens from
dust. Do not use any commonly
available lens cleaning discs, as they
may damage the optical lens of the unit.
The lens may cloud over when the unit is moved from cold
to warm surroundings. Playing a disc is not possible then.
Leave the unit in a warm environment until the moisture
evaporates.
Disc handling
To take a disc out of its box easily,
press the center spindle while lifting
it.Always hold a disc by the edge
and put it back in its box after use.
Never attach a sticker to a disc. If
you want to label a disc, use a soft,
felt-tipped pen and write only on
the printed side.
To clean a disc, wipe it in a straight
line from the center toward the
edge using a soft, lint-free cloth.
Any cleaning agents may damage
the disc!
Environmental information
All redundant packing material has been omitted.We have
tried to make the packaging easy to separate into three
single materials: cardboard (box), polystyrene foam (buffer)
and polyethylene (bags, protective foam sheet).
Your unit consists of materials which can be recycled if
disassembled by a specialized company. Please observe the
local regulations regarding the disposal of packing materials,
dead batteries and old equipment.
General information
7
English
5 cm
10 cm
10 cm
5 cm
Page 8
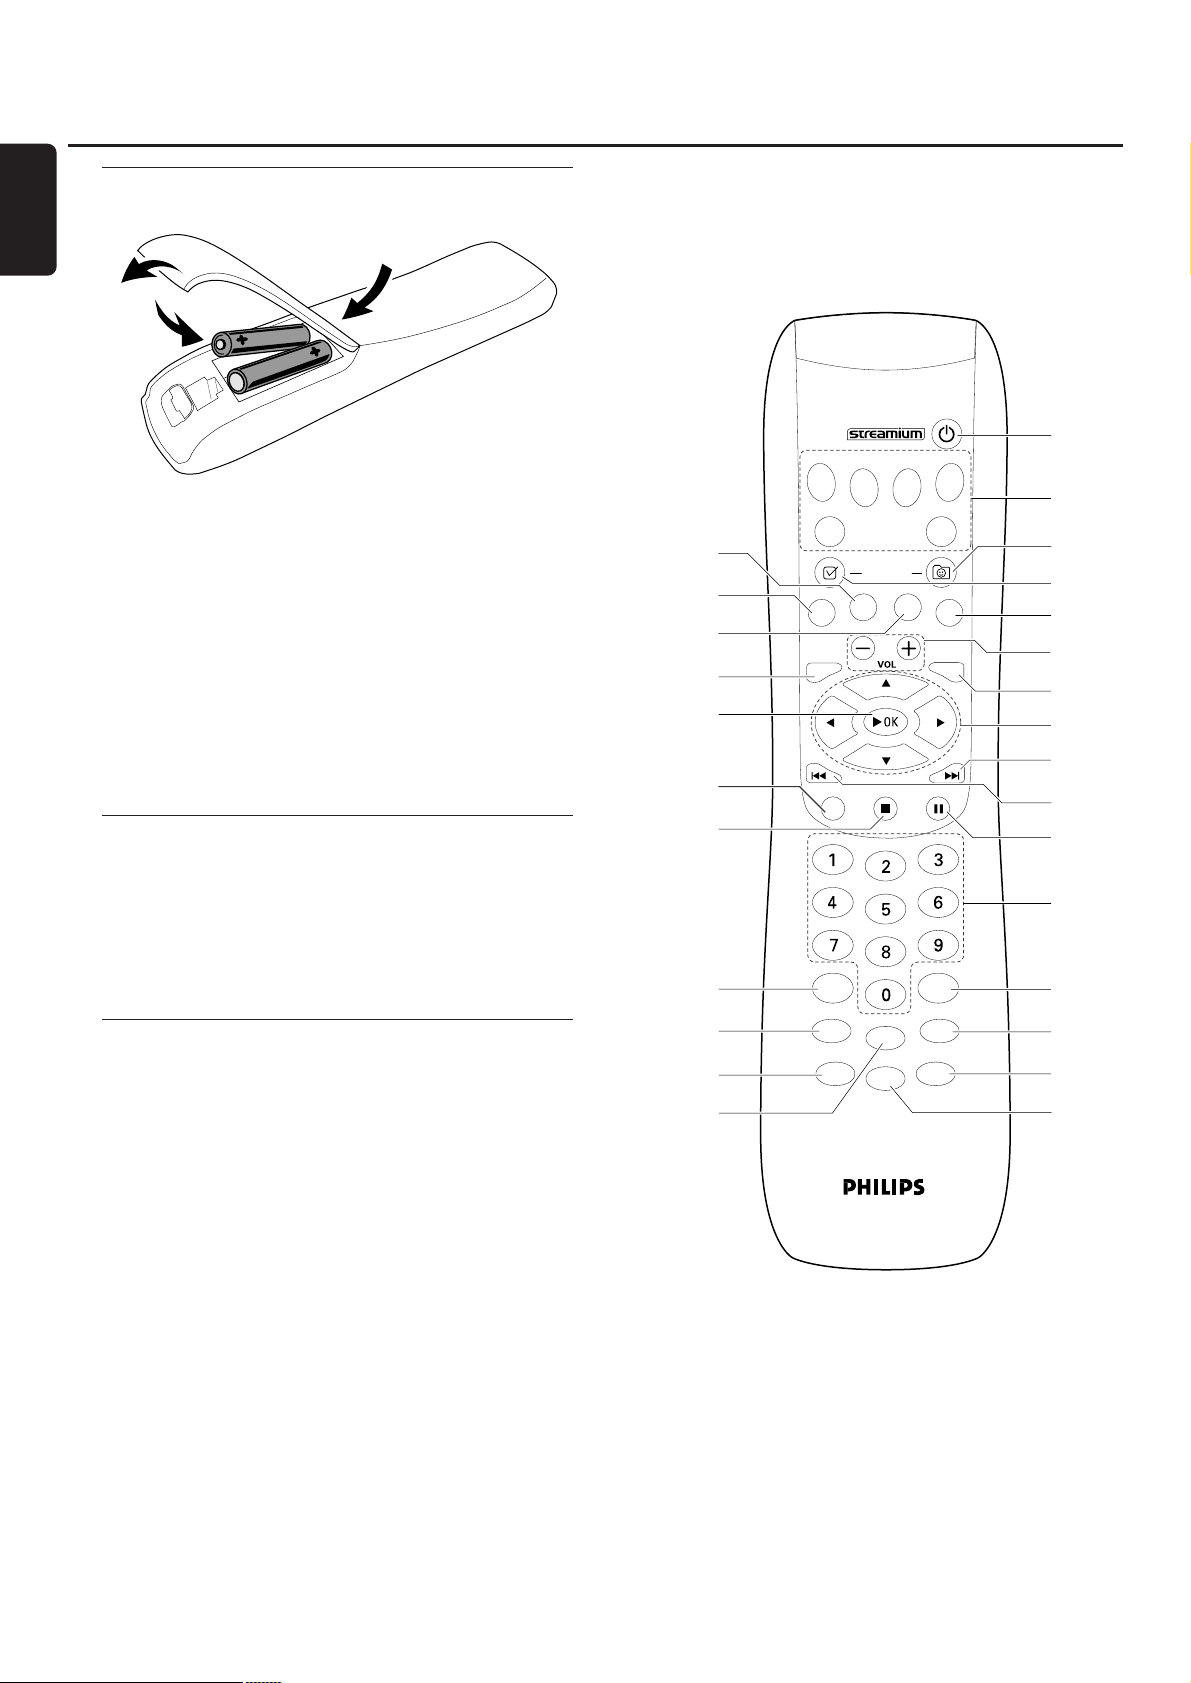
Inserting the batteries
1 Open the battery compartment of the remote control.
2 Insert two alkaline batteries, type AA (R06, UM-3),
according to the + and – indications.
3 Close the battery compartment.
Do not combine old and new or different types of
batteries.
Remove batteries if they are discharged or if the remote
control will not be used for a long time.
Batteries contain chemical substances, so they should
be disposed of properly.
Using the remote control
1 Aim the remote control directly at the remote sensor of
the Streamium System.
2 Select the source you wish to control by pressing one of
the source buttons on the remote control, e. g.TV,TUNER.
3 Next, select the desired function, e. g.2OK.
Using the remote control to control a Philips TV
When TV is selected, the remote control will control some
functions on your Philips TV,e. g.
– 0–9 select a TV channel.
– SYSTEM MENU switches the system menu of the TV
on/off.
– 1, 2, 3, 4 navigate in the system menu.
– S, T select the previous/next TV channel.
– 9 exits the system menu of the TV.
– MUTE mutes the sound on the TV.
– INFO! switches TV text on/off.
To control the TV, aim the remote control directly at the TV.
Remote control
8
English
≥
§
∞
≤
£
™
¡
)
(
*
&
DVD
TV
SUBTITLE
SYSTEM
MENU
RETURN
GHI
PQRS
SOUND
SHUFFLE
INTERNET
(UN) MARK
ANGLE ZOOM
-
–
FAVORITES
ABC
JKL
TUV
.@
INFO !
MUTE
PC LINK
VIEW
TUNER
AUX
AUDIO
DISC
MENU
RESUME
DEF
MNO
WXYZ
SURROUND
RECENT
USERREPEAT
1
2
3
4
5
6
7
8
9
0
!
@
#
$
%
^
Page 9

1 2
switches the unit to standby (off).To activate the unit, press
any source button.
2 source buttons
INTERNET connects to the Internet
PC LINK connects to the PC
DVD selects discs 1–5. Press repeatedly.
TV plays the TV sound on the Streamium System.
TUNER selects FM or AM radio. Press repeatedly.
AUX selects AUX DIGITAL or AUX ANALOG. Press
repeatedly.
3 VIEW FAVORITES
INTERNET,TUNER: shows your favorite Internet media
services and radio stations
4 (UN)MARK FAVORITES
INTERNET,TUNER: marks and unmarks favorites
5 AUDIO (blue button)
DVD: selects an audio channel (e. g.a different language)
during playback of a DVD or (Super) Video CD
INTERNET, PC LINK: multifunction button
6 VOL+,
–
adjust the volume
7 DISC MENU
enters and exits the disc menu (DVD)
8 1 2 3 4
moves the cursor left, right, up or down in the menus
TUNER: 3, 4 selects favorite radio stations,
1, 2 tunes to a radio station, press for 1 second to auto
search for a radio station.
9 T
DVD: skips to the beginning of the next chapter/title/track
of a disc; searches forward if pressed longer than 2 seconds.
Press again for various search speeds.
TV: selects a higher channel.
0 S
DVD: skips to the beginning of the current or previous
chapter/title/track of a disc; searches backward if pressed
longer than 2 seconds. Press again for various search
speeds.
TV: selects a lower channel.
! ;
pauses playback
@ 0–9 to enter numbers 0–9 and characters
(to enter a number with two or more digits, press 0–9
repeatedly within 2 seconds)
# SURROUND
selects the different sound settings: multi-channel surround,
Hall or stereo mode.
$ RECENT
INTERNET, PC LINK: displays the last 20 items played
% USER
selects an active user
^ MUTE
switches the speakers’ sound off or on again.
TV: switches the sound on the TV off/on.
& INFO!
INTERNET, PC LINK: requests on-line information about
currently playing item through e-mail (if available).
* REPEAT
selects the different repeat modes (depending on the
media type); switches repeat mode off.
( SHUFFLE
plays tracks in random order
) SOUND
selects a different sound setting for bass, treble, loudness
and clearvoice.
¡ 9
stops playback.
™ RETURN
returns to the previous menu.
£ 2OK
starts playback, resumes playback, or confirms a selection.
≤ SYSTEM MENU
DVD, INTERNET, PC LINK,AUX: enters the system menu.
∞ ZOOM (yellow button)
shows a close up view of a particular por tion of the picture
on the TV screen,
INTERNET, PC LINK: multifunction button
§ SUBTITLE (red button)
switches on or off the subtitles of a DVD during playback
INTERNET, PC LINK: multifunction button
≥ ANGLE (green button)
selects the camera angle (if available) of a DVD during
playback
INTERNET, PC LINK: multifunction button
Remote control
9
English
Page 10

1 STANDBY-ON
switches the unit on or to standby (off)
2 IR sensor for the remote control
3 INTERNET, PC LINK: multifunction button (same function
as red button on the remote control)
4 display
5 INTERNET, PC LINK: multifunction button (same function
as green button on the remote control)
6 1234
moves left, right, up or down in the menus,
selects favorite radio stations
7 9
stops playback
8 p
6.3 mm headphones jack
9 VOLUME
adjusts the volume
0 ;
pauses playback
! 2OK
starts playback, resumes playback, or confirms a selection
@ SOURCE
selects a source (DISC 1–5,TV,TUNER, AUX DIGITAL,
AUX ANALOG, INTERNET, PC LINK)
#
INTERNET,TUNER: shows your favorite Internet media
services and radio stations
$ (same function as RECENT on the remote control)
INTERNET, PC LINK: displays the last 20 items played
% disc trays 1–5
^ DISC 1–5, OPEN·CLOSE /
opens/closes disc trays 1–5
Controls
10
English
$
1 2
^
3
!%
6 7
4
#
@
5
90
8
Page 11
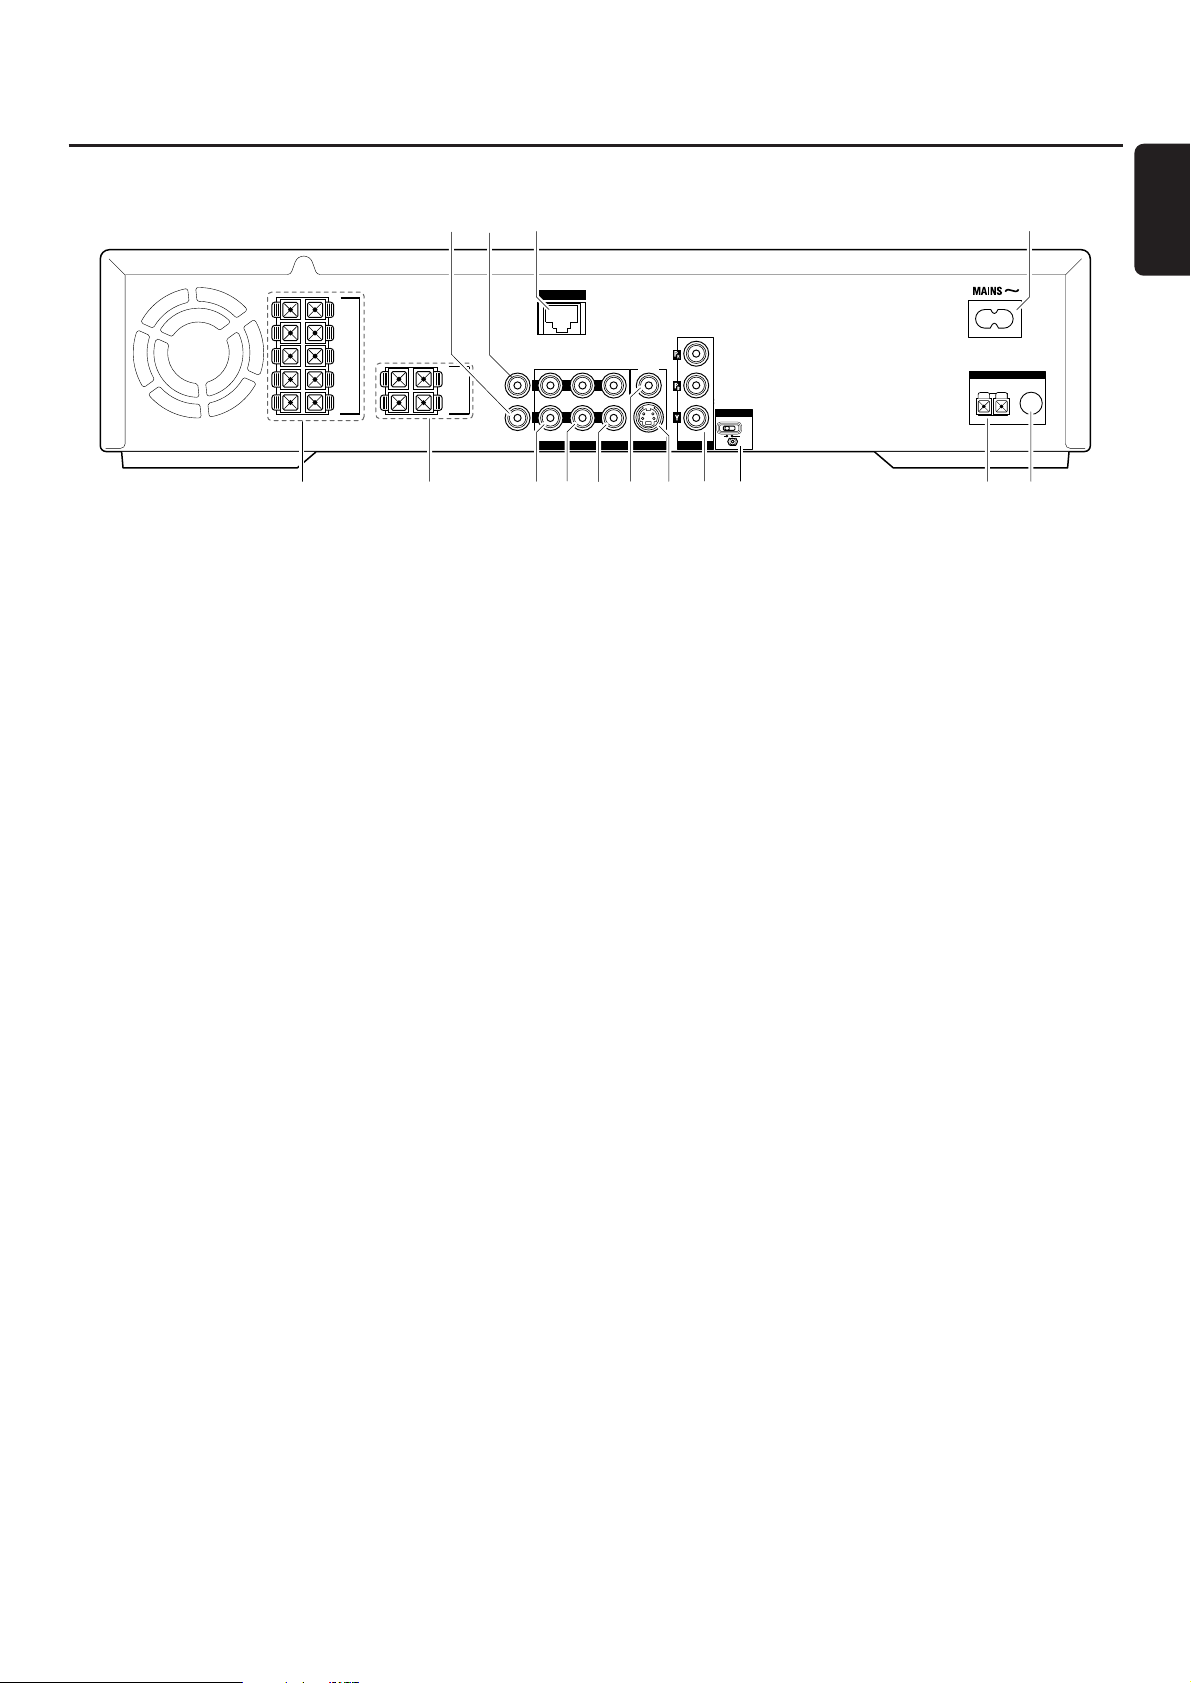
1 FRONT LEFT, FRONT RIGHT, CENTRE,
SURR LEFT, SURR RIGHT
FRONT LEFT: connect the front left speaker
FRONT RIGHT: connect the front right speaker
CENTRE: connect the center speaker
SURR LEFT: connect the surround left speaker
SURR RIGHT: connect the surround right speaker
2 SUB-W LEFT, SUB-W RIGHT
connect the left and right subwoofers
3 AUX IN L, R
connect to the left and right analog audio output jacks of
external equipment (e. g. tape deck,VCR, …)
4 TV IN L, R
connect to the left and right AUDIOOUT jacks of the TV
5 LINE OUT L, R
connect to the left and right analog audio input jacks of an
external equipment (e. g. tape deck, …)
6 VIDEO OUT/CVBS
connect to the Composite Video input of the TV
7 VIDEO OUT/S-VIDEO
connect to S-Video input of the TV
8 COMPONENT P
R,PB
,Y
connect to the corresponding Component video inputs of
the TV
9 P-SCAN
to switch on or off progressive scan
0 ANTENNA / AM
connect the AM loop antenna
! ANTENNA / FM
connect the FM antenna cable
@ MAINS ~
After all other connections have been made, connect
the power cable to the power outlet.
# ETHERNET
connect to router, broadband Internet, or PC
$ DIGITAL OUT
connect to the digital coaxial input of digital equipment
% DIGITAL IN
connect to the digital coaxial output of digital equipment
Before starting with the connections, make sure
all equipment you want to connect – as well as the
Streamium System – are disconnected from the
power outlets.
Connections
11
English
FRONT
LEFT
FRONT
RIGHT
CENTRE
SURR
LEFT
SURR
RIGHT
SUB-W
LEFT
SUB-W
RIGHT
12%35 7
$#
ETHERNET
DIGITAL
L
OUT
DIGITAL
R
IN
AUX IN TV IN LINE OUT S - VIDEO
CVBS
P-SCAN
AUDIO VIDEO OUT COMPONENT
48
6 9
OFFON
@
ANTENNA
AM FM
!0
Page 12
Before you make connections, make sure the unit is
not connected to the power supply.
Assembling of the speakers
You can use the subwoofers as speaker stands for the front
or for the rear speakers.The following text describes the
setup of the subwoofers in the front.
Attaching the front speakers to the subwoofers
1 Connect the speaker cables to the connectors on the
bottom of the subwoofers before attaching the front
speakers.
2 Put the front speakers on top of the subwoofers and press
them down gently until you hear a “click.”
➜ The front speakers are now connected to the
subwoofers.
3 Next, attach the rear speakers to the wall or use the
supplied mini speaker stands.
Attaching the mini speaker stands to the rear speakers
● Attach a supplied speaker stand firmly to the bottom of
each rear speaker using the supplied screws.
Attaching the rear speakers to the wall
1 Attach the supplied bracket firmly to the rear of the rear
speaker using the supplied screws.
2 Hook the speaker carefully onto a screw in the wall, using
the hole in the bracket.
Positioning of the speakers and the subwoofers
1 Place the subwoofers with the front speakers at an equal
distance to your TV.The distance between your listening
position and the left and right front speakers should be
approximately equal to the distance between the left and
right front speakers.
2 Place the center speaker on top of the TV.
3 Place the left and right rear speakers to the left and right
of your preferred listening position.
Notes:
Keep the speakers away from the room´s corners.
Position the speakers at ear level.
Leave enough space between the left and right front
speakers and the TV to avoid magnetic interference.
Connecting …
12
English
front R,
subwoofer
rear R
centre
white (red) purple
front L,
subwoofer
rear L
Page 13
Connecting the speakers and the subwoofers
We recommend connecting all speakers. At least the
front speakers (left and right) and the subwoofers
must be connected. If you do not connect all speakers,
press SURROUND repeatedly to select STEREO after
switching on the Streamium System.
When connecting the speakers make sure the colors
of the speaker cables correspond with the colors of the
connectors.
1 Insert the supplied speaker cables into the click-fit
connectors on the speakers.
2 Then connect the speaker cables to the corresponding
click-fit connectors on the rear of the unit so that the
colors of the speaker connectors and the speaker cables
match.
Speaker
++ −−
Front Left white black
Front Right red black
Center green black
Surround Left blue black
Surround Right grey black
Subwoofer Left purple black
Subwoofer Right purple black
How to use the click fit connectors
1 Press down the clip and fully insert the stripped portion of
the speaker cable into the socket.
2 Release the clip again.
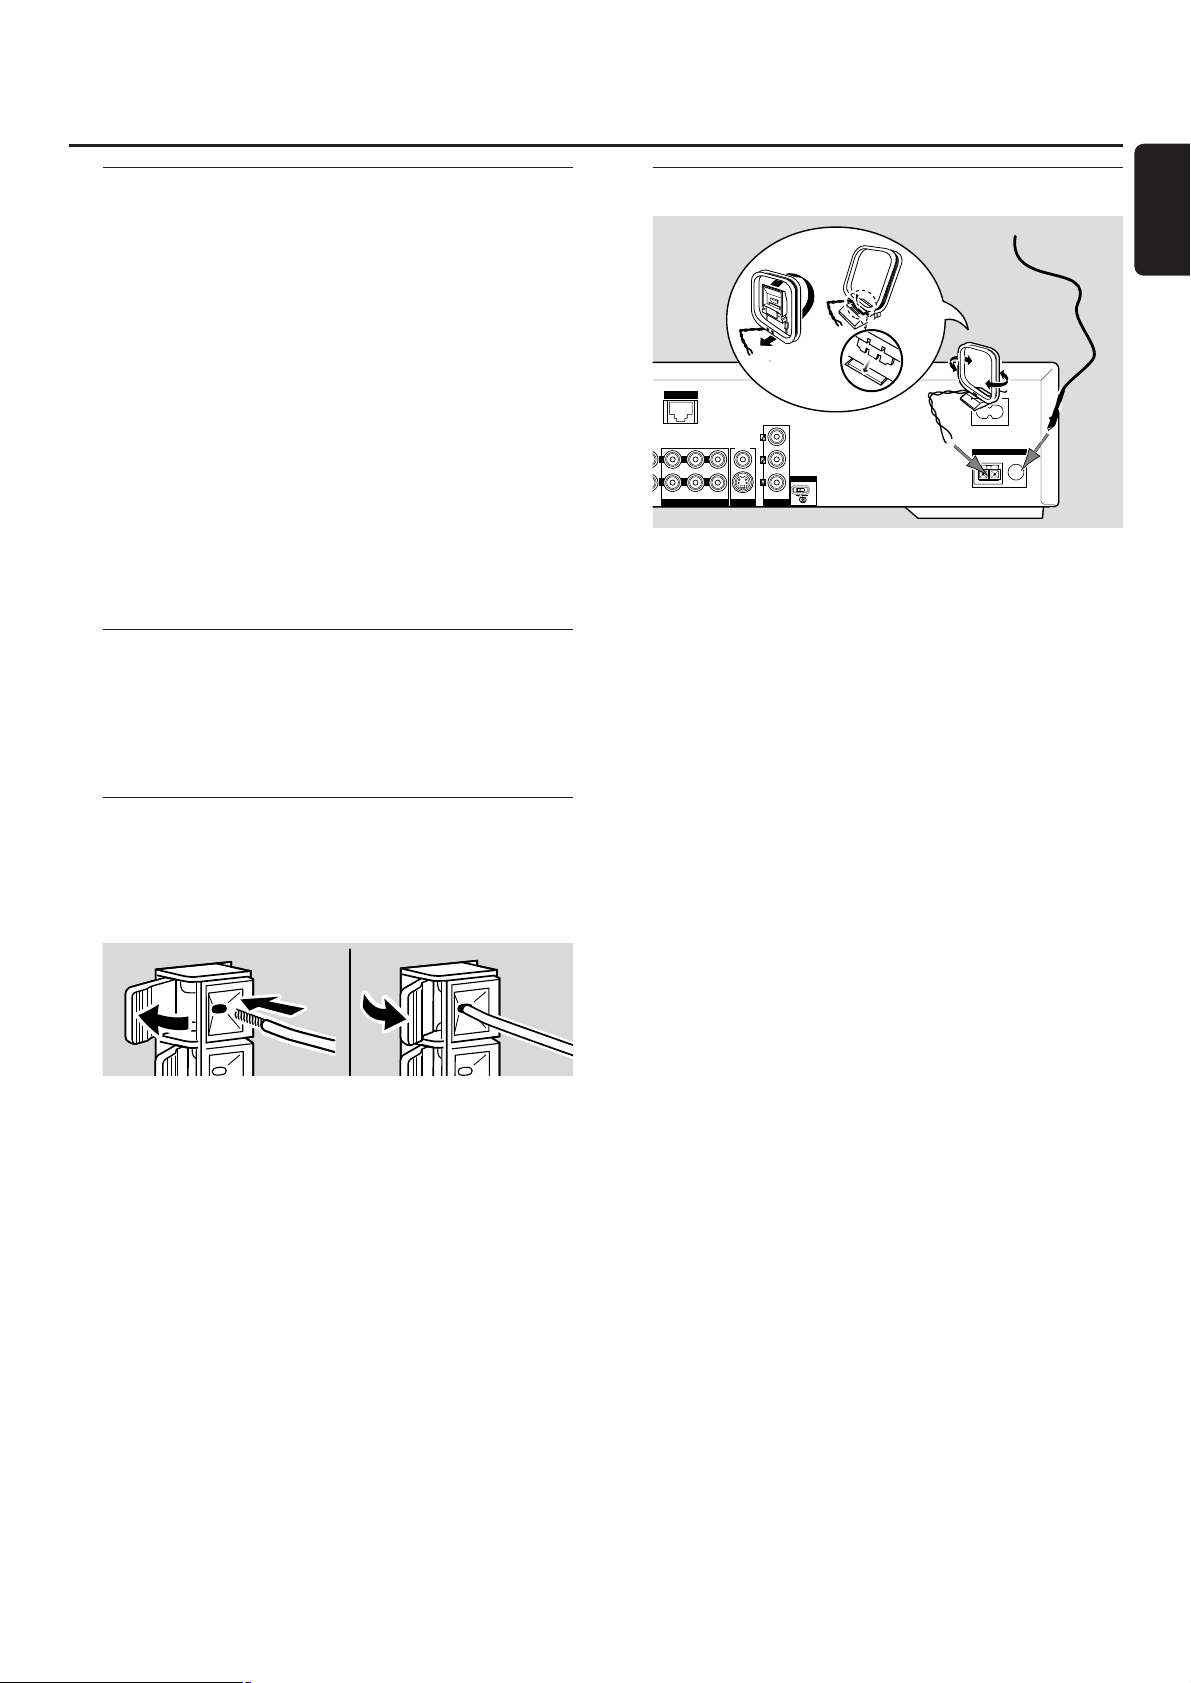
Connecting the tuner antennas
Connecting the FM antenna
1 Connect the supplied FM antenna cable to the
FM ANTENNA jack on the rear of the unit.
2 Extend the antenna cable and put it in a position where the
reception is best.
Connecting the AM antenna
1 Assemble the supplied AM loop antenna as shown above.
2 Connect the antenna to the AM ANTENNA jack on the
rear of the unit.
3 Place the antenna on a shelf or mount it on the wall in a
position where the reception is best.
Connecting …
13
English
➠
ETHERNET
L
R
AUX IN TV IN LINE OUT S - VIDEO
CVBS
AUDIO VIDEO OUT COMPONENT
P-SCAN
OFFON
ANTENNA
AM FM
Page 14
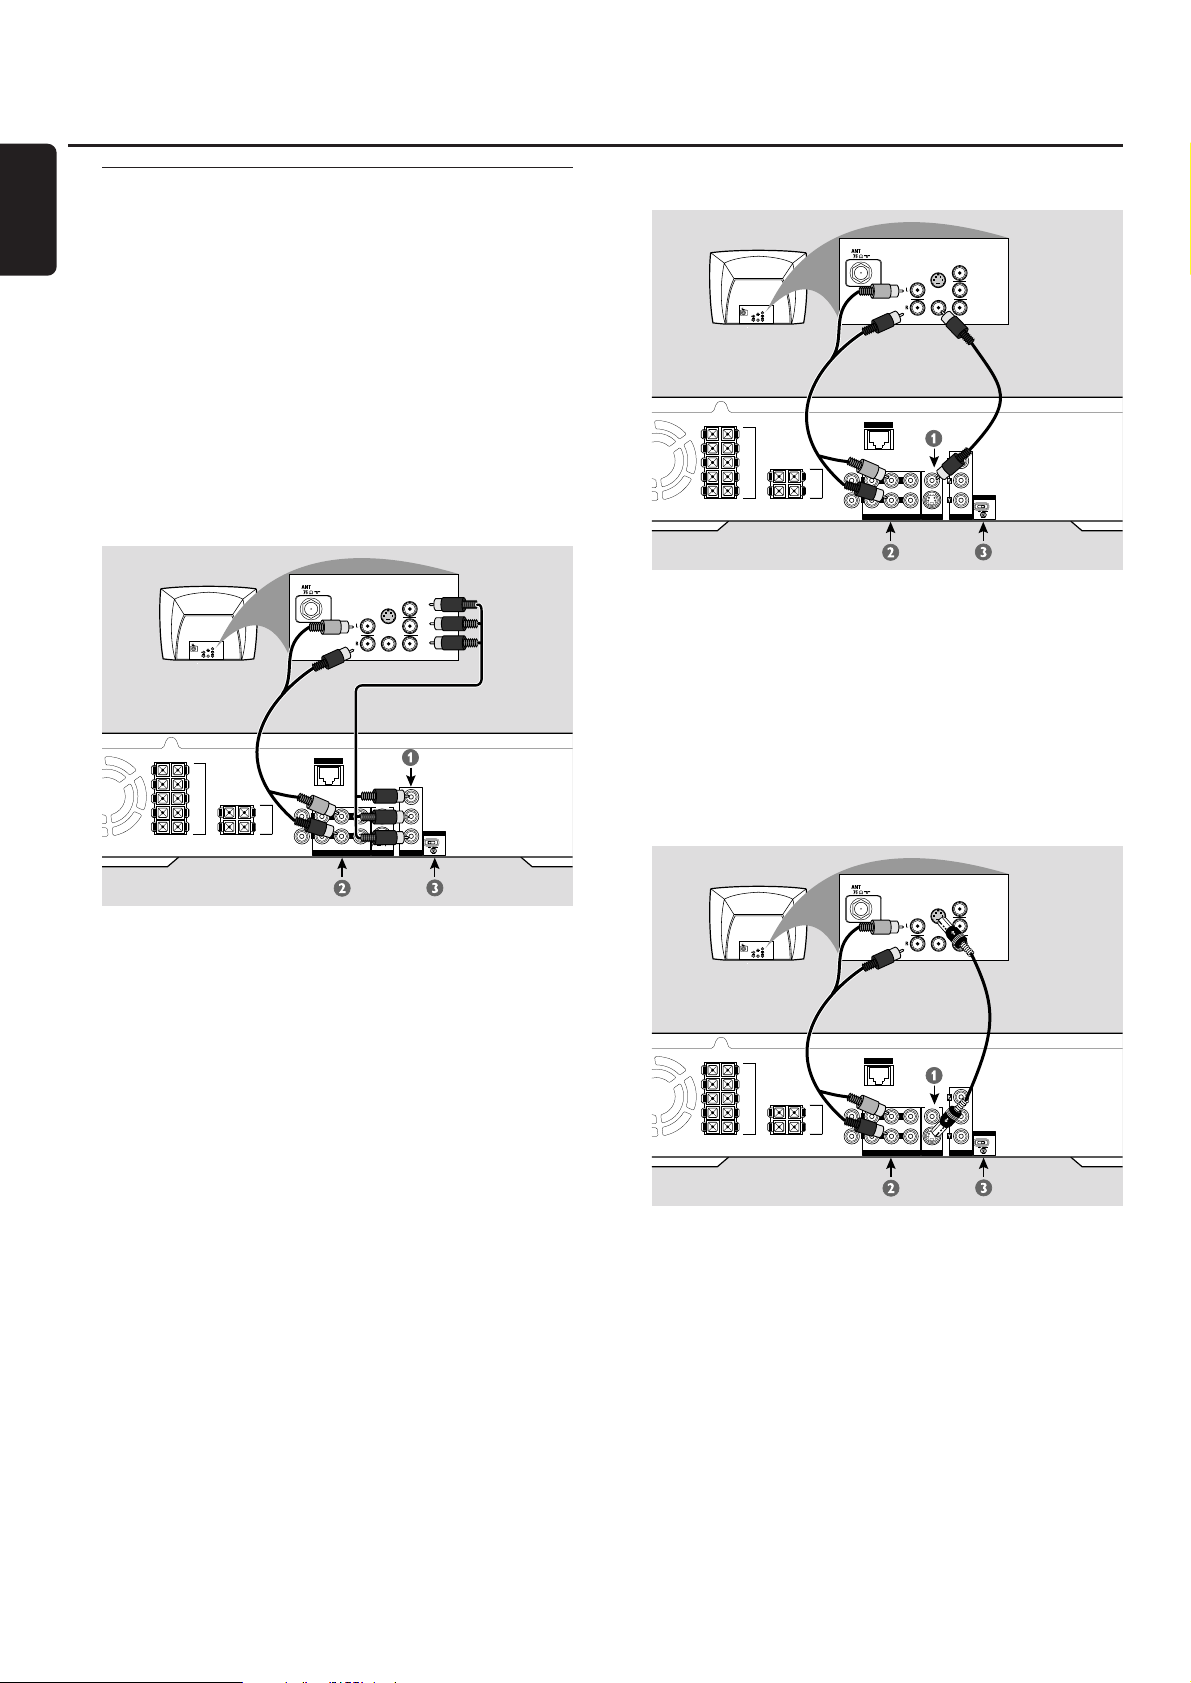
Connecting the TV
After connecting the speakers, choose one of several kinds
of video connections, which differ in quality. For the
availability of the necessary connectors on your TV, please
read the user´s manual of your TV.
You only need one video connection between the
TV and the Streamium System (Component Video,
S-Video, or Composite Video).
S-Video or Component Video provides better picture
quality than Composite Video.To use these connections,
these options must be available on your TV.
Connect the Streamium System directly to the TV.
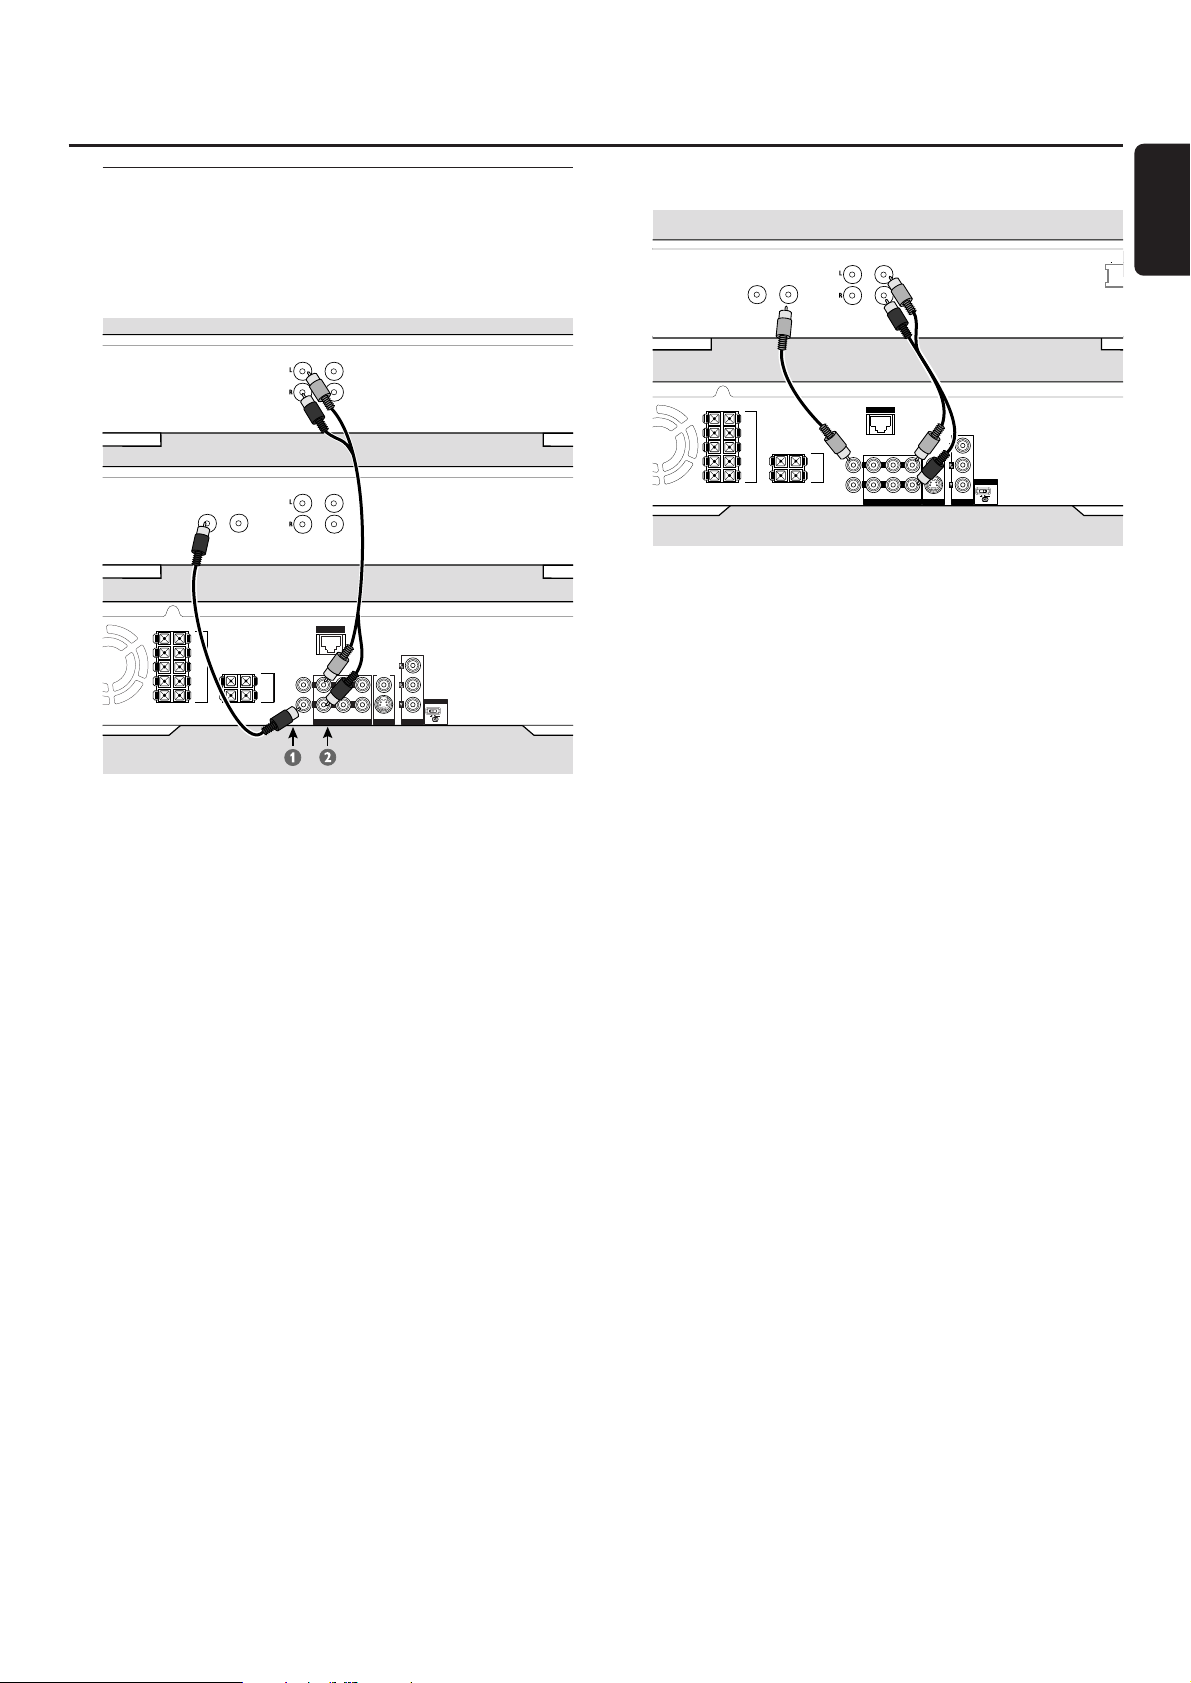
Using Component Video (PRPBY)
1 Use the component video cables (red/blue/green) to
connect the Streamium System’s COMPONENT PRPBY
jacks to the corresponding Component Video Input jacks
(or labelled as Pr/Cr Pb/Cb Y or YUV) on the TV.
2 To hear the sound of the TV through this Streamium System,
use the audio cables (white/red) to connect TV IN (L/R)
jacks to the corresponding AUDIO OUT jacks on the TV.
3 If you are using a Progressive Scan TV (TV must indicate
Progressive Scan or ProScan capability,) set the P-SCAN
switch (at the rear of the Streamium System) to ON.
Otherwise, set it to OFF.
Notes:
To set Video Output to ‘Y PBPR’, change the setting manually
in the System Menu. See chapter “No picture or distorted
picture.”
The progressive scan video quality is only possible through
the COMPONENT PRPBY output.
Using Composite Video (CVBS)
1 Use the composite video cable (yellow) to connect the
Streamium System’s CVBS jack to the video input jack (or
labelled as A/V In,Video In, Composite) on the TV.
2 To hear the sound of the TV through this Streamium
System, use the audio cable (white/red) to connect TV IN
(L/R) on the Streamium System to the corresponding
AUDIO OUT jacks on the TV.
3 Set the P-SCAN switch to OFF.
Using S-Video
1 Use an S-Video cable (not supplied) to connect the
Streamium System’s S-VIDEO jack to the S-Video input jack
(or labelled as Y/C or S-VHS) on the TV.
2 To hear the sound of the TV through this Streamium
System, use the audio cable (white/red) to connect TV IN
(L/R) on the Streamium System to the corresponding
AUDIO OUT jacks on the TV.
3 Set the P-SCAN switch to OFF.
Connecting …
14
English
COMPONENT
VIDEO IN
S-VIDEO
IN
Pr/Cr
AUDIO
OUT
Pb/Cb
COMPONENT
VIDEO IN
S-VIDEO
IN
Pr/Cr
AUDIO
OUT
Pb/Cb
VIDEO IN
Y
SUB-W
LEFT
SUB-W
RIGHT
DIGITAL
OUT
DIGITAL
IN
ETHERNET
L
R
AUX IN TV IN LINE OUT S - VIDEO
FRONT
LEFT
FRONT
RIGHT
CENTRE
SURR
LEFT
SURR
RIGHT
VIDEO IN
Pr
CVBS
Pb
AUDIO VIDEO OUT COMPONENT
Y
Y
P-SCAN
OFFON
COMPONENT
VIDEO IN
S-VIDEO
IN
AUDIO
COMPONENT
VIDEO IN
S-VIDEO
IN
Pr/Cr
AUDIO
OUT
Pb/Cb
VIDEO IN
Y
SUB-W
LEFT
SUB-W
RIGHT
DIGITAL
OUT
DIGITAL
IN
ETHERNET
L
R
AUX IN TV IN LINE OUT S - VIDEO
AUDIO VIDEO OUT COMPONENT
FRONT
LEFT
FRONT
RIGHT
CENTRE
SURR
LEFT
SURR
RIGHT
Pr/Cr
OUT
Pb/Cb
VIDEO IN
Y
CVBS
P-SCAN
OFFON
Page 15
Connecting audio equipment
Connections for playback
To play the sound of additional audio equipment on the
Streamium System, one digital and one analog connection
are available.
1 Connect a digital RCA-style cable to the DIGITAL IN of the
Streamium System and to the digital output jack of the
digital equipment.
2 Connect an RCA-style audio cable to AUX IN (L/R) on the
Streamium System and to the left and right analog output
jacks of your tape deck, CD player, or similar.
Notes:
To use these connections, press AUX on the remote control
repeatedly (or rotate SOURCE on the Streamium System) to
select AUX DIGITAL or AUX ANALOG.
You cannot connect a turntable to AUX IN.
Connection for digital or analog recordings
● To record the sound from the Streamium System to a
digital system, connect a digital RCA-style cable to
DIGITAL OUT on the Streamium System and to the
DIGITAL IN jack of the digital equipment.
00
When digital recording is not permissible, record the analog
sound from the Streamium System. Use the audio cable
(white/red) to connect LINE OUT (L/R) on the Streamium
System to the corresponding AUDIO IN (L/R) jacks on the
digital equipment.
00
Refer to the Instruction Manual of the digital equipment on
recording.
Recording is permissible insofar as copyright or other
rights of third parties are not infringed upon.
When playing an MP3-CD on the Streamium System,
no signal will be available using DIGITAL OUT.
This product incorporates Macrovision copyright protection
technology that is protected by US patent no. 4631603,
4577216 and 4819098, as well as other intellectual
property rights. Use of this copyright protection technology
must be authorized by Macrovision Corporation, and is only
intended for home use and other pay-per-view applications.
Macrovision must provide written authorization for any
other use. Change to the device, reverse engineering or
disassembly is prohibited.
Connecting …
15
English
M
digital or analog
ANALOG
OUT
IN
OUT
DIGITAL
OUT
DIGITAL
IN
IN
ANALOG
ETHERNET
L
R
AUX IN TV IN LINE OUT S - VIDEO
AUDIO VIDEO OUT COMPONENT
CVBS
OUT
IN
DIGITAL
FRONT
LEFT
FRONT
RIGHT
CENTRE
SURR
LEFT
SURR
RIGHT
SUB-W
LEFT
SUB-W
RIGHT
Tape deck
CD recorder
P-SCAN
OFFON
OUT
OUT
IN
DIGITAL
IN
ANALOG
FRONT
LEFT
FRONT
RIGHT
CENTRE
SURR
LEFT
SURR
RIGHT
ETHERNET
SUB-W
DIGITAL
LEFT
L
OUT
SUB-W
RIGHT
DIGITAL
R
IN
AUX IN TV IN LINE OUT S - VIDEO
CVBS
AUDIO VIDEO OUT COMPONENT
P-SCAN
OFFON
~ AC
Page 16
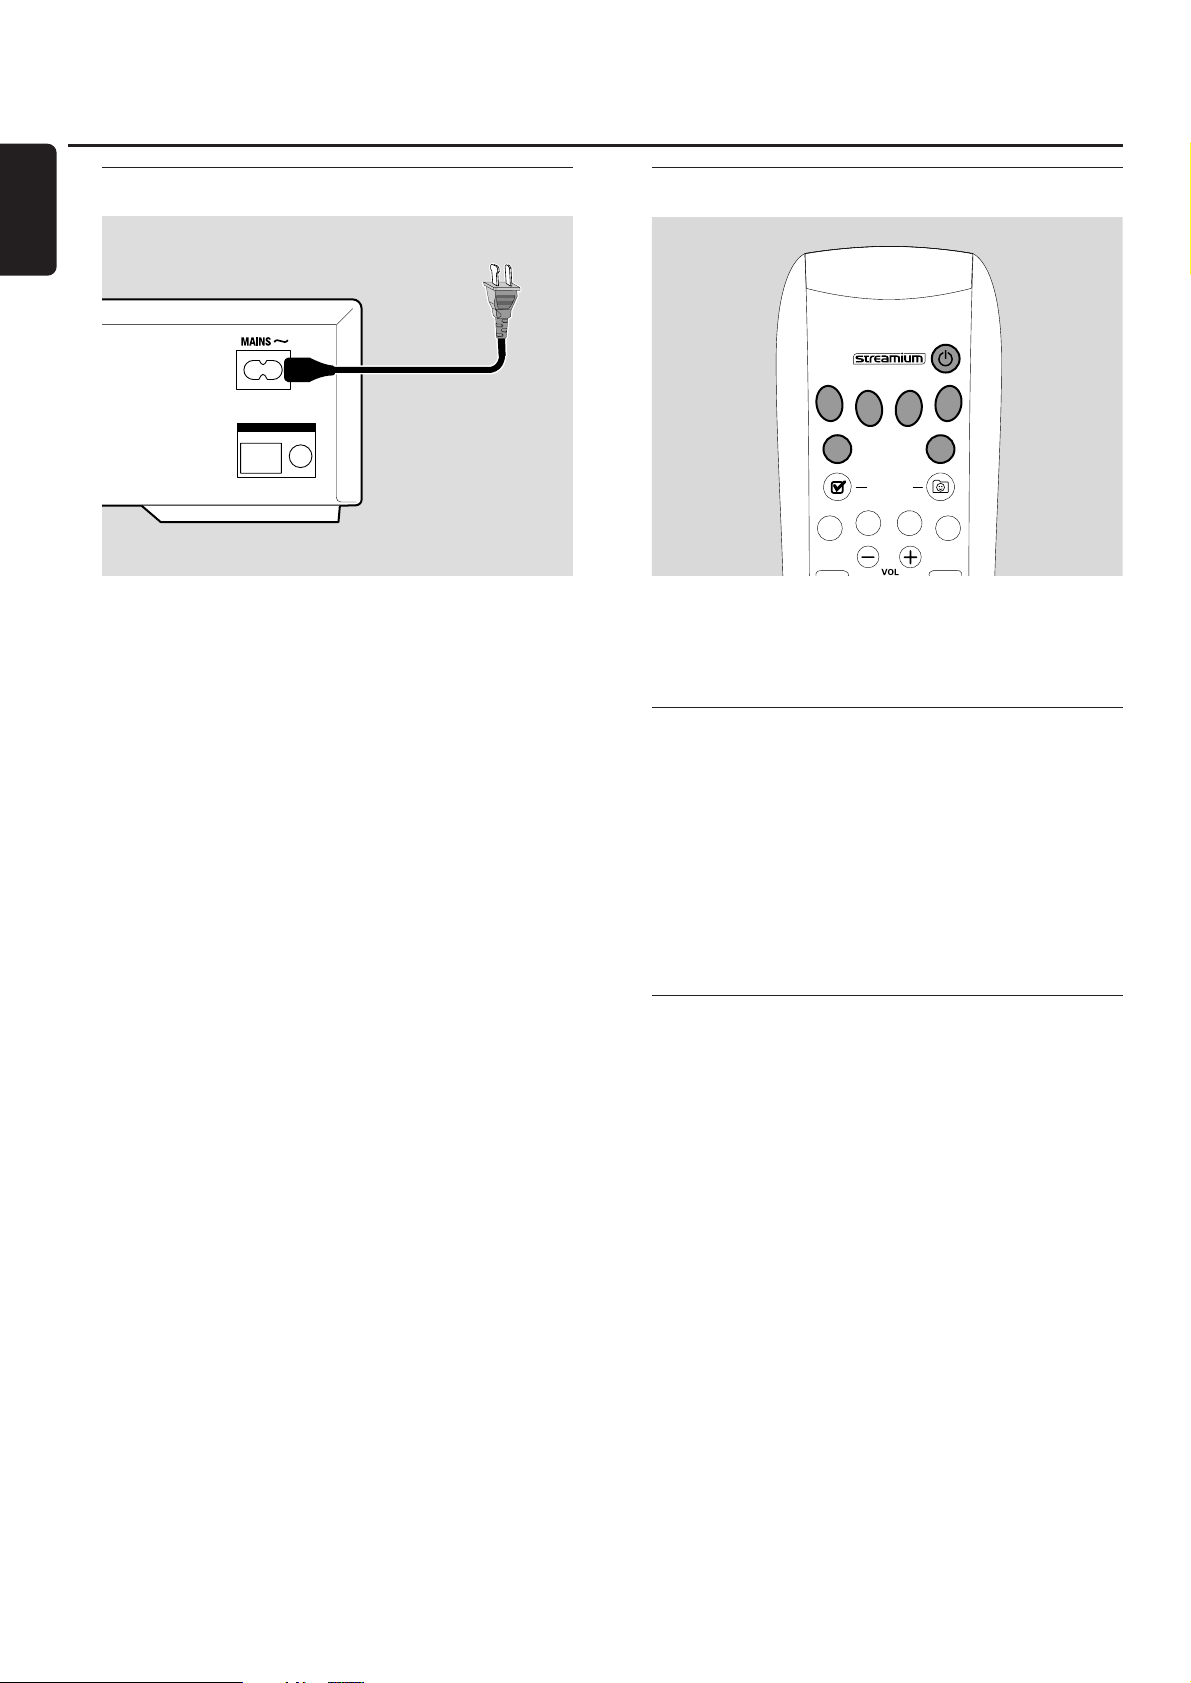
Connecting to power supply
The type plate is located on the rear of the unit.
1 Check whether the power voltage as shown on the type
plate corresponds to your local power voltage. If it does
not, consult your dealer or service organization.
2 Make sure your TV is switched off before connecting the
Streamium System to the power supply for the first time.
3 Make sure all connections have been made before
switching on the power supply.
4 Connect the supplied power cable to MAINS ~ at the rear
of the Streamium System and to the power outlet.
When the unit is switched to standby (off), it is still
consuming some power.To disconnect the unit from the
power completely,remove the power plug from the
wall outlet.
To avoid overheating of the unit,a safety circuit has
been built in.Therefore your unit may disconnect
under extreme conditions. If this happens, unplug the
unit and let it cool down before reusing it.
Switching on the system
● Press STANDBY-ON on the Streamium System or one of
the source buttons on the remote control (DVD,TV,
TUNER,AUX, INTERNET, PC LINK) to switch on the
Streamium System.
Selecting a source
● Turn SOURCE on the Streamium System or press DVD,
INTERNET, PC LINK,TUNER,TV or AUX on the remote
control to select a source.
➜ The selected source will be displayed.
On the remote control:
– To select disc 1, 2, … 5, press DVD repeatedly.
– To select equipment connected to AUX IN or
DIGITAL IN on the Streamium System, press AUX
repeatedly.
Switching to Eco Power standby
● Press STANDBY-ON on the Streamium System or 2 on
the remote control.
➜ The STANDBY-ON button will light up on the system.
➜ The display screen will go blank.
Note:The Streamium System will switch to Standby
automatically after 20 minutes of no activities, if “Sleep timer”
is switched on in the System Menu and if DVD or INTERNET is
selected.
Connecting …
16
English
ANTENNA
AM FM
DVD
INTERNET
TV
(UN) MARK
FAVORITES
ANGLE ZOOM
SUBTITLE
SYSTEM
MENU
PC LINK
VIEW
TUNER
AUX
AUDIO
DISC
MENU
Page 17
The following settings optimize the connection between
the Streamium System and the TV.
Check if you see a picture
1 Switch on your TV.
2 Press AUX on the remote control.
3 Next, press SYSTEM MENU on the remote control.
4 If necessary set the TV to the correct audio/video channel
for the Streamium System. Such channels may be called
AUX or AUXILIARY IN,AUDIO/VIDEO or A/V IN, EXT1,
EXT2 or EXTERNAL IN, etc.These channels are often near
channel 00. If you are using an RF modulator, select the
channel for the RF modulator.
➜ The system menu of the Streamium System should
appear on the TV.
No picture or distorted picture
The Streamium System may be set to the wrong video
signal. Observe the display on the Streamium System.
1 If necessary,press AUX on the remote control. Next, press
SYSTEM MENU.
2 Press 4 repeatedly to select PICTURE. Next press 2.
3 Press 4 repeatedly to select TV SETTINGS. Next, press 2.
4 Press 4 repeatedly to select VIDEO OUTPUT.
Next, press 2.
5 Press 4 or 3 repeatedly to select
– Y PB PR (COMPONENT VIDEO) if you have connected
the TV to COMPONENT PRPBY on the Streamium
System,
– CVBS if you have connected the TV to CVBS or S-Video
on the Streamium System.
6 Press 2OK to confirm the setting.
7 Next, press SYSTEM MENU to exit the system menu.
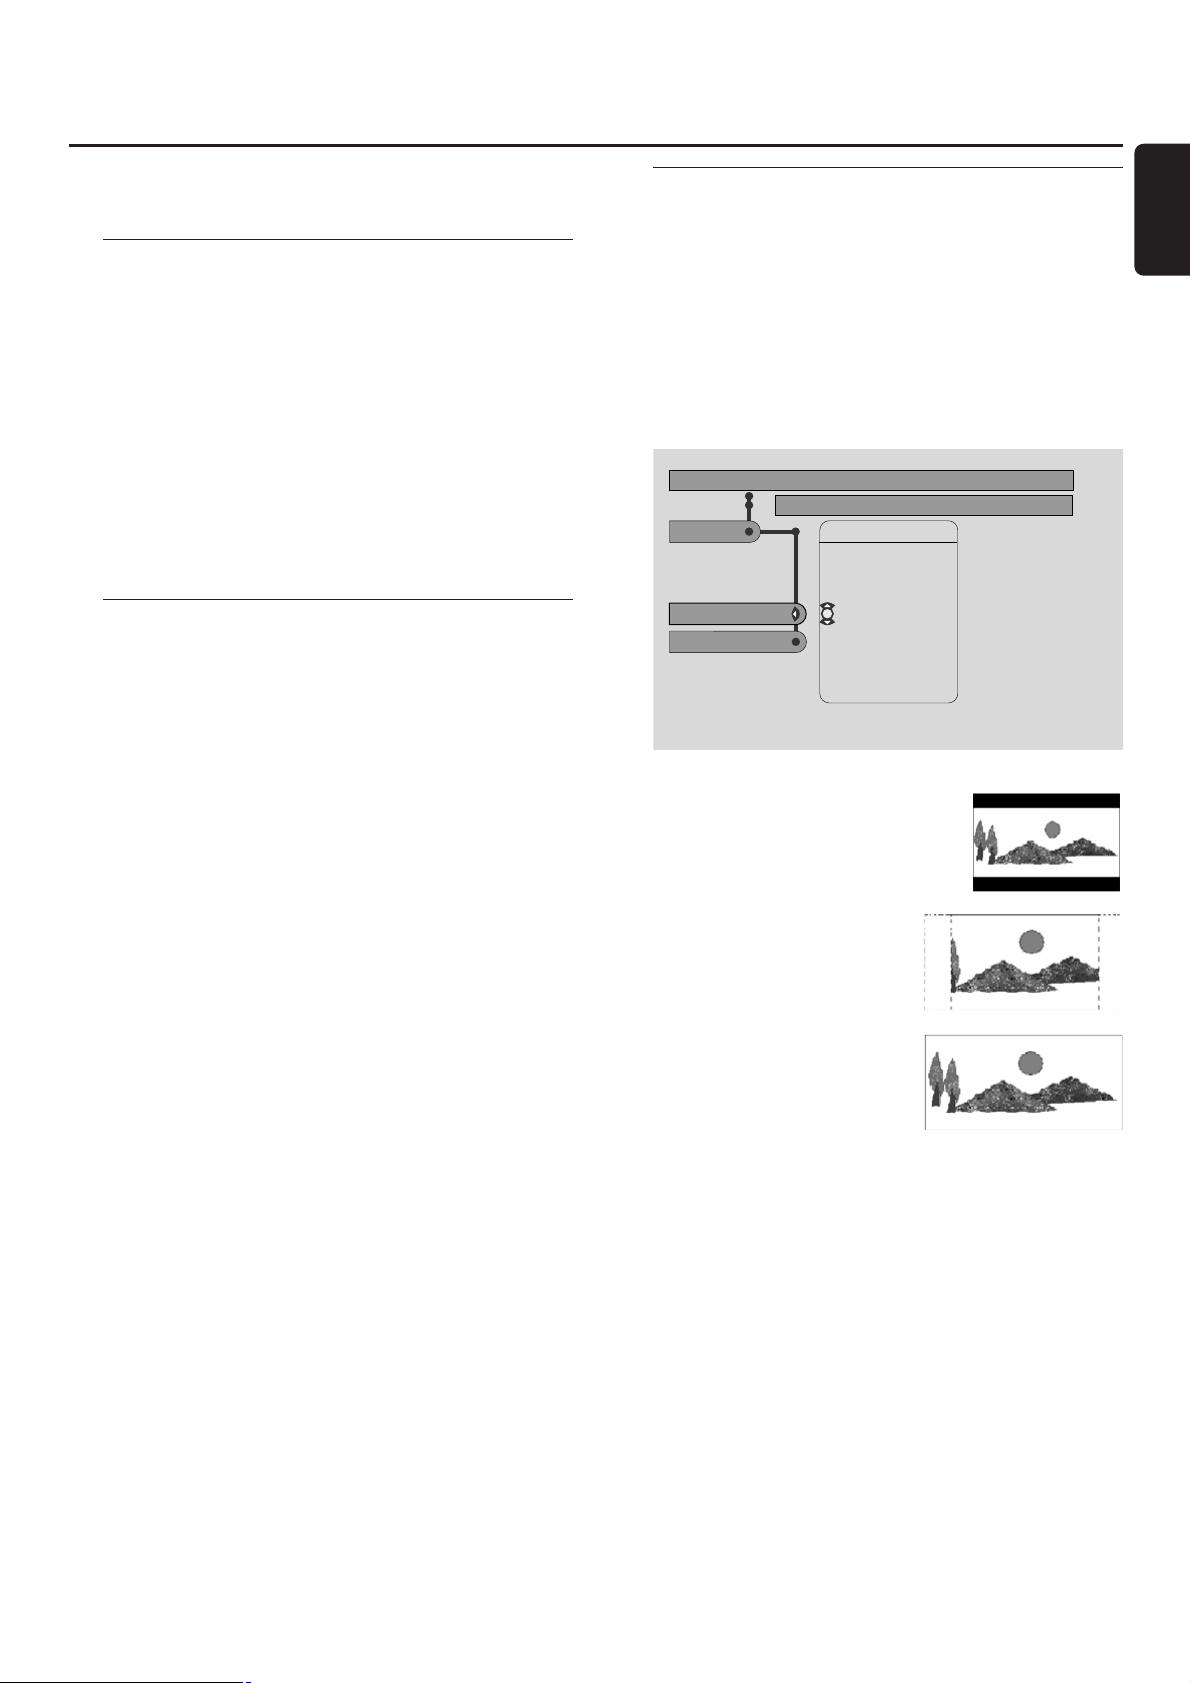
TV Shape
You may set the Streamium System to display a DVD movie
in one of three formats: Letterbox, Panscan, or Widescreen.
The TV Shape you select must be supported by the movie.
If not, the TV Shape settings will not affect the picture.
1 Press SYSTEM MENU on the remote control.
2 DVD: Use 1, 2, 3 or 4 to select Setup ➜ TV ➜
TV Shape.
INTERNET, PC LINK, AUX: Use 1, 2,3 or 4 to select
Picture ➜ TV Settings ➜ TV Shape.
3 Press 2 to enter the menu and 4 to select
– 4:3 Letterbox if you have a
regular TV and the picture will have
black bars at the top and bottom
of the screen,
– 4:3 Panscan if you have a
regular TV and both sides of
the picture will be trimmed
to fit your TV screen,
– Widescreen if you have a
widescreen TV.
Note: Some widescreen TVs may show only part of the System
Menu.This is not an error of the Streamium System settings.
Adjust the screen mode on your TV. See your TV owner’s manual
for details.
Settings for the TV
17
English
DVD Stop
TV View Program
Setup
TV shape
Video output
Surround R Size
Use ± or ≠ to select other options, = to enter the option
TV shape
NTSC
4:3 Panscan
4:3 Letterbox
Widescreen
Page 18

The System Menu allows you to operate features available
in this Streamium System.
Please be aware that the System Menu and the available
features in the menu depend on the selected source. Even
though the System Menus of DVD and INTERNET/PC LINK
look different, many features (e. g.color settings, parental
control, etc.) are available in both menus and work similarly.
Most of the illustrations in this manual show the System
menu when DVD is selected.
1 Press SYSTEM MENU on the remote control to enter the
System menu.
2 Press 1, 2, 3, 4 on the remote control to navigate in the
menu, to select a feature or to change the setting of a
feature.
3 Press 2OK to confirm a setting.
00
To exit the System Menu press SYSTEM MENU.
Using the System Menu
18
English
PQRS
TUV
WXYZ
GHI
JKL
MNO
ABC
DEF
–
-
RETURN
RESUME
MENU
MENU
SYSTEM
DISC
SUBTITLE
ANGLE
ZOOM
AUDIO
FAVORITES
(UN) MARK
VIEW
TV
AUX
DVD
INTERNET
PC LINK
TUNER
Page 19

Adjusting the Volume
● Turn VOLUME on the Streamium System or press VOL+ or
VOL– on the remote control to adjust the volume.
➜ The volume setting will be displayed.
00
To switch off the sound, press MUTE on the remote
control.
00
To switch the sound on again, press MUTE again.
Note:When TV is selected, MUTE will switch off the sound on
your Philips TV.
Adjusting Bass,Treble, Loudness and ClearVoice
1 Press SOUND on the remote control repeatedly to select
BASS, TREBLE, LOUDNESS or CLEARVOICE.
2 Bass or Treble:Within 3 seconds, press 1, 2, 3 or 4 to
adjust the level of bass/treble.
Loudness or ClearVoice: Within 3 seconds, press 1, 2, 3 or
4 to switch Loudness/ClearVoice on or off.
3 Press 2OK on the remote control to confirm.
Note: ClearVoice enhances the voices in surround sound signals
to make dialogues easier to follow. ClearVoice is available for
surround sounds only.
Listening through Headphones
● Connect the headphones plug (6.3mm) to the headphones
jack (;) on the Streamium System.
➜ The sound on all the speakers will be muted.
Adjusting the Surround Sound
To have optimum surround sound ensure that all the
speakers and subwoofers are connected properly.
The available multi-channel sounds include: DTS (Digital
Theater Systems) Surround, Dolby Digital, Dolby Surround
and Dolby Pro Logic 2.
A sursound sound effect will only be available if it is
supported by the disc, the media file, or the media service
you are playing.
The number of speakers that play a sound depends on
the selected surround sound and the sound available on
the disc (e .g. when Stereo is selected, only the front left
and right speakers and the subwoofers will operate).
● Press SURROUND on the remote control repeatedly to
select STEREO, MULTI-CHANNEL (DTS and DOLBY) or HALL.
➜ The selected sound will be displayed.
Notes:
You can also set the Surround sound in the System Menu.
See “Analogue output.”
If you have not connected all speakers, press SURROUND
repeatedly to select STEREO.
Manufactured under license from Dolby
Laboratories. “Dolby”,“Pro Logic”, and
the double-D symbol are trademarks
of Dolby Laboratories.
Manufactured under license from
Digital Theater Systems, Inc . US Pat. No.
5,451,942, 5,956,674, 5,974,380, 5,978,762
and other world-wide patents issued
and pending.“DTS” and “DTS Digital Surround” are
registered trademarks of Digital Theater Systems, Inc.
Copyright 1996, 2000 Digital Theater Systems, Inc.
All Rights reserved.
Volume and sound
19
English
MUTE
USERREPEAT
SHUFFLE
INFO !
RECENT
SOUND
SURROUND
.@
PQRS
TUV
WXYZ
GHI
JKL
MNO
ABC
DEF
–
-
RETURN
RESUME
MENU
MENU
SYSTEM
DISC
Page 20

Internet and PC Link
20 Please visit http://My.Philips.com
English
General information on INTERNET and PC LINK
This Philips Streamium System is a wireless broadband
Internet system. It is compliant with the IEEE 802.11g
standard.The Streamium System can connect to your
wireless or wired home network and play various Internet
media services (e. g. Internet radio, video …) as well as
media files (music, pictures …) stored on the PCs of your
home network.
The Streamium System is upgradable through your Internet
connection. From time to time, new features will be
available and the functionality of this Streamium System will
change.Therefore, this manual offers only a rough overview
of the Internet and PC link functionality.
Please visit “My.Philips.com”for the latest information on
available services and new functionality.
Requirements to use Internet media services
– broadband Internet access (DSL, cable modem),
– an email address.
Please ask your Internet service provider
– if you can connect several devices (computers and the
Streamium System) to your Internet connection,
– if he allows only devices with registered MAC addresses
to connect to the Internet,
– if he charges extra fees for exceeding a certain limit of
transferred data.When you use Internet media services
on a daily basis, you may exceed such a limit. For
example:When you listen to Internet radio (transmitting
at 64 kbit/sec) for about 36 hours, 1 GB (Gigabyte) of
data will be transferred to your Streamium System.
Requirements to use PC LINK
– a computer with Windows® operating system
(Windows 98 SE or higher) or Mac OS® X,
– installation of the Philips Media Manager software on
your computer.
The following file formats stored on your computer are
supported at the time of printing this manual (subject to
change):
– Music: MP3 and MP3pro streams; bit rates:
32–320 kbit/sec, variable bit rate
– Pictures: JPEG, JPEG2000, .bmp, .gif
– Video: MPEG 1, MPEG 2, MPEG 4, DivX® 4.0/5.03
Please visit My.Philips.com for the latest information on
supported operating systems and file formats.
How to ensure a good wireless connection
– Place your wireless router as close as possible to the
center of the area you want to cover.
– Keep the antenna(s) away from large metal objects to
avoid interference.
– Avoid placing the Streamium System close to microwave
ovens.
– Avoid placing this Streamium System directly under or
above the wireless router.
– Refer to the signal strength indication to locate the
best position for the wireless router and the Streamium
System.To display the signal strength indication,
press SYSTEM MENU and select Network. Next,
select Wireless Info ➜ Signal Level.
Network name (SSID)
The network name (SSID) identifies your computer in a
wireless network. Please keep in mind that the network
name is case sensitive.
WEP encryption
WEP encryption protects your wireless network against
intrusion.WEP encryption uses up to 4 encryption keys to
encrypt the data sent in your wireless network.
If you use WEP encryption make sure
– the number and the order of encryption keys on the
Streamium System and on your wireless router/wireless
network adapter are the same,
– all encryption keys you enter have the same format
(either ASCII or HEX format) and the same length
(ASCII, either 5 or 13 characters; HEX,either 10 or 26
digits).
Note: Some wireless routers/wireless network adapters allow
you to type in a passphrase instead of an encryption key. Do
not use passphrases with the Streamium System, since
passphrases are not supported.
Windows is a registered trademark of Microsoft
Corporation in the United States and other countries.
Mac OS is a registered trademark of Apple Computer,Inc.
DivX® is a registered trademark of DivXNetworks, Inc.
Page 21

Internet and PC Link
Please visit http://My.Philips.com 21
English
Before connecting
1 If you have a wired or a wireless home network and you
have not set it up yet,consult the user´s manual of your
(wireless) router on how to set up the network and how
to connect to the Internet.
2 Check if the computers in your network connect properly
to the Internet and to each other.If you face any problems
connecting to the Internet, consult your Internet service
provider.
3 Install the Philips Media Manager software on the PCs of
your network:
Either download the latest version at “My.Philips.com” or
install it from the supplied CD-ROM. Please refer to the
installation guide of the Media Manager software for
installing the software and making media files of your PCs
available to the Streamium System.
4 Switch on the TV and set the TV to the correct audio/video
channel for the Streamium System. Such channels may be
called AUX or AUXILIARY IN, AUDIO/VIDEO or A/V IN,
EXT1, EXT2 or EXTERNAL IN, etc.These channels are
often near channel 00.
Note: If you did not connect the Streamium System to a TV,
observe the display on the Streamium System.
5 Switch on the Streamium System.
6 Depending on your home network, continue with one of
the following 4 sections:
– A) Wireless home network with a wireless router,
– B) PC with a wireless network card or with a wireless
USB adapter,
– C) Wired home network with a router,
– D) PC only with a network interface (Ethernet) card.
Check the illustrations at the beginning of each section to
find out which of the 4 cases describes your home network
best.
A) Wireless home network with wireless router
Follow these instructions if you have
– a wireless router and
– broadband Internet access.
1 Press INTERNET on the remote control.
➜ The Streamium System tries to connect automatically to
a wireless network.
2 If the Streamium System connects to a wireless network, it
will display its network name (SSID) briefly. Please verify
that the displayed network name corresponds to the
network you want to join. If you want to connect to
another network, press SYSTEM MENU and select
Network Settings ➜ Network Config. to change the
wireless network settings.
After connecting to the Internet the Streamium System
will ask you to enter your email address.Continue with
“Registration.”
If the Streamium System fails to connect, read the message
on the TV screen and continue with one of the following
paragraphs.
If ‘Choose your wireless network’ appears
Several wireless networks or one encrypted network are
available.
1 Press 4 or 3 repeatedly to select the network you want to
join.
If the desired network does not appear,press the
red button (SUBTITLE) on the remote control to select
manual and continue with “If ‘Enter wireless network
name (SSID)’ appears.”
2 Press the green button (ANGLE) on the remote control to
confirm the selected network.
3 If the selected network is WEP encrypted, continue with
“If the network is WEP encrypted.”
If the Streamium System connects to the Internet, continue
with “Registration.”
broadband internet
Page 22

Internet and PC Link
22 Please visit http://My.Philips.com
English
If ‘Are you using a wireless (WiFi/802.11) or a
wired (Ethernet) network connection?’ appears
● Press the red button (SUBTITLE) on the remote control to
connect to a wireless network.
If ‘Enter wireless network name (SSID)’ appears
1 Press the red button (SUBTITLE) on the remote control to
search again for all available networks or, use the number
buttons to enter the network name (SSID) of your wireless
network.
The network name is case sensitive. Press the number
buttons repeatedly to change from lower to upper case
characters. On the display of the Streamium System casesensitive characters are distinguished by size. For example,
“Gg” will be shown as “GG.”
2 Press 2OK to confirm.
➜ Are you using an Access Point or Ad-Hoc
network? appears.
3 Press the red button (SUBTITLE) on the remote control to
select Access Point.
➜ Are you using WEP encryption on your wireless
network? appears.
4 If your network is not WEP encrypted, press the red button
(SUBTITLE) on the remote control to connect to the
Internet.
If the network is WEP encrypted, press the green button
(ANGLE) on the remote control.
If the network is WEP encrypted
You will be asked to enter up to 4 encryption keys. Check
the setup menu of your wireless router to see which
encryption keys are used.
1 Use the number buttons to enter the encryption key. Next,
press 2OK to confirm.
2 Repeat step 1 for all encryption keys. If not all of the
4 encryption keys are used in your network, enter “0”
(zero) for no encryption key.
If the Streamium System does not connect to the
Internet
The Streamium System may not connect to the Internet
because
– a connection error has occurred. Press INTERNET again
to reconnect.
– the wireless router is not connected to the Internet.
Check if the computers in your network have access to
the Internet.
– the IP settings are not correct. Continue with “If ‘An IP
address could not be obtained automatically.Would you
like to enter your network settings manually?’ appears.”
– your Internet service provider is using a proxy. Continue
with “If ‘The system could not connect to the server.’
appears.”
If ‘An IP address could not be obtained
automatically.Would you like to enter your
network settings manually?’ appears
1 Press the red button (SUBTITLE) on the remote control to
connect again to the Internet automatically. Always try this
solution first. If necessary,repeat this step several times.
2 If the Streamium System connects to the Internet, continue
with chapter “Registration.”
If the Streamium System does not connect to the Internet,
press the green button (ANGLE) on the remote control to
enter the IP settings manually. Please contact your Internet
service provider to get all the information you need below.
Next, you will be asked to enter
– the IP address for the Streamium System
– the netmask: Make sure all computers in your network
as well as the Streamium System have the same
netmask. If you are not sure, try 255.255.255.0.
– Default Gateway: the IP address of your router
– two DNS.
Use the number buttons on the remote control to enter
each setting and press 2OK to confirm each setting.
If ‘The system could not connect to the server.’
appears
Maybe the system does not connect to the Internet
because your Internet service provider uses a proxy.You
need to enter the proxy name and proxy port. Please
contact your Internet service provider to get this
information.
1 Press the green button (ANGLE) on the remote control if
your Internet service provider uses a proxy.
2 Use the number buttons to enter the proxy name. Next,
press 2OK.
3 Use the number buttons to enter the proxy port. Next,
press 2OK.
➜ The Streamium System tries to connect to the Internet.
PC LINK connection
● After the Streamium System has connected successfully to
the Internet, press PC LINK to connect to the PCs in your
network.
The Streamium System may not connect to the PC
because
– a connection error has occurred. Press PC LINK again.
– you have not yet installed the Philips Media Manager
software on your PC.
– the PC is switched off.
Page 23

Internet and PC Link
Please visit http://My.Philips.com 23
English
B) PC with a wireless network card or with a wireless USB adapter
Follow these instructions
– if you have no router and
– if you have a PC with a wireless network card or with a
wireless USB adapter.
You will be able to access media files (e. g. MP3 files) stored
on your PC.
1 Make sure the network settings of the wireless network
card on your PC are set to “ad-hoc mode” (“peer-to-peer”
or “computer-to-computer”).
2 If necessary,switch on your PC.
3 Press PC LINK on the remote control.
➜ The Streamium System tries to connect automatically to
a wireless network.
4 If the Streamium System connects to a wireless network, it
will display its network name (SSID) briefly. Please verify
that the displayed network name corresponds to your
PC. If it does not, press SYSTEM MENU and select
Network Settings ➜ Network Config. to change the
wireless network settings.
If the Streamium System connects to the PC, the computer
name of your PC will be displayed. Please keep in mind that
“network name” (SSID) and “computer name” are not the
same.
If the Streamium System fails to connect, read the message
on the TV screen and continue with one of the following
paragraphs.
If ‘Choose your wireless network’ appears
Several wireless networks or one encrypted network are
available.
1 Press 4 or 3 repeatedly to select the network name of
your PC.
If the network name of your PC does not appear, press
the red button (SUBTITLE) on the remote control to select
manual and continue with “If ‘Enter wireless network
name (SSID)’ appears.”
2 Press the green button (ANGLE) on the remote control to
confirm the selected network.
3 If the selected network is WEP encrypted, continue with
“If the network is WEP encrypted.”
If ‘Are you using a wireless (WiFi/802.11) or a
wired (Ethernet) network connection?’ appears
● Press the red button (SUBTITLE) on the remote control to
connect to a wireless network.
If ‘Enter wireless network name (SSID)’ appears
1 Press the red button (SUBTITLE) on the remote control to
search again for all available networks or, use the number
buttons to enter the network name (SSID) of your PC.
The network name is case sensitive. Press the number
buttons repeatedly to change from lower to upper case
characters. On the display of the Streamium System casesensitive characters are distinguished by size. For example,
“Gg” will be shown as “GG.”
2 Press 2OK to confirm.
➜ Are you using an Access Point or Ad-Hoc
network? appears.
3 Press the green button (ANGLE) on the remote control to
select Ad-Hoc network.
➜ Are you using WEP encryption on your wireless
network? appears.
4 If your network is not WEP encrypted, press the red button
(SUBTITLE) on the remote control to connect to your PC.
If the network is WEP encrypted, press the green button
(ANGLE) on the remote control.
If the network is WEP encrypted
You will be asked to enter up to 4 encryption keys. For the
encryption keys check the network settings of the wireless
network card on your PC.
1 Use the number buttons to enter the encryption key. Next,
press 2OK to confirm.
2 Repeat step 1 for all encryption keys. If not all of the
4 encryption keys are used in your network, enter “0”
(zero) for no encryption key.
If the Streamium System does not connect to
your PC
The Streamium System may not connect to the PC
because
– a connection error has occurred. Press PC LINK again.
– you have not yet installed the Philips Media Manager
software on your PC.
– the IP address of the Streamium System and that of your
PC are not in the same subnet.
– the PC is switched off.
wireless
USB adapter
Page 24

C) Wired home network with a router
Follow these instructions if you have a home network with
a router and broadband Internet access.
1 Connect ETHERNET on the Streamium System to a
LAN port of your router with the supplied ethernet cable.
2 Press INTERNET on the remote control.
If the Streamium System connects to the Internet you will
be asked to register with “My.Philips.com.” Continue with
chapter “Registration.”
If the Streamium System does not connect to the
Internet
The Streamium System may not connect to the Internet
because
– a connection error has occurred. Press INTERNET again
to reconnect.
– the router is not connected to the Internet. Check if the
computers connected to the router have access to the
Internet.
– the IP settings are not correct. Continue with “If ‘An IP
address could not be obtained automatically.Would you
like to enter your network settings manually?’ appears.”
– your Internet service provider is using a proxy. Continue
with “If ‘The system could not connect to the server.’
appears.”
If ‘An IP address could not be obtained
automatically.Would you like to enter your
network settings manually?’ appears
1 Press the red button (SUBTITLE) on the remote control to
connect again to the Internet automatically. Always try this
solution first. If necessary,repeat this step several times.
2 If the Streamium System connects to the Internet, continue
with chapter “Registration.”
If the Streamium System does not connect to the Internet,
press the green button (ANGLE) on the remote control to
enter the IP settings manually. Please contact your Internet
service provider to get all the information you need below.
Next, you will be asked to enter
– the IP address for the Streamium System
– the netmask: Make sure all computers in your network,
as well as the Streamium System, have the same
netmask. If you are not sure, try 255.255.255.0.
– Default Gateway:The IP address of your router
– two DNS.
Use the number buttons on the remote control to enter
each setting and press 2OK to confirm each setting.
If ‘The system could not connect to the server.’
appears
Maybe the system does not connect to the Internet
because your Internet service provider uses a proxy.You
need to enter the proxy name and proxy port. Please
contact your Internet service provider to get this
information.
1 Press the green button (ANGLE) on the remote control if
your Internet service provider uses a proxy.
2 Use the number buttons to enter the proxy name. Next,
press 2OK.
3 Use the number buttons to enter the proxy port. Next,
press 2OK.
➜ The Streamium System tries to connect to the Internet.
PC LINK connection
● After the Streamium System has connected successfully to
the Internet, press PC LINK to connect to the PCs in your
network.
The Streamium System may not connect to the PC
because
– a connection error has occurred. Press PC LINK again.
– you have not yet installed the Philips Media Manager
software on your PC.
– the PC is switched off.
Internet and PC Link
24 Please visit http://My.Philips.com
English
broadband internet
router
Page 25

Internet and PC Link
Please visit http://My.Philips.com 25
English
D) PC only with a network interface (Ethernet) card
Follow these instructions if you want to connect the
Streamium System directly to your PC without using a
wireless connection.
1 Connect ETHERNET on the Streamium System to the
ethernet jack of the PC with a cross over ethernet cable
(not supplied).
Only use a cross over ethernet cable to connect the
Streamium System directly to the PC.
2 If necessary,switch on your PC.
3 Wait for 10 seconds, then press PC LINK on the remote
control.
➜ If the Streamium System connects to the PC, the
computer name of your PC will be displayed.
If the Streamium System does not connect to
the PC
The Streamium System may not connect to the PC
because
– a connection error has occurred. Press PC LINK again.
– you have not yet installed the Philips Media Manager
software on your PC.
– the PC is switched off.
– the IP address of the Streamium System and that of your
PC are not in the same subnet.
cross over
ethernet cable
Page 26

Internet and PC Link
26 Please visit http://My.Philips.com
English
Registration
When the Streamium System connects to the Internet for
the first time, you will be asked to enter your email address.
1 Use the number buttons on the remote control to enter
your email address. If you mistyped, press 1 to delete the
character you have entered.
00
To exit without registering, press 9.
Note: Internet services will be available only if you register.
2 Next, press 2OK to send your email address.
➜ Within a short time, you will receive an email with
instructions on how to create your user´s account at
“My.Philips.com.”
3 Create the user´s account at “My.Philips.com.”
4 Next, press INTERNET on the the remote control to
connect to the Internet.
➜ The available media types (music, video, …) appear.
About “My.Philips.com”
To activate online services, every owner of a Streamium
System has to register with My.Philips.com.This website
allows you to:
– select and manage online media services
– manage your Internet favorites
– add music streams (currently MP3, MP3pro) to the
Streamium System that are not offered through the
available Internet service providers
– find links to background information and online support
– download PC Link software
– purchase media
Prerequisites for My.Philips.com:
– a Streamium System
– a computer
– access to the Internet
– an Internet browser
– an email address
To access My.Philips.com, open your Internet browser and
type in: http://my.philips.com
Reviewing and changing network settings
The Streamium System tries to connect automatically to
your network. In case of any problems or after changing
your network, you can change/review the settings of your
network here.
1 If necessary,press INTERNET or PC LINK. Next, press
SYSTEM MENU.
2 Press 4 repeatedly to select Network. Next, press 2.
3 Press 4 or 3 repeatedly and select
– Network Type: to switch between a wired and a
wireless network,
– Network Config.: to enter the network settings of
your network (IP address, netmask, gateway and DNS),
– Wireless Config.: to enter the settings of your
wireless network (network name (SSID), channel
number…)
– Encryption Config.: to switch WEP encryption on/off
and to enter the encryption keys
– Proxy Config.: to enter the proxy name and proxy
port
– Network Info.:to review the network settings
(IP address, netmask, …),
– Wireless Info.:to view information about the wireless
network (network name, signal level, MAC address of
the wireless card in your Streamium System, …).
4 Next, press 2 to enter the selected menu.
Page 27

Internet and PC Link
Please visit http://My.Philips.com 27
English
Internet services
The Internet is a rapidly evolving and changing medium.
Available media services and media service providers may
change with time.This manual gives a rough overview on
how to select a media service. Please visit “My.Philips.com”
for the latest list of services and service providers.
1 Press INTERNET on the remote control.
➜ The available media types (music, video, …) appear.
2 Press 3 or 4 to select a media type. Next, press 2.
➜ The available service providers for the selected media
type appear.
3 Press 3 or 4 to select a service provider. Next, press 2.
➜ The following menus will depend on the service provider.
For example, you may select among different categories
of music or video clips.
4 Press 2 to enter a category. Press 3 or 4 to select a
service (e. g. an Internet radio station …). Next, press 2OK
to start the selected service.
00
To go back to the previous menu, press 1.
PC LINK
With PC LINK you get access to the media files (music,
pictures, video) stored on the PCs of your home network
and play them on your Streamium System. Select the media
files directly on the Streamium System.
For the latest information on the supported media formats
please visit “My.Philips.com.”
To use PC LINK
– your PC must be switched on.
– the Philips Media Manager software must be installed on
the PCs of your home network. Please refer to the
installation guide of the Media Manager software for
installing the software and making media files of your
PCs available to the Streamium System.
1 Press PC LINK to connect to the PCs of the network.
➜ The PCs of your home network on which you installed
the Philips Media Manager software appear.
Notes:
If No PCs found appears, the Streamium System has not
been able to connect to the PCs. Repeat step 1 until the unit
connects properly or check your network settings.
If you do not use a router, only one PC will be available.
2 Press 4 or 3 repeatedly to select a PC. Next, press 2.
➜ The available media types (music, pictures, video) on the
computer appear.
3 Press 4 or 3 repeatedly to select a media type.
Next press 2.
➜ The available media files appear.
4 Press 4 or 3 repeatedly to select a file, then press 2OK to
play it.
Page 28

Internet and PC Link
28 Please visit http://My.Philips.com
English
Using the colored multifunction buttons – SUBTITLE,ANGLE, ZOOM and AUDIO
The function of the colored buttons on the remote control
(SUBTITLE,ANGLE, ZOOM and AUDIO) and of the
2 multifunction buttons on the Streamium System depend
on the media type you are using.The display on the TV
screen will indicate which buttons have a special functionality.
INFO!
Some Internet media service providers offer additional
information about the media that is currently playing, e. g.
the track/artist played on the selected Internet radio
station.The availability of INFO! depends on the media and
the media service provider.
● Press INFO! to receive an email from My.Philips.com with
information about the media currently played.
Notes:
The requested information is also available at your
My.Philips.com account.
If no information is available, NO INFO AVAILABLE
appears.
FAVORITES
To handle the large amount of Internet services easily, you
can add Internet services to your favorites.The favorites
feature is available for INTERNET services only.
Adding a service to your favorites
1 Select an Internet service (Internet radio station, movie …).
➜ indicates that the service is already a favorite.
➜ indicates that the service is not a favorite yet.
2 Press (UN)MARK FAVORITES to add the service to
your favorites.
00
To remove a favorite Internet service from your favorites,
select the service and press (UN)MARK FAVORITES
twice within 2 seconds.
Note:There may be some media services that you cannot add
to your favorites.
Accessing your favorites
1 If necessary,press INTERNET.
2 Press VIEW FAVORITES to view your favorites.
00
To view the favorites of one media type only (e. g. music),
press the red multifunction button (SUBTITLE). Press 3 or
4 repeatedly to select the media type. Next, press 2OK to
confirm.
3 Select any favorite and press 2OK to play it.
ZOOM
VIEW
AUX
AUDIO
DISC
MENU
RESUME
TV
(UN) MARK
FAVORITES
ANGLE
SUBTITLE
SYSTEM
MENU
RETURN
Page 29

Internet and PC Link
Please visit http://My.Philips.com 29
English
Recently used media services – RECENT
RECENT lets you review and quickly access the media
services you have been using recently. RECENT displays the
last 20 media services you have been using.RECENT is
available for INTERNET only.
1 Press RECENT to display the media services you have used
recently.
2 Press 4 or 3 repeatedly to select a media service.
3 Press 2OK to start the media service.
00
To switch RECENT off and return to the normal display,
press RECENT again.
Multiple users – USER
You can “personalize” this Streamium System for various
users. Each user will have his own user account at
My.Philips.com, his own favorites, and get information to his
email address when pressing INFO!
Adding a new user
1 Press USER to display the users of this Streamium System.
2 Press the green multifunction button (ANGLE) on the
remote control to add a new user.
3 Use the number buttons to enter the email address of the
new user.
4 Press 2 OK to confirm.
5 If you entered the email address of a user already
registered with “My.Philips.com”:
Use the number buttons to enter the user´s password.
Next, press OK.
If you entered the email address of a user who has
not registered yet:
An email will be sent to the new user with further
instructions on how to register.The user will be available on
this Streamium System shortly after registration.
Selecting a user
1 Press USER to display the users of this Streamium System.
2 Press 3 or 4 repeatedly to select a user.
3 Press 2OK to confirm.
➜ The nickname of the selected user appears.
Removing a user
1 Press 3 or 4 repeatedly to select the user you want to
remove from the unit.
2 Press the red multifunction button (SUBTITLE) on the
remote control to remove the user.
3 Enter the password of the primary user, i. e. the user who
was the first to register this unit.
4 Press 2OK to confirm.
➜ The user will be removed from the unit.
Notes:
You cannot remove the primary user on the unit. But you
can delete the account of the primary user at “My.Philips.com”
or change its personal data at any time.
Some features (e .g . Parental level) are only available to the
primary user of the unit.
Page 30

General Information
When referring to this manual, remember …
[DVD] Indicates the feature may be on some Digital Video
Discs.
[CD] Indicates the feature may be on some Audio
Compact Discs.
[VCD] Indicates the feature may be on some Video
Compact Discs.
[MP3] Indicates the feature may be on some MP3 Discs.
Playable Discs
This system will play Digital Video Discs (DVDs),
(Super) Video CDs, and Audio CDs.This system will also
play MP3 files (music tracks compressed with MPEG 1
Audio Layer 3 technology) recorded onto a Compact
Disc Recordable (CD-R) or a Compact Disc Rewritable
(CD-RW).
Discs having the following logos should play on this
Streamium System.
This Streamium System supports only the first session of
multi-session discs.
Important!
1) This system is designed for regular discs.
Therefore, do not use any accessories such as disc
stabilizer rings or disc treatment sheets, etc. as
offered on the market, because they may cause
jamming of the changer mechanism.
2) Do not load more than one disc into one
disc tray.
Region Codes
DVDs must be labelled for ALL regions or for Region 1
in order to play on this system.You cannot play discs that
are labelled for other regions.
The number inside the globe refers to a region of the
world. A disc encoded in a specific region format can play
only on DVD Players that have the same region code. So, if
a disc is labelled for Region 2, you cannot play that DVD on
this Streamium System (because it is a Region 1 system).
Available disc Features
Features described in this manual may not be available on
every disc. If the feature is not on the disc, you cannot use
the system to make the feature available.An “X” will appear
in the top left corner of the TV screen if you try to access a
feature that is not on the disc.
Disc
30
English
Page 31

Disc Playback [DVD/VCD/CD]
1 Press DVD on the remote control to turn on the system.
2 Turn on your TV. Set it to the correct Video In channel.
➜ You should see the Streamium System’s blue background
screen on the TV.
3 Press DISC 1 (OPEN/CLOSE /) on the Streamium System
to open disc tray 1. Load your disc in the tray,with the label
facing up and the shiny side facing down. If the disc is twosided, ensure that the side you wish to play is facing up.
4 Press DISC 1 (OPEN/CLOSE /) again to close the tray.
00
To load the rest of the disc trays, press the respective
DISC (OPEN/CLOSE /) button.Then press the same
button again to close the disc tray.
5 Press DVD on the remote control repeatedly or rotate
SOURCE on the Streamium System to select the disc that
you want to play.
6 If playback does not start automatically, press 2OK.
00
If DVD playback does not start automatically, a disc menu
may appear. If the title or chapter selections are numbered,
press a Number button on the remote control to select an
item. Or press 1, 2, 3, 4 to select an item for playing, then
press 2OK.
00
Press ; to pause playback temporarily.To resume playback,
press 2OK.
7 Press 9 to stop playback.
Note:You can only open one disc tray at a time. If the current
disc tray is open and you attempt to open another disc tray,
the first disc tray will close automatically before the second disc
tray can be opened.
Selecting next disc
00
Press DVD on the remote control or rotate SOURCE on
the Streamium System to select the next disc you wish to
play.
Resume [DVD/VCD]
The resume feature is available with the last five DVDs and
(Super) Video CDs you played.
1 Press 9 on the remote control to stop playback.
➜ Resume feature is activated.
➜ The next time you start playing the same disc, play will
resume at the same point at which you last stopped it.
00
However, if you press 9 twice to stop disc playback, resume
will not be activated.The next time you start playing the
same disc, play will start at the beginning of the disc.
00
If the resume symbol appears on the TV screen when you
reload a disc, play will resume from the point at which you
last stopped playback if you press 2 while the resume
symbol is still displayed.
Note: Resume may not be available with some discs.
Chapter Preview [DVD]
This feature allows you to preview the first 10 seconds of
each DVD chapter.
1 Press SYSTEM MENU. Next, select Toolbar ➜ View ➜
Chapter Preview.
2 Press 2 to select On. Next, press SYSTEM MENU to exit
the system menu.
➜ The first 10 seconds of every chapter will be shown.
After that, playback will stop.
00
To switch Chapter Preview off and continue with
normal playback, press 2OK.
Disc
31
English
DVD
SUBTITLE
SYSTEM
MENU
TV
INTERNET
(UN) MARK
ANGLE
FAVORITES
PC LINK
ZOOM
TUNER
AUX
VIEW
AUDIO
DISC
MENU
RETURN
RESUME
Page 32

Chapter/track selection
[DVD/VCD/CD]
1 Press T briefly during playback to go to the next
track/chapter.
Press S briefly to return to the beginning of the current
track/chapter.
Press S repeatedly and quickly to step back to previous
tracks/chapters.
2 To go directly to any track/chapter during playback, press
the number buttons to enter the track/chapter number.
➜ The System Menu Bar may appear briefly.It will
disappear once the new track/chapter starts to play.
Make sure the track/chapter number you enter is available
on the disc.When you enter an invalid number
➜ an “X” may appear in the top left corner of the TV
screen.
➜ the current track or Chapter will continue to play.
➜ an incorrect track/chapter may begin to play.
Forward and Reverse Searching
[DVD/VCD/CD/MP3]
You can do a forward or reverse searching while playing
back a DVD,VCD, CD or MP3 disc.
1 On a DVD or (Super) Video CD, to search the disc at four
times the normal speed, press and hold S or T for
about two seconds during playback.To search at 32 times
the normal speed, press and hold S or T again
(DVD only).
➜ The sound will be muted.
On an Audio CD, to search the disc at four times the
normal speed, press and hold S or T for about two
seconds during playback. Sound will be intermittent.To
search at eight times the normal speed, press and hold
S or T again.
➜ The sound will be muted.
2 To end the search, press 2OK to resume playback or press
9 to stop playback.
Note:This feature is available in the System Menu as Fast.
Searching in the System Menu
In the system menu, additional search features are available:
Time Search, Fast Motion, Slow Motion.
1 Press SYSTEM MENU.
2 Select Toolbar ➜ Search.
Time Search [DVD/VCD]
Time Search lets you choose a specific elapsed playing time
at which you want to begin disc playback.
1 Select Time.
➜ Playback will pause.
➜ A time edit box will appear, showing the elapsed playing
time of the current disc, or the point at which the disc is
currently.
2 Press the number buttons to enter the time at which you
want playback to begin. Enter the hour, minute, and second
from left to right in the box.
➜ Make sure the time you enter is within the total playing
time of the current Title/track.
3 Press 2OK.
➜ Playback will start at the point you have selected after a
few seconds.
00
If you enter an invalid time, the incorrect information will
blink in the time edit box. Enter a time that is available in
the current Title/track and press 2OK again.
Disc
32
English
DVD Stop
Search View Program
Toolbar
Time
Fast
Slow
Frame by Frame
Page 33

Fast, Slow [DVD/VCD]
1 Select the speed:
Fast: -32x, -8x, -4x (backward), or 1x, 4x, 8x, 32x (forward).
-32x, 32x … DVD only.
Slow: -1, -1/2, -1/4 or -1/8 (backward), or 1/8, 1/4, 1/2 or 1
(forward).
➜ Sound will be muted during Fast (Slow) Motion playback.
00
Press ; on the remote control to pause the picture.
2 To return to normal playback, press 2OK.
Notes:
Start forward Fast Motion playback simply by pressing 2
during playback. Press 2 repeatedly to choose a Fast Motion
speed.
If you reach the beginning of the disc or title during a reverse
search, regular playback will resume automatically.
Still Picture/Frame-by-Frame Playback [DVD/VCD]
This feature allows you to view individual frames as still
pictures during playback.
1 During playback, press ; on the remote control.
➜ A still picture will appear on the TV screen.
2 To advance the still picture one frame at a time, press ;
repeatedly.
3 To resume normal playback, press 2OK.
Notes:
You can also pause the picture by pressing 3 during
playback.
Frame-by-Frame playback is also available in the System
Menu.
Repeat [DVD/VCD/CD]
You may play a chapter,track, title, or entire disc repeatedly.
1 During playback, press REPEAT on the remote control
repeatedly to choose a repeat mode.
00
To repeat the current chapter/track, press REPEAT once.
➜ REPEAT CHPT or REPEAT TRK will appear on the
display of the Streamium System.
00
To repeat the current title, press REPEAT repeatedly until
REPEAT TITL appears on the display of the Streamium
System.
00
To repeat the entire disc, press REPEAT repeatedly until
REPEAT DISC appears on the display of the Streamium
System.
2 To cancel repeat playback, press REPEAT repeatedly until
REPEAT OFF appears on the display of the Streamium
System.
Notes:
Repeat can only be used for the selected disc tray.
Repeating more than one disc tray is not possible.
Shuffle [DVD/VCD/CD]
On a DVD, this shuffles the playing order of chapters within
a title, if the title includes more than one chapter. On an
Audio CD and (Super) Video CD, activating Shuffle will play
all the tracks in random order.
1 Press SHUFFLE on the remote control.
➜ SHUFFLE will appear briefly on the display of the
Streamium System.The tracks or chapters will begin
playing in random order.
2 To return to normal order playback, press SHUFFLE again.
➜ Regular playback will resume from the current
track/chapter.
➜ SHUFFLE OFF will appear briefly on the display of the
Streamium System.
Notes:
Shuffle can only be used for the selected disc tray.
Shuffling more than one disc tray is not possible.
Disc
33
English
Page 34

Program [DVD,VCD, CD,MP3]
Program allows you to play your favorite titles/chapters or
tracks/indexes in the order you select.
1 Press SYSTEM MENU.
2 Select Toolbar ➜ Program.
Programming tracks/chapters/titles
1 To program your favorite tracks, chapters, or titles, press
4 repeatedly to select Tracks. Next, press 2.
2 Press 3 or 4 to select the desired track, chapter, or title,
then press 2OK.
➜ The selected track, chapter, or title will be stored.
00
To store other tracks, chapters or titles, repeat step 2.
3 Press 1 to exit the menu.
Playing a program
1 Press 3 to select Program.
2 Press 2 repeatedly to select On. Next, press 2OK.
➜ FTS on (Favorite track selection) appears.
Your program will play.
00
To return to normal playback, select Toolbar ➜
Program ➜ Program. Press 2 repeatedly to select off.
Next, press 2OK.
➜ FTS off appears.
Reviewing / Deleting programmed tracks
Playlist allows you to view the tracks, chapters or titles of
your program.
1 Press 4 repeatedly to select Playlist. Next,press 2.
2 Press 3 or 4 repeatedly to scroll through the tracks,
chapters, or titles of your program.
00
To delete a track, chapter or title from your program, press
3 or 4 repeatedly to select the track, then press 2OK.
➜ The selected track, chapter or title will be deleted from
your program.
3 Press 1 to exit the menu.
Note: Playlists generated on a computer and stored on the
CD-ROM are not supported.
Clearing the entire program
1 Press 4 repeatedly to select Clear all.
2 Press 2 to clear the entire program.
➜ Cleared will be displayed and the program will
be cleared.
Disc
34
English
DVD Stop
Program View Program
Toolbar
Program
Tracks
Playlist
Clear all
Use ≠ or ± to select other options, = to enter the option
Page 35

Disc Menu [DVD]
1 Press DISC MENU on the remote control.
➜ If the current title of the current disc has a menu, the title
menu will appear on the screen.
➜ Otherwise, the main DVD disc menu will appear.
The menu may list camera angles, spoken language and
subtitle options, chapters for the title, or other disc
features.
2 Press 1 2 3 4 on the remote control to select the desired
items in the menu, then press 2OK.
3 If you do not start playback from the menu, press
DISC MENU to exit.
Audio [DVD,VCD]
Some DVDs are recorded in different languages.You may
be able to hear the same movie dialog in English, French,
Spanish, etc.
1 Press AUDIO on the remote control during DVD playback.
2 Press AUDIO repeatedly within five seconds to see the
different languages available. Or press 3 or 4 to see the
different languages.
➜ The language you select will be audible in a few seconds.
3 Press 2OK to exit.
Note:Audio is also available in the System Menu.
Subtitles [DVD]
Some DVDs include subtitles in different languages.
You can choose subtitles only if they are available on
the DVD.
1 Press SUBTITLE on the remote control during DVD
playback.
2 Press SUBTITLE repeatedly within five seconds to see
the different subtitle languages. Or press 3 or 4 to see
the different subtitle languages.
➜ The language may be abbreviated or numbered.
➜ Subtitles will appear after a few seconds.
3 Press 2OK to exit.
Note: Subtitle is also available in the System Menu.
Camera Angle [DVD]
Some DVDs include scenes recorded from different angles.
You can watch these different angles if the angle symbol
F ANGLE appears during DVD playback. If the DVD was
not recorded with different angles, this feature is not
available. Check the DVD case first to see if multiple angles
are available.
1 During DVD playback, F ANGLE will appear at the top
of the TV screen if multiple angles are available.
2 Press ANGLE on the remote control during DVD playback.
➜ The available angles will appear.
3 Press ANGLE or 4 or 3 repeatedly to select the angle
from which you want to watch the current scene.
4 Press 2OK to exit.
Note:Angle is also available in the System Menu.
Zoom [DVD]
This feature lets you enlarge the video image during
playback and pan through the enlarged image.
1 Press ZOOM on the remote control during playback.
➜ Four arrows and a yellow dot appear on the TV screen.
2 While the arrows and the yellow dot are displayed:
Press 2OK repeatedly to select the zoom factor: Zoom 1,
Zoom 2, Zoom 4, Zoom 8.
Press 1234to move to the left, right, top, or bottom of
the picture.
3 Press ZOOM to exit.
00
To return to normal playback, press ZOOM.Next, press
2OK repeatedly to select Zoom 1. Press ZOOM again.
Note: Zoom is also available in the System Menu.
Disc
35
English
Zoom 4
Use ≠=+± to pan, OK to zoom in, RETURN to zoom out, ZOOM
key to exit.
Page 36

Selecting the menu language, country, audio language and subtitle language
These features are only available when DVD is selected.
1 Press SYSTEM MENU on the remote control.
2 DVD: Select Setup ➜ Language.
Menu Language [DVD,VCD, CD, MP3]
Select your preferred language for the System menu.
● Press 3 or 4 to select the desired language , then press
2OK to confirm.
Country [DVD,VCD, CD, MP3]
Select the country where this Streamium System is used.
● Press 3 or 4 to select the country, then press 2OK to
confirm.
Default Audio (DVD)
Select the audio language you prefer whenever you play
any DVD. If the default language is not available on the
DVD, the first audio language on the disc will be selected.
● Press 3 or 4 to select the desired default audio language,
then press 2OK.
Default Subtitle (DVD)
Select the subtitle language you prefer whenever you play
any DVD. If the default subtitle is not available on the DVD,
the first subtitle on the disc will be selected.
● Press 3 or 4 to select the desired default subtitle language,
then press 2OK.
Playback Control (PBC) [VCD]
This feature is available only for (Super) Video CDs
compatible with PBC. (Super) Video CDs with Playback
Control offer additional features. Check the (Super) Video
CD case for details.
Switching PBC on/off [VCD]
1 Press SYSTEM MENU on the remote control.
2 Select Setup ➜ Features ➜ PBC.
3 Press 2 repeatedly to switch PBC on or off.
Next, press 2OK.
Note: If a (Super) Video CD does not play, set PBC to Off.
Playing a (Super) Video CD with PBC
1 Load a (Super) Video CD with PBC and press 2OK.
➜ The (Super) Video CD will show instructions or options
on the TV screen.
2 Use the remote control buttons as directed by the (Super)
Video CD.
00
To return to a previous menu, press RETURN.
00
If a PBC menu has titles, select a title directly by pressing
the number buttons on the remote control.
Disc
36
English
DVD Stop
Language View Program
Setup
Menu Language
Country
Default Audio
Default Subtitle
Use ± or ≠ to select other options, = to enter the option
Menu Language
Bahasa Melayu
English
NTSC
Español
Français
Português
Page 37

Playing MP3 discs
MP3 is a compression method that makes digital music files
up to 10 times smaller without losing significant sound
quality. MP3 is common on the Internet, letting you transfer
tracks to your computer and onto a CD Recordable or
CD Rewritable.
MP3 files are recorded at a certain bit rate or speed. For a
good sound quality a bit rate of 128 kbps or higher is
recommended.
This system supports the following formats:
– File names ending in .mp3
– Names of albums, artists, etc., with a maximum of
30 characters
– Maximum nested directory of eight levels
– Sampling frequencies: 32 kHz, 44.1 kHz, 48 kHz
– Bit-rates: 32-320 kbps
– Multisession discs, if finalized
The following formats are not supported:
– File names ending in .wma, .aac, .dlf, .m3u, and .pls
– Chinese file names
– unfinalized discs
– discs recorded in UDF format
1 Insert a disc with MP3 files.
➜ It may take the Streamium System several seconds to
recognize the MP3 disc. MP3 text may appear on the TV
screen or the display of the Streamium System.This
could be the song title, artist name, track number, etc.,
depending on how you recorded the MP3 files.
2 Press 3 or 4 or use the number buttons to select an
album.
3 If you want to play the selected album, press 2OK.
If you want to play a track of the album, press 2 to enter
the selected album. Press 4 or 3 repeatedly or use the
number buttons to select a track. Next, press 2OK to play
the selected track.
00
To skip to another track, press 3 or 4 or use the number
buttons.
00
To search within an MP3 track, press S or T.
00
To select an available repeat option, press REPEAT
repeatedly.
Disc
37
English
MP3 2 Play
Audio Menu
Track
1 Love
2 People
3 Peace
4 Sunshine
5 Wind
6 Storm
7 Air
Use ≠ or ± to change values, + or = for other lists.
NTSC
Page 38

Playing picture CDs
With the Streamium System you can play Kodak Picture CDs
and your own CD-R(W)s with JPEG pictures (.jpg, jpeg).
1 Insert a disc with JPEG pictures.
➜ It may take the Streamium System several seconds to
find the pictures.
➜ A preview of 4 pictures will be displayed.
00
To see the next 4 pictures, press T. For the previous
4 pictures, press S.
2 Press 1, 2, 3 or 4 to select a picture.
3 Press 2OK to display the picture.
➜ The selected picture will be displayed.
00
To skip to the previous or next picture, press S or T.
Note: Some pictures may appear distorted.
Rotating a picture
You can rotate a picture in 90 degree steps. Rotate only
affects the selected picture.
1 Select a picture and press 2OK to display the picture.
2 Press SYSTEM MENU.
3 Select Toolbar ➜ View ➜ Rotate.
4 Press 2 to enter the menu. Next, press 1 or 2 to select
the rotation angle.
5 Press 2OK to confirm.
➜ The current picture will rotate.
6 Press SYSTEM MENU to exit the menu.
Playing a slide show
Play all the pictures of the inserted disc in sequence.
1 Select a picture and press 2OK to display the picture.
2 Press 2OK again to display all pictures of the inserted disc
in sequence.
00
To adjust the time each picture will appear on the
TV screen, press SYSTEM MENU on the remote control
and select Toolbar ➜ Slideshow ➜ Picture Time.
Select Slow, Medium, or Fast. Next, press SYSTEM MENU to
exit the menu.
3 To stop the slide show, press 9.
Disc
38
English
Page 39

Access Control [DVD]
Some DVDs may not be suited for children.With Access
Control you can limit the scenes to be shown.This feature
will not work if the disc is not provided with access control
information. Philips cannot guarantee the availability of
Access Control with all discs, and therefore denies any
liability associated with unintended viewing of discs. Make
sure your discs play according to your Access Control
settings before you allow children to access to the Streamium
System.
1 Press SYSTEM MENU on the remote control.
2 DVD: Select Setup ➜ Access.
3 Press 4 to select Enter PIN. Next, press 2.
4 Use the number buttons to enter the four digit code.When
using the Streamium System for the first time, enter “0000.”
00
To exit the menu without entering the PIN code, press
SYSTEM MENU.
5 Press 4 repeatedly to select either Parental Level,
Change PIN or Disc Lock. Press 2 to enter the selected
menu.
Parental Level
DVDs may contain alternative scenes that conform to the
Parental Level, or movie rating, that you select.The Parental
Level may apply to the complete disc or to certain scenes
on the disc. Follow the steps below to set the Parental
Level at which you want the discs to play.
● Press 3 or 4 or the number buttons (0-8) to select a
rating, then press 2OK.
00
Select “0” (– –) to deactivate Parental level. Or choose a
rating between 1-8; discs or scenes with the same rating or
lower will play. Higher rated discs or scenes will not play
unless you enter your four digit code. Follow the directions
given by the disc to enter your code and start playback.
Note:The rating numbers compare to standard U.S. movie
ratings as follows: 7 for NC-17; 6 for R; 4 for PG-13; 3 for PG,
and 1 for G.
Change PIN
1 Use the number buttons to enter the current Pin.
➜ Enter New Pin appears.
2 Use the number buttons to enter the new Pin.
➜ Confirm Pin appears.
3 Enter the new Pin again to confirm it.
➜ The Pin code is changed.
Note: Sometimes, the system will ask you to enter your code
twice to confirm the code.This is normal.
Disc Lock
Use Disc Lock to disable viewing of a specific disc,
regardless of its rating. A DVD must be in the disc tray.
1 Press 2 repeatedly to select
➜ On: Disc Lock is switched on. Locked discs will not play
unless you enter your four digit code.
➜ Off: Disc Lock is switched off.
2 Next, press 2OK.
Note: Lock/unlock each side of two sided DVDs and each
volume of multi-volume (Super) Video CDs.
If you forget your Pin
1 When asked to enter the PIN code, press 9.
2 Press DVD repeatedly to select a disc tray with no disc.
3 Press SYSTEM MENU.
4 Select Setup ➜ Acess ➜ Enter PIN. Next, press 2.
5 Press 9 4 times.
➜ Not possible now appears.
➜ Enter New Pin appears.
6 Use the number buttons to enter the new Pin code.
➜ Confirm Pin appears.
7 Enter the new Pin code again to confirm it.
➜ The Pin code is changed.
Access Control
39
English
DVD Stop
Access
Setup
Enter PIN
Parental Level
Change PIN
Disc Lock
Use ± or ≠ to select other options, = to enter the option
* * * *
Page 40

Adjusting the Picture Settings
This submenu allows you to adjust the settings for color,
brightness, contrast, sharpness, saturation and video shift.
These features are only available when DVD is selected.
1 Press SYSTEM MENU on the remote control.
2 DVD: Select Preferences ➜ Picture.
Color Settings
You can select predefined color settings or make your own
personal color settings. Although similar to adjusting
Brightness, Contrast, etc. on your TV, these settings affect
the picture the Streamium System sends to the TV.
● Press 3 or 4 to select Rich, Natural, Soft, Animation
or Personal, then press 2OK.
You may want to play a disc for a few minutes in each
setting to decide which you prefer.
If you selected Personal, adjust the brightness, contrast,
sharpness and saturation settings manually.
Brightness
● Press 1 or 2 to adjust to the desired picture brightness,
then press 2OK.
Contrast
● Press 1 or 2 to adjust to the desired picture contrast,
then press 2OK.
Sharpness
● Press 1 or 2 to adjust to the desired picture sharpness,
then press 2OK.
Saturation
● Press 1 or 2 to adjust the color saturation, then
press 2OK.
Video Shift
Use this feature to center the picture horizontally on the
TV screen, or “shift the video” from left to right.
● Press 1 or 2 to center the picture on your TV screen, then
press 2OK.
System Menu – Picture settings
40
English
DVD Stop
Picture
Preferences
Colour settings
Brightness
Contrast
Sharpness
Use ± or ≠ to change the values, OK to confirm, + to leave the
Color settings
Personal
Rich
NTSC
Natural
Soft
Animation
sub-menu.
Page 41

Night Mode
Night mode reduces the volume differences between loud
and quiet passages.At night, you can enjoy surround effects
at low volume without disturbing your children or
neighbors. Night mode is available only for Dolby Digital
and MPEG multi-channel signals and only if supported by
the source material (e. g. a movie).
1 Press SYSTEM MENU on the remote control.
2 DVD: Select Preferences ➜ Sound ➜ Night Mode.
INTERNET, PC LINK: Select Audio ➜ Night Mode.
3 Press 2 repeatedly to switch Night Mode on or off. Next,
press 2OK to confirm.
Analogue Output
This feature is similar to selecting the surround sound with
SURROUND on the remote control.
1 Press SYSTEM MENU on the remote control.
2 DVD: Select Preferences ➜ Sound ➜ Analogue
Output.
INTERNET, PC LINK: Select Audio ➜ Analogue
Output.
3 Press 4 repeatedly to select Multi-channel, Hall or
Stereo. Next, press 2OK to confirm.
Note: If you connected any equipment (e. g. a tape deck) to
LINE OUT on the Streamium System and the equipment is
suited for stereo signals only, set Analogue output to
Stereo.
Digital Output
Adjust Digital Output if you have connected the Streamium
System´s DIGITAL OUT to external digital equipment.
1 Press SYSTEM MENU on the remote control.
2 DVD: Select Setup ➜ Audio Menu ➜ Digital Output.
INTERNET, PC LINK: Select Audio ➜ Digital Output.
3 Press 3 or 4 to select
– Off if you do not use DIGITAL OUT in your
connections.
– PCM only if you use DIGITAL OUT in your
connections, but the Stereo equipment does not include
a built-in digital multi-channel decoder.
– All if you have connected the Streamium System to
Stereo equipment that has a built-in multi-channel
decoder.
4 Next, press 2OK to confirm.
System Menu – Audio settings
41
English
DVD Stop
Sound View Program
Preferences
Night mode
Analogue Output
ClearVoice
Use = to toggle the value, ≠ or ± to move to other options.
off on
Page 42

Speaker layout, speaker distances and volume balance
For optimal multi-channel sound experience, the Streamium
System can take the arrangement of your speakers and
your listening position into account. Select from different
speaker layouts or set the speaker distances and the
volume balance between the speakers individually.
When DVD is selected, the speaker layout is not available.
But if you select a speaker layout when INTERNET,
PC LINK or AUX is selected, this setting will also be valid
for DVD.
Speaker layout
1 Press AUX (or INTERNET or PC LINK) on the remote
control.
2 Press SYSTEM MENU on the remote control.
3 Select Audio ➜ Speaker Layout. Next, press 2 to enter
the menu.
4 Press 4 or 3 to select the speaker layout which resembles
the speaker arrangement in your home (Rectangular 1,
Rectangular 2, Trapezoid 1, Trapezoid 2) or select
Personal to adjust the speaker distances and the volume
balance individually.
5 Press 2 to enter the selected speaker layout. Next,use
1, 2, 3, 4 to select your listening position in the layout.
6 Press 2OK to confirm.
7 Press SYSTEM MENU to exit the system menu.
Speaker distances and volume balance
Instead of selecting a speaker layout, you can set the
distances between the speakers and your listening position
and the volume balance between the speakers.
To perform these settings, press SYSTEM MENU on the
remote control and select
DVD: Setup ➜ Speakers,
INTERNET, PC LINK: Audio ➜ Speaker Layout ➜
Personal.
System Menu – Audio settings
42
English
Page 43

Help Line and Status window
These features are only available when DVD is selected.
1 Press SYSTEM MENU.
2 DVD: Select Preferences ➜ Features.
Help Line
Set Help Line to On if you want to see helpful
information in the System Menu.When you select an item
in the System Menu, an explanation will appear at the
bottom of the TV screen.
● Press 2 repeatedly to switch Help Line on or off, then
press 2OK to confirm.
Status window
The Status window may indicate when the disc tray is
opening or closing, what type of disc is loaded, and total or
remaining disc playback time.
● Press 2 repeatedly to switch Status window on or off, then
press 2OK to confirm.
Sleep timer
The sleep timer (Smart Power Off) enables the Streamium
System to switch automatically to standby 20 minutes after
a disc or an online service has stopped playing if no other
activities have been performed.
When INTERNET or PC LINK is selected, the “Sleep timer”
feature is called “Smart Power Off.”
1 Press SYSTEM MENU on the remote control.
2 DVD: Select Setup ➜ Features ➜ Sleep timer.
INTERNET, PC LINK: Select Preferences ➜ Smart
Power Off.
3 Press 2 repeatedly to switch the sleep timer on or off.
Next, press 2OK to confirm.
Adjusting the display brightness
1 Press SYSTEM MENU on the remote control.
2 INTERNET, PC LINK: Select Preferences ➜ Dim Level.
3 Press 1 or 2 to select one of the levels for the display
brightness.
4 Next, press 2OK to confirm.
Online upgrade
The system checks if the latest software is installed on your
Streamium System. For this feature, you need broadband
Internet access.This feature is only available when
INTERNET or PC LINK is selected.
1 Press SYSTEM MENU on the remote control.
2 INTERNET, PC LINK: Select Online Upgrade.
Resetting the Streamium System
When resetting the Streamium System, you will lose all
your settings (network settings,TV settings, etc.). After
resetting do not forget to perform the TV settings of
chapter “Settings for the TV.”
1 Press SYSTEM MENU.
2 INTERNET, PC LINK: Select Reset settings.
Next, press 2.
➜ Do you want to delete all settings appears.
3 Press the red button (SUBTITLE) to confirm.
System Menu – Additional features
43
English
DVD Stop
Features View Program
Preferences
Help line
Status Window
Helpful text will appear here if Help Line is On.
Page 44

Tuning to radio stations
1 Press TUNER on the remote control to select TUNER.
➜ The current radio frequency will appear on the display.
➜ If an FM station is received in stereo,
=
is displayed.
2 Press TUNER on the remote control again to select the
desired waveband: FM or AM.
3 Press and hold 1 or 2 on the remote control until the
frequency indication starts to change, then release.
➜ SEARCHING... will be displayed until a radio station
with sufficient signal strength is found.
4 If necessary repeat step 3 until you find the desired radio
station.
To tune to a weak station
Press 1 or 2 on the remote control briefly and repeatedly
until optimal reception is achieved.
Automatic Preset Programming
1 Press TUNER on the remote control to select TUNER.
2 Press and hold VIEW FAVORITES for 5 seconds.
➜ AUTO PROGRAM FAVORITE STATIONS? is displayed.
3 Press the red button (SUBTITLE) on the remote control to
select YES.
➜ AUTO PROGRAM IN PROGRESS... is displayed.
➜ All available radio stations with sufficient signal strength
will be stored automatically.
➜ When all the available radio stations are stored or the
memory for 40 presets is used, the last preset radio
station will be played.
To stop storing the automatic preset
● Press 9.
Storing favorite radio stations manually
You can store up to 40 favorite radio stations in the
memory.
1 Tune to your desired radio station (refer to “Tuning to radio
stations”).
2 Press (UN)MARK FAVORITES on the remote control.
➜ The current station will be stored in the next available
preset number.
➜ will appear at the side of the display.
00
Repeat steps 1–2 to store other radio stations.
Notes:
The favorites function for TUNER is not user dependent.The
same favorites list applies for all users.
If you attempt to store more than 40 preset radio stations,
NO MORE FAVORITES CAN BE ADDED is displayed.
Selecting a favorite radio station
1 Press 3 or 4 on the remote control to select the desired
preset radio station from the favorite list.
2 Press 2OK on the remote control to confirm.
➜ The preset number, radio frequency, and waveband are
displayed.
Tuner
44
English
DVD
SUBTITLE
SYSTEM
MENU
RETURN
TV
INTERNET
(UN) MARK
FAVORITES
ANGLE
PC LINK
VIEW
ZOOM
TUNER
AUX
AUDIO
DISC
MENU
RESUME
Page 45

Deleting a favorite radio station
1 Press 3 or 4 on the remote control to select the desired
preset radio station from the favorite list.
2 Press (UN)MARK FAVORITES on the remote control.
➜ ERASE SELECTED RADIO STATION? is displayed.
3 Press the red button (SUBTITLE) on the remote control to
delete the radio station.
➜ The radio station continues to play but has been deleted
from the favorites list.All following favorite radio stations
will decrease their preset number by one.
Deleting all favorite radio stations
1 While TUNER is selected, press and hold (UN)MARK
FAVORITES for more than 5 seconds.
➜ DO YOU WANT TO DELETE ALL TUNER FAVOURITES? is
displayed.
2 Press the red button (SUBTITLE) on the remote control to
confirm.
➜ All the preset stations will be deleted.
Changing the order of favorite radio stations
1 Press 3 or 4 on the remote control to select the desired
preset radio station from the favorite list.
2 To move the radio station down in the favorites list, press
the red button (SUBTITLE) on the remote control.
To move the radio station up in the favorites list, press the
green button (ANGLE) on the remote control.
00
If necessary repeat steps 1–2 for other radio stations.
Tuner
45
English
Page 46

WARNING
Under no circumstances should you try to repair the unit yourself as this
will invalidate the warranty. Do not open the unit as there is a risk of
electric shock.
If a fault occurs, first check the points listed before taking the unit for
repair.If you are unable to solve a problem by following these hints,
consult your dealer or service center.
Problem Solution
Disc does not playback. – Make sure the correct program number (channel number) for the Streamium
System has been selected on the TV.
– Make sure the Streamium System and the TV are connected properly.
– Make sure the disc is not scratched or dirty. Replace or clean the disc.
– Make sure the disc has been inserted, printed side up.
– Make sure you have inserted the right disc type: DVD, (Super) Video CD,
Audio CD,CDR(W) or MP3-CD.
– Make sure the region code of the DVD matches the Streamium System.
– Change the Parental level (See “Access control”).
– Press SYSTEM MENU to exit the system menu.
Cannot activate some features, – The features may not be available on the disc.Try another disc.
such as angles, subtitles or
multi-language Audio.
No sound or distorted sound – Adjust the volume.
– Check the speaker connections and settings.
– Disconnect the headphones.
– Press 2OK to resume normal playback.
– Press the corresponding source button on the remote control (DVD,
INTERNET, …) to choose the source you want to hear through the
Streamium System.
No sound from the center and/or – Make sure the center and surround speakers are connected correctly.
surround speakers. – Press SURROUND on the remote control to select another surround effect.
No digital surround sound – Make sure the selected source (inserted disc, Internet media, …) supports
digital surround sound (Dolby Digital, DTS, MPEG).
– Make sure external exquipment that plays digital surround sound is
connected to DIGITAL IN.
Radio reception is poor. – If the signal is too weak, adjust the antenna or connect an external antenna
for better reception.
– Place the antenna farther away from other equipment (TV,VCR, digital
equipment, …) that may disturb radio reception.
– Increase the distance between the Streamium System and your TV or VCR.
The remote control does not function – Press the desired source button on the remote control (DVD,
properly. INTERNET, …), then press the desired function button (e. g. 2OK, T).
The Streamium System does not – Unplug the power cord and wait at least 10 seconds before reconnecting
respond to any of the buttons, including the unit.
the standby button.
Troubleshooting
46
English
Page 47

Problem Solution
VCR or other recording equipment – Press SURROUNDrepeatedly to select STEREO.
connected to the Streamium system – With equipment connected to DIGITAL OUT, make sure the setting of
does not record sound correctly “Digital output” in the System menu is correct. See “Digital output” on
page 41.
No picture or distorted picture – Make sure the P-SCAN switch on the rear of the Streamium System is set
to ON if you connected a Pro Scan capable TV to COMPONENT PRPBY on
the Streamium System.
– Press and hold the green button (ANGLE) on the remote control for
6 seconds to reset the video settings. Next, read “No picture or distorted
picture” on page 17.
– Use the CVBS connection instead of S-Video or Component Video to connect
your TV to the Streamium System. For this, press and hold the green button
(ANGLE) on the remote control for 6 seconds to reset the video settings,
disconnect the Streamium System from the power supply and follow the
instructions in “Using Composite Video (CVBS)” on page 14.
No video signal available on – When INTERNET or PC LINK is selected, a video signal will be available
video output jacks (CVBS, S-Video, either on the Component Video or on the CVBS and S-Video jacks.
Component) See “No picture or distorted picture” on page 17 to switch between
Component Video and S-Video/CVBS.
Playback of Internet services skips or – If you share the broadband Internet access with other users, there may not be
interrupts enough broadband Internet bandwidth available to the Streamium System.
Media file (music, video or photo) – The file format of the media file may not be supported by the
does not play or in poor quality only Streamium System. Play a media file with a supported file format.
Visit http://My.Philips.com for the latest information on supported file formats.
– The wireless reception is low. Change the position of your wireless
equipment to improve the reception.
– The media has been recorded in low quality, e. g. music files with a low
bitrate (64 kbps).
No connection to the Internet General solutions, always try first:
– Press INTERNET again. If necessary,repeat this step several times.
– Make sure the computers in your network connect to the Internet. If they do
not, consult your network administrator or Internet service provider.
“The system could not connect to – Check if your (wireless) router and your cable modem are
the server.” appears connected properly to each other.
– Your Internet service provider uses a proxy. Press the green button (ANGLE)
on the remote control to enter the proxy name and the proxy port.
“An IP address could not be obtained – If you use a (wireless) router, make sure “DHCP server” is enabled in the
automatically.” appears configuration menu of the router.
– Press the green button (ANGLE) on the remote control to enter the
IP settings manually.
“The WEP key you entered has – All WEP keys must have the same format (either ASCII or
an invalid format.” appears HEX format) and the same length (ASCII: either 5 or 13 characters,
HEX: either 10 or 26 digits).
Cannot access Internet media after – After entering your email address, you will get an email with instructions on
entering the email address how to create a user account. Please follow these instructions. Next, press
INTERNET on the remote control.
Troubleshooting
47
English
Page 48

Problem Solution
INTERNET, PC LINK: – Press STANDBY·ON to switch off the Streamium System. Next, press
Streamium System freezes INTERNET or PC LINK to switch it on again.
during startup – If the Streamium System does not react when you press STANDBY·ON,
disconnect the Streamium System from the power supply and wait at least
10 seconds before reconnecting the Streamium System.
– If the Streamium System freezes during startup before you can see
the INTERNET or PC LINK menu and if the hints above do not help,
the Streamium System may need a reinstallation of the software:
1 Make sure the Streamium System has access to the Internet through a
wired connection. If necessary,connect the Streamium System to a free
LAN port on your router (see page 24). Do not use a wireless connection.
2 Disconnect the Streamium System from the power supply.
3 Press and hold the red button (SUBTITLE) on the remote control while
you reconnect the power cord to the power supply.
4 Follow the instructions on the TV screen or on the display of the
Streamium System to establish a connection to the Internet and to reinstall
the software of the Streamium System.
Troubleshooting
48
English
Page 49

Please take the following problems/solutions into account:
Problem Solution
PC LINK: It takes about 2 minutes – Your PC may assign an IP address to itself automatically
before the Streamium System (Auto-IP).This can take some time.
connects to the PC Run the Philips AutoIP utility. See the chapter below.
(Windows operating system only)
PC LINK:The Streamium System – The PC may not get an IP address automatically.
does not connect to the PC Run the Philips AutoIP utility. See the chapter below.
(Windows operating system only)
Addendum
MX6000i/37
3103 306 1999.3 EL6593E003 VieChr0418
Using the Philips AutoIP utility
Run the Philips AutoIP utility on your PC if you have a
direct connection between the Streamium System and your
PC (case B on page 23 or case D on page 25 of the user
manual).
Do not run the Philips AutoIP Utility if you have a
wired or wireless home network using a base station,
router or gateway (case A on page 21 or case C on
page 24 of the user manual)
1 Press PC LINK on the Streamium System.
2 Insert the Philips Media Manager CD-ROM into the
CD-ROM drive of your PC.
Go to the folder “Software” ➜ “Tools”.
3 Double-click the “PhilipsAutoIPutility.exe”file to star t the
AutoIP utility.
➜ In some cases “Auto IP” may be deactivated on your
computer completely and you will be asked if you want
to enable Auto IP on your PC. Click on “OK”. Please be
aware that your PC will restart. Continue with step 2.
➜ A list with all network adapters found on your computer
will appear.The list may include old adapters that were
not properly uninstalled.
4 Click on the adapter which you want to use for the
communication between the PC and the Streamium System.
5 If the status of the adapter is “DHCP only”:
Click the “Enable AutoIP” button.
➜ The status changes to “DHCP/AutoIP”.
If the status of the adapter is “DHCP/AutoIP” or
“AutoIP”:
Wait until the IP address changes to 169.254.x.x.
x is a number between 0 and 255.
Next, click the “Lock AutoIP” button.
➜ The PC is properly set up now.
If the status of the adapter is “Static IP”:
In this case the AutoIP utility cannot make any changes on
your computer.
Either change the network settings of the Windows
operating system to “Obtain IP address automatically” and
continue with step 4 or
enter a static IP on the Streamium System. For this, press
SYSTEM MENU and select Network ➜ Network Config.
6 Click the “Exit”button to exit the AutoIP utility.
7 Press STANDBY·ON to switch the Streamium System to
standby. Next, press PC LINK.The Streamium System should
connect instantly to the PC now.
Note:You can reverse the settings of the AutoIP utility by clicking
again on the corresponding button.
Page 50

Subject to modification without notice.
General
Power supply rating –––––––––––––––––––– 120 V /60 Hz
Power consumption
Active ––––––––––––––––––––––––––––––––– 118 W
Standby –––––––––––––––––––––––––––––– < 0.5 W
Dimensions (w x h x d) –––––––––––– 17.1" x 3.8" x 14.6"
Weight –––––––––––––––––––––––––––– 8.0 kg, 17.6 lbs
Amplifier
Output power
Total output power –––––––––––––––––– 450 W RMS
360 W FTC
*
Stereo mode ––––––––––––––––––––– 2 x 75 W RMS
2 x 60 W FTC
Surround mode
Front ––––––––––––––– 2 x 75 W RMS / 60 W FTC
Center ––––––––––––––––– 75 W RMS / 60 W FTC
Surround –––––––––––– 2 x 75 W RMS / 60 W FTC
Subwoofer –––––––––––––– 75 W RMS / 60 W FTC
Total Harmonic Distortion ––––––––––– 10%, 1 kHz, 66 W
S/N ratio (unweighted) ––––––––––––––––––––– ≥ 92 dB
(A-weighted) –––––––––––––––––––––––––– 100 dBA
Crosstalk (1 kHz) ––––––––––––––––––––––––– ≥ -90 dB
*4 Ω, 120 Hz–12.5 kHz, 10% THD
Tuner
Tuning range
FM ––––––––––––––––––––––––– 87.5 MHz–108 Mhz
AM ––––––––––––––––––––––––– 530 kHz–1700 kHz
DVD
Disc diameter –––––––––––––––––––––––– 12 cm / 8 cm
Video Decoding –––––––––––––––––– MPEG-2 / MPEG-1
Video DAC –––––––––––––––––––––––– 9 bit, 5 channels
Signal system –––––––––––––––––––––––––––––– NTSC
Video format –––––––––––––––––––––––––––– 4:3 / 16:9
Video S/N ––––––––––––––––––––––– 56 dB (minimum)
Supported disc formats –––––– DVD, DVD+R, DVD+RW,
(Super) Video CD,
Audio CD,CD-R, CD-RW,
MP3-CD (ISO 9660)
INTERNET and PC LINK
Ethernet –––––––––––––––––– IEEE 802.3, 10/100 Base-T
Wireless –––––––––––––––– Wi-Fi Certified, IEEE 802.11g
Supported media formats (at the time of printing)
Music –––––––––––––––––– MP3 and MP3pro streams,
32–320 kbit/sec,
variable bit rate
Pictures ––––––––––––––––– JPEG, JPEG2000, .bmp, .gif
Video ––––––––––––––––– MPEG 1, MPEG 2, MPEG 4,
DivX 4.0/5.03
Analog audio connections
Analog in (AUX IN,TV IN) ––––––– 500 mV – 2 V / 22 kΩ
Analog out (LINE OUT) –– Stereo, 1.5 V / 1 kΩ, S/N 105 dB
Video connections
Video out (Component Video)
Y ––––––––––––––––––––––––––––––– 1.0 V
p-p
, 75 Ω
PB,PR–––––––––––––––––––––––––––– 0.7 V
p-p
, 75 Ω
Video out (S-VIDEO)
Y ––––––––––––––––––––––––––––––– 1.0 V
p-p
, 75 Ω
C ––––––––––––––––––––––––––––– 0.286 V
p-p
, 75 Ω
Video out (CVBS) ––––––––––––––––––––– 1.0 V
p-p
, 75 Ω
Digital connections
Digital Input/Output SPDIF (Sony Philips digital interface)
In –––––––––––––––––––––––––– > 200 mV
p-p
/ 75 Ω
Out –––––––––––––––––––––––––– 500 mV
p-p
/ 75 Ω
PCM –––––––––––––––––––––––––––––– acc. IEC 60958
Dolby Digital/DTS –––––––––– acc. IEC 60958, IEC 61937
Audio DAC ––––––––––––––––––––––––– 24 bit /96 kHz
Frequency Response
44.1 kHz –––––––––––––––––––––––– 10 Hz – 20 kHz
48 kHz ––––––––––––––––––––––––– 10 Hz – 22 kHz
96 kHz ––––––––––––––––––––––––– 10 Hz – 44 kHz
Speaker and headphones connections
Front, center and rear speakers –––––––––––––––––– 4 Ω
Subwoofers ––––––––––––––––––––––––––––––––– 8 Ω
Headphone (6.3 mm, 8–600 Ω) –––– 2.8V EMF,Ri= 80 Ω
Antenna connections
FM antenna –––––––––––––––––––––––––––––––– 75 Ω
AM antenna ––––––––––––––––––––––––––––––– 300 Ω
Speakers
Front and rear speakers
System –––––––––––––––– 2 way shielded, Closed Box
Impedance –––––––––––––––––––––––––––––––– 4 Ω
Speaker drivers –––––– 2 x 3" woofers, 1 x 13⁄4" tweeter
Dimensions (w x h x d) ––––––––––– 3.7" x 11.0" x 2.8"
Center speaker
System –––––––––––––––– 2 way shielded, Closed Box
Impedance –––––––––––––––––––––––––––––––– 4 Ω
Speaker drivers –––––– 4 x 2" woofers, 1 x 13⁄4" tweeter
Dimensions (w x h x d) ––––––––––– 17.1" x 2.9" x 2.6"
Subwoofer
System ––––––––––––––––––––––––––––– Bass Reflex
Impedance –––––––––––––––––––––––––––––––– 8 Ω
Speaker driver –––––––––––––––––––––––– 4" woofer
Dimensions base (w x h) –––––––––––––––– 9.4" x 1.2"
Dimensions tube (w x h) ––––––––––––––– 4.5" x 37.9"
Technical data
49
English
Page 51

AUDIO SYSTEM
One Year Free Labor
One Year Free Service on Parts
This product must be carried in for repair.
LIMITED WARRANTY
WHO IS COVERED?
You must have proof of purchase to receive warranty service.A sales
receipt or other document showing that you purchased the product is
considered proof of purchase.
WHAT IS COVERED?
Warranty coverage begins the day you buy your product.For one year
thereafter, all parts will be repaired or replaced, and labor is free. After
one year from the day of purchase, you pay for the replacement or
repair of all parts, and for all labor charges.
All parts, including repaired and replaced parts, are covered only for
the original warranty period.When the warranty on the product
expires, the warranty on all replaced and repaired parts also expires.
WHAT IS EXCLUDED?
Your warranty does not cover:
• labor charges for installation or setup of the product, adjustment
of customer controls on the product,and installation or repair of
antenna systems outside of the product.
• product repair and/or part replacement because of misuse,
accident, unauthorized repair or other cause not within the
control of Philips.
• reception problems caused by signal conditions or cable or
antenna systems outside the unit.
• a product that requires modification or adaptation to enable it to
operate in any country other than the country for which it was
designed, manufactured,approved and/or authorized, or repair of
products damaged by these modifications.
• incidental or consequential damages resulting from the product.
(Some states do not allow the exclusion of incidental or
consequential damages, so the above exclusion may not apply to
you.This includes, but is not limited to, prerecorded material,
whether copyrighted or not copyrighted.)
• a product that is used for commercial or institutional purposes.
WHERE IS SERVICE AVAILABLE?
Warranty service is available in all countries where the product is
officially distributed by Philips. In countries where Philips does not
distribute the product, the local Philips service organization will
attempt to provide service (although there may be a delay if the
appropriate spare parts and technical manual(s) are not readily
available).
MAKE SURE YOU KEEP...
Please keep your sales receipt or other document showing proof of
purchase.Attach it to this owner’s manual and keep both nearby. Also
keep the original box and packing material in case you need to return
your product.
BEFORE REQUESTING SERVICE...
Please check your owner's manual for assistance. If you have additional
questions, call us at 1-800-531-0039.
TO GET WARRANTY SERVICE IN U.S.A.,
PUERTO RICO, OR U.S. VIRGIN ISLANDS...
Take the product to a Philips factory service center (see enclosed list)
or authorized service center for repair.When the product has been
repaired,you must pick up the unit at the center. Centers may keep
defective parts. (In U.S.A.,Puerto Rico, and U.S.Virgin Islands, all
implied warranties, including implied warranties of merchantability and
fitness for a particular purpose, are limited in duration to the duration
of this express warranty. But,because some states do not allow
limitations on how long an implied warranty may last,this limitation
may not apply to you.)
TO GET WARRANTY SERVICE IN CANADA...
Please contact Philips at:
1-800-661-6162 (French Speaking)
1-800-531-0039 (English or Spanish Speaking)
(In Canada, this warranty is given in lieu of all other warranties.No
other warranties are expressed or implied,including any implied
warranties of merchantability or fitness for a particular purpose.
Philips is not liable under any circumstances for any direct, indirect,
special, incidental or consequential damages, howsoever incurred, even
if notified of the possibility of such damages.)
REMEMBER...
Please record below the model and serial numbers found on the
product.Also, please fill out and mail your warranty registration card
promptly. It will be easier for us to notify you if necessary.
MODEL # ________________________________________
SERIAL # ________________________________________
EL4965E007 / 8-02
This warranty gives you specific legal rights.You may have other rights which vary from state/province to state/province.
Philips, P.O.Box 520890, Miami,FL 33152, USA, (402) 536-4171
Page 52

2 Mount the 2 front
speakers (white,
red jack) onto the
2 subwoofers.
1
English
Quick use guide MX6000i
front R,
subwoofer
rear R
centre
1 Connect the speaker
cables to the base of
the subwoofers.
Connect the composite video input jack on the TV (labelled A/V In,Video In, Composite) to
VIDEO CVBS on the Streamium System with the supplied composite video cable (yellow).
For Component or S-Video connections, see page 14 of the user´s manual.
Connect the audio output jacks on the TV to TV IN (L/R) on the Streamium System with the
supplied RCA-style audio cable (white and red).
5 Connect the speaker cables to the Streamium System.
6 Connect the FM and the AM antenna.
7 After making all other connections connect
the power cord to MAINS ~ on the Streamium
System and to the power outlet.
3 Mount the 2 mini
speaker stands onto
the 2 rear speakers
(blue, grey jack) and
connect the
corresponding
speaker cables.
4 Position the speakers.
1 Insert batteries 2Connect TV
3 Connect speakers and antenna
Match the colors of the speaker cables and of the speaker jacks!
COMPONENT
VIDEO IN
S-VIDEO
IN
AUDIO
OUT
VIDEO IN
FRONT
LEFT
FRONT
RIGHT
CENTRE
SURR
LEFT
SURR
RIGHT
COMPONENT
VIDEO IN
S-VIDEO
IN
Pr/Cr
AUDIO
OUT
Pb/Cb
VIDEO IN
Pr/Cr
Pb/Cb
Y
ETHERNET
SUB-W
DIGITAL
LEFT
L
OUT
SUB-W
RIGHT
DIGITAL
R
IN
AUX IN TV IN LINE OUT S - VIDEO
AUDIO VIDEO OUT COMPONENT
Y
CVBS
P-SCAN
OFFON
ANTENNA
AM FM
white (red) purple
FRONT
LEFT
FRONT
RIGHT
CENTRE
SURR
LEFT
SURR
RIGHT
SUB-W
DIGITAL
LEFT
OUT
SUB-W
RIGHT
DIGITAL
IN
subwoofer
ETHERNET
L
R
AUX IN TV IN LINE OUT S - VIDEO
AUDIO VIDEO OUT COMPONENT
front L,
rear L
CVBS
P-SCAN
OFFON
ANTENNA
AM FM
Page 53

32
music
pictures
video
music
pictures
video
Install the supplied wireless USB adapter on your
computer
1 Insert the installation disc of the USB adapter into the disc drive of your
computer.The installation guide on the CD-ROM will start automatically.
2 Follow the on-screen instructions on the computer. Connect the wireless
USB adapter to the free USB port on your computer when the installation guide
asks you to do so.
Play music, picture and video from your computer with
the Streamium System
1 Press PC LINK on the remote control.
➜ The computer name will appear on the TV screen.
2 Press 2OK to access music, pictures and video on your computer.
If you have trouble connecting to the computer, press PC LINK again.
See page 23 of the user´s manual for additional help.
Play online music, picture and video services with the
Streamium System
1 Press INTERNET on the remote control.
➜ You will be asked to enter your email address.
2 Use the remote control to enter your email address and press 2OK to confirm.
Example: Press O twice for “@”.To delete a character,press 1.
3 You will receive an email with instructions on how to create your user account
at “My.Philips.com”.
4 After creating your user account, press INTERNET on the remote control to
access online media services.
Play music, picture and video from your computer with
the Streamium System
1 Press PC LINK on the remote control.
➜ The available computer names will appear on the TV screen.
2 Select a computer and press 2OK to access music, pictures and video on the
computer.
If you have trouble connecting to the Internet or to your computers,
press INTERNET or PC LINK again. See pages 21–22 in the user´s manual
for additional help.
You have
– broadband Internet
– a wireless base station (not included)
– computer connected to the wireless network
PC:Windows 98 SE or later,
Apple Macintosh: Mac OS 10.1.5 or higher
First, make sure all computers of your network connect
to the Internet and to each other.
4 Install the tuner
1 Press TUNER on the remote control.
2 Press and hold VIEW FAVORITES on the remote
control for 5 seconds.
➜ AUTO PROGRAM FAVORITE STATIONS? is displayed.
3 Press the red button (SUBTITLE) on the remote control to
start the installation of radio stations.
➜ It may take several minutes to search and store the radio
stations.
5 Switch on the TV
1 Switch on your TV.
2 Press AUX on the remote control of the Streamium
System.
3 Set the TV to the correct audio/video channel for the
Streamium System:A/V IN, AUX, EXT1,2, …
➜ The Philips Streamium startup screen will appear on
the TV screen.
If you have any problems with the picture quality,
please read page 17 of the user´s manual.
6 Install the Philips Media Manager
With the installation of the Philips Media Manager software
on your computer, you can make the media files on your
computer available to the Streamium System.
1 Download the latest version of the Philips Media Manager
software at “My.Philips.com”or insert the supplied CD-ROM
into the CD-ROM drive of your computer.
2 Double-click the “PMMSetup.exe” file to install the Philips
Media Manager software on your computer(s). During the
installation you will be asked which media files should be
added to the Philips Media Manager.
You have
– a computer with a free USB port (USB 2.0 recommended)
– Windows 98 SE or later
With the installation of the supplied wireless USB adapter on your
computer you get a wireless connection to the Streamium System.
Then you can access the media files of your computer with your
Streamium Home Entertainment System.
supplied wireless
USB adapter
7 Option A
Option Bor
broadband Internet
+
music
pictures
video
computer
computer
music
pictures
video
DVD
SUBTITLE
SYSTEM
MENU
TV
INTERNET
(UN) MARK
ANGLE
FAVORITES
PC LINK
ZOOM
VIEW
TUNER
AUX
MENU
AUDIO
DISC
DVD
SUBTITLE
SYSTEM
MENU
INTERNET
TV
(UN) MARK
PC LINK
FAVORITES
ANGLE ZOOM
VIEW
AUX
TUNER
AUDIO
DISC
MENU
RETURN
GHI
PQRS
SOUND
SHUFFLE
RESUME
-
–
ABC
INFO !
DEF
MNO
JKL
WXYZ
TUV
SURROUND
.@
RECENT
Page 54

4 3103 306 1988.2 EL6572E002 VieChr0411
8 Select and play media
9 Play a disc
1 Press 3 or 4 to move up or down
in the menu.
2 Press 2 to enter the menu to the
right.
3 Repeat step 1 and 2 to navigate to
the desired playable item (Internet
radio station, movie, album, track, …)
4 Press 2OK to play the playable item.
00
To go back to the previous (left)
menu, press 1.
00
To stop playback, press 9.
1 Press DVD on the remote control. 2 Press DISC 1 (OPEN/CLOSE /) to
open tray 1.
3 Insert a disc into tray 1.
4 Press DISC 1 (OPEN/CLOSE /) to
close tray 1.
5 Press 2OK to start playback.
Some discs will start automatically.
00
To skip to previous or following
chapters/tracks, press S or T
repeatedly.
Please visit http://My.Philips.com
RETURN
RESUME
MENU
MENU
SYSTEM
DISC
RETURN
RESUME
MENU
MENU
SYSTEM
DISC
DVD
INTERNET
TV
(UN) MARK
PC LINK
TUNER
AUX
VIEW
SYSTEM
MENU
RETURN
DISC
MENU
RESUME
Page 55

English
PHILIPS CONSUMER ELECTRONICS NORTH AMERICA
Knoxville,Tennessee 37914-1810, U.S.A.
W
Printed in China
3103 306 1975.3
IB 8459E003 / VieChr0415
CLASS 1
LASER PRODUCT
 Loading...