

Page 1
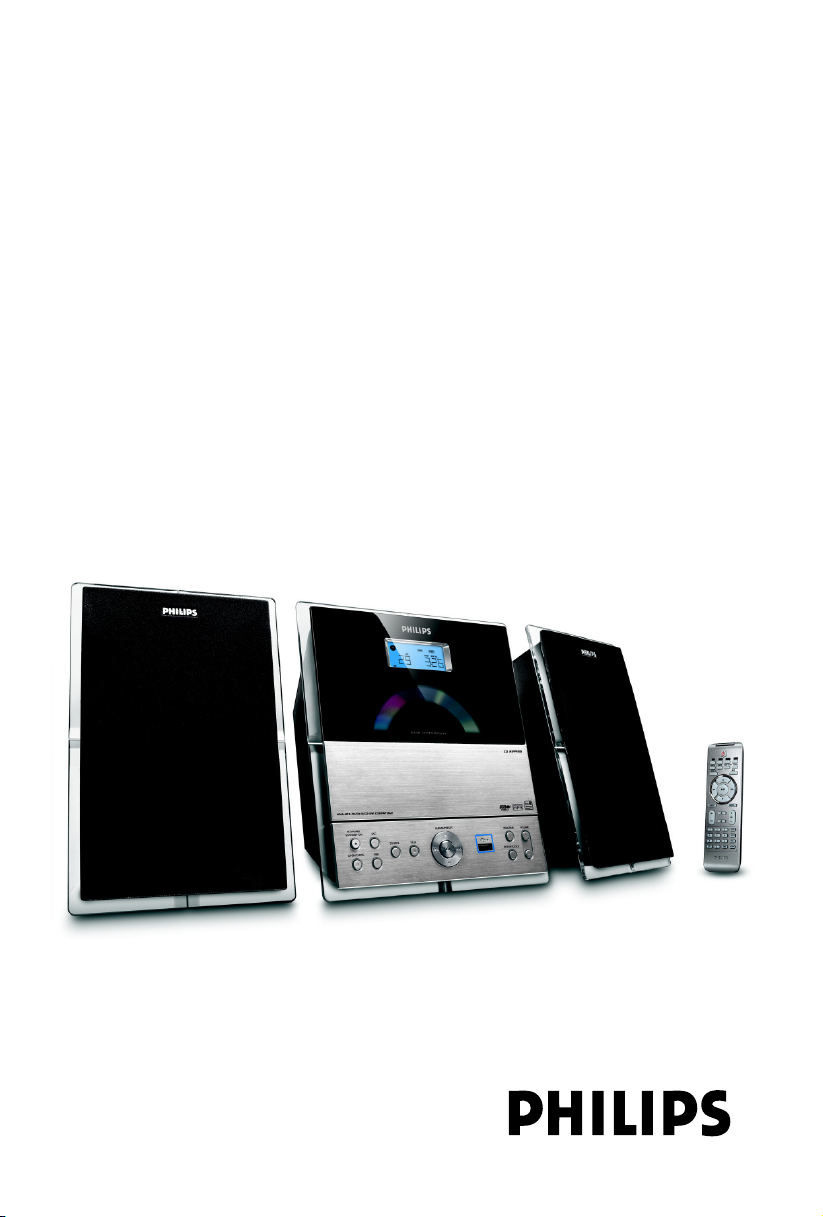
Micro Hi-Fi System
Register your product and get support at
www.philips.com/welcome
User manual
Manual de usuario
Manual do usuário
MCM239D
MCM279
Page 2
México
Es necesario que lea cuidadosamente su instructivo de
manejo.
PRECAUCIÓN - ADVERTENCIA
No abrir, riesgo de choque eléctrico
Verifique que el voltaje de alimentación
sea el requerido para su aparato
Para evitar el riesgo de choque eléctrico, no quite la tapa.
En caso de requerir servicio, dirijase al personal calificado.
Descripción: Minisistema de Audio
Modelo : MCM279/ 55
Alimentación: 100 – 240V~; 50 – 60 Hz
Consumo: 19 W
Importador: Philips Mexicana, S.A. de C.V.
Domicilio: Av. La Palma No.6
Localidad y Tel: Edo. de México C.P. 52784
Exportador: Philips Electronics HK, Ltd.
País de Origen: China
Nº de Serie: ______________________________
ATENCIÓN
Col. San Fernando La Herradura
Huixquilucan
Tel.52 69 90 00
LEA CUIDADOSAMENTE ESTE INSTRUCTIVO
ANTES DE USAR SU APARATO.
AVISO IMPORTANTE
Philips Mexicana, S.A. de C.V. no se hace
responsable por daños o desperfectos causados por:
– Maltrato, descuido o mal uso, presencia de
insectos o roedores (cucarachas, ratones etc.).
– Cuando el aparato no haya sido operarado
de acuerdo con el instructivo del uso, fuera
de los valores nominales y tolerancias de las
tensiones (voltaje), frecuencia (ciclaje) de
alimentación eléctrica y las características
que deben reunir las instalaciones auxiliares.
– Por fenómenos naturales tales como:
temblores, in
eléctricas, rayos etc
terceros (choques asaltos, riñas
2
undaciones, incendios,descargas
.o delitos causados por
, etc.).
Page 3
6
IR
MICRO SYSTEM MCM279
7
8
9
0
!
@
WMA-MP3-CD/CD-R/CD-RW COMPATIBLE
STANDBY-ON
OPEN/CLOSE
DSC
DBB
SOURCE STOP
ALBUM/PRESET
DISPLAY/CLOCK
1
VOLUMEPROGRAM
2
3
4
5
3
Page 4

CAUTION
Use of controls or adjustments or
performance of procedures other
than herein may result in hazardous
radiation exposure or other unsafe
operation.
ATENCIÓN
El uso de mando o ajustes o la
ejecucción de métodos que no sean
los aquí descritos puede ocasionar
peligro de exposición a radiación.
CUIDADO
A utilização de comandos ou ajustes
ou a execução de procedimentos
diferentes dos descritos neste manual
podem provocar uma exposição a
radiações perigosas ou outras
operações inseguras.
4
Page 5

Index
English ------------------------------------------------ 6
Español --------------------------------------------- 28
Português ------------------------------------------ 52
EnglishEspañol
Por tuguês
NederlandsItalianoSvenskaDansk
5
Page 6

Contents
English
General Information
Supplied accessories ............................................ 7
Environmental information ................................ 7
Safety information ................................................ 8
Controls
Controls on the set ............................................. 9
Remote control ............................................ 10-11
Installation
Placing MCM279 ................................................. 11
Mounting stand onto the set
Rear connections ......................................... 12-13
Speaker connections
Antenna connections
Connecting an additional appliance .......... 13-14
Connecting a USB device
Connecting a non-USB device
Using AC power ................................................. 14
Preparations
Using the remote control ................................ 15
Setting the clock ................................................. 15
Basic Functions
Switching on/off the set and
selecting functions .............................................. 16
Auto-standby ....................................................... 16
Volume control ................................................... 16
Volume adjustment
MUTE
Sound control ..................................................... 16
DSC
DBB
Displaying the clock ........................................... 16
Tuner
Tuning to radio stations .................................... 20
Programming radio stations ............................. 20
Autostore: Automatic programming
Manual programming
To listen to a preset station
Changing tuning grid .......................................... 20
USB
Using a USB mass storage device ............. 21-23
Playing a USB mass storage device
CD Ripping - Recording disc files to a USB
device
Deleting audio files on a USB device
AUX
AUX (Listening to an external source) ......... 23
Timer
Setting the timer ................................................. 24
Activating and deactivating TIMER ................. 24
SLEEP
................................................................................ 24
Specifications ........................................... 25
Maintenance .............................................. 25
Tr oubleshooting .............................. 26-27
CD
Discs for playback .............................................. 17
Playing discs ......................................................... 17
Selecting and searching ..................................... 18
Selecting a different track
Finding a passage within a track during playback
Programming tracks ........................................... 18
Reviewing the program
Erasing the program
Different play modes: REPEAT, SHUFFLE...... 19
Display track information
(MP3/WMA only) ............................................... 19
6
Page 7

General Information
Congratulations on your purchase and
welcome to Philips!
To fully benefit from the support that
Philips offers, register your product at
www.philips.com/welcome.
Supplied accessories
–1 X certified power adapter
(Brand name: PHILIPS,
Model No.: AS-650-190-AB340
Input: 100-240V ~50/60Hz 1.6A,
Output: 19.0V 3.4A)
–2 speaker boxes including 2 speaker cables
– remote control (with 1 x CR2025 battery)
– MW loop antenna
– FM wire antenna
– stand
–Power plug adaptor
Environmental Information
All unnecessary packaging has been omitted. We
have tried to make the packaging easy to
separate into three materials: cardboard (box),
polystyrene foam (buffer) and polyethylene (bags,
protective foam sheet).
Your system consists of materials which can be
recycled and reused if disassembled by a
specialized company. Please observe the local
regulations regarding the disposal of packaging
materials, exhausted batteries and old
equipment.
Safety Information
● Place the system on a flat, hard and stable
surface.
● Where the MAINS plug or an appliance coupler
is used as the disconnet device, the disconnet
device shall remain readily operable.
● Install the unit near the AC outlet and where the
AC power plug can be easily reached.
● The apparatus shall not be exposed to
dripping or splashing.
● Place the system in a location with adequate
ventilation to prevent internal heat build-up in
your system. Allow at least 10 cm (4 inches)
clearance from the rear and the top of the unit
and 5 cm (2 inches) from each side.
● The ventilation should not be impeded by
covering the ventilation openings with items,
such as newspapers, table-cloths, curtains, etc.
● Do not expose the system, batteries or discs to
excessive moisture, rain, sand or heat sources
caused by heating equipment or direct sunlight.
● No naked flame sources, such as lighted candles,
should be placed on the apparatus.
● No objects filled with liquids, such as vases, shall
be placed on the apparatus.
● If the system is brought directly from a cold to a
warm location, or is placed in a very damp room,
moisture may condense on the lens of the disc
unit inside the system. Should this occur, the CD
player would not operate normally. Leave the
power on for about one hour with no disc in the
system until normal playback is possible.
● The mechanical par ts of the set contain self-
lubricating bearings and must not be oiled or
lubricated.
● Batteries (batter y pack or batteries installed)
shall not be exposed to excessive heat such as
sunshine, fire or the like.
● When the system is switched to Standby
mode, it is still consuming some power.
To disconnect the system from the
power supply completely, remove the AC
power plug from the wall socket.
English
7
Page 8

General Information
English
Hearing Safety
Listen at a moderate volume.
● Using headphones at a high volume can impair
your hearing. This product can produce sounds
in decibel ranges that may cause hearing loss for
a normal person, even for exposure less than a
minute. The higher decibel ranges are offered
for those that may have already experienced
some hearing loss.
● Sound can be deceiving. Over time your hearing
"comfort level" adapts to higher volumes of
sound. So after prolonged listening, what sounds
"normal" can actually be loud and harmful to
your hearing. To guard against this, set your
volume to a safe level before your hearing
adapts and leave it there.
To establish a safe volume level:
● Set your volume control at a low setting.
● Slowly increase the sound until you can hear it
comfortably and clearly, without distortion.
Listen for reasonable periods of time:
● Prolonged exposure to sound, even at normally
"safe" levels, can also cause hearing loss.
● Be sure to use your equipment reasonably and
take appropriate breaks.
Be sure to observe the following
guidelines when using your headphones.
● Listen at reasonable volumes for reasonable
periods of time.
● Be careful not to adjust the volume as your
hearing adapts.
● Do not turn up the volume so high that you
can't hear what's around you.
● You should use caution or temporarily
discontinue use in potentially hazardous
situations.
● Do not use headphones while operating a
motorized vehicle, cycling, skateboarding, etc.; it
may create a traffic hazard and is illegal in many
areas.
8
Page 9

Controls
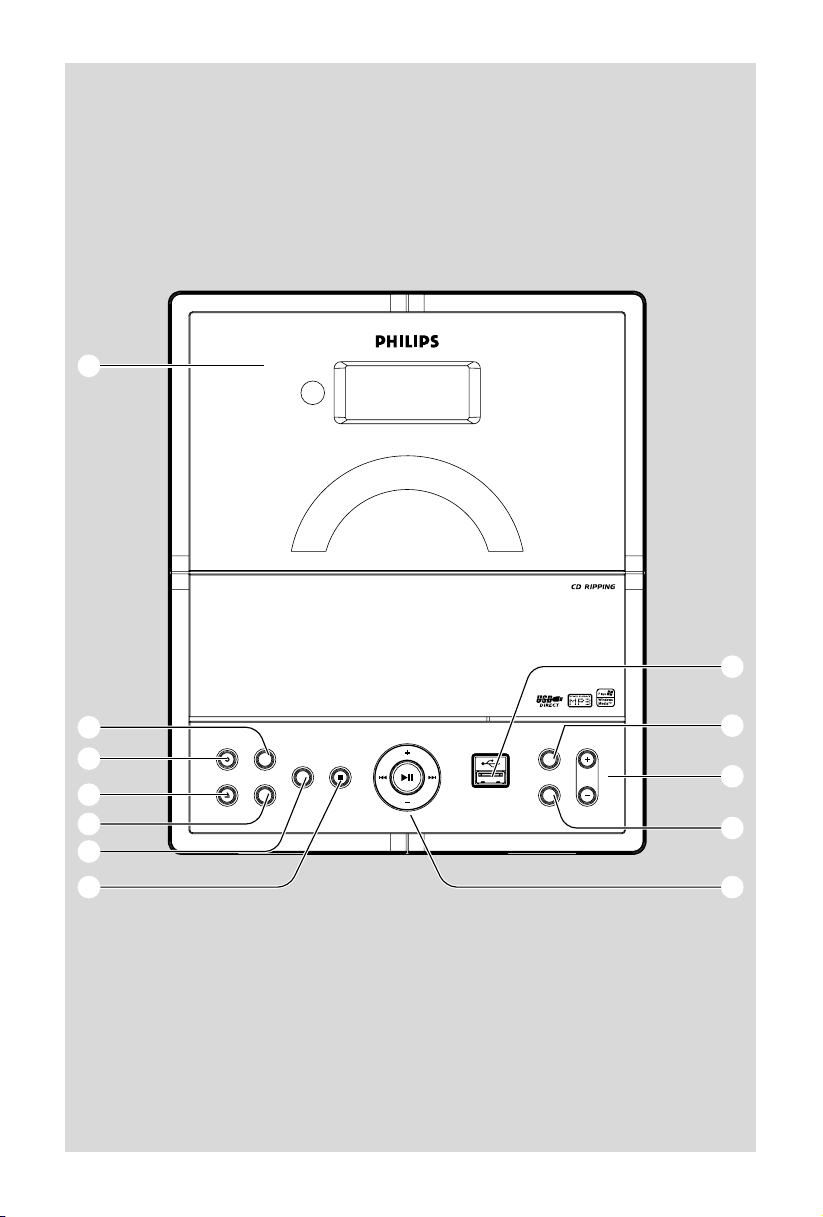
Controls on the set (illustrations
on page 3)
1
– jack for the external USB mass storage device
2 PROGRAM
– CD/USB: programs tracks
– Tuner: programs preset radio stations
– In clock setting mode: switches between 12
hour and 24 hour display
3 VOLUME
– adjusts the volume level
– Clock/Timer: adjusts the hours and minutes
4 DISPLAY/CLOCK
– Clock:
- displays the set time
- In standby mode: enters the clock setting mode
(press and hold for more than 2 seconds)
– TUNER/AUX: switches between clock display
and playback display
– MP3/WMA files: displays disc information
during playback
5 ALBUM/ PRESET + /-
– CD/USB: selects albums (for MP3/WMA only)
– TUNER: selects a preset radio station
4 / ¢
– CD/USB: (press and hold) fast searches CD
tracks/files backwards/forwards
– Tuner: tunes to radio stations
ÉÅ
– CD/USB: starts or pauses playback
6 IR
– sensor for the infrared remote control
Helpful hints: Always point the remote control
towards this sensor.
7 DSC (Digital Sound Control)
– selects predefined sound settings: ROCK,
JAZZ, POP, CLASSIC, OFF
8 STANDBY-ON
– press briefly to switch the set on or off (standby)
9 OPEN/CLOSE 0
– opens/closes the CD door.
0 DBB (Dynamic Bass Boost)
– turns the bass enhancement on/off
! SOURCE
– selects sound source CD, USB, TUNER, or
AUX
– In standby mode: switches the set on and
selects sound source CD, USB, TUNER or
AUX
@ STOP
– CD/USB: stops playback; erase a program
– Tuner: press and hold to change tuning grid
between 10 kHz and 9 kHz
English
9
Page 10
Controls
English
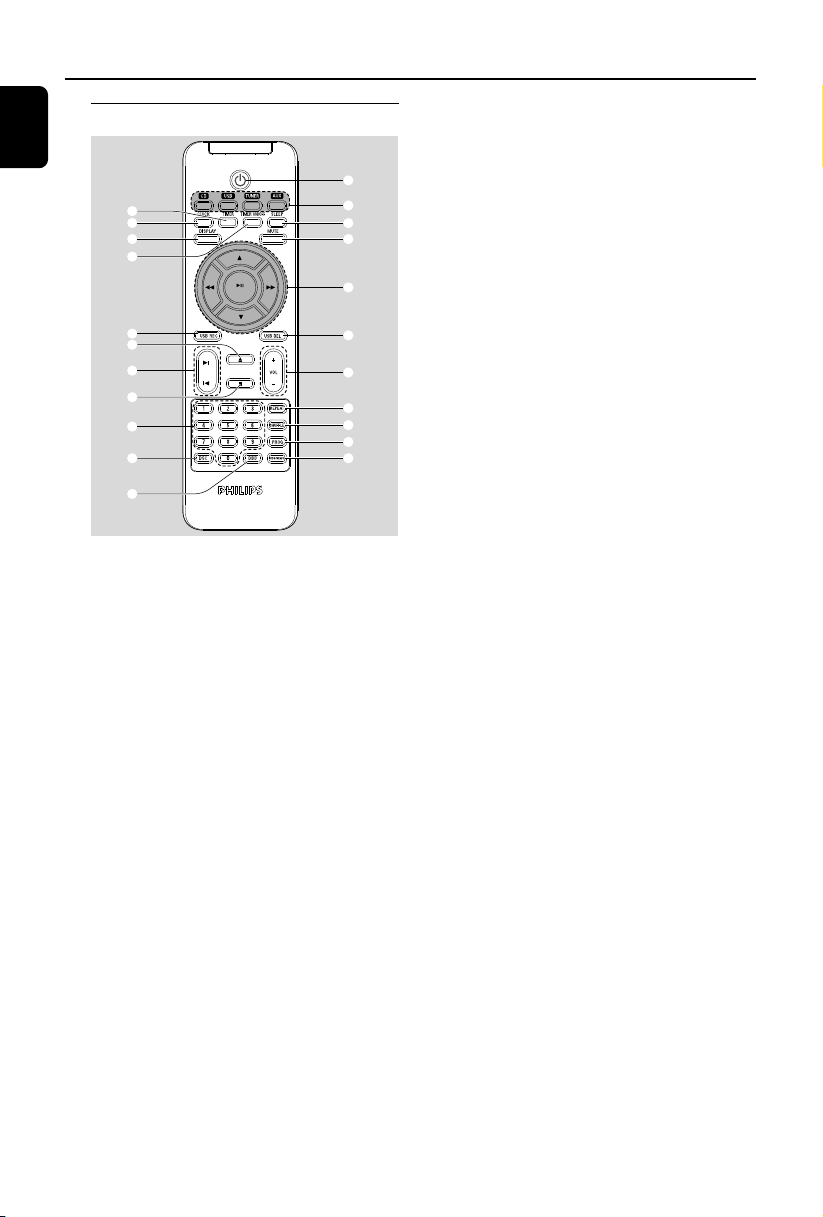
Remote control
@
#
%
^
&
*
(
)
¡
™
Notes for remote control:
– First select the source you wish to
control by pressing one of the source select
keys on the remote control (for example
CD, TUNER).
– Then select the desired function (for
example ÉÅ,í , ë).
BB
1
B
BB
– press briefly to switch the set on or off (standby)
2 Source buttons
USB
– selects USB source
– In standby mode: switches the set on and
selects USB source.
CD
– selects CD source
– In standby mode: switches the set on and
selects CD source.
TUNER
– selects TUNER source and toggles between the
wavebands: FM and MW
– In standby mode: switches the set on and
selects TUNER source
AUX
– selects the audio input from an additional
connected appliance
1
2
3
4$
5
6
7
8
9
0
!
– In standby mode: switches the set on and
selects the audio input from an additional
connected appliance
3 SLEEP
– set the sleep timer
4 MUTE
– switches the sound off temporar ily
5 à / á
– CD/USB: (press and hold) fast searches CD
tracks/files backwards/forwards
– Tuner: tunes to radio stations
3 / 4
– CD/USB: selects the next/previous album (for
MP3/WMA only)
– Tuner: selects a preset station
ÉÅ
– CD/USB: starts or pauses playback
6 USB DEL
7 VOL +/-
– adjusts the volume level
– Clock/Timer: adjusts the hours and minutes
8 REPEAT
– selects continuous playback
9 SHUFFLE
– selects random playback
0 PROG
– CD/USB: programs tracks
– Tuner: programs preset radio stations
– In clock setting mode: switches between 12
hour and 24 hour display
! RDS/NEWS (no function on this version)
@ TIMER
– enters the timer setting mode (press and hold
for more than 2 seconds)
10
Page 11
Controls Installation
# CLOCK
– Clock: - displays the set time
- In standby mode: enters the clock
setting mode (press and hold for more
than 2 seconds)
– TUNER/Audio CD/USB/AUX: switches
between clock display and playback display
$ DISPLAY
– MP3/WMA files: displays disc information
during playback
– Audio CD: display current track remaining play
time during playback
% TIMER ON/OFF
– switches the timer on/off (press and hold for
more than 2 seconds)
^ USB REC
– USB: copies one file or all files of a disc to an
external portable USB storage device/MP3
player.
& 0
– opens/closes the CD door.
* í/
ë
– CD/USB: selects previous/next track
( 9
– CD/USB: stops playback; erase a program
– Tuner: press and hold to change tuning grid
between 10 kHz and 9 kHz
) Numeric keypad (0-9)
– selects track or station number
¡ DSC (Digital Sound Control)
– selects predefined sound settings: ROCK,
JAZZ, POP, CLASSIC, OFF
™ DBB (Dynamic Bass Boost)
– turns the bass enhancement on/off
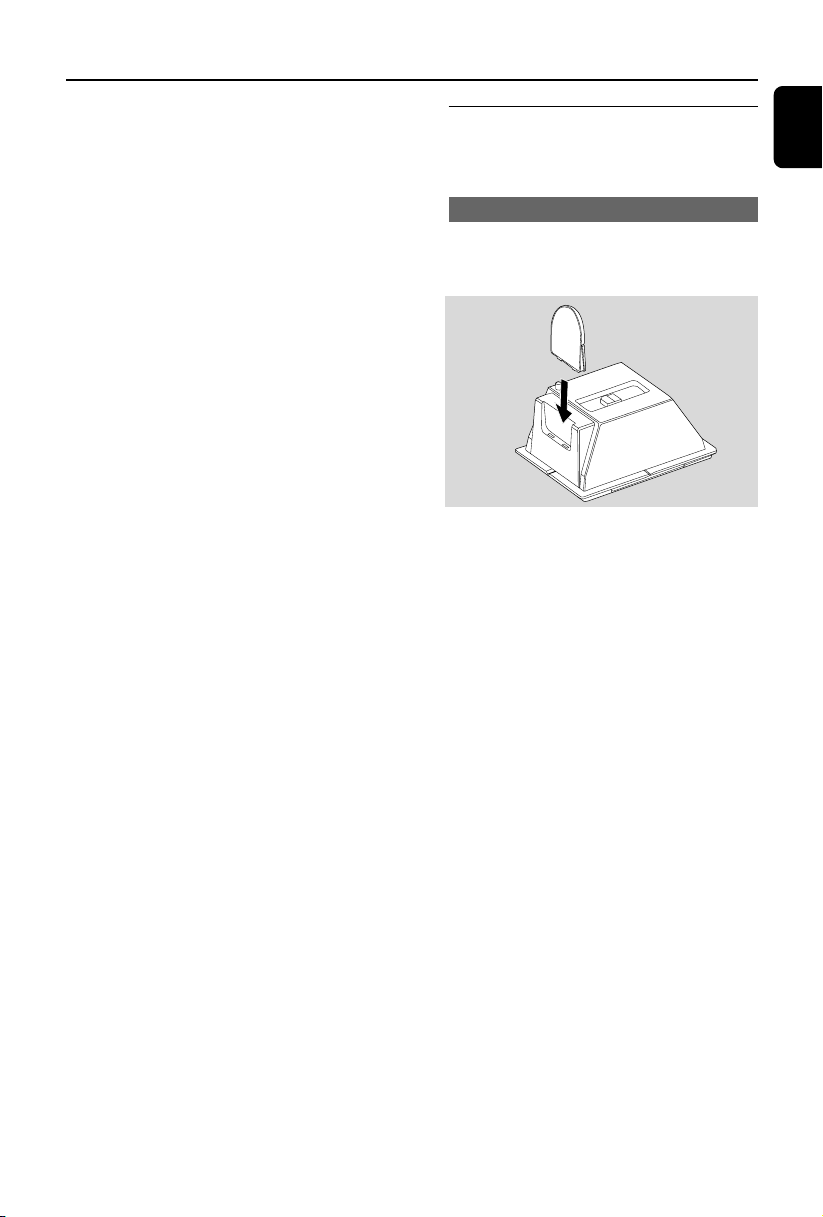
Placing MCM279
MCM279 is supplied with a stand, you may
attach or detach the stand to/from the main set.
Mounting the stand onto the set
1 Locate the bottom of the main unit and find the
slot, then slide the stand in the slot until it stops,
as indicated in the figure below.
English
11
Page 12
Installation
English
Rear connections
Warning:
– Never make or change connections with
the mains supply switched on.
– Install your set near the AC outlet and
where the AC power plug can be reached
easily.
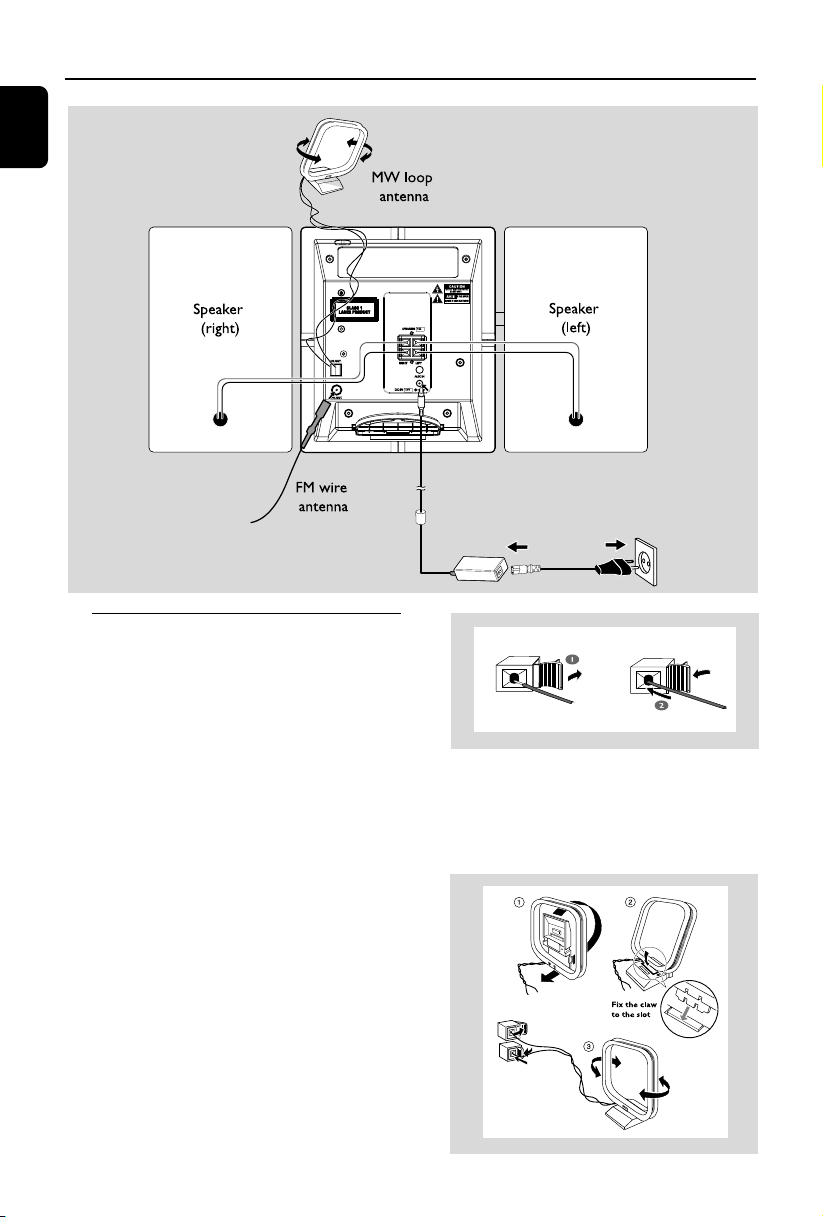
A Speaker connections
Use the supplied speakers only. Using other
speakers can damage the set or the sound
quality will be negatively affected.
B Antenna connections
MW antenna
Connect the supplied MW loop antenna to the
“AM aerial” terminal. Adjust the position of the
antenna for optimal reception.
● Connect the cable of the left speaker to LEFT
(red and black) and the cable of the right
speaker to RIGHT (red and black) as follows:
a. Press the clip of the red terminal and fully
insert the stripped portion of the colored (or
marked) speaker cable into the socket, then
release the clip
b. Press the clip of the black terminal and fully
insert the stripped portion of the black (or
unmarked) speaker cable into the socket, then
release the clip
12
Page 13
Installation
● Position the antenna as far as possible from a TV,
VCR or other radiation source.
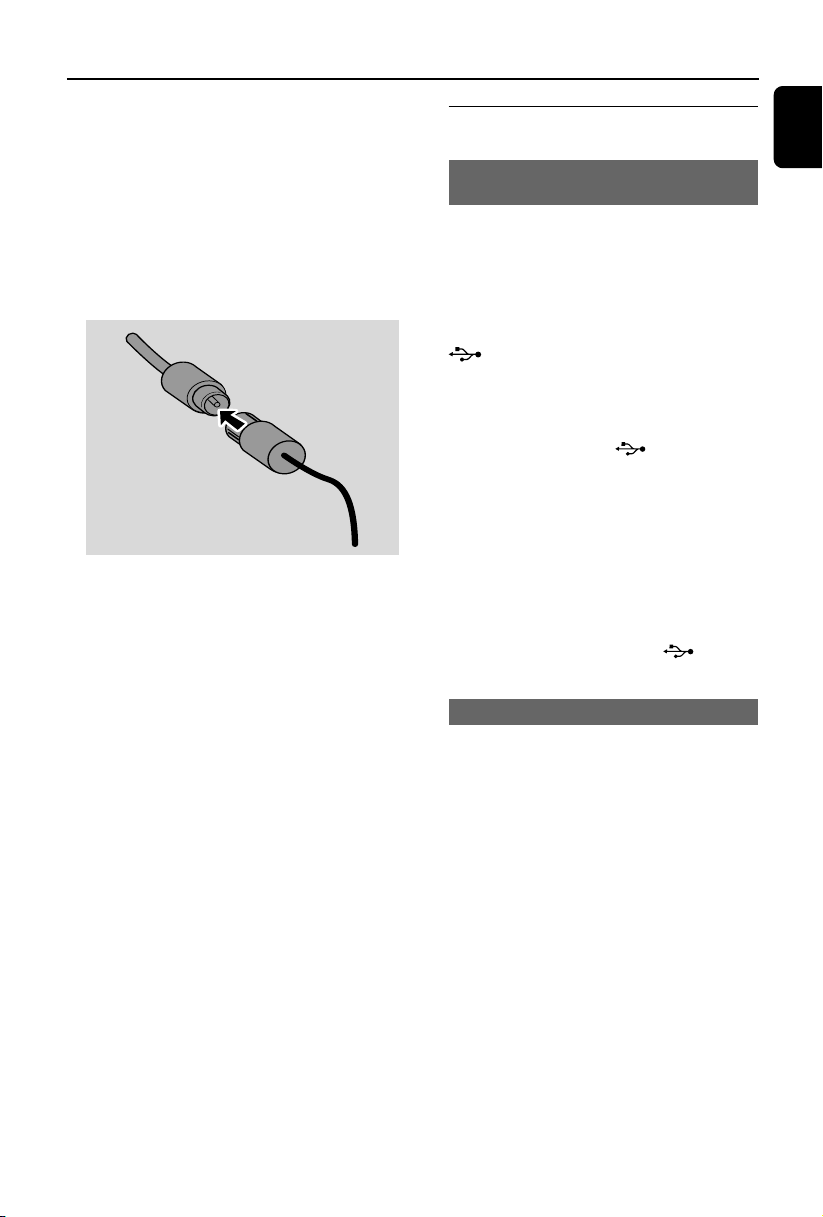
FM antenna
The wire antenna supplied can only be used to
receive nearby stations. For better reception we
recommend using a cable antenna system or an
outdoor antenna.
1 Extend the wire antenna and fit it to FM
ANTENNA as shown below.
Note: If you are using a cable antenna system or
an outdoor antenna, fit the antenna plug, instead of
the wire antenna, to FM ANTENNA .
2 Move the antenna in different positions for
optimal reception (as far away as possible from
the TV, VCR or other radiation sources)
3 Fix the antenna’s end to the wall.
Helpful hints:
–To receive optimal radio reception, put the main
unit and the antennas as far away as possible from
the power adaptor.
Connecting an additional
appliance
Connecting a USB device or memory
card
By connecting a USB mass storage device
(including USB flash memory, USB flash players
or memory cards) to the Hi-Fi system, you can
enjoy the music stored on the external device
through the powerful speakers of Hi-Fi system.
1 Insert the USB device’s USB plug into the socket
on the front panel of the main set.
Or,
for the devices with USB cable:
a. Inser t one plug of the USB cable (not
supplied) to the socket on the front
panel of the main set.
b. Insert the other plug of the USB cable to the
USB output terminal of the USB device.
Or,
for the memory card:
a. Insert the memory card into a card reader
(not supplied).
b. Use a USB cable (not supplied) to connect
the card reader to the socket .
on the front panel of the main set.
Connecting a non-USB device
It is possible to use an additional appliance, e.g.
TV, VCR or CD recorder with the set. On
MCM279, you can playback music from an
external source.
1 Insert one plug of the audio cable (not supplied)
to the socket AUX IN at the rear panel of the
main set.
2 Connect the other end of the audio cable to the
AUDIO OUT terminal of the additional
appliance.
3 Select AUX mode on the set.
English
Helpful hints:
– Always refer to the owner’s manual of other
equipment for complete connection.
13
Page 14

Installation
English
Using AC power
1 Make sure all the connections have been made
before switching on the power supply.
2 Connect the supplied AC/DC power adaptor to
the DC jack (located on the rear panel of the
main set) and to the wall socket. This switches on
the power supply.
To avoid damage to the set, use only the
adaptor supplied.
When MCM279 is switched to standby, it is still
consuming some power. To disconnect the
system from the power supply completely,
remove the power plug from the wall
socket.
The type plate is located on the rear of the
set.
Warning!
To avoid overheating of the system, a safety
circuit has been built in. Therefore, your
system may switch to Standby mode
automatically under extreme conditions. If
this happens, let the system cool down
before reusing it (not available for all versions).
This product complies with the radio
interference requirements of the European
Community.
CAUTION
Visible and invisible laser radiation. If the
cover is open, do not look at the beam.
High voltage! Do not open. You run the risk
of getting an electric shock.
The machine does not contain any userserviceable parts.
Modification of the product could result in
hazardous radiation of EMC or other
unsafe operation.
14
Page 15
Preparation
Using the remote control
IMPORTANT!
– Remove the
protective plastic tab
before using the
remote control.
– Always point the
remote control directly
towards IR area on the main set.
Notes for remote control:
– First select the source you wish to
control by pressing one of the source select
keys on the remote control (for example
CD, TUNER).
– Then select the desired function (for
example ÉÅ,í , ë).
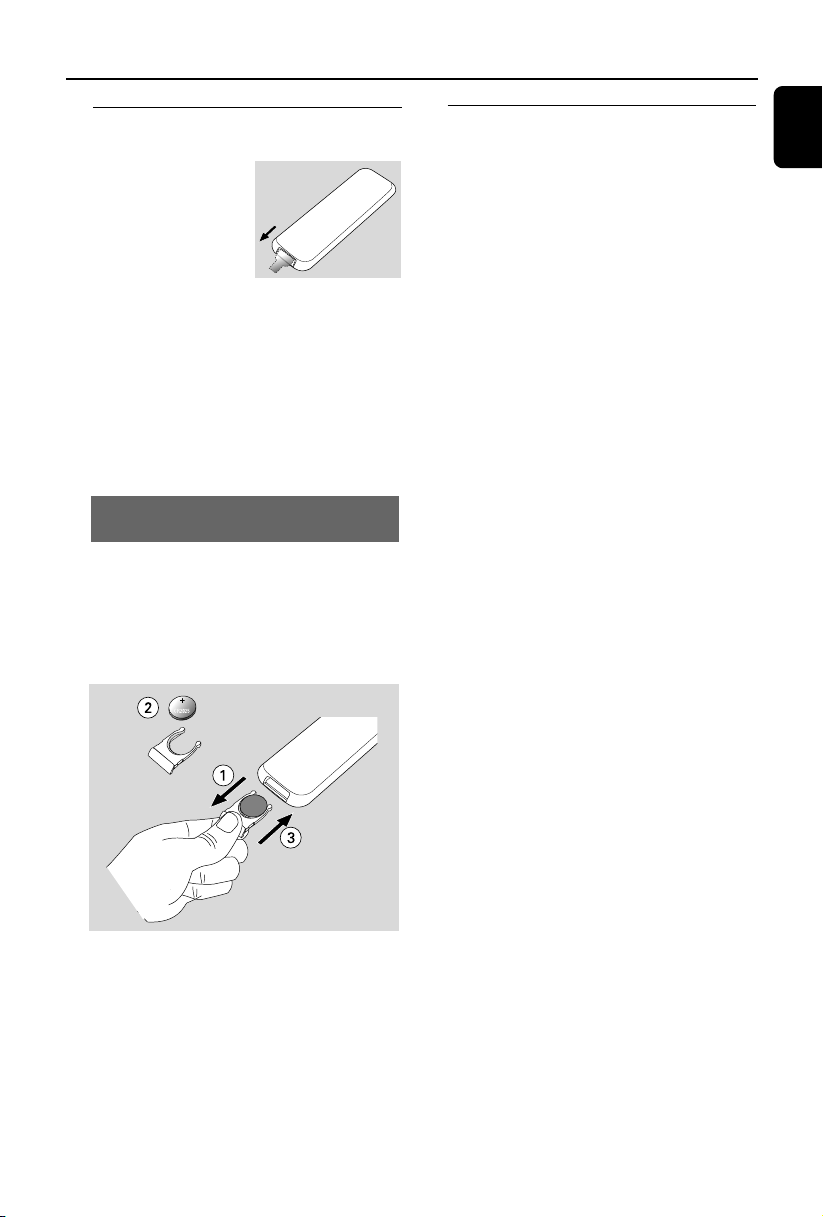
To replace the remote controls’
battery (CR2025)
1 Push to open the battery tray.
2 Replace a new battery according to the
indicated polarity.
3 Push the battery tray back to close it.
Setting the clock
After connecting MCM279 to the power supply,
set the clock first.
1 Press and hold STANDBY-ON/ ECO
POWER to switch the set to Standby mode.
➜ The display shows the set time.
➜ -- --:-- -- displays by default if you have not set
the clock.
2 In the standby mode, press and hold DISPLAY/
CLOCK ( or CLOCK on the remote control ).
➜ The hours digits star t flashing.
3 To switch between 12 hour and 24 hour display,
press PROGRAM
control )
.
( or PROG on the remote
4 Hold down or press VOLUME +/- repeatedly
to set the hours.
5 Press DISPLAY/
the remote control ) to confirm.
➜ The minutes digits star t flashing
CLOCK
( or CLOCK on
6 Hold down or press VOLUME +/- repeatedly
to set the minutes.
7 Press DISPLAY/
the remote control ) to confirm.
– To exit without storing the clock setting press
9.
Helpful hints:
– The clock setting will be erased when the system
is disconnected from the power supply.
– The set will exit from the clock setting mode if
no button is pressed within 90 seconds.
CLOCK
( or CLOCK on
English
CAUTION!
– Batteries contain chemical substances,
so they should be disposed of properly.
15
Page 16

Basic Functions
English
Switching on/off the set and
selecting functions
1 To switch on, press STANDBY-ON or
SOURCE on the set (or y on the remote
control).
➜ The set switches to the last source selected.
OR
On the remote control, press the source button
(e.g. USB, CD, TUNER, AUX).
2 When the set is on, press STANDBY-ON to
switch off (or y on the remote control).
3 To select your function, press SOURCE once
or more on the set (or USB, CD, TUNER,
AUX on the remote control).
To switch the system to standby mode
● Press STANDBY-ON y ( or y on the
remote).
Volume control
Volume adjustment
● Adjust the volume by pressing VOLUME +/- .
➜ VOL and the actual value (between 1 and 31)
are displayed.
➜ VOL MIN is the minimum volume level.
➜ VOL MAX is the maximum volume level.
MUTE
You can temporarily switch off the sound
without switching off the set.
1 Press MUTE to switch off the sound.
➜ MUTE appears. Playback continues without
sound.
2 To switch on the sound, you can:
– press MUTE again;
– adjust the volume controls;
– change source.
Helpful hints:
– In the standby mode, the tone, sound settings,
tuner presets and the volume level (up to a
maximum volume level of 12) will be retained in
the set’s memory.
Auto-standby
When the set has reached the end of CD
playback and remains in the stop position for
more than 15 minutes, the set will switch off
automatically to save power.
Sound control
DSC
Digital Sound Control enables you to select
predefined sound settings.
● Press DSC repeatedly to select the desired
sound setting: ROCK, JAZZ, POP, CLASSIC,
OFF.
DBB
● Press DBB (Dynamic Bass Boost) once or
more to switch bass enhancement on or off.
➜ DBB appears if DBB is activated.
Displaying the clock
● During playback, press CLOCK on the remote
control repeatedly to switch between the clock
display and the playback display.
16
Page 17
CD
Discs for playback
With this system, you can play
– all pre-recorded audio CDs (CDDA)
– all finalized audio CD-Rs and CD-RWs
– MP3/WMA-CDs (CD-Rs/CD-RWs with
MP3/WMA files)
IMPORTANT!
– This system is designed for regular
discs. Therefore, do not use any
accessories such as disc stabilizer rings or
disc treatment sheets, etc.
About MP3/ WMA
The music compression technology MP3
(MPEG1 Audio Layer 3) and WMA (Windows
Media Audio) significantly reduces the digital data
of an audio CD while maintaining CD quality
sound.
Windows Media Audio® is a registered
trademark of Microsoft Corporation.
Supported formats:
– Disc format ISO9660, Joliet, UDF (created on
Adaptec Direct CD) and multi-session CDs
– MP3 bit rate (data rate): 32-320 Kbps and
variable bit rate
– Directory nesting up to a maximum of 8
levels
– Max. track number plus album: 999
– WMA v9 or earlier
The system will not play or support the
following:
•Empty albums: an empty album is an album
that does not contain MP3/WMA files, and will
not be shown in the display.
• Non-supported file formats are skipped. This
means that e.g.: Word documents .doc or MP3
files with extension .dlf are ignored and will not
be played.
• DRM protected WMA files
• WMA files in Lossless or VBR format
IMPORTANT!
– Make sure that the file names of MP3 files end
with .mp3.
– For DRM protected WMA files , use Windows
Media Player 10 (or later) for CD burning/
conversion. Visit www. microsoft.com for details
about Windows Media Player and WM DRM
(Windows Media Digital Rights Management).
Playing discs
1 Press SOURCE once or more to select CD (or
CD on the remote control).
➜ The CD icon appears.
2 Press OPEN/CLOSE0 to open the CD door.
➜ OPEN is displayed.
3 Insert a disc with the printed side facing outward.
Then press OPEN/CLOSE0 again to close
the CD door.
➜ READING is displayed as the CD player scans
the contents of a disc.
➜ Audio CD: the total number of tracks and
playing time are shown.
MP3/WMA: Display shows total album
number and total track number.
Helpful hints:
– If you have not organized MP3/WMA files into
any albums on your disc, an album “00” will be
automatically assigned for all those files.
4 Press ÉÅ to start playback.
➜ Display shows current track.
number and elapsed playing time.
5 To pause playback, pressÉÅ. To resume
playback, press the button again.
6 To stop playback, press STOPÇ.
Helpful hints:
CD playback will also stop when
– the CD door is opened.
– the disc has reached the end.
– you select another source: TUNER, USB or
AUX.
English
17
Page 18

CD
English
Selecting and searching
Selecting a different track
● Press 4 / ¢ on the set (or í/ ë on the
remote control ) once or repeatedly until the
desired track number appears in the display.
MP3/WMA: ➜ Tr ack information scrolls briefly.
MP3/WMA:
● Press ALBUM/ PRESET +/- on the set (or 3
/ 4 on the remote control ) once or more to
select the next or previous album.
➜ Album information scrolls briefly.
or
● In the stop position, press ALBUM/ PRESET
+/- on the set (or 3 / 4 on the remote
control ) and then 4 / ¢ ( or í/ ë on
the remote control ) to select the desired album
and track.
➜ MP3/WMA: Display shows current album/
track number.
Finding a passage within a track
during playback
1 During playback, press and hold 4 / ¢ on
the set (or à / á on the remote control ).
➜ The CD plays at a high speed.
2 When you recognize the passage you want,
release 4 or ¢ or à / á.
➜ Normal playback resumes.
Programming tracks
You may store up to 40 tracks in the desired
sequence. If you like, store any track more than
once.
1 In the stop position, press PROGRAM to start
programming.
➜ PROG flashes.
2 Press 4 / ¢ on the set (or í/
remote control ) once or repeatedly until the
desired track number appears in the display.
● MP3/WMA: press ALBUM/ PRESET +/- on
the set (or 3 / 4 on the remote control ) and
4 / ¢ on the set (or í/ ë on the
remote control ) to select the desired album and
track.
ë on the
3 Press PROGRAM to confirm.
➜ Display shows briefly the number of tracks
programmed.
➜ Then, the display shows the track number
you just stored.
4 Repeat steps 2-3 to select and store all desired
tracks.
➜ FULL is displayed if you attempt to program
more than 40 tracks.
5 Press ÉÅ to play the program.
Helpful hints:
– The set will return to the stop position if no
button is pressed within 90 seconds. To resume
programming, press PROGRAM.
– MP3/WMA: When playing a program, use of
ALBUM/ PRESET are void.
18
Erasing the program
You can erase the contents of the memor y by:
● Press STOP 9
– once if in the stop position;
– twice during playback;
● Press STANDBY-ON.
● Select another sound source.
● Open the CD door.
➜ PROG disappears.
Page 19

CD
Different play modes: REPEAT,
SHUFFLE
REP TRACK– plays the current track
continuously.
REP ALL– plays the entire disc/program
continuously.
SHUF – plays all the tracks in random order.
1 During playback, press once or more REPEAT
or SHUFFLE to select play modes.
2 To return to normal playback, press REPEAT or
SHUFFLE repeatedly until the various modes
are no longer displayed.
Helpful hints:
– In the shuffle mode, press ¢ to select tracks.
Display track information
(MP3/WMA only)
The ID3 tag is part of an MP3/WMA file and
contains various track information such as the
track´s title or the artist´s name.
● During playback, press DISPLAY repeatedly on
the remote control.
➜ Display show title name, album name and ID3
tag information.
Helpful hints:
- Complete the ID3 tag information with
your MP3/WMA encoder software before
burning the MP3/WMA-CD.
English
19
Page 20

Tuner
English
Tuning to radio stations
1 Press SOURCE once or more to select
TUNER (or TUNER on the remote control).
2 Press TUNER on the remote control.
repeatedly to select your desired waveband, FM
or MW.
➜ Display shows: , radio station frequency,
waveband and if programmed, a preset number.
3 Press and hold 4 / ¢ on the set (or à /
á on the remote control ) until SEARCH
appears.
➜ The radio automatically tunes to a station
with sufficient reception. Display shows SEARCH
during automatic tuning.
➜ FM: If a station is received in stereo, is
shown.
4 Repeat step 3 if necessary until you find the
desired station.
● To tune to a weak station, press 4 / ¢
on the set (or à / á on the remote control )
briefly and repeatedly until you have found
optimal reception.
Manual programming
1 Tune to your desired station (see Tuning to
radio stations).
2 Press PROGRAM to activate programming.
➜ PROG flashes.
3 Press ALBUM/ PRESET +/- on the set (or 3
/ 4 on the remote control ) to allocate a
number from 1 to 40 to this station.
4 Press PROGRAM to confirm.
➜ Display shows the preset number, waveband
and the frequency of the preset station.
5 Repeat steps 1-4 to store other stations.
● You can erase a preset station by
storing another frequency in its place.
To listen to a preset station
● Press ALBUM/ PRESET +/- on the set (or 3
/ 4 on the remote control ) buttons once or
more until the desired preset station is displayed.
Programming radio stations
You can store up to a total of 40 radio stations
(FM and MW) in the memory, manually or
automatically (Autostore).
Autostore: Automatic programming
Automatic programming will start from preset 1
or a chosen preset number. From this preset
number upwards, former programmed tuner
stations will be erased. The set will only program
stations which are not in the memory already.
1 Press ALBUM/ PRESET +/- on the set (or 3
/ 4 on the remote control ) buttons once or
more to select the preset number where
programming should start.
Note:
– If no tuner preset number is selected, default is
preset 1 and all your presets will be erased.
2 Press and hold PROGRAM until AUTO
appears.
➜ Available stations (FM and MW) are
programmed.
➜ After all stations are stored, the first preset
station will then be played.
20
Changing tuning grid
In some countries, the frequency step between
adjacent channels is 9 kHz (10 kHz in some
areas). The preset frequency step in the factory
is 10 kHz.
1 Select tuner mode.
2 Press and hold 9 for more than 2 seconds .
Note:
– All preset stations will be lost and need to be
reprogrammed.
Page 21
USB
Using a USB mass storage device
By connecting a USB mass storage device to the
Hi-Fi system, you can enjoy the music stored on
the external device through the powerful
speakers of Hi-Fi system.
Playing a USB mass storage device
Compatible USB mass storage devices
With the Hi-Fi system, you can use
– USB flash memory (USB 2.0 or USB1.1)
– USB flash players (USB 2.0 or USB1.1)
– memory cards (requires an additional card
reader to work with this Hi-Fi system)
Note:
– In some USB flash players (or memory
devices), the stored contents are recorded using
copyright protection technology. Such
protected contents will be unplayable on any
other devices (such as this Hi-Fi system).
Supported formats:
– USB or memory file format FAT12, FAT16,
FAT32 (sector size: 512 - 65,536 bytes)
– MP3 bit rate (data rate): 32-320 Kbps and
variable bit rate
– WMA v9 or earlier
– Directory nesting up to a maximum of 8
levels
– Number of albums/ folders: maximum 999
– Number of tracks/titles: maximum 999
– ID3 tag v2.0 or later
– File name in Uicode UTF8 (maximum length:
128 bytes)
The system will not play or support the
following:
•Empty albums: an empty album is an album
that does not contain MP3/WMA files, and will
not be shown in the display.
• Non-supported file formats are skipped. This
means that e.g.: Word documents .doc or MP3
files with extension .dlf are ignored and will not
be played.
•AAC , WAV, PCM audio files
• DRM protected WMA files
• WMA files in Lossless format
How to transfer music files from PC to a
USB mass storage device
By dragging and dropping music files, you can
easily transfer your favorite music from PC to a
USB mass storage device.
For the flash player, you can also use its music
management software for the music transfer.
However, those WMA files may be
unplayable for compatibility reasons.
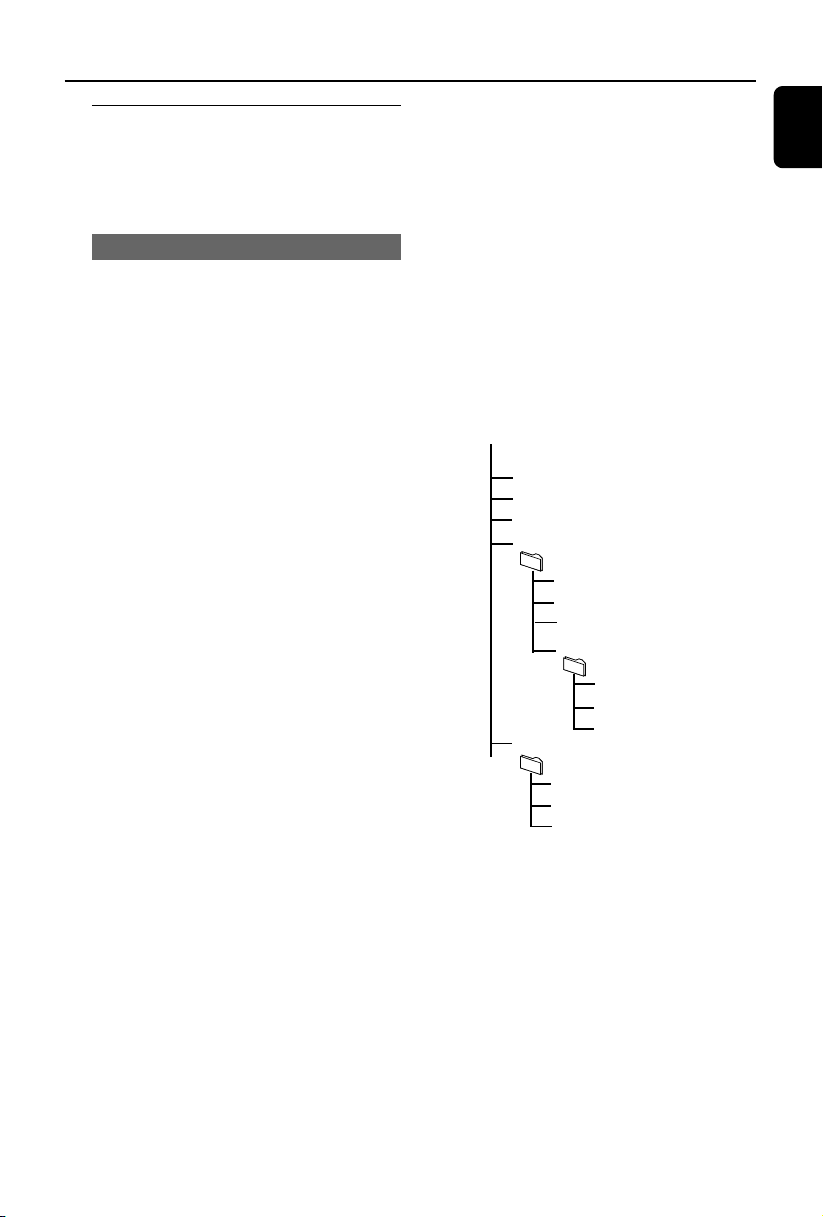
How to organize your MP3/WMA files
on the USB mass storage device
This Hi-Fi system will browse the MP3/WMA
files in the folders/sub-folders/titles order.
Example:
Root
Title 001
Title 002
Title 003
Album 01
Title 001
Title 002
Title 003
Album 02
Title 001
Title 002
Title 003
Album 03
Title 001
Title 002
Title 003
Organize your MP3/WMA files in different
folders or subfolders as required.
Note:
– If you have not organized MP3/WMA files into
any albums on your disc, an album “00” will be
automatically assigned for all those files.
– Make sure that the file names of MP3 files end
with .mp3. and the file names of WMA files end
with .wma.
– For DRM protected WMA files, use Windows
Media Player 10 (or later) for conversion. Visit www.
microsoft.com for details about Windows Media
Player and WM DRM (Windows Media Digital
Rights Management).
English
21
Page 22

USB
English
1 Check the USB device has been properly
connected. (See Installation: Connecting an
additional appliance).
2 Press SOURCE once or more to select USB
(or USB on the remote control).
➜ The icon appears.
– NO AUDIO appears if no audio file is found in
the USB device.
3 Play the USB’s audio files as you do with the
albums/tracks on a CD (See CD).
Note:
– For compatibility reasons, the album/track
information may differ from what it is displayed
through flash players’ music management software.
– File names or ID3 tags will be displayed as --if they are not in English.
INFORMATION REGARDING USB DIRECT:
1. Compatibility of the USB connection on this micro
system:
a) This micro system supports most USB Mass
storage devices (MSD) that these devices are
compliant to the USB MSD standards.
i) Most common Mass storage class devices are
flash drives, memory sticks, jump drives and
etc.
ii) If you see a "Disc Drive" showing up on
your computer after you have plugged the
mass storage device into your computer, most
likely it is MSD compliant and it will work
with this micro system.
b) If your Mass storage device requires a battery/
power source, please make sure you have a
fresh battery in it or charge the USB device
first and then plug it into the micro system
again.
2) Supported Music type:
a) This device only supports unprotected music
with file extension: .mp3 .wma
b) Music bought from on-line music stores are not
supported because they are secured by Digital
Rights Management protection (DRM).
c) File name extensions that ended with the
following are not supported: .wav; .m4a; .m4p;
.mp4; .aac and etc.
3) No Direct connection can be made from a
Computer USB port to the micro system even you
have either or both mp3 or wma file in your
-computer.
22
CD Ripping - Recording disc files to a
USB device
MCM279 allows you to copy the music files or
spoken contents of a disc to the external USB
device. You can record one track, the whole disc
or even selected tracks through the Program
function.
1 Check the USB device has been properly
connected. (See Installation: Connecting an
additional appliance)
2 Insert a disc (audio CD or MP3 or WMA). If
desired, program the disc.
3 Press SOURCE once or more to select CD
(or CD on the remote control).
4 To record one file
a. Select the track you want to record
b. Press once or repeatedly USB REC until “RIP
ONE” appears, flashing.
➜ Disc playback will start automactially from the
beginning of the selected track.
4 To record all files
a. Press repeatedly USB REC until “RIP ALL”
appears, flashing.
➜ Disc playback will start automactially from the
beginning.
5 To stop recording, first press 9, then unplug the
USB device.
● In the rip-one mode, the playback will auto go to
the stop position after one track/file comes to an
end.
● During MP3 and WMA recording, make sure the
playback of the file you want to record is wholly
completed before manually stop recording. Or
any part of the file will not be recorded.
● During recording, if the memory of the USB
device runs out, playback will not continue.
Page 23
AUX
Helpful hints:
– In recording mode (even the USB device is
unplugged from the set), selections of track/album,
play modes (repeat and shuffle modes) are not
available.
– All the recorded audio files will be stored in the
folder named _PHILIPS which is automatically
created for recording.
– The recorded audio file will be stored in either
.mp3 format (for the disc of audio or MP3), or
.wma format (for WMA disc).
– Copyright-protected CD will not be recorded.
– DRM-protected WMA is not supported.
– Do not directly unplug the USB device to stop
recording for a possible loss of some of the
recorded contents.
–For MP3 and WMA recording, if the name of a
file to be recorded is the same as the one of a file
stored in the USB device, the file will not be
recorded. In this case, MCM279’s display will show
flashing “Err” and “duP” interchangeably 3 seconds.
–For some USB device of low speed, the playback
may go with muted sound for some seconds which
will depend on the capability of the low-speed USB
device.
Deleting audio files on a USB device
1 Check the USB device has been properly
connected. (See Installation: Connecting an
additional appliance).
2 Press SOURCE once or more to select USB
(or USB on the remote control).
3 Select the track you want to delete before or
during playback.
● In the stop position, you may select an album to
delete.
4 Briefly press USB DEL on the remote contorl.
➜ “Del Trk or Del Alb” is displayed, flashing.
5 To delete, press USB DEL again.
6 To not to delete, wait until “Del Trk” or “Del Alb”
disappears after 4 seconds of flashing, or just
press 9.
Helpful hints:
–For some MP3 players, MCM279 will read it as
only one folder which will wrap up all the audio
files on the player regardless of more than one
folder on that player.
– MCM279 may not be able to delete a file /
albume stored on some MP3 players.
The making of unauthorized copies of
copy-protected material, including
computer programmes, files, broadcasts
and sound recordings, may be an
infringement of copyrights and constitute
a criminal offence. This equipment should
not be used for such purposes.
AUX (Listening to an external
source)
You can listen to the sound of the connected
external device through your MCM279.
1 Check the external device has been properly
connected (See Installation, Connecting an
additional appliance).
2 Press SOURCE once or more to select AUX
(or AUX on the remote control).
3 To avoid noise distortion, turn down the volume
on your external device.
4 Press the PLAY key on the connected device to
start playback.
5 To adjust the sound and volume, use the sound
controls on your external device and the
MCM279.
English
23
Page 24

Timer SLEEP
English
Setting the timer
The set can be used as an alarm clock, whereby
the selected source (CD, TUNER or USB) starts
playback at a preset time. Make sure the
clock is set before using the timer.
1 In standby mode, press and hold TIMER on the
remote control until appears.
➜ flashes. SELECT SOURCE displays.
2 Press SOURCE on the set repeatedly to select
the source (or press CD, TUNER or USB on
the remote control).
3 Press TIMER to confirm.
➜ The hours digits star t flashing.
4 Hold down or press VOLUME +/- repeatedly
to set the hours.
5 Press TIMER to confirm.
➜ The minutes digits start flashing.
6 Hold down or press VOLUME +/- repeatedly
to set the minutes.
7 Press TIMER to confirm.
➜ The timer is now set and activated.
➜ At the set alarm time, the CD, TUNER or
USB will switch on (volume level: max. 13).
Note:
– The set will exit from the timer setting mode if
no button is pressed within 90 seconds.
Activating and deactivating
TIMER
● In standby mode, press and hold TIMER ON/
OFF on the remote once or more to activate
or deactivate the timer.
➜ Display shows if activated, and
disappears if deactivated.
Helpful hints:
The timer will not work at the set time if
- the set is switched on
- the timer is deactivated
The set will switch to Tuner source
automatically if :
- no CD is inserted when the selected source is CD;
- no USB device is connected when the selected
source is USB.
SLEEP
You can set a cer tain period of time after which
the set will switch off.
● During playback, on the remote control, press
SLEEP repeatedly to select the desired time
period options (in minutes):
➜ Display shows in sequence: Sleep 15, 30,
45, 60, 75, 90, 00.
➜ Display shows the selected option briefly and
returns to its previous status. The icon
appears.
To deactivate the sleep timer, press
SLEEP again.
➜ The icon disappear s.
or
Press STANDBY-ON to switch off the set (or
y on the remote control).
Helpful hints:
– The SLEEP function does not affect your alarm
time setting.
24
Page 25
Specifications
AMPLIFIER
Output power ....................................... 2 x 30 W RMS
Signal-to-noise ratio ....................................... ≥ 65 dBA
Frequency response ............. 100 – 18kHz, ± 3 dB
Input sensitivity AUX ....................... 0.5 V (max. 1 V)
Impedance loudspeakers .....................................≥ 6 Ω
Impedance headphones ....................32 Ω -1000 Ω
..................................................................................... <15mW
CD PLAYER
Frequency range ....................................... 100 – 18kHz
Signal-to-noise ratio ............................................ 65 dBA
TUNER
FM wave range ...................................87.5 – 108 MHz
MW wave range
1. Tuning grid 10 kHz ....................... 530 – 1700 kHz
2. Tuning grid 9 kHz.......................... 531 – 1602 kHz
Number of presets ........................................................ 40
Antenna
FM .................................................................... 75 Ω wire
MW ......................................................... Loop antenna
USB PLAYER
USB ......................................................................... V2.0/ V1.1
......................................... support MP3 and WMA files
Number of albums/ folders ............. maximum 999
Number of tracks/titles ...................... maximum 999
SPEAKERS
Bass reflex system
Dimensions (w x h x d) .. 158 x 250x 185 (mm)
GENERAL INFORMATION
AC Power .......................... 100 – 240 V, 50 Hz/60Hz
Dimensions (w x h x d, with/without the stand)
............... 211 x 250 x 160/211 x 250 x 126 (mm)
Weight(with/without speakers) ......... 3.7 / 1.33 kg
Standby power consumption ............................ <2 W
Specifications and external appearance are
subject to change without notice.
English
Maintenance
Cleaning the Cabinet
● Use a soft cloth slightly moistened with a mild
detergent solution. Do not use a solution
containing alcohol, spirits, ammonia or abrasives.
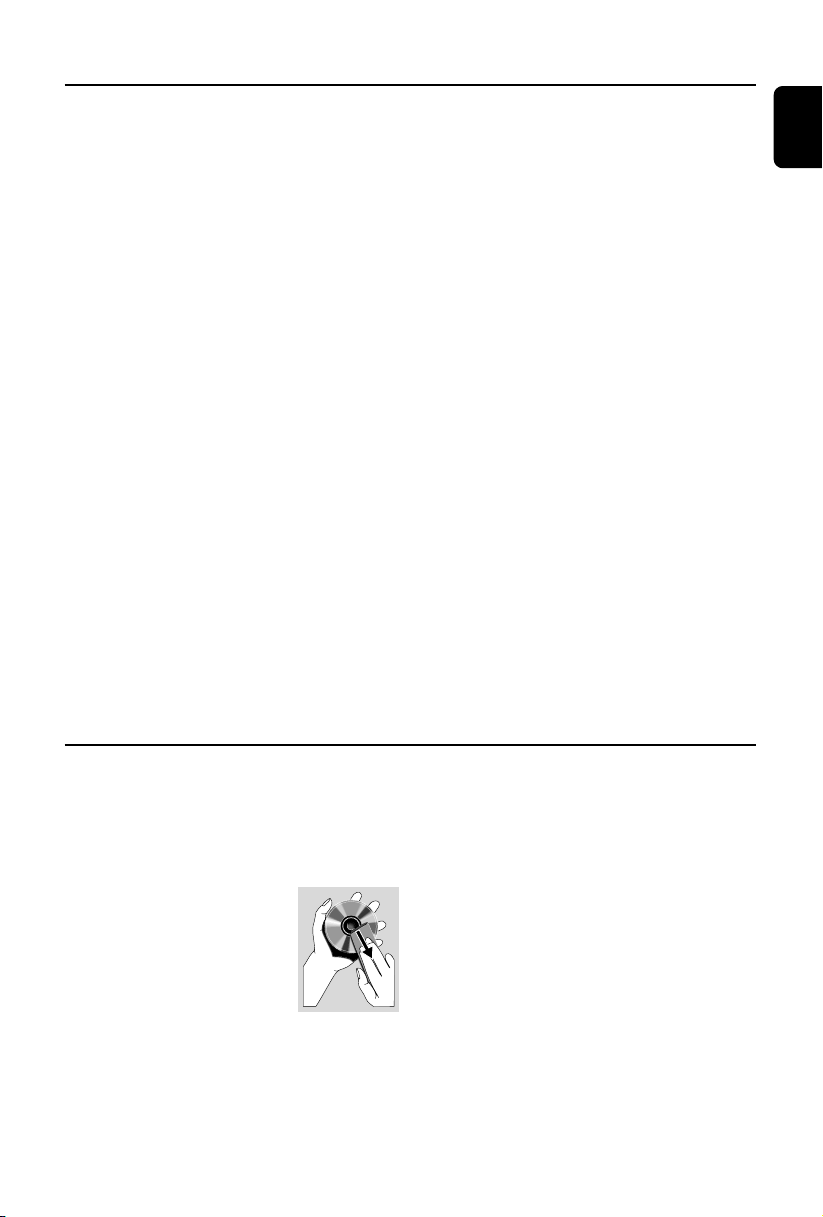
Cleaning Discs
● When a disc becomes dir ty,
clean it with a cleaning cloth.
Wipe the disc from the centre
out.
● Do not use solvents such as
benzene, thinner, commercially
available cleaners, or antistatic spray intended for
analogue records.
Cleaning the disc lens
● After prolonged use, dirt or dust may
accumulate at the disc lens. To ensure good
playback quality, clean the disc lens with Philips
CD Lens Cleaner or any commercially available
cleaner. Follow the instructions supplied with
cleaner.
25
Page 26

Troubleshooting
English
WARNING
Under no circumstances should you try to repair the system yourself, as this will invalidate the
warranty. Do not open the system as there is a risk of electric shock.
If a fault occurs, first check the points listed below before taking the system for repair. If you
are unable to remedy a problem by following these hints, consult your dealer or Philips for
help.
Problem
“NO DISC” is displayed.
Some files on the USB device are not
displayed.
Radio reception is poor.
The system does not react when buttons
are pressed.
Sound cannot be heard or is of poor
quality.
Solution
✔ Insert a disc.
✔ Wait until the moisture condensation at the lens
has cleared.
✔ Replace or clean the disc, see “Maintenance”.
✔ Use a finalised CD-RW or a correct MP3/WMA
-CD format disc.
✔ Check if the number of folders exceeds 999 or
the number of titles exceeds 999
✔ If the signal is too weak, adjust the antenna or
connect an external antenna for better
reception.
✔ Increase the distance between the Micro HiFi
System and your TV or VCR.
✔ Remove and reconnect the AC power plug and
switch on the system again.
✔ Adjust the volume.
✔ Disconnect the headphones.
✔ Check that the speakers are connected correctly.
✔ Check if the stripped speaker wire is clamped.
✔ Make sure the MP3-CD was recorded within
32~256 kbps bit rate with sampling frequencies
at 48 kHz, 44.1 kHz or 32 kHz.
The left and right sound outputs are
reversed.
26
✔ Check the speaker connections and location.
Page 27

Troubleshooting
The remote control does not function
properly.
The timer is not working.
The Clock/Timer setting is erased.
The USB device doesn’t play on my
MCM279.
The disc file cannot be recorded to the
USB device
✔ Select the source (CD or TUNER, for example)
before pressing the function button (ÉÅ,í,
ë).
✔ Reduce the distance between the remote
control and the system.
✔ Insert the battery with its polarities
(+/– signs) aligned as indicated.
✔ Replace the battery.
✔ Point the remote control directly toward
IR sensor on the front of the system.
✔ Check the set is switched off
✔ Set the clock correctly.
✔ Press TIMER to switch on the timer.
✔ Power has been interrupted or the power cord
has been disconnected. Reset the clock/timer.
✔ It is not set in the USB mode. Select USB mode.
✔ The device is not securely connected to
MCM279’s USB port. Re-connect the device.
✔ The device is not supported by MCM279, or the
audio file format stored on the device is not
supported by MCM279. Use a compatible
device/ playable audio file format.
✔ You stop recording when the MP3 or WMA file
you want to record is still playing. Select record-
one mode to record, or stop recording only
when the playback of MP3 or WMA file is wholly
completed.
✔ The memory of the USB device runs out. Delete
some unwanted files on the USB device to free
some memory, or use another USB device of
sufficient free memory to record.
✔ The name of a MP3 or WMA file on the disc is
identical to the one of a file on the USB device.
Change to a different name for the file on the
USB device.
English
27
 Loading...