

Page 1

*
Philips A1 and A3 Patient Monitors
A1 Models: M3921A
M3922A
M3923A
M3924A
A3 Models: M3926A
M3927A
M3928A
M3929A
Service Guide
*M3921-9000C
Part Number M3921-9000C
Printed in the U.S.A. February 2002
First Edition
Page 2

About this Manual
Proprietary Information
This document contains proprietary information, which is protected by copyright. All Rights
Reserved. Reproduction, adaptation, or translation without prior written permission is
prohibited, except as allowed under the copyright laws.
Philips Medical Systems
3000 Minuteman Road
Andover, MA 01810-1085
(978) 687-1501
Publication number
M3921-9000C
Printed in USA
Warranty
The information contained in this document is subject to change without notice.
Philips Medical Systems makes no warranty of any kind with regard to this material,
including, but not limited to, the implied warranties or merchantability and fitness for Philips
Medical Systems shall not be liable for errors contained herein or for incidental or
consequential damages in connection with the furnishing, performance, or use of this material.
Copyright
Printing History
Copyright © 2002 Philips Electronics North America Corporation
New editions of this document incorporate all material updated since the previous edition.
Update packages may be issued between editions and contain replacement and additional
pages to be merged by a revision date at the bottom of the page. Pages that are rearranged due
to changes on a previous page are not considered revised.
The documentation printing date and part number indicate its current edition. The printing
date changes when a new edition is printed. (Minor corrections and updates that are
incorporated at reprint do not cause the date to change.) The document part number changes
when extensive technical changes are incorporated.
This edition, M3921-9000C combines both A1 and A3 Service Guides into one book.
There is no M3921-9000B book.
First Edition............................................................... February 2002
ii
Page 3

Philips Software License Terms
ATTENTION: USE OF THE SOFTWARE IS SUBJECT TO THE PHILIPS SOFTWARE LICENSE
TERMS SET FORTH BELOW. USING THE SOFTWARE INDICATES YOUR
ACCEPTANCE OF THESE LICENSE TERMS. IF YOU DO NOT ACCEPT THESE
LICENSE TERMS, YOU MAY RETURN THE SOFTWARE FOR A FULL REFUND. IF
THE SOFTWARE IS BUNDLED WITH ANOTHER PRODUCT, YOU MAY RETURN
THE ENTIRE UNUSED PRODUCT FOR A FULL REFUND.
PHILIPS SOFTWARE LICENSE TERMS
The following License Terms govern your use of the accompanying Software unless you have
a separate signed agreement with Philips Medical Systems.
License Grant. Philips Medical Systems grants you a license to Use one copy of the
Software. "Use" means storing, loading, installing, executing or displaying the Software. You
may not modify the Software or disable any licensing or control features of the Software. If
the Software is licensed for "concurrent use", you may not allow more than the maximum
number of authorized users to Use the Software concurrently.
About this Manual
Ownership. The Software is owned and copyrighted by Philips or its third party suppliers.
Your license confers no title to, or ownership in, the Software and is not a sale of any rights in
the Software. Philips’ third party suppliers may protect their rights in the event of any
violation of these License Terms.
Copies and Adaptations. You may only make copies or adaptations of the Software for
archival purposes or when copying or adaptation is an essential step in the authorized Use of
the Software. You must reproduce all copyright notices in the original Software on all copies
or adaptations. You may not copy the Software onto any public network.
No Disassembly or Decryption. You may not disassemble or decompile the Software unless
Philips prior written consent is obtained. In some jurisdictions, Philips consent may not be
required for limited disassembly or decompilation. Upon request, you will provide Philips
with reasonably detailed information regarding any disassembly or decompilation. You may
not decrypt the Software unless decryption is a necessary part of the operation of the
Software.
Transfer. Your license will automatically terminate upon any transfer of the Software. Upon
transfer, you must deliver the Software, including any copies and related documentation, to
the transferee. The transferee must accept these License Terms as a condition to the transfer.
Termination. Philips Medical Systems may terminate your license upon notice for failure to
comply with any of these License Terms. Upon termination, you must immediately destroy
the Software, together with all copies, adaptations and merged portions in any form.
Export Requirements. You may not export or re-export the Software or any copy or
adaptation in violation of any applicable laws or regulations.
U.S. Government Restricted Rights. The Software and any accompanying documentation
have been developed entirely at private expense. They are delivered and licensed as
iii
Page 4

About this Manual
"commercial computer software" as defined in DFARS 252.227-7013 (Oct. 1988), DFARS
252.211-7015 (May 1991) or DFARS 252.227-7014 (Jun. 1995), as a "commercial item" as
defined in FAR 2.101(a), or as "Restricted computer software" as defined in FAR 52.227-19
(Jun. 1987)(or any equivalent agency regulation or contract clause), whichever is applicable.
You have only those rights provided for such Software and any accompanying documentation
by the applicable FAR or DFARS clause or the Philips standard software agreement for the
product involved.
iv
Page 5

Text Conventions
The following conventions for Notes, Cautions, and Warnings are used in this manual.
NOTE
A Note calls attention to an important point in the text.
A Caution calls attention to a condition or possible situation that could damage or destroy the
product or the user’s work.
A Warning calls attention to a condition or possible situation that could cause injury to
the user and/or patient.
About this Manual
Caution
WarningWarning
Explanation of Symbols
Symbols on products and packaging mean the following:
Battery Gauge icon
Defibrillator-proof type CF equipment
On/Standby button.
Alarm Limits icon.
Adjust Screen Contrast to display (monochrome) or invert the video to (color).
Adjust Heart Rate Tone volume.
Initiate NiBP measurement
v
Page 6

About this Manual
T
Temperature
NiBP
ECG
SpO
2
SpO
2
Located on recorder. Produces a 20 Second Snapshot
Located on recorder. Produces a Continuous Print
Signal (ECG) Input
Signal (ECG) Output
Data input/output
Alternating Current
Direct Current
Temperature
Humidity
Altitude or atmospheric pressure
vi
Page 7
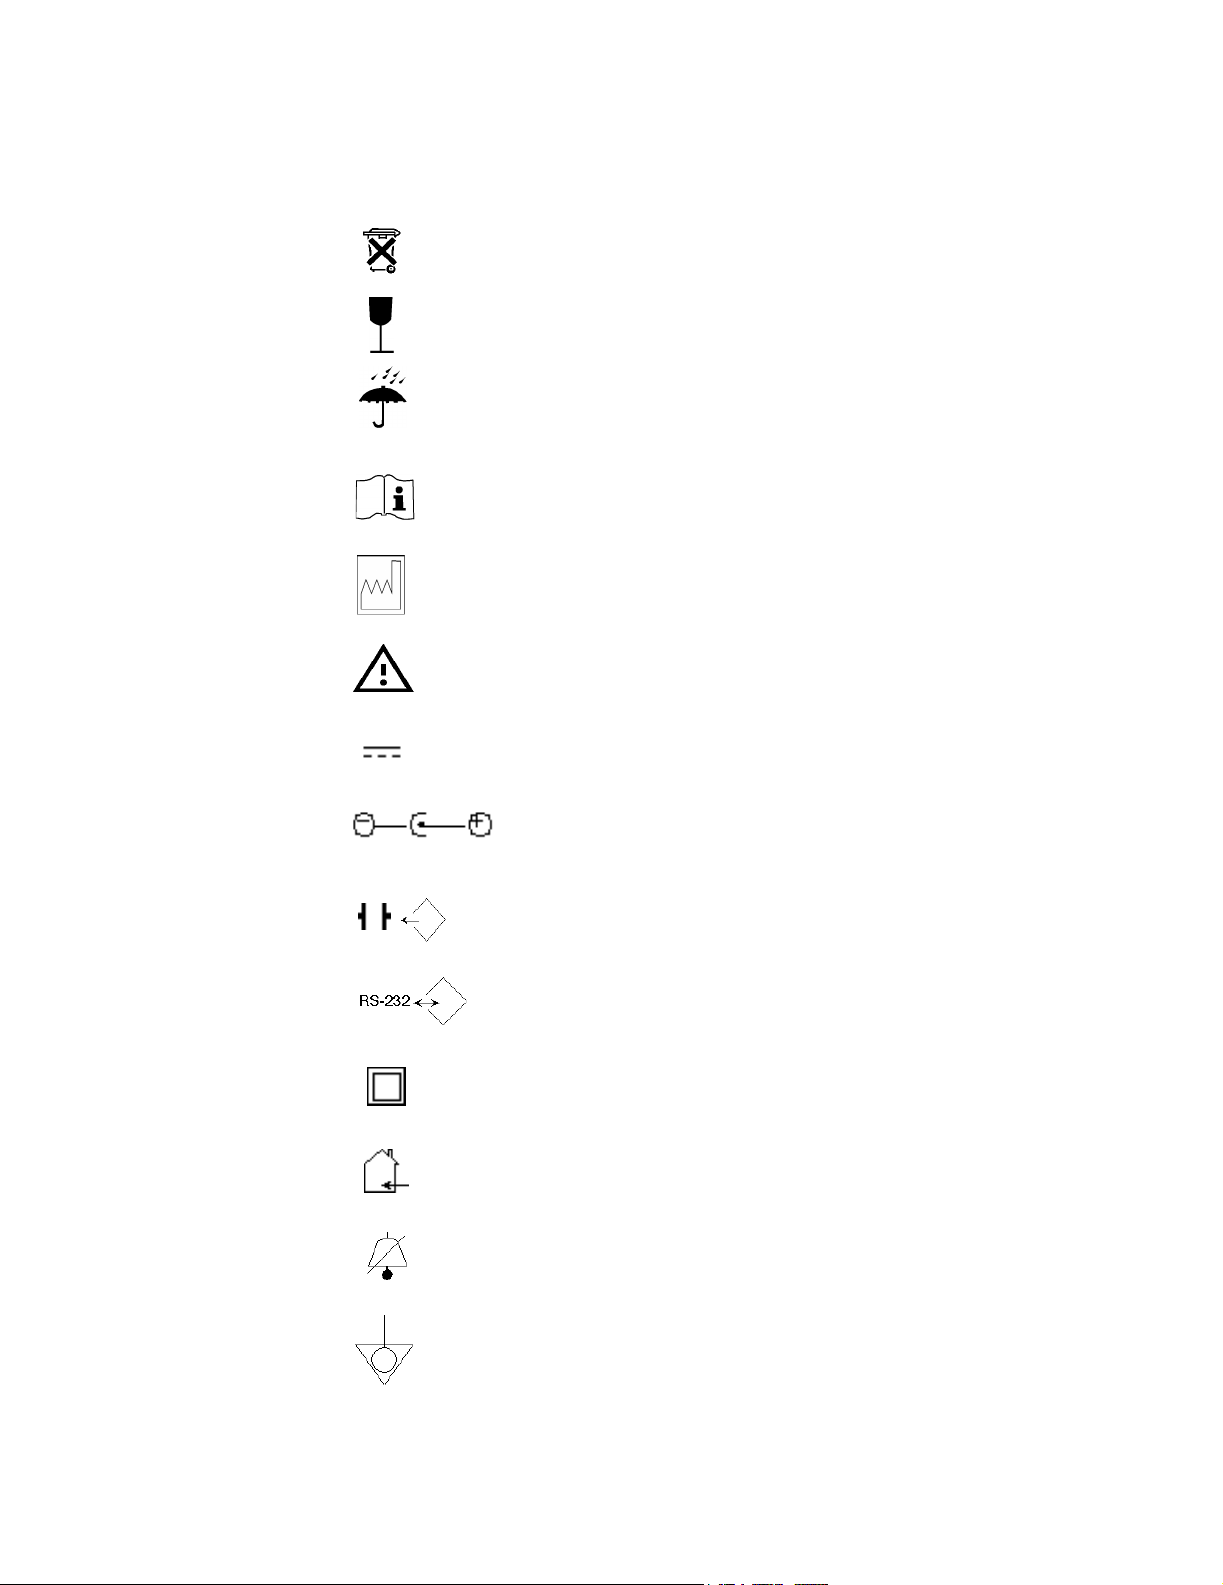
About this Manual
Contains parts that may not be put into normal waste disposal but must be recycled or
dealt wi disposed as chemical waste
Fragile, handle with care
Keep dry
Consult instructions for use
Date of manufacture
Refer to User’s Guide
DC Lines
DC Input
Defib Sync.
RS-232 I/O
Class II Equipment
Power supply if for indoor use only
Silence Alarm
Equipotential Ground
vii
Page 8

About this Manual
Recorder’s front-panel charging LED
Recorder’s front-panel communication LED
Ground Wire
viii
Page 9

Contents
1. Introduction . . . . . . . . . . . . . . . . . . . . . . . . . . . . . . . . . . . . . . . . . . . . . . . . . . . . . . . . 1
Manual Overview . . . . . . . . . . . . . . . . . . . . . . . . . . . . . . . . . . . . . . . . . . . . . . . . . . . . . . . . . . 1
Patient Monitor Description . . . . . . . . . . . . . . . . . . . . . . . . . . . . . . . . . . . . . . . . . . . . . . . . . . 2
Introduction to External Recorder (M3925A) . . . . . . . . . . . . . . . . . . . . . . . . . . . . . . . . . . . . . 3
Related Documents . . . . . . . . . . . . . . . . . . . . . . . . . . . . . . . . . . . . . . . . . . . . . . . . . . . . . . . . 3
2. Routine Maintenance . . . . . . . . . . . . . . . . . . . . . . . . . . . . . . . . . . . . . . . . . . . . . . . . . 5
Cleaning . . . . . . . . . . . . . . . . . . . . . . . . . . . . . . . . . . . . . . . . . . . . . . . . . . . . . . . . . . . . . . . . 5
Periodic Safety And Functional Checks . . . . . . . . . . . . . . . . . . . . . . . . . . . . . . . . . . . . . . . . 5
Battery . . . . . . . . . . . . . . . . . . . . . . . . . . . . . . . . . . . . . . . . . . . . . . . . . . . . . . . . . . . . . . . . . . 5
Environmental Protection . . . . . . . . . . . . . . . . . . . . . . . . . . . . . . . . . . . . . . . . . . . . . . . . . . . . 6
3. Performance Verification. . . . . . . . . . . . . . . . . . . . . . . . . . . . . . . . . . . . . . . . . . . . . . 7
Introduction . . . . . . . . . . . . . . . . . . . . . . . . . . . . . . . . . . . . . . . . . . . . . . . . . . . . . . . . . . . . . . 7
Test And Inspection Matrix. . . . . . . . . . . . . . . . . . . . . . . . . . . . . . . . . . . . . . . . . . . . . . . . . . . 8
Equipment Needed . . . . . . . . . . . . . . . . . . . . . . . . . . . . . . . . . . . . . . . . . . . . . . . . . . . . . . . 10
Performance Tests. . . . . . . . . . . . . . . . . . . . . . . . . . . . . . . . . . . . . . . . . . . . . . . . . . . . . . . . 11
Battery Charge . . . . . . . . . . . . . . . . . . . . . . . . . . . . . . . . . . . . . . . . . . . . . . . . . . . . . . . . . . . 11
Battery Performance Test . . . . . . . . . . . . . . . . . . . . . . . . . . . . . . . . . . . . . . . . . . . . . . . . . . 12
Power-On Self-Test . . . . . . . . . . . . . . . . . . . . . . . . . . . . . . . . . . . . . . . . . . . . . . . . . . . . . . . 13
Hardware and Software Tests . . . . . . . . . . . . . . . . . . . . . . . . . . . . . . . . . . . . . . . . . . . . . . . 14
Testing . . . . . . . . . . . . . . . . . . . . . . . . . . . . . . . . . . . . . . . . . . . . . . . . . . . . . . . . . 14
SpO
2
Operation with an ECG Simulator . . . . . . . . . . . . . . . . . . . . . . . . . . . . . . . . . . . . . . . . . 17
Operation with a Respiration Simulator (A3 only) . . . . . . . . . . . . . . . . . . . . . . . . . . . . . 18
Verification of Pneumatic System . . . . . . . . . . . . . . . . . . . . . . . . . . . . . . . . . . . . . . . . . 19
Operation with a Temperature Simulator (A1 only) . . . . . . . . . . . . . . . . . . . . . . . . . . . . 25
Operation with a Temperature Simulator (A3 only) . . . . . . . . . . . . . . . . . . . . . . . . . . . . 25
General Operation . . . . . . . . . . . . . . . . . . . . . . . . . . . . . . . . . . . . . . . . . . . . . . . . . . . . . . . . 26
Serial Interface Test . . . . . . . . . . . . . . . . . . . . . . . . . . . . . . . . . . . . . . . . . . . . . . . . . . . . 26
Printer Verification (For A1 Optional Printer M3925A) . . . . . . . . . . . . . . . . . . . . . . . . . . 28
Safety Tests . . . . . . . . . . . . . . . . . . . . . . . . . . . . . . . . . . . . . . . . . . . . . . . . . . . . . . . . . . . . . 29
Ground Integrity . . . . . . . . . . . . . . . . . . . . . . . . . . . . . . . . . . . . . . . . . . . . . . . . . . . . . . . 29
Electrical Leakage . . . . . . . . . . . . . . . . . . . . . . . . . . . . . . . . . . . . . . . . . . . . . . . . . . . . . 31
4. Power-up Defaults Menu And Diagnostic Mode . . . . . . . . . . . . . . . . . . . . . . . . . . 37
Introduction . . . . . . . . . . . . . . . . . . . . . . . . . . . . . . . . . . . . . . . . . . . . . . . . . . . . . . . . . . . . . 37
Power-up Defaults Menu . . . . . . . . . . . . . . . . . . . . . . . . . . . . . . . . . . . . . . . . . . . . . . . . . . . 37
Diagnostic Mode . . . . . . . . . . . . . . . . . . . . . . . . . . . . . . . . . . . . . . . . . . . . . . . . . . . . . . . . . 40
Error Codes . . . . . . . . . . . . . . . . . . . . . . . . . . . . . . . . . . . . . . . . . . . . . . . . . . . . . . . . . . 40
System Information . . . . . . . . . . . . . . . . . . . . . . . . . . . . . . . . . . . . . . . . . . . . . . . . . . . . 41
System A/D Values . . . . . . . . . . . . . . . . . . . . . . . . . . . . . . . . . . . . . . . . . . . . . . . . . . . . 42
NIBP Test . . . . . . . . . . . . . . . . . . . . . . . . . . . . . . . . . . . . . . . . . . . . . . . . . . . . . . . . . . . . 43
Restoring Factory Settings. . . . . . . . . . . . . . . . . . . . . . . . . . . . . . . . . . . . . . . . . . . . . . . . . . 45
Contents ix
Page 10

5. Troubleshooting. . . . . . . . . . . . . . . . . . . . . . . . . . . . . . . . . . . . . . . . . . . . . . . . . . . . 49
Introduction. . . . . . . . . . . . . . . . . . . . . . . . . . . . . . . . . . . . . . . . . . . . . . . . . . . . . . . . . . . . . . 49
How To Use This Section . . . . . . . . . . . . . . . . . . . . . . . . . . . . . . . . . . . . . . . . . . . . . . . . . . . 49
Who Should Perform Repairs. . . . . . . . . . . . . . . . . . . . . . . . . . . . . . . . . . . . . . . . . . . . . . . . 49
Replacement Level Supported . . . . . . . . . . . . . . . . . . . . . . . . . . . . . . . . . . . . . . . . . . . . . . . 49
Obtaining Replacement Parts. . . . . . . . . . . . . . . . . . . . . . . . . . . . . . . . . . . . . . . . . . . . . . . . 50
Troubleshooting Guide . . . . . . . . . . . . . . . . . . . . . . . . . . . . . . . . . . . . . . . . . . . . . . . . . . . . . 50
Power . . . . . . . . . . . . . . . . . . . . . . . . . . . . . . . . . . . . . . . . . . . . . . . . . . . . . . . . . . . . . . . 50
Error Codes . . . . . . . . . . . . . . . . . . . . . . . . . . . . . . . . . . . . . . . . . . . . . . . . . . . . . . . . . . 53
Generating an Error Log Printout (A1 only) . . . . . . . . . . . . . . . . . . . . . . . . . . . . . . . . . . 53
Serviceable Hardware Error Codes . . . . . . . . . . . . . . . . . . . . . . . . . . . . . . . . . . . . . . . . 54
Other Error Codes (All Monitors) . . . . . . . . . . . . . . . . . . . . . . . . . . . . . . . . . . . . . . . . . . 57
Buttons/Wheels (All Monitors) . . . . . . . . . . . . . . . . . . . . . . . . . . . . . . . . . . . . . . . . . . . . 58
Display/Audible Tones (All Monitors) . . . . . . . . . . . . . . . . . . . . . . . . . . . . . . . . . . . . . . . 59
Operational Performance . . . . . . . . . . . . . . . . . . . . . . . . . . . . . . . . . . . . . . . . . . . . . . . . 60
6. Disassembly Guide . . . . . . . . . . . . . . . . . . . . . . . . . . . . . . . . . . . . . . . . . . . . . . . . . 63
Introduction. . . . . . . . . . . . . . . . . . . . . . . . . . . . . . . . . . . . . . . . . . . . . . . . . . . . . . . . . . . . . . 63
How To Use This Chapter . . . . . . . . . . . . . . . . . . . . . . . . . . . . . . . . . . . . . . . . . . . . . . . . . . 64
Disassembly Procedures (A1) . . . . . . . . . . . . . . . . . . . . . . . . . . . . . . . . . . . . . . . . . . . . . . . 65
Closed Case Disassembly Procedures . . . . . . . . . . . . . . . . . . . . . . . . . . . . . . . . . . . . . 65
Separation of Front and Rear Case Assemblies . . . . . . . . . . . . . . . . . . . . . . . . . . . . . . 68
Front Case Disassembly Procedures . . . . . . . . . . . . . . . . . . . . . . . . . . . . . . . . . . . . . . . 70
Rear Case Disassembly Procedures . . . . . . . . . . . . . . . . . . . . . . . . . . . . . . . . . . . . . . . 75
Main PCB Disassembly Procedures. . . . . . . . . . . . . . . . . . . . . . . . . . . . . . . . . . . . . . . . 77
Disassembly Procedures (A3) . . . . . . . . . . . . . . . . . . . . . . . . . . . . . . . . . . . . . . . . . . . . . . . 79
Closed Case Disassembly Procedures . . . . . . . . . . . . . . . . . . . . . . . . . . . . . . . . . . . . . 79
Separation of Front and Rear Case Assemblies . . . . . . . . . . . . . . . . . . . . . . . . . . . . . . 80
Front Case Disassembly Procedures . . . . . . . . . . . . . . . . . . . . . . . . . . . . . . . . . . . . . . . 82
Rear Case Disassembly Procedures . . . . . . . . . . . . . . . . . . . . . . . . . . . . . . . . . . . . . . . 85
7. Spare Parts . . . . . . . . . . . . . . . . . . . . . . . . . . . . . . . . . . . . . . . . . . . . . . . . . . . . . . . . 91
Introduction. . . . . . . . . . . . . . . . . . . . . . . . . . . . . . . . . . . . . . . . . . . . . . . . . . . . . . . . . . . . . . 91
Small Parts Kit . . . . . . . . . . . . . . . . . . . . . . . . . . . . . . . . . . . . . . . . . . . . . . . . . . . . . . . . . . . 91
Top Level Assembly . . . . . . . . . . . . . . . . . . . . . . . . . . . . . . . . . . . . . . . . . . . . . . . . . . . . . . . 92
Front Case Assembly . . . . . . . . . . . . . . . . . . . . . . . . . . . . . . . . . . . . . . . . . . . . . . . . . . . . . . 97
Rear Case Assembly . . . . . . . . . . . . . . . . . . . . . . . . . . . . . . . . . . . . . . . . . . . . . . . . . . . . . 103
Main PCB Assembly (A1) . . . . . . . . . . . . . . . . . . . . . . . . . . . . . . . . . . . . . . . . . . . . . . . . . . 107
Power Supply, Cables, and Miscellaneous Parts . . . . . . . . . . . . . . . . . . . . . . . . . . . . . . . . 109
Exchange Unit Part Numbers . . . . . . . . . . . . . . . . . . . . . . . . . . . . . . . . . . . . . . . . . . . . . . . 112
8. Packing For Shipment . . . . . . . . . . . . . . . . . . . . . . . . . . . . . . . . . . . . . . . . . . . . . . 113
General Instructions . . . . . . . . . . . . . . . . . . . . . . . . . . . . . . . . . . . . . . . . . . . . . . . . . . . . . . 113
Repacking In Original Carton . . . . . . . . . . . . . . . . . . . . . . . . . . . . . . . . . . . . . . . . . . . . . . . 113
Repacking In A Different Carton. . . . . . . . . . . . . . . . . . . . . . . . . . . . . . . . . . . . . . . . . . . . . 113
x Contents
Page 11

9. RS-232 Interface . . . . . . . . . . . . . . . . . . . . . . . . . . . . . . . . . . . . . . . . . . . . . . . . . . 115
Cable Connections . . . . . . . . . . . . . . . . . . . . . . . . . . . . . . . . . . . . . . . . . . . . . . . . . . . . . . .116
Nurse Call . . . . . . . . . . . . . . . . . . . . . . . . . . . . . . . . . . . . . . . . . . . . . . . . . . . . . . . . . . . . . . 116
10. Training Program. . . . . . . . . . . . . . . . . . . . . . . . . . . . . . . . . . . . . . . . . . . . . . . . . 117
Introduction . . . . . . . . . . . . . . . . . . . . . . . . . . . . . . . . . . . . . . . . . . . . . . . . . . . . . . . . . . . . .117
Levels of Involvement . . . . . . . . . . . . . . . . . . . . . . . . . . . . . . . . . . . . . . . . . . . . . . . . . . . . . 117
Preventative Maintenance Only . . . . . . . . . . . . . . . . . . . . . . . . . . . . . . . . . . . . . . . . . . 117
Phone Support or Service . . . . . . . . . . . . . . . . . . . . . . . . . . . . . . . . . . . . . . . . . . . . . . .117
Training Materials . . . . . . . . . . . . . . . . . . . . . . . . . . . . . . . . . . . . . . . . . . . . . . . . . . . . . . . . 118
Essential Materials . . . . . . . . . . . . . . . . . . . . . . . . . . . . . . . . . . . . . . . . . . . . . . . . . . . . 118
Optional Materials . . . . . . . . . . . . . . . . . . . . . . . . . . . . . . . . . . . . . . . . . . . . . . . . . . . . . 118
Overview . . . . . . . . . . . . . . . . . . . . . . . . . . . . . . . . . . . . . . . . . . . . . . . . . . . . . . . . . . . . . . . 119
Support Strategies. . . . . . . . . . . . . . . . . . . . . . . . . . . . . . . . . . . . . . . . . . . . . . . . . . . . . . . .120
Unit exchange . . . . . . . . . . . . . . . . . . . . . . . . . . . . . . . . . . . . . . . . . . . . . . . . . . . . . . . . 120
Bench repair . . . . . . . . . . . . . . . . . . . . . . . . . . . . . . . . . . . . . . . . . . . . . . . . . . . . . . . . .120
Theory of Operation and System Architecture . . . . . . . . . . . . . . . . . . . . . . . . . . . . . . . . . . 121
General . . . . . . . . . . . . . . . . . . . . . . . . . . . . . . . . . . . . . . . . . . . . . . . . . . . . . . . . . . . . .121
System Overview - A1 . . . . . . . . . . . . . . . . . . . . . . . . . . . . . . . . . . . . . . . . . . . . . . . . . . 121
Block Diagram - A1 . . . . . . . . . . . . . . . . . . . . . . . . . . . . . . . . . . . . . . . . . . . . . . . . . . . . 121
Block Diagram - A1 . . . . . . . . . . . . . . . . . . . . . . . . . . . . . . . . . . . . . . . . . . . . . . . . . . . . 122
System Overview - A3 . . . . . . . . . . . . . . . . . . . . . . . . . . . . . . . . . . . . . . . . . . . . . . . . . . 123
Block Diagram - A3 . . . . . . . . . . . . . . . . . . . . . . . . . . . . . . . . . . . . . . . . . . . . . . . . . . . . 123
Block Diagram - A3 . . . . . . . . . . . . . . . . . . . . . . . . . . . . . . . . . . . . . . . . . . . . . . . . . . . . 124
Troubleshooting. . . . . . . . . . . . . . . . . . . . . . . . . . . . . . . . . . . . . . . . . . . . . . . . . . . . . . . . . .129
Disassembly . . . . . . . . . . . . . . . . . . . . . . . . . . . . . . . . . . . . . . . . . . . . . . . . . . . . . . . . . . . . 130
Monitor Applications and Algorithms . . . . . . . . . . . . . . . . . . . . . . . . . . . . . . . . . . . . . . . . . . 132
Reference Documents and Other Sources . . . . . . . . . . . . . . . . . . . . . . . . . . . . . . . . . . 132
Preventative Maintenance . . . . . . . . . . . . . . . . . . . . . . . . . . . . . . . . . . . . . . . . . . . . . . . . . 133
Index
Contents xi
Page 12

xii Contents
Page 13

Manual Overview
1
Introduction
This manual contains information for servicing the A1 and A3 patient
monitors, subsequently referred to as the monitor throughout this manual.
Only where there are differences in service procedures for the two monitor
types is each monitor referred to specifically as A1 and A3. Only qualified
service personnel should service this product. Before servicing the monitor,
read the User Guide carefully for a thorough understanding of operation.
Introduction 1
Page 14

Patient Monitor Description
Patient Monitor Description
The purpose and function of the patient monitor is to monitor: ECG; heart
rate; noninvasive blood pressure (systolic, diastolic, and mean arterial
pressures); functional arterial oxygen saturation; respiration rate (A3 only);
and temperature for adult and pediatric patients in all hospital areas and
hospital-type facilities. It can be used during hospital transport and in mobile,
land-based environments, such as ambulances.
The physical and operational characteristics of the monitor are described in
the User Guide.
The measurement parameters and features for each model are indicated
below.
Model
NIBP SpO
M3921A Yes Yes No No No No Mono
M3922A Yes Yes Yes No No No Mono
M3923A Yes Yes No Yes No No Mono
M3924A Yes Yes Yes Yes No No Mono
M3925A Optional Standalone Recorder for A1
M3926A Yes Yes Yes Yes Yes
M3927A Yes Yes Yes Yes Yes
M3928A Yes Yes Yes Yes Yes
M3929A Yes Yes Yes Yes Yes
Measurement Parameters and Features
Temp ECG Resp Integral
2
A1 Monitor
A3 Monitor
Recorder
No
Yes
No
Yes
Color/
Mono
Mono
Mono
Color
Color
2 Introduction
Page 15

Introduction to External Recorder (M3925A)
The recorder is an optional, standalone printer designed for use with the A1
patient monitor. The recorder communicates with the monitor using a nullmodem cable connected between each device’s RS-232 connector.
The recorder contains an internal battery, which, when fully charged, will
operate the recorder for 3 hours (typical, at 25°C, producing fifteen 20-second
printouts per hour). The recorder can be connected to AC power using an
external power supply. The recorder uses the same type of power supply as
the A1 monitor, the PS-120V or PS-240V.
The recorder does not have an On/Off switch. The recorder can sense when it
has an established communication link with the monitor. At that time, the
green LINKED indicator on the front panel lights, indicating that the recorder
is ready for operation. See the recorder’s User Guide for more information
regarding its operation.
Introduction to External Recorder (M3925A)
Related Documents
To perform test and troubleshooting procedures and to understand the
principles of operation and circuit analysis sections of this manual, you must
know how to operate the monitor. Refer to the User Guide to understand the
various sensors, ECG lead, blood pressure cuffs, and temperature probes that
work with the monitor. Refer also to the user guide and individual directions
for use that accompany these accessories.
Introduction 3
Page 16

Related Documents
4 Introduction
Page 17

Routine Maintenance
Cleaning
Warning Do not immerse the monitor or its accessories in liquid or
clean with caustic or abrasive cleaners. Do not spray or
pour any liquid on the monitor or its accessories.
To clean the monitor, dampen a cloth with a commercial, nonabrasive cleaner
and wipe the exterior surfaces lightly. Do not allow any liquids to come in
contact with the power connector or switches. Do not allow any liquids to
penetrate connectors or openings in the instrument. For cables, sensors and
cuffs, follow the cleaning instructions in the directions for use that accompany
these accessories.
2
Periodic Safety And Functional Checks
The monitor requires cleaning, battery maintenance and NiBP performance
and verification check every two years. The following performance
verification tests may be used following repair or during routine maintenance
(if required by your local institution).
1. Inspect the exterior of the monitor for damage.
2. Inspect labels for legibility. If the labels are not legible, contact Philips’
Response Center or your local Philips representative.
3. Verify that the NiBP performs properly as described in “Verification of
Pneumatic System” on page 21.
Battery
If the monitor has not been used for a long period of time, the battery will
need charging. To charge the battery, connect the monitor to an AC outlet, or
external DC supply in the case of the A3, as described in “Battery Charge” on
page 13 or the “Setup and Use” chapter of the User Guide.
Note Storing the monitor for a long period without charging the battery
can degrade the battery capacity. A complete battery recharge
requires 8 hours.
Chapter 2 - Routine Maintenance 5
Page 18

Environmental Protection
The battery can be recharged while the monitor is in use, in
which case, the battery requires 14 hours to be recharged.
The battery can require a full discharge/charge cycle to restore
normal capacity.
If the monitor operates1 for less than one hour on battery power before the
low battery alarm occurs, the battery should be conditioned.
If the same symptom persists even after the battery is conditioned and
indicating a full charge, the battery should be replaced.
Refer to Chapter 6, “Disassembly Guide”.
Environmental Protection
Follow local governing ordinances and recycling plans regarding disposal or
recycling batteries and other device components.
1. See “Battery Performance Test” on page 14 for typical battery operating times
and conditions.
6 Chapter 2 - Routine Maintenance
Page 19

Introduction
3
Performance Verification
This section discusses the tests used to verify performance following repairs
or during routine maintenance. All tests can be performed without removing
the covers of the monitor.
If the monitor fails to perform as specified in any test, repairs must correct the
problem before the monitor is returned to the user.
Performance Verification 7
Page 20

Test And Inspection Matrix
Test And Inspection Matrix
The following test map shows which tests are required in which situations.
Table 1 Test Map
Service Event (When
Performing…)
Installation Visual and Power On Tests
Repairs
A. Unit Exchange Visual and Power On Tests
B. Unit Opened Power On Test
C. NBP Pump replaced Power On Test
D. SpO
E. Front End Connectors replaced Power On Test
Module replaced Power On Test
2
Test Blocks Required (…Complete
these Tests)
Basic Pneumatic Leakage Test (BPL)
Ground Integrity Test
Leakage Current Test
NBP Tests:
Pneumatic Leakage and Inflation Rate
BPL Test
Tests:
SpO
2
Dynamic Operating Range and
LED Excitation
BPL Test
Performance test for the parameter that had
the connector replaced.
F. Power Supply replaced (A3 only) Power On, BPL, and Safety tests
G. Component level repair on any
PC board
H. Main PC board replaced Power On Test
All software upgrades Power On
Preventative maintenance Power On and NBP Performance Tests
8 Performance Verification
Power On Test
All Performance Tests
All Safety Tests
All Performance tests except Battery
Charge Test and Battery Performance Test
Page 21

Table 2 Test and Inspection Reporting
Test And Inspection Matrix
1
Test
Visual: Inspect exterior
of monitor for damage
Power-On Self-Test Displays Normal Monitoring
Basic Pneumatic
Leakage Test (NBP
test)
NiBP Accuracy Test 250 mmHg; ±5 mmHg
NiBP Leakage Test After 1 Minute at 250 mmHg,
NiBP Inflation Rate
Test
NiBP Overpressure
Test
Expected Results
No Visual Damage V:P or V:F
Screen Configuration and emits
tones
After 1 minute at approximately
250 mmHg, pressure drops no
more than 6 mmHg.
pressure drops no more than
6 mmHg
Monitor Reports NiBP = 280
mmHg in <6 seconds
Overpressure Deflation is
activated at a value between
280 mmHg to 330 mmHg
What to Record
PO:P or PO:F
BPL: Px6
Where x6 =Pressure
Drop in mmHg
PN:P/X1…X4 (or X5
PN:F/X1…X4 (or X5
Record Pressure in
mmHg = X1
Record Pressure
Drop in mmHg = X2
Record Time to
280 mmHg in
Seconds = X3
Record value in
mmHg at which
Overpressure
Deflation occurs =X4
2
3
)
3
)
NiBP Deflation Rate
Test (A3 only)
Safety Performance
Tests
Monitor reports NiBP >10
mmHg and <190 mmHg
All Safety Performance Tests
are in range of Table 5 to
Table 12
Record value in
mmHg on monitor at
1 min = X5
S:P or S:F
1. Details of the tests are included later in this chapter.
2. When authorized Philips Medical Systems personnel service the instrument. The results are reported back to Philips. The collected data form a
database to be used in product development. It is not necessary for hospital personnel to report these results.
3. In the case of the NiBP Deflation Rate Test, applicable to the A3 only.
Performance Verification 9
Page 22

Equipment Needed
Equipment Needed
The following table lists the equipment required for performance verification.
Table 3 Required Test Equipment
Required For
Equipment Description A1 A3
Digital multimeter
(DMM)
Sensor extension cable M4787A
Finger clip sensor M4789A
Oxisensor® II adhesive
sensor
ECG cable M3913A M3923A and
ECG electrodes Standard M3923A and
ECG leads M3914A (IEC) or M3915A
NiBP tubing M3918A
NiBP cuff 40401C
Pulse oximeter tester Nellcor Puritan Bennett SRC-2
ECG simulator Dynatech Nevada medSim
Fluke Model 87 or equivalent
D-25
(AAMI)
300 or equivalent
··
··
··
··
M3924A only
M3924A only
M3923A and
M3924A only
··
··
··
··
·
·
·
NiBP simulator Bio-Tek BP Pump or
equivalent
Temperature simulator medSim 300 or equivalent M3922A and
Respiration simulator medSim 300 or equivalent
Safety analyzer Bio-Tek 601 Pro or equivalent
Stopwatch Manual or electronic
10 Performance Verification
··
·
M3924A only
-·
··
··
Page 23

Performance Tests
Battery Charge
Performance Tests
The battery charge and battery performance test should be performed before
monitor repairs whenever the battery is suspected as being a source of the
problems. All other tests can be used following repairs or during routine
maintenance (if required by your local institution). Before performing the
battery performance test, ensure that the battery is fully charged. (See
“Battery Charge” below).
This section is written using factory-set power-up defaults. If your institution
has pre configured custom defaults, those values display.
To fully charge the battery:
1. Connect the monitor to an AC power source using the proper power cord. For
the A1, use the PS-120V or PS-240V external power supply and power cord.
2. • For the A1, verify that the EXTERNAL POWER indicator is
lit.
• For the A3, verify that the
BATTERY CHARGING/AC SOURCE
indicator is lit.
3. Charge the battery for at least 8 hours.
The battery can require a complete discharge/charge cycle to restore its normal
capacity, depending on its previous usage.
4. To check for a full charge, perform the procedure described in “Battery
Performance Test” on page 12.
Performance Verification 11
Page 24
Battery Performance Test
Battery Performance Test
The the A1 and A3 mono monitors are specified to typically operate on
battery power for a minimum of 4 hours, at 25°C, with no printing, and one
NiBP measurement every 15 minutes. The A3 color monitor is specified to
typically operate on battery power for a minimum of 3 hours, at 25°C, with no
printing, and one NiBP measurement every 15 minutes. Before performing
this test, ensure that the battery is fully charged (see “Battery Charge”).
1. Connect the Nellcor Puritan Bennett SRC-2 pulse oximeter tester to the monitor
via the M4787A sensor cable.
2. Connect the NiBP simulator to the monitor via the M3918A tubing.
3. Set the SRC-2 switches as follows:
SWITCH POSITION
RATE 38
LIGHT LOW
MODULATION LOW
RCAL/MODE RCAL 63/LOCAL
4. Set the NiBP simulator to simulate a pressure setting of 120/80 mmHg and heart
rate of 80 bpm.
5. Ensure that the monitor is not connected to AC power.
6. With the monitor turned off, press the ON/STANDBY button and verify
that the battery icon appears at the bottom of the display after the power-on selftest is completed. The boxes in the battery icon should all be filled, indicating
that the battery is charged.
7. Verify that the monitor is responding to the SpO
audible alarm is sounding. Use the wheel to select the SpO
permanently silence the SpO
8. Use the wheel to select the NiBP Menu and set the Automatic Measurement
Interval to 15 minutes. Exit the menu and press the front panel NiBP button
to manually start the first NiBP measurement. Subsequent NiBP
measurements are taken automatically every 15 minutes.
audible alarm.
2
simulator signal and that the
2
Menu and
2
12 Performance Verification
Page 25

Power-On Self-Test
Power-On Self-Test
9. The A1 and A3 mono monitors must operate for at least 4 hours before they
automatically power down due to low battery condition. The A3 color monitor
must operate for at least 3 hours before the monitor automatically powers down
due to low battery condition.
10. Verify that the low battery alarm occurs 15-30 minutes before the battery fully
discharges.
11. Allow the monitor to operate until it automatically powers down due to low
battery condition. Verify that the audible alarm sounds when the monitor
automatically shuts down. Press the Alarm Silence button to terminate this
audible alarm.
12. If monitor passes this test, immediately recharge the battery. (See “Battery
Charge” on page 11).
1. Connect the monitor to an AC power source. For the A1, use the PS-120V or
PS-240V power supply and power cord. For the A3, use the proper power cord
supplied.
2. • For the A1, verify that the EXTERNAL POWER indicator is
lit.
• For the A3, verify that the
BATTERY CHARGING/AC SOURCE
indicator is lit.
3. Do not connect any input cables to the monitor.
4. Observe the monitor front panel. With the monitor off, press the ON/
STANDBY button . The monitor must perform the following sequence:
a. The A1 emits a beep.
The A3 emits three consecutively higher pitched beeps.
b. A few seconds later, the display backlight illuminates, but the display is
blank.
c. The version numbers of the boot and operational software display in the
lower left corner of the display.
d. A beep signals the end of the power-on self-test. Power-on self-test takes
approximately 10 seconds to complete.
e. Upon successful completion of the power-on self-test, the display is in
normal monitoring screen configuration. No vital-sign numeric values or
waveforms are displayed.
Performance Verification 13
Page 26

Hardware and Software Tests
Hardware and Software Tests
Hardware and software testing includes the following tests applicable to the
indicated models in the series:
SpO2 Testing A1, A3 - all models
Operation with an ECG Simulator A1 - M3923A, M3924A
Operation with a Respiration Simulator A3 - all models
Verification of Pneumatic System A1, A3 - all models
Operation with a Temperature Simulator A1 - M3922A, M3924A
Test Applies to Model(s)
A3 - all models
A3 - all models
SpO
Testing
2
Alarms and Alarm
Silence
General Operation A1, A3 - all models
SpO2 testing includes the following tests:
n Alarms and Alarm Silence
n Heart Rate Tone Volume Control
n Dynamic Operating Range
n LED Excitation Test
1. Connect the SRC-2 pulse oximeter tester to the M4787A sensor cable and
connect the cable to the monitor.
2. Set SRC-2 as follows:
SWITCH POSITION
RATE 38
LIGHT LOW
MODULATION OFF
RCAL/MODE RCAL 63/LOCAL
3. Press the ON/STANDBY button to turn the monitor on.
4. After the normal power-up sequence, verify that the SpO
14 Performance Verification
% display initially
2
Page 27
Hardware and Software Tests
indicates zero or is blank. The pulse bar can occasionally indicate a step change
as the monitor is in the pulse search mode.
5. Move the modulation switch on the SRC-2 to LOW.
6. Verify the following monitor reaction:
a. The pulse bar begins to track the artificial pulse signal from the SRC-2.
b. Initially, zero is displayed in the SpO
frame, or it is blank.
2
c. After about 10 to 20 seconds, the monitor displays saturation and heart rate
as specified by the tester. Verify that the values are within the following
tolerances:
Oxygen Saturation Range 79% to 83%
Heart Rate Range 35 to 41 bpm
d. The audible alarm sounds and both the SpO2% and HEART RATE displays
flash, indicating both parameters have violated the default alarm limits.
e. The heart rate tone is heard. For this test, the user should set the heart rate
tone source to SpO
7. Press the ALARM SILENCE button on the front panel of the monitor.
The audible alarm is temporarily silenced.
8. Verify the following:
a. The audible alarm remains silenced.
b. The slashed bell icon appears in each numeric frame on the display.
c. The SpO
% and HEART RATE displays continue flashing.
2
from the Heart Rate Menu.
2
d. The heart rate tone remains audible.
e. The audible alarm returns in approximately 60 seconds.
Heart Rate Tone
Volume Control
1. Connect the SRC-2 pulse oximeter tester to the M4787A sensor cable and
connect the cable to the monitor.
2. Set SRC-2 as follows:
POSITION
SWITCH
A1 A3
RATE 38 38
LIGHT LOW LOW
MODULATION LOW OFF
RCAL/MODE RCAL 63/LOCAL RCAL 63/LOCAL
Performance Verification 15
Page 28
Hardware and Software Tests
3. Power on the monitor and verify that the SpO2 and heart rate values are
correctly displayed.
4. Press the ALARM SILENCE button on the front panel of the monitor
to temporarily silence the audible alarm.
5. Verify that the heart rate tone source, found in the Heart Rate Menu, is set to
SpO
.
2
6. Press the Heart Rate Tone VOLUME button on the front panel of the
monitor. Within 3 seconds of having pressed the button, rotate the wheel
clockwise and verify that the beeping heart rate tone sound level increases.
7. Rotate the wheel counterclockwise and verify that the beeping heart rate tone
decreases until it is no longer audible. Rotate the wheel clockwise to return the
beep volume to a comfortable level.
3 seconds after the last button-press or rotation of the wheel, function of the
wheel reverts to moving the highlight on the display screen.
Dynamic Operating
Range
The following test sequence verifies proper monitor operation over a range of
input signals.
1. Connect the pulse oximeter tester to the monitor and turn the monitor on.
2. Place the SRC-2 pulse oximeter tester in the RCAL 63/LOCAL mode.
3. Set the SRC-2 as indicated in below. Verify that the monitor readings are within
the indicated tolerances. Allow the monitor several seconds to stabilize the
readings.
Table 4 SRC 2 Settings and Monitor Indications
SRC-2 Settings Monitor Indications
RATE LIGHT MODULATION SpO2 Pulse Rate
38 HIGH2 LOW
112 HIGH1 HIGH
201 LOW LOW
201 LOW HIGH 79-83* 195-207*
An * indicates values that produce an alarm. Press the ALARM SILENCE
button to temporarily silence the audible alarm.
For the pulse rate setting of 201 bpm, the pulse rate tolerance of 195 to 207 bpm
is greater than the ±3 bpm accuracy specification of the monitor, due to the
performance characteristics of the SRC-2 tester.
79-83* 35-41*
79-83* 109-115
79-83* 195-207*
4. Turn the monitor off.
LED Excitation Test
16 Performance Verification
This procedure uses normal system components to test circuit operation. A
Page 29

Hardware and Software Tests
Nellcor Puritan Bennett Oxisensor II adhesive sensor, model D-25, is used to
examine LED intensity control. The red LED is used to verify intensity
modulation caused by the LED intensity control circuit.
1. Connect a M4787A sensor extension cable to the monitor.
2. Connect a D-25 sensor to the sensor extension cable.
3. Press the ON/STANDBY button to turn the monitor on.
4. Leave the sensor open with the LED and photo detector visible.
5. After the monitor completes its normal power-up sequence, verify that the
sensor LED is brightly lit.
6. Slowly move the sensor LED in proximity to the photo detector element of the
sensor. Verify, as the LED approaches the optical sensor, that the LED intensity
decreases.
7. Open the sensor and notice that the LED intensity increases.
8. Repeat step 6 and the intensity again decreases. This variation is an indication
that the micro-processor is in proper control of LED intensity.
9. Turn the monitor off.
Operation with an ECG Simulator
1. With the monitor off, connect the ECG leads to the appropriate jacks on the
ECG tester.
2. Connect the leads to the ECG cable.
3. Connect the cable to the ECG input port on the monitor.
4. Set the ECG simulator as follows:
Heart rate: 30 bpm
Amplitude: 1 millivolt
Lead select: II
Wave Type: Normal sinus rhythm
Patient Type: Adult mode
Note
The accuracy of the monitor’s ECG measurements is ±5 bpm. In
the procedure below, add the tolerance of the simulator to the
acceptable range of readings.
5. Press On/Standby button to turn monitor on.
Performance Verification 17
Page 30

Hardware and Software Tests
6. After normal power-up sequence, verify the following monitor reactions:
a. After at least five heartbeats, the monitor displays a heart rate of 30 ±5 bpm.
b. The audible alarm sounds and the
indicating heart rate is below the default lower alarm limit.
7. Press the ALARM SILENCE button. Verify that the audible alarm is
silenced.
8. Increase the heart rate setting on the ECG simulator to 240 bpm.
9. After at least five heartbeats, verify that the monitor displays a heart rate of 240
±5 bpm.
10. Verify that the audible alarm sounds and the
indicating that the heart rate is above the default upper alarm limit.
11. Press ALARM SILENCE button to silence alarm.
12. Decrease the heart rate setting on ECG simulator to 120 bpm.
13. After at least five heartbeats, verify that the monitor displays a heart rate of 120
±5 bpm.
14. Disconnect the LL lead from ECG simulator.
15. Verify that the
displayed in
sounds.
16. Reconnect the LL lead to ECG simulator. Verify that the
message no longer appears and audible alarm is silenced.
17. Repeat steps 14 through 16 for LA and RA leads.
18. Turn the monitor off.
Leads Off alarm message appears, three dashes are
HEART RATE display, and the low priority audible alarm
HEART RATE display flashes,
HEART RATE display flashes,
Leads Off alarm
Operation with a Respiration Simulator (A3 only)
1. With the monitor off, connect the ECG leads to the appropriate jacks on the
respiration simulator.
2. Connect the ECG leads to the ECG cable.
3. Connect the cable to the ECG input port on the monitor.
Note
The accuracy of A3 measurements is ±3 breaths per minute. In
the procedure below, add the tolerance of the simulator to the
acceptable range of readings.
4. Set the simulator for a respiration rate of 120 breaths per minute.
5. Press the ON/STANDBY button to turn the monitor on.
18 Performance Verification
Page 31

Hardware and Software Tests
6. After the normal power-up sequence, verify the following monitor reactions:
a. The monitor displays a respiration rate of 120 ±3 breaths per minute.
b. The audible alarm sounds and
indicating respiration rate is above default upper alarm limit.
7. Press the ALARM SILENCE button . Verify that the alarm is silenced.
8. Decrease the respiration rate setting on the respiration simulator to 20 breaths
per minute.
9. Verify that the monitor displays a respiration rate of 20 ±3 breaths per minute.
Verification of Pneumatic System
The following tests, from “Basic Pneumatic Leakage Test” on page 19
through “Over-Pressure” on page 23, verify the functionality of the pneumatic
system of the monitor. All these tests, with the exception of the Basic
Pneumatic Leakage Test, require the use of an appropriate NiBP simulator.
Although the tests were designed to use the Bio-Tek BP Pump noninvasive
blood pressure simulator, any equivalent NiBP simulator with the same
internal test volume can be used. The internal test volume of the Bio-Tek
simulator is 250 ml.
The monitor must be placed in Diagnostic Mode, with the NiBP Test screen
active for each of the NiBP tests. For a detailed explanation of the Diagnostic
Mode, refer to Chapter 4, “Power-up Defaults Menu And Diagnostic Mode”.
RESPIRATION RATE display flashes,
Basic Pneumatic
Leakage Test
The purpose of this test is to verify the integrity of the NiBP Pneumatic
System after the monitor has been opened. This covers all external and
internal tubing and tubing connections. No simulator is required for this test.
In cases where the performance of the NiBP is in question or could have been
compromised during repair the complete set of NiBP performance tests
described in this service manual should be used (see test map, page 8, for
guidance).
1. Attach an NiBP cuff (adult model 40401C is recommended) and the NiBP
adapter cable to the monitor NiBP connector.
2. Wrap the cuff around itself and place on a table for the test, DO NOT place the
cuff on your arm.
Performance Verification 19
Page 32

Hardware and Software Tests
3. Power on the monitor and enter the NiBP test screen.
a. Use the wheel to select Set up menu (screwdriver icon on bottom
of screen.)
b. Select the Power up defaults menu.
c. Use the wheel to select password 2-1-5.
Note
d. Select
e. Select NBP test.
4. Press the Heart Rate Tone VOLUME button to close valves.
5. Press NBP start/stop switch, hold until the monitor screen shows 250 mmHg.
6. Wait 15-20 seconds to allow the value to stabilize.
7. Note the value on the screen, start 1-minute timer.
8. After 1 minute note the value on the screen, if the difference is less than or equal
to 6 mmHg the test has passed.
9. Press and hold the Heart Rate Tone VOLUME button until the screen
shows the pressure has released and the value is 0 mmHg.
10. Turn the monitor off.
Enter Diagnostic Mode = yes.
If the test fails, ensure the integrity of the cuff and adapter tubing,
then test again. If the test fails again, verify the integrity of all the
pneumatic system tubing inside the monitor. If the test still does
not pass, see test map, page 8.
Each of the tests mentioned below must be performed to verify pneumatic
system functionality. These tests can be performed individually (in any order)
or sequentially. Prior to performing any of these tests, perform the following
setup procedure. If these tests are performed in sequence, this procedure
needs to be performed once prior to the first test.
1. Turn on the Bio-Tek simulator and press the MODE button to place the
simulator in test mode. The simulator screen indicates
Pressure Gauge.
and
2. Connect the simulator tubing to the NiBP connector on the monitor.
3. Follow the procedure described in Chapter 4 to place the monitor in Diagnostic
Mode with the NiBP Test screen active.
Pressure Transducer
Accuracy
20 Performance Verification
The pressure transducer accuracy test verifies the pressure accuracy of the
monitor’s pressure transducer.
Internal Cuff
Page 33

Hardware and Software Tests
1. Confirm that the Bio-Tek simulator is in test mode. The simulator should display
Pressure Gauge.
2. Confirm that the simulator is set up for the internal cuff.
3. Confirm that the NiBP Test screen is active on the monitor.
• On the A1, press, then release, the Heart Rate Tone VOLUME button
to verify that the valve is closed.
• On the A3, press the ALARM SILENCE button to ensure that
both valves are closed.
4. Perform an offset adjustment so that the simulator and monitor both display a
pressure of 0 mmHg by doing the following:
a. Press the CONTRAST button on the monitor.
b. Press the ZERO button on the simulator.
5. Press the SELECT button on the simulator until the simulator displays
Pressure Source Set Test Pressure.
6. Use the UP/DOWN buttons on the simulator to adjust for a pressure of 250
mmHg.
7. Press the START PUMP button on the simulator. The simulator begins to
pressurize. The current pressure in mmHg is displayed on both the simulator and
the monitor displays.
8. Allow 15-20 seconds for the pressure to stabilize.
The pressure displayed on the monitor and the simulator should be within 5
mmHg of one another to complete the test successfully.
9. Press the STOP PUMP button on the simulator to stop the test.
10. Press and hold the Heart Rate Tone VOLUME button until the monitor
displays a pressure of 0 mmHg.
Additional NiBP tests can be performed at this time. If no further NiBP tests
are to be conducted, turn the monitor off. Normal monitoring operation
returns the next time the monitor is turned on.
Performance Verification 21
Page 34

Hardware and Software Tests
Pneumatic Leakage The pneumatic leakage test verifies the integrity of the pneumatic system.
1. Ensure that the Bio-Tek simulator is in test mode. The simulator should display
Pressure Gauge.
2. Confirm that the simulator is set up for the internal cuff.
3. Ensure that the NiBP Test screen is active on the monitor.
4. Press the Heart Rate Tone VOLUME button on the monitor.
• On the A1, this verifies that the valve is closed.
• On the A3, this verifies that both the valves are closed.
5. Perform an offset adjustment so that the simulator and monitor both display a
pressure of 0 mmHg by doing the following:
a. Press the CONTRAST button on the monitor.
b. Press the ZERO button on the simulator.
6. Press the NiBP button on the monitor to activate the pump.
7. Hold the NiBP button until the monitor displays a pressure of
approximately 250 mmHg.
8. Allow 15-20 seconds for the pressure to stabilize.
9. Record the pressure displayed on the monitor.
10. Start a 1 minute timer.
11. After 1 minute, again record the pressure displayed.
The test is successfully completed if the pressure has dropped by 6 mmHg, or
less, during the 1 minute period.
12. Press and hold the Heart Rate Tone VOLUME button until the monitor
displays a pressure of 0 mmHg.
Additional NiBP tests can be performed at this time. If no further NiBP tests
are to be conducted, turn the monitor off. Normal monitoring operation
returns the next time the monitor is turned on.
22 Performance Verification
Page 35

Hardware and Software Tests
Inflation Rate The inflation rate test verifies the inflation rate of the monitor.
1. Ensure that the Bio-Tek simulator is in test mode. The simulator should display
Pressure Gauge.
2. Confirm that the simulator is set up for the internal cuff.
3. Ensure that the NiBP Test screen is active on the monitor.
4. Press the Heart Rate Tone VOLUME button on the monitor.
• On the A1, this verifies that the valve is closed.
• On the A3, this verifies that both the valves are closed.
5. Perform an offset adjustment so that the simulator and monitor both display a
pressure of 0 mmHg by doing the following:
a. Press the CONTRAST button on the monitor.
b. Press the ZERO button on the simulator.
1. Press the NiBP button on the monitor to activate the pump, and
simultaneously start the timer.
2. Hold the NiBP button until the monitor displays a pressure of 280
mmHg, then stop the timer.
The test is successfully completed if the inflation time is between 1 and 6
seconds.
3. Press and hold the Heart Rate Tone VOLUME button until the monitor
displays a pressure of 0 mmHg.
Additional NiBP tests can be performed at this time. If no further NiBP tests
are to be conducted, turn the monitor off. Normal monitoring operation
returns the next time the monitor is turned on.
Over-Pressure The over-pressure test verifies the functionality of the over-pressure relief
system of the monitor.
1. Ensure that the Bio-Tek simulator is in test mode. The simulator should display
Pressure Gauge.
2. Confirm that the simulator is set up for the internal cuff.
3. Ensure that the NiBP Test screen is active on the monitor.
4. Press the Heart Rate Tone VOLUME button on the monitor.
• On the A1, this verifies that the valve is closed.
• On the A3, this verifies that both the valves are closed.
5. Perform an offset adjustment so that the simulator and monitor both display a
Performance Verification 23
Page 36

Hardware and Software Tests
pressure of 0 mmHg by doing the following:
a. Press the CONTRAST button on the monitor.
b. Press the ZERO button on the simulator.
6. Press the NiBP button on the monitor to activate the pump.
7. Hold the NiBP button until the monitor displays a pressure of
approximately 250 mmHg.
8. Press the SELECT button on the simulator until the simulator displays
Overpressure Test.
9. Press the START TEST button on the simulator. The simulator pressurizes the
system until the monitor’s overpressure relief system activates, including the
warning display screen. The simulator displays the pressure value that caused
the monitor’s overpressure relief system to activate. The test is successfully
completed if the simulator displays a pressure reading of 280 mmHg to 330
mmHg.
10. Press and hold the Heart Rate Tone VOLUME button to ensure that the
monitor displays a pressure of 0 mmHg.
Additional NiBP tests can be performed at this time. If no further NiBP tests
are to be conducted, turn the monitor off. Normal monitoring operation
returns the next time the monitor is turned on.
Deflation Rate The deflation rate test verifies the deflation rate of the A3 monitor. (There is
no deflation rate test for the A1).
1. Ensure that the Bio-Tek simulator is in test mode. The simulator should display
Pressure Gauge.
2. Confirm that the simulator is set up for the internal cuff.
3. Ensure that the NiBP Test screen is active on the monitor.
4. Press the Heart Rate Tone VOLUME button on the monitor. This verifies
that both the valves are closed.
5. Perform an offset adjustment so that the simulator and monitor both display a
pressure of 0 mmHg by doing the following:
a. Press the CONTRAST button on the monitor.
b. Press the ZERO button on the simulator.
6. Press the NiBP button on the monitor to activate the pump.
24 Performance Verification
Page 37

Hardware and Software Tests
7. Hold the NiBP button until the monitor displays a pressure of
approximately 250 mmHg.
8. Start 1 minute timer, and simultaneously press and hold the ALARM SILENCE
button on the monitor.
This causes the pneumatic system to deflate at a rate of 3 mmHg/s ±1.5 mmHg/
s.
9. After 1 minute, record the pressure displayed on the monitor. The test has been
successfully completed if the monitor displays a pressure reading of 10 mmHg
to 190 mmHg.
10. Press and hold Heart Rate Tone VOLUME button until monitor displays
a pressure of 0 mmHg.
Additional NIBP tests can be performed at this time. If no further NiBP tests
are to be conducted, turn the monitor off. Normal monitoring operation
returns the next time the monitor is turned on.
Operation with a Temperature Simulator (A1 only)
1. Remove the probe from its holder.
2. Insert the calibration key in the temperature input port T on the A1.
3. Press the ON/STANDBY button to turn the monitor on. After the normal
power-up sequence, verify that the temperature reads 36.3 ± 0.1°C (or 97.3 ±
0.2°F).
4. Turn the monitor off.
Operation with a Temperature Simulator (A3 only)
1. With monitor off, connect the temperature cable (supplied with the temperature
simulator) to the appropriate connector on temperature simulator.
2. Connect the temperature cable to the temperature input port on the A3.
3. Set the temperature simulator as follows:
Temperature: 37°C (98.6°F)
Probe Type: YSI 400 Series
Note
The accuracy of A3 temperature measurements is ±0.1°C
(±0.2°F). In the procedure below, add the tolerance of the
simulator to the acceptable range of readings.
Performance Verification 25
Page 38

General Operation
General Operation
Serial Interface Test
4. Press the ON/STANDBY button to turn monitor on.
5. After normal power-up sequence, verify temperature reads 37°C ±0.1°C (98.6°F
±0.2°F if Fahrenheit is selected as temperature units.)
6. Turn the monitor off.
The following tests provide an overall performance check of the system:
• Serial Interface Test
• Printer Verification (for optional printer - A1 only)
Note Perform only if nurse call signal is used.
Perform the following procedure to test the serial port voltages. The test is
qualitative and only verifies that the serial interface port is powered correctly,
and that the Nurse Call signal is operational. The serial connector is a male
DB-9 located on the monitor’s real panel, identified with the RS-232 symbol
.
1. Turn the monitor on.
2. Set up the DMM with the function set to
3. Connect the DMM negative lead to connector pin 5 (GND), or the shell of the
RS-232 connector.
4. Referring to the following table, connect the DMM positive lead to each pin in
turn, and verify the voltage values listed. Voltage for pin 9 is that listed for the
VDC at a range of 10 volts.
no alarm condition.
26 Performance Verification
Page 39

General Operation
Table 5 Serial Interface Voltages
Measurement (V)
Pin Signal Direction
Min. Typical Max.
1 not used 0.4 0.0 0.4
2 RXD<<< input –0.4 0.0 0.4
3 TXD>>> output –0.5 –9.0 –15.0
4 DTR>>> output –5.0 –9.0 –15.0
5 GND –0.4 0.0 0.4
6 DSR<<< input –0.4 0.0 0.4
7 RTS>>> output –5.0 –9.0 –15.0
8 CTS<<< input –0.4 0.0 0.4
9 Alarm Out>>>
(no alarm)
9 Alarm Out>>>
(alarm underway)
output –5.0 –9.0 –15.0
output 5.0 9.0 15.0
5. Connect the Nellcor Puritan Bennett SRC-2 pulse oximeter tester to the monitor
via the M4787A sensor extension cable.
6. Set the SRC-2 switches as follows:
SWITCH POSITION
RATE 38
LIGHT LOW
MODULATION LOW
RCAL/MODE RCAL 63/LOCAL
7. Verify that the monitor is responding to the SpO
simulator signal and the
2
audible alarm is sounding. If desired, press the ALARM SILENCE button
to temporarily silence the audible alarm.
8. Connect the DMM positive lead to pin 9 and verify the voltage value listed in
Table 5. Voltage for pin 9 is that listed for the
alarm underway
condition.
Performance Verification 27
Page 40

General Operation
Printer Verification (For A1 Optional Printer M3925A)
Printer verification consists of connecting the printer to the monitor and the
monitor to a human subject for a qualitative test.
1. Connect the output of the appropriate power supply, PS-240V or PS-120V, to
the labeled connector on the rear of the printer. When the
printer’s external power supply is connected, the printer front-panel charging
LED is lit.
2. Connect the serial cable between the labeled connectors on the
rear panels of the monitor and the printer.
3. The printer front panel communication LED is lit when the RS-232
communications link is completed.
4. Rotate the monitor wheel to highlight the setup icon . Press the wheel
and ensure Communications Selection is
Printer.
5. Connect a M4787A sensor extension cable to the monitor. Connect an oxygen
transducer to the sensor extension cable. Attach it to the subject as described in
the sensor directions for use.
6. Press the ON/STANDBY button to turn the monitor on and verify that
the monitor is operating.
7. The monitor should stabilize on the subject’s physiological signal in about 15 to
30 seconds. Verify that the saturation and heart rate is reasonable for the subject.
8. Press the printer CONTINUOUS button . Verify that the printout contains
vital signs across the top of the paper, and that a SpO
waveform, with grid
2
marks, occupies the center portion of the paper. To terminate the printout, press
the CONTINUOUS button again.
9. Disconnect the sensor and shut off the monitor.
28 Performance Verification
Page 41

Safety Tests
Ground Integrity
Safety Tests
Philips safety tests meet the standards of, and are performed in accordance
with IEC 601-1, Clause 19 (EN60601-1, Second Edition, 1988; Amendment
1, 1991-11, Amendment 2, 1995-03).
The A1 patient monitor is a Class II device. It is double insulated and does not
require a protective earth (ground) wire. The A3 patient monitor is a Class I
device. It requires a protective earth (ground) wire. Test requirements differ
for Class I and Class II devices. Be aware of the differences and use the
appropriate test procedure for the monitor in use.
There are two categories of safety tests:
n Ground Integrity
n Electrical Leakage
Table 6 Ground Integrity
Test or “Inspection” to Perform Expected Test Results
Protective Earth
See “Safety Test Diagram - Protective
Earth” on page 30
With mains cable:
Maximum impedance = x <= 100 mOhms
Performance Verification 29
Page 42

Safety Tests
Safety Test Diagram - Protective Earth
Test or Inspection to Perform
Measures impedance of Protective Earth (PE) terminal to all exposed metal parts of
IUT, which are for safety reasons connected to the Protective Earth (PE). Max. 100
mOhm. Test current 25 Amps applied for 5 to 10 seconds. We recommend to flex
the main cable during the test in order to identify potential bad contact or damage of
the earth wire. Safety test according to EN60601-1 (Clause 18). Report largest
value.
Note The A1 does not require an isolated Earth Ground terminal,
neither is one installed. No Protective Ground Continuity check is
required.
30 Performance Verification
Page 43

Electrical Leakage
Safety Tests
The following tests verify the electrical leakage of the monitor:
n Earth Leakage Current (A3 only)
n Enclosure Leakage Current
n Patient Leakage Current
n Patient Source Current, with Mains Voltage on the Applied Part
Perform all leakage tests any time the unit is opened.
Earth Leakage Current
(A3 only)
This test is in compliance with IEC 601-1 (Earth Leakage Current). In
locations where mains voltage is 100-120 volts, the applied voltage is 132
volts. In locations where mains voltage is 220-240 volts, the applied voltage is
264 volts. The applied AC frequency should be the same as the local mains
(50 or 60 Hz).
All measurements shall be made with the power switch in both
ON and OFF
positions.
1. Connect the monitor AC plug to the electrical safety analyzer as recommended
by the analyzer operating instructions.
2. Perform test as recommended by analyzer operating instructions.
Earth leakage current is measured under various conditions of the AC mains
and protective earth conductor. For each condition, the measured leakage
current must not exceed that indicated below
Table 7 Earth Leakage Current Values (A3 Only).
Tes t
Condition
Normal
1
S.F.C
Open
Supply
Polarity Allowable Leakage Current
Normal 300 µA
Reversed 300 µA
Normal 1000 µA
Reversed
1000 µA
1. S.F.C = Single Fault Condition
Enclosure Leakage
Current
This test is compliance with EN60601-1 (Enclosure Leakage Current). Test at
110% of the nominal line voltage.
1. Connect the A3’s AC mains power cord to the analyzer as recommended by the
analyzer operating instructions.
2. Using the appropriate test cable, connect the analyzer to the snap nearest to the
handle fixing screw as shown in the following photograph.
Performance Verification 31
Page 44

Safety Tests
C
onnect analyzer
test cable to the
snap as arrowed
(or alternatively,
to the handle
fixing screw)
NOTE: do NOT use this
snap on the rear of the
case, or any of the
other screws on the rear
of the monitor
3. Turn the monitor on.
4. Perform the test as recommended by the analyzer operating instructions.
The analyzer leakage current indication must not exceed the values listed
below.
32 Performance Verification
Page 45

Safety Tests
Table 8 Enclosure Leakage Current
EN60601-1 (1990 + A1, A2, A11, A12, A13) and UL2601 (2nd Ed. 1997) US Deviations
Test Condition Polarity Allowable Leakage Current
Patient Leakage
Current
Normal
1
S.F.C
Open Supply
(A1 Only)
1
Open
S.F.C
Protective Earth
(A3 Only)
Normal 100 µA
Reversed 100 µA
Normal 150 µA
Reversed 150 µA
Normal 300 µA
Reversed
300 µA
1. S.F.C = Single Fault Condition
This test measures patient leakage current in accordance with EN60601-1,
Clause 19, for Class I, type CF equipment. Patient leakage current in this test
is measured from any individual patient connection to earth (power ground).
This test requires a sample patient cable for each device parameter. These
must be configured as recommended by the safety analyzer operating
instructions.
1. Configure the electrical safety analyzer as recommended by the analyzer
operating instructions.
2. • A1 - Connect the appropriate external power supply input power cord
to the analyzer as recommended by the analyzer operating instructions.
Connect the external power supply output cord to the monitor.
• A3 - Connect the monitor’s AC mains power cord to the analyzer as
recommended by analyzer operating instructions.
3. Connect the ECG test cable between the ECG connector on the monitor
and the appropriate input connector on the analyzer.
4. Turn the monitor on.
5. Perform the test as recommended by the analyzer operating instructions.
Patient leakage current is measured under various conditions of the AC mains
and protective earth conductor. For each condition, the measured leakage current
must not exceed that indicated below.
6. Repeat the test for SpO
and temperature patient connections, using appropriate
2
test cables.
Performance Verification 33
Page 46

Safety Tests
Table 9 Patient Leakage Current Values
Test Condition Polarity
Allowable Leakage
Current (Max.)
Typ e CF
Normal
S.F.C.
S.F.C.
1
(Open Supply)
(A1 Only)
1
(Open Earth/Ground)
(A3 Only)
Normal 10 µA
Reversed 10 µA
Normal 50 µA
Reversed 50 µA
Normal 50 µA
Reversed 50 µA
1. S.F.C. = Single Fault Condition
Patient Leakage
Current, with Mains
Voltage on the Applied
Part
This test measures patient leakage current in accordance with EN60601-1,
Clause 19, for Class I, type CF equipment. In this test, 110% of mains voltage
is applied between each patient connection and earth (power ground). Patient
leakage current is then measured from any individual patient connection to
earth.
Warning AC mains voltage is present on the applied part terminals
during this test. Exercise caution to avoid electrical shock
hazard.
Table 10 Safety Tests - Patient Leakage Current, with Mains
Voltage on the Applied Part
Test or “Inspection” to Perform Expected Test Results
Patient Leakage Current - AC
See “Safety Test Diagram - Patient
Leakage Current - AC” on page 35
34 Performance Verification
Maximum leakage current = x
<= 50 mA @ 250V (IEC601-1 or UL2601-1)
Test at 110% of the nominal line voltage.
Page 47

Safety Test Diagram - Patient Leakage Current - AC
Test or Inspection to Perform
Safety Tests
Measures patient leakage current from Applied Part to earth caused by external
mains voltage on Applied Part with switch S5 open and closed. Each polarity
combination possible is tested using S2 and S6.
Safety test according to EN60601-1 (Clause 19.4.h). Report largest value.
Performance Verification 35
Page 48

Safety Tests
36 Performance Verification
Page 49

Power-up Defaults Menu And Diagnostic
Mode
Introduction
This section discusses use of the Power-up Defaults Menu to configure
power-on default settings, and the Diagnostic Mode to obtain service-related
information about the monitor.
Power-up Defaults Menu
The purpose of the Power-up Defaults Menu is to allow the authorized user to
create a power-up default for each setting in the monitor. Power-up defaults
are the settings in effect each time the monitor is powered on. Once the
Power-up Defaults Menu is entered, physiological monitoring is terminated.
The screen layouts do not display any information associated with normal
monitoring operation.
4
Note
Use the following procedure to configure the power-up default settings for the
monitor:
1. Set the monitor to normal monitoring mode.
2. Adjust each accessible setting on the monitor as desired.
Use the techniques described in the User Guide. Such settings
include alarm limits, choice of display type for the graphic
frames, and ECG lead select.
3. Use the wheel to invoke the Set-up Menu (choose the screwdriver icon
found along the bottom of the display).
4. Select menu item
selected, a pop-up box will appear with the text
Passcode.
5. Use the wheel to enter the passcode,
Enter Power-Up Defaults Menu. Once
Enter 3-Digit
2 1 5.
Note
Power-up Defaults Menu And Diagnostic Mode 37
This passcode is set at the factory and cannot be changed.
6. The Power-up Defaults Menu is now present. The available menu items are
explained below. Make changes to these menu items as desired.
Page 50

Power-up Defaults Menu
Menu Item* Choices** Explanation
Accept Current
Settings as Power-Up
Defaults?
Adult/Neonatal Mode
(A3 only)
Alarm Silence Period 30 s, 60 s,
Permanent Audible
Alarm Silent
Yes
No
90 s, 120 s
Make Available
Deny Access
If Yes is chosen, the current monitor
settings become the power-up defaults.
Neonatal mode is not available at this time;
thus, when this item is selected, the
following pop-up message will appear:
Selection not available.
Time is indicated in seconds. Pressing the
front-panel Alarm Silence button
temporarily silences audible alarms for the
time indicated in the Silence Period menu
item. Alarm state(s) in effect at the end of
the pre-set interval cause the audible alarm
to sound. Pressing the Alarm Silence
button a second time (while the silence
interval is still in effect) ends the interval
immediately. Silencing audible alarms
does not affect visual alarm indications.
If Make Available is chosen, the
caregiver may permanently silence the
audible alarm for a particular parameter via
the Alarm/Limits Menu. Some institutions
may wish to prevent audible alarms from
being permanently silenced. If so, Deny
Access should be selected.
Alarm Suspend Make Available
Deny Access
Auto-Set Limits Make Available
Deny Access
SpotCheck Mode
(A1 only)
Deny Access
Make Available
If Make Available is chosen, the
caregiver may invoke the Alarm Suspend
Mode by pressing and holding the Alarm
Silence button for 2 seconds. Some
institutions may wish to prevent Alarm
Suspend from being invoked. If so, Deny
Access should be selected.
If Make Available is chosen, the
caregiver may invoke the Auto-Set Limits
function via the Alarm/Limits Menu. Some
institutions may wish to prevent Auto-Set
Limits from being invoked. If so, Deny
Access should be selected.
If Make Available is chosen, the
caregiver will invoke the SpotCheck Mode
as one of four choices available through
the Display icon in the Menu Frame. The
factory default is to Deny Access,
allowing only three choices available
through the Display icon in the Menu
Frame.
38 Power-up Defaults Menu And Diagnostic Mode
Page 51

Power-up Defaults Menu
Menu Item* Choices** Explanation
Language*** English
French
German
Italian
Japanese
Portuguese
Spanish
Russian
Chinese
Enter Diagnostic
Mode
Done When selected, the Power-up Defaults
Yes
No
Dutch
Turkish
Arabic
Norwegian
Swedish
Finnish
Polish
Czech
The language selected will be used for all
the text shown on the display; the selected
language will be effective the next time the
monitor is powered up.
Note: Language selection screen upon
boot up can be reactivated by
following the steps listed in the
section Restoring Factory
Settings.
If Yes is chosen, the Power-up Defaults
Menu is exited and the Diagnostic Menu
appears.
Menu is immediately exited and the user is
instructed to power down the monitor.
* The choice in effect at the time the screen is accessed is shown in parentheses following the menu item.
** Bold type indicates the choice when the factory-set default menu appears. The highlighting is displayed in
reverse video.
*** Although the language choices are shown here in English, they appear in their own respective language and
script on the Boot Up Screen and in the Power-up Defaults Menu.
7. After making any desired changes to the menu items, choose the menu item Accept
current setting?
8. Select YES.
9. Select
Done.
Upon selecting Done, a Notice Screen appears, with the directions that the monitor
must be powered off, and that any changes made to the power-up defaults are in effect
the next time the unit is powered up.
Power-up Defaults Menu And Diagnostic Mode 39
Page 52

Diagnostic Mode
Diagnostic Mode
The purpose of Diagnostic Mode is to allow factory, field-service, and hospital
biomedical technicians access to a series of test and system-related information
screens for the purpose of verifying monitor performance or troubleshooting
problems.
To access the Diagnostic Mode:
1. Invoke the Power-up Defaults Menu. (See “Power-up Defaults Menu” on page 37.).
2. Select the menu item,
3. Choose
Yes. The Power-up Defaults Menu is exited and the Diagnostic menu appears.
Enter Diagnostic Mode.
DIAGNOSTIC
MENU
Error Codes
System Information
System A/D Values
NiBP Test
Return
The Diagnostic Menu lists the test and system-related information screens. Selection
of an item in the menu invokes that test or information screen. The test and
information screens that appear in the Diagnostic menu are as follows:
n Error Codes
n System Information
n System A/D Values
n NiBP Test
n Return
Error Codes
This screen displays the 10 most recent error code types, logged by the monitor. After
10 error code types have been logged, the oldest error code type is deleted as new
error code types are added. Adjacent to each error code is an entry which is the
number of occurrences of that error. This means that if there are many occurrences of
one type of error code, that one error code won’t overwrite the other 9 error codes.
Next to the occurrence field is the time and date of the most recent occurrence of the
40 Power-up Defaults Menu And Diagnostic Mode
Page 53

error code. Error codes cannot be changed or reset in this screen. When in the Error
Code screen, the
user to the Diagnostic Menu. Rotating the wheel while in the Error Code screen has no
effect.
Refer to “Error Codes”, Chapter 5, for more detail on error codes.
System Information
Monitor On-Time 1563
Backlight On-Time 871
Diagnostic Mode
Return item is always highlighted; a press of the wheel returns the
SYSTEM INFORMATION
Recorder On-Time
Battery Deep Discharges 152
System Software Version V1.02
SpO2 Software Version V1.2.0
Return
1. A3 only
1
37
This screen displays several system-related items:
• Monitor On-time: Displays the number of hours, rounded to the
nearest hour, that the Main PCB has been
operational. This value cannot be reset.
Note The Monitor On-time, Backlight On-time, and Battery Deep Discharge
values are stored in nonvolatile memory. When a new Main PCB is
installed, this value is reset to zero.
• Backlight On-time: Displays the number of hours, rounded to the
nearest hour, that the LCD Backlight has been
operational. This value can be reset to zero, for
instance at the time when a technician changes the
backlight or installs a new LCD.
• Recorder On-time: Displays the number of hours, rounded to the
nearest hour, that the A3 Recorder has been
Power-up Defaults Menu And Diagnostic Mode 41
Page 54

Diagnostic Mode
operational. This value can be reset to zero, for
instance at the time when a technician installs a
new recorder.
• Battery Deep Discharges: Displays the number of deep-discharge cycles seen
by the battery. The monitor records a deep
discharge cycle when the battery volt-age reaches
5.6 volts, the voltage at which a
Low Battery
alarm is issued. This value can be reset to zero, for
instance at the time when a technician installs a
new battery.
• System Software Version: Displays the revision level of the system software.
The revision level is also momentarily shown on
the LCD as part of the Copyright screen. This value
cannot be changed by the user.
•
SpO2 Software Version: Displays the revision level of the software of the
MP-205 SpO
module. This value cannot be
2
changed by the user.
When in the System Information screen, the wheel can be rotated to select any of the
changeable items. If one of those items is selected, a press of the wheel causes a popup menu to appear. The first item in the pop-up reads
second item in the pop-up reads
Reset to zero. Exiting the screen is
accomplished in the normal manner, by selecting
Make no change; the
Return.
System A/D Values
The System A/D screen displays the current value of each analog-to-digital (A/D)
channel in volts. Some of the channels are for AC-coupled signals (such as ECG
input), so the numbers on the screen are constantly changing when an input signal is
present. These AC-coupled values are shown to give an indication as to whether basic
functionality of the channel is present, but no significance can be derived from the
values of the numbers displayed. However, others of the A/D channels read DC
voltages, (for example, power supply voltages and battery voltage) and those voltage
values directly provide useful diagnostic information.
The Primary and Secondary Status messages from the SpO
updated at the rate of about once per second. Presence of the correct SpO
indicates that, at a basic level, communication between the SpO
monitor processor is working correctly. None of the displayed values can be changed
or reset in this screen.When in the System A/D screen, the Return item is always
highlighted; a press of the wheel returns the user to the Diagnostic Menu. Rotating the
wheel while in the System A/D screen has no effect. The A/D channel designators are
shown below.
module are displayed and
2
message
2
module and the main
2
42 Power-up Defaults Menu And Diagnostic Mode
Page 55

Diagnostic Mode
A/D Channel Designators
A1 A3
1. ECG 1. ECG
2. RWAVE 2. RWAVE
3. PACEMAKER 3. PACEMAKER
4. TEMP 1 (93° TO 112°) 4. RESPIRATION
5. PRESSURE XDUCER 1 5. PRESSURE XDUCER 1
6. PRESSURE XDUCER 2 6. PRESSURE XDUCER 2
7. NiBP OSCILLATORY 7. NiBP OSCILLATORY
8. ECG LEAD OFF 8. ECG LEAD OFF
9. TEMP 2 (59° TO 93°) 9. TEMPERATURE
10. ISOLATED VOLTAGE REF 10. ISOLATED VOLTAGE REF
11. ISOLATED VOLTAGE ZERO 11. ISOLATED VOLTAGE ZERO
2 S1 S018 SpO2 S1 S018
SpO
12. (BATTERY VOLTAGE) X 0.5 12. (BATTERY VOLTAGE) X 0.5
13. TEMP PROBE <=0=ORAL,
1=RECTAL, 2=CAL KEY,
>=3 NONE)
14. +3.3 VDC POWER SUPPLY 14. +3.3 VDC POWER SUPPLY
15. (NiBP VOLTAGE REF) X 0.5 15. (+12 VDC POWER SUPPLY) X
16. GROUND REFERENCE 16. (NiBP VOLTAGE REF) X 0.8
17. (+5 VDC POWER SUPPLY) X 0.5 17. GROUND REFERENCE
18. ADC MID-SCALE VALUE 18. (+5 VDC POWER SUPPLY) X 0.8
19. ADC ZERO-SCALE VALUE 19. ADC MID-SCALE VALUE
20. ADC FULL-SCALE VALUE 20. ADC ZERO-SCALE VALUE
13. NOT USED
0.33
21. ADC FULL-SCALE VALUE
NIBP Test
Warning A blood pressure cuff, connected to the monitor, should never be
applied to a human subject while the monitor is in Diagnostic
Mode. Injury could result.
Power-up Defaults Menu And Diagnostic Mode 43
Page 56

Diagnostic Mode
NiBP TEST
Pressure (mmHg) 179
Valve: OPEN
Press
NiBP to activate pump;
release to stop pump.
Volume to open valve;
Press
release to close valve.
Press Alarm Silence to open
proportional valve and deflate at
3 mmHg/s; release to close valve.
Contrast to perform offset
Press
adjust.
Return
An NiBP Test screen is provided to facilitate troubleshooting problems and
performing verification testing for the NiBP subsystem. Typically, when these tests
are performed, the pneumatic system is connected to an external pressure-reading
device and a closed reference volume. The NiBP Test screen provides a real-time
numeric display of the pressure in the pneumatic system, means for controlling the
pump and valves, and a display indicating whether the proportional and safety valves
are open or closed.
The NiBP Test screen elements are described below:
• Pressure Display: The real-time value of the system pneumatic
pressure is displayed in mmHg. The value is
updated at the rate of approximately two times per
second.
• Proportional Valve The display indicates whether the
Display: proportional valve is open or closed.
• Safety Valve Display: The display indicates whether the safety valve is
open or closed.
• Activate Pump: For as long as the NiBP Start/Stop button
is pressed, the pump runs. If system pressure
reaches the hardware over-pressure protection point
(280 to 330 mmHg), the safety valve opens and the
pump disables, until the pressure falls below the
safety threshold.
• Deflate: For as long as the
44 Power-up Defaults Menu And Diagnostic Mode
ALARM SILENCE button
Page 57

Restoring Factory Settings
is pressed, the proportional valve opens
and bleeds off pressure at the rate of 3 ±1.5 mmHg/
s. It is useful to control the bleed rate to 3 mmHg/
second to facilitate certain AAMI SP10 tests. Any
time the bleed rate falls below 3 mmHg/second, the
valve opens and remains at maximum as long as
the button is pressed.
• Open Valve (A1): While the Heart Rate Tone
is pressed, the valve opens and remains at
maximum as long as the button is pressed.
• Open Both Valves (A3): For as long as the Heart Rate Tone
button is pressed, the safety valve and
proportional valve opens and remains at maximum
as long as the button is pressed.
• Offset Adjust: A momentary press of the
button invokes the
routine that is performed immediately prior to each
blood pressure measurement. This routine looks at
the pressure in the system, and if the pressure is
non-zero, an offset is applied which causes the
system pressure to display as
When in the NiBP Test screen, the
wheel returns the user to the Diagnostic Menu. Rotating the wheel while in the NiBP
Test screen has no effect.
Return item is always highlighted; a press of the
VOLUME button
VOLUME
CONTRAST ADJUST
zero calibration
zero.
Restoring Factory Settings
Caution In addition to restoring factory defaults, this procedure clears the
contents of trend memory.
Note Read this procedure completely before performing the first step.
The following technique can be used to restore the monitor’s power-up default
Power-up Defaults Menu And Diagnostic Mode 45
Page 58

Restoring Factory Settings
settings which were originally established at the factory:
1. With the monitor powered off, simultaneously press the VOLUME and
2. While continuing to press the VOLUME and CONTRAST buttons, power-
3. Continue to keep the VOLUME and CONTRAST buttons depressed until
CONTRAST buttons on the front keypad.
up the monitor.
the power-up diagnostic sequence is complete. When the normal monitoring screen
appears, release the two buttons.
46 Power-up Defaults Menu And Diagnostic Mode
Page 59

Introduction
This section explains how to troubleshoot the monitor if problems arise.
Tables are supplied that list possible monitor difficulties, along with probable
causes, and recommended actions to correct the difficulty.
How To Use This Section
Use this section in conjunction with Chapter 3, “Performance Verification”,
and Chapter 7, “Spare Parts”. To remove and replace a part you suspect is
defective, follow the instructions in Chapter 6, “Disassembly Guide”. The
Circuit Analysis chapter in the Concepts Guide offers information on how the
monitor functions.
5
Troubleshooting
Who Should Perform Repairs
Only qualified service personnel should open the monitor housing, remove
and replace components, or make adjustments. If your medical facility does
not have qualified service personnel, contact Philips’ Response Center or your
local Philips representative.
Replacement Level Supported
The replacement level supported for this product is to the printed circuit board
(PCB) and major subassembly level. Once you isolate a suspected PCB,
follow the procedures in Chapter 6, “Disassembly Guide”, to replace the PCB.
Check to see if the symptom disappears and that the monitor passes all
performance tests. If the symptom persists, swap back the replacement PCB
with the suspected malfunctioning PCB (the original PCB that was installed
when you started troubleshooting) and continue troubleshooting as directed in
this section.
Chapter 5 - Troubleshooting 47
Page 60

Obtaining Replacement Parts
Obtaining Replacement Parts
Philips’ Response Center provides technical assistance information and
replacement parts. To obtain replacement parts, contact your local Philips
representative. Refer to parts by the part names and part numbers listed in
Chapter 7, “Spare Parts”.
Troubleshooting Guide
Problems with the monitor are separated into the categories indicated below.
Refer to the section indicated for further troubleshooting instructions.
Taking the recommended actions discussed in this section will correct the
majority of problems you may encounter. However, problems not covered
here can be resolved by calling Philips’ Response Center or your local
representative.
Power
Problem Area Refer To:
1. Power
• No power-up
• Fails power-on self-test
• Powers down without apparent cause
2. Error Messages “Error Codes” on page 51
3. Buttons/Wheel
• Monitor does not respond properly to buttons
4. Display/Audible Tones
• Display does not respond properly
• Tones do not sound properly
5. Operational Performance
• Displays appear to be operational, but monitor
shows no readings
• Suspect readings
• Recorder not responding
“Power” on page 48
“Buttons/Wheels (All
Monitors)” on page 56
“Display/Audible Tones (All
Monitors)” on page 57
“Operational Performance”
on page 58
All categories listed above are discussed in the following sections.
The following table lists recommended actions to address A1 power
48 Chapter 5 - Troubleshooting
Page 61

problems.
Condition Recommended Action
Troubleshooting Guide
1. With external power
supply connected
the green
EXTERNAL
POWER indicator
on the front panel is
not lit.
2. The A1 fails to
power-up when the
ON/STANDBY
button is
pressed…with the
monitor connected
to external power
supply.
1. Ensure that the external power supply input (PS-120V
or PS-240V) is plugged into an operational AC outlet
of appropriate voltage and frequency.
2. Disconnect the power supply output cable from the
monitor. Measure the voltage across pins 1 and 4 of
output connector. If the open circuit voltage does not
measure approximately 17 ±3 V~RMS, replace the
power supply.
3. If the battery is severely discharged or shorted, the
EXTERNAL POWER indicator does not light. Connect
the external power supply to an AC outlet and to the
monitor. Allow the battery to charge for 30 minutes. If
the EXTERNAL POWER indicator still does not light,
replace the battery.
4. Inside the monitor, check the ribbon cable and ensure
that it is properly connected to the main PCB.
5. The EXTERNAL POWER indicator is embedded in
the keypad. Ensure that the keypad is plugged into
Main PCB. If the connection is good, replace the
keypad.
6. If the problem persists, replace main PCB.
1. Connect the appropriate external power supply (PS120V or PS-240V) to the monitor. Ensure that the
external power supply input is plugged into an
operational AC outlet of the appropriate voltage and
frequency. Ensure that the green EXTERNAL
POWER indicator is lit. If the indicator is not lit, follow
the steps described in Condition 1, above.
2. Ensure that the keypad is plugged into Main PCB. If
the connection is good, replace keypad.
3. If the problem persists, replace the main PCB.
3. The A1 fails to
power-up when the
ON/STANDBY
button is pressed
with the monitor not
connected to
external power
supply.
Chapter 5 - Troubleshooting 49
1. First, follow the steps described in Condition 2,
above, to ensure that the monitor operates when
connected to an external power supply.
2. Check fuse F301 located on the Main PCB, near the
battery cable connector. Replace fuse if necessary.
3. Recharge the battery as directed in “Battery Charge”
on page 11. If the battery fails to hold a charge,
replace the battery.
4. If the problem persists, replace the main PCB.
Page 62

Troubleshooting Guide
Condition Recommended Action
4. The A1 turns on,
then shuts off and
sounds an alarm
and no error code is
displayed.
1. Press the alarm silence button to terminate the
audible alarm. Ensure that the external power supply
is connected and the green EXTERNAL POWER
indicator is lit. If the monitor operates successfully, the
battery could be discharged, or the battery fuse could
be blown.
2. Recharge the battery as directed in “Battery Charge”
on page 11. If the battery fails to hold a charge,
replace the battery.
3. Check fuse F301 located on the Main PCB, near the
battery cable connector. Replace the fuse if
necessary.
4. If problem persists, replace the main PCB.
The following table lists recommended actions to address A3 power
problems.
Condition Recommended Action
1. The A3 fails to
power-up when the
ON/STANDBY
button is pressed.
1. Ensure power cord is plugged into operational AC
outlet of appropriate voltage and frequency. Ensure
green BATTERY CHARGING/AC SOURCE indicator
is lit. If indicator is not lit, replace power supply
assembly.
2. Check fuses located on power supply assembly
above AC inlet receptacle. Replace fuses if
necessary.
3. Inside monitor, check main ribbon cable and ensure
that it is connected to main PCB and power supply
assembly.
4. Ensure that the keypad is plugged into Main PCB. If
the connection is good, replace the keypad.
5. If the problem persists, replace main PCB.
50 Chapter 5 - Troubleshooting
Page 63

Troubleshooting Guide
Condition Recommended Action
Error Codes
2. The A3 turns on,
then shuts off and
sounds an alarm
and no error code is
displayed.
1. Press Alarm Silence switch to terminate audible
alarm. Ensure AC power cord is connected and green
BATTERY CHARGING/AC SOURCE indicator is lit,
or ensure DC source is connected and green
BATTERY CHARGING/DC SOURCE is lit. If monitor
operates successfully, battery can be discharged.
2. Recharge the battery as directed in “Battery Charge”
on page 11. If the battery fails to hold a charge,
replace the battery.
3. If the problem persists, replace the main PCB.
4. If the problem persists, replace the power supply
assembly.
When the monitor detects an error condition, the monitor shows an error code
on the display screen. If such an error occurs during monitoring operation, an
audible alarm tone also sounds. Press the
ALARM SILENCE button to
terminate the audible alarm tone.
When an error code appears on the display, a number in hexadecimal
representation indicates the nature of the error. Additionally, Diagnostic Mode
can be used to gain access to an error code record, stored in nonvolatile
memory, of the last 10 error codes encountered by the monitor. See Chapter 4
for further details on Diagnostic Mode.
Each error code corresponds to a particular problem in the monitor.
Recommended actions to take when an error code is encountered are listed in
the sections that follow.
As an aid to troubleshooting, the A1 provides the capability for technicians to
print out a copy of the error log.
Generating an Error Log Printout (A1 only)
1. Connect the recorder to the monitor, and its power supply to an
appropriate source. Refer to the operator’s manual.
2. Use the
Recorder mode is the selected option for the Communications Selection
item. (It is the factory-set default value.)
3. Turn monitor power OFF.
Chapter 5 - Troubleshooting 51
SETUP button and displayed menu to verify that the
Page 64

Troubleshooting Guide
4. Simultaneously press the CONTRAST button and the ON/
STANDBY
button depressed until the monitoring screen appears (after 10 seconds).
The error code printout is generated automatically.
If error codes listed on the Diagnostic Mode error code screen or on the error
log printout are in the range from 1 to 65 (hex), a hardware problem has been
detected. Refer to the section titled, “Serviceable Hardware Error Codes” for
additional information on these codes.
Serviceable Hardware Error Codes
Serviceable Hardware
Error Codes for A1
Listed below are error codes for the A1 that correspond to hardware problems,
and the recommended actions to take should such an error be encountered.
Hex Code Explanation Recommended Action
1 Improper shutdown. 1. Cycle power.
2 NiBP Sensor Error.
button to power up the monitor. Keep the contrast
2. If this error persists, return
monitor for service.
1. Check for blocked tubing in
• The two pressure system.
transducers do not agree.
the pneumatic system.
2. Replace Main PCB.
3 NiBP Pressure Violation Error.
• The pressure on the cuff
could not be removed by
normal means.
• A fault has been detected in
the NiBP system that could
not be handled by releasing
pressure by normal means.
4 The measured value of the 3.3V
power supply is low.
5 The measured value of the 3.3V
power supply is high.
7 The measured value of the 12V
power supply is high.
8 The measured value of the 5V
power supply is low.
9 The measured value of the 5V
power supply is high.
52 Chapter 5 - Troubleshooting
1. Cycle power.
2. Check for blocked tubing in
the pneumatic system.
3. Replace Main PCB.
1. Check power supply.
2. Replace Main PCB.
1. Check power supply.
2. Replace Main PCB.
1. Check power supply.
2. Replace Main PCB.
1. Check power supply.
2. Replace Main PCB.
1. Check power supply.
2. Replace Main PCB.
Page 65

Troubleshooting Guide
Hex Code Explanation Recommended Action
A The measured value of the
isolated reference supply on the
front end is low.
B The measured value of the
isolated reference supply on the
front end is high.
D A checksum error is detected on
the NiBP region of Flash Memory.
E A checksum error is detected on
the power-up settings region of
Flash memory.
64 The SpO
error message to the host CPU.
module is sending an
2
1. Check power supply.
2. Replace Main PCB.
1. Check power supply.
2. Replace Main PCB.
1. Cycle power.
2. If error persists, replace
main PCB.
1. Turn Power Off.
2. Turn power back on while
pressing both the
CONTRAST and VOLUME
buttons. See “Restoring
Factory Settings” on
page 45, Chapter 4.
3. All user selections must be
restored.
4. If error persists, replace
Main PCB.
1. Cycle power.
2. If problem persists, replace
Main PCB.
Serviceable Hardware
Error Codes for A3
65 The SpO
communicating with the host
CPU.
module is not
2
1. Cycle power.
2. If problem persists, replace
main PCB.
IListed below are error codes for the A3 that correspond to hardware
problems, and the recommended actions to take should such an error be
encountered.
Hex Code Explanation Recommended Action
1
2 NiBP Sensor Error.
Improper shutdown. 1.Cycle power.
2. If this error persists, return
monitor for service.
1. Check for blocked tubing in
• The two pressure system.
transducers do not agree.
the pneumatic system.
2. Replace Main PCB.
Chapter 5 - Troubleshooting 53
Page 66

Troubleshooting Guide
Hex Code Explanation Recommended Action
3 NiBP Pressure Violation Error.
• The pressure on the cuff
could not be removed by
normal means.
• A fault has been detected in
the NiBP system that could
not be handled by releasing
pressure by normal means.
• NiBP system has released
pressure using safety valve.
4 The measured value of the 3.3V
power supply is low.
5 The measured value of the 3.3V
power supply is high.
6 The measured value of the 12V
power supply is low.
7 The measured value of the 12V
power supply is high.
1. Cycle power.
2. Check for blocked tubing in
the pneumatic system.
3. Replace Main PCB.
Note: This error may occur
during a blood
pressure measurement
in STAT mode, if the leg
cuff is used.
1. Check power supply.
2. Replace power supply
assembly.
1. Check power supply.
2. Replace power supply
assembly.
1. Check power supply.
2. Replace power supply
assembly.
1. Check power supply.
2. Replace power supply
assembly.
8 The measured value of the 5V
power supply is low.
9 The measured value of the 5V
power supply is high.
A The measured value of the
isolated reference supply on the
front end is low.
B The measured value of the
isolated reference supply on the
front end is high.
C The measured value of the
isolated reference supply on the
front end is high.
64 The SpO
module is sending an
2
error message to the host CPU.
1. Check power supply.
2. Replace power supply
assembly.
1. Check power supply.
2. Replace Main PCB.
1. Check power supply.
2. Replace Main PCB.
1. Check power supply.
2. Replace Main PCB.
1. Check power supply.
2. Replace Main PCB.
1. Ensure MP-205 module is
properly connected.
2. Replace MP-205 module.
3. If problem persists, replace
Main PCB.
54 Chapter 5 - Troubleshooting
Page 67

Troubleshooting Guide
Hex Code Explanation Recommended Action
65, 66 MP-205 SpO2 module has
6E-71 MP-205 SpO
Other Error Codes (All Monitors)
If an error code occurs that is not listed in “Serviceable Hardware Error
Codes”, take the following actions:
1. Turn the monitor off, then on again.
2. If the error code still appears, take the monitor out of service and contact
Philips’ Response Center or your local Philips representative for advice
on remedial action.
3. If the monitor powers up and the error code does not recur, enter the
Diagnostic Mode and invoke the Error Code screen. Examine the record
of the last 10 error codes and determine if the same error code occurred
previously.
4. If the Error Code screen indicates that the same error has occurred
previously, take the monitor out of service and contact Philips’ Response
Center or your local Philips representative for advice on remedial action.
5. If the Error Code screen indicates no previous occurrences of this error,
the monitor can be returned to service.
As a reference, following lists the general categories for other error codes.
The error code categories are shown only in hexadecimal format.
detected an error during
initialization.
module has
2
detected an error on its serial port.
1. Replace MP-205 module.
2. If problem persists, replace
Main PCB.
1. Replace MP-205 module.
2. If problem persists, replace
Main PCB.
Code (hex) Explanation
500xxxx internal user interface error
501xxxx remote serial port error
502xxxx date and time error
503xxxx NiBP error
504xxxx front end error
505xxxx alarm error
506xxxx audio error
507xxxx recorder error
Chapter 5 - Troubleshooting 55
Page 68

Troubleshooting Guide
Code (hex) Explanation
508xxxx trend error
509xxxx flash memory data error
50axxxx SpO
50bxxxx ECG error
50cxxxx power-down task error
50dxxxx on-board diagnostic error
50exxxx power monitor error
50fxxxx temperature measurement error
510xxxx internal user interface error
511xxxx error handling error
513xxxx serial driver error
514xxxx system software errors (A1 only)
Buttons/Wheels (All Monitors)
The following lists recommended actions to address problems with the wheel
and front-panel buttons.
error
2
Condition Recommended Action
1. The monitor fails to power-up when
the ON/STANDBY button is pressed.
2. The monitor powers-up, but some/
one of the other buttons does not
respond.
3. When the wheel is rotated, no
highlight appears on the display
screen, and/or the monitor does not
respond to wheel presses.
56 Chapter 5 - Troubleshooting
1. Take steps as noted in “Power” on
page 48.
1. Ensure that the keypad is plugged
into the Main PCB. If the connection
is good, change the keypad.
2. If the problem persists, change the
Main PCB.
1. Ensure that the encoder cable is
plugged into the Main PCB. If the
connection is good, change the
encoder.
2. If the problem persists, replace the
Main PCB.
Page 69

Display/Audible Tones (All Monitors)
The following lists recommended actions to address problems with the
display and audible tones.
Condition Recommended Action
Troubleshooting Guide
1. System powers-up
and…
• LCD screen is totally
black or white.
Or,
• LCD screen is
illuminated, but no
data is visible.
Or,
• LCD screen has data,
but is not illuminated.
2. Monitor responds to
button press, but key
press tone fails to
sound.
Note: Pressing the A3 contrast adjust switch
causes the LCD contrast setting to
immediately change to normal, factorydefault value. Pressing the A3 contrast
adjust switch toggles the display between
the two different color schemes (black
background and white background).
1. A1 and A3: Adjust the LCD screen contrast by
pressing the CONTRAST button momentarily,
then turning the wheel four revolutions in each
direction. Turning the wheel clockwise should
brighten the screen; turning the wheel counterclockwise should darken the screen.
2. A3: Ensure red LED, located on the top left corner
of the Main PCB, is illuminated. If the LED is not
illuminated, the monitor is not in on state: follow
troubleshooting steps in “Power” on page 48.
3. Ensure that the backlight cable is connected to
the Main PCB.
4. Ensure that the LCD connector is properly
connected to the Main PCB and LCD PCB.
5. If problem persists, replace Main PCB.
6. A3: If problem persists, replace backlight PCB.
7. If problem persists, replace LCD assembly.
1. Ensure that the speaker cable is connected to the
Main PCB.
2. If the problem persists, replace the speaker
assembly.
3. If the problem persists, replace the Main PCB.
3. Audible alarm does not
sound.
Chapter 5 - Troubleshooting 57
1. Verify alarm volume setting in the Alarm/Limits
menu, and test operation of the alarm tone by
pressing the volume button while the alarm
volume setting is displayed.
2. Ensure that the speaker cable is connected to the
Main PCB.
3. If the problem persists, replace the speaker
assembly.
4. If the problem persists, replace the Main PCB.
Page 70

Troubleshooting Guide
Operational Performance
Operational
Performance
Problems - A1
Operational
Performance
Problems - A3
The following lists recommended actions to address problems related to
operational performance of the A1.
Condition Recommended Action
1. The monitor appears to
be operational, but the
physiological values are
suspect or nonexistent.
1. Replace each patient cable (or tubing) with a
known good cable.
2. Ensure that the Patient Connector PCB is
properly connected to the Main PCB. Ensure that
the tubing in the pneumatic system are properly
connected, and that the NiBP pump motor is
connected to the Rear Connector PCB.
3. If the problem persists, replace the Patient
Connector PCB.
4. If the problem persists, replace Main PCB.
The following lists recommended actions to address problems related to
operational performance of the A3.
Condition Recommended Action
1. Monitor appears to be
operational, but
physiological values are
suspect or nonexistent.
2. Recorder paper will not
advance.
1. Replace each patient cable (or tubing) with a
known serviceable cable.
2. Ensure internal ECG, temperature, and SpO2
cables are connected to Main PCB. Ensure tubing
in pneumatic system are properly connected, and
NiBP pump motor is connected to power supply
PCB.
3. If problem persists, replace main PCB.
1. Open recorder door and check paper is present.
Press recorder module firmly into monitor to
ensure recorder module is fully engaged with
connector on recorder PCB.
2. Cycle power on monitor. Recorder should execute
a line feed at conclusion of power-up sequence.
3. If problem persists, ensure main ribbon cable is
connected to printer PCB, power supply and Main
PCB.
4. If problem persists, replace recorder.
5. If problem persists, replace recorder PCB.
6. If problem persists, replace Main PCB.
58 Chapter 5 - Troubleshooting
Page 71

Troubleshooting Guide
Condition Recommended Action
3. Recorder paper will
advance but paper
remains blank when
printing should be
present.
1. Open recorder door and check paper is oriented
correctly; paper should exit from bottom of roll.
See User Guide for an illustration of correct paper
orientation.
2. If problem persists, replace recorder.
Chapter 5 - Troubleshooting 59
Page 72

Troubleshooting Guide
60 Chapter 5 - Troubleshooting
Page 73

Disassembly Guide
Warning Performance verification: do not place the monitor into
operation after repair or maintenance has been performed,
until all recommended Performance Tests and Safety Tests
listed in Chapter 3 of this service manual have been
performed. Failure to perform all tests could result in
erroneous monitor readings.
Introduction
The monitor can be disassembled down to all major component parts,
including:
• PCBs
•battery
6
•cables
• function buttons
• chassis enclosures
The following tools are required:
• small/medium, Phillips-head screwdriver
• needle-nose pliers
• 9/16-inch socket (for wheel encoder)
• 3/16-inch socket (for rear-panel RS-232 connector).
Warning Before attempting to open or disassemble the monitor,
disconnect the power supply from the monitor.
Warning High voltage is generated by the LCD backlight driver.
Exercise caution when operating the monitor with the
covers open.
Caution Observe ESD (electrostatic discharge) precautions when
working within the unit.
Chapter 6 - Disassembly Guide 61
Page 74

How To Use This Chapter
Caution If the internal battery cable has been disconnected, pay
particular attention to the polarity of the cable before
reattaching. If the battery cable polarity is reversed, it is
likely that circuit damage will occur.
How To Use This Chapter
The step-by-step procedures that are used to access replaceable parts of the
monitor are illustrated in the Disassembly sections which follow. These
describe and photographically illustrate procedures for disassembling the
monitor to enable removal and replacement of suspected defective
assemblies/components.
The monitor consists of two main assemblies, the front case assembly, and the
rear case assembly. The main PCB assembly is separable from the front case
assembly.
All part numbers and exploded views of some assemblies are found in
Chapter 7, “Spare Parts”.
62 Chapter 6 - Disassembly Guide
Page 75

Disassembly Procedures (A1)
Closed Case Disassembly Procedures
This section describes the items that can be removed without disassembling
the main case of the A1 monitor.
Procedure to remove the battery from Models M3921A and
M3923A when a temperature module is not installed:
1. Use a Phillips-head screwdriver to remove the two screws fastening the
battery cover to the rear case.
Disassembly Procedures (A1)
Battery
pad
2. Remove the battery cover.
3. Disconnect the spade terminal connectors from the battery terminals.
Caution During reassembly, pay particular attention to the polarity
of the battery cable before reattaching. The polarity is
marked on the circuit board. Red connects to the +ve
terminal, black connects to the –ve terminal. If battery cable
polarity is reversed, it is likely that circuit damage will
occur.
4. Remove the battery.
Chapter 6 - Disassembly Guide 63
Page 76

Disassembly Procedures (A1)
5. As required, remove the battery cushions on the inside of the battery
compartment, and the battery cover.
Foot
cushions
Battery
cover
Procedure to remove the battery from the monitor when a
temperature module is installed:
For models with temperature module
Te mp
module
1. Use a Phillips-head screwdriver to remove the two screws fastening the
temperature module housing to the rear case assembly. The same screws
also hold the battery cover.
64 Chapter 6 - Disassembly Guide
Page 77

Disassembly Procedures (A1)
2. Remove the temperature module housing and the battery cover.
Battery
cover
Removed
temperature
module
housing
3. The probe sensor contact switch is mounted on the outer side of the
battery cover. As required, disconnect the leads from the probe sensor
switch to the rear panel connector.
4. Remove the switch.
Temperature
probe grommet
Probe sensor
switch
Spare probe
sensor switch
5. Disconnect the spade terminal connectors from the battery terminals.
Caution During reassembly, pay particular attention to the polarity
of the battery cable before reattaching. The polarity is
marked on the circuit board. Red connects to the +ve
terminal, black connects to the –ve terminal. If battery cable
polarity is reversed, it is likely that circuit damage will
occur.
6. Remove the battery.
7. As required, remove the battery cushions on the inside of the battery
Chapter 6 - Disassembly Guide 65
Page 78

Disassembly Procedures (A1)
compartment, and the battery cover.
Battery
cover
Separation of Front and Rear Case Assemblies
This section describes the procedures required to separate the front and rear
case assemblies of the A1 monitor.
Foot
cushions
Procedure to separate the front and rear case assemblies:
1. Remove the SpO
connector hood by squeezing the sides to release the
2
detents holding the hood in place.
During reassembly, the notch on the SpO
connector hood should be
2
facing down.
SpO
2
connector
hood
2. Use a Phillips-head screwdriver to remove the four screws fastening
together the front and rear case assemblies.
3. Separate the main front and rear case assemblies.
4. If the rear cover gasket seal is to be replaced, remove it.
66 Chapter 6 - Disassembly Guide
Page 79

Rear case
assembly
Disassembly Procedures (A1)
Front case
assembly
During reassembly, align the ridge in the front case assembly with the
groove in rear case assembly. The gasket snake break should be placed at
the bottom of the unit. Line up the connector panel with the slots in the
rear case, making sure speaker wire is out of the way. Power up the
monitor prior to installing the final four screws. If the monitor boots
properly, insert the four screws and proceed to the performance tests.
5. Disconnect the ribbon cable and its connector from the PCB assembly.
Ribbon cable
and
connector
6. Disconnect the battery cable spade terminals from the main PCB
assembly. If the battery cable is to be removed, the cable must also be
disconnected from the battery.
Chapter 6 - Disassembly Guide 67
Page 80

Disassembly Procedures (A1)
Caution During reassembly, pay particular attention to the polarity
of the battery cable before reattaching. The polarity is
marked on the circuit board. Red connects to the +ve
terminal, black connects to the –ve terminal. If battery cable
polarity is reversed, it is likely that circuit damage will
occur.
7. Unscrew the NiBP Luer connector.
During reassembly, preload the NBP Luer connector by twisting the
silicone NBP tubing in opposite directions prior to making the Luer
connection. This prevents disconnection.
Front and rear case assemblies are now completely separate from one another.
Luer connector
to NiBP pump
tubing
Front Case Disassembly Procedures
This section describes how to remove/replace items from the front case
assembly. First separate the front and rear assemblies as described in the
section “Separation of Front and Rear Case Assemblies” on page 78.
Procedure to remove the main PCB assembly from the front case
assembly:
1. Use a Phillips-head screwdriver to remove the screw holding the main
PCB assembly in place in the front cover assembly.
For reassembly, note the two guides in the cover and the corresponding
two notches in the PCB.
Battery
cable
68 Chapter 6 - Disassembly Guide
Page 81

Disassembly Procedures (A1)
2. Remove the board by gently pulling to disconnect from LED connector.
Pull straight back to avoid bending the pins.
During reassembly, line up the LED connector when replacing the main
PCB in the front case assembly, press gently into position, and feed the
ribbon cable through the hole for the wheel.
3. Disconnect the backlight, keypad, speaker connector, and wheel ribbon
connector.
During reassembly, tuck the speaker cable out of the way.
There are now three separate items:
• Front case assembly
• Rear case assembly
• Main PCB assembly
Main PCB
assembly
Rear case
assembly
Front case
assembly
Chapter 6 - Disassembly Guide 69
Page 82

Disassembly Procedures (A1)
Procedure to remove the display:
Caution Perform this step in a dust-free environment to avoid
damage to the LCD display.
1. Use a Phillips-head screwdriver to unfasten the four corner screws. These
screws also hold the LCD assembly in place.
2. Remove the display shield.
Backlight
connector
Speaker
connector
Keypad cable
and connector
Wheel
encoder
assembly
3. Remove the LCD assembly, providing access to the display window.
4. Remove the display window by carefully prying up one corner and then
peeling back.
PCB
LCD
assembly
70 Chapter 6 - Disassembly Guide
Page 83

Disassembly Procedures (A1)
Procedure to remove the speaker:
1. Remove the retaining spring clip.
2. Remove the speaker.
3. Orient the speaker wires towards the handle (as shown in the
photograph).
Handle
Spare
speaker,
leads
attached
Procedure to remove the wheel and encoder:
1. From the front, remove the wheel by grasping the sides of the wheel
firmly and pulling straight back from the monitor. (The wheel is friction
fit on the stem of the encoder assembly).
If the wheel is not easily removable by hand, a small flat-headed
screwdriver can be used to gently pry off the wheel. If necessary, apply
some adhesive tape to the front cover and the head of the screwdriver to
prevent any damage.
2. Use a 9/16” hex socket to unscrew the fastening nut on the outside of the
front case. The encoder can now be pulled away from the front case.
During reassembly, orient the ribbon connector so that the cable lies
parallel to the bottom of the board and pin 1 is oriented close to the
handle.
Nut
Spare
wheel
Chapter 6 - Disassembly Guide 71
Encoder
assembly
Page 84

Disassembly Procedures (A1)
Procedure to remove the keypad:
The keypad is attached with an adhesive to the front panel.
1. From the front side of the panel, carefully pry up one corner of the
keypad from the cover, and then peel it away from the cover.
2. Carefully thread the cable out through the slot in the cover.
Spare wheel
Keypad, integral
cable and
connector
72 Chapter 6 - Disassembly Guide
Page 85

Rear Case Disassembly Procedures
This section describes the items that can be removed or replaced on the rear
case assembly of the A1 monitor. First separate the front and rear assemblies
as described in the section “Separation of Front and Rear Case Assemblies”
on page 78.
Procedure to remove a rear connector PCB:
1. Use a Phillips-head screwdriver to remove the two screws holding the
rear connector PCB to the rear cover.
2. From outside the rear cover, use a 3/16 socket driver to remove the two
standoff fasteners of the RS-232 connector.
3. From inside the rear cover, remove the rear connector PCB assembly.
NiBP pump,
tubing and lead
attached
Disassembly Procedures (A1)
Rear connector
board assembly
Procedure to remove NIBP pump:
1. Use a Phillips-head screwdriver to unfasten the screw holding the clamp
to the rear cover.
2. Disconnect the power lead from the rear connector PCB.
3. Remove the clamp and the pump.
NiBP pump
Pump power
lead
Chapter 6 - Disassembly Guide 73
Page 86

Disassembly Procedures (A1)
Procedure to remove handle and foot cushions:
Each end of the handle is friction-fit onto a cross-shaped boss.
1. Use flat-bladed screwdriver to carefully pry one end of the handle.
2. When the end of the handle has begun to loosen from the boss, use the
same technique to begin to pry up the other end.
3. Alternately apply this prying action between each end of the handle until
the handle is free of the rear case.
4. The foot cushions are attached with an adhesive to the bottom surface of
the rear cover, and can be removed by lifting one end of the foot and
peeling off.
74 Chapter 6 - Disassembly Guide
Page 87

Main PCB Disassembly Procedures
This section describes the items that can be removed or replaced from the
main PCB assembly of the A1 monitor. The main PCB assembly is separable
from the front case assembly.
First separate the front and rear assemblies as described in the section
“Separation of Front and Rear Case Assemblies” on page 66.
Then perform “Procedure to remove the main PCB assembly from the front
case assembly”, page 68.
Procedure to remove NiBP pneumatic assembly from the main
PCB assembly:
1. Pull the tubing from the barbed fitting on the rear of the NiBP panel
connector.
2. Pull the tubing from the fittings on the the pressure sensors and valve.
Disassembly Procedures (A1)
NiBP
pneumatic
assembly
group
Pressure
sensor
Procedure to separate the patient connector PCB assembly from
the main PCB assembly:
1. Use needle-nose pliers or a Tinnerman tool to remove the two Tinnerman
fasteners securing the patient connector PCB assembly to the underside
of the main PCB.
2. Disconnect the patient connector PCB assembly by pulling it straight up
from the main PCB.
3. The battery fuse F301, located near the battery cable connector on the
main PCB can be replaced if necessary. (The battery fuse is located
between the two round yellow poly fuses).
Chapter 6 - Disassembly Guide 75
Page 88

Disassembly Procedures (A1)
Patient connector PCB assembly
Main PCB
assembly
Foot of moulded connector panel after removal of Tinnerman nut
Procedure to separate the patient connector PCB from the
connector panel:
1. Use a Phillips-head screwdriver to remove four screws fastening the two
assemblies together.
Two of the screws are accessible on the face of the connector PCB, two
are accessible through access holes in the PCB.
2. Separate the two assemblies.
Connector
panel
Patient
connector
PCB
76 Chapter 6 - Disassembly Guide
Page 89

Disassembly Procedures (A3)
Closed Case Disassembly Procedures
This section describes the items that can be removed without disassembling
the main case of the A3 monitor.
Procedure to remove front panel wheel:
The wheel is friction-fit on the encoder shaft.
1. Grasp the sides of wheel firmly and pull straight back from the monitor.
The wheel should slip off the encoder shaft.
2. If wheel does not move, separate front and rear cases as described in
“Separation of Front and Rear Case Assemblies” on page 78. There is a
hole in the front cover behind the wheel. Insert a small screwdriver blade
in the hole and push firmly against the back of the wheel.
Disassembly Procedures (A3)
Procedure to remove carrying handle:
1. Use screwdriver to remove the two fastening screws and washers. Retain
them for reassembly.
2. Remove the handle by sliding it straight back towards the rear of the
monitor.
Chapter 6 - Disassembly Guide 77
Page 90

Disassembly Procedures (A3)
Procedure to remove recorder:
1. Press the
Paper Eject button on the right side of the recorder. The door
drops forward.
2. Remove the paper roll, if installed. Two fastening screws are visible on
the back panel of the recorder.
3. Use a screwdriver to back out the captive fastening screws.
4. Pull the recorder straight out of the side of the monitor, disengaging the
connector at the rear of the module from the recorder PCB in the
assembly.
Note that removal of the recorder PCB can be accomplished only after
the front and rear cases are separated.
Separation of Front and Rear Case Assemblies
Procedure to separate front and rear case assemblies:
1. Remove handle as indicated in procedure on page 77.
2. Use screwdriver to remove four screws fastening Rear Case Assembly to
Front Case Assembly to Front Case Assembly. Retain for reassembly.
Note that the gasket must be inserted around the top of the rear case
before reassembly.
3. Separate the two major case assemblies. There is enough cable and
tubing slack to permit the two assemblies to remain at an angle of
approximately 90 degrees to each other.
During reassembly, preload the NBP Luer connector by twisting the
silicone NBP tubing in opposite directions prior to making the Luer
connection. This prevents disconnection.
78 Chapter 6 - Disassembly Guide
Page 91

Disassembly Procedures (A3)
Main ribbon
cable assembly
NiBP tubing
Connector to recorder PCB
(when installed)
4. Disconnect the large ribbon-cable connector from the main PCB.
5. Unscrew the NiBP tubing connector from the pump to the main PCB.
The front and rear case assemblies are now completely separate from one
another.
SpO2 module
Chapter 6 - Disassembly Guide 79
Page 92

Disassembly Procedures (A3)
Front Case Disassembly Procedures
Procedure to remove SpO2 module, ECG/Temp connector
assembly, and encoder assembly:
• SpO
module: remove the three screws located at the corners of the
2
SpO
module and lift off the ground wire and the foil shield. Then pull
2
the SpO
module straight up to disengage it from main PCB.
2
Note Important for reassembly: the insulator goes on the non-foil
screw hole. The washers, star-washers, and foil screw holes
should be assembled together.
• ECG/Temp cable/connector assembly: unplug the connector from the
main PCB. Remove the screws fastening the ECG connector to the front
case, rotate the temperature connector counter-clockwise to unscrew it
from the fastening nut on outside of the front case.
Disconnect the white cable and move the SpO
cable before attempting to disconnect the temperature connector.
• The encoder assembly: unplug the connector from the main PCB.
Remove the wheel, as described in step 1A. Use a 9/16” hex socket to
unscrew the fastening nut on the outside of the front case. The encoder
can then be pulled away from the front case.
During reassembly, the ribbon cable should orient towards the PCB, and
after connection, the excess should be fed under the PCB.
front connector ground
2
Procedure to remove the main PCB:
1. Disconnect the connectors from the main PCB for:
• Switch panel
•SpO
2
•ECG/Temp
• Encoder
• LCD (display). Do not cut the tie wrap over the connector, slide it
out of the way to remove the connector.
•Backlight
80 Chapter 6 - Disassembly Guide
Page 93

Encoder
Switch panel
connector
Disassembly Procedures (A3)
NiBP tubing
connector
SpO
cable
2
2. Use a screwdriver to remove the six fastening screws around the
periphery of the main PCB. Retain the fastening screws for reassembly.
3. Lift the main PCB slightly and unscrew the tubing connector near the
NiBP front panel fitting.
4. The main PCB can now be removed. This allows access to the SpO
2
front panel connector, NiBP fitting and backlight inverter. These can be
removed by removing the appropriate screws or nuts.
During reassembly, the backlight inverter cable should be wrapped over
the screw post. (See the upper left hand corner of the picture).
Backlight
inverter
cable
Backlight inverter Display backplate
Chapter 6 - Disassembly Guide 81
Page 94

Disassembly Procedures (A3)
Procedure to remove the switch panel:
1. The switch panel is attached with an adhesive to the front panel.
2. Carefully lift up one corner of the switch panel and peel it away from the
front panel. When the switch panel is free, feed the connector through the
slot in the front panel.
Procedure to remove the LCD:
1. Remove the six fastening screws around the periphery of the display
backplate. Retain the fastening screws for reassembly.
2. Carefully remove the metal and foil grounding tabs and washer noting
their location and orientation for reassembly. The display backplate can
now be removed.
3. Disconnect the backlight connector from the backlight inverter. The LCD
can now be lifted out of the front bezel assembly.
For reassembly, place the LCD into the backplate before seating down on
the screws. Confirm that the foil ground tab and unused white wire cable
is placed out of the way and over the taller standoff.
Foil ground tab
82 Chapter 6 - Disassembly Guide
Page 95

Rear Case Disassembly Procedures
Procedure to remove the battery:
1. Use a screwdriver to remove the three screws holding the battery cover
plate in place.
Disassembly Procedures (A3)
2. Grasp the strap, accessible through the opening in the top foam cover,
and gently pull the battery from its housing.
3. Remove the wire connectors from the battery clips. Remember that the
red wire is connected to the plus (+) side of the battery pack.
The + indicator is located under the foam piece.
Chapter 6 - Disassembly Guide 83
Page 96

Disassembly Procedures (A3)
Procedure to remove the recorder and the battery housing:
1. Remove the battery as described in the procedure on page 83. Carefully
remove the two foam battery pads from the battery housing.
2. If a recorder is installed, remove it as described in the procedure on
page 78.
3. If a recorder is not installed, remove the recorder blanking cover by
slipping a small flat-blade screwdriver into one of the slots on the
blanking cover. Use a screwdriver to gently depress the snap-tab on the
inside of the cover, while pulling the cover away from the monitor. After
the first tab is released, repeat the process on the other side of the cover
and remove cover.
Recorder housing
4. On the rear panel of the monitor, remove the three screws fastening the
battery housing.
84 Chapter 6 - Disassembly Guide
Page 97

Disassembly Procedures (A3)
5. Carefully slide the battery housing from the rear case assembly.
Screws fastening battery housing
6. Disconnect the speaker twisted-pair-connector from the power supply
PCB. The speaker is mounted on one side of the battery housing.
7. If a recorder is installed, disconnect the ribbon cable from the recorder
PCB. The recorder PCB can be removed by removing the four screws
fastening the PCB to the battery housing.
Chapter 6 - Disassembly Guide 85
Page 98

Disassembly Procedures (A3)
Procedure to remove fuses:
1. Remove the AC power input fuses, as shown, using the fuse pullers.
Fuse F1
Fuse F2
Procedure to remove the power supply assembly:
1. On the rear panel of the monitor, remove the eight screws holding the
power supply assembly.
Screws fastening the power supply assembly
2. Carefully lift the power supply assembly from the rear case.
3. The power supply assembly can be disassembled into the following
elements:
• Power supply PCB
• NiBP pump
• Heat sink/chassis
• Main ribbon cable
86 Chapter 6 - Disassembly Guide
Page 99

Main PCB
Disassembly Procedures (A3)
NiBP pump
assembly
Main ribbon
cable
Chapter 6 - Disassembly Guide 87
Page 100

Disassembly Procedures (A3)
88 Chapter 6 - Disassembly Guide
 Loading...