


Register your product and get support at
www.philips.com/welcome POCKET MEMO
LFH9380/27
EN User manual 3
DE Benutzerhandbuch 29
FR Manuel de l‘utilisateur 55
ES Manual del usuario 81
IT Manuale di istruzioni 107
NL Gebruikershandleiding 133


User manual
1 Important 2
2 Your Pocket Memo 3
2.1 Product highlights 3
2.2 What’s in the box 3
2.3 Overview 4
2.3.1 Controls and connections 4
2.3.2 Display indicators and symbols 5
3 Get started 6
3.1 Install the batteries 6
3.2 Use rechargeable batteries 6
3.3 Insert and eject the memory card 7
3.4 Format a new memory card 7
3.5 Activate the Pocket Memo 8
3.5.1 Set the language 8
3.5.2 Set the date and time 8
3.6 Power-save mode 9
4 Use your Pocket Memo 10
4.1 Recording 10
4.1.1 Create a recording 10
4.1.2 Add to a recording (insert/overwrite) 11
4.1.3 Finish (lock) a recording 12
4.1.4 Change the recording format 13
4.1.5 Adjust the microphone sensitivity 14
4.2 Playback 15
4.2.1 Overview of playback functions 16
4.3 Delete 16
4.3.1 Delete a file 16
4.3.2 Delete part of a recording 17
4.3.3 Delete all dictations 18
5 Use more of your Pocket Memo 19
ENGLISH
5.1 Use Philips SpeechExec software 19
5.1.1 Advanced configuration 19
5.1.2 Download recordings to the PC 19
5.2 Menu settings 20
5.2.1 Menu list 20
5.3 Use voice-activated recording 21
5.4 Work with index marks 22
5.4.1 Insert an index mark 22
5.4.2 Delete an index mark 23
5.4.3 Delete all index marks 23
5.5 Assign an author’s name 24
6 Technical data 25
3User manual

1 Important
Philips reserves the right to change products at
any time without being obliged to adjust earlier
supplies accordingly.
The material in this manual is believed
adequate for the intended use of the system.
If the product, or its individual modules or
procedures, are used for purposes other than
those specified herein, confirmation of their
validity and suitability must be obtained.
Safety
• To avoid a short circuit, do not expose the
product to rain or water.
• Do not expose the device to excessive heat
caused by heating equipment or direct sunlight.
• Protect the cables from being pinched,
particularly at plugs and the point where they
exit from the unit.
• Back up your files. Philips is not responsible
for any loss of data.
Hearing safety
Observe the following guidelines when using
your headphones:
• Listen at reasonable volumes for reasonable
periods of time.
• Be careful not to adjust the volume higher as
your hearing adapts.
• Do not turn up the volume so high that you
can’t hear what’s around you.
• You should use caution or temporarily discontinue use in potentially hazardous situations.
• Do not use headphones while operating a
motorized vehicle, cycling, or skateboarding,
etc. It may create a trac hazard and is illegal
in many areas.
Important (for models supplied with
headphones):
Philips guarantees compliance with the
maximum sound power of its audio players
as determined by relevant regulatory bodies,
but only with the original model of provided
headphones. If these headphones need
replacement, we recommend that you contact
your retailer to order a Philips model identical
to that of the original.
Small children
Your device and its enhancements may contain
small parts. Keep them out of the reach of small
children.
Disposal of your old product
• Your product is designed and manufactured
with high quality materials and components
that can be recycled and re-used.
• When this crossed-out wheeled bin
symbol is attached to a product, it
indicates that the product is covered
by the European Directive 2002/96/EC.
• Become informed about your local separate
collection system for electrical and electronic
products.
• Act according to your local rules and do
not dispose of old products with normal
household waste. The correct disposal of old
products will help prevent potential negative
consequences for the environment and human
health.
• Batteries (including built-in rechargeable
batteries) contain substances that may pollute
the environment. All batteries should be
disposed of at an ocial collection point.
4 User manual

2 Your Pocket Memo
Congratulations on your purchase and welcome
to Philips!
To fully benefit from the service that Philips
oers, visit our Website for support information
such as user manuals, software downloads,
warranty information and more:
www.philips.com/support.
2.1 Product highlights
• The Pocket Memo’s asymmetrical and
ergonomic design delivers unparalleled userfriendly operation. All buttons are within the
sweep-angle of the thumb.
• Two smart buttons let you scroll through
menu options and quickly make selections.
• A large graphical display lets you view all file
information, such as keywords (author name),
length of dictation, position within the file,
and other vital information at a glance. A
backlit display shows all information, even in
poor lighting conditions.
• The .dss file format is the international
standard for professional speech processing.
Oering excellent audio quality for recorded
voice, .dss files allow a high compression
rate, reduced file sizes, network trac and
required storage capacity.
• SpeechExec Dictate is the perfect download
software to manage voice files. The intuitive
user interface makes job retrieval simple and
fast, and the job status information allows the
tracking of all the work in progress.
2.2 What’s in the box
Pocket Memo
Memory card
Pouch
Register your product and get support at
POCKET MEMO
www.philips.com/welcome
EN
Quick start guide
DE
Kurzanleitung
FR
Guide de démarrage rapide
ES
Guía de inicio rápido
IT
Guida rapida di introduzione
NL
Snelle startgids
SV
Snabbstartsguide
LFH9380
with SpeechExec
workflow software
Quick start guide
ENGLISH
CD-ROM containing
software and user
manual
Rechargeable batteries
USB cable
5User manual
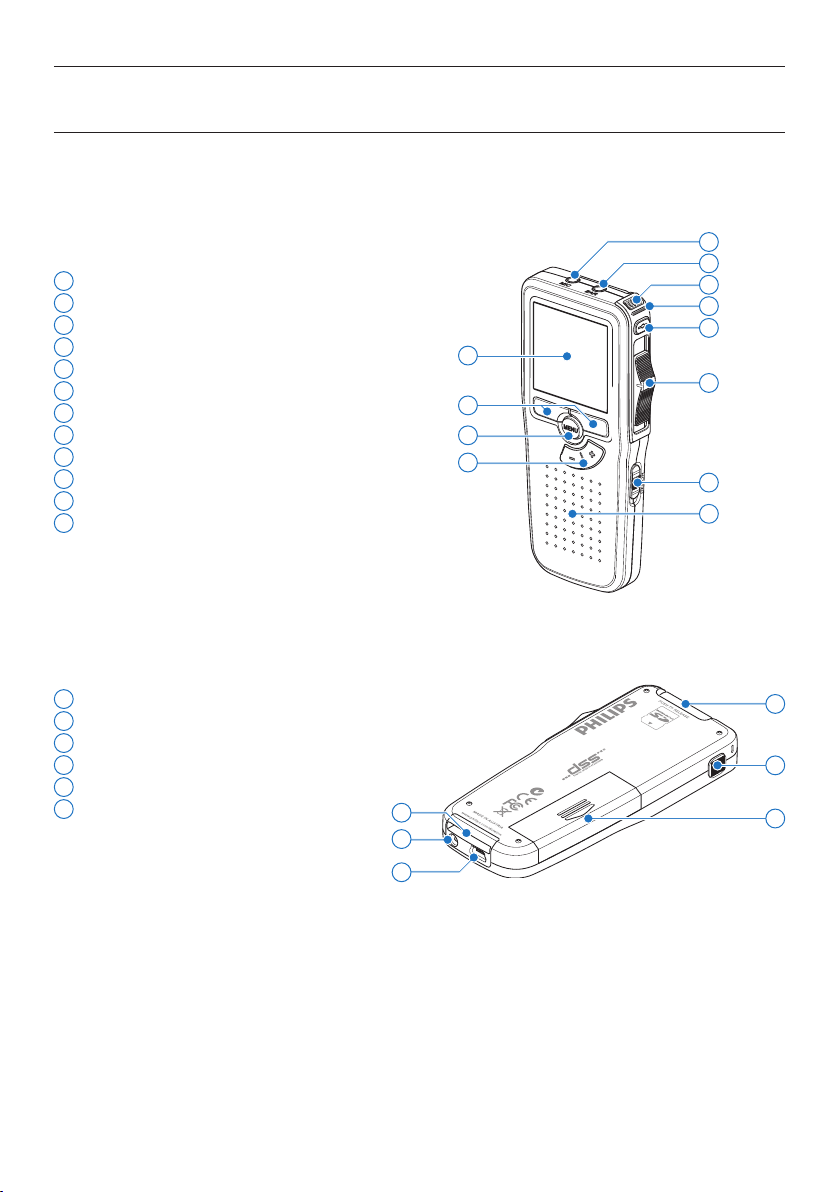
2.3 Overview
2.3.1 Controls and connections
1
Microphone socket
2
Headphone socket
3
Built-in microphone
4
Status LED
5
EOL (end-of-letter) button
6
Slide switch
7
On/o switch
8
Speaker
9
Display
10
Smart buttons
11
Menu button
12
+/–, menu navigation and volume control
1
2
3
4
5
9
6
10
11
12
7
8
13
Memory card slot
14
FWD (forward) button
15
Battery compartment
16
Docking station connection slot
17
Power supply socket
18
USB connection slot
16
17
18
13
14
15
6 User manual

2.3.2 Display indicators and symbols
DPM 9380.DSS
BEGIN NEW
9:23
6 7 8 9 10
ENGLISH
11
5
4
3
2
1
1
Current function of the left smart button
2
File name
3
Recording number
4
Position bar
5
Recording / playback time
6
Battery level indicator
7
Recording format
8
Memory card is write-protected (locked)
9
Insert recording mode is activated
10
Voice-activated recording in progress
12
13
14
15
1718 16
11
Recording level meter
12
Sensitivity level for voice-activated recording
13
Current position in the recording
14
Positions of the slide switch
15
Current function of the right smart button
16
Recording is marked finished (EOL) and
locked
17
Recording is marked priority
18
Recording contains index mark
7User manual
3 Get started
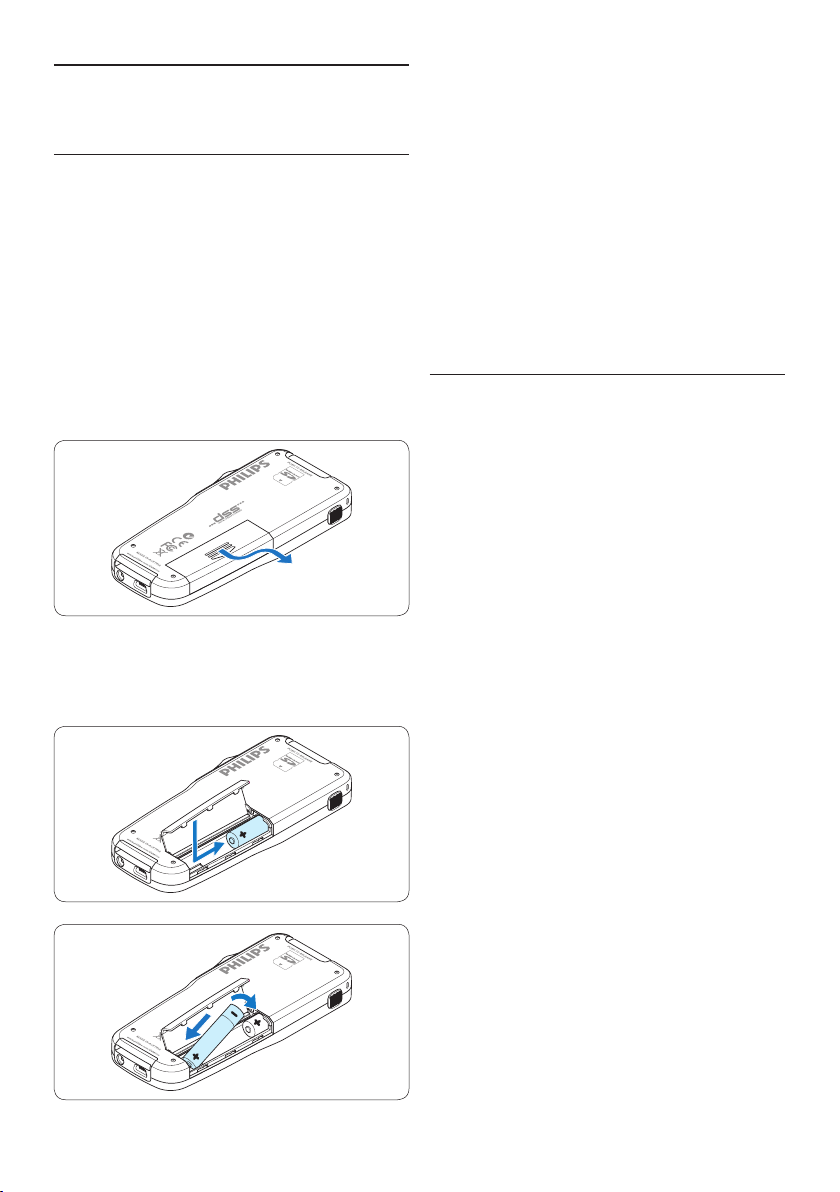
3.1 Install the batteries
The Pocket Memo can be operated with the
two AAA rechargeable batteries LFH9154
delivered with the product. Standard (nonrechargeable) AAA alkaline batteries may also
be used.
1 The on/o switch of the Pocket Memo must
be in the
2 Open the battery compartment on the
back side of the Pocket Memo by sliding it
outwards then folding it up.
3 Insert the two AAA batteries. The correct
polarity is indicated on the inside of the
battery compartment cover.
OFF position.
4 Close the battery compartment by folding it
down and sliding the battery compartment
cover inward until it clicks.
D Note
Do not mix battery types! Use two
rechargeable batteries (Philips LFH9154) or two
non-rechargeable alkaline batteries.
3.2 Charge the batteries
The Pocket Memo can be operated with Philips
rechargeable batteries LFH9154. To recharge
these batteries, use USB cable. Optionally, the
Philips Power Supply 9146 or the USB Docking
Station 9120 may also be used.
When the Pocket Memo is connected to a
PC or notebook computer with the supplied
USB cable, the rechargeable batteries are
automatically recharged. If the USB port on the
computer is high powered, a complete recharge
cycle takes about 2.5 hours.
D Note
The PC must be ON when charging battery via
the USB cable connection. The Pocket Memo
may become warm during fast recharging.
C Important
If the USB port of the computer does not
supply enough power capacity (500 mA), disable
the USB quick charge function in the menu of
the Pocket Memo and recharge.
8 User manual

3.3 Insert and eject the memory card
The Pocket Memo operates with a SD
(SecureDigital) memory card and supports
SDHC cards with storage capacities of up to 32
GB.
To insert a memory card:
1 Locate the memory card slot on the top
back side of the Pocket Memo.
2 Slide the memory card into the slot. A small
illustration under the memory card slot
indicates the correct orientation.
3 Push the memory card in until it clicks.
3.4 Format a new memory card
When a new, unformatted memory card (or a
memory card that was formatted with a nonPocket Memo device) is inserted, the Pocket
Memo will display a prompt to format the
memory card.
1 To confirm and start the formatting process,
press the
OK smart button.
Delete all:
Yes - format
!! ATTENTION !!
OK CANCEL
2 To cancel the formatting process, remove
the memory card or press the
CANCEL
smart button.
ENGLISH
To eject the memory card:
1 Locate the memory card slot on the top
back side of the Pocket Memo.
2 Press the memory card into the Pocket
Memo until it clicks.
3 Release the memory card. It will slightly
emerge from the memory card slot. Simply
slide it out.
D Note
If the Pocket Memo is turned to the
ON
position and there is no memory card inserted,
a warning screen is displayed.
Delete all:
Yes - format
!! ATTENTION !!
OK CANCEL
D Note
Formatting is not possible if the memory card is
in read-only mode (locked).
9User manual

3.5 Activate the Pocket Memo
The Pocket Memo is turned on and o by sliding
the
ON/OFF switch. When using it for the first
time, you will be prompted to set the language,
date and time.
3.5.1 Set the language
When using the Pocket Memo for the first
time, you will be prompted to set the language.
1 Press the + or – button on the Pocket
Memo to select a language.
D Note
It is possible to change the language later using
the menu. See 5.2 Menu settings on page 22
for more information.
3.5.2 Set the date and time
When using the Pocket Memo for the first time,
you will be prompted to set the current date
and time.
1 Press the + or – button to change the value
for the year, month or day.
DATE:
2009-11-01
12/24: TIME:
24 14:22
OK
LANGUAGE
LANGUE
SPRACHE
IDIOMA
INT
FR
DE
ES
2 Press the → smart button to advance the
arrow (↑) to the next entry. After setting
the day, press the → smart button to
advance the settings to the correct time.
EXIT OK
- / +
DATE:
2009-11-01
12/24: TIME:
24 14:22
2 Press the OK smart button to confirm the
OK
selection. The selected language will be
displayed.
LANGUAGE
LANGUE
SPRACHE
IDIOMA
INT
FR
DE
ES
3 Press the + or – button to select a 2-hour
or 24-hour clock, AM or PM (if a 2-hour
clock is selected), and to change the value of
EXIT OK
- / +
the hour and minute settings.
10 User manual

DATE:
2009-11-01
12/24: TIME:
24 14:22
OK
4 Press the → smart button to confirm the
date and time.
The Pocket Memo is now ready to function.
DATE:
2009-11-01
12/24: TIME:
24 14:22
OK
D Note
If a mistake is made in setting the date/time,
use the ← smart button any time during the
procedure to step back to make corrections. It
is also possible to change the date and time later
using the menu. See 5.2 Menu settings on page
22 for more information.
3.6 Power-save mode
After sixty minutes of inactivity, the Pocket
Memo automatically goes into power-save mode
and the LCD screen will display the date and
time. Press any button to reactivate it.
If the Pocket Memo is not used for more than
two hours, it turns o completely. Turn the unit
on by moving the On/O switch to the OFF
position and then back to the ON position.
ENGLISH
DATE:
2009-11-01
12/24: TIME:
24 14:22
OK
11User manual

DPM 9380.DSS
0:00
#2
DPM 9380.DSS
0:39
#2
4 Use your Pocket Memo
4.1 Recording
4.1.1 Create a recording
Follow these steps to create a recording with
the Pocket Memo:
1 A memory card must be inserted into the
memory card slot. See 3.3 Insert and eject
the memory card on page 9 for more
information.
2 Slide the On/O switch to the
to switch on the Pocket Memo.
3 Press the NEW smart button to create a
new recording.
D Note
The
NEW smart button is not displayed if
the current recording is empty.
ON position
• The status LED glows in red (in overwrite
mode) or green (in insert mode) while recording.
• The following information is displayed:
a
Recording format
b
Recording time
c
Current position in the recording
d
File number
e
File name
a
b
c
d
e
0:34
#2
DPM 9380.DSS
5 To stop recording, move the slide switch to
the
STOP position.
0:00
#1
DPM 9380.DSS
NEW
4 To start recording, move the slide switch to
the
REC position and start speaking.
D Note
For best results, speak clearly and keep the
microphone about four inches (ten centimeters)
away from your mouth.
12 User manual

4.1.2 Add to a recording (insert/
Delete dictation
Index set
Insert mode
Author
Overwrite
overwrite)
Files are recorded in overwrite mode by default.
Follow these steps to switch to insert mode to
make additions to a recording:
Insert mode:
Overwrite
Insert
Insert mode:
Overwrite
Insert
OK CANCEL
ENGLISH
1 Press the
MENU button while in the stop
position to open the menu.
0:00
#2
DPM 9380.DSS
NEW
2 Press the + or – button to select the Insert
mode menu and press the
ENTER smart
button to enter the submenu.
Delete dictation
Index set
Insert mode
Overwrite
Author
BACK ENTER
2
1
3 Press the + or – button to choose between
Insert or Overwrite mode.
• In insert mode, the record position of the
slide switch reads
iREC and the status LED
glows in green while recording.
• In overwrite mode, the record position of
the slide switch reads
REC and the status
LED glows in red while recording.
OK CANCEL
4 Press the OK smart button to save the
setting or press the
CANCEL smart button
to exit the sub-menu without changing the
setting.
Insert mode:
Overwrite
Insert
OK CANCEL
5 Press the + or – button to select the file
into which the insertion should be made.
0:00
#2
DPM 9380.DSS
NEW
6 Play, forward or rewind to the position
where the insertion should be made.
7 To insert an additional recording, move the
slide switch to the
REC position and start
speaking. The insertion will not overwrite
the recording.
13User manual

DPM 9380.DSS
0:39
#2
DPM 9380.DSS
0:25
#2
8 To end the inserted recording, move the
DPM 9380.DSS
0:39
#2
slide switch to the
STOP position.
9 If the recording is not finished, simply fast
forward to the end of the file and continue
recording.
⑩ Repeat from step 1 to return to overwrite
recording mode.
4.1.3 Finish (lock) a recording
When a recording is finished and no additional
changes will be made, follow these steps to
mark it as finished and protect it from being
accidentally deleted:
1 Press the + or – button while in the stop
position to select the recording to be
marked finished.
0:00
#2
DPM 9380.DSS
NEW
2 Press the end-of-letter (EOL) button to lock
the file and mark it as finished.
The ┱ symbol is displayed.
3 To assign priority status to the recording,
press the
EOL button again within half a
second.
The
! symbol is displayed, indicating that the file
has priority status.
4 To make changes to the recording, press the
EOL button again to remove the finished
mark.
E Tip
Philips SpeechExec software can be configured
to download only those files from the Pocket
Memo to the PC that are marked finished.
14 User manual

BACK ENTER
Microphone
Voice activation
Record format
Backlight
SP <DSS>
Microphone
Voice activation
Record format
Backlight
SP <DSS>
C Caution
BACK ENTER
Index set
Insert mode
Author
Setup
Language
BACK ENTER
Index set
Insert mode
Author
Setup
Language
Locked files are deleted when the memory card
is formatted or the delete-all-dictations function
is used.
4.1.4 Change the recording format
The recording format determines the audio
quality of recordings and aects the number of
audio files that can fit on the memory card. The
Pocket Memo supports the following recording
formats:
• Standard Play (SP) requires 1 megabyte for 10
minutes of recording.
• Quality Play (QP) requires 1 megabyte for 5
minutes of recording.
1 Press the
MENU button while in the stop
position to open the menu.
0:00
#2
DPM 9380.DSS
NEW
2 Press the + or – button to select the Setup
menu item and press the
ENTER smart
button.
3 Press the + or – button to select the Record
format menu item and press the
ENTER
smart button.
2
1
4 Press the + or – button to choose between
SP and QP.
Record format:
SP <DSS>
QP <DS2>
OK CANCEL
Record format:
SP <DSS>
QP <DS2>
OK CANCEL
5 Press the OK smart button to save the
setting or press the
CANCEL smart button
to exit the sub-menu without changing the
setting.
Record format:
SP <DSS>
QP <DS2>
ENGLISH
OK CANCEL
2
1
15User manual

4.1.5 Adjust the microphone sensitivity
BACK ENTER
Index set
Insert mode
Author
Setup
Language
BACK ENTER
Index set
Insert mode
Author
Setup
Language
BACK ENTER
Record lamp
Contrast
Device beep
Microphone
Dictate
Record lamp
Contrast
Device beep
Microphone
Dictate
Set the microphone sensitivity for the
environment and your recording preferences.
4 Press the + or – button to choose the
microphone sensitivity: Private (low), Dictate
(medium) and Conference (high).
1 Press the
MENU button while in the stop
position to open the menu.
0:00
#2
DPM 9380.DSS
NEW
2 Press the + or – button to select the Setup
menu item and press the
ENTER smart
button.
2
1
3 Press the + or – button to select the
Microphone menu item and press the
ENTER
smart button.
Microphone:
Dictate
Private
Microphone:
Dictate
Private
Conference
OK CANCEL
Conference
OK CANCEL
5 Press the OK smart button to save the setting
or press the
CANCEL smart button to exit
the sub-menu without changing the setting.
Microphone:
Dictate
Private
Conference
OK CANCEL
2
1
16 User manual

DPM 9380.DSS
0:00
#2
4.2 Playback
DPM 9380.DSS
0:00
#2
1 Press the + or – button while in the stop
position to select the file to play and locate
the beginning of the recording.
0:00
#2
DPM 9380.DSS
NEW
2 Move the slide switch to the PLAY position
to start playback.
3 Press the + or – button to adjust the
playback volume during playback.
MIN MAX
– +
4 Press the SPEED smart button to adjust
faster or slower file playback.
0:34
#2
DPM 9380.DSS
SPEED
5 Move the slide switch to the STOP position
to stop playback.
ENGLISH
The following information is displayed:
a
Recording format
b
Playback position (minutes : seconds)
c
Current position in the recording
d
File number
e
File name
a
b
c
d
e
0:34
#2
DPM 9380.DSS
SPEED
17User manual

Delete dictation
Index set
Delete?
4.2.1 Overview of playback functions
4.3 Delete
File
selection
Fast
rewind
Fast
forward
Playback
speed
Press the + button once while in the
stop position to skip to the end of a
file. Press the
+ button again to skip
to the beginning of the next file.
Press the
– button once while in the
stop position to skip to the beginning
of a file. Press the
– button again to
skip to the end of the previous file.
Move the slide switch to the ┤
position. Move the slide switch to the
STOP position to stop rewinding or
the
PLAY position to stop rewinding
and begin playback.
Press and hold the
FWD button while
in the stop or play position. Release
the
FWD button to stop forwarding.
Press the
SPEED smart button during
playback to adjust faster or slower file
playback.
D Note
Before deleting a file, make sure that it is not
marked finished and that the memory card is not
set to read-only (locked). If the file is marked finished, unlock it by pressing the
EOL button once.
4.3.1 Delete a file
Follow these steps to delete a file entirely:
1 Press the + or – button while in the stop
position to select the file to be deleted.
0:00
#2
DPM 9380.DSS
NEW
2 Press the MENU button to open the menu.
The Delete dictation
menu item is selected.
0:00
#2
DPM 9380.DSS
NEW
3 Press the ENTER smart button to enter the
sub menu.
Delete dictation
Delete?
Index set
Insert mode
Author
BACK ENTER
18 User manual

4 Press the OK smart button to delete the
BACK ENTER
Insert mode
Author
Setup
Delete section
BACK ENTER
Insert mode
Author
Setup
Delete section
DPM 9380.DSS
CANCEL MARK 2
0:36
#2
0:36
#2
DPM 9380.DSS
CANCEL DELETE
0:36
#2
0:36
#2
file permanently. Press the
CANCEL smart
button to cancel the operation and leave the
recording intact.
3 Using the play, forward or rewind functions,
navigate to the beginning of the section to
be deleted. Press the
MARK smart button.
A cross symbol appears on the screen.
ENGLISH
Delete dictation:
Delete ?
!! ATTENTION !!
OK CANCEL
4.3.2 Delete part of a recording
Follow these steps to delete a section from a
recording:
1 Press the
MENU button while in the stop
position to open the menu.
0:00
#2
DPM 9380.DSS
NEW
2 Press the + or – button to select the Delete
section menu item and press the
OK smart
button.
0:25
#2
DPM 9380.DSS
CANCEL MARK 1
4 Navigate to the second mark position using
playback, forward or rewind. Press the
MARK2 smart button.
The second cross appears.
5 Press the DELETE smart button and the OK
smart button to confirm the deletion of the
marked section, or press the
CANCEL smart
button to exit without deleting.
2
1
19User manual

4.3.3 Delete all dictations
BACK ENTER
Index set
Insert mode
Author
Setup
Language
BACK ENTER
Index set
Insert mode
Author
Setup
Language
BACK ENTER
Device beep
Microphone
Date & time
Delete dictations
Delete all ?
BACK ENTER
Device beep
Microphone
Date & time
Delete dictations
Delete all ?
C Caution
Files marked finished (EOL) are deleted when
the delete-all-dictations function is used.
4 Press the ENTER smart button and the OK
smart button to confirm the deletion, or
press the
CANCEL smart button to exit
without deleting.
Follow these steps to delete all recordings:
1 Press the
MENU button while in the stop
position to open the menu.
0:00
#2
DPM 9380.DSS
NEW
2 Press the + or – button to select the Setup
menu item and press the
ENTER smart
button.
2
1
3 Press the + or – button to select the Delete
dictations menu item and press the
ENTER
smart button.
Delete all:
Yes - delete
!! ATTENTION !!
OK CANCEL
20 User manual
2
1

5 Use more of your Pocket
Memo
5.1 Use Philips SpeechExec software
Philips SpeechExec software can be used for
advanced configuration of the Pocket Memo and
automatic download, conversion and routing of
dictation files.
D Note
For detailed information about SpeechExec
software, refer to the SpeechExec user manual.
5.1.1 Advanced configuration
The Pocket Memo Configuration Wizard is part
of the Philips SpeechExec Dictate software and
guides users through the device configurations
and settings of their Pocket Memo. The wizard
assists users in configuring the time format,
sound feedback, voice-activated recording,
display appearance (standard or advanced display
mode), the recording format, microphone
sensitivity, author names, and file download to
the PC.
1 Connect the Pocket Memo to the PC using
a USB cable.
2 Start Philips SpeechExec Dictate software.
3 Click
4 Click the
Settings > General Settings on the menu
bar of SpeechExec to open the settings
menu and select
Wizard from the list on the left side.
DPM/DT Configuration > DPM
Start Wizard... button to open the
wizard. Follow the on-screen instructions to
customize the Pocket Memo.
5 Click the
and confirm the transfer of the new settings
to the Pocket Memo.
D Note
When the Pocket Memo is connected to the
PC for the first time, Windows detects the new
hardware and automatically installs the required
drivers. When the installation is complete,
Windows may prompt you to restart the PC.
5.1.2 Download recordings to the PC
With USB mass storage support, the Pocket
Memo is automatically displayed as an external
drive when it is connected to the computer. It
can then be accessed easily with any Microsoft
Windows program as a regular drive.
Use Philips SpeechExec software for automatic
download, conversion and routing of files.
1 Make a recording with the Pocket Memo.
2 Start Philips SpeechExec Dictate software.
3 Connect the Pocket Memo to the PC using
the USB cable or the optional USB docking
station.
4 By default, the recordings on the Pocket
Memo will be downloaded automatically to
the PC and moved to the Finished dictations
folder of the worklist.
D Note
How and which files are downloaded after a
Pocket Memo is connected can be configured
in the settings menu of SpeechExec or with the
Configuration Wizard.
Finish button to close the wizard
ENGLISH
21User manual

5.2 Menu settings
To access the Pocket Memo menu:
4 Press the BACK smart button to exit the
menu.
1 Press the
MENU button while stopped to
open the Pocket Memo menu.
0:00
#2
DPM 9380.DSS
NEW
2 Press the + or – button to select the next/
previous menu item.
Delete dictation
Index set
Insert mode
Author
BACK ENTER
3 Press the ENTER smart button or the MENU
button to enter a submenu.
Delete dictation
Index set
Insert mode
Author
BACK ENTER
Delete dictation
Index set
Insert mode
Author
BACK ENTER
5 Press the + or – button to select a function.
6 Press the
selection or the
OK smart button to confirm a
CANCEL smart button to
exit a sub-menu without changing a setting.
5.2.1 Menu list
Press the MENU button
DELETE DICTATION (see page 18)
INDEX SET/CLEAR (see page 24)
INSERT / OVERWRITE MODE (see page 13)
AUTHOR (KEYWORD) (see page 26)
DELETE ALL INDICES (see page 25)
DELETE SECTION (see page 19)
LANGUAGE (see page 10)
RECORD FORMAT (see page 15)
VOICE ACTIVATION (see page 23)
BACKLIGHT (OFF / 8 Sec. / 20 Sec.)
RECORD LAMP ON/OFF
DEVICE BEEP ON/OFF
MICROPHONE SENSITIVITY (see page 16)
DATE & TIME (see page 10)
USB QUICK CHARGE ON /OFF
DELETE ALL DICTATIONS (see page 20)
FORMAT MEMORY (see page 9)
DEVICE FONT (MODERN/CLASSIC)
SETUP
LCD CONTRAST
PLAYBACK VOLUME
MAIN MENUSETUP MENU
22 User manual

BACK ENTER
Language
Record format
Voice activation
Backlight
Off
Language
Record format
Voice activation
Backlight
Off
D Note
BACK ENTER
Index set
Insert mode
Author
Setup
Language
BACK ENTER
Index set
Insert mode
Author
Setup
Language
• Some settings, such as defining author names
or switching to the simple display mode,
are available only through Philips SpeechExec
Dictate. See 5.1.1 Advanced configuration on
page 21 for more information.
• Press and hold the
MENU button for a few
seconds to access additional information
about files, the device, and the memory card.
3 Press the + or – button to select the Voice
activation menu item and press the
ENTER
smart button.
2
ENGLISH
5.3 Use voice-activated recording
Voice-activated recording is a convenience
feature for hands-free recording. When voiceactivated recording is enabled, recording will
start when you begin speaking. When you stop
speaking, the Pocket Memo will automatically
pause recording after three seconds of silence,
and resume only when you begin speaking again.
1 Press the
MENU button while in the stop
position to open the menu.
0:00
#2
DPM 9380.DSS
NEW
2 Press the + or – button to select the Setup
menu item and press the
ENTER smart
button.
1
4 Press the + or – button to choose O or
On.
Voice activation:
Off
On
OK CANCEL
Voice activation:
Off
On
OK CANCEL
5 Press the OK smart button to save the
setting or press the
CANCEL smart button
to exit the sub-menu without changing the
setting.
Voice activation:
Off
On
OK CANCEL
6 To start recording, move the slide switch to
the
2
1
REC position and start speaking.
The status LED glows in red (in overwrite mode)
or green (in insert mode) while recording. When
the sound level drops below the threshold sound
level, recording pauses after three seconds and
the status LED flashes.
23User manual

BACK ENTER
Delete dictation
Index set
Insert mode
Author
Delete dictation
Index set
Insert mode
DPM 9380.DSS
0:00
#2
7 Press the + or – button to adjust the
DPM 9380.DSS
0:39
#2
DPM 9380.DSS
0:39
#2
threshold sound level while recording.
8 To stop recording, move the slide switch to
the
STOP position.
5.4 Work with index marks
Index marks can be used to mark certain points
in a recording as points of reference. A point
of reference may be the beginning of a major
section, or a part of the recording that you may
want to revise later or access quickly.
5.4.1 Insert an index mark
1 Play back, fast forward or fast rewind to the
position where the index mark should be
set.
2 Press the
MENU button while in the stop
position to open the menu.
0:00
#2
DPM 9380.DSS
NEW
3 Press the + or – button to select the Index
set menu and press the
OK smart button.
24 User manual
2
1

BACK ENTER
Insert mode
Author
Setup
Delete indices
Delete all ?
BACK ENTER
Insert mode
Author
Setup
Delete indices
Delete all ?
5.4.2 Delete an index mark
BACK ENTER
Delete dictation
Index clear
Insert mode
Author
Delete dictation
Index clear
Insert mode
5.4.3 Delete all index marks
1 Play back, fast forward or fast rewind to the
index mark to be deleted.
2 Press the
MENU button while in the stop
position to open the menu.
0:00
#2
DPM 9380.DSS
NEW
3 Press the + or – button to select the Index
clear menu and press the
OK smart button.
2
1
1 Press the
MENU button while in the stop
position to open the menu.
0:00
#2
DPM 9380.DSS
NEW
2 Press the + or – button to select the Delete
indices menu item and press the
ENTER
smart button.
2
1
3 Press the ENTER smart button and the OK
smart button to confirm the deletion, or
press the
CANCEL smart button to exit
without deleting.
ENGLISH
Delete all:
Yes - delete
!! ATTENTION !!
OK CANCEL
D Note
The Delete Indices menu item is available only if
the current file has at least one index mark.
25User manual

5.5 Assign an author’s name
Insert mode
Author
Setup
DPM 9380
A keyword, such as the author’s name can be
assigned to every recording. The keyword can
be used to identify recordings and automatic file
routing in Philips SpeechExec software.
D Note
Author names must first be set up with Philips
SpeechExec software. See 5.1.1 Advanced
configuration on page 21 for more information.
By default, the keyword category AUTHOR
with the keywords ‘DPM 9380’ and ‘- - -’ (empty
= default) is available on the Pocket Memo.
3 Press the ENTER smart button to display the
list of names.
Insert mode
Author
DPM 9380
Setup
Delete indices
BACK ENTER
4 Press the + or − button to select a name.
To assign an author’s name to a recording:
1 Press the
MENU button while in the stop
position to open the menu.
0:00
#2
DPM 9380.DSS
NEW
2 Press the + or – button to select the Author
menu item.
Insert mode
Author
DPM 9380
Setup
Delete indices
BACK ENTER
Author:
DPM 9380
Peter
Author:
DPM 9380
Peter
- - -
OK CANCEL
- - -
OK CANCEL
5 Press the OK smart button to confirm or
the
CANCEL smart button to exit without
assigning a name.
Author:
DPM 9380
Peter
- - -
OK CANCEL
26 User manual

6 Technical data
Connectivity
• Headphones: 3.5 mm
• Microphone: 3.5 mm
• USB: High-speed USB 2.0
• Docking connector
• Memory card slot
Display
• Type: LCD
• Diagonal screen size: 44 mm/1.7 in.
• Backlight: white
Storage media
• Exchangeable memory card
• Memory card types: Secure Digital (SD),
Secure Digital (SDHC)
• Mass storage class compliant
Audio recording
• Recording formats: Digital speech standard
(DSS)
• Built-in microphone: mono
• Recording modes: QP (DSS/mono), SP (DSS/
mono)
• Bit rate: 13.5, 27 kbps
• Recording time (2 GB card): 349 hours (SP),
170 hours (QP)
• Sample rate: 16 kHz (QP), 12 kHz (SP)
Sound
• Speaker type: built-in round dynamic speaker
• Speaker diameter: 30 mm
• Speaker output power: 200 mW
• Frequency response: 300–7,000 Hz (QP),
300–5,700 Hz (SP) Hz
Convenience
• Professional editing functions
• Multiple language support: 4 languages (EN,
FR, DE, ES)
• 2 smart buttons
• Author ID setting
• Control via slide switch
• File lock
ENGLISH
• One-thumb operation
• Priority setting
• Voice-activated recording
• Automatic software updates
Power
• Battery type: AAA/LR03 Alkaline, Philips AAA
Ni-MH LFH9154
• Number of batteries: 2
• Rechargeable: yes, via USB
• Battery lifetime: up to 23 hours in SP
recording mode
• Batteries included
System requirements
• Processor: Pentium III 1GHz, Pentium IV
recommended
• RAM memory: 512 MB (1 GB recommended)
• Hard disk space: 100 MB for SpeechExec,
250MB for Microsoft .NET
• Headphone output or speakers
• Operating system: Windows 7/Vista/XP
• Free USB port
• DVD-ROM drive
• Sound card
Green specifications
• Compliant to 2002/95/EC (RoHS)
• Lead-free soldered product
Accessories
• SpeechExec Dictate software
• USB cable
• Secure Digital memory card
• Pouch
• Quick start guide
• 2 × AAA batteries
Design and finishing
• Color(s): silver/black
• Material: full metal body
27User manual

28 User manual

Benutzerhandbuch
1 Wichtig 30
2 Ihr Pocket Memo 31
2.1 Produkt-Highlights 31
2.2 Packungsinhalt 31
2.3 Übersicht 32
2.3.1 Bedienungselemente und Anschlüsse 32
2.3.2 Displaysymbole 33
3 Erste Schritte 34
3.1 Einsetzen der Batterien 34
3.2 Aufladen der Batterien 34
3.3 Einsetzen und Auswerfen der
Speicherkarte 35
3.4 Formatieren einer neuen
Speicherkarte 35
3.5 Aktivieren des Pocket Memo 36
3.5.1 Einstellen der Sprache 36
3.5.2 Einstellen von Datum und Uhrzeit 36
3.6 Energiesparmodus 37
4 Verwenden des Pocket Memo 38
4.1 Aufnehmen 38
4.1.1 Erstellen einer neuen Aufnahme 38
4.1.2 Ergänzungen in ein Diktat einfügen 39
4.1.3 Abschließen (Sperren) eines Diktats 40
4.1.4 Ändern des Aufnahmeformats 41
4.1.5 Mikrofonempfindlichkeit einstellen 42
4.2 Wiedergabe 43
4.2.1 Überblick Wiedergabefunktionen 44
4.3 Löschen 44
4.3.1 Löschen eines Diktats 44
4.3.2 Löschen eines Abschnittes innerhalb
eines Diktats 45
4.3.3 Alle Diktate löschen 46
5 Weitergehende Funktionen 47
5.1 Philips SpeechExec verwenden 47
5.1.1 Weitergehende Konfiguration 47
5.1.2 Herunterladen von Aufnahmen auf den
PC 47
5.2 Menüeinstellungen 48
5.2.1 Menüübersicht 48
5.3 Sprachaktivierte Aufnahme 49
5.4 Indexmarkierungen verwenden 51
5.4.1 Einfügen einer Indexmarkierung 51
5.4.2 Löschen einer Indexmarkierung 51
5.4.3 Löschen aller Indexmarkierung 51
5.5 Einen Autornamen zuweisen 52
6 Technische Daten 54
DEUTSCH
29Benutzerhandbuch

1 Wichtig
Philips behält sich das Recht vor, Produkte
jederzeit zu ändern, ohne die Verpflichtung,
frühere Lieferungen entsprechend
nachzubessern.
Die Informationen in diesem Handbuch werden
für den bestimmungsgemäßen Gebrauch des
Systems als angemessen erachtet.Wenn das
Produkt oder seine einzelnen Module oder
Vorgänge für andere Zwecke verwendet werden,
als hier angegeben, ist eine Bestätigung für deren
Richtigkeit und Eignung einzuholen.
Sicherheit
• Das Gerät vor Regen oder Wasser schützen,
um einen Kurzschluss zu vermeiden.
• Das Gerät keiner durch Heizgeräte oder
direkte Sonneneinstrahlung verursachten
starken Hitze aussetzen.
• Darauf achten, dass Kabel nicht gequetscht
werden, vor allem an Steckern und am
Geräteausgang.
• Sichern Sie Ihre Dateien. Philips ist für
Datenverlust nicht haftbar.
Gehörschutz
Halten Sie bei Verwendung der Kopfhörer die
folgenden Richtlinien ein:
• Stellen Sie die Lautstärke moderat ein, und
hören Sie nicht zu lange über Kopfhörer.
• Achten Sie unbedingt darauf, die Lautstärke
nicht höher einzustellen, als es Ihr Gehör
verträgt.
• Stellen Sie die Lautstärke nur so hoch ein,
dass Sie immer noch hören, was um Sie
herum geschieht.
• In möglicherweise gefährlichen Situationen
sollten Sie sehr vorsichtig sein oder die
Nutzung vorübergehend unterbrechen.
• Setzen Sie keine Kopfhörer auf, wenn Sie
mit dem Auto, Fahrrad, Skateboard usw.
unterwegs sind. Sie können dadurch den
Verkehr gefährden und verstossen damit
eventuell gegen gesetzliche Bestimmungen.
Wichtig (bei Modellen mit Kopfhörern):
Philips garantiert die Übereinstimmung der
maximalen Schallleistung seiner Audiogeräte mit
den geltenden Bestimmungen, jedoch nur mit
dem ursprünglichen Modell der im Lieferumfang
enthaltenen Kopfhörer. Wenn diese Kopfhörer
ersetzt werden müssen, sollten Sie bei Ihrem
Händler ein dem Original entsprechendes
Philips-Modell erwerben.
Kleinkinder
Das Gerät und sein Zubehör können Kleinteile
enthalten. Halten Sie diese außerhalb der
Reichweite von kleinen Kindern.
Entsorgung des alten Geräts
• Zur Herstellung des Geräts wurden
hochwertige Materialien und Kompo nenten
verwendet, die recycelt und wiederverwertet
werden können.
• Das durchgestrichene
Mülleimersymbol weist darauf hin,
dass das Gerät der europäischen
Richtlinie 2002/96/EC entspricht.
• Informieren Sie sich über das
Mülltrennungssystem in Ihrer Region für
elektrische und elektronische Geräte.
• Halten Sie sich an die jeweils geltenden
gesetzlichen Vorschriften, und entsorgen
Sie diese Produkte nicht mit dem normalen
Hausmüll. Durch die sachgerechte Entsorgung
alter Geräte werden schädliche Einflüsse auf
Umwelt und Gesundheit vermieden.
• Batterien und Akkus enthalten Substanzen,
die die Umwelt gefährden. Sie müssen daher
an oziellen Sammelstellen abgegeben
werden.
30 Benutzerhandbuch

2 Ihr Pocket Memo
Herzlichen Glückwunsch zu Ihrem Kauf und
willkommen bei Philips!
Besuchen Sie unsere Webseite für zusätzliche
Informationen wie Benutzerhandbücher,
Software-Downloads, Garantieinformationen
und vieles mehr: www.philips.com/support.
2.1 Produkt-Highlights
• Das asymmetrische und ergonomische Design
des Pocket Memo macht die Aufnahme
von Diktaten besonders komfortabel. Der
seitliche Schiebeschalter ermöglicht die
einfache Bedienung mit nur einer Hand.
• Zwei intuitive Smart Buttons sorgen für
einfache Bedienbarkeit und ermöglichen die
schnelle Navigation durch das Menü.
• Mit dem großen grafischen Display sind
wesentliche Informationen wie die Diktatlänge
oder die aktuelle Position im Diktat auf
einen Blick leicht zu erkennen – dank der
integrierten Hinter grund beleuchtung selbst
bei schlechten Lichtverhältnissen.
• Das .dss-Format ist ein internationaler,
herstellerunabhängiger Standard für
professionelle Sprachverarbeitung.
Neben hervorragender Tonqualität für
Sprachaufnahmen besticht das .dss-Format
durch seine hohe Kompressionsrate, wodurch
die Dateigröße, die Netzwerkbelastung bei
Dateitransfer sowie der Speicherbedarf
deutlich reduziert werden.
• Die Download-Software SpeechExec Dictate
vereinfacht die Kommunikation zwischen
Autor und Schreibkraft. Dank moderner
Benutzeroberfläche und Netzwerkfähigkeit
können Sie noch leichter auf Diktate
zugreifen, sie gemeinsam verwalten und
archivieren.
2.2 Packungsinhalt
Pocket Memo
Speicherkarte
Tasche
Register your product and get support at
POCKET MEMO
www.philips.com/welcome
EN
Quick start guide
DE
Kurzanleitung
FR
Guide de démarrage rapide
ES
Guía de inicio rápido
IT
Guida rapida di introduzione
NL
Snelle startgids
SV
Snabbstartsguide
LFH9380
with SpeechExec
workflow software
Quick start guide
DEUTSCH
CD-ROM mit
Software und
Benutzerhandbuch
Akkus
USB-Kabel
31Benutzerhandbuch

2.3 Übersicht
2.3.1 Bedienungselemente und Anschlüsse
1
Mikrofonanschluss
2
Kopfhöreranschluss
3
Integriertes Mikrofon
4
Status-LED
5
EOL-Taste (Briefende/End-of-letter)
6
Schiebeschalter
7
Ein-/Ausschalter (OFF/ON)
8
Lautsprecher
9
Display
10
Smart-Buttons
11
Menü-Taste
12
+/-, Menü-Navigations- und Lautstärketaste
1
2
3
4
5
9
6
10
11
12
7
8
13
Speicherkarteneinschub
14
FWD-Taste (Vorlauf )
15
Batteriefach
16
Anschluss für die Docking Station
17
Netzteilanschluss
18
USB-Anschluss
16
17
18
13
14
15
32 Benutzerhandbuch

2.3.2 Displaysymbole
DPM 9380.DSS
START NEU
9:23
6 7 8 9 10
11
5
4
3
2
1
1
Aktuelle Funktion des linken Smart-Buttons
2
Dateiname
3
Aufnahmenummer
4
Positionsleiste
5
Aufnahme- / Wiedergabedauer
6
Batteriestatusanzeige
7
Aufnahmeformat
8
Speicherkarte ist schreibgeschützt (gesperrt)
9
Einfügemodus ist aktiviert
10
Sprachaktivierte Aufnahme ist aktiviert
11
Aufnahme-/Wiedergabepegel
12
13
14
15
1718 16
12
Empfindlichkeitsregler für sprachaktivierte
Aufnahme
13
Aktuelle Position in der Aufnahme
14
Positionen des Schiebeschalters
15
Aktuelle Funktion des rechten Smart-
Buttons
16
Aufnahme als abgeschlossen (EOL) und
gesperrt gekennzeichnet
17
Aufnahme mit Priorität gekennzeichnet
18
Indexmarkierung
DEUTSCH
33Benutzerhandbuch

3 Erste Schritte
3.1 Einsetzen der Batterien
Das Pocket Memo kann mit den beiden mitgelieferten AAA-Akkus Philips LFH9154 betrieben
werden. Es können auch herkömmliche AlkaliBatterien verwendet werden.
1 Stellen Sie sicher, dass das Pocket Memo
ausgeschaltet ist.
2 Önen Sie das Batteriefach auf der
Rückseite des Pocket Memo. Schieben Sie
dazu die Abdeckung nach außen und klappen
Sie sie dann auf.
3 Legen Sie die beiden AAA-Batterien ein. Die
richtige Polarität ist auf der Innenseite der
Batteriefachabdeckung angegeben.
4 Schließen Sie das Batteriefach wieder, indem
Sie es zuklappen und die Abdeckung wieder
hinein schieben, bis Sie ein Klicken hören.
D Hinweis
Keine unterschiedlichen Batterietypen
verwenden! Nehmen Sie entweder zwei
aufladbare Batterien (Philips LFH9154) oder
zwei nicht aufladbare Alkalibatterien.
3.2 Aufladen der Batterien
Das Pocket Memo kann mit wiederaufladbaren
AAA-Batterien 9154 von Philips betrieben
werden. Benutzen Sie zum Aufladen dieser
Batterien das USB-Kabel. Optional können auch
das Philips-Netzteil 9146 oder die USB Docking
Station 9120 (beides als Zubehör erhätlich)
verwendet werden.
Schließen Sie das Pocket Memo mit dem
mitgelieferten USB-Kabel an einen PC oder
ein Notebook an, um die wiederaufladbaren
Batterien automatisch aufzuladen. Wenn der
USB-Anschluss des PCs den High-PowerStandard unterstützt, dauert ein kompletter
Ladevorgang etwa 2.5 Stunden.
D Hinweis
Der PC muss eingeschaltet sein, um die
Batterien über das USB-Kabel aufzuladen. Das
Pocket Memo kann sich während des Aufladens
erwärmen.
C Wichtig
Wenn der USB-Anschluss Ihres PCs nicht
genügend Strom liefert (500 mA), deaktiveren
Sie USB-Schnelladen im Menü des Pocket Memos.
34 Benutzerhandbuch

3.3 Einsetzen und Auswerfen der
Speicherkarte
Das Pocket Memo wird mit einer SecureDigitalSpeicherkarte (SD) betrieben. Es unterstützt
SDHC-Karten mit einer Speicherkapazität von
bis zu 32 GB.
So setzen Sie eine Speicherkarte ein:
1 Der Speicherkartensteckplatz befindet sich
auf der Rückseite des Pocket Memo.
2 Schieben Sie die Speicherkarte in den
Steckplatz. Eine kleines Symbol neben dem
Steckplatz zeigt die richtige Ausrichtung an.
3 Drücken Sie die Speicherkarte hinein, bis Sie
ein Klicken hören.
So werfen Sie die Speicherkarte aus:
1 Der Speicherkartensteckplatz befindet sich
auf der Rückseite des Pocket Memo.
2 Drücken Sie die Speicherkarte hinein, bis Sie
ein Klicken hören.
3 Lassen Sie die Speicherkarte los. Sie schiebt
sich etwas aus dem Speicherkartensteckplatz
heraus und kann herausgezogen werden.
3.4 Formatieren einer neuen
Speicherkarte
Wenn Sie eine neue, unformatierte
Speicherkarte (oder eine Speicherkarte, die mit
einem anderen Gerät als einem Pocket Memo
formatiert wurde) einsetzen, werden Sie vom
Pocket Memo gefragt, ob Sie die Speicherkarte
formatieren möchten.
1 Drücken Sie den Smart-Button
OK, um
dies zu bestätigen und das Formatieren zu
starten.
Alles löschen ?
Ja - formatiere
!! ACHTUNG !!
OK ABBRUCH
2 Wenn Sie den Formatierungsvorgang
abbrechen möchten, können Sie entweder
die Speicherkarte entfernen oder den
Smart-Button
ABBRUCH drücken.
Alles löschen ?
Ja - formatiere
!! ACHTUNG !!
OK ABBRUCH
DEUTSCH
D Hinweis
Wenn Sie das Pocket Memo einschalten und
keine Speicherkarte eingesetzt ist, wird ein
Warnhinweis auf dem Bildschirm angezeigt.
D Hinweis
Das Formatieren ist nicht möglich, wenn die
Speicherkarte schreibgeschützt (gesperrt) ist.
35Benutzerhandbuch

3.5 Aktivieren des Pocket Memo
Das Pocket Memo kann mit dem
SCHALTER aktiviert werden. Beim ersten Ein-
EIN-/AUS-
schalten werden Sie vom Gerät aufgefordert, die
Sprache für die Benutzeroberfläche und das aktuelle Datum sowie die aktuelle Zeit anzugeben.
D Hinweis
Die Sprache kann auch zu einem späteren
Zeitpunkt über das Menü geändert werden.
Weitere Informationen finden Sie unter 5.2
Menüeinstellungen auf Seite 48.
3.5.2 Einstellen von Datum und Uhrzeit
Nach der Auswahl der Sprache werden Sie vom
Pocket Memo zur Angabe des aktuellen Datums
und der aktuellen Zeit aufgefordert.
1 Drücken Sie wiederholt die Taste + oder –,
um die Werte für Jahr, Monat bzw. Tag zu
ändern.
3.5.1 Einstellen der Sprache
Wenn Sie das Pocket Memo zum ersten Mal
aktivieren, müssen Sie die Sprache für die
Benutzeroberfläche auswählen.
1 Drücken Sie die Taste + oder – auf dem Po-
cket Memo, um eine Sprache auszuwählen.
LANGUAGE
INT
LANGUE
FR
SPRACHE
DE
IDIOMA
ES
EXIT OK
- / +
2 Drücken Sie den Smart-Button OK,
um die Auswahl zu bestätigen. Die
Benutzeroberfläche wird in der
ausgewählten Sprache angezeigt.
LANGUAGE
INT
LANGUE
FR
SPRACHE
DE
IDIOMA
ES
EXIT OK
- / +
DATE:
2009-11-01
12/24: TIME:
24 14:22
OK
2 Drücken Sie den Smart-Button →, um den
Pfeil (↑) zum nächsten Eintrag zu bewegen.
Nachdem Sie den Tag eingestellt haben,
drücken Sie den Smart-Button →, um die
richtige Zeit einzustellen.
DATE:
2009-11-01
12/24: TIME:
24 14:22
OK
3 Drücken Sie wiederholt die Taste + oder
–, um das 12-Stunden oder 24-Stunden-
Format auszuwählen, AM oder PM (wenn
das 12-Stunden-Format gewählt wurde)
auszuwählen und die Werte für Stunden und
Minuten zu ändern.
36 Benutzerhandbuch

DATE:
2009-11-01
12/24: TIME:
24 14:22
OK
4 Drücken Sie den Smart-Button →, um die
Richtigkeit von Datum und Uhrzeit zu
bestätigen.
Das Pocket Memo ist jetzt einsatzbereit.
DATE:
2009-11-01
12/24: TIME:
24 14:22
OK
D Hinweis
Falls Sie einen Fehler gemacht haben, können
Sie mit dem Smart-Button ← jederzeit wieder
zurück gehen und Korrekturen vornehmen.
Sie können Datum und Uhrzeit auch später
über das Menü des Pocket Memo ändern.
Weitere Informationen finden Sie unter 5.2
Menüeinstellungen auf Seite 48.
3.6 Energiesparmodus
Bleibt das Pocket Memo länger als 60 Minuten
inaktiv, wechselt es automatisch in den
Energiesparmodus. Auf dem LCD-Bildschirm
werden dann Datum und Uhrzeit angezeigt. Sie
können das Pocket Memo durch Drücken einer
beliebigen Taste wieder aktivieren.
Wird das Pocket Memo länger als 2 Stunden
nicht benutzt, schaltet es sich ganz ab. In diesem
Fall kann es wieder eingeschaltet werden, indem
Sie den Aus-/Einschalter auf die Position
und dann auf die Position
ON schieben.
OFF
DEUTSCH
DATE:
2009-11-01
12/24: TIME:
24 14:22
OK
37Benutzerhandbuch

DPM 9380.DSS
0:00
#2
4 Verwenden des Pocket
Memo
4.1 Aufnehmen
4.1.1 Erstellen einer neuen Aufnahme
Gehen Sie wie folgt vor, um eine Aufnahme mit
dem Pocket Memo zu erstellen:
1 Stellen Sie sicher, dass sich im
Speicherkartensteckplatz eine Speicherkarte
befindet. Weitere Informationen finden
Sie unter 3.3 Einsetzen und Auswerfen der
Speicherkarte auf Seite 35.
2 Schieben Sie den Ein-/Ausschalter auf
die Position
ON, um das Pocket Memo
einzuschalten.
3 Drücken Sie den Smart-Button NEU, um
eine neue Aufnahme zu erstellen.
D Hinweis
Der Smart-Button
NEU wird nicht angezeigt,
wenn die aktuelle Aufnahme leer ist.
Sie den Schiebeschalter auf die Position
AUFN und beginnen Sie zu diktieren.
• Die Status-LED leuchtet während der
Aufnahme rot (im Überschreibmodus) oder
grün (im Einfügemodus).
• Das Display zeigt die folgenden
Informationen:
a
Aufnahmeformat
b
Aufnahmedauer
c
Aktuelle Position in der Aufnahme
d
Aufnahmenummer
e
Dateiname
a
b
c
d
e
0:34
#2
DPM 9380.DSS
0:00
#1
DPM 9380.DSS
NEU
4 Um mit der Aufnahme zu beginnen, schieben
5 Um die Aufnahme zu beenden, schieben Sie
den Schiebeschalter auf die Position
STOP.
38 Benutzerhandbuch

DPM 9380.DSS
0:39
#2
D Hinweis
Diktat löschen
Index setzen
Einfügemodus
Autor
Überschreiben
Um optimale Ergebnisse zu erzielen, sprechen
Sie klar und deutlich und halten Sie zum
Mikrofon eine Entfernung von ca. 10 cm ein.
4.1.2 Ergänzungen in ein Diktat einfügen
Gemäß Voreinstellung werden die Diktate im
Überschreibmodus aufgezeichnet. Gehen Sie wie
folgt vor, um zum Einfügemodus zu wechseln
und Ergänzungen zu Ihrem Diktat aufzunehmen:
3 Drücken Sie die Taste + oder –, um
zwischen den Modi Einfügen und
Überschreiben zu wechseln.
• Im Einfügemodus trägt die Aufnahme-
position des Schiebeschalters die
Aufschrift
eAUFN und die Status-LED
leuchtet während der Aufnahme grün.
• Im Überschreibmodus trägt die Aufnahme-
position des Schiebeschalters die
Aufschrift
AUFN und die Status-LED
leuchtet während der Aufnahme rot.
Einfügemodus:
Überschreiben
Einfügen
OK ABBRUCH
Einfügemodus:
Überschreiben
Einfügen
OK ABBRUCH
DEUTSCH
1 Drücken Sie im Stoppmodus die
Taste, um das Menü aufzurufen.
0:00
#2
DPM 9380.DSS
NEU
2 Drücken Sie die Taste + oder –, um den
Menüeintrag Einfügemodus auszuwählen und
drücken Sie den Smart-Button
WÄHLEN, um
den Menüpunkt aufzurufen.
Diktat löschen
Index setzen
Einfügemodus
Überschreiben
Autor
ZURÜCK WÄHLEN
MENÜ-
1
4 Drücken Sie den Smart-Button OK, um die
Einstellung zu speichern oder den SmartButton
ABBRUCH, um den Menüpunkt ohne
Ändern der Einstellungen zu verlassen.
Einfügemodus:
Überschreiben
Einfügen
OK ABBRUCH
5 Drücken Sie die Taste + oder –, um die
Datei, in die Sie Ergänzungen einfügen
möchten, auszuwählen.
0:00
#2
DPM 9380.DSS
2
NEU
39Benutzerhandbuch

DPM 9380.DSS
0:39
#2
6 Steuern Sie durch Wiedergabe, Vorlauf
DPM 9380.DSS
0:25
#2
DPM 9380.DSS
0:39
#2
bzw. Rücklauf die Position an, an der Sie
Korrekturen vornehmen möchten.
7 Um Ergänzungen im Diktat einzufügen,
schieben den Schiebeschalter auf die Position
eAUFN und beginnen Sie zu diktieren.
Die vorhandene Aufnahme wird nicht
überschrieben.
8 Um das Einfügen zu beenden, schieben Sie
den Schiebeschalter auf die Position
STOP.
1 Drücken Sie im Stoppmodus die Taste +
oder –, um das Diktat auszuwählen, das Sie
als fertig gestellt markieren möchten.
0:00
#2
DPM 9380.DSS
NEU
2 Drücken Sie die EOL-Taste (Briefende/End-
of-letter), um das Diktat zu sperren und als
fertiggestellt zu markieren.
Das Symbol ┱erscheint auf dem Display.
3 Falls Sie das Diktat mit einer Priorität ver-
sehen möchten, drücken Sie die
EOL-Taste
innerhalb einer halben Sekunde noch einmal.
9 Wenn Sie mit dem Diktat noch nicht fertig
sind, spulen Sie zum Ende des Diktats vor
und setzten Sie die Aufnahme fort.
⑩ Beginnen Sie erneut bei Schritt 1, um zum
Überschreibmodus zurückzukehren.
Das Symbol ! wird angezeigt und gibt an, dass
das Diktat Priorität hat.
4 Wenn Sie Änderungen am Diktat
vornehmen möchten, drücken Sie die
Taste erneut, um die Markierung ‚fertig
EOL-
gestellt‘ wieder aufzuheben.
4.1.3 Abschließen (Sperren) eines Diktats
Wenn Sie fertig diktiert haben und keine
weiteren Änderungen mehr vornehmen
möchten, markieren Sie das Diktat wie folgt
als fertig gestellt und schützen Sie es vor
E Tipp
In der Philips SpeechExec Software können Sie
einstellen, dass nur Diktate vom Pocket Memo
auf den PC übertragen werden, die als ‚fertig
gestellt‘ gekennzeichnet sind.
irrtümlichem Löschen:
C Achtung
Gesperrte Dateien werden trotzdem gelöscht,
wenn die Speicherkarte formatiert wird oder die
Menüoption ‚Alle Diktate löschen‘ benutzt wird.
40 Benutzerhandbuch

ZURÜCK WÄHLEN
Mikro-Empfindl.
Sprachaktiviert
Aufnahmeformat
Beleuchtung
SP <DSS>
Mikro-Empfindl.
Sprachaktiviert
Aufnahmeformat
Beleuchtung
SP <DSS>
4.1.4 Ändern des Aufnahmeformats
ZURÜCK WÄHLEN
Index setzen
Einfügemodus
Autor
Einstellungen
Language
ZURÜCK WÄHLEN
Index setzen
Einfügemodus
Autor
Einstellungen
Language
Das Aufnahmeformat bestimmt die
Audioqualität der Aufnahmen und beeinflusst
ebenfalls die Menge der auf die Speicherkarte
passenden Audiodaten. Das Pocket Memo
unterstützt folgende Aufnahmeformate:
• Standard Play (SP): benötigt 1 MB für 10
Minuten Aufnahme.
• Quality Play (QP): benötigt 1 MB für 5
Minuten Aufnahme.
1 Drücken Sie im Stoppmodus die
MENÜ-
Taste, um das Menü aufzurufen.
0:00
#2
DPM 9380.DSS
NEU
3 Drücken Sie die Taste + oder –, um den
Menüeintrag Aufnahmeformat auszuwählen
und drücken Sie den Smart-Button
WÄHLEN.
1
4 Drücken Sie die Taste + oder –, um
zwischen SP und QP zu wechseln.
Aufnahmeformat:
SP <DSS>
QP <DS2>
Aufnahmeformat:
SP <DSS>
QP <DS2>
OK ABBRUCH
2
DEUTSCH
2 Drücken Sie die Taste + oder –, um den
Menüeintrag Einstellungen auszuwählen und
drücken Sie den Smart-Button
WÄHLEN.
1
OK ABBRUCH
5 Drücken Sie den Smart-Button OK, um die
Einstellung zu speichern oder den SmartButton
ABBRUCH, um den Menüpunkt ohne
Ändern der Einstellungen zu verlassen.
2
Aufnahmeformat:
SP <DSS>
QP <DS2>
OK ABBRUCH
41Benutzerhandbuch

4.1.5 Mikrofonempfindlichkeit einstellen
ZURÜCK WÄHLEN
Index setzen
Einfügemodus
Autor
Einstellungen
Language
ZURÜCK WÄHLEN
Index setzen
Einfügemodus
Autor
Einstellungen
Language
ZURÜCK WÄHLEN
Aufnahme-Lampe
Kontrast
Piepton
Mikro-Empfindl.
Diktat
Aufnahme-Lampe
Kontrast
Piepton
Mikro-Empfindl.
Diktat
Stellen Sie die Mikrofonempfindlichkeit
Ihrem Umfeld und Ihrem Diktierverhalten
entsprechend ein.
1 Drücken Sie im Stoppmodus die
MENÜ-
Taste, um das Menü aufzurufen.
0:00
#2
DPM 9380.DSS
NEU
2 Drücken Sie die Taste + oder –, um den
Menüeintrag Einstellungen auszuwählen und
drücken Sie den Smart-Button
WÄHLEN.
2
4 Drücken Sie die Taste + oder –, um die
Mikro fonempfindlichkeit auszuwählen: Privat
(niedrig), Diktat (mittel) und Konferenz (hoch).
Mikro-Empfindl.:
Diktat
Privat
Mikro-Empfindl.:
Diktat
Privat
Konferenz
OK ABBRUCH
Konferenz
OK ABBRUCH
5 Drücken Sie den Smart-Button OK, um die
Einstellung zu speichern oder den SmartButton
ABBRUCH, um den Menüpunkt ohne
Ändern der Einstellungen zu verlassen.
Mikro-Empfindl.:
Diktat
Privat
Konferenz
OK ABBRUCH
1
3 Drücken Sie die Taste + oder –, um den
Menüeintrag Mikro-Empfindl. auszuwählen
und drücken Sie den Smart-Button
WÄHLEN.
42 Benutzerhandbuch
2
1

DPM 9380.DSS
0:00
#2
4.2 Wiedergabe
DPM 9380.DSS
0:00
#2
1 Drücken Sie im Stoppmodus die Taste +
oder –, um das Diktat auszuwählen, das Sie
wiedergeben möchten und an den Beginn
der Aufnahme zu springen.
3 Drücken Sie die Taste + oder –, um die
Wiedergabelautstärke zu verändern.
MIN MAX
– +
0:00
#2
DPM 9380.DSS
NEU
2 Schieben Sie den Schiebeschalter auf die
Position
WIED, um die Wiedergabe zu
starten.
Das Display zeigt die folgenden Informationen:
a
Aufnahmeformat
b
Wiedergabeposition (Minuten : Sekunden)
c
Aktuelle Position in der Aufnahme
d
Aufnahmenummer
e
Dateiname
4 Drücken Sie den Smart-Button TEMPO,
um die Wiedergabegeschwindigkeit zu
erhöhen oder zu verringern.
0:34
#2
DPM 9380.DSS
TEMPO
5 Schieben Sie den Schiebeschalter auf
die Position
STOP, um die Wiedergabe
anzuhalten.
DEUTSCH
a
b
c
d
e
0:34
#2
DPM 9380.DSS
TEMPO
43Benutzerhandbuch

4.2.1 Überblick Wiedergabefunktionen
4.3 Löschen
Dateiauswahl
Schneller
Rücklauf
Schneller
Vorlauf
Wiedergabegeschwindigkeit
Drücken Sie die Taste + im
Stoppmodus einmal, um zum Ende
einer Datei zu springen. Drücken Sie
die Taste
+ erneut, um zum Beginn
der nächsten Datei zur springen.
Drücken Sie die Taste
– im
Stoppmodus einmal, um zum Beginn
einer Datei zu springen. Drücken Sie
die Taste
– erneut, um zum Ende der
vorherigen Datei zur springen.
Schieben Sie den Schiebeschalter
auf die Position ┤. Schieben Sie
den Schiebeschalter auf die Position
STOP, um den Rücklauf zu stoppen
oder auf die Position
WIED, um
den Rücklauf zu stoppen und die
Wiedergabe zu starten.
Halten Sie die
FWD-Taste im
Stoppmodus oder während der
Wiedergabe gedrückt. Lassen Sie
die
FWD-Taste los, um den Vorlauf
anzuhalten.
Drücken Sie während der
Wiedergabe den SmartButton
TEMPO, um die
Wiedergabegeschwindigkeit zu
erhöhen oder zu verringern.
D Hinweis
Stellen Sie vor dem Löschen eines Diktats
sicher, dass das Diktat nicht als fertig gestellt
markiert (EOL) und die Speicherkarte nicht
schreibgeschützt (gesperrt) ist. Drücken
Sie die
EOL-Taste, um ein als ‚fertig gestellt‘
gekennzeichnetes Diktat löschen zu können.
4.3.1 Löschen eines Diktats
Gehen Sie wie folgt vor, um ein einzelnes Diktat
vollständig zu löschen:
1 Drücken Sie im Stoppmodus die Taste +
oder –, um das Diktat auszuwählen, das Sie
löschen möchten.
0:00
#2
DPM 9380.DSS
NEU
2 Drücken Sie die MENÜ-Taste, um das Menü
aufzurufen.
Der Menüeintrag Diktat löschen
ist ausgewählt.
0:00
#2
DPM 9380.DSS
NEU
44 Benutzerhandbuch

3 Drücken Sie den Smart-Button WÄHLEN,
Diktat löschen
Index setzen
Löschen ?
ZURÜCK WÄHLEN
Einfügemodus
Autor
Einstellungen
Abschnitt löschen
ZURÜCK WÄHLEN
Einfügemodus
Autor
Einstellungen
Abschnitt löschen
DPM 9380.DSS
ABBRUCH MARK 2
0:36
#2
0:36
#2
um den Menüpunkt aufzurufen.
Diktat löschen
Löschen ?
Index setzen
Einfügemodus
Autor
ZURÜCK WÄHLEN
2 Drücken Sie die Taste + oder –, um den
Menüeintrag Abschnitt löschen auszuwählen
und drücken Sie den Smart-Button
OK.
4 Drücken Sie den Smart-Button OK, um
das Diktat endgültig zu löschen. Drücken
Sie den Smart-Button
ABBRUCH, um den
Löschvorgang abzubrechen.
Diktat löschen:
Löschen ?
!! ACHTUNG !!
OK ABBRUCH
4.3.2 Löschen eines Abschnittes innerhalb
eines Diktats
Gehen Sie wie folgt vor, um einen Abschnitt
eines Diktats zu löschen:
1 Drücken Sie im Stoppmodus die
MENÜ-
Taste, um das Menü aufzurufen.
3 Navigieren Sie durch Wiedergabe,
Vorlauf oder Rücklauf zum Anfang des zu
löschenden Abschnitts und drücken Sie den
Smart-Button
Auf dem Display wird ein
MARK 1.
0:25
#2
DPM 9380.DSS
ABBRUCH MARK 1
X angezeigt.
4 Suchen Sie die zweite zu markierende
Position mittels Wiedergabe oder Vor-/
Rücklauf und drücken Sie den Smart-Button
MARK 2.
Ein zweites
X wird angezeigt.
2
1
DEUTSCH
0:00
#2
DPM 9380.DSS
NEU
45Benutzerhandbuch

5 Drücken Sie den Smart-Button LÖSCHEN
DPM 9380.DSS
ABBRUCH LOSCHEN
0:36
#2
0:36
#2
ZURÜCK WÄHLEN
Index setzen
Einfügemodus
Autor
Einstellungen
Language
ZURÜCK WÄHLEN
Index setzen
Einfügemodus
Autor
Einstellungen
Language
ZURÜCK WÄHLEN
Device beep
Mikro-Empfindl.
Date & time
Diktate löschen
Alle löschen?
ZURÜCK WÄHLEN
Device beep
Mikro-Emfpindl.
Date & time
Diktate löschen
Alle löschen?
und den Smart-Button
OK, um das Löschen
des markierten Abschnitts zu bestätigen,
oder drücken Sie den Smart-Button
ABBRUCH, um den Vorgang ohne Löschen
zu beenden.
4.3.3 Alle Diktate löschen
C Achtung
Auch gesperrte Dateien werden gelöscht, wenn
die Menüoption ‚Alle Diktate löschen‘ benutzt
wird.
Gehen Sie wie folgt vor, um alle Diktate zu
löschen:
1 Drücken Sie im Stoppmodus die
MENÜ-
Taste, um das Menü aufzurufen.
0:00
#2
DPM 9380.DSS
NEU
2 Drücken Sie die Taste + oder –, um den
Menüeintrag Einstellungen auszuwählen und
drücken Sie den Smart-Button
WÄHLEN.
1
3 Drücken Sie die Taste + oder –, um den
Menüeintrag Diktate löschen auszuwählen
und drücken Sie den Smart-Button
WÄHLEN.
1
4 Drücken Sie den Smart-Button WÄHLEN
und den Smart-Button
OK, um das Löschen
des markierten Abschnitts zu bestätigen,
oder drücken Sie den Smart-Button
ABBRUCH, um den Vorgang ohne Löschen
zu beenden.
2
2
Alles löschen ?
Ja - löschen
!! ACHTUNG !!
OK ABBRUCH
46 Benutzerhandbuch

5 Weitergehende
Funktionen
5.1 Philips SpeechExec verwenden
Die beiliegende Philips SpeechExec Software
erlaubt eine weitergehende Konfiguration der
Einstellungen des Pocket Memos und ermöglicht
automatischen Download, Umwandlung und
Weiterleitung der Diktatdateien.
D Hinweis
Detaillierte Information über SpeechExec
entnehmen Sie bitte dem SpeechExecBenutzerhandbuch oder der Programmhilfe.
5.1.1 Weitergehende Konfiguration
Der Konfigurationsassistent für das Pocket
Memo ist Teil der Philips SpeechExec Diktiersoftware und unterstützt die Benutzer
bei der Konfiguration ihrer Geräte, wie
beispielsweise Zeitformat, akustische
Rückmeldungen, sprachaktivierte Aufnahme,
Darstellung der Anzeige (Standard oder
erweiterter Anzeige modus), Aufnahmeformat,
Mikrofonempfindlichkeit, Definition von
Autornamen und Herunterladen von Dateien
auf den PC.
1 Schließen Sie das Pocket Memo mit einem
USB-Kabel an Ihrem PC an.
2 Starten Sie Software Philips SpeechExec
Dictate.
3 Klicken Sie in der Menüleiste auf
Einstellungen > Allgemeine Einstellungen,
um das Menü Einstellungen zu önen. Wählen
Sie dann DPM/DT Konfiguration > DPM-
Assistent aus der Liste auf der linken Seite.
4 Klicken Sie auf die Schaltfläche Assistent
starten ..., um den Assistenten zu
önen. Folgen Sie den Anweisungen auf
dem Bildschirm, um das Pocket Memo
entsprechend anzupassen.
5 Klicken Sie auf die Schaltfläche Fertig stellen,
um den Assistenten zu schließen und die
Übertragung der neuen Einstellungen auf das
Pocket Memo zu bestätigen.
D Hinweis
Wenn das Pocket Memo zum ersten Mal an
den PC angeschlossen wird, erkennt Windows
ein neues Gerät und installiert automatisch
die erforderlichen Treiber. Nach Abschluss
der Installation werden Sie gegebenenfalls von
Windows aufgefordert, den PC neu zu starten.
5.1.2 Herunterladen von Aufnahmen auf
den PC
Als USB-Massenspeichergerät wird das Pocket
Memo automatisch als externes Laufwerk
erkannt, wenn Sie es an den PC anschließen.
Das erlaubt den einfachen Zugri mit dem
Windows Explorer und jedem anderen
Microsoft Windows-Programm.
Die Philips SpeechExec Software ermöglicht
darüber hinaus automatischen Download,
Umwandlung und Weiterleitung der
Diktatdateien.
1 Nehmen Sie ein Diktat mit dem Pocket
Memo auf.
2 Starten Sie Software Philips SpeechExec
Dictate.
3 Schließen Sie das Pocket Memo mit einem
DEUTSCH
47Benutzerhandbuch

USB-Kabel oder der optionalen USB
Docking Station an Ihrem PC an.
4 Die Diktate auf dem Pocket Memo werden
automatisch heruntergeladen und in den
Ordner Fertig gestellt der Arbeitsliste
verschoben.
D Hinweis
Welche Dateien wie heruntergeladen werden,
nachdem ein Pocket Memo angeschlossen
wurde, kann im Menü Einstellungen
von SpeechExec oder mit Hilfe des
Konfigurationsassistenten konfiguriert werden.
5.2 Menüeinstellungen
So nehmen Sie Einstellungen im Menü des
Pocket Memo vor:
1 Drücken Sie im Stoppmodus die
MENÜ-
Taste, um das Menü aufzurufen.
0:00
#2
DPM 9380.DSS
NEU
2 Drücken Sie die Taste + oder –, um
den nächsten/vorherigen Menüeintrag
auszuwählen.
3 Drücken Sie den Smart-Button WÄHLEN
oder die
MENÜ-Taste, um ein Untermenü zu
önen.
Diktat löschen
Index setzen
Einfügemodus
Autor
ZURÜCK WÄHLEN
4 Drücken Sie den Smart-Button ZURÜCK, um
das Menü zu verlassen.
Diktat löschen
Index setzen
Einfügemodus
Autor
ZURÜCK WÄHLEN
5 Drücken Sie die Taste + oder –, um einen
Wert oder eine Option auszuwählen.
6 Drücken Sie den Smart-Button
OK, um die
Einstellung zu speichern oder den SmartButton
ABBRUCH, um den Menüpunkt ohne
Ändern der Einstellungen zu verlassen.
5.2.1 Menüübersicht
Diktat löschen
Index setzen
Einfügemodus
Autor
ZURÜCK WÄHLEN
D Hinweis
• Einige Einstellungen, wie das Wechseln zum
einfachen Displaymodus und die Definition
von Schlagwörtern können nur mit der Philips
SpeechExec Dictate Software geändert werden.
Weitere Informationen finden Sie unter 5.1.1
Weitergehende Konfiguration auf Seite 47.
• Halten Sie die
MENÜ-Taste für einige
Sekunden gedrückt, um weitere Informationen
zu Dateien, Gerät und Speicherkarte
anzuzeigen.
48 Benutzerhandbuch

ZURÜCK WÄHLEN
Index setzen
Einfügemodus
Autor
Einstellungen
Language
ZURÜCK WÄHLEN
Index setzen
Einfügemodus
Autor
Einstellungen
Language
Drücken Sie die MENÜ-Taste
DIKTAT LÖSCHEN (siehe Seite 44)
INDEX SETZEN / LÖSCHEN (siehe Seite 31)
EINFÜGEMODUS (siehe Seite 39)
AUTOR (SCHLAGWORT) (siehe Seite 52)
ALLE INDIZES LÖSCHEN (siehe Seite 51)
ABSCHNITT LÖSCHEN (siehe Seite 45)
LANGUAGE / SPRACHE (siehe Seite 36)
AUFNAHMEFORMAT (siehe Seite 41)
SPRACHAKTIVIERT (siehe Seite 49)
BELEUCHTUNG (OFF / 8 Sec. / 20 Sec.)
AUFNAHME-LAMPE EIN / AUS
MIKROFONEMPFINDLICHKEIT (siehe Seite 42)
DATUM & ZEIT (siehe Seite 36)
USB QUICK CHARGE ON /OFF
ALLE DIKTATE LÖSCHEN (siehe Seite 46)
SPEICHERKARTE FORMATIEREN (siehe Seite 35)
WIEDERGABELAUTSTÄRKE
SCHRIFTART (MODERN / KLASSISCH)
EINSTELLUNGEN
KONTRAST
PIEPTON EIN / AUS
5.3 Sprachaktivierte Aufnahme
Das Pocket Memo unterstützt sprachaktiverte
Aufnahme für freihändiges Diktieren. Wenn die
Funktion aktiviert ist und Sie eine Aufnahme
starten, beginnt die tatsächliche Aufnahme
erst, wenn Sie anfangen zu sprechen. Sobald
Sie aufhören zu sprechen, unterbricht das
HAUPTMENÜMENÜ EINSTELLUNGEN
Pocket Memo die Aufnahme automatisch nach
3 Sekunden Ruhe und setzt sie fort, wenn Sie
erneut zu sprechen beginnen.
1 Drücken Sie im Stoppmodus die
MENÜ-
Taste, um das Menü aufzurufen.
0:00
#2
DPM 9380.DSS
NEU
2 Drücken Sie die Taste + oder –, um den
Menüeintrag Einstellungen auszuwählen und
drücken Sie den Smart-Button
WÄHLEN.
DEUTSCH
1
3 Drücken Sie die Taste + oder –, um den
Menüeintrag Sprachaktiviert auszuwählen und
drücken Sie den Smart-Button
WÄHLEN.
2
49Benutzerhandbuch

DPM 9380.DSS
0:00
#2
DPM 9380.DSS
0:39
#2
DPM 9380.DSS
0:39
#2
ZURÜCK WÄHLEN
Language
Aufnahmeformat
Sprachaktiviert
Beleuchtung
Aus
Language
Aufnahmeformat
Sprachaktiviert
Beleuchtung
Aus
2
1
4 Drücken Sie die Taste + oder –, um
zwischen Aus und Ein zu wechseln.
7 Drücken Sie während der Aufnahme die
Taste + oder –, um den Schwellenwert
anzupassen.
Sprachaktiviert:
Aus
Ein
OK ABBRUCH
Sprachaktiviert:
Aus
Ein
OK ABBRUCH
5 Drücken Sie den Smart-Button OK, um die
Einstellung zu speichern oder den SmartButton
ABBRUCH, um den Menüpunkt ohne
8 Um die Aufnahme zu beenden schieben Sie
den Schiebeschalter auf die Position
Ändern der Einstellungen zu verlassen.
Sprachaktiviert:
Aus
Ein
OK ABBRUCH
6 Um mit der Aufnahme zu beginnen schieben
Sie den Schiebeschalter auf die Position
AUFN und beginnen Sie zu diktieren.
Die Status-LED leuchtet während der Aufnahme
rot (im Überschreibmodus) oder grün (im
Einfügemodus). Wenn die Lautstärke den
Schwellenwert unterschreitet wird die Aufnahme
nach 3 Sekunden unterbrochen und die StatusLED blinkt.
50 Benutzerhandbuch
STOP.

ZURÜCK WÄHLEN
Diktat löschen
Index löschen
Einfügemodus
Autor
Diktat löschen
Index löschen
Einfügemodus
5.4 Indexmarkierungen verwenden
ZURÜCK WÄHLEN
Diktat löschen
Index setzen
Einfügemodus
Autor
Diktat löschen
Index setzen
Einfügemodus
Mit Indexmarkierungen können bestimmte
Stellen in einem Diktat als besonders interessant
markiert werden. Besonders interessante
Stellen wären beispielsweise der Anfang eines
Hauptabschnitts, ein später zu überarbeitender
Teil des Diktats oder irgendeine andere Stelle,
auf die Sie später schnell zugreifen möchten.
5.4.2 Löschen einer Indexmarkierung
1 Navigieren Sie durch Wiedergabe, Vorlauf
oder Rücklauf zu der Indexmarkierung, die
Sie löschen möchten.
2 Drücken Sie im Stoppmodus die
MENÜ-
Taste, um das Menü aufzurufen.
5.4.1 Einfügen einer Indexmarkierung
1 Navigieren Sie durch Wiedergabe, Vorlauf
oder Rücklauf an die Stelle, wo Sie die
Indexmarkierung setzten möchten.
2 Drücken Sie im Stoppmodus die
MENÜ-
Taste, um das Menü aufzurufen.
0:00
#2
DPM 9380.DSS
NEU
3 Drücken Sie die Taste + oder –, um den
Menüeintrag Index setzen auszuwählen und
drücken Sie den Smart-Button
OK.
0:00
#2
DPM 9380.DSS
NEU
3 Drücken Sie die Taste + oder –, um den
Menüeintrag Index löschen auszuwählen und
drücken Sie den Smart-Button
OK.
1
5.4.3 Löschen aller Indexmarkierung
1 Drücken Sie im Stoppmodus die
MENÜ-
Taste, um das Menü aufzurufen.
DEUTSCH
2
2
1
0:00
#2
DPM 9380.DSS
NEU
51Benutzerhandbuch

Einfügemodus
Autor
Einstellungen
DPM 9380
2 Drücken Sie die Taste + oder –, um den
ZURÜCK WÄHLEN
Einfügemodus
Autor
Einstellungen
Indizes löschen
Alle löschen ?
ZURÜCK WÄHLEN
Einfügemodus
Autor
Einstellungen
Indizes löschen
Alle löschen?
Menüeintrag Indizes löschen auszuwählen und
drücken Sie den Smart-Button
WÄHLEN.
5.5 Einen Autornamen zuweisen
Jeder Aufnahme kann ein Schlagwort, wie z.B.
der Name des Autors zugewiesen werden. Das
Schlüsselwort dient zur Identifikation einzelner
Aufnahmen und kann in der Philips SpeechExec
Software für die automatische Weiterleitung von
Diktatdateien verwendet werden.
2
1
3 Drücken Sie den Smart-Button WÄHLEN
und den Smart-Button
OK, um das Löschen
aller Indizes zu bestätigen, oder drücken
Sie den Smart-Button
ABBRUCH, um den
Vorgang ohne Löschen zu beenden.
Alles löschen ?
Ja - löschen
!! ACHTUNG !!
OK ABBRUCH
D Hinweis
Der Menüeintrag Indizes löschen ist nur
vorhanden, wenn das aktuelle Diktat zumindest
eine Indexmarkierung hat.
D Hinweis
Autorennamen müssen zunächst mit der
Philips SpeechExec Soft ware angelegt werden.
Weitere Informationen finden Sie unter 5.1.1
Weitergehende Konfiguration auf Seite 47.
Standardmäßig stehen die Autorennamen ‚DPM
9380‘ und ‚- - -‘ (leer = Voreinstellung) zur
Verfügung.
So weisen Sie einer Aufnahme einen
Autorennamen zu:
1 Drücken Sie im Stoppmodus die
MENÜ-
Taste, um das Menü aufzurufen.
0:00
#2
DPM 9380.DSS
NEU
2 Drücken Sie die Taste + oder –, um den
Menüeintrag Autor auszuwählen.
Einfügemodus
Autor
DPM 9380
Einstellungen
Indizes löschen
ZURÜCK WÄHLEN
52 Benutzerhandbuch

3 Drücken Sie den Smart-Button WÄHLEN,
um die Liste der Autorennamen anzuzeigen.
Einfügemodus
Autor
DPM 9380
Einstellungen
Indizes löschen
ZURÜCK WÄHLEN
4 Drücken Sie die Taste + oder –, um einen
Namen auszuwählen.
DEUTSCH
Autor:
DPM 9380
Peter
Autor:
DPM 9380
Peter
- - -
OK ABBRUCH
- - -
OK ABBRUCH
5 Drücken Sie zum Bestätigen den Smart-
Button
OK oder den Smart-Button
ABBRUCH, um keinen Namen zuzuweisen.
Autor:
DPM 9380
Peter
- - -
OK ABBRUCH
53Benutzerhandbuch

6 Technische Daten
Anschlussmöglichkeiten
• Kopfhörer: 3,5 mm
• Mikrofon: 3,5 mm
• USB: High Speed USB 2.0
• Ladestecker
• Speicherkartensteckplatz
Display
• Typ: LCD
• Bildschirmgröße diagonal: 44 mm
• Hintergrundbeleuchtung: Weiß
Speichermedien
• Austauschbare Speicherkarte
• Speicherkartentypen: Secure Digital (SD),
Secure Digital (SDHC)
• Kompatibel mit Massenspeicherklasse
Audioaufzeichnung
• Aufnahmeformate: Digital Speech Standard
(DSS)
• Integriertes Mikrofon: mono
• Aufnahmemodi: QP (DSS/mono), SP (DSS/
mono)
• Bitrate: 13,5, 27 Kbit/s
• Aufnahmezeit (2 GB-Karte): 349 Stunden
(SP), 170 Stunden (QP)
• Abtastrate: 16 kHz (QP), 12 kHz (SP)
Sound
• Lautsprechertyp: Integrierter dynamischer
Lautsprecher, rund
• Lautsprecherdurchmesser: 30 mm
• Lautsprecher-Ausgangsleistung: 200 mW
• Frequenzgang: 300 bis 7.000 Hz (QP), 300 bis
5.700 Hz (SP) Hz
Komfort
• Professionelle Bearbeitungsfunktionen
• Unterstützung mehrerer Sprachen: 4 Sprachen
(EN, FR, DE, ES)
• 2 Smart Buttons
• Autoren-ID-Einstellung
• Steuerung über Schiebeschalter
• Dateisperre
• Daumensteuerung
• Prioritäteneinstellung
• Sprachaktivierte Aufnahme
• Automatische Softwareaktualisierungen
Leistung
• Batterietyp: AAA/LR03 Alkali, Philips AAA
Ni-MH LFH9154
• Anzahl der Batterien: 2
• Wiederaufladbar: Ja, über USB
• Batterielebensdauer: bis zu 23 Stunden im
SP-Aufnahmemodus
• Batterien im Lieferumfang enthalten
Systemanforderungen
• Prozessor: Pentium III, 1 GHz, Pentium IV
empfohlen
• RAM-Speicher: 512 MB (1 GB empfohlen)
• Festplattenspeicher: 100 MB für SpeechExec,
250 MB für Microsoft .NET
• Kopfhörerausgang oder Lautsprecher
• Betriebssystem: Windows 7/Vista/XP
• freier USB-Anschluss
• DVD-ROM Laufwerk
• Soundkarte
Umwelteigenschaften
• Entspricht 2002/95/EC (RoHS)
• Bleifrei gelötetes Produkt
Zubehör
• SpeechExec Diktiersoftware
• USB-Kabel
• SD-Speicherkarte
• Tasche
• Schnellstartanleitung
• 2 × AAA-Batterien
Design und Materialausführung
• Farbe(n): Silberfarben/Schwarz
• Material: Vollmetallgehäuse
54 Benutzerhandbuch

Manuel de l‘utilisateur
1 Important 56
2 Votre Pocket Memo 57
2.1 Points forts 57
2.2 Contenu de l’emballage 57
2.3 Aperçu général 58
2.3.1 Commandes et connexions 58
2.3.2 Indicateurs et symboles de l’écran 59
3 Pour commencer 60
3.1 Mettre les piles en place 60
3.2 Recharger les piles 60
3.3 Mettre en place/retirer la carte
mémoire 61
3.4 Formater une nouvelle carte
mémoire 61
3.5 Mettre le Pocket Memo en service 62
3.5.1 Programmer la langue 62
3.5.2 Programmer la date et l‘heure 62
3.6 Mode économique 63
4 Utilisation de votre Pocket
Memo 64
4.1 Enregistrer 64
4.1.1 Créer un enregistrement 64
4.1.2 Compléter un enregistrement (insérer/
écraser) 65
4.1.3 Terminer (verrouiller) un
enregistrement 66
4.1.4 Modifier le format d’enregistrement 67
4.1.5 Régler la sensibilité du microphone 68
4.2 Lecture 69
4.2.1 Aperçu général des fonctions de
lecture 70
4.3 Supprimer 70
4.3.1 Supprimer une dictée 70
4.3.2 Supprimer une partie d‘une dictée 71
4.3.3 Supprimer toutes les dictées 72
5 Comment mieux tirer parti de
votre Pocket Memo 73
5.1 Utiliser le logiciel Philips SpeechExec 73
5.1.1 Configuration avancée 73
5.1.2 Transférer des enregistrements sur le
PC 73
5.2 Paramètres du menu 74
5.2.1 Liste des menus 75
5.3 Utiliser le déclenchement vocal de
l’enregistrement 75
5.4 Utiliser des index 77
5.4.1 Insérer un index 77
5.4.2 Supprimer un index 77
5.4.3 Supprimer tous les index 78
5.5 Attribuer un nom d’auteur 78
6 Données techniques 80
FRANÇAIS
55Manuel de l‘utilisateur

1 Important
Philips se réserve le droit de modifier les produits à tout moment, mais n’est pas contraint de
modifier les ores précédentes en conséquence.
Le contenu de ce manuel est jugé conforme
à l’usage auquel ce système est destiné. Si
le produit ou les modules et procédures
correspondants sont utilisés à d’autres fins que
celles spécifiées dans le présent manuel, vous
devrez obtenir la confirmation de leur validité et
de leur adéquation.
Sécurité
• Pour éviter les courts-circuits, n’exposez pas
le produit à la pluie ou à l’eau.
• N’exposez pas cet appareil à une chaleur
excessive causée par un équipement ou la
lumière directe du soleil.
• Protégez les câbles des pincements,
notamment au niveau des prises et à l’endroit
où ils sortent de l’unité.
• Sauvegardez vos fichiers. Philips n’accepte
aucune responsabilité en cas de perte de
données.
Sécurité auditive
Respectez les consignes suivantes en utilisant
vos écouteurs :
• Écoutez à un volume raisonnable pendant une
durée raisonnable.
• Veillez à ne pas augmenter le volume, car
votre audition s’adaptera.
• N’augmentez pas le volume au point de ne
plus entendre ce qui se passe autour de vous.
• Vous devez être prudent et interrompre
l’utilisation temporairement dans les
situations potentiellement dangereuses.
• N’utilisez pas les écouteurs en conduisant
un véhicule motorisé, en faisant du vélo, du
skateboard, etc. Vous pourriez créer un risque
pour la circulation et ce mode d’écoute est
souvent illégal.
Important (pour les modèles fournis avec
des écouteurs) :
Philips garantit la conformité avec la puissance
de son maximale de ses lecteurs audio prescrite
par les organismes régulateurs concernés,
mais seulement avec le modèle d’origine des
écouteurs fournis. Si ces écouteurs ont besoin
d’être remplacés, nous vous conseillons de
contacter votre revendeur pour commander un
modèle Philips identique à celui d’origine.
Enfants
Votre appareil et ses accessoires ne sont pas
des jouets. Ils peuvent contenir des éléments
de petite taille. Gardez-les hors de portée des
enfants.
Élimination de votre produit périmé
• Votre produit a été conçu et fabriqué avec des
matériaux et des composants de haute qualité
qui peuvent être recyclés et réutilisés.
• Lorsque ce symbole de poubelle
barrée est joint à un produit, il
indique que ce produit est couvert
par la directive europénne 2002/96/EC.
• Informez-vous sur le système de récupération
spécial pour les produits électriques et
électroniques.
• Respectez les règles locales ; ne jetez pas vos
produits périmés avec vos ordures ménagères.
L’élimination correcte des produits périmés
permettra d’éviter des conséquences
négatives potentielles pour l’environnement
et la santé des personnes.
• Les batteries et piles (y compris les batteries
rechargeables intégrées) contiennent
des substances qui peuvent polluer
l’environnement.Toutes les batteries et piles
doivent être remises à un point de collecte
agréé.
56 Manuel de l‘utilisateur

2 Votre Pocket Memo
Félicitations pour votre achat et bienvenue chez
Philips !
Afin de bénéficier pleinement de l’assistance
oerte par Philips, consultez notre site Web
pour obtenir des informations sur l’assistance
sous la forme de manuels d’utilisation, de
téléchargements de logiciels, d’informations sur
la garantie et plus encore :
www.philips.com/support.
2.1 Points forts
• Le modèle asymétrique et ergonomique du
Pocket Memo permet des manipulations
d’une facilité inégalée. Tous les boutons sont
manipulables d’un seul pouce.
• Deux boutons “smart” vous permettent de
voyager dans les options du menu et de faire
des sélections rapides.
• Un large écran graphique vous permet de voir
toutes les informations relatives au fichier,
telles que les mots-clés (nom d’auteur), la
longueur de la dictée, la position dans le
fichier, et d’autres informations vitales d’un
seul coup d’œil. Un achage rétro-éclairé
vous permet de tout voir, même dans de
mauvaises conditions d’éclairage.
• Le format de fichier .dss est le standard
international du traitement professionnel de la
voix. Orant une qualité audio incomparable
de l’enregistrement vocal, les fichiers .dss
permettent un taux de compression élevé,
une réduction de la taille des fichiers, du trafic
sur le réseau et de la capacité de stockage
requise.
• Speech Exec Dictate est le logiciel de
transfert parfait au traitement des fichiers
vocaux. L’interface utilisateur intuitive rend la
recherche d’un travail simple et rapide et les
informations concernant le statut d’une dictée
permettent de vérifier toute la progression
du travail.
2.2 Contenu de l’emballage
Pocket Memo
CD-ROM contenant
logiciel et manuel de
l‘utilisateur
Carte mémoire
Housse
Register your product and get support at
POCKET MEMO
www.philips.com/welcome
EN
Quick start guide
DE
Kurzanleitung
FR
Guide de démarrage rapide
ES
Guía de inicio rápido
IT
Guida rapida di introduzione
NL
Snelle startgids
SV
Snabbstartsguide
LFH9380
with SpeechExec
workflow software
Piles rechargeables
Câble USB
Guide de démarrage
rapide
FRANÇAIS
57Manuel de l‘utilisateur

2.3 Aperçu général
2.3.1 Commandes et connexions
1
Connexion microphone
2
Connexion écouteurs
3
Microphone intégré
4
Voyant d’état
5
Bouton EOL (end-of-letter/fin de dictée)
6
Interrupteur à 4 positions
7
Mise sous/hors tension
8
Haut-parleur
9
Ecran
10
Boutons multifonctions
11
Bouton Menu
12
+/–, navigation menu et contrôle du volume
1
2
3
4
5
9
6
10
11
12
7
8
13
Emplacement carte mémoire
14
Bouton FWD (avance)
15
Compartiment des piles
16
Connexion station d’accueil
17
Connexion alimentation
18
Connexion USB
16
17
18
13
14
15
58 Manuel de l‘utilisateur

2.3.2 Indicateurs et symboles de l’écran
DPM 9380.DSS
DEBUT NOUVEAU
9:23
6 7 8 9 10
11
5
4
3
2
1
1
Fonction actuelle du bouton multifonctions
de gauche
2
Nom de fichier
3
Numéro de l‘enregistrement
4
Barre d‘état
5
Durée d’enregistrement / de lecture
6
Témoin de charge des piles
7
Format d‘enregistrement
8
Carte mémoire protégée en écriture
(verrouillée)
9
Mode d’insertion activé
10
Déclenchement vocal activé
12
13
14
15
1718 16
11
Volume d’enregistrement
12
Seuil de déclenchement vocal de
l‘enregistrement
13
Position actuelle dans l‘enregistrement
14
Position actuelle de l’interrupteur à 4
positions
15
Fonction actuelle du bouton multifonctions
de droite
16
Enregistrement marqué comme terminé
(EOL) et verrouillé
17
Enregistrement marqué comme prioritaire
18
Enregistrement avec index
FRANÇAIS
59Manuel de l‘utilisateur

3 Pour commencer
3.1 Mettre les piles en place
Le Pocket Memo est alimenté par deux piles
rechargeables AAA LFH9154, livrées avec le
produit. Vous pouvez également utiliser des piles
alcalines AAA standard (non rechargeables).
1 Vérifiez que le Pocket Memo est hors
tension.
2 Ouvrez le compartiment des piles, à l‘arrière
du Pocket Memo, en faisant coulisser le
couvercle vers le haut puis en le soulevant.
3 Insérez les deux piles AAA en respectant
la polarité comme indiqué à l‘intérieur du
compartiment.
4 Refermez le compartiment des piles en
rabattant le couvercle puis en le faisant
coulisser vers le bas jusqu‘à ce que vous
entendiez un clic.
D Note
Ne mélangez pas diérents types de piles !
Utilisez soit deux piles rechargeables soit deux
piles alcalines non rechargeables.
3.2 Recharger les piles
Le Pocket Memo peut être alimenté avec
les piles rechargeables Philips LFH9154. Pour
les recharger, vous pouvez utiliser le câble
USB, la station d‘accueil (en option), ou le bloc
d’alimentation Philips (en option).
Lorsque le Pocket Memo est connecté à un PC
ou un portable à l’aide du câble USB fourni, les
piles se rechargent automatiquement. Si le port
USB de votre ordinateur est à haute puissance,
un cycle de charge complet prend environ 2h30.
D Note
Le PC doit être sous tension pendant la charge
des piles via le câble USB. Le Pocket Memo peut
chauer pendant la charge rapide.
C Attention
Si le port USB de votre ordinateur n‘est pas
compatible avec la norme haute alimentation
(500 mA), désactivez Charge rapide USB à partir
du menu du Pocket Memo.
60 Manuel de l‘utilisateur

3.3 Mettre en place/retirer la carte
mémoire
Le Pocket Memo fonctionne avec une carte
mémoire SD (SecureDigital). Il accepte les
cartes SDHC jusqu’à 32 Go.
Pour insérer une carte mémoire :
1 Localisez l’emplacement de la carte mémoire
en haut, à l’arrière du Pocket Memo.
2 Insérez la carte mémoire dans la fente.
Un petit symbole, à côté de la fente vous
indique le sens d’insertion.
3 Poussez la carte mémoire jusqu’à ce que
vous entendiez un clic.
3.4 Formater une nouvelle carte
mémoire
Lorsque vous insérez dans le Pocket Memo une
nouvelle carte mémoire non formatée ou une
carte qui a été formatée avec un autre appareil
qu’un Pocket Memo, celui-ci vous demande si
vous voulez formater la carte mémoire.
1 Pour confirmer et commencer le formatage,
appuyez sur le bouton
OK.
Supprimer tout:
Oui - formater
!! ATTENTION !!
OK ANNULER
2 Si vous voulez annuler l’opération, retirez
la carte mémoire ou appuyez sur le bouton
ANNULER.
FRANÇAIS
Pour éjecter une carte mémoire:
1 Localisez l’emplacement de la carte
mémoire, en haut, à l’arrière du Pocket
Memo.
2 Appuyez sur la carte mémoire jusqu’à ce
que vous entendiez un clic.
3 Relâchez la carte mémoire : elle sort
légèrement de la fente.
D Note
Si vous mettez le Pocket Memo sous tension
sans avoir inséré de carte mémoire, un message
d’avertissement est aché.
Supprimer tout ?
Oui - formater
!! ATTENTION !!
OK ANNULER
D Note
Il est impossible de formater une carte mémoire
qui est en mode lecture seule (verrouillée).
61Manuel de l‘utilisateur

3.5 Mettre le Pocket Memo en service
Pour mettre le Pocket Memo sous/hors tension,
utilisez l‘interrupteur
ON/OFF. Lors de la
première utilisation, vous devrez indiquer la
langue choisie ainsi que la date et l‘heure.
D Note
Vous pourrez modifier la langue plus tard à
partir du menu. Pour plus d‘informations,
reportez-vous à la rubrique 5.2 Paramètres du
menu page 74.
3.5.2 Programmer la date et l‘heure
Une fois que vous avez choisi la langue de
l’interface utilisateur, vous devez programmer la
date et l‘heure actuelles sur le Pocket Memo.
1 Modifiez les données achées pour l‘année,
le mois ou le jour en appuyant le nombre de
fois nécessaire sur les boutons + ou –.
3.5.1 Programmer la langue
Lors de la première utilisation vous devez
choisir une langue.
1 Sélectionnez la langue voulue en appuyant
sur les boutons + et – du Pocket Memo.
LANGUAGE
INT
LANGUE
FR
SPRACHE
DE
IDIOMA
ES
EXIT OK
- / +
2 Appuyez sur le bouton OK pour confirmer
votre choix.
L‘interface utilisateur est alors achée dans la
langue sélectionnée.
LANGUAGE
INT
LANGUE
FR
SPRACHE
DE
IDIOMA
ES
EXIT OK
- / +
DATE:
2009-11-01
12/24: TIME:
24 14:22
OK
2 Appuyez sur le bouton → pour placer le
curseur (↑) au niveau de l‘entrée suivante.
Une fois que vous avez programmé la date,
appuyez sur le bouton → pour placer le
curseur au niveau de l‘heure.
DATE:
2009-11-01
12/24: TIME:
24 14:22
OK
3 A l‘aide des boutons + ou – choisissez
l‘achage sur 2 ou 24 heures, AM (avantmidi) ou PM (après-midi) dans le cas de
l‘achage sur 2 heures, et réglez l‘heure et
les minutes.
62 Manuel de l‘utilisateur

DATE:
2009-11-01
12/24: TIME:
24 14:22
OK
4 Appuyez sur le bouton → pour confirmer la
date et l‘heure saisies.
Vous pouvez maintenant vous servir du Pocket
Memo.
DATE:
2009-11-01
12/24: TIME:
24 14:22
OK
D Note
En cas d‘erreur en cours de programmation,
vous pouvez utiliser le bouton ← à n‘importe
quel moment pour revenir en arrière et
corriger. Vous pourrez modifier plus tard la
date et l‘heure à partir du menu. Pour plus
d‘informations, reportez-vous à la rubrique 5.2
Paramètres du menu page 74.
3.6 Mode économique
Après 60 minutes d’inactivité, le Pocket Memo
se met automatiquement en mode économique
et son écran à cristaux liquides ache la date
et l’heure. Appuyez sur n’importe quel bouton
pour le réactiver.
Si le Pocket Memo n’est pas utilisé pendant
plus de deux heures, il s’éteint complètement.
Allumez-le en plaçant l’interrupteur On/O sur
la position
OFF, puis sur la position ON.
FRANÇAIS
DATE:
2009-11-01
12/24: TIME:
24 14:22
OK
63Manuel de l‘utilisateur

DPM 9380.DSS
0:00
#2
4 Utilisation de votre Pocket
Memo
4.1 Enregistrer
4.1.1 Créer un enregistrement
Pour enregistrer avec le Pocket Memo, procédez
comme indiqué ci-dessous :
1 Vérifiez qu‘une carte mémoire est
insérée à l‘emplacement voulu. Pour plus
d‘informations, reportez-vous à la rubrique
3.3 Mettre en place/retirer la carte mémoire
page 61.
2 Mettez le Pocket Memo sous tension en
faisant coulisser l‘interrupteur sur la position
ON.
3 Appuyez sur le bouton multifonctions
NOUVEAU pour créer un nouvel
enregistrement.
D Note
Le bouton multifonctions
NOUVEAU n’est
pas aché si l’enregistrement actuel est
vide.
0:00
#1
DPM 9380.DSS
NOUVEAU
4 Pour démarrer l’enregistrement, déplacez
l’interrupteur à 4 positions sur la position
ENRE et commencez à parler.
• Pendant l‘enregistrement, le voyant d‘état est
rouge (en mode Remplacement) ou vert (en
mode Insertion).
• L’information suivante s’ache:
a
Mode d’enregistrement
b
Durée d’enregistrement
c
Position dans l’enregistrement
d
Numéro de l’enregistrement
e
Nom de fichier
a
b
c
d
e
0:34
#2
DPM 9380.DSS
5 Pour arrêter l’enregistrement, déplacez
l’interrupteur à 4 positions sur la position
ARRÊT.
64 Manuel de l‘utilisateur

3 Appuyez sur le bouton + ou – pour choisir
DPM 9380.DSS
0:39
#2
Supprimer dictée
Insérer index
Mode d'insertion
Auteur
Ecraser
Insérer ou Écraser.
• En Mode d’insertion, l’interrupteur à 4
positions ache
iENRE et le voyant d’état
est vert pendant l’enregistrement.
• En Mode d’écrasement, l’interrupteur à 4
positions ache
ENRE et le voyant d’état
est rouge pendant l’enregistrement.
D Note
Pour obtenir un bon résultat, placez le
microphone à environ 10 centimètres de votre
bouche et parlez clairement.
4.1.2 Compléter un enregistrement
(insérer/écraser)
Par défaut, les enregistrements s‘eectuent
en Mode d’écrasement. Pour passer en Mode
d’insertion et ajouter des éléments dans votre
dictée, suivez les instructions données ci-après :
1 En position
MENU pour ouvrir le menu.
ARRÊT, appuyez sur le bouton
0:00
#2
DPM 9380.DSS
NOUVEAU
2 Appuyez sur le bouton + ou – pour
sélectionner le menu Mode d’insertion
et appuyez sur le bouton multifonctions
ENTRER pour entrer dans le sous-menu.
Supprimer dictée
Insérer index
Mode d'insertion
Ecraser
Auteur
RETOUR ENTRER
Mode d'insertion:
Ecraser
Insérer
OK ANNULER
Mode d'insertion:
Ecraser
Insérer
OK ANNULER
FRANÇAIS
4 Appuyez sur le bouton multifonctions OK
pour enregistrer le paramétrage ou sur
le bouton multifonctions
ANNULER pour
quitter le sous-menu sans modifier les
paramétrages.
Mode d'insertion:
Ecraser
Insérer
OK ANNULER
5 Appuyez sur le bouton + ou – pour
sélectionner le fichier dans lequel vous
souhaitez insérer du texte.
0:00
#2
DPM 9380.DSS
NOUVEAU
2
1
65Manuel de l‘utilisateur

DPM 9380.DSS
0:39
#2
6 Avancez ou revenez en arrière jusqu’à la
DPM 9380.DSS
0:25
#2
DPM 9380.DSS
0:39
#2
vous souhaitez marquer comme terminé.
position où l’insertion doit être faite.
7 Pour insérer un enregistrement
supplémentaire, déplacez l’interrupteur
à 4 positions sur la position
iENRE et
commencez à parler. Le texte inséré ne
remplace pas l’enregistrement.
0:00
#2
DPM 9380.DSS
NOUVEAU
2 Appuyez sur le bouton EOL pour que la
dictée soit marquée comme terminée.
Le symbole ┱ est aché sur l‘écran.
8 Pour arrêter d’insérer un enregistrement
supplémentaire, déplacez l’interrupteur à 4
positions sur la position
ARRÊT.
3 Si vous voulez que cette dictée soit marquée
comme prioritaire, appuyez de nouveau sur
le bouton
EOL dans la demi-seconde qui
suit.
Le symbole ! est aché sur l‘écran. Il
indique que la dictée est prioritaire pour la
9 Si la dictée n’est pas terminée, avancez
simplement rapidement jusqu’à la fin du
fichier et continuez à enregistrer.
⑩ Si vous souhaitez revenir en Mode
transcription.
4 Si vous souhaitez la modifier, il vous faudra
appuyer de nouveau sur la touche
EOL pour
supprimer la marque terminée.
d’écrasement, reprenez à partir de l’étape 1.
E Conseil
Le logiciel SpeechExec peut être configuré pour
4.1.3 Terminer (verrouiller) un
enregistrement
transférer des fichiers uniquement marqués
comme terminés du Pocket Memo vers le PC.
Lorsque vous avez terminé un enregistrement
et ne souhaitez pas apporter d’autres
modifications, suivez les indications données ciaprès pour qu’il soit marqué comme terminé et
protégé contre toute suppression accidentelle :
1 En position
ou – pour sélectionner l’enregistrement que
ARRÊT, appuyez sur le bouton +
C Attention
Les fichiers marqués comme terminés sont
supprimés lorsque la carte mémoire est
formatée ou lorsque la fonction ‘Supprimer
toutes les dictées’ est utilisée.
66 Manuel de l‘utilisateur

RETOUR ENTRER
Microphone
Déclenchem. vocal
Format enregistr.
Eclairage
SP <DSS>
Microphone
Déclenchem. vocal
Format enregistr.
Eclairage
SP <DSS>
4.1.4 Modifier le format d’enregistrement
RETOUR ENTRER
Insérer index
Mode d'insertion
Auteur
Installation
Language
RETOUR ENTRER
Insérer index
Mode d'insertion
Auteur
Installation
Language
Le format choisi détermine la qualité audio
de vos enregistrements et le temps total
d’enregistrement que vous pouvez sauvegarder
sur votre carte mémoire. Le Pocket Memo
accepte les formats suivants :
• Standard Play (SP) : 1 Mo pour un
enregistrement de 10 minutes.
• Quality Play (QPm) : 1 Mo pour un
enregistrement de 5 minutes.
1 En position
MENU pour ouvrir le menu.
ARRÊT, appuyez sur le bouton
0:00
#2
DPM 9380.DSS
NOUVEAU
2 Appuyez sur le bouton + ou – pour
sélectionner l’option Installation du menu
puis sur le bouton multifonctions
ENTRER.
2
1
4 Appuyez sur le bouton + ou – pour choisir
SP ou QP.
Format enregistr.:
SP <DSS>
QP <DS2>
OK ANNULER
Format enregistr.:
SP <DSS>
QP <DS2>
OK ANNULER
5 Appuyez sur le bouton multifonctions OK
pour enregistrer le paramétrage ou sur
le bouton multifonctions
ANNULER pour
quitter le sous-menu sans modifier le
paramétrage.
FRANÇAIS
3 Appuyez sur le bouton + ou – pour
sélectionner l’option Format enregistrement
du menu et appuyez sur le bouton
multifonctions
ENTRER.
Format enregistr.:
SP <DSS>
QP <DS2>
OK ANNULER
2
1
67Manuel de l‘utilisateur

4.1.5 Régler la sensibilité du microphone
RETOUR ENTRER
Insérer index
Mode d'insertion
Auteur
Installation
Language
RETOUR ENTRER
Insérer index
Mode d'insertion
Auteur
Installation
Language
RETOUR ENTRER
Lampe témoin
Contraste
Signal sonore
Microphone
Dictée
Lampe témoin
Contraste
Signal sonore
Microphone
Dictée
Réglez la sensibilité du microphone en fonction
de l’environnement sonore et de votre façon de
dicter.
1 En position
MENU pour ouvrir le menu.
ARRÊT, appuyez sur le bouton
0:00
#2
DPM 9380.DSS
NOUVEAU
4 Appuyez sur le bouton + ou – pour choisir
la sensibilité du microphone: Privé (bas),
Dictée (moyen) et Conférence (haut).
Microphone:
Dictée
Privé
Microphone:
Dictée
Privé
Conférence
OK ANNULER
Conférence
OK ANNULER
5 Appuyez sur le bouton multifonctions OK
pour enregistrer le paramétrage.
2 Appuyez sur le bouton + ou – pour
sélectionner l’option Installation du menu
puis sur le bouton multifonctions
ENTRER.
2
1
Microphone:
Dictée
Privé
Conférence
OK ANNULER
3 Appuyez sur le bouton + ou – pour
sélectionner l’option Microphone du menu
puis sur le bouton multifonctions
68 Manuel de l‘utilisateur
ENTRER.
2
1

DPM 9380.DSS
0:00
#2
4.2 Lecture
DPM 9380.DSS
0:00
#2
1 En position
ARRÊT, appuyez sur le bouton
+ ou – pour sélectionner le fichier à
écouter et pour localiser le début de
l’enregistrement.
0:00
#2
DPM 9380.DSS
NOUVEAU
2 Mettez l’interrupteur à 4 positions sur LECT
pour commencer la lecture.
L’information ci-après s’ache:
a
Format d’enregistrement
b
Position lecture (minutes : secondes)
c
Position actuelle dans l’enregistrement
d
Numéro de fichier
e
Nom de fichier
MIN MAX
– +
4 Appuyez sur le bouton multifonctions
VITESSE pour régler la vitesse de lecture du
fichier.
0:34
#2
DPM 9380.DSS
VITESSE
5 Pour arrêter la lecture, mettez l’interrupteur
à 4 positions sur
ARRÊT.
FRANÇAIS
a
b
c
d
e
3 Appuyez sur le bouton + ou – pour régler le
niveau sonore pendant la lecture.
0:34
#2
DPM 9380.DSS
VITESSE
69Manuel de l‘utilisateur

4.2.1 Aperçu général des fonctions de
lecture
Sélection
du fichier
En position ARRÊT, appuyez une
fois sur le bouton
+ pour vous
positionner à la fin d’un fichier.
Appuyez à nouveau sur le bouton
pour vous positionner au début du
fichier suivant.
En position
sur le bouton
ARRÊT, appuyez une fois
– pour vous positionner
au début d’un fichier. Appuyez
à nouveau sur le bouton
– pour
vous positionner à la fin du fichier
précédent.
Retour
rapide
Déplacez l’interrupteur à 4 positions
sur la position ┤. Déplacez
l’interrupteur à 4 positions sur la
position
rapide ou sur la position
ARRÊT pour arrêter le retour
LECT pour
arrêter le retour rapide et démarrer
la lecture.
Avance
rapide
Appuyez et maintenez le bouton
tout en étant en position
LECT. Relachez le bouton FWD pour
ARRÊT ou
arrêter l’avance rapide.
Vitesse de
lecture
Appuyez sur le bouton multifonctions
VITESSE pendant la lecture pour
accélérer ou ralentir la vitesse de
lecture.
4.3 Supprimer
D Note
Avant de supprimer une dictée, vérifiez qu‘elle
n‘est pas marquée comme terminée et que
la carte mémoire n‘est pas en lecture seule
(verrouillée). Si la dictée est marquée comme
+
terminée, déverrouillez-la en appuyant une fois
sur le bouton
EOL.
4.3.1 Supprimer une dictée
Pour supprimer une dictée, procédez comme
indiqué ci-dessous:
1 En position
ARRÊT, appuyez sur le bouton
+ ou – pour sélectionner le fichier que vous
souhaitez supprimer.
0:00
#2
DPM 9380.DSS
FWD
NOUVEAU
2 Appuyez sur le bouton MENU pour ouvrir le
menu. L’option Supprimer dictée
sélectionnée.
du menu est
0:00
#2
DPM 9380.DSS
NOUVEAU
70 Manuel de l‘utilisateur

3 Appuyez sur le bouton multifonctions
Supprimer dictée
Insérer index
Supprimer ?
RETOUR ENTRER
Mode d'insertion
Auteur
Installation
Supprimer section
RETOUR ENTRER
Mode d'insertion
Auteur
Installation
Supprimer section
DPM 9380.DSS
ANNULER MARQUE2
0:36
#2
0:36
#2
ENTRER pour entrer dans le sous-menu.
Supprimer dictée
Supprimer ?
Insérer index
Mode d'insertion
Auteur
RETOUR ENTRER
2 Appuyez sur le bouton + ou – pour
sélectionner l’option Supprimer section
du menu et appuyez sur le bouton
multifonctions
OK.
2
4 Appuyez sur OK pour supprimer la dictée.
Appuyez sur
ANNULER pour annuler
l‘opération et conserver la dictée.
Supprimer dictée:
Supprimer ?
!! ATTENTION !!
OK ANNULER
4.3.2 Supprimer une partie d‘une dictée
Pour supprimer une partie d‘une dictée,
procédez comme indiqué ci-dessous:
1 En position
MENU pour ouvrir le menu.
ARRÊT, appuyez sur le bouton
0:00
#2
DPM 9380.DSS
NOUVEAU
1
3 Placez-vous au début de la section que vous
souhaitez supprimer à l’aide des fonctions
lecture ou avance/retour. Appuyez sur le
bouton
MARQUE .
Une croix est achée sur l‘écran.
0:25
#2
DPM 9380.DSS
ANNULER MARQUE1
4 Placez-vous à la fin de la section à
supprimer à l’aide des fonctions lecture ou
avance / retour et appuyez sur le bouton
multifonctions
MARQUE 2.
Une deuxième croix est achée.
FRANÇAIS
71Manuel de l‘utilisateur

5 Pour confirmer que vous voulez la partie
DPM 9380.DSS
ANNULER SUPPRIM
0:36
#2
0:36
#2
RETOUR ENTRER
Insérer index
Mode d'insertion
Auteur
Installation
Language
RETOUR ENTRER
Insérer index
Mode d'insertion
Auteur
Installation
Language
RETOUR ENTRER
Signal sonore
Microphone
Date & heure
Sprrimer dictées
Supprimer tout
RETOUR ENTRER
Signal sonore
Microphone
Date & heure
Sprrimer dictées
Supprimer tout
marquée, appuyez sur le bouton
sur le bouton
ANNULER pour sortir sans eacer.
OK, ou appuyez sur le bouton
SUPPRIM et
4.3.3 Supprimer toutes les dictées
C Attention
Les fichiers marqués comme terminés (EOL)
sont supprimés quand la fonction ‘Supprimer
toutes les dictées’ est utilisée.
2 Appuyez sur le bouton + ou – pour
sélectionner l’option Installation du menu
et appuyez sur le bouton multifonctions
ENTRER.
3 Appuyez sur le bouton + ou – pour
sélectionner l’option Supprimer les dictées
puis sur le bouton multifonctions
ENTRER.
2
1
Suivez les instructions ci-après pour supprimer
toutes les dictées:
1 En position
MENU pour ouvrir le menu.
ARRÊT, appuyez sur le bouton
4 Appuyez sur le bouton multifonctions
0:00
#2
DPM 9380.DSS
NOUVEAU
72 Manuel de l‘utilisateur
ENTRER et sur le bouton multifonctions OK
pour confirmer la suppression, ou appuyez
sur le bouton multifonctions
ANNULER pour
quitter sans supprimer.
Supprimer tout:
Oui - supprimer
!! ATTENTION !!
OK ANNULER
2
1

5 Comment mieux tirer parti
de votre Pocket Memo
5.1 Utiliser le logiciel Philips
SpeechExec
Le logiciel Philips SpeechExec peut être utilisé
pour la configuration avancée du Pocket
Memo, pour le téléchargement automatique, la
conversion et le routage des fichiers de dictée.
D Note
Pour plus d’informations sur le logiciel Philips
SpeechExec, veuillez consulter le manuel de
l’utilisateur de SpeechExec.
5.1.1 Configuration avancée
L’assistant de configuration du Digital Pocket
Memo fait partie du logiciel de dictée Philips
SpeechExec. Il guide l’utilisateur dans la
configuration et les paramétrages de son
Digital Pocket Memo : configuration du
format de l’heure, du signal sonore, du
déclenchement vocal de l’enregistrement, de
l’achage écran (mode standard ou avancé),
du format de l’enregistrement, de la sensibilité
du microphone, du nom des auteurs, et du
téléchargement des fichiers sur un PC.
sélectionnez Configuration DPM/DT >
Assistant DPM à partir de la liste achée
sur la gauche.
4 Cliquez ensuite sur le bouton Démarrer
l‘assistant. Suivez les instructions achées
pour personnaliser le Digital Pocket Memo
en fonction de vos besoins.
5 Cliquez sur le bouton Terminer pour quitter
l‘assistant et confirmer le transfert des
nouveaux paramètres vers le Digital Pocket
Memo.
D Note
Lorsque vous connectez le Pocket Memo à
votre PC pour la première fois, Windows
détecte un nouveau matériel et installe
automatiquement les pilotes nécessaires. Une
fois l‘installation terminée, Windows peut vous
demander de redémarrer votre PC.
5.1.2 Transférer des enregistrements sur
le PC
Avec la connexion USB, le Pocket Memo
est automatiquement reconnu comme un
périphérique externe quand il est connecté
à l’ordinateur. Ainsi, il est facile d’accéder
au contenu de l’appareil avec n’importe quel
programme de Microsoft Windows comme à
toute unité externe.
Utilisez le logiciel Philips SpeechExec pour le
téléchargement automatique, la conversion et le
routage des fichiers.
FRANÇAIS
1 Connectez le Digital Pocket Memo à votre
PC à l‘aide d‘un câble USB.
2 Démarrez le logiciel de dictée Philips
SpeechExec Dictate.
3 Cliquez sur Paramètres > Paramètres
généraux dans la barre de menu et
1 Eectuez un enregistrement avec le Pocket
Memo.
2 Démarrez le logiciel de dictée SpeechExec.
3 Connectez le Pocket Memo à votre PC
à l‘aide d‘un câble USB ou de la station
d’accueil USB (option).
73Manuel de l‘utilisateur

4 Par défaut, les enregistrements présents
sur le Pocket Memo seront téléchargés
automatiquement sur le PC et déplacés dans
le dossier Dictées terminées de la liste de
travail.
D Note
Lorsqu‘un Pocket Memo est connecté, vous
pouvez configurer le téléchargement (quels
fichiers doivent être téléchargés et comment) à
partir du menu Paramètres de SpeechExec ou via
l‘assistant de configuration.
3 Pour sélectionner un sous-menu, appuyez
sur le bouton
ENTRER ou MENU.
Supprimer dictée
Insérer index
Mode d'insertion
Auteur
RETOUR ENTRER
4 Pour sortir du menu, appuyez sur RETOUR.
5.2 Paramètres du menu
Pour accéder au menu du Pocket Memo:
1 En position
MENU pour ouvrir le menu.
ARRÊT, appuyez sur le bouton
0:00
#2
DPM 9380.DSS
NOUVEAU
2 Appuyez sur le bouton + ou – pour vous
déplacer dans le menu.
Supprimer dictée
Insérer index
Mode d'insertion
Auteur
RETOUR ENTRER
Supprimer dictée
Insérer index
Mode d'insertion
Auteur
RETOUR ENTRER
5 Sélectionnez une fonction à l‘aide des
boutons + ou –.
6 Pour confirmer une sélection, appuyez sur
OK, pour annuler, appuyez sur ANNULER.
74 Manuel de l‘utilisateur

RETOUR ENTRER
Insérer index
Mode d'insertion
Auteur
Installation
Language
RETOUR ENTRER
Insérer index
Mode d'insertion
Auteur
Installation
Language
5.2.1 Liste des menus
D Note
• Certains paramètres, tels que définir les noms
d’auteurs ou passer à un mode d’achage
simple, sont uniquement disponibles via Philips
SpeechExec Dictate. Pour plus d‘informations,
reportez-vous à la rubrique 5.1.1 Configuration
avancée page 73.
• Pour accéder à des informations
supplémentaires sur les fichiers, l‘appareil et
la carte mémoire, appuyez en continu sur le
bouton
MENU.
Appuyez sur le bouton MENU
SUPPRIMER DICTÉE (page 70)
INSÉRER / SUPPRIMER INDEX (page 77)
MODE D’INSERTION (page 65)
AUTEUR (MOT-CLÉ) (page 78)
SUPPRIMER L’INDEXAGE (page 78)
SUPPRIMER SECTION (page 71)
LANGUAGE (LANGUE) (page 62)
FORMAT D’ENREGISTREMENT (page 67)
DÉCLENCHEMENT VOCAL (page 75)
RETRO-ECLAIRAGE (OFF / 8 Sec. / 20 Sec.)
TÉMOIN D’ENREGISTREMENT ON / OFF
SIGNAL SONORE ON / OFF
SENSIBILITÉ DU MICROPHONE (page 68)
DATE & HEURE (page 62)
CHARGE RAPIDE USB ON / OFF
SUPPR. TOUTES LES DICTÉES (page 72)
FORMATER LA MÉMOIRE (page 61)
CARACTÈRE (MODERNE/CLASSIQUE)
VOLUME DE LECTURE
INSTALLATION
CONTRASTE
5.3 Utiliser le déclenchement vocal de
l’enregistrement
Le déclenchement vocal de l’enregistrement
est une fonction pratique pour les dictées
« mains libres ». Lorsque cette fonction est
activée, l’appareil ne commence à enregistrer
que lorsque vous commencez à parler. Si
vous cessez de parler, le Pocket Memo arrête
automatiquement d’enregistrer (au bout
de 3 secondes de silence) et ne reprend
l’enregistrement que lorsque vous recommencez
à parler.
1 En position
MENU pour ouvrir le menu.
MENU PRINCIPALMENU DE PARAMETRAGE
ARRÊT, appuyez sur le bouton
0:00
#2
DPM 9380.DSS
NOUVEAU
2 Appuyez sur le bouton + ou – pour
sélectionner l’option Installation du menu
puis sur le bouton multifonctions
ENTRER.
3 Appuyez sur le bouton + ou – pour
sélectionner l’option Déclenchement vocal
du menu puis sur le bouton multifonctions
ENTRER.
FRANÇAIS
2
1
75Manuel de l‘utilisateur

DPM 9380.DSS
0:00
#2
DPM 9380.DSS
0:39
#2
DPM 9380.DSS
0:39
#2
RETOUR ENTRER
Language
Format enregistr.
Déclenchem. vocal
Eclairage
Désactivé
Language
Format enregistr.
Déclenchem. vocal
Eclairage
Désactivé
2
1
4 Appuyez sur le bouton + ou – pour choisir
Marche ou Arrêt.
Déclenchem. vocal:
Désactivé
Activé
Déclenchem. vocal
Désactivé
Activé
OK ANNULER
:
7 Appuyez sur le bouton + ou – pour régler le
seuil d’enregistrement.
OK ANNULER
5 Confirmez la nouvelle sélection en
appuyant sur le bouton
OK ou conservez la
sélection actuelle en appuyant sur le bouton
8 Pour arrêter l’enregistrement, déplacez
l’interrupteur à 4 positions sur la position
ARRÊT.
ANNULER.
Déclenchem. vocal:
Désactivé
Activé
OK ANNULER
6 Pour démarrer l’enregistrement, déplacez
l’interrupteur à 4 positions sur la position
ENRE et commencez à parler.
Pendant l‘enregistrement, le voyant d‘état est
rouge (en mode Remplacement) ou vert (en
mode Insertion). Si le niveau sonore est inférieur
à un certain seuil l’enregistrement s’arrête
au bout de trois secondes et le voyant d’état
clignote.
76 Manuel de l‘utilisateur

RETOUR ENTRER
Supprimer dictée
Supprim. l'index
Mode d'insertion
Auteur
Supprimer dictée
Supprim. l'index
Mode d'insertion
5.4 Utiliser des index
RETOUR ENTRER
Supprimer dictée
Insérer index
Mode d'insertion
Auteur
Supprimer dictée
Insérer index
Mode d'insertion
Vous pouvez insérer des index dans une dictée
pour repérer des points intéressants, par
exemple le début d’une partie importante, un
passage que vous souhaitez corriger plus tard,
ou un élément auquel vous souhaitez avoir accès
rapidement et facilement.
5.4.2 Supprimer un index
1 Placez-vous à l’endroit où vous voulez
supprimer un index, à l’aide des fonctions
avance ou retour rapide.
2 En position
MENU pour ouvrir le menu.
ARRÊT, appuyez sur le bouton
5.4.1 Insérer un index
1 Placez-vous à l’endroit où vous voulez
insérer un index, à l’aide des fonctions
avance ou retour rapide.
2 En position
MENU pour ouvrir le menu.
ARRÊT, appuyez sur le bouton
0:00
#2
DPM 9380.DSS
NOUVEAU
3 Appuyez sur le bouton + ou – pour
sélectionner l’option Insérer index puis sur le
bouton multifonctions
OK.
0:00
#2
DPM 9380.DSS
NOUVEAU
FRANÇAIS
3 Appuyez sur le bouton + ou – pour
sélectionner l’option Supprimer l’index puis
sur le bouton multifonctions
2
OK.
2
1
1
77Manuel de l‘utilisateur

Mode d'insertion
Auteur
Installation
DPM 9380
5.4.3 Supprimer tous les index
RETOUR ENTRER
Mode d'insertion
Auteur
Installation
Suppr. l'indexage
Supprimer tout
RETOUR ENTRER
Mode d'insertion
Auteur
Installation
Suppr. l'indexage
Supprimer tout
1 Appuyez sur le bouton
MENU quand
l’appareil est arrêté pour ouvrir le menu.
0:00
#2
DPM 9380.DSS
NOUVEAU
2 Appuyez sur le bouton + ou – pour
sélectionner l’option Supprimer l’indexage
du menu puis sur le bouton multifonctions
ENTRER.
5.5 Attribuer un nom d’auteur
Un mot-clé, comme le nom de l’auteur, peut
être associé à chaque enregistrement. Le
mot clef peut être utilisé pour identifier les
enregistrements et pour le routage des fichiers
dans le logiciel Philips SpeechExec.
D Note
Les noms des auteurs doivent être définis au
préalable avec le logiciel Philips SpeechExec. Pour
plus d‘informations, reportez-vous à la rubrique
5.1.1 Configuration avancée page 73. Par
défaut, c’est la catégorie de mot-clé AUTEUR
avec les mots-clé ‘DPM 9370’ et ‘- - -’ (vide =
défaut) qui est définie sur le Pocket Memo.
Pour associer le nom d’un auteur à un
enregistrement :
1 En position
MENU pour ouvrir le menu.
ARRÊT, appuyez sur le bouton
2
1
0:00
#2
DPM 9380.DSS
NOUVEAU
3 Appuyez sur le bouton multifonctions
ENTRER et le bouton multifonctions OK
pour confirmer la suppression, ou appuyez
sur le bouton multifonctions
quitter sans supprimer.
Supprimer tout:
Oui - supprimer
!! ATTENTION !!
OK ANNULER
ANNULER pour
2 Appuyez sur le bouton + or – pour
sélectionner l’option Auteur du menu.
Mode d'insertion
Auteur
DPM 9380
Installation
Suppr. l'indexage
RETOUR ENTRER
D Note
L’option Supprimer l’indexage du menu est
accessible uniquement si la dictée actuelle
comporte au moins un index.
78 Manuel de l‘utilisateur

3 Appuyez sur le bouton multifonctions
ENTRER pour acher la liste des noms.
Mode d'insertion
Auteur
DPM 9380
Installation
Suppr. l’indexage
RETOUR ENTRER
4 Appuyez sur le bouton + or − pour
sélectionner un nom.
Auteur:
DPM 9380
Peter
Auteur:
DPM 9380
Peter
- - -
OK ANNULER
- - -
OK ANNULER
5 Appuyez sur le bouton OK pour confirmer
ou le bouton multifonctions
ANNULER pour
quitter sans sélectionner de nom.
Auteur:
DPM 9380
Peter
- - -
OK ANNULER
FRANÇAIS
79Manuel de l‘utilisateur

6 Données techniques
Connectivité
• Écouteurs: 3,5 mm
• Microphone: 3,5 mm
• USB: USB 2.0 haut débit
• Connecteur de synchronisation
• Logement carte mémoire
Achage
• Type: LCD
• Diagonale de l’écran: 44 mm/1,7 pouce
• Rétroéclairage: blanc
Supports de stockage
• Carte mémoire remplaçable
• Types de carte mémoire: Secure Digital (SD),
Secure Digital (SDHC)
• Compatible avec stockage de masse
Enregistrement audio
• Formats d’enregistrement: Digital speech
standard (DSS)
• Microphone intégré: mono
• Modes d’enregistrement: QP (DSS/mono), SP
(DSS/mono)
• Débit binaire: 13,5, 27 kbit/s
• Durée d’enregistrement (carte de 2 Go): 349
heures (SP), 170 heures (QP)
• Taux d’échantillonnage: 16 kHz (QP), 12 kHz
(SP)
Son
• Type de haut-parleur: haut-parleur dynamique
de forme arrondie intégré
• Diamètre de l’enceinte: 30 mm
• Puissance de sortie du haut-parleur: 200 mW
• Réponse en fréquence: 300–7 000 Hz (QP),
300–5 700 Hz (SP) Hz
Praticité
• Fonctions de modification professionnelles
• Langues prises en compte: 4 langues (EN, FR,
DE, ES)
• 2 boutons intelligents
• Paramètre d’ID d’auteur
• Contrôle via commutateur à coulisse
• Verrouillage des fichiers
• Fonctionnement d’un seul pouce
• Paramètre de priorité
• Enregistrement à déclenchement vocal
• Mises à jour automatiques du logiciel
Puissance
• Type de pile: alcaline AAA/LR03, Philips AAA
Ni-MH LFH9154
• Nombre de piles: 2
• Rechargeable: oui, via USB
• Autonomie des piles: jusqu’à 23 heures en
mode d’enregistrement SP
• Piles fournies
Configuration système requise
• Processeur: Pentium III 1 GHz, Pentium IV
recommandé
• Mémoire vive: 512 Mo (1 Go recommandé)
• Capacité disque dur: 100 Mo pour
SpeechExec, 250 Mo pour Microsoft .NET
• Sortie écouteurs ou haut-parleurs
• Système d’exploitation: Windows 7/Vista/XP
• Port USB libre
• Lecteur de DVD-ROM
• Carte son
Caractéristiques environnementales
• Conforme à la directive 2002/95/EC (RoHS)
• Produit sans soudures au plomb
• Accessoires
• Logiciel SpeechExec Dictate
• Câble USB
• Carte mémoire Secure Digital
• Housse
• Guide de mise en route
• 2 piles AAA
Design et finition
• Couleur(s): argenté/noir
• Matériau: boîtier tout en métal
80 Manuel de l‘utilisateur

Manual del usuario
1 Importante 82
2 Su Pocket Memo 83
2.1 Funciones destacadas del producto 83
2.2 Contenido del embalaje 83
2.3 Generalidades 84
2.3.1 Controles y conexiones 84
2.3.2 Indicadores y símbolos en la pantalla 85
3 Inicio 86
3.1 Colocar las baterías o pilas 86
3.2 Recarga de las baterías 86
3.3 Insertar y extraer la tarjeta de
memoria 87
3.4 Formatear una tarjeta de memoria 87
3.5 Activación del Pocket Memo 88
3.5.1 Selección del idioma 88
3.5.2 Ajuste de fecha y hora 88
3.6 Modo de ahorro de energía 89
4 Utilizar su Pocket Memo 90
4.1 Grabación 90
4.1.1 Crear una grabación 90
4.1.2 Anexar al dictado (insertar / sobrescribir)
91
4.1.3 Terminar (bloquear) una grabación 92
4.1.4 Cambiar el formato de grabación 93
4.1.5 Ajustar la sensibilidad del micrófono 94
4.2 Reproducir 95
4.2.1 Generalidades sobre las funciones de
reproducción 96
4.3 Eliminar 96
4.3.1 Eliminar un dictado 96
4.3.2 Eliminar una parte del dictado 97
4.3.3 Eliminar todos los dictados 98
5 Para sacar el mayor provecho de
su Pocket Memo 99
5.1 Utilizar Philips SpeechExec 99
5.1.1 Configuración avanzada 99
5.1.2 Descargar grabaciones al ordenador 99
5.2 Menú de configuraciones 100
5.2.1 Lista de menú 101
5.3 Utilizar la grabación con activación por
voz 101
5.4 Trabajar con marcas de índice 103
5.4.1 Insertar una marca de índice 103
5.4.2 Eliminar una marca de índice 103
5.4.3 Eliminiar todas las marcas de índice 103
5.5 Asignar un nombre de autor 104
6 Technical data 106
ESPAÑOL
81Manual del usuario

1 Importante
Philips se reserva el derecho a modificar los
productos en cualquier momento sin estar
obligada a ajustar los suministros anteriores con
arreglo a ello.
El material incluido en este manual se considera
suficiente para el uso al que está destinado
el sistema. Si el producto o sus módulos
o procedimientos individuales se emplean
para fines diferentes a los especificados en el
presente, deberá obtenerse una confirmación de
que son válidos y aptos para ellos.
Seguridad
• Para evitar un cortocircuito, no exponga el
producto a la lluvia ni al agua.
• No exponga el dispositivo a un calor excesivo
causado por equipos de calefacción o rayos
solares directos.
• Proteja los cables para evitar que se
pellizquen, en especial en los enchufes y en la
parte que sale de la unidad.
• Realice una copia de seguridad de los archivos.
Philips no se hace responsable de ninguna
pérdida de datos.
Seguridad de los oídos
Tenga en cuenta las siguientes indicaciones al
utilizar los auriculares:
• Escuche con niveles de volumen moderados
durante períodos de tiempo razonables.
• Tenga cuidado de no subir el nivel de volumen
a medida que sus oídos se adaptan.
• No suba el volumen a un punto tal que le
impida escuchar los sonidos ambientales.
• Debe tener precaución o interrumpir
temporalmente el uso ante situaciones
potencialmente peligrosas.
• No utilice auriculares mientras conduce un
vehículo motorizado, bicicleta, monopatín,
etc. Puede implicar un peligro para el tránsito
y es ilegal en varias zonas.
Importante (para modelos que incluyen
auriculares):
Philips garantiza la máxima potencia de sonido
de sus reproductores de audio en cumplimiento
con las regulaciones establecidas por los
organismos pertinentes, aunque sólo en el caso
de los modelos originales de los auriculares
proporcionados. En caso de que los auriculares
deban sustituirse, le recomendamos que se
ponga en contacto con su distribuidor minorista
para solicitar un modelo Philips idéntico al
original.
Niños
El dispositivo y sus accesorios no son juguetes.
Pueden contener piezas pequeñas. Manténgalas
fuera del alcance de los niños.
Desecho del producto anterior
• El producto está diseñado y fabricado con
materiales y componentes de excelente
calidad que pueden reciclarse y volverse a
utilizar.
• Cuando un producto viene con
el símbolo de un cubo de basura
con ruedas tachado, significa que
el producto está cubierto por la directiva
Europea 2002/96/EC.
• Infórmese acerca del sistema de recolección
selectiva local para productos eléctricos y
electrónicos.
• Respete las normas locales y no deseche los
productos anteriores junto con los residuos
domésticos habituales. El desecho adecuado
de los productos anteriores permitirá impedir
posibles consecuencias negativas para el
medio ambiente y la salud de las personas.
• Las pilas (incluidas las pilas recargables
incorporadas) contienen sustancias que
pueden contaminar el medio ambiente. Todas
las pilas deben desecharse en un punto de
recolección oficial.
82 Manual del usuario

2 Su Pocket Memo
Felicitaciones por su compra y bienvenido a
Philips.
Con el fin de aprovechar al máximo la asistencia
ofrecida por Philips, visite nuestro sitio web
para obtener información de soporte, como
manuales del usuario, descargas de software e
información sobre la garantía, entre otros:
www.philips.com/support.
2.1 Funciones destacadas del producto
• El diseño ergonómico y asimétrico del
Pocket Memo ofrece una operación amigable
sin comparación. El interruptor deslizante
permite un rápido control y su manejo son
una sola mano.
• Dos botones ‘inteligentes’ le permiten navegar
por el menú y seleccionar rápidamente.
• La pantalla grande le permite ver toda la
información referente a un archivo, como
palabras claves (nombre del autor), duración
del dictado, posición en el archivo y otra
información relevante de un vistazo. La
iluminación de la pantalla le permite ver esta
información incluso en la oscuridad.
• Los archivos con formato .dss son el estándar
internacional para la procesación de voz
profesional. Además de una calidad acústica
extraordinaria de la grabación, los archivos
.dss permiten un alto nivel de compresión,
reducen el tamaño de los archivos, el tráfico
en la red y la capacidad de memoria necesaria.
• El SpeechExec Dictate es el programa
perfecto para el manejo de archivos de voz.
La interfaz de usuario intuitiva, hace que el
trabajo sea rápido y sencillo; la información
de la condición o status del archivo permite el
seguimiento del progreso del trabajo.
2.2 Contenido del embalaje
Pocket Memo
CD-ROM con
software y manual del
usuario
Tarjeta de memoria
Funda
Register your product and get support at
POCKET MEMO
www.philips.com/welcome
EN
Quick start guide
DE
Kurzanleitung
FR
Guide de démarrage rapide
ES
Guía de inicio rápido
IT
Guida rapida di introduzione
NL
Snelle startgids
SV
Snabbstartsguide
LFH9380
with SpeechExec
workflow software
Baterías recargables
Cable USB
Guía de inicio rápido
ESPAÑOL
83Manual del usuario

2.3 Generalidades
2.3.1 Controles y conexiones
1
Conector para micrófono
2
Conector para auricular
3
Micrófono integrado
4
LED de estado
5
Botón EOL (end-of-letter/final de carta)
6
Interruptor de 4 posiciones
7
Interruptor de encendido/apagado
8
Altavoz
9
Pantalla
10
Botones inteligentes
11
Botón del menú
12
+/–, navegación menú y volumen
1
2
3
4
5
9
6
10
11
12
7
8
13
Ranura para tarjeta de memoria
14
Botón FWD (adelantar)
15
Compartimiento de las baterías
16
Ranura para conectar la base de conexión
17
Ranura para conectar la fuente de
alimentació
18
Ranura para conectar el cable USB
16
17
18
13
14
15
84 Manual del usuario

2.3.2 Indicadores y símbolos en la pantalla
DPM 9380.DSS
START NUEVO
9:23
6 7 8 9 10
11
5
4
3
2
1
1
Función actual del botón inteligente
izquierdo
2
Nombre del archivo
3
Número de grabación
4
Barra de posición
5
Tiempo de grabación / reproducción
6
Indicador del nivel de la batería
7
Formato de grabación
8
Tarjeta de memoria protegida contra
escritura (bloqueada)
9
La función insertar está activada
10
Grabación con activación por voz, habilitada
12
13
14
15
1718 16
11
Nivel de grabación
12
Nivel de sensibilidad donde comienza la
grabación con la función de activación por
voz
13
Posición actual de la grabación
14
Posición actual del interruptor de 4
posiciones
15
Función actual del botón inteligente derecho
16
Grabación marcada como finalizada y
bloqueada (EOL)
17
Grabación marcada con prioridad
18
Grabación contiene una marca de índice
ESPAÑOL
85Manual del usuario

3 Inicio
3.1 Colocar las baterías o pilas
El Pocket Memo funciona con dos baterías
recargables AAA LFH9154 que han sido
entregadas con el producto. También se pueden
utilizar baterías AAA alcalinas comunes (no
recargables).
1 El Pocket Memo debe estar desconectado
(
OFF).
2 Abra el compartimiento de las baterías que
se halla en la parte trasera del Pocket Memo.
3 Coloque las dos baterías AAA. El dibujo
que hay en el interior de la tapa del
compartimiento de las baterías muestra la
polaridad adecuada.
4 Cierre el compartimiento de las baterías y
deslícelo a su lugar hasta que escuche un clic
que indica que se acopló.
D Nota
No utilice baterías de diferente tipo! Utilice dos
baterías recargables (Philips LFH9154) o dos
baterías no recargables.
3.2 Recarga de las baterías
El Pocket Memo puede ser operado con las
baterías recargables Philips LFH9154. Estas
pueden ser recargadas por medio del cable USB,
la base de conexión LFH9120 (opcional), o la
fuente de alimentación Philips LFH9156 (opcional).
Cuando se conecta el Pocket Memo a un
ordenador o a un portátil por medio del cable
USB suministrado, las baterías recargables
automáticamente empiezan a ser cargadas. Si el
puerto USB que hay en el ordenador es de gran
capacidad, un ciclo completo de recarga toma
cerca de 2,5 horas.
D Nota
El PC debe estar encendido al cargar la batería
por medio de la conexión de cable USB. El
Pocket Memo se puede calentar a consecuencia
de la recarga rápida.
C Importante
Si el puerto USB del ordenador no tiene
suficiente capacidad de suministro (500 mA)
desactive la opción Cargado rápido USB en el
menú del Pocket Memo.
86 Manual del usuario
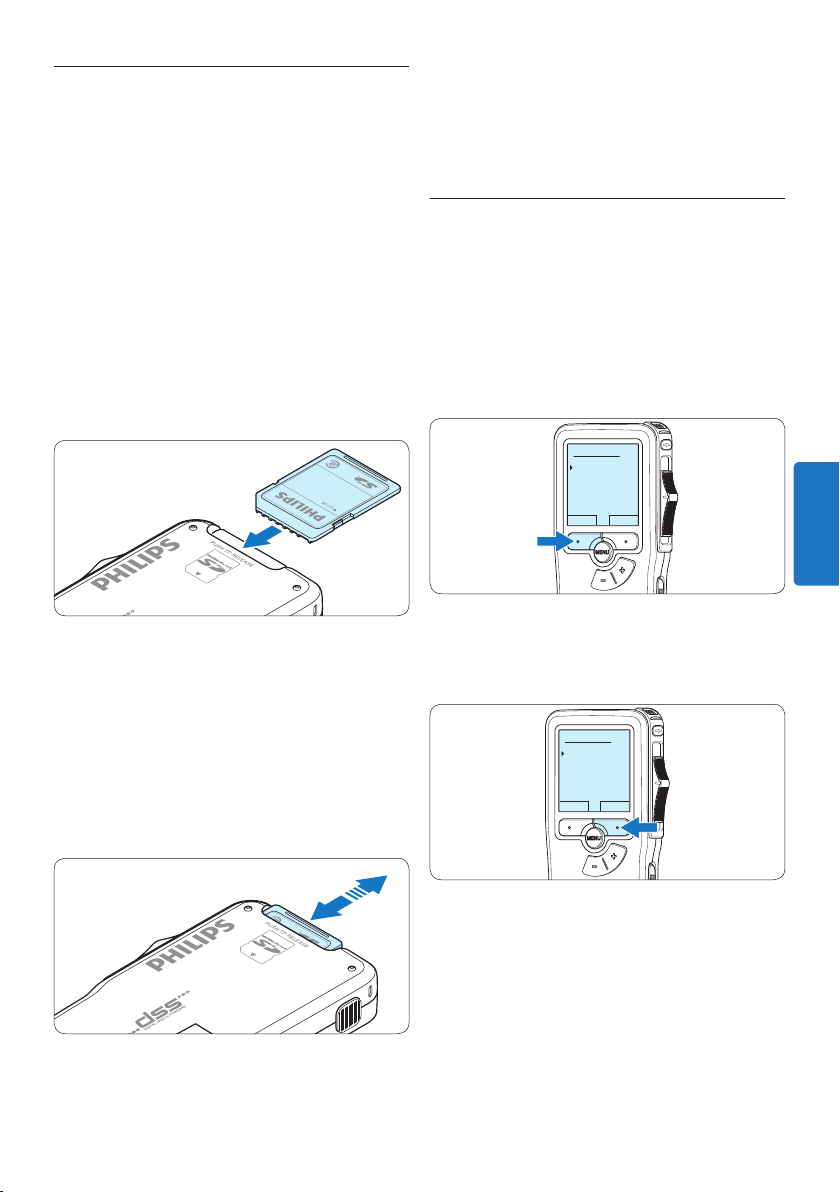
3.3 Insertar y extraer la tarjeta de
memoria
El Pocket Memo funciona con una tarjeta de memoria SD (SecureDigital) y admite tarjetas SDHC
con capacidad de almacenamiento de hasta 32 GB.
D Nota
Si el Pocket Memo está en la posición
ON
(encendido) y no tiene una tarjeta de memoria
insertada, aparece una pantalla de advertencia.
Para insertar una tarjeta de memoria:
1 Ubique la ranura de la tarjeta de memoria
en la parte superior trasera del Pocket
Memo.
2 Deslice la tarjeta de memoria dentro de la
ranura. Una pequeña ilustración debajo de la
ranura de la tarjeta de memoria le indica la
orientación correcta.
3 Empuje la tarjeta de memoria hacia dentro
hasta que escuche un clic.
Para extraer la tarjeta de memoria:
1 Ubique la ranura de la tarjeta de memoria
en la parte superior trasera del Pocket
Memo.
2 Presione la tarjeta de memoria hacia dentro
del Pocket Memo hasta que escuche un clic.
3 Suelte la tarjeta de memoria. La tarjeta
saldrá suavemente de su ranura. Ahora,
simplemente tire de ella.
3.4 Formatear una tarjeta de memoria
Cuando se inserta una tarjeta de memoria
nueva, sin formatear (o que no haya sido
formateada con un dispositivo Pocket Memo),
el Pocket Memo mostrará las indicaciones para
formatear la tarjeta.
1 Para confirmar e iniciar el proceso de
formateo, pulse el botón inteligente
Eliminar todo:
Si - formatear
!! CUIDADO !!
OK CANCEL
OK.
2 Para cancelar el proceso de formateo, retire
la tarjeta de memoria o pulse el botón
inteligente
CANCEL.
Eliminar todo:
Si - formatear
!! CUIDADO !!
OK CANCEL
ESPAÑOL
D Nota
No se podrá llevar a cabo el formateo si la
tarjeta de memoria está en el modo de sólo
lectura (bloqueada).
87Manual del usuario

3.5 Activación del Pocket Memo
El Pocket Memo es encendido o apagado
deslizando el interruptor encendido/apagado
(
ON / OFF). Cuando lo active por primera vez,
ajuste el idioma, la fecha y la hora.
3.5.1 Selección del idioma
Cuando lo utilice por primera vez seleccione el
idioma.
1 Presione los botones + o – en el Pocket
Memo para escoger un idioma.
D Nota
El idioma puede ser modificado posteriormente.
Véase 5.2 Menú de configuraciones en la página
100 para mayor información.
3.5.2 Ajuste de fecha y hora
Después de haber seleccionado el idioma, debe
ajustar la fecha y la hora en el Pocket Memo.
1 Presione repetidamente los botones + o –
para ajustar los valores correspondientes a
año, mes y día.
DATE:
2009-11-01
12/24: TIME:
24 14:22
OK
LANGUAGE
LANGUE
SPRACHE
IDIOMA
INT
FR
DE
ES
2 Presione el botón inteligente → para pasar la
flecha (↑) al siguiente espacio. Después de
ajustar el día, presione el botón inteligente
→ pasa a ajustar la hora correspondiente.
EXIT OK
- / +
DATE:
2009-11-01
12/24: TIME:
24 14:22
2 Presione el botón inteligente OK
OK
para confirmar su elección. El idioma
seleccionado aparecerá en la pantalla.
LANGUAGE
LANGUE
SPRACHE
IDIOMA
INT
FR
DE
ES
3 Presione los botones + o – para escoger el
sistema de 12 o 24 horas con símbolo AM o
PM y ajuste la hora y minutos.
EXIT OK
- / +
88 Manual del usuario

DATE:
2009-11-01
12/24: TIME:
24 14:22
OK
4 Presione el botón inteligente → 2 para
aceptar los ajustes.
A partir de este momento el Pocket Memo está
listo para ser puesto en funcionamiento.
DATE:
2009-11-01
12/24: TIME:
24 14:22
OK
D Nota
Si durante el ajuste de la fecha y la hora
cometió algún error, use el botón inteligente
← en cualquier momento de la operación
para regresar al estado inicial y corregir el
error. La fecha y hora pueden ser modificados
posteriormente por medio del uso del menú.
Véase 5.2 Menú de configuraciones en la página
100 para mayor información.
3.6 Modo de ahorro de energía
Después de estar inactivo durante 60 minutos,
el Pocket Memo entra automáticamente en el
modo de ahorro de energía y la pantalla LCD
mostrará la fecha y la hora. Oprima cualquier
botón para reactivarlo.
Si el Pocket Memo no se utiliza por más de dos
horas se apaga completamente. Encienda la
unidad moviendo el interruptor de encendido/
apagado a la posición
vuelta a la posición
OFF y a continuación de
ON.
ESPAÑOL
DATE:
2009-11-01
12/24: TIME:
24 14:22
OK
89Manual del usuario

DPM 9380.DSS
0:00
#2
DPM 9380.DSS
0:39
#2
4 Utilizar su Pocket Memo
4.1 Grabación
4.1.1 Crear una grabación
Siga los siguientes pasos para realizar una
grabación con el Pocket Memo:
1 Introduzca la tarjeta de memoria en la
ranura de la tarjeta de memoria. Véase 3.3
Insertar y extraer la tarjeta de memoria en la
página 87 para mayor información.
2 Deslice el interruptor
ON para encender el Pocket Memo.
3 Oprima el botón inteligente NUEVO para
crear una nueva grabación.
D Nota
El botón inteligente
grabación actual está vacía.
ON/OFF a la posición
NUEVO no aparece si la
• El LED de estado iluminará con una luz roja
(en modo sobrescribir) o con una luz verde
(en modo insertar) mientras se graba.
• La siguiente información es mostrada en la
pantalla:
a
Formato de grabación
b
Tiempo de grabación
c
Posición actual de la grabación
d
Número de grabación
e
Nombre del archivo
a
b
c
d
e
0:34
#2
DPM 9380.DSS
5 Para parar la grabación, deslice el
0:00
#1
DPM 9380.DSS
NUEVO
interruptor de 4 posiciones hacía la posición
de
STOP.
4 Para comenzar a grabar, deslice el
interruptor de 4 posiciones hacía la posición
de
REC y comience a hablar.
90 Manual del usuario

D Nota
Eliminar dictado
Fijar marca
Modo de insertar
Autor
Overwrite
Para lograr mejores resultados, mantenga el
micrófono a unos 10 cm de su boca y hable con
claridad.
4.1.2 Anexar al dictado (insertar /
sobrescribir)
Los dictados son grabados en modo sobrescribir
de acuerdo a los ajustes predeterminados.
Siga los siguientes pasos para activar el modo
insertar y por medio de éste pueda agregar
informaciones al dictado:
1 Presione el botón
posición de
MENÚ, mientras está en la
STOP, para abrir el menú.
y el LED se muestra en rojo durante la
grabación.
Modo de insertar:
Sobrescribir
Insertar
OK CANCEL
Modo de insertar:
Sobrescribir
Insertar
OK CANCEL
4 Oprima el botón inteligente OK para guardar
el ajuste u oprima el botón inteligente
CANCEL para salir del sub-menú sin cambiar
la configuración.
0:00
#2
DPM 9380.DSS
NUEVO
2 Presione los botones + o – para seleccionar
el menú Modo de insertar y presione el botón
inteligente
SEGUIR para entrar al sub-menú.
Eliminar dictado
Fijar marca
Modo de insertar
Overwrite
Autor
VOLVER SEGUIR
3 Oprima los botones + o – para escoger
entre los modos Insertar y Sobrescribir.
• En el modo insertar, la posición de
grabación del interruptor aparece en
y el LED se muestra en verde durante la
grabación.
• En el modo sobrescribir, la posición de
grabación del interruptor aparece en
1
2
iREC
REC
Modo de insertar:
Sobrescribir
Insertar
OK CANCEL
5 Presione los botones + o – para seleccionar
el archivo en el que se debería realizar la
inserción.
0:00
#2
DPM 9380.DSS
NUEVO
6 Reproduzca, avance o rebobine hasta llegar a
la posición donde quiera realizar la inserción.
7 Para insertar una grabación adicional,
deslice el interruptor de 4 posiciones hacía
la posición de
REC y comience a hablar. La
inserción no sobrescribirá la grabación.
91Manual del usuario
ESPAÑOL

DPM 9380.DSS
0:39
#2
DPM 9380.DSS
0:25
#2
8 Para finalizar la grabación insertada, deslice
DPM 9380.DSS
0:39
#2
el interruptor de 4 posiciones hacía la
posición de
STOP.
9 Si aún no ha terminado el dictado,
simplemente vaya al final del fichero con el
avance rápido y continúe la grabación.
⑩ Repita desde el paso 1 para regresar al
modo sobrescribir la grabación.
4.1.3 Terminar (bloquear) una grabación
Cuando termine una grabación y no se deseen
cambios adicionales, siga estos pasos para
marcarla como terminada y protegerla contra
una eliminación accidental:
1 Presione los botones + o –, mientras está
en la posición de STOP, para seleccionar la
grabación a ser marcada como terminada.
0:00
#2
DPM 9380.DSS
NUEVO
2 Pulse el botón EOL (end-of-letter/final
de carta) para marcar el dictado como
finalizado.
Aparece el símbolo ┱.
3 Para asignarle la condición de prioridad al
dictado, pulse nuevamente el botón EOL
dentro de un lapso de medio segundo.
Aparece el símbolo
!, el cual indica que el
dictado tiene prioridad.
4 Para realizar cambios en el dictado, pulse
nuevamente el botón
EOL para suprimir la
marca de finalización.
E Consejo
El programa Philips SpeechExec puede ser
configurado para que sólo descargue archivos
desde la Pocket Memo al ordenador que estén
marcados como finalizados.
92 Manual del usuario

VOLVER SEGUIR
Micrófono
Activación p. voz
Format grabar
Iluminación
SP <DSS>
Micrófono
Activación p. voz
Formato grabar
Iluminación
SP <DSS>
C Precaución
VOLVER SEGUIR
Fijar marca
Modo de insertar
Autor
Instalación
Language
VOLVER SEGUIR
Fijar marca
Modo de insertar
Autor
Instalación
Language
Los archivos bloqueados son eliminados cuando
la tarjeta de memoria es formateada o se usa la
función ‘Eliminar-todos-los-dictados’.
4.1.4 Cambiar el formato de grabación
El formato de grabación determina la calidad de
audio de sus grabaciones y afecta el tamaño del
archivo de audio que puede admitir la tarjeta de
memoria. El Pocket Memo admite los siguientes
formatos de grabación:
• La reproducción estándar (Standard Play/
SP) requiere 1 MB por cada 10 minutos de
grabación.
• La reproducción de larga duración (Quality
Play/QP) requiere 1 MB por cada 5 minutos
de grabación.
1 Presione el botón
posición de
MENÚ, mientras está en la
STOP, para abrir el menú.
0:00
#2
DPM 9380.DSS
NUEVO
1
4 Presione los botones + o – para escoger
entre SP y QP.
Formato grabar:
SP <DSS>
QP <DS2>
OK CANCEL
Formato grabar:
SP <DSS>
QP <DS2>
OK CANCEL
5 Oprima el botón inteligente OK para
guardar el ajuste u oprima el botón
inteligente
CANCEL para salir del sub-menú
sin cambiar la configuración.
Formato grabar:
SP <DSS>
QP <DS2>
2
ESPAÑOL
2 Presione los botones + o – para seleccionar
la opción de menú Instalación y presione el
botón inteligente
SEGUIR.
3 Presione los botones + o – para seleccionar
la opción de menú Formato grabar y presione
el botón inteligente
SEGUIR.
OK CANCEL
2
1
93Manual del usuario

4.1.5 Ajustar la sensibilidad del micrófono
VOLVER SEGUIR
Fijar marca
Modo de insertar
Autor
Instalación
Language
VOLVER SEGUIR
Fijar marca
Modo de insertar
Autor
Instalación
Language
VOLVER SEGUIR
LED grabar
Contraste
Señal sonora
Micrófono
Dictado
LED grabar
Contraste
Señal sonora
Micrófono
Dictado
Defina la sensibilidad del micrófono según
su ambiente de trabajo y sus preferencias de
dictado.
1 Presione el botón
posición de
MENÚ, mientras está en la
STOP, para abrir el menú.
Micrófono:
Dictado
Privado
Conferencia
OK CANCEL
Micrófono:
Dictado
Privado
Conferencia
OK CANCEL
0:00
#2
DPM 9380.DSS
NUEVO
2 Presione los botones + o – para seleccionar
la opción de menú Instalación y presione el
botón inteligente
SEGUIR.
2
1
3 Presione los botones + o – para seleccionar
la opción de menú Micrófono y presione el
botón inteligente
SEGUIR.
5 Oprima el botón inteligente OK para
guardar el ajuste u oprima el botón
inteligente
CANCEL para salir del sub-menú
sin cambiar la configuración.
Micrófono:
Dictado
Privado
Conferencia
OK CANCEL
2
4 Oprima los botones + o – para escoger la
sensibilidad del micrófono: Privado (baja),
Dictado (media) y Conferencia (alta).
94 Manual del usuario
1

DPM 9380.DSS
0:00
#2
4.2 Reproducir
DPM 9380.DSS
0:00
#2
1 Presione los botones + o – mientras está
en la posición de
STOP para seleccionar los
ficheros a reproducir y situarse al principio
de la grabación.
0:00
#2
DPM 9380.DSS
NUEVO
2 Deslice el interruptor de 4 posiciones
hacía la posición de
PLAY para comenzar la
reproducción.
3 Oprima los botones + o – para ajustar el
volumen durante la reproducción.
MIN MAX
– +
4 Oprima el botón inteligente VELOC para
hacer la reproducción del fichero más rápida
o más lenta.
0:34
#2
DPM 9380.DSS
VELOC
5 Deslice el interruptor de 4 posiciones
hacía la posición de
STOP para parar la
reproducción.
ESPAÑOL
La siguiente información es mostrada en la
pantalla:
a
Formato de grabación
b
Posición de la reproducción (min : seg)
c
Posición actual de la grabación
d
Número de grabación
e
Nombre del archivo
a
b
c
d
e
0:34
#2
DPM 9380.DSS
VELOC
95Manual del usuario

4.2.1 Generalidades sobre las funciones
de reproducción
Selección
de archivo
Presione el botón +, mientras
está en la posición de STOP, para
desplazarse al final de un archivo.
Presione el botón
+ de nuevo
para desplazarse al comienzo del
siguiente archivo.
Presione el botón
–, mientras
está en la posición de STOP, para
desplazarse al principio de un
archivo.
Presione el botón
– de nuevo para
desplazarse al final del archivo
anterior.
Rebobinado
rápido
Deslice y sostenga el interruptor
de 4 posiciones hacía la posición
┤. Deslice el interruptor hacía
la posición de
STOP para parar el
rebobinado, o hacía la posición de
PLAY, para parar el rebobinado y
comenzar la reproducción.
Avance
rápido
Presione y sostenga el botón
FWD, mientras se encuentra en la
posición de STOP o PLAY. Suelte el
botón FWD para parar el avance.
Velocidad
de reproducción
Presione el botón inteligente
VELOC durante la reproducción
para ajustar la velocidad de la
misma.
4.3 Eliminar
D Nota
Antes de eliminar un dictado, asegúrese de que
éste no está señalado como finalizado y que la
tarjeta de memoria no se halla en modo de sólo
lectura (read-only). Si el dictado está señalado
como finalizado, presione de nuevo el botón
EOL.
4.3.1 Eliminar un dictado
Siga los siguientes pasos para eliminar
totalmente un dictado:
1 Presione los botones + o –, mientras está
en la posición de
STOP, para seleccionar el
archivo a eliminar.
0:00
#2
DPM 9380.DSS
NUEVO
2 Presione el botón MENÚ para abrir el menú.
La opción de menú Eliminar dictado queda
seleccionada.
0:00
#2
DPM 9380.DSS
NUEVO
96 Manual del usuario

3 Presione el botón inteligente SEGUIR para
Eliminar dictado
Fijar marca
Eliminar?
VOLVER SEGUIR
Modo de insertar
Autor
Instalación
Eliminar sección
VOLVER SEGUIR
Modo de insertar
Autor
Instalación
Eliminar sección
DPM 9380.DSS
CANCEL MARCA 2
0:36
#2
0:36
#2
entrar al sub-menú.
Eliminar dictado
Eliminar?
Fijar marca
Modo de insertar
Autor
VOLVER SEGUIR
4 Para borrar definitivamente el dictado,
marque
OK. En caso de que ya no quiera
hacer esta operación, presione el botón
inteligente
CANCEL y así el dictado quedará
intacto.
Eliminar dictado:
Eliminar?
!! CUIDADO !!
OK CANCEL
2 Presione los botones + o – para seleccionar
la opción de menú Eliminar sección y
presione el botón inteligente
OK.
2
1
3 Busque el principio de la sección a ser
borrada reproduciendo o adelantando /
rebobinando y presione el botón inteligente
MARCA 1.
Aparecerá un símbolo de forma de cruz.
0:25
#2
DPM 9380.DSS
CANCEL MARCA 1
ESPAÑOL
4.3.2 Eliminar una parte del dictado
Siga los siguientes pasos si desea eliminar una
parte del dictado:
1 Presione el botón
posición de
MENÚ, mientras está en la
STOP, para abrir el menú.
0:00
#2
DPM 9380.DSS
NUEVO
4 Localice la posición de la segunda marca
reproduciendo o adelantando / rebobinando
y oprima el botón inteligente
MARCA 2.
Aparece la segunda cruz.
97Manual del usuario

5 Pulse los botones inteligentes ELIMINAR y
DPM 9380.DSS
CANCEL ELIMINAR
0:36
#2
0:36
#2
VOLVER SEGUIR
Fijar marca
Modo de insertar
Autor
Instalación
Language
VOLVER SEGUIR
Fijar marca
Modo de insertar
Autor
Instalación
Language
VOLVER SEGUIR
Señal sonora
Micrófono
Fecha & hora
Eliminar dictados
Eliminar todos
VOLVER SEGUIR
Señal sonora
Micrófono
Fecha & hora
Eliminar dictados
Eliminar todos
OK para confirmar la eliminación de la parte
que ha resaltado o si quiere salir sin borrar
presione el botón inteligente
CANCEL.
4.3.3 Eliminar todos los dictados
C Precaución
Los archivos marcados como terminados (EOL)
son eliminados cuando se utiliza la función
‘Eliminar-todos-los-dictados’.
2 Presione los botones + o – para seleccionar
la opción de menú Instalación y presione el
botón inteligente
SEGUIR.
2
1
3 Presione los botones + o – para seleccionar
la opción de menú Eliminar dictados y
presione el botón inteligente
SEGUIR.
Siga estos pasos para eliminar todas las
grabaciones:
1 Presione el botón
posición de
MENÚ, mientras está en la
STOP, para abrir el menú.
4 Presione el botón inteligente SEGUIR y el
botón inteligente
0:00
#2
DPM 9380.DSS
NUEVO
98 Manual del usuario
eliminación, o presione el botón inteligente
CANCEL para salir sin eliminar.
OK para confirmar la
Eliminar todos:
Si - eliminar
!! CUIDADO !!
OK CANCEL
2
1
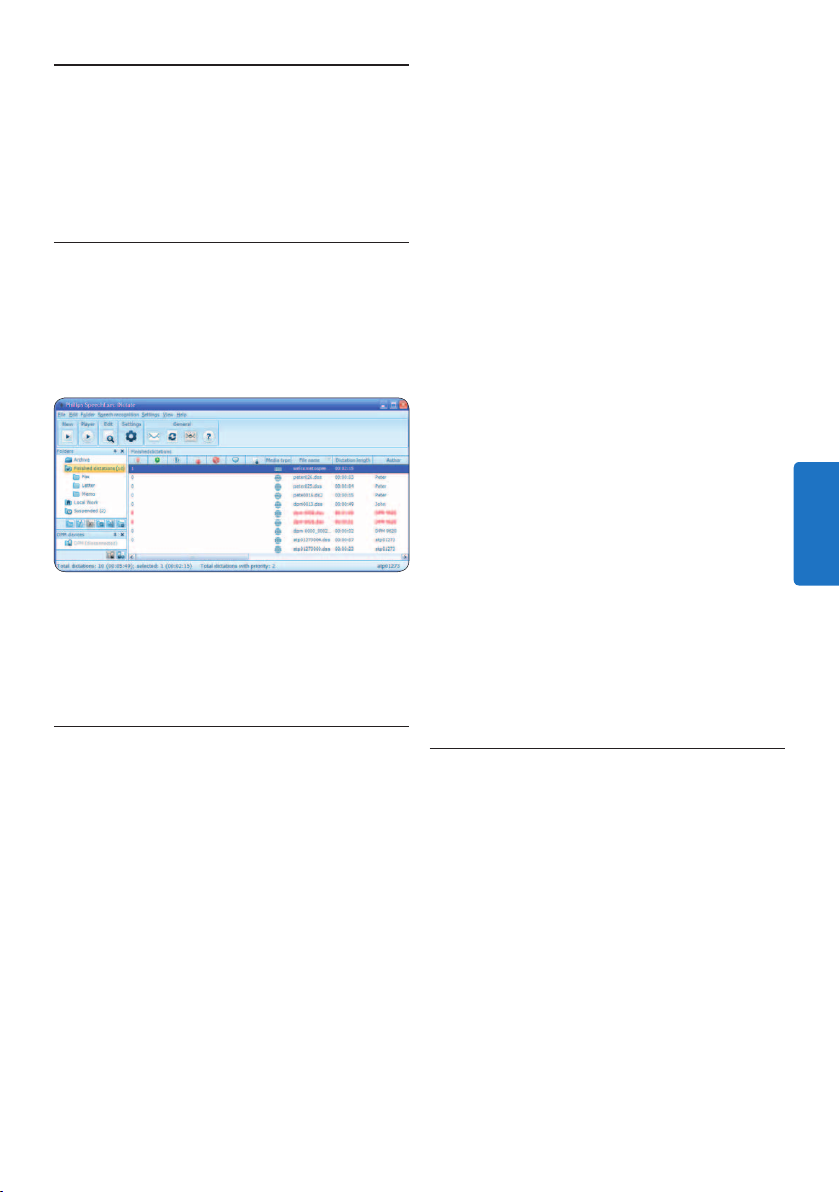
5 Para sacar el mayor
provecho de su Pocket
Memo
5.1 Utilizar Philips SpeechExec
El programa Philips SpeechExec puede ser
utilizado para la configuración avanzada del
Pocket Memo y la descarga, conversión y
enrutamiento automáticos de archivos de
dictado.
D Nota
Para información detallada acerca de
SpeechExec, consulte el manual del usuario de
SpeechExec.
5.1.1 Configuración avanzada
El Asistente para Configuración del Pocket
Memo es parte del programa Philips SpeechExec
Dictate y guía a los usuarios a través de las
configuraciones y ajustes de su Pocket Memo.
El asistente ayuda a los usuarios a configurar
el formato del tiempo, la retroalimentación
acústica, la grabación con activación por voz,
la apariencia de la presentación (modo de
presentación estándar o avanzado), el formato
de grabación, la sensibilidad del micrófono, los
nombres de los autores y la descarga del archivo
al ordenador.
1 Conecte el Pocket Memo a su ordenador
mediante un cable USB.
2 Inicie el programa Philips SpeechExec Dictate.
3 Haga clic en Ajustes > Ajustes Generales
en la barra de menú para abrir el menú de
ajustes y seleccione Configuración DPM/
DT > Wizard DPM de la lista ubicada a la
izquierda.
4 Haga clic en el botón Iniciar Wizard...
para abrir el asistente. Luego, siga las
instrucciones que aparecen en la pantalla
para configurar el Pocket Memo a sus
necesidades.
5 Haga clic en el botón Finalizar para cerrar el
asistente y confirmar la transferencia de los
nuevos ajustes al Pocket Memo.
ESPAÑOL
D Nota
Cuando se conecta por primera vez el Pocket
Memo al ordenador, Windows detecta un
nuevo dispositivo e instala automáticamente los
controladores requeridos. Una vez completada
la instalación, Windows puede indicarle que
reinicie su ordenador.
5.1.2 Descargar grabaciones al ordenador
Con el soporte para almacenamiento masivo
USB, el Pocket Memo aparece automáticamente
como una unidad externa cuando es conectado
al ordenador. A continuación se puede acceder
fácilmente con cualquier programa de Microsoft
Windows como una unidad normal.
Utilice el programa Philips SpeechExec
para descarga, conversión y enrutamiento
automáticos de archivos.
1 Haga una grabación con el Pocket Memo.
2 Inicie el programa Philips SpeechExec Dictate.
3 Conecte el Pocket Memo a su ordenador
mediante un cable USB.
99Manual del usuario

4 Por defecto, las grabaciones del Pocket
Memo serán descargadas automáticamente
al ordenador y movidas a la carpeta
Dictados terminados en la lista de trabajos.
D Nota
Después de conectar un Pocket Memo, puede
configurar cómo y cuáles archivos serán
descargados, mediante la utilización del menú
de ajustes de SpeechExec o del asistente de
configuración.
5.2 Menú de configuraciones
Búsqueda en el menú del Pocket Memo:
3 Presione el botón inteligente SEGUIR o el
botón
MENÚ para abrir un sub-menú.
Eliminar dictado
Fijar marca
Modo de insertar
Autor
VOLVER SEGUIR
4 Para salir del menú presione el botón
inteligente
VOLVER.
1 Presione el botón
posición de
MENÚ, mientras está en la
STOP, para abrir el menú.
0:00
#2
DPM 9380.DSS
NUEVO
2 Presione los botones + o – para señalar un
punto del menú adelante o atrás.
Eliminar dictado
Fijar marca
Modo de insertar
Autor
VOLVER SEGUIR
Eliminar dictado
Fijar marca
Modo de insertar
Autor
VOLVER SEGUIR
5 Con los botones + o – puede seleccionar
un valor.
6 Presione el botón inteligente
OK para
aceptar la selección que ha hecho o
presione el botón inteligente
CANCEL para
salir del sub-menú sin hacer modificaciones
de ajustes.
100 Manual del usuario
 Loading...