

Philips L04HU AA Service Manual
Colour Television Chassis
L04HU
AA
E_14840_000.eps
210904
Contents Page Contents Page
1. Technical Specifications, Connections,
and Chassis Overview 2
2. Safety Instructions, Warnings, and Notes 4
3. Directions for Use 6
4. Mechanical Instructions 7
5. Service Modes, Error Codes, and Faultfinding 9
6. Block Diagrams, Testpoint Overviews,
and Waveforms
Wiring Diagram Standard 19
Wiring Diagram System 20
Block Diagram Supply and Deflection 21
Testpoint Overview Mono Carrier 22
Block Diagram Video 23
Testpoint Overview CRT Panel 24
Block Diagram Audio/Control 25
I2C and Supply Voltage Overview 26
7. Circuit Diagrams and PWB Layouts Diagram PWB
Power Supply (Diagram A1) 27 39-44
Diversity Table for A1 (Power Supply) 28 39-44
Deflection (Diagram A2) 29 39-44
Diversity Table for A2 (Deflection) 30 39-44
Tuner IF (Diagram A3) 31 39-44
Hercules (Diagram A4) 32 39-44
Features & Connectivities (Diagram A5) 33 39-44
Class D - Audio Amplifier (Diagram A6) 34 39-44
Audio Amplifier (Diagram A7) 35 39-44
Rear I/O Cinch (Diagram A8) 36 39-44
Front Control (Diagram A9) 37 39-44
DVD Power Supply (Reserved) (Diagram A10) 38 39-44
CRT Panel (Diagram B1) 45 47-48
ECO Scavem Panel (Diagram B2) 46 47-48
Side AV + Headphone Panel (Diagram D) 49 50
Top Control Panel (Diagram E) 51 51
External Supply (Diag. EPS1B) 52 52
©
Copyright 2004 Philips Consumer Electronics B.V. Eindhoven, The Netherlands.
All rights reserved. No part of this publication may be reproduced, stored in a
retrieval system or transmitted, in any form or by any means, electronic,
mechanical, photocopying, or otherwise without the prior permission of Philips.
Linearity & Panorama Panel (Diagram G) 53 53
SP/LS Module (NA-LA) (Diagram I1) 54 55
Front AV Module (Diagram I2) 56 57
Front Interface Panel (Diagram J) 58 58
Front Interface Module (Diagram J1) 59 60
8. Alignments 61
9. Circuit Descriptions 66
Abbreviation List 76
IC Data Sheets 77
10 Spare Parts List (not applicable) 78
11 Revision List 79
Published by BB 0469 Service PaCE Printed in the Netherlands Subject to modification EN 3122 785 14840
EN 2 L04HU AA1.
Technical Specifications, Connections, and Chassis Overview
1. Technical Specifications, Connections, and Chassis Overview
Notes:
• Described specifications are valid for the whole product
range.
• Figures below can deviate slightly from the actual situation,
due to different set executions.
1.1 Technical Specifications
1.1.1 Reception
Display type : CRT-DV-SF
Screen size : 27”, 4:3
: 32”, 4:3
Tuning system : PLL
Color systems : NTSC
Sound systems : BTSC
Channel selections : 181, full cable
IF picture carrier : 45.75 MHz
Aerial input : 75 ohm, F-type
A/V Connections : NTSC M (3.58 - 4.5)
1.1.2 Miscellaneous
Audio output: : 2 x 5 W
: 2 x 10 W
Power supply:
- Mains voltage range : 90 - 140 V_ac
- Mains frequency : 60 Hz
1.2 Connections
Note: The following connector color abbreviations are used
(acc. to DIN/IEC 757): Bk= Black, Bu= Blue, Gn= Green, Gy=
Grey, Rd= Red, Wh= White, Ye= Yellow.
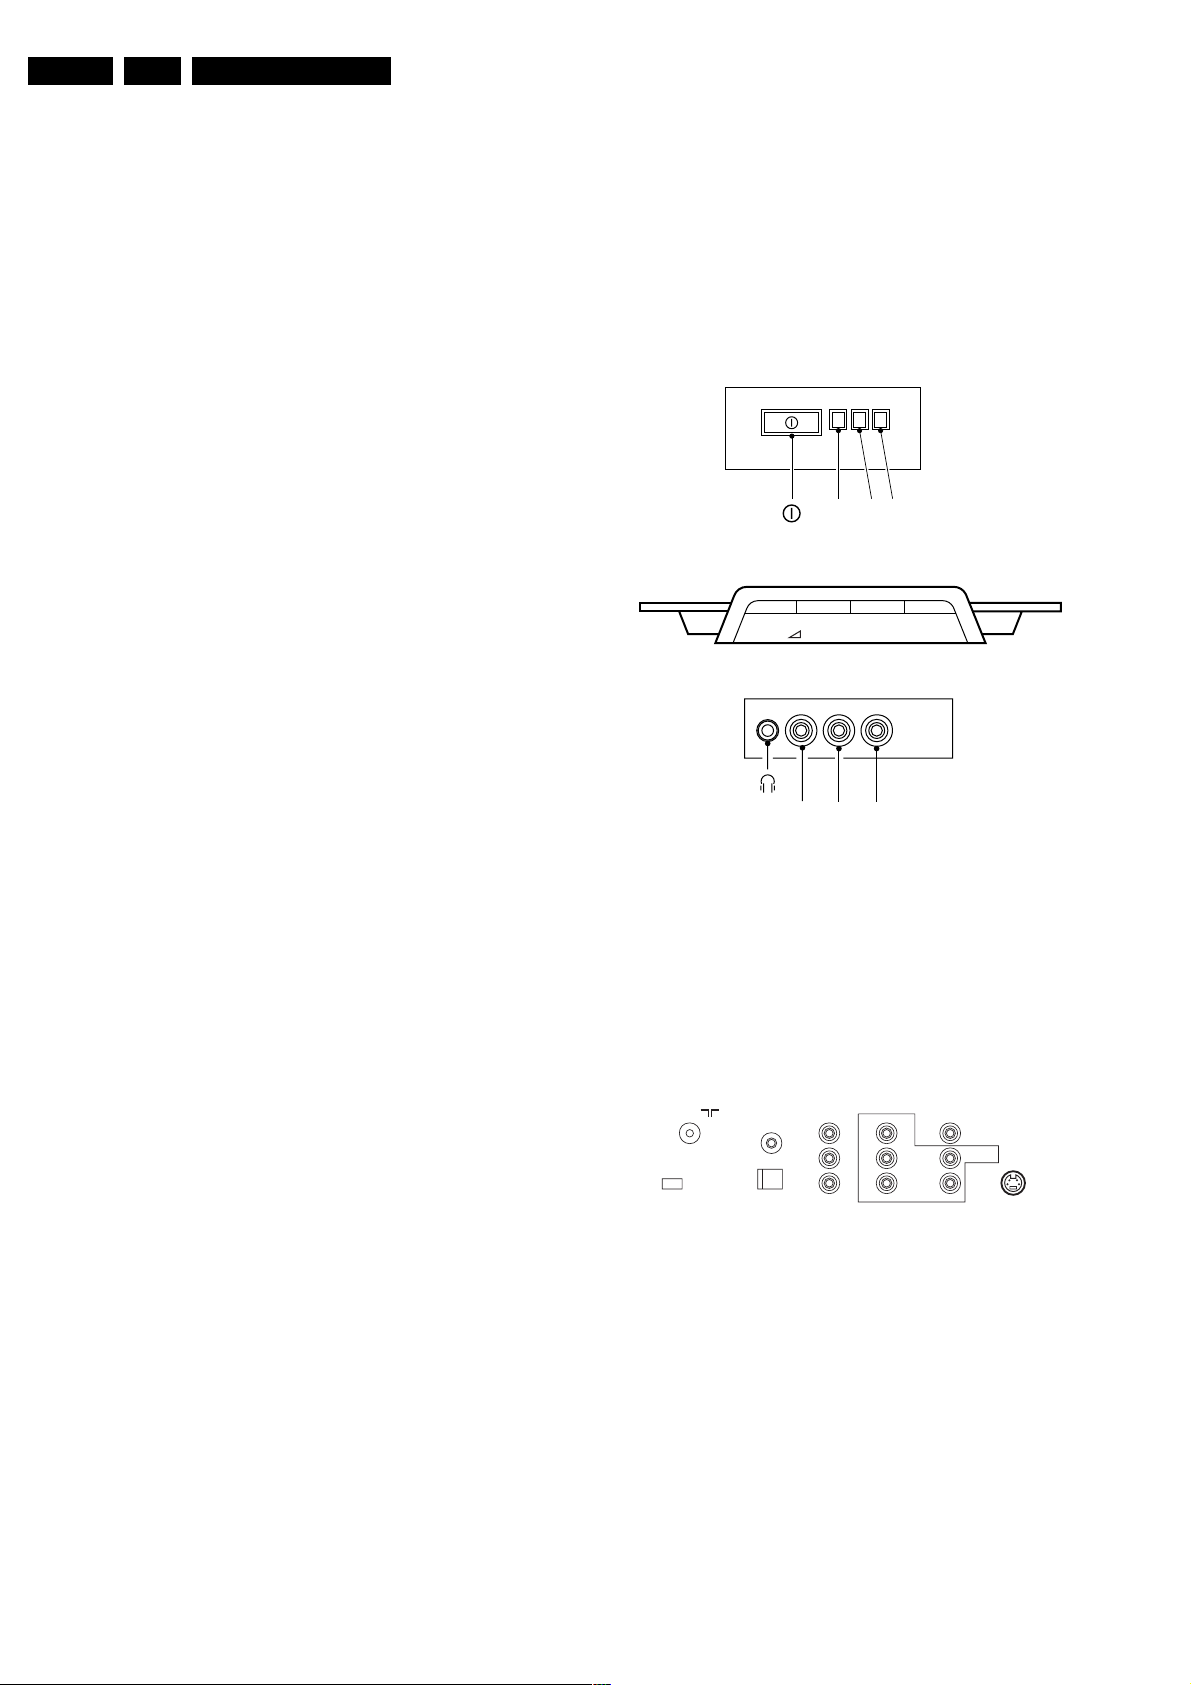
1.2.1 Top Control and Front / Side Connections
FRONT I/O
RED
IR LIGHT SENSOR
LED
TOP CONTROL
VOLUME-+-+PROGRAM
SIDE I/O
(OPTIONAL)
P
Ambient conditions:
- Temperature range : +5 to +45 deg. C
- Maximum humidity : 90% R.H.
Power consumption:
- Normal operation : from 56 W (25”)
: to 70 W (32”)
- Standby : < 1 W
R AUDIO L VIDEO
Figure 1-1 Top control and Front / Side connections
Audio / Video In
Ye - Video (CVBS) 1 V_pp / 75 ohm jq
Wh - Audio - L 0.2 V_rms / 10 kohm jq
Rd - Audio - R 0.2 V_rms / 10 kohm jq
Bk - Headphone 8 - 600 Ohm / 4 mW ot
1.2.2 Rear Connections
MONITOR
75 Ohm
ComPair
CONNECTOR
EXT.
SPEAKER
SMART
PLUG
COMPONENT VIDEO INPUT
OUT
L
R
Y
L
Pb
R
Pr
Figure 1-2 Rear connections
Aerial In
- F-type Coax, 75 ohm D
Monitor Out
Ye - Video (CVBS) 1 V_pp / 75 ohm kq
Wh - Audio - L 0.5 V_rms / 1 kohm kq
Rd - Audio - R 0.5 V_rms / 1 kohm kq
E_14480_045.eps
170204
VIDEO IN
AUDI O
S-VIDEO
E_14520_038.eps
210904
YUV In
Bu -U 0.7 V_pp / 75 ohm jq
Rd - V 0.7 V_pp / 75 ohm jq
Gn - Y 0.7 V_pp / 75 ohm jq
Technical Specifications, Connections, and Chassis Overview
AV1 In
Ye -Video (CVBS) 1 V_pp / 75 ohm jq
Wh - Audio - L 0.5 V_rms / 10 kohm jq
Rd - Audio - R 0.5 V_rms / 10 kohm jq
AV2 In
Ye -Video (CVBS) 1 V_pp / 75 ohm jq
Wh - Audio - L 0.5 V_rms / 10 kohm jq
Rd - Audio - R 0.5 V_rms / 10 kohm jq
AV2 In (SVHS)
1 - Ground GND H
2 - Ground GND H
3 - Y 1 V_pp / 75 ohm jq
4 - C 0.3 V_pp / 75 ohm jq
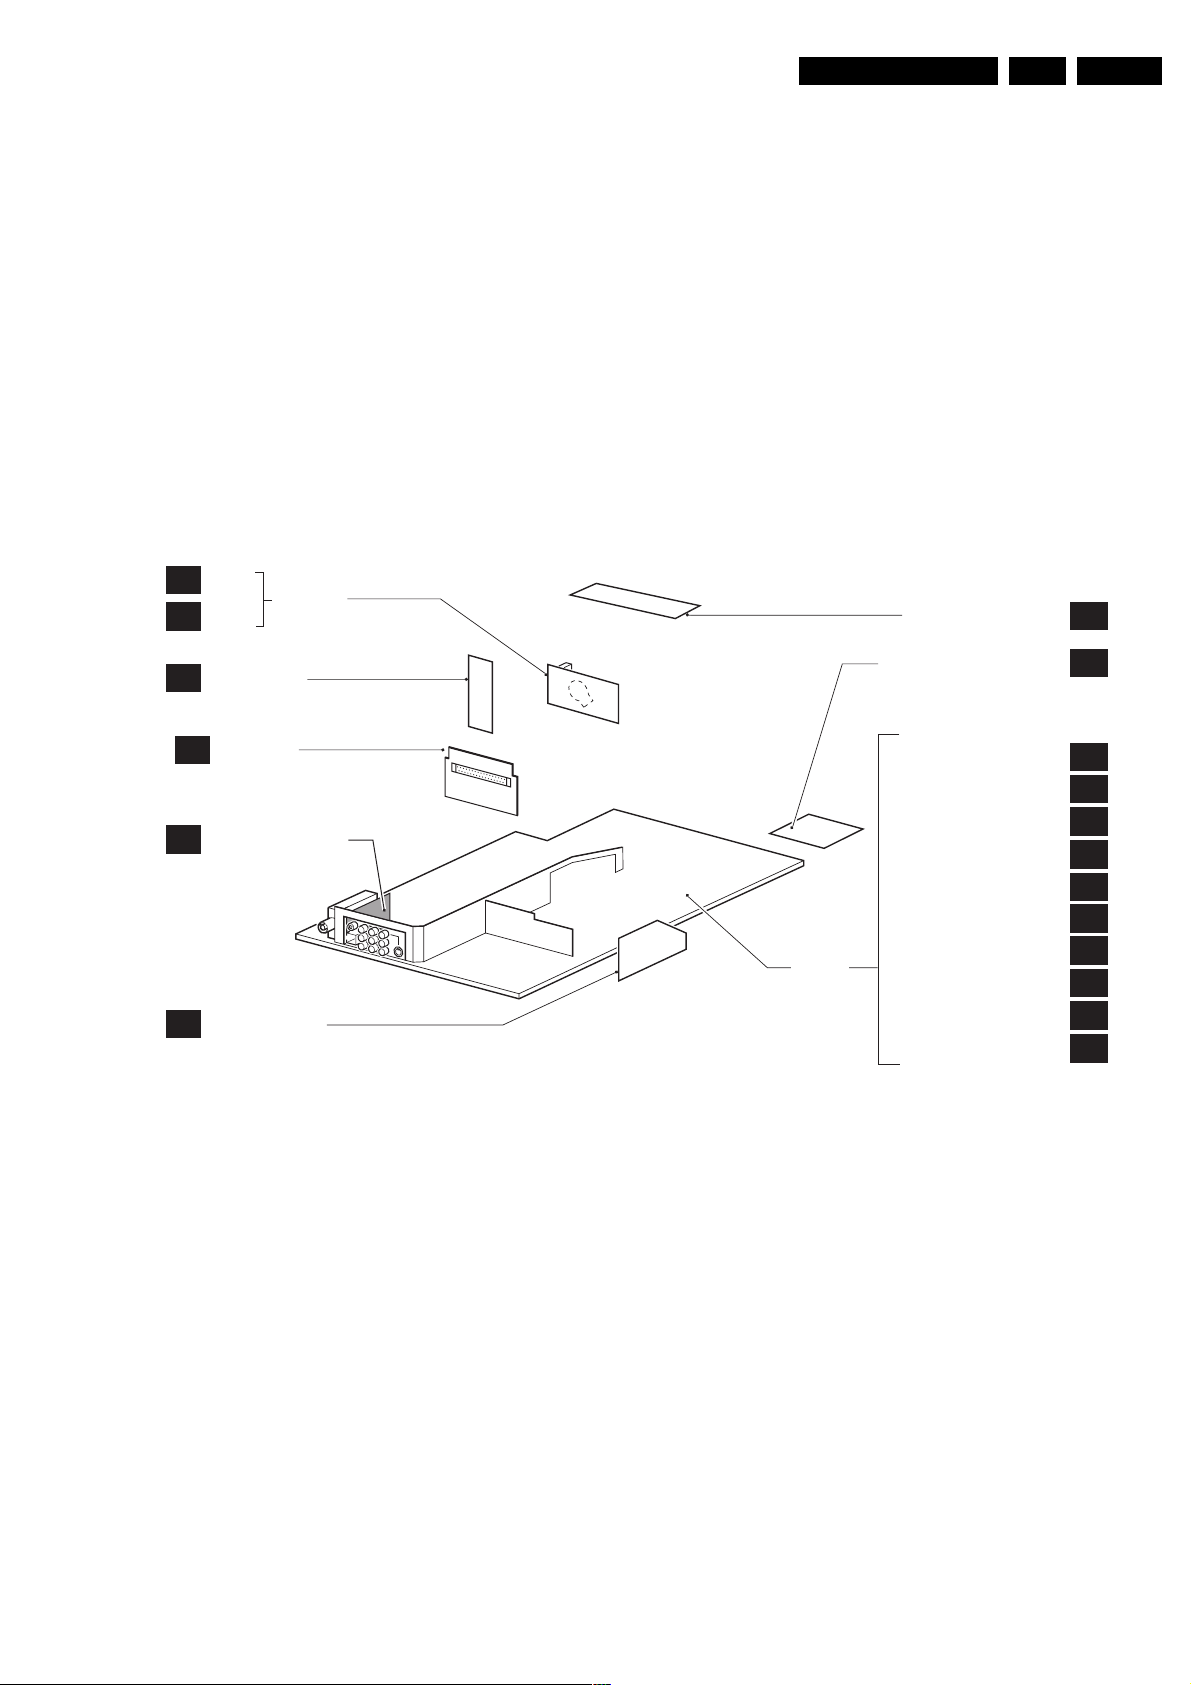
1.3 Chassis Overview
B1
B2
CRT
ECO
SCAVEM
CRT PANEL
TOP CONTROL PANEL
EN 3L04HU AA 1.
E
SIDE AV PANEL +
D
HEADPHONE
INTERFACE
J1
SMARD CARD
UIR/LS
(UNIVERSAL
INFRARED RECEIVER +
I
SMARD PLUG LOADER
+LOUDSPEAKER SOCKET )
LINEARITY &
G
PANORAMA PANEL
Figure 1-3 PWB location
MONO
CARRIER
FRONT INTERFACE PANEL
POWER SUPPLY
LINE DEFLECTION
TUNER IF
HERCULES
FEATURES & CONNECTIVITIES
CLASS D AUDIO AMPLIFIER
AUDIO AMPLIFIER
REAR I/O CINCH
FRONT CONTROL
DVD POWER SUPPLY
E_14820_037.eps
J
A1
A2
A3
A4
A5
A6
A7
A8
A9
A10
210904
EN 4 L04HU AA2.
Safety Instructions, Warnings, and Notes
2. Safety Instructions, Warnings, and Notes
2.1 Safety Instructions
Safety regulations require that during a repair:
• Connect the set to the Mains (AC Power) via an isolation
transformer (> 800 VA).
• Replace safety components, indicated by the symbol h,
only by components identical to the original ones. Any
other component substitution (other than original type) may
increase risk of fire or electrical shock hazard.
Safety regulations require that after a repair, the set must be
returned in its original condition. Pay in particular attention to
the following points:
• Route the wire trees correctly and fix them with the
mounted cable clamps.
• Check the insulation of the Mains (AC Power) lead for
external damage.
• Check the strain relief of the Mains (AC Power) cord for
proper function.
• Check the electrical DC resistance between the Mains (AC
Power) plug and the secondary side (only for sets which
have a Mains (AC Power) isolated power supply):
1. Unplug the Mains (AC Power) cord and connect a wire
between the two pins of the Mains (AC Power) plug.
2. Set the Mains (AC Power) switch to the "on" position
(keep the Mains (AC Power) cord unplugged!).
3. Measure the resistance value between the pins of the
Mains (AC Power) plug and the metal shielding of the
tuner or the aerial connection on the set. The reading
should be between 4.5 Mohm and 12 Mohm.
4. Switch "off" the set, and remove the wire between the
two pins of the Mains (AC Power) plug.
• Check the cabinet for defects, to avoid touching of any
inner parts by the customer.
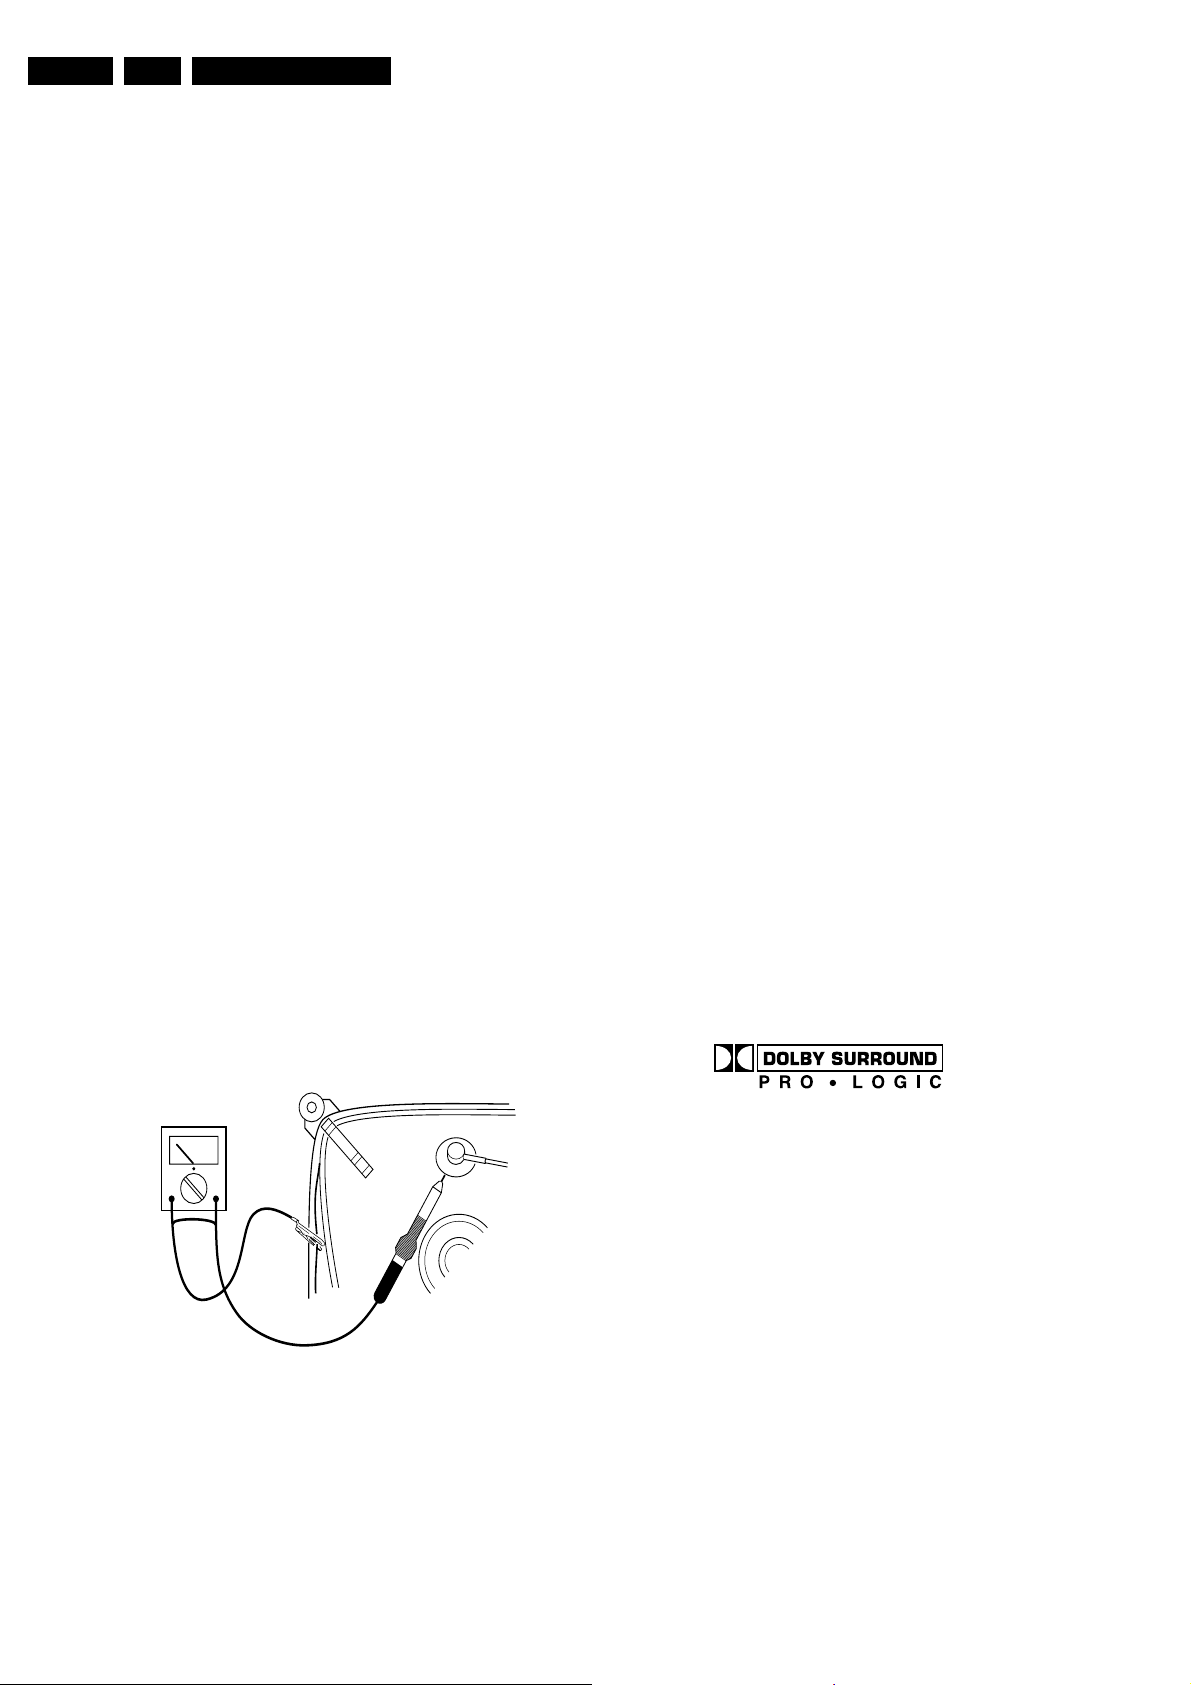
2.2 Warnings
• In order to prevent damage to ICs and transistors, avoid all
high voltage flashovers. In order to prevent damage to the
picture tube, use the method shown in Fig. 2-1, to
discharge the picture tube. Use a high voltage probe and a
multi-meter (position V_dc). Discharge until the meter
reading is 0 V (after approx. 30 s).
– Complete kit ESD3 (small tablemat, wristband,
connection box, extension cable and ground cable)
4822 310 10671.
– Wristband tester 4822 344 13999.
• Together with the deflection unit and any multi-pole unit,
flat square picture tubes form an integrated unit. The
deflection and the multi-pole units are set optimally at the
factory. We do not recommend adjusting this unit during
repair.
• Be careful during measurements in the high voltage
section and on the picture tube.
• Never replace modules or other components while the unit
is 'on’.
• When you align the set, use plastic rather than metal tools.
This will prevent any short circuits and the danger of a
circuit becoming unstable.
2.3 Notes
2.3.1 General
• Measure the voltages and waveforms with regard to the
chassis (= tuner) ground (H), or hot ground (I), depending
on the tested area of circuitry. The voltages and waveforms
shown in the diagrams are indicative. Measure them in the
Service Default Mode (see chapter 5) with a colour bar
signal and stereo sound (L: 3 kHz, R: 1 kHz unless stated
otherwise) and picture carrier at 475.25 MHz for PAL, or
61.25 MHz for NTSC (channel 3).
• Where necessary, measure the waveforms and voltages
with (D) and without (E) aerial signal. Measure the
voltages in the power supply section both in normal
operation (G) and in standby (F). These values are
indicated by means of the appropriate symbols.
• The semiconductors indicated in the circuit diagram and in
the parts lists, are interchangeable per position with the
semiconductors in the unit, irrespective of the type
indication on these semiconductors.
• Manufactured under license from Dolby Laboratories.
“Dolby”, “Pro Logic” and the “double-D symbol”, are
trademarks of Dolby Laboratories.
V
E_06532_007.eps
250304
Figure 2-1 Discharge picture tube
• All ICs and many other semiconductors are susceptible to
electrostatic discharges (ESD, w). Careless handling
during repair can reduce life drastically. Make sure that,
during repair, you are connected with the same potential as
the mass of the set by a wristband with resistance. Keep
components and tools also at this potential. Available ESD
protection equipment:
E_06532_006.eps
240604
Figure 2-2 Dolby PL Symbol
2.3.2 Schematic Notes
• All resistor values are in ohms and the value multiplier is
often used to indicate the decimal point location (e.g. 2K2
indicates 2.2 kohm).
• Resistor values with no multiplier may be indicated with
either an "E" or an "R" (e.g. 220E or 220R indicates 220
ohm).
• All capacitor values are given in micro-farads (µ= x10
nano-farads (n= x10
-9
), or pico-farads (p= x10
• Capacitor values may also use the value multiplier as the
decimal point indication (e.g. 2p2 indicates 2.2 pF).
• An "asterisk" (*) indicates component usage varies. Refer
to the diversity tables for the correct values.
• The correct component values are listed in the Electrical
Replacement Parts List. Therefore, always check this list
when there is any doubt.
-12
-6
),
).

Safety Instructions, Warnings, and Notes
EN 5L04HU AA 2.
2.3.3 Rework on BGA (Ball Grid Array) ICs
General
Although (LF)BGA assembly yields are very high, there may
still be a requirement for component rework. By rework, we
mean the process of removing the component from the PWB
and replacing it with a new component. If an (LF)BGA is
removed from a PWB, the solder balls of the component are
deformed drastically so the removed (LF)BGA has to be
discarded.
Device Removal
As is the case with any component that, it is essential when
removing an (LF)BGA, the board, tracks, solder lands, or
surrounding components are not damaged. To remove an
(LF)BGA, the board must be uniformly heated to a temperature
close to the reflow soldering temperature. A uniform
temperature reduces the chance of warping the PWB.
To do this, we recommend that the board is heated until it is
certain that all the joints are molten. Then carefully pull the
component off the board with a vacuum nozzle. For the
appropriate temperature profiles, see the IC data sheet.
Area Preparation
When the component has been removed, the vacant IC area
must be cleaned before replacing the (LF)BGA.
Removing an IC often leaves varying amounts of solder on the
mounting lands. This excessive solder can be removed with
either a solder sucker or solder wick. The remaining flux can be
removed with a brush and cleaning agent.
After the board is properly cleaned and inspected, apply flux on
the solder lands and on the connection balls of the (LF)BGA.
Note: Do not apply solder paste, as this has shown to result in
problems during re-soldering.
please contact the manufacturer of your soldering
equipment.
• Use only adequate solder tools applicable for lead-free
soldering tin.
• Adjust your solder tool so that a temperature around 217 220 deg. C is reached at the solder joint.
• Do not mix lead-free soldering tin with leaded soldering tin;
this will lead to unreliable solder joints!
• Use only original spare parts listed in this manual. These
are lead-free parts!
• On the website www.atyourservice.ce.philips.com
subscription, not available for all regions) you can find
more information on:
– Aspects of lead-free technology.
– BGA (de-)soldering, heating-profiles of BGAs used in
Philips sets, and others.
2.3.5 Practical Service Precautions
• It makes sense to avoid exposure to electrical shock.
While some sources are expected to have a possible
dangerous impact, others of quite high potential are of
limited current and are sometimes held in less regard.
• Always respect voltages. While some may not be
dangerous in themselves, they can cause unexpected
reactions - reactions that are best avoided. Before reaching
into a powered TV set, it is best to test the high voltage
insulation. It is easy to do, and is a good service precaution.
(needs
Device Replacement
The last step in the repair process is to solder the new
component on the board. Ideally, the (LF)BGA should be
aligned under a microscope or magnifying glass. If this is not
possible, try to align the (LF)BGA with any board markers.
To reflow the solder, apply a temperature profile according to
the IC data sheet. So as not to damage neighbouring
components, it may be necessary to reduce some
temperatures and times.
More Information
For more information on how to handle BGA devices, visit this
URL: www.atyourservice.ce.philips.com
not available for all regions) ). After login, select “Magazine”,
then go to “Workshop Information”. Here you will find
Information on how to deal with BGA-ICs.
2.3.4 Lead Free Solder
Some PWBs in this chassis are “lead-free prepared”. This is
indicated on the PWB by the PHILIPS lead-free logo (either by
a service-printing or by a sticker). It does not mean that leadfree solder is actually used!
(needs subscription,
P
b
Figure 2-3 Lead-free logo
Due to this fact, some rules have to be respected by the
workshop during a repair:
• Use only lead-free soldering tin Philips SAC305 with order
code 0622 149 00106. If lead-free solder paste is required,

EN 6 L04HU AA3.
3. Directions for Use
You can download this information from the following website:
http://www.philips.com/support
Directions for Use
4. Mechanical Instructions
Mechanical Instructions
EN 7L04HU AA 4.
Index of this chapter:
1. Set Disassembly
2. Service Position
3. Assy/Panel Removal
4. Set Re-assembly
Note: Figures below can deviate slightly from the actual
situation, due to different set executions.
4.1 Set Disassembly
Warning: Be sure to disconnect the AC power from the set
before opening it.
4.1.1 Rear Cover
1. Remove all fixation screws of the rear cover (Note: Do not
forget the screws that hold the rear connection panel).
2. Pull the rear cover backwards to remove it.
4.2 Service Position
Before placing the Mono Carrier in its service position, remove
the Front Interface assy/panel (see paragraph “Front Interface
Assy/Panel”) and the Side AV assy/panel (see paragraph “Side
AV Assy/Panel”).
1. Disconnect the degaussing coil [1].
2. Release the two fixation clamps (at the mid left and mid
right side of the bracket), and remove the bracket from the
bottom tray, by pulling it backwards [2].
3. Turn the chassis tray 90 degrees counter clockwise.
4. Move the panel bracket somewhat to the left and flip it 90
degrees [3], with the components towards the CRT.
5. Turn the panel bracket with the rear I/O toward the CRT.
6. Place the hook of the tray in the fixation hole of the cabinet
bottom [4] and secure it.
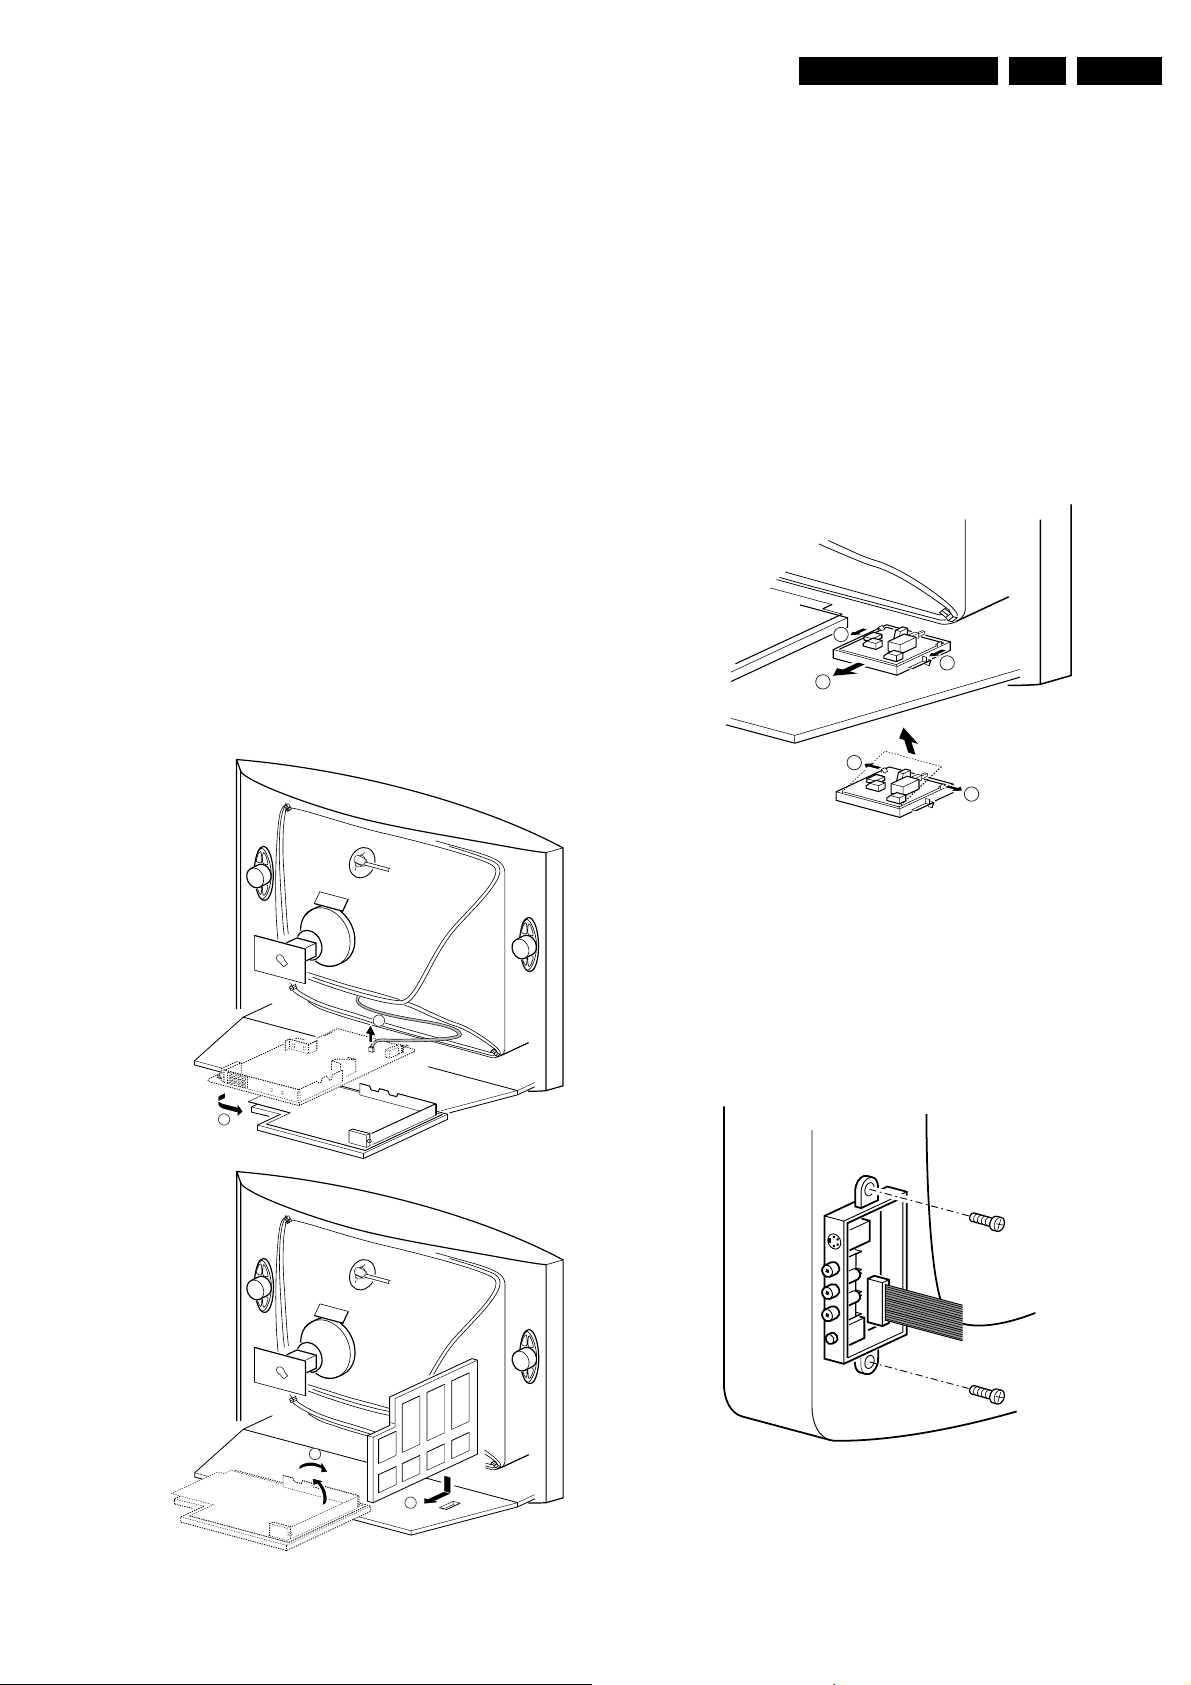
4.3 Assy/Panel Removal
4.3.1 Front Interface Assy/Panel
1
1
2
3
3
E_14480_049.eps
110204
Figure 4-2 Front interface assy/panel removal
1. Remove the complete module from the bottom plate, by
pulling the two fixation clamps upward [1], while sliding the
module away from the CRT [2]. Note: these clamps are
difficult to access.
2. Release the two fixation clamps [3] at the side of the
bracket, and lift the panel out of the bracket (it hinges at
1
one side).
4.3.2 Side AV Assy/Panel
2
A
3
4
B
Figure 4-1 Service position Mono Carrier
E_14480_048.eps
110204
E_14480_050.eps
170204
Figure 4-3 Side AV assy/panel removal
1. Remove the two fixation screws, and remove the complete
Side AV assembly.
2. Release the two fixation clamps, and lift the panel out of the
bracket.
EN 8 L04HU AA4.
Mechanical Instructions
4.3.3 LTI/CTI Interface Panel
Remove the LTI/CTI Interface panel from the Mono Carrier, by
disconnecting it from connector 1212.
4.3.4 Top Control Assy/Panel
1. Remove the two fixation screws.
2. Push the assy a little bit upwards, and then pull it
backwards to release it from the front hinge.
3. Lift the panel from its bracket, while releasing the two
fixation clamps. The panel hinges on the other side.
4.3.5 Linearity Assy/Panel
2
4.4 Set Re-assembly
To re-assemble the whole set, do all processes in reverse
order.
Note: before you mount the rear cover, perform the following
checks:
• Check whether the AC power cord is mounted correctly in
its guiding brackets.
• Check whether all cables are replaced in their original
position
1
1
Figure 4-4 Linearity assy/panel removal
1. Release the two fixation clamps [1] to lift the panel out of
the bracket [2].
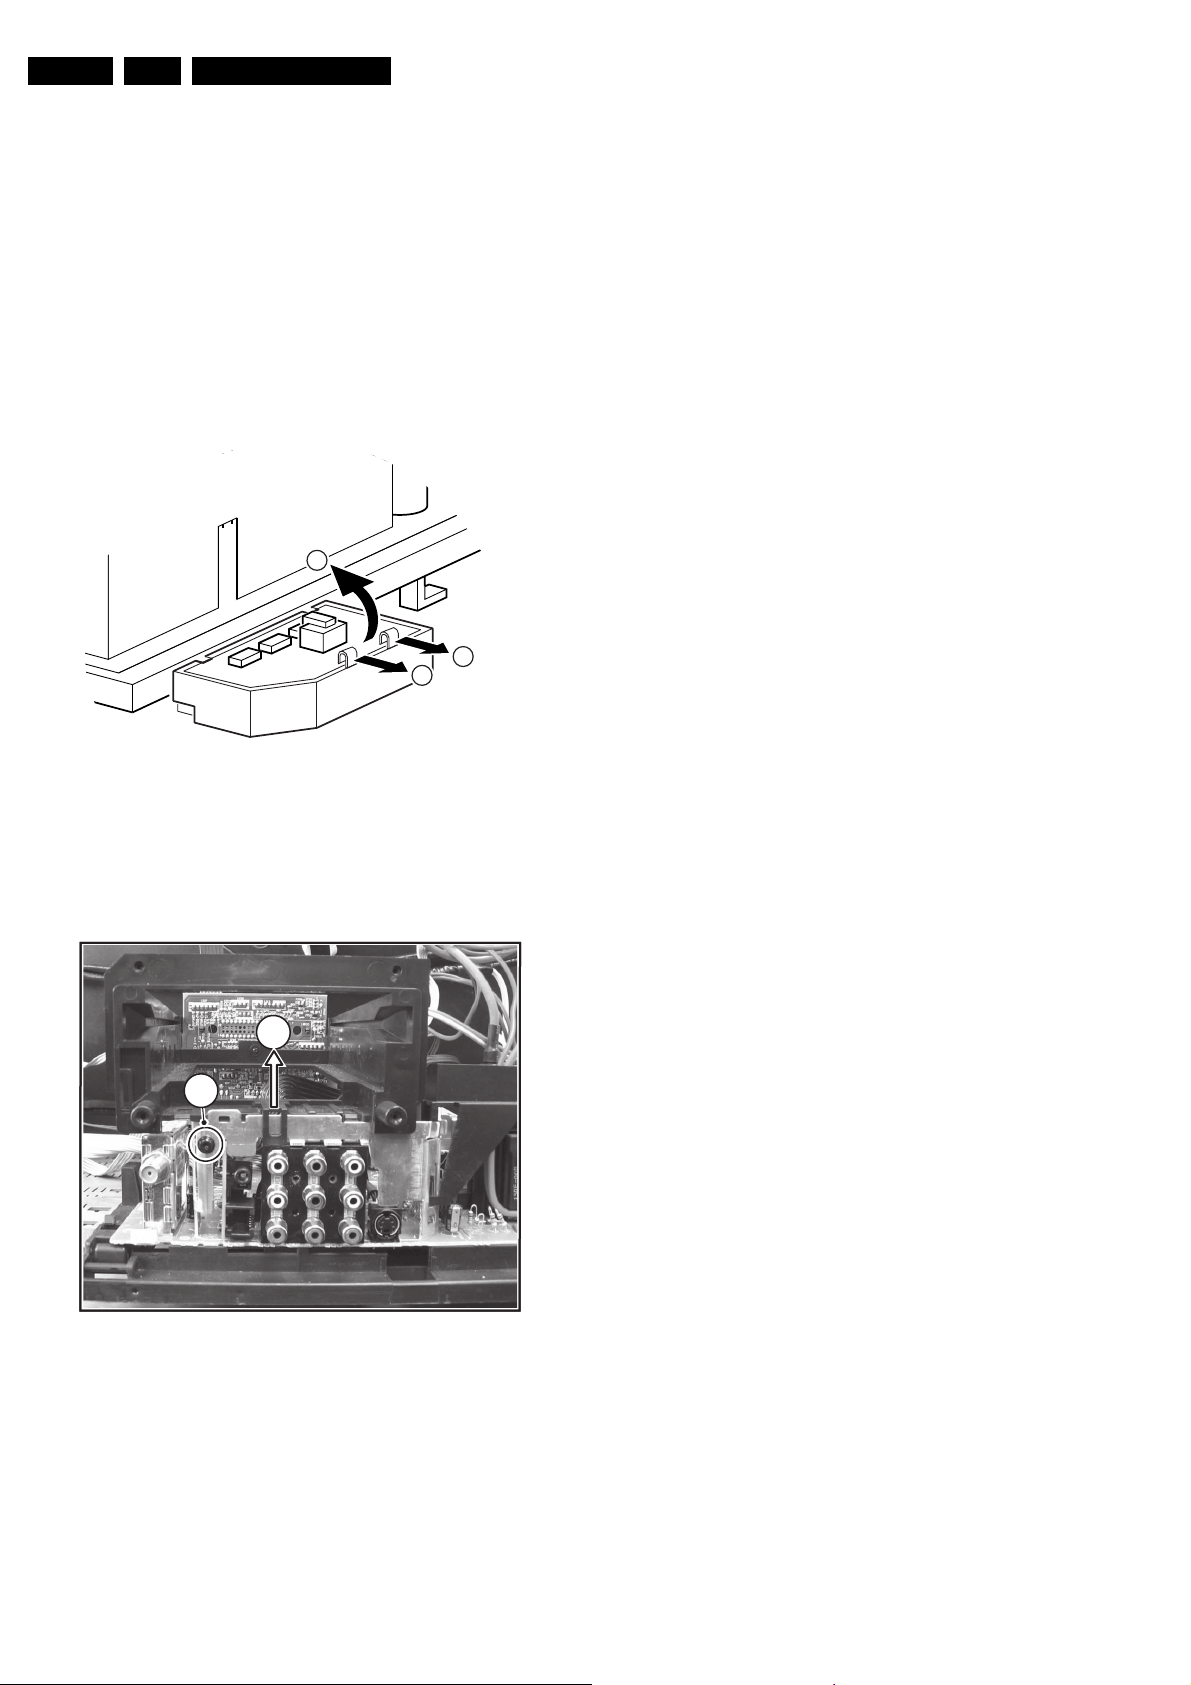
4.3.6 Interface Module Removal
2
1
E_14480_051.eps
270204
Figure 4-5
1. Unscrew the fixation srew [1].
2. Lift the fixation clamp [2] to release the bracket.
4.3.7 LS/SP Module Removal
Release the connector (1262) on the monocarrier and lift out
the module.
E_14820_041.eps
210904
Service Modes, Error Codes, and Fault Finding
5. Service Modes, Error Codes, and Fault Finding
EN 9L04HU AA 5.
Index of this chapter:
1. Test Points
2. Service Modes
3. Problems and Solving Tips (related to CSM)
4. ComPair
5. Error Codes
6. The Blinking LED Procedure
7. Protections
8. Fault Finding and Repair Tips
5.1 Test Points
This chassis is equipped with test points in the service printing.
In the schematics test points are identified with a rectangle box
around Fxxx or Ixxx. These test points are specifically
mentioned in the “Test Point Overview” as “half moons” with a
dot in the center.
Table 5-1 Test point overview
Test point Circuit Diagr.
F508, F535, F536, F537, F552, F561, F563, F573, F664,
I513, I518, I519, I524, I531, I533, I546
F401, F412, F413, F414, F418, F452, F453, F455, F456,
F458, F459, F460, F461, I408, I416, I417, I420, I462,
I468
F003, F004, I001, I002 Tuner IF A3
F201, F203, F205, F206 Hercules A4
F240, F241, F242 Features &
F952, F955, I951, I952 Audio Amplifier A7
F692 Front Control A9
F331, F332, F333, F338, F339, F341, F351, F353, F354 CRT Panel B1
F361, F362, F381, F382 ECO Scavem B2
Power supply A1
Line & Frame
Deflection
Connectivities
– (sleep) timer,
– child/parental lock,
– blue mute,
– hotel/hospitality mode
– auto switch-off (when no IDENT video signal is
received for 15 minutes),
– skip / blank of non-favourite presets / channels,
– auto store of personal presets,
– auto user menu time-out.
• Operation hours counter.
• Software version.
• Option settings.
• Error buffer reading and erasing.
• Software alignments.
How to enter SDAM
Use one of the following methods:
• Use a System 7 remote control type T374AH (RCtransmitter RG4172BK) and key in the code ‘062596’
directly followed by the ‘M’ (menu) button or
• Short circuit jumper wires 9252 and 9275 on the mono
carrier (see Fig. 8-1) and apply AC power. Then press the
power button (remove the short circuit after start-up).
A2
Caution: Entering SDAM by short circuiting wires 9252 and
9275 will override the +8V-protection. Do this only for a short
period. When doing this, the service-technician must know
exactly what he is doing, as it could lead to damaging the set.
A5
After activating SDAM, the following screen is visible, with S at
the upper right side for recognition.
SDAM Menu
Perform measurements under the following conditions:
• Television set in Service Default Alignment Mode.
• Video input: Color bar signal.
• Audio input: 3 kHz left channel, 1 kHz right channel.
5.2 Service Modes
Service Default Alignment Mode (SDAM) offers several
features for the service technician, while the Customer Service
Mode (CSM) is used for communication between dealer and
customer.
5.2.1 Service Default Alignment Mode (SDAM)
Purpose
• To change option settings.
• To create a predefined setting to get the same
measurement results as given in this manual.
• To display / clear the error code buffer when leaving SDAM
with “standby” key on remote control.
• To override SW protections.
• To perform alignments.
• To start the blinking LED procedure.
Specifications
• Tuning frequency:
– 61.25 MHz (channel 3)
• Colour system:
– NTSC
• All picture settings at 50 % (brightness, colour contrast,
hue).
• Bass, treble and balance at 50 %; volume at 25 %.
• All service-unfriendly modes (if present) are disabled, like:
LLLL AAABCD X . Y S
E
RR XX XX XX XX XX
O P
XXX XXX XXX XXX XXX XXX XXX
OPT I ONS >
D E F L E C T I O N >
TUNER >
AKB 0 / 1
WH I T E T O N E >
GEOMETRY >
E_14820_039.eps
Figure 5-1
1. LLLL
This is the operation hours counter. It counts the normal
operation hours, not the standby hours.
2. AAAABC-X.Y
This is the software identification of the main micro
controller:
– A = the project name (L04H).
– B = the region: E= Europe, A= Asia Pacific, U= NAFTA,
L= LATAM.
– C = the feature and language
– X = the main software version number.
– Y = the sub software version number.
3. S
Indication of the actual mode. S= SDAM= Service Default
Alignment mode.
4. Error buffer
Five errors possible.
5. Option bytes
Seven codes possible.
6. Clear
Erases the contents of the error buffer. Select the CLEAR
210904

EN 10 L04HU AA5.
Service Modes, Error Codes, and Fault Finding
menu item and press the MENU RIGHT key. The content
of the error buffer is cleared
7. ISP Mode
Can be used to switch on the television to ISP mode (for
uploading software
8. Options
To set the Option Bytes. See chapter 8.3.1 for a detailed
description.
9. Tuner
To align the Tuner. See chapter 8.3.3 for a detailed
description.
10. White Tone
To align the White Tone. See chapter 8.3.4 for a detailed
description.
11. Geometry
To align the Geometry. See chapter 8.3.5 for a detailed
description.
How to navigate
Use one of the following methods:
• In SDAM, select menu items with the CURSOR UP/DOWN
key on the remote control transmitter. The selected item
will be highlighted. When not all menu items fit on the
screen, move the CURSOR UP/DOWN key to display the
next / previous menu items.
• With the CURSOR LEFT/RIGHT keys, it is possible to:
– Activate the selected menu item.
– Change the value of the selected menu item.
– Activate the selected submenu.
• When you press the MENU key in a submenu, you will
return to the previous menu.
How to store settings
To store settings first go back to the main menu (fig. 5-1) with
“MENU” button on the remote control and leave the SDAM with
the “STANDBY” button on the remote control.
How to exit
Switch the set to STANDBY by pressing the power button on
the remote control transmitter. The error buffer is cleared. (If
you switch the set 'off' by removing the AC power, the set will
return in SDAM when AC power is re-applied and the error
buffer will not be cleared.)
5.2.2 Customer Service Mode (CSM)
Purpose
When a customer is having problems with his TV-set, he can
call his dealer. The service technician can than ask the
customer to activate the CSM, in order to identify the status of
the set. Now, the service technician can judge the severness of
the complaint. In a lot of cases he can advise the customer how
to solve the problem, or he can decide if it is necessary to visit
the customer.
The CSM is a read only mode, therefore modifications in this
mode are not possible.
How to enter
To enter the CSM by pressing RECALL on the System 7
remote control RG4172BK.
After switching ON the Customer Service Mode, the following
screen will appear:
CSM Menu
1AAABC X.Y CSM
2 CODE XX XX XX
3 OP XXX XXX XXX XXX XXX XXX XXX
4 DETECT ED SYS TEM DET ECTED SOUND
5 NOT TUNED SK I PPED
6TIMER
7
CO XX CL XX BR XX HU XX SH XX
8
VL XX BL XX
9
TR XX BS XX
10
M O D E X X X X X X X X X X X S M A R T P O R T X X X
11
P R O G R A M N O . X X X
XX XX
E_14820_040.eps
Figure 5-2
1. Software identification of the main micro controller (see
paragraph 5.2.1 for an explanation).
2. Error code buffer (see paragraph 5.4 for more details).
Displays the last five errors of the error code buffer.
3. In this line, the Option Bytes (OB) are visible. Each Option
Byte is displayed as a decimal number between 0 and 255.
The set may not work correctly when an incorrect option
code is set. See chapter 8.3.1 for more information on the
option settings.
4. Indicates which color and sound system is installed for the
selected pre-set.
5. Indicates if the set is not receiving an IDENT signal on the
selected source. It will display NOT TUNED.
6. Indicates if the sleep timer is enabled.
7. Value indicates parameter levels at CSM entry.
CO= CONTRAST, CL= COLOR, BR= BRIGHTNESS, HU=
HUE, SH= SHARPNESS
8. Value indicates parameter levels at CSM entry.
VL= VOLUME LEVEL, BL= BALANCE LEVEL
9. Value indicates parameter levels at CSM entry (only for
stereo sets).
TR= TREBLE, BS= BASS
10. Mode Commercial = Hotel / Institutional mode or mode
Consumer. Smartport. Indicates whether the Smart Port is
selected or not.
11. Program NO. TV. Indicates to what channel the TV is
tuned.
How to exit
Use one of the following methods:
• Press any button of the remote control transmitter keys.
• Press RECALL on a System 7 remote control (the RC-
transmitter RG4172BK).
• Switch-off the TV set with the AC power switch.
5.3 Problems and Solving Tips Related to CSM
5.3.1 Picture Problems
Note: The problems described below are all related to the TV
settings. The procedures used to change the value (or status)
of the different settings are described.
Picture too dark or too bright
If:
• The picture improves when you have press the AUTO
PICTURE button on the remote control transmitter, or
• The picture improves when you enter the Customer
Service Mode,
210904
Then:
1. Press the AUTO PICTURE button on the remote control
transmitter repeatedly (if necessary) to choose
PERSONAL picture mode.

Service Modes, Error Codes, and Fault Finding
EN 11L04HU AA 5.
2. Press the MENU button on the remote control transmitter.
This brings up the normal user menu.
3. In the normal user menu, use the MENU UP/DOWN keys
to highlight the PICTURE sub menu.
4. Press the MENU LEFT/RIGHT keys to enter the PICTURE
sub menu.
5. Use the MENU UP/DOWN keys (if necessary) to select
BRIGHTNESS.
6. Press the MENU LEFT/RIGHT keys to increase or
decrease the BRIGHTNESS value.
7. Use the MENU UP/DOWN keys to select PICTURE.
8. Press the MENU LEFT/RIGHT keys to increase or
decrease the PICTURE value.
9. Press the MENU button on the remote control transmitter
twice to exit the user menu.
10. The new PERSONAL preference values are automatically
stored.
White line around picture elements and text
If:
The picture improves after you have pressed the AUTO
PICTURE button on the remote control transmitter,
Then:
1. Press the AUTO PICTURE button on the remote control
transmitter repeatedly (if necessary) to choose
PERSONAL picture mode.
2. Press the MENU button on the remote control transmitter.
This brings up the normal user menu.
3. In the normal user menu, use the MENU UP/DOWN keys
to highlight the PICTURE sub menu.
4. Press the MENU LEFT/RIGHT keys to enter the PICTURE
sub menu.
5. Use the MENU UP/DOWN keys to select SHARPNESS.
6. Press the MENU LEFT key to decrease the SHARPNESS
value.
7. Press the MENU button on the remote control transmitter
twice to exit the user menu.
8. The new PERSONAL preference value is automatically
stored.
Snowy picture
Check CSM line 6. If this line reads “Not Tuned”, check the
following:
• Antenna not connected. Connect the antenna.
• No antenna signal or bad antenna signal. Connect a proper
antenna signal.
• The tuner is faulty (in this case line 2, the Error Buffer line,
will contain error number 10). Check the tuner and replace/
repair the tuner if necessary.
Black and white picture
If:
• The picture improves after you have pressed the AUTO
PICTURE button on the remote control transmitter,
Then:
1. Press the AUTO PICTURE button on the remote control
transmitter repeatedly (if necessary) to choose
PERSONAL picture mode.
2. Press the MENU button on the remote control transmitter.
This brings up the normal user menu.
3. In the normal user menu, use the MENU UP/DOWN keys
to highlight the PICTURE sub menu.
4. Press the MENU LEFT/RIGHT keys to enter the PICTURE
sub menu.
5. Use the MENU UP/DOWN keys to select COLOR.
6. Press the MENU RIGHT key to increase the COLOR value.
7. Press the MENU button on the remote control transmitter
twice to exit the user menu.
8. The new PERSONAL preference value is automatically
stored.
Menu text not sharp enough
If:
• The picture improves after you have pressed the AUTO
PICTURE button on the remote control transmitter,
Then:
1. Press the AUTO PICTURE button on the remote control
transmitter repeatedly (if necessary) to choose
PERSONAL picture mode.
2. Press the MENU button on the remote control transmitter.
This brings up the normal user menu.
3. In the normal user menu, use the MENU UP/DOWN keys
to highlight the PICTURE sub menu.
4. Press the MENU LEFT/RIGHT keys to enter the PICTURE
sub menu.
5. Use the MENU UP/DOWN keys to select PICTURE.
6. Press the MENU LEFT key to decrease the PICTURE
value.
7. Press the MENU button on the remote control transmitter
twice to exit the user menu.
8. The new PERSONAL preference value is automatically
stored.
5.4 ComPair
5.4.1 Introduction
ComPair (Computer Aided Repair) is a service tool for Philips
Consumer Electronics products. ComPair is a further
development on the European DST (service remote control),
which allows faster and more accurate diagnostics. ComPair
has three big advantages:
• ComPair helps you to quickly get an understanding on how
to repair the chassis in a short time by guiding you
systematically through the repair procedures.
• ComPair allows very detailed diagnostics (on I
is therefore capable of accurately indicating problem areas.
You do not have to know anything about I
yourself because ComPair takes care of this.
• ComPair speeds up the repair time since it can
automatically communicate with the chassis (when the
microprocessor is working) and all repair information is
directly available. When ComPair is installed together with
the SearchMan electronic manual of the defective chassis,
schematics and PWBs are only a mouse click away.
5.4.2 Specifications
ComPair consists of a Windows based faultfinding program
and an interface box between PC and the (defective) product.
The ComPair interface box is connected to the PC via a serial
or RS232 cable.
For this chassis, the ComPair interface box and the TV
communicate via a bi-directional service cable via the service
connector.
The ComPair faultfinding program is able to determine the
problem of the defective television. ComPair can gather
diagnostic information in two ways:
• Automatic (by communication with the television): ComPair
can automatically read out the contents of the entire error
buffer. Diagnosis is done on I
2
the I
C bus of the television. ComPair can send and
receive I
2
C commands to the micro controller of the
television. In this way, it is possible for ComPair to
communicate (read and write) to devices on the I
of the TV-set.
• Manually (by asking questions to you): Automatic
diagnosis is only possible if the micro controller of the
2
C level. ComPair can access
2
C level) and
2
C commands
2
C busses

EN 12 L04HU AA5.
E
R
Service Modes, Error Codes, and Fault Finding
television is working correctly and only to a certain extends.
When this is not the case, ComPair will guide you through
the faultfinding tree by asking you questions (e.g. Does the
screen give a picture? Click on the correct answer: YES /
NO) and showing you examples (e.g. Measure test-point I7
and click on the correct oscillogram you see on the
oscilloscope). You can answer by clicking on a link (e.g.
text or a waveform picture) that will bring you to the next
step in the faultfinding process.
By a combination of automatic diagnostics and an interactive
question / answer procedure, ComPair will enable you to find
most problems in a fast and effective way.
Beside fault finding, ComPair provides some additional
features like:
• Up- or downloading of pre-sets.
• Managing of pre-set lists.
• Emulation of the Dealer Service Tool (DST).
• If both ComPair and SearchMan (Electronic Service
Manual) are installed, all the schematics and the PWBs of
the set are available by clicking on the appropriate
hyperlink.
Example: Measure the DC-voltage on capacitor C2568
(Schematic/Panel) at the Mono-carrier.
– Click on the “Panel” hyperlink to automatically show
the PWB with a highlighted capacitor C2568.
– Click on the “Schematic” hyperlink to automatically
show the position of the highlighted capacitor.
5.4.3 How To Connect
1. First, install the ComPair Browser software (see the Quick
Reference Card for installation instructions).
2. Connect the RS232 interface cable between a free serial
(COM) port of your PC and the PC connector (marked with
“PC”) of the ComPair interface.
3. Connect the mains adapter to the supply connector
(marked with “POWER 9V DC”) of the ComPair interface.
4. Switch the ComPair interface “OFF”.
5. Switch the television set “OFF” with the mains switch.
6. Connect the ComPair interface cable between the
connector on the rear side of the ComPair interface
(marked with “I
2
C”) and the ComPair connector at the rear
side of the TV.
7. Plug the mains adapter in a mains outlet, and switch the
interface “ON”. The green and red LEDs light up together.
The red LED extinguishes after approx. 1 second while the
green LED remains lit.
8. Start the ComPair program and read the “Introduction”
chapter.
TO
I2C SERVIC
CONNECTO
Note: If you encounter any problems, contact your local
support desk.
5.5 Error Codes
The error code buffer contains all errors detected since the last
time the buffer was erased. The buffer is written from left to
right. When an error occurs that is not yet in the error code
buffer, it is displayed at the left side and all other errors shift one
position to the right.
5.5.1 How To Read The Error Buffer
You can read the error buffer in 3 ways:
• On screen via the SAM (if you have a picture).
Examples:
– ERROR: 0 0 0 0 0 : No errors detected
– ERROR: 6 0 0 0 0 : Error code 6 is the last and only
detected error
– ERROR: 9 6 0 0 0 : Error code 6 was detected first and
error code 9 is the last detected (newest) error
• Via the blinking LED procedure (when you have no
picture). See “The Blinking LED Procedure”.
• Via ComPair.
5.5.2 How To Clear The Error Buffer
The error code buffer is cleared in the following cases:
• By using the CLEAR command in the SAM menu:
– To enter SAM, press the following key sequence on the
remote control transmitter: “062596” directly followed
by the OSD/STATUS button (do not allow the display
to time out between entries while keying the
sequence).
– Make sure the menu item CLEAR is highlighted. Use
the MENU UP/DOWN buttons, if necessary.
– Press the MENU RIGHT button to clear the error
buffer. The text on the right side of the “CLEAR” line will
change from “CLEAR?” to “CLEARED”
• If the contents of the error buffer have not changed for 50
hours, the error buffer resets automatically.
Note: If you exit SAM by disconnecting the AC power from the
television set, the error buffer is not reset.
5.5.3 Error Codes
In case of non-intermittent faults, write down the errors present
in the error buffer and clear the error buffer before you begin
the repair. This ensures that old error codes are no longer
present.
If possible, check the entire contents of the error buffer. In
some situations, an error code is only the result of another error
and not the actual cause of the problem (for example, a fault in
the protection detection circuitry can also lead to a protection).
Figure 5-3 ComPair Interface connection
5.4.4 How To Order
ComPair order codes:
• ComPair Software: ST4191.
• ComPair Interface Box: 4822 727 21631.
• AC Adapter: T405-ND.
• ComPair Quick Start Guide: ST4190.
PC VCR I2CPower
9V DC
E_06532_008.eps
180804
Service Modes, Error Codes, and Fault Finding
Table 5-2 Error code overview
Error Device Error description Check item Diagram
0 Not applicable No Error
1 Not applicable X-Ray/Over-voltage protection (US only) 2411, 2412, 2413, 6404, 6411, 6412 A2
2 Not applicable High beam (BCI) protection 3404, 7405 A2
3 Not applicable Vertical guard protection 3466, 7451, 7452, 7453, 7454 A2
4 Tuner I2C error while communicating with 2nd tuner 1000, 5010, (PIP Module) F2
5 Not applicable +5v protection 7604, 7605 A5
6 I2C bus General I2C error 7200, 3207, 3214 A4
7 Not applicable - - -
8 Not applicable - - -
9 24C16 I2C error while communicating with the EEPROM 7601, 3604, 3605 A5
10 Tuner I2C error while communicating with the PLL tuner 1000, 5001 A3
11 TDA6107/A Black current loop instability protection 7330, 3351, CRT B1
12 SDA9488X I2C error while communicating with the PIP processor 7242 (PIP Module) F1
13 Not applicable - - -
14 DVD Loader I2C error while communicating with the DVD Interface module DVD Interface module DVD Loader
15 TDA9178T/N1 I2C error while communicating with LTI module 7610 H
16 TDA9887 I2C error while communicating with PIP_Demodulator 7201 F2
17 Not applicable - - -
18 Not applicable - - -
19 TDA1200x I2C error while communicating with SSD stereo sound decoder 7200 A4
20 TDA1200x I2C error while communicating with video cosmic in Hercules IC 7200 A4
EN 13L04HU AA 5.
5.6 The Blinking LED Procedure
Using this procedure, you can make the contents of the error
buffer visible via the front LED. This is especially useful when
there is no picture.
When the SDM is entered, the front LED will blink the contents
of the error-buffer:
• When all the error-codes are displayed, the sequence
finishes with a LED blink of 1.5 seconds,
• The sequence starts again.
Example of error buffer: 12 9 6 0 0
After entering SDM, the following occurs:
• 1 long blink of 5 seconds to start the sequence,
• 12 short blinks followed by a pause of 1.5 seconds,
• 9 short blinks followed by a pause of 1.5 seconds,
• 6 short blinks followed by a pause of 1.5 seconds,
• 1 long blink of 1.5 seconds to finish the sequence,
• The sequence starts again at 12 short blinks.
5.7 Protections
If a fault situation is detected, an error code will be generated;
and, if necessary, the television set will go into protection
mode. Blinking of the red LED at a frequency of 3 Hz indicates
the protection mode. In some error cases, the microprocessor
does not put the set in protection mode. The error codes of the
error buffer and the blinking LED procedure can be read via the
Service Default Menu (SDM), or via ComPair.
To get a quick diagnosis the chassis has three service modes
implemented:
• The Customer Service Mode (CSM).
• The Service Default Mode (SDM).
• The Service Alignment Mode (SAM).
For a detailed mode description, see the relevant sections.
5.8 Fault Finding and Repair Tips
5.8.1 NVM Editor
In some cases, it can be handy if one directly can change the
NVM contents. This can be done with the “NVM Editor” in SAM
mode.
5.8.2 Power Supply
Set Not Working
Check Power
Supply Mains
Switch
Not Ok
Check fusible
resistor 3510 &
circuit before it
Check IC7511 &
IC7531
Ok
Set able to
start-up
Ye s
End
No
Bridge Rectifier
circuit 6500
Ok
Check DC
voltage at
2505/2507
Ok
Check
fusible
resistor 3532
Not Ok
Check
7512
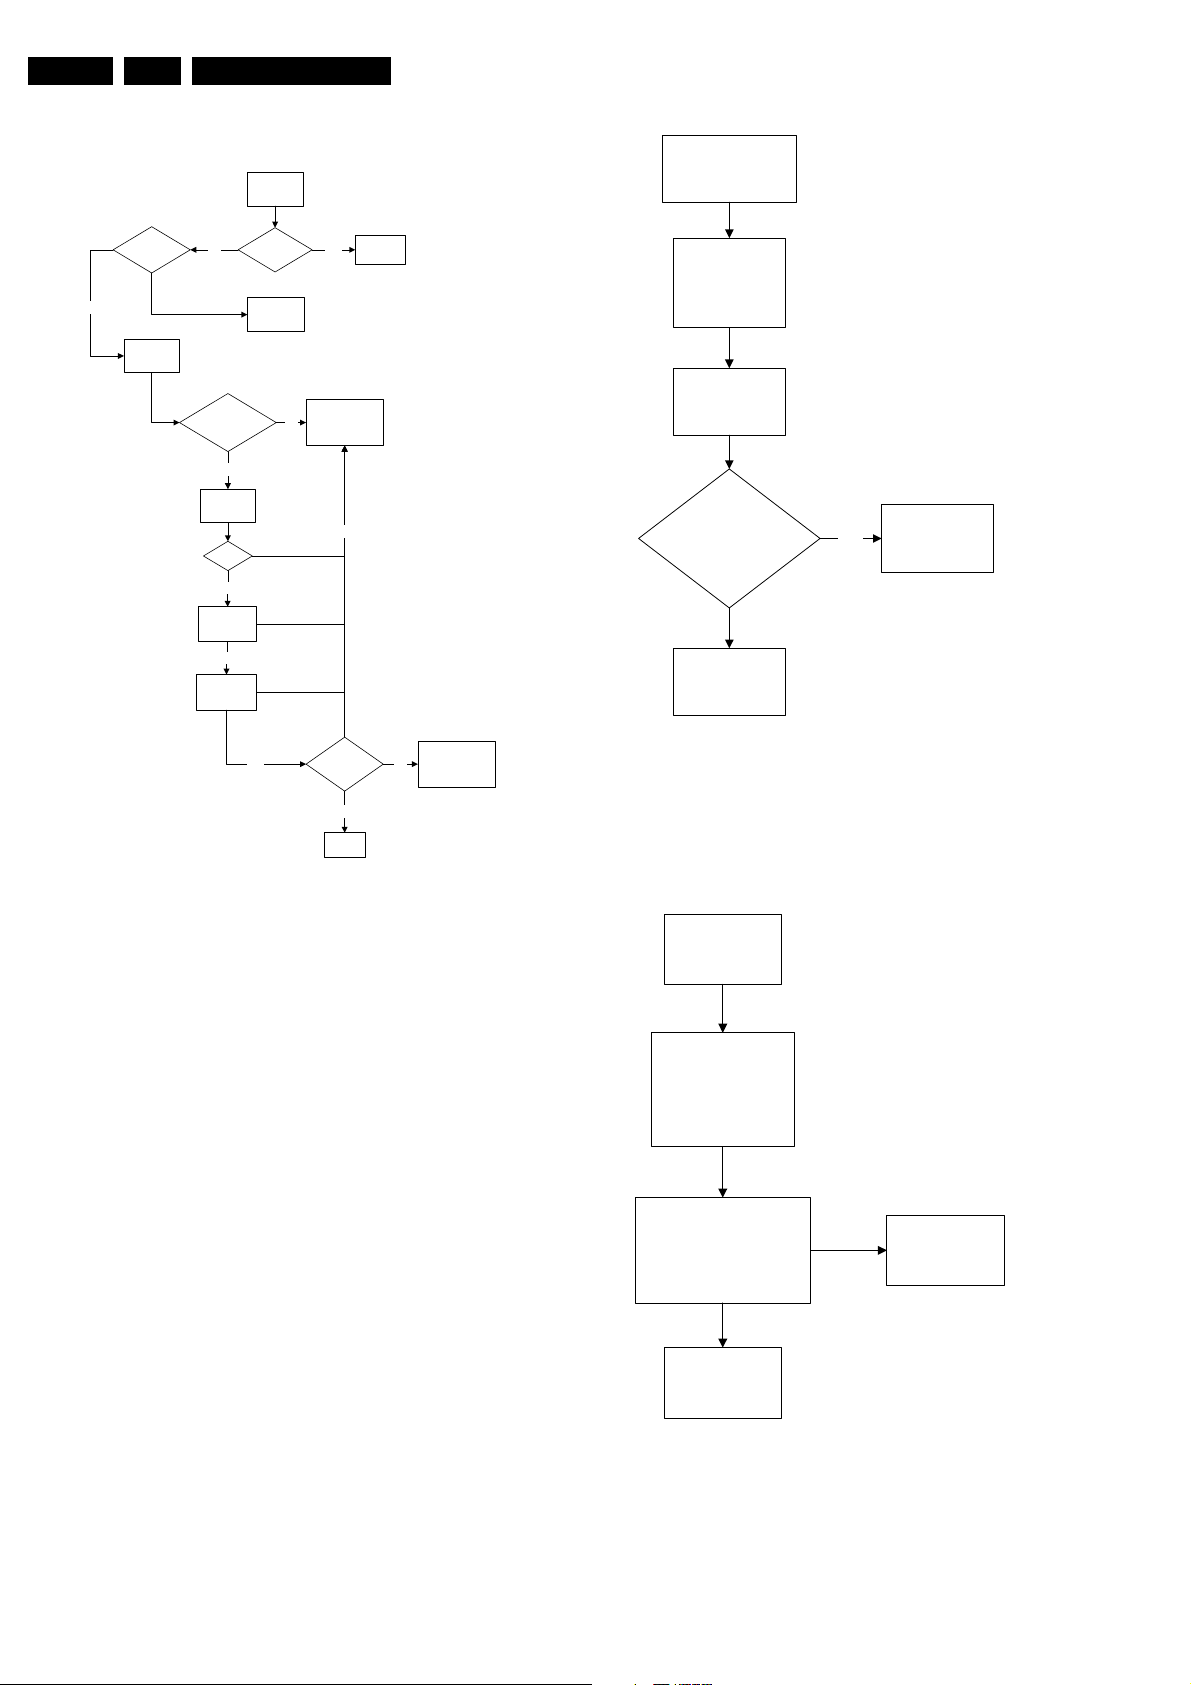
Figure 5-4 Fault finding tree “Set not working”
Check other
fusible resistor
and capacitor in
the circuit
E_14480_057.eps
190204
Notes:
• It is assumed that the components are mounted correctly
with correct values and no bad solder joints.
• Before any fault finding actions, check if the correct options
are set.
EN 14 L04HU AA5.
Set Does Not Start Up
Set Unable
to Start
Service Modes, Error Codes, and Fault Finding
One Thin Vertical Line
LED Blinking
Software
loaded?
Yes
Check
voltage
across 2552
No
Is Vbatt
approximately
140V
Yes
Check
voltage 2562
&2563
16V
Yes
Check 3V
across 2535
Yes
Check 6V
across 2535
Fuse Blown?
Load
Software
Yes
No
Yes
Check Power
Supply circuit
No
Set able to
Start
Yes
End
Change
Fuse
No
Check Line
Transistor 7405
E_14480_058.eps
Figure 5-5 Fault finding tree “Set does not start up”
170204
Check all
connection and
peripheral at
Deflection Circuit in
place
Check
Line Transistor
7405
Is VBE between
200mV to 30mV & V
approximately 500mV
CB
Yes
Check Horizontal
Deflection
Circuitry
Replace transistor
E_14480_059.eps
170204
Figure 5-6 Fault finding tree “One thin vertical line”
One Thin Horizontal Line
Quick check:
• Set in protection mode.
• LED blinking with error “2”.
5.8.3 Deflection
One Thin Vertical Line
Quick check:
• Set in protection mode.
• LED blinking with error “3”.
One Horizontal
Thin Line
LED Blinking
Check all connection
and peripheral at
Deflection Circuit
in place
Check transistor
(7451, 7523, 7543) at
Vertical Deflection Circuitry
Check Vertical
Deflection Circuit
Replace transistor
E_14480_060.eps
170204
Figure 5-7 Fault finding tree “One thin horizontal line”
Blank Screen
Service Modes, Error Codes, and Fault Finding
5.8.5 Tuner and IF
EN 15L04HU AA 5.
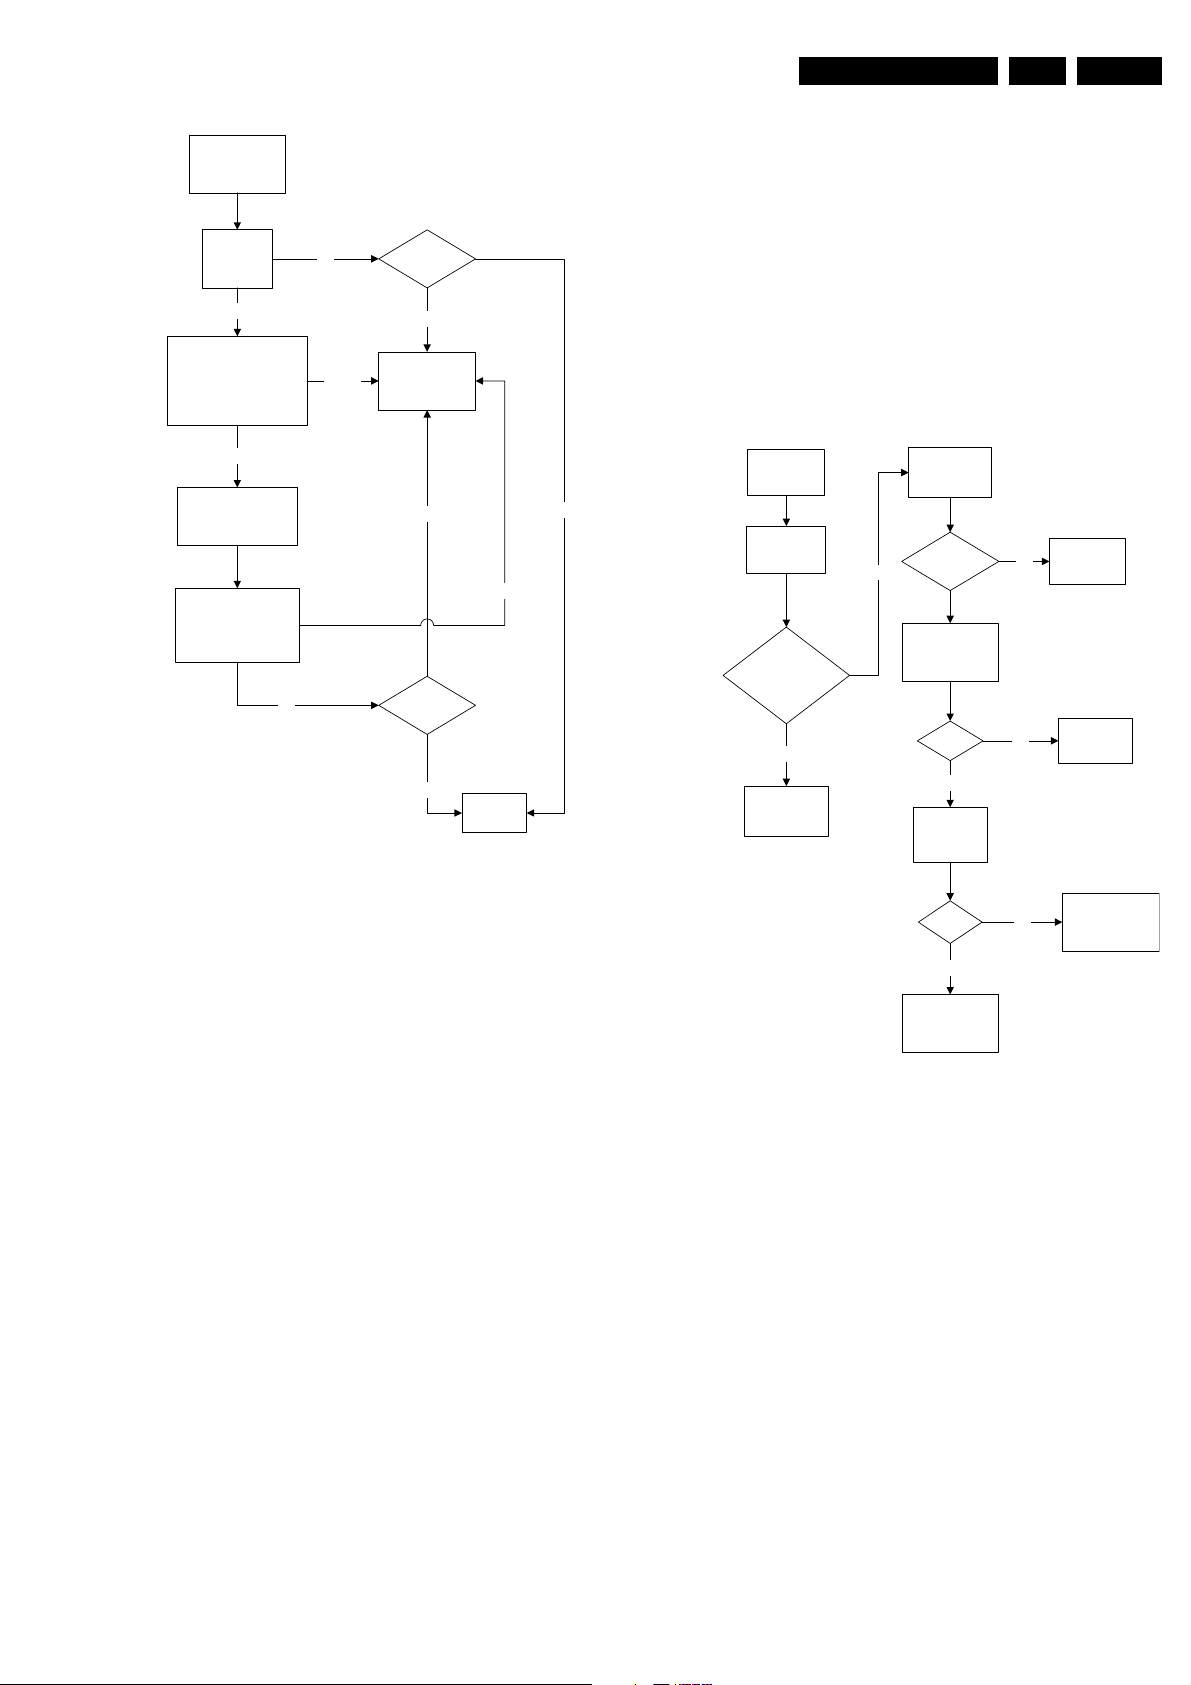
Blank Screen
Check Vg2
(fine tune)
Not Ok
Check Beam Current Limit
(voltage is 1.8V-2V when
brightness and contrast is
set to the maximum
Ok
Check heater voltage
(measure pin 9&10
at the CRT socket)
Check video supply
(2457) is approximately
180V
Ok
Ok
Not Ok
Picture
appears?
Picture not appearing
Check deflection
circuit
Picture not appearing
Picture
appears?
Ok
Not Ok
End
E_14480_061.eps
170204
No Picture
1. Check that the Option settings are correct.
2. If correct, check that supply voltages are there.
3. If supply voltages are present, check whether picture is
present in AV.
4. If picture is present in AV, check with the scope the Tuner
IF output signal by manual storage to a known channel.
5. If IF output is present, Tuner is working fine. If no IF output,
I2C data lines may be open, check continuity of I2C lines.
If I2C lines are ok, Tuner may be defect, replaced Tuner.
6. If Tuner IF is present and yet still no picture in RF mode, go
to Video Processing troubleshooting section.
No Picture, No Sound
Yes
Check tuning
supply voltage,
pin 9 of tuner
>30V & <35V
Check supply
voltage, pin 7 of
tuner
5V
Yes
Check Tuner
pin 4 & 5
I2C Bus
Check
Supply
V
No
T
Section
Check Power
No
Supply
No Picture,
No Sound,
Raster Ok
Ok
Check AGC
Voltage, pin 1
of tuner
AGC voltage
changes with
different signal
strength
No
Check AGC
circuit section
Figure 5-8 Fault finding tree “Blank screen”
5.8.4 Source Selection
Set is not able to go into AV or any missing AV is encountered
E.g. AV1 is available but not able to enter to AV1: Check if the
option setting is correct.
Set is able to go to AV, but no audio is heard.
1. Check that continuity of signal is there from the SCART/
Cinch input to the input of the Hercules.
2. If continuity is there and still no audio, check that option
settings are correct.
3. If logic setting is correct and still no audio, proceed to Audio
Decoder/Processor troubleshooting section.
Set is able to go into AV but no video is available:
1. Check continuity from AV input to HERCULES depending
on the input.
2. If continuity is available and yet no video, proceed to Video
Processor troubleshooting section.
Ok
Yes
Replace Tuner
No
Check other
functional area
E_14480_062.eps
Figure 5-9 Fault finding tree “No picture, no sound”
170204
EN 16 L04HU AA5.
Service Modes, Error Codes, and Fault Finding
Picture Ok, No Sound
Picture Ok,
No Sound
Check IF output of
tuner, pin 11
CVBS
present?
Ye s
Check SAW filter output
(pin 4&5)
EU/AP/CH (QSS)- 1001
NA/LA/AP INT - 1002
Output Ok?
Ye s
Check other
functional area
No
No
Refer to fig.
"Power Supply:
Set not working"
Replace SAW
filter
E_14480_063.eps
170204
Figure 5-10 Fault finding tree “Picture ok, no sound”
Unable To Perform Tuning
Unable to
perform tuning
Enter SDM
check optionbyte 1
Correct
Check if tuner
Supply Voltage
pin 7
Incorrect
5V
Yes
Check Tuner
Supply Voltage
Check I2C at pin
4 & 5 and tuner
Ok
Check other
functional area
Enter SDM and change
to the appropriate byte
Check Power
No
Supply
No
33V
Yes
Not Ok
Check I2C
circuit
Not Ok
I2C
Not Ok
Replace
Tuner
Not Ok
Tuner
E_14480_064.eps
Figure 5-11 Fault finding tree “Unable to perform tuning”
5.8.6 Controller
Below are some guidelines for troubleshooting of the Micro
Controller function. Normally Micro Controller should be
checked when there is a problem of startup.
1. Check that both +3.3 V_dc and +1.8 V_dc are present.
2. Check that crystal oscillator is working.
3. Check that Power Good signal is at “high” logic, normal
operation.
4. Check that HERCULES is not in standby mode. Pin 15 of
HERCULES should be 0 V_dc.
5. Make sure H-drive pulse is there. This can be checked at
resistor R3239. If H-drive does not exist, remove resistor
R3239 to check if there is loading.
Note: When the set shuts down after a few second after power
“on”, the main cause is that Vg2 not aligned properly, try
adjusting Vg2 during the few seconds of power “on”.
5.8.7 Video Processing
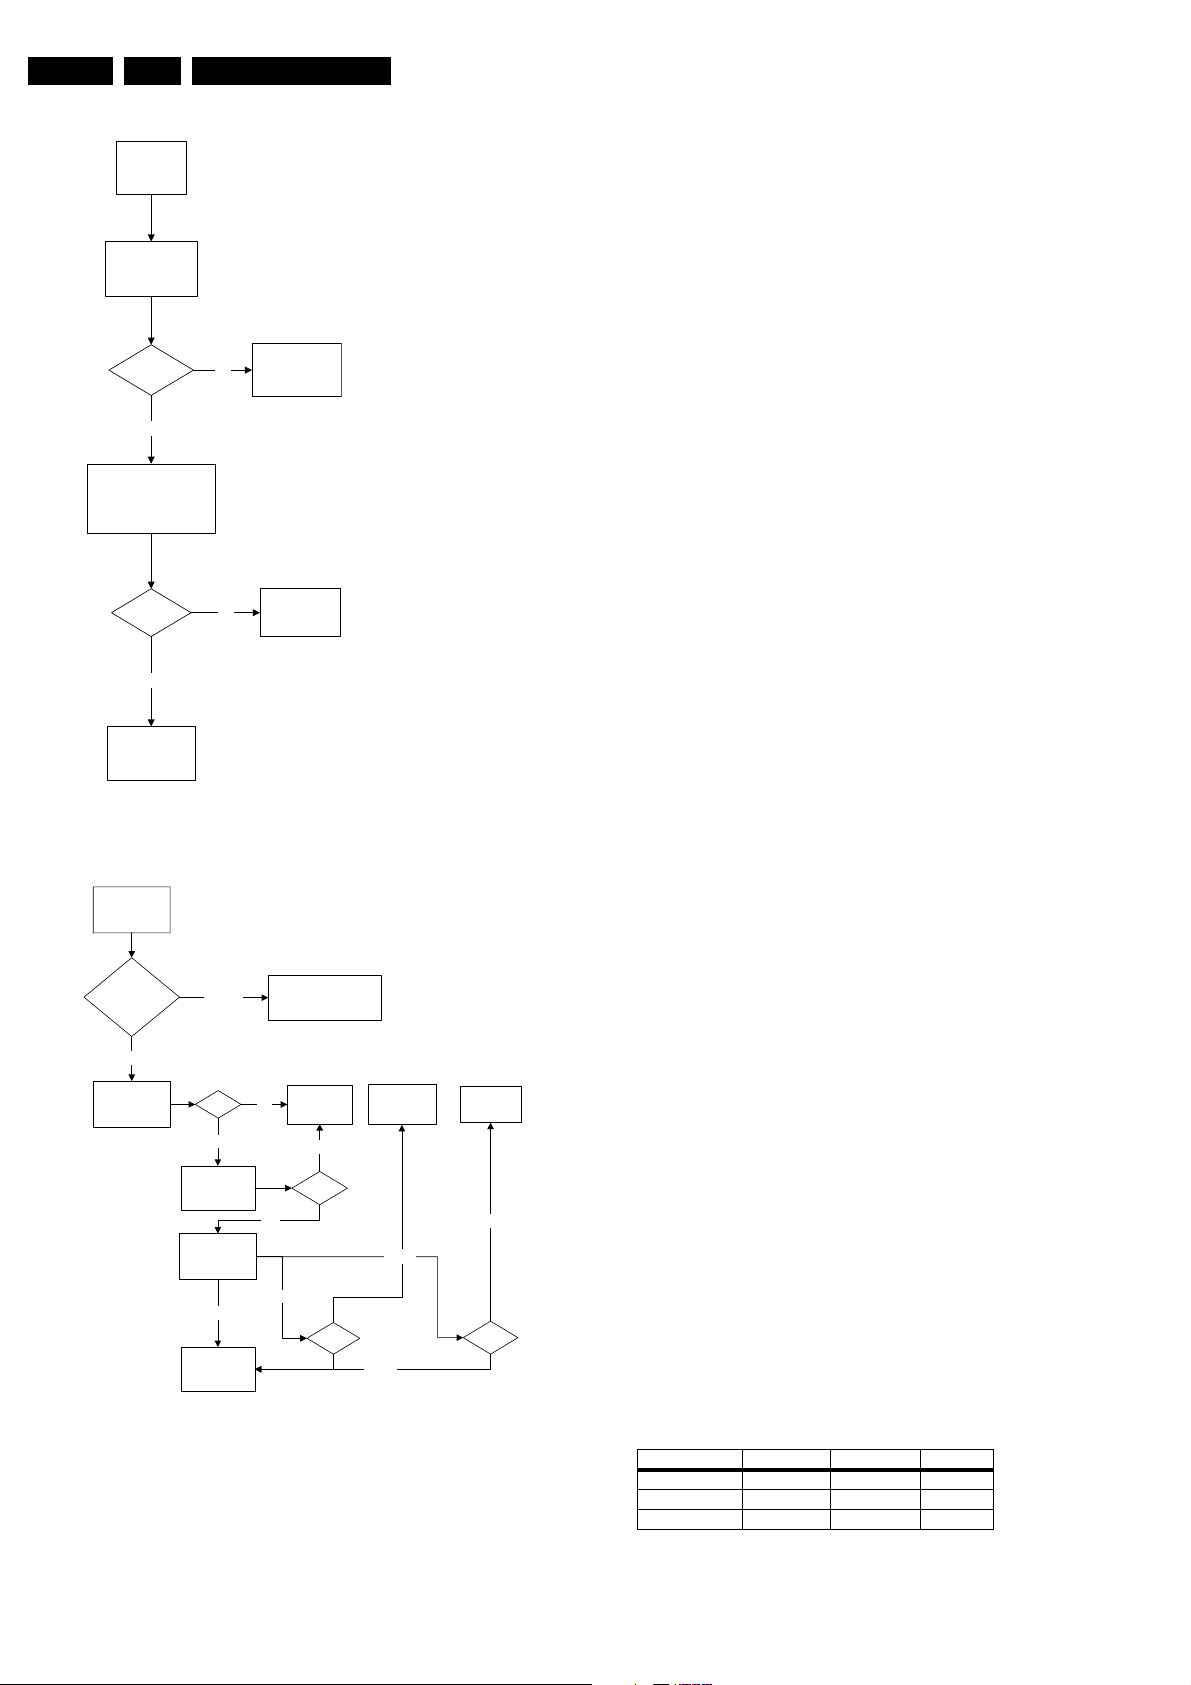
No Picture
When “no picture in RF”, first check if the microprocessor is
functioning ok in section “Controller”. If that is ok, follow the
next steps.
When “no picture in AV”, first check if the video source
selection is functioning ok in section “Source Selection”. If that
is ok, follow the next steps.
1. Check that normal operating conditions are met.
2. Check that there is video signal at pin 81. If no video,
demodulator part of the HERCULES is faulty, replace with
new HERCULES.
3. If video signal is available at pin 81, check pin 56, 57, and
58 for the RGB signal.
4. If signal is not available, try checking the BRIGHTNESS
and/or CONTRAST control, and make sure it is not at zero.
5. If still with the correct settings and no video is available,
proceed to the CRT/RGB amplifier diagram.
For sets with TDA9178, follow steps below:
1. Put Option Byte 2 bit 4 to “0”; if video signal is not available,
then check fault finding section “Controller”, Section
“Source Selection”, and steps above.
2. If video is available but not correct, put Option Byte 2 bit 4
to “1”, then check if LTI panel is present. If not, put LTI
panel in the main chassis (connector 1221).
3. If LTI panel is in main chassis, check cable between LTI
panel and main chassis (position is 1206). If it is
connected, then the LTI panel is faulty, replace it.
For sets with Scavem, and Scavem does not work, follow steps
below:
1. Check Scavem coil connector (position is 1361) if
connected; if not, connect it.
2. If connected, check NVM “bit storage” byte 1 bit 7; if it is not
“1”, set it to “1”.
3. If it is “1”, then check the data of the NVM addresses as in
the next table. If the data is not correct, then set these
addresses to diagram values.
4. If it still not works, track Scavem output from pin64 of
HERCULES to CRT panel.
170204
Table 5-3 NVM default values for Scavem
Description Address (dec) Address (hex) Value (hex)
SPR, WS 140 8C 00
VMA, SVM 141 8D 32
NVM_SOC_SMD 142 8E 03

5.8.8 Audio Processing
No Sound
Picture Ok,
No Sound
Tuner IF Ok Check Tuner/IFNot Ok
Ok
Check AUDOUTLSL &
AUDOUTLSR pin at
Hercules
Ok
Service Modes, Error Codes, and Fault Finding
Check Hercules IC
Not Ok
EN 17L04HU AA 5.
Check Audio
Amplifier
Not Ok
Check Audio
Power Supply
Ok
Check Audio
Amplifier Circuit
and loud speaker
Ok
Check NVM
Not Ok
Check Power
Supply
Replace Audio
Amplifier
E_14480_065.eps
170204
Figure 5-12 Fault finding tree “No sound”
No RF audio for QSS/Inter-Carrier stereo sets.
1. Check pin 99 and 100 for SIF signal (for QSS) or pin 104
and 105 for video with SIF (for Inter-Carrier)
2. If signal is not present, check for the QSS/FMI bit settings.
Check also the NVM data.
3. If signals are present and still no audio, check the audio
supply voltage +8V are present.
4. If still no audio signal at Hercules output, Hercules is faulty.
No AV audio.
1. Check troubleshooting methods in section “Source
Selection”.
2. Check the output of the Hercules to see if there is signal
available. If no, check the normal operating condition and
also the NVM data.
3. If still no audio signal at Hercules output, Hercules is faulty.
Note: If there is audio signal at Hercules output and no audio
at loudspeaker, proceed to Audio Amplifier troubleshooting
methods.
5.8.9 Audio Amplifier
No RF as well as AV audio at the loudspeaker:
1. Check that the normal operation condition of the amplifier
is met.
2. If normal operation conditions are met, check the continuity
from Hercules output to input of the amplifier.
3. If continuity is there and still no audio, check speaker wire
connections. If still no audio, amplifier IC might be faulty

EN 18 L04HU AA5.
Personal Notes:
Service Modes, Error Codes, and Fault Finding
E_06532_012.eps
060804
Block Diagrams, Testpoint Overviews, and Waveforms
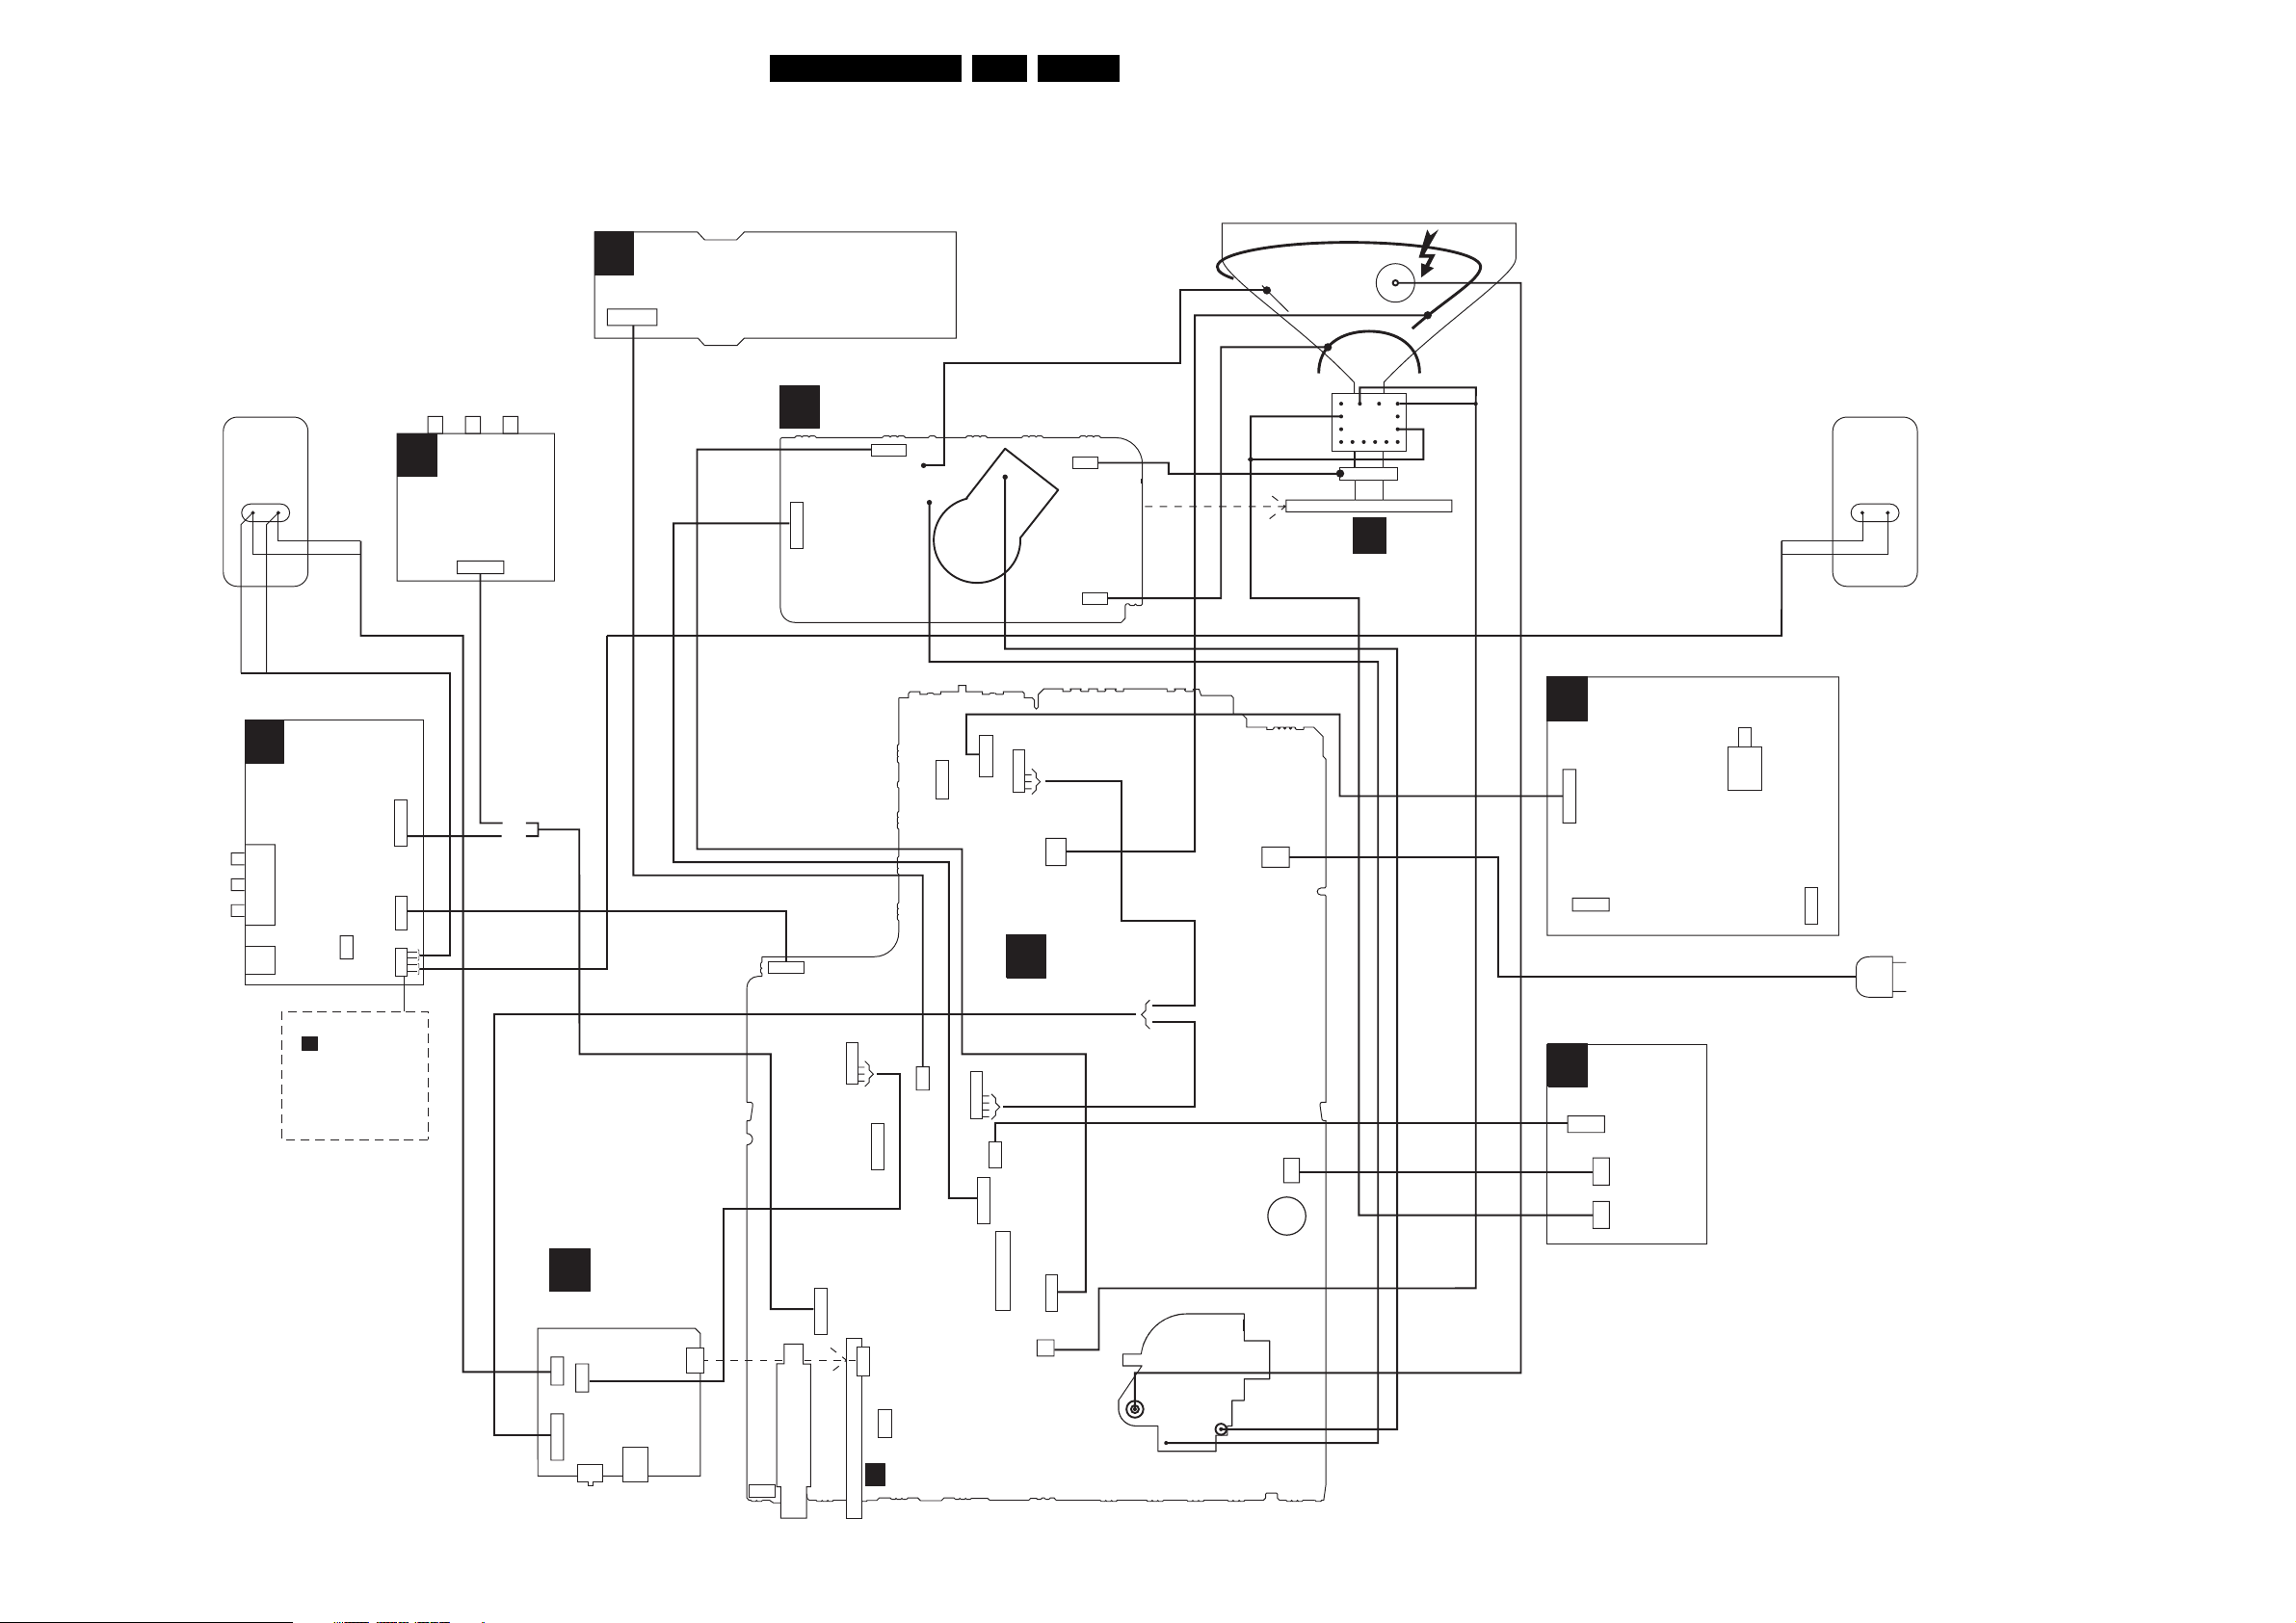
6. Block Diagrams, Testpoint Overviews, and Waveforms
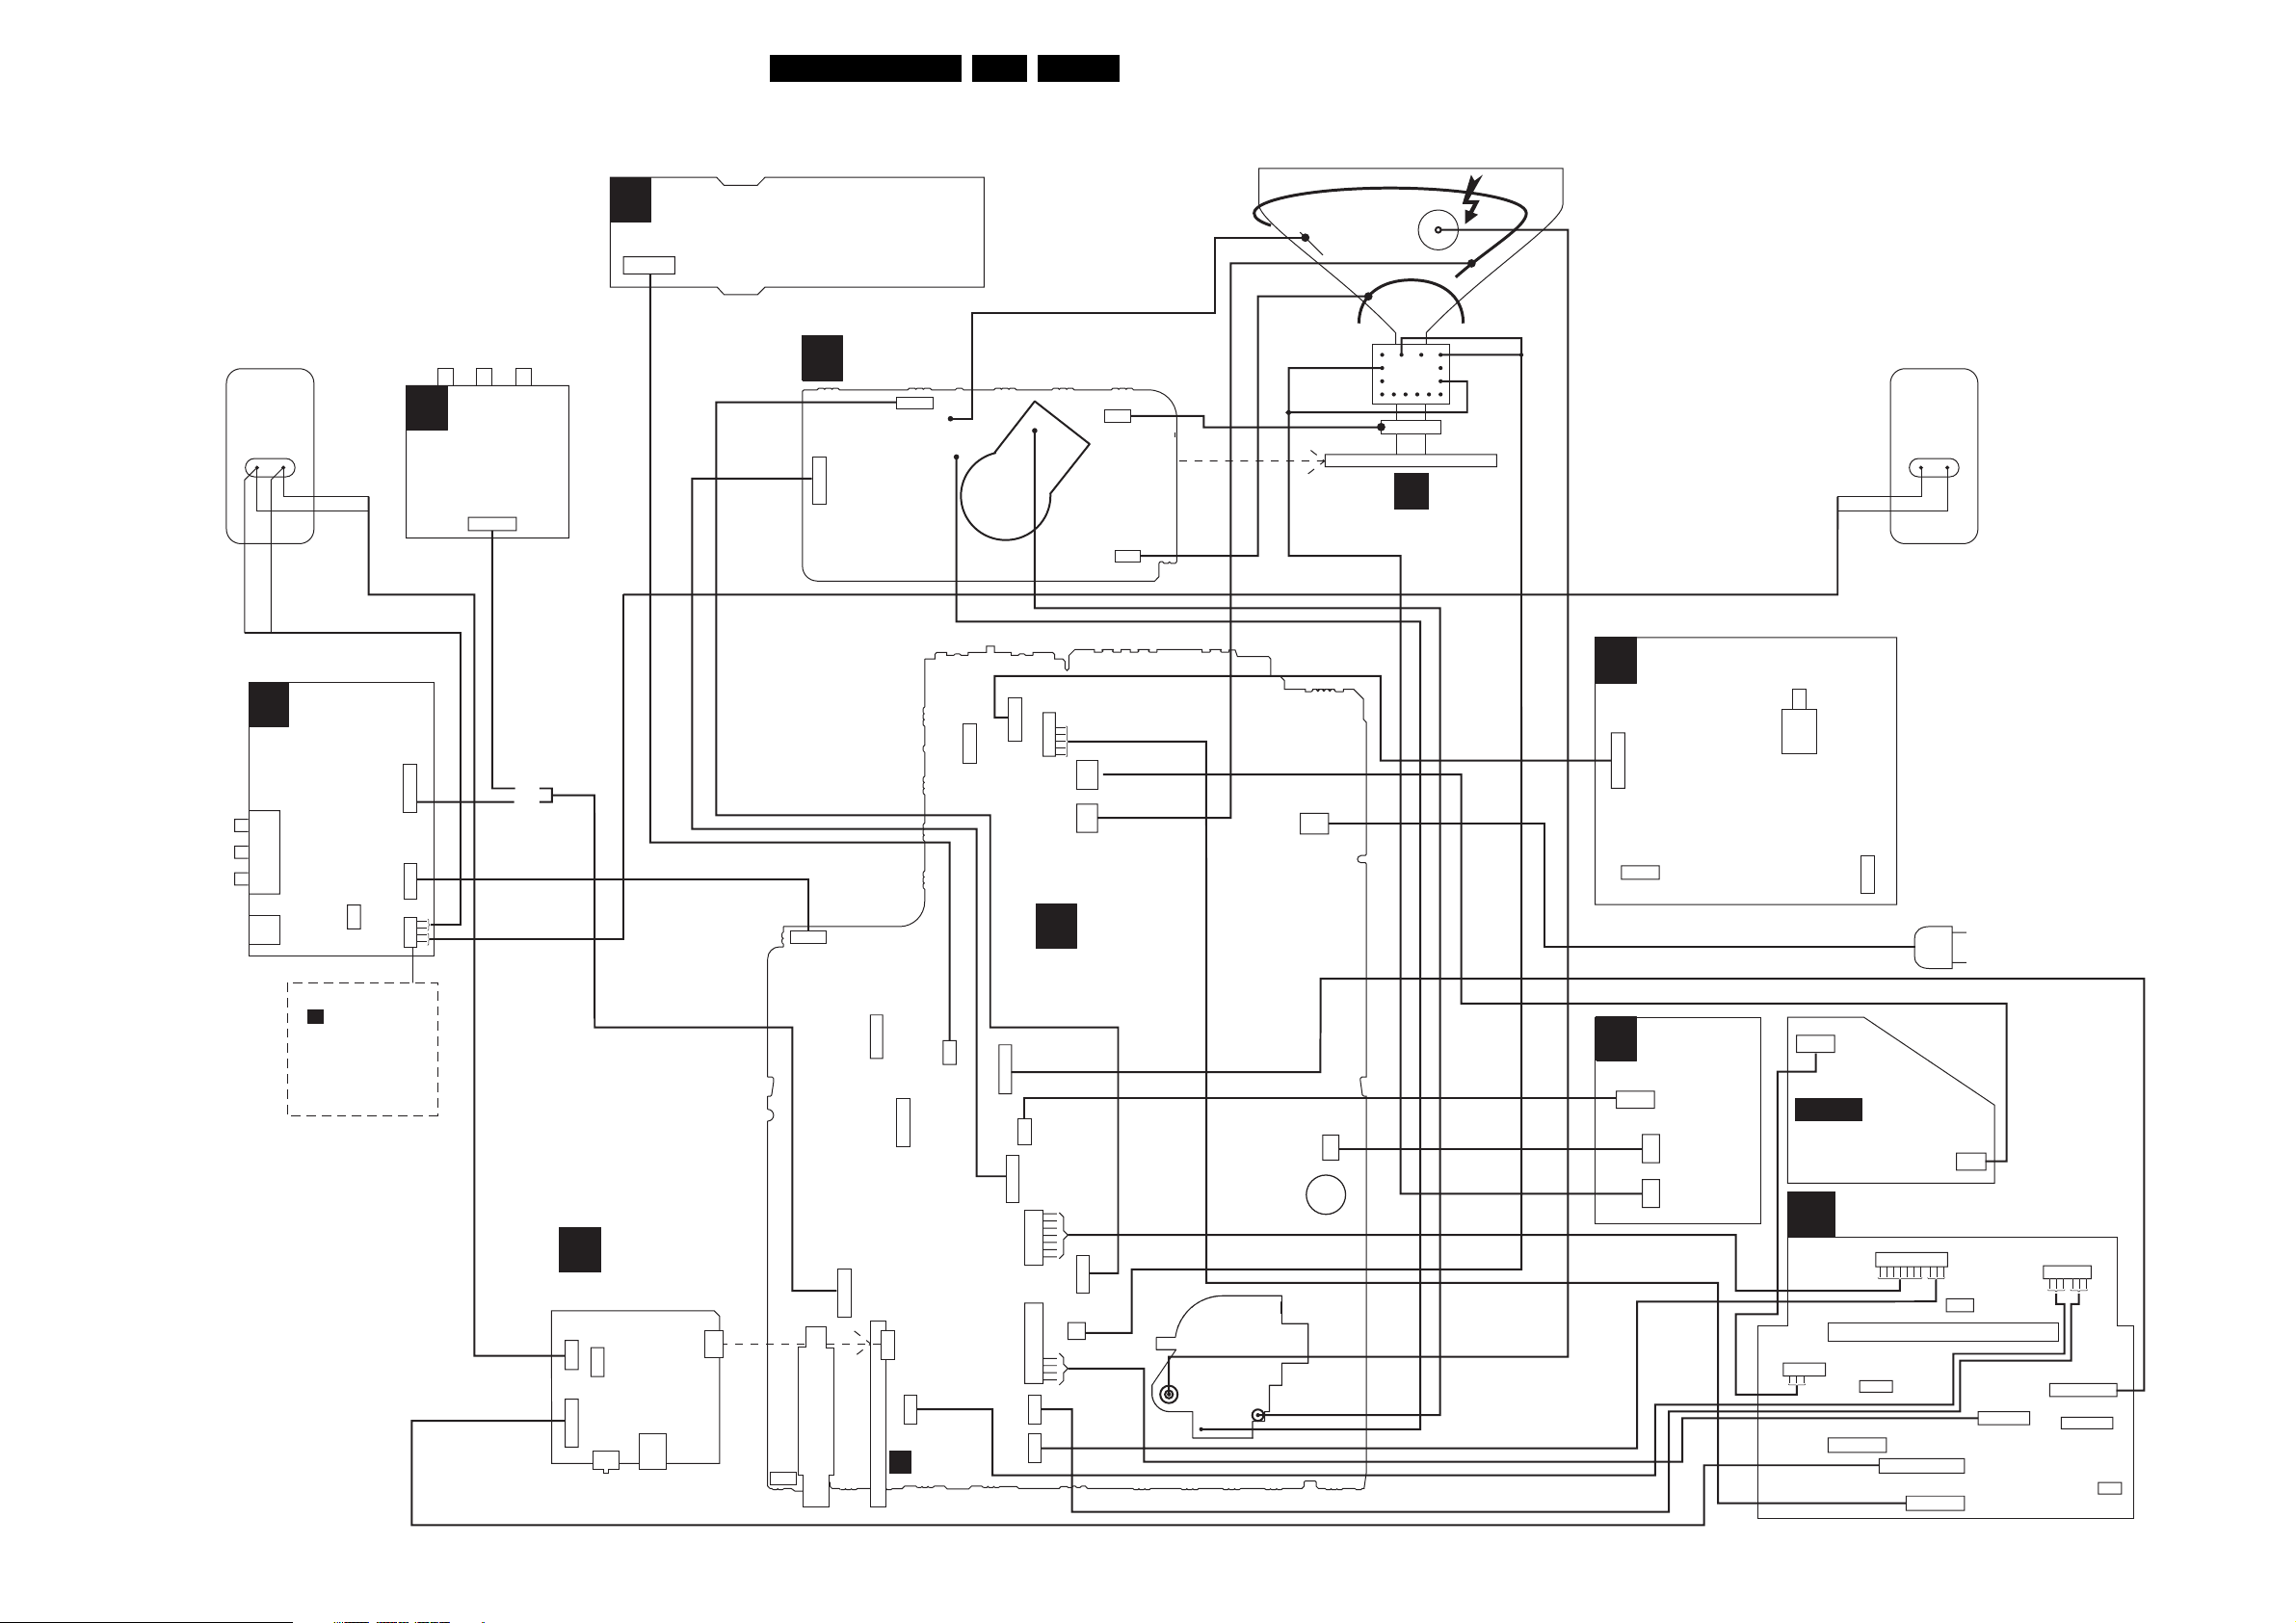
Wiring Diagram Standard
19L04HU AA 6.
CVBS (YELLOW)
LEFT (WHITE)
RIGHT (RED)
HEADPHONE
WIRING DIAGRAM
FOR “STANDARD”
RIGHT
SPEAKER
SIDE
D
A/V PANEL +
HEADPHONE
1279
1252
1254
1278
3P
I2
7P
5P
4P
FRONT AV
1252
7P
OR
OR
TOP CONTROL PANEL
E
1010
3P
(component view)
CRT PANEL
B
1331
7P
5P
15
1280
5P
1351
1352
1332
SOCKET
1902
5P
CRT
1693
DEGAUSSING COIL
BLUE
RED
CRT
FRAME
RO TAT IO N
COIL
YELLOW
ORANGE
SCAVEM
COIL
EHT
CRT
LEFT
SPEAKER
1361
3P
AQUADAG
B
CRT PANEL
1381
1692
7
6P
7P
1
1504
2P
MONO
A
CARRIER
(optional)
3P
FRONT INTERFACE
J
1693
1505
2P
6P
1505
NAFTA SETS HAVE TACT SWITCH
2P
MAINS
SWITCH
(NOT FOR NAFTA)
1211
2P
MAINS
CORD
REMARK:
D
IF SIDE AV
PANEL IS NOT MOUNTED
THE SPEAKERS
ARE CONNECTED
TO CONNECTOR
1280 ON THE
MONO CARRIER
SP/LS
I1
MODULE
(SMART PLUG+
BATH ROOM SPEAKER)
1246
1251
3P
1259
9P 3P
U1
U2
0262
3P
1005
COMPAIR
CONNECTOR
1220
6
1682
6P
1
1206
7P
1207
7P
1262
3P
1236
I1
3P
SP/LS
MODULE
TUNER
3P
1213
7
3P
7P
1
1204
1221
7P
1212
1
3P
1401
12P
5P
1451
2P
LOT
1404
2P
5401
LINEARITY &
G
PANORAMA
(optional)
1462
3P
1464
2P
1461
2P
E_14820_004.eps
210904
Block Diagrams, Testpoint Overviews, and Waveforms
Wiring Diagram System
20L04HU AA 6.
CVBS (YELLOW)
LEFT (WHITE)
RIGHT (RED)
HEADPHONE
WIRING DIAGRAM
FOR “SYSTEM”
RIGHT
SPEAKER
SIDE
D
A/V PANEL +
HEADPHONE
1279
1252
1254
1278
3P
I2
7P
5P
4P
FRONT AV
1252
7P
OR
OR
TOP CONTROL PANEL
E
1010
3P
(component view)
CRT PANEL
B
1331
7P
5P
15
1280
5P
1351
1352
1332
SOCKET
1902
5P
CRT
1693
DEGAUSSING COIL
BLUE
RED
CRT
FRAME
ROTATION
COIL
YELLOW
ORANGE
SCAVEM
COIL
EHT
CRT
LEFT
SPEAKER
1361
3P
AQUADAG
B
CRT PANEL
1381
3P
1692
7
6P
7P
1
1507
2P
1504
2P
MONO
A
CARRIER
(optional)
1505
2P
FRONT INTERFACE
J
1693
6P
NAFTA SETS HAVE TACT SWITCH
1505
2P
MAINS
SWITCH
(NOT FOR NAFTA)
1211
2P
MAINS
CORD
REMARK:
D
IF SIDE AV
PANEL IS NOT MOUNTED
THE SPEAKERS
ARE CONNECTED
TO CONNECTOR
1280 ON THE
MONO CARRIER
SP/LS
I1
MODULE
(SMART PLUG+
BATH ROOM SPEAKER)
1246
1251
3P
1259
9P 3P
U1
U2
0262
3P
1005
COMPAIR
CONNECTOR
1220
6
1682
6P
1
1206
7P
1207
7P
1262
3P
1236
I1
3P
SP/LS
MODULE
TUNER
3P
1213
7
3P
7P
1
1204
1221
1219
7P
1
1
9
3P
1212
7P
9P
1227
3P
1229
3P
1401
5P
1451
2P
LOT
1404
2P
5401
LINEARITY &
G
PANORAMA
(optional)
1462
3P
1464
2P
1461
2P
0228
3P
EPS1B
J1
0228
5P
15
EXTERNAL
POWER SUPPLY
INTERFACE MODULE
1800
1534
1220
6P
0213
2P
1212
10P
1
1215
3P
32P
3P
1259
9P
1692
5P
1219
4P
1227
6P
1
6
1213
7P
0237
4P
1775
1P
E_14820_005.eps
210904

Block Diagrams, Testpoint Overviews, and Waveforms
Block Diagram Supply and Deflection
SUPPLY AND DEFLECTION
EPS1B
0213
EXTERNAL POWER SUPPLY
- for “SYSTEM” version only -
BR1
AC
DC
IC1
CONTROL
D2
C21
HOT GROUND
1
2
5
4
HOT
T1
CR1
C
COLD
L5 +12V
C23
C7
COLD GROUND
0228
3
2
1
N.C.
INTERFACE MODULE (SUPPLY PART)
J1
- for “SYSTEM” version only -
0228
1
2
3740
3
4
5
6703
2703
+12V
+5V
DEFLECTION
21L04HU AA 6.
LINEARITY & PANORAMA
TO 1221
A5
CONNECTIONS
G
ONLY FOR:
28"WSRF LA/NA
32" WSRF LA/NA
28" WS-SF LA
1404
4
1
1462
1
2
3
+9V
I2SD/1
7460
ACTIVATING
CIRCUIT
2466
LINEARITY AND
PANORAMA
CORRECTION
2474
2475
7462
7463
2464
2467
1463
1461
4
1
HOR.
DEFL.
COIL
POWER SUPPLY
A1
1505
7532
F508 268V / div DC
F511 15V5 / div DC
F531 2V7 / div DC
F537 0V (N.A.)
Degaussing
I511
6512
3519
1506
MAINS
SWITCH
(not USA)
Coil
1500
T4E
2
2511
6
3
6533
3530
6
I531
11
F552 130V / div DC
F561 15V9 / div DC
F564 9V4 / div DC
F573 0V (N.A.)
7511
TEA1506T
Vcc
CONTROL
CTRL
STANDBY
SUPPLY
7531
TEA1620
Vcc
CONTROL
REG
AUX
1504
5500 :
5502
DRAIN
IC
IC
DRIVER
SENSE
DEMAG
DRAIN
SOURCE
1507
3507
t
I513
14
11
I519
9
7
14
12
6532
I513 I516 I519 I533
3513
3514
3518
I533
3534
3531
3532
3517
2534
3538
6511
G
6500
7512
AC
DC
MAIN
SUPPLY
D
S
3516
2
F508
2505
5520
9
8
4
I516
5
3
7514
2
4
3
35321532
1A
5531
4
5
1
2
HOT GROUND COLD GROUND
1503
43
1
17
18
13
14
10
11
1
2
10
9
8
6
7541
ENERGIZING
5551
5562
5561
7515
TCET1103
CIRCUIT
(optional)
6551
6563
6562
6564
6535
6536
3571
6573
2564
2535
2536
V_DG
F552
1543
6571
7571
REFERENCE
CIRCUIT
+3V3
7573
STANDBY
CIRCUIT
6565 6566
3565
F536
6537
G
7536
7561
6676
DS
I573
I565
7535
For IDTV only
5552
Vbatt
F563
-Vaudio
F561
+Vaudio
+6VA
3575
3576
Stdby_Con
POWER-DOWN
A4
F564
+3V
+6VA
+6VA
5537
+6V
F537
Vaux
I548
B
A4
2x
A4
HERCULES
A4
INTF_Y GREEN_IN
A5
EHTinfo
A2
F401 130V / div DC
F402 32V8 / div DC
3232
PHI 1
DETECTOR
VERTICAL
SYNC
SEPARATOR
2240
HORIZONTAL
OSC.
SAND-
CASTLE
GENERATOR
X-RAY
PROTECTION
VERTICAL
DIVIDER
112
56
97
7200-H
(SYNC)
VIDEO
IDENT
MAIN
SYNC
SEPARATOR
EHTo
F412 F414
2V / div DC
20µs / div
200V / div DC
F455 F458 F459
A2 A2
EHTinfo
20µs / div
Vguard
113 116
VERTICAL
GUARD
DETECTOR
PHI 2
DETECTOR
VERTICAL
SAW-
THOOTH
R.G.B.
BLANKING
HORIZONTAL
OUTPUT
E/W
+
GEOMETRY
VERTICAL
OUTPUT
+
GEOMETRY
F418
5V / div DC
20µs / div
F452 -13V4 / div DC
F453 190V8 / div DC
F460 F461
LINE + FRAME DEFLECTION
A2
LINE
+
E/W
CORR.
7452
7411
3465
-12V
7454
Vbatt
OR
1404
1
2
7451
7453
3
1
F402
HOR.
DEFL.
COIL
3461
3466
5445
I462
3474
3471
F458
1491
1
2
F459
EHT
FOCUS VG2
10
6
5
7
8
9
Vguard
VER.
DEFL.
COIL
FRAME_FB
1454
3442
6481
Vbatt
A4
I433
TO
CRT
B1
+Vbatt
3481
3410
6483 6484
6453
6456
3457
3455
6401
3411
3451
2403
6452
3458
3484
3485
1452
2456
6459
Vbatt
7401 : 7403
7480 : 7483
EHTb
+
EHTinfo
+
BCL
PROC.
VIDEO/SUPPLY
3401
F401
POWER-DOWN
FRAME_FB
EHTb
EHTinfo
BCL
F452
F453
VIDEO/SUPPLY
F455
FILAMENT
6454
6455
EHTb
FILAMENT
VT_SUPPLY
A4
A1
A4
A4
-12V
+9V
1401
5
4
TO 1351
3
B1
2
CRT
1
+6VA
LINE
7408
F412
TO RGB
PROC.
F206
7207
F205
3291
HDRIVE
HD
SANDCASTLE
A5
HD_PIP
A5
EW_DRIVE
62
63
108
-9V
7404
+8V
7410
3498
HD
6486
5402
E/W
+8V
3420 3440
I417
7484
7405
BU4508DX
F418
7406
3497
F414
OUTPUT
CIRCUIT
FRAME
+9V
106
107
VDRA
VDRB
F460
F461
I417
3462
7455 7456
3463
I462
I468
I468I433
100V / div DC
5µs / div
100V / div DC
5µs / div
2V / div DC
5µs / div
100V / div DC
5µs / div
5V / div DC
20µs / div
20 V / div DC
5ms / div
1V / div DC
5ms / div
500mV / div DC
5ms / div
500mV / div DC
5ms / div
500mV / div DC
20µs / div
10V / div DC
20µs / div
10V / div DC
5ms / div
5V / div DC
5ms / div
E_14820_006.eps
140904
Block Diagrams, Testpoint Overviews, and Waveforms
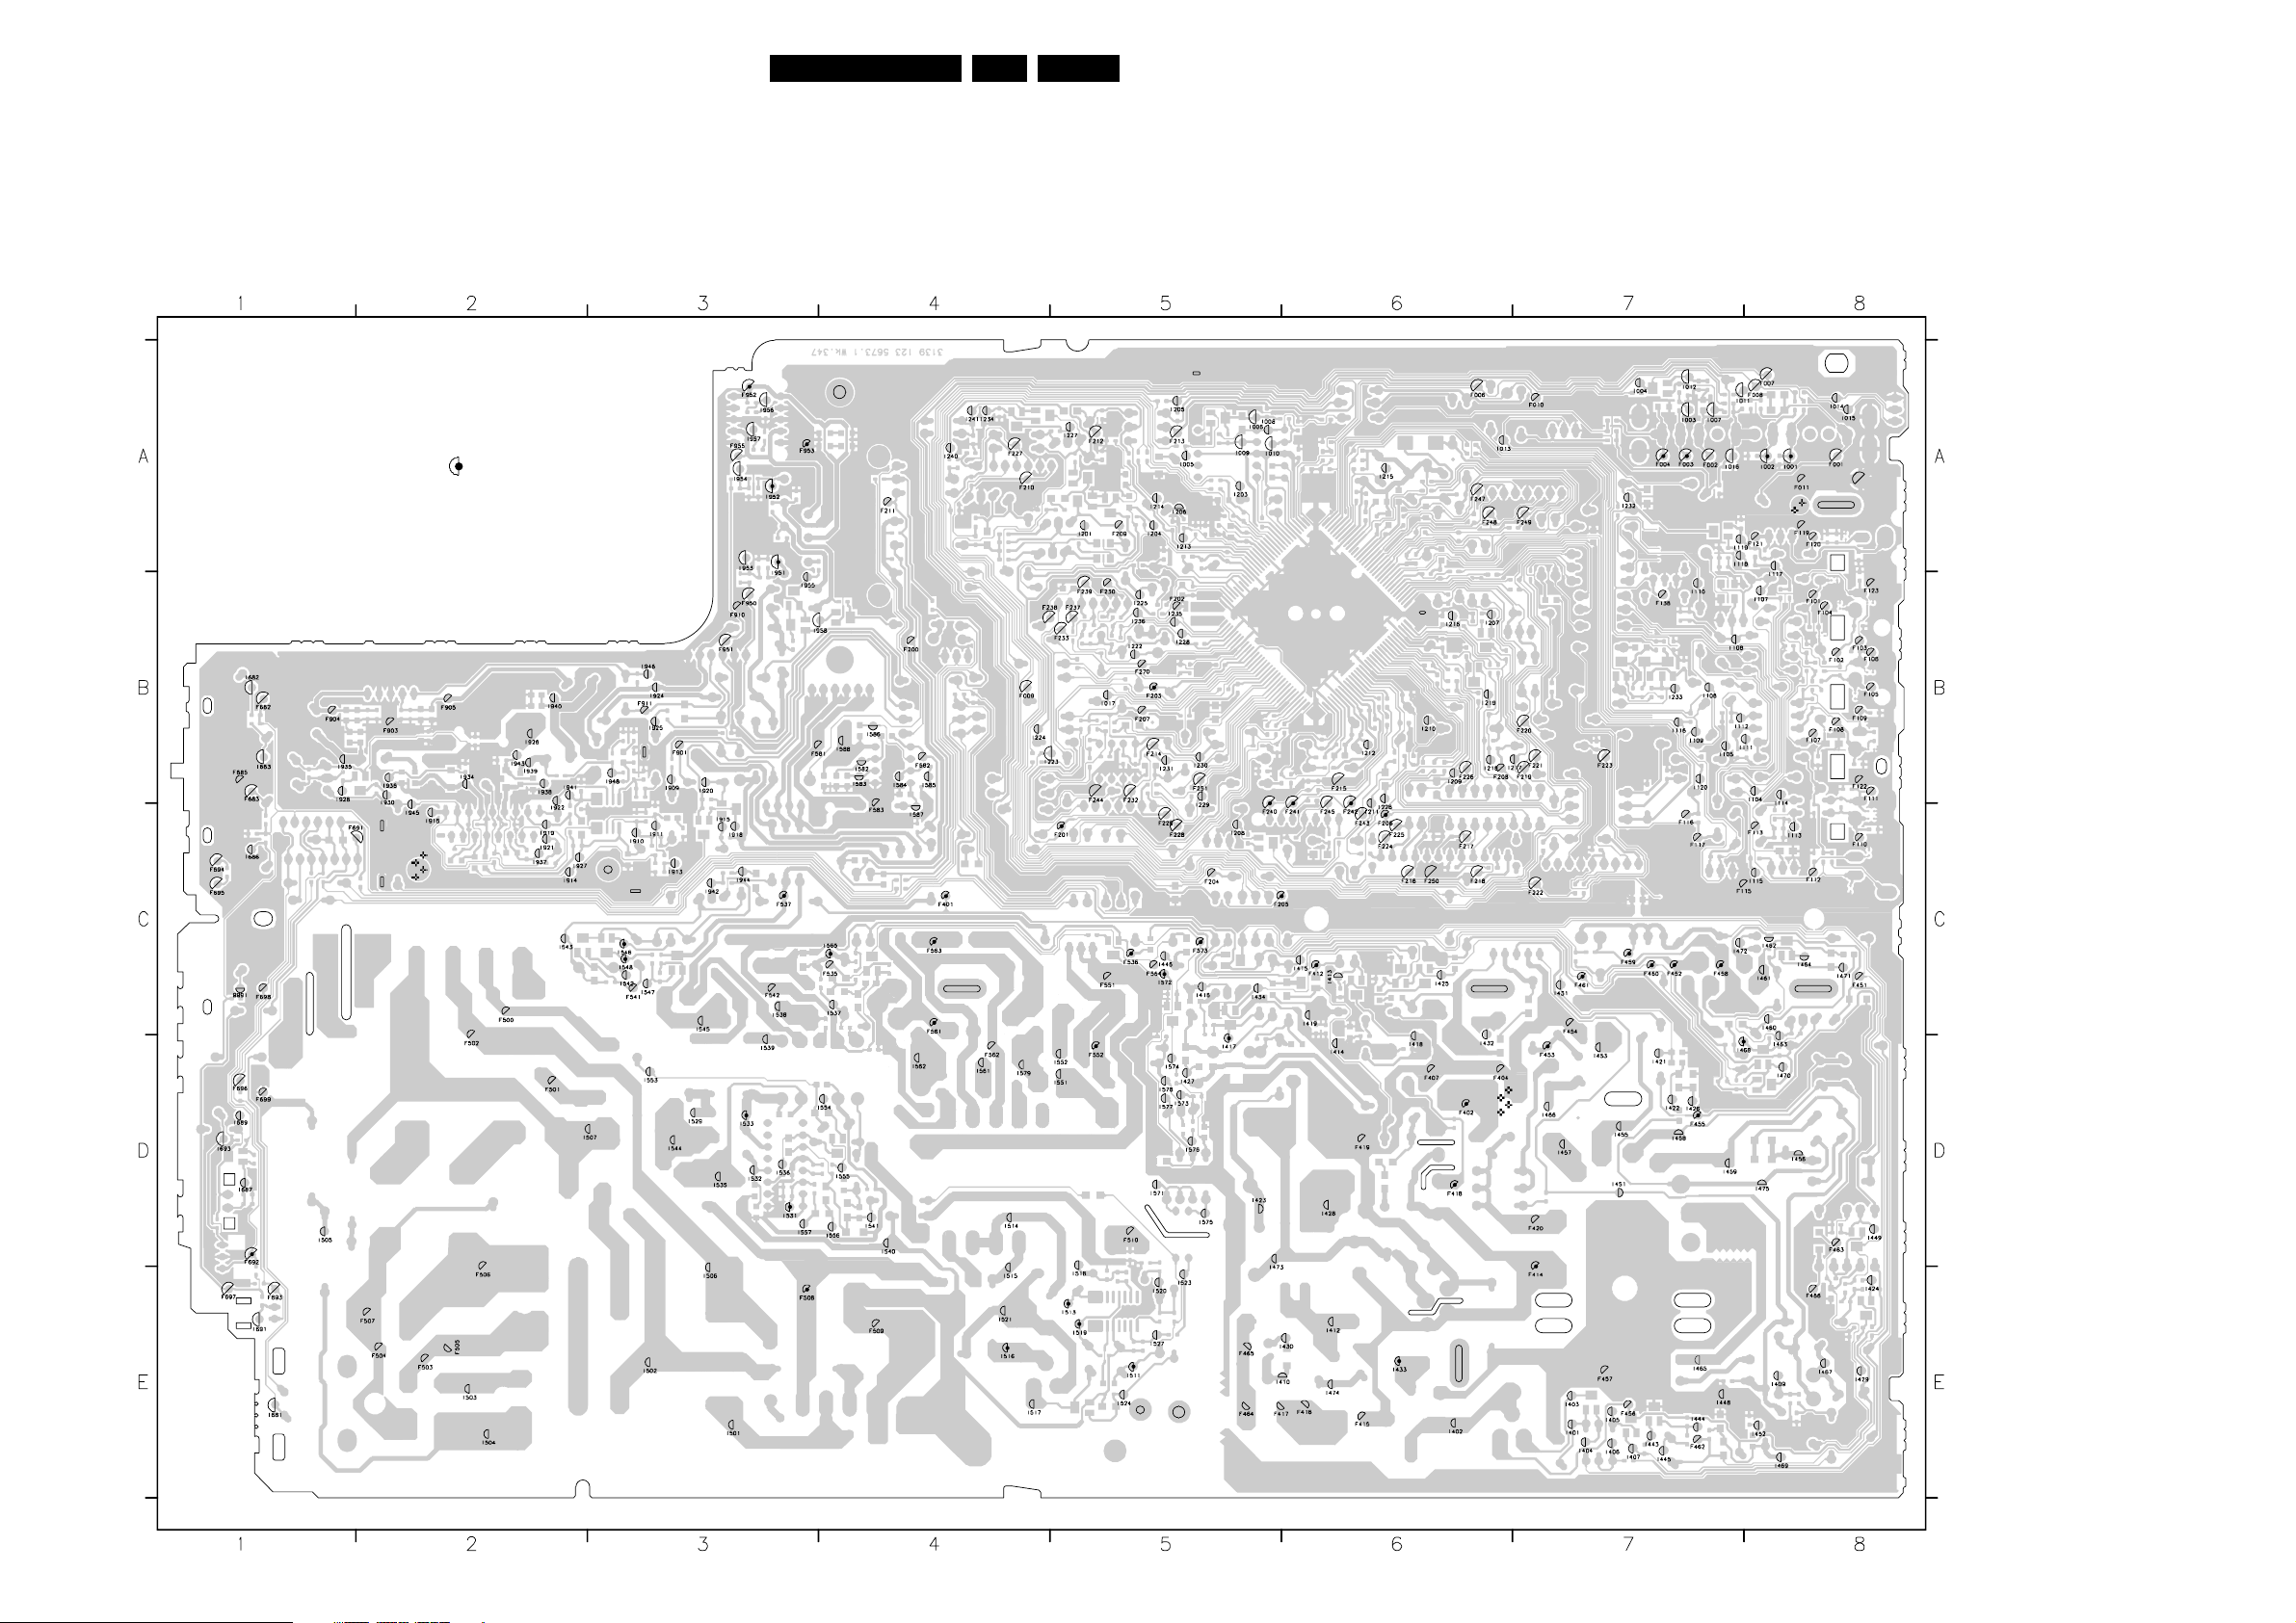
Testpoint Overview Mono Carrier
F001 A8
F002 A7
F003 A7
F004 A7
F005 A8
F006 A6
F007 A8
F008 A8
F009 B4
F010 A7
F011 A8
F101 B8
F102 B8
F103 B8
F104 B8
F105 B8
F106 B8
F107 B8
F108 B8
F109 B8
F110 C8
F111 B8
F112 C8
F113 C8
F115 C7
F116 C7
F117 C7
F119 A8
F120 A8
F121 A8
F122 B8
F123 B8
F138 B7
F200 B4
F201 C5
F202 B5
F203 B5
F204 C5
F205 C5
F206 C6
F207 B5
F208 B6
F209 A5
F210 A4
F211 A4
F212 A5
F213 A5
F214 B5
F215 B6
F216 C6
F217 C6
F218 C6
F219 B7
F220 B7
F221 B7
SERVICE TEST POINT
3139 123 5673.1
F222 C7
F223 B7
F224 C6
F225 C6
F226 B6
F227 A4
F228 C5
F229 C5
F230 B5
F232 B5
F233 B5
F237 B5
F238 B4
F239 B5
F240 C5
F241 C6
F242 C6
F243 C6
F244 B5
F245 C6
F247 A6
F248 A6
F249 A7
F250 C6
F251 B5
F270 B5
F401 C4
F402 D6
F404 D6
F407 D6
F412 C6
F414 E7
F415 E6
F416 E6
F417 E5
F418 D6
F419 D6
F420 D7
F451 C8
F452 C7
F453 D7
F454 C7
F455 D7
F456 E7
F457 E7
F458 C7
F459 C7
F460 C7
F461 C7
F462 E7
F463 D8
F464 E5
F465 E5
F466 E8
F500 C2
F501 D2
F502 D2
F503 E2
F504 E2
F505 E2
F506 E2
F507 E2
F508 E3
F509 E4
F510 D5
F535 C4
F536 C5
F537 C3
F541 C3
F542 C3
F551 C5
F552 D5
F561 C4
F562 D4
F563 C4
F564 C5
F573 C5
F581 B3
F582 B4
F583 C4
F682 B1
F683 B1
F685 B1
F691 C1
F692 D1
F693 E1
F694 C1
F695 C1
22L04HU AA 6.
F696 D1
F697 E1
F698 C1
F699 D1
F901 B3
F903 B2
F904 B1
F905 B2
F910 B3
F911 B3
F950 B3
F951 B3
F952 A3
F953 A3
F955 A3
I001 A8
I002 A8
I003 A7
I004 A7
I005 A5
I006 A5
I007 A7
I008 A5
I009 A5
I010 A5
I011 A7
I012 A7
I013 A6
I014 A8
I015 A8
I016 A7
I017 B5
I104 B8
I105 B7
I106 B7
I107 B8
I108 B7
I109 B7
I110 B7
I111 B8
I112 B7
I113 C8
I114 B8
I115 C8
I116 B7
I117 B8
I118 A7
I119 A7
I120 B7
I201 A5
I203 A5
I204 A5
I205 A5
I206 A5
I207 B6
I208 C5
I209 B6
I210 B6
I211 C6
I212 B6
I213 A5
I214 A5
I215 A6
I216 B6
I217 B7
I218 B6
I219 B6
I222 B5
I223 B5
I224 B4
I225 B5
I226 C6
I227 A5
I228 B5
I229 C5
I230 B5
I231 B5
I232 A7
I233 B7
I234 A4
I235 B5
I236 B5
I240 A4
I241 A4
I401 E7
I402 E6
I403 E7
I404 E7
I405 E7
I406 E7
I407 E7
I409 E8
I410 E6
I412 E6
I413 C6
I414 D6
I415 C6
I416 C5
I417 D5
I418 D6
I419 C6
I421 D7
I422 D7
I423 D5
I424 E8
I425 C6
I426 D7
I427 D5
I428 D6
I429 E8
I430 E6
I431 C7
I432 D6
I433 E6
I434 C5
I443 E7
I444 E7
I445 E7
I446 C5
I448 E7
I449 D8
I451 D7
I452 E8
I453 D7
I455 D7
I456 D8
I457 D7
I458 D7
I459 D7
I460 C8
I461 C8
I462 C8
E_14820_007.eps
160604
I463 D8
I464 C8
I465 E7
I466 D7
I467 E8
I468 D7
I469 E8
I470 D8
I471 C8
I472 C7
I473 E5
I474 E6
I475 D8
I501 E3
I502 E3
I503 E2
I504 E2
I505 D1
I506 E3
I507 D3
I511 E5
I513 E5
I514 D4
I515 E4
I516 E4
I517 E4
I518 E5
I519 E5
I520 E5
I521 E4
I523 E5
I524 E5
I527 E5
I529 D3
I531 D3
I532 D3
I533 D3
I535 D3
I536 D3
I537 C4
I538 C3
I539 D3
I540 D4
I541 D4
I542 C3
I543 C2
I544 D3
I545 C3
I546 C3
I547 C3
I548 C3
I551 D5
I552 D5
I553 D3
I554 D4
I555 D4
I556 D4
I557 D3
I561 D4
I562 D4
I565 C4
I571 D5
I572 C5
I573 D5
I574 D5
I575 D5
I576 D5
I577 D5
I578 D5
I579 D4
I582 B4
I583 B4
I584 B4
I585 B4
I586 B4
I587 C4
I588 B4
I681 E1
I682 B1
I683 B1
I686 C1
I687 D1
I688 C1
I689 D1
I691 E1
I693 D1
I909 B3
I910 C3
I911 C3
I913 C3
I914 C2
I915 C3
I916 C2
I918 C3
I919 C2
I920 B3
I921 C2
I922 C2
I924 B3
I925 B3
I926 B2
I927 C2
I928 B1
I930 B2
I934 B2
I935 B1
I936 B2
I937 C2
I938 B2
I939 B2
I940 B2
I941 B2
I942 C3
I943 B2
I944 C3
I945 C2
I946 B3
I948 B3
I951 B3
I952 A3
I953 A3
I954 A3
I955 B3
I956 A3
I957 A3
I958 B4

Block Diagrams, Testpoint Overviews, and Waveforms
Block Diagram Video
VIDEO
DCM
MODULE
TUNER IF
A3
+5V
+5VS
SDA
A4
SCL
A4
INTERFACE MODULE (VIDEO PART)
- for “SYSTEM” version only -
11
22
18
17
19
20
12
31
32
9002
VT_SUPPLY
A2
50019003
1000 6, 7 9
ERR
FM
TV
I002
3001
I001
3000
10
FM-RADIO
TUNER
+
TV TUNER
5
4
HSYNC_OUT
CVBS_OUT
G_IN
B_IN
R_IN
FBL_IN
VSYNC_OUT
Y_VIDEO_IN
C_VIDEO_IN
6001
BZX79-C33
VT
10
FM
IF
AGC
1
23L04HU AA 6.
A5J1
PLL
SOUND
MIXER
AM
SOUND
DET.
1219
1212
SOUND
TRAP
FM/QSS
AM
6
7
8
9
4
6
8
9
10
SWITCH
TO
AUDIO
PAR T
See block
diagram
AUDIO
N.C.
HD_PIP
ITV_V1OUT
INT_Y/GREEN_IN
INT_Pb/BLUE_IN
INT_Pr/RED_IN
INT_FBL
SANDCASTLE
86
A4
A4
SW_SC2_CVBS
SC1_CVBS_IN
SC2_Y/CVBS_IN
SIDE_Y/CVBS_IN
CVBS1
SC2_CHROMA_IN
SIDE_CHROMA_IN
See block
diagram
DEFLECTION
See block
diagram
DEFLECTION
7200-B (CVBS I/O + FILTERS + COLOUR DECODING)
81
74
71
78
70
77
INPUT
SWITCH
VIDEO
IDENT
CVBS/Y
C
COMB
FILTER
&TRAP
SWITCH
CHROMA/CVBS
OUTPUT
SWITCH
PAL, NTSC
SECAM
DECODER
(RGB/YPrPb/YUV
INPUT SWITCHING)
7200-C
INTF_CVBS_OUT
65
YintYint
Uint
Vint
SC1_FBL
N.C.
N.C.
Yint
Uint
Vint
INSSW352
SELECTION
LOGIC
SC1_BLUE_IN
51
YUV
RGB
DVD
SC1_RED_IN
SC1_GREEN_IN
50
49
YPrPb2/
YPrPb3
SELECTION
DVD
TO
DVD
DVD
RGB2/
RGB3
SELECTION
RGB
TO
DVD
RGB
INT_FBL
53
DVD
TO
YUV
5554
INTF_Pr/RED_IN
INTF_Pb/BLUE_IN
INTF_Y/GREE_IN
59
58
57
YUV
TO
DVD
YUV
DIGITAL SIGNAL PROC.
- 4:3 LINEAR/NON-LINEAR SCALING
- DOUBLE WINDOW PROC.
ADC
DAC
DINT
Y
Pr
Pb
HD
G
B
R
FBL
SC
Y/CVBS
Cin
See block
diagram
AUDIO
VCO
VIDEO
DEMOD
1219
1
2
3
4
1212
2
3
4
6
7
1229
1
2
3
PLL
VIDEO INTERFACE
7705,7706
PULSE
FORMER
7716
7708
7720
PULSE
FORMER
SSIF
A4
7003
SSIF
F002
1002
1003
VIF_1
VIF_2
SIF1
SIF2
24
25
RF
31
29
30
F004
11
HERCULES
7200-A (IF)
PHASE
VIDEO
TUNER IF
AUDIO IF
QSS/AM
TO
AUDIO
PAR T
(optionel)
DISC
IF
AGC
N.C.
CVBS0
REAR I/O CINCH
A8
SVHS
154
AV1
V
AV2
V
YUV INPUT
Y
U
V
MONITOR
OUTPUT
V
SIDE AV
D
SVHS
32
154
VIDEO
IN
FRONT AV
I2
32
Y/CVBS_IN
Y
C
SC2_Y/CVBS_IN
SC2_CHROMA_IN
SC1_CVBS_IN
SC1_GREEN_IN
SC1_BLUE_IN
SC1_RED_IN
SC2_CVBS_OUT
1252
7
6
5
1252
5
SC1_FBL
F205
1229
Y/CVBS_IN
CONNECTION
A5
7606
7607
SW_SC2_CVBS
1207
SIDE_CHROMA_IN
7
OR
6
5
SIDE_Y/CVBS_IN
OR
1
2
3
Cin
F201 2V / div DC
F203 2V / div DC
HERCULES
A4
7200-D (YUV PROCESSING)
Y
Pr
Pb
500mV / div DC
10ms / div
F216 F217 F218
1V / div DC
20us / div
PEAKING
SCAVEM
PROC.
1V / div DC
20us / div
WHITE/BLACK
STRETCH
GAMMA COR.
TINT CONTROL
SKINTONE
F206
1V / div DC
20µs / div
1V / div DC
20us / div
F240 F241 F242
500mV / div DC
20µs / div
500mV / div DC
20µs / div
500mV / div DC
F224 F225 F226
R_Y
G_Y
B_Y
500mV / div DC
20us / div
RGB
ADDER
500mV / div DC
7200-E (RGB PROCESSING + CATHODE CALIBRATION)
R
G
B
64
500mV / div DC
20us / div
MATRIXSATURATION
20µs / div
20us / div
CLAMP
+
MUTE
F331 F332 F333
500mV / div DC
20µs / div
500mV / div DC
20µs / div
F338 F339 F341
BLUE
STRETCH
&
CONTRAST
50V / div DC
20us / div
FROM µP PART
R_OSD
G_OSD
OSD
INSERTION
B_OSD
50V / div DC
FBL
20us / div
BRIGHTNESS
PEAK WHITE
LIM.
BEAM
CURRENT
LIM.
+
500mV / div DC
20µs / div
50V / div DC
20us / div
CATHODE
CALIBRATION
46
3226
42
STAGE
3227
43
3228
44
45
OUTPUT
BCL
A2 A4
7308
BOUT
GOUT
ROUT
IBLACK
SVM
A5
CRT
B1
F240
F241
F242
13311204
B
1
1
2
3
4
5
6
7
ROT
G
2
R
3
4
5
6
7
+200V
+200VA
BC_INFO
SVM
ROT
F354
2351
3351
1351
SCAVEM
B2
ROT
SVM
F331
7330
3
F332
1
2
F333
FILAMENT
VSVM
F353
1351
123 45
to 1401
A2
DEFLECTION
FILAMENT
1381
1
ROTATION
OUTPUT
FILAMENT
VSVM
SCAVEM
OUTPUT
+200VA
F341
3332
7
B
3334
9
G
3336
8
R
5
5352
EHT-b
1332
11
F338
F339
B
6
G
8
R
10 9 5 7 1
ROTATION
COIL
2
(OPTIONAL)
1361
1
SCAVEM
COIL
2
(OPTIONAL)
AQUADAG
DEFLECTION
FOCUS
VG2
A2
FROM DEFLECTION
E_14820_008.eps
CRT
25kV
EHT
210904
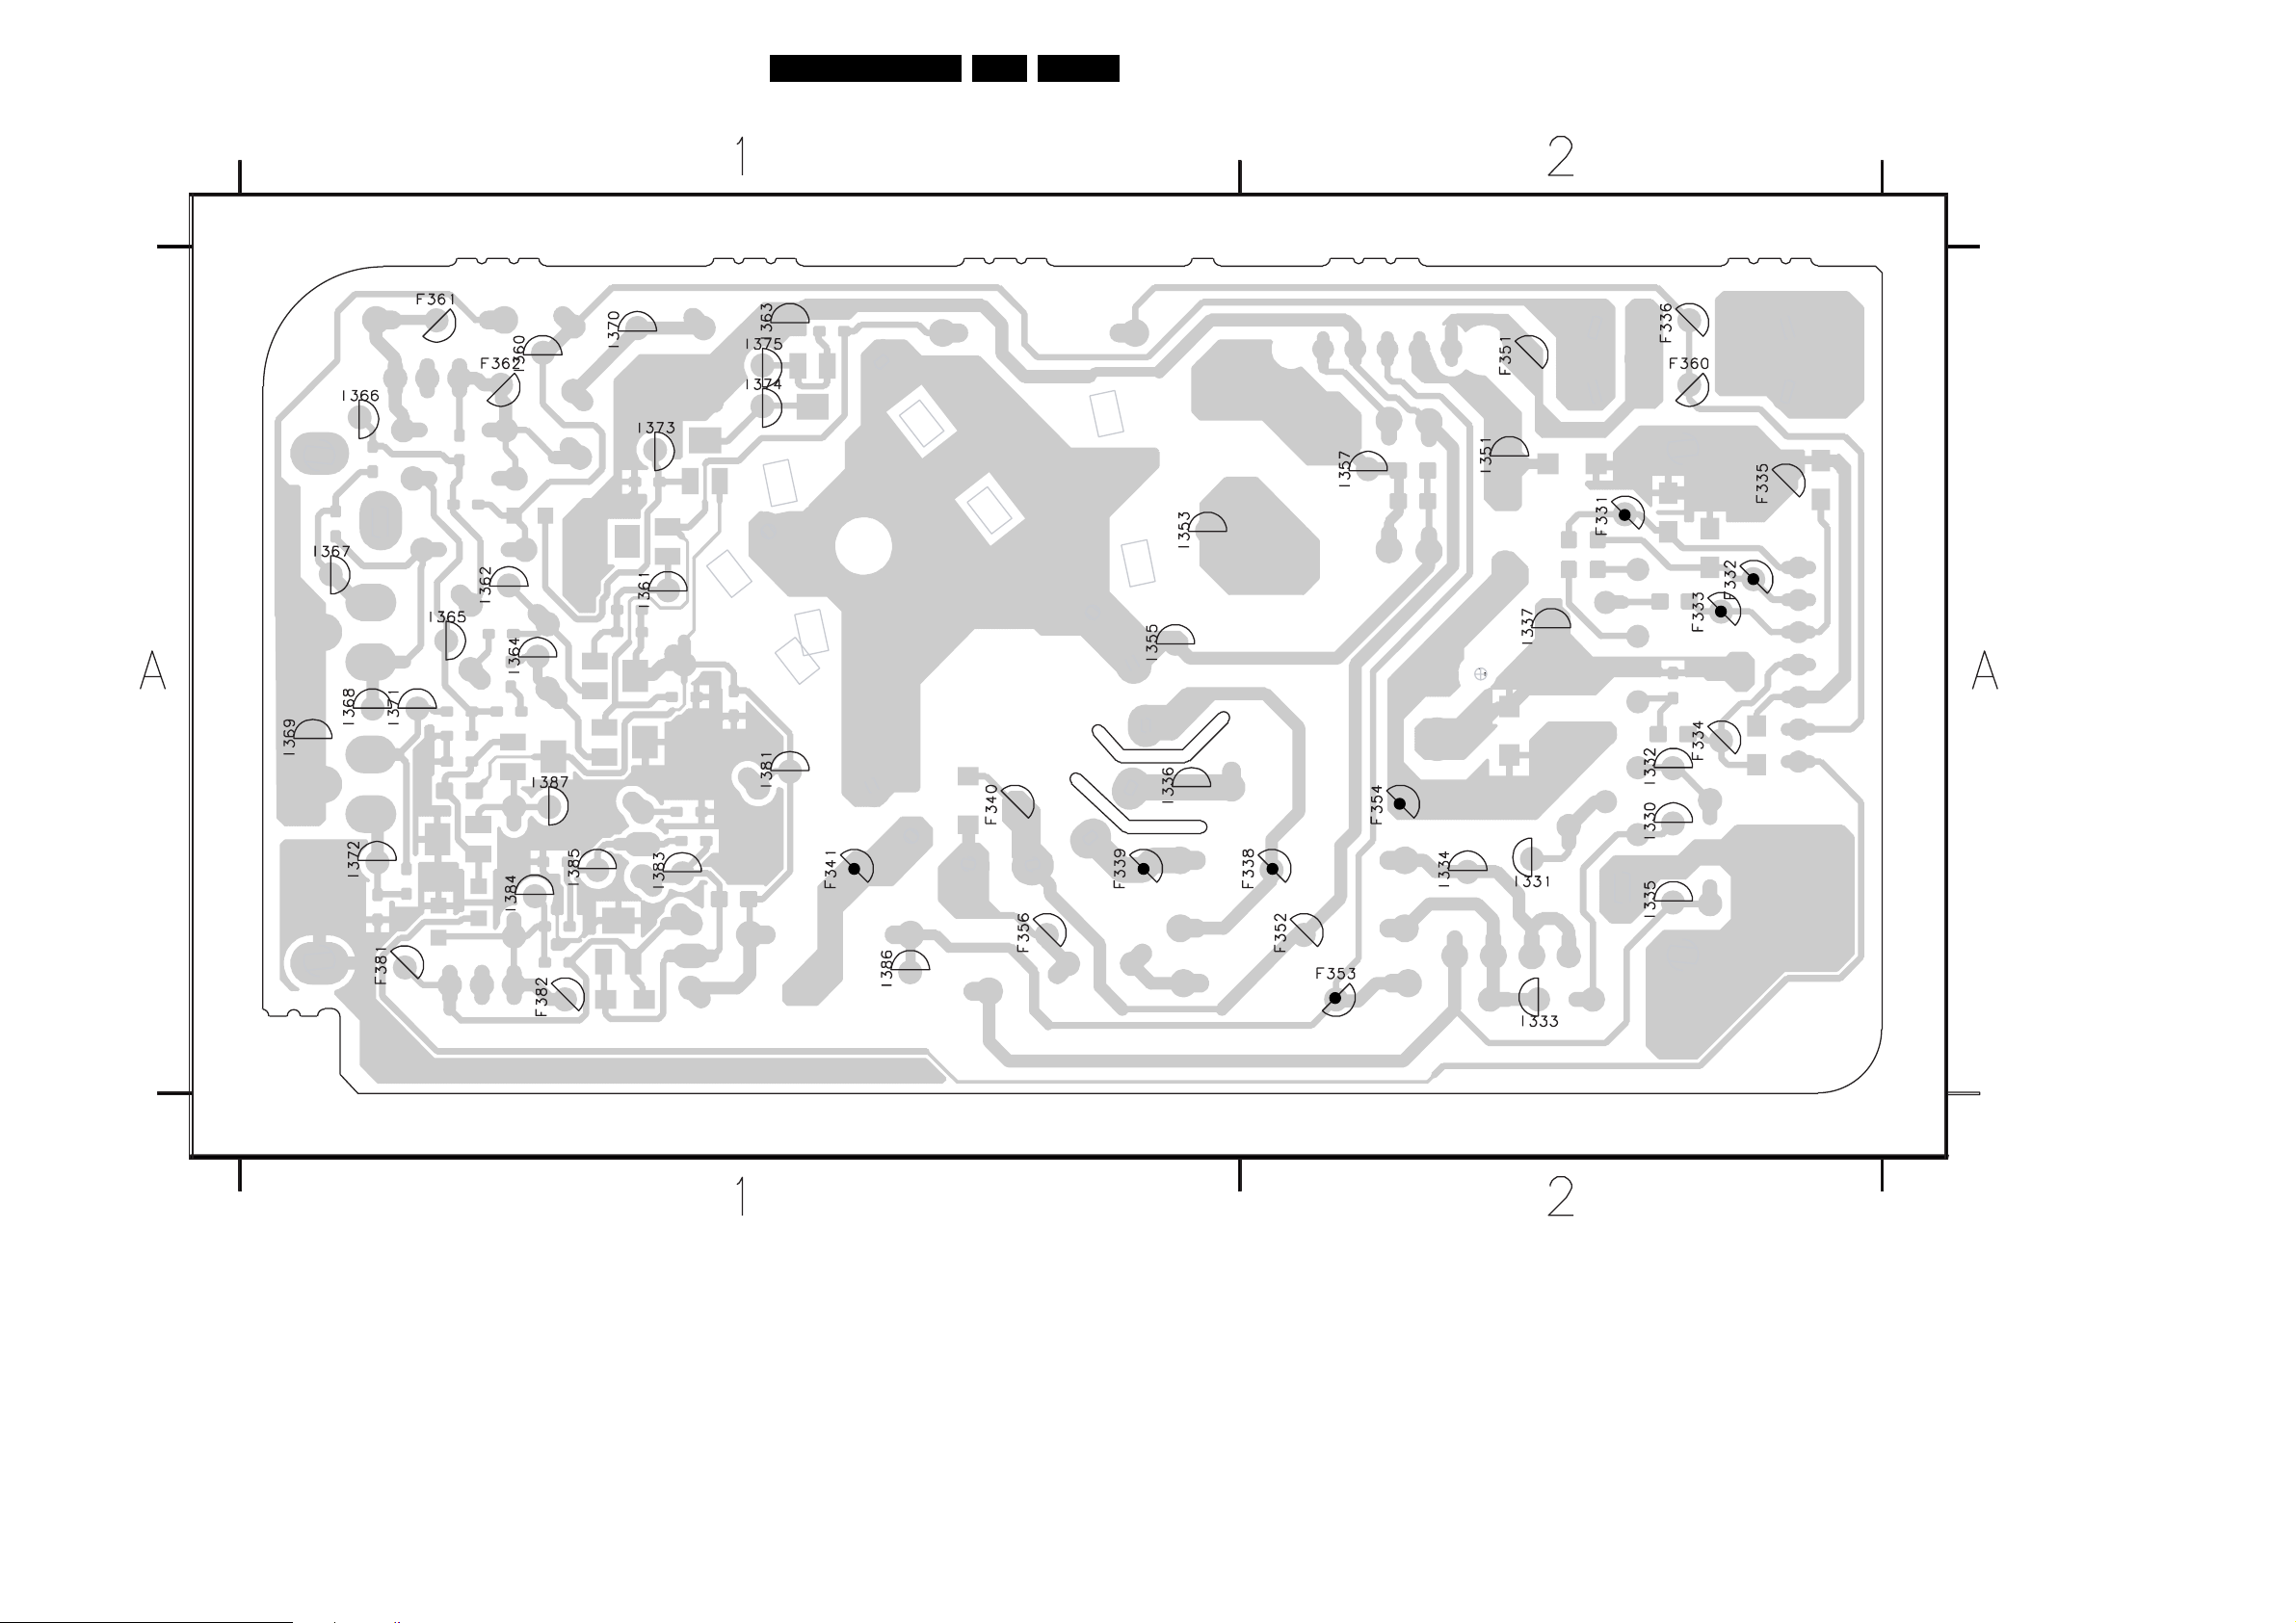
Block Diagrams, Testpoint Overviews, and Waveforms
Testpoint Overview CRT Panel
CRT
3139 123 5674.1
24L04HU AA 6.
F331 A2
F332 A2
F333 A2
F334 A2
F335 A2
F336 A2
F338 A2
F339 A1
F340 A1
F341 A1
F351 A2
F352 A2
F353 A2
F354 A2
F356 A1
F360 A2
F361 A1
F362 A1
F381 A1
F382 A1
I330 A2
I331 A2
I332 A2
I333 A2
I334 A2
I335 A2
I336 A1
I337 A2
I351 A2
I353 A1
I355 A1
I357 A2
I360 A1
I361 A1
I362 A1
I363 A1
I364 A1
I365 A1
I366 A1
I367 A1
I368 A1
I369 A1
I370 A1
I371 A1
I372 A1
I373 A1
I374 A1
I375 A1
I381 A1
I383 A1
I384 A1
I385 A1
I386 A1
I387 A1
E_14820_009.eps
090904
 Loading...