

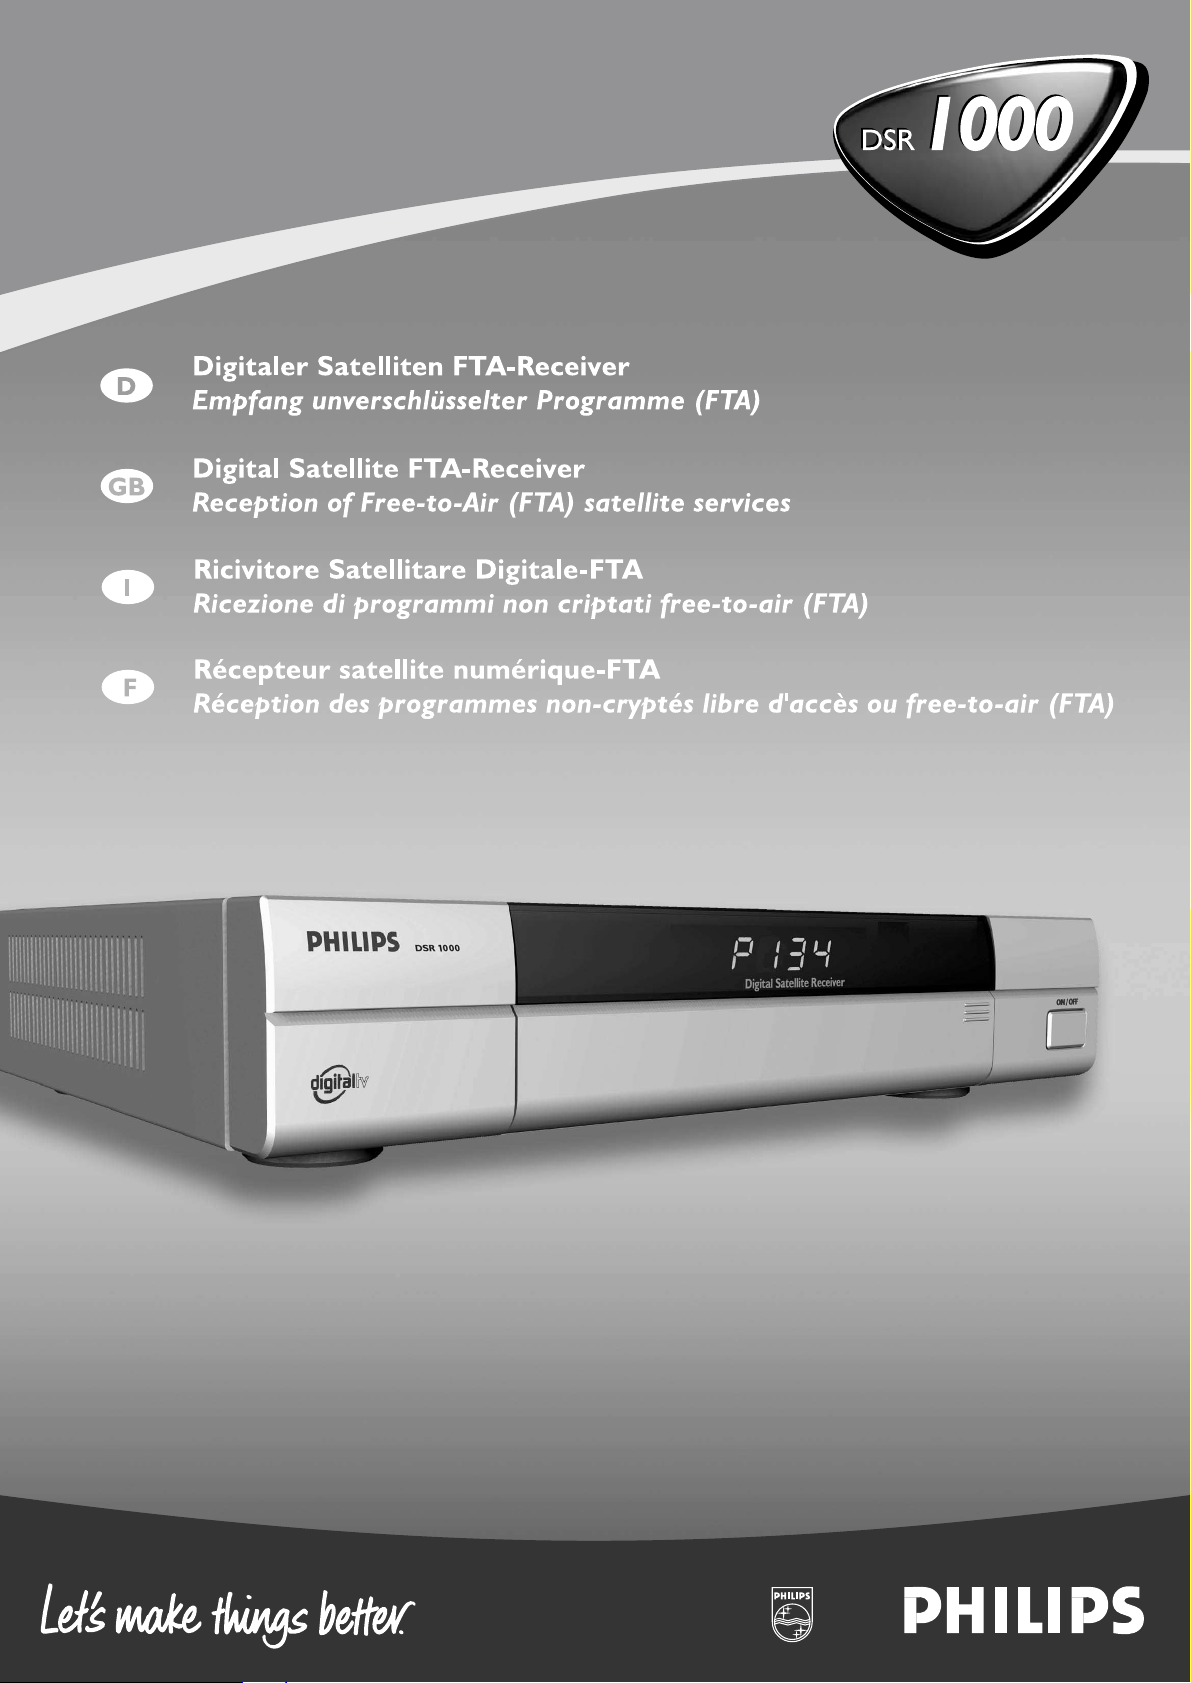
Page 1
Page 2

Dear customer,
Congratulations on your choice of Philips DSR 1000 satellite receiver. This Philips satellite
receiver will allow you to obtain digital satellite programmes and services.
We wish you much viewing pleasure with your new Philips DSR 1000.
Note: This product is intended for Germany, Austria and Italy.
CONTENTS
1. SAFETY INSTRUCTION . . . . . . . . . . . . . . . . . . . . . . . . . . . . . . . . . . . . . . . . .2
2. CONNECTIONS . . . . . . . . . . . . . . . . . . . . . . . . . . . . . . . . . . . . . . . . . . . . . . .4
3. OPERATING YOUR UNIT . . . . . . . . . . . . . . . . . . . . . . . . . . . . . . . . . . . . . . . .6
3.1 LOCAL OPERATION . . . . . . . . . . . . . . . . . . . . . . . . . . . . . . . . . . . . . . . . . . . . 6
3.2 REMOTE CONTROL FUNCTIONS . . . . . . . . . . . . . . . . . . . . . . . . . . . . . . . . . 7
3.3 SELECTING THE MENU LANGUAGE . . . . . . . . . . . . . . . . . . . . . . . . . . . . . . 7
3.4 CHANNEL SELECTION . . . . . . . . . . . . . . . . . . . . . . . . . . . . . . . . . . . . . . . . . 7
3.4.1 Channel selection using the number keys 0...9, V, W and list . . . . . . . . . . 7
3.4.2 Last channel using the E key . . . . . . . . . . . . . . . . . . . . . . . . . . . . . . . . . . 7
3.4.3 Zapper function using the OK and CVWB keys . . . . . . . . . . . . . . . . 7
3.4.4 Channel management using 10 favourite lists . . . . . . . . . . . . . . . . . . . . . . . 7
3.5 SWITCHING BETWEEN TV AND RADIO . . . . . . . . . . . . . . . . . . . . . . . . . . . . 8
3.6 SELECTING THE CHANNEL LANGUAGE . . . . . . . . . . . . . . . . . . . . . . . . . . . 9
3.7 ADJUSTING THE SOUND . . . . . . . . . . . . . . . . . . . . . . . . . . . . . . . . . . . . . . . 9
3.8 TIMER . . . . . . . . . . . . . . . . . . . . . . . . . . . . . . . . . . . . . . . . . . . . . . . . . . . . . . 9
3.9 EPG - PROGRAMME INFORMATION (BASIC NAVIGATOR) . . . . . . . . . . . . . 10
4. MENU STRUCTURE . . . . . . . . . . . . . . . . . . . . . . . . . . . . . . . . . . . . . . . . . . .11
4.1 CHANNELS . . . . . . . . . . . . . . . . . . . . . . . . . . . . . . . . . . . . . . . . . . . . . . . . . . 11
4.1.1 Favourite list . . . . . . . . . . . . . . . . . . . . . . . . . . . . . . . . . . . . . . . . . . . . . . . 11
4.1.2 Changing the favourite name . . . . . . . . . . . . . . . . . . . . . . . . . . . . . . . . . . 12
4.1.3 Channel pool (for advanced users) . . . . . . . . . . . . . . . . . . . . . . . . . . . . . . 13
4.1.4 Parental control . . . . . . . . . . . . . . . . . . . . . . . . . . . . . . . . . . . . . . . . . . . . 14
4.2 SEARCH MODE . . . . . . . . . . . . . . . . . . . . . . . . . . . . . . . . . . . . . . . . . . . . . . 15
4.2.1 Satellite search mode . . . . . . . . . . . . . . . . . . . . . . . . . . . . . . . . . . . . . . . . 15
4.2.2 Transponder search mode . . . . . . . . . . . . . . . . . . . . . . . . . . . . . . . . . . . . 15
4.2.3 Manual input (for advanced users) . . . . . . . . . . . . . . . . . . . . . . . . . . . . . . 15
4.3 SATELLITES . . . . . . . . . . . . . . . . . . . . . . . . . . . . . . . . . . . . . . . . . . . . . . . . . 16
4.4 INSTALLATION . . . . . . . . . . . . . . . . . . . . . . . . . . . . . . . . . . . . . . . . . . . . . . . 16
4.4.1 Time offset . . . . . . . . . . . . . . . . . . . . . . . . . . . . . . . . . . . . . . . . . . . . . . . . 16
4.4.2 Menu language . . . . . . . . . . . . . . . . . . . . . . . . . . . . . . . . . . . . . . . . . . . . 17
4.4.3 Signal paths . . . . . . . . . . . . . . . . . . . . . . . . . . . . . . . . . . . . . . . . . . . . . . . 17
4.4.4 LNB settings . . . . . . . . . . . . . . . . . . . . . . . . . . . . . . . . . . . . . . . . . . . . . . . 18
4.4.5 DiSEqC (Digital Satellite Equipment Control) . . . . . . . . . . . . . . . . . . . . . . 18
4.4.6 Download Over Air (software update via satellite) . . . . . . . . . . . . . . . . . . . 19
5. GLOSSARY . . . . . . . . . . . . . . . . . . . . . . . . . . . . . . . . . . . . . . . . . . . . . . . . .20
6. TECHNICAL DATA . . . . . . . . . . . . . . . . . . . . . . . . . . . . . . . . . . . . . . . . . . . .21
7. TROUBLESHOOTING . . . . . . . . . . . . . . . . . . . . . . . . . . . . . . . . . . . . . . . . .23
1
GB
Page 3

SAFETY INSTRUCTION
Important remarks on operation
The following section contains important remarks concerning the operation, location and
connection of the receiver.
Please read these instructions carefully before using the unit for the first time.
Extended absence/use during adverse weather conditions
Always switch off the unit during periods of extended absence and during thunder
storms by means of the power switch located on the front right-hand side. This also
applies to other units that are connected to the receiver.
Check if the timer is programmed and switch the unit on again in sufficient time for the
recording.
Mains cable
Ensure that the mains cable (power supply cable) is not damaged. Never use the unit if
the mains cable is damaged.
Cleaning
Disconnect the mains cable before cleaning the unit. For cleaning purposes use a dry
cloth and only clean the surface of the unit.
Do not open the casing under any circumstances due to risk of electric shock if contact
is made with any parts inside the unit.
Children
Take care that children do not insert any objects into the ventilation slots due to danger
of electric shock.
Repair
Any repairs or adjustments may only be performed by qualified personnel. The warranty
will become void if the user attempts to open and repair the unit.
Improper intervention may interfere with the electrical safety of the unit.
The manufacturer assumes no liability for any accidents suffered by the user if the unit
has been opened.
Connection
Incorrect connection may result in incorrect operation or defects in the equipment.
2
Page 4

GB
3
Important remarks on location and assembly
Location
All electronic equipment generates heat, which is however not dangerous. Delicate
furniture surfaces and finishes may become slightly discoloured over time due to the
permanent heat source. Likewise, the feet of the equipment may cause discolouring on
treated surfaces. If need be, place the unit on a suitable mat.
Ventilation
Heat occurring in this unit is discharged adequately. However, never install the receiver
in a cabinet or on a shelf where there is inadequate ventilation. Never cover the
ventilation slots of the unit.
Never place any objects on the unit and ensure that there is a space of at least 10 cm
above the unit to ensure that any heat occurring is discharged.
Humidity, sunlight, heat
Protect the unit from humidity, water droplets and spraying.
Do not locate the receiver in the vicinity of a heating source and avoid exposing it to
direct sunlight.
Electrical supply
Operate the unit only using a power source of 230 V/50 Hz. Connect the unit to the
power supply and switch on only after it has been connected to the antenna and
television unit.
Earth
Ensure that the parabolic antenna is correctly earthed observing the relevant local
and/or CE regulations.
Remote control
Insert the batteries supplied in the remote control. Ensure that the battery polarity is
correct observing the + and - markings in the battery compartment.
Page 5
4
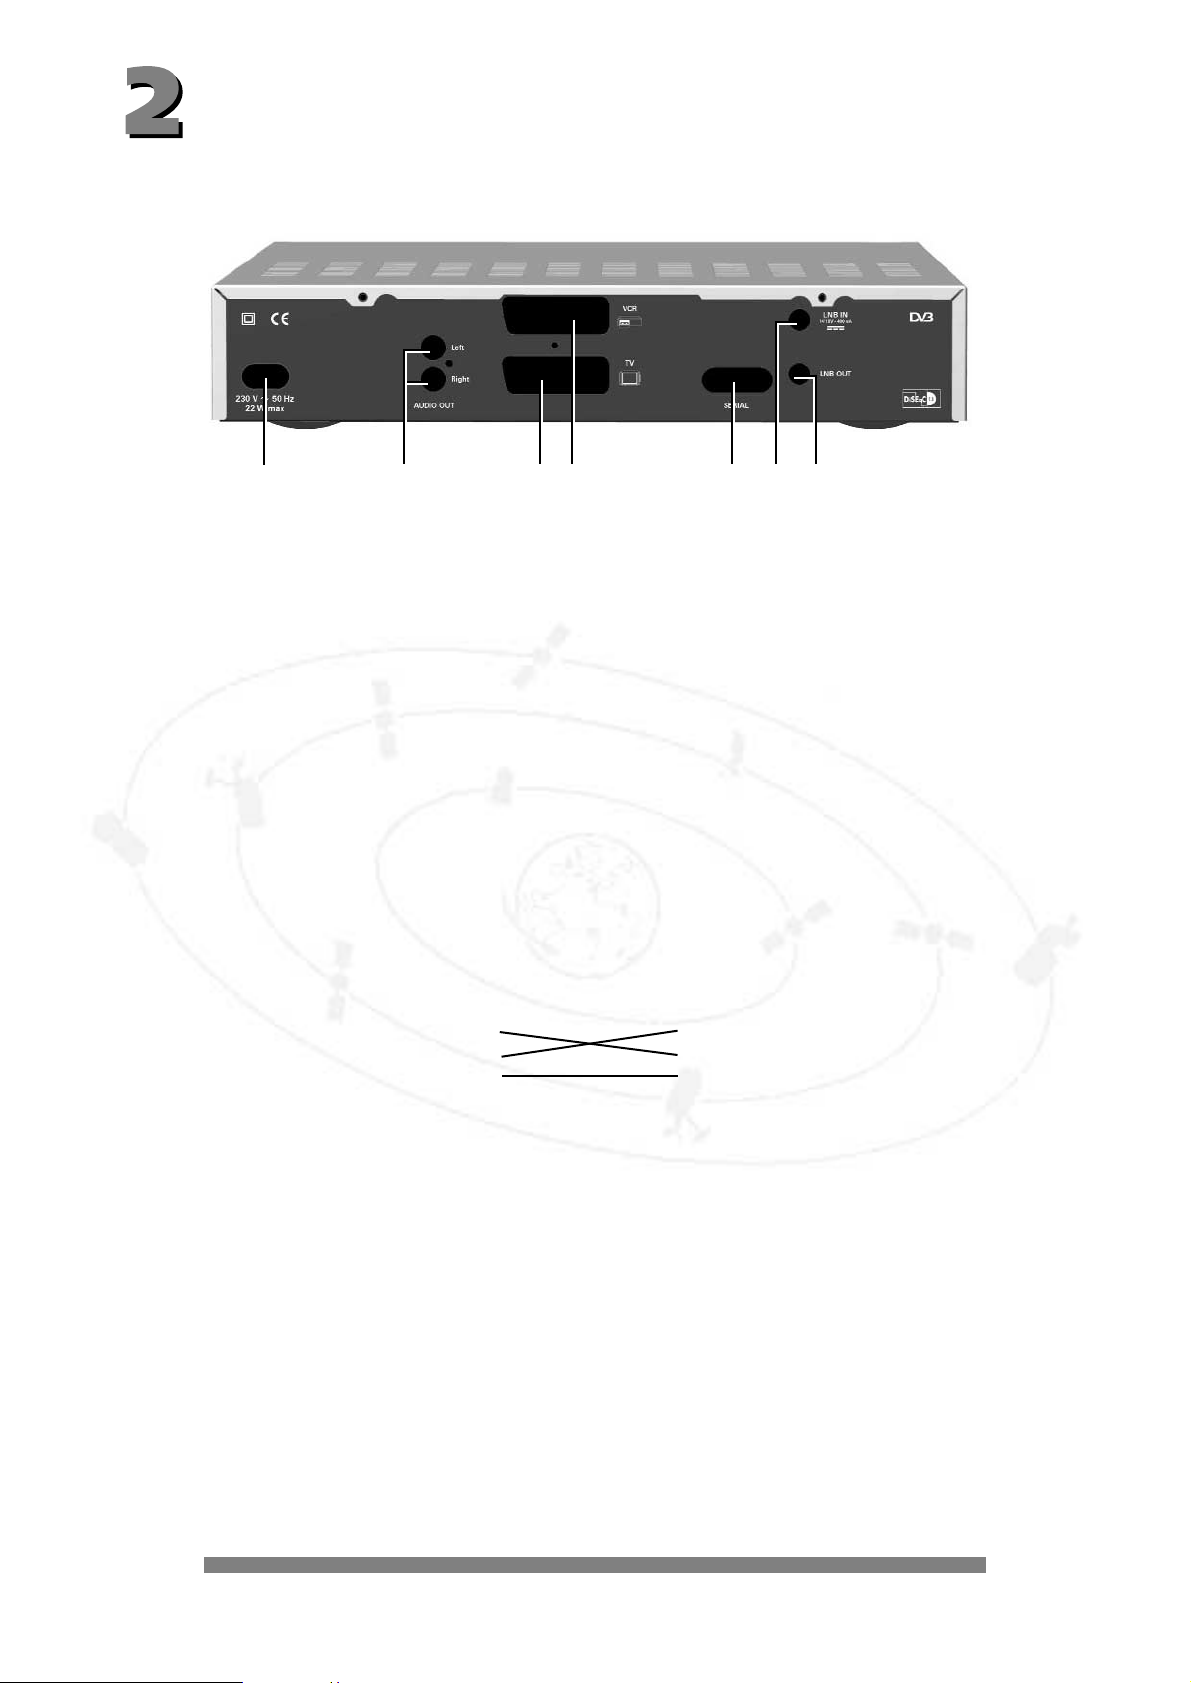
CONNECTIONS
The following connections are located on the back of the unit:
1 - 230 V/50 Hz: Connect the power cable to the power socket.
2 - AUDIO TV L & R: Audio output, left and right-hand channel for connecting to a stereo unit.
3 - TV: Connect the TV connection socket to your television unit using the
SCART cable supplied.
4 - VCR: VCR SCART socket for connecting a video recorder.
5 - DATA INTERFACE: RS 232 interface for serial data transfer during servicing.
0-modem cable (pins 2 and 3 crossed, pins 1, 4, 6-9 are not used).
Receiver: PC:
Pin 2 = RXD Pin 2 = RXD
Pin 3 = TXD Pin 3 = TXD
Pin 5 = GND Pin 5 = GND
6 - SAT-IF INPUT: Sat-IF signal input and output for LNB supply and control signals
connect the cable of your satellite unit to this socket.
7 - SAT-IF OUTPUT: IF signal output (e.g. for feeding through an analogue receiver).
Note: The label showing the type and serial number is underneath your receiver.
1234 567
Page 6
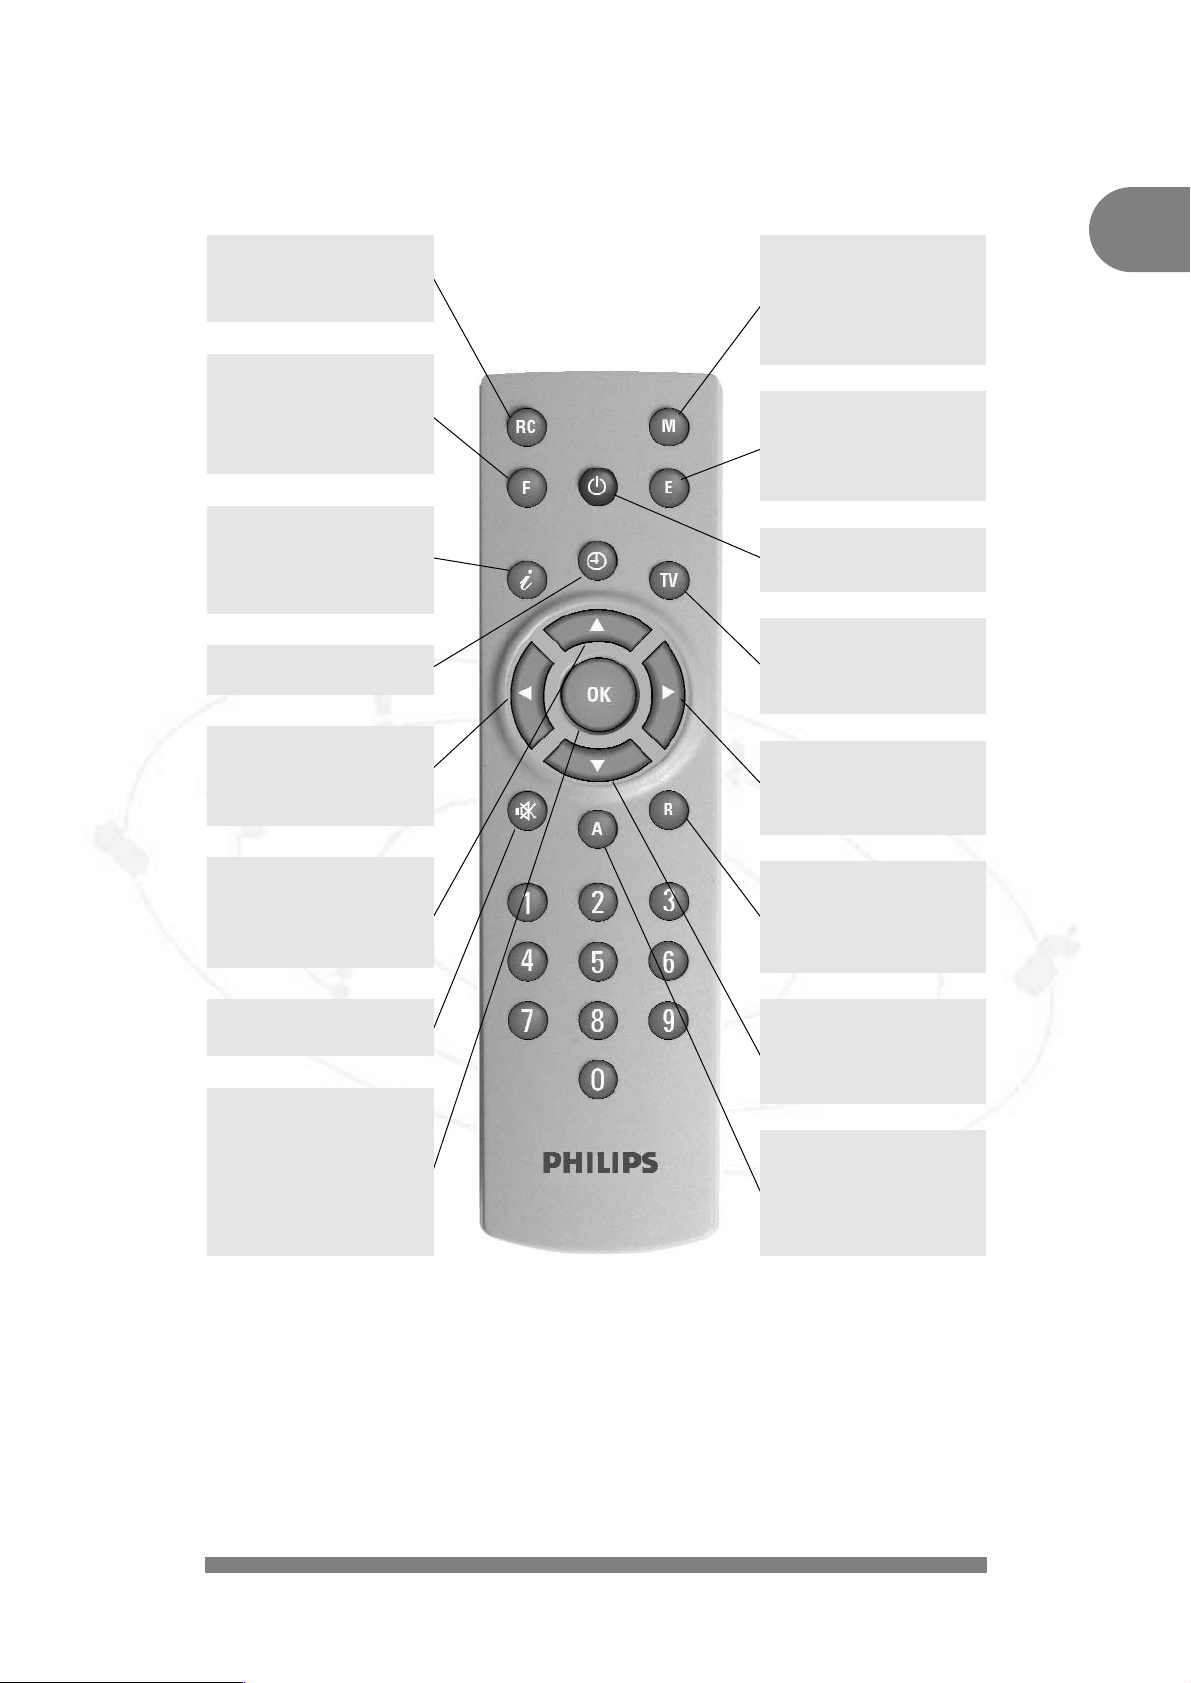
YOUR REMOTE
5
GB
F : Choose favourite
channel list
Menu:
Change transparency
of On-Screen-Display
(OSD).
I : Display Short and
extended information
(if broadcasted) about
current and next programmes.
V : Change channels up
by one unit.
Menu:
Choose previous
parameter.
cc
: Mute: turn the sound
off/on.
RC : Detailed
Remote Control functions on-screenDisplay (OSD) on/off.
R : Switch receiver from
TV to Radio mode or
switch between SatReceiver-Radio or TVset.
OK : Press OK once:
choose 1 to 4 previous
received channels.
Press OK twice:
choose a channel from
channel list.
Menu: Activate and
de-activate.
M : Activates MAIN-
MENU:
• channel Arrangement.
• Channel Search.
• Satellite Selection.
• Installation.
TV : Switch receiver from
Radio to TV mode or
switch between Sat.
Receiver-TV or TV-set.
B : Change volume up.
Menu:
Increase a selected
parameter by one unit.
W : Change channels
down by one unit.
Menu:
Choose next
parameter.
E : Switch to previous
channel
Menu:
Exit from current
menu.
A : Choose another audio
channel (Language
choice).
Or opens Radio
sub-channels if transmitted.
G : Activate TIMER MENU
C : Change volume down.
Menu:
Reduce a selected
parameter by one unit.
22
: Switch the receiver in
and out of standby
mode.
Page 7
OPERA TING Y OUR UNIT
3.1 LOCAL OPERATION
Open (and close) the flap on the front of the unit by pressing the marked area (on the right-hand
side).
Local operation is by means of the keys STANDBY, V and W for switching between channels
upwards/downwards (CH -/+), as well as
C and B for adjusting the volume (VOL -/+).
To switch between radio and TV, press the STANDBY key briefly and then within one second
the
C key for radio or B for TV mode.
1 - Flap
2 - 4 Digit LED front indicator
3 -
B: standby key
4 -
C and B: adjust volume key (Vol -/+)
5 -
V and W: upwards/downwards channels key (CH -/+)
6 - ON/OFF switch button
The LED indicator shows Radio/TV selection mode for one second.
The unit has an on/off switch with power separation.
The indicator for the channel number is via the 4-digit green 7-segment indicator.
TV channel indicator
Radio channel indicator
Indicator t = TV mode (+ channel number of satellite receiver)
N.B.: If the unit has been switched to TV mode by means of the TV key, the
image on the TV unit is the one transmitted by the TV unit, e.g. from an addi-
tional cable source.
The points are indicated if the unit is switched to «mute».
VCR indicator:
During play-back the video/audio signal from the video recorder is automati-
cally switched to the television unit - in standby mode also.
VCR indicator: switched through in standby mode.
The unit is in standby mode and can be switched on using the STANDBY key.
-
V c r -
V c r
P 2.3.4.
t 1 2 3
r 25
P 9 9 9
r t
6
1234546
Page 8

3.2 REMOTE CONTROL FUNCTIONS
Switching on from standby mode is done using the red key or using the number keys
0 ... 9.
The unit software contains a functional description for the remote control. To consult this, simply
press the RC key on the remote control and then the keys for which you require assistance the appropriate help instructions appear on the screen.
Exit the help menu by pressing the RC key again.
The keys located around the OK key
CB and VW operate the functions Volume -/+
(VOL -/+) and Channel -/+ (CH -/+) in standard mode.
3.3 SELECTING THE MENU LANGUAGE
The menu language can be switched between German, English, French, Italian, Spanish, Dutch
and Turkish.
Press the M, 4 and 2 keys to display respectively the main menu, installation menu and
language selection menu. Press the OK key and the choice of language is made as usual using
the
W and V keys.
The language originally set remains selected when you quit the menu using the E key.
The selected language is stored when you quit the menu using the OK key.
3.4 CHANNEL SELECTION
3.4.1 Channel selection using the number keys 0...9, V, W and list
The channel is set by directly entering the channel number via the number keys (N.B. 0 is also a
channel number).
Move back/forward between the next/previous channel using the V / W keys.
A sequential list of channel numbers appears after pressing the OK key twice. The desired
channel can be selected using the
C / B and V / W keys and can then be set using the
OK key. Pressing the OK key again or pressing the E key quits the list.
3.4.2 Last channel using the E key
Pressing the E key switches between the two last set channels.
3.4.3 Zapper function using the OK and CVWB keys
When the currently selected channel takes an advertising break, many users zap between one,
two or more alternative channels. It is easy to forget which was the original channel being
viewed.
The zapper function notes three other alternative channels starting from the selected channel.
However, note that only those channels that have been viewed for at least 5 seconds are stored
in the memory.
The last 4 channels stored in this way can be accessed directly using the OK key followed by
the
CVWB keys.
3.4.4 Channel management using 10 favourite lists
Digital television technology provides viewers with a wide range of channels. Depending on the
number of satellites that can be received, up to 2000 TV and 2000 radio channels are available.
To manage this (extremely) large number - who can remember several hundred channels and
the associated channel numbers? - the user has ten custom definable favourite lists, enabling
him to manage and sort the channels clearly.
7
GB
Page 9

A favourite list is a list in which channels selected from a channel pool can be organised.
By default the names of the favourite lists are pre-defined similar to the following example.
However, the name of the favourite list can be changed according to individual preferences.
Each favourite list has the available channel numbers P000....P999.
Favourite list Name sorted channels (example)
Example: F0: ALL (e.g. all free channels from the channel pool)
F1: NEWS (e.g. PHOENIX, n-TV, N-24, Bloomberg etc.)
F2: SPORT (e.g. DSF, EuroSport, Motors-TV etc.)
F3: MUSIC (e.g. MTV, VIVA, VIVA 2, Video Italia, Hit-Channel etc.)
F4: TRAVEL (e.g. Canal Canarias, Travel-Channel etc.)
F5: SHOPPING (e.g. Home Shopping, QVC, Wishline, ONYX etc.)
F6: CHILDREN (e.g. KIKA + other children’s channels etc.)
F7: MISCELLANEOUS (e.g. - all channels not previously allocated)
F8: ABC (e.g. ...)
F9: XYZ (e.g. ...)
The desired channels can be taken from the channel pool, which contains all channels in
alphabetical order, and copied into the target, i.e. one of the 10 favourite lists.
All free channels from the channel pool as stored by default in the favourite list 0 = «ALL».
Favourite list Fav 0 = ALL thus corresponds to the channel allocation you may already be familiar
with from satellite receivers.
Some of the channels transmitted by the Astra 19 and Eutelsat Hotbird satellites are also already
contained in various favourite lists.
Selecting a favourite list is done by pressing the F key and one of the allocated number keys
0...9.
N.B.: After selecting a channel the following message is displayed:
3.5 SWITCHING BETWEEN TV AND RADIO
Switching between radio and TV is done using the R or TV keys. Both keys also affect the
switching impulse voltage of the TV SCART socket. If you also receive channels on your TV set
via antenna or cable, you can switch between the channel received by your TV set or by the
satellite receiver using the TV key provided that the switching impulse voltage is detected and
processed by your TV set.
N.B.: All channel functions available for TV (last channel, zapper function,
favourite lists, channel lists and channel pool etc.) are also available
separately for 1000 radio channels.
8
Number and name of favourite list currently selected.
TV : F0 : ALL Mon. 31.05. 19:48
Channel
P 132 Channel name F Sat 1
Satellite (1....8)
19:30 - 20:00 News programme
F = free / $ = encrypted
Page 10

9
GB
3.6 SELECTING THE CHANNEL LANGUAGE
Press the A key to display the language selection menu. The number of available languages
depends on the particular channel. The choice of language is made as usual using the
W and
V keys.
The language originally set remains selected when you quit the menu using the E key.
The selected language is stored when you quit the menu using the OK key.
N.B.: Please note that many channels only offer one language. Many radio stations
do, however, offer up to 20 or more «sub»-channels. These channels can be
selected in radio mode also by pressing the A key.
3.7 ADJUSTING THE SOUND
a) The volume of the receiver can be adjusted in 20 stages using the C or B keys.
The current volume level is indicated in the channel indicator.
b) Switching the sound c on/off (mute) - when the sound is switched off, the OSD
displays a message for approx. 2 seconds. The «mute» function is cancelled by
pressing the volume keys
C or B again.
3.8 TIMER
The timer programming menu is accessed by pressing the G key. Up to 8 timer events can be
input for TV or radio channels, as required.
N.B.: Please note that the video recorder must also be set to identical recording times.
N.B.: Please note that the remote control is not active during timer recording to prevent
accidental recording of OSD messages.The volume is switched to full level during
recording.
If the remote control is activated, the channel indicator on the unit displays «r E c»
to indicate that a timer recording is currently active.
The timer recording can be interrupted prematurely only via the
G key.After
interrupting the recording, the display indicates «End».The unit then reverts to
normal operation.
If a timer recording is started from standby mode, the unit reverts to standby mode
after the recording has finished.
1...8
Select the next free input field using the number keys 1...8 or using the W or V keys.
BC Select consecutively the input fields for {Date} {Start} {Stop} and {Channel} (the input
field is highlighted in white).
OK
Activate the input for the selected field using the OK key (the input field is highlighted in
black).
Input the appropriate event either directly via the number keys 0...9 or by scrolling
through the options using the
BCkeys.
OK
Confirm your selection using the OK key and select the next input field.
E
After inputting {Date} {Start} {Stop} and {Channel}, you can exit the timer menu by
pressing E and quit or input further timed events. You can also programme the timer for
radio programmes in the Programme section using the R key.
If the data for timer programming are transmitted, they can also be transferred directly to
the timer via the menu ‘EPG...preview’ using the
G key.
E n d
r E c
L 2 0
Page 11

Deleting timer programming:
1...8
Select the timer row to be deleted using the number keys 1...8 or the W or V key
OK
and delete the programmed data using the OK key.
N.B.: If you accidentally delete a row and wish to reconstitute the original information,
exit the timer menu by pressing the E key twice.
N.B.: The time and date are programmed from the DVB data transmitted by the
channel. Please correct the ‘Time offset’ in the Installation menu when
switching from summer to winter time and vice versa.
CET summer time = {+2 h}
CET winter time = {+1 h}
Please note that some ‘exotic’ channels do not transmit correct time signals.
Check the date and time in the ‘Timer programming’ menu when performing
programming.
3.9 EPG - PROGRAMME INFORMATION (BASIC
NAVIGATOR)
The EPG (Electronic Programme Guide) contains information on current and subsequent
programmes.
The extent of this channel-related information is determined by the individual provider and varies
greatly from one channel to the next. Many channels are also transmitted without usable
additional information (SI data).
This is also the case for the preview. Some providers do not transmit any data; others already
transmit a preview, including additional information, up to a few days in advance.
The EPG information is accessed and quit using the i key.
a) Current and next programme
i
shows the title, start and end of the current programme,
and additional information on the programme, depending on the provider.
i
shows the title, start and end of the next programme,
and additional information on the programme, depending on the provider.
i
to exit channel information again.
E
to exit channel information immediately.
b) Further preview and additional information
i
Activate the basic navigator, show information on the current programme.
OK
Access the preview.
Depending on the provider, you receive a list of programmes for the current day or for
several days in advance.
You can skip forward or backward to the desired programme row-by-row or page-by-
page using the
WV or BC keys.
OK
Once you have selected the desired programme, you can consult additional detailed
information using the OK key. If no additional information is available, you will receive
the relevant message.
If the text of the additional information skips a page, you can skip forward or backward
row-by-row using the
WV keys.
Exit the additional information display using the OK key or the E key, which displays
the preview again.
c) Timer programming
The data from the preview can be transferred to the recorder timer using the relevant
key. If a preview is available, then select the desired programme and transfer the data
directly to the timer using the
G key.
10
Page 12

MENU STRUCTURE
4.1 CHANNELS
4.1.1 Favourite list
Call up the main menu using the M key and then press the OK key twice.
Sorting, swapping, copying and deleting channels - in one single menu!
i
Select one of the favourite lists 0...9.
M
Select the relevant satellite (e.g. Astra, Eutelsat or other).
TV
Select the channel source (e.g. NEW or ALL channels).
WV Select the target position in the favourite list (tip of grey or green arrow).
CB Select the channel from the source channel list (right-hand window).
The channels are arranged in alphabetical order.
c Remove the current channel from the favourite list to the tray (= remove).
A
Copy from the tray back into the favourite list (= insert).
OK
Transfer the channel selected in the source to the favourite list (left-hand window)
(= copy).
Place the red bar over the desired channel using the WV keys or by
inputting the channel number,
move to the clipboard using the
c key,
select the target channel number using the
WV keys or 0...9,
insert using the A key - done!
Place the red bar over the channel to be deleted using the
WV keys
(or by inputting the channel number), and then place it on the clipboard using
the c key.
Exit the menu using the E key and ‘delete’ using the OK key - done!
N.B.: «Deleted» channels are only removed from the favourite list, but continue to
be available in the channel pool and can be inserted again at any time.
Delete
:
Swap:
11
GB
Page 13

Switching to the left menu window is done using the W and V keys; switching to the right
menu window is done using the
C and B keys.
The highlighting of the windows heading and channel will show which window is active.
For each action (copying, swapping or deleting) you thus see the appropriate TV channel in the
current window.
The search function also locates channels that do not contain a usable TV channel. Atest
picture, for example, may initially be detected and is thus stored by error in one of the channel
lists.
N.B.: The transparency of the superimposed image can be switched between
variable and fixed (fixed in not transparent) using the F key.
In ‘VAR’ mode the transparency can be increased or decreased using the
C B keys.
This function is very useful when sorting and copying channels, as high
transparency gives the user the chance to quickly decide on the type
and content of a particular channel.
Adjust the desired source channel using the CB keys, then locate the
position in the favourite list where the channel is to be inserted using the
WV keys or directly via the number keys 0...9.
Press the OK key - done!
N.B.: The unit detects channels, which are already stored in the current
favourite list - if this is the case the equal symbol (=) is displayed in the
grey bar.
N.B.: If you have accidentally deleted channels or wish to cancel the changes
made, then exit the menu using the E key and then press the E key
again.
Any changes made will not be stored until you press the OK key.
4.1.2 Changing the favourite name
Call up the list using the OK key.
Select the input field {NAME} using the keys 0...9 or
WV and activate by pressing OK.
You can select letters (upper or lower case) or numbers using the
W or V key.
You can shift the input position right or left using the
B or C key.
After inputting the desired name, the input field is deactivated again by pressing the OK key.
Copying:
12
Page 14

4.1.3 Channel pool (for advanced users)
The channel pool contains all channels in alphabetical order. Selection depending on satellite is
done using the M key; free or encrypted channels are chosen by pressing the TV key . All free
(or all encrypted) channels on the selected satellite are contained in the «All Free» section, also
the new free or encrypted channels after performing satellite search mode.
WV Select channels in rows. CB Select channels in columns.
All selected channels are set immediately by the receiver and indicated in the background. The
screen transparency can be changed using the F key and (within 2 seconds) the
C or B key.
M
Selection of satellite using the M key.
TV
Selection of free or encrypted channels using the TV key.
c After pressing the MUTE key, individual channels can be deleted - e.g. channels that are
no longer on the air.
R
The channel pool activated using the M and TV keys can be managed here, i.e. all
«unused» channels or also all indicated channels can be deleted.
i
Show antenna signal and reception parameters.
If necessary, you can align your parabolic antenna using the sub-menu «Antenna signal». Turn
the antenna to the optimum position in the scales indicating field strength and signal reception
quality.
If the signal is very weak, the field strength scale may also fall to 0 - in which case you should
optimise the signal using the reception quality scale.
If the message «No signal» appears and only the field strength signal is indicated, the antenna
may be aligned with a satellite for analogue signals (which cannot be received by this receiver).
13
GB
Page 15

4.1.4 Parental control
The five-digit security code (PIN) is set to 0 0 0 0 0 in the factory by default.
a) Changing the security code (PIN)
Select the «Parental control» menu using key 4 from the Main menu «Channels». Then select
the {PIN} input field using key 2 or the
W key and activate it by pressing the OK key. Enter
the ‘old’ and your ‘new’ PIN in the following sequence.
1. Please enter the current PIN. (= 0 0 0 0 0 for first use)
2. Please enter the new PIN.
3. Please repeat the new PIN.
N.B.: Do not forget your PIN.
Resetting to the default settings is only possible by factory customer
service!
All channels are accessible using the default settings - you can block each individual channel
against unauthorised access.
Marking the channels to be blocked is done either via the «Favourite list» or «Channel pool»
menus using the RC key.
After marking, the channel name is preceded by a «?», after which the next channel is called up
to enable marking of several channels by repeatedly pressing the RC key.
To delete the marking, press the RC key again when the relevant channel is highlighted.
Example: Sky News
? Super Action
? Super Spezial
Südwest BW
b) Activating the parental control
To activate blocking of the channels marked «?», switch ON the {Security} input field in the
«Parental control» menu and confirm by pressing the OK key when exiting the menu.
When calling up the marked channels you will be required to enter your own five-digit PIN.
N.B.: Please note that, when the parental control is activated, the «Favourite list»,
«Channel pool» and «Search mode» menus can only be accessed by entering
the five-digit PIN.
This is to prevent overriding the parental control function, e.g. by deleting the
marking or adjusting the blocked channels via the transponder search mode
(... the block also cannot be overridden using the timer).
N.B.: To deactivate the parental control temporarily, e.g. in the evening, you can switch
the {Security} input field to OFF in the «Parental control» menu.
The «?» marking is not cancelled in this mode and appears again when the
parental control function is reactivated, i.e.when the {Security} input field is
switched to ON again.
14
Page 16

4.2 SEARCH MODE
4.2.1 Satellite search mode
Satellite search mode is performed for all frequencies on the selected satellite. Select the
desired settings in the menu sequence.
Selecting the individual parameters is performed after activating using the OK key and then
using the
B or C key.
We recommend launching the search mode occasionally in order to detect new channels. For
this purpose use the basic settings shown in {bold}.
If you wish to search for one single channel individually, you can shorten the search mode
duration by restricting certain known parameters, e.g. {Low} and {22}.
(1) the desired satellite {ASTRA} > {Hotbird} > {Sat 3} > to {Sat 8}
(2) the band {Low/High} > {Low} > {High}
(3) the symbol rate {22+27.5} > {22} > {27.5} > {FREE}
(4) or a free symbol rate {XXXX}
(only possible if the symbol rate under point (3) has been changed to {FREE})
(5) and then start the search mode using the OK key
and select whether the search is to be for non-encrypted or encrypted channels or
both simultaneously: select: «FREE» or «CA» or «FREE+CA».
N.B.: Some of the encrypted channels can also be received free or free at certain times.
Exception: The encrypted ORF channels are located under ‘FREE’!
4.2.2 Transponder search mode
All channels of a transponder are searched for in transponder search mode.
(1) Satellite
(2) Frequency
(3) Polarisation
(4) Symbol rate
If the parameters (satellite, frequency, polarisation, symbol rate) of the channel being searched
for are known, transponder search mode can then be used.
If, for example, a new channel belonging to a known channel group is launched, it is sufficient to
set a channel from this channel group initially via channel selection - the relevant parameters are
transferred to the transponder search mode.
If the message «No signal!» appears in the «START» line, reception is not possible. Please
check the parameters satellite, frequency, polarisation and symbol rate once again.
Search mode can be started if the «Signal!» message appears.
(5) Start search mode using the OK key.
Encrypted channels are denoted by the «$» symbol. Channels that you do not wish to transfer to
the channel pool can be deleted individually using the TV key.
New channels are marked by «+». Transfer to the channel pool can be done by pressing the OK
key.
4.2.3 Manual input (for advanced users)
If neither the satellite nor the transponder search mode detects the desired channel, all relevant
reception parameters can be set in «Manual input» mode. Manual input is very useful e.g. if the
reception data of the desired channel are known, but it only transmits at certain times.
15
GB
Page 17

16
4.3 SATELLITES
The ASTRA19.2° and Eutelsat 13° (Hotbird) satellites are activated as per the default factory
settings. Six other satellites are pre-programmed, but not activated. If you expand your reception
equipment, you can make the required settings and activations for the pre-programmed satellites
in the ‘Satellite’ menu.
Activate the desired satellite number, e.g. using the number keys 1...8, and call up the Input
menu using the OK key.
(1) Entering or amending a name
Activate the {NAME} input field using key 1 followed by OK.
You can select letters (upper or lower case) or numbers via the
W or V key.
You can shift the input position right or left using the B or C key.
After inputting the desired name, the input field is deactivated again by pressing the OK
key.
(2) Inputting LO1
(3) Inputting LO2
LO1 and LO2 are preset to 9750 MHz and 10600 MHz as default by the factory.
If the LNB-LO frequencies differ from the preset values, enter the relevant values here.
Activate using the OK key, enter the LO frequencies using the number keys 0...9, then
confirm using the OK key.
Please ensure that a digital-compatible LNB is installed in your reception equipment.
(4) Inputting the orbit position
The parameter «Orbit position» with possible values 1...4 must be stated when
operating using the DiSEqC feature.
(5) Enabling
{ON} The selected satellite is enabled for your reception equipment.
{OFF} The selected satellite is blocked.
4.4 INSTALLATION
4.4.1 Time offset
After switching on at the mains switch or after a power cut the time and date for the system clock
(timer) are transferred from the data received. To ensure that the time and date of the receiver
correspond to local time, a value for the deviation from standard time must be entered.
The offset value for CET summer time is {+2} hours, for CET winter time {+1} hour.
Please check or, if need be, correct the time offset value when setting up your equipment
and also when the time changes in spring and autumn.
(1) Select using key 1 or using the
WVkeys, then activate using the OK key and set
the desired time offset value using the
BCkeys. Confirm the modifications using the
OK key.
N.B.: If an incorrect time offset value is entered, programme times will be indicated
incorrectly.
Page 18

4.4.2 Menu language
(1) Select language.
The menu language can be switched between {{German}, {English}, {French}, {Italian},
{Spanish}, {Dutch} and {Turkish}.
(2) Select character set.
Automatic switching of the character set is defined in the DVB standard - however
unfortunately not all stations observe this standard with the result that characters from
an incorrect character set may appear in a text.
Automatic character switching is provided in this unit, however various character sets
can be installed if required, so that e.g. Greek texts are shown in the correct character
set and are thus legible.
Selection: {Auto} {Standard} {Latin} {Cyrillic} {Arab} {Greek} {Hebrew}.
4.4.3 Signal paths
Activation and modification of each individual field are following the usual procedure.
Select the appropriate input field {XYZ} using keys 0...9 or
W / V and activate using the OK
key.
The parameters are set using the
V or W key.
The selection is confirmed using the OK key.
(1) TV VCR Video output signals at TV and VCR SCART sockets
- - - - - - - - - - - - The following groups are possible in the TV and VCR sockets.
CVBS CVBS
CVBS YC
RGB CVBS (RGB offers the best picture quality on the television set)
RGB YC (You can use YC with SVHS video recorders)
YC CVBS
YC YC
CVBS: = Composite Video Broadband Signal
FBAS: = Farbbild Austast Synchron Signal (equals CVBS)
YC: = like S video (Y: «brightness», C: «croma»)
(2) TV > VCR Video/audio return path from TV to VCR unit
If {ON} is selected, the video and audio signals are also transmitted from the TV socket
to the VCR socket in standby mode.
In {OFF} position the power consumption is reduced by approximately 0.5 watts.
(3) VCR signal VCR signal from VCR unit to VCR SCART socket
In VCR play mode you can choose between {CBVS/RGB} or {YC} = S video for
connecting a SVHS video recorder.
(4) Picture format
If the {4:3} setting is set, all programmes are viewable in the 4:3 format
If the {16:9} setting is set, programmes transmitted in wide-screen format and also those
transmitted with the appropriate identification code are automatically viewable in 16:9
format.
However, automatic adjustment of the picture width is only effective if your TV unit is
equipped to process and display 16:9 formats (switching voltage 16:9 = 6 volts).
17
GB
Page 19

4.4.4 LNB settings
(1) LNB
{ON} standard setting
{OFF} operation without LNB signal (e.g. only with special cabling systems)
(2) In standby mode
{OFF} standard setting
N.B.: For certain units only use the {OFF} setting, as otherwise the receiver
continues to supply power to the LNB also in standby mode.
The power consumption of the receiver can thus increase from 2 watts to up
to 10 watts in standby mode.
{ON} The LNB power remains on in standby mode, e.g. to supply power to an
appropriate multi-consumer unit.
4.4.5 DiSEqC (Digital Satellite Equipment Control)
In the DiSEqC menu the control signals must be set in accordance with the requirements of your
satellite equipment.
(1) 22 kHz signal
{OFF} 22 kHz not active
{High/Low} 22 kHz switches between high and low band
{Pos. A/B} 22 kHz switches between 2 satellites
(2) Tone burst
{OFF}
{High/Low} activates the tone burst depending on the reception frequency
{Pos. A/B} selects orbit position 1/3 or 2/4
{Opt. A/B} switches between orbit position 1/2 and 3/4
(3) DiSEqC
{OFF}, {ON} Select {ON}, if you connect the receiver to a DiSEqC-compatible satellite
receiver.
(4) DiSEqC repeat (use for cascade arrays)
{OFF} no repetition of DiSEqC signal
{1} the DiSEqC signal is repeated once
{2} the DiSEqC signal is repeated twice
18
Page 20

4.4.6 Download Over Air (software update via satellite)
You can update the operating software and the channel lists (each individually) for your receiver
via the ASTRAsatellite (update via Download Over Air) using the Download sub-menu. The data
for various units are transferred consecutively on a special receiving channel (thus the term data
carousel). To receive this data your receiving unit must be aligned with the ASTRAsatellite at
19.2° east.
N.B.: Please note that, when updating the channel lists, your own channel allocation in
your favourite lists (10 each for TV and RADIO) will be overwritten!
a) Launch Software download in the INSTALLATION menu after selecting menu (6)
«Download» using the OK key. Download progresses in several stages, each stage
being accompanied by relevant information! You can interrupt these stages at any time.
b) Search for the download channel on the ASTRA satellite. This search takes place during
initialisation of the unit and may last for several minutes.
The next time download is launched, the stored download channel is set directly.
c) Load the receiver identification. This process may also take several minutes.
d) Depending on the availability of new data (operating programme or channel lists) from
the data carousel the following options are offered to you.
e) After selecting «1 Receiver software», the following menu appears.
f) After pressing the OK key, the software version is checked. If the data carousel
contains an older version, a message is displayed - if necessary you can interrupt
download prematurely.
Depending on the allocation rate of the data carousel, data downloading may take up to
one hour!
g) Save the downloaded data.
N.B.: You must not switch off the unit during this process!
N.B.
Download software version V Y.Y
Receiver software version V X.X
Continue?
YES =
OK NO = E
Download
1 Receiver software
2 Channel lists
CH+/- selection OK
19
GB
Page 21

GLOSSARY
Band Frequency band of a satellite.
Low band and high band.
CA Conditional Access: denotes encrypted channels.
CVBS Composite Video Burst Sync: video standard for TV or VCR equipment.
DiSEqC Digital Satellite Equipment Control
DVB Digital Video Broadcast
EPG Electronic Programme Guide
Favourite list List of selected channels from the channel pool.
Free Freely receivable (not encrypted) channels.
GHz Abbreviation for gigahertz (giga = billion).
LNB Low Noise Block Converter: electronic unit on parabolic antenna for
receiving satellite signals.
LO Local Oscillator: part of the LNB; converts the satellite signal into a
frequency range receivable by the receiver.
MHz Abbreviation for megahertz (mega = million).
MPEG Moving Picture Expert Group: standardisation body for encoding and
compression of images.
OSD On-screen Display: indication or flashing of information on the screen.
PID Packet Identification: identification number for video, audio, videotext etc.
PCR Program Clock Reference
Pool Channel pool: collection of all receivable TV and radio channels.
RGB Video standard (separated into 3 individual signals for red, green and
blue).
Standby Power saving sleep mode.
SVHS Super Video Home System: video recorder standard (S Video).
Symbol rate indicates the data rate transferred per second
(in MS/s Megasymbol/second or kS/s kilosymbol/second).
Transponder A digital transponder is capable of transmitting several TV and radio
channels simultaneously on a single transmitting frequency.
VCR Video Cassette Recorder
YC (Y = luminance, C = colour signal) video signal standard for SVHS
recorders.
Zapping Frequent switching between channels using remote control.
20
Page 22

TECHNICAL DATA
Channels
•
2000 storage positions for TV channels and for 2000 radio channels.
•
10 individually definable favourite lists each containing 1000 channel positions (e.g. for channel types
SPORT, NEWS, MUSIC etc.).
•
8 satellites (individually activatable).
•
24 characters for channel and/or station names.
•
Channel selection using 1, 2 or 3-digit input.
•
Channel selection using UP/DOWN keys.
•
Channel changing for 2 channels using one key (Last Channel).
•
Fast selection of last 4 viewed channels - zapper function.
•
Selection of channels from channel list.
•
Channel pool arranged in alphabetical order and in accordance with satellite, free, new free, encrypted
and new encrypted channels.
•
Copying, sorting, deleting of channels, all in a single clear menu.
Search mode
•
Automatic satellite search mode (SCPC compatible) for TV and radio channels including selection of
satellite, high/low band, fixed and freely definable symbol rates, for free (and encrypted) channels.
•
Automatic transponder search mode - detects TV/radio channels on a transponder.
•
For advanced users - manual input of all reception parameters.
•
Changing channel names.
OSD (On-Screen Display)
•
Clear menu structure with variable and fixed transparency.
•
Integrated operating instructions and functional description of remote control.
•
Menu languages - German, English, French, Italian, Spanish, Dutch and Turkish.
EPG (Electronic Programme Guide)
•
Fast programme information concerning current and next programmes.
•
Preview containing additional information several days in advance (depending on channel).
•
Simple transfer of data - channel, start time, end time, date - to timer.
Video/Audio
•
TV socket RGB, YC (S Video /SVHS), CVBS.
•
VCR socket YC and CVBS.
•
Automatic VCR to TV switching.
•
Automatic TV to VCR switching in standby mode (selectable).
•
Separate cinch sockets for L/R audio channels.
•
Volume adjustable in 20 stages, mute function.
•
Language selection for multilingual TV broadcasts and selection of additional channels in radio mode.
•
Stereo 24 Bit 96 kHz - Audio «Sigma-Delta» DAC.
Additional information
•
Local control for Channel +/-, Volume +/-, Standby and Radio/TV switching.
•
4-digit LED indicator (green).
•
Timer for 8 events (TV or radio).
•
Optimum alignment of parabolic antenna depending on field strength and reception conditions.
•
Tele-text reinsertion (for TV display).
21
GB
Page 23

RF range
•
Sat-IF frequency range 950 - 2150 MHz
•
Input level ranges 43 - 83 dBµV
•
Reception threshold (EB/NO) < 4.5 dB
TV system digital
•
Modulation, FEC, demultiplexer DVB-S standard
•
Video resolution CCIR 601 (720 x 576)
•
Input data rate 2 - 45 Msymbol/s
•
Bit rate 1.5 - 15 MBit/s
•
Video voltage/impedance 1 V/75 Ohm
•
S/N > 53 dB
•
Audio decoding MPEG-1/2, layers 1+2
•
Bit rate 32/44.1/48 kHz
•
Audio frequency range 0.04 - 20 kHz
CPU/Memory
•
32 bit RISC CPU 60 MHz clock rate (internal)
•
FLASH 2 MByte
•
DRAM 2 MByte
•
SDRAM 8 MByte
Power supply
•
Supply voltage 230 V (+10/-15%) / 50 Hz
•
Power consumption LNB = 400mA/18V 22 W max (19 W typ.)
•
Power consumption without LNB 12 W max (10 W typ.)
•
Power consumption in standby 2.5 W max (< 2 W typ.)
Connections
•
Sat-IF input/output F socket
•
TV/VCR SCART socket
•
Audio 2 cinch sockets
Software update
•
via data interface separately for: a) operating programme,
b) TV channel lists,
c) radio channel lists,
d) unit adjustment
[RS 232 Sub D, 9 channel (0-modem operation)].
•
via satellite separately for: a) operating programme,
b) TV and radio channel lists.
General information
•
Unit dimensions (W x H x D in mm) 335 x 68 x 280
•
Ambient temperature +5°C to +40°C
•
Weight 2 kg
22
Page 24

TROUBLESHOOTING
When you have problems with your Philips DSR 1000, first check following points.
23
GB
PROBLEM
No picture, no sound and no front
panel display.
No picture, no sound ; but the
front panel shows the time or
“--”.
No picture, no sound ; but the
indication on the front of the
receiver is correct.
Only the main menu and the
corresponding sub-menus are
available. You cannot choose a
service.
Main menu + sub-menus and
information are available. But
there is no reception (the screen
remains black).
Irregular or bad reception,
“mosaic” effect of the picture.
The remote control does not
operate.
By normal receiving, you may
have a black screen when you
choose some services.
POSSIBLE CAUSE
Receiver is not plugged into the
mains or is not switched on.
The receiver is on standby.
You are watching TV through your
UHF or VHF aerial connection.
The SCART connection has been
made wrong.
The connections are right, but the
television is NOT connected up to
the extern AV source (AV 1 or
EXT. 1, etc...).
The cable connections are maybe
faulty (damaged, broken or
squashed) are missing.
There is no download list of the
(digital) services in the memory of
the receiver.
The receiver has not been well
connected up to the dish.
The dish does not receive satellite
signals.
The mains of the LNB is
interrupted.
The received signal is too weak.
The dish is damaged.
Wrong cable connections
(damaged, broken or squashed
connectors or wires).
A weak signal because the dish is
not well positioned or is not stable
There are no batteries in the
remote control, the batteries are
nearby or completely used.
Your are watching a scrambled
service or programme.
ACTION
Check mains connection. Press
the ON/OFF button on the front of
the receiver.
Press on the B button on the
remote control to bring the
receiver out of standby.
Press the TV button on your
remote control.
Check the SCART connection
(see chapter 2).
Check the TV SCART
connection.
Check all your connections and
consult chapter 2.
Execute all the relevant steps for
installing indicated in chapter 4.
Check all the items of the menu
Installation antenne (LNB, mains,
LNB-type, LO frequence,...).
Check the installation and the
positioning of the dish.
Check the cable connection
between the LNB and the
satellite receiver.
Check the installation and the
positioning of the dish.
It may be due (rarely) to severe or
very cloudy weather.
Install a new dish.
Check all the connections and
cables.
Check antenna signal.
Reposition the dish. Fix your dish
strongly.
Check the batteries and change
them eventually.
Choose another service.
Page 25

Page 26

DFU DSR 1000 - 3111 176 51003 03 / 03
 Loading...