

Philips HTS3375X/78, HTS3375 Quick Start Manual

Manual do Usuário
HTS3375
Registre o produto e obtenha suporte em
www.philips.com/welcome

Responsabilidade Social
A Philips da Amazônia Indústria Eletrônica Ltda. é
uma empresa socialmente responsável, preocupada
com a valorização dos seus recursos humanos
internos, com o relacionamento correto e justo com
a comunidade, com o meio ambiente, com o
ambiente de trabalho e com o compromisso de
cumprimento das leis.
Sendo assim, realiza suas atividades em conformidade
com a norma SA-8000, que se baseia nos princípios
das convenções da Organização Internacional do
Trabalho, da Convenção das Nações Unidas sobre os
Direitos da Criança e na Declaração Universal dos
Direitos Humanos.
Informação ambiental
Todo o material desnecessário foi retirado da
embalagem do produto.
Nós tentamos fazer as embalagens de modo que elas
sejam fáceis de separar em três materiais: caixa de
papelão (caixa), calços de isopor e sacos plásticos.
O seu sistema contém materiais que podem ser
reciclados e usados novamente se desmontados por
uma empresa especializada. Por favor, observe os
regulamentos locais relacionados à disposição de
materiais da embalagem, baterias e equipamentos,
com relação à destinação no seu fi nal de vida.
Prezado Consumidor,
PARABÉNS POR TER ADQUIRIDO ESTE
PRODUTO...
E BEM VINDO À FAMÍLIA PHILIPS.
Agradecemos pela sua confi ança na Philips e temos a
certeza de que seu HTS3375 lhe trará muitos
momentos agradáveis, pois ele é um produto de
tecnologia moderna e com muitos recursos. Para
usufruir de todo seu potencial, basta ler atentamente
este manual e seguir as orientações dadas.
Atenciosamente,
Philips da Amazônia
Indústria Eletrônica Ltda.
Baterias e pilhas
“Evite o uso prolongado do aparelho
com volume superior a 85 decibéis pois
isto poderá prejudicar a sua audição.”
Nível de Exemplos
Decibéis
30 Biblioteca silenciosa,
sussurros leves
40 Sala de estar, refrigerador,
quarto longe do trânsito
50 Trânsito leve, conversação
normal, escritório silencioso
60 Ar condicionado a uma distância
de 6 m, máquina de costura
70 Aspirador de pó, secador de cabelo,
restaurante ruidoso
80 Tráfego médio de cidade, coletor
de lixo, alarme de despertador
a uma distância de 60 cm
OS RUÍDOS ABAIXO PODEM SER PERIGOSOS
EM CASO DE EXPOSIÇÃO CONSTANTE
90 Metrô, motocicleta, tráfego de
caminhão, cortador de grama
100 Caminhão de lixo, serra elétrica,
furadeira pneumática
120 Show de banda de rock em frente
às caixas acústicas, trovão
140 Tiro de arma de fogo, avião a jato
180 Lançamento de foguete
CUIDADO com o uso de pilhas ou baterias!
– Não descarte as pilhas ou baterias junta-
mente com o lixo doméstico.
– O descarte não controlado de pilhas e baterias
prejudica o meio ambiente e a saúde humana.
– Para contribuir com o meio ambiente e com a sua
saúde a Philips receberá nos postos de serviço técnico
as pilhas ou baterias fornecidas com seus produtos
após o uso e fará o descarte gratuitamente.
– Para evitar vazamentos nas pilhas ou baterias, o que
pode resultar em danos pessoais e materiais ou ao
produto: Remova as pilhas quando não utilizar o
controle remoto por um longo período; Não misture as
pilhas (antigas com novas ou de zinco-carbono com
alcalinas, etc.); Não deixe o controle remoto exposto a
altas temperaturas.
Em caso de dúvida ou consulta, favor ligar para a linha
verde (0+xx+92) 3652-2525. A Philips da Amazônia
Indústria Eletrônica Ltda. e o Meio Ambiente agradecem sua colaboração.

3
7 Adjust sound 33
Control the volume 33
Select surround sound 33
Select a preset sound 33
Adjusting microphone volume level 34
Karaoke settings 34
Turning vocals off (voice cancel) 35
8 Adjust settings 36
General setup 36
Audio setup 38
Video setup 40
Preferences 42
9 Additional Information 44
Update software 44
Care 44
10 Specifi cations 45
11 Troubleshooting 47
12 Glossary 49
Contents
1 Important 4
Safety and important notice 4
Trademark notice 5
2 Your Home Theater System 6
Feature highlights 6
Product overview 7
3 Connect 10
Place the Home Theater System 10
Connect video cables 10
Connect speakers and subwoofer 12
Connect radio antenna 13
Connect audio cables/other devices 13
Connect power cord 15
4 Get started 16
Insert the remote control batteries 16
Find the correct viewing channel 17
Select menu display language 17
Turn on Progressive Scan 18
Change speaker settings 19
Use Philips EasyLink 20
Select a play source 22
5 Play 23
Play a disc 23
Play video 23
Play music 27
Play photo 28
Play from USB device 29
Play from portable media player 30
Play from radio 30
6 Advanced features 32
Create MP3 audio fi les 32
Contents
English
EN
4
Copyright notice
This product incorporates copyright
protection technology that is protected
by method claims of certain U.S. patents
and other intellectual property rights
owned by Macrovision Corporation and
other rights owners. Use of this copyright
protected technology must be authorised
by Macrovision Corporation, and is intended
for home and other limited viewing uses only
unless otherwise authorised by Macrovision
Corporation. Reverse engineering or
disassembly is prohibited.
About Progressive Scan
Consumers should note that not all high
defi nition television sets are fully compatible
with this product and may cause artefacts to
be displayed on the picture. In case of 525
or 625 progressive scan picture problems,
it is recommended that the user switch the
connection to the ‘standard defi nition’ output.
If there are questions regarding our TV set
compatibility with this model 525p and 625p
DVD player, please contact our customer
service centre.
1 Important
Safety and important notice
Warning
Risk of overheating! Never install the Home Theater •
System in a confi ned space. Always leave a space of
at least 4 inches around the Home Theater System
for ventilation. Ensure curtains or other objects
never cover the ventilation slots on the Home
Theater System.
Never place the Home Theater System, remote •
control or batteries near naked fl ames or other heat
sources, including direct sunlight.
Only use this Home Theater System indoors. •
Keep this Home Theater System away from water,
moisture and liquid-fi lled objects.
Never place this Home Theater System on other
•
electrical equipment.
Keep away from this Home Theater System during •
lightning storms.
Where the mains plug or an appliance coupler is •
used as the disconnect device, the disconnect device
shall remain readily operable.
Visible and invisible laser radiation when open. Avoid
•
exposure to beam.
Recycling notice
This electronic equipment contains a large
number of materials that can be recycled
or reused if disassembled by a specialised
company. If you are disposing of an old
machine, please take it to a recycling centre.
Please observe the local regulations regarding
disposal of packaging materials, exhausted
batteries and old equipment.
EN

5
Windows Media and the Windows logo are
trademarks, or registered trademarks of
Microsoft Corporation in the United States
and/or other countries.
HDMI, and HDMI logo and High-Defi nition
Multimedia Interface are trademarks or
registered trademarks of HDMI licensing LLC.
The USB-IF Logos are trademarks of Universal
Serial Bus Implementers Forum, inc.
LASER RADIATION
DO NOT VIEW DIRECTLY
WITH OPTICAL INSTRUMENTS
CLASS 1M LASER PRODUCT
Trademark notice
Manufactured under license from Dolby
Laboratories. Dolby, Pro Logic and the
double-D symbol are trademarks of Dolby
Laboratories.
DivX, DivX Ultra Certifi ed, and associated
logos are trademarks of DivX, Inc. and are
used under license.
Offi cial DivX® Ultra Certifi ed product.
Plays all versions of DivX ® video (including
DivX ® 6) with enhanced playback of DivX®
media fi les and the DivX® Media Format.
Plays DivX® video with menus, subtitles and
audio tracks.
Manufactured under license under U.S. Patent
#’s: 5,451,942; 5,956,674; 5,974,380; 5,978,762;
6,487,535 & other U.S. and worldwide patents
issued & pending. DTS and DTS Digital
Surround are registered trademarks and the
DTS logos and Symbol are trademarks of
DTS, Inc. © 1996-2007 DTS, Inc. All Rights
Reser ved.
ENERGY STAR and the ENERGY STAR mark
are registered U.S. trademarks.
Important
English
EN

6
High speed USB 2.0 Link and MP3 link
Simply plug your USB device into the USB jack
to play your MP3/WMA/JPEG/DivX fi les; or
plug your portable media player to the MP3
LINK jack to enjoy the music play in superb
sound quality.
Sync the audio output with the video play
Synchronise audio and video by delaying the
audio output if the video signal sent to the TV
is slower than the audio streams.
Create MP3 fi les
Convert your favourite audio tracks from an
audio CD into MP3 format. The created MP3
fi les are saved in your USB device.
Screen Fit
View the movie in full screen display on any
TV.
Karaoke scoring function
Karaoke scoring gives a score and a comment
for each performance. Have your singing
performance scored for even more karaoke
fun at home!
Region codes
You can play discs with the following region
codes.
DVD region code Countries
Latin America
2 Your Home
Theater System
Congratulations on your purchase, and
welcome to Philips! To fully benefi t from the
support that Philips offers, register your product
at www.philips.com/welcome.
Feature highlights
Video upscaling to 1080p
Enjoy watching discs in the highest picture
quality available for your HDTV. This Home
Theater System offers full high-defi nition
video playback up to 1080p resolution
that provides a highly detailled picture and
increased sharpness that delivers a more
true-to-life picture for an amazing viewing
experience.
Philips EasyLink
Your Home Theater System supports
Philips EasyLink, which uses the HDMI CEC
(Consumer Electronics Control) protocol.
EasyLink-compliant devices that are connected
through HDMI connectors can be controlled
by a single remote control.
Note
Philips does not guarantee 100% interoperability •
with all HDMI CEC devices.
Listen to rich uncompressed multi-channel
surround sound
This Home Theater System supports 5.1
channels of uncompressed audio that delivers
a real-to-life sound experience as if you are
listening to it live.
EN
7
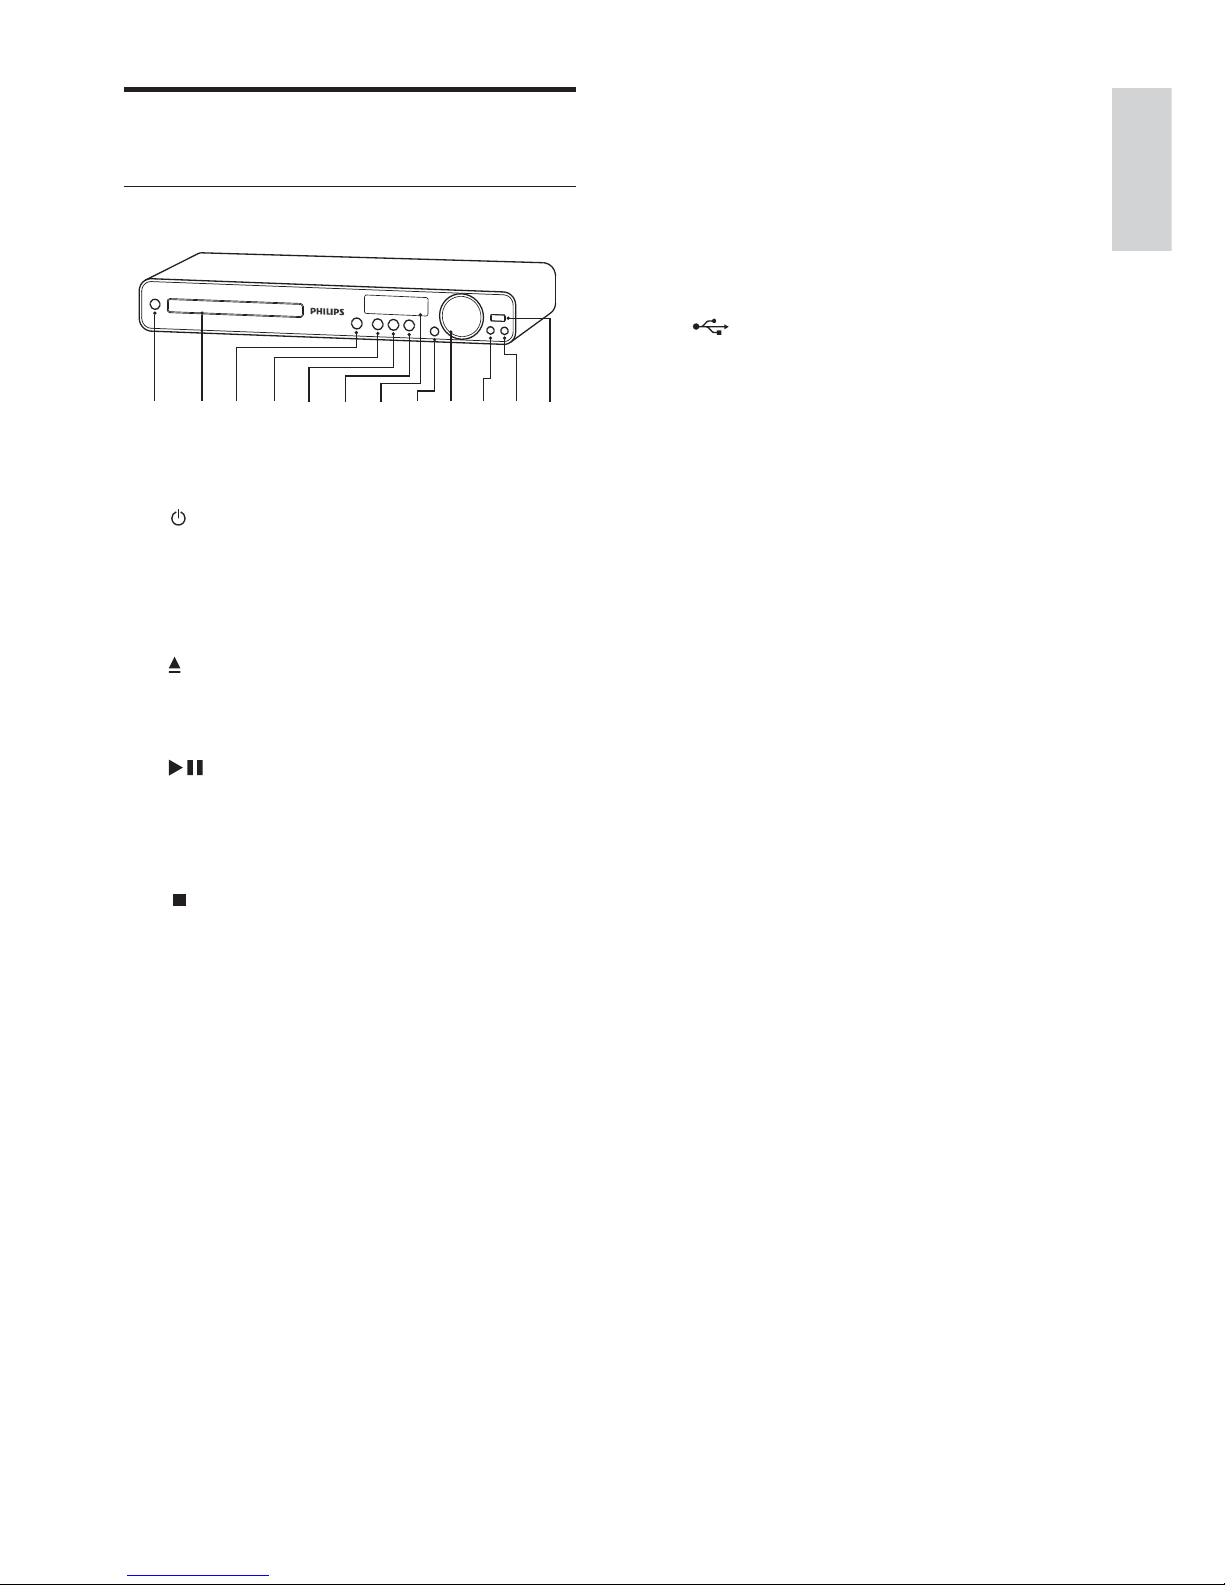
i VOL
Increases or decreases volume.•
j MP3 LINK
Connects a portable audio player•
k MIC
Connects a microphone.•
l
( USB )
Connects a USB supported device.•
Product overview
Main unit
a ( Standby-O n )
Turns on the Home Theater System •
or switches to standby mode.
b Disc compartment
c
( Open/Close )
Opens or closes the disc •
compartment.
d
( Play/Pause )
Starts, pauses or resumes disc play.•
In radio mode, automatically tunes •
radio stations during fi rst- t i m e se t u p .
e
( Stop )
Stops disc play.•
In radio mode, erases the current •
preset radio station.
f SOURCE
Selects a media to play or listen to •
audio from the connected device.
g Display panel
Displays the current status or disc •
information.
h IR sensor
Detects signals from the remote •
control. Point the remote control at
the IR sensor.
ab
ij
k
l
cdefgh
Your Home Theater System
English
EN
8
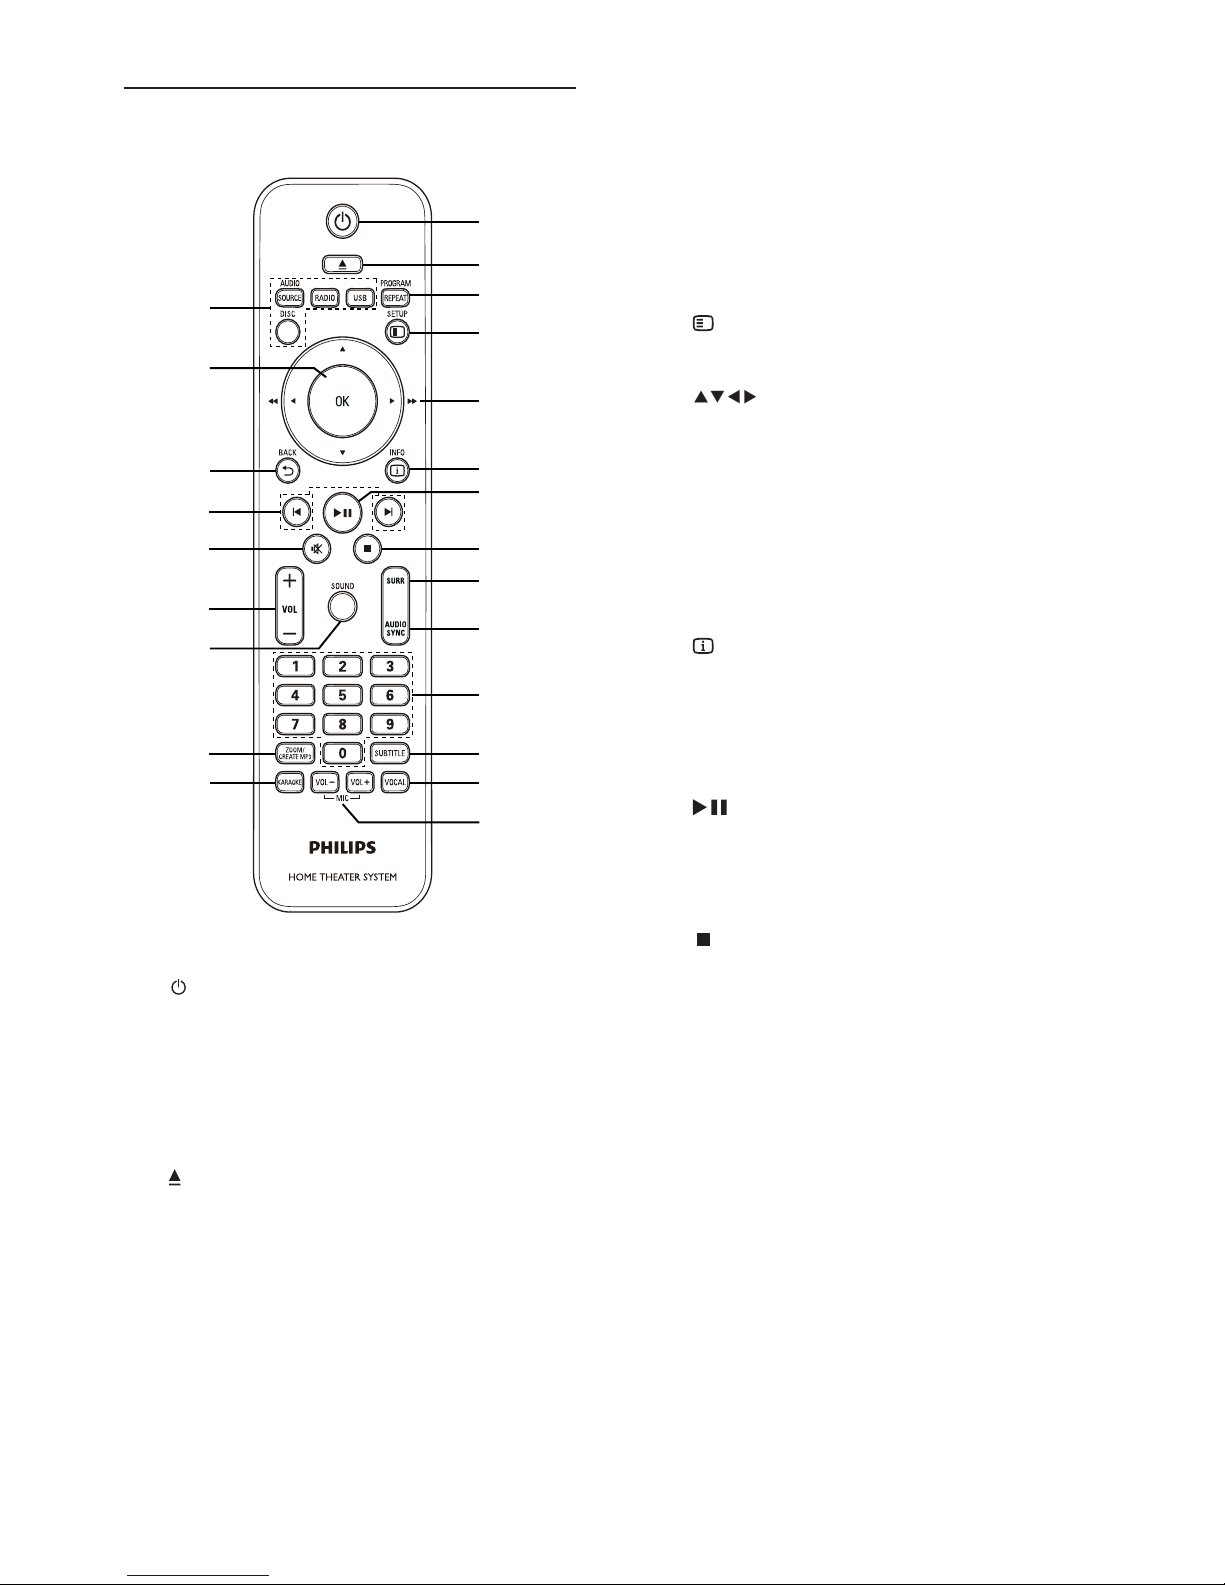
c PROGRAM / REPEAT
In radio mode, resets the list of •
preset stations: press to manually
reset; press and hold to automatically
reset.
Selects or turns off repeat or shuffl e •
mode.
d
SETUP
Accesses or exits the setup menu.•
e
( Navigation buttons )
Navigates through the menus.•
Press left and right for fast backward •
or forward search.
In radio mode, press up and down to •
tune the radio frequency.
In radio mode, press left or right to •
start auto search.
f
INFO
For discs, displays information about •
the current status or the disc.
For slideshows, displays a thumbnail •
view of photo fi les.
g
( Play/Pause )
Starts, pauses or resumes disc play.•
In radio mode, automatically tunes •
radio stations during fi rst- t i m e se t u p .
h
( Stop )
Stops disc play.•
In radio mode, erases the current •
preset radio station.
i SURR ( Surround Sound )
Switches to supported surround •
sound or stereo sound.
j AUDIO SYNC
Selects an audio language or channel.•
Press and hold to access the setting •
for audio sync, then press VOL +/- to
set the audio delay time.
k Numeric buttons
Selects an item to play.•
Remote Control
a ( Standby-O n )
Turns on the Home Theater System •
or switches to standby mode.
Press and hold to turn off the Home •
Theater System and all HDMI CEC
compliant devices.
b
( Open/Close )
Opens or closes the disc •
compartment.
n
q
p
o
r
s
t
u
v
w
m
a
b
c
d
e
f
g
h
i
j
k
l
EN

9
l S UBTITLE
Select DVD or DivX subtitle •
languages.
m VOCAL
Changes the audio channel of a •
karaoke disc.
n MIC ( VOL +/- )
Increases or decreases microphone •
volume.
o Source buttons
• AUDIO SOURCE : Selects an audio
input source.
• RADIO : Switches to FM band.
• USB : Switches to the USB source.
• DISC : Switches to the disc source.
p OK
Confi rms an entry or selection.•
q
BACK
Returns to a previous screen.•
For DVD, goes to the title menu.•
For VCD version 2.0 or SVCD with •
PBC turned on, returns to the menu
during playback.
r
/ ( Previous/Next )
Skips to the previous or next title, •
chapter or track.
s
( Mute )
Mutes or restores audio output.•
t VOL +/-
Increases or decreases volume.•
u SOUND
Selects a predefi ned sound effect.•
v ZOOM / CREATE MP3
Zooms in or out of the picture.•
Accesses the menu to create MP3.•
w KARAOKE
Accesses or exits the karaoke menu.•
English
EN
Your Home Theater System
10
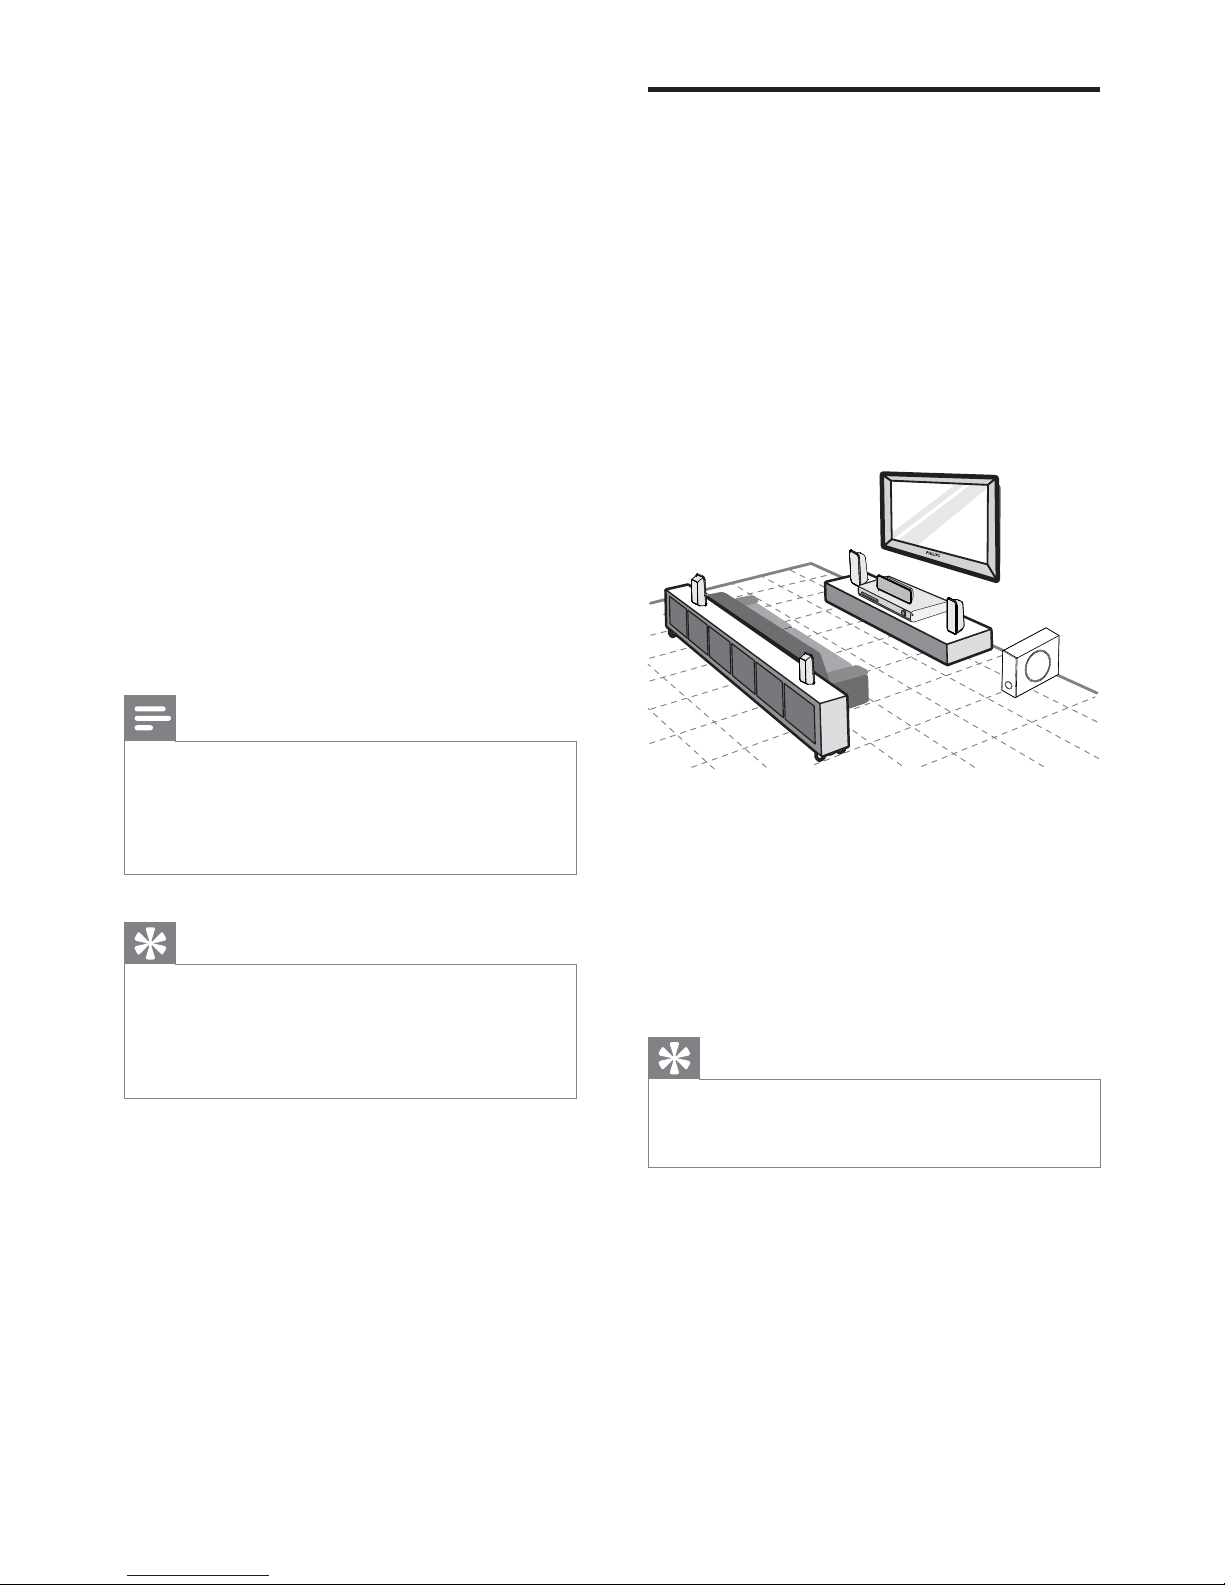
Place the Home Theater
System
Place the Home Theater System where •
it cannot be pushed, pulled over or
knocked down. Do not place it in an
enclosed cabinet.
Make sure that you have full access to the •
power cord for easy disconnection of the
Home Theater System from the power
supply.
1 Place this Home Theater System near the
TV.
2 Place the speakers system at normal
listening ear-level and directly parallel to
the listening area.
3 Place the subwoofer in the corner of the
room or at least 3 feet away from the TV.
Tip
To avoid magnetic interference or unwanted noise, •
never place this Home Theater System too close to
any radiation devices.
REAR
RIGHT
REAR
LEFT
FRONT
RIGHT
FRONT
LEFT
SUBWOOFER
3 Connect
Make the following connections to use your
Home Theater System.
Basic connections:
Video•
Speakers and subwoofer•
Power•
Optional connections:
Radio antenna•
Audio•
Audio from TV•
Audio from digibox/recorder/game •
console
Other devices•
Portable media player•
USB device•
Note
Refer to the type plate at the back or bottom of the •
product for identifi cation and supply ratings.
Before you make or change any connections, ensure •
that all the devices are disconnected from the power
outlet.
Tip
Different types of connectors may be used to •
connect this product to your TV, depending on
availability and your needs. A comprehensive
interactive guide to help you connect your product is
available at www.connectivityguide.philips.com.
EN
11
Tip
If the TV has a DVI connection only, connect via •
a HDMI/DVI adaptor. Connect an audio cable for
sound output.
You can optimise the video output. (see ‘Adjust
•
settings’ > ‘Video setup’ > [HDMI Setup] ).
This type of connection provides the best picture
•
quality.
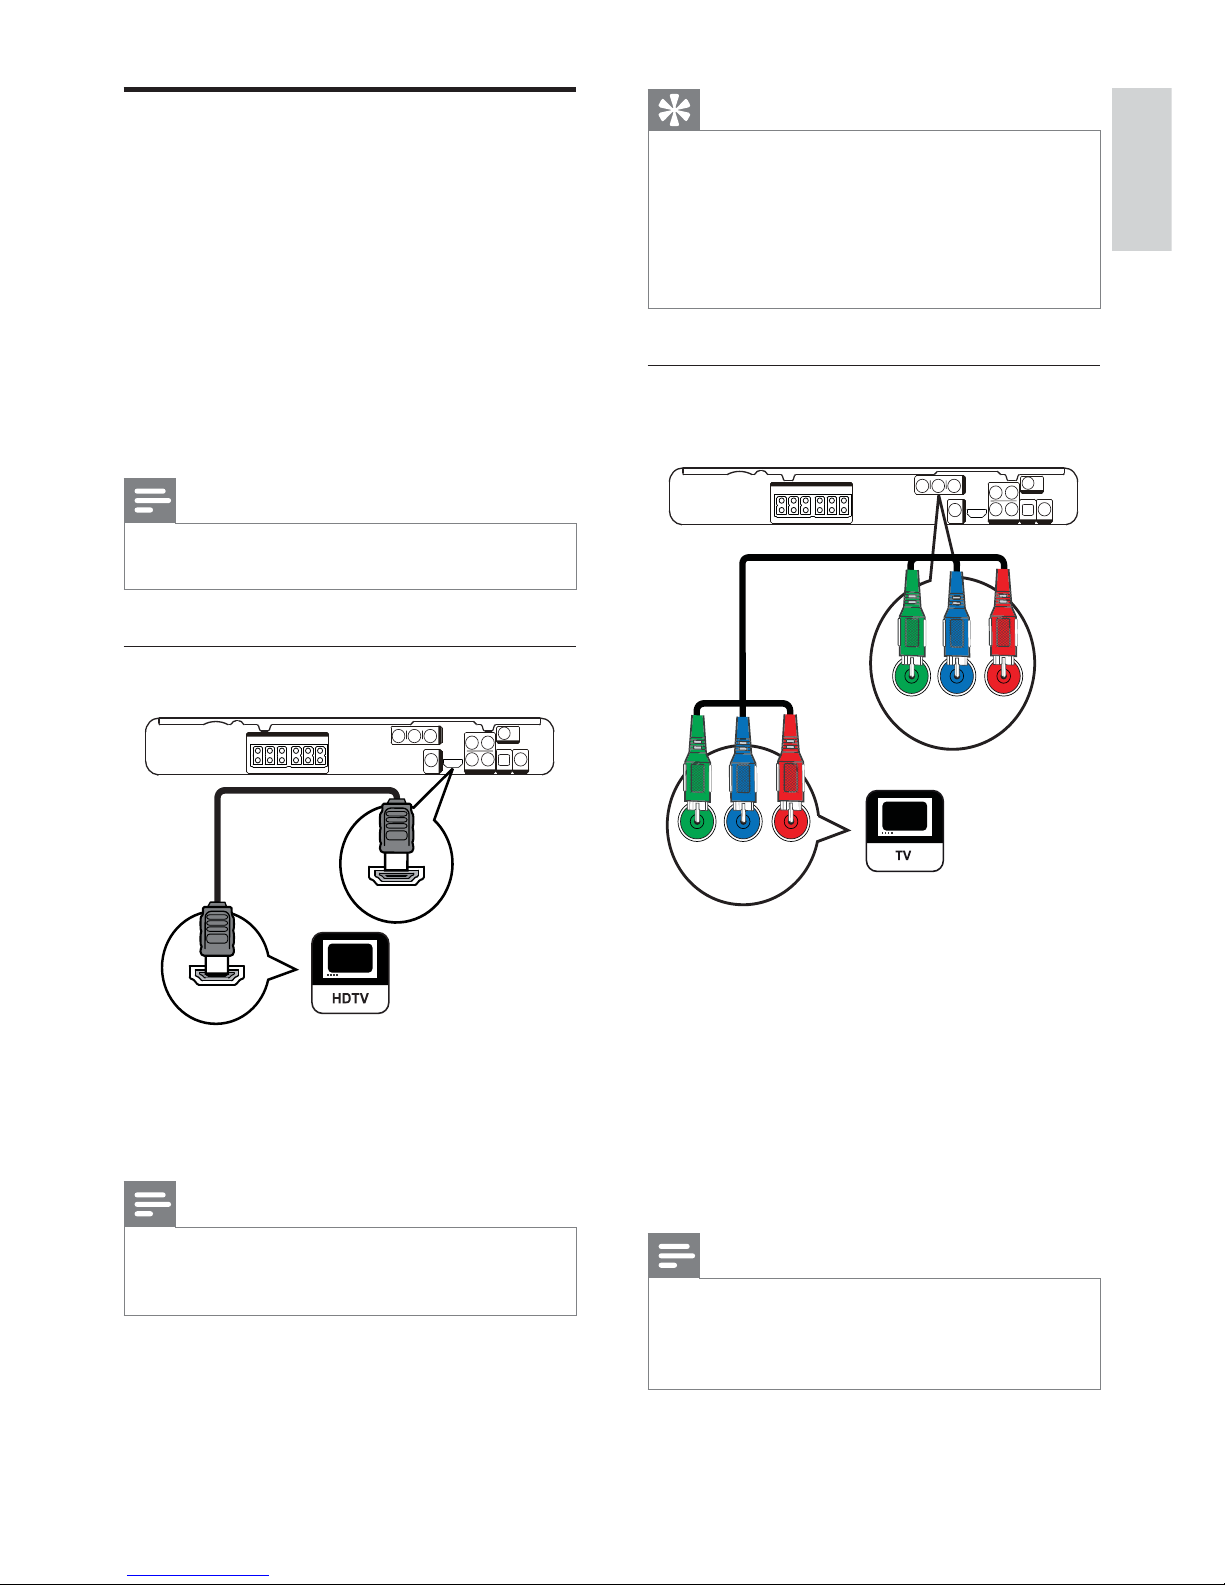
Option 2: Connect to the component
video jack
1 Connect the component video cable
(not supplied) to the Y Pb Pr jacks on
this Home Theater System and the
COMPONENT VIDEO input jacks on the
TV.
If a progressive scan TV is used, you •
may turn on the progressive scan
mode. (see ‘Get started’ > ‘Turn on
progressive scan’).
Note
The component video input jack on the TV might be •
labelled as Y Pb/Cb Pr/Cr or YUV.
This type of connection provides good picture •
quality.
VIDEO OUT
Pb PrY
Pb PrY
Connect video cables
Connect this Home Theater System to TV to
view disc play. Select the best video connection
that the TV can support.
Option 1: Connect to the HDMI jack (for •
a HDMI, DVI or HDCP-compliant TV).
Option 2: Connect to the component •
video jacks (for a standard TV or
progressive scan TV).
Option 3: Connect to the video (CVBS) •
jack (for a standard TV).
Note
You must connect this Home Theater System •
directly to a TV.
Option 1: Connect to the HDMI jack
1 Connect an HDMI cable to the HDMI
OUT jack on this Home Theater System
and the HDMI input jack on the TV.
Note
If your device supports HDMI CEC, you can control •
compliant devices with a single remote control. (see
‘Get started’ > ‘Use Philips EasyLink’).
HDMI OUT
HDMI IN
Connect
English
EN
12
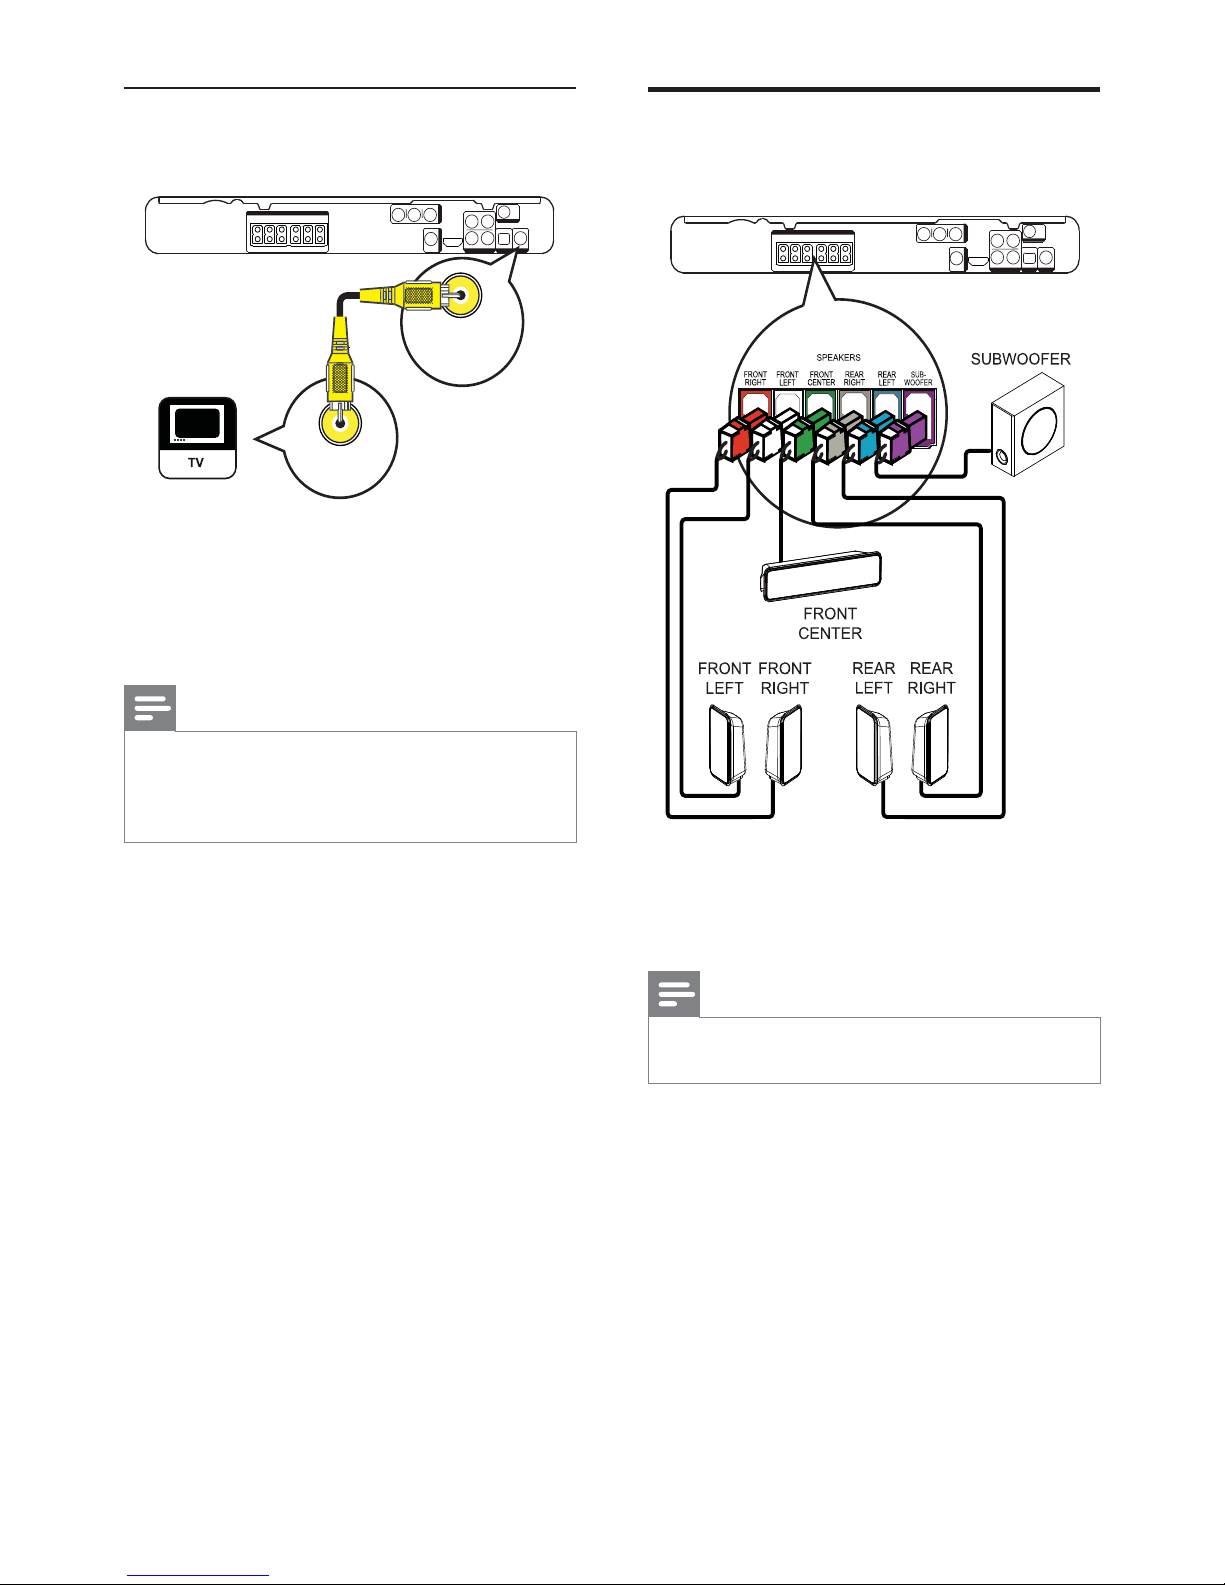
Connect speakers and
subwoofer
1 Connect the speakers and subwoofer to
the matching jacks on the Home Theater
System.
Note
Ensure that the colours of the plugs and jacks are •
matched.
Option 3: Connect to the Video
(CVBS) jack
1 Connect a composite video cable to
the VIDEO jack on this Home Theater
System and the VIDEO input jack on the
TV.
Note
The video input jack on the TV might be labelled as •
A/V IN, VIDEO IN, COMPOSITE or BASEBAND.
This type of connection provides standard picture
•
quality.
VIDEO
VIDEO OUT
VIDEO IN
EN
13
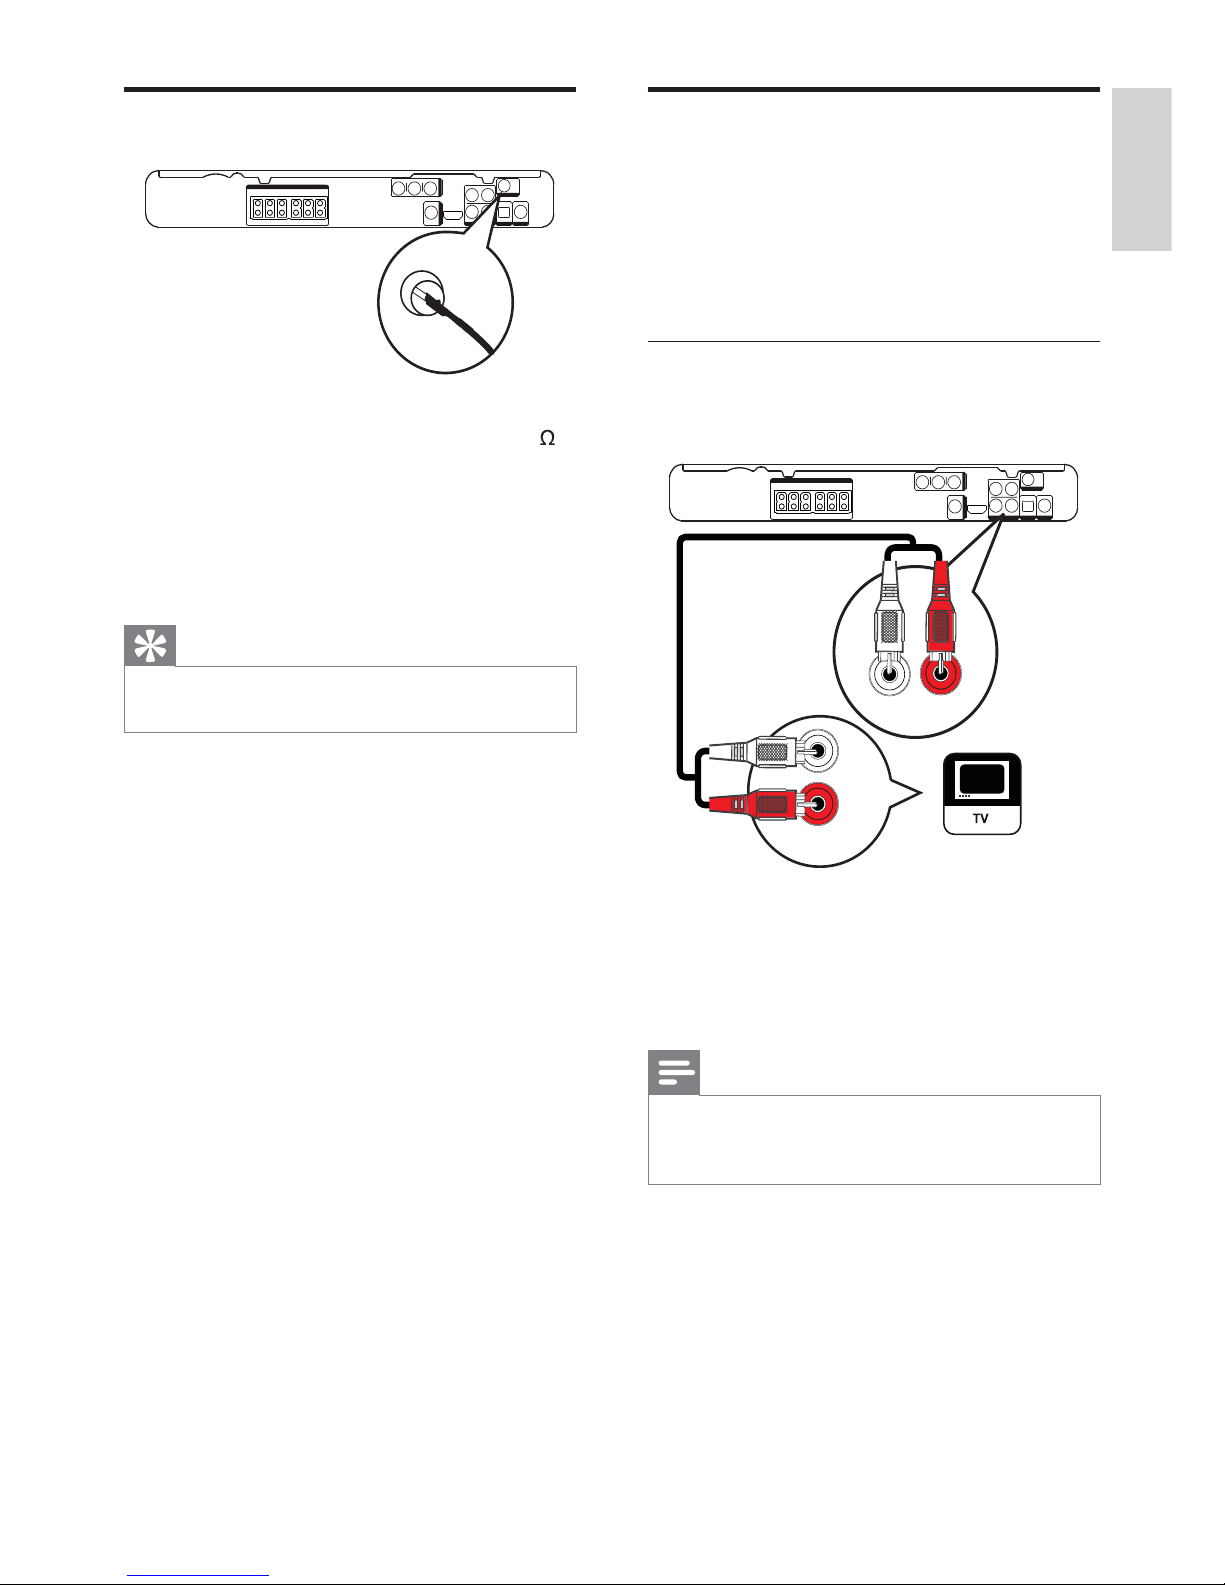
Connect audio cables/other
devices
Route the audio from other devices to this
Home Theater System to enjoy audio play with
multi-channel surround capabilities.
Connect audio to TV
(also used for EasyLink control)
1 Connect the audio cables (not supplied)
to the AUDIO IN-AUX1 jacks on the
Home Theater System and the AUDIO
output jacks on the TV.
Note
To listen to the audio output from this connection, •
press AUDIO SOURCE repeatedly until ‘AUX1’ is
displayed on the display panel.
AUDIO OUT
AUX 1
AUDIO IN
Connect radio antenna
1 Connect the FM antenna to the FM75
jack on this Home Theater System
(for some models, this cable is already
connected).
2 Extend the FM antenna and fi x its ends to
the wall.
Tip
For better FM stereo reception, connect to an •
external FM antenna.
FM (75 Ω)
ANTENNA
English
EN
Connect
14
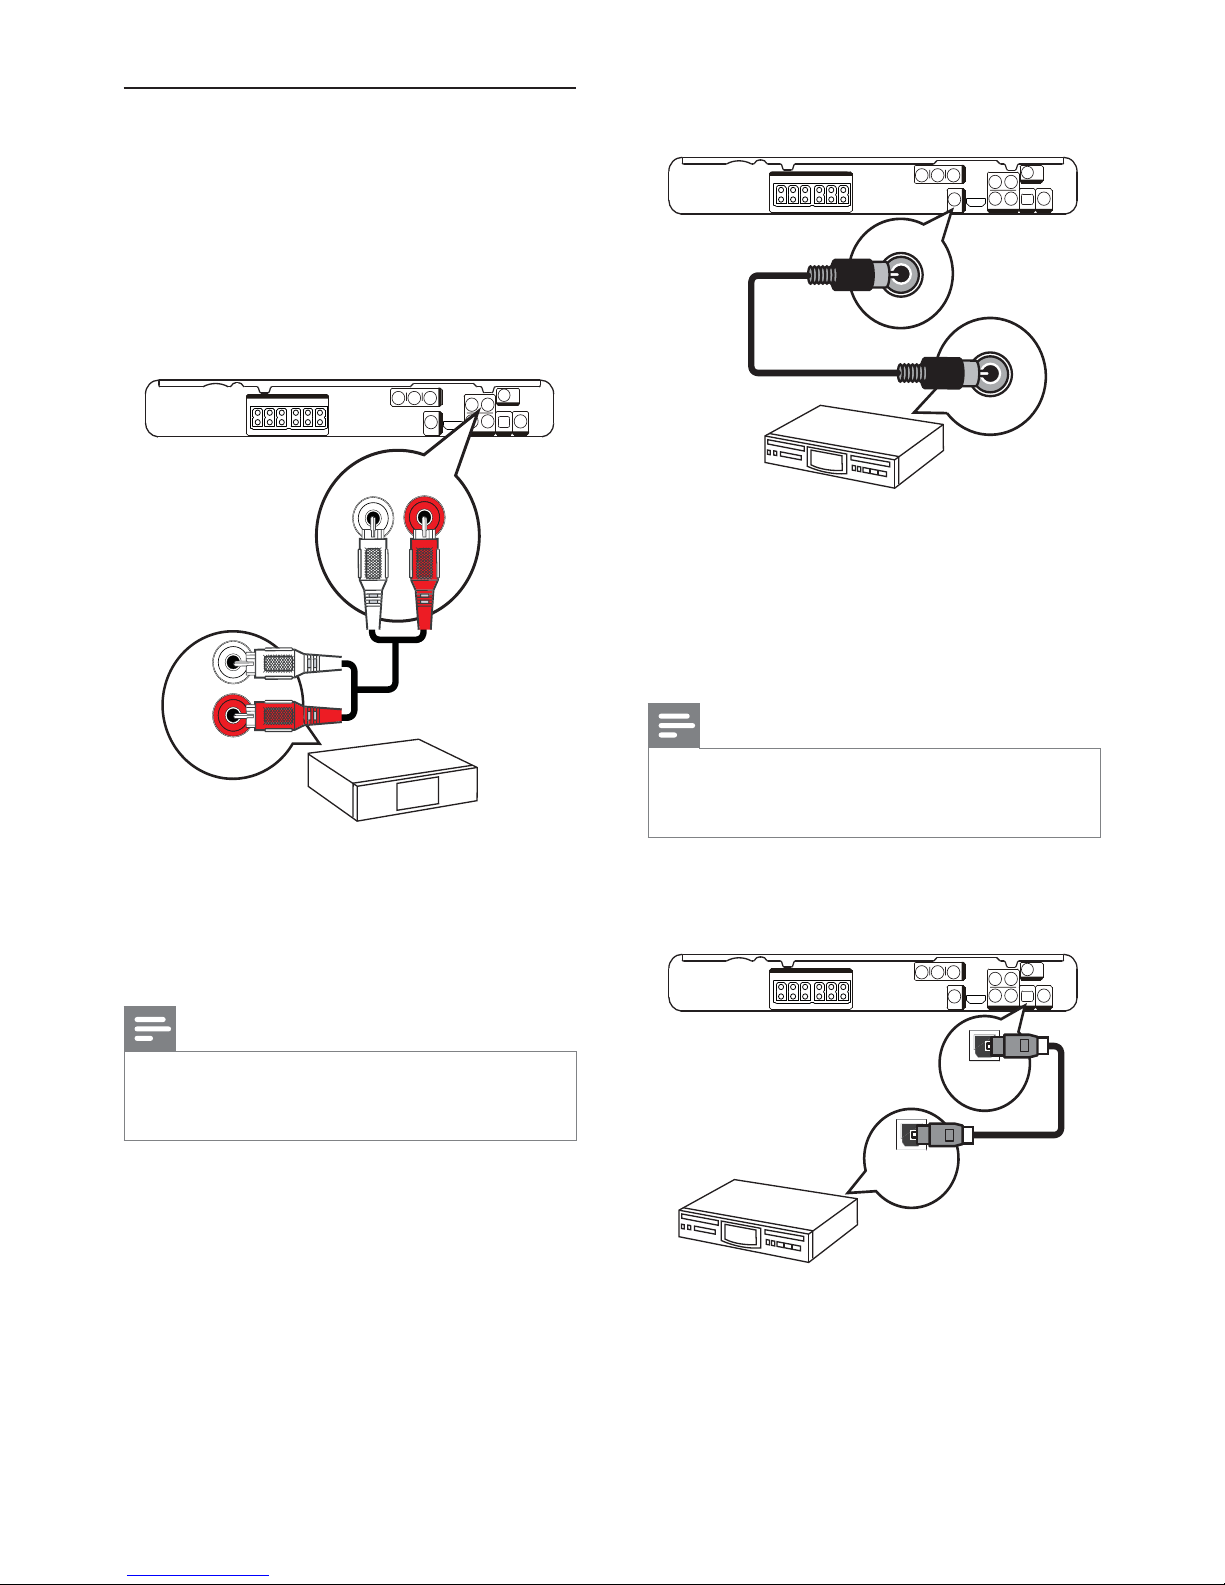
Connect to coaxial jack
1 Connect a coaxial cable (not supplied)
to the COAXIAL DIGITAL-IN jack
on the Home Theater System and the
COAXIAL/DIGITAL output jack on the
device.
Note
To listen to the audio output from this connection, •
press AUDIO SOURCE repeatedly until ‘COAX IN’
is displayed on the display panel.
Connect to optical jack
1 Connect an optical cable (not supplied)
to the OPTICAL DIGITAL-IN jack on the
Home Theater System and the OPTICAL/
SPDIF output jack on the device.
COAXIAL
DIGITAL OUT
COAXIAL
DIGITAL IN
DIGITAL IN
OPTICAL
DIGITAL OUT
OPTICAL
Connect audio from cable box/
recorder/game console
You can choose to connect to analogue
or digital jacks depending on the device
capabilities.
Connect to analogue jacks
1 Connect the audio cables (not supplied)
to the AUDIO IN-AUX2 jacks on the
Home Theater System and the AUDIO
output jacks on the device.
Note
To listen to the audio output from this connection, •
press AUDIO SOURCE repeatedly until ‘AUX2’ is
displayed on the display panel.
AUX 2
AUDIO OUT
AUX 2
AUDIO IN
EN
15
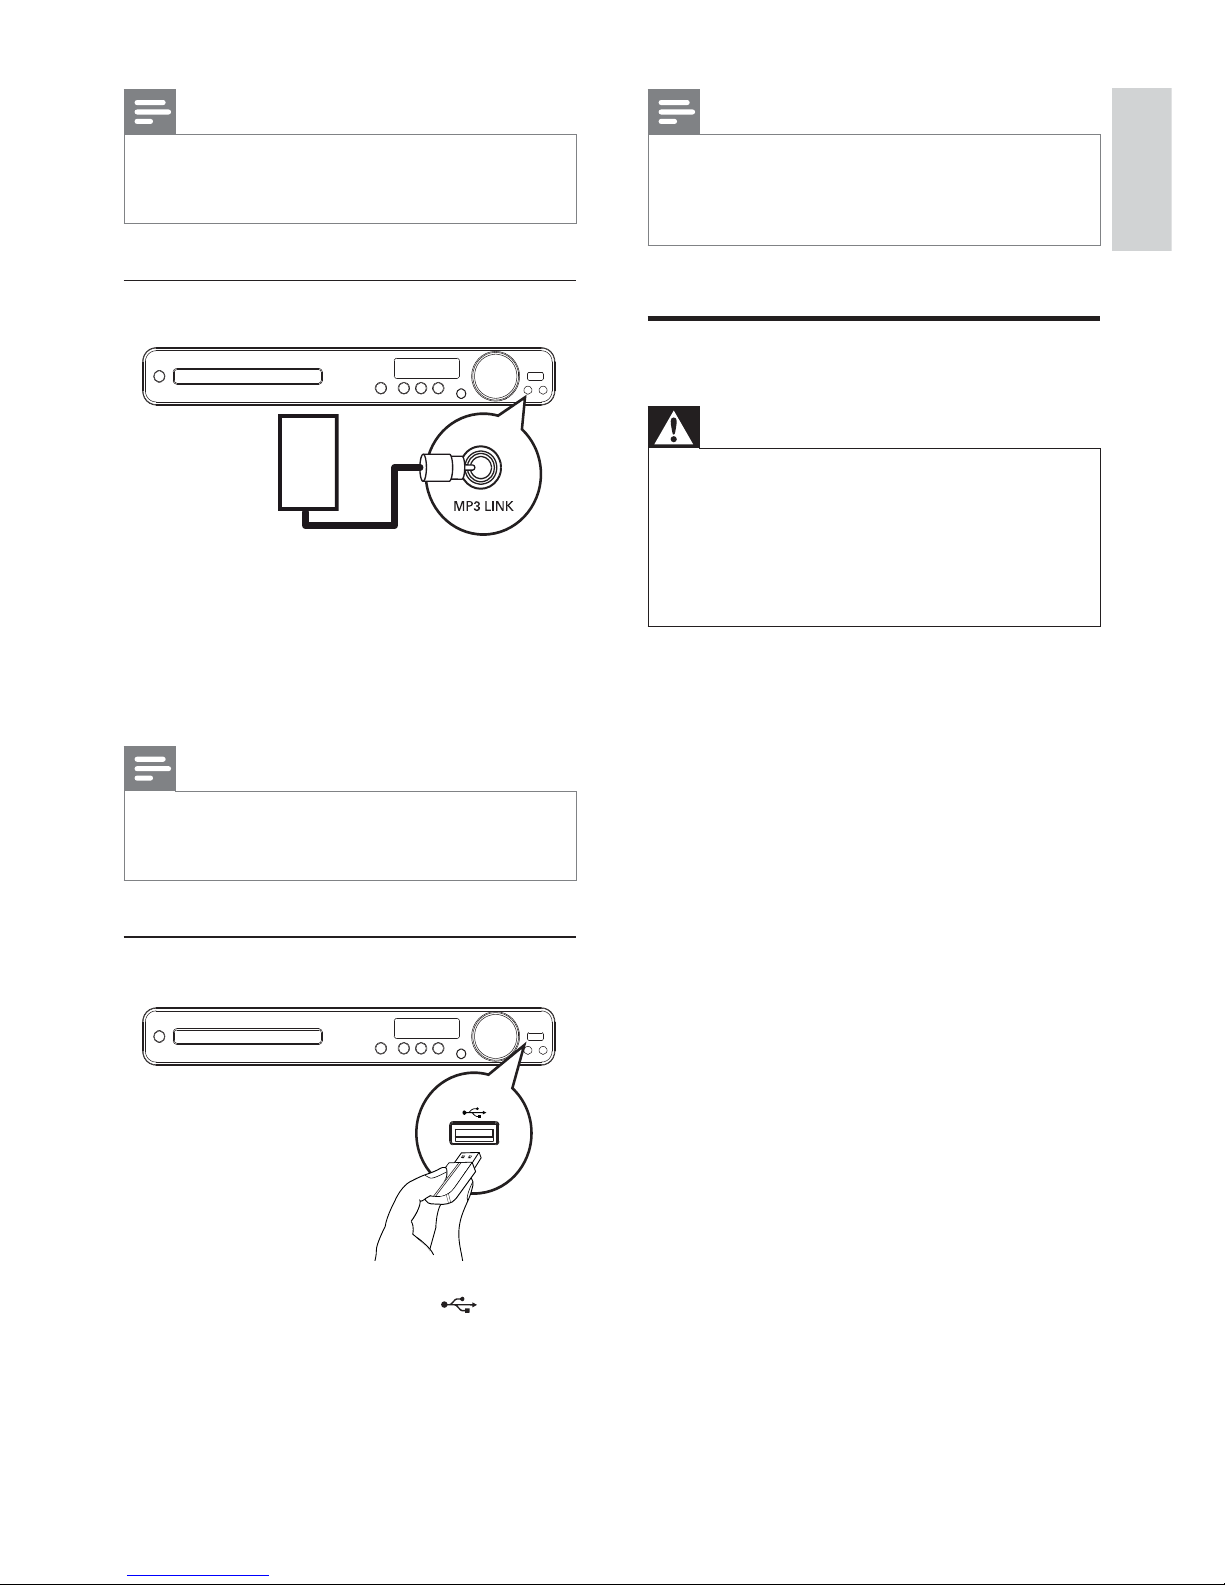
Note
This Home Theater System can only play/view MP3, •
WMA, DivX (Ultra) or JPEG fi les that are stored on
such devices.
Press • USB to access the content and play the fi les.
Connect power cord
Warning
Risk of product damage! Ensure that the power •
supply voltage corresponds to the voltage printed
on the back or the underside of the Home Theater
System.
Before connecting to a socket, set the voltage •
selector (at the rear or bottom of this Home Theater
System) to the local power line voltage.
1 Connect the power cord to the socket
when all the required connections are
made.
The Home Theater System is ready to »
be set up for use.
Note
To listen to the audio output from this connection, •
press AUDIO SOURCE repeatedly until ‘OPTI IN’ is
displayed on the display panel.
Connect portable media player
1 Connect a 3.5mm stereo audio cable (not
supplied) to the MP3 LINK jack on this
Home Theater System and the phone
jack on the portable media player (such as
MP3 player).
Note
To listen to the audio output from this connection, •
press AUDIO SOURCE repeatedly until ‘MP3 LINK’
is displayed on the display panel.
Connect USB device
1 Connect the USB device to USB jack
on this Home Theater System.
MP3
English
EN
Connect
 Loading...