

Register your product and get support at
www.philips.com/welcome
HTS3265
EN DVD Home Theater System 6
ZH_CN DVD
ZH_TW DVD
MS_MY Sistem Teater Rumah DVD 150
家庭影院系统 54
家庭劇院系統 102
䚼ӊৡ⿄
1DPHRIWKH3DUWV䪙3E/HDG
∲+J
0HUFXU\
᳝↦᳝ᆇ⠽䋼ܗ㋴
+D]DUGRXV7R[LF6XEVWDQFH
䬝&G
&DGPLXP
݁Ӌ䫀
&KURPLXP
⒈㘨㣃
3%%
⒈Ѡ㣃䝮
3%'(˅
+RXVLQJ
'9'ORDGHU
'9'ܝⲦ
6XEZRRIHU
䍙䞡Ԣ䷇ㆅ
/RXGVSHDNHUV
ুܗ
3:%V
⬉䏃ᵓ㒘ӊ
$FFHVVRULHV
5HPRWHFRQWURO
FDEOHV
䰘ӊ˄䘹఼ˈ
⬉⑤㒓ˈ䖲㒓˅
%DWWHULHVLQ
5HPRWH&RQWURO
=Q&
䘹఼⬉∴
ƻ˖㸼⼎䆹᳝↦᳝ᆇ⠽䋼䆹䚼ӊ᠔᳝ഛ䋼ᴤ᭭Ёⱘ䞣ഛ6-7ޚ㾘ᅮⱘ䰤䞣㽕∖ҹϟDŽ
O: Indicates that this toxic or hazardous substance contained in all of the homogeneous
materials for this part is below the limit requirement in SJ/T11363 – 2006.
h˖㸼⼎䆹᳝↦᳝ᆇ⠽䋼㟇ᇥ䆹䚼ӊⱘᶤϔഛ䋼ᴤ᭭Ёⱘ䞣䍙ߎ6-7ޚ㾘ᅮⱘ䰤䞣㽕∖DŽ
X: Indicates that this toxic or hazardous substance contained in at least one of the
homogeneous materials used for this part is above the limit requirement in SJ/T11363 - 2006.
OOO O O O
XOO O O O
XO
OO
XO
OO OO
OO OO
OO OO
XOO O O O
XOO O O O
⦃ֱՓ⫼ᳳ䰤Environmental Protection Use Period
ℸ䆚ᣛᳳ䰤˄ᑈ˅ˈ⬉ᄤֵᙃѻકЁ᳝ⱘ᳝↦᳝ᆇ⠽䋼ܗ㋴ℷᐌՓ⫼ⱘᴵӊϟϡӮথ
⫳⊘さবˈ⫼᠋Փ⫼䆹⬉ᄤֵᙃѻકϡӮᇍ⦃๗䗴៤Ϲ䞡∵ᶧᇍ݊Ҏ䑿ǃ䋶ѻ䗴៤Ϲ䞡ᤳᆇ
ⱘᳳ䰤DŽ
This logo refers to the period ( 10 years ) during which the toxic or hazardous substances or elements
contained in electronic information products will not leak or mutate so that the use of these [substances or
elements] will not result in any severe environmental pollution, any bodily injury or damage to any assets.
⬉∴䆚Battery labeling logo
ℸ䆚ᣛᳳ䰤˄Ѩᑈ˅ˈ⬉∴Ё᳝ⱘ᳝↦᳝ᆇ⠽䋼ܗ㋴ℷᐌՓ⫼ⱘᴵӊϟϡӮথ⫳⊘さ
বˈ⫼᠋Փ⫼䆹⬉∴ѻકϡӮᇍ⦃๗䗴៤Ϲ䞡∵ᶧᇍ݊Ҏ䑿ǃ䋶ѻ䗴៤Ϲ䞡ᤳᆇⱘᳳ䰤DŽ
This logo refers to the period ( 5 years ) during which the toxic or hazardous substances or elements
contained in the battery will not leak or mutate so that the use of these [substances or elements] will not
result in any severe environmental pollution, any bodily injury or damage to any assets.
⦃ֱՓ⫼ᳳ䰤Environmental Protection Use Period
2

LASER
Type Semiconductor laser
GaAIAs
Wave length 650 - 660 nm (DVD)
784 - 796 nm (CD)
Output Power 7 mW (DVD)
10 mW (VCD/CD)
Beam divergence 60 degrees
‘CONSUMERS SHOULD NOTE THAT NOT ALL HIGH
DEFINITION TELEVISION SETS ARE FULLY
COMPATIBLE WITH THIS PRODUCT AND MAY CAUSE
ARTIFACTS TO BE DISPLAYED IN THE PICTURE. IN
CASE OF 525 OR 625 PROGRESSIVE SCAN PICTURE
PROBLEMS, IT IS RECOMMENDED THAT THE USER
SWITCH THE CONNECTION TO THE ‘STANDARD
DEFINITION’ OUTPUT. IF THERE ARE QUESTIONS
REGARDING OUR TV SET COMPATIBILITY WITH THIS
MODEL 525p AND 625p DVD PLAYER, PLEASE
CONTACT OUR CUSTOMER SERVICE CENTER.’
Manufactured under license from Dolby
Laboratories. Dolby, Pro Logic and the
double-D symbol are trademarks of Dolby
Laboratories.
Manufactured under license under U.S.
Patent #’s: 5,451,942; 5,956,674; 5,974,380;
5,978,762; 6,487,535 & other U.S. and
worldwide patents issued & pending. DTS
and DTS Digital Surround are registered
trademarks and the DTS logos and Symbol
are trademarks of DTS, Inc. © 1996-2007
DTS, Inc. All Rights Reserved.
DivX, DivX Ultra Certi ed, and associated
logos are trademarks of DivX, Inc. and are
used under license.
Of cial DivX® Ultra Certi ed product.
Plays all versions of DivX® video (including
DivX ® 6) with enhanced playback of DivX®
media les and the DivX® Media Format.
CAUTION
Use of controls or adjustments or performance
of procedures other than herein may result in
hazardous radiation exposure or other unsafe
operation.
ATTENTION!
For Customer Use:
Read carefully the information located at the
bottom or rear of your DVD Home Theatre
System and enter below the Serial No. Retain
this information for future reference.
Model No. HTS3265
Serial No. _______________
Windows Media and the Windows logo are
trademarks, or registered trademarks of
Microsoft Corporation in the United States
and/or other countries.
The USB-IF Logos are trademarks of
Universal Serial Bus Implementers Forum,
Inc.
ENERGY STAR and the ENERGY STAR mark are
registered U.S. marks
3

Language Code
Abkhazian 6566
Afar 6565
Afrikaans 6570
Amharic 6577
Arabic 6582
Armenian 7289
Assamese 6583
Avestan 6569
Aymara 6589
Azerhaijani 6590
Bahasa Melayu 7783
Bashkir 6665
Belarusian 6669
Bengali 6678
Bihari 6672
Bislama 6673
Bokmål, Norwegian 7866
Bosanski 6683
Brezhoneg 6682
Bulgarian 6671
Burmese 7789
Castellano, Español 6983
Catalán 6765
Chamorro 6772
Chechen 6769
Chewa; Chichewa; Nyanja 7889
9072
中文
Chuang; Zhuang 9065
Church Slavic; Slavonic 6785
Chuvash 6786
Corsican 6779
Česky 6783
Dansk 6865
Deutsch 6869
Dzongkha 6890
English 6978
Esperanto 6979
Estonian 6984
Euskara 6985
6976
Faroese 7079
Français 7082
Frysk 7089
Fijian 7074
Gaelic; Scottish Gaelic 7168
Gallegan 7176
Georgian 7565
Gikuyu; Kikuyu 7573
Guarani 7178
Gujarati 7185
Hausa 7265
Herero 7290
Hindi 7273
Hiri Motu 7279
Hrwatski 6779
Ido 7379
Interlingua (International)7365
Interlingue 7365
Inuktitut 7385
Inupiaq 7375
Irish 7165
Íslenska 7383
Italiano 7384
Ivrit 7269
Japanese 7465
Javanese 7486
Kalaallisut 7576
Kannada 7578
Kashmiri 7583
Kazakh 7575
Kernewek 7587
Khmer 7577
Kinyarwanda 8287
Kirghiz 7589
Komi 7586
Korean 7579
Kuanyama; Kwanyama 7574
Kurdish 7585
Lao 7679
Latina 7665
Latvian 7686
Letzeburgesch; 7666
Limburgan; Limburger 7673
Lingala 7678
Lithuanian 7684
Luxembourgish; 7666
Macedonian 7775
Malagasy 7771
Magyar 7285
Malayalam 7776
Maltese 7784
Manx 7186
Maori 7773
Marathi 7782
Marshallese 7772
Moldavian 7779
Mongolian 7778
Nauru 7865
Navaho; Navajo 7886
Ndebele, North 7868
Ndebele, South 7882
Ndonga 7871
Nederlands 7876
Nepali 7869
Norsk 7879
Northern Sami 8369
North Ndebele 7868
Norwegian Nynorsk; 7878
Occitan; Provencal 7967
Old Bulgarian; Old Slavonic 6785
Oriya 7982
Oromo 7977
Ossetian; Ossetic 7983
Pali 8073
Panjabi 8065
Persian 7065
Polski 8076
Português 8084
Pushto 8083
Russian 8285
Quechua 8185
Raeto-Romance 8277
Romanian 8279
Rundi 8278
Samoan 8377
Sango 8371
Sanskrit 8365
Sardinian 8367
Serbian 8382
Shona 8378
Shqip 8381
Sindhi 8368
Sinhalese 8373
Slovensky 8373
Slovenian 8376
Somali 8379
Sotho; Southern 8384
South Ndebele 7882
Sundanese 8385
Suomi 7073
Swahili 8387
Swati 8383
Svenska 8386
Tagalog 8476
Tahitian 8489
Tajik 8471
Tamil 8465
Tatar 8484
Telugu 8469
Thai 8472
Tibetan 6679
Tigrinya 8473
Tonga (Tonga Islands) 8479
Tsonga 8483
Tswana 8478
Türkçe 8482
Turkmen 8475
Twi 8487
Uighur 8571
Ukrainian 8575
Urdu 8582
Uzbek 8590
Vietnamese 8673
Volapuk 8679
Walloon 8765
Welsh 6789
Wolof 8779
Xhosa 8872
Yiddish 8973
Yoruba 8979
Zulu 9085
4
Index
English ------------------------------------ 6
----------------------------- 54
--------------------------- 102
Bahasa Melayu ----------------------- 150
English
Ensure that the power outlet is always within
reach. If abnormal situations occur, fully
disconnect power: unplug the power cord
from the power outlet.
This product incorporates copyright protection
technology that is protected by method claims of
certain U.S. patents and other intellectual property
rights owned by Macrovision Corporation and
other rights owners. Use of this copyright
protection technology must be authorised by
Macrovision Corporation, and is intended for
home and other limited viewing uses only unless
otherwise authorised by Macrovision Corporation.
Reserve engineering or disassembly is prohibited.
通过此网站注册您的产品并获得支持:
www.philips.com/welcome
在以下位置註冊您的產品並獲得支援:
www.philips.com/welcome
Daftarkan produk anda dan dapatkan
sokongan di www.philips.com/welcome
Bahasa Melayu
5

Table of contents
English
General
General Information ........................................................................................................ 8
Setup precautions ................................................................................................................................................. 8
Accessories supplied ...........................................................................................................................................8
Cleaning discs ........................................................................................................................................................8
About recycling .....................................................................................................................................................8
Product Overview
Main Unit ...........................................................................................................................9
Remote Control .........................................................................................................10-12
Using the remote control ................................................................................................................................12
Connections
Basic Connections .....................................................................................................13-17
Step 1: Placing the speakers .............................................................................................................................13
Step 2: Connecting to TV ................................................................................................................................14
Option 1: Connecting to the Video socket ...................................................................................14-15
Option 2: Connecting to a Progressive Scan TV or component video input ............................15
Step 3: Connecting speakers and subwoofer .............................................................................................16
Step 4: Connecting the FM antenna ..............................................................................................................17
Step 5: Connecting the power cord ..............................................................................................................17
Optional Connections ....................................................................................................18
Connecting audio from other devices ..........................................................................................................18
Basic Setup
Getting Started ..........................................................................................................19-23
Finding the correct viewing channel .............................................................................................................19
Switching to different play source .................................................................................................................19
Setting language preferences .................................................................................................................... 20-21
On-screen display (OSD) language ....................................................................................................... 20
Audio, Subtitle and Menu language for DVD playback .............................................................. 20-21
Setting up Progressive Scan feature ............................................................................................................. 22
Setting the speakers’ channels ........................................................................................................................23
Disc Playback
Disc Operations ........................................................................................................ 24 -31
Playable discs .......................................................................................................................................................24
Playing a disc ........................................................................................................................................................24
Basic playback controls .................................................................................................................................... 25
Selecting various repeat/shuf e functions .................................................................................................. 25
Other playback features for video discs (DVD/VCD/SVCD) .........................................................26-28
Using the Disc menu ..................................................................................................................................26
Viewing playback information ..................................................................................................................26
Zooming.........................................................................................................................................................27
Changing subtitle language .......................................................................................................................27
Switching camera angles ............................................................................................................................27
Changing sound track language ...............................................................................................................27
Setting the delay times for audio playback ...........................................................................................27
Playback Control (VCD only) ................................................................................................................. 28
Preview function ( VCD/SVCD only) .................................................................................................... 28
6

Table of contents
Playing a MP3/ WMA disc ................................................................................................................................29
Playing a JPEG image le (slide show) .......................................................................................................... 30
Preview function ......................................................................................................................................... 30
Zooming........................................................................................................................................................ 30
Skip/Rotate picture .................................................................................................................................... 30
Playing music and photo les simultaneously .............................................................................................31
Playing a DivX
Playback other supported devices
Playback - Karaoke .........................................................................................................32
Playing a Karaoke disc .......................................................................................................................................32
Microphone setting ...................................................................................................................................32
Playback - USB Device ................................................................................................... 33
Playing from a USB device ................................................................................................................................33
Playback - Other Audio Player ..................................................................................... 34
Playing from other portable audio player ................................................................................................... 34
Setup Options
Setup Menu Options ................................................................................................. 35-42
Accessing the setup menu ................................................................................................................................35
General Setup ......................................................................................................................................................36
Audio Setup..........................................................................................................................................................37
Video Setup ................................................................................................................................................... 38 -39
Preferences ...................................................................................................................................................40- 42
Radio Tuning
Radio Operations ...................................................................................................... 43-45
Tuning to radio stations ....................................................................................................................................43
Changing tuning grid ..........................................................................................................................................43
Preset ting radio stations ................................................................................................................................. 44
Using auto install ........................................................................................................................................ 44
Using automatic preset ............................................................................................................................. 44
Using manual preset .................................................................................................................................. 44
Selecting a preset radio st ation ..................................................................................................................... 45
Deleting a preset radio station ...................................................................................................................... 45
®
disc ...........................................................................................................................................31
English
Others
Sound and Volume Controls .........................................................................................46
Volume control .................................................................................................................................................. 46
Selecting surround sound ................................................................................................................................46
Selecting digital sound effects ........................................................................................................................ 46
Other Features................................................................................................................47
Turning on the sleep timer ..............................................................................................................................47
Installing the latest software ...........................................................................................................................47
Troublesho oting ........................................................................................................ 48- 50
Speci cations .................................................................................................................. 51
Glossary...................................................................................................................... 52-53
7

General Information
English
WARNING!
This unit does not contain any userserviceable parts. Please leave all
maintenance work to quali ed
personnel.
Setup precautions
Finding a suitable location
– Place this unit on a at, hard and
stable surface. Never place the unit on a
carpet.
– Never place this unit on top of other
equipment that might heat it up (e.g.,
receiver or ampli er).
– Never put anything under this unit
(e.g., CDs, magazines).
– Install this unit near the AC outlet
where the AC power plug can be easily
reached.
Space for ventilation
– Place this unit in a location with
adequate ventilation to prevent internal
heat build up. Allow at least 10 cm (4”)
clearance from the rear and the top of
this unit and 5cm (2”) from the left and
right to prevent overheating.
Avoid high temperature, moisture,
water and dust
– This unit must not be exposed to
dripping or splashing.
– Never place any object or items that
can damage this unit (e.g., liquid lled
objects, lighted candles).
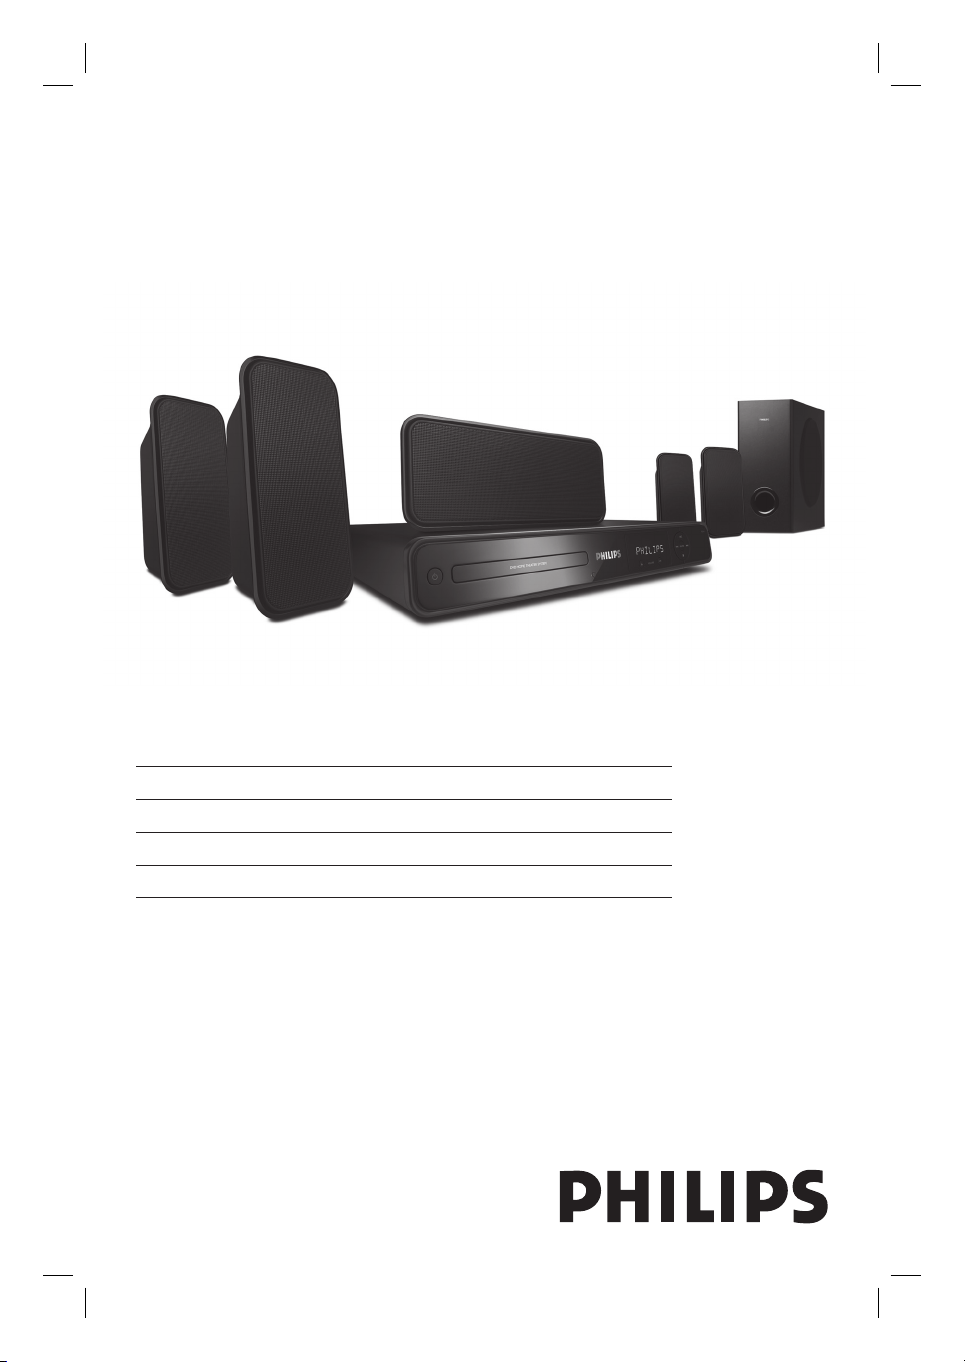
Accessories supplied
– 1 subwoofer
– 2 front speakers
– 2 rear speakers
– 1 centre speaker
– 1 remote control with batteries
– 1 composite video cable (yellow)
– 1 FM wire antenna
– 1 power cable
– Quick Start Guide
Cleaning discs
To clean a disc, use a micro bre cleaning
cloth and wipe the disc from the centre
to the edge in a straight line.
CAUTION!
Never use solvents e.g. benzene, thinner,
commercially available cleaners, or antistatic sprays intended for discs.
About recycling
These operating instructions have been
printed on non-polluting paper. The
electronic equipment contains a large
number of materials that can be recycled.
If you are disposing of an old machine,
please take it to a recycling centre.
Please observe the local regulations
regarding disposal of packaging materials,
exhausted batteries and old equipment.
8
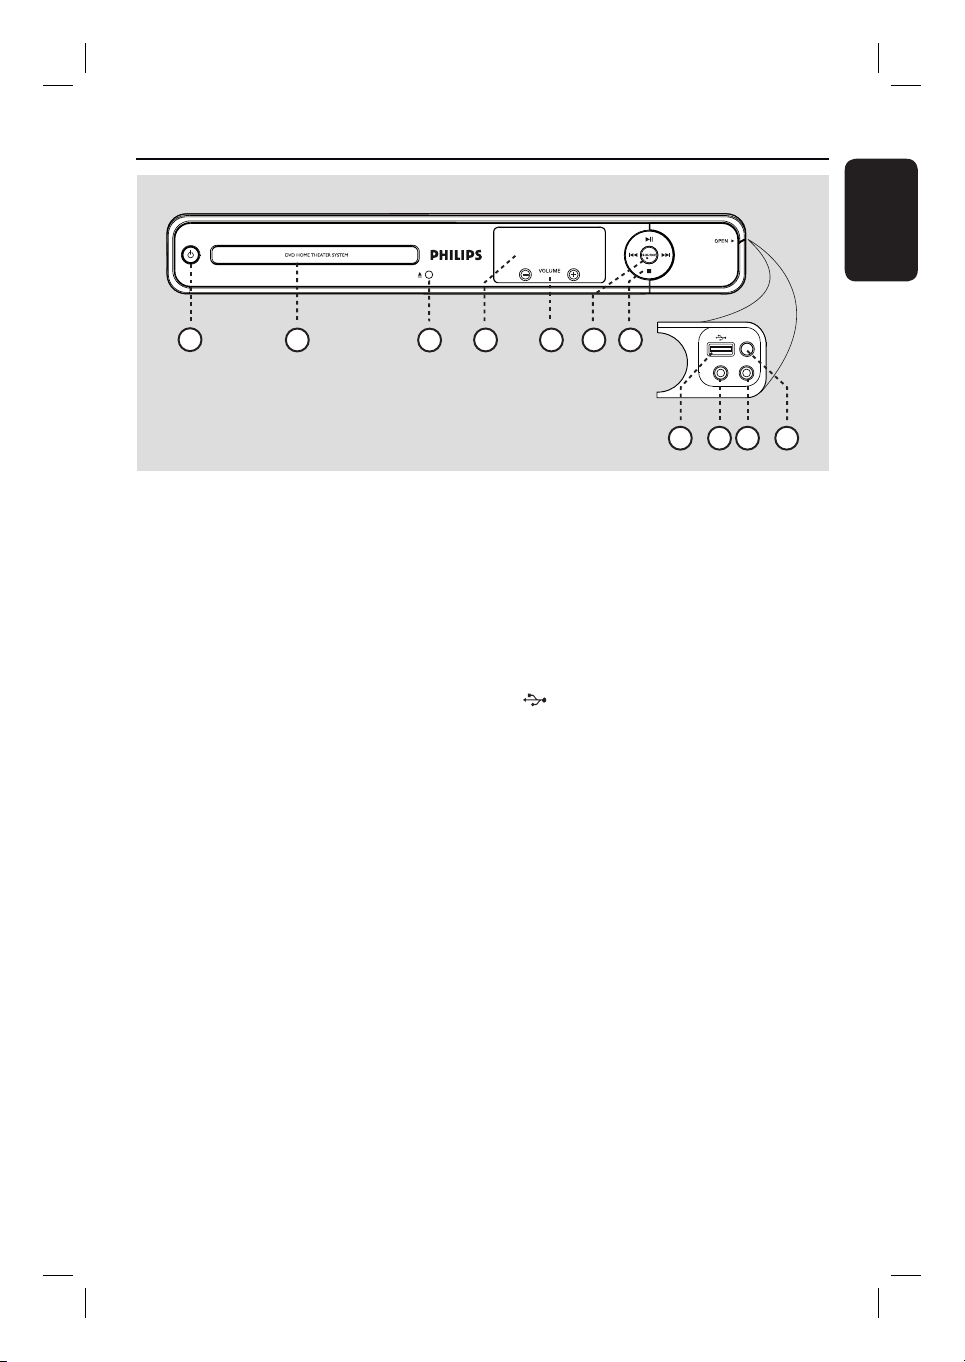
Main Unit
Front Panel View
English
Inside VIew
1
2
3
54 6
7
8
MIC LEVEL
MIC
MP3 LINK
9 10 11
a 2 (Standby-On)
– Turns on this unit or turns off to standby
mode.
b Disc Tray
c ç (Open/Close)
– Opens/closes the disc tray.
d Display panel
– Shows information about the current
status of the unit.
e VOLUME +-
– Adjusts the volume level.
f SOURCE
– Selects the relevant active source mode:
DISC, FM, AUX 1, AUX 2 or MP3 LINK.
g u (Play/ Pause)
– DISC: starts/pauses playback.
– RADIO: starts auto radio installation for
rst time setup.
. / > (Previous / Next)
– DISC: skips to the previous or next title/
chapter/track.
– DISC: press and hold this button for fast
forward and backward search.
– RADIO: selects a preset radio station.
(Stop)
– Exits an operation.
– DISC: stops playback.
– RADIO: press and hold this button to
erase the current preset radio station.
Note:
The following sockets are under the ap at the
right corner of the front panel, OPEN .
h (USB) socket
– Input for USB ash drive or USB memory
card reader.
i MP3 LINK socket
– Phono input for connecting to the
headphone out socket on your portable
audio player.
j MIC socket
– For microphone connection.
k MIC LEVEL
– Activates microphone level mode and use
the volume control to set the
microphone volume level.
9
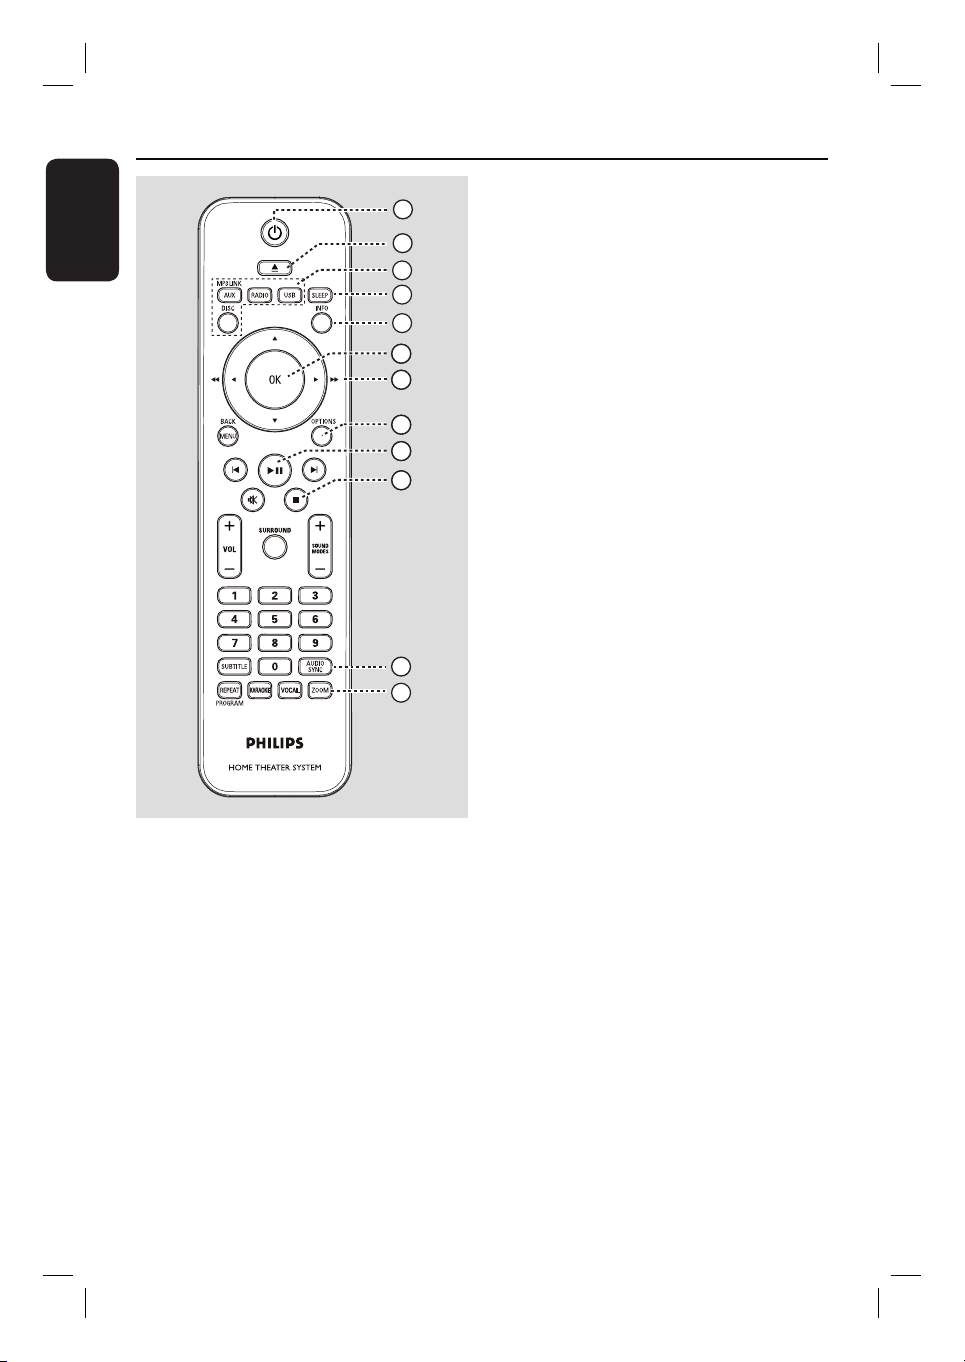
Remote Control
English
a 2 (Standby-On)
– Turns on this unit or turns off to standby
mode.
b ç (Open/Close)
– Opens/closes the disc tray.
c Source buttons
– AUX (MP3 LINK): switches to
AUX 1, AUX 2 or MP3 LINK external
source mode.
– RADIO: switches to FM bandwave.
– USB: switches to USB mode.
– DISC: switches to DISC mode.
d SLEEP
1
2
3
4
5
66
67
68
69
610
– Sets the sleep timer.
e INFO
– Displays the current status or disc
information.
f OK
– Con rms an entry or selection.
g v V b B
– DISC: selects movement direction in the
menu.
– DISC: press left or right for fast forward
and backward search.
– RADIO: press up or down to tune the
radio frequency.
– RADIO: press left or right to start auto
search.
h OPTIONS
– Enters or exits the system setup menu.
11
12
i u (Play/Pause)
– DISC: starts/pauses playback.
– RADIO: starts auto radio installation for
rst time setup.
j x (Stop)
– Exits an operation.
– DISC: stops playback.
– RADIO: press and hold this button to
erase the current preset radio station.
k AUDIO SYNC
– Select an audio language/channel.
– Sets the audio output delay times if the
video playback is slower than the audio
output.
l ZOOM
– Zoom the picture on the TV.
10
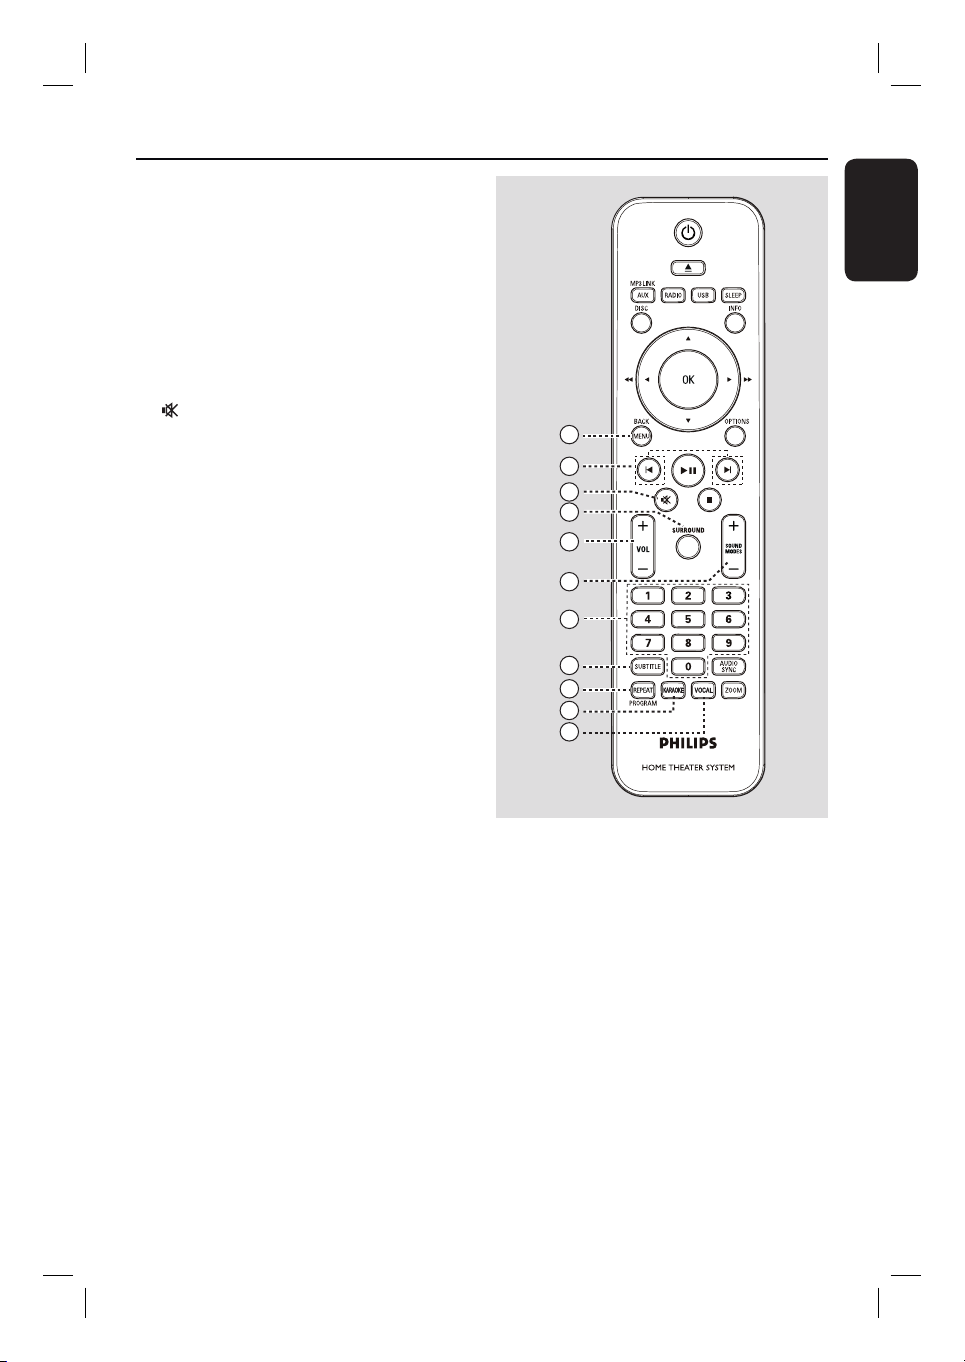
m MENU (BACK)
– DVD: go back to title menu.
– VCD/SVCD:
During playback (PBC ON mode only)
return to the PBC menu.
n í / ë (Previous / Next)
– DISC: skips to the previous or next title/
chapter/track.
– RADIO: selects a preset radio station.
o (Mute)
– Mutes or restores the volume.
p SURROUND
– Selects multi-channel surround or
stereo or party mode.
q VOL +/-
– Adjusts the volume level.
Remote Control (continued)
English
13
14
15
16
17
18
r SOUND MODES +/-
– Selects a prede ned sound effect.
s Numeric keypad 0-9
– Enters a track/title/chapter of the disc.
– Enters a number of a preset radio station.
t SUBTITLE
– Selects a DVD subtitle language.
u REPEAT (PROGRAM)
– DISC: Selects various repeat or shuf e
modes; turns off repeat or shuf e mode.
– RADIO: Press this button to start manual
preset programming.
– RADIO: Press and hold this button to
start automatic preset programming.
v KARAOKE
– Enters or exits microphone setting menu.
w VOCAL
– Toggles between various audio mode.
19
20
21
22
23
11
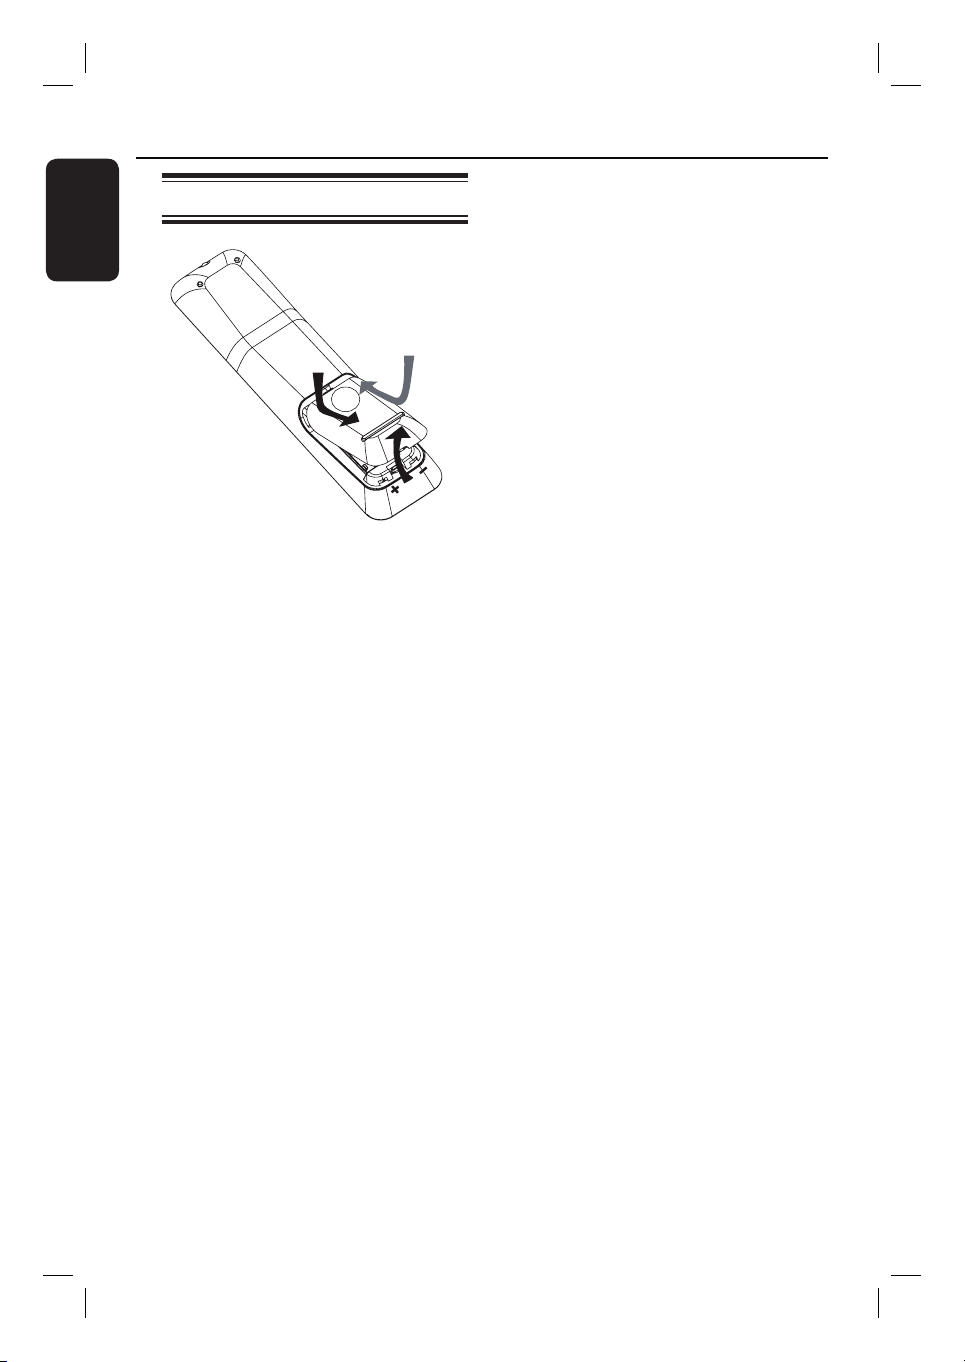
Remote Control (continued)
English
Using the remote control
A Push to open the battery compartment.
B Insert two batteries type R03 or AAA,
following the indications (+-) inside
the compartment.
C Close the cover.
D Point the remote control directly at the
remote sensor (iR) on the front panel.
E Select the source you wish to control by
pressing the AUX (MP3 LINK), RADIO,
USB or DISC button on the remote
control.
F Then select the desired function (for
example í, ë).
CAUTION!
– Remove batteries if they are
exhausted or if the remote control
is not to be used for a long time.
– Never mix batteries (old and new
or carbon and alkaline, etc).
– Batteries contain chemical
substances, they should be disposed
of properly.
12
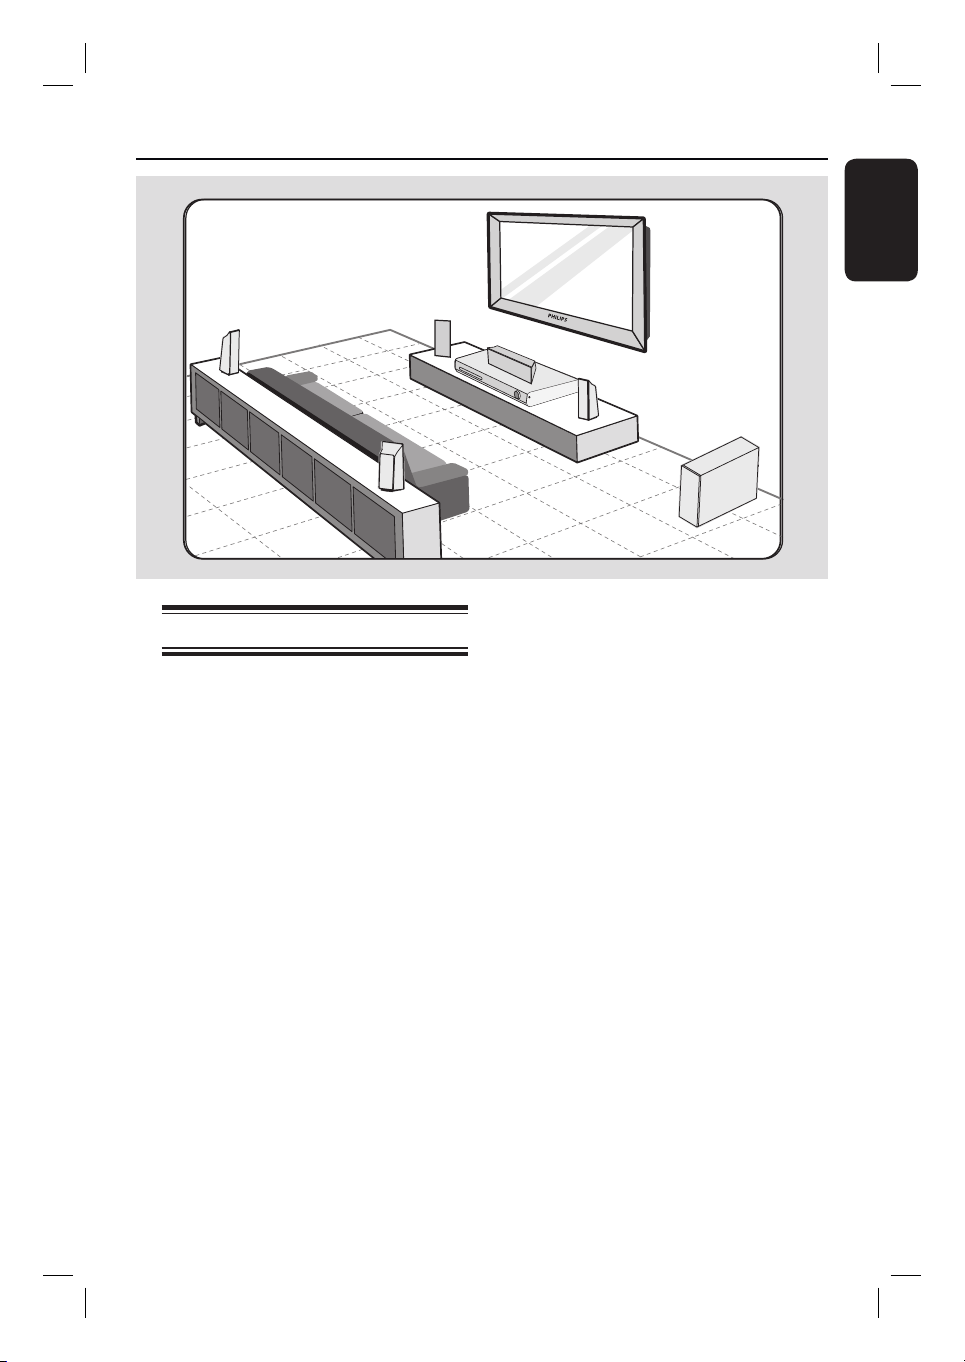
Basic Connections
English
REAR
LEFT
FRONT
LEFT
REAR
RIGHT
Step 1: Placing the speakers
The Philips Home Theatre System is
simple to install. However, proper system
placement is critical to ensure an
optimum sound experience.
A Place the front left and right speakers at
equal distances from the TV and at an
angle of approximately 45 degrees from
the listening position.
B Place the centre speaker above the TV or
the main unit such that the centre
channel’s sound is localised.
C Place the rear speakers at normal
listening ear level facing each other or
hang on the wall.
D Place the subwoofer at the corner of the
room. Otherwise, keep it at least one
metre away from the TV.
CENTER
FRONT
RIGHT
SUBWOOFER
Helpful Hints:
– The placement diagram shown here is
only a guideline that provides great system
performance. You may nd other placement
choices that are more suitable for your room
layout that provide the sound experience you
enjoy.
– To avoid magnetic interference, never
position the front speakers too close to your
TV.
– The rear speakers are labelled as REAR
LEFT or REAR RIGHT.
– The front speakers are labelled as
FRONT LEFT or FRONT RIGHT.
– For speaker setting, see ‘Getting Started Setting the speakers’ channels’.
13
Basic Connections (continued)
English
Main Unit (rear)
Option 1
Step 2: Connecting to TV
This connection enables you to view the
video playback from this unit. You only
need to choose one of the options
below to make the video connection.
– For a standard TV, follow option 1.
– For a progressive scan TV, follow
option 2.
Helpful Hint:
– It is important to connect this unit directly
to the TV in order to enjoy optimum video
quality.
– To hear the TV audio through this unit,
connect AUDIO IN-AUX sockets on the unit
to the audio output on your TV (cables not
supplied). Then press AUX (MP3 LINK)
repeatedly until ‘AUX 1’ or ‘AUX 2’ is
displayed on the front panel.
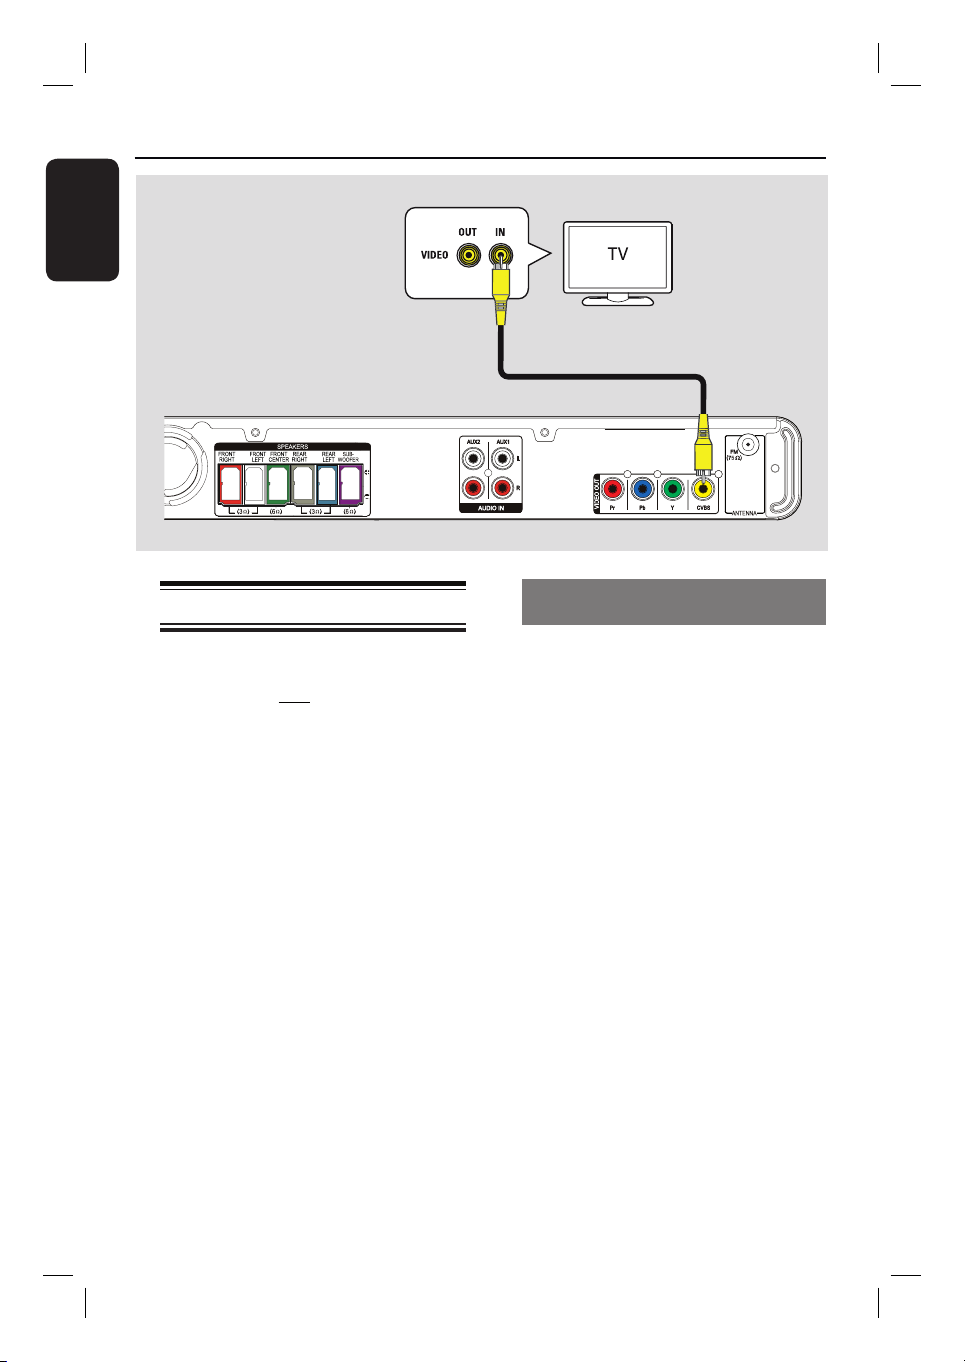
Option 1: Connecting to the Video
socket
Use a composite video cable (yellow -
supplied) to connect the CVBS socket
on the main unit to the video input
socket (or labeled as A/V In, Video In,
Composite or Baseband) on the TV.
It provides good picture quality.
14
Main Unit (rear)
Basic Connections (continued)
English
Option 2
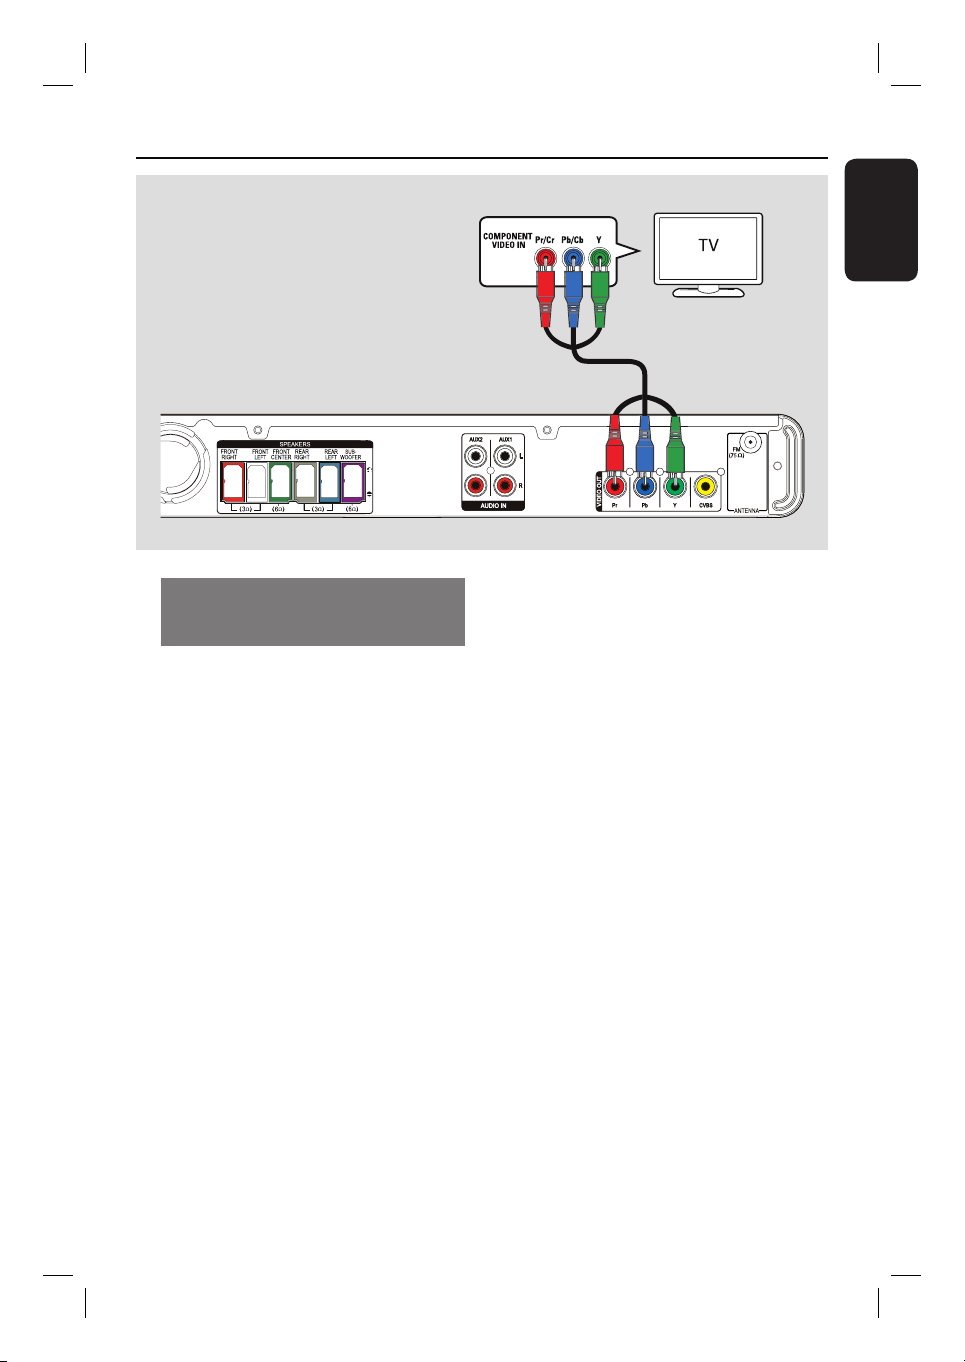
Option 2: Connecting to a
Progressive Scan TV or component
video input
The progressive scan video quality is
only available when using Y Pb Pr
connection and a progressive scan TV is
required. It provides superior picture
quality when watching DVD movies.
A Use the component video cables (red/
blue/green - not supplied) to connect the
Y Pb Pr sockets on the main unit to the
corresponding component video input
sockets (or labeled as Y Pb/Cb Pr/Cr or
YUV) on the TV.
It provides better picture quality.
B If your TV accepts progressive signals,
proceed to chapter ‘Getting Started Setting up Progressive Scan feature’ for
detailed progressive feature setup.
15
Basic Connections (continued)
English
FRONT
FRONT
RIGHT
LEFT
FRONT CENTRE
REAR
LEFT
REAR
RIGHT
SUBWOOFER
Main Unit (rear)
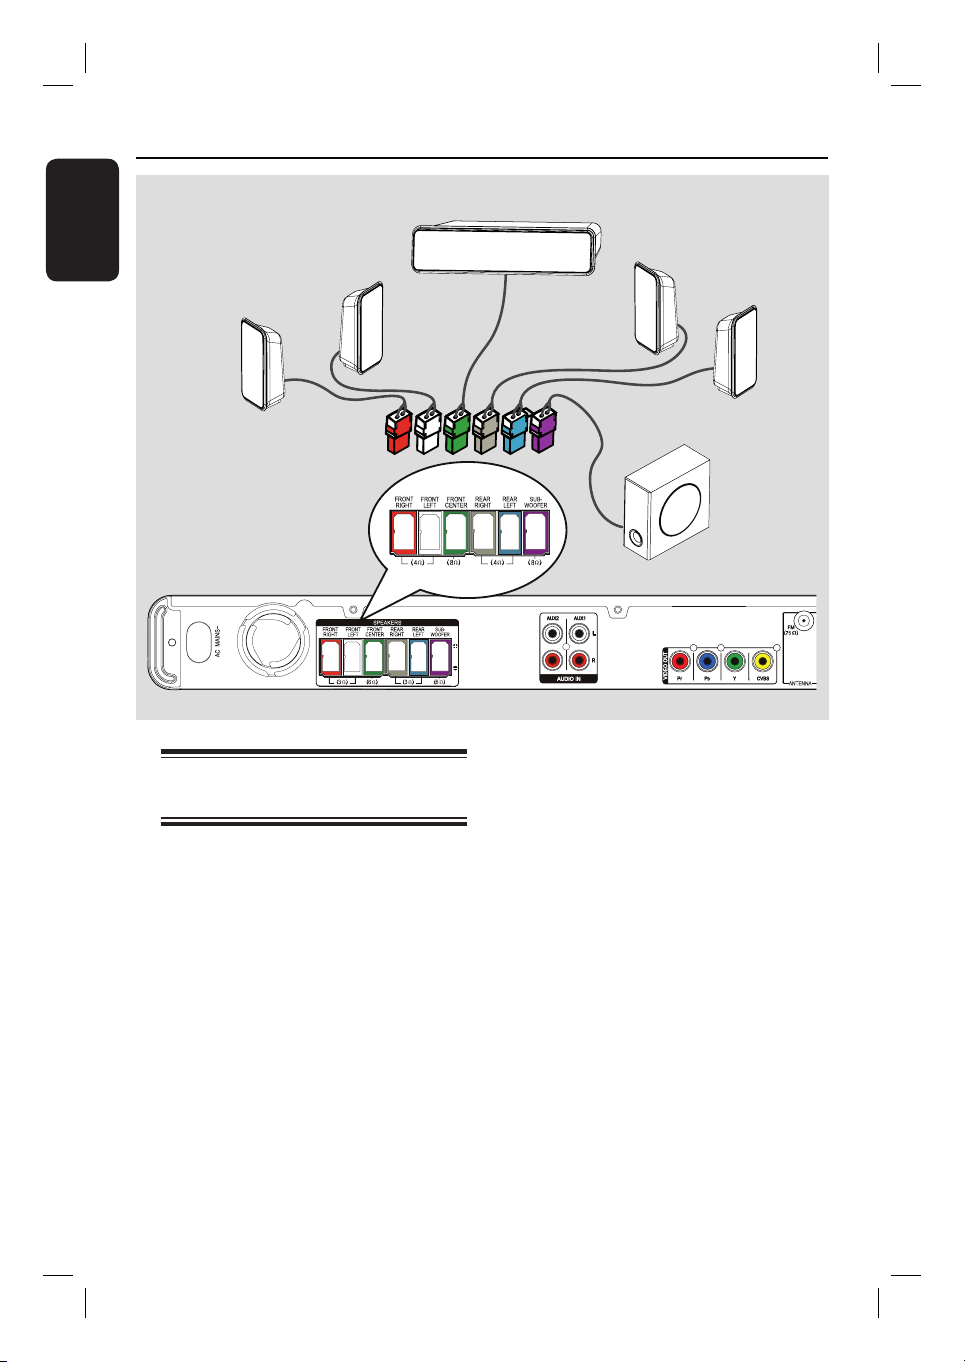
Step 3: Connecting speakers
and subwoofer
Connect all the speakers and subwoofer
to the matching sockets at the rear of the
main unit, Make sure that the colours of
the cables and sockets are matched.
Helpful Hint:
– To prevent unwanted noise, never place
the speakers too close to the main unit,
subwoofer, AC power adapter, TV or any
other radiation sources.
16
 Loading...