

Philips HTR5204/12, HTR5204 Quick Start Manual

Digital AV Receiver System
Quick Start Guide
Connect
Set up
Enjoy
1
2
3
What’s in the box?
Need help?
User Manual
See the user manual that came with your Philips Digital AV Receiver System.
Online
Go to www.philips.com/support.
HTR5204
2007 © Koninklijke Philips N.V.
All rights reserved.
sgpJOL707/12-eng
STANDBY-ON SURROUNDSOUND TREBLE BASS PROGRAM TUNING
SOURCE
PHONES MP3 LINE-IN
VOL
Main Unit
Remote Control
and 2 batteries
User
Manual
1 centre, 2 front, 2 rear speakers
and subwoofer
FM wire antenna AM/MW
loop antenna
MP3 Line-In cable for
portable audio player
Audio cable
Coaxial cable
2
Set up
Adjusting the speakers
A Press STANDBY-ON on the main unit to turn it
on.
B Press SURROUND on the remote control.
C Press and hold PROGRAM on the front panel to
access the system setup menu.
To adjust the audio delay for the centre
speaker only:
l Press .or > to until ‘CENTER DELAY’
appears.
l Rotate the VOL control to change the delay time.
To adjust the audio delay for the rear
speaker only:
l Press .or > to until ‘REAR DELAY’ appears.
l Rotate the VOL control to change the delay time.
D To confirm all settings, press PROGRAM.
3
Enjoy
Start Playback
A Press STANDBY-ON on the main unit to turn it
on.
Note Ensure all the audio/video devices are connected
before you start playback.
B Turn on the connected audio/video device.
C Press PLAY on the connected audio/video device.
D Press DISC/DI, RADIO, TV or AUX to select
the preferred audio input source.
Playback from portable audio
player
Listen to audio from your portable audio player by
connecting the device to your main unit.
A Connect the supplied MP3 Line-In cable from the
MP3 LINE-IN socket on the main unit to the
headphone output socket on your portable audio
player.
B Press PLAY on your portable audio player.
C Press MP3 LINE-IN to listen to the playback.
See the accompanying user manual for other
options to ne-tune your speaker settings.
See the accompanying user manual for radio
tuning and other playback settings.
Power cable
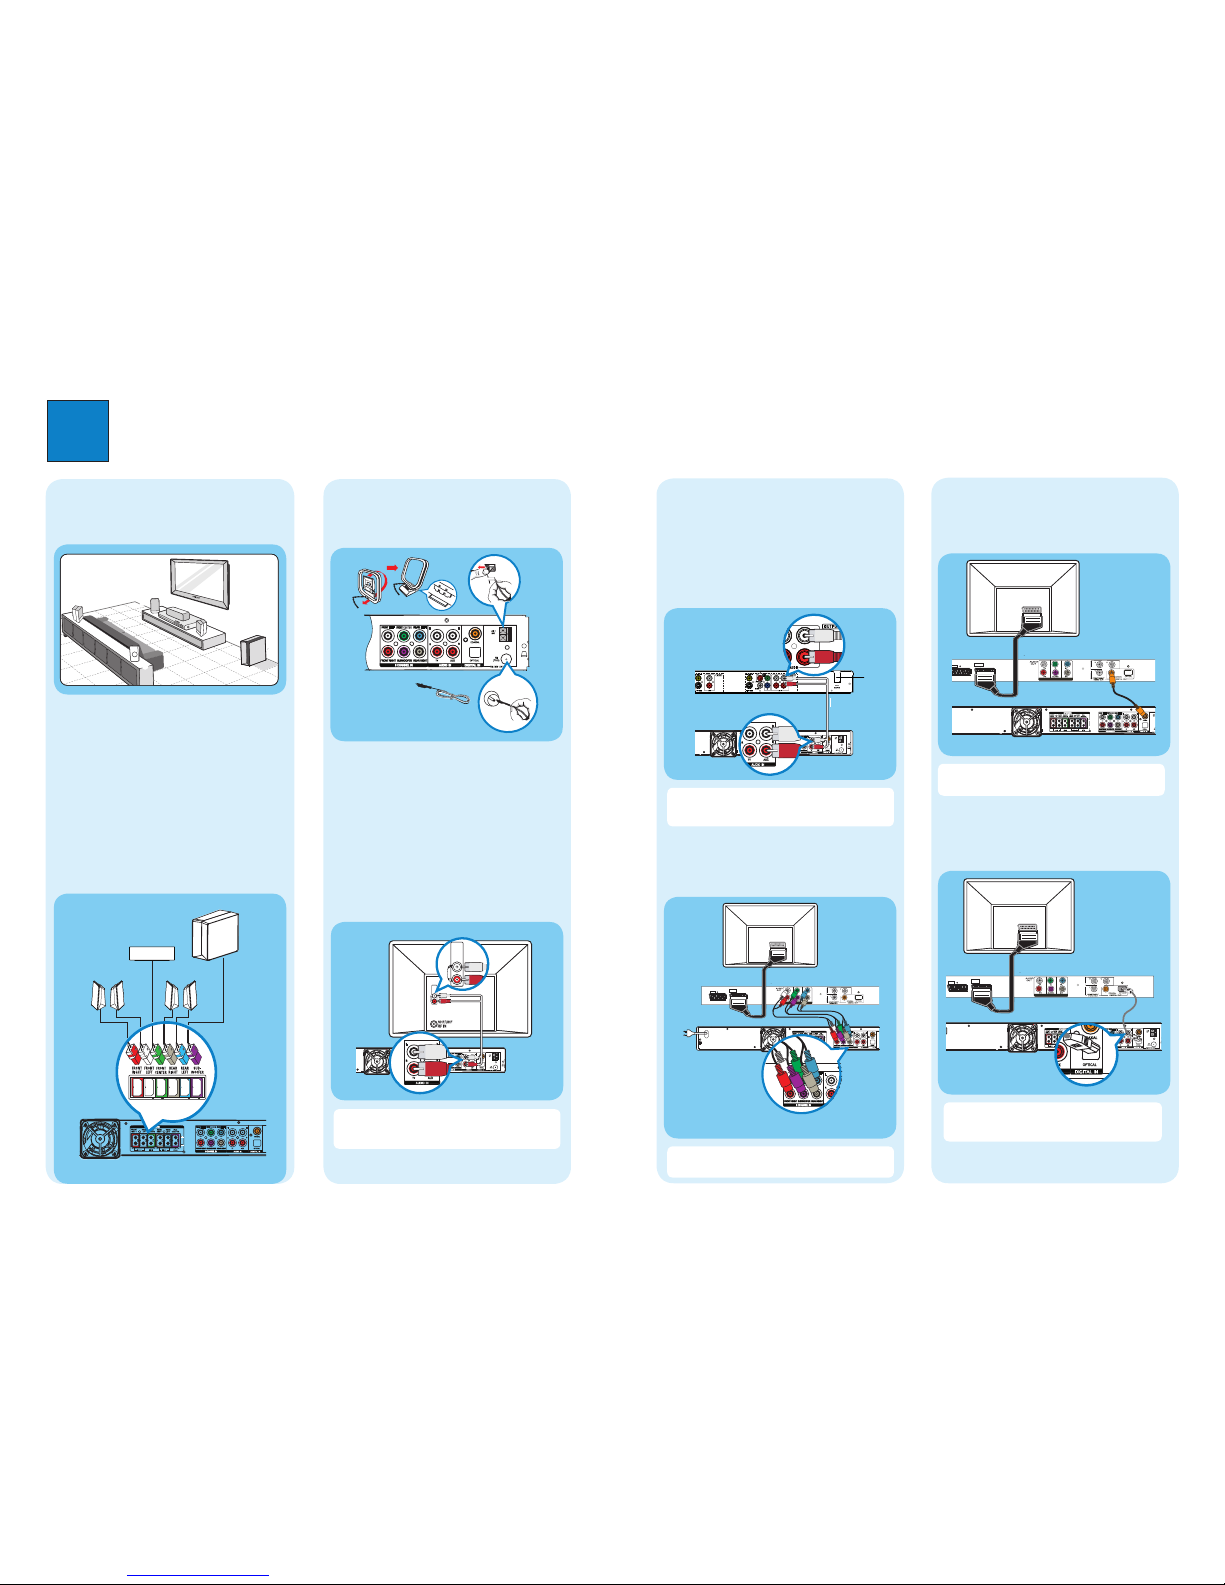
1
Connect
A
Placement
Proper speakers system placement is important to
ensure optimum sound performance.
A
B
C
D
D
C
A Place the centre speaker above or close to the TV.
B Place the subwoofer on the floor, at least one meter
away from the TV.
C Place the front speakers at equal distances from the
TV.
D Place the rear speakers at normal listening ear level.
B
Connect the speakers and
subwoofer
Connect the various coloured plugs from the speakers
and subwoofer to the same coloured sockets at the rear
of the main unit.
C
Connect the radio antennas
Keep the antennas away from the electronic devices to
prevent unwanted interference.
12 mm
B
C
A
A Connect the FM antenna to the FM 75 Ù socket.
Extend the wire and fix its end to the wall.
B Unfold the AM/MW loop antenna and fix the claw
into the slot. Push the tabs and insert the wires into
the AM/MW sockets.
D
Connect the audio from TV
(optional)
Connect the red and white audio cable from the AUDIO
IN - TV sockets on the main unit to the AUDIO OUT
sockets on your TV.
AUDIO
OUT
AUDIO IN
AUDIO
OUT
AUDIO OUT
Note Press TV on the remote control to get the sound
output from the speakers system when watching the TV
program.
E
Connect the audio from audio/video
devices (DVD Player, Recorder or Cable/Satellite
Receiver)
Option 1: Using the analogue audio sockets
Connect the red and white audio cable from the AUDIO
IN - AUX sockets on the main unit to the AUDIO OUT
sockets on the other device.
Note Start playback on the device. Press AUX on the
remote control to hear the sound output from the
speakers.
Option 2: Using the 6 Channel In sockets
Connect the audio cables (not supplied) from the 6
CHANNEL IN sockets on the main unit to the six
channel AUDIO OUT sockets on the other device.
TO TV - I/OEXT1
AUX - I/OEXT2
SCART IN
Note Start playback on the device. Press DISC/DI on
the remote control repeatedly until ‘DISC 6CH’ appears.
Option 3: Using the Coaxial In socket
Connect a coaxial cable from the COAXIAL socket on
the main unit to the COAXIAL OUT sockets on the
other device.
TO TV - I/O
EXT1
AUX - I/OEXT2
SCART IN
Note Start playback on the device. Press DISC/DI on
the remote control repeatedly until ‘COAX IN’ appears.
Option 4: Using the Optical In socket
Connect an optical cable (not supplied) from the
OPTICAL sockets on the main unit to the OPTICAL
OUT sockets on the other device.
TO TV - I/O
EXT1
AUX - I/OEXT2
SCART IN
Note Start playback on the device. Press DISC/DI
on the remote control repeatedly until ‘OPTI IN’
appears.
Main Unit (rear)
SUBWOOFER
FRONT
RIGHT
FRONT
LEFT
REAR
RIGHT
REAR
LEFT
FRONT CENTER
Audio/Video device (rear)
Television (rear)
Audio/ Video device (rear)
Main Unit
(rear)
Television (rear)
Main
Unit
(rear)
FM antenna
AM/MW
antenna
Main Unit
(rear)
Audio/ Video device (rear)
Television (rear)
Television (rear)
Audio/ Video device (rear)
Main Unit (rear)
Main Unit
(rear)
Main Unit
(rear)
 Loading...